

ISEEKA WT10, BU10 User Manual
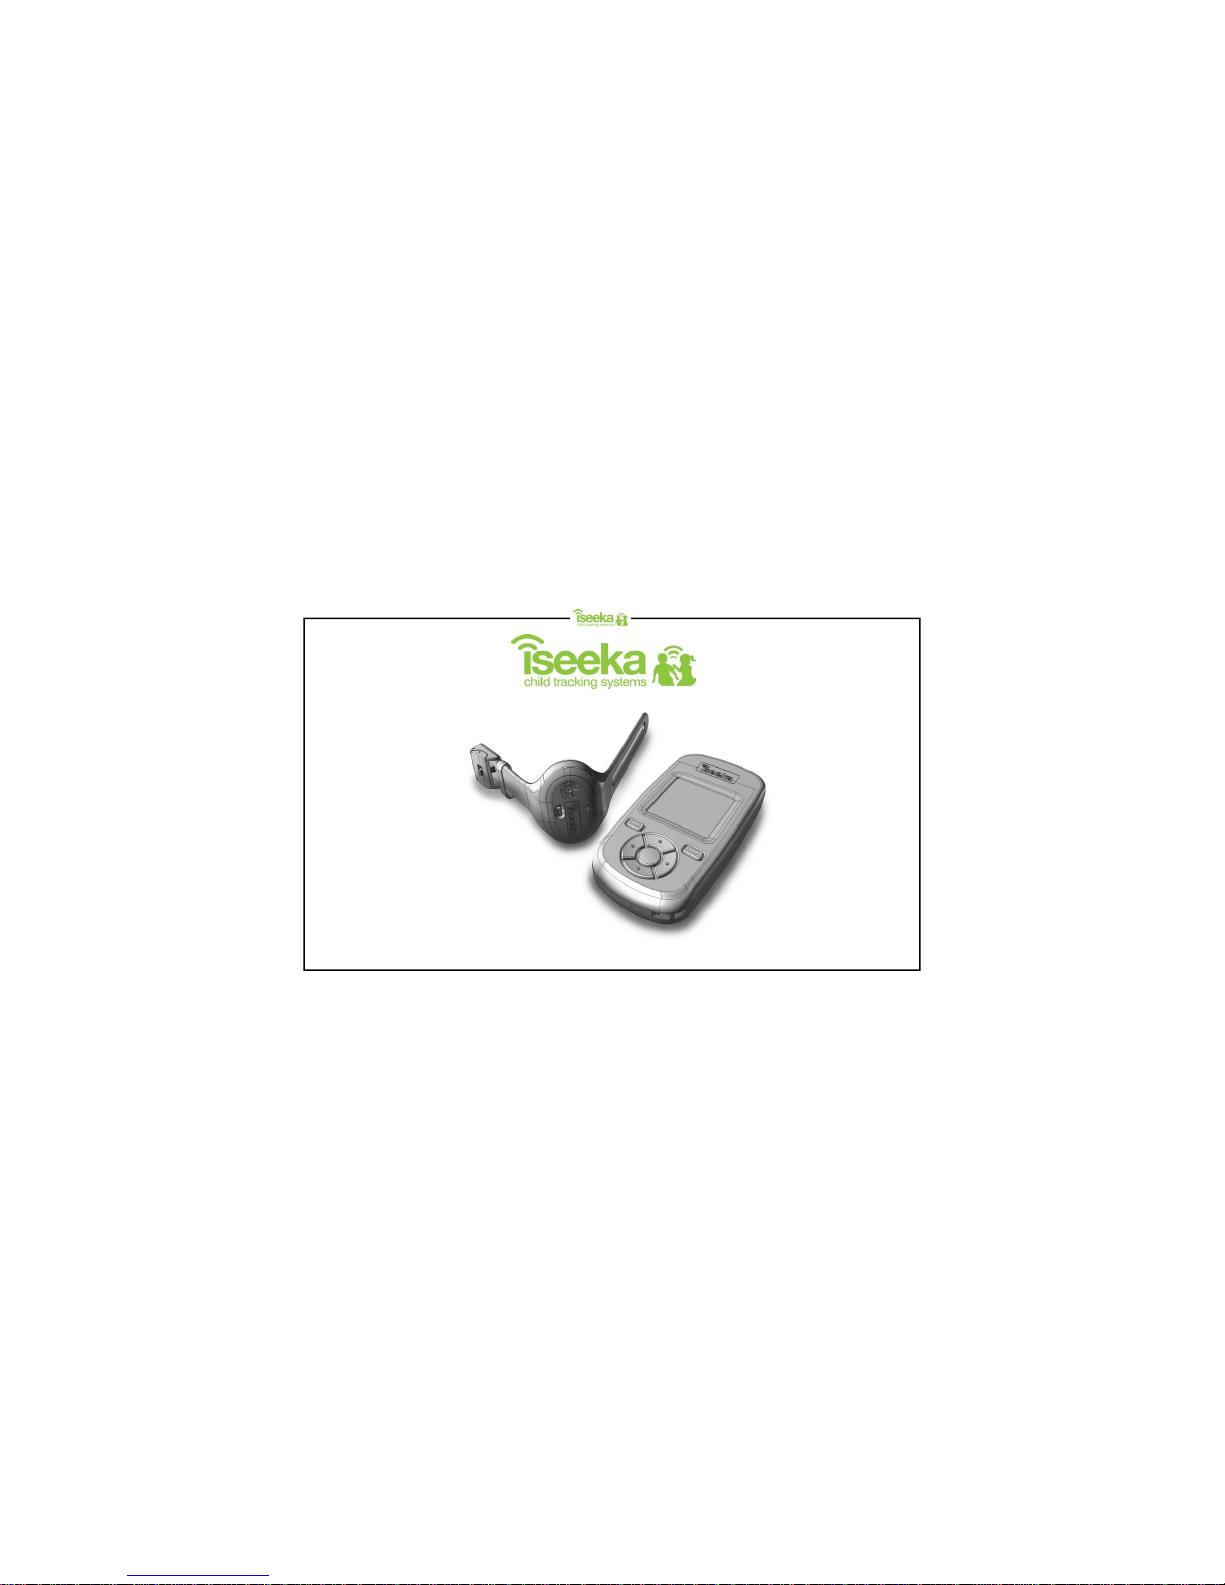
Base Unit - BU10
Wrist Tag - WT10

Content PageContent Page
Table of Contents
1: General Information……………………………………………… 1
1.1 Standard Package Contents…………………………………….. 1
1.2 Display Indicators and Icons…………………………………….. 1
1.3 Summary of Tag and Base LED and Alert …………………….. 2
1.4 Wrist Tag Features……………………………………………….. 3
1.5 Base Features…………………………………………………….. 3
2: Getting Started…………………………………………………… 4
2.1 Installing and Removing the Battery on the Wrist Tag……... 4
2.2 Attaching and Detaching the Wrist Tag……………………….. 5
2.3 Installing and Removing the Batteries on the Base Unit……... 6
2.4 Switching On/Off………………………………………………….. 7
2.5 Register Tag to Base (Association Mode)……………………... 8
3: General Functions……………………………………………….. 9
3.1 Keypad Lock………………………………………………………. 9
3.2 Main Menu………………………………………………………… 10
3.3 Viewing the Tag…………………………………………………... 10
3.4 Finding the Tag…………………………………………………… 11
3.5 Renaming the Tag………………………………………………... 11
3.6 Unregistering the Tag……………………………………………. 12
3.7 Return to Base……………………………………………………. 12
3.8 Tag Power Saver………………………………………….………. 13
3.9 Setting Comfort Zone …………………………………………….. 14
4: Understanding the Monitoring Mode…………………………. 15
4.1 Main Screen (Monitoring Mode)………………………………… 15
5: Understanding the Find Mode…………………………………. 16
5.1 Find Mode Screen………………………………………..……..… 16
6: Alerts……………………………………………………………….. 17
6.1 Panic Alert…………………………………………………………. 17
6.2 Outside Comfort Zone Alert……………………………………… 18
6.3 Out of Range (OOR) Alert……………………………………….. 19
6.4 Tag Low Battery Alert……………………………………………. 20
6.5 Base Low Battery Alert…………………………………………… 21
6.6 Flat Battery Alert………………………………………….……..… 21
7: Advance Settings for Base………………………….…………. 22
7.1 Tag Alert…………………………………………………………… 22
7.2 Base Alert………………………………………………………….. 23
7.3 RF Channel………………………………………………………... 24
8: Trouble Shooting Guide…………………………………………. 25
Support Information…………………………………………………... 26
Product Guarantee……………………………………………………. 27
FCC Statement…………………………………………………………..28

1: General Informatio n
1.1 Standard Package Contents
Package Contents:
1: Wrist Tag with Wrist Strap X 1
2: Base Unit x 1
3: Spare Latch Key (to unlock Wrist Tag) X 1
4: CR 2032 Coin Cell Battery X 1
5: AAA Alkaline Battery X 2
6: User’s Manual X 1
Icon Description Remark
Displays in Main Screen and Find Mode Screen
Displays in Main Screen and Find Mode Screen
Comfort zone alert enabled icon
Comfort zone alert disabled icon
Displays in Main Screen and Find Mode Screen
Displays in Main Screen and Find Mode Screen Low battery indicator
Battery gauge
(3 bars, 2 bars, 1 bar)
Displays in View Tag Screen Tag Low Battery Alert Icon
Tag Comfort Zone Alert Icon
Tag Panic Alert Icon
Search Icon Displays in Register Tag, Unregister Tag and Tag Power Saver Screen
Displays in View Tag Screen
Displays in View Tag Screen
1.2 Display Indicators and Icons
Page 1
Welcome
Welcome to Iseeka, a simple and innovative way to monitor your children.
Please take a few minutes to familiarise yourself with the system. You will
find all of the components to be extremely easy to operate. When you have
become familiar with their operation, we suggest that you practice with the
units by playing a game of hide-n-seek.
If you have questions please call us at 0844 543 63 63

Normal Silent
Association Mode
Blinks once every 15 sec 2 chirps 2 chirps No alert No alert
Monitoring Mode
No alert No alert No alert No alert
Outside Comfort Zone
1 chirp every
second
No alert
1 chi rp
(with vibration)
every second
3 short vibrations
Return to base
1chirp every
second
No alert No alert No alert
Tag Low battery
3 chirps No alert
3 chirps
(with vibration)
1 short vibration
Tag Gone Battery Shutdown
LED Continuously on No alert No alert NA NA
Panic Button
Blinks once when
panic signal is sent
1 chirp every
second
No alert
1 chi rp
(with vibration)
every second
3 short vibrations
Find Mode
Blinks every 0.5 sec
1 chirp every
second
No alert
Ascending &
descending beeps
dependant on the
distance / direction
from the Tag.
No alert
Out of Range
Blinks once every 1 second
for 15 mins
1 chirp every
2 seconds for
5 minutes
No alert
1 chirp
(with vibration)
every second
3 short vibrations
Idle Mode
Blink once every 30 sec No alert No alert No alert No alert
Sleep Mode
LED off No alert No alert No alert No alert
Base Battery Low
Base Gone Battery Shutdown
NA NA NA
3 chirps (without
vibration)
1 short vibration
Blinks once every 2 sec
Tag Base
SilentNormalLED
Alert
Page 2
1.3 Summary of Tag and Base LED and Alert
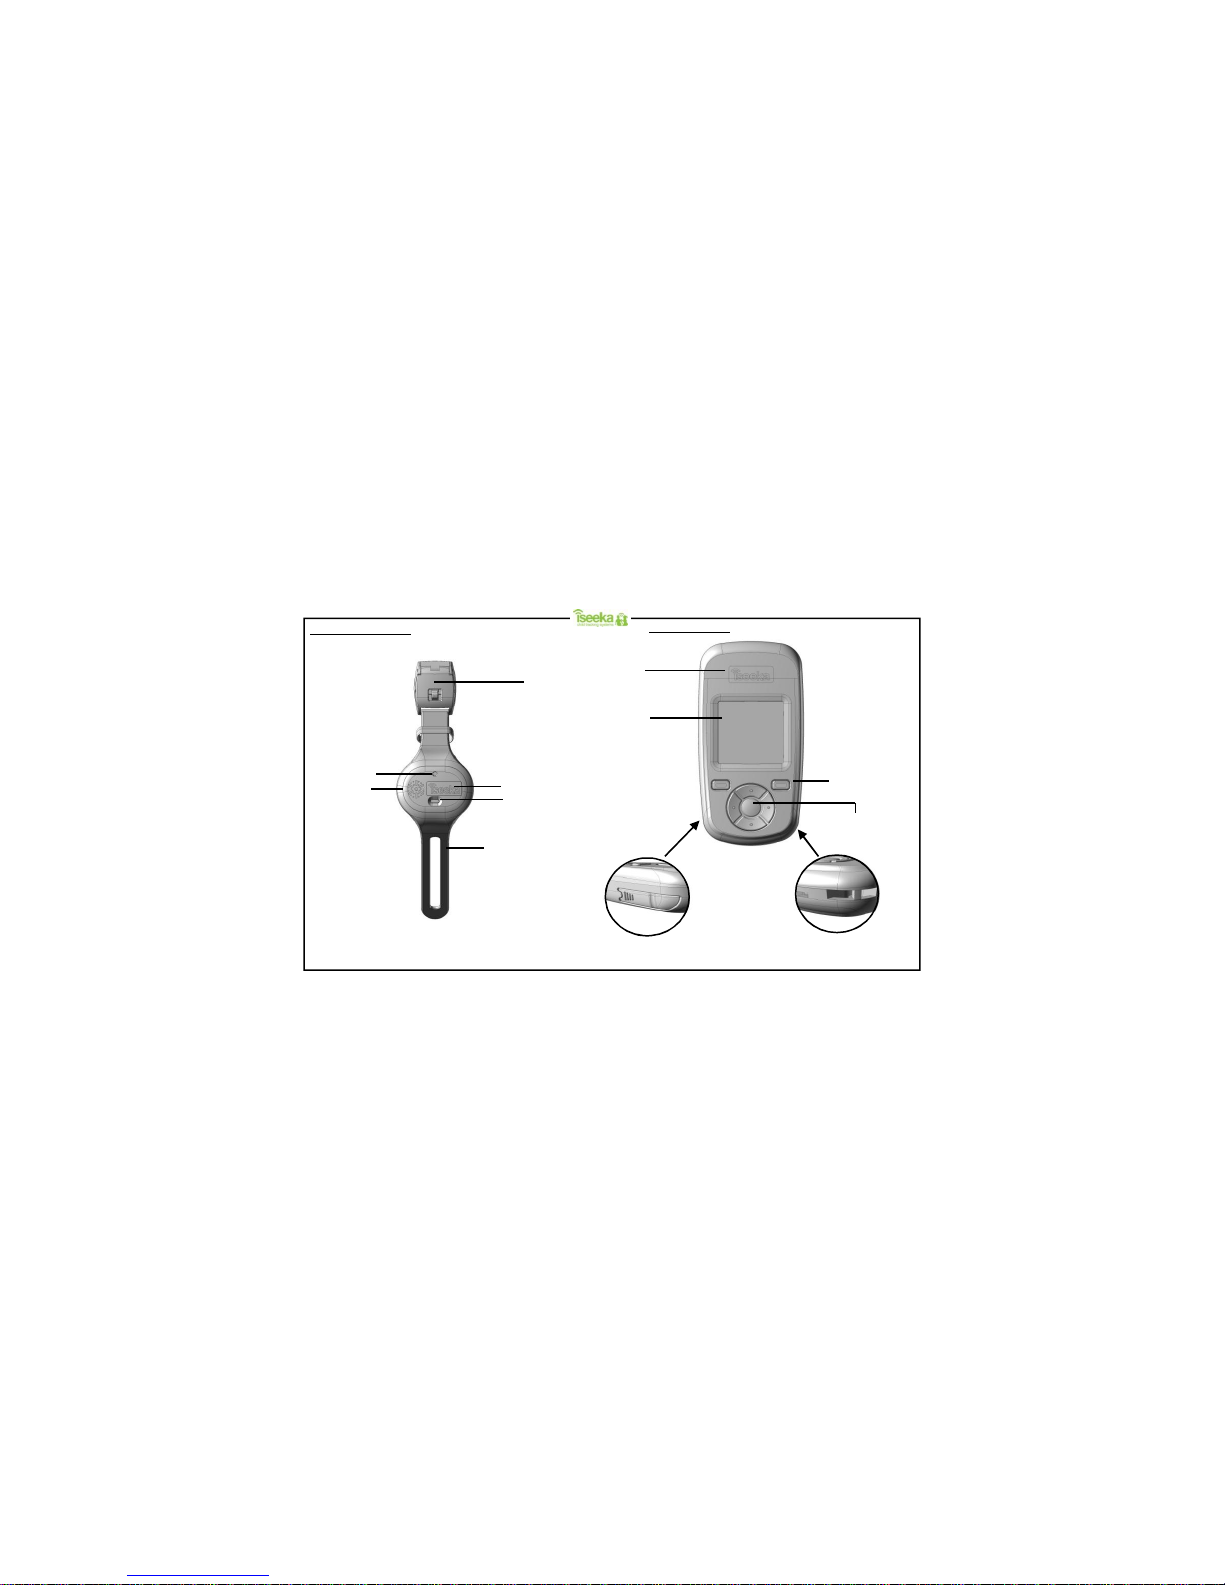
Press to activate
panic mode
Alert LED (red)
Speaker
Hole
Rubber Strap
Strap Lock
Logo
1.5 Base Features
1.5” LCD
2 x Soft Keys
Multi-directional keypad.
Logo
On the bottom left: Latch Key
On the bottom right: Lanyard Loop
Page 3
1.4 Wrist Tag Features

Step 1:
To insert the battery, slide the
battery under the contact spring
bar as shown and ensure that the
rubber seal is in place.
Step 2:
Click the two housings together until
you hear a snap. Ensure that it is
properly closed in all directions.
Step 1:
Stretch and pull the rubber strap apart
and eject the tag out by pushing it from
the bottom.
Step 2:
With a coin, slot it in between the
housing flaps and twist to remove the
battery door.
Step 3:
Use the pointed edge of the latch key
and insert it into the slot (as shown in
the figure in Step 3) and lift.
Step 4:
The battery will be lifted out
of its compartment.
To remove the battery
To install the battery
2: Getting Starte d
2.1 Installing and Removing the Battery on the Wrist Tag (battery’s positive polarity faces upwards)
Step 3:
Align the flange of the tag to the wrist strap’s rubber
groove and slide one side in first. Next, stretch the
rubber strap and slide the other end of the tag into
the other rubber groove.
Page 4
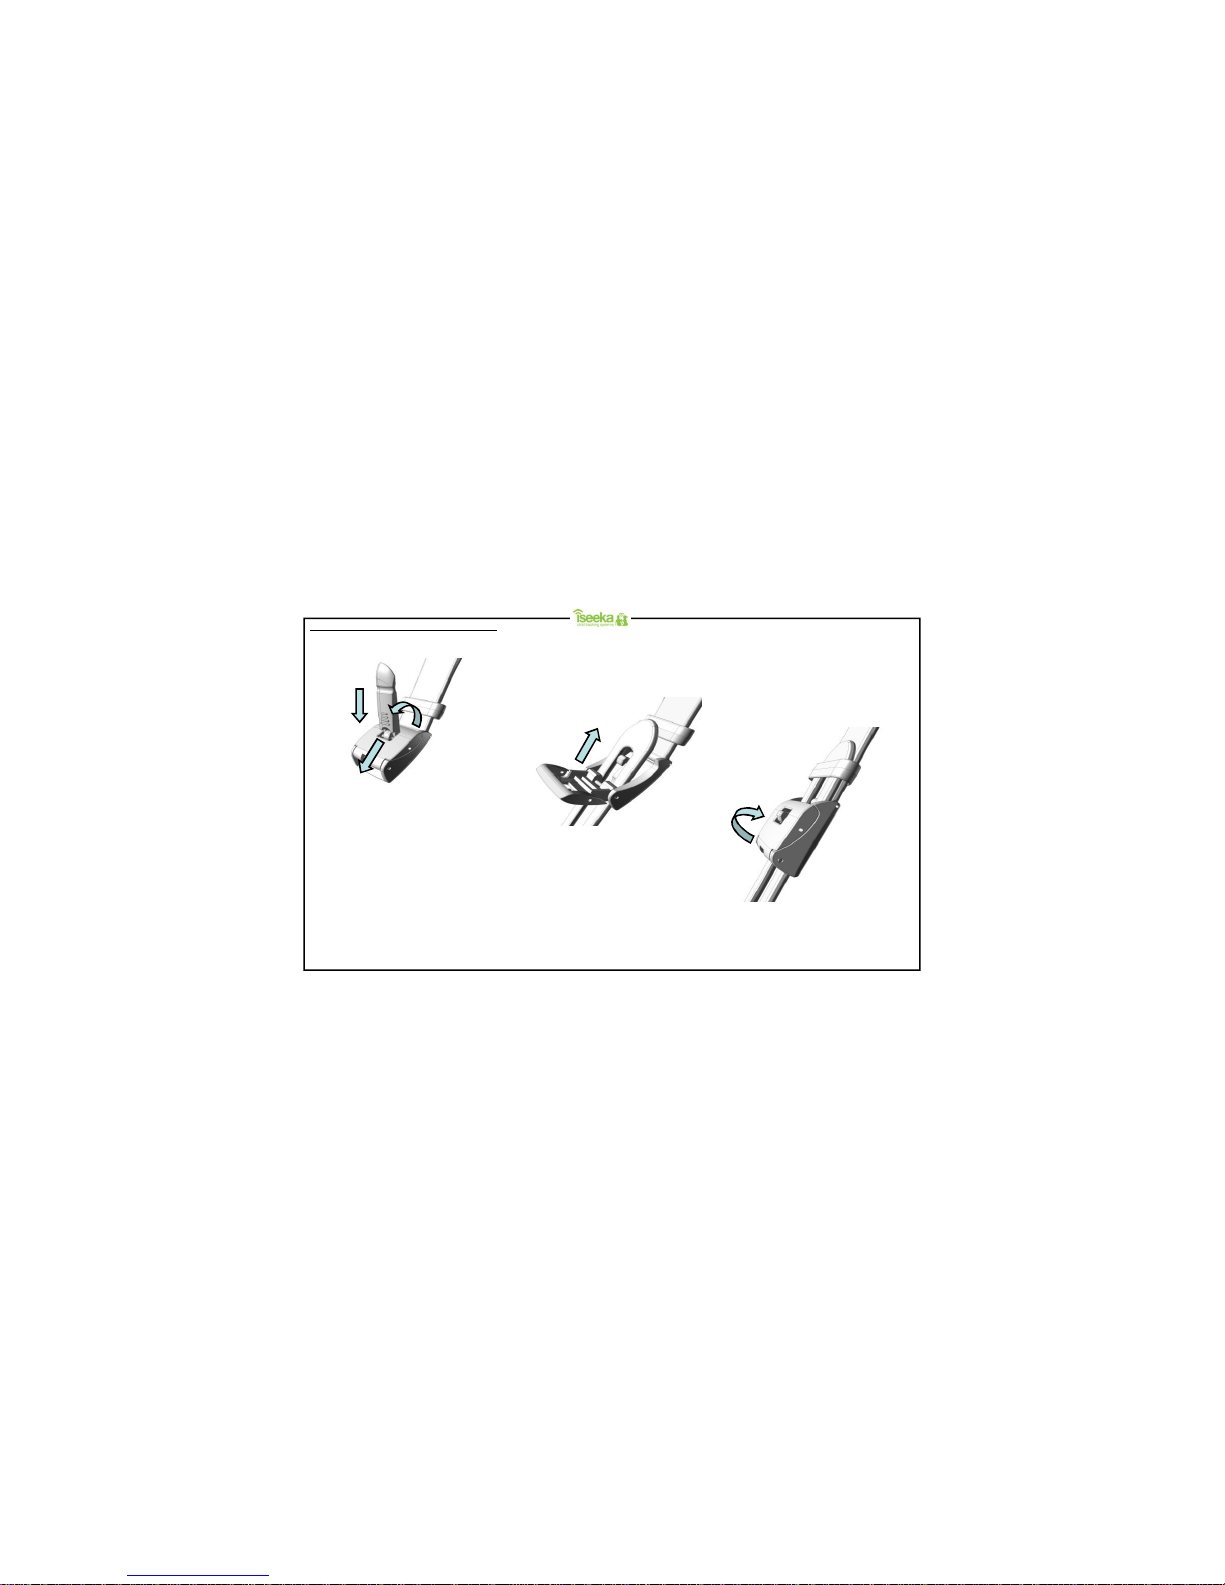
2.2 Attaching and Detaching the Wrist Tag
Step 1:
With the latch key (located on the
bottom left of the handheld unit), insert
the key into the latch as shown, using
the forked edge push the metal pin
forward and lift the door open.
Step 3:
With the desired length, flip the latch
back until it locks in place.
Step 2:
Slide the other end of the rubber strap
through the latch.
Page 5
1
2
3

2.3 Installing and Removing the Batteries on the Base Unit
Step 1:
Push the battery door down where the
arrow indicator is then slide outwards to
remove the battery door.
Step 2:
Following the directions on the casing
firmly insert 2 X AAA batteries.
Step 3:
Once the batteries are firmly placed, slide the battery door until it clicks in place.
Page 6
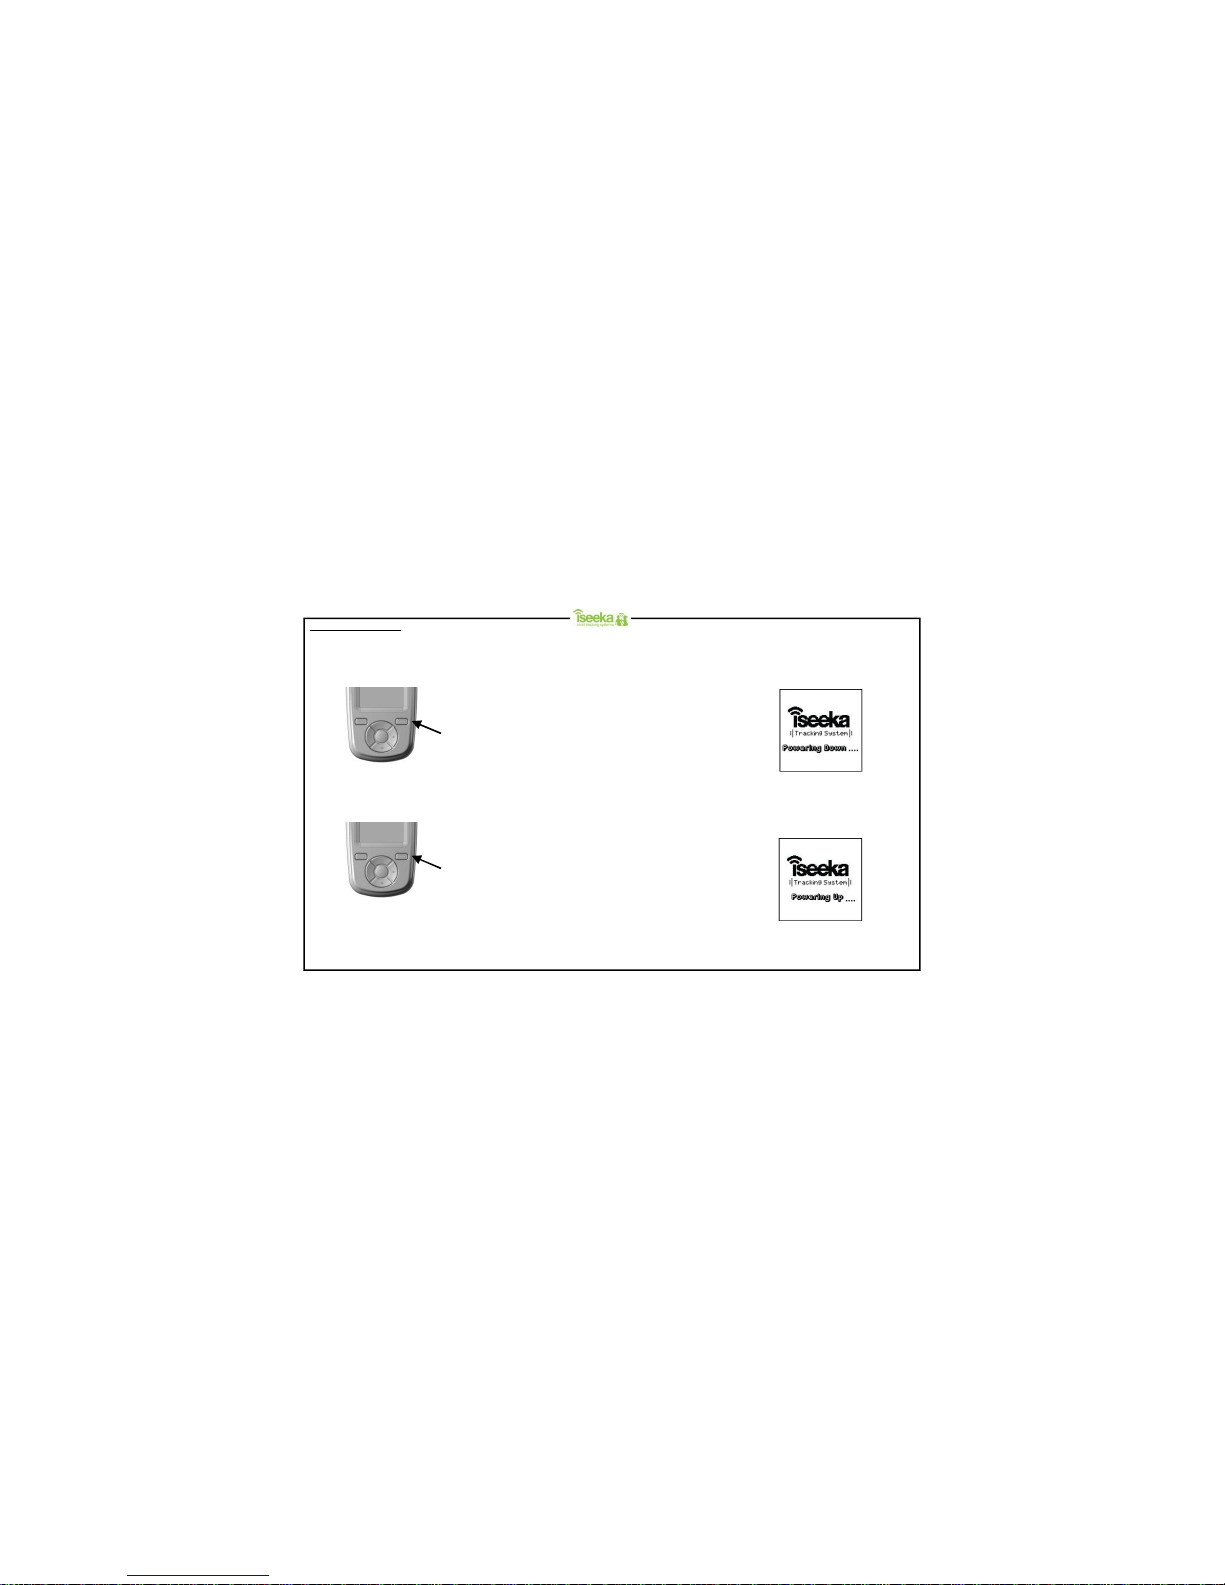
2.4 Switching On/Off
The Base will turn on when new batteries are inserted.
To turn off the Base:
The base will stop communicating to the Tag/Tags and display the power down screen before it turns off.
Power Up Screen
To turn on the Base:
Upon power up, the Base will emit a chirp and display the power up screen. Thereafter, the screen will enter monitoring mode.
Power Down Screen
Press and hold the key for 2
seconds in the main screen
(Monitoring Mode).
Press and hold the key
for 2 seconds
when the screen is off.
Page 7
 Loading...