

Page 1
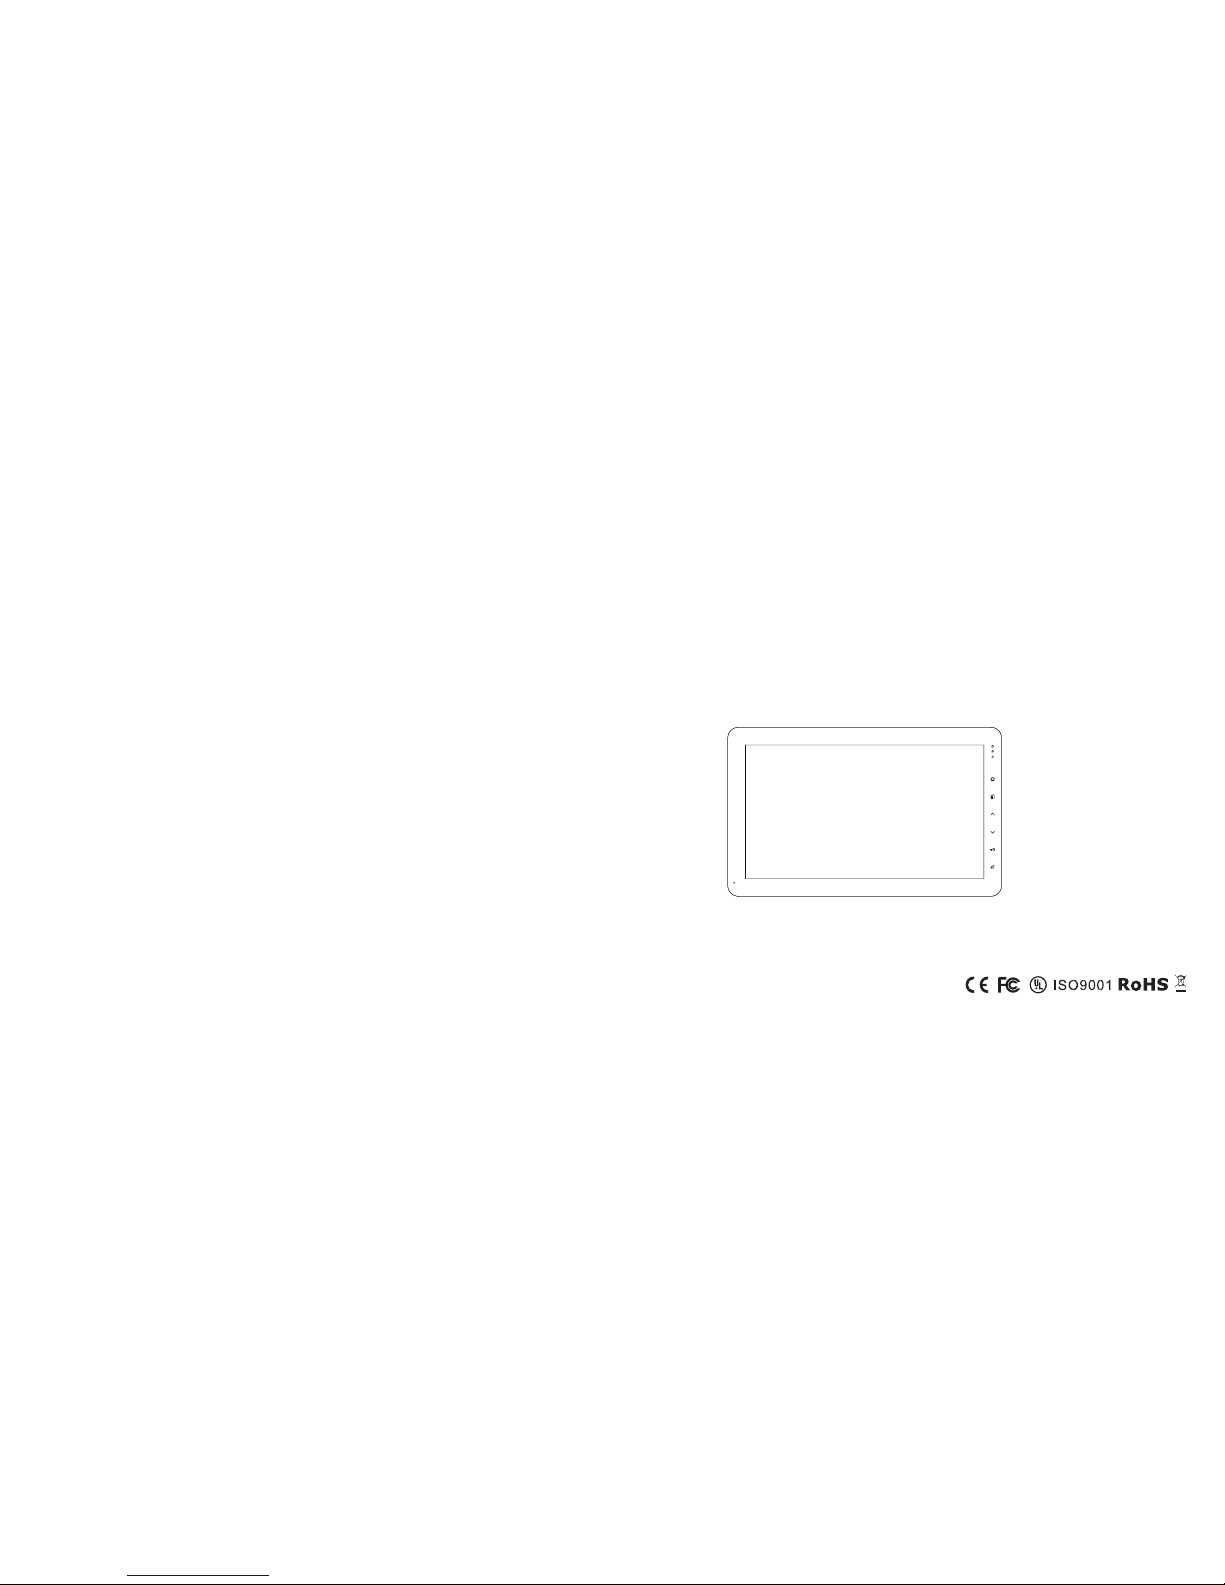
CA10FC
4-WIRES VIDEO DOOR PHONE
—10.1"COLOR INDOOR MONITOR
Page 2
3
Thank you for purchasing our products of building intercom system series. Please read the instructions carefully
before installing your system and follow all of the directions to ensure proper installation.Refer to the products
whenever you call upon your dealer.
Product Introduction
Do not remove front or back cover, please ask the professional person if maintenance needed
Note: Important operation and maintenance instructions are contained in this manual.
General Feature
High resolution screen
Remote unlock/monitor
Color,contrast,brightness adjustable
Volume adjustable
Don not disturb(Mute) function
2nd door calling
*The manufacturer reserves the right to change the specification without prior notice.The pictures are
with subtle difference from the real products.Please refer to the real products.
Multi-polyphonic ringtone
Able to connect with max 8 pcs CCTV
Able to connect with max 8 pcs indoor monitor
Support SD card(photo,video)
Clock function
Note
2
Pro duct in trodu ction ····· ····· ····· ····· ····· ····· ····· ····· ····· ····· ····· ····· ····· ····· ····· ····· ····· ····· ····· ····· ····· ··3
Par ts and Fe ature s···· ····· ····· ····· ····· ····· ····· ····· ····· ····· ····· ····· ····· ····· ····· ····· ····· ····· ····· ····· ····· ····· ·4
Mai n menu· ····· ····· ····· ····· ····· ····· ····· ····· ····· ····· ····· ····· ····· ····· ····· ····· ····· ····· ····· ····· ····· ····· ····· ····· 5
Ope ratio n···· ····· ····· ····· ····· ····· ····· ····· ····· ····· ····· ····· ····· ····· ····· ····· ····· ····· ····· ····· ····· ····· ····· ····· ···6
1.O n/Off /Stan d by··· ····· ····· ····· ····· ····· ··· ····· ····· ····· ····· ····· ····· ····· ····· ····· ····· ····· ····· ····· ····· ····· ····6
2.O utdoo r Camer a Calls I n···· ····· ····· ····· ····· ····· ····· ····· ····· ····· ····· ····· ····· ····· ····· ····· ····· ····· ····· ····· ·7
2.1 Tal k···· ····· ····· ····· ····· ····· ····· ····· ····· ··· ····· ····· ····· ····· ····· ····· ····· ····· ····· ····· ····· ····· ····· ····· ····· 7
2.2 Tak e photo ····· ····· ····· ····· ····· ····· ····· ····· ····· ··· ····· ····· ····· ····· ····· ····· ····· ····· ····· ····· ····· ····· ····· 7
2.3 R ecord V ideo· ····· ····· ····· ····· ····· ····· ····· ····· ··· ····· ····· ····· ····· ····· ····· ····· ····· ····· ····· ····· ····· ····· ·8
2.4 U nlock ····· ····· ····· ····· ····· ····· ····· ····· ····· ····· ····· ····· ····· ····· ····· ····· ····· ····· ····· ····· ····· ····· ····· ···8
2.5 E xtens ion Swi tch·· ····· ····· ····· ····· ····· ····· ····· ····· ····· ····· ····· ····· ····· ····· ····· ····· ····· ····· ····· ····· ···8
2.6 C all Tran sfer· ····· ····· ····· ····· ····· ····· ····· ····· ····· ····· ····· ····· ····· ····· ····· ····· ····· ····· ····· ····· ····· ····· 9
2.7 I mage Adj ustme nt··· ····· ····· ····· ····· ····· ····· ····· ····· ····· ····· ····· ····· ····· ····· ····· ····· ····· ····· ····· ····· 10
2.8 Tal k Volume Ad justm ent·· ····· ····· ····· ····· ····· ····· ····· ····· ····· ··· ····· ····· ····· ····· ····· ····· ····· ····· ····· ·10
2.9 An other O utdoo r Camer a Calls I n···· ····· ····· ····· ····· ····· ····· ····· ····· ····· ····· ····· ····· ····· ····· ····· ····· ·11
3.M onito r Outdo or Came ra··· ····· ····· ····· ····· ····· ····· ····· ····· ····· ····· ····· ····· ····· ····· ····· ····· ····· ····· ····· ·11
4.C CTV Mon itori ng··· ····· ····· ····· ····· ····· ····· ····· ····· ····· ····· ····· ····· ····· ····· ····· ····· ····· ····· ····· ····· ····· ·13
5.M ain Men u···· ····· ····· ····· ····· ····· ····· ····· ····· ····· ····· ····· ····· ····· ····· ····· ····· ····· ····· ····· ····· ····· ····· ···15
5.1 P hoto Ma nagem ent·· ····· ····· ····· ····· ····· ····· ····· ····· ····· ····· ····· ····· ····· ····· ····· ····· ····· ····· ····· ····· 16
5.2 V ideo Ma nagem ent·· ····· ····· ····· ····· ····· ····· ····· ····· ····· ··· ····· ····· ····· ····· ····· ····· ····· ····· ····· ····· ···17
5.3 R ingto ne Setu p···· ····· ····· ····· ····· ····· ····· ····· ····· ····· ····· ····· ····· ····· ····· ····· ····· ····· ····· ····· ····· ····2 0
5.4 I nterc om··· ····· ····· ····· ····· ····· ····· ····· ····· ····· ····· ····· ····· ····· ····· ····· ····· ····· ····· ····· ····· ····· ····· ··23
5.5 Ti me setu p···· ····· ····· ····· ····· ····· ····· ····· ····· ····· ····· ····· ····· ····· ····· ····· ····· ····· ····· ····· ····· ····· ····2 4
5.6 S ystem S etup· ····· ····· ····· ····· ····· ····· ····· ····· ····· ····· ····· ····· ····· ····· ····· ····· ····· ····· ····· ····· ····· ···25
5.7 O SD Sett ing·· ····· ····· ····· ····· ····· ····· ····· ····· ····· ····· ····· ····· ····· ····· ····· ····· ····· ····· ····· ····· ····· ····2 7
5.8 S D Card Se tting ····· ····· ····· ····· ····· ····· ····· ····· ····· ····· ····· ····· ····· ····· ····· ····· ····· ····· ····· ····· ····· ··30
5.9 S ystem I nform ation ····· ····· ····· ····· ····· ····· ····· ····· ····· ····· ····· ····· ····· ····· ····· ····· ····· ····· ····· ····· ···32
5.1 0 Facto ry Defa ult Set ting· ····· ····· ····· ····· ····· ····· ····· ····· ····· ····· ····· ····· ····· ····· ····· ····· ····· ····· ····· 32
6. Sh ortcu t Key·· ····· ····· ····· ····· ····· ····· ····· ····· ····· ····· ····· ····· ····· ····· ····· ····· ····· ····· ····· ····· ····· ····· ···33
7. Bu sy Stat us··· ····· ····· ····· ····· ····· ····· ····· ····· ····· ····· ····· ····· ····· ····· ····· ····· ····· ····· ····· ····· ····· ····· ···33
8. 2n d Door ca lling ····· ····· ····· ····· ····· ····· ····· ····· ····· ····· ····· ····· ····· ····· ····· ····· ····· ····· ····· ····· ····· ····· ·33
LED /Voice G uide· ····· ····· ····· ····· ····· ··· ····· ····· ····· ····· ····· ····· ····· ····· ····· ····· ····· ····· ····· ····· ····· ····· ····· 35
Trou blesh ootin g Guide ····· ····· ····· ····· ····· ····· ····· ····· ····· ····· ····· ····· ····· ····· ····· ····· ····· ····· ····· ····· ····· 36
Spe cific ation ····· ····· ····· ····· ····· ····· ····· ····· ····· ····· ····· ····· ····· ····· ····· ····· ····· ····· ····· ····· ····· ····· ····· ··37
3
4
5
6
6
7
7
7
8
8
8
9
10
10
11
11
13
15
16
17
20
23
24
25
27
30
32
32
33
33
33
35
36
37
Page 3
5
4
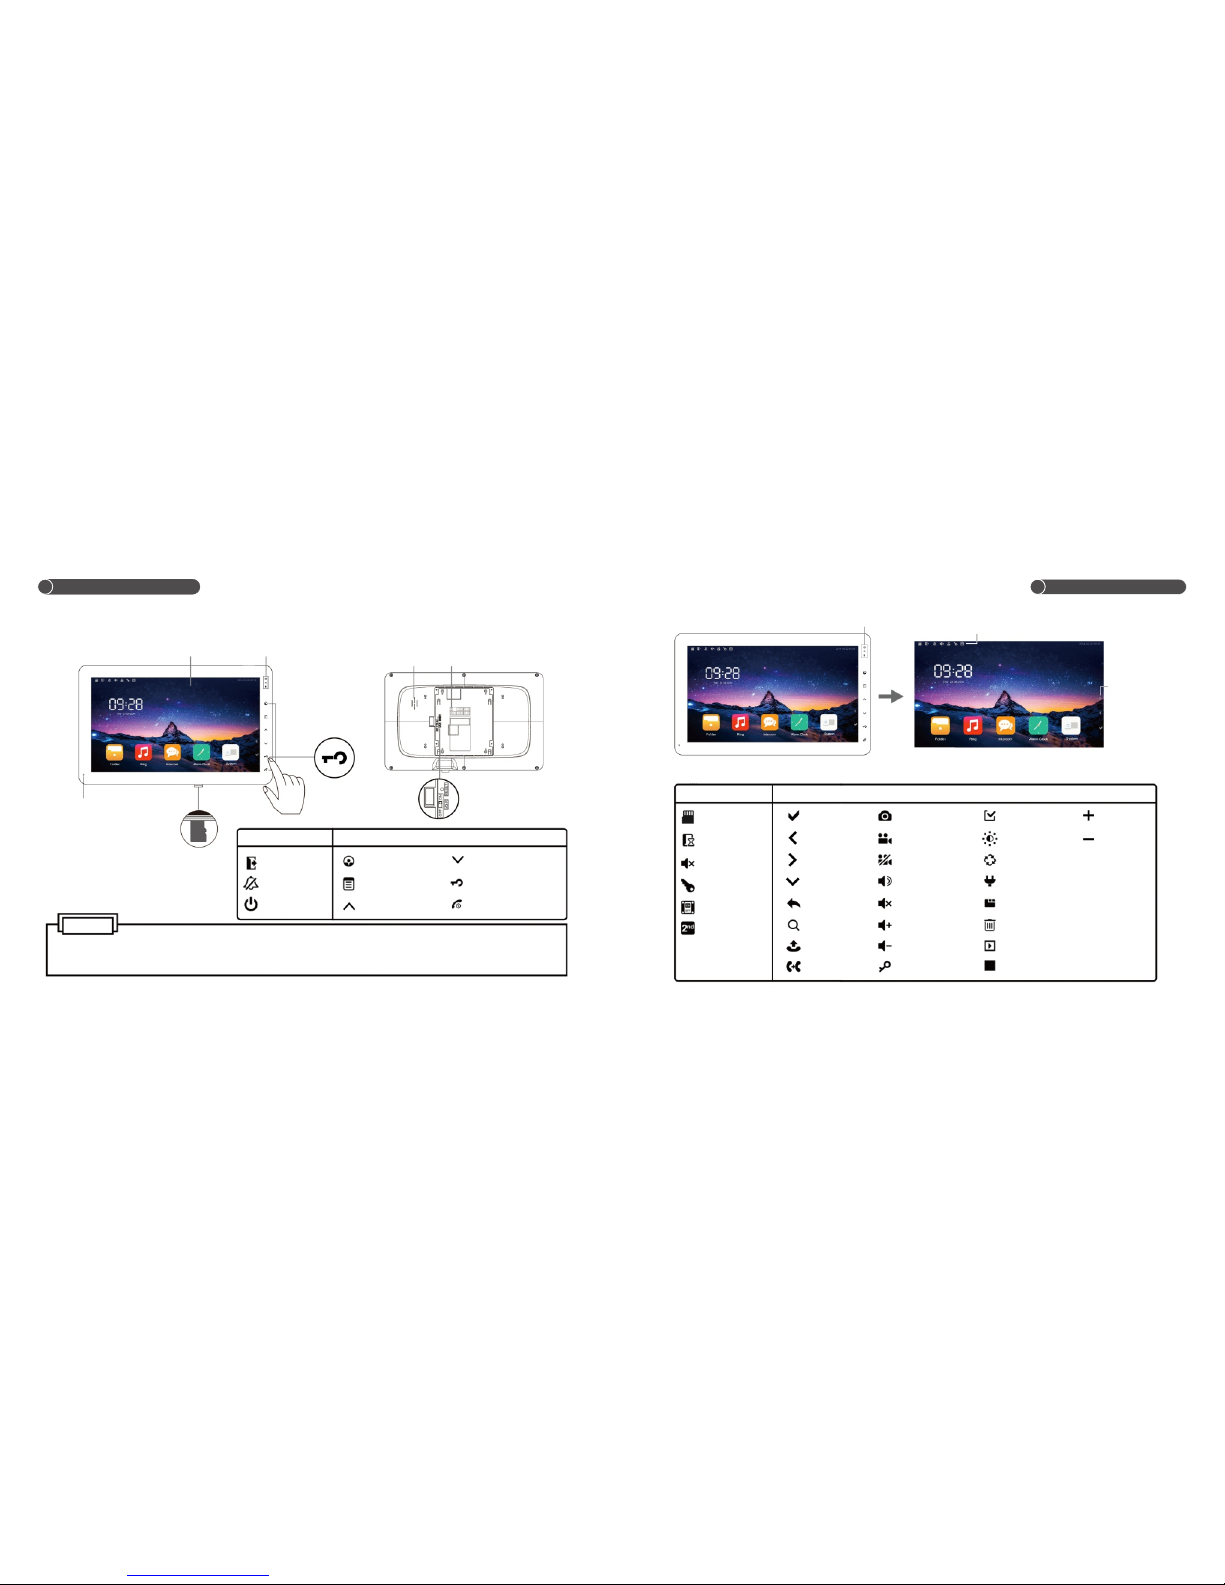
Parts and Features
Status bar
LED
Navigation button
Main menu
Screen
LED
Touch button
Press on the
middel of buttons
Speaker Power
VD-R On/Off/Reset
Mic
SD
LED Touch Button
Away
Power
Mute
Monitor
Up/Away
Menu
Down/Mute
Talk/Stop/Power
Unlock/Return
Note
1.Please touch the middle of the button(As above photo shows).
2.Please take off gloves while operation.
SD card
Mute
Another outdoor
camera calls in
Unlock
2 door calling
Extension switch
Confirm
Right
Left
Down
Zoom In
Return
Call
Answer
nd
Photo
Stop recording
Video
Volume adjustment
Volume up
Mute
Unlock
Volume Down
Select
Loop monitor
Picture adjustment
Extension switch
Delete
Switch
Pause
Play
Plus
Minus
Page 4
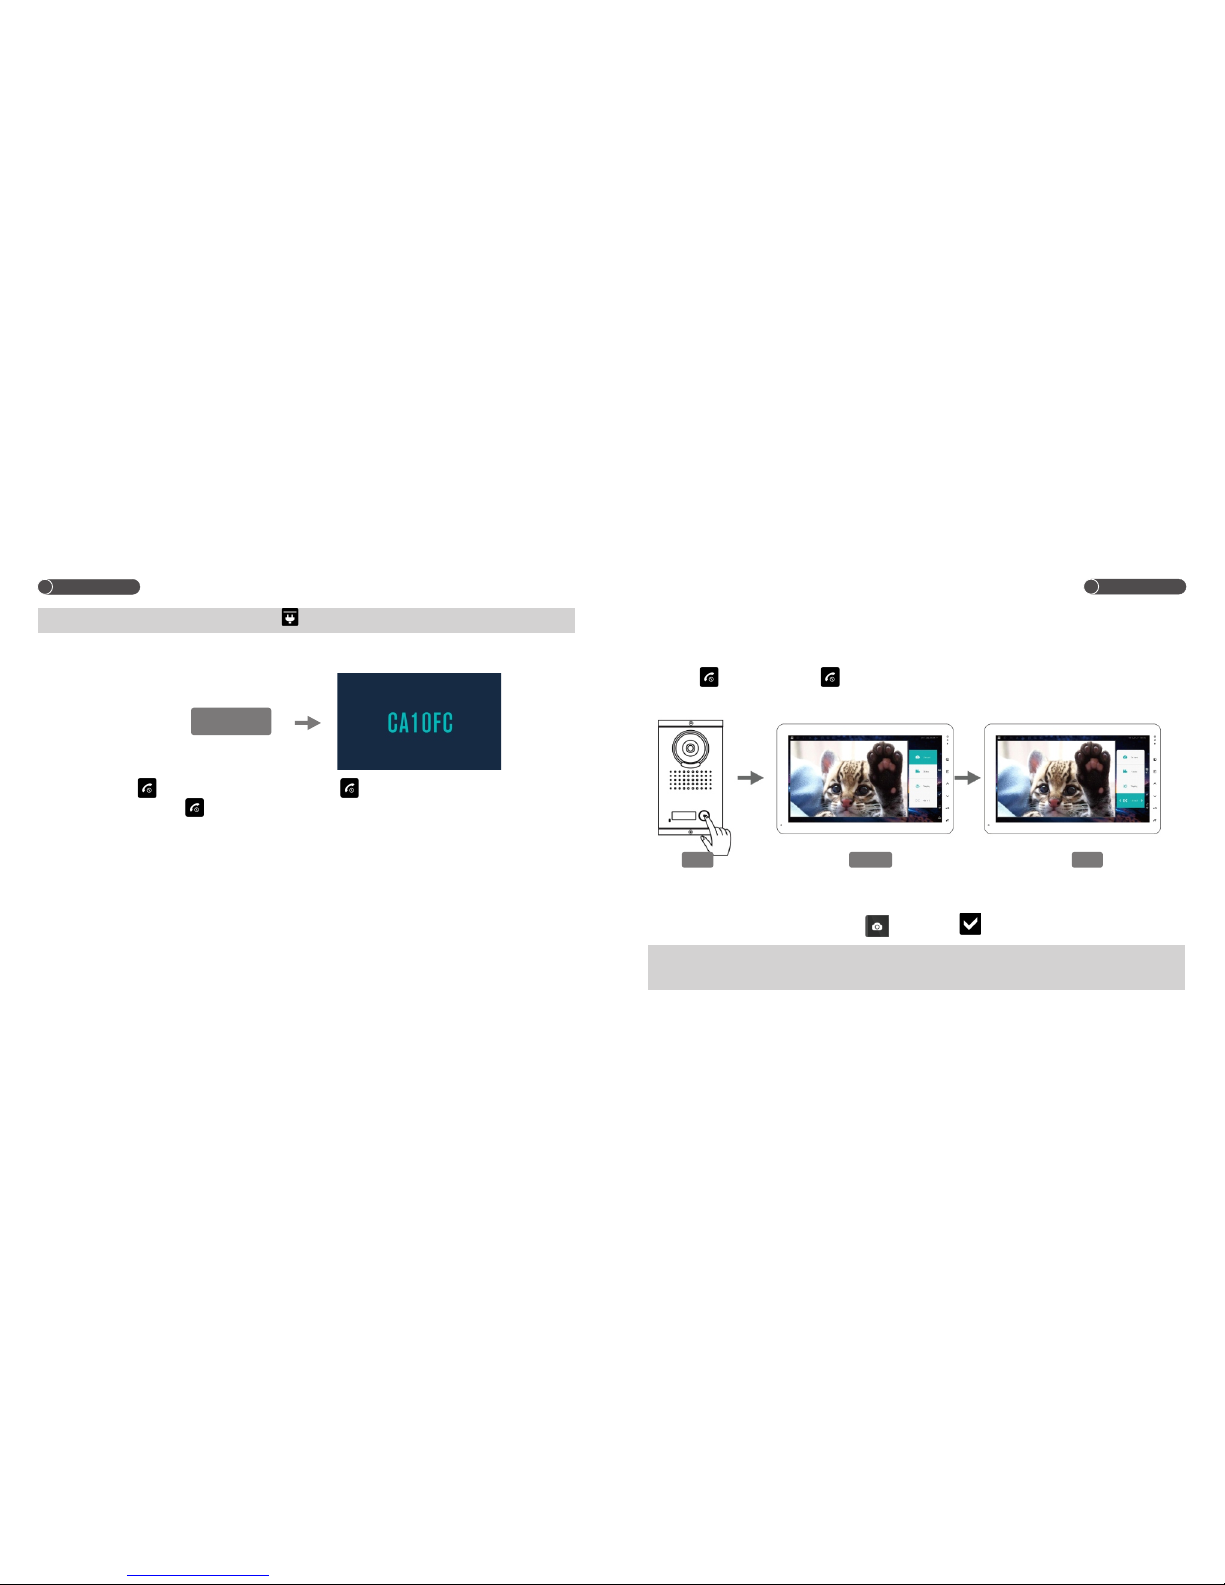
2. Outdoor Camera Calls in
2.1 Talk/Stop
When the outdoor camera calls in,the ringtone sounds.
touch to talk。touch again to stop。
2.2 Take Photo
Under talking, choose the photo option , then touch to take photo.
Note:1. Do not pull out the SD card while take photos.
2. Review/delete photos,Pls refer to chapter 5.1.
Note:When a line display on the top,such as ,pls hold to touch for operation.
1. On/Off/Standby
a. After connected power , the unit will sound”DI”and then enter into main menu.
b. b. Hold to touch for around 2S to power off.Touch again to power on.
C. Under main menu, touch to standby.Or it will go standby automatically if no operation in the set
time.(Pls refer to chapter XX)
6
7
Operation
Call
Answer
Talk
Operation
Power on
Page 5
8
9
2.3 Record Video
Under talking, choose the video option , then touch to record video, touch
again to save and stop.
Note:1. Do not pull out the SD card while record videos.
2. Review/delete videos,Pls refer to chapter 5.2
2.4 Unlock
Under talking, touch to unlock,the mark will display on the screen。
2.5 Extension Switch
Under talking, hold and touch o active extension switch.
(Pls refer to chapter 6 for the time setup of extension switch)
Note:1、This function only can control the device which connect to the terminal of
extension switch.
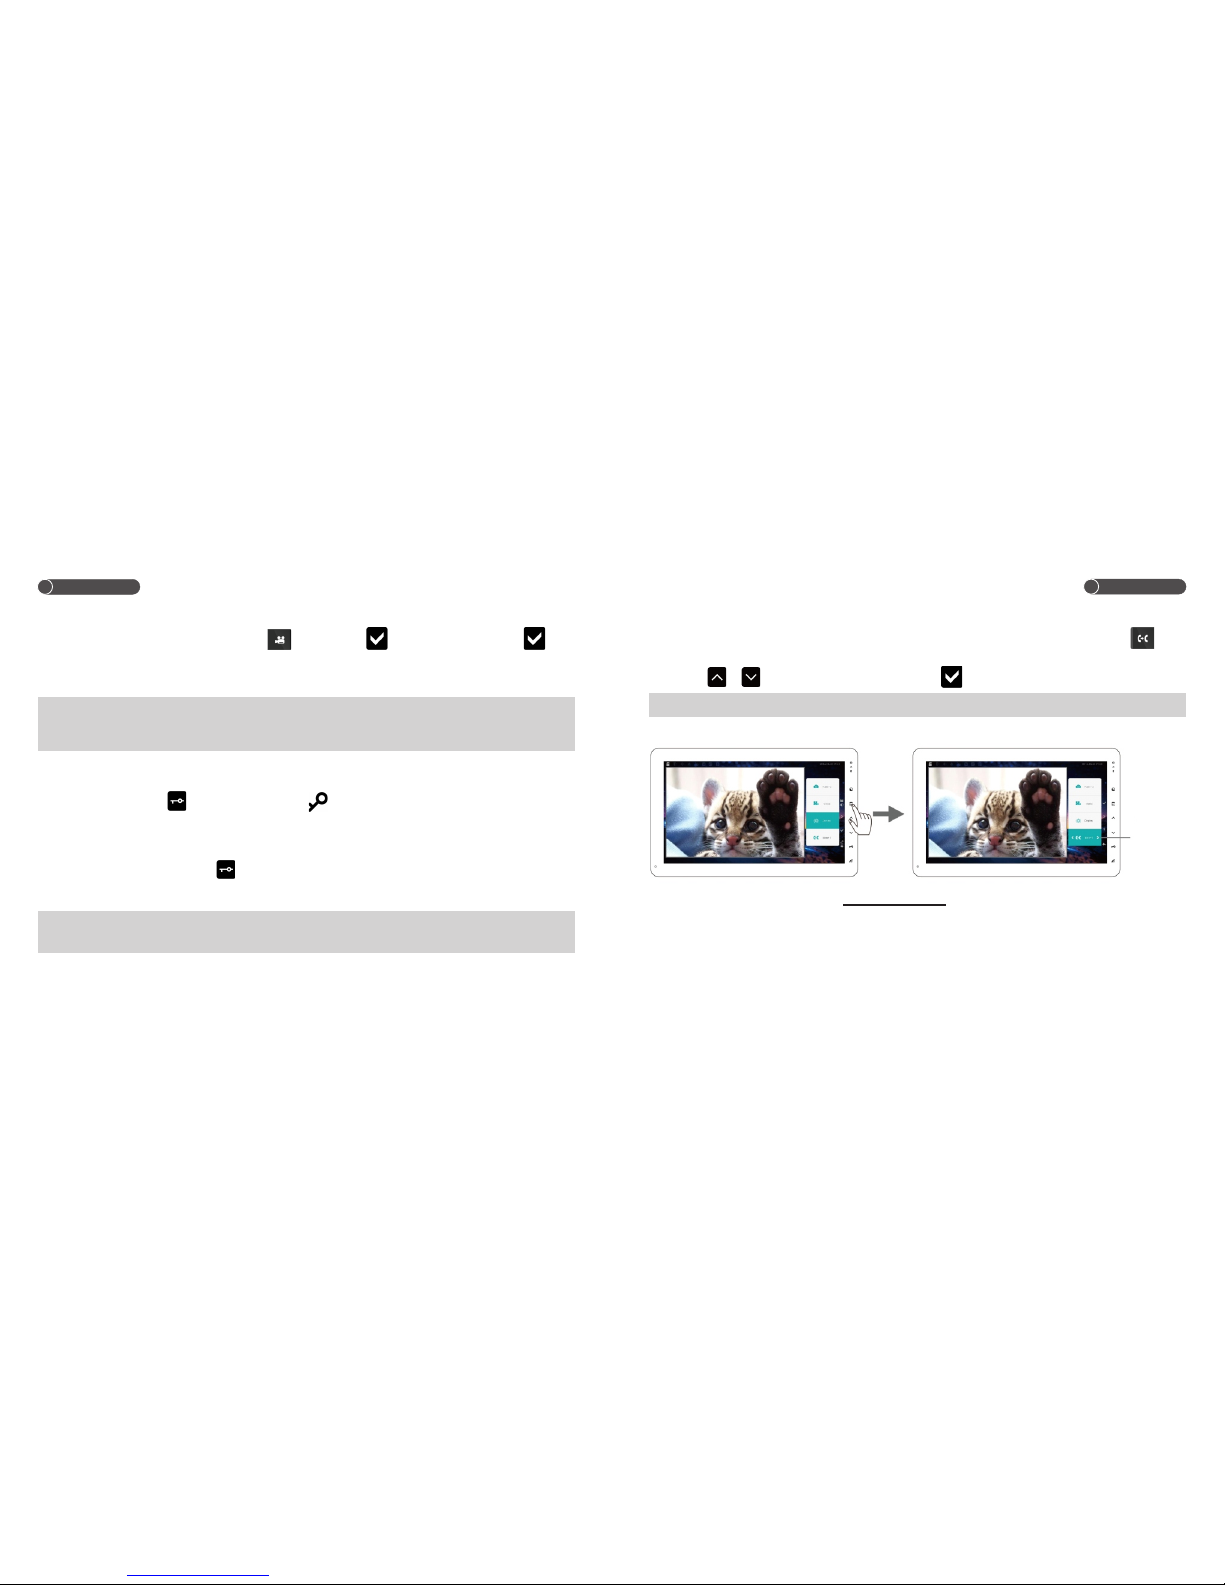
2.6 Call Transfer
Under talking, if want to transfer the call to other indoor monitor,select the intercom option ,
then press / to choose room number,press to confirm.
Note:If the room number is not exit, remind with a failure sound.
Operation
Operation
Indoor monitor 1
(Talking with outdoor camera 1)
Indoor monitor 1
(Call transfer page)
Call transfer
Choose
room number
Page 6
10
Operation
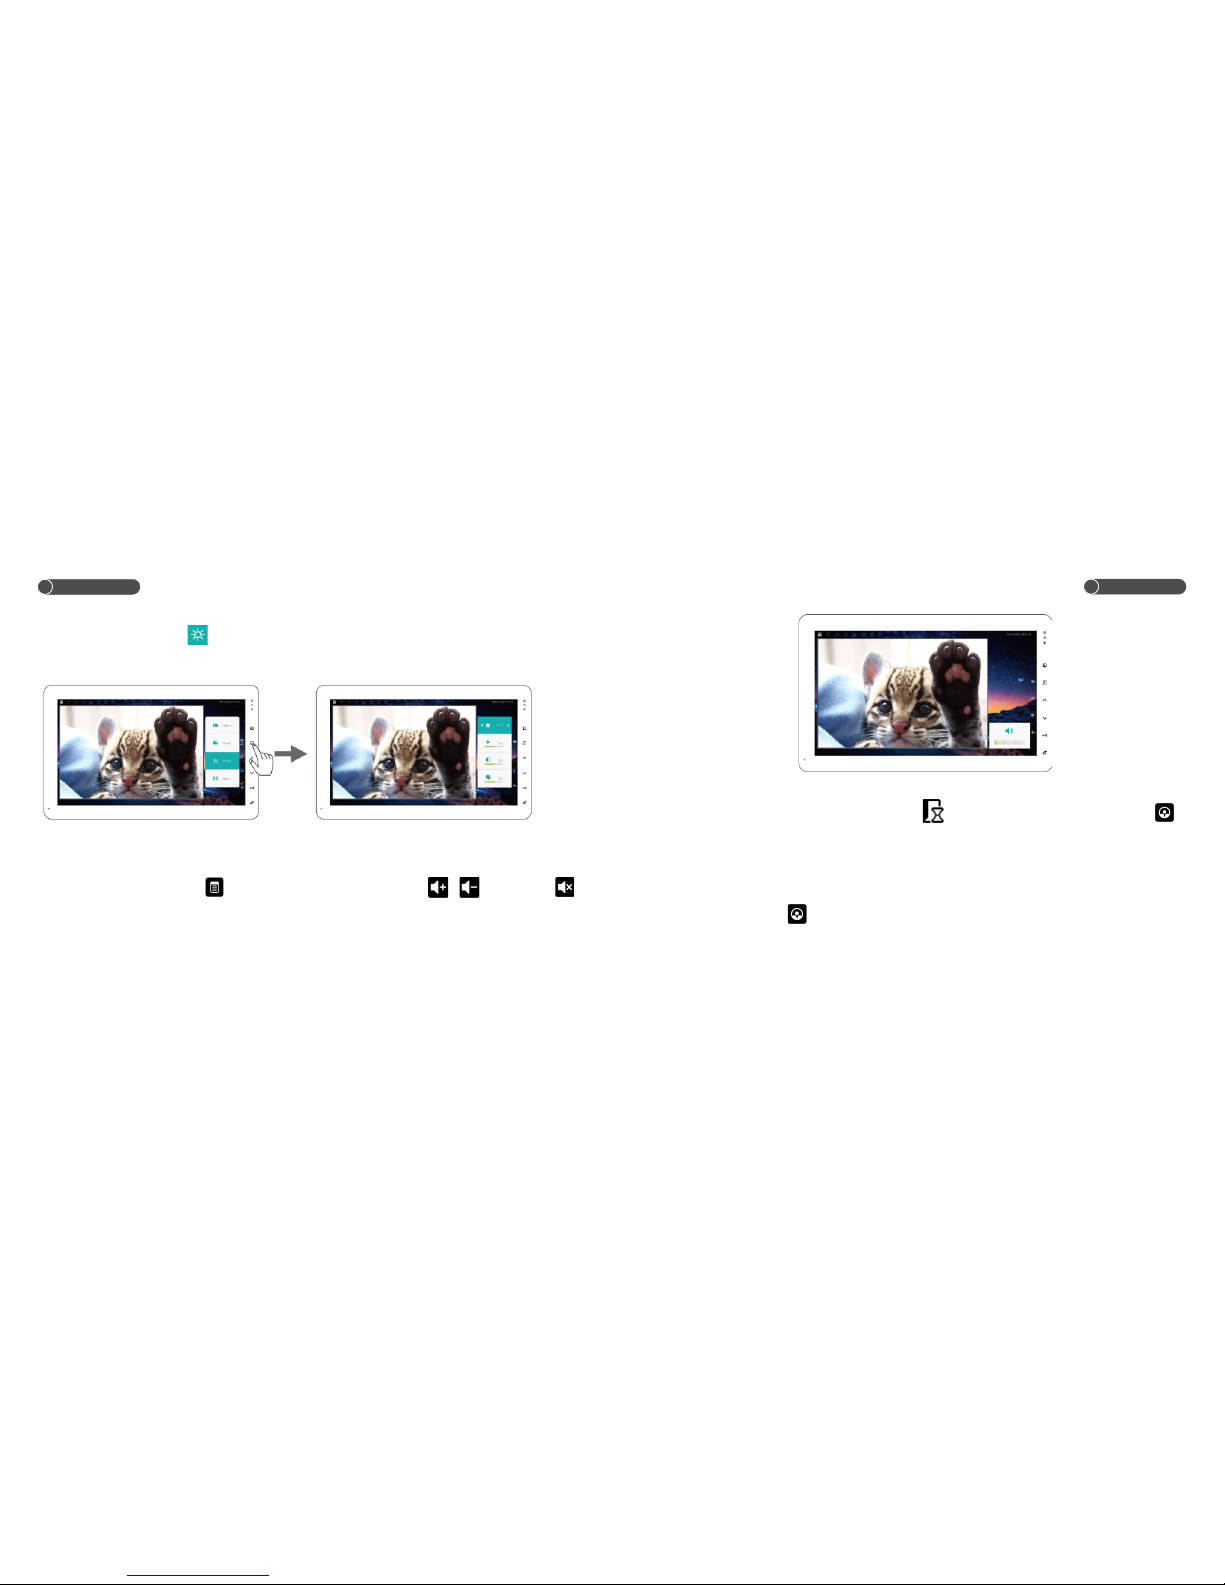
2.7 Image Adjustment
Under talking, choose the option to enter into image adjustment interface.
2.8 Talk Volume Adjustment
Under talking ,hold and touch to pop up adjust interface,then touch / adjust,touch
or mute.
11
Operation
2.9 Another Outdoor Camera Calls In
Under talking, if another outdoor calls in,the Icon display on the screen,then can touch
to switch.
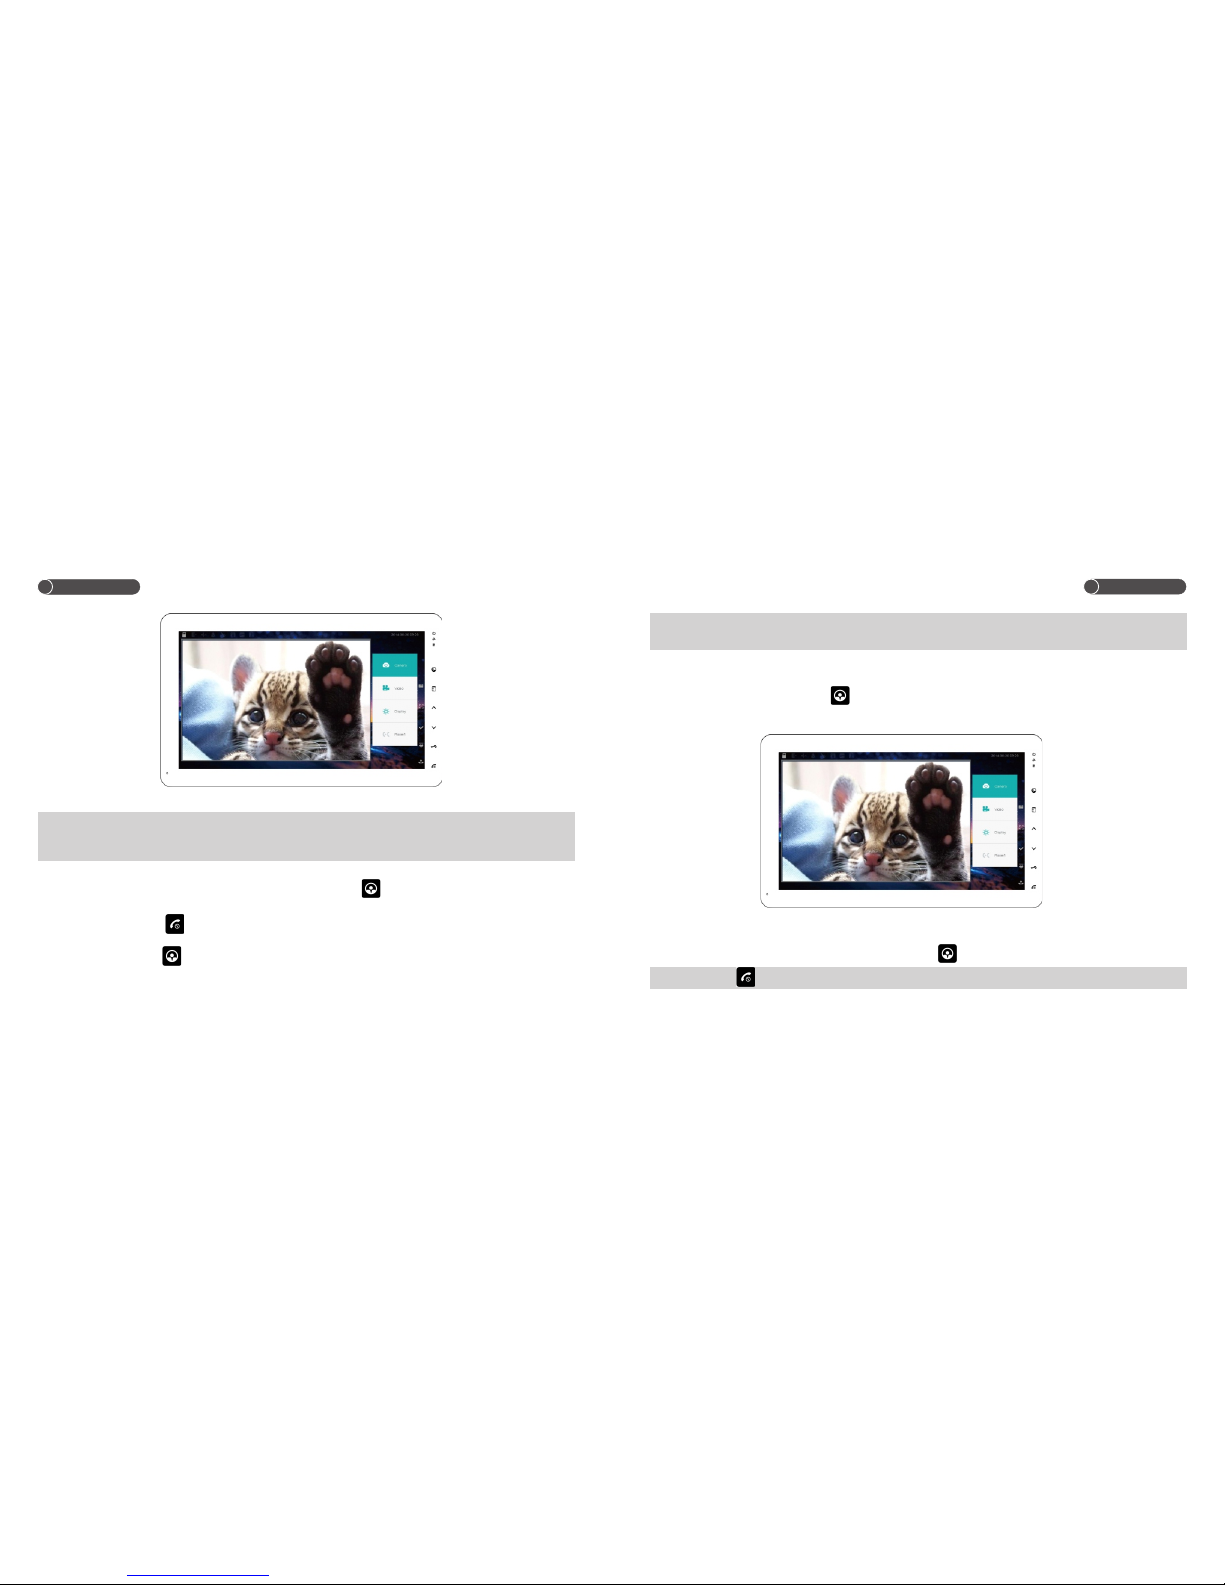
3. Monitor Outdoor Camera
Under standby,touch to enter into monitor interface.( Switch to monitor outdoor
amera/Monitor transfer to talk/record video,photo/Turn on or turn off extension switch/Image
adjustment)
Page 7
12
13
Operation
Operation
Note:1. Under monitoring,unlock and call transfer are limited.
2. When a indoor monitor in the system is under monitoring/talking/intercom, other indoor monitor can
not monitor outdoor.
A. Switch To Monitor Outdoor Camera
Under monitoring,,default to monitor CH1(outdoor camera 1),touch CH2 to switch to outdoor camera 2.
B. Monitor Transfer To Talk
Under monitoring,touch to talk.
C. Exit Monitoring Status
Under monitoring,touch to exit ,or waiting the time up ,it will automatically exit.
Note: 1.When monitor transfer to talk, user can not use intercom function.
2.The video recorded during monitoring, there is no sound.
4. CCTV Monitor
Under standby,hold and touch to enter into CCTV monitor interface, user can monitor CCTV,
record video/photo,turn on/off extension switch, cycle monitoring.
A. Switch CCTV To Monitor
Under monitoring,default to monitor CCTV1,touch to switch CCTV 1-8 for monitoring.
Note:touch to exit monitoring ,or waiting the set time up ,it will automatically exit.
Page 8
15
Operation
Operation
B. Cycle monitoring
Under monitor interface,choose the and touch / to turn on /off this function.
The CCTV will be switched in each set time. It can not record video or photo while cycle monitoring.
C、CCTV setup
Under monitor interface,choose , then touch to enter into setup interface, then choose
the CCTVchannel you want for cycle monitoring.
Choose “CCTV ,touch / to set the loop time.
D. Exit CCTV Monitoring
Under monitor interface, touch to exit, or wait the set time up to exit automatically.(Please refer
chapter for CCTV time5.6
14
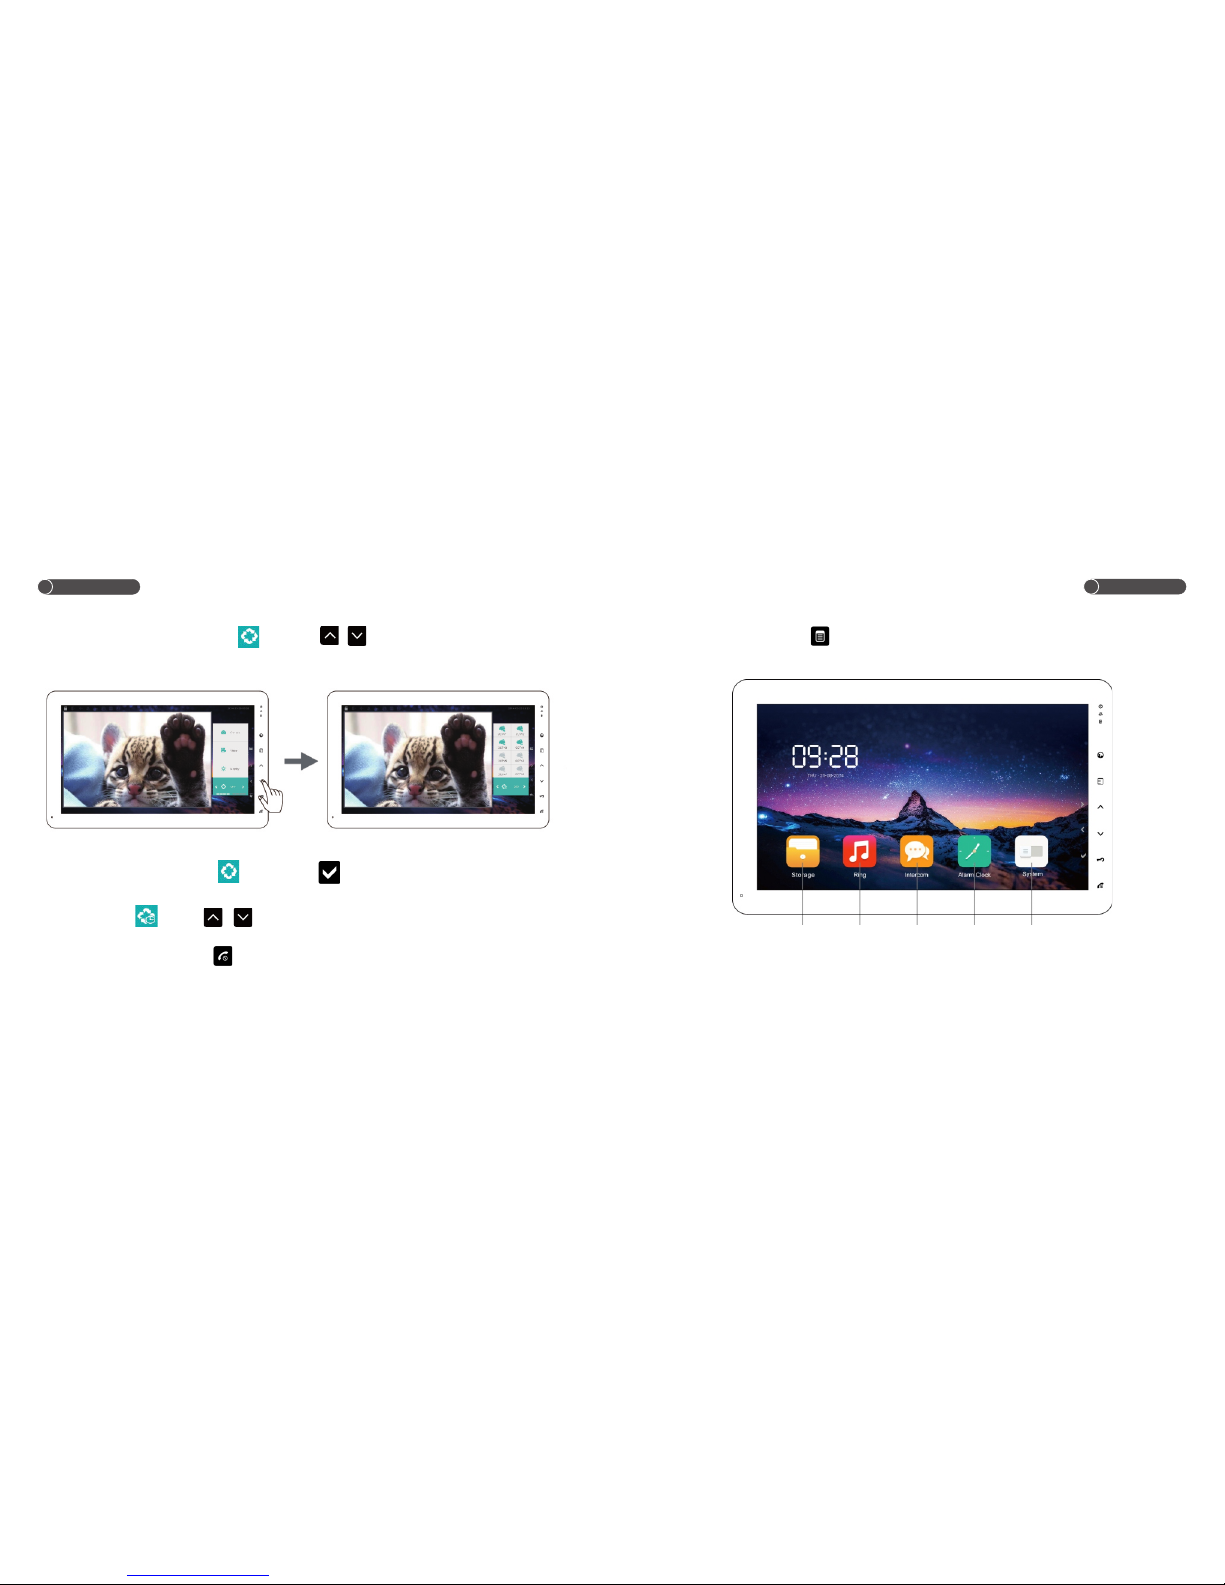
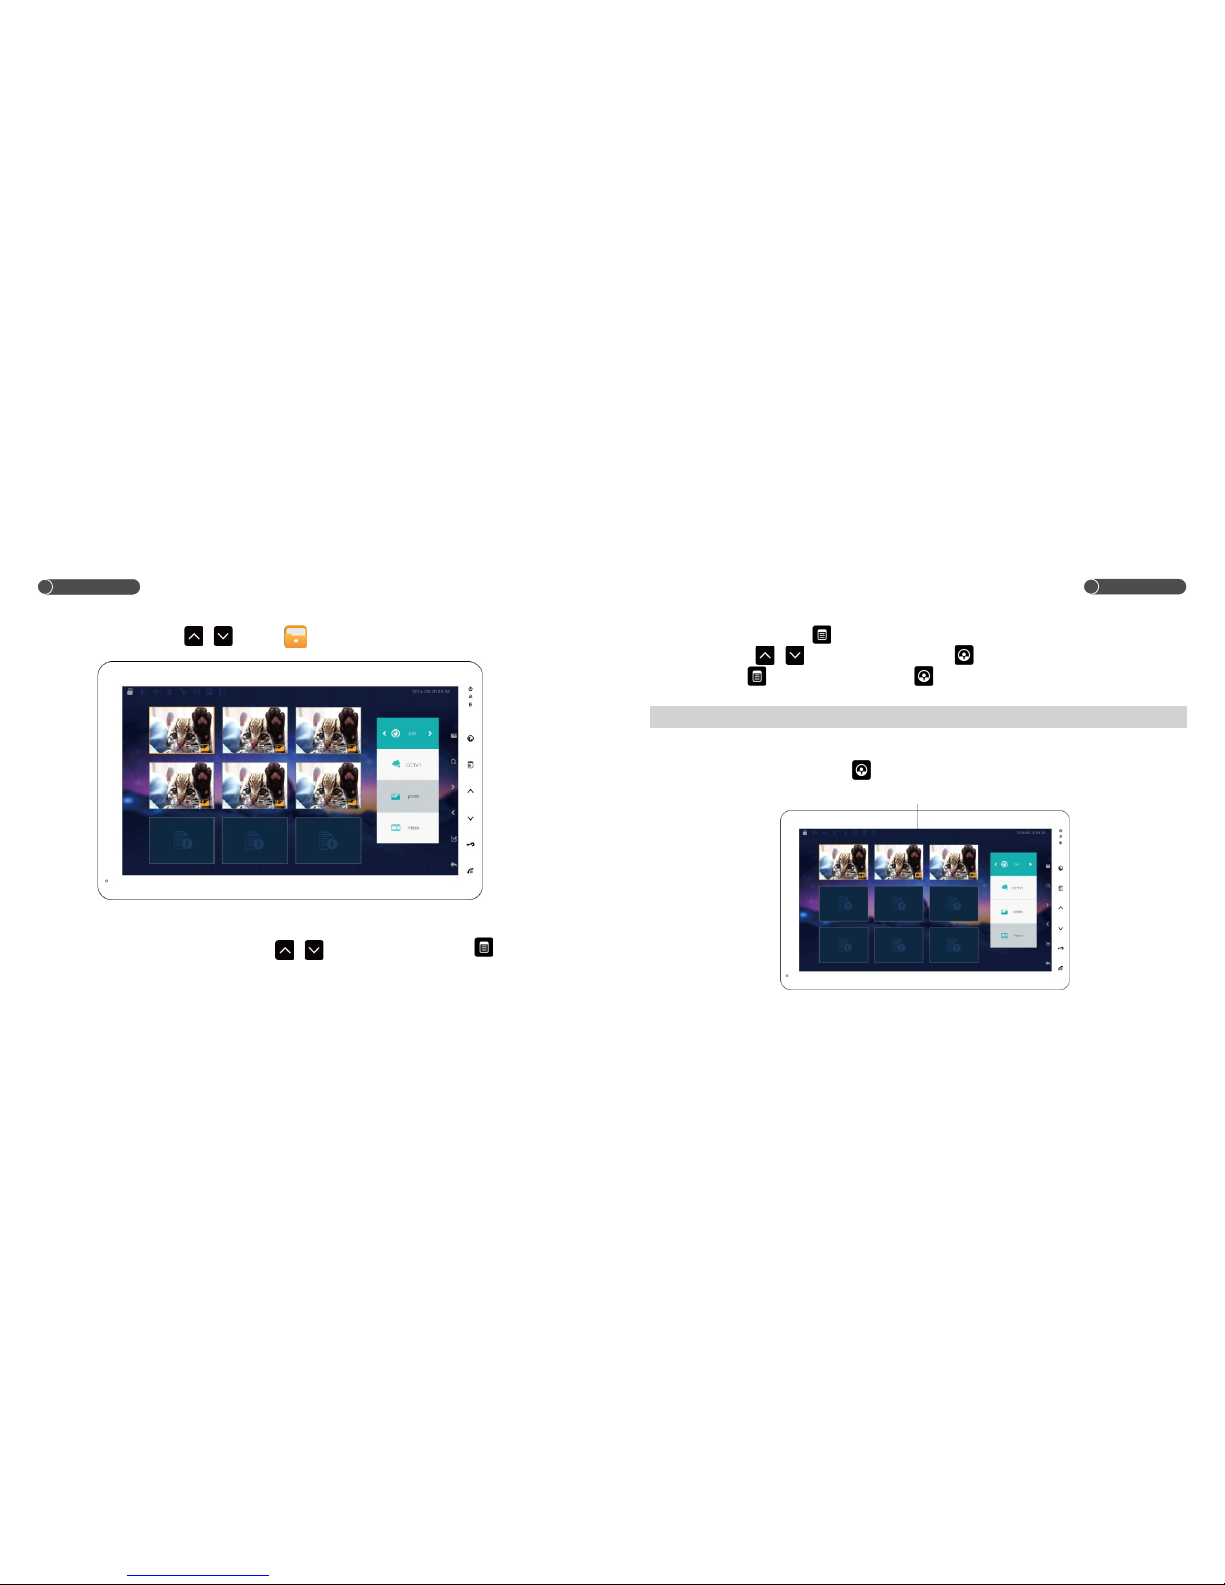
5.Main Menu
Under standby status, touch to enter into main menu.
User can manage the setup of storage,ring,intercom,alarm clock, system.
Storage Ring Inercom Alarm Clock System
Page 9
Operation
Operation
17
16
5.1 Photo Management
Under main menu,touch / to select to enter into photo management interface.
A. Review Photo
Under photo management interface,touch / to select photo,then touch to view.
B. Delete Video
Method 1: Hold and touch to delete.
Method 2: Touch / to select photo,then touch to confirm,or choose several photos
and then touch to delete(Hold and touch can select all photos)
Note:If need delete all photos,please refer to chapter 5.8 for formatting the SD card.
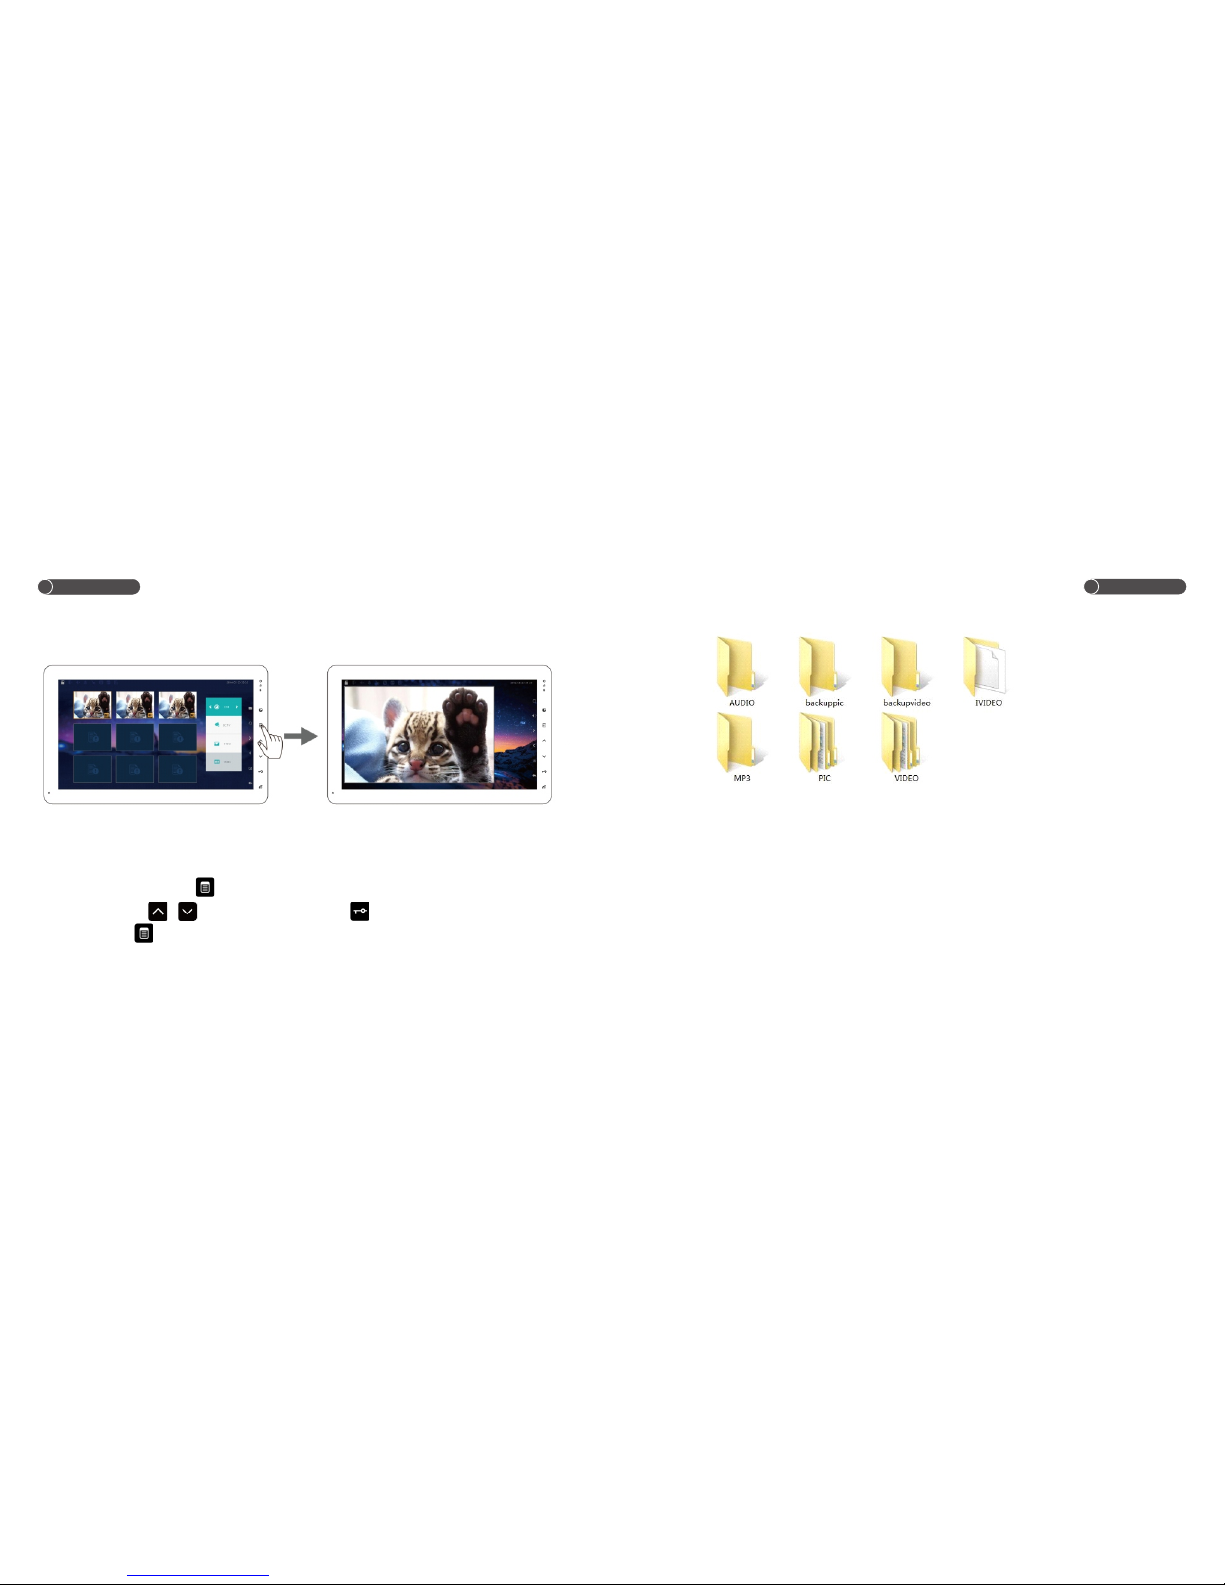
5.2 Video Management
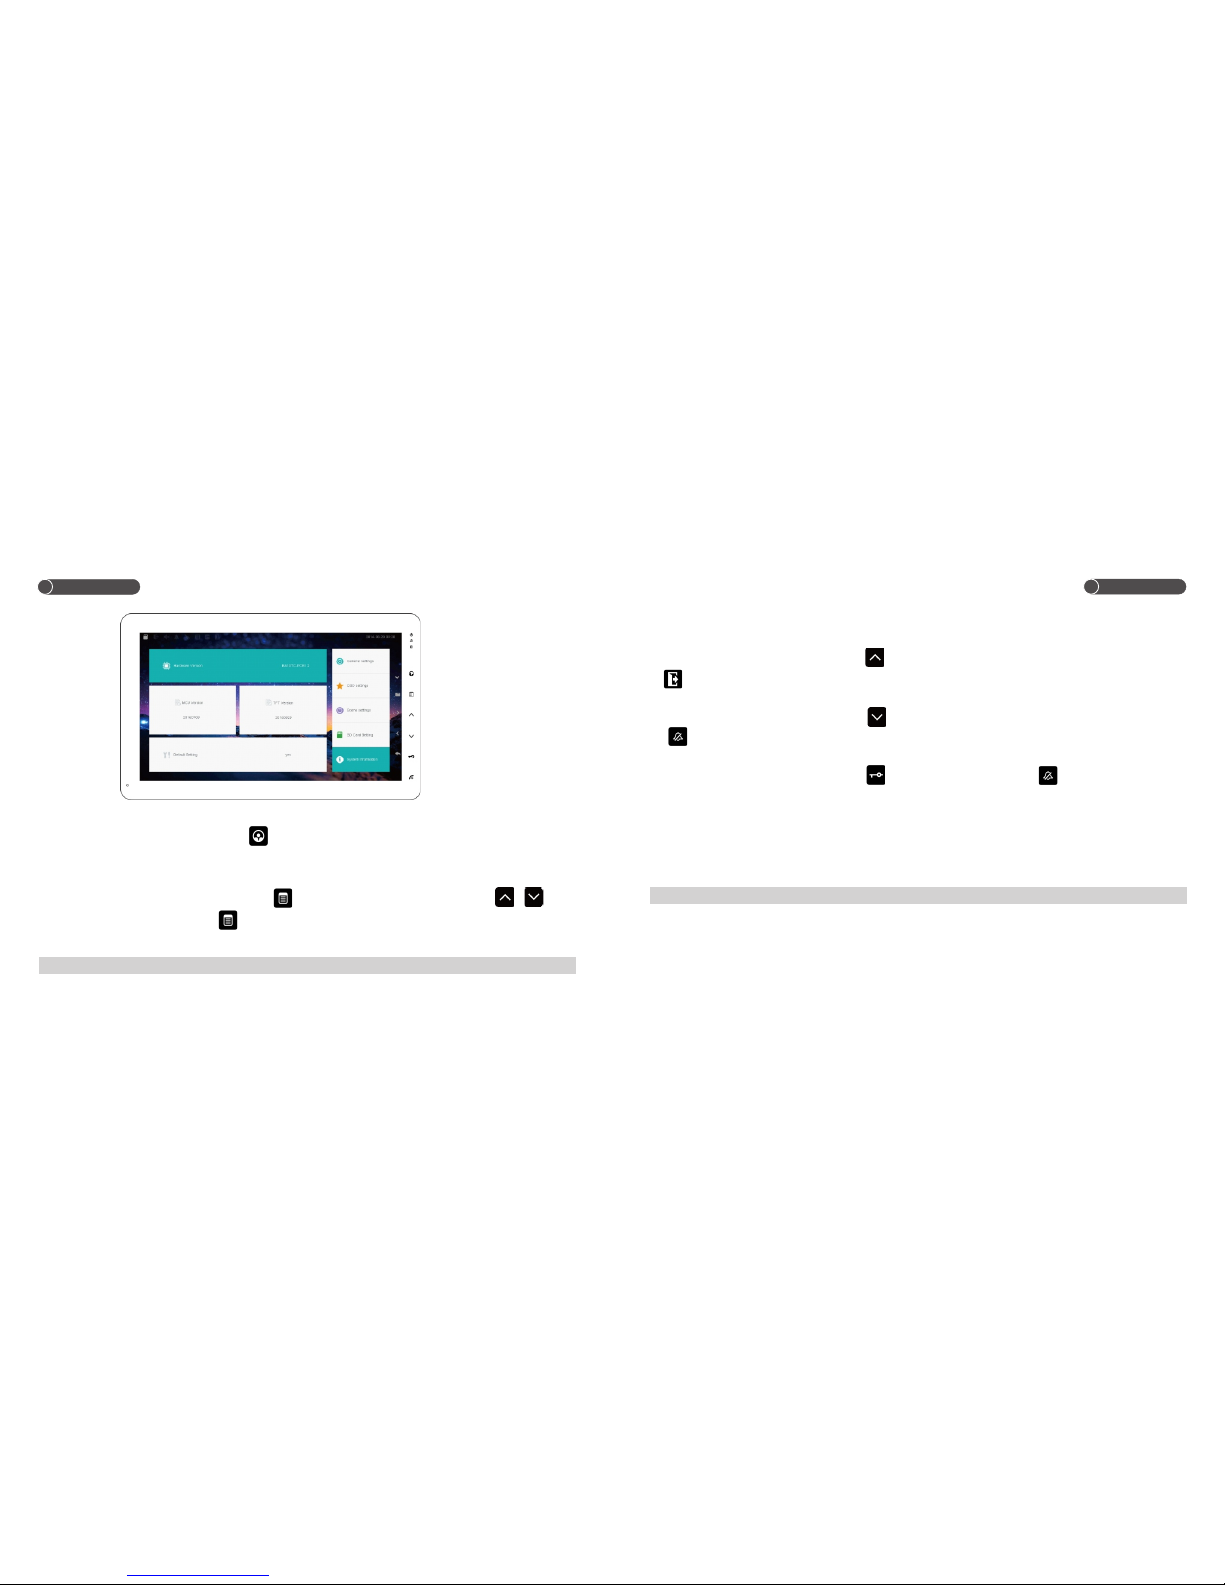
While review photo, touch and hold to enter into video management interface.
record sign
Page 10
19
18
C. SD Card
The above photo is Root directory file in SD card.
PIC= All photos are saved in it..VIDEO= All videos are saved in it.
Backuppic= the backup file of photos. backupvideo=the backup file of videos.
Operation
A. Review Video
B. Delete Video
Method 1: Hold and touch to delete.
Method 2: Touch / to select video,then touch to confirm,or choose several videos
and then touch to delete.
Operation
Page 11
21
20
Operation
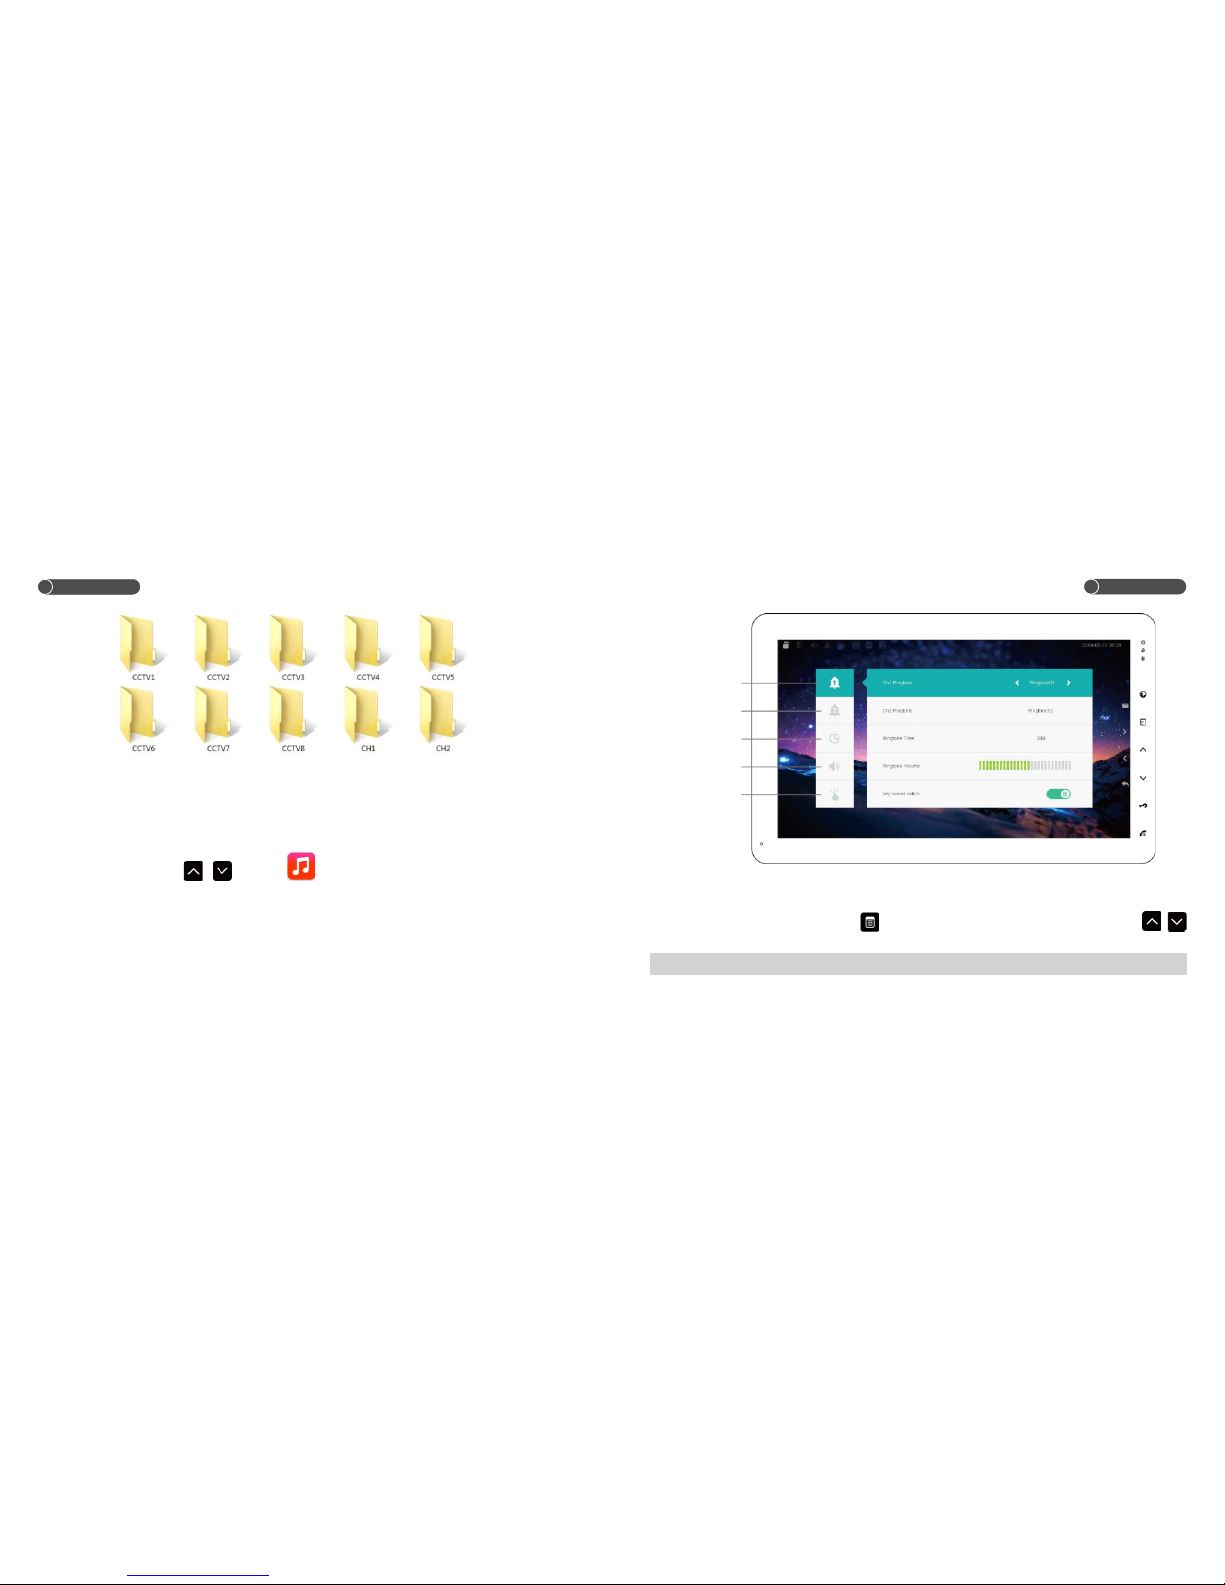
The above files store all the photos and video which captured by different CCTV/outdoor unit.
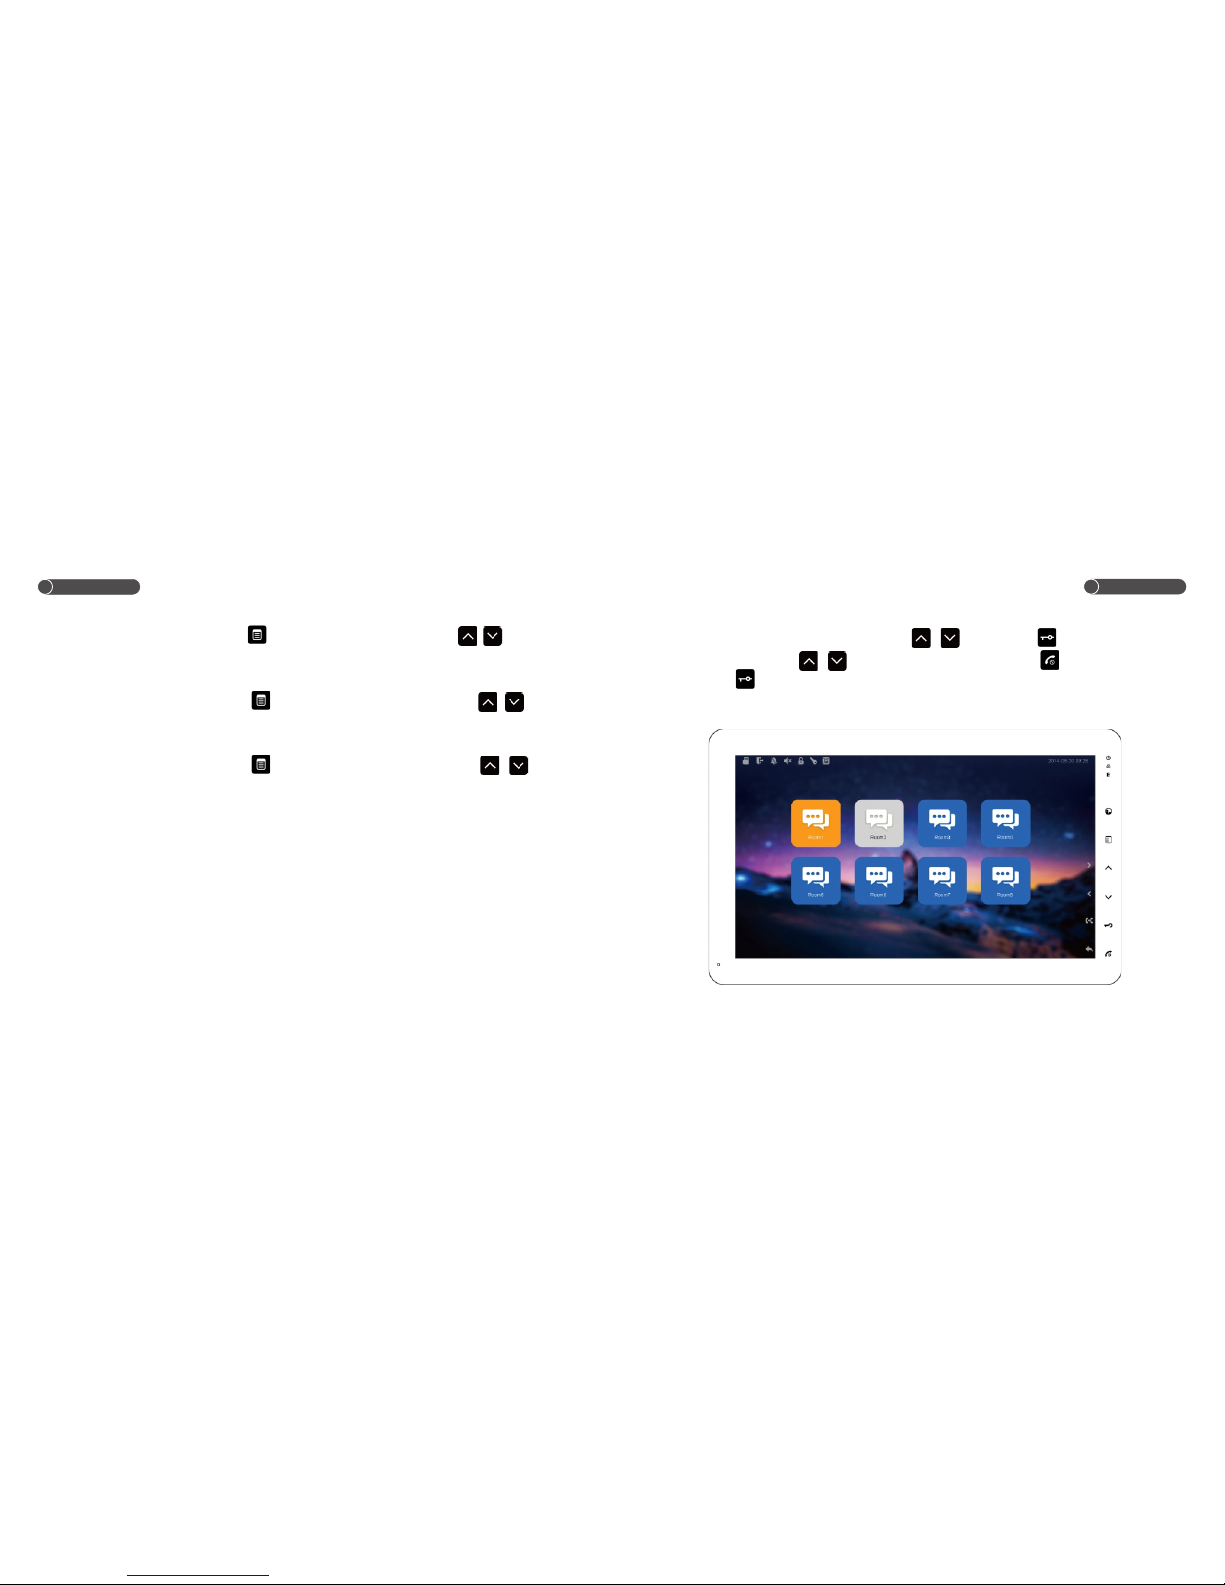
5.3 Ringtone Setup
Under main menu,touch / to select to enter ringtone setup.(CHA/CH2
ringtone/ringtone time/ringtone volume/key sound).
Operation
A. CH1/2 Ringtone
Under ringtone setup interface,touch to select Ch1 Ringtone/Ch2 Ringtone,then touch /
to choose the ringtone you want.
Note:Under mute mode, no ringtone.
Ch1 ringtone
Ringtone volume
Ringtone time
Ch2 ringtone
Key sound
Page 12
23
22
Operation
B. Ringtone Time
Under ringtone setup interface,touch to select Ringtone Time,then touch / to set the
time(5S/10S/15S/20S).
C. Ringtone Volume
Under ringtone setup interface,touch to select Ringtone Volume,then touch / to adjust
volume.
D. Key Sound
Under ringtone setup interface,touch to select Ringtone Volume,then touch / to
choose ON/OFF.
Operation
5.4 Intercom
Under Main menu,choose Intercom by touching / ,then touch enter into
intercom interface,touch / to choose the room number,touch to talk or stop.( If call
failed,touch to exit).
Page 13
25
24
Operation
Operation
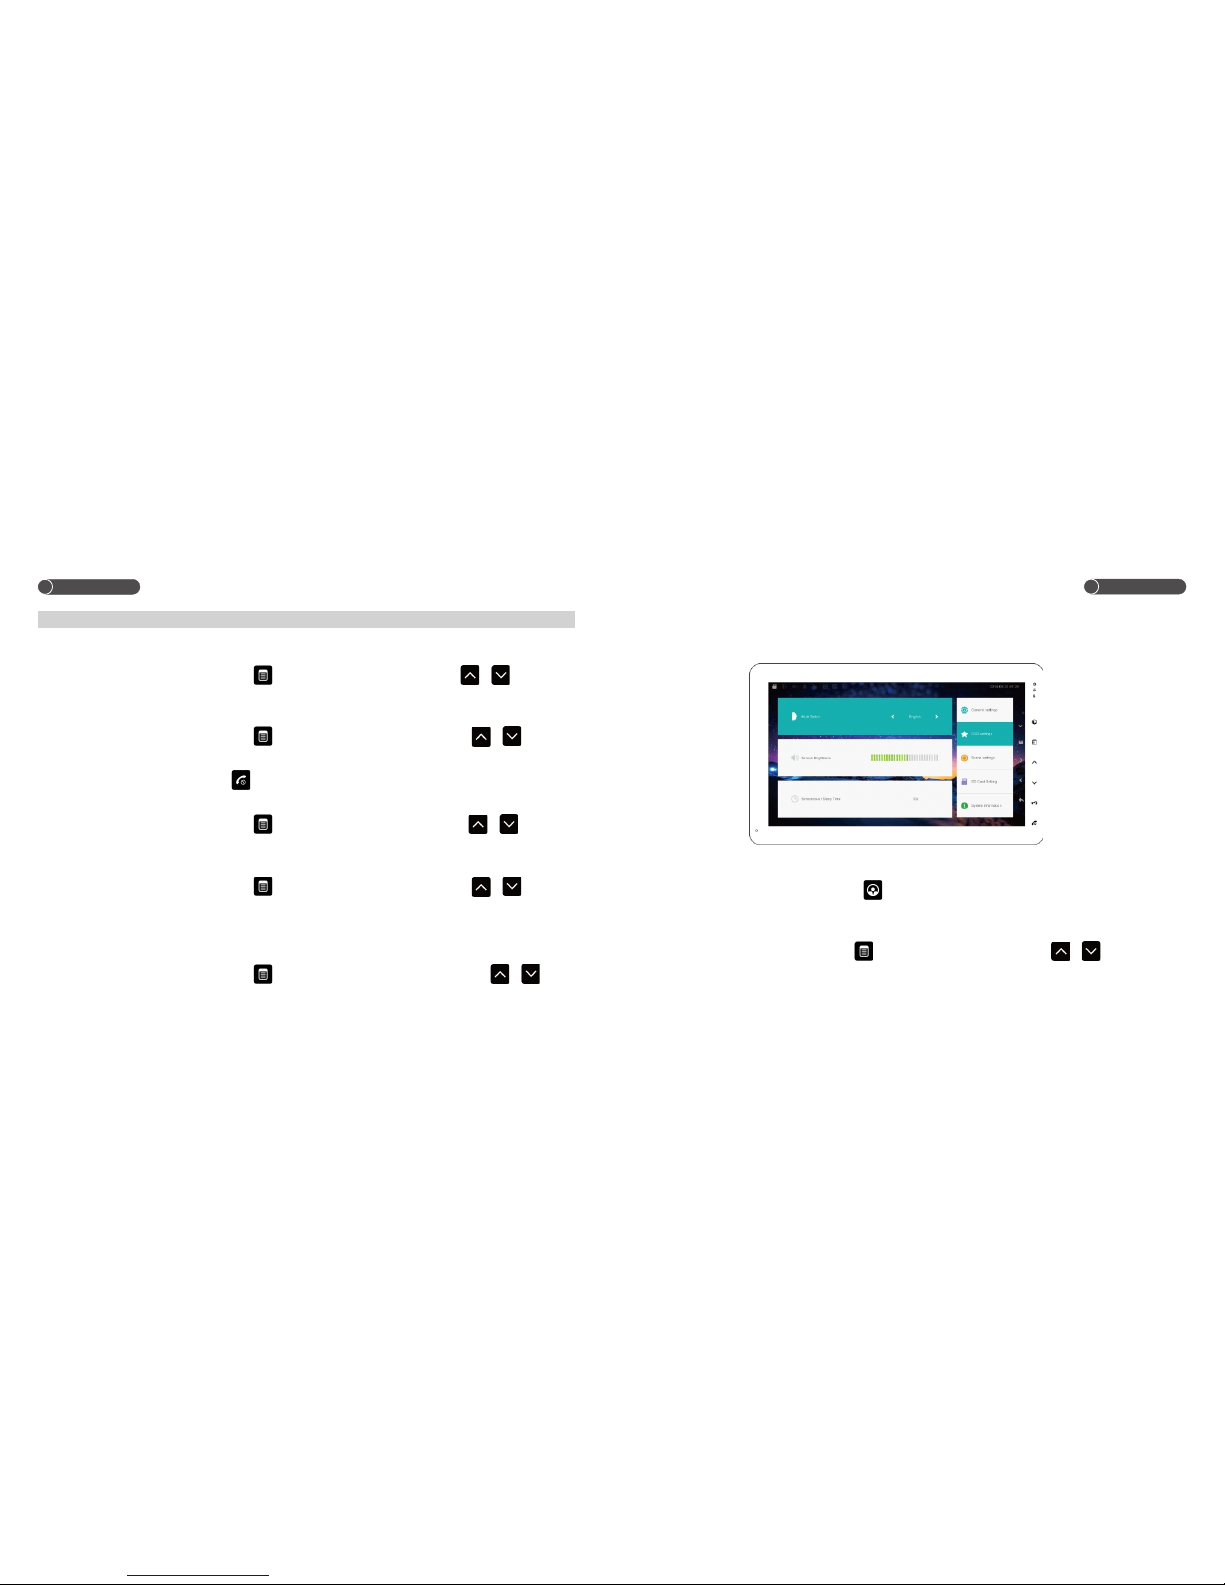
5.6 System Setup
Under main menu,touch / to choose , to enter the setup Interface.(General
setting,OSD setting,sence setting、SD setting、system information)
Under general setting, user can setup max room NO,room number,CCTV time,multi-switch,
extension switch time.
A.Max Room No.
Under general setting interface,touch to slecet “Max Room No”, then touch / to set the
max room No.(Max4/Max8).
The Max room No= The max indoor monitors in the system(4PCS/8PCS), Default 4 PCS.
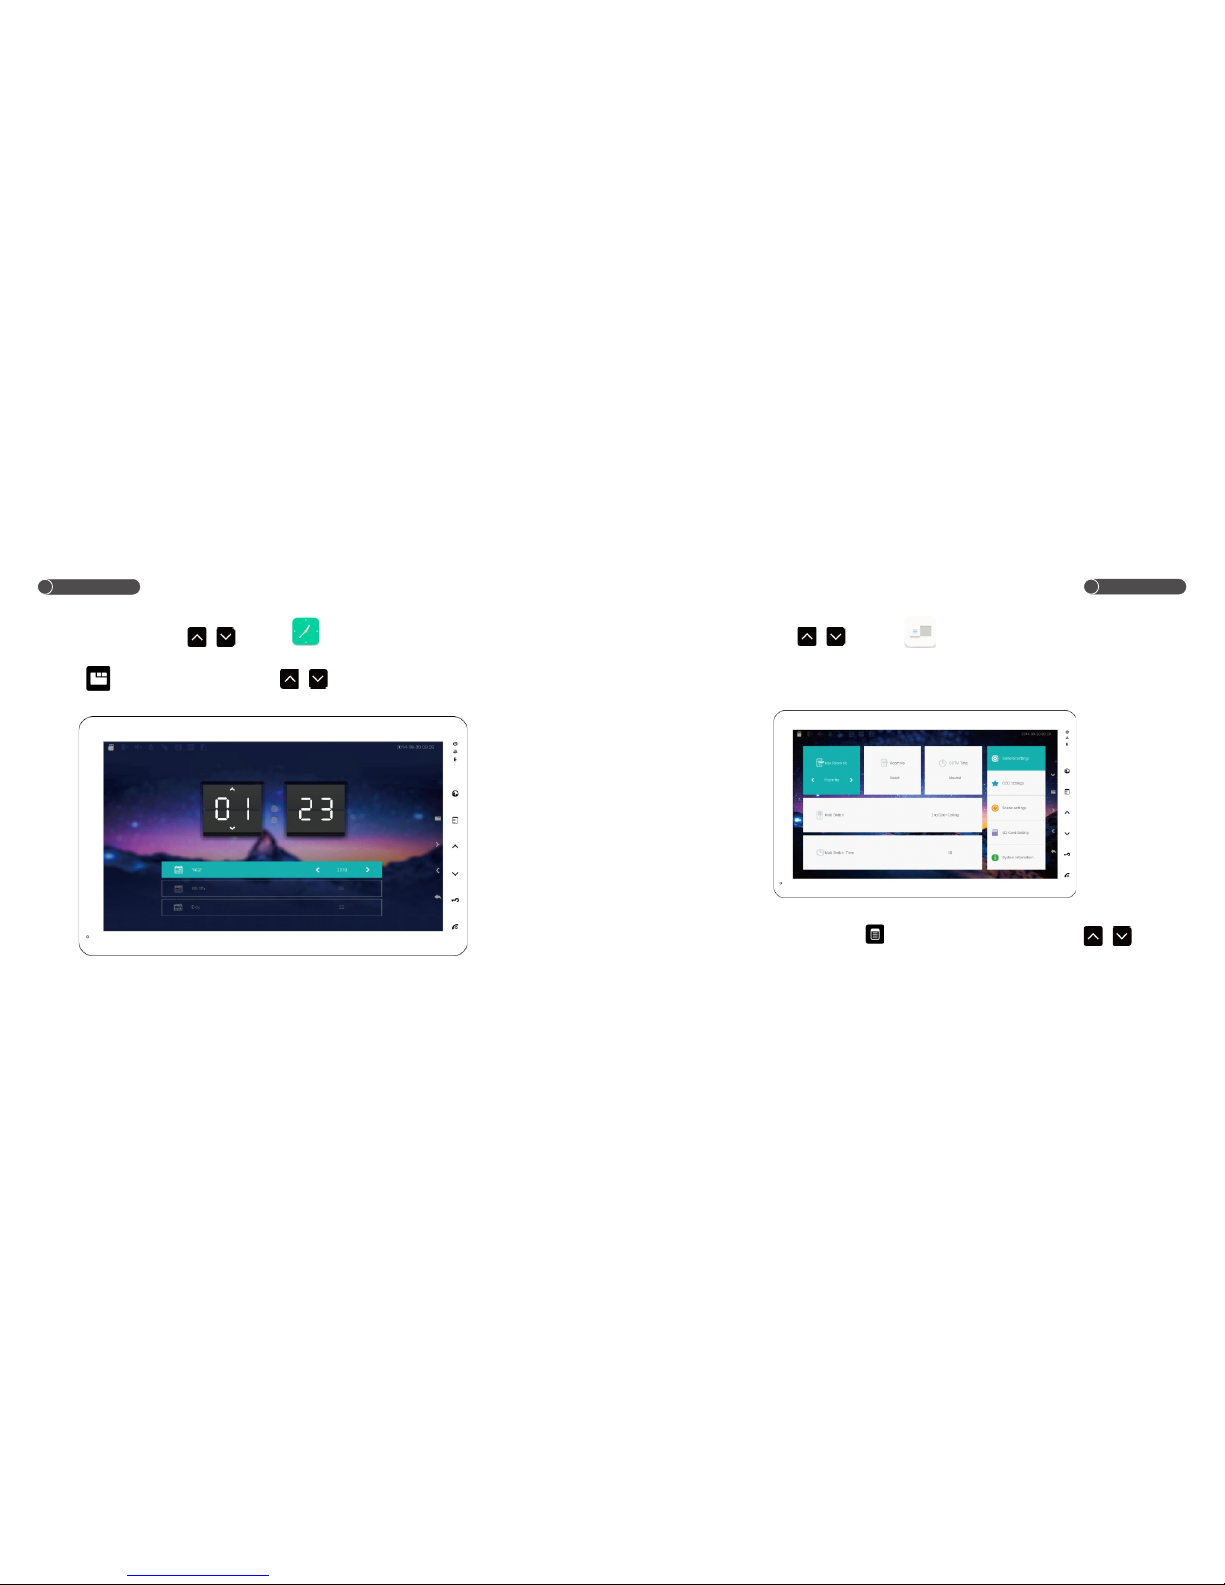
5.5 Time setup
Under main menu,touch / to choose to enter the setup interface.(Setup
year/month/day/hour/minute).
Touch to choose the item,then touch / to setup.
Page 14
27
26
Operation
Note:Only main unit can set the Max room NO.
B. Room No.
Under general setting interface,touch to choose “Room No”. ,then touch / to set the
room No.
C.CCTV Time
Under general setting interface,touch to choose “CCTV Time",then touch / to set
CCTV monitor time.(Manual/10Mins/12Hrs)
Default set as manual, need touch to exit while monitoring.
D.Multi-switch
Under general setting interface,touch to select “Multi Switch” ,then touch / to choose
the function.(2nd door calling /Extension switch).
E.Unlock Time
Under general setting interface,touch to select “Unlock Time",then touch / to set the
time(1S/3S/5S/10S).
Default time is 3S,means the unlock status will be keeping for 3S。
F. Extension Switch Time.
Under general setting interface,touch to select “Extension Switch",then touch / to set
the time(1S/3S/10S/20S),
Default time is 1S,means the extension switch will be on fo 1S.
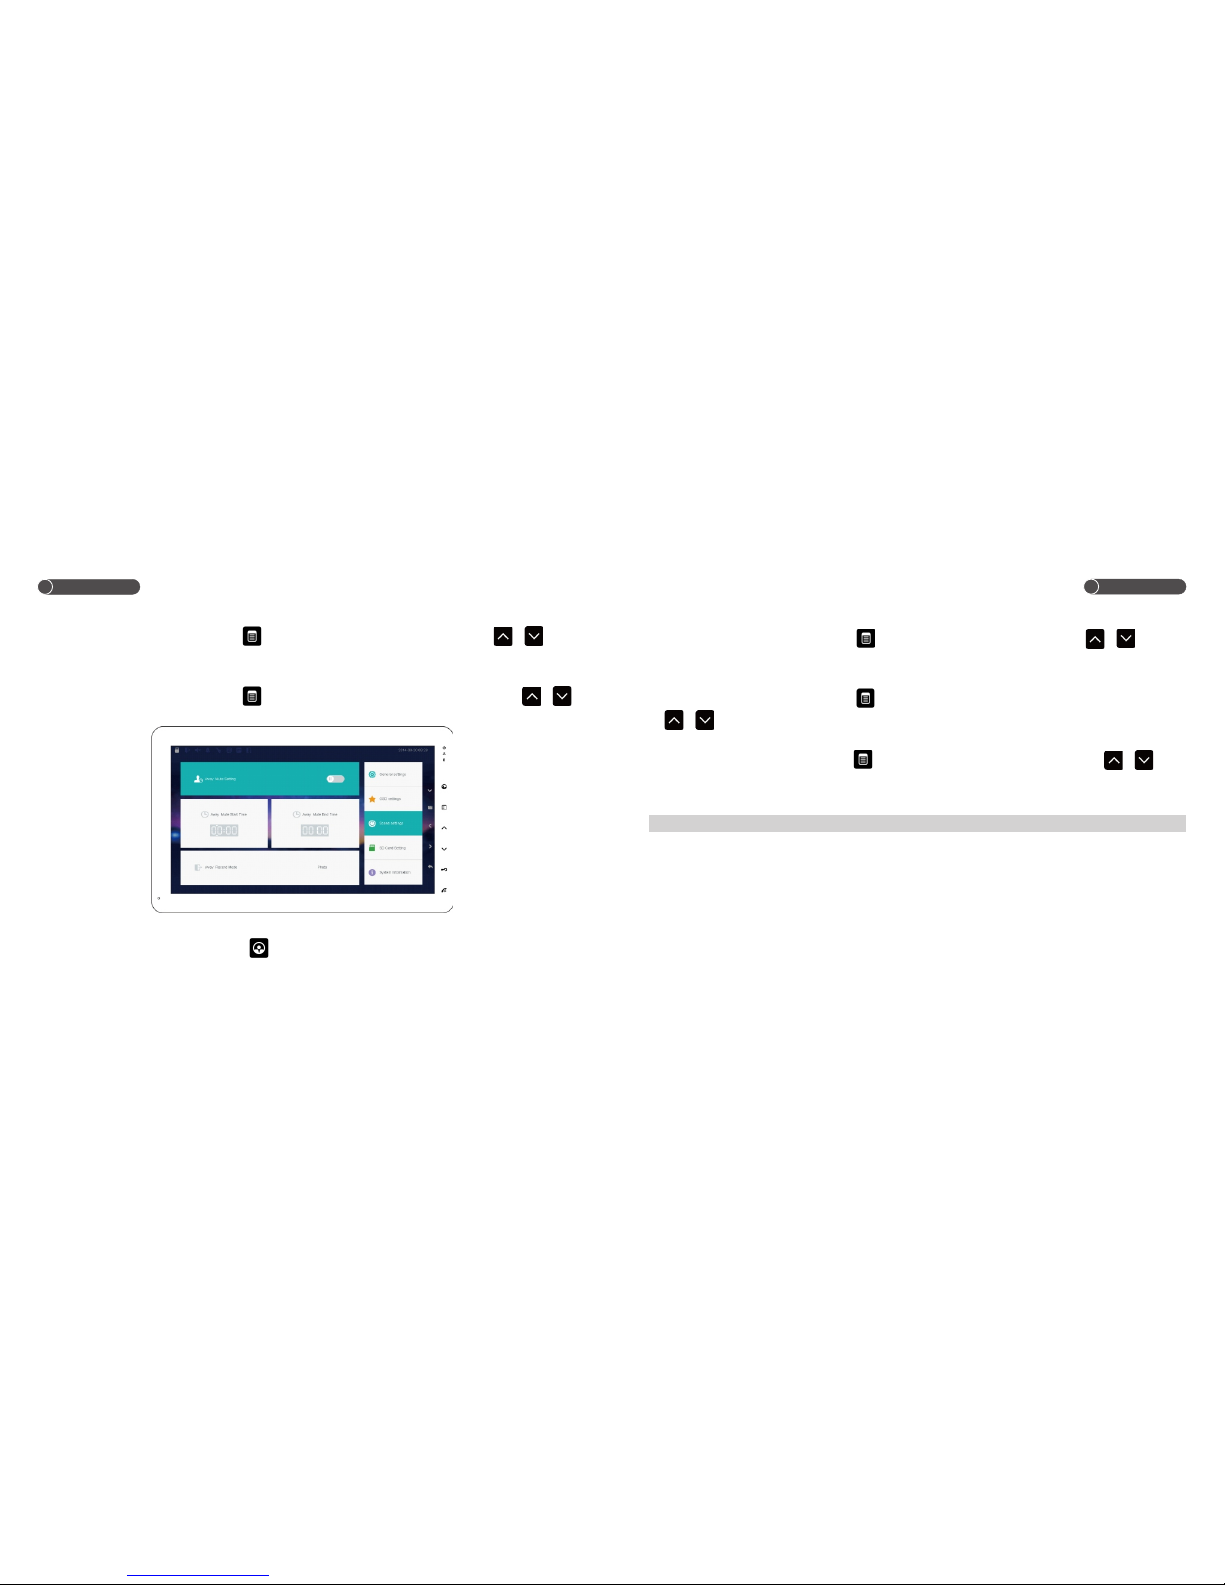
5.7 OSD Setting
Under system setting interface,touch to select “OSD Setting”.(Set “Language/Screen
Brightness/Screensaver sleep time”)
A. Language
Under OSD setting interface,touch to select “Language",then touch / to set the
language.
Operation
Page 15
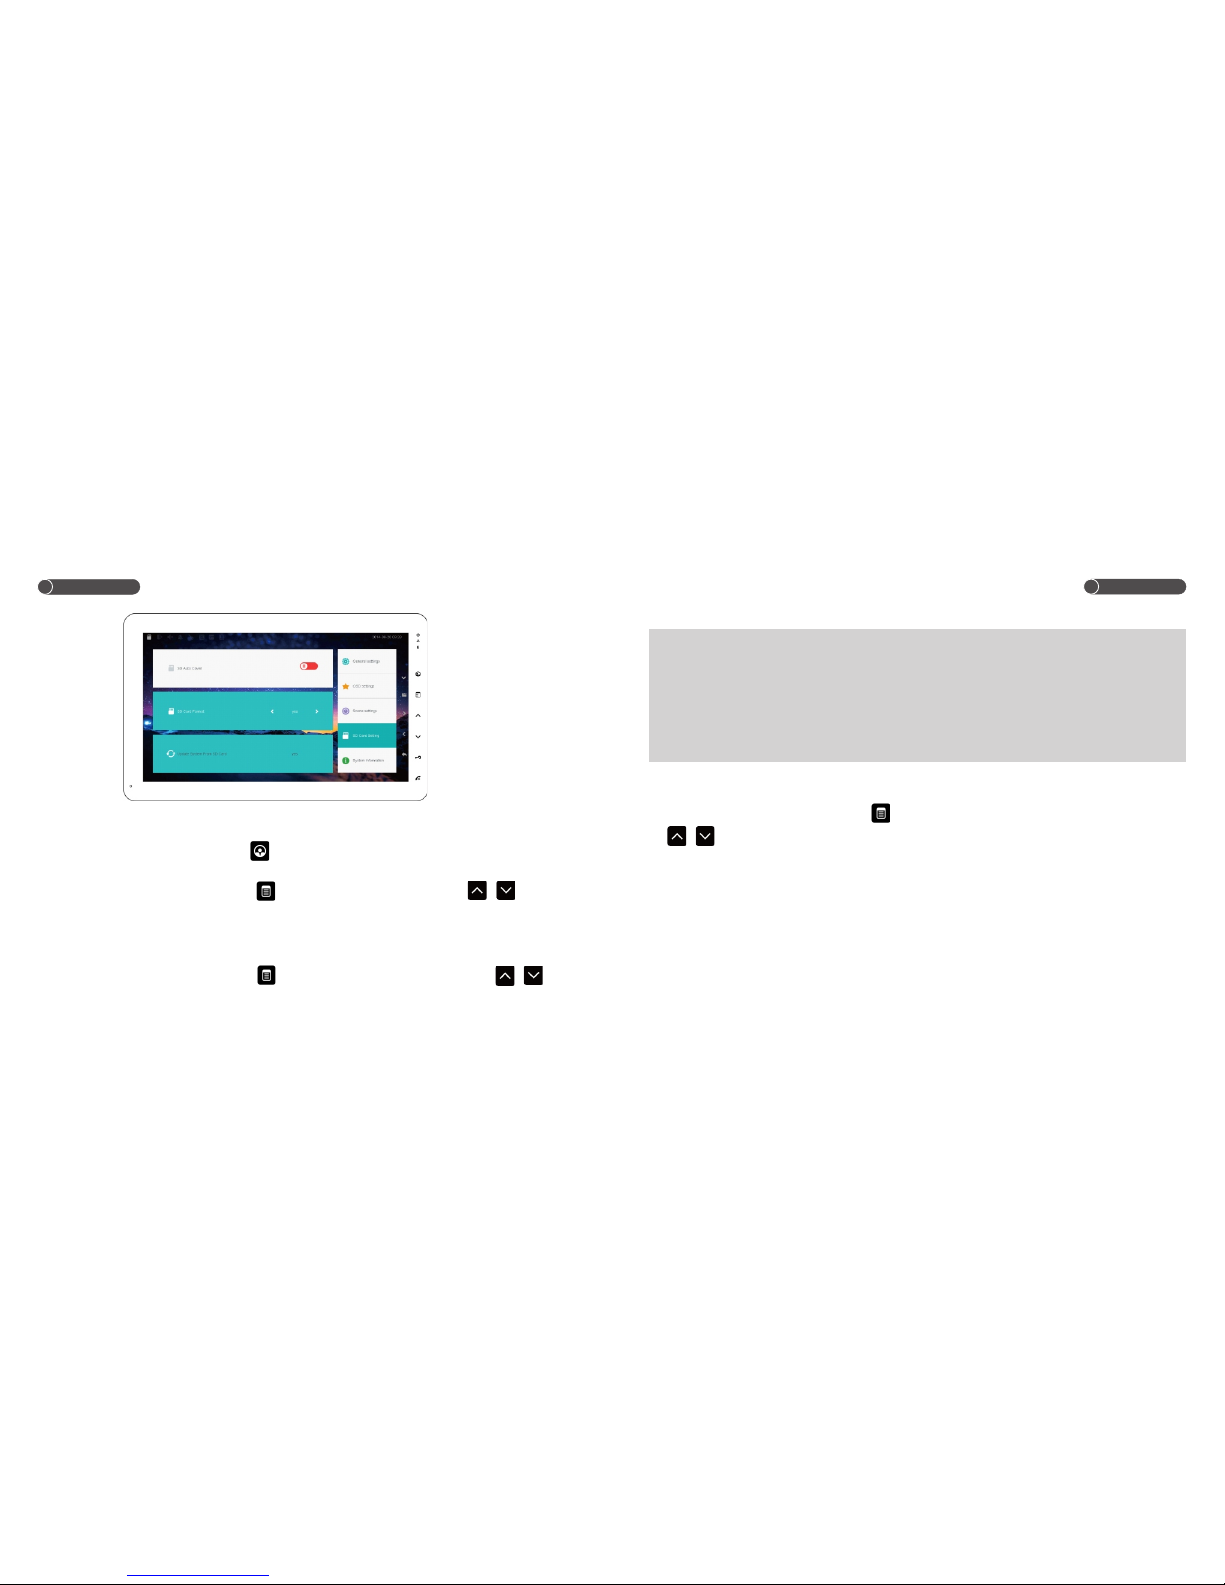
E. Aoto Mute Mode
Under Scene setting interface, touch to select “Auto Mute Setting"then touch / to turn
on/off.
F. Aoto Mute Start/End Time
Under Scene setting interface, touch to select “Aoto Mute Start/End Time",then touch
/ to adjust.Note: touch unlock button to switch set hour or minute.
G. Away Mode
Under Scene setting interface, touch to select “Away Record Mode",then touch / to set
o set away mode.(Photo/Photo*3/REC-10S/REC-30S)
Note:photo*3=take 3 photos,Rec-10S= Video recording for 10S
Operation
Operation
29
28
B.Screen Brightness
Under OSD setting interface,touch to select “Screen Brightness",then touch / to
adjust.
C.Screensaver Sleep Time
Under OSD setting interface,touch to select “Screensaver Sleep Time",then touch /
to adjust.
D. Scene Setting
Under system setting interface,touch to select “Scene Setting”(User can set the Mute
mode/Away mode, mute start time/mute end time.)
Page 16
Operation
Operation
31
30
5.8 SD Card Setting
Under system setting interface,touch to select SD Setting.
A. SD Auto Cover
Under SD card setting interface,touch to select SD Auto Cover, then touch / to
choose(ON/OFF),When it is ON,once the SD card is full,new video/photo will automatically cover
the oldest ones.
B. SD Card Format
Under SD card setting interface,touch to choose SD Card Format, then touch / to
format the card.
Note:1.When you insert the SD card, pls make sure the power is off.
2. Format the SD card first before use.
3. Support the SD card (512M-32G)
4.If the SD card >2G,should use the Class6 SD card.
5.Max record 500 pcs photos/videos,when the quantity >500,the data will be record
in files(backup-Video or backup-pic). Can be reviewed by through the computer.
C、Update System From SD Card
Under SD card setting interface,touch to choose Update system from SD Card, then touch
/ to confirm or cancel.
Page 17
Operation
Operation
33
32
5.9 System Information
Under system setting interface,touch to select “System Information”.(User cab check Hardware
version/MCU version/TFT version)
5.10 Factory Default Setting
Under system information interface,touch to select “Default Setting",then touch / to
choose reset or not, then touch to confirm.
If appear the words“Success Reset”,means the operation is done.
Note:Except time,language,photo and video, all the other information will be reset.
6. Shortcut Key
A. Away Mode
Under standby mode,hold and touch to turn on/off away mode,when the mode is on, LED
display on the right top side.
B. Mute Mode
Under standby mode,hold and touch to turn on/off mute mode,when the mode is on,LED
display on the right top side.
C. Extension Switch
Under standby status,hold and touch to turn on the switch,LED flashes on the right
top side.
7. Busy Status
A random indoor monitor is under talking and monitoring,the other indoor monitor will be under busy
status.
Note:The indoor monitor which under busy status can not setup the room NO or reset.
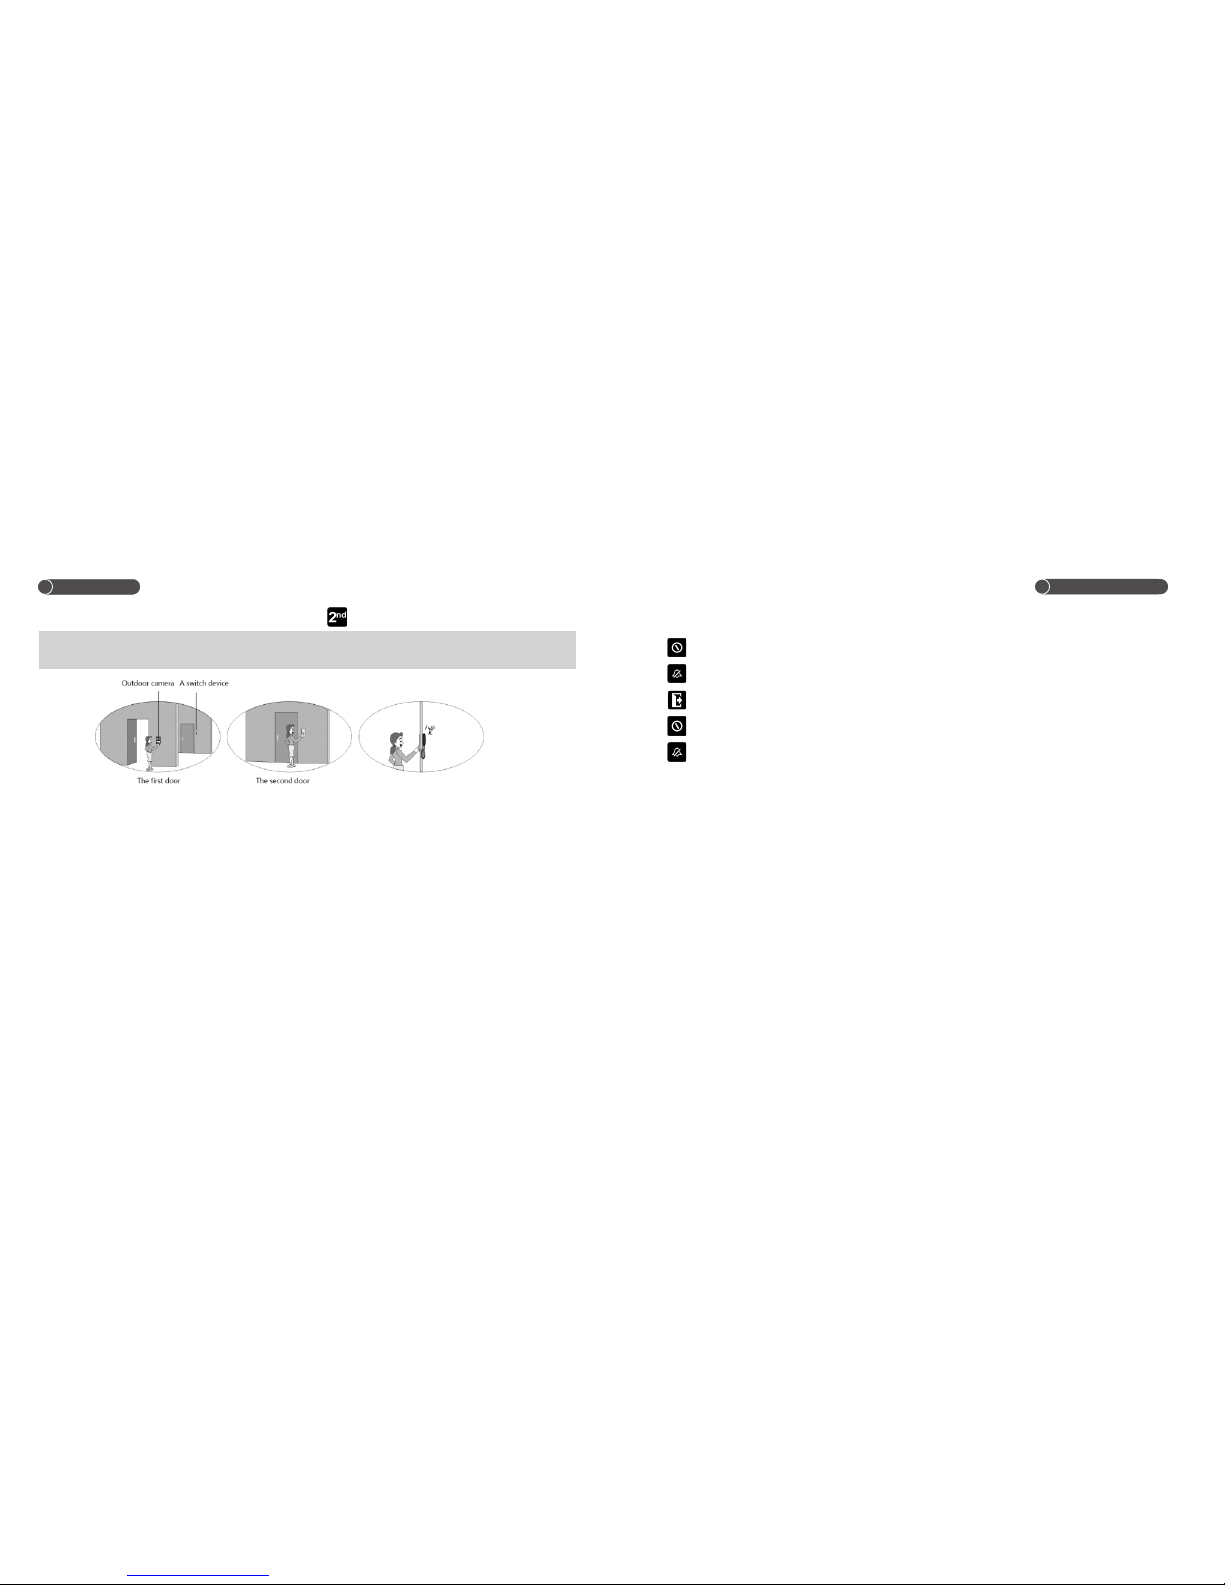
8. 2 Door calling
1.Under standby status,touch the 2nd door calling button,indoor monitor will ring.
nd
Page 18
Operation
35
34
2.In other status,touch the 2nd door calling button,( )will display on the screen,no ring.
Note:Required to connect a switch device for 2nd door calling function.Please refer to the
connection diagram.
1.LED
2. Voice
“DI”at intervals, it means room number conflict.
“DI,DI”at intervals, it means communication fault.
“DU”, it means the operation is forbidden.
Long “DI”, it means power on.
LED/Voice Guide
lig ht on:T he unit i s power o n.
lig ht flas hes:T he unit i s power ing on.
lig ht on:T he away m ode is on .
lig ht on:T he mute m ode is on .
lig ht flas hes:T he exte nsion s witch i s on.
Page 19
37
36
Trouble Shooting Guide
Operation Specifications
Mod el
Ite m
Scr een
Pow er supp ly
Con necti on with e xtens ion uni ts
Talk
Con sumpt ion
CCT V input
Wor king te mpera ture
Com patib le indo or unit
Com patib le outd oor uni t
Sto rage te mpera ture
CA1 0FC
10. 1inch c olor TF T
DC1 3.5-1 5V/1. 5A
Cas cade co nnect ion
Han dfree
14V /700m A(MAX )
1Vp -p(75 )ohm
0℃ to + 55℃
All o f our 4-w ire ind oor uni ts with i nterc om func tion
All o f our 4-w ire out door un its
-10 °to +60 °
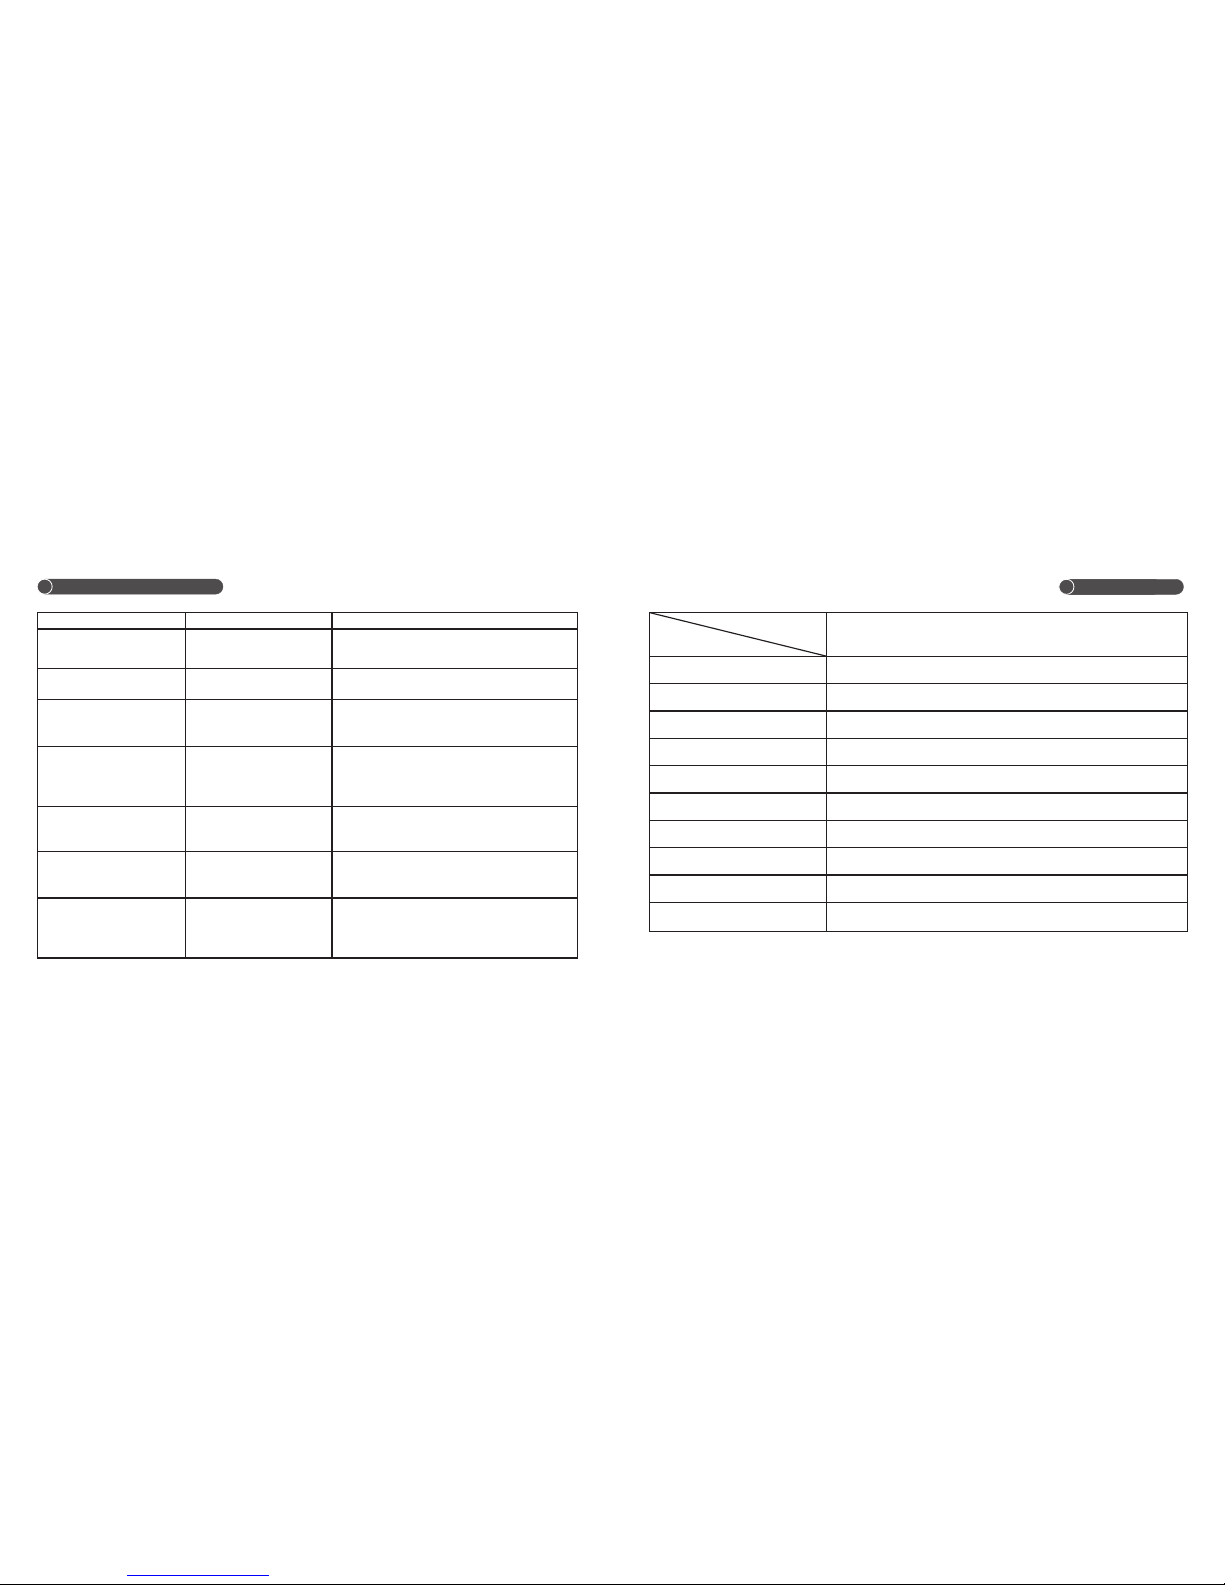
Pro blem
Pos sible R eason
Sol ution
Total ly can no t work.
Can n ot moni tor out door un it.
Sou nd“DI ,DI”( Whe n sever al
ind oor uni ts in the s ystem .)
Sou nd“DI ,DI”a t inter vals(
Whe n sever al indo or unit s
in th e syste m.)
Ind oor uni t can not m onito r.
Out door ca n not cal l and sou nd
“DI ,DI”a t inter vals.
The o utdoo r unit ca n hear
nor mal voi ce,bu t the ind oor uni t
onl y can hea r such lo w voice .
Sou nd“DI ,DI”a t inter vals
(Wh en seve ral ind oor uni ts
in th e syste m.)
Power is off.
-The wire cut off.
-Indoor unit power off.
-Fault room No.
-Short circuit between indoor
and outdoor units.
-Indoor unit power off.
-The wire cut off between
indoor units.
-Room No conflict.
-No main indoor unit
-Main indoor unit power off
-Talk volume is low.
Che ck the po wer wir e.
Check the wire between indoor and outdoor units.
Make sure the indoor unit is activated.
-Reset the room No.
-Check the wire between indoor and outdoor units.
-Po wer on
-Ch eck the w ire bet ween in door un its.
-Reset the room No.
-Reset the unit and then reset the room No.
-Adjust the talk volume
 Loading...