

Page 1

Dear ISE customer,
Thank you for choosing this quality pr oduct from Scandinavia,
which was made in Sweden.
We want you to feel assured that the inside of your new ma-
chine is just as good as the outside and that the ethics and
standards that went into the production of this machine are
just as high as the quality and performance that you will receive from it. We hope that this product will give you many
years of pleasure.
To ensure that you get the most out of your new mac hine , we
recommend that you read the operating instructions before
using the machine. The operating instructions also contain
information on how to avoid damaging the environment.
Operating Instructions
Washing Machine
ISE 1606W
Page 2

4
Before using your machine for
the first time
4Transport protection
4Packing material
4Washer door
4Checking water hardness
5Safety instructions
5General
5Installation
5Overflow guard function
5Transport/Winter storage
5Recycling
6Child safety
6Keep an eye on children!
6Automatic door opening
7
Description of the washing
machine
7Detergent compartment
8Front panel
8Options button
9Advice and tips before washing
9Sorting your laundry
9Clothing
9Laundry labels
9Laundry label symbols
10Coloured cotton
10Delicates
10Wool and silk
10Artificial fibres and synthetic fibres
10Save time and energy
10Economy and effciency
10Detergents
11Washing
11Sort your laundry.
11Turn on the main power switch.
11
Open the washer door and load
the washing
11
Add detergent and fabric softener,
as required
12Select the programme
14Select options and settings
15
Close the door and press the
Start/Stop button
15Once the program has finished
16Care and cleaning
16
Checking the filter and drainage
pump
16
Cleaning the detergent
compartment
16
Cleaning the outside of the
machine
17
Cleaning the inside of the machine
to avoid unpleasant smells
18Rinse holes under the agitator
18If you have hard water
19Troubleshooting
19The washer door will not open
19The machine will not start
20Error messages
21Technical information
21Technical data
21Standard tests
22Transport protection
23Installation
23Positioning the washing machine
23Adjusting the feet
23Connection to water supply
24Drainage connection
24Electrical installation
24
Programme plate in multiple
languages
2
Contents
Page 3

25Service
25
Before contacting the service
division
28Quick guide
28Washing
28Load the laundry
28Detergent compartment
28Select the programme
28Program finished
3
Contents
Page 4

Transport protection
Has the transport protection been removed?
If not, see the “Transport protection” chapter.
Packing material
Please sort waste materials in accordance
with local guidelines.
Washer door
•
The washer door cannot be opened until
the machine is connected to the electricity
supply.
•
To open the door manually, see the section
"The door will not open" in the
"Troubleshooting" chapter.
•
It is not possible to start the machine with
the door open.
•
To open the washer door while a programme is running, see the section entitled
"Close the door and press the Start/Stop
button".
Checking water hardness
The quantity of detergent needed depends,
amongst other things, on how hard the water
is. Phone your local water company to check
the water hardness in your area.
Note!
Each machine is tested before leaving the
factory. A small amount of water may remain
in the drain pump, though this does not affect
quality or damage the machine.
See the Quick guide on the last page.
4
Before using your machine for the first time
Page 5

General
•
Read the operating instructions and keep
them in a safe place!
•
Installation of water and electricity, if required, should be carried out by a qualified
professional.
•
The machine should only be used for
washing items as described in these instructions. It is not intended for dry cleaning!
•
Please use only detergent intended for
machine washing!
•
Remove any transport protection devices
before using the machine, see the “Transport protection” chapter.
•
Repairs and maintenance relating to safety
or performance must be carried out by a
qualified professional.
•
Damaged mains cables must only be replaced by a qualified electrician.
Installation
See the “Installation” chapter.
Overflow guard function
If the machine’s water level rises above the
normal level, the overflow guard function begins to pump water out and shuts off the water
intake. If the water level has not dropped
within 60 seconds, the program is terminated.
Transport/Winter storage
If the machine is to be transported or stored
in unheated premises where the temperature
can fall below freezing, do as follows:
•
Empty the filter and drainage pump (see
the “Care and cleaning” chapter).
•
Shut off the water to the washing machine,
loosen the supply hose to the intake valve
and let the water run out from the valve and
hose.
•
After emptying the pump, a small amount
of water may remain in the machine. This
does not affect quality or damage the machine.
Recycling
This machine is manufactured and labelled
for recycling. In order to prevent injuries, the
machine must be made unusable once the
decision has been taken to dispose of it.
Contact your local authority for information
about where and how your machine can be
recycled correctly.
5
Safety instructions
Page 6

Keep an eye on children!
•
Always close the door and start the programme immediately once you have added
detergent.
•
Do not allow small children to use or play
with the washing machine.
•
Store detergent and fabric softener out of
the reach of children!
Automatic door opening
The machine comes with an automatic door
opening function, which means that the door
opens automatically once the programme has
finished.
If you wish to prevent small children or pets
from climbing into the machine, you can deactivate the automatic door opening function.
1.
Turn off the machine using the main power
switch.
2.
Press the Door Open button while simultaneously pressing the main power switch.
Release the buttons.
3.
Press the Key button and the red field goes
out. Automatic door opening is now deactivated.
4.
Press the Start/Stop button to store the
setting.
If you want to reactivate the function, follow
the instructions above. When you press the
button with the key symbol (point 3), the red
fields light up. Store the setting by pressing
the Start/stop button.
6
Child safety
Page 7
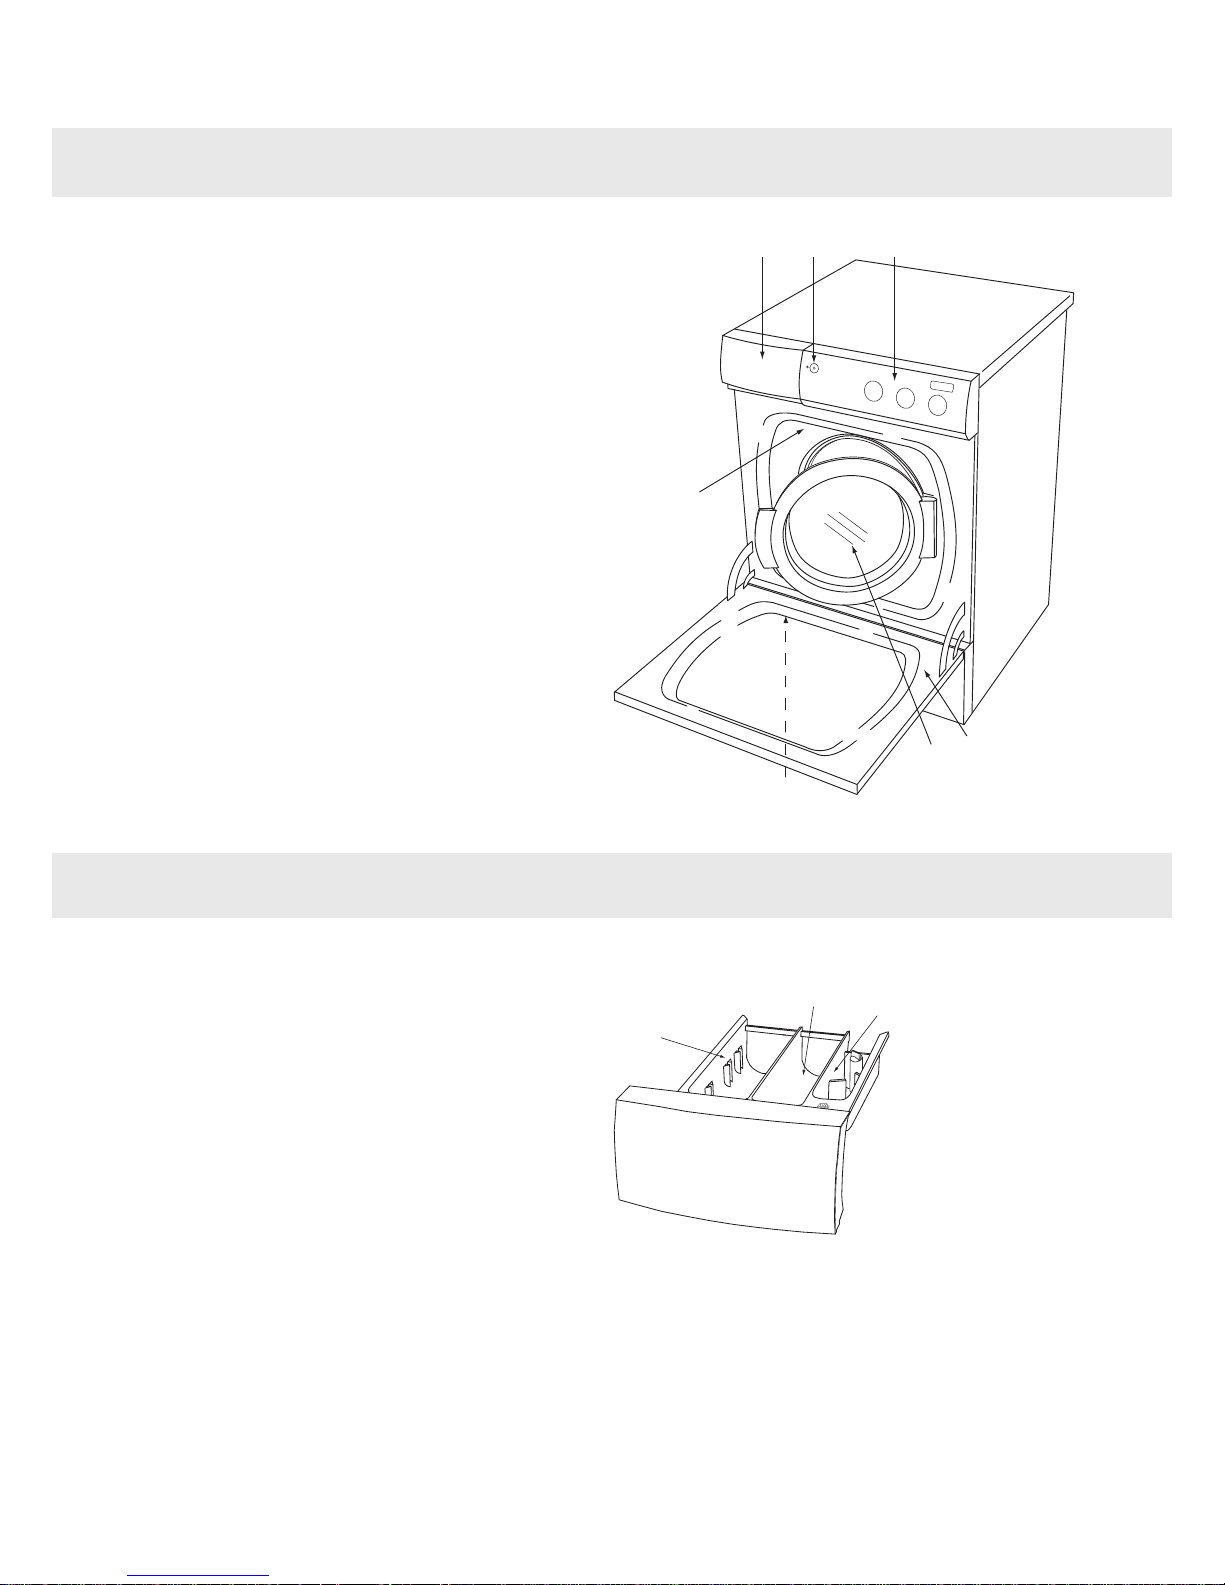
1
2 3
4
8
7
5,6
1.
Detergent compartment
2.
Main power switch
3.
Programme panel
4.
Type plate
5.
Hatch - drainage pump
6.
Drainage pump (behind hatch)
7.
Washer door
8.
Outer door (not all models)
Detergent compartment
1
3
2
1.
Detergent compartment - pre-wash
2.
Detergent compartment - main wash
3.
Fabric softener compartment
7
Description of the washing machine
Page 8
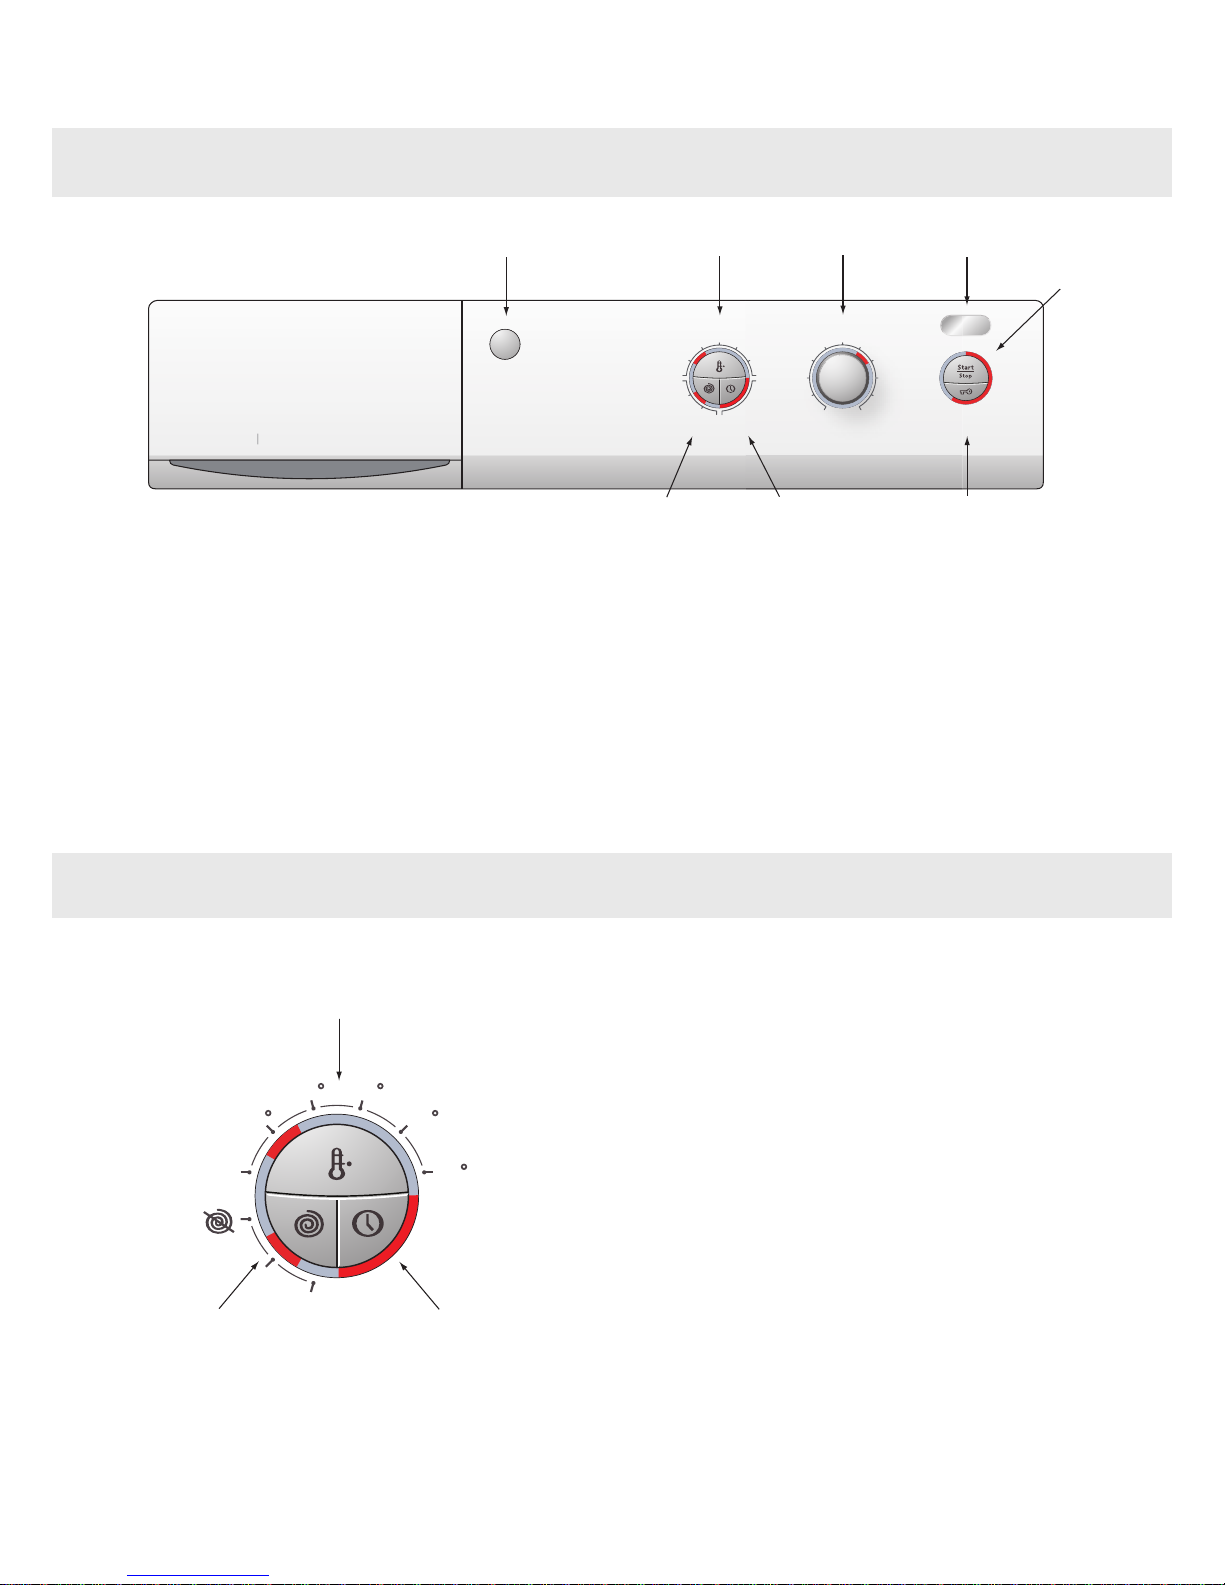
1
3
4
8
7
6
5
2
Display window6.Main power switch1.
Start/Stop7.Options buttons2-4.
Door opening8.Programme selector5.
Options button
30
40 50
60
95
2
4
3
Cold
1600
800
Button for selecting Temperature2.
Button for selecting Spin speed3.
Button for selecting Delayed Start4.
8
Front panel
Page 9
Here are some tips that may help you before
washing.
Sorting your laundry
Sort items according to:
•
how soiled they are
•
colour
•
material
Clothing
•
Do up zips so that they don’t harm fabrics.
•
New coloured items may contain excess
dye and should therefore be washed separately the first few times.
•
Turn delicate items inside out. This reduces the risk of burling and fading.
•
Empty pockets and wash them inside out
if possible!
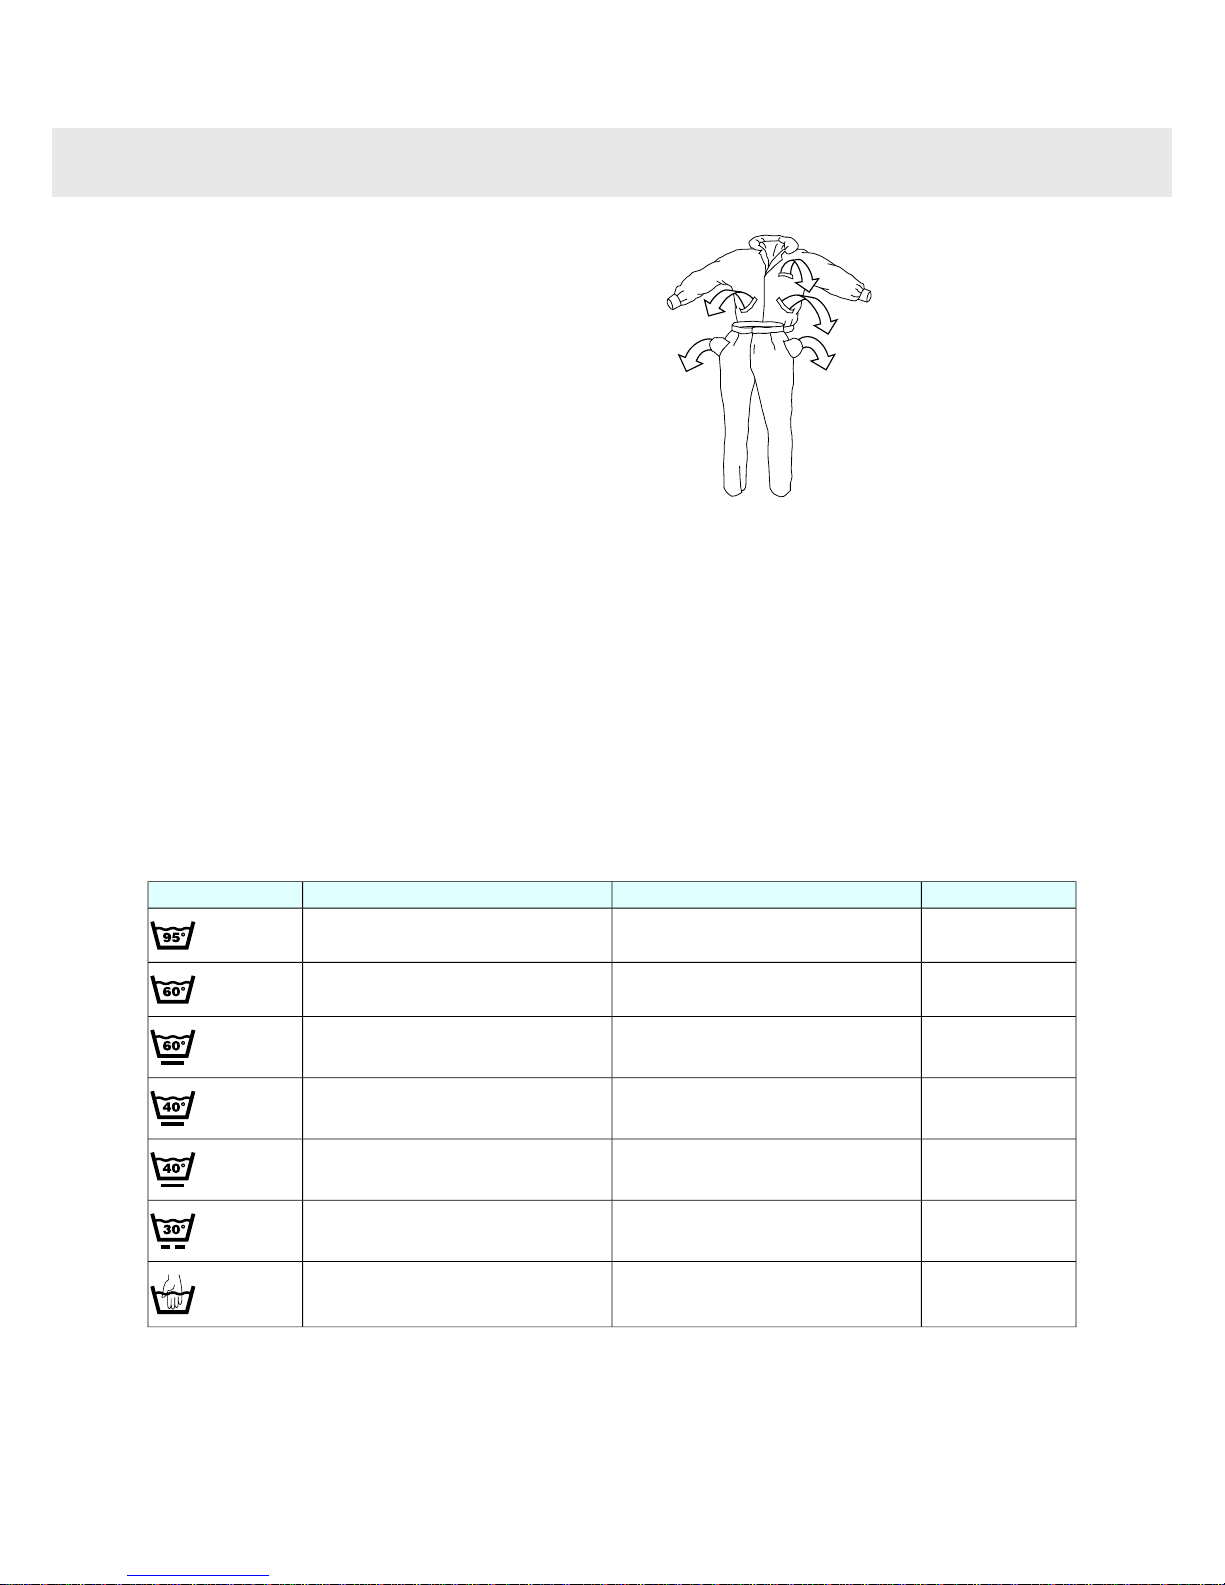
Laundry labels
Look at the item's laundry label. The table
below shows suitable wash programmes for
different materials and wash loads. Using
modern washing machines and detergents,
for example compact detergents, you can
usually wash at lower temperatures. It is a
good idea to use trial and error to find out
what produces the best results.
Laundry label symbols
LoadProgramMaterialLaundry labels
1/1 drumWhite cotton 60°C to 95°CCotton, linen, white and light-coloured
items.
1/1 drumColoured cottons 60°CCotton, linen. Dark-coloured items.
1/2 drumSynthetic 60°CPolyester, cotton/polyester, nylon. White
items.
1/2 drumSynthetic 40°CRayon, acetate, acrylic. Non-colourfast
items.
1/2 drumSynthetic 40°CPolyester, cotton/polyester, nylon. Col-
oured items.
1/3 drumSynthetic 30°CSilk and very delicate items
1/3 drumWool/Hand 40°CItems labelled with the IWS or Superwash
mark
9
Advice and tips before washing
Page 10

Coloured cotton
Coloured cotton items with the washing instruction 60°C should be washed at 60°C for
the first time in order to remove any excess
dye. If you do not do so, there is a risk that
the colour will run. Use detergent without
bleach in order to preserve the colour of the
fabric.
Delicates
Unbleached linen
Unbleached linen fabrics should be washed
at 60°C, using detergent containing no bleach
or optical whiteners. Heavily-soiled linen can
occasionally be washed at higher temperatures, but not too often because the heat can
destroy the linen’s shine and strength.
Wool and silk
These fabrics are sometimes labelled as machine washable and sometimes as hand
wash. The machine's Wool/Hand programme
is just as gentle as washing by hand.
Wool is especially sensitive to processes such
as washing.
If you do not wish to spin dry, you can
squeeze out the water using terry towels. In
this case select No spin.
To find out how to select this setting, see the
Washing chapter. However, most garments
can withstand a short spin. Choose a short
spin by selecting a spin speed of 800 rpm or
less.
Artificial fibres and synthetic fibres
These materials require plenty of room to
prevent them from getting creased. Only fill
the drum half full when washing artificial or
synthetic fibres. Choose a short spin by selecting a spin speed of 800 rpm or less.
Note!
Viscose and acetates are fragile when wet.
Save time and energy
Use the Cotton eco programme to save time
and energy. This programme has a shorter
main wash than Normal, but is often sufficient
for lightly soiled washing.
Economy and effciency
You can save a lot of energy by not using
higher temperature programs than necessary.
•
Select Quick if you just need to freshen up
shirts or exercise clothes, for example. This
will save both water and energy.
•
If you select a fast spin speed, this reduces
energy consumption when drying in a
tumble dryer or drying cabinet.
•
Always wash with a full load when using
the Heavy, White cotton, Coloured cottons
and Cotton eco programmes!
•
Avoid washing with pre-wash. Modern
machines and detergents clean without
pre-wash. Only very heavily soiled laundry
such as overalls and similar garments are
likely to need a pre-wash.
Detergents
Eco-labelled detergents are less harmful to
the environment.
Detergent overdosing does not give better
washing results; it merely causes a greater
impact on the environment.
Try to use less detergent, and increase only
if you are not satisfied with the results.
Note!
Because of environmental concerns we discourage the use of strong chemicals.
When using agents for bleaching or stain removal, there is a risk of rust (corrosion) and
discolouration of the machine.
10
Advice and tips before washing
Page 11
1
Sort your laundry.
See the "Advice and Tips" section before washing.
Note!
Place underwired bras in a laundry net.
Note!
Empty pockets. Coins, nails and the like can
cause damage to the machine and fabrics.
See the "Advice and Tips" section before
washing.
2
Turn on the main power switch.
3
Open the washer door and load
the washing
If the door is closed, press the Door
opening button (key symbol). The red field
lights up and the door opens after a few
seconds. Load the laundry. The laundry programme chart shows how much laundry can
be washed with each programme.
4
Add detergent and fabric
softener, as required
The detergent packaging will have recommendations for how much detergent you
should use. The machine holds 7kg of laundry. If you only have a small amount of laundry
in the machine, you can reduce the amount
of detergent used.
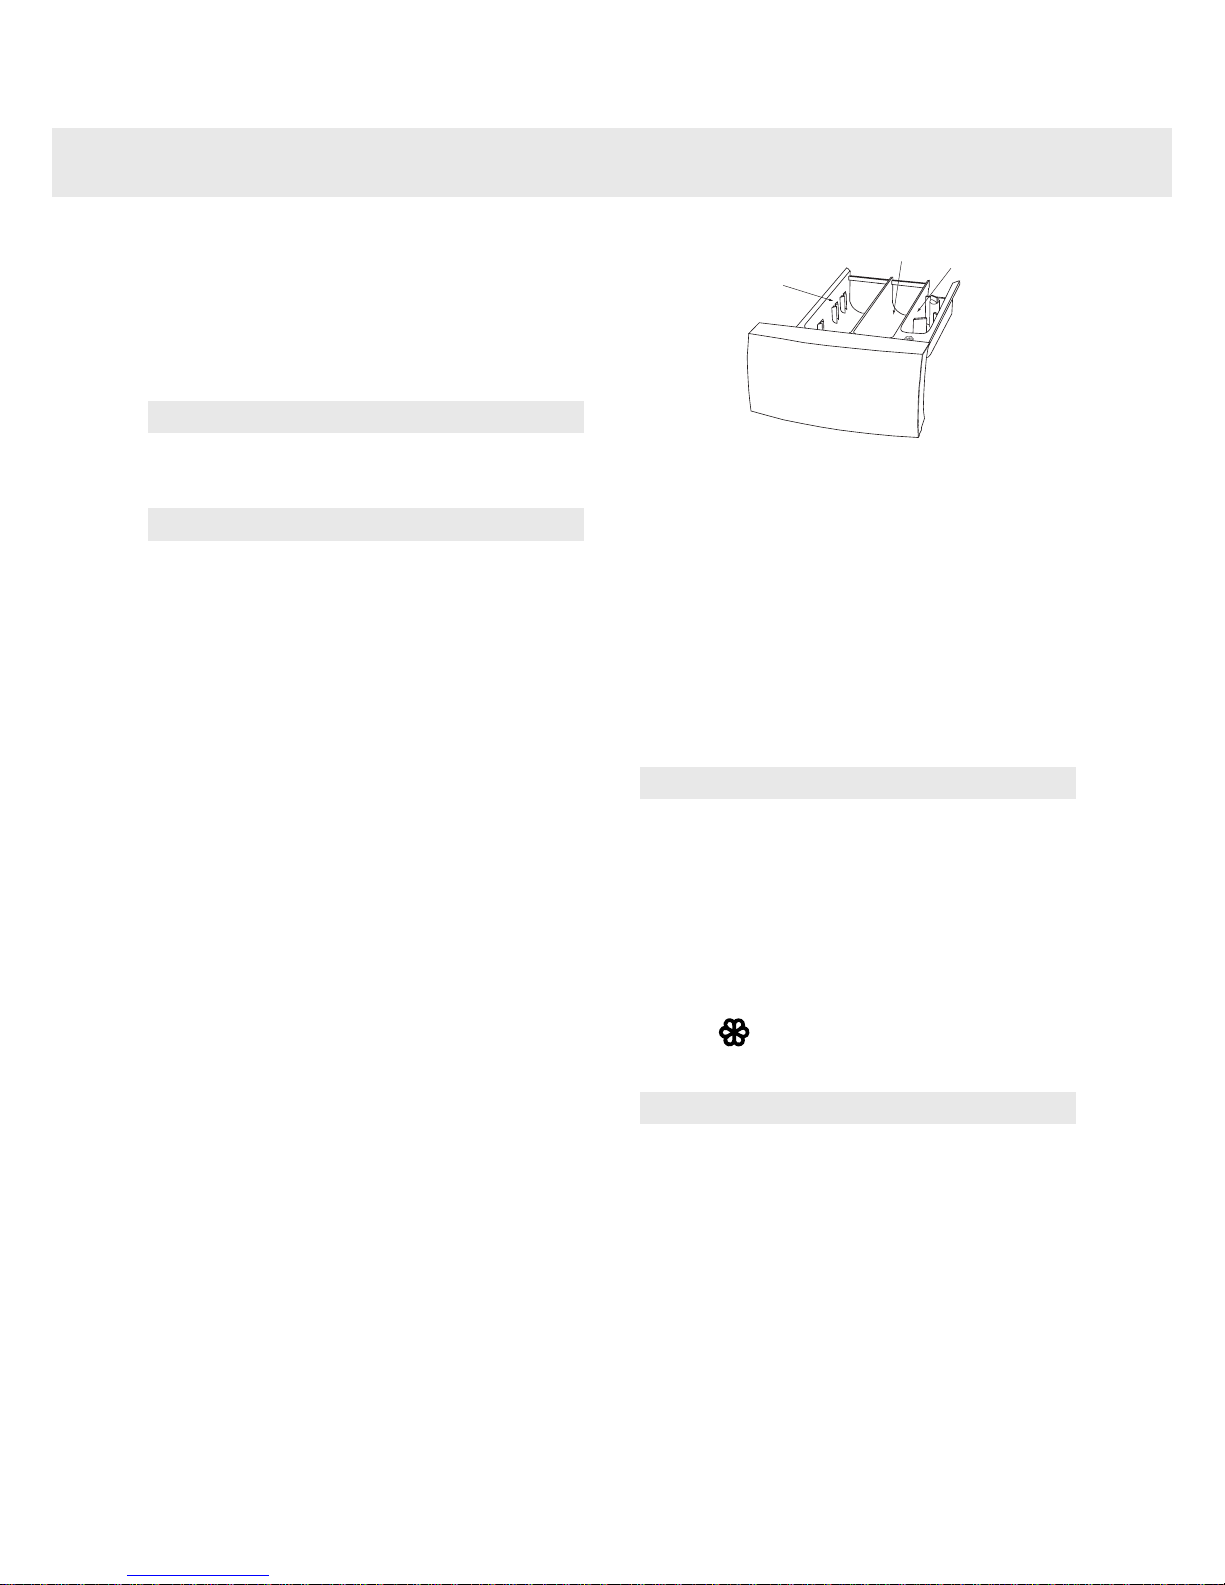
Powder detergent
Pour the powder into the compartment for the
main wash, and pre-wash as well if desired.
Main wash
Pre-wash
Fabric softener
Liquid detergent
When using liquid detergent, follow the detergent manufacturer’s recommendations. We
recommend always using a wash ball with
very thick liquid detergent.
Wash ball or net
If you use a wash ball or net, place it directly
in the drum and select a programme without
pre-wash.
Note!
Detergent overdosing does not give better
washing results; it merely causes a greater
impact on the environment.
Try using less detergent, and increase only if
you are not satisfied with the results.
Fabric softener
Pour the fabric softener into the compartment
with the symbol. Follow the recommendations on the fabric softener packaging.
Note!
Do not fill above the compartment’s maximum
fill level. Otherwise fabric softener will run in
too early, which impairs the washing effect.
11
Washing
Page 12

5
Select the programme
You can select a programme by turning
the programme selector. A red field
lights up beside the selected programme and
the estimated programme time appears on
the display. Start the programme by pressing
the Start/Stop or go on to options and settings.
Quick
Coloured cottons
Cotton eco
White cotton
Heavy cotton
Synthetic
Wool/Hand
Rinse
Spin
Drain
Heavy cotton
Program for heavily soiled laundry, with dirt
that needs to be fully dissolved before the
main wash. A pre-wash is used to do this. You
can select the temperature freely, so follow
the washing instructions for each garment.
The highest temperature, 95°C, is suitable for
very heavily soiled laundry. The spin speed
can be selected freely. The machine adapts
the program time and water consumption to
the load size.
White cotton
Program for normally to heavily soiled laundry,
whites and colors. You can select the temperature freely, so follow the washing instructions
for each garment. 60°C is a good temperature
for heavily soiled cotton garments, as well as
for garments worn next to the skin. Select
40°C if the laundry is less soiled. The spin
speed can be selected freely. The machine
adapts the program time and water consumption to the load size.
Cotton eco
A standard program for lightly to moderately
soiled laundry. The temperature can be selected freely, so follow the washing instructions
for each garment. Garments worn next to the
skin ought to be washed at 60°C. The spin
speed can be selected freely. The machine
adapts the program time and water consumption to the load siz
Coloured cottons
Standard program for lightly soiled laundry.
The temperature can be selected freely, so
follow the washing instructions for each garment. Garments worn next to the skin ought
to be washed at 60°C. Very lightly soiled
laundry, however, often comes clean at 40°C.
The spin speed can be selected freely.
Quick
Fast program for laundry that just needs
freshening up. The program can be run at any
temperature, so follow the washing instructions for each garment. The lower the selected temperature, the shorter the program time.
Garments worn next to the skin ought to be
washed at 60°C. The spin speed can be selected freely.
Synthetic
Program for synthetics, blended materials,
and permanent press cotton. Suitable for
shirts and blouses. The temperature can be
selected freely, so follow the washing instructions for each garment. Garments worn next
to the skin ought to be washed at 60°C. Many
synthetics will come clean at 40°C too. The
maximum spin speed is 800 rpm.
Wool/Hand
A gentle laundry program for wool, silk, and
garments that should be washed by hand.
The highest temperature is 30°C. This program has a short spin. The maximum spin
speed is 800 rpm.
12
Washing
Page 13
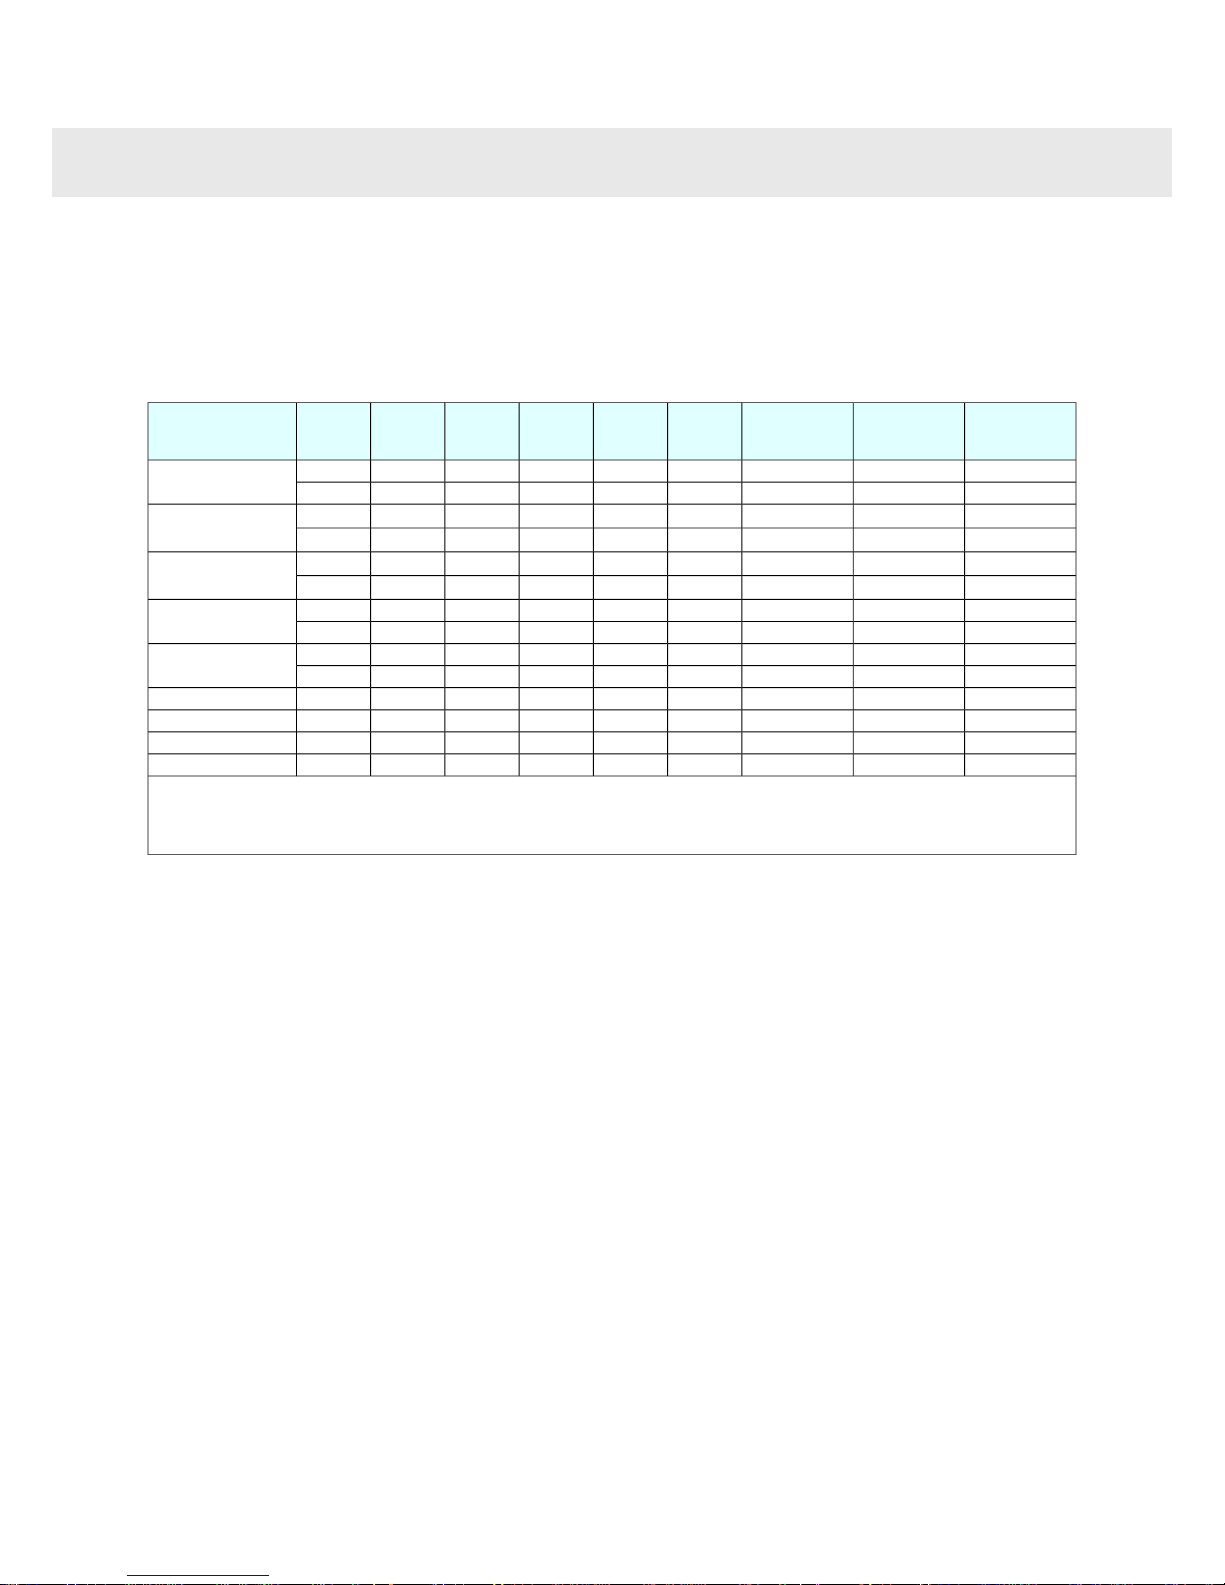
Rinse
This program performs one cold rinse cycle
+ spin. Suitable for laundry that just needs to
be dampened and for cleaning cloths and
mops.
Spin or Drain
To be used when you only want to spin the
load or drain the water from the machine.
Programme chart
Programme time
(approx. min)
Energy consumption ( approx.
kWh)
Water consumption (approx.
liter)Max. loadMax. RPM
Rinses
(number)Temp. °CMain washPre-washProgram
1702,2751/11600595LongYesHeavy cotton
1601,2651/11600560LongYes
1551,19591/116003
60
1)
LongNo
White cotton
1400,5601/116003
40
2)
LongNo
900,9601/116003
60
3)
ShortNo
Cotton eco
850,5451/216003
40
3)
ShortNo
800,5451/21600360ShortNo
Coloured cottons
750,4451/21600340ShortNo
450,5301/21600260ShortNo
Quick
400,4301/21600240ShortNo
800,3351/2800340ShortNoSynthetic
450,5801/3800330ShortNoWool/Hand
200,181/216001Rinse
150,11/21600Spin
1
Test program in accordance with EN 60456.
2
40°C program for test institute. Option function 40°C must be selected.
3
Short program for test institute. Option function 40°C or 60°C must be selected.
13
Washing
Page 14
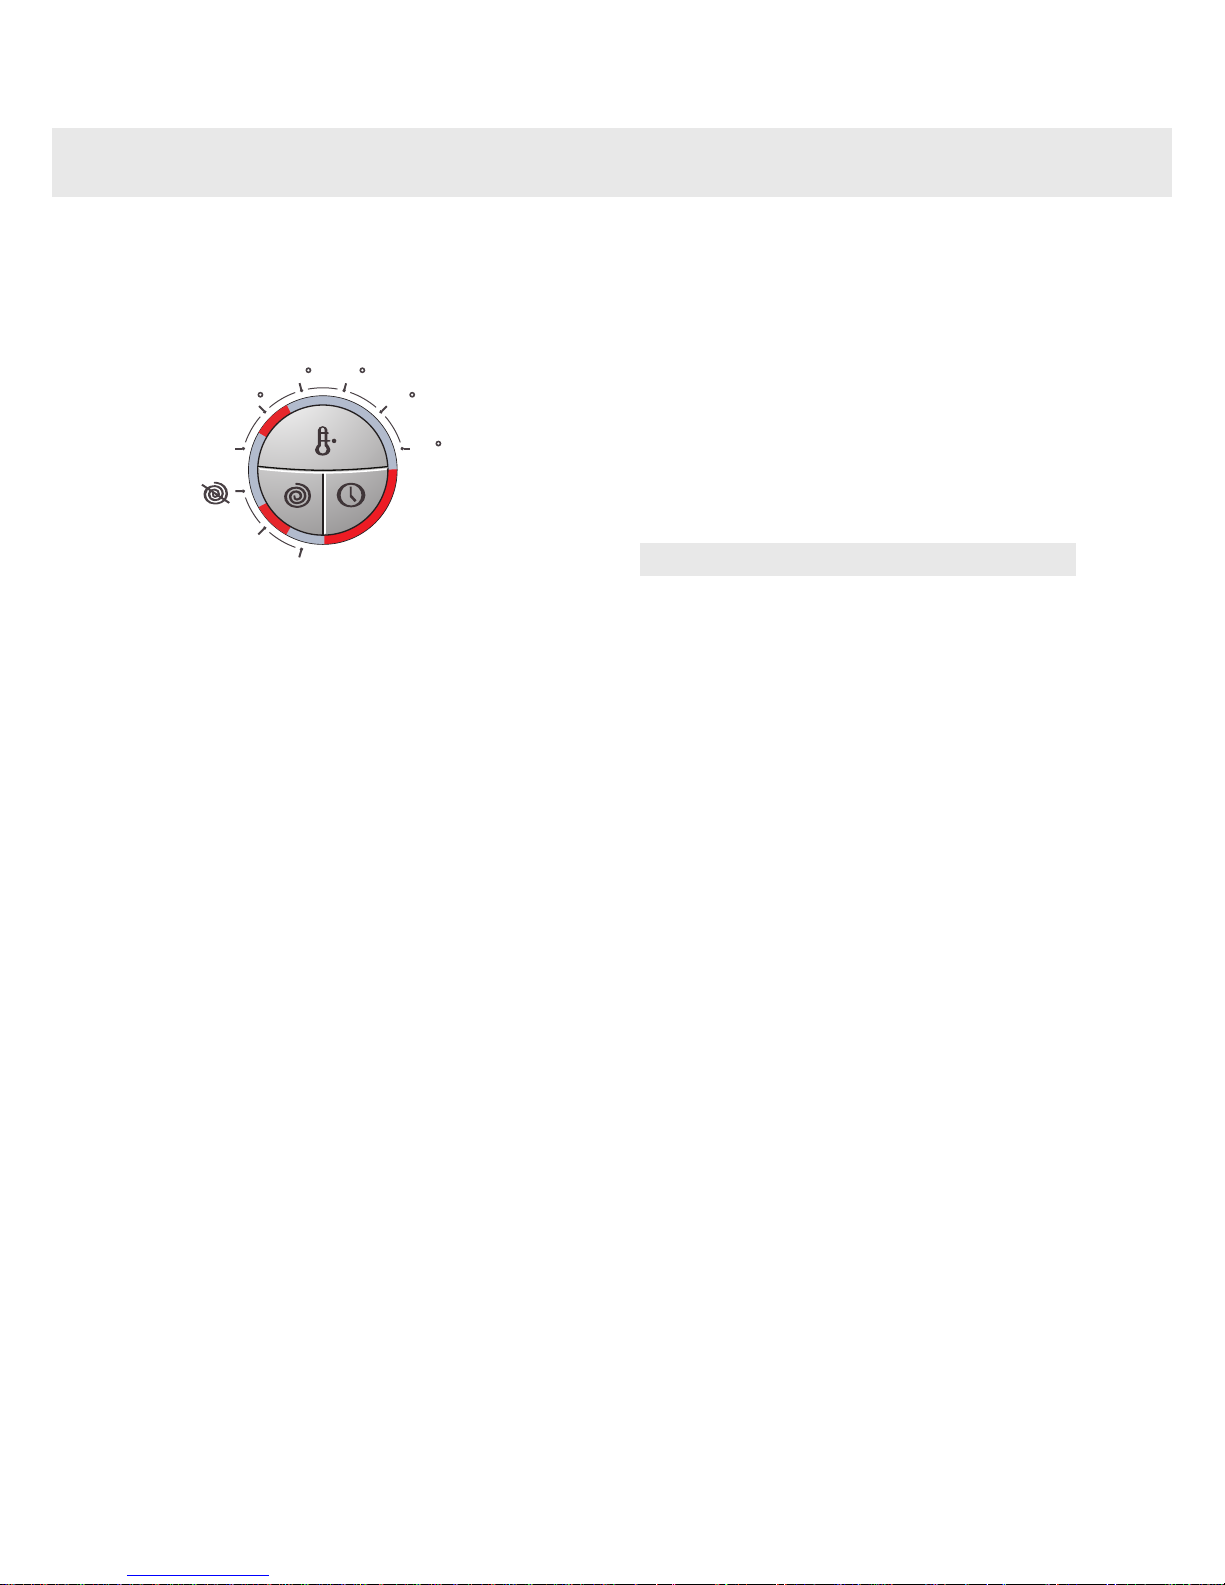
6
Select options and settings
By changing options and settings you
can adjust the washing program to suit
your own specific requirements.
30
40 50
60
95
Cold
1600
800
Temperature
Select temperature by pressing the Temperature button until the red field lights up beside
the desired temperature.
You can select temperatures between 30°C
and 95°C or Cold. If you select Cold, the
washing temperature will be the same as that
of the water coming into the machine.
For Wool/Hand it is not possible to select a
temperature higher than 40°C. See the table.
Spin speed/No spin
Select the spin speed by pressing the Spin
button until the red field next to the spin speed
you want lights up.
You can select speeds between 800 and
1600 rpm, No spin
Spin at 800 rpm always signifies short spin.
For certain programmes, it is not possible to
select a speed in excess of 800 rpm (see
table).
No spin means that the program does not include a spin cycle and ends by draining.
Delayed Start
When you select Delayed Start, the machine
will start 1-24 hours after you press the
Start/Stop button.
•
Press the Delayed Start button the same
number of times as the number of hours
you want to delay the start by (1-24 hours).
A lighted red field next to the button indicates that the option has been activated.
•
The number of hours delay until start is
shown in the display window.
•
Press the Start/Stop button.
•
The number of hours to start is displayed
with a countdown one hour at a time.
•
Cancel Delayed Start by pressing the
Start/Stop button for 3 seconds. The red
field will go out.
Important!
Remember to press Delayed Start followed
by the Start/Stop button to start the pro-
gramme.
14
Washing
Page 15
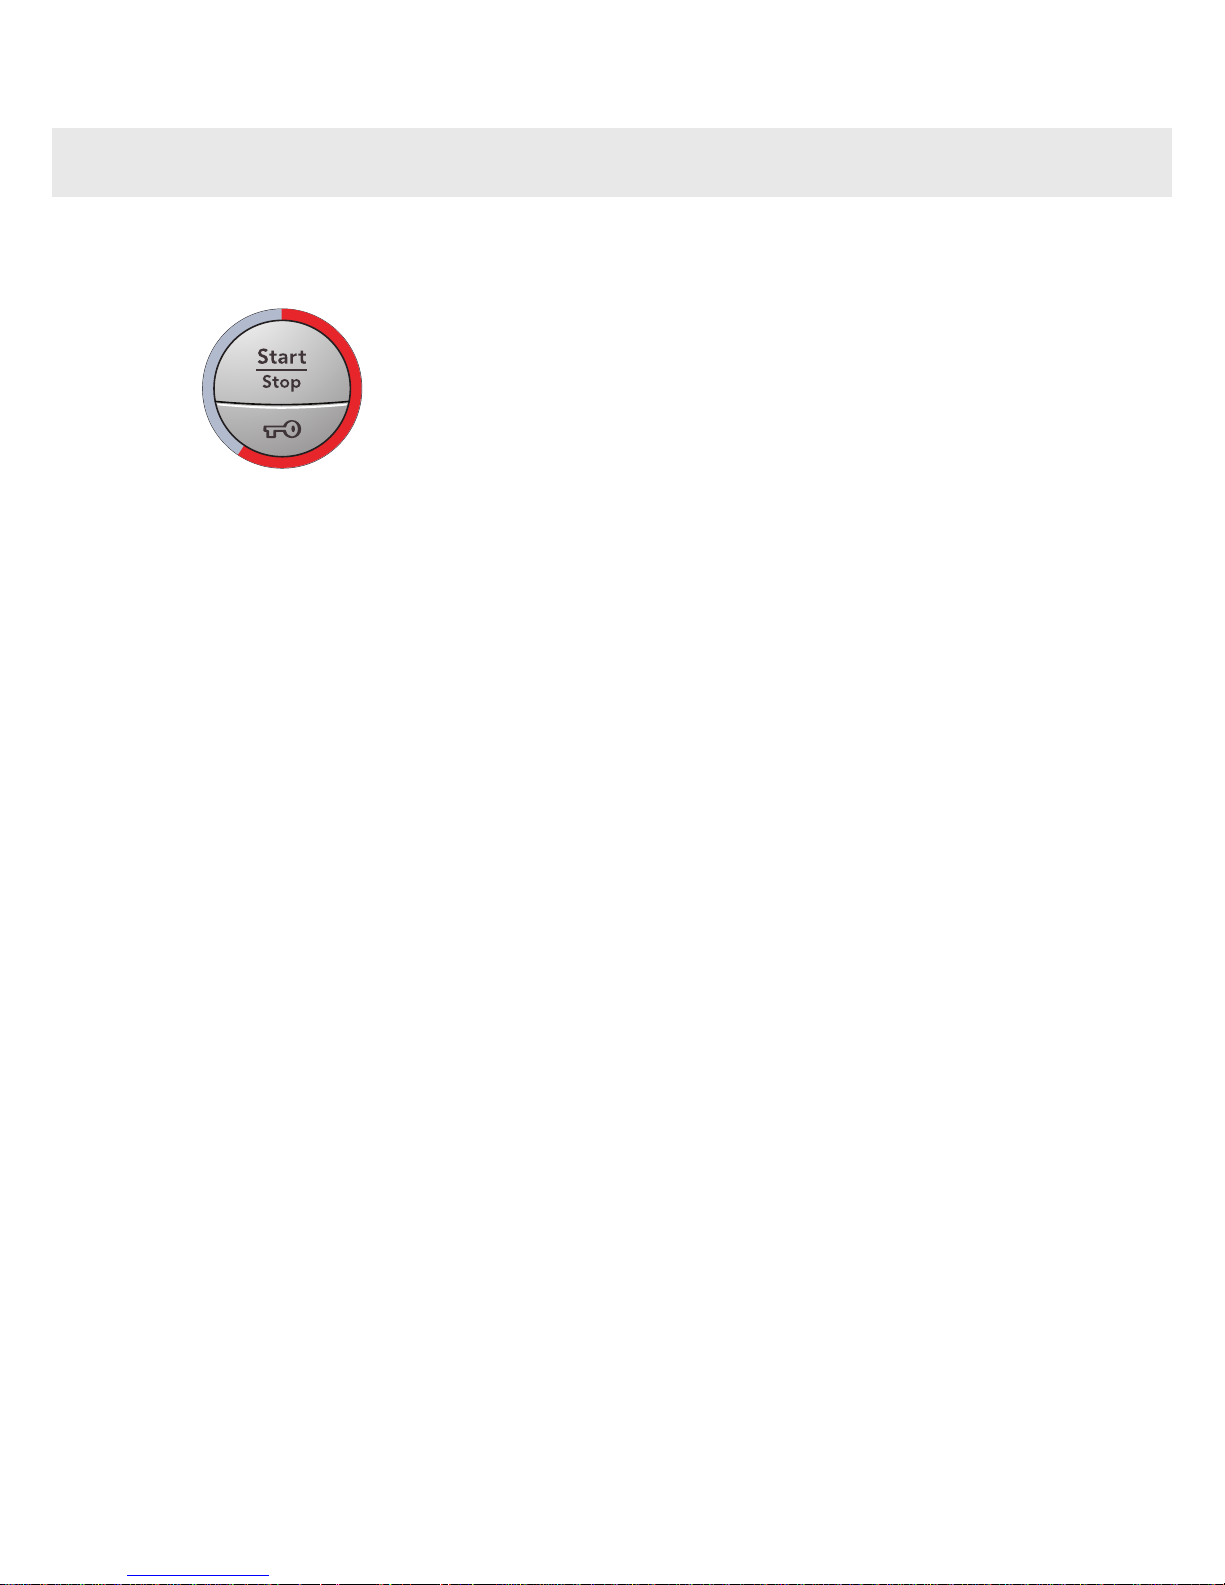
7
Close the door and press the
Start/Stop button
Time remaining
The time remaining is shown in hours and
minutes. The time counts down in minutes as
the program runs. Once a program is selected, the estimated program time is displayed.
This may differ from time to time depending
on the temperature of the water entering the
machine and the size of the load. If the program time is longer than the previous wash
with the same program, “1” will be displayed
until the program finishes. This is normal! The
next time you use the program under similar
conditions, the estimated program time will
be more accurate.
To add or remove washing after the
program starts
If you want to add or remove items after the
programme has started, you can stop the
programme by pressing and holding the Door
opening button (key symbol) for three
seconds. The red field will flash. When you
restart the machine, add any extra detergent
needed and close the door. The machine
continues automatically from the point where
the programme was interrupted.
Stopping or changing a programme
You can also stop a programme by pressing
the Start/Stop button for three seconds. To
restart the machine, select a new programme,
add any extra detergent needed and press
the Start/Stop button.
8
Once the program has finished
Once a programme is finished, "END"
appears on the display.
The door opens automatically once the program has finished. If you want to deactivate
"automatic door opening", see the Child safety
chapter.
•
Remove the laundry.
•
Turn off the main power switch, and
you will save energy.
If you have small children or pets at home,
close the washer door once you have removed the laundry.
15
Washing
Page 16
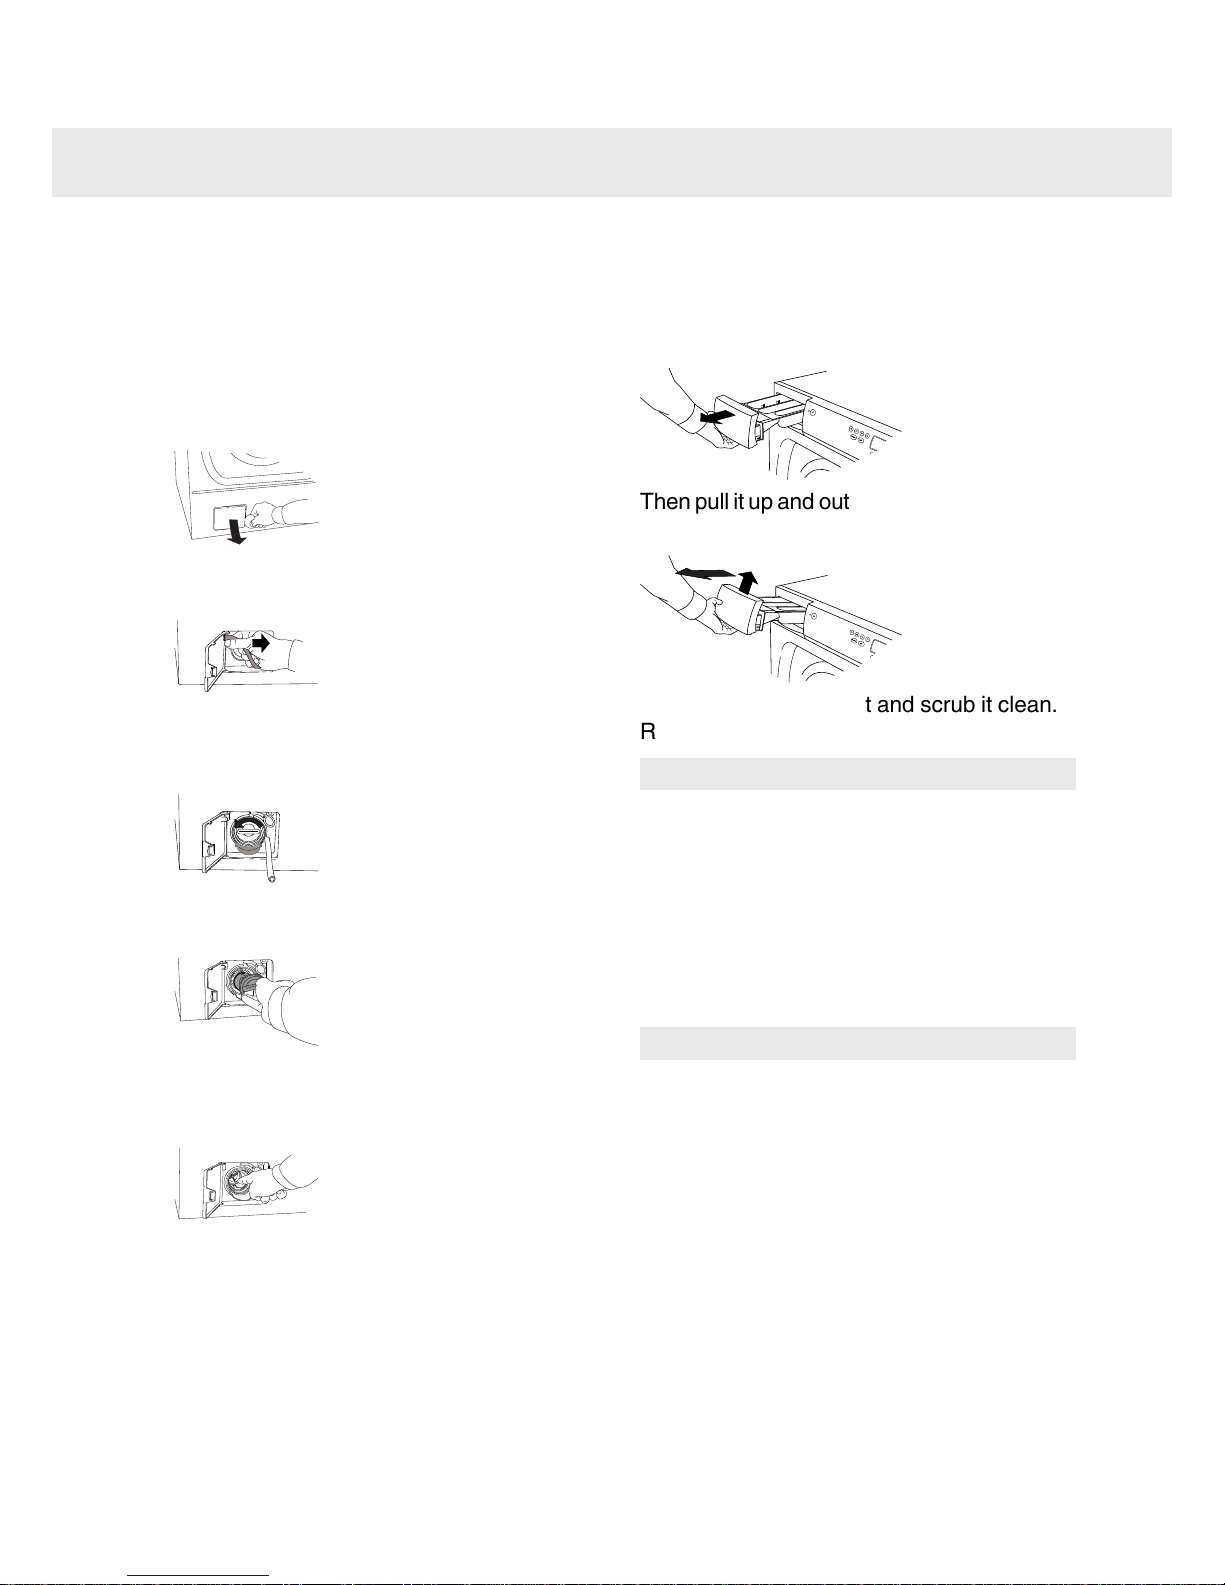
Checking the filter and drainage
pump
The washing machine has a filter, where
coins, hairpins and the like can get caught.
To clean the filter and drainage pump:
1.
Make sure the machine is empty of water
and that it is switched off at the mains.
2.
Open the hatch for the drainage pump as
shown in the illustration.
3.
Drain out the water, into a bowl, for example, by unhooking the drainage hose
from the pin inside the hatch.
4.
Open the pump by screwing the cover anticlockwise. Remove the cover with the filter.
5.
Remove any objects or rubbish from the
pump housing. Check to see that the pump
blades, right at the back, will rotate.
6.
Screw on the cover, replace the drainage
hose on the hatch pin and close the hatch.
Cleaning the detergent
compartment
Pull the detergent compartment out as far as
it will go.
Start/Stop
P3
P1
P2
P4
Then pull it up and out as shown in the illustration.
Start/Stop
P3
P1
P2
P4
Rinse the compartment and scrub it clean.
Replace the compartment.
Note!
Do not run the detergent compartment
through a dishwasher!
Cleaning the outside of the machine
Clean the outside of the machine and the
program panel with a mild cleaner. Do not use
any solvents, as these can damage the machine.
Note!
Do not hose down or spray the machine with
water.
16
Care and cleaning
Page 17

Cleaning the inside of the machine
to avoid unpleasant smells
Modern detergents often allow clothes to be
washed at low temperatures. This means that
small deposits can build up in the machine.
These, in turn, may lead to unpleasant smells
developing.
To avoid this, we recommend running a 95°C
wash programme once a month. When you
do this, use a small quantity of detergent. It
is not necessary to put any washing in the
machine.
17
Care and cleaning
Page 18
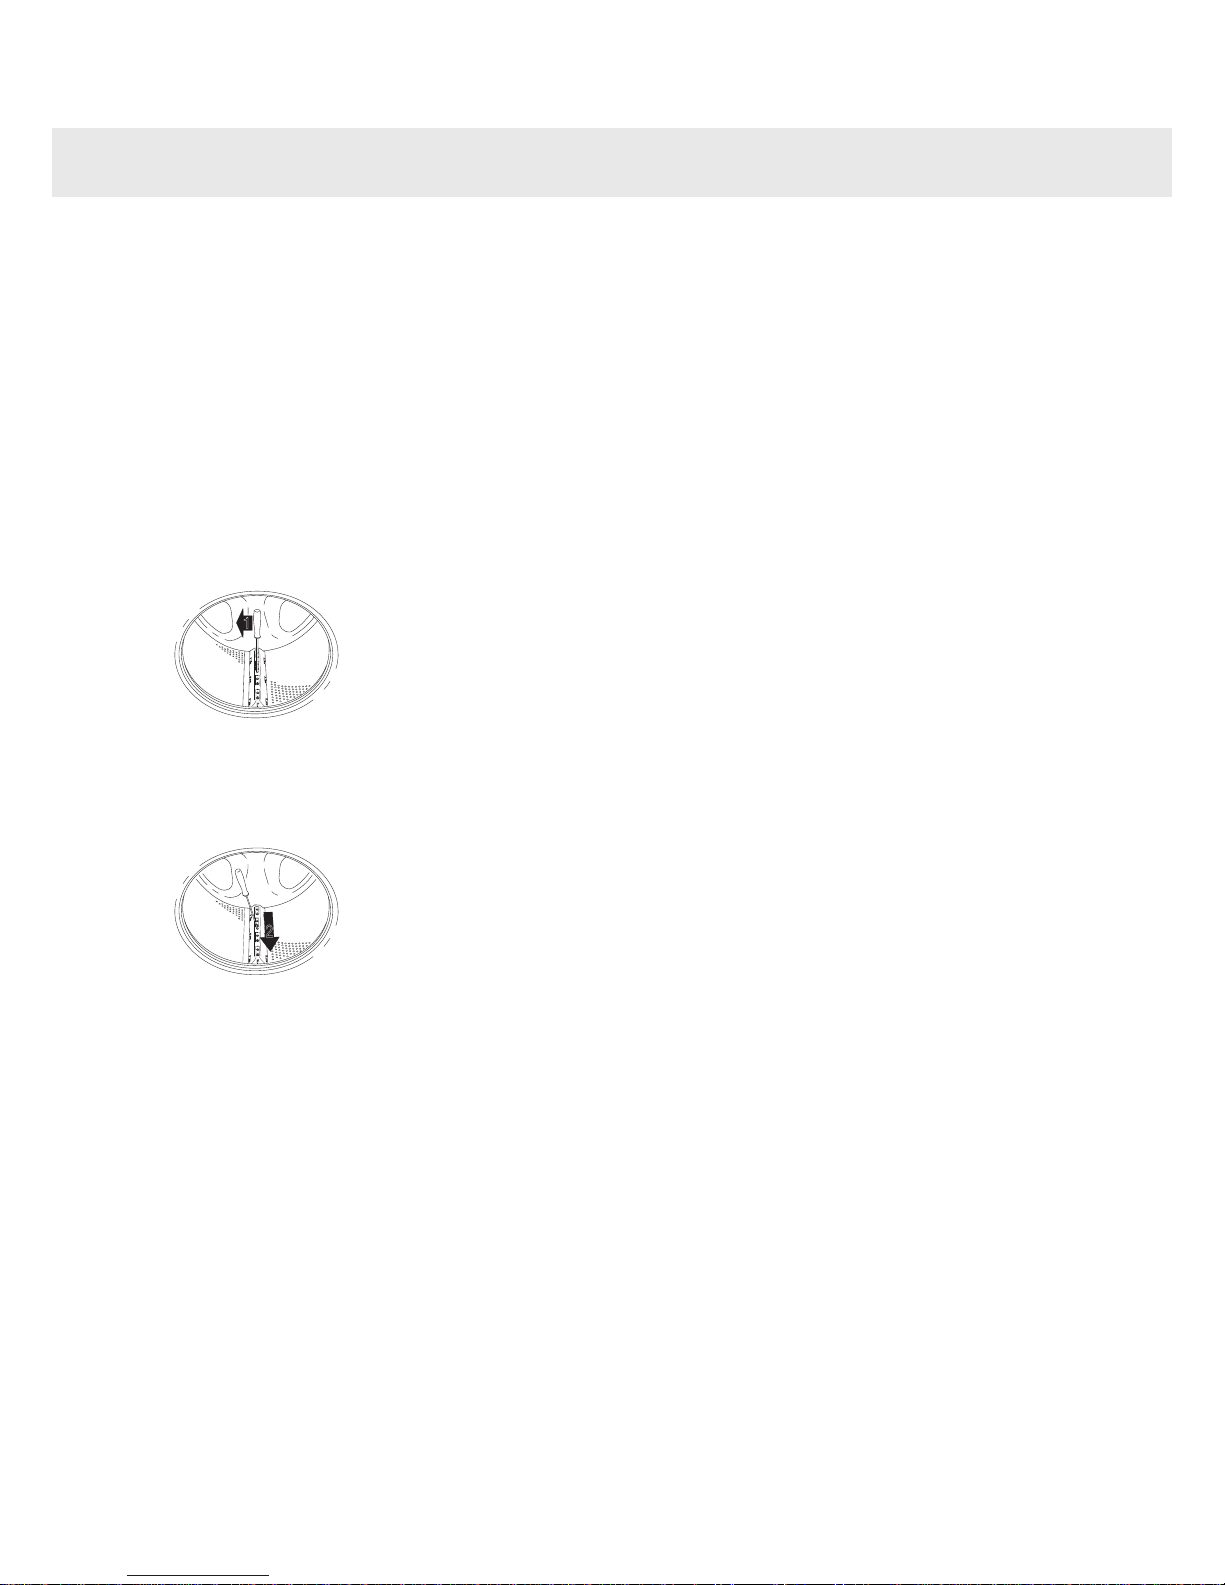
Rinse holes under the agitator
If you think that an object, such as a nail or a
paper clip, may have fallen through the wash
drum, you should check the container under
the agitator. Objects of this kind can rust and
cause spots on clothing. Nails and other sharp
objects can make holes in fabric.
Do as follows:
1.
Use a screwdriver or similar tool.
2.
Insert the screwdriver into the central hole
on the agitator and turn the screwdriver
handle gently to the left.
1
3.
With your other hand, hold the agitator and
pull it towards you as shown in the illustration.
4.
Lift the agitator.
2
5.
Remove any objects.
6.
Place the agitator in the mounting hole with
the F-mark towards you. Ensure that all the
agitator fasteners are in their holes in the
drum. Push it away from you until it
catches.
If you have hard water
If you live in an area with hard water (limescale), the washer drum may develop a greyish-white coating. To remove this, empty a
sachet of citric acid, approx. 20gram, into the
washer drum and run the Heavy white programme at 95°C. Repeat if necessary.
18
Care and cleaning
Page 19
The washer door will not open
1.
Check that the main power switch is on.
2.
Has the power supply been cut off? Check
the house fuses (circuit breakers). The
washer door cannot be opened using the
button with the key symbol if the power
supply has been cut off.
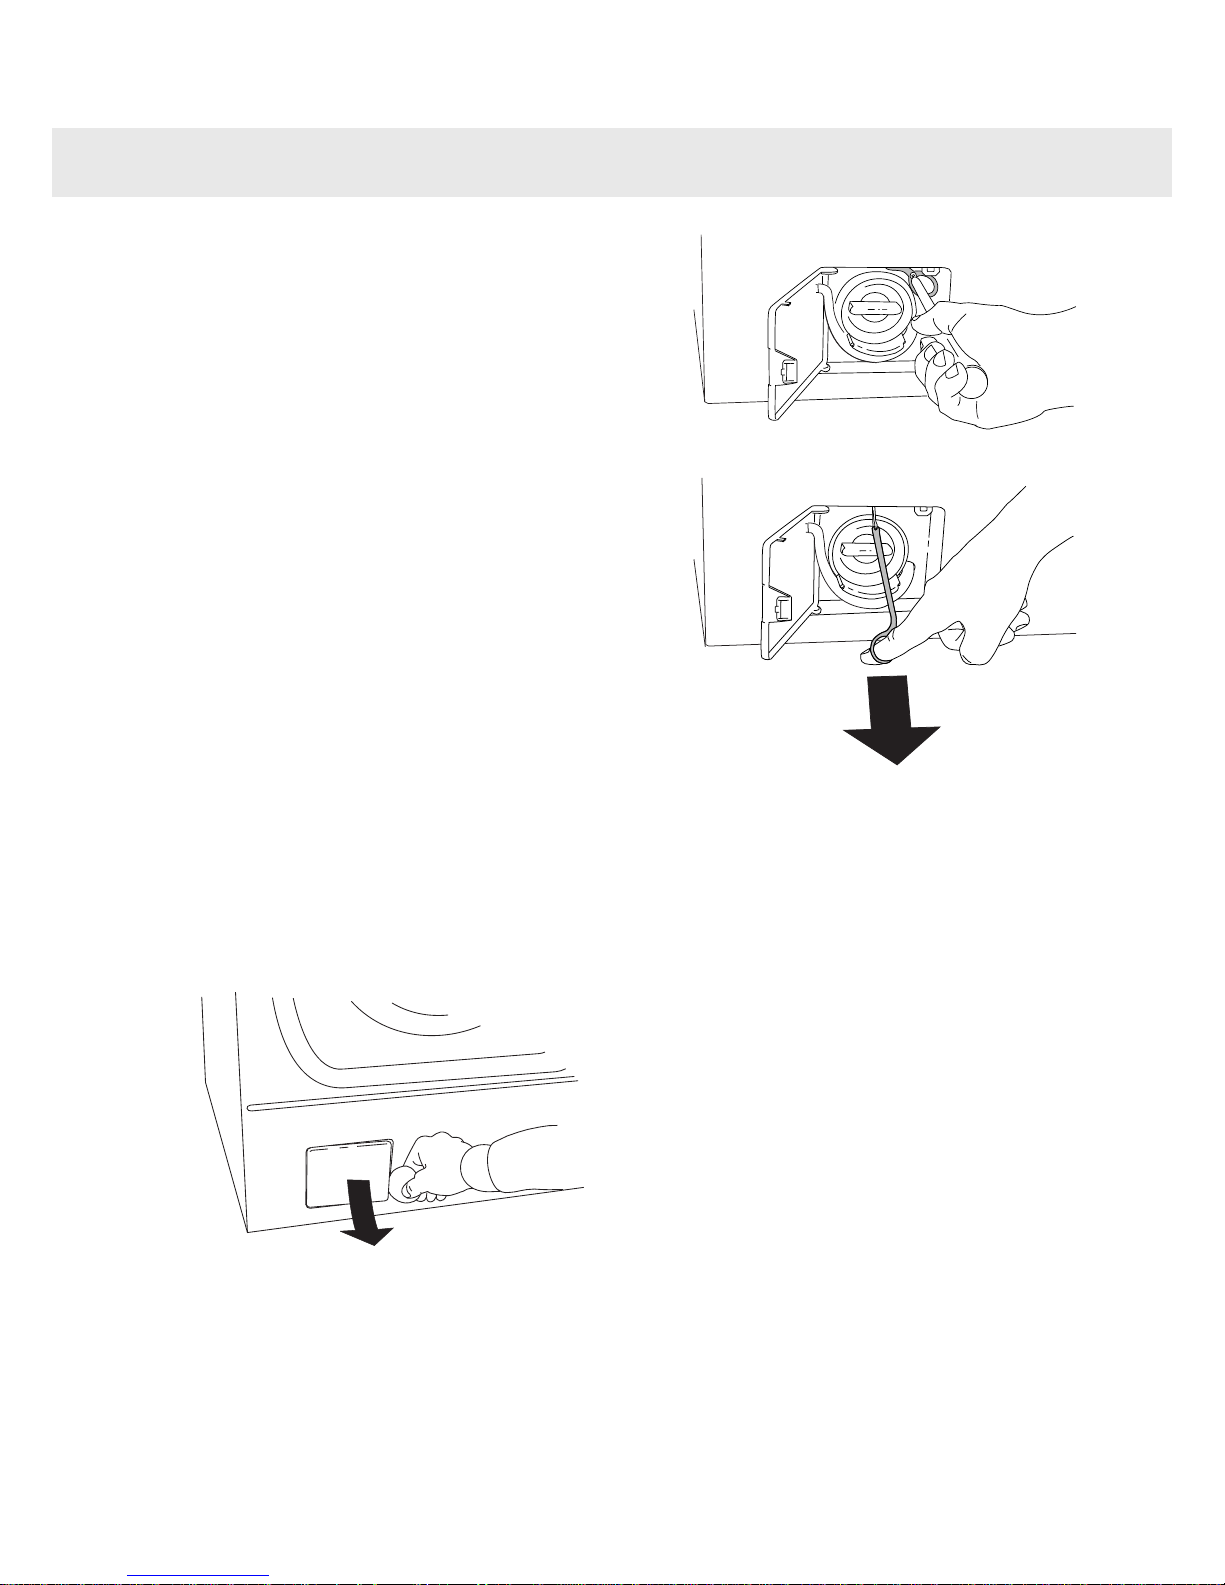
If nothing else works, the washer door
can be opened as follows:
•
This must only be done in an emergency
if the machine's glass door does not
open automatically when the programme has finished.
•
First check that there is no water left in
the machine. If there is any water left
and you are unable to run the Drain
program, empty the machine by detaching the drainage hose. This is described
under the heading “Checking the Filter
and Drainage pump”, in chapter 11,
“Care and cleaning”.
•
Make sure that the mains power switch
is off and that the plug has been removed from the wall socket.
•
Open the hatch to the drainage pump,
bottom left as shown in the illustration.
•
Unfasten the screws holding the red
plastic handle in place.
•
Pull the handle and the door opens.
•
Insert the handle back into its slot and
screw it tight. Close the hatch to the
drainage pump.
If the machine's glass door does not open the
next time a washing programme has finished,
call the service division.
The machine will not start
1.
Is the washer door properly closed? Push
it firmly.
2.
Is there power? Check your home’s fuses.
3.
Check that you have not selected Delayed
Start. Stop the programme if you want.
19
Troubleshooting
Page 20

Error messages
The display indicates if an error has occurred
during the program. After taking the measures
described below, turn off the machine to leave
error message mode.
The error messages that may be shown are:
The door is not closed
If the first red field beside the Start/Stop button is flashing, you have tried to start a programme with the door open. Close the door
and the programme will start.
Over filling
If F1 is flashing in the display.
1.
Shut off the water tap.
2.
Call the service division!
Drainage error
If F3 is flashing in the display, there is a
problem with drainage. Check:
•
that no objects are stuck in the drainage
hose outlet.
•
that the drainage pump is not blocked by
foreign objects. Clean the pump (see the
“Care and cleaning” chapter).
•
that there are no kinks in the drainage
hose.
After taking the necessary action, run the
Drain programme or press the Door Open
button (key symbol) to empty the machine. If
this does not resolve the problem, call the
service division!
Water intake error
If F4 is flashing on the display.
Fault with water supply. Check:
•
that the tap on the water pipe is open.
•
that the filter in the machine’s water intake
is not blocked.
1.
Shut off the water tap.
2.
Unscrew the hose.
3.
Clean the filter in the intake valve on the
machine.
4.
Screw the hose back on.
5.
Turn on the tap.
6.
Run the program again to check if the fault
is fixed.
7.
If this does not resolve the problem, call
the service division!
Door opening error
if F6 is flashing on the display, call the service
division!
20
Troubleshooting
Page 21

Technical data
850mmHeight:
595mmWidth:
585mmDepth:
73 (78)kg (with outer door)Weight:
50lCylinder volume:
7kgMax. washing capacity:
800 - 1600Spin speed (rpm)
See type plate.Rated power:
See type plate.Heater output:
0,1 - 1 MPa
1 - 10 kp/cm2
10 - 100 N/cm2
Water pressure:
Stainless steelWash drum and liquid compartment material:
Powder-coated and hot-galvanized sheet steel
or stainless steel.
Outer casing material:
1,5m pex pipeWater connection:
1,7m polypropylene hoseDrain:
Standard tests
EN 60456Europe:
White cotton, 60°C, 7 kg cottonWashing program:
Cold water 15°CConnection:
IEC-60704-2-4Test method for noise measurement:
< 0,2 WPower requirement when machine turned off
< 9,0 WPower requirement for time-delayed start
< 9,0 WPower requirement when programme finished
21
Technical information
Page 22
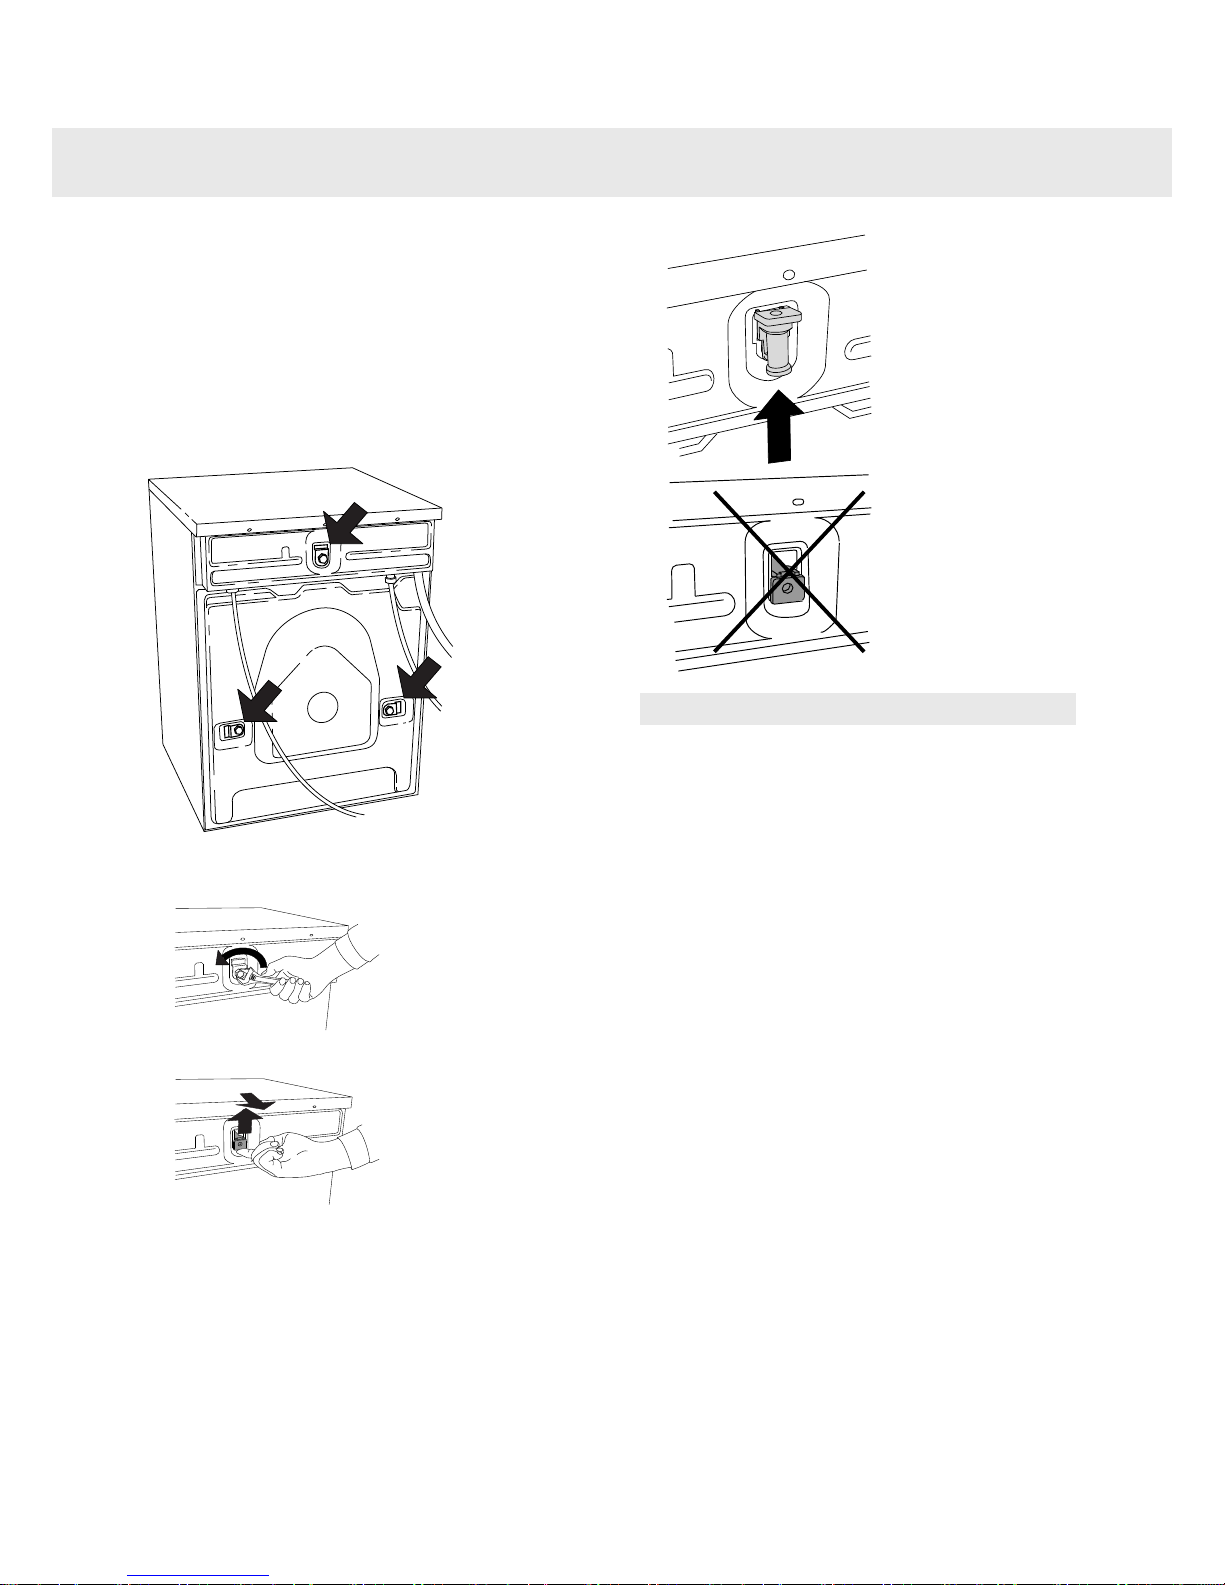
Before the machine is used, the three transport protection devices should be removed
as shown below.
Each transport protection device consists of
a screw, a washer and a rubber spacer. After
the protection device has been removed, the
rubber spacer acts as a plug for the holes for
the device and also as a damper.
•
First remove the screws and remove the
washers.
•
Then remove the rubber spacers.
2
1
•
Finally, the rubber spacers should be
turned over and replaced in the transport
protection device holes.
Important!
In order to prevent the machine from being
damaged when it is transported, use the
transport protection device, which locks the
entire inner compartment in place. If the
transport protection device is missing, you
can order one from your retailer.
Item number:
8064206 Rubber spacer
8901037 Bolt
8061767 Washer
Order three of each item!
22
Transport protection
Page 23
Positioning the washing machine
The washing machine can be installed as a
built-in or freestanding unit. Position the machine so that the electrical plug is easily accessible.
A. Built-in
The washing machine can be installed under
a counter top with a working height of 850 900 mm. Leave a 5 mm space around the
machine, particularly between the rear edge
of the top cover and the wall behind it.
B. Freestanding
The washing machine can be positioned beside or under a dryer.
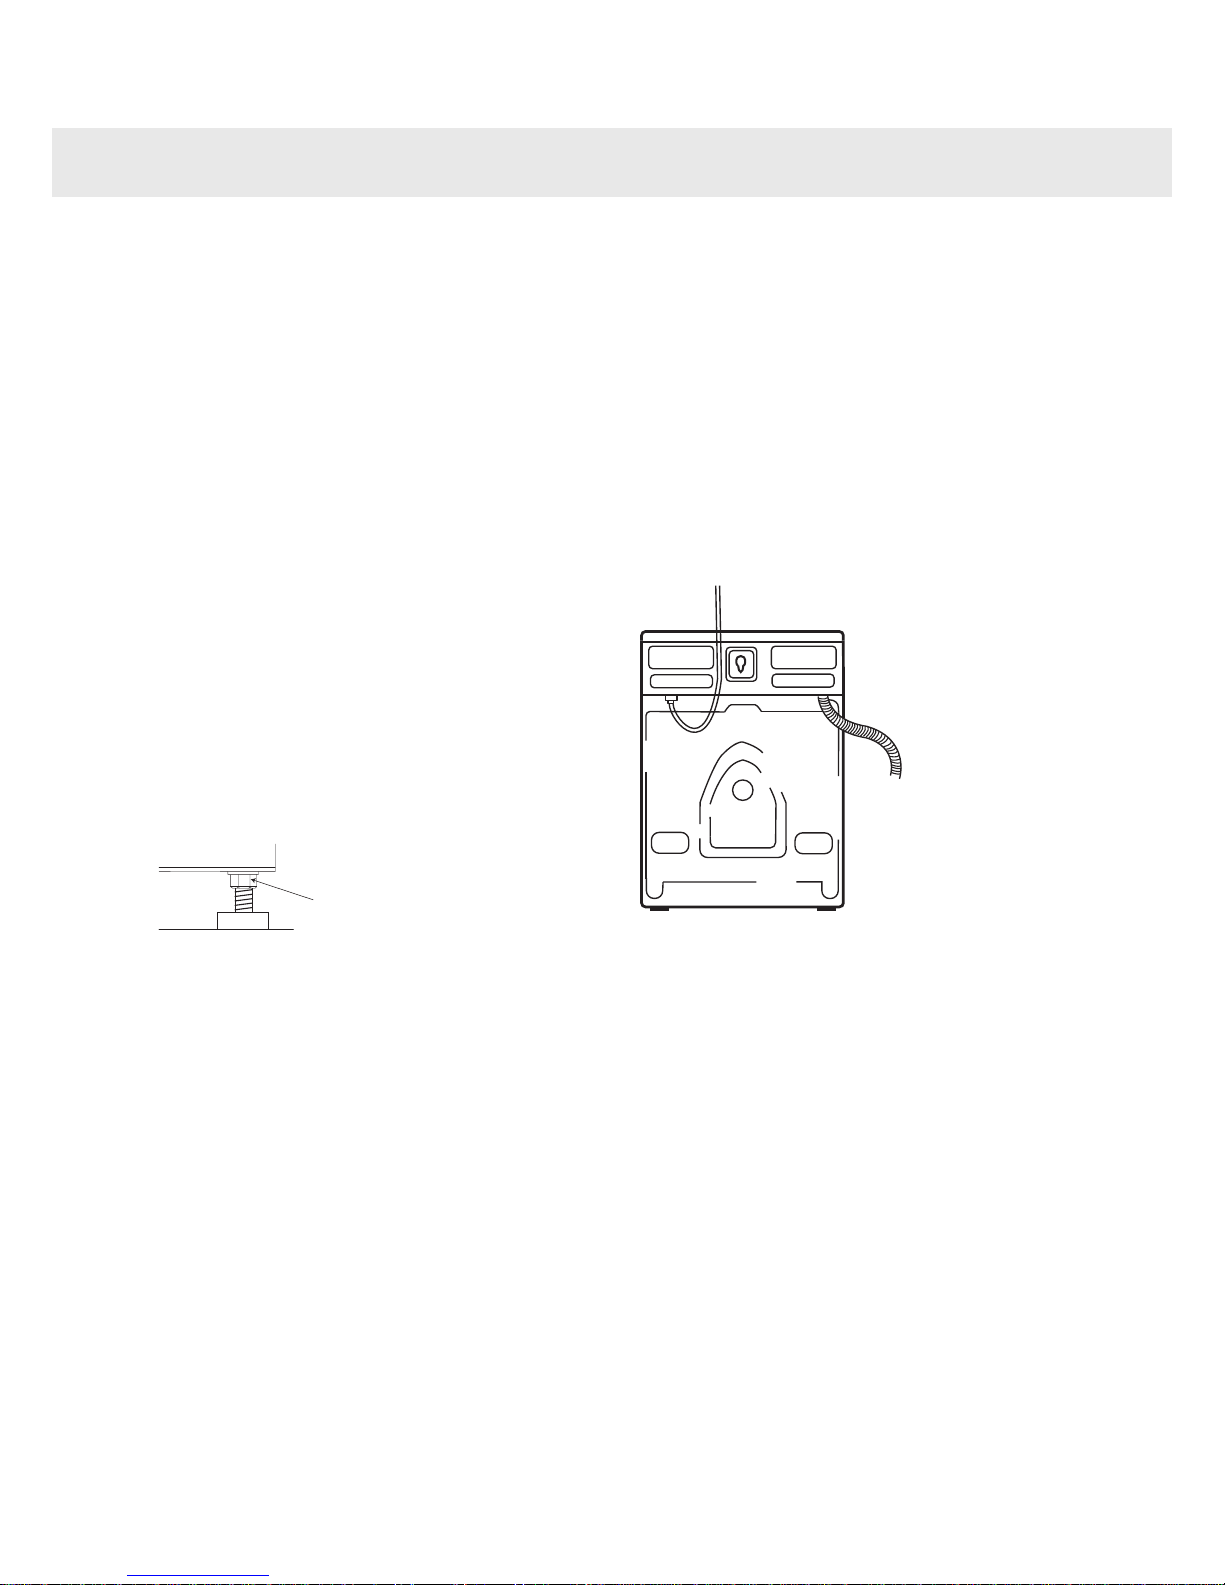
Adjusting the feet
Keep the noise that the machine produces to
a minimum by adjusting the feet so that the
machine is steady and balanced on the floor.
Tighten the lock nuts.
Locking nut
Connection to water supply
Water connection should be carried out by a
qualified professional. Connect the machine
using the accompanying supply hose. Water
pressure should be 0.1–1MPa (approx.
1–10kp/cm2 ; 10-100N/cm2). There should
be a stopcock on the water pipe.
If the pipes are newly installed, it may be wise
to flush them through so that any dirt is
washed away. Otherwise, dirt can clog the
filter in the machine’s water intake and cut off
the water supply.
Only use the inlet hose supplied with the machine. Do not reuse old or other loose inlet
hoses.
23
Installation
Page 24
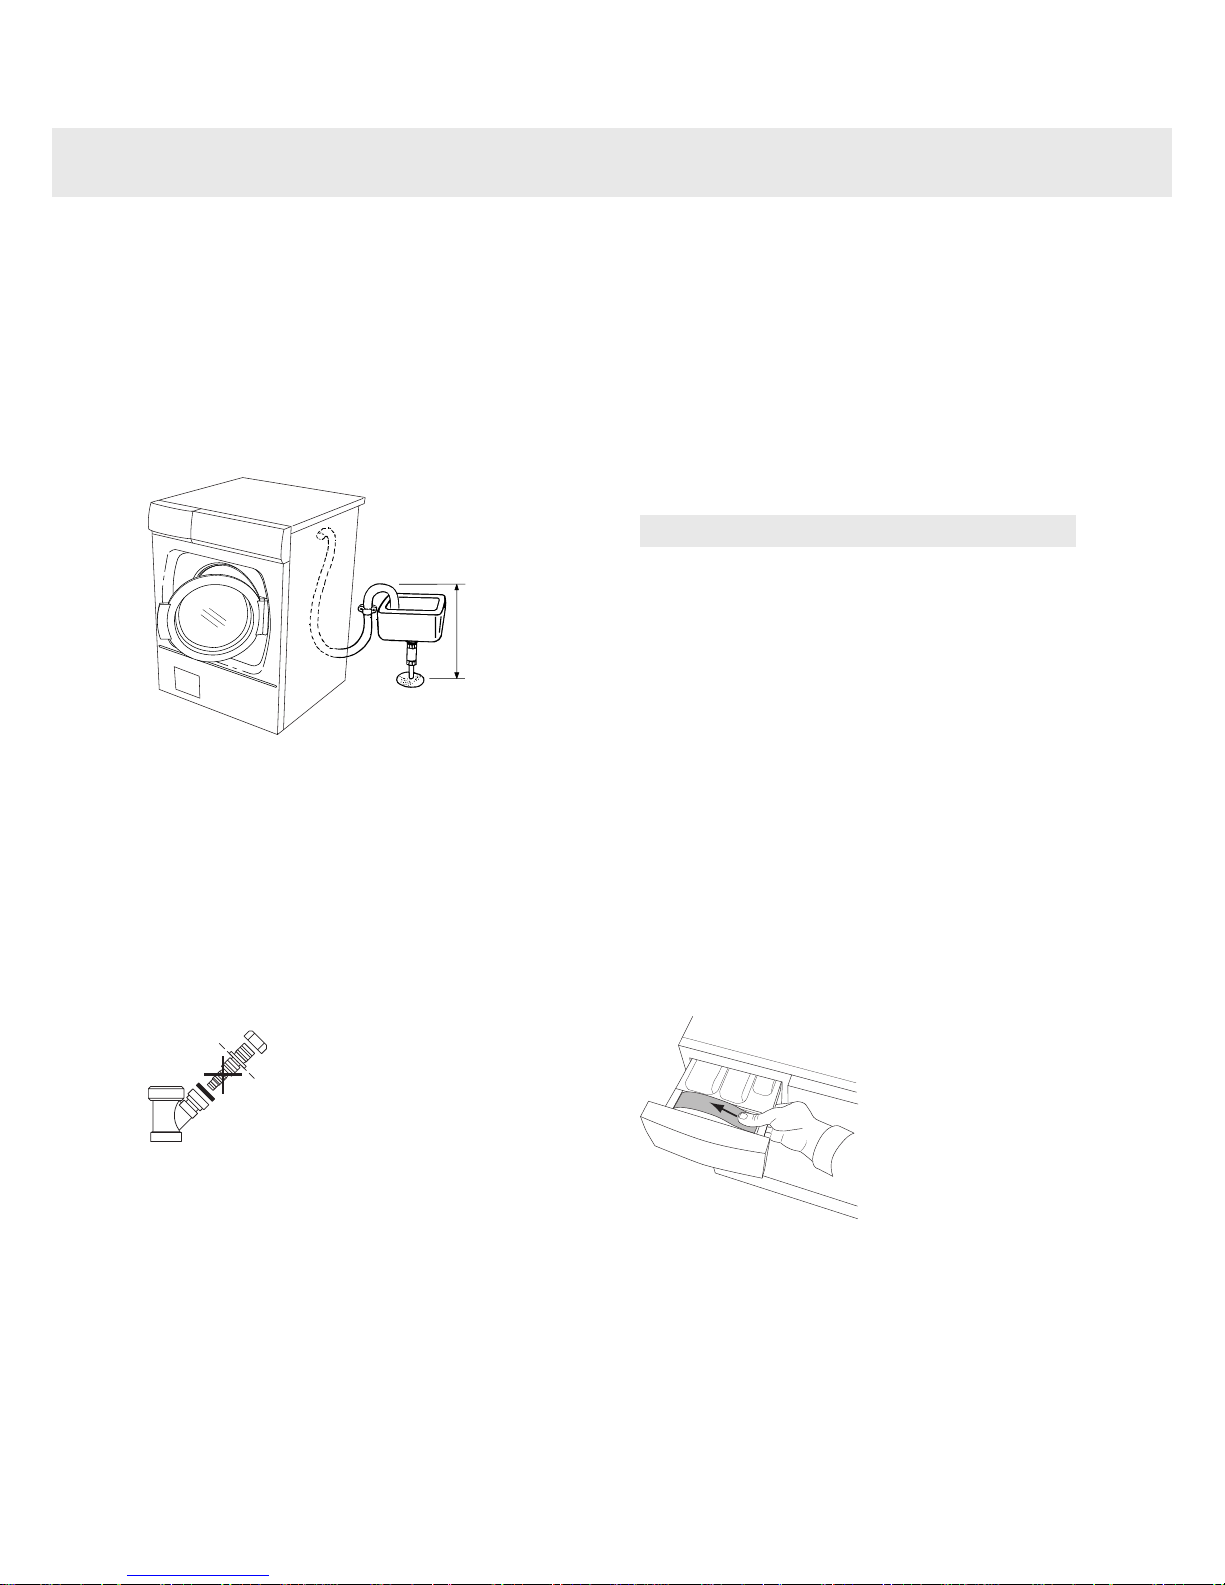
Drainage connection
The machine is supplied with a connected
drainage hose that can be fastened to a
laundry sink or similar. The height must be
600 - 900 mm above floor level.
The lower position (600 mm) is always
preferable. Ensure that the drainage hose has
no kinks.
600-900 mm
The machine can also be connected to the
drain via a spigot connection. In this case the
hose should also be 600-900 mm above the
floor. The internal diameter of the hole should
be at least 18 mm.
•
Cut the nipple
•
Remove burrs from the hole.
See the illustration.
Minimum 18 mm
Electrical installation
Electrical connections must be via a plug
connected to an earthed wall socket or by
cable for fixed installation, with all-pole disconnection, by a qualified professional.
Connection on delivery
The machine is supplied as 1-fas, 230V, 50HZ
with a plug, heat output 2000W and has a 10A
fuse. Any earth fault fuses must be type A.
Note!
Repairs and maintenance relating to safety
or performance must be carried out by a
qualified professional.
Programme plate in multiple
languages
Certain machines include double-sided programme plates in different languages (see
the detergent compartment and the bag with
the user handbook that comes with the machine).
You can replace or turn the card yourself to
get the language most appropriate for you.
To remove the card from its holder in the detergent compartment, press the card with your
thumb and push it sideways (see picture).
The card will then bend slightly and you can
easily remove it. To fit the card, bend it slightly
in order to easily insert it into the holder in the
detergent compartment.
24
Installation
Page 25
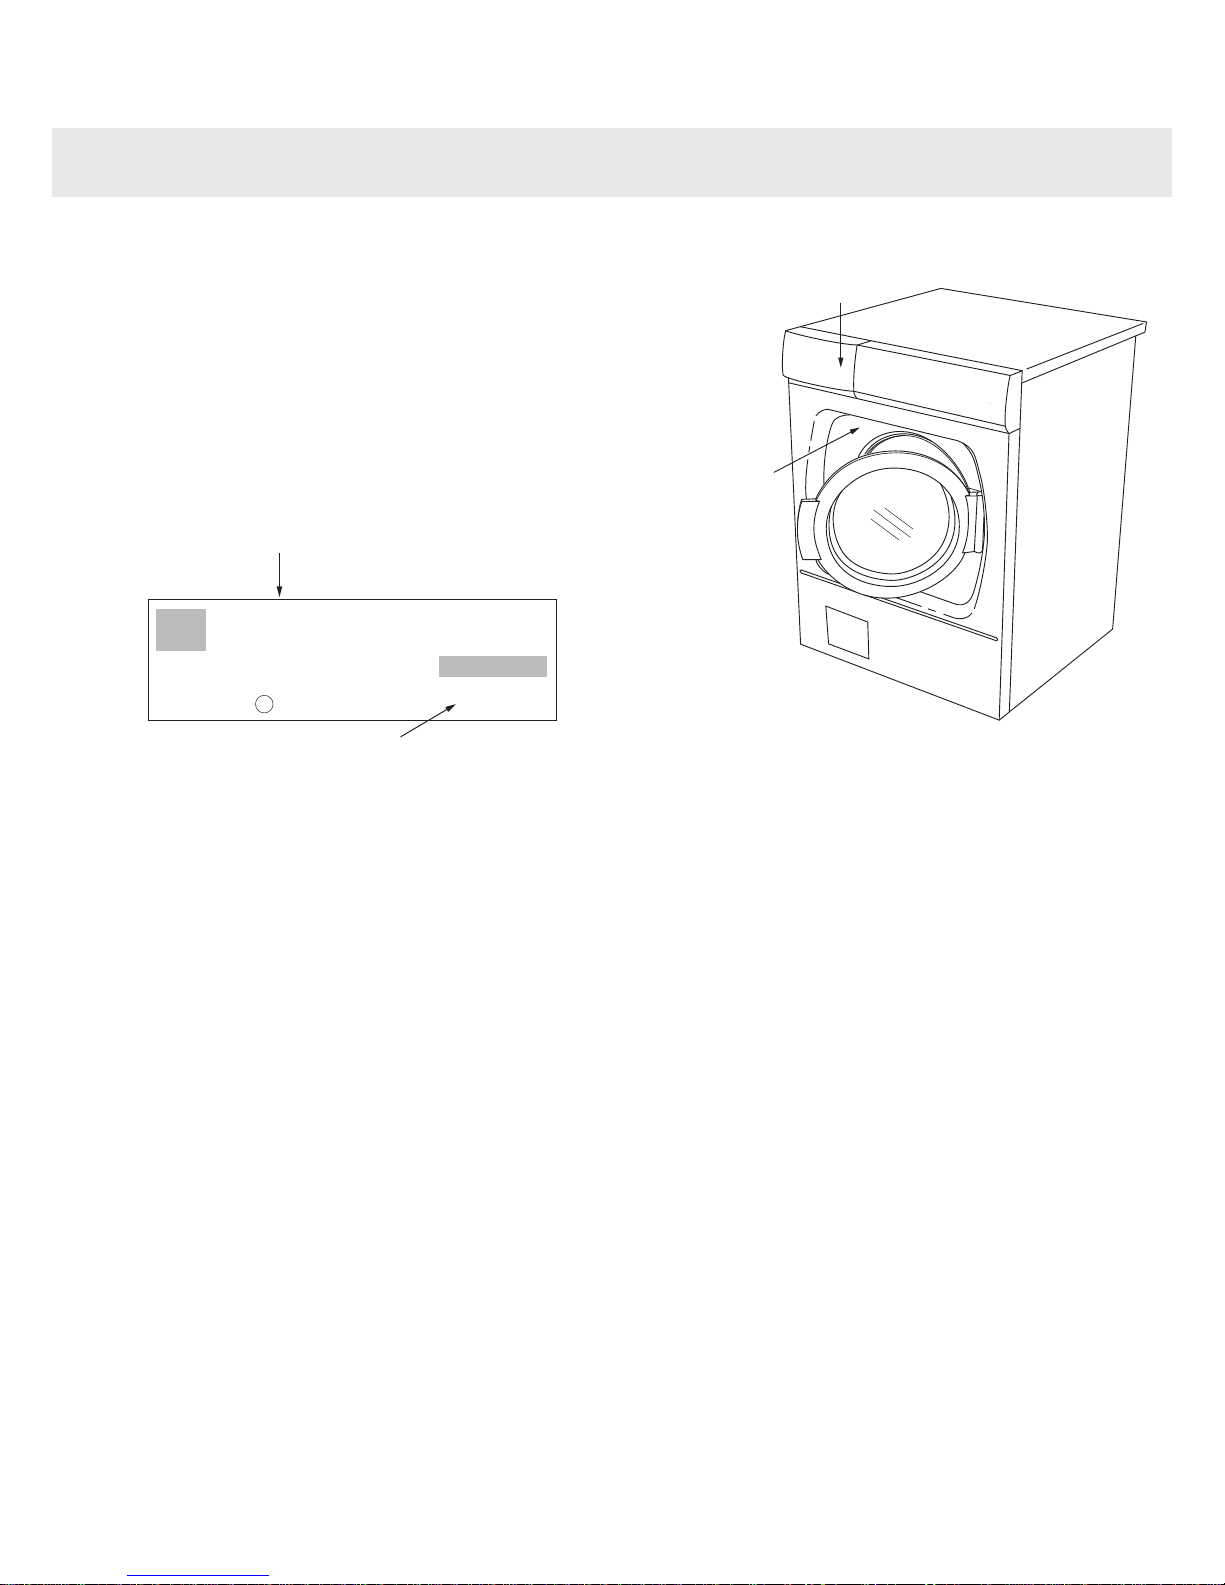
Before contacting the service division
Before you contact the service division, make
sure that you know the model designation,
type designation and serial number.
The model designation can be found on the
detergent compartment. Type designation
and serial number can be found on the type
plate above the washer door.
000000000000
TYPE: WMxx
xxx x xxxxxxx M xxxxxxxW
Type designation WMxx0
Serial number (12 digits)
Model designation
Type plate
25
Service
Page 26

26
Your notes
Page 27

27
Your notes
Page 28

1
Washing
•
Empty pockets and refasten zips.
•
Read the item’s laundry label.
•
Sorting laundry.
Note!
Place underwired bras in a laundry net.
2
Load the laundry
•
Press the main power switch.
•
If the door is closed, press the Door
opening button (key symbol). The red
field lights up and the door opens
after a few seconds.
•
Load the laundry and close the door.
3
Detergent compartment
•
Pour detergent into the main wash
compartment, and pre-wash compartment as well if required. Pour fabric
softener into the compartment on the
right with the -symbol.
•
If you use liquid detergent, follow the
detergent manufacturer’s recommendations.
4
Select the programme
•
Select a programme by turning the
programme selector.
•
Select options and settings.
•
Press the Start/Stop button.
5
Program finished
•
The text END on the display indicates
that the wash programme has finished.
•
The washer door opens automatically
once the programme has finished.
•
Remove the laundry.
•
Turn off the main power switch.
If you have small children or pets at home,
close the washer door once you have removed the laundry.
Art. No.: 80 837 83. Rev. 01. We reserve the right to make changes.
Printed on environmentally friendly paper that meets the requirements of MIljöförbundet and Naturskyddsföreningen.
28
Quick guide
 Loading...