

ISAFE MOBILE ADVANTAGE 1 SERIES User Manual
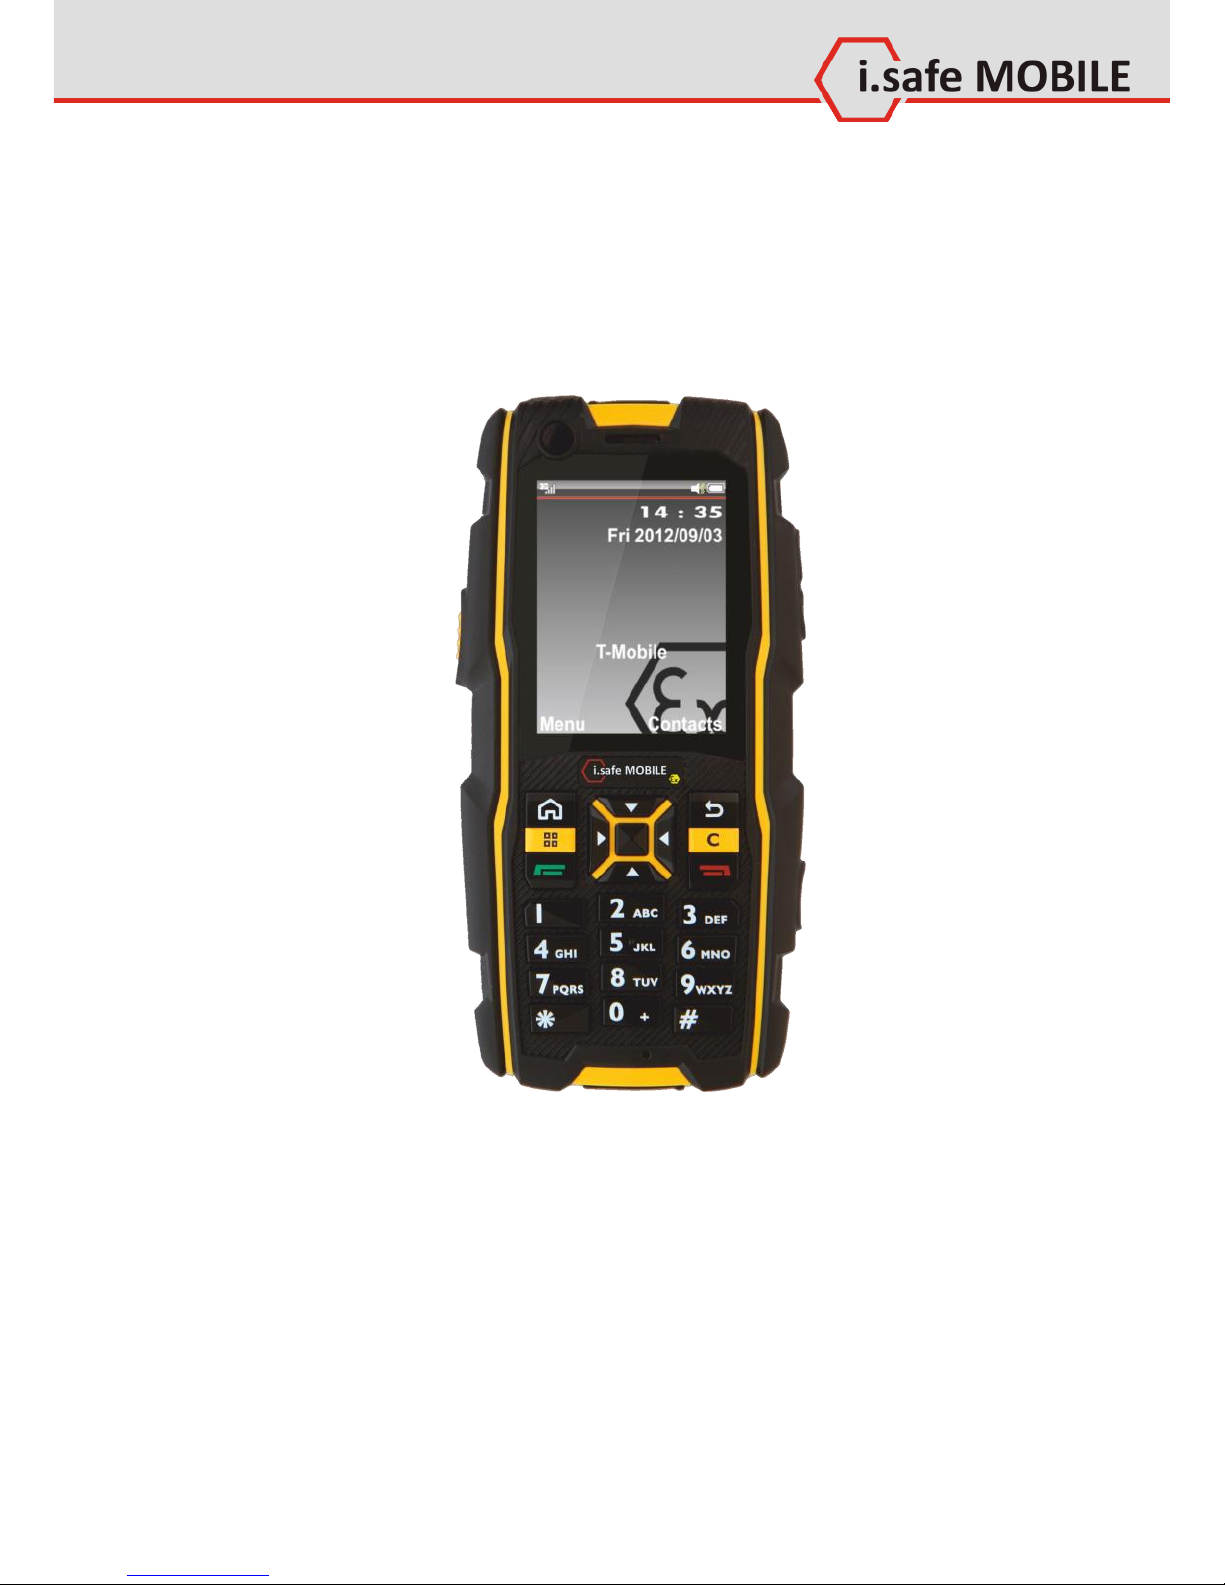
ADVANTAGE 1.x
Manual

Note
Template: TEMPMD01REV00
Document No. 1005DI02REV00
Version: 2013-06-20
Reservation: Technical Data is subject to change without notice.
Changes, errors and misprints may not be used as a basis for any
claim for damages.
All rights reserved.
i.safe MOBILE GmbH cannot be held responsible for any data or
other loss and direct or indirect damages caused by any improper use of this phone.
(c) 2013 i.safe MOBILE GmbH
i.safe MOBILE GmbH
i_PARK TAUBERFRANKEN 14
97922 Lauda-Koenigshofen
Germany
Tel. +49 9343/60148-0
info@isafe-mobile.com
www.isafe-mobile.com

Safety
3
Part I Safety 6
1 Specifications 7
1.1 Ex-Specifications 7
1.2 Technical Specifications 8
1.3 Variants 8
2 Safety Instructions 9
2.1 Faults and Damages 9
2.2 Ex-relevant Safety Regulations 10
2.3 Further Safety Advises 11
3 i.safe PROTECTOR 13
Part II Quick start 14
1 Keys 15
2 Status Icons 16
3 First Steps 17
3.1 Battery 17
3.2 Installation of the SIM Card 18
3.3 Installation of the Micro-SD Card 19
4 How to Localize the Phone 20
5 How to use Contacts 20
6 How to use Profiles 21
7 How to use Network functions 22
8 How to use Email 23
8.1 Setup 23
8.2 Write an Email 24
8.3 Receive an Email 24
9 How to Use Messages 25
9.1 Send a Message 25
9.2 Read a New Message 25
10 How to Use the Camera (ADVANTAGE 1.0 Only) 26
11 How to Use Bluetooth 27
11.1 Transmitting Documents via Bluetooth 27
11.2 Using a Bluetooth Headset 27

Contents
4
Part III All Options 29
1 Main Menu 29
2 Contacts 30
2.1 Search Contacts 31
2.2 Other Options 33
3 Messages 36
3.1 SMS 37
3.2 MMS 41
3.3 Email Options 44
4 call log 46
4.1 Check Call Logs 46
5 Camera 49
5.1 Preview Screen in Snapshot Mode 50
6 Media player 53
6.1 Options 54
6.2 Now Playing 54
7 JAVA Apps 56
8 Settings 57
8.1 Emergency Call 58
8.2 Display 59
8.3 Ringtone 60
8.4 Phone settings 61
8.5 Call settings 62
8.6 Networks 64
8.7 Connectivity Settings 65
8.8 Security Settings 66
8.9 Reset Default 66
9 Profiles 67
10 File Manager 69
11 Extra 71
11.1 Bluetooth 72
11.2 Calendar 73
11.3 Notes 74
11.4 Calculator 74
11.5 Recorder 75
11.6 Clock 76

Safety
5
11.7 Converter 77
11.8 Pedometer 77
11.9 GPS 77
12 FM Radio 78
13 Browser 79
Part IV 81
1 Troubleshooting 82
2 Maintenance 84

Safety
6
Part I
Safety
Introduction
This document contains information and safety regulations
which are to be observed without fail for safe operation of the
mobile phone ADVANTAGE 1.x under the described conditions.
Non-observance of this information and instructions can have
serious consequences and / or may violate regulations.
Please read the manual and these safety instructions before using the phone. In case of contradicting information, the text of
these safety instructions shall apply.
In case of any doubt, the German version shall apply.
The current EC declaration of conformity, EC and IECEx certificates of conformity, safety instructions and manual can be found
at www.isafe-mobile.com, or requested from i.safe MOBILE
GmbH.

Safety
7
1 Specifications
1.1 Ex-Specifications
The ADVANTAGE 1.x is a mobile phone suitable for use in potentially explosive atmospheres (zones 1, 21, 2 and 22) in accordance with directives 94/9/EC (ATEX 95) and 99/92/EC (ATEX 137),
as well as the IECEx scheme.
Ex-markings
ATEX: II 2G Ex ib IIC T4 Gb
II 2D Ex ib IIIC T135°C Db IP6X
EPS 12 ATEX 1 463 X
2004
IECEx: Ex ib IIC T4 Gb
Ex ib IIIC T135°C Db IP6X
IECEx EPS 12.0022X
Temperature range: -20 ... +60°C
Manufactured by:
i.safe MOBILE GmbH
i_PARK TAUBERFRANKEN 14
97922 Lauda-Koenigshofen
Germany

Safety
8
1.2 Technical Specifications
Frequencies: GSM 850 / 900 / 1800 / 1900 MHz
3G 850 /1900 / 2100 MHz
Supported networks: WWAN (HSPA/EDGE/GPRS/GSM)
Dimension: 63 mm X 127 mm X 24 mm
Screen size: 2,2 in QVGA
Camera: 2,0 MP (only ADVANTAGE 1.0)
Wireless technologies: Bluetooth
Battery: 1000 mAh
Operating Temperature: -20°C ... 60 C
Memory: Micro-SD, supports up to 16GB
1.3 Variants
ADVANTAGE 1.0 is equipped with a 2 MP camera,
ADVANTAGE 1.1 is not equipped with a camera.

Safety
9
2 Safety Instructions
2.1 Faults and Damages
If there is any reason to suspect that the safety of the phone has
been compromised, it must be withdrawn from use and removed
from any ex-hazardous areas immediately.
Measures must be taken to prevent any accidental restarting of
the phone.
The safety of the phone may be compromised, if, for example:
malfunctions occur.
the housing of the phone or the battery shows damage.
the phone has been subjected to excessive loads.
the phone has been stored improperly.
markings or labels on the phone are illegible.
It is recommended that a phone which shows or which is suspected of faults and damages is returned i.safe MOBILE GmbH
for inspection.

Safety
10
2.2 Ex-relevant Safety Regulations
Use of this phone assumes that the operator observes the conventional safety regulations and has read and understood manual, safety instructions and certificate.
The following safety regulations must also be complied with:
Inside ex-hazardous areas all openings of the phone must be
closed. The battery has to be fixed by the two screws and the
covers of the USB and Headset interfaces have to be closed.
The battery may only be exchanged or charged outside ex-
hazardous areas.
The phone may only be charged outside ex-hazardous
areas using the i.safe PROTECTOR USB-cable or other equipment approved by i.safe MOBILE GmbH.
USB-connections to other equipment are only allowed out-
side ex-hazardous areas using the i.safe PROTECTOR USBcable or other equipment approved by i.safe MOBILE GmbH.
Use only the appropriate battery type BPA01A.
It is not allowed to carry spare batteries into ex-hazardous ar-
eas.
The phone may be charged only at temperatures in between
0°C ... 45°C.
The phone must not be exposed to abrasive acids or bases.
The phone must not be taken into zones 0 or 20.
Only accessories approved by i.safe MOBILE GmbH may be
used.

Safety
11
2.3 Further Safety Advises
Do not touch the screen of the phone with sharp objects.
Dust particles and nails may scratch the screen. Please maintain the screen clean. Remove dust on the screen with a soft
cloth gently, and do not scratch the screen.
Charge the phone under indoor conditions only.
Please do not put the phone in environments with excessive
temperatures, as this could lead to heating of the battery, resulting in fire or explosion.
Do not charge the phone near any flammable or explosive
substances.
Do not charge the phone in environments with much dust,
humidity, or excessively high or low temperatures (the permitted charging temperature range is 0 ... 45°C).
Do not use the phone in areas where regulations or legisla-
tives prohibit the use of a mobile phone.
Do not expose the phone, battery or charger to strong mag-
netic fields, such as are emitted from induction ovens or microwave ovens.
Do not attempt to open or repair the phone. Improper repair
or opening can lead to the destruction of the phone, fire or
explosion. Only authorized personnel are allowed to repair
the phone.
Only use accessories approved by i.safe MOBILE GmbH.
Please do not directly connect the poles of the battery to
avoid short-circuiting the battery.
Power off the phone in hospitals or other places where the
use of mobile phones is prohibited. This phone may affect
proper work of medical equipment, such as pacemakers, so
always keep a distance of at least 15 cm between the phone
and these devices.
Observe all corresponding laws that are in force in the respec-
tive countries regarding the use of mobile phones while operating a vehicle.

Safety
12
Please power off the phone and disconnect the charging ca-
ble before cleaning the phone.
Do not use any chemical cleaning agents to clean the phone
or the charger. Use a damp and anti-static soft cloth for cleaning.
Do not discard old and abandoned lithium batteries into the
trash, send them to designated waste disposal locations or return them to i.safe MOBILE GmbH.
The user alone is responsible for any and all damages and lia-
bilities caused by malware downloaded when using the network or other data-exchange functions of the phone. i.safe
MOBILE GmbH cannot be held responsible for any of those
claims.
Warning
i.safe MOBILE GmbH will not assume any liability for damages
caused by disregarding any of these advices or by any inappropriate use of the phone.

Safety
13
3 i.safe PROTECTOR
The ADVANTAGE 1.x contains specially designed safety circuits.
Connecting the phone to non-ex-approved equipment like a
computer can endanger the safety of the phone, as faults in the
non-approved equipment could lead to a power surge into the
phone large enough to destroy the safety circuits.
The i.safe PROTECTOR is a USB-cable for connecting the phone
with non-ex-approved equipment. It contains additional safety
circuits to protect the phone from possible faults in the non-exapproved equipment.
For this reason, charging and USB-connections are only allowed
using the i.safe PROTECTOR.

Quick Start
14
Part II
Quick start
Throughout this guide, the following formats are used:
[OK], [SEND] signify physical keys to be pressed.
<Menu>, <Settings> represent text options on the screen of
the phone that have to be selected by using the keys.
Quick Start
15
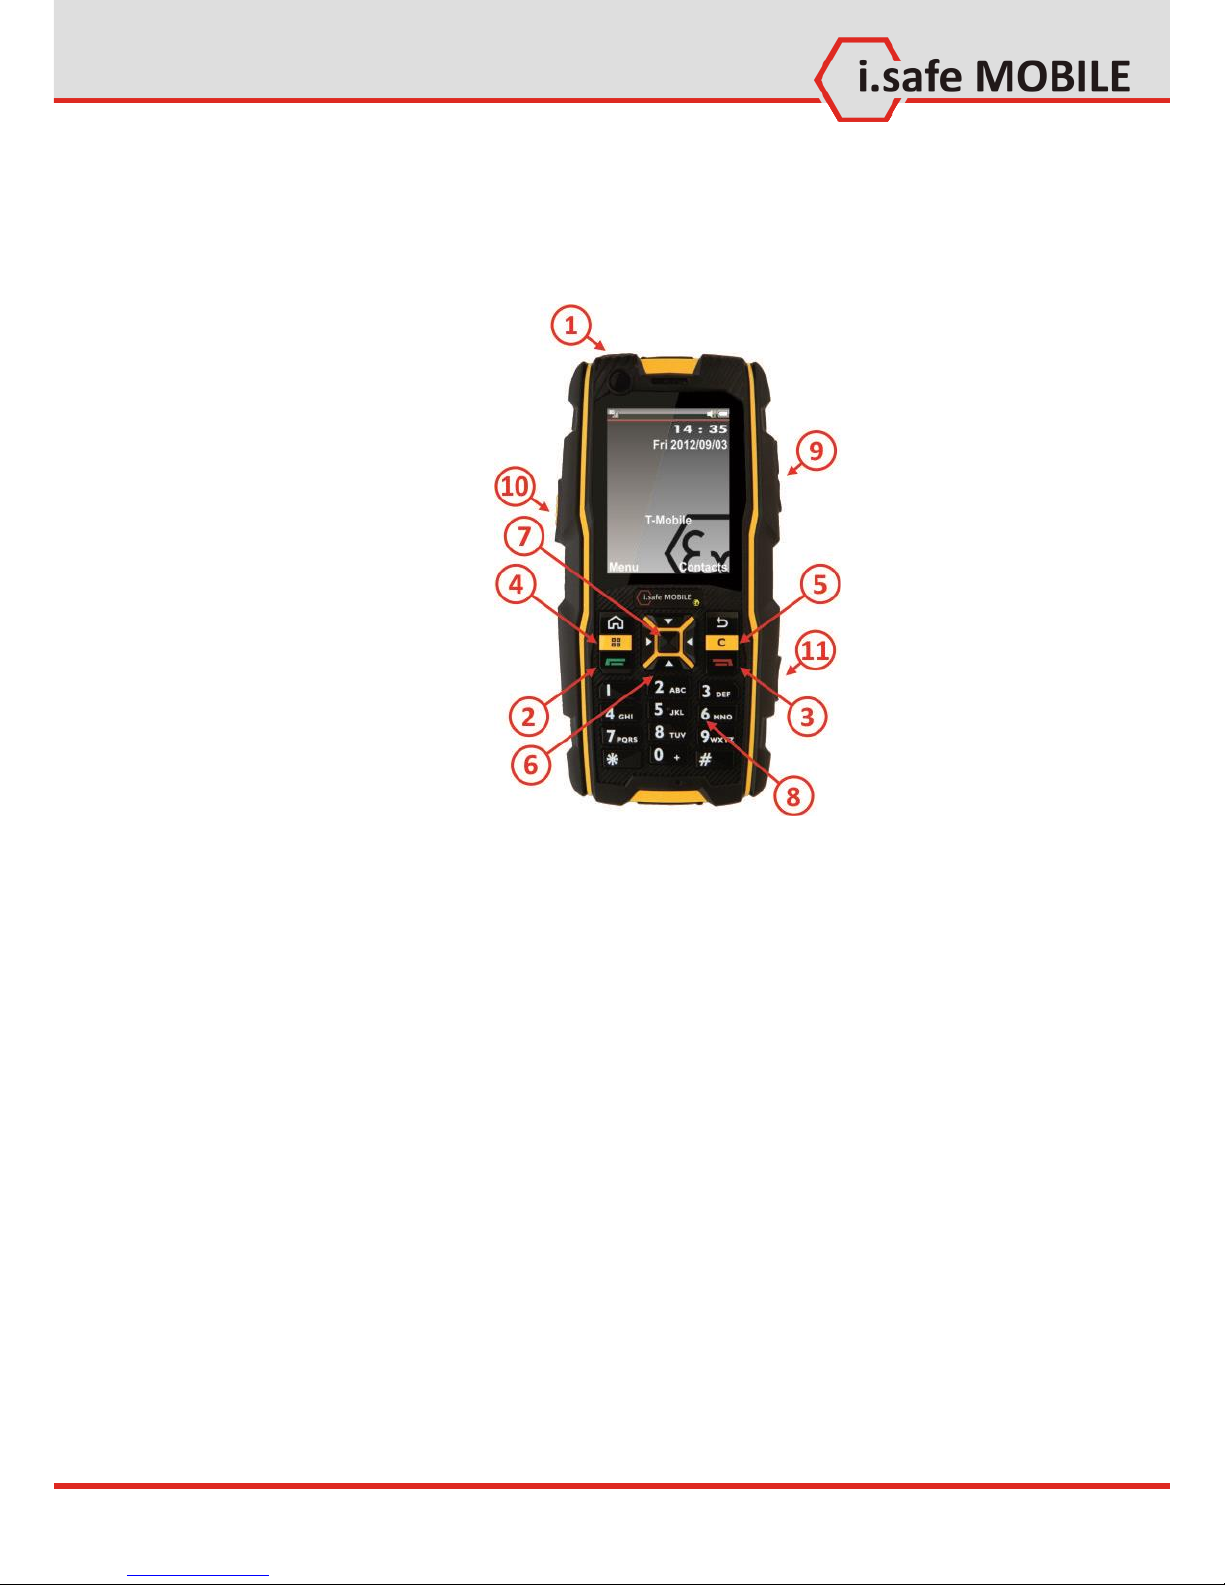
1 Keys
[1] Power: Long press to power the phone up or down.
Short press to lock the phone.
[2] Send: Bring up the call log or answer a call when the
phone is ringing.
[3] End: Return to homescreen from any menu.
End or reject a call.
[4] Menu: While on the homescreen: enter settings.
[5] Clear: Deletes your selection.
[6] Navigation: 4-way navigation through menus.
[7] OK: Confirm the selected item or function.
[8] Keypad: Use for text or number entry.
[9] Volume: Adjust the volume.
[10] Camera: Take a picture when in camera mode.
(only valid for ADVANTAGE 1.0).
Long press for switching torch on or off.
[11] SOS: Long press to activate the SOS-alert and call a
pre-defined number sequence.
Quick Start
16
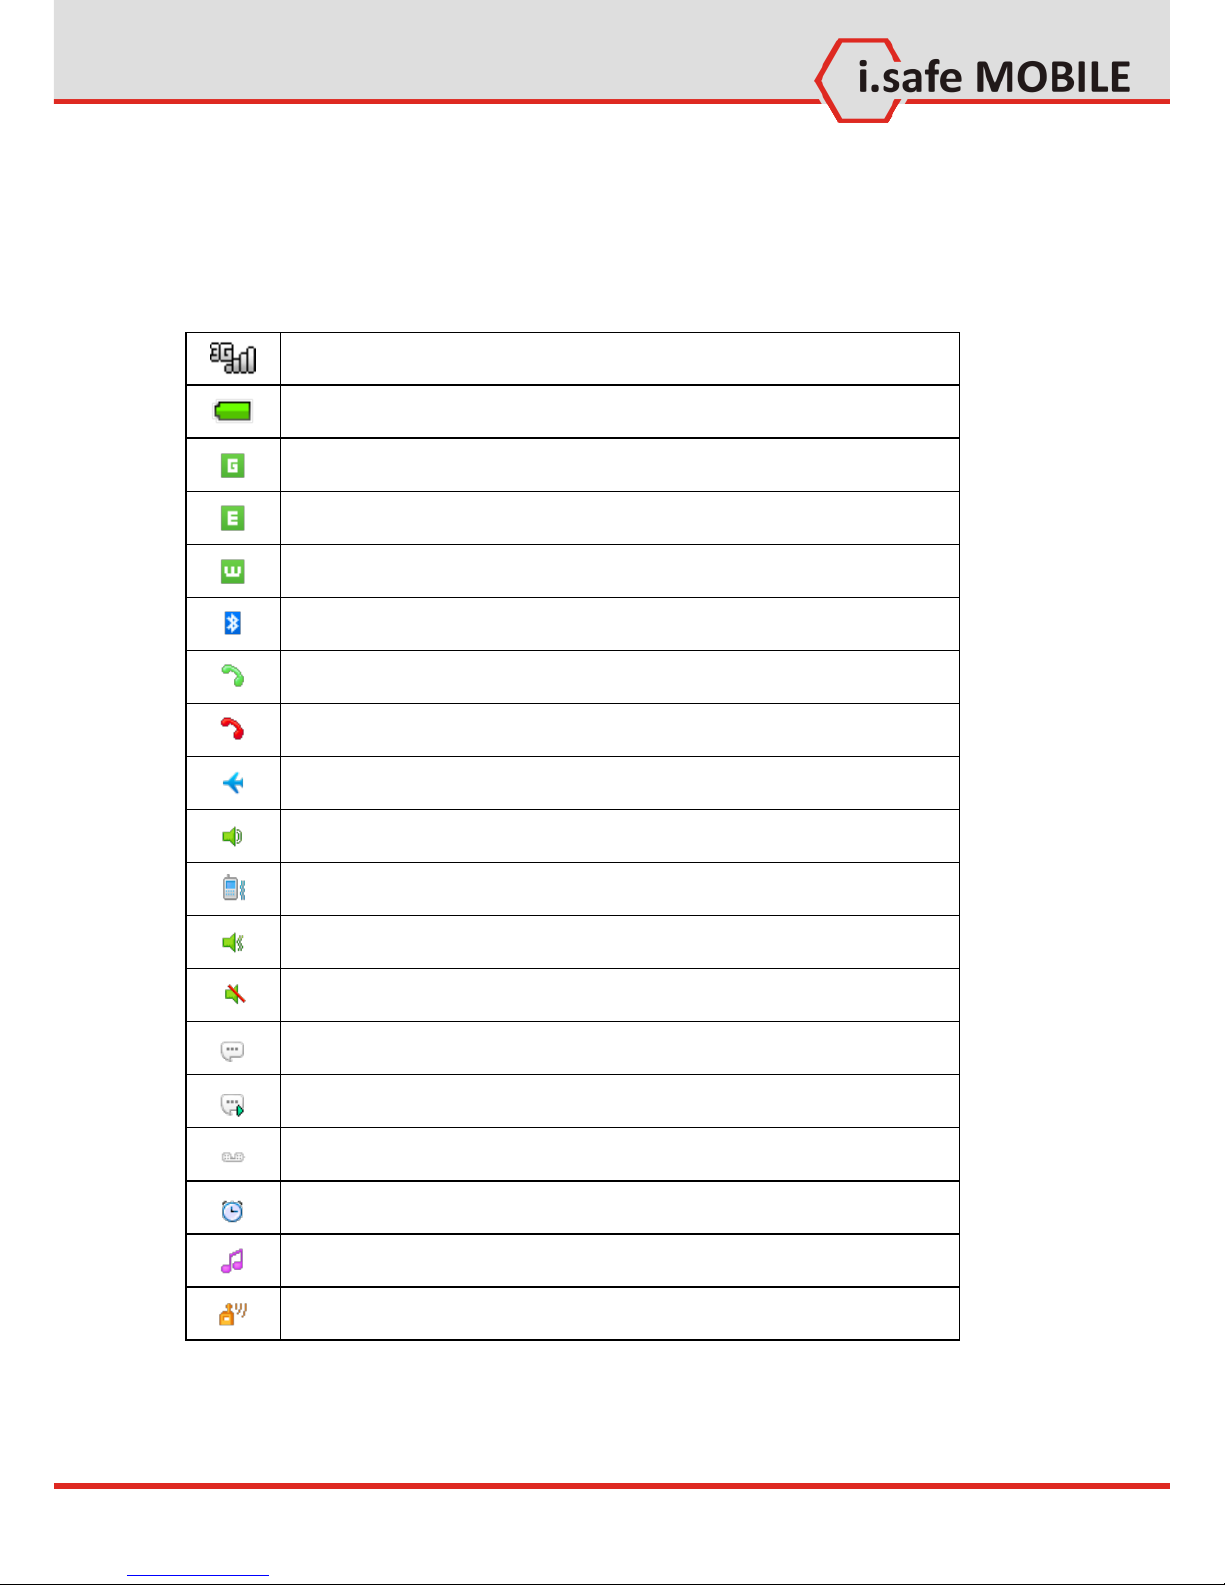
2 Status Icons
These icons will be displayed in the status bar in the upper part
of the display.
Current Signal Strength
Battery power level indicator
GPRS Connection
EDGE Connection
UMTS Connection
Bluetooth active
Call in progress
Missed calls
Flight mode
ringtone only
vibration only
vibration and ringtone
mute
New SMS
New MMS
New voice mails
Alarm clock active
MP3 playing
FM radio active
Quick Start
17
3 First Steps
3.1 Battery
The battery is inserted into the back of the mobile phone. The
battery is not fully charged when the mobile phone is purchased,
but it contains enough energy to power on the phone. To obtain
best battery performance and battery life, let the battery discharge completely before charging it completely for the first
three charging cycles.
3.1.1 Installing and Extracting the Battery
When installing the battery, insert the teeth at the top of the
battery into the corresponding notches of the mobile phone,
then press the battery down and secure it by turning the two
screws with the included screw driver (TORX T8). Ensure that the
battery is safely in place before powering on the phone.
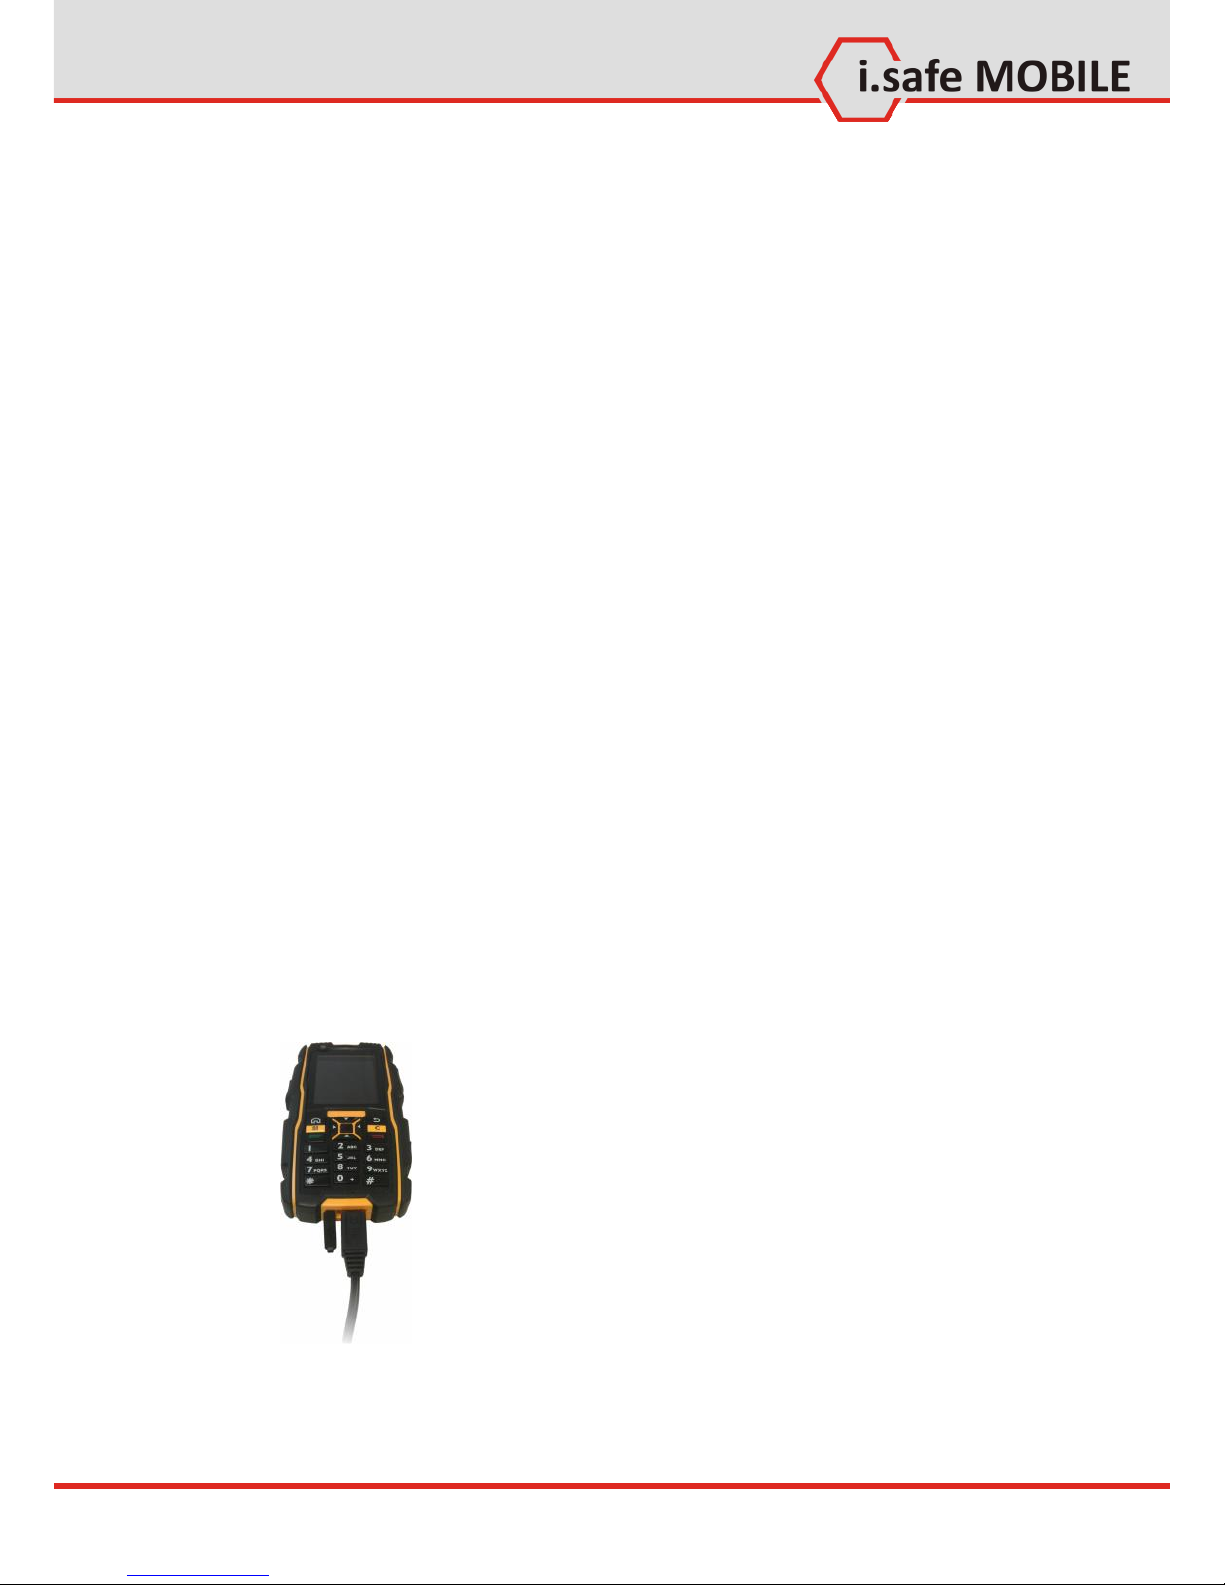
3.1.2 Charging the Battery
Connect the i.safe PROTECTOR USB-cable with the phone as indicated in the picture below:
Connect the plug with the socket of the power supply.
After charging, remove the USB-cable from the charger.

Quick Start
18
3.1.3 Battery Use
In actual use, the standby time and talk time of the mobile
phone varies with the network status, working environment and
usage.
When the power of the battery is lower than normal, the phone
will prompt you to charge it. Please charge the battery; otherwise you may lose any files which are not saved.
If you do not charge for a long time, the phone will be powered
off automatically.
Warning:
The phone may only be charged at ambient temperatures in a
range from 0°C ... 45°C. Please do not use charging equipment if
the temperature exceeds this range. Only use the i.safe
PROTECTOR USB-cable to connect to a charger. Using any other
cable may cause danger and will void the warranty.
3.2 Installation of the SIM Card
The SIM-card holder is placed in the battery compartment.
Please remove the battery to gain access to the holder.
Unlock the SIM-card-holder by sliding it forward as indicated on
the holder. Open the holder and insert the SIM-card. Close the
holder and lock it again to safely retain the SIM-card.
Warning:
Do not try to insert or remove the SIM card when any external
power supply is connected, otherwise the SIM card or the mobile
phone may be damaged.

Quick Start
19
3.3 Installation of the Micro-SD Card
The SD-card holder is placed in the battery compartment. Please
remove the battery to gain access to the holder.
Unlock the SD-card-holder by sliding it forward as indicated on
the holder. Open the holder and insert the SD-card. Close the
holder and lock it again to safely retain the SD-card.

Quick Start
20
4 How to Localize the Phone
With the phone showing the home screen, press [OK] and select
settings. In <Phone settings>, in the item <Time and date> and
<Language> you can change the settings according to the local
time zone, language, date format, etc.
5 How to use Contacts
5.1.1 Add a New Contact
In the contact list, press [LSK] and select <Add new contact> to
access the editing interface for the new contact.
In the editing interface, input the contact name, number, email
and etc., then press [LSK] to save all the information.
You may choose any image from your pictures to add as a contact picture. To add more information, you can choose <Add de-
tail>.
5.1.2 Edit Contact Information
In the contact details, press [LSK], then choose <Edit>.
Delete contacts
In the contact list, press [LSK], choose <Delete> , press [LSK] to
confirm;
If you want to delete more, press [LSK], choose <Mark> , select
contacts to delete or < All>, press [LSK], choose <Delete> , press
[LSK] to confirm;
Speed find
In the contact list, input letters to find the contact. (For example:
if want to find „Eric”, press [3] [7] [4] [2].)

Quick Start
21
6 How to use Profiles
Profile settings can help you to set the ringing tone, message
alert tone, volume, notification type and etc. Profiles modes include <General>, <Silence>, <Meeting>, <Outdoor>, <Flight>,
<Headset>, <Customized>.
In the main menu, select <Profiles> to set or edit any of these
profiles.
Profile settings
In <Profiles> menu, select the profile you prefer to set <On>.
Editing a Profile
In <Profile> menu, Press [LSK] to select Settings.
Set the options. You can change the <Call alert type>, the <Vol-
ume level> and the <Keypad tone>.
In Standby mode, the current profile settings and ring mode is
displayed in the status bar on the top of screen.
Display settings
Set the theme, wallpaper, and shortcuts.
Ringtone settings
Here you can change the settings for the call default, SIM, voice
call and message ringtones.

Quick Start
22
7 How to use Network functions
This phone supports wireless application protocol WAP and
WWW service. Please make sure Internet service is available for
SIM before using the function. The network service providers
provide the fee information and other specific settings.
You can access different Internet services such as news, weather
reports, flight information, etc. These services are especially designed for mobile phones and maintained by WAP / WWW service providers.
Network service is necessary for WAP. Please contact your network provider and/or the service provider of the desired service.
The service provider will also provide instructions about how to
use their service.
Important:
Information regarding the fees and other specific settings are
provided by the network service providers.
For using the above mentioned services the APN (access point
name) settings have to be installed for the network settings of
the phone. The APN settings are provided by the network provider. They are unique for every provider. Please ask your provider or look at their webpage for the correct settings.
Settings for T-Mobile
Account name: T-Mobile INTERNET
APN: internet.t-mobile
Username: t-mobile
Passwort: tm
To enter the APN settings navigate to <Settings> <Connectivi-
ty> <Data account> <Options> then select <Add> and enter
the provider specific settings.
Quick Start
23
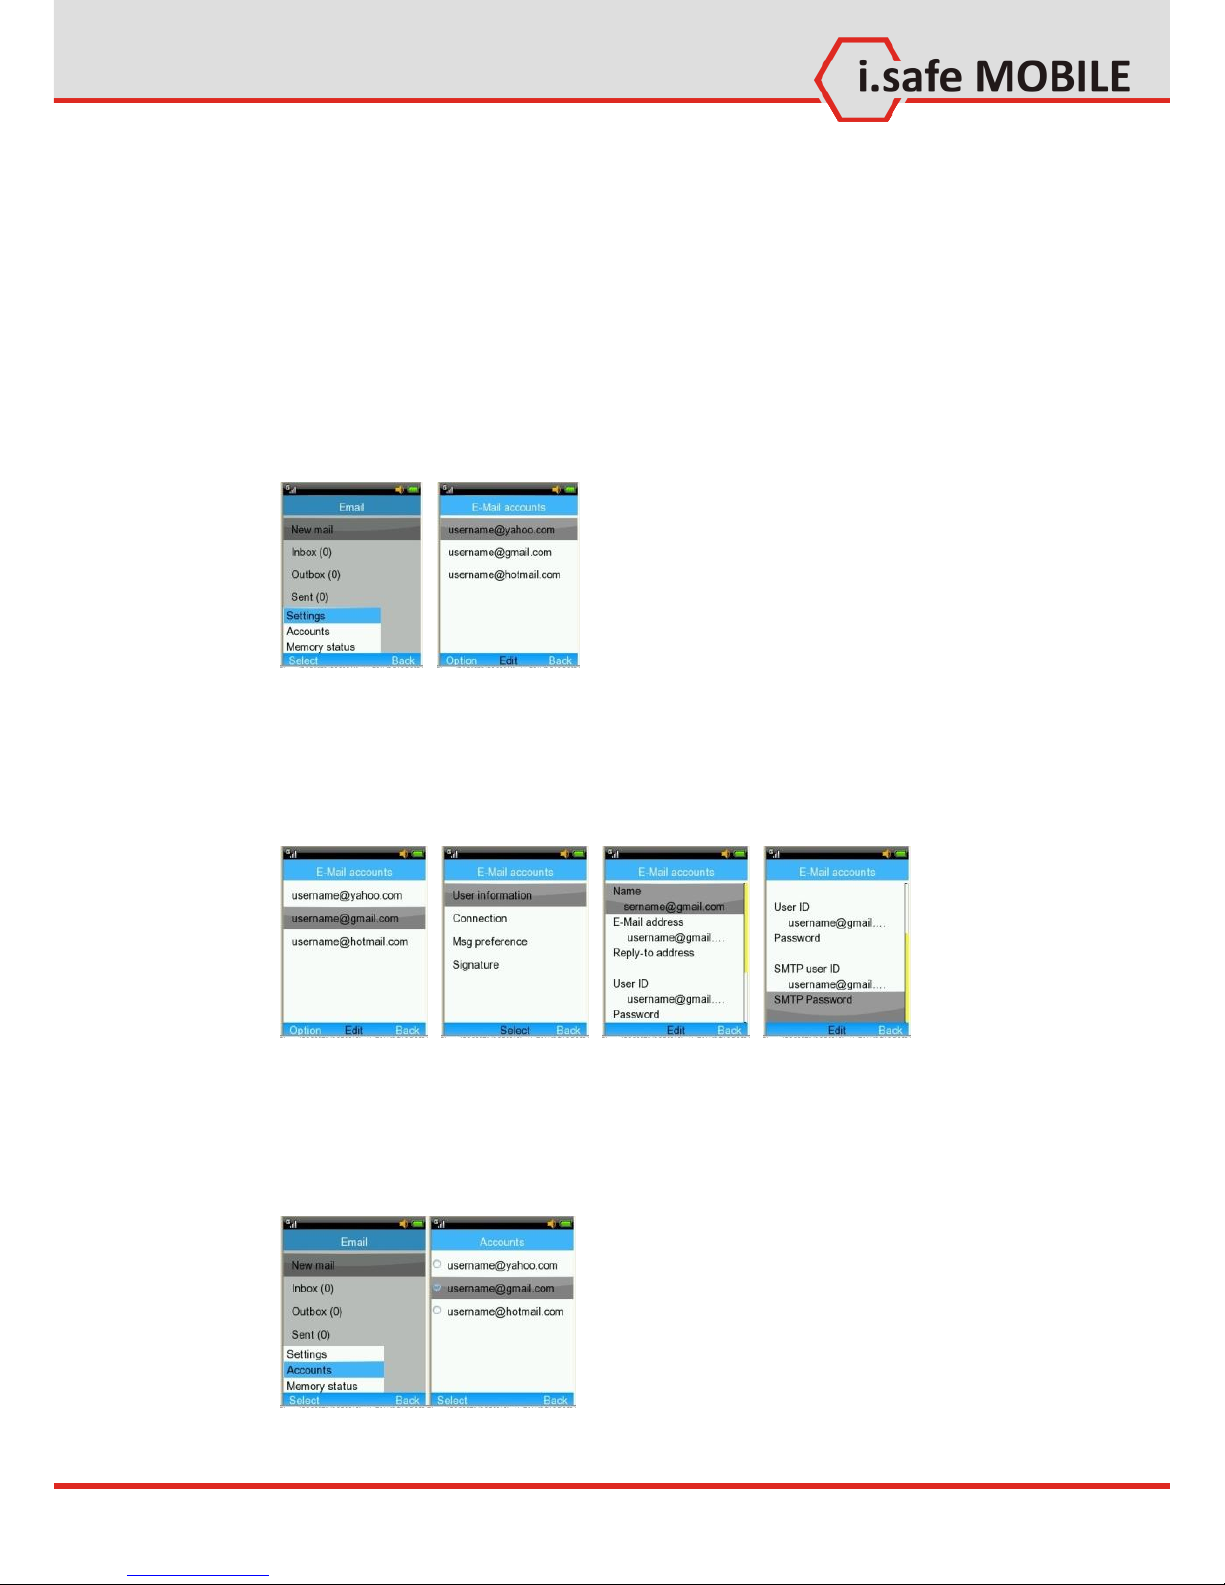
8 How to use Email
8.1 Setup
Navigate to <Menu> <Messages> <Email> to enter the
email app.
Choose <Option> <Settings> to set up a new email-account.
There are 3 default templates. These can be changed to your
preferred settings or you can build a new profile.
To edit an existing account, select the account, choose <Setting>
and add your account information.
Depending on your email service provider, you might need to
change the settings for the incoming and outgoing server.
Choose <Option> <Settings> to use your account.
Quick Start
24
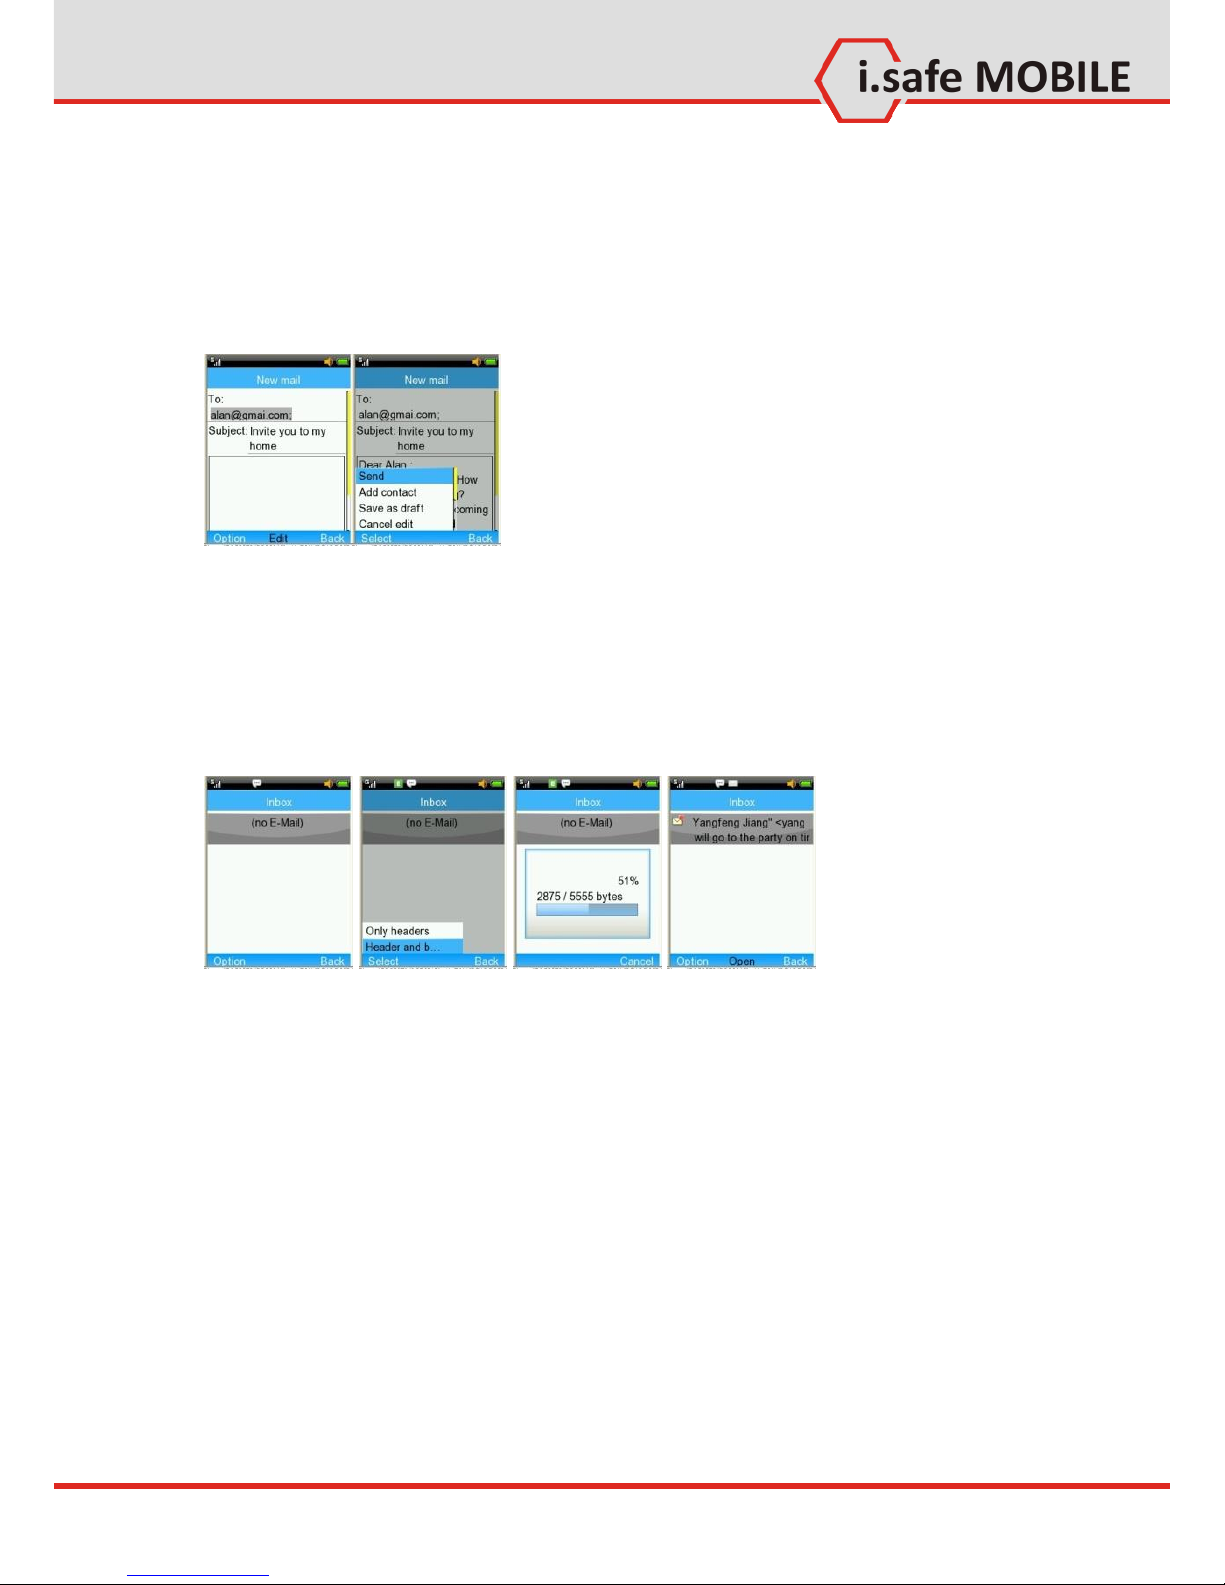
8.2 Write an Email
Navigate to <Menu> <Messages> <Email> to enter the
email app.
Enter <New mail>, compose your message and choose <Option>
<Send> to send out the email.
8.3 Receive an Email
Navigate to <Menu> <Messages> <Email> to enter the
email app.
Select <Inbox> <Option> <Retrieve> to receive new emails.

Quick Start
25
9 How to Use Messages
9.1 Send a Message
Navigate to <Menu> <Messages> <SMS> to enter the SMS
app.
Navigate to <Menu> <Messages> <MMS> to enter the
MMS app.
To create and send a SMS/MMS message, choose <New SMS> /
<New MMS> to create a new message.
Input the phone number or choose a number from <Contacts>.
Compose your message text and select <Option> <Send> to
send it.
When composing an SMS, select <Option> <Insert> to insert
Contact info, Text templates or Calendar events.
When composing an MMS, select <Option> <Insert> to insert
pictures, videos or sounds.
9.2 Read a New Message
When a new SMS or MMS message I received, a message box
pops up. To read the message, press [OK], to ignore the message
press [RSK]. If you ignore the new message, the missed message
icon (see page 16) appears in status bar.

Quick Start
26
10 How to Use the Camera
(ADVANTAGE 1.0 Only)
To take a picture, press [OK] or the [Camera key] when you are
on the homescreen. You can then delete, send and rename the
picture taken or set it as wallpaper or contact picture, slideshow,
etc.
Record a video
To record a video, press [OK] when you are on the homepage,
select <Pause> to pause recording or <Stop> to stop recording.
You can then delete, send, rename or play the video recorded.
 Loading...