


READY
TO
ASSEMBLE
Phillips Head
Screwdriver
Customer Supplied
BOOKCASE HEADBOARD
ASSEMBLY INSTRUCTIONS
( TWIN, FULL )
Before assembling your bookcase Headboard, please
read through these instructions carefully and familiarize yourself with the different parts.
Please note that you will require a Phillips Head Screwdriver and an Allen wrench.
Adult Assembly
BOOKCASE BED WITH BED DRAWER
BOOKCASE BED WITH TRUNDLE BED
HEADBOARD HARDWARE
JCB M6 X 1 2/8”(30mm) - pcs4
A
JCB M6 X 1 1/2”(35mm) - 6 pcs
B
JCB M6 X 2”(50mm) - 4 pcs
C
WOODEN DOWEL 10 X 30mm - 4 pcs
D
Spare - pc1
Spare - 1 pc
Spare - 1 pc
Spare - 1 pc
BOOKCASE HEADBOARD WITH METAL FRAME
NOTE: WE INCLUDE SPARE HARDWARE IN CASE THE ALLEN WRENCH, JCB, WOODEN DOWEL,
OR WOOD SCREW ARE DAMAGED DURING ASSEMBLY.WASHER
WOODEN 2PULL SCREW - pcs
J
METAL L-BRACKET - 3 pcs
F
JCB M6 X 1”( 5mm) - 6 pcs2
WOOD SCREW 1/2” - 6 pcs
G
WOOD SCREW 1 1/2” - 4 pcs
H
Spare - 1 pc
Spare - 1 pc
K
SPLIT WASHER - 4 pcs
L
FLAT WASHER - 4 pcs
M
Spare - pc1
Spare - 1 pc
Spare - 1 pc
WOODEN DOWEL 8 X 30mm - 12 pcs
E
BOOKCASE HEADBOARD
Spare - 1 pc
WOODEN 2PULL - pcs
I
ALLEN WRENCH - 1 pc
N
Spare - 1 pc
Page 1 of 5
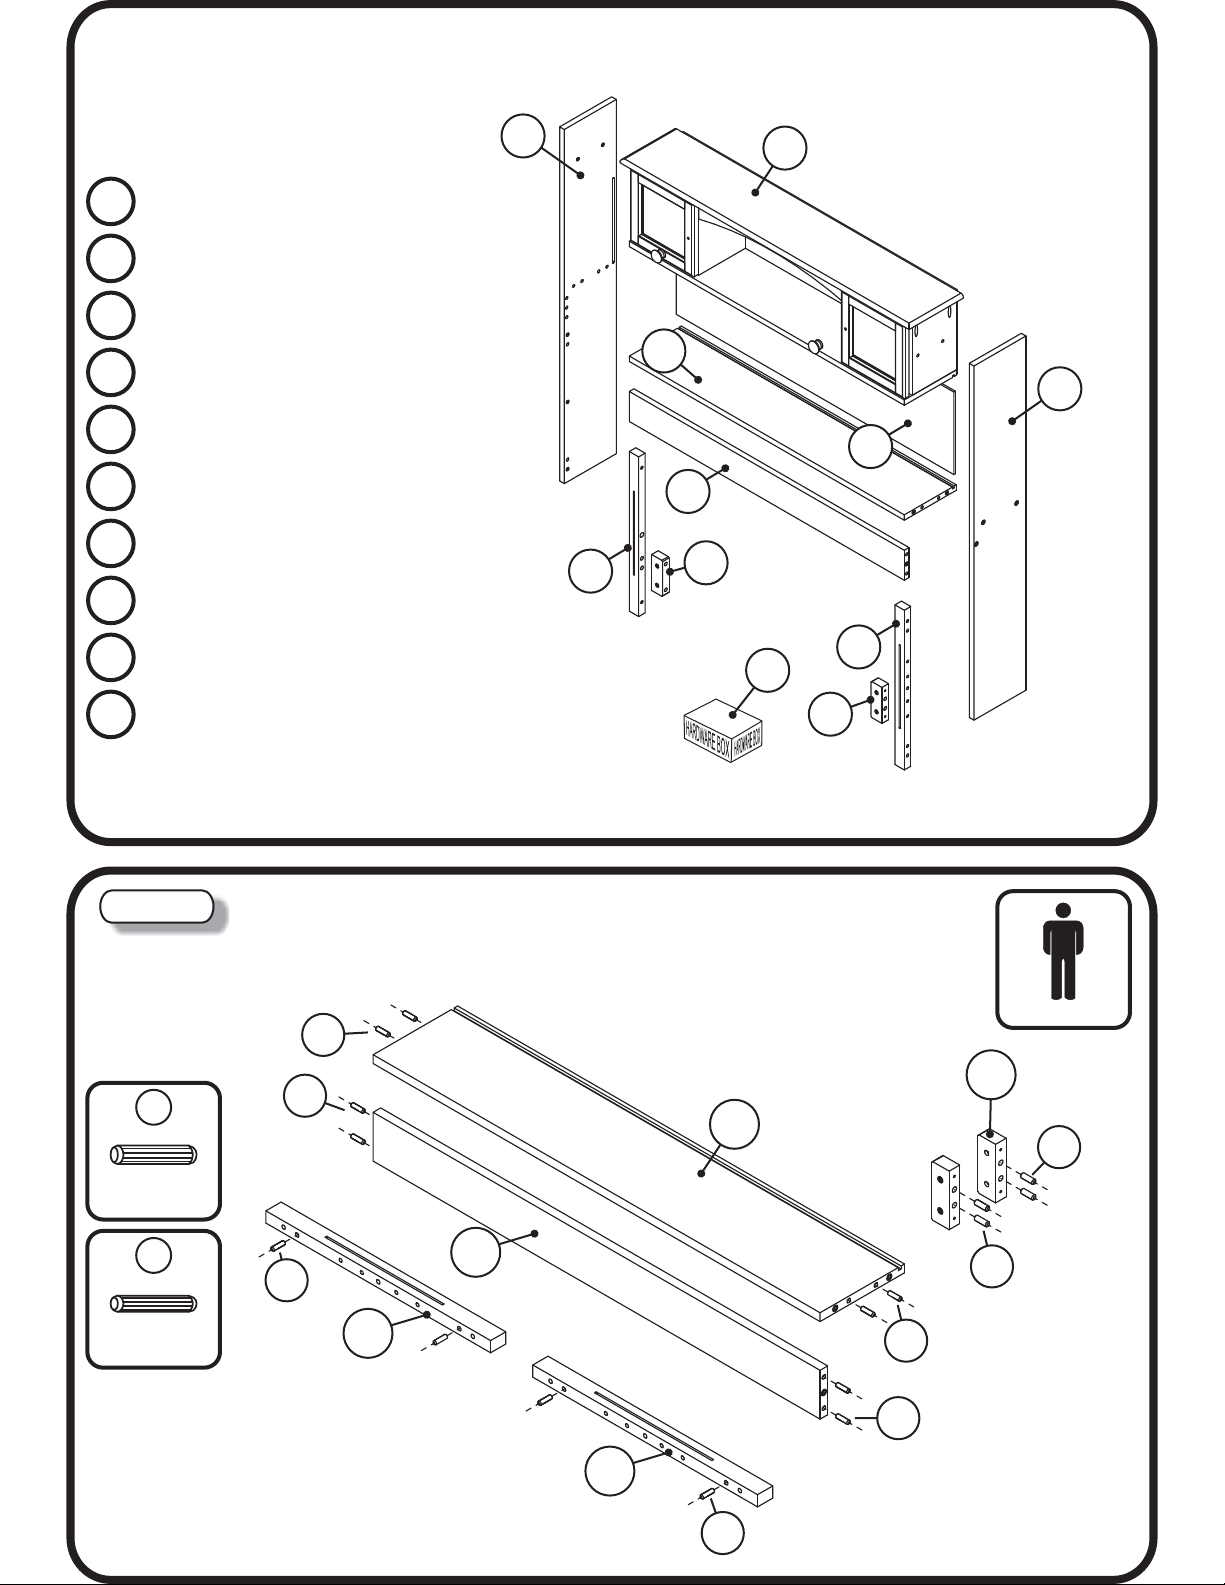
HEADBOARD
PARTS LIST
01
02
03
04
05
06
07
08
09
10
HARDWARE 1 BOX
TOP STORAGE
LEFT SIDE PANEL
RIGHT SIDE PANEL
LOWER SHELF
PILLOW STOP
BACK PANEL
LEFT POST
RIGHT POST
SPACER BLOCK
1 SET
1 PC
1 PC
1 PC
1 PC
1 PC
1 PC
1 PC
2 PCS
03
08
02
05
04
07
06
10
09
01
10
STEP 1
Insert wooden dowel to locator holes will receive (D)(E) as shown below.
E
D
E
05
10 X 30mm
WOODEN DOWEL
E
06
E
8 X 30mm
WOODEN DOWEL
08
09
Adult Assembly
10
D
D
E
E
BOOKCASE HEADBOARD
E
Page 2 of 5

STEP 2
Attach the left, right post (08) and (09) to the left, right side panel (03) and (04) as shown below. Using
JCB (C) and (K). Tighten with allen wrench (N).
03
Adult Assembly
C
STEP 3
C
K
08
C
C
09
K
04
C
Attach the lower shelf (05), pillow stop (06) & back panel (07) to side panels (03) and (04)
as shown below. Using JCB (B), tighten with Allen wrench (N).
Attach the spacer block (10) to side panels (03) and (04) as shown below.
Using wood screw (H), tighten with Phillips head screwdriver. (Customer Supplied )
JCB M6 X 2”
K
JCB M6 X 1”
N
ALLEN WRENCH
B
B
H
10
BOOKCASE HEADBOARD
03
06
05
10
H
07
B
04
B
Adult Assembly
B
JCB M6 X 1 1/2”
H
WOOD SCREW
N
ALLEN WRENCH
Page 3 of 5

STEP 4
Lay the top storage (02) on the floor upside
down, taking care to lay it on some cardboard
to prevent scratching. Stand the side panel
assembly upside down and using JCB (A),
tighten with Allen wrench (N).
Adult Assembly
A
A
A
JCB M6 X 1 2/8”
N
ALLEN WRENCH
Adult Assembly
F
METAL L-BRACKET
02
UPSIDE DOWN
STEP 5
Install metal L- Bracket (F) as shown below.
Using wood screw (G), tighten with Phillips
head screwdriver. ( Customer supplied )
G
G
F
A
STEP 6
Install wooden pull (I) to each of the
doors as shown. Using wooden pull screws (J),
tighten with Phillips head screwdriver.
G
WOOD SCREW
I
WOODEN PULL
J
WOODEN PULL SCREW
BOOKCASE HEADBOARD
Phillips Head
Screwdriver
Customer Supplied
J
I
Your Bookcase Headboard is now ready for use.
Page 4 of 5

STEP 7
Adult Assembly
K
Attach headboard assemby to the bed frame as shown below. (Purchased separately)
or Install the Headboard to the metal frame (Purchased separately).Using bed hook
K L and M NUsing JCB ( ) split and flat washer ( ) ( ) tighten with allen wrench ( ).
JCB M6 X 1”
L
SPLIT WASHER
M
FLAT WASHER
N
ALLEN WRENCH
For Slat kit assembly,
follow assembly instructions included with slat kit.
M
L
K
To ensure lasting safety, we recommend that you periodically check
BOOKCASE HEADBOARD
Congratulations!
Your Bookcase Bed is now ready for use.
that all screws are tight and all parts are secure.
Page 5 of 5
 Loading...