

Page 1
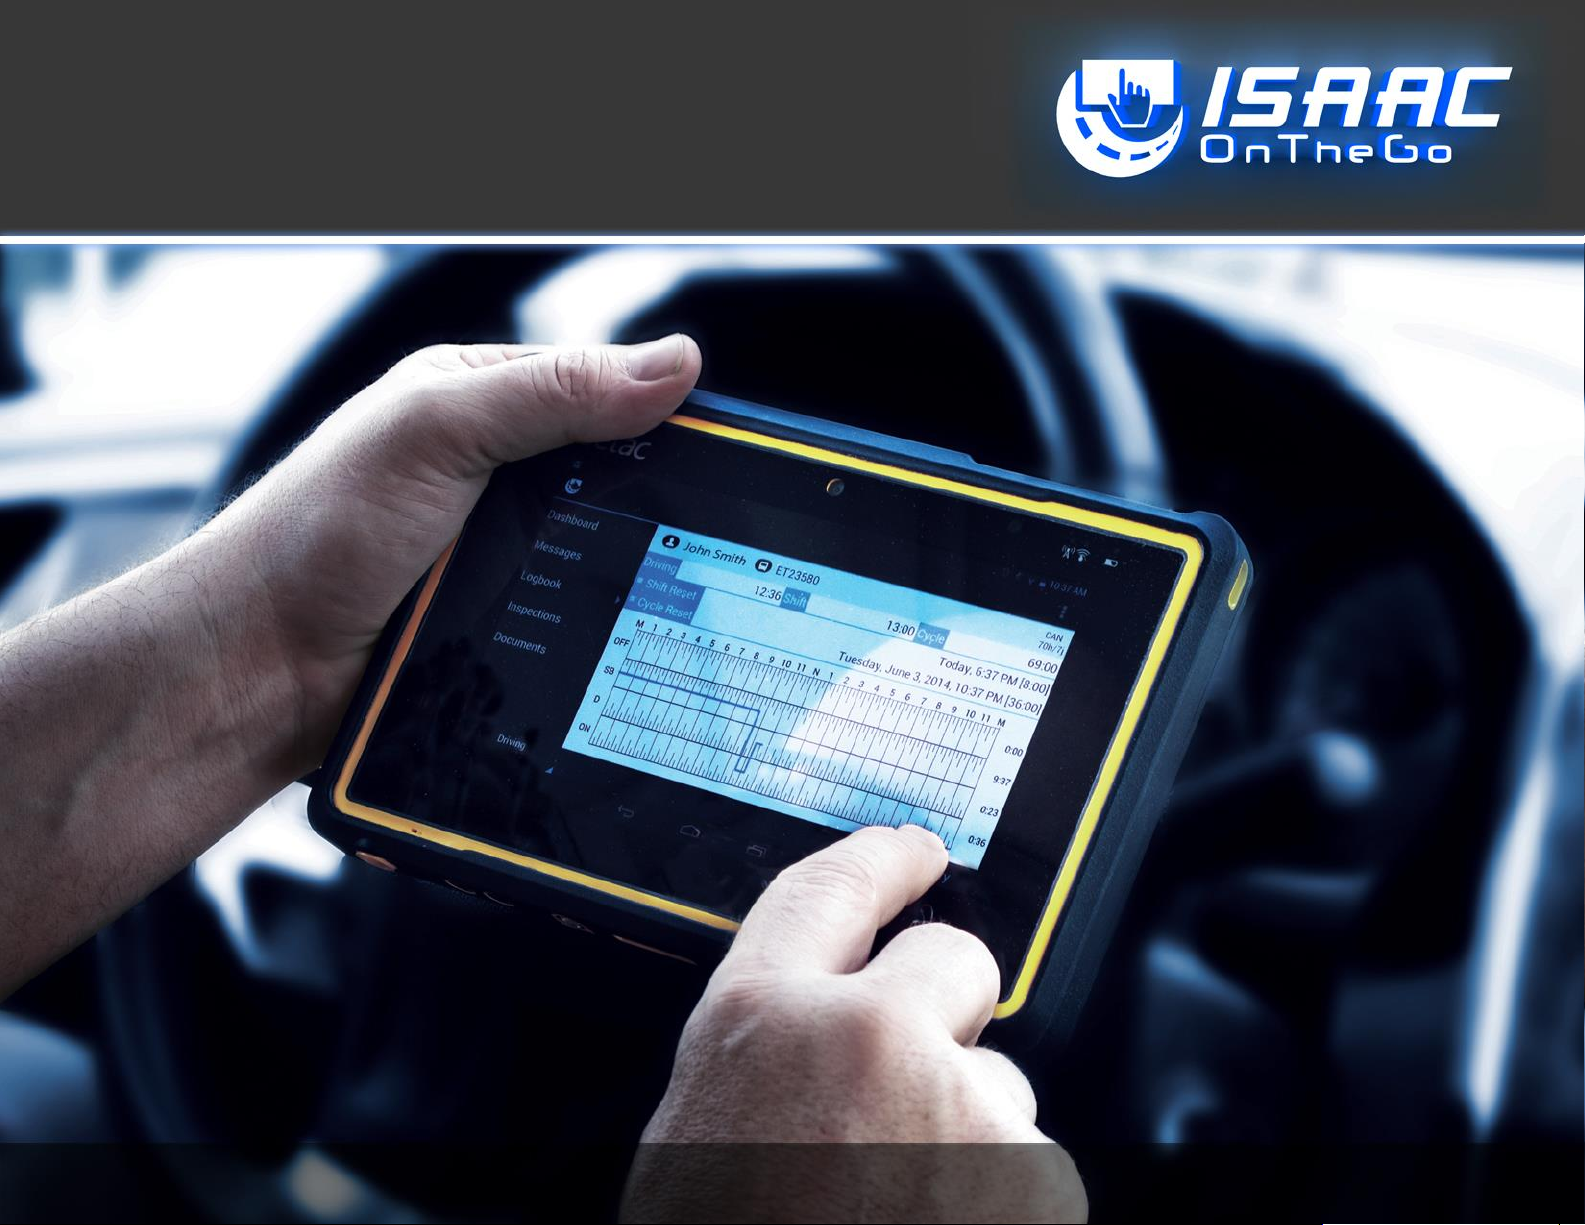
Basic Quick Reference
ISAAC OnTheGo - Basic Quick Reference - Rev2
© 2018 ISAAC Instruments Inc. – All rights reserved
Page 2

ISAAC OnTheGo - Basic Quick Reference - Rev2
i
Disclaimer
ISAAC Instruments Inc. shall not be liable for any errors contained herein or for incidental or consequential damages in connection
with the performance or use of its software, hardware, or documentation.
ISAAC Instruments Inc. reserves the right to modify the content herein without notifying any person of such revision or changes.
Page 3

Contents
ISAAC OnTheGo - Basic Quick Reference - Rev2
ii
BASIC OPERATIONS ...................................................................................................... 1
TURNING ON THE TABLET (ELECTRONIC LOGGING DEVICE) ....................................................... 1
STARTING ISAAC ONTHEGO .............................................................................................. 1
LOGGING IN AND LOGGING OUT ........................................................................................... 2
MANAGING TEAM DRIVING .................................................................................................. 3
SWITCHING OPERATOR ROLES .............................................................................................. 4
UNLOCKING AN OPERATOR PROFILE ...................................................................................... 4
CHANGING THE HOURS OF SERVICE DISPLAY MODE (CANADIAN OR U.S. REGULATIONS) ................ 4
SYSTEM MALFUNCTIONS AND EVENTS ......................................................................... 5
MANAGING COMPLIANCE MALFUNCTIONS AND DATA DIAGNOSTIC EVENTS.................................. 5
PRE-TRIP INSPECTION................................................................................................... 6
VIEWING AN INSPECTION REPORT ......................................................................................... 6
ADDING A SIGNATURE TO AN INSPECTION REPORT ................................................................... 7
RECORDING REPAIRS ON REPORTED DEFECTS .......................................................................... 8
OPERATOR ACTIVITIES .................................................................................................. 9
VIEWING THE OPERATOR’S STATUS (SERVICE HOURS) ............................................................... 9
RECORDING THE OPERATOR’S ACTIVITY .................................................................................. 9
SPECIFYING THE DIFFERENT DRIVING TYPES – YARD MOVE AND PERSONAL CONVEYANCE ............. 10
REVIEWING UNASSIGNED DRIVING ...................................................................................... 11
RECORDING THE OPERATOR’S ACTIVITY AFTER DRIVING .......................................................... 12
SUPER-ACTIVITY HOOK/DROP (EQUIPMENT) ................................................................... 13
SUPER-ACTIVITY INSPECTION (DVIR) ............................................................................. 15
SUPER-ACTIVITY ACCESSING THE ROADSIDE INSPECTION ACTIVITY ....................................... 17
PERFORMING A ROADSIDE INSPECTION IN THE U.S. .............................................................. 18
PERFORMING A ROADSIDE INSPECTION IN CANADA ............................................................... 19
SUPER-ACTIVITY SHIFT END OR TRACTOR CHANGE ........................................................... 20
LOGBOOK – HOURS OF SERVICE ................................................................................. 21
VIEWING THE CURRENT DAILY LOG ..................................................................................... 21
VIEWING THE SERVICE HOURS RECAP .................................................................................. 22
UNDERSTANDING THE HOURS-OF-SERVICE RECAP ................................................................. 23
ENTERING SHIPPING DOCUMENT NUMBERS ON THE DAILY LOG ............................................... 24
SIGNING THE DAILY LOG .................................................................................................... 25
DISPLAYING LOGBOOK ACTIVITY DETAILS .............................................................................. 26
MODIFYING LOGBOOK ACTIVITIES ....................................................................................... 27
SPLITTING AN ACTIVITY ..................................................................................................... 28
REVIEWING CARRIER MODIFICATIONS ................................................................................. 28
VIEWING PREVIOUS DAILY LOGS ......................................................................................... 29
DASHBOARD .............................................................................................................. 30
VIEWING THE DASHBOARD ................................................................................................ 30
APPENDIX A ─ MALFUNCTIONS AND DIAGNOSTIC EVENTS ......................................... 31
APPENDIX B – ELD INDICATORS .................................................................................. 33
Page 4
Basic Operations
ISAAC OnTheGo - Basic Quick Reference - Rev2
1 / 33
BASIC OPERATIONS
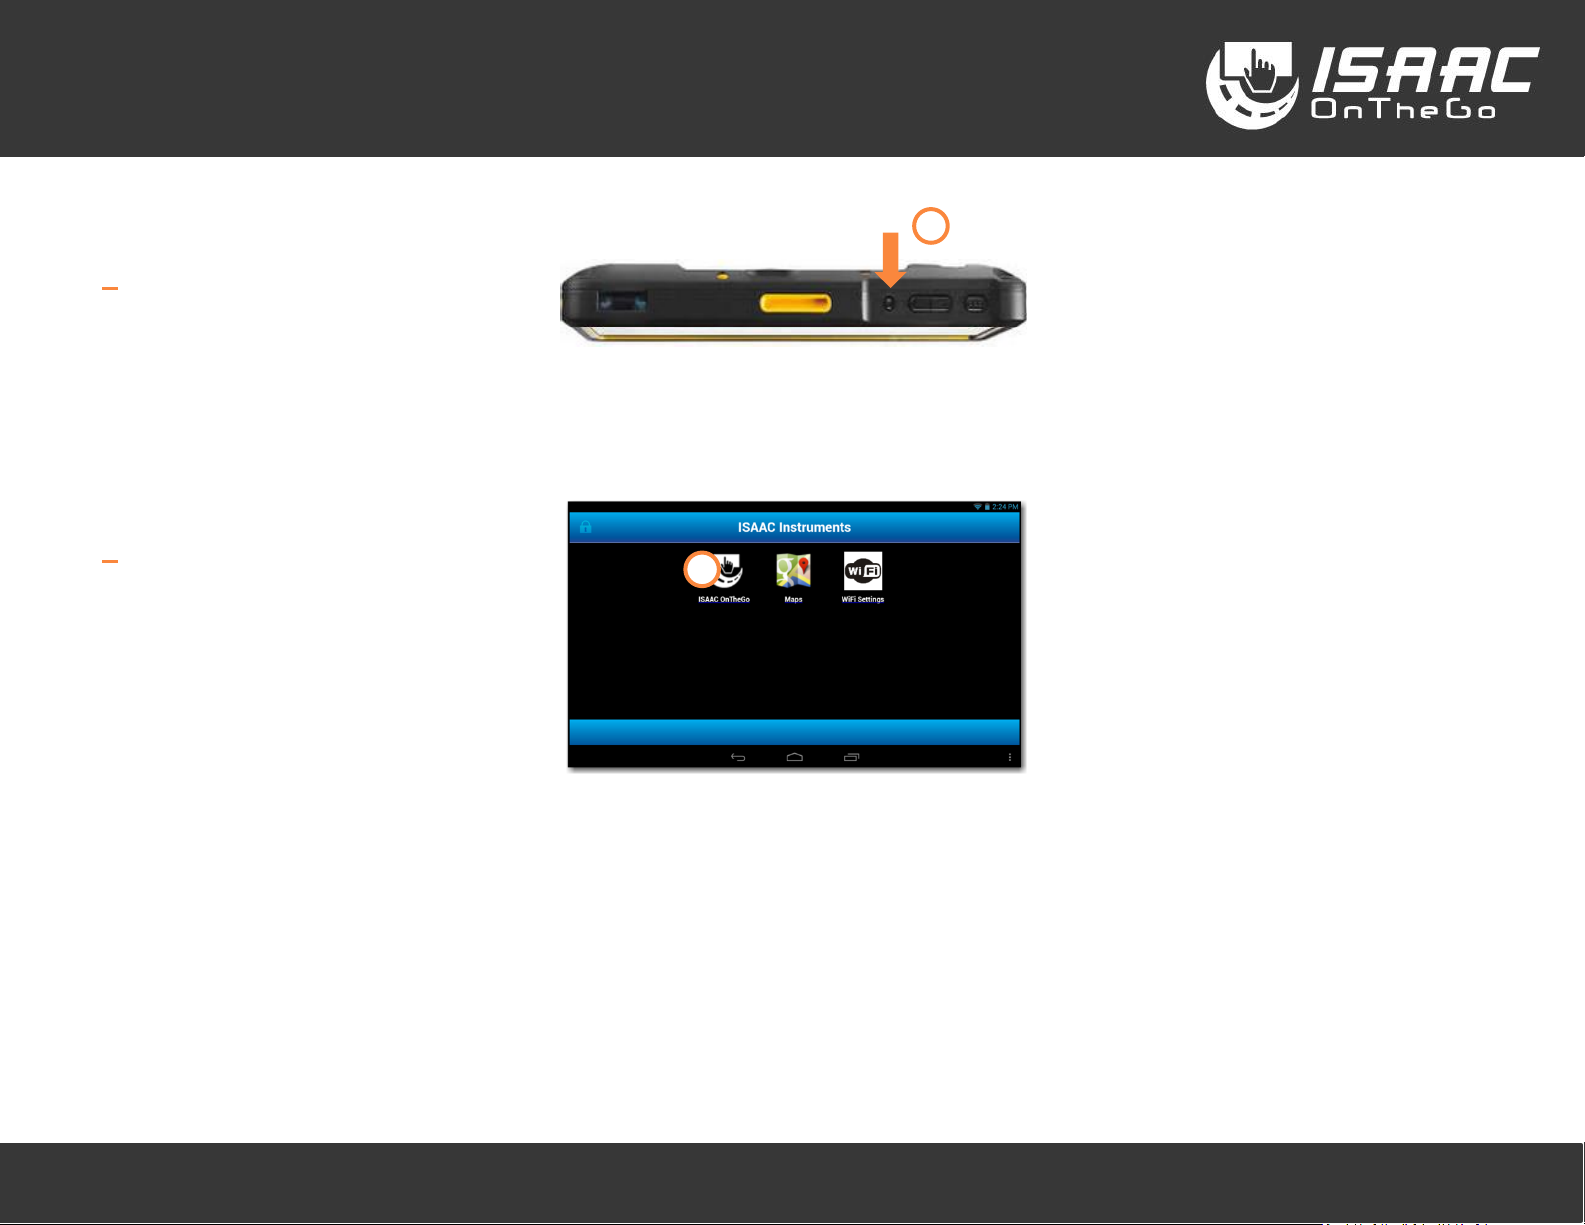
Turning on the tablet (Electronic Logging Device)
1. Press the power button located on the top of
the tablet.
If the tablet is powered off (as opposed to in
sleep mode), press and hold the power button
for 3 seconds.
Startup may take up to 30 seconds.
Starting ISAAC OnTheGo
1. Tap the ISAAC OnTheGo icon on the home
page.
Power button located on the
top of the tablet.
1
1
Page 5
Basic Operations
ISAAC OnTheGo - Basic Quick Reference - Rev2
2 / 33
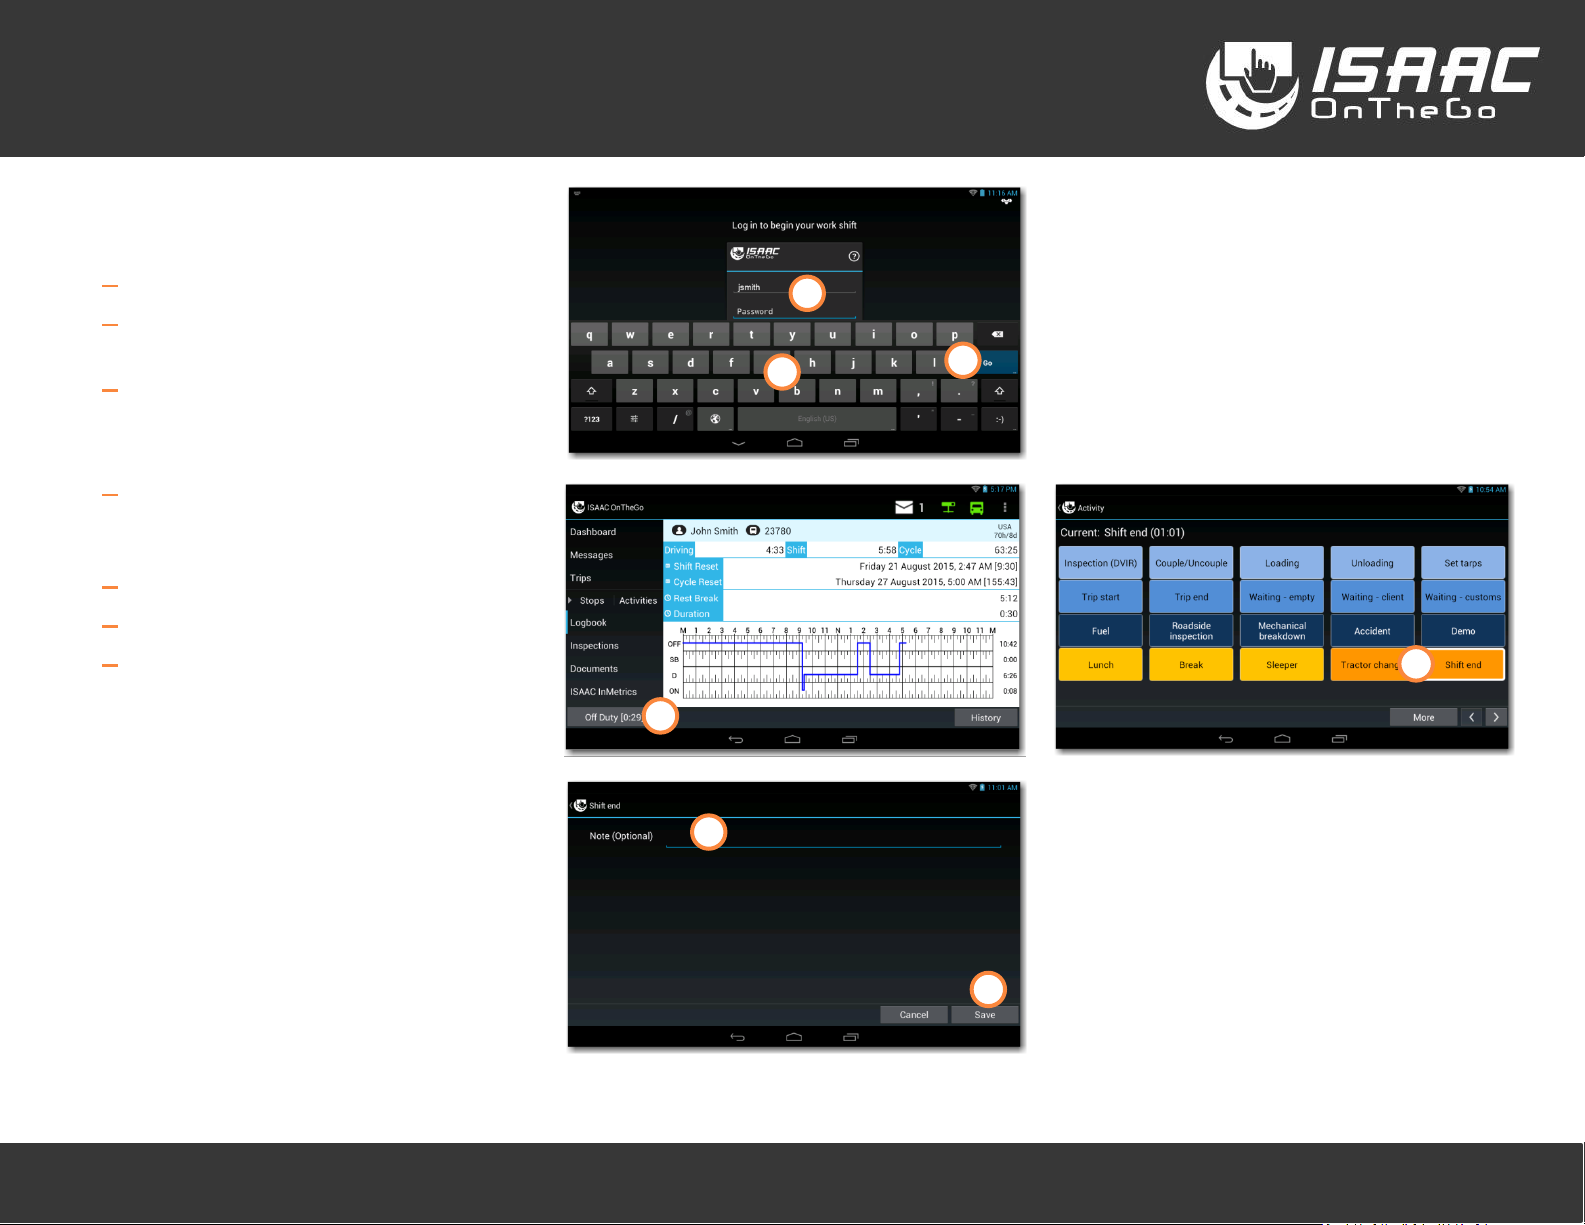
Logging in and logging out
To log in:
1. Tap the Operator Identification field.
2. Enter your user name and password using the
on-screen keyboard.
3. Tap OK.
The dashboard displays after logging in
To log out:
1. Tap the current activity button at the bottom
of the main menu to display the activities
page.
2. Select the Shift end or Tractor change activity.
3. Enter a note if required.
4. Tap Save to confirm.
3
4
1
1
2
3
2
Page 6
Basic Operations
ISAAC OnTheGo - Basic Quick Reference - Rev2
3 / 33
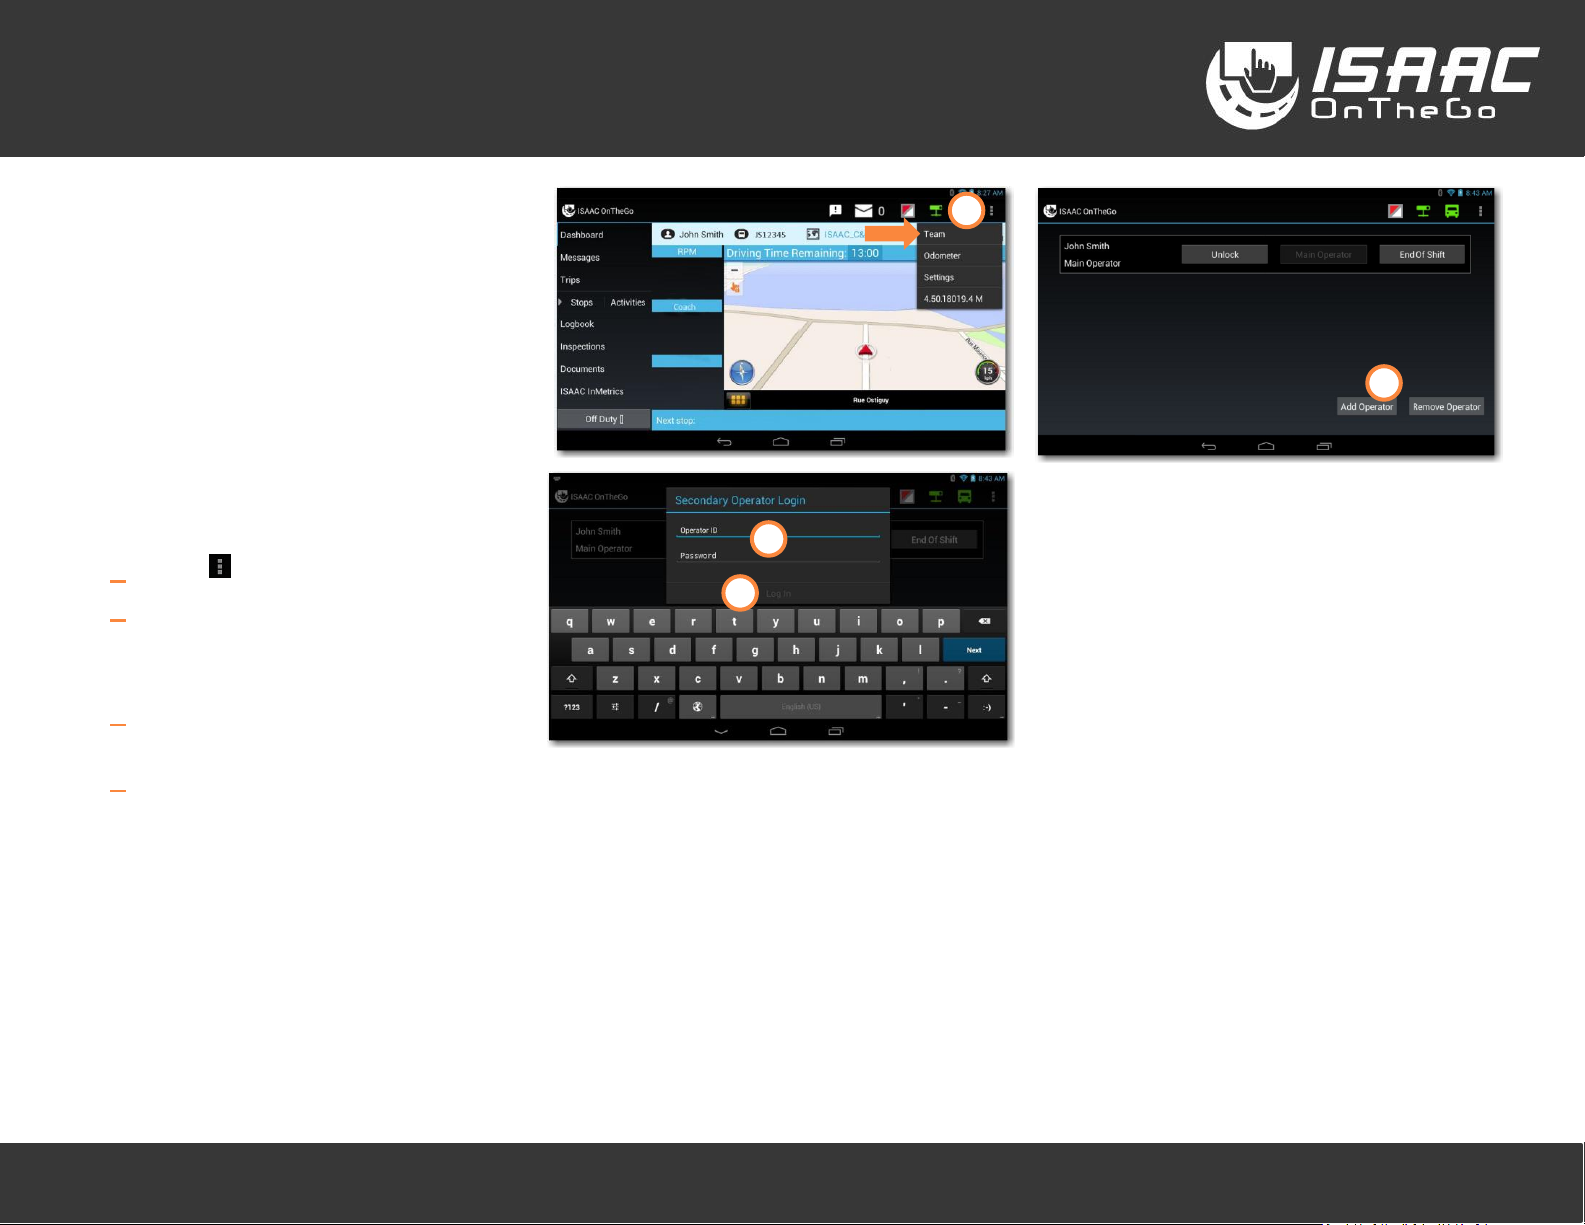
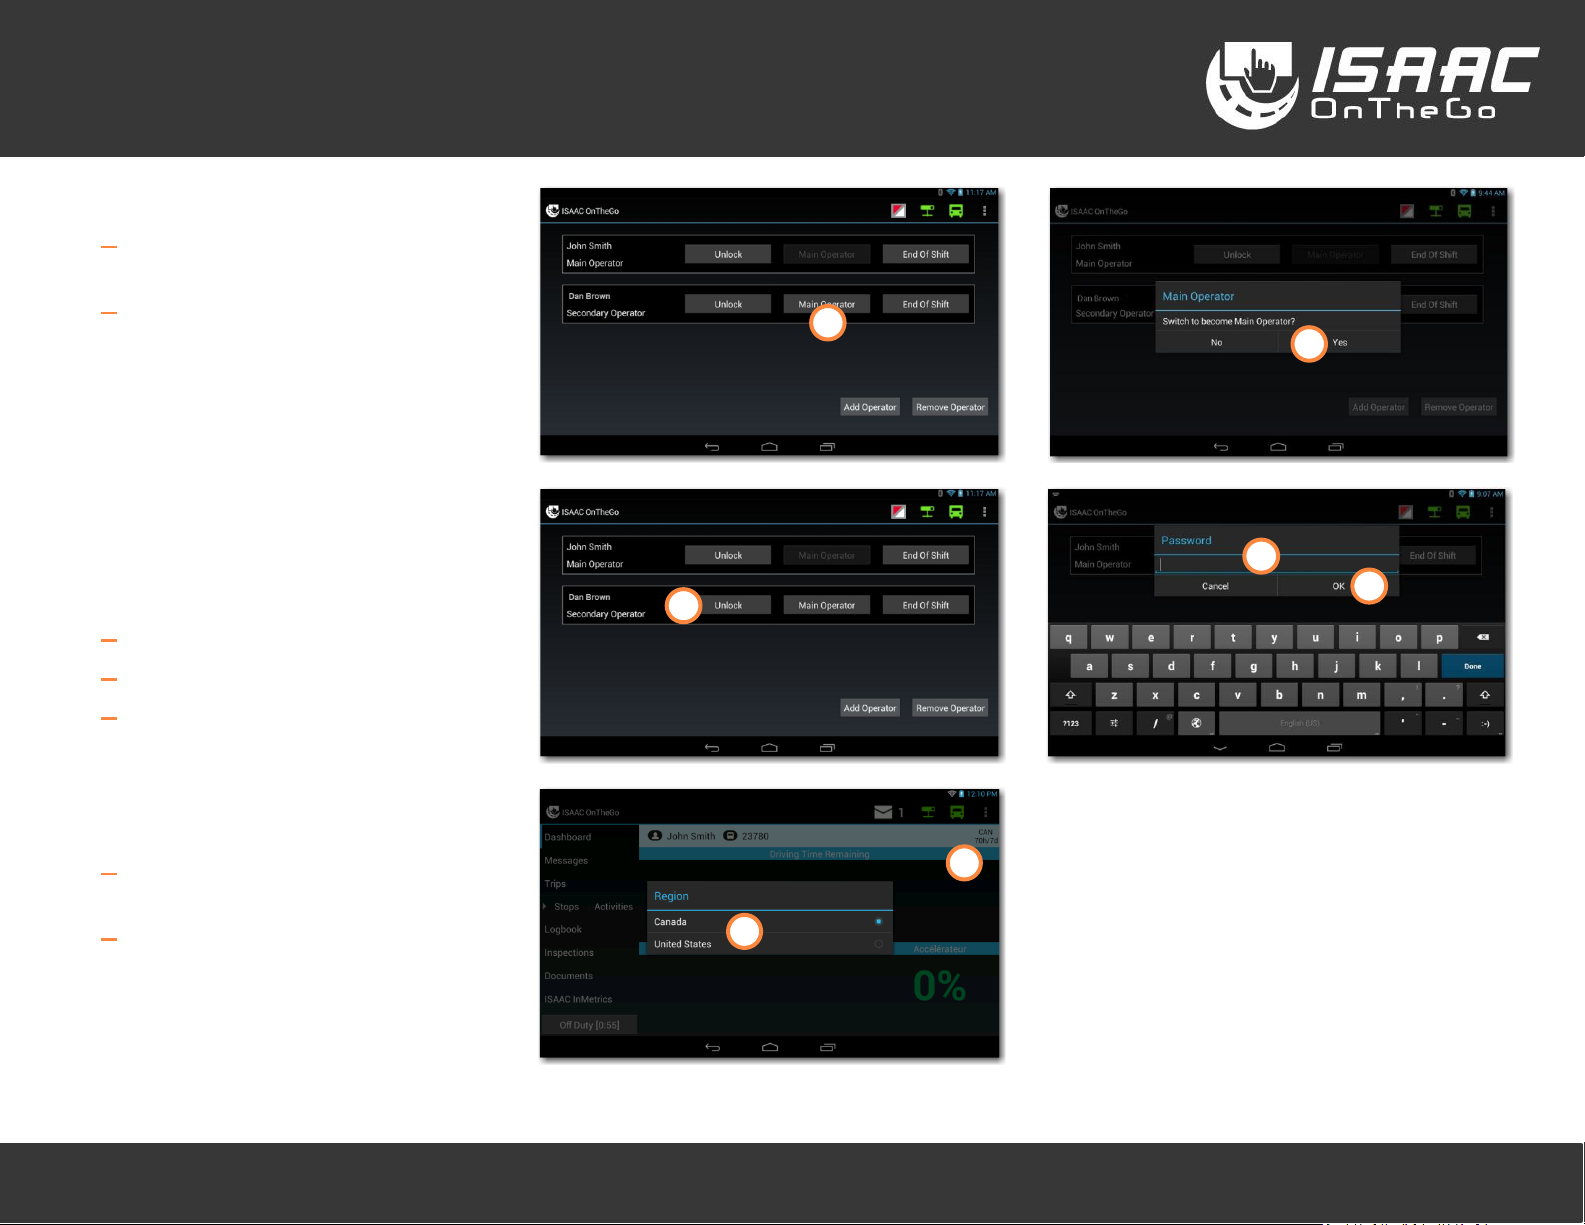
Managing team driving
When working in teams, ISAAC OnTheGo allows
all team operators to be logged into the vehicle’s
tablet at the same time. The Main Operator --
typically the one driving, and the Secondary
Operator(s) -- typically the one(s) on lunch, break
or in the sleeper, can view their individual
information alternately, switch operator roles, or
log out.
NOTE: To log in, log out, or switch operator
roles, the vehicle must be stationary.
To log in as a Secondary Operator:
1. Tap the button, and then select Team.
2. Tap the Add Operator button.
Note that you can tap the Remove
Operator button to remove an Operator.
3. Enter your user name and password using
the on-screen keyboard.
4. Tap Log In.
Note that you can tap End of Shift to log
out.
Repeat steps 2-4 to log in more than one
Secondary Operator.
3
4
1
2
Page 7
Basic Operations
ISAAC OnTheGo - Basic Quick Reference - Rev2
4 / 33
Switching operator roles
1. Tap the Main Operator button to the right
of the Secondary Operator.
2. Tap Yes on the displayed message.
Unlocking an operator profile
By unlocking your operator profile you have
access to your messages, logbook information and
all your information available on ISAAC OnTheGo.
1. Tap Unlock next to your name.
2. Enter your password.
3. Tap OK.
Changing the hours of service display mode (Canadian or U.S. regulations)
1. Tap the display mode (CAN or U.S.) on the
page header.
2. Select the required regulations from the list
(Canada or United States)
1
2
1 2 3
1
2
Page 8
System Malfunctions and Events
ISAAC OnTheGo - Basic Quick Reference - Rev2
5 / 33
SYSTEM MALFUNCTIONS AND EVENTS
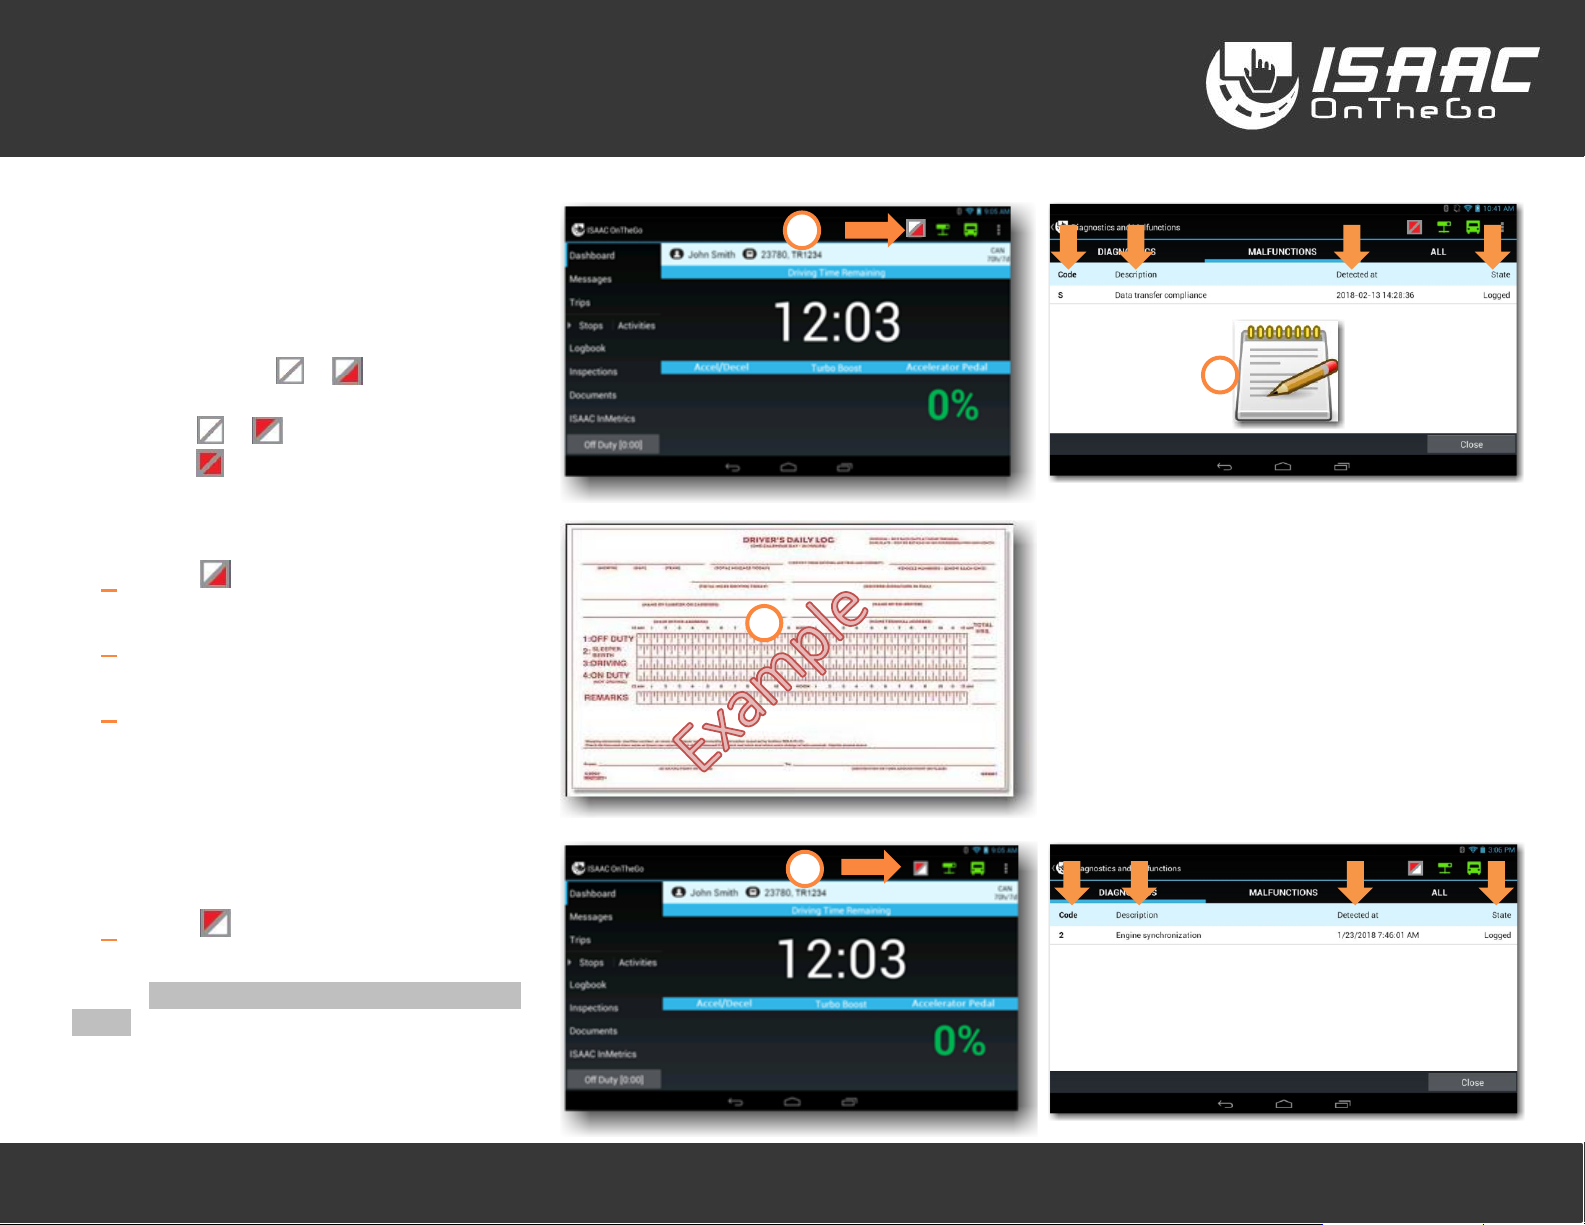
Managing compliance malfunctions and data diagnostic events
ISAAC OnTheGo detects and logs all compliance
malfunctions and data diagnostic events. An icon
serves as a visual cue,
• changing from to for a compliance
malfunction,
• from to for a data diagnostic event,
• or to , indicating both a compliance
malfunction and a data diagnostic event.
To view a compliance malfunction:
1. Tap the icon to view the malfunction
code, description, time, and state.
2. Take note of the malfunction and provide
written notice to the motor carrier.
3. Reconstruct the record of duty status (RODS)
on graph-grid paper logs that comply with
FMCSA’s 49 CFR 395.8 If data for the current
24-hour period , and for the previous 7
consecutive days cannot be extracted from
the tablet
To view a data diagnostics event:
4. Tap the icon to view the data diagnostic
event code, description, time, and state.
Refer to Appendix A ─ Malfunctions and Diagnostic
Events for more information on the data diagnostic
event and possible required actions.
4
3
1
2
Page 9

Pre-trip Inspection
ISAAC OnTheGo - Basic Quick Reference - Rev2
6 / 33
PRE-TRIP INSPECTION
Viewing an inspection report
1. Select Inspections on the main menu to
display the list of existing inspection reports.
The left-hand side of the list shows a summary
status for each inspection:
– no defects
– minor defects
– major defects
2. Swipe the page upward or downward to scroll
through the list.
3. Select the report you wish to view.
4. Tap the button next to an inspection item to
see its details.
5. Press the tablet’s Return button to return to
the reports list.
5
4
1
3
2
Page 10
Pre-trip Inspection
ISAAC OnTheGo - Basic Quick Reference - Rev2
7 / 33
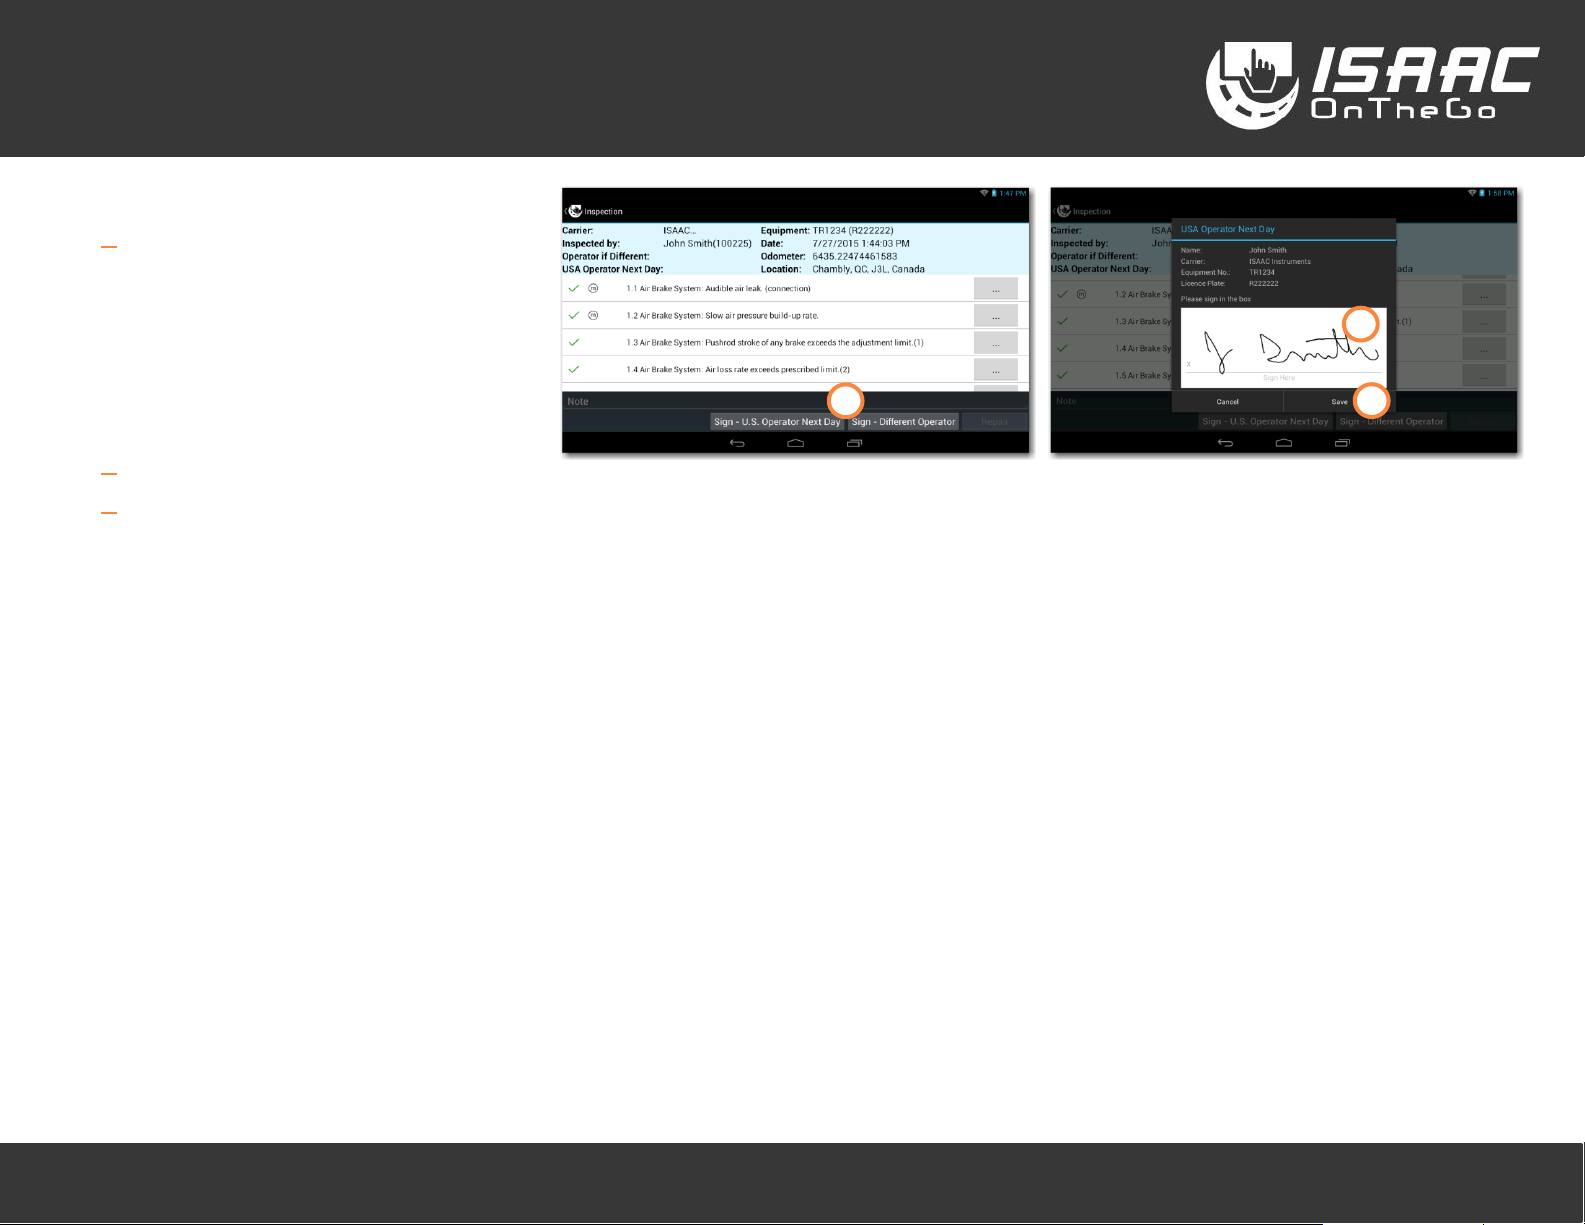
Adding a signature to an inspection report
1. Tap the button at the bottom of the report to
add the appropriate signature:
- the operator signature, if a different
person inspected the vehicle
- up to four operator
countersignatures
- the next-day operator signature
(U.S. inspections)
2. Sign in the space provided.
3. Tap Save.
Note that all signatures and countersignatures are
present in the roadside inspection report.
1
2
3
Page 11

Pre-trip Inspection
ISAAC OnTheGo - Basic Quick Reference - Rev2
8 / 33
Recording repairs on reported defects
On the inspection report:
1. Tap the Repair button at the bottom of the
screen.
2. Enter the repair order number.
3. Tap the button next to the defect to change
the status.
Note that you must record repairs on all
reported defects to apply signatures and
complete the process. Partial repairs are not
allowed.
To add the mechanic’s signature:
4. Tap the signature button at the bottom of the
report.
5. Enter the required information, and sign in
the space provided.
6. Tap Save.
To add the carrier’s signature:
Repeat steps 4, 5, and 6.
5
6
1
2
4
3
Page 12

Operator Activities
ISAAC OnTheGo - Basic Quick Reference - Rev2
9 / 33
OPERATOR ACTIVITIES
Viewing the operator’s status (service hours)
1. View the operator status displayed at the
bottom of the main menu. The status
duration is shown in brackets [].
Note that when the operator is driving, the
dashboard is in full-screen mode and the main
menu is not visible.
Recording the operator’s activity
1. Tap the operator status at the bottom of the
main menu.
2. Select the activity you are about to perform.
If the activity does not appear on the page:
- Tap the arrows to scroll
through the favorite activities
pages.
- Tap the More button to see all
available activities.
If a Warning indicates the log is signed:
3. Tap OK to continue or Cancel to interrupt the
operation.
To complete the operation:
4. Enter the requested details (vary based on the
activity).
5. Tap Save.
The new status appears at the bottom of the
main menu and on the daily log.
1
3
1
5
4
2
Page 13

Operator Activities
ISAAC OnTheGo - Basic Quick Reference - Rev2
10 / 33
Specifying the different driving types – Yard move and Personal conveyance
ISAAC OnTheGo allows to choose the driving type for the operator’s needs.
Unless otherwise specified, the system records
• Regular driving, which affects the available driving hours.
However; the operator can choose a different type of driving:
• Personal Conveyance, which is recorded in the Off Duty status, and does not affect the available driving hours. This driving type is used for personal
transportation, for example, driving home.
• Yard move, which is recorded in the On Duty status, and does not affect the available driving hours. This driving type is used, for example, to move around
in the yard to hook or unhook equipment.
To select the driving type:
1. Tap the operator status at the bottom of the
main menu.
2. Select the driving activity you are about to
perform.
NOTE: You must enter an explanation note when
selecting a driving activity.
Once you begin driving, the dashboard displays the
driving type in a colored bar.
To promote safe driving, you can no longer access
other ISAAC OnTheGo features or Android apps.
Once you finish driving, ISAAC OnTheGo displays the
appropriate page according to the driving type.
1
2
Page 14

Operator Activities
ISAAC OnTheGo - Basic Quick Reference - Rev2
11 / 33
Reviewing unassigned driving
ISAAC OnTheGo keeps records of all driving
activities. If the vehicle is moving and no one is
logged into the vehicle’s tablet, a message
prompting the operator to stop the vehicle and log
in is displayed.
All operators that log in following the unassigned
driving activity are prompted to review the
unassigned driving activities.
To review unassigned driving:
1. Tap Unassigned driving detected.
2. Select the unassigned driving activity you
want to review.
3. Tap Confirm to modify your logbook to include
unassigned driving segment, or Reject to leave
your logbook unchanged.
NOTE: Once you have rejected an unassigned
driving activity, you will no longer be
prompted to review it.
NOTE: If you chose not to review the unassigned
driving upon login, you can do so later by tapping
the icon, located on the dashboard, and the
following the steps above.
2
3
1
Page 15

Operator Activities
ISAAC OnTheGo - Basic Quick Reference - Rev2
12 / 33
Recording the operator’s activity after driving
ISAAC OnTheGo requests that a new activity be
entered when it detects driving has stopped.
1. If the End driving mode button displays on the
dashboard, tap it to quit the Driving mode
and to display the activities page.
This button displays only for vehicles with a
mechanical parking brake not detected by
ISAAC OnTheGo.
2. The activities page displays to allow entering
the next driver activity.
Depending on the vehicle’s location, the page
displayed could be the regular
Activities(Favorites) page or the activities page
featured on the trip instructions.
If no activity is defined:
3. A reminder will display after a certain amount
of time (as configured).
4. Tap:
Define to enter an activity.
OR
Close to ignore the reminder. Reminders will
keep displaying at regular intervals until an
activity is defined.
3
4
2 1 2
Page 16

Operator Activities
ISAAC OnTheGo - Basic Quick Reference - Rev2
13 / 33
SUPER-ACTIVITY Hook/Drop (equipment)
To hook equipment:
1. Tap Hook/Drop on the activities page.
2. Tap Add at the bottom of the equipment list.
3. Enter the equipment type and number.
If you enter an equipment number unknown to the
system:
4. Confirm whether you wish to create a new
piece of equipment.
If you are creating a new piece of equipment:
5. Enter the additional information required.
To complete the operation:
6. Slide the button to indicate whether you
hooked the equipment.
7. Tap Save.
The hooked equipment will appear on the
list.
6
7
5
hook
hooked
3
hook
hooked
Hook/Drop
1
4
2
Page 17

Operator Activities
ISAAC OnTheGo - Basic Quick Reference - Rev2
14 / 33
To drop equipment:
1. Tap Hook/Drop on the activities page.
2. Select the piece of equipment on the list.
3. Tap Remove at the bottom of the list.
1
Hook/Drop
2
3
Page 18

Operator Activities
ISAAC OnTheGo - Basic Quick Reference - Rev2
15 / 33
SUPER-ACTIVITY Inspection (DVIR)
Creating an inspection report
1. Tap the Inspection (DVIR) button on the
activities page.
2. Select the vehicle or equipment you are
inspecting.
3. Tap the Inspect button.
4. If you’re inspecting equipment (semi-trailer)
with a license plate, a window displays
allowing you to enter the number.
5. If you are inspecting equipment and wish to
provide the odometer value, tap the
Odometer button and enter the value.
6. Swipe the page upward and downward to
scroll through the list of inspection items.
Note the indicators of the left-hand side:
– Success
– Fail
– Minor inspection item (travelling is
allowed even if the status is failed)
– Item includes a note or a picture
Declaring a defect
7. Tap the ellipsis button next to the
inspection item.
8. Slide the button to record a Fail status and
enter a note if required.
7
6
4
1
8
5
5
3
2
Page 19

Operator Activities
ISAAC OnTheGo - Basic Quick Reference - Rev2
16 / 33
Including a picture
9. Tap the camera icon.
10. Tap the blue button to take the picture.
11. Tap Done to return to the previous screen.
(or Cancel to take a new picture)
Saving the defect entry:
12. Tap Save to return to the inspection report.
Signing the inspection report:
13. Tap Sign at the bottom of the report.
14. Sign in the space provided.
15. Tap Save.
Note that once the report is signed, it can no longer
be changed, and the dispatcher can view it.
13
11
9
14
15
12
10
Page 20

Operator Activities
ISAAC OnTheGo - Basic Quick Reference - Rev2
17 / 33
SUPER-ACTIVITY Accessing the roadside inspection activity
This activity allows to either transfer ELD data
when a roadside inspection takes place in the U.S.
or generate an on-screen report when in Canada.
1. Tap Roadside inspection on the activities
page.
The page displayed depends on whether the
roadside inspection takes place in the U.S. or
in Canada
2. If the country displayed is not the country
you are in, select the Country you are in.
1
2
Page 21

Operator Activities
ISAAC OnTheGo - Basic Quick Reference - Rev2
18 / 33
Performing a roadside inspection in the U.S.
1. Select the transfer method: Web Services or
Email.
2. Enter a comment if requested by the
roadside inspector.
3. Tap ELD Transfer.
4. If the transfer is successful, tap OK, and
proceed to step 7.
If the ELD data transfer isn’t successful and the
situation calls for displaying information on the tablet:
5. Select the report you want to generate on
screen: Display Active Driver Report or
Display Unidentified Driver report.
6. Tap Generate.
Note that an extra window may appear
asking to select the application for opening
the report in PDF format on the tablet.
7. View the report on screen.
To resume driving, place the tablet back in the
cradle and drive. ISAAC OnTheGo resumes
automatically.
To go back to your ISAAC OnTheGo session:
8. Tap the tablet’s return button to return
to ISAAC OnTheGo.
9. Enter your ISAAC OnTheGo password.
10. Enter the required information on the
activity form.
11. Tap Save.
9
5 6 8
1
3
2
10
11
7
4
Page 22

Operator Activities
ISAAC OnTheGo - Basic Quick Reference - Rev2
19 / 33
Performing a roadside inspection in Canada
1. Select the format, the number of days to
include and the report’s language.
2. Specify what to include on the report: Recap
and/or Daily Logbook (HOS) and/or
Daily Inspection Report (DVIR).
3. Tap Generate.
Note that an extra window may appear
asking to select the application for opening
the report in PDF format on the tablet.
4. View the report on screen.
To resume driving, place the tablet back in the
cradle and drive. ISAAC OnTheGo resumes
automatically.
To go back to your ISAAC OnTheGo session:
5. Tap the tablet’s return button to return
to ISAAC OnTheGo.
6. Enter your ISAAC OnTheGo password.
7. Enter the required information on the
activity form.
8. Tap Save.
6
1
3
2
5
7
8
4
Page 23

Operator Activities
ISAAC OnTheGo - Basic Quick Reference - Rev2
20 / 33
SUPER-ACTIVITY Shift end or Tractor change
This activity ends the ISAAC OnTheGo session.
The operator will need to log in again when starting a
new work shift or when starting to work on a new
tractor.
1. Tap Shift end or Tractor change on the
activities page.
If some daily logs are unsigned:
2. Specify if you wish to sign daily logs before
logging off.
If prompted to sign daily logs before logging off:
3. Select the logs and include your signature as
instructed in section Signing the daily log.
Complete the operation:
4. Enter a note if required.
5. Tap Save.
The screen will show the activity was
successfully recorded, and display the login
window.
3
1
4
5
2
Page 24

Logbook – Hours of Service
ISAAC OnTheGo - Basic Quick Reference - Rev2
21 / 33
LOGBOOK – HOURS OF SERVICE
Viewing the current daily log
1. Select Logbook from the main menu.
The current daily log displays.
NOTE: Tap the Header button to view the
current daily log header.
2. Tap a section on the graph to display the
duration of the corresponding hours of
service status.
The logbook header section shows:
- the hours remaining in the work
shift and work cycle
- the remaining driving hours in the
work shift
- the reset date and time for the work
shift and work cycle
When the display mode is set for U.S.
regulations, the header section also shows:
- the hours remaining before a
mandatory break
- the break duration
1
2
Page 25

Logbook – Hours of Service
ISAAC OnTheGo - Basic Quick Reference - Rev2
22 / 33
Viewing the service hours recap
1. Tap History at the bottom of the daily log.
2. Tap the RECAP tab.
See the section Understanding the hours-of-
service recap on the following page for an
explanation of the information displayed.
3. Press the tablet’s return button to go back to
the list of daily logs.
3
1
2
Page 26

Logbook – Hours of Service
ISAAC OnTheGo - Basic Quick Reference - Rev2
23 / 33
Understanding the hours-of-service recap
The left side of the recap page shows:
a. The hours worked per day
b. The time of the cycle reset
c. The total hours worked
in the last 6 days (CAN rule) or 7 days (U.S. rule)
OR
the total hours worked
since the last cycle reset
d. The on-duty hours available
at the start of the day
e. The hours worked today
f. The projected number of on-duty hours
available at the start of the day tomorrow, if
the driver finishes his work day now
g. The projected number of on-duty hours
available at the start of the day after
tomorrow
The right side of the recap page shows:
h. The remaining hours currently available in the
shift
i. The remaining hours currently available in the
cycle
j. The remaining driving hours currently
available
The driver worked
62:08 hours in the last 4 days.
The driver worked
4:00 hours in the current day.
13:52 of on-duty hours would be available at the start of the day
tomorrow, if the driver was to finish his work day now. Tomorrow,
the 10:00 hours worked on 2016-11-30 will no longer count in the
cycle.
28:04 of on-duty hours would be available at the start of the day
after tomorrow, if the driver was to finish his work day now and not
work tomorrow. After tomorrow, the 14:12 hours worked on 2016-
12-01 will no longer count in the cycle.
3:52 available work hours currently
remain in the cycle.
b
a
c
d e f
g
h
i
j
Page 27

Logbook – Hours of Service
ISAAC OnTheGo - Basic Quick Reference - Rev2
24 / 33
Entering shipping document numbers on the daily log
1. Tap History at the bottom of the daily log.
2. Select a daily log from the list.
3. Tap the HEADER tab.
4. Enter the document number (ex. manifest no.
or B/L no.) in the Documents field.
If this field does not appear, swipe the screen
to scroll through the page.
5. Press the tablet’s return button to go back to
the list of daily logs.
3
1
4
5
2
Page 28

Logbook – Hours of Service
ISAAC OnTheGo - Basic Quick Reference - Rev2
25 / 33
Signing the daily log
1. Tap History at the bottom of the current daily
log.
2. Select a daily log from the list.
3. Tap Sign.
If the sign button is not active, it means the daily log
is already signed.
A message asking you to certify your data entries is
displayed.
4. Check the Sign this document electronically
checkbox.
5. Tap Agree.
Note that tapping the Not Ready button exits
the window and leaves the daily log unsigned.
Note that once the daily log is signed:
• Existing activities on the log can no longer be
modified.
• If entering new activities, the signature will be
removed.
• If driving is detected, the signature is
removed.
3
1
4
5
2
Page 29

Logbook – Hours of Service
ISAAC OnTheGo - Basic Quick Reference - Rev2
26 / 33
Displaying logbook activity details
1. Tap History at the bottom of the current daily
log.
2. Select a daily log from the list.
3. Select an activity.
4. Tap Details.
5. Press the tablet’s return button to go back to
the current daily log.
4
3
5
1
2
Page 30

Logbook – Hours of Service
ISAAC OnTheGo - Basic Quick Reference - Rev2
27 / 33
Modifying logbook activities
Note that a signed daily log cannot be changed.
1. Tap History at the bottom of the current daily
log.
2. Select a daily log from the list.
3. Select the activity.
4. Tap Edit.
Note that driving activities cannot be
modified.
To change the activity:
5. Tap on the information fields to modify the
contents.
An explanatory note is mandatory for all
logbook changes.
To change the activity detail:
6. Tap the Activity Details button.
7. Make the required changes.
8. Tap Finish.
See more steps below.
8
7
4
3 1 5
6
2
Page 31

Logbook – Hours of Service
ISAAC OnTheGo - Basic Quick Reference - Rev2
28 / 33
Splitting an activity
1. Tap Split.
2. Select the time of the split.
3. Tap OK.
4. Enter the information required for the two
resulting activities.
To apply changes:
5. Tap Save.
Reviewing carrier modifications
ISAAC OnTheGo notifies you when a modification
was made to your logbook and prompts you to
review it.
To review modifications upon login:
1. Tap Modifications to your daily logs need your
attention on the page displayed after logging
in.
2. Tap the pending logbook modification you
would like to review
3. Tap Confirm to modify your logbook to include
the modification, or Reject to leave your
logbook unchanged.
NOTE: an explanary note is required when a
modification is rejected.
NOTE: if you choose not to review carrier
modifications upon login, you can do so later by
tapping the Actions Required button from the
logbook page.
1
2
3
5
4
3
1
2
Page 32

Logbook – Hours of Service
ISAAC OnTheGo - Basic Quick Reference - Rev2
29 / 33
Viewing previous daily logs
ISAAC OnTheGo keeps up to 14 days worth of daily
logs on the tablet.
1. Tap History at the bottom of the current daily
log.
The list of available log pages appears.
2. Swipe the page upward and downward to
scroll through the list.
To see log details:
3. Select a log page from the list to display
details.
4. Tap the arrows at the bottom of the page to
scroll through the different daily logs.
4
1
3
2
Page 33

Dashboard
ISAAC OnTheGo - Basic Quick Reference - Rev2
30 / 33
DASHBOARD
Viewing the dashboard
When the dashboard displays while travelling, other
tablet functions cannot be accessed, to promote
safe driving.
To display the dashboard:
1. Select Dashboard on the main menu.
The dashboard displays:
• the remaining driving time
• the next planned stop, if trip instructions are
activated in ISAAC OnTheGo
• the time remaining before the next mandatory
break – if the display mode is for U.S.
regulations
• the navigation panel, if CoPilot
TM
Truck is
activated in ISAAC OnTheGo
• the traffic conditions, If the Active Traffic™
option is activated.
When the vehicle is travelling, the dashboard shows:
• driving performance indicators
• the navigation panel, if CoPilot
TM
Truck is
activated
• notifications of hours-of service violations
The vehicle’s geographical position determines if
notifications are issued based on Canadian or U.S.
regulations.
• notifications of alarms detected by the
recorder (ex. excessive speed, hard turn, etc.)
Dashboard and navigation, displayed from the menu option
Dashboard and navigation displayed while driving
Dashboard notification of hours-of-service violation
Dashboard displayed from the menu option
Full-page dashboard displayed while driving
Dashboard notification of alarm
1
1
Page 34

Appendix A ─ Malfunctions and Diagnostic Events
ISAAC OnTheGo - Basic Quick Reference - Rev2
31 / 33
APPENDIX A ─ MALFUNCTIONS AND DIAGNOSTIC EVENTS
ISAAC OnTheGo detects two types of anomalies:
Compliance malfunctions ( )and Data diagnostic events ( ).
Both are signalled to the driver by an indicator on ISAAC’s tablet,
and require different actions based on the category.
Refer to the code below corresponding to the code on the tablet
for details on the possible malfunctions, events, and required actions.
CODE
CATEGORY
WHAT’S HAPPENING
ANOMALY TYPE
REQUIRED ACTION
9
Power
The electronic logging device (tablet) is not powered and
fully functional within one minute of the vehicle’s engine
receiving power and does not remain powered for as long
as the vehicle’s engine stays powered.
Data diagnostic
event
Make sure the key in the ignition is in the ON position, and the tablet
is correctly inserted in its cradle. For further diagnostics, contact
ISAAC Instruments technical support team.
P
The electronic logging device (tablet) is not powered for an
aggregated in-motion driving time of 30 minutes or more
over a 24-hour period across all driver profiles.
Compliance
malfunction
Inform the transporter of the malfunction. Use compliant paper logs
to reconstruct the record of service hours for the current 24-hour
period and the previous 7 consecutive days. Continue recording
hours of service on compliant paper logs until the electronic logging
system is back in compliance.
2
Engine
synchronization
The electronic logging system loses ECM connectivity to any
of the required data sources (engine power status, vehicle
motion status, miles driven, and engine hours) and can no
longer acquire updated values for the required ELD
parameters within five seconds of the need.
Data diagnostic
event
This usually occurs while the recorder is performing a firmware
update. Communication generally returns on its own after a few
minutes. If this state persists, contact ISAAC’s technical support
team.
E
The electronic logging system connectivity to any of the
required data sources (engine power status, vehicle motion
status, miles driven, and engine hours) is lost for more than
30 minutes during a 24-hour period aggregated across all
driver profiles.
Compliance
malfunction
Inform the transporter of the malfunction. Use compliant paper logs
to reconstruct the record of service hours for the current 24-hour
period and the previous 7 consecutive days. Continue recording
hours of service on compliant paper logs until the electronic logging
system is back in compliance.
T
Time
The electronic logging system can no longer meet the
underlying compliance requirement to record Coordinated
Universal Time (UTC), where ELD time must be
synchronized with UTC, not to exceed an absolute deviation
of 10 minutes at any time.
Compliance
malfunction
Inform the transporter of the malfunction. Use compliant paper logs
to reconstruct the record of service hours for the current 24-hour
period and the previous 7 consecutive days. Continue recording
hours of service on compliant paper logs until the electronic logging
system is back in compliance.
Page 35

Appendix A ─ Malfunctions and Diagnostic Events
ISAAC OnTheGo - Basic Quick Reference - Rev2
32 / 33
CODE
CATEGORY
WHAT’S HAPPENING
ANOMALY TYPE
REQUIRED ACTION
L
Positioning
For a cumulative elapsed time that exceeds 60 minutes over
a 24-hour period, the electronic logging system failed to
acquire a valid position measurement within 5 miles of the
commercial motor vehicle’s movement.
Compliance
malfunction
Inform the transporter of the malfunction. Use compliant paper logs
to reconstruct the record of service hours for the current 24-hour
period and the previous 7 consecutive days. Continue recording
hours of service on compliant paper logs until the electronic logging
system is back in compliance.
R
Data recording
The electronic logging system can no longer record or retain
required events or retrieve recorded logs that are not kept
remotely by the motor carrier.
Compliance
malfunction
Inform the transporter of the malfunction. Use compliant paper logs
to reconstruct the record of service hours for the current 24-hour
period and the previous 7 consecutive days. Continue recording
hours of service on compliant paper logs until the electronic logging
system is back in compliance.
3
Missing required
data elements
Any required data field is missing at the time of its
recording.
Data diagnostic
event
No immediate action is required. Missing data events are monitored
by ISAAC’s electronic logging system, and in the event they persist,
will generate a compliance malfunction listed in this table.
4
Data transfer
The operation of the data transfer mechanism(s) is not
confirmed
Data diagnostic
event
Alternatively, you can display requested information to roadside
authorities directly on the tablet. The data transfer mechanism will
be unsuccessful when no cellular communication is available, and
will resume when communication returns. If data transfer fails when
cellular communication IS available, contact ISAAC’s technical
support team.
S
Following the electronic logging system’s first failure to
confirm the success of the data transfer mechanism which
was reported as a Data diagnostic event, the system stays in
the unconfirmed data transfer mode in the next three
consecutive monitoring checks performed every 24hrs.
Compliance
malfunction
Inform the transporter of the malfunction. Use compliant paper logs
to reconstruct the record of service hours for the current 24-hour
period and the previous 7 consecutive days. Continue recording
hours of service on compliant paper logs until the electronic logging
system is back in compliance.
5
Unidentified
(unassigned)
driving records
More than 30 minutes of driving time for an unidentified
driver is recorded within a 24-hour period
Data diagnostic
event
No immediate action is required. When logging into ISAAC’s tablet,
you are advised of and can claim unidentified (unassigned) driving
time for the vehicle. Remaining unclaimed driving hours are visible
to office personnel with ISAAC’s reporting.
Page 36

Appendix B – ELD Indicators
ISAAC OnTheGo - Basic Quick Reference - Rev2
33 / 33
APPENDIX B – ELD INDICATORS
Indicator
Status
Description
Radio frequency
Blinking - Blue
Bluetooth communication active
Blinking - Orange
WLAN communication active
Blinking - Purple
GPS reception active
Note: Indicators show the activity of different communication types in alternation.
Battery
Solid Orange
Battery currently charging
Solid Green
Battery fully charged
Blinking Orange
Intermittent charging detected – verify the connection.
Alternate blinking
Red and Orange
Abnormal battery status – place a service call.
Solid Red
Weak battery charge (< 10%)
Blinking Red
Battery not charging – temperature < 0°C
Android system
indicators
Note: The indicators appearing in ISAAC OnTheGo are managed by the Android
operating system and are similar to those of the Getac Z710 tablet described in items
and .
Icon with exclamation
mark
There are items to review: unassigned driving, unapproved
logbook modifications, or unsigned daily logs
Or
White
Unread messages with number of messages shown.
Red
Some unread messages are priority messages.
or or
White/White
There are no data diagnostic events and no compliance
malfunctions.
White/Red
There is at least one compliance malfunction.
Red/White
There is at least one data diagnostic event.
Or
Green
Connection between the tablet and the telemetry server is
active (via the cellular network).
Red
No connection between the tablet and the telemetry server
(via the cellular network).
Or
Green
Connection between the tablet and the recorder aboard the
vehicle. Is active.
Red
No connection between the tablet and the recorder aboard
the vehicle.
1 2 3 2 1
4 5 6
7
8
1
2
3
4 7 6
5
8
 Loading...