

Isaac Bicycle Instruction Manual
Tehava International is the exclusive importer for ISAAC Cycles / www.isaac-cycle.com / info@isaac-cycle.com
Instruction manual

2 3
Adjusting and operating the bike 21
Adjusting the adjustable stem (optional) 21
Adjusting the saddle position 21
Adjusting the saddle height 21
Operating the gears 21
Shimano STI 22
Campagnolo Ergopower 23
SRAM 24
Operating the brakes 24
Operating the quick release axle 24
Using clipless pedals 28
While cycling 30
Faults 30
Gears and drivetrain 30
Brakes 31
Frame 32
Wheels and tyres 32
After a fall or accident 33
Transporting your bike 34
Fitting and removing wheels 34
Fitting and removing seatpost with saddle 37
Cleaning and caring for your bike 40
Storing your bike for an extended period 42
Guarantee and warranty 43
Key to figures 44
About this instruction manual 4
Instruction manual 4
Scope of application 4
Other valid documentation 4
Images 4
Conventions 4
Key 4
Orientation 5
List of abbreviations/definition of terms 5
For your safety 6
Use your bike as it is intended to be used 6
Who may ride your bike? 6
How may you ride your bike? 6
Where may you ride your bike? 6
What condition must your bike be in when
you ride it? 6
What you may not do 7
Residual risks 7
Risks due to faulty final assembly 7
Risks due to improper use 7
Risk of burns 8
Other risks and safety precautions 8
Disposal 8
Product contents, technical data 9
Product contents 9
Technical data 9
Screw/bolt torque 9
Structure and features 10
Frame 10
Brakes 10
Gears 10
ISAAC cycle frame 11
Before first use 12
Before every ride 13
Check wheels 13
Check assembly 13
Check wheel rims 13
Check tyres 14
Other checks 16
Check saddle and seatpost 16
Check handlebars and stem 17
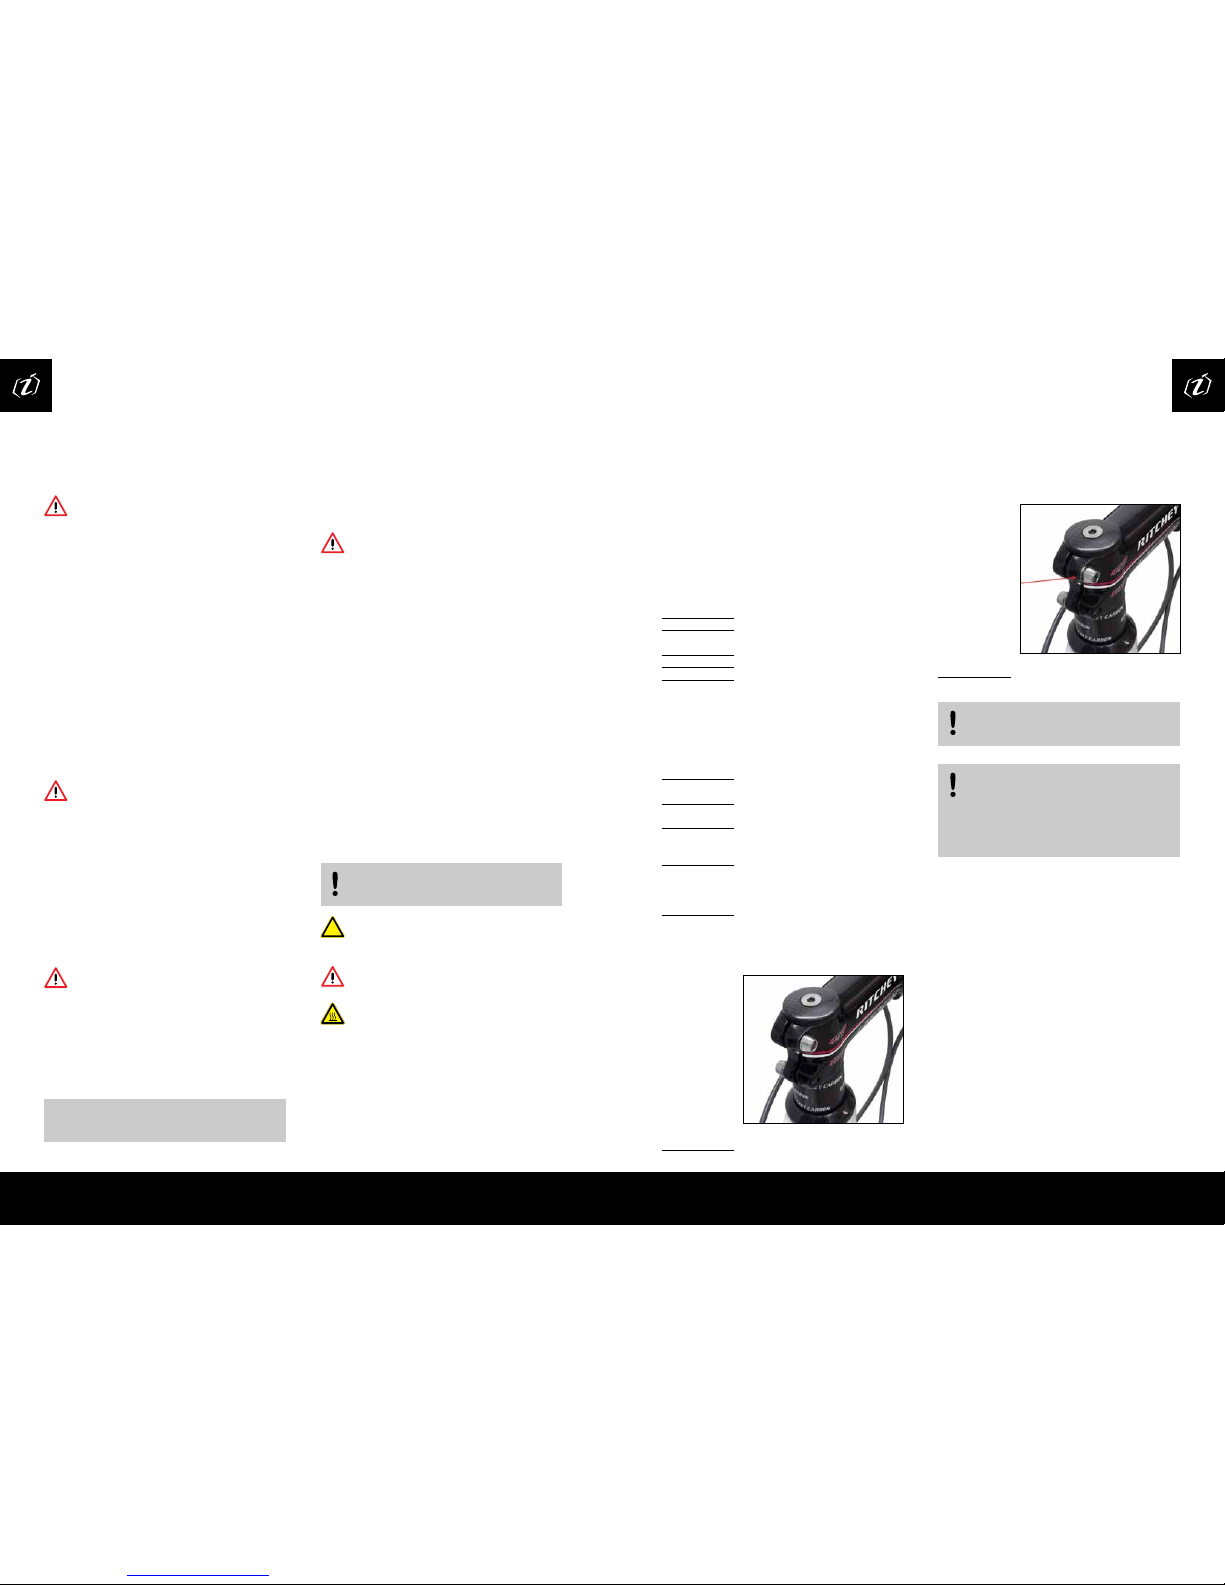
Check handlebar attachments 18
Check headset 18
Check brakes 18
Check cable-actuated calliper brake
(racing bike version) 19
Check drivetrain and chain 20
1
1.1
1.1.1
1.1.2
1.1.3
1.2
1.2.1
1.2.2
1.2.3
2
2.1
2.1.1
2.1.2
2.1.3
2.1.4
2.1.5
2.2
2.2.1
2.2.2
2.2.3
2.2.4
2.3
3
3.1
3.2
3.3
4
4.1
4.2
4.3
5
6
7
7.1
7.1.1
7.1.2
7.1.3
7.1.4
7.2
7.3
7.4
7.5
7.6
7.6.1
7.7
8
8.1
8.2
8.3
8.4
8.4.1
8.4.2
8.4.3
8.5
8.6
8.7
9
9.1
9.1.1
9.1.2
9.1.3
9.1.4
10
11
11.1
11.2
12
13
14
15
Dear customer,
We would like to congratulate you on your choice of an ISAAC bike and thank you for your confidence in us.
In buying this bike, you have acquired a high-quality, environmentally-friendly means of transportation which will give
you a great deal of pleasure and which will at the same time benefit your health.
In this handbook, we have compiled lots of tips for the operation of the bike and plenty of useful information about
cycle technology, maintenance and care.
Please read this brochure thoroughly!
Your ISAAC specialist cycle dealer will remain important for you even after advice and final assembly. This is your point
of contact for maintenance, inspections, modifications and repairs of all kinds. If you have any questions about our
products, please contact your ISAAC specialist bike dealer.
1
4 5
List of abbreviations/definition of terms1.2.3
Other valid documentation
- enclosed component instruction manuals for
the respective manufacturers.
Risk of damage or injury!
- Due to the variety of available cycle
components, it is impossible to produce an
instruction manual that is generally valid.
- It may be that components have been fitted
to this bike which are not described in this
instruction manual.
- For this reason, always follow the enclosed
component instruction manuals from the
respective manufacturer(s).
- Priority should be given to following and
observing the instructions and information
which these contain!
- Consult your specialist dealer for more
information.
Images
You will find the images that go with the
descriptions immediately before or after the
texts in question.
Conventions
Key
Advice!
Highlights information which requires your
special attention.
Warning!
Alerts you to a risk of minor damage and/or
personal injury.
Danger!
Alerts you to a risk of serious injury or death.
Risk of burns!
Alerts you to temperatures above 45°C (at
which protein coagulates), which can cause
burns in humans.
Instruction manual
Risk of damage or injury!
If you disregard this instruction manual, this
may result in dangerous cycling situations, falls,
accidents and damage to your bike.
- Read this instruction manual carefully before
you use your bike for the first time.
- All the bike parts named below are shown in
the figures.
- The figures printed in this instruction manual
are generic and apply to all ISAAC racing bikes
and ISAAC racing frames.
- Keep this instruction manual and include it
with the bike if you ever sell it or give it away.
- It is your responsibility to check your bike
and have any necessary work carried out as
stipulated.
- If you do not understand any part of this
instruction manual, please consult your
specialist dealer.
Scope of application
Risk of damage or injury!
- These are not instructions for riding a bike.
- These are not instructions for riding
techniques.
This instruction manual is applicable to:
- all Isaac brand racing bikes from model year
2010 supplied new and fully assembled with
this manual enclosed (in full).
- all Isaac brand racing bike frames from model
year 2010 supplied new with this manual
enclosed (as extracts). Please note point 5 in
this regard.
Risk of damage or injury!
New technical advances may result in changes
to the models and their operation, and even in
new models.
- Please observe the separate guidelines, if
available.
- Consult your specialist dealer on whether this
instruction manual is up-to-date
Consult your specialist dealer regarding which
of the points listed here apply to a bike
constructed specially for you.
1.1
1.1.1
About this instruction manual
!
1.2
1.2.1
1.2.2
If the wheel rim is out-of-round,
this is colloquially referred to as a
“buckled wheel”.
Usual unit of air pressure
Indicates how tightly a bolt is
tightened.
German Standards Institute
European Norm (often linked to DIN)
Specialist dealers and workshops
are firms authorised by the
competent authorities in the
relevant country to refer to
themselves as such, and to sell and
repair bikes. The ISAAC brand only
permits selected specialist dealers
to sell and repair its products.
Newton metre; unit of torque
pounds per square inch; American
unit of pressure; 1 psi = 0.06897
bar
German road traffic regulations
German road traffic licensing
regulation
The term “bolt correctly fitted”
means the condition in which
the bolt heads fit tightly to the
component over their entire area.
A loose bolt is often recognisable
by a protruding bolt head.
Buckle
Bar
Torque
DIN
EN
Specialist dealer
/ workshop for
bikes
Nm
psi
Road Traffic
Regulations
(StVO)
Road Traffic
Licensing
Regulation
(StVZO)
Bolt correctly
fitted
Bolt incorrectly
fitted
bolt incorrectly fitted:
gap between bolt head and surface
1.1.2
1.1.3
You can find the technical terms for bike parts
in the figures in the fold-out pages or beside
the individual images.
Laws:
STVO and STVZO are laws which apply only in
Germany. Before you use your bike for the first
time, familiarise yourself with the laws which
apply in your country. Consult the competent
authorities and your specialist dealer for more
information
Orientation
Where this instruction manual refers to “right”,
“left”, “front” or “back”, this always refers to the
position viewed in the direction of travel (i.e.
from the viewpoint of the cyclist when seated
on the saddle).
bolt correctly fitted:
bolt head touching surface
6 7
Risk of damage or injury!
Stationary bike trainers can damage your bike.
- The use of stationary bike trainers which
involve clamping the bike by the fork and/or
the chain stays is not permitted.
Residual risks
Risks due to faulty final assembly
Risk of damage or injury!
Improper final assembly of this cycle can result
in dangerous cycling situations, falls, accidents
and damage.
Have your specialist dealer confirm the correct
final assembly and adjustment for the seating
position which is appropriate for you.
Use the pre-printed form in this instruction
manual for this purpose.
Risks due to improper use
Risk of damage or injury!
If you disregard this instruction manual, this
may result in dangerous cycling situations,
falls, accidents and damage to your bike.
- Observe the guidelines under point 2.1.
- Only carry your baggage in a suitable cycle
rucksack.
- The ISAAC brand does not permit the
attachment of any kind of baggage rack.
- Do not exceed the maximum permitted
weight; see chapter 3.2.
Ascertain the total weight by standing on a
calibrated scale while lifting up the bike with its
full load and wearing your full cycling clothing.
Observe the maintenance and care guidelines in
chapters 11 and 12.
Racing bikes weighing less than 11 kg are
exempt from the dynamo requirement.
If you have a racing bike which is except from
the dynamo requirement, you must carry
reliable battery-powered lighting even in
daytime.
While taking part in races, racing bikes are
exempt from this requirement.
- white front reflector (often integrated into the
front headlamp) and red rear reflector
- two bright yellow reflectors on each wheel;
alternatively, tyres with reflective stripes on
both sides
- two bright yellow reflectors on each pedal;
All lighting and reflector parts must be
approved.
You can recognise approved parts because they
will be marked with a “K”, a wave-shaped line
and a multi-digit number.
Please consult your specialist dealer on fitting
these parts in accordance with regulations.
What you may not do
Risk of damage or injury!
Many cyclists like to modify their bikes to
suit their particular requirements. Saddle,
handlebars, pedals, brakes, tyres, spring
elements – there are many ways to retrofit your
bike.
Work on the bike, even work that appears
easy, requires proper training, knowledge and
experience. Work carried out to your bike by
a non-professional can result in dangerous
cycling situations, falls, accidents and damage
to your bike.
- Use only EN-certified accessories. Exceptions
are the bike computer and bottle holder,
provided they are chosen and fitted by your
specialist dealer.
- Consult your specialist dealer when choosing
accessories.
- Any additions, modification, service and
other work to your bike should be carried out
exclusively by your specialist workshop.
2.1.5
compromise your riding safety and damage
your bike.
The manufacturer approves the following uses
for the following categories of roads or tracks:
- Racing and time trialling: roads, no jumps
- Wheels fitted with racing or similar tyres:
roads, no jumps
Cycles which fall into different categories may
also be fitted with racing cycle tyres or similar.
Such tyres may be recognised by a maximum
width of 28 mm, indicated for example by two
figures on the tyre, such as 28-622 or 28-559.
Bikes with these tyres may only be used on
tarmac roads.
Consult your specialist dealer for more
information.
Risk of damage or injury!
At high speeds, there is an inherent risk of
falling. Only ride at high speeds if you are in full
control of the bike.
What condition must the bike be in when you
ride it?
Your new bike is a piece of sports equipment
and, in accordance with the German Road
Traffic Licensing Regulation (StVZO), it may not
be used on public roads without being fitted
with additional equipment.
In order to meet current StVZO requirements,
your bike must be fitted with the following
equipment.
The specifications below have been simplified.
For the full wording of the regulations which
apply for cycling in Germany, please consult
the StVZO or your specialist dealer. For use
outside Germany, please observe the traffic
regulations which are in force in your country.
Consult your specialist dealer or the
competent authority.
- two independently functioning brakes
- a bell
- dynamo-powered front (white) and rear
(red) lighting
2.1
2 For your safety
Use your bike as it is meant
to be used
Who may ride your bike?
Risk of damage or injury!
The rider must be competent to ride a bike, i.e.
he/she must have basic knowledge about the
use of a bike and have the necessary sense of
balance to be able to direct and steer a bike.
- The rider must be tall enough to ride this bike
(ask your specialist dealer if you are unsure).
- The rider must be physically and mentally
capable of riding this bike in traffic.
How may you ride your bike?
Risk of damage or injury!
Sit on the saddle or stand on one pedal and
push off with the other foot.
- Hold the left handlebar grip with your left
hand and the right handlebar grip with your
right hand.
- To ride the bike, place your left foot on the left
pedal and your right foot on the right pedal.
- Use the bike only as a means of
transportation.
Where may you ride your bike?
Risk of damage or injury!
All bikes made by this manufacturer are either
racing bikes or time trial bikes. The category of
your bike is shown on your service card. It will
be entered there by your specialist dealer when
you buy it (See also chapter 4).
The different types of roads and tracks you
may encounter are classified as follows:
- Road: tarmac
- Track: sand, gravel or similar surface (e.g.
forest track, farm track)
- Paved footpath: few if any roots, sleepers,
stones, potholes, etc.
- Unpaved footpath: roots, sleepers, stones,
potholes, etc. present
- Sports park: track especially designed for freeriding, downhill, BMX and dirt riding
Please be aware that any road or track can be
damaged and/or present obstacles which may
2.1.1
2.1.2
2.1.3
2.1.4
2.2
2.2.1
2.2.2

8 9
3.3 Crew/bolt torqueProduct contents
Complete bike without pedals / frame kit with
Isaac instruction manual plus all other relevant
instruction manuals from manufacturers
whose parts are fitted.
Technical data
3.1Disposal
Dispose of your cycle properly at the end of its
useful life. Consult your specialist dealer for
more information or use a recycling depot.
Risk of burns
Risk of burns!
After long descents, wheel rims can get very
hot.
- Do not touch the rim immediately after a
descent.
- Leave the rim to cool off before you touch it
(test it with the back of your finger).
Other risks and safety precautions
Risk of damage or injury!
If you disregard this instruction manual, this
may result in dangerous cycling situations, falls,
accidents and damage to your bike.
- Wear a helmet when riding your bike.
- Ride defensively, keeping your eyes on the
road ahead.
- Do not ride under the influence of alcohol.
- Ride in such a way that you always have
your bike under control and will not get into
difficulties if a dangerous situation suddenly
arises.
- In wet weather, the effectiveness of the
brakes may be reduced.
- Only wear suitable cycle clothing which will
not impair the operation of the bike or your
vision.
- Only wear tightly fitting trousers/leggings.
Loose clothing can get caught in the bike and
result in serious falls.
- In the dark and when visibility is poor, wear
clothing with reflective strips and ride with
lights on.
- Heavier loads increase your braking distance.
- Bear in mind that certain types of clothing
and/or the use of a rucksack can restrict your
mobility.
- Observe the maintenance and care guidelines
in chapters 11 and 12.
2.2.3
2.2.4
!
2.3
3 Product contents, technical data
3.2
Type of bike
Head tube diameter
Build year
Seatpost diameter
Type
Bottom bracket
Rider weight limit [kg]
Ambient temperatures
Racing bike
1 1/8 “ ahead
from 2010
31.6 mm
Exception: Meson with
ISAAC Aero seatpost
Racing bike
Boson: BSA, 68mm
Meson: BB 30
Proton, Proton FW: Pressfit
Graviton: 130 kg
Kaon: 115 kg
Kaon+: 115 kg
Boson: 115 kg
Meson: 115 kg
Proton: 115 kg
Element: 115 kg
Photon: 90 kg
Muon: 100 kg
Proton XC: 100 kg
- 10°C to 50°C
Risk of damage or injury!
Technical advances may lead to changes to
the models and their operation, and even to
new models
- Please observe the separate guidelines,
if available.
- Consult your specialist dealer on whether
these technical data are up-to-date.
Type
Seatpost clamp
Seat clamp
Model
Proton, Proton
FW, Boson:
Meson:
all models
Tightening torque
6 - 7 N m
9 - 10 N m
4 - 5 N m
Meson, an example of an ISAAC racing bike.

10 11
Risk of damage or injury!
Mistakes in the assembly of your frame can
lead to serious falls!
ISAAC frames are also available individually
and you can have them set up according to
your individual wishes. The following guidelines
should be observed in all cases.
- THE ISAAC BRAND ONLY PERMITS ITS
AUTHORISED SPECIALIST DEALERS TO BUILD
UP ITS FRAMES.
- The person who builds up the frame
into a complete bike is deemed to be the
manufacturer and is liable for any assembly
errors and defects.
- This instruction manual is not an assembly
instruction for your bike frame.
- When building up your bike, exclusively
use EN-certified branded accessories. You
can recognise these by the accompanying
documents showing the following information:
• Details of manufacturer including full address
• Information about inspections passed and
inspection guidelines with EN number
• comprehensive and clear product information
and assembly guidelines in your national
language
- Consult your specialist dealer if you have any
questions regarding suitable accessories.
Risk of damage or injury!
Only rigid racing bike forks may be fitted
to this frame.
Suspension forks may not be fitted.
Gears
Your bike has:
- derailleur gears and a chainset with two or
three chainrings
This gear system offers you the optimum gear
for every speed and makes managing gradients
easier.
You can work out the number of gears as
follows:
- Derailleur gears: number of chainrings at the
front multiplied by the number of sprockets at
the back.
E.g. 2 chainrings x 10 sprockets = 20 gears.
This type of bike comes in the following
versions.
- Classic racer: drop handlebars, two racing bike
calliper brakes
- Racing bike in time trial/triathlon design
(from 2011): Aero handlebars, Aero frame
All racing bikes made by this manufacturer
are fitted with wired-on tyres as standard.
When using wheels with glued tube-type
tyres, always follow the instruction manual
for the relevant rim/tyre manufacturer.
Consult your specialist dealer for more
information.
Frame
Your bike is fitted with an unsprung carbonfibre frame.
Risk of damage or injury!
Carbon is a light material with excellent
strength properties in normal and approved
use. However, it is sensitive to falls and knocks,
and to assembly faults.
- Observe the guidelines in chapters 10, 11
and 12.
Brakes
Your bike has two independent calliper brakes.
Risk of damage or injury!
Improper operation of the brakes can result in
dangerous cycling situations, falls, accidents
and damage to your bike.
- Familiarise yourself with the operation of the
brakes.
- Establish which brake lever operates the front
brake and which operates the back brake.
- To do so, operate each brake lever several
times while stationary. You can watch the
brake blocks opening and closing on the
relevant wheel rim.
4.1
Structure and features ISAAC bike frame4 5
!
4.2
4.3
12 13
Some racing bikes are fitted with so-called
tubular tyres. These have an inner tube
sewn into the tyre. The tyre including inner
tube is glued to the specially built wheel rim
during assembly. In doing so, the assembly
instructions of the tyre, glue and rim
manufacturers must be observed.
Be sure to observe the guidelines under
point 7.1.3.
In StVZO-equipped bikes, rim reflectors may be
fitted.
Check assembly
Shake both pedals forcefully perpendicular to
the direction of travel.
- The wheels must not move in their clamping
mechanisms.
- No clicking or grating noises must be audible.
Contact your specialist dealer if the check
shows up defects of any kind.
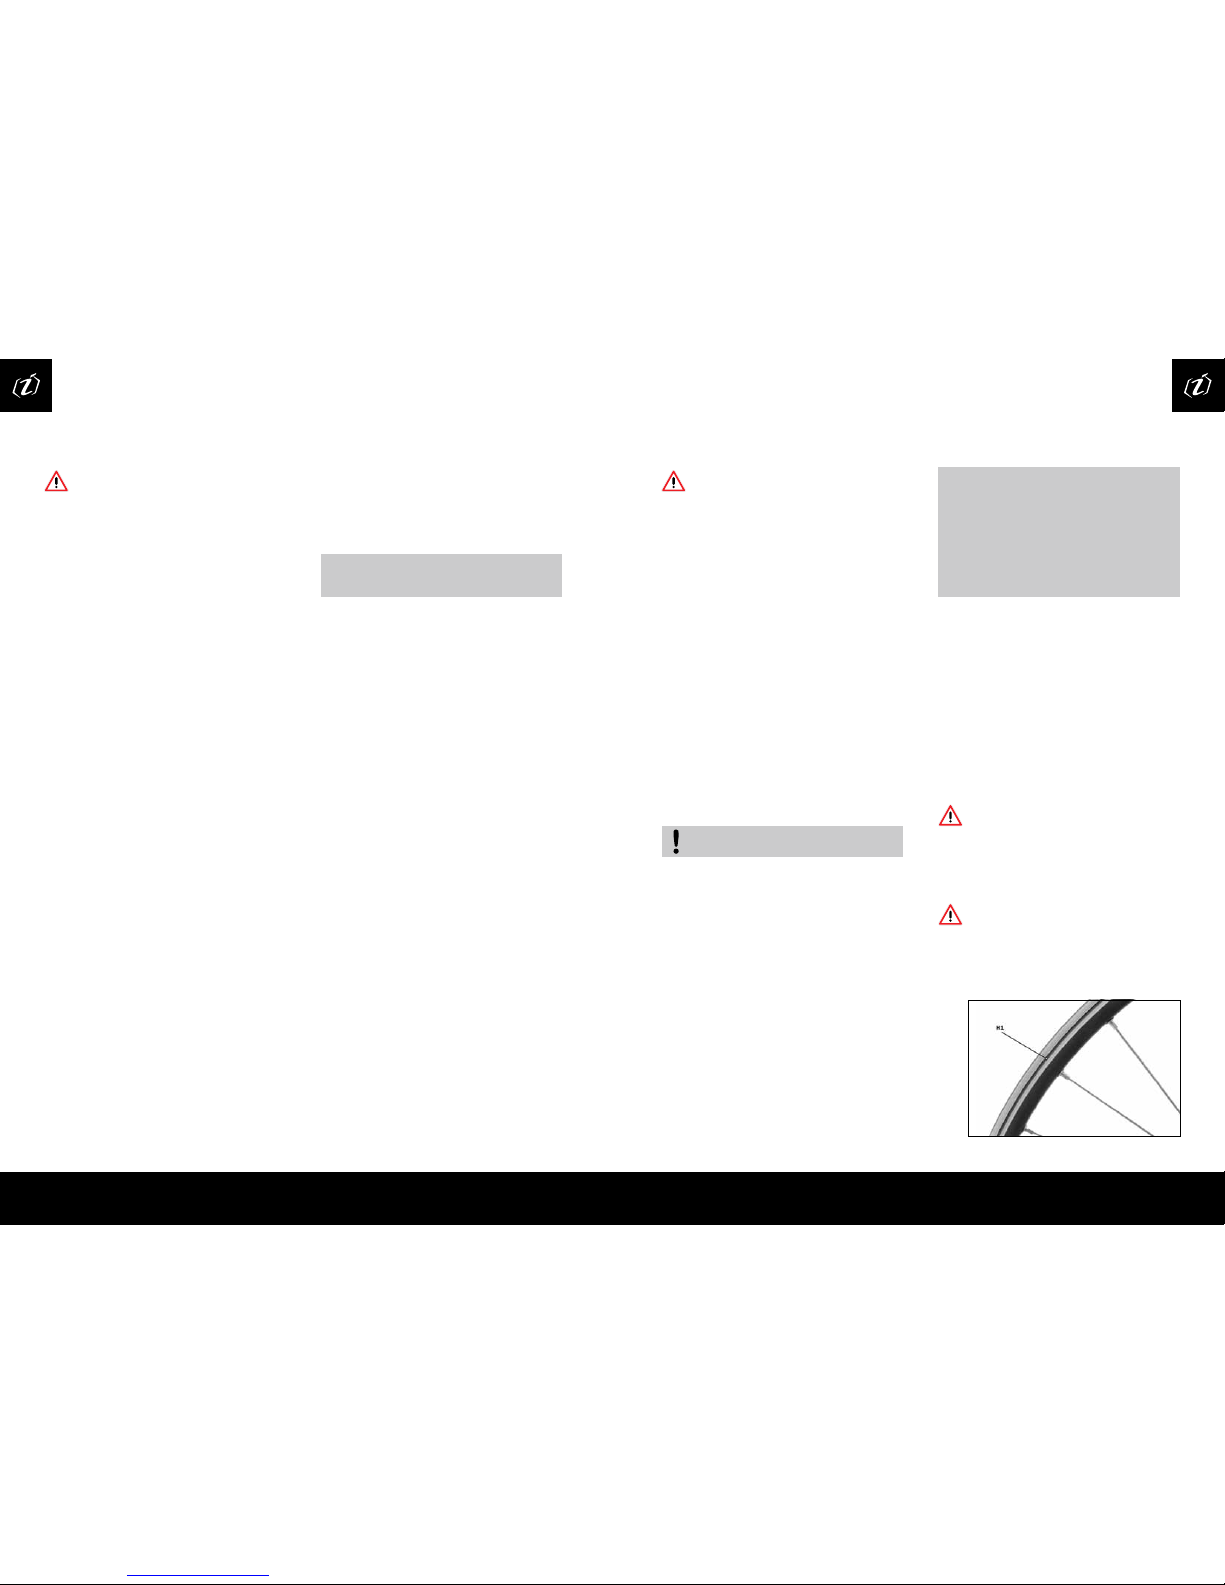
Check rims
Risk of damage or injury!
Worn wheel rims and/or significant buckling
can result in dangerous cycling situations, falls,
accidents and damage to your bike.
Worn rims must be replaced and buckles
repaired!
Risk of damage or injury!
If you have calliper brakes: dirty wheel rims can
reduce the effectiveness of your brakes.
Dirty wheel rims must be cleaned immediately.
Risk of injury or damage!
A bike that is not in proper working order can
result in dangerous cycling situations, falls,
accidents and damage to the bike.
Consider the possibility that your bike may have
fallen over while it was not in your sight or that
someone may have interfered with it.
- Before every ride, check that your bike is safe
to ride.
- Memorise the condition of your bike when
new to make it easier to spot deviations from
the correct condition later (taking your own
photos can be a valuable aid).
- Contact your specialist dealer immediately if
your bike deviates from its proper condition in
any way.
- Only continue riding your bike once it has been
properly overhauled by your specialist dealer.
Perform a sight check of the whole bike:
- Check all the attachment bolts to make sure
they are correctly bolted (see chapter 1.2.4).
- Check the complete bike for dents, nicks, deep
scratches and other mechanical damage.
Contact your specialist dealer if the sight check
shows up defects of any kind.
Check wheels
A wheel consists of:
- the hub
- sprocket(s) (only on the rear wheel hub), also
known as the sprocket cassette, cogset or
freewheel
- spokes
- wheel rim and
- tyres, which in turn consist of
• tyre,
• inner tube and
• rim tape.
1 Have your specialist dealer confirm that your
bike has been assembled correctly and is in
full working order.
2 Have your specialist retailer set the correct
saddle position.
You can fine-tune your bike and make small
adjustments yourself as described in chapter
8.2 and 8.3.
3 Only use this bike after your specialist dealer
has talked you through the technology used
in a briefing.
4 Seal your cycle with spray wax,
see chapter 12.
5 Before use, pay attention to chapter 7.
Risk of damage or injury!
A bike that is not in proper working order can
result in dangerous cycling situations, falls,
accidents and damage to the bike. The same is
true if you are not yet familiar with your new
bike and how to operate it.
- Before setting out on your first ride, familiarise
yourself with your bike. In particular,
determine which brake lever operates the
front wheel brake and which brake lever
operates the rear brake; see paragraph 8.5.
- Modern brakes have a very strong braking
effect. Applying too much force to the brake
lever can cause the wheel in question to
block and so result in a fall. Take your time to
familiarise yourself with the braking effect of
your bike on safe terrain.
- With new calliper brakes, or new friction pads,
the full braking performance only develops
after a certain wearing-in time. For this
reason, assume a longer braking distance
initially.
- If your cycle is fitted with clipless pedals,
which lock your shoes to the pedals: practice
getting on and off before you use the bike.
Clipless pedals are not safety pedals!
- If you remove the seatpost, front and/or rear
wheels for transportation after purchasing
your bike, follow the instructions in chapter
11.1 and 11.2.
67Before first use
Before every ride
!
7.1
!
7.1.1
Rim with groove wear indicator
7.1.2

14 15
Check your tyres for external damage and wear:
• The tyre rubber must be present across the
entire surface in the original profile.
• The tyre material under the rubber layer must
not be visible.
• There must not be any dents or tears.
Check the air pressure:
determine what type of tyres you have.
Mountain bikes can be fitted with racing tyres
and racing bikes with trekking tyres.
Rule of thumb:
Mountain bike tyres:
tyre thickness greater than 40mm
Trekking/cross and fitness bike tyres:
tyre thickness 28mm - 40mm
Racing tyres:
tyre thickness less than 28mm.
Consult your specialist dealer to determine the
type of tyres for your bike.
Guideline values for air pressure:
mountain bike tyres 2.5 - 3.5 bar
trekking bike tyres 3.5 - 5.0 bar
racing tyres 6.0 - 10.0 bar
Risk of damage or injury!
If the air pressure is too low, this will result in
an increased risk of accidents and above all
to poor handling characteristics. The tyre may
come loose from the curve of the rim
and encourage the tyre to drift on the rim.
This can result in dangerous cycling situations,
falls, accidents and damage to your bike.
Pump up your tyre to the specified air pressure.
Some air pressure indications are shown in
“psi”. You can convert the air pressure with the
help of the following table.
Check the air pressure using a tyre air pressure
meter. Simple devices are often included with
bicycle inner tubes; high-quality devices are
available from specialist stores.
Either read the relevant operating instructions
or ask your specialist dealer to show you how to
use it.
If the air pressure is too low: increase the air
pressure using a suitable pump.
If the air pressure is too high: allow a suitable
amount of air to escape from the valve and
then check the air pressure again.
If you use a bicycle pump with a manometer,
you can check the air pressure while pumping.
First allow some air to escape from the tyre
and then increase the air pressure up to the
desired level.
There are different types of valves. With a ‘car
valve’ or ‘Dunlop valve’/‘Woods valve’ you can
attach the pump head directly.
With a racer valve, you must first unscrew the
small safety nut until it reaches the stop collar
and, after inflating, screw the valve back shut.
Ask your specialist dealer to show you how to
operate the valves.
7.1.3
3 Check your rims for dirt, particularly oil and
grease.
4 Dirty wheel rims must be cleaned immediately
(see chapter 12).
Check tyres
Check the valve position:
Risk of damage or injury!
If the valve is crooked, it could tear off while
you are riding, which will cause a sudden loss of
pressure in the tyre. This can lead to dangerous
cycling situations, falls, accidents and damage
to your bike.
Have the tyre position corrected by a specialist
workshop.
You can carry out this work yourself if you are
familiar with the fitting and removal of the
wheels (Chapter 11.1) and the replacement of
tyre and inner tube.
- Remove the valve nut if appropriate.
- Check the valve position: the valves must
point to the centre of the wheel.
1 Check the rims for wear:
- Rims with wear indicators:
Sight check
- Rims without wear indicators:
• Sight check
• Fingernail test: draw your fingernail
across the side of the rim.
You must not be able to detect any
grooves.
- If the wear indicator is no longer visible, or the
rim has visible grooves which can be felt with
a fingernail, the rim needs to be replaced.
2 Check the rims for buckling:
• Lift the bike and turn the front and back
wheels in turn.
• Note the distance between rim and brake
blocks. The maximum permissible deviation
per revolution is 2 mm.
!
Felge mit Verschleißindikator als Rille
Felge mit Verschleißindikator als Punkt
Felge ohne Verschleißindikator
correct valve position:
valve points to centre of wheel
incorrect valve position:
valve does not point to centre of wheel
psi
bar302,1402,8503,5604,1704,8805,5906,2
100
6,9
110
7,6
120
8,3
130
9,0
140
9,7
You can ascertain the actual permitted air
pressure from the specifications of the tyre
and rim manufacturer.
The permitted tyre pressure is usually printed
on the side of the tyre. Consult your specialist
dealer for more information.
!
!
!
Valve types
!
The greater your body weight, the higher the
air pressure in the tyres will need to be.
16 17
- You should not be able to twist or move any
of the components.
- There should not be any clicking or grating
noises.
If the saddle and/or seatpost do move, secure
them (see chapter 8.2, 8.3 and 11.2).
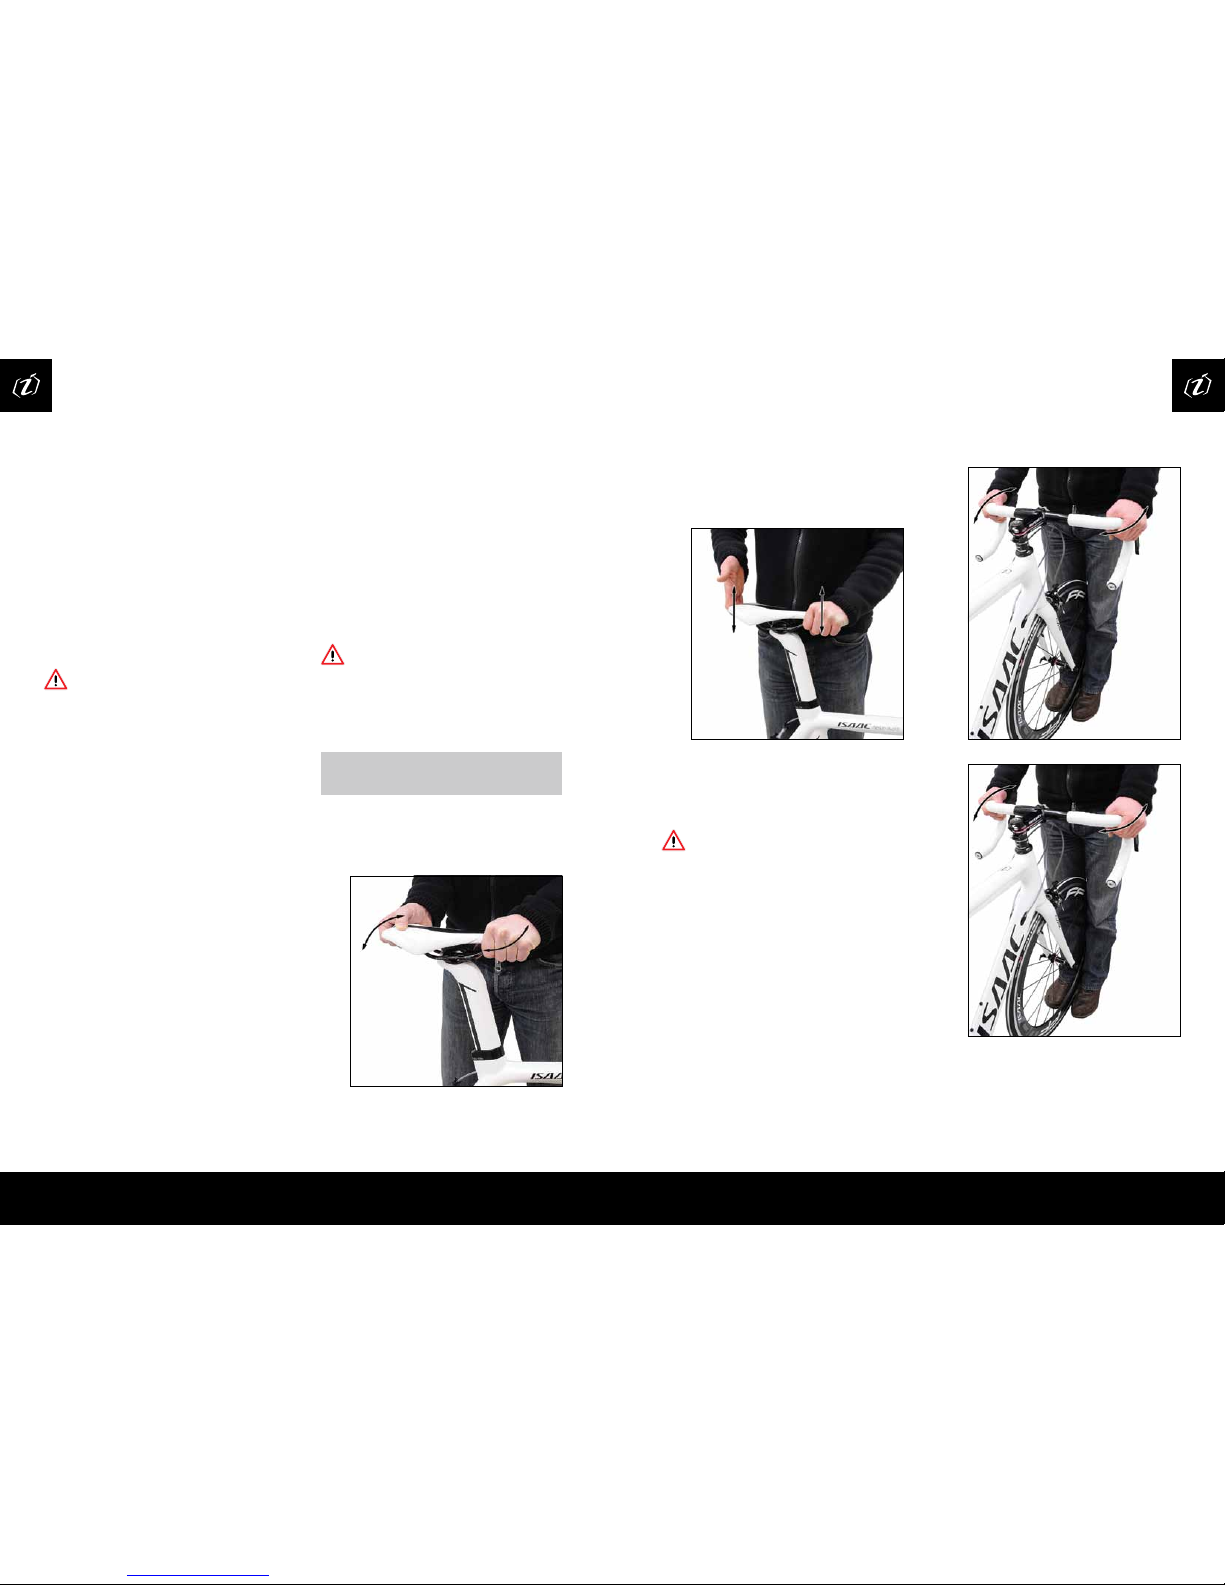
Check handlebars and stem
Risk of damage or injury!
The handlebars and stem are very important
components for your cycling safety. Damage
to these components and errors in fitting can
result in serious falls.
If you observe defects to these parts or have
doubts about them, you must on no account
continue to use your bike. Consult a specialist
workshop immediately.
Check the fitting of the handlebars and stem.
- The stem must be aligned parallel to the front
wheel rim, while the handlebars must be
aligned at right angles to it.
- Hold the front wheel firmly between your legs.
- Take hold of the handlebars at both ends.
- Try to twist the handlebars in both directions
by hand.
- Try to twist the handlebars within the stem
by hand.
7.2
If debris is present:
- Remove it if you can do so without exerting
much force.
- Check whether your wheels have been
damaged by the debris.
- Reattach loose cycle parts such as spoke
reflectors. If you are unable to do so, contact
your specialist dealer immediately.
- Please ensure that all reflectors are present,
correctly attached and not obscured or dirty,
in accordance with StVZO (see chapter 2.1.4).
Check saddle and seatpost
Risk of damage or injury!
If the seatpost has not been inserted far
enough, it can come loose. This can result in
dangerous cycling situations, falls, accidents
and damage. Please ensure that the seatpost
is inserted to the correct depth, taking note of
chapter 8.3.
If you have the appropriate technical expertise,
you may carry out this job yourself, taking note
of chapters 8.2, 8.3 and 11.2.
Check that the saddle and seatpost are firmly
positioned:
- Attempt to twist the saddle and seatpost
within the frame by hand. You should not be
able to move the saddle/seatpost.
In tubular tyres:
Some racing cycles are fitted with so-called
tubular tyres. These have an inner tube sewn
into the tyre. The tyre including inner tube is
glued to the specially built wheel rim during
assembly. When doing so, the assembly
instructions of the tyre, glue and
rim manufacturers must be observed.
Risk of damage or injury!
A tyre which has not been properly glued on can
come loose from the wheel rim while cycling
and cause serious falls.
- Check the fitting of your tyres:
- If you can push the tyre away from the rim
by hand, the cycle is not safe for use.
- The tyre must be glued on again.
When doing so, observe the instructions of
the tyre, glue and rim manufacturers.
- Consult your specialist dealer for more
information.
Try to push the inflated tyre away from the
wheel rim sideways at various points around
the tyre. The tyre must remain attached to
the rim.
If you can push the tyre away from the rim
by hand, the cycle is not safe for use.
Have the tyre glued back on in a specialist
workshop.
A freshly glued tyre needs time to dry.
Observe the instructions of the tyre, glue
and rim manufacturers.
Other checks
Check your wheels for debris such as pieces
of wood, remains of material, loose spoke
reflectors, etc.
7.1.4
!
Checking the seatpost
- Attempt to move the clamped saddle by
hand by moving the two ends up and down
in opposition to each other. You should not
be able to move the saddle.
Checking the saddle Checking that the stem is secure
7.3
Checking that the handlebars are secure
Check the fitting of your tyres:
• To do so, lift the front and back wheels in turn
and turn them by hand.
• The tyre must run true. There may not be any
vertical or horizontal bulging.
 Loading...