

Page 1

A Simpler and Smarter Wireless Lighting Control Solution
Programming Guide
Page 2

OS-NET Programming Guide
Table of Contents
1. OVERVIEW ........................................................................................................ 3
2. BASIC OPERATION ............................................................................................. 3
2.1 MAIN MENU ........................................................................................................................................................ 5
2.2 ON/OFF CONTROL ............................................................................................................................................... 5
2.3 SETTING .............................................................................................................................................................. 5
2.4 UPLOAD ............................................................................................................................................................... 6
2.5 DOWNLOAD ........................................................................................................................................................ 6
3. SETTING ............................................................................................................ 7
3.1 SETTING ITEMS .................................................................................................................................................... 7
3.2 GROUP LINK SETTING ............................................................................................................................................. 8
EZ-GROUP ....................................................................................................................................................... 8
ADVANCED ...................................................................................................................................................... 8
UNGROUP ....................................................................................................................................................... 8
3.3 CRE AT ING A NEW OS-NET NETWORK .......................................................................................................................... 9
3.4 ADDING MORE OS-NET DEVICES TO AN EXISTING NETWORK............................................................................................. 9
3.5 DEVICE SETTING ..................................................................................................................................................... 9
CONTROL ......................................................................................................................................................... 9
AMBIENT LUX ................................................................................................................................................ 11
DEL AY ............................................................................................................................................................ 11
TIME OFF ....................................................................................................................................................... 11
HIGH DIM ...................................................................................................................................................... 11
LOW DIM/SmartDIM ..................................................................................................................................... 11
RAMP UP ....................................................................................................................................................... 11
FADE DOWN .................................................................................................................................................. 11
VM-TB ........................................................................................................................................................... 11
VM-TA ........................................................................................................................................................... 11
SENSITIVITY ................................................................................................................................................... 11
BURN-IN ........................................................................................................................................................ 11
TEST (10-MIN) ............................................................................................................................................... 12
LED INDICATOR .............................................................................................................................................. 12
DEFAU LT ........................................................................................................................................................ 12
3.6 SAVE/RECALL ..................................................................................................................................................... 13
SAVE AS ......................................................................................................................................................... 13
RECALL .......................................................................................................................................................... 13
3.7 LOCK/UNLOCK ................................................................................................................................................... 12
4. SETTING ACKNOWLEDGMENT INDICATION ..................................................... 14
OS-NET Programming Guide R0 2
Page 3
OS-NET Programming Guide
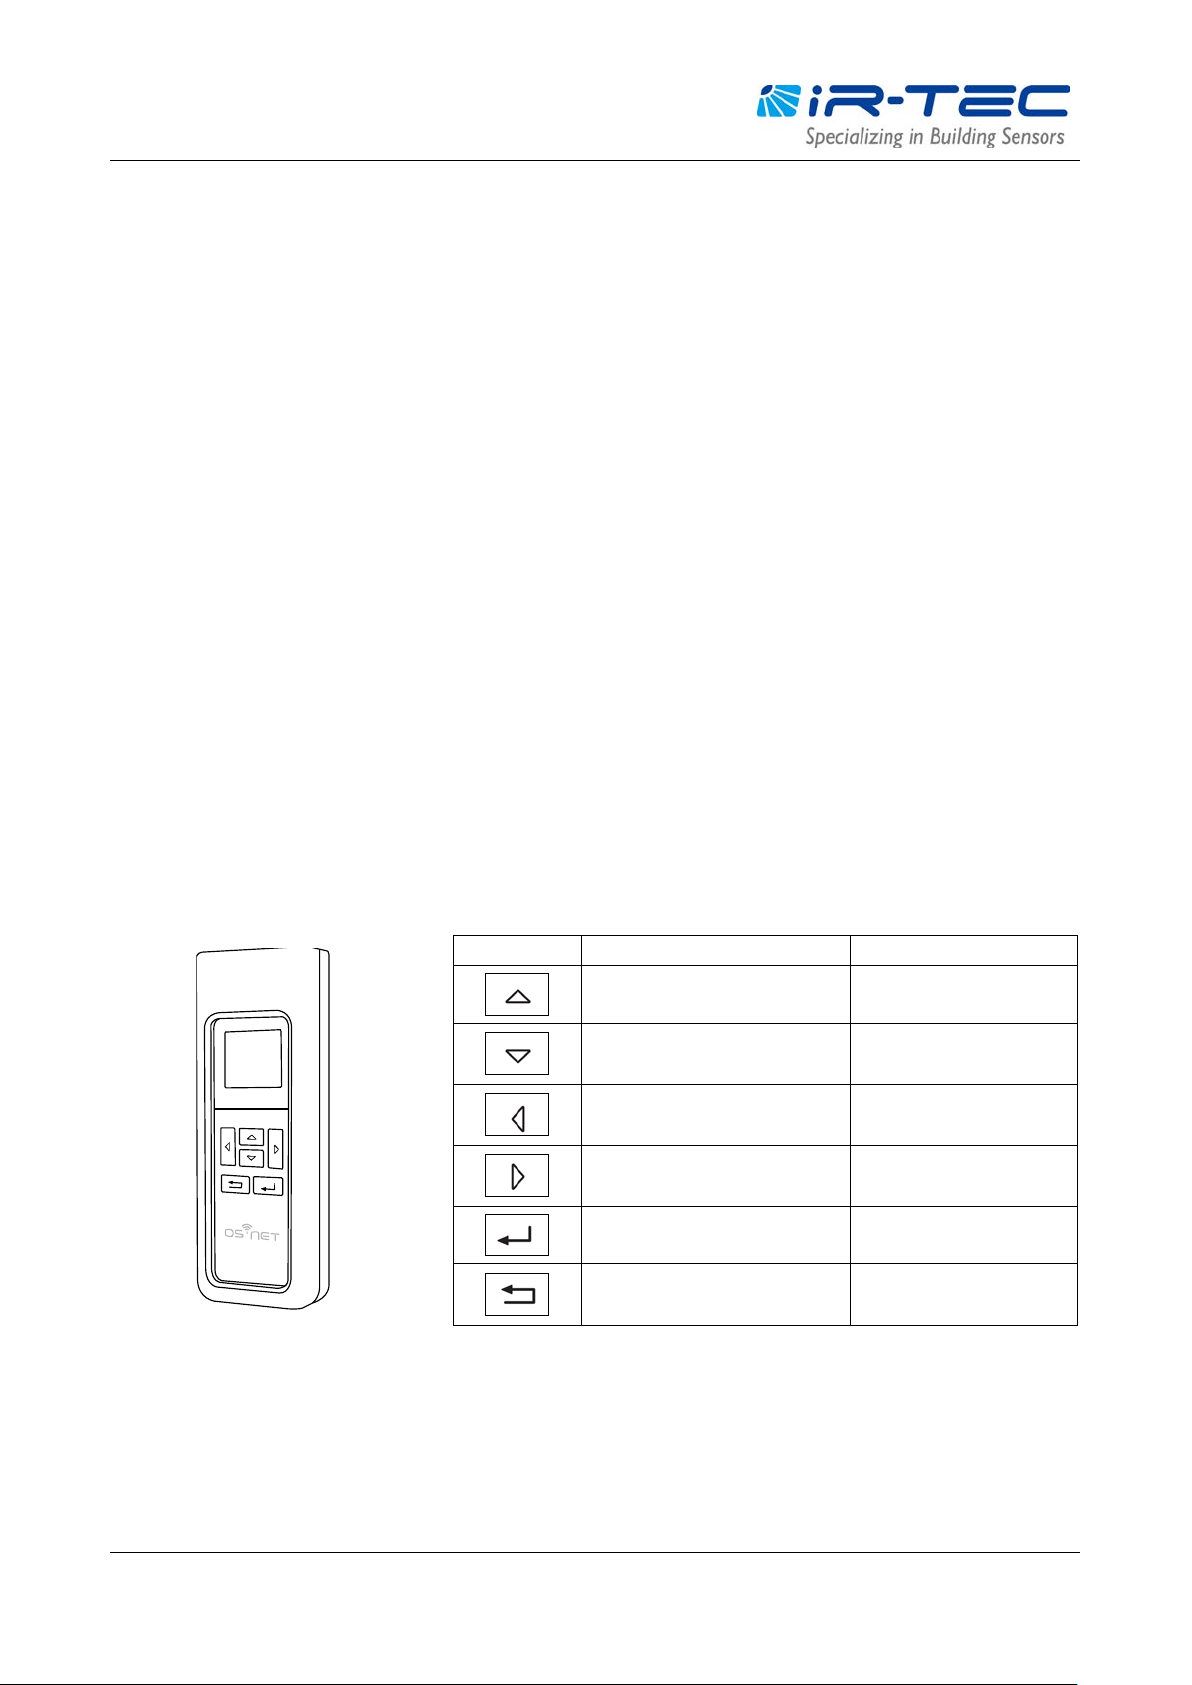
KEY
Move UP setting bar
Move DOWN setting bar
Change setting (decrease)
Change setting (increase)
1. Overview
Thank you for your interest in OS-NET, a simpler and smarter wireless lighting control solution developed by IR-TEC to
enable sophisticated controls on every luminaire and circuit. The OS-NET is a wireless sensor mesh network
simultaneously deployed through installing the OS-NET enabled luminaires and circuits. The OS-NET enabled luminaire
refers to the luminaire integrated with an OS-NET sensor or controller, and the OS-NET enabled lighting circuit refers to
the power line electrically controlled by an OS-NET sensor or controller.
The OS-NET network is formed by a number of wirelessly connected OS-NET devices, including the fundamental OS-NET
Sensors (ONS), the supplementary OS-NET Controllers (ONC), and the optional OS-NET Buttons (ONB). Each device not
only provides its distinctive functionalities, but also operates as a node to transmit, receive, or forward wireless
communication commands within network.
After installing an OS-NET enabled lighting system, every OS-NET device should be grouped and linked with the network
to enable wireless control via operating a SRP-281, a 2-way IR remote programmer exclusively designed for configuring
OS-NET devices. This guide is intended to help you conduct all necessary configurations and settings correctly.
2. Basic Operation
The SRP-281 is a handheld programming tool for you to configure the settings of OS-NET network and devices. In
addition, it can be used as a remote to control (on/off/dim) the OS-NET enabled lighting in individual/group basis.
Before operating the SRP-281, ensure that good batteries are correctly placed in the compartment. Press any key will
activate the MAIN MENU for operating. 6 keys are available for operation with distinctive functions described as below;
MAIN MENU
Enter into UPLOAD page
Enter into DOWNLOAD page
Turn ON the controlled light
Turn OFF the controlled light
Enter into SETTING pages Confirm the operation
Select individual/group on/off
SETTING PAGE
Upload setting to device
Back to the previous
page
OS-NET Programming Guide R0 3
Page 4
OS-NET Programming Guide
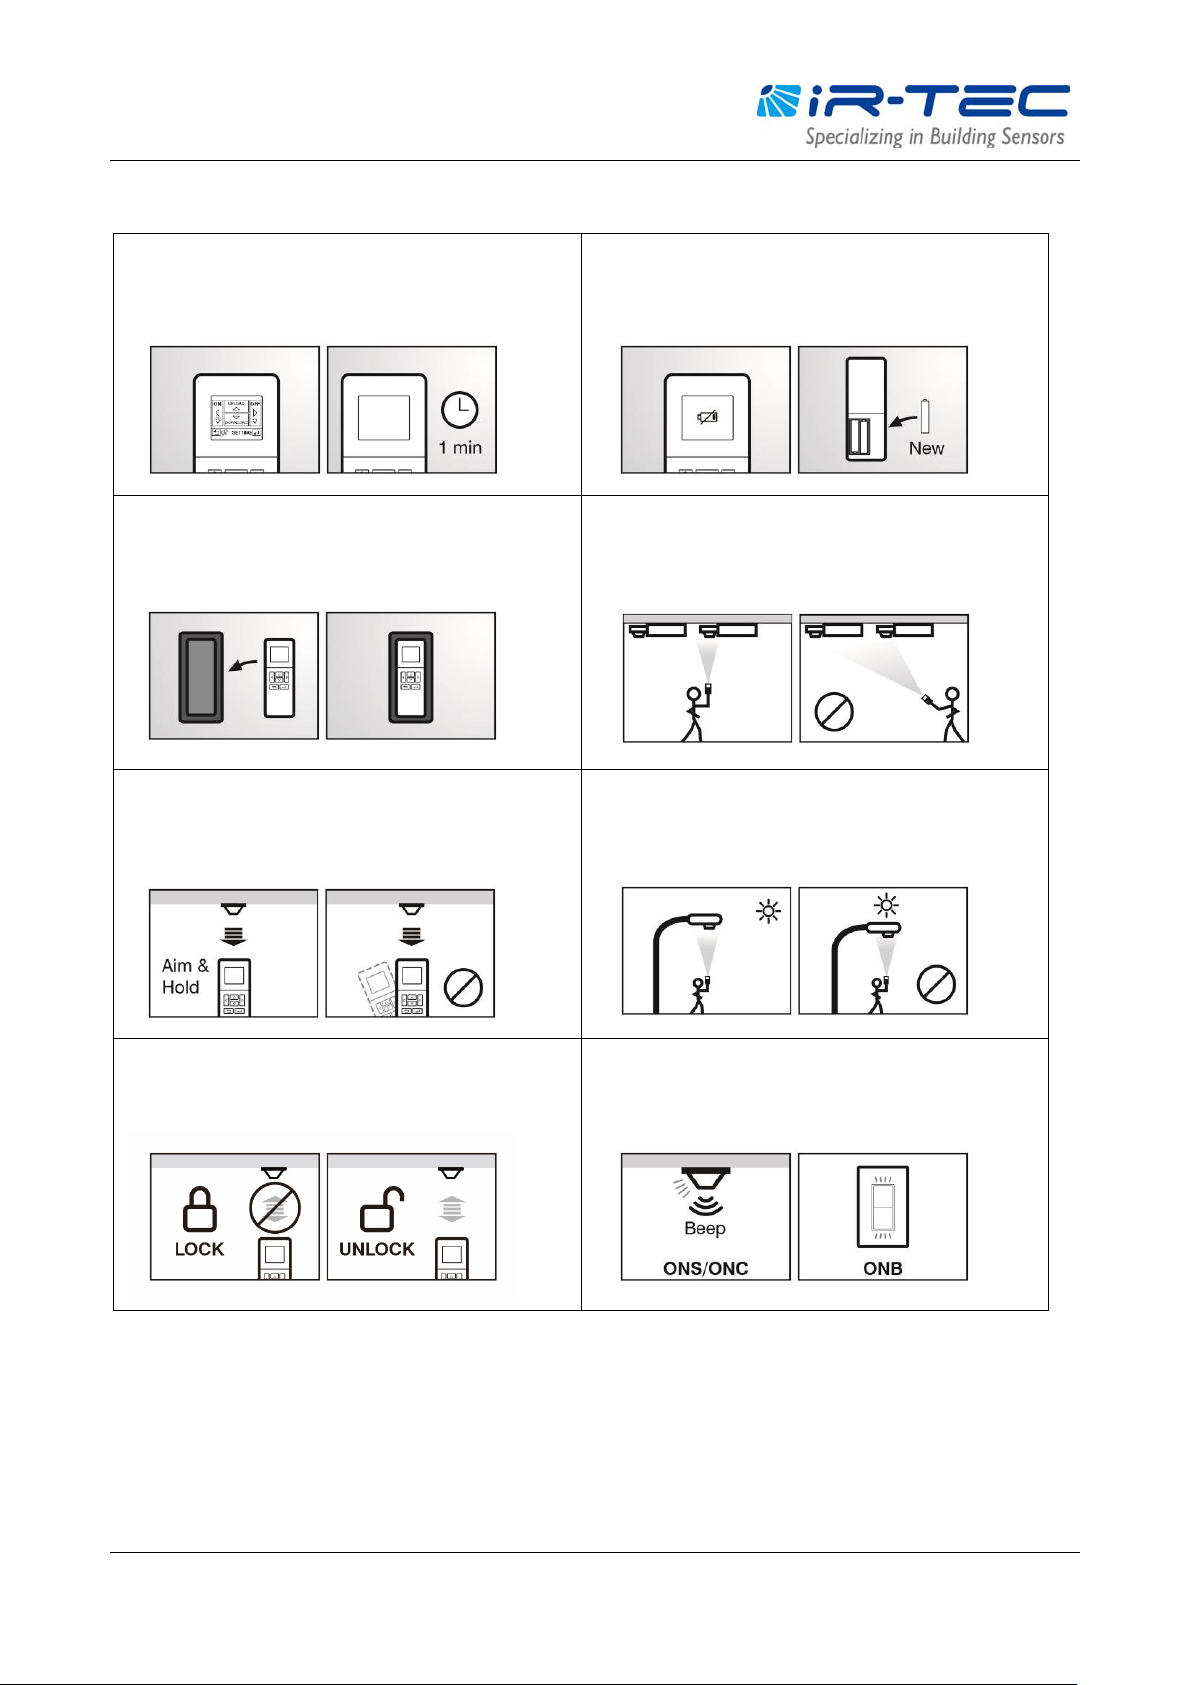
OPERATION NOTES
The LCD will automatically shut off 1 minute after the
last key operation to save battery power. Pressing any
key will wake up the LCD.
If low battery sign appears while LCD waking up,
replace the battery as soon as possible.
The rubber housing can effectively protect the remote
from falling. Always have the rubber housing on the
remote while operating.
To ensure successful download from target device,
always aim the remote at the target device and hold
until download completed.
Some setting operations may be inhibited if the
network is locked. Ensure to unlock the network prior
to setting change.
To avoid programming the devices nearby, always aim
and hold the remote right under the target device
while uploading.
Direct sunshine on the window of remote could affect
the upload and download operation. Avoid aiming the
device with direct sunshine on its back.
The OS-NET sensor/controller will beep and blink the
LED, and the OS-NET button will blink the LED to
acknowledge successful setting.
OS-NET Programming Guide R0 4
Page 5
OS-NET Programming Guide
Operation Instructions
Displays
: Individual control
: Group control
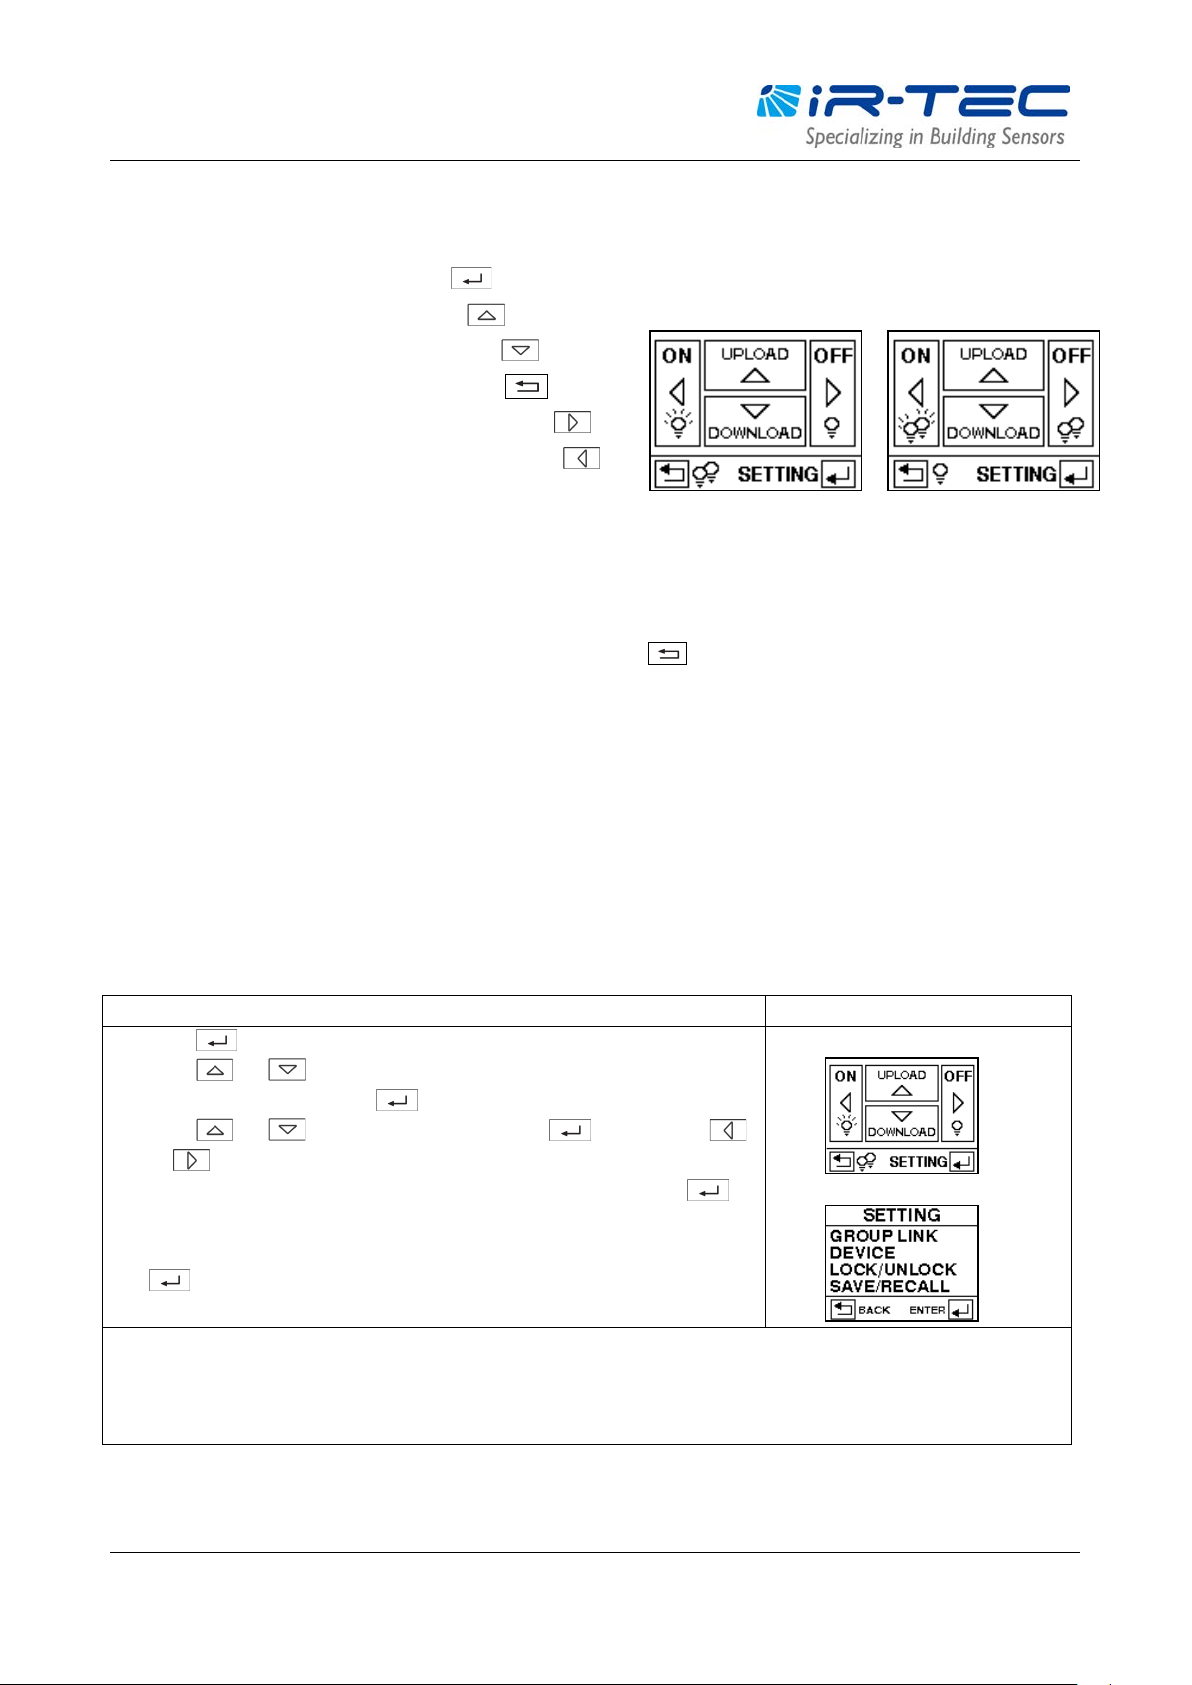
2.1 MAIN MENU
The main menu allows you to conduct basic operations as below;
To enter into SETTING pages, press
To conduct UPLOAD operation, press
To conduct DOWNLOAD operation, press
5
55
To swop individual or group control, press
To turn off the light, aim at the device and press
To turn on the light*, aim at the device and press
*OS-NET will resume control after the delay time elapsed.
2.2 ON/OFF CONTROL
Press the LEFT/RIGHT key with remote aiming toward an OS-NET device will turn ON/OFF the lighting in individual or
group basis. You can select individual or group control by pressing
Individual control (5) means to turn on/off only the lights that are physically controlled by the OS-NET sensor/controller.
Group control (55) means to turn on/off all the lights of the group(s) that the OS-NET sensor/controller has been
assigned.
key.
2.3 SETTING
The SETTING pages allow you to setup/change the settings of OS-NET devices, including group link, device control,
save/recall, and lock/unlock. The following are general instructions for SETTING operation. More details are available in
section 3.
1. Press to enter into SETTING pages from MAIN MENU.
2. Press
UNLOCK, SAVE/RECALL) press
3. Press
or to select the desired parameter.
4. After all items are selected, aim the remote at the target device and press
upload the setting data.
5. If you want other devices to have identical setting, just aim at the device and press
NOTE: To setup newly installed OS-NET devices, complete the GROUP LINK setting for all devices first. Then execute the DEVICE
control settings via GROUP-SET to save time.
NOTE: It may take several seconds to complete data transmission, please aim and hold the remote right under the device while
uploading.
OS-NET Programming Guide R0 5
or to select the setting option (GROUP LINK, DEVICE, LOCK/
to enter next page.
or to select the setting item, press to enter. Press
to
to duplicate the setting.
1. MAIN MENU
2. SETTING options
Page 6

OS-NET Programming Guide
Operation Instructions
Displays
NOTE: It may take several seconds to complete data transmission, please aim and hold the remote while uploading.
Operation Instructions
Displays
NOTE: It may take several seconds to complete data transmission, please aim and hold the remote while downloading.
2.4 UPLOAD
The UPLOAD function allows you to configure all device settings via simple remote operation. You may select the
CURRENT SETTING or an EZ-SET profile for uploading to a specific OS-NET sensor or controller. Selecting CURRENT
SETTING means to upload the current settings, and selecting EZ-SET 1-4 means to upload the settings saved in the
EZ-SET profile to the target device in one operation. The following are general instructions for UPLOAD operation.
1. Press to enter into UPLOAD pages from MAIN MENU with below options;
CURRENT SETTING
EZ-SET 1
EZ-SET 2
EZ-SET 3
EZ-SET 4
2. Press or to select the profile for uploading. Press to enter into
next page with below options;
GROUP LINK
DEVICE
BOTH
3. Press
4. Aim the remote at the target device and press
5. The remote will display UPLOAD OK following with a successful upload. If UPLOAD
FAIL displays, press to try again.
or to select the data for uploading. Press to confirm.
to upload the data.
1. MAIN MENU
2. UPLOAD pages
2.5 DOWNLOAD
The DOWNLOAD function allows you to read many data, including group member, device setting, current dim, and
current lux, from an installed sensor/controller while you can also obtain basic information of the remote and network.
The following are general instructions for DOWNLOAD operation.
1. Press to enter into DOWNLOAD pages from MAIN MENU with below options
GROUP INFO
DEVICE SETTING
CURRENT DIM
CURRENT LUX
REMOTE INFO
DEVICE INFO
NETWORK INFO
2. Press
3. Aim the remote at the target device (excl. REMOTE INFO) and press
download the data.
4. The remote will display DOWNLOAD OK follow with a successful download. If
DOWNLOAD FAIL displays, press to try again.
NOTE:
or to select the download option, press to confirm.
to
Downloaded data of GROUP INFO and DEVICE SETTING will display on the respective pages.
1. MAIN MENU
2. DOWNLOAD pages
OS-NET Programming Guide R0 6
Page 7

OS-NET Programming Guide
Setting
Item
Brief Description
ONS
ONC
ONB
EZ-GROUP
Easy group assignment to all OS-NET devices
√ √ √
ADVANCED
Setting specific device for one way operation
√ √ √
UNGROUP
INDIV-SET
To setup an individual device
√ √
GROUP-SET
To setup all devices of the group with same settings
√ √
CONTROL
area is vacated.
control is selected.
SmartDIM
will become SmartDIM bar if SmartDIM control is selected.
RAMP UP
FADE DOWN
Speed of lighting output decrease.
√ √
Only available if DSVM is selected.
Only available if DSVM is selected.
SENSITIVITY
Not available on ONC and ONB.
occupant. N/A for lighting control.
BURN-IN
uncertain duration, select MANUAL.
seconds delay.
DE FAULT
Resume factory default settings of the REMOTE or DEVICE.
√ √
LOCK
UNLOCK
Open the network to allow OS-NET setting change.
√ √ √
AUTO LOCK
Automatically lock the network 12 hours after created.
√ √ √
RECALL
SAVE AS
Save the settings as an EZ-SET profile for future use.
√ √
RECALL
Recall an EZ-SET profile saved in the remote.
√ √
3. Setting
3.1 SETTING ITEMS
The table below highlights all setting items of the SRP-281 and the available on different OS-NET devices. Due to
different functionality, certain setting items and options may not be applicable on specific OS-NET device. The remote
will display N/A to indicate not-applicable settings and options.
GROUP
LINK
Disengage the device from the connected network √ √ √
DEVICE
Control modes available for OS-NET sensor and controller. √ √
AMBIENT LUX Thresholds of ambient light level for OS-NET sensor and controller to
execute the control.
DEL AY Time that sensor/controller will turn off or fade down the light after the
√ √
√ √
TIME OFF Time that sensor/controller will keep the light at low dim level after the
DELAY time elapsed under OSLATO mode.
HIGH DIM High dim is the output level set to control the light during occupancy, or
when ambient light is lower than the threshold if daylight sensing
LOW DIM/
Low dim is the output level set to dim the light when space is vacant. It
Speed of lighting output increase. √ √
VM-TB Time duration BEFORE Virtual Midnight.
VM-TA Time duration AFTER Virtual Midnight.
Sensitivity of occupancy sensor.
ON DEL AY
Delay time to turn on the load after detecting the presence of
Time duration for burn-in test. To conduct the burn-in test with
TEST (10-MIN) Sensor/controller will control the light as the mode set, but with 10
√ √
√ √
√ √
√ √
√ √
√
√ √
√ √
LOCK/
Close the network to inhibit OS-NET setting change. √ √ √
UNLOCK
SAVE/
OS-NET Programming Guide R0 7
Page 8

OS-NET Programming Guide
3.2 GROUP LINK setting
GROUP LINK is a fundamental setting for all OS-NET devices of an OS-NET enabled lighting system. Every OS-NET device,
regardless of luminaire integrated or ceiling mounted, must be assigned to at least one control group in order to link
up the network. To conduct GROUP LINK setting, press
the setting pages. Three items are available for settings as below.
EZ-GROUP
The group control of OS-NET devices is actually a combined operation of TRANSMITTING and RECEIVING groups. When
any OS-NET sensor of the group detects the presence of occupant, it will transmit the OCC signal with the
TRANSMITTING group number it belongs, to the OS-NET devices with the same RECEIVING group number to execute the
programmed control respectively.
The EZ-GROUP setting allows you to quickly complete the network linking and grouping of all OS-NET devices. EZ-GROUP
will set all the OS-NET devices assigned to the same group with identical group numbers for the TRANSMITTING and
RECEIVING groups. The following procedures of EZ-GROUP setting are listed as below;
1. After entering the EZ-GROUP page, 4 lines of MBR OF GRP (Member of Group) will be available for assignment.
2. Press
the selection.
3. Aim at the target device and press
or to select the group numbers (max. 4) assigned for the target device. Press to confirm
to upload the data while also link up the network.
from MAIN MENU and select the GROUP LINK to enter
NOTE: The target device will blink its LED in BLUE and GREEN intermittently while linking up, and stop after linkage
completed.
ADVANCED
Although general group control requirements for most applications can be achieved by EZ-GROUP setting, some specific
spaces may require sophisticated group control. This may need the ADVANCED setting to achieve.
Example of special group control: When Zone A is occupied, the lighting of Zone A and B should be activated. But when
Zone B is occupied, only the lighting of Zone B are required to be activated.
To achieve the above control, you can use EZ-GROUP to setup the OS-NET devices of Zone A and B with respective group
numbers, then use the ADVANCED setting to change the number of TRANSMITTING or RECEIVING group of zone devices.
You can either add the group number of Zone B to the TRANSMITTING group of Zone A device, or add group number of
Zone A to the RECEIVING group of Zone B device.
UNGROUP
The UNGROUP setting can be used to off-link an OS-NET device from the connected network. Ungrouping an OS-NET
device may be needed if the device has been wrongly grouped, or mistakenly connected to the neighboring network. To
ungroup an OS-NET device, select the UNGROUP under the GROUP LINK page, and press
UNGROUPING page. Press
target device and press
or to select YES and press to confirm UNGROUPING. Aim toward the
again to ungroup.
to enter the
NOTE: An ungrouped OS-NET sensor can still individually control the lighting connected as set, but an ungrouped
OS-NET controller or button cannot execute its control.
OS-NET Programming Guide R0 8
Page 9

OS-NET Programming Guide
3.3 Creating a new OS-NET network
After completing the installation of an OS-NET enabled lighting system, a new OS-NET network can be created as
instructed below.
1. Ensure the field is free of neighboring OS-NET network.
2. Grouping two new OS-NET devices within 30 seconds by EZ-GROUP setting to create a new OS-NET network.
3. After the network is created, continue to group all other devices of the whole network as planned.
NOTE: To verify the field is free of other OS-NET network, you can select a newly installed OS-NET sensor and test with a
temporary group setting. Wait and observe the LED indicator of the sensor after uploading the group setting data. The
device will beep and the LED will blink from blue to green while linking. If the LED turns to BLUE after linking process
completed, it means that the nearby field is free of any OS-NET network. If the LED remains in GREEN after linking
process completed, it means that the sensor has linked to an open (unlocked) neighboring OS-NET. Execute the
UNGROUP process to off-link the testing sensor from the connected network to prevent the unwanted cross-network
group control.
3.4 Adding more OS-NET devices to an existing network
If more OS-NET devices are installed for adding to an existing network, ensure to UNLOCK the network before grouping
the new device. Once the grouping command is entered, the device will scan for an open (unlocked) OS-NET network on
the field and link up automatically. Continue to group all other new devices before conducting the DEVICE setting.
3.5 DEVICE setting
DEVICE setting is to configure how an OS-NET sensor/controller will control the lighting physically connected. You can
setup the connected OS-NET devices in individual or group basis.
To setup an individual sensor/controller
Select and enter the INDIV-SET after entering the DEVICE setting page. A single lamp sign (5) will display at the
right-top cover of all pages to indicate the settings are for individual sensor/controller.
To setup multiple sensors/controllers in group basis
Select and enter the GROUP-SET to setup up all OS-NET sensors/controllers of the same group with identical settings.
A double lamp sign (55) will display at the right-top cover of all pages to indicate the settings are for grouped sensors
and controllers.
The following are items available for OS-NET sensor/controller setting in display sequence.
CONTROL
Every OS-NET sensor/controller can be set to provide different control modes, from on/off switching, bi-level or
continuous dimming, to connected lighting performance on occupancy sensing and/or daylight sensing control
strategies.
Following table highlights the operational descriptions of available control modes for OS-NET sensor/controller.
OS-NET Programming Guide R0 9
Page 10

OS-NET Programming Guide
CONTROL
DESCRIPTION
ON/OFF
NOTE: This mode is available for dimmable or non-dimmable lighting, but not for HID lighting.
OSO
NOTE: This mode requires dimmable lighting to enable dimming control.
OSLA
remain on whenever the ambient light level is lower than the set threshold.
OSLATO
before turning off.
dim control and the delay time will be extended with the TIME OFF (TO) delay.
DSVM
remain on whenever ambient light level is lower than the set threshold.
DSC
remain on whenever ambient light level is lower than the threshold.
VSC
dim control and the delay time will be extended with the TIME OFF (TO) delay.
OFF
Once this mode is set, all lighting controlled by the sensor/controller will remain off until another mode is selected.
This is a commonly used occupancy sensing control mode.
Lighting will be inhibited when the ambient light level is higher than the set threshold, regardless of occupancy or
vacancy. When the ambient light level is lower than the set threshold, the controlled light will be automatically
turned on once the sensor detects the presence of occupant, and turned off after the delay time has elapsed.
This is an occupancy sensing control mode can be applied in spaces that require lighting for 24 hours a day.
When space is vacant, the light will be on at Low Dim level. When space is occupied, lighting output will be instantly
increased to High Dim level or continuously regulated to maintain within a pre-set range by SmartDIM control.
This is an occupancy sensing control mode can be applied in spaces that require automatic lighting when the
ambient light level is lower than the set threshold.
Lighting will be inhibited when the ambient light level is higher than the set threshold, regardless of occupancy or
vacancy. When the ambient light level is lower than the set threshold, the sensor/controller will automatically set the
light to the Low Dim level. Once the sensor detects the presence of an occupant, the lighting output will be increased
to the High Dim level or continuously regulated within a pre-set range by SmartDIM control. Lighting output will be
reduced to the Low Dim level after delay time elapsed or shut off if the ambient light is higher than the threshold.
NOTE: This mode requires dimmable lighting to enable dimming control. If lighting is non-dimmable, all lights will
This is an occupancy sensing control mode can be applied in spaces that require maintaining Low Dim lighting for a
period of time after the delay time has elapsed.
Lighting will be inhibited when the ambient light level is higher than the set threshold, regardless of occupancy or
vacancy. When the ambient light level is lower than the set threshold and any sensor detects the presence of
occupant, the sensor/controller will instantly increase the lighting output to the High Dim level or continuously
regulate the output to maintain overall lighting level within a pre-set range by SmartDIM control. After the delay time
has elapsed, lighting output will be reduced to the Low Dim level for a period of TIME OFF delay
NOTE: This mode requires dimmable lighting to enable dimming control. If lighting is non-dimmable, there will be no
This is a daylight sensing control mode can be applied in spaces that require automatically dimming the lighting
output to a low level between a certain time before and after midnight.
When the ambient light level is lower than the set threshold, the sensor/controller will turn the light to the High Dim
level or continuously regulate the output to maintain overall lighting level within a pre-set range by SmartDIM
control. Lighting output will be reduced to the Low Dim level from a certain time before virtual midnight to a certain
time after. Lighting will be inhibited during daytime.
NOTE: This mode requires dimmable lighting to enable dimming control. If lighting is non-dimmable, all lights will
This is a daylight sensing control mode can be applied in spaces that require automatic lighting whenever the
ambient light is lower than the set threshold.
The sensor/controller will automatically turn on the light to the High Dim level or continuously regulate the output to
maintain overall lighting level within a pre-set range by SmartDIM control when the ambient light level is lower than
the set threshold, and automatically turn off the light when the ambient light level is higher than the set threshold.
NOTE: This mode requires dimmable lighting to enable dimming control. If lighting is non-dimmable, all lights will
This is a vacancy sensing control mode can be applied in spaces that require users to turn on the light manually, and
have the sensor/controller turn off the light automatically.
The occupant would have to press the upper part of OS-NET button to turn the light to the High Dim level or
continuously regulate the output to maintain overall lighting level within a pre-set range by SmartDIM control. The
sensor/controller will control the connected lighting as per OSLATO mode.
NOTE: This mode requires dimmable lighting to enable dimming control. If lighting is non-dimmable, there will be no
This is a manual control mode can be used when you need the light to be off for a certain period of time.
OS-NET Programming Guide R0 10
Page 11

OS-NET Programming Guide
AMBIENT LUX
AMBIENT LUX represents various thresholds of ambient light level set for OS-NET sensor and controller to execute the
control. The higher the lux value is, the brighter the ambient light level. DISABLE means to disable the ambient light
sensor which will allow sensor/controller to execute the control regardless of the ambient light level. CURRENT means
setting the current ambient light level as threshold.
DELAY
DELAY represents the time (in minutes) that OS-NET sensor/controller will turn off or dim the light down after the area is
vacated.
TIME OFF
TIME OFF represents the time that OS-NET sensor/controller will keep the light at low dim level after the DEL AY time
elapsed. TIME OFF setting is applicable only if the OSLATO mode is set.
HIGH DIM
HIGH DIM setting is to set the output level (in %) of connected lighting during occupancy, or when ambient light level is
lower than the threshold if daylight sensing control is set. For StepDIM control, 8 levels ranging from 50% to 100% can
be selected. If SmartDIM is set, the sensor/controller will continuously dim the lighting output to maintain the overall
area lighting level within the preset range.
LOW DIM/SmartDIM
LOW DIM setting is to set the output level (in %) of connected lighting during vacancy. The OS-NET sensor/controller will
regulate the lighting output at the set level. Setting the LOW DIM at 0 means light off during vacancy. The LOW DIM
setting will become a SmartDIM setting bar if the sensor/controller is set with SmartDIM control, and the LOW DIM level
will be 50% of the SmartDIM setting.
RAMP UP
RAMP UP represents the speed of lighting output will be increased when sensor detects the presence of occupant. 3
options (INSTANT/SOFT/SLOW) are available for selection.
FADE DOWN
FADE DOWN represents the speed of lighting output will be decreased by the sensor/controller. 3 options
(INSTANT/SOFT/SLOW) are available for selection.
VM-TB
VM-TB is to set the time period BEFORE Virtual Midnight. This setting is available only if DSVM control is set.
VM-TA
VM-TA is to set the time period AFTER Virtual Midnight. This setting is available only if DSVM control is set.
SENSITIVITY
SENSITIVITY is for setting the occupancy sensing sensitivity of OS-NET sensor. For typical indoor/outdoor, low bay
applications, LOW sensitivity can be set to eliminate false-on triggering. For high bay applications, NORMAL or HIGH
sensitivity can be set to improve occupancy sensing capability. This setting is only available for OS-NET sensor.
BURN-IN
BURN-IN setting is to conduct a test with all lightings continuously on for a period of time set (in hours) or manual
OS-NET Programming Guide R0 11
Page 12

OS-NET Programming Guide
control to start and stop by the remote.
TEST (10-MIN)
TEST mode can be initiated to verify how the OS-NET sensor/controller will control the lights with shorten delay time (10
seconds). The TEST mode will last for 10 minutes and then resume to normal control. You may exit the TEST mode
anytime by giving the STOP command to the device.
LED INDICATOR
This setting allows you to enable/disable the LED indicator of OS-NET device. Factory preset is enabled.
DEFAULT
DE FAU LT allows you to resume factory default settings for the REMOTE or DEVICE if necessary. To resume factory default
for an OS-NET device, select DEVICE and press
factory default for the SRP-281 remote programmer, just select REMOTE and press
3.6 LOCK/UNLOCK
To prevent unauthorized setting changes of OS-NET devices and ensure the independence of an existing OS-NET
network, you should lock the network after completing the settings of all devices.
LOCK is to close the network to inhibit setting changes on the installed OS-NET device.
while aiming the remote toward the target device. To resume
.
UNLOCK is to open the network to allow setting changes on the installed OS-NET devices.
AUTO LOCK is a self activated function that will automatically lock the network in 12 hours after it is created. This
function is designed to prevent accidental linkage by neighboring network in case of forgetting to lock the network after
setting completed.
NOTE: A locked network will still allow certain remote control operations, including Light ON, Light OFF, TEST, BURN-IN,
current lux/dim and network data reading.
NOTE: The AUTO LOCK is factory set enabled. If setting the whole network requires more than 12 hours to complete,
and you are certain that no other OS-NET will be established within the field
To lock an OS-NET network
1. Enter the LOCK/UNLOCK page and select LOCK.
2. Pointing the remote to an OS-NET device and press enter key.
To unlock an OS-NET network
1. Enter the LOCK/UNLOCK page and select UNLOCK.
2. Pointing the remote to an OS-NET device and press enter key.
OS-NET Programming Guide R0 12
Page 13

OS-NET Programming Guide
PROFILE
DE FAULT
EZ-SET 1
EZ-SET 2
EZ-SET 3
EZ-SET 4
CONTROL
OS LATO
ON/OFF
OSO
OSLA
OS LATO
LUX
DELAY
10 MIN
10 MIN
3 MIN
5 MIN
5 MIN
TIME OFF
10 MIN
N/A
N/A
N/A
3 MIN
Max
Max
LOW DIM
-
N/A
30%
30% - RAMP UP
INSTANT
N/A
INSTANT
INSTANT
INSTANT
FADE DOWN
SOFT
N/A
SOFT
SOFT
SOFT
VM-TB
N/A
N/A
N/A
N/A
N/A
VM-TA
N/A
N/A
N/A
N/A
N/A
SENSITIVITY
HIGH
HIGH
HIGH
HIGH
HIGH
3.7 SAVE/RECALL
SAVE is to store the frequently used control mode and parameters as an EZ-SET profile in the remote for future use.
RECALL is to recall the DEFAULT setting or an existing EZ-SET profile stored in the remote for uploading to the OS-NET
sensor/controller.
NOTE: SAVE/RECALL is a remote operation that can be done without being at site.
SAVE AS
To save the current settings as a new EZ-SET profile
1. Enter the SETTING page and navigate to the setting item.
2. Press or to select the desired parameter.
3. Continue setting on all other items as required.
4. Enter the SAVE AS page and select an EZ-SET profile (1-4) to be saved.
5. Press to save the settings as a new EZ-SET profile.
RECALL
This operation allows you to recall the factory DE FA U LT or an existing EZ-SET profile for setting other OS-NET sensors
and controllers with the same control parameters saved. The parameters of selected profile will be shown on the
respective setting pages for your review. Following table highlights the factory preset parameters.
Factory preset parameters of DEFAULT and EZ-SET profiles
AMBIENT
HIGH DIM SmartDIM
DISABLED DISABLED N/A DISABLED DISABLED
N/A 70% 70% SmartDIM
OS-NET Programming Guide R0 13
Page 14

OS-NET Programming Guide
INDICATION
ACKNOWLEDGEMENT
REMARKS
2-second in GREEN or BLUE.
BLUE means the device is unlinked.
command.
2. SmartDIM setting completed.
INDICATION
ACKNOWLEDGEMENT
REMARKS
Device LED lit for 2 seconds
Grouping completed
network.
4. Setting Acknowledgment Indication
The OS-NET devices will acknowledge the setting success or failure with different indications by device LED and the
connected lighting.
OS-NET Sensor/Controller
Device LED fast blinking in GREEN
and BLUE.
Device LED blinks twice every
Device LED blinks twice every
2-second for 5 minutes, and then
15-second after power applied.
Device short beeps twice. Receiving a single setting or control
Device beeps one long and two
short. The connected lights flash
twice.
The connected lights flash twice. 1. Factory default setting resumed.
The device is scanning and linking to the
network.
The sensor detects occupant’s motion. GREEN means the device is network linked.
The device is set with daylight sensing
control. (DSVM or DSC)
Multiple setting data UPLOAD successful.
OS-NET Button
Device LED blinking Receiving commands from the remote
The fast blinking (on-off per 0.2 second)
only appears during network linking.
GREEN means the device is network linked.
BLUE means the device is unlinked.
Device LED slow blinking The device is unlinked One flash per second
Device LED fast blinking The device is scanning and linking to the
Device LED blinks twice per
second
Network linkage fail
On and Off for every 0.2 second
OS-NET Programming Guide R0 14
 Loading...