

Page 1

... ... ... ... ... ... ... ... ... ... ... .pe rf ect .ti min g.. ..
Mete-On 1
A short guide to starting-up
Kurzanleitung zur
ersten Inbetriebnahme
Guide pour la première mise
en service
Istruzioni per la prima messa
in servizio
Page 2

English..........................................................................page 3
Deutsch.........................................................................Seite 7
Français.....................................................................page 11
Italiano...................................................................pagina 15
Page 3
A short guide to starting-up your Mete-On 1 Please read first!
1. Please check that you have all the accessories listed
• Mete-On 1 (Main unit) • Power adapter
• Manuals • Table stand
- Operating instructions • 4x Batteries LR6 AA (in the main unit)
- Short guide (this document)
- Personal Meteo Centre PMC «Important»
This»Short guide” explains the first steps to start-up the Mete-On 1, its basic settings and the standard
operations to read and select the weather forecasts available in your Personal Meteo Centre
Basic information about your Mete-On 1
The Mete-On 1 is a highly engineered product using the atomic clock time signal with the extra function
of the»Meteotime-Personal Meteo Centre” reception.
On the LCD you will see weather forecasts which are received from the Swiss (HBG) or the German (DCF)
transmitter
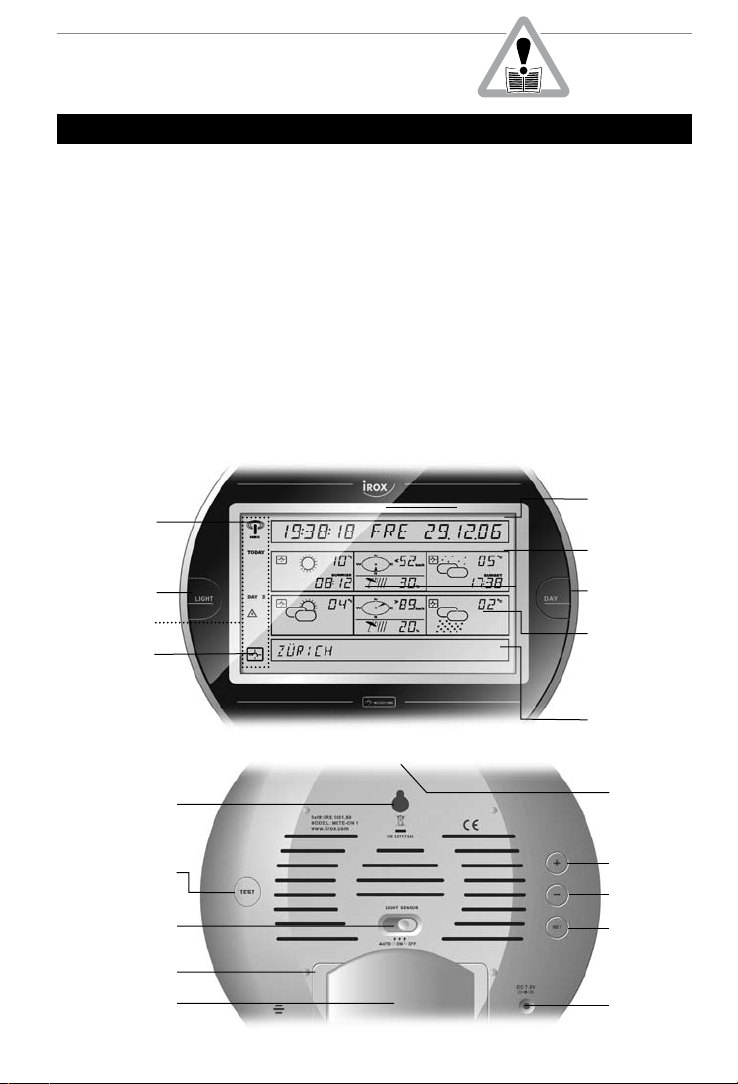
Display and operations on the front of the Mete-On 1
Time
Time signal
reception from
HBG or DCF
Backlight
Status section
Meteotime-Icon
window
Weather
window
(current day)
Key to select
forecast day 1-3
Weather
window for
day 1, 2 or 3
View and operations on the back of the Mete-On 1
Wall hanger
Start reception test
Backlight
operation (linked
to light sensor)
Battery lid
Removable
table-stand
Info window
Light sensor
Key (+)
(–)
Key
Key (SET)
Socket for
the power
adapter
3
Page 4
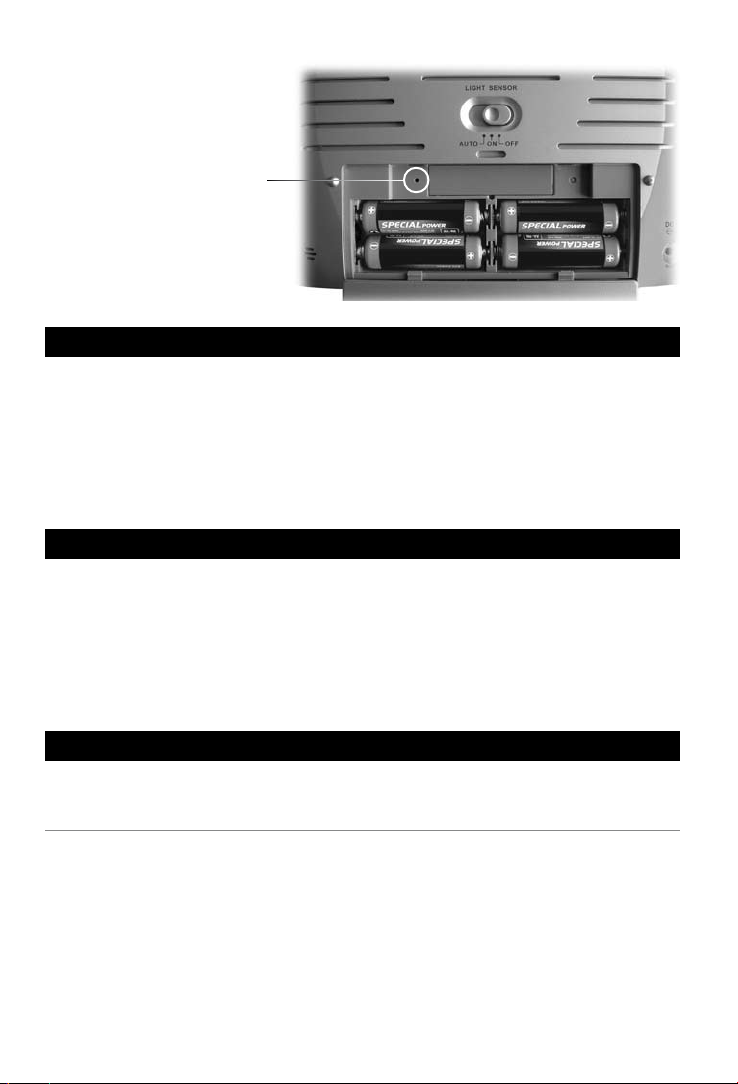
View with removed stand and open battery lid
Reset-Contact
(operate with a thin pin)
2. Where to place the Mete-On 1
Please place the unit as far away as possible from any potential electric device which may disturb the reception of the Meteotime signal.
For more information, please take note of the advice provided in the Meteotime brochure
Center PMC Important».
The Mete-On 1 may be hung on a wall or placed on a table. If you place the unit on a table, please use the
provided table stand to assure stability.
«Personal Meteo
3. Starting-up the Mete-On 1
The Mete-On 1 may be operated by batteries and/or through the power adapter from the mains. If you are
using the power adapter, we strongly recommend leaving the activated batteries in the unit to prevent a
dataloss in case of a power interruption.
To open the battery lid, please remove the table stand.
In the battery compartment you will find the batteries already inserted, but deactivated by an insulation
strip. Please remove this strip in order to activate the batteries!
4. Setting the Mete-On 1
After providing power to the unit, you have to enter the basic settings to assure the expected operation
of the Mete-On 1.
4.1 Select the city for which you wish to view forecasts for
The Mete-On 1 can give you weather forecasts for up to 90 regions in Europe. To give you an optimal use,
we have preset a total of more than 250 cities located in these 90 regions.
By default, the capital of Switzerland is activated (Bern/Schweiz). You may select at any time another city
by doing the following:
In the basic display, press the «SET» key on the back once. You will now see in the Info window on the
SELECT COUNTRY». By pressing the keys (+) or (–) you may scan step by step through the
display «
countries available (in alphabetical order).
As soon as you reach the country of your choice, press the «
4
SET» key. In the Info window you will now see
Page 5

«SELECT CITY». By pressing the keys (+) or (–) you may scan step by step through the cities available in
the selected country (in alphabetical order).
By pressing the «SET» key you will activate your choice and return to the basic display.
4.2 Select your time zone
The time you receive from the transmitters HGB and DCF is the continental European time. Specifically in
the UK you may want to adjust the time zone to show your local time (–1 h versus the continent).
In the basic display, press the «SET» key on the back twice. You will now see in the Info window on the
display «TIME ZONE» and the currently adjusted time difference versus the received time (from + 12 h to
– 11 h). By pressing the keys
By pressing the «SET» key twice you will activate your choice and return to the basic display.
(+) or (–) you may adjust this now.
4.3 Select the language of the Mete-On 1
The default language of the Mete-On 1 is English. If you wish to change this, you may do so and select
one of the other 5 languages (German, French, Italian, Spanish, Swedish).
In the basic display, press the «
ENGLISH”.
display «
By pressing the keys (+) or (–) you may adjust this now.
By pressing the «SET» key once you will activate your choice and return to the basic display.
SET» key on the back 3 times. You will now see in the Info window on the
4.4 How to activate the backlight
At any time, you may press the «LIGHT” key on the front and activate the backlight for a few seconds.
When you make use of the power adapter, you have more options for the backlight to choose from.
On the back of the Mete-On 1 you will find the slide switch «LIGHT SENSOR». With this you may select
how the backlight shall be activated when the power adapter is connected.
AUTO»: The backlight is activated automatically when the light sensor on the product’s top
Position «
decides that the light of the environment is too dim to read the display.
ON»: The backlight is permanently on.
Position «
OFF»: The backlight is permanently off.
Position «
5. What the front shows
The Mete-On 1 has a well structured display
• Time window Time and Calendar
• Weather window TODAY Weather forecast for the current day (day time and night time)
• Weather window DAY 1 / 2 / 3 Weather forecast for the coming days (Day 1, Day 2 or Day 3)
• Info window Location for which the displayed forecast is valid
(and other massages)
Key functions:
• Key «DAY» to select the forecast in the «Weather window Day 1/2/3”
• Key «LIGHT» to activate the display backlight for approx. 7 seconds
5
Page 6

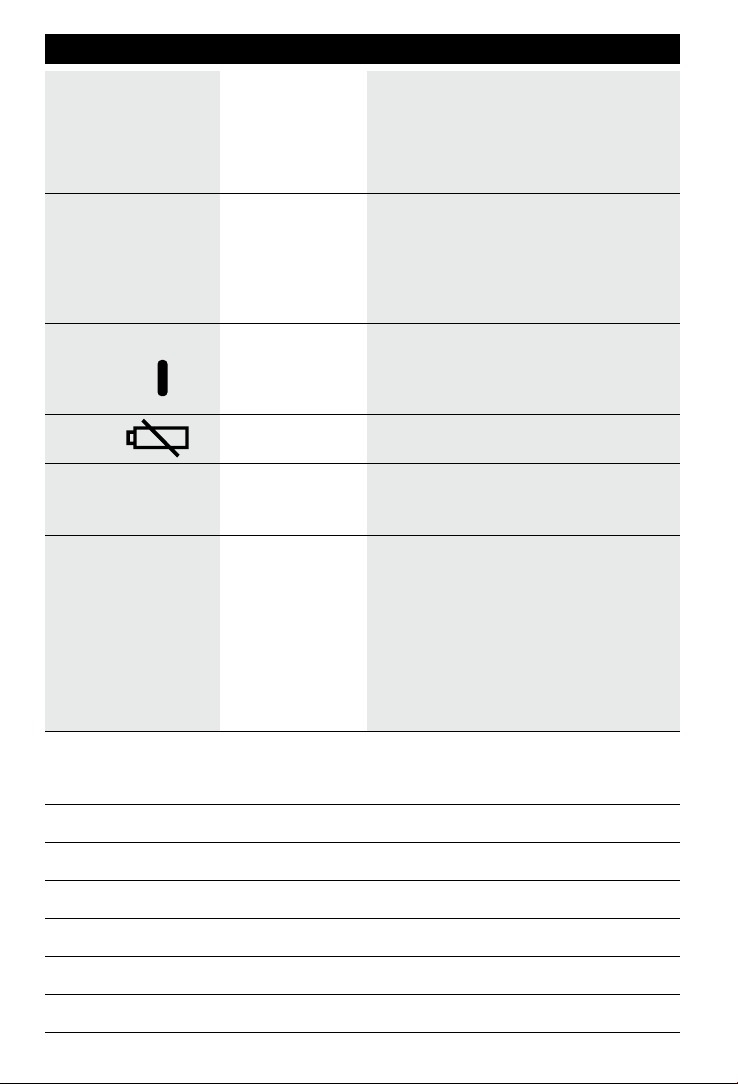
Errors and corrective actions
ERROR
REASON
WHAT TO DO
• Time and Day
are completely wrong
• The Meteotime-Icon in
the Status window is not
fully activated.
• The forecasts are not
complete or missing
completely.
• the time signal icon
has no
«waves».
• Low Bat.
• the Meteotime Icon in the
relevant forecast window
is not fully displayed
• no function, no regular
display, no reaction to
any keypress
The time signal recep
tion is interrupted or
disturbed.
The time signal
reception is interrupted or disturbed.
The Mete-On 1 was
not able to receive a
good time signal in
the last 12 hours.
The batteries are used
up.
This piece of the fore
cast has not been
fully received.
After a battery
exchange, the unit
has not started up
correctly.
An unusal and very
strong electrical
occurance has created
a problem in the
unit’s processor.
-
The position and location of the Mete-On 1 are not
suitable. Find a new place with good reception.
For this use the «Reception Test» described
in the Operating Instructions.
The position and location of the Mete-On 1 are not
suitable. There may be electrical interferances in the
surroundings or the signal may not get to the unit.
Find a new place with good reception or move
the electrical device to a place min. 1m away
For this use the «Reception Test» described
in the Operating Instructions.
The position and location of the Mete-On 1 are not
suitable. Find a new place with good reception.
For this use the «Reception Test» described
in the Operating Instructions.
Replace the batteries with new ones
(4x Batteries LR6 AA - Alkaline or better)
-
Most likely the reception was interrupted or
disturbed by a one-time interference. If this
status remains over repeated days, find another
place or remove potential sources of a problem.
Remove all batteries and press the key «LIGHT» to
make sure any remaining power in the unit is
discharged. After this, reinsert the batteries.
or
Press the RESET contact in the battery
compartment.
Notes
6
Page 7

Kurzanleitung zur ersten Inbetriebnahme Bitte zuerst lesen!
1. Überprüfen des mitgelieferten Zubehörs
• Mete-On 1 (Hauptgerät) • Netzteil
• Bedienanleitungen • Aufsteller
- Bedienungsanleitung • 4 Batterien LR6 AA (im Gerät)
- Kurzanleitung zur ersten Inbetriebnahme (dieses Dokument)
- Personal Meteo Centre PMC «Important»
Die vorliegende Anleitung erläutert die Inbetriebnahme, Grundeinstellung und einfache Bedienung zur
Anzeige der Wetterprognosen für ein gewünschtes Wettergebiet.
Grundsätzliches zum Gerät Mete-On 1
Das Mete-On 1 ist ein hochentwickeltes Produkt auf der Basis der Funkuhrtechnologie mit der zusätzlichen Funktion des Meteotime-Wetterdatenempfangs.
In der Anzeige erscheinen Wetterprognoseinformationen, die über die Zeitzeichensender HBG in der
Schweiz und DCF in Deutschland übertragen werden.
Anzeige und Bedienung von der Vorderseite
Anzeige Zeit-
zeichenempfang
von HBG oder DCF
Taste Licht
Status-
anzeigebereich
Meteotime-Symbol
Ansicht und Bedienung von der Rückseite
Wandaufhänger
Empfangstest
Lichtsteuerung
Batteriefachdeckel
abnehmbarer
Aufsteller
Zeitfenster
Wetterfenster
(aktueller Tag)
Taste Auswahl
Prognosetag
Wetterfenster
für Prognosetag 1 oder 2
oder 3
Infofenster
LichtstärkeFühler
Taste (+)
(–)
Taste
Taste (SET)
Anschlussbuchse
für Netzteil
7
Page 8

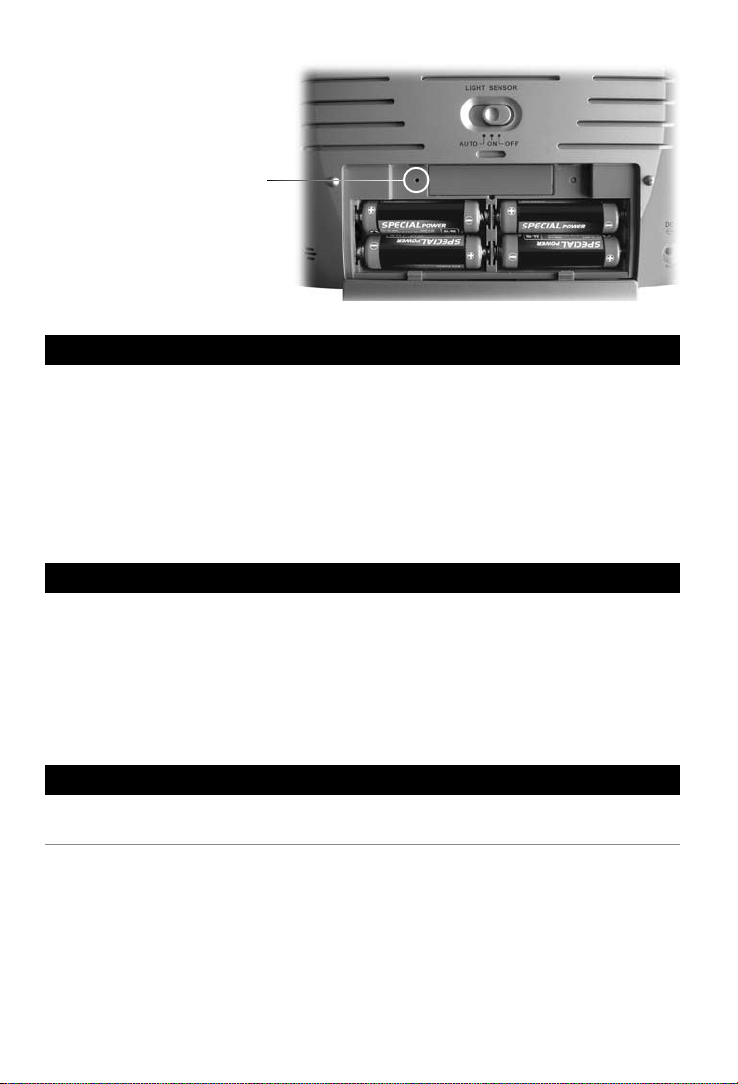
Aufsteller entfernt und Batteriefach geöffnet
Reset-Taste
mit dünnem Stössel bedienen
2. Aufstellungsort festlegen
Suchen Sie einen Aufstellungsort für das Mete-On 1, an dem möglichst keine elektrisch störenden Geräte
den Empfang der Uhrzeit und der Wetterdaten beeinträchtigen. Für einen sicheren Stand ist der mitgelie
ferte Aufsteller an der Rückseite zu montieren.
Nähere Hinweise zum Aufstellungsort entnehmen Sie bitte der Meteotime-Broschüre «
Center PMC Important».
Das Mete-On 1 kann an einer Wand aufgehängt oder mit dem Aufsteller auf einen Tisch aufgestellt werden.
Personal Meteo
3. Inbetriebnahme des Gerätes
Das Gerät Mete-On 1 kann mit Batterie oder mit Netzteil betrieben werden. Es ist empfehlenswert, bei
Netzbetrieb ebenfalls die Batterien im Gerät zu belassen, um bei Netzausfall alle Funktionswerte zu erhalten.
Zum Öffnen des Batteriefachs muss der Aufsteller an der Rückseite abgenommen werden.
Die bei der Auslieferung bereits eingelegten Batterien sind mit Isolierstreifen abgeschaltet. Zum Aktivieren
der Batterien sind die Isolierstreifen zu entfernen.
4. Einstellen des Mete-On 1
Nach dem erstmaligen Aktivieren der Batterien muss das Mete-On 1 für seinen Betrieb eingestellt werden.
-
4.1 Einstellen des Anzeigeortes
Das Mete-On 1 kann Ihnen Wetterinformationen von bis zu 90 Gebieten von Europa anzeigen. Sie finden
eine Auswahl von Städten dieser Regionen im Gerät vorprogrammiert.
Bei der Auslieferung ist Bern/Schweiz eingestellt. Die Stadt Ihrer Wahl können Sie wie folgt einstellen:
Betätigen Sie die Taste «SET» auf der Rückseite 1 mal. Damit erscheint im Infofenster «LAND EIN-
STELLEN» («SELECT COUNTRY»). Danach wählen Sie mit der Betätigung der Taste (+) oder (–) das
gewünschte Land aus.
Wenn im Infofenster das gewünschte Land angezeigt wird, betätigen Sie die Taste «
im Infofenster «
gewünschte Stadt des ausgewählten Landes einstellen. Danach betätigen Sie die Taste «
in die Grundanzeige zurückzukehren.
8
STADT EINSTELLEN» («SELECT CITY»). Danach können Sie mit der Taste (+) oder (–) die
SET». Damit erscheint
SET», um wieder
Page 9

4.2 Einstellen der Zeitzone
Die von den Zeitzeichensendern HBG und DCF empfange Zeit ist die in Mittel Europa gültige Zeit. Im
Normalfall brauchen Sie hier also nichts einzustellen.
Zur Einstellung einer Zeitzone (z. B. England –1 h) betätigen Sie aus der Grundanzeige die Taste «
auf der Rückseite 2 mal. Danach erscheint im Infofenster «
Abweichung gegenüber der empfangenen Zeit (+ 12 h bis – 11 h).
Jetzt kann mit der Taste (+) oder mit der Taste (–) die gewünschte Zeitabweichung eingestellt werden.
Danach betätigen Sie wieder die Taste «SET» 2 mal, um in die Grundanzeige zurückzukehren.
ZEITZONE» («TIME ZONE») mit Angabe der
SET»
4.3 Einstellen der Sprache
Die Werkseinstellung des Mete-On 1 ist englisch. Sie haben die Auswahl von 5 weiteren Sprachen
(Deutsch, Französisch, Italienisch, Spanisch, Schwedisch).
Zur Einstellung der Sprache betätigen Sie aus der Grundanzeige die Taste «SET» auf der Rückseite 3 mal.
Danach erscheint im Infofenster der Anzeige «
(–) die gewünschte Sprache ausgewählt werden.
Taste
Nachdem Sie die gewünschte Sprache ausgewählt haben, betätigen Sie wieder die Taste «SET», um in
die Grundanzeige zurückzukehren.
ENGLISH». Danach kann mit der Taste (+) oder mit der
4.4 Einstellen der Beleuchtung
An der Rückseite der Mete-On 1 ist der Schalter zur Lichtsteuerung für die Beleuchtung der Anzeige. Nur
bei der Verwendung eines Netzteils ist es möglich, die Beleuchtung mit diesem Schalter zu steuern.
In der Stellung «
In der Stellung «
In der Stellung «
AUTO» schaltet sich die Beleuchtung der Anzeige automatisch bei Dämmerung ein.
ON» ist die Beleuchtung der Anzeige ständig aktiviert.
OFF» ist die Beleuchtung der Anzeige abgeschaltet.
5. Bedienen der Anzeige mit den Tasten auf der Front
Das Mete-On 1 hat eine klar strukturierte Anzeige mit folgenden Fenstern:
• Zeitfenster Uhrzeit und Datum
• Wetterfenster TODAY Wetterprognose des aktuellen Tages und der Nacht
• Wetterfenster DAY 1 / 2 / 3 Wetterprognose für den Tag 1 oder den Tag 2 oder den Tag 3
• Infofenster Anzeigeort für die Wetterprognose (und weitere Meldungen)
Tastenfunktionen:
• Taste «DAY» mit der Taste «DAY» kann der Anzeigetag im «Wetterfenster
Tag 1/2/3» verändert werden
• Taste «LIGHT» mit der Taste «LIGHT» wird die Beleuchtung für die Anzeige
für 7 Sekunden aktiviert
9
Page 10
Fehleranzeigen und deren Behebung
FEHLER
URSACHE
BEHEBUNG
• keine richtige Uhrzeit
und Datum in der
Anzeige.
• das Meteotime-Symbol
im Statusbereich ist nicht
voll angezeigt;
• die Wetterprognosen
sind lückenhaft;
nicht vorhanden.
• am Funkturm fehlen
die Kreise.
• Low Bat.
• das Meteotime-Symbol in
den Prognosefenstern ist
nicht voll angezeigt.
• keine Funktion oder
fehlerhafte Anzeige oder
keine Reaktion auf Tasten betätigung
Der Funkempfang
vom Mete-On 1
ist gestört.
Der Funkempfang vom
Mete-On 1 ist gestört.
Die Uhrzeit konnte
innerhalb der letzten
12 Std. nicht aktuali
siert werden.
Die Batterien sind
verbraucht.
Die betroffenen Wetterdaten konnten nicht
empfangen werden.
Beim Batteriewechsel
ist in der Elektronik
ein undefinierter
Zustand entstanden.
Durch eine starke elek
trische Störung ist in
der Elektronik ein
undefinierter Zustand
entstanden.
-
Der Aufstellungsort der Mete-On 1 ist ungeeignet.
Finden Sie einen Aufstellungsort, bei dem der Funkempfang nicht gestört ist. Benutzen Sie die Funktion «Empfangstest» aus der Bedienungsanleitung.
An dem Aufstellungsort des Mete-On 1 gibt
es elektrische Störungen oder der Empfang ist
zu schwach. Benutzen Sie die Funktion «Emp
fangstest» aus der Bedienungsanleitung, um einen
günstigeren Aufstellungsort zu finden oder das
störende Gerät zu entfernen.
An dem Aufstellungsort des Mete-On 1 ist der
Empfang gestört. Benutzen Sie die Funktion «Emp
fangstest» aus der Bedienungsanleitung, um einen
günstigeren Aufstellungsort zu finden.
Austausch der Batterien.
(4 Batterien LR6 AA - Alkaline oder besser)
Bei dieser Empfangsstörung handelt es sich um eine
zeitweise Störung; bei häufigerem Auftreten sollte
ein günstigerer Aufstellungsort gefunden werden.
Batterien aus dem Batteriefach entnehmen, mit der
Taste «LIGHT» die gespeicherte Energie entladen
und danach die Batterien neu einsetzen
oder
mit dünnem Stössel die Taste «RESET» betätigen.
-
-
-
Bemerkungen
10
Page 11

Guide pour la première mise en service Prière de lire avant
l’utilisation
1. Contrôle des accessoires
• Mete-On 1 (appareil principal) • Adaptateur secteur
• Modes d’emploi • Support
- Mode d’emploi complet • 4 piles LR6 AA (dans l’appareil)
- Guide pour la première mise en service
- Personal Meteo Centre PMC «Important»
Le présent guide vous indique comment procéder à la mise en service de l’appareil, comment réaliser les
réglages de base et comment utiliser de manière simple les prévisions météo d’un secteur donné.
Vue d’ensemble du Mete-On 1
Le Mete-On 1 est un appareil développé entièrement sur la base de la technologie des horloges radiocontrôlées; il comprend de plus des fonctions supplémentaires liées à la réception des données météoro
logiques de Meteotime. L’affichage indique notamment des informations concernant les prévisions mé
téorologiques. Ces dernières sont transmises grâce aux émetteurs HBG en Suisse et DCF en Allemagne.
Affichage et utilisation de la face avant de l’appareil
-
-
Réception du
signal HGB
ou DCF
Eclairage
Indicateur du statut
Symbole Meteotime
Présentation et utilisation de la face postérieure de l’appareil
Encoche pour
suspension murale
Test de réception
Réglage de l’éclairage
Compartiment à piles
Support amovible
Fenêtre horaire
Prevision
jour actuel
Choix du jour
1-3 à analyser
Prévisions pour
le jour 1 ou 2
ou 3
Fenêtre
d’information
Sonde d'intensité
de la lumière
Touche (+)
(–)
Touche
Touche (SET)
Raccordement
secteur
11
Page 12
Présentation lors du retrait du support et de l’ouverture du compartiment
Touche Reset à utiliser
avec un objet pointu
2. Choix de la place de l’appareil
Choisissez un emplacement pour le Mete-On 1 qui soit, dans la mesure du possible, dépourvu de sources
électriques susceptibles de déranger ou empêcher la réception du signal horaire et des données météo.
Vous trouverez de plus larges informations concernant le choix de l’emplacement de l’appareil dans la
brochure Meteotime: «
Le Mete-On 1 peut être fixé à un mur grâce à l’encoche prévue, ou posé sur une table au moyen du
support fourni.
Afin de garantir la stabilité de l’appareil, le support fourni doit être utilisé.
Personal Meteo Center PMC Important».
3. Mise en service de l’appareil
L’appareil Mete-On 1 peut fonctionner sur piles ou grâce à l’alimentation secteur. Il est recommandé de
laisser les piles dans l’appareil même en cas d’utilisation de l’alimentation secteur. Ainsi, l’appareil peut
continuer à fonctionner même en cas de panne de courant.
Pour ouvrir le compartiment à pile, il faut auparavant ôter le support fixé au dos.
Les piles fournies avec l’appareil sont maintenues hors-circuit grâce à des bandes d’isolation. Ces bandes
doivent être retirées.
4. Réglage du Mete-On 1
Lors de la première activation des piles, il est nécessaire de procéder au réglage du Mete-On 1.
4.1 Installation du lieu
Le Mete-On 1 peut vous fournir des informations météorologiques concernant 90 régions d’Europe. L’appareil vous propose notamment une pré-programmation pour plusieurs villes de ces diverses régions.
Lors de la livraison, la ville de Berne/Suisse est installée. Vous pouvez modifier ce choix de la manière
suivante:
Pressez la touche «SET» à l’arrière de l’appareil. «CHOIX DU PAYS» («SELECT COUNTRY») apparaît
alors à l’écran. Vous pouvez maintenant choisir le pays désiré grâce aux touches
Lorsque le pays désiré apparaît à l’écran, pressez la touche «
12
SET». «CHOIX DE LA VILLE» («SELECT
(+) ou (–).
Page 13

CITY») apparaît alors à l’écran. Vous pouvez maintenant choisir la ville désirée grâce aux touches (+) ou
(–). Pressez maintenant la touche «SET» pour retourner au fonctionnement normal de l’appareil.
4.2 Réglage de la zone horaire
Pour régler la zone horaire (par exemple Grande-Bretagne –1 h) pressez deux fois la touche «SET» à
l’arrière de l’appareil.
FUSEAU HORAIRE» («TIME ZONE») apparaît alors à l’écran avec l’indication de la différence d’heure
«
à effectuer (+ 12 h bis – 11 h).
Vous pouvez maintenant procéder au réglage grâce aux touches (+) ou (–).
Pressez maintenant deux fois la touche «SET» pour retourner au fonctionnement normal de l’appareil.
4.3 Réglage de la langue
Pour procéder au réglage de la langue, pressez trois fois la touche «SET» à l’arrière de l’appareil.
«ENGLISH» apparaît alors à l’écran. Vous pouvez maintenant procéder au réglage de la langue grâce
aux touches
Allemand, Français, Italien, Espagnol, Suédois
Une fois que vous avez choisi la langue adéquate, pressez la touche «SET» pour retourner au fonctionnement normal de l’appareil.
(+) ou (–) jusqu’à l’apparition de la langue souhaitée. Les langues disponibles sont: Anglais,
4.4 Réglage de l’éclairage
A l’arrière de l’appareil se trouve un commutateur pour le réglage de l’éclairage de l’écran. Cette fonction
n’est toutefois disponible qu’avec une alimentation secteur.
En fonctionnement «
En fonctionnement «
En fonctionnement «
AUTO» , l’éclairage s’enclenche automatiquement le soir.
ON», l’éclairage est constamment actif.
OFF», l’éclairage est désactivé
5. Utilisation de l’affichage avec les touches
situées à l’avant
Le Mete-On 1 indique:
• Fenêtre horaire Heure et date
• Prévision TODAY Prévisions du jour / de la nuit actuels
• Prévision DAY 1 / 2 / 3 Prévision pour le jour 1 ou 2 ou 3
• Fenêtre d’information Indication du lieu des prévisions météo
(et des autres informations)
Touches:
• Touche «DAY» avec la touche «DAY» vous pouvez choisir
le jour indiqué (1, 2 ou 3)
• Touche «LIGHT» la touche «LIGHT» active l’éclairage durant 7 secondes
13
Page 14

Dépannage et résolution de problème
PROBLèME
CAUSE
SOLUTION
• Affichage erroné de
l’heure et de la date
• le symbole Meteotime
n’est pas entièrement
affiché dans l’indicateur
de statut
• les prévisions météo sont
incomplètes ou inexistantes
• il manque des segments
autour du pylône
• Piles faibles
• le symbole Meteotime
dans la fenêtre des
prévisions n’est pas
entièrement affiché
• pas de fonctions disponi bles, erreur d’affichage,
pas de réaction à la
pression des touches
La réception radio est
perturbée
La réception radio est
perturbée
L’heure n’a pas pu être
actualisée depuis
12 heures
Les piles sont usées
Les données météo
concernées n’ont pas
pu être reçues
Un problème électronique de nature indéfinie
est survenu lors du
changement des piles
Un fort dérangement
électrique a créé dans
l’électronique de
l’appareil un problème
de nature indéfinie
Le placement de l’appareil est inadéquat.
Cherchez un endroit où la réception n’est pas
perturbée.
Pour ceci, utilisez la fonction «Test de réception»
décrite dans le mode d’emploi.
Il y a des interférences électriques proches de
l’appareil, ou le signal est trop faible.
Utilisez la fonction «Test de réception» décrite dans
le mode d’emploi afin de trouver un endroit
approprié pour l’appareil, ou déplacez l’appareil
perturbateur.
Il y a des interférences proches de l’appareil.
Utilisez la fonction «Test de réception» décrite
dans le mode d’emploi afin de trouver
un endroit approprié pour l’appareil.
Remplacement des piles
(4 piles LR6 AA - Alcaline ou mieux)
Il s’agit d’un dérangement occasionnel.
Si toutefois cela devait se répéter, il serait
préférable de chercher un endroit plus approprié
pour l’appareil.
Retirez les piles du compartiment et pressez la touche
«LIGHT» afin de décharger l’énergie restante, puis
ré-installez les piles
ou
appuyez sur la touche «RESET» avec un objet pointu.
Notes
14
Page 15

Istruzioni per la prima messa in servizio
Si prega di leggere
prima dell’utilizzo!
1. Controllo degli accessori
• Mete-On 1 (unità principale) • Adattatore setto
• Istruzioni per l’uso • Appoggio
- Istruzioni complete per l’uso • 4 pile LR6 AA (nell’apparecchio)
- Istruzioni per la prima messa in servizio
- Personal Meteo Centre PMC «Important»
Queste istruzioni indicano come procedere alla messa in servizio, come regolare l’apparecchio e come
utilizzare in modo semplice le previsioni meteorologiche di una regione.
Vista generale del Mete-On 1
Il Mete-On 1 è un apparecchio sviluppato interamente sulla base della tecnologia degli orologi radio controllati. Comprende anche funzioni supplementari come la ricezione dei dati meteorologici di Meteotime.
L’affissione indica in particolare informazioni per le previsioni meteorologiche. Queste previsioni sono
trasmesse grazie alle emittenti HGB in Svizzera e DCF in Germania.
Affissione ed utilizzo dello schermo
Ricezione del
segnale HGB
o DCF
Illuminazione
Indicatore
del stato
Simbolo
Meteotime
Presentazione ed utilizzo della parte posteriore dell‘apparecchio
Tacca per la
fissazione murale
Prova di ricezione
Regolazione
dell’illuminazione
Scompartimento
Appoggio amovibile
a pile
Finestra oraria
Finestra
previsioni giorno
attuale
Scelta del
giorno per la
previsione
Finestra previsioni per il
giorno 1 o 2 o 3
Finestra
Informazioni
Sensore d‘intensità della luce
Tasto (+)
(–)
Tasto
Tasto (SET)
Collegamento
alimentazione
settore
15
Page 16

Presentazione al ritiro dell’appoggio e all’apertura del compartimento
Tasto RESET da usare con un
oggetto aguzzo
2. Scelta del posto dell’apparecchio
Scegliere un posto per il Mete-On 1 sprovvisto di fonti elettriche suscettibili di disturbare o impedire la
ricezione del segnale orario e dei dati meteorologici.
Troverete più ampie informazione sulla scelta del posto dell’apparecchio nell’opuscolo «Personal Meteo
Center PMC Important» («Indicazioni importanti»).
Mete-On 1 può essere fissato ad una parete grazie alla tacca prevista, o su una tavola tramite l’appoggio
fornito.
Per garantire la stabilità dell’apparecchio, l’appoggio fornito deve essere utilizzato.
3. Messa in servizio
L’apparecchio Mete-On 1 può funzionare con pile o con l’alimentazione settore.
Si raccomanda di lasciare le pile nell’apparecchio anche se l’apparecchio funziona con l’alimentazione
settore: cosi, l’apparecchio può continuare a funzionare anche in caso di guasto di corrente.
Per aprire lo scompartimento a pila, occorre prima togliere l’appoggio. Le pile fornite sono mantenute
inattive con un isolante che deve essere ritirato.
4. Impianto del Mete-On 1
All’attivazione delle pile, è necessario procedere alla regolazione del Mete-On 1.
4.1 Regolazione del luogo
Il Mete-On 1 può fornire informazioni meteorologiche per 90 regioni dell’Europa. L’apparecchio propone
in particolare una pre-programmazione per molte città.
Alla messa in servizio, la città Berna / Svizzera è scelta. Per modificare questa scelta seguire le istruzioni
seguenti:
Premere il tasto «SET» alla parte posteriore dell’apparecchio. «SCELTA DEL PAESE» («SELECT COUNTRY») appare allo schermo. Può scegliere il paese voluto con i tasti (+) o (–).
Quando il paese voluto appare allo schermo, premere il tasto «
CITY») appare allo schermo. Può scegliere la città con i tasti (+) o (–).
Premere ancora il tasto «SET» per tornare al funzionamento normale dell’apparecchio.
16
SET». «SCELTA DELLA CITTA» («SELECT
Page 17

4.2 Regolazione della zona oraria
Per regolare la zona oraria (per esempio Inghilterra –1 h) premere due volte il tasto «SET» alla parte
posteriore dell’apparecchio. «
della differenza da calcolare (+ 12 h fino à – 11 h).
Può procedere alla regolazione con i tasti (+) o (–).
Premere adesso due volte il tasto «SET» per tornare al funzionamento normale dell’apparecchio.
ZONA ORARIA» («TIME ZONE») appare allo schermo con l’indicazione
4.3 Regolazione della lingua
Per procedere alla regolazione della lingua, premere tre volte il tasto «SET» alla parte posteriore dell’apparecchio. «
(–). Le lingue disponibili sono: inglese,tedesco, francese, italiano, spagnolo, svedese.
Premere il tasto «SET» per tornare al funzionamento normale dell’apparecchio
ENGLISH» appare allo schermo. Può procedere alla regolazione della lingua con i tasti (+) o
4.4 Regolazione dell’illuminazione
Il commutatore per la regolazione dell’illuminazione si trova alla parte posteriore dell’apparecchio.
Questa funzione è disponibile soltanto con l’alimentazione settore.
In funzionamento «
In funzionamento «
In funzionamento «
AUTO» , l’illuminazione si attiva automaticamente alla sera.
ON», l’illuminazione è sempre attiva.
OFF», l’illuminazione è disattivata
5. Utilizzazione dell’affissione e dei tasti
Il Mete-On 1 indica:
• Finestra oraria Ora e data
• Finestra previsione TODAY Previsioni del giorno / della notte attuali
• Finestra previsioni DAY 1 / 2 / 3 Previsioni per il giorno 1 o 2 o 3
• Finestra informazioni Luogo della previsione (ed altre informazioni)
Tasti:
• Tasto «DAY» con il tasto «DAY» può scegliere il giorno indicato
nella finestra «
• Tasto «LIGHT» il tasto «LIGHT» attiva l’illuminazione durante 7 secondi
DAY 1/2/3»
17
Page 18

Riparazione e risoluzione di problema
PROBLEMA
CAUSA
SOLUZIONE
• Affissione falsa della data
e dell’ora
• il simbolo Meteotime non
è completamente affisso
nell’indicatore di stato
• le previsioni sono
incomplete o inesistenti
• mancano segmenti
intorno del pilone
• Pile debole
• il simbolo Meteotime non
è completamente affisso
nella finestra delle
previsioni
• nessune funzioni disponi bili, errore di affissione,
nessune reazione alla
pressione dei tasti
La ricezione
è perturbata
La ricezione
è perturbata
L’ora non è stata
ricevuto da 12 ore
Le pile sono debole
L’apparecchio non ha
ricevuto
i dati meteorologiche
Un problema elettronico di natura
indefinita è successo
al cambiamento delle
pile.
Una forte perturbazio
ne elettrica ha creato
nell’elettronica
dell’apparecchio un
problema di
natura indefinita
Il posto dell’apparecchio è inadeguato.
Cercare un posto dove la ricezione non sarà
perturbata.
Utilizzare la funzione «Prova ricezione» indicata
nel modo di uso.
Ci sono interferenze elettriche vicino
all’apparecchio, o il segnale è troppo debole.
Utilizzare la funzione «Prova ricezione» indicata nel
modo di uso per trovare un’altro posto, o
muovere l’apparecchio perturbatore.
Ci sono interferenze.
Utilizzare la funzione «Prova ricezione» indicata nel
modo di uso per trovare un’altro posto.
Spostamento delle pile
(4 pile LR6 AA - Alcaline o meglio)
E una perturbazione sporadica.
Se deve ripertersi, è preferibilie cercare un’altro
posto per l’apparecchio.
Ritirare le pile dello scompartimento e premere il
tasto «LIGHT» per scaricare l’energia, poi rimettere
le pile nello scompartimento
o
premere sul tasto «RESET» con un ogetto aguzzo.
-
Note
18
Page 19

www.irox.com
IRMO1.06.S01
 Loading...