


i-Climber ER
Bedienungsanleitung
iClimber-ER
Instruction Manual

Index
1. Introduction Page 3
2. Putting into operation Page 4
3. Operation elements Page 5
3.1 LCD display and buttons Page 5
3.2 Operation logic of buttons Page 6
3.3 Locking the buttons (“Key-Lock”) Page 7
3.4 Meaning of the LCD icons Page 8
3.5 Bezel Page 9
3.6 Battery compartment Page 9
4. Functions and operation Page 10
4.1 Time (time and alarm) Page 12
4.2 Timer Page 16
4.3 Sport (stopwatch, VERTIC-LOG) Page 19
4.4 DATA LOG (retrieving stored data) Page 28
4.5 Altimeter (altimeter, thermometer) Page 33
4.6 Barometer (air pressure, weather, measuring units) Page 37
4.7 Compass Page 40
5. Battery replacement Page 44
6. Maintenance Page 44
7. Support Page 45
8. Technical information Page 46
9. VERTIC-LOG – how to use Page 47
Brief instruction DATA LOG seperate sheet
Version 1.102008
2 • Index

1. INTRODUCTION
Thank you for choosing the iClimber-ER by IROX. You are now the owner of a high
quality watch which is the result of Italian design, Swiss engineering, Canadian and
Swiss technology, and is manufactured in the greater Hong Kong area.
The iClimber-ER offers true novelties in the watch market. Among other things the
VERTIC-LOG® function, which was developed in cooperation with Swiss mountain guides. Besides the operating steps described in chapter 4 you will also find
an explanation of how to use this function in chapter 9 and why mountain guides
requested this function.
Please read the instructions carefully. You will find useful and interesting information
beyond the operation explanations.
About IROX
IROX, as a brand, was founded in the year 2002 in Switzerland. IROX has established itself as specialist for measuring devices for weather, environment, and
sports and is internationally present. Besides closely collaborating with the best
manufacturers in the electronics branch worldwide, IROX has also developed, and
made market ready, real innovations some of which have totally revolutionised the
market. The weather stations with the Meteotime System are only one example.
Introduction • 3

2. PUTTING INTO OPERATION
The iClimber is delivered with inserted battery and the watch in a battery conserving
sleep-mode. In this state the display is switched off, “blank”.
The watch is activated by a short pressing of any button.
The watch can now be operated as described in chapter 4.
! Important information
The iClimber is a high quality measuring device with several functions that you
can influence and also some that can not be influenced because they run in the
background (e.g. pressure measurement). Please be aware that active use of
each additional function requires energy and therewith battery. Often activating
the backlight, using the Key-Tone or compass for bearings also draws power
from the battery and this has a direct influence on the battery life.
If you are going on an expedition during which you will be intensely using the
watch and exposing yourself and your equipment to very cold temperatures we
strongly recommend taking along replacement batteries (Type CR2032).
The watch battery, if the watch is simply used as a wristwatch, has a lifetime of
up to one year. The repeated use of several functions can reduce the battery
lifetime by a few months!
4 • Putting into operaton

3. OPERATION ELEMENTS
3. BEDIENELEMENTE
3.1 LCD ANZEIGE UND TASTEN
Sämtliche Funktionen werden auf der Flüssigkristallanzeige (LCD) auf 5 Zeilen
dargestellt und die Bedienung erfolgt über die 4 seitlichen Tasten.
3.1 LCD DISPLAY AND BUTTONS
All functions are shown in 5 lines on a liquid crystal display (LCD) and can be
operated with the 4 buttons on the sides.
Complete segment with the four button labels
If displays with data are used in this manual, the data herein will vary from the data
on your watch. These printed displays are only for better understanding.
Operation elements • 5
3.2 OPERATION LOGIC OF BUTTONS
--►
Taste kurz drücken
--►
Taste kurz drücken
--► Taste 2 Sekunden gedrückt halten
The button functions are described in detail in chapter 4. Where button symbols are
used, please remember the following logic:
Press button
Press and hold button for 2 seconds
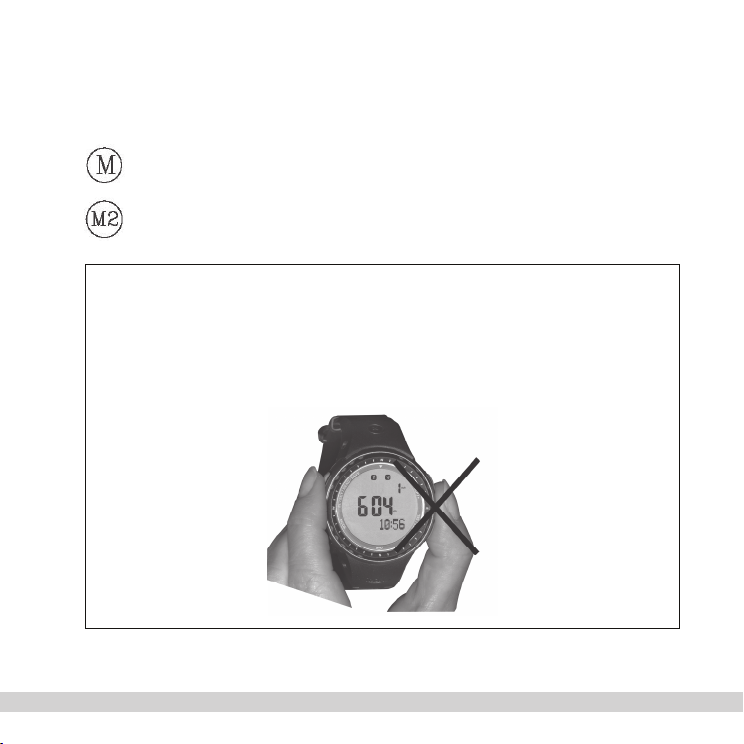
! Good to know
Important: When operating the buttons with your fingers please avoid covering
the opening on the right side of the case. The pressure sensor for the altimeter/
barometer is located directly behind the opening and such manual operations
may influence the measuring.
6 • Operation elements

3.3 LOCKING THE BUTTONS (“KEY-LOCK”)
3.4 TASTEN BLOCKIERUNG ("KEY-LOCK")
Um ein ungewolltes Betätigen der Tasten zu vermeiden, können Sie die
Tasten deaktivieren:
"Key-Lock" aktivieren:
+ --►Drücken Sie während mindestens 2 Sekunden
die Tasten M und S/L zusammen.
7
3.4 TASTEN BLOCKIERUNG ("KEY-LOCK")
Um ein ungewolltes Betätigen der Tasten zu vermeiden, können Sie die
Tasten deaktivieren:
"Key-Lock" aktivieren:
+ --►Drücken Sie während mindestens 2 Sekunden
die Tasten M und S/L zusammen.
Anzeige wenn "Key-Lock" aktiv:
Sind die Tasten deaktiviert, erscheinen auf der
Anzeige am Rang 4 Punkte.
Drücken Sie in diesem Zustand eine einzelne Taste,
erscheint unten in der Anzeige der kurz der Hinweis
"LOCKED"
You can deactivate the buttons to avoid undesired operation of the buttons:
Activate “Key-Lock”:
Press the M and S/L buttons simultaneously for
at least 2 seconds.
Display for activated “Key-Lock”:
If the buttons are deactivated 4 dots will appear
on the border of the display.
If you press any button in this state, the
information “LOCKED” will appear at the bottom
of the display.
Operation elements • 7

Deactivate “Key-Lock”:
"Key-Lock" deaktivieren:
+ --►Drücken Sie kurz die Tasten M und S/L
"Key-Lock" deaktivieren:
+ --►Drücken Sie kurz die Tasten M und S/L
zusammen. Die vier Punkte verschwinden und
die Tasten sind wieder bedienbar.
3.5 BEDEUTUNG DER LCD ICONS
--► Vertic-Log ist aktiv
--► Wecker ist aktiv
--► Tasten-Ton ist aktiv
--► Batterie schwach (siehe Kap 2, 3.6 und 5)
Press the M and S/L buttons simultaneously.
The four dots will disappear and the buttons
can be operated again.
3.4 MEANING OF THE LCD ICONS
VERTIC-LOG is active
Alarm is active
Key tone is active
Battery weak (see chapter 2, 3.6 and 5)
8 • Operation elements

3.5 BEZEL
The bezel serves for position finding with the compass. Operating was arranged
in such a manner that the ring can be turned, but does not move easily when only
slightly brushed.
3.6 BATTERY COMPARTMENT
1x 3V battery type CR2032
You can replace the battery yourself.
Proceed as follows:
– Place the watch face down, on a soft cloth, on a table
– Take a fitting coin (e.g. a 2 Euro or SFR 2 coin) and open the screw cap on the
back of the watch by turning counter clockwise
– Use tweezers to remove the batteries
– Reversing the procedure insert a new battery into the watch (please pay attention
to the correct polarity)
– Make sure that the gasket is still in place. If possible put some silicone grease on
the sealing ring.
– Screw the lid clockwise onto the watch again. Make sure that at least one
complete turn, clockwise, can be conducted without resistance. If this is not
possible the lid is not lying correctly in the thread and too much force would
destroy the thread.
Illustrated instructions can be found at www.irox.com.
Operation elements • 9

4. FUNCTIONS AND OPERATION
--►
Taste kurz drücken
The iClimber has 7 function windows. They are:
TIME Your time (T+), another time zone (T2) and
the alarm time (AL)
TIMER Timer 1 und Timer 2
SPORT Stopwatch, VERTIC-LOG
DATA LOG Retrieval of stored stopwatch data (tour data,
lap times, VERTIC-LOG evaluation)
ALTIMETER Altimeter, thermometer
BARO Air pressure data, weather forecast and setting
of the measuring units
COMPASS Compass and its calibration
Move from function to function with the
MODE button.
Two additional functions of the watch have a “superior” function available in all
modes: the backlight and the key tone.
10 • Functions and operation

a) Backlight
a- Hintergrundlicht:
Zusätzlich besteht die Möglichkeit, eine Hintergrundbeleuchtung der Anzeige
einzuschalten.
+ Drücken Sie dazu die beiden Tasten EL und S/L
gleichzeitig. Die LCD Beleuchtung wird dadurch
für 4 Sekunden eingeschaltet.
a- Hintergrundlicht:
Zusätzlich besteht die Möglichkeit, eine Hintergrundbeleuchtung der Anzeige
einzuschalten.
+ Drücken Sie dazu die beiden Tasten EL und S/L
gleichzeitig. Die LCD Beleuchtung wird dadurch
für 4 Sekunden eingeschaltet.
Gut zu wissen
Wenn Sie innerhalb der 4 Sekunden weitere Tasten drücken, bleibt das Licht mit
jedem Tastendruck weitere 4 Sekunden eingeschaltet. Das erleichtert z.B. eine
Wecker-Einstellung oder DATA-LOG Auslesung während der Nacht!
b- Tasten-Ton:
Sie können einen Tasten-Ton ("Key Tone") ein- oder ausschalten.
..........Gehen Sie dazu in die Anzeige der Zeit (mit der Angabe des Tages
unterhalb der Zeit!) und drücken Sie S/R2
In addition there is the option of switching on a backlight of the display.
To do this, press the EL and S/L buttons
simultaneously. The LCD lighting will be
activated for 4 seconds.
! Good to know
If you press other buttons within these 4 seconds, the light will stay on for 4
seconds longer each time you press. This makes it easier to set the alarm or
read-out the DATA-LOG during the night!
b) Key tone:
You can switch a button sound (“Key tone”) on or off.
move to the time display (with the day displayed
under the time!) and press S/R2
will appear in the upper part of the display and the key tone is active.
To switch off, proceed accordingly in reverse sequence.
Functions and operation • 11

4.1 TIME (TIME AND ALARM)
4.1 TIME (ZEIT UND WECKER)
Im Zeitfenster sehen Sie die Zeit, das Datum und der Wochentag. Zusätzlich kann
eine zweite Zeitzone angezeigt werden sowie ein Wecker mit einem 1-minütigen
Weckton aktiviert werden.
--►Drücken bis in der Anzeige TIME erscheint.
Mit der gleichen Taste können Sie, solange Sie sich nicht
in einer Einstellung befinden, jederzeit in die nächste Funktion gehen.
--►.Auswahl der Anzeige in folgendem Ablauf:
- Ihre lokale Zeit (T1)
In the time window you can see the time, the date, and the weekday. A second
time zone can also be displayed, and an alarm with a 1-minute alarm sound can be
activated.
Press until TIME appears in the display
You can, at any time, use the same button to
move to the next function, unless you are
conducting a setting.
Select the display in the following
sequence:
– your local time (T1)
– other time zone (T2)
– alarm (AL)
Different entries can be made according to the display.
12 • Functions and operation

4.1.1 Local time (T1)
4.1.1 Lokale Zeit (T1)
--► drücken bis in der Anzeige der Tag (3 Buchstaben unterhalb der
Minuten) erscheint.
--► Ein-/Ausschalten des Tasten-Tones
--► Damit gelangen Sie in die Zeiteinstellung.
Das einzustellende Element beginnt zu blinken und zusätzlich erscheint
ein Text in Englisch, was einzustellen ist.
13
4.1.1 Lokale Zeit (T1)
--► drücken bis in der Anzeige der Tag (3 Buchstaben unterhalb der
Minuten) erscheint.
--► Ein-/Ausschalten des Tasten-Tones
--► Damit gelangen Sie in die Zeiteinstellung.
Das einzustellende Element beginnt zu blinken und zusätzlich erscheint
ein Text in Englisch, was einzustellen ist.
Wenn Sie in der Einstellung während mehr als einer Minute keine Taste drücken,
verlässt die Uhr den Einstellmodus automatisch. Die bis zu diesem Ablauf
gemachten Eintellungen werden dabei übernommen.
Die Befehle während der Zeiteinstellung sind folgende:
--► Mit den Tasten verändern Sie den Einstellwert
--► Zum nächsten Einstell-Wert springen (bis zum Verlassen des Einstell-
Modus)
--► Den Einstellmodus verlassen. Die bis hier gemachten Einstellungen
werden übernommen.
Press until the day (3 letters, below the minutes) appears on the display.
To switch the key tone on/off
This brings you to the time set mode.
The element to be set will start to blink and a text will appear, in English,
informing you of what needs to be set.
If during setting for longer than one minute no button is pressed,
the watch will automatically leave the set mode. The settings made up
to this point will be stored.
The commands for setting the time are as follows:
With these buttons you change the setting value
Skip to the next setting value (until you leave the set mode)
Leave the set mode. The settings made up to this point will be stored.
Functions and operation • 13
4.1.2 Time zone (T2)
4.1.2 Zeitzone (T2)
In der Zeiteinstellung nach Ablauf 4.2.1 können Sie auch einen "T2 Off-Set"
einstellen. Dabei wird für die Zeitzone T2 der eingestellte "OFF Set" von der lokalen
Zeit (T1) zugerechnet oder abgezogen. Die Off Set Einstellung kann von -23 bis +23
Stunden eingestellt werden.
--► drücken bis in der Anzeige "T2" klein erscheint.
--► damit wird die T2 als Hauptzeit in die grosse Anzeige verschoben.
Unten (kleinT1) erscheint Ihre "Heimzeit".
4.1.3 Weckzeit (AL)
Die Uhr bietet einen täglichen Weckalarm der, wenn aktiv gesetzt, zur
entsprechenden Zeit während max. einer Minute ertönt.
Als gültige Zeit für den Wecker gilt dabei die Zeit, die als Hauptzeit (gross) auf der
Anzeige erscheint. Dass kann T1 oder T2 sein !
--► drücken bis in "AL" mit der Weckzeit klein erscheint.
--►.Aktivieren / Deaktivieren des Weckers. Ist der Weckalarm aktiv,
erscheint oben in der Anzeige das Glockensymbol:
In the time set mode, following the instructions in 4.2.1, you can also set a “T2 OffSet”. For this the “OFF Set” setting for time zone T2 is either added or subtracted
from the local time (T1). The Off Set setting can be set from –23 to +23 hours.
Press until “T2” appears in small on the display.
This moves the T2 as main time into the big display.
On the bottom (small T1) your “home time” is displayed.
4.1.3 Alarm (AL)
The watch offers a daily alarm function which, when activated, will sound for one
minute at the time for which it is set.
The valid time for the alarm is the time that appears as the main time (large) on the
display. This can be T1 or T2!
Press until “AL” appears, with the alarm time small.
Activate / Deactivate the alarm. If the alarm is active the bell
symbol will appear at the top of the display:
14 • Functions and operation

This brings you to the set mode for the alarm time.
--► Damit gelangen Sie in die Einstellung der Weckzeit.
Das einzustellende Element beginnt zu blinken und zusätzlich erscheint in
Englisch, was einzustellen ist.
Wenn Sie in der Einstellung während mehr als einer Minute keine Taste drücken,
verlässt die Uhr den Einstellmodus automatisch. Die bis zu diesem Ablauf
gemachten Einstellungen werden dabei übernommen.
Achtung: Der Wecker muss noch separat aktiviert werden!
Die Befehle während der Weckzeiteinstellung sind folgende:
--► Mit den Tasten verändern Sie den Einstellwert
--► Zum nächsten Einstell-Wert springen (bis zum Verlassen des Einstell-
Modus)
--►Den Einstellmodus verlassen. Die bis hier gemachten Einstellungen
werden übernommen.
--► Damit gelangen Sie in die Einstellung der Weckzeit.
Das einzustellende Element beginnt zu blinken und zusätzlich erscheint in
Englisch, was einzustellen ist.
The element to be set will start to blink and a text will appear, in English,
informing you of what needs to be set.
If during setting for longer than one minute no button is pressed, the
watch will automatically leave the set mode. The settings made up
to this point will be stored.
Attention: The alarm must be activated separately!
The commands for setting the alarm time are as follows:
With these buttons you change the setting value
Skip to the next setting value (until you leave the set mode)
Leave the set mode. The settings made up to here will be stored.
The alarm will sound for 1 minute and, unless the alarm function is
deactivated, will sound again the next day.
The sounding 1 minute alarm tone can be interrupted with this button.
Functions and operation • 15

4.2 TIMER
4.2 TIMER
In der Timer Funktion können Sie eine Zeitvorgabe einstellen und diese Zeit in
Sekundenschritten auf null zurückzählen lassen.
Es stehen zwei Timer zur Verfügung (TIMER 1 und TIMER 2) die unabhängig
voneinander eingestellt werden können.
--►Drücken bis in der Anzeige TIMER erscheint.
Mit der gleichen Taste können Sie, solange Sie sich nicht in einer
Einstellung befinden, jederzeit in die nächste Funktion gehen.
--► Auswahl des Timers (TIMER 1 <---> TIMER 2)
--►Drücken bis in der Anzeige TIMER erscheint.
Mit der gleichen Taste können Sie, solange Sie sich nicht in einer
Einstellung befinden, jederzeit in die nächste Funktion gehen.
--► Auswahl des Timers (TIMER 1 <---> TIMER 2)
4.2 TIMER
In der Timer Funktion können Sie eine Zeitvorgabe einstellen und diese Zeit in
Sekundenschritten auf null zurückzählen lassen.
Es stehen zwei Timer zur Verfügung (TIMER 1 und TIMER 2) die unabhängig
voneinander eingestellt werden können.
--►Drücken bis in der Anzeige TIMER erscheint.
Mit der gleichen Taste können Sie, solange Sie sich nicht in einer
Einstellung befinden, jederzeit in die nächste Funktion gehen.
--► Auswahl des Timers (TIMER 1 <---> TIMER 2)
--► Damit gelangen Sie in die Einstellung des Timers.
Das einzustellende Element beginnt zu blinken und zusätzlich erscheint
In the timer function you can set a time target and have this time counted down in
seconds to zero.
There are always two timers available (TIMER 1 and TIMER 2) which can be set
independently of each other.
Press until TIMER appears in the display.
If you are not in a setting mode you can use the same button to,
at any time, move to the next function.
Selecting the timer (TIMER 1 – TIMER 2)
This brings you to the set mode for the timer.
The element to be set will start to blink and a text will appear, in English,
informing you of what needs to be set.
If during setting for longer than one minute no button is pressed, the
watch will automatically leave the set mode. The settings made up
to this point will be stored.
16 • Functions and operation

The timers can not be active together at the same time.
17
Zur gleichen Zeit kann nur einer der beiden Timer aktiv sein.
Mit den beiden Timern können ein paar spezielle Funktionen ausgeführt werden:
INT.LEAVE (Interleave) : Nach Ablauf des Timers 1 startet automatisch Timer 2
REPEAT (Wiederholung) : Sobald der aktive Timer abgelaufen (bei Interleave
nach Ablauf des Timer 2), beginnt der Zähler wieder
von vorne mit dem Countdown.
CT BEEP (Countdown Ton) : Während des Rückwartszählens, werden zu
bestimmten Zeiten akustische Signale gegeben:
Je 1 Sek. Ton bei erreichen der letzten 5, 4, 3,2 und 1
Minuten
Je 1 Sek. Ton bei erreichen der letzten 50, 40, 30, 20
und 10 Sekunden
In den letzten 5 Sekunden ertönt ein schnelles Beep-
Beep. Diese Funktion kann z.B. als Regatten-Timer
eingesetzt werden.
Nach Ablauf der eingestellten Zeit, also bei erreichen von 0:00:00, ertönt in jedem
Fall ein Signal (Dauer: 20 Sekunden)
Zeiteinstellung der Timer: von 0:01 bis 9:59 Stunden in Minuten Schritten.
Die Befehle während der Timer-Zeiteinstellung sind folgende:
--► Mit den Tasten verändern Sie den Einstellwert
--► Zum nächsten Einstell-Wert springen (bis zum Verlassen des Einstell-
Modus)
Some special functions can be carried out with the two timers:
INT.LEAVE (Interleave): After the countdown of timer 1, timer 2 starts
automatically.
REPEAT (Repeat): As soon as the active timer has counted down
(in Interleave after the countdown of timer 2),
the counter begins again with the countdown.
CT BEEP (Countdown tone): During the countdown, at certain times,
acoustic signals will sound: A 1 second beep for
each of the last 5, 4, 3,2 and 1 minutes
A 1 second beep for each of the last 50, 40, 30,
20 and 10. During the last 5 seconds a fast
beep-beep will sound. This function can be
used as a Regatta Timer, for example.
At the end of the countdown, when the timer reaches 0:00:00, there will be a signal
(length: 20 seconds)
Time setting of the timer: from 0:01 to 9:59 hours in minute steps.
The commands for setting the time of the timer are as follows:
With these buttons you change the setting value
Skip to the next setting value (until you leave the set mode)
Functions and operation • 17

As soon as the settings have been made, following commands are possible:
18
Sobald die Einstellungen gemacht wurden, sind folgende Befehlt möglich:
--► Start des Timers
--► Stopp des Timers
--► Rücksetzen des Timers auf den Ausgangswert (bei gestopptem
Timer)
--► Den ertönenden 20 Sekunden Ton unterbrechen
Start the timer
Stop the timer
Reset the timer to the initial value (when the timer is stopped)
Interrupt the sounding 20 second tone
18 • Functions and operation

4.3 SPORT (STOPWATCH, VERTIC-LOG)
In der SPORT Funktion steht die Stoppuhr mit bis zu 99 Runden/Zwischenzeiten
(LAP) zur Verfügung. Ein solcher Datensatz kann nach Abschluss der Zeitmessung
in einem LOG abgespeichert werden.
Die Beschreibung zur Auslesung der Messblöcke (LOG) finden Sie in Kapitel 4.4
Die zeitliche Auflösung ist bis zu einer max. Rundenzeit von 59 Minuten ist 1/100
Sekunde. Danach und bei der akkumulierten Zeit ist die Auflösung 1 Sekunde.
--►Drücken bis in der Anzeige SPORT erscheint.
Mit der gleichen Taste können Sie, solange Sie sich nicht in einer
Einstellung befinden, jederzeit in die nächste Funktion gehen.
---> akkumulierte Zeit aller LAPs in diesem Messblock
----> laufende Runde ( LAP)
► Damit gelangen Sie in die Einstellung der Weckzeit.
Das einzustellende Element beginnt zu blinken und zusätzlich erscheint in
Englisch, was einzustellen ist.
Wenn Sie in der Einstellung während mehr als einer Minute keine Taste drücken,
verlässt die Uhr den Einstellmodus automatisch. Die bis zu diesem Ablauf
gemachten Einstellungen werden dabei übernommen.
Achtung: Der Wecker muss noch separat aktiviert werden!
Die Befehle während der Weckzeiteinstellung sind folgende:
--► Mit den Tasten verändern Sie den Einstellwert
--► Zum nächsten Einstell-Wert springen (bis zum Verlassen des Einstell-
Modus)
In the SPORT function the stopwatch is available with up to 99 laps/interims (LAP).
This data can be stored in a LOG at the end of the timing.
The description on how to read-out the measuring blocks (LOG) can be found in
chapter 4.4
The resolution is 1/100 seconds for lap times of up to 59 minutes. Thereafter and for
the accumulated time the resolution is 1 second.
Press until SPORT appears on the display.
You can, at any time, use the same button to
move to the next function,
unless you are conducting a setting.
accumulated time of all LAPs in this
measuring block
running lap (LAP)
In addition, in the SPORT function, the VERTIC-LOG function is also activated/
deactivated and then started via the stopwatch. If the VERTIC-LOG is switched on
when climbing in the mountains, every 100 m net altitude ascent the climbing data
is stored in the lap memory. The LAP function via the S/L buttons is switched off.
The operation logic with or without VERTIC-LOG has only slight differences and is
described separately in the following.
Functions and operation • 19

4.3.1 STOPWATCH with LAP function
► STOPPUHR mit LAP Funktion
--► Start und Wieder-Start ("Restart") der Stoppuhr
--► Stoppt den Lauf der Stoppuhr
► STOPPUHR mit LAP Funktion
--► Start und Wieder-Start ("Restart") der Stoppuhr
--► Stoppt den Lauf der Stoppuhr
● Bei laufender Stoppuhr:
--► Stoppt Runden/Zwischenzeit. Die Stoppuhr läuft weiter.
Während 5 Sekunden bleibt jedoch die LAP Zeit mit der LAP Nr. auf der
Start and restart (“Restart”) the stopwatch
Stops the running stopwatch
When the stopwatch is running:
Counts laps/interims. The stopwatch continues running.
The LAP time with LAP No. remains on the display for five seconds.
Then the running time of the new lap appears.
Attention: For 5 seconds no other lap time can be measured, that means the
buttons S/L and S/R are inactive during these 5 seconds.
20 • Functions and operation

4.3.2 When the stopwatch is stopped
● Bei gestoppter Stoppuhr:
--► Löschen (ERASE) der Stoppuhr-Zeiten. Es erscheint danach die
Frage "ERASE?" auf dem Display. Um das zu bestätigen, muss die Taste
● Bei gestoppter Stoppuhr:
--► Löschen (ERASE) der Stoppuhr-Zeiten. Es erscheint danach die
Frage "ERASE?" auf dem Display. Um das zu bestätigen, muss die Taste
nochmals 3 Sekunden gedrückt werden. Die so gelöschten Daten sind danach
unwiderruflich gelöscht ! Wollen Sie die Daten nicht löschen, drücken Sie kurz
nochmals die Taste S/R.
--► Damit können die Daten in den LOG abgespeichert werden. Es
erscheint die Aufforderung "HOLD TO SAVE". Wenn Sie die Taste
Delete (ERASE) stopwatch times. The question “ERASE?” will appear
on the display. To confirm, press the button again for 3 seconds.
The data that has been deleted can not be retrieved! If you do not want
to delete the data, press and release the S/R button again.
With this button the data can be stored in the LOG. The prompt “HOLD
TO SAVE” will appear. When the button is released you will return to the
current display. If you press the button for another 3 seconds the data
will be stored in the DATA LOG. The information “LOG xx SAVED”
(xx is the LOG number) will appear.
After successful LOG storing the stopwatch, in the SPORT mode, will return to the
initial value (0:00:00).
There are up to 10 LOGs available. If they have all been used “ALL LOGS FULL”
will appear at the next attempt to store.
In this case go to the function DATA LOG (see chapter 4.4), delete a LOG and then
return to SPORT, to store.
Functions and operation • 21

4.3.3 STOPWATCH with VERTIC-LOG function
► STOPPUHR mit VERTIC-LOG Funktion
Um die Funktion einzuschalten und fortan damit zu arbeiten, muss die Stoppuhr auf
0:00:00 stehen und bereit für einen neuen LOG sein.
Aktivieren/Deaktivieren der VERTIC-LOG Funktion:
--► Damit gelangen Sie zur Ein- resp. Ausschaltung der VERTIC-LOG
Funktion. Das einzustellende Element (ON <---> OFF) beginnt zu blinken
--► Mit dieser Taste wird der VERTIC-LOG aktiviert/deaktiviert. Wenn
aktiv, erscheint das Icon
To switch on this function and continue working with it the stopwatch must be on
0:00:00 and ready for a new LOG.
Activate / deactivate the VERTIC-LOG function:
With this button you reach the ON / Off switching of the VERTIC-LOG
function. The element to be set (ON– OFF) will start to blink.
The VERTIC-LOG is activated / deactivated with this button.
If active the icon will appear.
Confirm setting and return to stopwatch.
If during setting for longer than one minute no button is pressed, the watch will
automatically leave the set mode. The settings made up to this point will be stored.
As soon as the stopwatch is started the VERTIC-LOG begins recording the
climb log.
One lap (LAP) is recorded per 100 m climbed. The first 100 m are LAP 1, the second
LAP 2 etc.
22 • Functions and operation

After a total of 1000 m of actual climbing (equals 10 LAPs), the time and the altitude
► STOPPUHR mit VERTIC-LOG Funktion
Um die Funktion einzuschalten und fortan damit zu arbeiten, muss die Stoppuhr auf
0:00:00 stehen und bereit für einen neuen LOG sein.
Aktivieren/Deaktivieren der VERTIC-LOG Funktion:
--► Damit gelangen Sie zur Ein- resp. Ausschaltung der VERTIC-LOG
Funktion. Das einzustellende Element (ON <---> OFF) beginnt zu blinken
--► Mit dieser Taste wird der VERTIC-LOG aktiviert/deaktiviert. Wenn
aktiv, erscheint das Icon
gain for these 1000 m is additionally stored (LAP +1000).
The same is done for the next 1000m etc. (LAP +2000, LAP +3000 etc.).
LAP 1–10 – LAP +1000
LAP 11–20 – LAP +2000
LAP 21–30 – LAP +3000
etc.
4.3.4 Beginning the climb
To start the previously activated VERTIC-LOG function you must start the stopwatch
at the beginning of the climb you want to monitor!
Start the stopwatch and with that the VERTIC-LOG recording
Important: The recording of the climb will be interrupted when the stopwatch is
stopped. If you press the S/R button by mistake, do a “RESTART” with the S/L
button. The interrupted LAP x will be stored at its last status and a new LAP x+1
will begin with the RESTART. If altitude was gained during this time it is lost to the
VERTIC-LOG recordings. To avoid unintentionally operating the STOP button (S/R)
we recommend activating the key lock.
Functions and operation • 23

4.3.5 Operation during the climb
Zur gleichen Zeit kann nur einer der beiden Timer aktiv sein.
Mit den beiden Timern können ein paar spezielle Funktionen ausgeführt werden:
INT.LEAVE (Interleave) : Nach Ablauf des Timers 1 startet automatisch Timer 2
REPEAT (Wiederholung) : Sobald der aktive Timer abgelaufen (bei Interleave
nach Ablauf des Timer 2), beginnt der Zähler wieder
von vorne mit dem Countdown.
CT BEEP (Countdown Ton) : Während des Rückwartszählens, werden zu
bestimmten Zeiten akustische Signale gegeben:
Je 1 Sek. Ton bei erreichen der letzten 5, 4, 3,2 und 1
Minuten
Je 1 Sek. Ton bei erreichen der letzten 50, 40, 30, 20
und 10 Sekunden
In den letzten 5 Sekunden ertönt ein schnelles Beep-
Beep. Diese Funktion kann z.B. als Regatten-Timer
eingesetzt werden.
Nach Ablauf der eingestellten Zeit, also bei erreichen von 0:00:00, ertönt in jedem
Fall ein Signal (Dauer: 20 Sekunden)
Zeiteinstellung der Timer: von 0:01 bis 9:59 Stunden in Minuten Schritten.
Die Befehle während der Timer-Zeiteinstellung sind folgende:
--► Mit den Tasten verändern Sie den Einstellwert
Sobald die Einstellungen gemacht wurden, sind folgende Befehlt möglich:
--► Start des Timers
--► Stopp des Timers
--► Rücksetzen des Timers auf den Ausgangswert (bei gestopptem
Timer)
--► Den ertönenden 20 Sekunden Ton unterbrechen
For each LAP during the climb, that means while the stopwatch is running, following
data is available:
– climbing speed in m/h as the case may be min/100 m
– in this LAP total meters climbed (UP). This means when you climb 50 m, then
descend 20 and climb 40 again that you are 70 m above the starting point and
UP 90m will be displayed.
– the LAP number alternates in a 2 second rhythm with the remaining meters until
100 m is achieved (in the example above that would be 30m)
Following display will then appear with the above data:
In this display the last segment (LAP) is always displayed.
With the S/L and S/R buttons you can retrieve previous recordings
which will be displayed for approx. 4 seconds.
24 • Functions and operation

When at least 10 LAPs have been completed, the “1000 Meter” summary will
Sobald die Einstellungen gemacht wurden, sind folgende Befehlt möglich:
--► Start des Timers
--► Stopp des Timers
--► Rücksetzen des Timers auf den Ausgangswert (bei gestopptem
Timer)
--► Den ertönenden 20 Sekunden Ton unterbrechen
Insofern mindestens 10 LAP abgeschlossen sind, erscheint beim neuerlichen
Drücken der EL Taste die "1000 Meter" Zusammenfassung.
appear if you press the EL button again.
Analogue to the individual LAPs here too the S/L and S/R buttons can be used to
scroll through other such summaries.
Return to the running stopwatch.
Functions and operation • 25

4.3.6 End of climb – Store data in LOG
► STOPPUHR mit LAP Funktion
--► Start und Wieder-Start ("Restart") der Stoppuhr
--► Stoppt den Lauf der Stoppuhr
● Bei gestoppter Stoppuhr:
--► Löschen (ERASE) der Stoppuhr-Zeiten. Es erscheint danach die
Frage "ERASE?" auf dem Display. Um das zu bestätigen, muss die Taste
nochmals 3 Sekunden gedrückt werden. Die so gelöschten Daten sind danach
unwiderruflich gelöscht ! Wollen Sie die Daten nicht löschen, drücken Sie kurz
nochmals die Taste S/R.
--► Damit können die Daten in den LOG abgespeichert werden. Es
erscheint die Aufforderung "HOLD TO SAVE". Wenn Sie die Taste
Stops the stopwatch
To store when the stopwatch is stopped:
With this button the data can be stored in the LOG. The prompt “HOLD
TO SAVE” will appear. When the button is released the watch will return
to the current display. If you press the button for another 3 seconds the
data will be stored in the DATA LOG. The information “LOG xx SAVED”
(xx is the LOG number) will appear.
After successful LOG storing the stopwatch, in the SPORT mode, will return to the
initial value (0:00:00).
There are up to 10 LOGs available. If they have all been used “ALL LOGS FULL”
will appear at the next attempt to store.
In this case go to the function DATA LOG (see chapter 4.4), delete a LOG and then
return to SPORT, to store.
26 • Functions and operation

Attention:
● Bei gestoppter Stoppuhr:
--► Löschen (ERASE) der Stoppuhr-Zeiten. Es erscheint danach die
Frage "ERASE?" auf dem Display. Um das zu bestätigen, muss die Taste
In order to be able to retrieve additional data stored in the VERTIC-LOG, you must
store the LOG in the stopwatch function at the end of your climb. If you delete the
stopwatch times before storing, the VERTIC-LOG data will also be deleted!
Important:
The VERTIC-LOG function was developed for mountain climbers making ascensions. When you have reached the highest point of your tour, stop the watch and
store the LOG. There is no need for descent data in the VERTIC-LOG! For longer
interruptions we recommend closing the LOG and when the tour is continued beginning with a new LOG.
If you do not wish to store the LOG, you can delete the data (stopwatch and
VERTIC-LOG):
Delete (ERASE) the stopwatch times. The question “ERASE?” will
appear on the display. To confirm, press the button again for 3 seconds.
The data that has been deleted can not be retrieved! If you do not
want to delete the data, press and release the S/R button again and
move to LOG memory.
Functions and operation • 27

4.4 DATA LOG (RETRIEVING STORED DATA)
4.4 DATA LOG (ABRUF GESPEICHERTER DATEN)
► Beachten Sie zur Bedienung dieser Funktion auch die Kurzanleitung !
Mit jedem LOG, der mit der Stoppuhr resp. dem VERTIC-LOG in der Funktion
SPORT abgespeichert wurde, sind eine Anzahl weiterer Daten abgespeichert
worden. Im DATA LOG können diese LOGs ausgelesen werden und, bei Bedarf,
ausgewählte oder alle LOGs gelöscht werden.
Die Speicherkapazitäten sind max. 10 LOGs zu je max. 99 LAPs
--► Drücken bis in der Anzeige DATA LOG erscheint.
Oberhalb des DATA LOG erscheint während ca. 1 Sekunde auch eine
28
4.4 DATA LOG (ABRUF GESPEICHERTER DATEN)
► Beachten Sie zur Bedienung dieser Funktion auch die Kurzanleitung !
Mit jedem LOG, der mit der Stoppuhr resp. dem VERTIC-LOG in der Funktion
SPORT abgespeichert wurde, sind eine Anzahl weiterer Daten abgespeichert
worden. Im DATA LOG können diese LOGs ausgelesen werden und, bei Bedarf,
ausgewählte oder alle LOGs gelöscht werden.
Die Speicherkapazitäten sind max. 10 LOGs zu je max. 99 LAPs
--► Drücken bis in der Anzeige DATA LOG erscheint.
Oberhalb des DATA LOG erscheint während ca. 1 Sekunde auch eine
Nummer von 00 bis 10. Das zeigt Ihnen an, wie viele LOGs sich im Speicher
befinden. (Mit der gleichen Taste können Sie, solange Sie sich nicht in der Lösch-
Funktion befinden, jederzeit in die nächste Funktion gehen.)
Als erste Anzeige erscheint folgende Information („LOG ANZEIGE“):
------> Datum der Abspeicherung des LOG x
------> Zeit der Abspeicherung des LOG x
------> bereiter LOG zur Auslesung
------> LOG Nummer auswählen mit Taste S/R
Hier können zwei Wege eingeschlagen werden
--► LOG Löschfunktion (einzelne oder alle) Æ siehe Seite 29
--► Weiter zum Auslesen der LOG Daten Æ siehe Seite 30
4.4 DATA LOG (ABRUF GESPEICHERTER DATEN)
► Beachten Sie zur Bedienung dieser Funktion auch die Kurzanleitung !
Mit jedem LOG, der mit der Stoppuhr resp. dem VERTIC-LOG in der Funktion
SPORT abgespeichert wurde, sind eine Anzahl weiterer Daten abgespeichert
worden. Im DATA LOG können diese LOGs ausgelesen werden und, bei Bedarf,
ausgewählte oder alle LOGs gelöscht werden.
Die Speicherkapazitäten sind max. 10 LOGs zu je max. 99 LAPs
--► Drücken bis in der Anzeige DATA LOG erscheint.
Oberhalb des DATA LOG erscheint während ca. 1 Sekunde auch eine
Nummer von 00 bis 10. Das zeigt Ihnen an, wie viele LOGs sich im Speicher
befinden. (Mit der gleichen Taste können Sie, solange Sie sich nicht in der Lösch-
Funktion befinden, jederzeit in die nächste Funktion gehen.)
Als erste Anzeige erscheint folgende Information („LOG ANZEIGE“):
------> Datum der Abspeicherung des LOG x
------> Zeit der Abspeicherung des LOG x
------> bereiter LOG zur Auslesung
------> LOG Nummer auswählen mit Taste S/R
To operate this function please also note the short instructions!
With each Log that was stored in the SPORT function via the stopwatch or the VERTIC-LOG numerous other data has also been stored. These LOGS can be read-out
in the DATA LOG and if necessary either individual or all LOGS can be deleted.
The memory capacity is 10 LOGs with up to 99 LAPs each.
Press until DATA LOG appears in the display.
For approx. 1 second a number from 00 to 10 will appear above the
DATA LOG. This demonstrates how many LOGs are in the memory.
(You can, at any time, use the same button to move to the next function
unless you are in the delete function.)
The first to appear on the display is following information (“LOG DISPLAY”):
Time of the storing of LOG x
LOG ready to be read-out
select LOG number with the S/R button
There are two ways to do this
LOG delete function (individual or all) – see page 29
Further to read-out LOG data – see page 30
28 • Functions and operation
Date of the storing of LOG x

4.4.1 LOG delete (ERASE)
As described on the previous page you reach the LOG delete function with the EL2
button. The deleting is important to remove old data and make room for new data.
If you have 5 logs for example, they are numbered in numerical order 1-5. If you
delete No. 3, 4 and 5 will move one down.
On the operation screen the LOG No. ready to be deleted will appear along with the
question ERASE? (= delete?).
If yes: Select the corresponding LOG No. using the S/L and S/R buttons. By then
pressing the button EL2 again, the selected LOG will be removed from the memory.
The remaining number of LOGs will be displayed (remaining = REMAIN). After 2
seconds you will be returned to the LOG display.
If no: You can use the M button to move to the question ALL ERASE?
If yes: Confirm again with EL2. The remaining number of LOGs will be displayed,
zero (= 00 DATALOG). With the M button you can move to the next function –
4.5 ALTIMETER
If no: Return to the LOG display with the M button
Functions and operation • 29

4.4.2 READING-OUT THE LOG DATA
►AUSLESEN DER LOG DATEN
Wie zu Beginn dieses Kapitels beschrieben, gelangt man mit der EL Taste in die
Auslesung der Daten des in der LOG ANZEIGE angewählten LOGs.
------> bereiter LOG zur Auslesung (hier als Beispiel "01"
------> LOG Nummer auswählen mit Taste S/R
►AUSLESEN DER LOG DATEN
Wie zu Beginn dieses Kapitels beschrieben, gelangt man mit der EL Taste in die
Auslesung der Daten des in der LOG ANZEIGE angewählten LOGs.
------> bereiter LOG zur Auslesung (hier als Beispiel "01"
------> LOG Nummer auswählen mit Taste S/R
LOG xx (xx mit S/R auswählen)
Es stehen sehr viele Daten zur Verfügung. Um sich möglichst klar durch die Daten
zu bewegen, stellen Sie sich vor, dass Schubladen mit Dateninhalten geöffnet und
geschlossen werden. Die Bedien-Tasten haben dazu eine bestimmte Logik:
--► Vorgeschlagene Auswahl akzeptieren und eine "Daten-Schublade"
öffnen.
--► Innerhalb der Daten-Schublade zur nächsten Information
--► Schublade schliessen und zurück zur letzten Auswahl (wiederholt
drücken, um an den Ausgangspunkt, die „LOG ANZEIGE“, zu gelangen).
As described in the beginning of this chapter you can reach the data read-out of the
LOG selected in LOG DISPLAY using the EL button.
LOG ready for read-out
(here, as an example, “01”)
Select LOG number with S/R button
LOG xx (select xx with S/R)
There is a lot of data available. In order to easily and understandably move around
through the data, imagine there are drawers filled with data contents that have to be
opened and closed. The operation buttons have certain logic for this purpose:
Accept suggested selection and open a “Data-Drawer”
Within the Data-Drawer to the next information
Close the drawer and return to the last selection (press repeatedly
to move to the initial point, the “LOG DISPLAY”).
All data, stored either by the stopwatch or the VERTIC-LOG function after every
100 m climb, are ready for the LOGs. The only exceptions are the LAP +1000 which
are only available for the VERTIC-LOG recordings.
30 • Functions and operation

Possible choices of “Data Drawers” (from LOG DISPLAY with EL):
Mögliche Auswahl an "Datenschubladen" (von LOG ANZEIGE mit EL):
- SUMMARY Taste S/R � LAP INFO
SUMMARY button S/R LAP INFO
– With EL from SUMMARY: total time of selected LOG, this means all LAPs (select
TOTAL TIME, altimeter data ALTI UP, DOWN, MAX and MIN with S/R)
– With EL from LAP INFO: total time (ACC.TIME) of individual LAPs in hh:mm:ss.
Select the desired LAP in ACC.TIME via the S/R button.
– With EL from ACC.TIME: data from individual LAPs (LAP TIME in mm:ss and
1/100 secs, select altimeter data ALTI UP, ALTI DOWN with S/R)
Functions and operation • 31

If this LOG has VERTIC-LOG data and at least 10 complete LAPs:
4.4 DATA LOG (ABRUF GESPEICHERTER DATEN)
► Beachten Sie zur Bedienung dieser Funktion auch die Kurzanleitung !
Mit jedem LOG, der mit der Stoppuhr resp. dem VERTIC-LOG in der Funktion
SPORT abgespeichert wurde, sind eine Anzahl weiterer Daten abgespeichert
worden. Im DATA LOG können diese LOGs ausgelesen werden und, bei Bedarf,
ausgewählte oder alle LOGs gelöscht werden.
Die Speicherkapazitäten sind max. 10 LOGs zu je max. 99 LAPs
--► Drücken bis in der Anzeige DATA LOG erscheint.
Oberhalb des DATA LOG erscheint während ca. 1 Sekunde auch eine
with EL from LAP TIME: LAP +1000 *
* A summary is stored (LAP +1000, LAP +2000 etc.) in the VERTIC-LOG after each
10 x 100 m (10 LAPs). If such a data record is available in a LOG, the data can be
retrieved from the LAP TIME / ALTI UP/DOWN display with the EL button. If there
are more than one data record the S/R button can be used to scroll.
When reading-out the data, you can use this button to move to the
next function – 4.5 ALTIMETER at any time.
32 • Functions and operation

4.5 ALTIMETER (ALTIMETER, THERMOMETER)
4.4 DATA LOG (ABRUF GESPEICHERTER DATEN)
► Beachten Sie zur Bedienung dieser Funktion auch die Kurzanleitung !
Mit jedem LOG, der mit der Stoppuhr resp. dem VERTIC-LOG in der Funktion
SPORT abgespeichert wurde, sind eine Anzahl weiterer Daten abgespeichert
worden. Im DATA LOG können diese LOGs ausgelesen werden und, bei Bedarf,
ausgewählte oder alle LOGs gelöscht werden.
Die Speicherkapazitäten sind max. 10 LOGs zu je max. 99 LAPs
--► Drücken bis in der Anzeige DATA LOG erscheint.
Oberhalb des DATA LOG erscheint während ca. 1 Sekunde auch eine
The altimeter (ALTIMETER) functions by measuring the air pressure. The air pressure is generally determined by two factors:
– the weather
– the height of your location above sea level
! Important notice
The display in meter (or foot) is hereby subject to certain fluctuations which can
be influenced by the atmospheric pressure, your vertical movements, and also
technical characteristics of the watch.
Please consider: 1 m difference in altitude is about 0.1 hPa. The pressure
measurement is conducted in regular intervals and is further processed inside
the watch. Thereby there are also calculated rounding offs that may influence
the value.
Before you start a tour or want to use the altimeter we recommend calibrating it.
In this function you have various display options and functions such as calibration, altitude alarm, and the storing of 3 reference altitudes.
Press until ALTIMETER appears on the display.
(You can, at any time, use the same button to move to the next function,
unless you are in a setting mode.)
Functions and operation • 33

The first display on the screen is:
Als erste Anzeige erscheint folgender Bildschirm:
----> Aufstiegsgeschwindigkeit in m/h oder min/100m
----> Aktuelle Messung des Höhenmeters
----> Temperaturmessung an der Uhr
Als erste Anzeige erscheint folgender Bildschirm:
----> Aufstiegsgeschwindigkeit in m/h oder min/100m
----> Aktuelle Messung des Höhenmeters
----> Temperaturmessung an der Uhr
Aufstiegsgeschwindigkeit: Anzeige in m/h. Bis zum Wert von 120 m/h. Danach
schaltet die Anzeige auf min/100m um.
Die m/h beziehen sich auf die letzte Stunde. Sie ziehen also quasi einen Faden
hinter sich her der letzten Stunde und für diesen Faden wird der Aufstieg angezeigt.
► Anzeigeoptionen
....Im Anzeigefeld der Temperatur kann mit dieser Taste folgende
Information angezeigt werden (in der Reihenfolge der Anzeige) :
Climbing speed in m/h or min/100 m
Current measuring of the altimeter
Temperature measurement on the watch
Rate of climb: displayed in m/h. Up to 120 m/h. Then the display switches to
min/100 m.
The m/h refers to the last hour. You are, so to speak, pulling a string of the last hour
along behind you and the climb is displayed for this string.
Display options
In the temperature field of the display following information can
be shown with this button (in the sequence of the display):
– time (the main time of the watch, meaning T1 or T2 as in chapter 4.1)
– positive altitude travelled *
– negative altitude travelled *
* These two recordings are only conducted when the stopwatch is running. As soon
as the stopwatch is set back to zero these two values will also be set back to zero.
This ensures that the time frame for which you want to monitor your climb is clearly
defined.
34 • Functions and operation

4.5.1 Settings (calibration, reference heights, altitude alarm)
► Einstellungen (Kalibrierung, Referenz Höhen, Höhen-Alarm)
Wichtiger Hinweis:
Wenn Sie eine Höhen-Kalibrierung vornehmen, stellen Sie bitte sicher, dass in
diesem Zeitpunkt der TIMER und die STOPPUHR nicht läuft. Die Funktionen können
durch den extra Speicherbedarf die Kalibrierung negativ beeinflussen.
--► Damit gelangen Sie in den Einstellmodus mit dem Menüs
SET ALTI - ALTI RECALL - ALTI ALARM
--► Mit diesen Tasten können Sie zwischen den drei obigen
Einstellmenüs hin- und herscrollen
--► Damit gelangen Sie aus einem der 3 Menüs in die entsprechende
Einstellung in dem ausgewählten Menü.
! Important notice
If you conduct an altitude calibration, please make sure that at that moment the
TIMER and the STOPWATCH are not running. Due to the extra memory requirements the calibration may be negatively influenced.
With this button you can move to the set mode with the menus
SET ALTI - ALTI RECALL - ALTI ALARM
With these buttons you can scroll back and forth between the
three upper setting menus
With this button you move from one of the three menus to the
respective setting in the selected menu
1) SET ALTI
The current measured altitude is blinking and can be adjusted (calibrated) up/down
with the S/R and S/L buttons.
Confirm with M. On the next display, which can be selected with S/L and S/R, you
have following options: Curr – rEF-1 – rEF-2 – rEF-3 – ABORT.
This determines whether the set altitude should only be taken over as current altitude (Curr) or at the same time stored as one of the reference altitudes (rEF 1-3).
(ABORT = abort setting).
As soon as the corresponding option is on the display, confirm with M and then
return to the menu SET ALTI.
Functions and operation • 35

2) ALTI RECALL
This enables you to retrieve one of the 3 reference altitudes. Selectable with S/L
and S/R: rEF-1 – rEF-2 – rEF-3 – ABORT
(Set reference altitudes in “SET ALTI”).
When the retrieved reference altitude appears press and release M to confirm and
return to the menu ALTI RECALL. Beforehand the selected reference altitude will
appear with the text “APPLY ALTI” for 1 second.
For ABORT the retrieval of the reference altitude will be stopped and you will move
directly to the menu ALTI RECALL.
3) ALTI ALARM
Programming an altitude alarm. The ON or OFF blinks and can be changed with S/L
or S/R. Then confirm with M.
For OFF: Return to menu ALTI ALARM
or ON: Continue to set the altitude at which an acoustic alarm should sound (setting with S/L and S/R). If this altitude is exceeded and endless alarm will sound.
! Good to know
If during setting for longer than one minute no button is pressed the settings
made will be deleted and you will leave the set mode (return to the display of
the current altitude).
36 • Functions and operation

4.6 BAROMETER (AIR PRESSURE, WEATHER, MEASURING UNITS)
In the BAROMETER function in general the atmospheric pressure is measured and
displayed in mbar (hPa).
For this purpose following display options are available
A) Display of locally measured effective air pressure (LOCAL) and the temperature
measured in the watch, along with a chart of the pressure course of the last 24
hours (horizontal in ½ hour steps, vertical in 1 mbar resolution). The current value is
found here on the right side of the bar diagram and in the vertical middle of it.
B) Pressure display compensated on sea level (according to the setting of the local
altitude or the “SEA LEVEL” value) together with the current temperature of the
watch and the current time.
C) Day’s MAX value of SEA LEVEL pressure and also the temperature of the watch
D) Day’s MIN value of SEA LEVEL pressure and also the temperature of the watch
E) Weather forecast/trend with 5 symbols and the current temperature of the watch.
The weather forecast only applies for the next day and has a probability of approx.
70%. If the watch is worn at greater heights the forecast probability can decrease.
Display example A–E see next page.
The measuring units can also be set in the BAROMETER function.
Functions and operation • 37

4.6.1 Display Options
► Anzeigeoptionen
--► Drücken bis in der Anzeige ALTIMETER erscheint.
(Mit der gleichen Taste können Sie, solange Sie sich nicht in einer
Einstellung befinden, jederzeit in die nächste Funktion gehen.)
Als erste Anzeige erscheint folgender Bildschirm:
ANZEIGE....A
--► Mit dieser Anzeige wird durch die Anzeigeoptionen gescrollt
(A bis E und retour wieder in A)
► Anzeigeoptionen
--► Drücken bis in der Anzeige ALTIMETER erscheint.
(Mit der gleichen Taste können Sie, solange Sie sich nicht in einer
Einstellung befinden, jederzeit in die nächste Funktion gehen.)
Als erste Anzeige erscheint folgender Bildschirm:
► Anzeigeoptionen
--► Drücken bis in der Anzeige ALTIMETER erscheint.
(Mit der gleichen Taste können Sie, solange Sie sich nicht in einer
Einstellung befinden, jederzeit in die nächste Funktion gehen.)
Als erste Anzeige erscheint folgender Bildschirm:
ANZEIGE....A
--► Mit dieser Anzeige wird durch die Anzeigeoptionen gescrollt
(A bis E und retour wieder in A)
► Anzeigeoptionen
--► Drücken bis in der Anzeige ALTIMETER erscheint.
(Mit der gleichen Taste können Sie, solange Sie sich nicht in einer
Press until ALTIMETER appears on the display.
(You can, at any time, use the same button to move to the next function,
unless you are conducting a setting.)
The first display on the screen is:
Display A
With this display you can scroll through the display options
(A to E and back to A)
Display B C D E
38 • Functions and operation

4.6.2 Settings
► Einstellungen
Es stehen in der Anzeige der Messwerte diverse Mass-Einheiten zur Verfügung.
Diese können in der BAROMETER Funktion definiert werden.
--► Damit gelangen Sie in den Einstellmodus der Masseinheiten
DEGREE °C <--> DEGREE °F
mbar / hPa <--> inHg
METRIC (m) <--> IMPERIAL (ft)$
Kalibrierung der Druckanzeige (auf dem Niveau SEA LEVEL) *
Kalibrierung der Temperaturmessung *
Eingabe des aktuellen Wetters (einer der 5 Symbole) *
--► Mit diesen Tasten können Sie zwischen den obigen Einheiten hin- und
herschalten
--► Damit gelangen Sie zur nächsten Einstellung. Nach der letzen
Einstellung zurück zur BAROMETER Anzeige
► Einstellungen
Es stehen in der Anzeige der Messwerte diverse Mass-Einheiten zur Verfügung.
Diese können in der BAROMETER Funktion definiert werden.
--► Damit gelangen Sie in den Einstellmodus der Masseinheiten
DEGREE °C <--> DEGREE °F
mbar / hPa <--> inHg
In the display for the measuring values there are several measuring units to choose
from. They can be defined in the BAROMETER function.
With this button you can move to the set mode for the measuring units
DEGREE °C <--> DEGREE °F
mbar / hPa <--> inHg
METRIC (m) <--> IMPERIAL (ft)
Calibration of the pressure gauge (on SEA LEVEL) *
Calibration of temperature gauge *
Enter the current weather (one of the 5 symbols) *
With these buttons you can switch back and forth between the
above units
This button brings you to the next setting. After the last setting return
to BAROMETER display
* Attention
When conducting settings, we recommend only changing the values if there is a
clearly defined reference available.
For the pressure entry the altitude shown by the altimeter is also modified.
For the thermometer all further measurements will be corrected accordingly.
For weather the adjustments in extreme weather situations are easiest and most
effective.
Functions and operation • 39

4.7 COMPASS
40
4.7 COMPASS (KOMPASS)
Der Kompass basiert auf einem empfindlichen magnetischen Messelement. Es gilt
dabei, dass das weisse Dreieck im inneren Ring der Uhr die Richtung der Uhr
anzeigt.
In der COMPASS Funktion wird in der Mitte der Anzeige gross die aktuelle Zeit
gezeigt. Oberhalb davon ist eine Anzeige der Himmelsrichtung in Grad (0-359°),
unterhalb die Angabe der Richtung der Uhr in den Abkürzungen der 4
Himmelsrichtungen (N, S, W, E=East=Ost), sowie der 4 Nebenhimmelsrichtungen.
Wichtig ist, dass Sie die Uhr zur exakten Peilung waagrecht halten und mit dem
Dreieck Ihre Peilung vornehmen. Schauen Sie direkt nach Norden, werden auf der
Uhr 0° und NW-
N-NE erscheinen.
Am Rande der LCD finden Sie zusätzlich 1 resp. 3 Punkte die sich entsprechend der
Peilung ausrichten (1 Punkt: Nord / 3 Punkte: Süd)
Ost (E)
N
Beispiel wenn sich Norden um 90°
verschoben in der 9 Uhr Position befindet.
The compass is based on a sensitive, magnetic measuring element. The white
triangle in the inner ring of the watch shows the direction of the watch.
In the COMPASS function in the middle of the display the current time is shown in
large numbers. Above this there is a display of the directions in degrees (0–359°),
below this the direction of the watch, abbreviated in the 4 directions (N, S, W, E), as
well as the 4 in between directions.
It is important that for the exact fixing of a position the watch is held horizontal and
that you fix your position with the triangle position fixing. If you look directly to the
north, 0° and NW-N-NE will appear on the watch.
On the edge of the LCD you will also find 1, respectively 3 dots that will align
accordingly with the positioning (1 dot: North / 3 dots: South)
East (E)
N
As an example here, if north is shifted
by 90°degrees to the 9 o’clock position.
40 • Functions and operation

Press until COMPASS appears on the display.
ausgewählte oder alle LOGs gelöscht werden.
Die Speicherkapazitäten sind max. 10 LOGs zu je max. 99 LAPs
--► Drücken bis in der Anzeige DATA LOG erscheint.
Oberhalb des DATA LOG erscheint während ca. 1 Sekunde auch eine
28
befinden. (Mit der gleichen Taste können Sie, solange Sie sich nicht in der Lösch-
Funktion befinden, jederzeit in die nächste Funktion gehen.)
Als erste Anzeige erscheint folgende Information („LOG ANZEIGE“):
------> Datum der Abspeicherung des LOG x
------> Zeit der Abspeicherung des LOG x
------> bereiter LOG zur Auslesung
------> LOG Nummer auswählen mit Taste S/R
Hier können zwei Wege eingeschlagen werden
--► LOG Löschfunktion (einzelne oder alle) Æ siehe Seite 29
--► Weiter zum Auslesen der LOG Daten Æ siehe Seite 30
(You can, at any time, use the same button to move to the next function,
the TIME function, unless you are in a setting mode.)
First a display, as described on the previous pages, will appear with the current
bearings.
After approx. 30 seconds the bearing is switched off, to conserve the battery.
With the EL button the bearing in the COMPASS mode can be switched
on again for 30 seconds.
Attention: It may occur that at the first start-up of the compass function the
iClimber requests a calibration. In this case please read the directions on the
following pages in “Settings”.
Functions and operation • 41

4.7.1 Settings
42
► Einstellungen
Die Kalibrierung ist empfohlen oder nötig, wenn Sie offensichtliche Abweichungen in
der Peilung feststellen. Auch bei Geräten bei denen der Kompass noch nie oder
längere Zeit nicht gebraucht wurde, empfiehlt es sich, die Kalibrierung
durchzuführen.
Die Eingabe des Deklinationswinkels, der Abweichung zwischen geographischer
und magnetischer Nordrichtung, bedingt, dass Sie diesen am Ort des Einsatzes des
Kompasses kennen. Sollte dies unmöglich sein, dann belassen sie den
Deklinationswinkel auf 0°.
Auf dem Internet finden Sie eine Vielzahl an Informationen dazu (z.B. auf Wikipedia)
und auch Links auf Seiten die über die Koordinaten die Deklination berechnen.
(z.B. http://www.ngdc.noaa.gov/geomagmodels/Declination.jsp)
Die Einstellbereich im i-Climber liegt zwischen ist von -90° bis +90°. Es gilt dabei
Deklinationswinkel Ost (E - East) = positive Zahl
Deklinationswinkel West (W) = negative Zahl
--► Damit gelangen Sie in den Kalibriermodus (CAL)
Es stehen zwei Möglichkeiten offen
---> Kalibrierung
---> Einstellen des Deklinationswinkels
--► Mit dieser Taste gelangen Sie erst in den Kalibriermodus (danach in
die Einstellung des Deklinations-Winkels)
oder....
--► Mit dieser Taste gelangen Sie direkt in die Einstellung des
Deklinationswinkels
Calibration is recommended or necessary if you detect apparent discrepancies in
the position fixing. Also for devices where the compass has never or only seldom
been used it is recommended to conduct a calibration.
The input of a declination angle, the variance between geographic and magnetic
north direction requires that you know this at the site of compass use. If this is not
possible leave the declination angle at 0°.
In the Internet you can find a multitude of information about this (e.g. Wikipedia) and
also links on pages on how to calculate the declination using the coordinates.
(e.g. http://www.ngdc.noaa.gov/geomagmodels/Declination.jsp)
The iClimber setting range is from –90° to +90°. Following applies
Declination angle east (E) = positive number
Declination angle west (W) = negative number
With this button you can move to the calibration mode (CAL)
There are two options available
– Calibration
– Setting the declination angle
With this button you can move to the calibration mode (thereafter to
the setting of the declination angle)
or…
With this button you move directly to the setting of the declination angle
42 • Functions and operation

4.7.2 Calibration
► Kalibrierung
In der Kalibrierung erscheint folgender Bildschirm:
► Kalibrierung
In der Kalibrierung erscheint folgender Bildschirm:
Halten Sie die Uhr möglichst flach zum Boden und drehen Sie diese 2 x langsam im
Uhrzeigersinn (eine Umdrehung ca. 15 Sekunden).
--► Mit dieser Taste beenden Sie die Kalibrierung (CAL DONE). Nach ca.
2 Sekunden werden Sie aufgefordert, den Deklinationswinkel einzugeben.
► Deklination
In der Deklination erscheint folgender Bildschirm:
43
► Kalibrierung
In der Kalibrierung erscheint folgender Bildschirm:
Halten Sie die Uhr möglichst flach zum Boden und drehen Sie diese 2 x langsam im
Uhrzeigersinn (eine Umdrehung ca. 15 Sekunden).
--► Mit dieser Taste beenden Sie die Kalibrierung (CAL DONE). Nach ca.
2 Sekunden werden Sie aufgefordert, den Deklinationswinkel einzugeben.
► Deklination
In der Deklination erscheint folgender Bildschirm:
--► Mit diesen Tasten können Sie den Deklinations- Winkel von -90° bis
+90° verändern (Erklärungen dazu siehe weiter oben in diesem Kapitel)
--► Nach Abschluss, retour zur Kompass-Peilung
In the calibration mode following display appears:
Hold the watch as level as possible to the ground and rotate it slowly, 2 x, clockwise
(one rotation approx. 15 seconds).
With this button you end the calibration (CAL DONE).
After approx. 2 seconds you will be prompted to enter the declination
angle.
4.7.3 Declination
In the declination mode following display will appear:
With these buttons you can modify the declination angle from
–90° to +90° (instructions on how to do this can be found in the
beginning of this chapter)
After completing, return to compass bearing
Functions and operation • 43

5. BATTERY REPLACEMENT
Battery replacement display
Depending on use of the device the battery lasts from a couple of months up to
one year (please note chapter 2 “Putting into operation”). To avoid a sudden and
unpleasant interruption of operation a battery symbol will appear, above the date
symbol, as soon as the battery becomes too weak and needs to be replaced.
To replace the batteries please follow the instructions in chapter 3.7 (Battery compartment).
If the battery is replaced in one minute’s time, certain information will remain stored:
– Alarm setting
– Compass calibration
– Data Logs
– Display units
The other settings are lost and must be re-set.
Please remember that used batteries do not belong in normal household trashcans,
they should be collected and disposed of at the appropriate collection sites. The
environment appreciates it!
6. MAINTENANCE
– Do not expose the device to extreme temperatures or direct sunlight.
– Avoid bumps or shocks of any kind to the device.
– For cleaning use a dry, soft cloth moistened with water and a mild cleaning agent.
You must never use volatile substances such as benzene, thinner, cleaning
agents in spray cans etc.
44 • Battery replacement / Maintenance

– If the device is not being used store it in a dry place and out of the reach of small
children.
In such cases it is important to remove the battery!
– If a function is activated in extremely cold temperatures it may occur that the
display is illegible and does not or only slowly change. This is normal because the
battery may be too weak or the liquid crystals in the display are so to say frozen.
As soon as the device is returned to a warmer environment it will function
properly again.
– Store the operating instructions and other documents included in the delivery
in order to be able to read them at a later time.
– Important: For all Irox devices all disposal fees are completely compensated,
in Switzerland (vRG) as well as in the European Union (WEEE).
7. SUPPORT
This device is a new development of Irox Development Technology. All information
was given in accordance with a functioning device and checked for correctness.
Prototypes were successfully tested during expeditions before production began.
It may still occur that adjustments and improvements which, due to print technical
procedures, were conducted on the device but were not able to be included in these
instructions. If you notice variances that make operating and handling the device difficult, you can download the updated version of the instructions from www.irox.com
at any time, free of charge onto your PC (please note the version number). We are
also thankful for any information concerning such discrepancies.
© IROX Development Technology
® IROX, iClimber and VERTIC-LOG are registered trademarks and may only
be used by Irox.
Maintenance / Support • 45

8. TECHNICAL INFORMATION
Important: All information with nominal battery charging!
Operating temperature –10°C to +60°C (14°F to 140°F)
Temperature measurement
Measuring range: –40°C to +90.0°C (–40°F to 194°F)
Resolution: 0.1°C (0.2°F)
Measuring accuracy: +/– 1°C ranging from 0°C to +40°C
+/– 2°C for the rest
Pressure measurement (Barometer/Altimeter)
Measuring range: 300–1100 hPa (mBar) (8.86–32.48 inHg)
(equals approx. –380 m to +9000 m)
Resolution: 0.1 hPa (0.01 inHg)
1 m (3.3 ft)
rel. measuring accuracy: +/– 0.5 hPa at specific pressure
abs. measuring accuracy: +/– 1 hPa over 500–1100 hPa
Measuring frequency of every 30 seconds
the Altimeter: With stopwatch running: Every 2–4 seconds
Compass
Measuring range: 0 to 359°
Resolution: 1°
Measuring accuracy: +/– 3°
Quartz watch mov. variance: +/– 1 second/month
Power supply: 1 CR2032 3.0V battery
Dimensions: 67 g (including battery); visible display Ø 30 mm
46 • Technical information

9. VERTIC-LOG – HOW TO USE
9. VERTIC-LOG – wie einsetzen
Mischu Wirth ist ein international anerkannter Bergführer IVBV, Ausbildner, Leiter
von Expeditionen in aller Welt und Inhaber der Bergsportschule „MWGuiding“ in
Bern/Schweiz (www.mwguiding.ch).
Mischu hat mit seinem Team die Funktionen des Vertic-Logs spezifiziert.
Mischu Wirth is an internationally renowned mountain guide IVBV, trainer, leader
of exhibitions throughout the world and owner of the Mountain Sports School
“MWGuiding” in Bern/Switzerland (www.mwguiding.ch).
Mischu and his team specified the functions of the VERTIC-LOGs.
VERTIC-LOG has basically two user groups:
– The interested outdoor athlete and hiker who has fun with the watch and also
wants to monitor his/her performance
– The mountain climber who wants to conduct his/her tours and behaviour on the
mountain in a professional manner.
For the mountain climber Mischu explains on the following pages how to professionally use this function.
VERTIC-LOG – How to use • 47

VERTIC-LOG – successfully to the peak!
Mountain sports are great – and demanding. Beside a good physical condition,
mental readiness and resilience and technical skills the active participation in this
sport also requires a clear thought-out strategy with a realistic and coordinated time
management.
Let your theoretic knowledge and your practical experience flow into the planning.
Visualise your tour from the beginning, over the ascent, the stay on the peak, to the
descent and through to the desired time of return.
Consider the fact that conditions in the mountains can change very fast. Organise
your time so that you can return early enough, without the risk of getting caught in a
storm.
As soon as you start your tour, begin recording your ascent with the VERTIC-LOG.
The VERTIC-LOG independently divides your ascent into segments of 100 m
effective altitude increase, and while your are still climbing you can monitor the most
important data and that way adjust your progress to your time plan. This also allows
you to make safety relevant decisions.
After finishing your tour, be this at home or in a bivouac, you can evaluate the
VERTIC-LOG data stored in the iClimber and compare it to the plan gaining valuable conclusions. This helps set-up and strengthen tactical intelligence. And that
improves your safety on the mountain in the future.
Mischu Wirth, autumn 2008
www.irox.com
48 • VERTIC-LOG – How to use
 Loading...