

Page 1
1
CBR606
RADIO CONTROLLED WEATHER STATION
WITH TEMPERATURE AND HUMIDITY
USER MANUAL
Page 2

2
CONTENTS
INTRODUCTION X
MAIN FUTURES X
INSTALLATION X
RECEPTION OF RC XX
SIGNAL STRENGTH INDICATOR XX
MANUAL TIME SETTING XX
ALARM AND SNOOZE SETTING XX
WEATHER FORECAST FUNCTION XX
COLOUR CHANGE DISPLAY XX
CHECKING AND DELETING MAX/MIN RECORDS XX
VIEWING THE CHANNEL XX
LOW BATTERY INDICATOR XX
ICE ALERT INDICATOR XX
PRECAUTIONS XX
SPECIFICATION XX
EU-DECLARATION OF CONFORMITY XX
Page 3
3
INTRODUCTION
Thank you for purchasing this delicate radio controlled clock with
temperature and humidity. Utmost care has gone into the design and
manufacture of the clock. Please read the instructions carefully and keep
the manual well for Future reference.
MAIN FUTURES
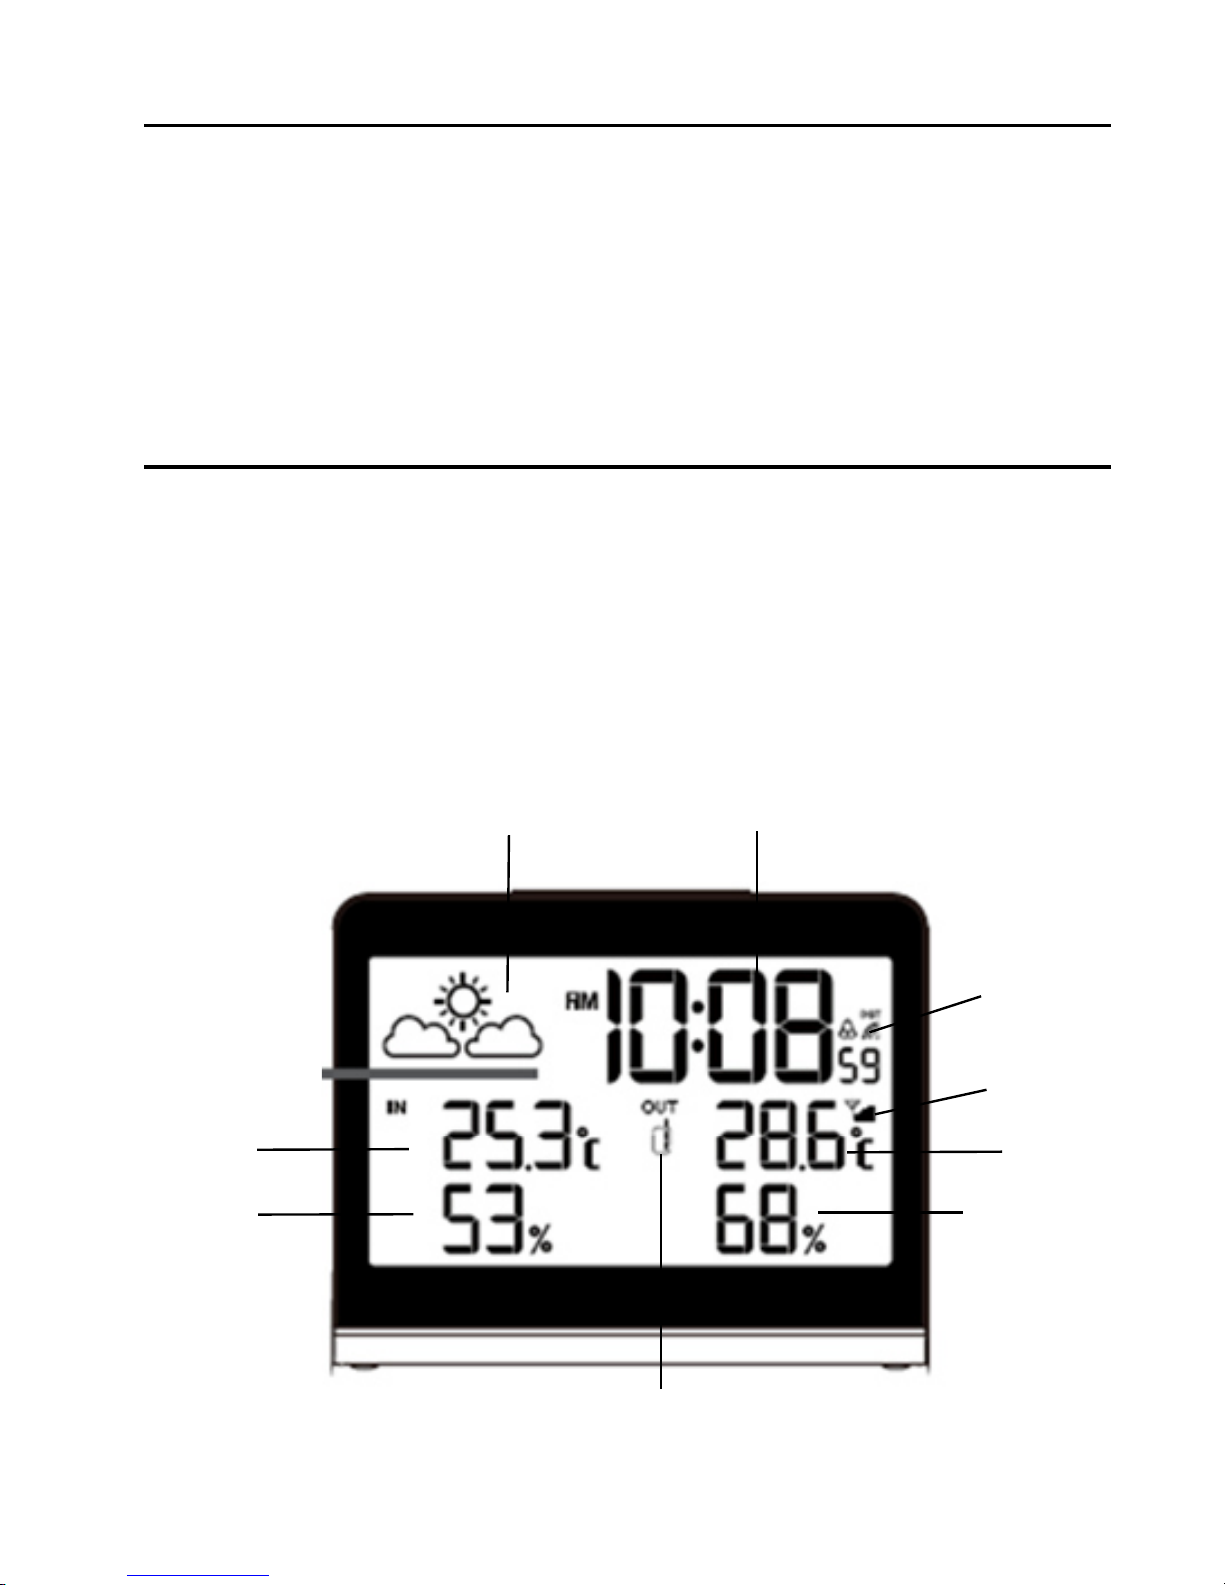
LCD DISPLAY
1. TIME
2. WEATHER FORECAST icon
3. INDOOR TEMPERATURE
4. INDOOR HUMIDITY
7
3
6
5
9
8
4
2
1
Page 4
4
5. OUTDOOR TEMPERATURE
6. OUTDOOR HUMIDITY
7. CHANNEL
8. TRANSMITTER SIGNAL QUALITY
9. SIGNAL DCF77 QUALITY
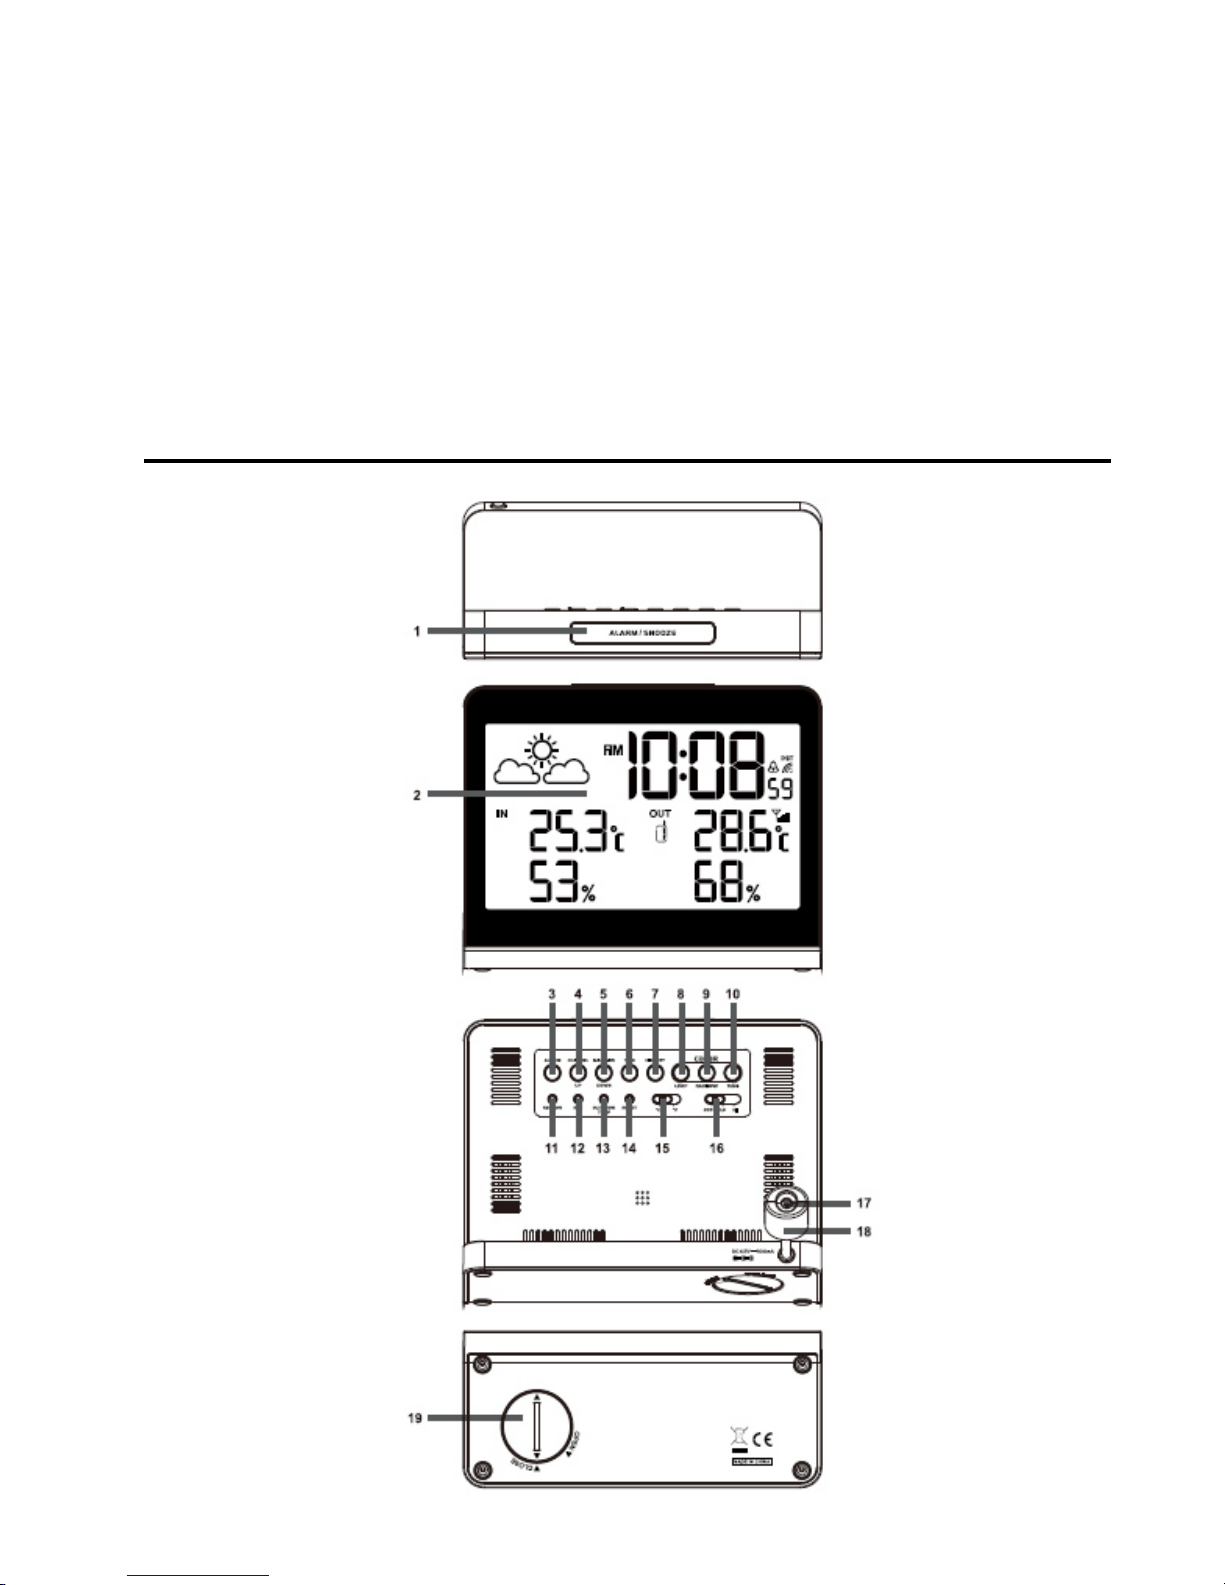
DESCRIPTION OF BUTTONS
Page 5

5
1. ALARM/SNOOZE key
- Press it to stop the current alarm and enter into snooze mode.
- Hold it for 2 seconds to turn off the alarm function.
2. LCD display
3. ALARM key
- In normal time display, press to enter the alarm mode.
- In alarm time mode, press it to turn on/off the alarm function.
- Press it to stop the current alarm when the bell is ringing and turn off
- the alarm and snooze function.
- In alarm time mode, press and hold it for 2 seconds to enter alarm
- time setting.
4. CHANNEL/UP key
- In setting mode, press it to increase the setting values.
- In normal time mode, press it to switch among Channel 1, 2 and 3.
5. MAX/MIN/DOWN key
- In setting mode, press it to decrease the setting values.
- Press to check the minimum and maximum temperature and
humidity records.
6. TIME key
- Press and hold it for 2 seconds to enter normal time setting.
7. HISTORY key
- Press it to check the temperature and humidity records.
8. LOOP key
- Press LOOP key and the backlight colour will change automatically;
Press it again, the backlight colour will stop the change.
9. RAINBOW key
- Turn off the LOOP function and press RAINBOW, the backlight will
change its colour in this sequence: white
˃ red ˃ orange ˃ yellow ˃
Page 6

6
green ˃ cyan ˃ blue ˃purple.
10. TUNE key
- Turn off the LOOP function and press TUNE key, the backlight will
display 256 colours.
10. SENSOR key
- Press it to receive the data from the transmitter.
11. RCC key
- Press it to receive the RC signal for reception testing.
12. OUTDOOR TEMP key
- Turn on the function, the backlight colour will change automatically
according to the temperature
12. RESET key
- Press it to reset all values to default values.
- In case of malfunction, the unit may be required to reset.
13. ºC/ºF slide switch
- Press it to switch between Celsius and Fahrenheit.
14. OFF/LO/HI slide switch
- Slide it to turn on/off the backlight function.
15. DC jack
16. TEMPERATURE/HUMIDITY sensor
17. BATTERY door
18. Accommodates lithium battery CR2032 for back-up (included).
Page 7

7
TRANSMITTER
1. LED indicator
- Flashes when the remote unit transmits a reading.
2. LCD display
- Display of the channel, temperature and humidity.
3. RESET key
- Press it to restart the transmitter.
4. Wall Mounting Holder
- Use it to support the transmitter on the wall.
5. CHANNEL slide switch
- Assign the transmitter to Channel 1, 2 or 3.
6. Battery Compartment
- Accommodates 2 x AA size batteries (not included)
BEFORE USING THE TRANSMITTER
1. Remove the battery door.
2. Insert 2 x AA size batteries into the battery compartment. Make sure
you insert them the right way according to the polarity information
Page 8

8
marked on the battery compartment.
3. Replace the battery door.
4. Once batteries are placed in the transmitter, it will start transmitting at
12 second intervals within 5 minute to allow the main unit more easily to
search the transmitter. After 5 minute the transmitter will back to normal
transmitting mode with 60 second intervals the LED and antenna icon
will flash during signal transmission.
NOTE:
1. Once the channel is assigned to one transmitter, you can only change it
by removing the batteries or resetting the unit.
2. Avoid placing the transmitter in direct sunlight, rain or snow.
WEATHER STATION
1. Remove the insulation strip in the battery compartment
2. Plug the adaptor into the DC jack.
3. Press RESET key to restart the clock and it will synchronize the
channels of transmitter automatically.
NOTE:
1. The building material and the position of the receiver and transmitter
affect the effective range. So try various locations to obtain the best
result.
2. Place the units away from metal objects and electrical appliances to
minimize the interference. Position the receiver and transmitter within
the effective transmission range: 30, in usual circumstances.
Page 9

9
RECEPTION OF RADIO CONTROLLED TIME SIGNAL RCC
The time and date are radio-controlled. The current time and date
are automatically synchronized with the time signal transmitted from
DCF77. When used for the first time (after inserting the batteries or
pressing RESET and RCC key), the clock will start to receive the RC
signal in 5 minutes with the signal strength indicator flashing.
SIGNAL STRENGTH INDICATOR
The signal indicator displays signal strength in 4 levels. Wave
segment flashing means time signals are being received. The signal
quality could be classified into four types:
NOTE:
1. Everyday the unit will automatically search for the time signal at 2:00
am, 8:00 am, 2:00 pm and 8:00 pm.
2. Always place the unit away from interfering sources such as TV set,
computer, etc.
3. Avoid placing the unit on or next to metal plate.
4. Closed area such as airport, basement, tower block or factory is not
recommended.
5. Do not start reception on a moving article such as vehicle or train.
Page 10

10
MANUAL TIME SETTING
If you are out of the reach of the Radio Controlled Transmitter or if the
reception is not reachable, the time can be set manually. As soon as
the transmitter is received again, the clock will automatically
synchronize with received time:
1. In normal time mode, press and hold TIME key for 2 seconds,
"12H" or "24H" digit flashes.
2. Press UP or DOWN key to set the hour format.
3. Press TIME key again to complete the setting in this sequence:
12/24-hr --> Hour --> Minute --> ±23 hour offset --> DST
AUTO/OFF.
4. Press TIME key to save and exit the setting or let it exit automatically
30 seconds later without pressing any key.
ALARM AND SNOOZE SETTING
1. Press ALARM key to enter the alarm time mode. Press it again and
the alarm icon will be displayed.
2. Press and hold ALARM key for 2 seconds and the hour digits flashes.
3. Press UP or DOWN key to set the desired value.
4. Repeat the step 2 and step 3 to set the minute.
5. Press ALARM key to save and exit the setting.
NOTE:
1. If no key is pressed during the alarm period, the alarm will turn off
automatically. Alarm beeping lasts for 2 minutes.
2. Press SNOOZE key to stop the current alarm and enter snooze.
Alarm icon will be flashing continuously. The alarm will sound again
Page 11

11
in 5 minutes. Snooze can be operated continuously in 24 hours.
3. Press ALARM key for about 2 seconds to turn off the alarm. The
alarm stays turned on for the next day.
4. To turn off the alarm press ALARM key 2X.
WEATHER FORECAST FUNCTION
The indoor console contains a built-in sensitive pressure sensor to
predict the weather forecast for the next 12-24 hours.
NOTE:
If there is any inconsistency of weather forecast between any local
weather station and this unit, the local weather station's forecast should
prevail. The manufacturer is not responsible for any errors due to incorrect
forecasting from this unit.
COLOUR CHANGE DISPLAY
1. Press LOOP key and the backlight colour will change automatically;
Press it again, the backlight colour will stop the change.
2. Turn off the loop function and press RAINBOW key, the backlight
Page 12

12
will change its colour in this sequence: white > red > orange >
yellow > green > cyan > blue > purple.
3. Turn off the loop function and press TUNE key, the backlight will
display 256 colours.
4. Press OUTDOOR TEMP key and the backlight colour changes his
colour according to the changes of outdoor temperature
transmitted from the transmitter. He has 17 backlight colours to
display different temperature ranges.
Page 13

13
CHECKING AND DELETING MAX/MIN TEMPERATURE AND
HUMIDITY RECORDS
1. Press MAX/MIN key once to check the maximum temperature and
humidity records. Press it twice to check the minimum records.
Press it again to exit.
2. Press and hold MAX/MIN key for 3 seconds to delete the maximum
and minimum temperature and humidity records, with beep tone.
VIEWING THE CHANNEL
The default channel is Channel 1. In normal time mode, press
CHANNEL/up key to view the channels from 1 to 3. Besides, the
channels can automatically switch by pressing and holding
CHANNEL/UP key for 2 seconds, with beep tone.
NOTE:
The main station can display the temperature and humidity records of
maximum 3 transmitters of the same type. In each different channel (1, 2
or 3) must be set for each remote sensor.
Page 14

14
LOW BATTERY INDICATOR
If the low battery indicator displays in the outdoor temperature
window, it indicates that the battery power of the transmitter is not
enough, and you should replace with 2 x AA size batteries at once.
NOTE:
If the battery power of the transmitter is not enough, insert 2x AA size
batteries and press RESET key of transmitter and SENSOR key of the
main unit, so that it can receive the time and temperature automatically.
IMPORTANT:
Old batteries do not belong in household waste. If batteries into the
environment, these environmental and health damage may result. You can
use batteries free of charge back from your dealer and collection centers.
They are as a consumer to return
Batteries moral obligation!
Our environment will thank you!
ICE ALERT INDICATOR
Appear when the outdoor temperature is between -2.0°C (28°F)
and 3.0°C (37°F).
Page 15

15
PRECAUTIONS
- Read and keep these instructions.
- Heed all warnings.
- Follow all instructions.
- Do not subject the unit to excessive force, shock, dust, temperature or
humidity.
- Do not cover the ventilation holes with any items such as newspapers,
curtains etc.
- Do not immerse the unit in water. If you spill liquid over it, dry it
immediately with a soft, lint-free cloth.
- Do not clean the unit with abrasive or corrosive materials.
- Do not tamper with the unit’s internal components. This invalidates the
warranty.
- Only use fresh batteries. Do not mix new and old batteries.
- Only use attachments/accessories specified by the manufacturer.
- Images shown in this manual may differ from the actual display.
- When disposing of this product, ensure it is collected separately for
special treatment.
- Placement of this product on certain types of wood may result in
damage to its finishing for which manufacture will not be responsible.
Consult the furniture manufacturer’s care instructions for information.
- The technical specifications for this product and the contents of the user
manual are subject to change without notice.
Page 16

16
SPECIFICATION
MAIN UNIT
Operating temperature range: -5°C-50°C 23°F-122°F
Resolution: 0.1°C/°F (above -10°C/14°F)
1°C/°F (below -10°C/14°F)
Operating humidity range: 10% ∼ 99%
Radio controlled signal: DCF77 version
TRANSMITTER
Operating temperature range: -20°C-60°C -4°F-140°F
Resolution: 0.1°C/°F (above -10°C/14°F)
1°C/°F (below -10°C/14°F)
RF transmission frequency: 433MHz
No. of remote sensor: up to 3 units
RF transmission range: maximum 30 meters
Temperature sensing cycle: around 60-64 seconds
POWER
Main unit: AC / DC adapter 4.5V, 300 mA
Lithium battery CR2032 for back-up
Transmitter: 3V, use 2xAA 1.5V (alkaline battery
recommended)
DIMENSION
Main unit: 139 (W) x 109 (H) x 59,5 (D) mm
Transmitter: 65 (W) x 100 (H) x 35 (D) mm
Page 17

17
EC-DECLARATION OF CONFORMITY
Product: CBR606
This product contains the approved transmitter and complies with the
essential requirements of Article 3 of the R&TTE Directives 1999/5/EC, if
used for its intended use and that the following standard(s) has/ have been
applied.
IMPORTANT:
In all iROX devices all disposal fees in Switzerland (ARF).
 Loading...