

Ironton 46780 Owner's Manual

10” Multi-Slide Miter Saw
OWNER’S MANUAL
WARNING:
Read carefully and understand all ASSEMBLY AND OPERATION INSTRUCTIONS
before operating. Failure to follow the safety rules and other basic safety
precautions may result in serious personal injury.
Item# 46780

Thank you very much for choosing an Ironton product! For future reference, please complete the
owner’s record below:
Model: _______________ Purchase Date: _______________
Save the receipt, warranty and these instructions. It is important that you read the entire manual to
become familiar with this product before you begin using it.
This machine is designed for certain applications only. The distributor cannot be responsible for
issues arising from modification. We strongly recommend this machine not be modified and/or used
for any application other than that for which it was designed. If you have any questions relative to a
particular application, DO NOT use the machine until you have first contacted the distributor to
determine if it can or should be performed on the product.
For technical questions please call 1-800-222-5381.
CAUTION
Before using our miter saw, please read this
manual carefully to understand the proper use of
your unit.
Keep this manual handy.

TABLE OF CONTENTS
Safety symbols....................................................................................................................1
General safety instructions..................................................................................................2
Special safety instructions...................................................................................................4
Additional safety instructions...............................................................................................7
Electrical..............................................................................................................................8
Application...........................................................................................................................9
Specificatons and features.................................................................................................11
Assembly and adjustment .................................................................................................14
Operation ..........................................................................................................................24
Maintenance......................................................................................................................32
Trouble shooting................................................................................................................35
Warranty............................................................................................................................36

SAFETY SYMBOLS
1
NOTE: Some of these following
symbols may be used on this tool.
Please study them and learn their
meaning.
Proper interpretation of these symbols
will allow you to operate the tool better
and safer.
Symbol
Name
Designation / Explanation
Read the operator’s
manual
To reduce the risk of injury, user must read
instruction manual.
Hearing protection
Wear hearing protection to reduce the risk of
induced hearing loss.
Inhalation protection
Wear respiratory protection to reduce the
risk of inhalation of harmful dust.
Eye protection
Always wear safety goggles, safety glasses
with side shields, or a full face shield when
operating this product.
Hand protection
Wear gloves while handling saw blades and
rough material (recommendation that saw
blades should be carried in a holder
wherever practicable).
Class II construction
Double insulated construction
Safety alert
Precautions that involve your safety.
Do not use in rain
Do not expose and operate the tool in rain.
No hands symbol
Failure to keep your hands away from the
blade will result in serious personal injury.
Hot surface
To reduce the risk of injury or damage, avoid
contact with any hot surface.
WARNING! To ensure safety and reliability, all repairs should be performed by a
qualified service technician.

GENERAL SAFETY INSTRUCTIONS
2
WARNING! Read all these instructions
before attempting to operate this product
and save these instructions. When using
electric tools basic safety precautions
should always be followed to reduce the
risk of fire, electric shock and personal
injury including the following:
Keep guards in place and in working
order.
Keep work area clear. Cluttered areas and
benches can cause injuries.
Consider work area environment
- Do not expose tools to rain.
- Do not use tools in damp or wet locations.
- Keep work area well lit.
- Do not use tools in the presence of
flammable liquids or gases.
Guard against electric shock. Avoid body
contact with earthed or grounded surfaces
(e.g. pipes, radiators, ranges and,
refrigerators).
Make the workshop childproof with
padlocks and master switches, or by
removing starter keys.
Keep other persons away. Do not let
persons, especially children, not involved in
the work touch the tool or the extension
cord, and keep them away from the work
area.
Store idle tools when not in use. Tools
should be stored in a dry locked-up place,
out of reach of children.
Do not force the tool. The tool will perform
better and safer at the rate for which it was
intended.
Use the right tool
- Do not force small tools to do the job of a
heavy duty tool.
- Do not use tools for purposes not intended;
for example, do not use circular saws to cut
tree limbs or logs.
Personal Use
- For personal use only. Not intended for
commercial or professional work.
Dress properly
- Do not wear loose clothing or jewelry, these
can be caught in moving parts.
- Non-slip footwear is recommended when
working outdoors.
- Wear protective hair covering or pull hair
back to contain long hair.
Use protective equipment
- Use safety glasses.
- Use face or dust mask if working operations
create dust.
Connect dust extraction equipment. If
the tool is equipped with dust extraction
and collection features, ensure these are
connected and properly used.
Do not abuse the cord. Never yank the
cord to disconnect it from socket. Keep the
cord away from heat, oil and sharp edges.
Secure the work piece. Use clamps or a
vise to hold the work piece whenever
practical. These precautions are safer than
using your hands and frees both hands to
operate the tool.
Do not overreach. Keep proper footing
and balance at all times.
Maintain tools with care
- Keep cutting tools sharp and clean for
safety and improved performance.
- Follow instructions for lubricating and
changing accessories.
- Inspect tool cords periodically, and if
damaged have cords repaired by an
authorized service facility.
- Inspect extension cords periodically and
replace if damaged.
- Keep tool handles dry, clean and free from
oil and grease.
Disconnect tools before servicing and
when changing accessories (e.g. blades,
bits and, cutters).
Use recommended accessories. Consult
the information in this operator’s manual for
recommended accessories. The use of
improper accessories may cause a risk of
injury to persons.
GENERAL SAFETY INSTRUCTIONS
3
Remove adjusting keys and wrenches.
Form a habit of checking to see that keys
and adjusting wrenches are removed from
the tool before turning it on.
Avoid unintentional starting. Ensure
switch is in "off" position when plugging in.
Use intended extension cords. When the
tool is used outdoors, use only extension
cords intended for outdoor use and so
marked.
Stay alert. Watch what you are doing, use
common sense and do not operate the tool
when you are tired or impaired.
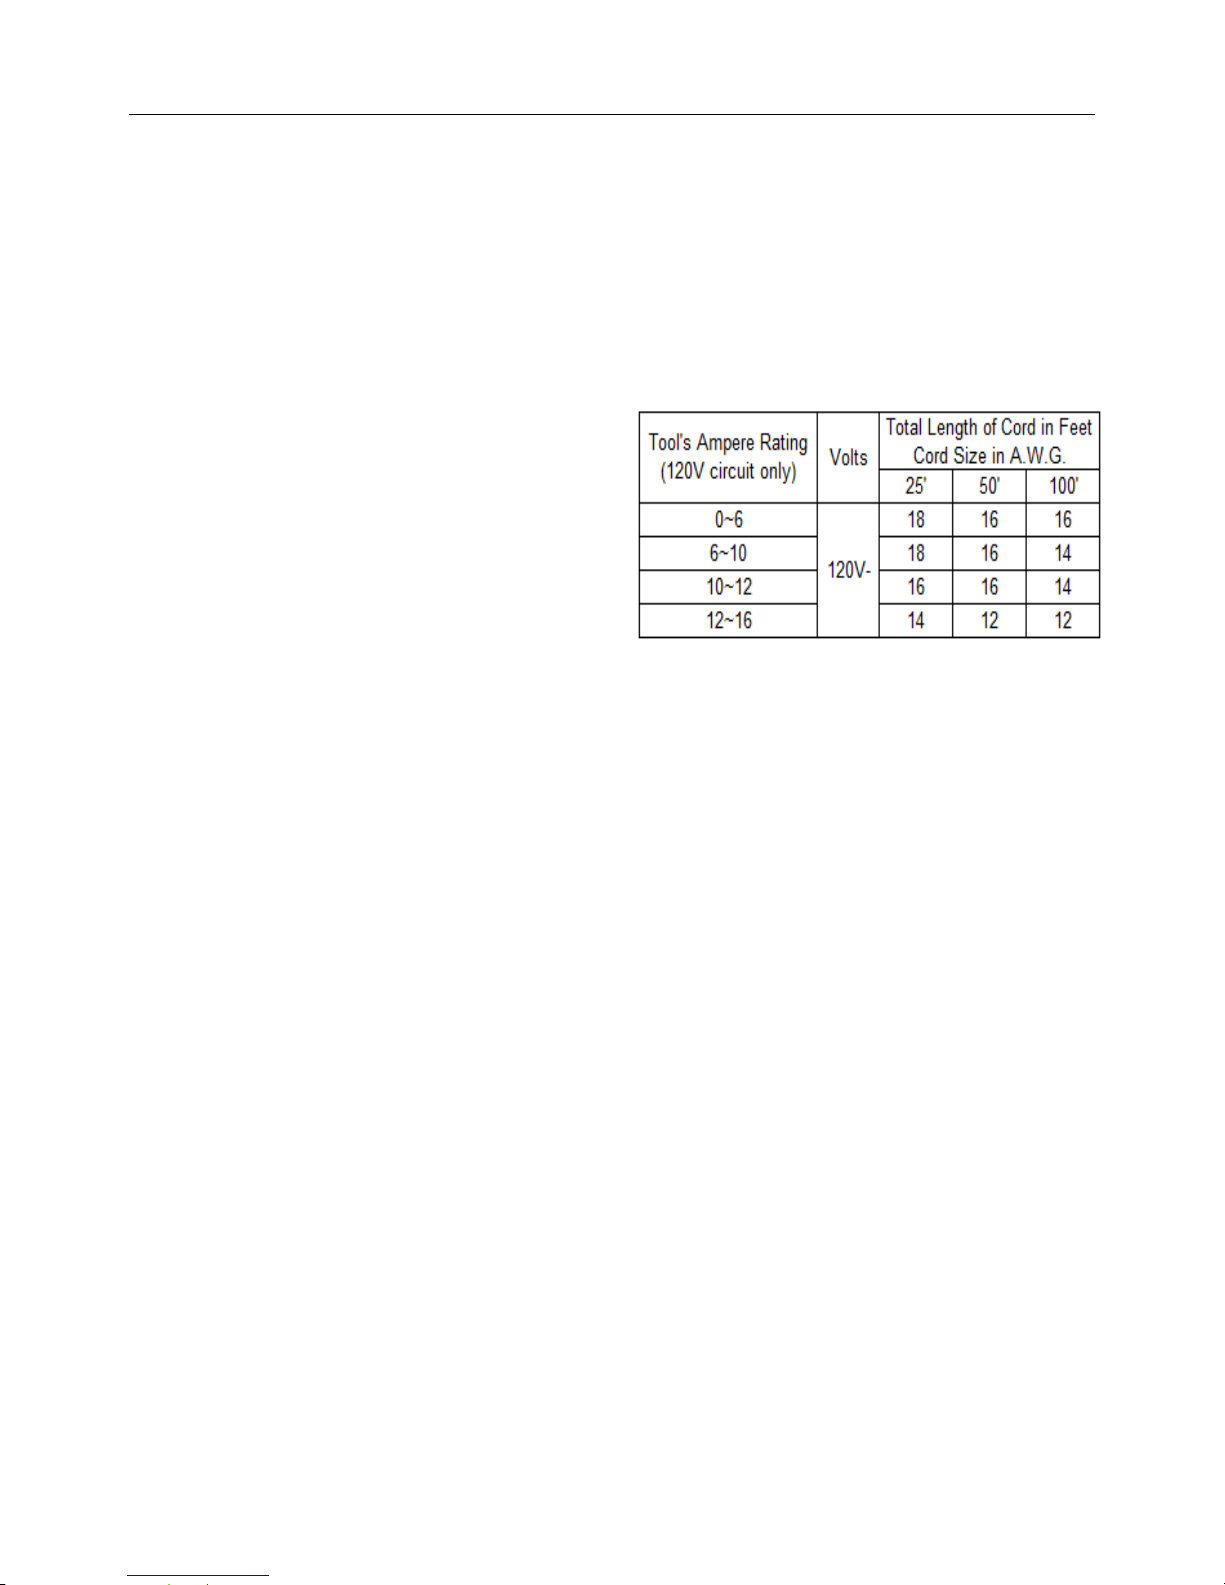
Use proper extension cord
Make sure your extension cord is in good
condition. When using an extension cord,
be sure to use one that is heavy enough to
carry the current your product will draw. An
undersized cord will cause a drop in line
voltage, resulting in loss of power and
overheating. Table 1.1 shows the correct
size to use depending on cord length and
nameplate ampere rating. If in doubt, use
the next heavier gauge. The smaller the
gauge number, the heavier the cord.
Table 1.1
Minimum gauge for cord

SPECIAL SAFETY INSTRUCTIONS
4
WARNING: The use of any
accessory or attachment other than one
recommended in this instruction
manual may present a risk of personal
injury.
Have your tool repaired by a
qualified person. This electric tool
complies with the relevant safety rules.
Repairs should only be carried out by
qualified persons using genuine spare
parts, otherwise this may result in
considerable danger to the user. For
replacement parts, call 1-800-222-5381.
Check damaged parts
- Before further use of tool, it should be
carefully checked to determine that it
will operate properly and perform its
intended function.
- Check the alignment of moving parts,
binding of moving parts, breakage
mounting and any other conditions of
parts that may affect its operation.
- A guard or other part that is damaged
should be properly repaired or replaced
by an authorized service center unless
otherwise indicated in this instruction
manual.
- Have defective switches replaced by
an authorized service center.
- Do not use the tool if the switch does
not turn it on and off.
Never stand on the tool. Serious injury
could occur if the tool is tipped or if the
blade is contacted unintentionally.
Direction of feed. Always feed work
into a blade or cut against the direction
of rotation of the blade or cutter.
Never leave a tool running
unattended. Turn the power off. Don’t
leave the tool until it comes to a
complete stop.
Make workshop kid proof with
padlocks, master switches, or by
removing starter keys.
Don’t force tool. It will perform better
and safer at the rate for which it was
designed.
Never use saw blades which are
damaged or deformed.
Replace the table insert when worn
Use only saw blades specified by the
manufacturer.
Never use saw blades manufactured
from high speed steel.
Wear suitable personal protective
equipment when necessary; this could
include:
i) Hearing protection to reduce the risk of
induced hearing loss;
ii) Eye protection;
iii) Respiratory protection to reduce the
risk of inhalation of harmful dust; and
iv) Gloves for handling saw blades and
rough material.
Connect the saw to a dust-collecting
device when cutting wood.
Select the correct saw blade for the
material to be cut.
Never use the saw to cut materials
other than those specified (See
APPLICATION section).
Only use the saw with guards in
good working order, properly
maintained, and in position.
Keep the floor area free of loose
material (e.g. chips and cut-offs).
Ensure the speed marked on the saw
blade is at least equal to the speed
required for the saw.
Ensure that any spacers and spindle
rings used are suitable for the
purpose as stated by the manufacturer.
Never remove any cut-offs or other
parts of the work piece from the
cutting area while the blade is moving
with an unguarded saw blade.
Do not operate the saw without the
guards in place.
Be sure to turn the tool off and wait

SPECIAL SAFETY INSTRUCTIONS
5
for the saw blade to stop before
moving the work piece or changing
the settings.
Be sure that the power is
disconnected before changing the
blade or servicing the saw.
Never reach around the saw blade.
Do not perform any operation free
hand. Always place the work piece to be
cut on the miter saw table, and position
it firmly against the fence as a backstop.
Always use the fence.
Always keep hands out of the path of
the saw blade. Do not reach under the
material being cut or into the blade’s
cutting path with your fingers or hand for
any reason.
To reduce the risk of injury, return the
saw arm to the full rear position after
each crosscut operation.
Always make sure that the miter table
and saw arm (bevel function) are
locked in position before operating
your saw. Lock the miter table by
securely tightening the miter-lock lever.
Lock the saw arm (bevel function) by
securely tightening the bevel locking
lever.
Be sure that the blade path is free of
nails. Always carefully inspect lumber
and remove all nails before cutting.
Always be sure that the blade clears
the work piece. Never start the saw with
the blade touching the work piece.
Always allow the motor to come to full
speed before starting a cut.
Support long work pieces when
cutting to minimize the risk of blade
pinching or kickback. The saw may
slip, walk or slide while cutting long or
heavy boards.
Never use a length-stop on the free
(scrap) end of a clamped work piece.
Never hold onto or bind the free (scrap)
end of the work piece in any operation. If
a clamp and a length-stop are used
together, ensure these are both installed
on the same side of the saw table to
prevent the saw from catching the loose
end and kicking up.
Never cut more than one work piece
at a time. Do not stack more than one
work piece on the worktable at a time.
Avoid awkward operations and hand
positions where a sudden slip could
cause your hand to move into the
blade. Always make sure that you have
good balance. Never operate the saw on
the floor or in a crouched position.
Only use the correct blades. Use the
correct blade size, style and cutting
speed for the material and the type of cut.
Do not use blades with incorrect size
holes. Never use blade washers or blade
bolts that are defective or incorrect.
Always keep blades clean and sharp
to minimize stalling and kickback.
Do not use dull or damaged blades.
Bent blades can break easily or cause
kickback. Inspect blade before each use.
Never hold a work piece by hand if too
small to be clamped. Always keep your
hands clear of the “no hands” zone.
Never apply lubricants to the blade
when it is running.
Never use solvents to clean plastic
parts. Solvents could dissolve or
otherwise damage the material.
Do not turn the motor switch on and
off rapidly. This could cause the blade
to loosen, which could create a hazard.
Should this ever occur, stand clear and
allow the saw blade to come to a
complete stop. Disconnect the saw from
the power source and securely tighten
the blade bolt.
Never leave saw unattended while it is
connected to a power supply. Turn
power off. Don’t leave the tool until it
comes to a complete stop.

SPECIAL SAFETY INSTRUCTIONS
6
Keep the motor air slots clean and
free of chips or dust. The motor should
be blown out or vacuumed frequently to
keep sawdust from interfering with the
motor ventilation. Disconnect the saw
from the power source before removing
dust.
Never lift this tool by gripping the
cutting handle or the miter fence. This
may cause misalignment. Always lock
the saw arm in the “DOWN” position and
then carry the saw by holding the base
or lift it using the carrying handle/
support bracket.

ADDITIONAL SAFETY INSTRUCTIONS
7
Know your power tool. Read the
Operator’s Manual carefully. Learn the
applications and limitations, as well as
the specific potential hazards related to
this tool. Following this rule will reduce
the risk of electric shock, fire or serious
injury.
Before beginning power tool
operation, always wear safety
goggles, safety glasses with a side
shield, or a full face shield when
needed. We recommend a Wide Vision
Safety Mask for use over eyeglasses or
standard safety glasses with side
shields. Always use eye protection
marked to comply with ANSI Z87.1.
Protect your lungs. Wear a face mask
or a dust mask if the operation
produces dust.
Protect your hearing. Wear
appropriate personal hearing protection
during use. Under some conditions and
duration of use, noise from this product
may contribute to hearing loss.
Protect your eyes. Wear eye
protection marked to comply with ANSI
Z87.1.
Protect your hands. Wear gloves
when handling blade. [Do not wear
gloves when operating saw]
All visitors and bystanders must
wear the same safety equipment that
the operator of the saw wears.
Inspect the tool cords periodically, if
damaged, have these repaired by a
qualified person.
Always check the tool for damaged
parts. Before further use of the tool, a
guard or other part that is damaged
should be carefully checked to
determine whether it will operate
properly and perform its intended
function. Check for misalignment or
binding of moving parts, broken parts,
and any other condition that may affect
the tool’s operation. A guard or other
part that is damaged should be properly
repaired or replaced by a qualified
person.
Save these instructions. Refer to
them frequently and use these to
instruct others who may use this tool. If
someone borrows this tool, make sure
he/she has these instructions also.
ELECTRICAL
8
WARNING: Do not permit fingers to
touch the terminal or the plug when
installing or removing the plug from an
outlet.
To reduce the risk of electric shock,
double-insulated tools are equipped with
a polarized plug (one blade is wider than
the other). This plug will fit into a
polarized outlet only one way. If the plug
does not fit in the outlet properly, reverse
the plug. If it still does not fit, contact a
qualified electrician to in
stall a polarized
outlet. Do not alter the plug in any way.
Double insulation eliminates the need for
the three-wire grounded power cord and
grounded power supply system.
Applicable only to Class II (doubleinsulated) tools. This compound miter
saw is a double-insulated tool.
WARNING: Double insulation does
not take the place of normal safety
precautions when operating this tool.
Before plugging in the tool, be sure that
the outlet voltage supplied i
s within the
voltage marked on the tool’s data plate.
Do not use “AC only” rated tools with a
DC power supply.
Avoid body contact with grounded
surfaces such as pipes, radiators,
ranges and refrigerators. There is an
increased risk of electric shock if your
body is grounded.
Do not expose power tools to rain or
wet conditions, and do not use power
tools in wet or damp locations. Water
entering a power tool will increase the
risk of electric sh
ock. This tool is
intended for indoor use only.
If operating a power tool in damp
locations is unavoidable, always use a
ground fault circuit interrupter to supply
power to the tool. Always wear
electrician’s rubber gloves and footwear
in damp conditions.
Inspect tool cords for damage. Have
damaged tool cords repaired by a
qualified person. Be sure to stay
constantly aware of the cord location,
and keep it away from the moving blade.
Do not abuse the cord.
Never use the
cord to carry the tool or to remove the
plug from the outlet. Keep the cord
away from heat, oil, sharp edges and
moving parts. Replace damaged cords
immediately. Damaged cords increase
the risk of electric shock.
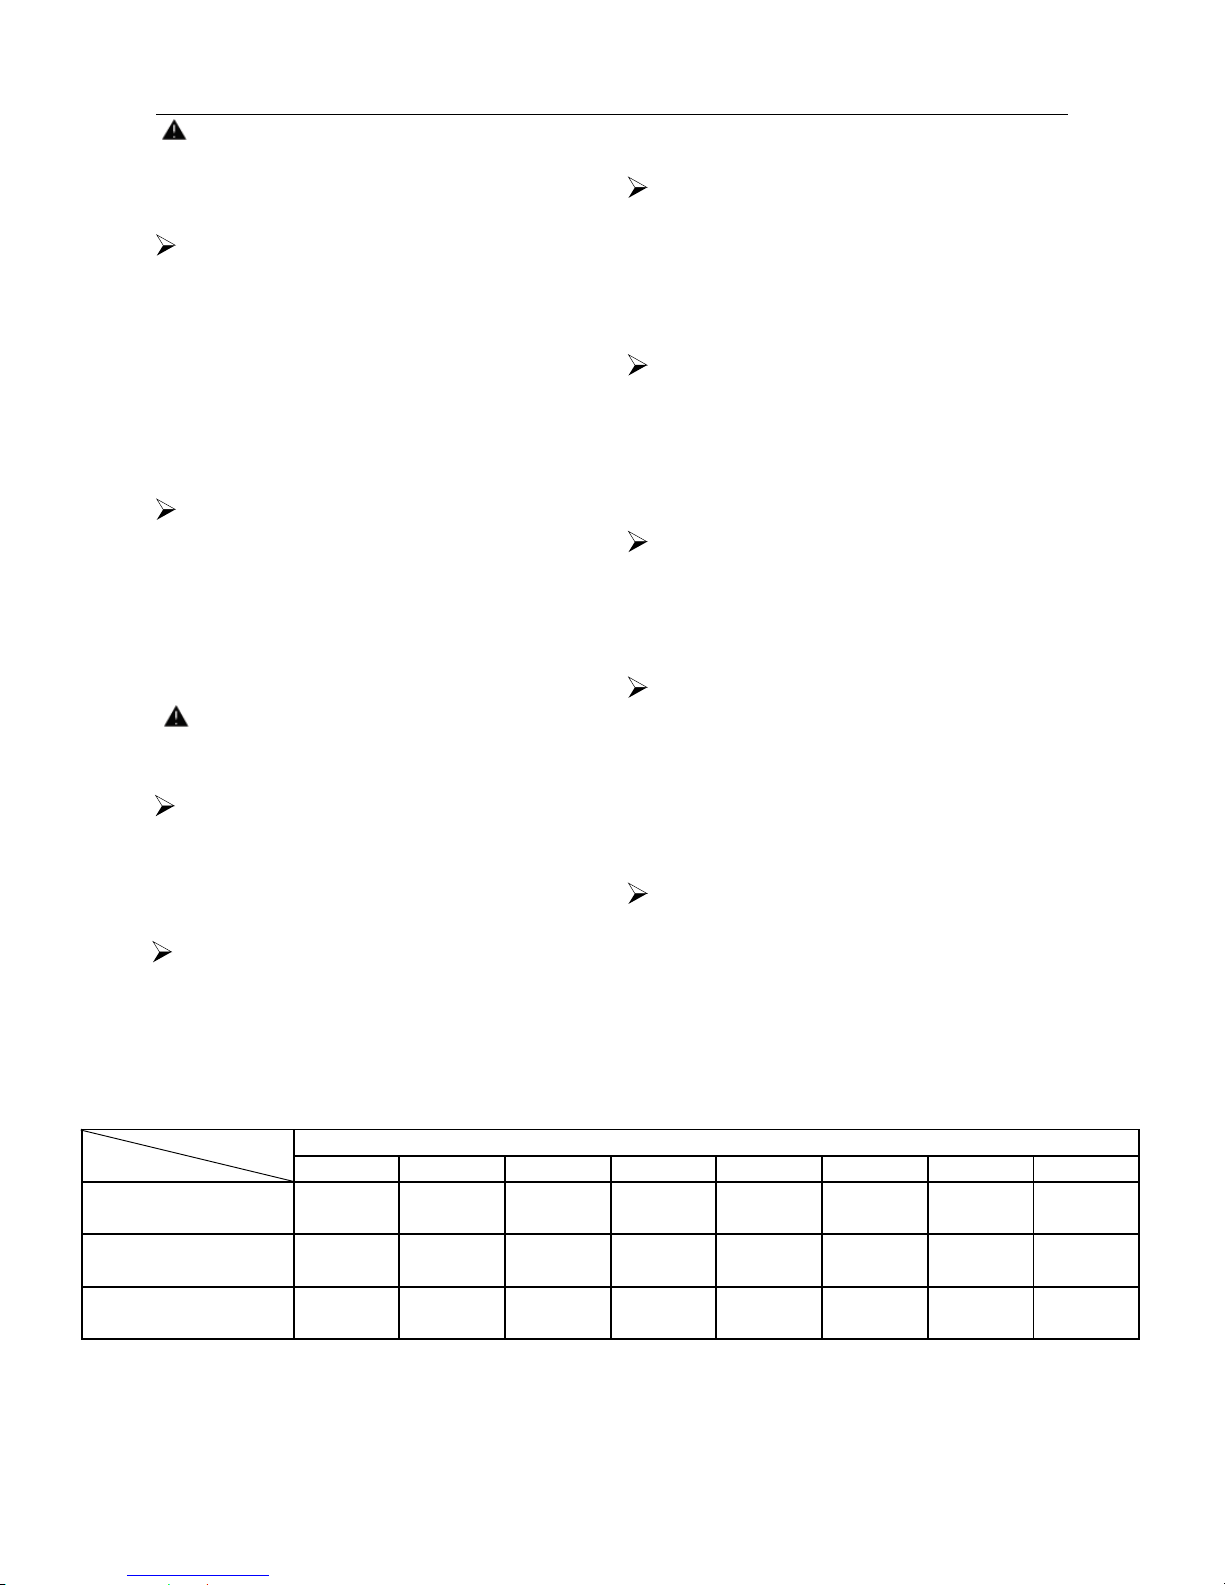
If you use an extension cord, make sure
to use only UL listed cords having the
correct gauge and length (see Table
1.2)
Table 1.2
Length
AMP RATING
25' 50' 75' 100' 125' 150' 175' 200'
18 18 16 16 14 14 12 12
Gauge Gauge Gauge Gauge Gauge Gauge Gauge Gauge
16 16 14 14 14 12 12 12
Gauge Gauge Gauge Gauge Gauge Gauge Gauge Gauge
14 14 12 12 12 12 12 -
Gauge Gauge Gauge Gauge Gauge Gauge Gauge Gauge
13.1-15
Total Extension Cord Length (in Feet)
0-10
10.1-13

APPLICATIONS
9
FUNCTION DESCRIPTIONS AND
INTENDED USE
This miter saw has been designed for
making straight lengthways and crossway
cuts in to wood.
The capacity of this miter saw is designed
for cuts into hardwood and softwood.
This miter saw is not suitable for cutting
aluminum or other non- ferrous metals, or
alloys.
OPERATOR’S GLOSSARY OF TERMS
Bevel Cut: A cutting operation made
with the blade at any angle other than
90° to the miter table.
Blade Flange: A ring or collar on a
spindle or arbor that permits other
objects, such as a blade, to be attached
to it.
Chamfer Cut: A cut that removes a
wedge from a block of wood so that the
end (or part of the end) is angled at
more than 90°.
Compound Miter Cut: A cut made
using both a miter angle and a bevel
angle at the same time.
Crosscut: A cutting operation made
across the grain of the work piece.
Freehand Cut: Performing a cut
without using a fence, miter gauge,
fixture, work clamp, or other proper
device to keep the work piece from
twisting or moving during the cut. Do
not perform any operation freehand.
Use a clamp or a vise whenever
possible.
Kerf: The material removed by the
blade in a through cut, or the slot
produced by the blade in a non-through
or partial cut.
Kickback: A hazard that can occur
when the blade binds or stalls, throwing
the work piece back toward the
operator.
Miter Cut: A cutting operation made
with the blade at any angle other than
90° to the fence.
No-Hands Zone: The area between
the marked lines on the left and right
side of the miter-table base. This zone
is identified by the No-Hands Zone
symbols inside the lines marked on the
miter table base.
Non-through Cut: Any cutting
operation where the blade does not
extend completely through the
thickness of the work piece.
Revolutions Per Minute (RPM): The
number of turns completed by a
spinning object in one minute.
Saw-Arm Locking Pin: Locks the saw
arm in the “DOWN” position.
Saw Blade Path: The area over, under,
behind, or in front of the blade, as it
applies to the work piece; the area that
will be or has been cut by the blade.
Set: The distance that the saw blade
tooth is bent (or set) outward from the
face of the blade.
Slide Bars: Guide the saw arm when
making a slide cut.
Spindle Lock: Allows the user to stop
the blade from rotating while tightening
or loosening the blade screw during
blade replacement or removal.
Throat Plate: A plate inserted in the
Miter Saw’s table that allows for blade
clearance.
Through Sawing: Any cutting
operation where the blade extends
completely through the thickness of the
work piece.
Work Piece or Material: The item on
which the cutting operation is
performed. The surfaces of a work
piece are commonly referred to as
faces, ends, and edges.
 Loading...