

Ironton 45988 Owner's Manual

10IN. TABLE SAW
OWNER’S MANUAL
WARNING:
Read carefully and understand all ASSEMBLY AND OPERATION
INSTRUCTIONS before operating. Failure to follow the safety rules and other
basic safety precautions may result in serious personal injury.
Item# 45988

Page of 30
2
Thank you very much for choosing an Ironton product! For future reference, please complete
the owner’s record below:
Model: _______________ Purchase Date: _______________
Save the receipt, warranty and these instructions. It is important that you read the entire manual
to become familiar with this product before you begin using it.
This machine is designed for certain applications only. The distributor cannot be responsible for
issues arising from modification. We strongly recommend this machine not be modified and/or
used for any application other than that for which it was designed. If you have any questions
relative to a particular application, DO NOT use the machine until you have first contacted the
distributor to determine if it can or should be performed on the product.
For technical questions please call 1-800-222-5381.
INTENDED USE
The Ironton Table Saw has been designed to cut timber and timber products. The large work
table with easy to install side tables provide greater stability when cutting larger workpieces.
Designed for multi-purpose applications such as ripping and crosscuts of timber, chipboard and
plywood. The saw can be tilted up to 45º for miter cuts.
Stand with anti slip rubber feet provides full support and stability. Wheels on the stand make it
easy to maneuver and transport.
TECHNICAL SPECIFICATIONS
Capacity with 10 in. Blade:
Depth of cut at 90°
3-1/8 in.
Maximum tilt angle of arbor (left)
45°
Depth of cut at 45°
2-5/32 in.
Max. cut right of blade with rip fence
24-1/2 in.
Saw Dimensions:
Cabinet depth
11-13/32 in.
Cabinet width
20-3/4 in.
Cabinet length
25-15/32 in.
Main table
24 x 21-1/16 in.
Right extension table
5-63/64 x 21-1/16 in.
Rear extension table
24 x 2-35/64 in.
Saw blade:
Blade max. capacity
10 in.
Blade arbor
5/8 in.
Saw Constructions:
Cabinet
Plastic
Table
Cast aluminum
Rip fence
Aluminum extrusion
Drive system
By gear
Miter gauge
Cast aluminum with T-slot roller guide
Blade guard
Acrylic with anti-kickback pawls
Motor
120 V, 15 A, 60 Hz
No load speed
4500 RPM
Net weight
81.4 lbs

Page of 30
3
GENERAL SAFETY RULES
WARNING: Read and understand all instructions. Failure to follow all instructions listed
below may result in serious injury.
CAUTION: Do not allow persons to operate or assemble this Table Saw until they
have read this manual and have developed a thorough understanding of how the Table Saw
works.
WARNING: The warnings, cautions, and instructions discussed in this instruction
manual cannot cover all possible conditions or situations that could occur. It must be
understood by the operator that common sense and caution are factors that cannot be built into this
product, but must be supplied by the operator.
SAVE THESE INSTRUCTIONS
IMPORTANT SAFETY CONSIDERATIONS
1) Work area safety
a) Keep work area clean and well lit. Cluttered or dark areas invite accidents.
b) Do not operate power tools in explosive atmospheres, such as in the presence of flammable
liquids, gases or dust. Power tools create sparks which may ignite the dust or fumes.
c) Keep children and bystanders away while operating a power tool. Distractions can cause you
to lose control.
2) Electrical safety
a) Power tool plugs must match the outlet. Never modify the plug in any way. Do not use any
adapter plugs with earthed (grounded) power tools. Unmodified plugs and matching outlets will
reduce risk of electric shock.
b) Avoid body contact with earthed or grounded surfaces, such as pipes, radiators, ranges and
refrigerators. There is an increased risk of electric shock if your body is earthed or grounded.
c) Do not expose power tools to rain or wet conditions. Water entering a power tool will
increase the risk of electric shock.
d) Do not abuse the cord. Never use the cord for carrying, pulling or unplugging the power tool.
Keep cord away from heat, oil, sharp edges or moving parts. Damaged or entangled cords
increase the risk of electric shock.
e) When operating a power tool outdoors, use an extension cord suitable for outdoor use. Use
of a cord suitable for outdoor use reduces the risk of electric shock.
f) If operating a power tool in a damp location is unavoidable, use a residual current device
(RCD) protected supply. Use of an RCD reduces the risk of electric shock.

Page of 30
4
3) Personal safety
a) Stay alert, watch what you are doing and use common sense when operating a power tool.
Do not use a power tool while you are tired or under the influence of drugs, alcohol or
medication. A moment of inattention while operating power tools may result in serious personal
injury.
b) Use personal protective equipment. Always wear eye protection. Protective equipment such
as dust mask, non-skid safety shoes, hard hat, or hearing protection used for appropriate
conditions will reduce personal injuries.
c) Prevent unintentional starting. Ensure the switch is in the off-position before connecting to
power source and/or battery pack, picking up or carrying the tool. Carrying power tools with
your finger on the switch or energizing power tools that have the switch on invites accidents.
d) Remove any adjusting key or wrench before turning the power tool on. A wrench or a key left
attached to a rotating part of the power tool may result in personal injury.
e) Do not overreach. Keep proper footing and balance at all times. This enables better control
of the power tool in unexpected situations.
f) Dress properly. Do not wear loose clothing or jewelry. Keep your hair, clothing and gloves
away from moving parts. Loose clothes, jewelry or long hair can be caught in moving parts.
g) If devices are provided for the connection of dust extraction and collection facilities, ensure
these are connected and properly used. Use of dust collection can reduce dust-related
hazards.
4) Power tool use and care
a) Do not force the power tool. Use the correct power tool for your application. The correct
power tool will do the job better and safer at the rate for which it was designed.
b) Do not use the power tool if the switch does not turn it on and off. Any power tool that cannot
be controlled with the switch is dangerous and must be repaired.
c) Disconnect the plug from the power source and/or the battery pack from the power tool
before making any adjustments, changing accessories, or storing power tools. Such preventive
safety measures reduce the risk of starting the power tool accidentally.
d) Keep cutting tools sharp and clean. Properly maintained cutting tools with sharp cutting
edges are less likely to bind and are easier to control.
e) Use the power tool, accessories and tool bits etc. in accordance with these instructions,
taking into account the working conditions and the work to be performed. Use of the power tool
for operations different from those intended
could result in a hazardous situation.
5) Service
a) Have your power tool serviced by a qualified repair person using only identical replacement
parts. This will ensure that the safety of the power tool is maintained.
b) If the supply cord is damaged, it must be replaced by the manufacturer, its service agent or
similarly qualified persons in order to avoid a hazard.

Page of 30
5
TABLE SAW USE AND CARE
• Do not modify the Table Saw in any way. Unauthorized modification may impair the function
and/or safety and could affect the life of the equipment. There are specific applications for which
the Table Saw was designed.
• Always check of damaged or worn out parts before using the Table Saw. Broken parts will
affect the Table Saw operation. Replace or repair damaged or worn parts immediately.
• Store idle Table Saw. When Table Saw is not in use, store it in a secure place out of the reach
of children. Inspect it for good working condition prior to storage and before re-use.
• No other people are allowed to stand in the direct vicinity of the machine when it is in use.
People not operating the machine must maintain a suitable safe distance.
• Never lay the power cable over the saw table.
• Use the push rod to pass the workpiece safely into the saw blade. Do not come too close to the
saw blade.
• Make sure that the thickness of the material to be cut is less than the maximum possible cutting
depth.
• Never cut “handsfree.” The workpiece must always lie level on the machine table and be
moved along the stop! The workpiece must always be pressed hard against the stop.
• Never cut workpieces that are so small that they cannot be safety pressed against the stop and
could turn.
• Never cut workpieces that are so small that they cannot be moved by the push rod at a safe
distance from the saw blade.
• Only cut one workpiece at a time. Never cut several workpieces simultaneously. Workpiece
must not be placed behind or on top of each other. There is a danger of the workpiece
“jamming” and slipping away.
• Make sure that the workpiece cannot slip while cutting or get jammed in the saw blade.
• Clean the working area and the workpiece after each cut.
WARNING: Switch the tool off, remove the plug from the power socket and let the machine
come to a standstill. No foreign bodies are allowed to be on the workpiece or the machine table. Cut
pieces of the workpiece can be caught by the rotating cutting disc and be flung away.
• Never reach into the openings of the table saw. Never insert objects into the openings of the
tool (e.g. the saw blade casing, dust extraction adaptor). Danger of cuts.
• Never remove the cutting piece if the machine is still switched on or running. Danger of cutting
yourself.
• Cut workpieces may have sharp edges, ridges or wooden splinters. Danger of cutting injuries.
• Always switch the machine off and remove the power plug when your leave the machine.
• Never expose the tool to rain or extreme moisture.
• Do not perform any cuts with this table saw, other than those described in these operating
instructions. Do not saw seams and notches.
• This table saw cannot to be used for slitting (notches which end in the workpiece).
Page of 30
6
ASSEMBLY
UNPACKING
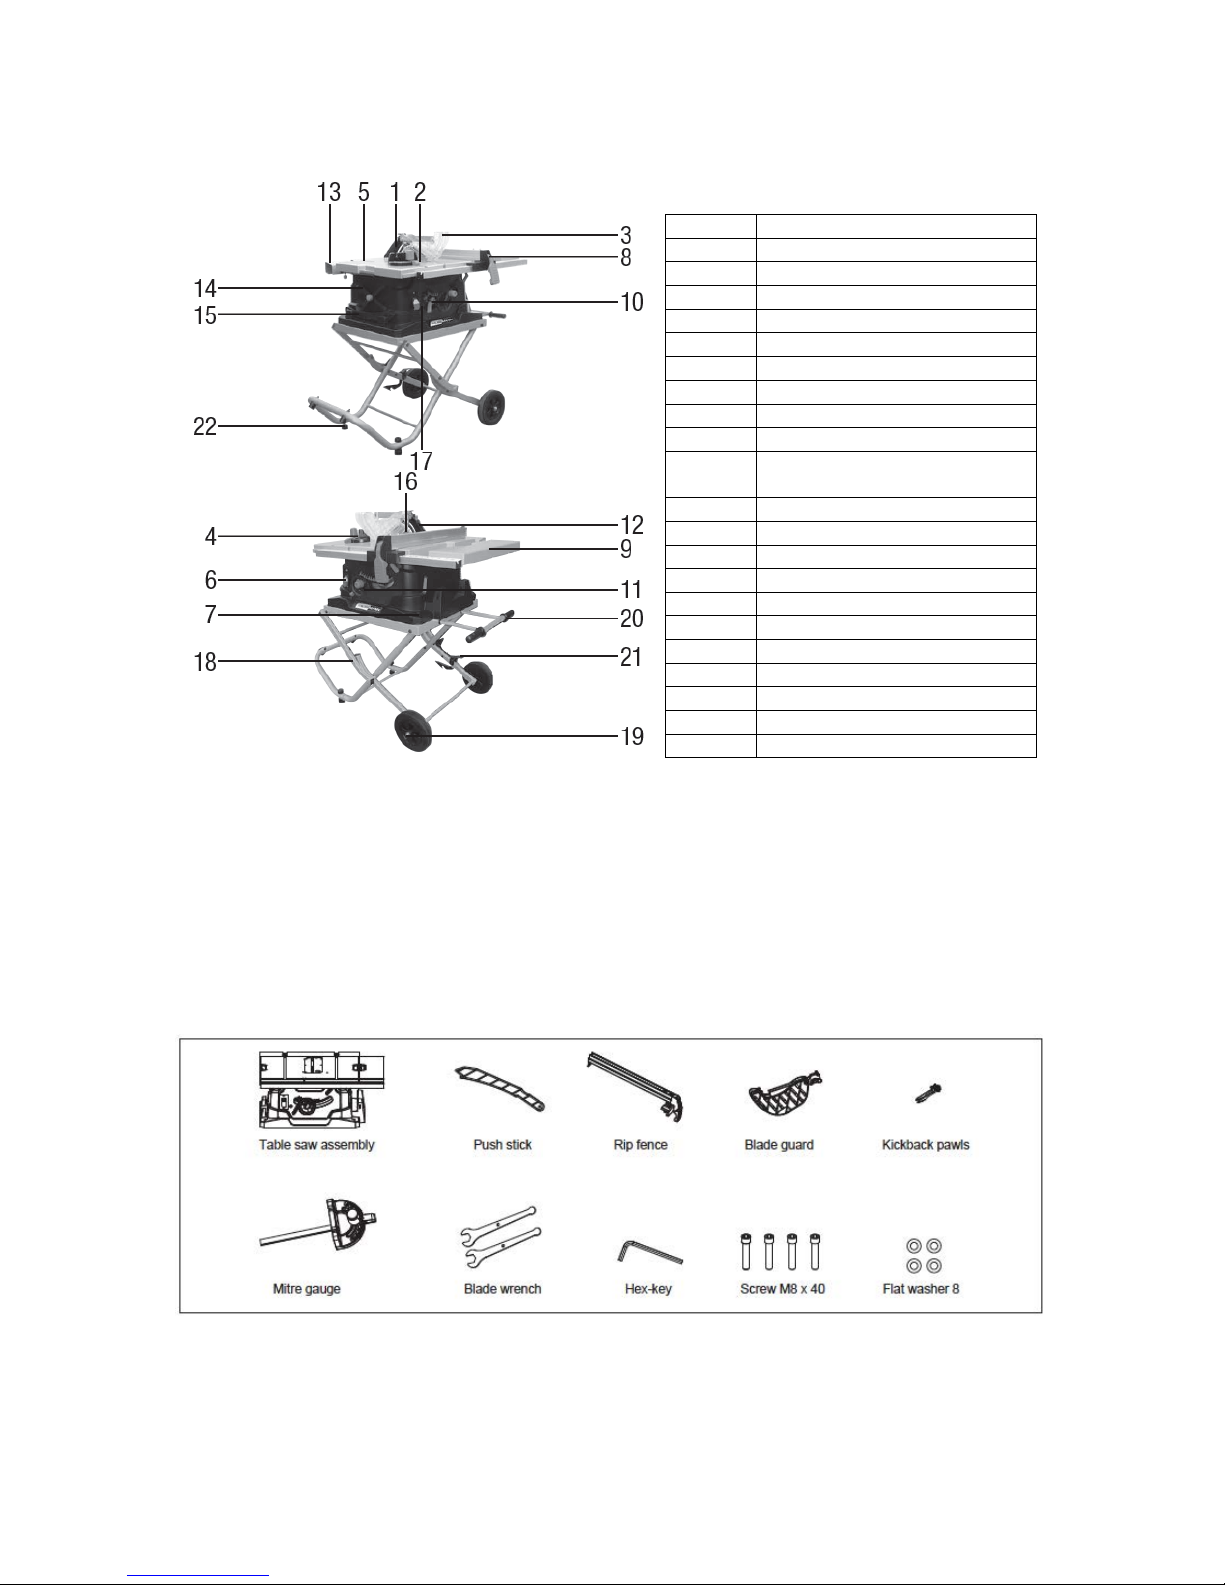
Refer to Figure A-B.
1. Carefully remove the table saw from the carton.
2. Separate the parts.
3. Lay out the parts, and check them against the parts listed below. Examine the
parts carefully.
A. Table saw parts
1
Riving knife
2
Table insert
3
Blade guard
4
Miter gauge
5
Working table
6
ON/OFF switch with key
7
Mounting holes
8
Rip fence
9
Right extension table
10
Blade bevel lock knob
11
Blade tilt/elevation
handwheel
12
Kickback pawls
13
Rear table
14
Blade wrench
15
Push stick
16
Blade
17
Overload reset switch
18
Stand
19
Wheel
20
Handle
21
Release lever
22
Leveling foot
Page of 30
7
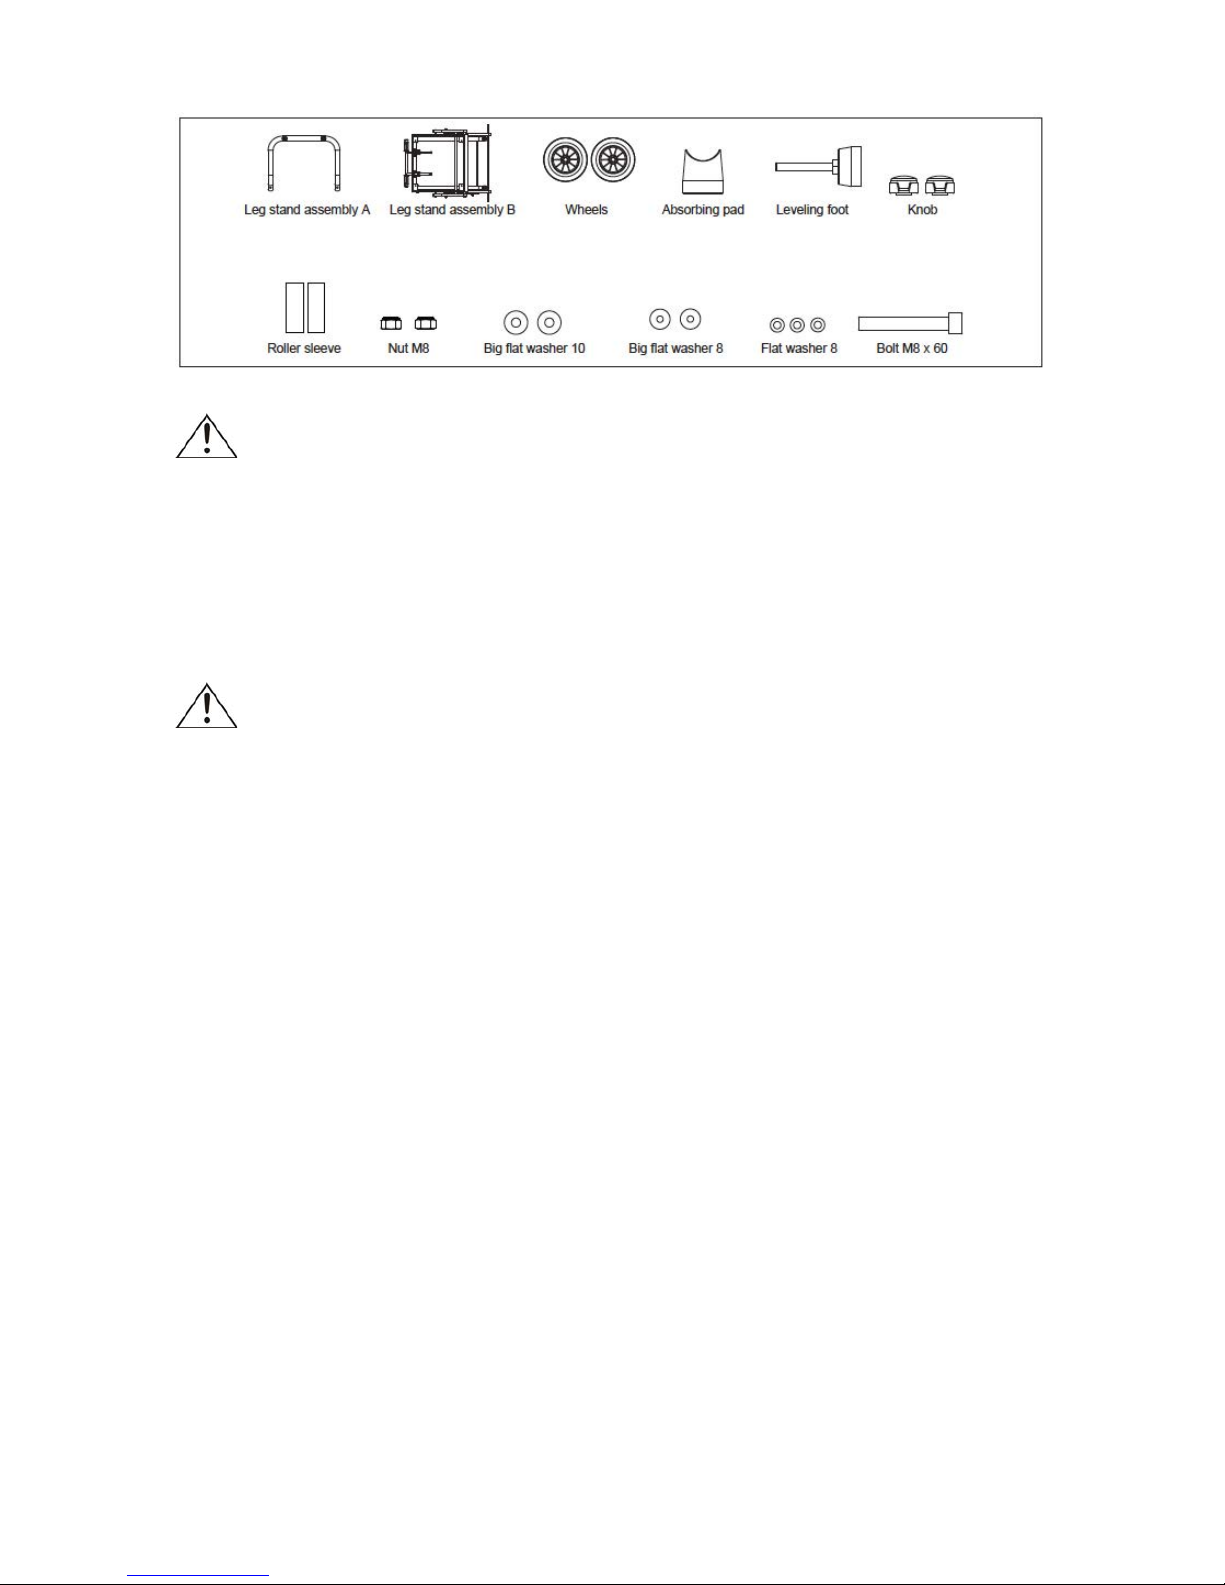
B. Stand parts
WARNING: If any part is missing or damaged, do not plug in the table saw until you have
replaced the missing or damaged parts. To avoid injury, the styrofoam block should be removed
between the motor and the table.
ASSEMBLY AND ADJUSTMENTS
WARNING: DO NOT CONNECT THE PLUG TO THE OUTLET UNTIL ALL
INSTALLATIONS AND ADJUSTMENTS HAVE BEEN COMPLETED AND YOU HAVE READ AND
UNDERSTOOD THE SAFETY AND OPERATIONAL INSTRUCTIONS.
Page of 30
8
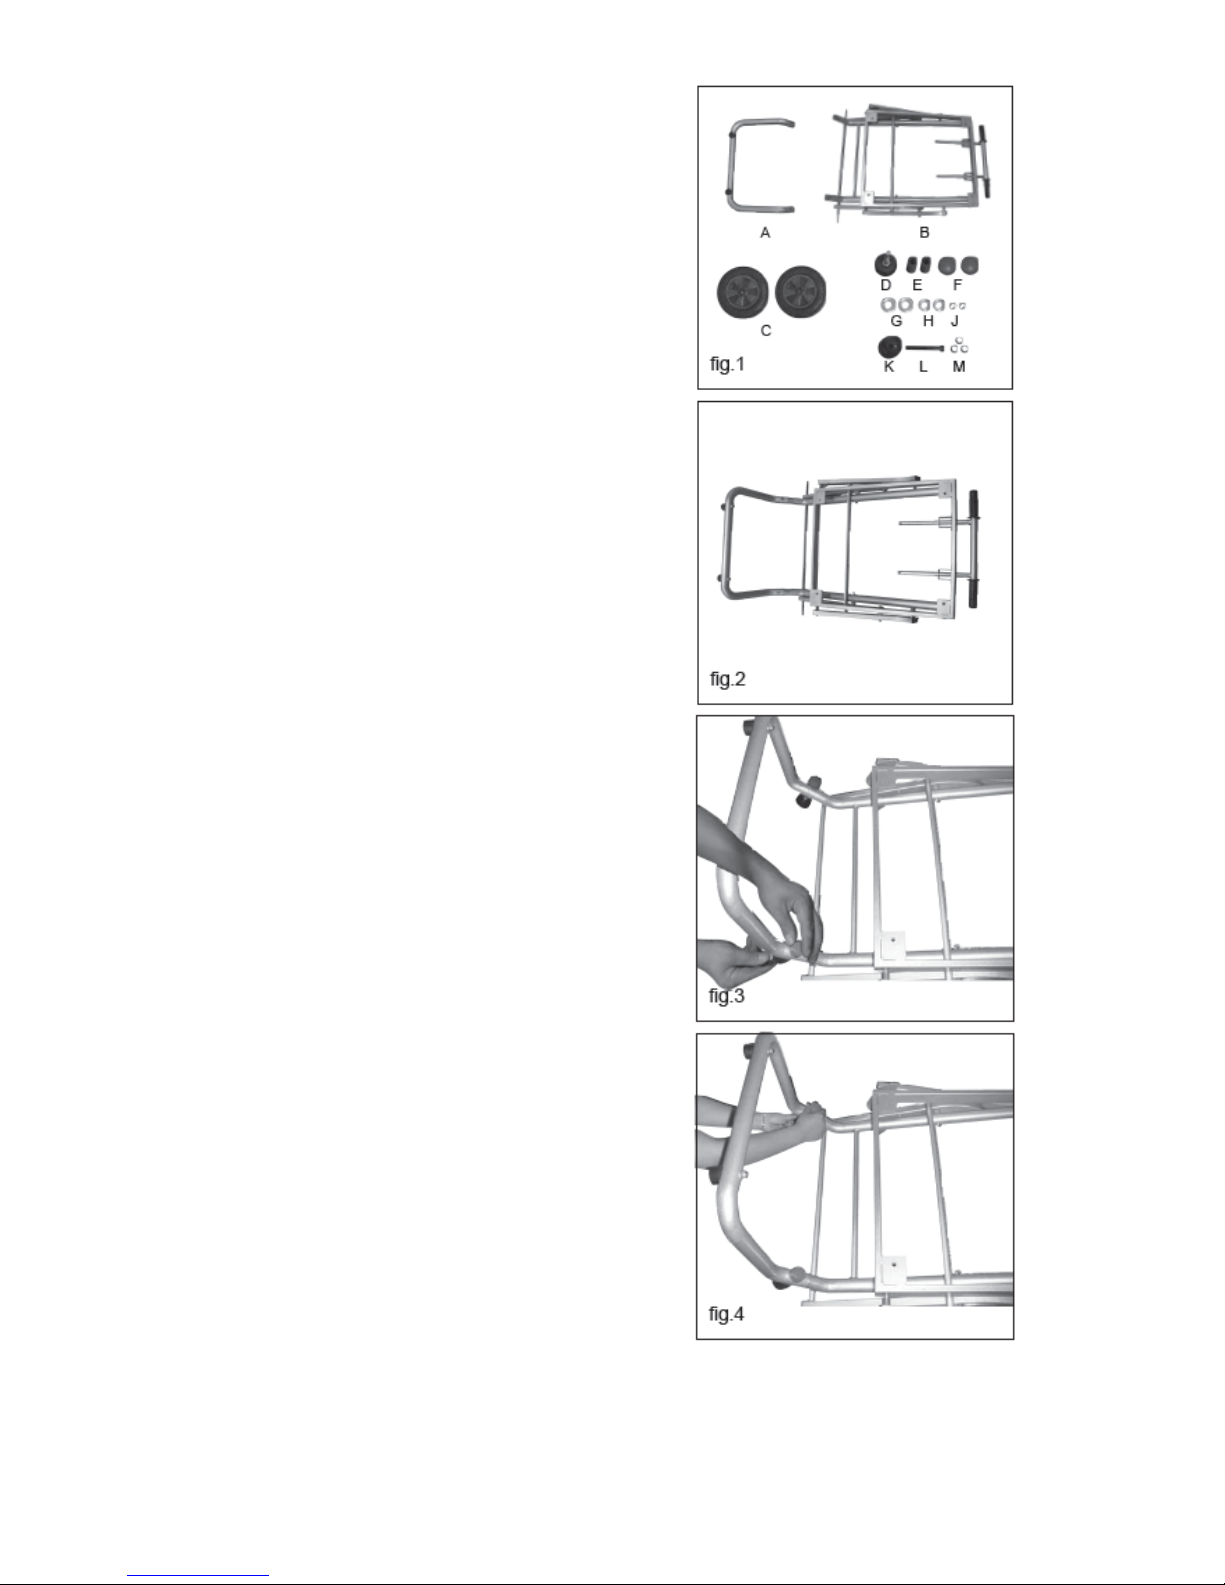
ASSEMBLE THE STAND (fig. 1-6)
• Unpack all of the parts, and group them by type and
size. Refer to the parts list for correct quantities. (See
Fig. 1)
• Attach the tubes of the stand assembly (B) with the
corresponding tubes of the stand assembly (A) and
align the holes. (See Fig. 2)
• Place the flat washer M8 (M), leveling foot (K)
before insert the bolt M8 x 60 (L) into hole and put
the flat washer M8 (M) on the opposite to the tube,
then tighten the knob (F) with hex key tightening the
bolt (L). (See Fig. 3)
• Insert the bolt with leveling foot (D) into hole, and
put flat washer M8 (M) on the opposite tube, then
tighten the knob (F), and you can See Fig. 4.
Page of 30
9
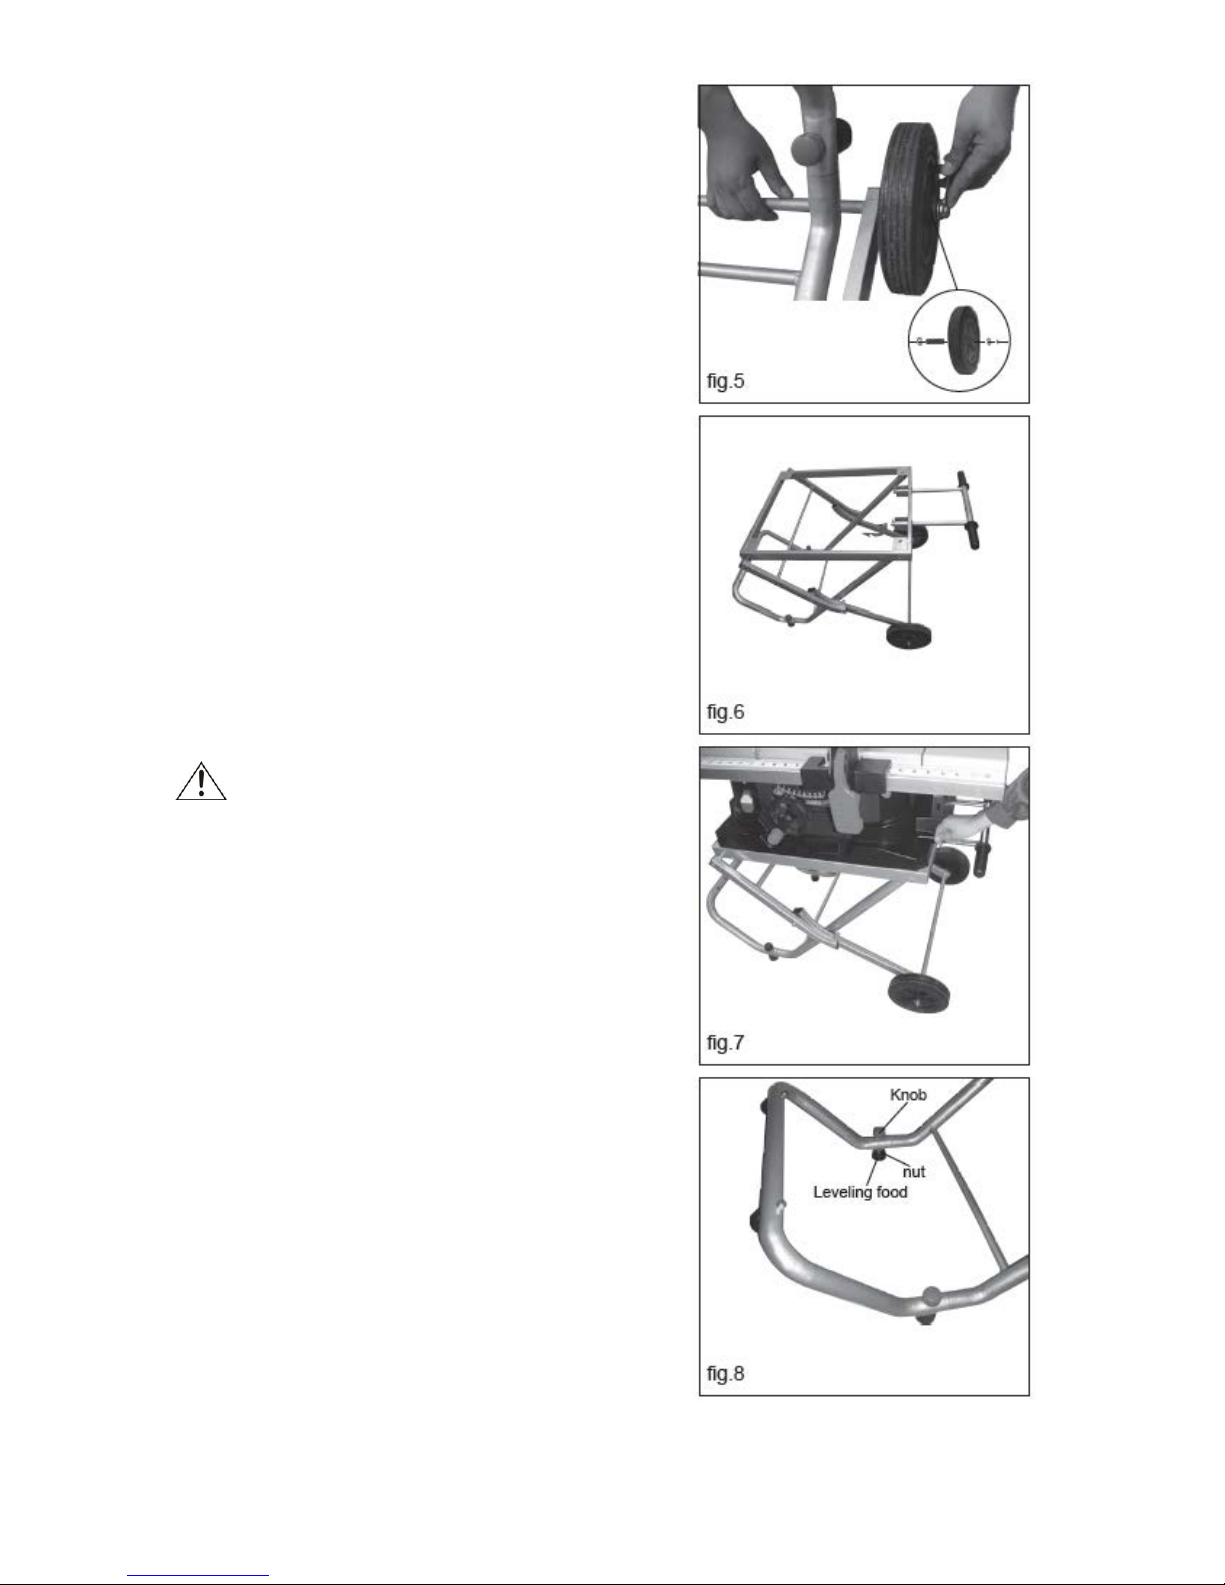
• Slide the flat washer M10 (G), roller sleeves (E),
wheels (C), and flat washer M8 (H) and nut M8 (J) onto
the axle through the hole in the center of the wheel as
illustrated. Secure in place using the wrench. (See Fig.
5)
• Repeat with the second wheel. Fig. 6 shows
completed stand assembly.
NOTE: Verity that the stand is securely locked in an
open position and that the shock adoption pad
stabilized the table saw before operation.
ATTACH THE TABLE SAW TO THE STAND (Fig. 7)
WARNING: DO NOT OPERATE THIS
MACHINE ON THE FLOOR. THIS IS A VERY
DANGEROUS POSITION.
• Place the stand on a level surface and level the stand
to the floor.
• Place the table saw on top of the stand, aligning the
holes in the base with the holes in the stand.
• Place the flat washer before insert four hex bolts
through the holes in the base and the stand.
• Tighten all four bolts with hex key.
NOTE: DO NOT OVER-TIGHTEN THE NUTS THAT
HOLD THE SAW TO THE STAND. DOING SO WILL
DAMAGE THE SAW BASE. TO SECURE/LEVEL
THE TABLE SAW (Fig. 8)
With the stand open and the table saw resting on a flat,
level surface, the table saw should not move or rock
from side to side. If the table saw rocks from side to
side, the leveling foot needs adjusting until the stand is
balanced.
• Loosen the knob counterclockwise.
• Lift the table saw slightly so that you may turn the
leveling foot until the stand no longer rocks.
• Turning clockwise will lower the foot.
• Turning counterclockwise will raise the foot.
NOTE: Only the leveling foot with nut can be adjusted
 Loading...