

IronPort Systems 4108GL User Manual
management and
configuration guide
hp procurve
switch 4108gl
www.hp.com/go/hpprocurve


HP Procurve Switch 4108GL
Software Release G.01.xx or Later
Management and Configuration Guide

© Copyright 2001 Hewlett-Packard Company
All Rights Reserved.
This document contains information which is protected by
copyright. Reproduction, adaptation, or translation without
prior permission is prohibited, except as allowed under the
copyright laws.
Publication Number
5969-2378
May 2001
Applicable Product
HP Procurve Switch 4108GL (J4865A)
Trademark Credits
Microsoft, Windows, Windows 95, and Microsoft Windows
NT are registered trademarks of Microsoft Corporation.
Internet Explorer is a trademark of Microsoft Corporation.
Ethernet is a registered trademark of Xerox Corporation.
Netscape is a registered trademark of Netscape Corporation.
Disclaimer
The information contained in this document is subject to
change without notice.
HEWLETT-PACKARD COMPANY MAKES NO WARRANTY
OF ANY KIND WITH REGARD TO THIS MATERIAL,
INCLUDING, BUT NOT LIMITED TO, THE IMPLIED
WARRANTIES OF MERCHANTABILITY AND FITNESS
FOR A PARTICULAR PURPOSE. Hewlett-Packard shall not
be liable for errors contained herein or for incidental or
consequential damages in connection with the furnishing,
performance, or use of this material.
Hewlett-Packard assumes no responsibility for the use or
reliability of its software on equipment that is not furnished
by Hewlett-Packard.
Warranty
See the Customer Support/Warranty booklet included with
the product.
A copy of the specific warranty terms applicable to your
Hewlett-Packard products and replacement parts can be
obtained from your HP Sales and Service Office or
authorized dealer.
Hewlett-Packard Company
8000 Foothills Boulevard, m/s 5551
Roseville, California 95747-5551
http://www.hp.com/go/hpprocurve

Preface
Preface
Use of This Guide and Other Procurve Switch Documentation
This guide describes how to use the command line interface (CLI), menu
interface, and web browser interface for the HP Procurve Switch 4108GL—
also referred to as the Switch 4108GL.
■ If you need information on specific parameters in the menu interface,
refer to the online help provided in the interface.
■ If you need information on a specific command in the CLI, type the
command name followed by “help” (<command> help).
■ If you need information on specific features in the HP Web Browser
Interface (hereafter referred to as the “web browser interface”), use the
online help available for the web browser interface. For more information
on web browser Help options, refer to “Online Help for the HP Web
Browser Interface” on page 4-12.
■ If you need further information on Hewlett-Packard switch technology,
refer to HP’s Procurve website at:
http://www.hp.com/go/hpprocurve
Just Want a Quick Start?
IP Addressing. If you just want to give the switch an IP address so that it
can communicate on your network, or if you are not using VLANs, HP
recommends that you use the Switch Setup screen to quickly configure IP
addressing. To do so, do one of the following:
■ Enter setup at the CLI Manager level prompt.
HP4108# setup
■ Select 8. Run Setup in the Main Menu of the menu interface.
For more on using the Switch Setup screen, see the Installation and Getting
Started Guide you received with the switch.
iii

Preface
To Set Up and Install the Switch in Your Network
Use the HP Procurve Switch 4108GL Installation and Getting Started Guide
(shipped with the switch) to guide you in the following:
■ Physically installing the switch in your network
■ Quickly assigning an IP address and subnet mask, set a Manager pass-
word, and (optionally) configure other basic features.
iv

Contents
Preface . . . . . . . . . . . . . . . . . . . . . . . . . . . . . . . . . . . . . . . . . . . . . . . . . . . . . . . . iii
Use of This Guide and Other Procurve Switch Documentation . . . . . . iii
Just Want a Quick Start? . . . . . . . . . . . . . . . . . . . . . . . . . . . . . . . . . . . . . . iii
To Set Up and Install the Switch in Your Network . . . . . . . . . . . . . . . . . iv
Selecting a Management Interface
Contents . . . . . . . . . . . . . . . . . . . . . . . . . . . . . . . . . . . . . . . . . . . . . . . . . . . . . . 1-1
Overview . . . . . . . . . . . . . . . . . . . . . . . . . . . . . . . . . . . . . . . . . . . . . . . . . . . . . 1-2
Understanding Management Interfaces . . . . . . . . . . . . . . . . . . . . . . . . . 1-2
Advantages of Using the Menu Interface . . . . . . . . . . . . . . . . . . . . . . . . 1-3
Advantages of Using the CLI . . . . . . . . . . . . . . . . . . . . . . . . . . . . . . . . . . . 1-4
Advantages of Using the HP Web Browser Interface . . . . . . . . . . . . . 1-5
Advantages of Using HP TopTools for Hubs & Switches . . . . . . . . . 1-6
Using the Menu Interface
Contents . . . . . . . . . . . . . . . . . . . . . . . . . . . . . . . . . . . . . . . . . . . . . . . . . . . . . . 2-1
Overview . . . . . . . . . . . . . . . . . . . . . . . . . . . . . . . . . . . . . . . . . . . . . . . . . . . . . 2-2
Starting and Ending a Menu Session . . . . . . . . . . . . . . . . . . . . . . . . . . . 2-3
How To Start a Menu Interface Session . . . . . . . . . . . . . . . . . . . . . . . . . 2-4
How To End a Menu Session and Exit from the Console: . . . . . . . . . . 2-5
Main Menu Features . . . . . . . . . . . . . . . . . . . . . . . . . . . . . . . . . . . . . . . . . . 2-7
Screen Structure and Navigation . . . . . . . . . . . . . . . . . . . . . . . . . . . . . . . 2-9
Rebooting the Switch . . . . . . . . . . . . . . . . . . . . . . . . . . . . . . . . . . . . . . . . . 2-12
Menu Features List . . . . . . . . . . . . . . . . . . . . . . . . . . . . . . . . . . . . . . . . . . . 2-14
Where To Go From Here . . . . . . . . . . . . . . . . . . . . . . . . . . . . . . . . . . . . . . 2-15
Using the Command Line Interface (CLI)
Chapter Contents . . . . . . . . . . . . . . . . . . . . . . . . . . . . . . . . . . . . . . . . . . . . . 3-1
v

Overview . . . . . . . . . . . . . . . . . . . . . . . . . . . . . . . . . . . . . . . . . . . . . . . . . . . . . 3-2
Accessing the CLI . . . . . . . . . . . . . . . . . . . . . . . . . . . . . . . . . . . . . . . . . . . . . 3-2
Using the CLI . . . . . . . . . . . . . . . . . . . . . . . . . . . . . . . . . . . . . . . . . . . . . . . . . 3-2
Privilege Levels at Logon . . . . . . . . . . . . . . . . . . . . . . . . . . . . . . . . . . . . . 3-3
Privilege Level Operation . . . . . . . . . . . . . . . . . . . . . . . . . . . . . . . . . . . . . 3-4
How To Move Between Levels . . . . . . . . . . . . . . . . . . . . . . . . . . . . . . . . 3-7
Listing Commands and Command Options . . . . . . . . . . . . . . . . . . . . . . 3-8
Displaying CLI "Help" . . . . . . . . . . . . . . . . . . . . . . . . . . . . . . . . . . . . . . . 3-11
Configuration Commands and the Context Configuration Modes . . 3-13
CLI Control and Editing . . . . . . . . . . . . . . . . . . . . . . . . . . . . . . . . . . . . . . 3-16
Using the HP Web Browser Interface
Chapter Contents . . . . . . . . . . . . . . . . . . . . . . . . . . . . . . . . . . . . . . . . . . . . . 4-1
Overview . . . . . . . . . . . . . . . . . . . . . . . . . . . . . . . . . . . . . . . . . . . . . . . . . . . . . 4-2
General Features . . . . . . . . . . . . . . . . . . . . . . . . . . . . . . . . . . . . . . . . . . . . . . 4-3
Web Browser Interface Requirements . . . . . . . . . . . . . . . . . . . . . . . . . . 4-4
Starting an HP Web Browser Interface Session with the Switch . . 4-5
Using a Standalone Web Browser in a PC or UNIX Workstation . . . . 4-5
Using HP TopTools for Hubs & Switches . . . . . . . . . . . . . . . . . . . . . . . 4-6
Tasks for Your First HP Web Browser Interface Session . . . . . . . . . 4-8
Viewing the “First Time Install” Window . . . . . . . . . . . . . . . . . . . . . . . . 4-8
Creating Usernames and Passwords in the Browser Interface . . . . . . 4-9
Online Help for the HP Web Browser Interface . . . . . . . . . . . . . . . . . 4-12
Support/Mgmt URLs Feature . . . . . . . . . . . . . . . . . . . . . . . . . . . . . . . . . . 4-13
Support URL . . . . . . . . . . . . . . . . . . . . . . . . . . . . . . . . . . . . . . . . . . . . . . 4-14
Help and the Management Server URL . . . . . . . . . . . . . . . . . . . . . . . . 4-14
Status Reporting Features . . . . . . . . . . . . . . . . . . . . . . . . . . . . . . . . . . . . 4-16
The Overview Window . . . . . . . . . . . . . . . . . . . . . . . . . . . . . . . . . . . . . . 4-16
The Port Utilization and Status Displays . . . . . . . . . . . . . . . . . . . . . . . 4-17
The Alert Log . . . . . . . . . . . . . . . . . . . . . . . . . . . . . . . . . . . . . . . . . . . . . . 4-20
The Status Bar . . . . . . . . . . . . . . . . . . . . . . . . . . . . . . . . . . . . . . . . . . . . . 4-23
Setting Fault Detection Policy . . . . . . . . . . . . . . . . . . . . . . . . . . . . . . . . 4-24
vi

Switch Memory and Configuration
Chapter Contents . . . . . . . . . . . . . . . . . . . . . . . . . . . . . . . . . . . . . . . . . . . . . 5-1
Overview . . . . . . . . . . . . . . . . . . . . . . . . . . . . . . . . . . . . . . . . . . . . . . . . . . . . . 5-2
Overview of Configuration File Management . . . . . . . . . . . . . . . . . . . 5-2
Using the CLI To Implement Configuration Changes . . . . . . . . . . . . 5-4
Using the Menu and Web Browser Interfaces To Implement
Configuration Changes . . . . . . . . . . . . . . . . . . . . . . . . . . . . . . . . . . . . . . . . 5-7
Using the Menu Interface To Implement Configuration Changes . . . 5-8
Using the Web Browser Interface To Implement Configuration
Changes . . . . . . . . . . . . . . . . . . . . . . . . . . . . . . . . . . . . . . . . . . . . . . . . . . 5-11
Using Primary and Secondary Flash Image Options . . . . . . . . . . . . . 5-11
Displaying the Current Flash Image Data . . . . . . . . . . . . . . . . . . . . . . 5-12
OS Downloads . . . . . . . . . . . . . . . . . . . . . . . . . . . . . . . . . . . . . . . . . . . . . 5-14
Local OS Replacement and Removal . . . . . . . . . . . . . . . . . . . . . . . . . . 5-15
Rebooting the Switch . . . . . . . . . . . . . . . . . . . . . . . . . . . . . . . . . . . . . . . 5-17
Operating Notes . . . . . . . . . . . . . . . . . . . . . . . . . . . . . . . . . . . . . . . . . . . . 5-19
Interface Access and System Information
Chapter Contents . . . . . . . . . . . . . . . . . . . . . . . . . . . . . . . . . . . . . . . . . . . . . 6-1
Overview . . . . . . . . . . . . . . . . . . . . . . . . . . . . . . . . . . . . . . . . . . . . . . . . . . . . . 6-2
Interface Access: Console/Serial Link, Web, and Inbound Telnet . 6-3
Menu: Modifying the Interface Access . . . . . . . . . . . . . . . . . . . . . . . . . . 6-4
CLI: Modifying the Interface Access . . . . . . . . . . . . . . . . . . . . . . . . . . . . 6-5
System Information . . . . . . . . . . . . . . . . . . . . . . . . . . . . . . . . . . . . . . . . . . . 6-8
Menu: Viewing and Configuring System Information . . . . . . . . . . . . . . 6-9
CLI: Viewing and Configuring System Information . . . . . . . . . . . . . . 6-10
Web: Configuring System Parameters . . . . . . . . . . . . . . . . . . . . . . . . . 6-13
Configuring IP Addressing
Contents . . . . . . . . . . . . . . . . . . . . . . . . . . . . . . . . . . . . . . . . . . . . . . . . . . . . . . 7-1
Overview . . . . . . . . . . . . . . . . . . . . . . . . . . . . . . . . . . . . . . . . . . . . . . . . . . . . . 7-2
IP Configuration . . . . . . . . . . . . . . . . . . . . . . . . . . . . . . . . . . . . . . . . . . . . . . 7-3
Just Want a Quick Start? . . . . . . . . . . . . . . . . . . . . . . . . . . . . . . . . . . . . . 7-4
vii

IP Addressing with Multiple VLANs . . . . . . . . . . . . . . . . . . . . . . . . . . . . 7-4
IP Addressing in a Stacking Environment . . . . . . . . . . . . . . . . . . . . . . . 7-5
Menu: Configuring IP Address, Gateway, and Time-To-Live (TTL) . . 7-5
CLI: Configuring IP Address, Gateway, Time-To-Live (TTL), and
Timep . . . . . . . . . . . . . . . . . . . . . . . . . . . . . . . . . . . . . . . . . . . . . . . . . . . . . 7-7
Web: Configuring IP Addressing . . . . . . . . . . . . . . . . . . . . . . . . . . . . . . . 7-9
How IP Addressing Affects Switch Operation . . . . . . . . . . . . . . . . . . . . 7-9
Globally Assigned IP Network Addresses . . . . . . . . . . . . . . . . . . . . . . 7-14
Time Protocols
Chapter Contents . . . . . . . . . . . . . . . . . . . . . . . . . . . . . . . . . . . . . . . . . . . . . 8-1
Overview . . . . . . . . . . . . . . . . . . . . . . . . . . . . . . . . . . . . . . . . . . . . . . . . . . . . . 8-2
TimeP Time Synchronization . . . . . . . . . . . . . . . . . . . . . . . . . . . . . . . . . . 8-2
SNTP Time Synchronization . . . . . . . . . . . . . . . . . . . . . . . . . . . . . . . . . . 8-2
Overview: Selecting a Time Synchronization Protocol or Turning Off
Time Protocol Operation . . . . . . . . . . . . . . . . . . . . . . . . . . . . . . . . . . . . . . 8-3
General Steps for Running a Time Protocol on the Switch: . . . . . . . . 8-3
Disabling Time Synchronization . . . . . . . . . . . . . . . . . . . . . . . . . . . . . . . 8-4
SNTP: Viewing, Selecting, and Configuring . . . . . . . . . . . . . . . . . . . . . 8-4
Menu: Viewing and Configuring SNTP . . . . . . . . . . . . . . . . . . . . . . . . . . 8-5
CLI: Viewing and Configuring SNTP . . . . . . . . . . . . . . . . . . . . . . . . . . . . 8-8
viii
TimeP: Viewing, Selecting, and Configuring . . . . . . . . . . . . . . . . . . . . 8-13
Menu: Viewing and Configuring TimeP . . . . . . . . . . . . . . . . . . . . . . . . 8-14
CLI: Viewing and Configuring TimeP . . . . . . . . . . . . . . . . . . . . . . . . . . 8-16
SNTP Unicast Time Polling with Multiple SNTP Servers . . . . . . . . 8-20
Address Prioritization . . . . . . . . . . . . . . . . . . . . . . . . . . . . . . . . . . . . . . . 8-21
Adding and Deleting SNTP Server Addresses . . . . . . . . . . . . . . . . . . . 8-21
Menu Interface Operation with Multiple SNTP Server Addre sses Configured
8-23
SNTP Messages in the Event Log . . . . . . . . . . . . . . . . . . . . . . . . . . . . . . 8-23
Using Passwords and TACACS+ To Protect Against
Unauthorized Access
Contents . . . . . . . . . . . . . . . . . . . . . . . . . . . . . . . . . . . . . . . . . . . . . . . . . . . . . . 9-1

Overview . . . . . . . . . . . . . . . . . . . . . . . . . . . . . . . . . . . . . . . . . . . . . . . . . . . . . 9-2
Configuring Username and Password Security . . . . . . . . . . . . . . . . . . 9-3
Menu: Configuring Passwords . . . . . . . . . . . . . . . . . . . . . . . . . . . . . . . . . 9-5
CLI: Setting Manager and Operator Passwords . . . . . . . . . . . . . . . . . . . 9-6
Web: Configuring User-Names and Passwords . . . . . . . . . . . . . . . . . . . 9-7
TACACS+ Authentication for Central Control of Switch Access Security
9-8
Terminology Used in TACACS Applications: . . . . . . . . . . . . . . . . . . . . 9-9
General System Requirements . . . . . . . . . . . . . . . . . . . . . . . . . . . . . . . . 9-10
General Authentication Setup Procedure . . . . . . . . . . . . . . . . . . . . . . 9-11
Configuring TACACS+ on the Switch . . . . . . . . . . . . . . . . . . . . . . . . . . 9-14
How Authentication Operates . . . . . . . . . . . . . . . . . . . . . . . . . . . . . . . . 9-24
Using the Encryption Key . . . . . . . . . . . . . . . . . . . . . . . . . . . . . . . . . . . 9-26
Controlling Web Browser Interface Access When Using TACACS+ Authentication
9-28
Messages . . . . . . . . . . . . . . . . . . . . . . . . . . . . . . . . . . . . . . . . . . . . . . . . . . 9-28
Operating Notes . . . . . . . . . . . . . . . . . . . . . . . . . . . . . . . . . . . . . . . . . . . . 9-29
Troubleshooting TACACS+ Operation . . . . . . . . . . . . . . . . . . . . . . . . . 9-29
Using Authorized IP Managers for Increased Management
Security
Chapter Contents . . . . . . . . . . . . . . . . . . . . . . . . . . . . . . . . . . . . . . . . . . . . 10-1
Overview . . . . . . . . . . . . . . . . . . . . . . . . . . . . . . . . . . . . . . . . . . . . . . . . . . . . 10-2
Using Authorized IP Managers . . . . . . . . . . . . . . . . . . . . . . . . . . . . . . . 10-4
Access Levels . . . . . . . . . . . . . . . . . . . . . . . . . . . . . . . . . . . . . . . . . . . . . . 10-5
Defining Authorized Management Stations . . . . . . . . . . . . . . . . . . . . . 10-5
Menu: Viewing and Configuring IP Authorized Managers . . . . . . . . . 10-7
CLI: Viewing and Configuring Authorized IP Managers . . . . . . . . . . . 10-8
Web: Configuring IP Authorized Managers . . . . . . . . . . . . . . . . . . . . 10-10
Building IP Masks . . . . . . . . . . . . . . . . . . . . . . . . . . . . . . . . . . . . . . . . . 10-10
Operating and Troubleshooting Notes . . . . . . . . . . . . . . . . . . . . . . . . 10-13
Optimizing Port Usage Through Traffic Control and Port
Trunking
Chapter Contents . . . . . . . . . . . . . . . . . . . . . . . . . . . . . . . . . . . . . . . . . . . . 11-1
ix

Overview . . . . . . . . . . . . . . . . . . . . . . . . . . . . . . . . . . . . . . . . . . . . . . . . . . . . 11-2
Viewing Port Status and Configuring Port Parameters . . . . . . . . . . 11-2
Menu: Viewing Port Status and Configuring Port Parameters . . . . . 11-5
CLI: Viewing Port Status and Configuring Port Parameters . . . . . . . 11-6
Web: Viewing Port Status and Configuring Port Parameters . . . . . . 11-9
Port Trunking . . . . . . . . . . . . . . . . . . . . . . . . . . . . . . . . . . . . . . . . . . . . . . . 11-10
Switch 4108GL Port Trunk Features and Operation . . . . . . . . . . . . . 11-11
Trunk Configuration Methods . . . . . . . . . . . . . . . . . . . . . . . . . . . . . . . 11-12
Menu: Viewing and Configuring a Static Trunk Group . . . . . . . . . . . 11-16
CLI: Viewing and Configuring a Static or Dynamic Port Trunk Group . .
11-18
Web: Viewing Existing Port Trunk Groups . . . . . . . . . . . . . . . . . . . . 11-24
Trunk Group Operation Using LACP . . . . . . . . . . . . . . . . . . . . . . . . . 11-25
Trunk Group Operation Using the “Trunk” Option . . . . . . . . . . . . . . 11-28
Trunk Operation Using the “FEC” Option . . . . . . . . . . . . . . . . . . . . . 11-29
How the Switch Lists Trunk Data . . . . . . . . . . . . . . . . . . . . . . . . . . . . 11-29
Outbound Traffic Distribution Across Trunked Links . . . . . . . . . . . 11-30
Configuring for Network Management Applications
Chapter Contents . . . . . . . . . . . . . . . . . . . . . . . . . . . . . . . . . . . . . . . . . . . . 12-1
Overview . . . . . . . . . . . . . . . . . . . . . . . . . . . . . . . . . . . . . . . . . . . . . . . . . . . . 12-2
SNMP Management Features . . . . . . . . . . . . . . . . . . . . . . . . . . . . . . . . . 12-2
Configuring for SNMP Access to the Switch . . . . . . . . . . . . . . . . . . . . 12-4
SNMP Communities . . . . . . . . . . . . . . . . . . . . . . . . . . . . . . . . . . . . . . . . 12-5
Trap Receivers and Authentication Traps . . . . . . . . . . . . . . . . . . . . . 12-8
Advanced Management: RMON . . . . . . . . . . . . . . . . . . . . . . . . . . . . . . 12-11
CDP . . . . . . . . . . . . . . . . . . . . . . . . . . . . . . . . . . . . . . . . . . . . . . . . . . . . . . . . 12-12
Introduction . . . . . . . . . . . . . . . . . . . . . . . . . . . . . . . . . . . . . . . . . . . . . . 12-12
Outgoing Packets . . . . . . . . . . . . . . . . . . . . . . . . . . . . . . . . . . . . . . . . . 12-14
Incoming CDP Packets . . . . . . . . . . . . . . . . . . . . . . . . . . . . . . . . . . . . . 12-15
Configuring CDP on the Switch . . . . . . . . . . . . . . . . . . . . . . . . . . . . . . 12-18
Viewing the Switch’s Current CDP Configuration . . . . . . . . . . . . . . 12-19
Viewing the Current Contents of the Switch’s CDP Neighbors
Table . . . . . . . . . . . . . . . . . . . . . . . . . . . . . . . . . . . . . . . . . . . . . . . . . . . . 12-19
Clearing (Resetting) the CDP Neighbors Table . . . . . . . . . . . . . . . . . 12-20
x

Configuring CDP Operation . . . . . . . . . . . . . . . . . . . . . . . . . . . . . . . . . 12-21
Effect of Spanning Tree (STP) On CDP Packet Transmission . . . . 12-23
How the Switch Selec ts the IP Address To Inc lude in Outbound C DP Packets
12-24
CDP Neighbor Data and MIB Objects . . . . . . . . . . . . . . . . . . . . . . . . . 12-25
Operating Notes . . . . . . . . . . . . . . . . . . . . . . . . . . . . . . . . . . . . . . . . . . . 12-27
HP Procurve Stack Management
Chapter Contents . . . . . . . . . . . . . . . . . . . . . . . . . . . . . . . . . . . . . . . . . . . . 13-1
Overview . . . . . . . . . . . . . . . . . . . . . . . . . . . . . . . . . . . . . . . . . . . . . . . . . . . . 13-3
HP Procurve Stack Management . . . . . . . . . . . . . . . . . . . . . . . . . . . . . . 13-4
Which Devices Support Stacking? . . . . . . . . . . . . . . . . . . . . . . . . . . . . 13-5
Components of HP Procurve Stack Management . . . . . . . . . . . . . . . . 13-6
General Stacking Operation . . . . . . . . . . . . . . . . . . . . . . . . . . . . . . . . . . 13-6
Operating Rules for Stacking . . . . . . . . . . . . . . . . . . . . . . . . . . . . . . . . . 13-7
Overview of Configuring and Bringing Up a Stack . . . . . . . . . . . . . . 13-10
Using the Menu Interface To View Stack Status and Configure Stacking
13-14
Using the Commander To Manage The Stack . . . . . . . . . . . . . . . . . . 13-18
Monitoring Stack Status . . . . . . . . . . . . . . . . . . . . . . . . . . . . . . . . . . . . 13-27
Using the CLI To View Stack Status and Configure Stacking . . . . . 13-31
SNMP Community Operation in a Stack . . . . . . . . . . . . . . . . . . . . . . 13-45
Using the CLI To Disable or Re-Enable Stacking . . . . . . . . . . . . . . . 13-46
Transmission Interval . . . . . . . . . . . . . . . . . . . . . . . . . . . . . . . . . . . . . . 13-46
Stacking Operation with Multiple VLANs Configured . . . . . . . . . . . 13-46
Web: Viewing and Configuring Stacking . . . . . . . . . . . . . . . . . . . . . . 13-47
Status Messages . . . . . . . . . . . . . . . . . . . . . . . . . . . . . . . . . . . . . . . . . . . 13-48
Port-Based Virtual LANs (VLANs) and GVRP
Chapter Contents . . . . . . . . . . . . . . . . . . . . . . . . . . . . . . . . . . . . . . . . . . . . 14-1
Overview . . . . . . . . . . . . . . . . . . . . . . . . . . . . . . . . . . . . . . . . . . . . . . . . . . . . 14-3
Port-Based Virtual LANs (Static VLANs) . . . . . . . . . . . . . . . . . . . . . . 14-4
Overview of Using VLANs . . . . . . . . . . . . . . . . . . . . . . . . . . . . . . . . . . . 14-7
Menu: Configuring VLAN Parameters . . . . . . . . . . . . . . . . . . . . . . . . . 14-11
CLI: Configuring VLAN Parameters . . . . . . . . . . . . . . . . . . . . . . . . . . 14-16
xi

Web: Viewing and Configuring VLAN Parameters . . . . . . . . . . . . . . 14-22
VLAN Tagging Information . . . . . . . . . . . . . . . . . . . . . . . . . . . . . . . . . 14-23
Effect of VLANs on Other Switch Features . . . . . . . . . . . . . . . . . . . . 14-27
VLAN Restrictions . . . . . . . . . . . . . . . . . . . . . . . . . . . . . . . . . . . . . . . . . 14-29
GVRP . . . . . . . . . . . . . . . . . . . . . . . . . . . . . . . . . . . . . . . . . . . . . . . . . . . . . . . 14-30
General Operation . . . . . . . . . . . . . . . . . . . . . . . . . . . . . . . . . . . . . . . . . 14-31
Per-Port Options for Handling GVRP “Unknown VLANs” . . . . . . . . 14-33
Per-Port Options for Dynamic VLAN Advertising and Joining . . . . 14-35
GVRP and VLAN Access Control . . . . . . . . . . . . . . . . . . . . . . . . . . . . . 14-36
Planning for GVRP Operation . . . . . . . . . . . . . . . . . . . . . . . . . . . . . . . 14-37
Configuring GVRP On a Switch . . . . . . . . . . . . . . . . . . . . . . . . . . . . . . 14-37
GVRP Operating Notes . . . . . . . . . . . . . . . . . . . . . . . . . . . . . . . . . . . . . 14-42
Multimedia Traffic Control with IP Multicast (IGMP)
Chapter Contents . . . . . . . . . . . . . . . . . . . . . . . . . . . . . . . . . . . . . . . . . . . . 15-1
Overview . . . . . . . . . . . . . . . . . . . . . . . . . . . . . . . . . . . . . . . . . . . . . . . . . . . . 15-2
General Operation and Features . . . . . . . . . . . . . . . . . . . . . . . . . . . . . . 15-3
IGMP Terms . . . . . . . . . . . . . . . . . . . . . . . . . . . . . . . . . . . . . . . . . . . . . . . 15-4
IGMP Operating Features . . . . . . . . . . . . . . . . . . . . . . . . . . . . . . . . . . . . 15-5
xii
CLI: Configuring and Displaying IGMP . . . . . . . . . . . . . . . . . . . . . . . . 15-6
Web: Enabling or Disabling IGMP . . . . . . . . . . . . . . . . . . . . . . . . . . . . 15-10
How IGMP Operates . . . . . . . . . . . . . . . . . . . . . . . . . . . . . . . . . . . . . . . . . 15-11
Operation With or Without IP Addressing . . . . . . . . . . . . . . . . . . . . . 15-12
Automatic Fast-Leave IGMP . . . . . . . . . . . . . . . . . . . . . . . . . . . . . . . . 15-13
Forced Fast-Leave IGMP . . . . . . . . . . . . . . . . . . . . . . . . . . . . . . . . . . . 15-14
Configuring Per-Port Forced Fast-Leave IGMP . . . . . . . . . . . . . . . . . 15-17
Querier Operation . . . . . . . . . . . . . . . . . . . . . . . . . . . . . . . . . . . . . . . . . 15-18
The Switch Excludes Well-Known or Reserved Multicast Addresses
from IP Multicast Filtering . . . . . . . . . . . . . . . . . . . . . . . . . . . . . . . . . . 15-19
Spanning Tree Protocol (STP)
Chapter Contents . . . . . . . . . . . . . . . . . . . . . . . . . . . . . . . . . . . . . . . . . . . . 16-1
Overview . . . . . . . . . . . . . . . . . . . . . . . . . . . . . . . . . . . . . . . . . . . . . . . . . . . . 16-2
Menu: Configuring STP . . . . . . . . . . . . . . . . . . . . . . . . . . . . . . . . . . . . . . . 16-4

CLI: Configuring STP . . . . . . . . . . . . . . . . . . . . . . . . . . . . . . . . . . . . . . . . . 16-5
Web: Enabling or Disabling STP . . . . . . . . . . . . . . . . . . . . . . . . . . . . . . . 16-9
How STP Operates . . . . . . . . . . . . . . . . . . . . . . . . . . . . . . . . . . . . . . . . . . . 16-9
STP Fast Mode . . . . . . . . . . . . . . . . . . . . . . . . . . . . . . . . . . . . . . . . . . . . 16-10
STP Operation with 802.1Q VLANs . . . . . . . . . . . . . . . . . . . . . . . . . . . 16-12
Monitoring and Analyzing Switch Operation
Chapter Contents . . . . . . . . . . . . . . . . . . . . . . . . . . . . . . . . . . . . . . . . . . . . 17-1
Overview . . . . . . . . . . . . . . . . . . . . . . . . . . . . . . . . . . . . . . . . . . . . . . . . . . . . 17-2
Status and Counters Data . . . . . . . . . . . . . . . . . . . . . . . . . . . . . . . . . . . . 17-3
Menu Access To Status and Counters . . . . . . . . . . . . . . . . . . . . . . . . . 17-4
General System Information . . . . . . . . . . . . . . . . . . . . . . . . . . . . . . . . . 17-5
Switch Management Address Information . . . . . . . . . . . . . . . . . . . . . . 17-6
Module Information . . . . . . . . . . . . . . . . . . . . . . . . . . . . . . . . . . . . . . . . 17-7
Port Status . . . . . . . . . . . . . . . . . . . . . . . . . . . . . . . . . . . . . . . . . . . . . . . . 17-8
Viewing Port and Trunk Group Statistics and Flow Control Status . 17-9
Viewing the Switch’s MAC Address Tables . . . . . . . . . . . . . . . . . . . . 17-12
Spanning Tree Protocol (STP) Information . . . . . . . . . . . . . . . . . . . . 17-17
Internet Group Management Protocol (IGMP) Status . . . . . . . . . . . 17-19
VLAN Information . . . . . . . . . . . . . . . . . . . . . . . . . . . . . . . . . . . . . . . . . 17-20
Web Browser Interface Status Information . . . . . . . . . . . . . . . . . . . . 17-22
Port Monitoring Features . . . . . . . . . . . . . . . . . . . . . . . . . . . . . . . . . . . 17-23
Menu: Configuring Port Monitoring . . . . . . . . . . . . . . . . . . . . . . . . . . 17-24
CLI: Configuring Port Monitoring . . . . . . . . . . . . . . . . . . . . . . . . . . . . 17-25
Web: Configuring Port Monitoring . . . . . . . . . . . . . . . . . . . . . . . . . . . 17-27
Troubleshooting
Chapter Contents . . . . . . . . . . . . . . . . . . . . . . . . . . . . . . . . . . . . . . . . . . . . 18-1
Overview . . . . . . . . . . . . . . . . . . . . . . . . . . . . . . . . . . . . . . . . . . . . . . . . . . . . 18-2
Troubleshooting Approaches . . . . . . . . . . . . . . . . . . . . . . . . . . . . . . . . . . 18-3
Browser or Telnet Access Problems . . . . . . . . . . . . . . . . . . . . . . . . . . . 18-4
Unusual Network Activity . . . . . . . . . . . . . . . . . . . . . . . . . . . . . . . . . . . . 18-6
Using the Event Log To Identify Problem Sources . . . . . . . . . . . . . 18-16
xiii

Menu: Entering and Navigating in the Event Log . . . . . . . . . . . . . . . 18-17
CLI: . . . . . . . . . . . . . . . . . . . . . . . . . . . . . . . . . . . . . . . . . . . . . . . . . . . . . 18-18
Diagnostic Tools . . . . . . . . . . . . . . . . . . . . . . . . . . . . . . . . . . . . . . . . . . . . 18-19
Port Auto-Negotiation . . . . . . . . . . . . . . . . . . . . . . . . . . . . . . . . . . . . . . 18-19
Ping and Link Tests . . . . . . . . . . . . . . . . . . . . . . . . . . . . . . . . . . . . . . . . 18-19
Displaying the Configuration File . . . . . . . . . . . . . . . . . . . . . . . . . . . . 18-24
CLI Administrative and Troubleshooting Commands . . . . . . . . . . . 18-25
Restoring the Factory-Default Configuration . . . . . . . . . . . . . . . . . 18-26
Restoring a Flash Image . . . . . . . . . . . . . . . . . . . . . . . . . . . . . . . . . . . . . 18-27
File Transfers
Appendix Contents . . . . . . . . . . . . . . . . . . . . . . . . . . . . . . . . . . . . . . . . . . . A-1
Overview . . . . . . . . . . . . . . . . . . . . . . . . . . . . . . . . . . . . . . . . . . . . . . . . . . . . A-2
Downloading an Operating System (OS) . . . . . . . . . . . . . . . . . . . . . . . A-2
General OS Download Rules . . . . . . . . . . . . . . . . . . . . . . . . . . . . . . . . . A-2
Using TFTP To Download an OS Image from a Server . . . . . . . . . . . A-3
Using Xmodem to Download an OS Ima ge From a PC or UNIX Workstation
A-6
Switch-to-Switch Download . . . . . . . . . . . . . . . . . . . . . . . . . . . . . . . . . A-9
Using the HP TopTools for Hubs & Switches Utility . . . . . . . . . . . . A-11
xiv
Troubleshooting TFTP Downloads . . . . . . . . . . . . . . . . . . . . . . . . . . . A-12
Transferring Switch Configurations . . . . . . . . . . . . . . . . . . . . . . . . . . A-13
Copying Diagnostic Data to a Remote Host, PC, or Unix Workstation
A-16
MAC Address Management
Contents . . . . . . . . . . . . . . . . . . . . . . . . . . . . . . . . . . . . . . . . . . . . . . . . . . . . . B-1
Overview . . . . . . . . . . . . . . . . . . . . . . . . . . . . . . . . . . . . . . . . . . . . . . . . . . . . B-1
Determining MAC Addresses . . . . . . . . . . . . . . . . . . . . . . . . . . . . . . . . . . B-2
Menu: Viewing the Switch’s MAC Addresses . . . . . . . . . . . . . . . . . . . . B-3
CLI: Viewing the Port and VLAN MAC Addresses . . . . . . . . . . . . . . . . B-4
Daylight Savings Time on HP Procurve Switches

Selecting a Management
Selecting a Management Interface
Contents
Overview . . . . . . . . . . . . . . . . . . . . . . . . . . . . . . . . . . . . . . . . . . . . . . . . . . . . . . 1-2
Understanding Management Interfaces . . . . . . . . . . . . . . . . . . . . . . . . . . . . . 1-2
Advantages of Using the Menu Interface . . . . . . . . . . . . . . . . . . . . . . . . . . . . 1-3
Advantages of Using the CLI . . . . . . . . . . . . . . . . . . . . . . . . . . . . . . . . . . . . . . 1-4
Advantages of Using the HP Web Browser Interface . . . . . . . . . . . . . . . . . 1-5
Advantages of Using HP TopTools for Hubs & Switches . . . . . . . . . . . . . . 1-6
1
Interface
1-1

Selecting a Management Interface
Overview
Interface
Overview
Selecting a Management
This chapter describes the following:
■ Management interfaces for the Switch 4108GL
■ Advantages of using each interface
Understanding Management Interfaces
Management interfaces enable you to reconfigure the switch and to monitor
switch status and performance. The HP Switch 4108GL offers the following
interfaces:
■ Menu interface—a menu-driven interface offering a subset of switch
commands through the built-in VT-100/ANSI console—page 1-3
■ CLI—a command line interface offering the full set of switch commands
through the VT-100/ANSI console built into the switch—page 1-4
■ Web browser interface --a switch interface offering status information
and a subset of switch commands through a standard web browser (such
as Netscape Navigator or Microsoft Internet Explorer)—page 1-5
■ HP TopTools for Hubs & Switches--an easy-to-use, browser-based
network management tool that works with HP proactive networking
features built into managed HP hubs and switches
1-2
This manual describes how to use the menu interface (chapter 2), the CLI
(chapter 3), the web browser interface (chapter 4), and how to use these
interfaces to configure and monitor the switch.
For information on how to access the web browser interface Help, see “Online
Help for the Web Browser Interface” on page 4-12.
To use HP TopTools for Hubs & Switches, refer to the HP TopTools User’s
Guide and the TopTools online help, which are available electronically with
the TopTools software. (To get a copy of HP TopTools for Hubs & Switches
software, see the Read Me First document shipped with your switch.)
Selecting a Management Interface
Advantages of Using the Menu Interface
Advantages of Using the Menu Interface
Figure 1-1. Example of the Console Interface Display
■ Provides quick, easy management access to a menu-driven subset of
switch configuration and performance features:
Selecting a Management
Interface
• IP addressing
• VLANs and GVRP
• Port Security
• Port and Static Trunk Group
• Stack Management
• Spanning Tree
• System information
• Passwords
• SNMP communities
• Time protocols
The menu interface also provides access for:
• Setup screen
• Event Log display
• Switch and port
status displays
■ Offers out-of-band access (through the RS-232 connection) to the
• Switch and port statistic and counter
displays
• Reboots
• Software downloads
switch, so network bottlenecks, crashes, lack of configured or correct IP
address, and network downtime do not slow or prevent access
■ Enables Telnet (in-band) access to the menu functionality.
■ Allows faster navigation, avoiding delays that occur with slower
display of graphical objects over a web browser interface.
■ Provides more security; configuration information and passwords are
not seen on the network.
1-3

Selecting a Management Interface
Advantages of Using the CLI
Interface
Advantages of Using the CLI
Selecting a Management
HP4108>
HP4108#
HP4108(config)#
HP4108(<context>)#
Operator Level
Manager Level
Global Configuration Level
Context Configuration Levels (port, VLAN)
Figure 1-2. Example of The Command Prompt
■ Provides access to the complete set of the switch configuration, perfor-
mance, and diagnostic features.
■ Offers out-of-band access (through the RS-232 connection) or Telnet (in-
band) access.
■ Enables quick, detailed system configuration and management access to
system operators and administrators experienced in command prompt
interfaces.
■ Provides help at each level for determining available options and vari-
ables.
CLI Usage
■ For information on how to use the CLI, refer to chapter 3. "Using the
Command Line Interface (CLI)".
■ To perform specific procedures (such as configuring IP addressing or
VLANs), use the Contents listing at the front of the manual to locate the
information you need.
■ To monitor and analyze switch operation, see chapter XXXX, "Monitoring
and Analyzing Switch Operation".
■ For information on individual CLI commands, refer to the Index or to the
online Help provided in the CLI interface.
1-4
Advantages of Using the HP Web Browser Interface
Selecting a Management Interface
Advantages of Using the HP Web
Browser Interface
Selecting a Management
Interface
Figure 1-3. Example of the HP Web Browser Interface
■ Easy access to the switch from anywhere on the network
■ Familiar browser interface--locations of window objects consistent
with commonly used browsers, uses mouse clicking for navigation, no
terminal setup
■ Many features have all their fields in one screen so you can view all
values at once
■ More visual cues, using colors, status bars, device icons, and other
graphical objects instead of relying solely on alphanumeric values
■ Display of acceptable ranges of values available in configuration list
boxes
For specific requirements, see “Web Browser Interface Requirements” on pag e
4-4.
1-5
Selecting a Management Interface
Advantages of Using HP TopTools for Hubs & Switches
Interface
Advantages of Using HP TopTools for
Selecting a Management
Hubs & Switches
You can operate HP TopTools from a PC on the network to monitor traffic,
manage your hubs and switches, and proactively recommend network
changes to increase network uptime and optimize performance. Easy to install
and use, HP TopTools for Hubs & Switches is the answer to your management
challenges.
1-6
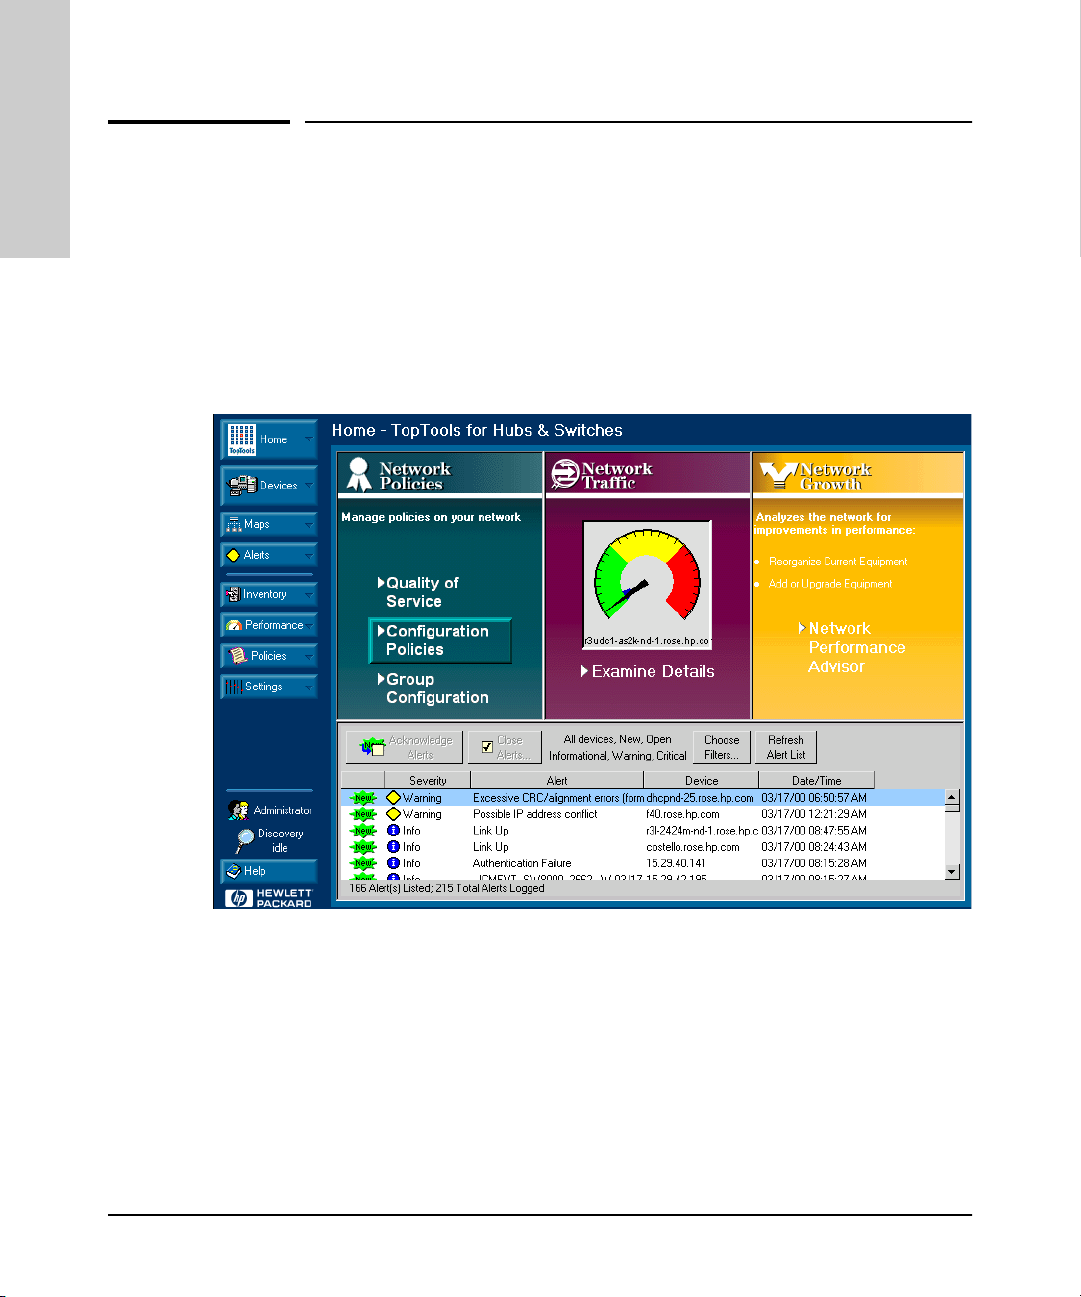
Figure 1-4. Example of HP TopTools Main Screen
HP TopTools for Hubs & Switches enables greater control, uptime, and
performance in your network:
■ For networked devices
• Enables fast installation of hubs and switches.
• Enables you to proactively manage your network by using the Alert
Log to quickly identify problems and suggest solutions, saving valuable time.

Advantages of Using HP TopTools for Hubs & Switches
Selecting a Management Interface
• Notifies you when HP hubs use “self-healing” features to fix or limit
common network problems.
• Provides a list of discovered devices, with device type, connectivity
status, the number of new or open alerts for each device, and the type
of management for each device.
• Provides graphical maps of your networked devices, from which you
can access specific devices.
• Identifies users by port and lets you assign easy-to-remember names
to any network device.
• Enables you to configure and monitor HP networked devices from
your network management PC, including identity and status information, port counters, port on/off capability, sensitivity thresholds for
traps, IP and security configuration, device configuration report, and
other device features.
• Enables policy-based management through the Quality of Service
feature (QoS) to establish traffic priority policies for controlling and
improving throughput across all the HP switches in your network that
support this feature.
■ For network traffic:
• Watches the network for problems and displays real-time information
about network status.
• Shows traffic and “top talker” nodes on screen.
• Uses traffic monitor diagrams to make bottlenecks easy to see.
• Improves network reliability through real-time fault isolation.
• Lets you see your entire network without having to put RMON probes
on every segment (up to 1500 segments).
■ For network growth:
• Monitors, stores, and analyzes network traffic to determine where
upgrades are needed.
• Uses Network Performance Advisor for automatic traffic analysis
and easy-to-understand reports that give clear, easy-to-follow plans
for cost-effectivly upgrading your network.
Selecting a Management
Interface
1-7

Selecting a Management Interface
Advantages of Using HP TopTools for Hubs & Switches
Interface
Selecting a Management
1-8

Using the Menu Interface
Contents
Overview . . . . . . . . . . . . . . . . . . . . . . . . . . . . . . . . . . . . . . . . . . . . . . . . . . . . . . 2-2
Starting and Ending a Menu Session . . . . . . . . . . . . . . . . . . . . . . . . . . . . . . . 2-3
How To Start a Menu Interface Session . . . . . . . . . . . . . . . . . . . . . . . . . 2-4
How To End a Menu Session and Exit from the Console: . . . . . . . . . . 2-5
Main Menu Features . . . . . . . . . . . . . . . . . . . . . . . . . . . . . . . . . . . . . . . . . . . . 2-7
Screen Structure and Navigation . . . . . . . . . . . . . . . . . . . . . . . . . . . . . . . . . . 2-9
Rebooting the Switch . . . . . . . . . . . . . . . . . . . . . . . . . . . . . . . . . . . . . . . . . . . 2-12
Menu Features List . . . . . . . . . . . . . . . . . . . . . . . . . . . . . . . . . . . . . . . . . . . . . 2-14
Where To Go From Here . . . . . . . . . . . . . . . . . . . . . . . . . . . . . . . . . . . . . . . . 2-15
2
Using the Menu Interface
2-1

Using the Menu Interface
Overview
Overview
This chapter describes the following features:
■ Overview of the Menu Interface (page 4-1)
■ Starting and ending a Menu session (page 2-3)
■ The Main Menu (page 2-7)
■ Screen structure and navigation (page 2-9)
■ Rebooting the switch (page 2-12)
The menu interface operates through the switch console to provide you with
Using the Menu Interface
a subset of switch commands in an easy-to-use menu format enabling you to:
■ Perform a "quick configuration" of basic parameters, such as the IP
addressing needed to provide management access through your network
■ Configure these features:
• Manager and Operator passwords
• System parameters
• IP addressing
• Time protocol
• Ports
• Trunk groups
■ View status, counters, and Event Log information
■ Update switch software
■ Reboot the switch
• A network monitoring port
• Stack Management
• Spanning Tree operation
• SNMP community names
• IP authorized managers
• VLANs (Virtual LANs) and
GVRP
For a detailed list of menu features, see the "Menu Features List" on page 2-14.
Privilege Levels and Password Security. HP strongly recommends that
you configure a Manager password to help prevent unauthorized access to
your network. A Manager password grants full read-write access to the switch.
An Operator password, if configured, grants access to status and counter,
Event Log, and the Operator level in the CLI. After you configure passwords
on the switch and log off of the interface, access to the menu interface (and
the CLI and web browser interface) will require entry of either the Manager
or Operator password. (If the switch has only a Manager password, then
2-2

Starting and Ending a Menu Session
Using the Menu Interface
someone without a password can still gain read-only access.) For more
information on passwords, see “Configuring Username and Password Security” on page 9-3.
Menu Interaction with Other Interfaces.
■ The menu interface displays the current running-config parameter set-
tings. You can use the menu interface to save configuration changes made
in the CLI only if the CLI changes are in the running config when you save
changes made in the menu interface. (For more on how switch memory
manages configuration changes, see Chapter 5, “Switch Memory and
Configuration”.)
■ A configuration change made through any switch interface overwrites
earlier changes made through any other interface.
■ The Menu Interface and the CLI (Command Line Interface) both use the
switch console. To enter the menu from the CLI, use the
To enter the CLI from the Menu interface, select
Command Line (CLI) option.)
menu command.
Starting and Ending a Menu Session
You can access the menu interface using any of the following:
■ A direct serial connection to the switch’s console port, as described in the
installation guide you received with the switch
■ A Telnet connection to the switch console from a networked PC or the
switch’s web browser interface. Telnet requires that an IP address and
subnet mask compatible with your network have already been configured
on the switch.
■ The stack Commander, if the switch is a stack member
Using the Menu Interface
Note This section assumes that either a terminal device is already configured and
connected to the switch (see the Installation and Getting Started Guide
shipped with your switch) or that you have already configured an IP address
on the switch (required for Telnet access).
2-3

Using the Menu Interface
Starting and Ending a Menu Session
How To Start a Menu Interface Session
In its factory default configuration, the switch console starts with the CLI
prompt. To use the menu interface with Manager privileges, go to the Manager
level prompt and enter the
1. Use one of these methods to connect to the switch:
• A PC terminal emulator or terminal
• Telnet
(You can also use the stack Commander if the switch is a stack member.
See Chapter 13, “HP Procurve Stack Management”).
2. Do one of the following:
Using the Menu Interface
• If you are using Telnet, go to step 3.
• If you are using a PC terminal emulator or a terminal, press [Enter] one
or more times until a prompt appears.
3. When the switch screen appears, do one of the following:
• If a password has been configured, the password prompt appears.
Password: _
Type the Manager password and press [Enter]. Entering the Manager
password gives you manager-level access to the switch. (Entering the
Operator password gives you operator-level access to the switch. See
“Configuring Username and Password Security” on page 9-3.)
• If no password has been configured, the CLI prompt appears . Go to
the next step.
menu command.
2-4
4. When the CLI prompt appears, display the Menu interface by entering the
menu command. For example:
HP4108# menu [Enter]
results in:
Starting and Ending a Menu Session
Using the Menu Interface
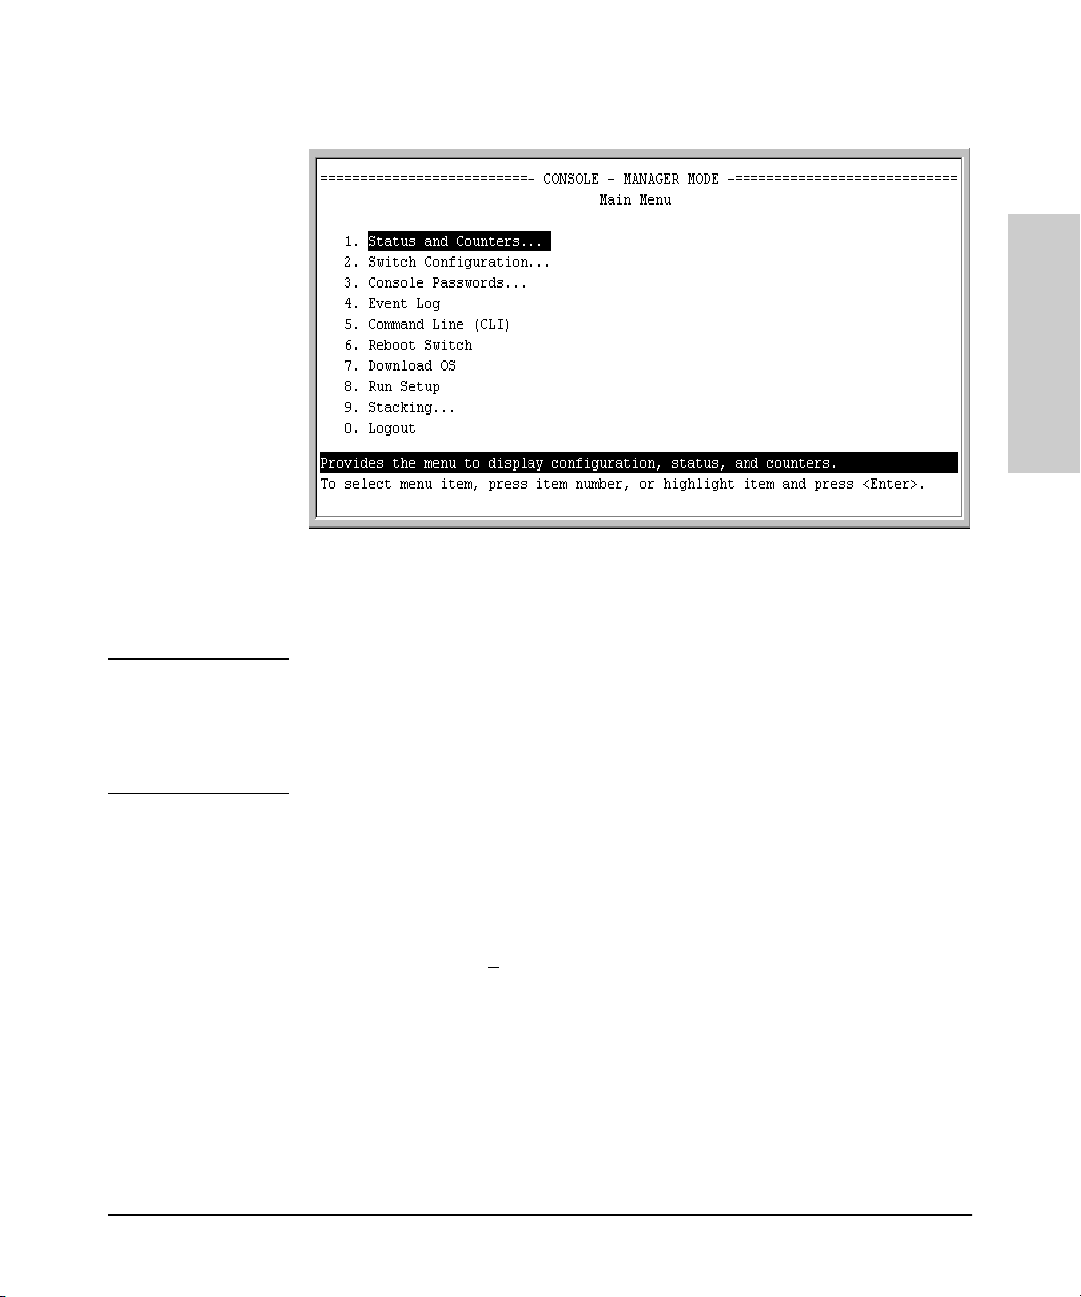
Figure 2-1. The Main Menu with Manager Privileges
For a description of Main Menu features, see “Main Menu Features” on page
2-7.
Using the Menu Interface
Note To configure the switch to start with the menu interface instead of the CLI, go
to the Manager level prompt in the CLI, enter the
resulting desplay, change the
mation, see the Installation and Getting Started Guide you received with the
switch.
Logon Default parameter to Menu. For more infor-
setup command, and in the
How To End a Menu Session and Exit from the Console:
The method for ending a menu session and exiting from the console depends
on whether, during the session, you made any changes to the switch configuration that require a switch reboot to activate. (Most changes via the menu
interface need only a S
changes needing a reboot are marked with an asterisk (*) next to the configured item in the menu and also next to the Switch Configuration item in the
Main Menu.
ave, and do not require a switch reboot.) Configuration
2-5

Using the Menu Interface
Starting and Ending a Menu Session
Asterisk indicates a
configuration change
that requires a reboot
to activate.
Using the Menu Interface
Figure 2-2. An Asterisk Indicates a Configuration Change Requiring a Reboot
1. In the current session, if you have not made configuration changes that
require a switch reboot to activate, return to the Main Menu and press [0]
(zero) to log out. Then just exit from the terminal program, turn off the
terminal, or quit the Telnet session.
2. If you have made configuration changes that require a switch reboot—
that is, if an asterisk (*) appears next to a configured item or next to Switch
Configuration in the Main Menu:
a. Return to the Main Menu.
b. Press [6] to select Reboot Switch and follow the instructions on the
reboot screen.
Rebooting the switch terminates the menu session, and, if you are using
Telnet, disconnects the Telnet session.
(See “Rebooting To Activate Configuration Changes” on page 2-13.)
3. Exit from the terminal program, turn off the terminal, or close the Telnet
application program.
2-6
 Loading...