

Iron-Fence Shop STRONGHOLD IRON Installation Manual

!
!
1!
STRONGHOLD IRON®
INSTALLATION GUIDE
!
!!!!!!!!!!
!
!
!
!
!
!
!
!
Revised 01/16
!

!
!
2!
PLEASE NOTE – All installations have a varying degree of ‘uniqueness’ to them. The
following instructions are meant to be general guidelines. If you are installing your fence in
a different manner or have any questions that this guide does not answer, please contact us
via phone or email. You can also view helpful installation techniques in our Video Library
and Blog within the Knowledge Center of our website (www.ironfenceshop.com)
Before You Start!.........................................................................................................................!3!
Mark Your Fence Layout!...................................................................................................................!3!
Obtain a Fence Permit (if Required)!...............................................................................................!3!
Have Your Utilities Marked!..............................................................................................................!3!
Gather the Required Tools!................................................................................................................!3!
Purchase Concrete and Miscellaneous Supplies!...........................................................................!4!
Determining Post Hole Placement!........................................................................................!5!
Run Your String Line!..........................................................................................................................!5!
Determining Post Spacing for Panels and Gates!..........................................................................!6!
Fence Panel Post Spacing!.................................................................................................................................!6!
Walk and Driveway Gate Post Spacing!........................................................................................................!6!
Digging Your Post Holes!...................................................................................................................!9!
Setting Your Posts in Concrete (Standard Posts)!.......................................................................!11!
Setting Your Posts on a Surface (Flange Posts)!.........................................................................!12!
Installing the Fence Panels!...................................................................................................!14!
Trimming a Fence Panel!.................................................................................................................!16!
Installing Fence Panels in a Sloped Yard!....................................................................................!16!
Installing!The!Post!Caps!.....................................................................................................!18!
Installing Walk Gates and Driveway Gates!.......................................................................!19!
Determine Your Gate Hardware!....................................................................................................!19!
Install the Gate Hinges!....................................................................................................................!20!
Safetech Self-Closing Hinges!........................................................................................................................!20!
J-Bolt Hinges (5.5” and 7”)!...........................................................................................................................!20!
Install the Gate Latch!......................................................................................................................!22!
Safetech Cobra Latches!.................................................................................................................................!22!
Safetech Pool Latch!........................................................................................................................................!23!
Locinox Latch!..................................................................................................................................................!23!
Gravity Latch!....................................................................................................................................................!23!
Drop Rod (Double Gates Only)!.................................................................................................................!23!
Project Completion and Maintenance on Your Fence and Gates!.................................!24!

!
!
3!
Before You Start
• Before you get started with your installation, ensure you have done the following items first:
Mark Your Fence Layout
• In preparation for installation and for permit approval purposes (if required), you will want to mark the
outline of where the fence will be installed. This can be done with a string line, marking spray paint or
flags. If you are installing over or on concrete, you can mark the outline with chalk.
Obtain a Fence Permit (if Required)
• Call your local Building/ Engineering Department and ask if a permit needs to be obtained. Obtaining a
fence permit typically requires filling out a form, paying a small fee and having a local inspector take a look
at where your fence is going to be installed based on your marked layout.
Have Your Utilities Marked
• Even if you are not required to obtain a fence permit, call to have your utilities marked. It is important to
know what’s buried below before you begin digging post holes. Simply dial ‘811’ and they will get you in
contact with your local utility provider to come out and mark any buried lines at no charge. They will
typically come out within 24-48 hours and will mark any buried utilities with flags or spray paint. You can
visit www.call811.com for more info on how the process works.
Gather the Required Tools
To install your Stronghold Iron® fence, you will typically need the following tools:
• String Line
• Shovel and Post Hole Digger (manual or powered) for Post Holes
• Tub, Wheelbarrow or Powered Mixer for Concrete
• Measuring Tape
• Level
• Rubber Mallet and Regular Hammer
• Hacksaw or Sawzall for trimming panels (if necessary)
• High Speed and Quality Drill or Power Driver
• Center Punch
• Socket and/or wrench set for installing supplied gate hardware
• Caulk Gun
!

!
!
4!
Purchase Concrete and Miscellaneous Supplies
The following building materials will need to be purchased from your local hardware store unless they are
noted as optional. NOTE – If you are using our specialized flange posts, you will not need to purchase
concrete or gravel.
Concrete Mix
• Any standard concrete mix will work. You can utilize reinforced or fast setting concrete if you like, but it
is not required.
• The number of concrete bags required will vary based on the size and length of post being buried. You
can find concrete calculators online to help determine how many bags you will need. You will need to
know the following to utilize the online calculators:
o Size of your posts
o Diameter of the hole (usually 3x the post size)
o Depth of the hole
o Number of posts
Large Size Gravel (optional)
• While this is optional, adding gravel to the bottom of your post hole will allow for drainage of moisture
and less chance of post heaving/ sinking due to freezing ground or excessive water. It is also beneficial to
use if you accidentally over dig the depth of a post hole.
High Visibility Spray Paint
• This will be used when marking where to dig your post holes as you determine their location in the layout.
Steel Rebar or Wood Stakes
• These will be tapped in ground and your string line wrapped around them when marking your layout for
installation.
!
!
5!
Determining Post Hole Placement
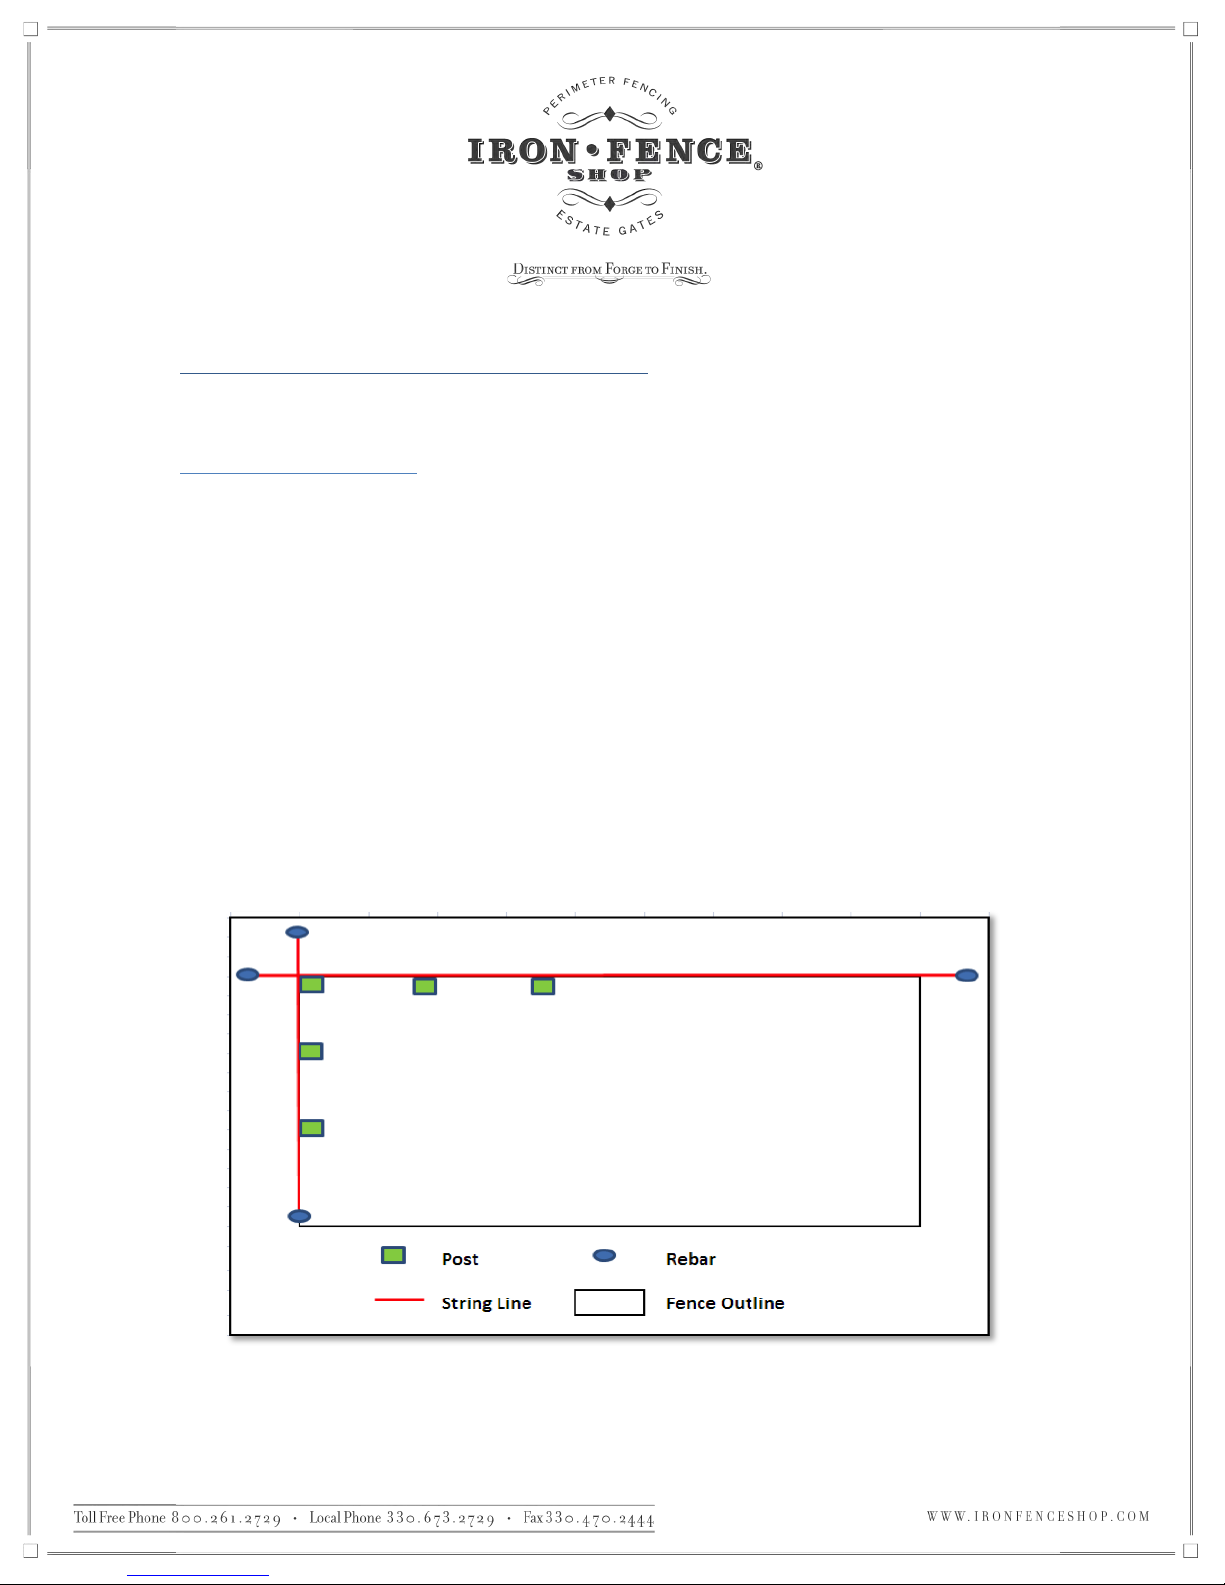
Run Your String Line
If you ran a string line when you marked the fence layout initially, you can skip this step. The purpose of the
string line is to make sure all of your posts remain in a straight line as you bury the post in ground in concrete
and install the fence.
• Purchase a string line that is bright and easily visible. This can commonly be found at any local hardware
store, but any string that will be easily visible and able to pulled taught will work.
• Using your marking spray paint, mark on your grass where the fence will go. This will act as your guide
for laying the string line out.
• When tapping your rebar in ground and running your string line, keep in mind that the string line should
be the outside edge of your post and NOT the center of the fence line. For corners and ends, have the
rebar or stake be a foot or more outside the fence layout. This will ensure that the string is your guide and
the rebar is not in your way when you dig the post hole.
!!!!!!!!!!!!!!!!!!!!!!!!!!!!!!
!
Figure 1 –Example of a String Line Layout
!
!

!
!
6!
Determining Post Spacing for Panels and Gates
Now that you have your string line run for guidance, you need to determine how far apart your posts will be
spaced so you can dig your holes. This will vary based on whether a full fence panel, trimmed fence panel or
gate is going in-between two posts. NOTE – If you are utilizing our specialized flange posts, you will
use the ‘between posts’ measurement discussed on pages 12-13 and not the ‘on center’ measurement.
Fence Panel Post Spacing
• All of our standard wrought iron panels are 96 inches (8 feet) wide from end-of-rail to end-of-rail. You
will want to aim for a 96-inch wide space between posts for mounting fence panels. The brackets do not
add any additional width.
• The easiest way to determine where your post will go in the ground is to determine the ‘on center’
measurement for your post. This measurement is the dead center of where the post will be installed in the
post hole that you will dig.
• To calculate your ‘on center’ post measurement, add the width of your fence panel (96”) plus the width of
ONE fence post. (If you are unsure of what size fence post you have, refer to your itemized invoice or
measure one face of the post) For example:
96” Fence Panel + 2” Fence Post = 98” on center measurement
• This measurement holds true for full size and trimmed fence panels. If you had to trim a fence panel at
the end of a run, you would simply substitute the 96” fence panel part of the equation with the width of
your trimmed fence panel (ex: 57” Fence Panel + 2” Fence Post = 59” on center measurement)
• Once you have your ‘on center’ post measurement, you can begin marking your post holes in the grass
with your marking spray paint. Start in a corner or at the end of a run. Mark the end or corner, measure
out your ‘on center’ post measurement and mark again in the grass. Continue doing this until you have
marked where all your post holes will need to be dug up in the layout.
Walk and Driveway Gate Post Spacing
Just as we did with our fence panels, we will want to determine the ‘on-center’ post measurement for our gates
in a similar way. Post spacing for gate openings will vary based on gate width and the hinge/ latch hardware
being installed. So before we can calculate our ‘on-center’ post measurement for the gate, you will need to note
the following items down:
o The width of the gate
o The space needed for the hinges
o The space needed for the latch
!
!
7!
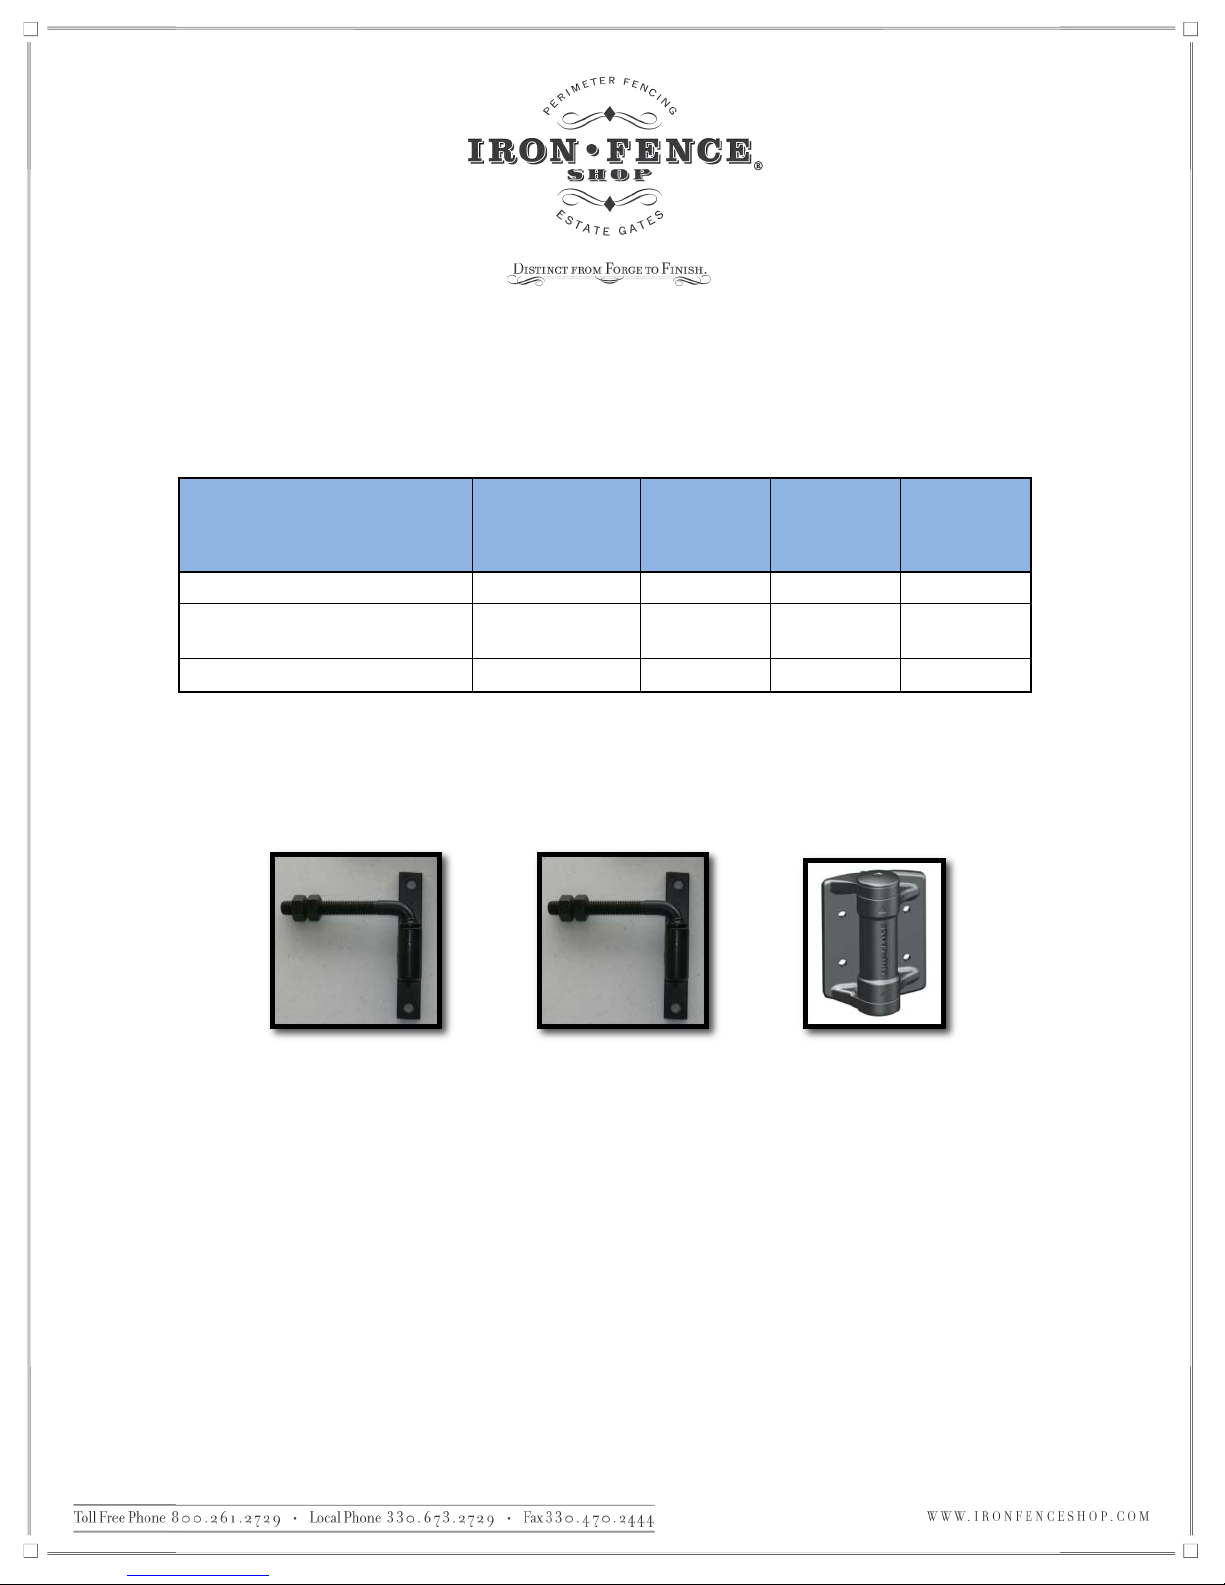
• First, let’s determine which style of hinge was supplied in your order. If you are unsure which hinge you
have, you can refer to your itemized invoice or the photos in Figure 3 below. Once you know which hinge
your gate is utilizing, note the single (one leaf) or double (two leaf) gate width measurement in Figure 2
below:
Hinge Name
Use
Adjustable
Single
Gate
Width
Double
Gate
Width
5.5" J-Bolt Hinge
Walk Gates
Yes
3"
6"
7" J-Bolt Hinge
Driveway
Gates
Yes
3" to 4"
6" to 8"
Self-Closing Hinge*
Walk Gates
No
3/4"
1.5"
Figure 2 - Hinge Width Table
* NOTE – Covers all models of self-closing hinge
Figure 3 – 5.5" J-Bolt Hinge / 7" J-Bolt Hinge/ Self-Closing Hinge
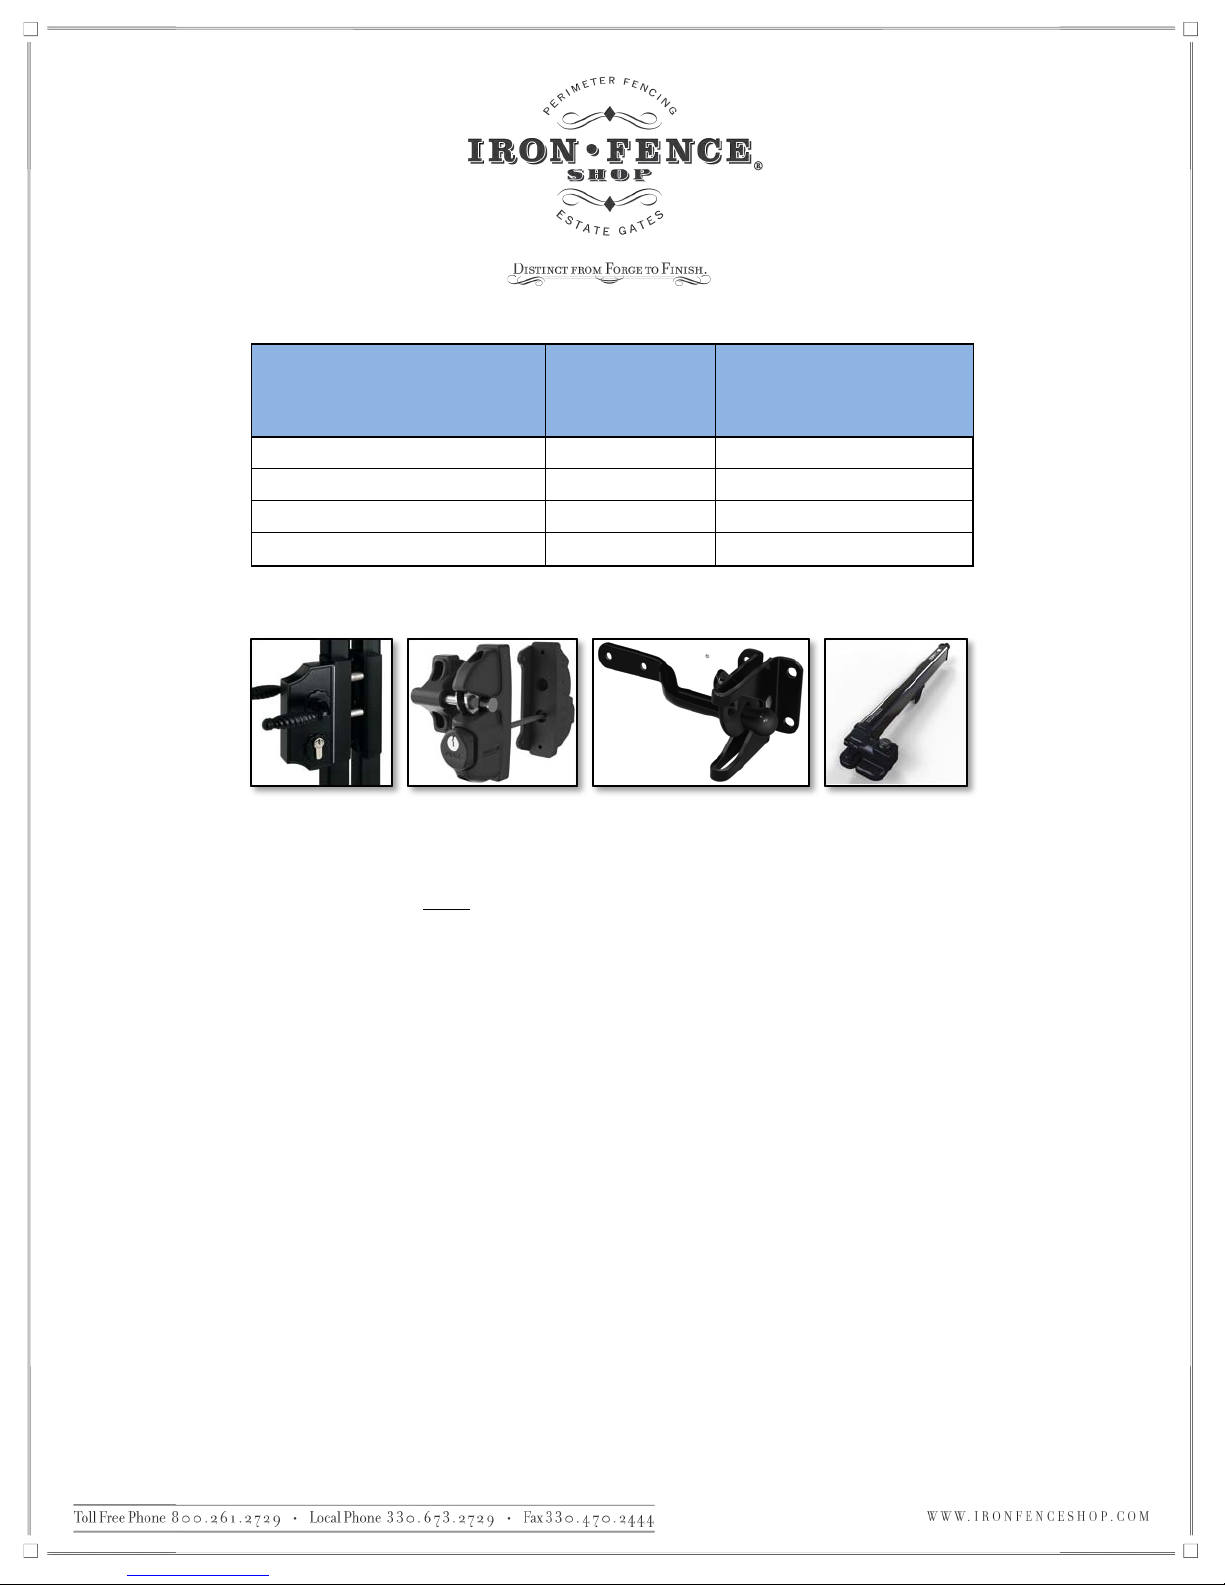
• Next, let’s determine which style of latch was supplied in your order. If you are unsure which latch you
have, you can refer to your itemized invoice or look at the photos in Figure 5. Once you know which
latch your gate is utilizing, note the width measurement in Figure 4:
!
!
8!
Latch Name
Key
Lockable?
Target Width Between
Mounting Points
Gravity Latch
No
1"
Safetech Cobra Latch*
Yes
3/4"
Safetech Pool Latch
Yes
3/4"
Locinox w/ Ext Kit
Yes
1/2"
Figure 4 - Latch Width Table
Figure 5 - Locinox / Safetech Cobra / Gravity Latch / Safetech Pool Latch
• Now that you have all of your width measurements (gate, hinges, latch), we are going to add all of those
together plus the width of ONE post to get the ‘on-center’ post measurement:
Gate Width + Hinge Width + Latch Width + 1 Post Width = Gate On-Center
• Using that equation, let’s calculate the gate post ‘on-center’ measurement for the following situation:
o 48” Wide Single Gate (one leaf)
o 3” for 5.5” J-Bolt Hinge
o 1” for Gravity Latch
o 2” Posts Being Used
48” Gate + 3” Hinge + 1” Latch + 2” Post = 54” On-Center for Gate Posts
• If you were installing a double walk gate or double driveway gate (two leafs make up the total width) then
you would need to use the double gate hinge measurement in the table since you will have two sets of
hinges instead of one. Let’s look at that same equation with a double gate:
o 10ft (120”) Arched Double Driveway Gate (two 5’ leafs)
o 8” for 7” J-Bolt Hinges (4” each side of the gate)
o 1” for Gravity Latch
o 4” Posts Being Used
 Loading...