

Page 1

iFP-700 Series
iFP-800 Series
iFP-900 Series
iFP-1000 Series
http://www.iRiverAmerica.com
iRiver Music Manager
Picture shown in this manual are for iFP-1000 model only
and may be different from the models.
http://www.iRiverAmerica.com
Software
Instruction Manual
Page 2

PC software installation
Attach the player
Operate the Software
Using iRiver Music Manager on Mac
2
9
13
55
Contents
1
This manual covers the installation and use of the software included with the iFP players.
For details regarding the hardware operation, please see the Hardware Instruction Manual.
Page 3
PC software installation
PC software installation
Software installation
3
PC software installation
PC software installation
Software installation
2
Insert the Installation CD into the CD-ROM drive.
The installation will start automatically.
System Requirements (Windows)
"
Pentium 133MHz or faster
"
USB port
"
Window 98SE / ME / 2000 / XP
"
CD-ROM drive
"
10MB free hard disk space
Note
"
The player can store MP3 files or files of any type.
You can upload files, other than music (MP3, WMA, OGG, ASF), to the PC using the iRiver
Music Manager Program.
"
Download latest versions of drivers and iRiver Music Manager at www.iRiverAmerica.com
"
Please be sure your login has Administrator privileges if using Windows 2000 or Windows XP.
"
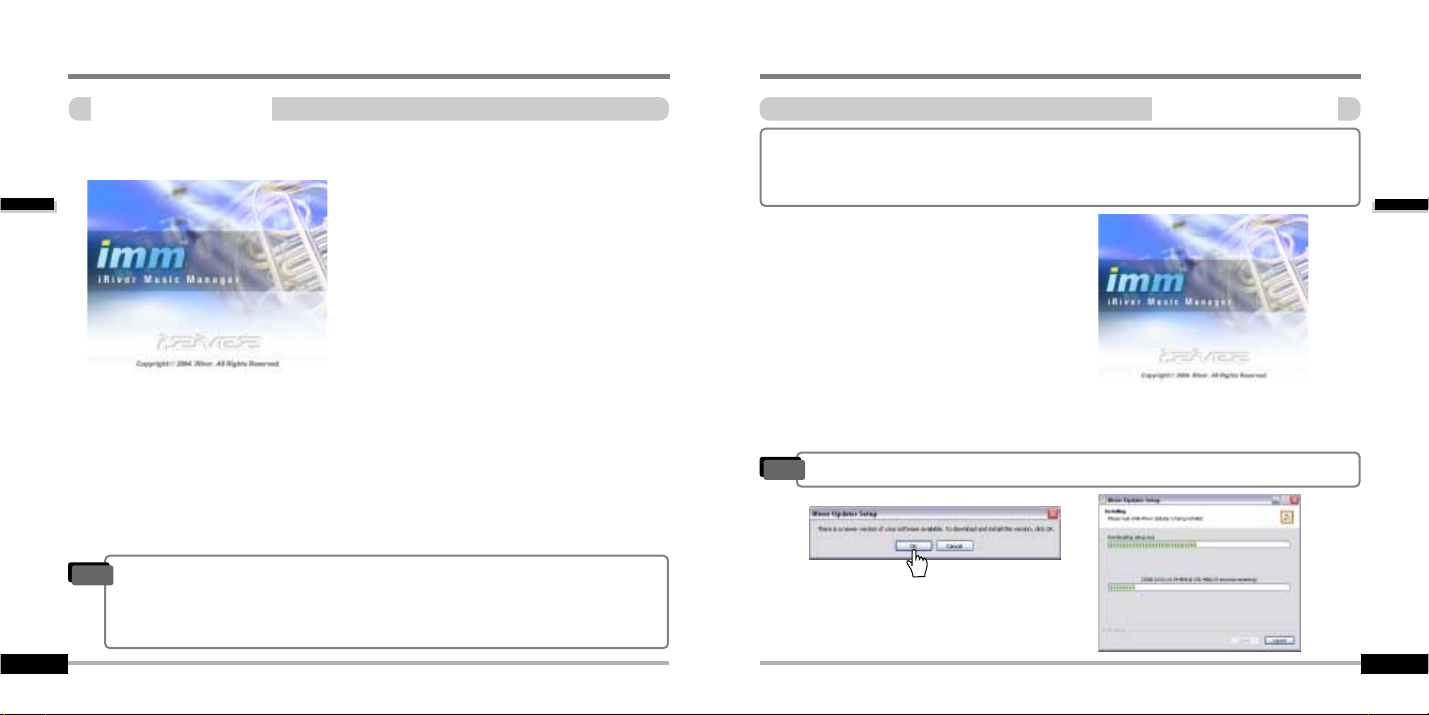
Insert the Installation CD into the CD-ROM drive.
The following screen appears after inserting the CD.
"
If the installation doesn't automatically begin,
execute the "setup.exe" file in the installation
CD.
The installation program will begin.
"
The installation CD contains the following
contents :
- Device Driver
- iRiver Music Manager
- Manager Program for Mac
During this installation, the software will check online for the most recent updates.
Please note that the installation screens may differ slightly from those appearing
here, as software may be of a more recent version. If your screens differ, please
visit www.iRiverAmerica.com/software for an updated user guide
After checking for updates, click “OK” to contine
installing the most updated version.
"
If there is an updated software version available you will see this message.
Note
The installation will check for the most recent updates online. It is strongly
recommended that your computer be connected to the internet before continuing the
installation.
Page 4
PC software installation
PC software installation
Software installation
5
PC software installation
PC software installation
Software installation
4
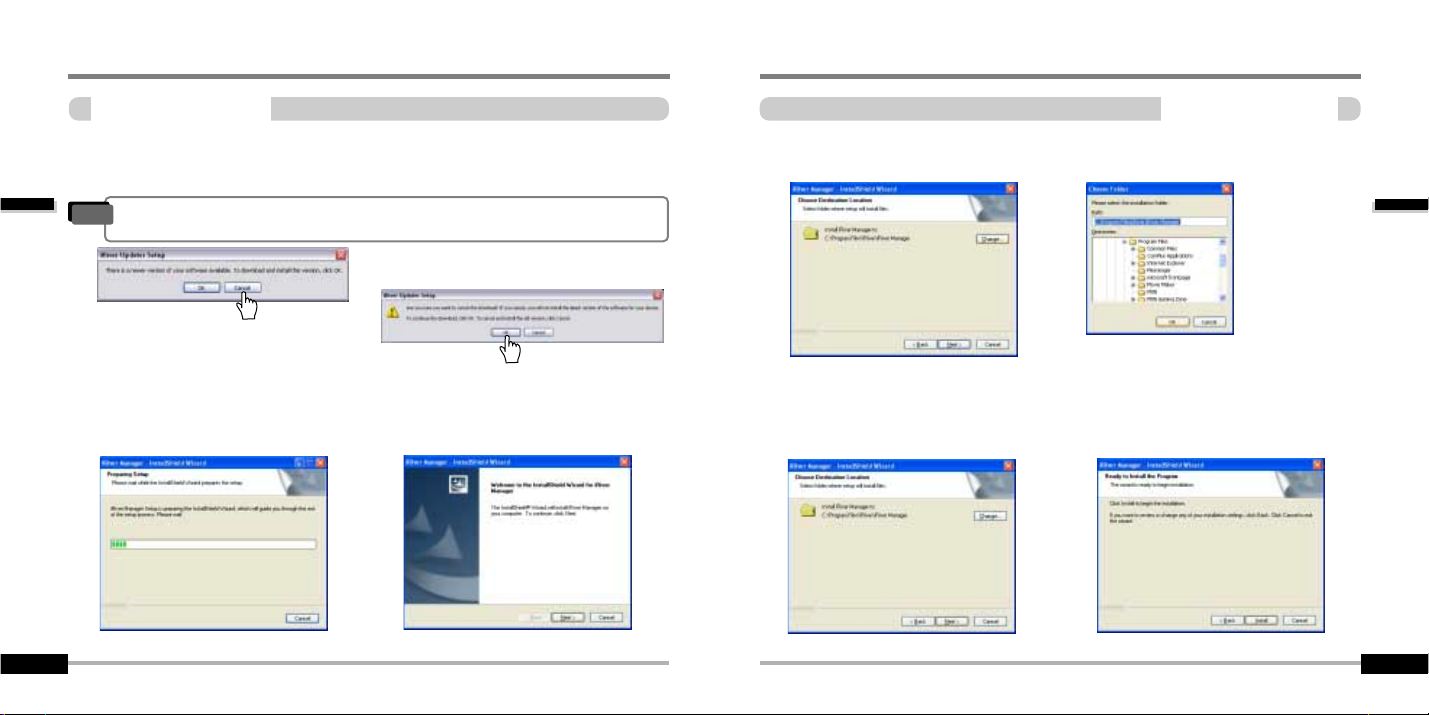
Click “Install” to begin the installation.
5
5
6
6
Click “Next” after confirming the
installation folder.
2
2
3
3
Software setup is preparing the install
shield wizard.
Click “Next” to Install iRiver Music Manager.
Select the folder to Install. Click “Next”.
4
4
1
1
If for any reason you would like to not install the lastest software and continue the
installation from the CD-ROM, click “Cancel” (not recommended).
"
Canceling at this stage will not cancel the installation, just the downloading of updated
software. Installation will continue as directed in the following steps.
Note
Page 5
Attach the player
Attach the player
Connecting to the PC
7
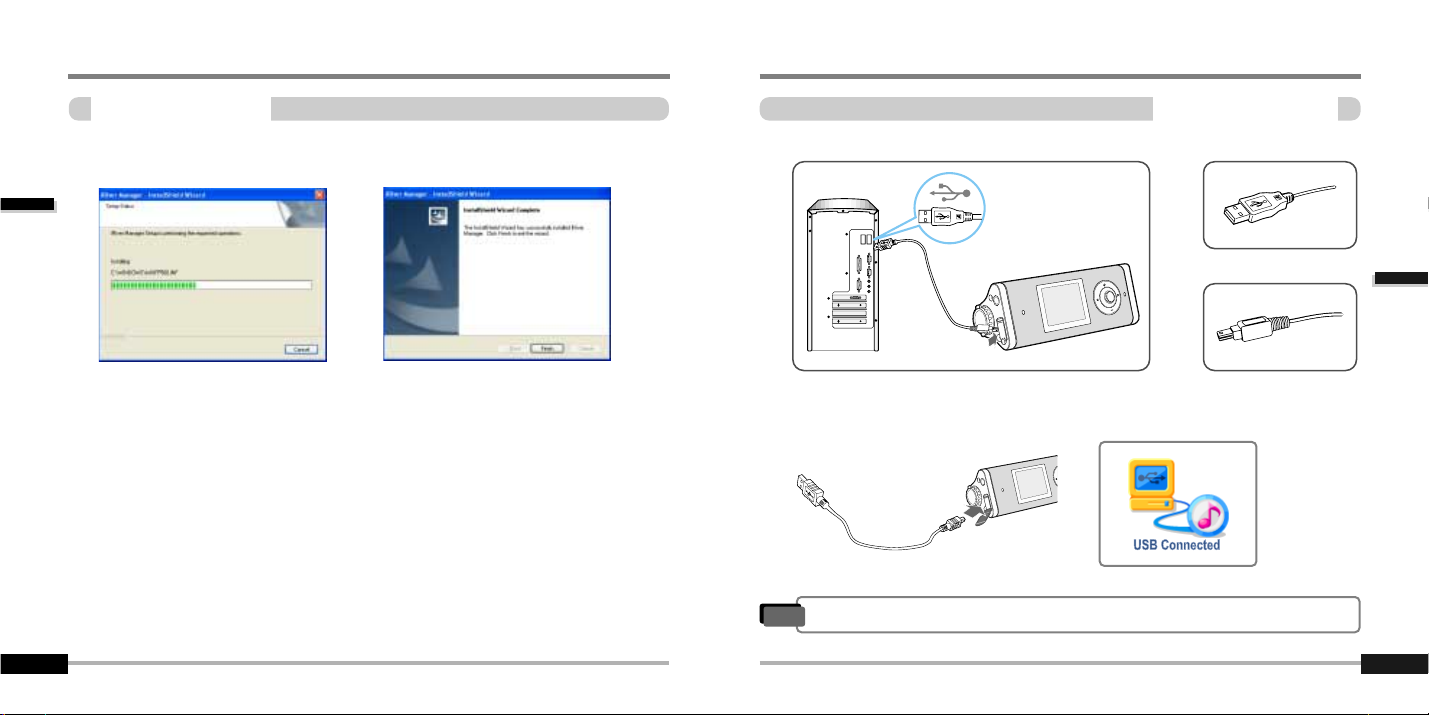
Connect the USB cable (provided) to the USB port of your computer.
Type “A”
Type “B”
USB port on the PC
USB port on the
iFP-1000 Series
USB cable
Type “A”
Type “B”
Turn on the player by pressing the button
marked STEREO. Lift the protective cover
over the USB port and connect the USB
cable to the player.
“USB CONNECTED” will appear on the
LCD screen of the player.
1
1
2
2
3
3
"
Connect the USB cable to the PC after playback stops to avoid errors.
Note
PC software installation
PC software installation
Software installation
6
7
7
Click “Finish” after the installation is completed.
Page 6
Attach the player
Attach the player
Installation of New Hardware
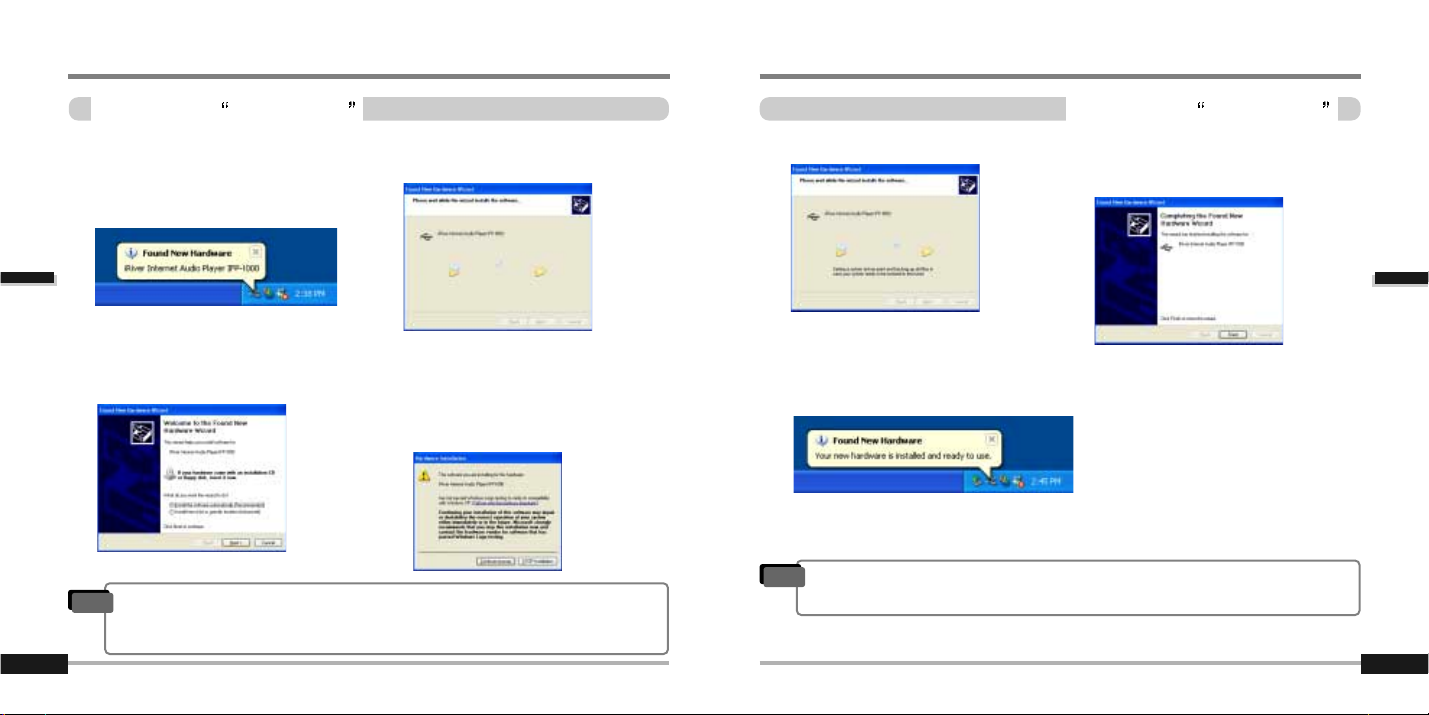
9
Attach the player
Attach the player
Installation of New Hardware
8
Select “Install the software automatically
(Recommended)” and click “Next”.
If a "Hardware Installation" warning message
appears, click "Continue Anyway".
(Windows XP)
The iRiver software driver will not cause any
damage to your computer.
1
1
3
3
4
4
After installing iRiver Music Manager from
the CD and connecting the player to your
PC, "Found New Hardware" screen is
displayed.
2
2
The computer will automatically search to
find your new hardware.
Information screen is displayed on the PC. New hardware is installed successfully and
ready to use.
5
5
7
7
The installation will continue.
Click “Finish”
Completed the installation of “New
hardware”.
6
6
"
Windows 98SE, Windows ME, Windows 2000 O.S do not need any other device
driver installation.
"
Install New Hardware after installing iRiver Music Manager program.
Note
"
Connect the USB cable to the PC after playback stops to avoid errors.
"
Remove the player to the PC after safe remove to avoid errors.
Note
Page 7
Operate the software
Operate the software
Operatie the software
11
Attach the player
Attach the player
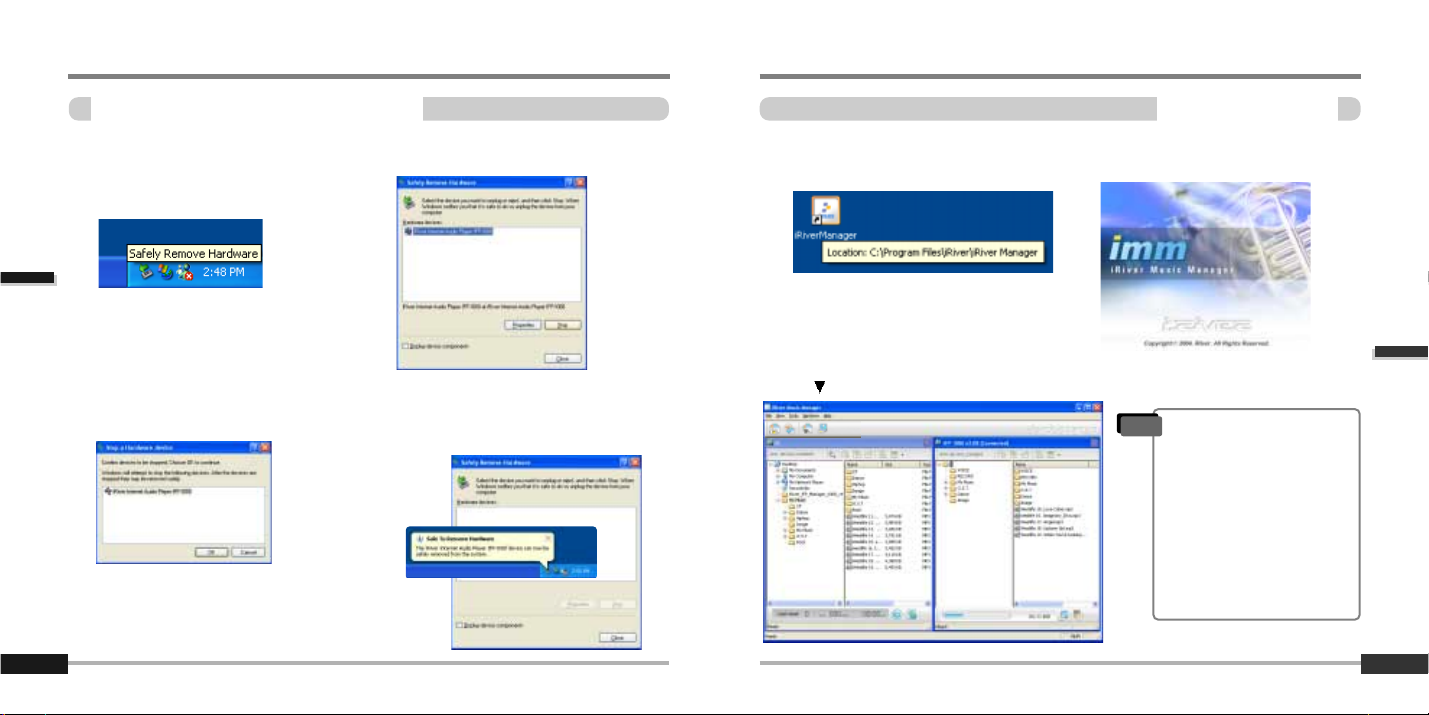
Safely Removing the player from the PC
10
Click the “OK” after confirming the
hardware to remove.
1
1
3
3
4
4
Select the “Safely Remove hardware”
after clicking the “Safe To Remove
Hardware” by using the right button of
mouse.
2
2
Click the “Stop” after selecting the device
to remove.
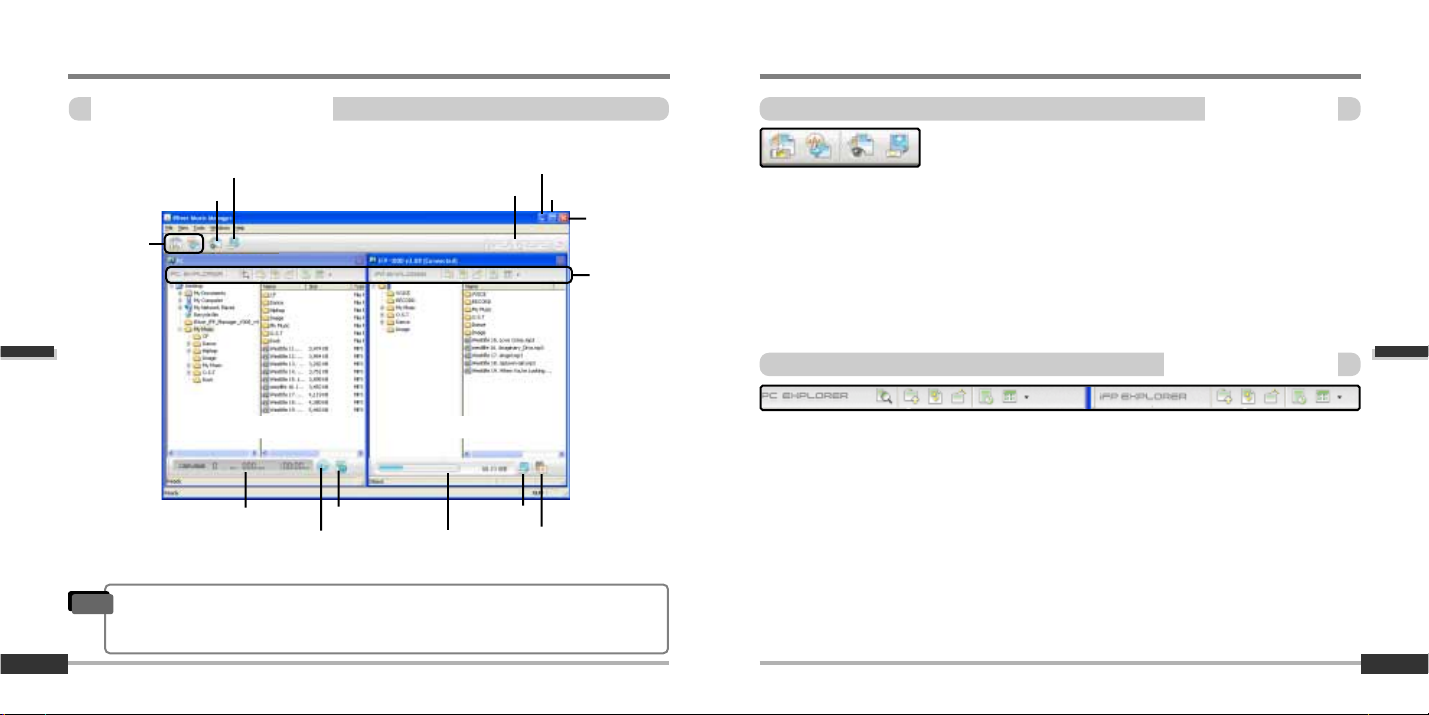
Double click the iRiver Music Manager
icon.
IRiver Music Manager version installed
is displayed.
Initial iRiver Music Manager window
1
1
2
2
Click the “Close” after confirming the
Safely Remove Hardware message.
(In case of Windows XP)
"
The right side of iRiver Manager
will display the contents of your
player.
If nothing is displayed in the
right section, please be sure
that the player is properly
connected to the USB cable and
to the PC.
It may be necessary to
disconnect the player from the
cable and reconnect it to activate
the right side of iRiver Manager.
Note
An updated version of iRiver software may have been
installed. Please visit www.iRiverAmerica.com/software
for an updated user guide and other helpful information.
Page 8
Operate the software
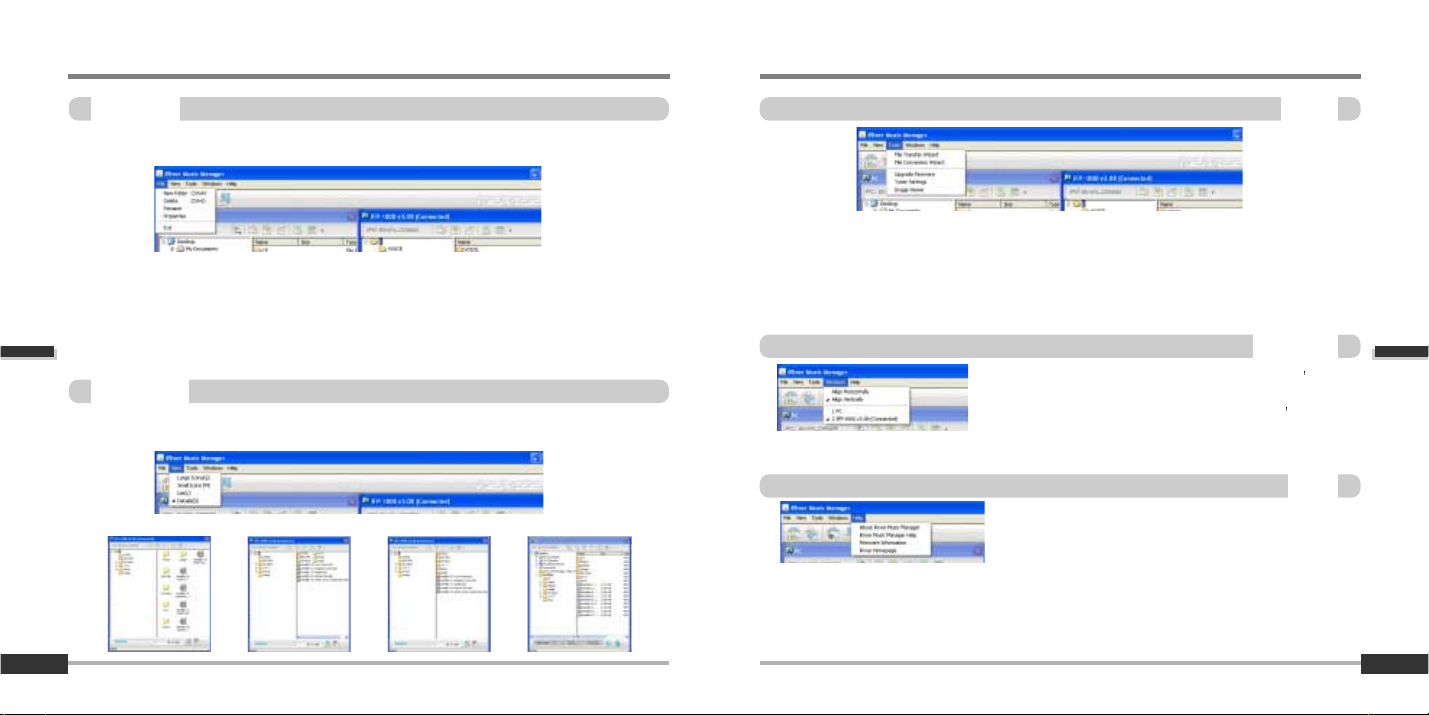
Preview
Toolbar menu
13
Preview
Operate the software
Learning the Basic Function
12
Remaining capacity
on the player
Wizard
Image viwer
Firmware Upgrade
File
Managing
Tools
MP3 file Information display bar
ID3 tag Editor
Play an audio file (using your
default playback program)
Tuner setting
Format player
"
File Transfer Wizard : To transfer files from PC to iFP player.
"
File Conversion Wizard : To convert recorded REC files to a format your PC can use.
"
Image Viewer : To see or manage the pictures or images made JPG format on the player.
"
Firmware Upgrade : To upgrade iFP Firmware.
"
Search Icon : To search Files or Folders on the PC or the player.
"
Select upper folder : To select the upper folder.
"
Refresh : To display the contents of the PC or the player.
"
New folder : To make a new folder.
"
Properties : To display detailed information about the folder or file selected.
"
View : To change how to display the selected folder.
File managing tools
iRiver homepage link
Maximize
Minimize
Exit
Player’s ExplorerPC’s Explorer
"
The fucntions in the "File" menu will only apply to the active window.
The active window is either the left or the right side of iRiver Manager depending on
where you last clicked.
Note
An updated version of iRiver software may have been
installed. Please visit www.iRiverAmerica.com/software
for an updated user guide and other helpful information.
An updated version of iRiver software may have been
installed. Please visit www.iRiverAmerica.com/software
for an updated user guide and other helpful information.
Page 9
Operate the software
Preview
Tools
15
Preview
Operate the software
File menu
14
"
New folder : To make a new folder on the PC or the player.
"
Delete : To delete the selected folder or files on the PC or player.
"
Rename : To rename the selected file or folder on the PC.
"
Properties : To display detailed information about the folder or file selected.
"
Settings : To set iFP Firmware Upgrade Method through Internet.
"
Exit : To exit the iRiver Music Manager.
<Large Icons>
"
File Transfer Wizard : To transfer files from PC to iFP player.
"
File Conversion Wizard : To convert recorded REC files to a format your PC can use.
"
Upgrade Firmware : To upgrade iFP Firmware.
"
Tuner Settings : To edit the FM preset station’s frequency or name manually.
"
Image Viewer : To see or manage the pictures or images made JPG format on the player.
"
Align Horizontally : To display the PC and player s
windows horizontally.
"
Align Vertically : To display the PC and player s windows
Vertically.
"
About iRiver Music Manager : To confirm the version of Manager.
"
iRiver Music Manager Help : To get the help about Manager.
"
Firmware Information : To see the information about the player.
"
iRiver Homepage : To connect the iRiver Homepage.
Windows
Help
View menu
The fucntions in the "File" menu will only apply to the active window. The active window is
either the left or the right side of iRiver Manager depending on where you last clicked.
The fucntions in the "File" menu will only apply to the active window. The active window is
either the left or the right side of iRiver Manager depending on where you last clicked.
<Details>
<List><Small Icons>
An updated version of iRiver software may have been
installed. Please visit www.iRiverAmerica.com/software
for an updated user guide and other helpful information.
An updated version of iRiver software may have been
installed. Please visit www.iRiverAmerica.com/software
for an updated user guide and other helpful information.
Page 10
Operate the software
File/Folder management
Downloading from the PC
17
3
3
Download is completed.
Once the music files appear on the right side of iRiver Manager, they are on your MP3
player.
File/Folder management
Operate the software
Downloading from the PC
16
1
1
2
2
Download is in processing.
Drag
& Drop
Select the folders or files on the PC to transfer to the player.
Drag and drop to move folders or files to the desired location on the player.
"
Files with a name over 127 English characters (Korean: 63 characters) will not transfer.
"
Files over 511 English characters (including path name and file name) will not transfer.
"
The ROOT folder is limited to 1024 files and folders total.
Subfolders do not have a limit to the number of files.
Note
An updated version of iRiver software may have been installed.
Please visit www.iRiverAmerica.com/software for an updated
user guide and other helpful information.
An updated version of iRiver software may have been installed.
Please visit www.iRiverAmerica.com/software for an updated
user guide and other helpful information.
Page 11

Operate the software
File/Folder management
Making a new folder on the player
19
File/Folder management
Operate the software
Making a new folder on the PC
18
Type the name in the new folder and press <Enter>.
A new folder is created.
1
1
2
2
3
3
Type the name in the new folder and press <Enter>.
Click the “New Folder” icon or select “FileNew folder” in the file menu to make a new
folder.
A new folder is created.
1
1
2
2
3
3
"
Only 8 levels of subfolders are allowed, beginning with the Root (\) folder.
Note
Click the “New Folder” icon or select “FileNew folder” in the file menu to make a new
folder.
An updated version of iRiver software may have been installed.
Please visit www.iRiverAmerica.com/software for an updated
user guide and other helpful information.
An updated version of iRiver software may have been installed.
Please visit www.iRiverAmerica.com/software for an updated
user guide and other helpful information.
Page 12

Operate the software
File/Folder management
Deleting foldwers or files from the plyer
21
File/Folder management
Operate the software
20
Select the files or folders to delete. Select “File-Delete” in the file menu to
delete files.
Click “Yes” on the alert display to
delete.
Files are deleted.
1
1
2
2
3
3
4
4
Select the files or folders to delete.
Select “File-Delete” in the file menu to
delete files.
Click “OK” on the alert display to delete. Files are deleted.
1
1
2
2
3
3
4
4
Deleting foldwers or files from the PC
An updated version of iRiver software may have been installed.
Please visit www.iRiverAmerica.com/software for an updated
user guide and other helpful information.
An updated version of iRiver software may have been installed.
Please visit www.iRiverAmerica.com/software for an updated
user guide and other helpful information.
Page 13

Operate the software
File/Folder management
Renaming folder or file on the player
23
File/Folder management
Operate the software
Renaming folder or file on the PC
22
Select folder or file to rename.
1
1
Select “File-Rename” in the file menu to
rename file.
2
2
Type the new name and press <Enter>.
Renaming is complete.
3
3
Select folder or file to rename on the
player.
1
1
Select “File-Rename” in the file menu to
rename file.
2
2
Type the new name and press <Enter>.
Renaming is complete.
3
3
"
You can not change the extension of a file.
Note
An updated version of iRiver software may have been installed.
Please visit www.iRiverAmerica.com/software for an updated
user guide and other helpful information.
An updated version of iRiver software may have been installed.
Please visit www.iRiverAmerica.com/software for an updated
user guide and other helpful information.
Page 14

File/Folder Management
Operate the software
To view the properties of a file (PC)
24
Select the file or folder to view.
1
1
Select “File-Properties” in the file menu to
view the properties of the file.
2
2
The properties of the selected file are displayed.
3
3
Select the file or folder to view.
1
1
Select “File-Properties” in the file menu to
view the properties of the file.
2
2
The properties of the selected file are displayed.
3
3
Operate the software
File/Folder management
To view the properties of a file (Player)
25
An updated version of iRiver software may have been installed.
Please visit www.iRiverAmerica.com/software for an updated
user guide and other helpful information.
An updated version of iRiver software may have been installed.
Please visit www.iRiverAmerica.com/software for an updated
user guide and other helpful information.
Page 15

Operate the software
File/Folder management
Uploading to the PC
27
Click “Searching” icon on the PC window.
1
1
Select the drive or folder to search.
2
2
The searching results are displayed.
Click “Close” button to finish.
4
4
Click “Search” after typing the searching
condition.
3
3
File/Folder management
Operate the software
Searching for music files
26
Select the folders or files on the player to transfer to the PC.
Drag and drag to move folders or files to the desired location on the PC.
2
2
1
1
Upload is in processing.
An updated version of iRiver software may have been installed.
Please visit www.iRiverAmerica.com/software for an updated
user guide and other helpful information.
An updated version of iRiver software may have been installed.
Please visit www.iRiverAmerica.com/software for an updated
user guide and other helpful information.
Page 16

Operate the software
File/Folder management
Changing the position of folders or files on the player
29
Upload is completed.
3
3
File/Folder management
Operate the software
Uploading to the PC
28
"
Music files (MP3, WMA, OGG, ASF) can not be uploaded from the player to the PC in
accordance with current copyright guidelines.
"
You can upload pictures, recorded files, or any data files to your PC.
"
MP3, WMA, OGG or ASF files may not be transferred to your PC from the player.
Note
Drag and drop to move a folder or file to the desired location.
"
You may only move one file or folder at a time.
"
You can not move files or folders to another folder.
Note
An updated version of iRiver software may have been installed.
Please visit www.iRiverAmerica.com/software for an updated
user guide and other helpful information.
An updated version of iRiver software may have been installed.
Please visit www.iRiverAmerica.com/software for an updated
user guide and other helpful information.
Page 17

Operate the software
Various windows
Windows
2-
File/Folder management
Operate the software
Moving to the upper folder(PC and player)
30
31
Click the move to “upper folder” icon in the menu bar of the iRiver Music Manager.
Move to the upper
folder on the PC
Move to the upper
folder on the player
Click the “Refresh” icon to display the contents of the PC or the player.
Refresh to the current
folder on the PC.
Refresh to the current
folder on the player.
Refresh(PC and Player)
Select “Align Vertically” in the Windows menu to display the PC and player s windows
Vertically.
Select “Align Horizontally” in the Windows menu to display the PC and player s windows
horizontally.
An updated version of iRiver software may have been installed.
Please visit www.iRiverAmerica.com/software for an updated
user guide and other helpful information.
An updated version of iRiver software may have been installed.
Please visit www.iRiverAmerica.com/software for an updated
user guide and other helpful information.
Page 18

Operate the software
Wizard
File transfer wizard
33
Various windows
Operate the software
Windows
32
To make the PC side of iRiver Manager active, click Window -> PC
To make the player side of iRiver Manager active, click Window -> iFP-XXX.
The file transfer wizard can help guide you through the process of copying songs to your player.
Click “Tools-File Transfer Wizard” on the menu or “File Transfer Wizard” icon on the Toolbar
menu files or folders.
File Transfer Wizard window is displayed on the PC.
Click “Add Folder” or “Add File” after selecting folder or file to transfer.
1
1
2
2
Click “Next” after selecting files or folders.
3
3
The file transfer wizard is only for
transferring files To the player, it can not
be used to upload files FROM the player.
An updated version of iRiver software may have been
installed. Please visit www.iRiverAmerica.com/software
for an updated user guide and other helpful information.
An updated version of iRiver software may have been
installed. Please visit www.iRiverAmerica.com/software
for an updated user guide and other helpful information.
Page 19

Wizard
Operate the software
File transfer wizard
34
Click “Next” after selecting the folder to be transferred to the player or creating a folder on
the player.
File transferring is in processing.
Click “Finish” after completing file transferring
5
5
4
4
Selecting the location to save
Creating a new folder
Operate the software
Wizard
File Convertion Wizard
35
Use the File Conversion Wizard to convert recorded REC files to a format your PC can use.
Click “Tools-File Conversion Wizard” on
the menu or “File Conversion Wizard”
icon on the Toolbar menu files to convert
REC files to MP3 format.
File Conversion Wizard window is
displayed. Click “Select File” to select the
file to convert.
1
1
2
2
Click “Open” and “Next” after selecting files.
3
3
To cancel the file conversion, click
“Delete” after selecting files to cancel.
4
4
"
You must first upload REC files from the player to your PC before converting them,
(Refer to page 25~26)
Note
An updated version of iRiver software may have been
installed. Please visit www.iRiverAmerica.com/software
for an updated user guide and other helpful information.
An updated version of iRiver software may have been
installed. Please visit www.iRiverAmerica.com/software
for an updated user guide and other helpful information.
Page 20

Operate the software
Wizard
File Convertion Wizard
37
Wizard
Operate the software
File Convertion Wizard
36
Click “Next” after comfirmming the
selected files.
Click “Change” to change the location to
save after converting.
5
5
6
6
Click “OK” after selecting the location to
save after converting.
Click “Rename” after selecting the file to
be renamed.
7
7
8
8
Click “Next” after typing new file name.
Click “OK” to confirm.
File converting is in processing.
Click “Finish” after completing file
conversion.
9
9
10
10
12
12
Click “Next” after selecting whether
deleting or not the original file.
11
11
An updated version of iRiver software may have been
installed. Please visit www.iRiverAmerica.com/software
for an updated user guide and other helpful information.
An updated version of iRiver software may have been
installed. Please visit www.iRiverAmerica.com/software
for an updated user guide and other helpful information.
Page 21

Operate the software
Player management
Upgrading the firmware
39
Player management
Operate the software
Upgrading the firmware
38
Visit www.iRiverAmerica.com to download
the latest firmware for your player.
Unzip the downloaded firmware file and
double click the EXE file.
This will create the firmware file.
(IFP-XXXXT.HEX)
Click "Tools-Firmware Upgrade" or “Firmware
Upgrade Icon on the Toolbox.
Click " Upgrade".
1
1
2
2
3
3
The window below is displayed as the firmware upgrade is in processing.
Click “OK” after the player turns off.
5
5
Locate and select the IFP-XXXXT.HEX then click “Open”.
4
4
"
Do not disconnect the player from the PC or remove the battery from the player
during the firmware upgrade process.
Note
An updated version of iRiver software may have been
installed. Please visit www.iRiverAmerica.com/software
for an updated user guide and other helpful information.
An updated version of iRiver software may have been
installed. Please visit www.iRiverAmerica.com/software
for an updated user guide and other helpful information.
Page 22

Operate the software
Player management
Tuner Settings
41
Format will erase all the files and folders in your players memory.
Click the “format” icon on the Toolbox to
format.
The alert below is displayed.
Click “OK” to initialize.
Formatting is in processing.
Formatting is completed.
Click “OK”.
1
1
2
2
3
3
4
4
"
Do not disconnect the player from the PC or remove the battery from the player
during the format process.
Note
Player management
Operate the software
Format
40
3
3
Select “Tools-Tuner Settings” on the menu or “Tuner Settings” icon to modify FM stations.
The previous preset menu is displayed.
Click “Edit” button after selecting station
to edit.
1
1
2
2
Click “Scan Device” to view the previous
settings.
You can modify the FM stations with the iRiver Music Manager and modify or change 20
stations preset on the player.
"
The station name can not exceed six characters.
Note
An updated version of iRiver software may have been
installed. Please visit www.iRiverAmerica.com/software
for an updated user guide and other helpful information.
An updated version of iRiver software may have been
installed. Please visit www.iRiverAmerica.com/software
for an updated user guide and other helpful information.
Page 23

Operate the software
Additional functions
Playing music files on the PC
43
Player management
Tuner Settings
42
Click “OK” after typing the information to
change.
Click “Open file” to open the saved file.
4
4
Click “Save” after selecting folder to save
and typing the file name.
Click “Open” after selecting the folder and
file to open.
5
5
6
6
7
7
8
8
Repeat step 3~ step 5 to edit the preset stations.
Click “Play” icon after selecting a file to play.
1
1
When you play a file, your default media player will open and begin playing the selected
song.
2
2
An updated version of iRiver software may have been
installed. Please visit www.iRiverAmerica.com/software
for an updated user guide and other helpful information.
An updated version of iRiver software may have been
installed. Please visit www.iRiverAmerica.com/software
for an updated user guide and other helpful information.
Page 24

Operate the software
Additional functions
Image Viewer
45
Additional functions
Operate the software
Modifing ID3 tags
44
Click “Modify ID3 tags” icon after
selecting a MP3 or OGG file .
1
1
Type tag information.
2
2
Click “save .
Modifing of ID3 tags is completed.
3
3
"
You can only modify the tag information of MP3 or OGG files and only files that are
on your PC.
Note
1
1
Use the Image Viewer to view the JPG files stored on the player.
Select “Tools-Image Viewer” after
selecting pictures or images on the
player.
A Preview of the images stored on the player will
be displayed.
2
2
Select an image and click "View" to display the full sided image.
3
3
An updated version of iRiver software may have been
installed. Please visit www.iRiverAmerica.com/software
for an updated user guide and other helpful information.
An updated version of iRiver software may have been
installed. Please visit www.iRiverAmerica.com/software
for an updated user guide and other helpful information.
Page 25

Operate the software
Additional functions
Image Viewer
47
Additional functions
Operate the software
Image Viewer
46
Click “Previous” or “Next” icons to display the previous or next picture.
4
4
Click “+” or “-” icon to see the picture larger or smaller ratio than the actual size.
5
5
Previous image Next image
To enlarge image
To reduce image
Click “Full Screen” icon to see the picture in full screen.
Click “Original Screen” to see the picture in actual size.
6
6
7
7
An updated version of iRiver software may have been
installed. Please visit www.iRiverAmerica.com/software
for an updated user guide and other helpful information.
An updated version of iRiver software may have been
installed. Please visit www.iRiverAmerica.com/software
for an updated user guide and other helpful information.
Page 26

Operate the software
Help
To view about iRiver Music Manager Information
49
Additional functions
Operate the software
Image Viewer
48
Click “Delete” icon to delete the
selected image.
Click “Yes”.
Image deleting is completed.
8
8
9
9
Click “Refresh” to display the images of
the selected folder afresh.
Click “Close” icon to exit the program.
10
10
11
11
1
1
The version information of iRiver Music
Manager is displayed.
Click “OK” to exit.
2
2
Select “Help-iRiver Music Manager
Information”.
An updated version of iRiver software may have been
installed. Please visit www.iRiverAmerica.com/software
for an updated user guide and other helpful information.
An updated version of iRiver software may have been
installed. Please visit www.iRiverAmerica.com/software
for an updated user guide and other helpful information.
Page 27

Operate the software
Help
Printing iRiver Music Manager Help
51
Help
Operate the software
iRiver Music Manager Help
50
Select “Help-iRiver Music Manager Help”
in the menu.
3
3
Help screen about how to use “iRiver
Music Manager” program is displayed.
Click head heading to read the details of
the iRiver Manager functions.
1
1
2
2
Click “Print” icon to print iRiver Music
Manager Help.
1
1
Click “OK” after selecting the range to
print.
2
2
Click “Print” after selecting the printer.
Printing is started.
3
3
An updated version of iRiver software may have been
installed. Please visit www.iRiverAmerica.com/software
for an updated user guide and other helpful information.
An updated version of iRiver software may have been
installed. Please visit www.iRiverAmerica.com/software
for an updated user guide and other helpful information.
Page 28

Help
Operate the software
To view firmware Information
52
Select “Help-Firmware Information” in the
menu.
1
1
Information about Firmware is displayed.
Click “OK” to exit.
2
2
Click the Icon to connect to iRiver Website.
Connecting to iRiver Website
Using iRiver Music
Manager on MAC
Using iRiver Music Manager on Mac
Mac Software Installation (Mac OS 9.2)
53
3
3
Double click the "IRIVER MUSIC
MANAGER FOR OS 9.SIT" file to
extract the VISE installation file for
iRiver Music Manager.
Copy the "MAC OS
OS 9 IRIVER
MUSIC MANAGER FOR MAC OS-
9.SIT" file on the installation CD-ROM in
the MAC-OS folder to your desktop.
Double click the VISE icon to begin the
installation.
Click “Install” after selecting the folder
to install.
4
4
2
2
1
1
An updated version of iRiver software may have been
installed. Please visit www.iRiverAmerica.com/software
for an updated user guide and other helpful information.
Page 29

Using iRiver Music
Manager on MAC
Using iRiver Music Manager on Mac
Connecting to a Mac
55
Using iRiver Music Manager on Mac
Using iRiver Music
Manager on MAC
Mac Software Installation (Mac OS X )
54
Double click the "MAC OS OS X
IRIVER MUSIC MANAGER FOR MAC
OS X.DMG" in the MAC -OS folder on
the installation CD-ROM." The DMG file
will mount a temporary "drive" icon called
"iRiver Music Manager”.”
Installation of iRiver Music Manager for
OS X is completed.
Open the iRiver Music Manager
"drive" and move the iRiver Music
Manger icon to your Dock or
Desktop.
1
1
2
2
3
3
System Requirements (Mac)
"
Mac OS 9.2.2 or later
"
Mac OS X 10.2 or later
"
CarbonLib 1.6 or later
Note
CarbonLib Update Method
"
OS X : Apple Menu System Preferences
System Software Update
"
OS 9 : Control Panels Software Update
Open iRiver Music Manager after connecting the
player to a Mac.
Click the “Refresh” icon
to display the
contents of the player.
Click the “New Folder” icon
iRiver Music
Manager.
Making new folders on the Mac Refresh (Player)
"
Only 8 levels of subfolders are allowed, beginning with the Root folder.
Note
Page 30

Using program
Using iRiver Music
Manager on MAC
Using iRiver Music Manager on Mac
Uploading to the Mac
57
Using iRiver Music Manager on Mac
Using iRiver Music
Manager on MAC
Deleting folders or files
56
Format
After selecting the files or folders to
delete, click “Delete” icon to delete.
Format will erase all files in your player
memory.
Click the “Format” icon
to format.
After selecting the files or folders to download, drag and drop them to the folder to
download on the player.
Drag &
Drop
Downloading from the Mac
"
Files with a name over 127 English characters (Korean: 63 characters) will not transfer.
"
Files over 511 English characters (including path name and file names) will not transfer.
"
The ROOT folder is limited to 1024 files and folders total.
Subfolders do not have a limit to the number of files.
Note
After selecting the files or folders to upload, drag and drop them to the folder to upload
on the Mac.
Drag &
Drop
"
Music Files (MP3, WMA, OGG, ASF) can not be uploaded from the player to the Mac
in accordance with current copyright guidelines.
"
You can upload recorded FM, Line in, or Voice files to your Mac as well as any data files.
"
MP3, WMA, OGG or ASF files may not be transferred to your Mac from the player.
Note
Page 31

Using iRiver Music Manager on Mac
Using iRiver Music
Manager on MAC
Firmware Upgrade
58
Download the latest Firmware from
our website. Click “File
Firmware
Update” on the menu.
Click “Open” after selecting file to
update.
While update is completed, the player is automatically turned off.
Click “Close”.
1
1
2
2
3
3
Page 32

 Loading...