

IRIS Spreaders VIKING-6000W, VIKING-4000, VIKING-6000WT, VIKING-8000, VIKING-4000W Operator's Manual
...
FERTILIZER SPREADER
Dry fertilizer Spreader for tractor - Mod. VIKING MODEL
OPERATOR'S MANUAL
& Please Read this operator's manual before operating the machine

- INDEX -
1. Introduction ....................................................................................... 1
2. Technical data ................................................................................... 2-4
3. Terminology ....................................................................................... 5
4. Operation ................................................................................................. 6-7
5. Important safety information .................................................. 8-9
6. Checkup ................................................................................................. 10
7. Storage ................................................................................................... 10
8. Trouble shooting ............................................................................... 11
9. Parts sales & After service .......................................................... 12
10. Complimentary check & Repair .............................................. 12
11. Certificate of quality assurance .......................................... 13-18
1. Introduction
1) Stainless steel hopper that does not rust.
2) Spreads dry granular fertilizer, organic compost, lime, pellet, etc.
3) Capacity : 2ton, 3ton, 4ton, 6ton, 8ton, 10ton
4) The stainless steel chain conveyor system allows exact transfer
of fertilizer to spread exact amount of it.
5) Width of stainless steel chain conveyor : 500mm, 800mm
6) Based on the wheel driving system, you can spread the same amount
of fertilizer regardless of working speed.
7) Conveys exact power by using a steel mesh wheel, without causing
a sip from the wheel.
8) Tandem axle (VIKING-8000, 8000W, 10000, 10000W)
Single axle (VIKING-2000, 3000, 4000, 4000W, 6000, 6000W)
9) Tandem axle available for VIKING-6000,6000W
10) Amount of fertilizer can be controlled in the tractor by using
the switchgear of oil hydraulic cylinder.
11) The size of the fertilizer opening is set in advanced, to spread
the exact amount of designated fertilizer.
- 1 -
Model
VIKING-2000
VIKING-3000
VIKING-4000
VIKING-4000W
Hopper Capacity
1.8㎥
2.7㎥
3.6㎥
3.6㎥
Nominal Capacity
2ton
3ton
4ton
4ton
Weight of
the Machine(㎏)
1135
1185
1450
1630
Width(㎜)
2250
2250
2360
2360
Height(㎜)
1570
1795
2115
2115
Length(㎜)
4326
4326
4373
4373
Feed Mesh Chain
Width(㎜)
500
500
500
800
Disc Size(mm)
600
600
600
800
Spreading Width(m)
20~30
AXLES
Single axle
TIRES
11.5/80-15.3 tires X 2
400/60-15.5 tires X 2
POWER
Ground Driven/Hydraulic
2. Technical date
VIKING-2000 VIKING-4000
- 2 -
Model
VIKING-6000
VIKING-6000W
VIKING-6000T
VIKING-6000WT
Hopper Capacity
5.3㎥
5.3㎥
5.3㎥
5.3㎥
Nominal Capacity
6ton
6ton
6ton
6ton
Weight of
the Machine(㎏)
1760
1940
1910
2090
Width(㎜)
2460
2460
2460
2460
Height(㎜)
2450
2460
2450
2460
Length(㎜)
4810
4845
4810
4845
Feed Mesh Chain
Width(㎜)
500
800
500
600
Disc Size(mm)
600
800
600
800
Spreading Width(m)
20~30
AXLES
Single axle
Tandem axle
TIRES
500 X 17 tires X 2
11.5/80-15.3 tires X 4
POWER
Ground Driven/Hydraulic
VIKING-4000 VIKING-6000T
- 3 -
Model
VIKING-8000
VIKING-8000W
VIKING-10000
VIKING-10000W
Hopper Capacity
7㎥
7㎥
8.7㎥
8.7㎥
Nominal Capacity
8ton
8ton
10ton
10ton
Weight of
the Machine(㎏)
2380
2560
2470
2650
Width(㎜)
2500
2500
2500
2500
Height(㎜)
2430
2400
2680
2670
Length(㎜)
5540
5575
5540
5575
Feed Mesh Chain
Width(㎜)
500
800
500
800
Disc Size(mm)
600
800
600
800
Spreading Width(m)
20~30
AXLES
Tandem axle
TIRES
500 X 17 tires X 4
POWER
Ground Driven/Hydraulic
- 4 -

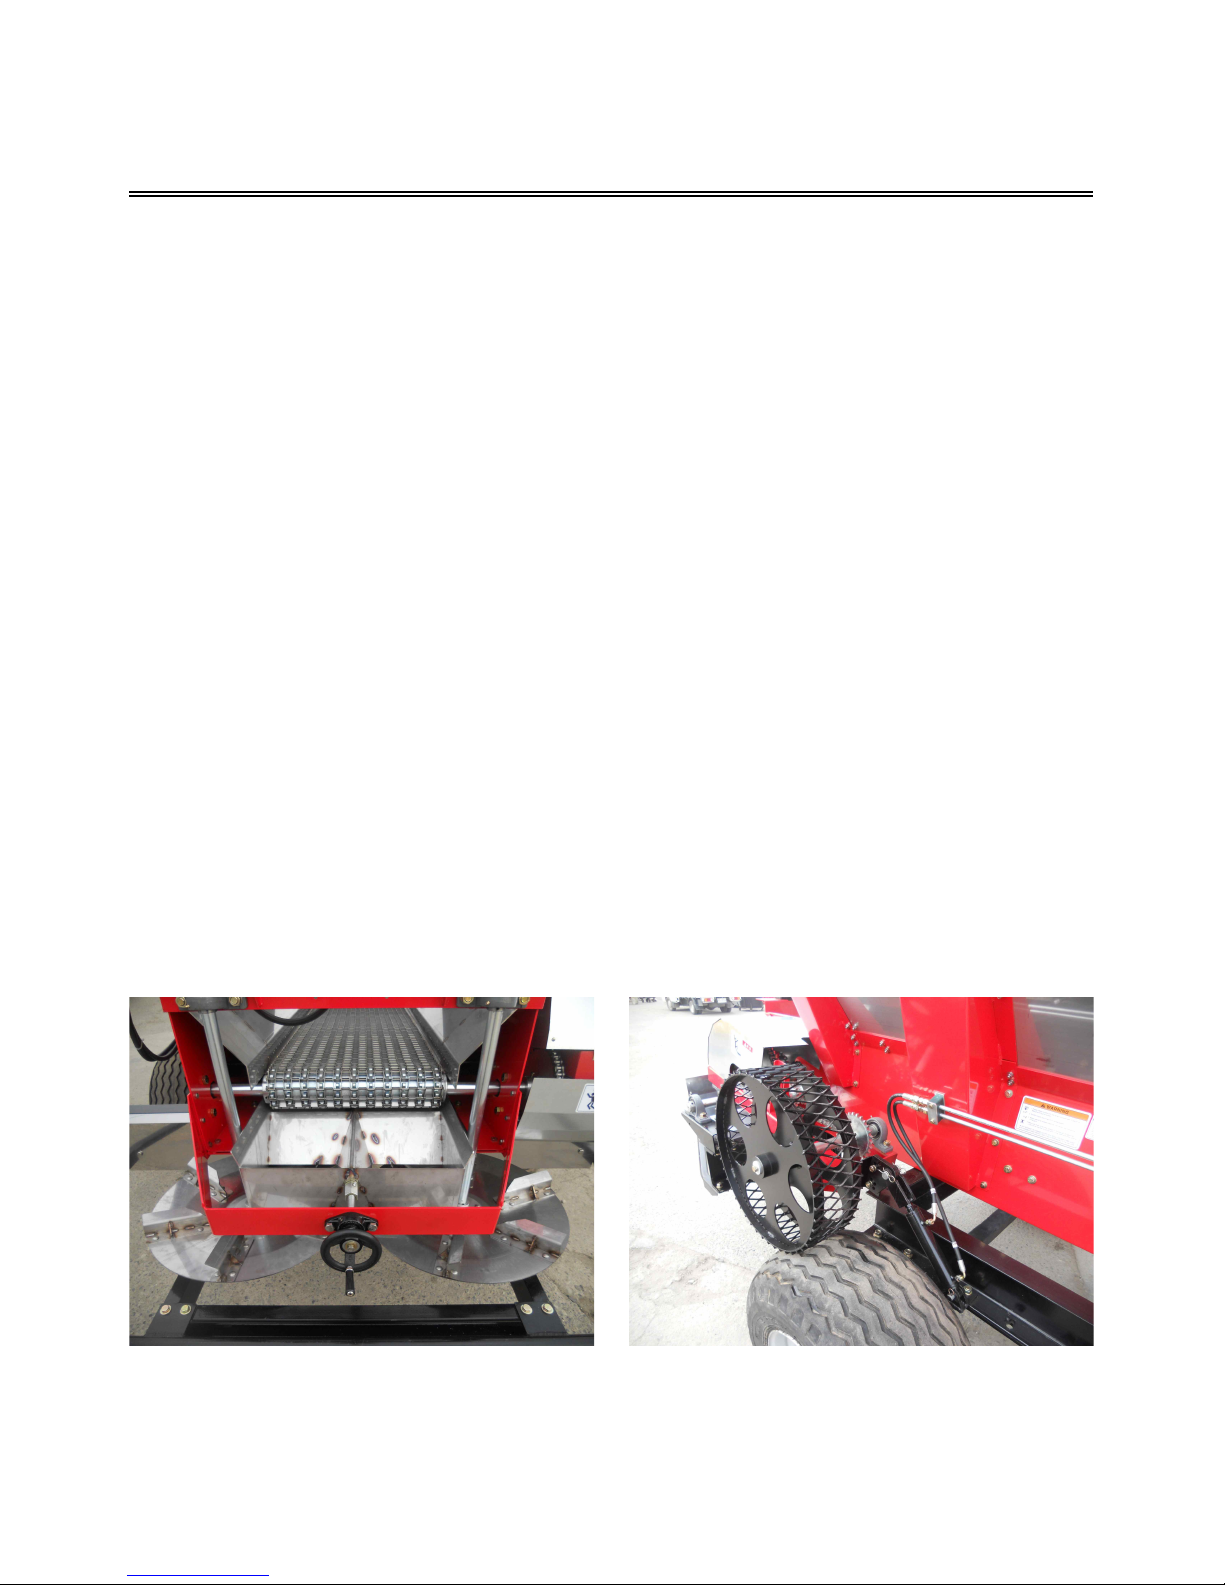
3. Terminology
VIKING MODEL
➀
➁
➂
➃ ➄
➅ ➆
➇
⑨
➀ Extension Hopper ➁ Stainless Hopper
➂ Hopper Brace ➃ Hydraulic Motor
➄ Steel Mesh Wheel ➅ Spreading Disc
➆ Drawbar ➇ Tire
⑨ Frame
- 5 -

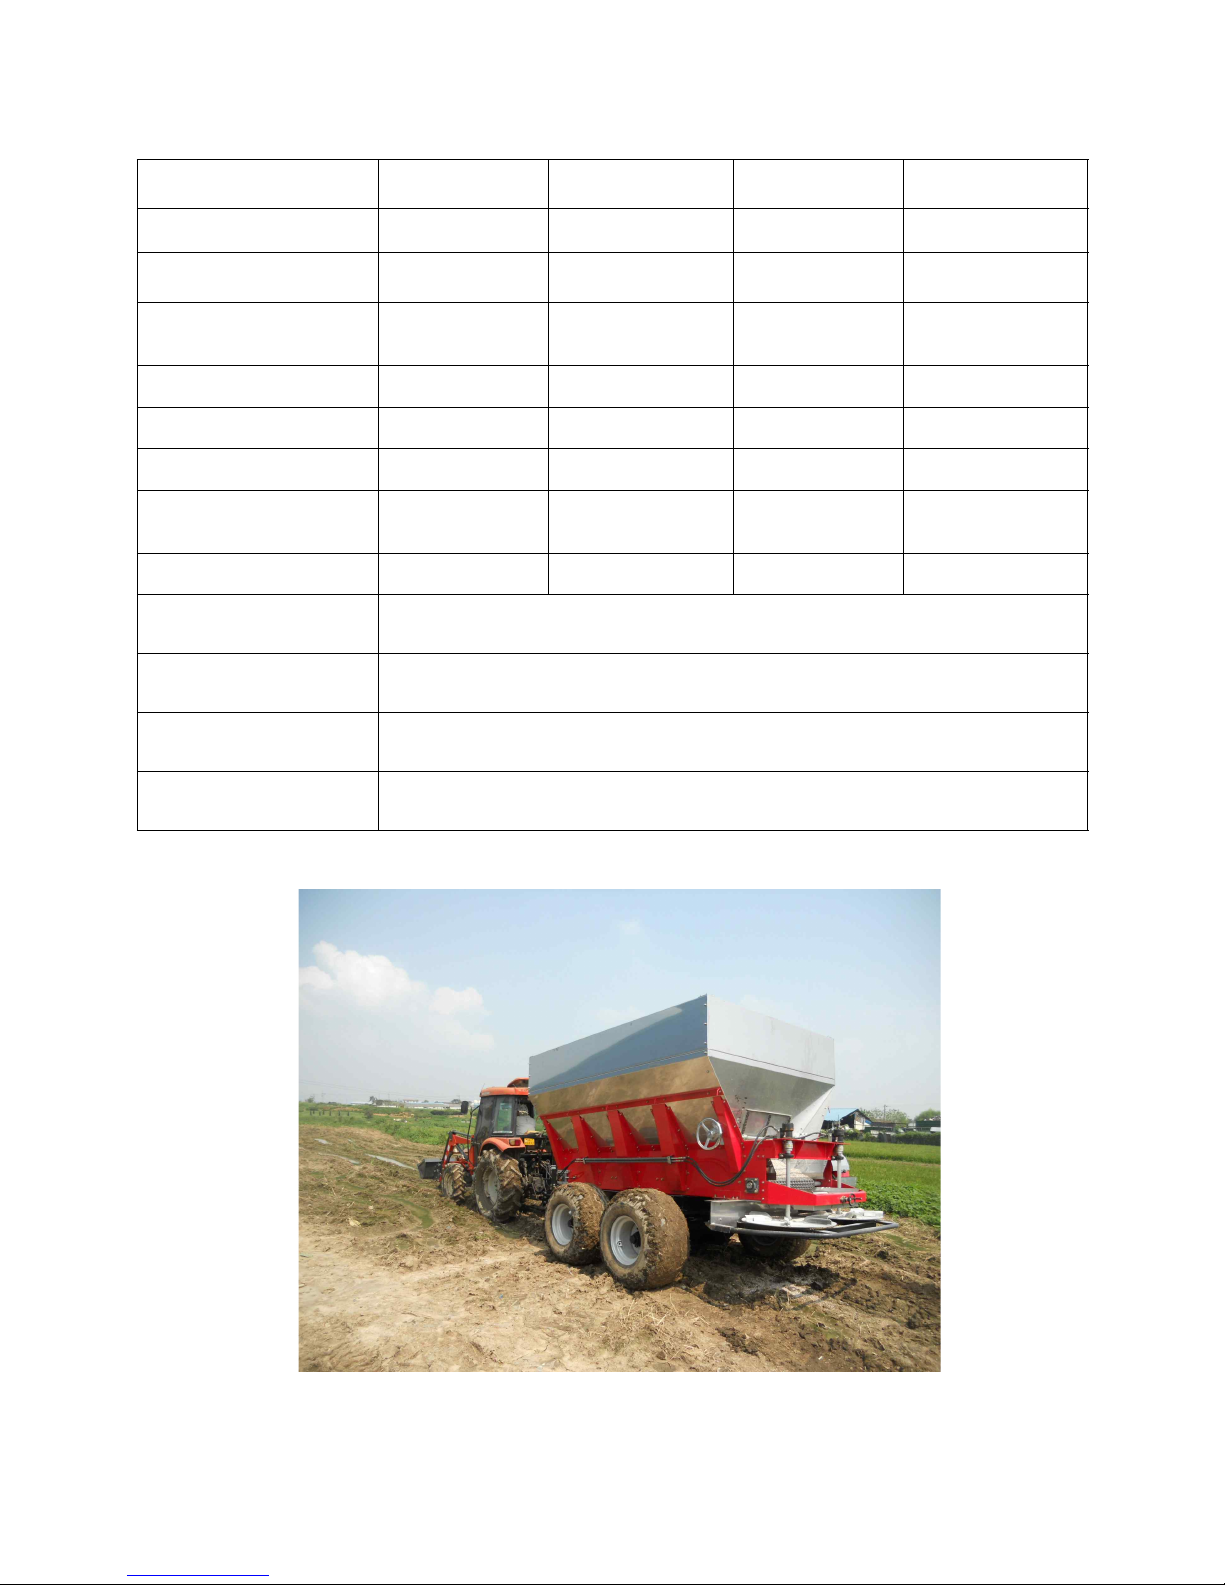
4. Operation
1) Connect and fix the pintle behind the tractor with the pintle.
on the front of the fertilizer distributor with a pin.
2) Connect the pin plug of oil hydraulic motor and pin plug of the steel
mesh wheel driving cylinder to the pin plug socket of the tractor.
3) Check if the shutter is closed and load fertilizer and dry compost, etc.
in the hopper.
4) Put on the fixing stand and move it safely to the place you want to
spread.
5) Open and close the shutter according to the desired amount.
Handle Type Hydraulic Type
- Handle type: open and close the shutter by rotating the handle.
- Hydraulic type: rotate two handles and set it to the desired level; and
open and close the shutter in the tractor
(The shutter opens until the point marked on the gauge)
- 6 -

6) Operate the operation lever of steel mesh wheel driving cylinder on the
desired place, to contact the steel mesh wheel and the tire.
7) Operate the hydraulic motor lever and rotate the driving plate.
8) Run the tractor to spread fertilizer and dry compost, etc.
- 7 -

5. Important safety information
① Before Operation
1) Read the manual and instruction on the machine carefully and learn
how to use it properly
2) Wear simple clothes and safety device during operation.
3) When two or more people are working together, watch and check each
other during operation.
4) Make sure there is nobody and no obstacle within the working space of
the fertilizer distributor.
5) Avoid extreme operation and shock.
6) Do not remove the safety cover on the back of the gear chain.
7) If there is an error during operation, turn off the tractor engine,
stop the parking brake, and refer to the error and response.
(See 8. Trouble shooting Tips)
8) Do not remove the safety cover on the power transmission mesh wheel.
9) Inspect the machine before use. (Especially, the looseness of the bolt
and nut, joint pin, grease oil, etc.)
10) Comply with the traffic laws while driving.
11) Before starting to control each part, stop the tractor engine first.
12) Make sure there is nobody and no obstacle within the working
perimeter.
13) Check the machine’s operation by warm-up driving.
14) Excessive operation and shock can shorten the life of the machine.
15) Do not sit anywhere else than the driver’s seat.
16) Install and remove the oil hydraulic coupler after stopping the engine.
17) If an abnormal behavior of the machine is noticed, stop the engine
first before checking.
- 8 -

② During Operation
1) Drive at a safe speed on a slope or unsafe road.
2) Make sure to put on the luminous sign during the night driving.
3) Turn off the hydraulic unit lever when driving on the road.
4) When the equipment malfunctions, turn off the engine first and check.
5) If you have to leave the tractor during operation, make sure to stop
the engine and put on the parking brake. If there is no parking brake,
use the propping device on the front and back of the wheels.
6) Attaching or detaching of hydraulic unit’s coupler should be performed
after turn off the engine.
7) Do not sit anywhere on the tractor except driver’s seat.
③ After Operating
1) After operation is finished, wash with water and let it dry.
Inspect thoroughly and apply oil on the parts with risk of corrosion to
prevent problem for future operation.
2) Prop the main body and other parts so that they do not fall.
(Pay attention to the safety of children)
3) For long-term storage, put on the protection cover and store in
a storehouse away from rain and snow.
- 9 -

6. Checkup
1) Make sure to apply oil before operation and check the looseness
of bolt and nut, etc.
2) Place the spreader on the flat surface and check if it balances (left and
right) with the tractor.
3) Test-drive before operation to check if there is any error.
4) Check the air pressure of tires.
5) Before operation, check if the power transmission device (hydraulic-
device, chain, etc.) is properly installed.
6) After operation, wash the fertilizer distributor and dry. Apply rust
preventive oil to the parts with risk of corrosion and store in a
safe place
7. Storage
1) For long-term storage, apply rust preventive oil to the parts with risk
of corrosion.
2) When storing the fertilizer distributor and tractor separately, fix the
distributor prop.
3) Prop the fertilizer distributor properly on an even floor so that it does
not fall. Especially, make sure to prevent safety-related accident caused
by children.
4) For long-term storage, store in a storehouse and, when storing
outdoors, put it on an even floor and cover it to protect it from rain
and snow.
5) After use, clean thoroughly to prevent damage caused by animals.
6) Store in a way to prevent foreign substances from entering the power
transmission device.
- 10 -

Symptom
Inspection
Response
hydraulic motor is not
working well
Check if the valve of
the oil pipe is closed
If the oil supply line has
no problem, check if the
shaft is intact and
replace it
Oil is leaking from the
hydraulic coupler
Check if the coupler joint
is loosened
If loosened, fasten the
joint. If it is excessively
worn, replace the part
Chain makes noise when
rotating, and the chain
sprocket slips
Check if it is touched,
the wear of the chain,
adjustment of tension
- Remove the touched
part,
- Maintain the chain
tension
- If excessively worn,
replace the part or
raise the tension
Chain sprocket does not
rotate
Check the damage of the
axle joint, chain’s power
transmission part
Fix the key if it is
displaced
If the axle is damaged,
replace and fix it firmly
The spreading discs
direction is reverse
Check the damage of the
hydraulic check valve
Replace if it the check
valve is damaged
The driving plate
shakes too much
Check if it is touched or
shocked during operation
Replace if it is excessive
Oil is leaking from the
hydraulic motor
Check damage or wear
of the retainer
Replace if worn
excessively
The hydraulic motor
stops after rotating
Check the amount of
hydraulic pressure
Supply hydraulic oil
The distribution is not
even
- Replace the chain if it
is too old
- Check the wear of
chain sprocket and
replace if worn
excessively
The chain makes noise
Check if there is foreign
substance, wood chip, or
gravel stuck while
transportin the fertilizer,
and remove them
8. Trouble shooting
- 11 -

Model
Number
Description
Quantity
VIKING-4000
Vane
1
9. Parts sales & After service
Parts sales
1) The parts list provided is in compliance with VIKING MODEL
standards. Refer to this list when order any parts.
2) Follow next steps as below when order parts:
ex) We would like to order 1 unit of Vane
3) To purchase the parts, contact the dealer where you purchased the
equipment or our main office.
After service
1) If any malfunction occurs, please refer to “Trouble Shooting” section
first.
2) If “Trouble Shooting”does not solve the issue, contact authorized dealer
or manufacturer’s After Service Department.
10. Complimentary check up & Repair
1) The limited warranty is good for one year from the date the equipment
was delivered to the consumer.
2) Even after one-year warranty period, we would gladly check up and
repair the equipment at a reasonable price.
3) With a faith that any one-time customer is a customer for forever, we
would continue to take care of our company’s products for you until
they last.
- 12 -

CERTIFICATE OF QUALITY ASSURANCE
All products manufactured and sold by IRIS SPREADERS,
Co. are designed and assembled in accordance with
regulations on farm machinery under very strict quality
management. If the product is managed and used in
accordance with instructions on regular check-ups and
maintenance schedule provided in the owner’s operation
manual then we assure you that the product always will
be at its best condition and outstanding performance, and
safely maintained. Thus, we are pleased to offer you the
assurance terms as below.
1. SCOPE OF WARRANTY
If the product you purchased was managed and used in
accordance with instructions on regular check-ups and
maintenance schedule provided in the owner’s operation
manual AND the product is still within warranty period and
used less than allowed usage time for warranty AND
technical analysis reveals that the malfunction was caused
by quality of the parts or manufacturing defects, we will
repair it or exchange with our qualified replacement parts.

▶ On delivery the customer should check the censure that the
machine has not been damaged in transit, and that it
complies with that ordered as that it is complete with all the
accessories as specified in the purchase contract. If it is
found defective, a written complaint should be sent within
8 days of receipt of the same.
2. WARRANTY PERIOD: 1 FULL YEAR
When the product requires complementary repairs or
maintenance, simply Present “Certificate of Warranty” to
an authorized dealer or our main office for inspections
and repairs.
3. RESPONSIBILITIES OF THE OWNER
Since any unauthorized inspections or use of non-genuine
parts that are not prescribed in Owner’s Operation Manual may
decrease the performance of the parts or cause fatal damages
to the product, it is very critical to follow all the instructions
prescribed in the Owner’s Operation Manual and Certificate of
Quality Assurance.
4. EXCLUSIONS (Even within Warranty Period)
1) Items to be checked frequently for management :
cleaning fuel-related parts,
Items to be checked on regular basis :
inspection of breaks and adjustment
2) Wear and Tear parts
(except manufacturer’s defect):
filters, elements, rubber parts, vinyl parts, fuse, and wires.

3) Any malfunction or defect caused by using unspecified fuel
(low quality fuel or contaminated fuel)
4) Any malfunction caused by not complying with instructions
prescribed in Owner’s Operation Manual or Warning Signs
5) Any defect caused by unauthorized modification of the
product or use of non-genuine parts.
6) Any defect caused by negligence in storing and managing
such as damages due to extreme weather conditions.
7) Minor issues not related with the function (smell, vibrations,
shape, sensitivity)
8) Major discrepancies between the parts and its serial
numbers recorded in our data base.
9) Malfunction caused by natural calamities.
5. PROCEDURE FOR WARRANTY REPAIR

6. In case we upgrade the specifications of certain model, we do
not have any responsibility to upgrade
the already-sold-equipments.
7. TRANSFER OF WARRANTY
Since we honor the remaining warranty time even after the
transfer of ownership through sale or donation, it is very
important to acquire the Certificate of warranty when transfer of
the product takes place.
※ We will honor all the terms prescribed above. However if you
are not satisfied with the service provided to you, you may
contact our customer service center directly and we will do our
best to support you.

Name
Address
Model Name
Model #
Serial #
Date of
Purchase
Date of Service
Used
Time
Name
Address
Model Name
Model #
Serial #
Date of
Purchase
Date of Service
Used
Time
WARRANTY INFORMATION
○ In order for us to guarantee our highest quality on our products, we
offer complimentary inspections in designated agencies. If any
malfunction occurs caused by manufacturing defect during warranty
period, we will repair or replace the parts at free of charge.
○ WARRANTY EXCLUSIONS:
1. Modified products
2. Missed or skipped check-ups and measures
3. Damages or malfunction caused by negligence
Certificate of After Service ( 1 )
Please bring this certificate within 1 year from the date of purchase to
have routine inspection.
This certificate should be submitted when you request an inspection.
Certificate of After Service ( 2 )
Please bring this certificate within 1 year from the date of purchase to
have routine inspection.
This certificate should be submitted when you request an inspection.

DATE
PERFORMED
TECHNICIAN
CONFIRMED
After Service Execution Report
 Loading...