


S
t
a
t
S
p
i
n
M
P
M
u
l
t
i
p
u
r
p
o
s
e
C
e
n
t
r
i
f
u
g
S
t
a
t
S
p
i
n
M
P
M
u
l
t
i
p
u
r
p
o
s
e
C
e
n
t
r
i
S
t
a
t
S
p
i
n
M
P
M
u
l
t
i
p
u
r
p
o
s
e
C
e
n
Operator’s Manual
t
r
f
i
f
u
u
g
g
e
e
e

Operator’s Manual
StatSpin MP Multipurpose Centrifuge
Model Number M901
FOR IN VITRO DIAGNOSTIC USE
Product Number
SSMP StatSpin MP for 100-240 VAC, 50/60 Hz
(with 2 rotors, RT12 and RH12)
SSMP-1 StatSpin MP for 100-240 VAC, 50/60 Hz
(with 1 rotor, RT12)
SSMP-2 StatSpin MP for 100-240 VAC, 50/60 Hz
(with sample pack of PlasmaRotors)
StatSpin is a registered trademark of StatSpin Inc., a Subsidiary of IRIS International, Inc.
Copyright 2004
Printed in U.S.A.

i
Table of Contents
How to use this manual.................................................................................................................. i
Section 1 ............................................................................................................................................ 1
Unpacking and Installation ........................................................................................................... 1
Inspect Packaging.................................................................................................................. 1
Verify Contents........................................................................................................................ 1
Install System........................................................................................................................... 1
Connect Power ........................................................................................................................ 1
Section 2 ............................................................................................................................................ 2
System Overview............................................................................................................................. 2
Principle and Intended Use................................................................................................. 2
Symbols and Definitions....................................................................................................... 2
Error Indicators........................................................................................................................ 3
Accessories............................................................................................................................... 4
Section 3 ............................................................................................................................................ 5
Operating Instructions.................................................................................................................... 5
Opening and Closing the Cover........................................................................................ 5
Installing the Rotor ................................................................................................................. 5
Description of Rotors............................................................................................................. 6
Cycle Selection........................................................................................................................ 7
Instructions for Use ................................................................................................................ 7
Section 4 ............................................................................................................................................ 8
Maintenance ...................................................................................................................................... 8
Overview .................................................................................................................................... 8
Cleaning ..................................................................................................................................... 8
Checking the Rotor Speed.................................................................................................. 8
Replacing the O-Ring............................................................................................................ 8
Service ........................................................................................................................................ 9
Troubleshooting....................................................................................................................... 9
Section 5 .......................................................................................................................................... 10
Specimen Processing................................................................................................................... 10
Venous Blood for Coagulation and Chemistry .......................................................... 10
Preparation of Urine Sediment for Microscopic Examination .............................. 10
Lipemia Clearing with LipoClear
®
................................................................................... 10
Determination of Packed Red Cell Volume or Microhematocrit......................... 10
Appendix.......................................................................................................................................... 13
Appendix A - Specifications.............................................................................................. 13
References.............................................................................................................................. 14
StatSpin Warranty ................................................................................................................ 15
Limitation of Liability ............................................................................................................ 15
i
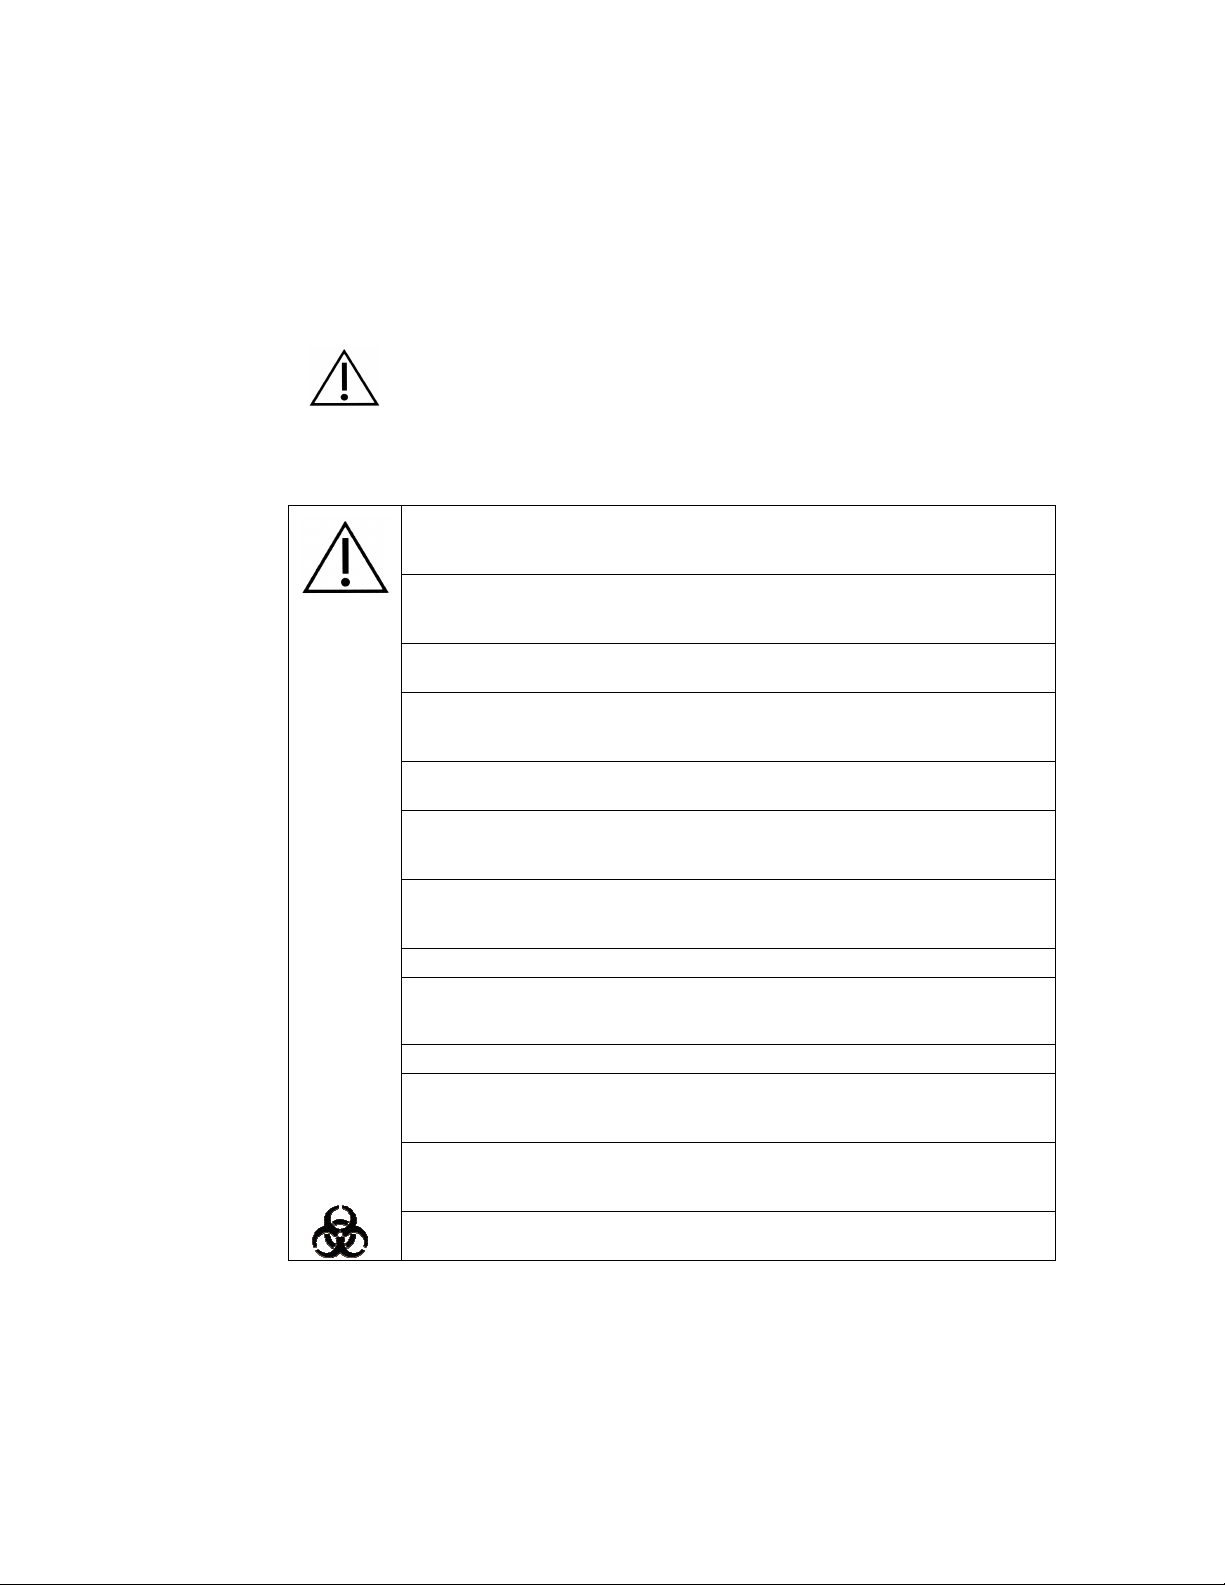
This manual along with inf ormation contained on product labels and in package inserts should
provide you with all the inf ormation you need t o operate and maintain the StatSpin MP.
Notes appear in italics to highlight inf ormation. W hen the information requires special attent ion, a
caution symbol appears next to the italicized text.
Please pay close attention to the instructions that accompany the notes and symbols as well as the
standard laboratory practices outlined by your facility and loc al regulatory agencies. The table bel ow
lists all the CAUTIONS/WARNINGS for the StatSpin MP.
WARNING - North American Installation: Only us e the power supply inc luded with the
unit. Use of other power supplies or transformers will damage the StatSpin MP
electronics and v oid the warranty.
WARNING - Outside of North America: Do Not Use the Line Cord Supplied. Use power
Please use the system as int ended. Improper us e of the StatSpin MP Multipurpos e Centrifuge
and/or its acc essories may cause damage to the syst em, inaccur ate results, or pot entially nullify
warranties.
cord for at least 1.0 Amp or more with an IEC320/CEE 22 female connector and male
connector suitable for the power outlet to be used.
CAUTION - The cover int erlock bypass is designed for emergency use only. If the
equipment is not used properly, safety may be impaired.
CAUTION-. Do not leave any rotor on the rotor-holder when the StatSpin is not in use for
an extended period of time. Doing so may compress the O-Ring and decrease its ability
to hold rotors.
CAUTION – Failure to properly install the rotor may result in damage to the centrifuge
and will v oid the warranty.
CAUTION – If rotor is left in place between runs, be certain to “bottom” the rotor on the
rotor-holder before spinning another sample. Failure to properly “seat” the rotor each
time may result in the rotor becoming loose dur ing centrifugation.
CAUTION - The RT12 and RM02 tube rotors must be balanced before operation. If only
one sample is being processed, a second sample can serve as the balance tube or use a
similar tube filled with water as a balance.
CAUTION – DO NOT use glass tubes of any kind in the RT12 rotor.
IMPORTANT: All StatSpin rotors have a finite lifespan that is dependant on usage.
Rotors should be inspected for cracks and should be replaced immediately when any
crack or visible wear occurs.
CAUTION – Unplug the StatSpin MP from the wall outlet before performing maintenance.
WARNING: Do not ex pose the StatSpin MP and its rotor to strong or concentrated acids,
bases, esters, aromatic or halogenated hydrocarbons, ketones or strong ox idizing
agents.
CAUTION: DO NOT spray the bow l or outer surfaces with detergent or bleach. Excess
liquid will harm the electronics and subsequent problems may not be covered under
warranty.
CAUTION - Universal Prec autions should be followed on all specimens, regardless of
whether a specimen is known to contain an infectious agent. (See references)
How to use this manual
The StatSpin MP Multipurpose Centrifuge and its associated components are covered under US
patent nos. 4,846,974 & 4,981, 585 & 5,257,984 &4, 884,827.
ii

Inspect Packaging
The StatSpin MP and its accessories are delivered in one carton. If the centrifuge or access ories
have suffered any damage in transport, pleas e inform your carrier immediately.
Section 1
Unpacking and Installation
NOTE: Save shipping carton and components to simplify return should service be required.
Verify Contents
Product No.: SSMP (supplied wit h 2 rotors, RT12 and RH12)
SSMP-1 (supplied with 1 rotor, RT12)
SSMP-2 (supplied with sample of PlasmaRotors)
Each of the above packages contains:
One Universal Switching Power Supply
(StatSpin Product No. 01-3553-001, APS Product No. AD-740U-1240)
One grounded line cord (for North American use only)
One Operator’s Manual
One Sample Pack-Varies depending on the package purchased
Install System
1. Place the StatSpin MP on a level surface suitable for laboratory instrumentation.
2. Maintain a 300mm clearance boundary around the centrifuge for ventilation and safety.
3. Position the StatSpin MP away from dir ect sunlight and sources of heat or cold.
(See Appendix A for specifications.).
Connect Power
Plug the power supply into a grounded outlet supplying the voltage and frequency indicated on the
power supply. When power is connected, the Power On LED will illuminate and the cover lock will
release.
WARNING - North American Installation: Only use t he power supply included with the unit. Use
of other power supplies or transformers will damage the StatSpin MP electronics and void the
warranty.
WARNING - Outside of North Amer ica: Do Not Us e the Li ne Cord Supplied. Use power cord
for at least 1.0 Amp or more with an IEC320/CEE22 female connector and male connector
suitable for the power outlet to be used.
1
Principle and Intended Use
IVD
For in vitro diagnost ic use for rapid separation of whole blood, pr eparing urine sediment f or
microscopic analys is and centrifuging microhematocrit tubes for packed c ell volume
determination.
The StatSpin MP is a small, quiet high speed centrifuge. It employs a unique, propriet ary drive and
suspension system which results in nearly vibration free operation. Light-weight, low mass r otors
achieve both top speed and full br aking in a few seconds. This St atSpin instrument is designed to
meet int ernational safety standards.
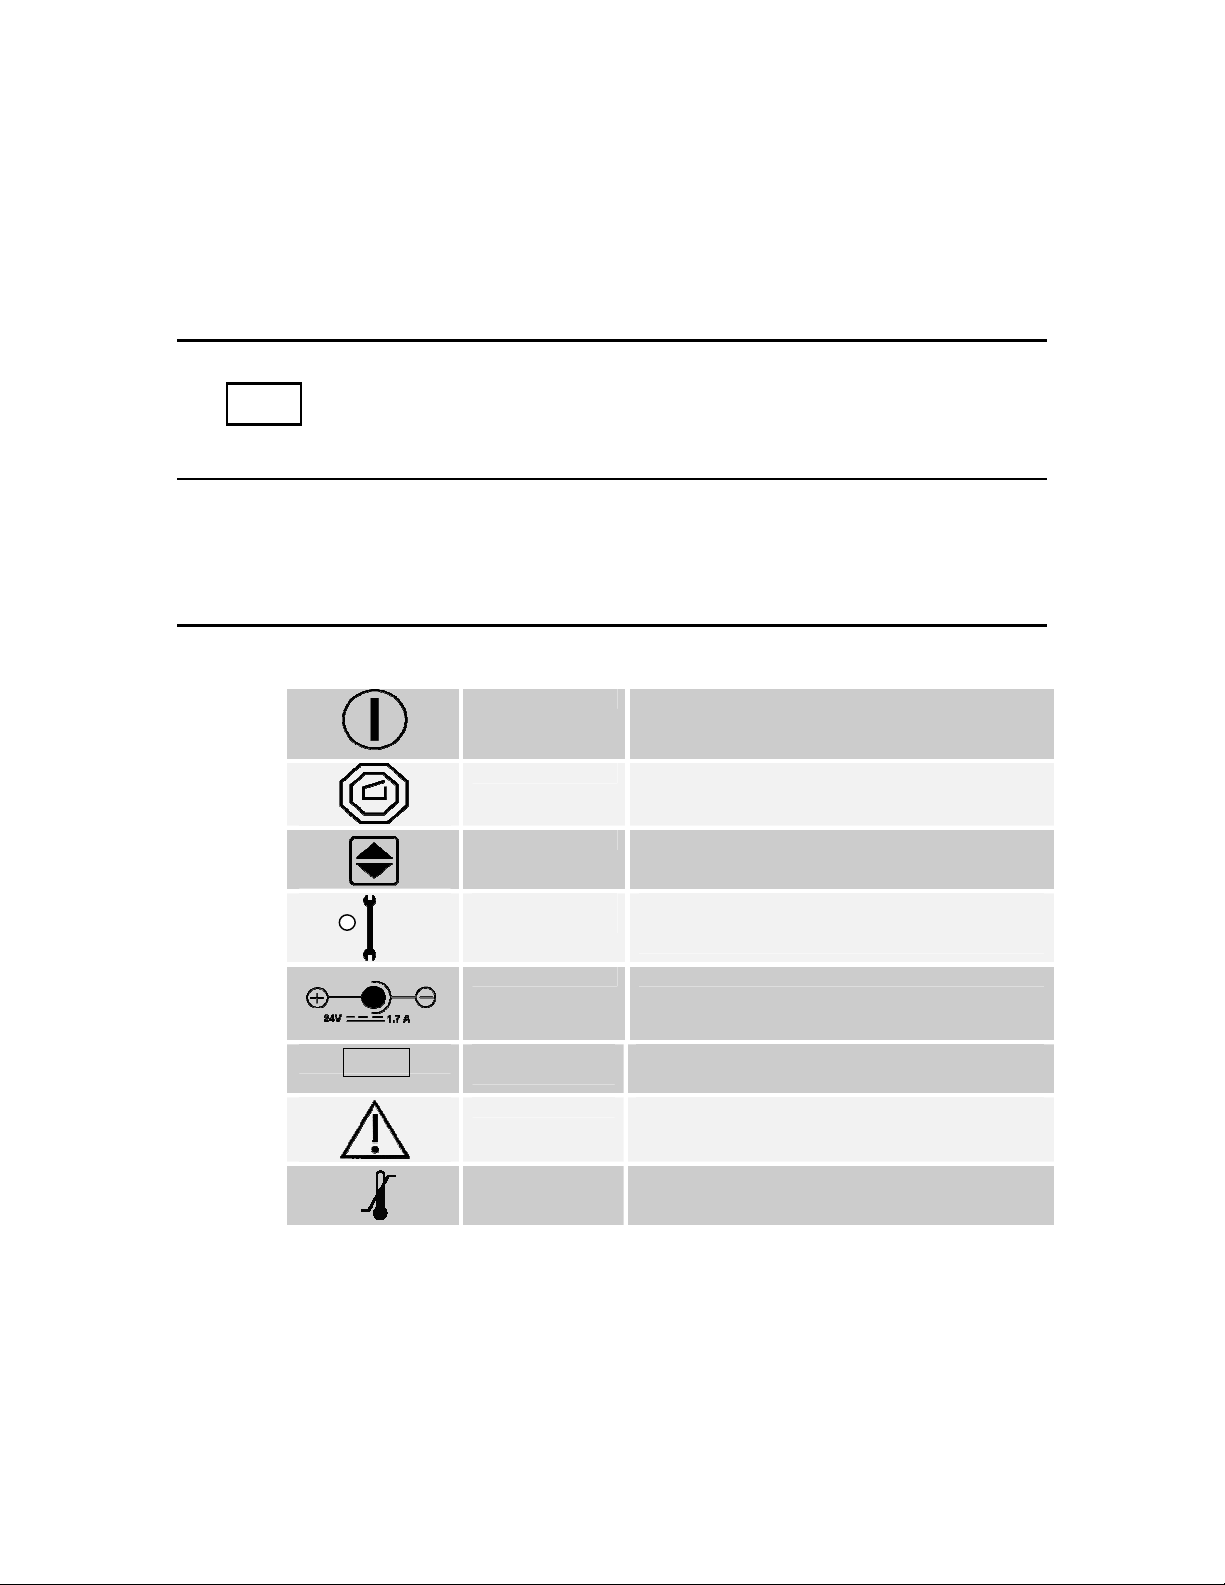
Symbols and Definitions
Section 2
System Overview
Start button The start button in it iates a pre-timed cyc le at a fixed
speed. NOTE: The Stat Spin MP does not have an
on/off switch and is normally left plugged in and “on”.
Stop/open button The stop/open button interrupts the cycle and stops
the centr ifugation. This button may also be used to
release the c ov er.
Cycle selector This button allows for selection of the appropriate
cycle.
Error/Service
indicator
Power input DC Power Input: 24V DC Plug-in
The red LED identified, as error/service is illuminated
continuously or flashing when service is required.
REF
Product/Reference
Number
Caution Statement of caution/warning, read instruction
Temperature
limitation
Indicates the StatSpin product/catalog number
carefully
Indicates st orage requirements range
2
Symbols and Definitions (cont.)
IVD
S N
For in vitro
diagnostic use
Non sterile Indicates non-sterile product
Serial Number Indicates instrument serial number code
Clarifies for use as in vitro diagnostic only
Consult
Instructions
Consult instruction manual or insert sheet for further
explanation
Biological Risk Universal precautions should be followed on all
specimens
Error Indicators
Error c odes for the StatSpin MP are specified by a combination of the Error/Service LED flashing or
continuous and any c ombination of the cycle LEDs on the front panel.
Error/Service =
Error/Service
light flashing
or continuous
Error/Servic e light will continuously illuminate when the centrifuge has achieved a total cycle count of 18,000, which
is the us eful life of the drive system. Drive mechanism needs replacing. Contact an aut horized service center.
Rotor failed
to reach rpm
within 30 s
Insufficient
power to
maintain
rpm
Cover opened
or cycle
changed during
operation
Rotor spun
backward
direction during
reverse braking
3

Accessories
Product No. Description Cycle
Required
RT12 2 x 1.5 ml Fixed Angle Rotor Urine, Tube, LipoClear
TU15-10 1.5 ml Pre-calibrated Urine Tube (10 bags of 50) Urine
TP1H 1.3 Lithium Heparin micro centrifuge tube (Bag of 100) Tube Rotor
TP1U 1.3 Untreated micro centrifuge tube (Bag of 100) Tube Rotor
SS1E StatSampler® (100 ul, EDTA) Hematology fingerstick collection system Tube Rotor
SS2E StatSampler
SS2H StatSampler® (200 ul, Li Heparin) Chemistry fingerstick collection system Tube Rotor
SS2U StatSampler
®
(200 ul, EDTA) Hematology fingerstick collection system Tube Rotor
®
(200 ul, Untreated) Chemistry fingerstick collection syst em Tube Rotor
SS2X StatSampler® (200 ul, EDTA) Hematology fingerstick collection syst em with
gel
LC10 LipoClear: 0.5 ml Prefilled reagent tubes for clearing lipemic serum or plasma
(Bag of 10)
LC40 LipoClear: 0.5 ml Prefilled reagent tubes for clearing lipemic serum or plasma
(Bag of 40)
LC15 LipoClear: 1.5 ml Prefilled reagent tubes for clearing lipemic serum or plasma
(Bag of 40)
RM02 2 x 0.8 ml Fixed Angle Rotor for BD Microtainers™ and 0.5 ml micro
centrifuge tubes
RD01-10 Dispos ab le Plasm aR ot or® used for separating up to 3 ml of whole blood. (10
Bags of 50)
RD01-10S Dis posabl e P las maRotor® used for separating up to 3 ml of whole blood,
includes push on st opper. (10 Bags of 50)
RH12 12 Position microhematocrit rotor with circular reader (HR4C) Hematocrit
HP8H-10 SafeCrit Capillary Tube (40 mm, Sodium Heparin), 100% plastic
microhematocrit tubes for the RH12 rotor. (10 vials of 100)
HP8U-10 SafeCrit Capillary Tube (40 mm, Untreated), 100% plastic microhematocrit
tubes f or the RH12 rotor. (10 vials of 100)
HT9H-10 Glass Capillary tube (40 mm Sodium Heparin), Glass microhematocrit tubes
for RH12 rotor. (10 vials of 100)
HT9U-10 Glass Capillary tube (40 mm Untreated), Glass microhematocrit tubes for
RH12 rotor. (10 vials of 100)
Tube Rotor
LipoClear
LipoClear
LipoClear
Tube
PlasmaRotor
Coag Plasma
PlasmaRotor
Coag Plasma
Hematocrit
Hematocrit
Hematocrit
Hematocrit
HS24-10 Sealant Pad for Capillary tubes (10 pads) NA
HR05 Hematocrit Reader, Card style for 40 mm hematocrit tubes NA
HR4C Hematocrit Reader, Circular designed to be used in c onjunction with the
RH12 rotor
00-Ring Replacement O-Rings for rotor holder ( 5 bags of 3) NA
NA
4
Opening and Closing the Cover
The centrifuge’s electrically operated cover interlock mechanism prevents operation until the cover is
completely closed and latched, and prevents the cover from being opened while the rotor is turning.
When the cover is completely closed and locked an operating cycle can be initiated.
The centrifuge is also equipped with a manually operated latch that holds the cover down after
spinning is complete. The interlock is automatically released at the end of the operating cycle or by
pushing the stop/open button. Squeeze the black latch pieces together to open cover.
Cover Interlock By-pass
The electronically operated cover interlock mechanism c an be releas ed manually by ins erting the
straightened end of a large paper clip or similar obj ect int o the small hol e in the center of the front
membrane panel. Manually push the lock lever inward about one inch (25mm) t o releas e the
interlock mechanism if the stop/open button does not release the cover.
CAUTION - The cover interlock bypass is designed for emergency use only. If the
equipment is not used properly, safety may be c ompromised.
Section 3
Operating Instructions
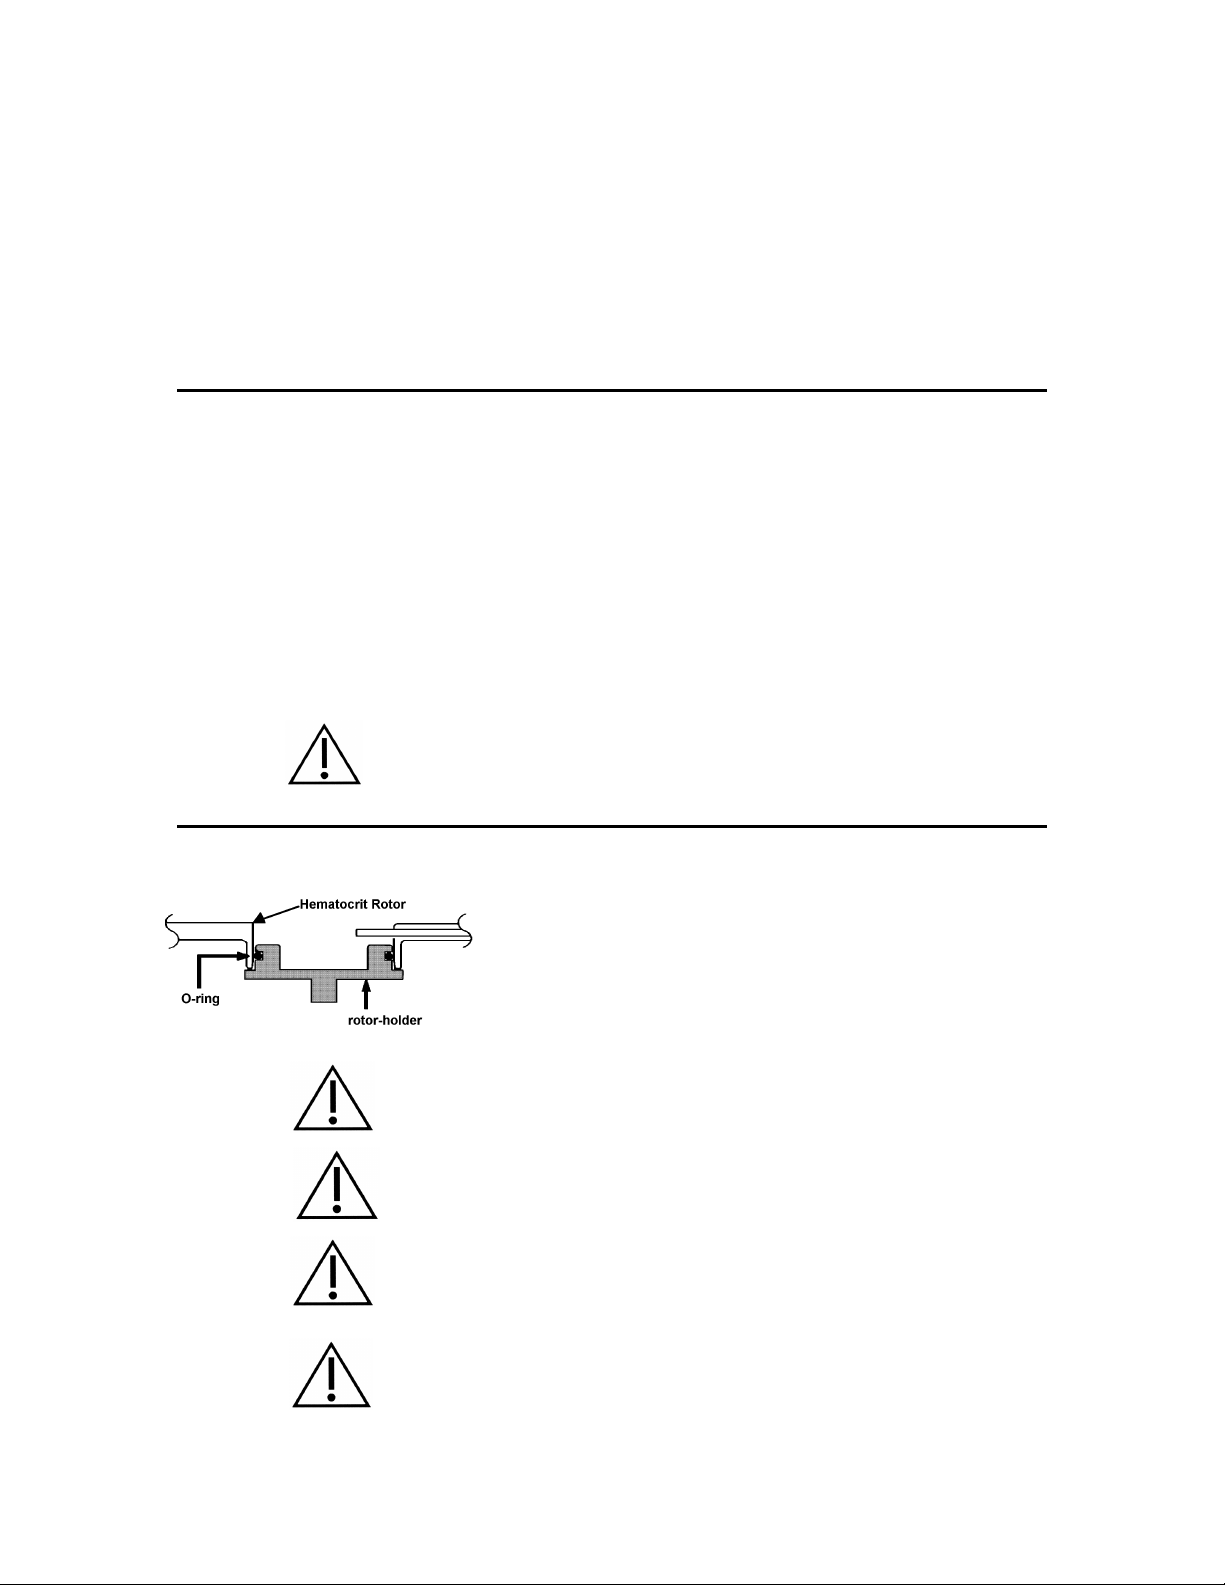
Installing the Rotor
All rotor bottoms fit over a rubber O-Ring on the rotor-holder. The
figure on the left shows a rotor, cross section, in plac e on the rotor
holder. As the rotor turns, the O-Ring is moved outward by
centrifugal force enhancing the frictional coupling between the
rotor-holder and the rotor.
CAUTION- Failure to properly install the rotor may result in damage to the centrifuge
and will void the warranty.
CAUTION- Do not leave any rotor on the rotor-holder when the StatSpin is not in use
for an extended period of time. Doing so may compress the O- Ring and decrease it’s
ability to hold rotors.
CAUTION- If rotor is left in place between runs, be certain to “bottom” the rotor on the
rotor-holder befor e spinning another sample. Failure to properly “seat” the rotor each
time may result in the rotor becoming loose during centrifugation.
CAUTION- The RT12 and RM02 tube rotors must be balanced before operation. If
only one sample is being processed, a second sample can serve as the balance tube
or use a similar tube filled with water as a balance.
5

Description of Rotors
RT12 Tube Rotor
A 2-place rotor designed to accommodate a variety of StatSpin tubes for blood and urine separat ion, in addition to
a variety of st andard 1.5 mL and 2.0 mL centrifuge tubes with a maximum diamet er of 10.9 mm. These tubes
should be supported by the collar of the r otor.
CAUTION – DO NOT use glass tubes of any kind in the RT12 rotor.
The following tubes are approved f or use with the RT12 rotor:
Prepared Microtubes: StatSpin TP1H, TP1U, TP5G and CH03
® :
StatSamplers
Precalibrated Urine Tube: StatSpin TU15-10
LipoClear Reagent Tubes: StatSpin LC10, LC40 and LC15.
Standard 1.5 – 2.0 mL microcentrifuge tube (e.g. Eppendorf
RMO2 Tube Rotor
Designed specifically for B-D Microtainer® brand tubes, this 2-place rotor also accepts standard 0.5 mL
microcentrifuge tubes. Maximum tube diameter is 8.3 mm. The following tubes are approved for us e in this rotor:
B-D Microtainer
StatSpin SS2H, SS2E, SS2U, SS2X, SS1E
®
)
®
- all styles except those with Microguard closure
0.5 mL micro centrifuge tubes (7.5 mm O.D. x 35 mm L)
RH12 Microhematocrit Rotor
A 12-place covered rotor used to c entrifuge StatSpin capillary tubes for microhematocrit testing. Maximum tube
size is 1.7 mm O.D. x 42 mm L. It is recommended that rubber cushions provided with the rotor be replac ed twice
a year or whenever a tube breaks in the rotor. Order StatSpin 01-2002-04 for a replacement set of twelve
cushions. The following tubes ar e approved f or use in the rotor:
StatSpin glass capillary tubes: HT9H; HT9U
®
StatSpin SafeCrit
plastic capillary tubes: HP8H, HP8U
RD01 Plasma Rotors
Used to process larger amounts (generally 2-3 mL) of blood for chemistry or coagulation testing. Consult the insert
sheet pr ovided with these rotors for instructions on their use. StatSpin plasma rotors are s elf balancing.
IMPORTANT: All StatSpin rotors have a finite lifespan that is dependant on usage. Rotors should be inspect ed
for cracks and should be replaced immediately when any crack or visible wear occurs.
To purchase additional rotors not supplied with your StatSpin centrifuge, contact your local distributor
and increase the versatility of your centrifuge.
6

Cycle Selection
Table 1: StatSpin MP Cycle Settings. The operator should experiment with different settings to achieve optimum
performance for specific applications. The following are general guidelines:
Setting RPM/RCF Time Rotor
Urine 9,800/3,900 45 seconds RT12
Hematocrit 16,000/ 13,700 120 s econds RH12
Tube Rotor 15, 800/12,000 30 seconds RT12/RM02
PlasmaRotor® 20,000/ 11,200 30 seconds RD01
LipoClear® 15, 800/12,000 95 seconds RT12
Coag Plasma 20,000/ 11,200 120 s econds RD01
Instructions for Use
1. Lift cover and install rotor.
2. Close and latch cover.
3. Choose desired cycle by depressing the “SET” button until the appropr iate LED is illuminated.
4. Press start button.
5. Upon c ompletion of the cycle, the rotor decelerat es to a c omplete stop in 10 s econds and the latc h
interlock automatically unlocks.
6. Squeeze the black latch pieces together to open cover.
7

Overview
StatSpin recommends that instrument operators perform periodic inspections and preventative
maintenance on all StatSpin instruments. Cont act St atSpin’s customer service department or
distributor if, at any time, the instrument is not functioning properly
Cleaning
The outs ide surfaces and switch overlay panel can be cleaned with a water-dampened cloth and
mild det ergent. The inner surface or bowl, a powder-coated steel surf ace, can be cleaned with a
mild detergent and disinf ected if necessary by wiping with a clot h dampened with 70% alcohol or
10% bleach.
Section 4
Maintenance
.
CAUTION - Unplug the StatSpin MP from the wall outlet before performi ng
maintenance.
WARNING - Do not expose the StatSpin MP and its rotor to strong or concentrated
acids, bases, esters, aromatic or halogenated hydr ocarbons, ketones or strong
oxidizing agents.
CAUTION - DO NOT s pray the bowl or outer surfaces with det ergent or bleach.
Excess liquid will harm the electronics and subsequent problems may not be covered
under warranty.
Checking the Rotor Speed
The rated speeds can be checked with a photoelectric tachometer available fr om many sources. If
the StatSpin MP fails to achieve operating speed (
Customer Service department.
Replacing the O-Ring
The figure on the left illustrates the position of the rubber O-Ring which is attached to
the rotor-holder. Should it ever break a new one can be installed as shown, by
weaving it behind and in front of the 6 pins on the rotor- holder.
The points at which the O-Ring touc hes the rotor are indicated by the letter “A”. Extra
O-Rings have been included.
+5%) contact your distributor or St atSpin
8

Service
Refer all service to qualified service personnel. Ref erenc e the StatSpin Warranty f or further
instruction. Be sur e to complete and return the warr anty c ard as directed.
Decontamination before returning for service
Any instrument or access ory cont aining accumulated blood and/ or other biological or chemical
deposits must be cleaned prior to shipment to the manufacturer/dealer for s ervic e. This
decontamination is required by Federal Law (Title 48 and 49 of the Federal Regulations) and in
accordance with the Environmental Pr otection Agency’s Regulations for Biohazard Waste
Management. StatSpin personnel cannot perform this decontamination.
Troubleshooting
No LED’s (lamps) are on.
↓
Is the power cord completely
plugged into the wall?
↓
YES
↓
Is the wall outlet working pr operly?
↓
Is the barrel connector from the
transformer completely plugged into
the centrifuge?
↓
YES
↓
Contact StatSpin or an Authorized
Repair Facility.
→ NO→
→ NO→
→ NO→
Plug power cord into the wall.
Try another wall out let.
Plug the barrel connector into the centrifuge.
Centrifuge Will Not Spin/Shuts
Off Prematurely
↓
Is the cover complet ely closed and
cannot be opened manually?
↓
YES
↓
Contact StatSpin or an Authorized
Repair Facility.
Centrifuge will not open at end
of cycle
↓
Is the bowl gasket completely
seated and sealing the bowl?
↓
YES
↓
Contact StatSpin or an Authorized
Repair Facility.
→ NO→
→ NO→
Completely close the cover.
Press the bowl gasket all the way down into
the housing slot.
9

Fill to here
Empty to here
Section 5
Specimen Processing
Venous Blood for Coagulation and Chemistry
PlasmaRotor® (RD01) consumable pr ovides a means for the rapid separation of plasma from
anticoagulation whole blood, up to 3 mL. T o prepare plasma for chemistry testing use the
PlasmaRotor cycle and for Coagulation testing using the Coag Plasma cycle.
Preparation of Urine Sediment for Microscopic Examination
The StatSpin MP quickly prepares urine sediment for microscopic examination. This is acc omplished
with the precalibrated urine tubes. (Product Number TU15)
Procedure
1. Add fr esh urine to a Urine tube (Product No. TU15) fill to the top mark (r epresenting 1.5 mL).
2. Cap the tube using t he att ached stopper and centrifuge in the Tube Rotor, RT12.
3. Balance the rotor either with another sample or with a water-filled tube. This balance tube does
not have to be exact.
4. Select the “Urine” setting.
5. When the cycle is c omplete the c over will release. Remove the tube from the r otor and remove
the stopper.
6. Invert the tube to dr ain fluid to the lower mark. (The surface tension will retain 0.1 mL.)
7. Recap the tube and re-suspend the sediment at the bottom of the tube by holding the tube with
the index finger and thumb and “flicking” the tube with the opposite hand.
8. After sediment has been re-suspended, apply one drop to a microscope slide, apply a cover slip
and read following the protocol used in your laboratory.
Lipemia Clearing with LipoClear®
StatSpin MP can be us ed to centrifuge samples treated with LipoClear (LC10, LC40, LC15). LipoClear
is a non-toxic, non-c arcinogenic, lipemic s ample clearing reagent, pre-filled in micr o centr ifuge tubes.
The kit is available for 0.5 mL and 1.5 mL s ample sizes (see table below). After sample is added,
mixed and allowed to stand for 5 minutes, the tubes are spun on the LipoClear cycle in the RT12 Tube
Rotor. See LipoClear Product Ins ert Sheet for details.
Product No. Sample Size Packaged As
LC10 0.5 mL 10 tubes/ pack
LC40 0.5 mL 40 tubes / pack
LC15 1.5 mL 40 tubes / pack
Determination of Packed Red Cell Volume or Microhematocrit
Both glass and plastic micro-c apillary tubes are available. Product Number HT9H(glass) &
For glass tubes only: if the vial of tubes is new, unscr ew the top, remove and discard the foam
HP8H(plastic) have been pretreated with heparin and should be used f or capillary blood. They
should be stored in a cool dry place. Product Number HT9U(glass) & HP8U(plastic) are untreated
and used for venipuncture (antic oagulated) samples.
cushion and reattach the t op. Now a single tube at a time can be shaken from the vial through the
small hole in the center of the cover.
10

Procedure
1a. Capillary ("fingerstick") blood - prepare a skin site and lance. Use heparinized tubes, Product
Number HT9H or HP8H.
1b. Venous blood - take well-mixed antic oagulated blood from a syr inge or a vac uum blood
collection tube. Use untreated tubes, Product Number HT9U or HP8U.
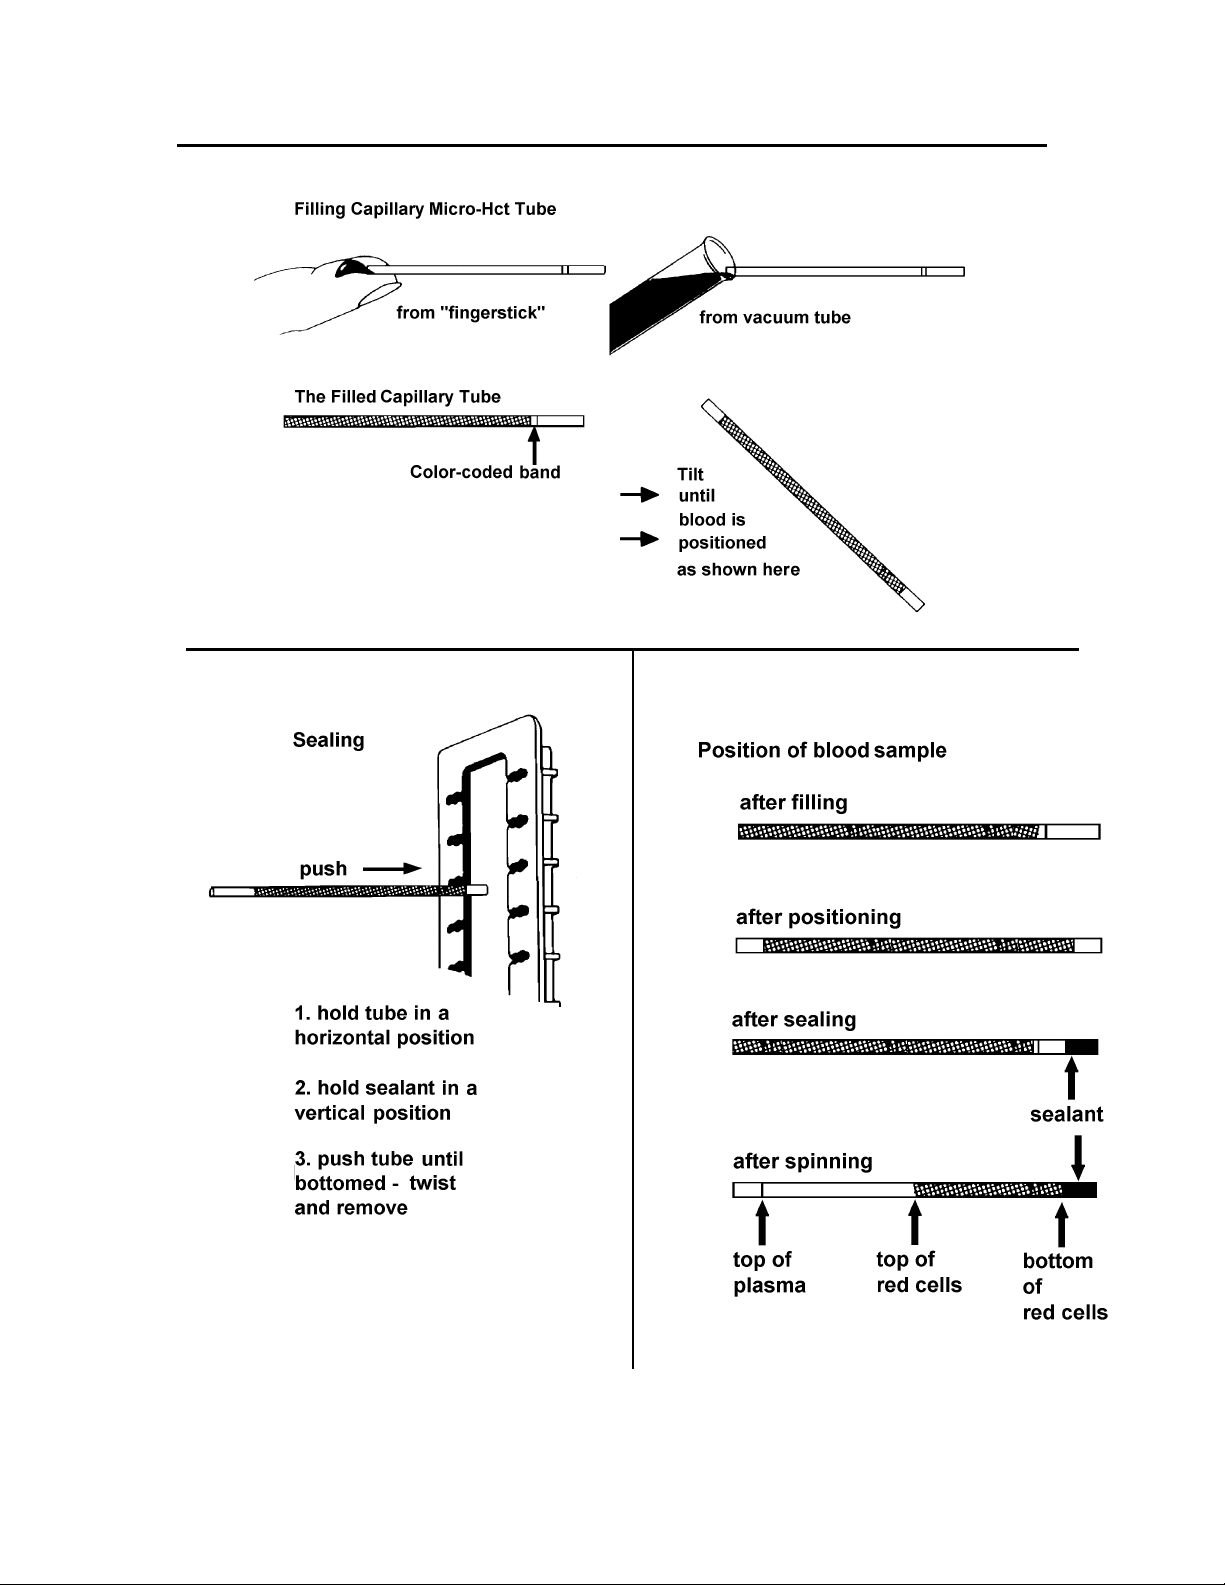
2. Hold the micro-capillary tube by the end with the color-coded band. (See Figures, page 12)
3. Fill to the color-coded band. Remove from sample and tilt the banded end downward until the
blood moves half-way between the band and the end of the tube.
4. Hold the tube in a horizontal position and push the dry (banded) end of the tube fully into the
vertic ally held sealing compound. Twist and remove.
5. Using a labor atory t issue wipe off any blood that is forced from the other end.
6. Put the tube, sealed end towards the outer rim, in any of the twelve positions on the
Hematocrit Rotor, RH12. This rotor need not be balanced. Screw cover in place.
7. Holding the rotor by the black "cover knob", attach the rotor to the rotor-holder.
MPORTANT: Always hold hematocrit rotor by the black knob on the rotor cover, when pressing
I
it firmly in a downward motion onto the rotor-holder and when removing t he rotor from the
centrifuge. Pressing on the outer edges of the Hemat ocrit Rotor, RH12, may result in damage
to the rotor.
8. Centrifuge the Hematocrit Rotor.
9. After the rotor stops, remove the rotor. To read hematocrit, place the rotor into the middle of
the illuminated, digital reader. Follow dir ections printed on the reader.
10. Spun tubes inside the Hematocr it rotor can also be read with the circular read er, HR4C as well
Quality Control
Normal Values
The following tables represent commonly acc epted hematocrit values:
Children
Age %
Birth 44 - 64
14 - 90 days 35 - 49
6 months - 1 year 30 - 40
4 - 10 years 31 - 43
Adults
Gender Mean % Range (2 s.d.)
Males 47 40 - 54
Females 42 37 - 47
Animals
Species %
Canine 37 - 55
Feline 24 - 45
Equine 32 - 52
Bovine 32 - 38
Porc ine 32 – 50
Ovine 24 – 45
as removed from the rotor and read with the card-style reader, HR05.
1. The Quality Control procedures established for your laboratory should be followed.
2. To verify the adequacy of c ell packing, on a daily basis, select one or more tubes,
(preferably with a hematocrit over 50), centrifuge and read. Spin these tubes a second time.
The diff erenc e between the initial reading and the second reading should be 1 percent or
less.
or
11
Illustrations
12

Appendix A - Specifications
Product No. SSMP (supplied with 2 rotors, RT12 and RH12)
SSMP-1 (supplied with 1 rotor, RT12)
SSMP-2 (supplied with sample of PlasmaRot ors)
Model No. M901
Cycles/Speeds
Urine 9,800 (3,900 x g); 45 seconds
Hematocrit 16,000 (13,700 x g); 120 seconds
Tube Rotor 15,800 (12, 000 x g); 30 s econds
PlasmaRotor® 20,000 ( 11,200 x g); 30 seconds
LipoClear® 15,800 ( 12,000 x g); 95 seconds
Coagplasma 20, 000 (11,200 x g); 120 seconds
Acceleration Time Approximately 6 seconds
Deceleration Time Appr oximately 10 seconds
Electrical 24 Volts, DC, 1.7 amp. Includes switching power supply for 100-240
Dimensions Diameter 6.6”/ 16.25 cm
Height 6.3”/13.2 cm
Weight 5.5 lbs/2.5 kg
Environmental Indoor use
Altitude up to 2000m
Temperature 5ºC to 40ºC
Maximum relative humidity 80% for temperatures up to 31ºC decreasing
Main supply voltage fluctuations not to exc eed +/- 10% of the nominal
Transient over-voltages according to installation category II
Pollution degree 2
Appendix
VAC, 50/60 Hz
linearly to 50% relative humidity at 40ºC
voltage
13

References
A Subsidiary of IRIS International Inc
Norwood, MA 02062 USA
Phone: 800-782-8774
or 781-551-0100
Fax: 781-551-0036
www.statspin.com
1. NCCLS. “Protection of Laboratory Workers from Occupationally Acquired Infections;
Approved Guideline-Second Edition.” NCCLS document M29-A2 [ISBN 1-56238-453-8].
NCCLS, 940 West Valley Rd, Suite 1400, Wayne, Pennsylvania 19087-1898 USA, 2001.
2. CDC. Recommendations for prevention of HIV transmission in health care settings.
MMWR (Suppl. No. 2S):2S-18S, 1987.
3. CDC. Updated: US Public Health Service Guidelines for the Management of Occupational
Exposures to HBV, HCV and HIV and Recommendations for Post Exposure Prophylaxis.
Appendix A and B. MMWR 50 (RR-11): 1-42, June 29, 2001.
4. NCCLS. “Procedure for Determining Packed Cell Volume by Microhematocrit Method.
Approved Standard-Third Edition.” NCCLS document H7-A3 [ISBN 1-56238-413-9].
NCCLS, 940 West Valley Rd, Suite 1400, Wayne Pennsylvania 19087-1898 USA, 2000.
5. NCCLS. “Procedures for the Collection of Diagnostic Blood Specimens by Venipuncture;
Approved Standard-Fourth Edition.” NCCLS document H3-A4 [ISBN 1-56238-350-7].
NCCLS, 940 West Valley Rd, Suite 1400, Wayne Pennsylvania 19087-1898 USA, 1998.
6. NCCLS. “Procedures and Devices for the Collection of Diagnostic Blood Specimens by
Skin Puncture; Approved Standard-Fourth Edition” NCCLS document H4-A4 [ISBN 156238-382-5]. NCCLS, 940 West Valley Rd, Suite 1400, Wayne Pennsylvania 190871898, 1999.
7. NCCLS. “Collection, Transport and Processing of Blood Specimens for Coagulation
Testing and General Performance of Coagulation Assays; Approved Guideline – Third
Edition.” NCCLS document H21-A3 [ISBN 1-56238-363-9]. NCCLS, 940 W est Valley Rd,
Suite 1400, Wayne Pennsylvania 19087-1898 USA, 1998.
55-001806-001 Rev. F
14

StatSpin Warranty
StatSpin, Inc., a Subsidiary of IRIS International, Inc. warrants that the instruments shall be free from defects in
material and/or workmanship, under normal use and service, for the period expiring twelve (12) months from the
date of installation, provided the purchas er has completed and forwarded to StatSpin the Warranty Registration
Card. StatSpin will, at its discretion repair or replace any unit covered under this warranty returned to StatSpin
with shipping costs prepaid. Repaired or replaced instruments supplied under this warranty carry only the
remaining portion of the original warrant y and repairs shall not interrupt or prolong this warranty. For warrant y
terms and conditions outside the United States, cont act your Authorized StatSpin Distributor.
No warranty extended by StatSpin shall apply to any instrument that has been damag ed due to misuse,
negligence, accident, or damage resulting from unauthorized repairs, alter ations, or improper installation.
StatSpin makes no warranty other than the one s et forth herein. This warr anty is given expressly in lieu of all other
warranties, expressed or implied. The purchaser agrees that there is no warrant y of merchantability or of fitness
for any intended pur pose and that there are no other remedies or warranties, expressed or implied, which extend
beyond the description on the face of the agreement. No agent or employee of StatSpin is authorized to extend
any other warranty or assume for StatSpin any liability except as set forth above. This warranty is only applicable
to the original purchaser.
Limitation of Liability
StatSpin shall not be liable for any loss of use, revenue or anticipated profits, or for any consequential or incident al
damages resulting from the sale or use of the pr oducts. The purchaser shall be deemed liable for any and all
claims, losses, or damages incurr ed by the use or misuse of the StatSpin instrument by the purchaser, its
employees or others, following receipt of the instrument or other it ems.
15
 Loading...