

Page 1

Marine IP Network Camera
Iris Innovations Unit 15 Fareham Innovation Center, Meteor Way, Lee on Solent. Hampshire PO13 9FU T +44(0)2392 556509 www.boat-cameras.com
IRIS404
Basic Operation Manual
Page 2

Regulatory Information
Disposal of Waste Equipment by Users in Private Household in the European Union.
This symbol on the product or its packaging indicates that it must not be disposed of with
your other household waste. Instead, it is your responsibility to dispose of your waste
equipment
by handing it over to a designated collection point for the recycling of waste electrical and
electronic equipment. The separate collection and recycling of your waste equipment at
the time of disposal will help to conserve natural resources and ensure that it is recycled
in a manner that protects human health and the environment. For more information about
where you can drop off your waste equipment for recycling please contact your local city
office, your
household waste disposal service or the shop where you purchased the product.
This device has been tested and found to comply with the limits for a Class B digital device, pursuant to Part 15 of the FCC rules. These limits are designed to provide reasonable protection against harmful interference in a residential installation. This equipment
generates, uses and can radiate radio frequency energy and, if not installed and used in
accordance
with the instructions, may cause harmful interference to radio or television reception.
However, there is no guarantee that interference will not occur in a particular installation. If this equipment does cause interference to radio and television reception, which
can be determined by turning the equipment off and on, the user is encouraged to try
to correct the interference by one or more of the following measures: Reorientate or
relocate the receiving antenna; Increase the separation between the equipment and
the receiver, connect the equipment to an outlet on a different circuit from that to which
the receiver is connected; consult the dealer or an experienced radio / TV technician
for help.
We hereby declare that the product is in compliance with the essential requirements
and other relevant provisions of European Directive 2004/108/EC, the RoHS Directive
2011/65/EU.
This camera conforms to compatibility standards as outlined by ONVIF, PSIA, CGI & ISAPI
Iris Innovations
IRIS404 User Guide v1.0 Jun17! 2
Page 3

IRIS404 User Guide
(C) 2017 Iris Innovations Limited.
ALL RIGHTS RESERVED
Any and all information, including, among others, wordings, pictures, graphs are the properties of IRIS INNOVATIONS., Ltd. or its subsidiaries (hereinafter referred to be “IRIS”). This user manual (hereinafter referred to be “the Manual”) cannot be reproduced, changed, translated, or distributed, partially or wholly, by
any means, without the prior written permission of IRIS. Unless otherwise stipulated, IRIS does not make
any warranties, guarantees or representations, express or implied, regarding to the Manual.
LEGAL DISCLAIMER
TO THE MAXIMUM EXTENT PERMITTED BY APPLICABLE LAW, THE PRODUCT DESCRIBED, WITH ITS
HARDWARE, SOFTWARE AND FIRMWARE, IS PROVIDED “AS IS”, WITH ALL FAULTS AND ERRORS,
AND IRIS MAKES NO WARRANTIES, EXPRESS OR IMPLIED, INCLUDING WITHOUT LIMITATION,
MERCHANTABILITY, SATISFACTORY QUALITY, FITNESS FOR A PARTICULAR PURPOSE, AND NONINFRINGEMENT OF THIRD PARTY. IN NO EVENT WILL IRIS, ITS DIRECTORS, OFFICERS, EMPLOYEES, OR AGENTS BE LIABLE TO YOU FOR ANY SPECIAL, CONSEQUENTIAL, INCIDENTAL, OR INDIRECT DAMAGES, INCLUDING, AMONG OTHERS, DAMAGES FOR LOSS OF BUSINESS PROFITS,
BUSINESS INTERRUPTION, OR LOSS OF DATA OR DOCUMENTATION, IN CONNECTION WITH THE
USE OF THIS PRODUCT, EVEN IF IRIS HAS BEEN ADVISED OF THE POSSIBILITY OF SUCH DAMAGES.
REGARDING TO THE PRODUCT WITH INTERNET ACCESS, THE USE OF PRODUCT SHALL BE
WHOLLY AT YOUR OWN RISKS. IRIS SHALL NOT TAKE ANY RESPONSIBILITIES FOR ABNORMAL OPERATION, PRIVACY LEAKAGE OR OTHER DAMAGES RESULTING FROM CYBER ATTACK, HACKER
ATTACK, VIRUS INSPECTION, OR OTHER INTERNET SECURITY RISKS; HOWEVER, IRIS WILL PROVIDE TIMELY TECHNICAL SUPPORT IF REQUIRED.
SURVEILLANCE LAWS VARY BY JURISDICTION. PLEASE CHECK ALL RELEVANT LAWS IN YOUR JURISDICTION BEFORE USING THIS PRODUCT IN ORDER TO ENSURE THAT YOUR USE CONFORMS
THE APPLICABLE LAW. IRIS SHALL NOT BE LIABLE IN THE EVENT THAT THIS PRODUCT IS USED
WITH ILLEGITIMATE PURPOSES.
IN THE EVENT OF ANY CONFLICTS BETWEEN THIS MANUAL AND THE APPLICABLE LAW, THE LATER
PREVAILS.
Iris Innovations Unit 15 Fareham Innovation Center, Meteor Way, Lee on Solent. Hampshire PO13 9FU T +44(0)2392 556509 www.boat-cameras.com
Page 4

Warnings & Important Product
Information
WARNING: Installation and Operation
This product must be installed and operated in accordance with
these instructions. Failure to do so may result in poor product
performance, damage to the product or vessel and or personal
injury. Installation should only be carried out be qualified personnel or by persons competent in electrical systems.
WARNING: Power Supply and Grounding
Ensure the boats power supply is switched off during installation. Ensure suitably rated circuit breakers / fuses are used in
the installation of the product in accordance with the electrical
values shown in the technical specifications of the product.
Never switch on power until the power connections are correctly
terminated in accordance with the information provided in this
document. Do not connect or disconnect the product with the
power supply switched on. Never disconnect the DC ground with
the power supply on.
WARNING: Wiring terminations
Where the products video, power and data terminations are
extended, ensure that suitable connectors are used and that the
point of termination for each cable is adequately protected
against moisture ingress. Ensure correct polarity is strictly observed. Do not cut or remove cable connectors without prior
permission from Iris Innovations Limited.
WARNING: Do Not Open the Unit
There are no user serviceable parts within the product so there s
no need to open the device. The product has been certified to
IP66 standards, however, submersion or the product or exposure to high pressure washing will invalidate the warranty.
WARNING: Disclaimer
This product is intended to be used only as an aid to navigation
and must never be used as an alternative to correct navigational
practices and judgements made on the basis of approved navigation methods. It is the users responsibility to observe correct
and proper navigational skill when using this product. Only officially approved charts and notices to mariners contain the current information required for safe navigation.
Operating the camera or viewing the video input whilst the vessel is moving could cause a distraction and result in accidental
collision resulting in property damage, injury or death. Iris Innovations cannot be held liable for any incidental, special, indirect
or consequential damages whether resulting from the use, misuse or inability to use this product.
CAUTION: Switch Camera Off When Not in Use.
To prolong the operation life of the the cameras sensor we
strongly advise that power to the camera is routed via a dedicated switch.
CAUTION: Service and Maintenance
This product contains no user serviceable parts. Please refer all
maintenance and repair issues to your authorized Iris Innovations dealer. Any unauthorized work to the product may affect
the warranty.
CAUTION: Care and Cleaning
This product is a sensitive piece of electronic, imaging equipment and must be handled and treated accordingly. Do not drop
or shake the unit during installation. Avoid exposure of the imager to direct sunlight where possible as this may degrade the
cameras performance over time.
When cleaning the device, ensure power is switched off. Clean
the camera housing with a soft cloth. Moisten the cloth and use
a mild detergent if required. The lens window has a protective
coating which may suffer damage as a result of improper cleaning. To clean the lens window use a soft cotton cloth. Moisten
with clean water if necessary. For further advise on cleaning the
lens window, contact Iris Innovations.
INFORMATION: Product Disposal and Recycling
Dispose of this product in accordance with the WEEE Directive.
The Waste Electrical and Electronic Equipment (WEEE) Directive requires the recycling of waste electronic and electrical
equipment. Iris Innovations supports the WEEE policy and politely request you observe correct disposal methods. For further
information on how to correctly dispose of this product please
contact Iris Innovations.
Please recycle unwanted packaging and documentation. The
cardboard carton, all paper manuals and documents and the
protective plastic bag in which the camera is shipped are widely
recyclable. Please check with your local recycling plant for confirmation.
Iris Innovations Unit 15 Fareham Innovation Center, Meteor Way, Lee on Solent. Hampshire PO13 9FU T +44(0)2392 556509 www.boat-cameras.com
Page 5

Introduction
Thanks for buying the IRIS404 Marine IP Network Camera.
Manufactured from lightweight anodized and powder coated
aluminium, the IRIS404ʼs compact and waterproof form factor
make it an ideal choice for many on board monitoring and leisure applications, such as deck, companionway and engine
room monitoring, Sports Fishing ʻTag and Releaseʼ recording
and situational awareness monitoring.
The IRIS404 produces superb, true high definition 1920 x 1080P
images with High Profile H.264 compression to minimize network latency issues. An intuitive user interface provides facility
to alter Brightness, Contrast, Saturation and image orientation
as well as a number of alarm notification settings such as motion
detection and line crossing.
Dual streams are available with definable resolution and bit rate
settings.
The camera is fitted with a 4mm fixed megapixel lens which
provides an 85 # Horizontal Field of View (HFOV) and a powerful
infra-red LED ring which operates automatically in low light conditions to give up to 30 meters visibility at night.
Connection to the camera is via a rugged, IP68 rated, waterproof RJ45 connector and the camera is powered via
IEEE802.3af Power over Ethernet*.
On the underside of the housing is a 1/4” Whitworth connection
for attach- ing to your bracket for maximum flexibility.
* 12VDC and 24VDC Non PoE versions available - please
contact your Iris dealer for more information.
Overview of Key Features
Hereʼs a brief list of some of the IRIS404ʼs key features:
•
1920 x 1080 True 2MP HD Resolution
•
High Performance LED - 30 Meter Range
•
Mechanical IR Cutout filter for True Day / Night Operation
•
Power over Ethernet (PoE) IEEE802.3af
•
12VDC / 24VDC Optional
•
IP67 Ingress Protection
•
Small, Compact Housing
•
Waterproof Ethernet Connector
•
Suitable for Multiple Applications, such as on-board security,
sports fishing, engine room monitoring and vehicle
monitoring.
•
Wide Operating Temperature Range
•
Password Protected.
Contents of Package
Please unpack your IRIS404 and check to make sure the following items are included. If there are any items missing please
contact your Iris dealer:
•
1 x IRIS404 Marine IP Camera
•
1 x Field Installable Waterproof RJ45 Connector
•
1 x Instruction Manual
Iris Innovations Unit 15 Fareham Innovation Center, Meteor Way, Lee on Solent. Hampshire PO13 9FU T +44(0)2392 556509 www.boat-cameras.com
Page 6
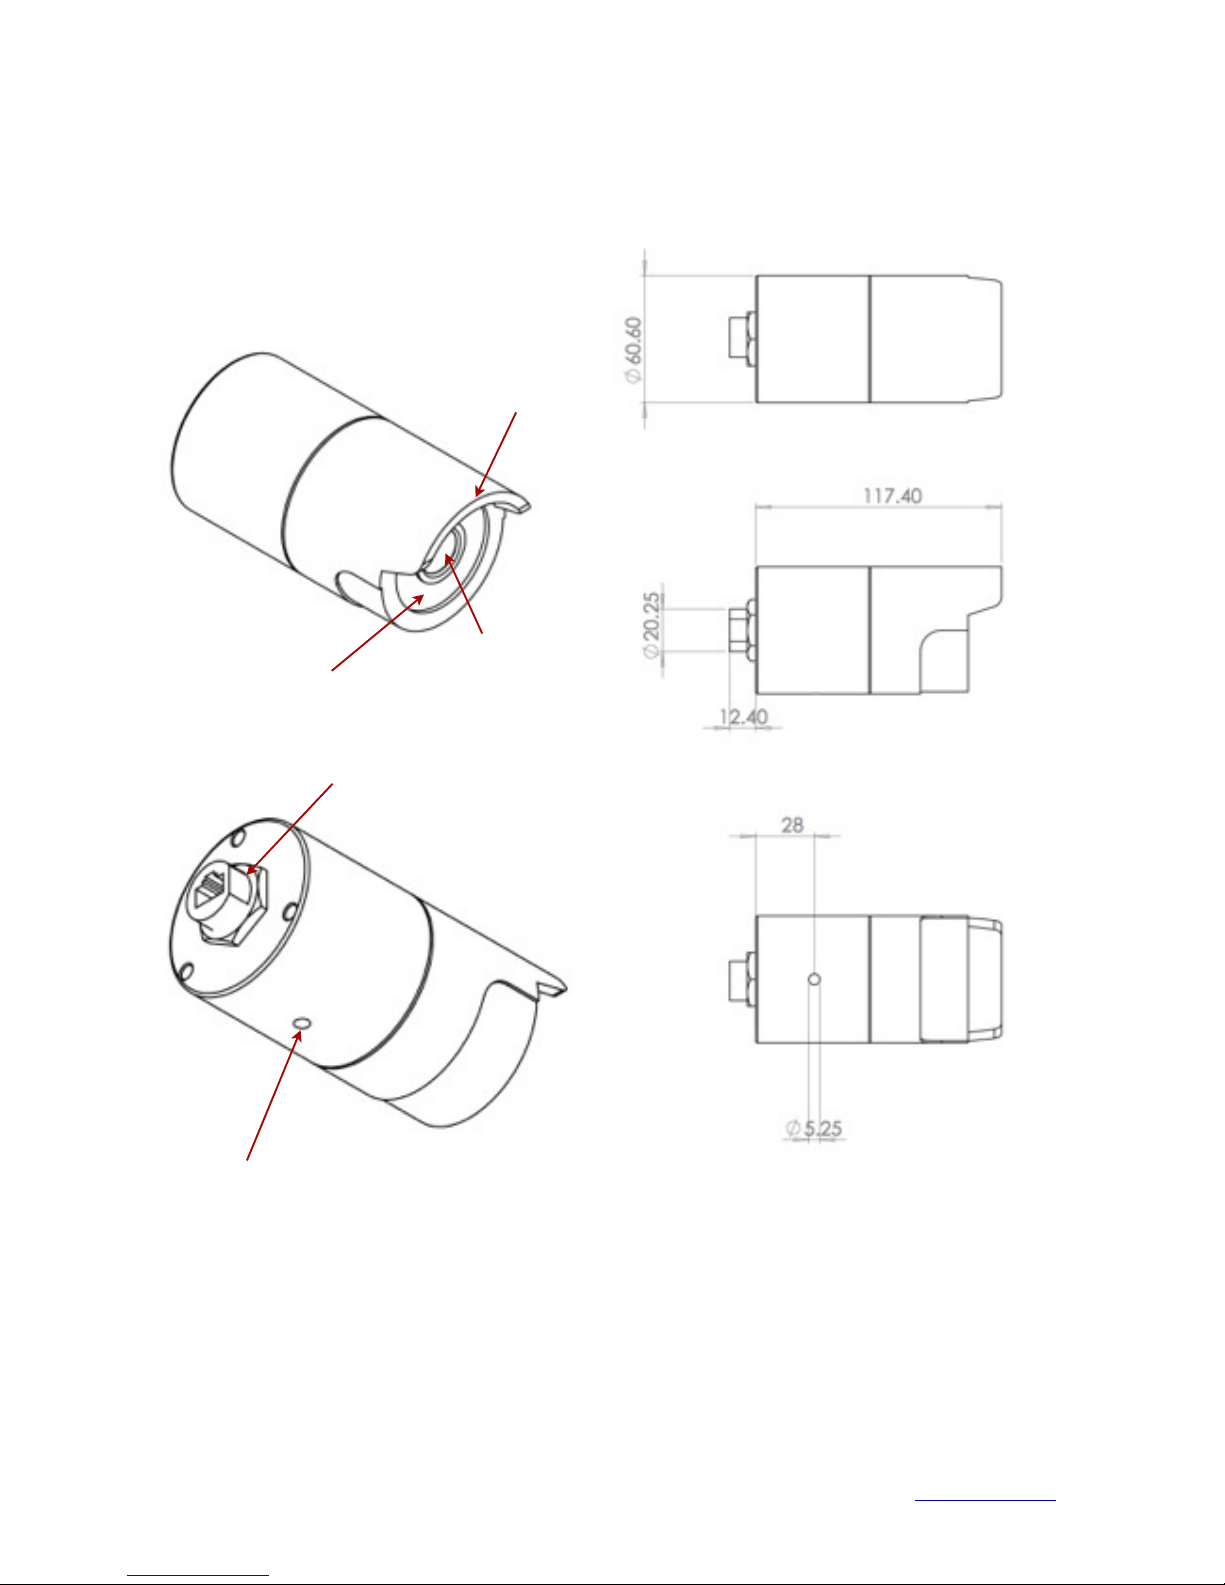
Camera Overview
The diagram below details the various parts of your
camera:
*Non PoE versions of the camera feature a glanded cable
entry.
Camera Dimensions
Key dimensions of the IRIS404 shown below in mm.
Iris Innovations Unit 15 Fareham Innovation Center, Meteor Way, Lee on Solent. Hampshire PO13 9FU T +44(0)2392 556509 www.boat-cameras.com
Sun-Visor
LED Ring
Lens
Waterproof RJ45 Socket (PoE Versions)*
1/4” Whitworth Threaded Fixing Point for Mounting
Page 7

How to fit Field Installable
Waterproof RJ45 Jacket
When installing in an external location, or any position that
will be prone to moisture ingress or harsh weather, it is
important the the waterproof RJ45 connector (supplied) is
used to protect the cameras connections.
Part No
Description
1
Cameras Network Interface Socket
2
O Seal
3
RJ45 Network Connector
4
Waterproof Endcap
5
Rubber Gasket
6
Lock Nut
7
Network cable to Router / Switch / Hub / etc..
Method
Step.1:
Feed the plug-less network cable (7) through the lock nut
(6), waterproof rubber gasket (5) (ensuring the rubber
gasket inset ridge faces the end-cap (4).
Step.2:
Crimp an RJ45 Network plug (3) onto the end of the cable
in accordance with the diagram below, taking care to
ensure the wires are terminated in the correct order and
are not crossed.
Step.3:
Place the O Seal (2) onto the end of the cameras network
interface socket (1).
Step.4:
Insert the network plug (3) into the cameras network
interface socket (1).
Step.5:
Insert the waterproof rubber gasket (5) into the waterproof
end-cap (4) and secure lock nut (6) with the waterproof
end cap (4).
Step.6:
Align the snap on the waterproof end-cap (4) with the
notch on the cameras network interface socket (1) and
then secure the waterproof end-cap (4) to the cameras
network interface socket (1).
Iris Innovations Unit 15 Fareham Innovation Center, Meteor Way, Lee on Solent. Hampshire PO13 9FU T +44(0)2392 556509 www.boat-cameras.com
Pin No
Wire Colour
1
White / Orange
2
Orange
3
White / Green
4
Blue
5
White / Blue
6
Green
7
White / Brown
8
Brown
Page 8

Mounting the Camera
On the underside of the cameras housing is an industry
standard 1/4” Whitworth (1/4-20 UNC) threaded hole for
connecting photographic / CCTV mounting brackets /
tripods.
Once you have sighted your camera in order to achieve the
desired view, fix your mount to the camera and then fix
your mount in accordance with the manufacturers
instructions. Iris accept no responsibility for the security
and performance of any third party mounting equipment.
It is strongly recommended that you sight your camera
before fixing into position.
Ensure the camera is mounted in such a way that it is not
prone to exposure to excessive moisture, and so that it is
not facing sunlight or any other direct light source.
When mounting, also consider the cameras connector and
allow sufficient space for an adequate bite of cable from
the camera.
Do not stretch cables or subject them to stresses which
may lead to the breakdown of the outer sheath.
Do not install the camera in locations prone to exposure to
chemicals, gases or extremes of temperature.
We also recommend that you test and configure the
camera as required prior to locking in place.
Iris Innovations Unit 15 Fareham Innovation Center, Meteor Way, Lee on Solent. Hampshire PO13 9FU T +44(0)2392 556509 www.boat-cameras.com
Page 9

Configuring the Camera over the
LAN
WARNING: Stay Secure!
When connecting any device to a network with access
over the internet brings risks to the security of your
network and your data. Your IRIS404 features built in User
Name and Password authentication but it is also your
responsibility to strengthen your network security where
ever possible. Please contact your IT expert for further
advise. Iris cannot provide support with any aspect of your
network security, other than the cameras built in security
settings.
Basic Setup: Single Camera / Computer
The diagram below shows a very basic setup, with a single
camera being viewed on a PC (or laptop).
Use a standard 568B ethernet CAT5 cable to hook your
computer up to the PoE injector, and then another 568B
cable to hook the camera up to the injector.
With this type of installation, you must ensure the IP
address of the camera is in the same range as the network
adapter in your computer used to communicate with the
camera. Consult documentation for your computer for
information on how to view (and edit) your network adapter
IP address.
The camera is set as default to DHCP, which means it has
no IP address set, and awaits for a router on your network
to assign the address.
To find your camera on the network, use an IP camera
discovery tool, or an ONVIF Device Manager. A discovery
tool called SADP can be downloaded from our website.
Once downloaded and installed, run the tool to find your
camera. Once your camera is found you can change its
address within the tool to fit into the IP address range of
your network adapter. Further details are shown on page
X.
A great Onvif Device Manager can be found here:https://
sourceforge.net/projects/onvifdm/
Once you’ve downloaded and installed the Device
Manager software, open the program and then click the
REFRESH button at the bottom of the device list on the left
hand side. If everything is hooked up correctly, the details
of your camera, including its IP address, will be displayed
in the list.
If the cameras IP address falls outside the range of the IP
address of your computers network adapter, you’ll have to
change the address on your adapter so it corresponds
with the address of the camera. Once this is done (and
you’ll usually need to reboot your computer) you should
simply be able to open your web browser, type the IP
address of the camera into the address bar and access the
camera. From here, if required, you can change the IP
address of the camera as desired - back to the original
address range of your computer for example. If you do
this, then you will also have to change the address of your
network adapter back to its previous range.
Basic Setup: Single Camera / Computer via Router
using DHCP (default)
The diagram below shows a simple one camera / one
computer device, but this time a router is used to manage
your network devices and address allocation.
As mentioned previously, the camera as default is set to
obtain its IP address automatically via DHCP. This means
that once connected, your router will detect the device and
assign it an IP address within its designated range (refer to
the documentation for your router for further details). You
must also ensure the network adapter for your computer is
set to obtain its address via DHCP.
Iris Innovations Unit 15 Fareham Innovation Center, Meteor Way, Lee on Solent. Hampshire PO13 9FU T +44(0)2392 556509 www.boat-cameras.com
PoE
Injector
IRISPoE1
6~36VDC
PoE
Injector
IRISPoE1
6~36VDC
Router
Network
Cable
Network
Cable
Network
Cable
Network
Cable
Network
Cable
Page 10

Using the SADP Software Tool to
Discover Cameras
SADP is a software discovery tool for IP cameras, including
the IRIS404. It can be downloaded from: http://www.boat-
cameras.com/products/ip-cameras (scroll down to the
IRIS404 panel and click on downloads.
NOTE: SADP is a Windows Only tool.
Using the SADP tool you can not only discover cameras
connected to your network but also set the IP address, or
switch to DHCP and change the device password.
1. Download the setup.exe to your computer (Windows
Only).
2. Double click on the setup.exe icon to install to your
computer. Follow the prompts during installation.
3. Once installed, double click on the SADP Tool icon to
open tool.
4. To discover your camera, click on the Refresh button as
shown in the screen grab below:
5. The tool will now scan your network for any connected
cameras. Once a camera has been found, it’s details will
display in the device list as highlight above.
6. The panel on the right side of the window shows
Network Parameters for the highlighted camera. To
change any of these values, ensure the camera is
highlighted in the device pane. Once highlighted, the
values in the Network Parameter panel will become
editable.
Default Camera Settings
IP Address:
By default the camera is set to DHCP which means it waits
to obtain its IP address automatically from your router. To
change the IP address to a fixed address, uncheck the
DHCP box. Doing so will liven up the IP Address, Subnet
Mask and Port details for you to input as required.
User Name & Password
By default, the user name and password are set as follows:
User Name:" admin
Password:" iris2017
WARNING:
We strongly recommend that you change your security
settings in order to maintain your network security.
Passwords should be a minimum of 8 characters, and can
include upper case and lower case letters, numbers and
special characters.
Iris Innovations Unit 15 Fareham Innovation Center, Meteor Way, Lee on Solent. Hampshire PO13 9FU T +44(0)2392 556509 www.boat-cameras.com
Page 11

Accessing your Camera via a Web
Browser
System Requirements:
Operating System: Microsoft Windows XP SP1 and
higher / MAC OSX version 10.6.8 or higher
CPU: 2.0 GHz or higher
RAM: 1GB or higher
Display: 1024x768 resolution or higher
Web Browser: Internet Explorer 8.0 and higher, Apple
Safari 5.0.2 and higher, Mozilla Firefox 5.0 and higher and
Google Chrome 18 and higher.
Steps:
1. Open your web browser
2. Enter the cameras IP address in the browsers address
bar and press ENTER
3. Once presented with the cameras login panel, input the
correct user name and password
WARNING:
After 7 failed login attempts (Admin) and 5 failed attempts
(user / operator) the device IP address will be locked for 30
minutes.
INFORMATION:
Depending on your browser, it may be necessary to install
plug-ins from the camera in order to view the live video.
Follow the on screen instructions accordingly.
Following the installation of any plug ins it may be
necessary to re-start the browser and log back into the
camera to view.
Iris Innovations Unit 15 Fareham Innovation Center, Meteor Way, Lee on Solent. Hampshire PO13 9FU T +44(0)2392 556509 www.boat-cameras.com
The screen grab above shows the IRIS404 login panel.
Page 12

Operation
Once logged into the camera, you will be presented with
the main viewing screen as shown below.
The main part of the screen is taken up by the camera
viewing window.
Across the top of the window are tabs which link you to
the following pages:
•
Live View (Default)
•
Playback - Enters playback search window
•
Picture - Enters Picture search window
•
Configuration - Enters the Set Up Page
On the right hand side of the tab bar is displayed the
current user level of the person logged in and the Logout
button.
Below the main viewing window there are a line of buttons
to control the following features, from left to right:
(Left Hand Side)
•
Aspect Ratio
•
Stream Type - Stream 1 or 2
•
Plug-in Switch - Starts / Stops Plug-ins
(Right Hand Side)
•
Stop Live Stream - Pauses video
•
Snapshot - Takes a snapshot of the live stream
•
Start Recording - Starts Recording (Press again to stop)
•
Digital Zoom - Once selected, use the cursor to define a
region of interest. This will fill the screen. To zoom in
further repeat this process. To exit out to normal view,
de-select this function by clicking on it.
Playback Window:
The playback window, shown below is used to search for
recorded footage and to play it back.
The screen is split into 3 areas as shown:
Searching for recordings is as simply as selecting the
desired date in the Date Search Pane and then scrolling
through the Timeline to your desired time, or until you can
see activity markers, which depict the duration of the
recording on the Timeline. Different types of recording are
colour coded thus:
•
Yellow - Manual Recording
•
Green - Command Recording
•
Magenta - Alarm Recording
•
Blue - Continuous Recording
Iris Innovations Unit 15 Fareham Innovation Center, Meteor Way, Lee on Solent. Hampshire PO13 9FU T +44(0)2392 556509 www.boat-cameras.com
Date Search paneEvent Playback pane
Timeline Search Panel Video Controls
Page 13

Picture Window:
The Picture Window (shown below) is used to search,
review and download saved snapshots. The camera can
store up to 4000 snapshots.
To search for snapshots, use the START and STOP date
search parameters on the left hand side of the screen to
define your desired timeframe. There is also a drop down
box where you can filter the various types of snapshot
(Alarm, Manual etc).
Once the desired timeframe has been defined, a list of files
will be presented in the main browser window. From here
you can select your desired file and hit the Download
button to copy onto your computer.
Iris Innovations Unit 15 Fareham Innovation Center, Meteor Way, Lee on Solent. Hampshire PO13 9FU T +44(0)2392 556509 www.boat-cameras.com
Picture Window - Manage Stored Snapshots
Page 14

Configuration
The cameras configuration window is shown below.
Within the configuration window there are the following
submenus accessed from the panel on the left hand side:
•
Local
•
System
•
Network
•
Video / Audio
•
Image
•
Event
•
Storage
Local Settings
Defines Live View parameters such as protocol,
performance, image format etc and recording settings and
pictures clip settings, such as maximum file size and
defines recording path.
System Menu
The system menu is split further into the following sub
sections:
•
System Settings
" This is split again into the following tabs:
" Basic Info: Device name, serial number and
" firmware information
" Time Settings: Set time zone, NTP settings (if
" used) and manual time settings.
" Daylight Saving: Set Daylight Saving Time
" parameters (if required).
" RS232: Not Applicable
•
Maintenance
" Split into the following tabs:
" Upgrade & Maintenance: Reboot, restore factory
" defaults, export parameters, import configuration
" files, firmware upgrade.
" Log: System history logs, with start and end time
" search parameters.
! System Service: Enable / Disable IR LED’s.
•
Security
! Split into the following tabs:
! Authentication: RTSP Authentication settings
" IP Address Filter: For blocking / allowing specific
" IP addresses to connect to the camera.
" Security Service: Enable / Disable illegal login lock
•
User Management
! Split into the following tabs:
! User Management: Add / Modify / Delete user
" accounts and define access level.
" Online Users: Displays details of any users
" currently connected to the camera.
Network Menu
The Network Menu is split into two sub sections:
•
Basic Settings
! This is split again into the following tabs:
" TCP/IP: Define network address details, DHCP
" settings & DNS server details
" DDNS: Define DDNS server details.
" Port: Define camera port details.
" NAT: Define Network Address Translation details.
Iris Innovations Unit 15 Fareham Innovation Center, Meteor Way, Lee on Solent. Hampshire PO13 9FU T +44(0)2392 556509 www.boat-cameras.com
Page 15

Configuration
Continued....
Network Menu
•
Advanced Settings
! This is split again into the following tabs:
" FTP: Define FTP upload address, port, security and
" file transfer details.
" Email: Define list of email recipients, authentication
" and SMTP details for sending frames on alarm
" activity.
" Platform Access: Define domain details for
" network managed operation / cloud access.
" HTTPS: Displays and enables certificate details
" QoS: Defines bandwidth prioritization, assigning
" priority to Video/Audio streams, Event/Alarm data
" and Management Access data. Set values as
" required between 0~63 (63 being the highest
" priority).
" 802.1x: Manages network security authentication.
Video / Audio
The system menu is split further into the following sub
sections:
•
Video: Configure video streaming parameters, set
resolution, bit-rate, video quality/encoding methods etc.
•
R.O.I: Regions of Interest can be drawn on the screen
and assigned a value (between 1~6) to determine the
level of encoding within the set area. R.O.I’s are an
effective way of attributing higher levels of encoding for
important areas within a frame.
Image
The Image menu is split further into the following sub
sections:
•
Display Settings: Configure display parameters such
as brightness, contrast, saturation etc, Iris Performance
(in Exposure Settings tab), Day/Night switching
operation and sensitivity, Backlight settings, white
balance, Digital Noise Reduction (in Image Enhancement
tab) and configure video adjustment features such as
Mirror & Flip, Video Standard (PAL/NTSC) and Capture
Mode.
•
OSD Settings: Switch On/Off camera titles, including
time and date information and set text overlay
parameters.
•
Privacy Mask Enable and Define Privacy Masks.
Event
The Event menu is split further into the following sub
sections:
•
Basic
" This is split again into the following tabs:
! Motion Detection: Enable & Define areas within
! the frame that will trigger motion alarms, set alarm
! ‘Live’ schedule (ie, arming schedule) and set alarm
! notification actions (in Linkage Method).
" Video Tampering: Enable & Define video
" tampering alarm regions and sensitivity, and set
" alarm notification actions (in Linkage Method).
! Exception: Define actions when a ‘Normal
! Operation’ exception occurs, such as HDD Full,
! HDD Error, Network Disconnect, IP Address
! Conflict and Illegal Login.
•
Smart Event
! Smart events employ a degree of analytics to
" provide a higher level of alarm detection. This
" category is split further into the following two
" categories:
" Intrusion Detection: Used to detect people,
" vehicles and other objects within pre-defined
" regions. Configure the actions to take on Alarm
" Activity within the Linkage Method tab.
" Line Crossing Detection: Detects people,
" vehicles etc which cross a pre-defined line and
" determines the action to take on Alarm Activity
" within the Linkage Method tab.
Iris Innovations
IRIS404 User Guide v1.0 Jun17! 15
Page 16

Storage
The Storage menu is split further into the following sub
sections:
•
Schedule Settings
" This is split again into the following tabs:
" Record Schedule: Define recording schedule for
" all types of recording (continuous, motion, motion
" alarm and event).
" Capture: Define schedule and parameters for
" video snap-shots (captures) including image
" resolution and number of frames to be captured per
" event (as well as dwell time in milliseconds between
" each snapshot).
•
Storage Management
" This is split again into the following tabs:
" HDD Management: Displays details of connected
" hard drives and enables users to determine
" capacity for video recording and picture storage.
" Net HDD: Determines IP address, file storage
" paths and type of network storage.
Iris Innovations Unit 15 Fareham Innovation Center, Meteor Way, Lee on Solent. Hampshire PO13 9FU T +44(0)2392 556509 www.boat-cameras.com
Page 17

NOTES
Iris Innovations Unit 15 Fareham Innovation Center, Meteor Way, Lee on Solent. Hampshire PO13 9FU T +44(0)2392 556509 www.boat-cameras.com
Page 18

NOTES
Iris Innovations Unit 15 Fareham Innovation Center, Meteor Way, Lee on Solent. Hampshire PO13 9FU T +44(0)2392 556509 www.boat-cameras.com
Page 19

NOTES
Iris Innovations Unit 15 Fareham Innovation Center, Meteor Way, Lee on Solent. Hampshire PO13 9FU T +44(0)2392 556509 www.boat-cameras.com
Page 20

Iris Innovations Unit 15 Fareham Innovation Center, Meteor Way, Lee on Solent. Hampshire PO13 9FU T +44(0)2392 556509 www.boat-cameras.com
Iris Innovations Limited
Unit 15 Fareham Innovations Center, Meteor Way
Lee on Solent. Hampshire PO13 9FU. United Kingdom
Tel: +44(0)2392 556509 / email: irisuk@boat-cameras.com
Iris Innovations USA Corporation
2821 SW23rd Terrance Unit 5
Fort Lauderdale, 33312. Florida. USA
Tel: +1 (954) 533 9381 / email: info@boat-cameras.com
www.boat-cameras.com
 Loading...