

Page 1

IRIS130
Rugged Night Vision Pan Tilt Zoom Camera
USER GUIDE
Iris Innovations Limited
Units 8 & 9 Swanwick Business Centre
Bridge Road, Swanwick, Hampshire SO31 7GB
United Kingdom
Tel: +44(0)1489 570797 UK / 001 954 903 3666 USA
www.boat-cameras.com
Page 2

Thank You for Choosing the IRIS130 Night Vision PTZ from Iris!
When you open the box:
Check that the packing and the contents are not visibly damaged. Contact the retailer immediately if any parts are either
missing or damaged.
Make sure that all the contents detailed in the packing list are in the package.
Do not attempt to use the device with missing or damaged parts. Send the product back in its original packing if it is
damaged.
i / ii
The information contained in the document is subject to change without notice.
Page 3

Table of Contents
1.Safety Notes --- Important!!! 1
2.About The Product
2.1.Features 2
2.2.Functions 3
2.3.Technical Data 5
3.Preparation
3.1.DIP SWITCH 7
3.2.Initial power on test 8
3.3.Installation Place 8
4.Installation
4.1.Mounts 9
4.2.Installation 10
4.3.Camera Cable Package 12
5.Operation
5.1.Special Control Panel Commands 14
5.2.Operation 15
6.Trouble Shooting 17
7.Annex: DIP Switch – Camera Address 18
Page 4

1. SAFETY NOTES---IMPORTANT!!!
The following important notes must be followed carefully to run the camera and respective accessories in total safety.
The camera and relative accessories are called video system in this section.
␣ Before installing the camera, please read this manual carefully; when installing please follow instructions of installation
indicated in this manual. Please keep this manual for future use.
␣ The following installation should be performed by qualified service personnel or system installers in accordance with
all regional regulations.
␣ Before powering on the camera, please check the power voltage carefully. Make sure that you are using the correctly
rated power source and ensure the camera is correctly isolated, by either an in line fuse or preferably a suitably rated
circuit breaker on the vessels electrical distribution panel. It is advised that the camera is powered separately and that no
other devices share circuit protection to enable a suitably rated fuse / breaker to be employed.
␣ Please ensure cables suitable for the power, video and data to the camera are used. Refer to the product
specifications within this document for the electrical rating of the camera and use the appropriate size and rated cable.e
␣ Do not operate the camera beyond the specified temperature and humidity. The camera’s working temperature range
is between -45°C~+65°C. The ambient humidity range is less than 95%.
␣ When transporting, avoid violent shaking or undue force to the camera. Do not drop the camera. To prevent electric
shock, do not remove screws or covers of the camera. There are no self-serviceable parts inside. Refer to qualified
service personnel for servicing.
␣ Video cable and RS485 cable should ideally not be run in parallel with power cables. Use shielded twisted pair cable
for the RS485 telemetry data cable and suitable co-axial cable such as RG59, URM70 or RG179 Mini Coax for the video
feed. Pre-Made cables are available from Iris Innovations. For further information check the Knowledge Base at http://
www.boat-cameras.com/knowledge-base.php
␣ Never aim the lens of the camera at the sun or other extremely bright objects as this may cause damage to the
sensitive optical sensor within the camera.
␣ When cleaning the camera, please use soft cloth. If the camera is very dirty, wipe it off gently with a soft cloth
moistened with a weak solution of water and a neutral kitchen detergent. Wring all liquid from the cloth before wiping the
camera, then wipe off all remaining dirt with a soft, dry cloth. Use lens cleaning paper to clean the lens.
␣ Do not move the camera module manually. Doing so could result in malfunction to the camera. Do not hold the inner
dome section of the camera when carrying the video camera as this may damage the tilt gears.
Page 5

2. ABOUT THE PRODUCT
The Iris130 series camera is designed for fixed and mobile video surveillance and situation awareness application. It
consists of a high resolution zoom camera module, powerful IR or white lighting module, precise PTZ system, optional
damping vacuum systems.
ExView HAD CCD Modules
The 18X/28X/36X SONY ExView HAD CCD modules provide high resolution quality video effect.
Aux Lighting System
Powerful IR lighting or white LED light options. Ranges up to 120 meters. Ensures clear view of details at distance up to
120 meter in total dark environments.
Full Anodized Aluminum PTZ Case
The cameras housing is high strength is fully weather proof and suitable for various tough applications such as rugged
roads, sea, storm weather etc.
New Drive Mechanism
The PTZ camera employs a revolutionary new drive system with high precision and higher holding torque which does not
generate offset during positioning of Pan and Tilt.
Easy Installation Mounts
The new vacuum and magnetic vacuum can easily fix the PTZ camera firmly onto a metal surface. Meanwhile user can
easily carry the PTZ camera with the handle at the back side.
2.1. FEATURES
Aluminum PTZ case with high strength, full weather proof
IP index up to IP67
Optional damping system, for tough applications
Easy mounts with magnets and vacuum mechanism
Powerful IR lighting module, range up to 120 meters, auto adjust with zooms (for IR Version only)
Powerful aux white lighting system, range up to 120 meters (for White Light Version only)
Hidden seamless window wiper with adjustable speed
New design of drive system, PTZ positioning precision up to +/-0.05 ˚
Digital image stabilization
Image flip for stand / ceiling mount
Video freeze
ExView HAD CCD, 550TVL; 18X/28X/36X zooms
Wide Dynamic Range (WDR)
Day/night (Infra Red Cut-Out Filter)
9~36V voltage input
Auto power-off with low power supply
Page 6

2.2. FUNCTIONS
Day/Night Function
The cameras features an in-built, automatic Infra Red cut-out filter that switches the output from colour to monochrome in
low light conditions. This enhances the clarity of the image in low-light situations and provides clear video images in
illumination levels as low as 0.01 Lux. This feature can also be activated or deactivated using dedicated commands.
Save/Call Preset
Preset Positions are ‘Memory’ positions that are stored within the camera. There are 256 memory positions available to
the user. The user simply drives the cameras pan, tilt and zoom position and then stores the position in a dedicated
‘Preset’ position, which can be recalled at the touch of a button when required.
Zoom control
The camera features fully controllable optical and digital zoom controls, to a magnification level determined by the
particular model (x18, x28 or x36).
Focus control
System defaults to Auto Focus mode, that is, the lens and camera will automatically adjust the focus to get the best
image depending on the current field of view. This is an extremely powerful feature and rarely (if ever) requires manual
intervention.
Focus can also be controlled manually from the controller if required. Press Focus Near or Focus Far key to manually
focus. Focus can be manual via keyboard or other controller, please refer to control keyboard or other controller
operation manual for detailed operation.
The camera will NOT auto focus in the following situations:
Target is not in the center of image
Targets extend through the near and far depth of field
Target is a strong light source (such as spotlight)
Target is behind glass or there is a build up of water drop or dust.
Target is moving too quickly
The target occupies too much of the image (such as a wall)
Target is too dark of vague.
IRIS control
System defaults to Auto IRIS.
The Camera adjusts immediately according to the alteration of back ground illumination so that a steady image contrast
can be achieved.
You may adjust the IRIS via the controller to get required image brightness if necessary, depending on your controller,
and call back Auto IRIS when required.
Auto White Balance
Camera defaults to automatically adjust the white balance (WB) according to the alteration of background contrast to
give a true color image.
Back Light Compensation (BLC)
If a bright backlight is presents, the subjects in the picture may appear dark or as a silhouette. Backlight compensation
enhances objects in the center of the picture. The camera uses the center of the picture to adjust the IRIS. If there is a
bright light source outside this area, it will ordinarily wash out to white so the camera will adjust the IRIS so that the
object in the sensitive area is properly exposed.
Auto Cruise
Preset positions are programmed to be recalled in sequence. This feature is called auto cruise.
Page 7

2.2. FUNCTIONS (Continued...)
Auto, Random and Frame Scan
Auto Scan: Scans the camera through 360° from the current position.
Random Scan: Scans the camera in random intervals through 360˚ from the current position.
Frame Scan: Scans the camera between two set positions.
For Frame Scan: The zoom at two limits shall be programed the same.
Image Flip
The camera can either be installed in a ‘base down’ (standard) orientation or in a hanging position. The Image Flip
functions inverts the image accordingly.
Page 8
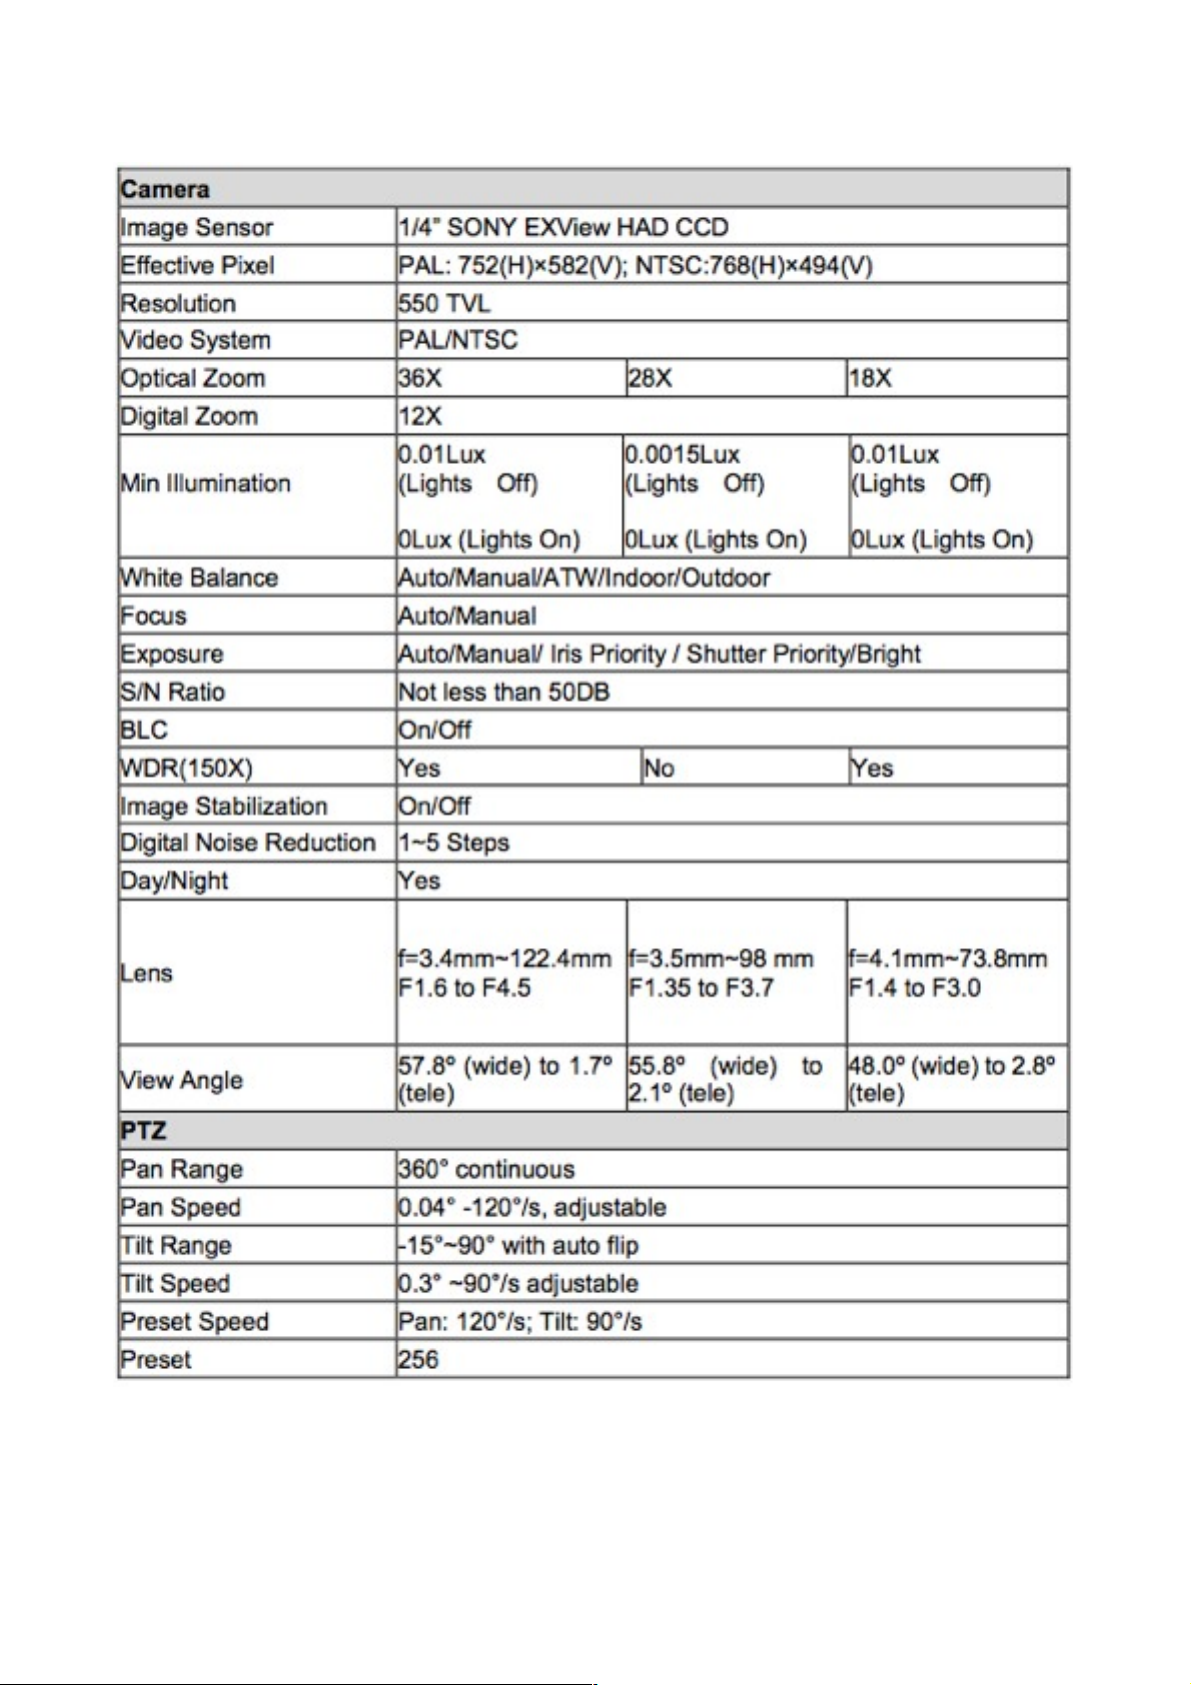
2.3. TECHNICAL DATA
Page 9
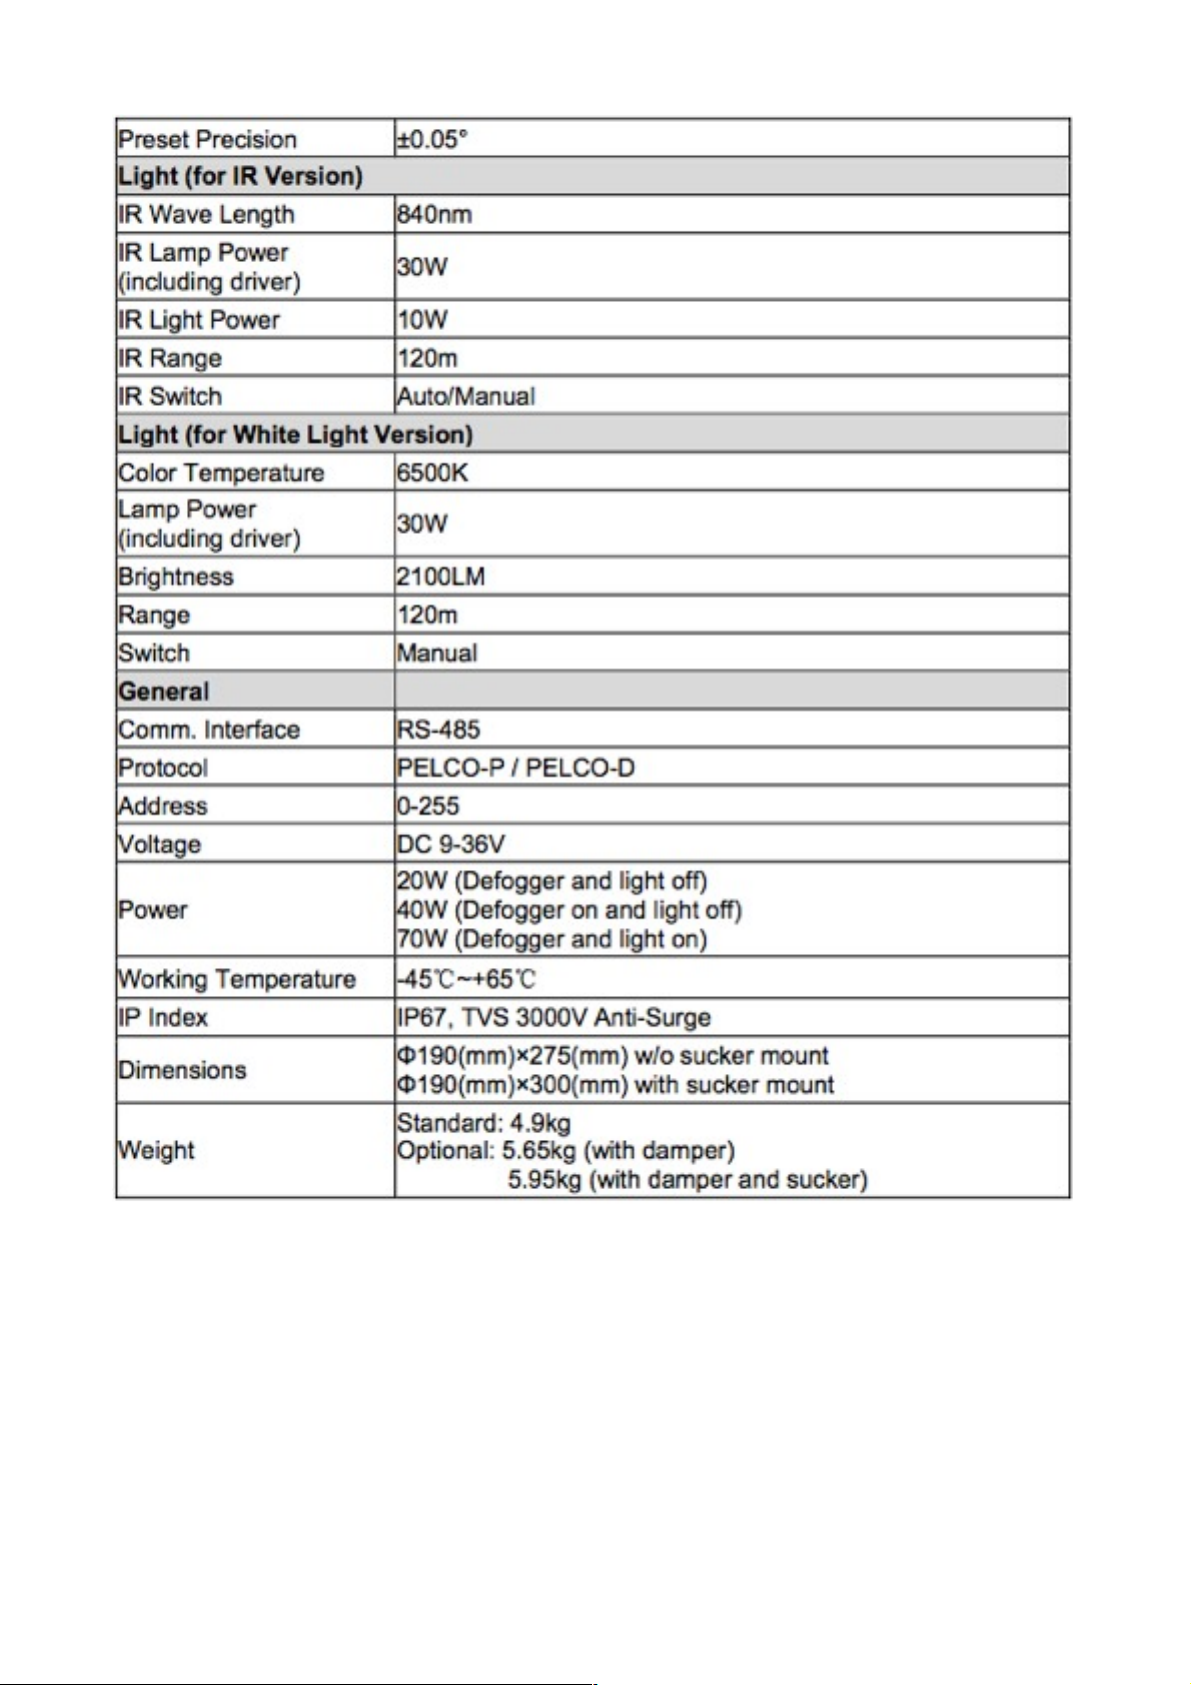
Table 1: Technical Data
Specifications are subject to change without notice.
Page 10
3. PREPARATION
This section contains detailed instructions for installing the camera. These instructions assume that the installer has a
good knowledge of installation techniques and is capable of adopting safe installation methods.
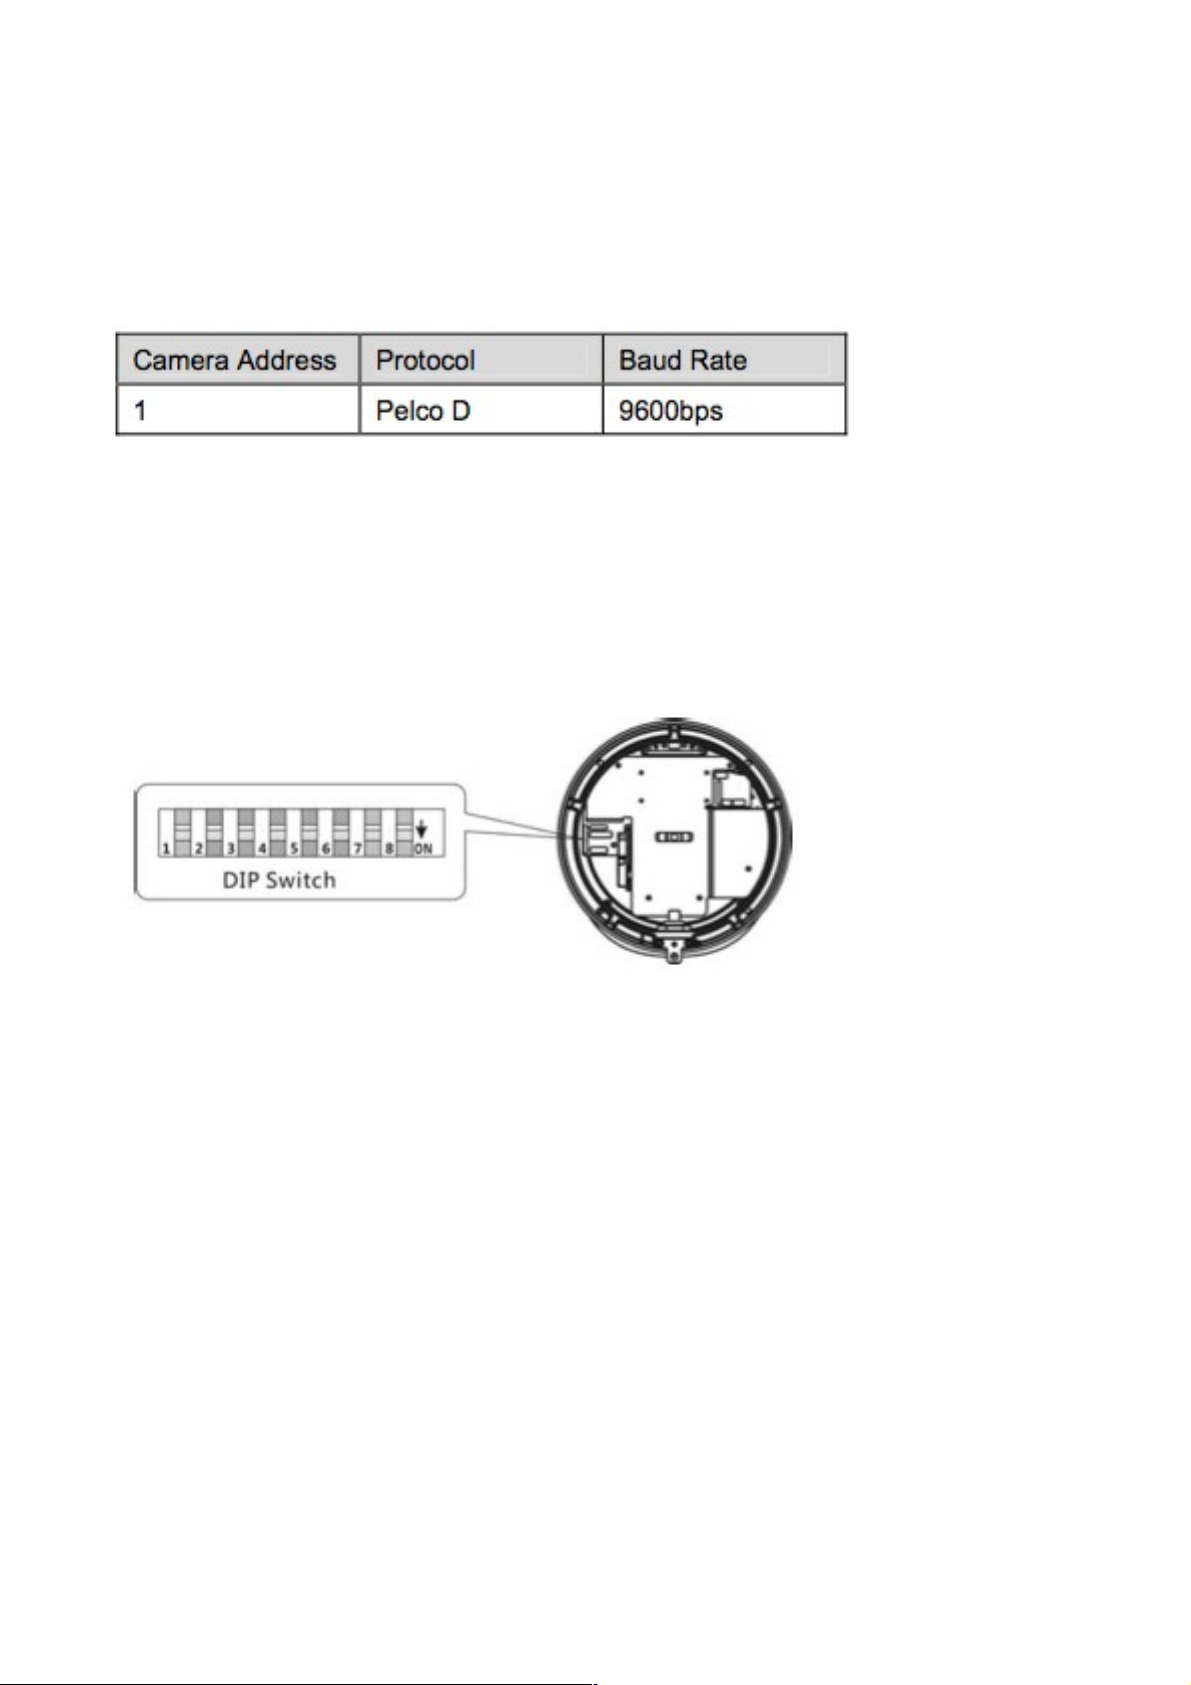
3.1. DIP SWITCH SETTINGS:
Factory defaults for the cameras address and communications settings are as follows:
The camera can detect and auto program its protocol (Pelco D, Pelco P) as well as baud rate (2400bps, 4800bps,
9600bps, 19200bps).
Only the camera address setting is necessary. There are two ways to program camera address:
Soft address: via special preset functions (see Section 5.1 Special Control Panel Commands)
DIP Switch: The switches to configure these settings are located on the main board inside the camera. See Fig. 1: DIP
Switch.
Fig.1: DIP Switch:
Details of how to set the camera address can be found in Section 7.
Please note, the camera will require rebooting after the address is set via DIP switches in order to activate the new
address setting.
Page 11
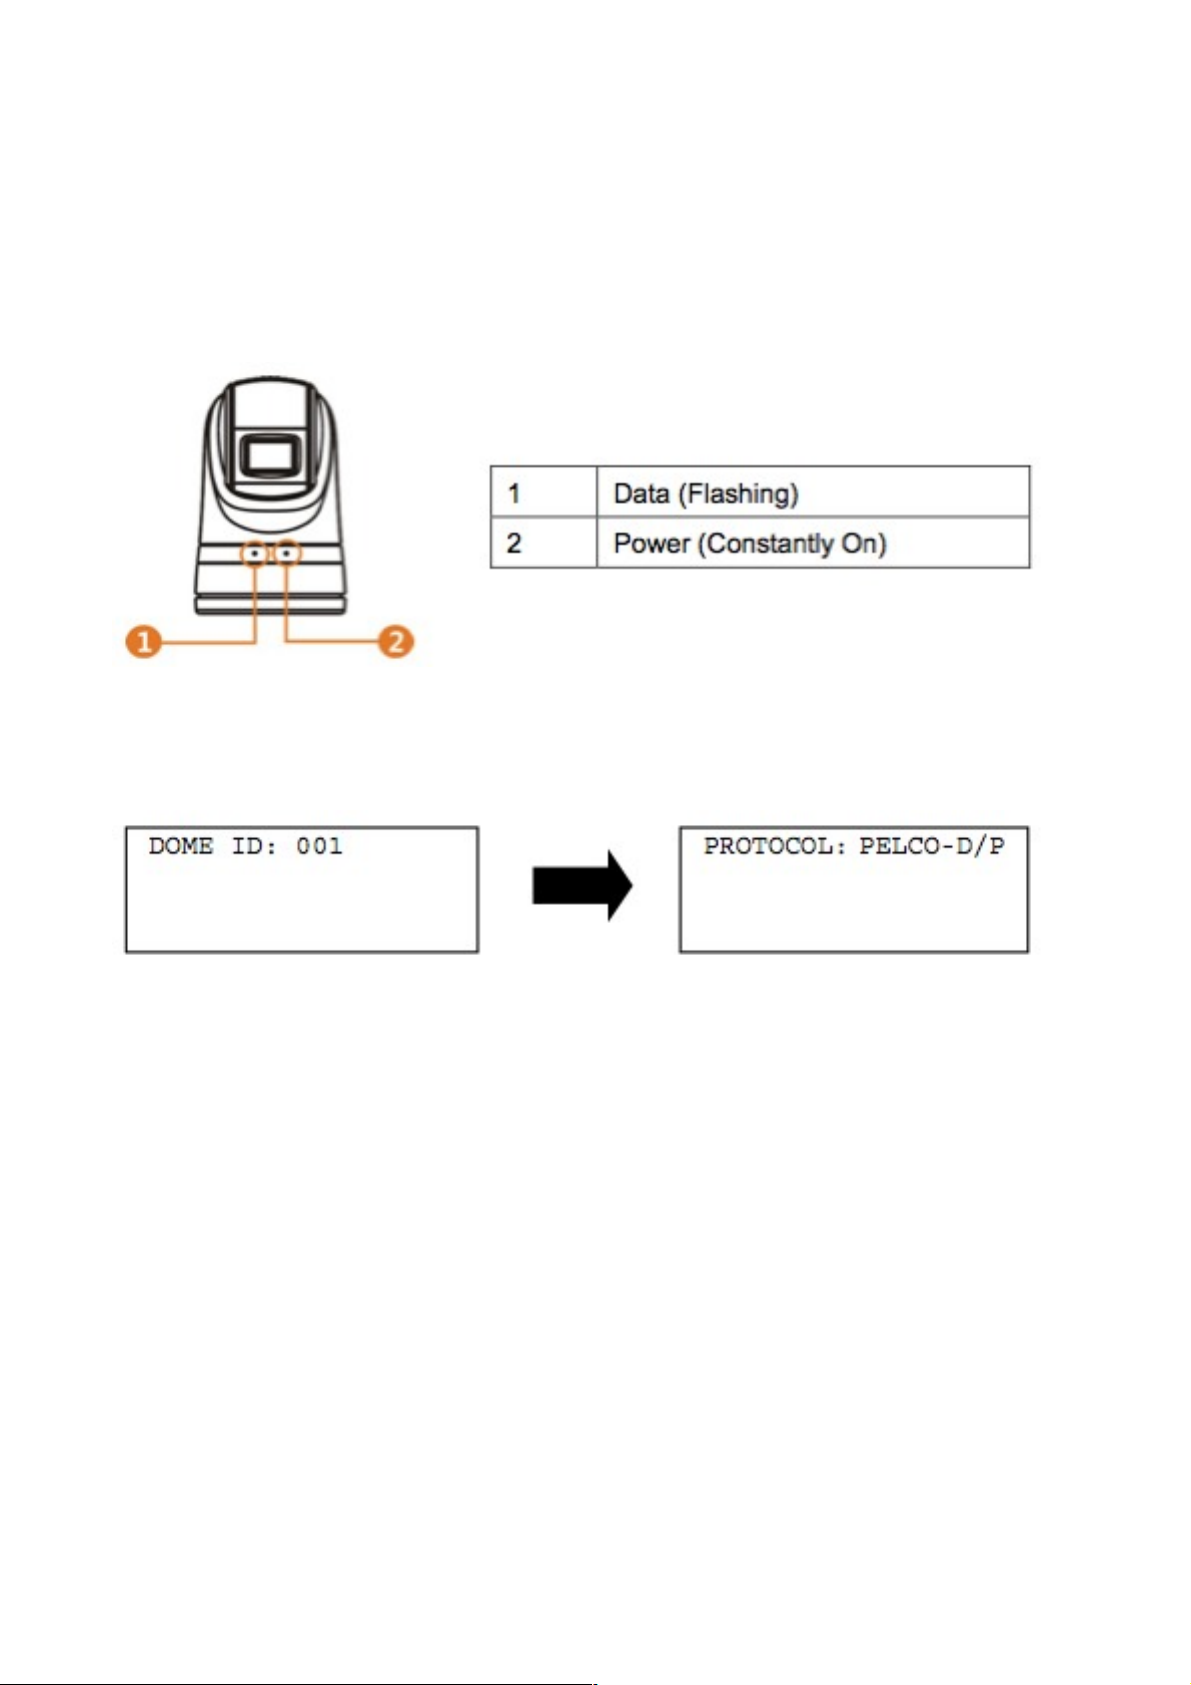
3.2. INITIAL POWER ON TEST
To ensure the camera operates correctly after installation, please power for an initial test following the steps below:
1) Connect the camera with correct power supply
2) Connect control cable, video cable
3) Power on the camera
When the camera is powered on, the LED indicators at the front will display the following:
Fig.2: LED Indicators
The camera will run a calibration procedure on power up and show the following messages on screen in three times
sequentially:
Fig.3: On Screen Messages During Power-Up
3.3. SIGHTING THE CAMERA FOR INSTALLATION
There are a number of issues to consider when sighting the position of the camera:
1. Does the position achieve the desired fields and angles of view?
(Iris strongly advise that a survey is carried out prior to fixing the camera into place to ensure desired views are
achievable. If necessary, power the camera up before fixing into place in order to test the view).
2. Will the position support the weight, size and movement of the camera without obstructions?
3. Are there likely to be obstructions behind the panel that will prevent or hinder the successful installation of the
camera?
4. Are there likely to be obstacles that will hinder the cable run or prevent interconnection behind the panel?
5. Are there any devices in the desired vicinity that may effect the operation of the camera?
Page 12

4. INSTALLATION
4.1. MOUNTS
There are two types of mounts:
Fixed Mount (Standard)
Sucker Mount (With Magnets and Vacuum System) (Optional)
An optional ‘Damper’ is also available for Fixed Mount Installations. Contact your dealer for more information if required.
Fig. 4: Fixed Mounts (with and w/o damping system)
Page 13

Fig. 5: Sucker Mount (Optional). Please note, this mounting option may not be suitable for Marine Installations.
4.2. INSTALLATION
To set the baud rate, protocol and camera hard address:
1) Remove the PTZ bottom plate
2) Set DIP Switch for baud rate, protocol and camera address
3) Re-Fix the bottom plate, making sure the sealing is in fact and not compromised.
Fig. 6: Bottom Plate
Page 14
4.2.1. FIXED MOUNTS
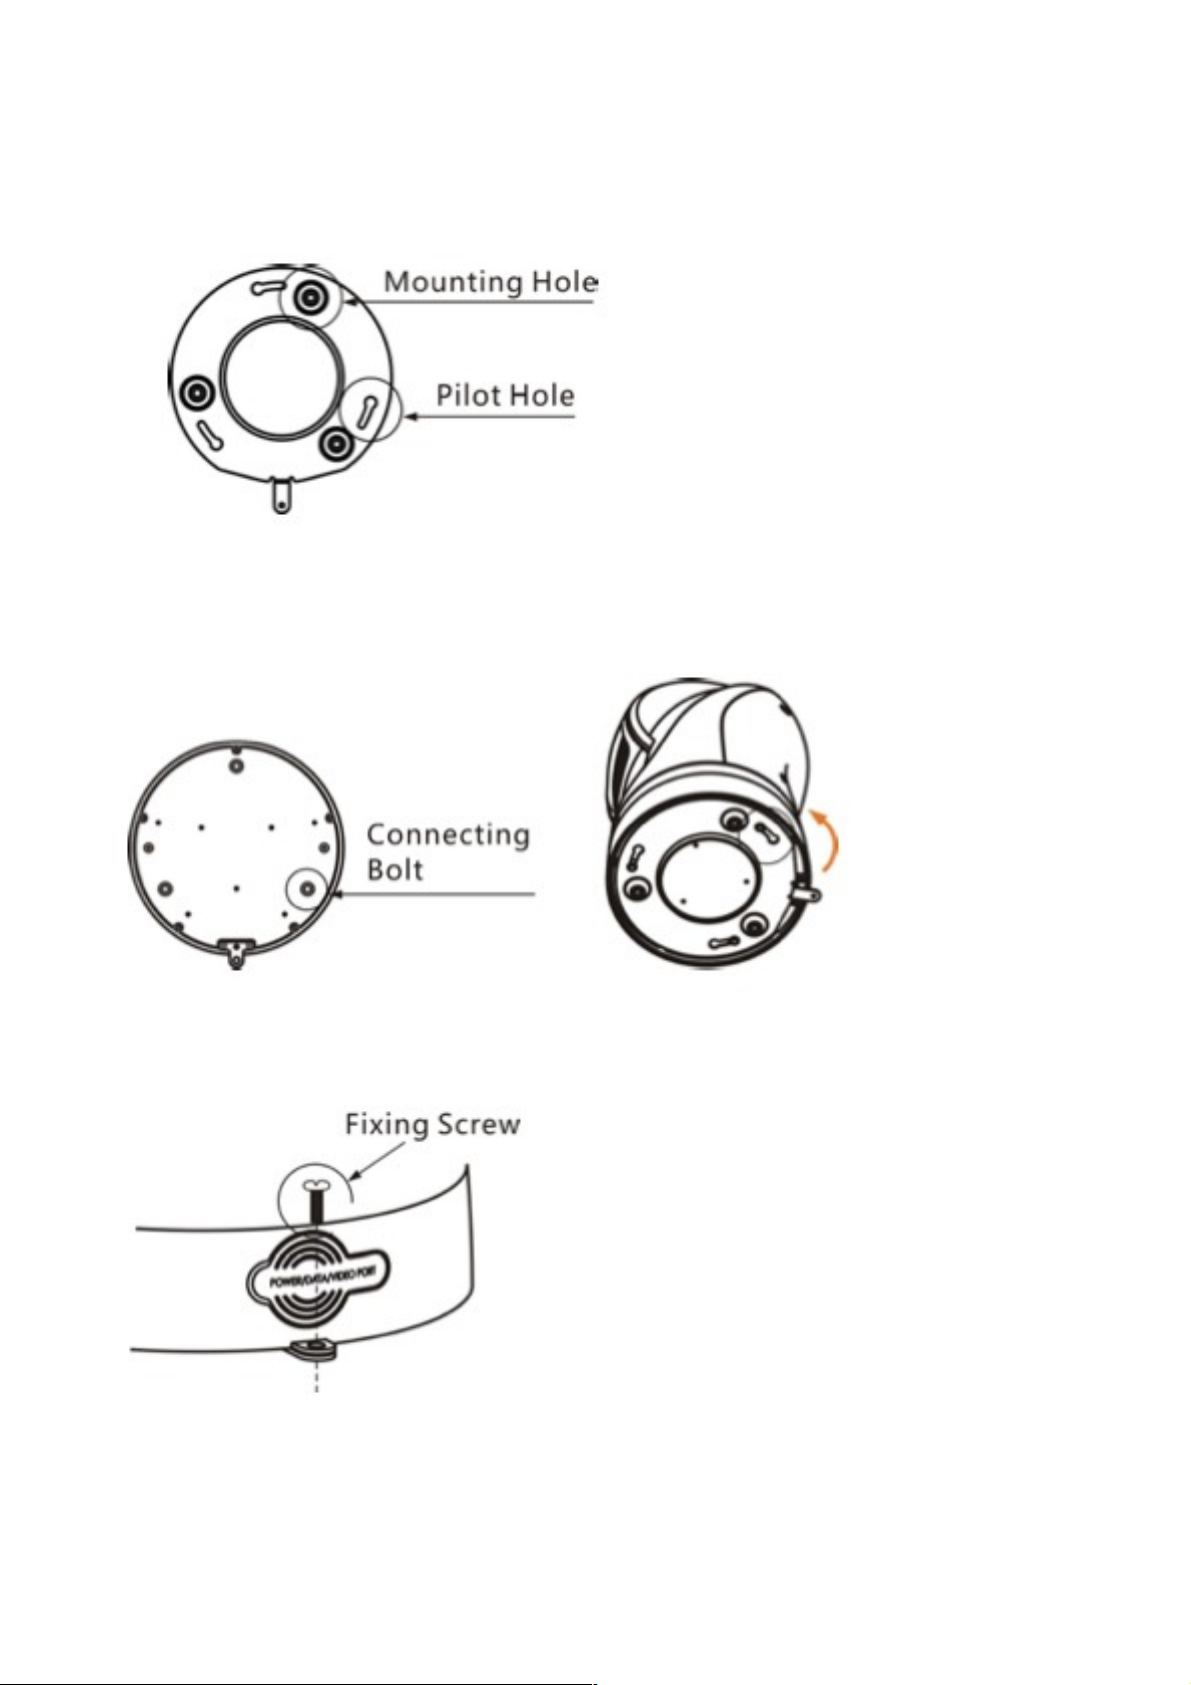
1) Take the installation plate out of packing and fix it to the desired surface position as per the plate dimensions (use the
plate as the template) using the correct screws for the type of surface.
Fig. 7: Installation Plate
2) Put the camera onto the installation plate. Make sure three installation bolts are in position with the fixing holes on the
plate. Rotate the camera clockwise.
Fig. 8: Mount the Installation Plate
3) Fix the camera to the installation plate with a screw.
Page 15

4.2.2. SUCKER MOUNTS (Optional)...
1) Take out the PTZ camera and place at a horizontal metal surface with the sucker mount.
Fig. 10: Installation of Sucker Mount
Page 16

4.3. CAMERA CABLE PACKAGE
Connect the cable observing correct polarity as per following diagrams:
Fig. 11: Cable Package
There are two red marks each on the plug and socket. Please match them during connection:
Fig. 12: Cable Connection 1
Connect correct cables to relative outputs (RS485 +/-, Video Output and Power):
Fig. 13: Cable Connection 2
Please ensure correct polarity is observed at all times when connecting cables. Failure to do so could result in
irreparable damage to the camera, surrounding vessel and even injury.
Page 17

5. OPERATION
5.1. SPECIAL CONTROL PANEL COMMANDS
The camera can be programmed and operated using various ‘quick’ commands as detailed in the list below:
Page 18

Table 2: Special Commands
Please Note: The camera can auto detect and set protocol and baud rate as per the whole system. There may be no
response to the first several operations after the power on as the camera may still be going through the initialization and
set-up stage.
5.2. OPERATION
Image Freeze
Call Preset 28 to pause (or freeze) and un-freeze. When it is on, during a regular preset call (see diagram below), the
video will be frozen at point A till Point B. At Point B, the video will be displayed normally.
Fig. 14: Image Freeze
Defogging
Call Preset 37 to turn on the Defogger function. The “DEFOGGING” label will flash at top of the screen. When the fog is
cleared, turn off the function in time to prevent the camera temperature getting too high.
Call Preset 38 to turn off the function. The “DEFOGGING” label at top of the screen will disappear from the screen.
Page 19

IR / White Light
Auto Mode (IR Version Only): The default IR mode is auto. Auto mode can also be activated via preset 22. In this mode,
preset commands 30~33 are disabled.
When the camera module is in mono, the camera will automatically turn on IR lights. The high beam and low beam will
be turned on/off as per the current zoom levels.
When the module is in color mode, the camera will automatically turn off IR lights.
Manual Mode: Call Preset 21 to turn on the manual mode. The module will be switched into color or mono mode. And
lights can be controlled via the commands of presets 30~33.
Soft Address
The camera address can be changed via presets 62 and 63. The new address will take effect after the camera is
rebooted.
Digital Noise Reduction
This function is set to OFF as default.
When the camera is in color mode, it is recommended to turn off the function, or there will be distortion to the video
image in the form of ‘trails’.
When the camera is in mono mode, call preset 27 to turn on/off the function. There are 1~5 steps from low to high. The
higher the level, the greater risk of distortion.
Wiper
Only activate the wiper when the lens window is wet. Failure to do so could result in the wiper blade prematurely wearing
out and the wiper itself scratching the lens window.
Page 20

6. TROUBLESHOOTING
Table 3: Trouble Shooting
Page 21

7. ANNEX:DIPSWITCH–CAMERA ADDRESS (0~64)
Page 22

 Loading...