


This unit complies with the interference limits relative to a Class B digital device, applicable under Part 15
of the FCC Rules regarding installation in a residential environment. If the unit is not installed in accordance
with these instructions, it could cause harmful interference to audio or television reception. If this condition
persists after corrective action, consult your dealer or experienced installation facility.
1
FCC Regulations
Cet appareil est conforme aux normes d'interference des appareils digitaux de Classe B, conformement
a l'article 15 du Reglement de la FCC, pour une installation domestique. Si l'appareil n'est pas installe
conformement aux instructions, il peut causer des interferences nuisibles a la reception audio ou televisuelle.
Si cette situation persiste malgre les actions correctives, consultez votre revendeur ou installateur agree.
Reglement FCC
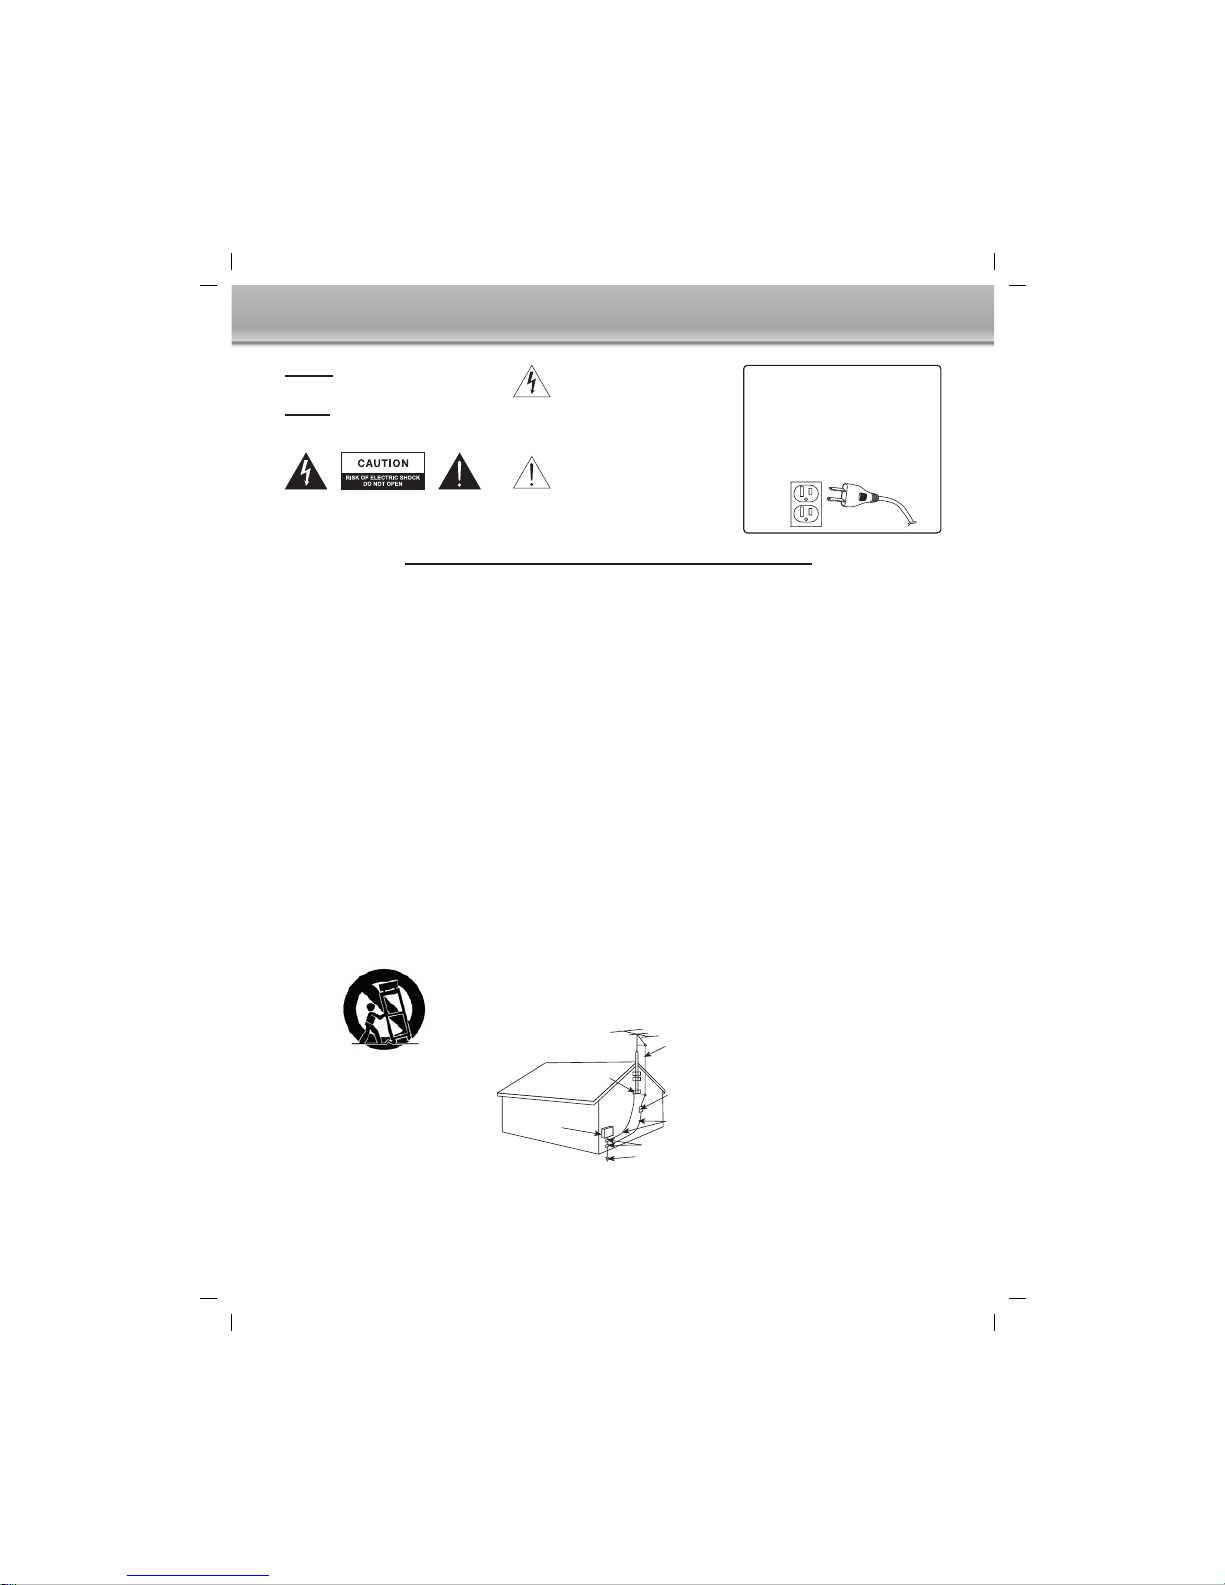
CAUTION:
TO PREVENT ELECTRIC SHOCK, MATCH
WIDE BLADE OF PLUG TO WIDE SLOT,
FULLY INSERT.
ATTENTION:
POUR ÉVITER LES CHOC ÉLECTRIQUES,
INTRODUIRE LA LAME LA PLUS LARGE DE
LA FICHE DANS LA BORNE
CORRESPONDANTE DE LA PRISES ET
POUSSER JUSQUAU FOND.
GROUND
CLAMP
ELECTRIC
SERVICE
EQUIPMENT
ANTENNA
LEAD IN
WIRE
ANTENNA
DISCHARGE UNIT
(NEC SECTION 810-20)
GROUND CLAMPS
GROUND CONDUCTORS
(NEC SECTION 810-21)
POWER SERVICE GROUNDING
ELECTRODE SYSTEM
(NEC ART 250, PART H)
NEC - NATIONAL ELECTRICAL CODE
WARNING:
To reduce the risk of fire or electric shock, do not
expose this appliance to rain or moisture.
CAUTION:
Use of controls or adjustments or performance of
procedures other than those specified may result
in hazardous radiation exposure.
CAUTION - TO REDUCE THE RISK OF
ELECTRIC SHOCK, DO NOT REMOVE COVER
(OR BACK). NO USER-SERVICING TO
QUALIFIED SERVICE PERSONNEL.
The lightning flash with arrowhead
symbol, within an equilateral triangle, is
intended to alert the user to presence
of uninsulated dangerous voltage
within the products enclosure that may
be of sufficient magnitude to constitute
a risk of electric shock to persons.
The exclamation point within an
equilateral triangle is intended to alert
the user to the presence of important
operating and maintenance (servicing)
instructions in the literature
accompanying the appliance.
IMPORTANT SAFETY INSTRUCTIONS
1. Read Instructions - All the safety and operating
instruction should be read before the product is
operated.
2. Retain Instructions - The safety and operating
instruction should be retained for future reference.
3. Heed Warnings - All warning on the product and
in the operating instructions should be adhered to.
4. Follow instructions - All operating and use
instructions should be followed.
5. Cleaning - Unplug this product from the wall outlet
before cleaning. Do not use liquid cleaners or
aerosol cleaners. Use a damp cloth for cleaning.
6. Attachments - Do not use attachments not
recommended by the product manufacturer as they
may cause hazards.
7. Water and Moisture - Do not use this product near
water - for example, near a bath tub, wash bowl,
kitchen sink, or laundry tub; in a wet basement, or
near a swimming pool, and the like.
8. Accessories - Do not place this product on an
unstable cart, stand tripod, bracket, or table. The
product may fall, causing serious injury to a child
or adult, and serious damage to the product. Use
only with a cart, stand, tripod, bracket, or table
recommended by the manufacturer, or sold with
the product. Any mounting of the product should
follow the manufacturer? instructions, and should
use a mounting accessory recommended by the
manufacturer.
9. A product and cart combination should be moved
with care. Quick stops, excessive force, and uneven
surfaces may cause the appliance and cart
combination to overturn.
12. Grounding or Polarization - This product may be
equipped with a polarized alternating-current line
plug (a plug having one blade wider than the other).
This plug will fit into the power outlet only one way.
This is a safety feature. If you are unable to insert
the plug fully into the outlet, try reversing the plug.
If the plug should still fail to fit, contact your
electrician to replace your obsolete outlet. Do not
defeat the safety purpose of the polarizes plug.
Alternate Warnings - This product is equipped with
a three-wire grounding-type plug, a plug having a
third (grounding) pin. This plug will only fit into a
grounding-type power outlet. This is a safety feature.
If you are unable to insert the plug into the outlet,
contact your electrician to replace your obsolete
outlet. Do not defeat the safety purpose of the
grounding-type plug.
13. Power-Cord Protection - Power supply cords should
be routed so that they are not likely to be walked
on or pinched by items placed upon or against
them, paying particular attention to cords at plugs,
convenience receptacles, and point where they
exit from the product.
14. Protective Attachment Plug - The product is
equipped with an attachment plug having overload
protection. This is a safety feature. See Instruction
Manual for replacement or resetting of protective
device. If replacement of the plug is required, be
sure the service technician has used a replacement
plug specified by the manufacturer that has the
same overload protection as the original plug.
15. Outdoor Antenna Grounding - If an outside antenna
is connected to the receiver, be sure the antenna
system is grounded so as to provide some
protection against voltage surges and built-up static
charges. Article 810 of the National Electrical Code,
ANSI/NFPA 70, provides information with regard
to proper grounding of the mast and supporting
structure, grounding of the mast and supporting
structure, grounding of the lead-in wire to an
antenna-discharge unit, size of grounding
conductors, location of antenna-discharge unit,
connection to grounding electrodes, and
requirements for the grounding electrode.
17. Power Lines - An outside antenna system should
not be located in the vicinity of overhead power
lines or other electric light or power circuits, or
where it can fall into such power lines or circuits.
When installing an outside antenna system, extreme
care should be taken to keep from touching such
power lines or circuits as contact with them might
be fatal.
18. Overloading - Do not overload wall outlets,
extension cords, or integral convenience
receptacles as this can result in a risk of fire or
electric shock.
19. Object and Liquid Entry - Never push objects of
any kind into this product through openings as they
may touch dangerous voltage points or short-out
parts that could result in a fire or electric shock.
Never spill liquid of any kind on the product.
20. Servicing - Do not attempt to service this product
yourself as opening or removing covers may expose
you to dangerous voltage or other hazards. Refer
all servicing to qualified service personnel.
21. Damage Requiring Service - Unplug this product
from the wall outlet and refer servicing to qualified
service personnel under the following conditions:
a) When the power-supply cord or plug is damaged,
b) If liquid has been spilled, or objects have fallen
into the product,
c) If the product has been exposed to rain or water,
d) If the product does not operate normally by following
the operating instructions. Adjust only those controls
that are covered by the operating instructions as
an improper adjustment of other controls may result
in damage and will often require extensive work
by a qualified technician to restore the product to
its normal operation.
e) If the product has been dropped or damaged in
any way, and
f) When the product exhibits a distinct change in
performance - this indicates a need for service.
22. Replacement Parts - When replacement parts are
required, be sure the service technician has used
replacement parts specified by the manufacturer
or have the same characteristics as the original
part. Unauthorized substitutions may result in fire,
electric shock, or other hazards.
23. Safety Check - Upon completion of any service or
repairs to this product, ask the service technician
to perform safety checks to determine that the
product is in proper operating condition.
24. Wall or Ceiling Mounting - The product should be
mounted to a wall or ceiling only as recommended
by the manufacturer.
25. Heat - The product should be situated away from
heat sources such as radiators, heat registers,
stoves, or other products (including amplifiers) that
produce heat.
10. Ventilation - Slots and openings in the cabinet are
provided for ventilation and to ensure reliable
operation of the product and to protect it from
overheating, and these openings must not be
blocked or covered. The openings should never
be blocked by placing the product on a bed, sofa,
rug, or other similar surface. This product should
not be placed in a built-in installation such as a
bookcase or rack unless proper ventilation is
provided or the manufacturer? instruction have
been adhered to.
11. Power Sources - This product should be operated
only from the type of power source indicated on
the marking label. If you are not sure of the type
of power supply to your home, consult your product
dealer or local power company. For products
intended to operate from battery power, or other
sources, refer to the operating instruction.
16. Lightning - For added protection for this product
during a lightning storm, or when it is left unattended
and unused for long periods of time, unplug it from
the wall outlet and disconnect the antenna or cable
system. This will prevent damage to the product
due to lightning and power-line surges.
See figure:
2

Congratulations on your choice of the iRhythms A-303 speaker system. This self contained desktop speaker
system is made for 3rd Generation iPod touch wheel with buttons, 4th Generation iPod with Click Wheel,
iPod mini, iPod photo, iPod shuffle and other portable audio sources. The A-303 is powerful enough to fill
the room with quality audio performance yet small enough to travel. Enjoy!
3
Introduction
The Package
Yes, get ready to enjoy!
Place the system on a firm flat surface.
The drivers in your
iRhythms
system are shielded and therefore limits the possibility of interference to video
and computer monitors. However, it is a good idea to leave a reasonable distance between the speaker
system and these devices.
Your next step is to install the proper insert into the universal dock located on the front bottom portion
of the system. Each insert is marked so choose one which fits your iPod. To install the insert simply let it
snap into the connector well.
Get Ready
Contents of this system include:
Remote Control
Power Cord Power Supply
Dock Inserts
3.5mm cable
Note:
iPod nano and ipod video come with their
own inserts that also fit into this universal well.
To remove insert guide
the screw driver into the
insert slot and gently pry
it upwards
Docking Well
3rd Generation iPod
with touch wheel and
buttons (10GB, 15GB
and 20GB)
4th Generation iPod
with Click Wheel
(20GB and 30GB)
3rd Generation
iPod with touch
wheel and
buttons (30GB
and 40GB)
4th Generation
iPod with Click
Wheel (40GB)
iPod photo
iPod shuffleiPod miniiPod nanoiPod with video
(30G)
iPod with video
(60G)
Digital Docking Speaker
TM
POWER
OFF ON
DC15V
Input
Place the enclosed AAA batteries in to remote control battery compartment. Follow the battery indicators
( + / - ) to make sure they are put in correctly.
Before your speaker will function the main power switch on the back of the speaker system has to be
turned on. After this switch is turned on the system can be turned on and off with the remote control. NOTE:
If the speaker will not be in use for long periods of time it is recommended to turn off the main power
switch in the back.
Using The System
4
Plug the power cord into the power supply. The barrel connector at the end of the power supply plugs
into the DC jack located at the back of the system. Now, plug the power cord into your AC wall socket
or surge protector.
Once again, make sure the correct insert for your iPod is in the universal dock. Plug your iPod into the
connector pin that comes through the well/insert.
Connections
Your iPod can be on or off when you place it into the dock connector. If your iPod is on and a music track
is playing you should hear sound immediately. If you dont hear anything recheck that the track is playing
and the volume on the system is turned up slightly. The volume can be turned up or down using the
remote or the volume + / - buttons on the front of the speaker.
NOTE: To avoid a popping sound make sure the iPod is already turned on when inserting
it into the dock connector.
Power On / Off
switch
Signal input jack
Two Way Stereo
Speaker System
Volume Up
Volume Down
Insert
Docking Well
volume down
volume up
Rear panel
AC/DC
power supply
Rear panel
DC15V
Input
DC input
AUX
POWER
OFF ON
Again, make sure batteries are installed.
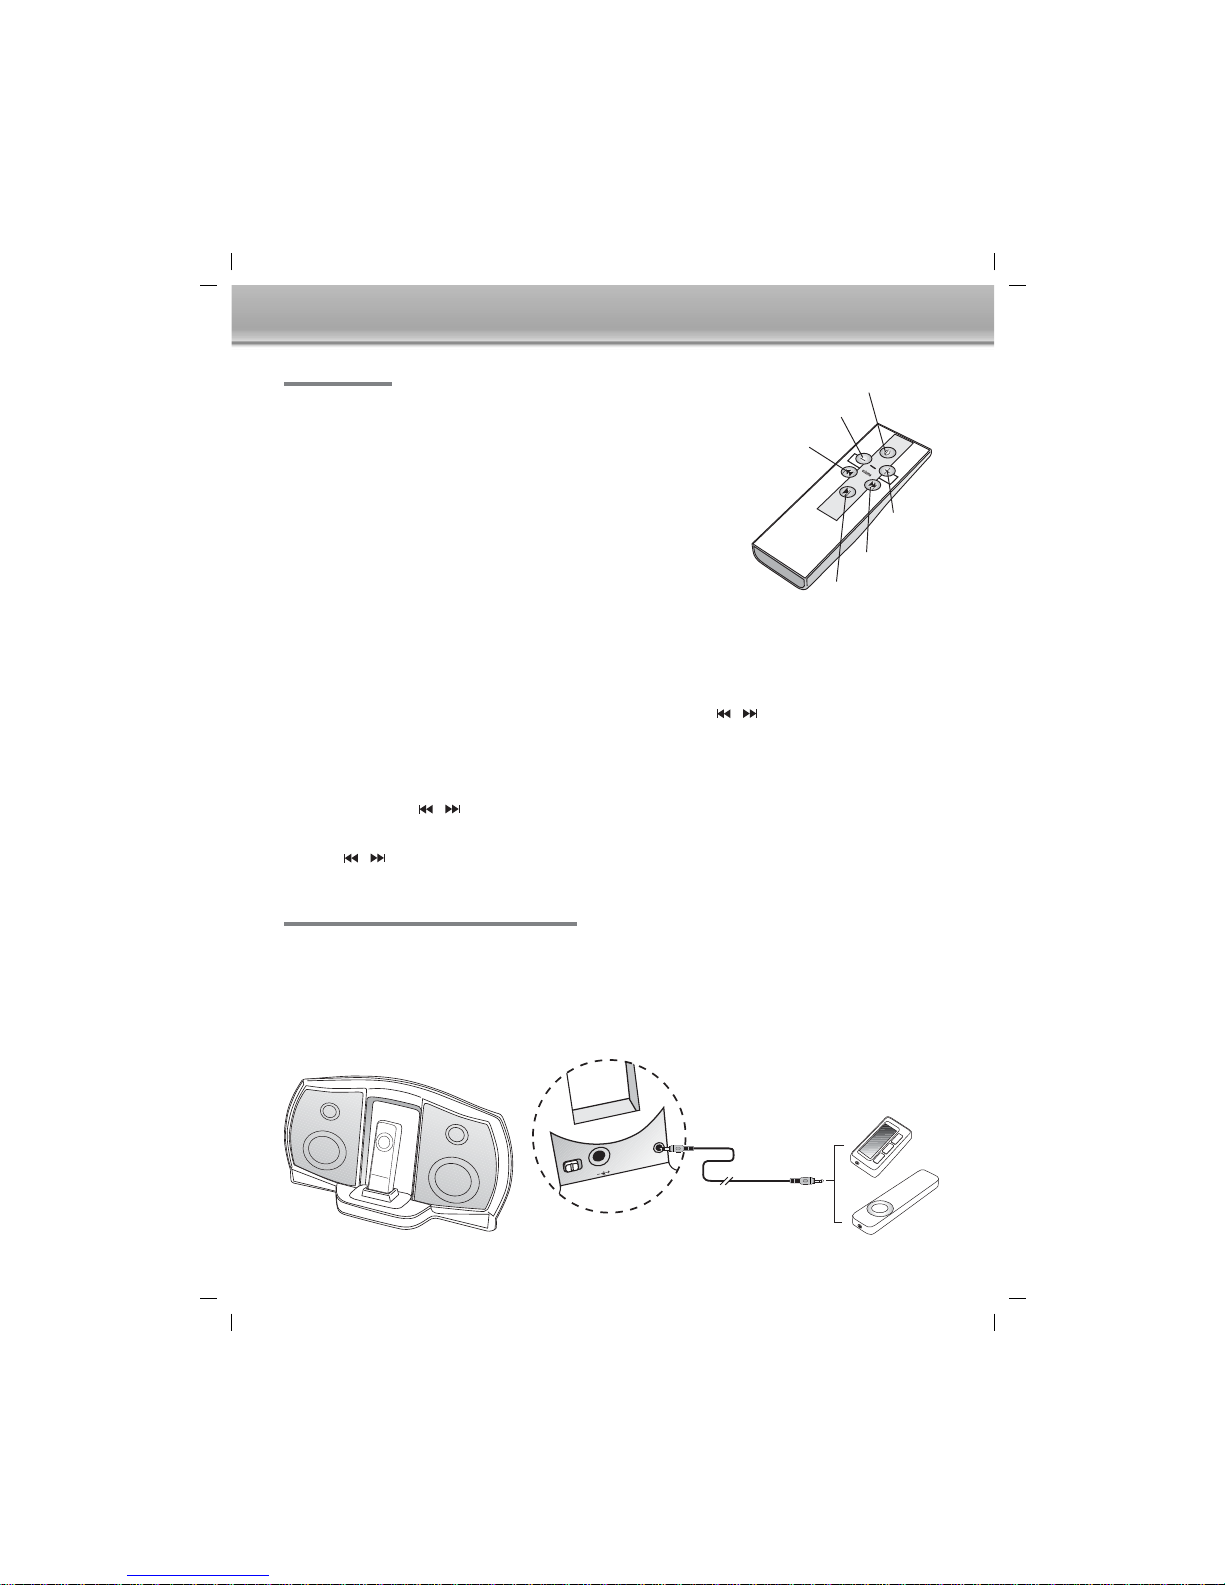
Power On / Off
The power button on the remote control will turn the speaker on and off.
An LED light at the dock station will illuminate blue when the system is
turned on.
It will turn red when powered off from the remote.
Volume
The volume can be turned up or down by pressing and holding the
+ / - buttons on the remote.
Other functions
You can navigate music tracks with the remote if you have a newer iPod that has software version of 2.1
or later.
Remote On / Off for iPod:
The iPod can be turned off by pressing the play/pause button and holding it down. The iPod can be turned
back on by pressing once on the play/pause button or once on the / forward / back buttons.
Play / Pause
Just press the play / pause button once to start or pause the music track.
Rewind and Fast Forward
If you hold down the / buttons the track will rewind or fast forward.
Skip one song forward or one song back
Press the / buttons just once to skip forward to next song or back to the beginning of the current
track.
Remote Control
Your speaker system has a 3.5mm input jack located on the back. Just connect the 3.5mm plug cable
that comes with the system to the headphone output jack on your iPod shuffle or other music source.
NOTE: The only remote functions that will work with these other sources is the power On / Off and volume
up and down. The song navigation features on the remote do not apply to these other devices.
Connecting to iPod Shuffle or other source
iPod Shuffle
MP3 Player
Power
Volume Up
Back
Volume
Down
Play / Pause
Forward
Back of dock station
5
P
O
W
E
R
O
F
F
O
N
D
C
1
5
V
In
p
u
t
A
U
X

6
No Power
Main power switch on the back is not turned on.
Power button on the front of the speaker or the remote hasnt been turned on.
AC power supply is not connected to the power cord or the wall socket.
No Sound
iPod is not docked properly. Make sure you are using the proper insert that best fits your iPod.
Volume is turned down.
Music track on your iPod is not playing. Check the music isnt paused or in between tracks.
Check and make sure your iPod is running the proper software. 2.1 or later version.
Not Charging and No Sound
Make sure the iPod is seated properly in the insert / dock and that it is getting good contact
to the connector pin.
Remote functions do not work
Make sure you are using good batteries.
Make sure batteries are seated properly.
If some of the navigation functions do not work it may be because you havent updated your iPod
software. These functions are designed for software version 2.1 or newer.
Trouble Shooting
iRhythms warrants to the purchaser that this product shall be free from defects in materials or workmanship
for a period of one year from original purchase date. Proof of purchase is required. Please retain your
receipt. The warranty registration card should also be filled out completely and immediately returned to
iRhythms.
During the warranty period, if this product is found to be defective under normal use and service, iRhythms
shall at its option repair or replace it with new or reconditioned product.
This warranty does not cover defects resulting from accidents, abuse, misuse, or unauthorized service.
This warranty gives you specific rights. You may have other legal rights which vary from state to state.
To obtain warranty service, return the product with shipping prepaid to iRhythms. iRhythms reserves the
right to replace any discontinued product with one of equal value.
Note:
1) For technical support and questions, please contact iRhythms
Tel: 360-823-4100 / Fax: 360-883-4888
2) You can now register your iRhythms product on line through our web site in
lieu of filling out and mailing this card: www.irhythms.com
Warranty

Wir gratulieren Ihnen zum Kauf des A-303 Lautsprechersystems von iRhythms. Dieses unabhängige
Lautsprechersystem für den Desktop ist für iPods der 3. Generation mit Touch Wheel und Steuertasten,
iPods der 4. Generation mit Click Wheel, iPods Mini, iPods Photo, iPod Shuffle und andere, portable
Audiogeräte geschaffen. Das A-303 Lautsprechersystem ist leistungsstark genug, um ein Zimmer mit
hochqualitativer Musikwiedergabe zu erfüllen, und doch klein genug, um Sie auf der Reise zu begleiten.
Genießen Sie!
7
Einfuhrung
Packungsinhalt
So bereiten Sie das Gerät für den Einsatz vor!
Stellen Sie das System auf einer stabilen, ebenen Oberfläche auf.
Die leistungsstarken Lautsprecher-Treibermagnete Ihres iRhythms Systems sind magnetisch abgeschirmt, und
das Auftreten von Störungen beim Betrieb in der Nähe von Video- und Computer-Monitoren wird dadurch
verringert. Wir raten Ihnen trotzdem eine ausreichende Distanz zwischen diesen Geräten und dem
Lautsprechersystem einzuhalten.
Als nächsten Schritt müssen Sie den korrekten Adapter in der "Universal-Dock" an der Vorderseite im unteren
Teil des Systems installieren. Jeder Adapter ist markiert, und Sie sollten den Adapter für Ihr jeweiliges iPodModell auswählen. Zur Installation lassen Sie den Adapter einfach in die Vertiefung des Anschlussdocks fallen.
Vorbereitung zum Einsatz
Dieses System besteht aus den folgenden Komponenten:
Fernbedienung
Netzkabel Netzadapter
Anschlussadapter
3,5mm Kabel
Zum Herausnehmen
fuhren Sie einen Schraubenzieher
in den Schlitz ein, und drucken
Sie den Adapter vorsichtig nach oben.
Anschlusbuchse
Hinweis:
iPod nano und iPod video werden mit
speziellen Einsätzen ausgeliefert, und passen
in diese Univeralbuchse.
Digital Docking Speaker
TM
iPod der 3.
Generation
mit Touch Wheel
und Bedientasten.
(10GB, 15GB und
20GB)
iPod der 4.
Generation
mit Click Wheel
(20GB und 30GB)
iPod der 3.
Generation
mit Touch Wheel
und
Bedientasten
(30GB und 40GB)
iPod der 4.
Generation
mit Click Wheel
(40GB)
iPod photo
iPod shuffleiPod miniiPod nanoiPod with video
(30G)
iPod with video
(60G)

DC15V
Input
Legen Sie die mitgelieferten Batterien der Größe "AAA" in das Batteriefach der Fernbedienung ein. Beachten
Sie die Polarisierungsangaben (+/-), und stellen Sie sicher, dass diese korrekt ausgerichtet sind.
Ihr Lautsprechersystem ist einsatzbereit sobald Sie das Gerät mittels des Hauptschalters an der Rückseite
eingeschaltet haben. Nachdem Sie das System mittels dieses Schalters eingeschaltet haben, könne Sie
das Gerät mittels der Fernbedienung ein- und ausschalten. HINWEIS: Wenn das Lautsprechersystem
voraussichtlich längere Zeit nicht im Betrieb sein wird, empfehlen wir das Gerät mittels des Hauptschalters
an der Rückseite auszuschalten.
Der Einsatz des Systems
8
Verbinden Sie das Netzkabels mit der Netzstromversorgung. Der Klinkenstecker am Ende des Adapterkabels
muss an der DC-Buchse an der Rückseite des Systems angeschlossen werden. Verbinden Sie nun den
Stecker des Netzkabels mit einer AC-Wandsteckdose oder einer geschützten Steckerleiste.
Überprüfen Sie nochmals, ob der korrekte Adapter für Ihren iPod in die "Universal-Dock" eingeführt wurde.
Schließen Sie Ihren iPod an den Kontaktstiften an, die an der Anschlussseite des Adapters/der Buchse
sichtbar sind.
Anschlüsse
Ihr iPod kann beim Anschluss an der Verbindungsbuchse ein- oder ausgeschaltet sein. Wenn Ihr iPod
eingeschaltet ist und ein Musiktitel abspielt, dann sollten Sie sofort die Wiedergabe über die Lautsprecher
hören. Falls Sie keine Wiedergabe hören, dann sollten Sie überprüfen, ob ein Titel abspielt, und es kann
sein, dass Sie die Lautstärke etwas aufwärts einstellen müssen. Die Lautstärke kann mittels der Fernbedienung
oder dem "+/- "Lautstärkeregler an der Vorderseite des Systems aufwärts oder abwärts eingestellt werden.
HINWEIS: Um zu verhindern, dass Lautstärkespitzen auftreten, sollten Sie sicher stellen,
dass Ihr iPod bereits eingeschaltet ist, bevor Sie das Gerät an der Anschlussbuchse
anschließen.
Hauptschalter
Ein/Aus
Anschlussbuchse fur externe Signalquelle
2-Wege Stereo-Lautsprec
hersystem
Lautstärke Aufwärts
Lautstärke Abwärts
Adapter
Anschlussbuchse
volume down
volume up
Rückseite
AC/DCNetzadapter
Rückseite
DC15V
Input
DC-Anschlussbuchse
AUX
POWER
OFF ON
POWER
OFF ON

Bitte stellen Sie sicher, dass die Batterien eingelegt wurden.
Hauptschalter "Ein/Aus"
Der Hauptschalter an der Fernbedienung schaltet das Lautsprechersystem
"ein" und "aus". Ein LED-Indikator am Lautsprechersystem leuchtet "Blau",
und zeigt an, dass das Gerät eingeschaltet ist.
Der Indikator leuchtet "Rot", wenn das Gerät mittels der Fernbedienung
ausgeschaltet wird.
Lautstärke
Die Lautstärke kann aufwärts/abwärts eingestellt werden, indem Sie die
"+/-"Tasten an der Fernbedienung gedrückt halten.
Andere Funktionen
Sie können die Musiktitel mittels der Fernbedienung auswählen, wenn Sie ein neueres iPod-Modell mit der
Software-Version 2.1 oder später besitzen.
Fernbedienung "Ein/Aus" fur iPod:
Ihr iPod kann eingeschaltet werden, indem Sie die "Wiedergabe/Pause"-Taste gedrückt halten. Ihr iPod
kann wieder eingeschaltet werden, indem Sie die "Wiedergabe/Pause"-Taste oder die / "Schnell
Vorwärts"-Tasten einmal betätigen.
Wiedergabe/Pause
Betätigen Sie einfach die "Wiedergabe/Pause"-Taste einmal, um die Wiedergabe eines Titels zu beginnen
oder zu pausieren.
Schnell Rückwärts oder Vorwärts
Wenn Sie die / -Tasten gedrückt halten, dann wird eine Stelle in einem Titel vorwärts oder rückwärts
aufgesucht.
Einen Titel vorwärts oder rückwärts springen
Betätigen Sie die / -Taste einmal, um vorwärts an den Anfang des nächsten Titels, oder rückwärts
an den Anfang des abspielenden Titels zu springen.
Fernbedienung
Ihr Lautsprechersystem besitzt an der Rückseite eine 3,5mm Anschlussbuchse. Schließen Sie das mit dem
System ausgelieferte 3,5mm Klinkensteckerkabel an der Kopfhörerbuchse Ihres "iPod Shuffle" oder einer
anderen Signalquelle an.
HINWEIS: Die Funktionen der Fernbedienung, die beim Anschluss dieser anderen Signalquellen funktioniert,
sind der "Ein/Aus"-Hauptschalter und der "Auf/Ab"-Lautstärkeregler. Die Navigationsfunktionen der Fernbedienung
für die Titelsuche und den Titelsprung können für diese anderen Geräte nicht eingesetzt werden.
Anschließen an iPod Shuffle oder andere Signalquellen
iPod Shuffle
MP3 Player
Hauptschalter
Lautstärke
Aufwärts
Rückwärts
Lautstärke
Abwärts
Wiedergabe/Pause
Vorwärts
Rückseite des Lautsprechersystems
9
D
C
1
5
V
In
p
u
t
A
U
X
POWER
OFF ON

10
Kein Strom
Hauptschalter an der Rückseite ist nicht eingeschaltet.
Der Schalter an der Vorderseite des Lautsprechersystems oder an der Fernbedienung wurde nicht
betätigt.
AC-Netzadapter ist nicht an der Anschlussbuchse oder an der Wandsteckdose angeschlossen.
Kein Ton
Ihr iPod ist nicht korrekt an der Adapterbuchse angeschlossen. Stellen Sie sicher, dass Sie den korrekten
Adapter für Ihren iPod verwenden.
Lautstärke ist zu niedrig eingestellt.
KKein Titel spielt auf Ihrem iPod ab. Prüfen Sie ob die Wiedergabe im Pause-Modus funktioniert, oder
ob ein Titelsprung ausgeführt wird.
Stellen Sie sicher, dass die korrekte Software der Version 2.1 oder später auf Ihrem iPod installiert ist.
Kein Aufladen und kein Ton
Überprüfen Sie, ob Ihr iPod korrekt an der Buchse/dem Adapter angeschlossen ist, und der Kontakt
mit den Verbindungsstiften sichergestellt ist.
Fernbedienung funktioniert nicht
Stellen Sie sicher, dass Sie neue Batterien eingelegt haben.
Stellen Sie sicher, dass die Batterien mit korrekter Ausrichtung eingelegt wurden.
Wenn einige der Navigationsfunktionen nicht anwendbar sind, dann haben Sie möglicherweise Ihre
iPod-Software nicht aktualisiert. Die Funktionen dieses Gerätes sind ab Version 2.1 oder später
anwendbar.
Störungssuche
iRhythms garantiert dem Erstkäufer für einen Zeitraum von einem Jahr, beginnend mit dem Erstkaufdatum,
dass dieses Produkt frei von Material- oder Verarbeitungsfehlern ist. Das Kaufdatum muss durch den
Erstkaufbeleg nachgewiesen werden. Bitte bewahren Sie Ihren Kaufbeleg auf. Die Garantiekarte sollte
vollständig ausgefüllt und unverzüglich an iRhythms eingesandt werden.
Falls während der Garantiezeit im normalen Gebrauch und Einsatz des Gerätes Schäden festgestellt
werden, dann gewährleistet iRhythms nach Ermessen, das Gerät entweder zu reparieren, oder durch ein
neues Gerät oder ein repariertes Gerät zu ersetzen.
Diese Garantie deckt Schäden nicht ab, die durch Unfall, Missbrauch, Fehlbrauch oder unzulässige
Wartungsarbeiten entstanden sind. Diese Garantie gewährt Ihnen spezifische Rechte. Es kann sein, dass
von Staat zu Staat noch andere Rechte bestehen.
Senden Sie das Produkt portofrei an iRhythms ein, um Garantieleistungen in Anspruch zu nehmen. iRhythms
behält sich das Recht vor, ausgelaufene Geräte durch Modelle gleichen Funktionsumfangs zu ersetzen.
Note:
1) Für technische Unterstützung und Fragen treten Sie bitte mit iRhythms in Verbindung wie folgt:
wie folgt: Tel: 360-823-4100/Fax: 360-883-4888
2) Sie können Ihr iRhythms Produkt nun ersatzweise für die Einsendung der Registrierkarte auch über das
Internet auf unserer Webseite registrieren: www.irhythms.com
Garantie

Félicitations d'avoir choisi ce système d'enceintes A-303 d'iRhythms. Ce système d'enceintes de bureau
autonome est conçu pour fonctionner avec l'iPod 3e génération avec molette tactile et touches, l'iPod
4e génération avec molette cliquable, l'Ipod mini, l'iPod photo, l'iPod shuffle et d'autres sources audio
portables. Le système A-303 est à la fois assez puissant pour produire une performance audio de haute
qualité et assez compact pour le voyage. Amusez-vous !
Introduction
Le Pack
Êtes-vous prêt ?
Placez le système sur une surface solide et plane.
Les moteurs de votre système
iRhythms
sont blindés, ce qui limite les chances d'interférences avec les
écrans vidéo et d'ordinateur. Cependant, il est préférable de laisser une distance adéquate entre le
système d'enceintes et ces appareils.
Ensuite, placez l'insert approprié dans la cavité de la station d'accueil située sur la façade du système.
Chaque insert est marqué ; choisissez celui qui convient à votre iPod. Pour l'insérer, laissez-le tomber dans
la cavité.
A vos marques !
Le contenu du système comprend :
Télécommande
Cordon d'alimentation Bloc d'alimentation
Inserts pour station
d'accueil
Cordon 3,5 mm
Pour le retirer, glissez un
tournevis dans la fente de
l'insert, puis le degager
delicatement
11
Station d'Accueil
Remarque : les iPod nano et
iPod video sont également
fournis avec leurs propres
inserts pouvant se connecter
à cette station d'accueil.
Digital Docking Speaker
TM
iPod 3e génération
avec molette tactile
et touches
(10 GB, 15 GB
et 20 GB)
iPod 4e génération
avecmolette
cliquable
(20 GB, et 30 GB)
iPod 3e génération
avec molette tactile
et touches
(30 GB et 40 GB)
iPod 4
e
génération
avec molette
cliquable
(40 GB)
iPod photo
iPod shuffleiPod miniiPod nanoiPod with video
(30G)
iPod with video
(60G)

12
POWER
OFF ON
DC15V
Input
Placez les piles AAA fournies dans le compartiment à piles de la télécommande en respectant la polarité
(+ / -) indiquée.
Avant d'utiliser votre système, vous devez actionner l'interrupteur marche/arrêt principal situé à l'arrière du
système. Une fois mis sous tension, vous pouvez allumer et éteindre le système à l'aide de la télécommande.
REMARQUE : Si le système reste longtemps hors service, il est conseillé de le mettre hors tension à l'aide
de l'interrupteur principal.
Utilisation
Branchez le cordon sur le bloc d'alimentation. Branchez la fiche cylindrique du cordon du bloc d'alimentation
dans la prise DC située à l'arrière du système. Ensuite, branchez le cordon d'alimentation sur un prise
murale AC ou parasurtenseur.
Vérifiez que vous avez inséré l'insert correspondant à votre iPod dans la cavité. Branchez votre iPod sur
les connecteurs qui apparaissent à travers l'insert.
Connexions
Lorsque vous placez votre iPod sur la station d'accueil, celui-ci peut être soit allumé soit éteint. Si l'iPod
est allumé et une piste est en lecture, vous devrez entendre le son de suite. Si ce n'est pas le cas, vérifiez
que la piste est en lecture et le volume réglé normalement. Le volume peut être ajusté à l'aide de la
télécommande ou des touches + / - situées sur la façade.
REMARQUE : Pour éviter tout souffle, assurez-vous que l'iPod est allumé lorsque vous
le posez sur la station d'accueil.
Interrupteur
marche/arrêt
principal
Prise d'entrée de signal
Système d'enceintes
à deux voies
Volume (+)
Volume (-)
Insert
Cavité de la
station d'accueil
Volume (-)
Volume (+)
Face arrière
Bloc d'alimentation
AC/DC
Face arrière
POWER
OFF ON
DC15V
Input
Marche/arrêt
DC entrée
AUX

Assurez-vous que les piles sont installées.
Marche / arrêt
La touche marche/arrêt de la télécommande allume et
éteint le système. Lorsque le système est allumé, un
voyant LED bleu s'allume sur la station d'accueil.
Lorsque vous éteignez le système avec la télécommande,
le voyant passe au rouge.
Volume
Le volume peut être réglé en appuyant sur la touche +
télécommande.
Autres fonctions
Avec les derniers iPod muni de la version 2.1 du logiciel ou plus récent, vous pouvez naviguer parmi
les pistes avec la télécommande.
Marche/arrêt du iPod à distance :
L'iPod peut être éteint en maintenant enfoncée la touche lecture/pause. Il peut être allumé en
appuyant une fois sur la touche lecture/pause, retour ou avance rapides.
Lecture/pause
Appuyez sur la touche lecture/pause pour lire la piste ou interrompre sa lecture.
Retour et avance rapides
Maintenez enfoncée la touche ou pour revenir en arriere ou avancer rapidement.
Saut de piste avant ou arrière
Appuyez momentanément sur la touche ou pour revenir au début de la piste en lecture ou
sauter au début de la piste suivante.
Télécommande
Votre système d'enceintes dispose d'une prise 3,5mm située à l'arrière de l'unité. Il suffit de brancher le
cordon 3,5 mm fourni sur la prise casque de votre iPod Shuffle ou de tout autre source audio.
REMARQUE : Les seules fonctions disponibles avec ces autres sources audio sont marche/arrêt et réglage
du volume. Les fonctionnalités de navigation via la télécommande ne s'appliquent pas à ces autres
appareils.
Connexion du iPod Shuffle ou d'autre source audio
iPod Shuffle
Lecteur MP3
Marche/arrêt
Volume +
Retour rapide
Volume -
Lecture / Pause
Avance rapide
Face arrière de l'unité
P
O
W
E
R
O
F
F
O
N
D
C
1
5
V
In
p
u
t
A
U
X
13

14
Pas d'alimentation
L'interrupteur marche/arrêt principal est éteint.
La touche marche/arrêt sur la façade du système ou de la télécommande est éteinte.
Le bloc d'alimentation AC n'est pas branché sur le cordon d'alimentation ou la prise murale.
Ni rechargement ni son
L'iPod est mal enclenché sur la station d'accueil. Vérifiez que l'insert correspond à votre iPod.
Le volume est trop bas.
La piste sur votre iPod n'est pas en lecture. Vérifiez que la lecture n'est pas sur pause ou entre deux
pistes.
Vérifiez que votre iPod dispose du logiciel approprié : version 2.1 ou plus récent.
Ni rechargement ni son
Vérifiez le bon enclenchement de l'iPod dans l'insert/ la station et le contact avec les broches.
Aucune commande à distance
Assurez-vous que les piles utilisées sont neuves.
Vérifiez le bon positionnement des piles.
Si certaines fonctions de navigation ne fonctionnent pas, il se peut que le logiciel iPod ne soit pas
à jour. Ces fonctions sont conçues pour fonctionner avec la version 2.1 du logiciel ou plus récent.
Dépistage des Pannes
iRhythms garantit ce produit contre tout défaut de matières ou de fabrication pour une période d'un an
suivant la date d'achat initiale. Un justificatif d'achat est nécessaire, donc veuillez conserver votre ticket
de caisse. La fiche de garantie doit être complétée et renvoyée immédiatement à iRhythms.
Si, pendant la période de garantie et au cours d'un usage normal, un défaut du produit est constaté,
le produit sera soit réparé soit remplacé par un produit neuf ou reconditionné, à la seule discrétion
d'iRhythms.
Cette garantie ne couvre pas les défauts résultant d'accidents, d'un usage abusif ou incorrect ni d'une
intervention non autorisée. Cette garantie vous confère certains droits. Vous pouvez bénéficier d'autres
droits qui varient selon les états.
Pour toute intervention sous garantie, renvoyez le produit à iRhythms en port dû. iRhythms se réserve le
droit de remplacer un produit en fin de série par un autre de valeur égale.
Remarques :
1) Pour toute question ou support technique, appelez iRhythms
Tel. : 360-823-4100 / Fax : 360-883-4888
2) Au lieu de renvoyer cette fiche, vous pouvez enregistrer votre produit iRhythms en ligne
sur le site web : www.irhythms.com
Garantie

Complimenti per la vostra scelta di acquistare il sistema di diffusione acustica A-303 iRhythms. Questo
sistema desktop autonomo è realizzato per iPod Wheel di 3ª Generazione, iPod Click Wheel di 4ª
Generazione, iPod Mini, iPod Photo e iPod Shuffle ed altre sorgenti audio portatili. A-303 è sufficientemente
potente da offrire una riproduzione audio di elevata qualità in tutta la stanza e, nel contempo, piccolo
abbastanza per essere trasportato ovunque. Buon divertimento!
15
Introduzione
La confezione
Sì, preparatevi al divertimento!
Posizionare il sistema su una superficie stabile e piana.
I drivers del sistema
iRhythms
sono schermati e limitano pertanto la possibilità di interferenze ai monitor
di televisori e computer. Tuttavia è buona norma lasciare una distanza ragionevole tra il sistema di
diffusione e tali dispositivi.
Il passo successivo è l'installazione dei corretti inserti nell'incavo di connessione situato nella base del lato
anteriore del sistema. Ogni inserto è contrassegnato per facilitare la selezione di quello che meglio si
addice all'iPod in uso. Per installare l'inserto, infilarlo semplicemente nella presa di connessione.
Preparativi
Il contenuto della confezione include:
Telecomando
Cavo di alimentazione Alimentatore
Inserti Dock
Cavo da 3.5mm
Per rimuovere l'inserto,
basta infilare la punta di
un cacciavite nella fessura
dell'inserto e applicare una
leva leggera per sollevarlo
Dock
Nota: iPod nano e iPod
video vengono forniti di
serie con i rispettivi inserti
che sono anche adatti per
questo dock universale.
Digital Docking Speaker
TM
iPod di 3
a
Generazione
con Touch
Wheel e pulsanti
(10GB, 15GB e
20GB)
iPod di 4
a
Generazione
con Click Wheel
(20GB, e 30GB)
iPod di 3
a
Generazione
con Touch Wheel
e pulsanti
(30GB e 40GB)
iPod di 4
a
Generazione
con Click Wheel
(40GB)
iPod photo
iPod shuffleiPod miniiPod nanoiPod with video
(30G)
iPod with video
(60G)

DC15V
Input
Inserire le pile ministilo (in dotazione) nel vano batterie del telecomando, osservando le corrette polarità
(+ / -).
Accertarsi che l'interruttore di alimentazione principale sul retro del sistema di diffusione sia acceso. Fatto
ciò, il sistema potrà essere attivato o disattivato tramite il telecomando.
NOTA: se si prevede di non utilizzare il diffusore per lunghi periodi di tempo, si consiglia di spegnere
l'interruttore principale sul retro dell'unità.
Utilizzo del sistema
16
Collegare il cavo di alimentazione alla sorgente di alimentazione. Il connettore all'estremità dell'alimentatore
si collega alla presa CC situata sul retro del sistema. A questo punto, collegare il cavo di alimentazione
alla presa a muro CA o al dispositivo di protezione da sovracorrenti.
Assicurarsi ancora una volta che l'inserto corretto per il vostro iPod sia installato nell'incavo di connessione.
Collegare l'iPod ai piedini di connessione che emergono dall'inserto/incavo.
Connessioni
Quando viene inserito nel dock di connessione, l'iPod può essere spento o acceso. Se è acceso e il brano
è in fase di riproduzione, si dovrebbe sentire immediatamente l'audio. Se non si sente nulla, controllare
nuovamente che il brano sia in fase di riproduzione e che il volume sia aumentato leggermente. A questo
fine, usare i pulsanti di volume + / - sul lato anteriore del diffusore.
NOTA: per evitare un suono schioccante, accertarsi che l'iPod sia già acceso nel
momento in cui viene inserito nel dock di connessione.
Interruttore di
accensione/
spegnimento
Presa ingresso segnale
Sistema di diffusione
stereo a 2 vie
Aumento volume
Riduzione volume
Inserto
Dock
Riduzione volume
Aumento volume
Pannello posteriore
Alimentazione
CA/CC
Pannello posteriore
DC15V
Input
Ingresso CC
AUX
POWER
OFF ON
POWER
OFF ON

Assicurarsi che le pile siano inserite.
Accensione/spegnimento
Il pulsante di alimentazione del telecomando consente di accendere
o spegnere il diffusore. L'accensione del sistema è segnalata da un LED
blu, mentre lo spegnimento è indicato da un LED rosso.
Volume
Si puo aumentare o ridurre il volume tenendo premuto i pulsanti + / sul telecomando.
Altre funzioni
Il telecomando consente di "navigare" tra i brani se si dispone di un iPod piu recente con versione software
2.1 o superiore.
On / Off remoto per iPod:
Si puo spegnere l'iPod tenendo premuto il pulsante play/pause. Per riaccenderlo, premere una volta il
pulsante play/pause o i pulsanti di avanzamento/indietreggiamento / .
Play/Pause
Questo pulsante consente di avviare o interrompere l'esecuzione di un brano.
Arretramento e Avanzamento rapido
Per far avanzare o indietreggiare un brano, tenere premuti i pulsanti / .
Salto di un brano in avanti o indietro
Premere i pulsanti / una volta per accedere direttamente al brano successivo o tornare all'inizio
del brano corrente.
Telecomando
Sul retro del sistema di diffusione è situata una presa d'ingresso da 3.5mm. Collegare semplicemente il
cavo da 3.5mm fornito con il sistema alla presa di uscita cuffie dell'iPod Shuffle o altra sorgente musicale.
NOTA: le uniche funzioni telecomandate che operano con altre sorgenti musicali sono
Accensione/Spegnimento e Volume Su/Giù. Le funzioni di navigazione tra i brani del telecomando non
sono applicabili a tali sorgenti.
Collegamento a iPod Shuffle o altra sorgente
iPod Shuffle
Lettore MP3
Accensione
Aumento
volume
Indietro
Riduzione
volume
Play/Pausa
Avanti
Retro della dock station
D
C
1
5
V
In
p
u
t
A
U
X
POWER
OFF
ON
17

Assenza di alimentazione
L'interruttore di alimentazione principale sul retro dell'unità non è acceso.
Il pulsante di accensione sul lato anteriore del diffusore o sul telecomando non è stato acceso.
L'alimentatore CA non e collegato al cavo di alimentazione o alla presa a muro.
Assenza di audio
iPod non è posizionato correttamente sul dock. Accertarsi di utilizzare l'inserto adatto all'iPod in uso.
Il volume è al minimo..
Il brano selezionato non viene riprodotto. Controllare che non sia in corso una pausa o un intervallo
tra due brani.
Controllare che l'iPod stia utilizzando il corretto software (versione 2.1 o superiore).
Mancato caricamento e/o assenza di audio
Accertarsi che l'iPod sia correttamente posizionato nell'inserto/dock e che faccia contatto corretto
con i piedini di connessione.
Mancato funzionamento dei comandi a distanza
Accertarsi che le pile siano in buono stato.
Accertarsi che le pile siano posizionate correttamente in sede.
Se alcune delle funzioni di navigazione vengono meno, è possibile che il software dell'iPod non sia
stato aggiornato. Tali funzioni necessitano della versione 2.1 o superiore del software.
Diagnostica
iRhythms garantisce all'acquirente che il presente prodotto è privo di difetti di materiali o fabbricazione
per un periodo di un anno dalla data di acquisto originale. È richiesta la prova di acquisto, per cui si
raccomanda vivamente di conservare la ricevuta. Occorre inoltre compilare per intero la scheda di
registrazione della garanzia ed inviarla quanto prima a iRhythms.
Se nel corso del periodo di garanzia il prodotto presenta difetti durante il normale utilizzo, iRhythms
provvederà a propria discrezione a ripararlo o a sostituirlo con un prodotto nuovo o rimesso a nuovo.
La presente garanzia non copre difetti derivanti da incidenti, abuso, uso improprio o riparazione non
autorizzata e conferisce diritti specifici all'utente. Quest'ultimo può eventualmente vantare ulteriori diritti
legali che possono variare da stato a stato.
Per ricevere il servizio previsto dalla garanzia, restituire questo prodotto a iRhythms con prepagamento
delle spese di spedizione. iRhythms si riserva il diritto di sostituire un eventuale prodotto discontinuato con
un prodotto di eguale valore.
Nota:
1) Per eventuali quesiti e assistenza tecnica, contattare iRhythms
Tel: 360-823-4100 / Fax: 360-883-4888
2) Invece di compilare ed inviare la suddetta scheda, è ora possibile registrare il prodotto
iRhythms online tramite il nostro sito web www.irhythms.com.
Garanzia
18

Le felicitamos por haber escogido el sistema de altavoces A-303 de iRhythms. Este sistema compacto
de altavoces de sobremesa está preparado para funcionar con iPods de 3ª generación con rueda
giratoria y botones, iPods de 4º generación con rueda selector, iPod mini, iPod Photo y iPod shuffle y otras
fuentes de audio portátiles. El A-303 tiene potencia suficiente para llenar una habitación con calidad
de alta fidelidad y al mismo tiempo es suficientemente pequeño como para poder viajar con él. Disfrute!
Introducción
Contenido
Sí, prepárese para disfrutar!
Coloque el sistema sobre una superficie firme.
Los controladores en su Sistema
iRhythms
están protegidos y por lo tanto se limita la posibilidad de
interferencias a monitores de vídeo y ordenadores. No obstante, es una buena idea dejar una distancia
razonable entre el sistema de altavoces y estos aparatos.
El paso siguiente es instalar la pieza de inserción correcta en el Base Dock Universal, localizado en la
parte inferior delantera del sistema. Cada pieza de inserción está marcada para escoger la que se
adecua a su iPod. Para insertar, simplemente insértela directamente en el conector.
Preparación
Este sistema incluye:
Control Remoto
Cable de Alimentación Transformador
Piezas de Inserción
del Cargador
Cable de 3.5mm
Para retirar, guie el
destornillador hacia la
apertura y tire suavemente
hacia arriba
Cargador
19
Digital Docking Speaker
TM
iPod de 3a
generacion con
rueda giratoria
y botones
(10GB, 15GB
y 20GB)
iPod de 4o
generacion con
rueda selector
(20GB y 30GB)
iPod de 3a
generacion
con rueda giratoria
y botones
(30GB y 40GB)
iPod de 4o
generacion con
rueda selector
(40GB)
iPod photo
iPod shuffleiPod miniiPod nanoiPod with video
(30G)
iPod with video
(60G)
Nota:
Los modelos iPod nano y iPod video
vienen con sus propias conexiones
que se insertan correctamente en
esta base universal.

Entrada de Señal
POWER
OFF ON
DC15V
Input
Introduzca las pilas AAA que se acompañan en el compartimiento de pilas del control remoto. Respete
la polaridad al colocarlas (+/-) para su correcta inserción.
Antes de que sus altavoces puedan funcionar tiene que accionar el interruptor de encendido en la parte
trasera de la unidad. Una vez se ha accionado este interruptor, el sistema podrá encenderse y apagarse
por medio del control remoto. NOTA: Si los altavoces no van a utilizarse durante un período prolongado
de tiempo es aconsejable que se desconecte la unidad utilizando de nuevo este interruptor.
Utilización del Sistema
Inserte el cable de alimentación en el transformador. Inserte entonces el conector al otro extremo de
transformador en el jack CC en la parte posterior del sistema. Inserte ahora el cable de alimentación a
la toma de pared CA.
Una vez más, asegúrese de que la pieza de inserción correcta de su iPod está conectada al Base Dock
Universal. Enchufe su iPoden el pin conector que aparece a través del cargador/ pieza de inserción.
Conexiones
Su iPod puede estar conectado o desconectado cuando lo coloca sobre el conector. Si su iPod está
conectado y se está reproduciendo música debería escuchar un sonido inmediatamente. Si no escucha
nada, vuelva a comprobar el estado de la pista y si se ha subido ligeramente el control del volumen.
El volumen puede aumentarse o disminuirse usando el control remoto o el botón del volumen +/- en
la parte anterior de los altavoces.
NOTA: Para evitar oír un ruido de chasquido, asegúrese de que el iPod está encendido
antes de conectarlo al cargador.
Interruptor de
Encendido/
Desconexión
Sistema de Altavoces
Estéreo de Dos Vías
Aumento del Volumen
Disminución
del Volumen
Pieza de Inserción
Cargador
Disminución
del Volumen
Aumento del Volumen
Panel posterior
Transformad
or CA/CC
Panel Anterior
POWER
OFF ON
DC15V
Input
DC input
AUX
20

De nuevo, asegúrese de que las pilas se han insertado correctamente.
Encendido/ Desconexión
El botón de encendido del control remoto encenderá y desconectará
el sistema de altavoces. Se verá una luz azul LED en el cargador cuando
el sistema esté encendido.
Esta luz LED se volverá roja cuando se desconecte el sistema con ayuda
del control remoto.
Volumen
El volumen puede subirse o bajarse presionando los botones +/- en el
control remoto.
Otras funciones
Puede navegar a través de las pistas de música con el control remoto si cuenta con un iPod más
moderno que funciona con una versión de software 2.1 o más actualizada.
Encendido/ Desconexión del iPod por Control Remoto
El iPod puede desconectarse presionando y manteniendo apretado el botón play/pause. El iPod puede
volver a encenderse presionando una vez el botón play/pause o el botón / forward/ back.
Reproducción/ Pausa
Presione simplemente el botón Play/Pause una vez para iniciar o pausar una pista de música.
Retroceder/ Avanzar
Si mantiene apretados los botones / la pista retrocederá o se avanzará.
Saltarse una canción hacia delante o hacia atrás
Presione los botones / una vez para avanzar hacia la pista siguiente o retroceder al comienzo de
la pista en curso.
Control Remoto
Su sistema de altavoces tiene un jack de entrada de 3.5mm localizado en su parte posterior. Conecte
simplemente el enchufe de 3.5mm que viene con el sistema en el jack de salida de los auriculares en
su iPod shuffle u otra fuente de música.
NOTA: Las únicas funciones remotas que permanecerán activas con estas fuentes alternativas son el
Encendido/Desconexión y el Aumento y Disminución del Volumen. Las funciones de navegación a través
de las pistas del control remoto no son aplicables en estos otros aparatos.
Conectar el iPod Shuffle u otra fuente
iPod Shuffle
Reproductor MP3
Encendido
Subir
Volumen
Atrás
Bajar
Volumen
Reproducir/Pausa
Adelante
Parte posterior del cargador
P
O
W
E
R
O
F
F
O
N
D
C
1
5
V
In
p
u
t
A
U
X
21

No se enciende
No se ha accionado el interruptor de encendido en la parte posterior del sistema.
El botón de encendido en la parte anterior de los altavoces o el control remoto no han sido
accionados.
El suministro de corriente CA no se ha conectado a la toma de la pared.
No hay sonido
El iPod no se ha cargado correctamente. Asegúrese de que está usando la pieza de inserción que
mejor se adecua a su iPod.
El Volumen está al mínimo.
La pista en su iPod no se está reproduciendo. Compruebe que la música no es encuentra pausada
o que se encuentra en medio de dos pistas.
Compruebe y asegúrese de que el iPod está funcionando con el software adecuado. 2.1 o una
versión más nueva.
No se está cargando o no hay sonido
Asegúrese de que el iPod está bien colocado en la pieza de inserción/ cargador y que existe una
buena conexión con los pins conectores.
Las funciones remotas no funcionan
Asegúrese de que está usando buenas pilas.
Asegúrese de que las pilas están insertadas correctamente.
Si algunas de las funciones de navegación no funcionan puede que se deba a que no ha
actualizado su software. Estas funciones están diseñadas para software 2.1 o una versión más nueva.
Problemas y Soluciones
iRhythms garantiza garantiza al comprador que este producto está libre de defectos de fabricación por
un período de un año desde la fecha de compra del producto. Se requiere un comprobante de compra
para su efecto. Guarde su recibo de compra en un sitio seguro. La tarjeta de registro de garantía deberá
rellenarse completamente y ser enviada a iRhythms.
Durante el período de garantía, si se encuentra cualquier defecto en el funcionamiento del aparato bajo
condiciones normales de uso, iRhythms se reservará el derecho a reparar el aparato o a reemplazárselo
por uno nuevo.
Esta garantía no cubre defectos resultantes de accidentes, abuso, uso indebido o reparaciones no
autorizadas. Esta garantía le provee de derechos específicos. Puede que Ud. tenga otros derechos legales,
que varían de estado en estado.
Para hacer uso del servicio de garantía, devuelva el producto a portes pagados a iRhythms. iRhythms se
reserva el derecho de reemplazar un producto que ya esté fuera de producción por uno actualizado
de igual valor.
Nota:
1) Para soporte técnico y consultas, por favor póngase en contacto con iRhythms en el
Tel: 360-823-4100/ Fax: 360-883-4888
2) Puede Ud. registra ahora su producto de iRhythms a través de la internet en lugar de
ellenar y enviar la tarjeta por correo entrando en nuestro sitio web: www.irhythms.com
Garantía
22

Parabéns pela escolha deste sistema de auto-falantes A-303 da iRhythms. Este sistema de auto-falantes
de mesa foi criado para o iPod de 3a. Geração com Touch Weel (roda sensível) com botões, 4a.
Geração com Click Wheel (roda de clicar), iPod mini, iPod foto, iPod Shuffle (misturador) e outras fontes
portáteis de audio. O A-303 é capaz de preencher o espaço de uma sala com audio de alta qualidade
mas sendo pequeno o suficiente para viajar. Divirta-se!
Introdução
Conteúdo da Embalagem
Sim, prepare-se para divertir-se
Coloque o aparelho em uma superficie firme e plana.
As unidades de transmissão de seu Sistema
iRhythms
de Base estão protegidos e portanto limitam a
possibilidade de interferência aos aparelhos de vídeo e monitores de computadores. Porém, seria bom
permitir uma distância razoável entre este sistema e outros aparelhos.
O próximo passo é instalar o conector apropriado à base localizada na parte frontal inferior do sistema.
Cada conector está marcado, portanto, escolha o que se encaixa em seu iPod. Para instalar, inserte
simplemente en el conector.
Preparação Inicial
Este sistema inclui:
Controle Remoto
Fio de força Fonte de força
Conectores de Base
Cabo de 3.5mm
Para retirar, guie el
destornillador hacia la
apertura y tire suavemente
hacia arriba
Cargador
23
Nota: O iPod nano e o iPod
vídeo vêm com as suas
próprias inserções que
também servem nesta
base universal.
Digital Docking Speaker
TM
iPod de 3a. Geração
com touch wheel
e botões
(10GB, 15GB e
20GB)
iPod de 4a. Geração
com Click Wheel
(20GB e 30GB)
iPod de 3a.
Geração com
touch wheel e
botões
(30GB e 40GB)
iPod de 4a.
Geração com Click
Wheel (40GB)
iPod shuffleiPod miniiPod nanoiPod with video
(30G)
iPod with video
(60G)

POWER
OFF ON
DC15V
Input
Coloque as pilhas AAA incluídas no compartimento de pilhas do controle remoto. Siga os indicadores
de polaridade (+ / -) para operação correta.
Antes de iniciar a operação dos auto-falantes o interruptor principal de força localizado nos fundos do
aparelho deve ser ligado. Uma vez feito isto, a unidade poderá ser ligada e desligada por meio do
controle remoto. NOTA: Se não for usar os auto-falantes por período prolongado, recomenda-se que o
interruptor principal nos fundos da unidade seja desligado.
Uso do Sistema
Ligue o fio de força na fonte de força. O conector na extremidade da fonte de força pode ser ligado
ao conector DC localizado atrás do sistema. Agora, ligue o fio de força na tomada AC na parede.
Mais uma vez, certifique-se de inserir o seu iPod na base, ligue o seu iPod no pino conector presente na
base.
Conexões
O seu iPod poderá estar ligado ou desligado quando for colocado na base. Se estiver ligado e a trilha
estiver tocando você poderá escutar o som imediatamente. Se não escutar nada verifique se a trilha
está tocando e se o volume está ativado. O volume pode ser aumentado ou reduzido por meio do
controle remoto ou pelos botões de volume + / - na frente dos auto-falantes.
NOTA: Para evitar o som de surpresa verifique se o iPod está ligado ao inserí-lo na
base.
Interruptor de
força ligar / desligar
Conector de entrada de sinal
Sistema de auto-falantes
Aumentar Volume
Abaixar volume
Conector
Base
Abaixar volume
Aumentar Volume
Painel traseiro
Fonte de
força AC/DC
Painel traseiro
POWER
OFF ON
DC15V
Input
Entrada DC
AUX
24

Mais uma vez, certifique-se de que as pilhas estejam instaladas.
Ligar / Desligar
O botão de força no controle remoto ligará e desligará os auto-falantes.
Uma luz LED azul acenderá na base quando o sistema estiver ligado.
A mesma ficará vermelha quando o aparelho for desligado pelo controle
remoto.
Volume
O volume poderá ser aumentado ou reduzido pressionando e segurando
os botões + / - no controle remoto.
Outras funções
Você poderá navegar trilhas sonoras com o controle remoto se tiver um iPod mais novo com a versão
de software 2.1 ou outra mais recente.
Ligar / Deligar iPod pelo Controle Remoto:
O iPod poded ser desligado pressionando-se o botão de operação / pausa e segurando-o. O iPod pode
ser ligado novamente ao pressionar-se uma vez o botão de operação / pausa ou uma vez os botões
de adiantamente / atraso / .
Operação / Pausa
Pressione o botão de operação / pausa uma vez para iniciar a operação ou pausar a trilha sonora.
Atraso e Adiantamento
Ao pressionar e segurar os botões / , a trilha será atrasada ou adiantada.
Passagem para a próxima trilha ou para a trilha anterior
Pressione os botões / uma vez para passar para a próxima trilha ou para o inicio da trilha corrente.
Controle Remoto
O seu sistema de auto-falantes possui uma entrada de 3.5mm localizada nos fundos da unidade. Ligue
o fio com plug de 3.5mm que acompanha o sistema ao conector de saída dos fones de ouvidos em
seu iPod shuffle ou outra fonte de som.
NOTA: As únicas funções do controle remoto que funcionarão com outras fontes são a função de ligar
/ desligar e o volume. As funções de navegação da trilha sonora no controle remoto não são aplicáveis
a estes outros dispositivos.
Conexão ao iPod Shuffle ou outra fonte
iPod Shuffle
MP3 Player
Força
Aumentar
volume
Atraso
Abaixar
volume
Operação / Pausa
Adiantamento
Fundos da base
P
O
W
E
R
O
F
F
O
N
D
C
1
5
V
In
p
u
t
A
U
X
25

Falta de Força
O interruptor principal de força nos fundos da unidade está desligado.
O botão de força na frente dos auto-falantes ou do controle remoto não foi ligado.
O cabo de força AC não foi ligado na tomada na parede.
Falta de Som
O iPod não está posicionado corretamente na base. Use o conector mais adequado para o seu
iPod.
O volume está abaixado.
A trilha sonora no seu iPod não está tocando. Verifique se a trilha está em estado de pausa ou
transitando entre trilhas.
Verifique e certifique-se de que o seu iPod está utilizando o software correto 2.1 ou versão mais
recente.
Falta Som e Carga
Certifique-se de que o iPod está posicionado corretamente no conector / base e que faz bom
contato com os pinos do conector.
Funções remoto não funcionam
Certifique-se de que as pilhas estejam em bom estado.
Certifique-se de que as pilhas estejam posicionadas corretamente.
O possível não funcionamento das funções de navegação pode ser devido à não atualização
do software do iPod. Estas funções foram desenhadas para o software de versão 2.1 ou mais
recente.
Soluções Rápidas
iRhythms garante ao comprador que este produto estará livre de defeitos materiais ou de produção por
um período de um ano a partir da data da compra. A prova da compra será necessária. Favor manter
o recibo de compra. O cartão de registro da garantia também deverá ser preenchido por completo
e enviado imediatamente para a iRhythms.
Durante o período da garantia, se este produto apresentar defeito com o uso e serviço normais, iRhythms
poderá concertar ou trocar este produto por um novo ou recondicionado.
Esta garantia não cobre defeitos resultantes de acidentes, abuso, uso incorreto, ou serviço não autorizado.
Esta garantia oferece direitos específicos. Você poderá ter outros direitos legais que variam de estado
a estado.
Para obter o serviço dentro da garantia, retornar o produto com o custo de transporte pre-pago ao
iRhythms. iRhythms reserva-se o direito de trocar qualquer produto de linha extinta por um de igual valor.
Nota:
1) Para apoio tecnico e esclarecimentos, entrar em contato com iRhythms
Tel: 360-823-4100 / Fax: 360-883-4888
2) Você poderá registrar o seu produto Acoustic Authority por meio do website em vez
de preencher e enviar este cartão: www.irhythms.com
Garantia
26
 Loading...