


Installation and Setup
Installation and Set Up Procedure
Installation and setup are quick and easy. All remote units with styluses, the base and antenna, and the
USB cable are contained in the carrying case provided. The remote unit battery charging system, power
adapter with cords, and charging cables are packed in a separate box within the shipping container.
Remove all components and follow the procedures as described and illustrated on the following pages.
Setup Procedure
Unpack the iRespond Touch system
Charge Remote Units
Setup the iRespond System
Install the iRespond Software (Refer to the separate Quick Guide for Software Installation.
Perform Session Setup (Refer to the separate Quick Guide for Session Setup.
Remote Unit Battery Pack Charging
Each remote unit must be charged prior to use. Unpack the battery charging system from the carton.
Included are 8V charging adapters.
Connect the AC plug to a wall receptacle. Plug the
connector into a remote unit. Each remote will
take three to four hours to fully charge.
Continue this process until all remotes have been
charged. Under normal use, a remote will run for
approximately two weeks before recharging is
required.
1

iRespond System Setup
Linksys USB Hub Setup
• Attach USB cable to hub. Locate an available USB port on the computer and attach the other end of the USB
cable to this port. Attach the power adapter into the hub. Plug the adapter into a standard electrical outlet.
The hub will be automatically detected by the computer and is now ready for use.
Base Unit Setup
• Screw in the base unit antenna on the top of the unit. To maximize transmission, orient the antenna so that it
sticks straight up from the unit.
• Using the USB cable provided with the system, connect the end with the mini USB connector to the base unit.
Locate an available USB port on the Linksys hub. Connect the other end of the USB cable to the port.
• Apply power to the base unit by pressing the Power On/Off button in the upper-left of the unit.
• Setup for the base unit is now complete.
Remote Unit Setup
• Apply power to the remote units by pressing the Power On/Off button in the upper-left of each unit. Take
note of the UID number that appears on the bottom of the LCD. This UID number also appears on the back of
the remote unit on a separate label below the FCC Label.
The iRespond hardware setup is complete.
2

Using the Base and Remote Units
Key
Power
On/Off
F1 Function
F2 Function
Backspace
Flag
Cursors
Enter
Soft Keys
Function
This key, located top-left, turns power on and off the unit. Once a session is established the key is disabled.
Pressing this key simultaneously with the up-arrow cursor key will force a remote unit to power off.
This multipurpose key is used in combination with other keys. Also used to save settings in Configuration Mode.
The user may use this key to activate the soft keys in a session. The F2 key may also be used to access the Configure
and Diagnostics screen.
This key is useful for editing a User ID, a password, or a fill-in response. The Backspace key will erase the last
character entered.
This key allows the user to mark items for later review in a session.
These keys are used to scroll, navigate and highlight items on the LCD. A user may use these keys to scroll through
the question when it is displayed on the LCD.
If a remote unit fails to respond to the Power On/Off key, press the up-arrow and the Power On/Off keys
simultaneously to force the unit to power off.
This key submits the user's input to the base unit for recording or scoring.
A user will use these keys to select responses in a session. The Soft Keys are an alternative to selecting responses
directly on the touch panel with the stylus.
3

4

Software Installation and Setup
System Requirements
The iRespond System runs on customer supplied Windows
compliance before proceeding.
The Windows
• 400 MHz or higher Pentium II processor
• Windows
• CD ROM drive
• 1 free USB port
• 10 MB available disk space
• 128 MB RAM
TM
-based system requirements:
TM
95/98/ME/2000/NT/XP
TM
-based desktop PCs and laptops. Please verify system
Installation and Set Up Procedure
Software installation and setup is quick and easy. Locate the iRespond installation CD shipped with the
system, and then follow the procedures as described.
Procedure:
Install the software,
Set up the software to run sessions;
♦ Log In and Account Administration
♦ Set Up your Class Rosters
♦ Set Up your Test Banks
♦ Set Up your Remote Units
Installation
To ensure compatibility, please review the system requirements before installing the software, and then
follow the steps below.
• Insert the iRespond software installation disc in your CD-ROM drive.
• The iRespond Software will automatically launch the installation program. During this process, be sure to
answer the items that appear on the screen.
• If your computer is not configured to auto-start, select Run from the Start Menu and browse the
installation CD for "Setup.exe." Select that file and click OK to start the installation procedure.
Sun's Java
your computer, setup will automatically load the requisite files.
TM
JRE file system is required to run the iRespond software. If the JRE files are not already installed on
5

Introduction
After installing the software, it is necessary for you to set up user accounts, enter your class rosters, enter your
test banks, and set up the remote units before a session can be started. This guide is a step-by-step procedure
through those set up dialogs. Toolbar menu selection names and dialog names described in this guide are shown
in green. Text entries and toolbar button clicks required by you are shown in bright blue.
NOTE: All standard Windows™ conventions apply to iRespond.
Log In and Account Administration
Launch the iRespond software and the iRespond Login dialog appears.
This dialog prompts you for your user name and password. First-time log in is
done as administrator. Enter the default user name admin, and the default
password changeme, and click the Login button.
Successful login opens the iRespond Session Setup window.
NOTE: Username and Password are case sensitive.
From the iRespond Session Setup screen, change the administrator password by selecting
Tools/Change Password from the toolbar.
The Change Password dialog will appear. Enter the
old and new passwords, confirm the new password,
and click Change.
6

Account Administrator Dialog
The sole function of logging in as administrator is to create or edit your user accounts. When your user
account has been set up, log out as administrator and then log back in using your user name. Then you can
set up your Classes, Test Banks, and Remote Devices.
From the main toolbar menu, select Tools/Accounts, and the Account Administrator dialog will pop up. This
dialog displays a table of all user accounts. You may add, edit, and delete user accounts. To edit the Name,
Username, and Home Path fields in the accounts table, right-click on the name of the account you would like to
edit. Click Edit from the drop-down menu and the Edit Account dialog appears. Complete the required fields
and click Accept.
Create a New Instructor User Account
To create a new instructor user account, click the New User button on the Account Administrator toolbar. When
selected, the New Account dialog appears. This dialog prompts the user to enter a Username, Password, Full
Name, and a Profile Pathname. The path name entered specifies the folder in which iRespond stores the account
information for the new user. Unless you wish to specify a different directory for your files, accept the default
entry in Profile Pathname.
Note: If a nonexistent path is entered in the text box,
iRespond will create the folder(s) specified in the path,
provided the path is free of syntax errors.
Alternatively, clicking on the Browse button launches an Open
dialog (not shown) in which an existing folder may be selected for
your files. A new folder can be created in this dialog by clicking
the Create New Folder button on the dialog's toolbar. New folders
can also be created in your operating system, then browse to
them when setting up your accounts. The Properties button near
the bottom of the New Account dialog brings up the User Account
Properties dialog (not shown), which allows you to export session
results automatically to Edmastery
GradeBook2
properties, refer to the User Manual in the Help files.
When all information has been entered and accepted, the Account Administrator dialog appears as above. If all
information is correct, click Exit.
Now that the account administration is complete, proceed to setting up a class. To do this, logout as
administrator and then log back in as a user. From the File drop-down menu on the Session Setup screen toolbar
select Logout and click Yes in the Logout Confirmation dialog. The iRespond Login dialog appears. Enter your
new user name and password and then click Login. When the Session Setup screen re-appears, your user name
automatically appears in the Session Properties pane as Instructor.
TM
. For more detailed information on account
TM
, GradeQuickTM, and
7
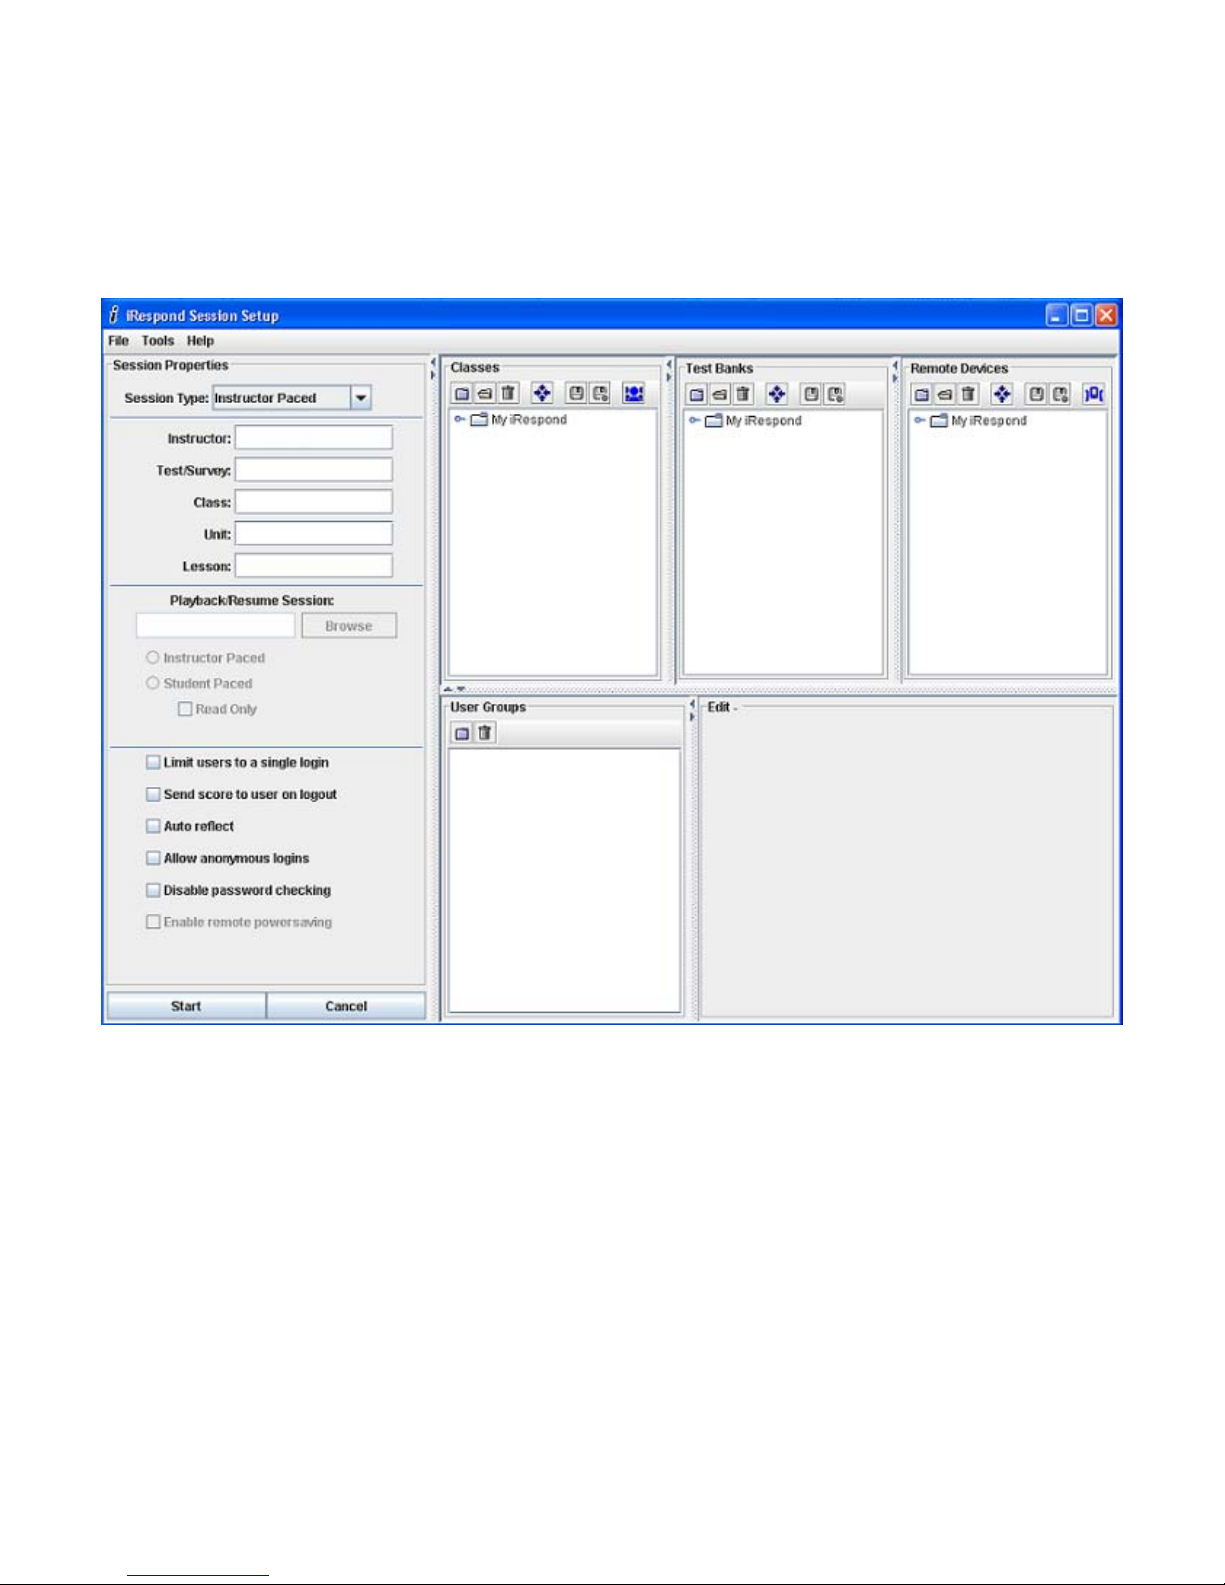
Set Up Classes
Classes are set up in the Session Setup window after logging in as a new user (shown below). The Classes pane is
located to the right of Session Properties, and Edit Classes is located in the lower right of the window. In these
two panes new classes can be created and deleted, or an existing class can be edited. A step-by-step guide for
entering and editing classes follows. Position the mouse pointer over a toolbar button to display its function.
Procedure to Create a New Class:
Click the New button on the Classes pane toolbar. Select Login Type dialog box appears with By PIN or By
Username and Password. Selecting By PIN creates a class where student users log in via PIN number, where By
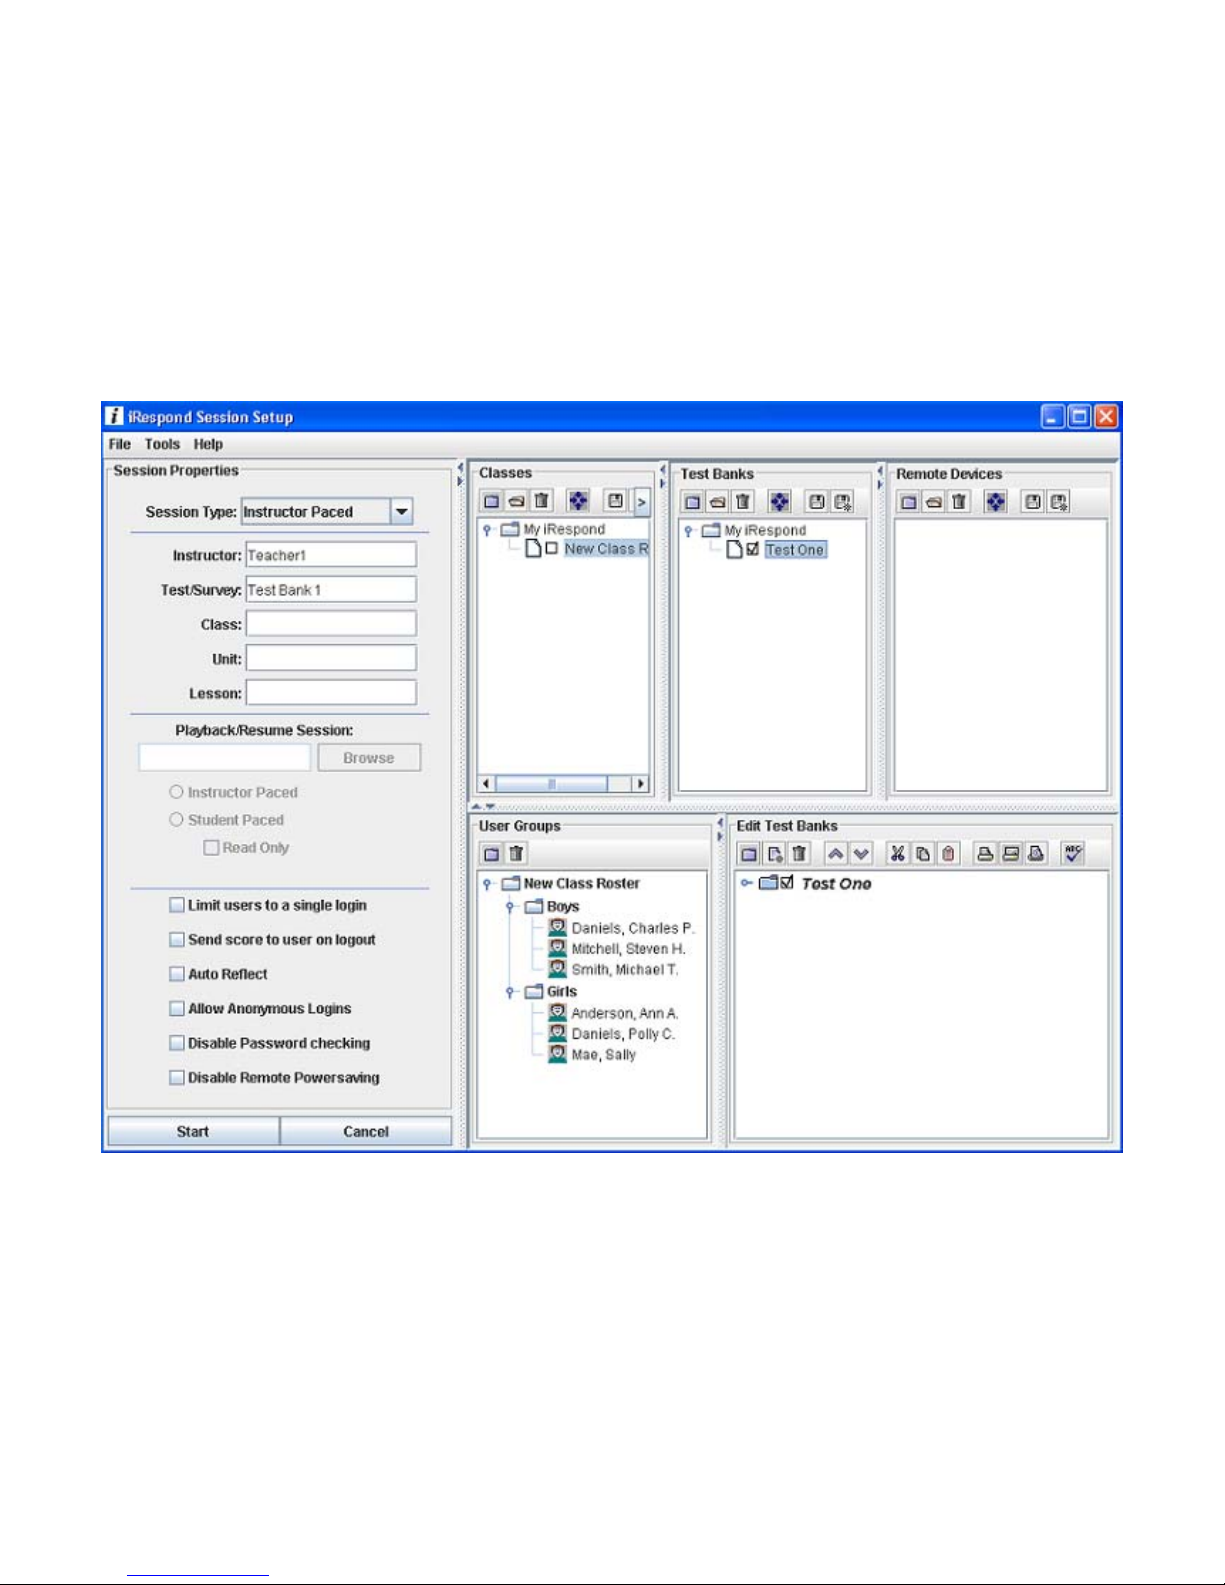
Username and Password creates a class where student users log in via Username and Password. The My iRespond
folder appears, and a blank checkbox with a highlighted file entitled New Class Roster* appears below the
folder. Notice in the User Groups and Edit Classes panes the new file name also appears, each with an asterisk
(*). The asterisk indicates the file has not been saved.
Right click on the new file name and select Rename from the drop-down dialog. Edit the file name as desired
and then enter. The new file name appears in all three panes (Classes, User Groups, and Edit Classes).
8
• Set up a Class Roster using the Roster Builder
Note: In order to use the Roster Builder, Remote Devices must be set up. If you
wish to use the Roster Builder to set up your class roster, please skip ahead to:
Set up Remote Devices.
o In the Remote Devices pane, click the checkbox to the left of the remote device group you wish to
user.
o In the Classes pane, click the checkbox to the left of the class roster you wish to build. Turn on the
Base Unit and click the Build Roster button on the toolbar.
o The Finding Base Unit dialog appears. When the dialog displays Found 1 iRespond Base Unit, click
the Done button.
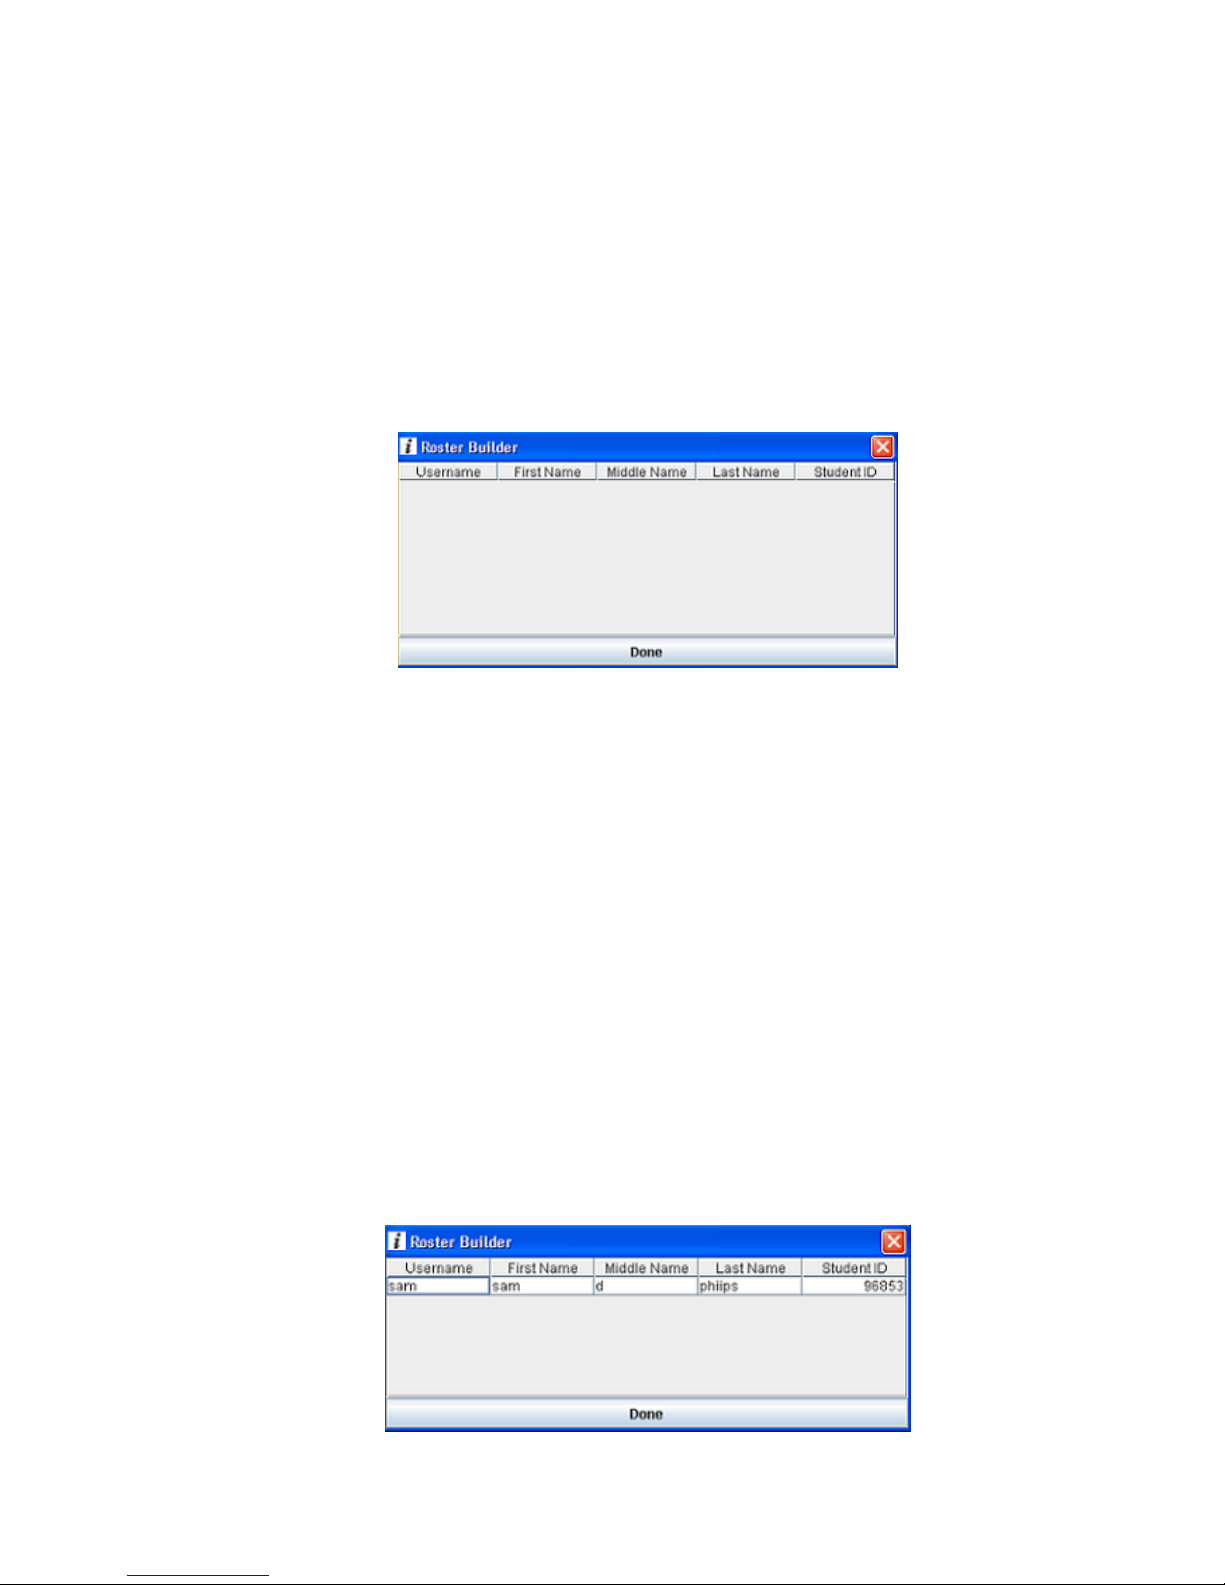
o The Roster Builder dialog appears. At this time, instruct the users to power on their Remotes.
o If the class type selected was By PIN, the user will be prompted to enter their PIN number on the
Remote. If By Username and Password was selected, users will be prompted to enter their username
and password. This information is entered on the Remote using the stylus or the soft keys. When the
username is entered, press the soft key under END to advance to the password. Enter password and
press the soft key under END. Once this has been entered, the Remote’s screen will ask the user to
press the Enter key to begin entering their profile information.
o If By Username / Password was selected, the user will be prompted to re-enter their password.
o To enter the First Name, press the soft key under the F. The user will then be able to enter their
last name using the stylus provided or using the soft keys on the remote. When the First Name is
entered, press the soft key under END on the display. If the First Name was entered correctly, press
the Enter key to submit the First Name.
o The remote will now prompt for the user’s MI (middle initial). Press the soft key under M and enter
the MI in the same manner as the First Name was entered.
o The Last Name is entered by pressing the soft key under L for Last Name, then entering the Last
Name in the same manner as the First Name and MI.
o The Remote will now prompt the user to enter their Student ID. Student ID’s must be numeric.
Press the soft key under the S on the display, then press the soft key under 123 to switch to
numbers. Enter the Student ID, press the soft key button under END when done, and then press the
Enter key if the Student ID was entered correctly.
o Remotes will power off automatically once the profile has been entered.
o As the users enter their profile, the information they enter will display in the Roster Builder dialog.
When all user profiles are showing in this dialog, click the Done button. The Base Unit will now
power off automatically.
9
• Set up a Class Roster using Instructor Software
o In the Classes pane, select the name of then Class you wish to create.
o In the Edit Classes pane, click the New User button, or right click on the class name and select New
User from the drop-down dialog to add a new student user to the class. In either case the New User
dialog appears.
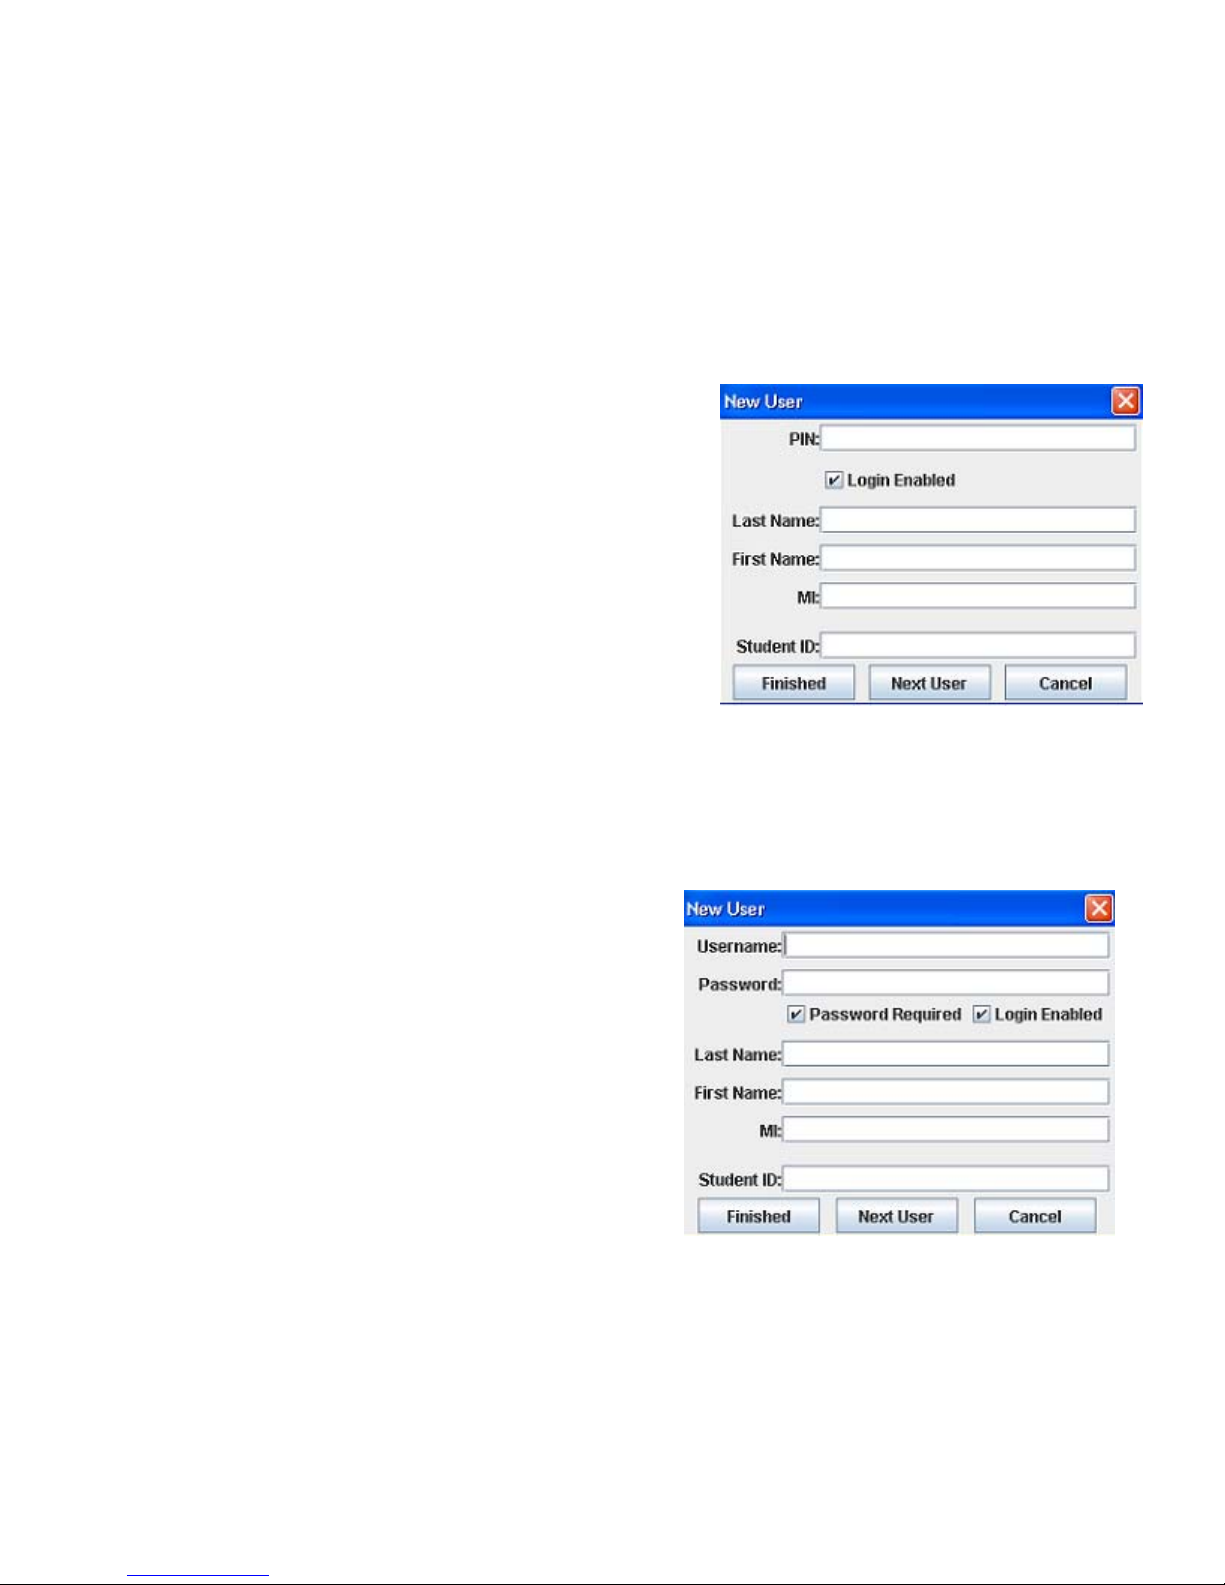
Setting up Class Roster By PIN
This dialog lets you enter the PIN, Last Name, First
Name, MI (middle initial) and Student ID of a new
student user. The Login Enabled checkbox gives the
user permission to log into the session. This
information will appear in various reports.
o Enter a PIN number for the user
o Ensure Login Enabled is checked
o Complete the Last Name, First Name,
MI, and Student ID of the user.
o If Next User is selected the New User
dialog re-appears for entry of another
user. If Finished is selected, the Session
Setup screen appears.
o After all users have been entered,
return to the Classes pane, ensure the
class name is still highlighted, and
click the Save button. Notice after
saving that the asterisk (*) disappears
from the file name.
Setting up Class Roster
By Username and Password
This dialog lets you enter the Username, Password,
Password Required, Login Enabled, Last Name, First
Name, MI (middle initial), and Student ID of a new
student user. The Password Required checkbox
exempts a user from having to enter a password
during login. The Login Enabled checkbox gives the
user permission to log into the session. The
information will appear in various reports.
o In the Username box, enter a username,
such as the three initials of the user’s name.
Usernames must be in lowercase.
o In the Password box, type a user-specific
password. The password may contain
letters, numbers, and spaces. If the session
does not require passwords, leave the
password blank and uncheck the option
“Password Required”.
o Ensure Login Enabled is checked.
o Complete the Last Name, First Name, MI, and Student ID of the user.
o If Next User is selected the New User dialog re-appears for entry of another user. If Finished is selected,
the Session Setup screen appears.
o After all users have been entered, return to the Classes pane, ensure the class name is still highlighted,
and click the Save button. Notice after saving that the asterisk (*) disappears from the file name.
10

• Editing a Class Roster
o To edit an existing username, right click on the
name and select Edit User from the drop-down
dialog. When the New User dialog appears,
make the desired corrections and click OK to
close the dialog.
o To delete a user, right click on the name and
select Delete from the drop-down dialog.
o After all changes have been made, return to
the Classes pane, ensure the class name is still
highlighted, and click the Save button. Notice
after saving that the asterisk (*) disappears
from the file name.
•
Create User Groups
Initially, when a class is first entered, there are no groups. However, it may be desirable to track class
progress by predefined groups. In the User Groups pane, groups can be created, and then students can be
added to a group. The User Groups pane, located to the left of the Edit Classes pane, displays all user
groups for classes selected in the Classes pane. This process is discussed below.
o To create initial User Groups,
select a class in the Classes pane.
In the User Groups pane, click the
file lever to the left of the class
name. The file will open and show
there are no groups in the class.
o To create a group, select New from
the User Groups toolbar. New User
Group 1 opens in a box, ready to be
renamed. Change group name and
press enter.
o Click the file lever in the Edit
Classes pane to show the student
names.
o To add a student user to the group,
select the name of a user in the
Edit Classes pane, hold the left
mouse button down and drag it to
the folder of the group in the User
Groups pane. Add more users in
the same manner until the group is
completed.
o To change the name of a group,
right click on the group name and
select Rename from the dialog.
o To delete a user group from a class,
highlight the group name and click
the Delete button. Classes are not
deleted by using this button – only
the selected group.
o To remove a student user from a group, right click on the user’s name and select Remove from the
dialog.
o When groups have been set up as desired, ensure the class is highlighted in the Classes pane and
click on the Save or Save As button on the Classes pane toolbar.
11
Set Up Test Banks
Test Bank creation is accomplished using the Test Banks and Edit Test Banks panes in the Session Setup window.
Together these panes provide an interface to author tests. These test banks contain the questions to be
administered in a session. Questions can be edited and new questions added to an existing test bank.
Additionally, each item can be augmented with an Objective and Remediation. Before conducting a session, one
or more test banks should be constructed.
The Test Banks pane contains toolbar buttons for New, Open, Delete, Uncheck All, Save, and Save As. Once a
Test Bank has been created, it is edited in the Edit Test Banks pane.
In the Edit Test Banks pane, tests may be added or edited to an existing test bank. This pane contains toolbar
buttons to facilitate the editing of one or more banks. All test banks selected in the Test Banks pane appear in
the Edit Test Banks pane.
A step-by-step guide to creating and editing Test Banks follows.
12
Procedure to Create a New Test Bank:
• Set up a Test Bank
o Click on the New button on the Test Banks toolbar. A blank checkbox and a highlighted file
entitled New Test Bank* appear. Notice the Edit pane has changed from Edit Classes to Edit Test
Banks and in that pane the new file name also appears with and asterisk (*). The asterisk
indicates the file has not been saved.
o Right click on the new file name and select Rename from the drop-down dialog. Edit the file
name as desired and then press enter. The new file name appears in both panes. At this point,
the Session Setup screen looks similar to the one on the previous page.
o Proceed to the Edit Test Banks pane to enter a test.
Enter / Edit a Test Bank
•
In the Edit Test Banks pane, ensure the file name is highlighted and then click the New Question button, or right
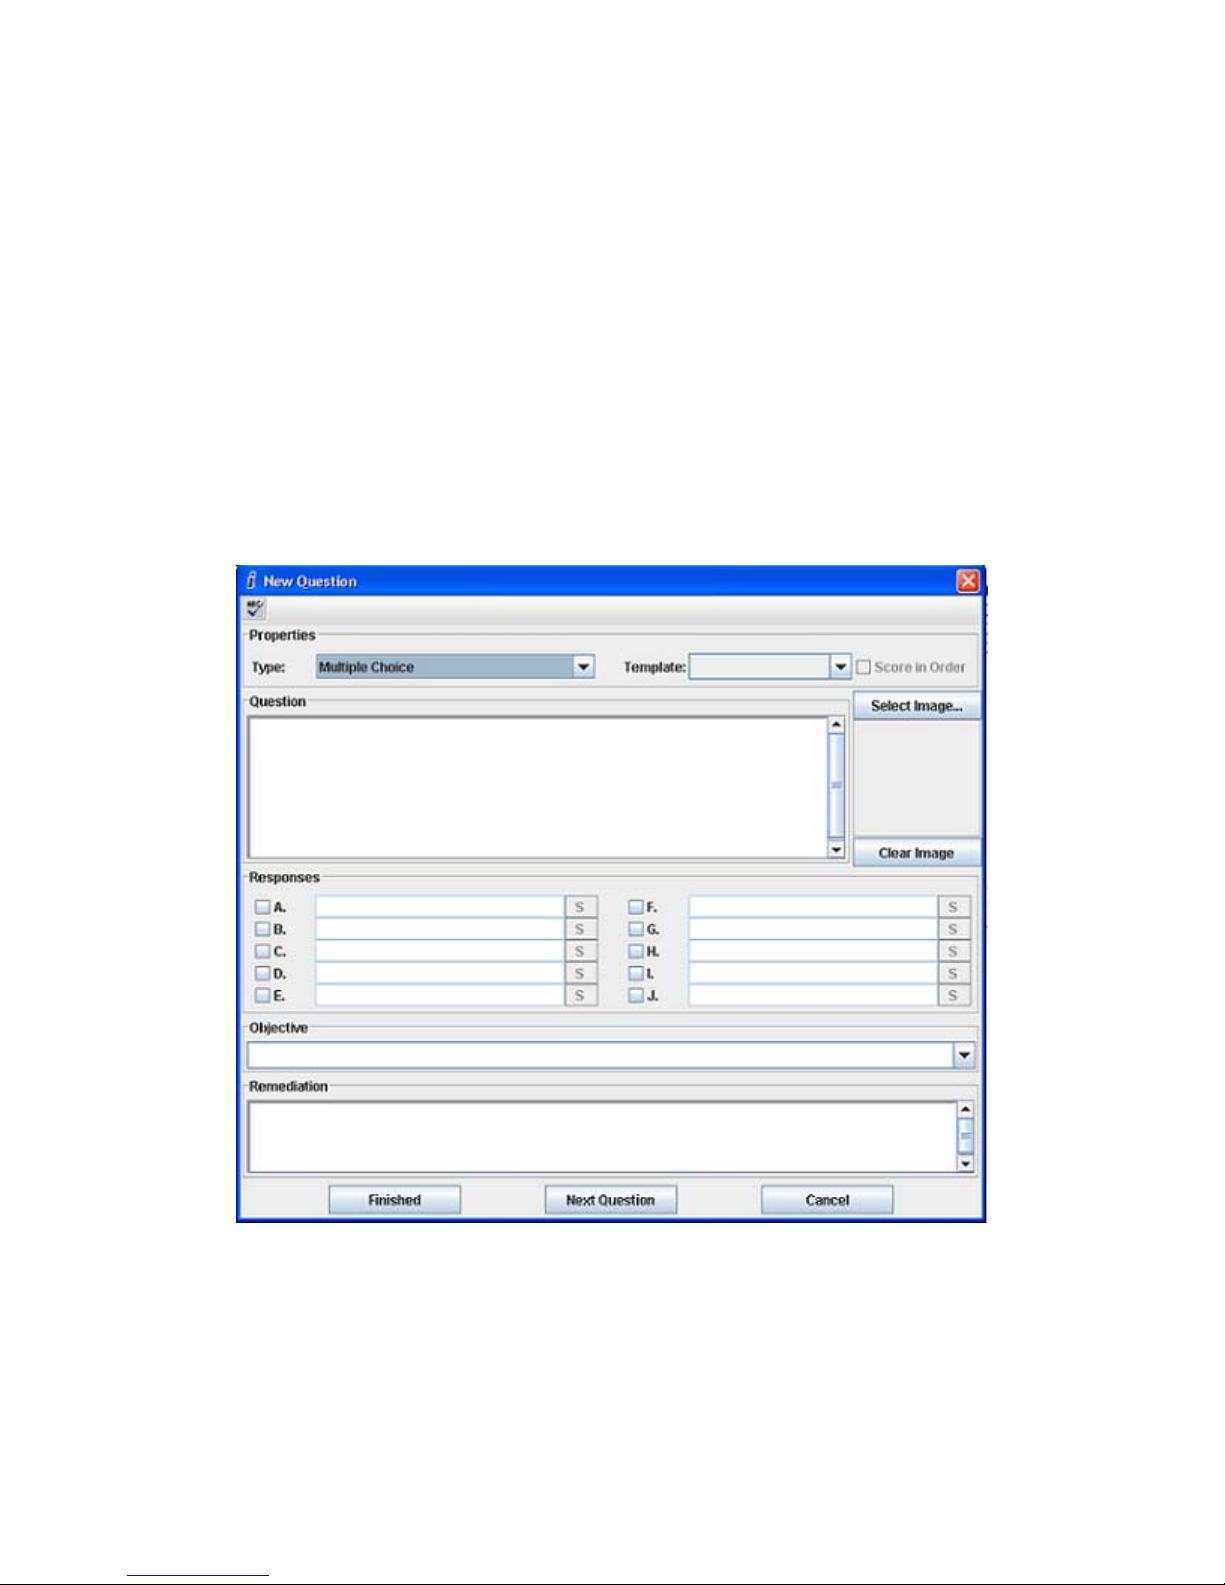
click on the test bank name and select New Question from the dialog. In either case, the New Question dialog
appears. This dialog lets you define question Type, Template (True/False) enter the Question, associated
Responses (mark correct response), Objective, and Remediation.
o Properties. Select the question Type from the drop-down menu. Choices are Multiple Choice,
Multiple Answer, and Fill – In. The Template drop-down choice will only need to be changed if a
True/False question is desired.
o Question. In the Question box, left click the mouse and a cursor appears. Enter a question.
o Responses.
o For multiple choice questions, click the checkbox to the left of response A and enter the
response in the area provided. To enter the remaining responses, follow the same
procedure. To indicate which response is correct, click the corresponding checkbox
again and the checkmark changes to green.
13
o For True/False questions, select True/False from the Template drop-down list.
Responses A and B automatically fill in with True and False. Click on the checkbox for A
or B to indicate which response is correct (checkmark changes to green).
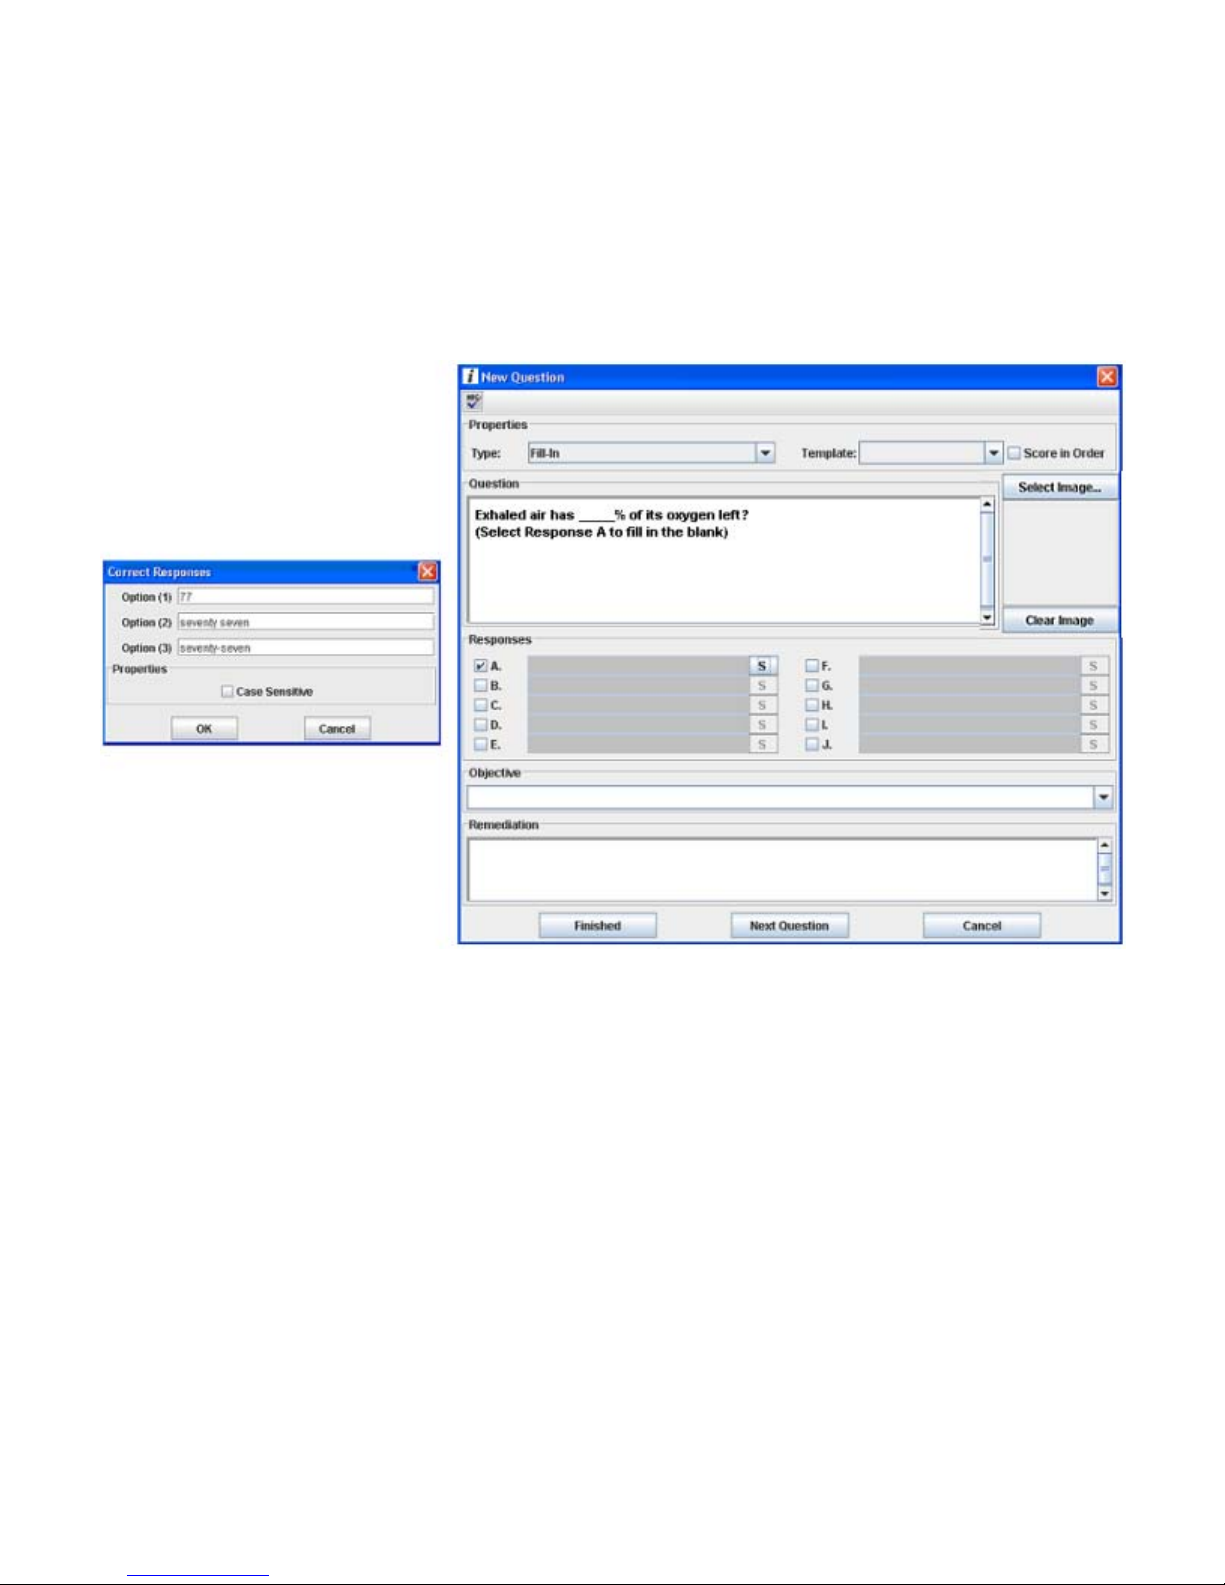
o Fill In questions are answered in the same manner, leaving an underscore line where the
information is to be supplied by the student. After entry of the Fill In question, enter
the sentence (Select response A to fill in the blank). Click the checkbox to the left of
response A, then click the S box to the right of the grayed entry area, and a Correct
Responses dialog appears. Enter up to three acceptable responses for the question.
Indicate whether the answer is case sensitive by clicking the checkbox, then click OK to
close the dialog.
o Objective and Remediation. Enter the appropriate objective and remediation for the
question in the areas provided.
o Spell Check. This button is located in the upper left of the New Question window. When
clicked, it launches the Spell Check dialog. Spell Check operates like any other
Windows
another question is to be entered into the Test Bank click Next Question and the New
Question window appears again. If all questions have been entered click Finished button
to return to the Session Setup screen.
o Continue until all questions have been entered. To keep the questions in the desired
order in the Edit Test Banks pane, highlight the last question entered before clicking the
New Question button. Question order can be changed by highlighting the individual
questions and using the Move Up and Move Down buttons on the toolbar.
TM
based program that performs the capability. Correct any errors found. If
14

o After all test questions have been
entered, go to the Test Banks pane of
the Session Setup window. Ensure the
Test Bank file name is highlighted and
then click either the Save or Save As
button on the toolbar. Once the file is
saved, the asterisk disappears from the
file name.
15

Set Up Remote Devices
The Remote Devices pane allows you to select the remote units to be used in a session. Each group of remotes
can be named reflecting a classroom set, carrying case set, or any other useful identifying name. The Remote
Devices pane contains the toolbar buttons New, Open, Delete, Uncheck All, Save, Save As, and Find Remotes.
Procedure to Set up Remote Devices:
Remote Devices can be set up automatically using the Find Remotes utility, or manually set up in the Edit
Remote Devices pane.
• Set up Remote Devices using the Find Remotes utility.
o In the Remote Devices pane,
click the New button. The New
Remote Device dialog appears.
In the Device Name box, enter
the name for the Remote Device
group. In the Device Type dropdown dialog select the type of
system you have and click the
Accept button. This Quick
Guide is designed for the
iRespond Advanced device type.
o Check the checkbox to the left of the Remote Device, and power on the Base Unit.
o Click the Find Remotes button on the Remote Devices toolbar. The Finding Base Unit dialog
appears. When the dialog displays Found 1 iRespond Base Unit, click the Done button.
a remote icon appears along with the
Remote’s UID in the Remote Collector
dialog.
o The Remote
Collector dialog
appears. Power on
all remotes to be
added. As each
Remote Device is
found and collected,
o When all Remotes are showing in the Remote Collector dialog, click the Done button. The
Base Unit and remotes will power off automatically.
Click either the Save or Save As button in the Remote Devices pane to save the remote device file.
16

• Set up Remote Devices Manually using Edit Remote Devices.
o In the Remote Devices pane, click the New Button. The New Remote Device dialog appears. In the
Device Name box, enter the name for the Remote Device group. In the Device Type drop-down
dialog select the type and click the Accept button (this Quick Guide is designed for the iRespond
Advanced device type).
o In the Edit Remote Devices pane, click
the New button to launch the New
Remote ID dialog. You can find the
remote unit ID number in two places; on
the remote unit splash screen after
power on, and below the equipment ID
label located on the back of each unit.
Enter the last 4 digits (may contain
number and/or letters) of the ID and
click Next Remote to enter another
Remote or Finished if you are done.
Click either the Save or Save As button in the Remote Devices pane to save the remote device file.
• Editing and Deleting Remote Devices.
o To edit or delete an existing remote ID number, right click on the appropriate ID number in the Edit
Remote Devices pane and select either Edit or Delete from the drop-down menu.
Click either the Save or Save As button in the Remote Devices pane to save the remote device file.
17
 Loading...