

IRAN KHODRO PEUGEOT 405 GLX, PEUGEOT 405 GLX BI - FUEL Owner's Manual

PEUGEOT 405
PEUGEOT 405 GLX
PEUGEOT 405 GLX BI - FUEL
May / 2016 Iran Khodro Co. All rights reserved.
9007051060134-16
e-code: 540701E004-16
Owner’s Manual
This Manual has been prepared for owner’s reference to vehicle’s
performance, safety, maintenance and everyday use guidelines.
Keeping the manual in your car is recommended for quick reference.
IRAN KHODRO Company (Public Joint Stock)
Gate No. 1, Iran Khodro Blvd,
KM.14 Karaj Makhsous Rd,
Shahid Lashgari Highway, Tehran, IRAN
Postal Code : 1389913657
Tel: (+9821) 48901
Fax: (+9821) 44934000-1
SMS Centre: (+98)30003
E-mail: info@ikco.ir
www.ikco.ir
OWNER’S MANUAL
PEUGEOT 405
In The Name of God
2
DEAR BUYER
We're thankful for choosing Iran Khodro product and we congratulate you for this good selection. We hope this new vehicle
contributes in happy moments of your life.
This manual helps you enjoy driving. Therefore to have an easy access, it would be advisable to be kept in your glove compartment.
The manual is divided into some sections for your convenience, and deals with various aspects of driving or maintenance of the car.
Before driving: Includes seat adjustment, Safety belts, heating and ventilation control system and also every other thing you
needed to know in order to settle comfortably.
Driving Controls: explain functions of switches, equipment and precautions.
Maintenance: Includes information about the checks you should carry out regularly.
Note:
Please refer to maintenance and guaranty services manual to know about the vehicle maintenance, regulation &
condition of guaranty services and periodic services.
Technical emergencies: Help solve some of unavoidable small emergencies occurring occasionally like replacing lamps fuses or changing wheels.
Technical data: It includes some information about engine, dimensions, capacities and weights.
WARNING, CAUTION and NOTE have special meanings. These special meanings apply except when laws or regulations require
that the signal words be used with a different meaning. Pay special attention to the messages highlighted by these signal words:
In the meanwhile consumptive material must be provided through authenticated representatives of IKCO. (Use the brands and
packages approved by ISACO)
WARNING: Indicates a potential hazard that could result in death or injury.
CAUTION: Indicates a potential hazard that could result in vehicle damage.
NOTE: Indicates a serious damage to your vehicle in the case of not paying attention to the warning and caution signals.
Important Point: The specication of each vehicle will vary according to its type. Therefore some information of this manual may
not be true about your vehicle. For any more information, you can consult with IRAN KHODRO dealers.
Reminder: Information about other varieties of this product have been mentioned in this manual and denoted by asterisk (*).

3
INDEX
1
2
3
4
5
6
7
PEUGEOT 405 AT A GLANCE
BEFORE DRIVING
DRIVING
MAINTENANCE
TECHNICAL EMERGENCIES
TECHNICAL DATA
INDEX

4
OVERVIEW
LOCKING/UNLOCKING OF DOORS ...................................................................................................................................................................... 20
THE SEATS .............................................................................................................................................................................................................23
SAFETY BELTS ...................................................................................................................................................................................................... 25
CHILD SAFETY ....................................................................................................................................................................................................... 26
THE VEHICLE SAFETY .......................................................................................................................................................................................... 28
WINDOW REGULATORS ....................................................................................................................................................................................... 29
STEERING WHEEL ................................................................................................................................................................................................30
HEATING/VENTILATION ...................................................................................................................................................................................31,66
INTERIOR EQUIPMENTS ....................................................................................................................................................................................... 35
INTRODUCTION TO GAS POWERED PARTS ...................................................................................................................................................... 37
CD PLAYER MANUAL............................................................................................................................................................................................. 39
INDICATORS OF DIGITAL INSTRUMENT PANEL ................................................................................................................................................. 52
AIR BAG .................................................................................................................................................................................................................. 54
STARTING AND DRIVING ...................................................................................................................................................................................... 57
STARTING AND DRIVING WITH CNG ................................................................................................................................................................... 58
LAMPS AND INDICATORS ..................................................................................................................................................................................... 62
WIPER AND WASHER ............................................................................................................................................................................................ 68
BRAKES SYSTEM (ABS)........................................................................................................................................................................................ 69
VEHICLE MAINTENANCE ...................................................................................................................................................................................... 71
RECOMENDATION FOR WASHING THE VEHICLE ..............................................................................................................................................80
TIRES ................................................................................................................................................................................................................. 81,84
BATTERY ........................................................................................................................................................................................................... 81,86
TOWING VEHICLE .................................................................................................................................................................................................89
FUSES..................................................................................................................................................................................................................... 92
LAMPS .................................................................................................................................................................................................................... 95
VEHICLE IDENTIFICATION PLATE ........................................................................................................................................................................ 98
WEIGHTS .............................................................................................................................................................................................................. 100
DIMENTION OF THE VEHICLE ............................................................................................................................................................................ 101
POLLUTION CONTROL SYSTEM ........................................................................................................................................................................ 102
INDEX.................................................................................................................................................................................................................... 105

5
YOUR VEHICLE AT A GLANCE
1
FASCIA .......................................................................... 6
KEYS .............................................................................. 7
LIGHTS ........................................................................ 10
SNOW WIPER ............................................................. 11
SEATS .......................................................................... 13
CONTROL INSTRUMENTS ......................................... 14
ADJUSTING STEERING WHEEL ............................... 16
FUEL CONVERSION KEY .......................................... 16
AIRBAG ....................................................................... 17
LOCKING/UNLOCKING OF DOORS (BONNET) ...... 18
6
1
YOUR VEHICLE AT A GLANCE
*If equipped
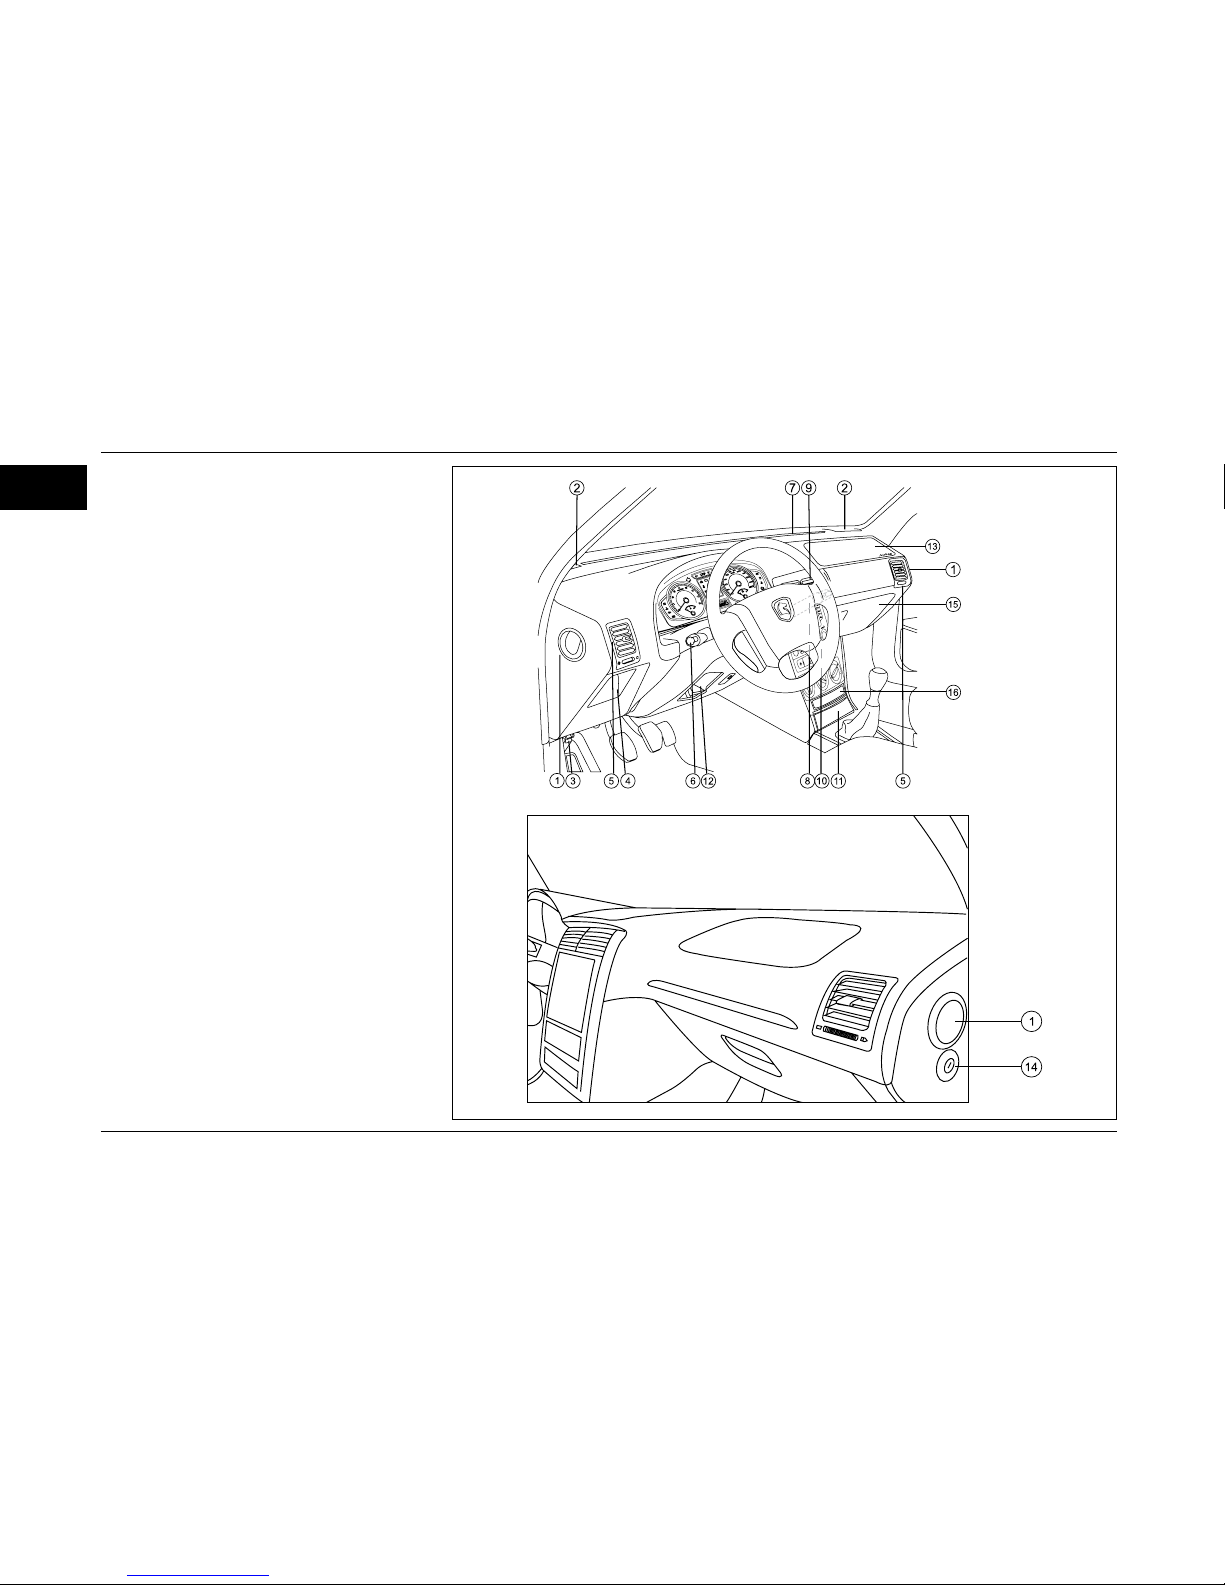
Dashboard
1. Air vents towards front side doors
2. Speaker location
3. Engine hood release handle
4. Fuse box
5. Side adjustable air vent
6. Horn, front lamp button and indicator
lever
7. Windshield defrosting and defogging
air vent
8. Snow wiper and windshield washer
button
9. Middle adjustable air vent
10. Radio installation place
11. Ashtray place
12. Adjusting lever of steering wheel
13. passenger Air bag
14. Deactivating passenger air bag switch
15. Dashboard box
16. Dashboard empty compartment
7
1
YOUR VEHICLE AT A GLANCE
Locking and unlocking the doors
Side doors - Boot door-Petrol cap
Using of the key :
pull upwards the outside lever to
open the door .
From inside :
To close the door press the internal
locking key. to unlock it pull the key
upwards. And pull the lever to open
the door.
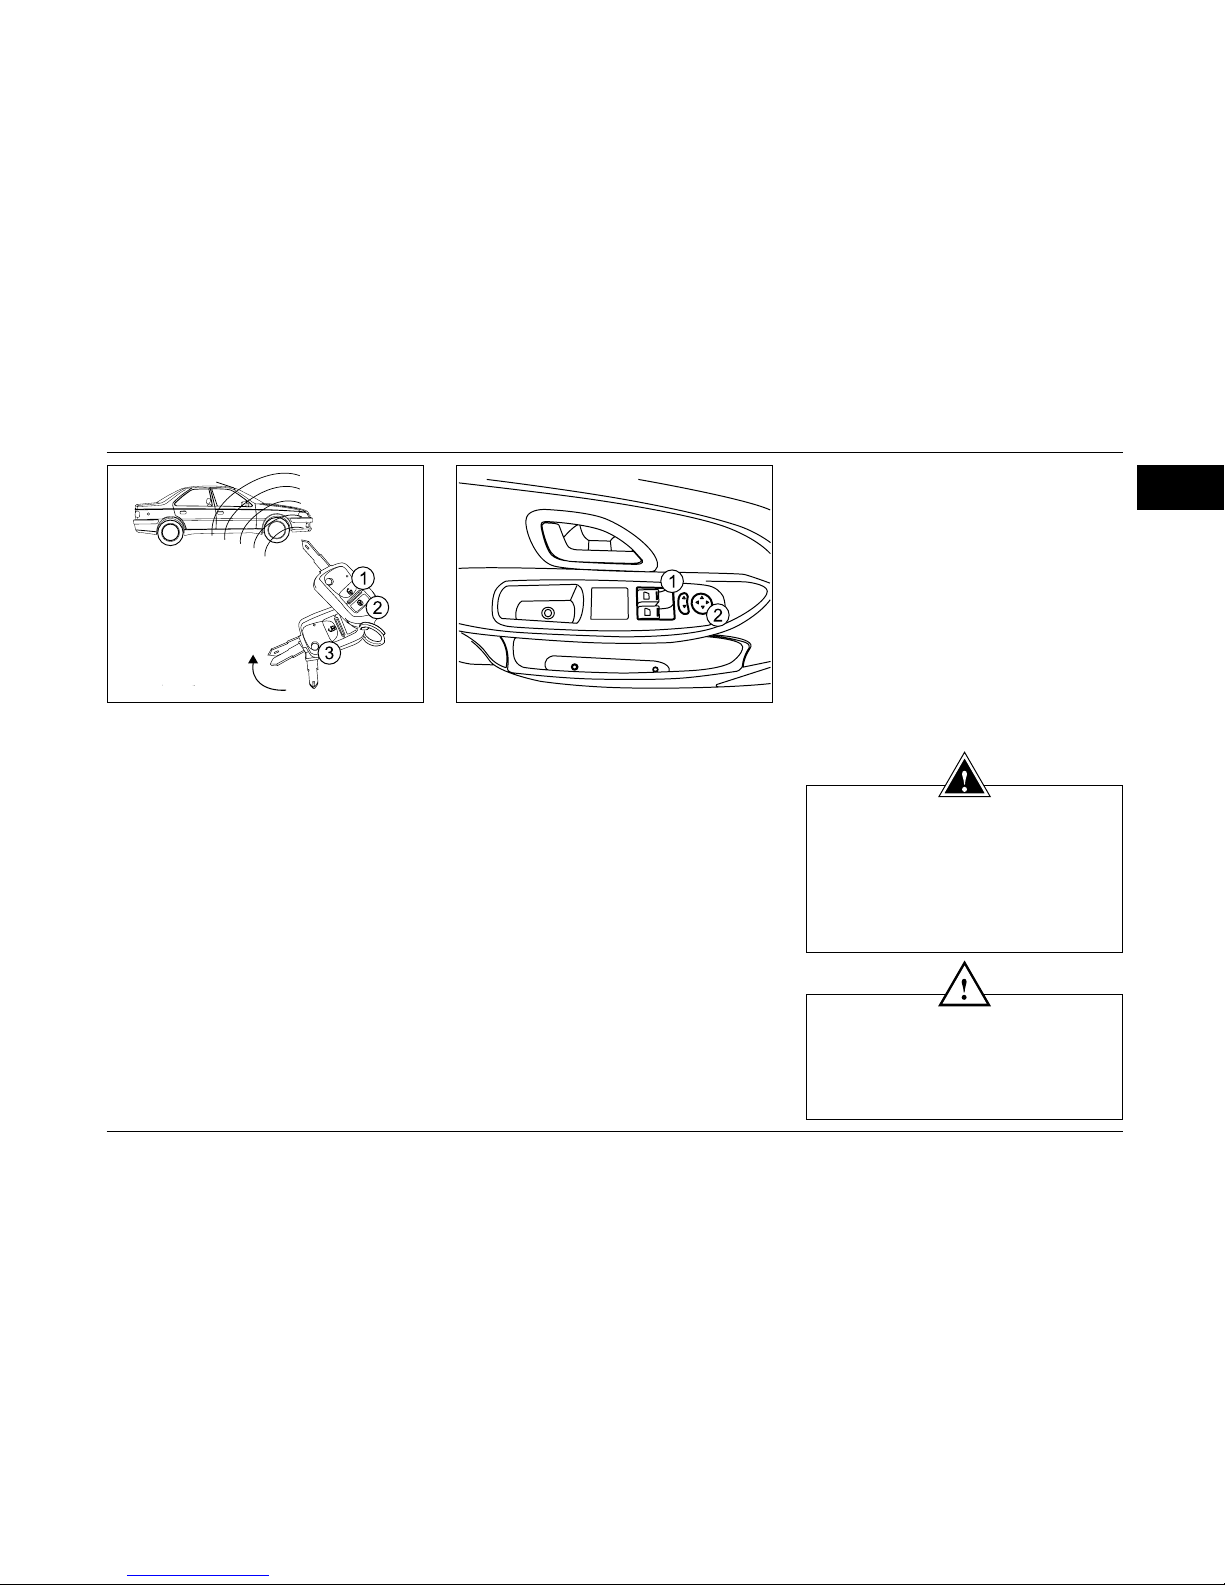
Locking and unlocking by remote
control
Take the remote control toward the vehicle:
- Switch 1 for unlocking
- Switch 2 for locking
- Switch 3 Jack knife switch.
Switch blade gets open clockwise.
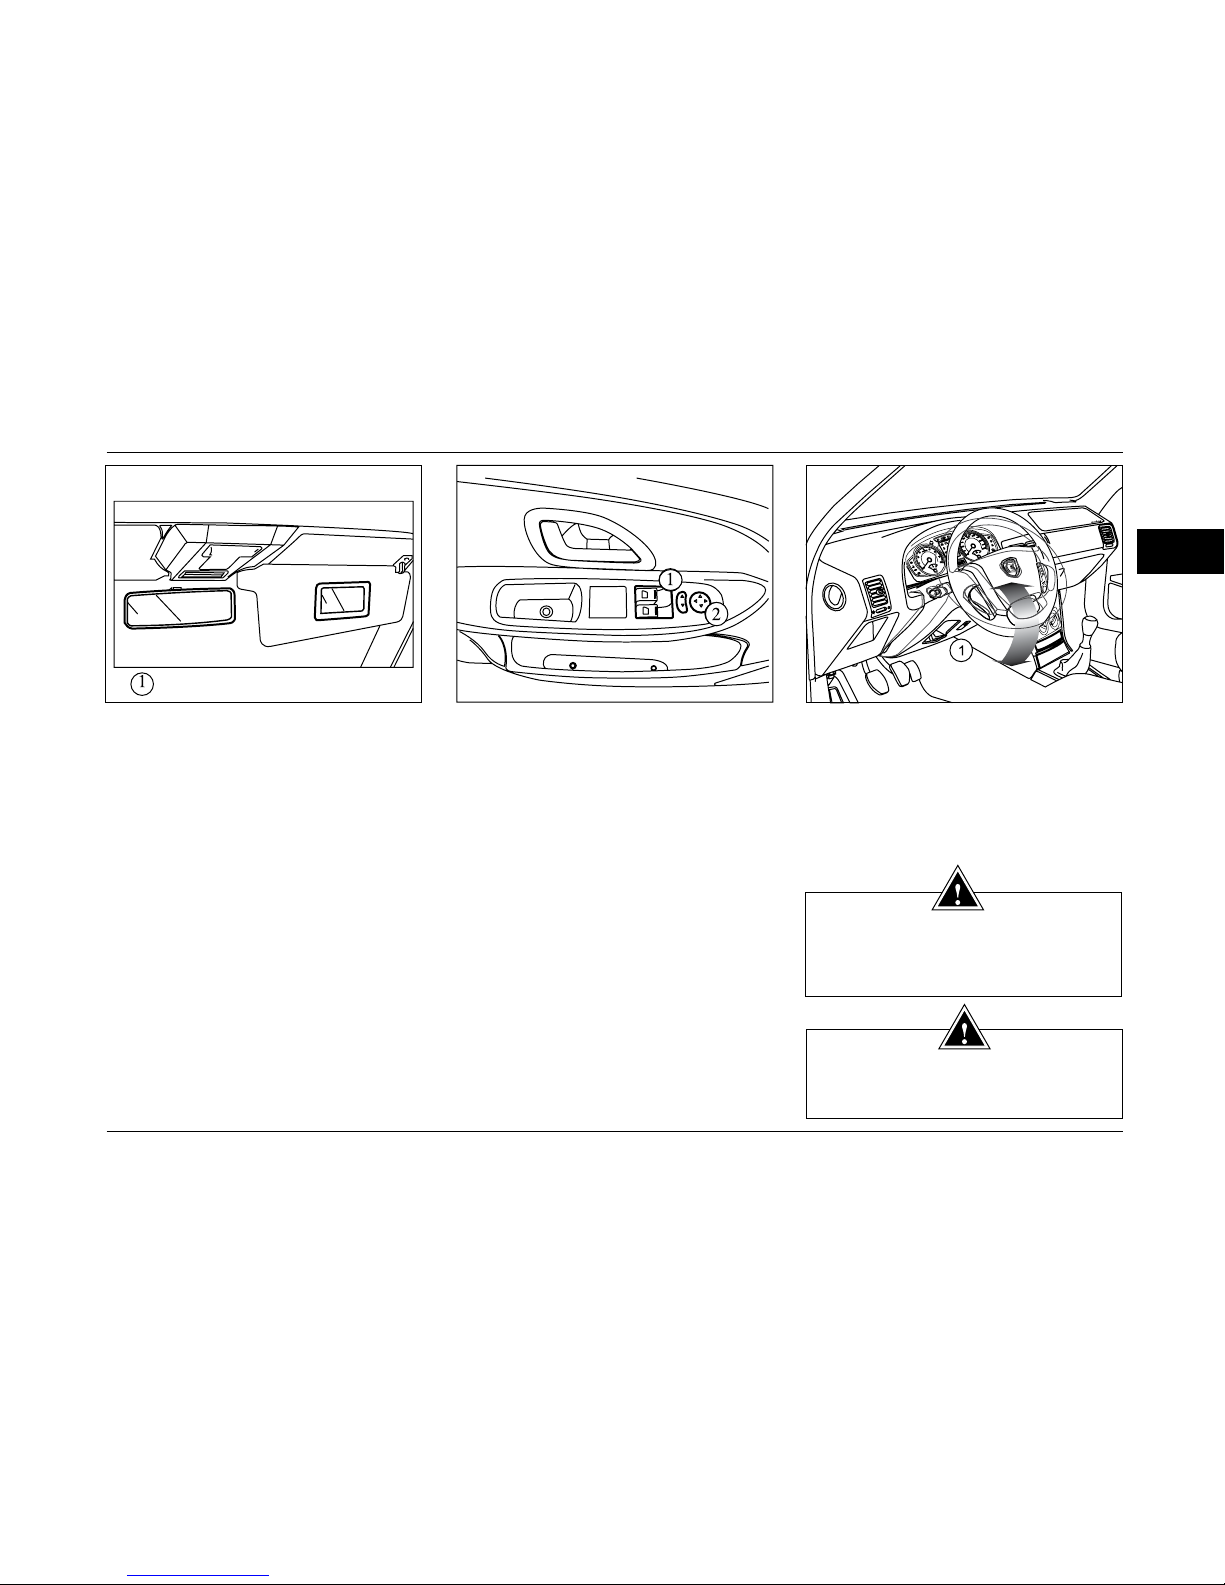
Electric windows
1- Automatic operation (One touch
operation):
By gently pressing on one end of the
driver’s side switches, the relative window
will be closed or opened fully.
2- Electrical operation – Driver’s window:
The window can be opened or closed by
pressing the switch. The window stops
as soon as the switch is released.
Adjusting electric mirror
1- Select the right or left mirror by pressing
the key no. 1 while the ignition switch is in
the “ON” position.
2- Adjust the mirror toward top, bottom,
right or left by pressing switch no. 2 in
four directions.
Electric folding mirrors*
These mirrors are automatically folded
and unfolded simultaneous with locking
and unlocking the vehicle’s doors by
remote control.
Warning
Avoid keeping the battery or remote
controller in infants’ access, because
swallowing of the battery can cause
death. In case of swallowing the battery,
refer to health care centers immediately.
Note :
Frequent pressing of the keys with a
short intervals stops functioning for 20
seconds.
8
1
YOUR VEHICLE AT A GLANCE
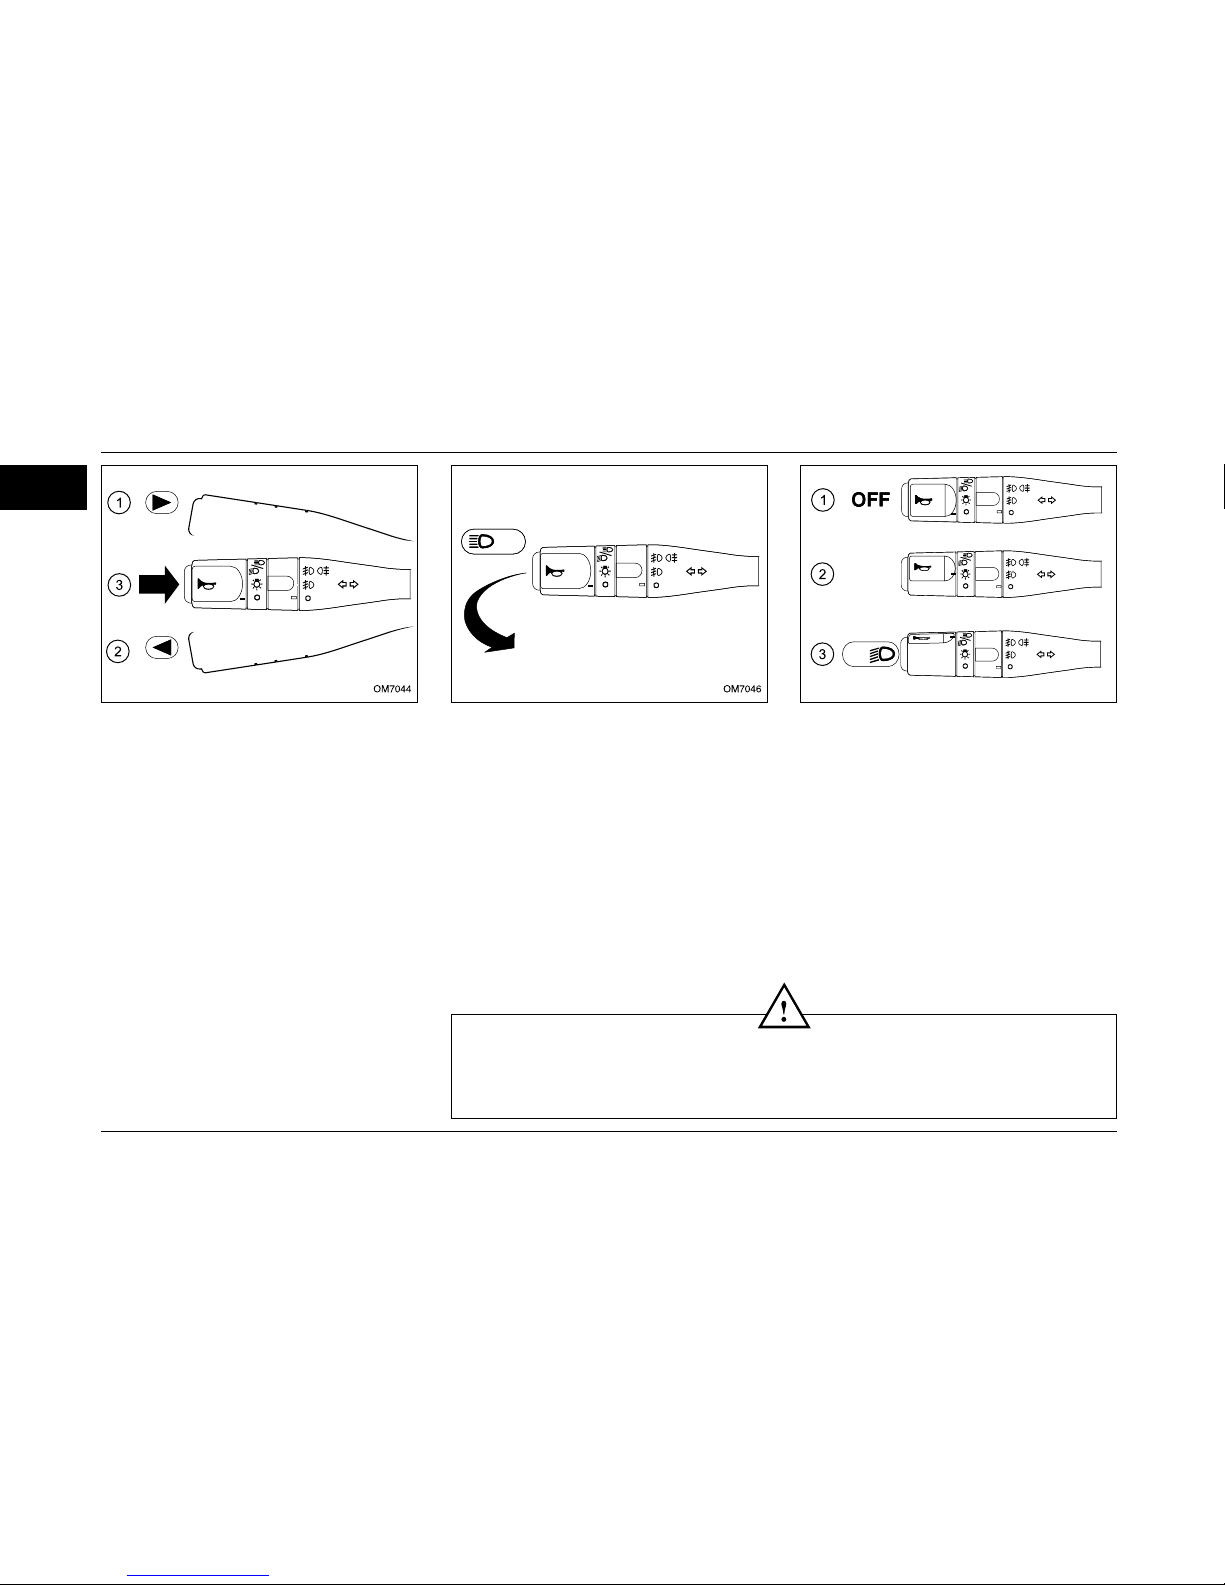
Left and Right indicator lamps
Positions 1 & 2: Before turning to left,
pull the lever downwards, and before
turning to right, pull the lever upwards.
(The green warning lamp will blinks
according to turning direction on the
instrument panel display.)
In case of knocking once on the left or
right indicator, the indicator lamp will be
activated and will go out after 4 ashings.
(Number of ashers are adjustable with
diagnostic instrument.)*
Horn
Position 3: In order to make horn,
press the button designed at the end of
indicator lever.
Low and High Beams
In order to shift through low and high
beams, pull the lever completely towards
the steering wheel (in this mode, the
blue indicator lamp of high beam will
be turned on). In order to make a signal
with main lamps (lighting), pull the lever
near the steering wheel and release it.
Lamps button
Position 1: All lamps OFF.
Position 2: Position lamps, tail lamps,
and instrument panel display lamps.
Position 3: Headlamps ON.
Warning Beep
It warns the driver when he leaves the
vehicle and the headlamps are ON,
it will beep when the driver’s door is
opened and the switch is OFF.
Warning
Before starting to drive at night: Ensure the appropriate functioning of electric equipment and adjust
the vehicle lamps. (In case of overloading) generally, ensure that the lamps are not covered. (Dirt,
mud, snow or any other object are not covering the lamps.)
9
1
YOUR VEHICLE AT A GLANCE
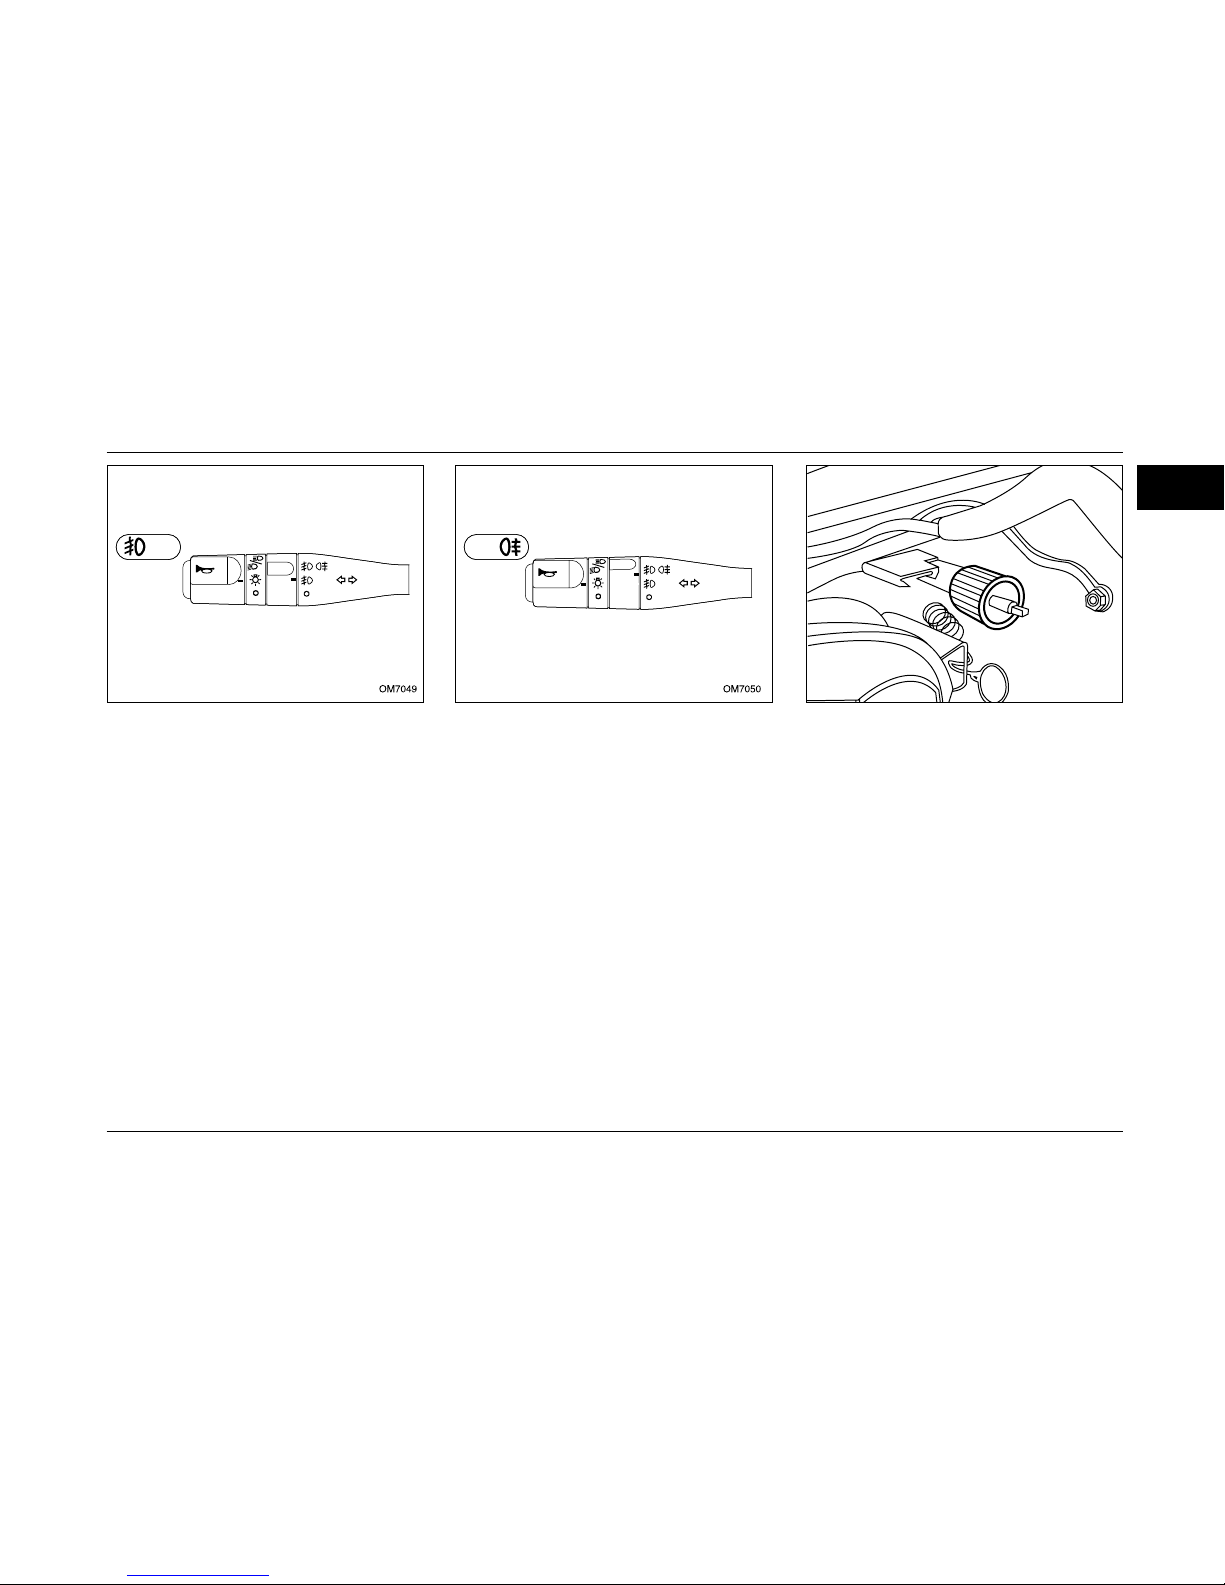
Front Fog Lamps
In order to turn on the front fog lamps,
turn the middle part of indicator lever
one step upwards. When the fog lamps
are turned on, the relevant indicator
lamp will emerge on the instrument
panel display.
These lamps are able to be turned
on only when the main headlamps or
positions lamps are turned on.
Rear Fog Lamps
In order to turn on the rear fog lamps,
turn the middle part of indicator lever two
step upwards. When the fog lamps are
turned on, the relevant indicator lamp
will emerge on the instrument panel
display.
These lamps are able to be turned on
providing that:
-The main headlamps or position lamps
are turned on.
-The side lamps or front fog lamps (if
existing) are turned on.
Pay attention to make use of fog lamps
only when the scope of vision is limited,
because in ordinary vision conditions, it
will annoy other drivers.
Adjustment From Inside The
Engine Compartment:
- Position 1 : When front seats are
occupied.
- Position 2: When front and back
seats are occupied and luggage
compartment is laden.
- Position 3: When the driver’s seat is
occupied and luggage compartment is
fully laden.
10
1
YOUR VEHICLE AT A GLANCE
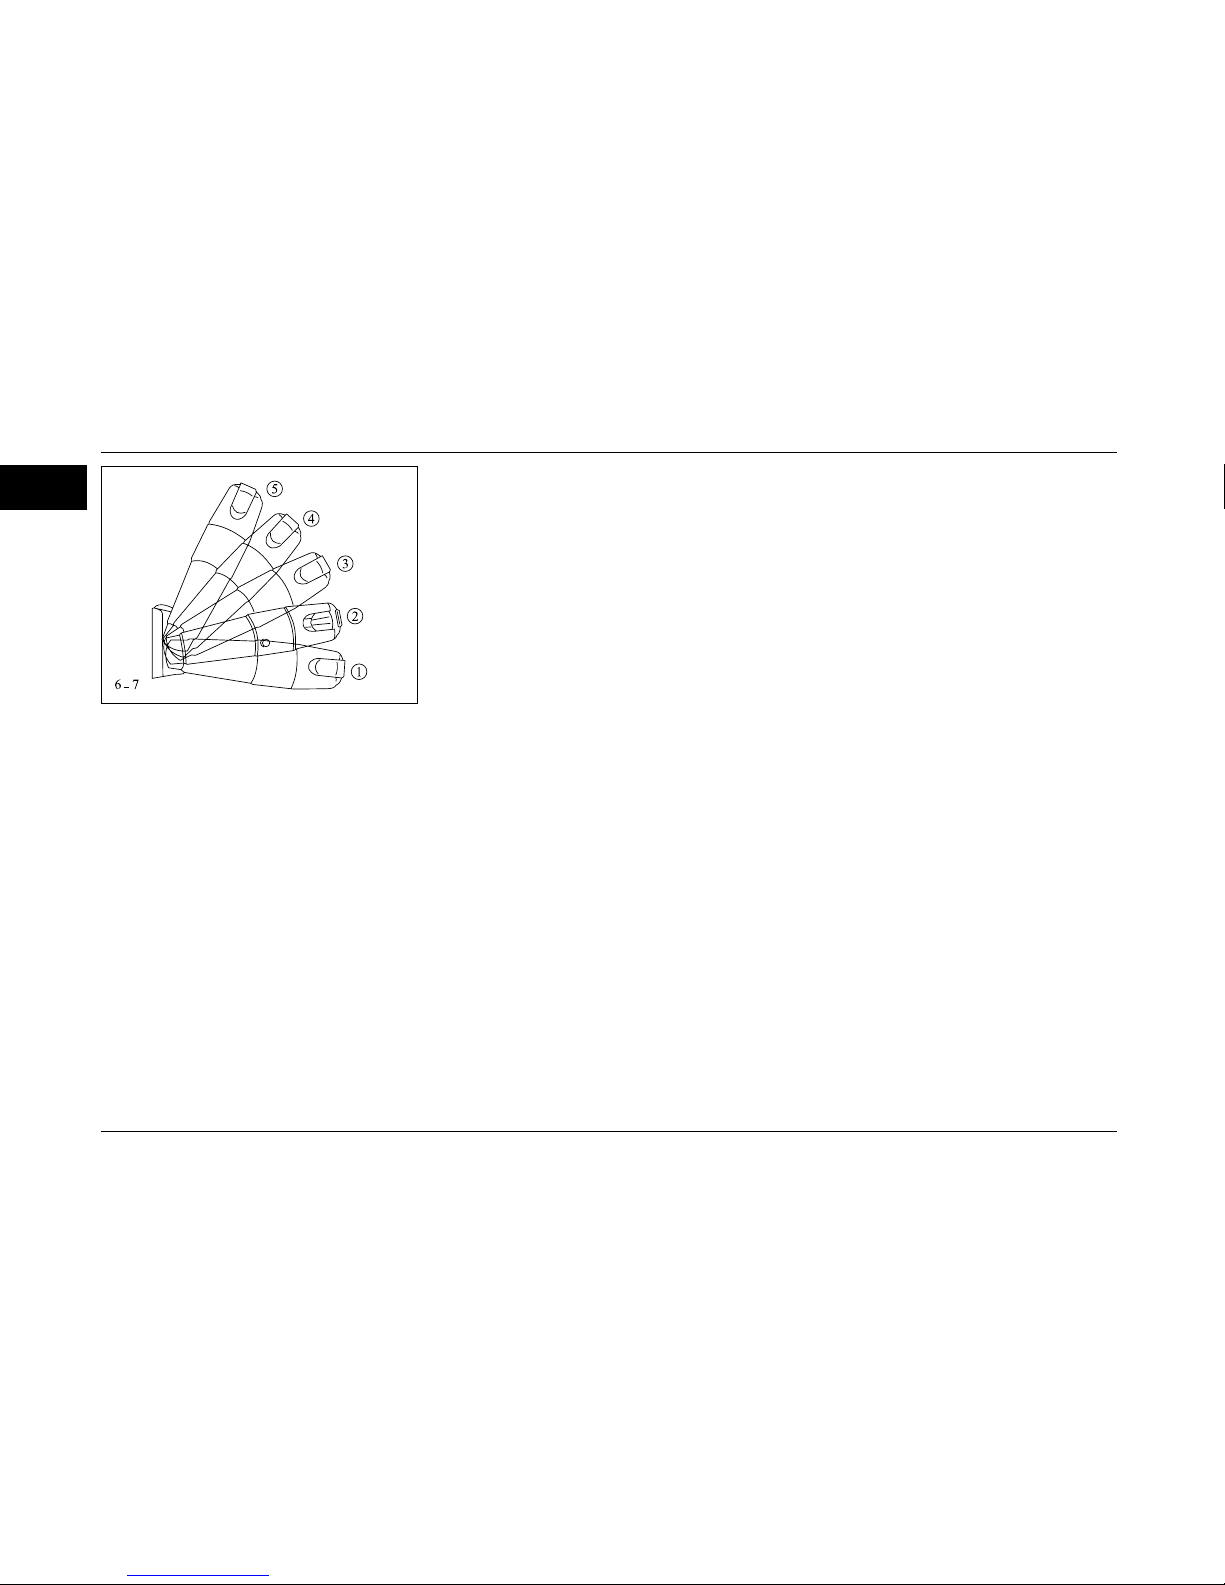
Windscreen
Positions of the Windscreen
Wiper Stalk:
1- Normal speed wipe (whilst held in
this position)
2- Stop Position
3- Intermittent Wipe
4- Normal Speed Wipe
5- High Speed Wipe
Wind Screen Washer: Pull the wiper
stalk towards the steering wheel
6- Wiper: The wiper will operate in
any switch position (1-2-3-4-5). Turn the
stalk 1/8 of a turn forwards.
7- Rear Window Washer: Rotate the
stalk a further 1/8 a turn forwards.
11
1
YOUR VEHICLE AT A GLANCE
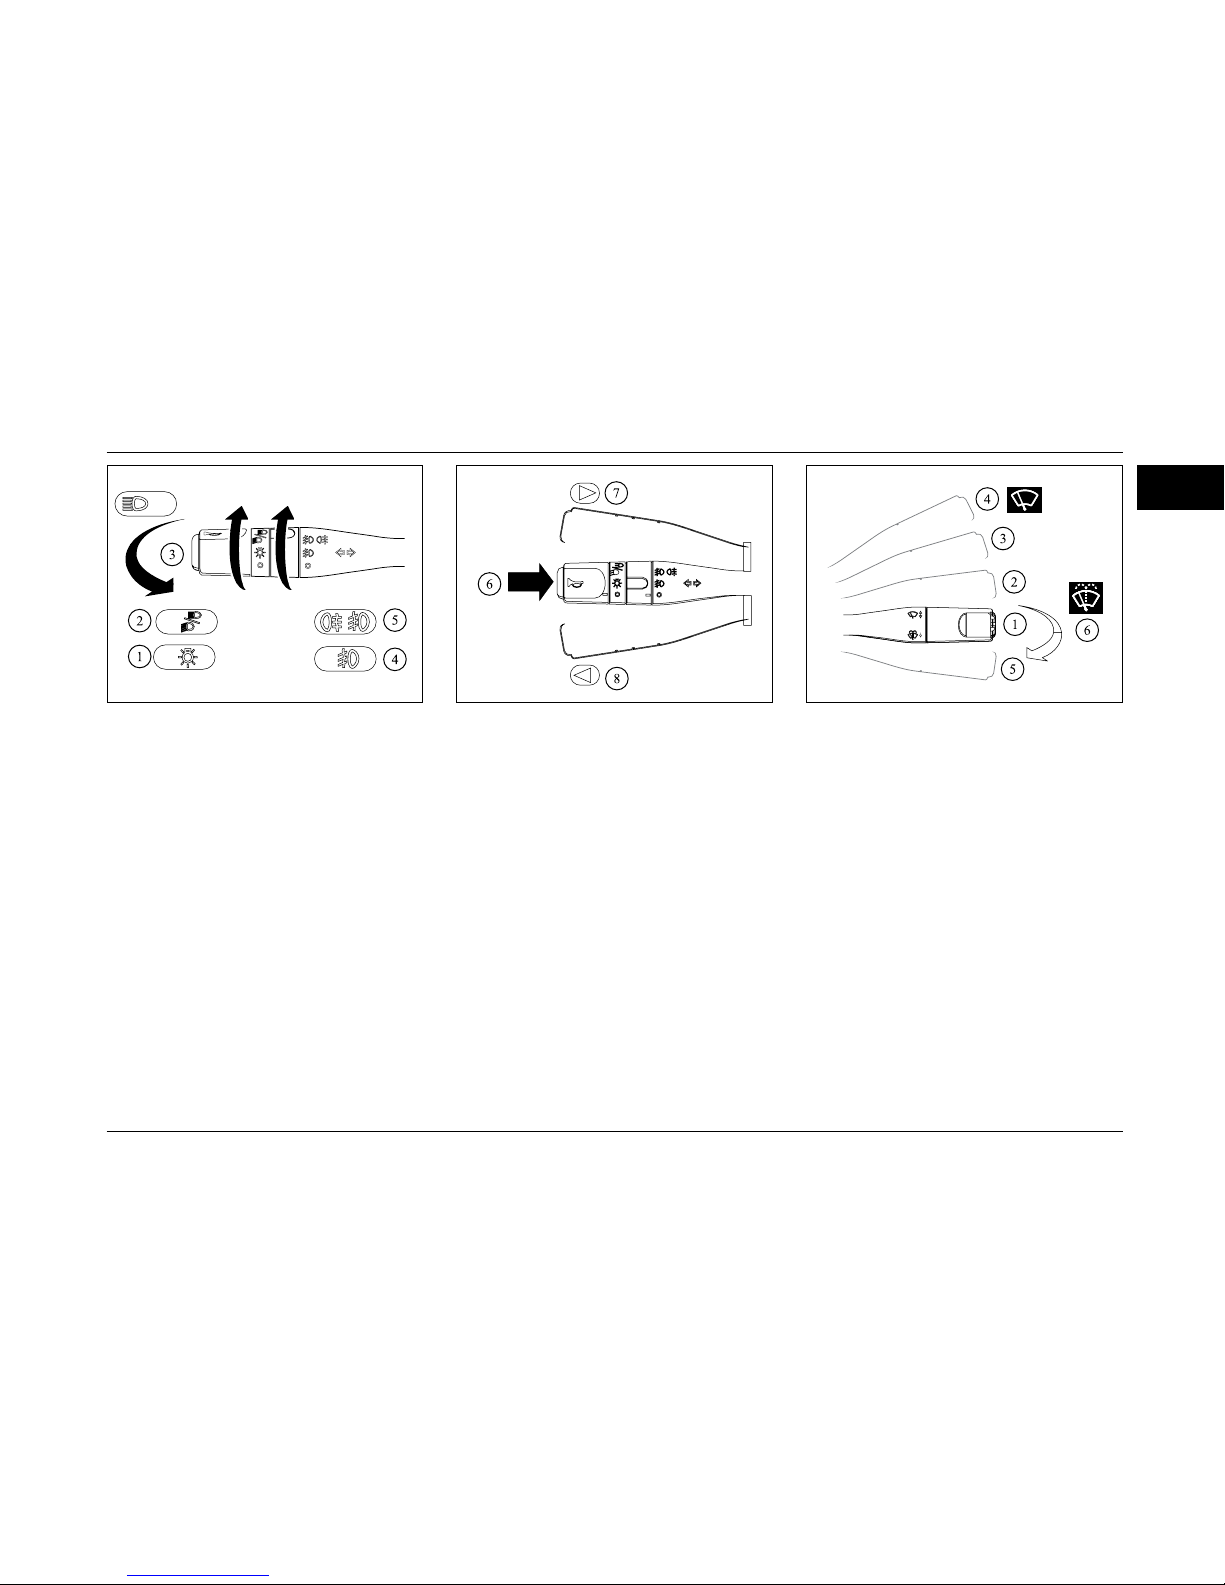
The key buttons for lights, side
light lever handle and horn: *
1-Small, rear lights and digital trip
recorder.
2- Head light, downward/upward beam.
3- Head light, upward beam (pulling the
lever toward the driver)
4- Front fog lamp
5- Front / rear fog lamp
6- Horn
7- Right side blinker
8- Left side blinker
Windscreen Wipers and Glass
Cleaners: *
1- Off
2- Time controlled window wipers. (Is
adjusted according to the vehicle speed)
3- Slow speed window wiper.
4- High speed window wiper.
5- Intermittent move of the window
wiper.
6- Glass cleaners. (pulling the lever
toward
the driver)
12
1
YOUR VEHICLE AT A GLANCE
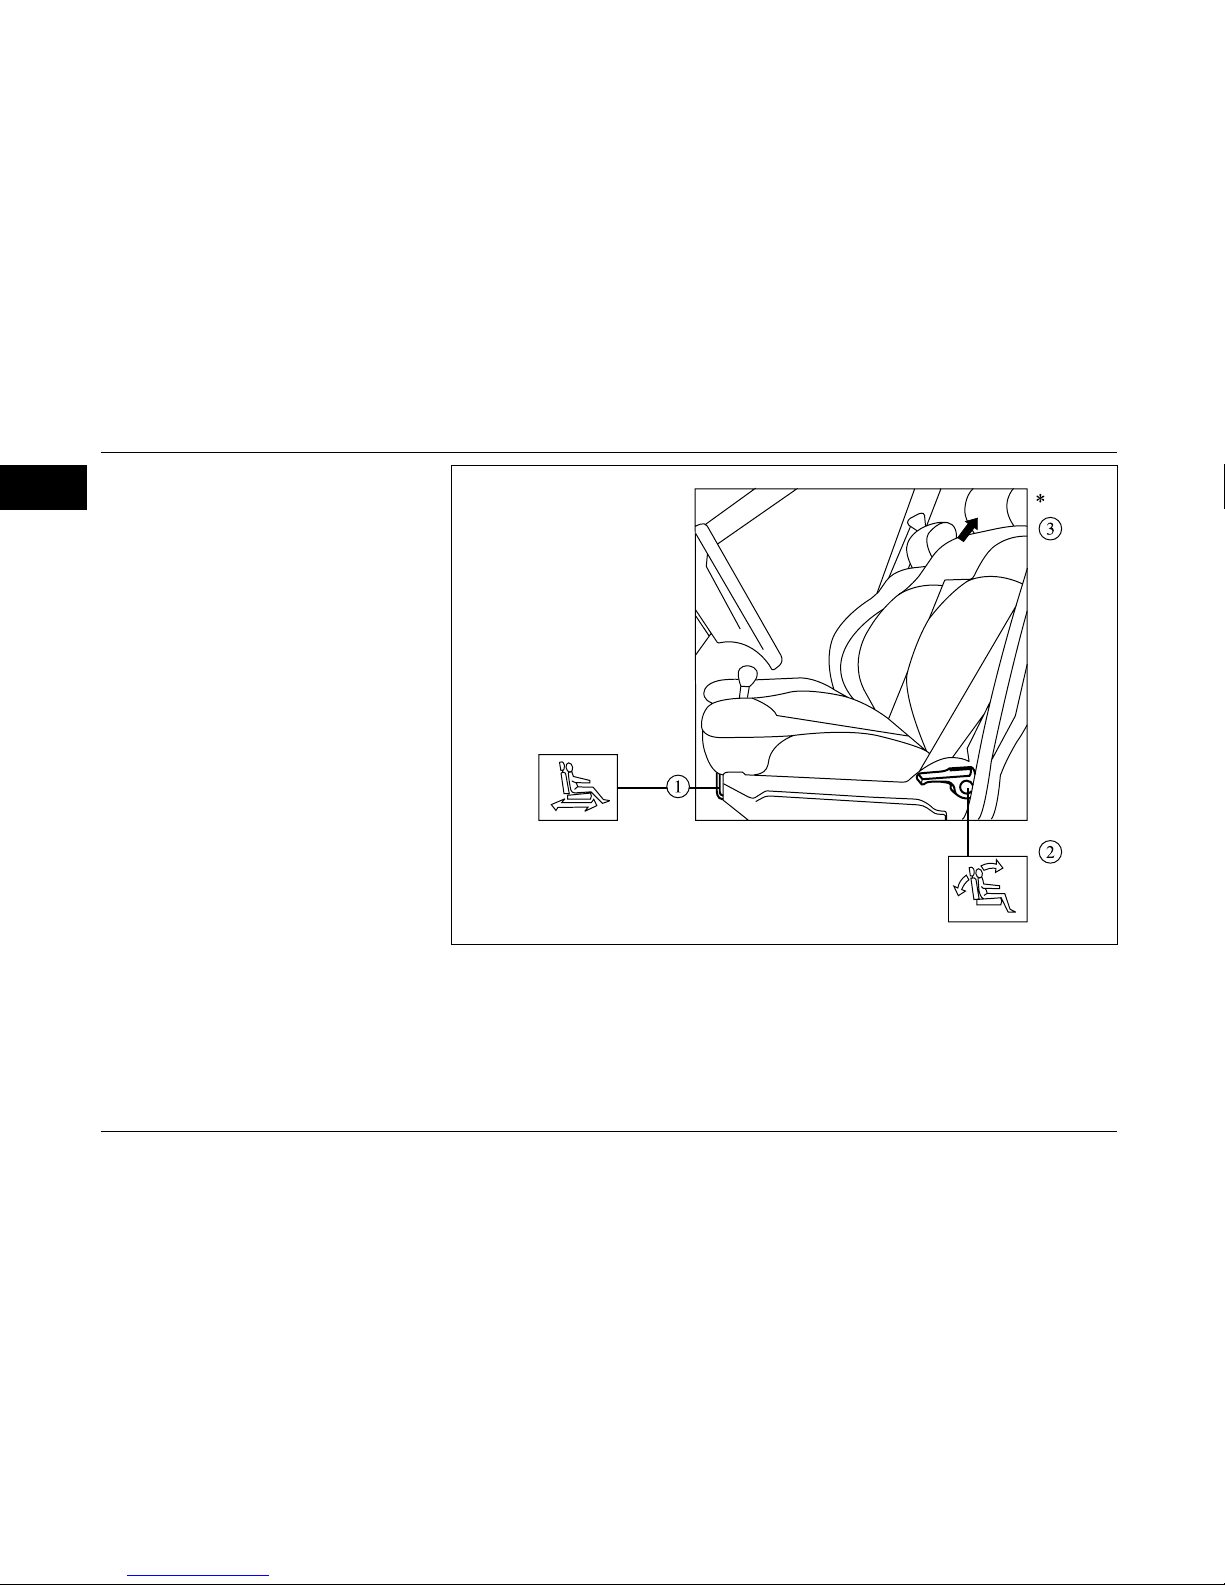
Seats
Front seats (Manual adjustment):
1- Forward and Backward Seat
Movement:
- Pull up the lever.
- Slide the seat to the favorable position.
- Release the lever till it will be locked.
Before driving, make sure the seat is in its
stable position.
2- Adjusting Lumber Support
Rotate the hand wheel to adjust the
lumbar region of the back* (In some
models, the adjustment is accomplished
by the lever).
3- Headrest Adjustment
Head Restrain: Pull the headrest up to
adjust the height. Pull it down to decrease
the height.
* If equipped
13
1
YOUR VEHICLE AT A GLANCE
YOUR VEHICLE AT A GLANCE
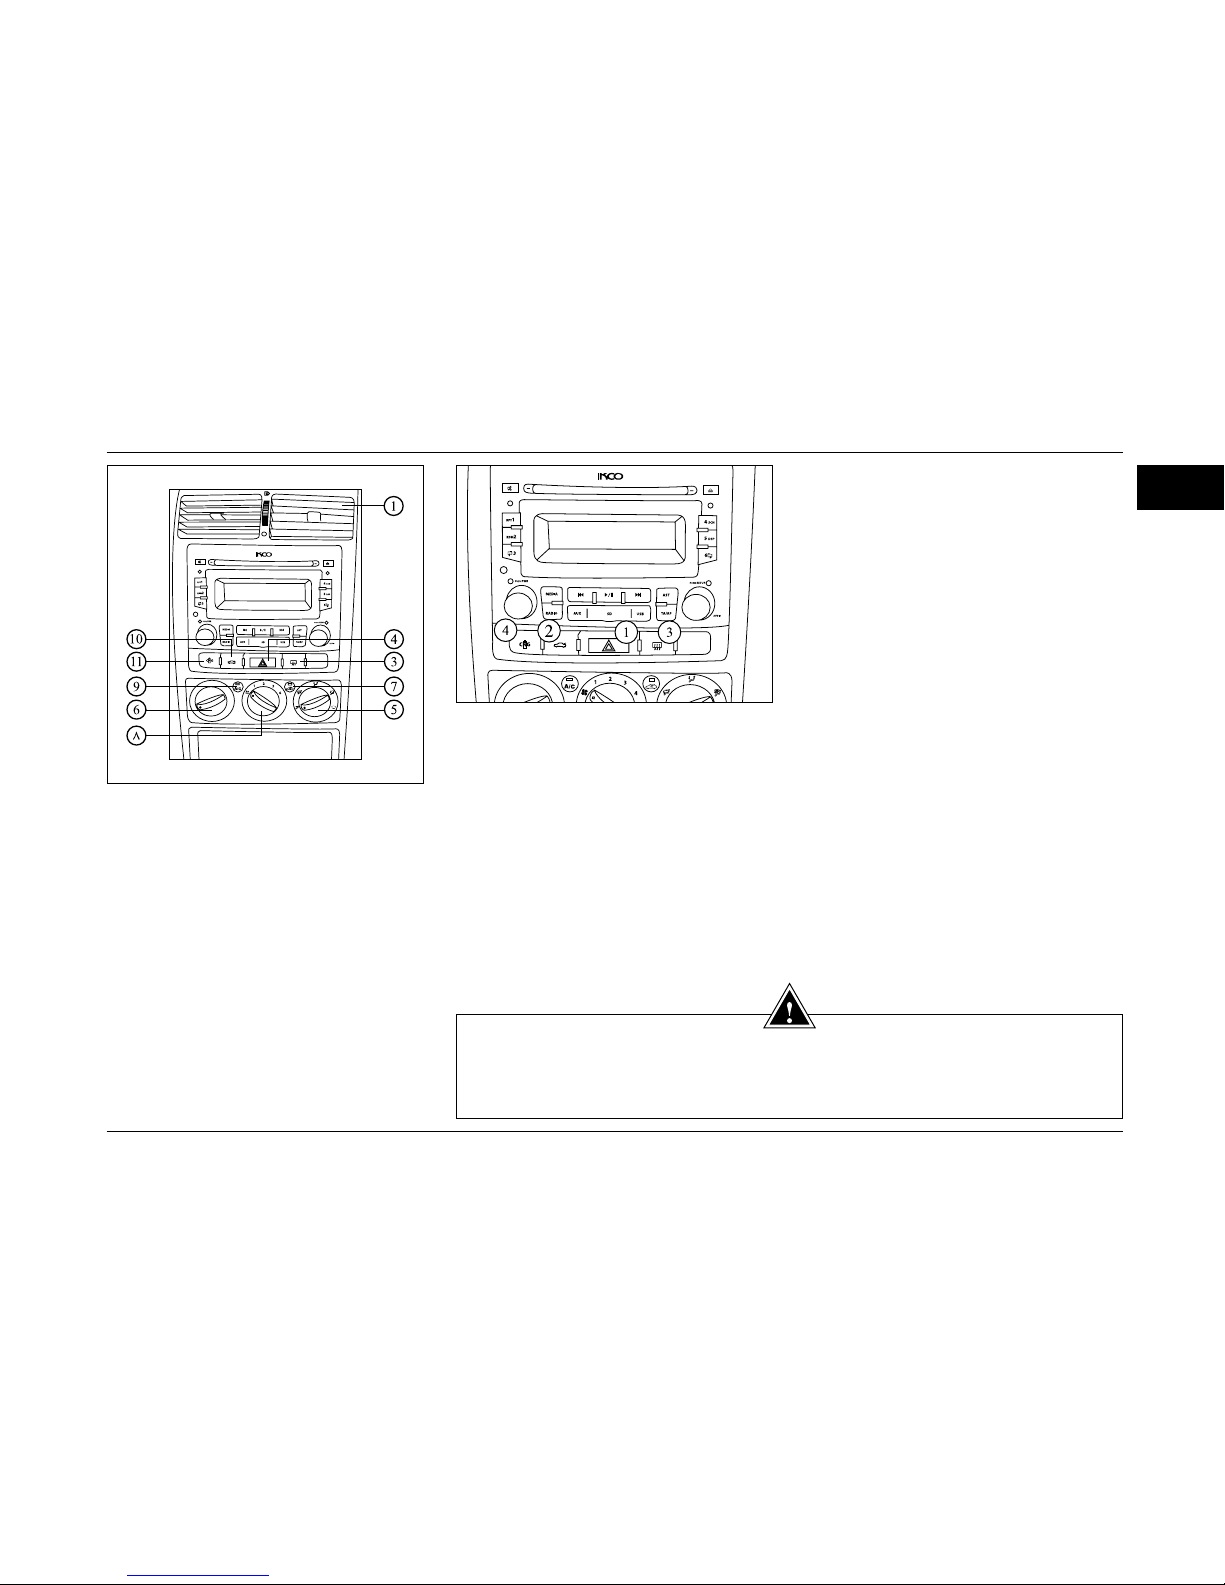
Control instruments
1- Air vent towards face.
2- Rear Fog Lamps button.
3- Rear Window De- icing/ Demisting
Switch
4- Hazard Warning Light (Flasher)
5- Air Distribution Lever
6- Temperature Adjustment Lever
7- Air Intake
8- Air Flow Adjustment
9- Air conditioning ON/ OFF
10- The Fuel Conversion Key*
11- Trunk Lid unlocking Key*
1-Hazard warning key (asher)
2-Trunk lid unlocking key
3-Heated rear window’s key
4- The Fuel Conversion Key
Warning
Rear window heater:
Use the heater only when the engine is on .Soon after defrosting turn off the heater .Avoid
scratching the window glass .
14
1
YOUR VEHICLE AT A GLANCE
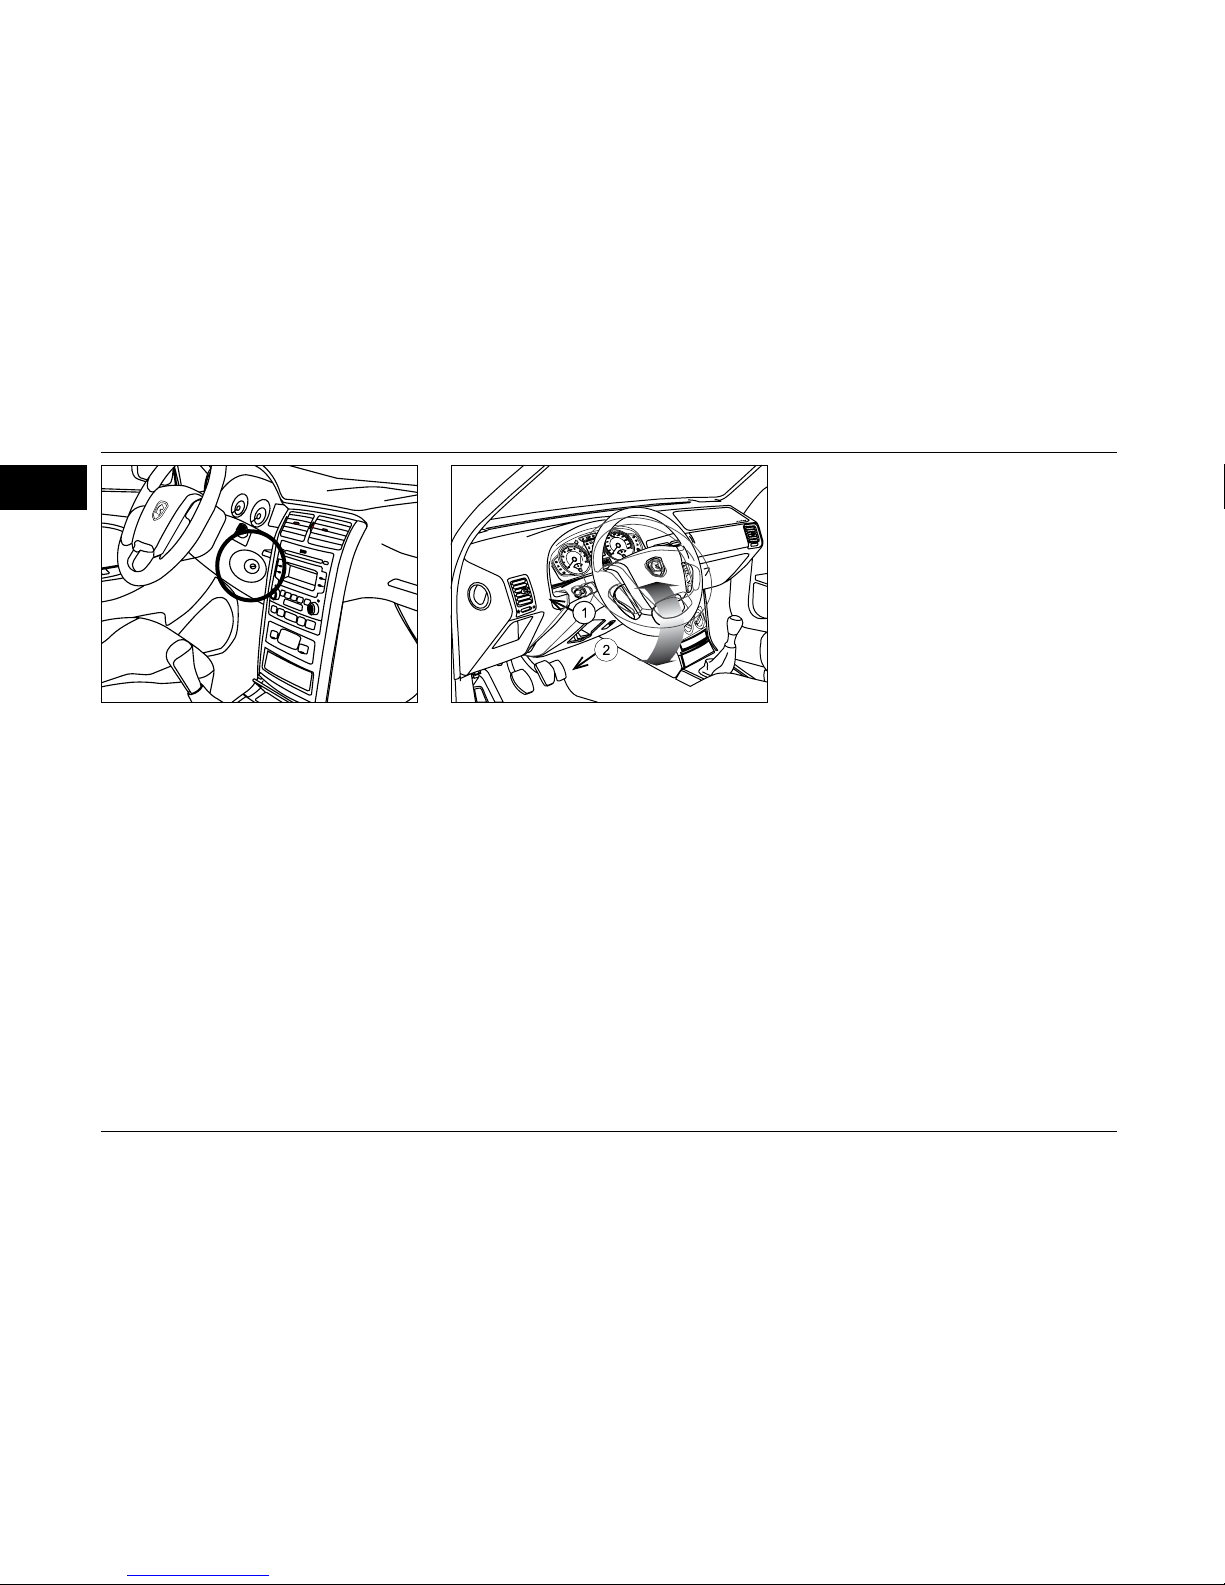
Steering Wheel Unlocking Switch:
Turn the switch after inserting with a
gently movement of the steering wheel
to be unlocked.
Adjusting steering wheel
To adjust the steering wheel height:
1- push the lever to be unlocked
2-Move the steering wheel up or down
to the desired location.
3-Pull the lever tobe locked after
adjusting
YOUR VEHICLE AT A GLANCE
15
1
YOUR VEHICLE AT A GLANCE
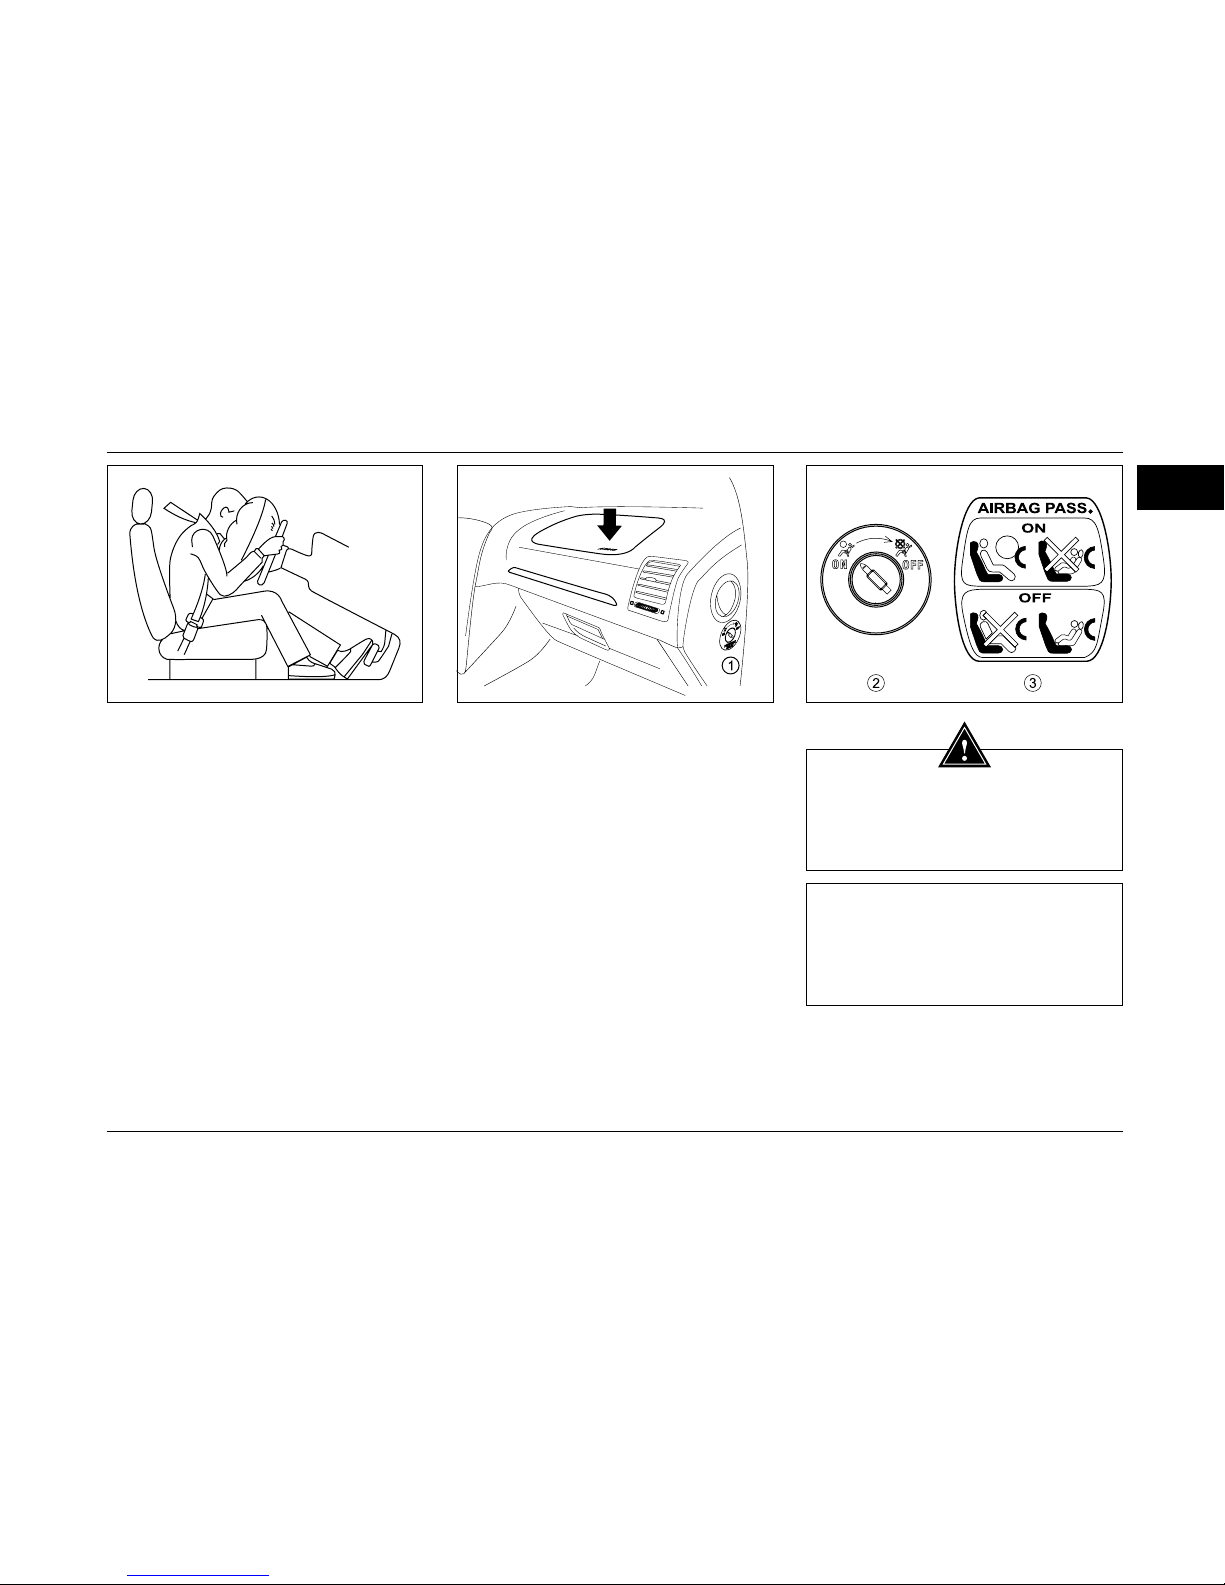
Air Bag
If your car is equipped with air bag, in
addition to the use of new design seat
belt , the system has a module air bag
for the driver and passengers.
When the ignition switch is placed in
the ON position, the air bag indicator
light on the instrument panel is turned
on and after 6 times blinking, is turned
off. Otherwise, (as below) suggests a
fault in the air bag system or safety belt
which should be referred to the dealer
of the car and x it.
- Air bag light stay on after blinking 6
times.
- When the ignition switch is placed in
the ON position, the air bag light does
not light up and does not blink.
Front passenger air bag :
Deactivation switch of air bag is located at
the side of dashboard .
1- You can turn the switch clockwise to
deactivate the air bag.
2- Avoid keeping the child seat (back to face)
in the front seat while the air bag switch is on.
3- If the air bag operates ,while the child seat
has been kept in front seat ,there is every
possibility of serous injury or death for the
child.
WARNING
- All the parts of the air bag must be
changed by the authorized dealer of IKCO,
If it is operated once.
- Keep your belt fastened so that the air
bag operates in a best condition.
Note:
To control the air bag indicator ashes, in
case of any two consecutive placing the
switch in ON position, it should be placed
at least three seconds on the off position
as well.
16
1
* If equipped
Engine hook lock*Locking /Unlocking of doors Bonnet:
1-From inside:Pull the bonnet release
from the passenger compartment (driver
side)
2-From outside:Pull the under- bonnet
release lever to lift it up.
YOUR VEHICLE AT A GLANCE

17
BEFORE DRIVING
2
LOCKING / UNLOCKING THE DOORS .............................. 20
SEATS .................................................................................. 23
SAFETY BELTS ................................................................... 25
CHILD SAFETY ................................................................... 26
THE VEHICLE SAFETY ...................................................... 28
MIRRORS ............................................................................. 29
STEERING WHEEL ............................................................ 30
HEATING AND VENTILATION ............................................ 31
INTERIOR EQUIPMENTS .................................................... 35
CNG SYSTEM* ................................................................... 37
CD PLAYER MANUAL ........................................................ 39
18
2
LOCKING / UNLOCKING THE DOORS
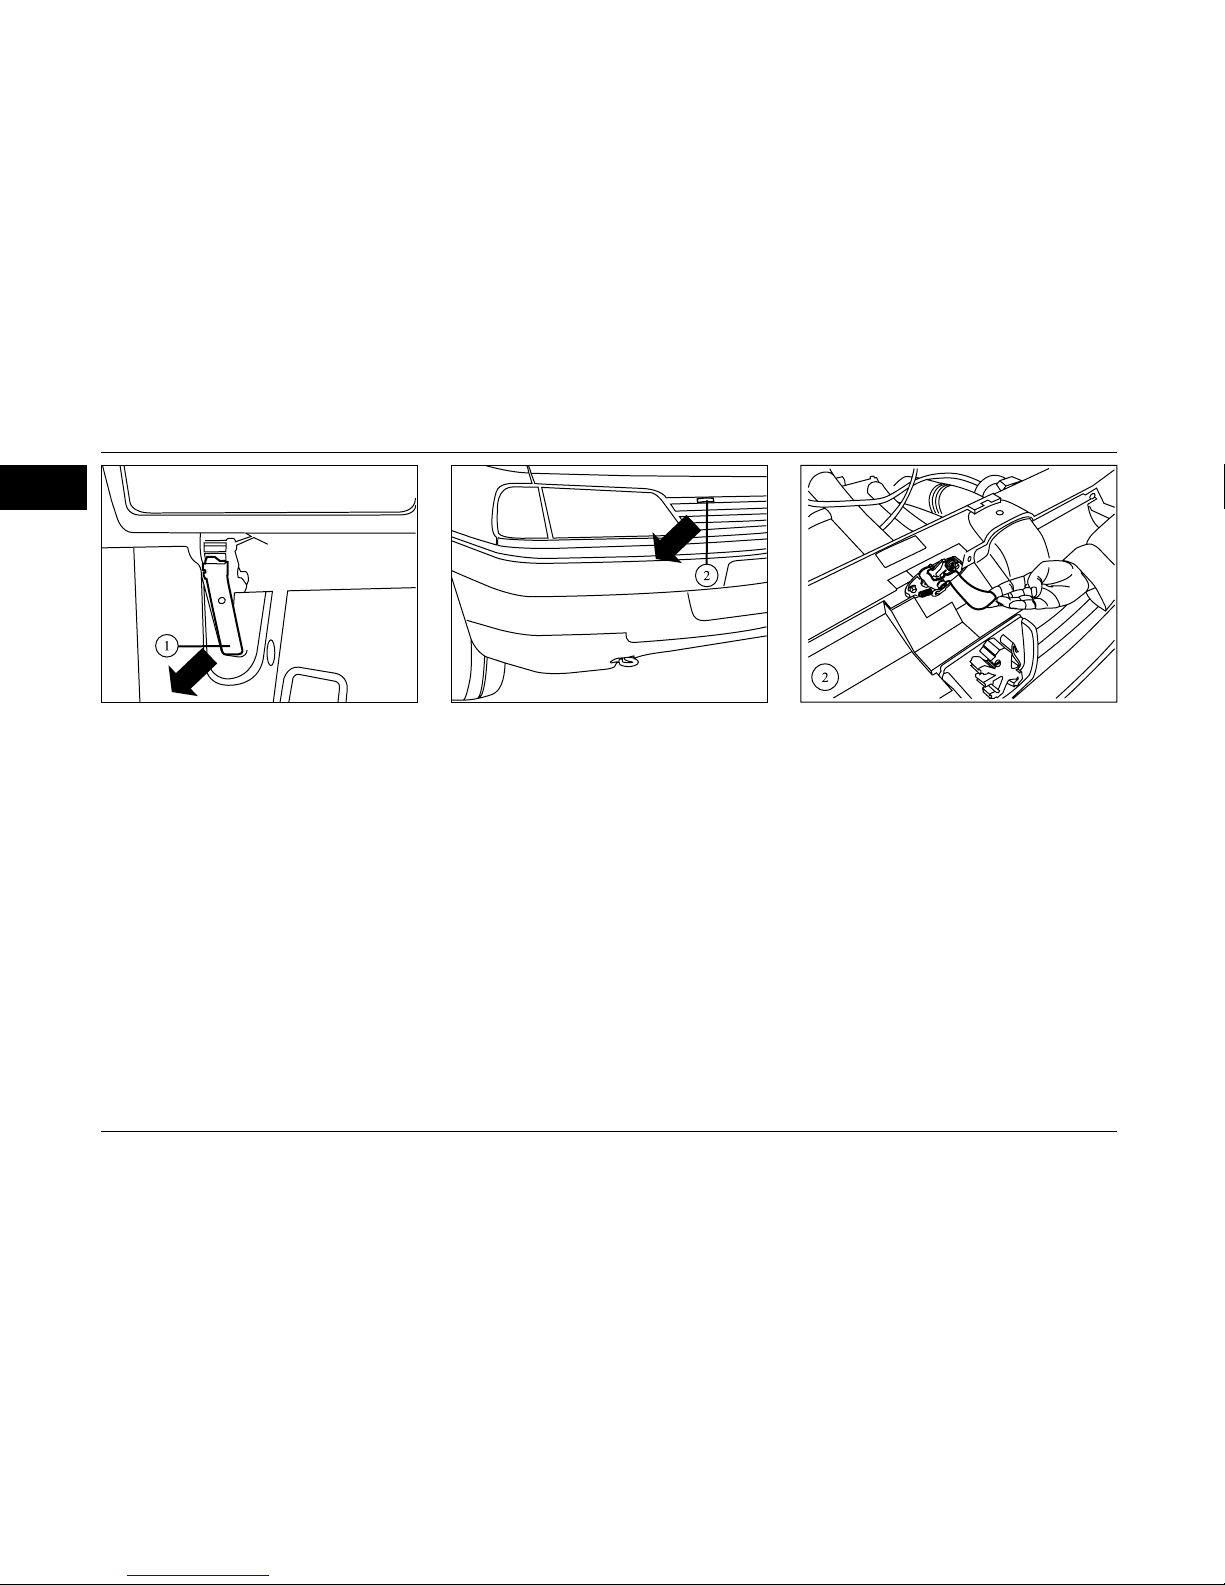
Locking and unlocking of the doors:
Side doors, rear trunk door, fuel
tank cap cover:
1- With the use of key:
For opening the door, pull up the external
handle.
From inside:
Push down the interior locking button,
door will be locked. For opening the
lock, pull up the same button and for
opening the door, pull the interior
handle.
NOTE
Frequent pressing of the keys in
short intervals will cause the keys
functioning cessation for 20 seconds.
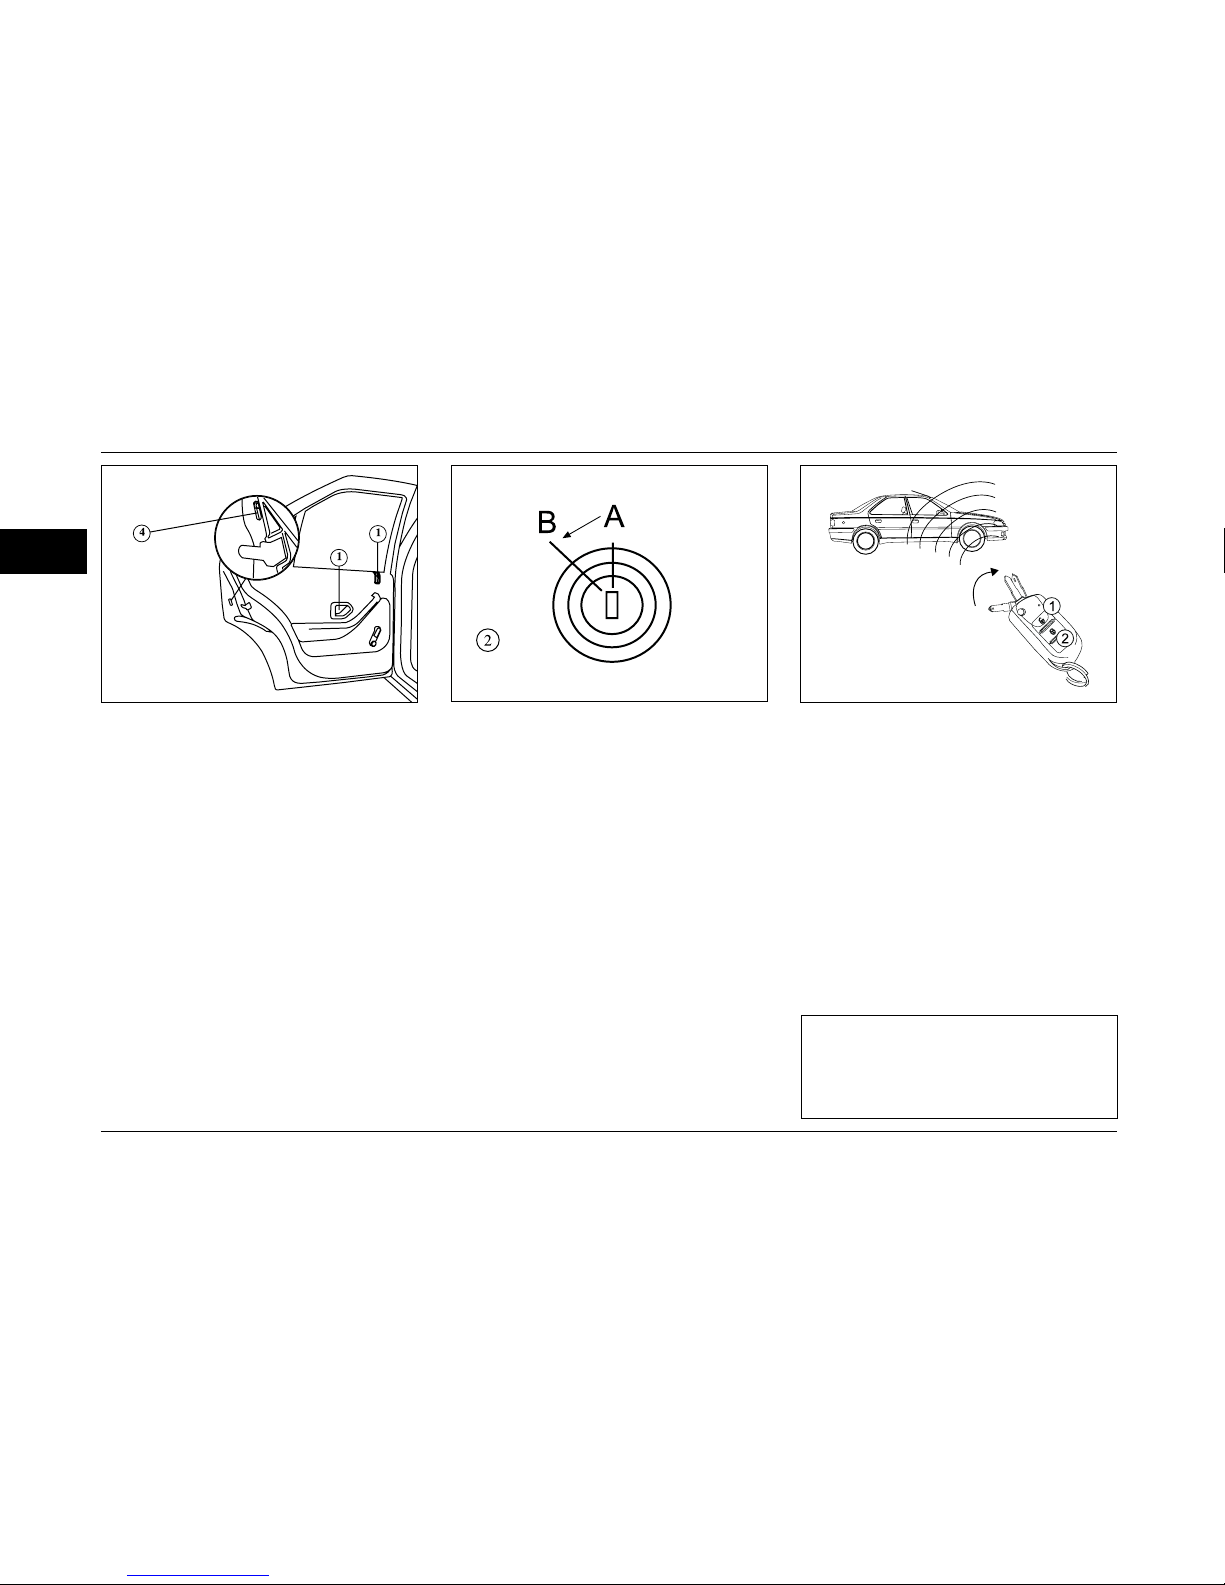
2- With the use of key (switch) and
central locking system:
All doors, rear trunk and fuel tank cap cover,
can be opened or closed simultaneously with
the help of switch key from outside and the
locking buttons on front doors from inside.
Vehicle: after locking doors by central
locking system , the rear trunk door can
be opened by the use of main switch
key and it’s turning anti clockwise (from
A to B).
3-With the use of remote control:
Keep the remote control key towards
the car:
- Press the key no.1 to open the door.
(anti theft system will be turned off)
- Press the key no.2 to luck the door.
(anti theft system will be turned on)
- The boot will get open by two successive
pressing and holding the key 3 for 6
seconds.*
4- Children safety lock:
To avoid opening of rear doors from
inside, push down the safety lock
button.
19
2
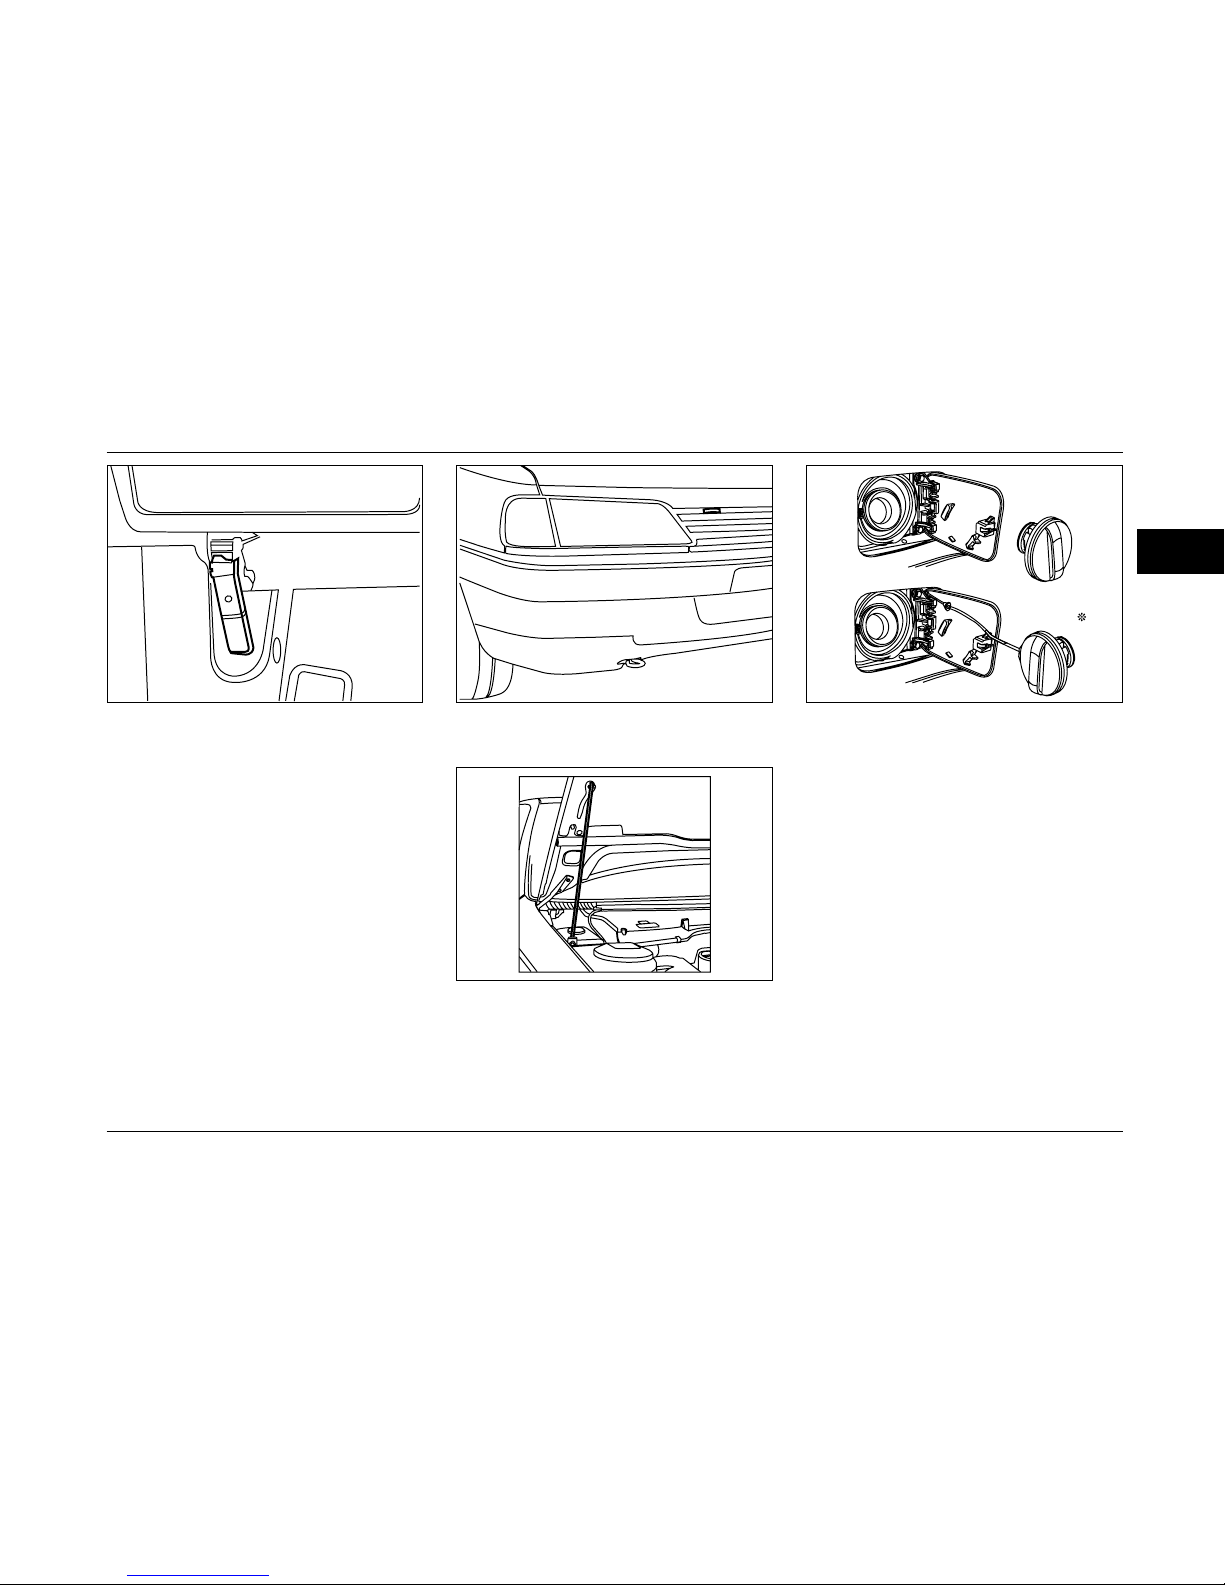
2- From outside: Pull the under- bonnet
release lever to lift it up.
Use the bonnet stay to hold the bonnet
open. To close, fold down the bonnet
stay, allowing the bonnet to drop from
30 cm height. Make sure the hood is
securely latched after closing.
LOCKING / UNLOCKING THE DOORS
Locking / Unlocking bonnet:
1- From inside: Pull the bonnet release
from the passenger compartment (driver
side)
Fuel ller cap:
To unlock the Cap Press the front of
the fuel ap to gain access to the ller
cap. To prevent loss of the cap, it can be
located inside the ap.
*If installed on your vehicle

20
2
LOCKING AND UNLOCKING THE DOORS
Battery Replacement of the Remote
Control Switch
If the indicator light on switch is not blinked
or the key is not functioned correctly, it is
necessary the battery be replaced.
1- Separate the part 1 and 2 with the help
of hand pressing from the described line.
2- Then separate the upper and Lower part
of the section 2 by hand pressing (g B).
3- Remove the discharged battery and
replace the new one. Ensure the battery
has been inserted properly (g C).Use the
battery of CR 2032.
4- Put the upper and lower part on each
other and insert it by hand pressing.
5- Put part 1 and 2 on each other and
insert it by hand pressing.
Emergency Release for Fuel
Filler Cap
Ifthe central locking system breaks
down, the fuel ap can be unlocked from
inside of the boot on the right:
-Remove the1rim (saloon) or cover
(estate)
-Pull back the lever
WARNING
Never discard used batteries in nature.
Give them to organizations responsible for
collecting and recycling this kind of batteries.
WARNING
Avoid keeping the battery or remote controller
in infants' access, because swallowing of
the battery can cause death. In case of
swallowing the battery, refer to health care
centers immediately.
21
2
THE SEATS
SEATS
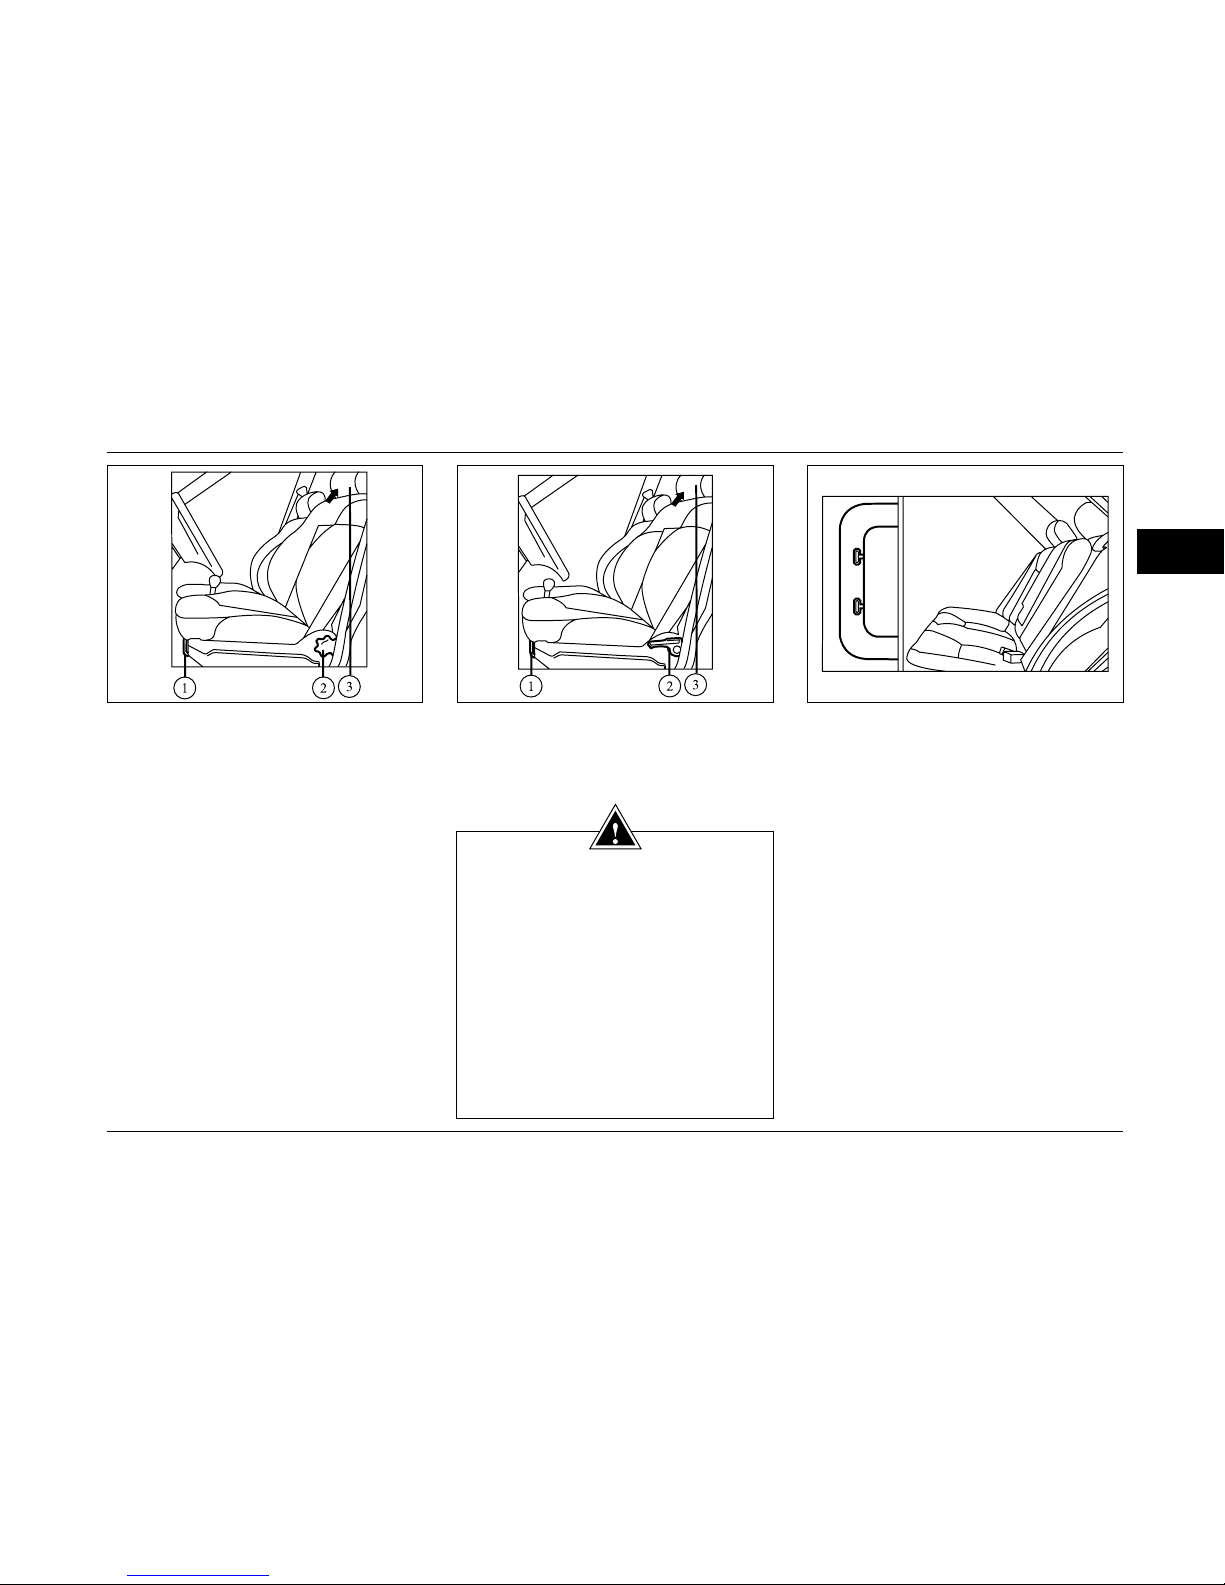
Adjusting Front Seats (Manual):
1- Moving the seat forward/backward:
pull up the lever and slide the seat to the
favored position, then release the lever
till it will be locked.
2- Adjusting seat back:
To adjust the seat back angle of the seat,
turn the adjusting knob to the favored
position.
3- Adjusting the Headrest:
To adjust the headrest height, lift it up.
Rear seats
The rear seat is in one piece. To remove,
lift the middle of the seat slightly so as to
release the hooks at the sides; then,
dislodge and remove the seats by
detaching it from the back support. To
remove the back support, lift the luggage
compartment cover to unhinge. Finally
pull to release the mountings from the
suspension mechanism.
To open back seat remove the rear
carpet from inside the trunk, pull out the
ratchet of the rear hook by special tool
and simultaneously pull up the seatback
until their top hooks are also released.
Warning
- Front passenger’s seatback should
be in upright position when driving.
Safety belts have their maximum
protection when the angle between the
seatback and vertical line is 25 degree.
- Head restraints are safety devices.
Be sure they are positioned in the
proper place.
- Never attempt to adjust the seat
while vehicle is running.
22
2
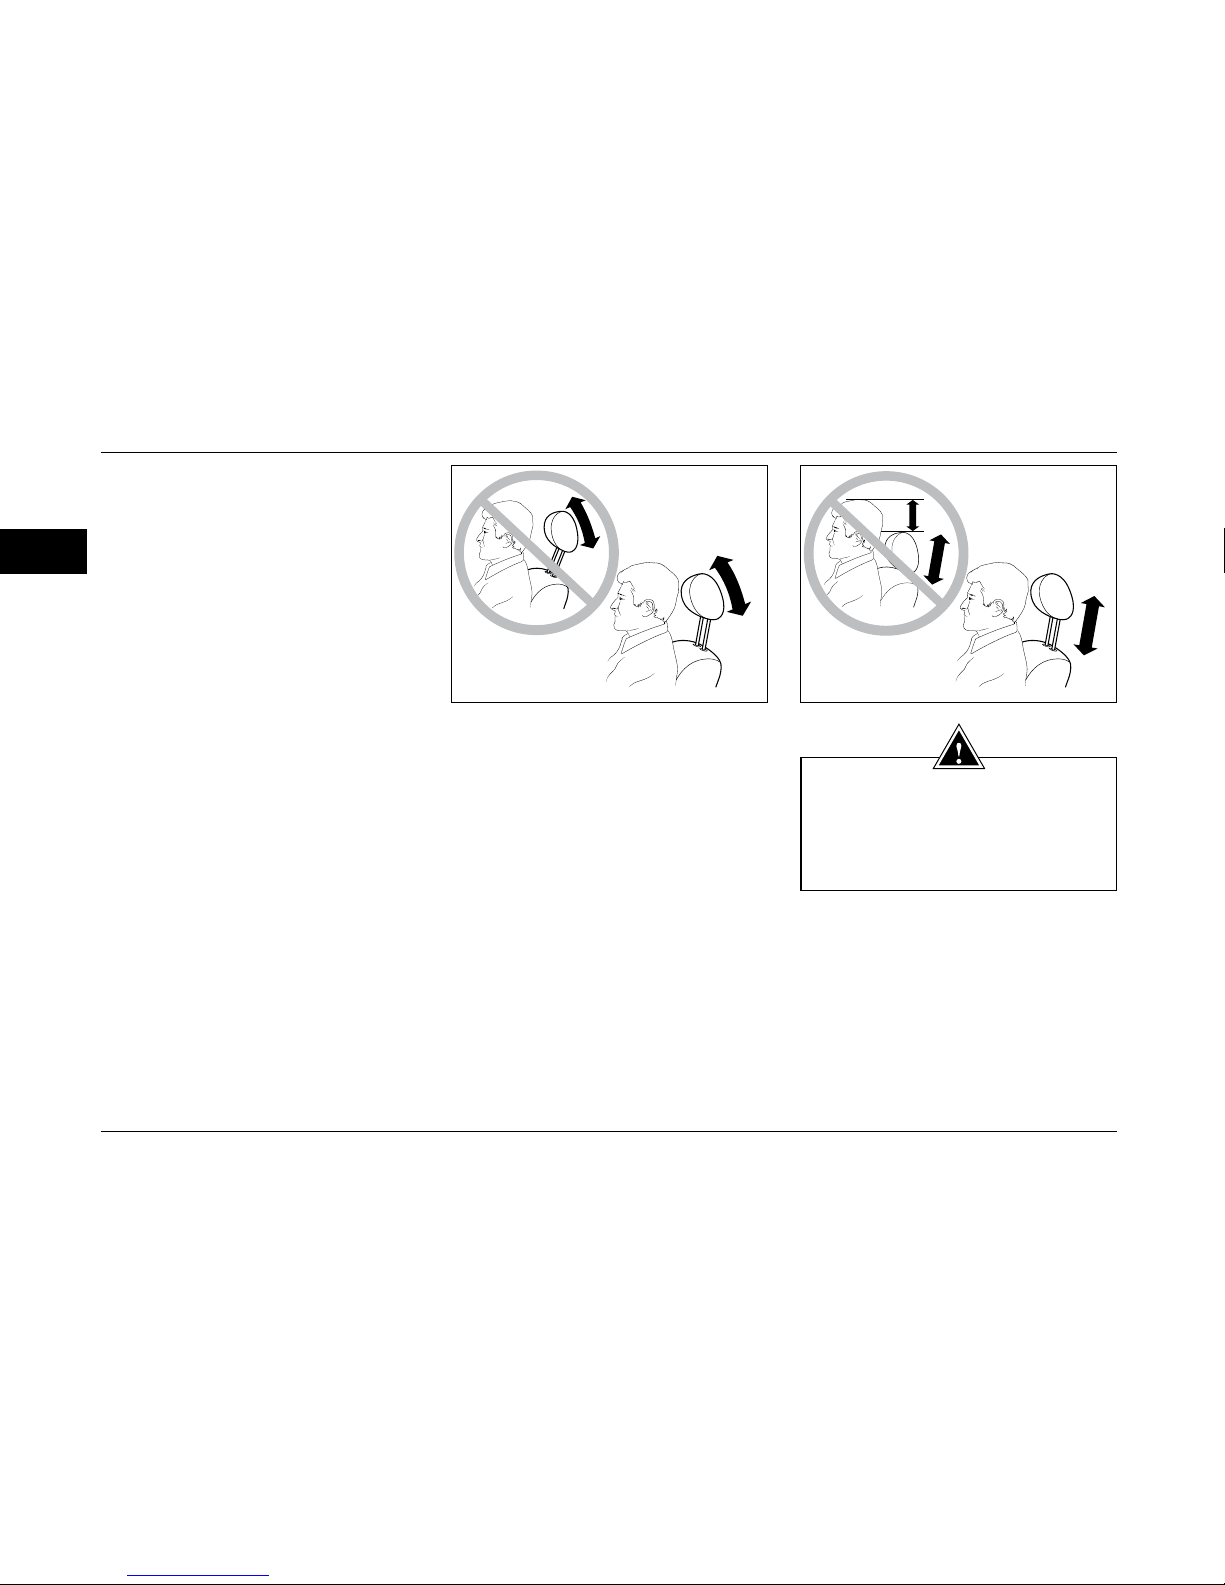
Warning
Adjust the head restraint height and
the position of the head as above
gures to reduce the risk to injuries
of driver and front passenger.
THE SEATS
23
2
SAFETY BELTS
Warning
- Seat belts are only safe and efcient when the seat is in upright position. The
seatback of the driver and front passenger should always be in upright position
while driving; otherwise the warning light on the digital instrument cluster goes out.
- To have maximum efciency of the seat belt, the shoulder straps should be worn
on the outside shoulder. Make sure the seatbacks are in proper and correct position.
- Avoid contamination of the seat belt webbing by foreign materials especially
adhesive substances which cause faulty operation of the seat belt lock.
Safety belts
Safety recommendations
- Have the latch plate checked regularly.
- Check their anchorage points after an
accident occurs.
- If they have to be replaced, always
use original spare parts from the same
manufacturer.
- No modication or manipulation is
permitted regarding their mounting points.
- You can adjust the safety belts for
children under the age of six, provided
that they are placed in especially
designated children seat
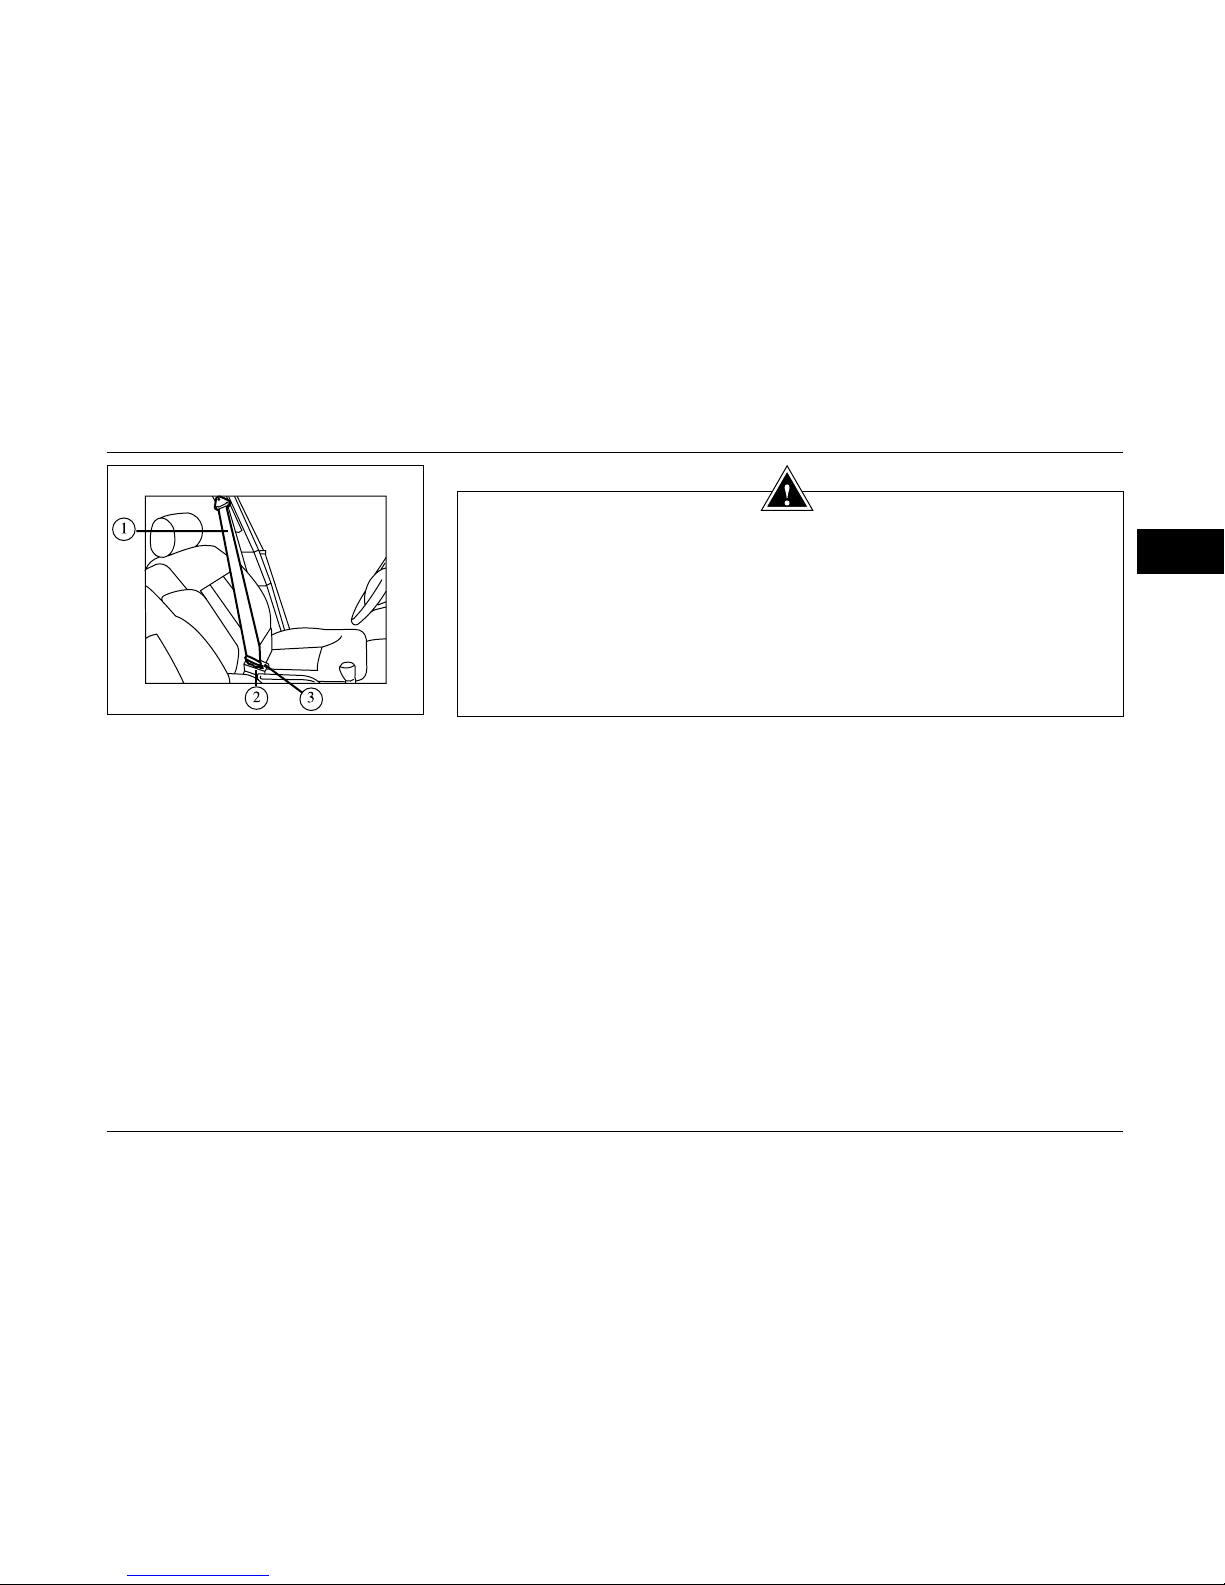
Seat belt adjustment
1- To adjust the height of the front seat
belts, tilt the adjusting button and move
the upper fastening to the desired position.
Fastening seat belt
2- Inertia reel belts: Pull the belt gently
in order not to lock the reel, and insert the
latch plate into the buckle. .The belt is
locked by braking or harsh acceleration,
on inclination of the vehicle and on
sharp turns.
3- Unfastening seat belts: Just press
the red button

24
2
CHILD SAFETY
Note: 7 or 8 years old people or less
are considered as child since the ratio
of their head weight to body weight
is different. In a sudden decrease of
vehicle speed, head weight of children
can cause serious injury to their spinal
column due to the weakness of their
neck muscles. Children of above 10
years or children with height of 135 cm
only can be considered as youngster.
That’s why there are certain rules and
regulations in most of the countries to
travel for children.
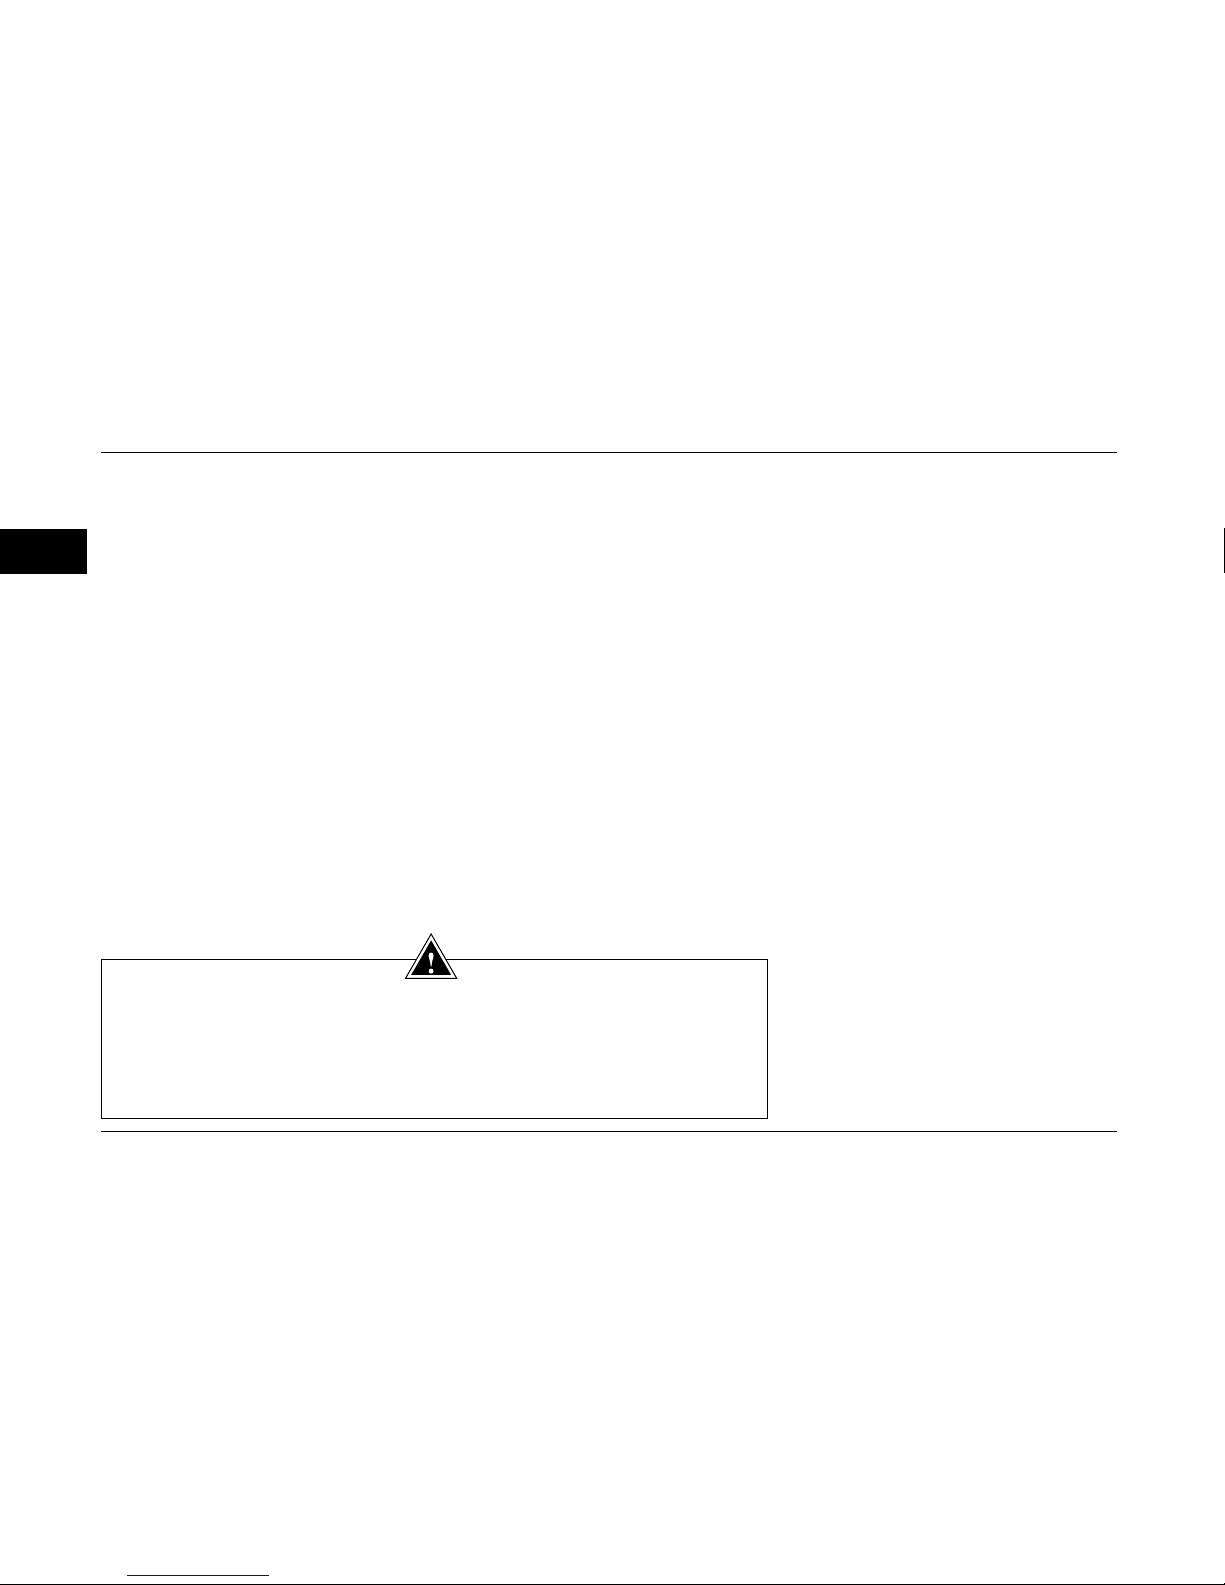
Warning
No object should be in the oor of the
vehicle (driver front side), otherwise
it may become caught under the
pedal, during a sudden and forcefully
brake, and prevent using the pedals.
Warning
Do not leave children (or pets) alone and unsupervised in a vehicle while ignition
key is also in vehicle. Child (or pet) may activate the electric windows switches
and part of its body (neck, arm, hand,) to be caught by window which causes
serious injuries. In such cases, release them by pressing the key in opposite
direction.
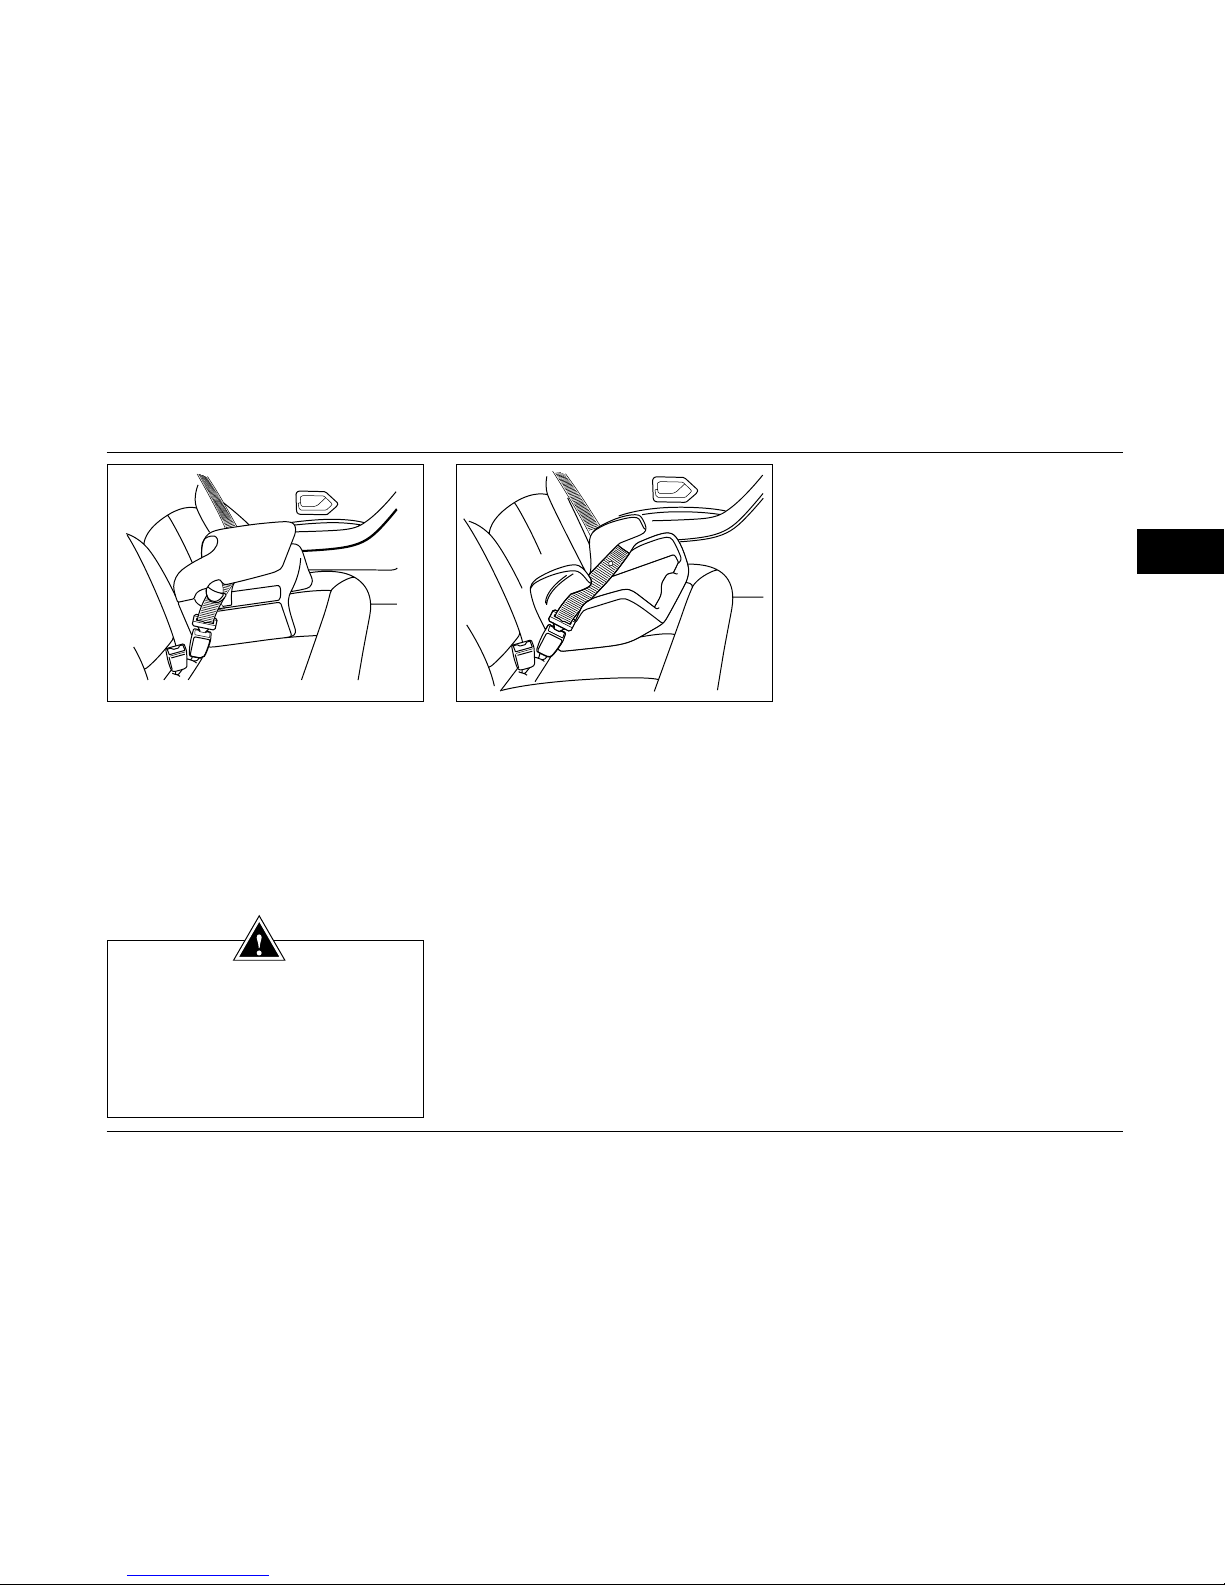
Babies under the 9 months (and less
than 10 kg) must be secured on a rearfacing seat in front or rear of the car.
Actually infant restraints provide
restraint with the seating surface against
the back of the car with a three- point
safety belt.
The seat of the child from 9 months to
3 years (up to 18 Kg) should be placed
forward- facing in the rear of the car and
fastened in the rear with a two- point or
three-point safety belt.
25
2
CHILD SAFETY
3 years old children and more (more
than 15 kg weight) may sit forwardfacing in rear seat by a special child
restraint system which is secured in two
or three points by seat belt (simple seat
belt or pretensioner system seat belt).
This method is especially suitable for
3-6 years old children.
3 years old child also could be sit
on rear sit forward-face by using an
auxiliary seat secured in two or three
points by seat belt (simple seat belt or
pretensioner system seat belt). This
method is especially suitable for 3-6
years old children.
Warning
Children should not be held on an
occupant’s lap.
When your child is held on your lap,
there is risk of serious injuries. Never
use the seat belt on more than one
occupant at same time.
26
2
Vehicle safety
Remove the metal plate attached to the
key and keep it in a safe and secure place
at all times. This plate represents the
vehicle’s identication number. Always
remember to turn the steering wheel a
little after removing the ignition key.
Road safety
Seat belt
The use of safety belts is mandatory and
not to be manipulated with in any way
(see page 29 for further details)
Brakes
Never drive downhill with the engine off,
or the booster of brakes won’t function.
On wet and humid roads, non- stickiness
of tires will cause the braking to delay;
hence great care must be taken when
driving in such conditions. Keeping a
safe distance from the vehicle in front
will guarantee your security. Inspect the
brake oil level regularly.
Tires
Make sure your vehicle’s tires are all
inated to the recommended pressure.
Not properly inated tires may cause an
adverse effect over turning the steering
wheel (see page 74 for more details).
Headlamps and direction indicators
Make sure that these lights are always kept
clean and dust free and in perfect working
order, and adjusted to the correct light.
Checks / Adjustments before travel:
Before Ignition:
- Check and adjust the Seat.
-Adjust exterior and interior mirrors.
-The gear lever in neutral position.
- Fasten the safety belt.
- Check the tire pressure.
- Check the Lights and Horn.
- Make sure the clutch cable is properly
adjusted.
Revise the liquids level:
-Engine Liquid
-Coolant Liquid Level
-Brake Fluid
-Windshield Washer Reservoir Liquid.
-Hydraulic Steering Pump Reservoir
Fluid.
- Fuel
Warning
- Avoid parking the vehicle in out of the way places
- Do not park the vehicle in dark places
- Never leave vehicle’s papers and/or switches in the vehicle
- Park in garage, if available, and take the switch with yourself.
VEHICLE SAFETY
27
2
WINDOW REGULATORS
Mirrors
Interior mirror
1-The interior mirror can be adjusted
for two positions day (normal) and night
(anti- dazzle) driving.
Adjust the mirror after seats and steering
wheel are adjusted. Press the button
beneath the mirror, and turn to “night”
position to get rid of back cars glare
effects. The mirror returns to its initial
position by pulling the button forwards.
Note:The amount of light reected into
your eyes in the night position, is very
small (comparing to its normal position).
but sometimes it misleads the driver in
recognizing the real position.
VANITY MIRROR
Turn the sun visor down to use the vanity
mirror.
Side mirrors
Realign the rear view mirror by hand
from the outside to its normal setting
before adjusting.
2- Electric adjustment of exterior mirrors
Move knob in all four directions to adjust
as required; return the knob to the
central position.
Adjusting Electric Mirror
1-Select the left or right mirror by pressing
the button no.1 after switch is on.
2- Adjust the mirror toward up, down left
and right by pressing the button no.2 in
four directions.
Electric Folding Mirror
This kind of mirrors can be opened or
closed simultaneously with opening and
closing of doors by remote controller
without using hand.
Steering wheel adjustment
1- Unlock the steering wheel by pushing
down the control lever.
2- Adjust the height of the wheel by
moving it to the appropriate level and
pull the control lever fully up to lock the
steering wheel.
Warning
The objects appear farther away
than when seen in the mirror.
Warning
- Never attempt to adjust the steering
wheel height while driving. This is
very dangerous.

28
2
HEATING AND VENTILATION
Air conditioning – heater
Air conditioning system
1- Defrosting and demisting of the windows
2- Side ventilation-hatch
3- Central ventilation-hatch
4- Front oor cooling
Demisting / Defrosting
a) In cold weather and for a better
defrosting of windows:
-Select “windshield” on the air control panel
-Slide the air temperature control to the
RED segment.
-Slide the blower switch to maximum.
By doing this you increase the windshield
temperature and prevent the appearance
of fog.
b) When the weather is pleasant but
with high humidity:
-Slide the air temperature control to the
blue segment.
-Select the interior air recirculation.
-Press air condition button.
-Select the minimum level of air blower.
By doing this you increase the windshield
temperature and prevent the appearance
of fog.
Using one of the above methods or a
mixture of the two depends on your
comfort when driving.
In some cases opening one of the side
windows up to 2 Cm will be useful.
Warning
- Use distilled water in radiator to avoid sedimentation in heater.
- Operate the air conditioner once per each 15 days for at least 10 minutes (even in winter).
- To switch off the vehicle’s air conditioner, rst Switch off the A/C key, then stop
the engine after a few seconds.
- Do not open the coolant uid tubes. This uid is very dangerous for eye and skin.
29
2
- Demisting the windows in cold and rainy days
- If required fresh air.
Air recirculation
7- Push the appropriate button (the light
comes on). Fresh air is no longer admitted;
the air in the passenger compartment is
reticulated. Only for the following situations:
- To exclude outside air (dust, unpleasant
smells etc.)
- To warm and cold the air in the passenger
compartment more quickly.Temperature
8- Temperature control:
- Blue: Ambient temperature
- Red: warm.
To keep an ambient temperature for inside the
cabin when outside temperature in between
-5° to +5° C follow the instruction set as
follows:
- Position the temperature selector (7) at the
center of thered zone.
- Position the air distribution control (1)
between windscreen and side/ central
ventilator
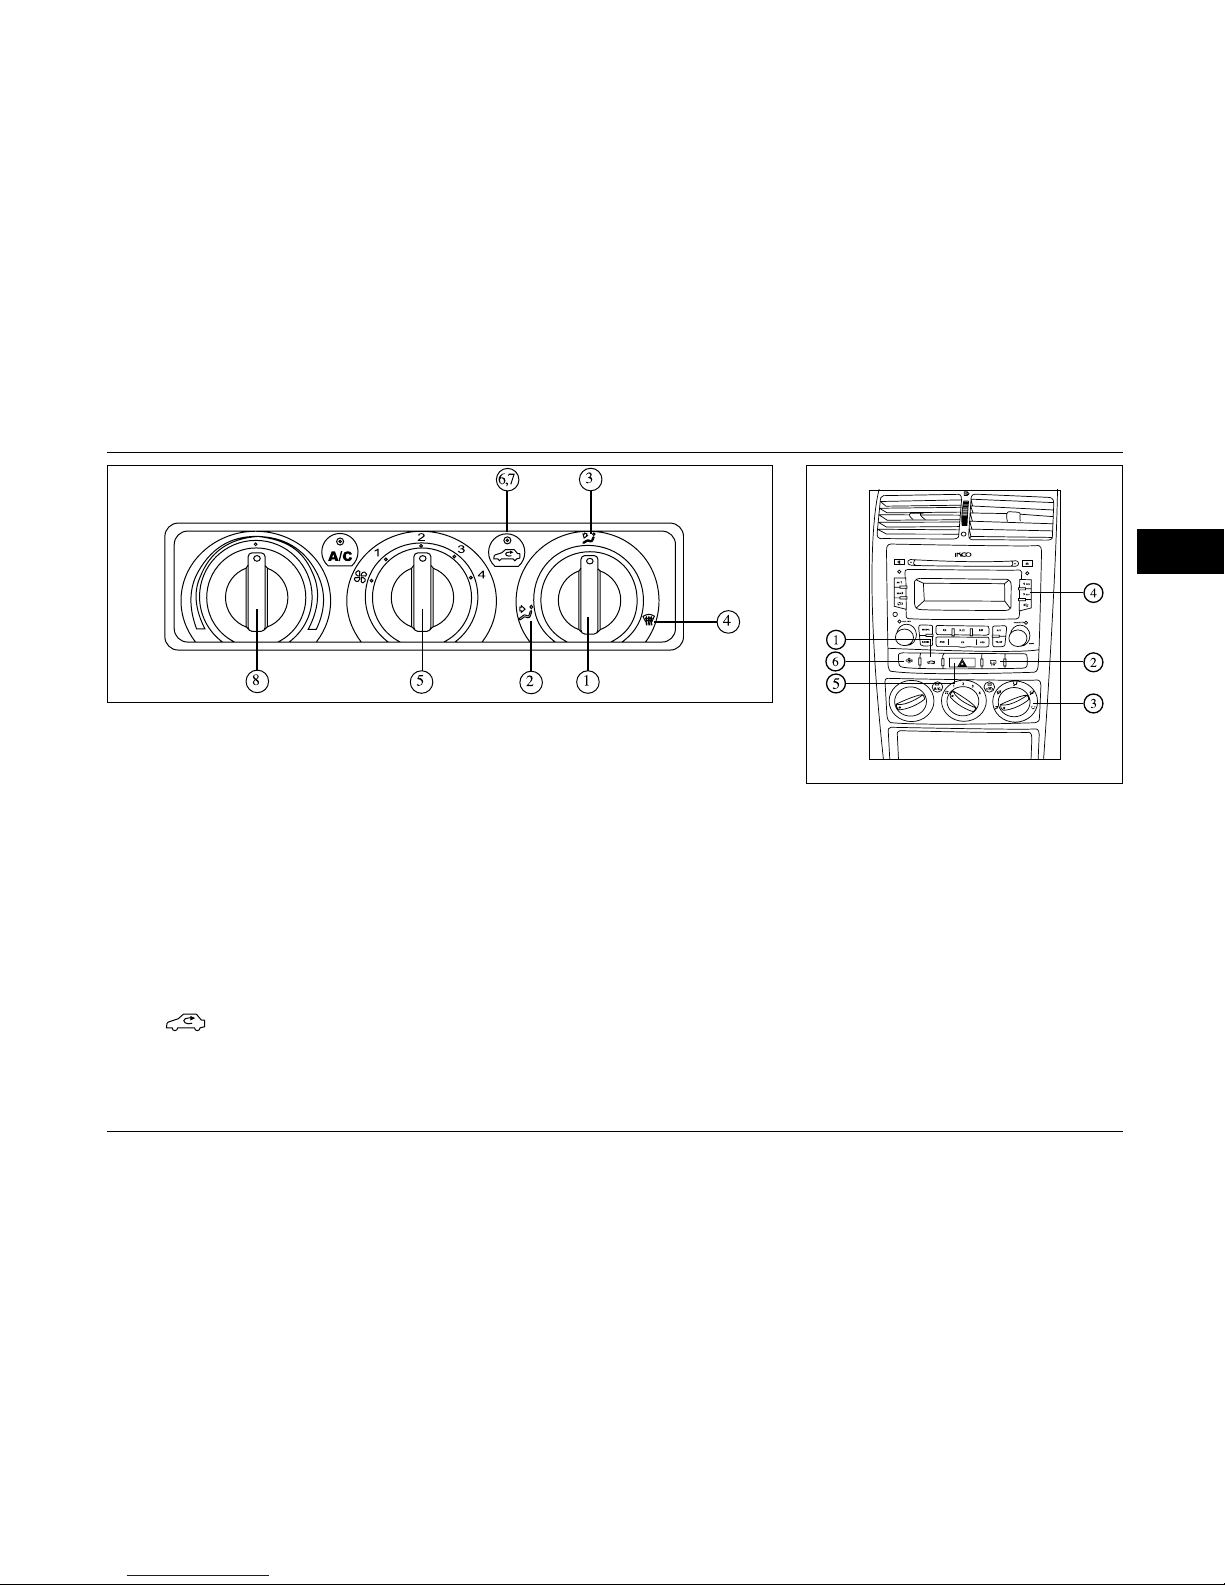
Air conditioning – heater
Distribution of air
1- Selection of air incoming inlet
2- Toward center sides outlet of inner vehicle
3- Toward oor outlet
4- Toward front and side windows
Select maximum mode for fan and temperature
to defrost and demist the side windows quickly.
Make sure that there be no obstacle in course
of external inlet of the air located in the below of
the front windscreen and also ventilation inlet
under front seat to obstruct fresh air recirculation
in the vehicle and its proper distribution.
5- Adjusting air inlet
Move the inlet air adjuster to have optimum
fan. The adjustable amount is from 1 to 4.
Fresh air function key
6- Push
key to switch off the light, open
outside inlet and air ows from outside into
vehicle. When this mode may be used:
- In cold winter weather while heater is on,
to have better ventilation when there is no
smoke or dust.
HEATING AND VENTILATION
Heating and ventilation system
1- Trunk lid opening key
2- Heated rear window
3- Heating and air conditioning screen
4- Place for installing the audio system
5- Hazard warning key (asher)
6- The Fuel Conversion Key
 Loading...