

IRA3D POETRY4 Original Instructions Manual
USER MANUAL
Professional 3D printer with FLD technology
Model: POETRY4
ENGLISH TRANSLATION OF THE ORIGINAL INSTRUCTIONS

2 User Manual: POETRY4 IRA3D
TABLE OF CONTENTS
1 INTRODUCTION .............................................................................................................................. 5
1.1 Manufacturer identification data ....................................................................................... 6
1.2 Service policies .................................................................................................................... 7
2 GENERAL DESCRIPTION ............................................................................................................ 8
2.1 Technical characteristics ..................................................................................................... 8
2.2 Poetry4 .................................................................................................................................. 9
3 SAFETY INFORMATION ............................................................................................................ 11
3.1 General safety warnings................................................................................................... 11
3.2 General accident prevention requirements .................................................................... 11
3.2.1 Safe use of materials ............................................................................................... 12
3.3 Residual risks ...................................................................................................................... 12
3.3.1 Burns ........................................................................................................................ 12
3.3.2 Crushing .................................................................................................................... 13
3.3.3 Fire ............................................................................................................................ 13
3.3.4 Toxic fumes .............................................................................................................. 13
3.3.5 Electrocution ............................................................................................................ 14
4 REMOVAL FROM THE BOX ...................................................................................................... 15
4.1 Opening the package ......................................................................................................... 15
4.2 Positioning the appliance .................................................................................................. 16
4.2.1 Levelling .................................................................................................................... 16
4.2.2 Working environment ............................................................................................. 16
4.3 Recovery of all parts .......................................................................................................... 17
5 ASSEMBLY ..................................................................................................................................... 18
5.1 Connect the appliance ....................................................................................................... 18
5.2 Plate assembly ................................................................................................................... 19
5.3 Install the lateral bulkheads............................................................................................. 20
5.4 Load the filament ............................................................................................................... 20
6 OPERATOR PANEL ...................................................................................................................... 22
6.1 Printer start-up ................................................................................................................... 22
6.2 DESKTOP screen ................................................................................................................ 23
6.2.1 Machine stop ............................................................................................................ 24
6.2.2 Printing process ....................................................................................................... 24
6.3 Main menu ......................................................................................................................... 25
6.3.1 PREPARE screen ....................................................................................................... 26

IRA3D User Manual: POETRY4 3
6.3.2 CONTROL screen ..................................................................................................... 27
6.3.3 SD CARD screen ....................................................................................................... 28
6.3.4 INFO screen ............................................................................................................. 29
6.3.5 WI-FI screen ............................................................................................................. 30
7 SOFTWARE AND G-CODE ...................................................................................................... 31
7.1 Basic terms......................................................................................................................... 31
7.2 Speed and temperature ................................................................................................... 32
7.3 Supports ............................................................................................................................. 33
8 FIRST USE ...................................................................................................................................... 34
8.1 SD Card ............................................................................................................................... 34
8.2 Plate set-up ........................................................................................................................ 34
8.3 Print start-up ...................................................................................................................... 34
8.4 Stop printing ..................................................................................................................... 35
8.5 Modifying parameters while printing .............................................................................. 35
8.6 Removing the printed object ............................................................................................ 36
9 PRINTING SURFACE AND MATERIALS ............................................................................... 38
9.1 Printing in ABS ................................................................................................................... 38
9.2 Printing in PLA ................................................................................................................... 39
9.3 Other materials ................................................................................................................. 39
9.3.1 H-Limofy® ................................................................................................................ 39
9.3.2 Nylon ........................................................................................................................ 39
10 MODEL PREPARATION .............................................................................................................. 40
10.1 Orientation ......................................................................................................................... 40
10.2 Number of parts ................................................................................................................ 40
10.3 Supports ............................................................................................................................. 41
10.4 Details in prints.................................................................................................................. 41
11 WI-FI AND REMOTE CONTROL ............................................................................................. 43
11.1 Connecting to the printer via Wi-Fi (Access Point) ......................................................... 44
11.1.1 Changing the Access Point configuration ............................................................. 47
11.2 Connecting the printer to an existing Wi-Fi network (Station Mode) ........................... 48
11.3 Printer remote control ...................................................................................................... 51
11.3.1 Status bar ................................................................................................................. 52
11.3.2 Motor movement parameters ............................................................................... 53
11.3.3 Print parameters ..................................................................................................... 55
11.4 Managing processes remotely ......................................................................................... 56
11.4.1 Starting a print job remotely .................................................................................. 57
11.4.2 Uploading a file on the SD card ............................................................................. 58

4 User Manual: POETRY4 IRA3D
11.4.3 Deleting a file from the SD card ............................................................................. 58
12 PRINTER ADJUSTMENT............................................................................................................ 59
12.1 Loading and unloading the material ................................................................................ 59
12.2 Printing bed ........................................................................................................................ 60
12.2.1 Plate surface ............................................................................................................. 60
12.2.2 Bed calibration ......................................................................................................... 61
12.2.3 When to perform the plate calibration .................................................................. 62
12.3 Extruder kit ......................................................................................................................... 63
12.3.1 Changing extruder Kit ............................................................................................. 63
13 ORDINARY MAINTENANCE ..................................................................................................... 65
13.1 Cleaning the device ............................................................................................................ 65
13.2 Printing surface .................................................................................................................. 65
13.2.1 Replacing the sheet ................................................................................................. 66
13.3 Cleaning the nozzle ............................................................................................................ 67
13.3.1 Clearing a clogged nozzle........................................................................................ 67
13.4 Fans ..................................................................................................................................... 68
13.5 Lubrication .......................................................................................................................... 68
13.6 Belt tension (X and Y calibration) ..................................................................................... 69
13.6.1 Tensioning the motor belts .................................................................................... 70
13.6.2 Tensioning the belts of the X and Y axes ............................................................... 71
13.7 Adjustment of the Z axis and Z end stop......................................................................... 72
14 IMPORTANT INFORMATION ................................................................................................... 73
14.1 Disposal of waste electrical and electronic equipment (WEEE)..................................... 73
14.2 Compliance with European directives ............................................................................. 73
IRA3D User Manual: POETRY4 5
1 INTRODUCTION
Read this manual before any operation
This instruction manual must be read before starting any operation. The
guarantee of smooth operation and full performance compliance of the printer is
strictly dependent on the application of all the instructions contained in this
manual.
Qualification of operators
The workers responsible of the use of this printer must have all necessary
information and education and must receive adequate training, in relation to
safety, and specifically:
The conditions of use of the equipment;
Foreseeable abnormal situations; within the meaning of art. 73 of Legislative
Decree No. 81/08 as amended.
We guarantee the compliance of the appliance with the specifications and the technical
instructions described in the Manual on the date of issue thereof, shown on this page; on the other
hand, the appliance may in future be subject to technical modifications, even important ones,
without the manual being updated.
Thus, please consult Ira3D to be informed about any variants implemented.
REV. 4 DATE: 22/12/2016

6 User Manual: POETRY4 IRA3D
1.1 Manufacturer identification data
IRA3D SRL
VAT No.: 02435070038
Registered office: Viale Marazza 30
28021 Borgomanero (NO) – Italy
Tel: +39 0322 862029
E-mail: info@ira3d.com
support@ira3d.com (technical support)
Web: http://ira3d.com

IRA3D User Manual: POETRY4 7
1.2 Service policies
In the event of problems using the printer, the procedure to be followed is as follows:
● Check the manual and the guides present on the web site;
● Contact any reseller from whom you purchased the printer
● Contact technical support by filling out the form in the support section of the web site
(http://ira3d.com/it/content/10-supporto), remember to fill out all the fields. Technicians
will be in contact within 3 working days.
In case you have to return the printer to the company for repair, technical support will assign
a return case number (RMA) and will provide all the necessary information.
CAUTION!
The original packaging must be sent under penalty of voidance of the guarantee.
Upon receipt, the technicians will assess whether the problem stems from a printer
malfunction, in which case the repair will be carried out under warranty for free, or from
improper use or from the use of components subject to wear or materials that are not
certified by Ira3D, in the latter case they will provide the customer with a quote to request
consent to repair.
For out of warranty printers a cost estimate for inspection will be required.
Troubleshooting is a fundamental activity and in order to execute it, it is necessary to share
experiences and solutions to problems, therefore Ira3D technicians invite customers to use
the forum which will also allow other users to benefit from practical advice and solutions to
problems.
The company Ira3D offers custom support programs tailored to the needs of the customer:
to take advantage of this service please contact the technicians at the address
support@ira3d.com.

8 User Manual: POETRY4 IRA3D
2 GENERAL DESCRIPTION
2.1 Technical characteristics
Technology
Fast Layer Deposition (FLD)
Extruders
2 - Optimised SSS
Print volume
250x250x300 mm +/-5mm
X and Y theoretical positioning
0.05 mm
Layer Thickness (min.)
0.015 mm
Extrusion hole diameter
0.4 mm (standard)
Filament diameter
1.75 mm
Filaments tested and supported
PLA, ABSuper, Poetry Filaments, and many others
External dimensions
41x50x75 cm / 41x55x75 cm (with spool holder)
Weight
40 kg
Consumption
320 W (max power)
Display
Touchscreen 3.4'' (~73x49 mm)
Printed circuit board
ARM Cortex - 1/32 step
Firmware
Piranha Firmware
IRA3D User Manual: POETRY4 9
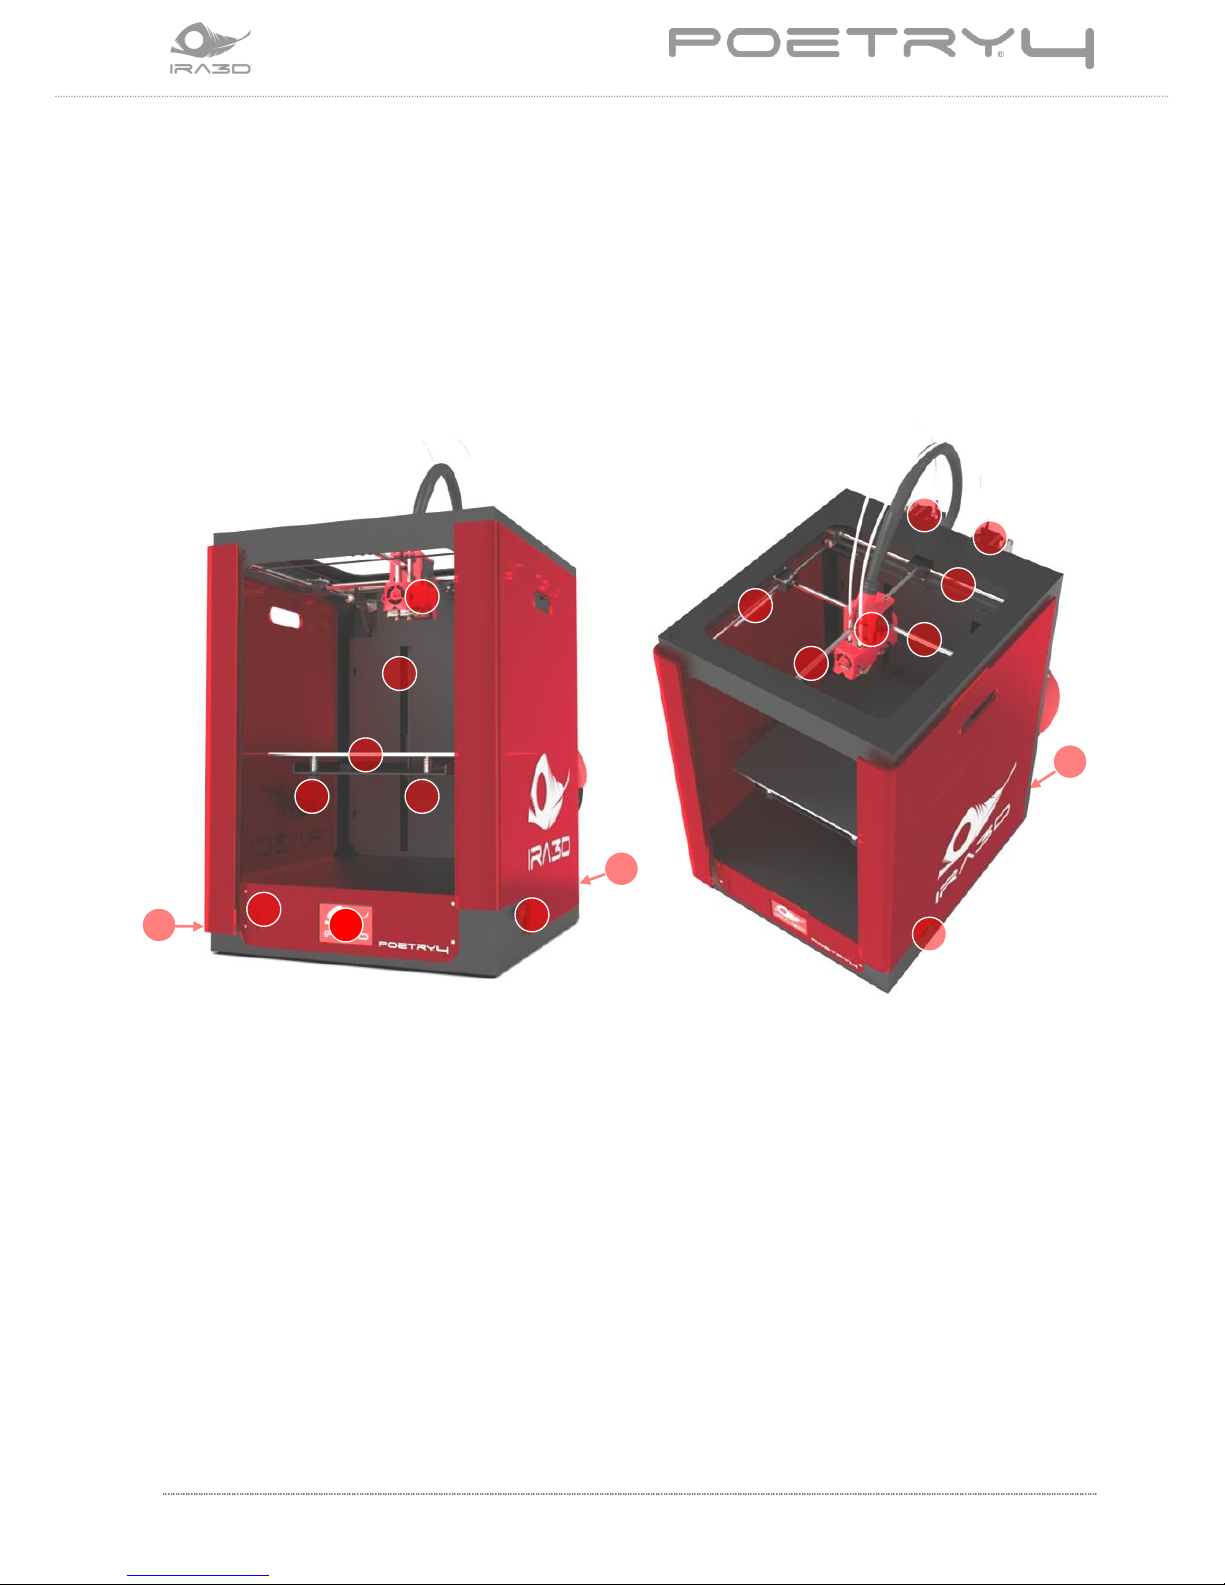
2.2 Poetry4
The 3D professional printer Poetry4 is a precision device, designed, developed and
assembled in Italy by qualified personnel.
Before leaving the factory, it was subjected to a quality control with suitable prints to check
for correct accuracy and calibration, in addition to a test to ensure operation. Before
attempting to operate, it is important to learn the terminology used in this manual and
recognise the various parts that compose Poetry4.
1. Ignition switch
2. LCD Display
3. SD Card Port
4. USB Port
5. Power Supply
6. Printing surface or plate
7. Printing plate adjustment knobs
8. Z axis
9. Extrusion motors
10. Axes
11. Guides
12. Printhead
1
2 3 4 5 6 7 7 8 9 9 10
10
11
11
5
12
12
1
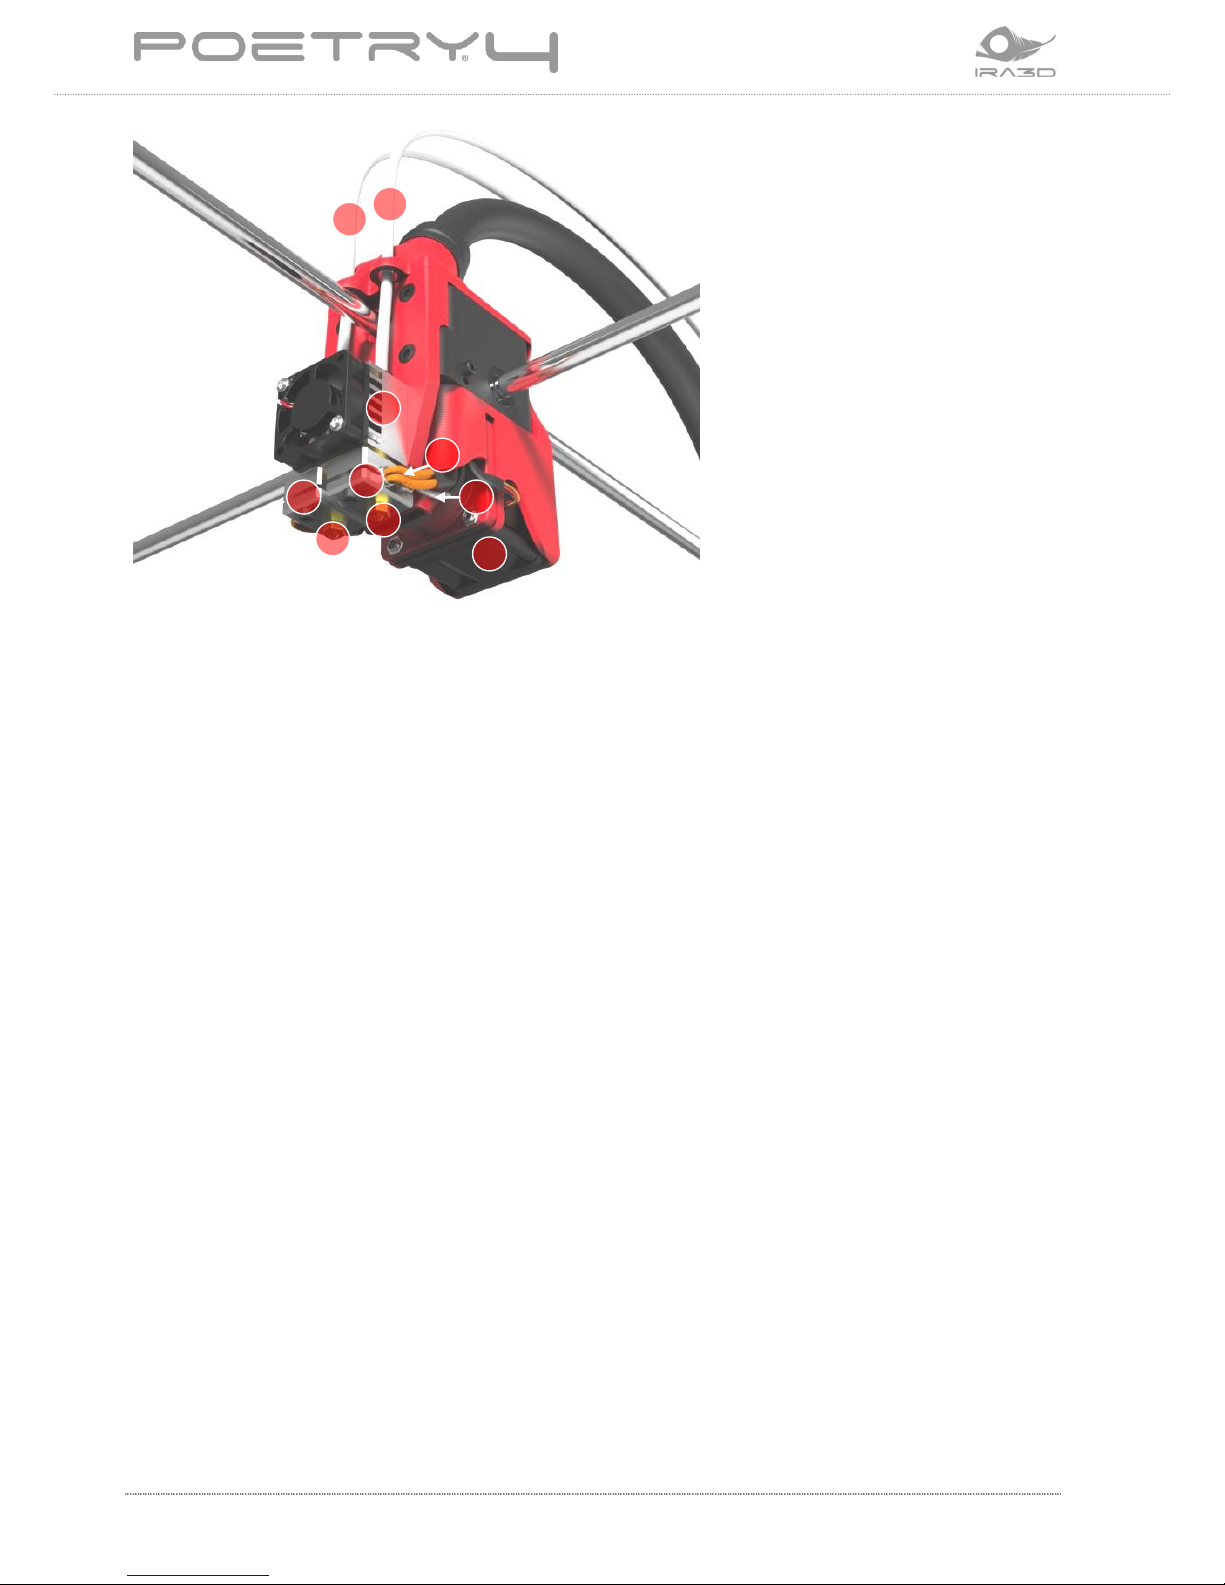
10 User Manual: POETRY4 IRA3D
13. Tubes for filament supply
14. Hot-end
15. Radiator
16. Nozzles
17. Material cooling fan
18. Resistor
19. Sensor
The EC marking and the information necessary for identification of the appliance are
positioned at the rear of the printer.
13
13
14
16
16
17
14
18
19
15

IRA3D User Manual: POETRY4 11
3 SAFETY INFORMATION
3.1 General safety warnings
The printer has been designed and tested in compliance with safety policies for the
protection of the operator and the work in an environment where residual risks are reduced
to the minimum.
There is however a set of rules to be followed strictly: non-compliance with the safety rules
could cause accidents during printer operation, maintenance or start-up.
3.2 General accident prevention requirements
The printer must be used exclusively to carry out the operations indicated in the technical
specifications; it is strictly forbidden to use materials which are not envisaged by the same.
IRA3D assumes no liability for damage resulting from improper use of the printer and its
components.
Turn off the printer before cleaning and always pull the plug, avoiding violent jerks, to isolate
it from the mains power supply.
Periodically check the power cable which can be subject to mechanical stresses and is
therefore liable to deterioration.
Do not wrap the power cord too tight around the printer, but wrap it with care and place it in
the appropriate TOOLS BOX.
If case of absence for long periods, always pull the plug from the power socket.
Keep out of the reach of children.
It is unadvisable for people who are not electronics expert to use the device.
The 3D printer is not intended for use by persons with reduced physical, sensory or mental
capabilities unless they are supervised by a third party or they are instructed on the use of
the device by a person responsible for their safety.
The 3D printer generates high temperatures and comprises moving parts that could cause
injury, always pay attention to movements near the same.
Never put your hands in the printer while it is running, and wait for it to cool after operation.
The device must not be modified in any way by the user.

12 User Manual: POETRY4 IRA3D
The printer is sensitive to electrostatic discharges. It is advisable to wear appropriate
personal protective equipment (e.g. insulating gloves) to prevent electrostatic charges from
causing damage.
3.2.1 Safe use of materials
This printer is designed to be used with filament made of PLA, ABS, and other materials.
PLA: is a safe and non-toxic material, there are no known risks relating to health safety when
used in 3D printers.
ABS: printing with ABS generates the characteristic smell of “burned” plastic. This is quite
normal. Risks related to inhalation include: headache, irritation of the respiratory tracts and
eyes in susceptible individuals (even if it is not toxic).
Use the printer in a place with constant air recycling; if printing is carried out using ABS we
recommend the use of a suction hood (with adequate active carbon filter, for constant air
recycling).
The suction of fumes is mandatory if the printer is expected to be used in offices, classrooms
and the like.
Never expose the printer filament to a free flame in order to prevent the generation of toxic
gases and vapours.
3.3 Residual risks
The operator must remember that, even following all the indications relating to the safe use
of the printer, there are residual risks of which it is necessary to be careful:
3.3.1 Burns
The filament printing process envisages the use of parts brought to high temperatures
(extruder and plate). To minimize risk, do not access the print zone while the printer is in
operation. When the printing process is finished, wait for the heated parts to cool or adopt
protective measures (heat insulating gloves) before working on the print area.
CAUTION - EXTRUDER
The thermoplastic filament fusion and extrusion system requires the presence of a head
(nozzle) heated to temperatures higher than 250° degrees. Contact, even for a very limited
time, with the heated part causes burns. Do not put your hands or other parts of the body in
the printing area during the printing process and/or for the minutes after the end thereof.
The current temperature of the extruder is indicated with precision on the LCD display.

IRA3D User Manual: POETRY4 13
CAUTION - HOT PLATE
The whole printing plate is made of aluminium, it is therefore resistant to high
temperatures. Below the printing surface there is a heated surface. This device is
electronically heated and serves to bring the whole printing plate to the desired
temperature. The temperature is measured directly on the heating plate and therefore
the temperatures of the aluminium plate may be lower or higher by a few degrees
centigrade than the one indicated.
In special cases, the plate can be set to temperatures of 90-100°C which can create
burns. Maximum caution is therefore recommended: always check the temperature
indicated on the display before starting operations such as the removal of the moulded
piece or the removal of the printing surface.
For many materials, for example PLA, the plate temperature can be set to about 45°C: in
these cases, inadvertent contact does not cause damage or burns if the part coming into
contact is retracted immediately, while at higher temperatures it can cause burns in
shorter times.
3.3.2 Crushing
The printer can start up even if the work area is not clear. Even if the installed power is low,
the movements can be fast enough to cause damage to objects and/or painful shocks. To
minimize risk, wait until the printing process is completely finished and/or make sure that the
printer is not actuated remotely (via Wi-Fi or software).
3.3.3 Fire
Do not use the printer in the presence of volatile flammable substances.
Do not use flammable products to clean the printer.
Allow correct ventilation of the printer: do not block the cooling air intake and exhaust ducts,
keeping them free from accumulated dust or other contaminants.
3.3.4 Toxic fumes
The use of certain materials or processes at high temperatures can cause the emission of
toxic fumes. Be sure to follow the filament supplier’s indications.
Do not use the printer in areas with no air exchange.

14 User Manual: POETRY4 IRA3D
3.3.5 Electrocution
Do not use the appliance in the presence of condensing humidity or conductive dust.
Disconnect the printer from the 220V mains power supply grid before accessing the internal
parts. In the event of any malfunction stop using immediately and promptly report the failure
to the production manager.
IRA3D User Manual: POETRY4 15
4 REMOVAL FROM THE BOX
CAUTION!
For the purposes of the validity of the guarantee, save the original packaging even after
having assembled the appliance.
Use the packaging in the event of moving or shipping the appliance.
The printer Poetry4 is provided with a set of accessories and tools that make it immediately
operational; including an SD card containing the manual and other useful files to start
printing.
4.1 Opening the package
Remove the various parts and elements which secure the unit to the inside of the cardboard
box according to the following suggestions, taking care not to damage the packaging.
Place the package on a stable and flat surface, preferably the floor.
With the aid of a pair of scissors proceed with unpacking, cutting the outer straps, open the
box and remove the upper polystyrene packaging.
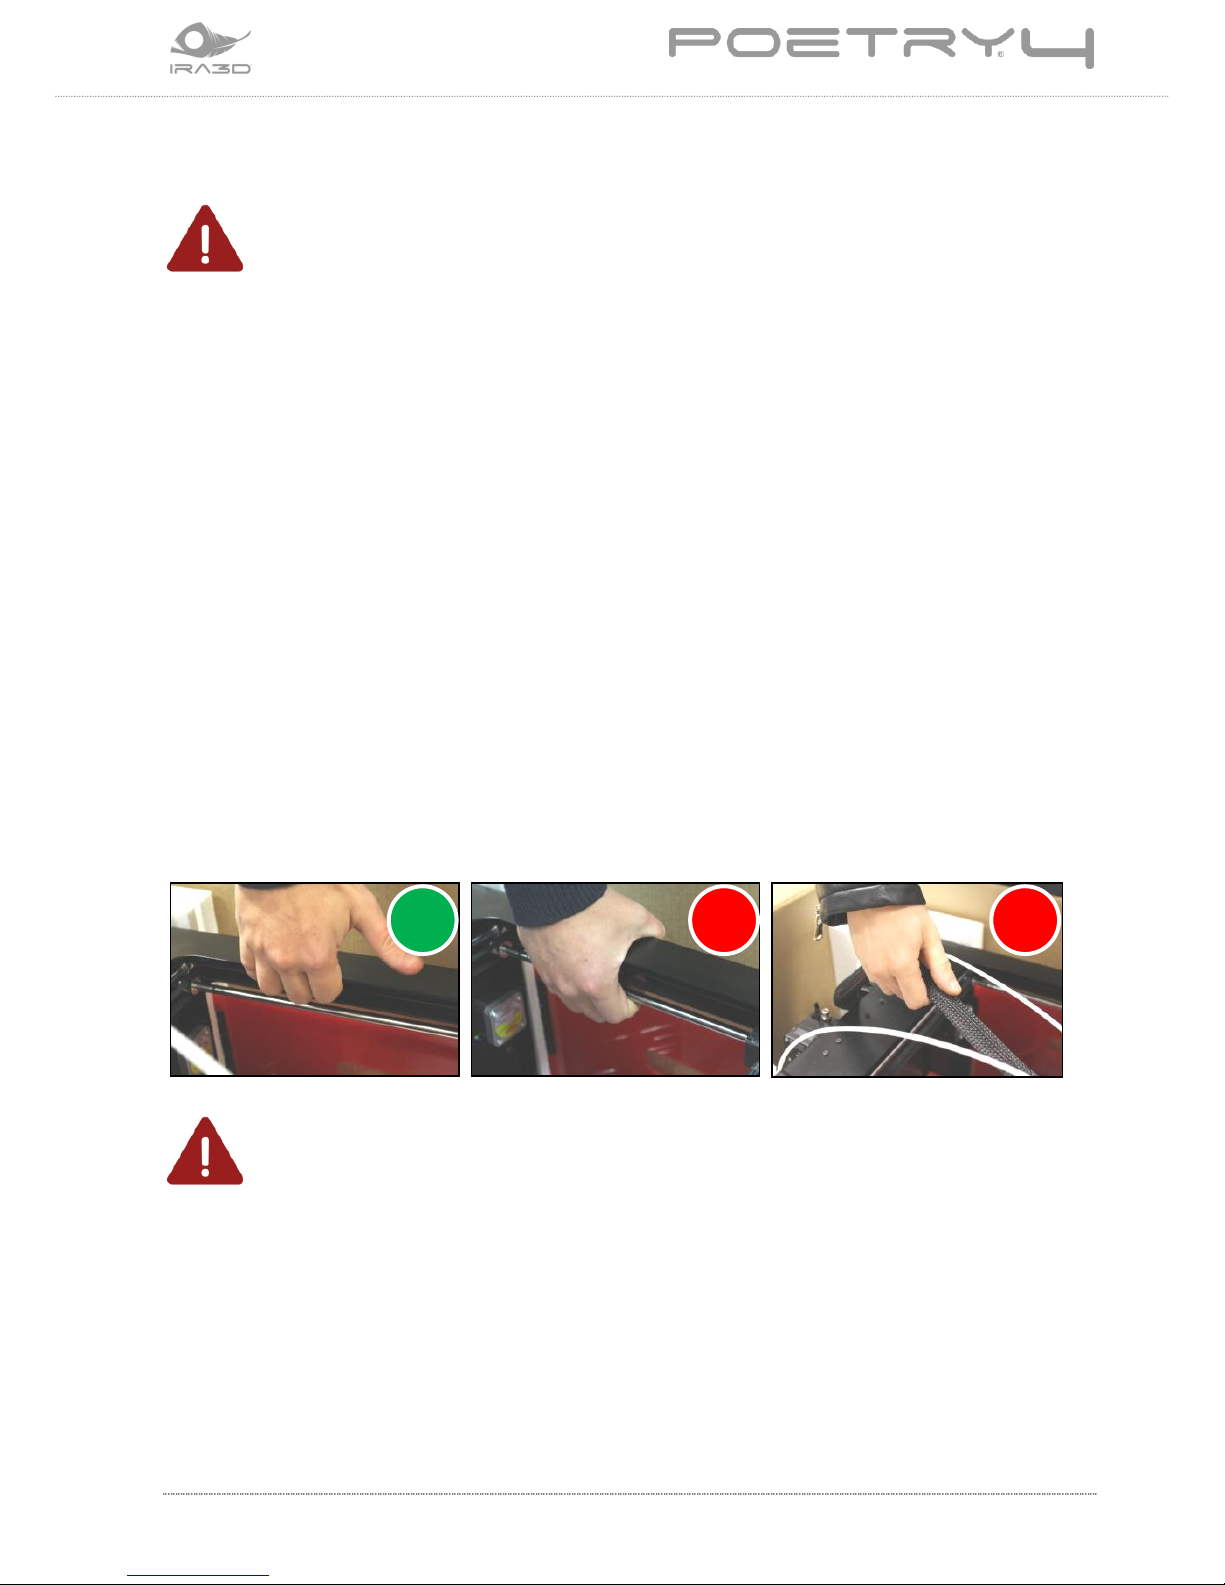
Remove the printer from the package; be careful not to handle from the inside or grasp the
axes: this could cause the guides to break. Lift the printer by grasping it from the body as
shown in the figure below.
CAUTION!
The weight of the appliance exceeds 30 kg, two operators are required to lift it.
Do not pull on the soft cable that comes out of the back of the printer and reaches the
extruder block: It is NOT a handle.
Extract the appliance and place it on the assembly surface, taking care to ensure it is flat,
stable and clear of other objects.
16 User Manual: POETRY4 IRA3D
4.2 Positioning the appliance
The appliance must be positioned in a suitably safe working environment and without
obstructions to the movements of the printhead.
4.2.1 Levelling
The printer must be positioned on a surface that is as level as possible.
4.2.2 Working environment
For the appliance to function properly, it must be installed in an environment that is clean
and free of dust, at an ambient temperature between 15 and 26°C.
CAUTION!
In environments subject to air currents or where it is not possible to maintain a
constant temperature, the correct efficiency of the printer is not guaranteed.
Avoid environments subject to air currents and/or air conditioning flows.
Avoid areas near sources of water or high humidity.
In any case keep the underside of the printer with no obstructions to ensure the circuit
cooling fan works properly.
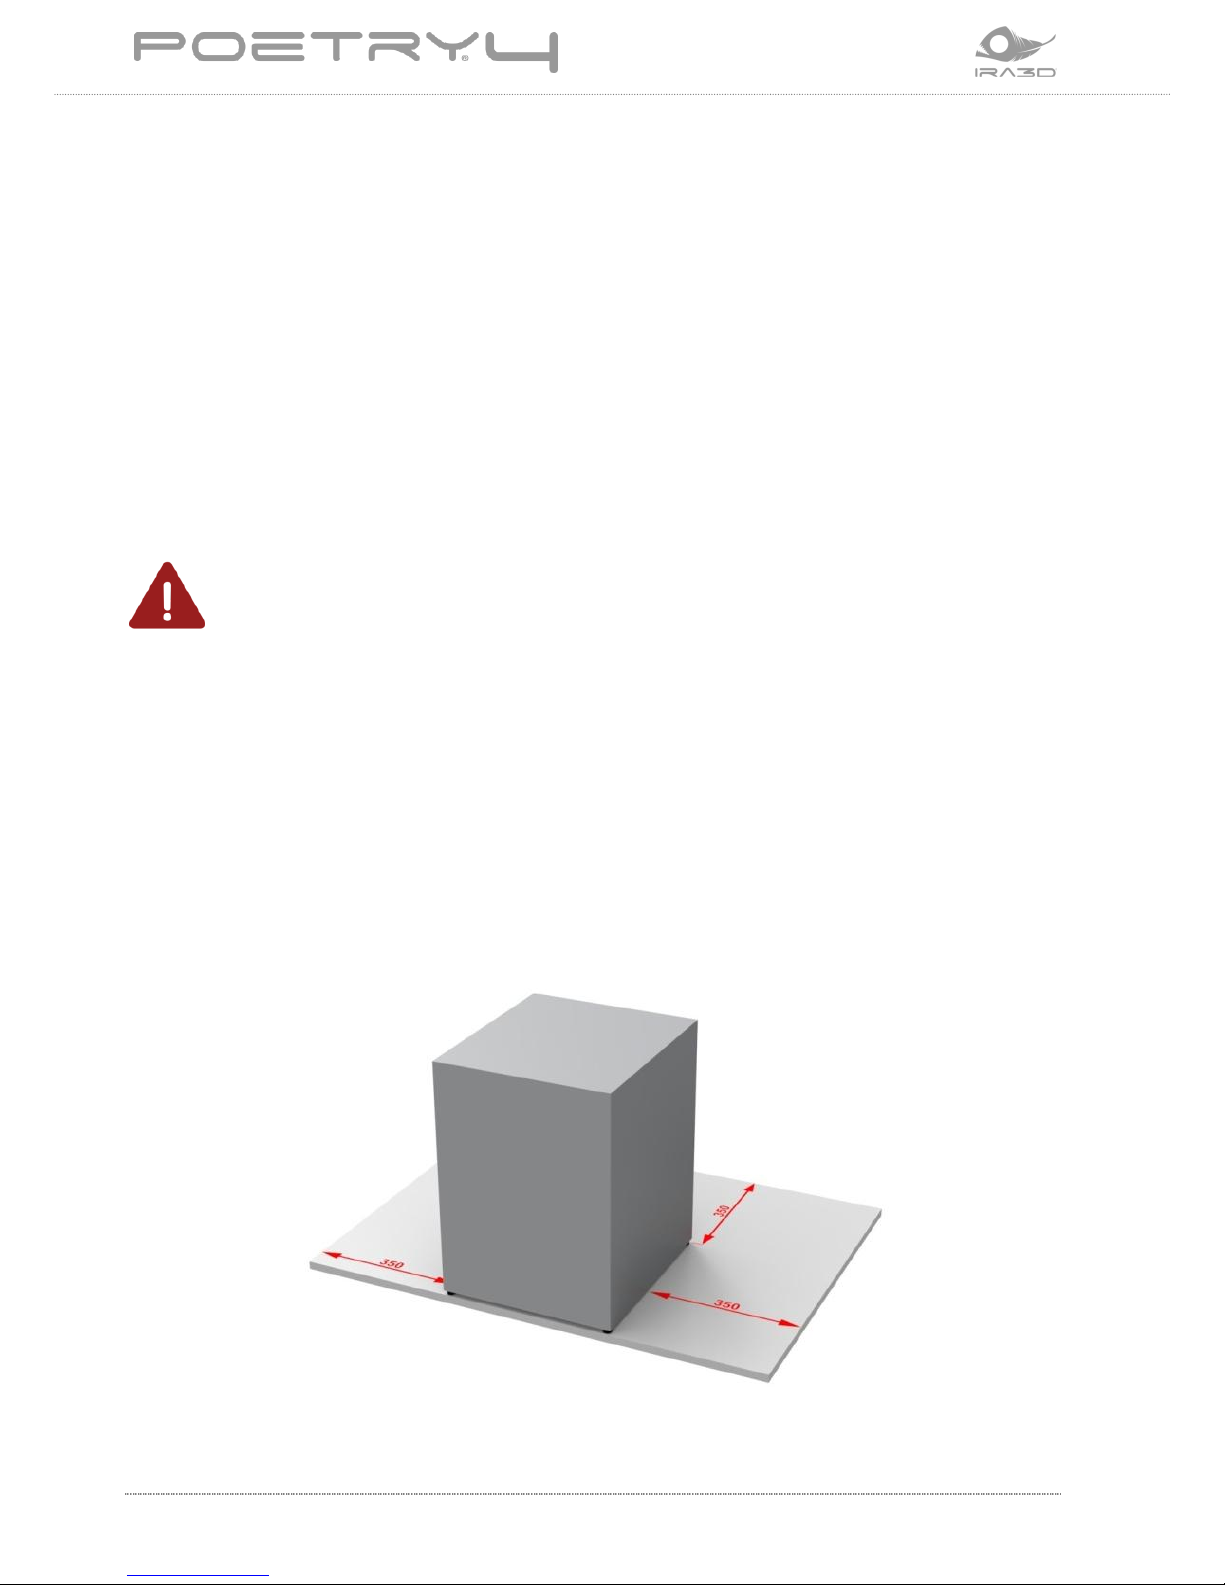
The on / off switch, the USB socket, the power socket and touch screen display must be easily
accessible for the operator: keep an accessible space laterally and to the rear of at least 35
cm from walls or other objects.
IRA3D User Manual: POETRY4 17
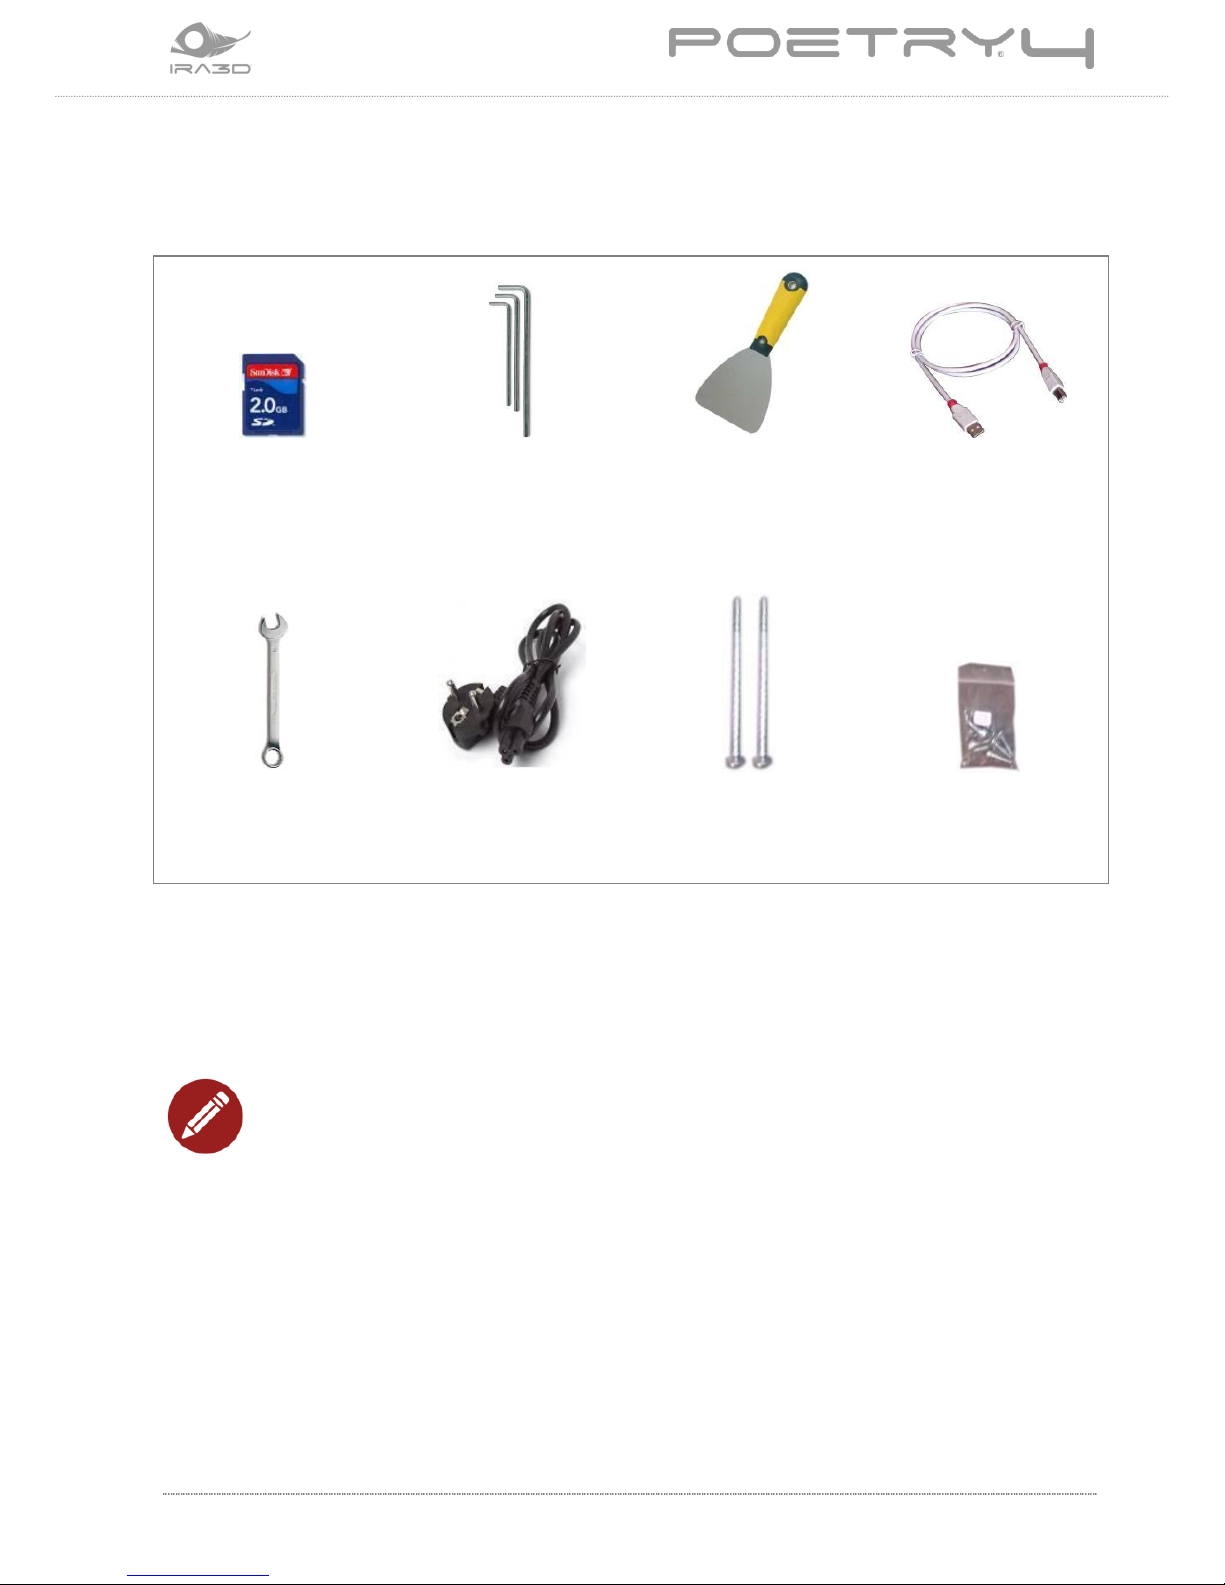
4.3 Recovery of all parts
Proceed with the recovery from the packaging of all parts, starting from the bowl and the
TOOLS BOX, and check that it includes the following tools:
1 SD Card
3 Allen keys of
various sizes
1 spatula
1 USB Cable
1 Spanner
1 Power cord
2 spool holders
4 plate screws
Remove the TOOLS BOX and bowl inside the printer before performing other operations.
To remove the printing plate, placed in a polystyrene package under the arms, follow the
directions in the next chapter.
NOTE:
In the event of returning the appliance for assistance, it is only necessary to send the
printer and its printing plate packed in the original packaging. It is not necessary to
send the TOOLS BOX and its contents.
18 User Manual: POETRY4 IRA3D
5 ASSEMBLY
The appliance comes with the Teflon tubes removed.
Insert the tubes into the appropriate quick inserts.
Once inserted, check that they are locked.
5.1 Connect the appliance
To remove the plate, contained in the box fixed by arms, it is necessary to connect the
appliance to the electrical current via the power supply cable.
Take the power cable from the TOOLS BOX, plug it into the back of the appliance and turn on
the printer using the power button on the side.
Wait for the software to start until the Ira3D logo appears. Touch the display and wait for the
following screen:
The plate indicator is : until it is assembled, will not be detected and its value shown
will be 0.
To raise the arms press , making sure that there is nothing obstructing the movement of
the axes. Stop it rising mid stroke by turning off the appliance.
CAUTION!
For the subsequent steps, it is not necessary to keep the printer turned on and
connected to the current, thus turn it off and disconnect the power supply.
IRA3D User Manual: POETRY4 19
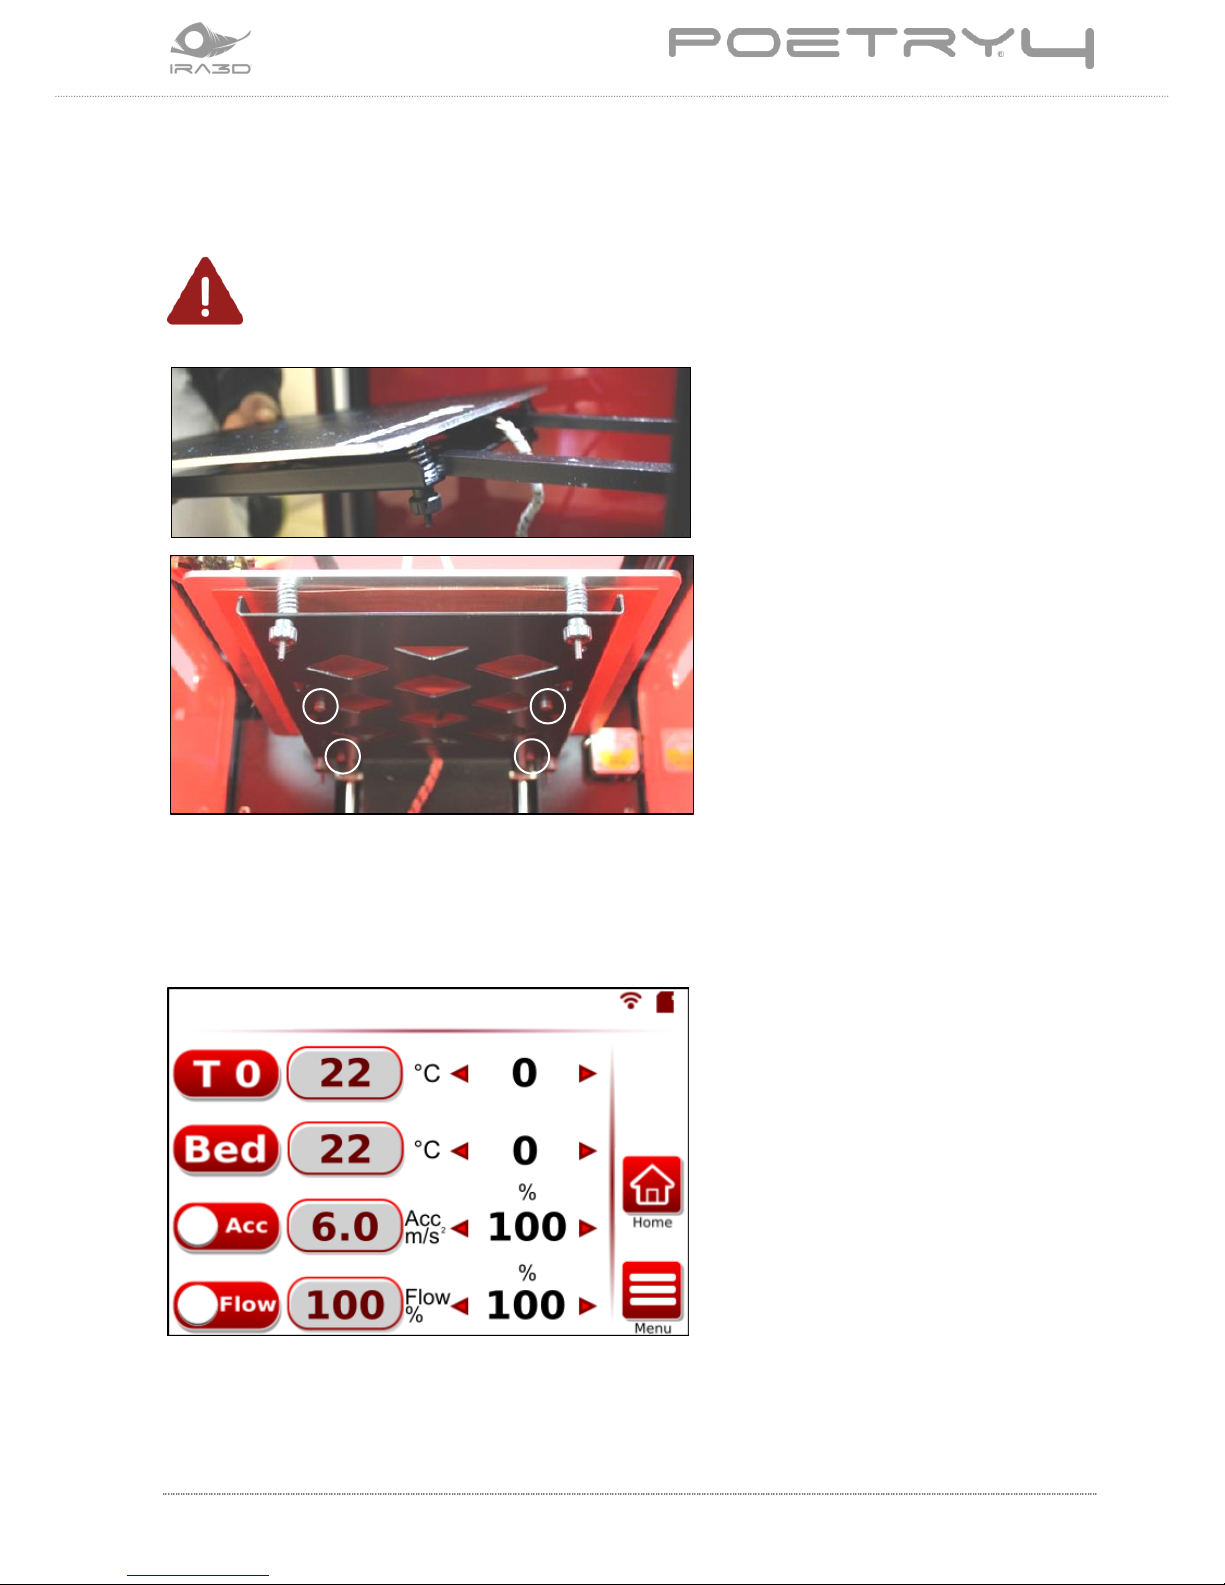
5.2 Plate assembly
After turning off the printer, remove the plate from the film and polystyrene packaging and
stretch the bundle of cables.
CAUTION!
For the purposes of the validity of the guarantee, save the packaging even after having
installed the printer.
To assemble the plate, place the arms
between the plate and the
underplate.
Secure the plate using the 4 socket
head screws, included in the bag
contained in the TOOLS BOX.
To assemble the plate, make sure
that it is aligned with the holes in the
arms and screw using the
appropriate Allen key.
Connect the signal and supply cables to the appliance using the special pin.
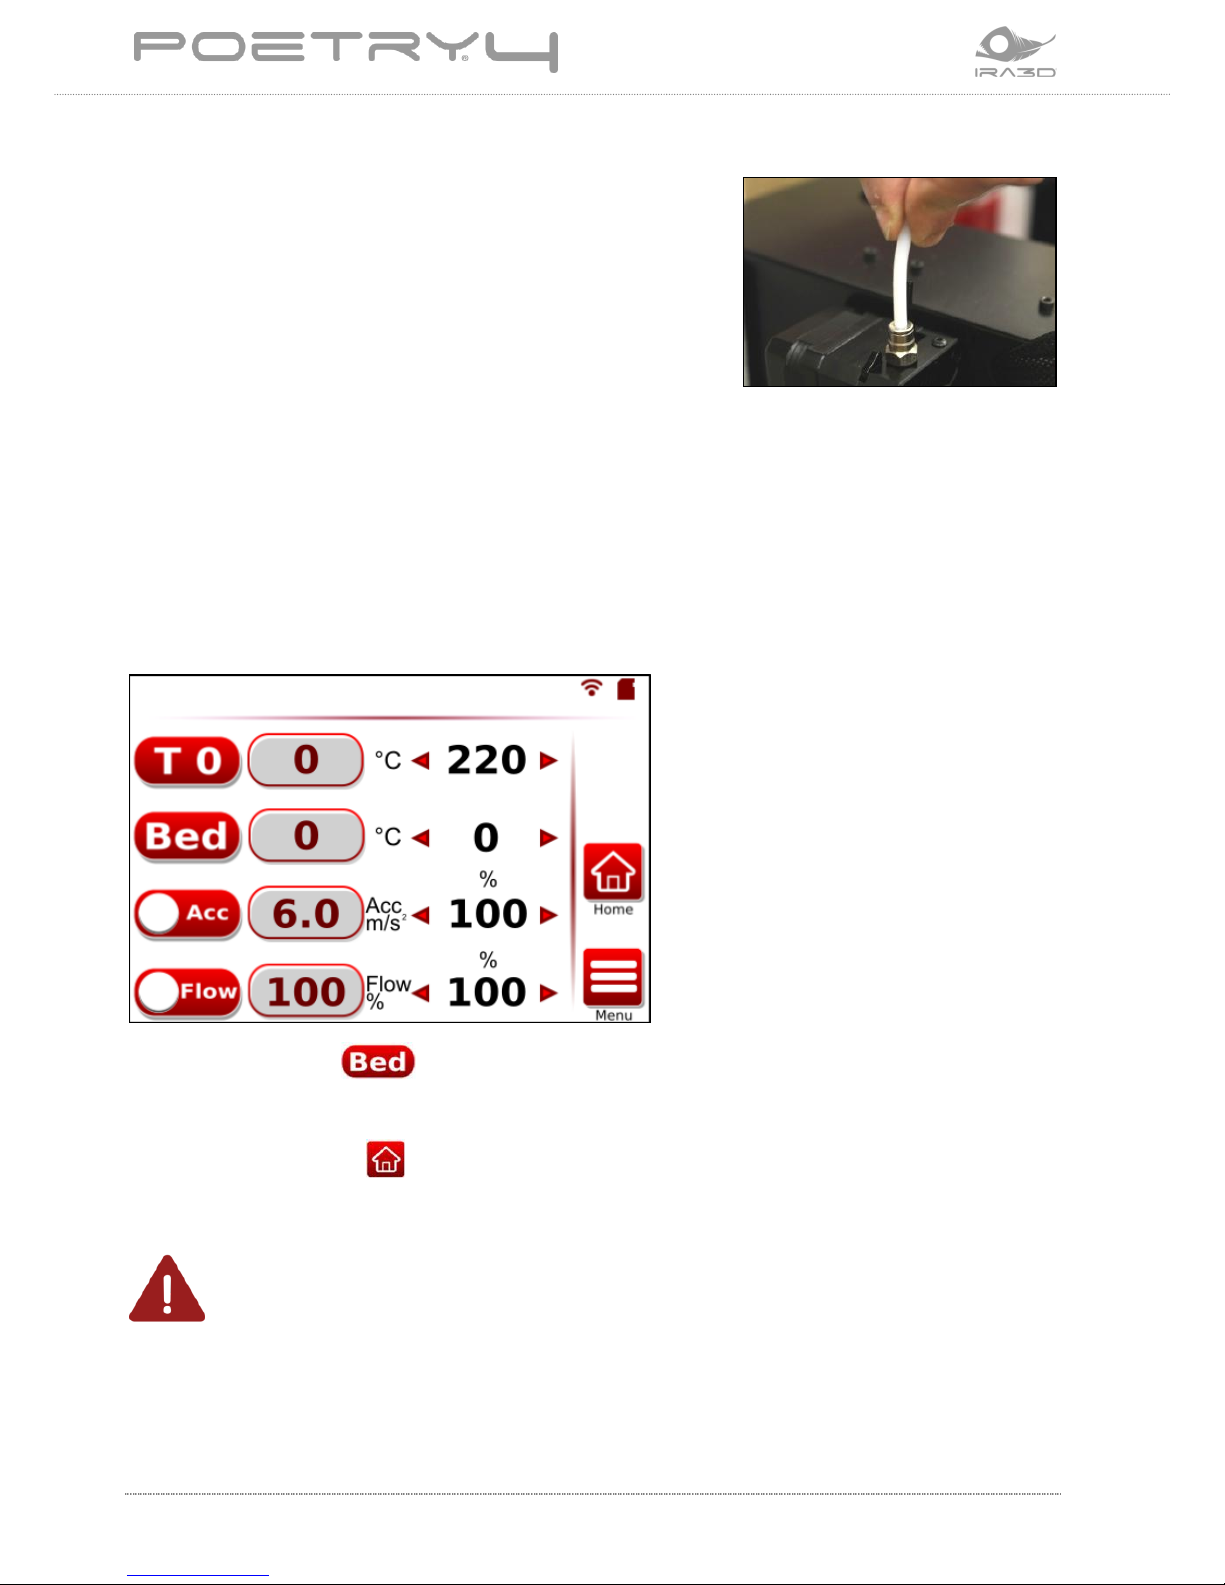
Turn on the printer and make sure that the appliance detects the plate from the control
panel display. Under BED the temperature detected (left column) is indicated with a
Bordeaux colour on a grey background.
In case the temperature is indicated in the colour red, turn the printer off and then on again.
20 User Manual: POETRY4 IRA3D
5.3 Install the lateral bulkheads
Apply the bulkheads making sure the Velcro strips join with those on the sides.
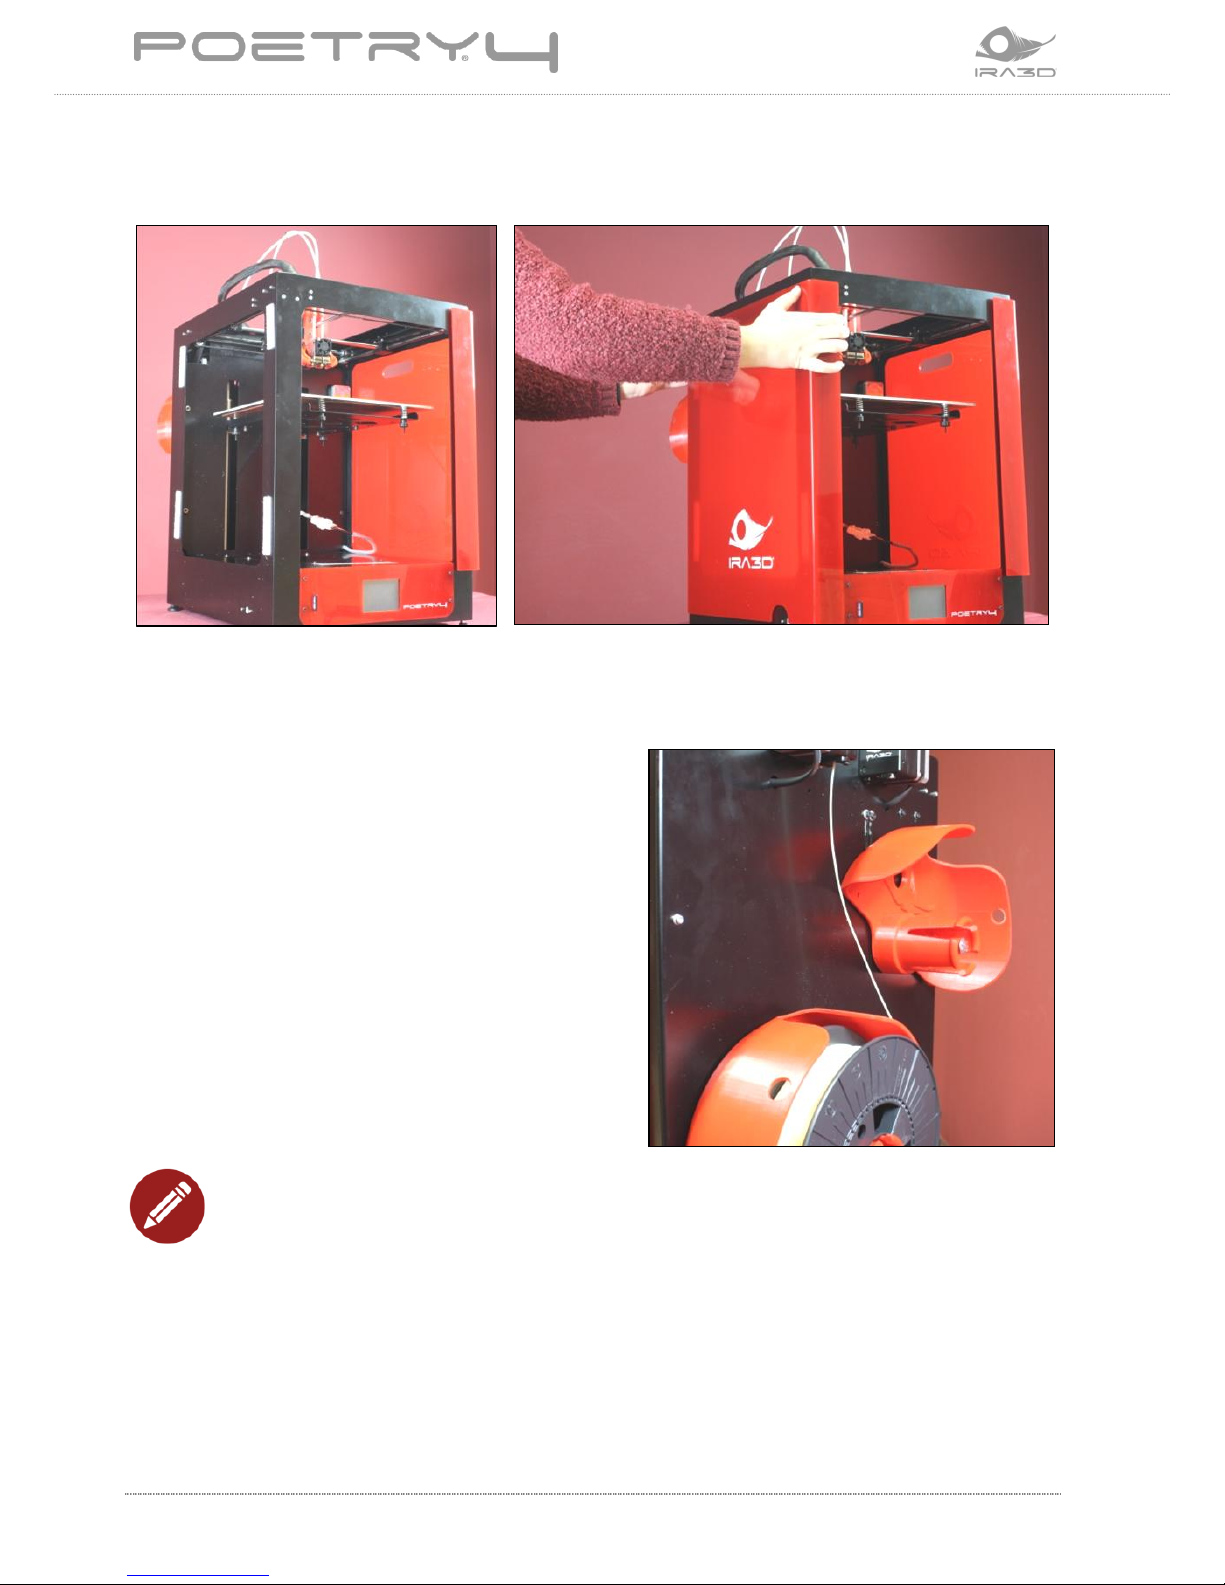
5.4 Load the filament
The filament should be inserted in the motors
located at the back of the printer. In order to
facilitate the unwinding of the filament during
printing supporting screws have been prepared
on which to rest the spools.
Install the spool holder by screwing the screws in
their housings on the back.
Place the spool on the spool holder ensuring that
the unwinding of the thread occurs on the inner
side, in order to facilitate unwinding during
printing.
NOTE:
In case the spool holders are not available, only screw the screws in their housings on
the back.
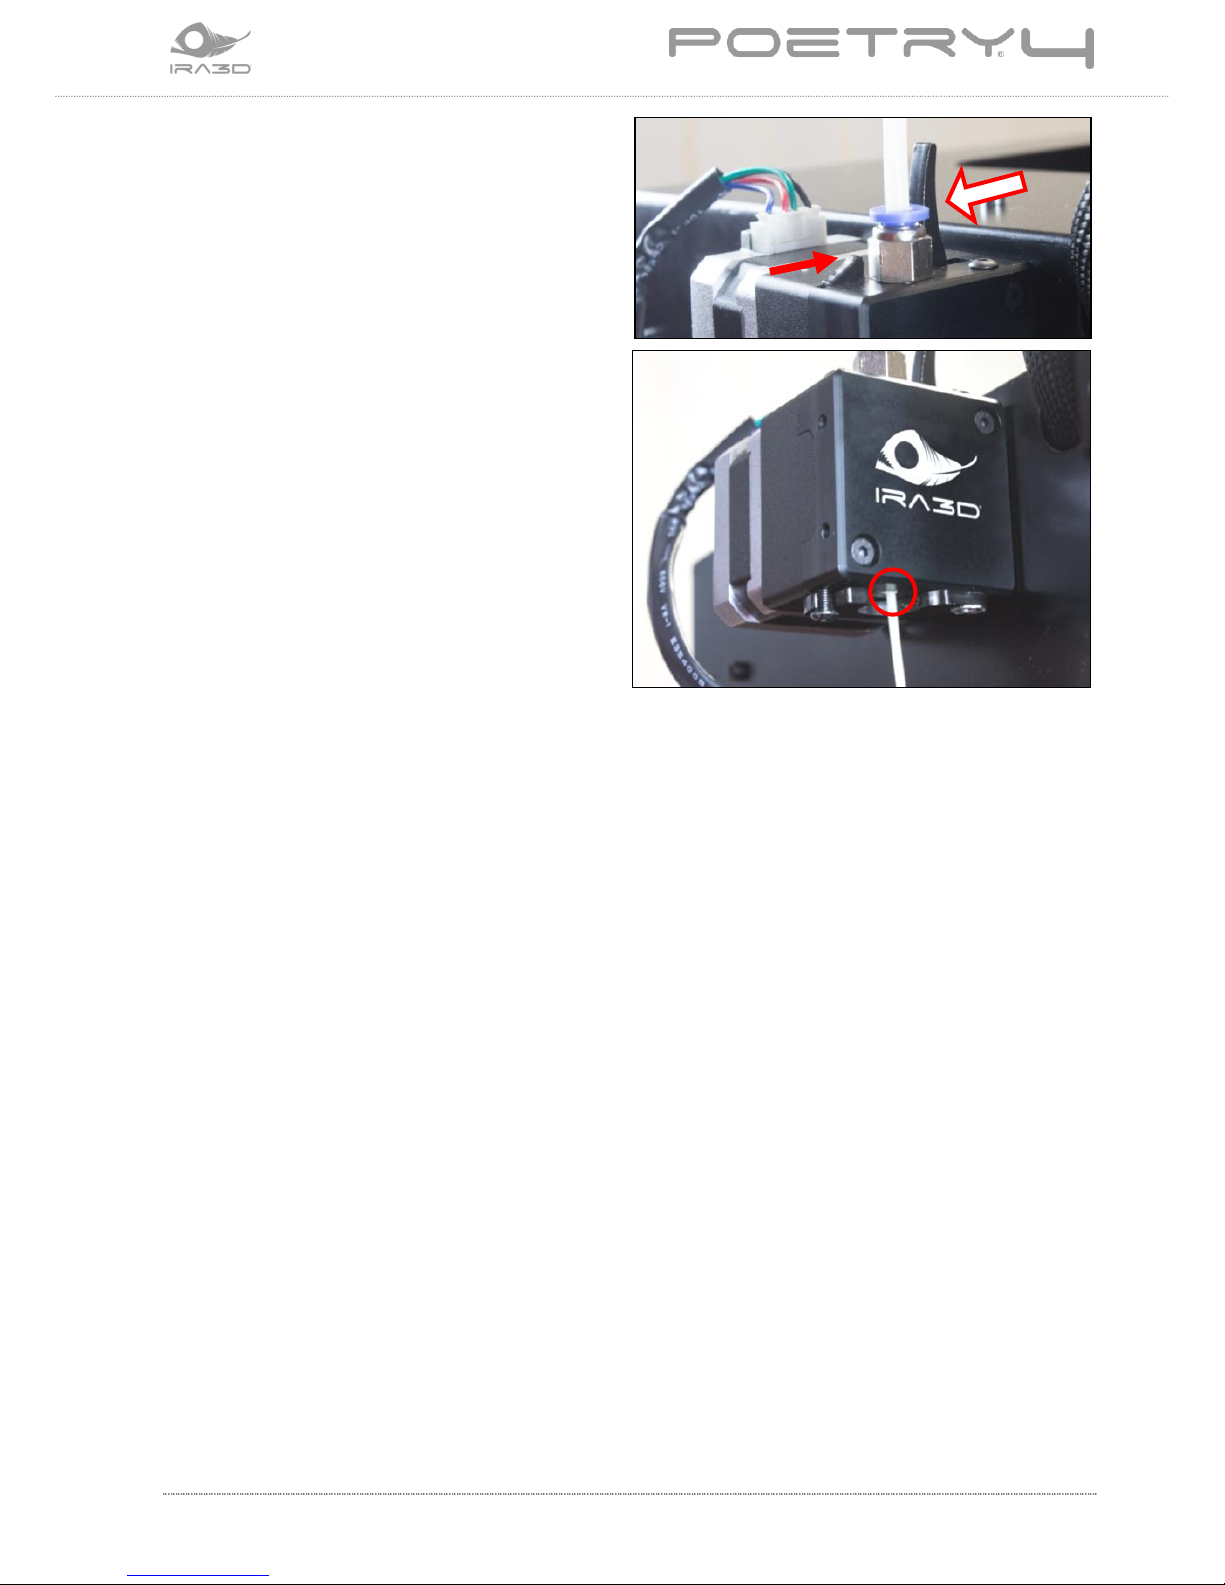
IRA3D User Manual: POETRY4 21
On the rear motors, push the biggest lever
(A) toward the quick coupling, hold down
and then push the small lever (B) to lock the
mechanism. It is possible to release the grip
on the two levers.
Insert the filament in the lower hole of the
motor and push it inside the Teflon tube to
the end, when it locks in the print head and
it is no longer possible to push further.
Then push the large lever (A) slightly to
unlock the mechanism.
From the printer display, set the nozzle loaded to the correct extrusion temperature and
check that the filament comes out.
A
B
22 User Manual: POETRY4 IRA3D
6 OPERATOR PANEL
Poetry4 is equipped with a touchscreen LCD control panel installed on the front side in the
lower area. Poetry4 is a printer that supports both autonomous operation and remote
operation from a computer (Windows, MacOS or Linux) and mobile devices with browsers.
In both cases the Touchscreen LCD panel performs both consultation and modification
functions.
It is possible to carry out/change the settings strictly linked to the printer (and not to the
model being processed, the G-Code or to the processing parameters, which are
predetermined by the Ira3D PC software).
6.1 Printer start-up
When the printer is switched on, the display will show this screen:
To access the functions, press any point of the display.
 Loading...