

Page 1
USER INSTRUCTIONS
REMOTE ENERGY CONTROL
Page 2

Customer support: 0800 0152252 www.iqe.co.uk
n The screen is touch activated.
In screen saver mode you need
to tap the screen to activate the
home page.
n Active buttons are highlighted in
solid green or are outlined in green.
n When placed in the plugged-in
docking unit, Halo will automatically
charge. Halo is a fully portable
mains powered unit with a 4 hour
charge (approx.).
Display Unit
BEFORE SETTING OR AMENDING ANY HALO SETTINGS, WE
RECOMMEND YOU READ THESE INSTRUCTIONS THOROUGHLY
Halo allows you to manage the central heating and hot water in your home.
It communicates with the heating and hot water system using a ‘wireless mesh network’.
The installer will have fitted a wireless temperature sensor and a relay box and will have
commissioned and paired the devices together. Using Halo, you can easily change
settings such as heating periods and temperature ranges.
CONTENTS
SECTION 1 - CENTRAL HEATING/HOT WATER PROGRAMS 4 - 14
SECTION 2 - CHANGING PRIMARY USER SETTINGS 15 - 17
SECTION 3 - ACTIVE ALERTS 18 - 19
Page 2
Page 3
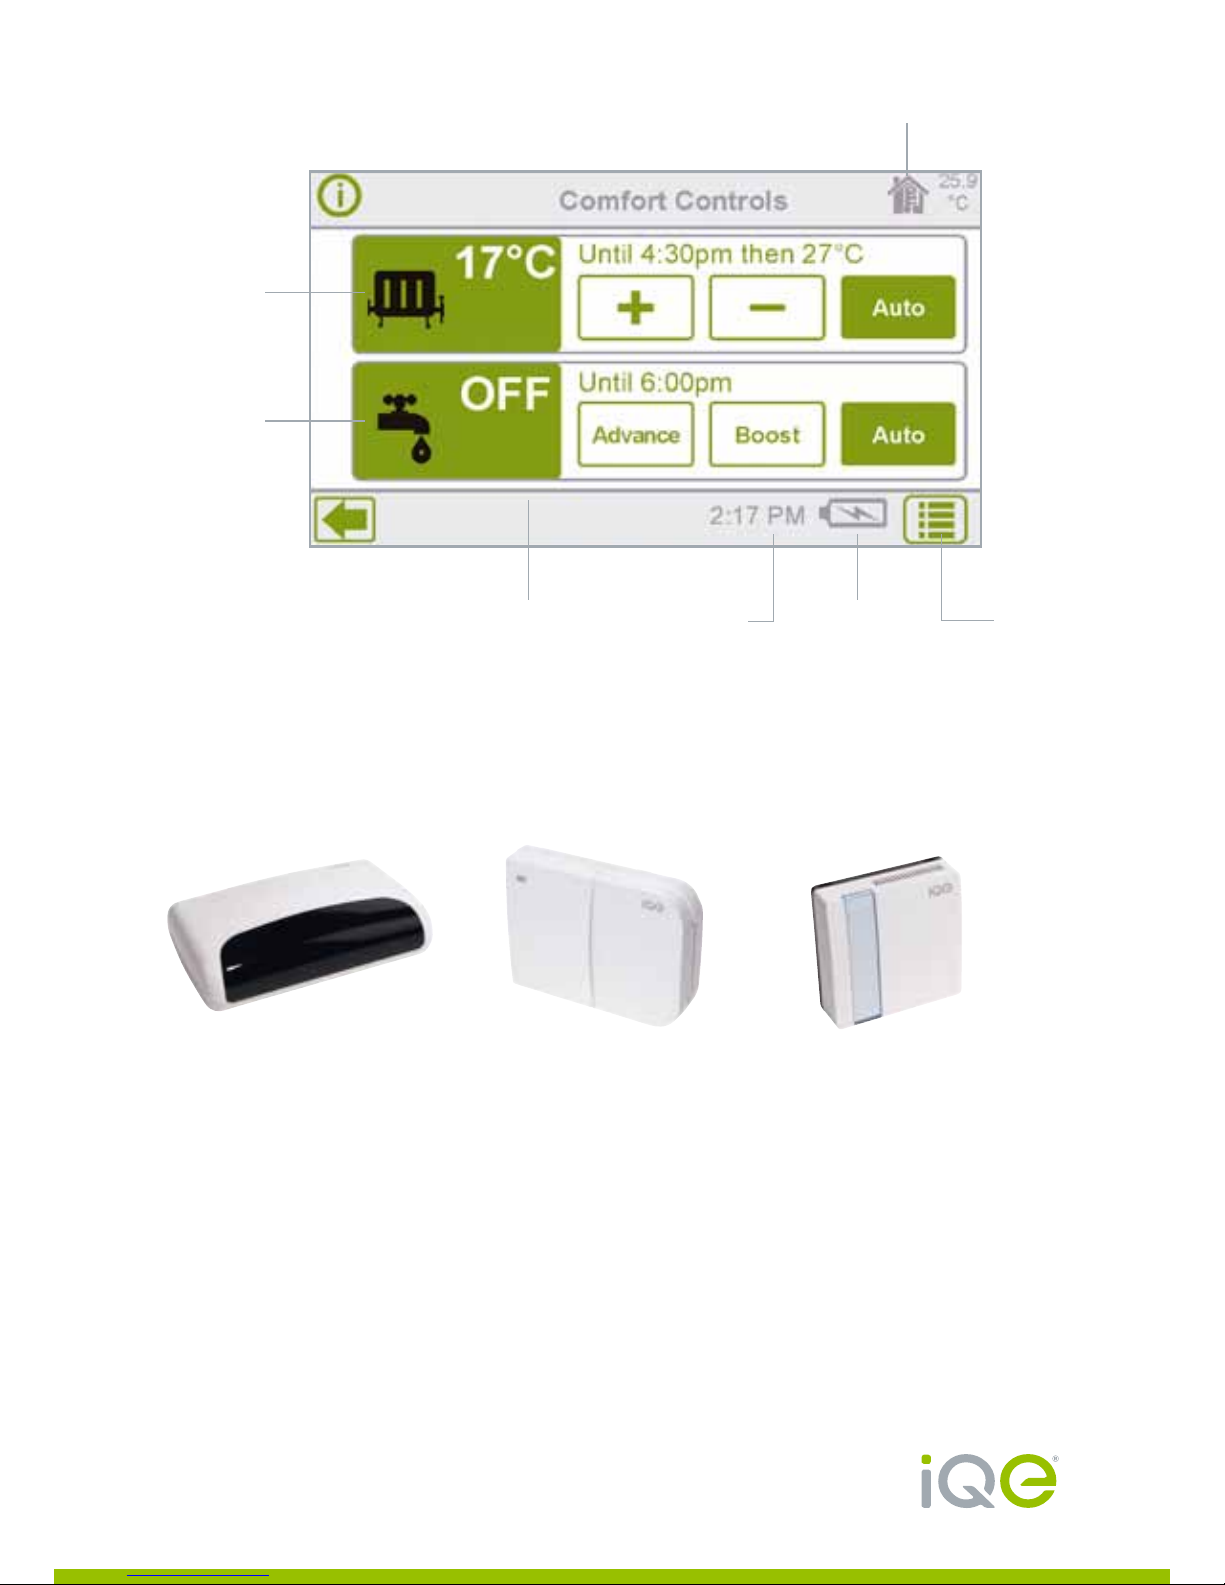
GATE WAY
This is a mains-powered
device that connects
your Halo unit to the
outside world via your
Internet router.
When set up and
‘paired’ with the rest
of the system, the
Gateway enables you to
use a smartphone app to
control and programme
your comfort settings
remotely.
RELAY SWITCH
This unit contains the
relays for switching the
boiler on and off, with
separate channels for
heating and hot water.
TEMPERATURE
SENSOR
This is a batterypowered unit that sends
temperature information
to the Halo Display via
Z-Wave low-power radio.
Central
Heating
Controls
Hot
Water
Controls
Active
Alerts
Clock
Read Out
Battery
Status
Menu
Room
Temperature
COMFORT CONTROLS HOME SCREEN
NOTE: Hot water will not be displayed if Halo is fitted to a Combi system.
Page 3
Page 4
Customer support: 0800 0152252 www.iqe.co.uk
Section 1: Central Heating/
Hot Water Programs
Halo is an advanced heating and hot water programmer that will allow more precise
and flexible control of your heating and hot water. This enables the most energy
efficient use of your heating system while maintaining existing comfort levels. The
temperature control employs the latest energy efficient TPI (Time Proportional
Integral) control software.
The temperature sensor will control the heating to the room temperature sensed at
that point. The actual required temperature settings are entered into the halo device
which is acting as a programmable room thermostat (PRT). (see ‘More Details’ in
Appendix 1 for explanation of a PRT).
Halo has a factory set core programme which can be adjusted as follows:
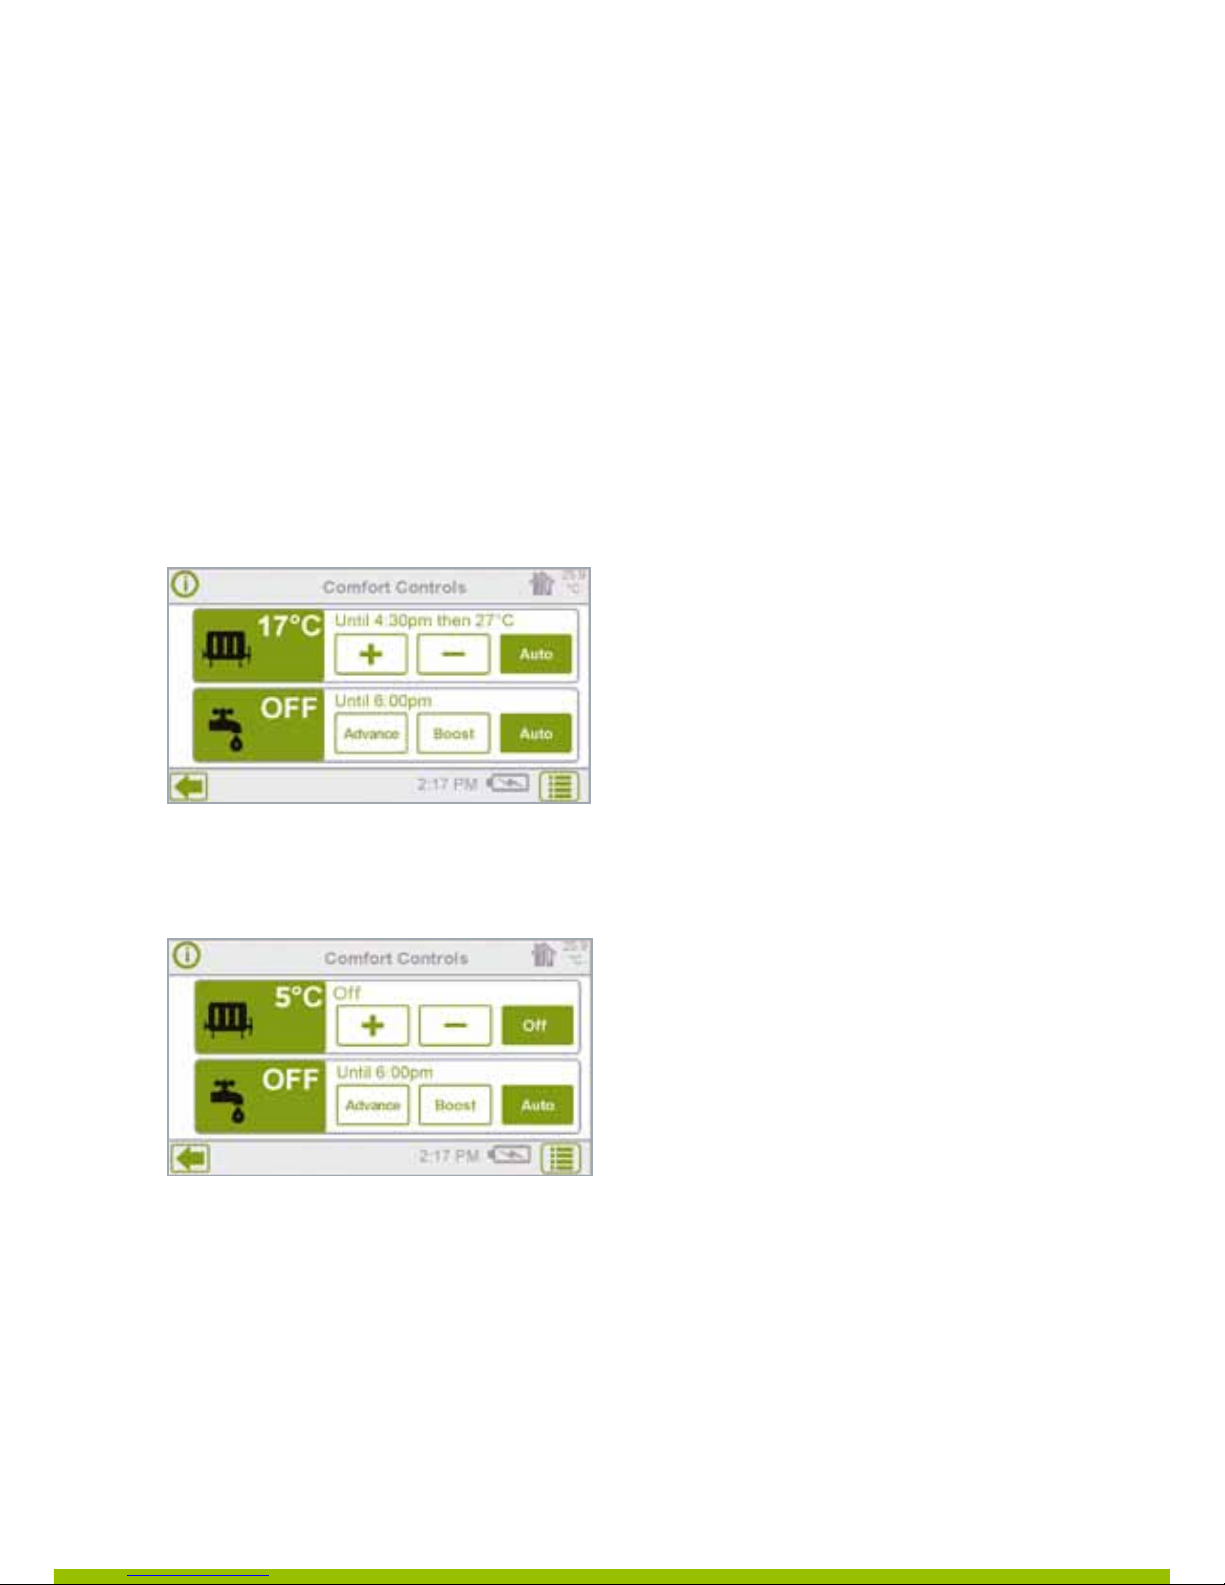
Icons on screen will display current status of heating and hot water.
HEATING CONTROL
In the Off mode, the Frost Protection setting of 5ºC is in place at all times. The Frost
Protection setting will ensure that your house will not freeze during Off periods.
A higher setting than 5ºC can be entered if required. This setting ensures that the
temperature in the house cannot fall below the temperature level measured at the
temperature sensor position.
The Off appears in the display and in this mode the heating will remain off until it
is manually switched back on by means of the touch screen button or via the app
where the word ‘Off’ appears.
Page 4
Page 5
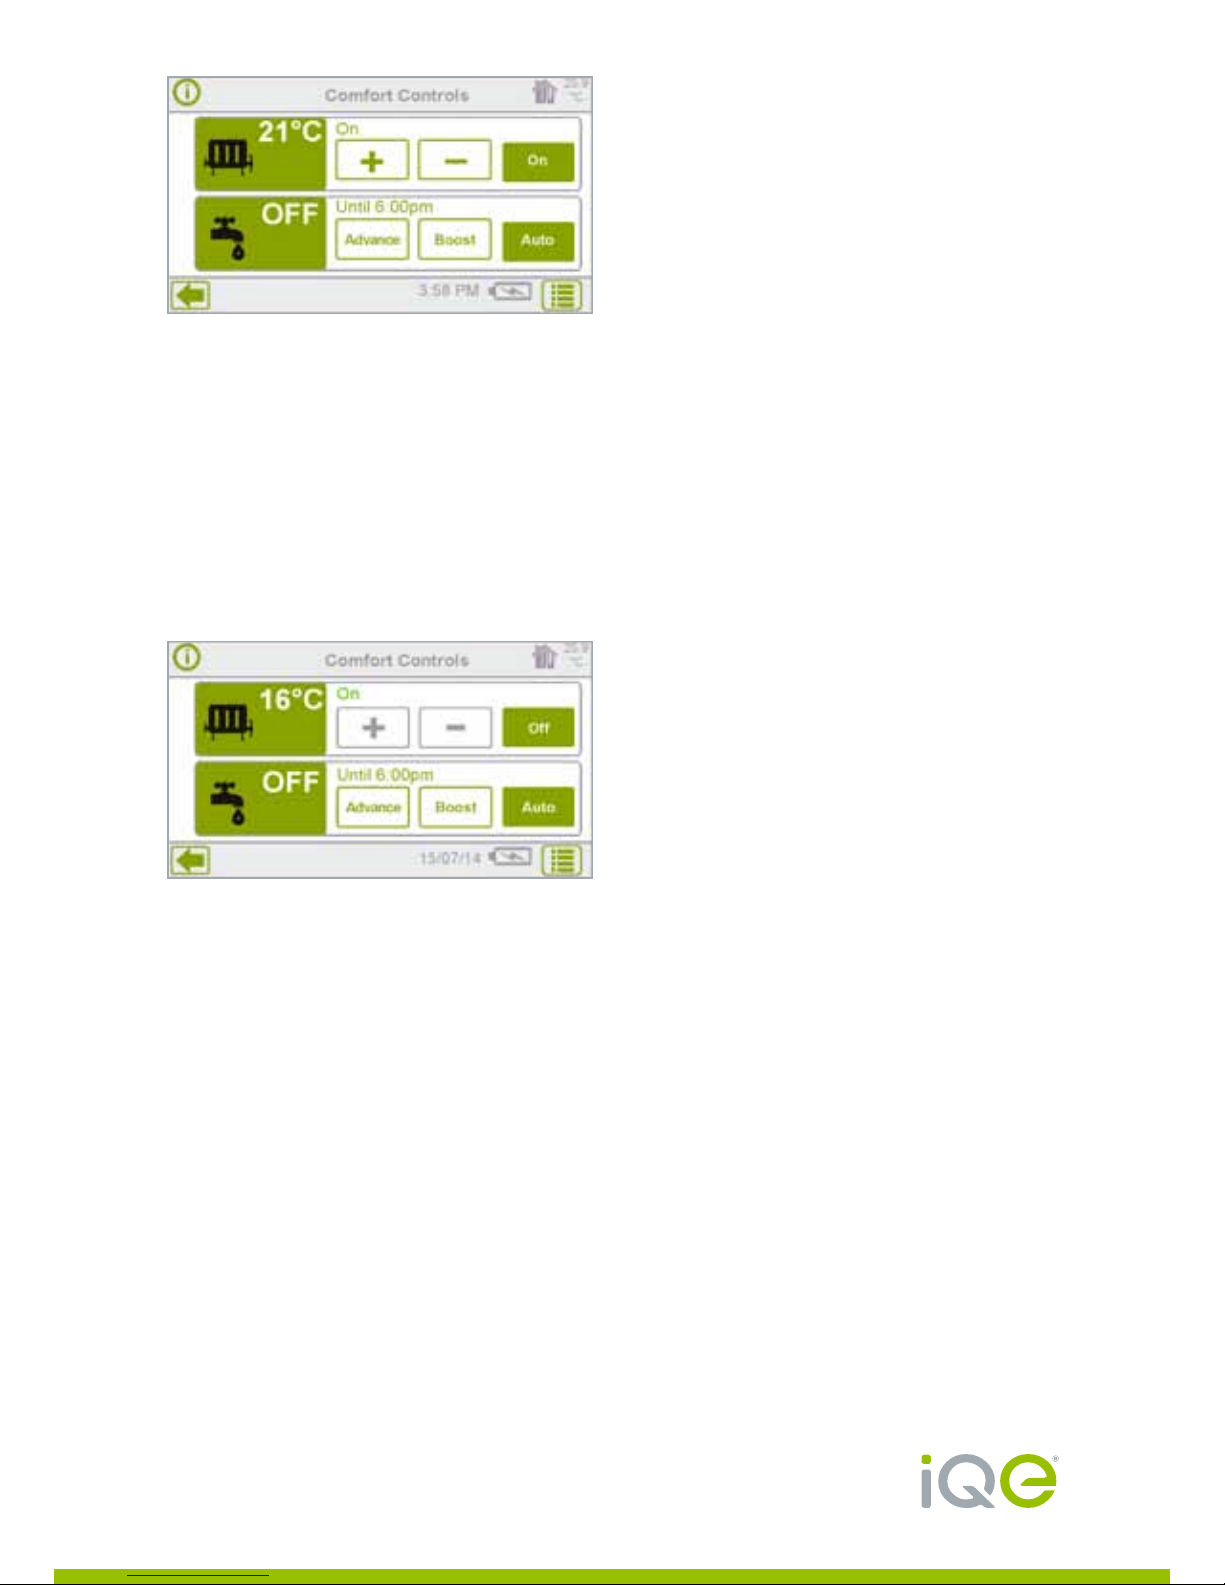
In the Auto mode the heating will
operate to the program entered into
the Halo controller.
Press “Auto” to toggle through
On/Off/Auto program modes.
In the On mode the heating will
remain on permanently at the default
temperature of 21°C. This can be
manually adjusted back to Auto or
Off by pressing the ‘On’ button once
or twice.
At any time Halo is in the (permanent) On or Auto programs, then a temporary
temperature adjustment can be made by using the ‘+’ or ‘–’ buttons.
In the On mode the temperature will remain unchanged until a further adjustment
is carried out either to the temperature using the ‘+’ or ‘–’ buttons or by altering the
program by pressing the ‘On’ button to change to the Auto mode.
In the auto program the temperature setting reverts to the original program settings.
To adjust the central heating
press the radiator icon.
Page 5
Page 6
Customer support: 0800 0152252 www.iqe.co.uk
To adjust central heating programmed times and temperatures:
Press the central heating (radiator) icon.
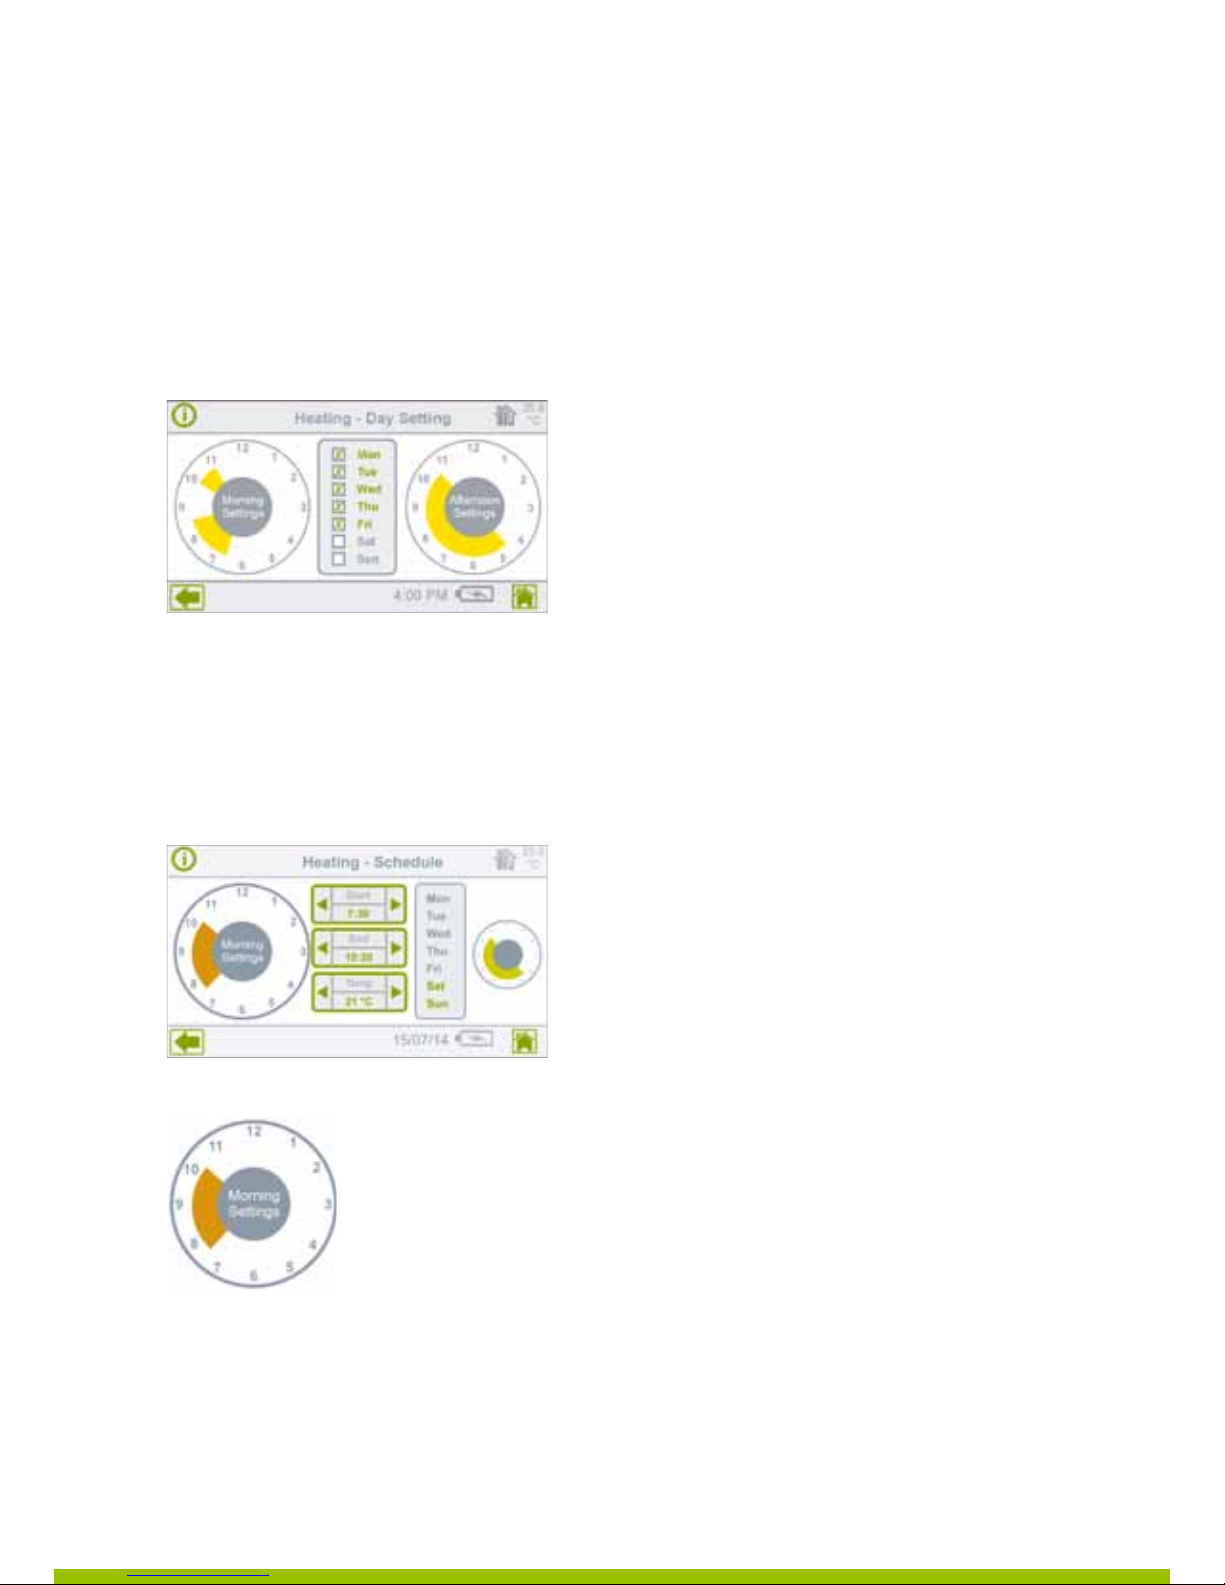
The Central Heating Day Set screen will appear showing the current schedule
for set temperature periods.
The left hand dial shows the Morning Settings and the right hand dial shows the
Afternoon Settings.
In the centre of the screen, the days of the week to which these programs apply are
marked with an X. Mark the days that you require this program to apply by adding
or removing the X against the days of the week.
Press either of the dials to bring up the Central Heating Programming screen.
Press the left hand dial marked ‘Morning Settings’.
The on times and target temperature settings for the morning period are displayed.
Section 1: Central Heating/
Hot Water Programs
Page 6
Page 7
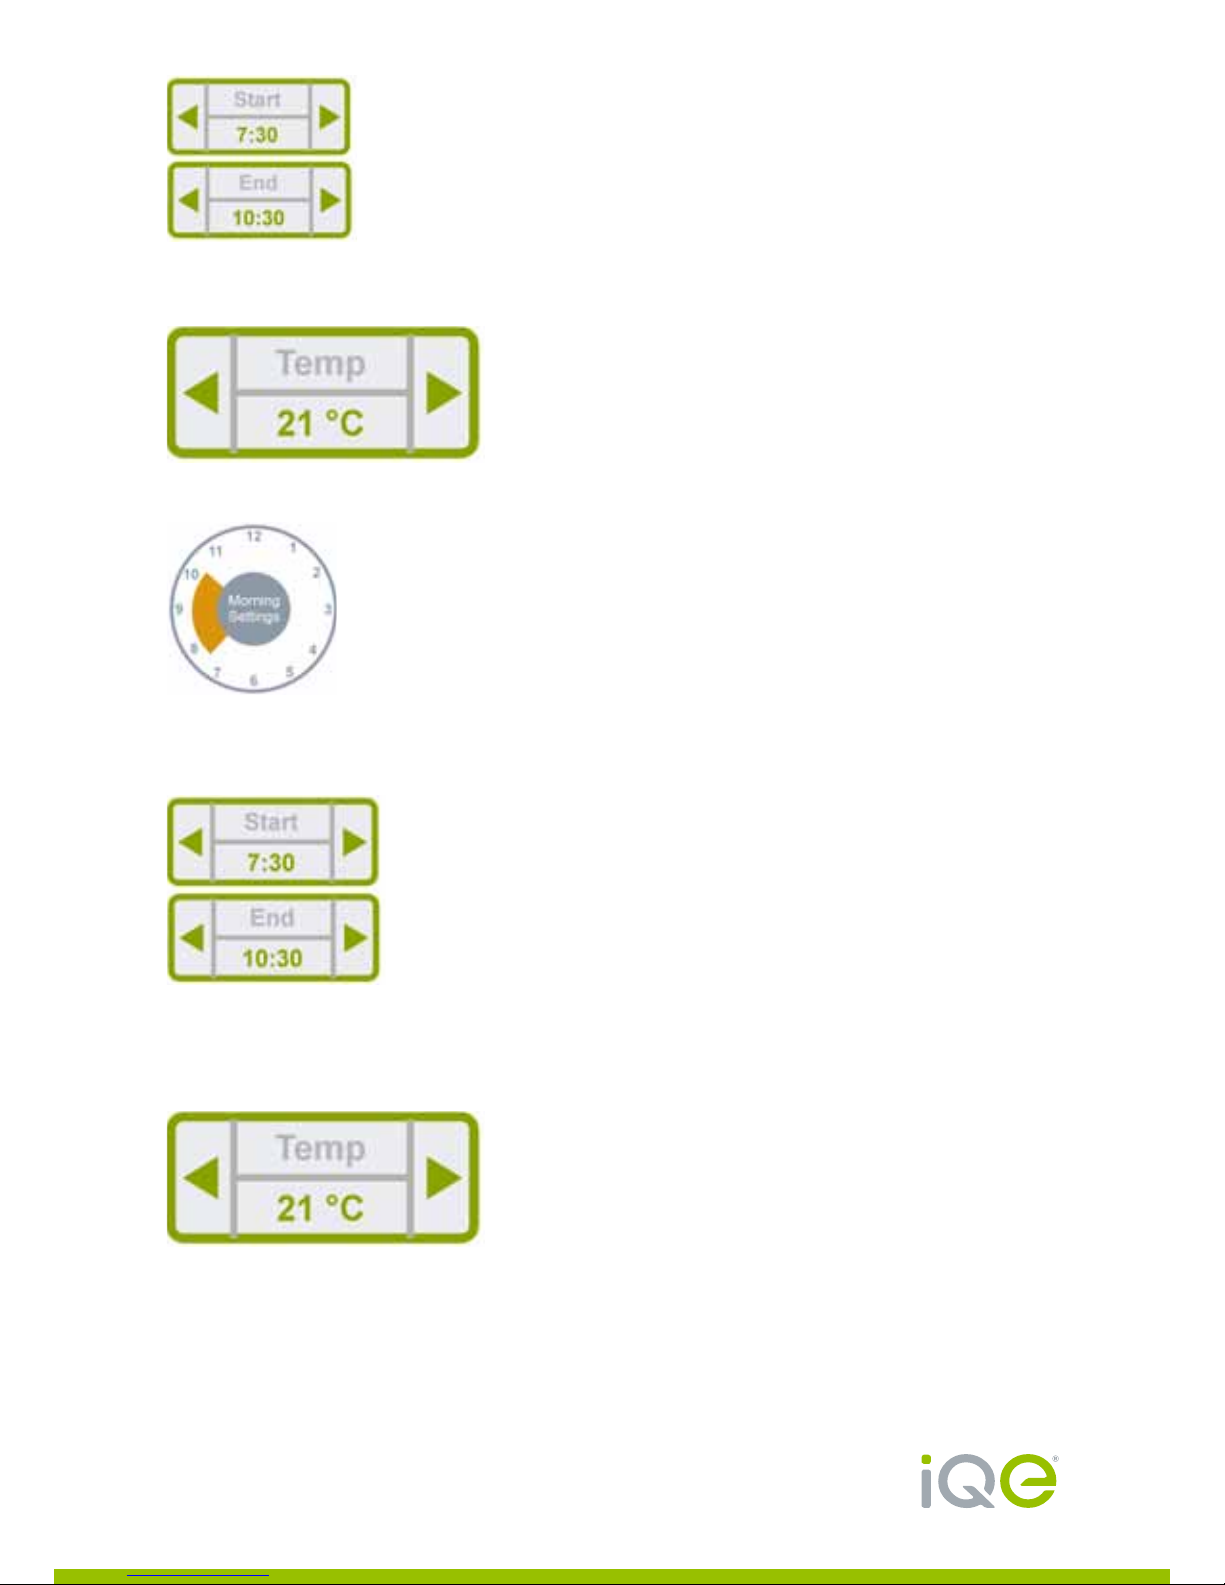
To adjust the existing time for the selected heating segment use the ‘Start’ and ‘End’
arrows to extend or decrease the time period.
The required temperature can also be adjusted using the ‘Temp’ adjustment arrows.
To add a further heating period to the Morning Settings touch the screen in the area
where you wish to include a segment and it will appear on the display in yellow.
Make the fine adjustment to the new on time by using the ‘Start’ and ‘End’ arrows to
extend or decrease the on time. Equalising the start and end times will remove
the segment.
A different temperature can be set for each on period. Adjust the temperature
setting using the ‘Temp’ adjustment arrows.
To remove a particular heating segment, simply double tap on it. This will bring up a
dialogue box allowing you to confirm or cancel deletion.
Page 7
Page 8
Customer support: 0800 0152252 www.iqe.co.uk
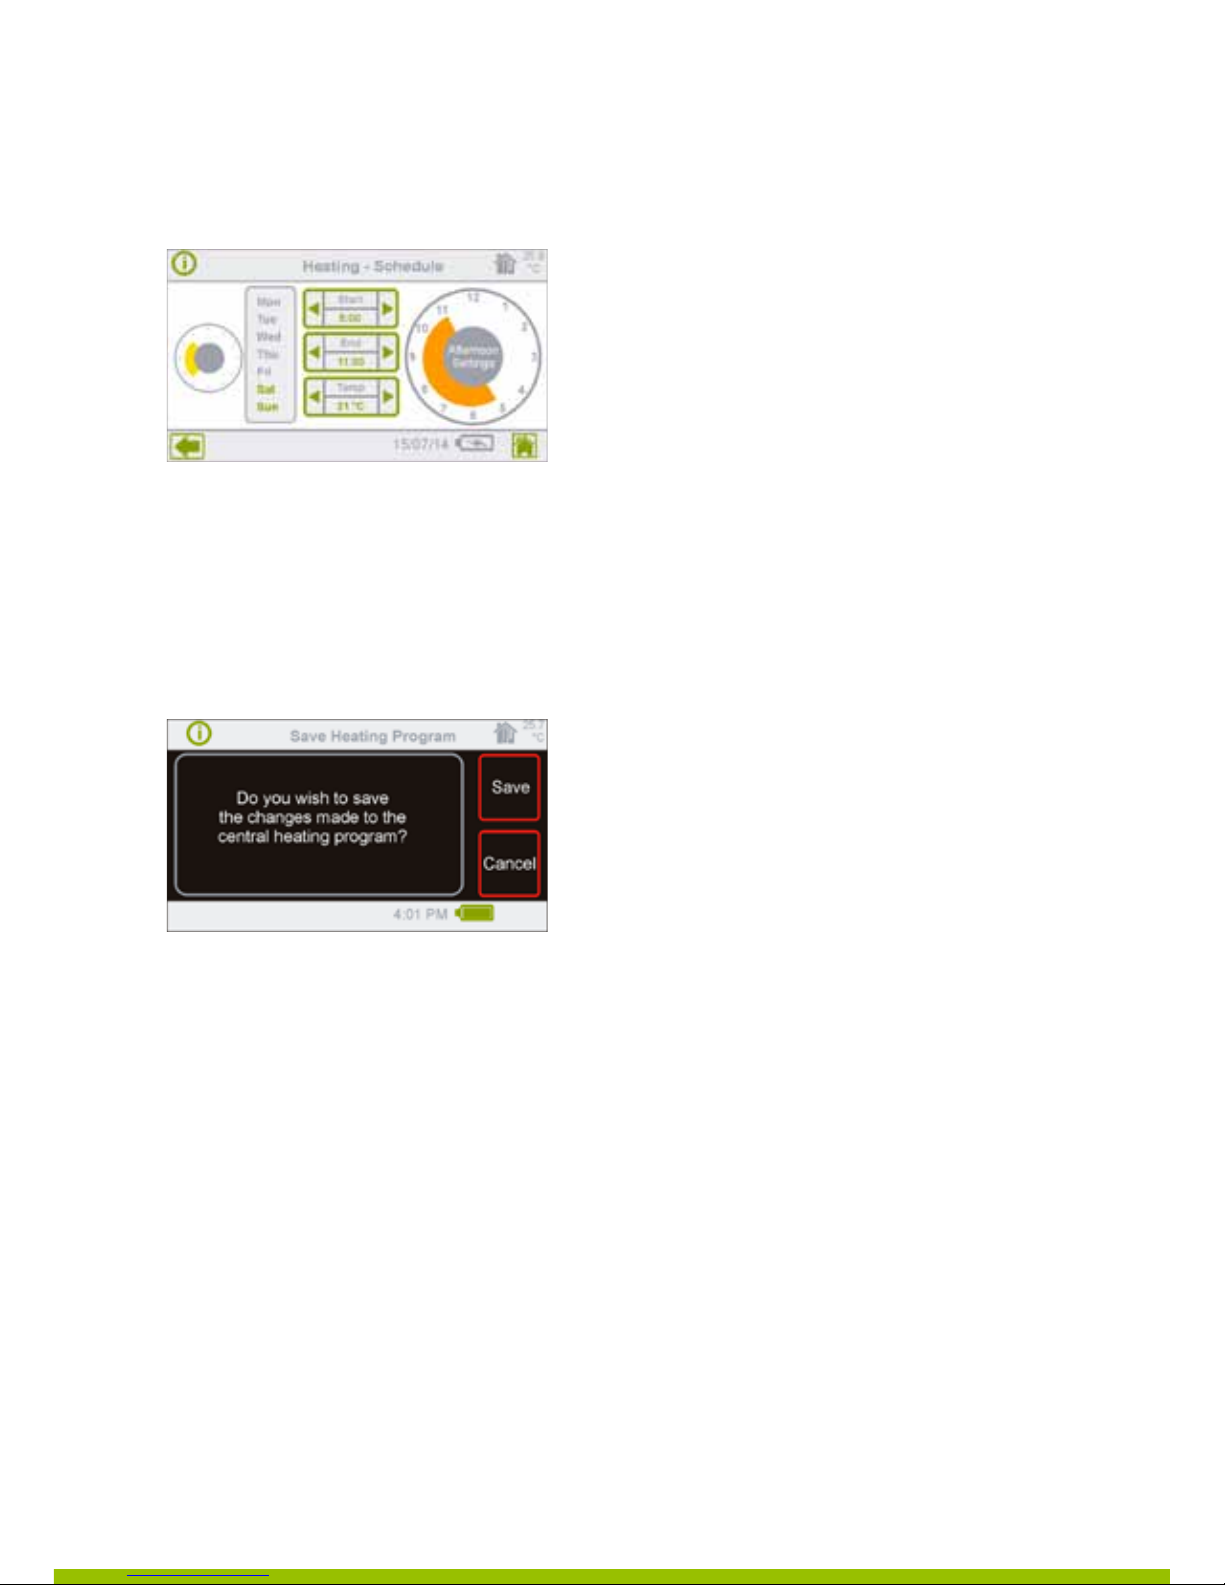
Repeat this procedure for the Afternoon Settings by pressing the right hand dial.
When the program has been set for the afternoon press the ‘Back’ arrow in
the bottom left hand corner of the display to bring up the central heating day
set screen.
Pressing the ‘Home’ button on the Central Heating Day Settings will then ask you
if you want to save changes (if you have made any). If not you will navigate to the
main screen straight away.
If you require different settings for different days of the week, for example
Saturday/Sunday, then go to the Mornings Settings screen by pressing the left hand
dial on the central heating day set screen.
Press the day of the week for which you wish to enter a different program.
Enter the new heating times as described earlier.
Press the ‘Back’ button to bring up the central heating day set screen and
check the days the program is set for are correct. Further days can be grouped or
ungrouped at this stage by adding or removing the X against the days in question.
Press the ‘Home’ button again and you will be asked if you wish to save the program.
Save the changes to the Central Heating Programme.
Repeat this process for any other days or groups of days that need different
settings. Press save and the new program settings will be stored in the
program memory.
Section 1: Central Heating/
Hot Water Programs
Page 8
Page 9
The changes detailed opposite are typical of the day-to-day changes you may
wish to make. However, if you wish to amend system settings, it will be necessary
to enter the Settings section under the main menu.
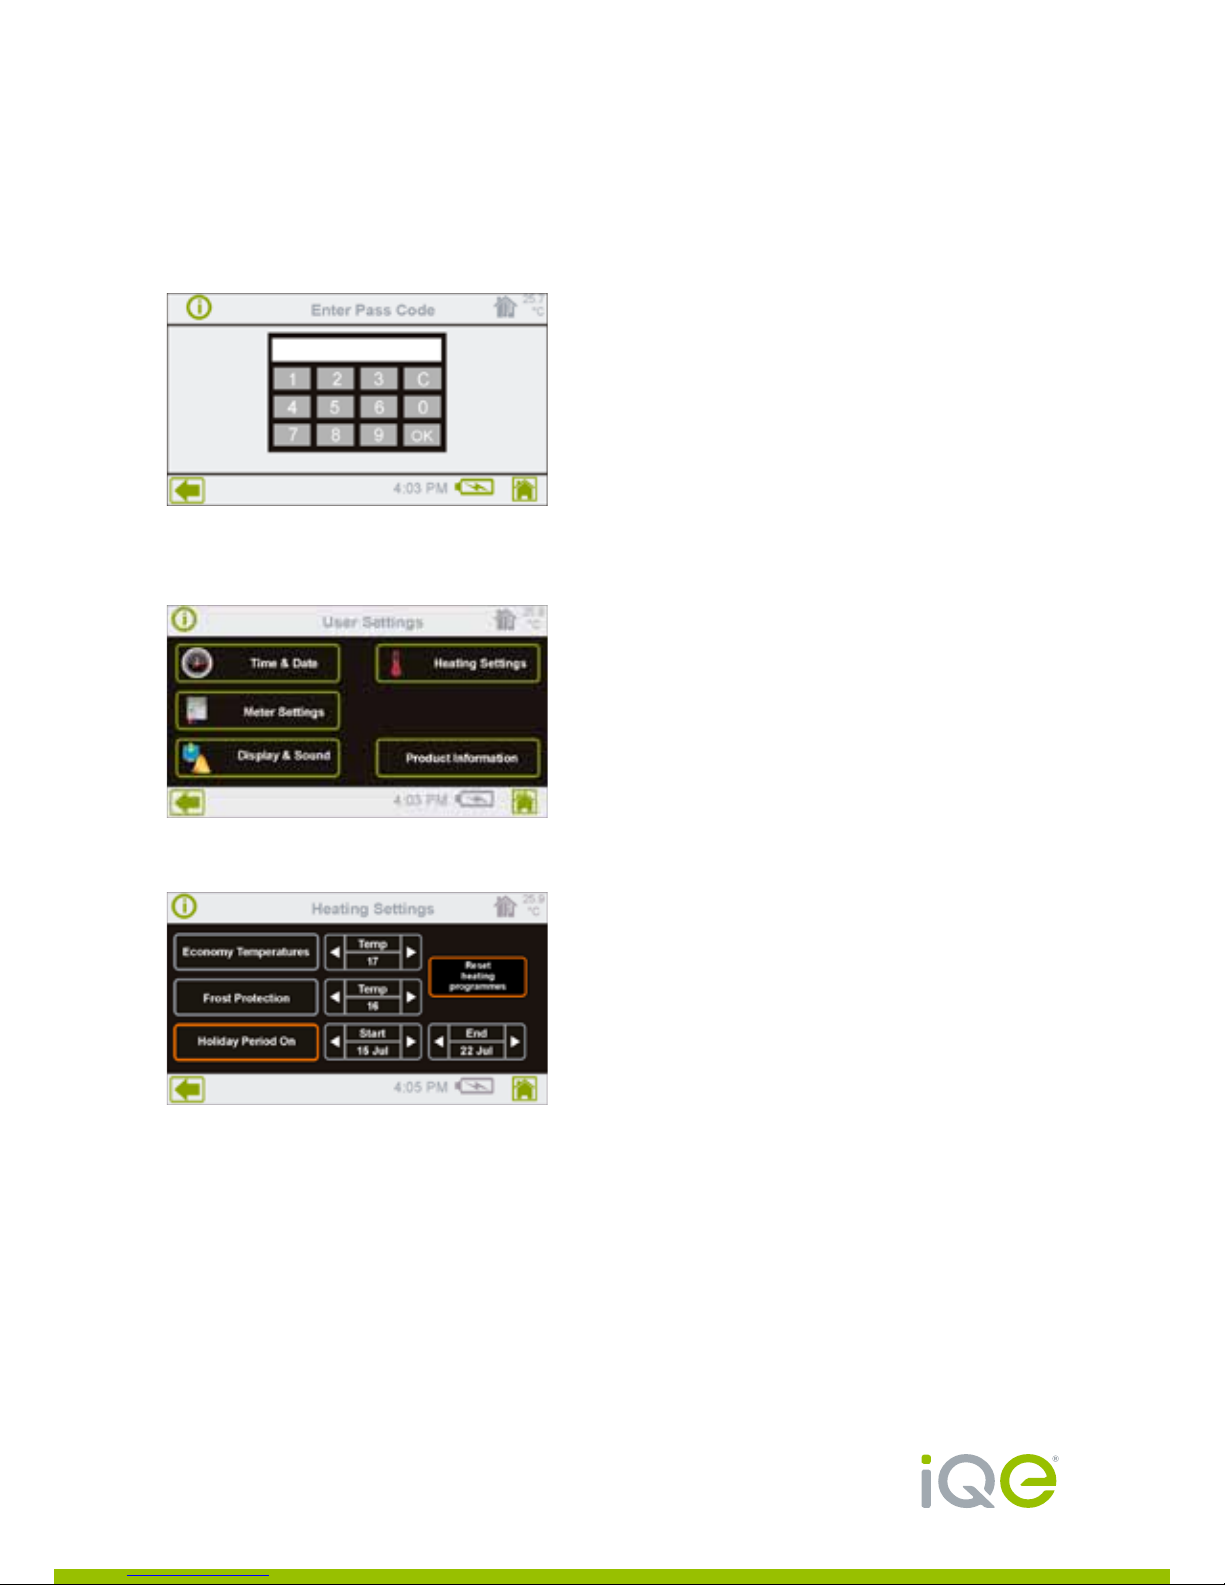
Press the ‘Menu’ button at bottom right hand side of the comfort controls
home screen.
Press ‘Settings’
Enter user code 0000 (or you own personal code if you have changed the defaults)
and press ‘OK’.
Press ‘Heating Settings’ box
The Economy setting, the Frost Protection setting and the Holiday settings are all
now shown on the screen and can be adjusted by means of the left and right arrows
to either side of the figure shown.
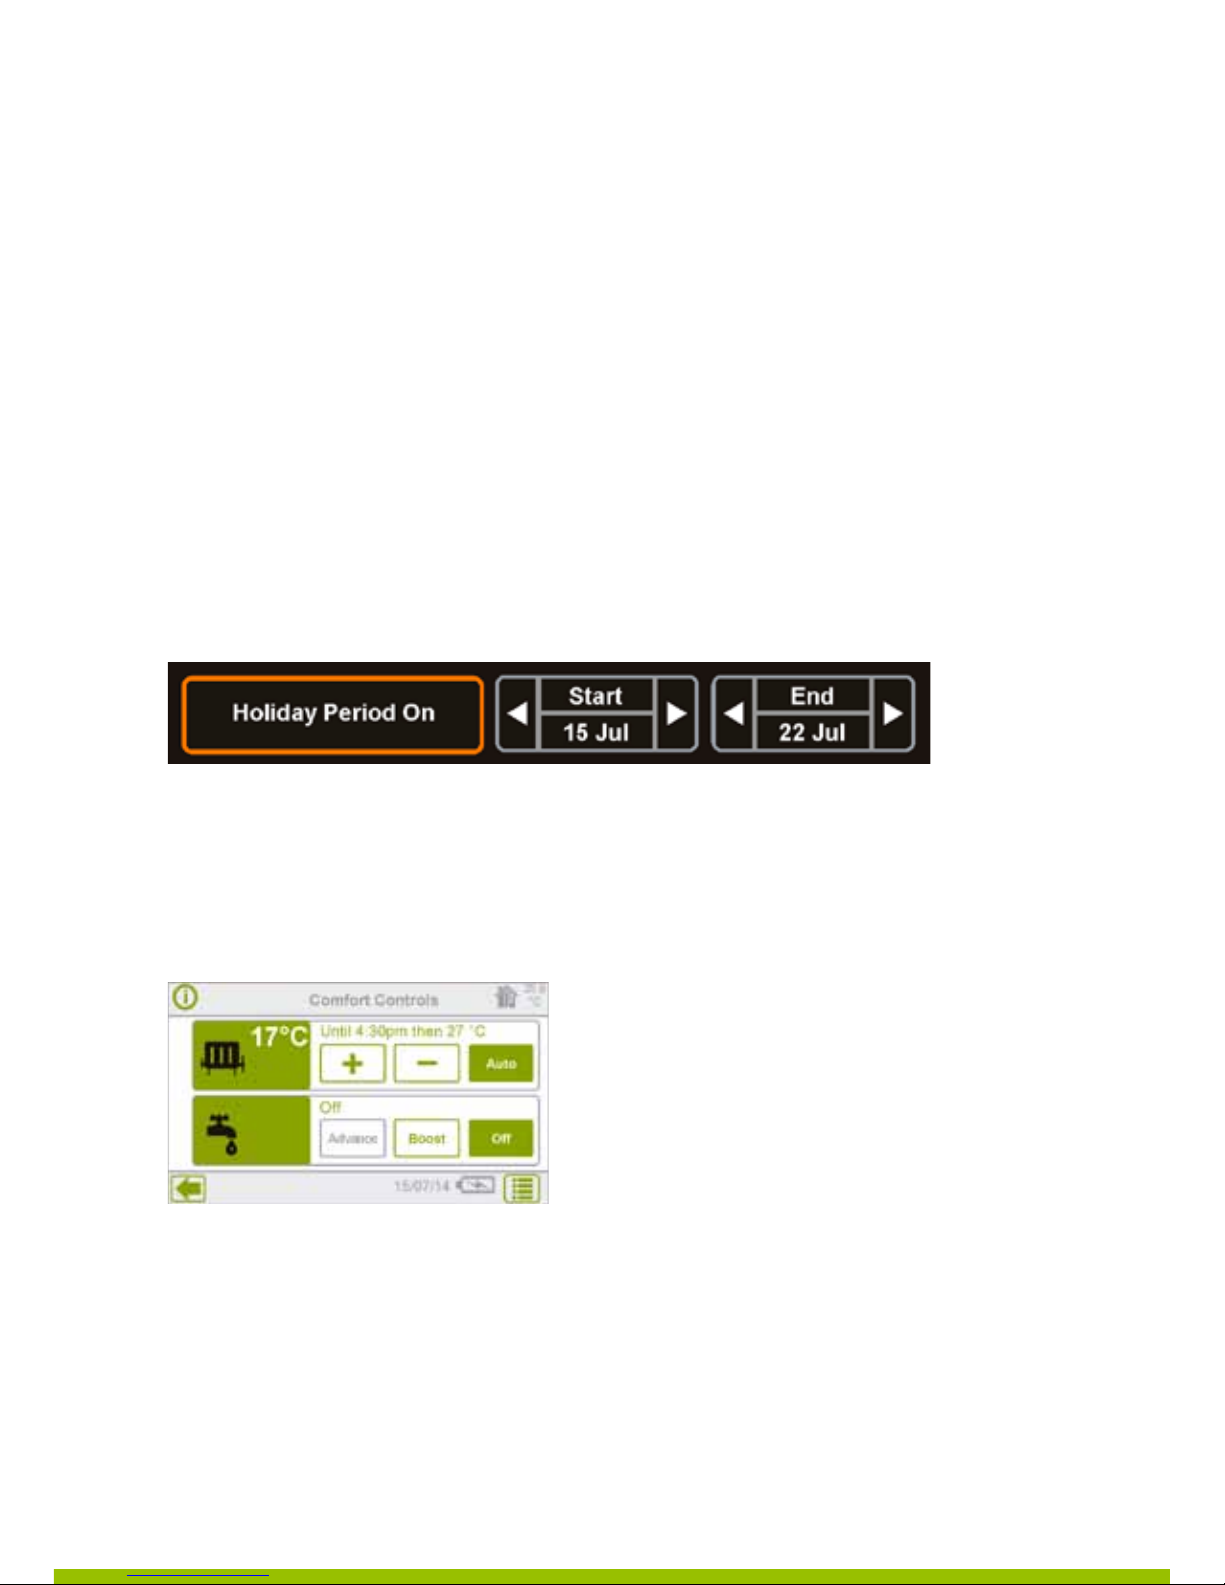
If the Holiday Period is currently set to off then no dates are displayed for Holiday
Period. To set a holiday period, switch Holiday Mode on by pressing the highlighted
‘Holiday Mode’ button and modify start & end dates as required. Your changes are
saved automatically on exiting the screen.
‘Reset Heating Programs’: Press this button to reset central heating and hot water
heating programs back to factory defaults.
Note: this option CAN NOT be undone once confirmed.
Page 9
Page 10
Customer support: 0800 0152252 www.iqe.co.uk
Economy temperature setting
This is a higher temperature setting than Frost Protection and will be operative
automatically during non programmed periods. In the event of extreme weather
conditions the heating may be brought on by the Economy Background
Temperature setting. Default setting is 10ºC.
Frost Protection
Adjust using ‘+’ or ‘–’ arrows. The minimum default setting permitted is 5ºC.
Holiday Setting
The Holiday Setting allows the heating and hot water system to set heating to
frost protection and hot water set to off for the duration of a holiday or extended
absence from the home.
Press the ‘Holiday Period’ button to activate holiday settings, set the start and finish
dates using the arrows provided and touch the ‘Holiday Period’ box to engage the
holiday function. This will show Holiday Period on.
The Frost Protection temperature setting will automatically be engaged.
SETTING/ADJUSTING THE HOT WATER PROGRAMME
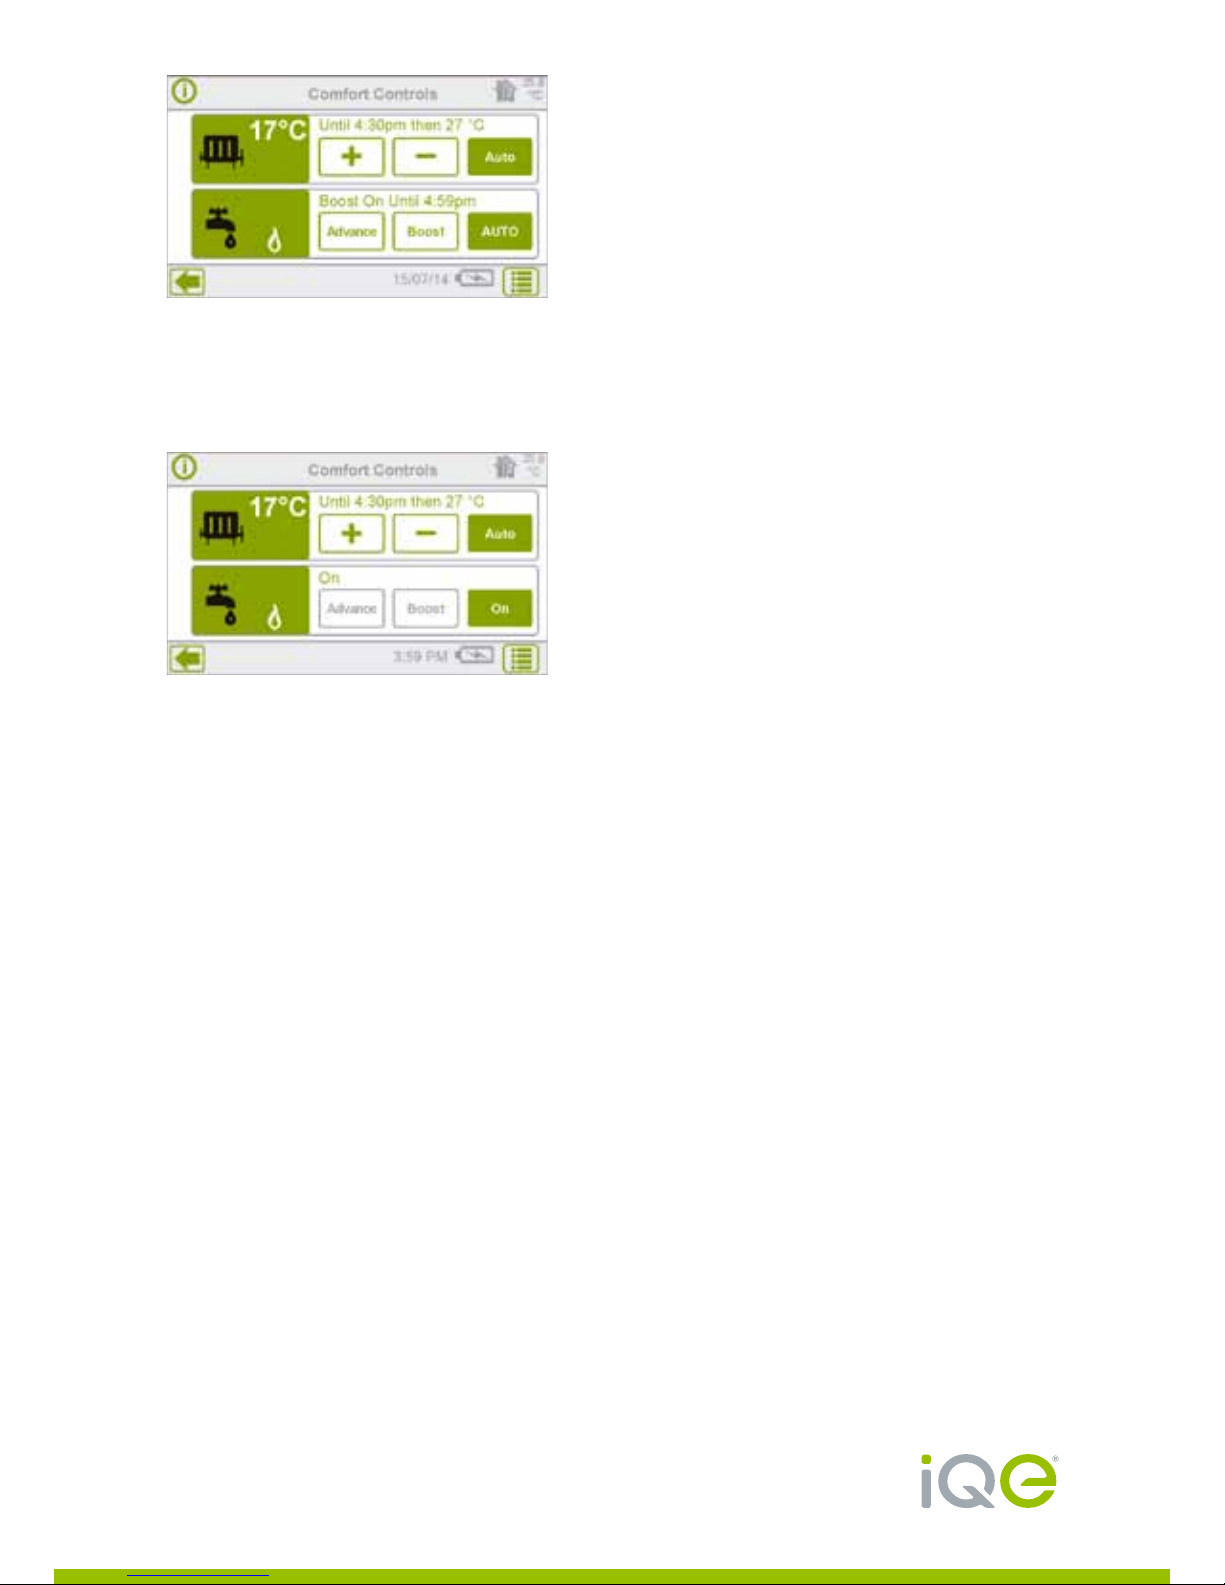
The Hot Water Icon will show current status of the hot water and the
‘Next On’ …or ‘Next Off’ …time.
In the Auto position the hot water will follow the automatic program times
entered into the control.
Press ‘Auto’ to toggle program between On/Off/Auto.
NOTE: Halo functions for hot water are not relevant if you have a Combi Boiler
Section 1: Central Heating/
Hot Water Programs
Page 10
Page 11
In the On program the hot water will be permanently on unless the
program button is pressed again.
Press ‘On’ and the program will toggle between Off/On/Auto.
In the Off program the hot water will not switch on again until the program
button is pressed again and the program returned to Auto under control of the
pre-programmed On/Off times.
The ‘Advance’ button will bring forward the next pre-programmed switching
operation and then return to the normal program. In other words, in the Auto
program if the hot water is off, the advance will bring it on early and if it is
on, the advance button will switch it off early.
The ‘Boost’ button will give a one or two hour on period of hot water only.
Press once for one hour, twice for two hours and again to cancel.
The ‘Boost’ button is still operative when the hot water
has been programmed
permanently off.
Page 11
Page 12
Customer support: 0800 0152252 www.iqe.co.uk
Setting the Hot Water
To adjust Hot Water programmed Times:
Press the Hot Water (Tap) icon.
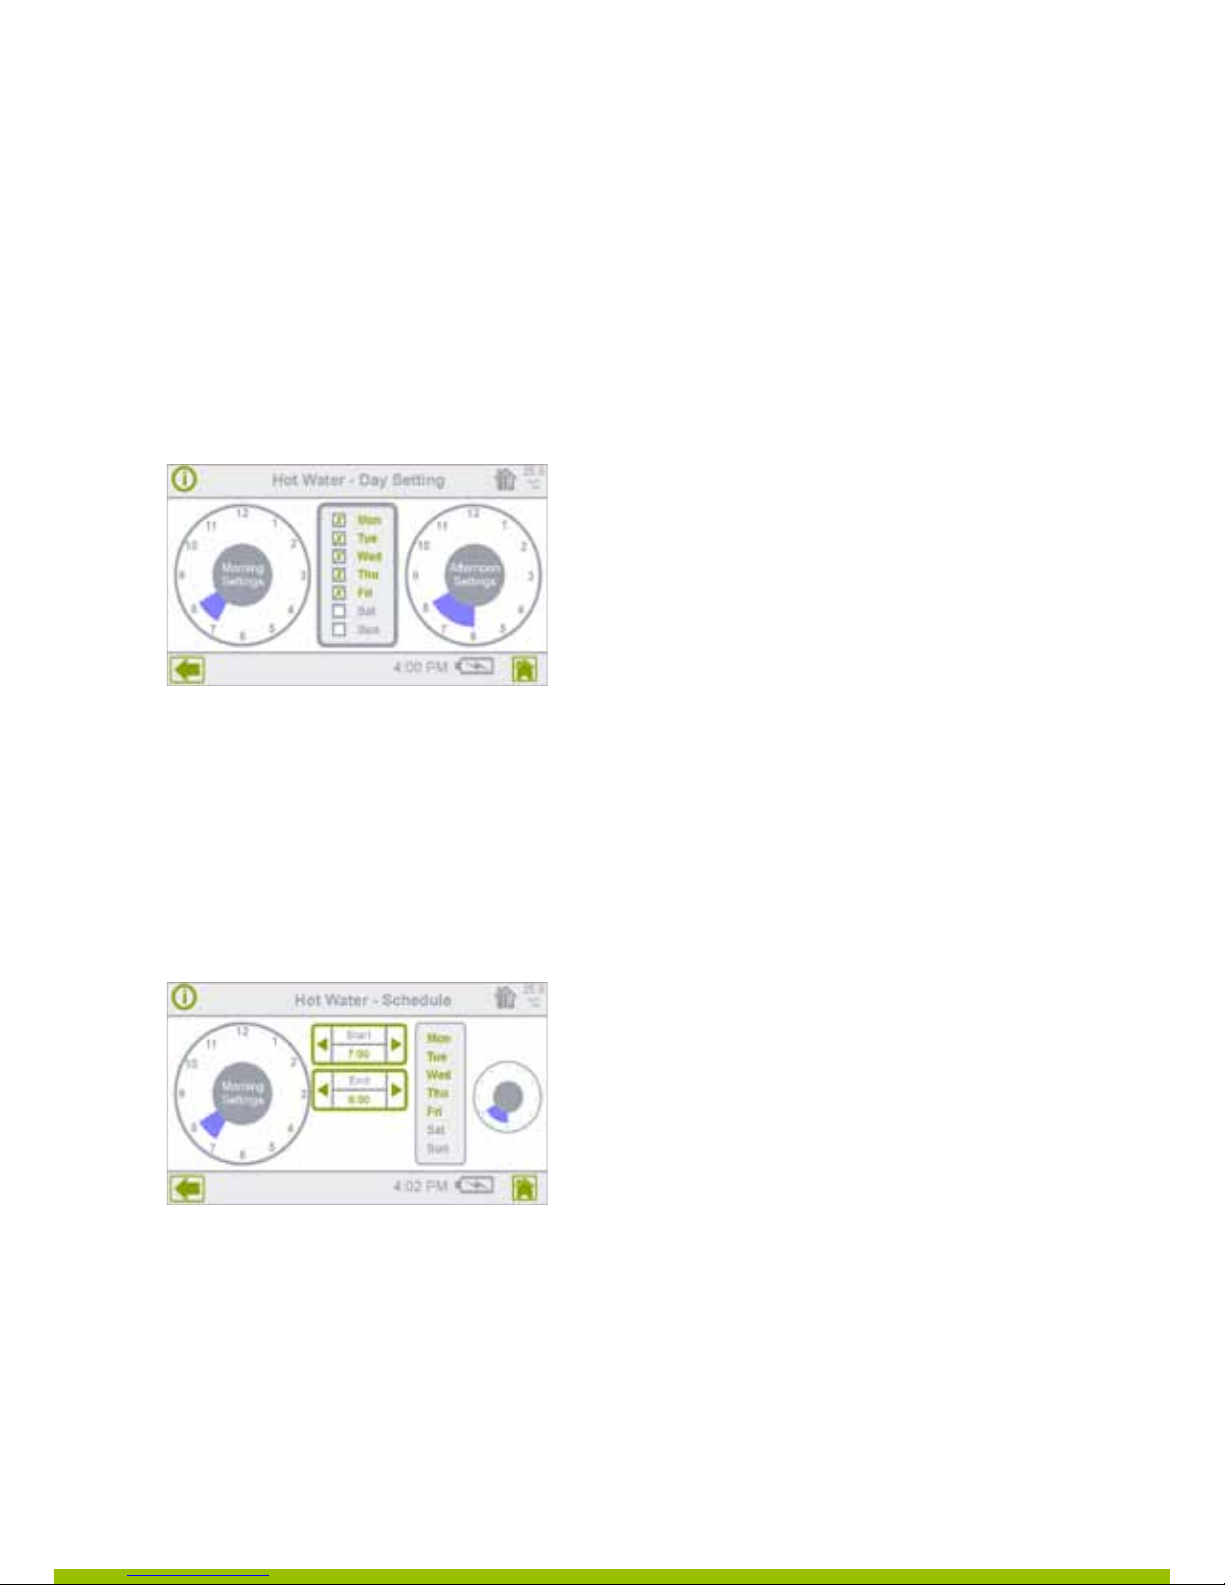
The hot water day set screen will appear showing the current schedule
of on and off settings.
The left hand dial shows the Morning Settings and the right hand dial shows the
Afternoon Settings.
In the centre of the screen the days of the week to which these programs apply
are marked with an X.
Mark the days that you require this program to apply by adding or removing
the X against the days of the week.
Press either of the dials to bring up the hot water programming screen.
Press the left hand dial marked ‘Morning Settings’.
Section 1: Central Heating/
Hot Water Programs
Page 12
Page 13
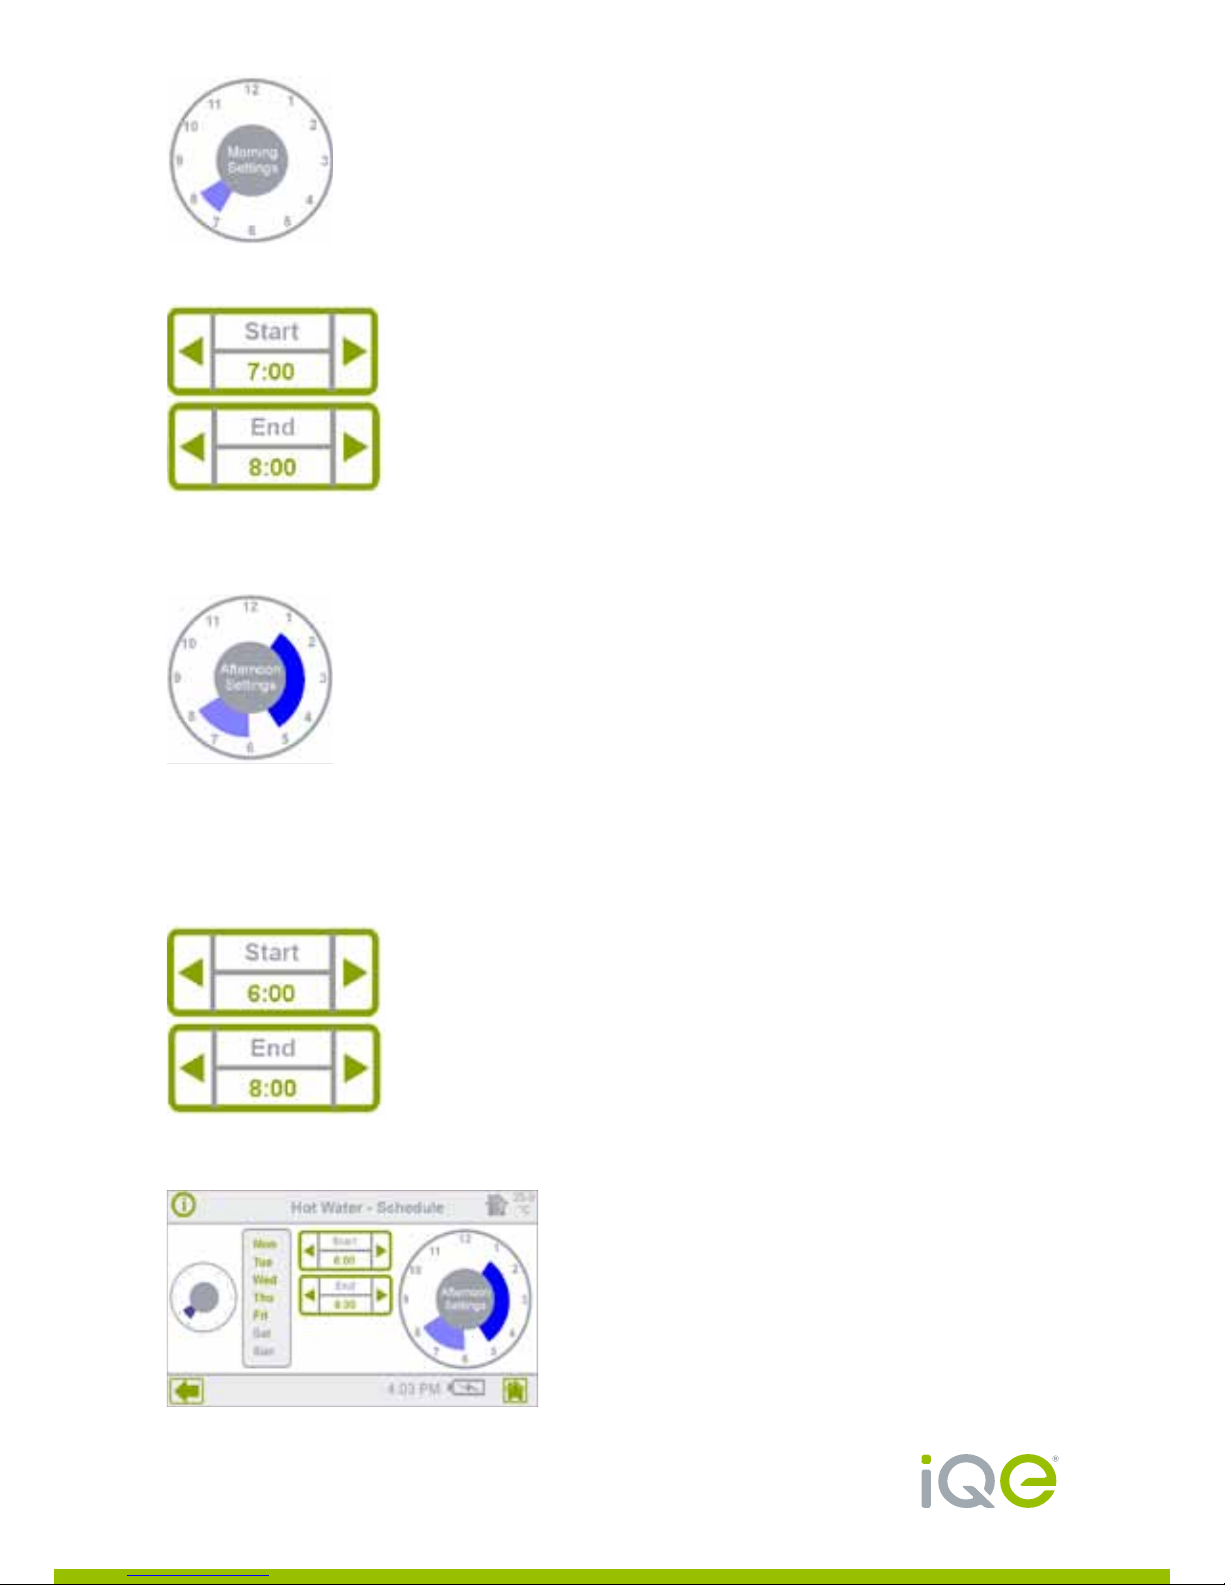
The on times for the morning period are displayed.
To adjust the existing time settings use the ‘Start’ and ‘End’ arrows to extend
or decrease the time period.
To add a further on period to the Morning Settings touch the screen in the area
where you wish to include a segment and it will appear on the display in blue.
Make the fine adjustment to the new on time by using the ‘Start’ and ‘End’ arrows
to extend or decrease the on time. Equalising the start and end times will remove
the segment.
Now repeat this procedure for the Afternoon Settings by pressing the right hand dial.
To remove a particular hot water segment, simply double tap it.
This will bring up a dialogue box allowing you to confirm or cancel
the deletion
Page 13
Page 14
Customer support: 0800 0152252 www.iqe.co.uk
When the programme has been set for the afternoon, press the ‘Back’ arrow
in the bottom left hand corner of the display, twice, to bring up the hot water
day set screen.
The days to which these programme settings apply are shown highlighted and
marked with an X.
Press the ‘Home’ button once.
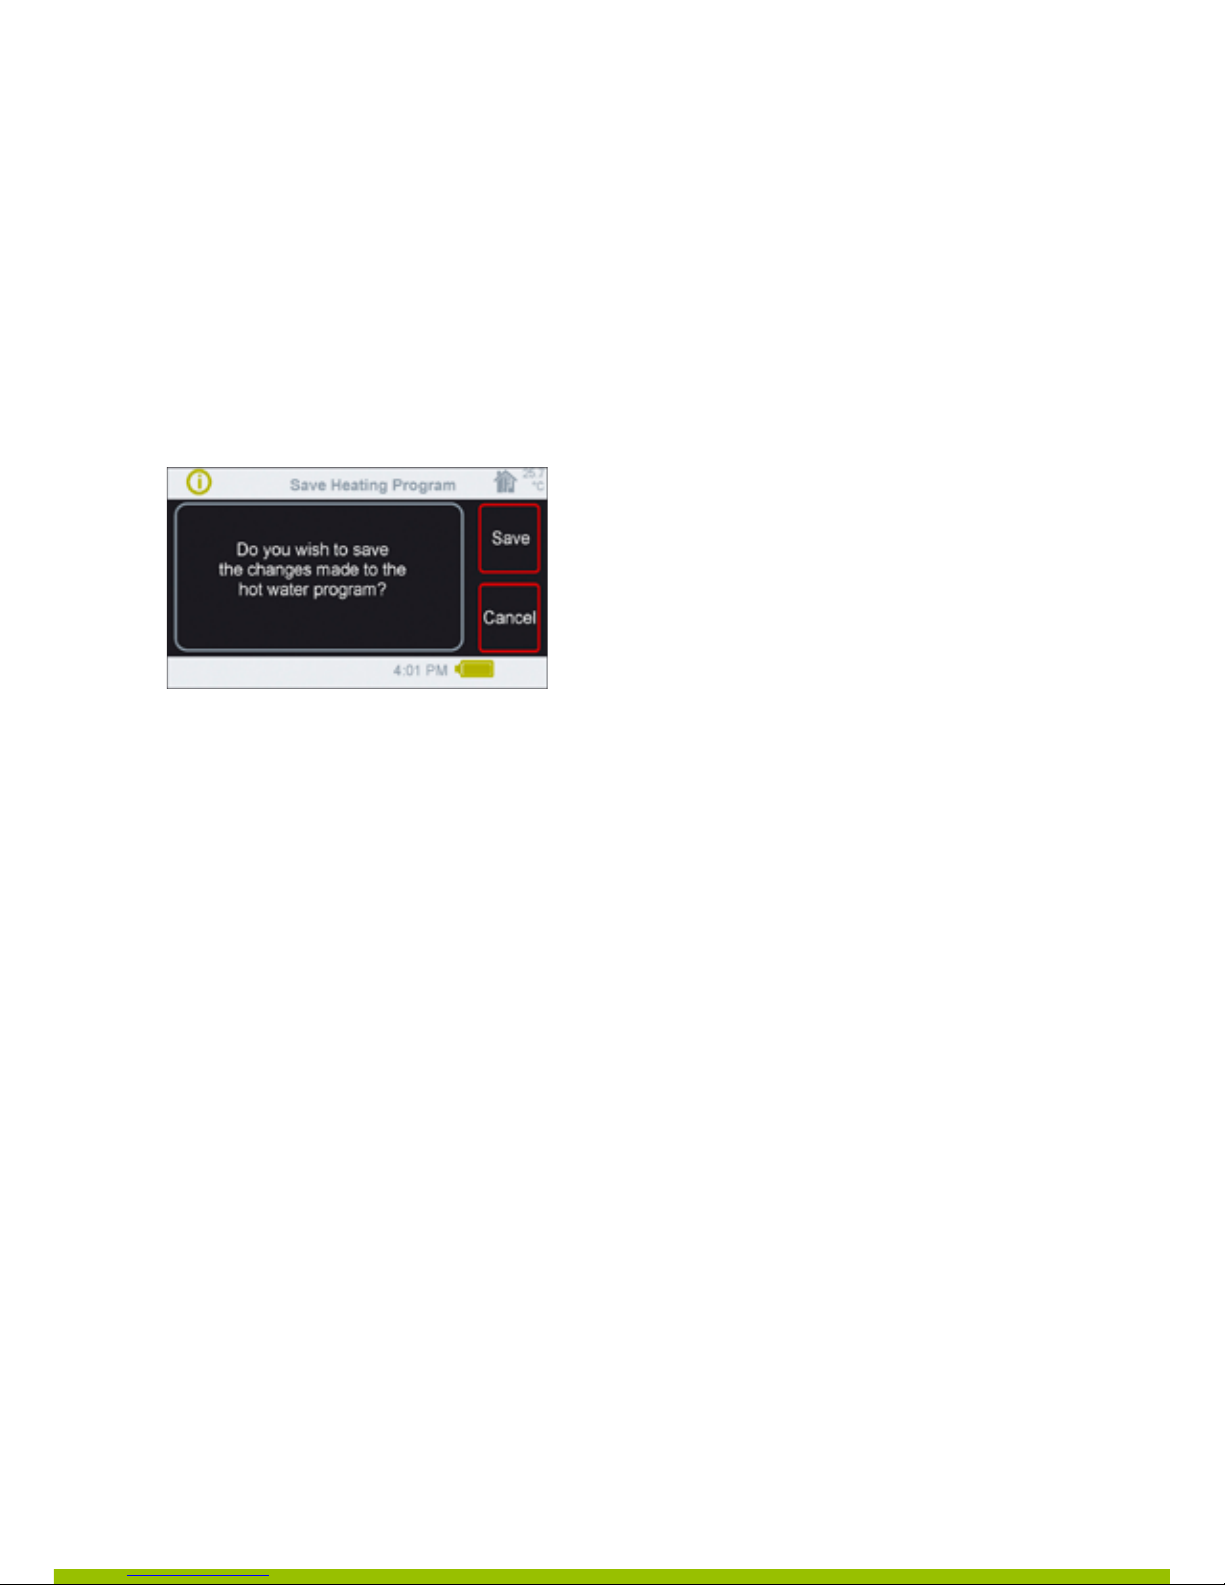
On the screen you will be asked if you want to save the changes you have made to
the Hot Water Program. Press ‘Save’ and the new program settings will be stored in
the program memory.
If you require different settings for different days of the week e.g. Saturday/Sunday
press the Hot Water Icon (tap symbol) then go to the Mornings Settings screen by
pressing the left hand dial on the hot water day set screen.
Press the day of the week for which you wish to enter a different program.
Enter the new on times as described above.
Press the ‘Back’ button to bring up the hot water day set screen and check the
days that you have set the program for.
Press the ‘Home’ button again and you will be asked if you wish to save the program.
Save the changes to the Hot Water Program.
Repeat this process for any other days that need different settings.
Section 1: Central Heating/
Hot Water Programs
Page 14
Page 15
Section 2: Changing Primary
User Settings
If you wish to amend user settings in Halo (that could impact on a number
of areas), it will be necessary to enter the ‘settings’ section by pressing the
‘Menu’ button (bottom right) of the Comfort Controls Home Screen and setting
the Settings option.
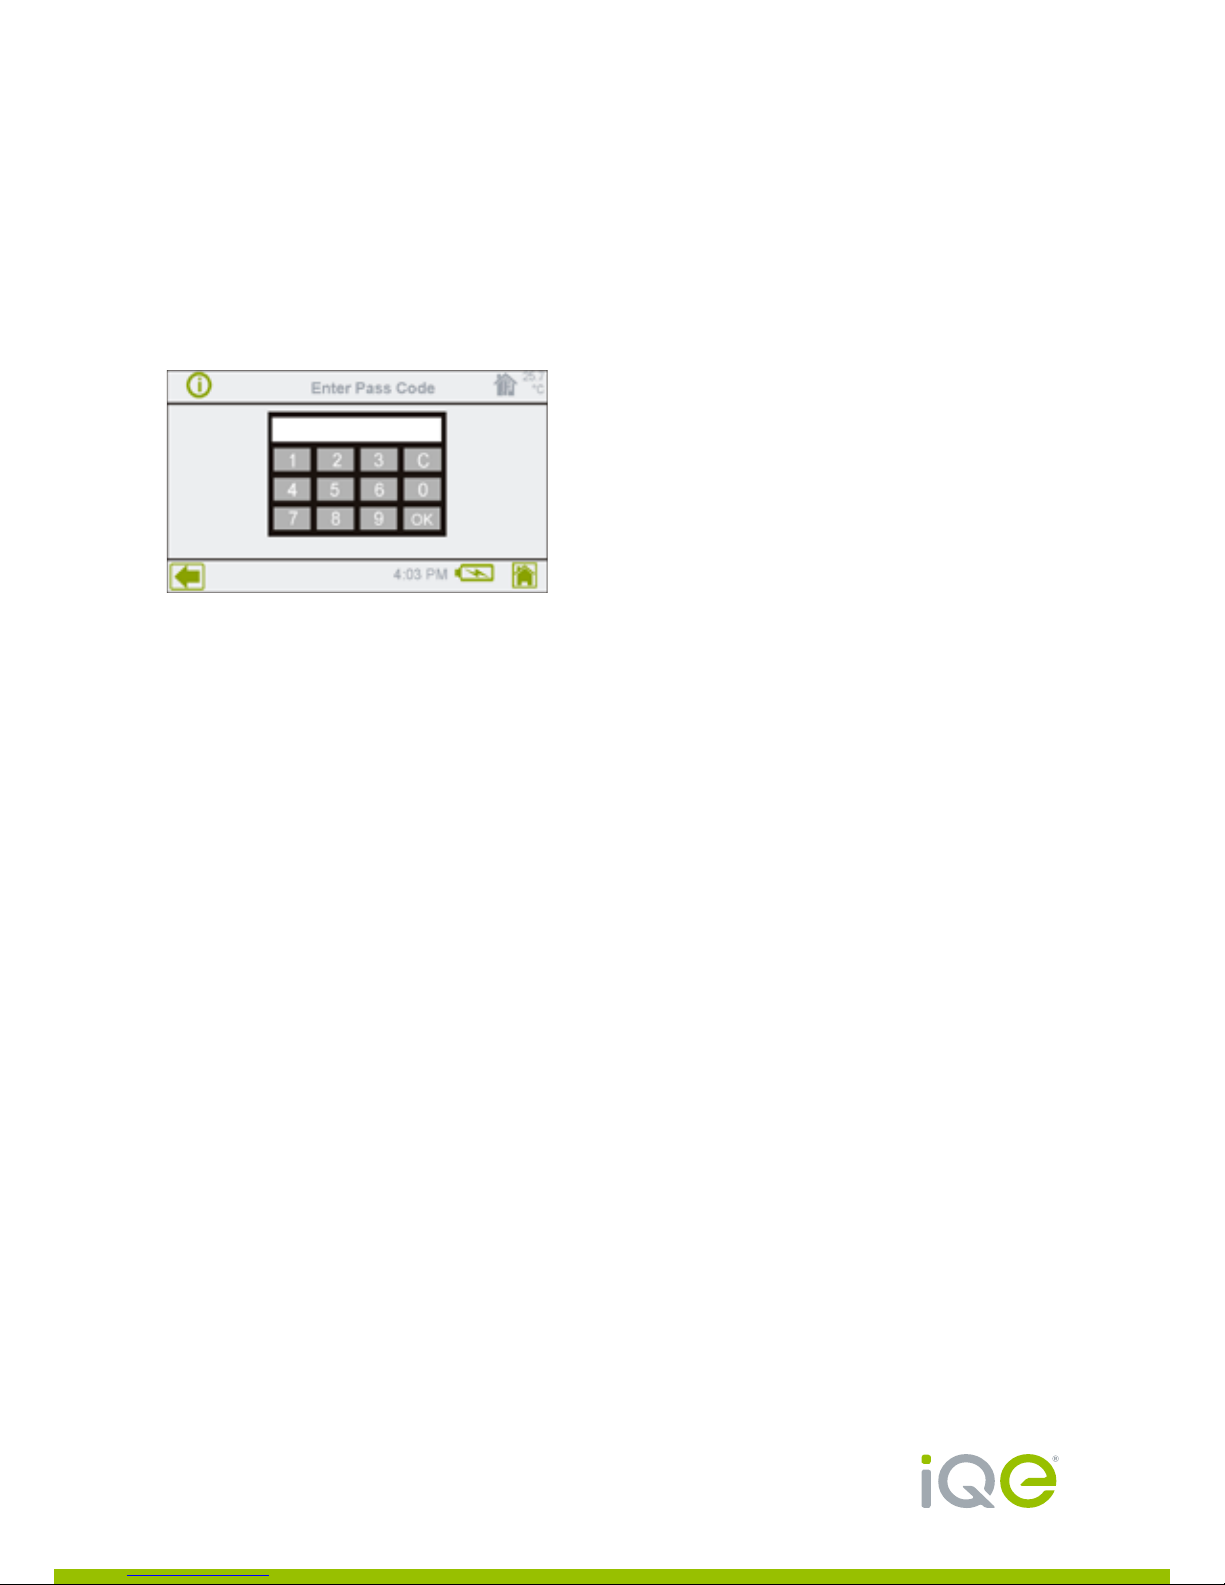
Enter the pass code – 0000 or your personal code if you have changed the
default pass code. Press OK.
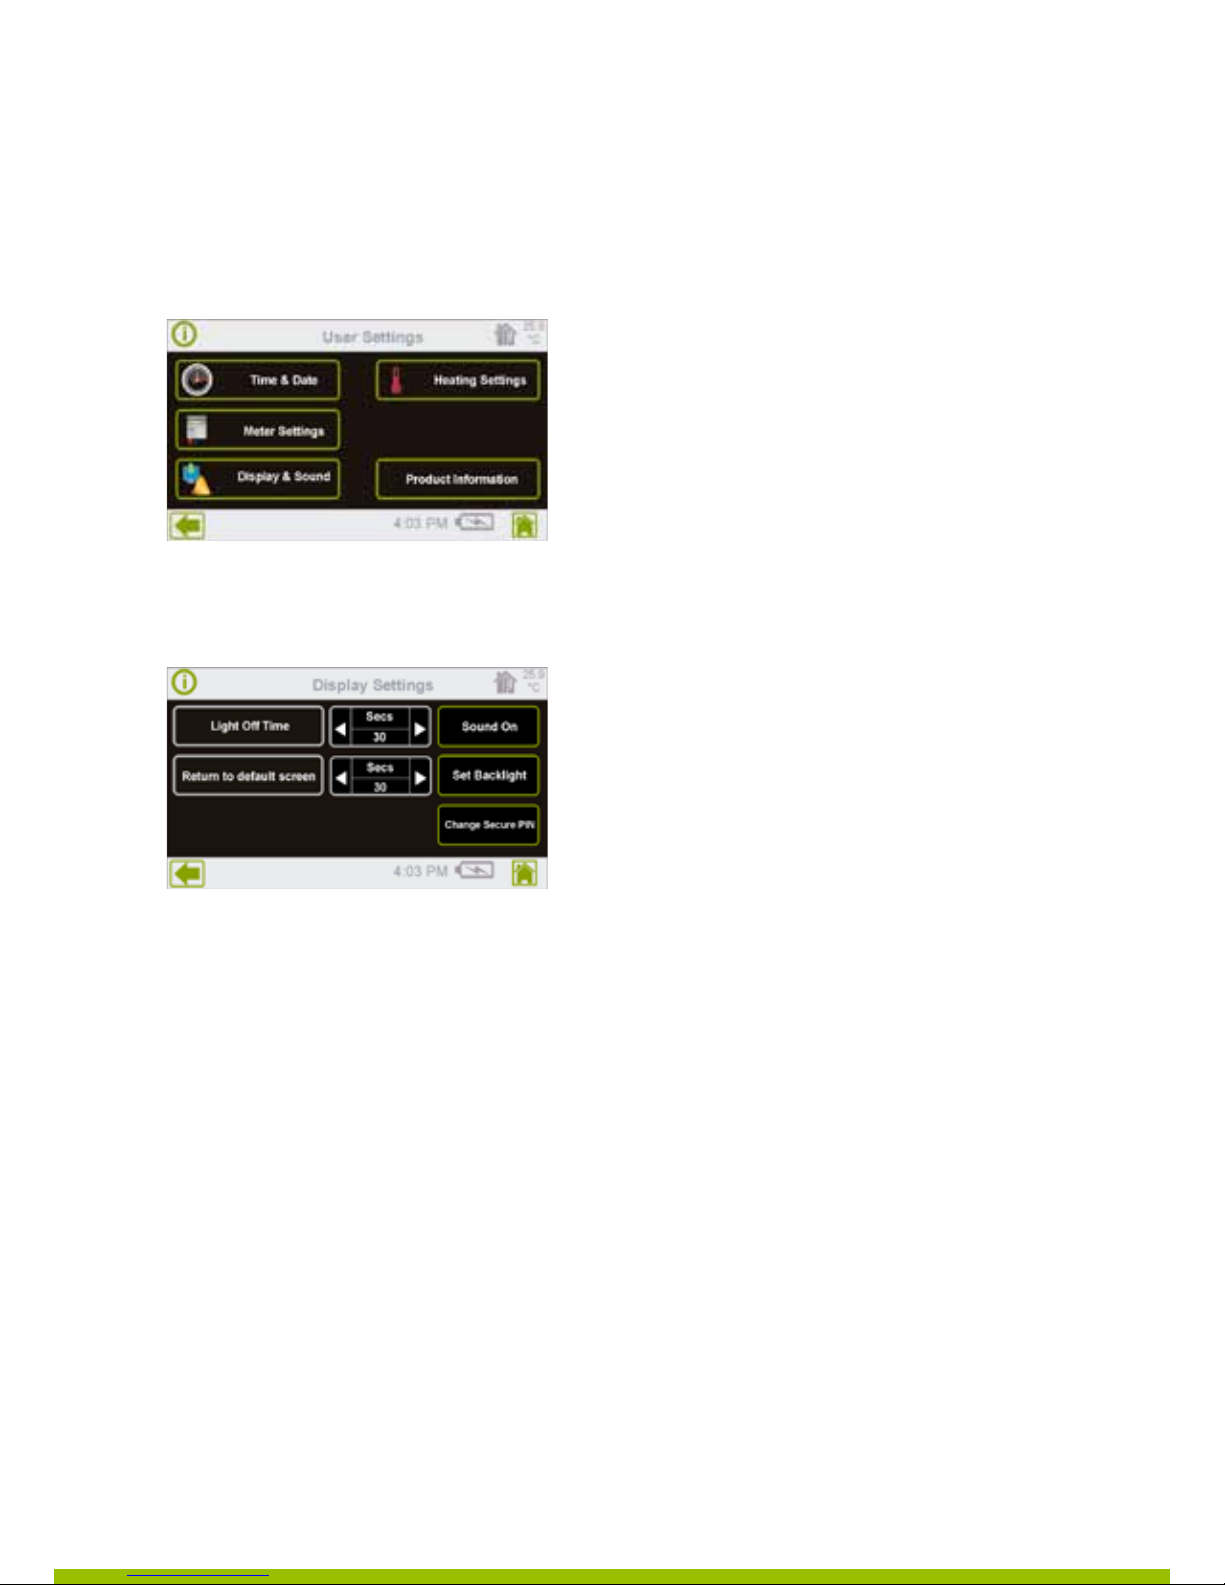
The screen displays the following options;
Time and Date settings
This will automatically set if your Halo has been installed along with a Gateway.
If not, then using the arrows provided on this screen, you will be able to enter
and amend the:
n Date/Month/Year
n Hours/Minutes
n Selection of 12/24 hour mode.
n BST/GMT selection
Page 15
Page 16
Customer support: 0800 0152252 www.iqe.co.uk
Display & Sound:
You will be able to enter the following settings using the Display and Sound Settings
Light off time:
This is the length of time after the last key touch before the backlight reverts
to the Idle setting.
Return to default screen:
This is the length of time after the last key touch before Halo automatically returns
to the home screen.
Halo does not return to the home screen if it is in one of the
PIN Protected Settings Screens.
Section 2: Changing Primary
User Settings
Page 16
Page 17
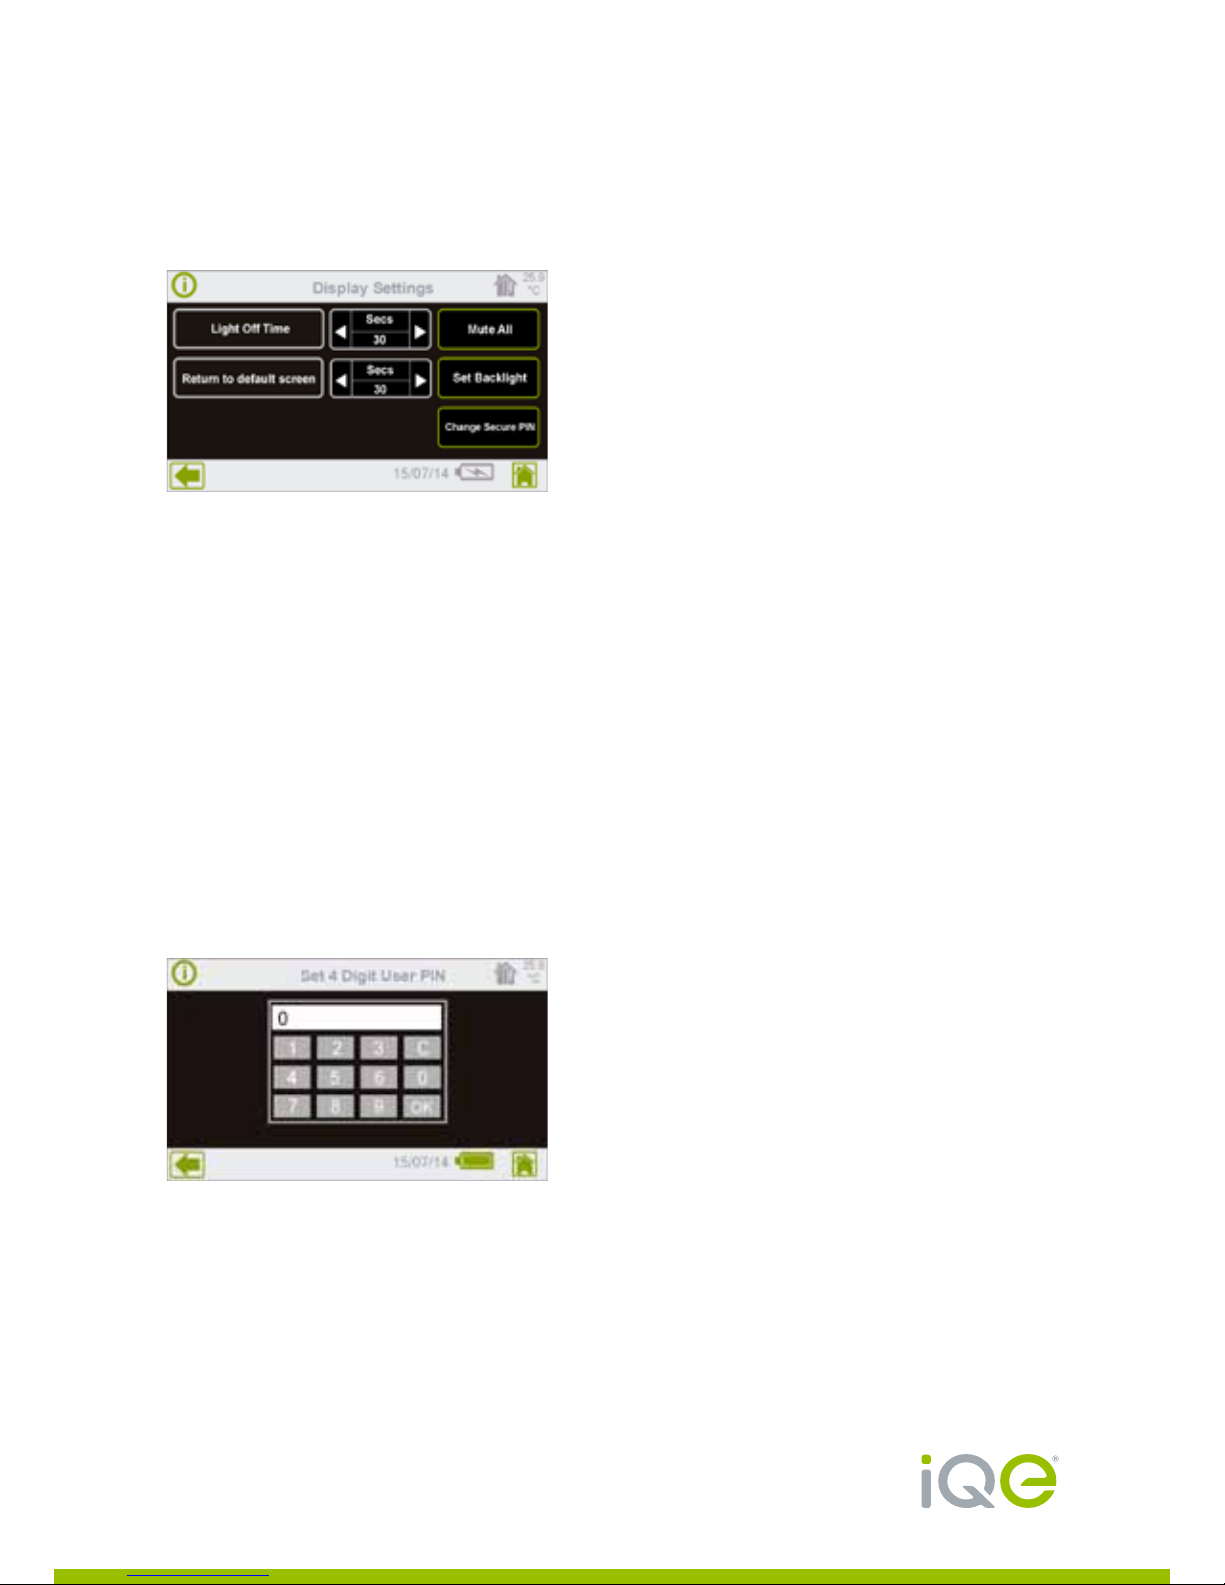
Sound settings:
The sound key toggles between these three settings:
n Sound on - Plays a sound for all key presses and alerts and warnings.
n Mute keys - only plays a sound for alerts and warnings.
n Mute all - Never plays any sounds.
Set backlight levels:
Halo allows you to set two different backlight levels, active and idle,
for both mains operated and battery operation.
Backlight levels available are zero (off) to six (brightest).
Active is the backlight level during normal operation.
Idle is the energy saving setting for when the unit is not in active use.
Battery settings are used when Halo is not being charged to allow you to set lower
backlight levels for improved battery life.
Change Secure PIN:
Allows the user to change the secure PIN (Personal Identification Number).
Enter the new PIN via the keypad.
Page 17
Page 18
Customer support: 0800 0152252 www.iqe.co.uk
Section 3: Active Alerts
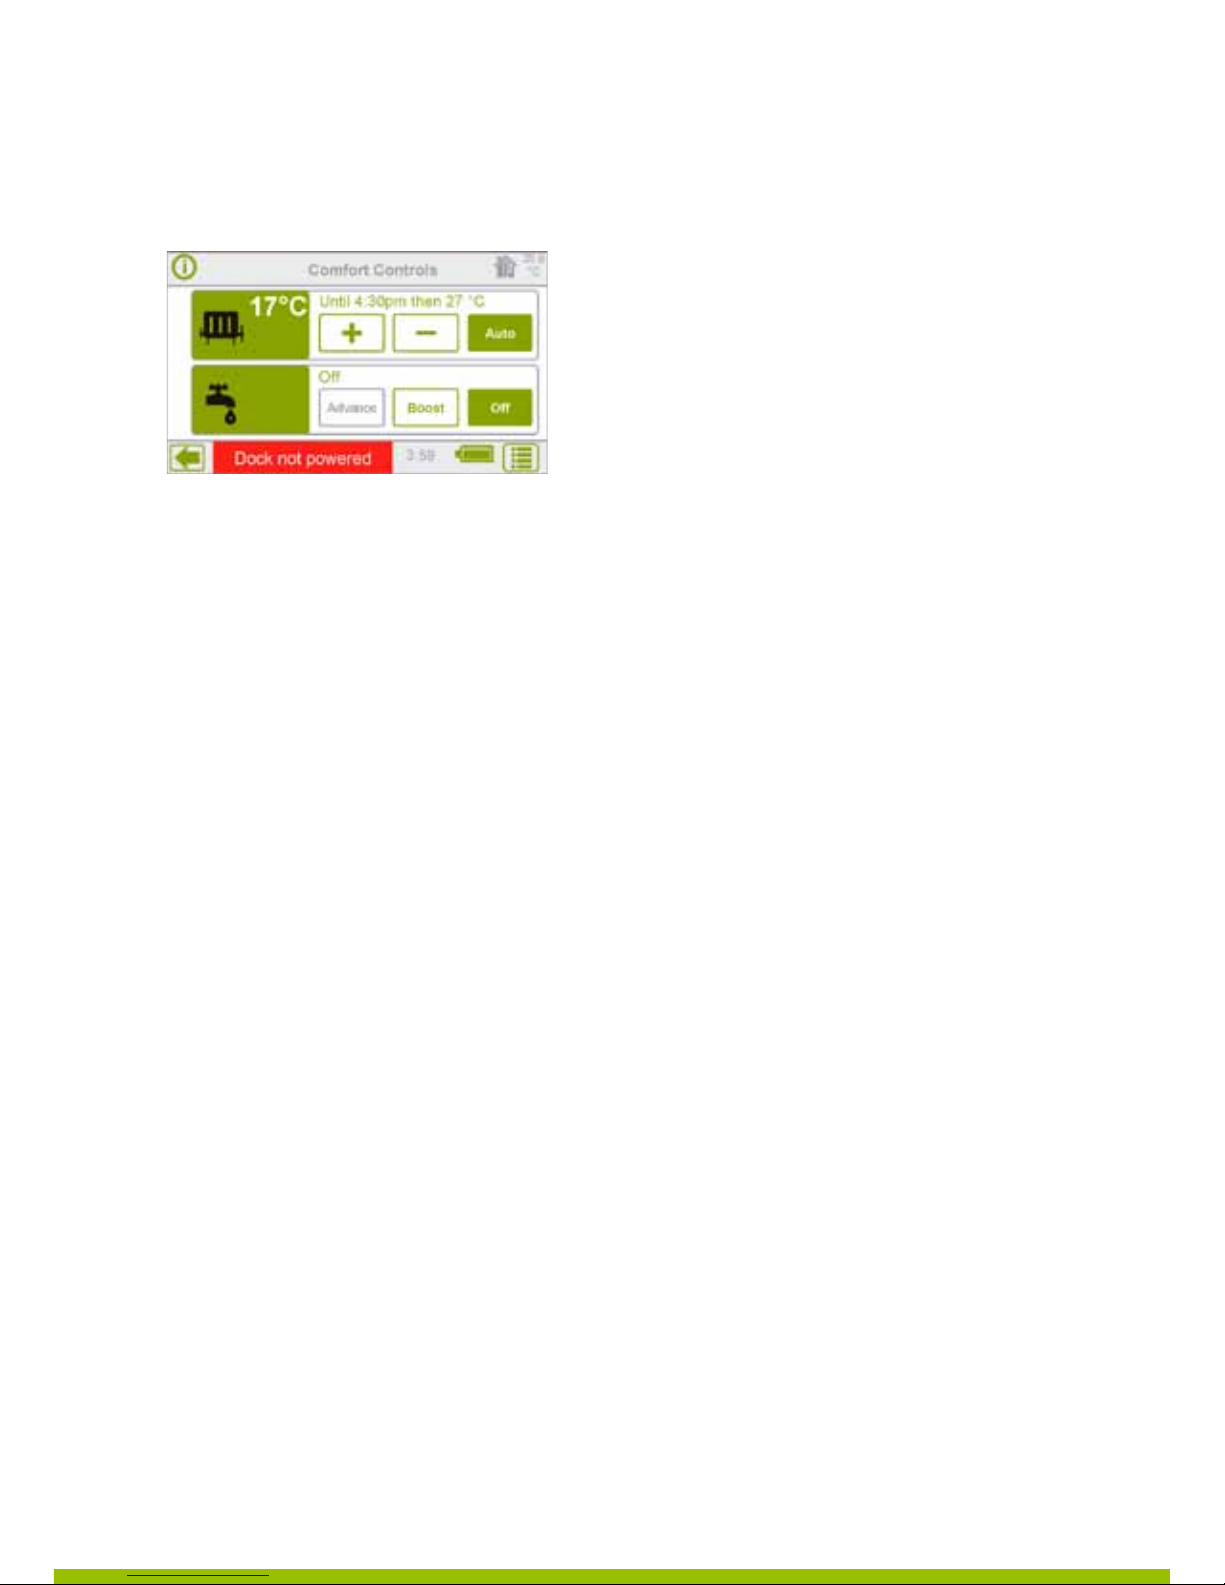
Halo has a range of in-built communication and active alerts which, if activated,
are displayed in a red panel on the bottom line of the home page.
Active alerts will be displayed one after another at 10 second intervals – the user
can view all active alerts by touching active alerts area and then acknowledge them
by pressing the OK button.
Communication failure:
Halo can detect communication failure with other devices in the network and will
display this in the active alert area. If there are multiple alerts it will display these
one after another at 10 second frequencies with an audio alert after 5 minutes
(Audio Alerts can be muted under User Settings). This can be acknowledged by
touching ‘Alert’ text in the bottom line. (It will appear again on next communication
if the failure still exists).
The duration of detection communication failure with the device will vary from one
device to another (because it is based on the communication frequency). Therefore
it will be less for frequently communicating devices and more for less frequently
communicating devices. Once communication is restored, Halo will automatically
clear all alerts.
IMPORTANT! In the event of a power failure or communication failure, Halo will
restore to the last set of saved programmes.
Battery status indicator:
If fully charged then it will have a green battery icon. The battery has a 4 hour life.
If the charge is low then it will have red battery icon.
If charging then it will display battery charging icon
Page 18
Page 19
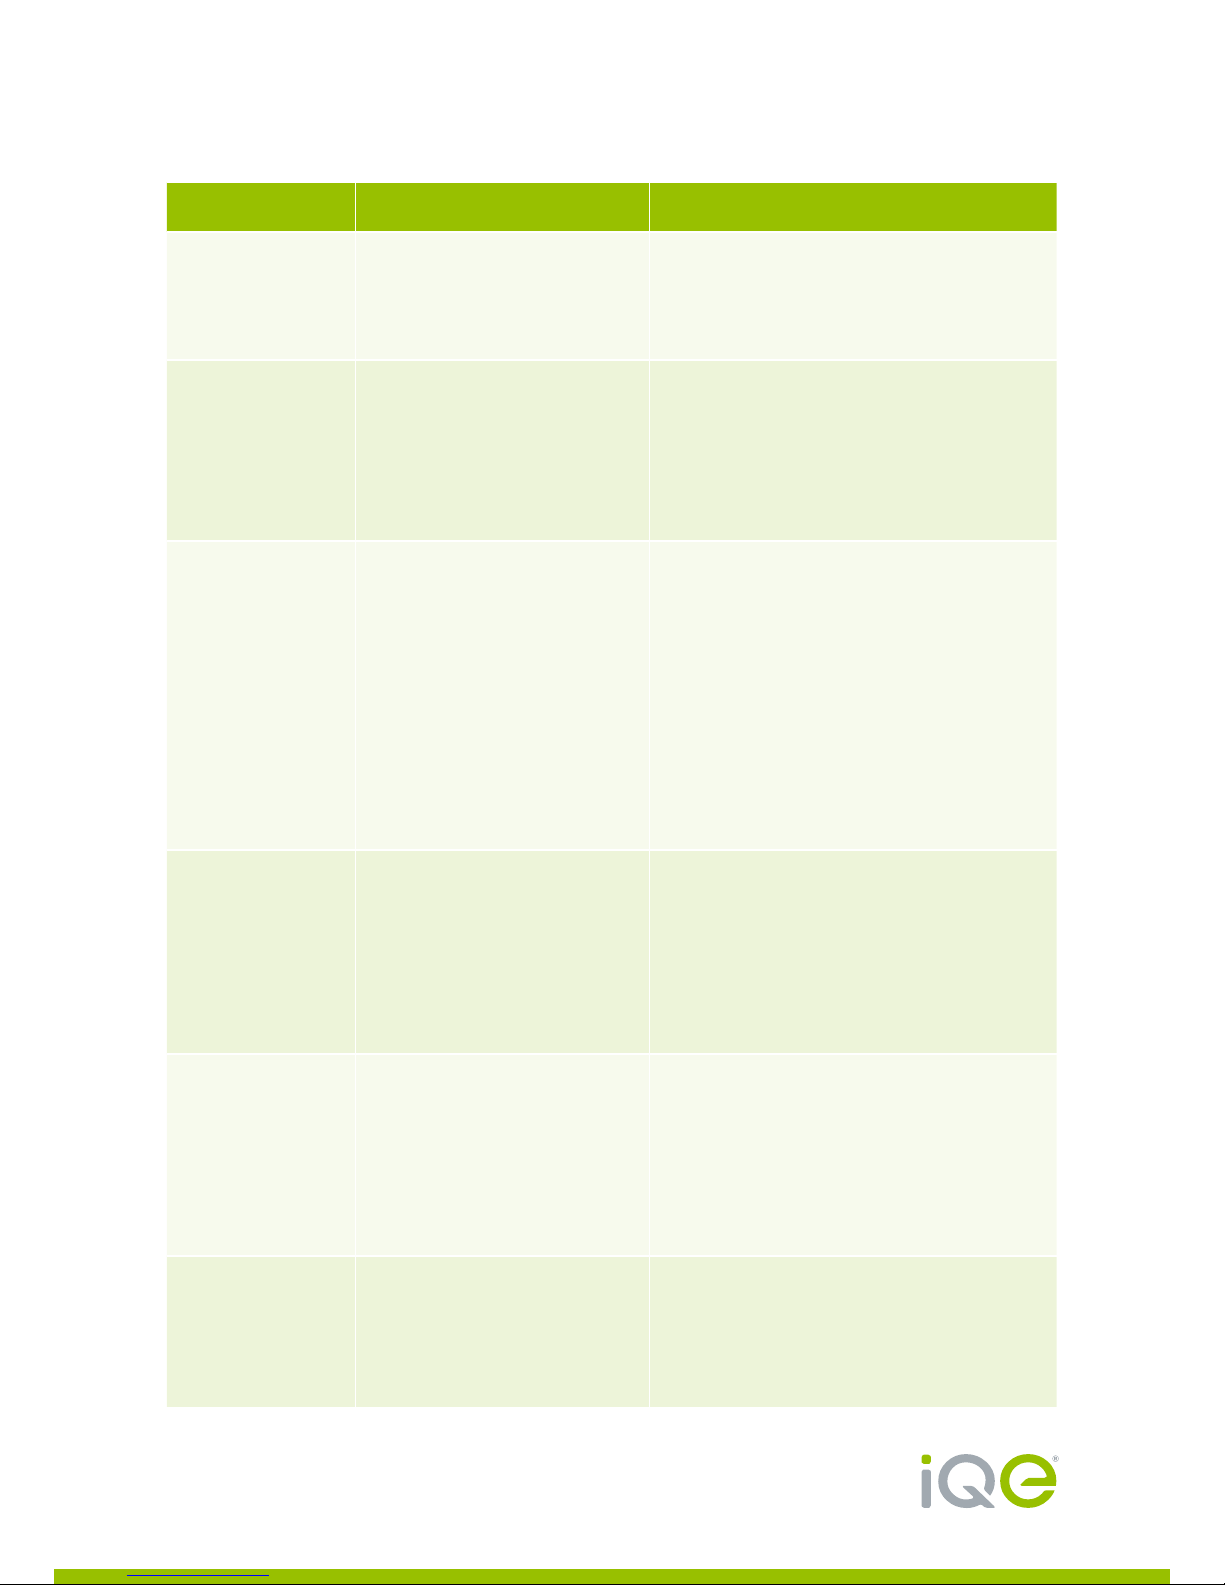
RELAY SWITCH LED INDICATORS
The table below explains the operation status of your Relay Switch.
Light displayed What does this mean? What to do
Flashing red The unit is not included
on a network.
Red and green buttons have no
function. White buttons are active
and available to use to pair the unit.
Flashing green The unit has been
successfully included
onto a network.
Red and green buttons on the relay
box have no function. White buttons
are active and available to use to
enable further network messages
to be sent from the relay box if
required.
Solid amber Relay is functioning
correctly (it is included
on a network).
Red and green buttons are available
to manually switch either the
Heating or Hot Water on or off at
the relay box. However, user must
first select which channel (Heating
or Hot Water) they wish to switch,
as described under ‘Solid red’ or
Solid green’. Until either of the white
buttons is pressed to select either
Heating or Hot Water the red button
remains inactive.
Solid red The unit is indicating the
status of the channel
that has been selected
by pressing one of the
white buttons. Solid
red indicates that the
selected channel is OFF.
Hold top white button for Channel 1,
or bottom white button for Channel
2. Red button switches
selected channel OFF. Green button
switches selected channel ON.
Solid green The unit is indicating the
status of the channel
that has been selected
by pressing one of the
white buttons. Solid
green indicates that the
selected channel is ON.
Hold top white button for Channel 1,
or bottom white button for Channel
2. Red button switches selected
channel OFF. Green button switches
selected channel ON.
Flashing amber One of the channels has
entered failsafe mode.
Hold top white button for Channel 1,
or bottom white button for Channel
2. Red button switches selected
channel OFF. Green button switches
selected channel ON.
Page 19
Page 20
Customer support: 0800 0152252 www.iqe.co.uk
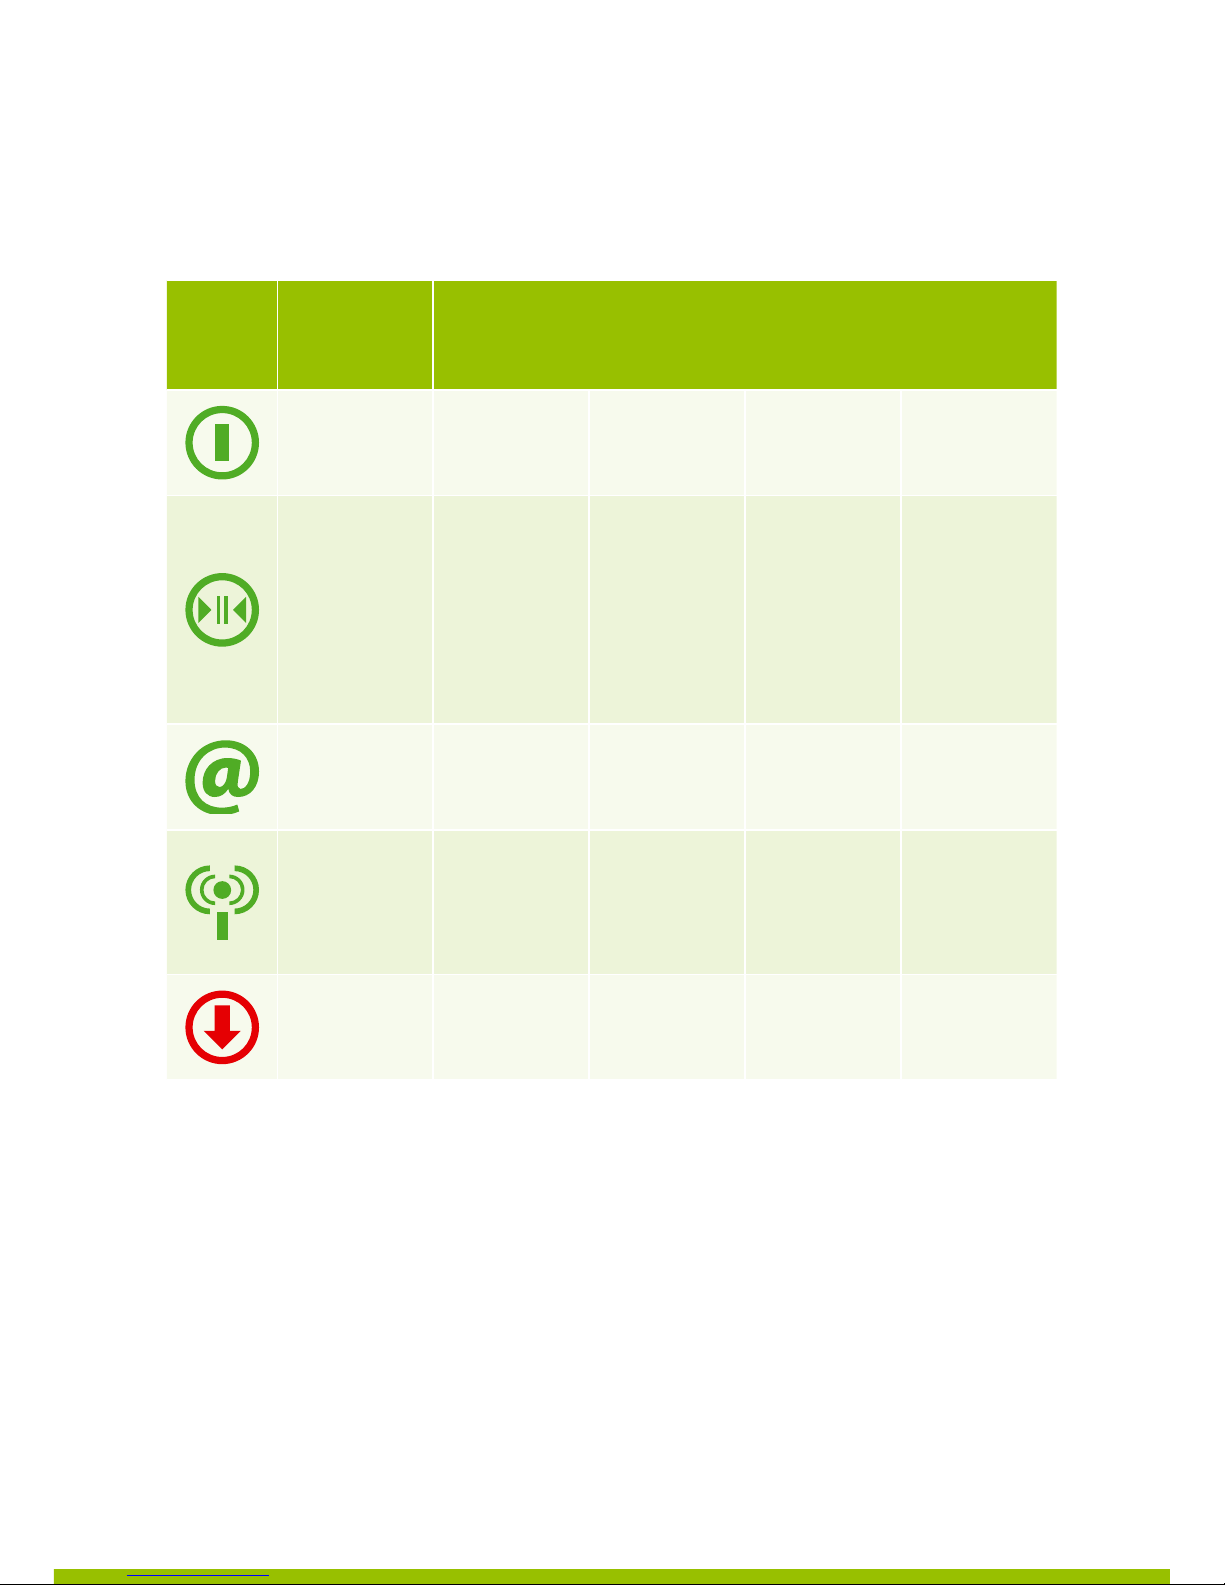
GATEWAY LED INDICATORS
The table below explains the operation status of your Gateway.
LED Off On
3 Short
flashes
Short
flashes,
1-second
intervals
Long
flashes,
3-second
intervals
Startup not
completed
Normal
operation
N/A N/A N/A
Normal
operation
Successful
inclusion or
exclusion
of device
(the LED is
illuminated
for 5 to 10
seconds)
Failure of
inclusion or
exclusion
of device
Device
inclusion
underway
Device
exclusion
underway
Normal
operation
Ethernet
connection
lost
N/A N/A N/A
Normal
operation
Connection
with Halo
or Relay
Switch lost
N/A N/A N/A
Normal
operation
N/A N/A Firmware
update
underway
N/A
Section 3: Active Alerts
Page 20
Page 21

Appendix 1:
Providing a Z-wave temperature sensor has been fitted, Halo will operate
as a programmable room thermostat.
What is a programmable room thermostat?
The programmable room thermostat is both a programmer and a room thermostat.
A programmer allows you to set on and off time periods to suit your own lifestyle.
The room thermostat works by sensing the air temperature, switching on the
heating when the air temperature falls below the thermostat setting and switching
it off once the set temperature has been reached. This allows you to choose what
times you want the heating to be on, and what temperature it should reach while
it is on. It also allows you to select different temperatures in your home at different
times of the day (and days of the week) to meet your particular needs.
Turning the programmable room thermostat to a higher setting will not make the
room heat up any faster. How quickly the room heats up depends on the design of
the heating system, for example, the size of the boiler and radiators. Neither does
the setting affect how quickly the room cools down. Turning the programmable
room thermostat to lower setting will result in the room being controlled at a lower
temperature, and saving energy.
The way to set and use your programmable room thermostat is to find a
temperature setting you are comfortable with at your selected times and then leave
it to do its job.
The best way to do this is to set low temperatures first, say 18ºC and then turn
them up by one degree each day until you are comfortable with the temperature.
You won’t have to adjust the thermostat further. Any adjustments above these
settings will waste energy and cost you more money.
If your heating system is a boiler with radiators, there will usually be only
one programmable room thermostat to control the whole house. But you can
have different temperatures in individual rooms by installing Thermostatic
Radiator Valves (TRVs) on individual radiators. If you don’t have TRVs, you
should choose a temperature that is reasonable for the whole house. If you
do have TRVs, you can choose a slightly higher setting to make sure that even
the coldest room is comfortable, and then prevent any overheating in other
rooms by adjusting the TRVs.
You may be able to temporarily adjust the heating programme, for example,
Override, Advance or Boost. These are explained in the manufacturer’s
instructions. Programmable Room Thermostats need a free flow of air to
sense the temperature, so they must not be covered by curtains or blocked
by furniture. Nearby electric fires, televisions, wall or table lamps may prevent
the thermostat from working properly.
Page 21
Page 22

Customer support: 0800 0152252 www.iqe.co.uk
 Loading...