

IQAir GCX AM, GCX Chemisorber, GCX MultiGas, GCX VOC User Manual
GCX Series
High-Performance Air Cleaning System
User’s Manual
Swiss Made

2
About This User’s Manual
Congratulations on your purchase of this IQAir® high-performance air cleaning system. Please study this user manual
carefully to familiarize yourself with the special features and functions of your IQAir® system and keep it in a safe
place for future reference.
Read these instructions before using the appliance:
• Do not use this appliance as sole protection against harmful pollutants.
• Do not immerse the appliance in water or other liquids.
• Always disconnect the power from this appliance by unplugging the power cable before adding or removing
parts and before cleaning.
• Do not operate this appliance if it has a damaged cord or plug, if the motor fan fails to rotate, if it is not working
properly, if it has been dropped or damaged, or dropped into water.
• If the power cord of this appliance should become damaged, it may be replaced with a similar two-pole cord set,
as is commonly used for computers and similar appliances.
• Only use this appliance for its intended purpose of air cleaning in non-industrial environments.
• Do not use this appliance in areas with very high concentrations of dusts or powder to prevent the danger of dust
explosions.
• Do not use this appliance in explosive areas.
• Do not use attachments or lters not recommended by IQAir®.
• Do not use outdoors.
• Do not obstruct the air inlet and air outlet of the appliance.
• Do not place the appliance on a soft surface such as a bed or other soft furnishings.
• Only use this appliance in an upright position.
• Do not place next to a humidier.
• Keep the power cord away from heated surfaces.
• Save these instructions for future reference.
Important Safety Instructions
The IQAir® Group reserves the right to change specications contained in this document at any time and without prior notice.
© 2009 The IQAir® Group. All rights reserved. IQAir® is the registered trademark of The IQAir® Group. EvenFlow™ is a trademark of The IQAir® Group. IQAir® systems
and lters are protected under U.S. patents 6 001 145 and 6159 260. Other U.S.,
European and Asian patents pending.
105.10.10.50 / 0309

3
Page
Important Safety Instructions 2
Chapter 1 – Air Cleaning Systems and Indoor Air Quality 4
1. 1 Improving Indoor Air Quality 4
Chapter 2 – Setting Up 5
2. 1 Unpacking 5
2. 2 Choosing a Suitable Location 6
2. 3 Connecting to Power 6
Chapter 3 – The IQAir® System’s Components 7
3. 1 Description of Housing Components 7
3. 2 Description of Removable Components 8
3. 3 How the IQAir® System Works 8
Chapter 4 – Using the Control Panel 9
4. 1 Description of Control Panel 9
4. 1. 1 Description of Control Panel Keys 9
4. 2 Control Panel Locking Function 10
4. 3 Fan Speed and Air Delivery 10
4. 3. 1 Regulating Fan Speed 10
4. 3. 2 Air Exchange Rates in Differently Sized Rooms 11
4. 4 Using the Menu Functions 11
4. 4. 1 Menu Overview 11
4. 4. 2 Filter Life Monitor 12
4. 4. 3 Setting the Auto Timer 13
4. 4. 4 Day-of-the-Week Timer 14
4. 4. 5 Timer ON/OFF Fan Speed Selection Menu 14
4. 4. 6 Timer Information in the Control Panel 15
4. 4. 7 Time & Day Setting 16
4. 4. 8 Filter Life Reset 16
4. 4. 9 Changing Airow Units 17
4. 4. 10 Language Setting 17
Chapter 5 – Using the Remote Control 18
5. 1 Remote Control Elements and Functions 18
5. 2 Getting the Best Transmission Results 18
5. 3 Replacing the Battery of the Remote Control 19
Chapter 6 – Replacing Filters 19
6. 1 Location of the Filter Elements 19
6. 2 Ordering Replacement Filters 20
6. 3 Opening and Closing the Housing 20
6. 3. 1 Troubleshooting when Closing the Housing 20
6. 4 Replacing the Pre-Filter (Filter 1) 20
6. 5 Replacing the Gas Phase Filter Cartridges
and Post-Filter Sleeves (Filter 2) 21
6. 6 Discarding Used Filters 22
Chapter 7 – Maintenance 22
7. 1 Cleaning the Housing 22
7. 2 Maintenance-Free Fan 22
7. 3 Technical Support and Repairs 22
7. 4 IQAir Warranty 22
Chapter 8 – Anti-Tampering Kit Instructions 23
Chapter 9 – IQAir® Accessories (Optional) 25
Table of Contents

4
Chapter 1 – Air Cleaning Systems and Indoor Air Quality
Chapter 1 – Air Cleaning Systems and Indoor Air Quality
State-of-the-art ltration technology
Your IQAir advanced air cleaning system has been developed especially for the control of specic gaseous
components. Thanks to advanced gas cartridge (GCX) lter technology, each model of the IQAir GCX Series has been
optimized for the control of specic gaseous pollutant groups. The following model congurations are available:
• IQAir® GCX VOC for the control of volatile organic compounds
• IQAir® GCX MultiGas for the control of volatile organic compounds and many inorganic compounds
• IQAir® GCX Chemisorber for the control of many inorganic compounds and some organic compounds
• IQAir® GCX AM for the control of ammonia and amines
1.1 Improving Indoor Air Quality
Air cleaning can play an important role when it comes to improving indoor air quality. However, it should be noted
that air cleaning should be used in conjunction with pollution source control and ventilation, wherever possible.
Strategy to improve indoor air quality
To tackle any indoor air quality problem, keep the following three-step strategy in mind:
1. Eliminate or reduce the air pollution source as much as possible. Source control is by far the most effective way to
improve indoor air quality, since it sets out to deal with air pollution at the point of origin.
2. Ensure that sufcient fresh air is entering the room from outside. Air cleaners are not a substitution for sufcient
ventilation. They are not able to reverse the conversion of oxygen (O2) into carbon dioxide (CO2), caused by
breathing and combustion processes.
3. Ensure the IQAir® system can clean enough air to cope with your room size. The actual hourly air volume cleaned
by the system should be at least double the air volume of your room. If the rate at which pollutants enter the room
air is high or the indoor air quality requirements are stringent, the hourly air delivery of the system needs to
exceed the room air volume several times. To achieve that level of air turnover, it may be necessary to employ
more than one IQAir system, or consider an IQAir whole-house system.
Air Cleaning Results
Although air cleaners may be advertised and sold to be suitable for use in specic indoor environments and to deal
with specic indoor air quality problems, the manufacturer and distributors make no claim as to the specic air
cleaning results that are achieved under the user’s individual operating conditions. The air quality improvements
that can be realized with the IQAir® system (as with any air cleaner) in indoor environments depends to a signicant
degree on circumstantial factors, which are out of the control of the manufacturer or distributors. Important factors
which will inuence the air quality improvements that can be achieved in an indoor environment with an air cleaner
include:
• Type of air pollutants present
• Intensity of the pollutant source(s)
• Pollutant concentration
• Size of the indoor environment (room size)
• Operating speed of the unit
• Number of air cleaners placed in the indoor environment
• Saturation state of the lters in the air cleaner
Consult a qualied specialist to determine an effective and comprehensive indoor air quality strategy.

GCX Series
High-Performance Air Cleaning System
User’s Manual
Swiss Made
Power cord
User manual
IQAir®
Advanced Air Cleaning System
Remote control
including battery
4 gas phase filter cartridges
Note: The gas phase filter cartridges for the air cleaner are
supplied in a separate box and must be installed before use.
4 post filter sleeves
Note: The sleeves are supplied inside the IQAir system. Pull
the post filter sleeves over the cartridges before installing
the cartridges in the air cleaner.
5
Chapter 2 – Setting Up
Chapter 2 – Setting Up
2.1 Unpacking
To unpack the IQAir® system, open the top of the box and remove the square styrofoam pad which contains all
accessories and product literature. Lay the box on its side, hold the system by the handle and pull it out of the box.
Remove the plastic bag and foam belt. Keep the packaging for future transport and service needs.
QuickStart Guide
Getting Started with Your IQAir® GCX System
Thank you for choosing an IQAir advanced air cleaning system. This 2-page instruction sheet will assist you in getting
started with your IQAir in a matter of minutes. Simply follow the instructions below. To access some of the more
advanced features of your IQAir GCX system, such as the timer, please refer to the detailed instructions in the IQAir
User Manual.
Your IQAir GCX system is supplied with the following items:
• Individually Numbered Certificate of Performance
• User Manual with Warranty Registration Card
• IQAir Referal Program Card
• Power Connection Cord
• Remote Control (incl. battery)
• Set of 4 GCX Cartridges (delivered in a separate box)
• Set of 4 GCX Post-Filter Sleeves (inside the air cleaner in the F2 chamber)
• Getting Started Instructions
• How to Install Anti-tampering Features
• Anti-tampering Kit
1
2
Setting Up Your IQAir GCX System
A) Unpacking
To unpack your GCX system, open the top of the box and remove the user manual, certificate of performance and
the styrofoam pad. Lay the box on its side and pull the GCX system out by its top handle. Place the device in its
upright position and remove all packaging materials. The GCX cartridges are supplied in a separate box.
B) Choosing a suitable location
The GCX system should be positioned as centrally as possible in the room where clean air is desired and at least
one foot (12 inches) away from the nearest vertical surface.
C) Install your GCX Cartridges
Your GCX cartridges have come in a separate box - to avoid shipping damage. Therefore, you’ll need to install
your GCX cartridges. Open the GCX system to gain access to filter 2 (GCX cartridges). For further explanation,
please refer to the GCX User Manual chapter 6. Unpack the four (4) GCX cartridges located in a separate shipping
box. Cover the GCX cartridges with the post-filter sleeves provided.
D) Connecting the GCX system to the power supply
Plug the connector-end of the power cord into the base of the GCX system. Locate a suitable wall socket and
connect the power cord. The GCX system is now in standby mode ready to be switched on.
Using the Electronic Control Panel
A) Switching the GCX system on/off
To switch the GCX system on or off, simply press the POWER button , located on the far left of the control
panel.
B) Regulating the fan speed
To select the desired fan speed, simply press the ARROW button on the control panel. When the top speed
has been reached, the display will start again at the lowest fan speed with the next push of the “arrow” button.
C) Setting the clock
Setting the time and weekday is not essential for the GCX system to keep track of filter life. However, the setting
of the clock is required to program the GCX system’s daily and weekly timer. For detailed instructions, please
refer to the GCX Series user manual.
(over)
Certificate of
Performance
Referral Program
I certify that the above information is correct. Referrer’s Signature:
The IQAir®Referral Program
Shell no : Serial no: .
Last name: First name:
Company name: Phone:
Address : Purchased fro m:
City: Zip Code / Postal Code:
The IQAir®Referral Program
To thank you for recommending IQAir, we are proud to introduce the IQAir Referral Program. For every IQAir system
purchased through your recommenda tion, you will receive on e free pre-filter p er referral. The more p eople or
businesses you refer, the more pre-filters you’ll receive, FREE! Additional brochures for your family, friends, colleagues
or company are enclosed with the IQAir system you purchased. You may also download a brochure at www.iqair.com
and email it to them.
As an IQAir owner you experience first hand the performance and elegance of IQAir. Please share your satisfaction
with IQAir with your family, frien ds, colleagues and community . Word-of-mouth recommen dations allow an ever
increasing number of people to experience how truly clean air can improve their quality of life. The IQAir Referral
Program is IQAir’s way of s ayin g th an k you for sh arin g IQ Air with the peop le you care a bou t.
Thank you for choosing IQAi r as your air c leaning solut ion!
As an IQAir customer, we value your thoughts and suggestions. You can contact us at (877) 715-4-AIR (247), fax us a t
(562) 903-7601, or email us at feedback@iqair.com. We look forward to hearing from you.
Terms and Conditions:The referrer and the referee must be registered warranty customers. Referral claim must be
received within 6 weeks of refe ree’s purcha se. Pre-filter will b e shipp ed to referre r when refe rral sale be comes final.
Limited to one pre-filter per ref erral. Pleas e fill out on e card p er referral. Allow 4 weeks f or shipp ing. S elf referra l is not
eligible. The IQAir Referral Program is not available to IQAir Dealers, Resellers, Retailers or Installers. The Program terms
and conditions are subje ct to chang e withou t notice.
Fill out the card below to claim your free pre-f ilter. Please write legib ly. Tha nk y ou!
Information about you (referrer )
Please return this card to:IQAir North America, Inc., 10440 Ontiveros Place, Unit 1, Santa Fe Spr ings, CA 90670, USA
Alternatively you may fax this p age: (562) 903- 7601 Questions? Call us toll free at(877) 400-1050
Last name: First name:
Address: Phone:
City: Zip code:
Serial no. (if known):
.
Information about referee (person who pur chased IQAir on your recommendatio n)
0707/105 01 00 01
Anti-Tampering Kit
23
Chapter 8– Anti-Tampering Kit Instructions
Chapter 8 – Anti-Tampering Kit Instructions
Your IQAi r® system comes with two anti-tampering features designed to prevent unauthorized tampering with
the system:
• The arm-locking xture prevents unauthorized access to the system’s
replacement lters.
• The power cord inlet xture helps to prevent the unauthorized
unplugging of the system. Note: Additional measures have to be
taken to prevent unplugging of the air cleaner from the wall plug.
What’s included in the anti-tampering kit:
1 x Torx 10 Safety Tool
1 x Torx 20 Safety Tool
2 x Torx 10 Safety Screws
4 x Torx 20 Safety Screws
The only additional tool you need to enable the anti-tampering features is a
medium size at head screw driver.
How to install the power cable xture
1) Make sure the power cord
is unplugged. Plug the
power cable into the air
cleaner’s power socket.
2) The metal clamp on the
cable now lines up with two
screw holes in the base of
the air cleaner.
3) Insert two of the small
screws supplied (Torx 10)
and fix the metal clamp to
the air cleaner, using the
supplied tool.
1
3
1) Disconnect the power
cord. Press with the athead screwdriver into the
small opening on the side of
the arm with the IQAir logo
face plate (not the control
panel side).
2) Lift out the face plate.
2
3) Use the larger screws and
tool supplied. Insert the
screws through the two
holes and tighten.
How to install the arm locking xture
2
3
1
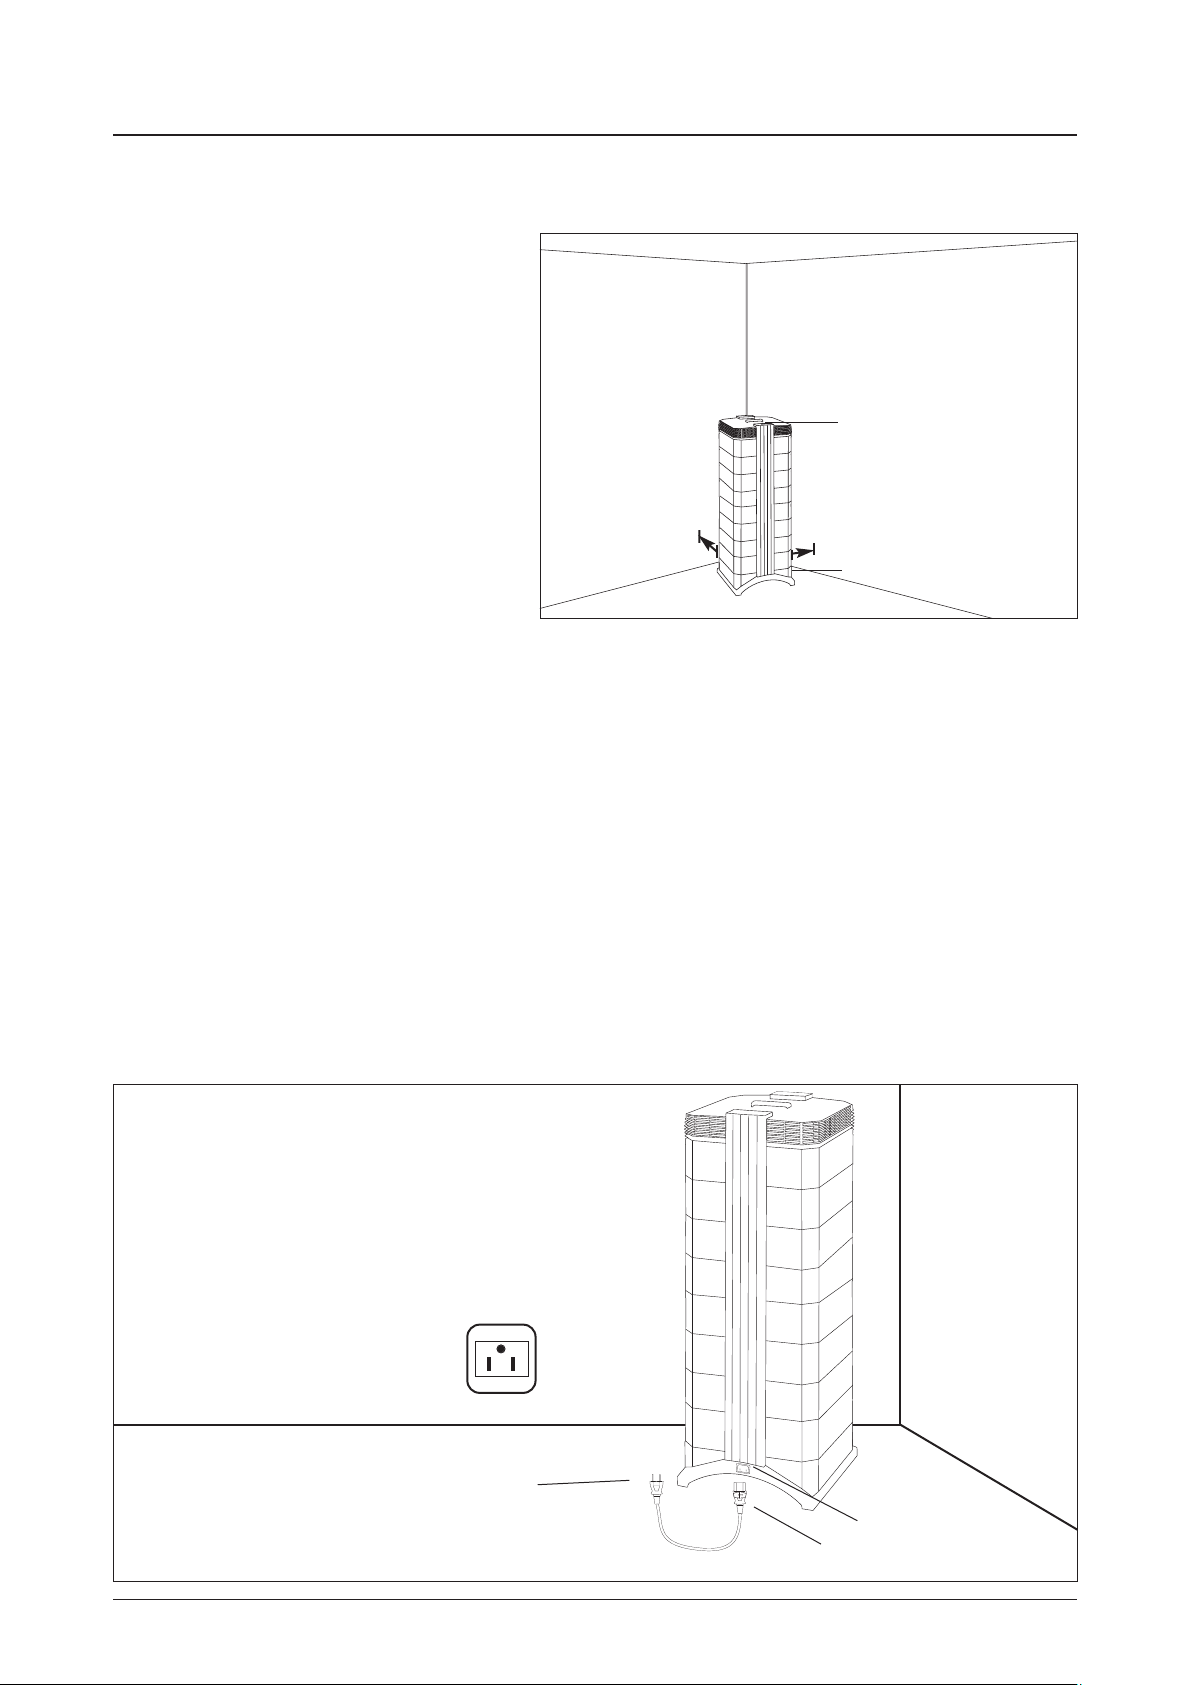
2.2 Choosing a Suitable Location
When choosing a suitable location for the
IQAir system, keep the following considerations
in mind:
• Choosing the most suitable room for the
system will depend on where you would
like the focus of the air cleaning efforts. Two
main considerations are the time you spend
in a particular room and the location of the
main air pollution sources. As a general rule,
the closer the system is located to the air
pollution source, the better the air cleaning
performance in the room.
Although an air cleaning result may be
achieved in adjacent rooms, the main air
cleaning will take place in the room where
the system is located. For the best air
cleaning results in adjacent rooms, make
sure that doors to these rooms are left wide
open.
• For best performance, the system should be positioned at least 12 inches (1 foot) away from the nearest vertical
surface, such as a wall or a cupboard. In general, the more centrally the system is positioned, the better the
performance.
• Position the system close to a power outlet and make sure that the power cord is positioned in a way that it does
not present an obstacle.
• Make sure that the system is positioned in such a way that the control panel is easily accessible.
2.3 Connecting to Power
1. Plug the connector end of the power cord into the recessed power inlet socket on the back of the system.
2. Plug the other end of the power cord into a power outlet or power strip.
Important: The only way to disconnect power completely is to unplug the power cord.
Do not use the IQAir® system when the power cord becomes damaged. The power cord may be replaced with an
approved cord with a two-pole plug. These power cords are commonly used for computers and similar appliances.
6
Chapter 2 – Setting Up
Power outlet
Power cord plug
(plug types vary)
Power cord connector
Power inlet socket
min. distance
12” (1 foot)
Control panel should
be easily accessible
Keep power cord
clear of walk-ways

7
Chapter 3 – System’s Components
Chapter 3 – The IQAir® System’s Components
3.1 Description of Housing Components
The IQAir® system features a modular tower design in which all important ltration and air moving components are
positioned vertically in-line, i.e. stacked on top of another. Air is drawn into the system at the base, and passes
through several lter stages to be returned to the room via the diffuser on top of the system. The housing modules
are held together by two locking arms.
• The Locking Arms hold the housing elements together. When opened, the locking arms allow easy access to all
filters.
• The Handle on top of the diffuser is designed for carrying the IQAir system.
• The EvenFlow™ Diffuser features an omni-directional horizontal air outlet.
• Frame 3 to 5 surrounds the 4 gas phase cartridges and filter sleeves to where the diffuser starts.
• The Filter Module 2 consists of frame 2 and a steel base plate in which the four gas phase filter cartridges are fixed
by means of a bayonet locking system.
• The Fan Assembly comprises two housing modules with the centrifugal fan inside.
• The Filter Module 1 consists of frame 1 and the particulate pre-filter which is secured inside the frame by several
filter clamps.
• The Base with its arched design features air intake openings on two sides.
EvenFlow™ Diffuser
Filter module 1
Fan assembly
Frame module 2
Frame module 3
Locking arms
Base
Handle
Air intake opening
Air outlet openings
Frame module 4
Frame module 5

8
Chapter 3 – System’s Components
1. Room air is drawn into the system via two arched open ings at the
base.
2. The air is drawn in through a high-efciency pre-lter that removes
most pollu tion particles.
3. At the heart of the system, sand wiched between the l ters, is a
powerful centrifugal fan which generates the airow.
4. The air is pushed through four steel cartridges that contain up to
31 lbs. of gas phase control media, which retains specic gaseous
pollutants.
5. Particulate post-lter sleeves hold back abrasion particles from the
gas phase lter media.
6. Low turbulence, low velocity air is returned to the room via the
EvenFlow™ diffuser.
3.2 Description of Removable Components
The IQAir® system features a modular housing design which enables the easy replacement of all lter elements in a
matter of seconds. The illustration below shows all the removable components. For more details on how to re pla ce
lters, please refer to Chapter 6 – Replacing Filters.
3.3 How the IQAir® System Works
Post-filter sleeves
Gas phase filter
cartridges
Pre-filter
Frame 2
Frame 1
Frame 3
Filter clamps
EvenFlow™ Diffuser
Frame 4
Frame 5
6
5
4
3
2
1
9
Chapter 4 – Using the Control Panel
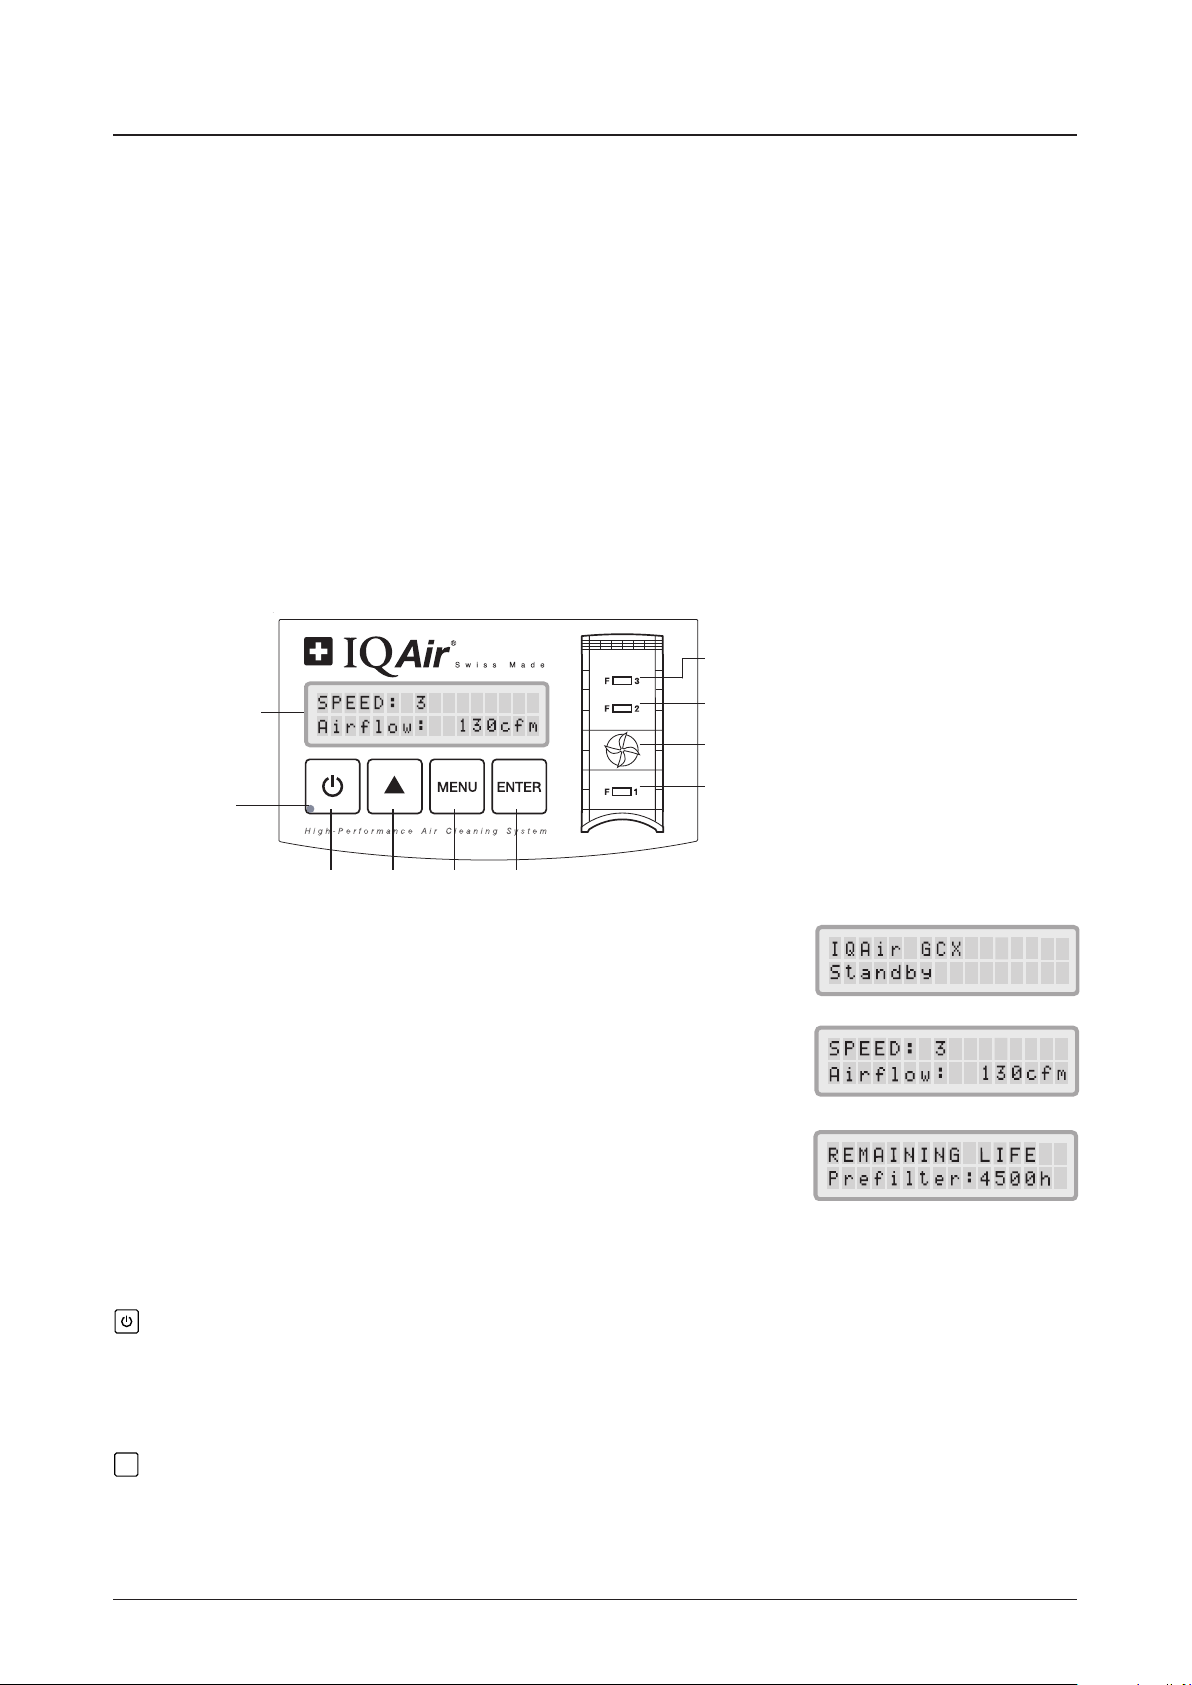
4.1.1 Description of Control Panel Keys
Power Key
The Power key switches the IQAir® system on and off. When the system is switched off, the fan stops to run, but the
system will remain connected to the power supply (standby mode). The standby mode allows for automatic timer
start-up. In the standby mode, the different menu functions can be accessed.
Tip: In a menu window, the Power key also serves as a quick exit key to return to the main display window.
Arrow () Key
When the system is switched on, the key allows the adjustment of the fan speed. In the enter mode, indicated by
the appearance of a black ashing cursor (see “Enter Key” below), the key is used to modify the selected setting in
the display window. Conrmed with the Enter key, the enter mode is automatically terminated. The LCD will then
display the current menu settings for another 15 seconds before reverting to the main window display.
Chapter 4 – Using the Control Panel
The IQAir® system is operated and controlled via the electronic control panel which is located at the top of the front
locking arm.
Several operations can be completed via the electronic control panel:
• Switching the system on and off
• Controlling the fan speed and corresponding air delivery rate
• Checking the remaining lter life of the individual lters
• Setting the automatic timer
• Resetting the Filter Life Monitor after replacing a lter
• Locking the control panel to avoid tampering with the system’s settings
• Choosing the desired display language
• Setting the day & time
4.1 Description of Control Panel
LCD = Liquid
Crystal Display
Power
Key
Enter
Key
Menu
Key
Arrow
Key
Post-Filter Life LED
Cartridges Life LED
Pre-Filter Life LED
Timer LED
Fan Speed LEDs
LCD Display
The 2-line LCD displays important information about the system’s settings.
In standby mode, without the timer activated, the first line displays IQAir GCX
and the second line displays Standby. If the timer is activated, the first line
displays the day and time and the programmed start and stop times will be
displayed on the second line.
If the IQAir® system is on, the rst line displays the current speed set ting and the
second line displays the corresponding air delivery rate of the system; however,
when the timer is activated the programmed start and stop times will be
displayed on the second line.
By pressing the Menu key, ten active menu functions may be accessed. These
functions are explained in detail in this chapter.
LED = Light Emitting Diode
Main window: Standby mode
Main window: On mode
Menu window: Filter Life Monitor
▲
Pre-Filter
Cartridges
Post-Filter
 Loading...