

IQAir Dental Hg, Dental Pro User Manual
Swiss Made
www. iqair.com
User’s Manual
Dental Series
IQAir®Dental Series
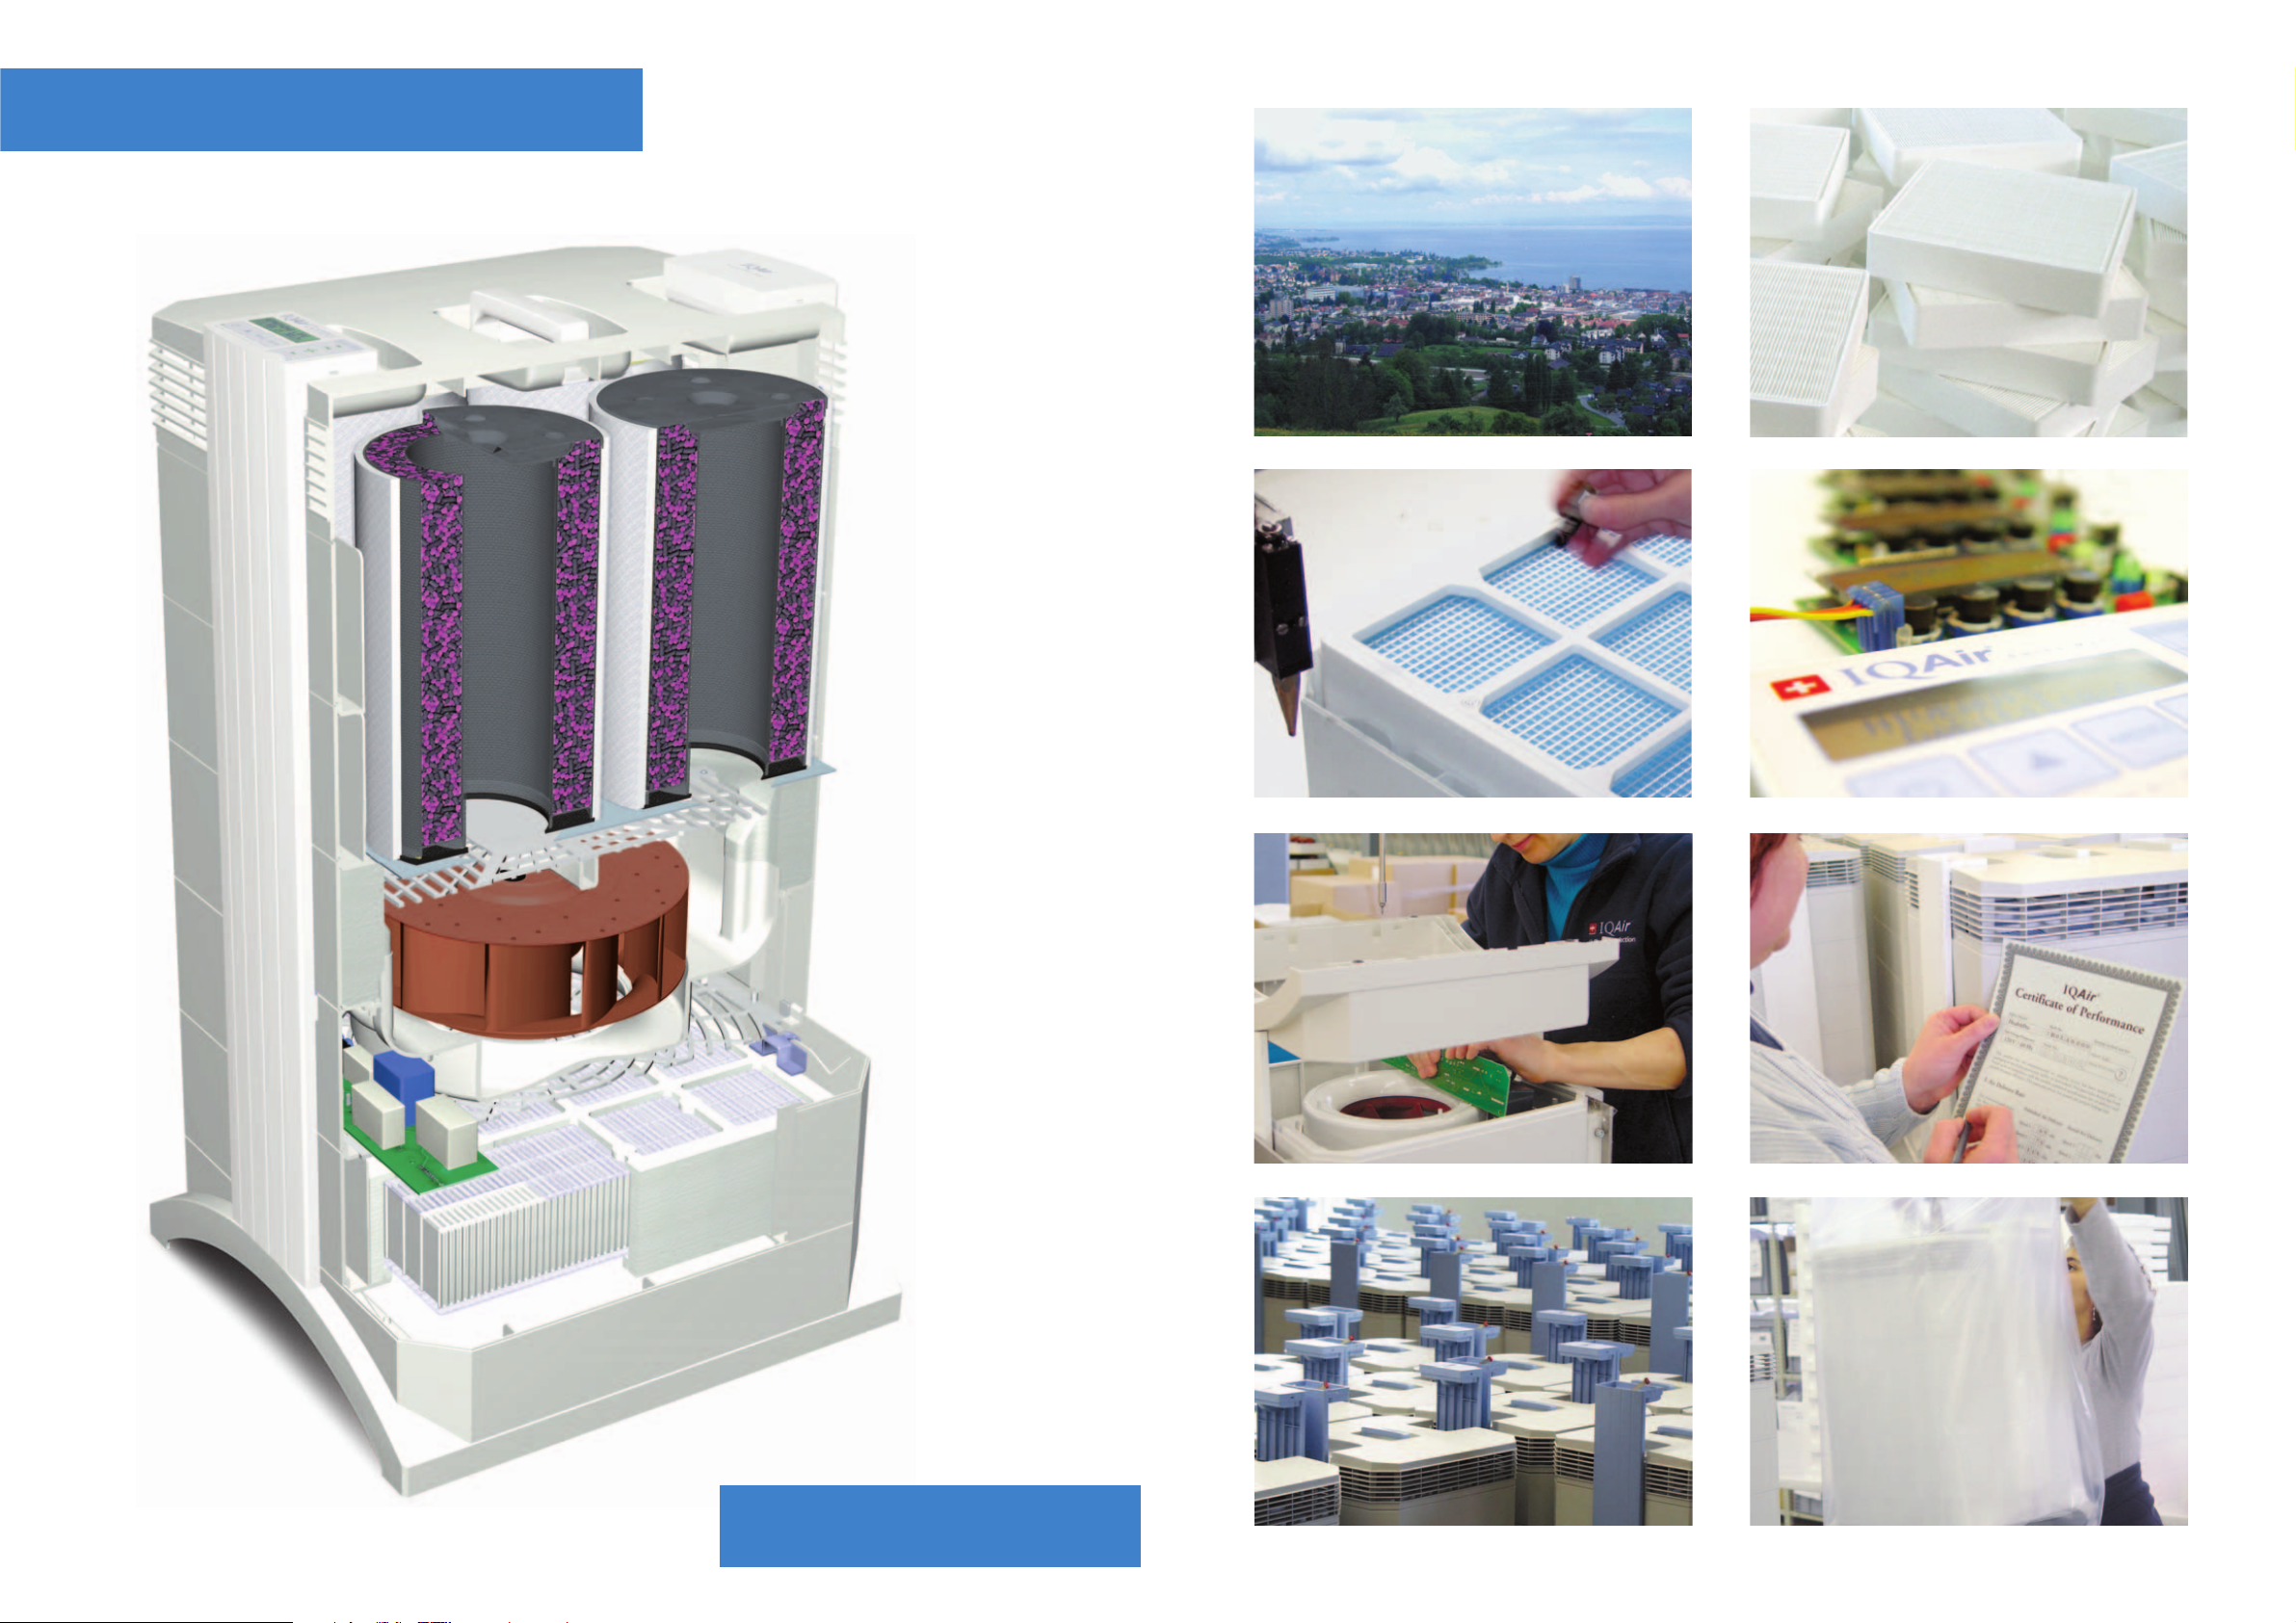
Internal View
Goldach, Switzerland - home of IQAir’s production facility
IQAir® assembly line
Final system assembly
Filters awaiting final sealing process
Filter quality control of a HyperHEPA® filter
Control panel assembly
Final inspection and packaging
Individual performance testing and certification

1
About This User’s Manual
Congratulations on your purchase of this IQAir® high-performance air cleaning system.Please study this user manual
carefully to familiarize yourself with the special features and functions of your IQAir® system and keep it in a safe
place for future reference.
Read these instructions before using the appliance:
• Do not use this appliance as sole protection against harmful pollutants.
• Do not immerse the appliance in water or other liquids.
• Always disconnect the power from your air cleaner by unplugging the power cable before adding or removing
parts and before cleaning.
• Do not operate this appliance if it has a damaged cord or plug, if the motor fan fails to rotate, if it is not working
properly,if it has been dropped or damaged, or dropped into water.
• If the power cord of this appliance should become damaged,it may be replaced with a similar two-pole cord set,
as is commonly used for computers and similar appliances.
• Only use this appliance for its intended purpose of air cleaning in non-industrial environments.
• Do not use this appliance in areas with very high concentrations of dusts or powder to prevent the danger of dust
explosions.
• Do not use this appliance in explosive areas.
• Do not use attachments or filters not recommended by IQAir®.
• Do not use outdoors.
• Do not obstruct the air inlet and air outlet of the air cleaner.
• Do not place the appliance on a soft surface such as a bed or other soft furnishings.
• Only use this appliance in an upright position.
• Do not place next to a humidifier.
• Keep the power cord away from heated surfaces.
• Save these instructions for future reference.
Important Safety Instructions
The IQAir® Group reserves the right to change specifications contained in this document at any time and without prior notice.
© 2005 The IQAir® Group. All rights reserved. IQAir® is the registered trademarks of The IQAir® Group. EvenFlow™ ia a trademark of The IQAir® Group. IQAir® systems
and filters are protected under U.S. patents 6 001 145 and 6159260. Other U.S.,
European and Asian patents pending.


3
Page
Important Safety Instructions 1
Chapter 1 – Air Cleaning Systems and Indoor Air Quality 4
1. 1 Improving Indoor Air Quality 4
Chapter 2 – Setting Up 5
2. 1 Unpacking 5
2. 2 Choosing a Suitable Location 6
2. 3 Connecting to Power 6
Chapter 3 – The IQAir® System’s Components 7
3. 1 Description of Housing Components 7
3. 2 Description of Removable Components 8
3. 3 How the IQAir® System Works 8
Chapter 4 – Using the Control Panel 9
4. 1 Description of Control Panel 9
4. 1. 1 Description of Control Panel Keys 9
4. 2 Control Panel Locking Function 10
4. 3 Fan Speed and Air Delivery 10
4. 3. 1 Regulating Fan Speed 10
4. 3. 2 Air Exchange Rates in Differently Sized Rooms 11
4. 4 Using the Menu Functions 11
4. 4. 1 Menu Overview 11
4. 4. 2 Filter Life Monitor 12
4. 4. 3 Setting the Auto Timer 13
4. 4. 4 Day of the Week Timer 14
4. 4. 5 Timer ON/OFF Fan Speed Selection 14
4. 4. 6 Timer Information in the Control Panel 15
4. 4. 7 Time & Day Setting 16
4. 4. 8 Filter Life Reset 16
4. 4. 9 Changing Airflow Units 17
4. 4. 10 Language Setting 17
Chapter 5 – Using the Remote Control 18
5. 1 Description of Remote Control Elements and Functions 18
5. 2 Getting the Best Transmission Results 18
5. 3 Replacing the Battery of the Remote Control 19
Chapter 6 – Replacing Filters 19
6. 1 Location of the Filter Elements 19
6. 2 Ordering Replacement Filters 20
6. 3 Opening and Closing the Housing 20
6. 3. 1 Troubleshooting when Closing the Housing 20
6. 4 Replacing the Pre-Filter (Filter 1) 20
6. 5 Replacing the Gas Phase Filter Cartridges
and Post-Filter Sleeves (Filter 2) 21
6. 6 Discarding Used Filters 22
Chapter 7 – Maintenance 22
7. 1 Cleaning the Housing 22
7. 2 Maintenance-Free Fan 22
Chapter 8 – IQAir® Accessories (Optional) 23
Table of Contents

4
Chapter 1 – Air Cleaning Systems and Indoor Air Quality
Chapter 1 – Air Cleaning Systems and Indoor Air Quality
State-of-the-art filtration technology
Your IQAir advanced air cleaning system has been developed especially for the control of specific gaseous
components.Thanks to advanced gas cartridge (GC) filter technology,each model of the IQAir Dental Series has been
optimized for the control of specific gaseous pollutant groups.The following model configurations are available:
• IQAir® Dental Pro for the control of volatile organic compounds (VOCs), inorganic gases, mercury vapors and
microorganisms
• IQAir® Dental Hg for the control of mercury vapors and fine drill aerosols
1.1 Improving Indoor Air Quality
Air cleaning can play an important role when it comes to improving indoor air quality.However, it should be noted
that air cleaning should be used in conjunction with pollution source control and ventilation, wherever possible.
Strategy to improve indoor air quality
To tackle any indoor air quality problem,keep the following three-step strategy in mind:
1. Eliminate or reduce the air pollution source as much as possible.Source control is by far the most effective way to
improve indoor air quality, since it sets out to deal with air pollution at the point of origin.
2. Ensure that sufficient fresh air is entering the room from outside. Air cleaners are not a substitution for sufficient
ventilation. They are not able to reverse the conversion of oxygen (O2) into carbon dioxide (CO2), caused by
breathing and combustion processes.
3. Ensure the IQAir® system can clean enough air to cope with your room size.The actual hourly air volume cleaned
by the system should be at least double the air volume of your room.If the rate at which pollutants enter the room
air is high or the indoor air quality requirements are stringent, the hourly air delivery of the system needs to
exceed the room air volume several times.To achieve that level of air turnover, it may be necessary to employ more
than one system.
Air Cleaning Results
Although air cleaners may be advertised and sold to be suitable for use in specific indoor environments and to deal
with specific indoor air quality problems, the manufacturer and distributors make no claim as to the specific air
cleaning results that are achieved under the user’s individual operating conditions.The air quality improvements that
can be realized with the IQAir® system (as with any air cleaner) in indoor environments depends to a significant
degree on circumstantial factors, which are out of the control of the manufacturer or distributors. Important factors
which will influence the air quality improvements that can be achieved in an indoor environment with an air cleaner
include:
• Type of air pollutants present
• Intensity of the pollutant source(s)
• Pollutant concentration
• Size of the indoor environment (room size)
• Operating speed of the unit
• Number of air cleaners placed in the indoor environment
• Saturation state of the filters in the air cleaner
Consult a qualified specialist to determine an effective and comprehensive indoor air quality strategy.
5
Chapter 2 – Setting Up
Chapter 2 – Setting Up
2.1 Unpacking
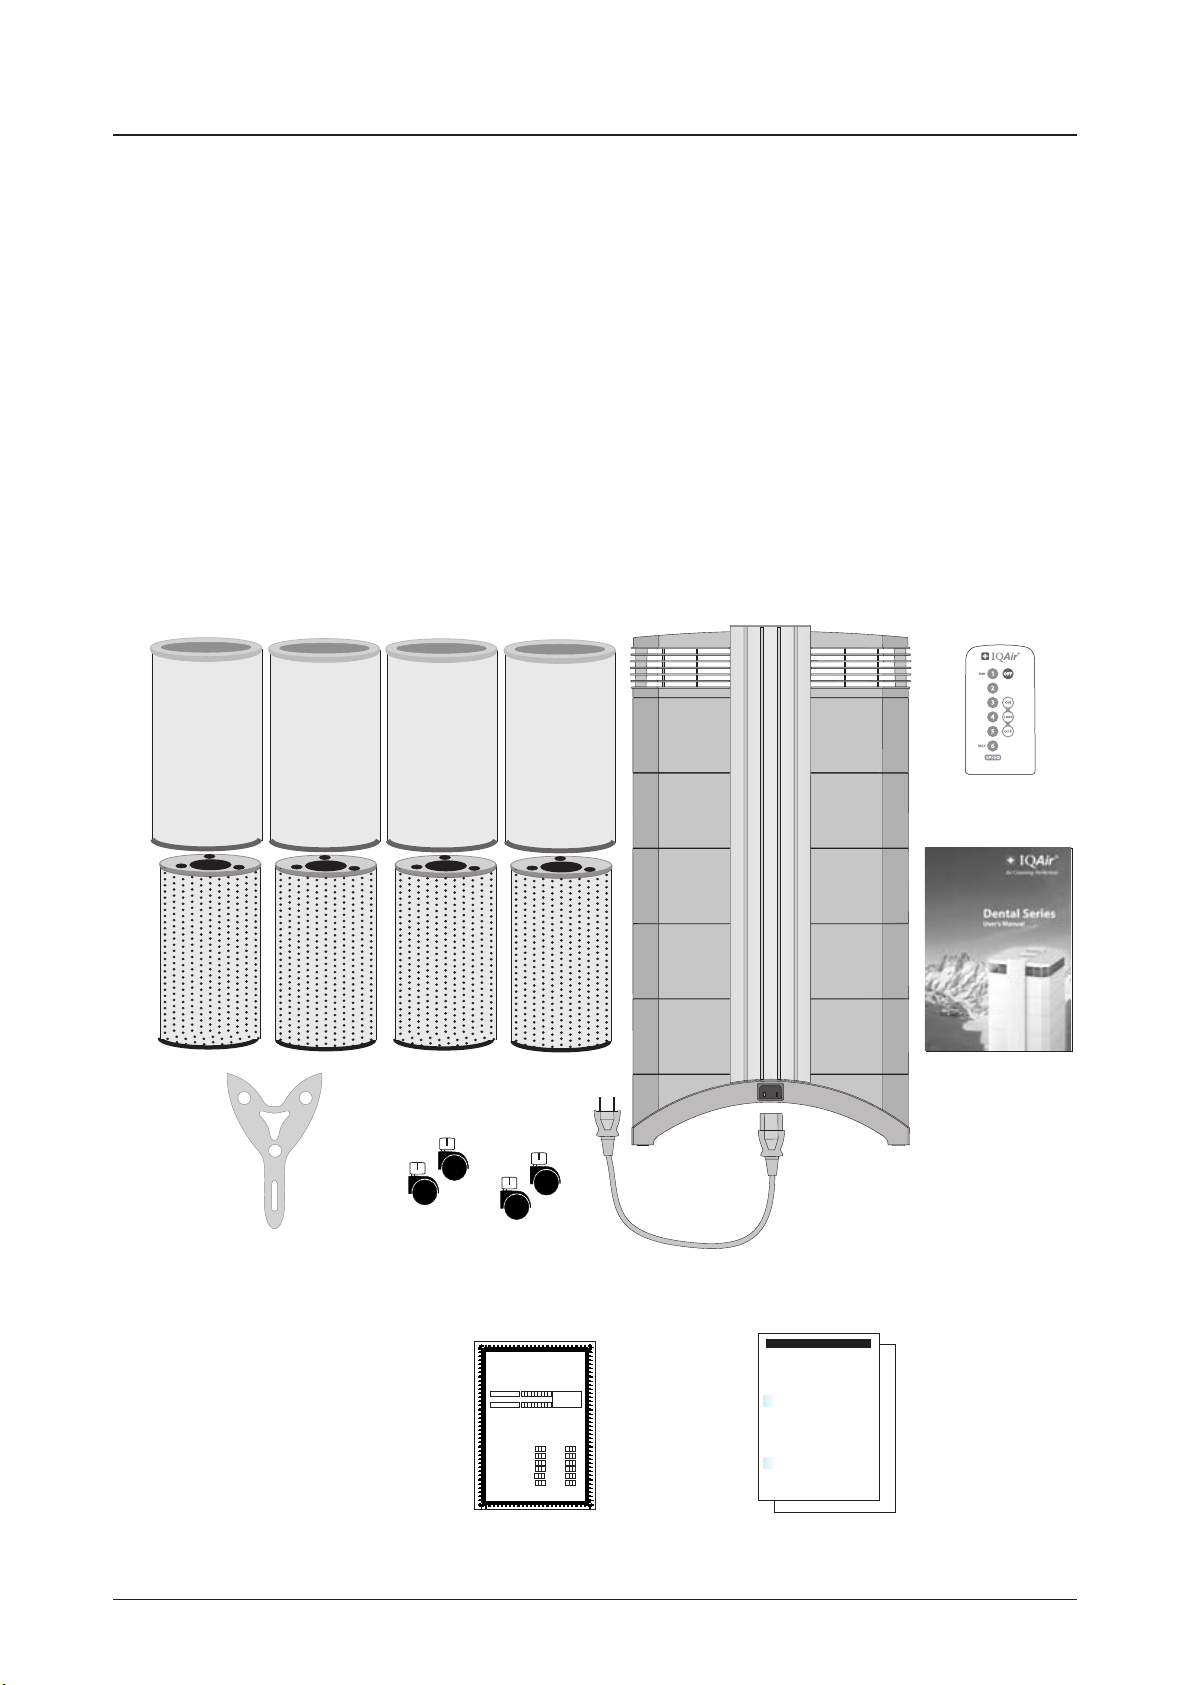
To unpack the IQAir® system, open the top of the box and remove the square styrofoam pad which contains all
accessories and product literature. Lay the box on its side, hold the system by the handle and pull it out of the box.
Remove the plastic bag and foam belt. Keep the packaging for future transport and service needs.
Power cord
Certificate of
Performance
IQAir®
Advanced Air Cleaning System
Set of casters
QuickStart Guide
Remote control
including battery
User manual
Cartridge tool
Cer
tificate of Perer
Cer
tificate of P
IQAir Model:
Dental Series
Test Voltage/Frequency:
120V / 60Hz
This certifies that the aforementioned air cleaning device has been tested prior to packaging
at the IQAir production facility in Switzerland. This particular device has been found to be
in compliance with the model’s published specifications for air delivery and particle filtration efficiency. This particular device has passed the particle leakage test. All test have been
carried out with a set of reference cartridges of the type P260 AC/4.
I. Air Delivery Rate
The aforementioned device
has been tested for its air
delivery at all fan speed settings. Due to component
tolerances, a divergence of
5% + 10 cfm is deemed
acceptable.
Note:
The air delivery rate refers to
the unit’s initial air delivery,
which will decrease as filters
load up with dust particles.
Measuring instrument: Alnor LoFlo Balometer.
Instrument accuracy: ±(3% + 5 cfm).
®
®
IQ
Air
Air
IQ
for
for
Shell No.:
Testing carried out by:
D0U
0
A
0
00
1
Signed:_________________
Serial No.:
Testing & QC Dept.
Published Air Delivery Actual Air Delivery
cfm
Speed 1:
Speed 1:
35
cfm
Speed 2:
Speed 2:
70
cfm
Speed 3:
Speed 3:
110
cfm
Speed 4:
Speed 4:
140
cfm
Speed 5:
Speed 5:
170
cfm
Speed 6:
Speed 6:
260
Page 1of 2
1D0UA0000/040713/105600007
mance
mance
cfm = cubic feet per minute
®
IQ
Air
High-Performance
Air Cleaning System
User Manual
Getting Started with Your IQAir® Dental System
Thank you for choosing an IQAir advanced air cleaning system.This 2-page instruction sheet will assist you in getting
star
ted with your IQAir in a matter of minutes.Simply follow the instructions below.To access some of the more
advanced features of your IQAir Dental system,such as the timer,please refer to the detailed instructions in the IQAir
User Manual.
Your IQAir Dental system is supplied with the following items:
• Individually Numbered Certificate of Performance
• User Manual with Warranty Registration Certificate
• Power Connection Cord
• Remote Control & Batteries
• Set of 4 Casters (including installation instructions)
• Dental Cartridge Tool
• Set of 4 Dental Cartridges (delivered in a separate box)
• Set of 4 Dental Post-Filter Sleeves (inside the air cleaner in the F2 chamber)
Setting Up Your IQAir Dental System
1
A) Unpacking
To unpack your Dental system,open the top of the box and remove the user manual,certificate of performance
and the styrofoam pad.Lay the box on its side and pull the Dental system out by its top handle.Place the device
in its upright position and remove all packaging materials.Dental cartridges are supplied in a separate box.
B) Installing the casters
Installing the optional casters is not necessary,however,it may facilitate moving the air cleaner more easily from
room to room.Please refer to the leaflet supplied with the casters for installation instructions.
C) Choosing a suitable location
The Dental system should be positioned as centrally as possible in the room where clean air is desired and at least
one foot away from the nearest vertical surface.
D) Install your Dental Cartridges
Your Dental cartridges have come in a separate box – to avoid shipping damage.Therefore,you’ll need to install
your Dental cartridges.Open the Dental system to gain access to filter 2 (Dental cartridges). For further
explanation,please see page 20 (Opening and Closing the Housing) and page 21 (Replacing the Gas Phase Filter
Cartridges (Filter 2) in the User Manual.Unpack and remove plastic from the four (4) Dental cartridges located in
a separate shipping box.Then lock in the four (4) Dental cartridges with the Dental cartridge tool provided.Cover
each of the Dental cartridges with the post-filter sleeves provided.
E) Connecting the Dental system to the power supply
Plug the connector-end of the power cable into the base of the Dental system.Locate a suitable wall socket and
cfm
cfm
cfm
cfm
cfm
cfm
connect the power cable.The Dental system is now in standby mode ready to be switched on.
Using the Electronic Control Panel
2
A) Switching the Dental system on/off
To switch the Dental system on or off,simply press the POWER button,located on the far left of the control panel.
B) Regulating the fan speed
To select the desired fan speed,simply press the ARROW button on the control panel.When the top speed has
been reached,the display will start again at the lowest fan speed with the next push of the “arrow”button.
C) Setting the clock
Setting the time and weekday is not essential for the Dental system to keep track of filter life.However,the setting
of the clock is required to program the Dental system’s daily and weekly timer.For detailed instructions,please
refer to the Dental Series user manual.
(over)
6
Chapter 2 – Setting Up
2.2 Choosing a Suitable Location
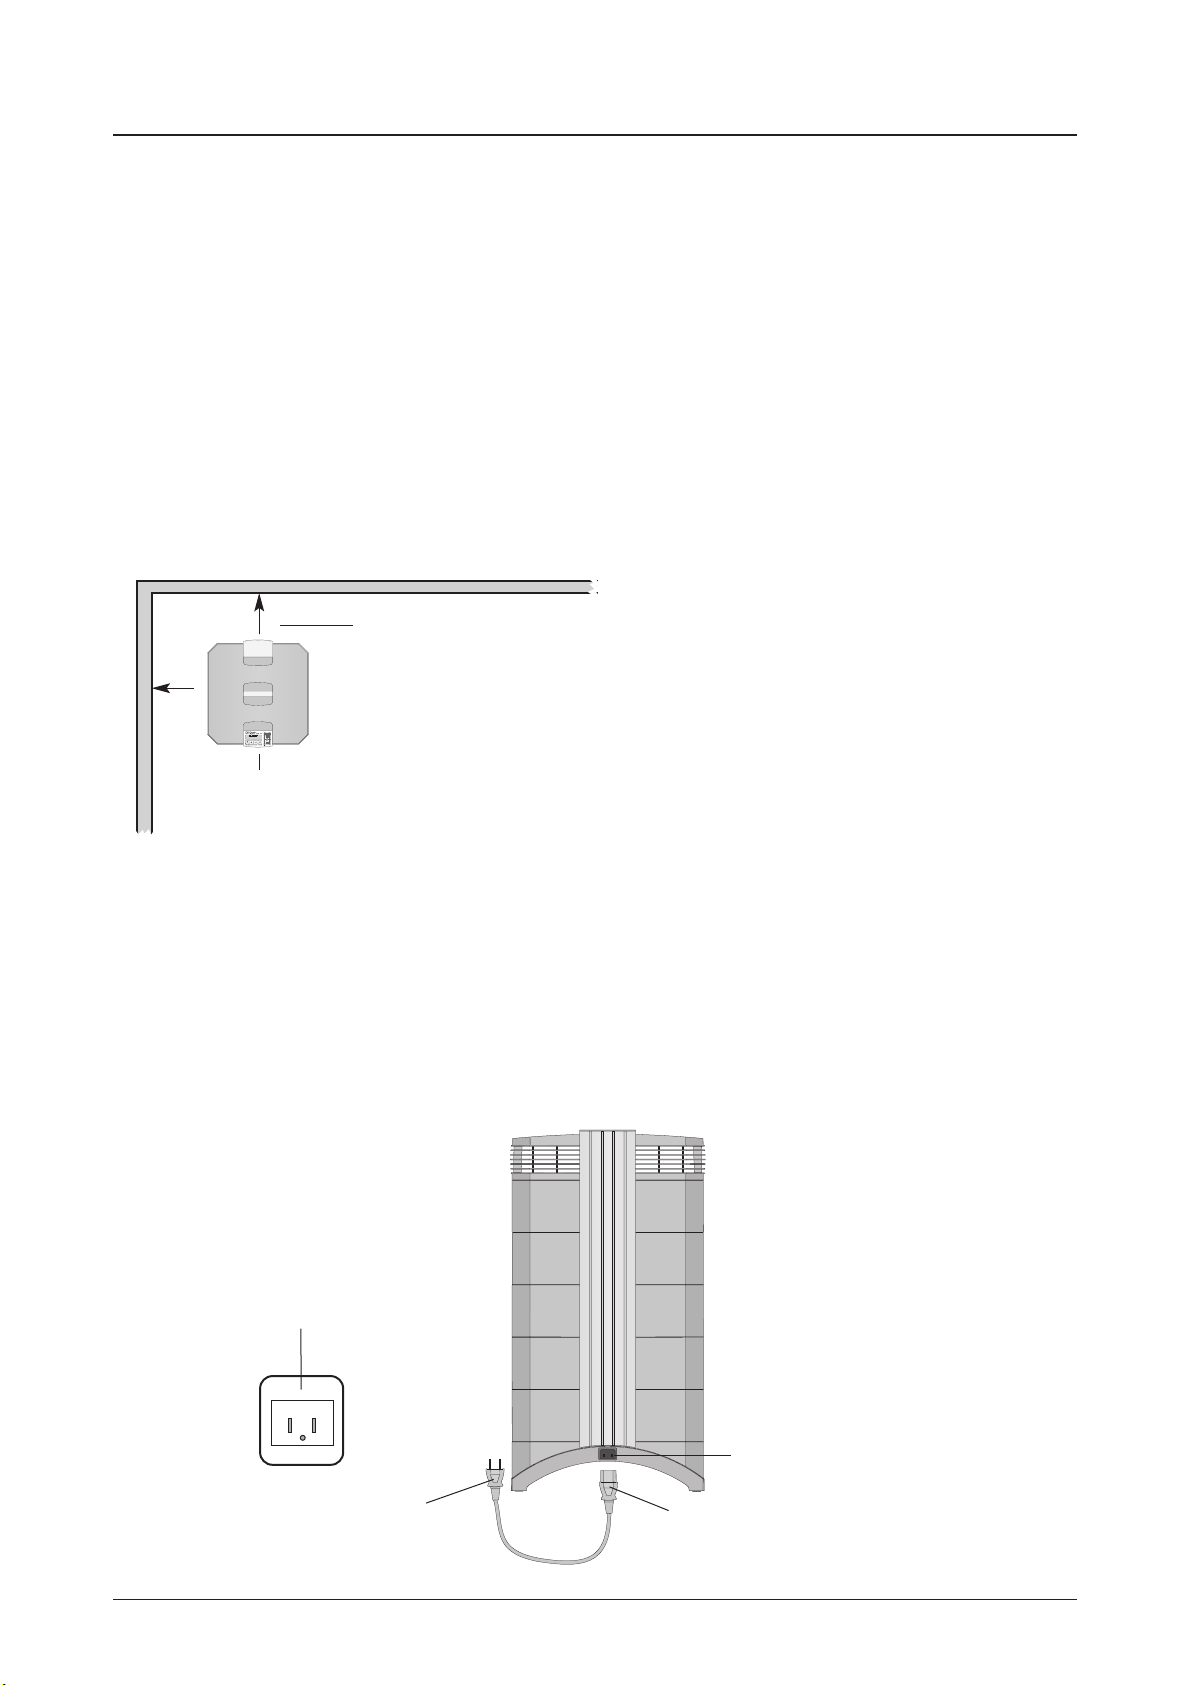
When choosing a suitable location for the IQAir® system, keep the following considerations in mind:
• Choosing the most suitable room for the system will depend on where you would like the focus of the air cleaning
efforts. Two main considerations are the time you spend in a particular room and the location of the main air
pollution sources. As a general rule, the closer the system is located to the air pollution source, the better the air
cleaning performance in the room.
Although an air cleaning result may be achieved in adjacent rooms, the main air cleaning will take place in the
room where the system is located. For the best air cleaning results in adjacent rooms, make sure that doors to
these rooms are left wide open.
• For best performance, the system should be positioned at least 12 inches (1 foot) away from the nearest vertical
surface, such as a wall or a cupboard. In general, the more centrally the system is positioned, the better the
performance.
• Position the system close to a power outlet and make sure that the power cable is positioned in a way that it does
not present an obstacle that could be tripped over.
• Make sure that the system is positioned in such a way that the control panel is easily accessible.
2.3 Connecting to Power
1. Plug the connector end of the power cord into the recessed power inlet socket on the back of the system.
2. Plug the other end of the power cord into a power outlet or power strip.
Important: The only way to disconnect power completely is to unplug the power cord.
Do not use the IQAir® system when the power cord becomes damaged.The power cord may be replaced with an
approved cord with a two-pole plug. These power cords are commonly used for computers and similar appliances.
min. distance
12” (1 foot)
Control panel should
be easily accessible
Keep power cable
clear of walkways
Power outlet
Power cord plug
(plug type can vary)
Power cord
connector
Power inlet socket
IQAir
 Loading...