

Page 1
User Guide
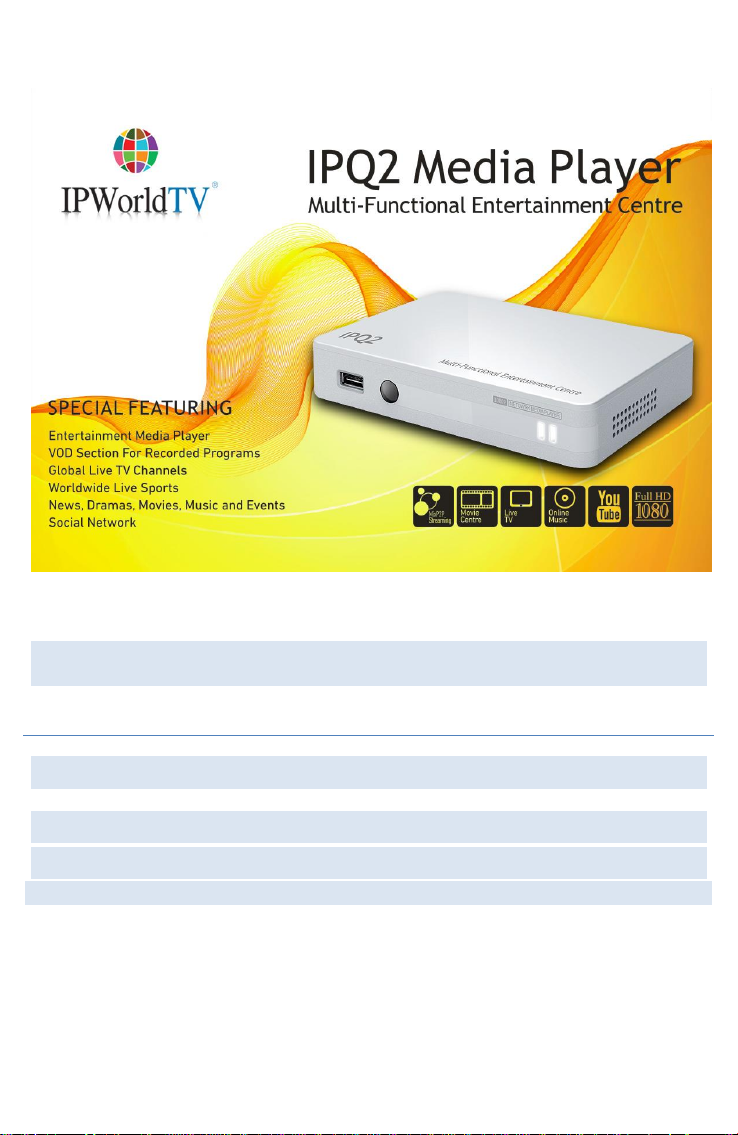
Model No . : IPQ2 MEDIA PLAYER
English
Page 2

Contents
1. WELCOME TO IPQ2MEDIA PLAYER EXPERIENCE ............................... 4
1.1.Features ............................................................................................ 4
1.2.Connectivity ...................................................................................... 4
1.3.Specification ..................................................................................... 5
2.EQUIPMENT ............................................................................................... 6
3.IPQ2MEDIA PLAYER PANELS ................................................................... 7
3.1. The IPQ2Media Player - Rear & Side Panels......................................... 7
3.2. The IPQ2Media Player - Front Panel ...................................................... 8
4.THE REMOTE ............................................................................................. 9
5.QUICK SETUP (A/V CVBS) ...................................................................... 10
6.QUICK SETUP (HDMI) .............................................................................. 11
7.THE MAIN MENU...................................................................................... 12
8.LIVE TV .................................................................................................... 13
8.1. Connection to the TV channel ............................................................. 14
8.2. Record a TV channel(not included in all boxes) ..................................... 14
8.3. Stop actual recording(not included in all boxes) ................................... 14
8.4.Play the recorded program(not included in all boxes) ...................... 14
8.5.Delete the recorded program(not included in all boxes) ................... 14
1
Page 3

9. MOVIE ................................................................................................... 15
10. DRAMA ............................................................................................... 156
11. MUSIC ................................................................................................... 17
12. APPLICATIONS .................................................................................... 18
12.1. YouTube ............................................................................................. 19
12.1.1.The Virtual Keyboard ............................................................. 19
12.1.2. How to Use the Virtual Keyboard .......................................... 19
12.2. Radio ...............................................................................................2019
12.3.Weather ............................................................................................2019
13. FILES ................................................................................................ .... 21
13.1. Playback Controls ............................................................................. 22
14. SETTINGS ............................................................................................. 23
14.1. Network Settings ............................................................................... 24
14.2. Video Settings .................................................................................... 25
14.3. Time Zone Settings ............................................................................ 26
14.4. Language Settings ............................................................................. 27
14.5. System Password .............................................................................. 28
14.6. System Info ........................................................................................ 29
15. SHUTDOWN & REBOOT ....................................................................... 30
2
Page 4

FREQUENTLY ASKED QUESTIONS ........................................................... 31
General ....................................................................................................... 31
Internet Connection .................................................................................... 31
IMPORTANT SAFETY ................................................................................. 32
Safety Information ................................ ...................................................... 32
AC Power Safety Warnings ........................................................................ 32
Conventions used in this manual .............................................................. 32
Electrical Safety ......................................................................................... 32
Operation Safety......................................................................................... 33
3
Page 5
1.1. Features
1.2. Connectivity
1. Welcome to IPQ2Media Player Experience
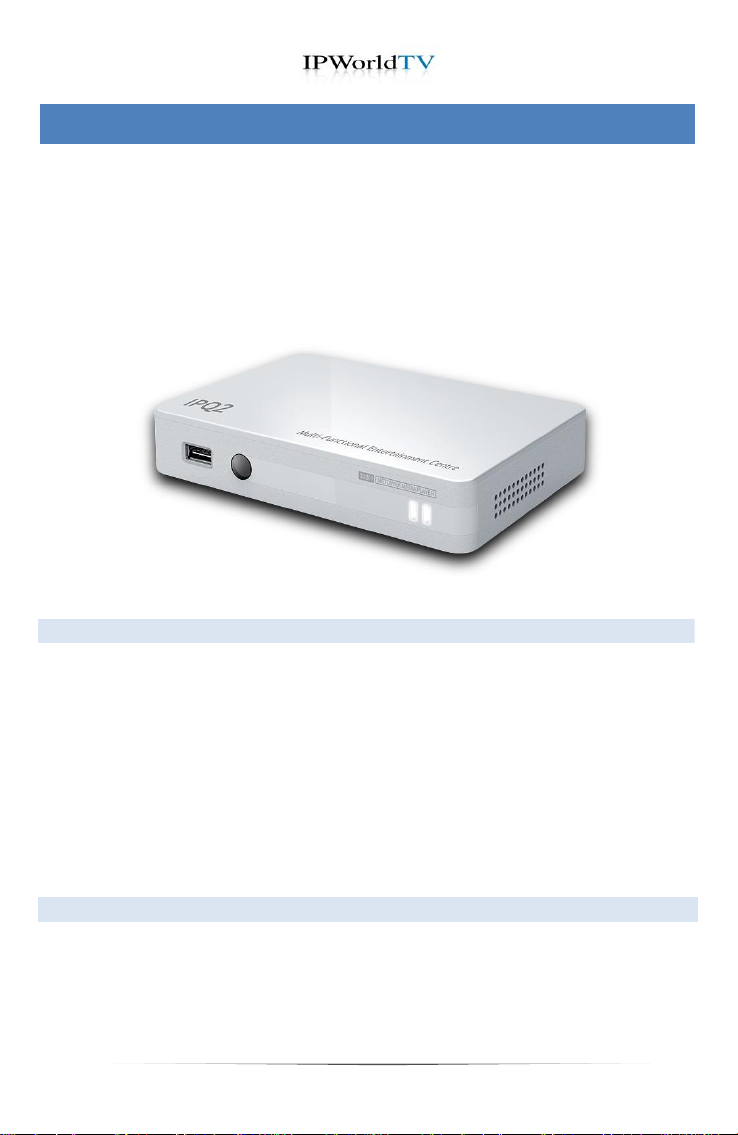
The IPQ2 Media player is the next generation media layer, delivers the
ultimate home entertainment experience that will transform your TV
viewing style. It seamlessly connects you to all the stuff you love –favorite
TV, movies, Youtube™ and home media –on your very own TV screen.
IPQ2 Media Player provides leading edge functionality for interactive TV
which includes HD channels broadcast and VOD; video on demand
service.
Video Resolution: 480i, 480p, 720p, 720i, 1080i & 1080p
Streams Live Digital channels including HD Channels
Full access to video on demand content
Browse and watch YouTube™ videos by category.
SD Card support
Integral HDD mount support
Supported TV Standards: PAL & NTSC
USB 2.0 support (play media files directly from USB flash and USB HDD)
1 x HDMI, Analog RCA video/stereo audio
1 x Ethernet 10/100BASE-T
2 x USB 2.0 ports
1 x MicroSD port
4
Page 6
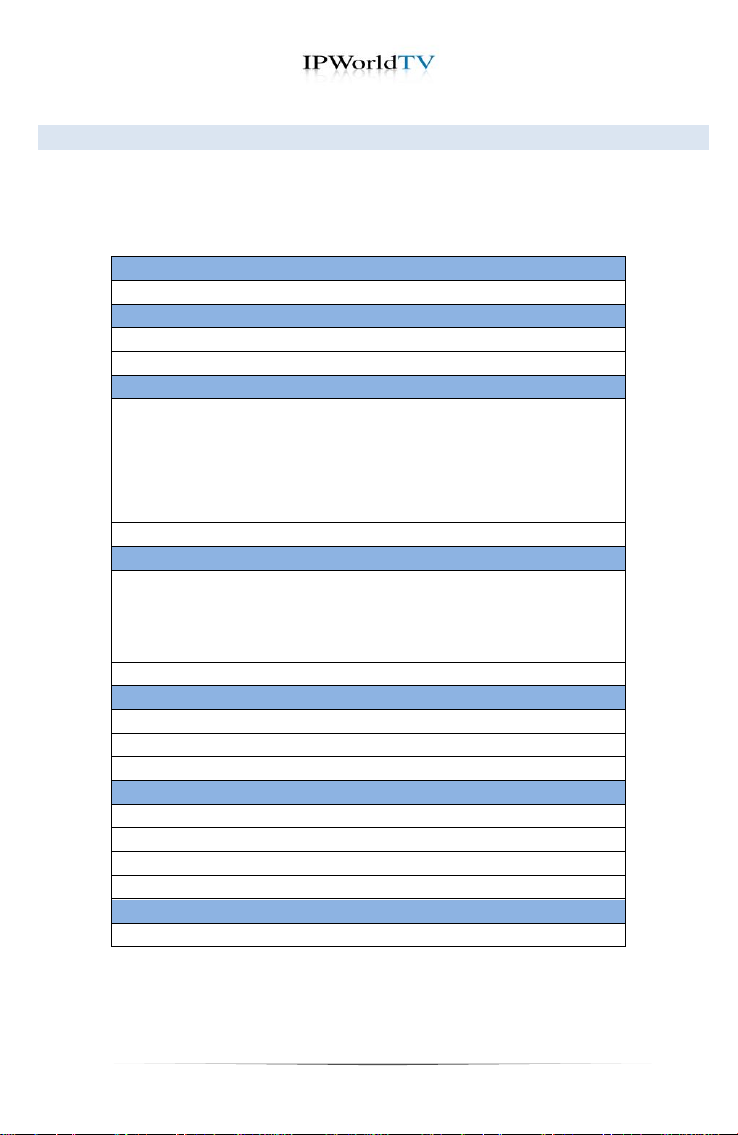
Processor
SoC
500Mhz MIPS
Memory
DRAM
256MB DDR2
FLASH
256MB NAND
Video Engine
Hardware Codec
MPEG1/2
MPEG4 (XVID4) MPEG4_Padding
DIVX3(Msmpeg4)
VC1 WMV9
H264 AVS H261
MJPEG DVDSpu BDRLE
Software Codec
FLV, RMVB, WMV8
Audio Engine
Hardware Codec
AC3 MPEG1(Layer 1,2,3) AAC DVDA PCM DTS
WMA WMAPRO EXAC ATX WMAPRO
DTSLBR Speech DRA FLAC
G711 VORBIS(Ogg)
Software Codec
RMAUDIO
Storage I/O
HDD
SATA x1, support transfer rates up to 1.5Gb/s
SD/MMC
x1
USB
x2, support USB disk, optical driver, WIFI
AV I/O
Composite
RCA x 1
Audio Stereo
RCA x 1
YPbPr
x1 , can use as component with convert cable
HDMI
1.3 x 1
Power
DC JACK
12V x 1
1.3. Specification
FULL HD 1080P IPTV Hardware
5
Page 7

IPQ2 Media Player
Remote
AC Adaptor
WI-FI antenna
Ethernet Cable
HDMI Cable
2. Equipment
You need following items to setup your IPQ2 Media Player:
6
Page 8
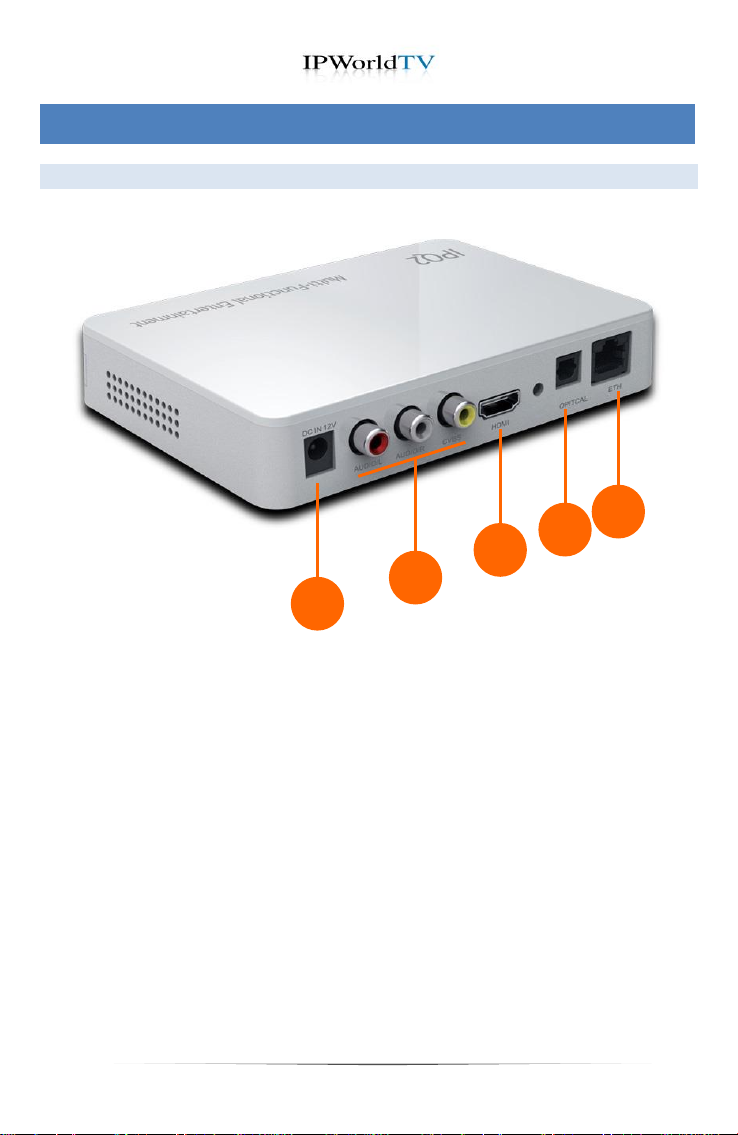
3.1 The IPQ2Media Player – Rear Panels
05
04
03
01
02
3. IPQ2Media Player Panels
1. AC Adaptor
2. Audio/Video(CVBS) output
3. HDMI
4. Optical output
5. ETH slot
7
Page 9
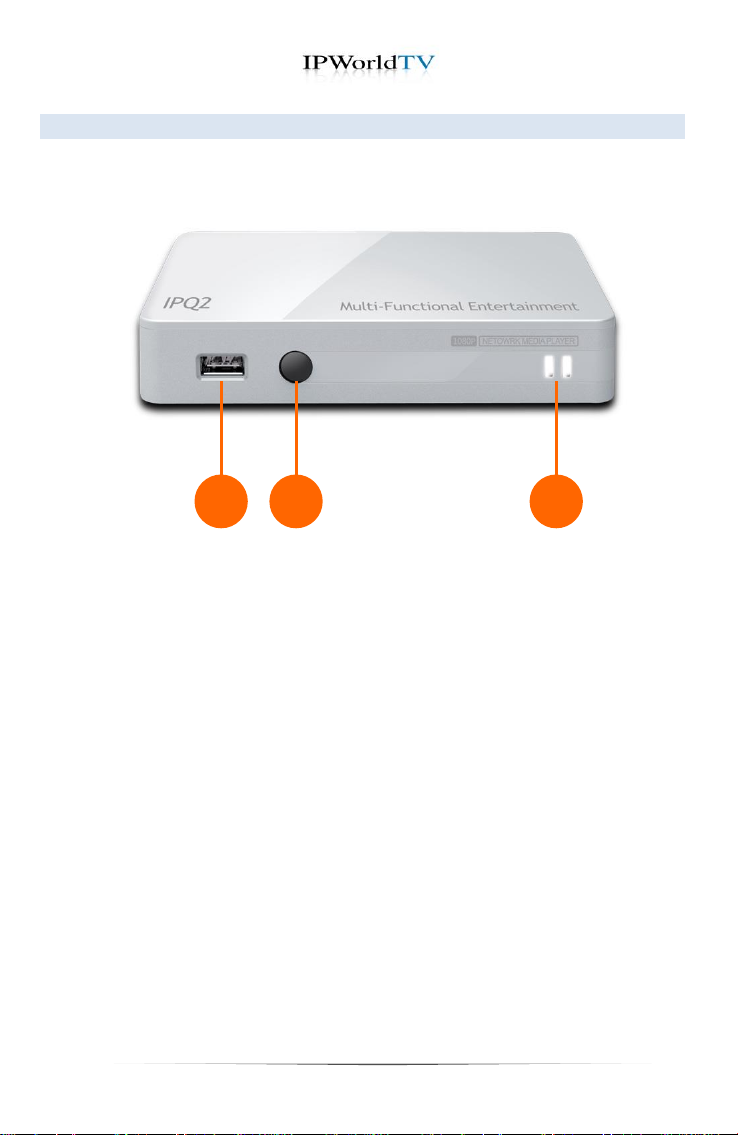
3.2 The IPQ2Media Player - Front Panel
1. USB Slot
2. Infra-red receptor
3. Power On/Off Display
(a) Red light indicates standby state
(b) Green light indicates on state
01
02
03
8
Page 10
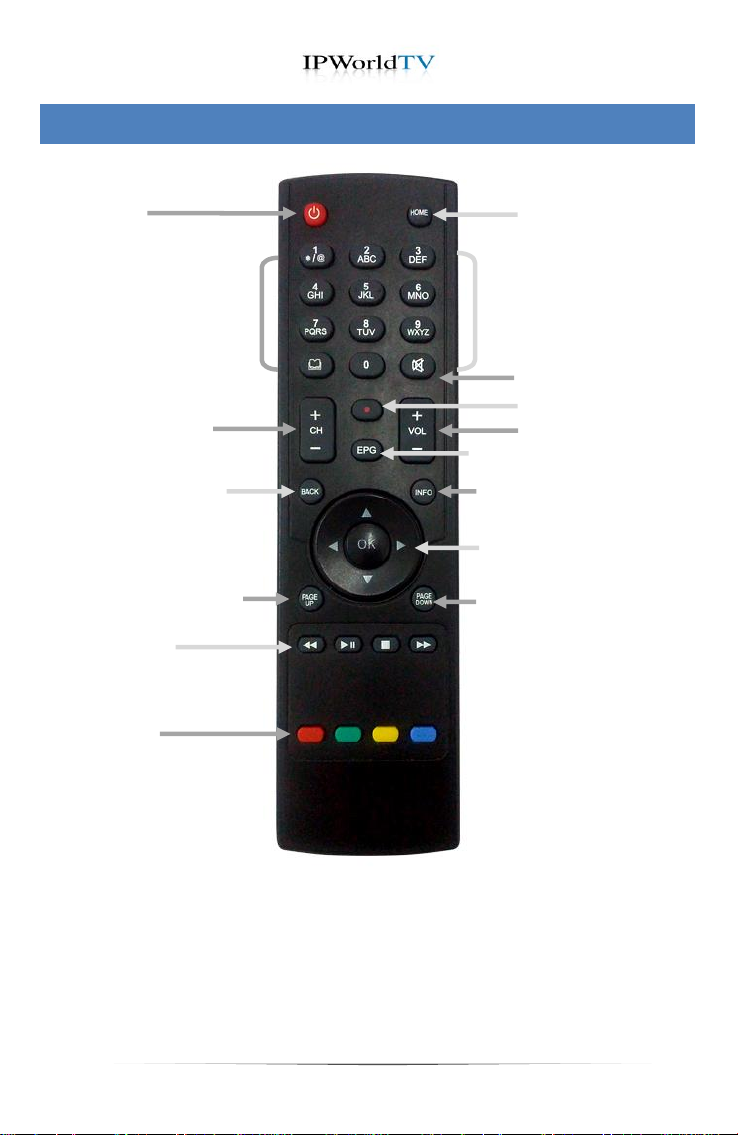
Power On/Off
The number keys can be
used to switch channels for
live TV or radio
Use the alphabetical keys to
type on virtual keyboard
Volume Up/Down
Mute audio
Record to USB HDD
Channel Up/Down for
live TV Channels
“INFO” button shows the current
playing title and play time
“Arrow Keys” When you are
navigating menus use the arrow
buttons to navigate and “OK” to
make selections
Pressing the “Page down” button
moves you backward one page
(if applicable)
EPG (Coming soon/Not available)
Pressing the “Page up”
button moves you forward
one page (if applicable)
Jumps you to “Main Menu”
Play control
previous /play.pause/stop/next
Special function
(Only applicable on special panel)
Pressing the “BACK”
button moves you back
one page (if applicable)
4. The Remote
9
Page 11
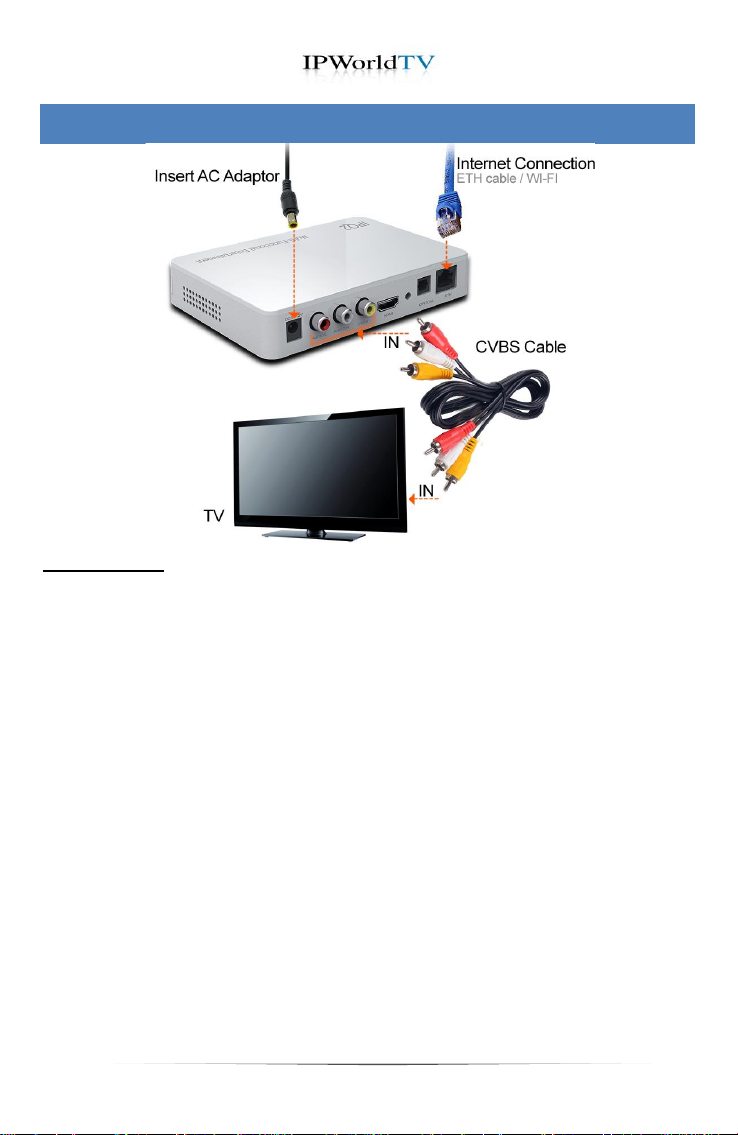
Instructions:
1. Plug the included audio cables (white, red) cables to the back of
your IPQ2Media Player. White cable plugs to white outlet. Red
cable plugs to red outlet. Then connect the other ends to your TV’s
“AUDIO LINE IN”, making sure to match the cable colors to the
same cable colored outlets on Audio LineIn.
2. Plug the included yellow Video cable to your IPQ2Media Player.
Yellow cable plugs to the yellow outlet. Then connect the other end
to your TV’s “VIDEO LINE IN” yellow outlet.
3. Plug the included Ethernet network cable to “LAN” on your
IPQ2Media Player. Then connect the other end to your Internet
router.
4. Connect the power cable to a power outlet. Use the remote control
to power on and off.
5. Follow the “Settings Guide” to adjust screen resolution.
5. Quick Setup (A/V CVBS)
10
Page 12
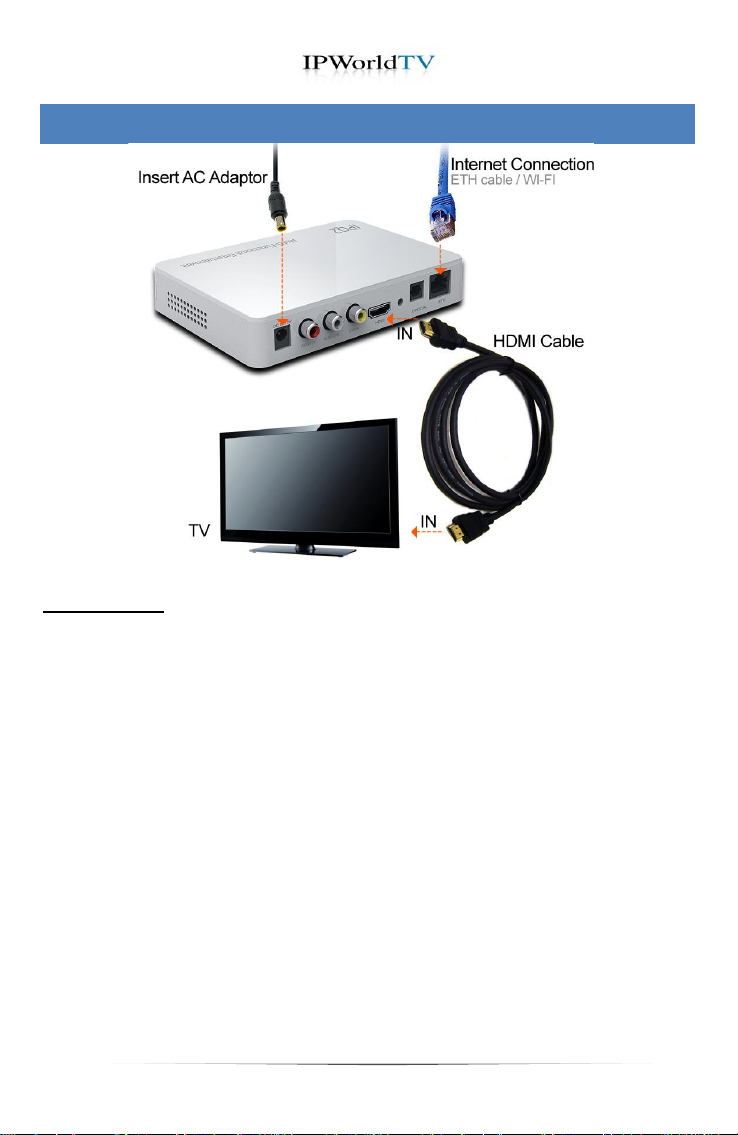
Instructions:
1. Plug the HDMI to the back of your IPQ2Media Player in HDMI Port.
Then connect the other end to your TV’s HDMI Port.
2. Plug the included Ethernet network cable to “LAN” on your
IPQ2Media Player. Then connect the other end to your Internet
router.
3. Connect the power cable to a power outlet. Use the remote control
to power on and off.
4. Follow the “Settings Guide” to adjust screen resolution.
1.
3.
6. Quick Setup (HDMI)
11
Page 13
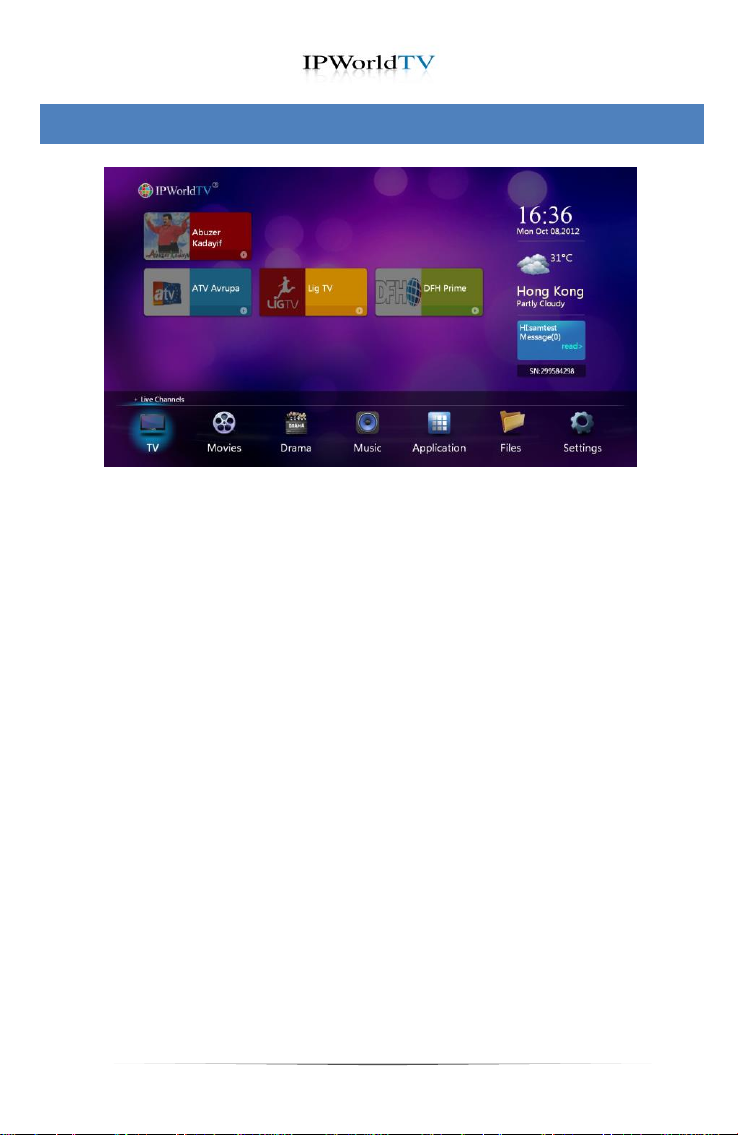
7. The Main Menu
The “Main Menu” is the first screen you will see when you start the
IPQ2Media Player. You can access it at any time by pressing the
“Home” key on your remote. To navigate use the left and right arrow
keys on the remote and then press “OK” to select. Main menu contains
following items.
TV – Watch live digital and HD channels
Movies– Watch your favorite movies collection.
Drama– Watch your favorite series collection.
Music– Hear live digital radio.
Application– Reach to your applications like YouTube, Weather,
Speed Test and etc.
Files – Watch media files by connecting USB Flash or HDD.
Settings – Configure settings of your IPQ2Media Player.
12
Page 14
8. Live TV
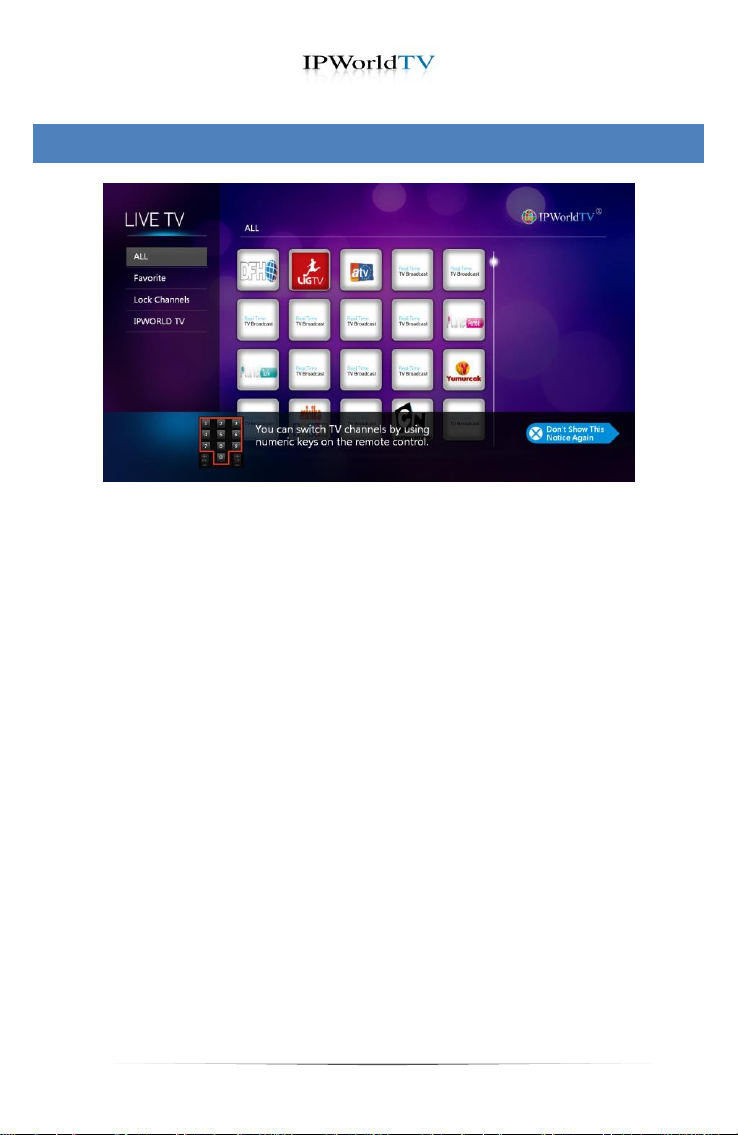
You can go to “TV” section by pressing “OK” key over TV icon in main
menu.
To watch specific channel, move your selection by using arrow keys on
the channel you want to watch and press “OK” key. You can watch
channels by different categories. To go to specific category, move your
selection to category and press “OK”. Default category shows all
channels.
You can switch channels using the “CH+” and “CH-“ keys. Alternatively,
if you know the number for the channel you want to watch, you can
enter this using the number keypad on the remote control; then select
the “OK” key to switch directly to that channel.
Press yellow key on remote to refresh channels and red key to sort
channels.Press blue key if you want to record the selected channel.
You can make your favorite channels list by moving your selection to
“add favorite” and press “OK”. In “Favorite” tab all your favorite channels
will appear and can be watched.
13
Page 15

8.1. Connection to the TV channel
The connection to the channels needs a predefined time. The existing
rule is you get with a faster internet connecting a faster connection to the
channels.
The rule is: higher bandwith = faster connection.
8.2. Record a TV channel(not included in all boxes)
To record a selected channel please press the Rec key on the channel
list and select the record length.
8.3. Stop actual recording(not included in all boxes)
Select the program which you record actually and press the OK key. Press
the yellow key to stop the actual recording.
8.4. Play the recorded program(not included in all
boxes)
To play a recordedprogram please press the Rec key either during
watching the channel on the channel list and select the record
lengthSelect with the "Arrow keys" the recorded program in the HDD
menu and press the OK key to play the recorded program.
8.5. Delete the recorded program(not included in all
boxes)
Select with the "Arrow keys"the recorded program in the HDD menu and
press the green key to delete the recorded program. Confirm with the OK
key.
14
Page 16
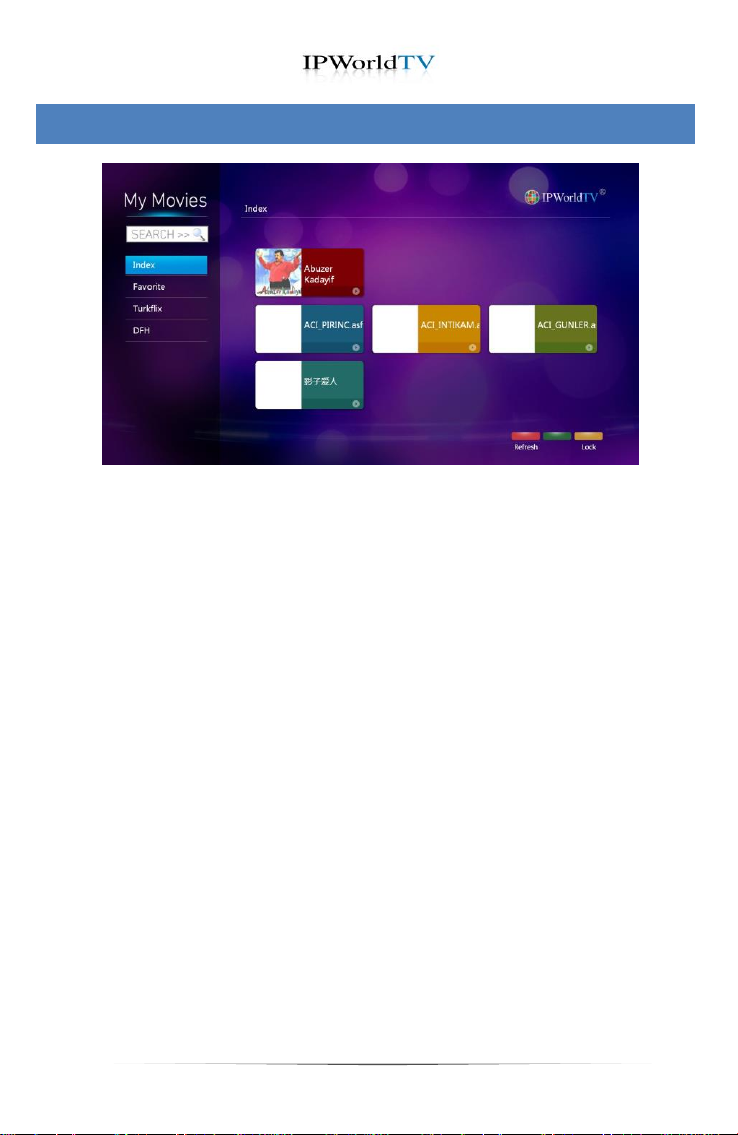
You can go to “Movie” section by pressing “OK” key over Movie icon in
main menu.
To watch specific movie, move your selection by using arrow keys on the
movie you want to watch and press “OK”.
You can watch movie by different categories. To go to specific category,
move your selection to category and press “OK”. Default category shows
all movies.
9. Movies
15
Page 17
10. Drama
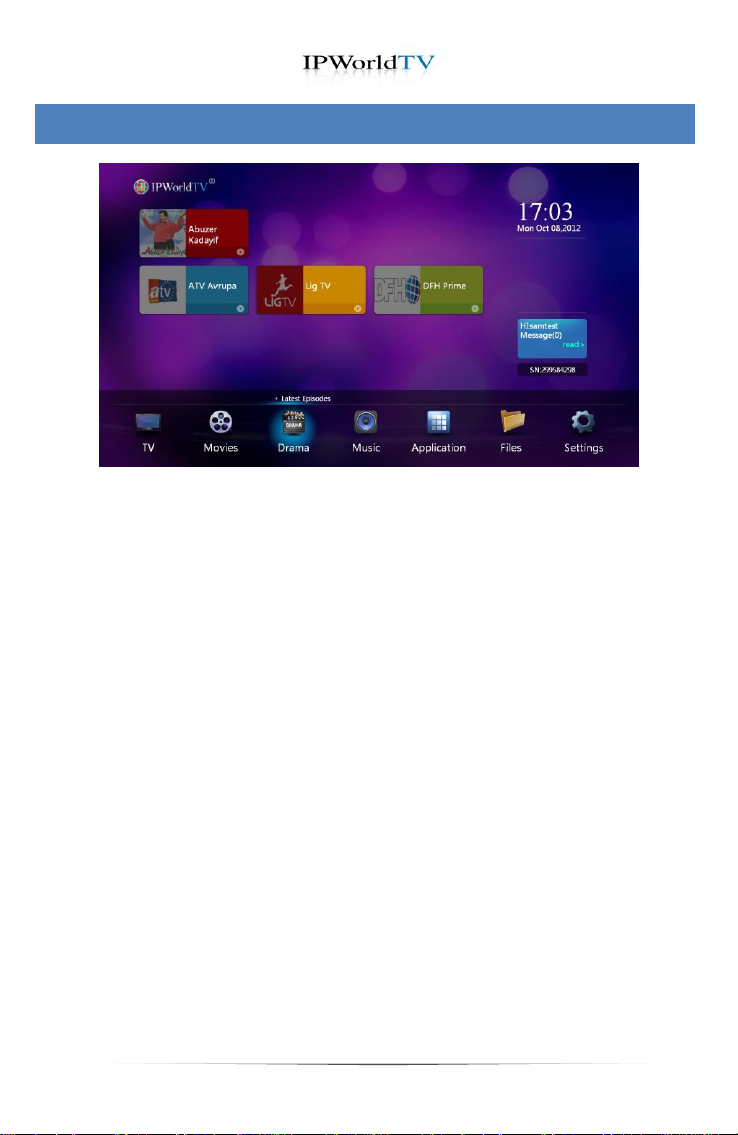
You can go to “Drama” section by pressing “OK” key over Drama icon in
main menu.
To watch specific series, move your selection by using arrow keys on the
movie you want to watch and press “OK”.
You can watch series by different categories. To go to specific category,
move your selection to category and press “OK”. Default category shows
all movies.
16
Page 18
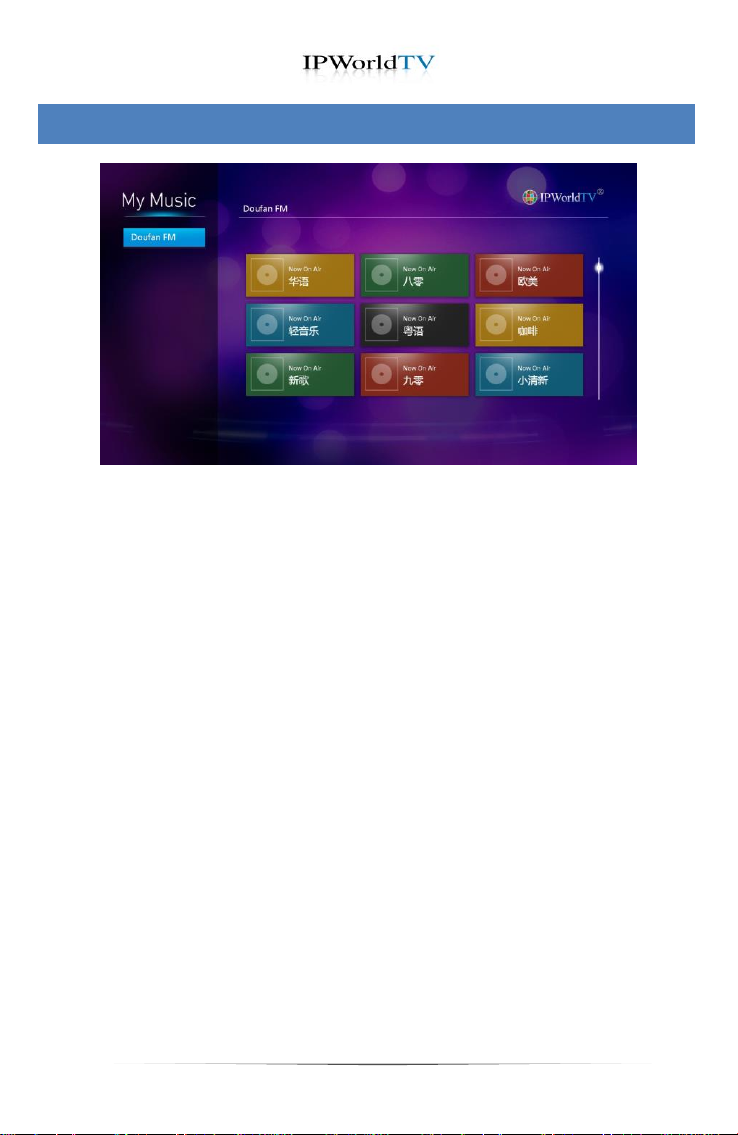
11. Music
You can go to “Music” section by pressing “OK” key over Music icon in
main menu.
To listen specific music channel, move your selection by using arrow
keys on the music channel you want to listen and press “OK” key. You
can listen channels by different categories. To go to specific category,
move your selection to category and press “OK”. Default category
shows all channels.
You can switch music channels using the “CH+” and “CH-“ keys.
Alternatively, if you know the number for the music channel you want to
listen, you can enter this using the number keypad on the remote
control; then select the “OK” key to switch directly to that radio channel.
Press yellow key on remote to refresh channels and red key to sort
channels.
You can make your favorite channels list by moving your selection to
“add favorite” and press “OK”. In “Favorite” tab all your favorite
channels will appear and can be watched.
17
Page 19
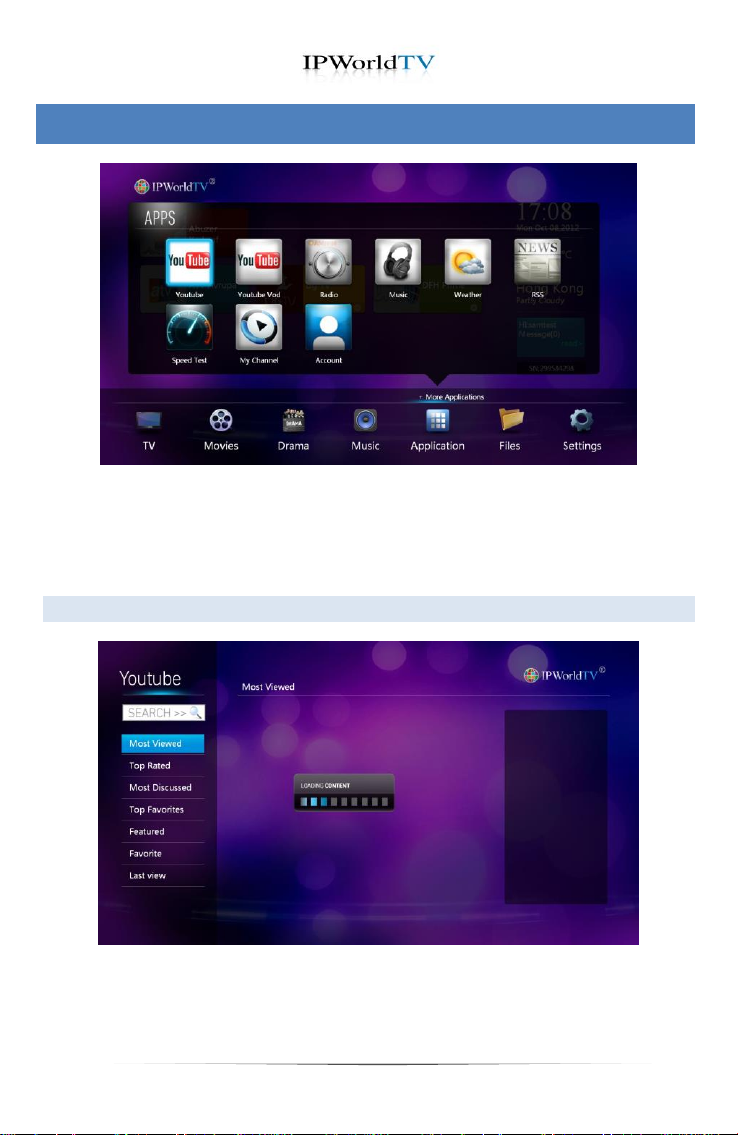
12. Applications
Yopu can go to "Applications" section to use the applications selected
for you to enjoy. You can wathc your YouTube Videos on your TV,
listen selectedradio channels, check the weather or read your
newspaper.
12.1. YouTube
You can go to “Youtube” section by pressing “OK” key over Youtube icon
in main menu.
18
Page 20

12.1.1. The Virtual Keyboard
12.1.2. How to Use the Virtual Keyboard
The default page shows some random videos on Youtube.
You can search Youtube videos by moving your selection over the search
box and press “OK”. The virtual keyboard will appear on the screen
(Please follow instructions below in “The Virtual Keyboard” section to use
virtual keyboard). Enter search query and move selection over the
“Search” button and press “OK”. The search results will appear on
screen.
Move your selection by using arrow keys over the title you want to watch
and press “OK” to play.
You can watch series by different categories. To go to specific category,
move your selection to category and press “OK”.
When input is required, the virtual keyboard will appear allowing you to
enter information via your remote control. The virtual keyboard is an onscreen representation of a keyboard that allows you to select characters
via your remote. The following section provides more details on how to
use the virtual keyboard.
Use the up, down, left, and right arrow keys on your remote to move
around the keyboard and highlight keys. Press “OK” on your remote to
select a key to “type”.
To move the cursor to different input fields, use the arrow keys on your
remote.
To complete and save your input, select the “OK” key on the keyboard.
The “OK” key is located in the lower right corner of the keyboard.
To delete a character, use the “< --” key.
To cancel all changes and exit from the virtual keyboard, press the “back”
key on remote.
There are more keys available, such as capital letters, numbers and
symbols. Press the “SHIFT” button on the remote control to access these
keys. Selecting “SHIFT” again, toggles between the two keyboards.
19
Page 21
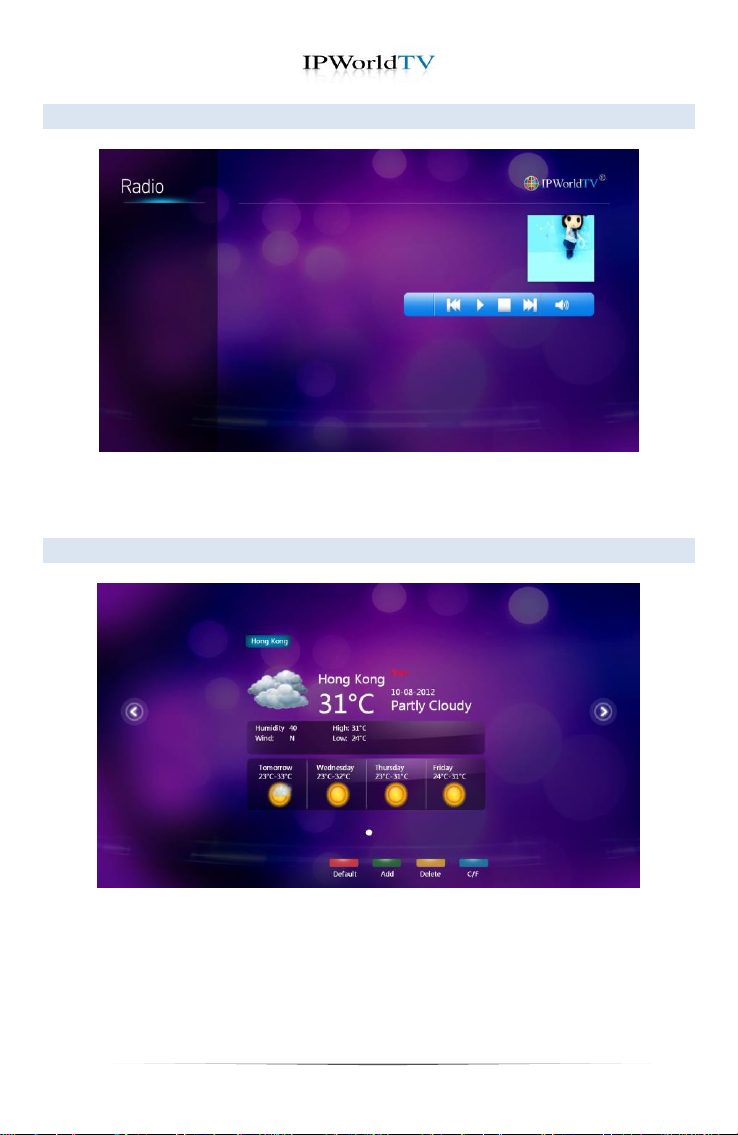
12.2. Radio
To listen specific radio channel, move your selection by using arrow
keys on the music channel you want to listen and press “OK” key.
12.3. Weather
You can go to “Weather” section by pressing “OK” key over Weather icon
in application menu. To see the actual weather in your city you need to
add in the weather menu your city. Press the green key in the weather
menu to enter to the weather settings.
20
Page 22
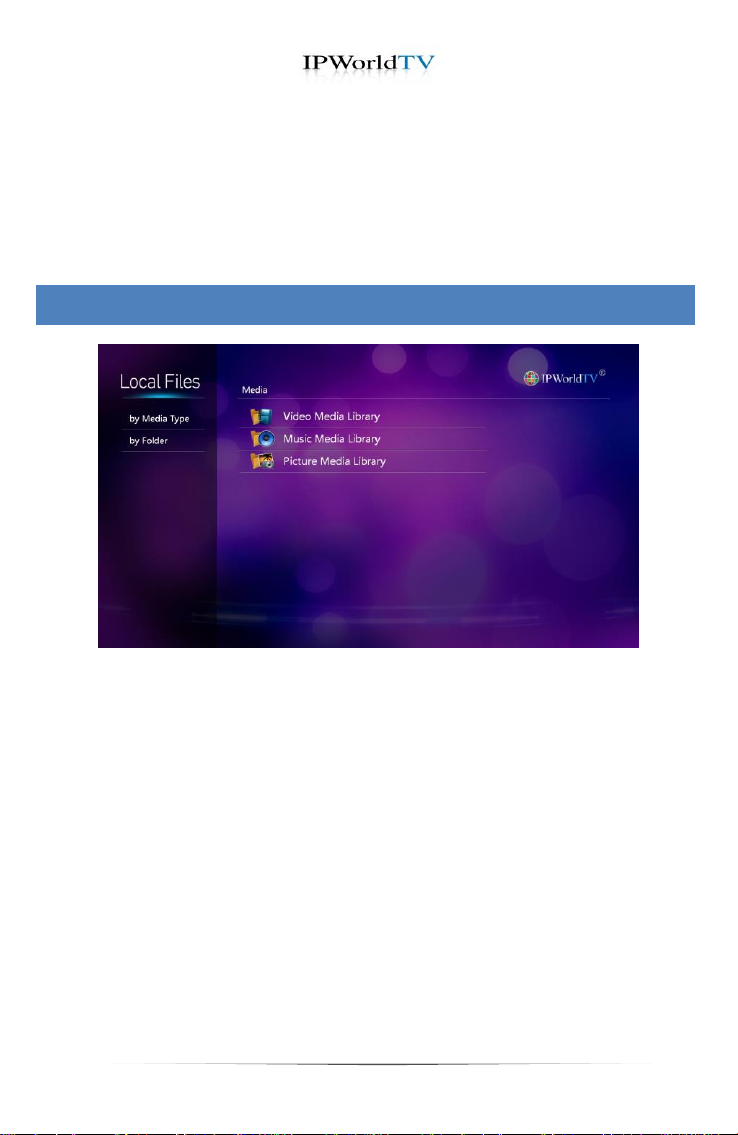
To add your city navigate with the arrow keys to the Add tab and press
the OK key.
To delete your city navigate with the arrow keys to the Delete tab and
press the OK key. Select the city which you want to delete and confirm it
with the OK key.
To see the actual weather in your city on the main menu you need to set
your selected city as a standard.
13. Files
You can play Home media files which include videos, movies, audio and
photos. Connect your USB flash drive or external HDD containing media
files into USB port on IPQ2Media Player‘s side panel.
Go to “Files” section by pressing “OK” key over local files icon in main
menu.
Next screen shows connected USB/Mounted drives. Move your selection
using arrow keys over the drive you want to open and Press “OK”. Press
“Red” key to refresh folders.
Use arrow keys to browse folders and press “OK” over the file you want
to play.
21
Page 23
13.1. Playback Controls
You can forward, rewind, pause and stop movie using remote control
keys.
Press “OK” while watching movie. This will show timeline, controls, file
information.
Move your selection using arrow keys on “info” icon and Press “OK”. It
will show you current played file’s video and audio information.
You can use on screen controls to forward, stop, pause and normalize.
Move your selection using arrow keys over the controls and press “OK”
key to set.
22
Page 24
14.Settings
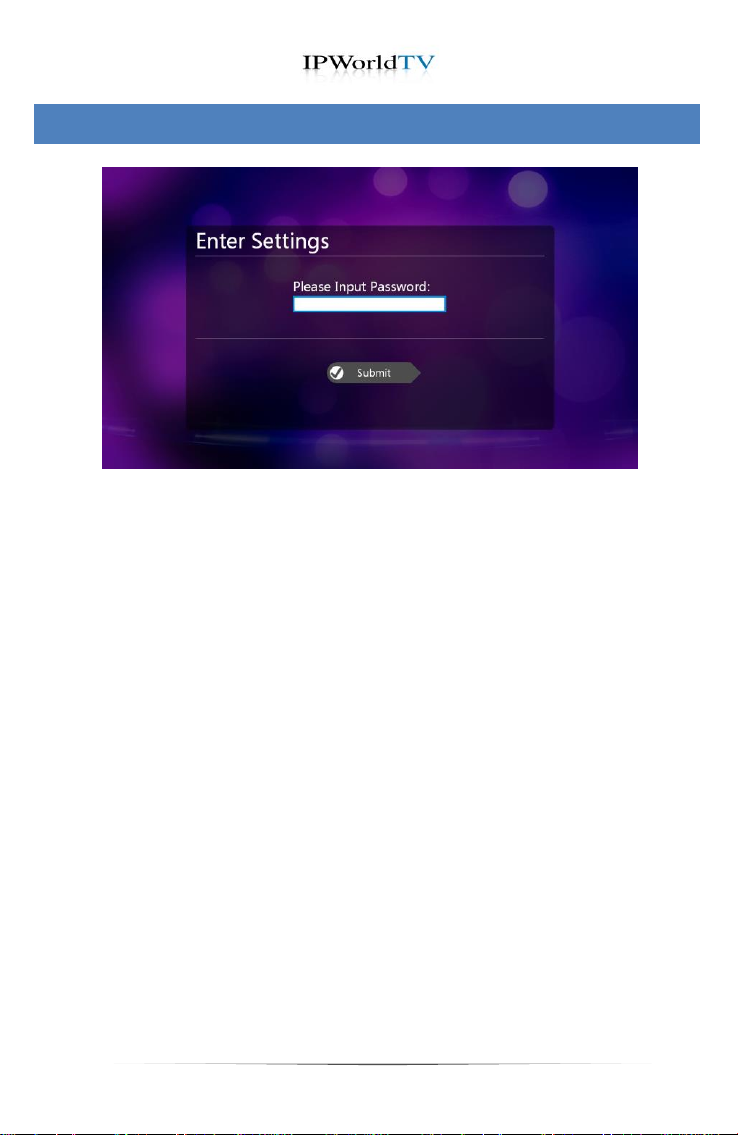
For entering into the Setting menu is the factory-set PIN CODE: 0000.
Please enter with the number keys of the remote control the number
and than navigate with the Arrow keys to Submit and confirm with the
OKkey.
23
Page 25
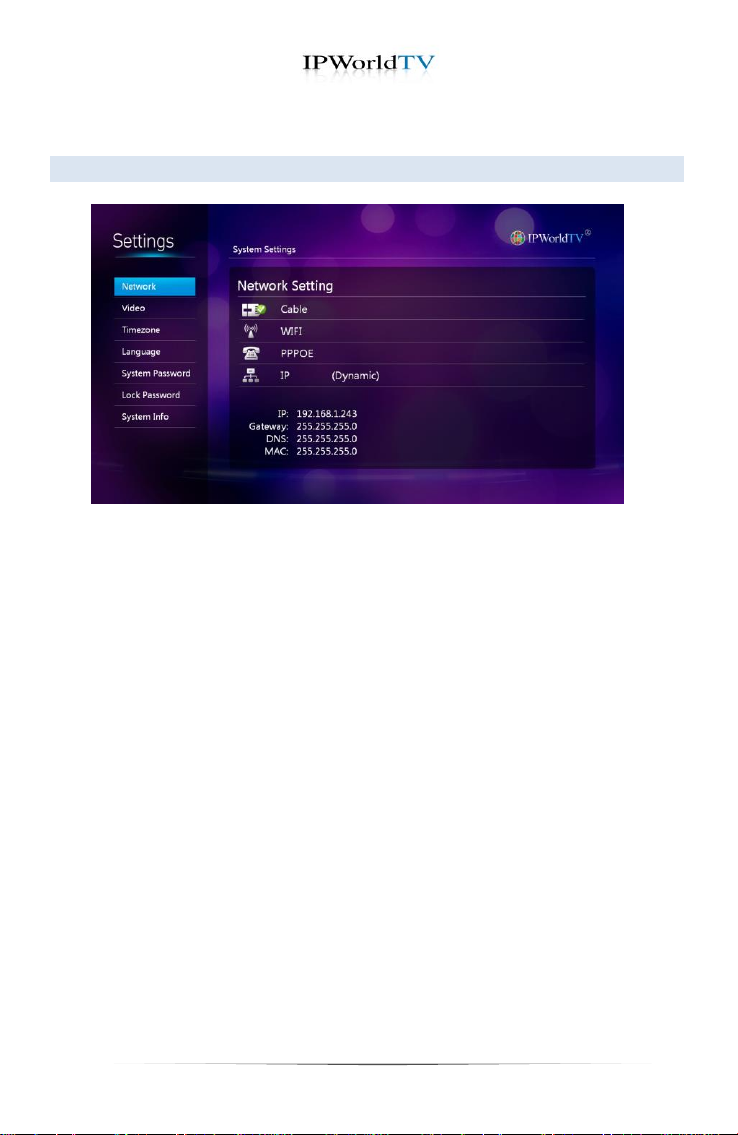
The IPQ2Media Player will automatically configure your IP using DHCP
on startup if you have connected your Ethernet cable. If your IPQ2
Media Player is wireless capable and you have not connected your
Ethernet cable at the startup "WiFi Settings" will come to your screen.
You can select the wireless network you want to connect to and enter
your password to connect. (Make sure that the Ethernet cable is
connected correctly or the password you enter for the wireless
connection is correct.)
To make changes in your method of connection you can go to
“Settings” and press “OK” key on remote. Under the Network Setting
you can select Cable, WiFi, or PPPOE for connection methods and you
can select between Static and DHCP IP.
Use numeric keys on remote to enter values and follow the on screen
instructions to save your changes.
14.1. Network Settings
24
Page 26
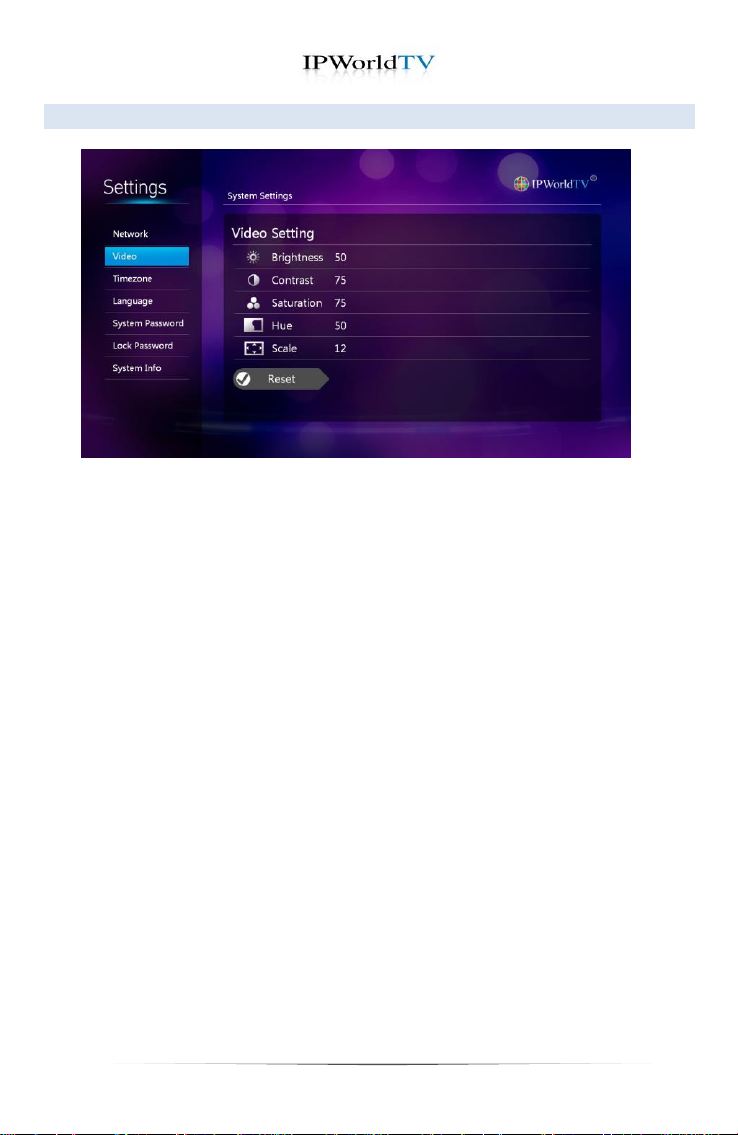
In “Video” tab under “Settings” menu, you can adjust brightness, contrast
and the other video settings of IPQ2Media Player.
Move your selection to any of the selections and Press “OK” to enter the
settings and use left & right arrow keys to adjust.
Press “Back” key to exit.
14.2. Video Settings
25
Page 27
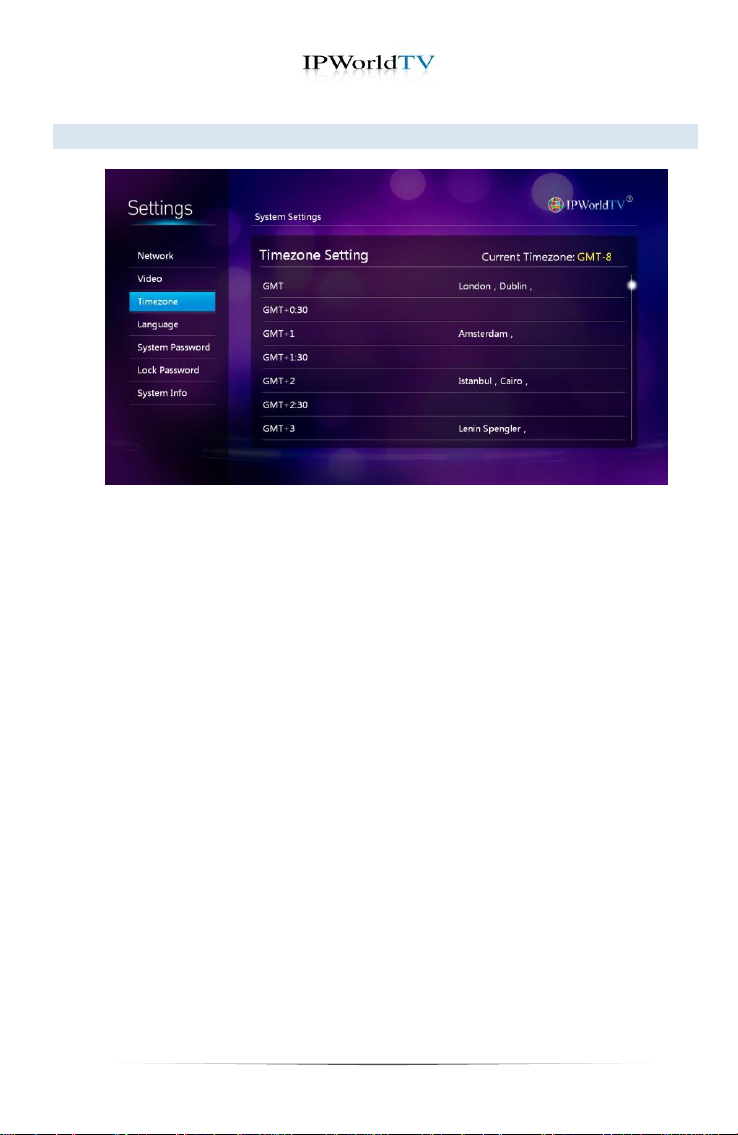
14.3. Time Zone Settings
In “Time Zone” tab under “Settings” menu, you need to select
time zone of your location.
Use arrows to make selection of your time zone. Press “OK” on Submit to
save settings.
Press “Back” key to exit.
26
Page 28
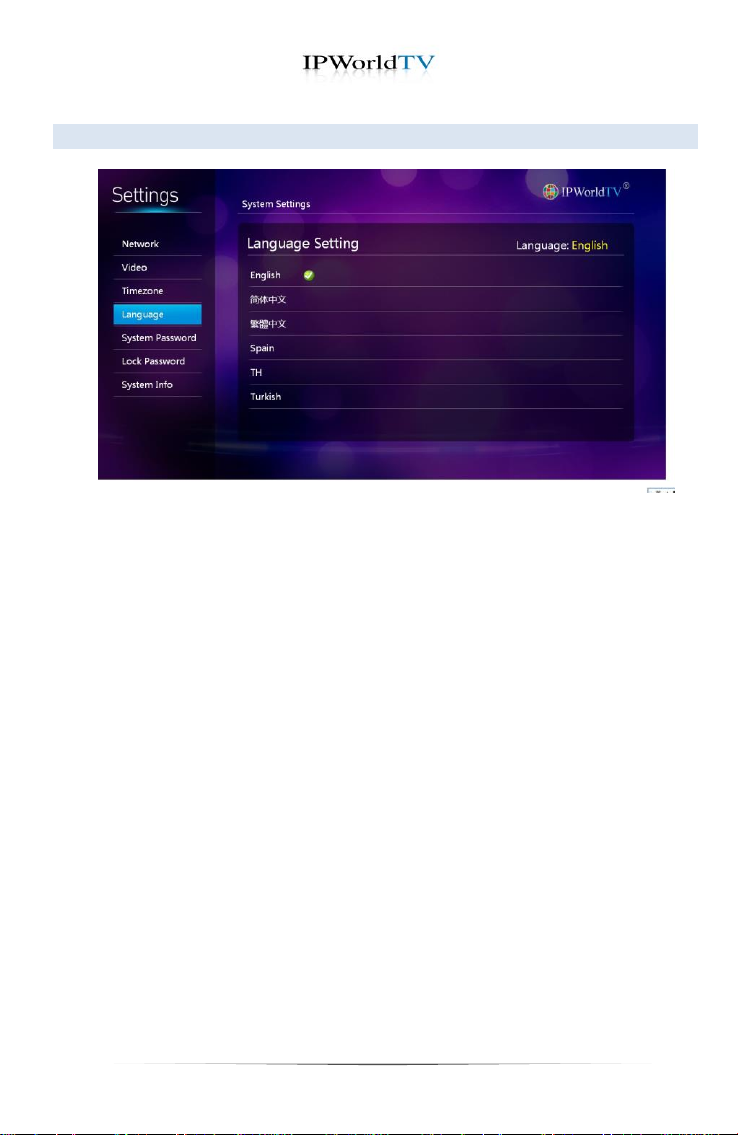
14.4. Language Settings
In “Language” tab under “Settings” menu, you need to select
Language of your IPQ2 Media Player.
Use arrows to make selection of your time zone. Press “OK” on Submit to
save settings.
Press “Back” key to exit.
27
Page 29
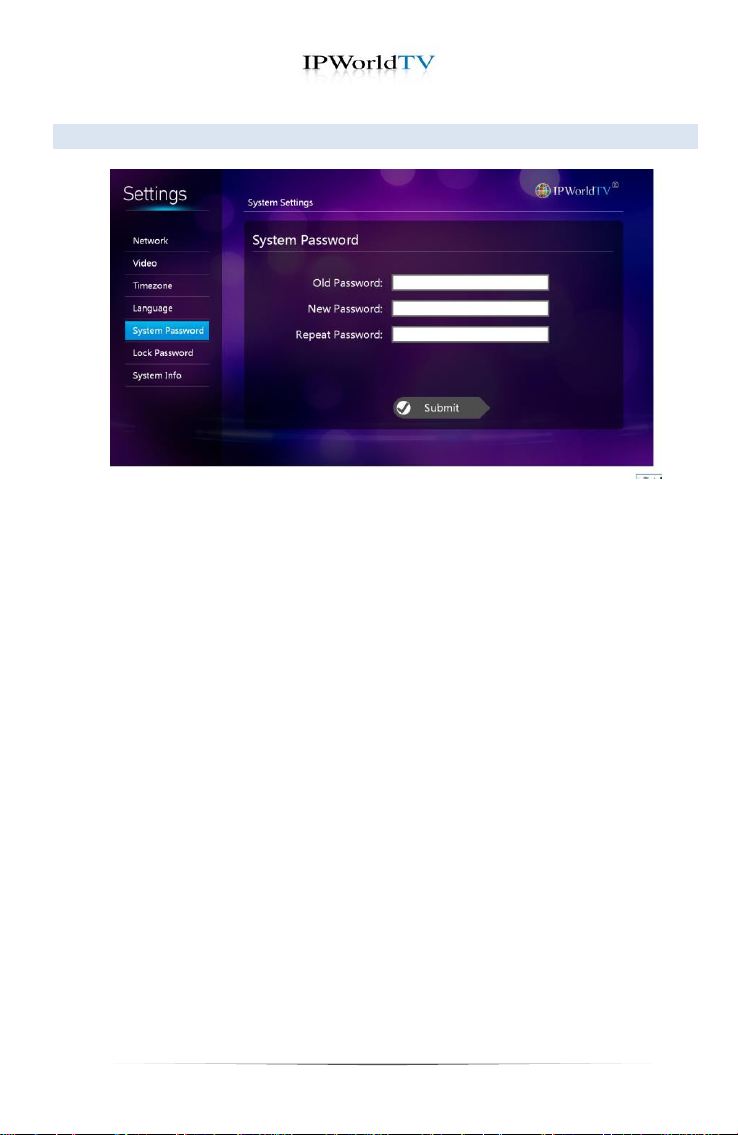
14.5. System Password
In “System Password” tab under “Settings” menu, you can change you
password to something you want.
Use arrows to move in between boxes. Press “OK” on Submit to save
settings when you are done.
Press “Back” key to exit.
28
Page 30
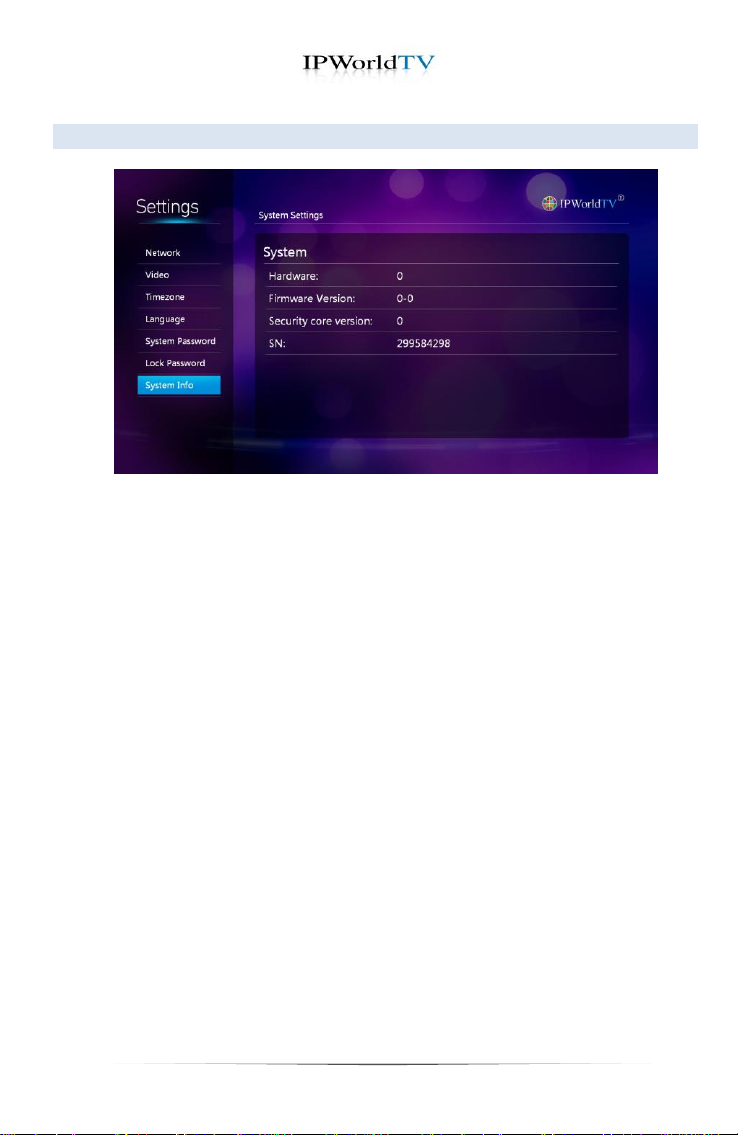
14.6. System info
In “System info” tab under “Settings” menu, you can view the Hardware,
Firmware Version, Security Core Version and Serial Number.
29
Page 31
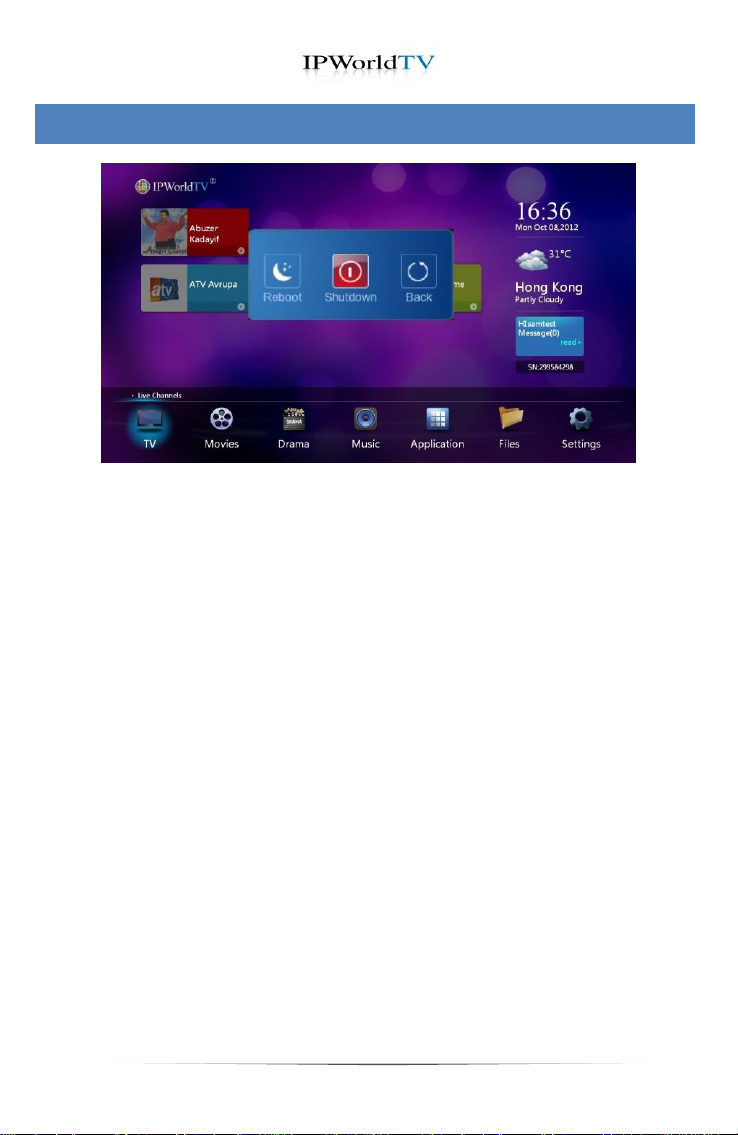
14. Shutdown&Reboot
To Shutdown or Reboot your system softly you need to press the
Power On/Off key on your remote.
30
Page 32

General
Internet Connection
Frequently Asked Questions
Q. My IPQ2 Media Player will not turn on.
A. Make sure the power pin is properly inserted into the back of the
IPQ2Media Player and power button is set to the “ON” position.
Q. I get an “error” screen when I start the box.
A. Your IPQ2Media Player is not able to access the service provider. This
is usually caused by an error establishing a connection to the Internet.
Please see “My IPQ2Media Player is not connecting to the internet”
below.
Q. My IPQ2Media Playeris not connecting to the internet.
A. If your IPQ2Media Playeris not able to connect to the Internet, make
sure you have connected the HDBoxto your router which is connected to
ONT device and you have configured IP settings properly.
a) Check if other devices connected to the router can access the Internet;
for example your PC.
b) Check that all the cables are connected firmly.
31
Page 33

Safety Information
AC Power Safety Warnings
Conventions used in this manual
Electrical Safety
Important Safety
Before getting started, please read the important safety information
below.
Install the IPQ2Media Playernear an AC outlet. The AC power cord is the
IPQ2Media Player‘smain AC disconnecting device and must be easily
accessible at all times.
For your safety, the power cord provided with your system has a
grounded plug. Always use the power cord with a properly grounded wall
outlet to avoid the risk of electrical shock.
WARNING: Information to prevent injury to yourself when trying to
complete a task.
CAUTION: Information to prevent damage to the components when
trying to complete a task.
To prevent electrical shock hazard, disconnect the power cable from the
electrical outlet before relocating the system.
DO NOT OPEN THE CHASSIS ANY TIME.
32
Page 34

Operation Safety
Before using the product, make sure all cables are correctly connected
and the power cables are not damaged. If you detect any damage,
contact IPWorldTV Inc.immediately.
To avoid short circuits, keep paper clips, screws, and staples away from
connectors, slots, sockets and circuitry.
Avoid dust, humidity, and temperature extremes. Do not place the
product in any area where it may become wet. Place the product on a
stable surface.
Slots and openings are provided for ventilation; to ensure reliable
operation of the product and to protect it from overheating. These
openings must not be blocked or covered. This product should never be
placed near or over a radiator or heat register.
33
 Loading...