

IPTC Albatross DEX28-GE2P Quick Installation Manual
IPTC Albatross™ DEX28-GE2P – Quick Installation Guide
1
DEX28-GE2P – Quick Installation Guide
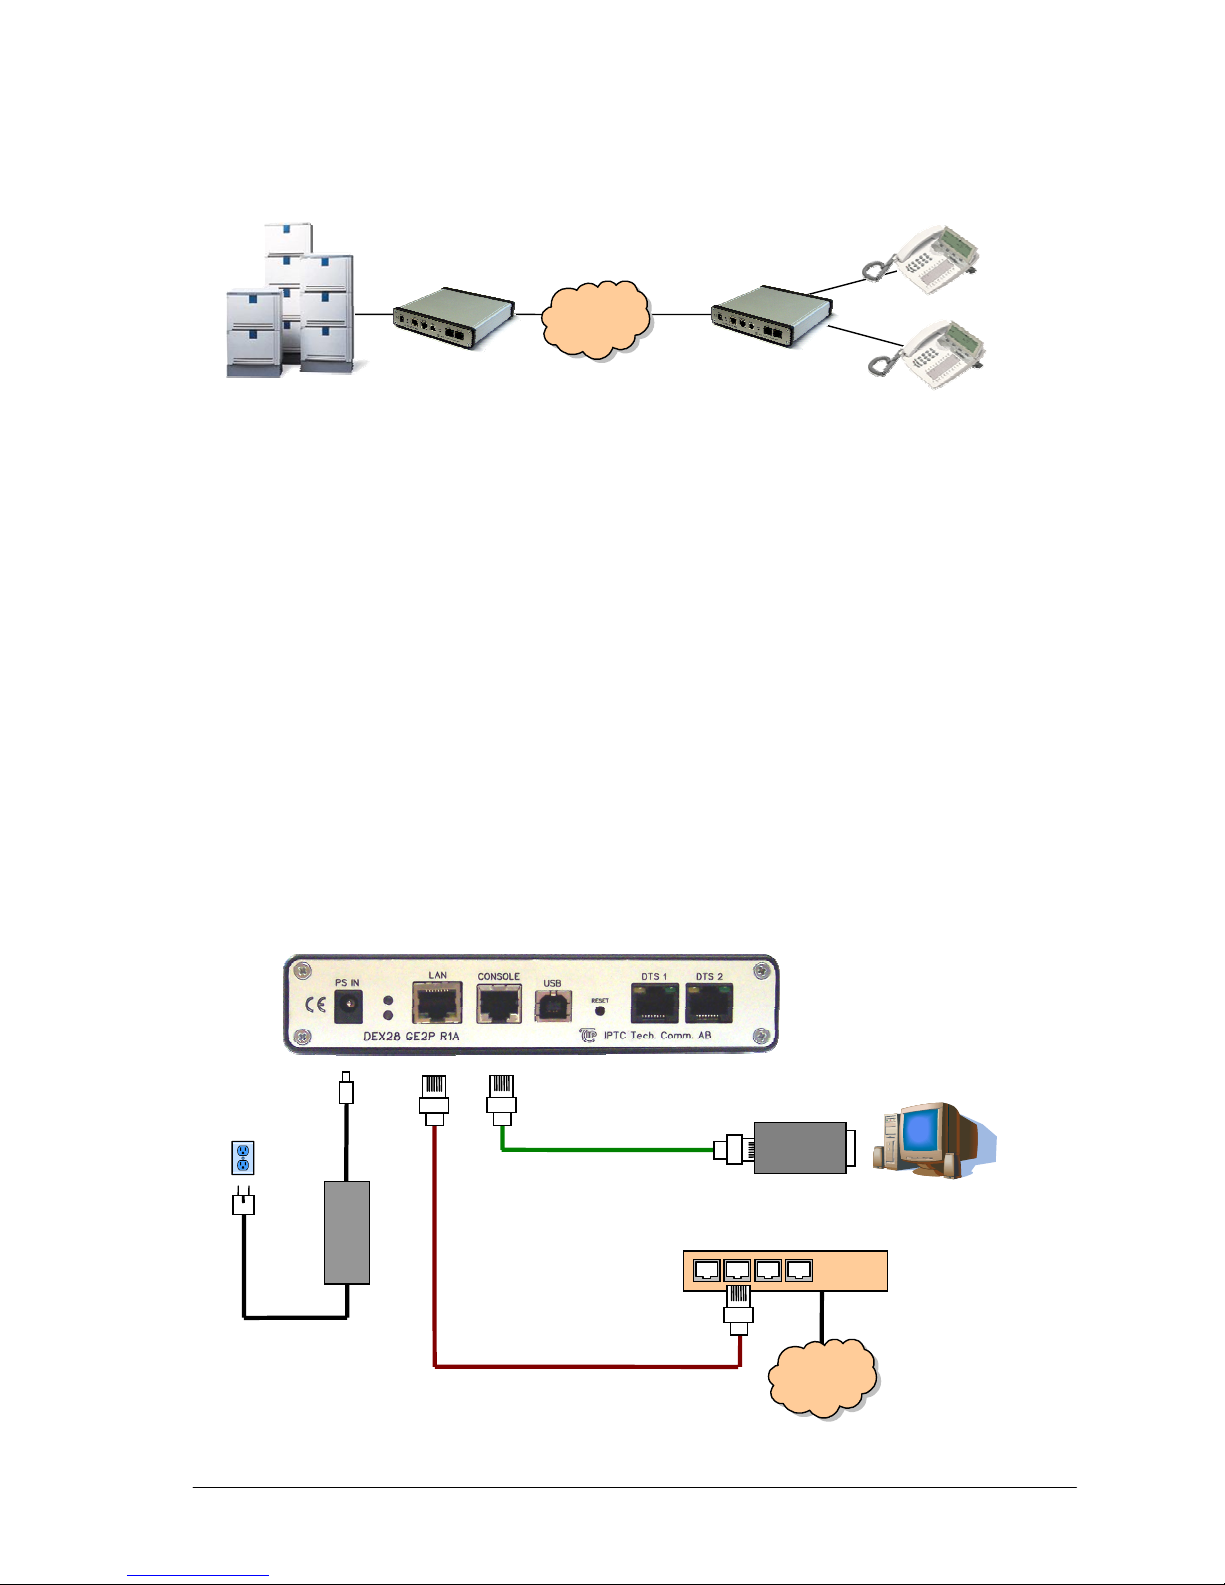
A) Switch Side
1. Connect DEX28 to IP network
2. Connect DEX28 console port to PC/terminal using provided DB9-RJ45 adapter
3. Connect the power to DEX28
4. Configure static or DHCP IP address setting using PC/terminal
5. Connect telephony ports to MD110 ELU28 board
6. Connect to DEX28 using web browser, and optionally configure users and port parameters
B) Extension Side
1. Connect DEX28 to IP network
2. Connect DEX28 console port to PC/terminal using provided DB9-RJ45 adapter
3. Connect the power to DEX28
4. Configure static or DHCP IP address setting using PC/terminal
5. Connect telephony ports to Ericsson Digital Telephone Sets (DTS)
6. Proceed with configuration using web browser, and configure DTS connection parameters.
At least Switch Side DEX28 Gateway IP address should be configured.
Note: It is recommended to assign static IP address to Switch Side DEX28 gateway. IP address of the Extension
Side DEX28 can be dynamic and is not important unless intermediate firewalls should be accounted.
IP
Switch Side Extension Side
GE2P
/ GW
GE2P
/ EXT
Ethernet Switch or Hub
IP
Power Supply
Adapter
RJ45-DB9 Adapter
Power Supply
Cord
RJ45 STP
Patch Cable
IPTC Albatross™ DEX28-GE2P –Quick Installation Guide
2
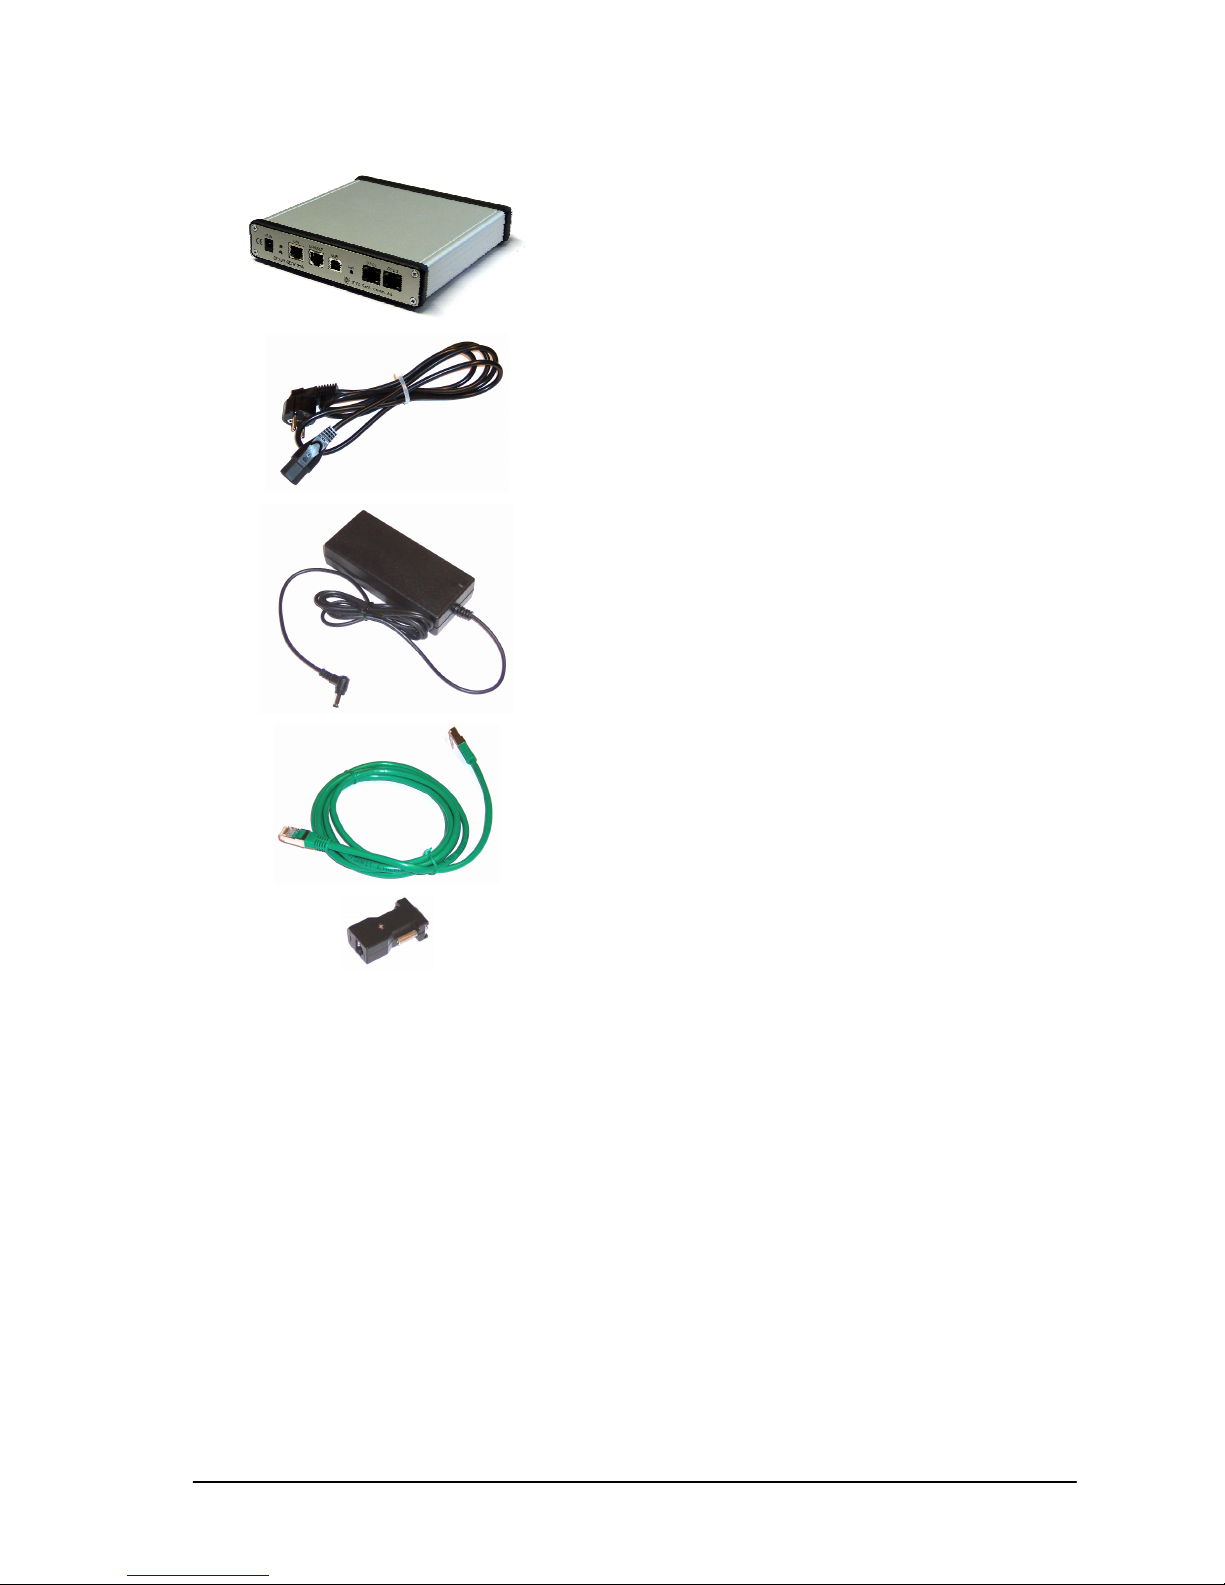
Parts List
The shipment of your DEX28 VoIP Gateway includes the following items:
One DEX28-GE2P VoIP Gateway, preconfigured in
factory for:
• Switch Side (to PBX), or
• Extension Side (to DTS)
One 2m long power supply cord (black).
One desktop AC/DC power adapter 18W.
One 2m long RJ45 STP patch cable (green).
Note: Patch cable can be used either to connect DEX28GE2P to local area network, or to connect its console port
to RS232 using RJ45-DB9 adapter.
One RJ45 to DB9 RS232 adapter (black).
The following cables will be locally sourced:
• Cables between DTS and DEX28-GE2P configured in Extension Side mode.
• Cables between PBX and DEX28-GE2P configured in Switch Side mode.
Unpacking
Check that the equipment has not been damaged during transport. Damaged equipment that needs to be replaced or
repaired at a service shop must be reported immediately and sent back.
Aids
To be able to install DEX28-GE2P one of the following equipment is necessary:
Serial setup (over Console port):
• Terminal or PC with terminal emulation (HyperTerminal)
Web setup (using network):
• PC installed with Internet Explorer (version 5.5 or higher)
IPTC Albatross™ DEX28-GE2P – Quick Installation Guide
3
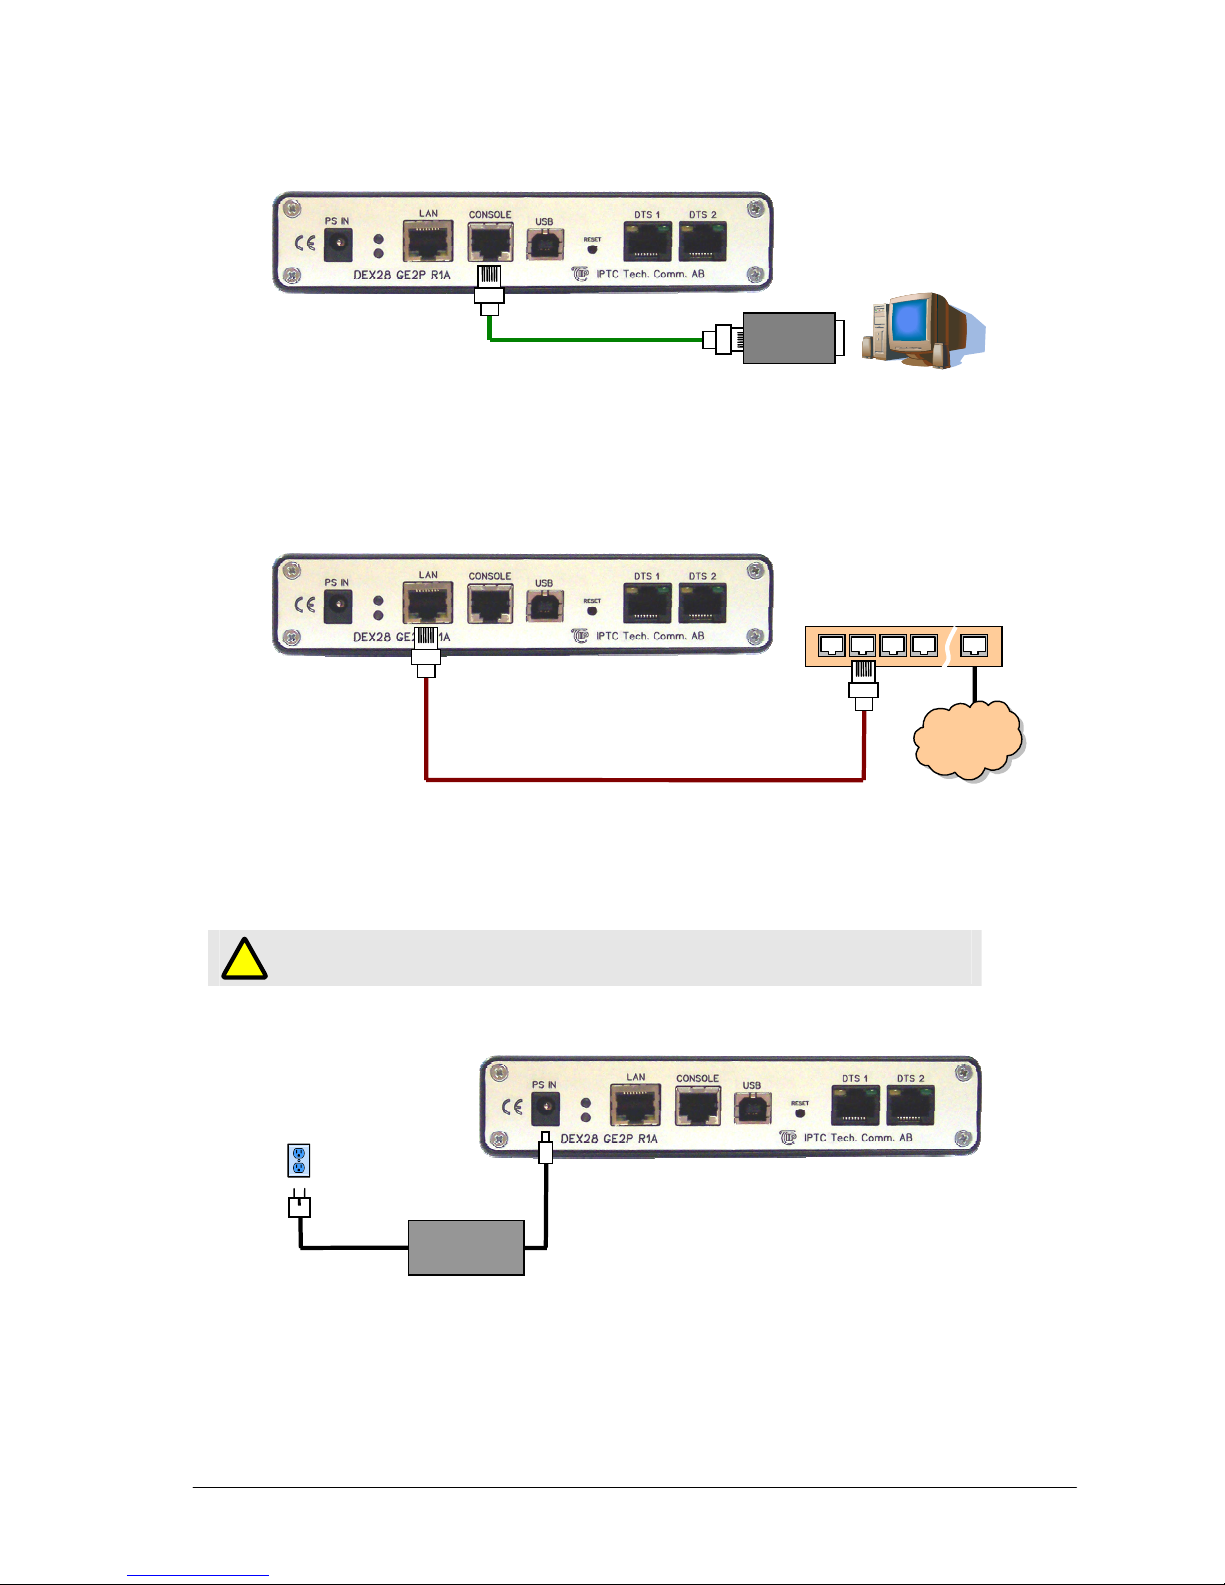
Connect a Terminal or PC to the Console Port
The console port is a service port to which you can connect a terminal or PC in order to configure the software by
using the command line interface. To connect a terminal or PC to the console port, follow the steps:
1. Connect the RJ-45 patch cable to the gateway’s console port and RJ45-DB9 adapter.
2. Connect the DB-9 connector to at terminal or PC.
Connect LAN to the Ethernet Port
To connect DEX28 to local area network, follow the steps:
1. Connect one end of the RJ-45 patch cable to the gateway’s Ethernet port.
2. Connect the other end of the RJ-45 patch cable to Ethernet hub/switch directly. Connection can be also
made indirectly through patch panel or wall outlet.
Connect the Power and Turn-On the Gateway
Caution:
Be sure to use the power supply that was supplied with your DEX28 gateway.
To connect the AC adapter to the DEX28 gateway and turn it on, follow the steps:
1. Connect one end of the power supply cable to the gateway’s input jack.
2. Connect the other end of the power supply cable to the desktop power adapter.
3. Plug the power cord of the desktop power adapter into an electrical outlet.
The blue LED on the front panel of the gateway lights when you connect the gateway to a power source. The
gateway is now ready to be used. If the blue LED does not turn on, refer to the “Troubleshooting the gateway”
chapter.
!
Ethernet Switch
IP
RJ45 STP
Patch Cable
RJ45-DB9 Adapter
Power Supply
Adapter
Power Supply
Cord

IPTC Albatross™ DEX28-GE2P –Quick Installation Guide
4
System Configuration Using Console Port
Start HyperTerminal (Start->Programs->Accessories->Communications->HyperTerminal).
RS232 settings should be 115200,8,n,1 with flow control disabled.
HyperTerminal should start and after pressing enter, following welcome screen from DEX28-GE2P should appear:
Type in username “setup” and press enter, then type in password “admin” and press enter.

IPTC Albatross™ DEX28-GE2P – Quick Installation Guide
5
Connect Switch Side DEX28 to PBX
Direct connection to PBX (when DEX28 is placed in patch panel room):
Indirect connection to PBX:
Note:
Instead of RJ45-RJ11 or RJ45-RJ45, RJ11-RJ11 Flat Patch Cable can be used.
RJ11 Wall Outle
t
RJ45-RJ11
Flat Patch
Cable
…
RJ45-RJ45
Patch Cable
…
Patch Panel
Patch Panel
 Loading...