

Page 1

IP0051
User Guide ver. 1.1
5 SIP + 1 IAX
page 1 of 20
IP0051 – SIP/IAX based VoIP Phone
© IPshop ApS 2009
User Guide v. 1.1
C:\I_drev_tmp\IP0051\IP0051_user_guide.doc Ver. 1.1
Page 2

IP0051
User Guide ver. 1.1
5 SIP + 1 IAX
page 2 of 20
Content
1. Technical Parameter and Hardware Specifications ……………………………………….. 3
1.1 Technical Parameter ………………………………………………………………………. 3
1.2 Hardware Specifications ………………………………………………………………….. 3
2. Packing ……………………………………………………………………………………. 3
3. Safety Information ………………………………………………………………………... 4
4. Installation ………………………………………………………………………………… 5
5. Keypad and LED Description …………………………………………………………….. 6
5.1 Keypad description ………………………………………………………………………... 6
5.1.1 Number Key Description …………………………………………………………………. 6
5.1.2 Function Key Description ………………………………………………………………… 7
5.1.3 Softkey Description ……………………………………………………………………….. 8
5.2 LED status display explanations ………………………………………………………….. 9
6. Configuration via Keypad ………………………………………………………………… 9
6.1 Network config …………………………………………………………………………… 9
6.2 VOIP config ………………………………………………………………………………. 11
7. Configuration via WEB …………………………………………………………………… 11
7.1 Network Configuration …………………………………………………………………… 12
7.2 SIP Configuration ………………………………………………………………………… 13
7.3 IAX2 Registration ………………………………………………………………………… 15
7.4 Function Key ……………………………………………………………………………… 15
7.4.1 LINE ………………………………………………………………………………………. 16
7.4.2 Memory Key ……………………………………………………………………………… 16
7.4.3 Key Event …………………………………………………………………………………. 17
7.4.4 DTMF ……………………………………………………………………………………... 17
8. Basic Call Functions ……………………………………………………………………… 17
8.1 Making calls ………………………………………………………………………………. 17
8.2 Answering calls …………………………………………………………………………… 18
8.3 HOLD ……………………………………………………………………………………... 18
8.3.1 Call waiting ……………………………………………………………………………….. 18
8.3.2 Call holding ……………………………………………………………………………….. 18
8.4 Forward …………………………………………………………………………………… 18
8.5 Blind transfer ……………………………………………………………………………… 18
8.6 Attend Transfer …………………………………………………………………………… 19
8.7 Three Way Call …………………………………………………………………………… 19
8.8 SMS ………………………………………………………………………………………. 19
8.9 Customized Ringtones ……………………………………………………………………. 19
9 Software Upgrade …………………………………………………………………………. 19
© IPshop ApS 2009
C:\I_drev_tmp\IP0051\IP0051_user_guide.doc Ver. 1.1
Page 3

IP0051
User Guide ver. 1.1
5 SIP + 1 IAX
page 3 of 20
1. Technical Parameter and Hardware Specifications
1.1 Technical Parameter
Support Protocol:
Support SIP (RFC3261, RFC2543)
Support IAX2
Support Voice codec: G711A/u, G729, and G723.1
Support G.168 echo cancellation standard, compliant 96ms with speaker mode.
Support Jitter Buffer, VAD, CNG, SIP Domain name register, point-to-point Call
Support RTP and RTCP voice communication
Support the Inbound/Outbound transmission; SIP info, DTMF Relay, RFC2833
Support many countries' standard ring
NAT transversal: Support STUN, CITRON, AVS Mode
Support SIP domain, SIPAuthentication (none, basic, MD5), Domain Name parse
Support 5 SIP servers and 1 IAX2 account synchronously, can call in and out by either proxy
Support SIP application, including SIP call forward/transfer/holding/waiting
Network Features:
Support two models: Bridge and Router, integrate two ports router function.
Support basic NAT and NAPT.
Support PPPoE for xDSL, and support off hook auto dial.
Support DHCP Client for WAN;
Support DHCP server for LAN;
Support DNS relay on LAN port and can provide DNS service for LAN Network equipment.
Support DNS SRV on WAN port
Support SNTP Client, can auto-obtain time from internet
Use advanced DSP tech to insure high quality voice
Use advanced jitter buffer tech to prevent the delaying and losing for package information
Support Network Tools, including ping, race route, and telnet client.
Support three modes to configure WAN port IP, they are: static, DHCP, and PPPoE.
Provide firewall control for small LAN.
Provide optional communication priority level for small LAN.
Support VPN—L2TP and Openvpn(SSL) protocol
Support Secondly Layer QoS (802.1p)
Advanced Function:
Support headset
Support 128*64 LCD
Support Power over Ethernet (POE) function
3 Interactive soft key, with more humanized operating prompt.
Support 5 SIP servers synchronously.
Support local voice record, message and server message.
Support sending and receiving short message
Support message wait indication.
Support user defined ring tone.
Support L2TP client.
Support call pickup, join call, auto-redial.
Support 5 programmable keys, 5 PSTN keys and 5 SIP keys, and it can be connected with the
expansion board
which can display more numbers' online status.
Support presence, BLF, Pust to talk
Support dial switchboard and extension number at one time, directly get through the ext. later.
Support phone book, and can set different rings according to different incoming callers.
© IPshop ApS 2009
C:\I_drev_tmp\IP0051\IP0051_user_guide.doc Ver. 1.1
Page 4

IP0051
User Guide ver. 1.1
5 SIP + 1 IAX
page 4 of 20
Call waiting, call transfer, three ways call, and multi-call forward
Caller ID display, ban calling out, setting no-disturb, dial number
automatically while picking up the telephone,
set VIP numbers.
Set the black name list and confine numbers
Support point-point calling directly.
Support flexible methods of receiving numbers.
Support silence suppression and silence detection.
Support noise background simulation.
Support echoes suppression and auto gain.
1.2 Hardware Specifications
Item IP0051
Standard AC Adapter Input:100-240V Output:5V 1.5A or PoE(802.3af, optional)
Interface WAN 10/100Base- T RJ-45 for LAN
LAN 10/100Base- T RJ-45 for PC
LCD size 128 * 64 full-dot matrix LCD
Operation Temperature 0~40℃
Operation Humidity 10~65%
Main Chipset MIPS32(150M), DSP(100M)
SDRAM 16M
Flash 4M
2 Packing
Please check whether the packing contains the following or not.
The basic unit with handset
One cable
Standard 5V/1.5A power supply
IP0051 extension board (optional for wholesales)
3 Safety Information
You have two options for providing the IP0051 with power:
● Power over the Ethernet (IEE 802.3af compatible)
● An external power supply (5V/1.5A)
Warn: Non-factory power supply may cause the phone damage.
© IPshop ApS 2009
C:\I_drev_tmp\IP0051\IP0051_user_guide.doc Ver. 1.1
Page 5

IP0051
User Guide ver. 1.1
5 SIP + 1 IAX
page 5 of 20
4 Installation
● First connect one end of the handset cable to the handset, and connect the other end to RJ11 port
on the phone’s left and bottom side.
● Plug the Ethernet (network) cable into the RJ45 connector labeled WAN, and the other end is
connected with internet or LAN.
● If you want to use labeled LAN port, use another Ethernet cable to connect PC with the phone’s
LAN port.
● If you are using an external power supply, get the standard 5V/1.5A power supply and connect
it to the phone’s power port; If you are using POE, just connect the Ethernet cable to the WAN
port, and the other end of cable is connected with the POE device.
● If you want to use a headset, connect the earphone(excluded in our packing) with the phone.
Please be sure the quality of the headset or the voice quality may be badly affected.
© IPshop ApS 2009
C:\I_drev_tmp\IP0051\IP0051_user_guide.doc Ver. 1.1
Page 6
IP0051
User Guide ver. 1.1
5 SIP + 1 IAX
page 6 of 20
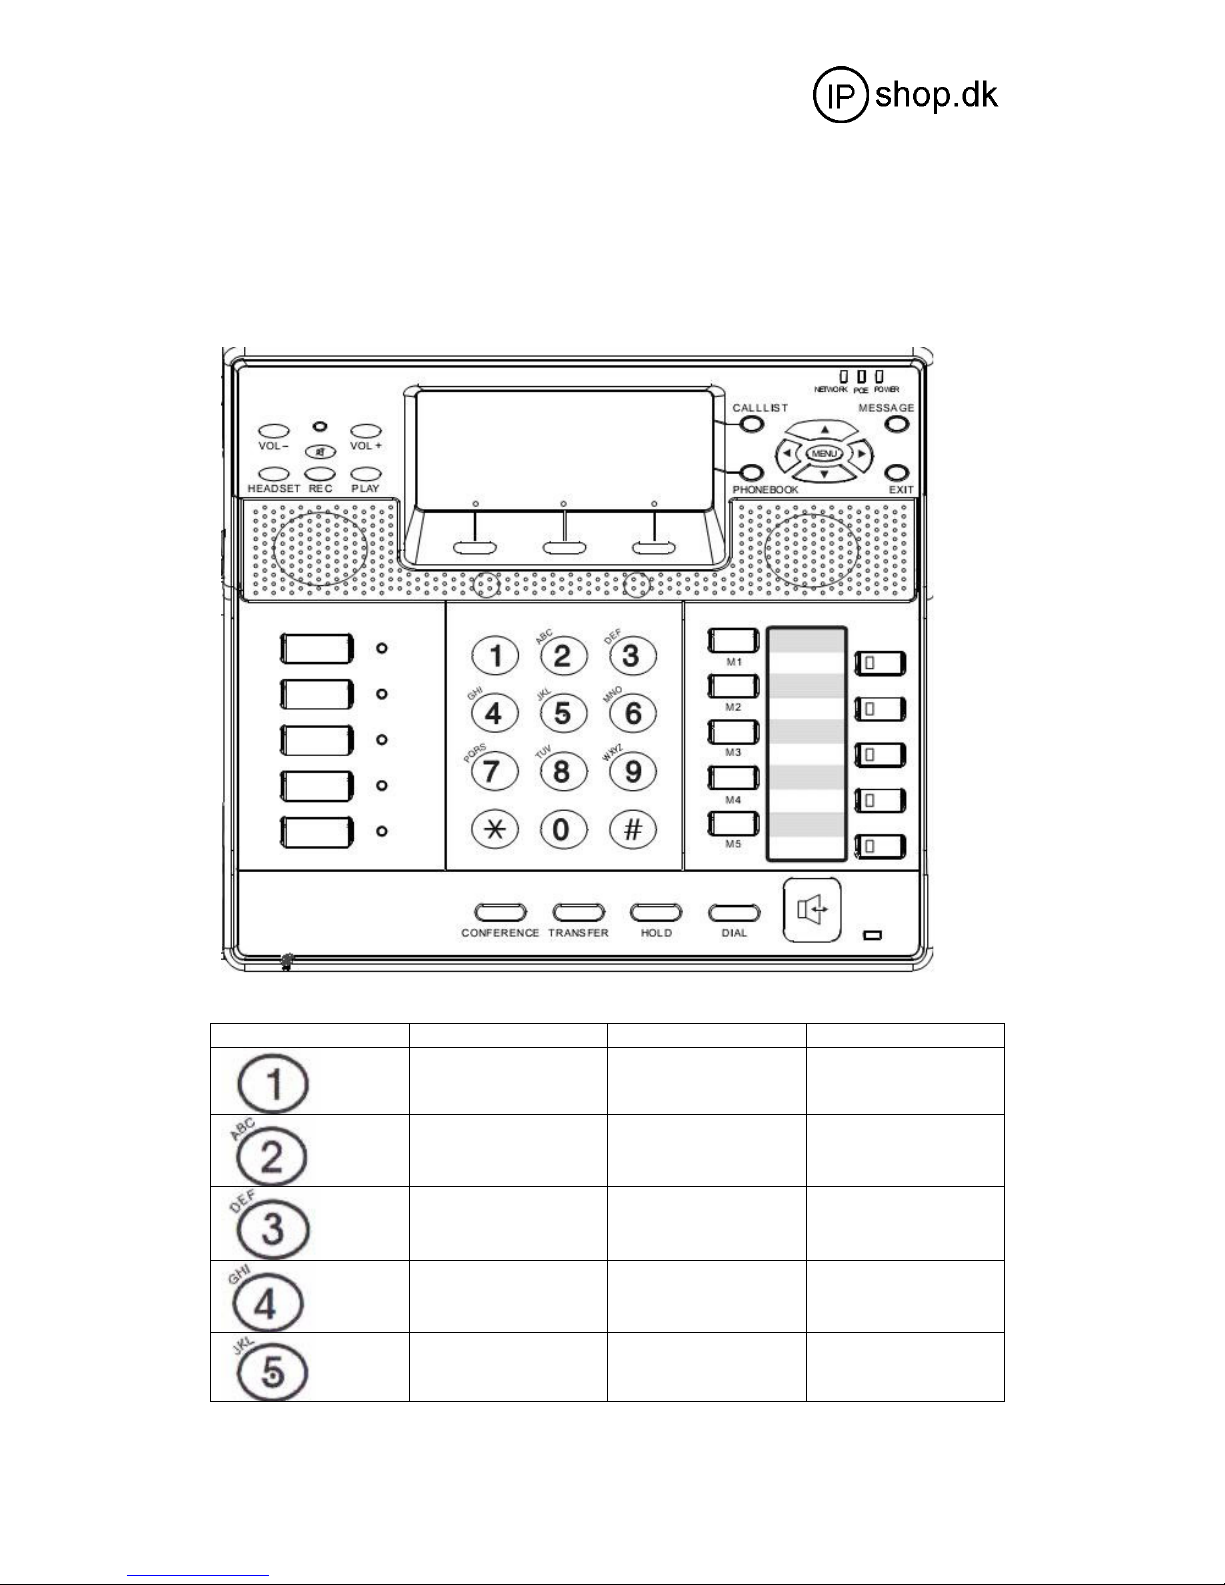
5 Keypad and LED Description
5.1 Keypad description
The numeric keypad with the keys 0 to 9, * , and # is used to enter digits and lettters. Depending
on the operating mode, different actions can be performed (see the table below):
5.1.1 Number Key Description
Key Digits Lower case Upper case
© IPshop ApS 2009
1
2
3
4
5
1 . - ? ! / : @ ‘ ’()+%
abc2
def3
ghi4
jkl5
1 . - ? ! / : @‘ ’()+%
ABC2
DEF3
GHI4
JKL5
C:\I_drev_tmp\IP0051\IP0051_user_guide.doc Ver. 1.1
Page 7
IP0051
User Guide ver. 1.1
5 SIP + 1 IAX
page 7 of 20
6
7
8
9
*
0
#
5.1.2 Function Key Description
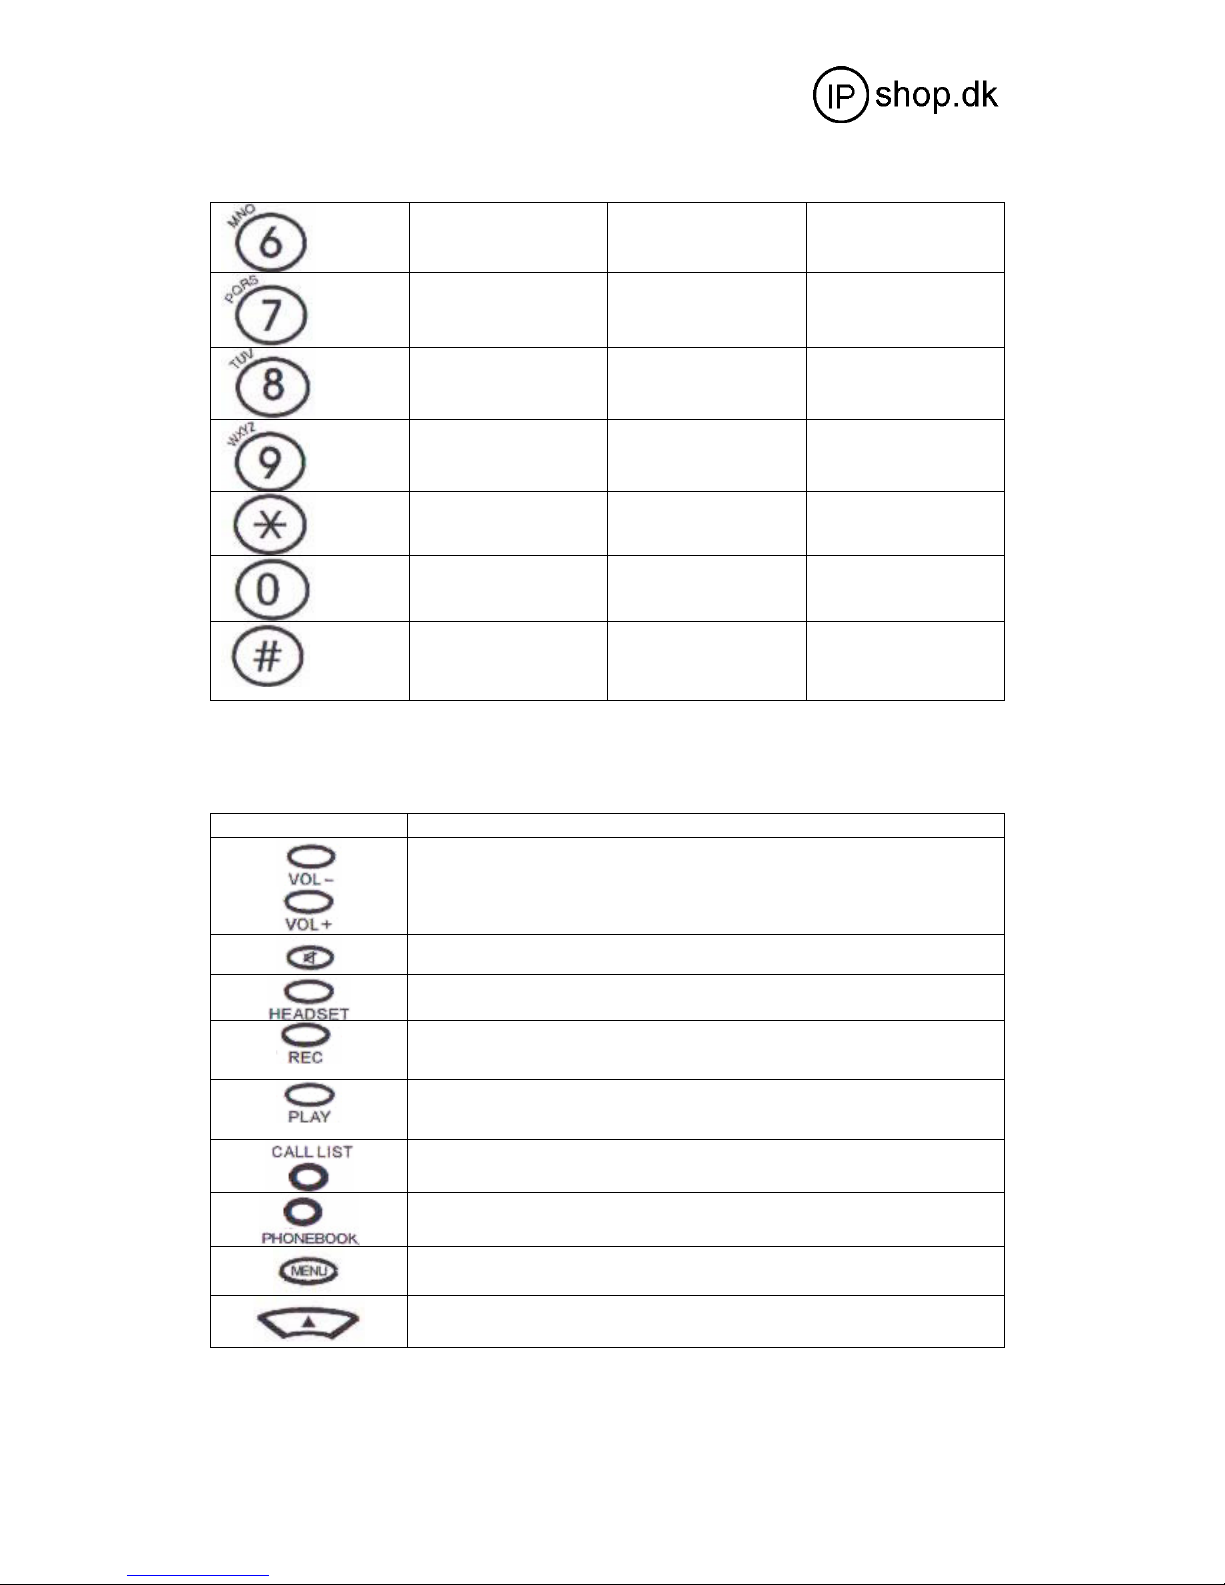
KEY Description
Adjust volume (lower/higher); in standby mode for ring tone volume adjustment, in
hands-free mode for speaker volume and in off-hook mode for headphone volume
adjustment.
Mute Microphone (on/off); When Mute function is on, LED light turns red.
Press this key to answer the call by headset.
Server’s record function. In the call status, press this button and the phone will send
a serial of pre-configed DTMF to registering server. Then server begin to record.
Press this button again, server will turn off the record. It needs server’s support.
When the phone get a new voice message, the MESSAGE light will flashes. Users
can press PLAY button and the phone will dial the special number to play the
message automatically.
Callist to display the Received calls, Missed calls, Dialed calls
Phonebook
Main menu
In stand-by mode, press this key to check Missed calls.
mno6
pqrs7
tuv8
wxyz9
“*”“.”
Eg: 192*168*1*110
(SPACE)_0
End the number and send;
# can also be used to
change and switch input
method(ABC, abc,123)
MNO6
PQRS7
TUV8
WXYZ9
“*”“.”
Eg: 192*168*1*110
(SPACE)_0
End the number and send;
# can also be used to
change and switch input
method(ABC, abc,123)
© IPshop ApS 2009
C:\I_drev_tmp\IP0051\IP0051_user_guide.doc Ver. 1.1
Page 8
IP0051
User Guide ver. 1.1
5 SIP + 1 IAX
KEY Description
page 8 of 20
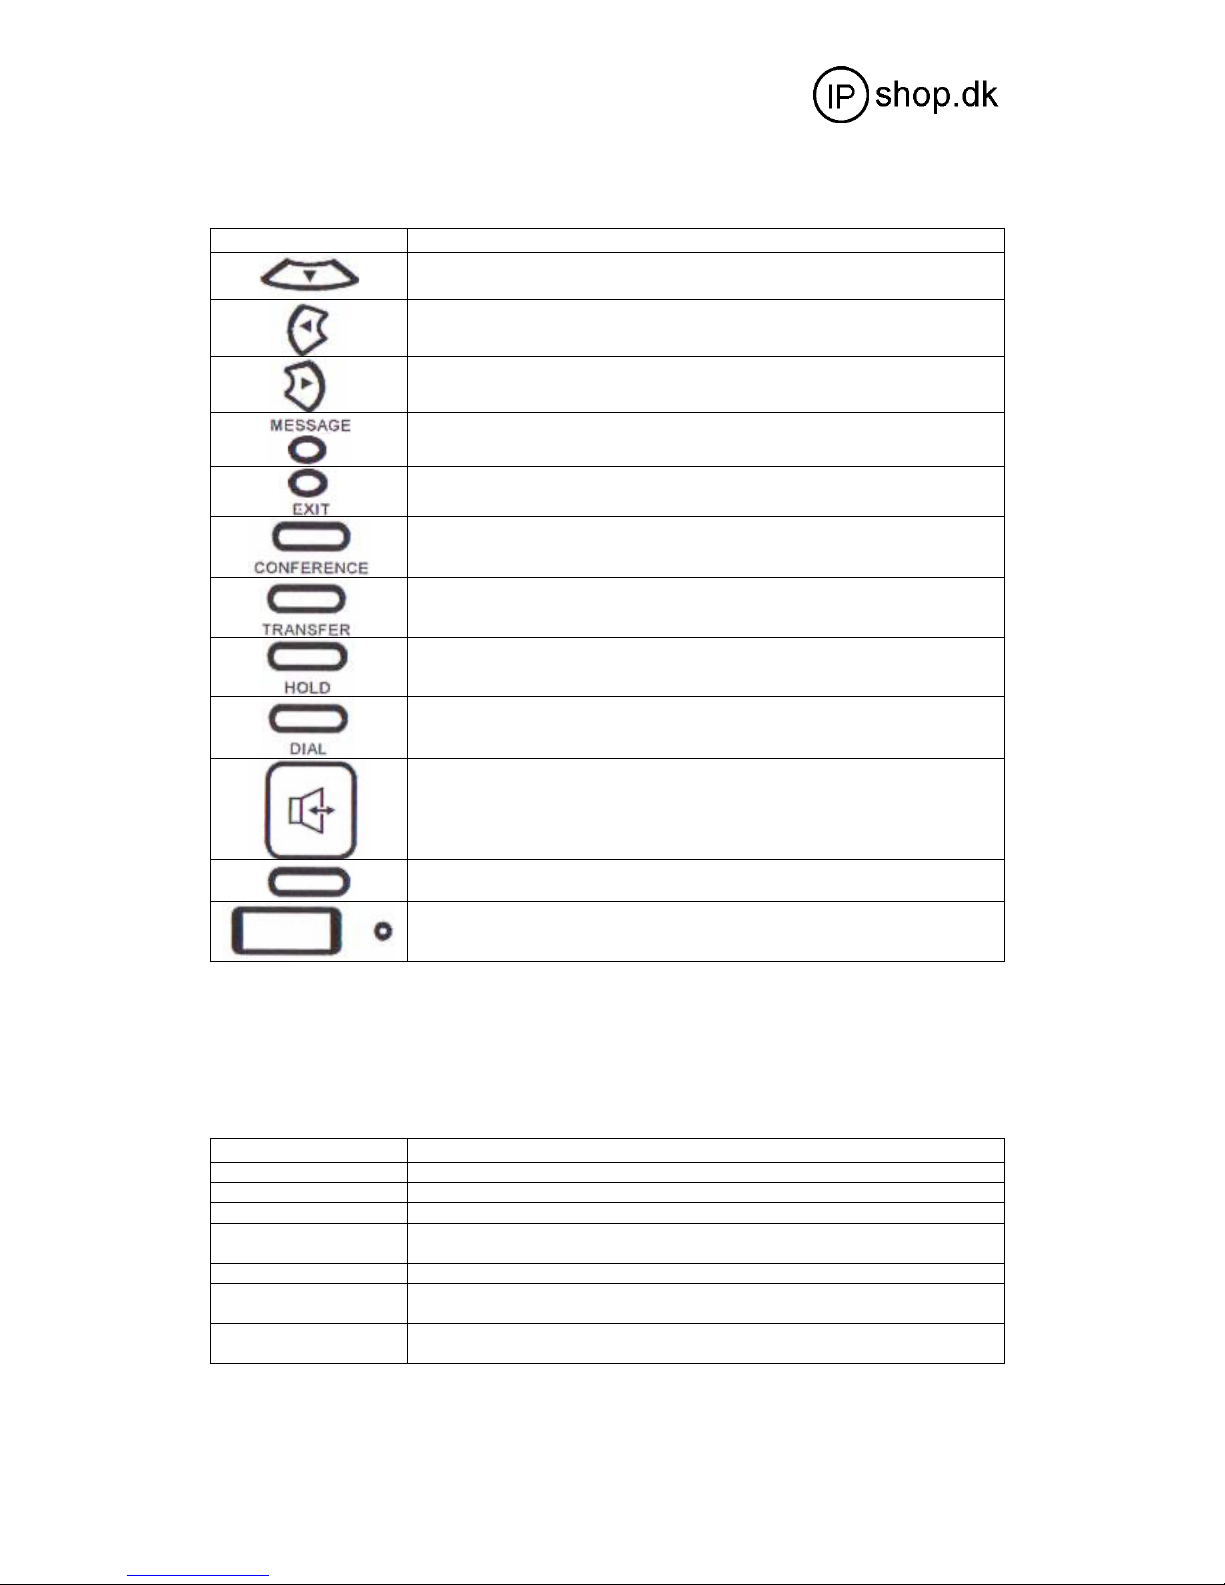
Press this key to check phone’s IP address in standby mode.
Check dialed call record in standby mode; adjust the volume in off-hook mode and
move the cursor to the left side in input mode.
Press this key to check SIP1-SIP5 registeration status in standby mode, adjust
volume in off-hook mode and move the cursor to the right side in input mode.
LED for MWI (Message waiting indication) ; When the phone get a new voice
message,the MESSAGE light will flashes.
RLS to home state
Establish 3-way conference.
In call status, press TRANSFER+number+# can make Blind transfer; Press
TRANSFER+number+Send(softkey2) can make Attend transfer.
Call hold / unhold; In call status, firstly press HOLD to hold the call; and press
HOLD again to unhold the call.
Press this button to send the number; In standby mode to Redial.
Speaker; In standby mode, press this button to enter hands-free mode; When there
comes the call, press this key to answer the call in hands-free mode.
Dynamic group function keys; In different situations, 3 softkeys including functions
such as enter, save, quit, del , edit, option, send, redial, split, divert and so on.
F1-F5; User-defined programmable keys;
They default as LINE1-LINE5. Right side LED
color indicates different status of LINE1to LINE5.
5.1.3 Softkey Description
Softkey is especially designed to improve the phone’s convenient and friendly operations.
For simple prompt keys, users can check it easily; Let’s mainly introduce the function keys below:
Function keys Descriptions
SMS
SDial
DND
Divert
Reject
Reset
Retrv
In standby mode, press softkey1 to check and send the message.
In standby mode, press softkey2 to edit and check the speed dial config.
In standby mode, press softkey3 to enable/disable DND(don’t disturb).
When there comes the call, press this key and input the number you want to transfer
then the call will be transferred directly.
Press this key to reject the incoming call.
When LINE1 is in call hold status, press this key to redial the LINE2 so that LINE1
can be holded and user can dial the LINE2 again.
When LINE1 is in call hold status, press this key to quit the call hold and turn back
to LINE1 talk status.
© IPshop ApS 2009
C:\I_drev_tmp\IP0051\IP0051_user_guide.doc Ver. 1.1
Page 9
IP0051
User Guide ver. 1.1
5 SIP + 1 IAX
page 9 of 20
Function keys Descriptions
Conf
Switch
Split
End
Option While checking phonebook and call record, press Option to enjoy further more
Press this key to make 3-way conference call; this key functions the sameas
CONFERENCE on the keypad.
Press this key to switch the line you want to hold or unhold.
In 3-way conference state, press Split to end it, bu can be available to keep the
communication with the other two separately.
In 3-way conference state, press End to end all communications with the other two at
the same time.
operations.
5.2 LED status display explanations
● MUTE LED: when MUTE is on, LED displays red if there is incoming call or in the call status.
● Network LED: LED is dark means no connection on WAN port; LED flashes green light means
there exist network flow.
● POE LED: When Power over Ethernet function turns on, LED is bright with light.
● Power LED: It brights means power supply is available.
● Memory LED: It can display different color and tell the presence status. Red color means the
ext. is offline, green means the ext. is free and available, while the flashing green light means the
ext. is busy or in the call status. More info please check 7.4.2 Memory Key.
● Message LED: It will flashes when there is voice mail from the server.
● LINE LED: Failed registration, LED is green and flashes occasionally.
When comes the call and it rings, LED will frequently flash green light.
In HOLD mode, LED will frequently flash green light.
In call status, LED is on with green light.
6 Configuration via Keypad
6.1 Network config
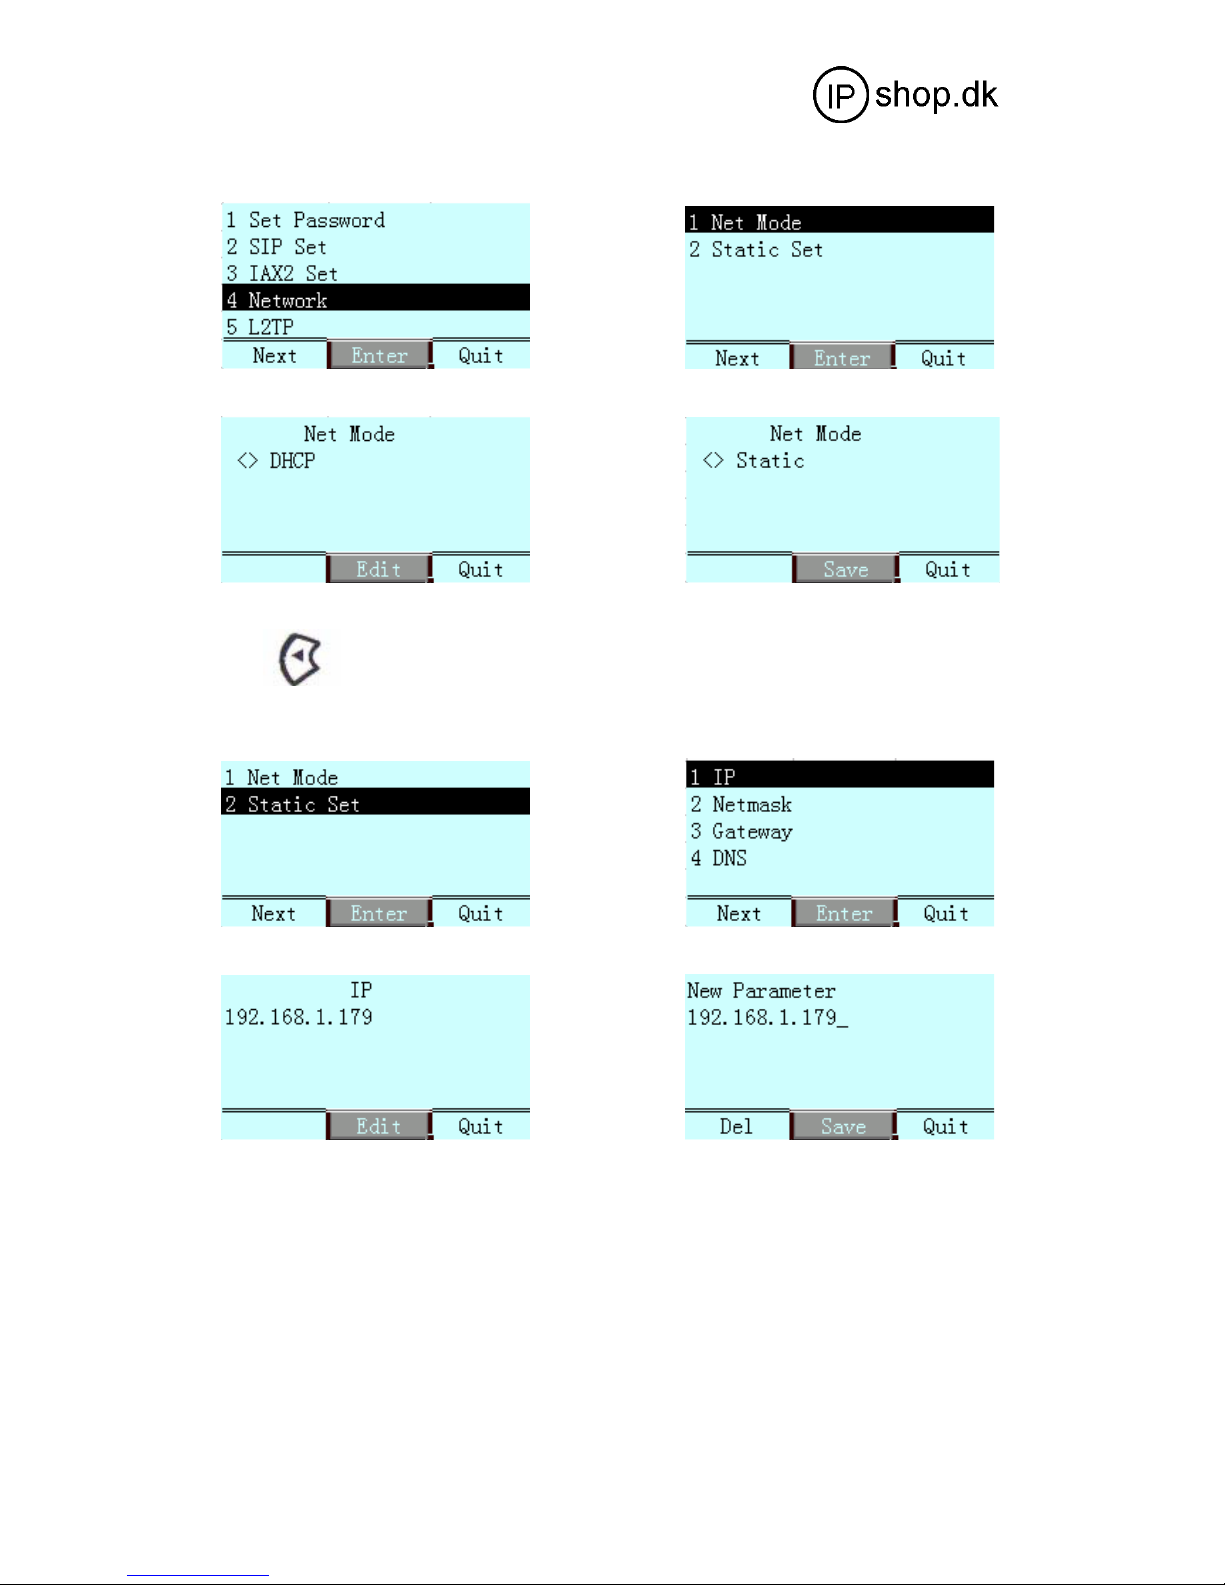
The phone defaults to obtain IP address via DHCP.
If DHCP mode isn’t supported from your netwrok environment, please congif static IP address
according to the following instructions:
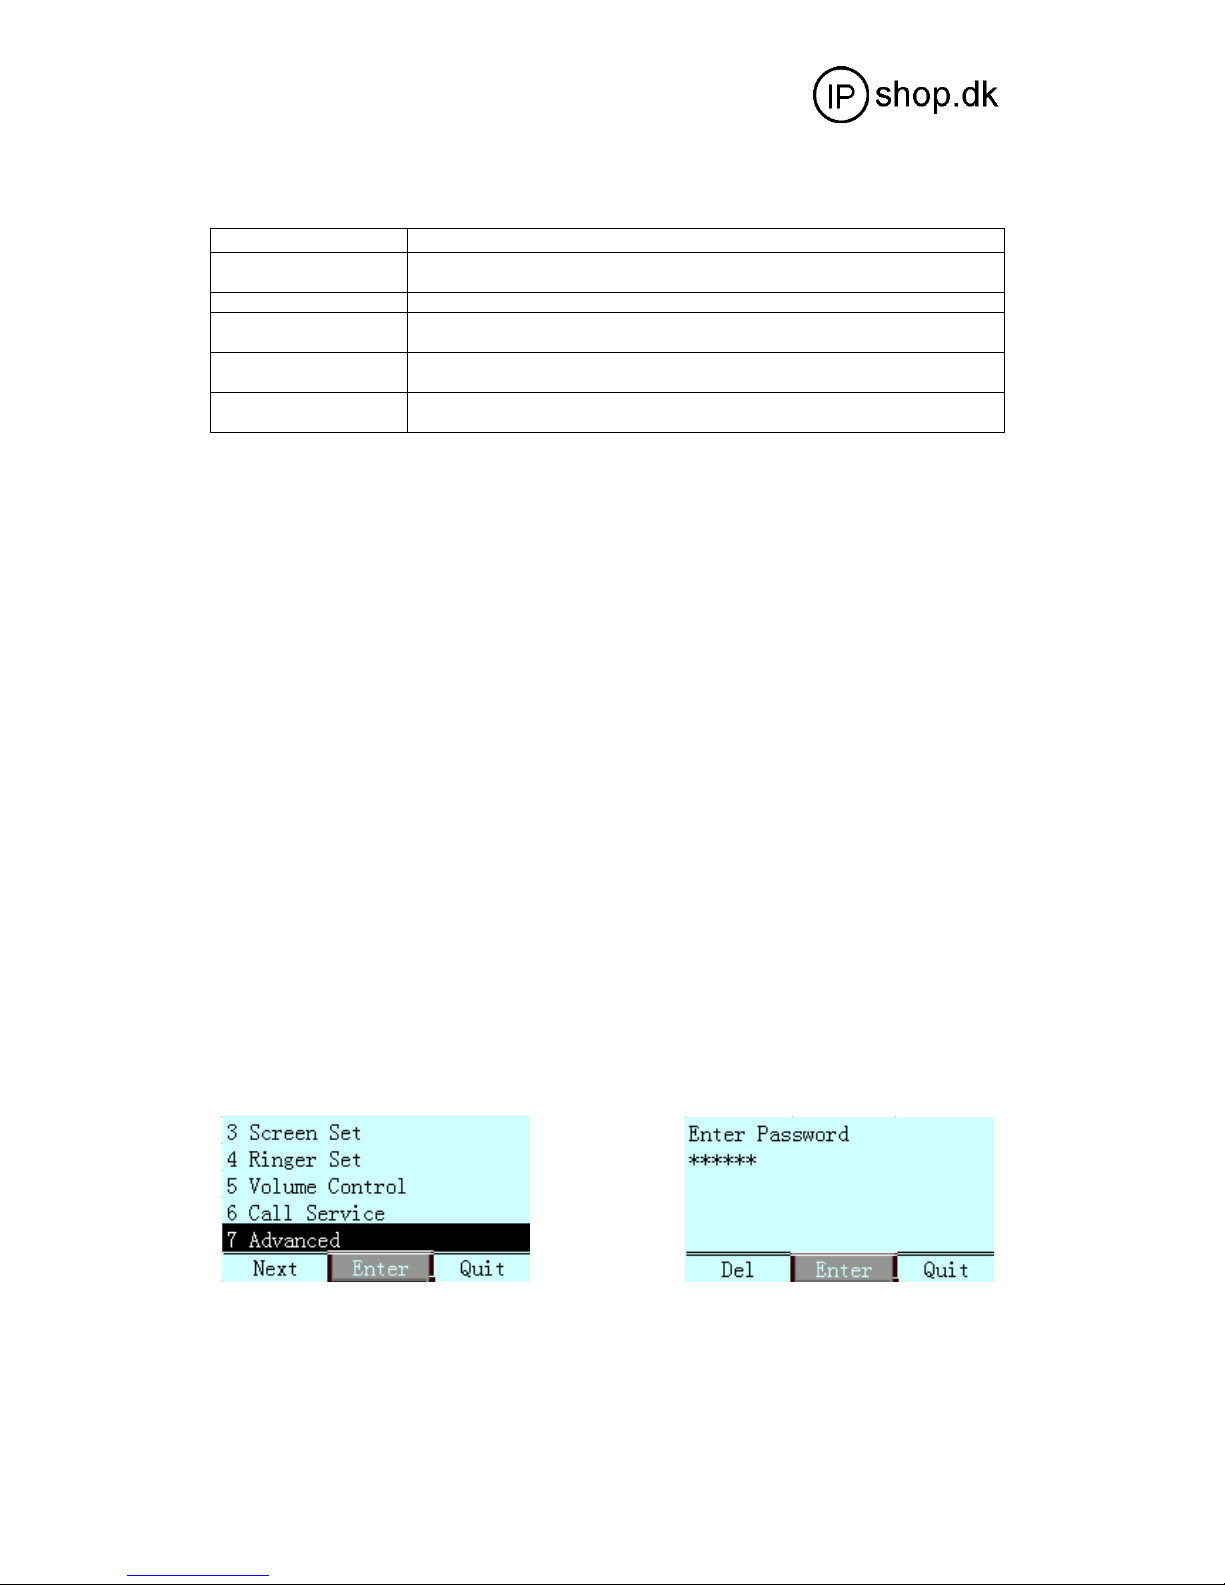
Press MENU key and select “Advanced” as the picture shows.
Enter password 123 and select “Network”. Then you can select the net mode according your
network connection model. Let’s take Static IP config for an example.
© IPshop ApS 2009
C:\I_drev_tmp\IP0051\IP0051_user_guide.doc Ver. 1.1
Page 10
IP0051
User Guide ver. 1.1
5 SIP + 1 IAX
page 10 of 20
Press to select DHCP or Static mode.
Select “Static”, and you can config IP address as the following instructions shows:
Press “Edit” key to edit IP address. You can use left/right key to move the cursor and insert the
character to input IP address. Never forget to press “Save” key to finish and save the config.
Config Netmask, Default Gateway and DNS by following the aboved steps.
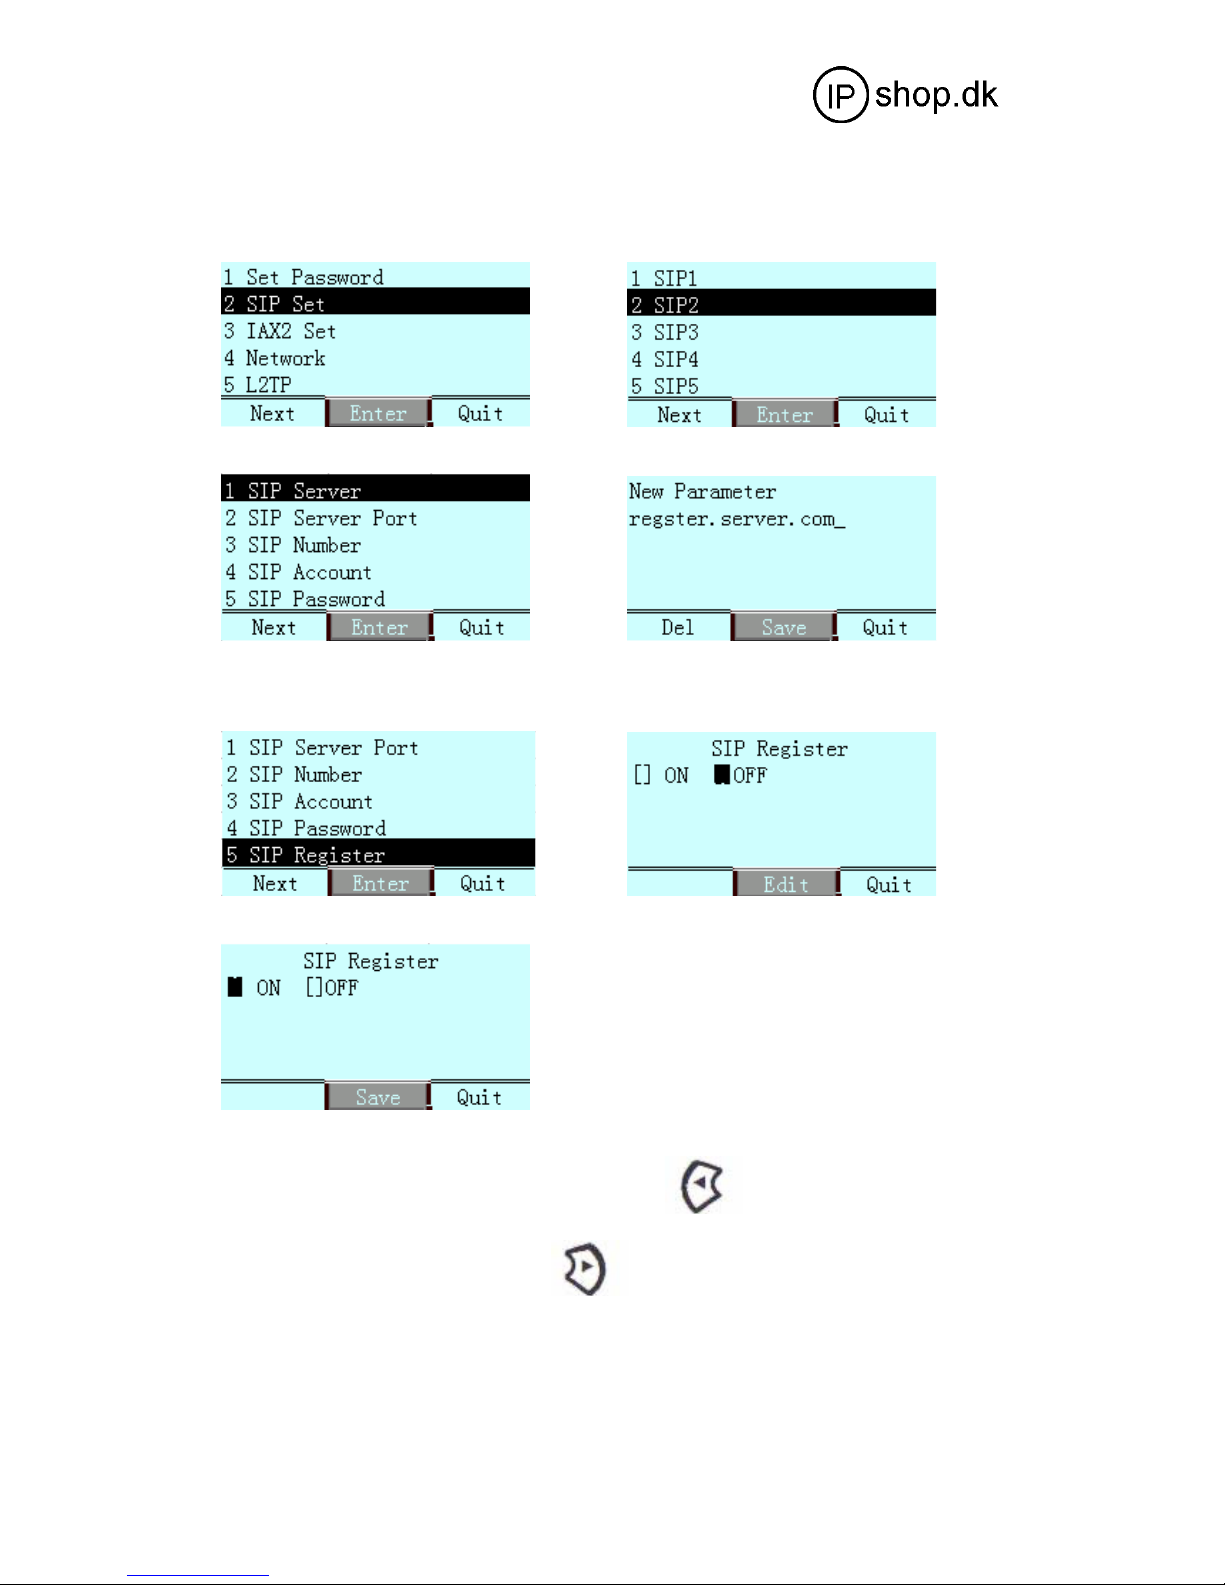
After the network is configured, we now begin to config VoIP account.
© IPshop ApS 2009
C:\I_drev_tmp\IP0051\IP0051_user_guide.doc Ver. 1.1
Page 11
IP0051
User Guide ver. 1.1
5 SIP + 1 IAX
page 11 of 20
6.2 VOIP config
As the steps shows above, config SIP Number, SIP Account and SIP Password accordingly.
Press “Edit” select “ON” to submit SIP registration via key. When it is registered
successfully, you may
check each LINE’s registration status via key.
© IPshop ApS 2009
C:\I_drev_tmp\IP0051\IP0051_user_guide.doc Ver. 1.1
Page 12
IP0051
User Guide ver. 1.1
5 SIP + 1 IAX
page 12 of 20
7 Configuration via WEB
Press “DOWN” key to check the phone’s IP address, and input the IP address on the browser bar.
Eg:
http://192.168.10.1
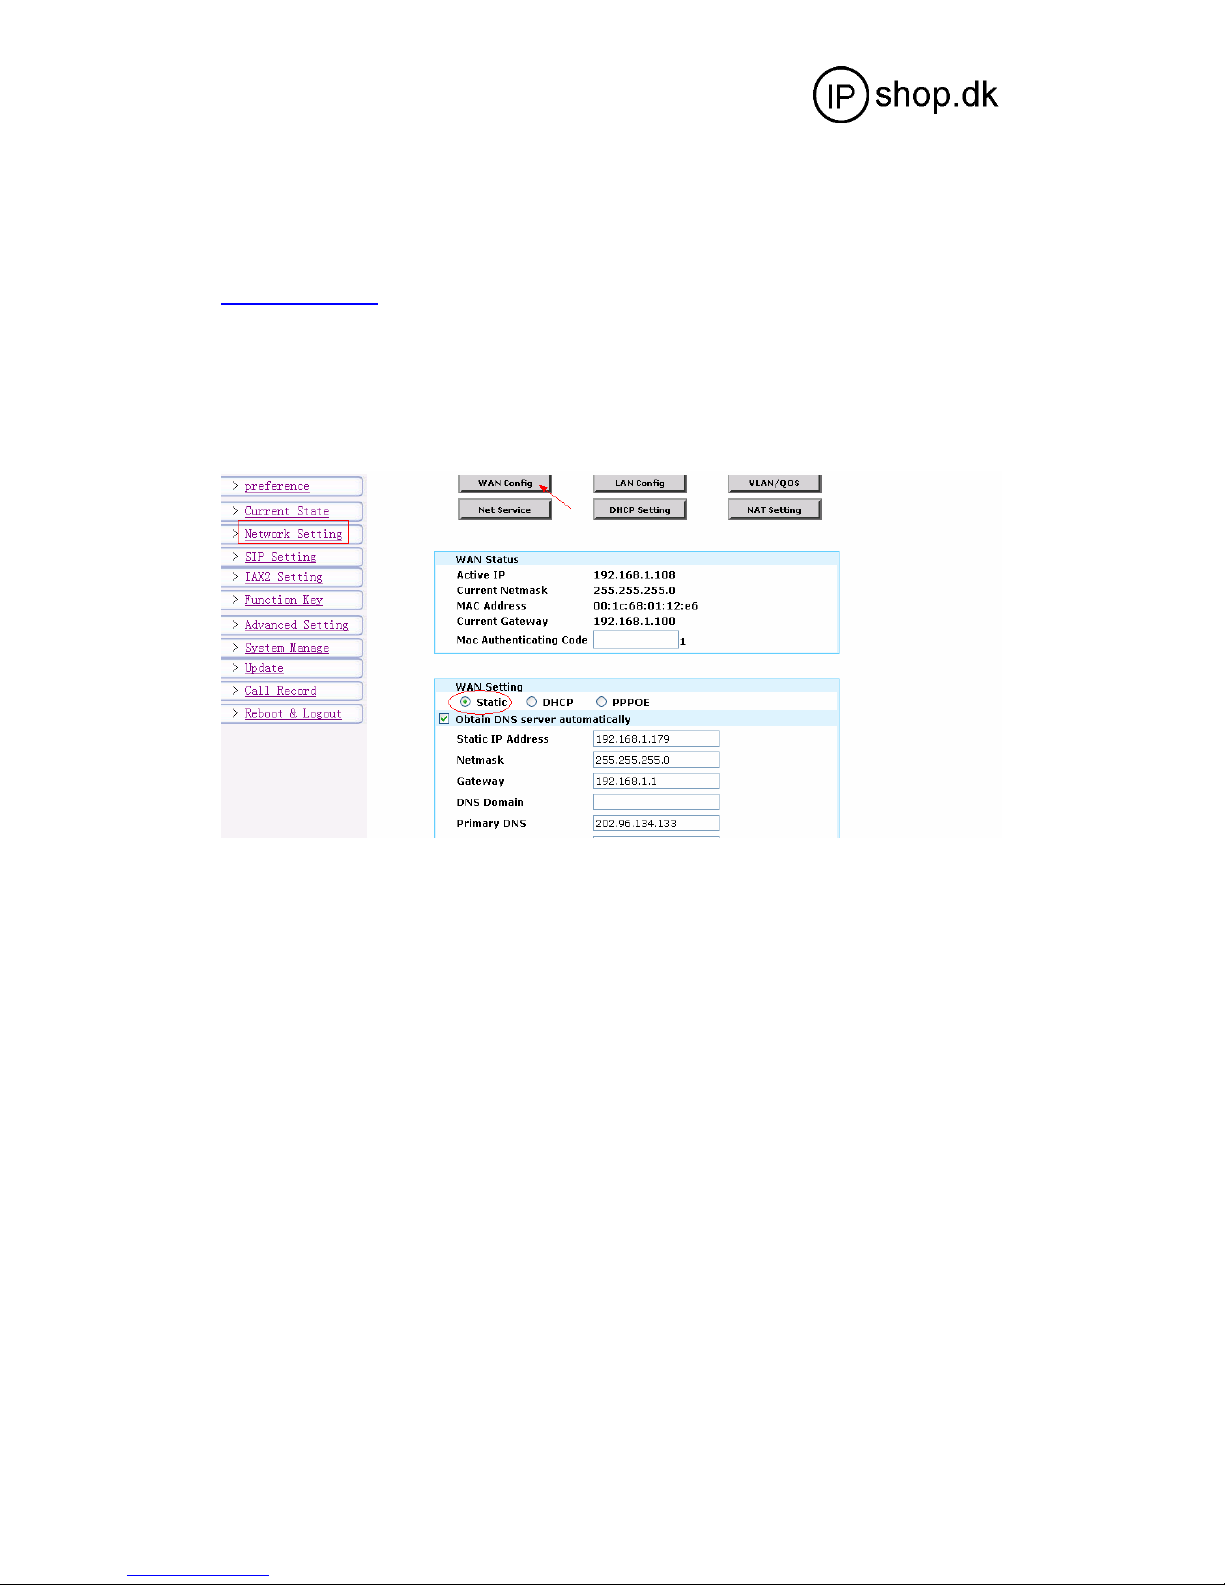
7.1 Network Configuration
The phone defaults to obtain IP address via DHCP. If there is a DHCP server in your LAN, the
phone’s WAN port can auto-obtain an IP address, not any network config is needed.
If your LAN router’s DHCP function isn’t open, then you will have to config static IP address on
the phone’s WAN port.
After finishing IP address config, you may login to the phone by telnet, then ping your
registration server’s address. Eg: Ping regiser.server.com, if ping works, it suggests your
network config is correct.
© IPshop ApS 2009
C:\I_drev_tmp\IP0051\IP0051_user_guide.doc Ver. 1.1
Page 13
IP0051
User Guide ver. 1.1
5 SIP + 1 IAX
7.2 SIP Configuration
page 13 of 20
© IPshop ApS 2009
C:\I_drev_tmp\IP0051\IP0051_user_guide.doc Ver. 1.1
Page 14
IP0051
User Guide ver. 1.1
5 SIP + 1 IAX
page 14 of 20
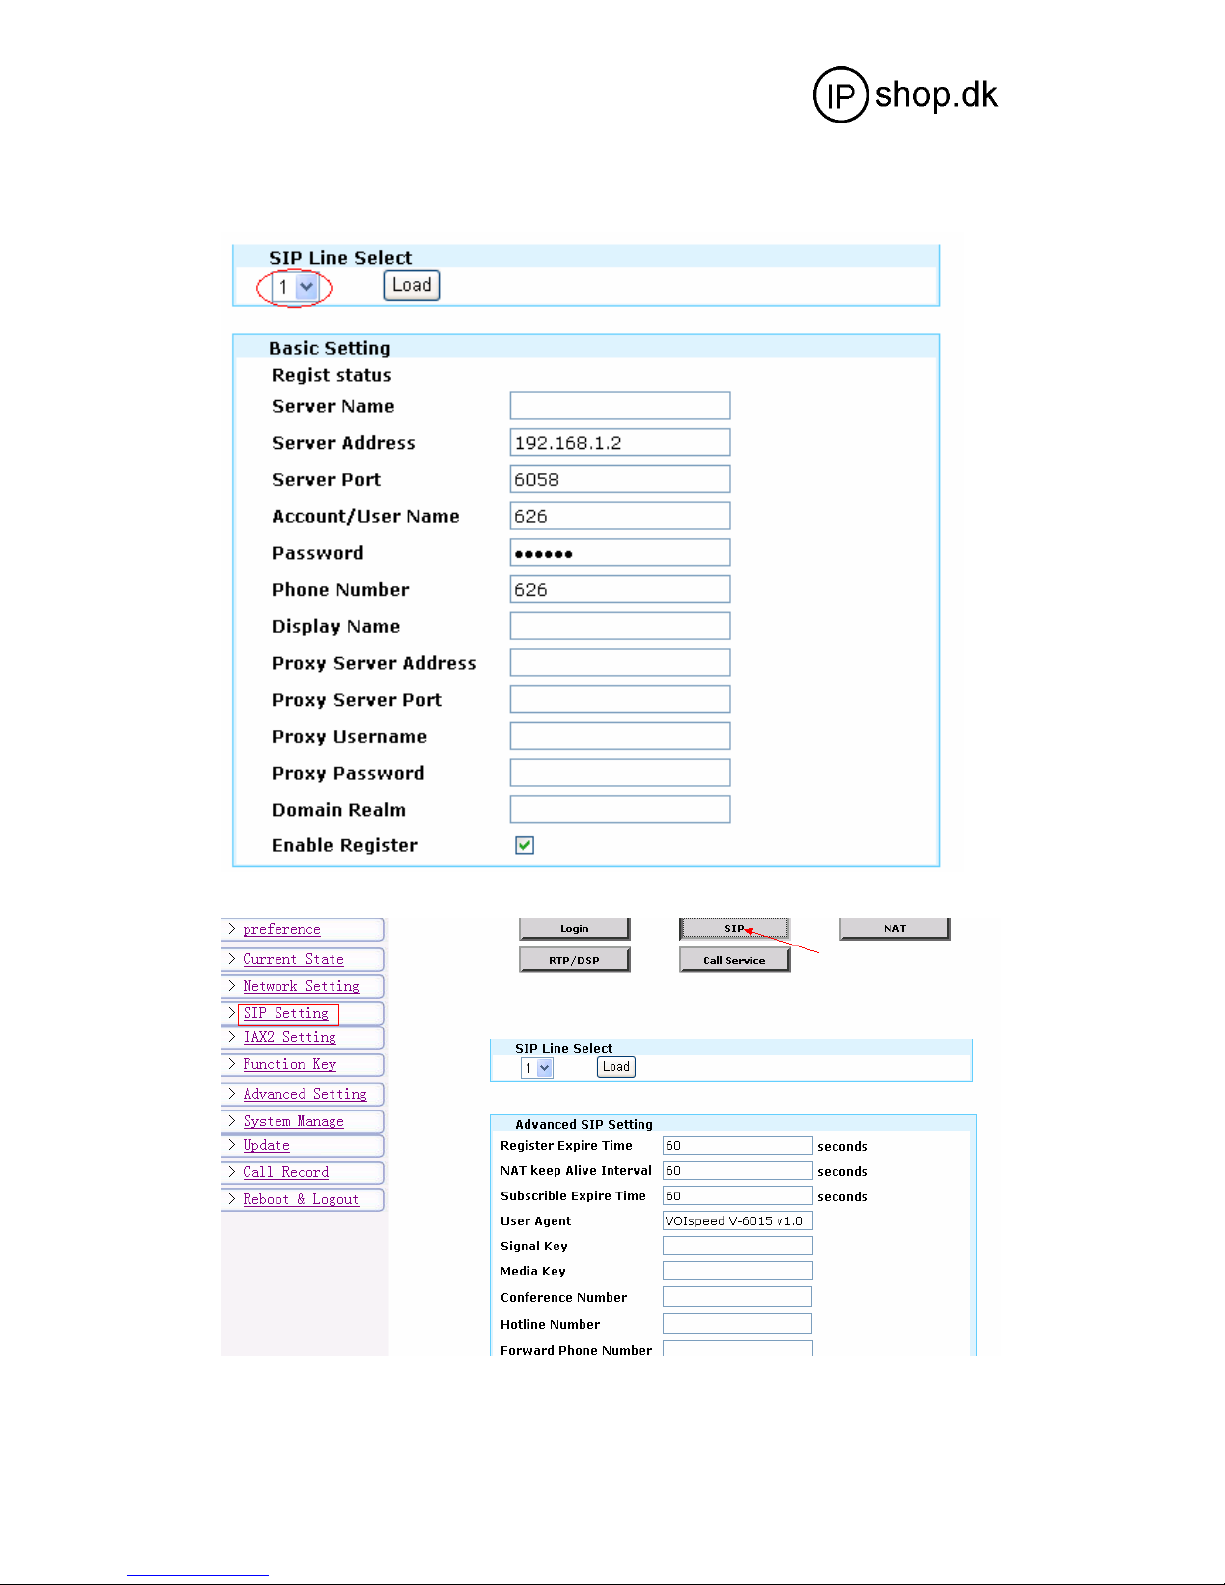
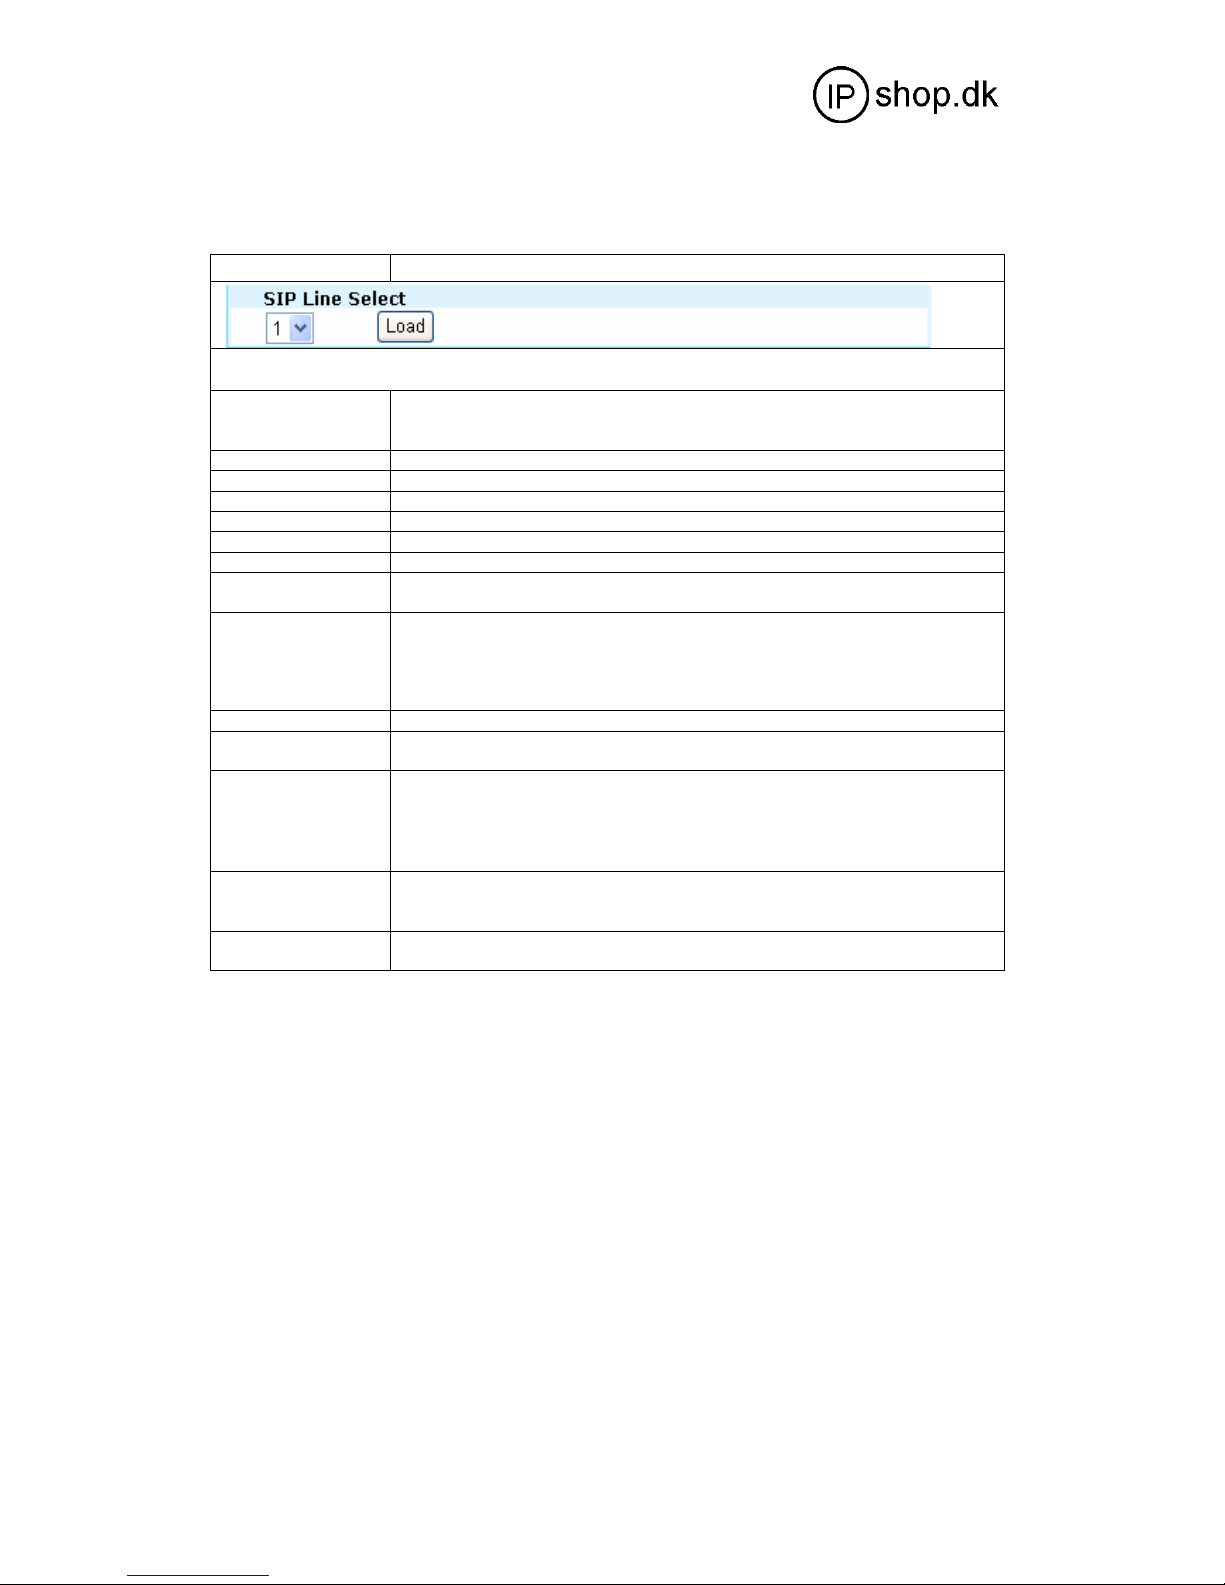
SIP Config
Field name Explanation
Select the SIP account you want to config, SIP1-SIP5 are optional. Then click 【Load】and switch to the
corresponding account config.
Register Status It displays SIP registration status. “Registered” means successful
Server Name Input server name
Server Address SIP registering server address, domain name is supported
Server Port Input SIP registering server port
Account Name Input SIP account’s name
Password Input SIP account’s password
Phone Number Input SIP server’s phone number. Blank means not to apply for registration.
Display Name Input the caller’s name you want in the callee’s display, English alphabets
Domain Realm Input SIP domain realm. If the server doesn’t request SIP terminal’s local
Enable Register Select enable/disable register
Register Expire Time Config SIP server register expire time, it defaults as 60s. It can be modified
DTMF Mode Total three DTMF modes:
Presence Mode IP0051 phone supports two standard format Presence definition as
Enable Subscribe After registered successfully, you can subscribe to others presence status or
registeration, or it will display “Unregistered”. “Unapplied” suggests the
register status display function isn’t applied.
input supported.
domain as appointed domain, then the local domain can be the same as SIP
server. Usually, to simplify user’s input, clients are not necessary to input
local domain. Because system will be filled with domain realm in the
Register server addr place.
on the phone according to server’s time request and register again.
- DTMF_RELAY
- DTMF_RFC2833
- DTMF_SIP_INFO。
Different SP may provide different mode.
follows: Special and Standard. Default for the Standard.
You need to restart to activate the phone after revising the mode.
voice messages etc.
© IPshop ApS 2009
C:\I_drev_tmp\IP0051\IP0051_user_guide.doc Ver. 1.1
Page 15
IP0051
User Guide ver. 1.1
5 SIP + 1 IAX
7.3 IAX2 Registration
page 15 of 20
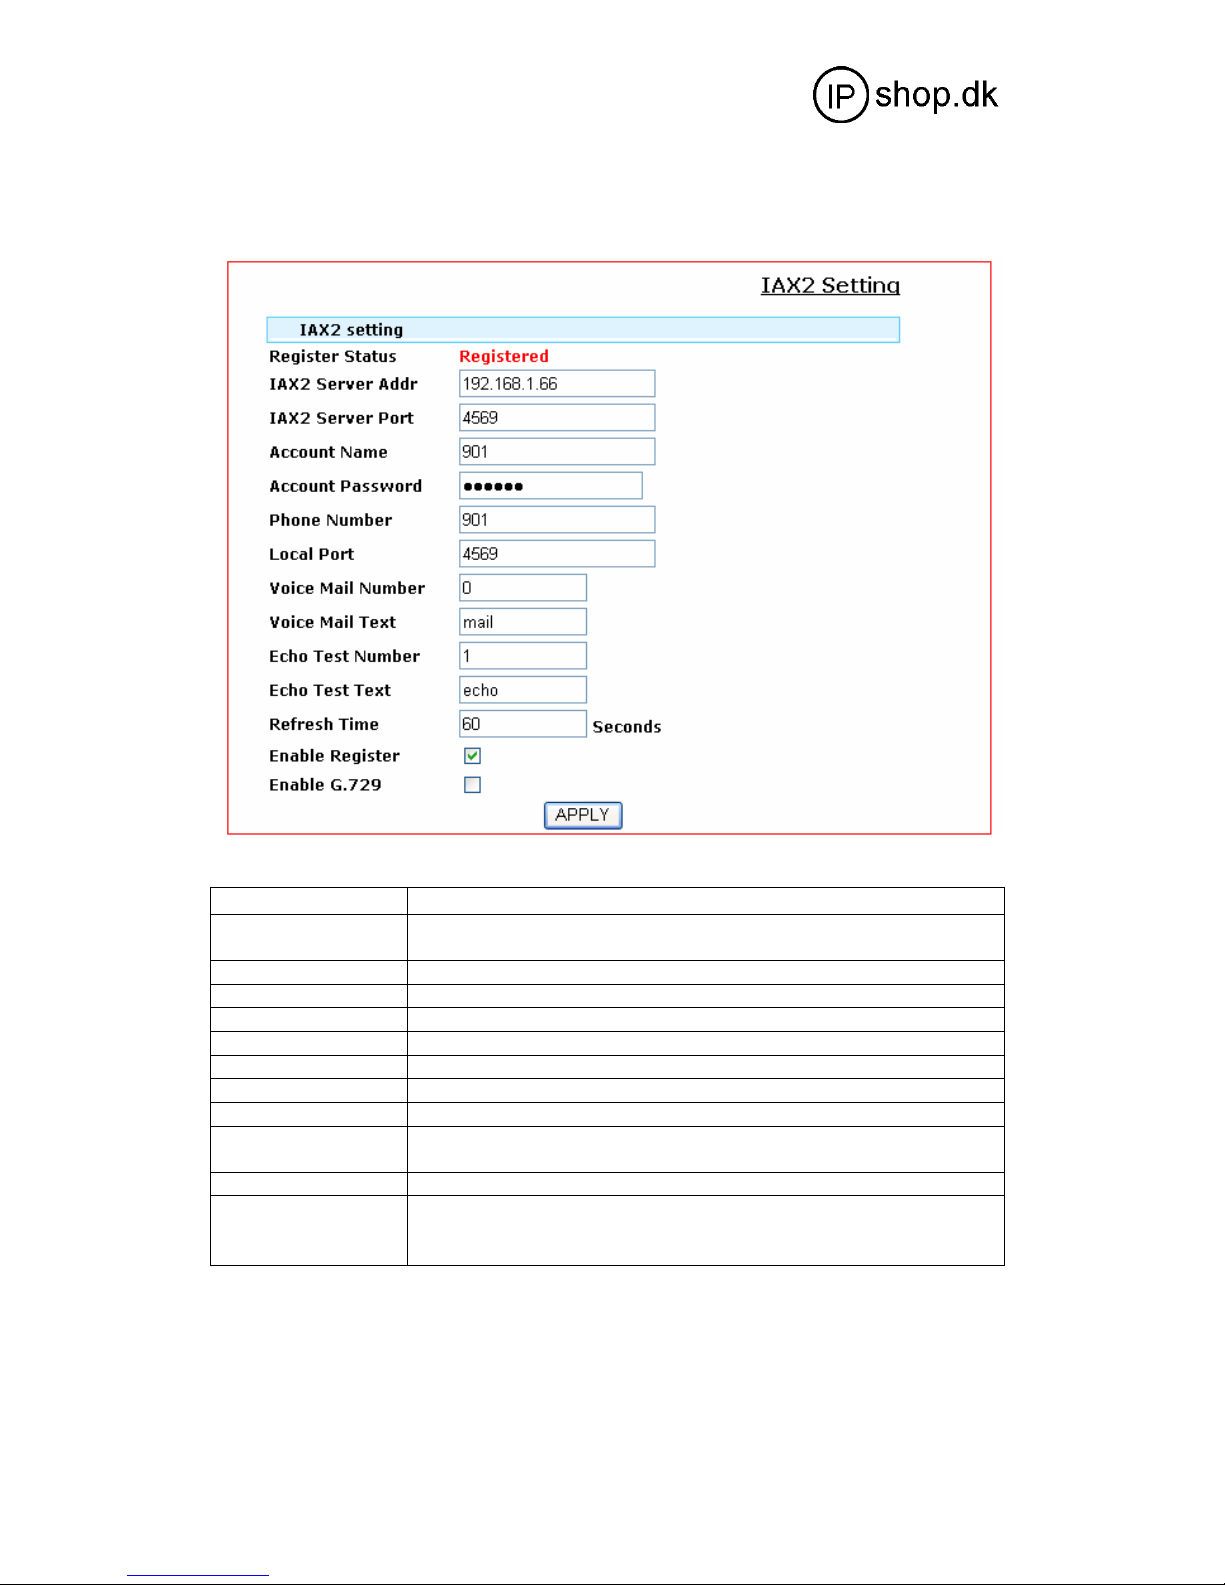
IAX2 Config
Field name Explanation
Register Status
IAX2 Server Addr
IAX2 Server Port
Account Name
Password
Phone Number
Local Port
Echo Test Text
Refresh Time
Enable Register
Enable G.729
It displays SIP registration status. “Registered” means successful
registeration, or it will display “Unregistered”.
Config IAX2 server address, can be in form of domain name.
Config IAX2 server port;
Config IAX2 authenticated account name;
Config IAX2 authenticated account password;
Config IAX2 phone number;
Config monitoring port of local IAX2;
Config echo test text.
IAX2 registration refresh time, which is in the “second” unit. It is
suggested that users make a choice between 60-3600;
Enable/disable registering to the server;
Enable/disable G.729; the phone supports G.729 codec.If you use the
idefisk (G.729 non-supported), then calling idefisk would result in
your PC corruption;
© IPshop ApS 2009
C:\I_drev_tmp\IP0051\IP0051_user_guide.doc Ver. 1.1
Page 16
IP0051
User Guide ver. 1.1
5 SIP + 1 IAX
page 16 of 20
7.4 Function Key
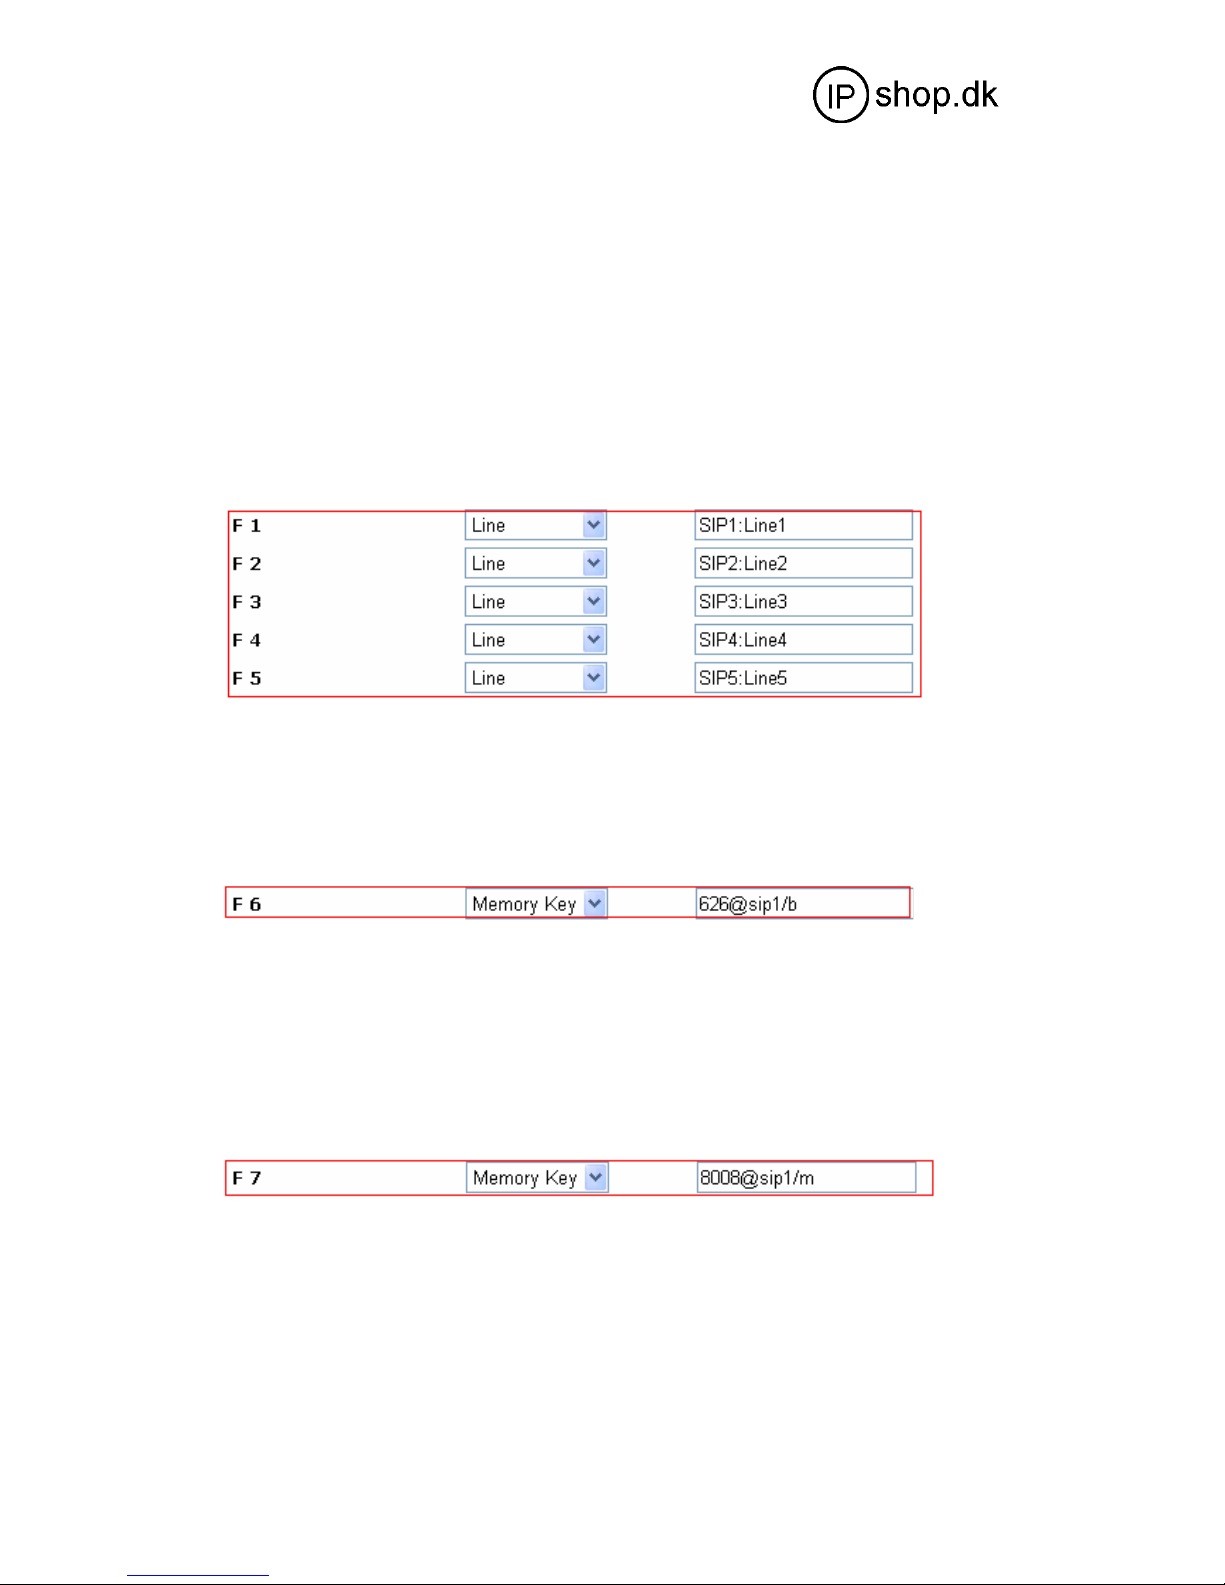
IP0051 phone’s Function key supports LINE, Memory Key, Key Event as well as 4 DTMF
models.
LINE: If you config the function key as SIP LINE via web, then you can select which SIP LINE to
call, only successfully registered SIP Line can be selected and available.
● Memory Key: this mode can support Presence, BLF, Push to talk, MWI and other functions.
● Key Event: the user can set shortcut keys as their preferences;
● DTMF: set the number sent by DTMF;
Specific settings are as follows:
7.4.1 LINE
7.4.2 Memory Key
BLF, presence, MWI and speed dial functions can be achieved by memory key.
● /b Busy Lamp Field: based on the asterisk platform, can be used to check the phone status(idle,
ring, busy), so that switchboard and phone operator to know other phones’ status and decide to
proceed the call or not.
You can config BLF function as the picture shows above: 300 is used to check the other number;
@1 means SIP1 is used or you can config @2(SIP2). Other lines followed by analogy; If not, that
is 300/b, then take the default SIP1 line; /b means to enable BLF function. At this moment, the
device will check others’ status every 60s. Idle state, LED out; ring state, LED flash red; in call or
unavailable state, busy state, LED long red light.
● /m MWI(message waiting indication): correspondingly, the key number is the
number of voicemails.
You can config MWI function as the picture shows above: 8008 is mailbox number; @1
means SIP1 is used or you can config @2(SIP2). Other lines followed by analogy; If not, that is
8008/m, then take the default SIP1 line; /m means to enable MWI function.
If there is a new voicemail, led flashing will prompt a new message, after finishing listening to the
message, server will send the current message to the phone. Receiving new MWI, led adjusts to
eliminate, said no new voicemail notification.
© IPshop ApS 2009
C:\I_drev_tmp\IP0051\IP0051_user_guide.doc Ver. 1.1
Page 17
IP0051
User Guide ver. 1.1
5 SIP + 1 IAX
page 17 of 20
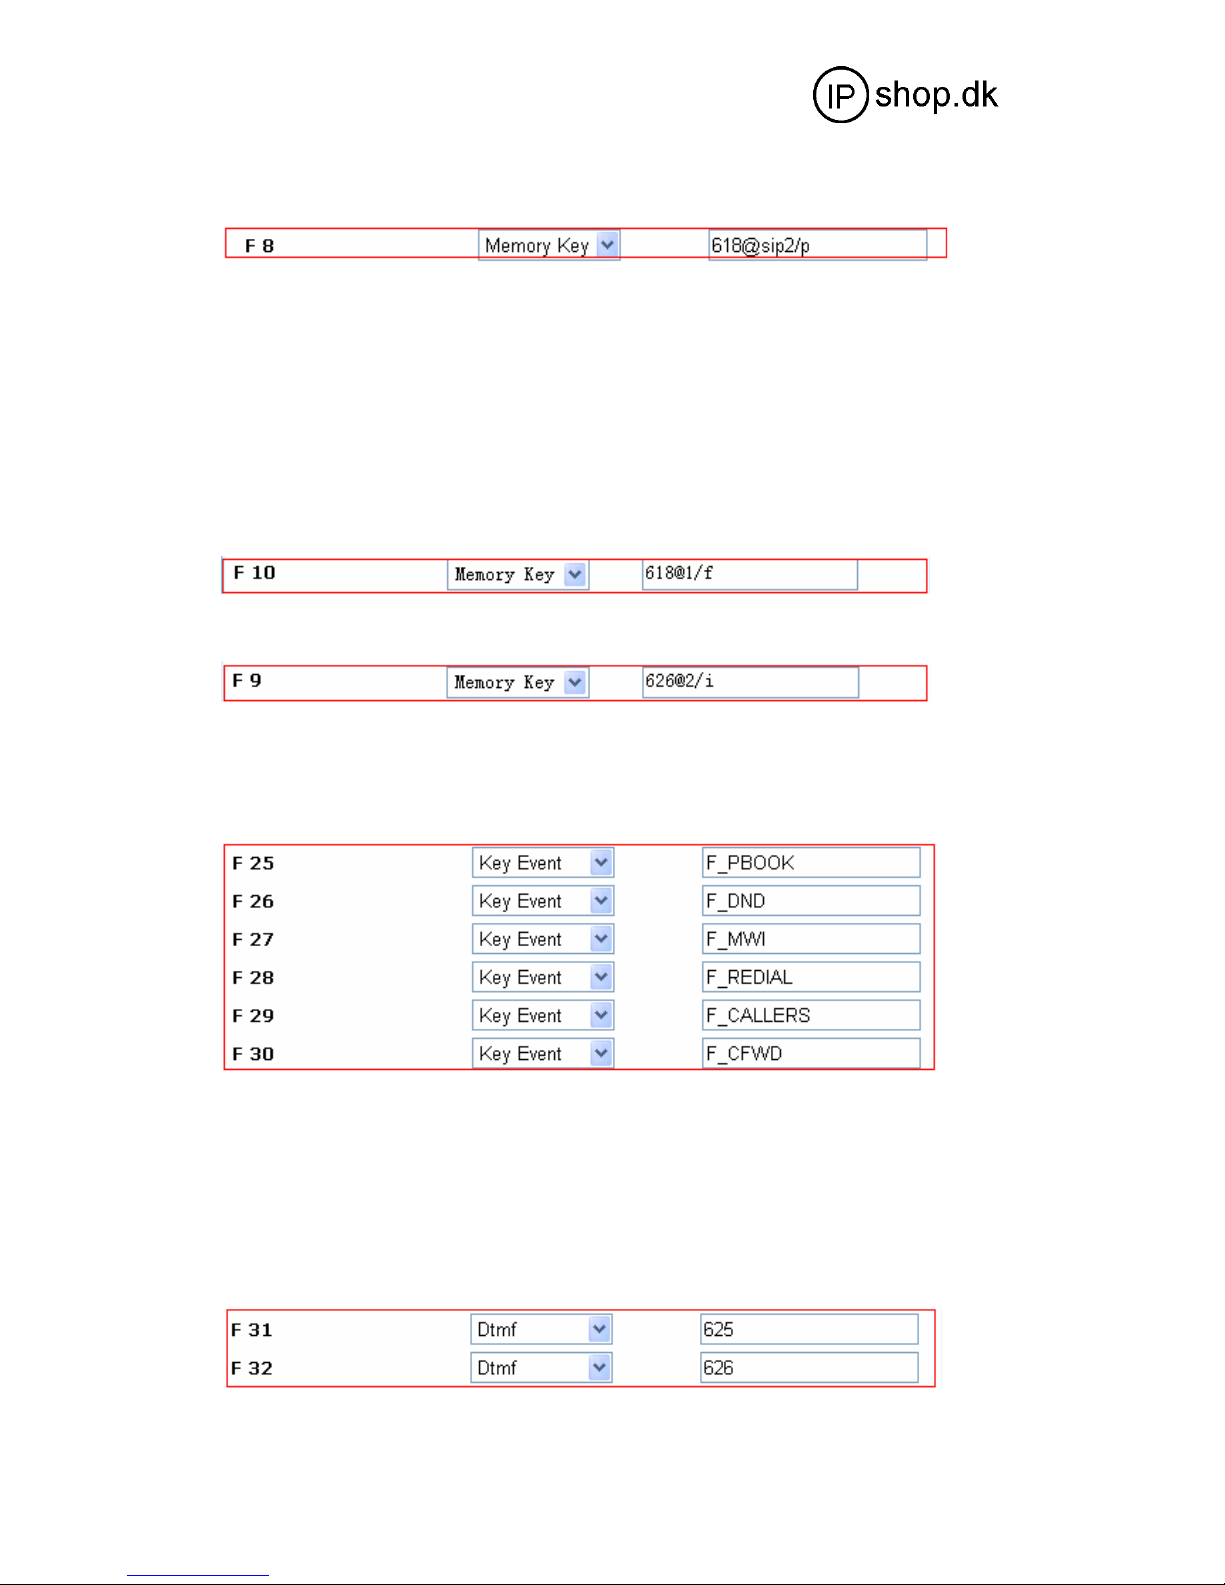
● /p Presence: that is, the phone can check the corresponding phone’s current state.
You can config Presence function as the picture shows above: 618 is the number you want to
check; @2 means SIP2 is used or you can config @3(SIP3). Other lines followed by analogy; If
not, that is 618/p, then take the default SIP1 line; /p means to enable Presence function. Press this
key, to check the number’s phone status(on, off, fail etc) on the screen.
Online and idle state, LED display long green light; Offline state, LED display long red light;
ringing or busy state, LED flash green light. If you are using special IP PBX, please select
Presence Mode--“special” on SIP-SIP webpage. If you are using Asterisk server, please select
“standard”.
You need to restart the phone after revising the presence mode.
● /f speed dial: In standby mode, press the key then the phone calls will be put through directly to
the speed-dial number.
● /i PUSH TO TALK: In standby mode, keep pressing this key to make outgoing call and the call
will be answered automatically; let go the key to hang up the call.
You can config push to talk function as the picture shows above: 626 is the other’s number; /i
means push to talk function is enable.
In standby mode and press this key to call 626, the call will be answered automatically.
Note: Automatic answering function need supports from callee’s phone features.
7.4.3 Key Event
● F_PBOOK: shortcut key to config phonebook;
● F_REDIAL: shortcut key to redial;
● F_DND: shortcut key for no disturb;
● F_MWI: MWI shortcut key to check the quantity of old and new message;
● F_CFWD: call forward shortcut key;
● F_CALLERS: shortcut key for call record;
7.4.4 DTMF
After configuration, the phone will send out the number by DTMF mode.
© IPshop ApS 2009
C:\I_drev_tmp\IP0051\IP0051_user_guide.doc Ver. 1.1
Page 18

IP0051
User Guide ver. 1.1
5 SIP + 1 IAX
page 18 of 20
8 Basic Call Functions
8.1 Making calls
1) Select LINEx(LINE 1, 2, 3, 4, LINE5) key, then dial the number and end the dialing by # or
dial key to choose the line you want to make outgoing call.
2) Press hands-free key in stand-by mode, then dial the number. It defaults outgoing call from
SIP1.
3) Press dial key in stand-by mode, then the screen will display the number you called. Select a
number to press Dial or hands-free key to put through the call/
4) Press hands-free key in stand-by mode, and select the kept number from Mrmory Key to make
an outgoing call fast.
5) Firstly press Memory Key, select a number you want to dial from the screen then press Dial or
hands-free key to put through the call.
6)Press Headset to use the earphone.
8.2 Answering calls
1) Press Answer key(softkey1)to answer the call; press Reject key(softkey3)to reject the
call.
2) Press hands-free key to answer the call.
3) Pick up the headphones to answer the call.
4) Press HEADSET to use the earphones to answer the call.
5) Select a LINE key to answer the incoming call accordingly.
8.3 HOLD
8.3.1 Call waiting
For users in the course of call, they may want to handle an emergency, but don’t want to get heard
from the other on the phone, so they can press button to hold the call temporarily and
press HOLD button to release the call holding and be back into the call state.
Note: In this mode, users cannot make a new outgoing call. You need to press HOLD button to
realse the call holding and hang up the phone to continue.
8.3.2 Call holding
For users in the course of call, they can press CONFERENCE button to hold the current call
temporarily to make a new call. When turns back to the first call, the second call will be holded
also. Use the Switch button in LCD to switch between these 2 calls. Besides, these 2 calls can be
ended separately or at the same time.
© IPshop ApS 2009
C:\I_drev_tmp\IP0051\IP0051_user_guide.doc Ver. 1.1
Page 19
IP0051
User Guide ver. 1.1
5 SIP + 1 IAX
page 19 of 20
8.4 Forward
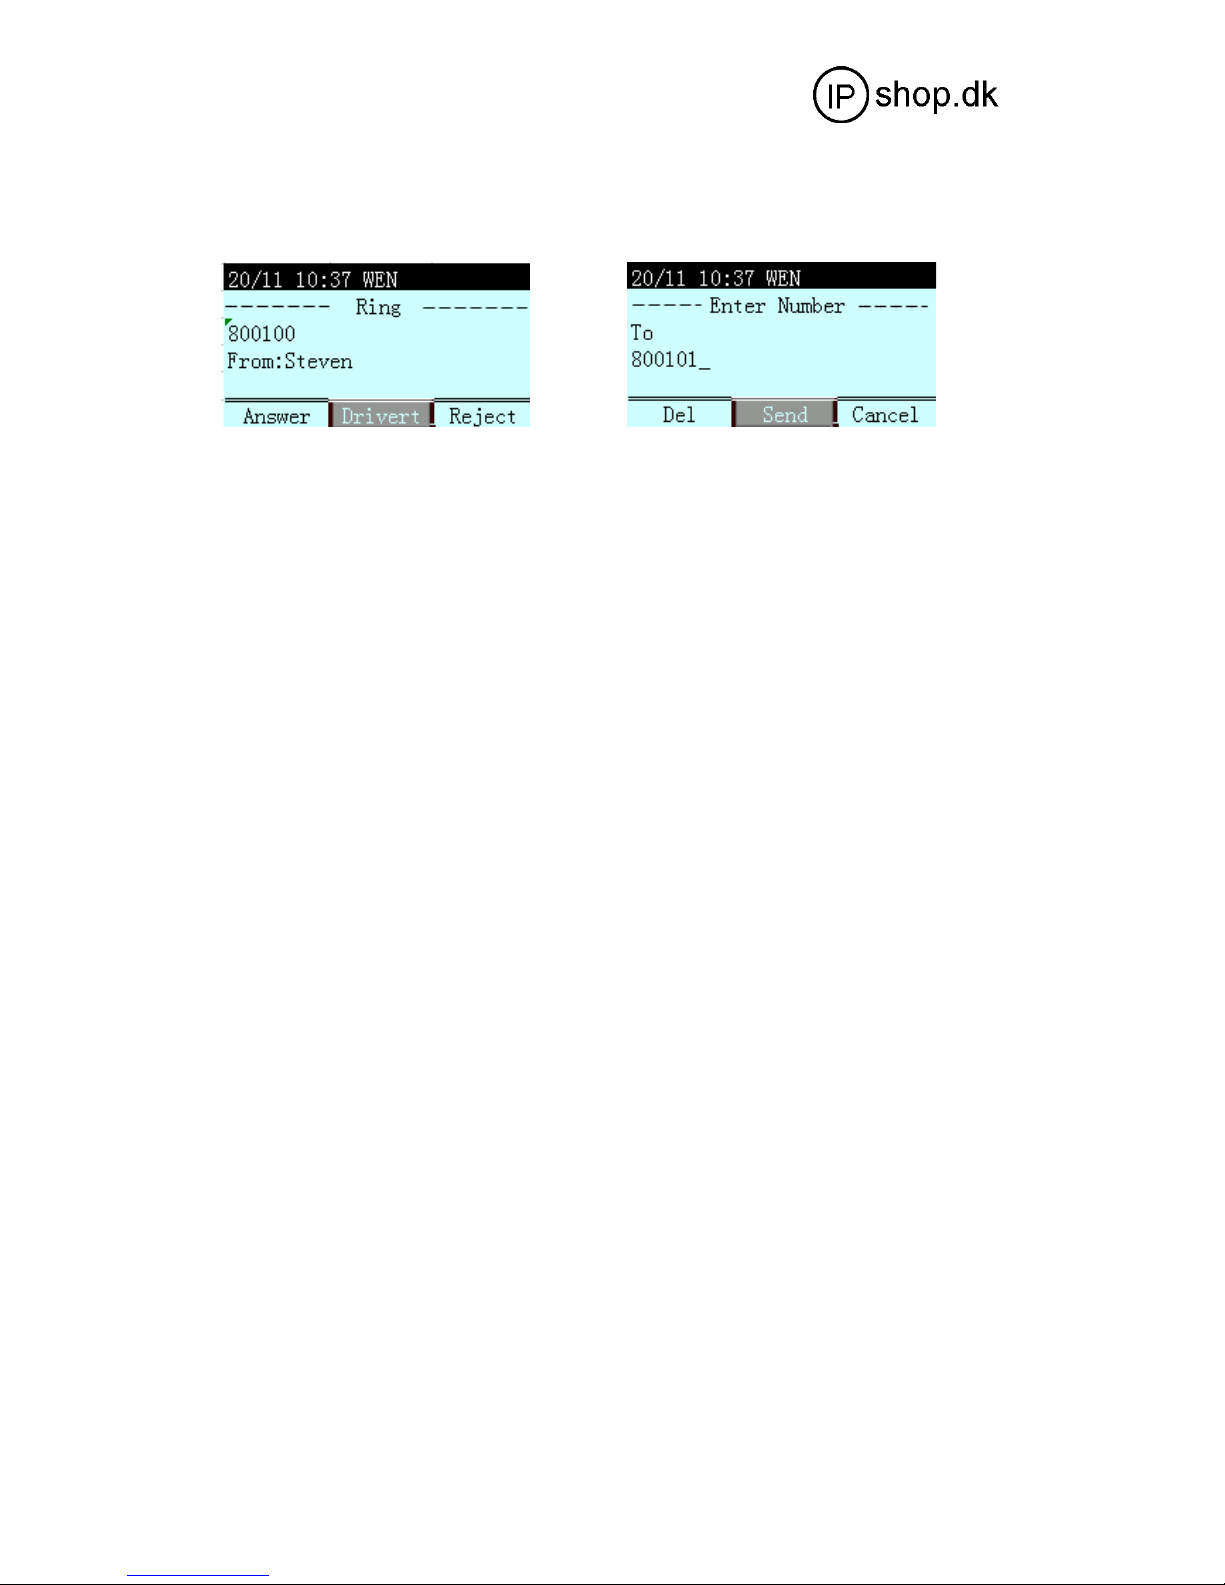
When there comes the incoming call, press Drivert when the phone rings, then enter the number
you want to call and press Send. This incoming call will be forwarded automatically. Therefore, if
you don’t answer a call, use this function to forward the call without caller’s awareness.
8.5 Blind transfer
When you get a call from A, but A wants to talk with B. Then you can press Transfer button,
input B’s number and end with # button to transfer the call and make A puts through with B.
Note: It can be applied when there comes a new call when you are in the course of call already. In
this situation, press Switch (softkey1) to switch between the two calls or press Transfer to
transfer the call.
8.6 Attend Transfer
When you get a call from A, and A wants to talk with B. But B might not in the office or busy
with something else, you can press Conference button to call B to check if B is available. If yes,
then you can press Transfer to forward the call to make A put through with B; If not, just press
Close to end your call with B and the call will be back to A’s talking status.
8.7 Three Way Call
When you are talking with A and want to get C in the call also, you can press CONFERENCE
button to hold the call with A temporarily and then call C, press CONFERENCE again to make 3way conference call.
8.8 SMS
Press SMS button(softkey1) in stand-by mode, SMS►Add►input the message text ►Send
►input the number ►Send(LINEx), then the short message will be sent to the inserted number
via SIP1. If you press LINEx to send the message, then the message will be sent via your selected
SIP LINE.
8.9 Customized Ringtones
Download your favourite MP3 music, and use the music format converter tool to change the music
into audio format which can be identified by the phone. One important thing is that the name
should be in 1.au, 2. au and should set USER1, USER2’s ringtone correspondingly. Then upgrade
the ringtone via WEB and config on SIP page’s ring type as user1, user2.
© IPshop ApS 2009
C:\I_drev_tmp\IP0051\IP0051_user_guide.doc Ver. 1.1
Page 20
IP0051
User Guide ver. 1.1
5 SIP + 1 IAX
page 20 of 20
9 Software Upgrade
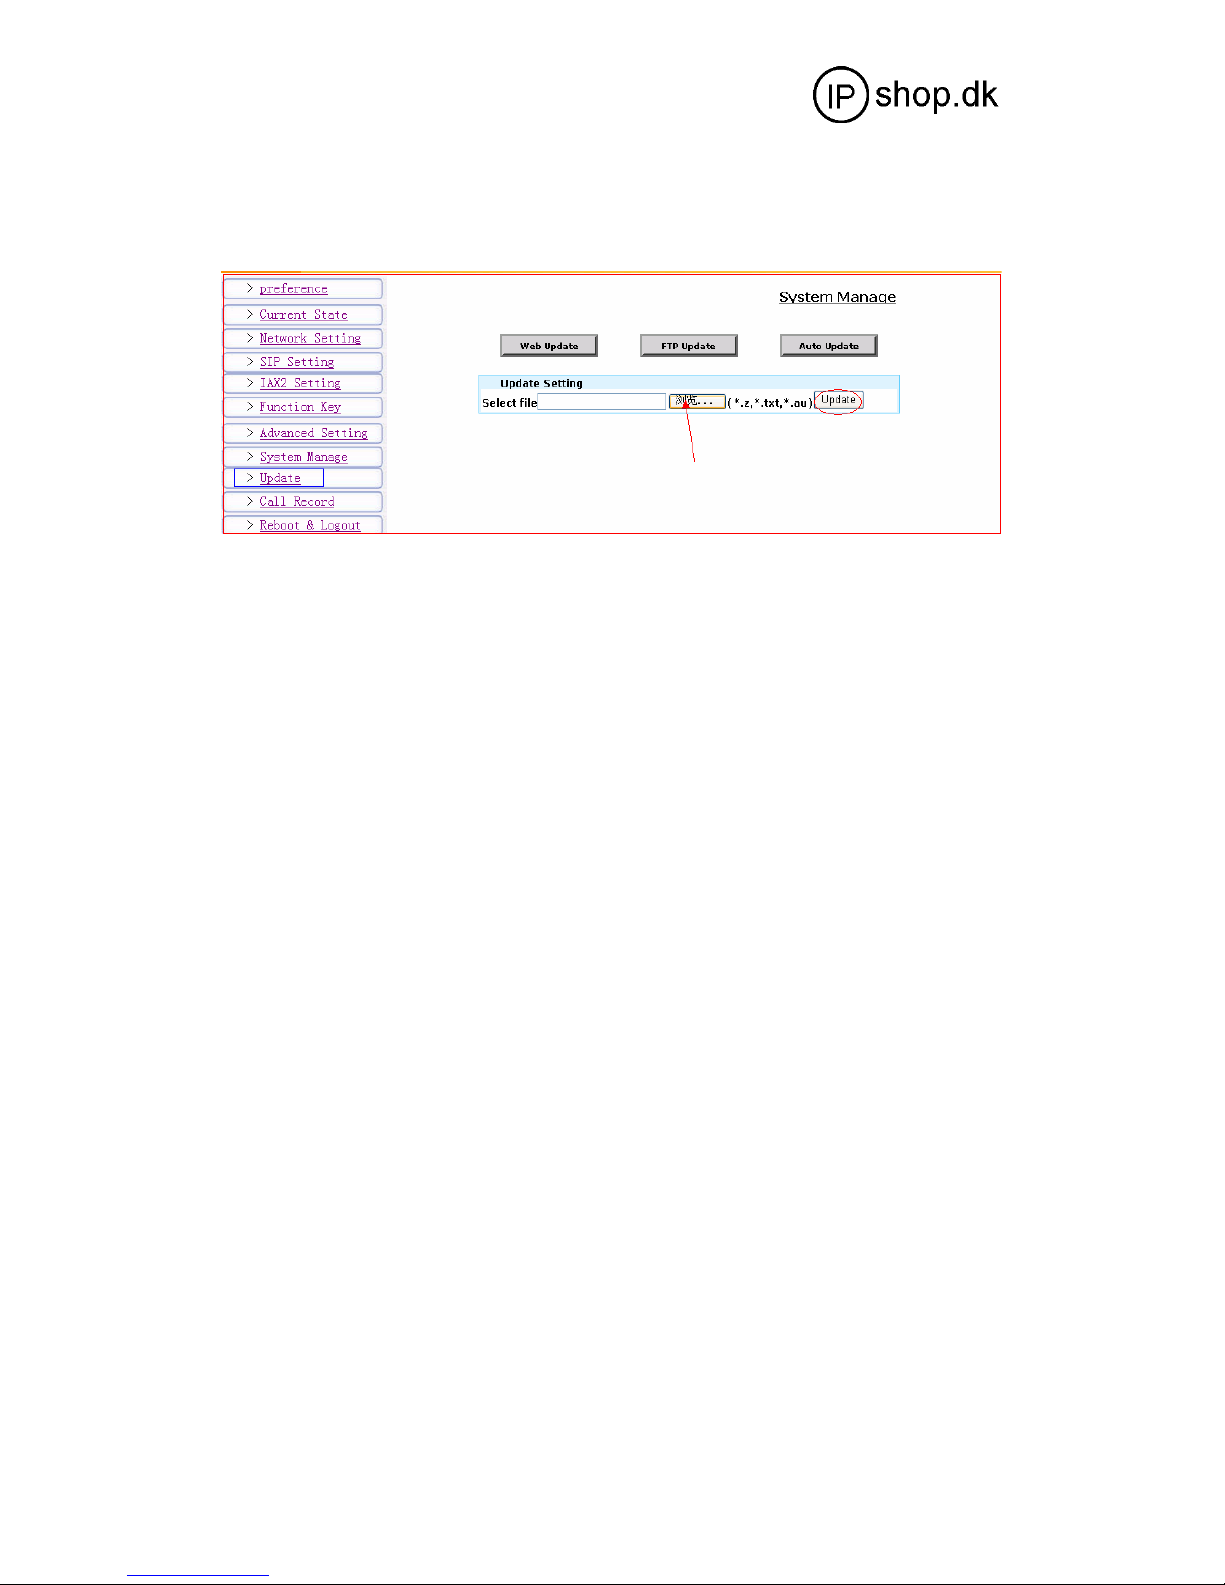
Browser to find previously saved configuration file (or files provided files), download to current
phone, which saves the configuration one by one. You can download system upgrade files,
ringtone files and mmiset files on this page. Note that for ringtone files, do config the name as
1.au, 2.au, correspondingly USER1, USER2 on ring type menu. Finally click 【Update】activate
the configuration.
© IPshop ApS 2009
C:\I_drev_tmp\IP0051\IP0051_user_guide.doc Ver. 1.1
 Loading...