


LED MONITOR
Ple ase rea d this ma nual ca reful ly befo re oper ating y our set .
Ret ain it fo r futur e refer ence.
Rec ord mod el numb er and se rial nu mber of t he set.
See t he labe l attac hed on th e back co ver and q uote th is
inf ormat ion to yo u r deale r when yo u requi re serv ice.
USER’S MANUAL
43'' Metal HDMI/VGA/BNC Monitor
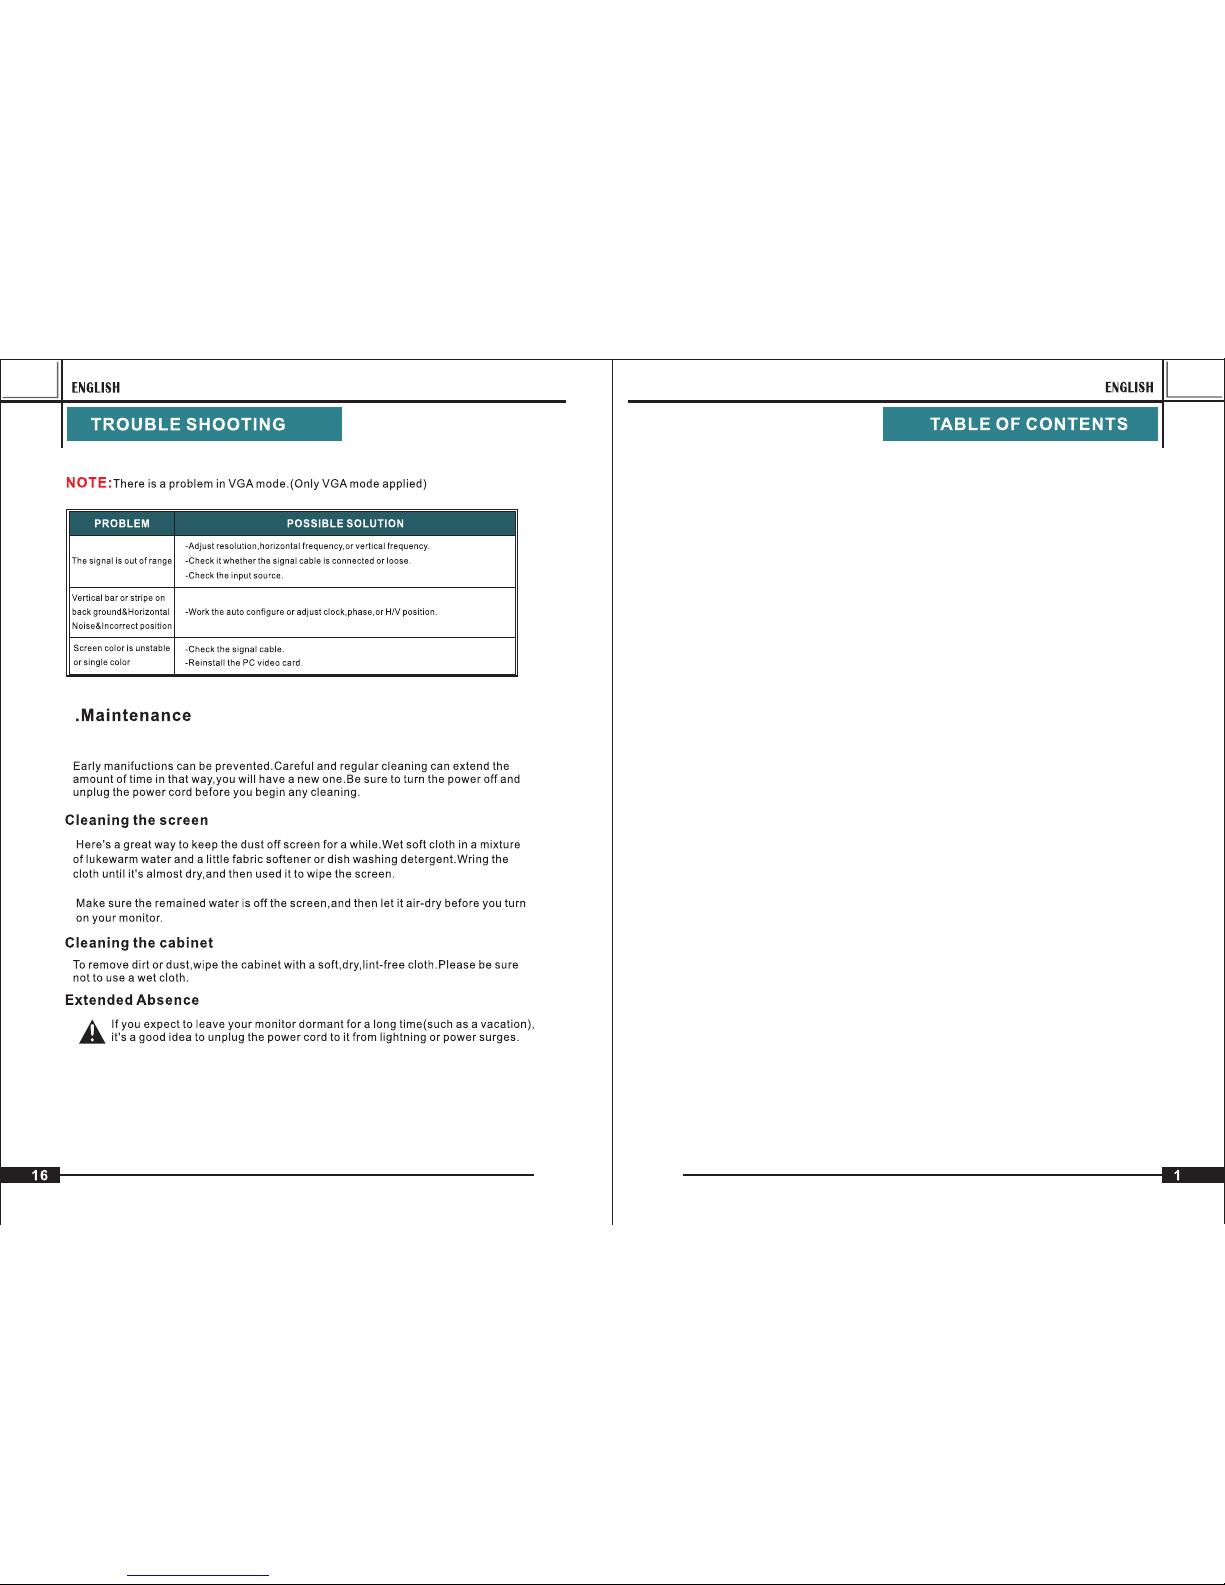
TABLE OF C ON TE NT S ……… … … … … ……… … … … …
WARNING … … … …… … … … … ……… … … … … …… … …
SAFETY IN ST RU CTIONS … … … …… … … … … ……… … …
1. INTRODUC TI ON … … … … ……… … … … … ……… … …
1.1 CONTROL S … … ……… … … … ……… … … … … ……
1.2 ACCESSOR IE S… ……… … … … … ……… … … … … …
1.3 CONNECT IO N OP ITONS…… … … … … ……… … … …
1.4 REMOTE CO NT RO L KEY F UN CTIONS… … … …… …
1.5 INSTAL LI NG B ATTERI ES… … … … … …… … … … … …
1.6 EXTERNA L EQUIPME NT C ONNECTION S … … ……
2.BASIC OSD S ET UP … … … … ……… … … … … ……… …
2.1 TUR NI NG O N AND O FF THE MO NI TOR ……… … …
2.2 SELECTI NG S CR EE N LA NGUAGE … … … …… … …
2.3 NO SYNC …… … … … … …… … … … … ……… … … …
2.4 SELECTI NG I NP UT SOURCE …… … … … ……… …
2.5 OSD STEP UN DE R VGA INPUT MO DE … … … … ……
2.6 OSD STEP UN DE R HDMI INPUT MO DE … … … … …
3. TROUBLE SH OO TI NG … … … … ……… … … … … ……
4. MAINTEAN CE … … … … … ……… … … … ……… … …
1
2
3
5
7
15
16
5
5
6
8
8
10
10
10
10
10
11
13
4

15
3

OSD LAN GUAGE
OSDDU RATION
BLEND ING
BACKL IGHT
RESTO RE DEFAU LT
SYST EM
OFF
ENGLI SH
FUNC TION
PICT URE
:SELEC T
:ADJUS T
50
CONTR AST
50
BRIGH TNESS
-Press “ ”button to select OSD menu.
-Use “ ” to select what you want to adjust in the
HDMI mode.
-Press button to adjust.“ ”
-When you are satisfied with your adjustment, press MENU to exit the
main menu.
2.7.2 O SD
-Press “ ”button to select OSD menu.
-Use “ ” to select what you want to adjust in the
HDMI mode.
-Press button to adjust.“ ”
-When you are satisfied with your adjustment, press MENU to exit the
main menu.
2.7.3 O SD
-Press “ ”button to select OSD menu.
-Use “ ” to select what you want to adjust in the
HDMI mode.
-Press button to adjust.“ ”
-When you are satisfied with your adjustment, press MENU to exit the
main menu.
50
HUE
50
COLOR
50
SHARP NESS
COLOR T EM
MEDIU M
SCALE
4:3
PICTU RE MODE
STANDA RD
100
OFF
COLOR R ANGE OFF
NOISE R EDUCT ION
Middl e
SCREE N
AUTO ADJU ST
UPDATE (USB)

2.6.2 O SD
-Press “ ”button to select OSD menu.
-Use “ ” to select what you want to adjust in the
AV1/AV2 mode.
-Press button to adjust.“ ”
-When you are satisfied with your adjustment, press MENU to exit the
main menu.
2.6.3 F UN CTION m en u opt io ns
-Press “ ”button to select FUNCTION menu.
-Use “ ” to select what you want to adjust in the
AV1/AV2 mode.
-Press button to adjust.“ ”
-When you are satisfied with your adjustment, press MENU to exit the
main menu.
A. Press the “MENU” button to access Main Menu setting interface.
B. Press the “ ”to select the desired submenu.
C. Press the “ ”again to enter the submenu.
2. 7 OS D se tu p un de r HD MI i np ut m ode.
2. 7. 1 HDMI menu opt io ns
:SELEC T
:ADJUS T
FUNC TION
SCREE N
COLOR R ANGE OFF
NOISE R EDUCT ION
Middl e
RESTO RE DEFAU LT
SYST EM
OSDDU RATION
OFF
OSD LAN GUAGE
ENGLI SH
:SELEC T
:ADJUS T
BLEND ING OFF
BACKL IGHT
100
AUTO ADJ UST
UPDATE (USB)

POWER
MUTE
PICTURE
FREEZE
INPUT
MENU
VGA
YPbPr
AV
S-VIDEO
DVI
MENU
-Press “ ”button to select GEOMETRY menu.
-Use “ ” to select what you want to adjust in the
VGA mode.
-Press button to adjust.“ ”
-When you are satisfied with your adjustment, press MENU to exit the
main menu.
A. Press the “MENU” button to access Main Menu setting interface.
B. Press the “ ”to select the desired submenu.
C. Press the “ ”again to enter the submenu.
-Press “ ”button to select PICTURE menu.
-Use “ ” to select what you want to adjust in the
AV1/AV2 mode.
-Press button to adjust.“ ”
-When you are satisfied with your adjustment, press MENU to exit the
main menu.
2.6 OSD s etup un der AV1 / AV2 i nput mode .
FUNC TION
SCREE N
AUTO ADJ UST
UPDATE (USB)
PICT URE
50
CONTR AST
50
BRIGH TNESS
50
HUE
50
COLOR
SHARP NESS
50
COLOR T EM
MEDIU M
PICTU RE MODE
STANDA RD
COLOR R ANGE OFF
NOISE R EDUCT ION
Middl e
SCALE
4:3
6
7
7
6
Power
Mode
Men u
Dow n
UP
Lef t
Rig ht
Pres s to turn o n/off Po wer
Pres s to chan ge Inpu t Sourc es
Pres s to turn o n/off M enu
Pres s to decr ease So und and M enu Adj ustme nt
Pres s to incr ease So und and M enu Adj ustme nt
Pres s to Menu A djust ment
Pres s to Menu A djust ment

PICT URE
:SELEC T
:ADJUS T
50
CONTR AST
50
BRIGH TNESS
50
HUE
50
COLOR
50
SHARP NESS
COLOR T EM
MEDIU M
SCALE
4:3
PICTU RE MODE
STANDA RD
A. Press the “MENU” button to access Main Menu setting interface.
B. Press the “ ”to select the desired submenu.
C. Press the “ ”again to enter the submenu.
-Press “ ”button to select PC menu.
-Use “ ” to select what you want to adjust in the
VGA mode.
-Press button to adjust.“ ”
-When you are satisfied with your adjustment, press MENU to exit the
main menu.
-Press “ ”button to select OSD menu.
-Use “ ” to select what you want to adjust in the
VGA mode.
-Press button to adjust.“ ”
-When you are satisfied with your adjustment, press MENU to exit the
main menu.
2.5.2 OS D me nu o pt io ns
RESTO RE DEFAU LT
SYST EM
OSDDU RATION
OFF
OSD LAN GUAGE
ENGLI SH
BLEND ING
OFF
BACKL IGHT
100
1
2
3
4
5
6
7
8
9
10
11
12
13
14
1515
16
17
18
USB
HDM I
DVI
VGA
AV5/ S-Y
AV4/ S-C
AV 3
AV 2
AV 1
AV 1-O UT
AV 2-O UT
Y
Pb
Pr
L1
L2
R1
R2
Usi ng for So ftwar e Updat ed or USB t ype Vid eo
Usi ng for HD MI Sour ce
Usi ng for DV I Sourc e
Usi ng for VG A So urc e
Usi ng for BN C Sourc e Input
Usi ng for BN C Sourc e Input
Usi ng for BN C Sourc e Input
Usi ng for BN C Sourc e Input
Usi ng for BN C Sourc e Input
Usi ng for BN C Sourc e Outpu t; Supp ort Rin g netwo rk link
Usi ng for BN C Sourc e Outpu t; Supp ort Rin g netwo rk link
Com ponen t Video C onn ector
Com ponen t Video C onn ector
Com ponen t Video C onn ector
Voic e Conne ction
Voic e Conne ction
Voic e Conne ction
Voic e Conne ction

PICT URE
50
CONTR AST
50
BRIGH TNESS
50
HUE
50
COLOR
50
SHARP NESS
COLOR T EM
MEDIU M
SCALE
4:3
PICTU RE MODE
STANDA RD
HDM I
YPBPR
MENU
POWER
MUTE
PICTUR E
FREEZ E
INPUT
VGA
AV
DVI
S-VID EO
HDMI
YPbP r
POWER
MUT E
MENU
INPUT
PICTU RE
-Press the “MENU” button into main menu.
-Press the “ ” button to
select OSD menu.
-Press the “ ” button to
select OSD LANGUAGE.
-Press the “ ” button to
select your language.
-When you are satisfied with your choice,
press MENU to exit.
-Press the “ ” button to select the source you want.
-Press the “INPUT” button to confirm.
nput source by pressing INPUT button on the remote
control on the front panel.
NO SIGNAL
PC
HDMI
AV 1
AV 2
NO SIGNAL

CR
2032
CR
2032
 Loading...