

Page 1

Outdoor Dome
Camera
Start Guide
Page 2

Contents
Whats in the box
Camera Features
Download App
Camera Setup
Reset
FAQs
2
3
4
5-8
9
10
Page 3

What’s in the box?
• WiFi Dome Camera
• Antenna
• UK Power Adapter
1. Screw the wi antenna into the camera
2. Connect the camera to the mains using the
power adapter provided
Please note: It is important that the camera is set up
correctly prior to installing outdoors
• Screws & Allen Key
• Screw Template
• Warranty Card
2
Page 4

Camera Features
Infrared LED lights
for Night Vision
Camera Lens
Micro SD
Card Slot
Reset Button
You will need to add a Micro SD Card to record footage. The
camera accepts up to 128GB
Main Power
WIFI
Antenna
3
Page 5
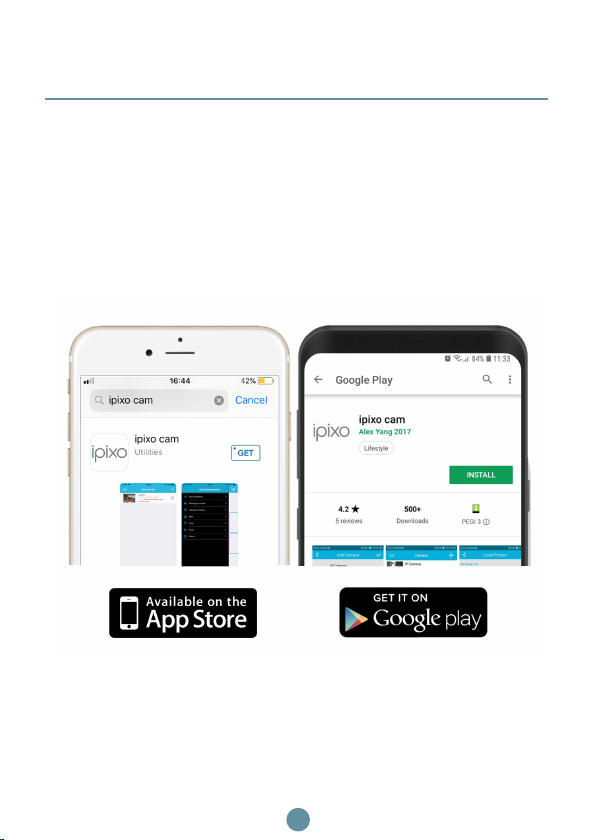
Download App
Download the ipixo cam app
from App Store or Google Play
4
Page 6
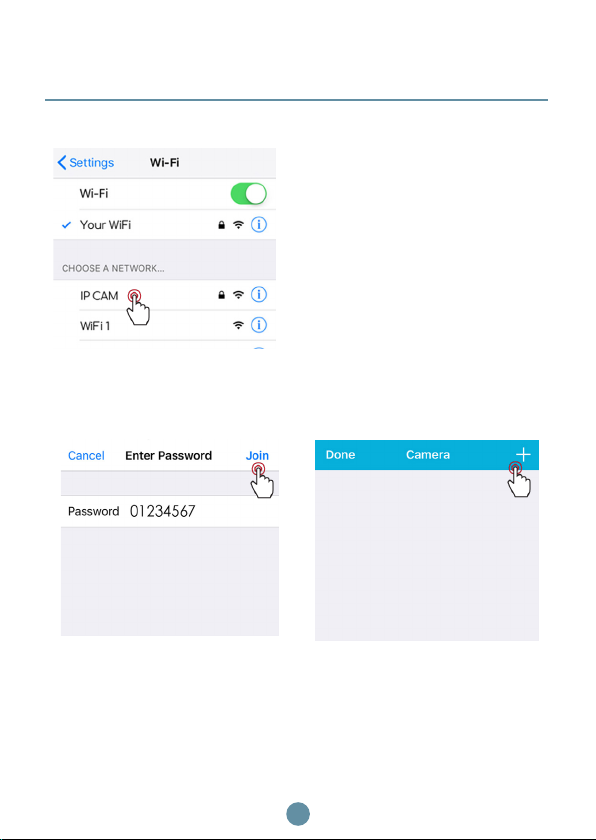
Camera Setup
Step 1
Add Camera to App
Go into the WIFI Settings
on your smartphone and
connect to the cameras
network.
It may take up to 90
seconds to appear under
the network list
Step 3Step 2
Enter 01234567 and click
connect
Open the ipixo cam app
Click on the + icon
5
Page 7
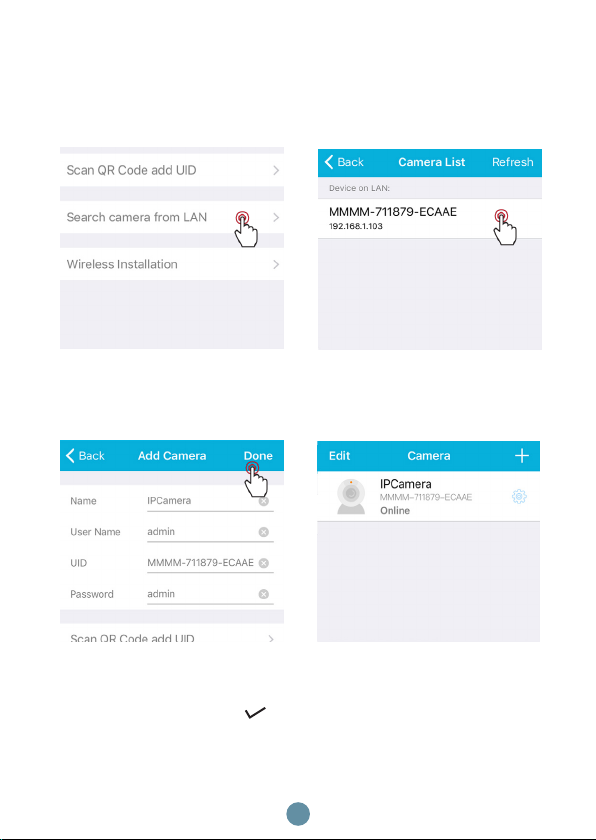
Step 4
Step 5
Then select search camera
from LAN
Your camera will appear
under the camera list,
click on it
Step 6
Enter Password: admin
Click Done
(Android users click )
Move on to the next step to connect the camera to your WIFI network
Your camera should
appear online
6
Page 8
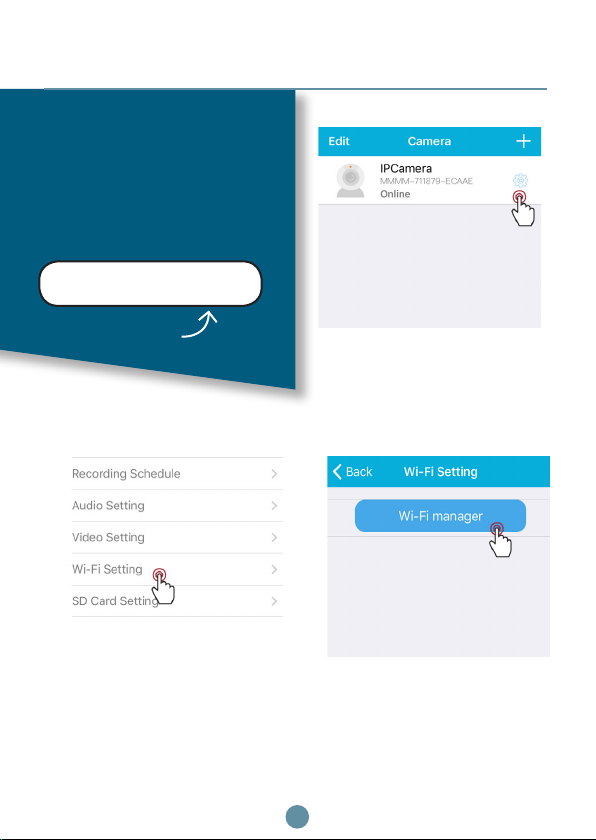
Camera Setup
Connect Wirelessly
Note down your
WiFi Password!
It is required for the WiFi
setup.
Write it down below so it’s
handy when you need it.
Your WiFi Password
Step 2
This will bring up a list of
the
camera settings.
Step 1
On the ipixo app, select the
settings cog
Step 3
Click on WiFi Manager to
bring up a list of nearby
WiFi Routers
Click on WiFi Setting
7
Page 9
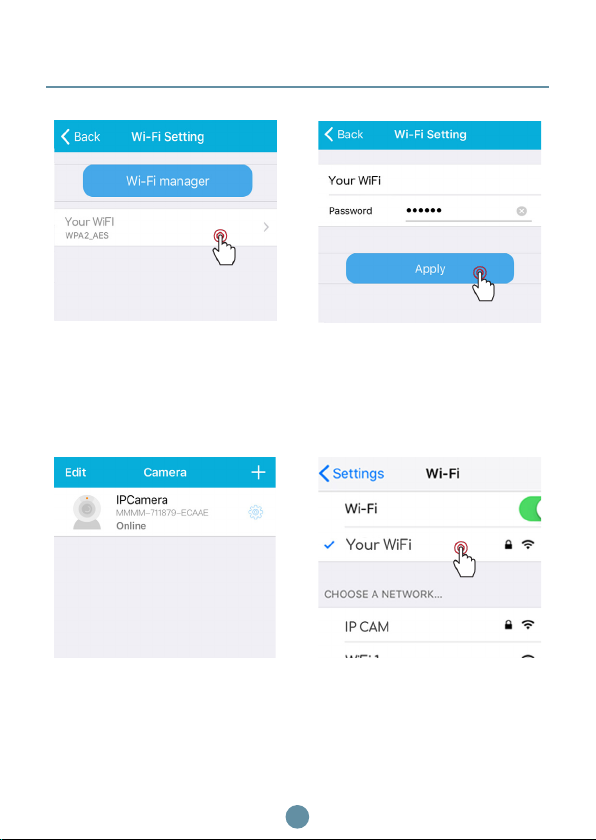
Step 4
Step 5
Click on your WiFi Router Enter your WiFi Password
Step 6
Your camera should then
appear online.
Android User: Return to
main page to view the
camers.
8
Click Apply
(Android Users : Click
Connect)
Step 7
Important: Reconnect to
your WiFi Router through
the WiFi Settings on
your smartphone
Page 10
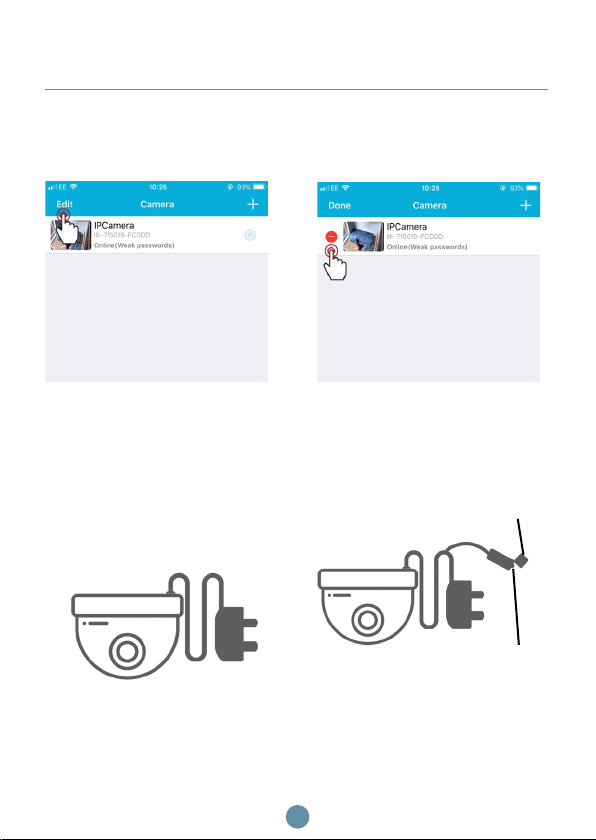
Reset
If you are having trouble connecting the camera, you may
need to do a reset.
Step 1
Go to the camera section on
the ipixo app to delete the
camera. Click Edit.
Step 3
Step 2
Then click the minus icon
of the camera you want to
delete.
Step 4
Cap
Press this
button
Ensure the camera is
plugged into the mains
Remove the cap from the
reset button and press for
15-20 seconds
9
Page 11

FAQs
1. How is the Camera powered? How long is the power
cable?
The camera is powered using a mains power supply. The power
cable is 1.5 metres.
You can purchase extension cables if required, on our website.
2. Does the Camera pan & tilt?
No. It is not a pan & tilt camera.
However, you can manually reposition the camera lens to cover the
area you would like to view.
3. Is there any memory built-in?
No. There is no built-in memory in this camera.
However, it does support Micro SD Cards up to 128GB which will be
required to record footage. See Page 3.
4. The Camera is not appearing under the WIFI networks
on my smartphone, am I doing something wrong?
It may take a few minutes for the smartphone to refresh the available networks and for the Camera to appear – remain on the page
until the “IP-Cam” network appears.
6. When connecting to the Cameras network, I am being
asked for a password
The password for the Cameras network is 01234567
7. What are the login details I should enter for the Camera?
The username is admin and the password is admin.
For your own security, please ensure the password is changed once
the camera has been set up.
10
Page 12
Additional Information
To get the best out of your Camera, please
visit: www.ipixo.com/domecamera
If you’re still struggling with setup and if you require any
help to make the most of your camera please contact our
customer services team.
Email: [email protected]
Phone: 0844 7400874
Or
Live chat with one of our customer service team on our
website www.ipixo.com
Warranty
Register your warranty online within 30 days of purchase
for 14 months warranty.
www.ipixo.com/warranty
 Loading...