

IPico WN400-S, WN400-O User Manual

IPico™ WN400 Integrated Access Device User Guide
User Guide © 2001 Lucid Voice
1
Table of Contents
________________________________
Introduction . . . . . . . . . . . . . . . . . . . . . . . . . . . . . . . . . . . . . . . . 1
Technical Support . . . . . . . . . . . . . . . . . . . . . . . . . . . . . . . . . . 2
Package Contents . . . . . . . . . . . . . . . . . . . . . . . . . . . . . . . . . . 3
Required Accessories . . . . . . . . . . . . . . . . . . . . . . . . . . . . . . . . 4
Quick Installation . . . . . . . . . . . . . . . . . . . . . . . . . . . . . . . . . . 5
Network Topology . . . . . . . . . . . . . . . . . . . . . . . . . . . . . . . . . . 6
Placing Calls . . . . . . . . . . . . . . . . . . . . . . . . . . . . . . . . . . . . . . . 7
Inter-site Telephony Connection . . . . . . . . . . . . . . . . . . . . . . 7
Setup . . . . . . . . . . . . . . . . . . . . . . . . . . . . . . . . . . . . . . . . . . . . 7
Placing a Call . . . . . . . . . . . . . . . . . . . . . . . . . . . . . . . . . . . . . . 8
Remote PBX Connection . . . . . . . . . . . . . . . . . . . . . . . . . . . . . 8
Setup . . . . . . . . . . . . . . . . . . . . . . . . . . . . . . . . . . . . . . . . . . . . 8
Placing a Call . . . . . . . . . . . . . . . . . . . . . . . . . . . . . . . . . . . . . . 9
Remote PSTN (Public Switched
Telephone Network) Connection . . . . . . . . . . . . . . . . . . . . 10
Setup . . . . . . . . . . . . . . . . . . . . . . . . . . . . . . . . . . . . . . . . . . . 10
Placing a Call . . . . . . . . . . . . . . . . . . . . . . . . . . . . . . . . . . . . . 10
Remote PBX Extension . . . . . . . . . . . . . . . . . . . . . . . . . . . . . . 11
Setup . . . . . . . . . . . . . . . . . . . . . . . . . . . . . . . . . . . . . . . . . . . 11
Placing a call . . . . . . . . . . . . . . . . . . . . . . . . . . . . . . . . . . . . . . 12

User Guide IPico™ WN400 Integrated Access Device
User Guide © 2001 Lucid Voice
2
Configuration . . . . . . . . . . . . . . . . . . . . . . . . . . . . . . . . . . . . . 12
Web Manager Configuration Tool . . . . . . . . . . . . . . . . . . . . 12
Accessing the unit . . . . . . . . . . . . . . . . . . . . . . . . . . . . . . . . . . 12
Parameters . . . . . . . . . . . . . . . . . . . . . . . . . . . . . . . . . . . . . . . . 13
COMmander Configuration Tool . . . . . . . . . . . . . . . . . . . . . 18
Specifications . . . . . . . . . . . . . . . . . . . . . . . . . . . . . . . . . . . . . 20
Indicators, Interfaces, and Controls . . . . . . . . . . . . . . . . . . . 20
Product Capabilities . . . . . . . . . . . . . . . . . . . . . . . . . . . . . . . . 20
Voice Support . . . . . . . . . . . . . . . . . . . . . . . . . . . . . . . . . . . . . 21
Management Features . . . . . . . . . . . . . . . . . . . . . . . . . . . . . 21
Security Features . . . . . . . . . . . . . . . . . . . . . . . . . . . . . . . . . . . 21
Interfaces . . . . . . . . . . . . . . . . . . . . . . . . . . . . . . . . . . . . . . . . . 21
Standards and Protocols Supported . . . . . . . . . . . . . . . . . . 22
Troubleshooting . . . . . . . . . . . . . . . . . . . . . . . . . . . . . . . . . . . 22
Dialing and Placing Calls . . . . . . . . . . . . . . . . . . . . . . . . . . . . 22
Using COMmander . . . . . . . . . . . . . . . . . . . . . . . . . . . . . . . . . 24
Using the Web Manager . . . . . . . . . . . . . . . . . . . . . . . . . . . . 24
Network Problems . . . . . . . . . . . . . . . . . . . . . . . . . . . . . . . . . . 25
Quality of Service (QoS) . . . . . . . . . . . . . . . . . . . . . . . . . . . . . 26
Error Messages . . . . . . . . . . . . . . . . . . . . . . . . . . . . . . . . . . . 27
Appendix A . . . . . . . . . . . . . . . . . . . . . . . . . . . . . . . . . . . . . . . . 29
Version Number . . . . . . . . . . . . . . . . . . . . . . . . . . . . . . . . . . . . 29
Factory Settings . . . . . . . . . . . . . . . . . . . . . . . . . . . . . . . . . . . . 29
Serial Parameters . . . . . . . . . . . . . . . . . . . . . . . . . . . . . . . . . . 29
Passwords . . . . . . . . . . . . . . . . . . . . . . . . . . . . . . . . . . . . . . . . . 29
Limited Warranty . . . . . . . . . . . . . . . . . . . . . . . . . . . . . . . . . . 30

IPico™ WN400 Integrated Access Device User Guide
User Guide © 2001 Lucid Voice
3
Introduction
Congratulations on your purchase of IPico™ WN400 Point-to-Point
system. The IPico is a complete, all-in-one voice and data Integrated
Access Device (IAD). IPico provides excellent, cost-effective voice over IP
(VoIP) and data integration for simultaneous telephony and data transfer
with Quality of Service (QoS) enforcement on a wide range of IP
networks. The state-of-the-art IPico technology allows voice and data
users to share bandwidth on a single wide area network (WAN) link.
Every telephone call is compressed and assigned a dedicated voice channel,
which is prioritized over the data channel. Because IPico prioritizes voice
over data, it guarantees toll-quality voice communications using advanced
real-time protocols (RTPs). IPico’s patented QoS guarantees optimal use
of multiple voice and data channels, regardless of bandwidth limitations
or network load.
IPico integrates fully with your existing IP data network and with your
existing telephones, facsimile machines, gateways, call managers, and local
Private Branch Exchange (PBX).
The IPico Model WN400-S supports voice, data, and fax communication
within or between your sites. It can also be connected to an existing
analog PBX. The IP ico WN400-O, in conjunction with the IPico
WN400-S can be used to connect your site to the Public Switched
Telephone Network (PSTN).
These instructions will guide you through the setup and installation of
IPico devices, enabling you to integrate the IPico devices into your
network.

User Guide IPico™ WN400 Integrated Access Device
User Guide © 2001 Lucid Voice
4
Technical Support
• Contact our international support team by
phone: +972-3-575-7488.
• Contact our U.S. support team by phone: (212) 686-7797.
• E-mail us at support@lucidvoice.com.
You can also fill out our support form at www.lucidvoice.com/support.htm
(Lucid Voice keeps all information confidential and does not sell or
distribute mailing lists, customer lists, or information obtained from this
form).
IPico™ WN400 Integrated Access Device User Guide
User Guide © 2001 Lucid Voice
5
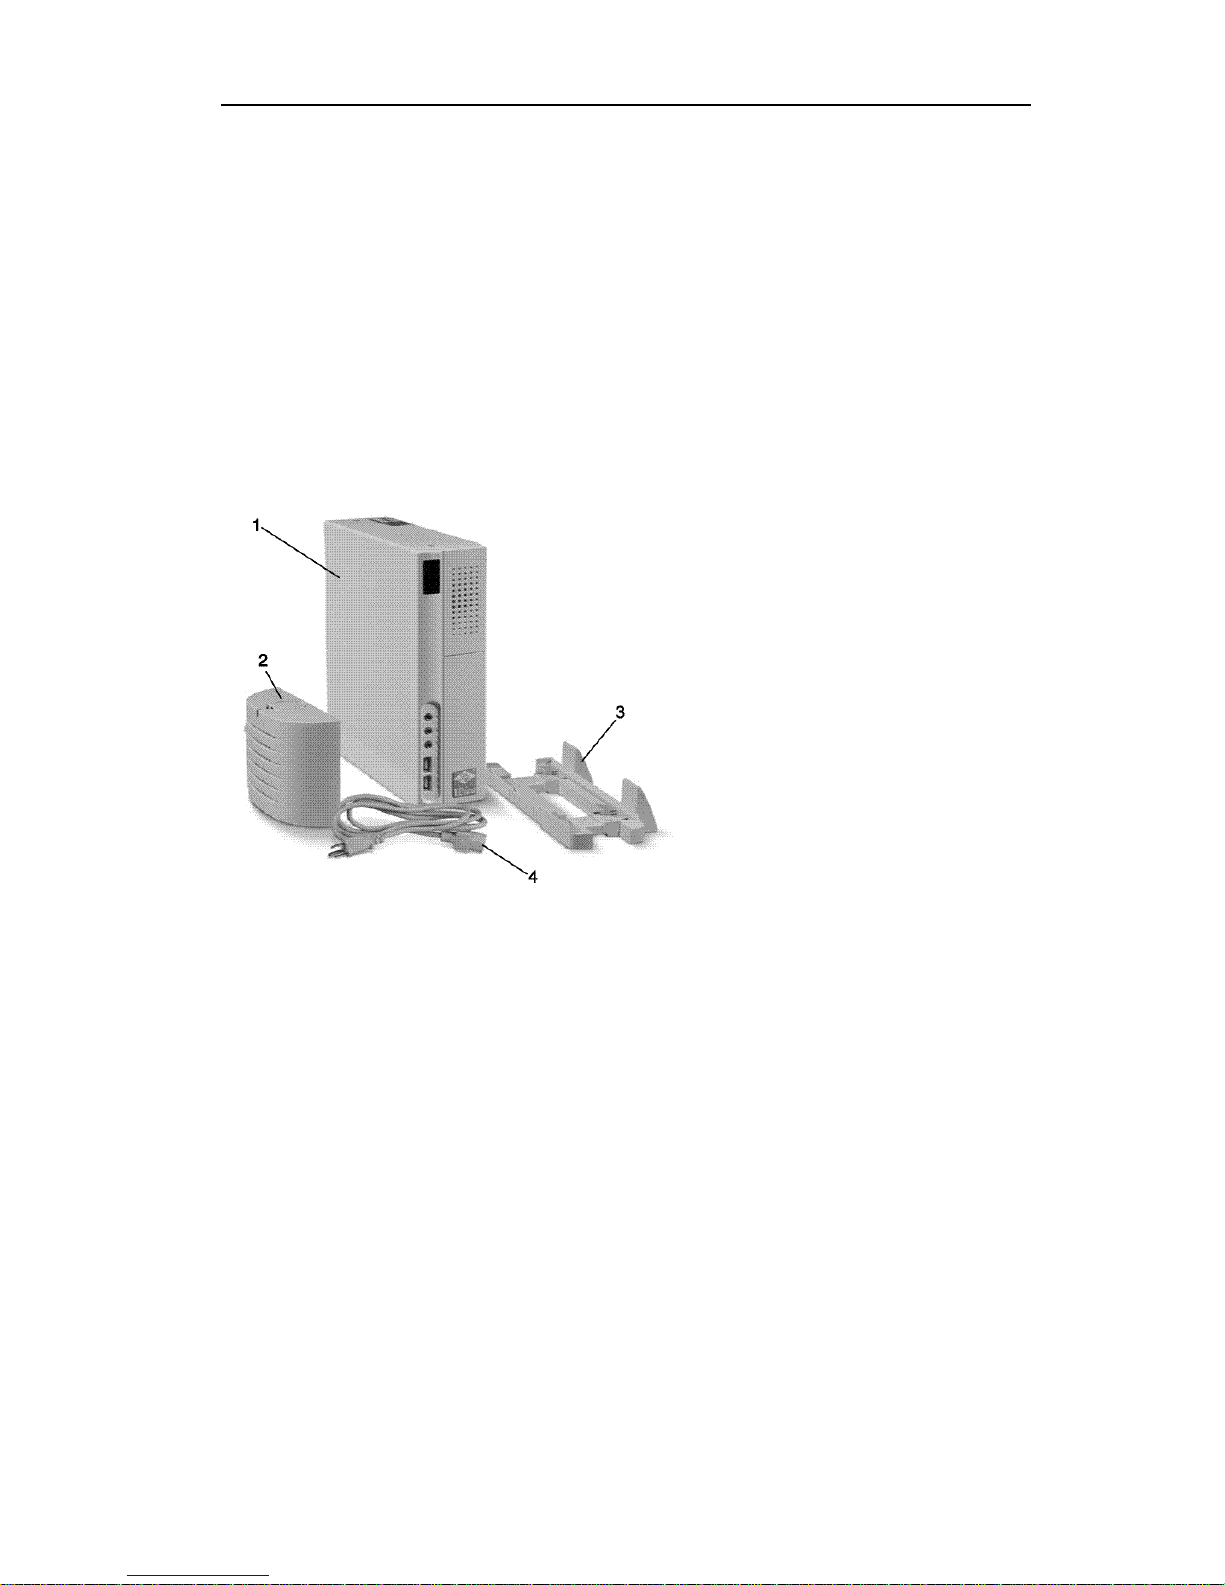
Package Contents
1. IPico unit
2. Power supply
3. Power supply bracket
4. Power cord
Figure 1

User Guide IPico™ WN400 Integrated Access Device
User Guide © 2001 Lucid Voice
6
Required Accessories
You will need:
• Two IPico units
• Two power supplies
• Two power supply brackets
• Two (or more) analog (dual-tone multifrequency [DTMF]) telephone
units (not supplied)
• Two Category 5 Ethernet (RJ-45) cables and an Ethernet hub (not
supplied)
or
• Crossover cable (not supplied)
• Serial cable (optional)
Figure 2

IPico™ WN400 Integrated Access Device User Guide
User Guide © 2001 Lucid Voice
7
Quick Installation
1. Pull power supply bracket until reaching ‘NC2’ mark.
2. Attach the power supply to the power supply bracket by firmly
inserting the metal latches into the appropriate slots in the power
supply bracket.
3. Place the IPico unit onto the power supply bracket, positioning the
rear panel sideways from the power supply cable.
4. Connect the power supply cable to the power connection on the rear
panel of the IPico and tighten the bolt.
5. Connect the power supply unit to the power connector.
6. Turn power supply switch to ‘ON’.
7. Turn on the IPico unit by pushing the ON/OFF button on the back
panel. You will hear a beep. A green LED on the front panel indicates
that the power is ON.
8. Connect each IPico’s WAN interface to a hub, using an Ethernet
cable. (You may also choose to connect the IPico units to each other
using a crossover cable.)
9. Wait 60 seconds for a complete reboot.
10. Repeat these instructions to power up the second IPico unit.
11. Pick up each telephone’s handset to verify a dial tone and put down
the handset.
12. See the Placing Calls section for further instructions.
User Guide IPico™ WN400 Integrated Access Device
User Guide © 2001 Lucid Voice
8
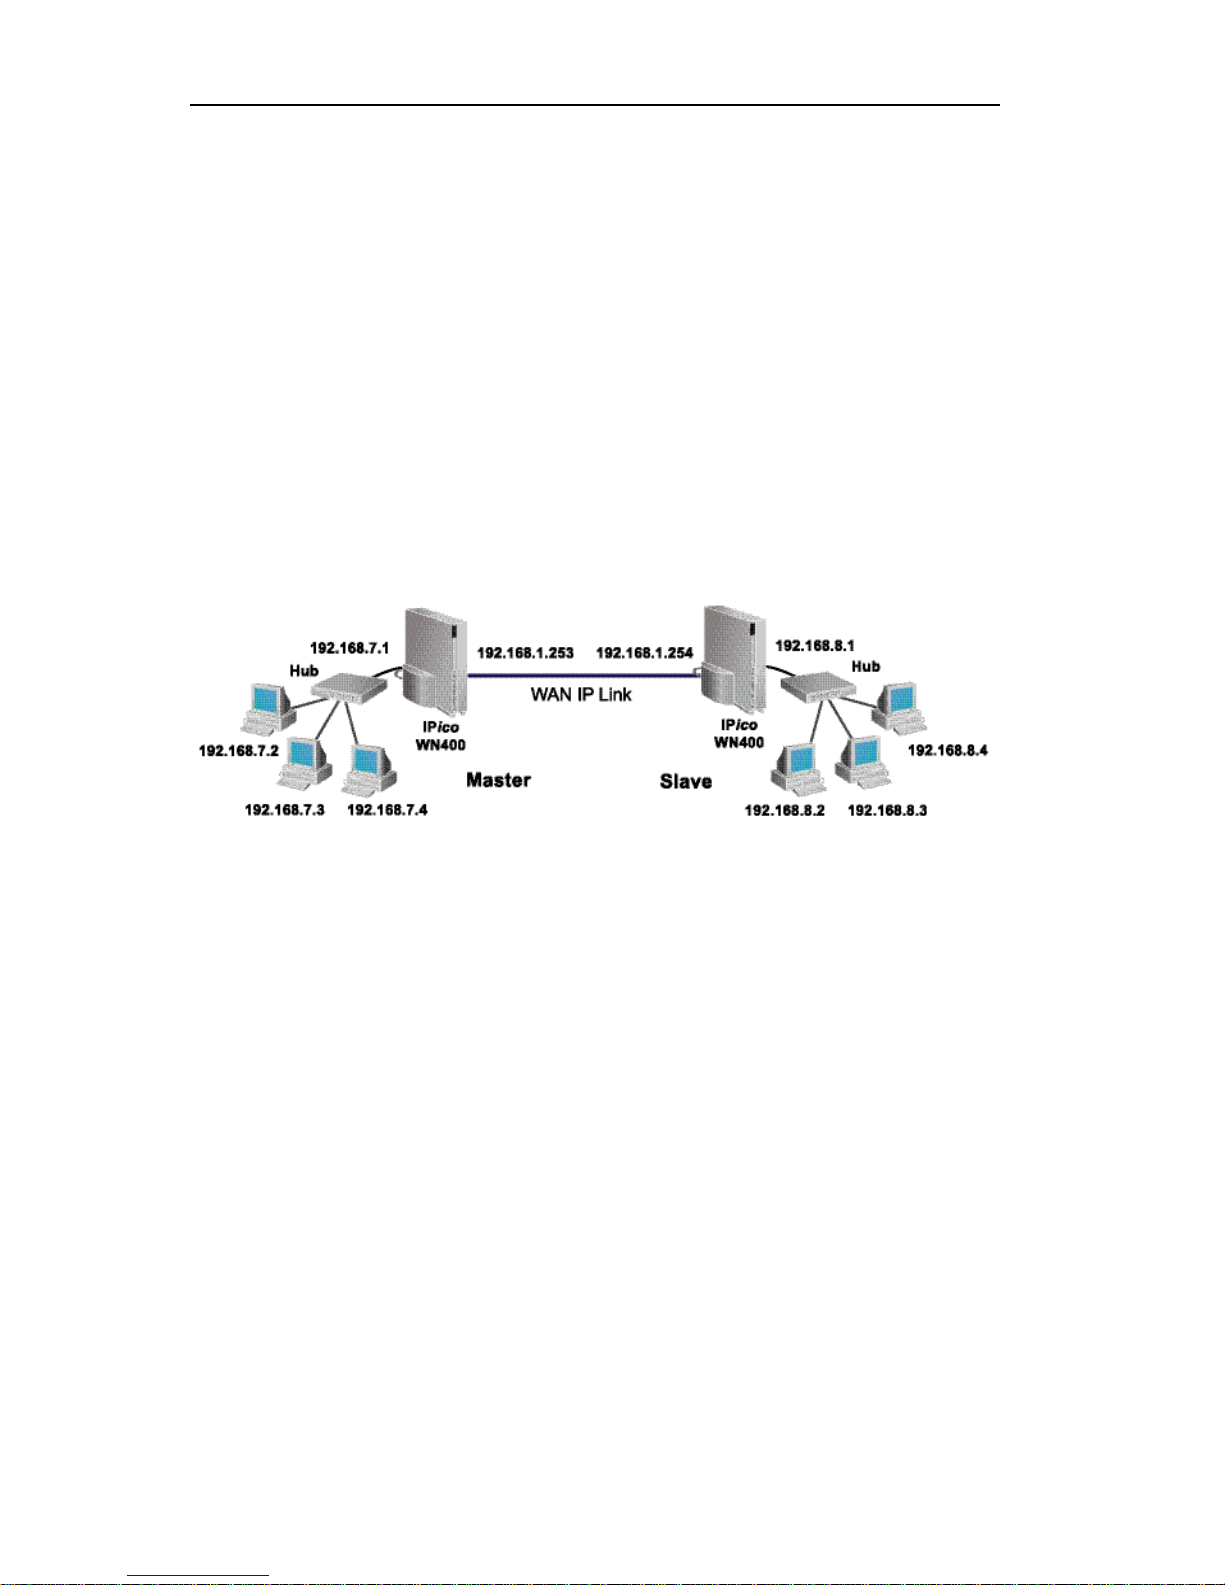
Network Topology
In a point-to-point network one IPico should be set as Master and the
other IPico should be set as Slave. All IPico WN-400-S devices are shipped
as Master and all IPico WN-400-O devices are shipped as Slave.
Use the IPico Web Manager Configuration tool to change between Master
and Slave.
A typical Master/Slave setup should resemble the following illustration:
Figure 3
Note: Both LAN and WAN segments need to be on unique (non-
equal) networks.
IPico™ WN400 Integrated Access Device User Guide
User Guide © 2001 Lucid Voice
9
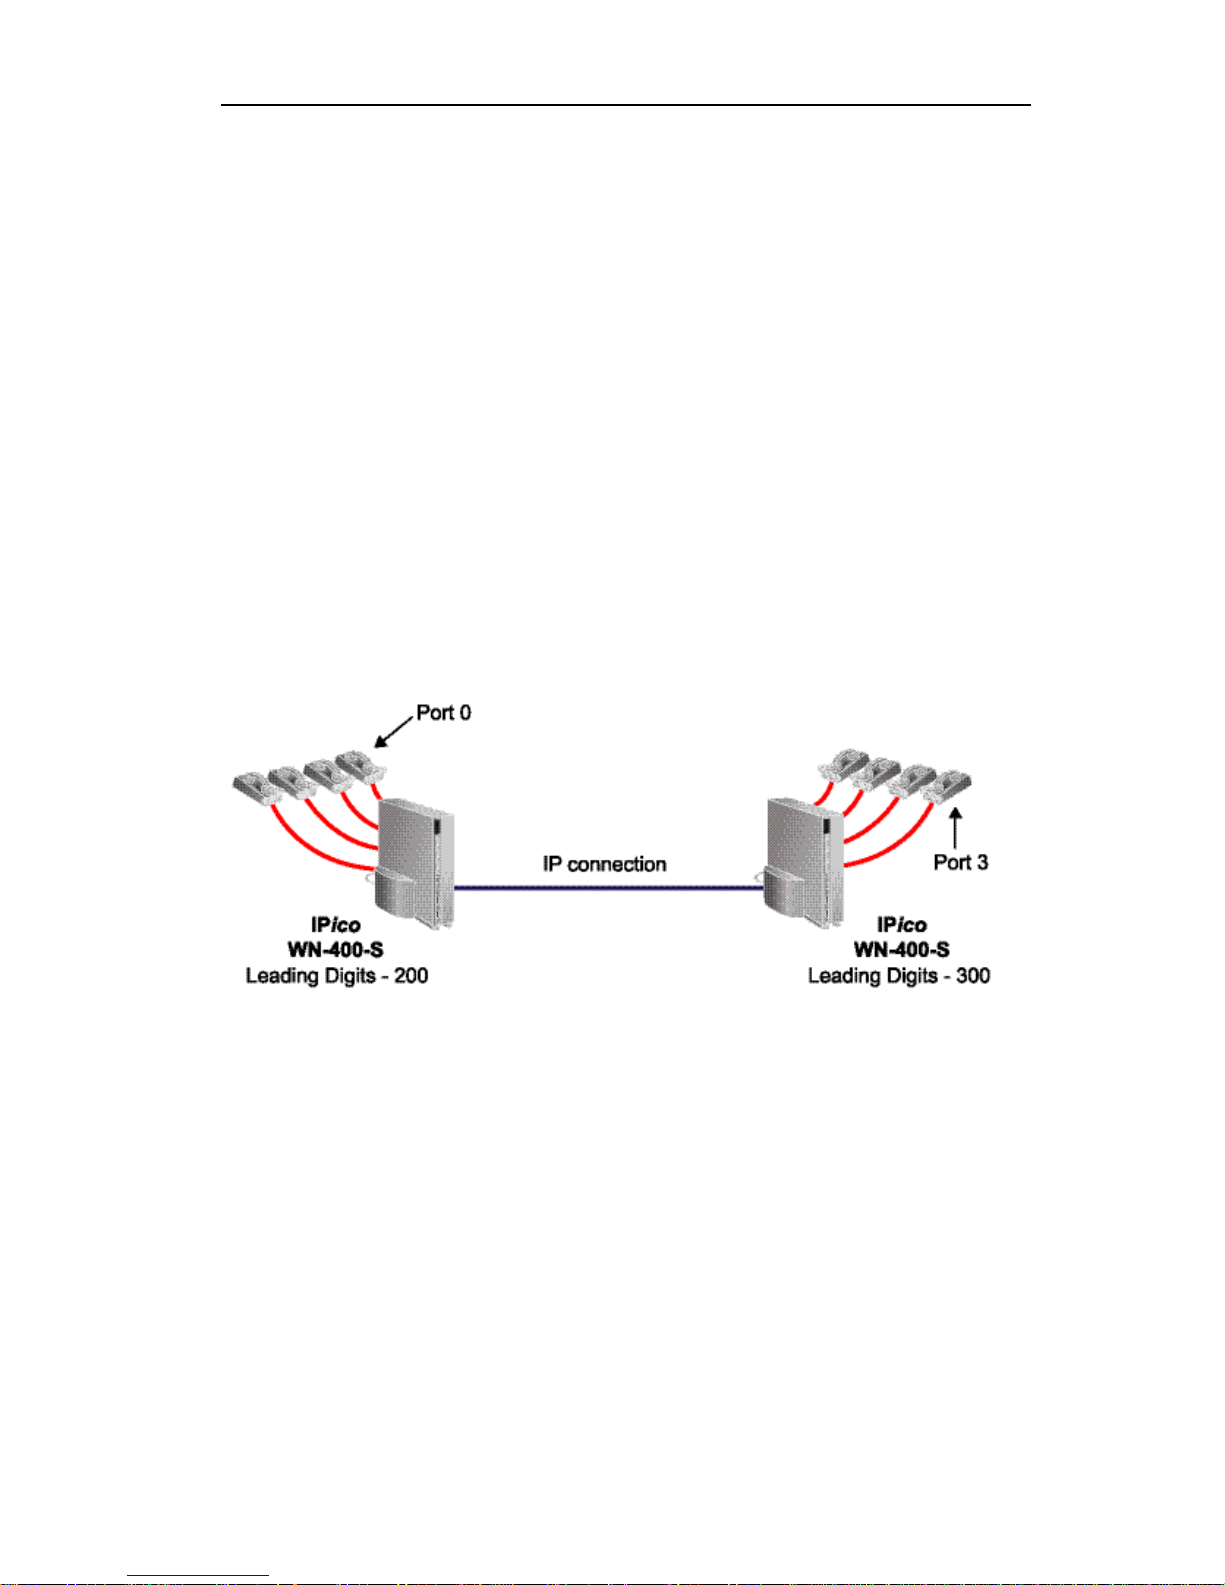
Placing Calls
To place a call, dial the four-digit number of the extension that you wish
to reach. The four-digit extension number has two parts: the leading digits
of the IPico device, followed by the port number, as shown in Figure 4.
You may change the leading numbers of the IP ico devices. Please refer to
the section titled Web Manager Configuration Tool to learn how to change
the leading digits.
Inter-site Telephony Connection
Setup
Figure 4
Plug analog telephones into Ports 0-3 of the IPico units. You may also
attach a facsimile machine to any of the ports.
Note: It is not necessary to attach a telephone or fax machine to
each port; you may use as many or as few as you wish.
User Guide IPico™ WN400 Integrated Access Device
User Guide © 2001 Lucid Voice
10
Placing a Call
To place a call, lift the handset, wait for a dial tone, and dial the leading
digits, followed by the port number (see Figure 4) of the extension that
you wish to reach. In Figure 4, to reach the extension on Port 0 attached
to the IPico device on the left, lift the handset connected to either IPico
device and dial the leading digits (200), followed by the port number (0).
For example, to reach the extension on Port 3 attached to the IPico unit
on the right, dial ‘3003’.
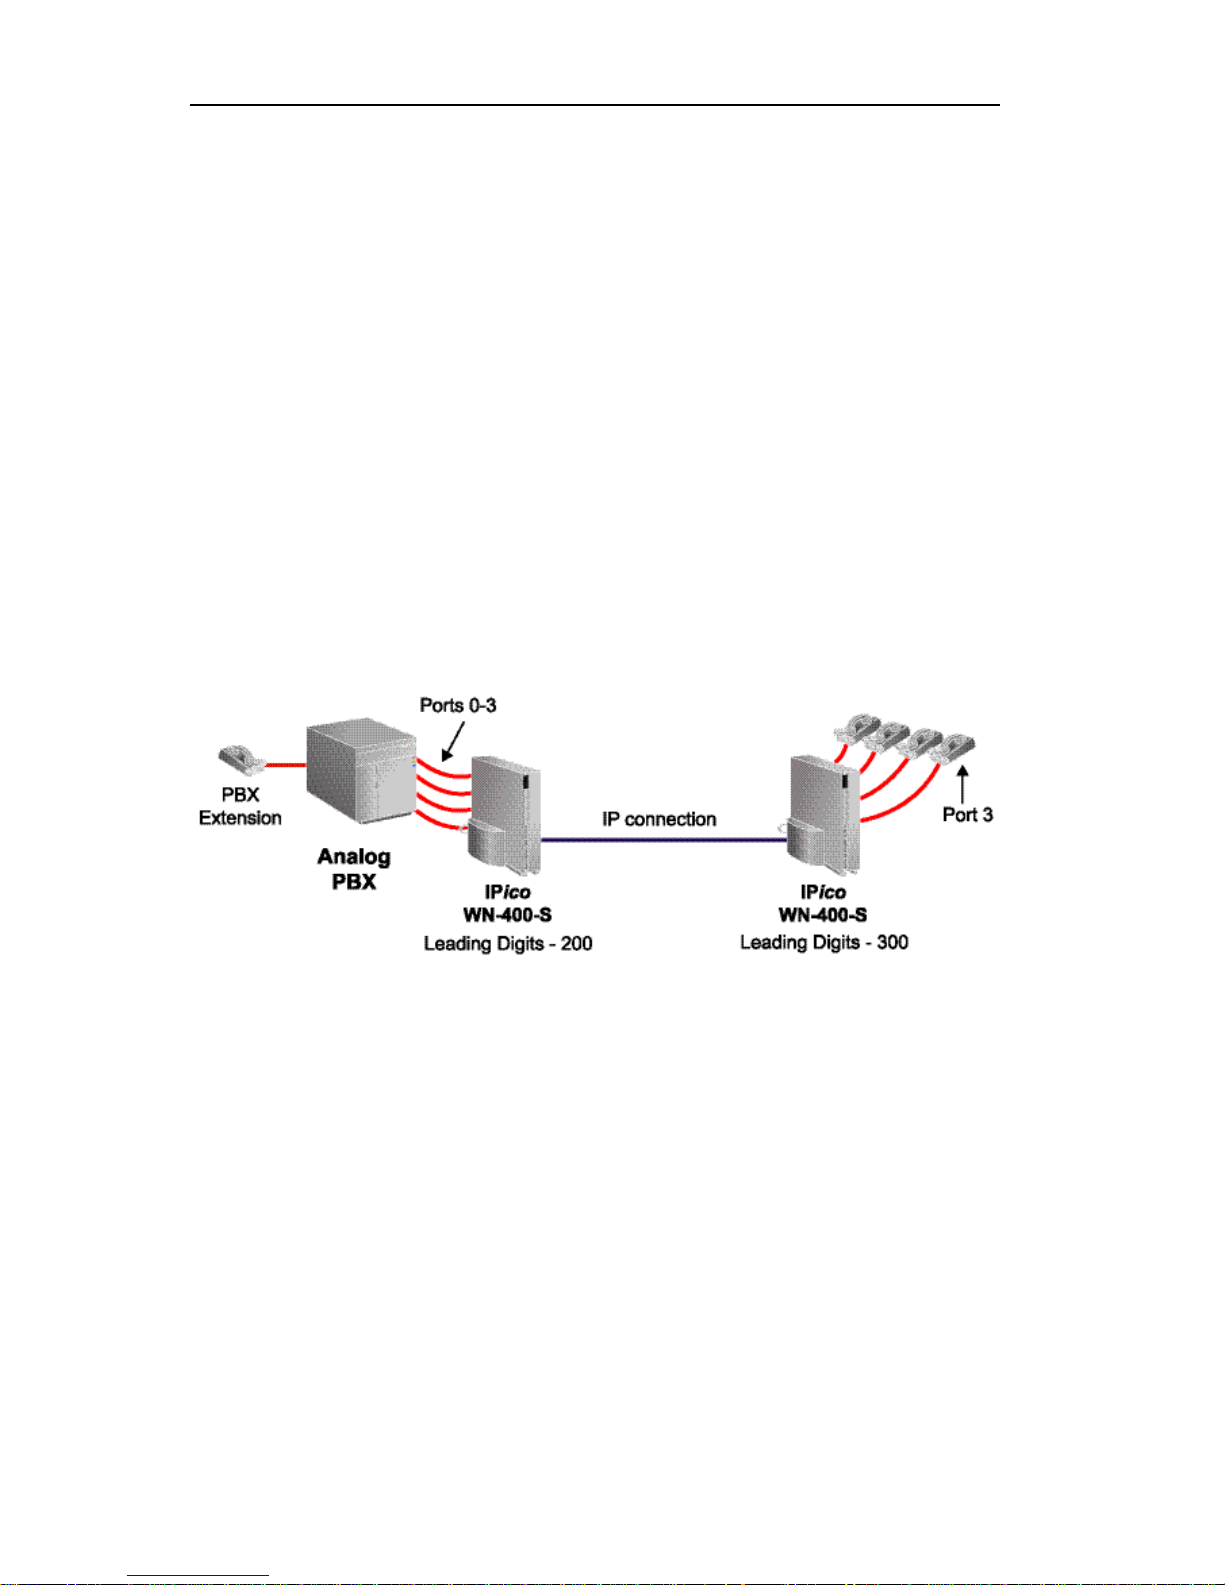
Remote PBX Connection
Setup
Figure 5
Connect Ports 0-3 of first IP ico unit to the outgoing lines (analog trunks)
of the PBX (left side in diagram), and connect analog telephones to Ports
0-3 of the second IPico unit. You may also choose to connect handsets to
any unused ports on the IPico that is connected to the PBX.
Note: It is not necessary to attach a telephone or fax machine to
each port; you may use as many or as few as you wish.
 Loading...