

Ipevo QSG 1014 Quick Start Manual

IPEVO Presenter
Quick Start Guide
Introduction
IPEVO Presenter is designed for use with the IPEVO line of document cameras, including the Point 2
View, Ziggi-HD, iZiggi-HD and VZ-1. Compatible with both PC and Mac, Presenter displays the live video
feed from your camera. It's an ideal solution to send live video from your computer to your projector
for lessons and presentations. Presenter also contains numerous handy tools and customizations to
help you get the most from your camera.
This guide will help familiarize you with Presenter's functions and settings.This guide will help familiarize you with Presenter's functions and settings.
Downloading IPEVO Presenter
Visit support.ipevo.com for the latest version of Presenter for PC and Mac. Click the download link
appropriate for your operating system, then follow the prompts to complete installation. Presenter is
free to use and may be installed on multiple computers.

Camera Mode
The default mode when starting IPEVO Presenter is Camera mode, selectable with the top tab on the
left-hand side. This mode displays the live image coming from the doc cam connected to your
computer. You can also customize your image in several ways using the pulldown menus and buttons.
Zoom
Mirror
Rotate
Resolution
Exposure
AF Lock/ Manual Focus
Full ScreenFull Screen
Select Video Device
Adjust
Snapshot
Auto (MAC ONLY)
Record
Freeze
Display ModeDisplay Mode
Focus & Focus Indicator
Zoom
Digitally zoom in on the subject. 1x (normal) to 6x zoom is possible.
Mirror
Flip the image along a horizontal axis, flop the image along a vertical axis, or select both Horizontal
and Vertical for an image that is flipped and flopped. The default is Off, i.e. no mirroring.
Rotate
Rotate the image 360 degrees. Slide the green marker to your desired degree, use the arrow keys Rotate the image 360 degrees. Slide the green marker to your desired degree, use the arrow keys
for incremental rotations, or use the preset buttons for instant 90-, 180- and 270-degree rotations.
Press the Reset key to return to the original position. Both Mirror and Rotate are useful for
orienting text so that it's readable.
Resolution
Change your resolution on the fly. Higher resolutions offer a higher-quality image, but they Change your resolution on the fly. Higher resolutions offer a higher-quality image, but they
consume more computing power. If your image stutters or suffers from a strobe-like effect,
consider lowering the resolution to increase the frame rate for a smoother image.
Exposure
Change your image exposure from 1 (darkest) to 15 (brightest). The default value is 8, i.e. medium
brightness. If your image is too dark, consider increasing the exposure. Check the AE - Lock button
to lock your camera's exposure to the current value.
AF Lock/ Manual FocusAF Lock/ Manual Focus
If Autofocus (AF) Lock is checked, your camera will try to find the best focus for a sharp image. If
you prefer manual focus instead, uncheck AF Lock and drag the slider to your desired focus, from
very close (the flower icon) to very far away (the infinity icon).
Full Screen
Clicking this will cause the Presenter window to occupy the entire screen. This is useful for lessons
and presentations.
Select Video DeviceSelect Video Device
Select the video device Presenter should use. If properly connected, your device's name should
appear here.
Special note for iZiggi-HD users – As a wireless document camera, iZiggi-HD connects to your
computer via Wi-Fi. First-time connections can take a minute or two to be reflected in the Select
Video Device box, so please allow for this delay before selecting iZiggi-HD as your video device.
Adjust
Pressing Adjust will take you to a Video Control menu with several camera settings you can adjust
by dragging the corresponding sliders.
Snapshot
Take a snapshot of the current image. The snapshot will be saved on your hard drive as a JPG file
and can be managed in Review mode.
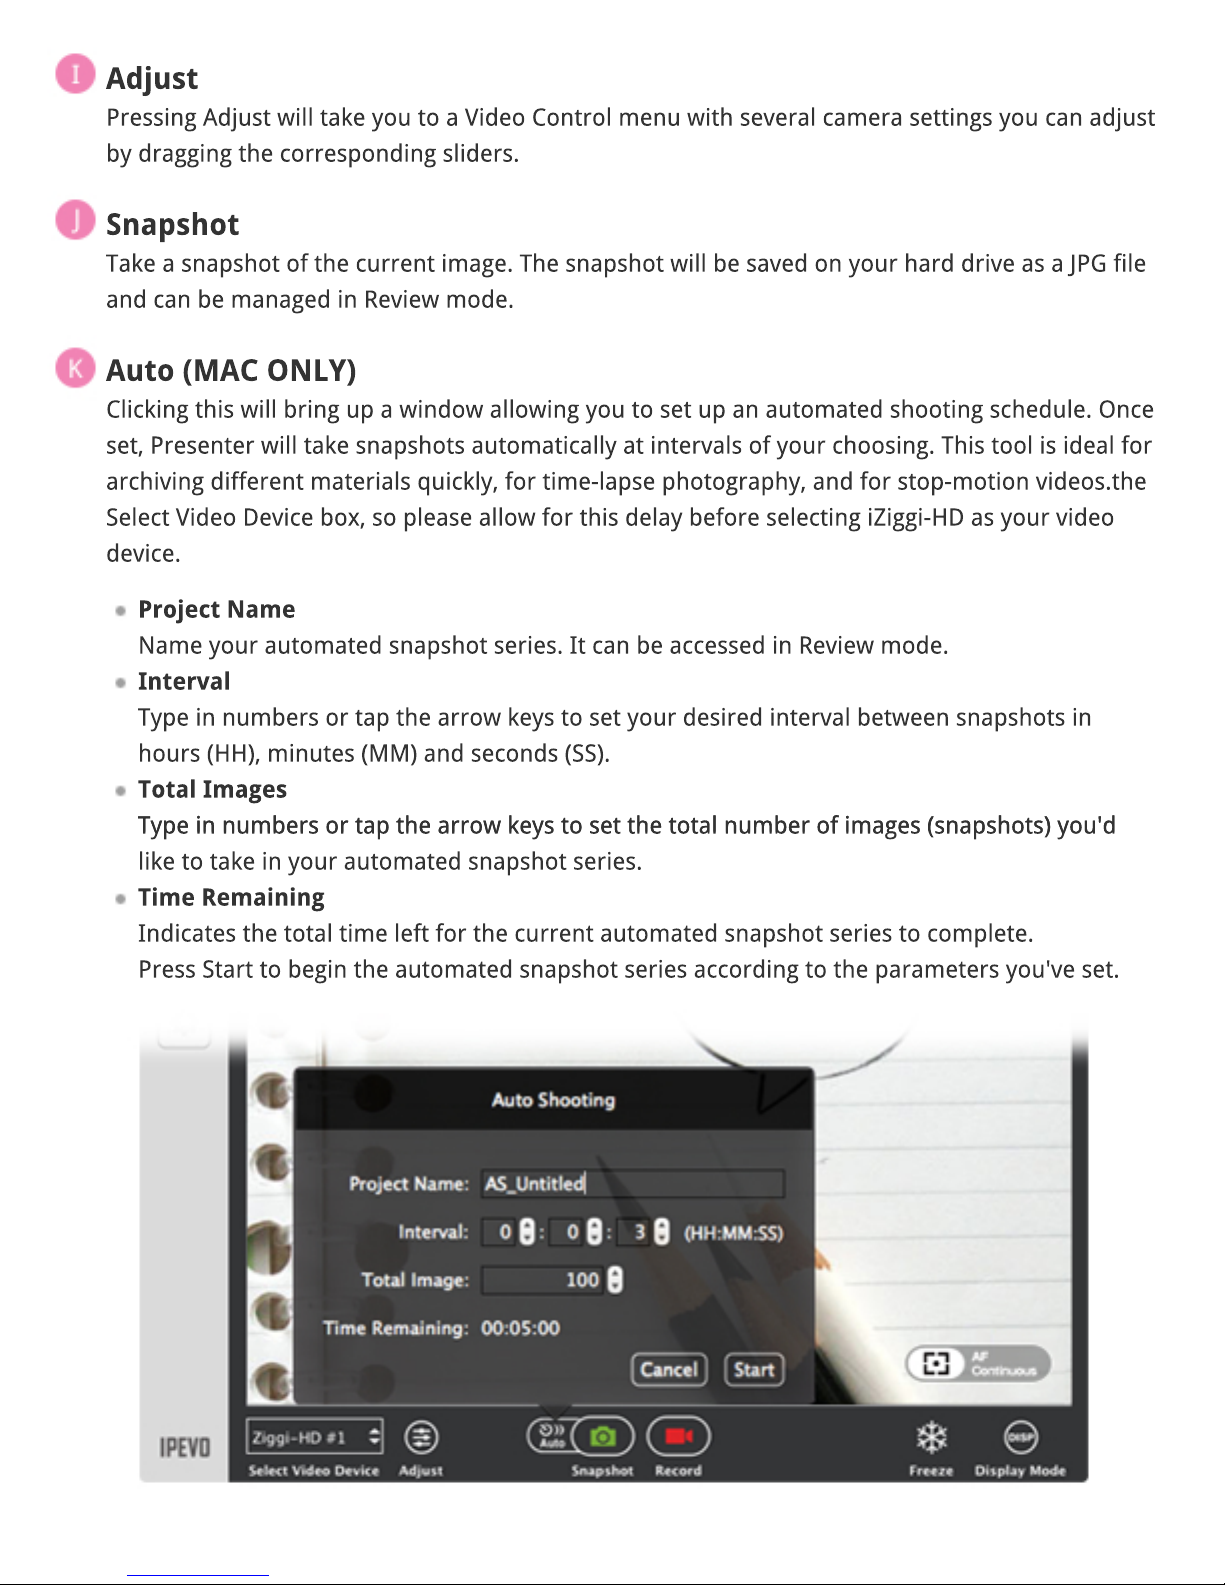
Auto (MAC ONLY)Auto (MAC ONLY)
Clicking this will bring up a window allowing you to set up an automated shooting schedule. Once
set, Presenter will take snapshots automatically at intervals of your choosing. This tool is ideal for
archiving different materials quickly, for time-lapse photography, and for stop-motion videos.the
Select Video Device box, so please allow for this delay before selecting iZiggi-HD as your video
device.
Project Name
Name your automated snapshot series. It can be accessed in Review mode.
Interval
Type in numbers or tap the arrow keys to set your desired interval between snapshots in
hours (HH), minutes (MM) and seconds (SS).
Total Images
Type in numbers or tap the arrow keys to set the total number of images (snapshots) you'd Type in numbers or tap the arrow keys to set the total number of images (snapshots) you'd
like to take in your automated snapshot series.
Time Remaining
Indicates the total time left for the current automated snapshot series to complete.
Press Start to begin the automated snapshot series according to the parameters you've set.

Record
Record a video of the current video feed. Once you press Record, it will turn into the Stop button,
which you can press to stop the video recording. The video file will be saved to your hard drive and
can be managed in Review mode.
Freeze
Pause the live image. Press again to unpause and return to live action.
Display ModeDisplay Mode
Press to make visual overlays disappear so you have an uncluttered image suitable for
presentation.
For Windows: Press to make all of the menu elements disappear. Press again to make those menu
elements reappear.
For Mac:For Mac: Press once to display the menu elements only. Press again to make the menu elements
and a grid appear. Press a third time to display only a grid and not the menus. Press a fourth time
to make both the grid and menu elements disappear. The cycle will then start over again with a
fifth press.
Focus & Focus Indicator
Indicates whether your doc cam is in Single focus mode (AF-S) or Continuous focus mode (AF-C).
Pressing the crosshairs will cause your doc cam to find a new focus.
When focusing, four corners of a red box will appear in the center of the screen and a beep will When focusing, four corners of a red box will appear in the center of the screen and a beep will
sound, letting you know your camera is attempting to focus. The image may appear to slightly
zoom in and out. When the doc cam is done focusing, the red corners will change to green corners,
and there will be a brief sound effect.
 Loading...