

Page 1
Quick Start Guide
for IW2S Wireless Interactive Whiteboard System
Short Throw Version
Page 2
1
The Basics
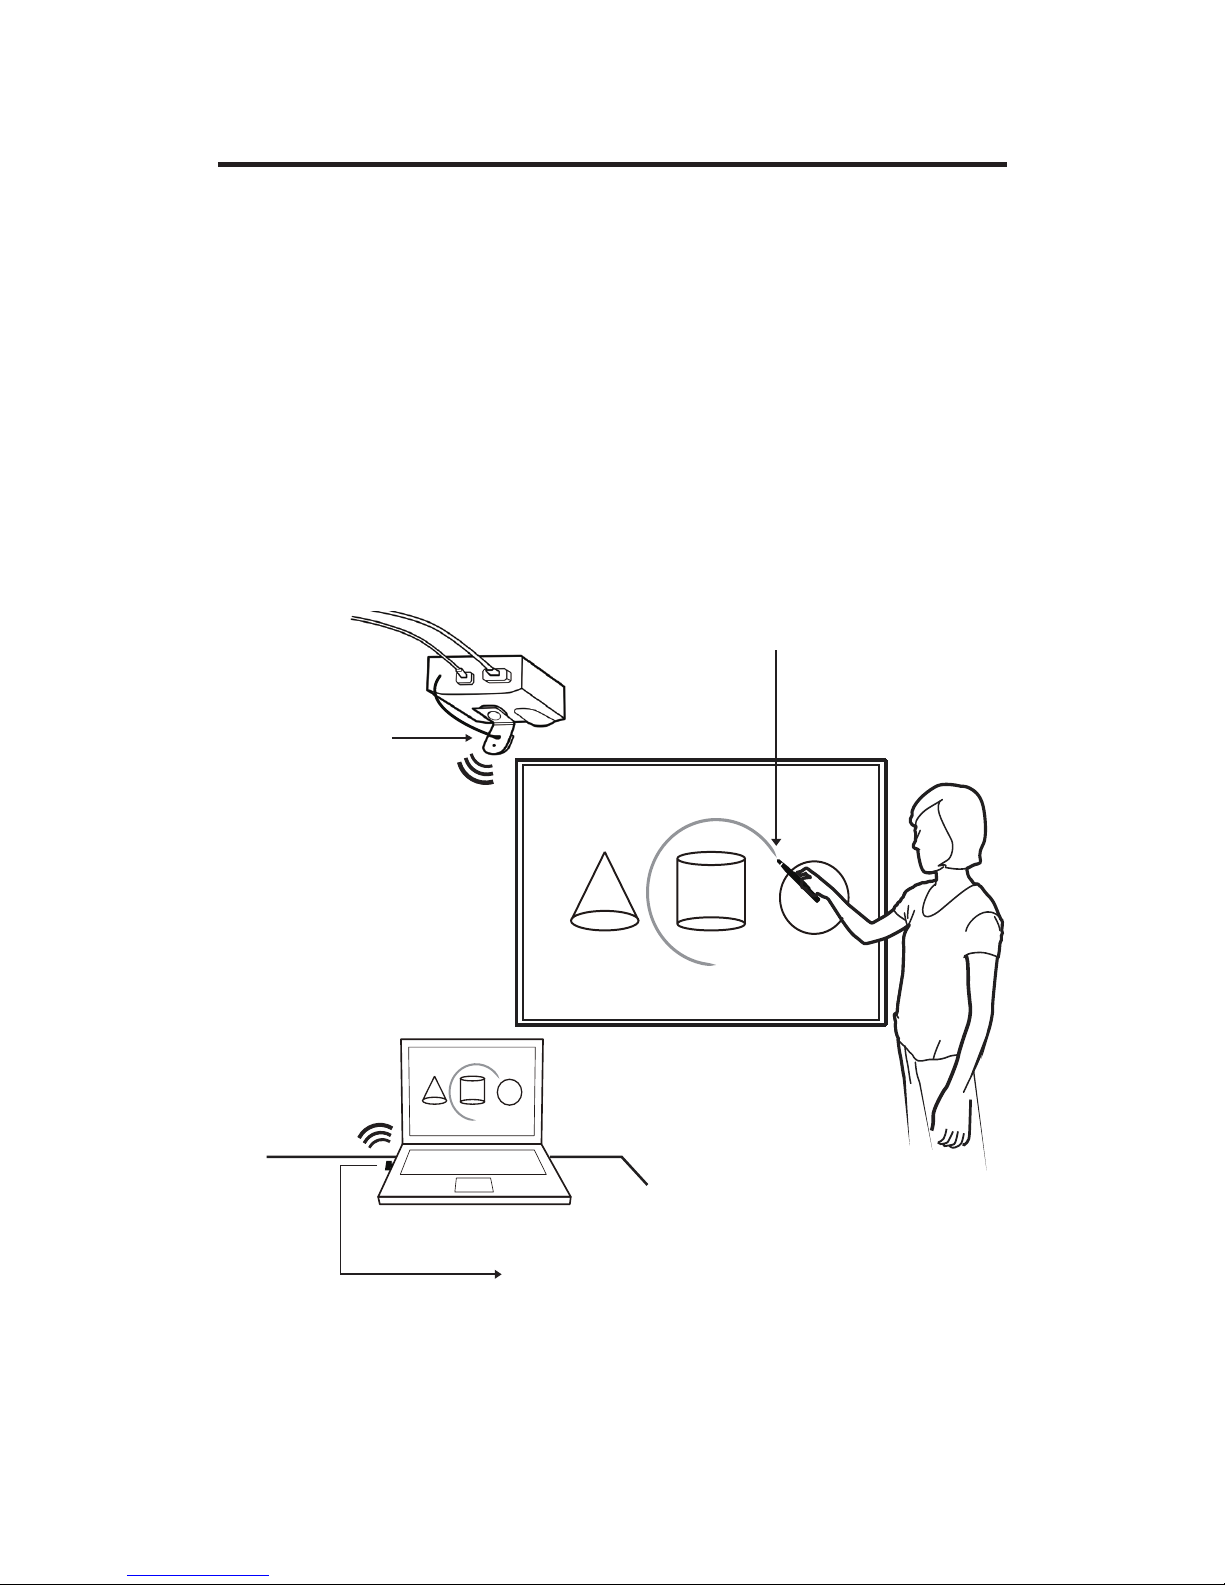
The IPEVO Wireless Interactive Whiteboard System Short Throw
Version, or IW2S, is a compact 3-piece system that turns your large
projection screen into an interactive touchscreen. It is specially
designed to use with ceiling-mounted short-throw projectors. Once
set up, you can use it to control your computer’s cursor. And if you
have any annotation software installed on your computer, you can also
use IW2S to draw/annotate on your projection screen.
Emits infrared signals on
contact or by pressing the
green button.
INTERACTIVE PEN
Reads infrared signals from
the Interactive Pen and
translates them into cursor
movements and mouse
button presses.
SENSOR CAM
Plugged into an open USB
port, it allows the Sensor Cam
to communicate wirelessly
with your computer.
WIRELESS RECEIVER
Page 3
2
Getting to Know IW2S
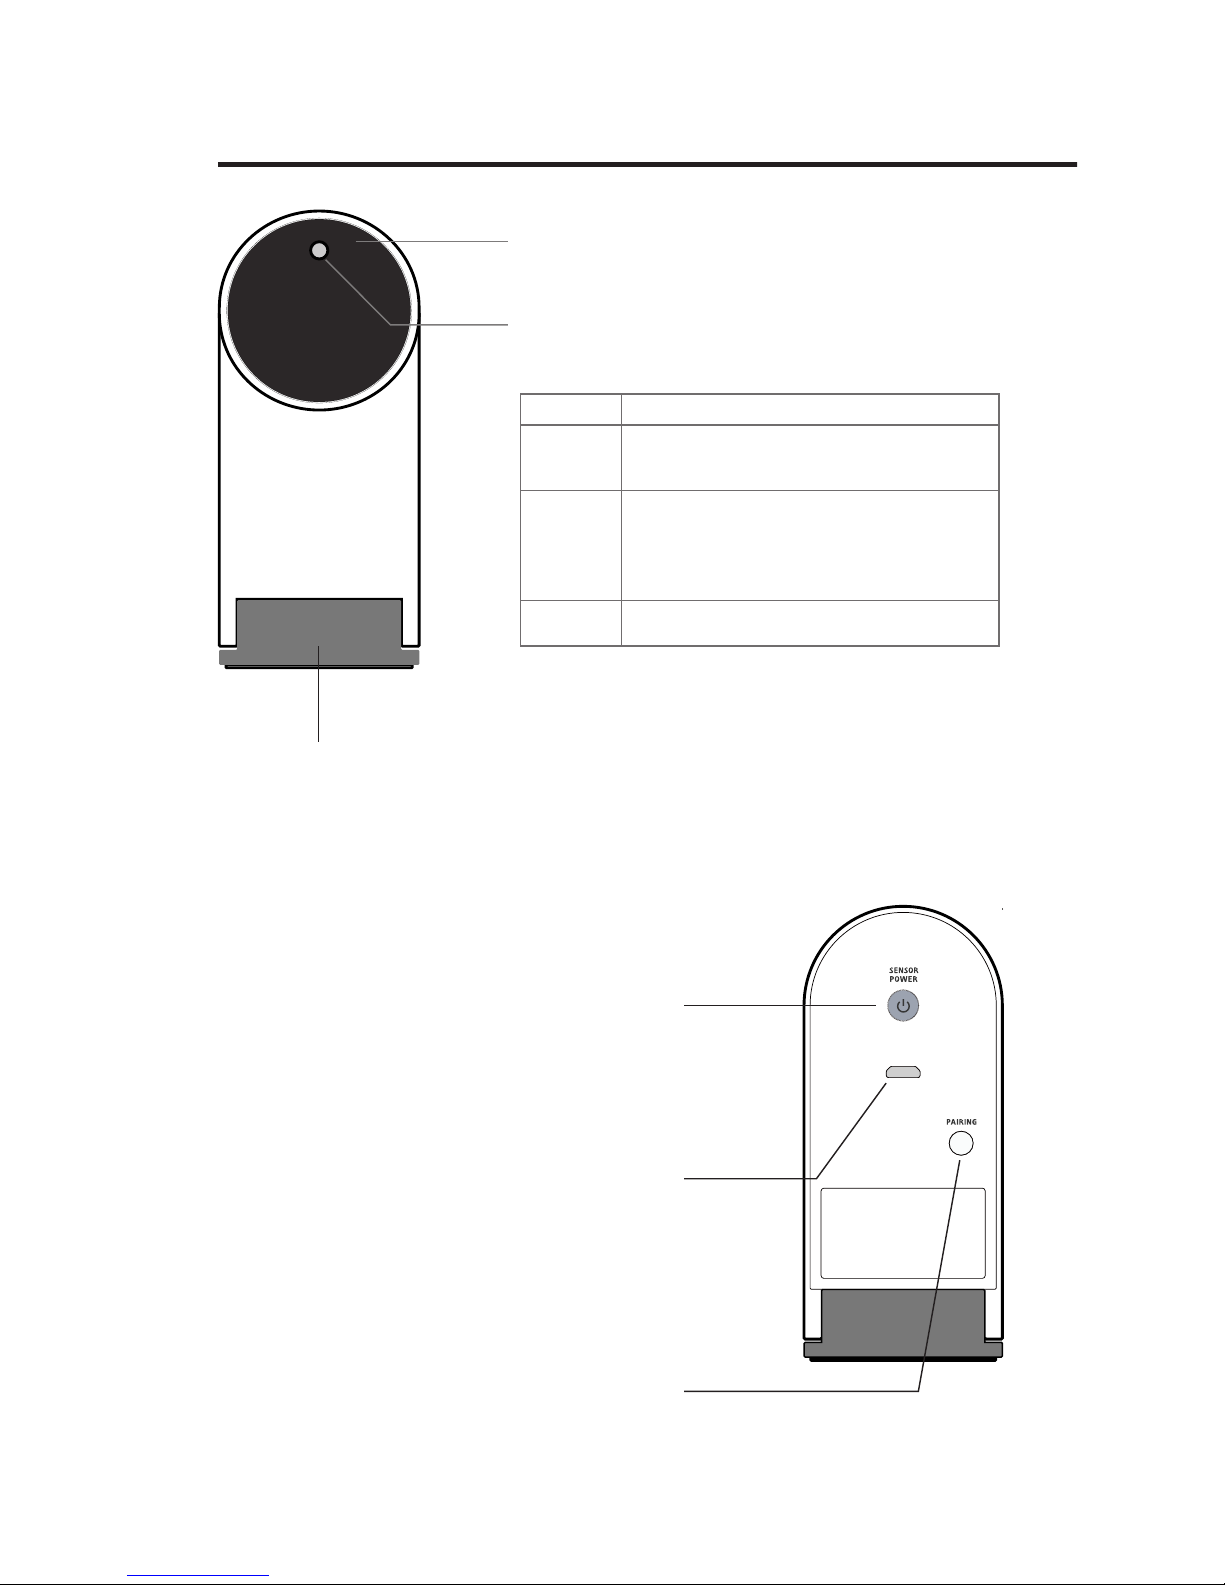
LED Indicator
Lights up when powered up and connected. Different colors
(solid and blinking) reflect different states.
Sensor Power Button
Press to turn on Sensor Cam and enter Active Mode. Press
again to enter Sleep Mode.
Lens
Detects signals emitted by the Interactive Pen.
Hinged Metal Base
Allows adjustment of the angle
of the Lens.
Micro-USB Port
Connect included Micro-USB cable here.
Pairing Button
Press for 3 seconds to enter Pairing Mode.
By default, no pairing action is required – the Sensor Cam and
Wireless Receiver you received are already paired. However, if you
are using a replacement Wireless Receiver or Sensor Cam, you’ll
need to pair them before use. For the pairing instructions, please
refer to the FAQ section at www.ipevo.com/iw2s.
Green
Color State
The Sensor Cam is powered on and connected
with the Wireless Receiver.
The Sensor Cam is not connected with the
Wireless Receiver. Check that the Wireless
Receiver is plugged into your computer and
placed within 16 ft (5m) of the Sensor Cam.
Blinking
Orange
Red
The Sensor Cam is in Sleep Mode.
Page 4
3
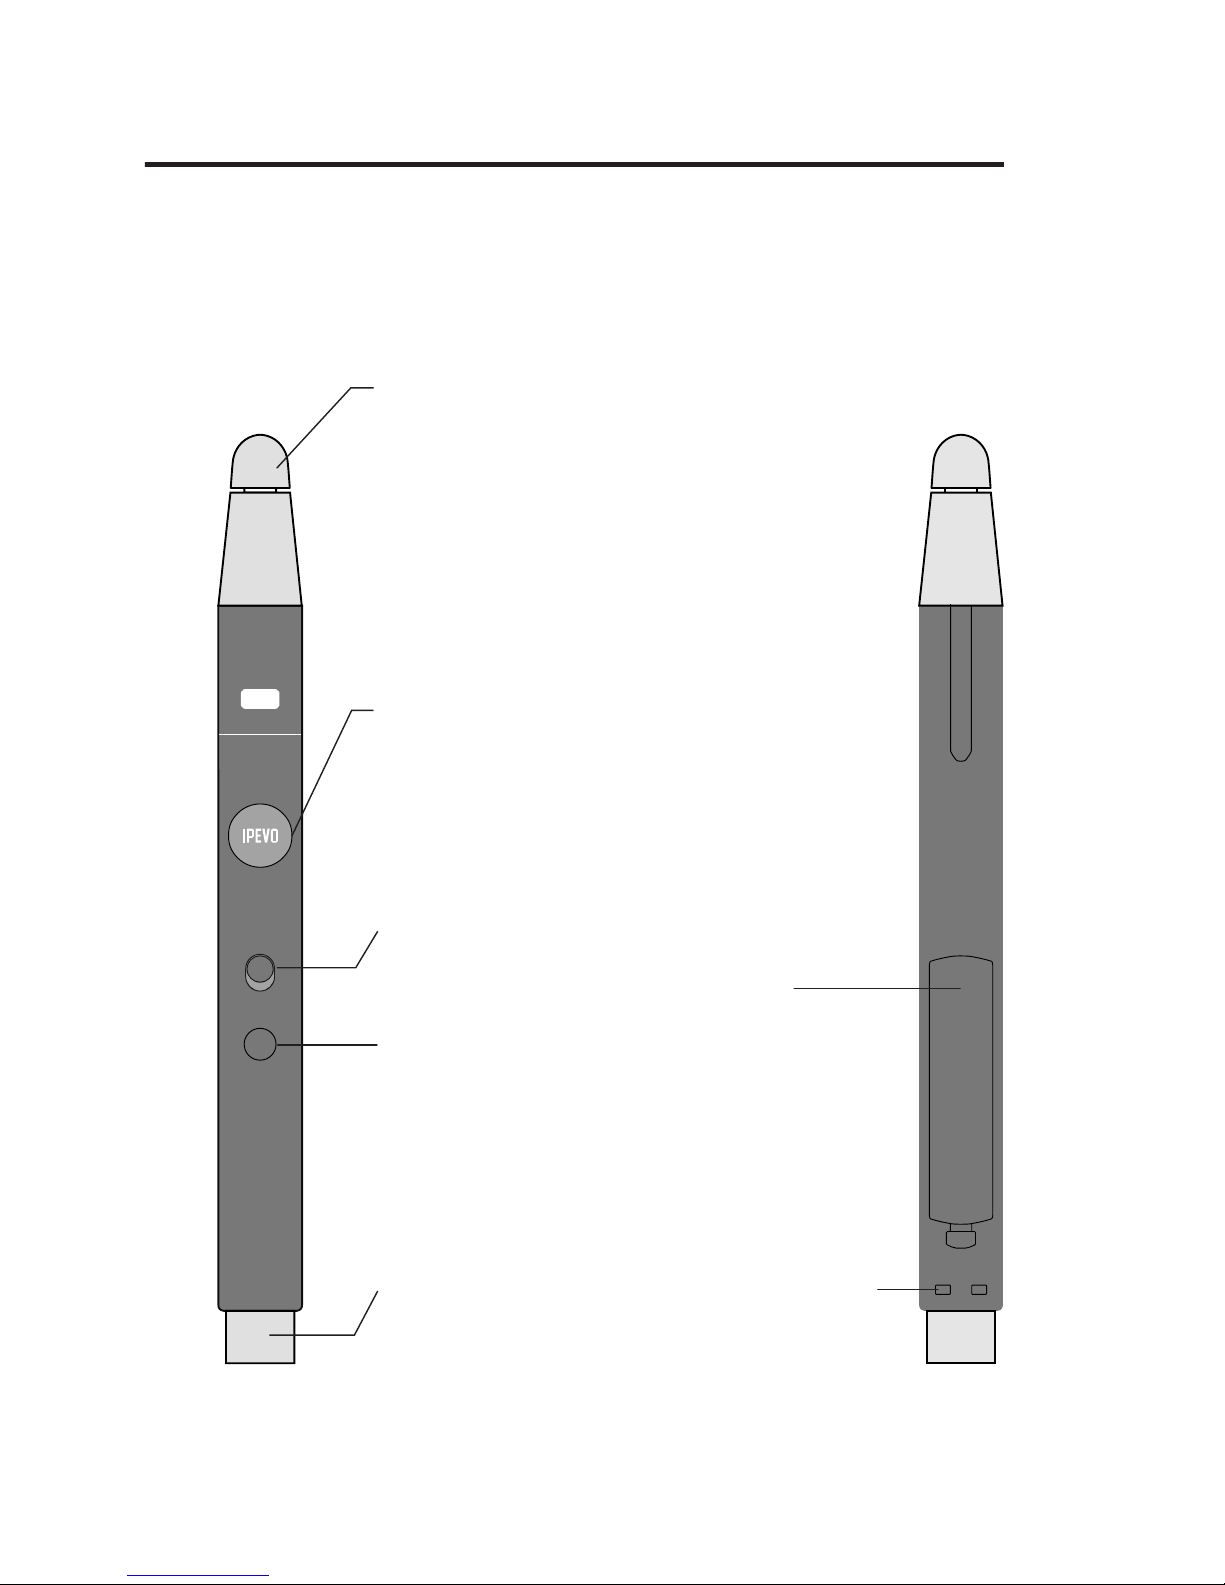
Contact Sensitive Tip
Tap for a left click, or tap
and hold for 2s or longer
for a right click. Quickly tap
twice for a double-click.
IPEVO Button
Press for a left click, or
press and hold for 2s or
longer for a right click.
Press twice for a double-click.
Wrist Strap Attachment
Holes
Attach the included wrist
strap here.
Wireless Receiver
Plug it into your computer
for a wireless connection
between your computer and
the Sensor Cam.
Battery Cover
Open to reveal slots for 2
AAA batteries.
Power Switch
Turn the Interactive Pen
on or off.
Sensor Power Button
Remotely turn your Sensor
Cam on or off.
Page 5
4
1. Software Installation
IW2S requires IW Driver to function. IW Driver allows you to calibrate
and control your IW2S. Please visit IPEVO website at support.ipevo.
com/iw2s to download it.
Installing IW2S
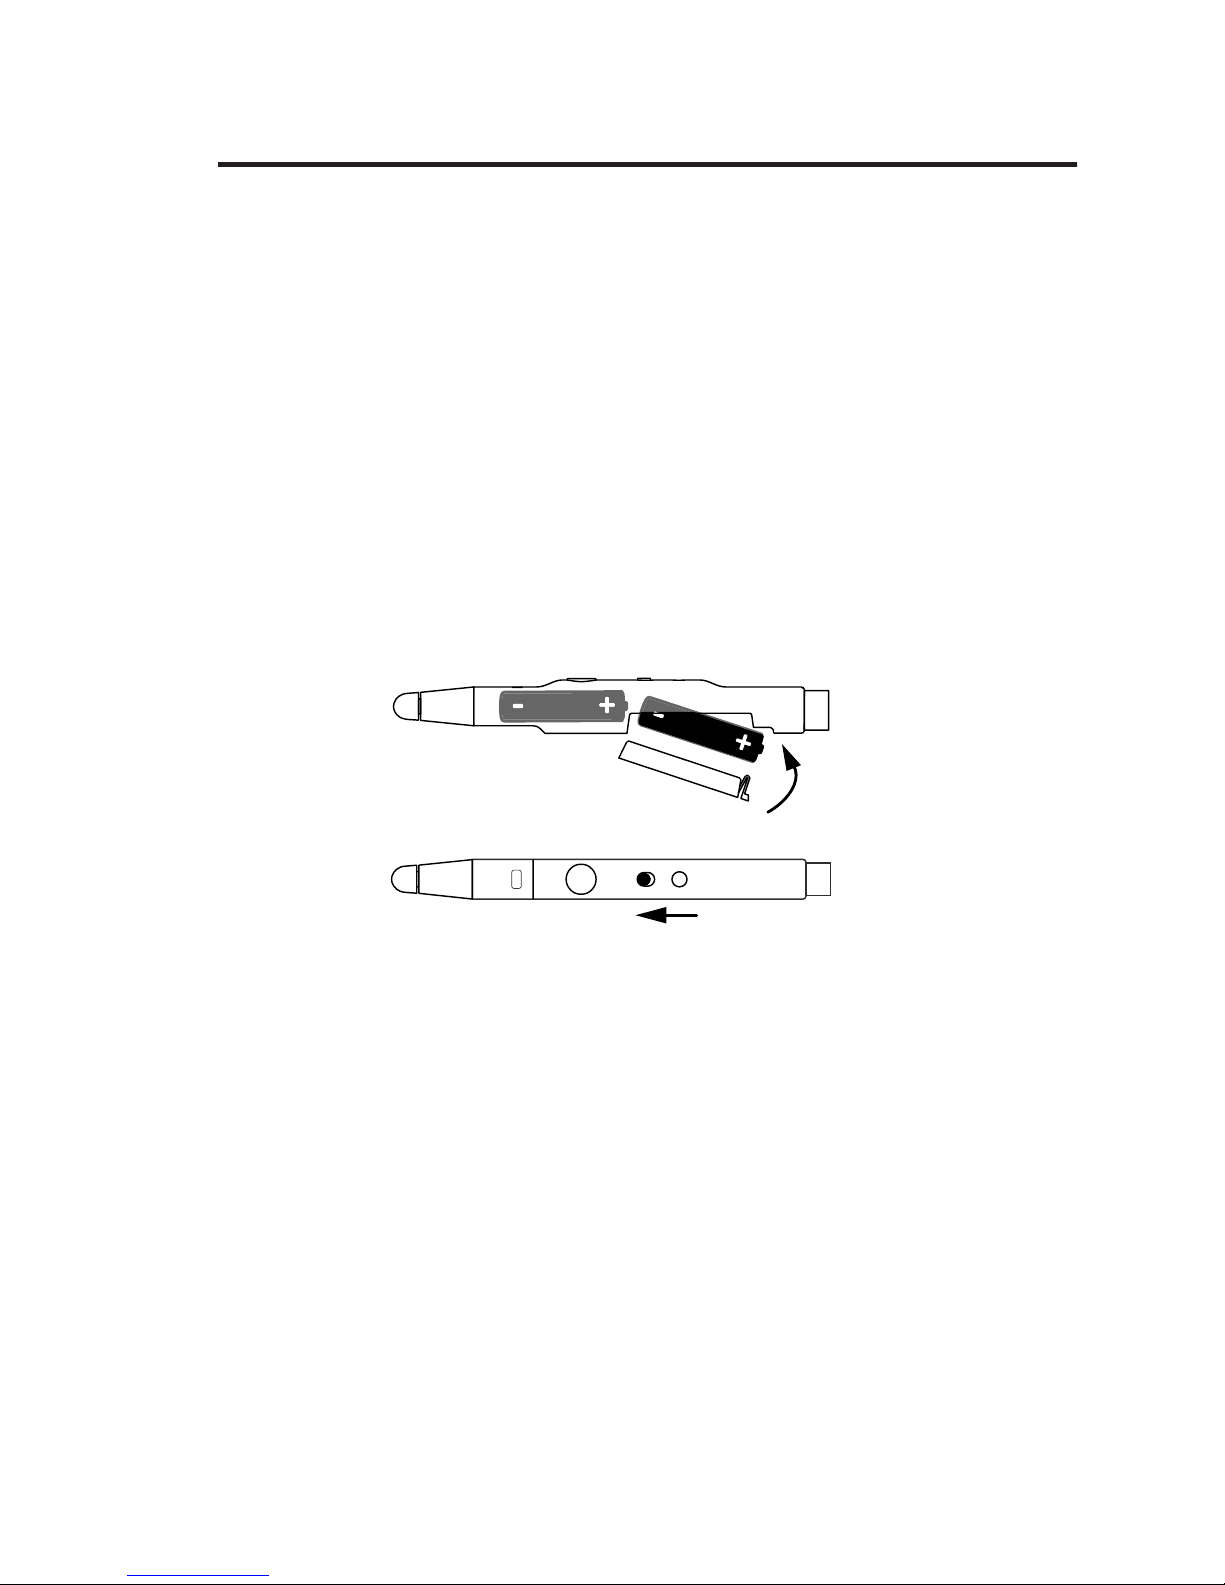
Remove the battery cover from the Interactive Pen and insert 2 AAA
batteries. Replace the cover. Attach the included wrist strap into the
attachment holes. Turn on the pen when ready to use.
2. Readying the Interactive Pen
Turn on
3. Connecting Sensor Cam to Computer
To connect the Sensor Cam wirelessly to your computer, please follow
the steps below:
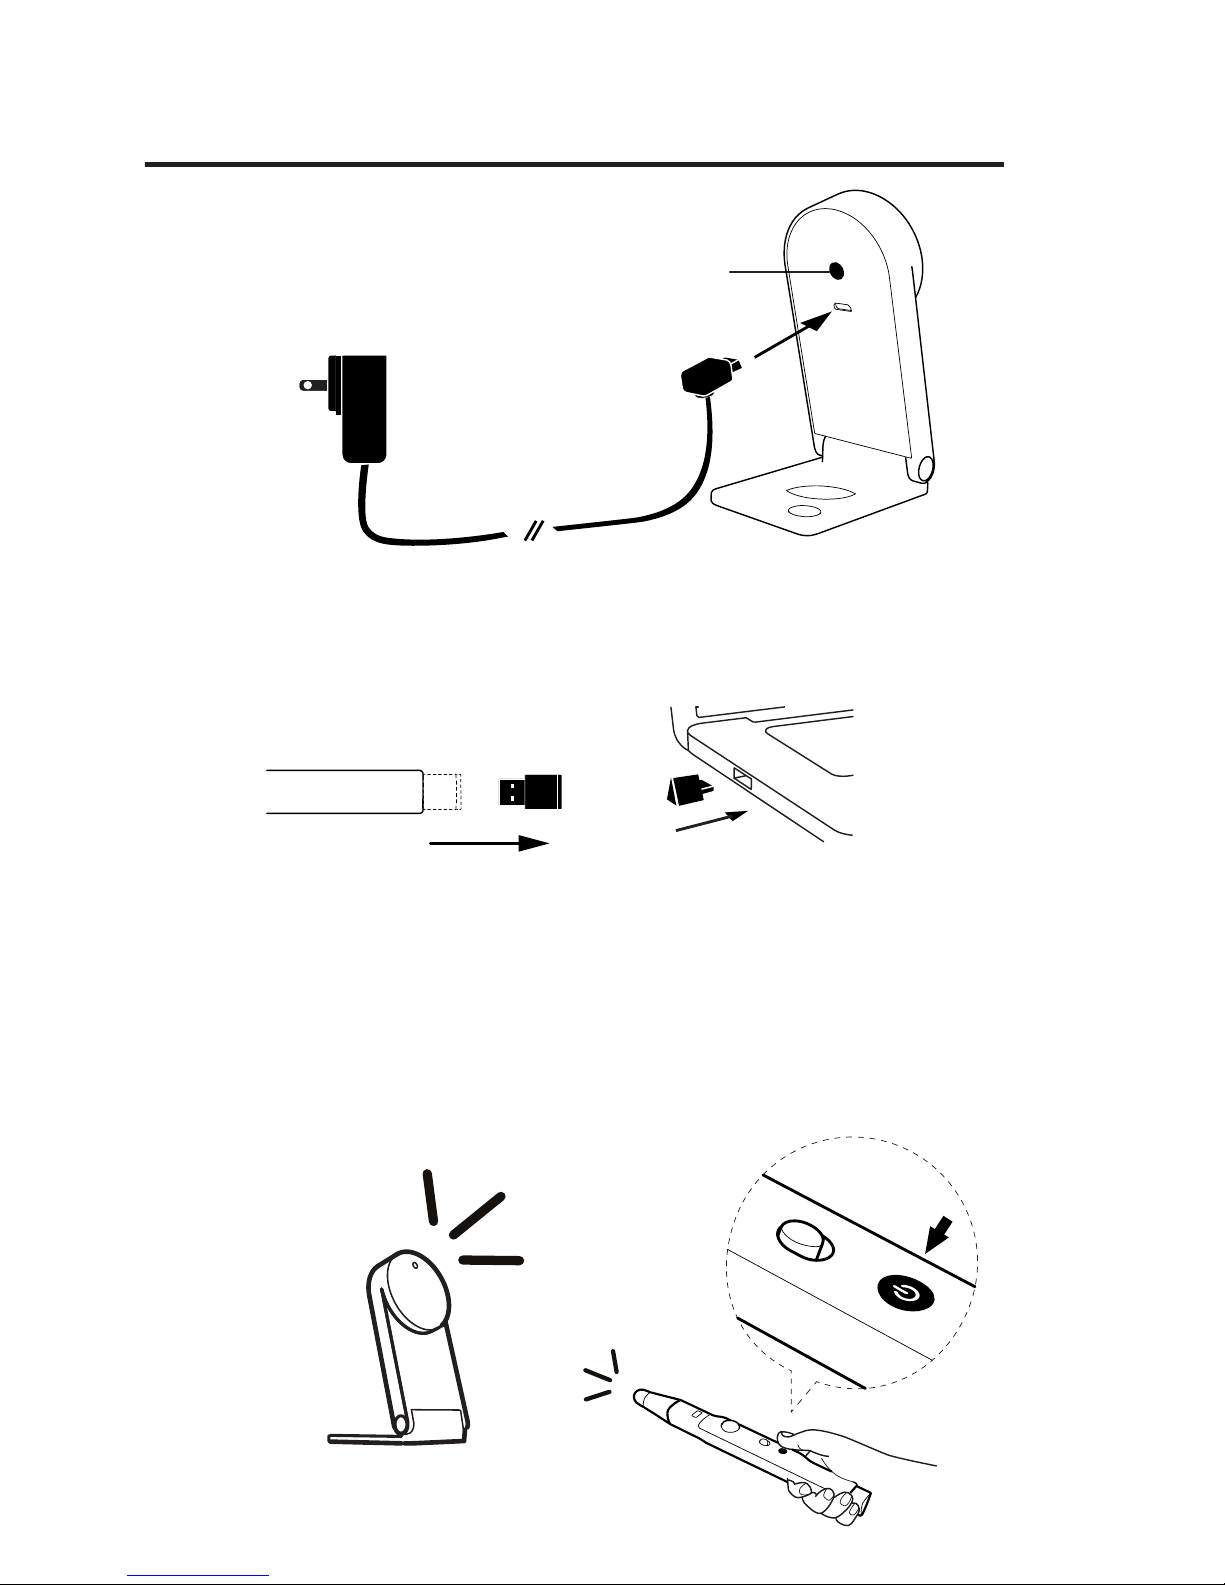
1. Connect the Sensor Cam to a power outlet by plugging the Micro-USB
cable into the Micro-USB port on the Sensor Cam, then plugging the
other end of the cable into the included power adapter. Lastly, plug
the power adapter into an outlet.
Note: DO NOT turn on the Sensor Cam during this step.
Page 6
5
Sensor Power Button
Power Adapter
3. Turn on the Sensor Cam by pressing the Sensor Power Button
located on the Interactive Pen. Next, check the LED indicator of the
Sensor Cam. It will light up Green once it is successfully connected to
your computer.
Green Light
Press the
Sensor Power Button
2. Detach the Wireless Receiver from the bottom of the Interactive Pen
and plug it into the USB port of your computer.
Page 7
6
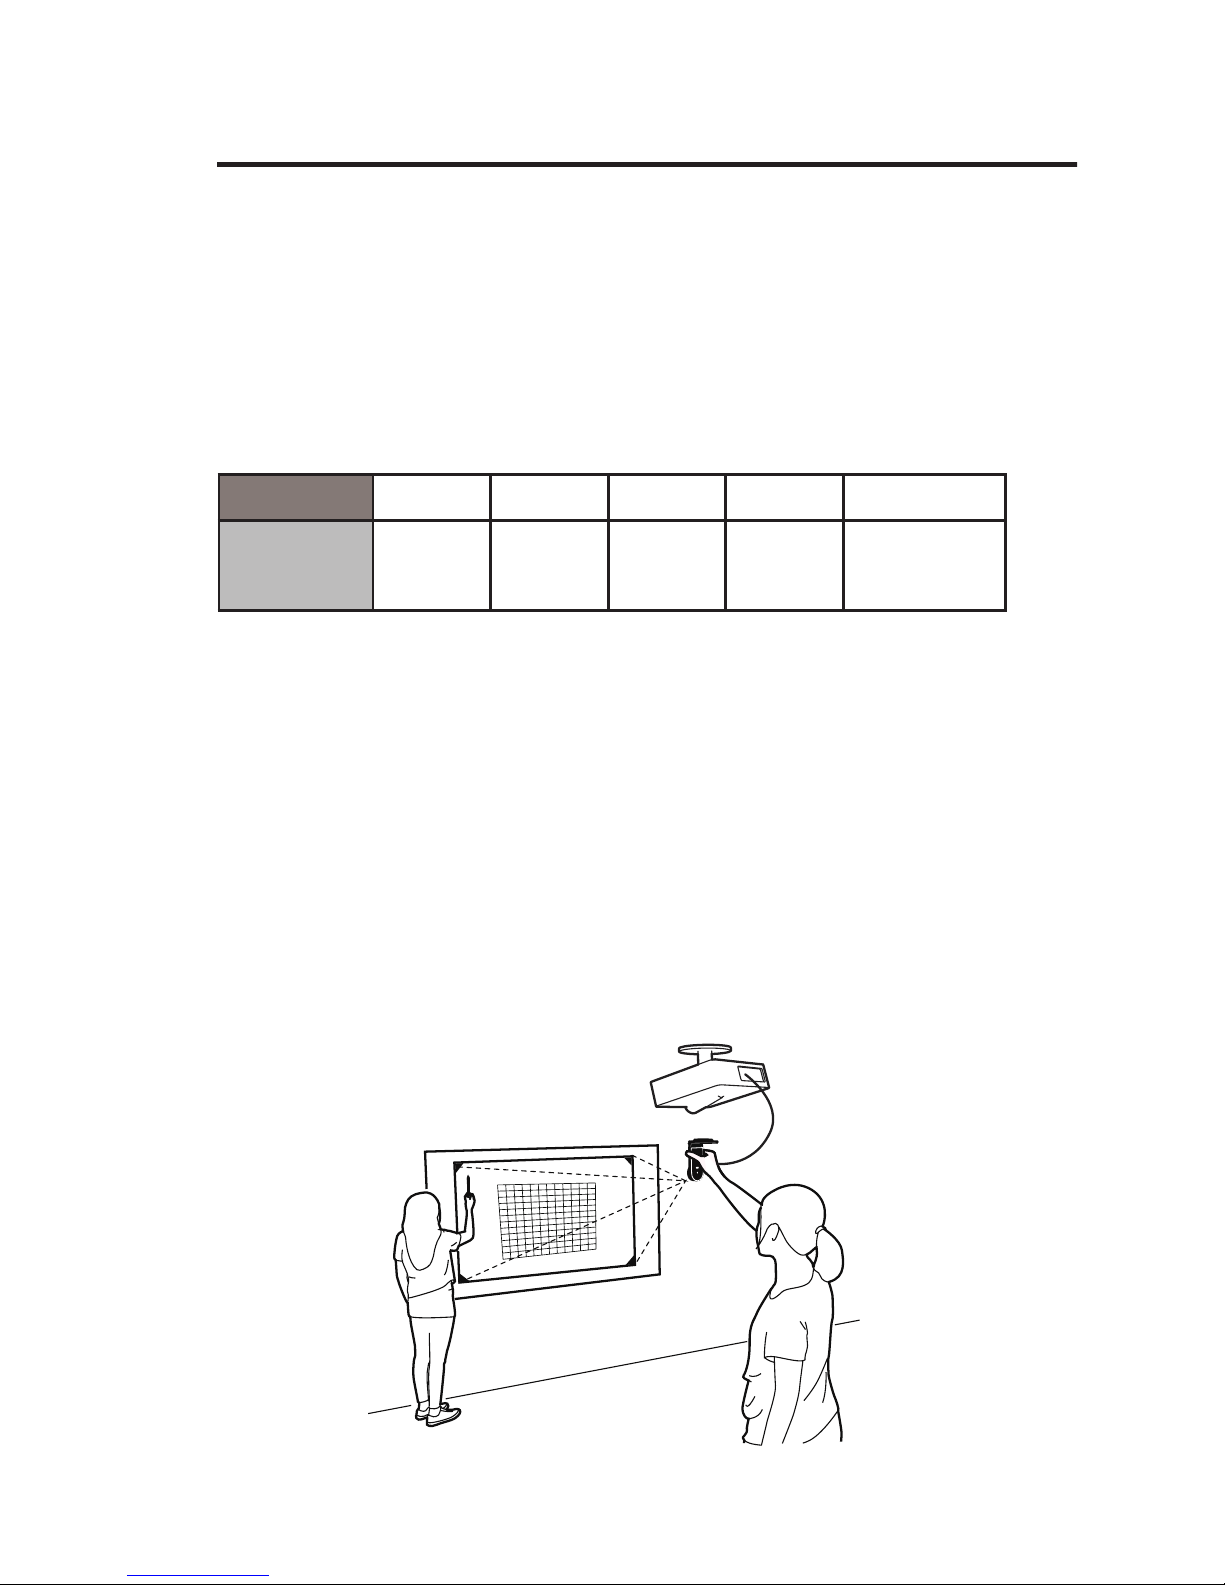
4. Positioning the Sensor Cam
The optimum position for the Sensor Cam will be the same location
as your ceiling-mounted short-throw projector. However, depending
on the make and model of your projector, and even your screen size,
there might be some exceptions. Please refer to the following chart for
a general guideline:
Screen Size 50” 60” 70” 80” 90”~100”
Minimal
Distance
1.6 ft
(50 cm)
2.0 ft
(60 cm)
2.3 ft
(70 cm)
2.6 ft
(80 cm)
3.0~4.0 ft
(90~120cm)
For maximum accuracy, the Sensor Cam MUST be positioned and
firmly affixed on your ceiling-mounted short-throw projector. Before
affixing the Sensor Cam, please hold the Sensor Cam in an area just
below (by a few inches) the projector and run the calibration
process once to make sure the Sensor Cam can indeed cover your
whole projection screen.
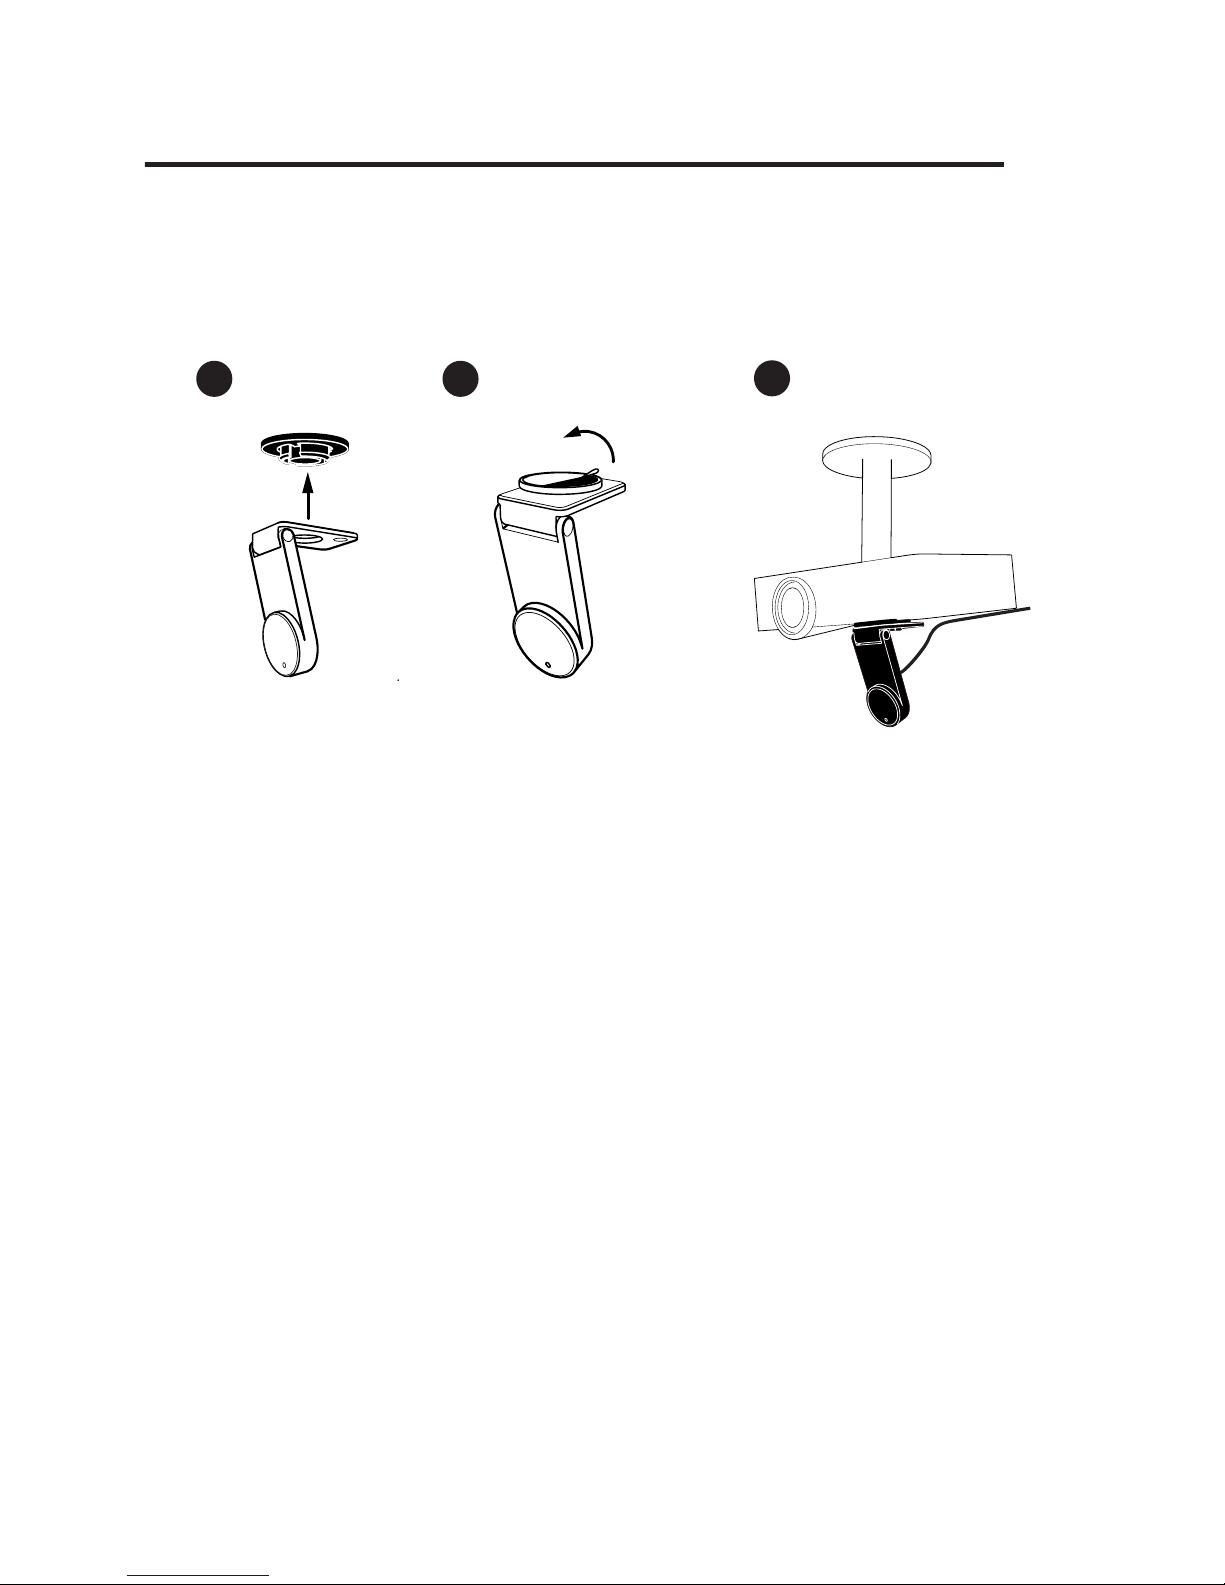
5. Securing the Sensor Cam
Installing IW2S (cont’d)
Page 8
7
After that, you can affix the Sensor Cam directly to the projector using
the included ceiling mount by following the steps below:
1 2
Remove the sticker
6. Calibration
IW2S must be calibrated before it can be used. To start the process,
please click on the IW Driver icon located in the task bar or status
bar and choose “Calibrate”. To complete the process, please follow
the onscreen instructions carefully. Your IW2S is ready for use once
calibration has been completed.
3
Page 9

8
Federal Communication Commission Interference Statement
This equipment has been tested and found to comply with the limits for a Class B digital device,
pursuant to part 15 of the FCC Rules. These limits are designed to provide reasonable protection
against harmful interference in a residential installation. This equipment generates, uses and can
radiate radio frequency energy and, if not installed and used in accordance with the instructions,
may cause harmful interference to radio communications. However, there is no guarantee that
interference will not occur in a particular installation. If this equipment does cause harmful
interference to radio or television reception, which can be determined by turning the equipment
off and on, the user is encouraged to try to correct the interference by one or more of the following
measures:
FCC Caution: Any changes or modifications not expressly approved by the party responsible for
compliance could void the user’s authority to operate this equipment.
This device complies with Part 15 of the FCC Rules. Operation is subject to the following two
conditions:
(1) This device may not cause harmful interference, and
(2) This device must accept any interference received, including interference that may cause
undesired operation.
This device and its antenna(s) must not be co-located or operating in conjunction with any other
antenna or transmitter.
• Reorient or relocate the receiving antenna.
• Increase the separation between the equipment and receiver.
• Connect the equipment into an outlet on a circuit different from that to which the receiver is
connected.
• Consult the dealer or an experienced radio/ TV technician for help.
Page 10

© 2017 IPEVO Inc. All rights reserved. IPEVO, IPEVO Annotator, IW2S, the IPEVO logo, and other IPEVO marks are
owned by IPEVO Inc. and may be registered. All other trademarks are the property of their respective owners.
Customer Service
Email: [email protected]
Tel: 1 (408) 490 – 3085
 Loading...