

Page 1

WIT-400HE
User Guide
Please read this User Guide carefully before
operating your set. Retain it for future reference.
Page 2

ii
Regulatory Notes and Statements
Wireless LAN, Health and Authorization for use
Radio frequency electromagnetic energy is emitted from Wireless LAN devices.
This energy levels of these emissions, however, are far much less than the
electromagnetic energy emissions from wireless devices such as mobile
phones. Wireless LAN devices are safe for use by consumers because they
operate within the guidelines found in radio frequency safety standards and
recommendations. The use of Wireless LAN devices may be restricted in some
situations or environments, such as :
On board an airplane, or
In an explosive environment, or
In situations where the interference risk to other devices or services is per-
ceived or identied as harmful.
In cases in which the policy regarding use of Wireless LAN devices in specic
environments is not clear (e.g., airports, hospitals, chemical/oil/gas industrial
plants, private buildings), obtain authorization to use these devices prior to
operation the equipment.
Regulatory Information / Disclaimers
"Privacy of communications may not be ensured when using this telephone".
Any changes or modications made to this device that are not expressly approved by the manufacturer may void the user’s authority to operate the equipment. The Manufacturer is not responsible for any radio or television interference caused by unauthorized modication of this device, or the substitution or
attachment of connecting cables and equipment other than those specied by
the manufacturer. It is the responsibility for the user to correct any interference
caused by such unauthorized modication, substitution or attachment. The
manufacturer and its authorized resellers or distributors will assume no liability
for any damage or violation of government regulations arising from failure to
comply with these guideline.
USA-FCC (Federal Communications Commission) Statement
This device complies with Part 15 rules. Operation is subject to the following
two conditions;
1. This device may not cause harmful interference, and
2. This device must accept any interference received, including interference
that may cause undesired operation.
FCC Interference Statement (for User manual)
This equipment has been tested and found to comply with the limits of a Class
B digital device, pursuant to Part 15 of the FCC Rules. These limits are designed
to provide reasonable protection against harmful interference when the
equipment is operated in a residential environment. This equipment generates,
uses, and radiates radio frequency energy, and if not installed and used in
accordance with the instructions, may cause harmful interference. However,
Page 3

iii
there is no guarantee that interference will not occur. If this equipment does
cause interference to radio or television reception, which can be determined
by turning the equipment o and on, the user is encouraged to correct the
interference by on of the following measure;
1. Reorient or relocate the receiving antenna.
2. Increase separation between the equipment and receiver.
3. Connect the equipment to an outlet on a circuit dierent from which the
receiver is connected.
4. Consult the dealer or an experienced radio/TV technician.
Compliance Statement for Canada
This Class B digital apparatus meets all requirements of the Canadian InterfaceCausing Equipment Regulations. "Cet appareil de la classe B respecte toutes
les exigences du Reglement sur le matereil brouiller du Canada." The device is
certied to the requirements of RSS-210 for 2.4GHz spread spectrum devices.
The use of this device in a system operating either partially or completely
outdoors may require the user to obtain a license for the system according to
the Canadian regulations. For further information contact your Local Industry
Canada oce.
European Union Declarations of Conformity
Ericsson-LG Co., Ltd. declares that the equipment specied in this document
bearing the "CE" mark conforms to the European Union Radio and Telecommunications Terminal Equipment Directive(R&TTE 1999/5/EC), including the
Electromagnetic Compatibility Directive(2004/108/EC) and Low Voltage Directive(2006/95/EC). Copies of these Declarations of Conformity (DoCs) can be
obtained by contacting your local sales representative.
The Products is CE marked.
The product fullls the essential requirements of the harmonized standards
shown above.
Product Safety Instructions
This product complies with and conforms to the following international Product Safety standards as applicable:
Safety of Information Technology Equipment, IEC60950-1, including all relevant
national deviations as listed in Compliance with IEC for Electrical Equipment
(IECEE)
Safety of Information Technology Equipment, CAN/CSA-C22.2 No. 60950-1/UL
60950-1
Specic absorption rate (SAR) , in Compliance with EN50360 + A1,EN622091-1,
FCC OET Bulletin 65 Supplement C, IEEE 1528 and ANSI/IEEE C95.1,C95.3
Hearing Aid Comparability and Volume Control, in Compliance with IC CS03
Part V Issue 9
Page 4

iv
Issue Release Date Changes
1.0 Mar 18, 2013 New Product Release
Page 5

v
Contents
Before Starting ...................................................................1
Important Safety Informations .........................................................................1
Inside the Package ................................................................................................. 5
Phone Basics .......................................................................7
Your Phone................................................................................................................7
Display Screen .......................................................................................................10
Getting Started ............................................................... 13
Battery and Charger ............................................................................................13
Turning Your Phone On and O......................................................................16
Navigating Through Menus and Options ..................................................17
Entering Text ..........................................................................................................18
Headset with Mic .................................................................................................21
Phone Carrying .....................................................................................................22
Access Point ............................................................................................................23
Registration ............................................................................................................25
Range ........................................................................................................................26
Signal Strength ......................................................................................................27
Access Point Probing ...........................................................................................27
Caller ID ....................................................................................................................27
Cleaning Phone .....................................................................................................27
Phone’s Menu ........................................................................................................28
Page 6

vi
Contents
Phone Calls .......................................................................31
Making Calls ...........................................................................................................31
Answering Calls .....................................................................................................34
In Call Options .......................................................................................................34
Using Quickly Change Mode ...........................................................................35
Using Keypad Lock (Keyguard) .......................................................................36
Phone Book ...................................................................... 37
About Phone Book (Contacts) .........................................................................37
Add New ..................................................................................................................38
Search Phonebook ...............................................................................................40
Caller Groups ..........................................................................................................41
Speed Dials .............................................................................................................44
Delete All .................................................................................................................46
Sound ................................................................................. 47
Alert By .....................................................................................................................47
Ring Tone .................................................................................................................47
Ring Tone Volume ................................................................................................48
Power-On Tone ......................................................................................................48
Power-O Tone ......................................................................................................48
Key Tone ...................................................................................................................49
Key Tone Volume ..................................................................................................49
Eect Sound ...........................................................................................................49
Display ................................................................................ 51
Screen Theme ........................................................................................................51
Greeting Note ........................................................................................................52
Idle Clock .................................................................................................................52
Dialing Font ............................................................................................................52
Menu Style ..............................................................................................................53
Backlight ..................................................................................................................53
Page 7

vii
Contents
Font Type .................................................................................................................53
Language .................................................................................................................54
Call History ....................................................................... 55
Call History ..............................................................................................................55
Call Duration ..........................................................................................................57
Messages ........................................................................... 59
Viewing Message ..................................................................................................59
Writing Text Message ..........................................................................................60
Inbox .........................................................................................................................61
Outbox ......................................................................................................................62
Draft ...........................................................................................................................62
Templates ................................................................................................................63
Tools .................................................................................... 65
Schedule ..................................................................................................................65
Memo ........................................................................................................................70
Alarm Clock .............................................................................................................71
Calculator ................................................................................................................73
World Time ..............................................................................................................73
Timer .........................................................................................................................74
System ................................................................................ 77
Call Forward ............................................................................................................77
3-Party Conference ..............................................................................................79
DND (Do Not Disturb) .........................................................................................80
Message Waiting/Call Back ...............................................................................80
Flash...........................................................................................................................82
System Speed ........................................................................................................82
System Redial .........................................................................................................86
lCM (Intercom) .......................................................................................................86
Mute ..........................................................................................................................87
Page 8

viii
Contents
Call Transfer.............................................................................................................87
Hold/Save ................................................................................................................88
Program....................................................................................................................88
Settings .............................................................................. 89
Prole Settings ......................................................................................................89
System Setting.......................................................................................................95
Codec Preference .................................................................................................96
Wireless LAN Setting ...........................................................................................97
Security.....................................................................................................................97
Wireless LAN Status .............................................................................................97
Network Information ..........................................................................................98
Phone Version ........................................................................................................98
Reset Settings ........................................................................................................98
Useful Information ........................................................99
Before Service Inquiry.........................................................................................99
Troubleshooting ................................................................................................ 102
Specication ........................................................................................................103
Caring for the Battery ......................................................................................105
Open Source Software Notice ......................................................................106
Caring for the Environment by Recycling ................................................ 107
Indexs ...............................................................................109
Page 9
1
Preparation
Before Starting
Important Safety Informations
Improtant safety informations that will help you safely use your
phone. Failure to read and follow the important safety information
in this phone user guide may result in serious bodily injury, death, or
property damage.
WARNING: Violation of the instructions may cause serious
injury of death.
CAUTION: Violation of the instructions may cause minor or
serious damage to the product.
CAUTION: Location and Environment for the Installation
Install the product strictly following the user guide included in
theproduct. If not, the product would not function or its lifetime
could be shortened.
Avoid installing the product towards the direct ray of the sun or
in locations exposed to direct sunlight, on carpets or cushions. If
not, the phone could be damaged, or re or electric shock could
be caused.
Avoid installing the product in dusty locations. If not, sand could
be intruded into the phone, and re, electric shock or other product defects can occur.
Avoid installing the product in the locations where a strong vibra-
tion exists. If not, the product performance could decline or its
lifetime could be shortened.
Do not place vase, cosmetics or containers lled with water, milk
or beverage in proximity to the product. The liquid spilt out could
cause re, electric shock, malfunction, etc.
Page 10

2 Preparation Before Starting
Avoid installing the product near re or in a small space with poor-
ventilation. If not, re or product defects could be caused.
Do not put the phone inside a washing machine or a microwave. It
could cause explosion, problems, deformation or defects.
Avoid installing the product on a shelf or a slanted surface. If not,
the product could fall, causing personal injuries or defects on the
phone.
Avoid installing the product close to other electronic products
such as TV, audio instruments, etc. It may cause some noises due to
electromagnetic interference. Properly install the base away from
such products.
Avoid installing or using the product near kitchen utensils such as
cooking table, humidier, rice-cooker, etc., or in locations exposed
to rain and wind or such places as bathroom where water might be
splashed. Electric shock, re, deformation or product defects could
be caused.
WARNING: Power Supply
Remove dust from the power plug pin and insert the power plug
tightly into power receptacle. If not, re or electric shock could be
caused.
Do not use a damaged or loosened plug, and do not modify or
damage the power cord. Fire or electric shock could be caused.
Do not connect a multiple number of cords into a single power
connector. Fire or electric shock could be caused.
Do not touch the power plug with wet hands and grasp the power
supply plug when unplugging the power cord. Fire or electric
shock could be caused.
Do not cover the power cord and the adaptor with a pad, and do
not place them near heating instruments. Do not let children or
pets bite the phone or the power cable. Fire or electric shock could
be caused.
Use the adaptor that was included in the product package (See
the product specication). Check the rated voltage at home. Using
other voltages may cause a re.
Ensure that the external cords of the phone are disconnected
before it is moved from the installation site. If not, re or electric
shock could be caused.
Do not bend the power cord reluctantly, and do not place a heavy
instrument on the power cord. Fire or electric shock could be
caused.
Page 11

3Preparation Before Starting
WARNING: Battery Handling
Do not disassemble or revise the battery and do not use it for
other purposes. Use the specied battery and adaptor only. Fire or
personal injury may be caused by heat or rupture.
If the battery is damaged, the battery liquid may leak out. Take care
not to contact the battery leakage. Keep it away from your eyes,
skin or cloths. If there is any contact, immediately clean it with
water and take medical care as soon as possible.
Dispose the used battery in a specied place. Improper treatment
may cause an unexpected accident.
Do not apply impact on the battery by throwing it, and do not
place it close to heating instruments (microwave, heater). The battery liquid may leak out, or re or explosion may be caused.
Never damage the shield tube nor contact the
and pins of the
battery with a metal. Fire or physical injury may be caused by heat
or rupture.
Do not store the battery in locations exposed to direct sunlight
or with high temperature and humidity (store it in a room at 0°~
+40°). Deformation or explosion could be caused.
Do not let children or pets suck or bite the battery. Putting the bat-
tery into mouth is harmful for human body. Should a child swallow
the battery, consult a physician as soon as possible.
If you detect smokes or a strange smell while using the phone
or charging the battery, unplug the power cord and contact the
service center. Using it in such condition may cause re or an
electric shock.
CAUTION: Operation
Do not let anybody disassemble or alter the device other than
qualied service personnel. Contact the distributor and the customer service center for the inspection and repair. Fire, an electric
shock or problems could be caused.
Do not touch the power plug during lightning storms. It can cause
an electric shock or death.
Be careful not to let any foreign materials get into the product. In
particular, if a staple and pins are magnetized on the receiver, make
sure to eliminate it before use. Using it in such condition may cause
re, electric shock, or injury especially on the face.
Do not drop objects or apply impact on the phone. The phone
could be damaged, or personal injury or product defects could be
caused.
Page 12

4 Preparation Before Starting
If you detect a burning smell or smoke, immediately stop using the
product, disconnect the power supply plug and the phone cable
and contact the service center. Using it in such condition may
cause re or electric shock.
Pay attention not to let the phone contact with volatile substances
(benzene, thinner, alcohol, acetone, etc.) If not, re, deformation or
decolorization could be caused.
Pay attention not to be stumbled over the phone cable or power
cord. Accident, injury or product defects could be caused.
Do not let water penetrate into the product. Should water pen-
etrate into the product, disconnect the power supply plug and
the phone cable and contact the distributor or the service center.
Using it in such condition may cause electric shock.
Do not drop the phone during operation and do not throw it to-
ward a person. If the product is dropped and damaged, disconnect
the power supply plug and contact the distributor or the service
center. The phone could be damaged, or accident, personal injury
or product defects could be caused.
Avoid using the phone where there is a gas leakage. If there is a
gas leakage, do not touch the phone, phone cord and receptacle
with hands and open the window for ventilation. Flames may
cause explosion, resulting in re or burn injury.
When the charging contacts are wet with water or stained with
foreign materials, use the product after wiping them with dry
towel. Using it in such condition may cause accident, injury or
product problems.
Do not cover the phone with wrap or vinyl for packing. The coating
may peel away.
Pay attention not to hurt with the edges or angles of the product,
and be careful not to let a child put the mic or power cord into the
mouth. If not, it can cause an accident, injury or product defects.
Never place your ears in proximity to the speaker hole, nor insert
a driver or tweezers into the hole of product. This may result in
accident, injury or defects of the product.
Separately record and keep the data of the phone. Since important
data stored in the memory could be lost by user s carelessness or
during repair or upgrade of the product, keep important numbers
and texts in a separate record. Note that the manufacturer is not
liable to any damage resulting from data loss.
Page 13
5Preparation Before Starting
Inside the Package
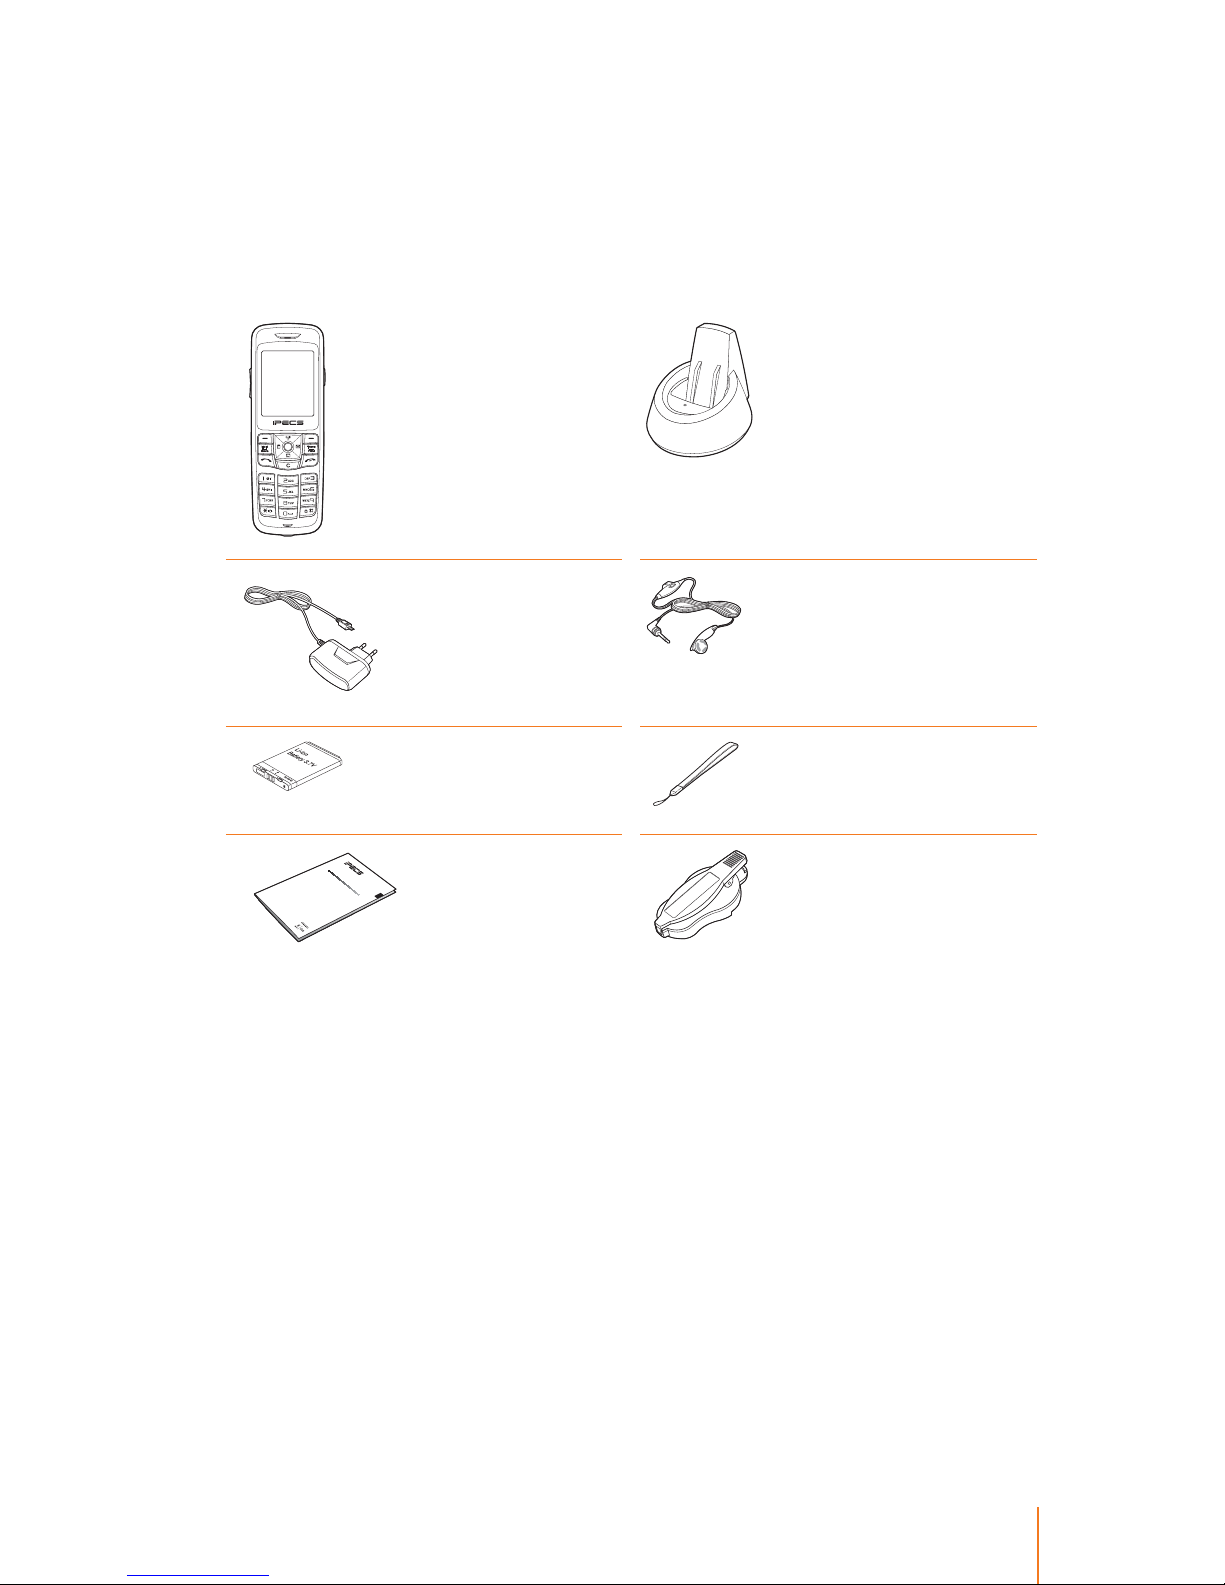
The following items are included in your phone package. Before
using the phone, ensure that you have the following package contents. If something is missing or not functioning, contact your local
distributor.
WIT-400HE Charger
Connect the Travel
Adapter to Charger,
then plug it into the
electrical outlet to
charge the battery.
Travel Adapter
Use to charge the
battery without
Charger.
Headset
Use the built-in microphone to talk.
Lithium Ion
(Li-Ion) Battery
(3.7V, 1150mAh)
Wrist Strap
Attaches to carry
your phone.
WI
T
-400HE
Q
uick
Sta
r
t Guide
P
lease r
ead this ma
nual ca
r
efully be
f
o
r
e
ope
ra
ting
y
our se
t
.
R
etain
it
f
or f
utu
r
e
r
e
f
e
r
en
c
e
.
Quick Start Guide
All you need
to know to get
going.
Optional Belt Clip
(Not included)
CAUTION:
Use only Ericsson-LG approved items with your phone. Failure to do
this may damage the phone and invaliable your warranty.
Note: The illustrations are used for explanation purposes, some of it may dier
slightly from what shown.
Page 14

Page 15
7
Chapter
1
Phone Basics
Your Phone
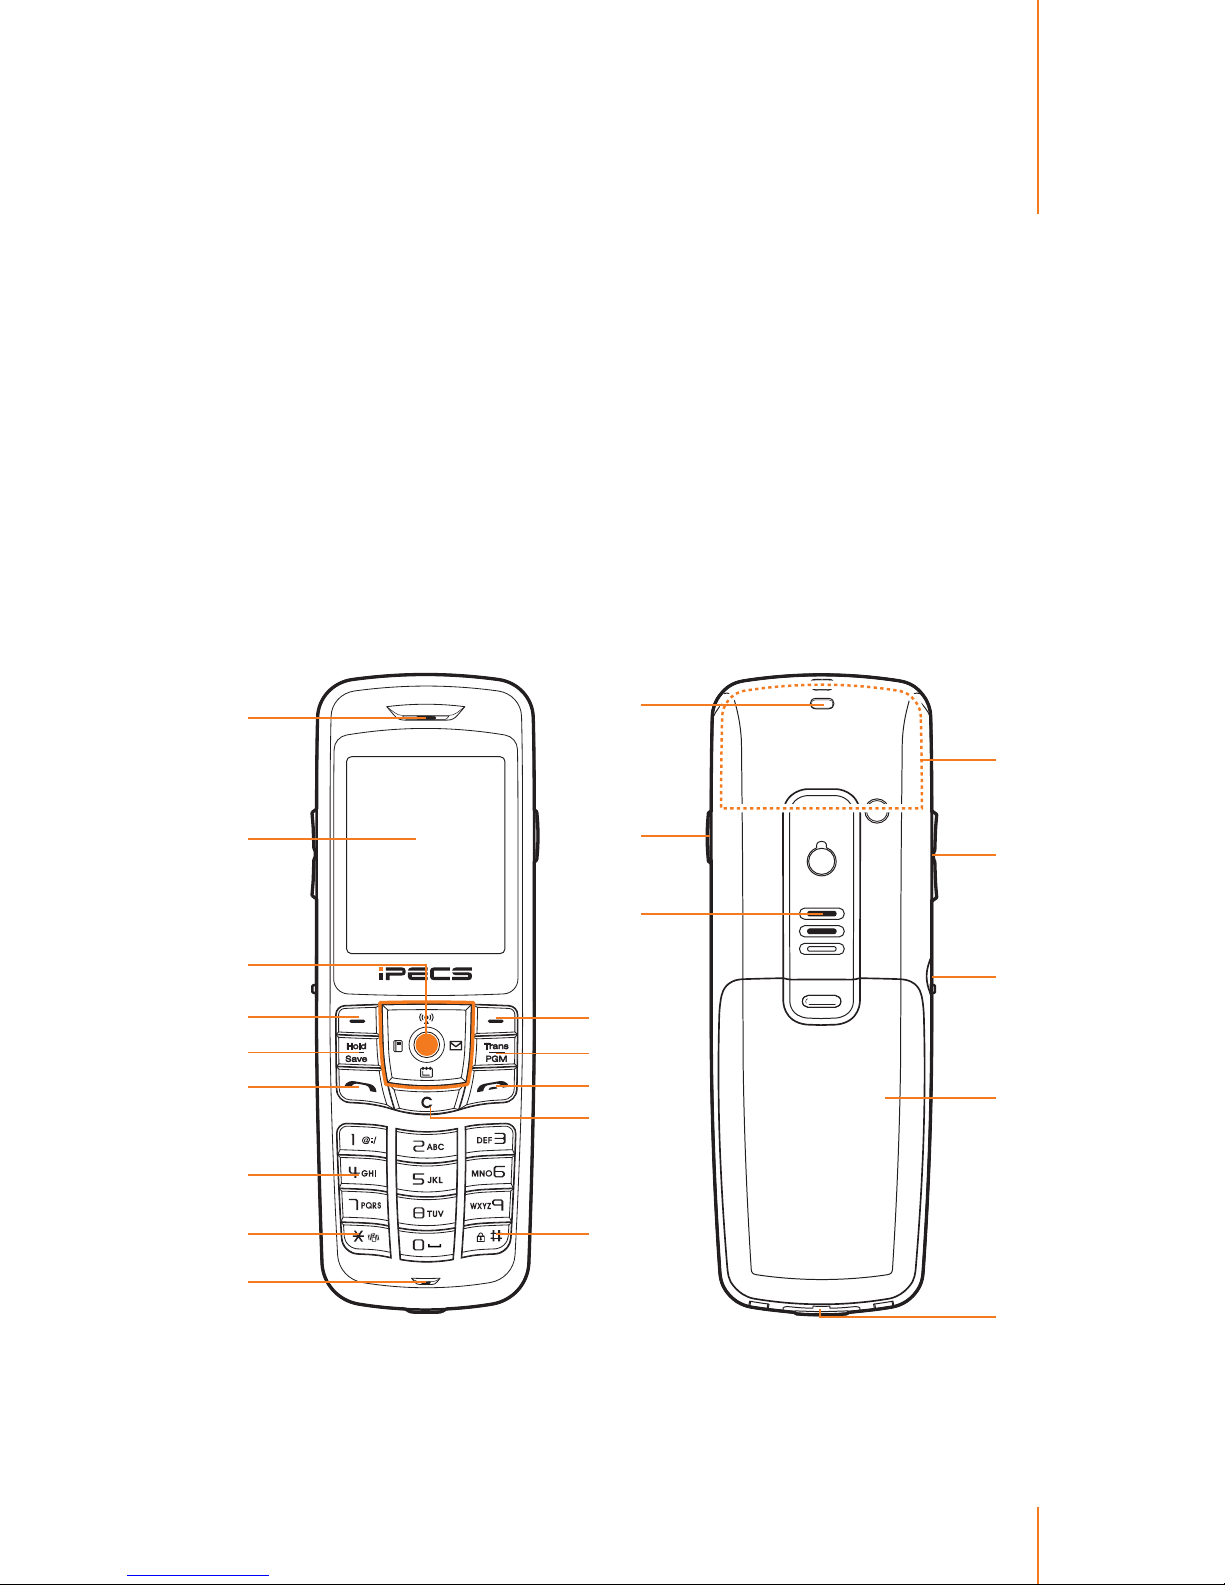
The following illustration will help you become familiar with your
new Wireless IP Phone.
Phone Layout
* This phone has an internal antenna. Avoid touching the antenna area unneces-
sarily while the antenna is transmitting or receiving. Contact with the antenna
aects communication quality.
1
2
4
5
6
7
8
9
3
16
17
15
*
19
18
10
11
12
14
13
20
21
Page 16

8 Chapter 1 Phone Basics
Key Functions
The following list gives a brief description of all available key functions of your phone.
1. Earpiece lets you hear the caller.
2. Display Screen displays all the information needed to operate
your phone, such as the call status, the date and time, and the
signal and battery strength.
3. Navigation/OK (
) Key scrolls through the phone’s menu op-
tions and acts as a shortcut key from standby mode
*1
and selects
the highlighted choice when navigating through a menu.
Press Up (
) to access Searching SSID.
Press Down (
) to access Schedule.
Press Left (
) to access System.
Press Right (
) to access Messages.
4. Left Softkey
*2
lets you access menu tiems or select softkey ac-
tions corresponding to the bottom left line on the display screen.
5. Hold/Save Key allows you to place a call on hold. Use to save
your changes while in the programming mode.
6. Send key allows you to place or receive calls, or use call hisyorys.
7. Alphanumeric Keypad lets you enter numbers, characters, and
navigate within menus. Press and hold keys from 1 to 9 for speed
dialing.
8. Manner Mode allows you to ativate the vibration mode from
standby mode.
9. Mic lets you transmit your voice.
10. Right Softkey lets you access the contact list or select softkey
actions corresponding to the bottom right line on the display
screen.
11. Trans/PGM Key allows you to transfer an active call. Pressing
this key accesses the menu for making changes to the IP phone
conguration in standby mode.
12. End/Power Key lets you turn the phone on or o, end a call, or
return to standby mode. While in the main menu, it returns the
phone to standby mode and cancels your input.
Page 17

9Chapter 1 Phone Basics
13. Clear Key deletes single spaces or characters with a quick tuch,
but press and hold to delete entire words from the display in
text entry mode. When in a menu, press this key to return to the
previous menu.
Keypad Lock allows you to lock the phone’s keypad immediately
in standby mode by pressing and holding it about two seconds.
14. Lock Mode allows you to lock the phone from standby mode.
15. Strap Eyelet allows you to connect the wrist strap.
16. Push-to-Talk(PTT) allows you to invoke announcements to other
numbers of the PTT group in standby mode.
17. Speaker lets you hear the dierent ringtones and sounds.
18. Side Volume Key allows you to adjust the key tone volume in
standby mode or adjust the earpiece volume during a call.The
side volume key can also be used to scroll up or down to navigate through the dierent menu options.
19. Headset Jack allows you to plug in a mono headset for conve-
nient, hands-free conversations.
20. Battery Cover push the back cover downward to remove it.
21. Charger Jack allows you to plug in your travel adapter to your
phone, rst open the external charger jack cover.
*
1 A standby mode is when the phone is ready for use. No menu is displayed and
the phone is not performing any action. It is starting point for all of the instruction steps, the phone is in the standby mode.
*
2 The roles of these soft keys vary according to the applications, each menu and
option lets you view and alter the settings of a specic function use the left
and right soft keys.
Page 18
10 Chapter 1 Phone Basics
Display Screen
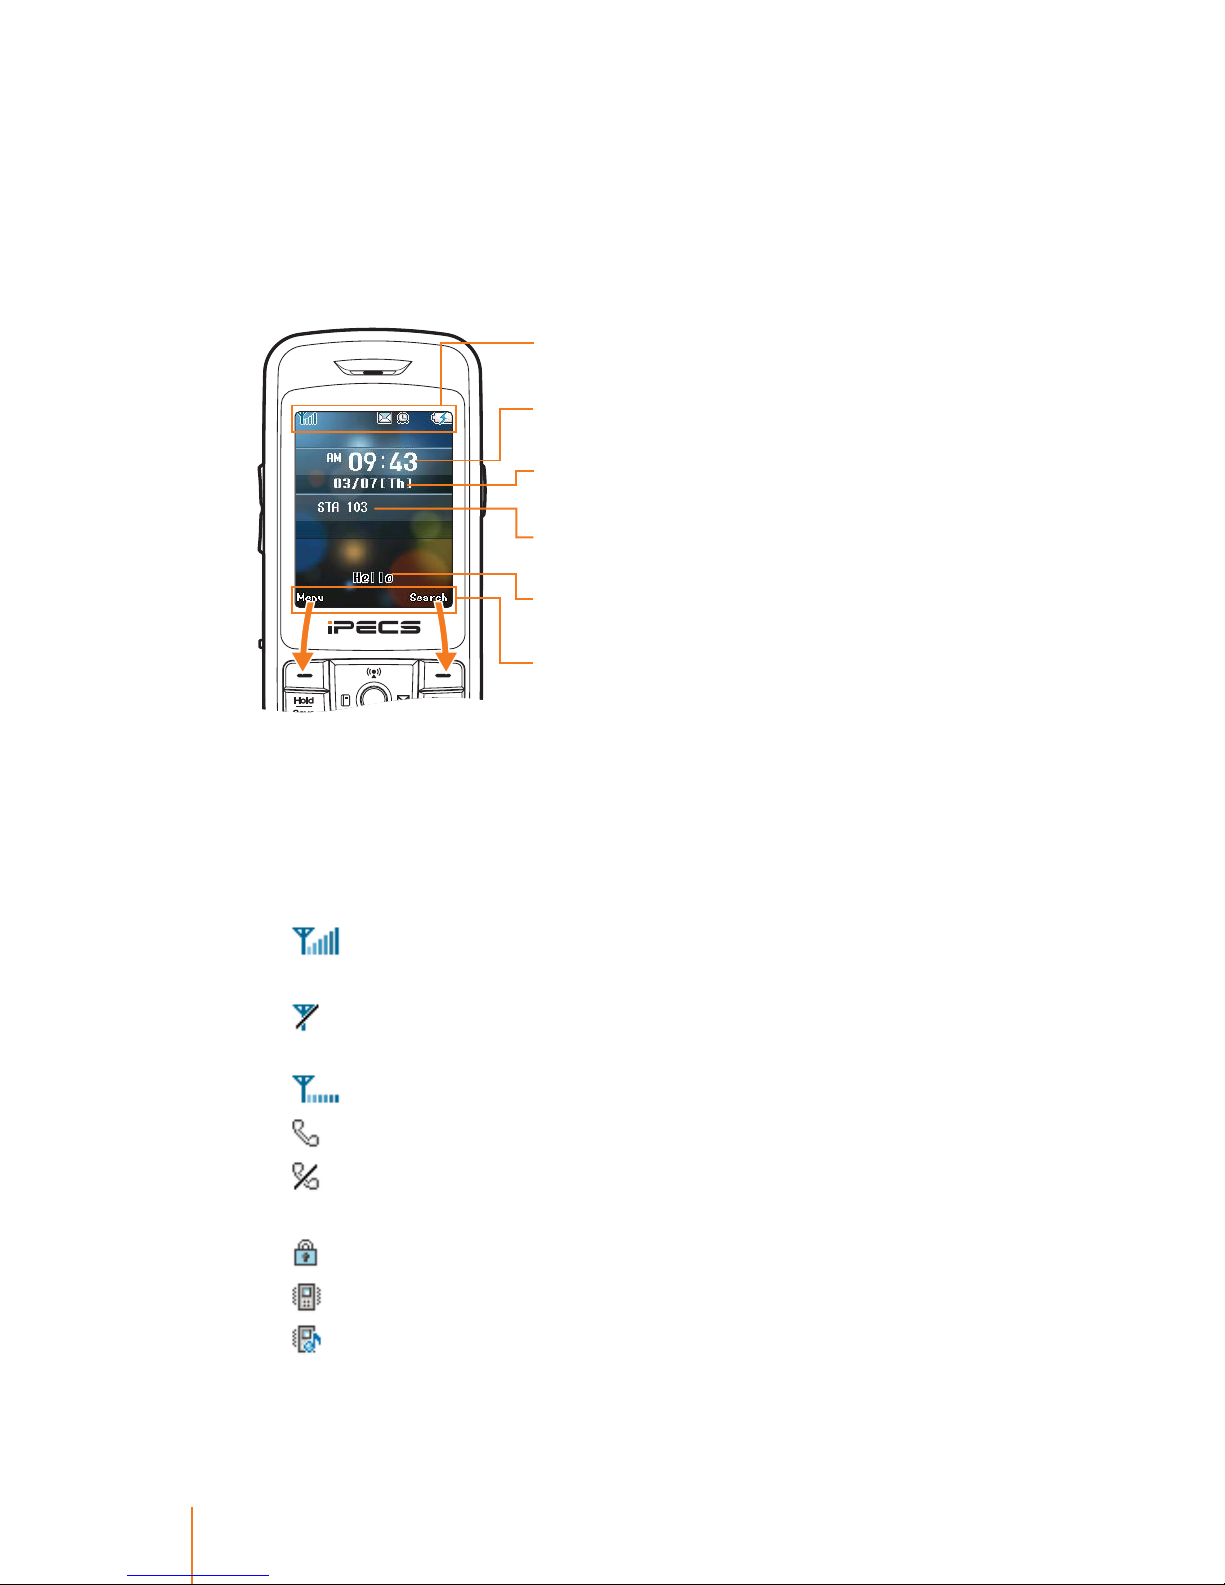
The display screen provides information about your phone’s status
and/or action of the functions shown after successful registration.
Display Informations
Status Icons
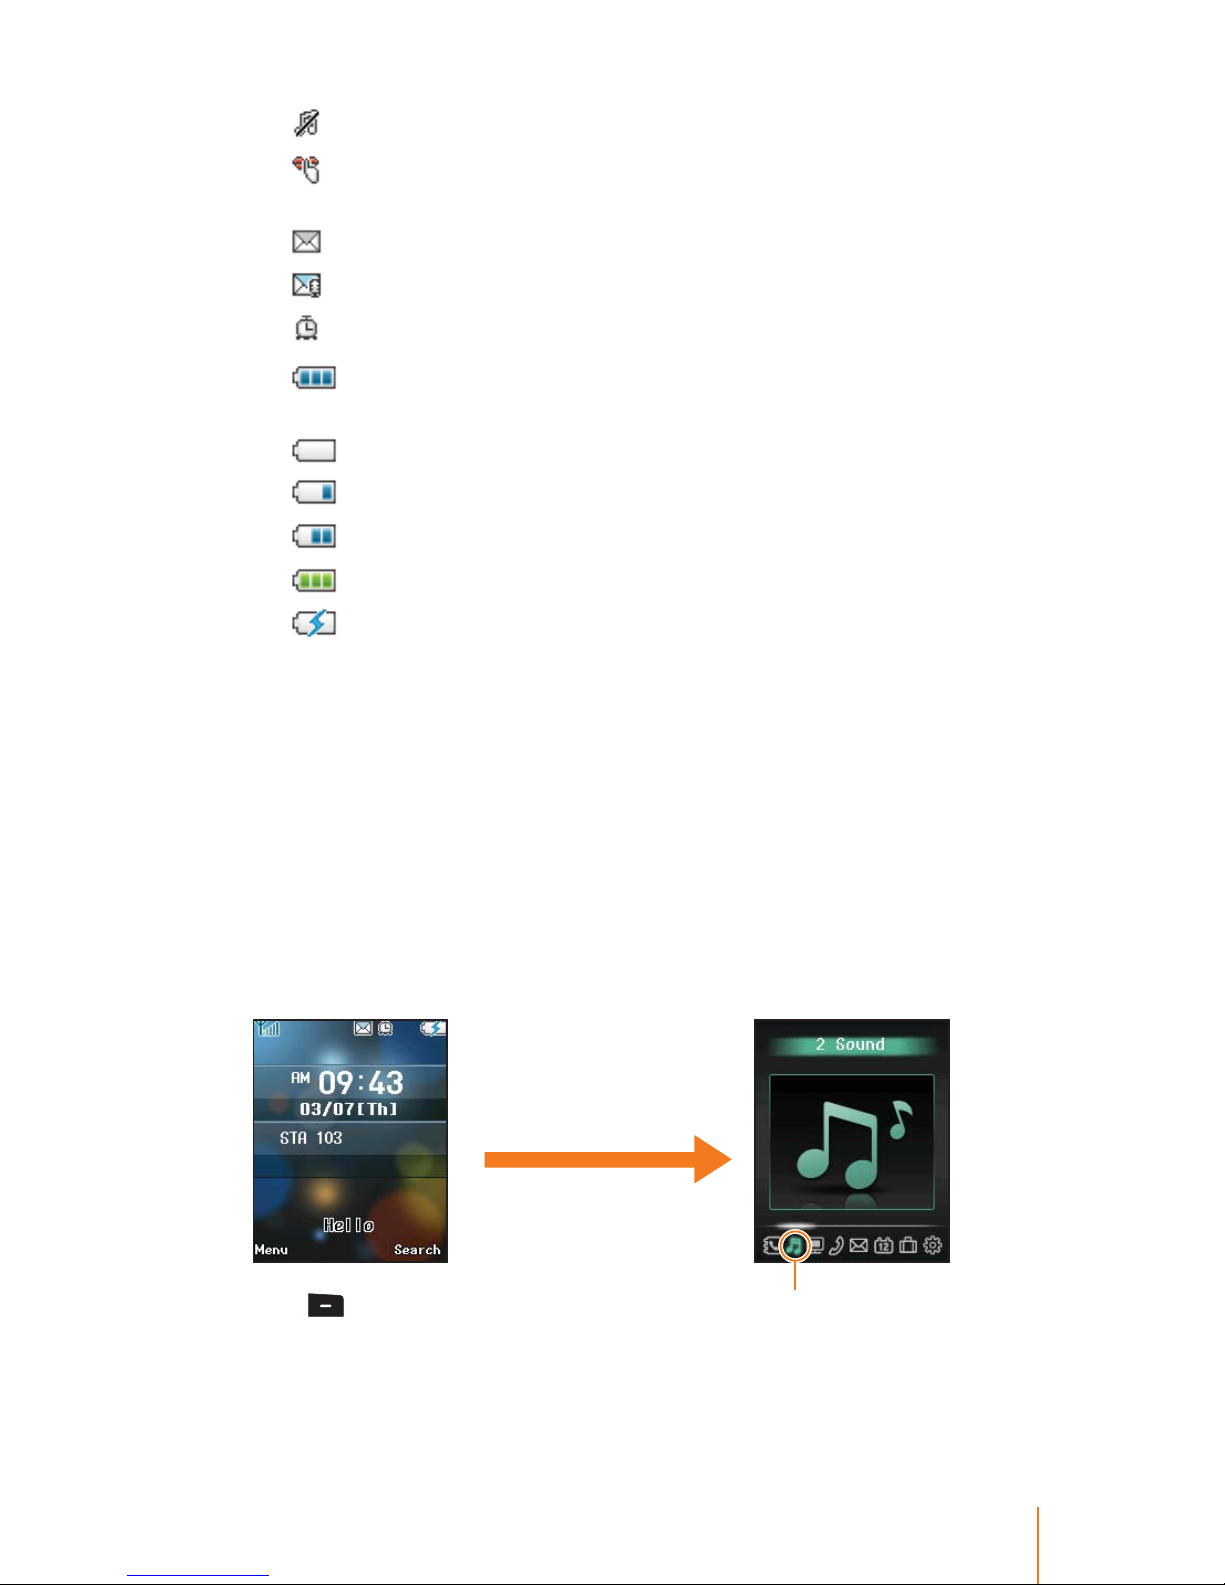
The following list gives a brief description of all showig status icons
of your phone. You will see this kind of icon at the top of the screen.
1.
shows your current signal RSSI level.*1 The more lines you
have, the stronger your signal.
means your phone is not registered within the required AP*2
or when your phone is out of range.
indicates your phone is trying to nd the AP.
2.
tells you a call is in progress or call is connected.
means your phone cannot nd a system signal or cannot
make a call.
3.
indicates phone lock is activated or keypad lock.
4.
indicates ringtone Vibration or Vibration Once.
indicates ringtone Ring after Vibration or Ring & Vibration.
Time displays the system time in the format
HH:MM with AM/PM.
Status Icons display at the top area of the display
screen.
Date and Day display current date, and the day
of the week in the format MM/DD.
Greeting Note appears when the greeting note
is set ON.
System Information displays the information,
such as station number, DND, Forward etc.
Menu Display Area oers a set of menus that
allow you to customize your phone. These
functions are accessed via the left and right soft
keys. The label on the bottom of the display (just
above each key) indicates its current function.
Page 19
11Chapter 1 Phone Basics
indicates ringtone o or Mute is set.
indicates manner mode is activated. Quickly set to vibration
mode, phone always vibrates instead of making a sound.
5.
indicates you have new text messages.
6.
indicates you have Message Waiting/Call Back.
7.
indicates alarm is activated.
8.
represents the amount of remaining battery charge
currently available in your phone.
indicates low battery.
indicates almost running out battery.
indicates starting low battery.
indicates full battery.
indicates charging low battery.
*
1 A RSSI (Received Signal Strength Indication) is a value representing the
received radio signal strength of the access point . You can see RSSI level icon
while the phone is operating.
*
2 An AP (access point) is device that allow wireless communication devices to
connect to the network. They are usually connected to the wired network and
allow communication between the wired and wireless devices.
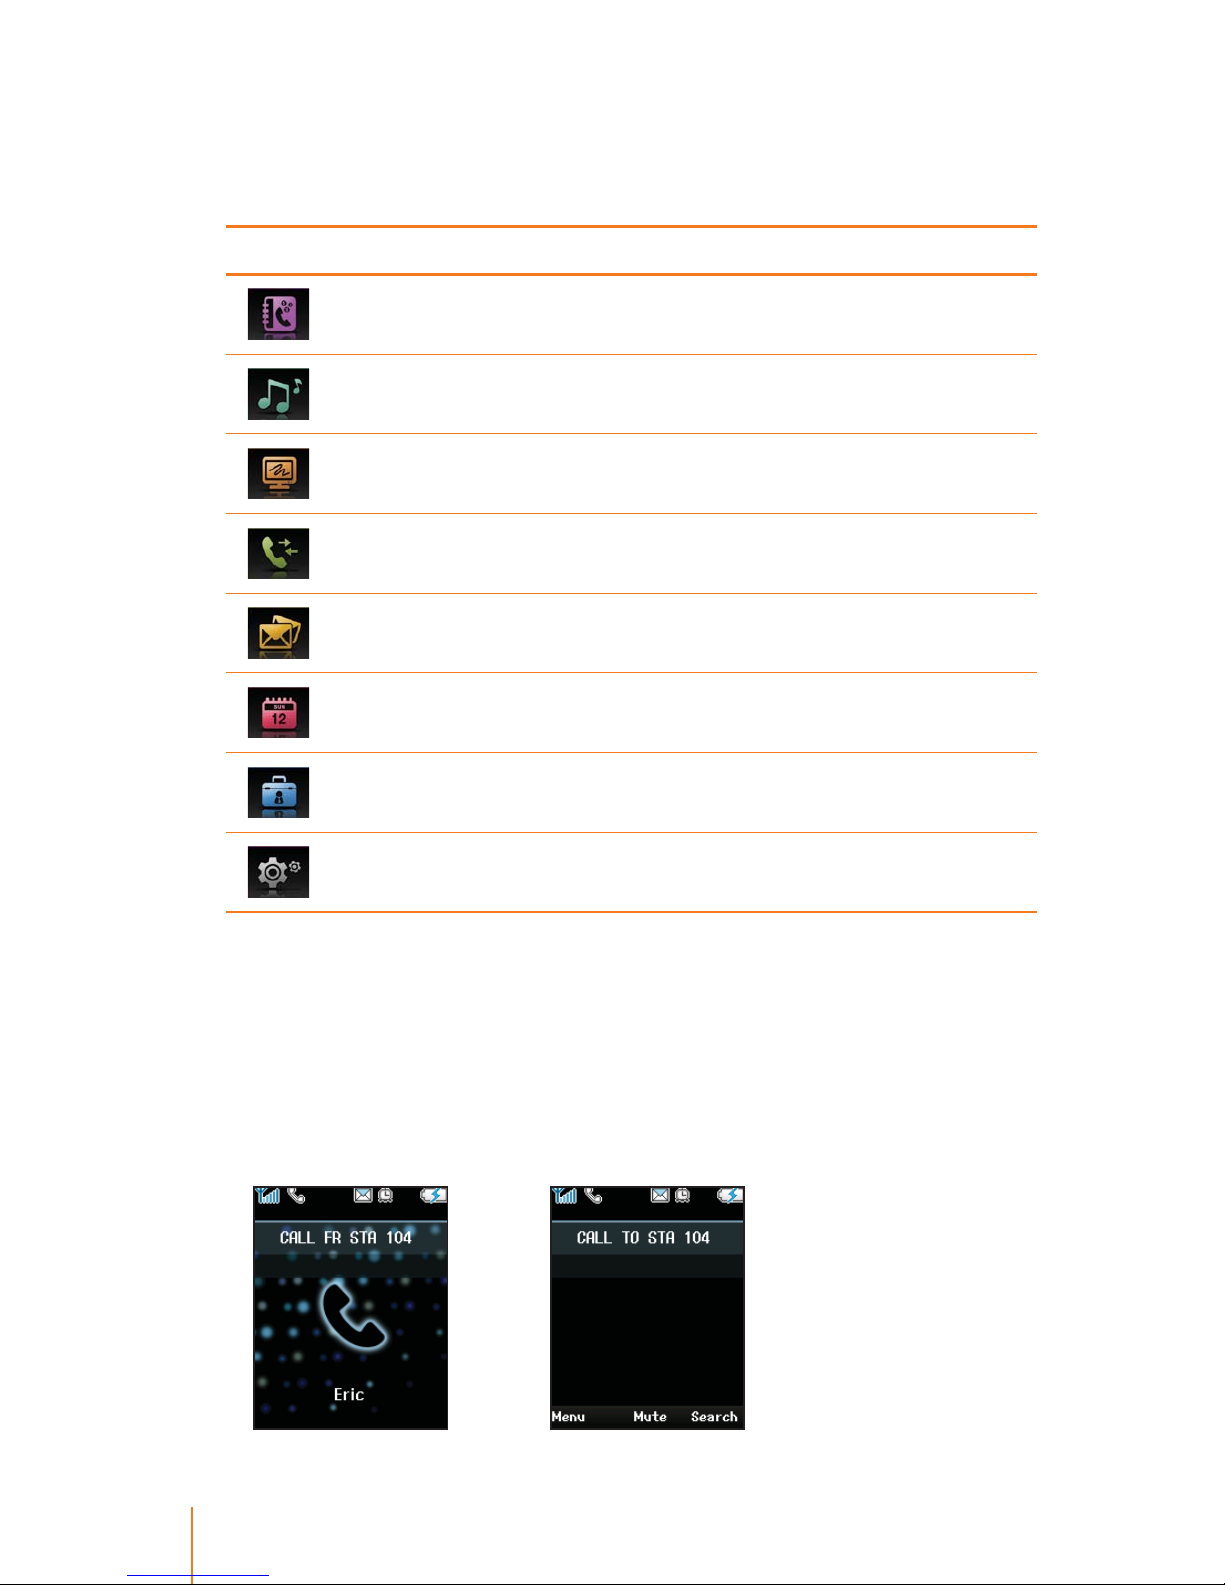
Main Menu
When the phone is switched on and standby mode press left softkey
to access the main menu.
t4UBOECZ.PEFt.FOV.PEF
Highlighted icon indicates
that Sound meun is selected.
Press
[Menu] and
select "Sound" menu.
Page 20
12 Chapter 1 Phone Basics
Main Menu Icons
These icons are used to access the following your phone’s main
menu options as described in table.
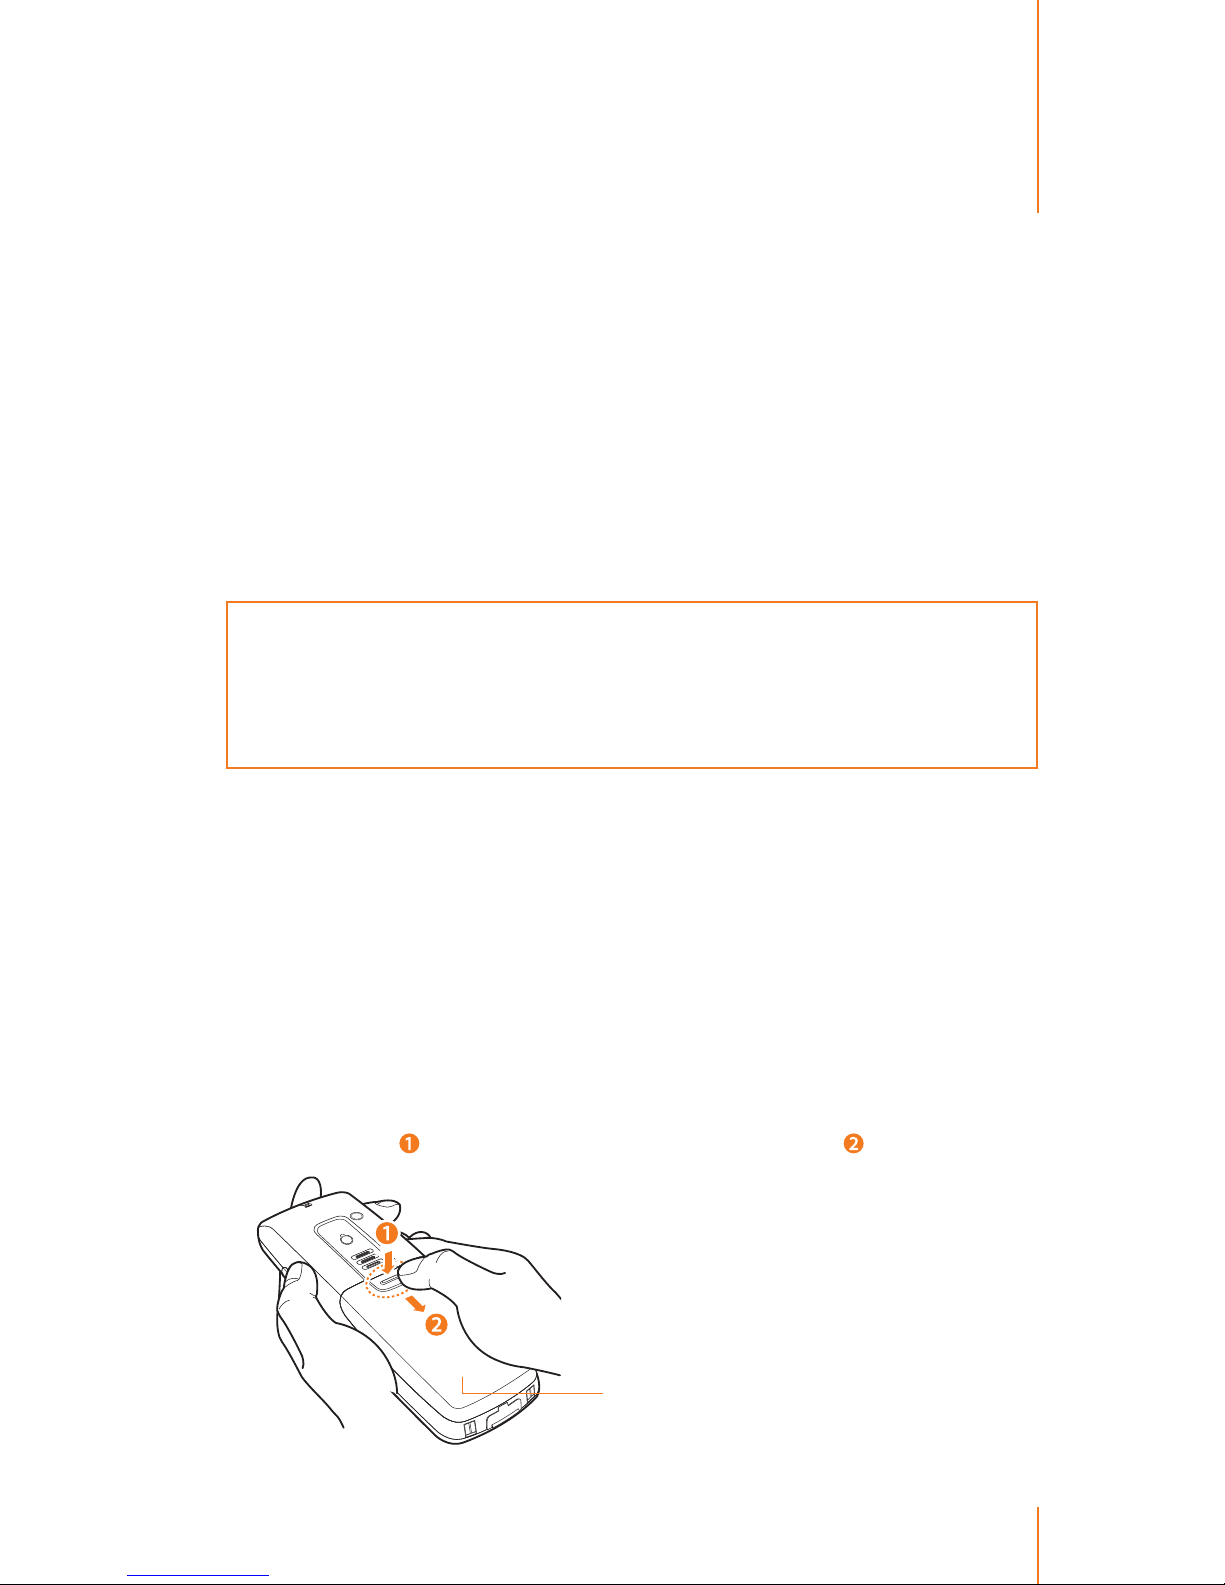
Icon Description
This icon refers to the menus related to Phone Book.
This icon refers to the menus related to Sound for user’s customization.
This icon refers to the menus related to Display for user’s customization.
This icon refers to the menus related to Call History.
This icon refers to the menus related to Messages.
This icon refers to the menus related to Tools for user’s convenience.
This icon refers to the menus related to Systems that provides a
user with variety of keyphone features.
This icon refers to the menus related to Settings of your phone.
State Displays
The phone will show both items on the display screen, if the caller’s
name and number are stored in your Phone Book. If not, phone will
only display the phone number. The following examples show the
call state displays.
t*ODPNJOH$BMM t0VUHPJOH$BMM
Page 21
13
Chapter
2
Getting Started
Battery and Charger
Your phone is equipped with a Lithium Ion (Li-Ion) battery. It allows
you to recharge your battery before it is fully drained.
WARNING: Use only Ericsson-LG approved battery, charger, and Power
Adapter with your phone. The failure to use a Ericsson-LG approved battery,
charger, and Power Adapter may increase the risk that your phone will
overheat, catch re, or explode, resulting in serious bodily injury, death, or
property damage.
When the battery reaches 10% of its capacity, your phone makes a
sound and displays a message. When there are approximately four
minutes of talk time left, the phone sounds an audible alert and then
turns o.
Installing and Removing the Battery
Always turn o your phone before installing or replacing the battery.
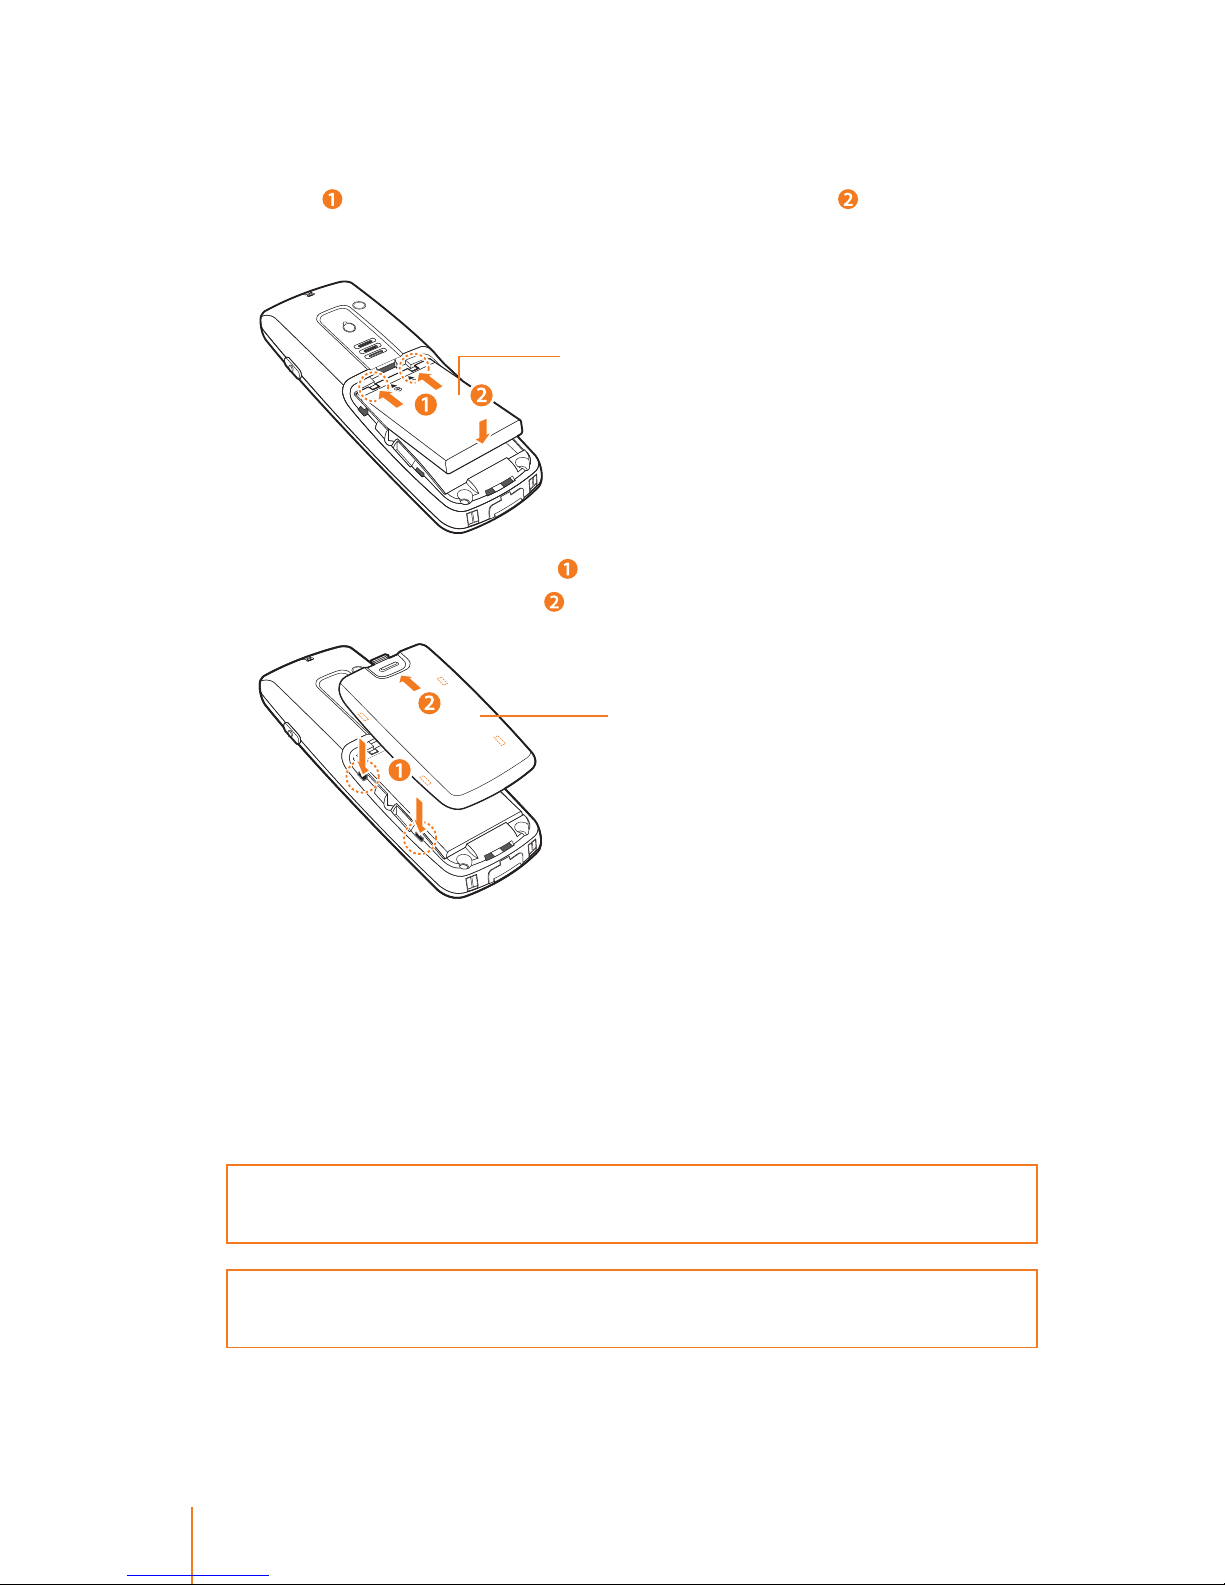
To install the battery:
1. With your thumb, press down on the battery cover on the back of
your phone (
) and slide it downward to release it ( ).
Battery cover
Page 22
14 Chapter 2 Getting Started
2. Remove the battery cover from the back of the phone.
3. Insert the battery into the opening, making sure the connectors
align (
). Gently press down to secure the battery ( ). Note: Do not
force the battery.
4. Replace the battery cover (
) and press up until you hear a click to
lock the cover into place (
).
To remove the battery:
1. Make sure the power is o so that you do not lose any stored numbers or messages.
2. Use your thumb press down battery release hook on the back of
your phone and remove the battery from the phone.
WARNING: Do not handle a damaged or leaking Li-Ion battery as you can be
burned.
Note: The battery has limited a lifespans and the battery is warranted for a
period of 6 months from the purchasing date.
Battery cover
Li-Ion battery
Page 23
15Chapter 2 Getting Started
Charging the Battery
When you use phone for the rst time, the battery is not fully
charged. Fully charge your battery as soon as possible so you can
begin using the phone.
An icon located in the upper right corner of the display screen shows
battery charging status. If the battery charge is getting too low, the
battery icon
blinks and the phone sounds a warning tone.
Always use a Ericsson-LG approved charger or power adapter to
charge your battery.
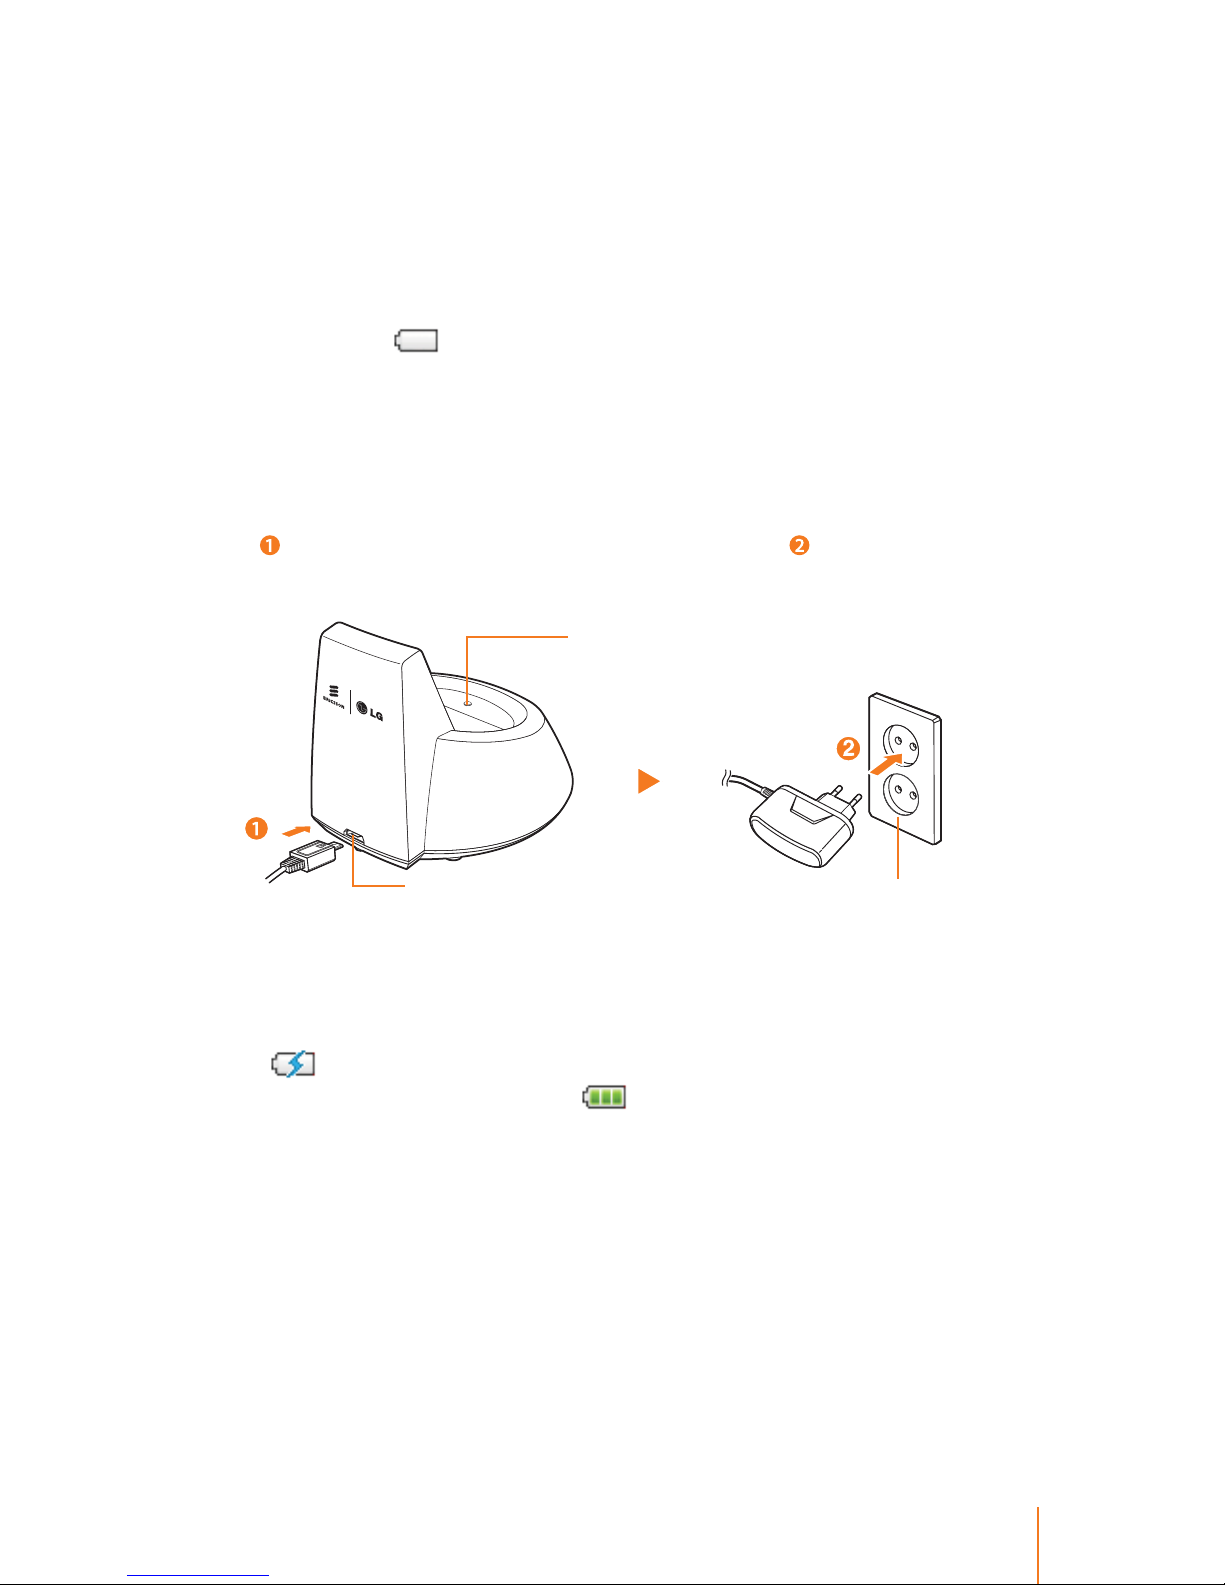
To install the charger:
1. Plug the at end of the travel adapter into the chager’s charging jack
(
) and the other end into an electrical outlet ( ). CAUTION: Using
incompatible accessory may damage the phone.
2. Charge the battery by placing the phone on the charger. With the
approved Li-Ion battery, you can recharge the battery before it
becomes completely run down.
As the battery is being charged while the power is on, a charging
icon appears on the display screen. After the battery has been
fully charged, a full battery
icon appears on the display screen.
(Refer to "Status Icons" on page 10.)
On the charger color indicator LED measns that:
- A red (
Ɣ) means the battery is charging or recharging.
- A green (
Ɣ) means the battery is at least 99 percent charged.
Estimated battery (Li-Ion 3.7V 950mAh) charging time is approxi-
mately 5 hours.
If the battery cannot be charged correctly, turn o the power once,
remove the battery, and then reinstall it to charge the battery
again.
Electrical outlet
Charging LED
Connector jack
Page 24
16 Chapter 2 Getting Started
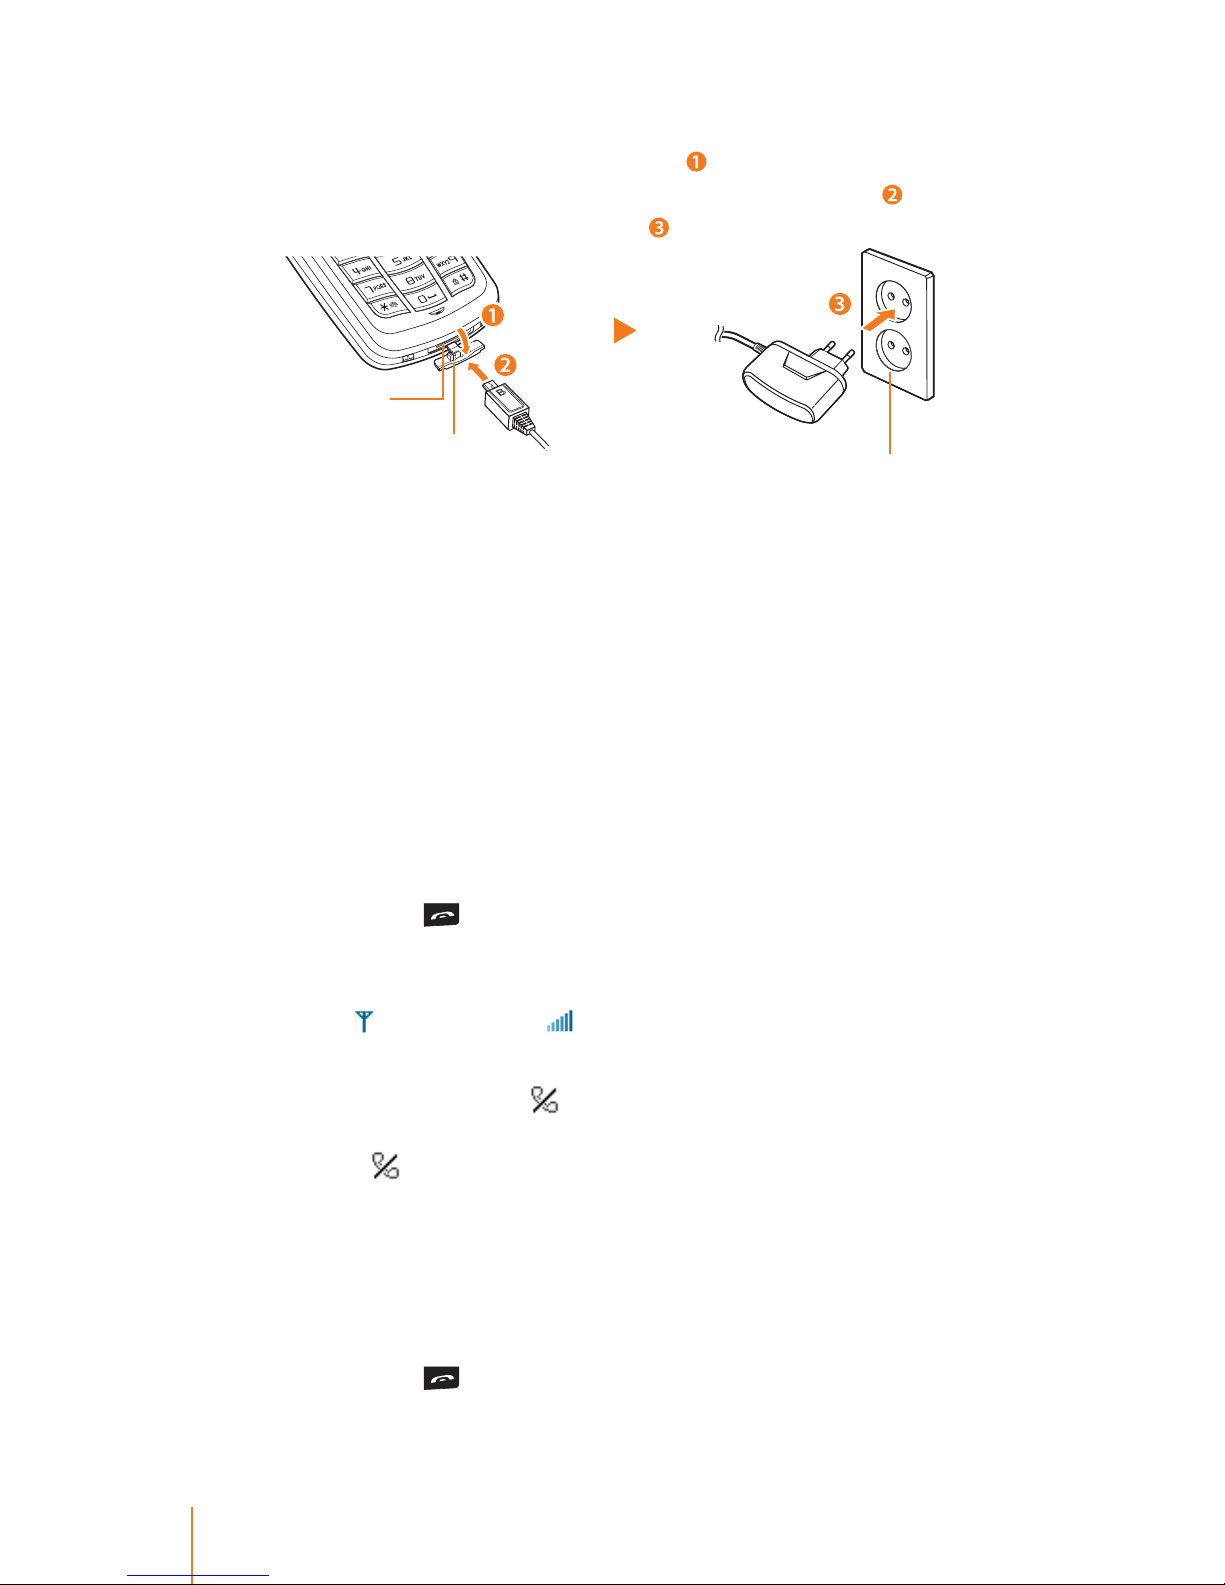
To install the travel adapter:
Ź Open the external charger jack cover ( ) of the phone. Plug the at
end of the travel charger into the phone’s charger jack (
) and the
other end into an electrical outlet (
).
Replacing the Battery
Rechargeable battery has a limited number of charge cycles and
may eventually need to be replaced.
The charging time may dier depending on the condition of your
battery, purchases a new battery when the battery run time gets
shortened.
Use only the Li-Ion battery supplied with your phone. New batter-
ies are available from Ericsson-LG.
Turning Your Phone On and O
Turning Your Phone On
Ź Press and hold for approximately two seconds.
After the powering on animation, the phone tries to lock the access point. As your phone connects to the access point, you see an
Antenna
and RSSI level icon on the display screen, it means all
procedures for initial setup are completed.
Your screen still remains
icon, the phone searchs for and sends
a registration message to system. If the phone receives Register
Response,
icon disappears from the display screen.
Setup and registration is completed, your phone automatically goes
to standby mode, you can make or receive any type of call. If not, see
"Registration" on page 25.
Turning Your Phone O
Ź Press and hold for three seconds until you see the powering
down animation on the display screen.
Cover
Charger jack
Electrical outlet
Page 25
17Chapter 2 Getting Started
Navigating Through Menus and Options
Your phone has a simple on screen menu to navigate. Each menu
has a list of options. (See "Phone’s Menu" on page 28.)
The navigation key on your phone lets you scroll through menus
easily. Some of the items you selected has a vertical scroll bar at
the right-hand side of the screen keeps track of your position in the
menu at all times.
Currently your phone’s menu view style is "List view", to change your
phone's menu view see "Menu Style" on page 53.
Selecting Menu Items
When the phone is switched on and in standby mode:
1. Press
to access the main menu.
2. Use the
to highlight the menu you want and press .
3. When the menu item you want is displayed, press:
to select the highlighted option.
to go to the previous menu.
to scroll through the list of options.
to return to standby mode.
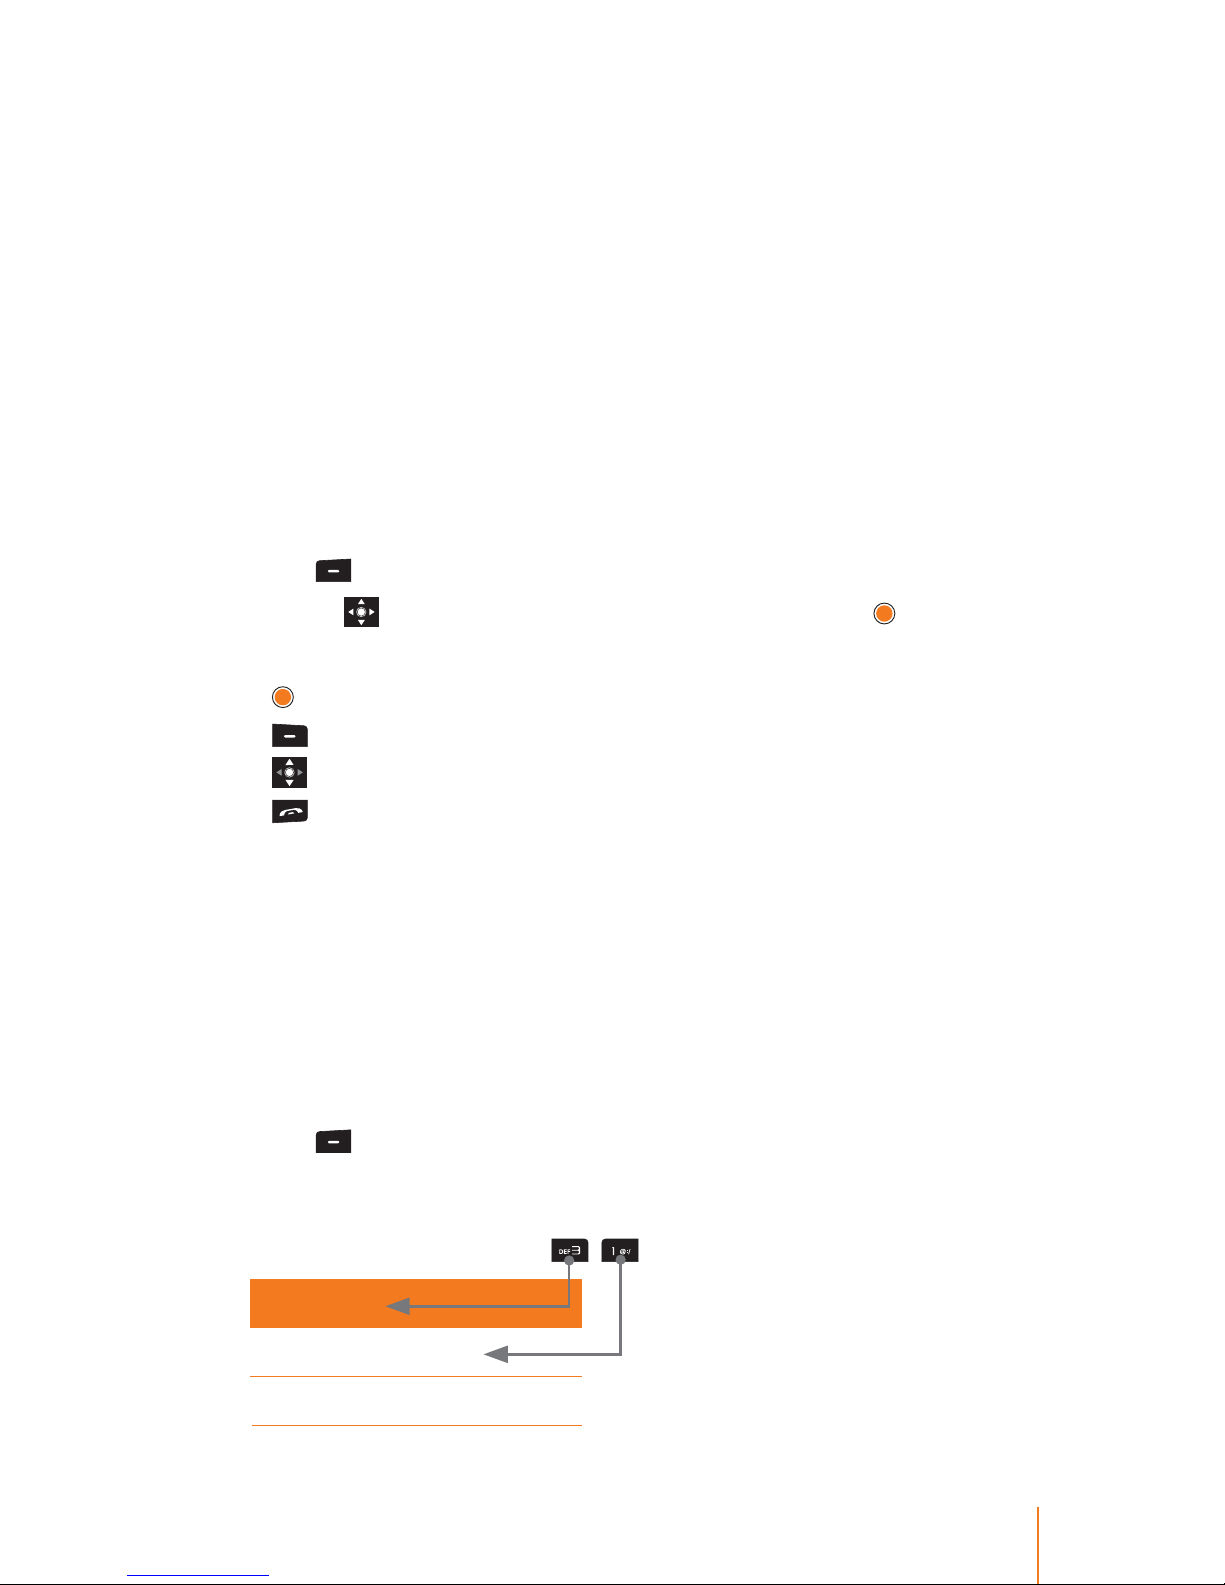
Pressing the Corresponding Number
You can quickly select a desired menu by pressing corresponding
number instead of navigating through menus with navigationkey.
When the phone is switched on and in standby mode:
1. Check the desired menu, referring to the "Phone’s Menu" on page 28.
Phone’s Menu table shows the avilable menu structure and indicates
the number assigned to each menu option.
2. Press
to access the main menu.
3. Press the number assigned to menu. For example, if you want to
select "Screen Theme" press the corresponding number on the
phone’s keypad as below "
, " to act the meun.
3 Display
3.1 Screen Theme
3.2 Greeting Note
Page 26

18 Chapter 2 Getting Started
Entering Text
You can enter alphanumeric characters using the keypad of the
phone.
Selecting a Text Input Mode
Your phone provides convenient ways to enter letters, puncuations,
numbers, and symbols whenever you are prompted to enter text (for
example, when adding a Phonebook or when composing text and
memo).
1. From a screen where you can enter enter text, press
to change
the text input mode to: abc, ABC, or 123.
Shows the text input mode indicator in the bottom right line on
the display screen.
2. Select one of the following options:
abc and ABC to cycle through the alpha characters associated with
the letters on the keypad.
- abc to enter lower case letters,
- ABC to enter upper case only.
123 to enter numbers by pressing the numbers on the keypad.
3. When you entering the text, press
and choose one of the follow-
ing options:
Common Terms to enter preprogrammed messages (see page 20).
Search Phonebook to nd saved entries (see page 40).
Symbol to enter symbols (see page 20).
Smiley to enter "emoticons" (see page 20).
Cancel to cancel writing.
Using ABC Mode
Using keys 2 through 9, press the key labeled with the desired letter.
Once for the rst letter, twice for the second letter, and so on.
1. Select the abc mode.
2. Press the corresponding keys repeatedly until the desired letter
appears. For example, to enter the word "good," press
once,
three times,
three times again, and once.
If the next letter you want is located on the same key as the pres-
ent one, wait until the cursor appear and enter the letter.
Page 27
19Chapter 2 Getting Started
The most common punctuation marks such as the "Period", "Com-
ma", "Question", and "Exclamation" are available under the
.
If you make a mistake, press
to erase a single character. Press
and hold
to erase an entire word.
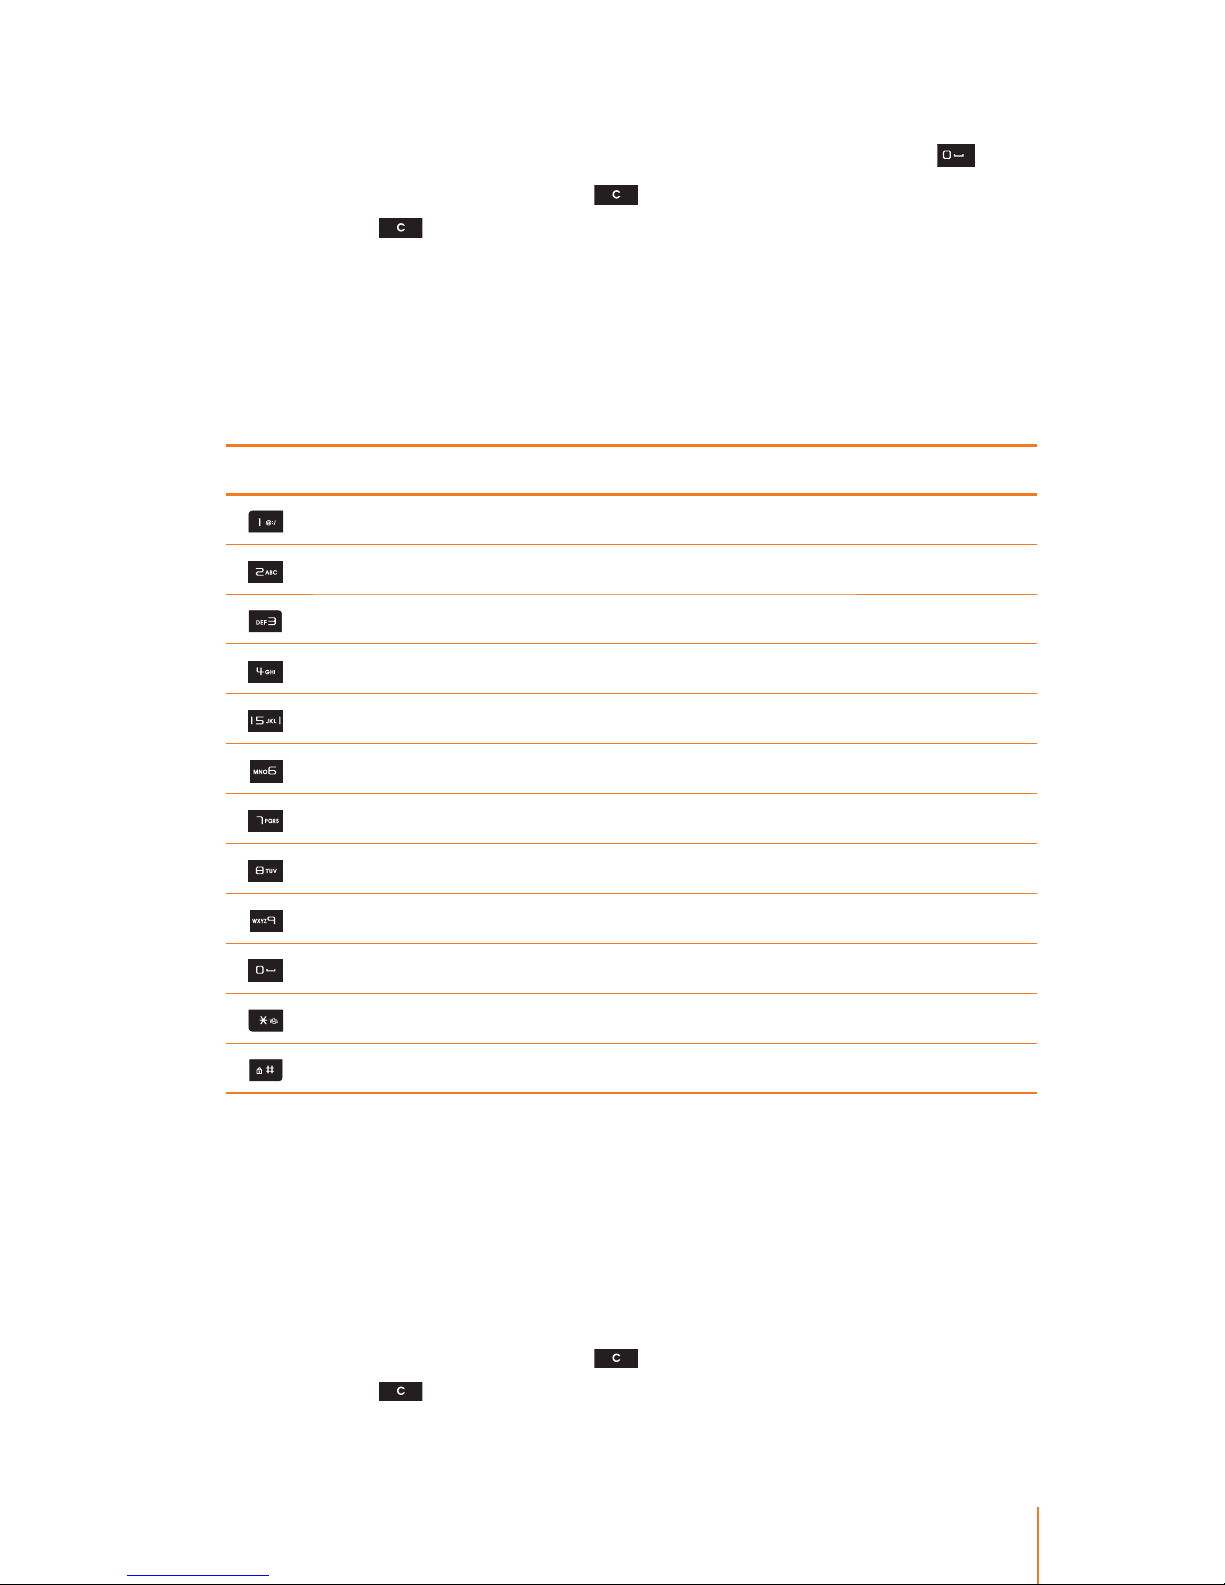
The following table shows you where each letter can be found on
the phone’s keypad. After a character is entered, the cursor automatically advances to the next space after two seconds or when you
enter a character on a dierent key.
Characters scroll in the following order:
Key Sequence in upper case Sequence in lower case
@ : / @ : /
A B C 2 a b c 2
D E F 3 d e f 3
G H I 4 g h i 4
J K L 5 j k l 5
M N O 6 m n o 6
P Q R S 7 p q r s 7
T U V 8 t u v 8
W X Y Z 9 w x y z 9
. , ? ! . , ? !
**
##
Using 123 Mode
The 123 Mode enables you to enter numbers in a text messages (a
telephone number, for example).
1. Select the 123 mode.
2. Press the appropriate keys to the required digits.
If you make a mistake, press
to erase a single character. Press
and hold
to erase an entire word.
Page 28

20 Chapter 2 Getting Started
Entering Common Terms, Symbols and Smileys
To enter common terms:
Common terms make composing text messages easier by allowing
you to enter quick messages, such as "Please, Call me back!", "I’m
late. I’ll be there at.", "Where are you now?" or a customized message
of your own. (For more information on preset messages, please see
"Templates"on page 63.)
1. Select the Common Terms mode.
2. Select a preset message and press
.
To enter symbols:
Symbols enable you to enter punctuation and other symbols. When
you entering the text, insert a space between the text and also force
a line break at a specic location in the text message.
1. Select the Symbols mode.
2. To insert a space, move the cursor where you want to insert a space
and press
.
3. To force a line break, move the cursor where you want to break a line
and press
.
4. To enter a symbol, press the appropriate key indicated on the display
and press
.
To enter smileys (emoticons):
An emoticon is a symbol used in text messages to show how someone is feeling.
1. Select the Smiley mode.
2. To enter an emoticon, press the appropriate key indicated on the
display and press
.
Page 29
21Chapter 2 Getting Started
Headset with Mic
The headset included with phone features a microphone and an
integrated button that allows you to answer and end calls easily.
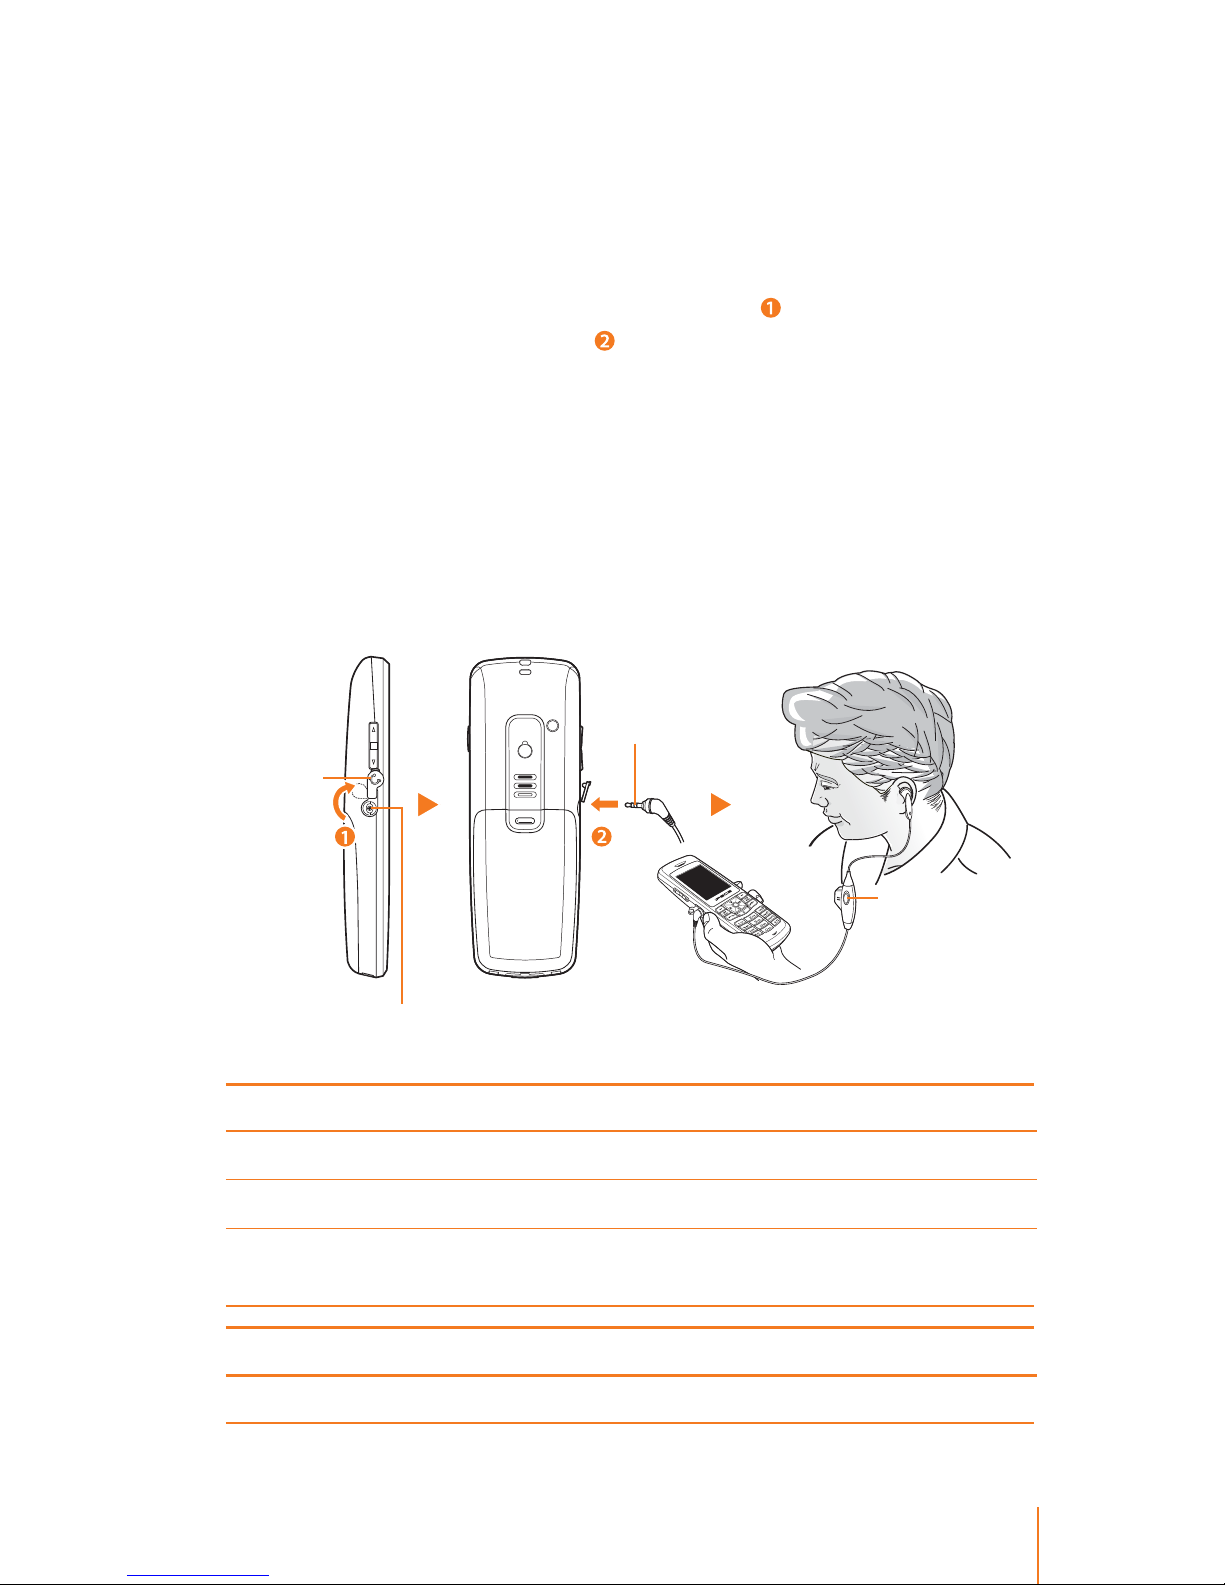
Connecting the Headsest
Ź Open the headset jack cover and ip it over ( ) and plug the head-
set into phone’s headset jack (
).
CAUTION: Using incompatible accessory may damage the phone.
WARNING: Do not insert any external substance except headset in
the headset jack. Inserting anything except for headset provided by
general maker may cause severe damage the phone.
Plug in the headset to make or answer a phone call. Callers hear
you through the headset microphone.
Even though the headset is plugged, incoming call ring tone is
heard through the speaker, not through the headset.
Press the mic button to control answer, hold, switch and end calls.
Standby mode:
Answering an incoming call Press once.
Go to the Call List Press once.
Redial call the most recent
number in the Call List
Press and hold for about two seconds.
During a call:
End the current call Press and hold for about two seconds.
Mic button
Headset jack
Headset plug
Cover
Page 30
22 Chapter 2 Getting Started
Phone Carrying
Using the Wrist Strap
Carry your phone with the wrist strap that included in your package.
This polyester carrying strap attaches easily to your phone.
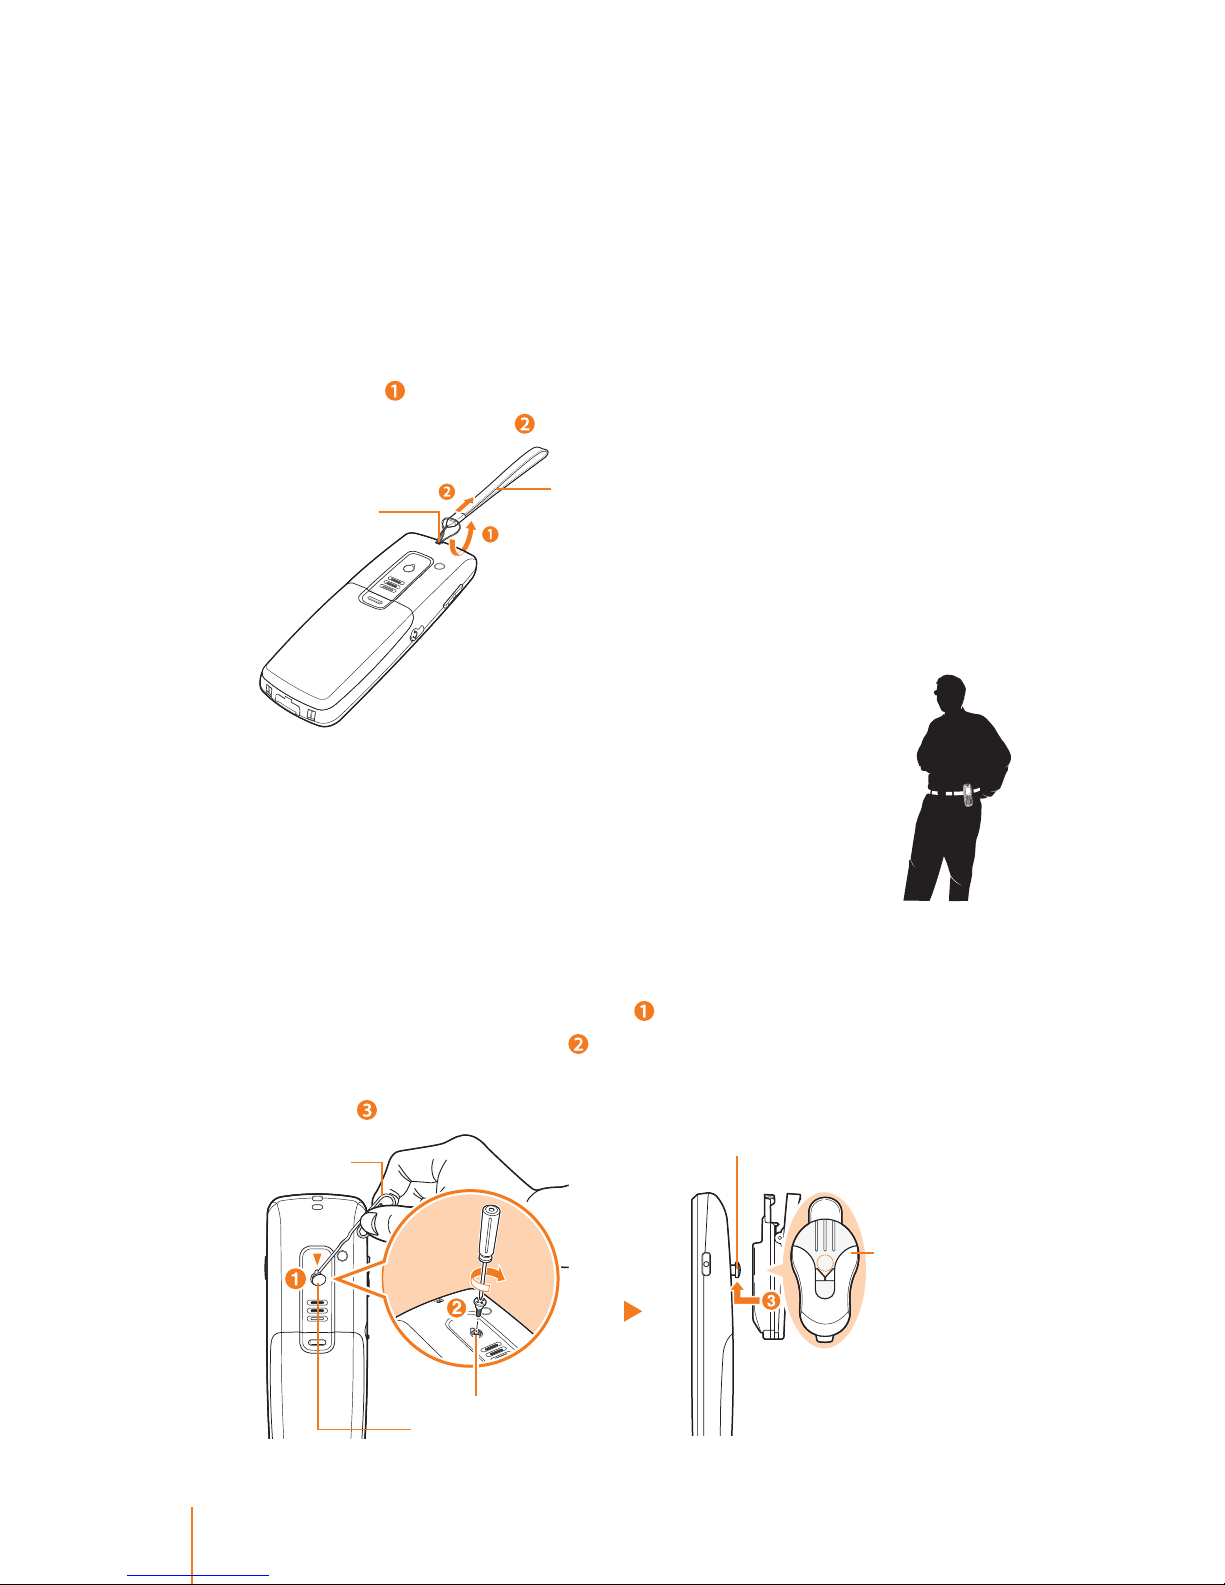
To connect the wrist strap:
Ź Thread the small loop of the wrist strap through the strap hole on
the phone (
) and pull the strap through the small loop until the
strap is rmly secured (
).
Using the Belt Clip (User Opinions)
The phone belt clip allows you to clip your phone to your
belt or porket when you work around the oce.
Note: This belt clip is not included in your package.
To attach the belt clip:
Ź To attache the belt clip remove the protective cover from the back
of the phone as indicated below (
) then tighten the screw that
provided with the belt clip (
). Place the belt clip, align the screw on
the back of the phone and push it up hard until the belt clip is rmly
secured (
).
Wrist strap
Strap eyelet
Belt clip (option)
Screw
Screw hole
Protective cover
Paper clip
Page 31

23Chapter 2 Getting Started
To remove the belt clip:
Ź To release the belt clip use your thumb push down on the unlock
button located on the upper side of the belt clip as shown in the
illustration below (
) and extract it from the phone ( ).
Access Point
Depending on the internal implementation of IEEE802.11b/g protocol inside of the APs, roaming across two contiguous regions may
be aected. Cisco is currently showing the most optimized seamless
roaming.
The CISCO APs are strongly recommended to customers.
The following is a list of APs that have been made an imperative
experimentation with the WIT-400HE and the result.
AP Cisco-AP1231G Cisco-AP1121G
Rank Best Good
Max Retry Counter O O
Simultaneous Call 12 10
Reject after Full Association X X
Roaming O O
Multiple SSID O O
Power Control O O
WPA O O
Belt clip
Unlock button
Page 32

24 Chapter 2 Getting Started
Max retry counter : It’s the maximum retry counter of data packet
from AP to client. If the retry counter of a packet exceeds the limit,
the packet is discarded. If the AP doesn’t support max retry counter,
it can make network busy by excessive retransmit when a user goes
to out-of-range in conversation.
When the receiving packet rate is very low during 10 seconds,
WIT-400HE disconnects the call to prevent excessive retransmit of
packets.
The simultaneous calls are estimated in idle network conguration, so it can be decreased by the network condition. When the AP
is commonly used for data and voice, the bandwidth for voice call
will be decreased. If you use overlapping channels, radio frequency
interference can occur, which leads to connectivity issues and in
poor throughput.
Reject after Full Association: This feature support to restrict the
number of association simultaneously for load balancing.
Roaming: It means that the call in conversation is not disconnected
when it roams to other AP. To support seamless roaming, the signal
range of each AP should be overlapped.
If you need to use roaming feature, we strongly recommend Cisco
AP. The other APs above support roaming but they are unstable. We
found that sometime the AP doesn’t send packets after roaming in
our laboratory investigation.
Recommended AP specication for WIT-400HE
To recommend proper Access Point for WIT-400HE, Ericsson-LG
specied as the following list.
No Item Description
1 802.11 b/g 802.11 b/g should be supported.
2 Simultaneous call Minimum 4 simultaneous calls should be
supported.
3 Reject access when full
trac
It can be adjusted in the admin program.
4 Max retry counter It can be set in the admin program or
should not be transmitted.
Page 33

25Chapter 2 Getting Started
5 Continuous call Long term call(longer 12 hours) should
be supported.
6 Roaming within same
kind of AP
Seamless handover/roaming should be
supported. AP should support IAPP for
roaming between APs.
7 Trac distance Longer than 200 meters.
8 Antenna diversity More than 2 antennas.
9 AP manager AP manager can some conguration like
channel, SSID, WEP key, and so on.
10 European CE Type Ap-
proval
CE should be approved for European
market.
11 USA UL Type Approval UL should be approved for USA market.
12 USA FCC Type Approval FCC should be approved for USA market.
13 Canada CSA Type Ap-
proval
CSA should be approved for Canada
market.
14 Korea MIC Type Approval MIC should be approved for Korea
market.
15 WiFi certication WiFi should be certied for mutual
compatibility.
16 RF power control Fixed power and auto power should be
supported.
17 DHCP, NAT DHCP and NAT should be supported.
18 QoS Voice packet should be handled with
high priority. IEEE802.11e should be
supported.
Registration
This phone is one of the iPECS phones recognized by the iPECS
system. Therefore, your phone must be registered with the iPECS
system for successful call processing.
The registration is accomplished in two phases; the rst phase is
Wireless LAN Connection, and the second is System Setting.
Page 34

26 Chapter 2 Getting Started
Wireless LAN Connection
SSID*1 is used as an identier which means, “you are part of the
802.11b/g compliant wireless network”. The phone should have the
same SSID as the one congured within an AP. (See "Prole Settings"
on page 89.)
*
1 An SSID (Service Set Identier) is the name of a wireless local area network.
Network
The phone can be a DHCP client or may be STATIC congured. (See
“Prole Settings_steps 8. To set network to the default prole:” on
page 89.)
System Setting
Enter the code to set the System Setting and press . The preset
code is “0000” which could be changed by the user.
Direct Send / Remote Mode
These are congured as the phone’s network status. (See “System
Settings” on page 95.
System IP
The phone must be programmed with the IP address of the iPECS
system to initially request the registration.
Station Set
Depend on the system this station number could be set by manual.
Restarting the Phone
If something is not working right, restarting or resetting your phone to
solve the problem. (See "Turning Your Phone On and O" on page 16.)
Range
In a typical oce environment where there are some obstacles,
the WLAN coverage area is approximately 15 ~ 30 meters. A better
coverage distance could be achieved in more open areas. The coverage area is, however, truly dependent on the oce environment
characteristics (e.g. construction material of walls, metallic objects,
doors, windows, stair-wells, etc). Other radio equipment could also
aect the coverage area. The coverage area will be unique for each
oce environment.
Page 35

27Chapter 2 Getting Started
Signal Strength
Call quality depends on the signal strength in your area. The signal
strength is indicated on the screen as the number of bars next to the
Antenna icon. The more bars shown, the better the signal strength. If
the phone is out of range of your access point, “Out of range” will be
displayed on the screen. If you go out of access point range, the connection will be lost. When in range again, you can reconnect.
Access Point Probing
The phone has an ability to detect all reachable access points. Your
phone’s display shows a list of the SSIDs
congured in the access
points from which to choose (50 maximum).
To detect an access point:
Ź In standby mode, press navigation key up ( ) to search wireless LAN
around your phone.
After a few seconds, the list of SSIDs congured in the access
points are displayed. You can choose one of them under this
preference.
Caller ID
Caller ID lets you know who is calling by displaying the number of
the person calling when your phone rings.
Cleaning Phone
Use the soft cloth to gently wipe the display screen and the case.
To clean the phone:
Ź Unplug all cables, such as headset, power adapter and turn o the
phone (press and hold
).
To clean the metallic part of phone, such as charging contacts of
charger and battery wipe them with a pencil eraser or cotton swab.
Avoid getting moisture in openings.
Clean the phone with a damp (not wet) cloth, or an antistatic wipe.
Never use a dry cloth as this may cause a static shock.
Do not use window cleaner household cleaners, household polish,
aerosol sprays, solvents, alcohol, ammonia, benzene, thinner, or
abrasives to clean the phone as this will damage the product.
Page 36

28 Chapter 2 Getting Started
Phone’s Menu
To view the Main Menu options, their respective submenus, refer to
the follow table, it shows the avilable menu structure and indicates
the number assigned to each menu option.
For more information about using phone's menu see "Navigating
Through Menus and Options" on page 17.
1 Phone Book
1.1 Add New
1.2 Search Phonebook
1.3 Caller Groups
1.4 Speed Dials
1.5 Delete All
2 Sound
2.1 Alert By
2.2 Ring Tone
2.3 Ring Tone Volume
2.4 Power-on Tone
2.5 Power-o Tone
2.6 Key Tone
2.7 Key Tone Volume
2.8 Eect Sound
3 Display
3.1 Screen Theme
3.2 Greeting Note
3.3 Idle Clock
3.4 Dialing Font
3.5 Menu Style
Page 37

29Chapter 2 Getting Started
3.6 Backlight
3.7 Font Type
3.8 Language
4 Call History
4.1 Call History
4.2 Call Duration
5 Messages
5.1 Write Message
5.2 Inbox
5.3 Outbox
5.4 Draft
5.5 Templates
6 Tools
6.1 Schedule
6.2 Memo
6.3 Alarm/Morning Call
6.4 Calculator
6.5 World Time
6.6 Timer
7 System
7.1 Forward
7.2 Conference
7.3 DND
7.4 MSG/CallBk
7.5 Flash
7.6 System Speed
Page 38

30 Chapter 2 Getting Started
7.7 System Redial
7.8 ICM
7.9 Mute
7.10 Transfer
7.11 Hold/Save
7.12 Program
8 Phone Setting
8.1 Prole Setting
8.2 System Setting
8.3 Codec Preference
8.4 Wireless LAN Setting
8.5 Security
8.6 Wireless LAN Status
8.7 Network Information
8.8 Phone Version
8.9 Reset Settings
Page 39
31
Chapter
3
Phone Calls
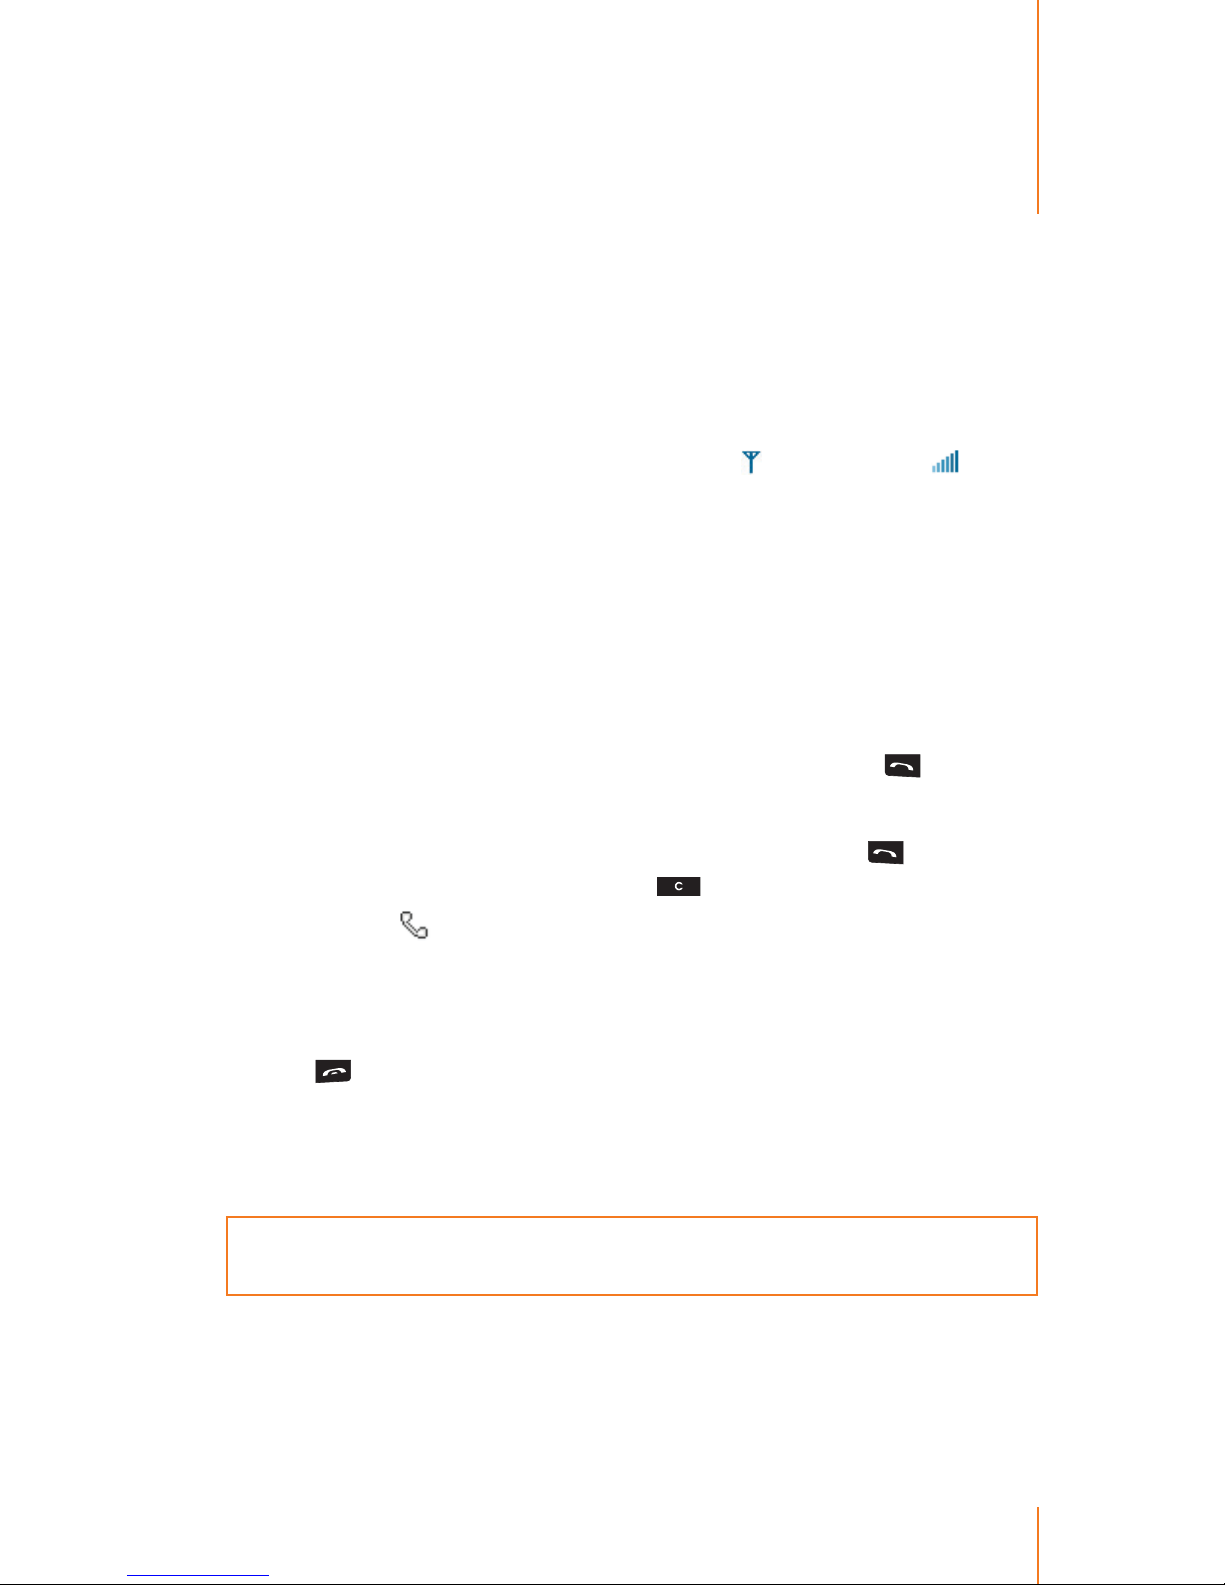
While the phone is operating, the Antenna and RSSI level icon
at the top of the screen shows whether your are in range of the
WLAN area and can make and receive calls. The more RSSI levels
mean the stronger signal and the call quality is good.
Making Calls
Dialing with a Phone Number
You can make a call to an internal (another user in your system) or to
an external party by entering the number and pressing
.
1. In standby mode,
2. Enter a phone number to connect a call and press the
. If you
make a mistake while dialing, press
to erase the numbers.
The phone
icon is shown on the display screen while trying to
connect.
During the conversation, press the side volume key on the left side
of the phone to control the volume level (from 0 to 10).
3. Press
to end an active call.
You can connect a provided headset to the phone. The headset has
a microphone and mic button to answer a call, or end a phone call.
(Refer to "Headset with Mic" on page 21 for more information.)
WARNING: When you use the headset, your ability to hear outside sounds
may be aected. Do not use the headset where it can endanger your safety.
Page 40
32 Chapter 3 Phone Calls
Dialing With a Finding Number
You can make a call after searching Phone Book and Call History for
phone numbers that contain a specic string of numbers.
1. In standby mode,
2. Enter one or more digits. The more numbers you enter, the more
specic the search becomes.
3. Scroll through a list of numbers to pick one and press
.
Dialing From Phone Book
You can make a call from the Phone Book. If you have saved several
numbers for an entry, select the desired number from the entry. (For
more information see "Search Phonebook" on page 40.)
1. Press
> Phone Book > Search Phonebook, or from standby
mode, press Search (right softkey) to access the Search Phonebook.
2. Select the entry you want to call and press
to dial the entry’s
default phone number.
or
To dial another number from the entry, select the name and press
,
and then select a number with which you wish to call and press
.
Dialing From Call History
The Call History contains the numbers of up to 100 of the most
recent calls you have made, received and missed.
1. In standby mode,
2. Press
to directly access the call list.
For phone calls, an additional icon appears giving information
about the call.
-
A call you made.
-
A call you received.
-
A missed call.
3. Scroll through the call list and select one.
4. Press
to make a call its number.
Page 41

33Chapter 3 Phone Calls
Dialing With Speed Dial
Each phone number stored in Phone Book is assigned a speed dial
number, which you can use to call that number.
1. In standby mode,
2. Press and hold the speed dial number. The display conrms that the
number has been dialed when it shows "Name and Number".
If you enter a number that is not associated to the speed dial, "No
Speed Dial Num" message will display.
To use one digits dialing for speed dial locations 1 – 9:
Ź Press and hold the appropriate key for approximately two sec-
onds.
To use two digits dialing for speed dial locations 10 – 99:
Ź Enter the rst digit, and then press and hold the second digit for
approximately two seconds.
Redialing the Last Number
This feature lets you redial the last number dialed from your phone.
1. In standby mode,
2. Press and hold
. The last dialed number will automatically redial.
If the headset is plugged in, press and hold Mic button on the
headset for about two seconds.
Dialing Options
When you enter numbers in standby mode, you will see a variety of
dialing options displayed on the screen. To select an option, press
the corresponding softkey.
Menu to display the options.
Save allows you to enter a number and save the phone number in
your Phone Book.
Search allows you to enter a digit or string of digits to display
Phone Book entries that contain the entered numbers.
Press
to dial the displayed phone number or the selected
phone number.
Page 42
34 Chapter 3 Phone Calls
Answering Calls
When the phone rings or vibrates, press . If the headset provided
is plugged to the phone, you can also answer an incoming call by
pressing the mic button on the headset when the ring sounds.
1. In standby mode,
2. Press
, to answer an incoming call. Depending on your settings,
you may also answer incoming calls by pressing any number key.
Your phone noties you of incoming calls by any combination
of ringing or vibrating, the backlight illuminating, or the screen
displaying an incoming call message.
If the incoming call is from a number stored in your Phone Book,
the entry’s name is displayed. The caller’s phone number may also
be displayed, if available.
Caller Groups can be distinguished with a dierent ring type.
Note: Screen can display numbers with a maximum of 16 digits, so
if the phone number (where the call was received) consist of more
than 9 digits the call time is not displayed.
Ending a Call
When the conversation is over, press to end an active call.
Or
1. Press Menu (left softkey) to display the options.
2. Select End and press
.
The phone number will be saved to the call list. Press
to access
the call list and then select an entry. Press
to save a number
that is not in your Phone Book.
In Call Options
Press during a call to display a list of available. To select an
option, highlight it and press
. The following options may be
available:
End to end a call.
Main menu to display the main menu of some of the phone, such
as Phone Book or Call List.
Page 43

35Chapter 3 Phone Calls
Using Quickly Change Mode
Activating Manner Mode (Quickly Set to Vibrate)
You can use the manner mode in public places.
To activate the manner mode quickly:
Ź From standby mode, activate the manner mode quickly by pressing
for 3 seconds. When the manner mode is set, the key tones are
silent, and the phone is set to vibrate.
Manner mode is on, the
icon appears on the standby mode.
The phone remains in manner mode even if you turn it o and back on
.
To release the manner mode:
Ź Press for 3 seconds to switch into normal mode.
Activating Lock Mode
You can use the lock mode to prevent others from using your phone.
When your phone is locked, you can only receive incoming calls or
make calls to emergency number.
To activate the lock mode quickly:
1. From standby mode, press within 3 seconds. "Lock mode on?" is
displayed.
2. Select Ye s to conrm and press
, or select No to return to the previ-
ous menu.
When phone lock mode is enabled, the keypad will automatically
lock on and the phone will prompt you to enter a security code.
Icon
and LOCK STATUS are displayed on the standby mode.
To release the temporary lock mode:
1. From standby, press to choose Unlock.
Security Code window will pop up.
2. Enter your security code as it is a required eld and then press
.
However, the phone will automatically lock up again after 10
seconds unless you change lock phone setting to "O".
If you release the lock mode permanetly see “To release the perma-
nent lock mode” on page 36.
Page 44

36 Chapter 3 Phone Calls
To release the permanent lock mode:
1. After releasing the temporary lock mode.
2. Press
> Settings > Security.
2. Enter your security code as it is a required eld and then press
.
The preset code is “0000”, you can change it to the security code of
your choice. (Refer to “Security” on page 97.)
3. Security sub-menus displayed, select Lock phone and then press
.
4. Select O to release permanently and press
.
Using Keypad Lock (Keyguard)
You can use the keypad lock to prevent accidental keypresses, select
menu. When the keyguard is on, calls may be possible to the ocial
emergency number programmed into your phone.
To activate keypad lock:
Ź From standby mode, press and hold it for about two seconds to
lock the keypad.
To answer a call when the keypad lack is on, press the
. When
you end or reject the call, the keypad automatically locks.
To release keypad lock:
Ź Press and hold it for about two seconds to unlock the keypad.
Page 45

37
Chapter
4
Phone Book
The Phone Book helps you stay in touch with the people by keeping
track of all their contact information. This chapter explains how to
use the Phone Book.
About Phone Book (Contacts)
This menu allows you to save and manage contact address information. The Phone Book option provides functions to add a new
address, or to search saved contact addresses information by name,
phone number and group.
A contact entry contains:
Name - A name is required when you are storing a number to
the entry. Typically, this is the name of the person whose contact
addresses information is stored in the entry.
Personal Bell - You can assign a ring tone to each entry. This is
the sound your phone makes when you receive phone calls or call
notications from any of the numbers stored in the entry of your
Phone Book.
Number(1)~(3) - Each number must be assigned one of the fol-
lowing contact types to be used default number. After selecting a
default to which you want to assign a number, the default number
is used in direct dialing.
-
Mobile - Mobile phone number for the entry.
-
Home - Home phone number for the entry.
-
Oce - Oce pnumber for the entry.
-
General - General phone umber for the entry.
-
Pager - Pager number for the entry.
-
Fax - Fax number for the entry.
Page 46

38 Chapter 4 Phone Book
You can enter or select an additional information for the entry,
other information is optional:
-
E-mail - E-mail address you assigned to the entry.
-
Group - Group you assigned to the entry.
-
Memo - Note, or other information that related to the entry.
Add New
This menu allows you to add a new contact address. You can enter
contact address information that includes name, phone number,
E-mail address, group information items, etc.
A name, number, and a contacts type are required for all contact
entries. Other information is optional. You may enter the information
in any order by scrolling through the entry details.
Creating a Contacts Entry
1. Press > Phone Book > Add New.
2. To assign the name to the new entry:
Select Name eld and enter the name.
- The name of an contact entry can contain up to 32 characters.
- Your phone can store up to 500 contacts, each entry can consist
of one name, three dierent phone numbers.
3. To store a the number to the name:
Select Number eld and enter the phone number being stored up
to 32 digits.
4. To assign a contact type to the number:
Press Menu to select Select Type and press
.
Press navigation key left or rignt to select a contact type Mobile,
Home, Oce, General, Pager, or Fax.
5. To assign more options to the number, proceed to steps 6 ~15.
Otherwise, skip to step 15. Scroll down to additional elds and enter
or edit information as desired.
6. To assign a speed dial to the number:
Press Menu to select Speed dial and press
.
Select an available speed dial location and press
.
Page 47

39Chapter 4 Phone Book
7. To store an e-mail address to the number:
Select E-mail eld and enter the e-mail address.
Press Menu (left softkey) to select an options .com, Symbol, Emoti-
con, or Cancel and then press
.
8. To assign a group to the number:
Select Group eld and select a group.
Press List (right softkey) to select an options No group, Family,
Friends, Business, or School and then press
.
9. To assign a personal bell to the number:
Select Personal Bell eld and select a ring tone to assign to the
entry so you can identify the caller by the ring tone.
Press List (right softkey). Use the navigation key to scroll through
available ring tone and then press
.
- When you highlight a ring type, a sample ring tone will sound.
10.To store a memo to the number, select Memo eld and compose a
note, or other information, and then press
.
11. When you are nished, press
to save the new contact entry.
If an entry has more than one number stored, you can assign
default numbers to an contact entry.
Select a number you want to set as a default and press
.
Storing Numbers Faster
To store numbers to Phone Book from standby mode:
1. Enter a phone number using the keypad.
2. Press
to store number.
3. Select one of the following options and press
.
Save new name to store the number to a new entry.
Add to name to add an entry to store it to an existing entry.
4. With the contact type eld highlighted, scroll left or right to select a
contacts type.
5. To add more information to the entry, follow the applicable instructions in " Add New" on page 38.
6. Press
to save the contact entry.
Page 48

40 Chapter 4 Phone Book
Search Phonebook
This menu allows you to search your contact entries. Generally, the
search operation is performed by entering a name in the eld.
1. Press
> Phone Book > Search Phonebook, or from standby
mode, press Search (right softkey) to access the Search Phonebook.
2. Either highlight an entry or enter the rst letter of a name in the
Name eld. You can nd the name you entered or the nearest match.
or
Press Menu (left softkey) to display the options, select one of the
following options and press
.
Search by Name to nd an entry by the name.
Search by Contact to nd an entry by the number.
Search by Group to nd an entry by the group.
3. If an entry has more than one number stored, contact type icons are
displayed. Scroll left or right to view the icon for each number stored
in the entry.
4. Press
to display the entry, and then scroll up or down to view all
information stored for the entry.
Adding a New Number to an Entry
1. Press Search (right softkey) to display a Phonebook entry.
2. Select an entry you wish to add a number to an existing entry and
press
.
3. Press Menu (left softkey) to display the options.
4. Select Edit and press
.
5. Scroll down to the open number eld, enter the new number and
press Type (right softkey) to select a contact type, and then press
.
6. Press the navigation key left or right to select a contact type and
press
.
7. Press
to save the new number.
or
To assign a speed dial number, select Menu > Speed dial. Complete
the process, press
to change default numbers to an entry.
8. Select a number you want to set as a default and press
.
Page 49

41Chapter 4 Phone Book
Editing an Entry
1. Press > Phone Book > Search Phonebook.
2. Select an entry you wish to edit.
3. Press Menu (left softkey) to display the options.
4. Select Edit and press
.
5. Follow the applicable instructions in "Add New" on page 38 to edit
the entry.
Deleting an Entry
1. Press > Phone Book > Search Phonebook.
2. Select an entry you wish to delete.
3. Press Menu (left softkey) to display the options.
4. Select Delete and press
.
5. Select Ye s to conrm and press
.
Caller Groups
This menu allows you to manage group information. By default,
there are 4 groups: family, friends, business, and school.
Assigning a Ring Tone to the Group
You can assign a ring tone for a caller group so the group ring tone
sounds when a call from a specic contact address within that group
arrives and there is no ring tone assigned for the contact address.
1. Press
> Phone Book > Caller Groups.
2. Select the group for which you wish to assign a ring tone.
3. Press Menu (left softkey) to display the options.
4. Select Group ring tone and press
.
5. Scroll through the list of ring tones and select one. A sample ring
tone will sound as you highlight each option.
6. Press
to assign the ring tone.
The ring icon
appears on the right side of the assigned group.
If the personal and group ring tone are assigned to the number
at the same time, personal ring will sound when a call from that
contact address.
Page 50

42 Chapter 4 Phone Book
Changing a Ring Tone
1. Press > Phone Book > Caller Groups.
2. Scroll to view ring tones assigned to the group and select one.
3. Press Menu (left softkey) to display the options.
4. Select Modify melody and press
.
5. Scroll through the list of ring tones and select one.
6. Press
to apply the ring tone.
Removing a Ring Tone from the Group
1. Press > Phone Book > Caller Groups.
2. Select the group from which you wish to remove a ring tone.
3. Press Menu (left softkey) to display the options.
4. Select Unset melody and press
.
5. Select Ye s to conrm and press
.
Creating a Group
You can create up to 30 caller groups, and their names can be up to
16 characters long.
1. Press
> Phone Book > Caller Groups.
2. Press Menu (left softkey) to display the options.
3. Select Add and press
.
4. To assign a name to the group, enter the caller group name using the
keypad.
When you enter the group name, as soon as you see the text input
rate on the top of the left side of the screen.
5. Press
to add a group.
If you do not assign a name, the screen will briey show "Write
group name".
Page 51

43Chapter 4 Phone Book
Editing a Group
You can edit a group except for default groups.
1. Press
> Phone Book > Caller Groups.
2. From the caller groups, select one.
3. Press Menu (left softkey) to display the options.
Press Change (right softkey) to directly access the edit mode.
4. Select Edit and press
.
5. To edit a name to the group, change the name using the keypad.
6. Press
to save.
Deleting a Group
You can delete a group except for default groups.
1. Press
> Phone Book > Caller Groups.
2. Select a group you wish to delete.
3. Press Menu (left softkey) to display the options.
4. Select Delete and press
.
5. Select Ye s to conrm and press
.
The numbers that existing in the group move to the No group
when the group is deleted.
Adding Group Members
You can add group members that have a connect number to your
group by selecting them from contact entries.
1. Press
> Phone Book > Caller Groups.
2. From the caller groups, select one and press
.
3. Press Add (right softkey). If the group has more than one number
stored, press Menu (left softkey) to display the options.
4. Select desired entry and press Add (right softkey) again to save
the group.
To deselect a entry, select it and press
to unselect.
A check mark
appears next to each selected member.
Press Menu (left softkey) to display the options.
Page 52

44 Chapter 4 Phone Book
Excluding Group Members
You can exclude group members from the caller group.
1. Press
> Phone Book > Caller Groups.
2. From the caller groups, select one and press
.
3. Select desired entry and press Menu (left softkey) to display the op-
tions.
4. Select Exclude member and press
.
5. Select Ye s to conrm and press
.
Deleting Group Members
You can delete group members from the caller group, as well as the
number will be deleted from the Phone Book.
1. Press
> Phone Book > Caller Groups.
2. From the caller groups, select one and press
.
3. Select desired entry and press Menu (left softkey) to display the op-
tions.
4. Select Delete and press
.
The number may be deleted from the Phone book.
5. Select Ye s to conrm and press
.
Speed Dials
Speed dialing allows you to make an outgoing call at a specic number by pressing either one or two key(s). Both the number and the
associated key are to be registered in the "Speed Dials" option under
the "Phone Book" menu.
Assigning a Speed Dial Number
Up to 99 phone numbers can be assigned to speed keys.
To assign a speed dial to an existing phone number:
1. Press > Phone Book > Speed Dials.
2. Press the navigation key down to scroll to the # [empty] and than
select an available speed dial location.
3. Press Add (right softkey). A listing of your Phone Book entries will be
displayed.
Page 53
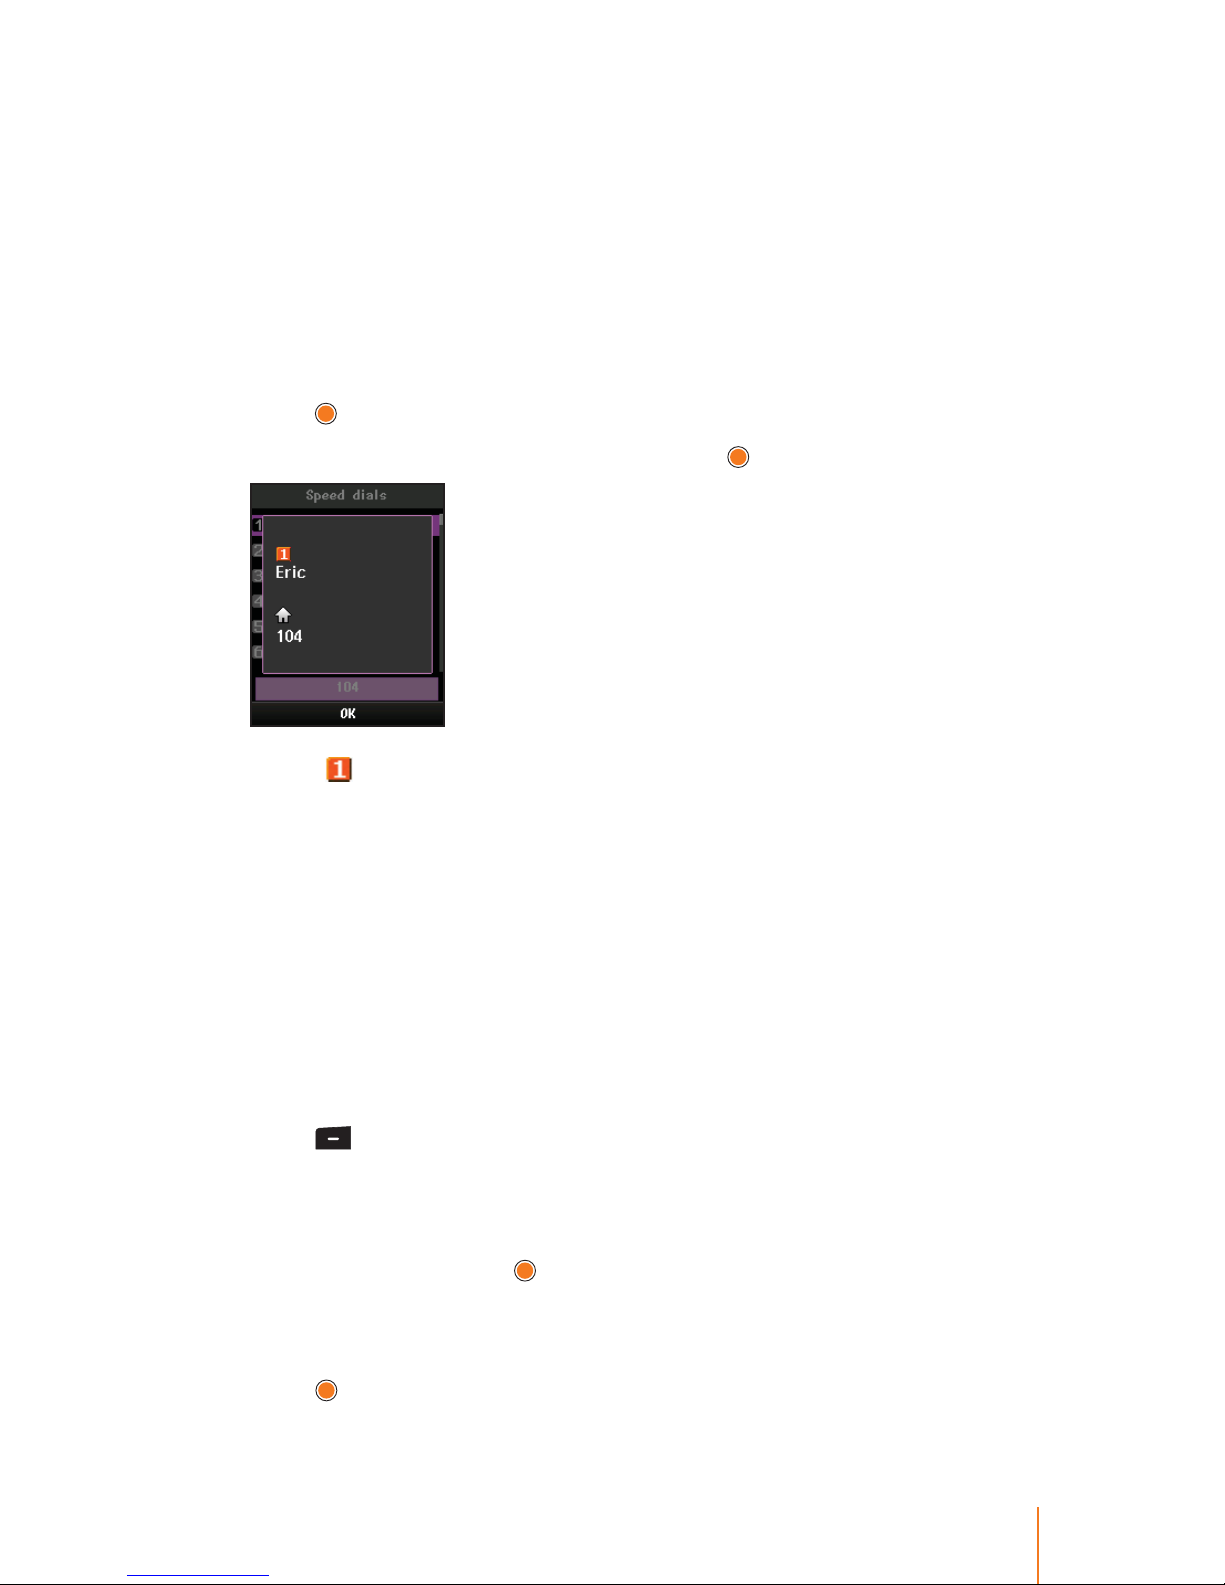
45Chapter 4 Phone Book
4. Select an entry for which you wish to assign a speed dial location.
If an entry has more than one number stored, press the navigation
key left or right to select a contact type.
Only numbers in your Phone Book can be assigned as speed dial
numbers.
If you attempt to assign an already associated phone number with
a new speed dial location, "Already assigned" message will be
displayed.
5. Press
to save the new speed dial number.
6. To view about the saved speed dial, press
.
Icon shows the assigned speed dial number.
To assign a speed dial to a new phone number:
You can also assign speed dial numbers when you add a new entry,
when you add a new phone number to an existing entry, or when
you edit an existing number. (See related each page for more
details.)
Moving a Speed Dial Number
You can move the already assigned phone number to a new speed
dial location.
1. Press
> Phone Book > Speed Dials.
2. Select a speed dial number you wish to move.
3. Press Option (left softkey) to display the options.
4. Select Move and press
.
5. Scroll up or down to nd an desired speed dial number and select
one.
6. Press
to apply the new speed dial number.
Page 54

46 Chapter 4 Phone Book
Changing a Speed Dial Number
You can change an already in use speed dial location to a new phone
number.
1. Press
> Phone Book > Speed Dials.
2. Select a speed dial number you wish to change.
3. Press Option (left softkey) to display the options.
4. Select Change and press
.
5. Select Ye s to conrm and press
.
6. Scroll up or down to nd an desired entry and select one.
7. Press
to apply the new speed dial number.
Removing a Speed Dial Number
You can remove assighed speed dial to a phone number either each
one or all of them at once.
1. Press
> Phone Book > Speed Dials.
2. Select a speed dial number you wish to remove.
3. Press Option (left softkey) to display the options.
4. Select Remove speed dial and press
.
If you select Remove all, all assigned speed dial number can be
deleted at once.
5. Select Ye s to conrm and press
.
Delete All
To delete all entries:
1. Press > Phone Book > Delete all.
2. Select Delete all and press
.
3. Select Ye s to delete all saved entries from Phone Book and press
.
Page 55

47
Chapter
5
Sound
This menu allows you to customize your phone to sound just the
way you want it to. Your phone provides a variety of ringer options
that allow you to set your ring, volume, or eect sound. This chapter
describes how to change your phone’s sound setting to best suit
your needs.
Alert By
You can set your phone to alert when you receive a call.
1. Press
> Sound > Alert by.
2. Scroll through the list of alert types and select one. A alert will sound
or vibrate as you highlight.
3. Press
to assign the current ringer.
Standby mode will display alert indicator depending on which
mode the alert is currently in. (Refer to "Status Icons" on page 10.)
The vibration option allows you to be notied of calls with a vibra-
tion instead of an audible alert.
Ring Tone
You can set the ring tone to identify for incoming call. The phone
supports 5 dierent ring tone category, each with several ring tones
under each category.
1. Press
> Sound > Ring Tone.
2. Select a category and press
.
3. Use the navigation key to scroll through the ring tone. A ring tone
will sound as you highlight each option.
4. Press
to assign a ring tone.
Page 56

48 Chapter 5 Sound
Ring Tone Volume
You can adjust the volume settings to suit your needs and your
environment.
1. Press
> Sound > Ring Tone Volume.
2. Using the navigation key, choose a volume level and press
.
The volume level is set at
, you will not hear any ring tone when
you receive a call regardless of the ring tone you have set.
Icon
will display in standby mode.
Power-On Tone
You can set the "switch -on" eect that sounds when the phone is
turned on.
1. Press
> Sound > Power-on Tone.
2. Select a category and press
.
3. Use the navigation key to scroll through the power-on tone. A
power- on tone will sound as you highlight each option.
No sound allows you to mute turning your phone on.
Set Default directly set a power-on tone to default.
4. Press
to assign a power-on tone.
Power-O Tone
You can set the "switch -o" eect that sounds when the phone is
turned o.
1. Press
> Sound > Power-o Tone.
2. Select a category and press
.
3. Use the navigation key to scroll through the powr-o tone. A powero tone will sound as you highlight each option.
No sound allows you to mute turning your phone o.
Set Default directly set a power-o tone to default.
4. Press
to assign a power-o tone.
Page 57

49Chapter 5 Sound
Key Tone
You can set the key tone that sounds when a key is pressed.
1. Press
> Sound > Key Tone.
2. Using the navigation key, select a key tone and press
.
No sound will not make key tone when you press keys.
Key Tone Volume
You can adjust the volume of the keypad tone.
1. Press
> Sound > Key Tone Volume.
2. Using the navigation key, choose a volume level and press
.
The volume level is set at
, you will not hear any keypad tone
when you press keys regardless of the key tone you have set.
Tip: You can adjust the key tone volume in standby mode by using
the side volume key on the left side of the phone.
Eect Sound
You can set the conrmation tone that sounds when a function is
set.
1. Press
> Sound > Eect Sound.
2. Select Ye s to conrm or No to cancel, and then press
.
If you choose "No", you will not hear any conrmation tone that
notify you the function is set.
Page 58

Page 59
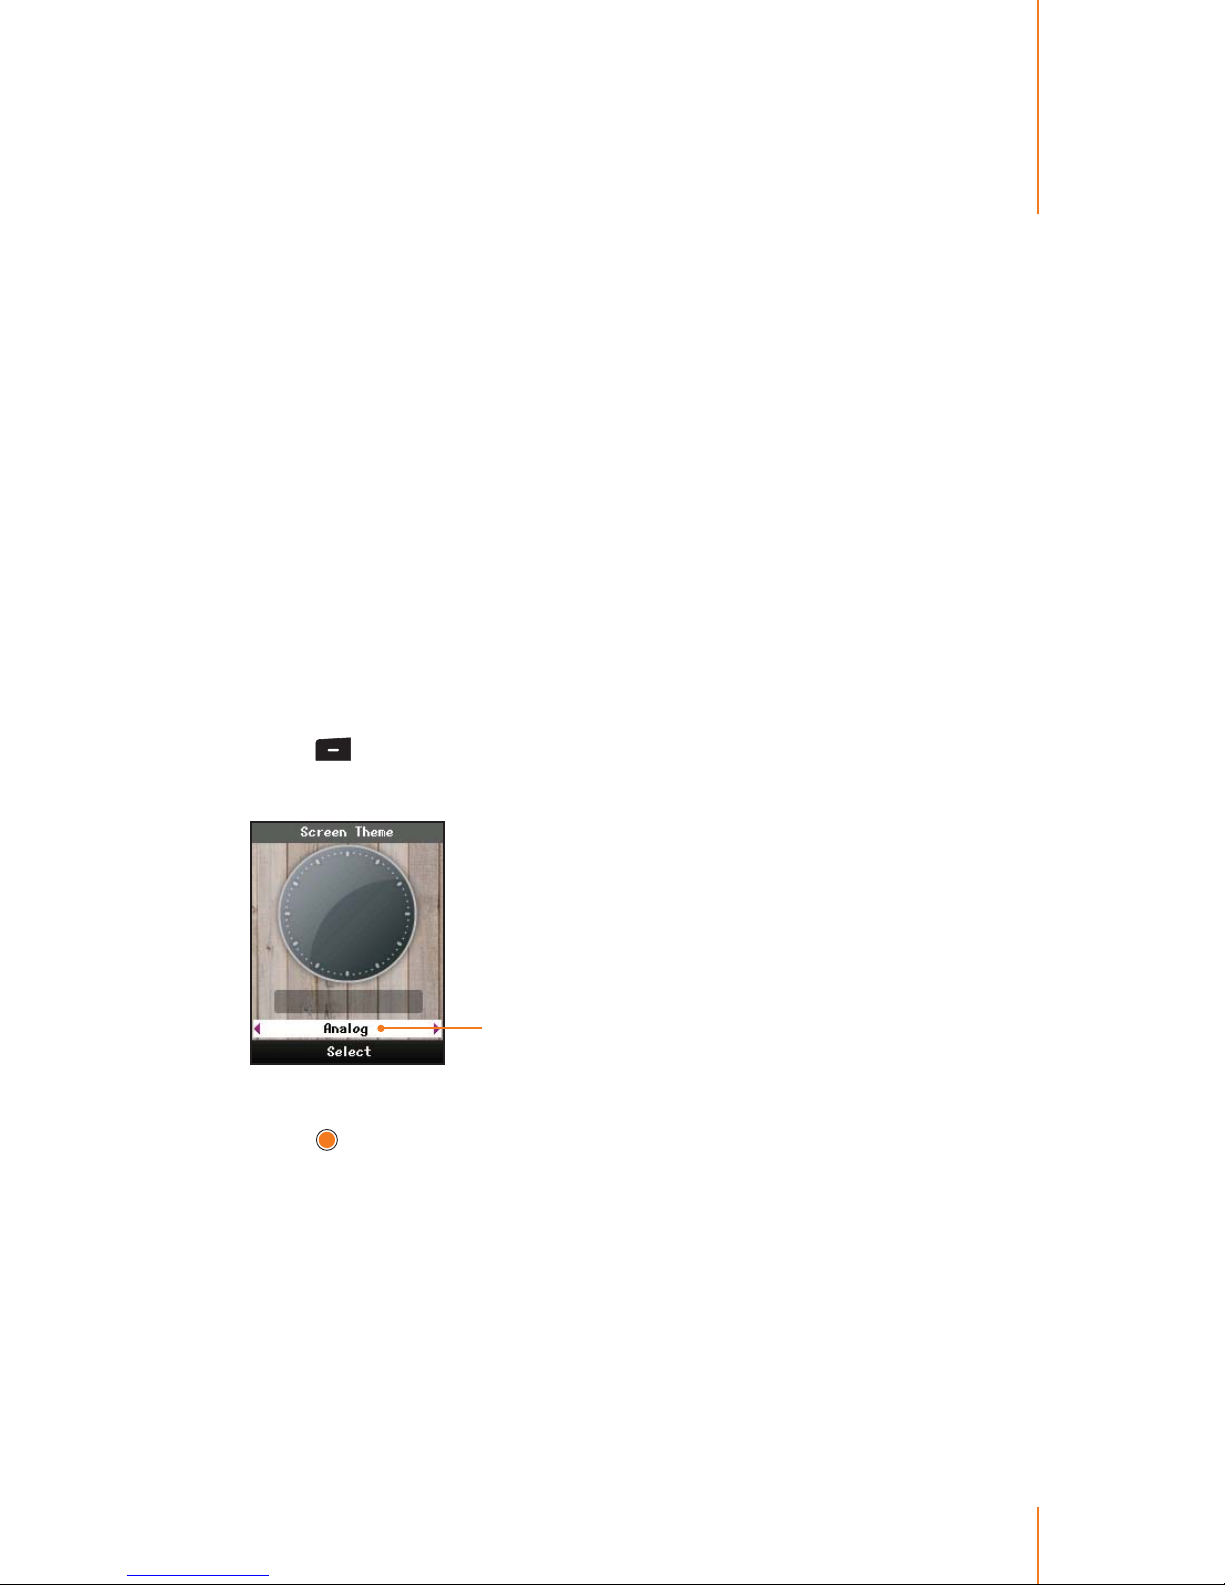
51
Chapter
6
Display
This menu allows you to customize your phone to look just the way
you want it to. This chapter describes how to change your phone’s
display setting to best suit your needs.
Screen Theme
You can choose what you see on the display screen when in standby
mode. The phone provides twenty screen themes, Including analog
clock mode.
1. Press
> Display > Screen Theme.
2. Use the navigation key to scroll through the image and select one.
File name eld
The name eld shows you le name.
3. Press
to assign an image.
If you choose an Analog, the current time will be displayed on the
screen in analog mode.
Page 60
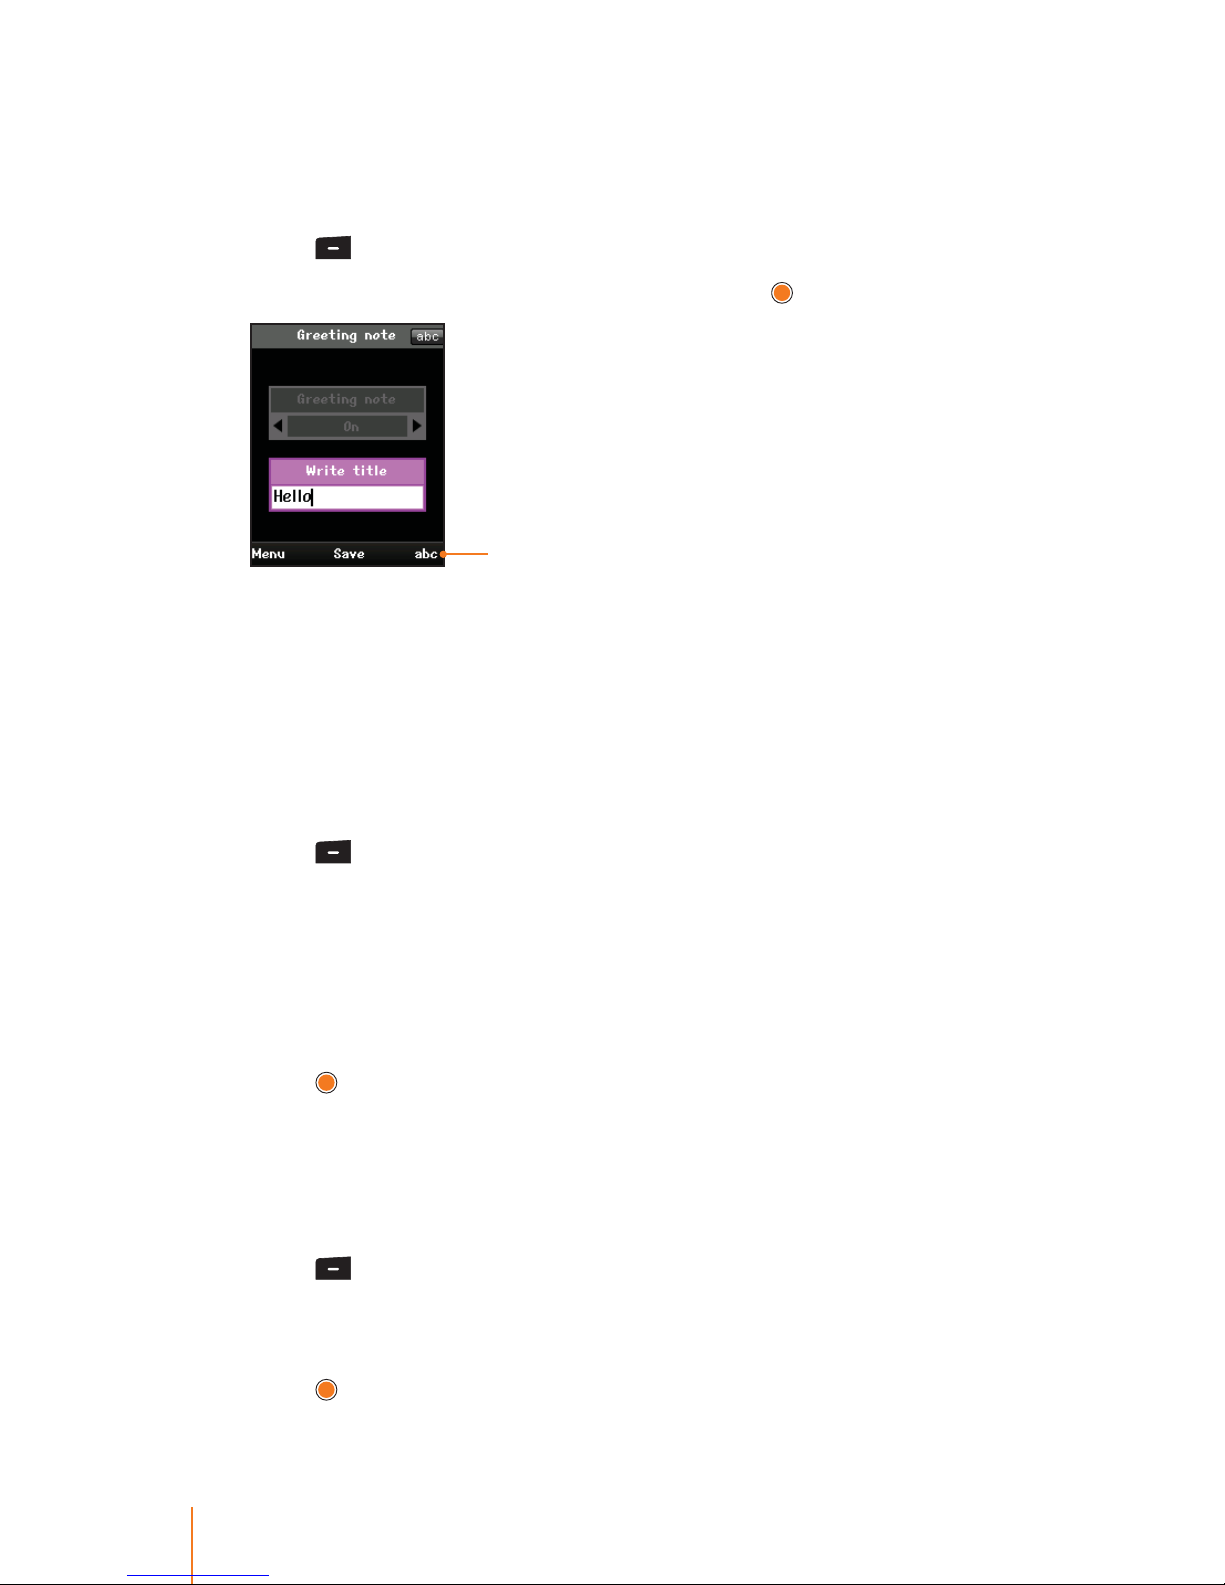
52 Chapter 6 Display
Greeting Note
You can set your own custom greeting to display on the screen in
standby mode.
1. Press
> Display > Greeting Note.
2. Select one of the following options and press
.
Change text input mode
On to show the greeting, enter a custom greeting up to 50 charac-
ters long. (See "Entering Text" on page 18.)
O to disable a greeting.
Idle Clock
You can select a type and color for the idle clock to be displayed
when in standby mode.
1. Press
> Display > Idle Clock.
2. Using the navigation key, select a clock type and color for the idle
clock.
Small or Large to show the idle clock, If you choose "Small or
Large", you can set the color using the color chart.
Clock O to disable the idle clock .
3. Press
to apply the setting.
Dialing Font
You can choose the dialing font and color when enter number (for
example, when dialing or pre-dialing).
1. Press
> Display > Dialing Font.
2. Using the navigation key, select a font size and color with which the
number will display on the screen.
3. Press
to apply the setting.
Page 61

53Chapter 6 Display
Menu Style
You can choose how your phone’s menu is displayed in either a list
style or an grid style on the screen.
1. Press
> Display > Menu Style.
2. Select one of the following options and press
.
List menu to display the menu as a list.
Grid menu to view the menu as a grid.
Backlight
You can select how long the display screen and keypad remain
backlight after any keypress is made, including a screen brightness
control.
1. Press
> Display > Backlight.
2. Select one of the following options and press
.
Following table shows the backlight time length and display screen
brightness.
Item Default value
Standard - LCD duration: 10 sec
- LCD brightness: Brightest
Saving - LCD duration: 5 sec
- LCD brightness: Bright
Ultra Saving - LCD duration: 5 sec
- LCD brightness: Normal
User Settings - LCD duration: 5 sec, 10 sec, 20 sec, 30 sec,1min, or 3min
- LCD brightness: Normal, Bright, or Brightest
Note: Long backlight settings, such as "3Min" and "Brightest" reduce
the battery’s talk and standby times.
Font Type
You can choose the font type to display your phone's screen.
1. Press
> Display > Font Type.
2. Select the font you want to use and press
.
Page 62

54 Chapter 6 Display
Language
You can set the language to use for displaying messages and menus.
1. Press
> Display > Language.
2. Select the language available in the language list and press
.
Currently supported languages are 6 Languages: Korean, English,
Spanish, Italian, German and Turkish.
Page 63

55
Chapter
7
Call History
The call history keeps track of all calls. This chapter guides you
through accessing and making the most of your call history.
Call History
The call history is a list of the last 100 phone numbers for calls you
have dialed, received, or missed. It is continually updated as new
numbers are added to the beginning of the list and the oldest
entries are removed from the bottom of the list.
If the number of a call history is stored in phone book, the following
information appears:
The name assigned to the number.
The contact type icon appears giving information about the call.
-
A Dialed call: Indicates outgoing calls made from your phone.
-
A Received call: Indicates received calls that were answered.
-
A Missed call: Indicates missed calls.
Viewing Call History
In standby mode, press to directly access the call history.
Or
1. Press
> Call History > Call History.
2. Select Missed Calls, Received Calls, Dialed Calls or All Calls.
Selecting "All Calls" will allow you to view the call history for all
types of calls.
3. Scroll through the list and select one.
4. Press
to view the details of an entry.
Page 64
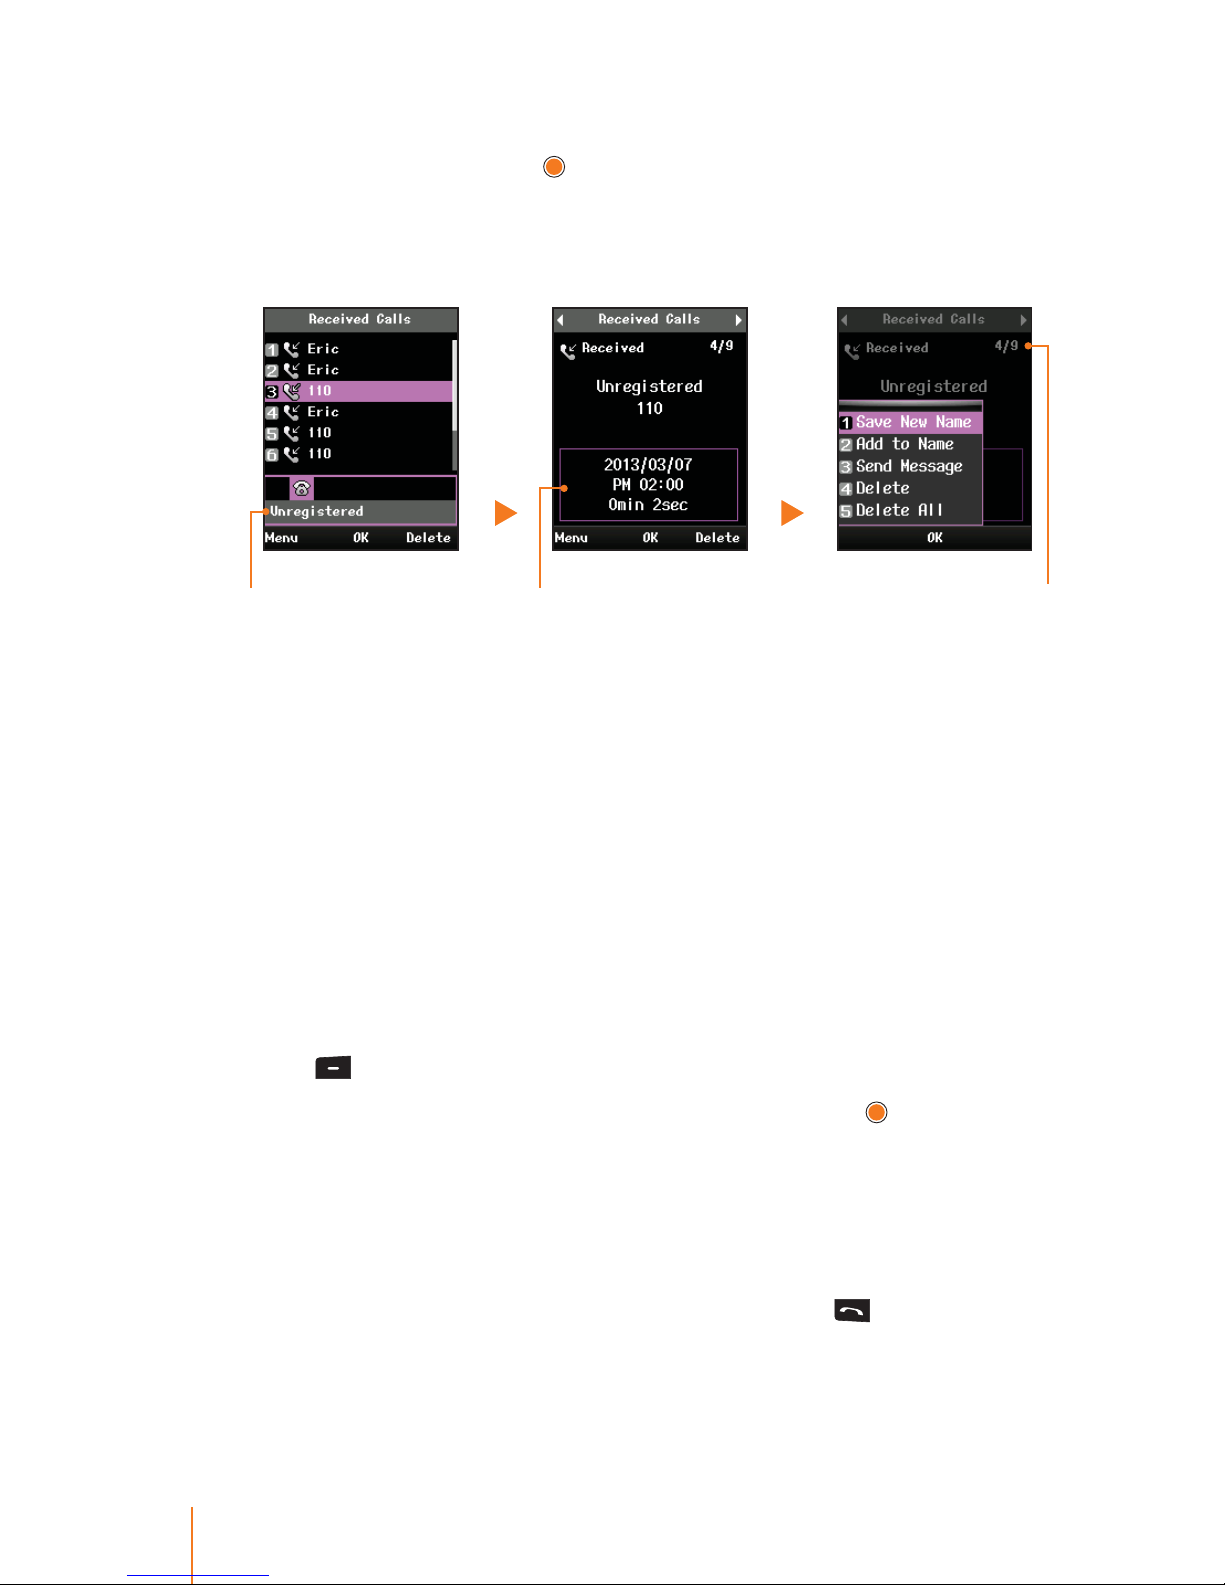
56 Chapter 7 Call History
Call History Options
Select an entry and press to display the date and time of the call,
the phone number, and the caller’s name (if the number is already in
your phonebook). Press Menu (left softkey) to display the following
options:
Call’s detail informationNot saved number Number of received call
Save New Name to save the number to the phone book. (It could
be visible if it is not already in your phone book.)
Add to Name to add the number to an existing phone book.
Send Message to send a message to the selected entry.
Delete to delete the entry.
DeleteAll to delete all calls entries.
Note: You can also view the next or previous call history entry by
pressing the navigation key left or right.
Making a Call From Call History
If you need to make a call from the calls history.
1. Press
> Call History > Call History.
2. Select one of the following call history type and press
.
Missed Calls contain any missed calls.
Received Calls contain any received calls that were answered.
Dialed Calls contain all outgoing calls made from your phone.
All Calls contain all type of the call.
3. Select an entry to make a call its number and press
.
Page 65

57Chapter 7 Call History
Call Duration
This menu allows you to view or reset the cumulative call time by
time since start use.
Viewing Call Duration
1. Press > Call History > Call Duration.
2. Select an option to view the cumulative call time.
When you select call option to view its details, you see all the
length of cumulative time the calls.
Resetting Call Duration
1. You can also reset a call duration by pressing Reset (right softkey)
after step 2 above.
2. If you are certain you want to erase the call duration, select Ye s .
Enter your password as it is a required eld and then press
.
The preset code is "0000", you can change it to the password of
your choice. (Refer to “Security” on page 97.)
or
Select No to cancel and return to the previous menu.
Page 66

Page 67
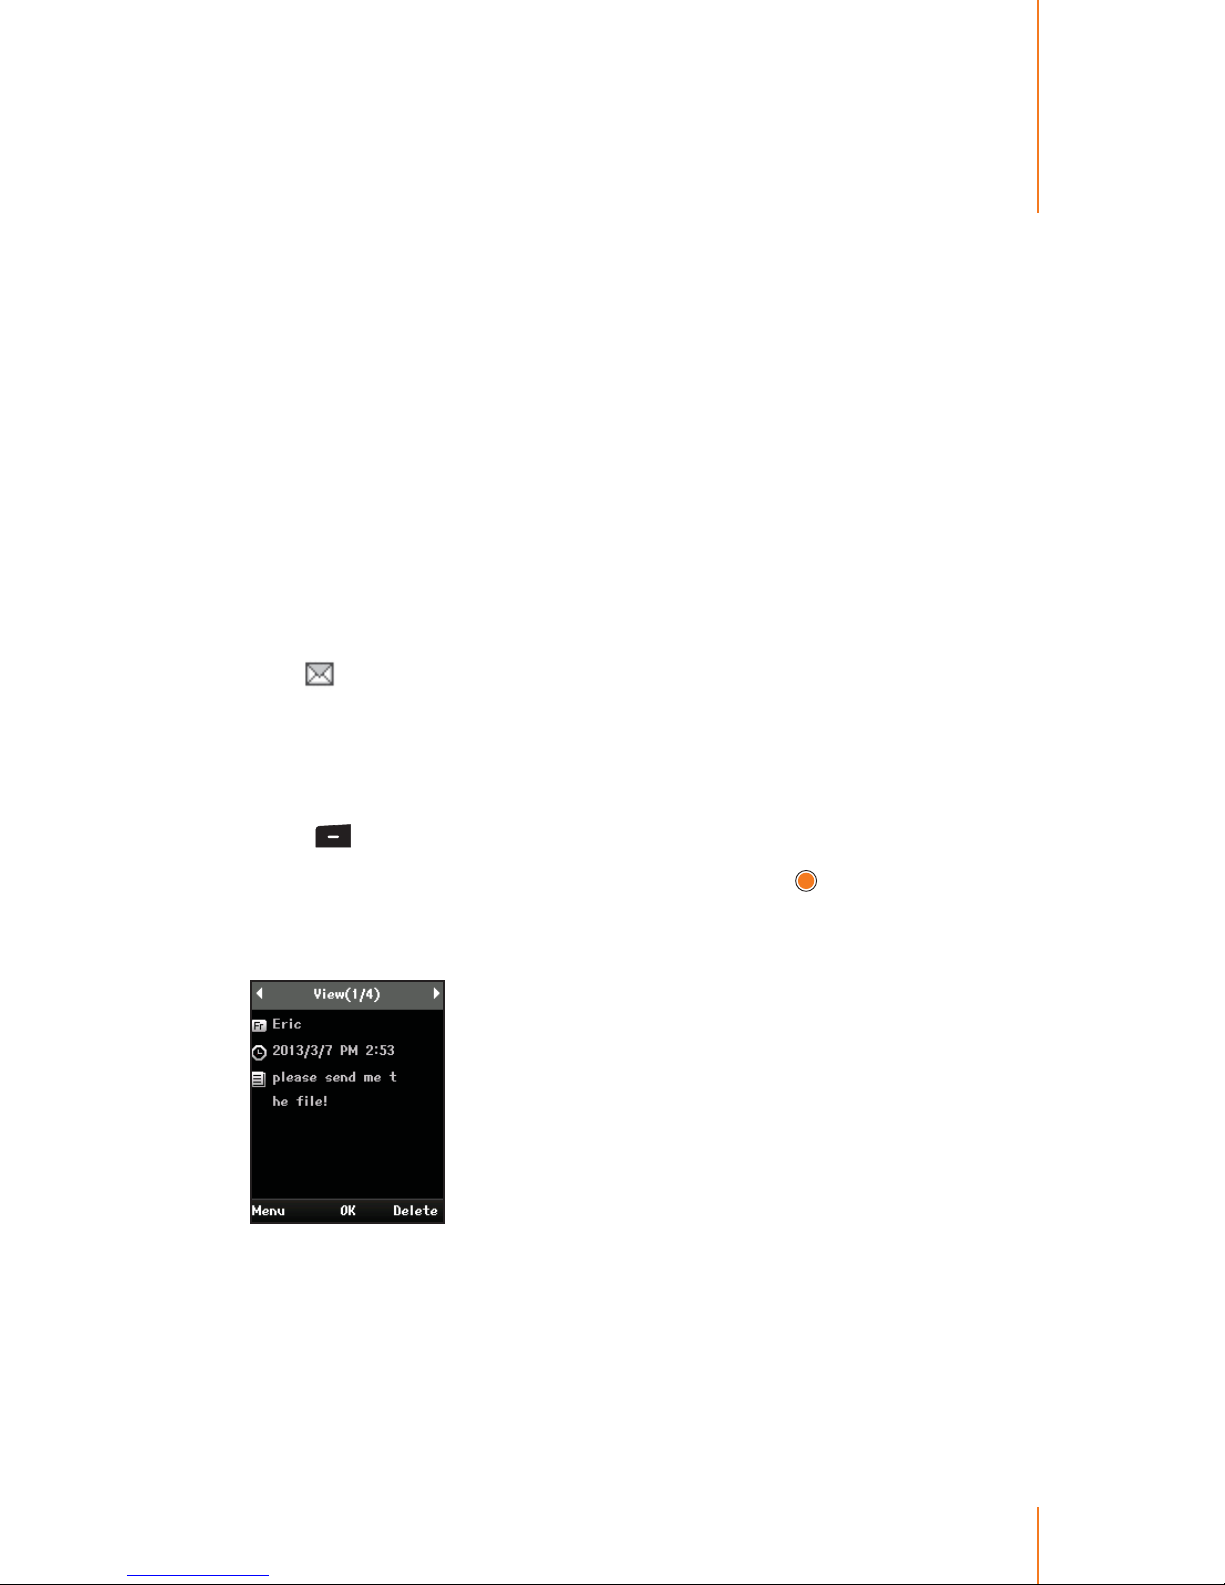
59
Chapter
8
Messages
With Messages, you can send and receive short text messages between your phone and another phone that has been registered with
in the iPECS system. This chapter explains how to use the Messages.
Viewing Message
When you receive a text message, your phone noties you with the
icon
at the top of your screen.
In standby mode, press navigation key right to directly access the
Messages.
Or
1. Press
> Messages > Inbox.
2. Select the message you want to view and press
.
3. After reading the message, select the one of following options you
want:
Menu to display the options which are available in the message.
(See "Inbox" on page 61.)
OK to go to the standby mode.
Delete to delete the current message.
Page 68
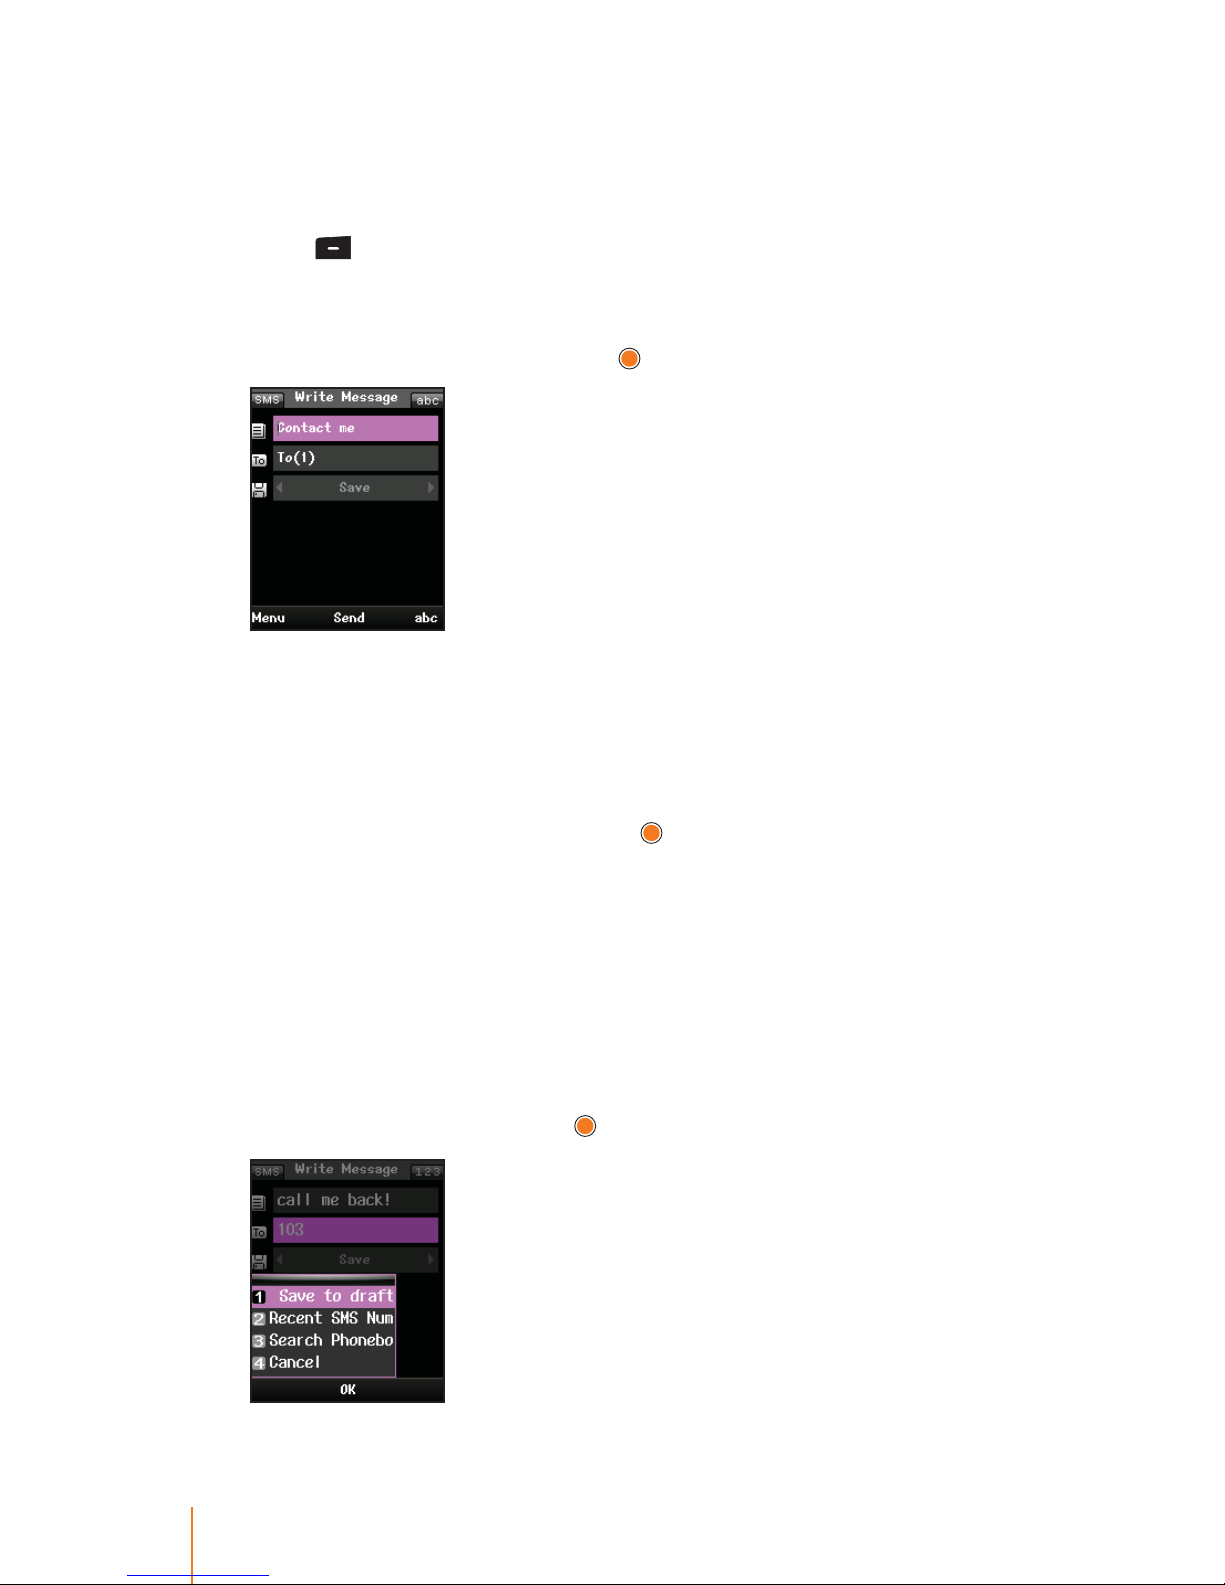
60 Chapter 8 Messages
Writing Text Message
Compose a text message you wish to send it. A single text message
can be up to 80 characters.
1. Press
> Messages > Write Message.
2. Select Contact me eld (It may already be highlighted.) to compose
a message. When writing a message you can use the common terms
or smiley (emoticons) and press
.
To type a message, use your keypad to enter your message. Use
the right softkey to select a character input mode. (See “Entering
Text”on page 18.)
To use a common terms or a smiley, press the Menu (left softkey),
select Common Terms or Smiley, and then highlight your desired
message or emoticon and press
. (For more information on com-
mon terms, please see "Templates"on page 63.)
3. Use the keypad to enter the number you wish to send a message or
press Menu (left softkey) to select the entry method you prefer:
Recent SMS Num. to select from a list of recent message recipients.
Search Phonebook to select a recipient from your Phonebook.
4. If you wish to save the current message, press navigation key left or
right to select Save or press Menu (left softkey) to select one of the
following options and press
.
Page 69
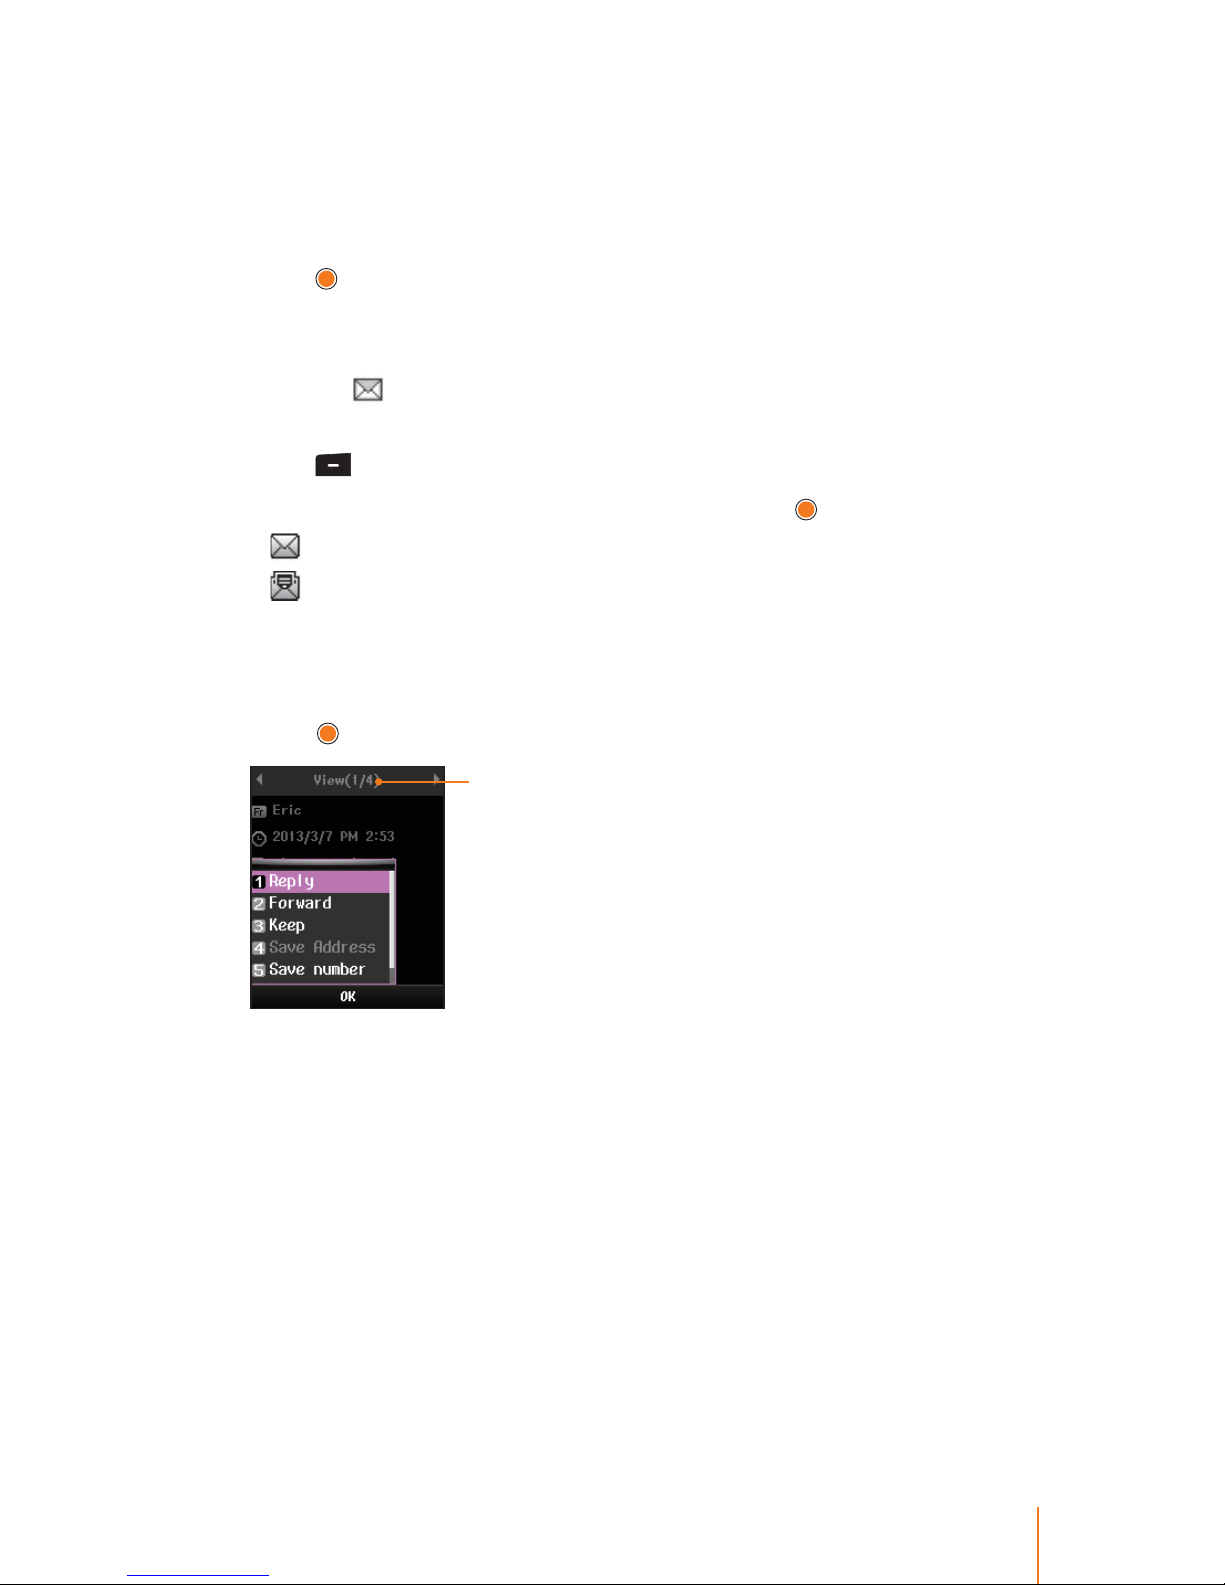
61Chapter 8 Messages
Save to draftbox to save a message as a draft.
Save option to select the option you prefer:
- Save message will automatically be saved in the Outbox.
- Not save message was sent but not saved in the Outbox.
5. Press
to send the message.
Inbox
The icon on your phone's screen will remain on until there are no
unread items in the Inbox.
1. Press
> Messages > Inbox.
2. Select the message you want to view and press
.
indicates unread text messages.
indicates that you have read messages.
Inbox shows all of your messages. Once a message is displayed,
you can use your navigation key to view the other messages.
3. Press Menu (left softkey) to select one of the following options and
press
.
Number of received
messages
Reply to reply to the recipients on the selected message. (Follow
steps under "Writing Text Message" on page 61 to complete and
send your reply.)
Forward to forward the selected message to another party.
Keep to protect the message cannot be deleted.
Save Address to add the number which you wish to save to the
Phonebook. (See "Add New" on page 38.)
Save number to get the number which was written in text mes-
sage and save it to phonebook.
Delete to delete the selected messages.
Page 70
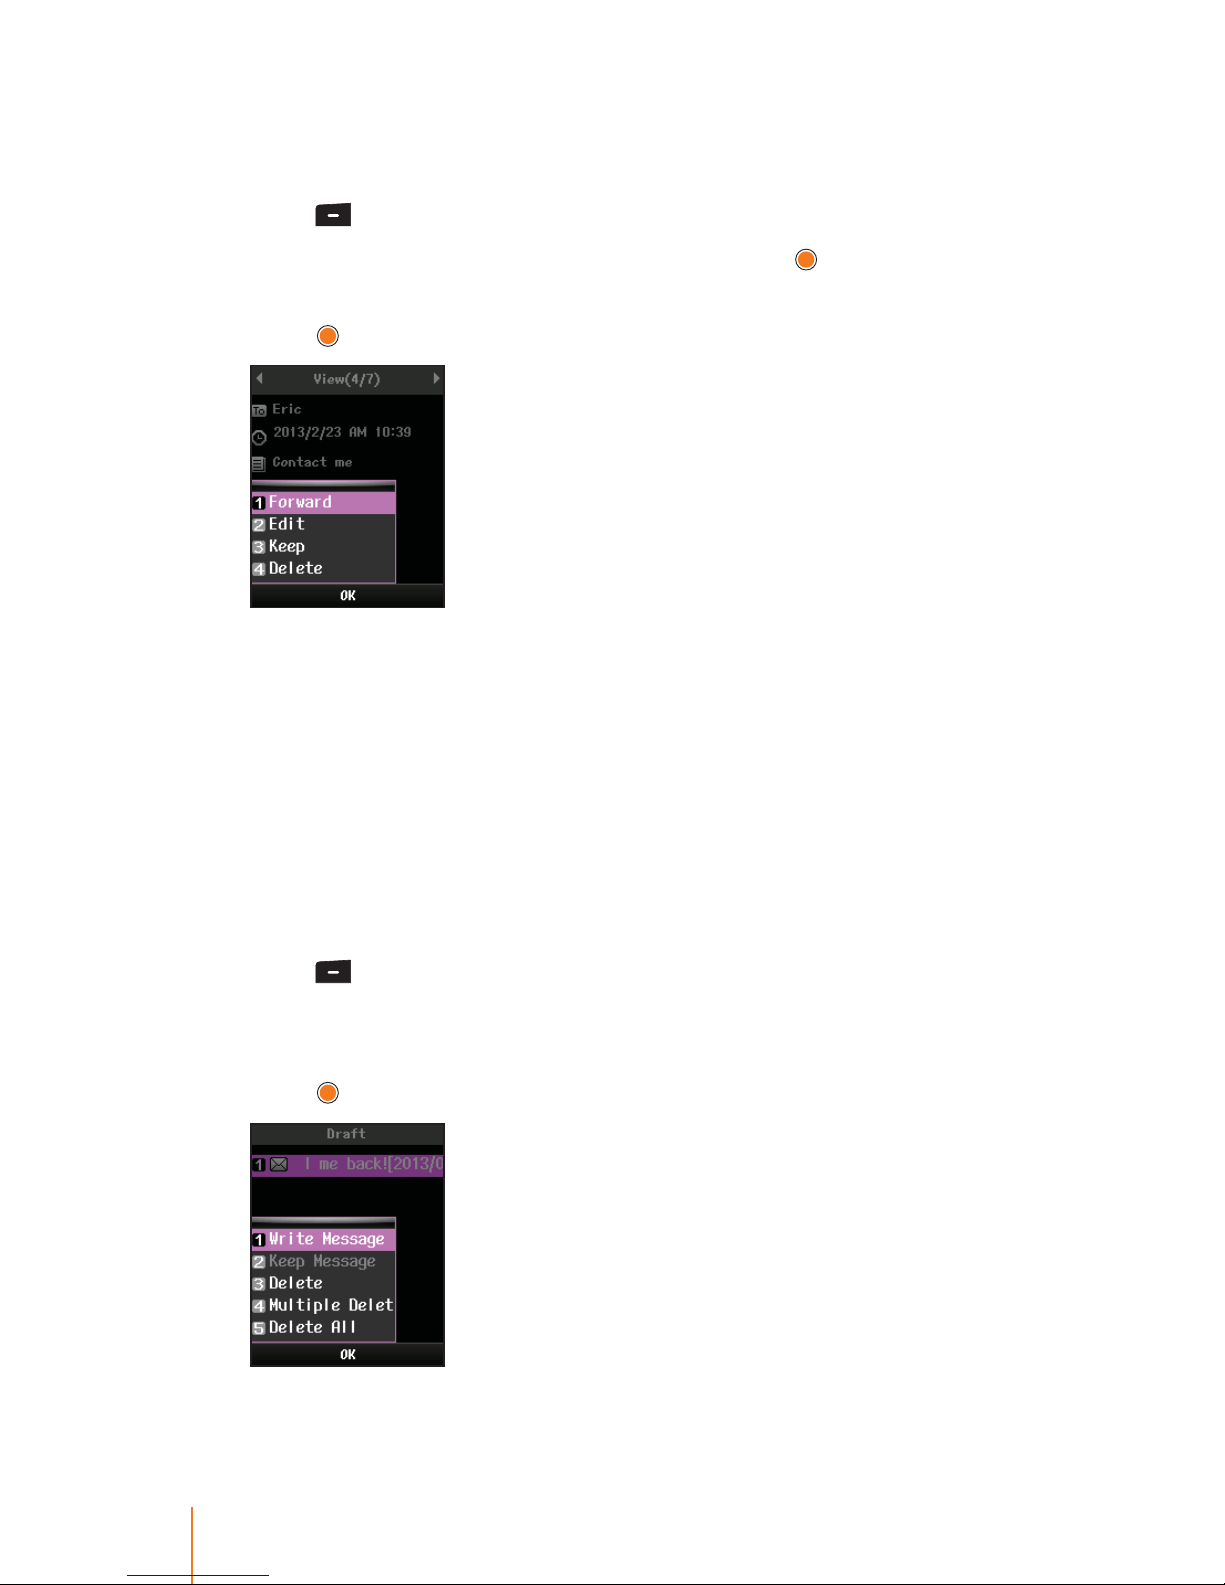
62 Chapter 8 Messages
Outbox
Any message sent from your phone is stored in the Outbox.
1. Press
> Messages > Outbox.
2. Select the message you want to view and press
.
3. Press Menu (left softkey) to select one of the following options and
press
.
Forward to send the selected message to another party.
Edit to edit message you want to change.
Keep to protect the message cannot be deleted.
Delete to delete the selected messages.
Draft
While you are creating a message, you can save it in Drafts before
you send. The draft messages are listed with the date of when the
messages were saved.
1. Press
> Messages > Draft.
2. Select message you want to view.
3. Press Menu (left softkey) to select one of the following options and
press
.
Page 71

63Chapter 8 Messages
Write Message to compose a text message.
Keep Message to protect the message cannot be deleted.
Delete to delete the selected messages.
Multiple Delete to delete many messages at once.
Delete All to delete all messages.
Templates
There are four preset messages to help make sending text messages
easier. Customize or delete these messages to suit your needs, or
add your own messages to the list.
Editing or Deleting a Preset Message
1. Press > Messages > Templates.
2. Select the message you want to edit or delete and press
.
3. Press Menu (left softkey) to display the options.
4. Select Edit and press
.
Edit the selected message (see "Entering Text" on page 18) and
press
.
or
5. Select Delete and press
.
Select Ye s to delete the selected message. (Select No to cancel the
deletion.)
Adding a New Preset Message
1. Press > Messages > Templates.
2. Press Add (right softkey) to add a new message.
3. Compose your own preset message and press
.
Your new preset message will be added to the end of the list.
Page 72

Page 73
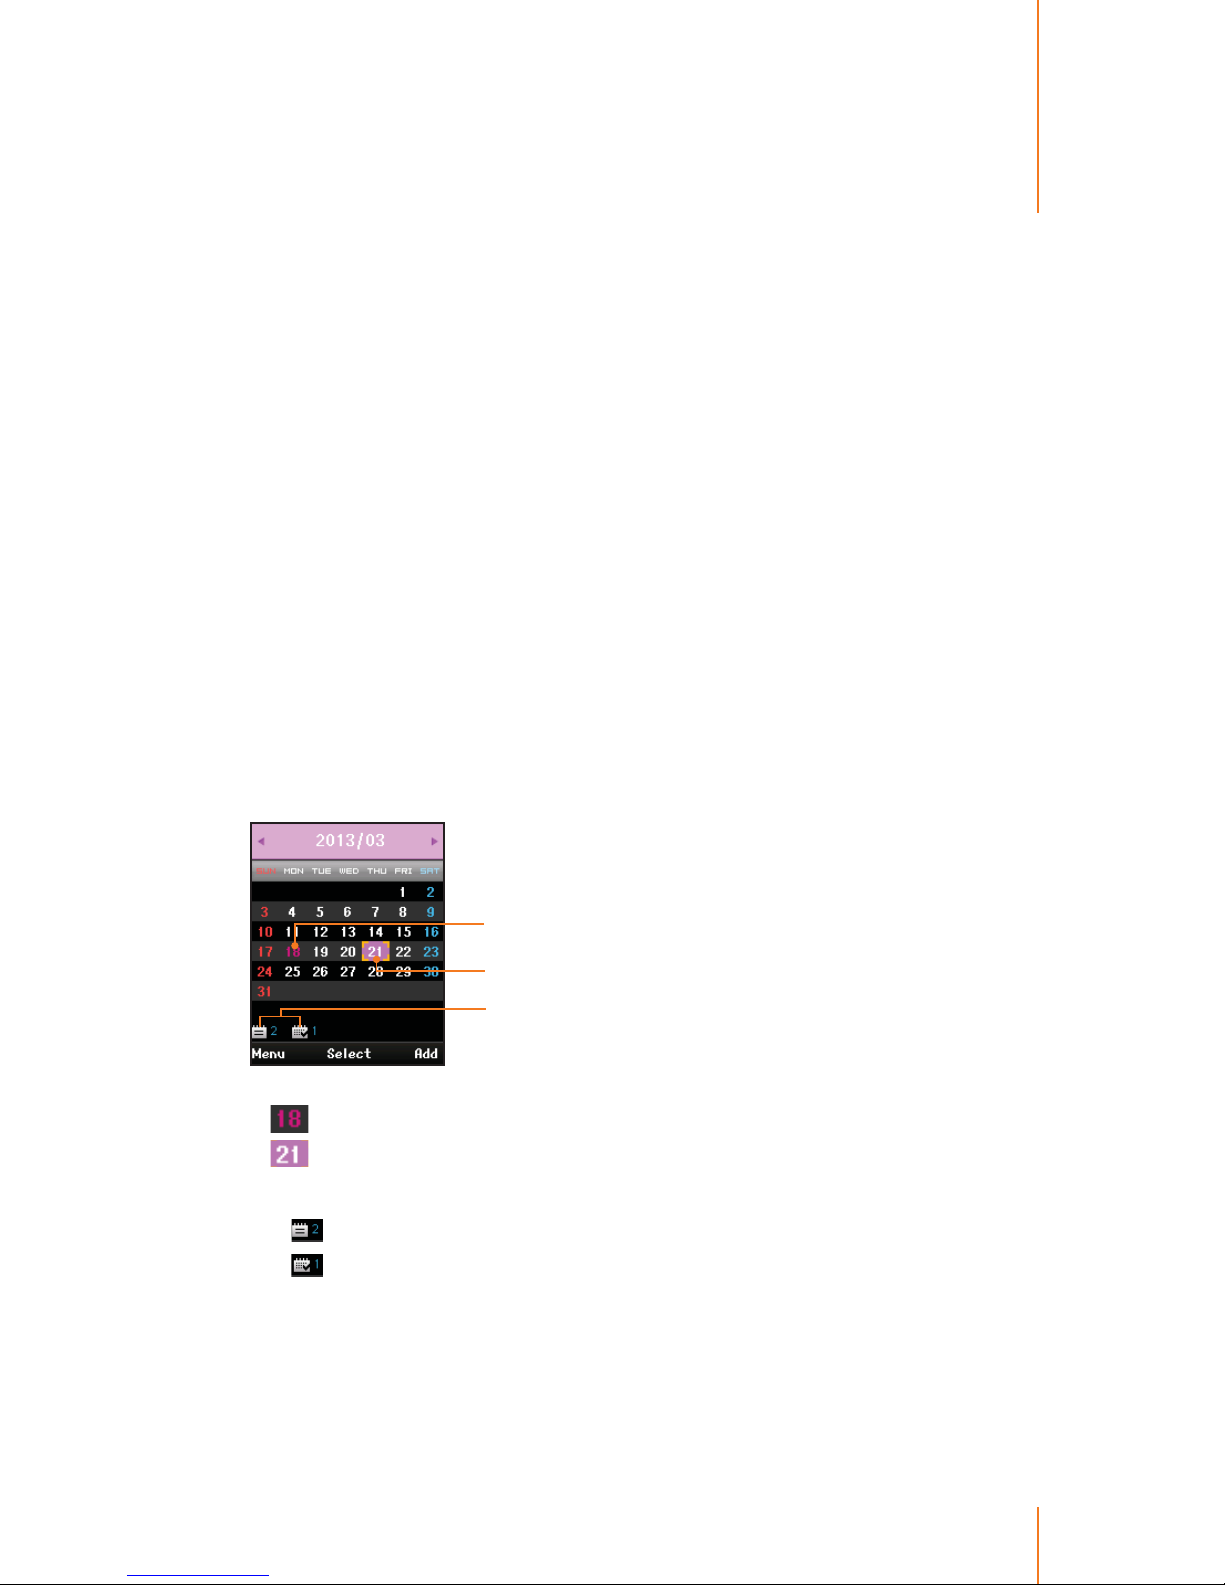
65
Chapter
9
Tools
Your phone is equipped with several personal information management features that help you manage your time eciently. This
chapter shows you how to use these features that helps you.
Schedule
The Scheduler keeps your event convenient and easy to access.
Simply store your events and your phone alerts you with a reminder
of your event.
In the calendar view, If you have events stored for the selected day,
they will be highlighted in a dierent color as follows:
Schedule or Anniverary
for selected day
Days have scheduled
events
User specied holiday
indicates a user specied holiday has been set.
indicates a schedule or anniversary have been set. The follow-
ing icons are used to show the types of events saved to the date.
- means a schedule and shows its number.
-
means an anniversary and shows its number.
Page 74

66 Chapter 9 Tools
Viewing an Events
You can view the schedule by the month and also view the details of
each event.
1. Press
> Tools > Schedule.
2. Select the day for which you would like to view events and press
.
Initially, the cursor
appears on today’s date according to the
phone settings.
Numbers in blue indicate Saturdays, in red indicates Sundays and
holidays, and scarlet indicate the user specied holiday.
3. Select an event to view its details and press
.
If you have up to 2 events scheduled for the day, they will be listed
in chronological order.
You can also view the next or previous day’s events by pressing the
navigation key left or right.
4. The schedule event contains:
Time - The time for the event.
Subject - The name you assigned to the event.
Type - The type you saved in the event.
Repeat - For recurring the event.
Reminder - The scheduled alert for the event that include a
start time.
Alarm - The ring tone for the reminder.
Adding an Event
Schedule event must have a subject and be stored to a date. Other
information is optional.
1. Press
> Tools > Schedule.
2. Using the navigation key, select the day to which you would like to
add an event and Add (right softkey)
3. Select a time for the event by highlighting the time eld.
Using the keypad or navigation key, enter the start and end times
for the event
The time is based on a 12-hour format, press right softkey to select
either "am" or "pm".
Page 75

67Chapter 9 Tools
4. Enter a title for the event by highlighting the Subject.
Enter the event title and press
. (See "Entering Text" on page 18.)
Event title must be entered to be saved to a date.
5. Choose a type for the event by highlighting the type eld.
Press the navigation key left or right to choose Schedule or An-
niversary.
6. Select a repeating status for the event by highlighting the repeat
eld.
Press the navigation key left or right to select Once, Daily, Weekly,
Monthly, Yearly, or Yearly(Lunar).
7. Select an alarm time for the event by highlighting the alarm eld.
Press the navigation key left or right to select No Alarm, On Time,
Before 15m, Before 30m, Before 1hr, Before 1day, Before 3day,
Before 1W.
8. Select a ringer type for the alarm by highlighting the ringer eld.
Use the navigation key to scroll through available alarm tones.
9. Press
to store the event.
Deleting an Event
In the monthly calender, days with events scheduled are highlighted.
To delete past events:
1. Press > Tools > Schedule.
2. Press Menu (left softkey) to display the options.
3. Select Delete and press
.
4. Select Delete Past to delete all past occurrences of the event and
press
.
5. Select Ye s to conrm and press
.
or
Select No to return to the previous menu.
To delete mutiple events:
1. Press > Tools > Schedule.
2. Press Menu (left softkey) to display the options.
3. Select Delete and press
.
Page 76
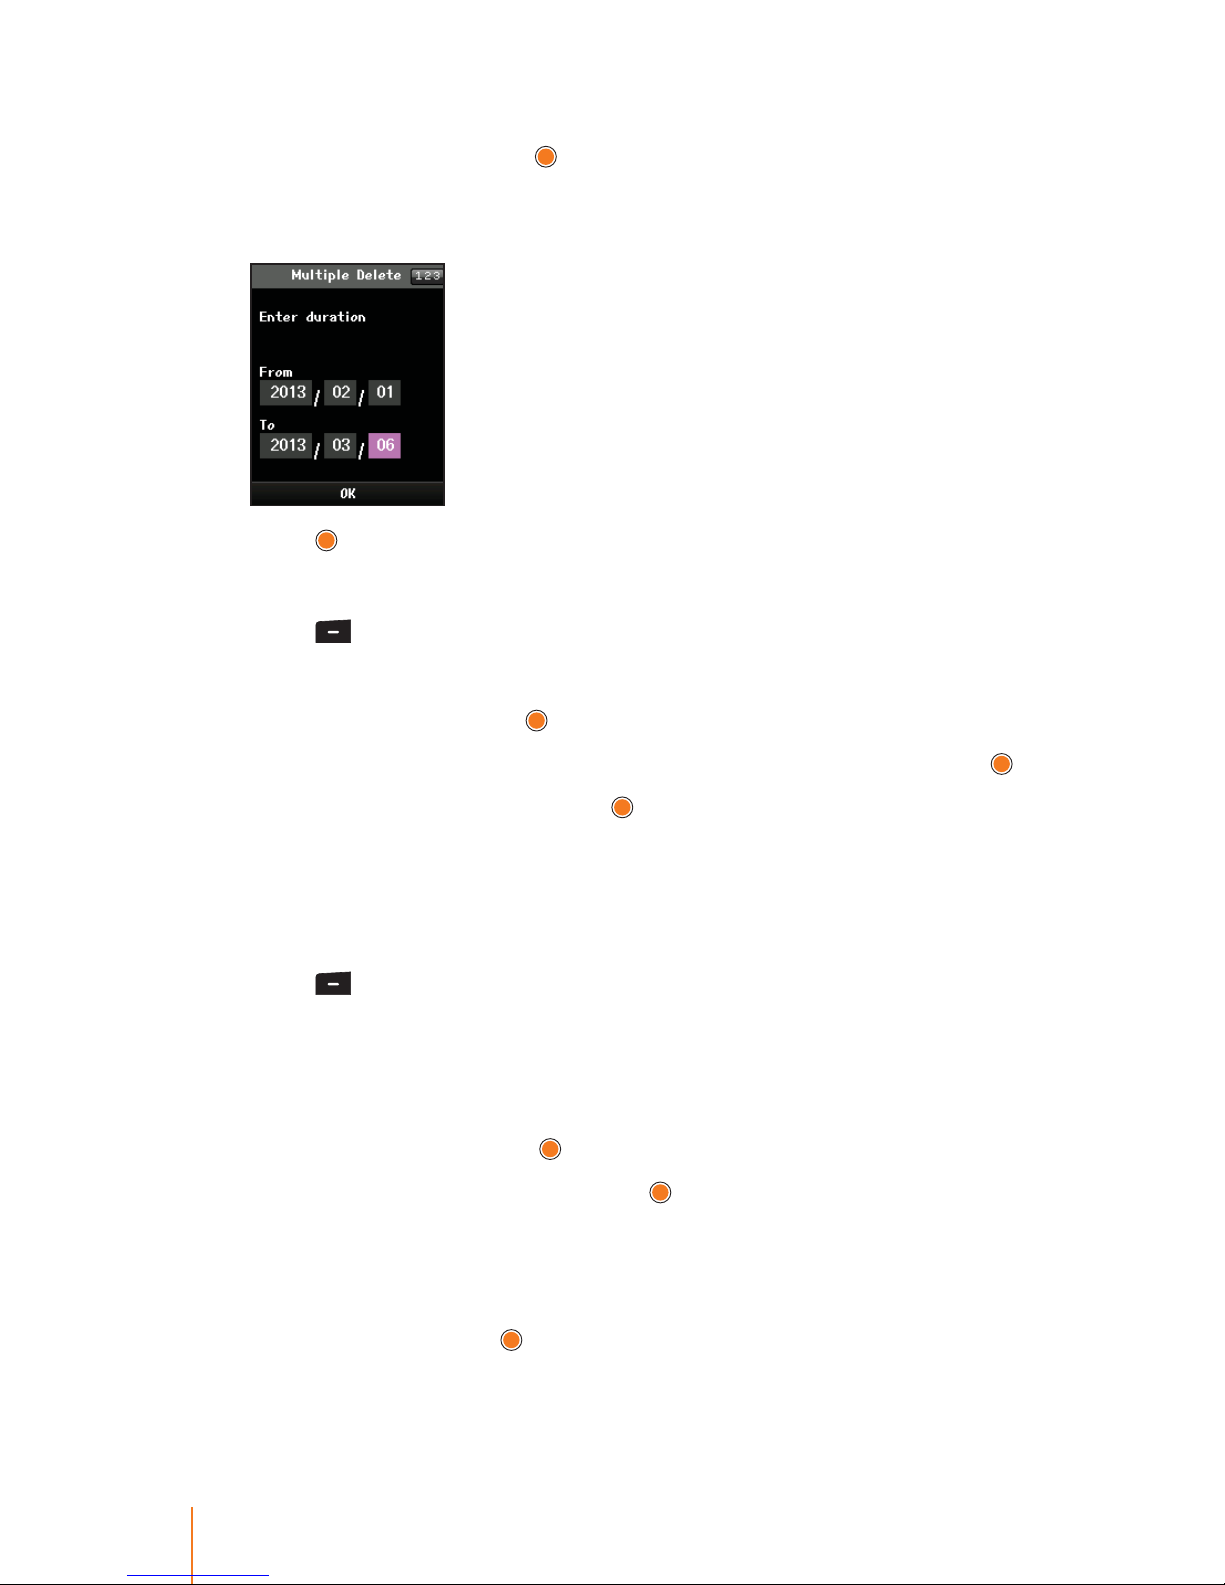
68 Chapter 9 Tools
4. Select Multiple Delete to delete an event through the specied
period of time and press
.
5. Using the keypad, enter the date for the duration by highlighting the
date eld.
6. Press to delete events.
To delete all events:
1. Press > Tools > Schedule.
2. Press Menu (left softkey) to display the options.
3. Select Delete and press
.
4. Select Delete All to delete all occurrences of the event and press
.
5. Select Ye s to conrm and press
, or select No to return to the previ-
ous menu.
Setting your Holiday
You can assign any of the days of the week to particular holiday.
1. Press
> Tools > Schedule.
2. Using the navigation key, select the day to which you would like to
assign a holiday.
3. Press Menu (left softkey) to display the options.
4. Select Holiday and press
.
5. Select an holiday option and press
.
Press the navigation key up or down to select On the day, Weekly,
Monthly, Yearly, and Mutiple Settings.
6. If you select Mutiple Settings, enter a number for holiday by using
the keypad and press
.
The date corresponding to the assigned holiday is represented "in
scarlet" in the monthly schedule management screen.
Page 77
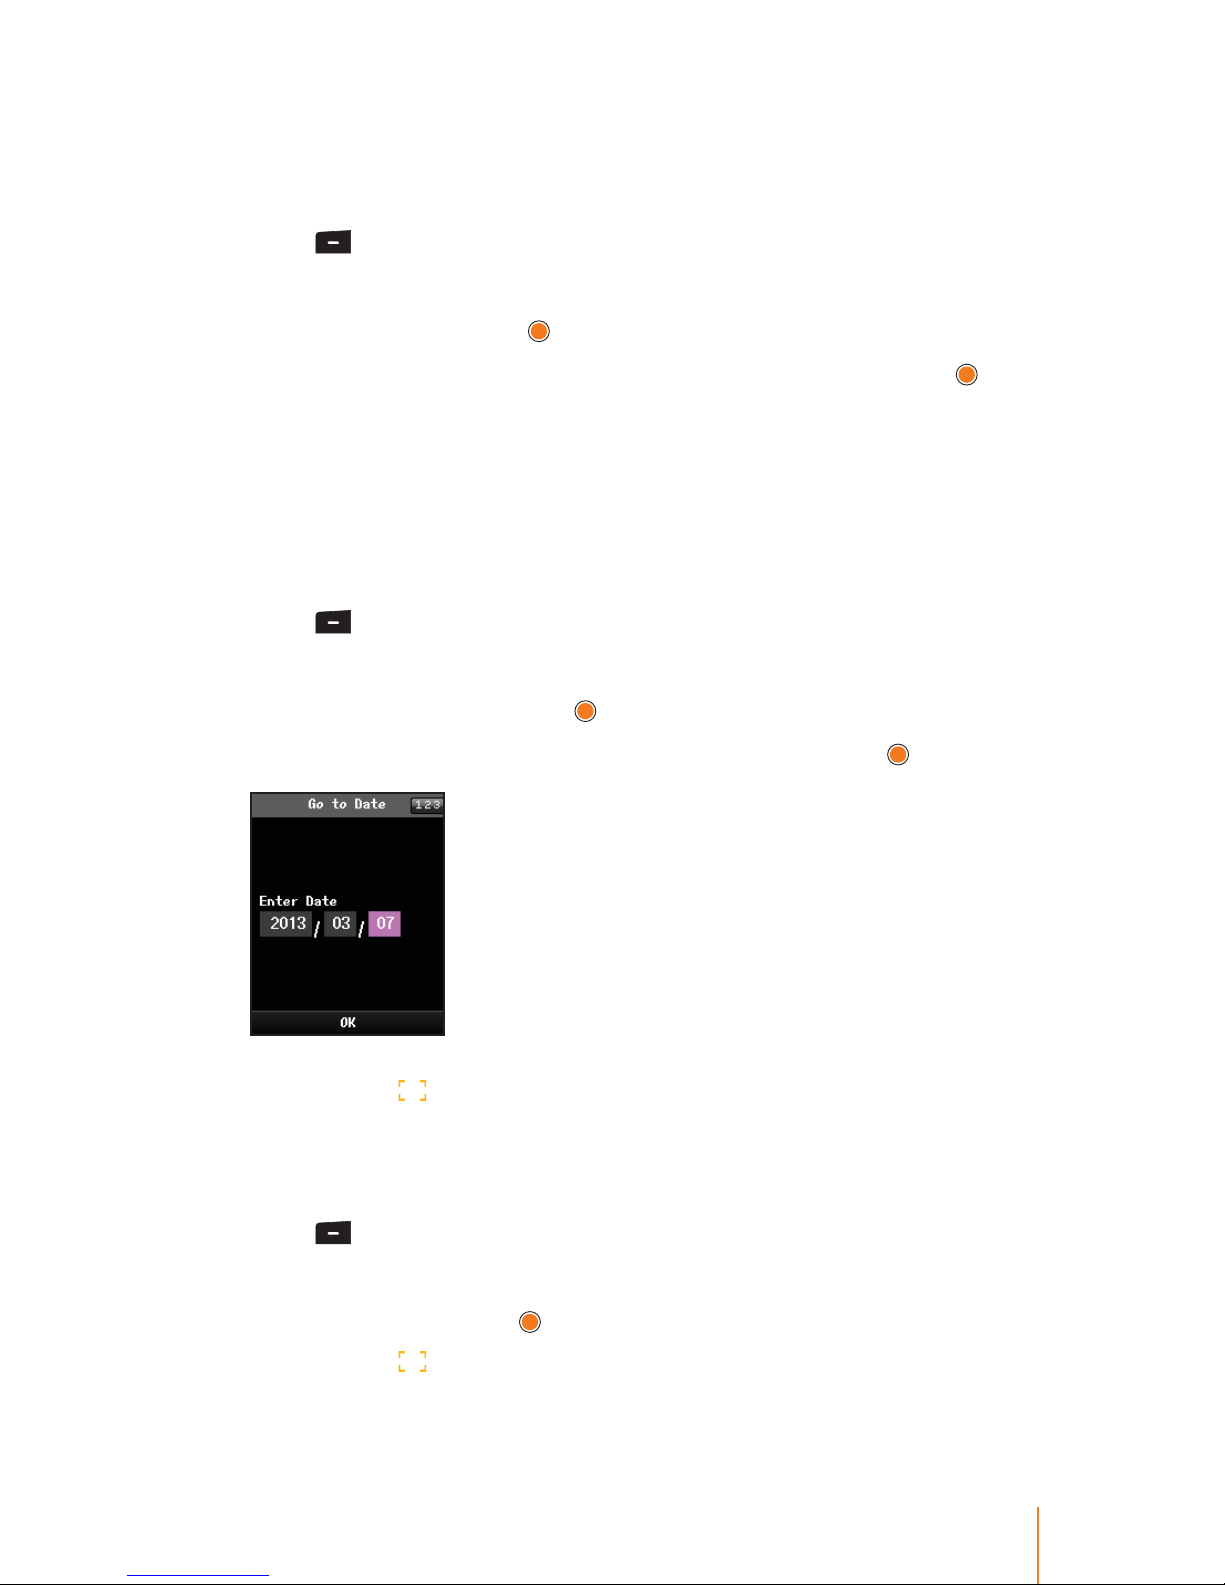
69Chapter 9 Tools
Searching an Event
You can nd an event which you would like to view by entering the
title of event.
1. Press
> Tools > Schedule.
2. Press Menu (left softkey) to display the options.
3. Select Search and press
.
4. Enter a title for searching and select a type of event and press
.
Press the navigation key left or right to select Schedule, Anniver-
sary, or All.
Moving to an Specic Event
You can go directly to the date of the event in order to view it at
once.
1. Press
> Tools > Schedule.
2. Press Menu (left softkey) to display the options.
3. Select Go to Date and press
.
4. Enter a date which you would like to move to and press
.
The cursor will then move to the specied date.
Going to Today
You can go to today’s date, while navigating the schedule.
1. Press
> Tools > Schedule.
2. Press Menu (left softkey) to display the options.
3. Select Today and press
.
The cursor
will then move to today’s date.
Page 78

70 Chapter 9 Tools
Memo
Your phone comes with a notepad that you can compose a note of
up to 180 characters, and store up to 30 memos.
Composing a Memo
1. Press > Tools > Memo, or from standby mode, press the naviga-
tion key down to directly access the Memo.
2. Press Menu (left softkey) to display the options.
3. Select Add and press
.
4. Type a memo using the keypad and press
. When entering text for
the memo, you may want to press Menu (left softkey) to display one
of the following options:
Template to use a template with a prepared message, such as
"Please Call me back!", or "I’m late. I will be there at.".
Symbol to apply to your text, press the appropriate key indicated
on the display.
Reading a Saved Memo
1. Press > Tools > Memo, or from standby mode, press the naviga-
tion key down to directly access the Memo.
2. The list of saved memos will be displayed. Scroll through the list and
select one.
3. Press
to display a memo details.
4. While reading the memo if you want to read other one, press
return to the previous menu and select a memo.
Deleting a Memo
1. Press > Tools > Memo.
2. The list of saved memos will be displayed. Scroll through the list and
select one.
3. Press Menu (left softkey) to display the options.
4. Select Delete and press
.
5. Select Ye s to delete the selected memo from the list and press
.
or
Select No to return to the previous menu.
Page 79

71Chapter 9 Tools
Deleting All Memo
1. Press > Tools > Memo.
2. Press Menu (left softkey) to display the options.
3. Select Delete All and press
.
4. Select Ye s to delete all saved memo and press
.
or
Select No to return to the previous menu.
Alarm Clock
Your phone comes with a built-in alarm clock that has multiple alarm
capabilities.
Viewing an Alarm
1. Press > Tools > Alarm/Morning Call, or from standby mode,
press the navigation key left to directly access the Alarm.
2. The list of saved alarm clocks will be displayed. Scroll through the list
and select one.
3. Press
to display an alarm details.
4. The alarm clock contains:
Time - The time for the alarm.
Repeat - For recurring the alarm.
Ring - The ring tone for the alarm.
Memo - The title you assigned to the alarm.
Indicator - The indicator for the alarm setting.
Setting an Alarm
You can set a time for the alarm including its title.
1. Press
> Tools > Alarm/Morning Call.
2. Press the New (right softkey) to add a new alarm.
3. Select a time for the alarm by highlighting the time eld.
Using the keypad, set the alarm time and press right softkey to
select either "am" or "pm".
4. Select a repeating status for the alarm by highlighting the repeat
eld.
Page 80

72 Chapter 9 Tools
Press the navigation key left or right to select Once, Mon~Wed,
Mon~Fri, Mon~Sat, Except holiday, and Everyday.
5. Select a ring type for the alarm by highlighting the ring eld.
Use the navigation key to scroll through available alarm ring.
6. Enter a title for the alarm by highlighting the Memo.
Enter the alarm title and press
. (See "Entering Text" on page 18.)
7. Turn the alarm on or o by highlighting the activation eld.
Press the navigation key left or right to select On or O.
8. Press
to set the alarm.
Icon
is displayed in standby mode indicates that alarm is set.
During a voice call, the alarm works in vibration mode.
Editing an Alarm
1. Press > Tools > Alarm/Morning Call.
2. The list of saved alarms will be displayed. Scroll through the list and
select one.
3. Press Menu (left softkey) to display the options.
4. Select Edit and press
.
5. Follow the applicable instructions in "Setting an Alarm" on page 75
to edit the alarm.
Deleting an Alarm
1. Press > Tools > Alarm/Morning Call.
2. The list of saved alarms will be displayed. Scroll through the list and
select one.
3. Press Menu (left softkey) to display the options.
4. Select Delete and press
.
5. Select Ye s to delete the selected alarm from the list and press
.
or
Select No to return to the previous menu.
Deleting All Alarm
1. Press > Tools > Alarm/Morning Call.
2. Press Menu (left softkey) to display the options.
Page 81
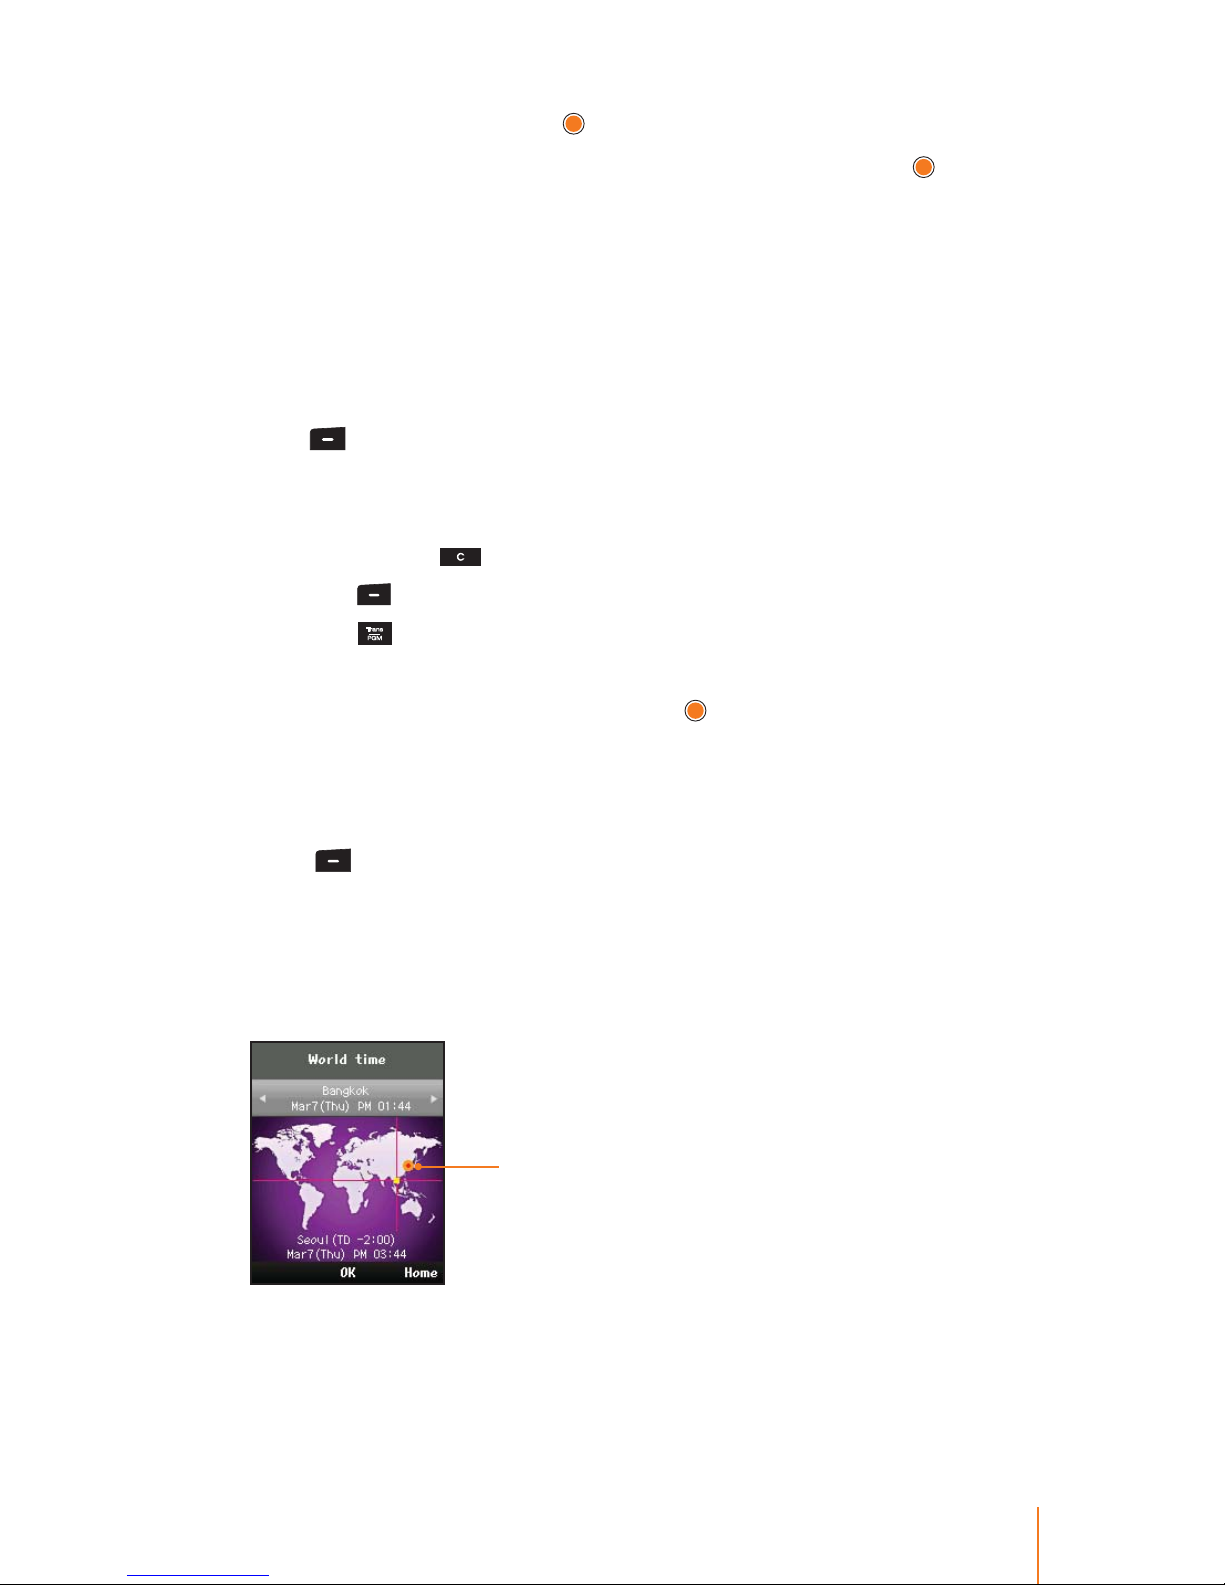
73Chapter 9 Tools
3. Select Delete All and press .
4. Select Ye s to delete all saved alarm from the list and press
.
or
Select No to return to the previous menu.
Calculator
Your phone comes with a built in calculator that has limited accuracy
for simple calculations, such as add, substract, multiply, and divide.
1. Press
> Tools > Calculator.
2. To make a calculation:
Enter the rst number of the calculation, if you want to remove a
number, press
.
- Press
(left softkey) to enter decimal points.
- Press
to change the numeric value from positive to negative.
Select a mathematical functions (+, –, ×, or ÷).
Enter the second number and press
for the total.
World Time
You can view the time in over 50 dierent locations.
1. Press
> Tools > World Time.
2. Press Home (right softkey) to select a city to be assigned the home
(the local area in which you live).
3. Press the navigation key left or right to scroll through dierent time
zones.
Indicates your local area
The time zones will be shown a time dierence between two cities
based on your local area.
Page 82

74 Chapter 9 Tools
Timer
The timer can be used for various calendrical calculations.
Using the D-Day Finder
You can calculate what date it will be in a number of days after a
particular date.
1. Press
> Tools > Timer.
2. Select D-day Finder and press
.
3. Enter date from and add a number of days to calculate a future date
and press
to get the result.
4. Press Reset (left softkey) to set the nder back to zero.
Using the D-Day Counter
You can use d-day counter to refer to the day that is chosen for the
beginning of an important event.
To set a D-day counter:
1. Press > Tools > Timer.
2. Select D-day Counter and press
.
3. Press Add (right softkey).
4. Enter a title for an upcoming event by highlighting title eld.
Enter the event counter title. (See "Entering Text" on page 18.)
5. Select a d-day for the event counter by highlighting the time eld.
6. Press
to save the counter.
To view a D-day counter:
1. Press > Tools > Timer.
2. Select D-day Counter and press
.
3. The list of saved counters will be displayed. Scroll through the list
and select one.
4. Read the information about the counter.
To edit a D-day counter:
1. Press > Tools > Timer.
2. Select D-day Counter and press
.
Page 83

75Chapter 9 Tools
3. The list of saved counters will be displayed. Scroll through the list
and select one.
4. Press Menu (left softkey) to display the options.
5. Select Edit and press
.
6. Follow the applicable instructions in "To set the D-day counter" to
edit the D-day counter.
To delete a D-day counter:
1. Press > Tools > Timer.
2. Select D-day Counter and press
.
3. The list of saved counters will be displayed. Scroll through the list
and select one.
4. Press Menu (left softkey) to display the options.
5. Select Delete and press
.
6. Select Ye s to delete the selected counter from the list and press
.
or
Select No to return to the previous menu.
To delete All D-day counter:
1. Press > Tools > Timer.
2. Select D-day Counter and press
.
3. Press Menu (left softkey) to display the options.
4. Select Delete All and press
.
5. Select Ye s to delete all saved counter from the list and press
.
or
Select No to return to the previous menu.
Using the Stopwatch
Your phone comes with a built in stopwatch.
1. Press
> Tools > Timer.
2. Select Stopwatch and press
.
3. To use a Stopwatch:
Page 84

76 Chapter 9 Tools
Press Go (OK key) to start the stopwatch.
Press Lap (left softkey) to make a lap time of up to 6.
Press Stop (OK key) to pause the stopwatch.
Press Reset (right softkey) to reset the stopwatch to zero.
Page 85

77
Chapter
10
System
This chapter explains how to use the System feature which can be
synchronized with iPECS System.
Note: Any of these features do not work on your phone, please con-
tact your system administrator or refer to the iPECS System Manual
for details.
Call Forward
Use the Call Forward features to redirect incoming calls from your
phone to another number. The types of Call Forwarding are:
Unconditional (U) Forward all incoming calls to another number.
Busy (B) Forward while your phone is busy.
No Answer (N) Forward when your phone is not answered after a
certain amount of time delay.
Busy/ No Answer (BN) Forward while the phone is busy, and all
calls forward when not answered.
A call already on your phone and recall cannot be forwarded.
Activating Call Forward
1. Press > System > Forward.
2. Select the type of call forward by entering a call forwarding code
(1~4). In iPECS-LIK, the codes of call forwarding are below:
Page 86
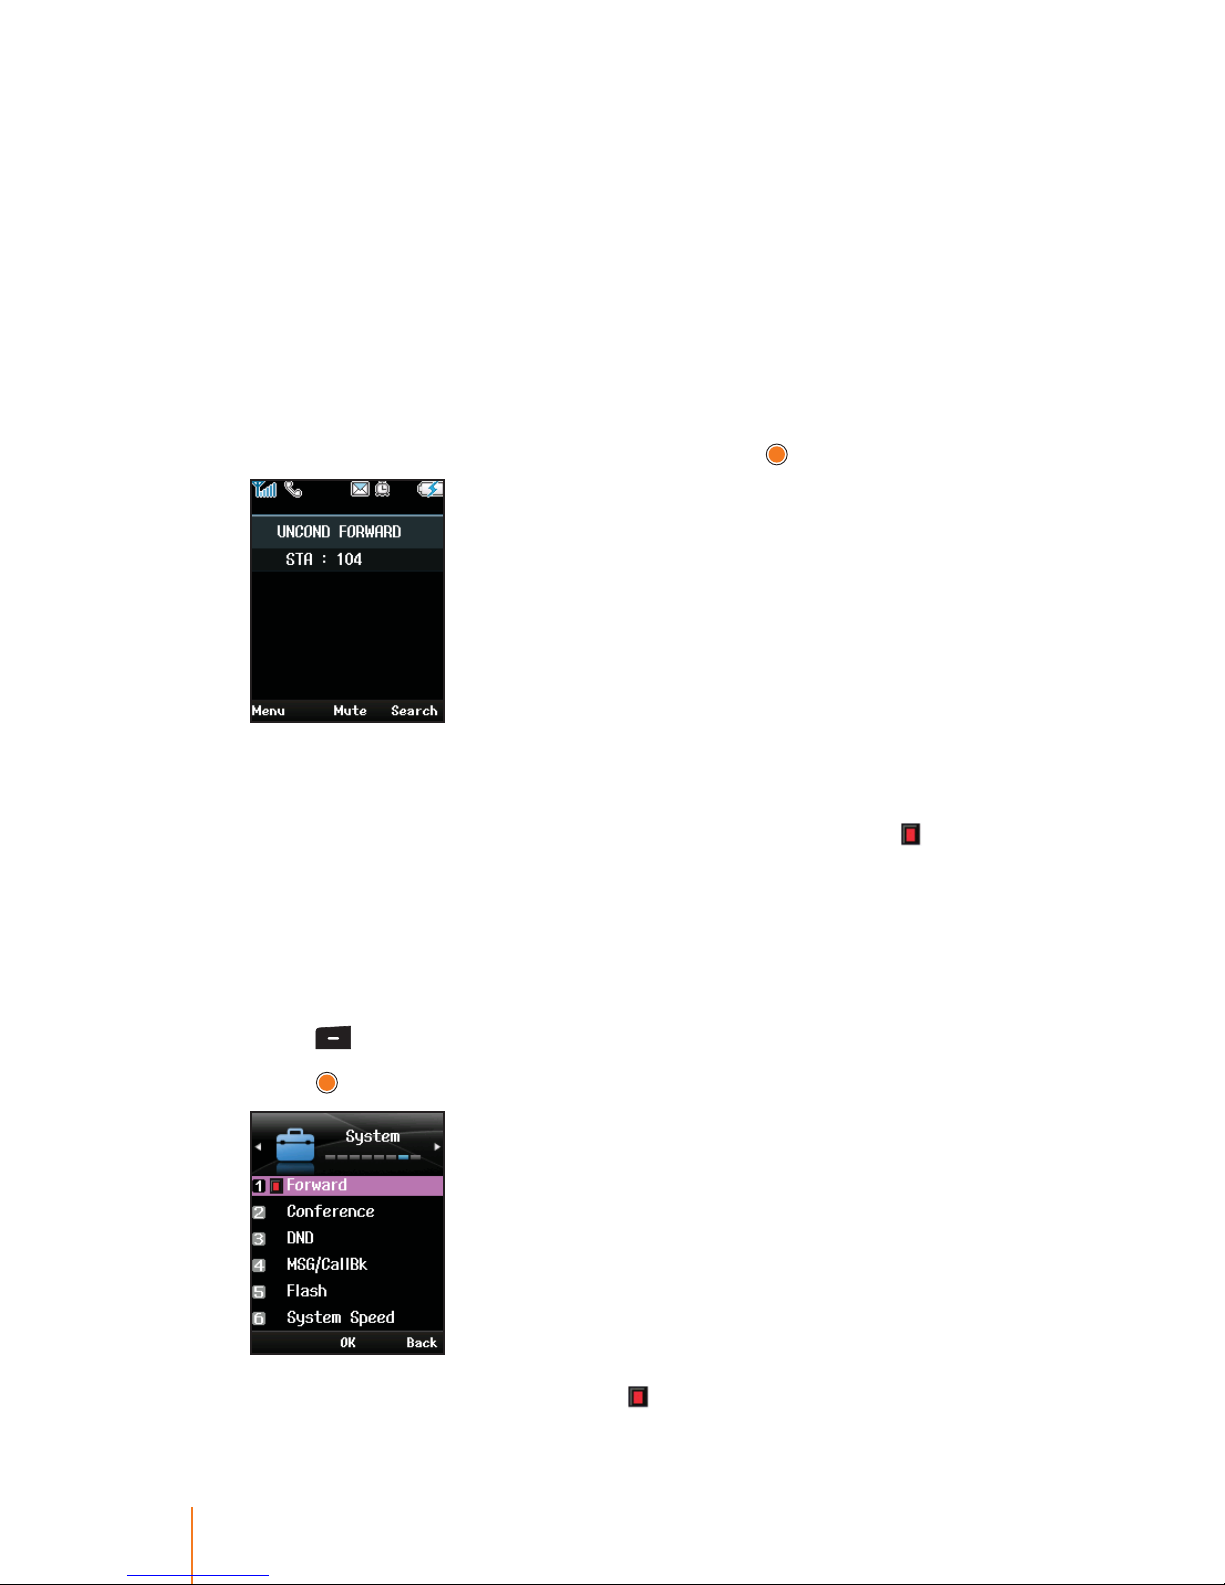
78 Chapter 10 System
Code 0: Remote Call Forward, enable call forward for your phone
from a dierent phone. It may need to enter your Authorization Code.
Code 1: Unconditional, refer to page 77.
Code 2: Busy, refer to page 77.
Code 3: No Answer, refer to page 77.
Code 4: Busy/ No Answer, refer to page 77.
Code 5: Attendant O-Premise, forward ncoming CO calls to an
outside number. It is not supported on WIT-400HE.
3. Enter the phone number (Internal, Internal Groups Number etc.) to
which you want to calls forwarded and press
.
You will see a system message informing you that call forwarding
is actvated. For example, Unconditional to the phone number 104,
"FWD104(U)" displays on the screen in standby mode. '
' appears
next to the function in the menu list.
Note:
When call forwarding is activated, you will not be able to answer
calls in your phone, as they will only ring at the forwarding number.
Deactivating Call Forward
1. Press > System > Forward.
2. Press
to disable Call Forward.
When the function is released, ' ' disappears.
Page 87
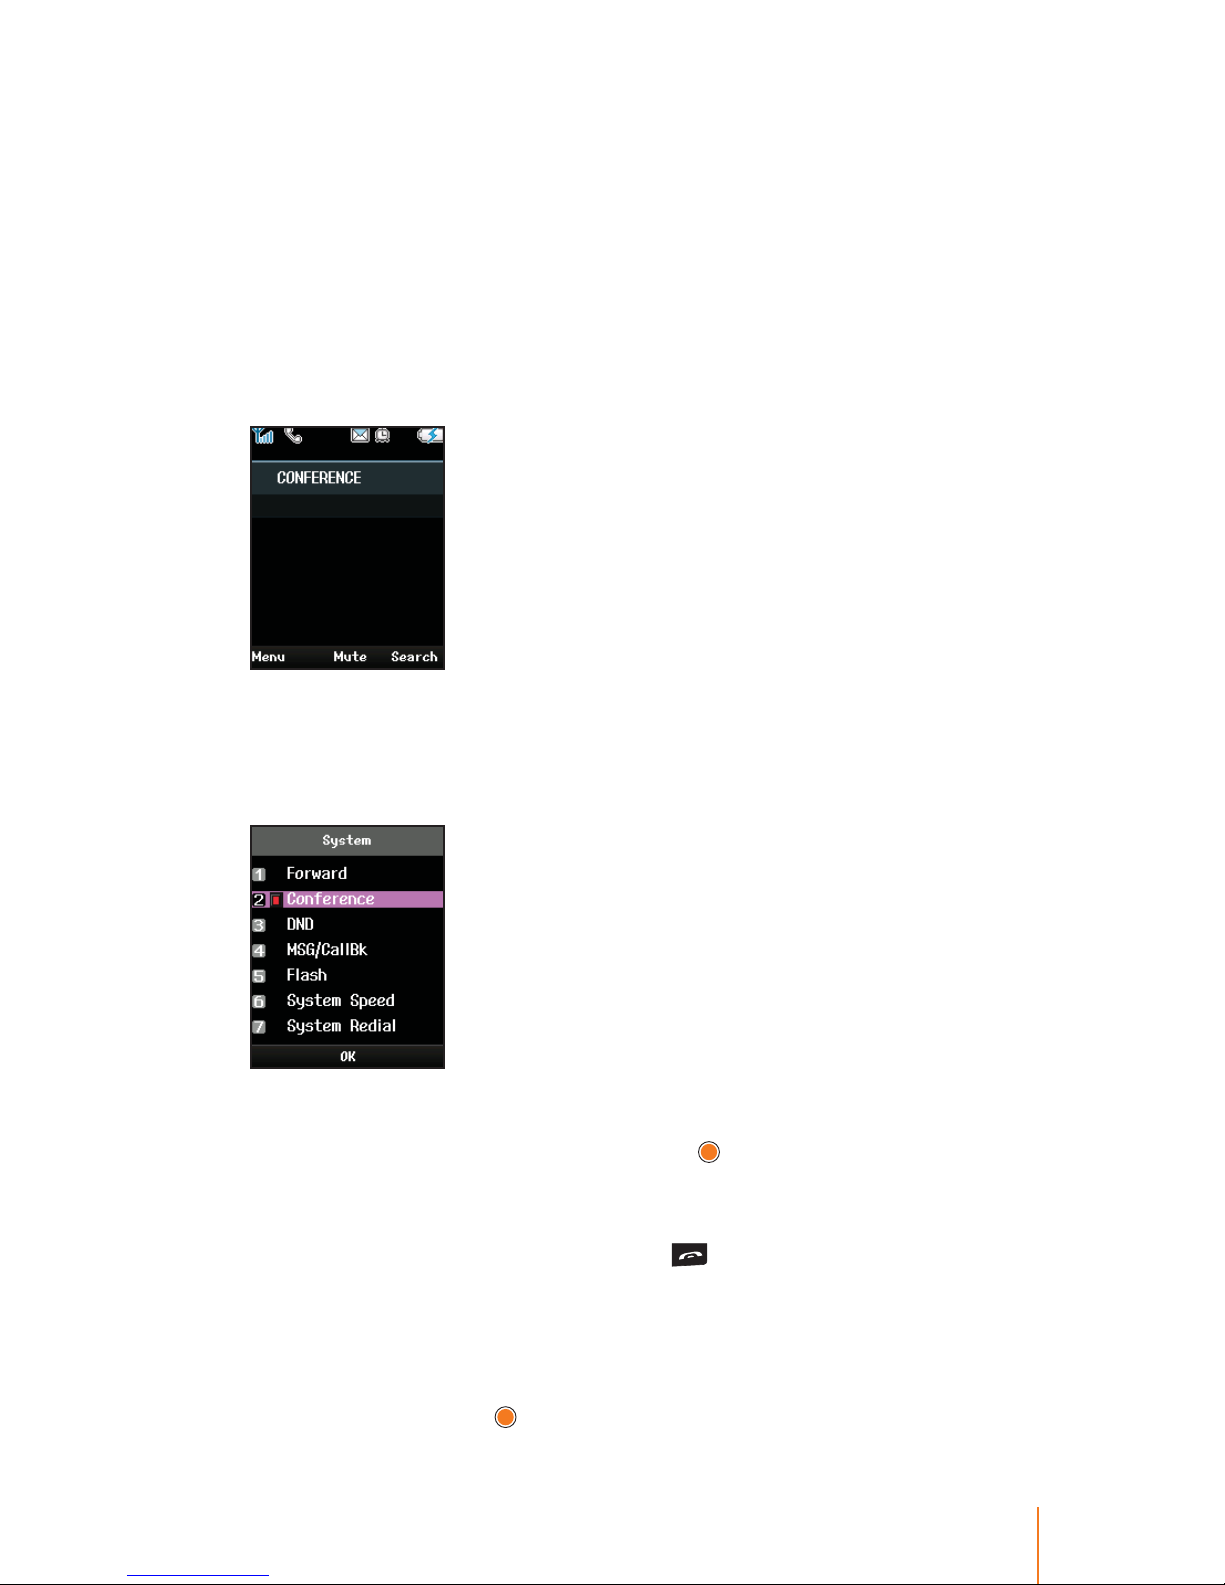
79Chapter 10 System
3-Party Conference
The phone supports conferencing with two other parties. The
number of person supported in a conference call depends on the
System. You can do more than a three person conference call with a
Multi-Party Conference Interface Module (MCIM).
Setting up a Conference Call
1. During a rst call, press navigation key left to select System > Con-
ference.
The rst call is on hold and dial tone is heared.
2. Dial the second party for the conference, and press navigation key
left to select System > Conference when the party answers.
For joining multiple person in a conference, repeat steps 1~2 .
3. Select System > Conference and press
to connect all parties.
Ending up a Conference Call
When the conversation is over, press to end a conference and
disconnect all parties.
or
1. Press Menu (left softkey) to display the options.
2. Select End and press
.
Page 88

80 Chapter 10 System
DND (Do Not Disturb)
When the DND (Do Not Disturb) feature is activated, the phone will
not notify you of an incoming call thus allowing you to work without
interruptions from incoming calls. Depending on the system the
caller will get the busy tone or voice announcement.
Activating DND
1. Press > System > DND.
2. Press
to enable DND.
When the function is set, "DO NOT DISTURB" displays on the screen
in standby.
Deactivating DND
1. Press > System > DND.
2. Press
to disable DND.
Message Waiting/Call Back
These functions can be used for internal calls when the called party
is busy, no answer or in DND (Do Not Disturb).
Message Waiting
Message waiting allows you to send a message to internal number
asking them to call you.
To send a message:
1. If the called party does not answer.
2. Press
navigation key
left to select System > MSG/CallBk and press .
When choose MSG/CallBk, at this point the call is terminated and
return to the standby mode.
Page 89
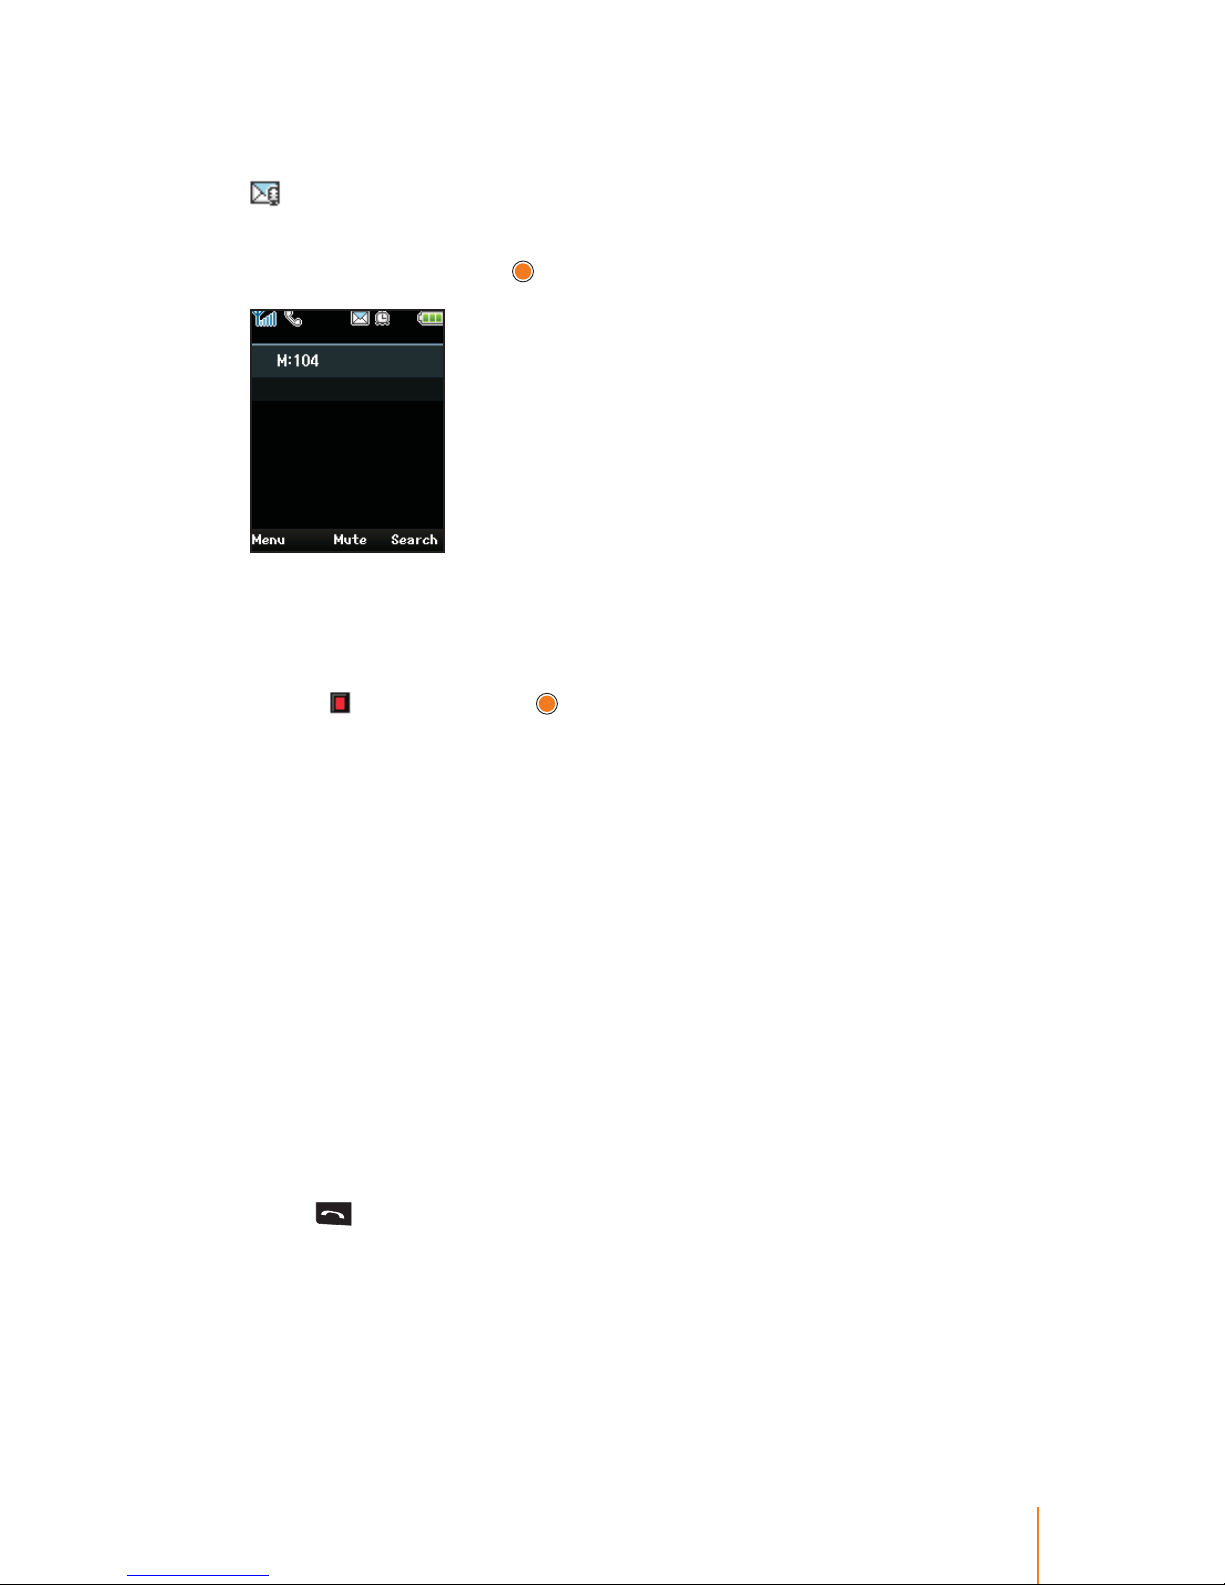
81Chapter 10 System
To review/call back a message:
When you receive a message, your phone noties you with the icon
at the top of phone's screen.
1. In standby mode, press navigation key left to access the System >
MSG/CallBk and press
.
For example, "M: 104" means that this message has been sent from
internal number 104.
2. Press the navigation key left to select the System > MSG/CallBk.
3. When '
' blinking, press to be connected to dial tone and then
place the call.
Call Back
Call Back allows you to reserve the call when a busy party becomes
available.
To reserve a call back:
1. If the called party is busy.
2. Press navigation key left to select System > MSG/CallBk.
When choose MSG/CallBk, at this point the call is terminated and
return to the standby mode.
To answer a call back:
1. When the called party becomes free, the system will call you back.
2. Press
to answer an Call Back call, the called party's phone will
ring and your call will be connected.
A Call Back will be canceled if not answerd within a certain amount
of time (set by your system administrator).
Page 90
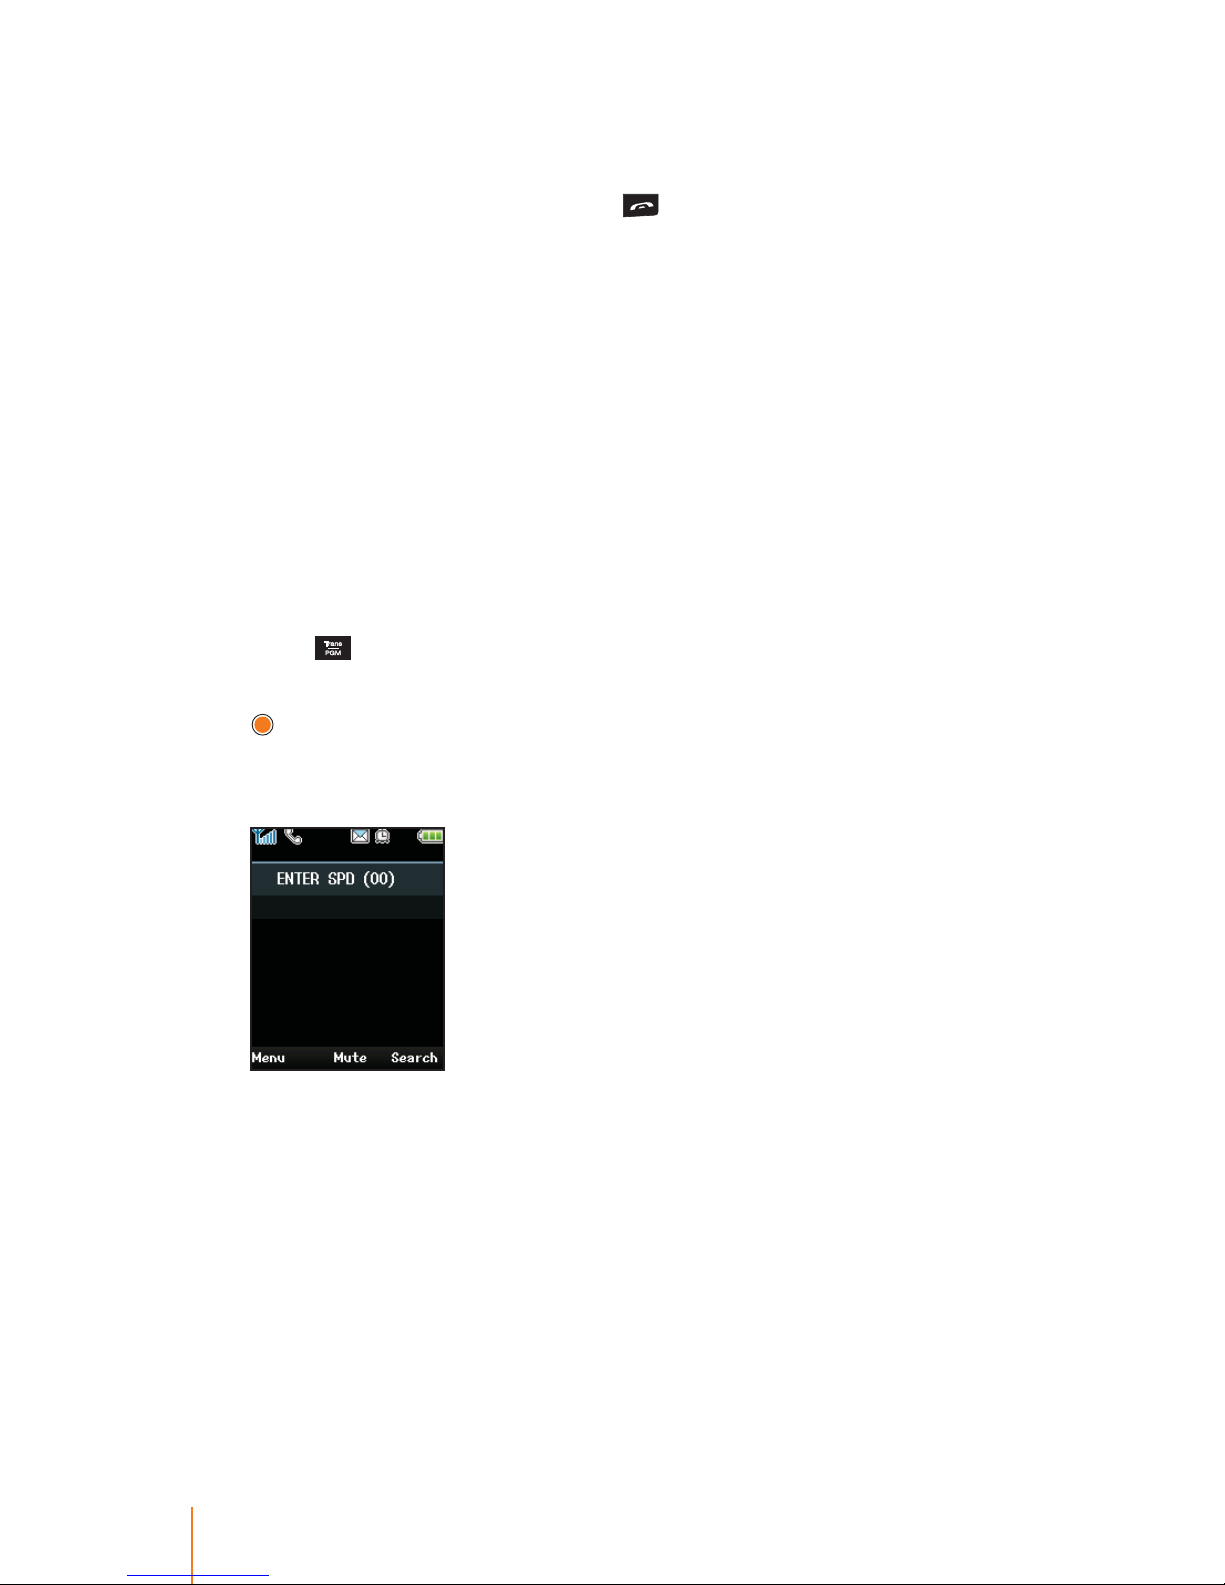
82 Chapter 10 System
Flash
The Flash function allows you to dial while busy tone is heard or to
make another call without press
to end a current call.
1. If the called party is busy.
2. Press navigation key left to select System > Flash.
2. When dial tone is heared, enter the phone number to which you
want to call again.
System Speed
You may program frenquently dialed external number of your choice
and store them in Speed Dial location on your phone. Internal number cannot be stored in speed dial.
Storing a Speed Dial
1. Press to access programing mode.
2. Press navigation key left to select System > System Speed and press
.
3. Enter the Speed Dial location with the number which can be up to 2
or 3 digits long, you want to store.
The screen will show "ENTER SPD (XX)" to prompt you to enter the
Speed Dial location number where required.
Assigned Speed Dial number for your phone may dier depend-
ing on what system you have used. In iPECS-LIK, the Speed Dial
number are:
- LIK 50/100: 00 ~ 19
- LIK 300: 000 ~ 099
Page 91
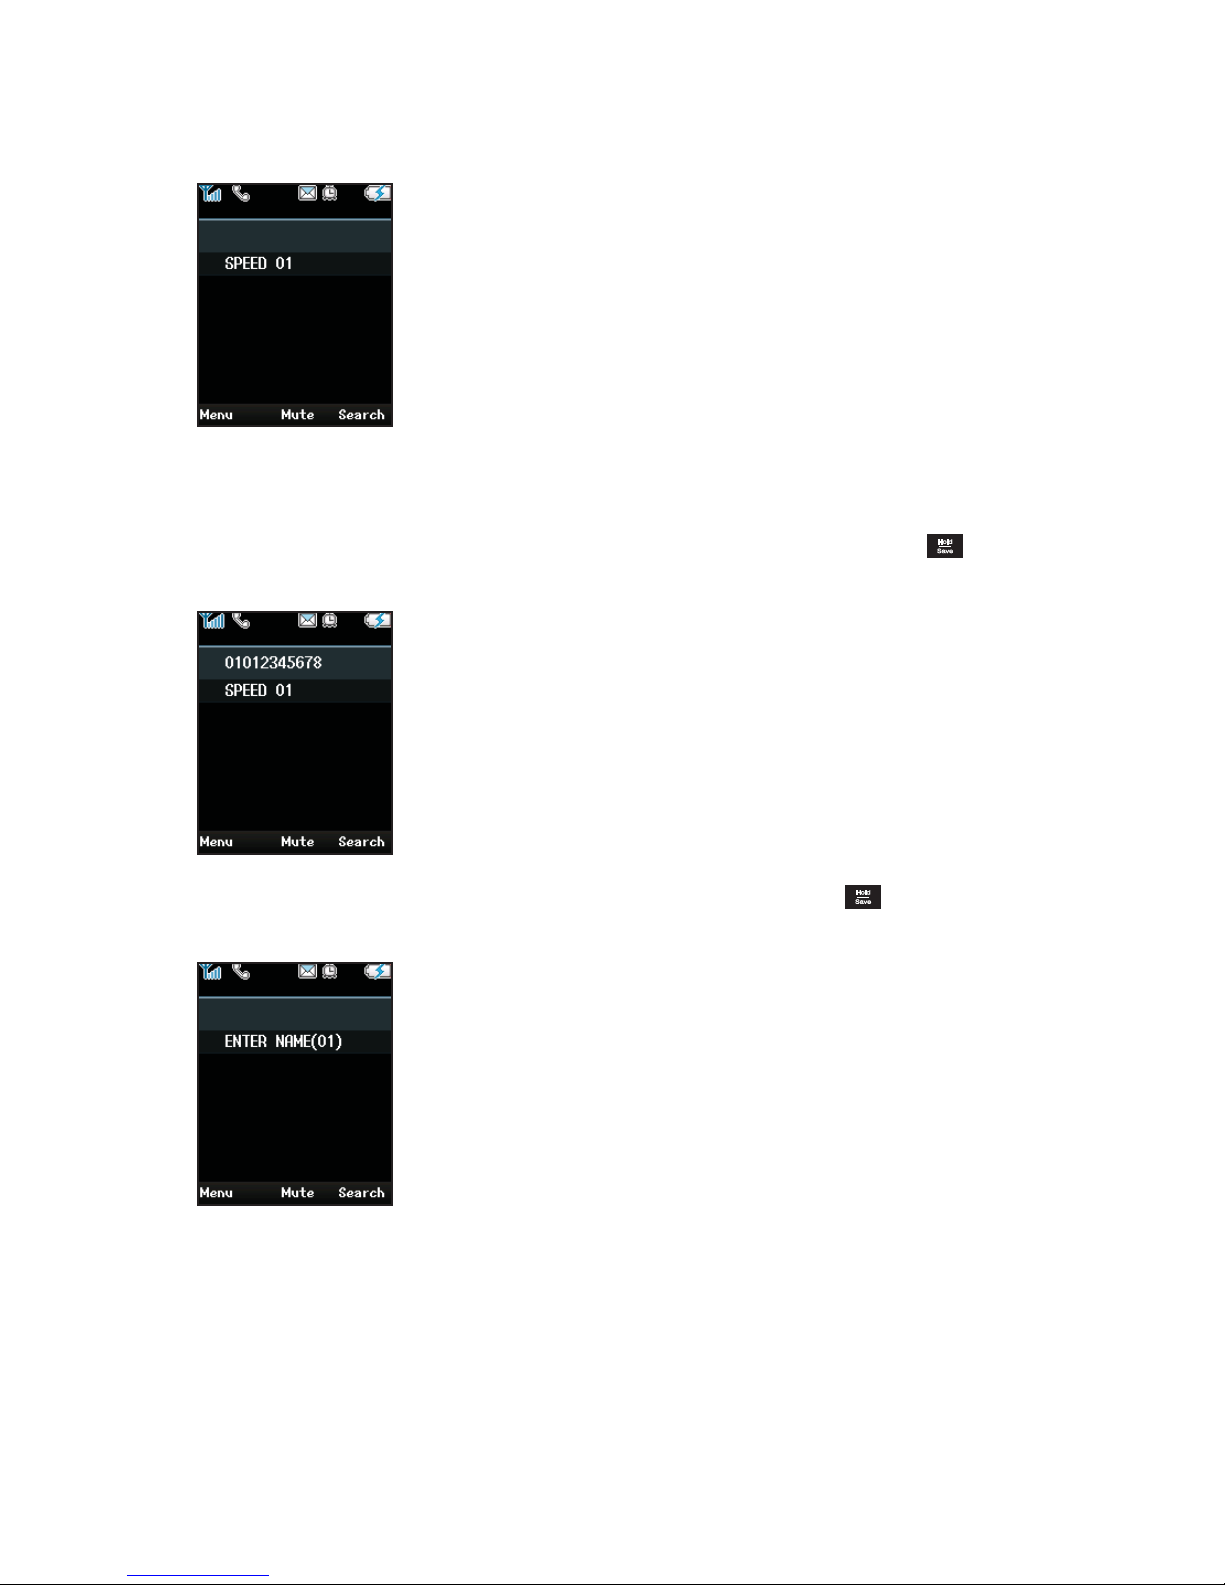
3. Enter the CO Code. Normally the CO code is '9' or '0' etc. For more information on this, please ask your system administrator.
For example, "SPEED 01" means that the number of location in the Speed
Dial you entered.
4. Eenter a phone number to the Speed Dial location 01 and press
to save
the location.
5. Enter a name to the number using the keypad and press to save the
name.
You can enter alphanumeric characters using the phone's keypad sup-
ported the text input mode are ABC or 123 refering to "Character Input
Table" on page 85.
The name of an Speed Dial can contain up to 16 characters.
6. Repeat steps 2~5 for each Speed Dial you want to add.
Page 92
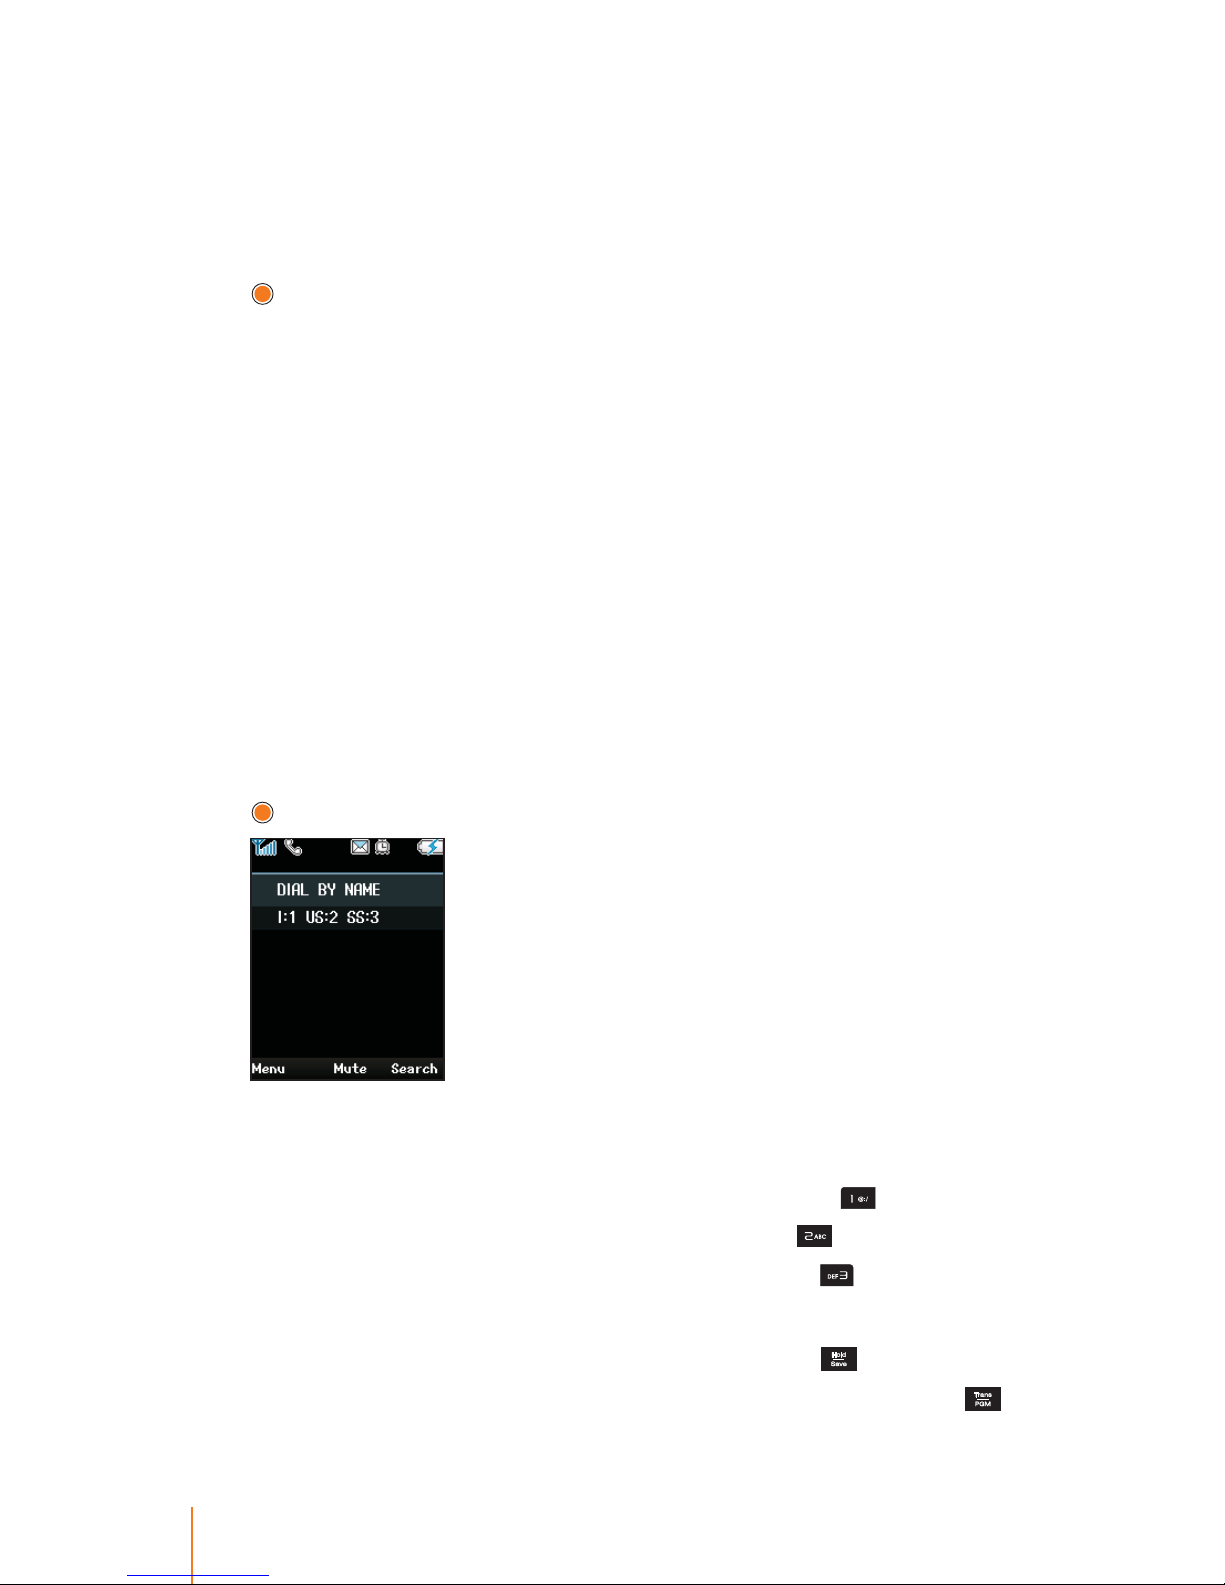
84 Chapter 10 System
Using a Speed Dial
You can make a call using Speed Dial in the phone.
To make a call using Speed Dial location number:
1. Press navigation key left to select System > System Speed and press
.
2. Press the Speed Dial location number using the keypad. The follow-
ing are number of Speed Dial for your reference:
Personal programing Speed Dial
- LIK 50/100: 00 ~ 19
- LIK 300: 000 ~ 099
System Speed Dial
- LIK 50/100: 200 ~ 999
- LIK 300: 2000 ~ 4999
3. Your phone automatically place the call.
To make a call after viewing the name:
1. Repeat above steps 1~2.
2. Press navigation key left to select System > System Speed and press
.
"DIAL BY NAME" is displayed along with informaing the Code as
below.
- I: 1 "I" means the Internal number's name, press
to view.
- US: 2 "US" means the User Speed Dial, press
to select.
- SS: 3 "SS" means the System Speed Dial, press
to select.
3. Press navigation key up or down to scroll though the Speed Dial.
4. When the desired number is displayed then press
to dial.
You can also view the number of selected name, by pressing
.
Page 93
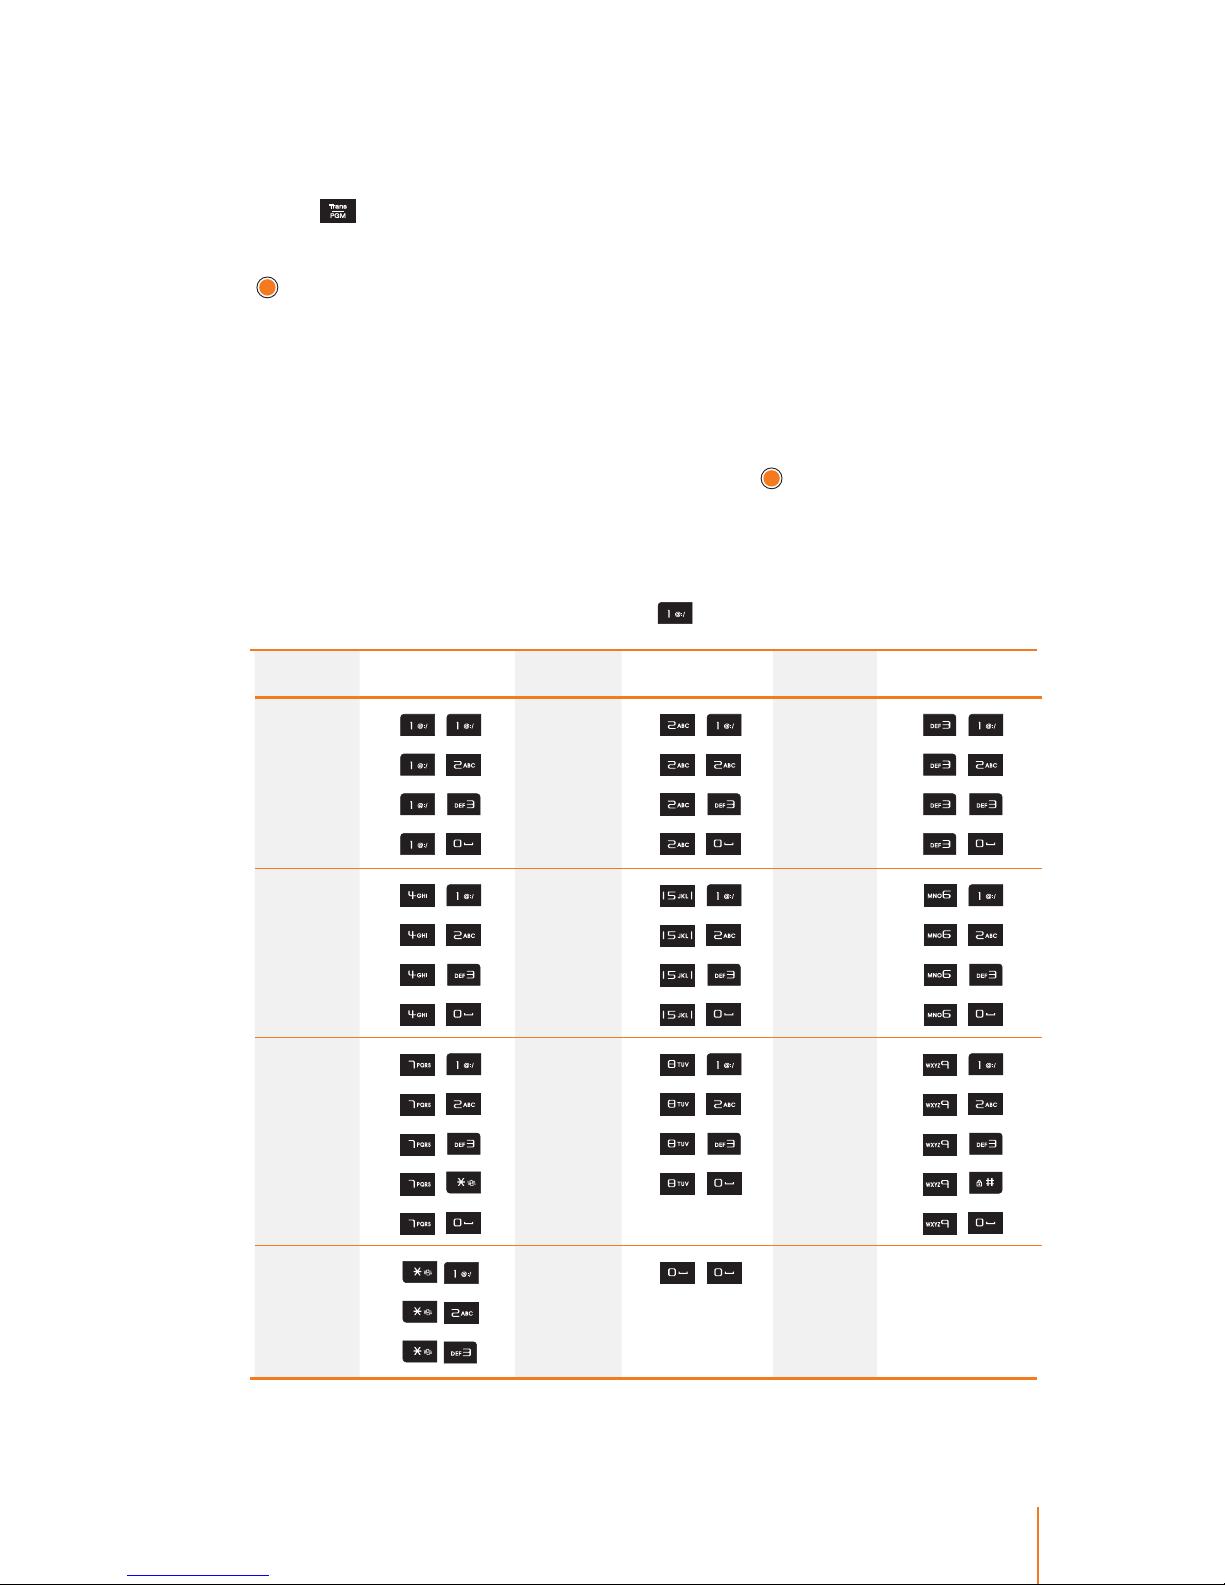
85Chapter 10 System
Deleting a Speed Dial
You can delete an existing Speed Dial in the phone.
1. Press
to access programing mode.
2. Press navigation key left to select System > System Speed and press
.
3. Enter the Speed Dial location with the number you want to delete.
For example, if you want to delete Speed Dial 01, Press "0" and "1"
using the keypad.
4. When displaying the number of Speed Dial, press navigation key left
to select System > System Speed and press
.
Character Input Table
The following table describes how to enter each letter and number.
For example, to enter the "Q" press
twice.
Letter Keypad Letter Keypad Letter Keypad
Q
Z
.
1
,
,
,
,
A
B
C
2
,
,
,
,
D
E
F
3
,
,
,
,
G
H
I
4
,
,
,
,
J
K
L
5
,
,
,
,
M
N
O
6
,
,
,
,
P
R
S
Q
7
,
,
,
,
,
T
U
V
8
,
,
,
,
W
X
Y
Z
9
,
,
,
,
,
Blank
:
,
,
,
,
0
,
Page 94
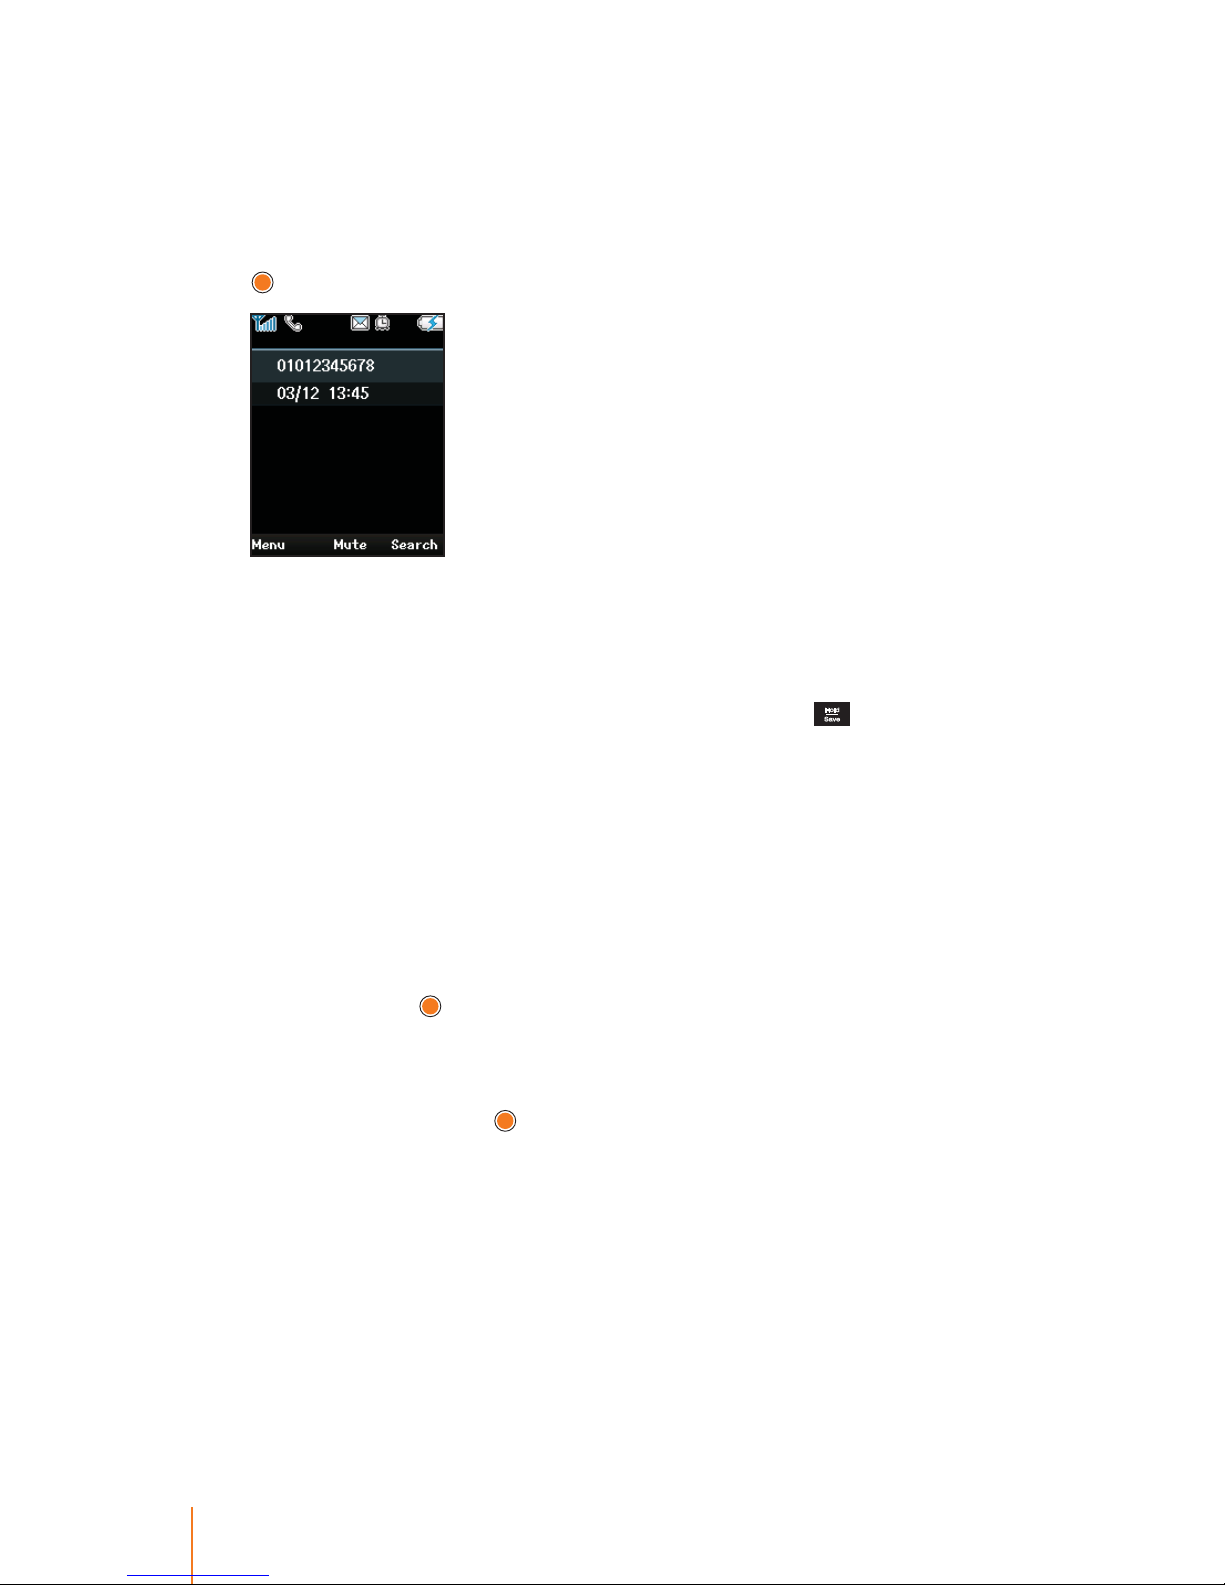
86 Chapter 10 System
System Redial
This feature allows you to redial the last number that you dialled
from your phone.
1. Press navigation key left to select System > System Redial and press
.
2. Press navigation key up or down to scroll though the last dialed
numbers.
The most recently dialed number is displayed on the top of list.
3. When the desired number is displayed then press
to dial.
The number will remain stored until another number is dialled,
thus erasing the previous number.
lCM (Intercom)
This feature allows you to hold an internal call and return to the
original caller.
1. During an internal call, press navigation key left to select System >
ICM and press
.
The other party is on hold and hold music is heared.
2. Return to the caller on hold, press navigation key left to select Sys-
tem > ICM and press
.
If you do not retrieve the call within a certain amount of time (set
by your system administrator) you will receive an internal call only
once from the other party.
Page 95
87Chapter 10 System
Mute
Use this feature, you can turn o the microphon in your phone. The
other party cannot hear you, but you can still hear them.
1. During a call, press navigation key left to select System > Mute and
press
.
or
Press Mute (middle softkey) to activate the mute feature.
2. Return to your phone conversation, press navigation key left to
select System > ICM and press
.
Call Transfer
The transfer feature redirects an active call to another number on the
system.
To talk to the transfer recipient before transferring a call
(Screened Transfer):
1. From an active call, press once or press navigation key left to
select System > Transfer and press
.
The rst call is on hold and hold music is heared.
2. Enter the destination number to which the call is to be transferred.
3. When the recipient answers, announce the caller.
4. press
to complete the transfer and end a call.
To transfer a call without talking to the transfer recipient
(Unscreened Transfer):
1. From an active call, press once or press navigation key left to
select System > Transfer and press
.
The rst call is on hold and hold music is heared.
2. Enter the destination number and press
to complete the transfer
and end a call.
To cancle a call transfer:
1. While you are transferring a call, press to cancel a call transfer.
2. Transferring a call is terminated and you will be reconnected to the
rst caller.
Page 96
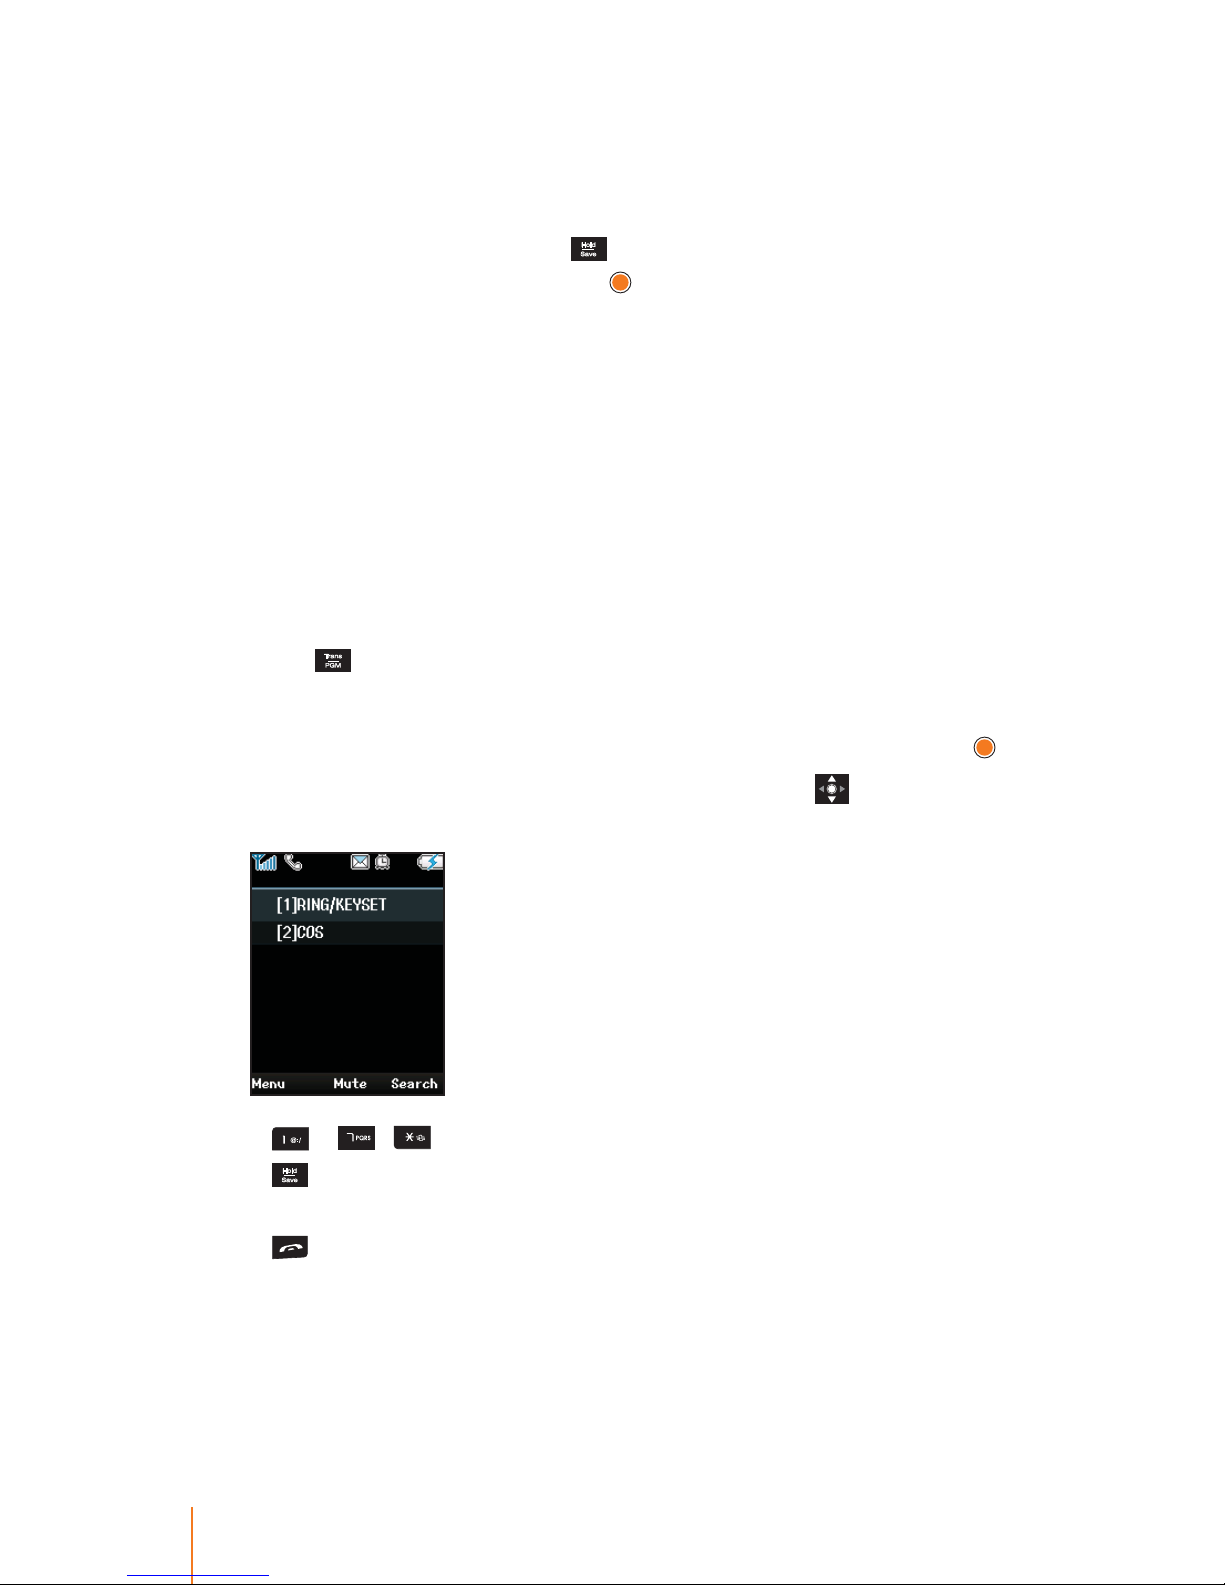
88 Chapter 10 System
Hold/Save
You can place an external call on hold to answer an incoming call or
place a call.
1. During a external call, press
or press navigation key left to select
System > Hold/Save and press
.
The current call is on hold and the hold music will be heard.
2. Press the number to which you want call.
3. Return to the caller on hold, enter the Access Held CO code. For more
information on this, please ask your system administrator.
Program
The Program allows you to set the features which required to use
the WIT-400HE. Some of that features might not be supported in
WIT-400HE.
1. Press
to access programing mode.
or
Press navigation key left to select System > Program and press
.
2. When the menu displayed on the screen, use the
to scroll
through the menu and press:
~ , to select the menu item.
to save the setting values (It may slightly dier defending on
what menu item you set.)
to move back to the current menu item or go to the standby
mode.
Page 97

89
Chapter
11
Settings
WIT-400HE is one of the phone to be recognized from the iPECS System. This chapter explains how to set the phone connects to a network as well as special features that let you manage your networks.
Prole Settings
The Prole Settings provide instructions for creating proles and
connecting to an wireless LAN in order to register your phone to the
iPECS System.
Creating Proles
Proles are used to connect to wireless LANs. Before connecting to
the selected wireless LAN, you are required to create and use a prole. Once you select the wireless LAN, the prole entry is displays.
To use phone’s default prole:
1. Press > Settings > Prole Setting.
2. Select SystemDefault. Only this default prole can be able to sup-
port Handover between the same SSID in the dierent AP (access
point).
3. Press Menu (left softkey) and select Edit, and then press
.
Prole entry eld
Page 98
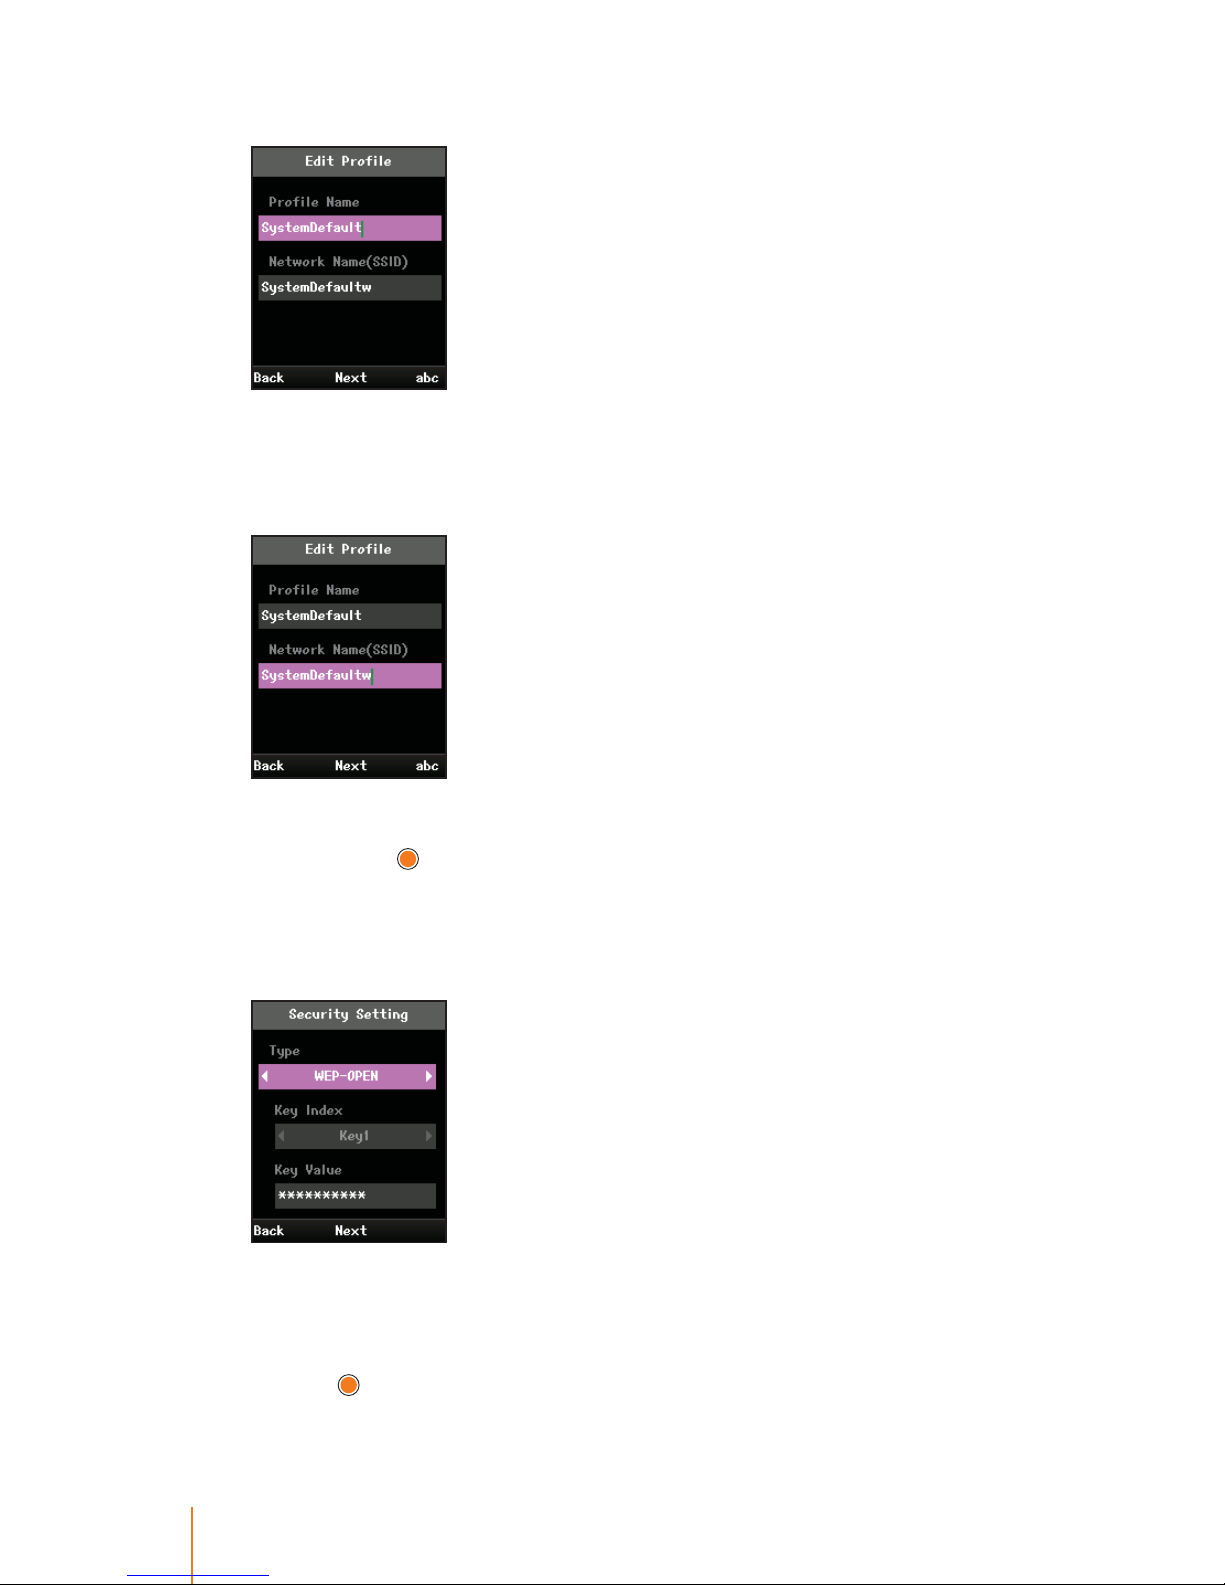
90 Chapter 11 Settings
4. To edit the name to use for the default prole:
Select Prole Name eld and enter a prole name to whatever you
want.
5. To assign a prole to the wireless LAN access point:
Select Network Name(SSID) eld and enter a network name, and
then press
.
This SSID must be exactly the same as it is in an access point which
you have installed.
6. To set an encryption type to the default prole:
Select Security Setting eld and press navigation key left or right
to select an valid value NONE, WEP-OPEN, WEP-SHARED, WPA-PSKTKIP, WPA-PSK-AES, WPA2-PSK-TKIP, or WPA2-PSK-AES, and then
press
.
Page 99
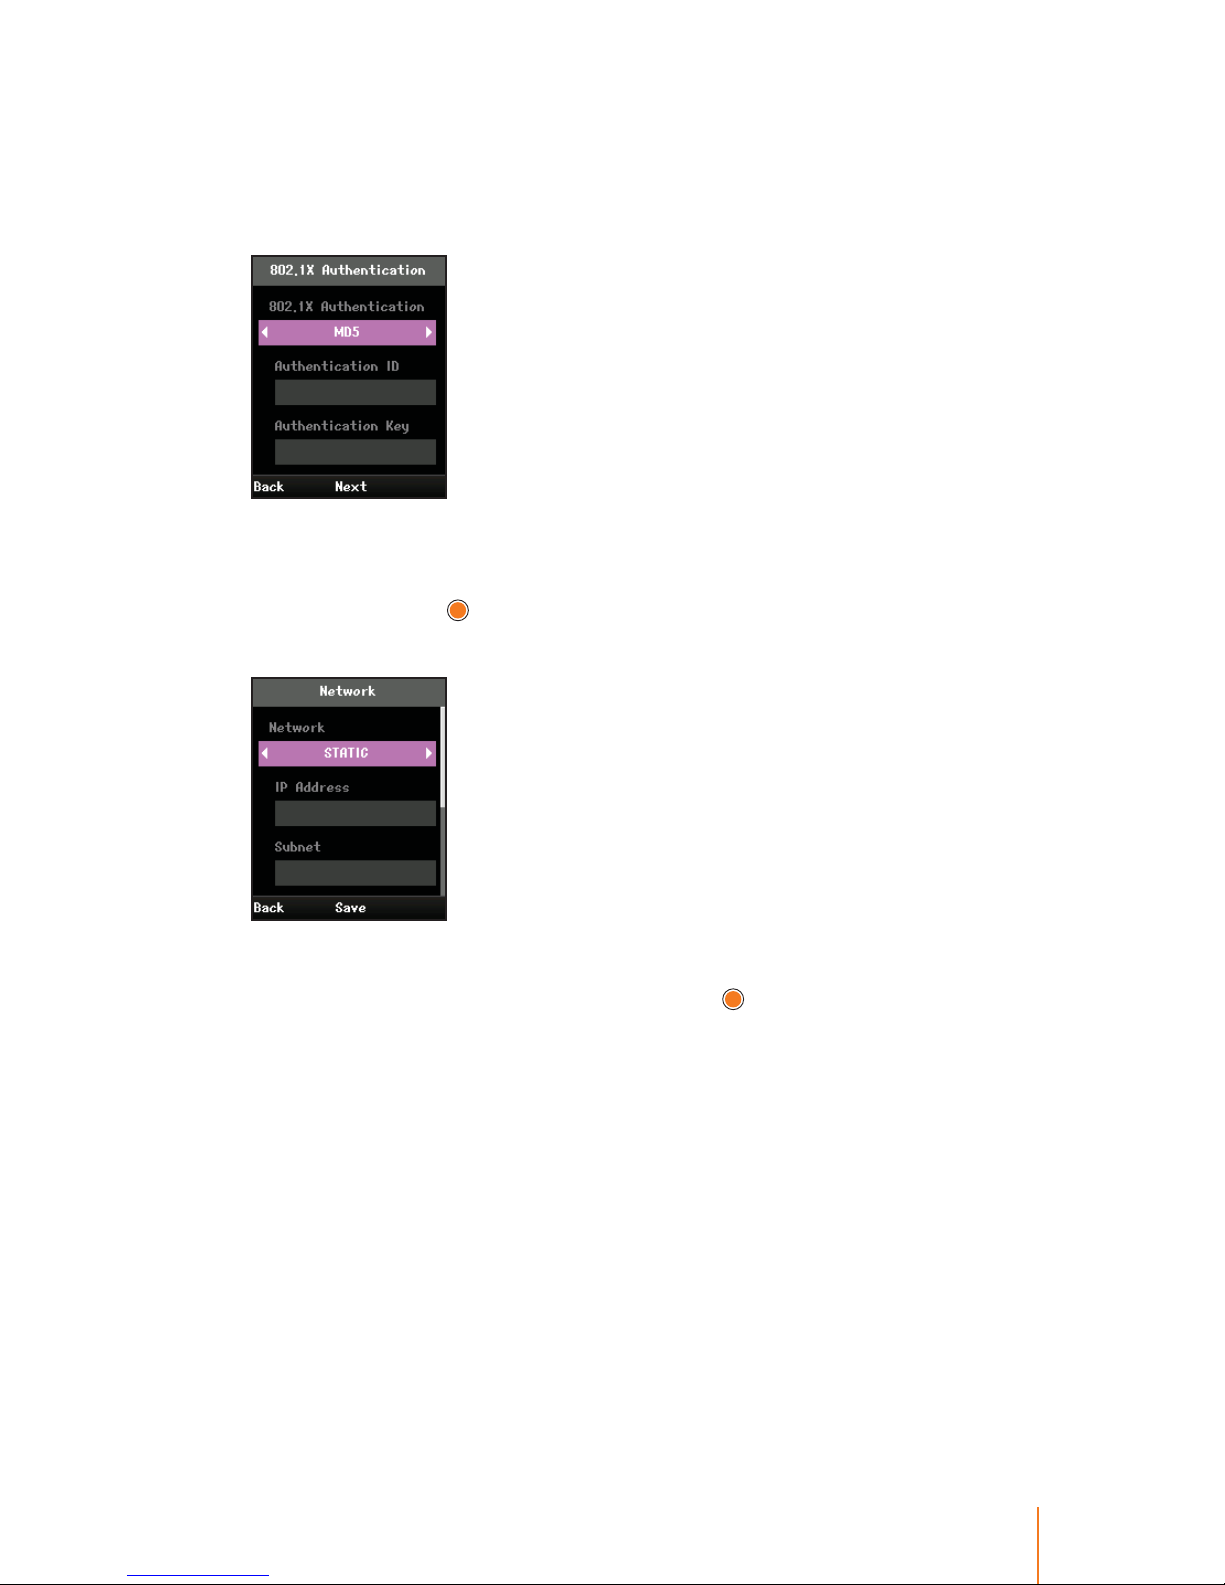
91Chapter 11 Settings
The encryption method in use for this prole. An encryption type
must be exactly the same as it is in an wireless LAN access point
which you have installed.
7. To set authentication to the default prole:
Select 802.1X Authenication eld and press navigation key left or
right to select an valid value NONE, MD5, TTLS, PEAP, LEAP, or TLS
and then press
.
8. To set network to the default prole:
Select Network eld and press navigation key left or right to select
one of DHCP or STATIC, and then press
.
IP Address must be within the same network area and all access
point’s IP address are within it too for supporting handover.
- DHCP is client provides a mechanism for allocating IP addresses
dynamically so that addresses can be reused when hosts no
longer need them.
- STATIC is a number that is assigned to a phone by an Internet
service provider to be its permanent address on the Internet. In
this case, you must manually enter the following information to
set for the network.
IP Address: The IP address of this phone.
Subnet: The subnet mask used for the network.
Primary GW: The IP address of the gateway for the network.
Page 100
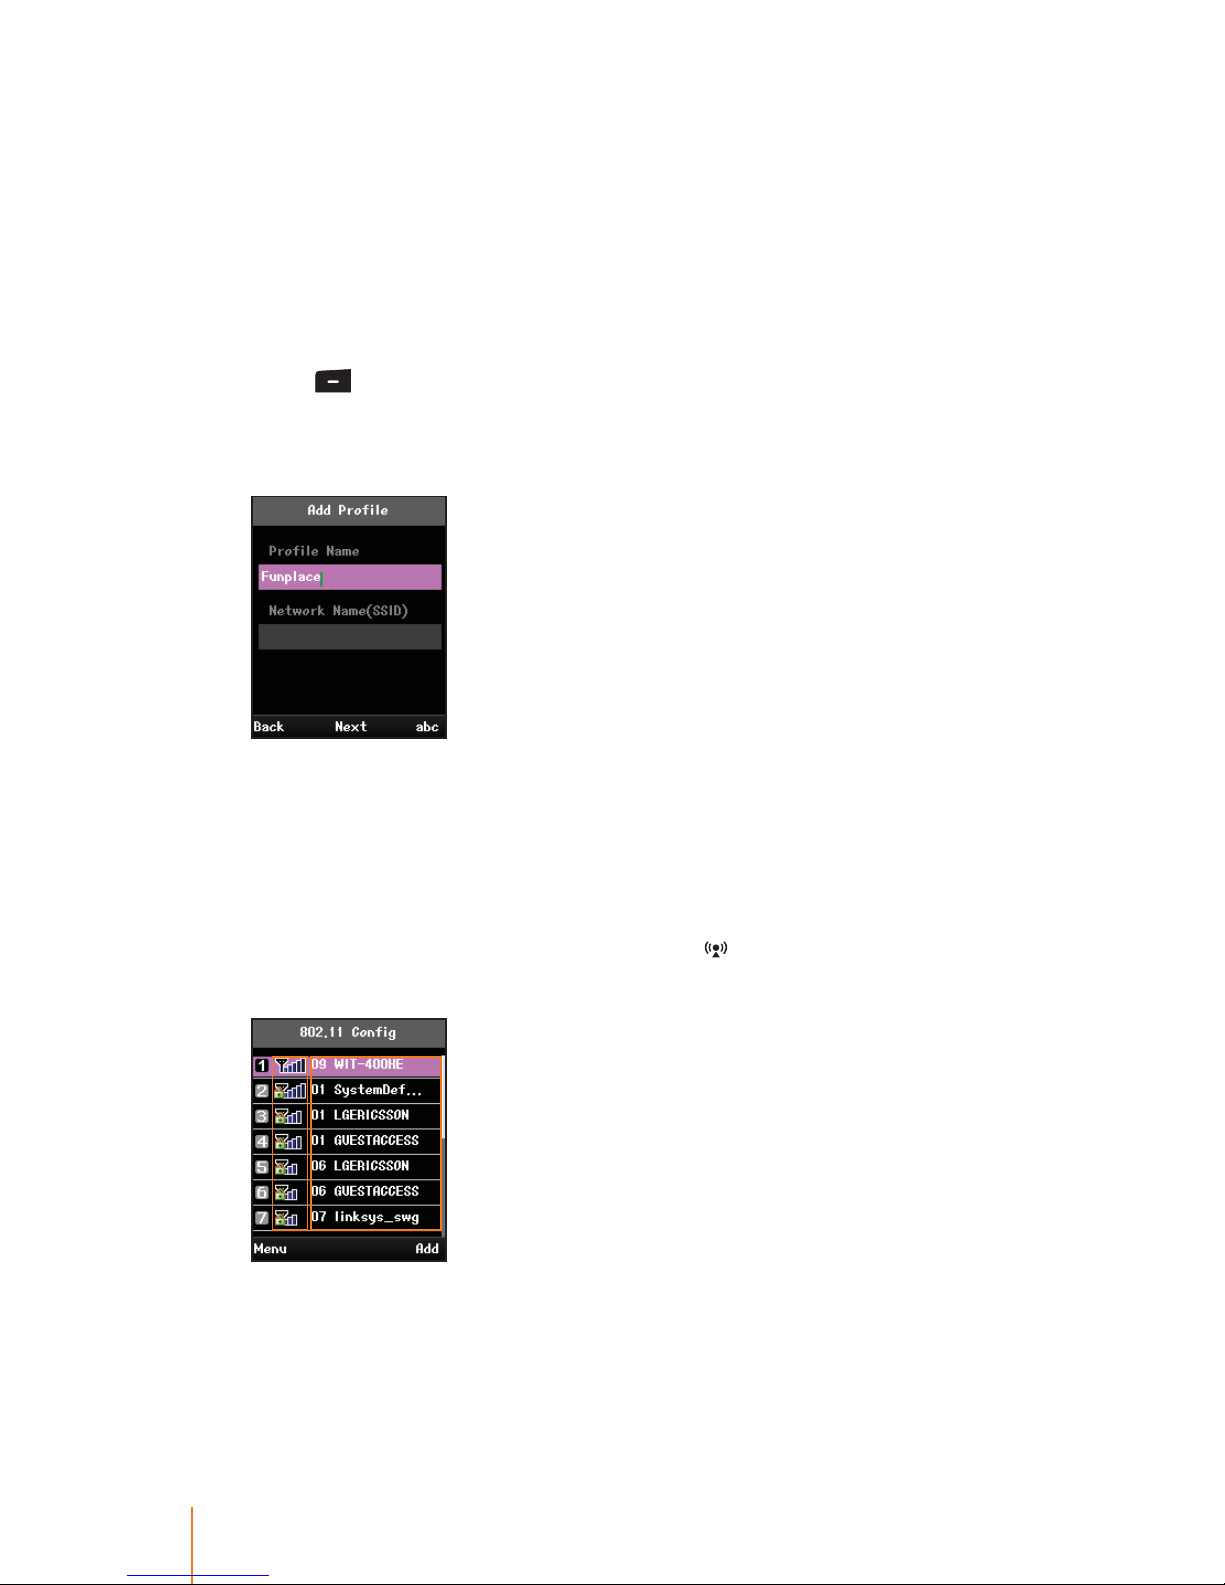
92 Chapter 11 Settings
Primary DNS: The primary IP address of the Domain Name Server for this
network.
Secondary DNS: The secondary IP address of the Domain Name Server for
this network.
9. After setting IP address, the phone tries to register with the system if
you select this prole.
To create a new prole:
1. Press > Settings > Prole Setting.
2. Press Add (right softkey) to create the new prole.
3. To assign the name to the new prole:
Select Prole Name eld and enter a prole name to whatever you want.
4. Follow the applicable instructions in "To use phone’s default prole:"
on page 85.
To create a new prole after searching wireless LAN:
1. In standby mode, press navigation key ( ) up to search wireless
LAN around the phone.
The screen shows "Searching SSID" for a while, and then displays
existing all the wireless LANs in the phone’s neighborhood.
Left part on the screen shows the security and signal strength of
the network.
 Loading...