

Page 1

LIP-9070
User Guide
Please read this manual carefully before operating Phone.
Retain it for future reference
Page 2

LIP-9070 iPKTS User Guide
What is new in this release?
Issue Date Change of Contents
1.0
March, 2013
Initial Release
Copyright© 2013 Ericsson-LG Co., Ltd. All Rights Reserved
This material is copyrighted by Ericsson-LG Co., Ltd. Any unauthorized reproductions, use or disclosure of
this material, or any part thereof, is strictly prohibited and is a violation of Copyright Laws. Ericsson-LG
reserves the right to make changes in specifications at any time without notice. The information furnished by
Ericsson-LG in this material is believed to be accurate and reliable, but is not warranted to be true in all
cases.
Page 3

LIP-9070 iPKTS User Guide
Regulatory and Safet y Notices
European Union Declara t ions of Conformity
Ericsson-LG Co., Ltd. declare that the equipment specified in this document bearing the “ CE” mark
conforms to the European Union Radio and Telecommunications Terminal Equipment Directive(R&TTE
1999/5/EC), including the Electromagnetic Compatibility Directive(2004/108/EC) and Low Voltage
Directive(2006/95/EC).
Copies of these Declarations of Conformity (DoCs) can be obtained by contacting your local sales
representative.
[USA/CSA]
FCC/IC Interference Statement
This equipment has been tested and found to comply with the limits for a Class B digital device, pursuant to
part 15 of the FCC Rules.
These limits are designed to provide reasonable protection against harmful interference in a residential
installation.
This equipment generates, uses and can radiate radio frequency energy and, if not installed and used in
accordance with the instructions, may cause harmful interference to radio communications. However, there
is no guarantee that interference will not occur in a particular installation. If this equipment does cause
harmful interference to radio or television reception, which can be determined by turning the equipment off
and on, the user is encouraged to try to correct the interference by one or more of the following measures:
ㆍ Reorient or relocate the receiving antenna.
ㆍ Increase the separation between the equipment and receiver.
ㆍ Connect the equipment into an outlet on a circuit different from that to which the receiver is connected.
ㆍ Consult the dealer or an experienced radio/TV technician for help.
This device complies with part 15 /RSS-GEN of the FCC/IC rules. Operation is subject to the following two
conditions:
(1)This device may not cause harmful interference; and (2) This device must accept any interference
received, including interference that may cause undesired operation.
This Class B digital apparatus complies with Canadian ICES-003.
Cet appareil numérique de la classe B est conforme à la norme NMB-003 du Canada.
The use of this device in a system operating either partially or completely outdoors may require the user to
obtain a license for the system according to the Canadian regulations.
CAUTION : Any changes or modifications in construction of this device which are not expressly
approved by the party responsible for compliance could void the user's authority to operate the
equipment.
Page 4

LIP-9070 iPKTS User Guide
Regulatory Information / Disclaimers
"Privacy of communications may not be ensured when using this telephone".
Any changes or modifications made to this device that are not expressly approved by the manufacturer may
void the user’s authority to operate the equipment.
The Manufacturer is not responsible for any radio or television interference caused by unauthorized
modification of this device, or the substitution or attachment of connecting cables and equipment other than
those specified by the manufacturer. It is the responsibility for the user to correct any interference caused
by such unauthorized modification, substitution or attachment.
The manufacturer and its authorized resellers or distributors will assume no liability for any damage or
violation of government regulations arising from failure to comply with these guideline.
The device is certified to the require ments of R SS-210 for 2.4GHz spread spectrum devices.
The use of this device in a system operating either partially or completely outdoors may require the user to
obtain a license for the system according to the Canadian regulations. For further information contact your
Local Industry Canada office.
Important Safety Instructions
When using your telephone equipment, basic safety precautions should always be followed to reduce the
risk of product damage, fire, electric shock and personal injury, including the following:
Please read and understand all instructions.
Follow all warnings and instructions marked on the product.
To prevent the risk of fire, electric shock or energy hazard, do not use this product near water or
expose this product to rain or any type of moisture at any time.
Do not place this product on an unstable table, stand, or card table; the product may fall, causing
serious damage to the product or serious injury to those nearby.
This product should be operated only from the type of power source indicated on the product label. If
you are not sure of the type of power supply at your location, consult your dealer or local power
company.
Do not allow anything to rest on the wiring to the product. Do not locate this product where the cords
or wiring could be abused by people walking on it.
Do not overload wall outlets and extension cords as this can result in the risk of fire or electric shock.
To reduce the risk of electric shock, do not disassemble this product. Instead, take it to a qualified
person when service or repair work is required. Opening or removing covers may expose you to
dangerous voltages or other risk. Incorrect reassemble can cause electric shock when the appliance
is subsequently used.
Unplug this product from the wall outlet and refer servicing to qualified service personnel under the
following conditions:
° When the power supply cord, plug or other wiring to the product is damaged or frayed.
° If liquid has been spilled into the product.
° If the product has been exposed to rain or water.
Page 5

LIP-9070 iPKTS User Guide
° If the product does not operate normally by following the operating instructions.
° If the product has been dropped.
° If the product exhibits a distinct change in performance.
° If a failure occurs which exposes any internal parts, disconnect the power supply cord and
wiring immediately and contact your system administrator.
Keep the product away from heating appliances and electrical noise generating devices such as
florescent lamps, motors and televisions. These noise sources can interfere with the performance of
the iPECS system.
This product should be kept free of dust, moisture, high temperature (more than 40 degrees) and
vibration, and should not be exposed to direct sunlight.
Avoid using the telephone during an electrical storm; there is a remote risk of electric shock from
lightning.
In the event of a gas leak, do not use the telephone near the leak.
Never attempt to insert wires, pins, etc. into the product. If the product does not operate properly, the
equipment should be repaired by an authorized Ericsson-LG service center.
Do not use benzene, paint thinner, or an abrasive powder to clean the product. Wipe it with a soft
cloth only.
Disposal of Old Appliance
When the displayed symbol (crossed-out wheeled bin) is adhered to a product, it designates the product is
covered by the European Directive 2012/19/EU.
All electric and electronic products should be disposed of only in special co llection faci lities
appointed by government or local/municipal authorities.
The correct disposal of your old appliance will help prevent potential negative
consequences for the environment and human health.
For more detailed information about disposal of your old appliances, please contact your
city office, waste disposal service or the place of product purchase.
Page 6

LIP-9070 iPKTS User Guide
Table of Contents
1 Introduction .......................................................................................... 1
2
Installation ............................................................................................ 2
2.1 Overview ........................................................................................................ 2
Removing the Cord Cover .............................................................................. 3
2.2
Mounting the Phone and Pedestal ................................................................. 3
2.3
Network Connections ..................................................................................... 3
2.4
Optional AC/DC Adapter Connections ........................................................... 4
2.5
Connect the Handset and Optional Headset .................................................. 4
2.6
2.7
Replace the Cord Cover ................................................................................. 4
Power up and Setup Wizard ........................................................................... 5
2.8
2.8.1 Language Selection ...................................................................................................... 5
2.8.2 Protocol Selection ......................................................................................................... 5
2.9 Registration .................................................................................................... 6
Mounting and Dismounting an SD card .......................................................... 7
2.10
3 Basics Operation ................................................................................. 8
3.1 Incoming Calls ............................................................................................... 8
Outgoing Calls ............................................................................................... 8
3.2
Holding Calls .................................................................................................. 9
3.3
Transferring a Call ......................................................................................... 9
3.4
3.5
Conference .................................................................................................... 9
4 Mini-Tab Phone Display Basics ......................................................... 10
4.1 Basic User Gestures .................................................................................... 10
Mini-Tab Function Buttons ........................................................................... 11
4.2
i
Page 7

LIP-9070 iPKTS User Guide
4.3 Mini-Tab Menus ........................................................................................... 11
4.3.1 Screen Option Menus ................................................................................................. 11
4.3.2 Touch and Hold Context Menus .................................................................................. 11
4.3.3 Dialogs and Popups .................................................................................................... 12
4.4 Launcher Screens ........................................................................................ 12
Home Screen ............................................................................................... 12
4.5
Application Dock .......................................................................................... 12
4.6
4.6.1 Managing the App Dock .............................................................................................. 13
4.6.1.1 Adding Icons to App Dock, ............................................................................................... 13
4.6.1.2
Deleting Icons from the Apps Dock .................................................................................. 13
4.7 Notification And Status Ba r ....................................................................... 14
Customize the Launcher Screens ................................................................ 16
4.8
4.8.1 Adding Apps and Widget ............................................................................................. 16
4.8.2 Reposition or Delete a Screen Item ............................................................................ 16
4.9 Handling Widgets ......................................................................................... 17
5 iPECS Phone ..................................................................................... 18
5.1 Speed .......................................................................................................... 19
5.1.1 Using Auto dialing ....................................................................................................... 19
5.1.2 Setting up a Station Speed Dial .................................................................................. 20
5.2 Call Back Message Wait ............................................................................ 20
5.3
Flex Buttons ............................................................................................... 21
Video Calling ................................................................................................ 21
5.4
iPECS Phone Call Settings .......................................................................... 22
5.5
5.5.1 Preferences ................................................................................................................. 23
5.5.2 Flex Button Labels ...................................................................................................... 23
5.5.3 Phone Management .................................................................................................... 24
5.5.4 Ringtone Sounds ......................................................................................................... 24
5.5.5 System Configuration .................................................................................................. 24
5.5.6 Reboot ........................................................................................................................ 25
Page 8

LIP-9070 iPKTS User Guide
6 Working with Contacts ....................................................................... 26
6.1 Searching the Contacts ................................................................................ 26
Communicating with Contacts ...................................................................... 26
6.2
Managing the Contact Database .................................................................. 27
6.3
6.3.1 Adding a Contact ......................................................................................................... 27
6.3.1.1 CO Access Code ............................................................................................................. 28
6.3.2 Display Options ........................................................................................................... 28
6.3.3 Import and Export Contacts ......................................................................................... 29
6.4 Managing a Contact Record ......................................................................... 30
6.4.1 Edit Contact Information .............................................................................................. 30
6.4.2 Deleting a Contact ....................................................................................................... 30
6.4.3 Joining Contact records .............................................................................................. 30
6.5 Favorites ...................................................................................................... 31
6.6
Miscellaneous Contact Options .................................................................... 31
6.6.1 Contact’s Default Number ........................................................................................... 31
6.6.2 Send to Voice Mail ...................................................................................................... 31
6.6.3 Contact Ringtone ........................................................................................................ 31
6.6.4 Share a Contact .......................................................................................................... 32
7 Call Log .............................................................................................. 33
7.1 Viewing the Call Logs ................................................................................... 33
Using the Call Logs ...................................................................................... 33
7.2
8 Using SMS (Short Message Service) ................................................ 35
8.1 Send a Message .......................................................................................... 35
8.1.1 Options Menu .............................................................................................................. 36
8.2 Receive a Message ...................................................................................... 36
8.3
Message Options ......................................................................................... 37
Messaging Screen Options Menu ................................................................ 37
8.4
8.4.1 Deleting a Message Thread ........................................................................................ 38
Page 9

LIP-9070 iPKTS User Guide
8.4.2 Messaging Settings ..................................................................................................... 38
9 Appointment/Event Calendar ............................................................. 39
9.1 Viewing Schedule details ............................................................................. 40
Managing Schedules .................................................................................... 40
9.2
9.2.1 Add an Event Schedule ............................................................................................... 40
9.2.2 Edit an Event Schedule ............................................................................................... 40
9.2.3 Delete an Event Schedule ........................................................................................... 41
9.3 Responding to a Reminder ........................................................................... 41
10 General Purpose Apps ...................................................................... 42
10.1 Setting the Alarm Clock ................................................................................ 42
Using the Calculator ..................................................................................... 43
10.2
Handling Pictures and Videos ...................................................................... 43
10.3
10.3.1 Taking Pictures ........................................................................................................... 44
10.3.2 Recording Videos ........................................................................................................ 44
10.3.3 Picture and Video Controls ......................................................................................... 45
10.3.4 Review Pictures and Videos ........................................................................................ 46
10.3.5 Using the Gallery and Albums ..................................................................................... 46
10.3.5.1 Viewing a Slide show ....................................................................................................... 47
10.3.5.2
10.3.5.3
10.3.5.4 Picture Gallery Tools ....................................................................................................... 48
10.3.5.5
Selecting Multiple Pictures ............................................................................................... 47
Viewing Pictures .............................................................................................................. 47
Viewing Videos ................................................................................................................ 49
10.4 Playing Music ............................................................................................... 49
10.4.1 Playing Songs ............................................................................................................. 50
10.4.2 Playing a Party-Shuffle ................................................................................................ 50
10.4.3 Play songs from a Playlist ........................................................................................... 50
10.4.4 Managing Playlists ...................................................................................................... 51
10.4.4.1 Cr e ate a Playlist .............................................................................................................. 51
Page 10

LIP-9070 iPKTS User Guide
10.4.4.2 Add Songs to a Playlist .................................................................................................... 51
10.4.4.3
10.4.4.4
10.4.4.5
Rename a Playlist ............................................................................................................ 52
Delete a Playlist ............................................................................................................... 52
Delete Song from Playlist ................................................................................................. 52
10.4.5 Delete Songs from SD Card ........................................................................................ 52
10.4.6 Use as Ringtone .......................................................................................................... 52
11 Managing Bluetooth ........................................................................... 53
11.1 Bluetooth Headset ....................................................................................... 53
Bluetooth Handsfree .................................................................................... 53
11.2
11.2.1 Bluetooth HF Call Waiting ........................................................................................... 54
11.2.2 Outgoing HFP call ....................................................................................................... 55
11.2.3 Audio Transfer ............................................................................................................. 55
11.2.4 Bluetooth HF Audio Priority ......................................................................................... 55
12 Settings .............................................................................................. 56
12.1 Network and Bluetooth ................................................................................. 56
12.1.1 Network (Ethernet) Configuration ................................................................................ 57
12.1.1.1 OpenVPN ........................................................................................................................ 57
12.1.1.2
12.1.1.3
LLDP Setting ................................................................................................................... 58
802.1x Setting .................................................................................................................. 58
12.1.2 Bluetooth settings ........................................................................................................ 58
12.2 Sound .......................................................................................................... 59
Display ......................................................................................................... 59
12.3
Applications .................................................................................................. 60
12.4
12.5
Privacy ......................................................................................................... 60
Storage ........................................................................................................ 60
12.6
12.6.1 SD Card ...................................................................................................................... 61
12.7 Language & Keyboard ................................................................................. 61
NTP settings ................................................................................................ 61
12.8
Page 11

LIP-9070 iPKTS User Guide
12.9 About phone ................................................................................................. 62
12.9.1 System Updates .......................................................................................................... 62
Appendix A Station User Programming ................................................. 63
Appendix B Web Admin
Appendix C Touch screen calibration
......................................................................... 66
..................................................... 75
Page 12
LIP-9070 iPKTS User Guide
1 Introduction
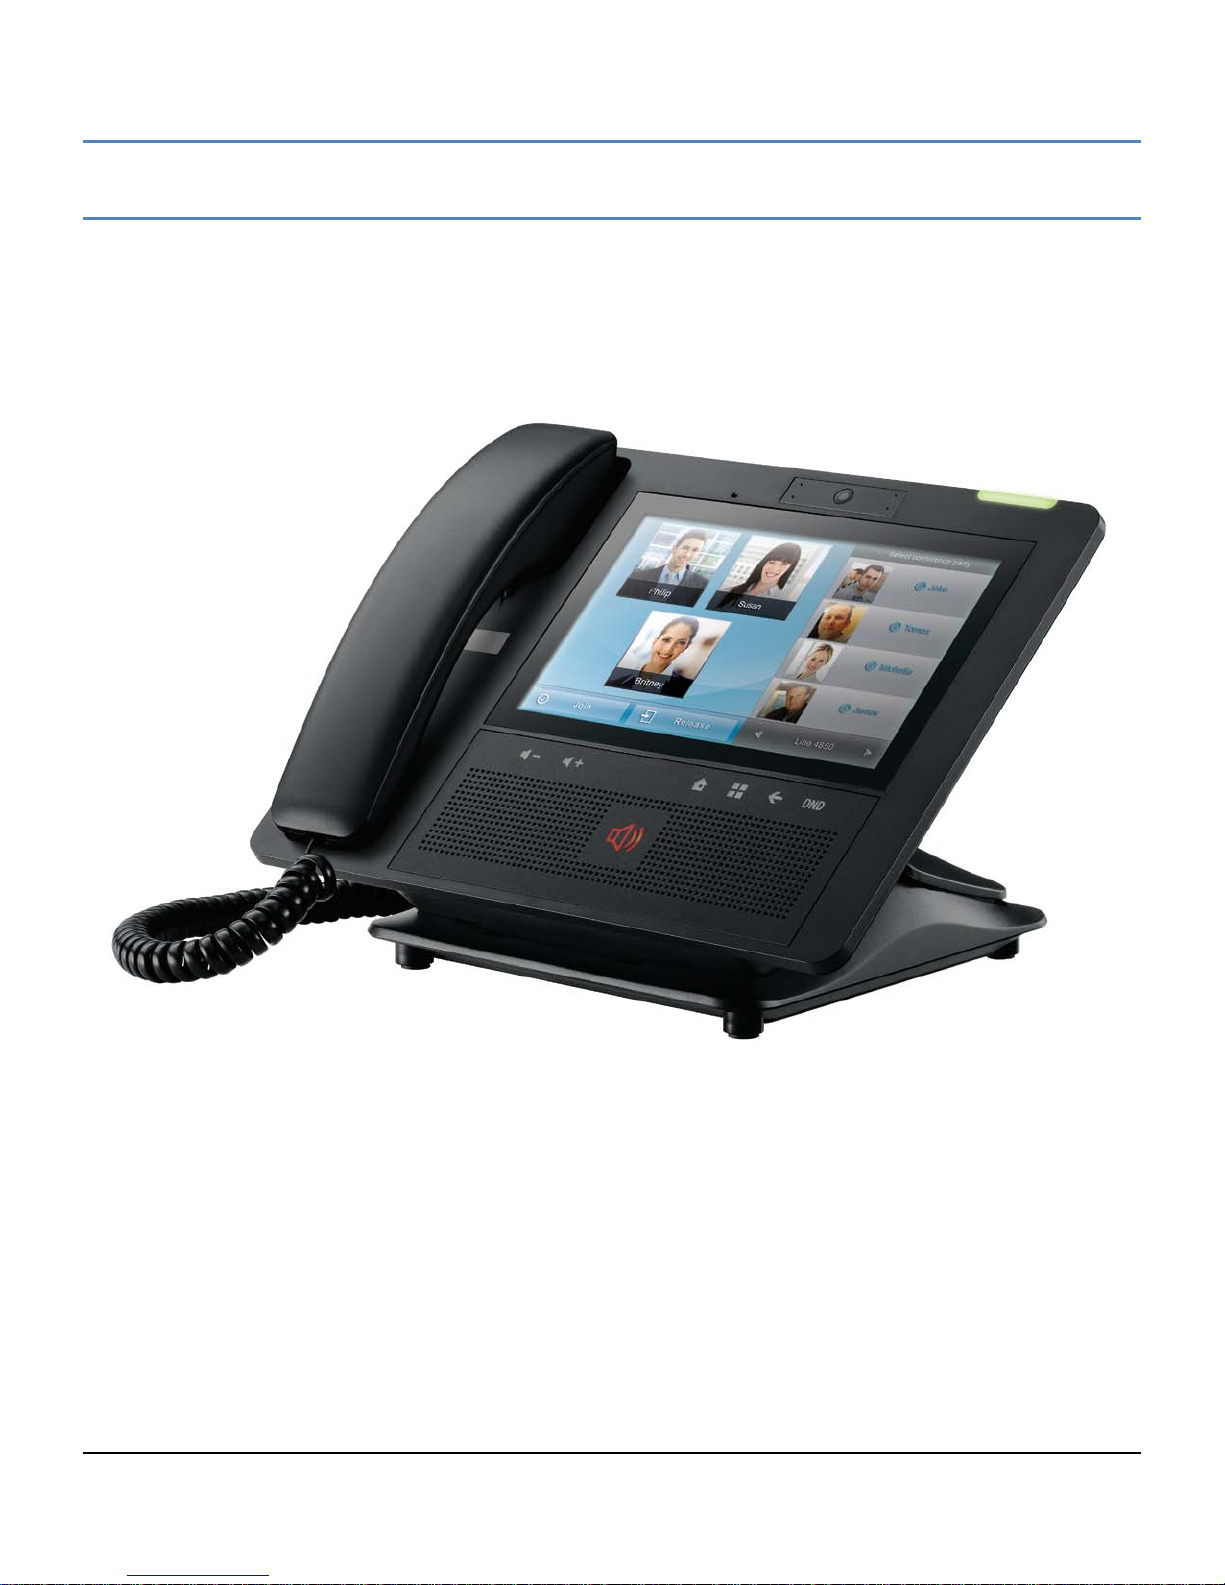
The LIP-9070 is an a dvanc ed b usines s com munic ations ter m inal for us e wit h iPECS platf orm s. T he phone em ploys a
Mini-tab running the An droid O S as a displ ay and user cont rol interf ace. T he iPECS Phone applicat ion is pe rm anentl y
installed and provides the user with access to all the features and functions of the iPECS plus the interaction with other
communications a ware apps with a trul y intuitive user touch inter face. In addition, t he Mini-tab is loaded with apps f or
Contacts, Calendar, Video, etc. to improve productivity and ease of use.
1
Page 13
LIP-9070 iPKTS User Guide
2 Installation
2.1 Overview
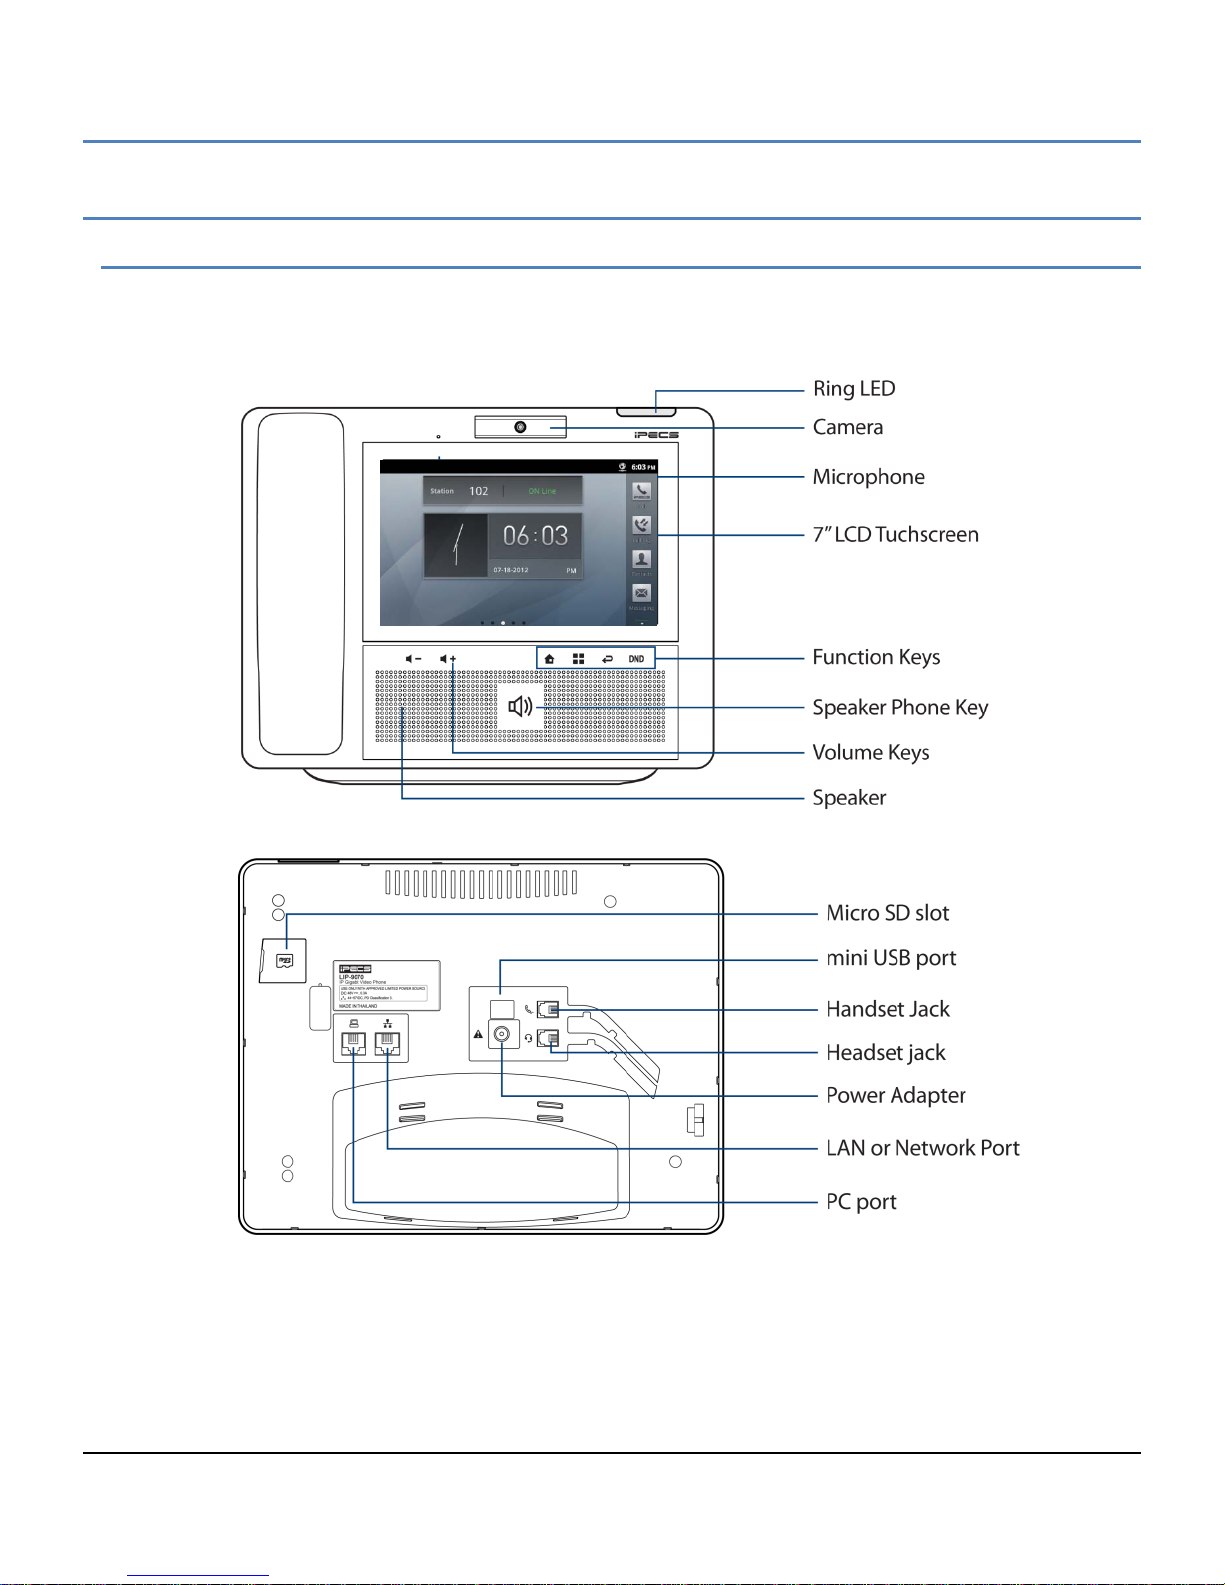
The LIP-9070 is shipped with the LIP-9070 phone, handset, pedestal, 6-ft Cat 5 cable terminated in RJ-45
connectors and the Qu ick Guide. An optional AC/DC adapter is a vailable for use when the network connection
does not support IEEE 802.3af class 3 PoE (Power o ver Ether net). T he figur es belo w prese nt line dr awings of the
front and rear of the LIP-9070 identifying major elements of the user interface and external connections.
2
Page 14
LIP-9070 iPKTS User Guide
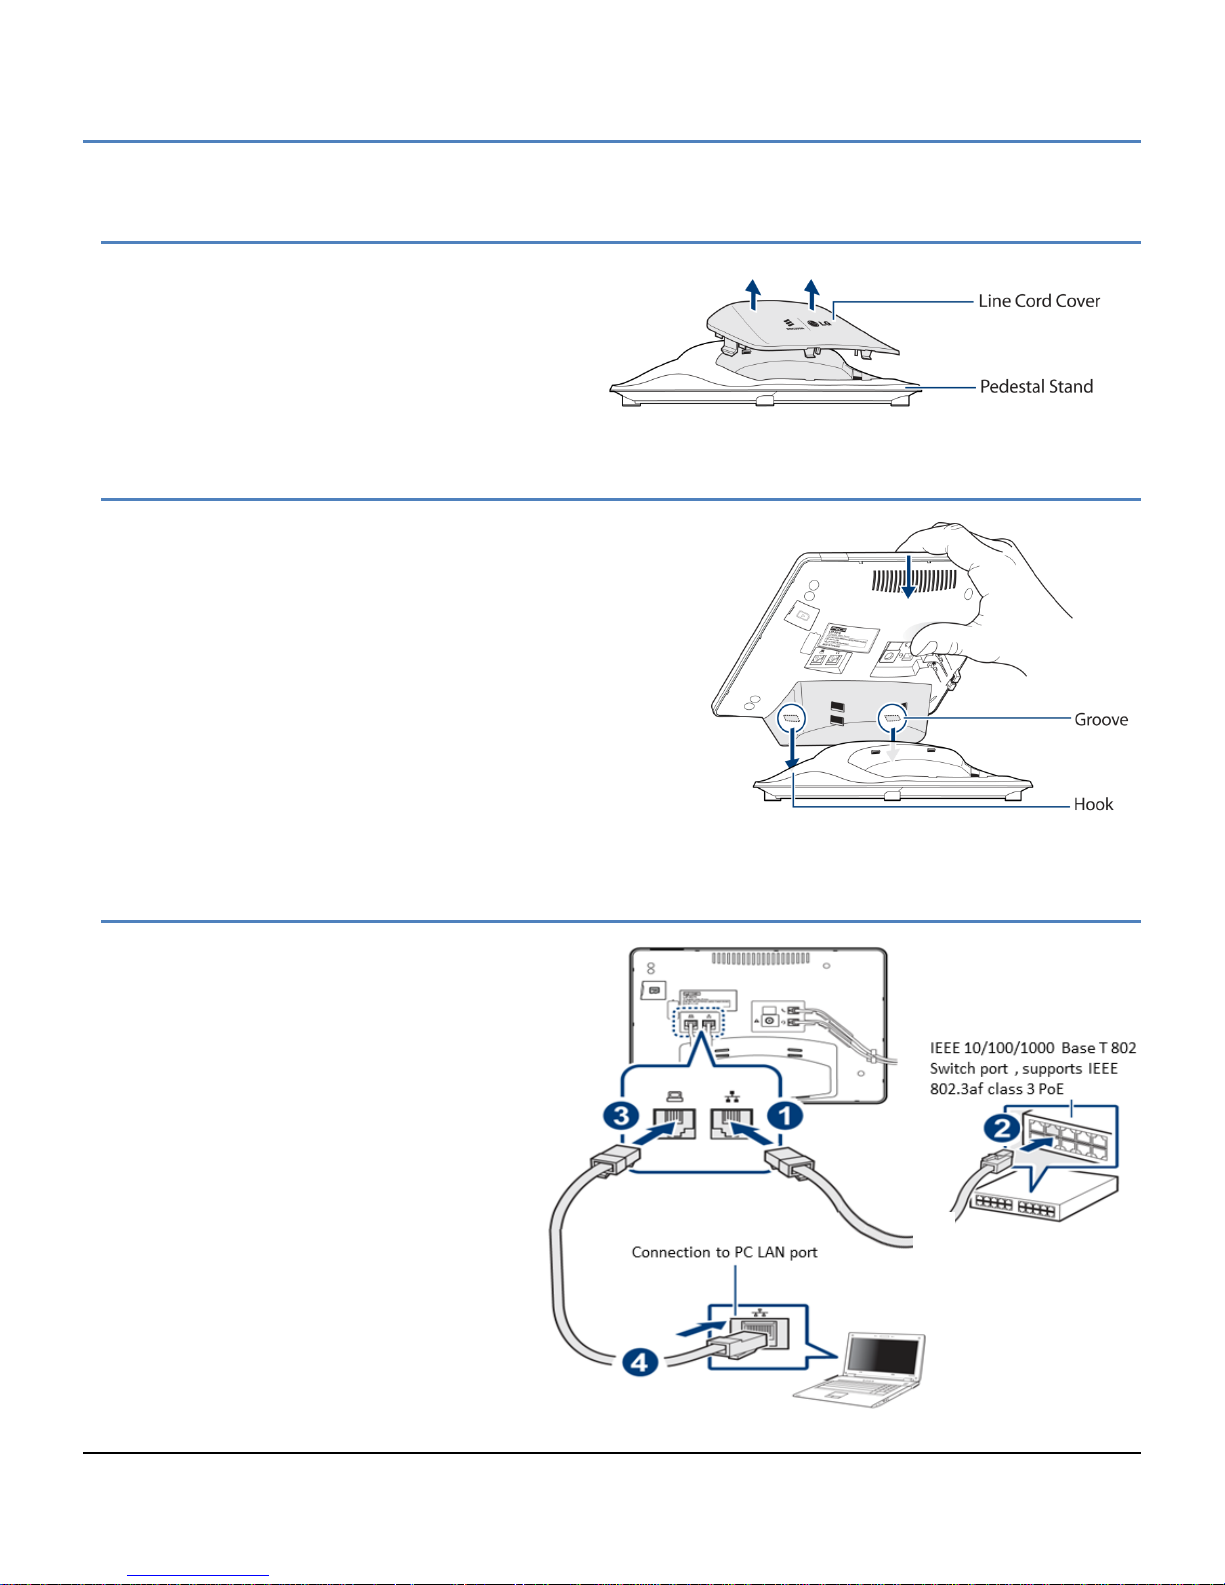
2.2 Removing the Cord Cover
Before proceeding with t he inst allat ion, the Line Cord
Cover, which protects the LAN cabling, should be
removed from the pedest al. T o rem ove the co ver, lift
the cover plate as shown.
2.3 Mounting the Phone and Pedestal
The phone attaches to the pedest al in either a 40° or 60° angle
and should be adjus ted at installation for the prefer red viewing
angle. To mount the phone on the pedestal,
1. Remove the wiring cover as in section 2.2.
2. Select which sid e of t he p e des tal to use, 40° or 60°, and
align the grooves in the base of the phone with the
appropriate hooks on the pedestal.
3. Pull down at the top of the phone to engage the hooks
of the pedestal with the slots in the phone base.
2.4 Network Connections
The LIP-9070 has two RJ-45 Ethernet LAN
jacks on the bottom of the phone. O ne of the
jacks is the interface to a local IEEE
10/100/1000 Base-T Network por t. The other
jack is a 10/100/1000 Base-T port for
connection to a PC.
The network interf ace port jack is wired as a
standard MDI connection and the PC port is
wired as an MDIX connection. This wiring
structure allows use of straight-through cables.
The LIP-9070 network and PC ports support
Auto negotiation for MDI/MDIX, speed and
duplex (full or half). The MDI and MDIX
wiring for the LIP-9070 network and PC
connections are in accordance with TIA/EIA
standard 568.
3
Page 15
LIP-9070 iPKTS User Guide
2.5 Optional AC/DC Adapter Connecti ons
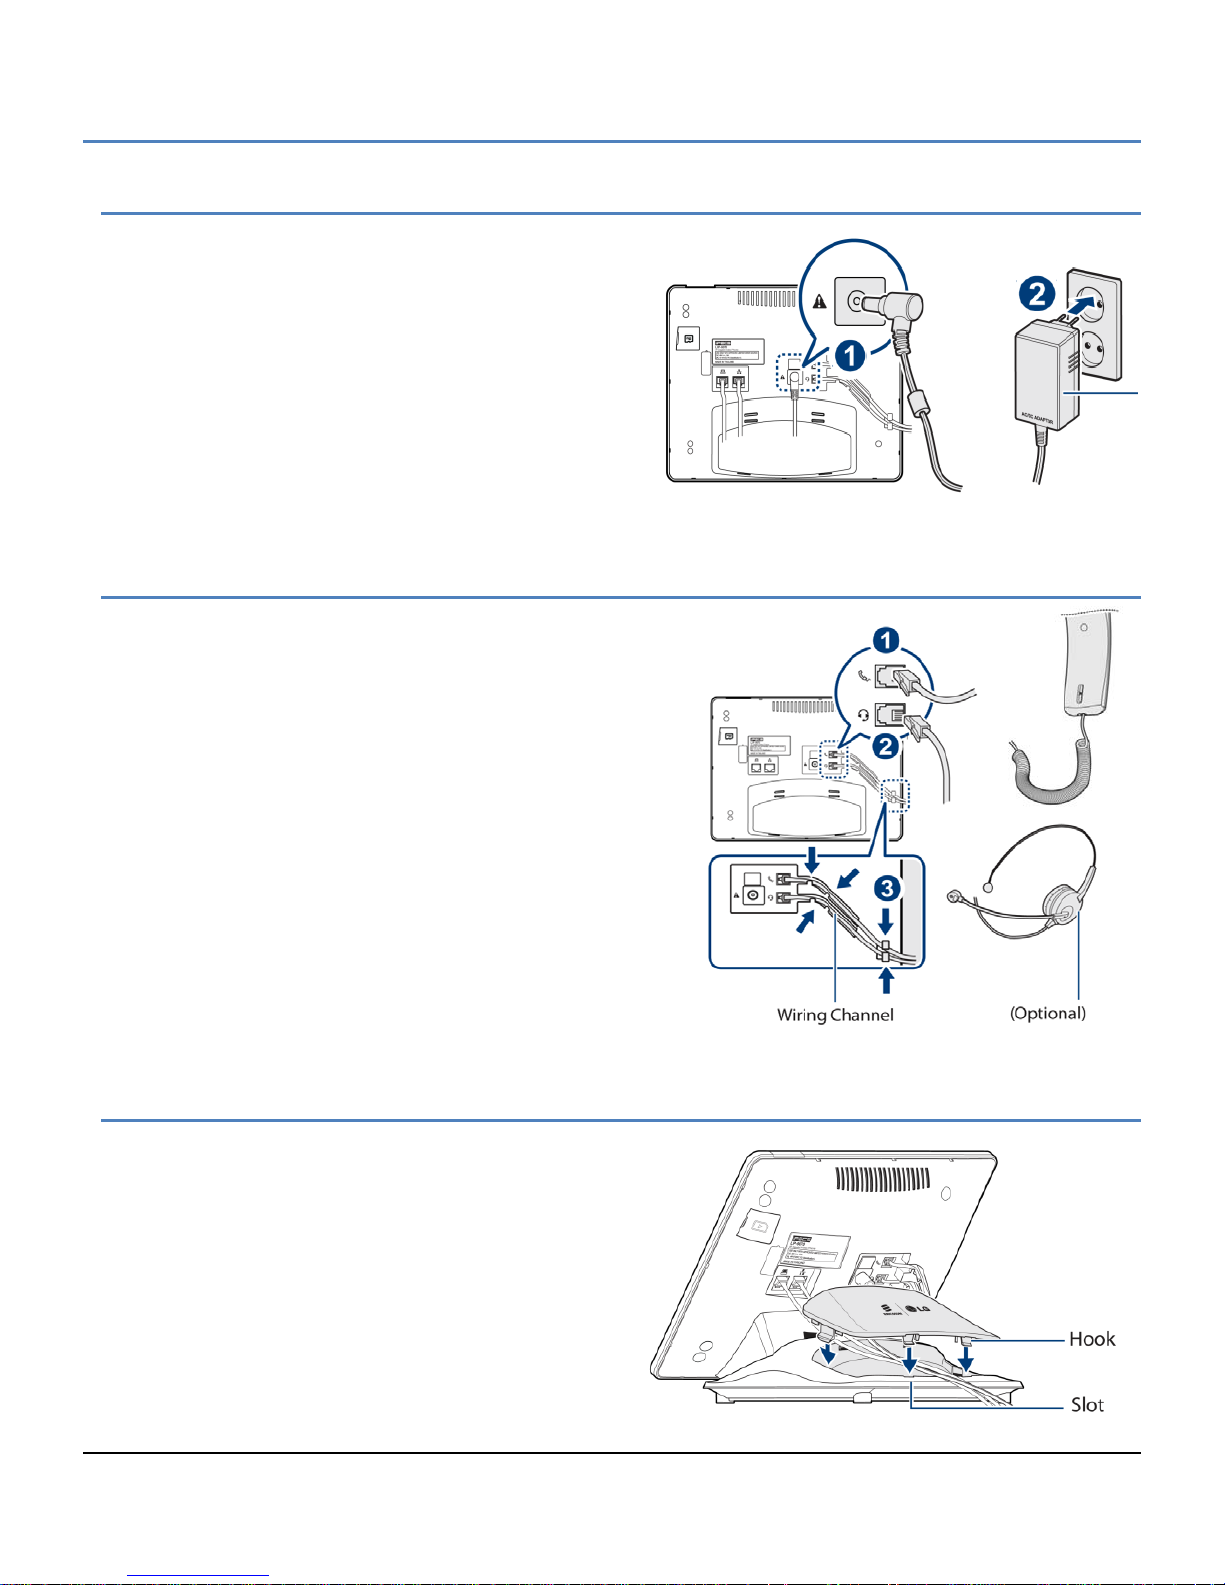
The optional AC/DC adapter is used when the network
connection is not PoE com patible. In this c ase, the A C/DC
adapter convert s the norm al AC p ower inpu t to the 4 8 VDC
at 0.3 amps required by the LIP-9070. The adapter is
plugged into a standard AC wall outlet and the DC
connector is inserted in t he DC jack located on the bo ttom
of the phone.
2.6 Connect the Handset and Optional Headset
The handset and headset connectors are located slightly to
the right center of the phone. T he handset coil cord RJ-9 is
plugged into the upper RJ-9 jack of the phone and handset.
The lower RJ-9 jack can be used for a wired heads et. When
using a wired headset, the Speakerphone button activates
audio to the headset.
After connecting th e handset coil cord and the hea dset cord,
firmly place the cords in the respective wiring channel to
protect the wiring.
2.7 Replace the Cord Cover
After completing the wiring and mounting of the phone,
the Line Cord cover should be replaced to protect the
Line cords and the AC/DC adap t er wiring. The cover has
tabs on the bottom that fit into slots in the pedest al. To
replace the cover, align the tabs with the slots making
sure the wiring is located b eneath the cover but not in the
path of the tabs. Pus h down firmly on the c over to fully
engage the tabs and slots.
4
Page 16
LIP-9070 iPKTS User Guide
2.8 Power up and Setup Wizard
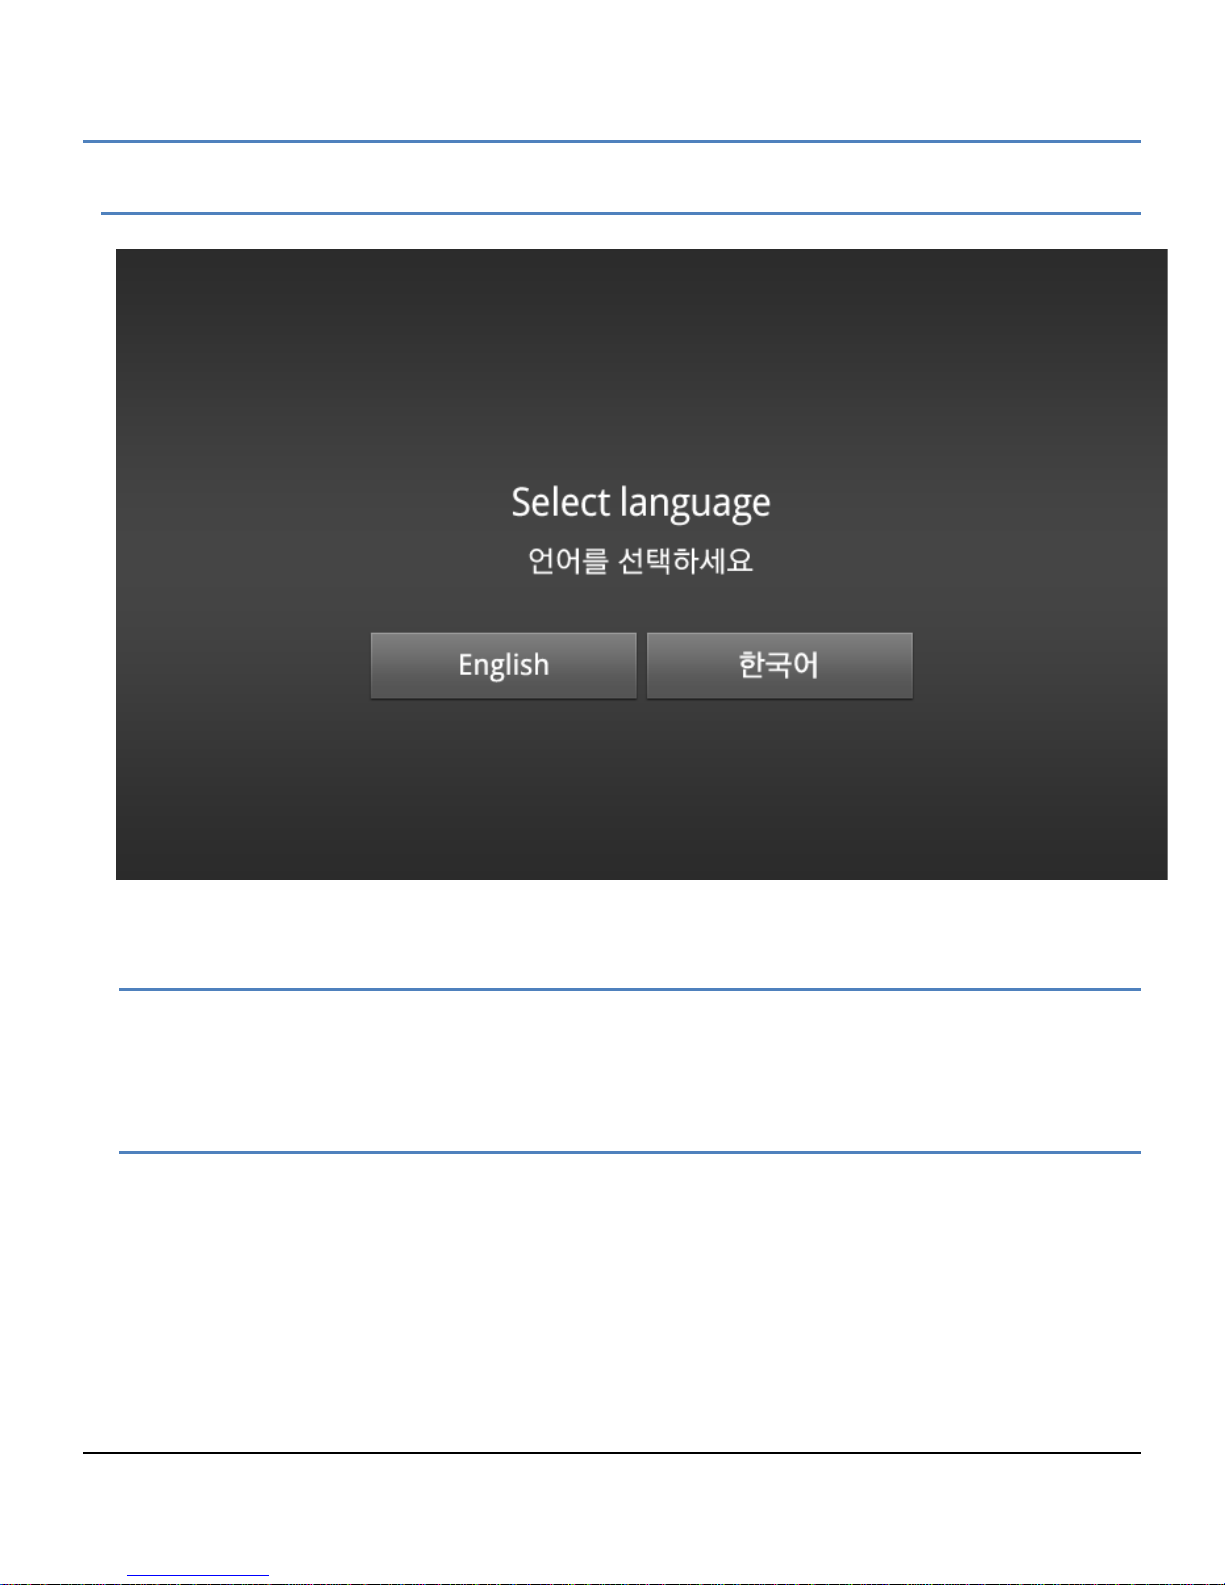
When connected to power, the phone will perform Setup Wizard for language selection.
2.8.1 Language Selection
When connected to power, the phone will perform language selection. User c an choose Langu age to be us ed for
the Phone. Base on this selection, the software keyboard and IME for phone will be changed.
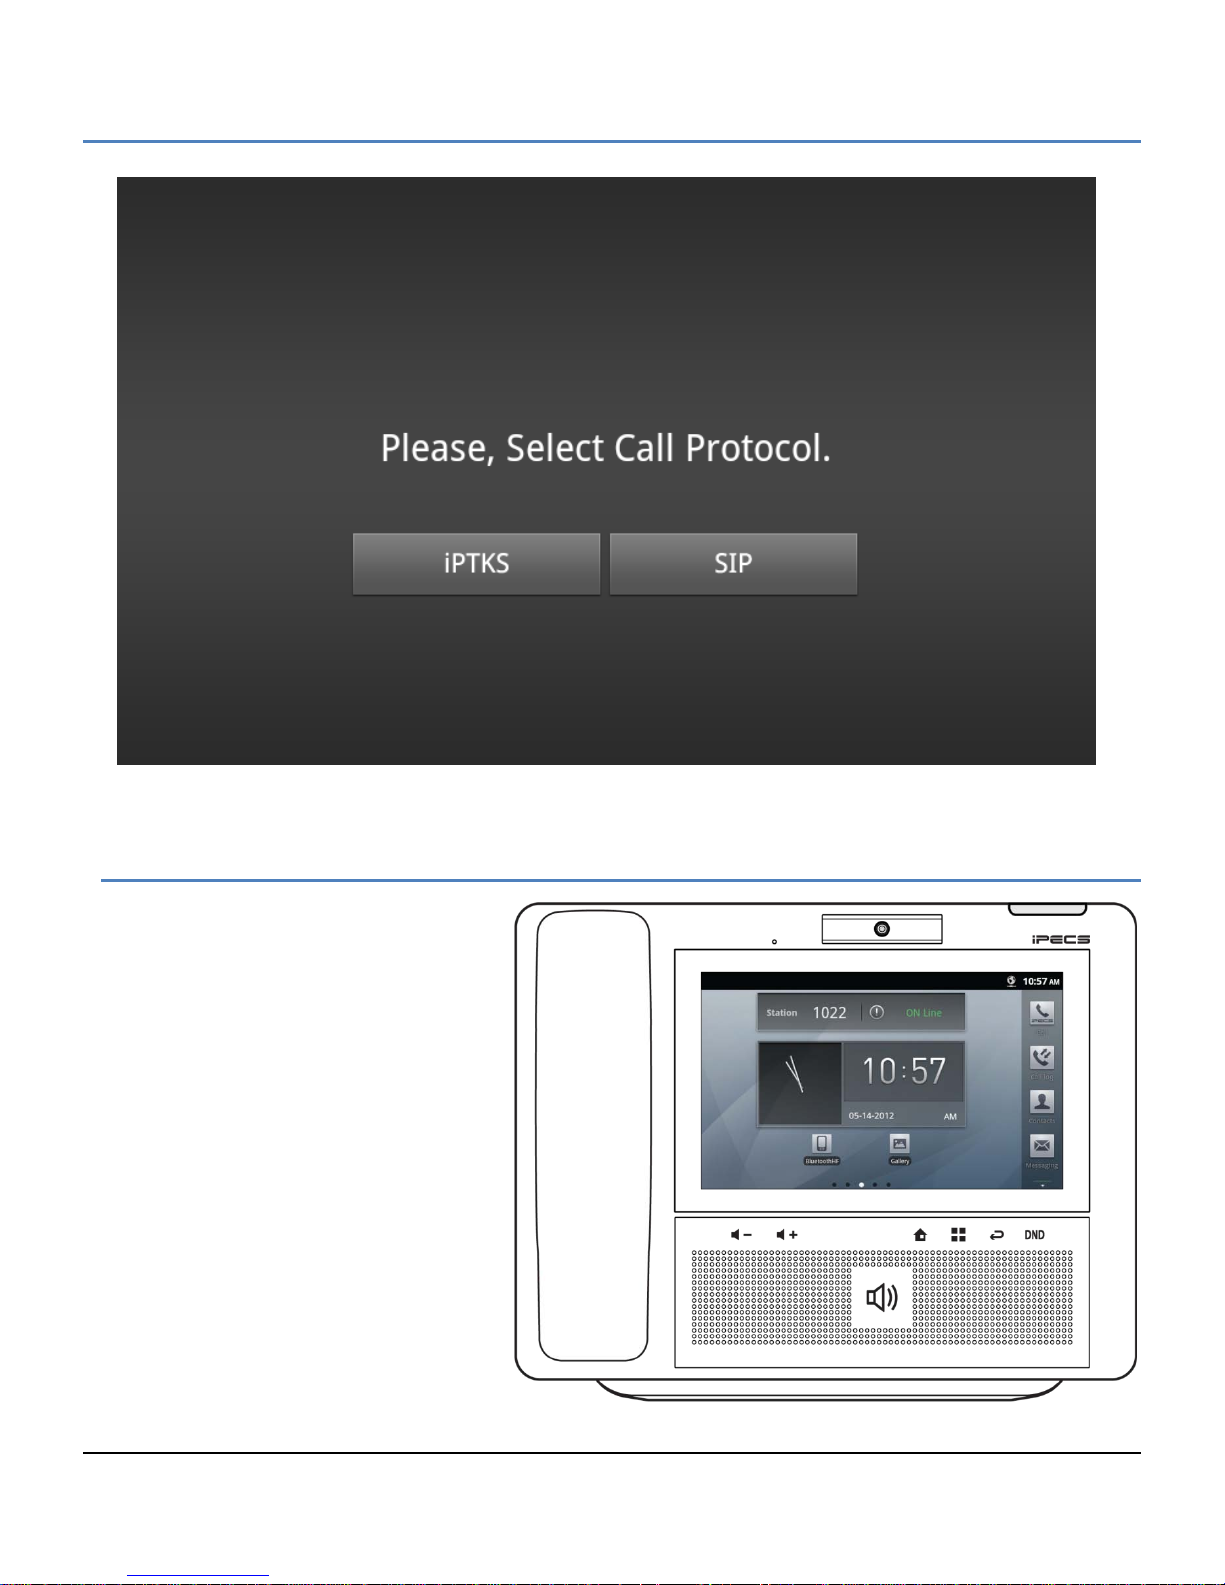
2.8.2 Protocol Selection
After select langua ge it c ould be guided to selec t call protocol . To use LIP-9070 as i PECS iPKT S phone, choos e
iPKTS protocol from below selection screen. Then will restart automatically.
5
Page 17
LIP-9070 iPKTS User Guide
2.9 Registration
When connected to power and th e net w ork ,
the phone will perform its power-up routine
and then attempt to locate and regis ter with
the iPECS s ystem. During the proc ess the
display will indicate status including
‘Searching for MFIM’, which is the iPECS
call server. In a default configuration,
iPECS will permit registration of the phone,
and will assign a statio n number and other
characteristics to the phone. Once
complete the phone is fully operatio nal and
displays the Home sc reen with the Station
Number and status ( On Lin e) show n above
the clock.
If the iPECS network settings have been
changed or the phone is installed in a
remote location, th e phone will not be able
to complete registration. The phone screen
will display a No Acknowledgement or
other fault message. In this case,
assistance of the iPECS administrator may
be required. iPECS m ay require configuration to allow registration of the LIP-9070. In additi on, the IP settings of
6
Page 18
LIP-9070 iPKTS User Guide
the phone, section 13.1.1, and the System Configuration data, section 6.5.5, may require modification with the
assistance of the iPECS administrator.
2.10 Mounting and Dismounting an SD card
An SD card can be installed in the SD card slot on the right side of the LIP-9070. The SD card expands the
mem ory of the LIP-9070, s tores pictures , videos and music. Note once an SD Card is inser ted in the sl ot, it must
be ‘unmounted’ properly to safely remove.
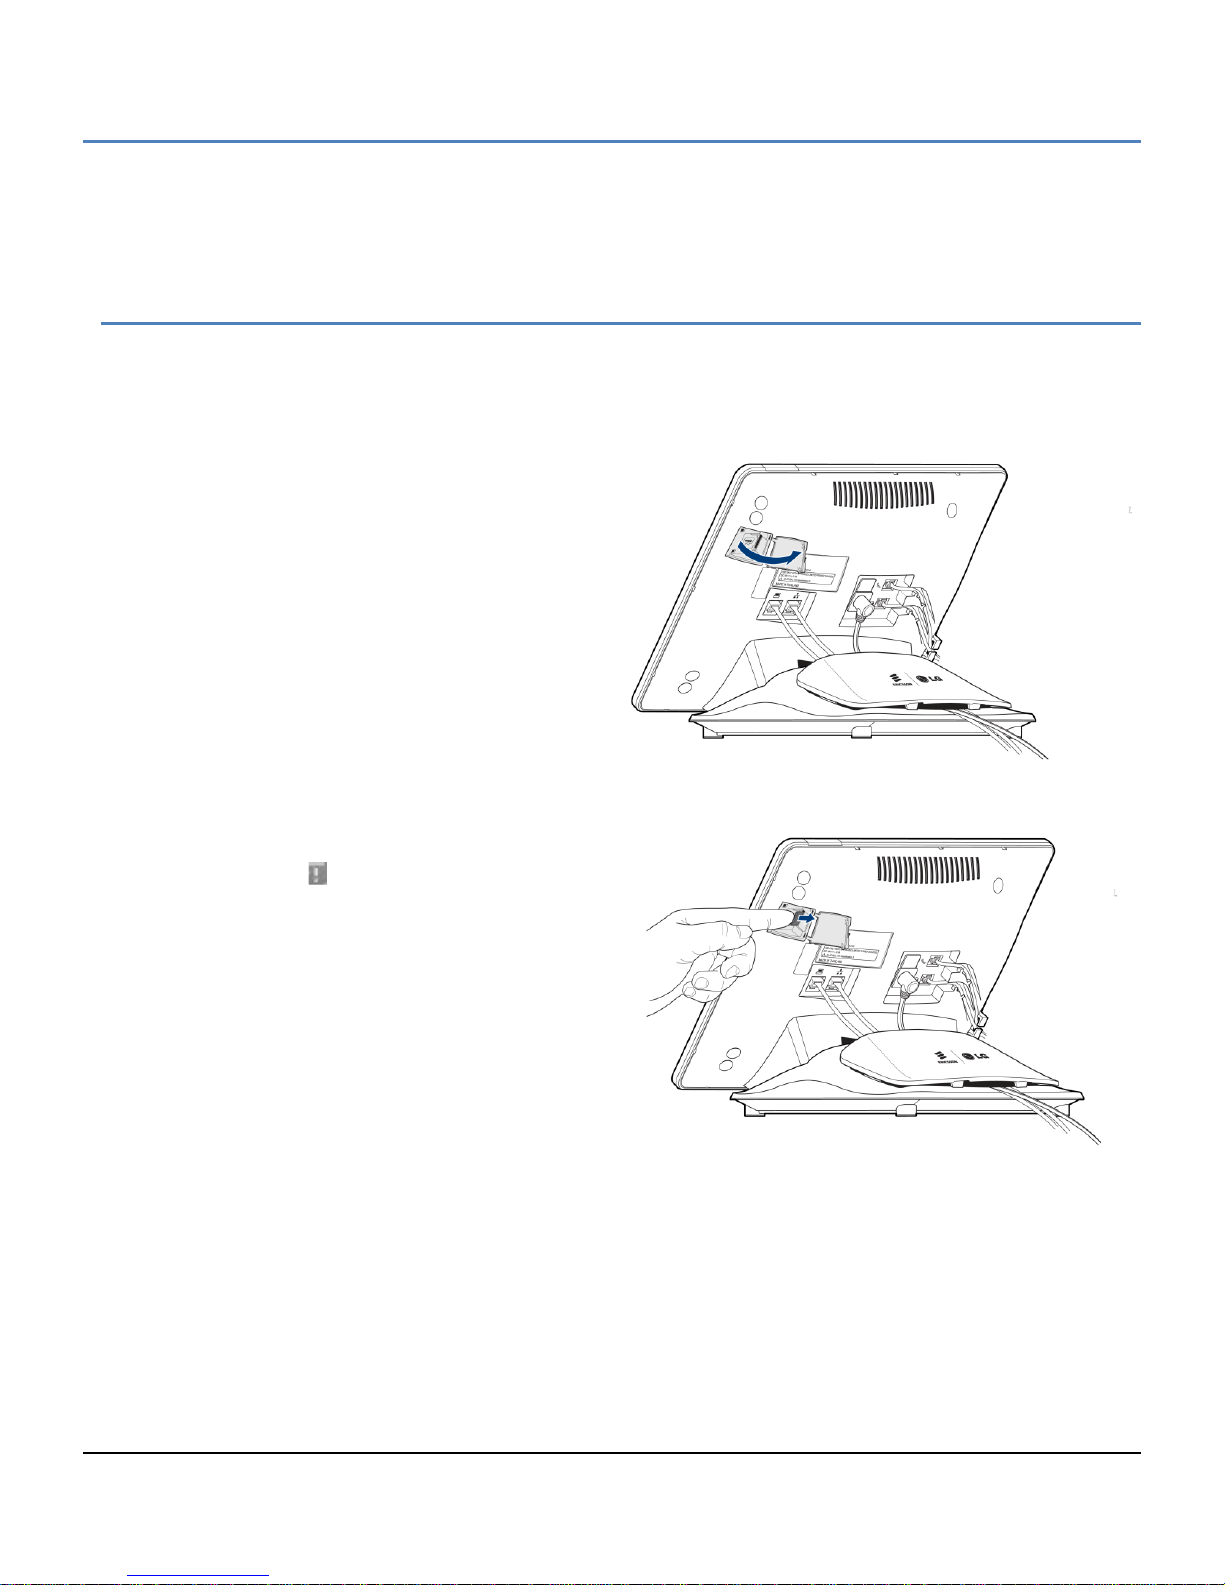
To mount an SD card:
1. Uncover the SD s lot locate d on the l eft side of
the phone.
2. Position the SD card with the gold strips facing
down.
3. Slide the card into place until it is full y inserted
and locked in place. The phone will inspect
the card to prepare it for use.
To safely remove the SD card from the phone, the card must first be unmounted. To remove the SD card,
1. Select ‘Unmount SD card’ from the System
Settings Storage menu as shown in section
12.6.1. The icon indicates that it is saf e to
remove the card.
2. Open the SD card slot cover.
3. Gently push the card in to release the card
lock.
4. Carefully pull the card from the slot.
Note
° Do not remove the SD card during a file
transfer or while files are being accessed or
transferred. If the card is removed in such
circumstances, loss or damage to data may result.
7
Page 19
LIP-9070 iPKTS User Guide
3 Basics Operation
The iPECS Phone application is fully ava ilable once the
LIP-9070 completes reg istration with the iPECS host as
outlined in section 2.8. The iPECS Call icon in the Apps
Dock opens the iPECS Phone app where calls can be
managed. Details for using the iPECS Phone window
beyond the basics are covered in section 6.
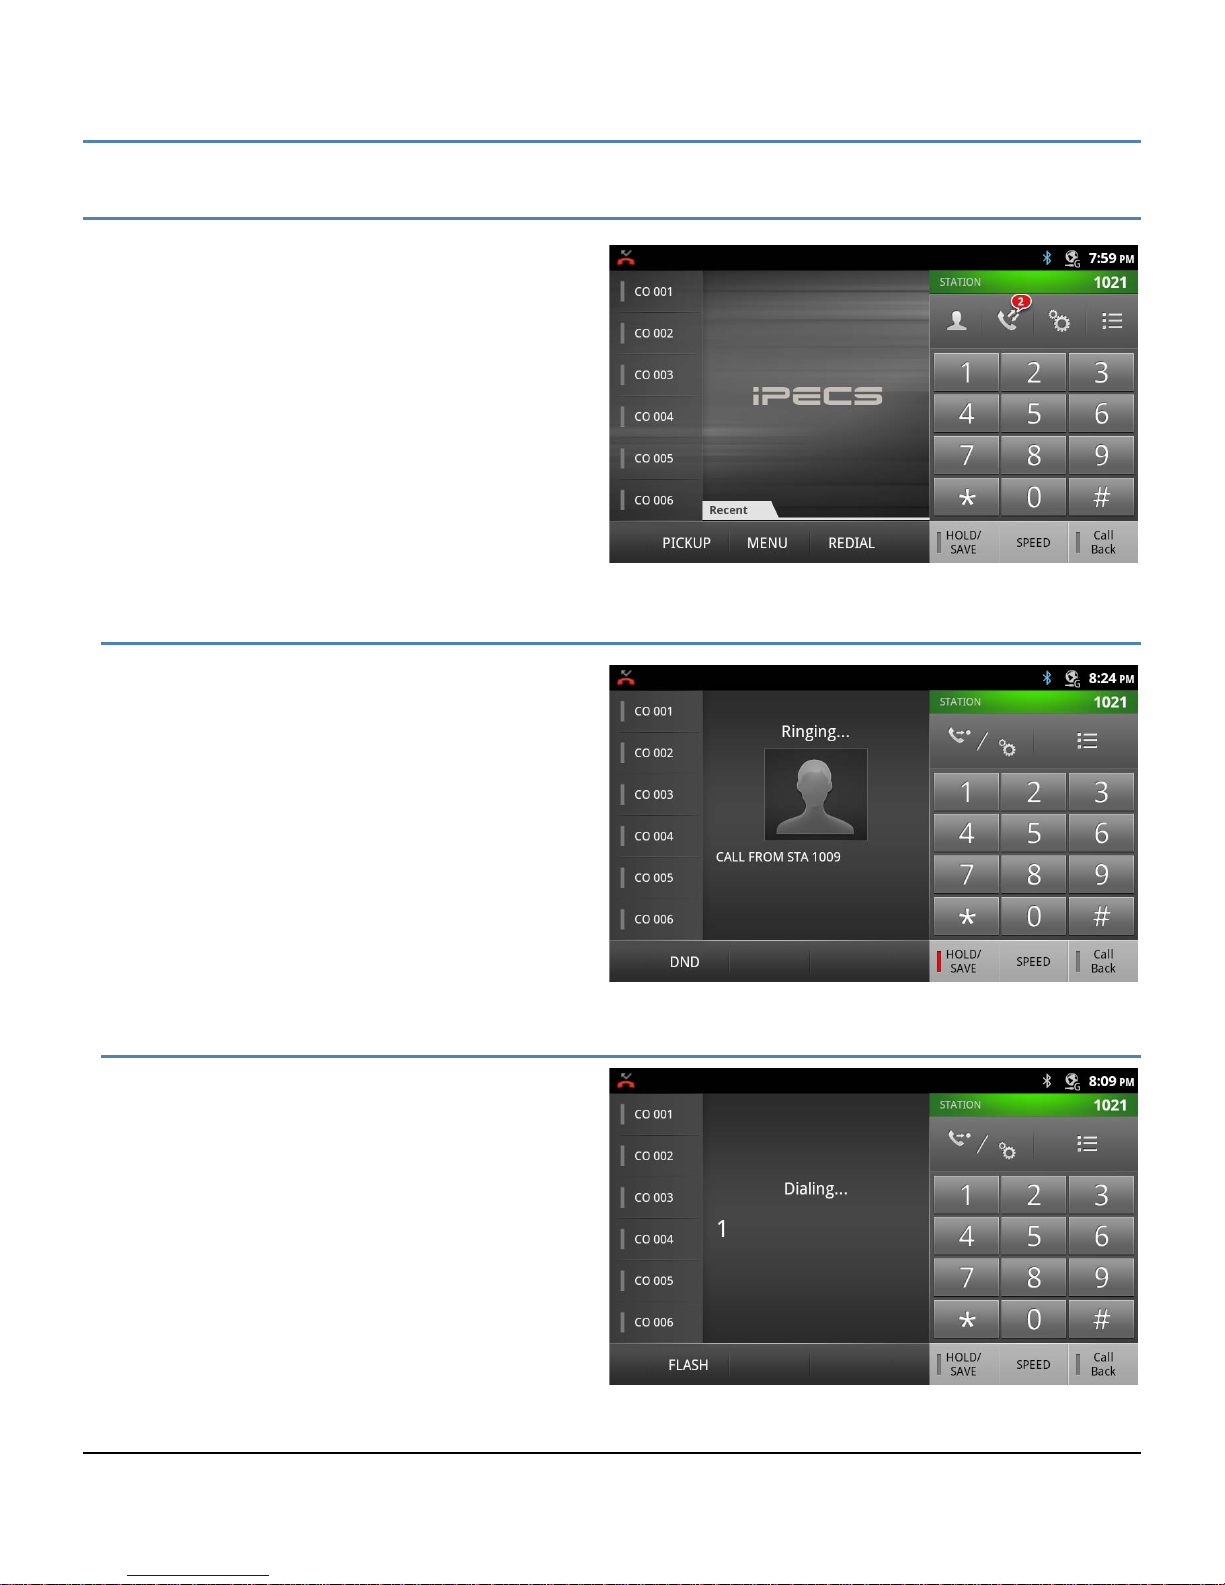
3.1 Incoming Calls
When a call is r eceived, the Call screen displays the
Caller Id for the call and the phone ri ngs. If the Caller
Id matches the number for a contact, the contact icon
and name of the Contact are shown.
To answer the call, lift the handset or press the
speakerphone button.
Note
° T he DND button is available to activate One-
time DND. For details refer to the iPECS
Phone user guide.
3.2 O ut going Calls
The LIP-9070 employs a “’live dial pad’ m eaning that
you need not lift the handset or press the
Speakerphone button to start a call. To place a call,
dial the desired number. This will activate the
speakerphone, send t he digits to the iPECS host and
show the dialing scr een. When sufficient digits ha ve
been dialed, the iPECS host routes the call.
Outgoing calls can a lso be placed from the Contacts
and Logs as well as Speed dial refer to sections 7, 8
and 6.1.1, respectively.
Note
° The user m ay go off -hook (press the Speakerphone button or lift the ha ndset) bef ore dialing. I n this case,
the phone receives dial tone from the iPECS host.
8
Page 20
LIP-9070 iPKTS User Guide
3.3 Holding Calls
You can place a call in a waiting state where the caller is connec ted to the Music on Hold source of the iPECS
system, freeing you for other activities. The call will remain on hold for the hold recall time then the user is recalled.
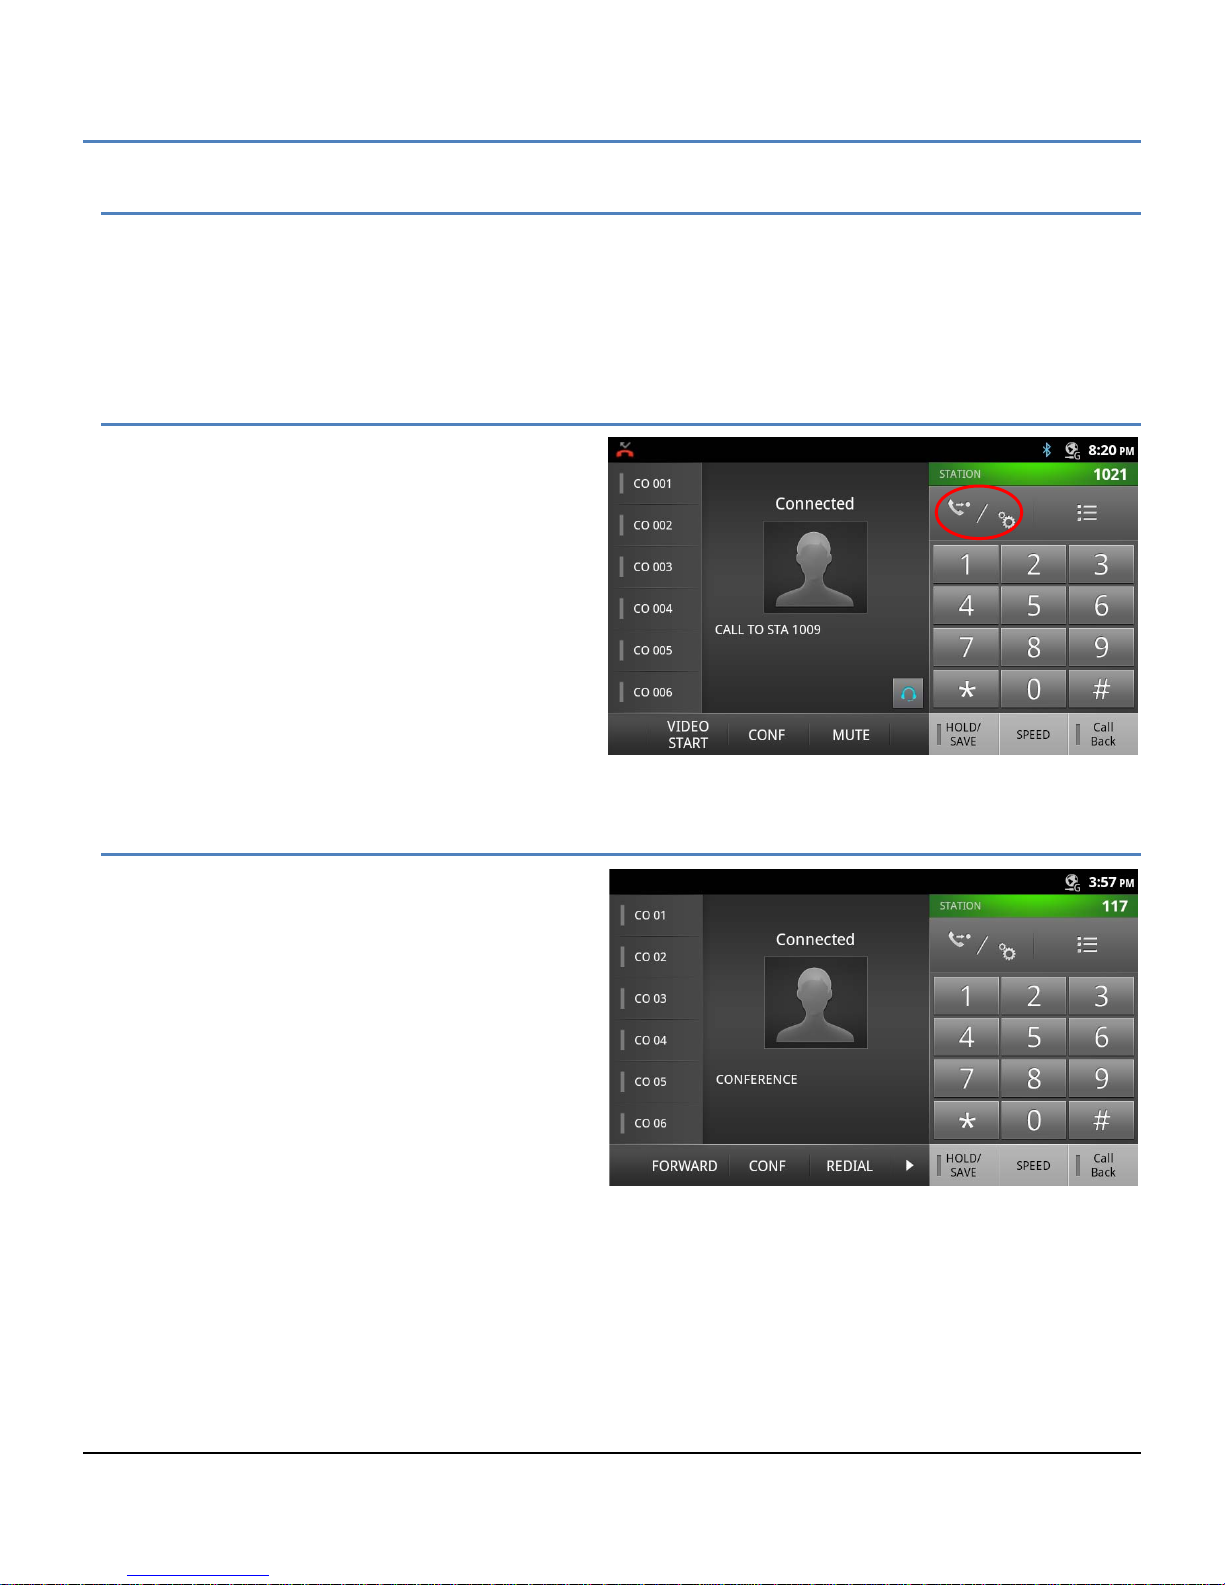
To place a call on Hold, touch the Hold/Save button, the button will light to indicate the held call.
3.4 Transferring a Call
Once connected to a call the Transfer icon, as
highlighted on the right, is used to send the call to
another destination. After touchi ng the T ransfer icon,
dial the station to recei ve the call. The call transfer
can be unannounced (sim ply hang-up) or a nnounced
(after the receiving p arty answers, announce the call
and hang-up).
Note
° A tra nsfer can be accomplished by touc hing
a Flex button assigned as a DSS f or another
station in the iPECS host.
3.5 Conference
An active call can be joined with another call to
establish a conference. If the iPECS host is equipped
with a Conference bridge, up to 32 parties can be
included in a conference.
To conference calls,
1. Place/receive first call as usual.
2. Touch the CONF soft button,
3. Place next call and press the CONF soft
button.
4. Repeat step 3 for additional parties
5. Press the CONF s oft button again to connec t
all parties.
Note
° T he LIP-9070 supports a 3-party conference witho ut the need of a Conference bridge. If c onferences wit h
more than three parties ar e require d, the iPECS host must be equi pped with a conf erenc ing bridg e such as
the MCIM.
9
Page 21
LIP-9070 iPKTS User Guide
4 Mini-Tab Phone Display Basics
The LIP-9070 phone em plo ys a Mini-tab running the A ndroid OS as the phone display a nd the m ain user inp ut device .
The Mini-tab is equippe d with several apps and widgets which are discussed in separate sections of this manual as
below.
iPECS Phone, section 5
Contacts, section 6
Call Logs, section 7
SMS, section 8
Appointment Calendar, section 9
Alarm Clock, section 10.1
Camera, section 10.2
Gallery, section 10.2
Music, section 10.3
Settings, section 12
In addition to the major applications above, several widgets are installed in the LIP-9070. Widgets are small
applications that displa y on a Launcher s creen and ar e self-contained, th at is no add itional scr eens are needed b y the
widget. Widgets ma y open a related application but are primarily intended to provide inform ation such as the time,
date, or status of music playing. Widgets settings are discussed in section 4.8 and 4.9, and include:
Clock widget
Play Music widget
Calendar widget
iPECS Station (Call Info) widget
4.1 Basic User Gestures
The Mini-tab uses a to uc hsc r een as the user interface. There are sever al finger gestures supp or ted by the Mini-tab
for user interaction.
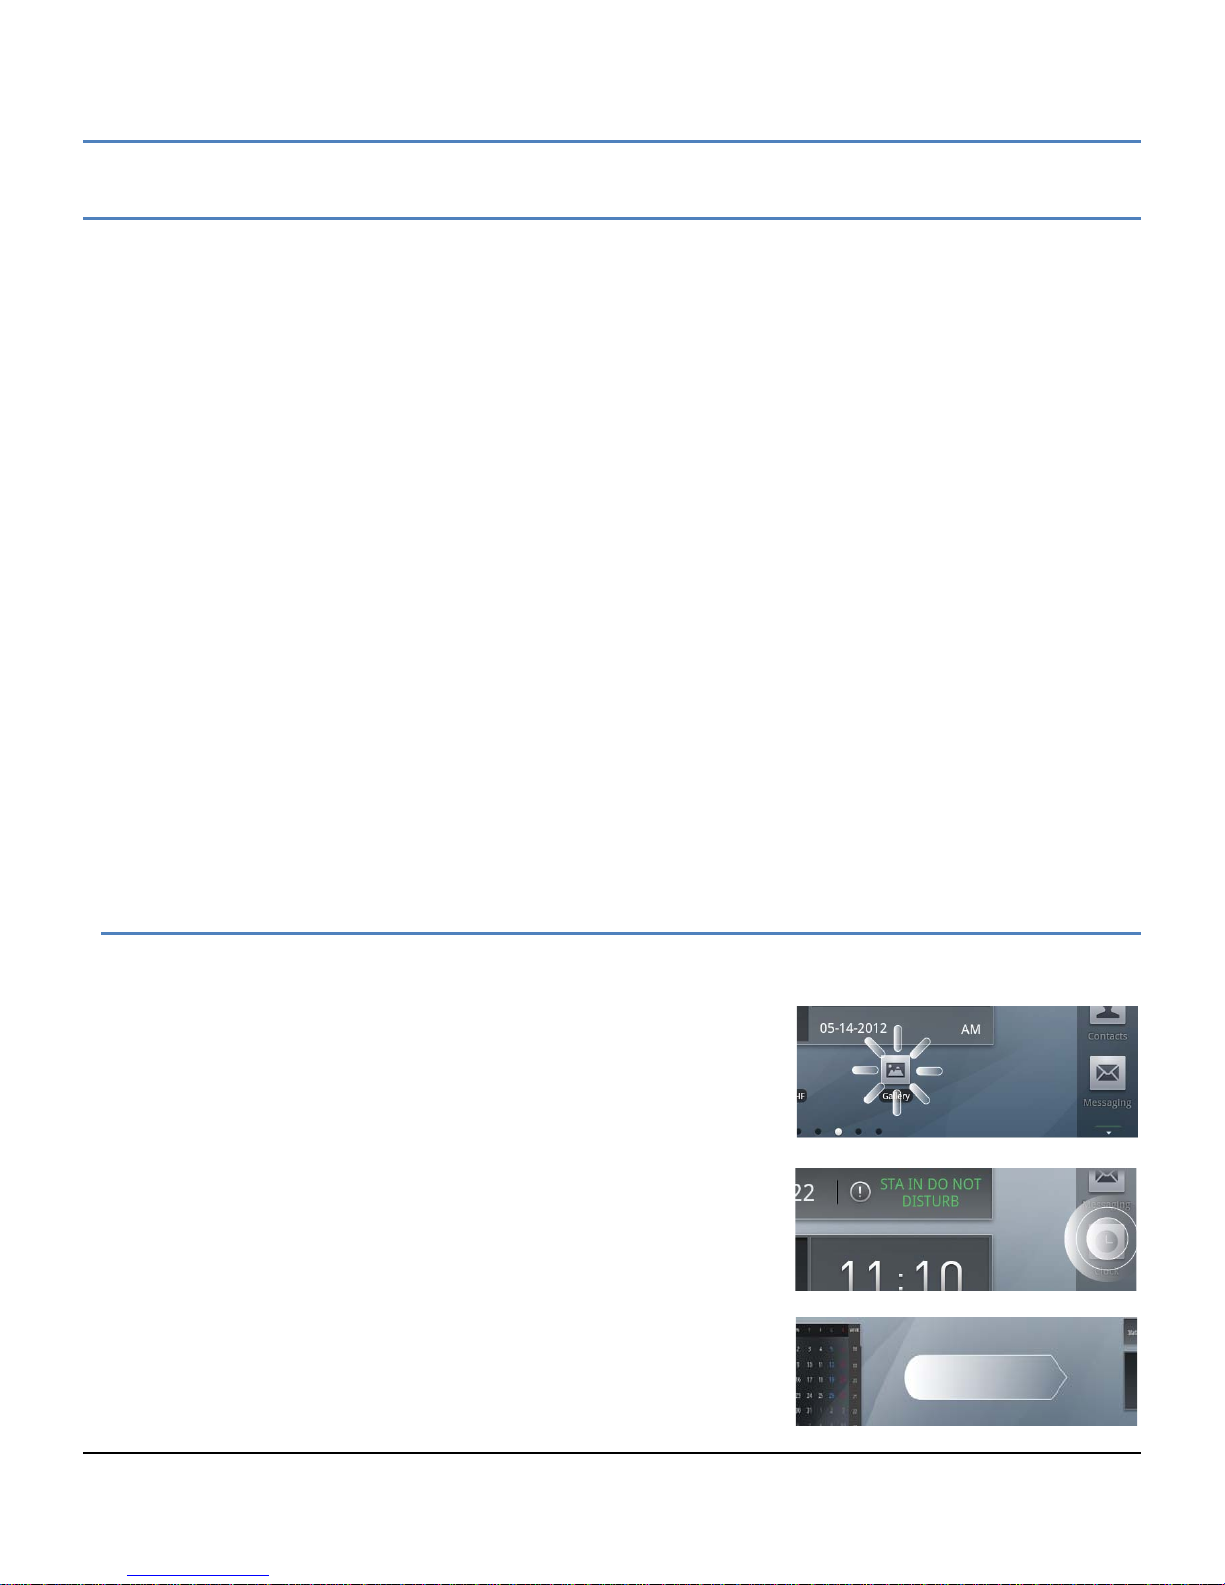
Touch or Tap: T o select items such as application ic ons, to press
onscreen buttons, or to t ype using t he onsc reen k eyboar d, touch or
tap the item.
Touch and Hold: To open the Context menu f or an item , touch and
maintain contact with the screen until an action occurs.
Swipe o r Flick: To move from one Launcher screen to a nother or
view the next or previous picture, touch the screen and quickly
move to the finger across the surface of the screen.
10
Page 22
LIP-9070 iPKTS User Guide
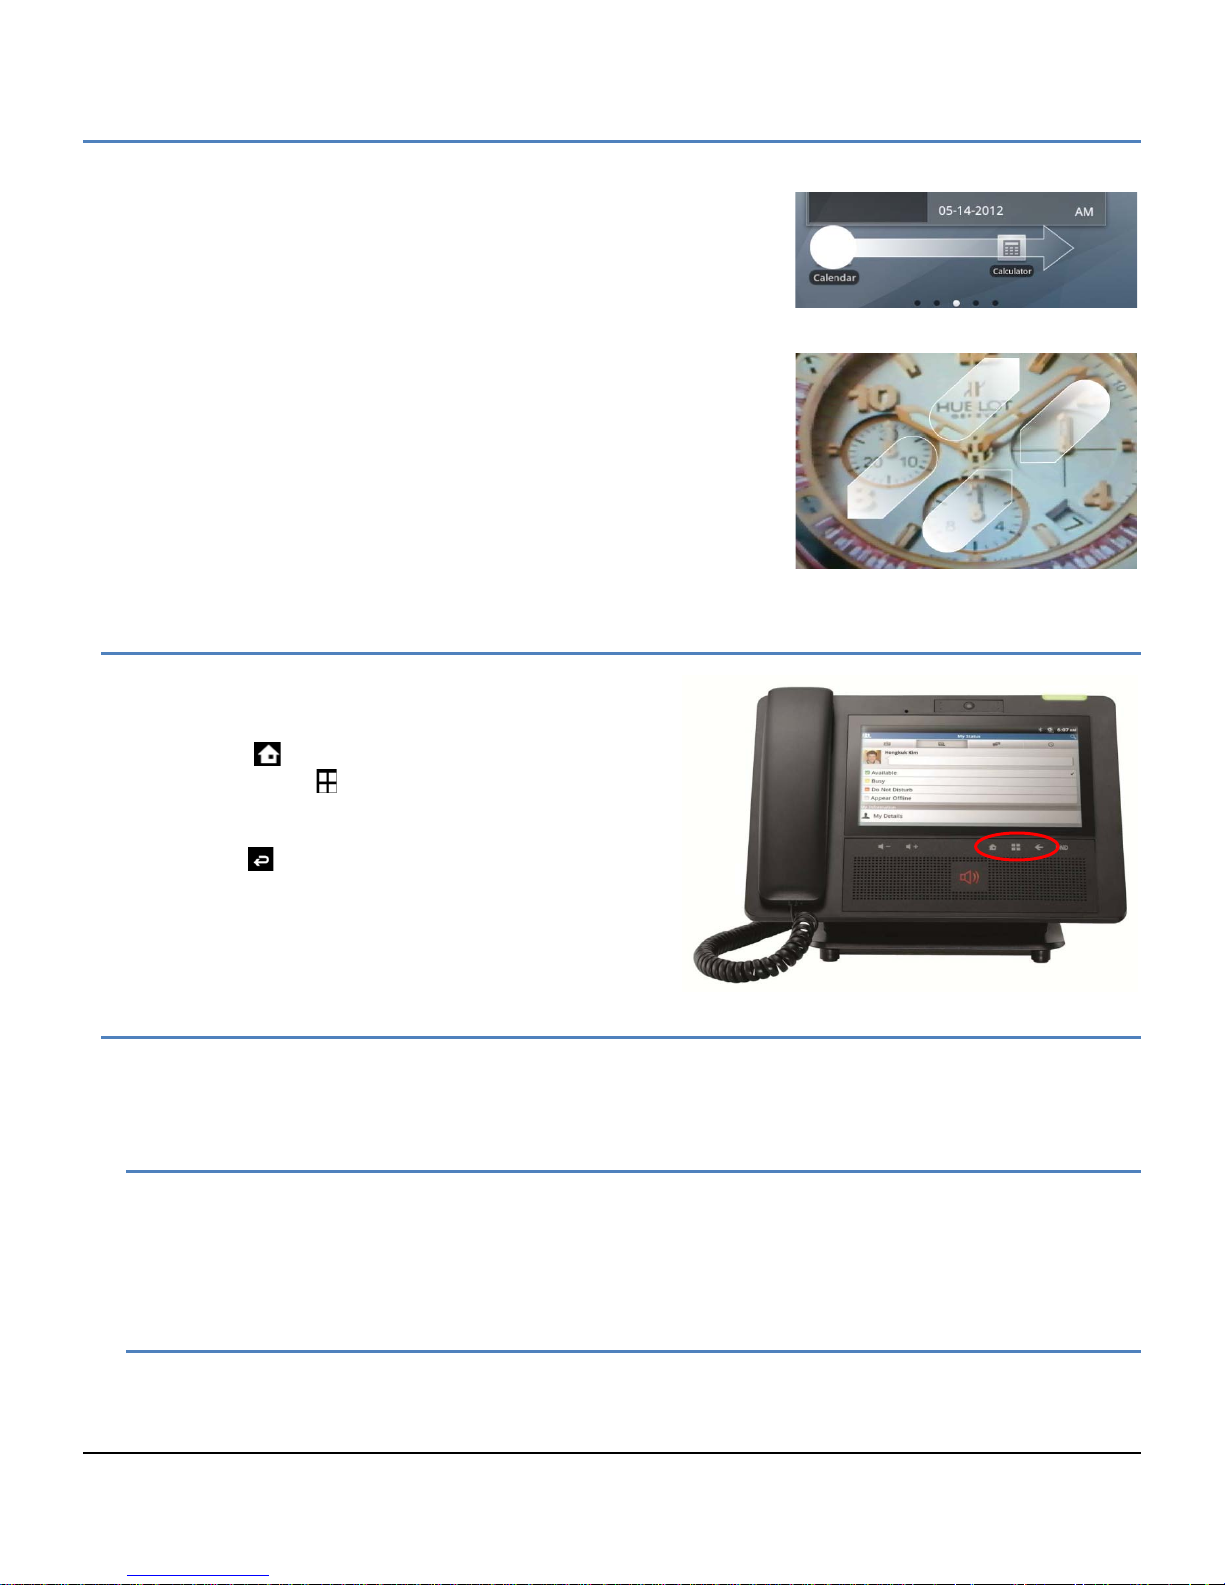
Drag and drop: To move an app or icon o n the Launcher screens,
touch and hold momentarily then, while maintaining contact with
the screen, drag the item on the Launcher screen.
Pinch: To zoom in and out on a picture, touch the screen with the
thumb and forefinger and bring together or separat e the fingers to
shrink or enlarge a picture.
4.2 Mini-Tab Funct ion Buttons
The LIP-9070 has three function buttons related to the
Android OS as shown to the right. The function buttons are:
Home: return to the Home screen.
Option menu:
screen. The menu displays in the bottom of the
screen.
Back :
keyboard or numeric k eypad is shown in the screen,
touching the Back button closes the keyboard or
keypad.
return to the previous screen. If a
menu associated with the viewed
4.3 Mini-Tab Menus
The Mini-tab has severa l menus structured by the Andr oid OS. Three basic menu types are em ployed the screen
Option menu, the touch and hold Context menu and general purpose popup menus.
4.3.1 Screen Option Menus
Many screens, incl uding the Launcher screens , have an Opt ions menu that is ac cessed by touching the Optio n
Menu button. The menu, which is specific to a screen, displays along the bottom of the screen. A ‘more’
selection is shown if there are more menu items then can be displayed comfortably. The ‘more’ selection
generally displays in a popup list.
4.3.2 Touch and Hold Context Menus
The Context menus impact an Individual item or record such as a contact, scheduled event, or song. These
menus display in a popup in response to the ‘Touch and Hold’ gesture.
11
Page 23
LIP-9070 iPKTS User Guide
4.3.3 Dialogs and Popups
Dialog boxes are emplo yed when a user entry is req uired such as a contact name. Popups are used to i nform
the user of potential issues or warning messages such as ‘Please insert SD card’ or ‘Bluetooth not connected’.
4.4 La unc he r Screens
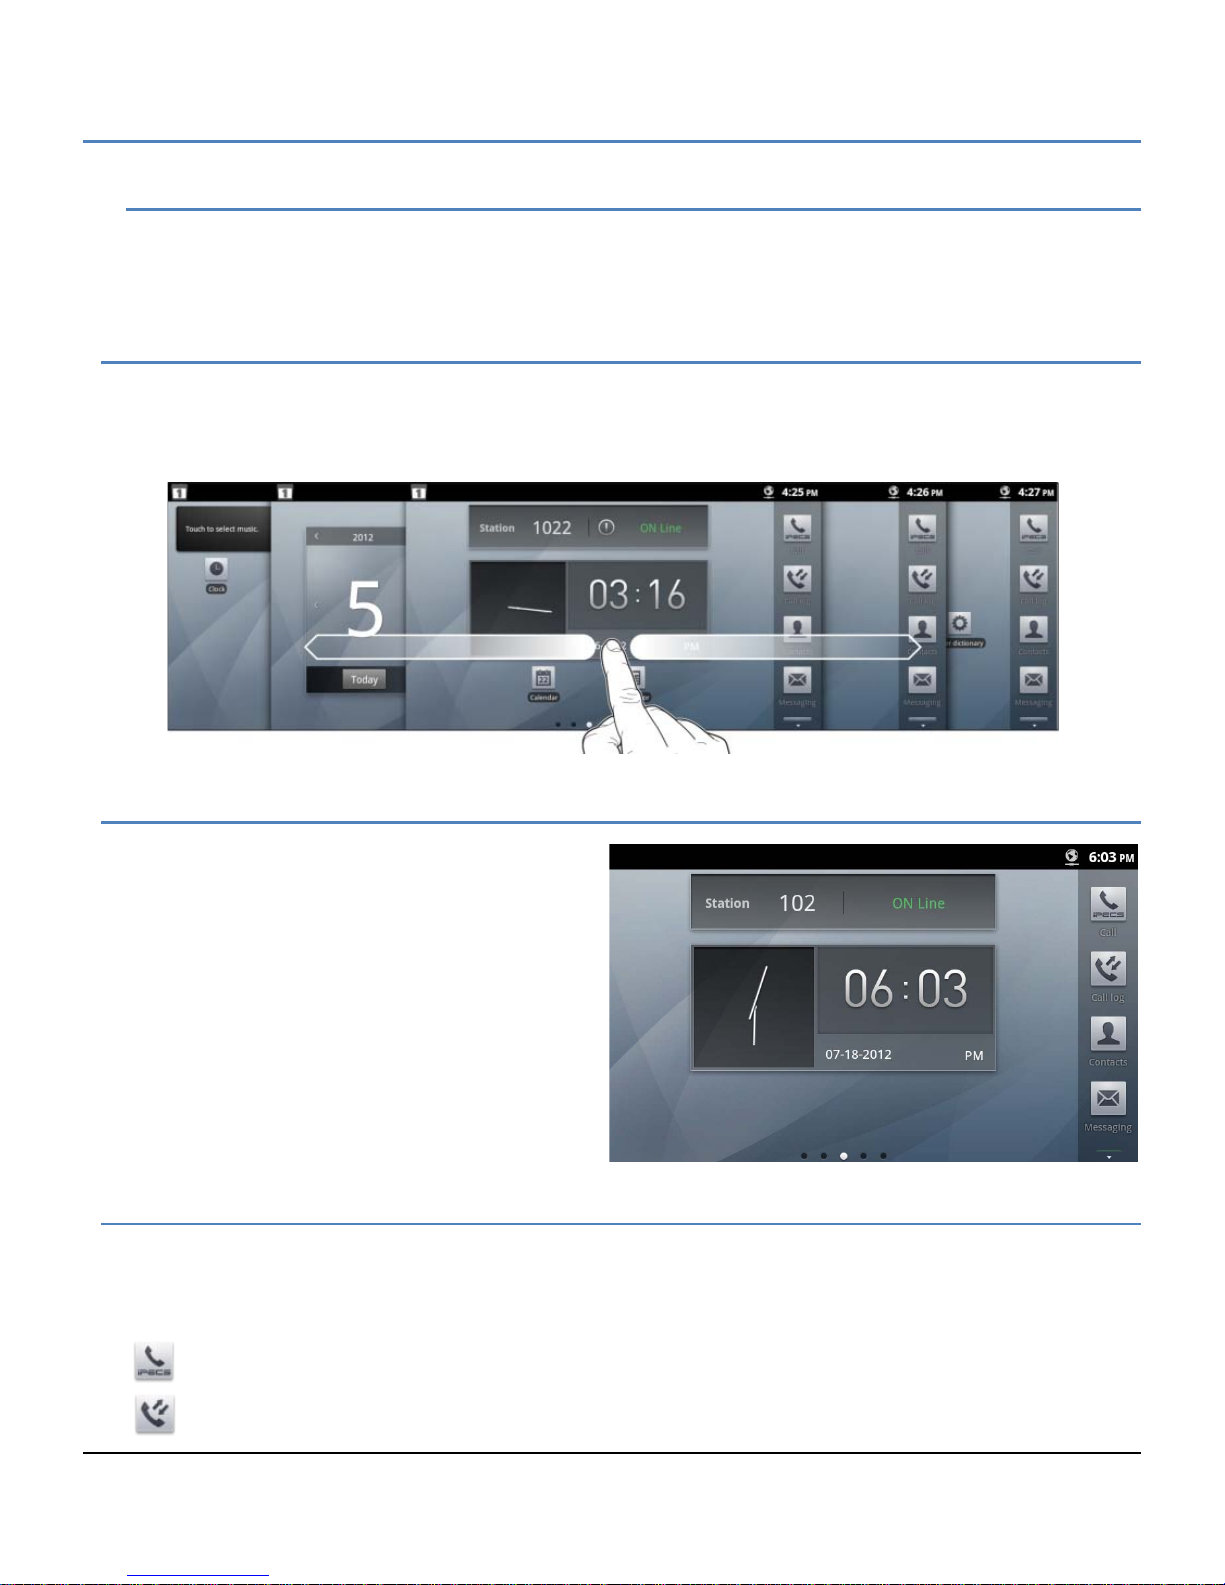
The Launcher is divided into five (5) screens where shortcut icons and widgets can be located. Selecting an
application icon from one of the Launcher screens opens the application. The Launcher Home screen displays
upon power-up. Other Launcher screens can be viewed employing the flick gesture. Each Launcher screen can be
customized by adding, deleting or moving application icons and widgets.
4.5 Home Scr een
The Home screen, as with all the Launcher screens, is
composed of the N otificat ion an d Stat us b ar at the to p
of the screen, the m ain dis pla y area wher e app lication
icons and widgets are dis pla yed and the App Doc k on
the right. The dots on the bottom of the screen
indicate the expos ed Lau nc her s c reen, 1 t o 5, with the
center screen ‘3’ as the Home screen.
The Home screen as a default includes the iPECS
Station (CalInfo) widget above the Clock widget in the
main display area.
4.6 Application Dock
The Application Doc k is scr ollable and displays up to twenty dock loc ations for applic ation icons. T he scrollable
App Dock appears on the right side of all the Lau ncher screens to permit quicker acces s to apps than moving
across the Launcher sc r ee ns . T he f ir st eight dock locatio ns ar e a va ilabl e a nd the first four are fixed with icons f or
applications in the LIP-9070 including:
iPECS Phone (Call)
Call Log
12
Page 24
LIP-9070 iPKTS User Guide
Contacts
SMS Message
4.6.1 Managing the App Dock
The icon for any installed a pplication c an be added t o the dock, deleted from the dock or the number of available
dock positions changed
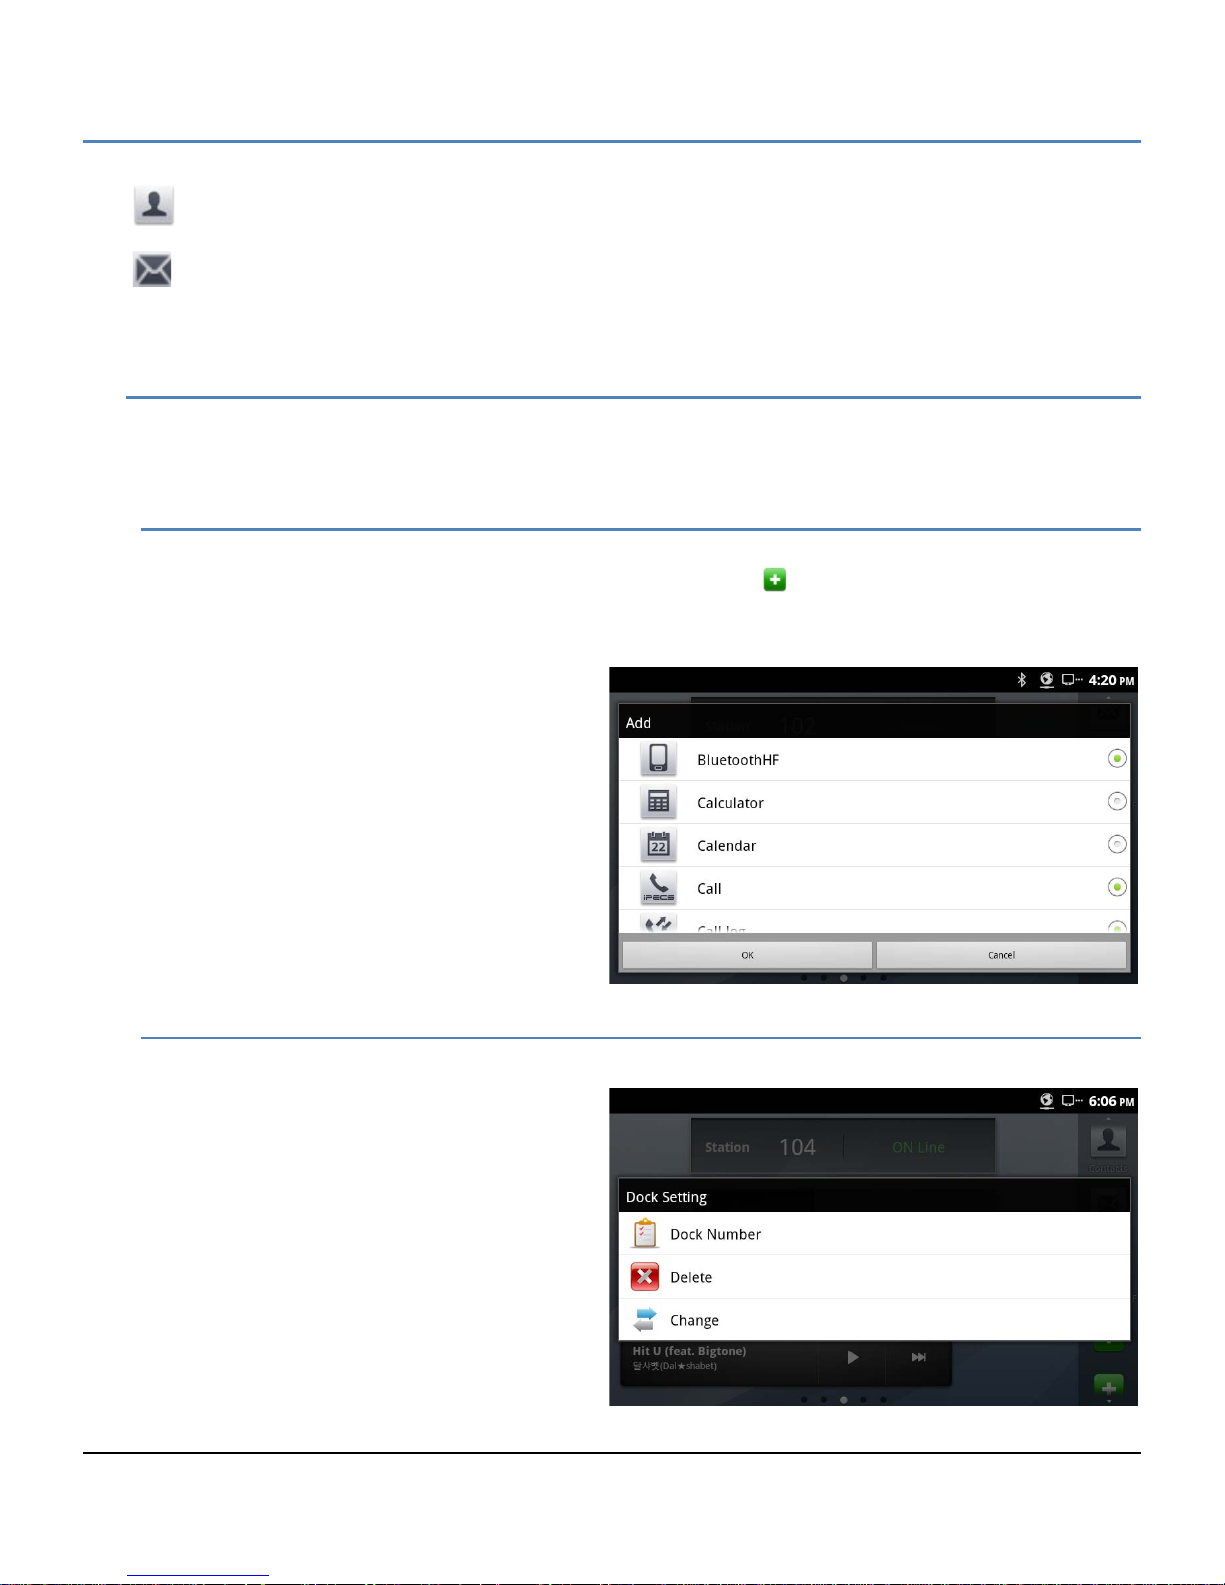
4.6.1.1 Adding Icons to App Dock,
To add an application icon to the Apps Dock,
1. Touch and hold an unocc upie d dock position s hown as the icon
Or
On a Launcher screen touch the Menu button then select the Add button
2. In the Add Context menu, select the
desired application icon.
3. Touch OK to add the icon to the dock.
4.6.1.2 Deleting Icons from the Apps Dock
To delete an icon from the dock,
1. In the dock, touch and hold the icon to
be deleted.
2. Select ‘Delete’ from the Dock Setting
menu. The icon is removed from the
dock but remains on the Launcher
screens.
In addition, from the Dock Setting menu the
number of availab le dock pos itions (maximum 20)
and an application icon in the dock can be
changed to another application icon.
13
Page 25
LIP-9070 iPKTS User Guide
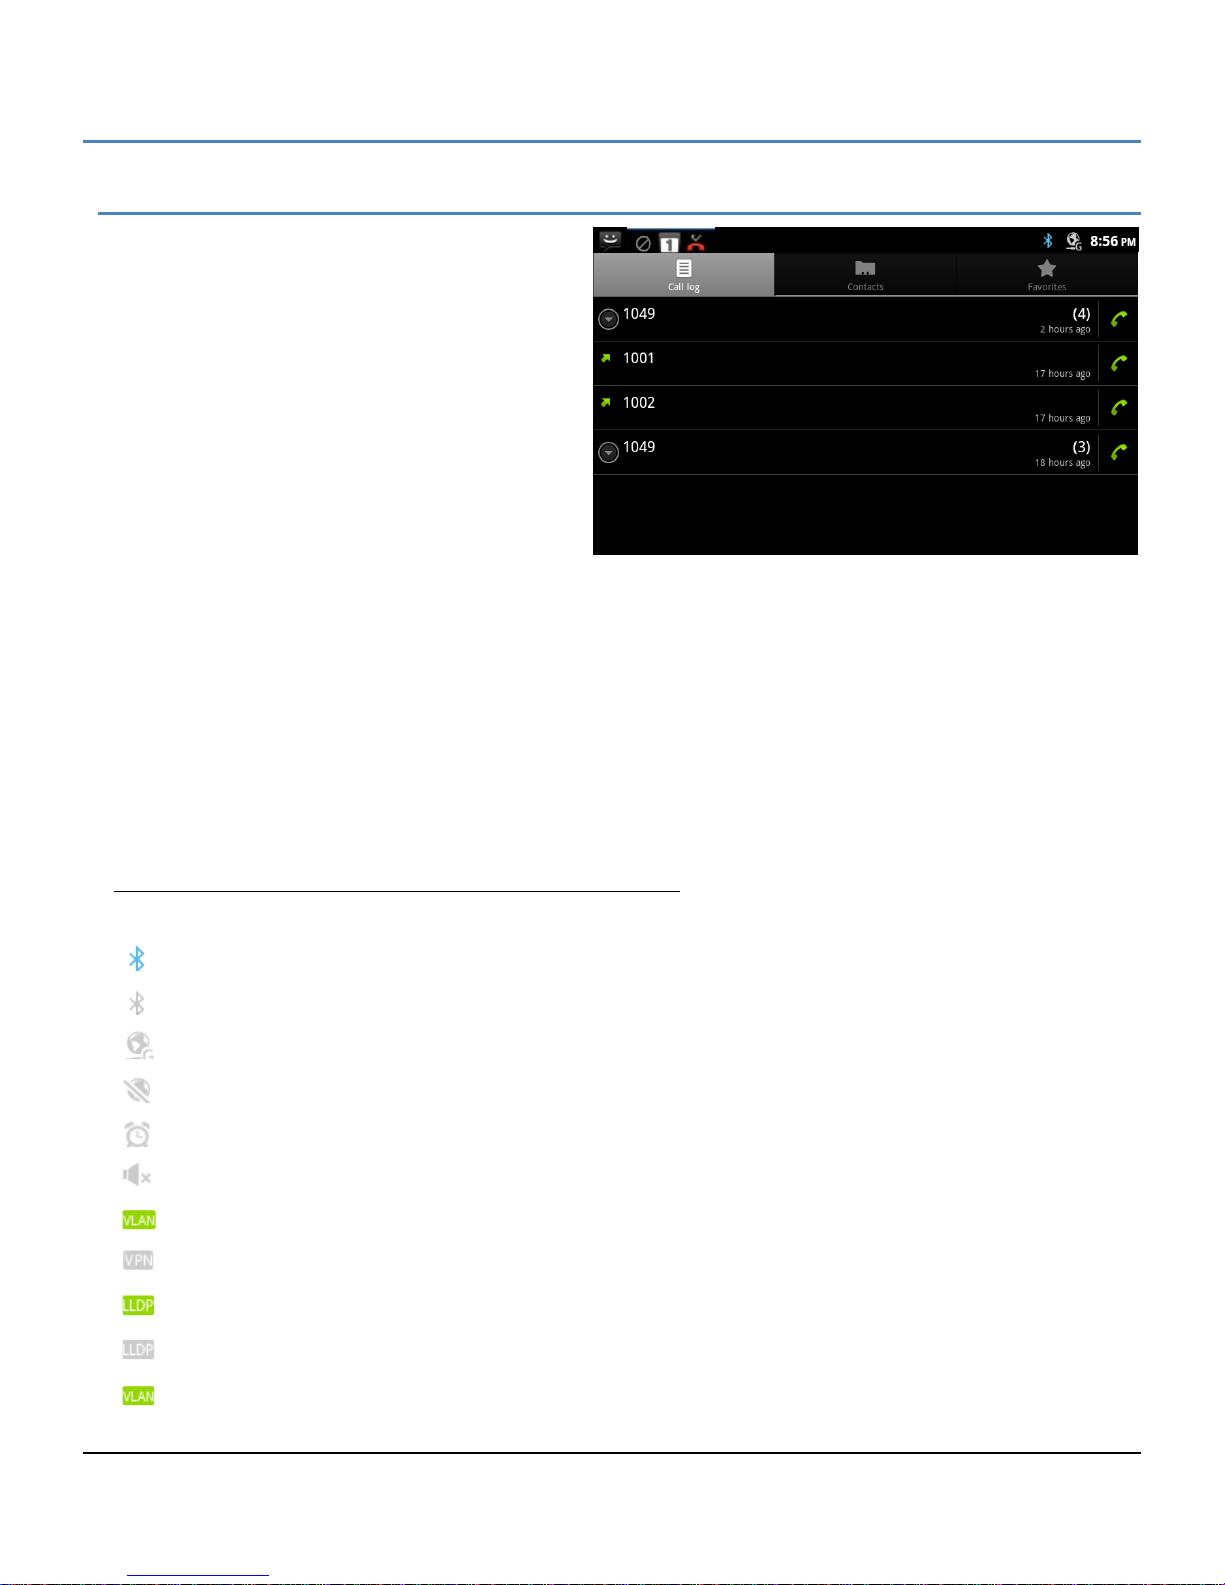
Icon
Description
Bluetooth interface active and connected
Bluetooth active, but not connected
LAN connected and available
LAN connected but internet is not available.
Alarm clock set
Speaker of speakerphone off. Music and alarms still sound
Phone is connected to a network using VPN.
VPN is enabled.
Phone is connected to a network using LLDP.
LLDP is enabled.
VLAN enabled, there is no disabled icon
4.7 Notification And Status Bar
At the top of the screen is the Notifications and
Status bar. Icons to the right i ndicate the status of
connections to the pho ne, the speaker and alarm s.
Icons to the left ar e n otif ic a tions of new events suc h
as a new SMS and missed call or ongoing events
such as call forward or mute. Icons displayed for
notifications and states are shown in the chart
below.
When a Notification is given a summary is
displayed briefly along with the icon. The user can
view details of the notificati on and respond from the
Notifications panel. The panel is a sc rollable list of
all active notifications starting with ongoing events.
To view the Notification panel,
1. On a Launcher screen touch the Option menu button
or
Touch anywhere along the Notification and Status bar to expose the Notification tab and drag the tab down
to open the panel.
2. Scroll the list to review the notifications.
3. Touch a notification to respond.
4. Touch ‘Clear’ to delete all notifications. This does not delete on-going events such as Call Forward.
5. Touch the Back button to return to the previous screen.
Status icons:
14
Page 26
LIP-9070 iPKTS User Guide
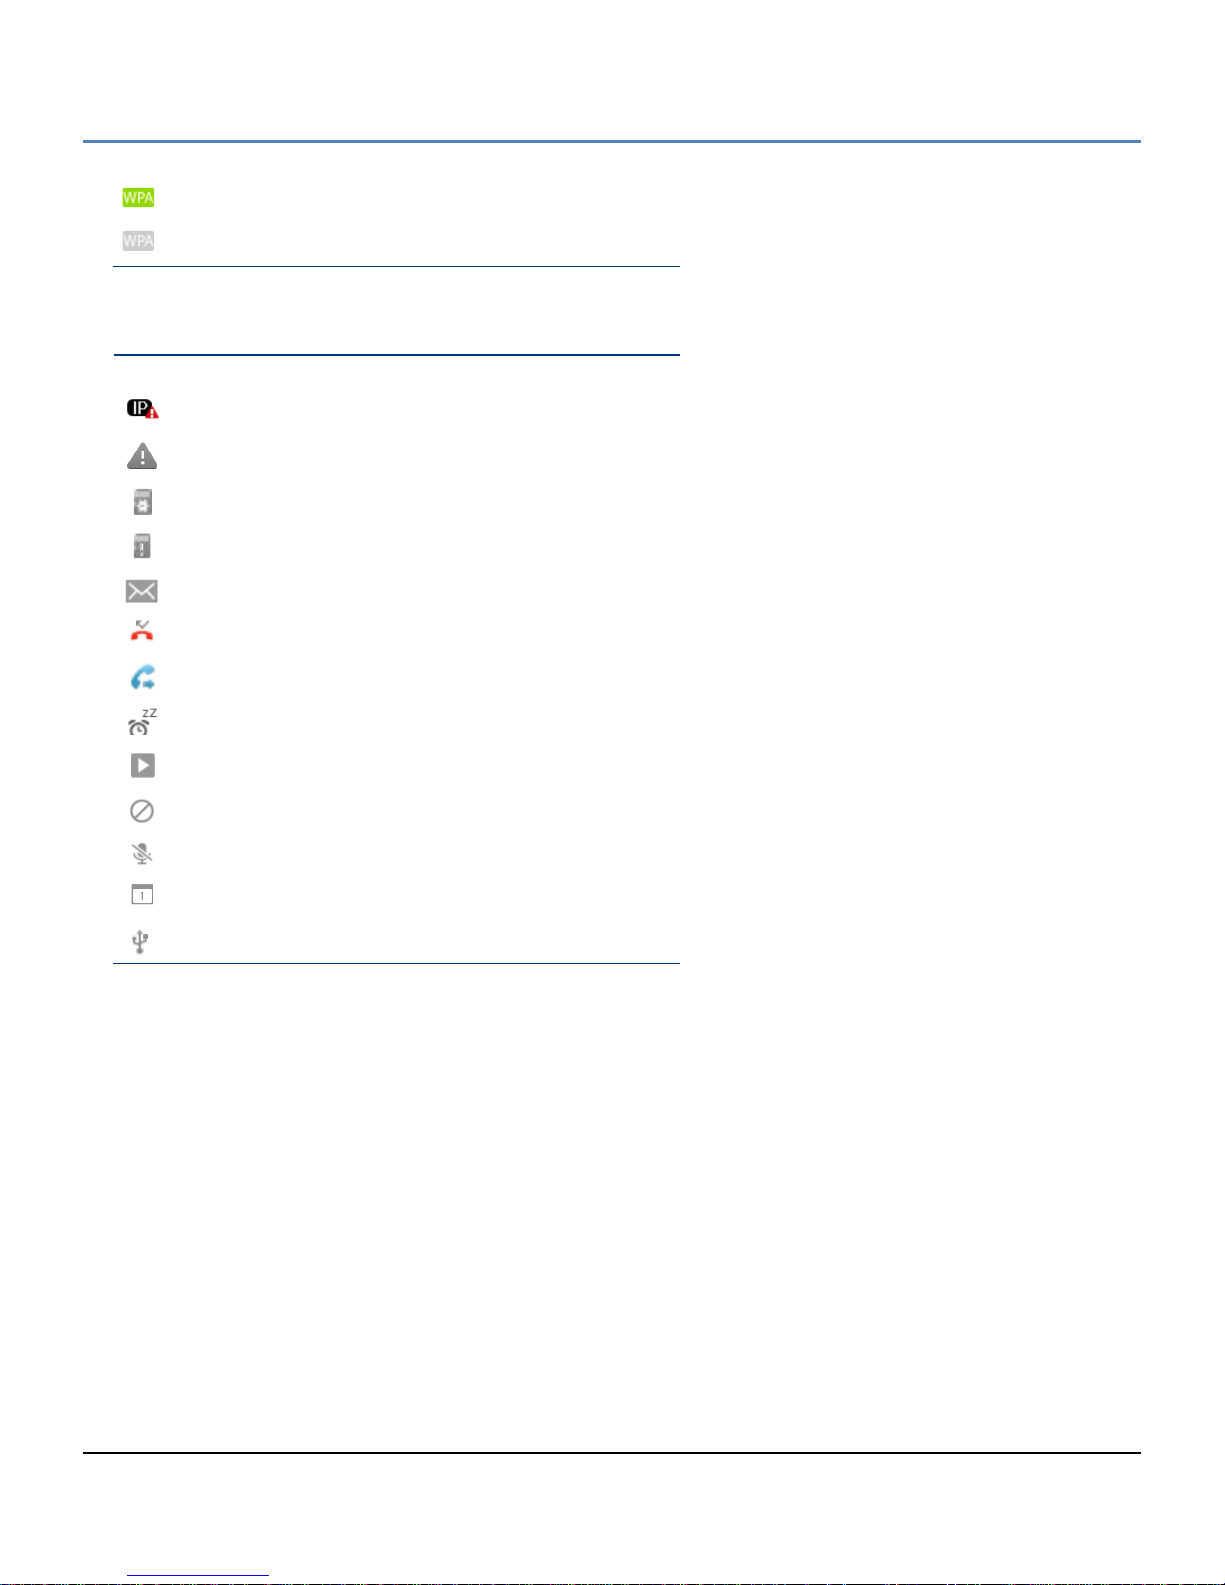
Icon
Description
IP Address collision occurs between the nodes.
SD card removed unexpectedly was not unmounted properly
SD card being mounted
SD card unmounted and can be safely removed
New text (SMS) messages
Missed calls.
Calls are being forwarded
Alarm Snooze active.
Music is playing.
DND (Do Not Disturb) active
Phone microphone muted.
Reminder of an upcoming event.
USB port connected
802.1x security active
802.1x security not active.
Notification Icons
15
Page 27
LIP-9070 iPKTS User Guide
4.8 Cus t om ize the Launcher Screens
Each of the Launcher screens display application icons, widgets and shortcuts to a favorites, playlists, etc. The
icons and widgets can be added to or deleted from the Lau ncher scr eens or repositioned on the s creens. Also, the
background wallpaper can be changed.
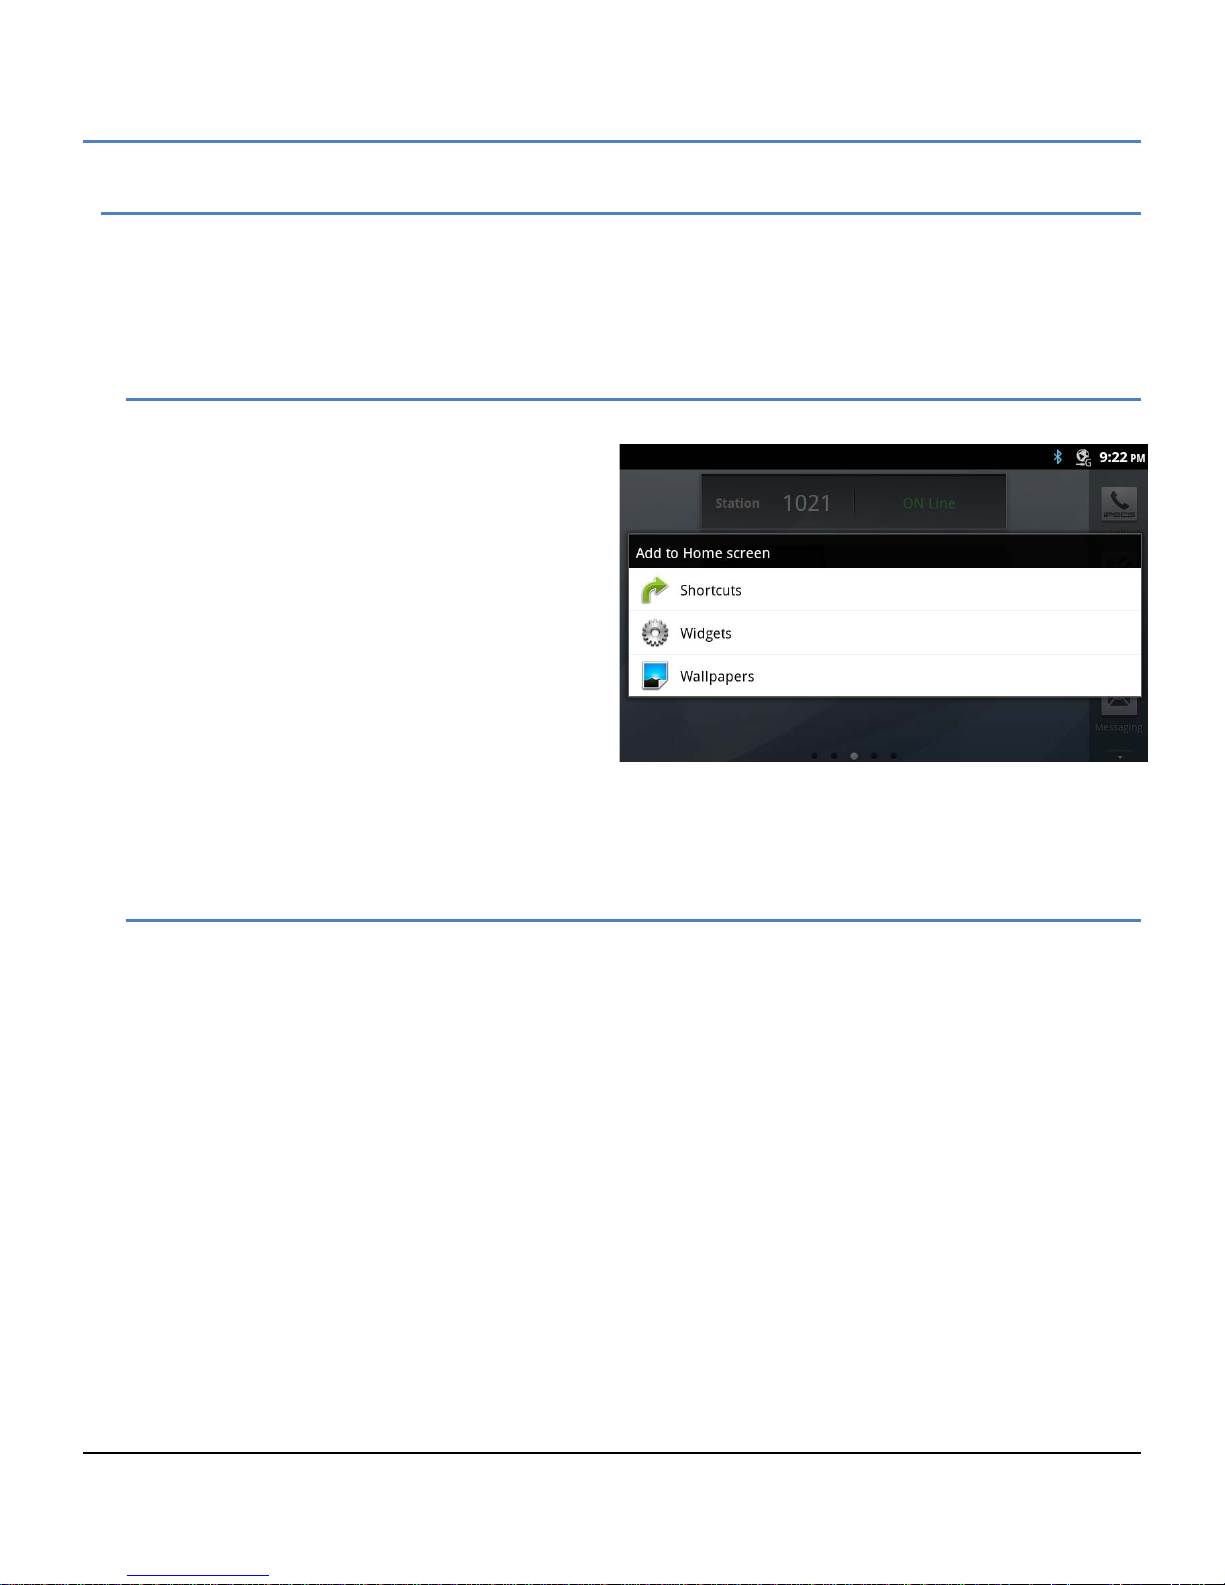
4.8.1 Adding Apps and Widget
To add a shortcut icon or widget to a Launcher screen,
1. Touch and hold an empty spot on the screen
or
on the desired Launcher screen, touch the
Option menu button and touch ‘Add’.
2. Select the type of item (Shortcut icon, widget
or Wallpapers).
3. In the popup select the specific item to add
and touch OK.
Note
° If there is no available space on a Launcher
screen, the Add se lection in the O ptions menu
will be grey out. To place another widget or icon on the screen an existing icon or widget must be deleted.
° A picture taken with the Camera app can be used as wallpaper as discussed in section 10.3.4.
° Deleting an app or widget from a screen does not delete the application from the LIP-9070.
4.8.2 Reposition or Delete a Screen Item
To reposition or delete an icon or widget, use the drag and drop gesture.
1. Touch and hold the application until the Waste-can appears to the right.
2. Drag the icon across the screen, releasing the item at the desired location or on Waste-can to delete.
3. Release the item to reposition or delete it.
Note
° When an item is dragged to the Waste-can it will change to a red color.
16
Page 28
LIP-9070 iPKTS User Guide
4.9 Ha ndling Widgets
The LIP-9070 is equipp ed with four (4) widgets; Cloc k,
Calendar, Music and iPECS Station. W idgets can be
located on any Launc her screen with available space.
Touching a widget will open a related application,
Clock opens the Alarm Clock, Calendar opens the
Appointment Calendar, iPECS Station opens the
iPECS Phone window and Music opens the Music
Library.
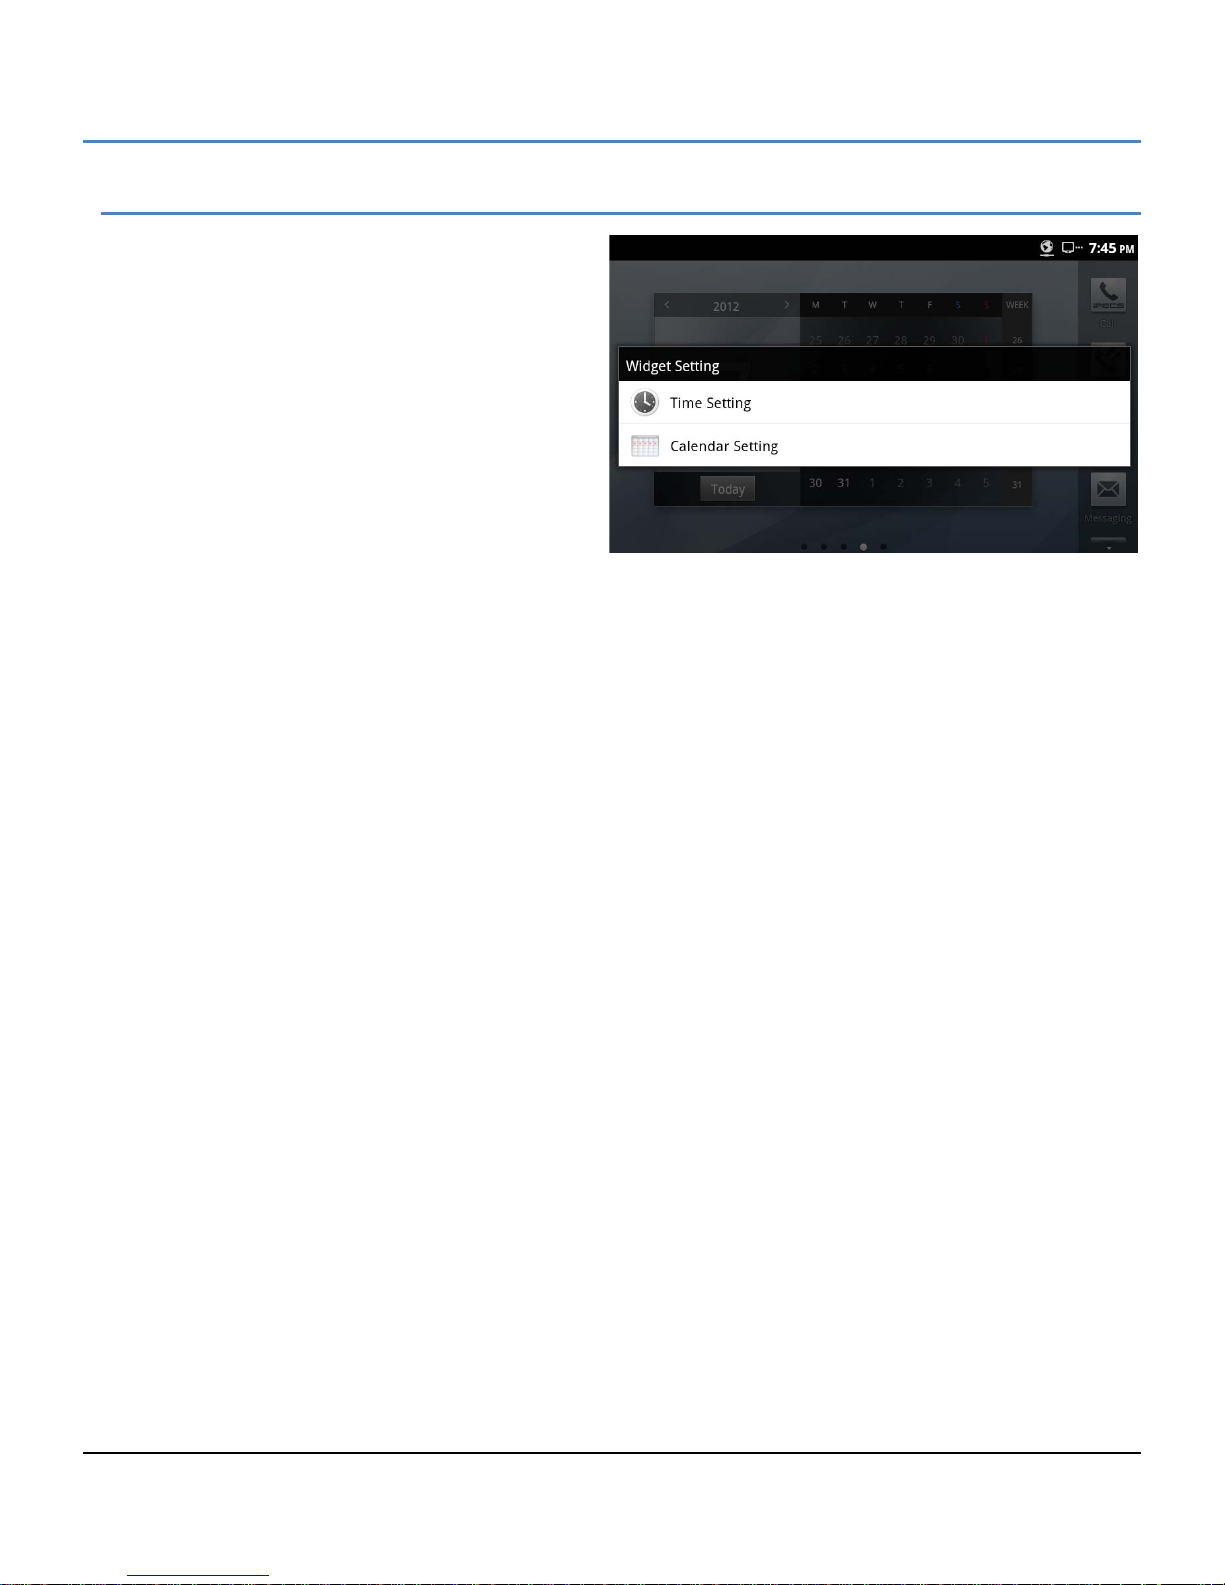
In addition, using Widgets Setting from the Option
menu, the time and date, and the weekday
appearance on the c lock and calendar widg et can be
changed to suit the user. Note the date and time are
determined by the information from the iPECS host.
To change the appearance of the time, date or weekday appearance,
1. On a Launcher screen touch the Option menu button.
2. Select ‘Widget Setting’.
3. For Date and Time Settings, select the clock format (12/24 hour) and the data format.
Or
For Calendar Setting, select the weekday order.
4. Touch the Back button to return to the Launcher screen.
17
Page 29
LIP-9070 iPKTS User Guide
5 iPECS Phone
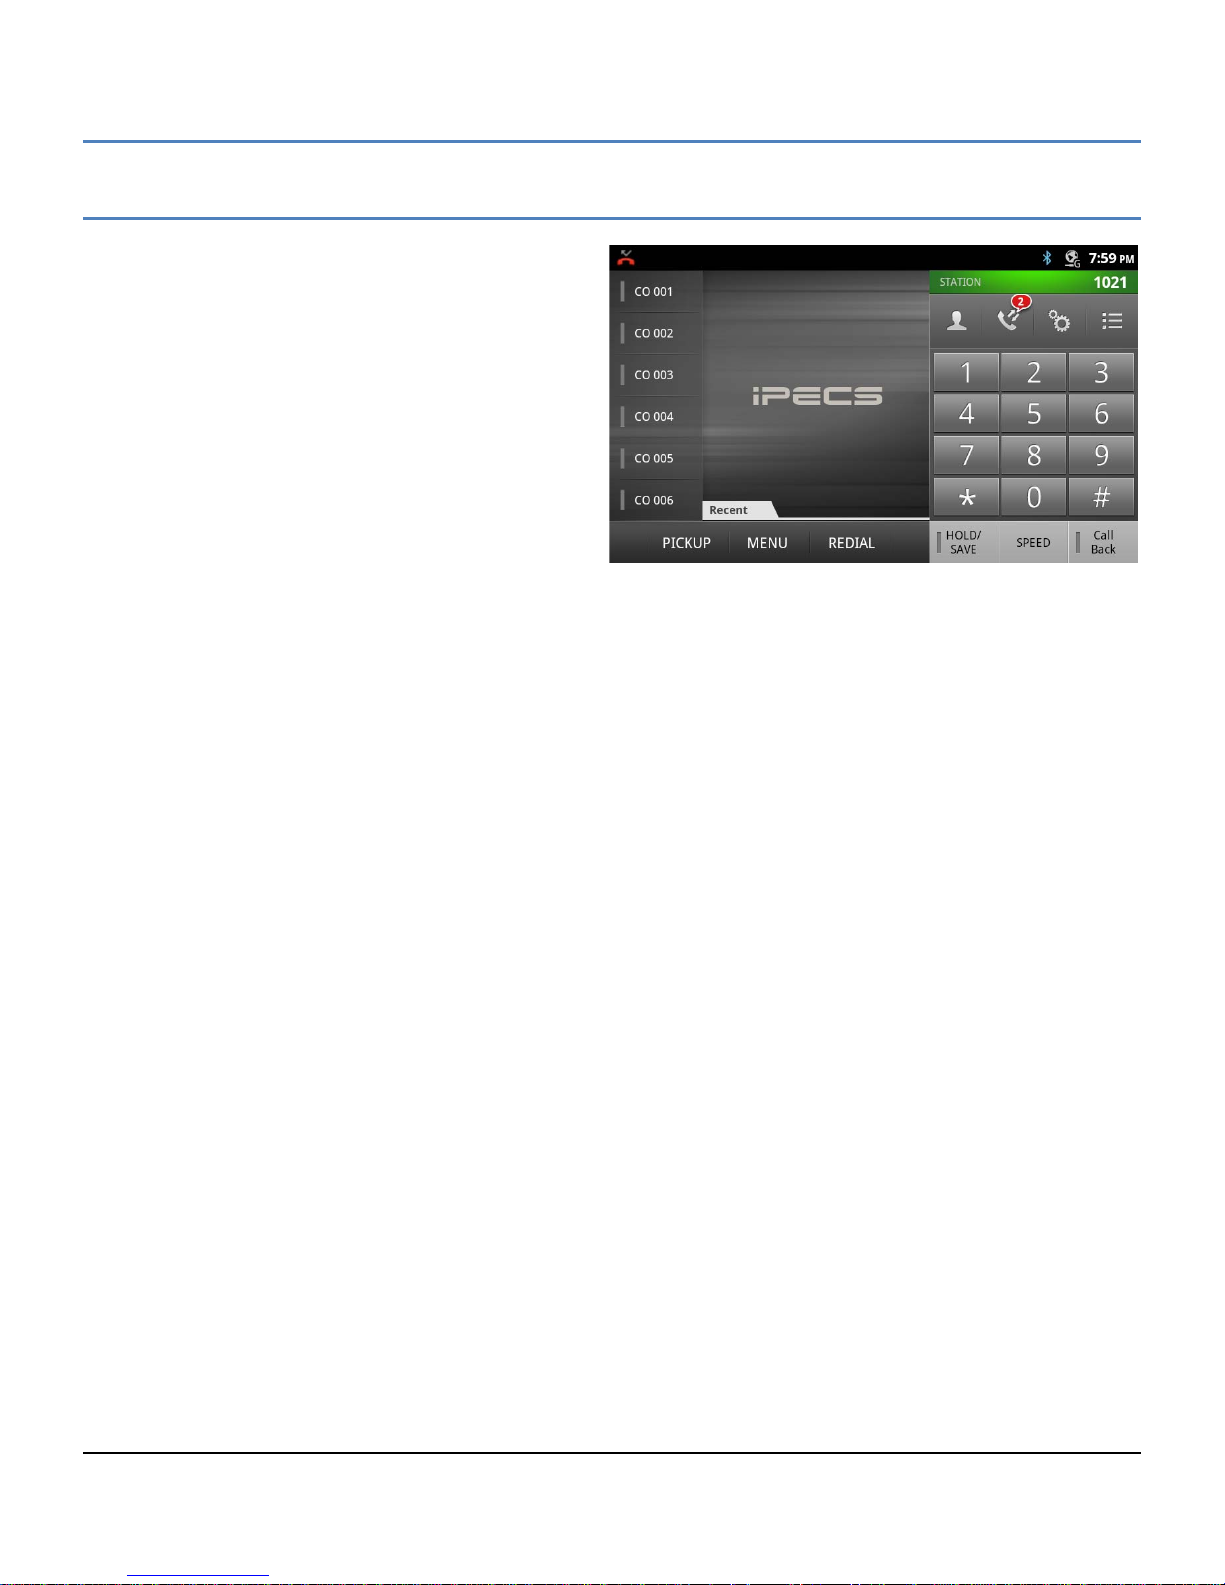
The iPECS Phone application is accessed with t he icon
in the Apps Dock, a Launcher screen or automatically
when answering a ca ll. The iPECS Phone window is a
virtual construction of the functional elements of an
advance business tele phone. Along the left are t he first
six (6) programmable ‘Flex’ butto ns. These allow acc ess
to CO Lines/Trunks , calls to other stations or activ ation
of an iPECS system feature. In the center of the wind ow
is the Call information screen that displays information
about active, incoming and held calls.
On the right at the top is the Station identifier with the
Station Name or num ber. Below the identifier are m enu
icons for
Contacts, section 7.
Logs w/missed calls, section 8.
PGM button with access to the Station User Menu, Appendix A.
Flex buttons access to buttons 7 to 30, section 6.3.
Across the bottom are two m enus. In the left m enu are three s oft keys that are context sens itive and show available
call functions from the iPECS hos t. If more than three selec tions are avai lable a left/right a rrow is exposed to access
the additional items. The idle mode iPECS menu presents:
Pickup: answer calls ringing another station.
Menu: access the Station User or Phone setting menu, Appendix A and section 5.5, respectively.
Redial: redial one of the last 10 dialed numbers.
The second menu is the t hree f ixed iPECS phone feature buttons Hold/Sa ve, Sp eed and C all Bac k that are discussed
in the following sections.
Note
° Sever al of the buttons and icons provide m ultiple functions bas ed on the state of the phone. For exam ple
the Hold/Save button places an active call on hold and saves entries made by the user when entering
speed dials and other inf or mation.
° The Recent call list can display in the Call screen by touching the ‘Recent’ tab.
° The LIP-9 070 does not su pport legacy iPE CS Muted Ring feature. It s upport through no tification m essage
on top bar as “new call wa it” with one time beep tone. This is almost same as what normal mobile phone
call waiting service.
18
Page 30
LIP-9070 iPKTS User Guide
5.1 Speed
5.1.1 Using Auto dialing
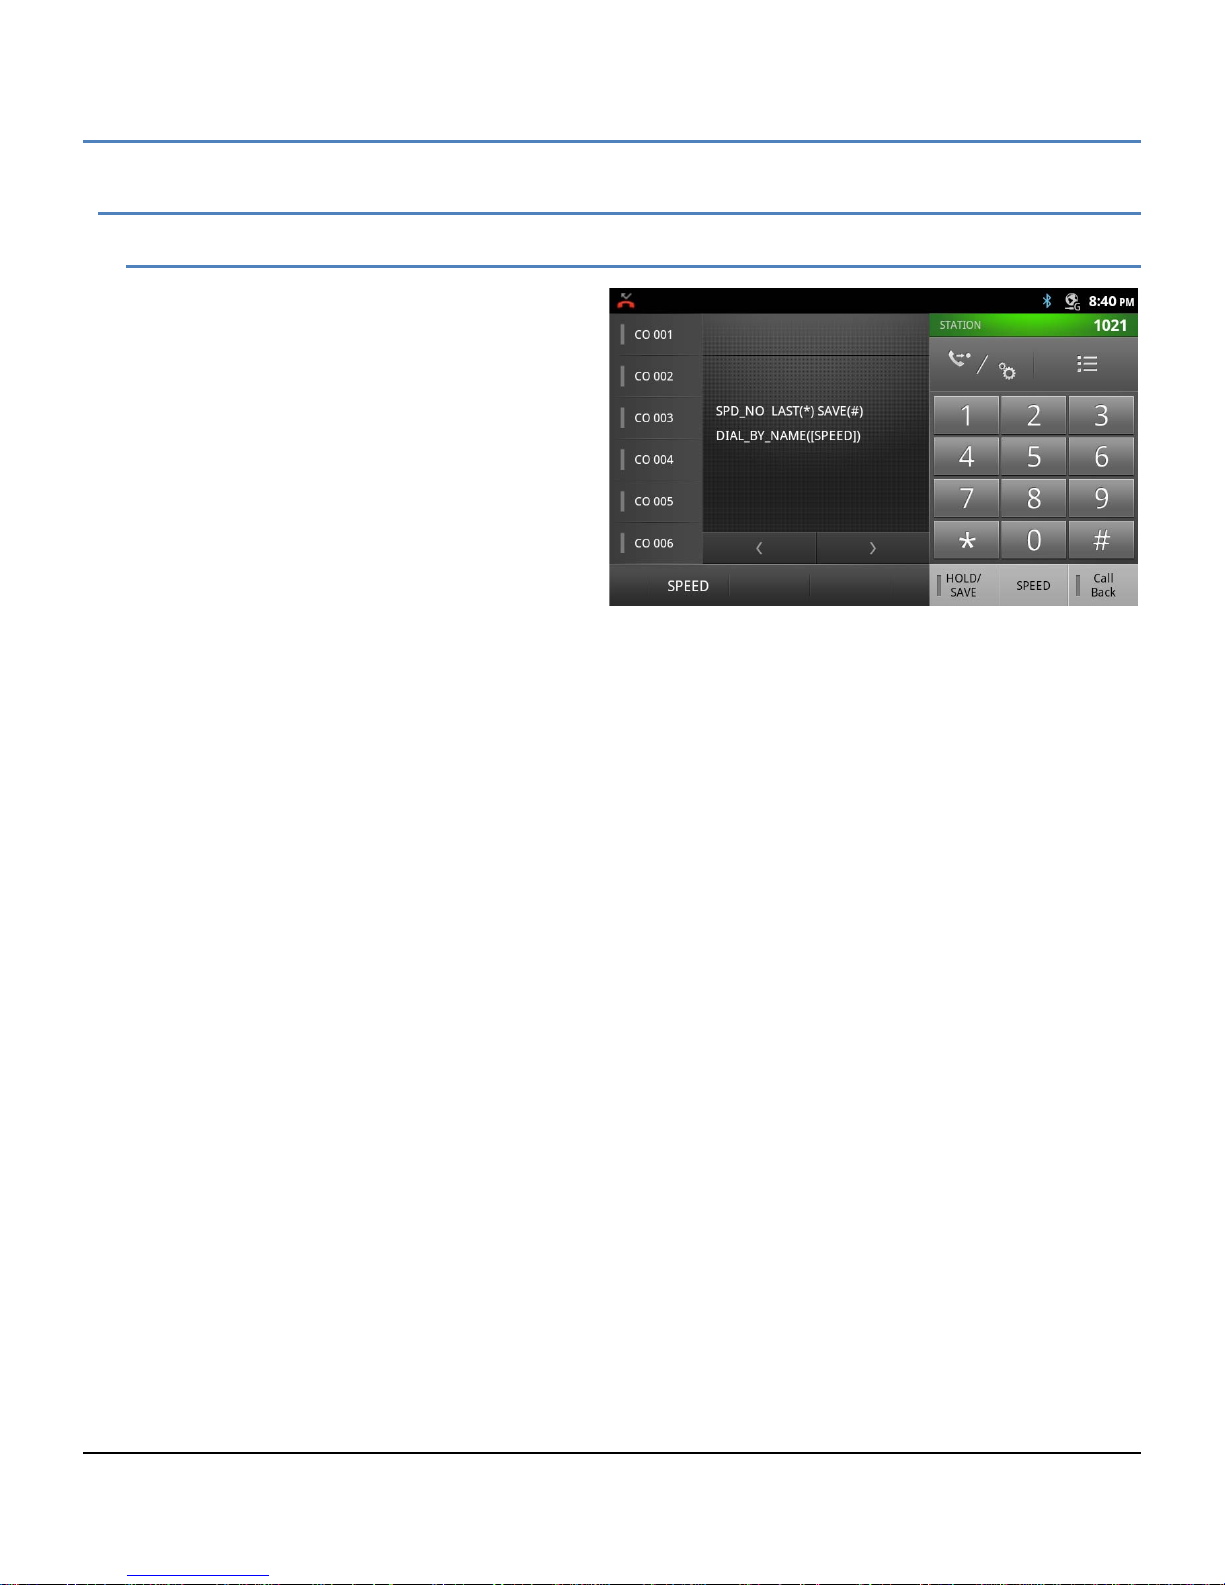
The iPECS system includes several automatic
dialing features acc es sed w ith the Speed button.
Redial number
The user selects from a list of the last ten (10)
numbers dialed for redialing.
Saved Number Redial
The user saves a num ber during a call a nd then
recalls the saved number for redialing.
Directory Dial
Dial-by-name directories to call other users or
dial a Station or System speed dial. Characters
are entered with two dial pad digits.
System and Station Speed Dial
Storage is allocated in the iPECS f or System Speed d ial num bers, num bers available to al l system users, and
Station Speed dial numbers, numbers available and configured by the station user.
To use an auto dial feature
1. Press the Speed button.
2. Dial the code for the auto dial feature desired.
a. To dial a number in a Speed dial, dial the Speed dial bin number.
b. Press Call.
A number must be stored in the Speed Dial bin. System Speed numbers are stored by the Attendant. The
user may assign Station Speed Dial numbers as detailed in section 6.1.2.
a. For Redial, press ‘*’.
b. Select one of the ten numbers from the list.
c. Press Call.
a. For Saved Number Redial, press ‘#’.
b. Press Call.
A number must be saved during a previous call.
a. For Directory Dial, press the Speed button a second time.
b. Select the desired directory, Internal, System Speed or Station Speed.
c. Use the dial pad to enter characters/scroll.
d. When the desired Name highlights, select Call.
19
Page 31
LIP-9070 iPKTS User Guide
(002)
5.1.2 Setting up a Station Speed Dial
Station Speed Dial numbers are somewhat like Contacts except with Speed Dial only a name and a phone
number are assigned. T he number of bins available will be f rom 20 to 100 depend ing on the iPECS sys t em . A
Speed Dial can be up to 48 digits in leng th and may include special characters. For more details, see the Feature
and Operation manual for the iPECS system.
To configure a Station Speed Dial number
1. Touch the PGM button to access the Station User menu.
2. Touch the Speed button.
3. Dial the CO Line/Trunk access code, generally ‘9’.
4. Dial the Speed Dial bin number (00 to 19 or 00 to 99).
5. Dial the telephone number for the Speed dial.
6. Touch the Hold/Save button.
7. Enter an optional Name using the dial pad with two digits for each character.
8. Touch the Hold/Save button to complete the Speed Dial entry.
5.2 Call Back Message Wait
When calling another s tation in the iPECS system and the call is not answered, you can leave a reques t for a call
back and activate an Intercom Message Wait to the called user.
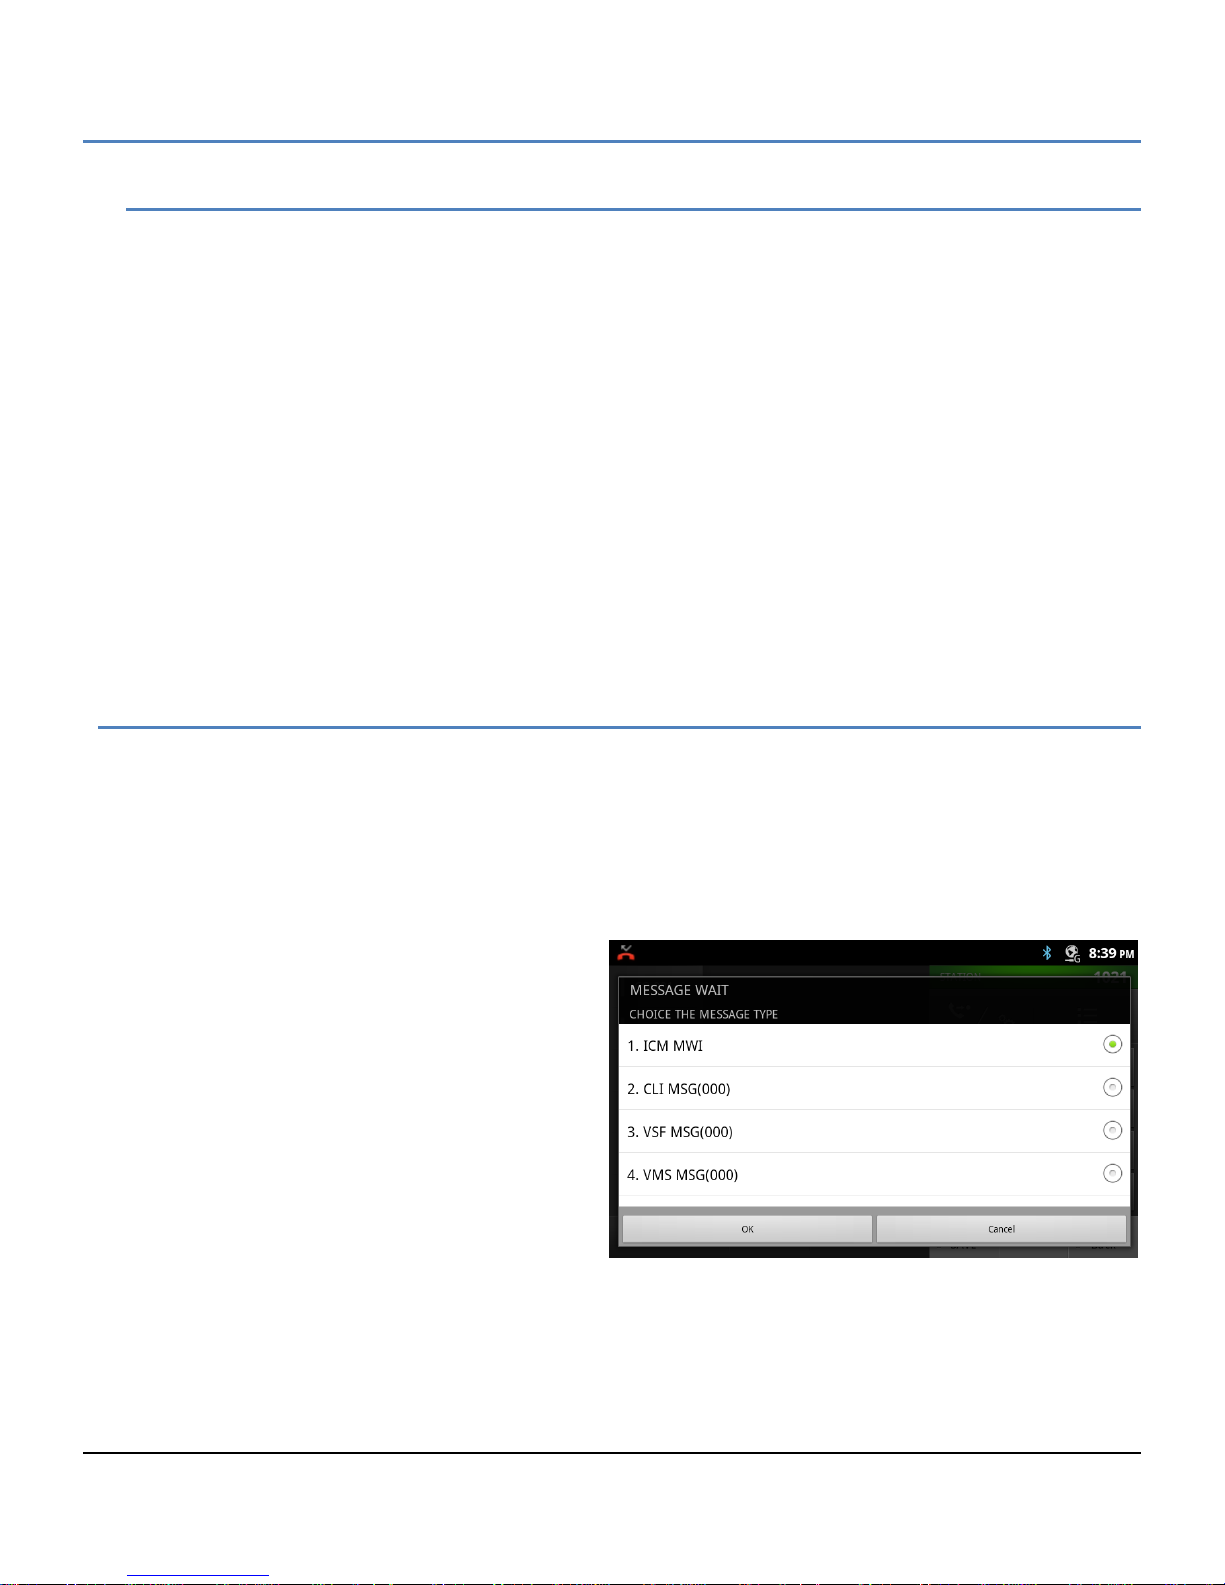
To activate a Call Back message wait
1. While receiving no ans wer on an internal ca ll, press Call bac k. A Call Back Message wait is activat ed and
the called station user receives a message waiting indication for the Intercom (ICM) call.
To respond to a Call Back message
1. Press the flashing Call Back button.
2. Select the ICM MWI radial button.
3. Select the Station to call back from the
Station message list.
20
Page 32
LIP-9070 iPKTS User Guide
5.3 Flex Buttons
Flex buttons, which ar e programmable, access resources of the iPECS such as CO Lines and paging as well as
call other st ations and activate f eatures of the iPECS. Buttons th at acc ess ex ternal n etwork s such as a CO Line or
Loop button are ass igne d by a dm inistrative users onl y. T he user can conf igure b uttons assign ed to other func tions
or unassigned buttons. For details on configuring a Flex button see Appendix A.
In addition to configuring Flex buttons, the user may assign a label to the button as discussed in section 5.5.2
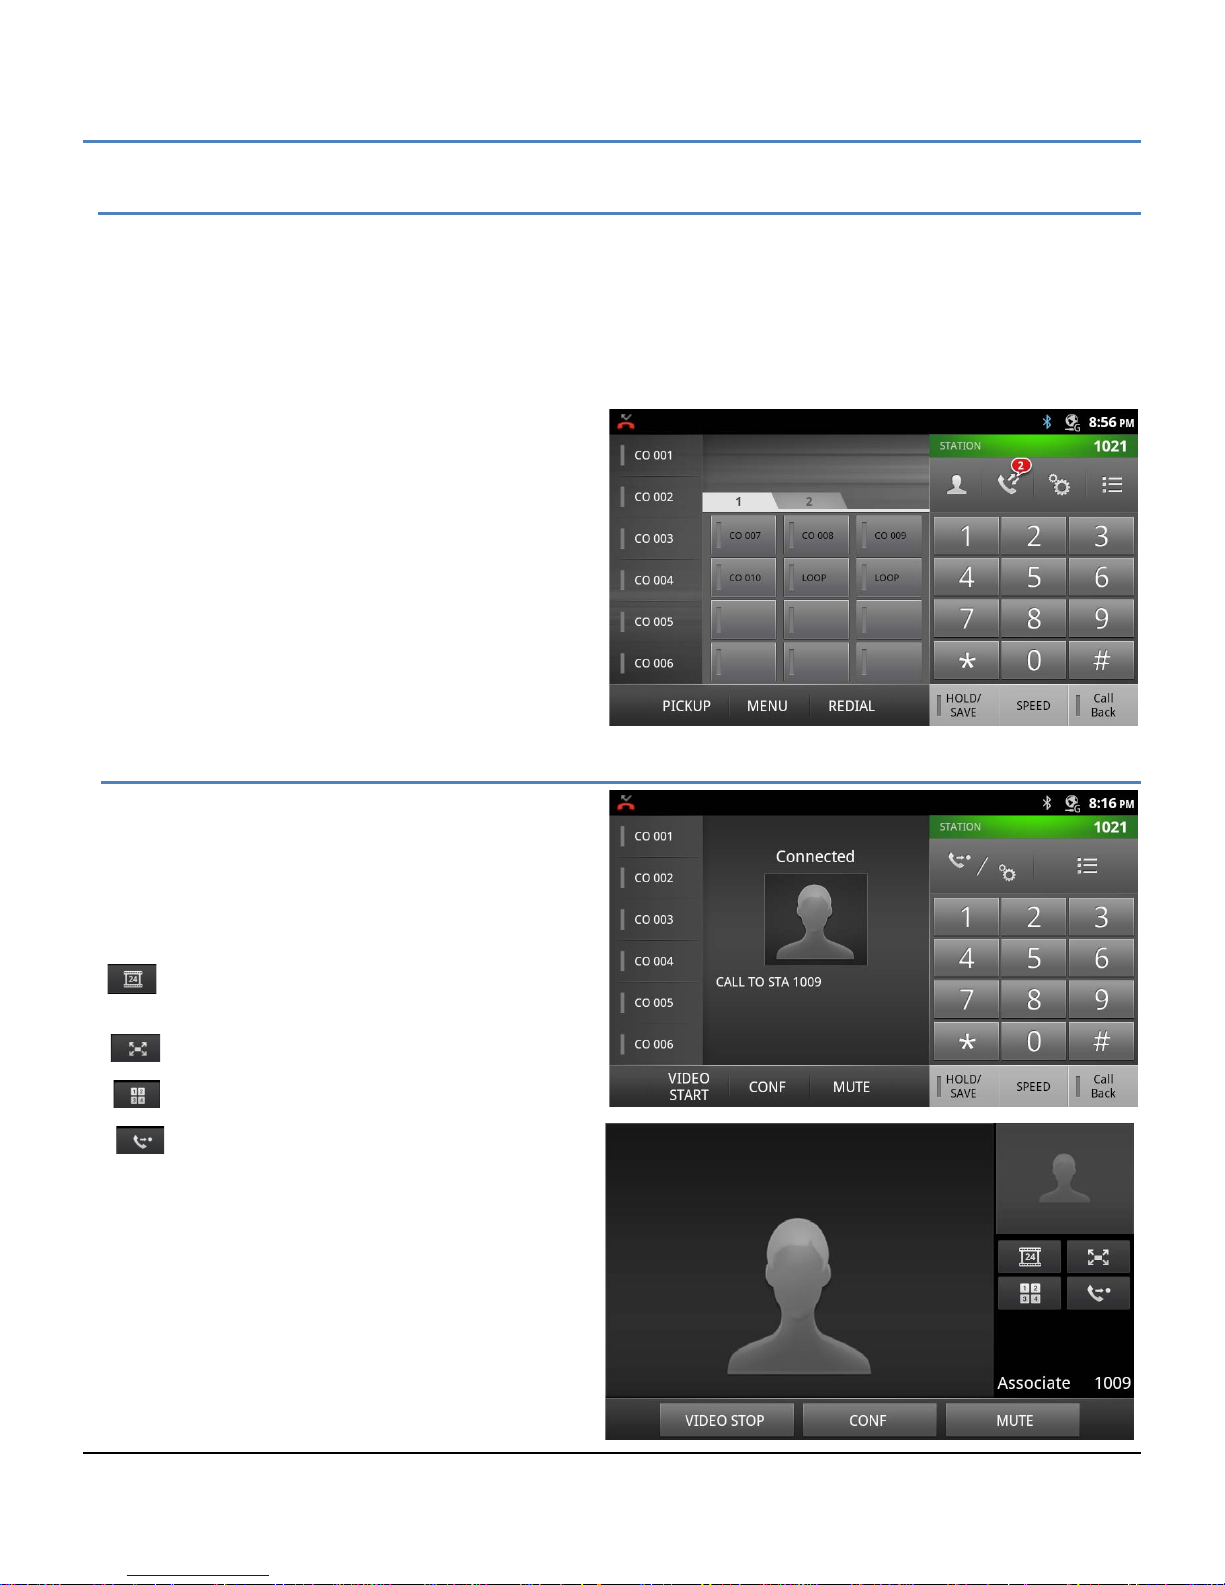
The iPECS Phone screen displ ays the fir st six (6) F lex
buttons on the left of the screen. The remaining 24
buttons can be displa ye d in the iPECS Phone screen
using the Flex button icon. The buttons are shown
under two tabs, buttons 7 to 18 under tab 1 and
buttons 19 to 30 under tab 2.
Note
° Buttons that are not assigned appear with no
label in the button display.
5.4 V ideo Calling
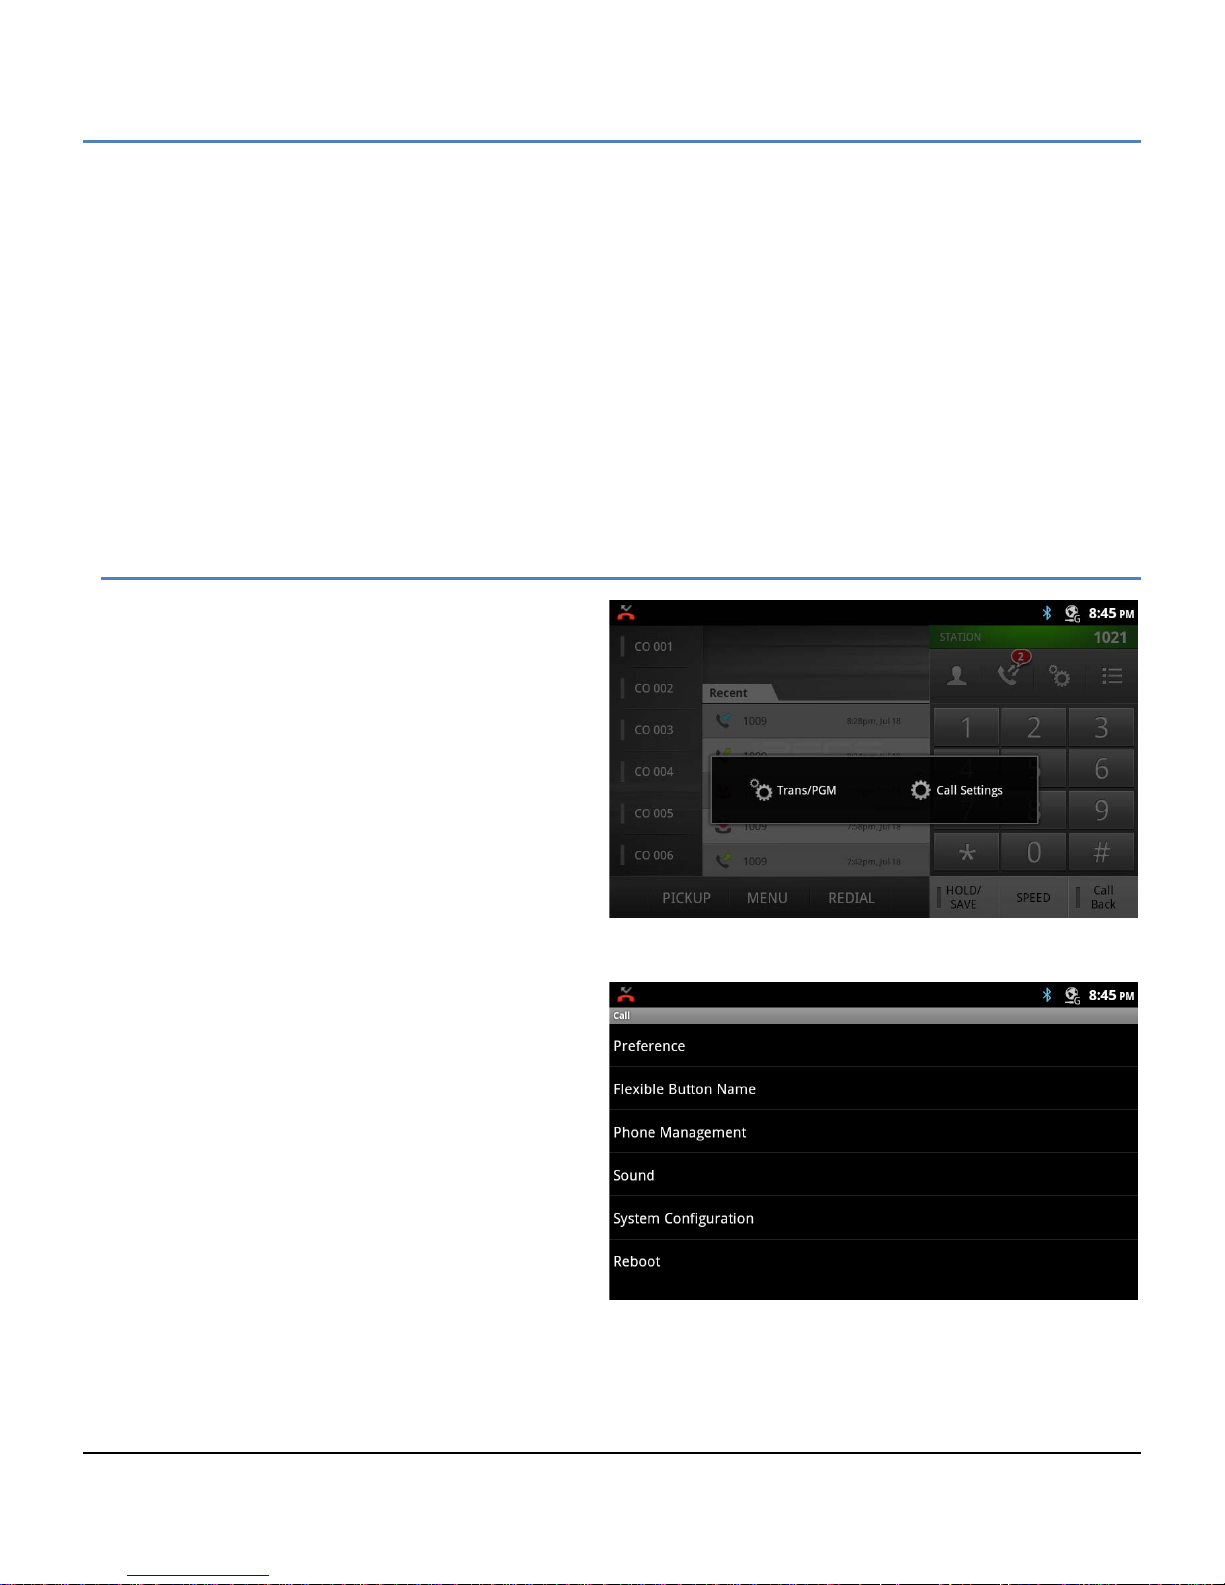
Once a voice call is established you can initiate or
accept a video call. To start or respond to a Video
Call invitation, pres s the Video Start button, which will
open the Video Call window. On the right s ide of the
window is a thum bnail of the video sent from the LIP9070 and controls for the Video call including:
Frame Rate: set the frame rate from 5 to 24
frames per second. Higher frame rates
improve quality but require higher bandwidth.
Video Screen size: adjust the size of the main
video screen.
Dial pad: sho w or hide the basic telepho ne dial
pad.
Transfer: send the call to another destination.
To the left is the main video screen that displays
video sent from the connected party. The video is
sent after the party accepts the Video call. Note it
may take a few moments to display the received
video when the call begins.
At the bottom of the sc reen are the soft menu buttons.
The buttons include,
Video Stop/Start: pause and restart video
transmission.
21
Page 33
LIP-9070 iPKTS User Guide
Conf: initiate a voice conferenc e.
Mute/Unmute: turn the microphone on or off, to control the speakerphone, handset or wired headset
microphone.
Note
° T he video call suppor ts m ultiple video co decs including {H.264, H.263 and, MPEG }. The codec for a given
call is negotiated between the devices.
° The LIP-9070 video call function requires below bandwidth based on the codec employed.
- H.263: 768kbps
- H.264/MPEG: max=2048kbps, min=384kbps, typical target = 768kbps
5.5 iPECS Phone Call Settings
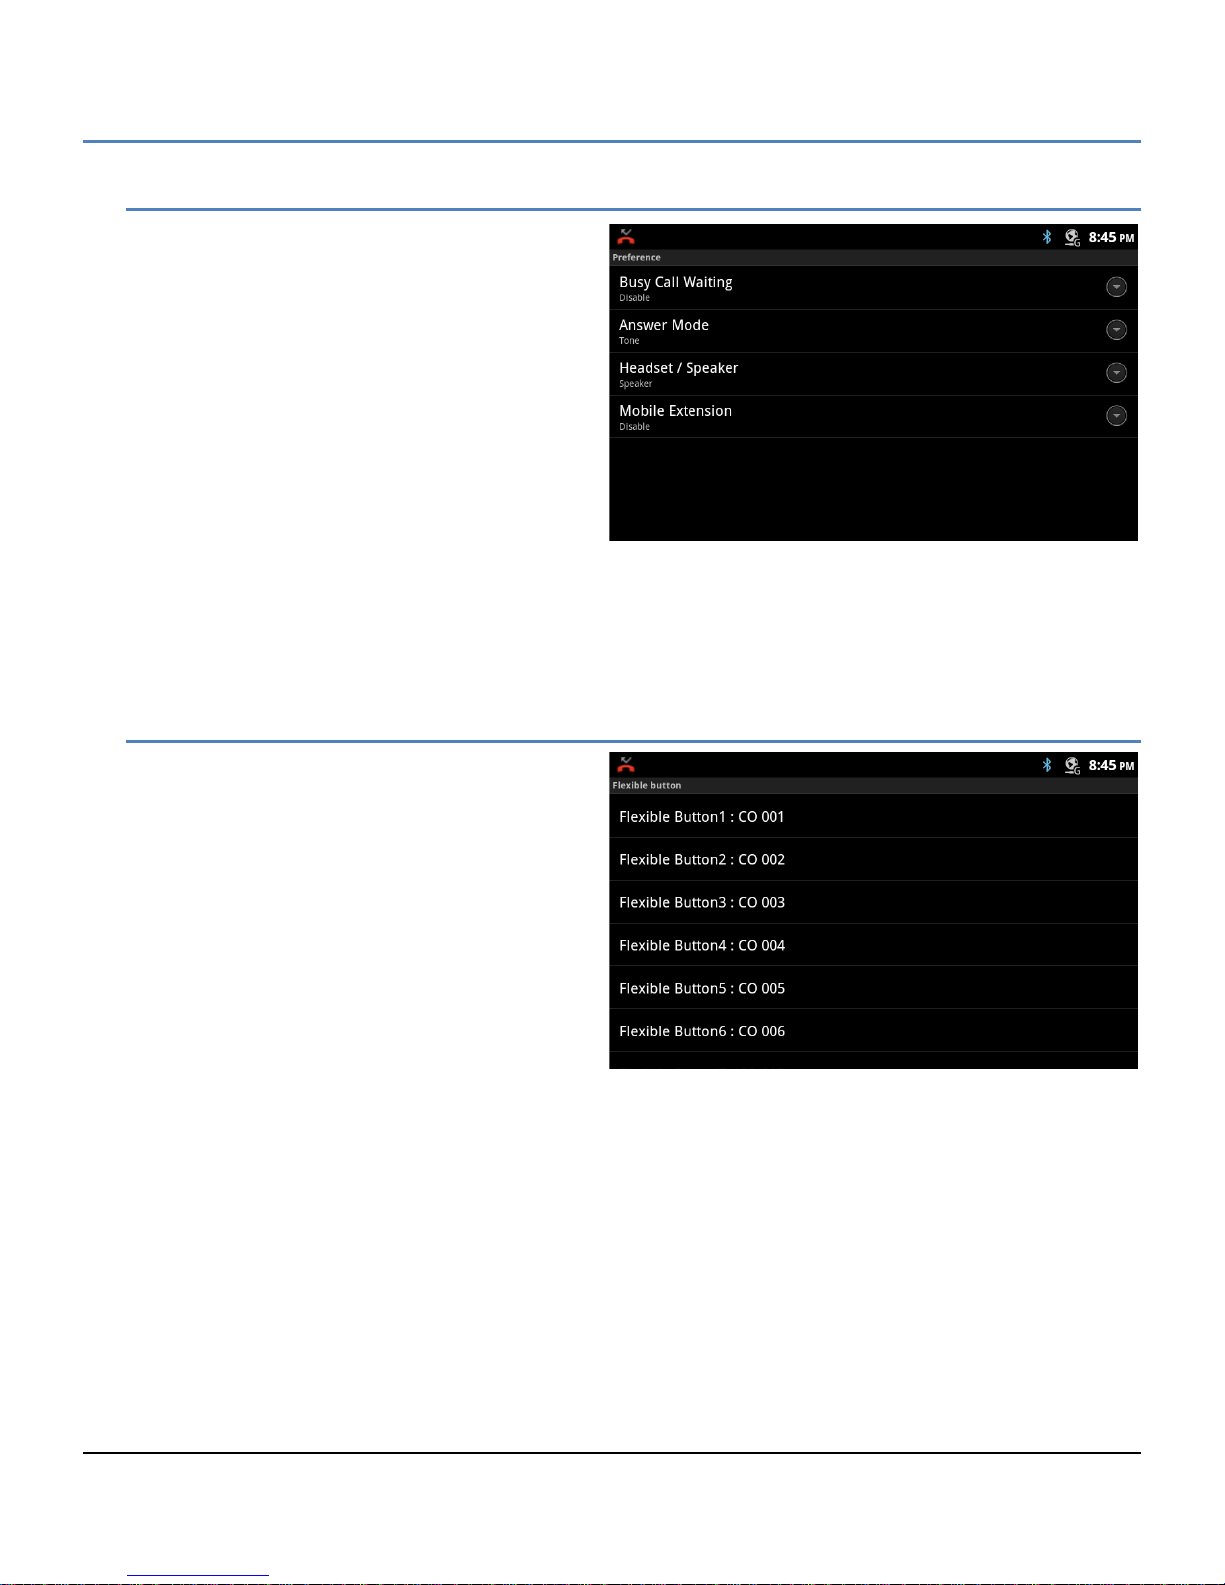
The Call Settings for the iPECS Phone impacts call
handling, button appearance, sounds and other
characteristics of the phone. To view the Call Settings
menu,
1. While on the iPECS phone screen, touch the
Menu button.
2. Select the Call Settings icon.
The Call Settings menu includes,
Preferences: section 5.5.1, set signaling and
answer for internal calls, configure wired
headset operation, etc.
Flexible Button Name : section 5.5.2, assig n a
name or label for each Flex button.
Phone Management: section 5.5.3; manage
characteristics of the phone including the
name, password, etc.
Sound: section 5.5.4, select the ringtone for
incoming internal and external calls.
System Configuration: section 5.5.5, assigns
the iPECS system IP address and the
connection mode.
Reboot: section 5.5.6, restart the LIP-9070
phone.
22
Page 34
LIP-9070 iPKTS User Guide
5.5.1 Preferences
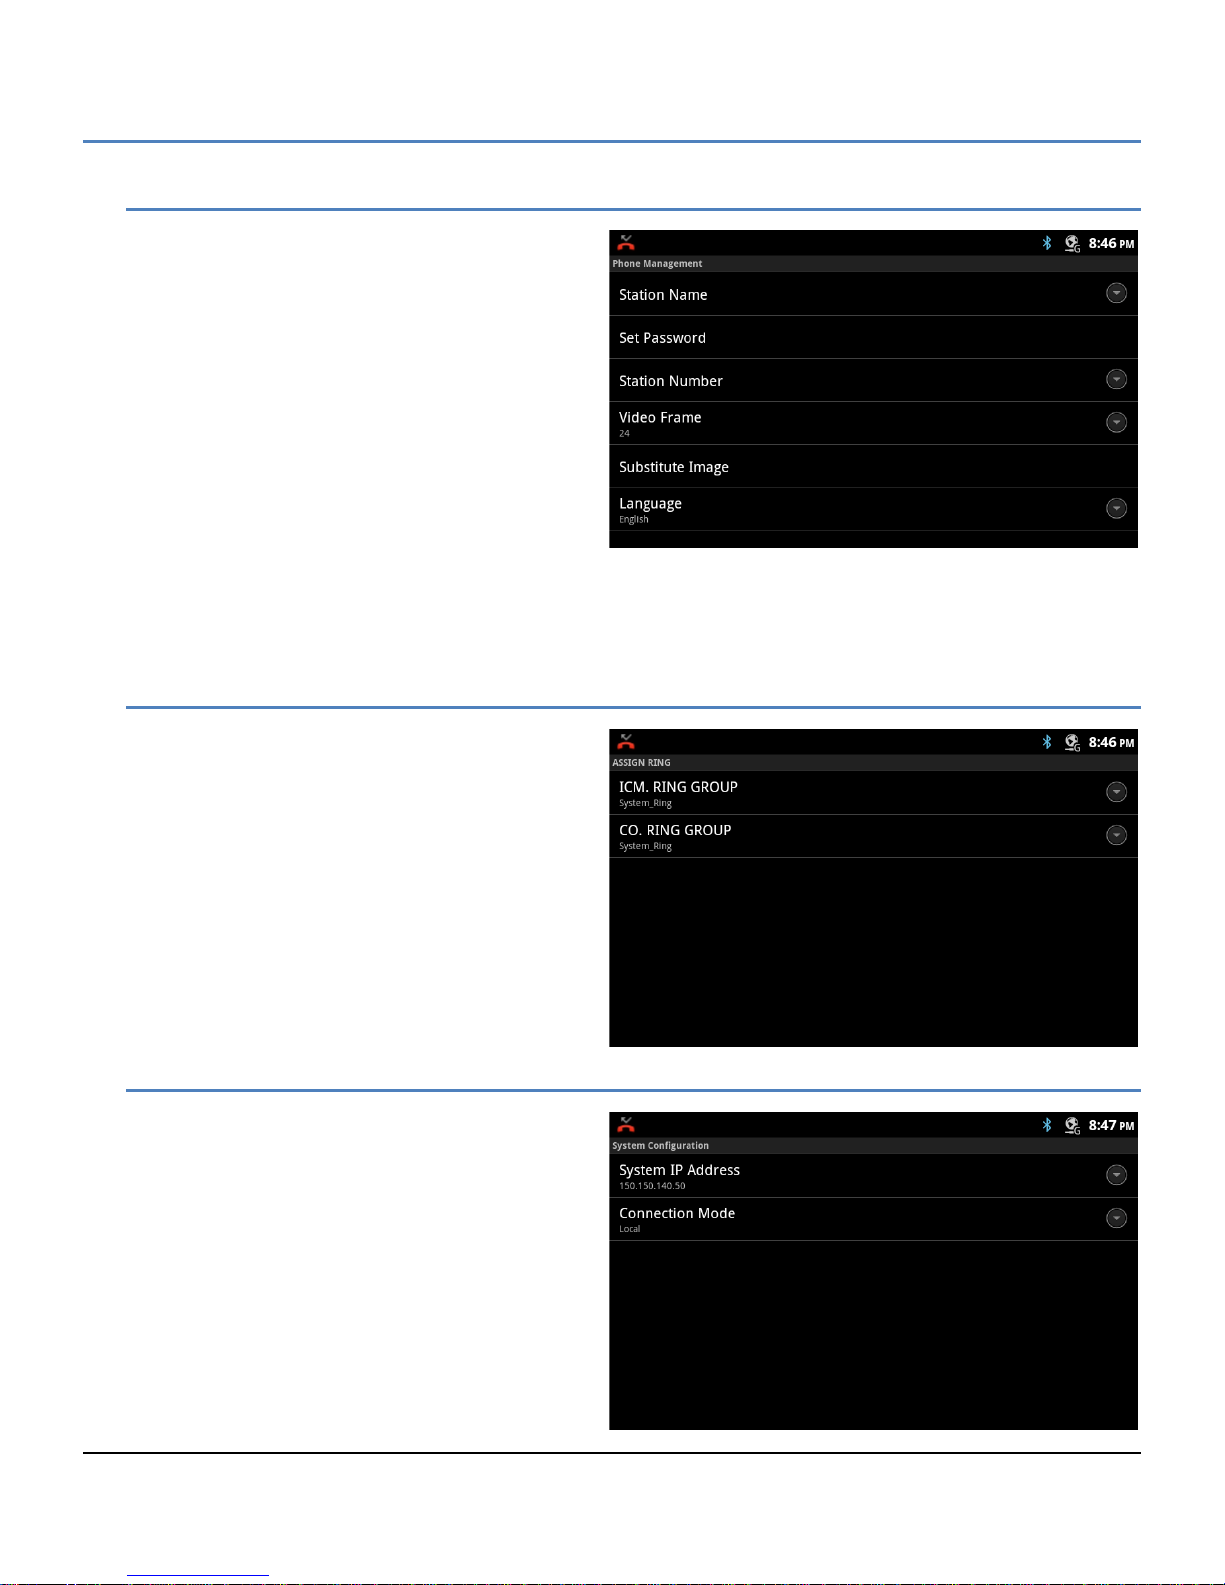
Preferences determine how calls to a busy station
are handled, how calls ar e ans wered and if calls ar e
sent to the user’s mobile phone.
Busy Call Waiting: while th e user is bus y on
a call, new DID and DISA calls can be
delivered to the phone or, when disabled,
the call routes based on the busy call
routing configured in the iPECS system.
Answer Mode: set the Inter c om Call Answer
Mode as HF (Handsfree Answerback to
Voice announced calls), Privacy (lift the
handset or press the Spea kerphone button
to answer a Voice announ ced call) or Tone
ring.
Headset/Speaker: configure the audio path when the speaker button is touched, route audio to the
headset or speakerphone.
Mobile Extension: send calls to a mobile phone associated with the station.
5.5.2 Flex Button Labels
A label or Name, up to 12 characters can be
configured for each Flex button by the user. If a
label is not configured the default name based on
the type button is used.
To configure a button label,
1. In the Call Setting screen, select Flexible
Button Name.
2. Select the desired Flex button, scrolling to
display the Flex button.
3. Enter the label, up to 16 characters.
4. Press Save to store the label.
23
Page 35
LIP-9070 iPKTS User Guide
5.5.3 Phone Management
The user can manage characteristics of the phone
including the name, password and number as well
as the contact icon and language for the display.
Station Name: set the display name for the
station that is delivered to other internal
parties during a call, 12 characters.
Set Password: set the phone password, 12
digits.
Station Number: select a desired Station
number that will be reques ted by the phone
during registration. If available, iPECS will
assign the Station the requested number.
Video Frame: adjust the video frame rate.
Substitute Image: change the user’s contact icon.
Language: select the display language.
5.5.4 Ringtone Sounds
The iPECS system includes 14 ringtones in memory
that can be used for internal an d external incoming
call ringtones. To select a ringtone,
1. In the Call Setting screen, select Sound.
2. Select the ICM (internal) or External Ring
Group down arrow.
3. Select the desired ringtone.
4. Select ‘Done’ to save the selection.
5.5.5 System Configuration
The System Configurati on menu allows input of the
IP address for the iPECS system and the
connection mode (local, remote and local/remote).
To change the system IP addres s or the connect ion
mode,
1. In the Call Setting screen, select System
Configuration.
2. Select the desired item.
3. Enter the IP address or select the
connection mode.
24
Page 36
LIP-9070 iPKTS User Guide
Note
° A reboot cycle is required to load the changes into the LIP-9070 active memory.
5.5.6 Reboot
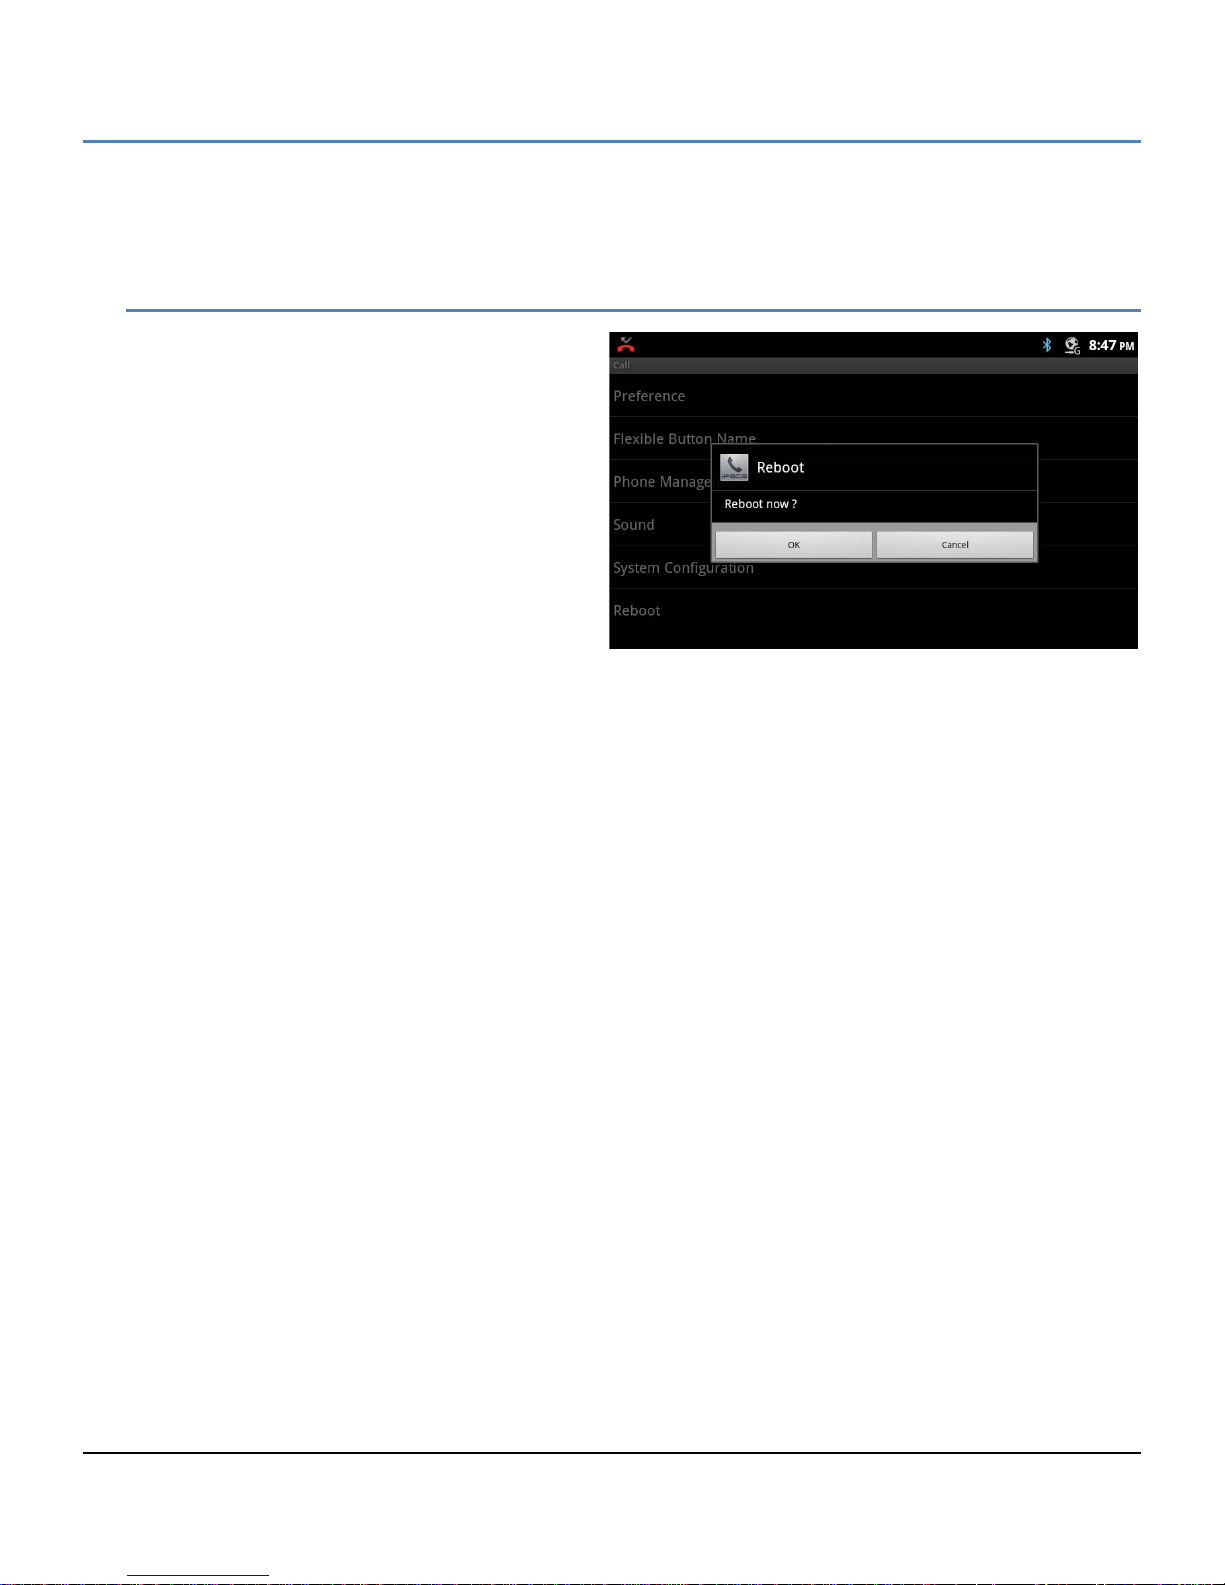
After modifying the System Configuration, it is
necessary to reboot the LIP-9070. To reboot,
1. With the iPECS Phone screen display,
select the Menu button.
2. Touch the Call Settings icon.
3. Select Reboot from the Call menu.
4. Select OK to reboot.
The LIP-9070 phone will restart and register with the
iPECS system.
25
Page 37
LIP-9070 iPKTS User Guide
6 Working with Contacts
With Contacts users have quick access to a database of
up to 1000 com monly called contacts. The database can
be searched and communication with a contact
established. Users can manage the database, adding,
deleting and editing contact information.
Contact information is stored in a VCard format that can
be imported to or exported from an SD card or an
external Bluetooth device.
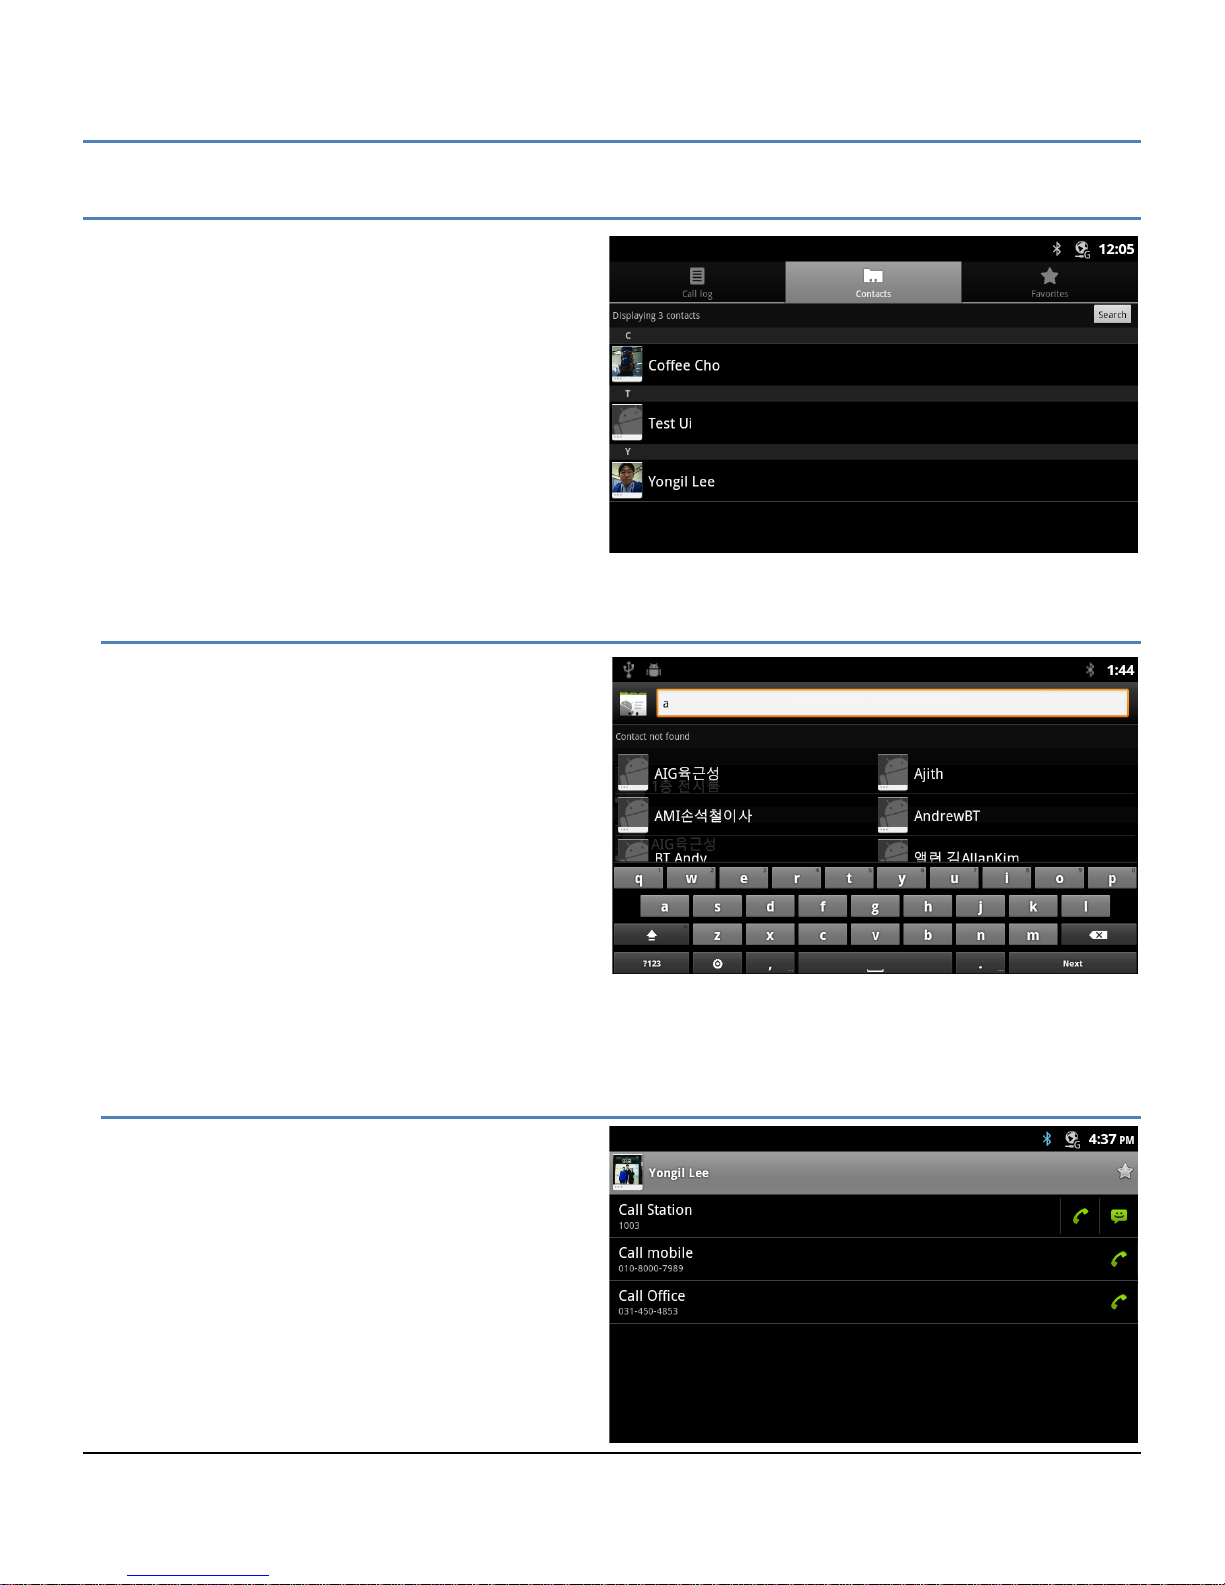
The Contacts list is opened with the Contacts icon in the
iPECS Call window (section 5) or from the Apps Dock
(section 4).
6.1 Searching the Contacts
The Contact list can be searched to quickly locate a
contact for further activity such as calling the contact.
To search for a contact:
1. Open the Contact app by touching the Co ntac t
icon in the Apps Dock or the iPECS Call
window.
2. Touch the Search button in the upper right.
3. Touch the Searc h text box to display th e soft
keyboard.
4. Enter the search text. As characters are
entered, matching records display.
Once located, the Contact can be called or the Contact Option menu can be opened to manage the contact.
6.2 Communicating with Contacts
After locating a contact, the contact is selected
(tapped) to display the options available for
communicating with the contact. When an option is
selected, the appropriate screen opens for the
communication, the iPECS Call window or the SMS
screen.
To use Contacts to set up a communication:
1. Open the Contacts list by touching the
Contacts icon in the Apps Dock or iPECS
Call window.
2. Locate and touch the desired contact.
26
Page 38
LIP-9070 iPKTS User Guide
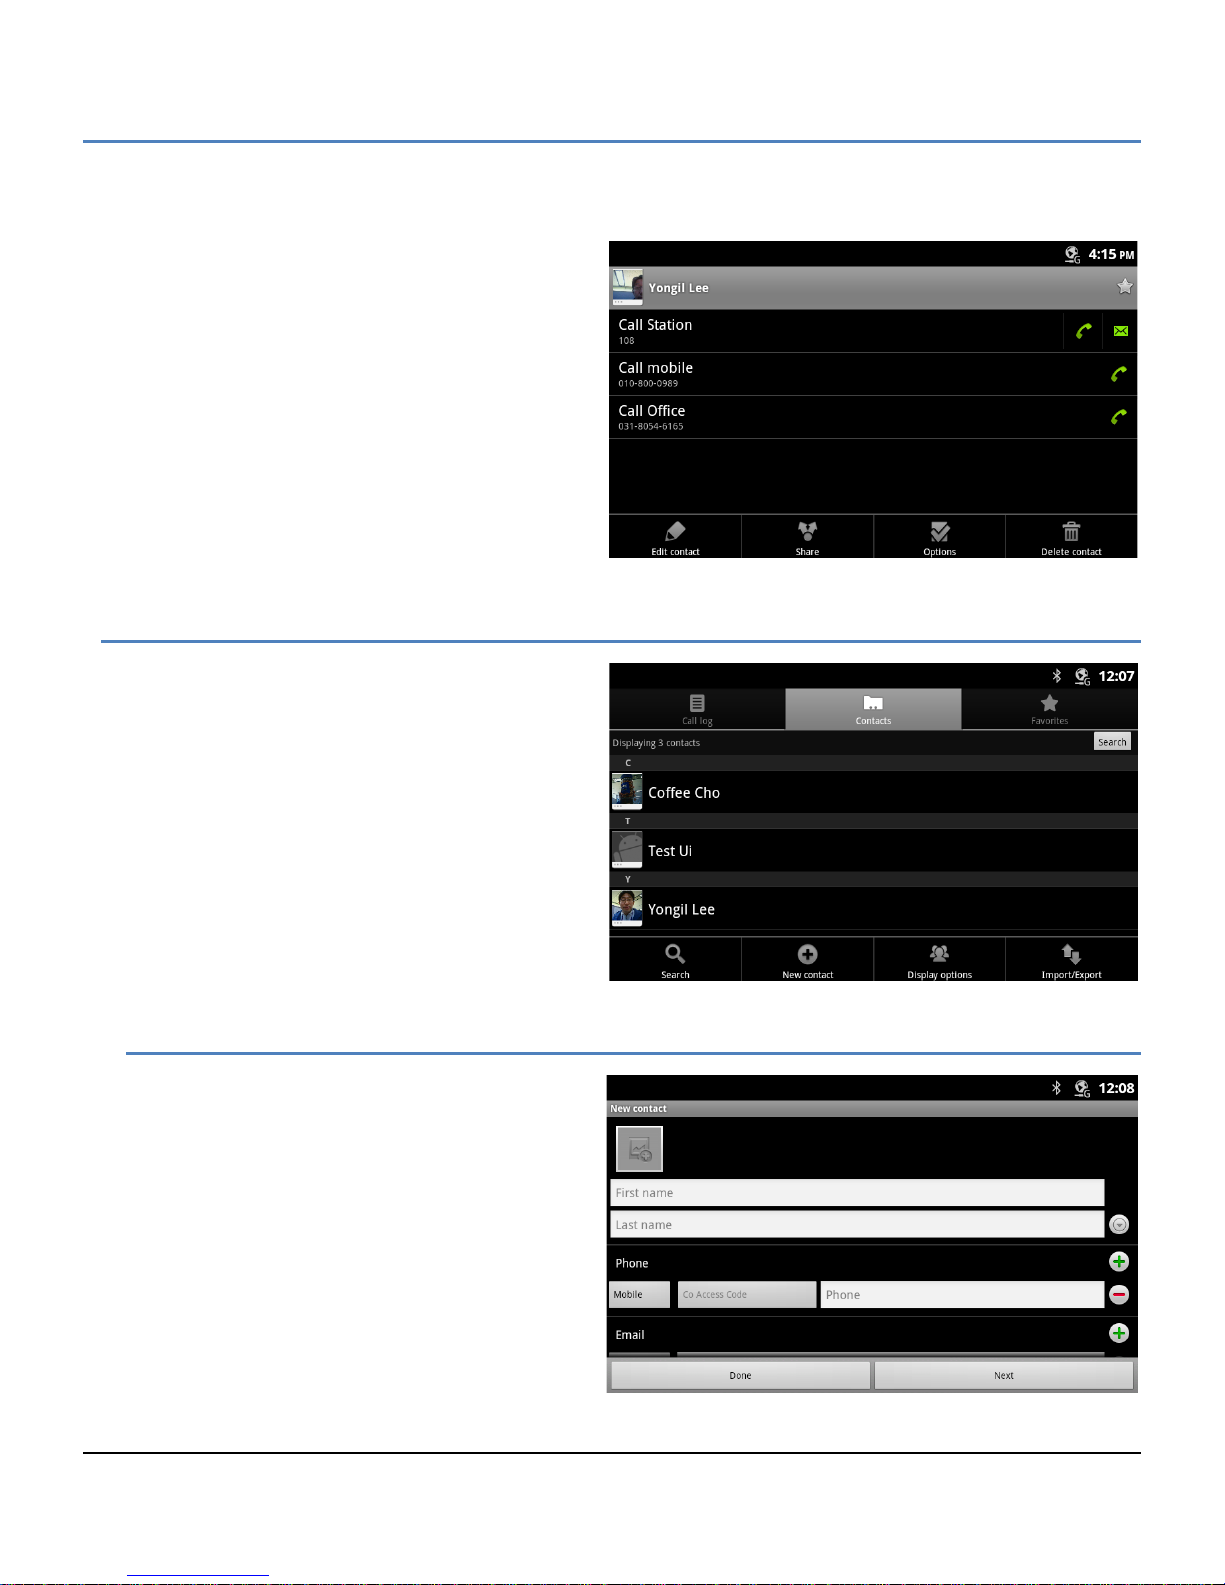
3. Touch the icon on the right to call or send an SMS. The appropr iate screen for the comm unication option
selected opens.
The Option menu for the Contact screen includes
tools as listed below.
Edit Contact: open the contact information
screen for editing.
Share: share the contact information with a
connected Bluetooth device, section 6.6.4.
Options: select options for the contact such as
send to voice mail, section 6.6.2, and
ringtones, section 6.6.3.
Delete contact: delete the contact.
6.3 Managing the Contact Database
Contacts are managed through one of two menus.
The Contacts list Option menu impacts the Contacts
list as a whole and permits contacts to be added,
imported or exported.
6.3.1 Adding a Contact
To add a Contact,
1. Open the Contacts list by touching the
Contact icon in the Apps Dock or the iPECS
Call window.
2. Touch the Menu button.
3. Select ‘New Contact’.
4. Touch and complete entries in the 'New'
contact form and select ‘Done’.
27
Page 39
LIP-9070 iPKTS User Guide
6.3.1.1 CO Access Code
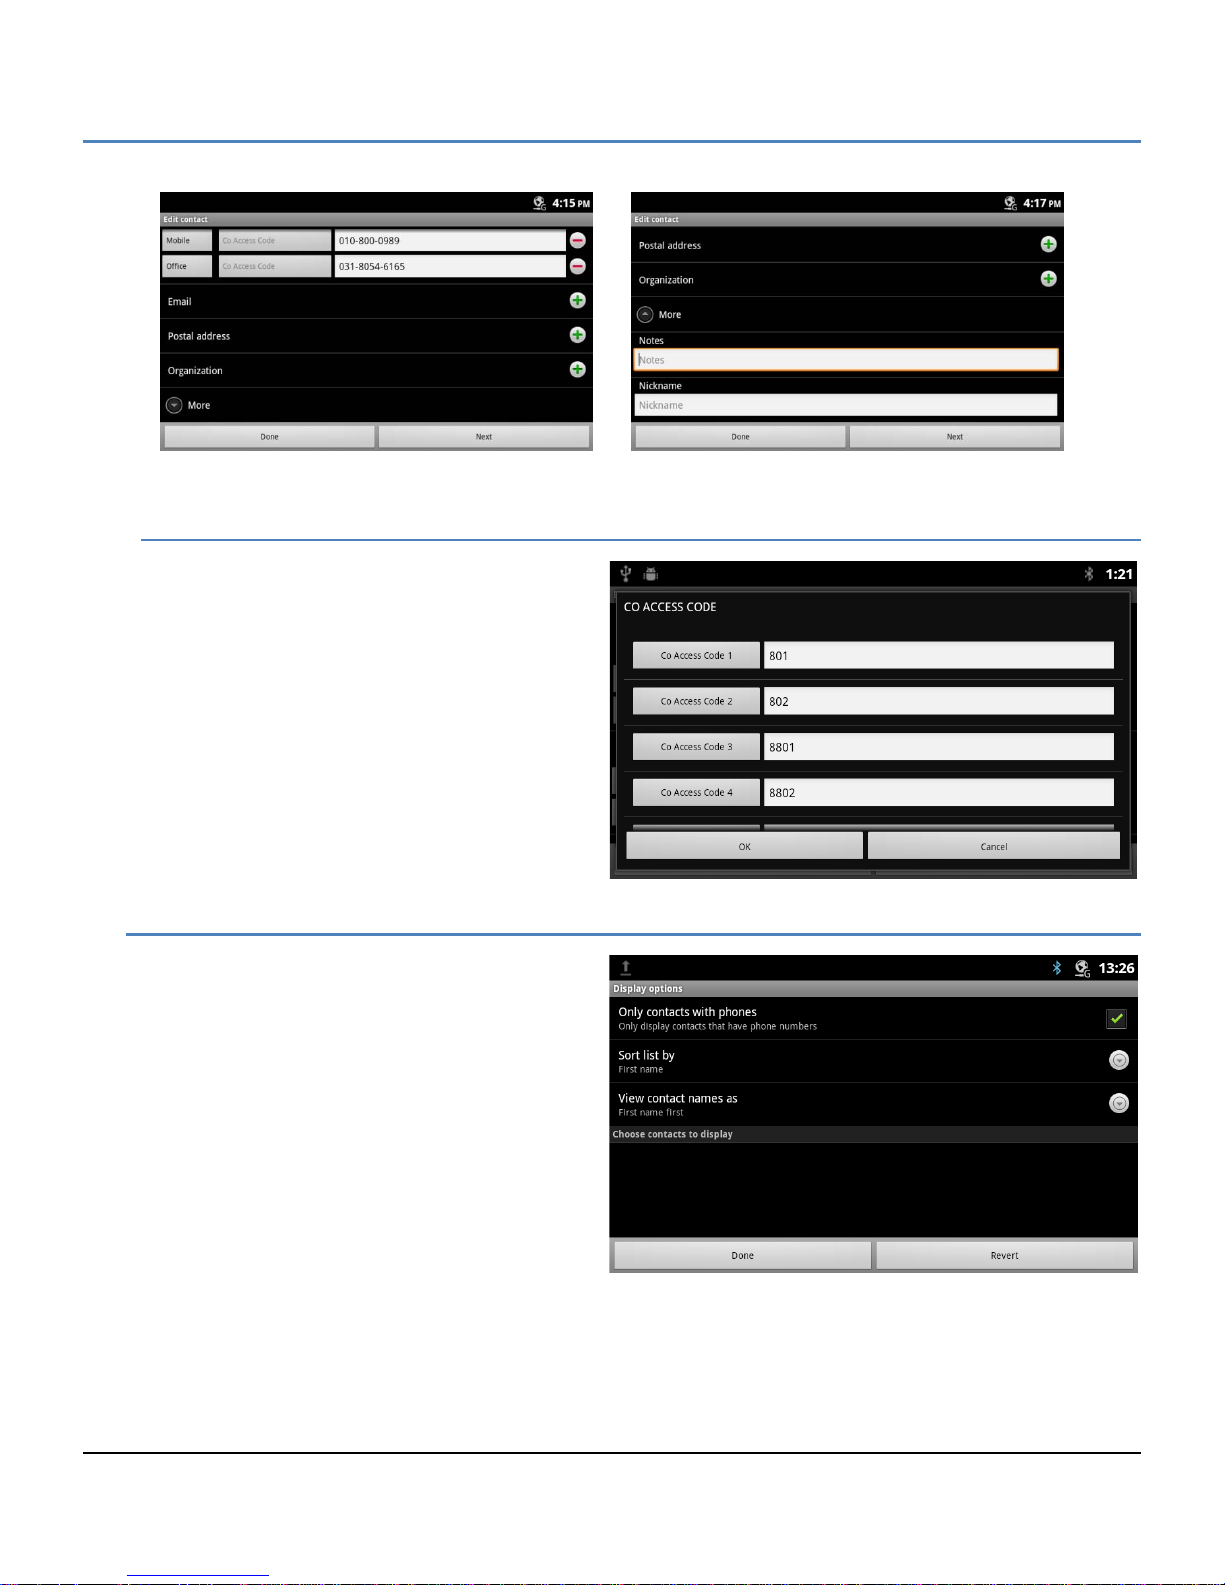
When an outside pho ne num ber is assigned to a
contact, a CO line or tr unk is needed to place t he
call. In this case, the iPECS s ystem m a y require
a CO/Trunk Acc ess Code, such as ‘9’, to select a
CO Line/Trunk for the call.
Touching the ‘Co Access Code’ button disp lays a
list of codes availa ble. Select the desired code
for use with each external number.
6.3.2 Display Options
The Display options determine the displayed
records, the sorting opti ons for the Contact list and
the way names are displayed.
To change the Display options:
1. Open the Contacts data base by touching the
Contact icon in the Apps Dock or the iPECS
Call window.
2. Touch the Menu button.
3. Select ‘Display options’.
4. Complete selections in the Display options
screen and select ‘Done’.
28
Page 40
LIP-9070 iPKTS User Guide
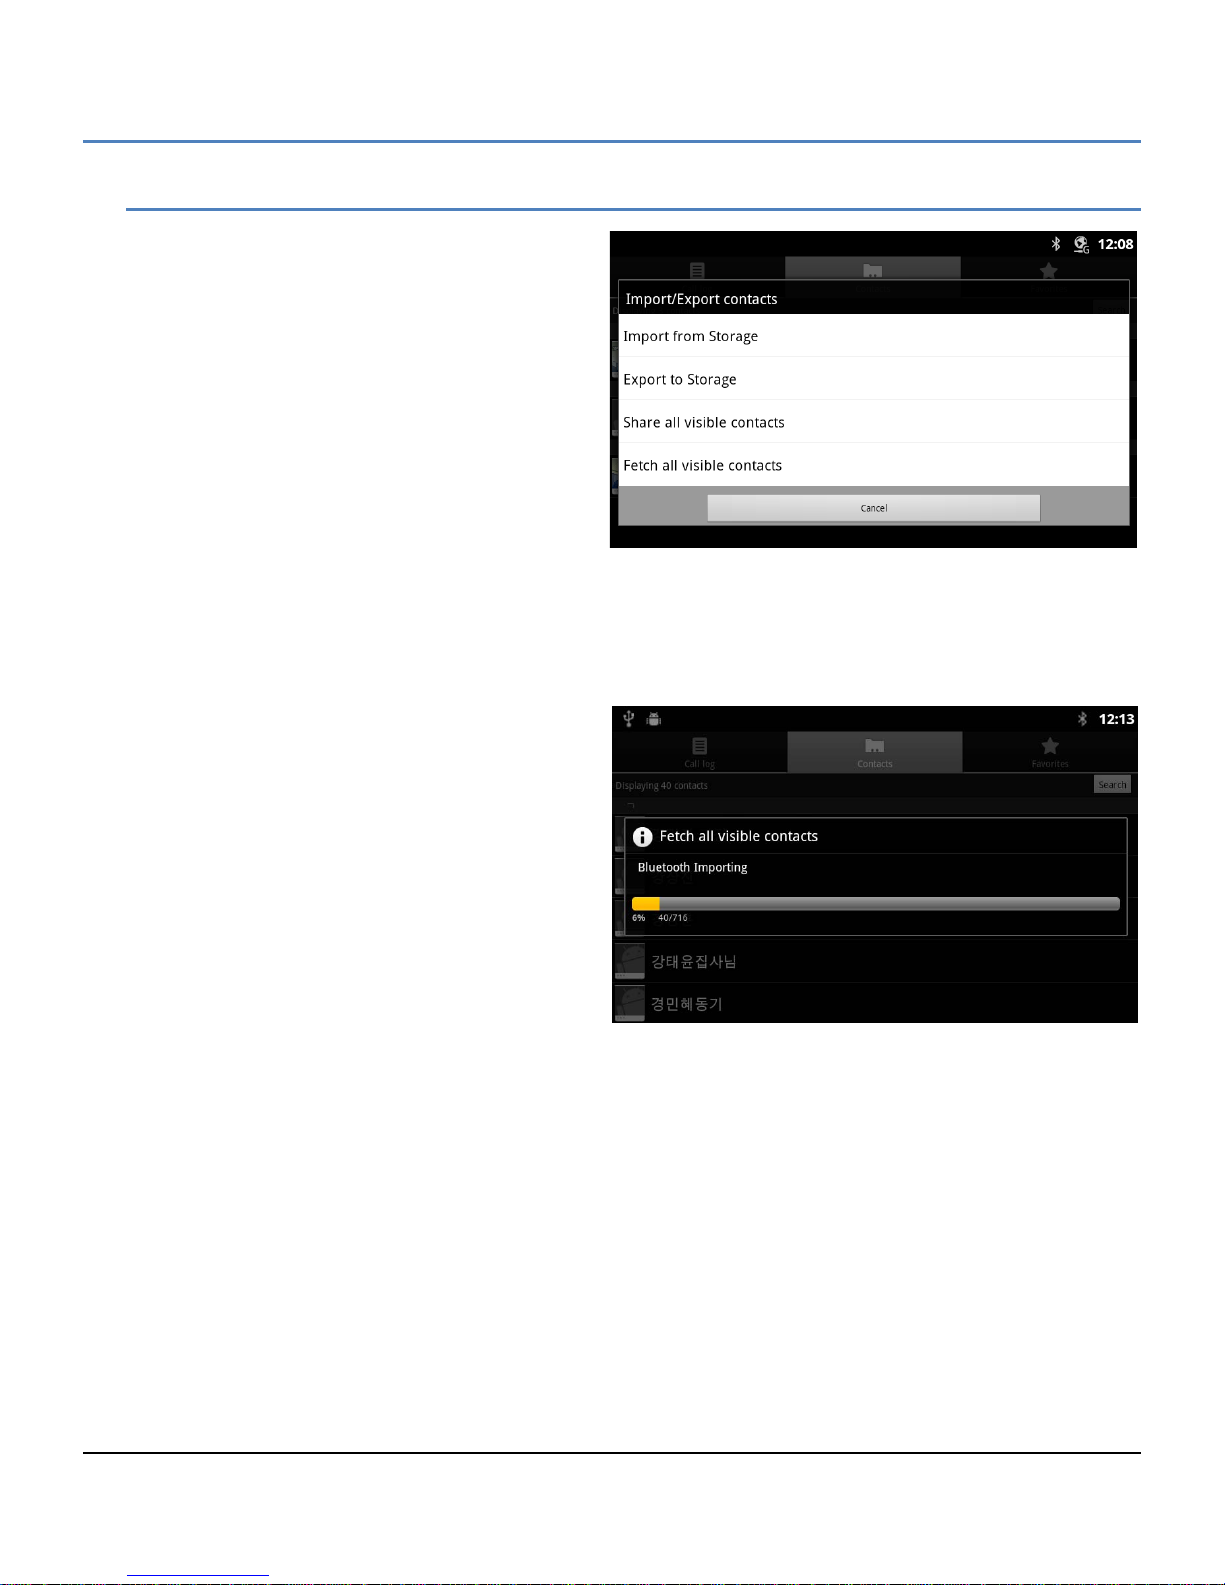
6.3.3 Import and Export Contacts
Import from SD card
1. Open the Contact application.
2. Touch the Menu button.
3. Select Import/Export.
4. Select Import from Storage.
5. If multiple VCard files exist on the SD card,
identify the files to import. The files are
imported to the Contacts database.
Export to SD card
1. Open the Contact application.
2. Touch the Menu button.
3. Select Import/Export.
4. Select Export to Storage.
5. Touch Ok. T he contacts are exported as a group VCard fil e with the vcf file extension. Files are nam ed
with the year, month and date with the vcf extension.
Import with Bluetooth - Fetch all visible contacts -
1. Open the Contact application.
2. Touch the Menu button.
3. Select Import/Export.
4. Select ‘Fetch all visible contacts’.
5. In the popup, select ‘Import to Storage (the SD
card) or the Contacts database. The phone
scans for and displays a list of nearby
Bluetooth devices.
6. Select the desired Bluetooth device for the
import, the phone imports the V-card files.
Export with Bluetooth - Share all visible contacts -
1. Open the Contact application.
2. Touch the Menu button.
3. Select Import/Export.
4. Select ‘Share all visible contacts’. The phone scans for and displays a list of nearby Bluetooth devices.
5. Select the desired Bluetooth device to receive the export, the phone exports the V-card files.
29
Page 41
LIP-9070 iPKTS User Guide
6.4 Managing a Contact Record
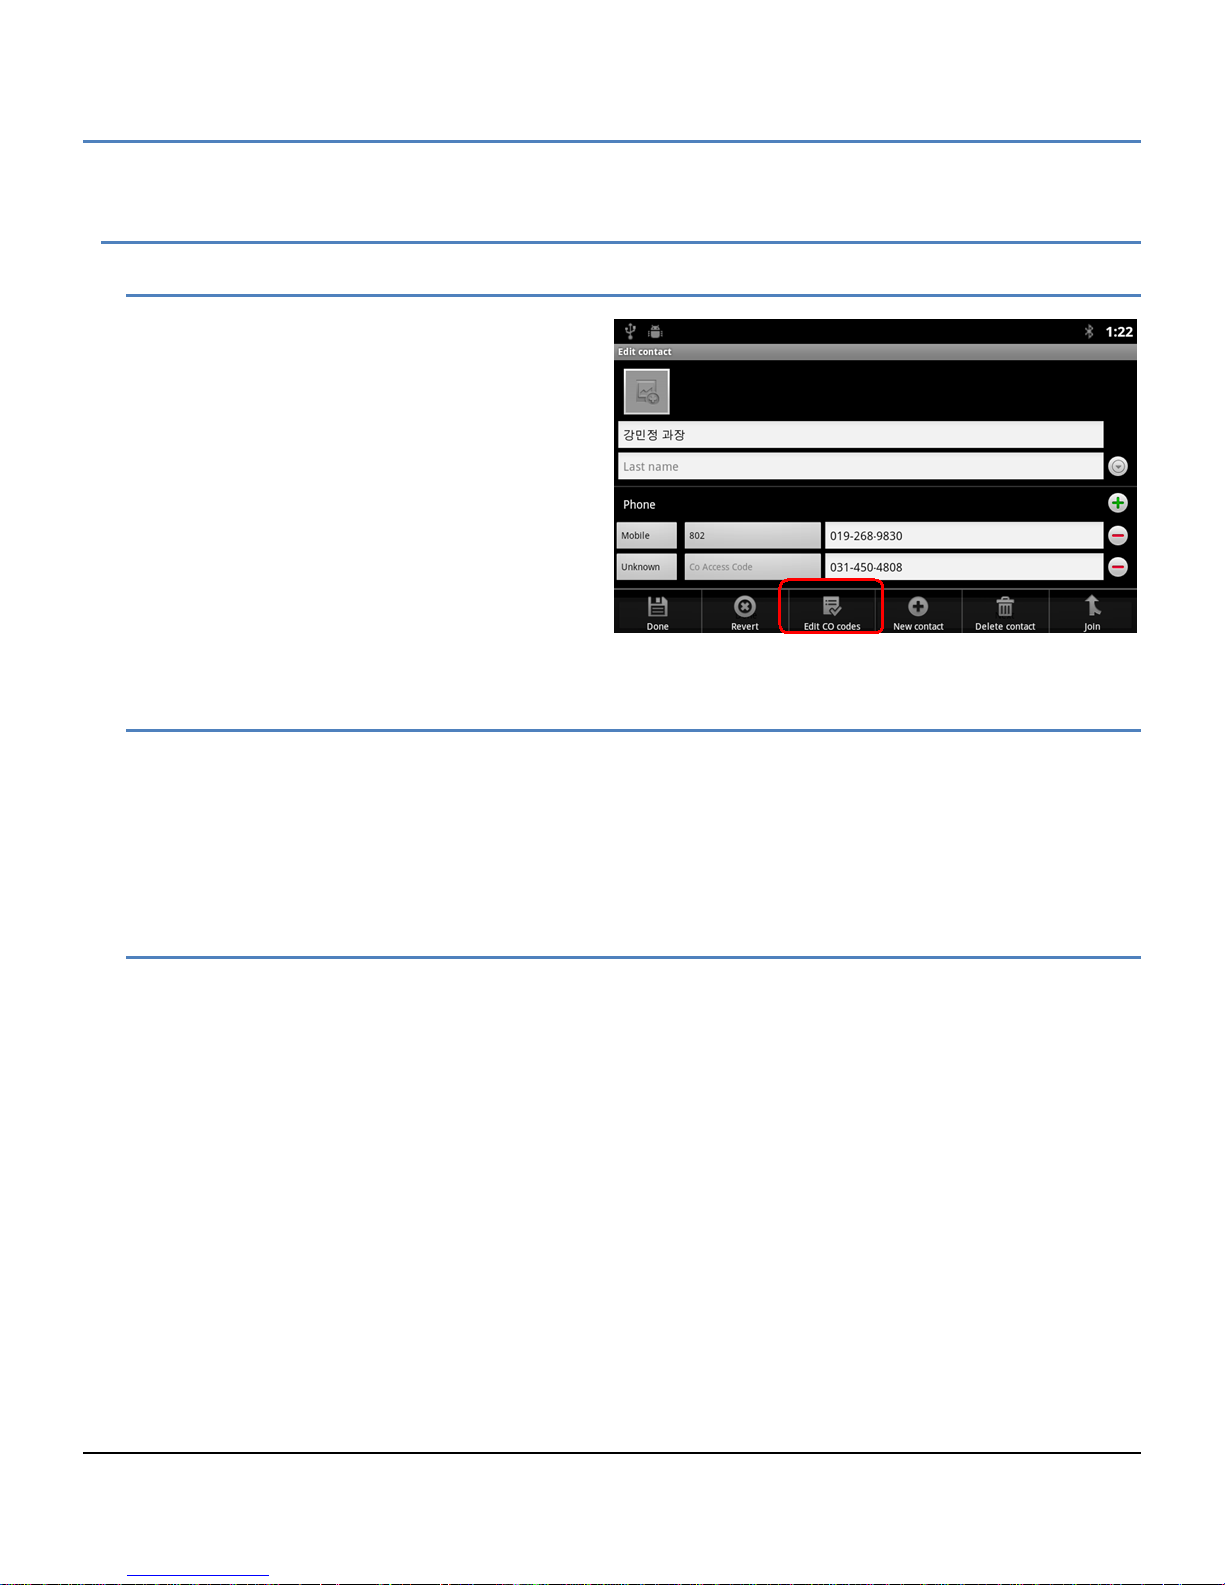
6.4.1 Edit Contact Information
To edit the information for a Contact,
1. Open the Contacts list by touching the
Contact icon in the Apps Doc k or the iPECS
Call window.
2. Touch and hold the desired Contact.
3. In the popup menu, select ‘Edit contact’.
4. Modify the desired information and press
Done.
Note
° The ‘Revert’ button returns to the previous
screen.
6.4.2 Deleting a Contact
To delete a Contact,
1. Open the Contacts list by touching the Contact icon in the Apps Dock or the iPECS Call window.
2. Touch and hold the desired Contact.
3. Touch the Menu button.
4. Select ‘Delete contact’.
6.4.3 Joining Contact records
When Contacts are imported from m ultiple s our ces , a c ontac t may have multiple i dent ic al rec or ds. In this case, a
record can be selected and joined with other records.
30
Page 42
LIP-9070 iPKTS User Guide
6.5 Favorites
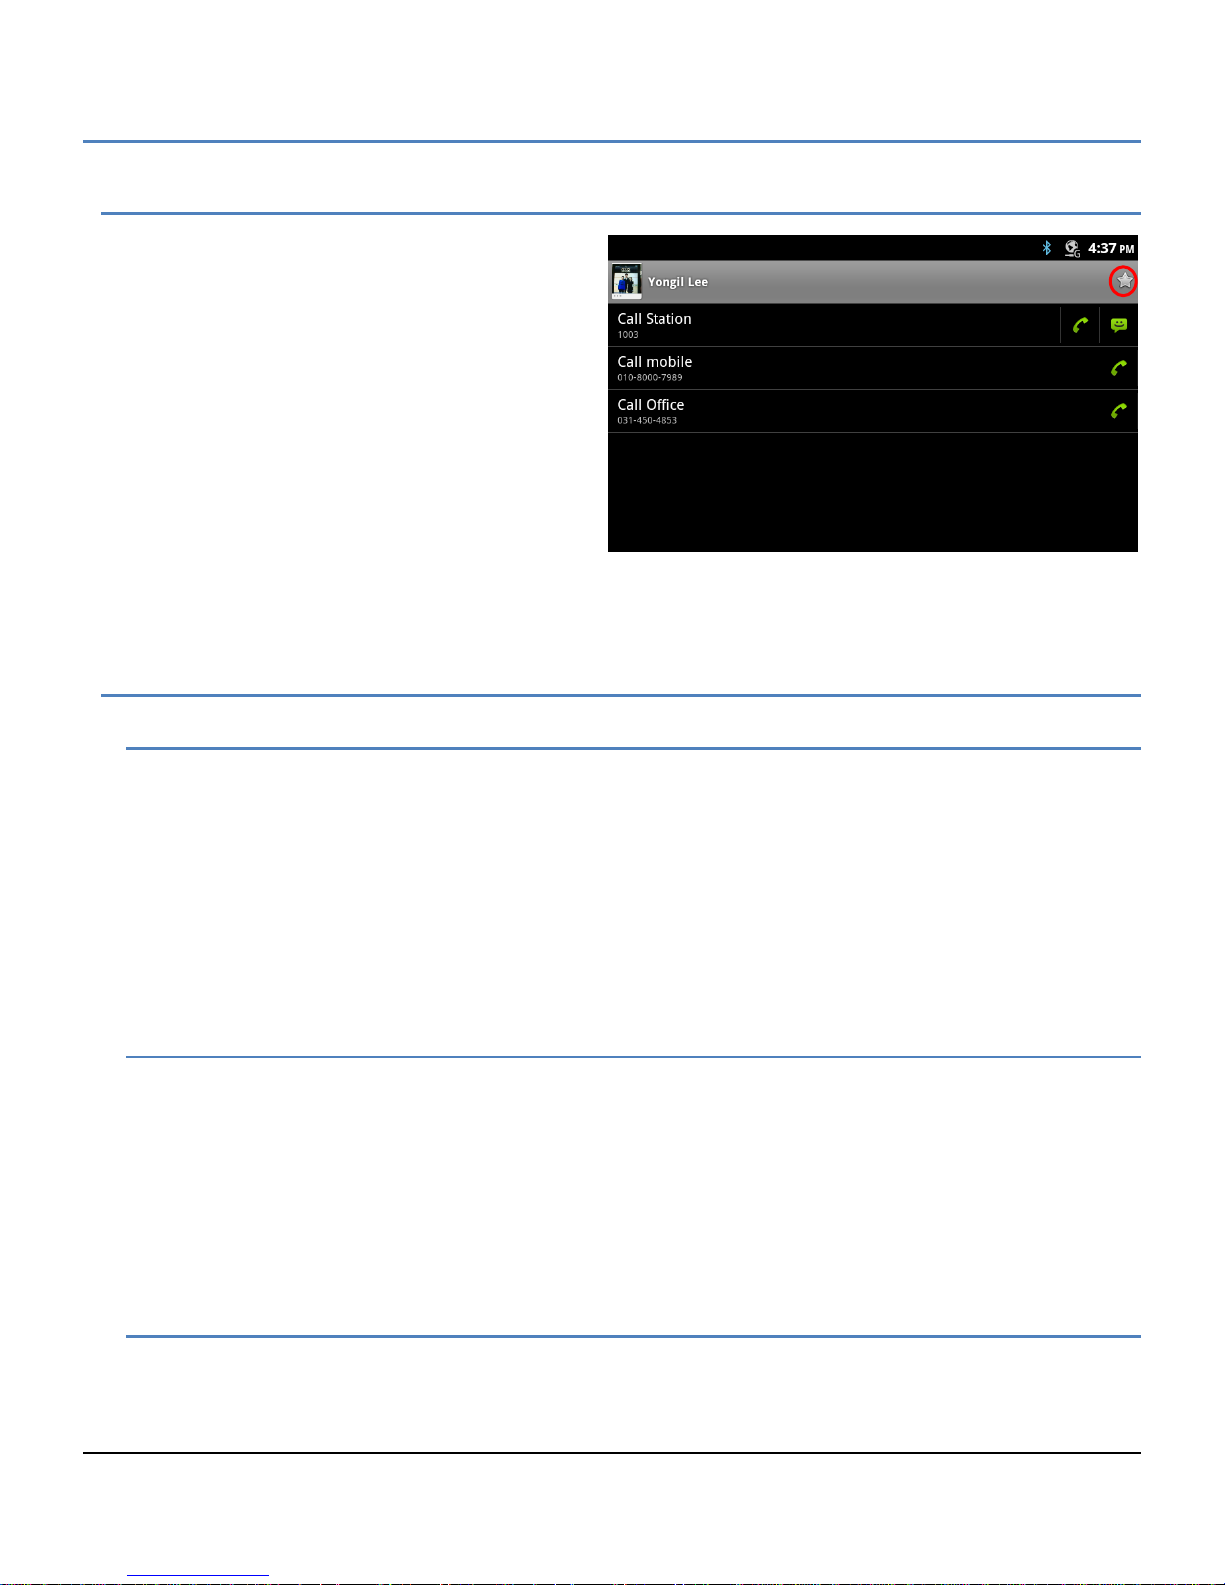
When a large num ber of Contacts are ent ered in the
database, it can be helpful to have a smaller list of
Favorite contacts for quicker access. Contacts
marked as a favori te, display when t he F avorit e tab of
the Call Log/Contact screen is selected. The list
shows the Favorite Contacts sorted alphabetically
followed by a listing of recent calls.
To assign a Contact to the Favorites list,
1. Open the Contacts list by touching the
Contacts icon in the Apps Dock or iPECS Call
window.
2. Locate and touch the desired contact.
3. Touch the star icon to the right of the Contact
name to toggle the Favorite status of the contact. The star icon is a golden color for a favorite.
6.6 Miscellaneous Contact O pti ons
6.6.1 Contact’s Default Number
The Contact’s default number is used when the contact record is touched and held to place a call or send an SMS.
The default number, which can be changed, is marked with a check in the Contact’s detailed information.
To change the default number,
1. Open the Contacts or Favorites list.
2. Touch the name of a contact in the list to view the Contact’s details.
3. Touch & hold the phone number to use as the default number.
4. Touch ‘Make default number’ in the Context menu.
6.6.2 Send to Voice Mail
Calls from a Contact can be sent to the users Voice mail automatically. The phone is not provided with
notification of the incoming call, which is directly routed to Voice Mail. To send calls from a Contact to Voice mail,
1. Open the Contacts or Favorites list.
2. Touch the name of a contact in the list to view the Contact’s details.
3. Touch the Menu button and touch Options.
4. Check Incoming calls.
5. Press the Back button.
6.6.3 Contact Ringtone
The ringtone recei ved when a call from the c ontact is received can be customized allowing the user to quickly
identify the calling party. To set the ringtone for a Contact,
1. Open the Contacts list by touching the Contacts icon in the Apps Dock or iPECS Call window.
2. Locate and touch the desired contact.
31
Page 43
LIP-9070 iPKTS User Guide
3. Press the Menu button and press Options.
4. Select Ringtone.
5. From the scrollable list of ringtones that opens, select the desired ringtone, a sample of the ringtone plays.
6. Touch OK.
6.6.4 Share a Contact
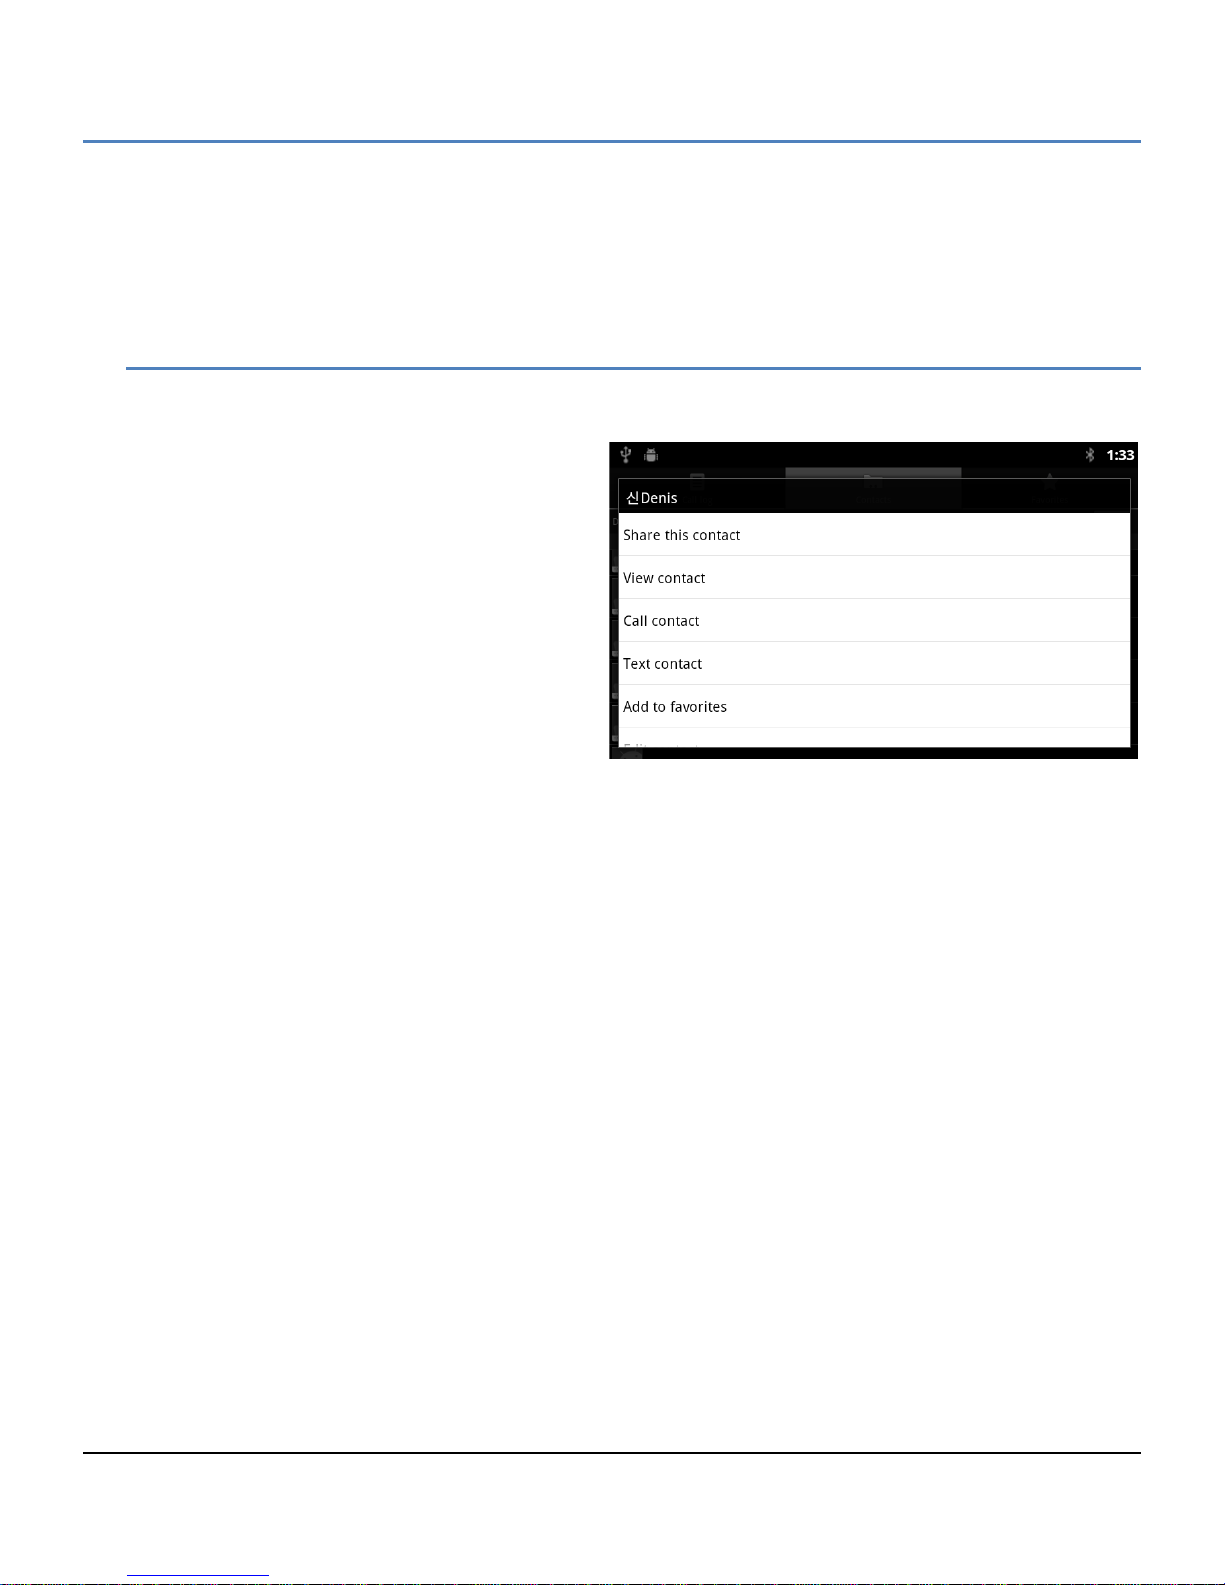
A Contact record can be shared with an external device employing Bluetooth. The record is sent as a Vcf file with
the contact’s first and last name as the file name (John Smith.vcf). To share a contact,
1. Open the Contacts list by touching the
Contacts icon in the Apps Dock or iPECS
Call window.
2. Touch and hold the desired contact.
3. Press Menu button.
4. In the menu, selecting ‘Share this contact’
displays the Bluetooth device screen.
5. Select the Bluetooth device to receive the
record, the record is sent.
32
Page 44
LIP-9070 iPKTS User Guide
7 Call Log
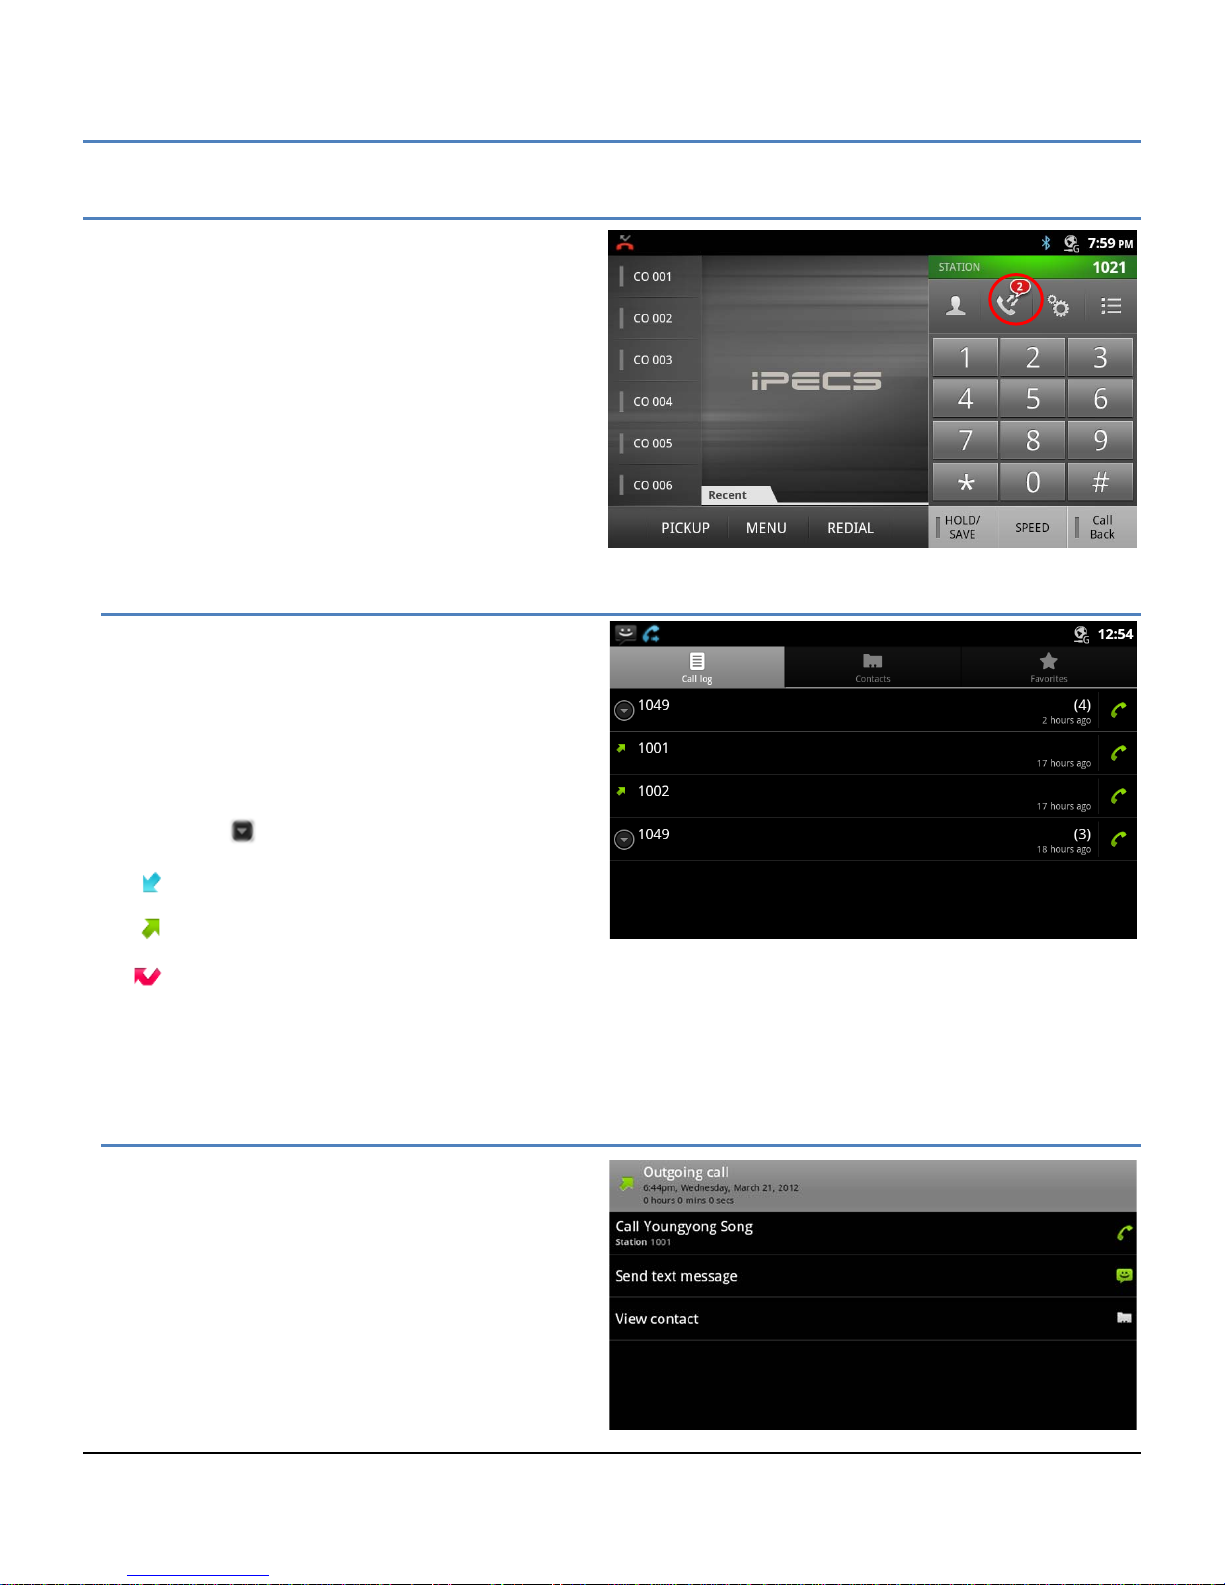
The LIP-9070 maintains a log of incom ing, outgoing and
missed calls. Up to 500 call records are stored; the
oldest record is deleted to provide room for a new record
when the record limit is reached. T he Log ico n indic ates
the number of new missed calls up to 99 and “…” will
display for more than 99.
7.1 V iewing the Call Logs
Tapping the Call Log icon in the iPECS phone window
or from the Call Log icon in the Ap p dock , displays the
Log list. The Log list can be scrolled and, from the
screen, the user’s Contacts and Favorites can be
accessed.
In the list, an icon on the l eft indicates the t ype of call
for the record. W hen a number has multiple logs, the
‘more’ icon ( ) opens a list of logs ass ociated with
the number. The call type icons are:
Incoming
Outgoing
Missed
To the right, the list indicates the number of logs associated with a number and when the last log was generated.
7.2 Us ing the Call Logs
To return a call, s imply touch the h andset icon to the
right of the Log entry.
Touching a log displays the actions available for the
log. The displa y will vary for records as sociated with
a Contact and numbers that can receive an SMS text
message.
33
Page 45
LIP-9070 iPKTS User Guide
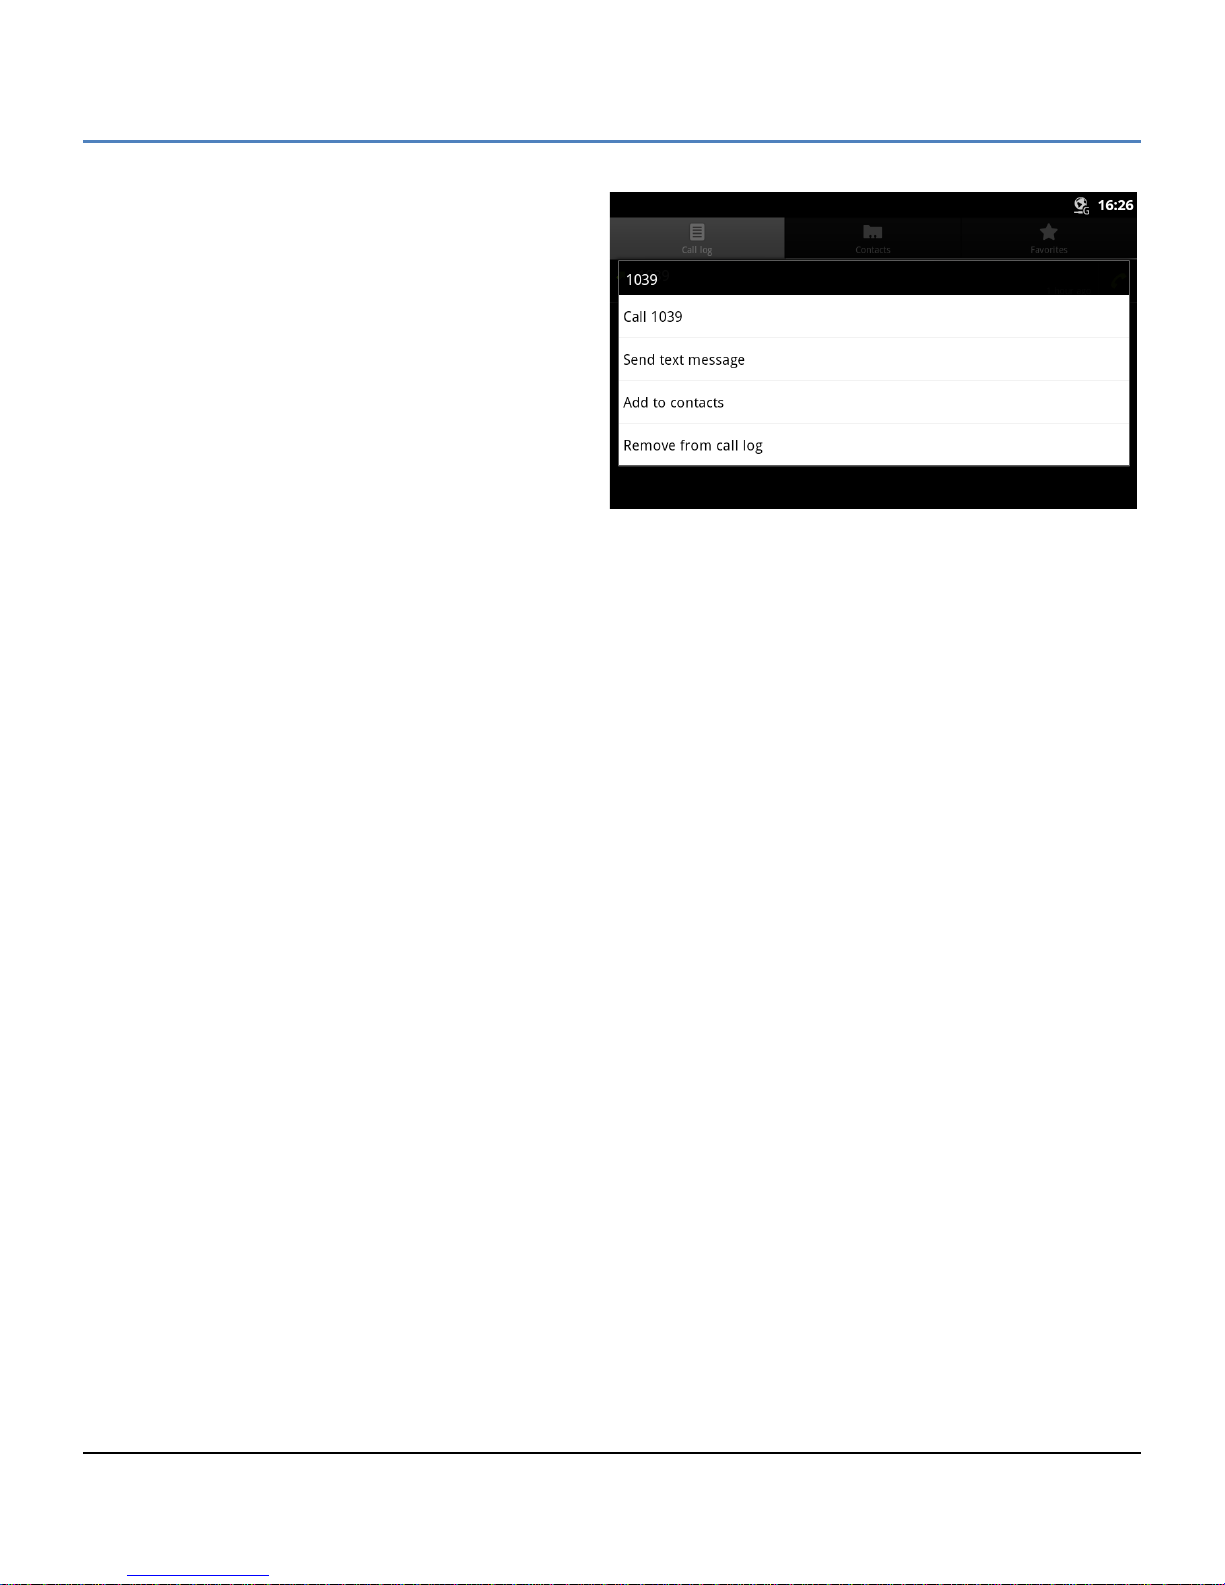
Touch and hold a record to displa y the Context menu
that permits the log to be added to the Contacts or
removed from the Cal l Log. O ther options are sho wn,
if available, to send a m essage or call the number in
the log.
34
Page 46
LIP-9070 iPKTS User Guide
8 Using SMS (Short Message Service)
The iPECS system incorporates a business SMS
application so users of iPECS phones including
softphones can send and rec eive shor t text m essages to
other users. Each message can be a maximum of 80
characters. W ith the LIP-9070, messages are stored as
a conver sation or thread b etween two spec ific users and
linked for display purposes. That is, all the messages
sent to or received from a user or group of users are
shown as a single thread in the Messaging screen. Up
to 100 threads with up to 100 messages each can be
stored.
The Messaging screen is shown when the Mess age icon
in a Launcher screen or in the dock is touched, or when a
‘New’ message notification is selected from the
Notifications screen.
8.1 Send a Message
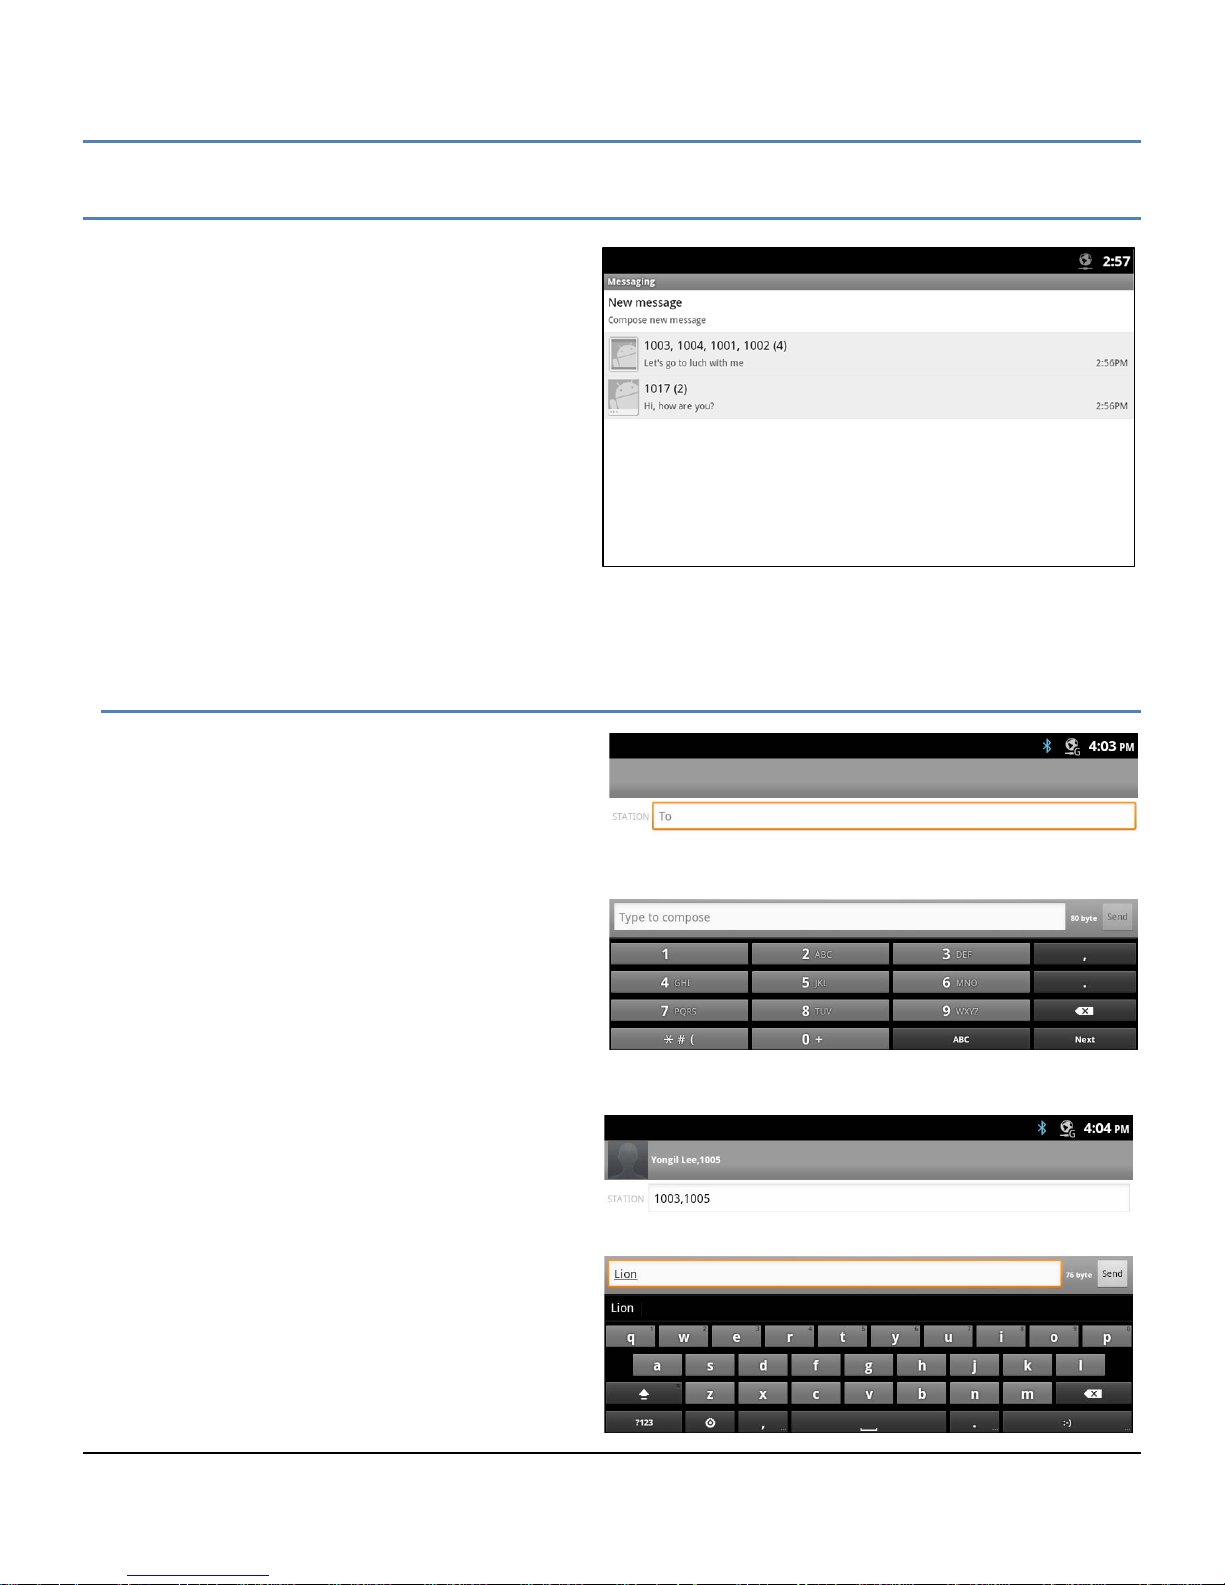
From the Messaging screen or from the Messaging
screen Option menu, see s ection 8.4, a n ew mes sage
can be prepared and sent to up to 4 users.
To send a message,
1. From the Messaging screen select ‘New
message’ or select ‘Compose’ from the
Option menu. The Compose screen appears.
2. Touch the ‘To’ entry box, a number pad
appears.
3. Enter the receiving station number.
Note for a receiver that is a Contact, the qwerty
keyboard can be displayed by touching ‘ABC’ on
the number pad, and then enter the name. Matches are displayed for selection as characters are entered.
4. Repeat steps 2 and 3 for up to four (4) receivers.
5. Touch the ‘Type to compose’ entry box and
enter the message. As characters are
entered, the number of bytes shown to the
right of the box is reduced to provide an
indication of the remaining characters
allowed.
6. When the message is c omplete, press Send.
The Messaging screen dis plays with the new
message added to the appropriate thread.
Prior to sending the message, the message can be
edited, or smiley faces can be added, section 8.1.1.
35
Page 47
LIP-9070 iPKTS User Guide
Note
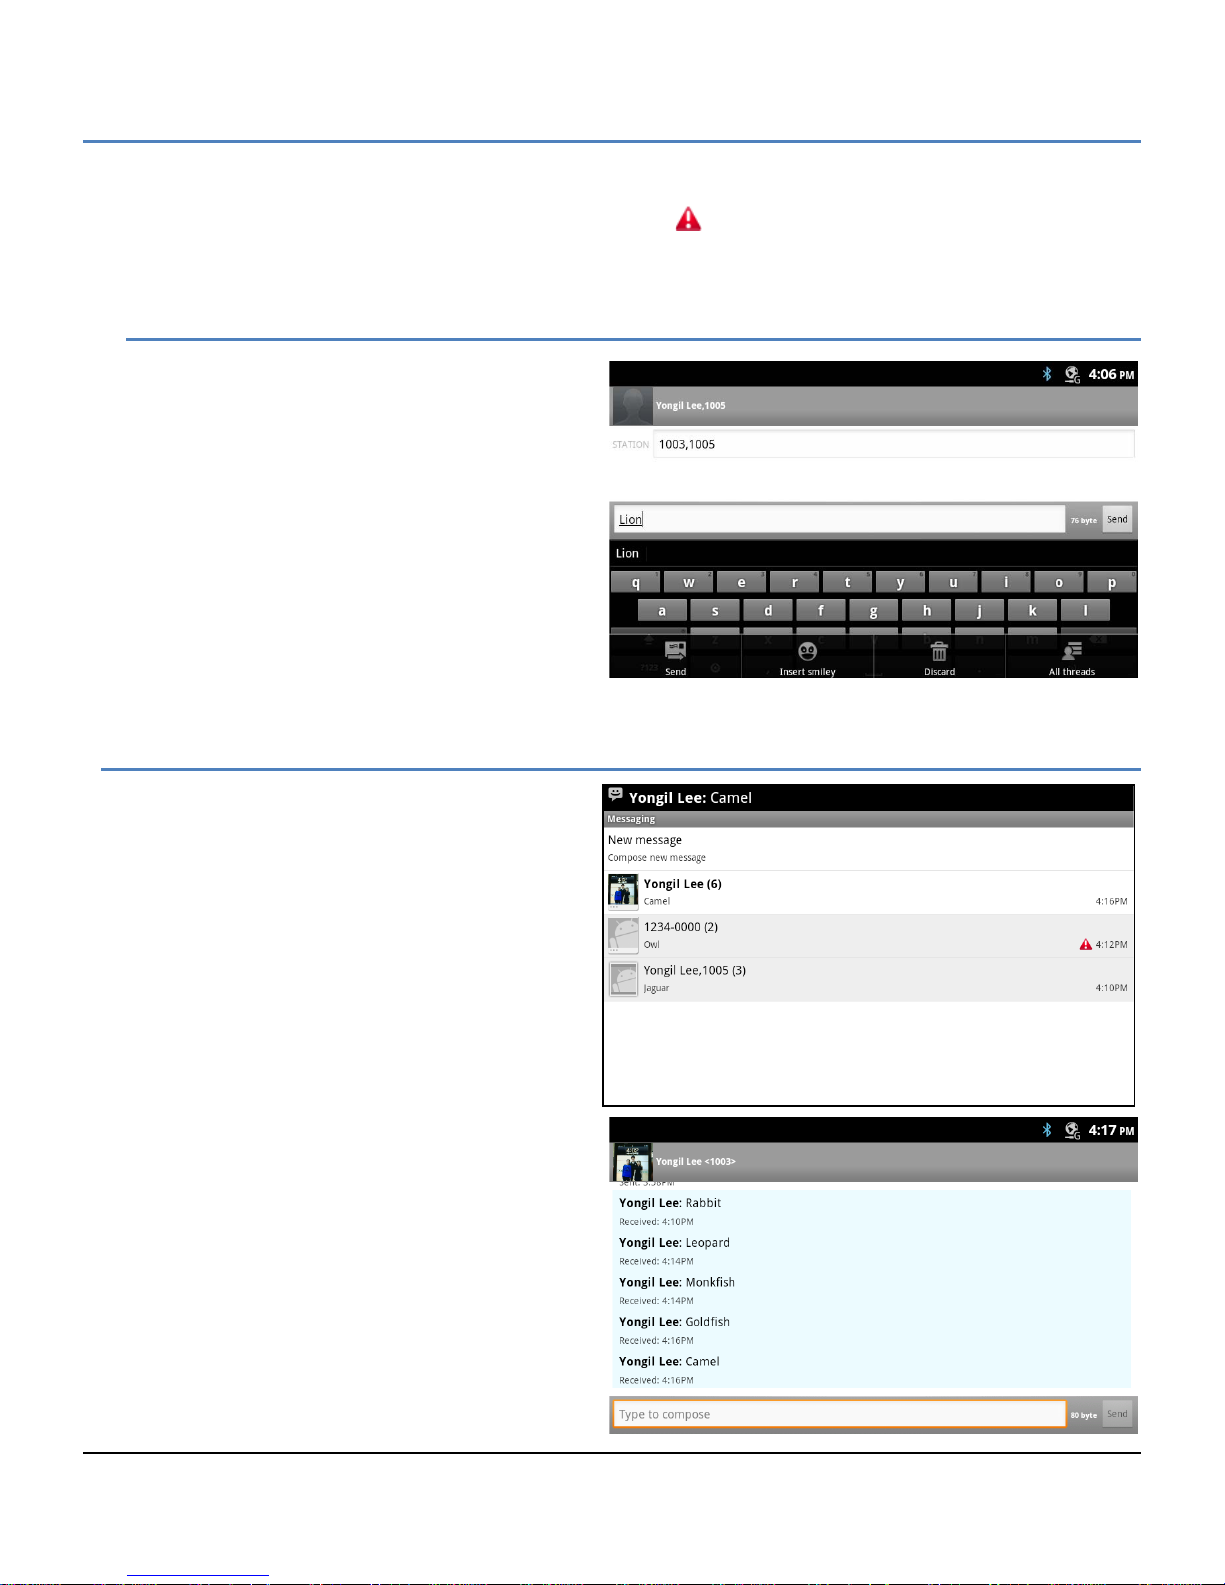
° If the message is not properly sent, the warning notice, , displays to the right of the message.
° To hide the keyboard, press the Back button.
8.1.1 Options Menu
The Compose scr een has an Option menu with the
following too ls .
Send: send the message.
Insert Smiley: drag and dr op a smiley face
into the message. A smiley face uses
several characters of the message.
Discard: erase the message and return to
the Messaging screen.
All threads: save the draft message and
return to the Messaging screen. The
message is saved and displays on the
Messaging screen as a draft where it can
be accessed, edited and sent.
8.2 Receive a Message
When a new message ar ri v es , the SM S icon app ear s
in the Notifications bar alon g with the sen der and part
of the message. To view the full contents of the
message,
1. Drag down the Notifications bar to expose
the Notification detail and select the SMS
notification.
or
Select the SMS ico n from a Launcher screen
or Apps Dock.
2. Touch the highlighted thread.
The most recent messages in the thread are
displayed and previous m es sages can be viewed wit h
the swipe gesture. The sender of the message is
identified follo wed by the message. Belo w the s e nder
and message, the time received is indicated.
The thread screen includes the ‘Type to compose’
box so that the user may quickly compose a return
message.
36
Page 48
LIP-9070 iPKTS User Guide
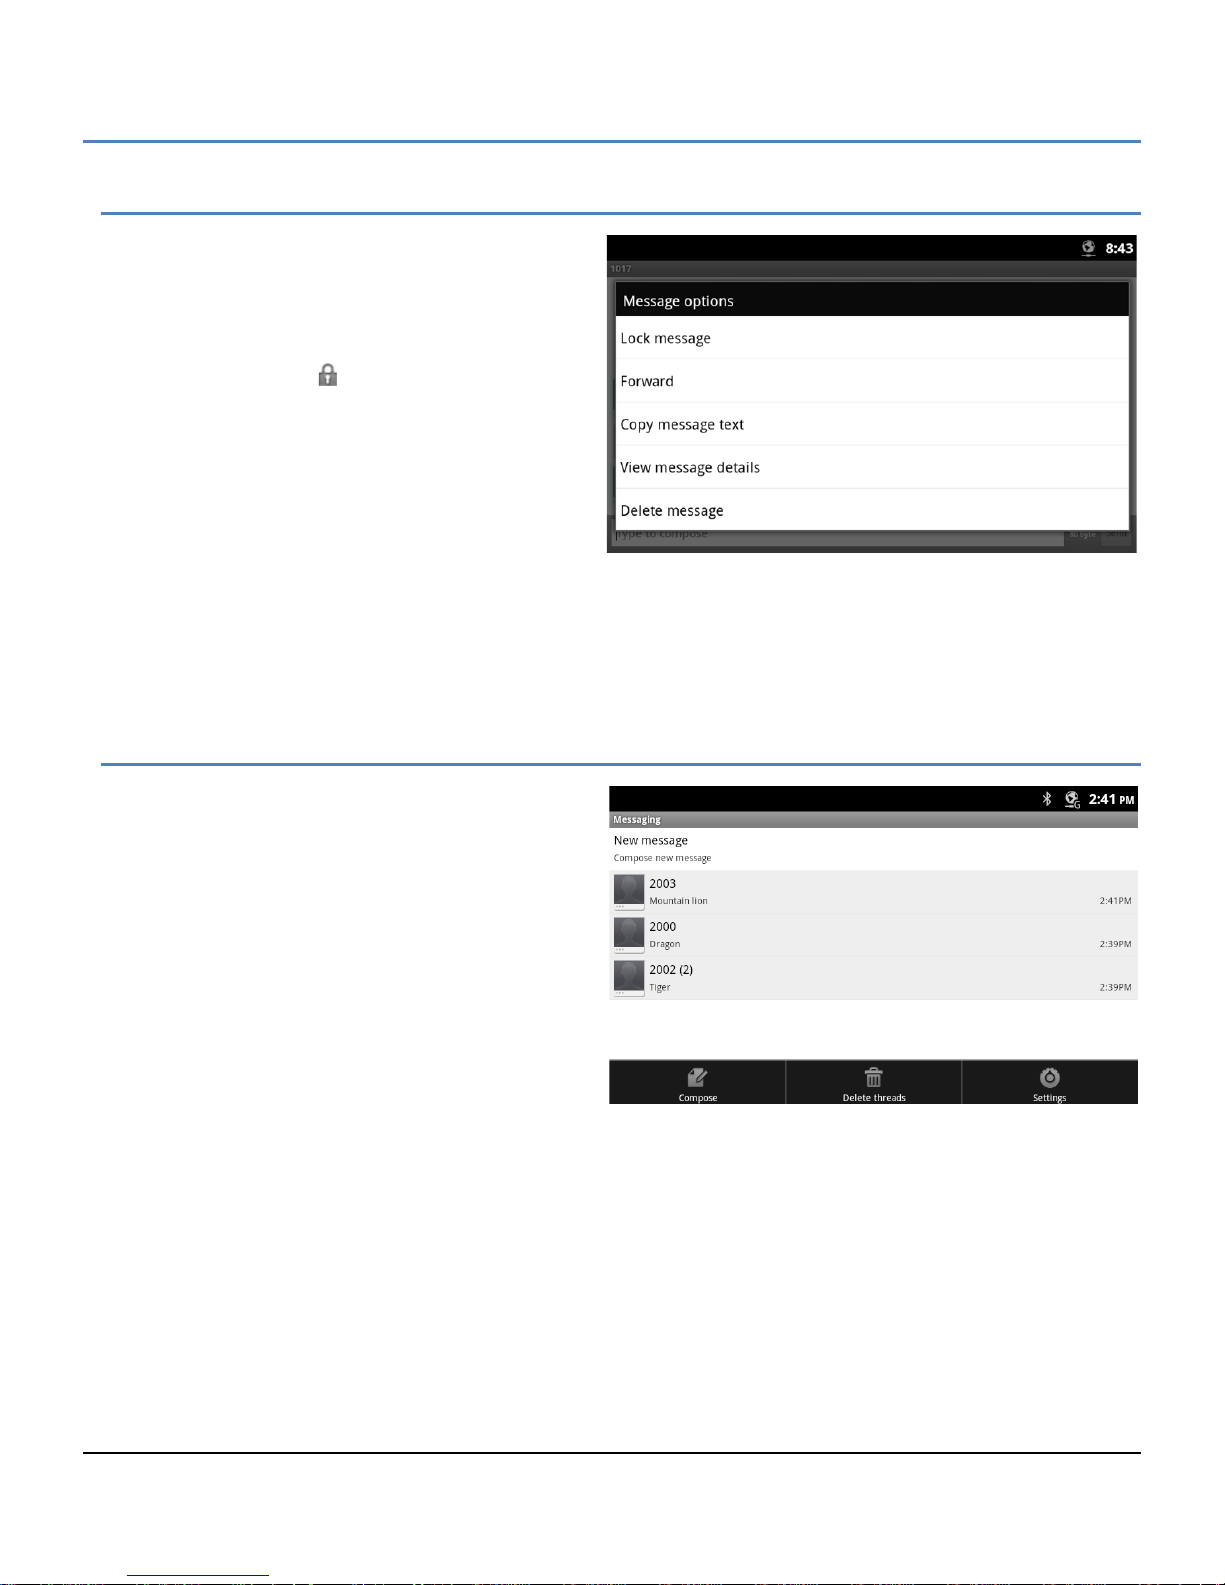
8.3 Message Options
Several actions can be taken relative to a message
employing the Context menu. To view the menu,
touch and hold a message. In the menu, the following
tools are available.
Lock Message: lock a message to avoid
accidental deletion. If a message is loc ked, a
pad lock icon, , appear s to the right of the
message record. To unlock a message,
touch and hold the message record.
Forward: send a copy of the message to
another user.
Copy Message Text: copy a selected
message, enter the ‘To’ user and send.
View message details: view details including
date and time sent or received and receiver or sender.
Delete message: delete the message. If the message is locked, an alert is provided before deletion. Also if
the message is to/fr om a user that is not a contact, th e user can be add ed to th e Cont acts databas e bef ore
deletion of the message.
8.4 Messaging Screen Options Menu
The Messaging screen Options menu is displayed
when the Menu button is touched while viewing the
Messaging screen. The Options menu includes the
following too ls .
Compose: section 8.1, compose a new SMS
Delete threads: section 8.4.1, delete all
messages in a thread.
Settings: section 8. 4.2, set m essage retenti on
and notifications
37
Page 49
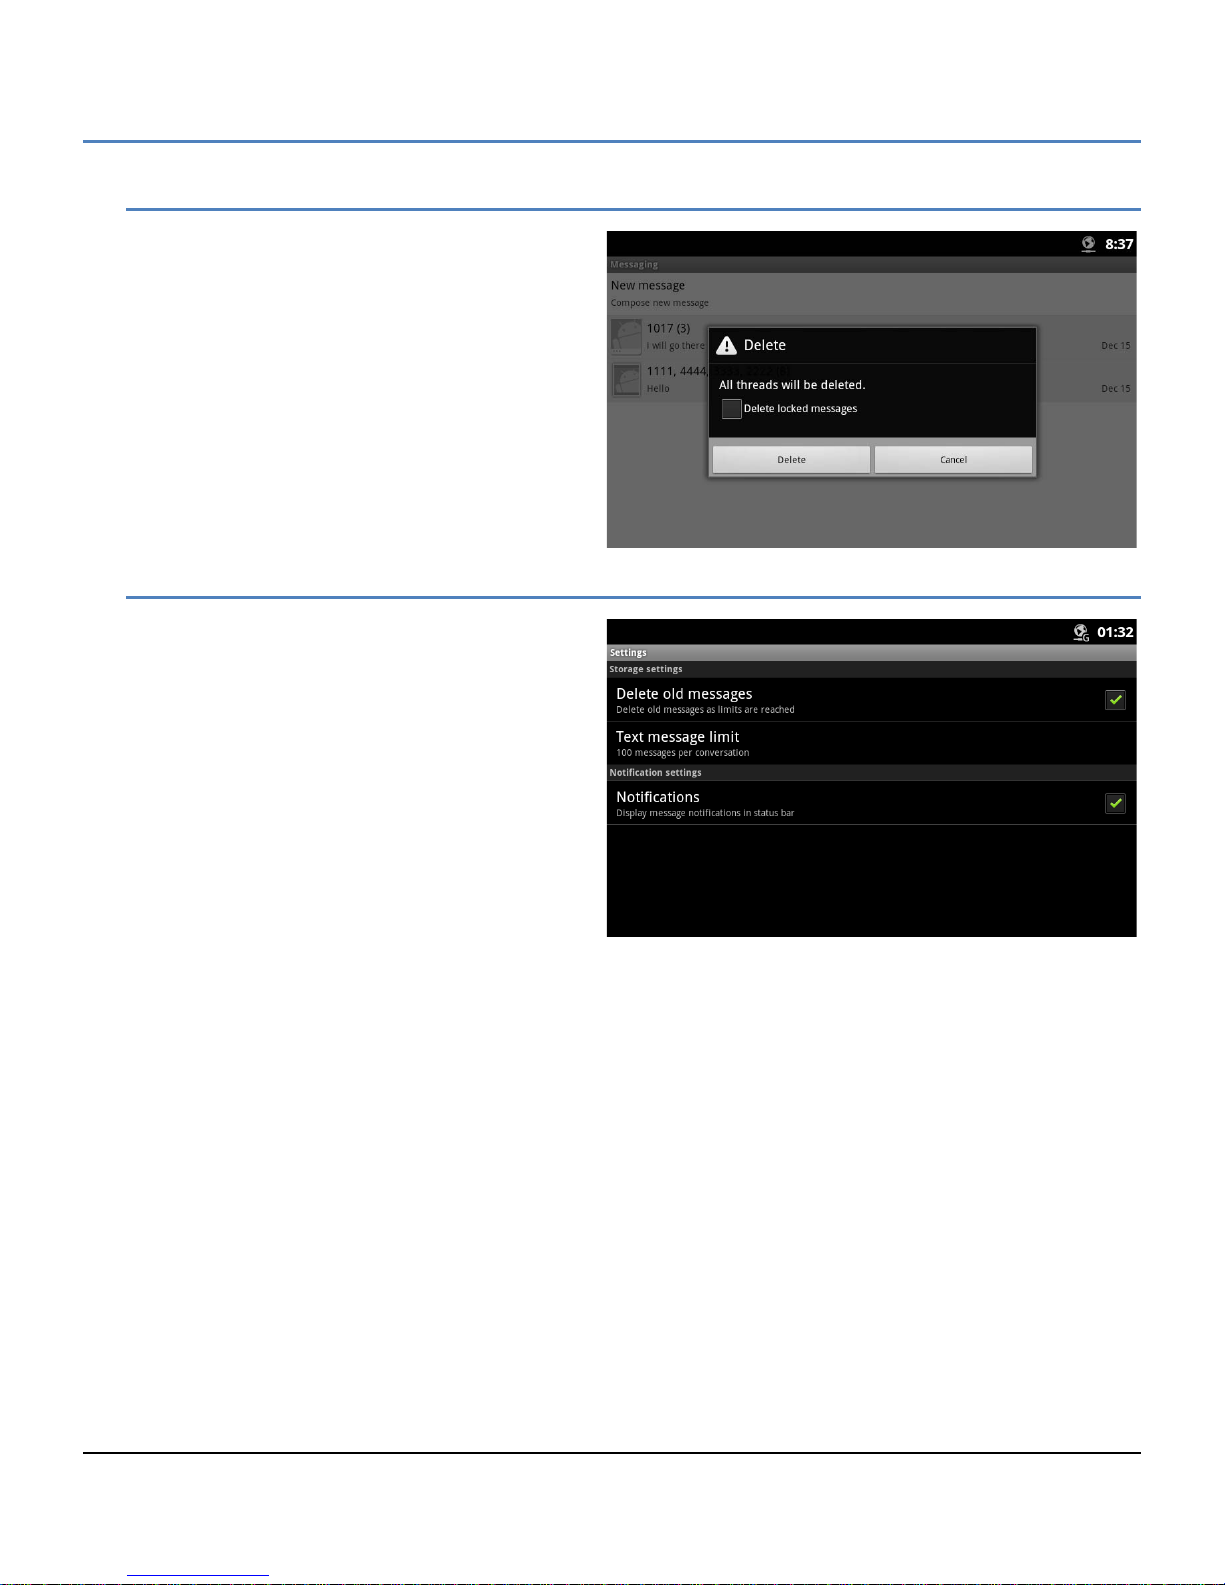
LIP-9070 iPKTS User Guide
8.4.1 Deleting a Message Thread
All messages in a t hread can be deleted. When a
thread is deleted that contains a locked message,
the delete confirmation includes a check box to
delete the locked messages as well as the unlocked
messages in the thread. In addition, if the
sender/receiver is not a contact, a popup menu
appears to allow the se nder/rec eiver to be add ed to
the Contacts database.
8.4.2 Messaging Settings
The Settings for the Messaging screen includes
items for managing the message retention and
activating new message notification.
Delete old messages: check the box to
delete old message when the message
limits are reached. If not checked, new
messages are ignored.
Text message limit: set the maximum
number of messages f or each thread, 1 to
100.
Notifications: chec k the box to receive new
SMS message notifications in the Status
bar.
38
Page 50
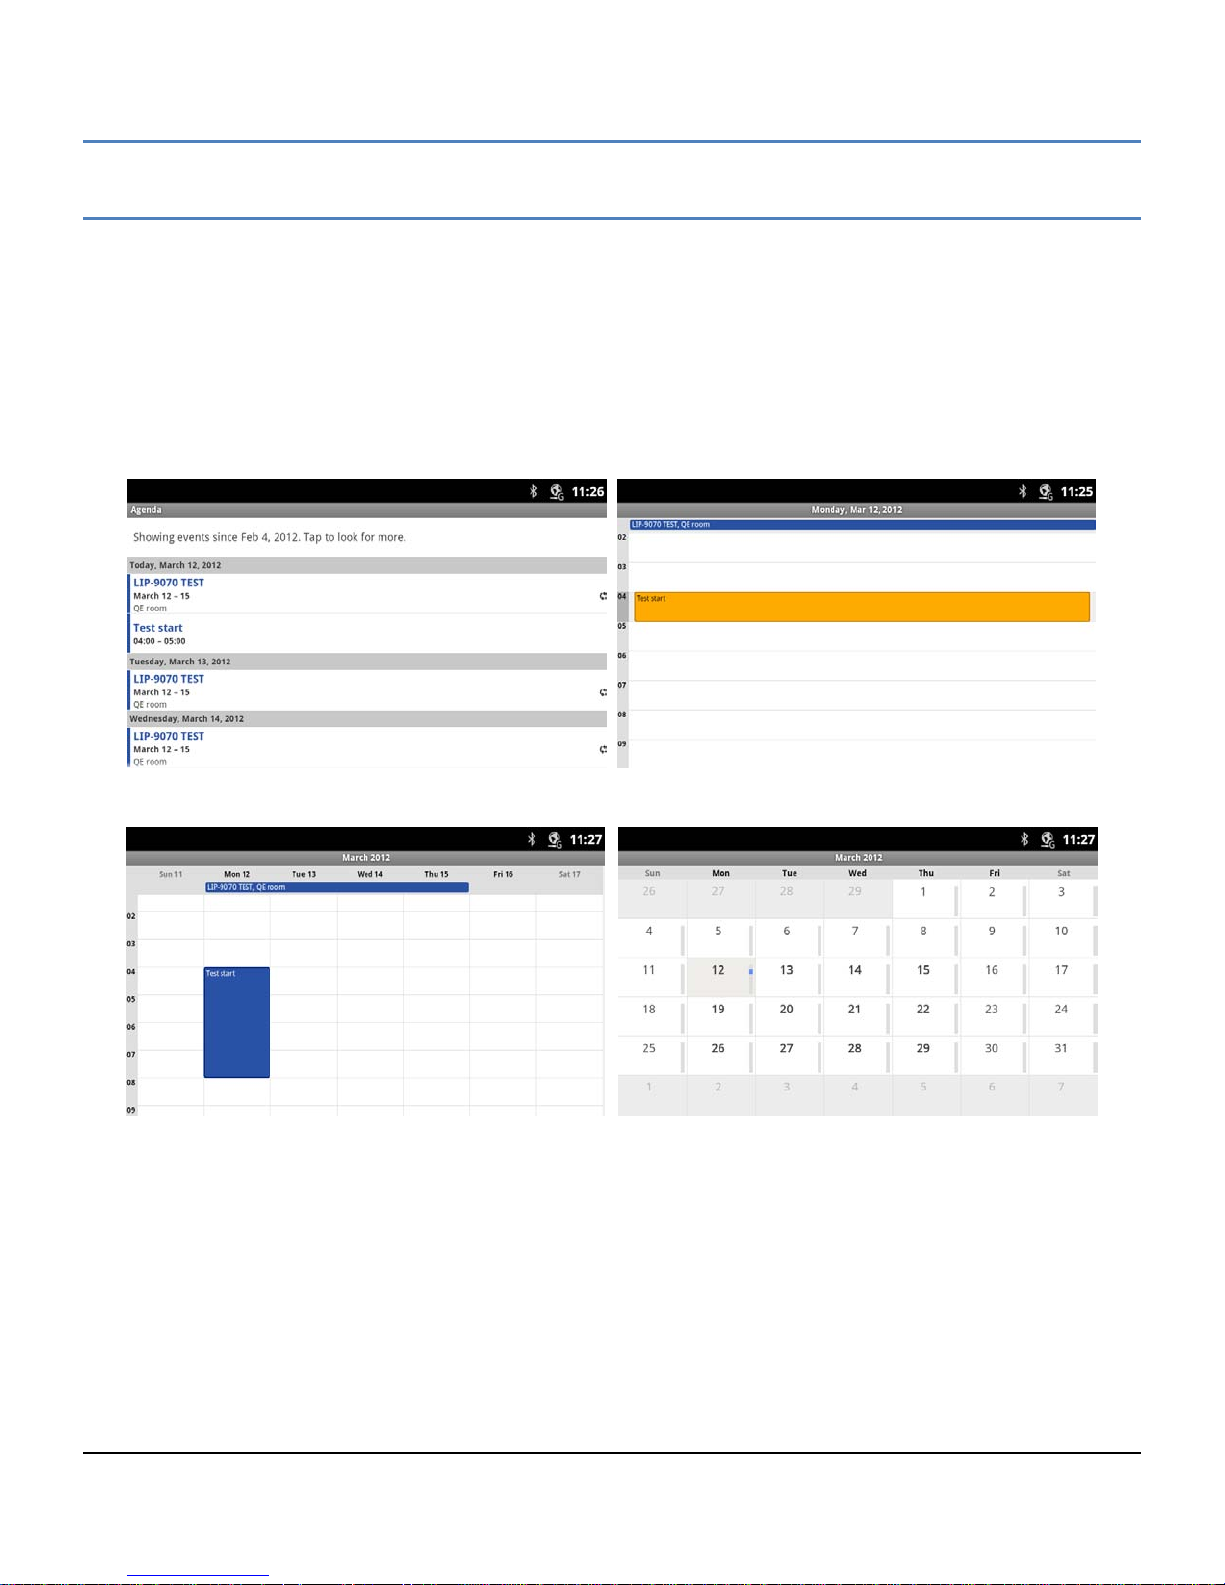
LIP-9070 iPKTS User Guide
9 Appointment/Event Calendar
In the Appointment Calendar application appoi ntments and events are sc hedule d and reminder s for the s chedules are
assigned. The application sends a notification at the s cheduled event reminder times. The Calendar is pre sented in
four (4) views:
Agenda displays events in chronological order beginning with the next upcoming event.
Day displays the day’s schedule with the hour on the right side and events highlighted over the hours the event
is scheduled.
Week displays the weeks schedules with the hour on the right side, the day across the top and events
highlighted over the hours the event is scheduled.
Month displays the months schedules.
Agenda View D ay View
Week View Month View
In the Day, Week and Month views, the swipe gesture can be used to display the next or previous Day, Week or Month,
as appropriate.
To select the schedule view,
1. Touch the Appointment Calendar icon in a Launcher screen or the Apps Dock.
2. Touch the Option menu button.
3. Select the desired view (Agenda, Day, Week or Month).
Note
° The Event Calendar does not work with the Google Calendar calendaring service.
39
Page 51
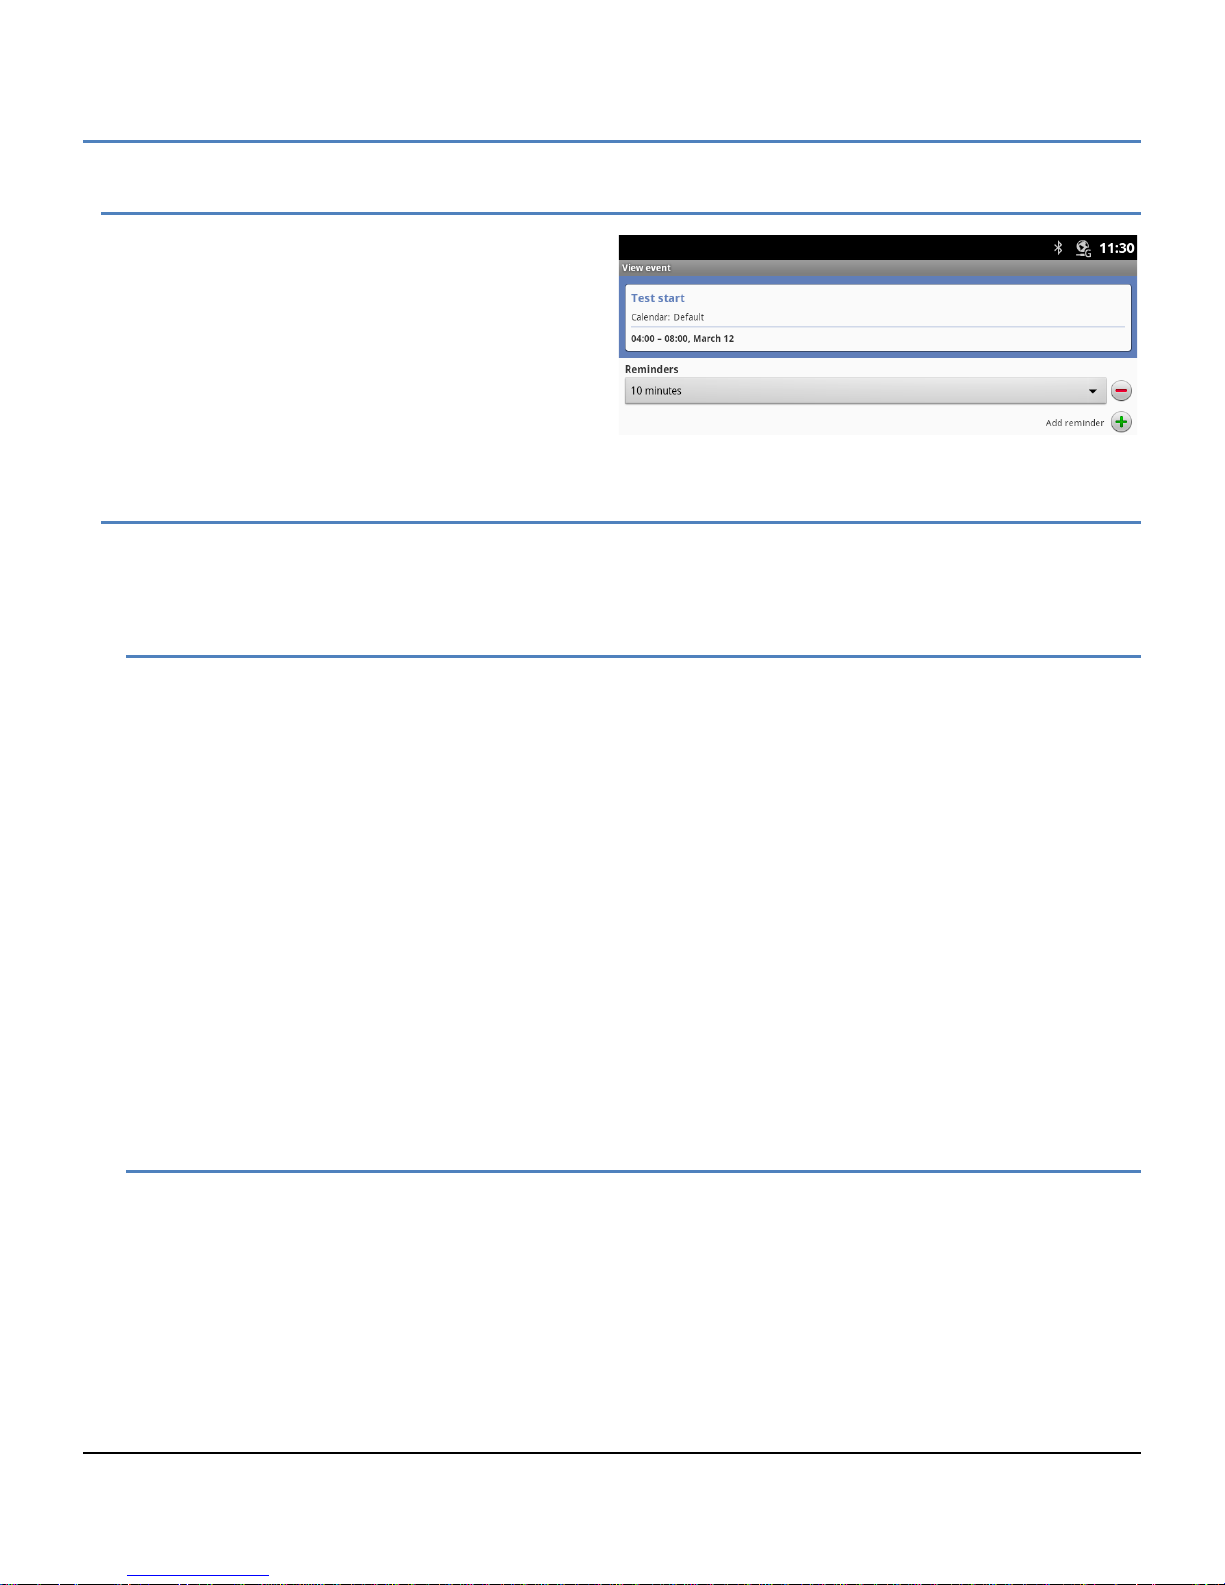
LIP-9070 iPKTS User Guide
9.1 Vi ewi ng Schedule details
The details of a scheduled event display by touching
the event in any of the Schedule views. The details
provided include the Event name, Calendar location,
the time and date for the event, and the reminder
setting.
To view the details,
1. Touch the event to display the details screen.
9.2 Managing Schedules
Event schedules can be m anaged from the day, week or month view using th e Context (touch and hold) menu.
Also, event schedules can be added from the Options menu of any schedule view.
9.2.1 Add an Event Schedule
An event can be schedule d in the Day, Week or Month vie w with the Context m enu or from any view using the
Options menu.
To schedule an event,
1. In any view, touch the Options menu button, select ‘more’ and then select ‘New Event.
or
Touch and hold a spot in the Day, Week or Month view.
2. In the popup, select ‘New event’, the Event details screen appears.
3. In the Event details screen touch and enter the:
Event Name,
Start time
End time
Location,
Event description,
Repetition
Reminder, time to begin reminder prior to the actual occurrence, multiple reminders can be ass ign ed
4. Touch ‘Done’ when finished or ‘Revert’ to cancel and return to the previous view.
9.2.2 Edit an Event Schedule
To edit an event schedule,
1. In the Day, Week or Month view, touch and hold a scheduled event.
2. In the screen Context menu, select ‘Edit’.
3. In the popup Event details screen, touch an item and enter new information.
4. Touch ‘Done’ when finished, ‘Revert’ to cancel or ‘Delete’, and return to the previous view.
40
Page 52

LIP-9070 iPKTS User Guide
9.2.3 Delete an Event Schedule
To delete an event schedule,
1. In the Day, Week or Month view, touch and hold a scheduled event.
2. In the screen Context menu, select ‘Delete’.
3. In the popup confirm the deletion or Cancel.
9.3 Re s ponding to a Reminder
At the scheduled e vent rem inder tim e, the event notific ation icon appears in the Notifications and Status bar and, if
assigned, the audibl e reminder tone pla ys. Also , the eve nt nam e displays briefly in the Notificat ion and Status bar.
The notification icon remains until the notification response.
To respond to a notification,
1. Touch the Notification and Status bar and drag the bar down to display the Notifications screen. The
screen disp lays all active notifications with ongoing events (DND, Forward, Alarms) followed by one-time
events such as scheduled event reminders.
2. Touch the notification desired.
3. In the popup select snooze or dismiss
or, for more than one reminder,
touch the desired reminder, the event detail screen displays and the notification is cancelled.
Note
° W hen viewing the iPECS Pho ne window, access to Notific ations screen is not allowed. Mo ve to another
screen to view the notifications or use the Option menu.
41
Page 53
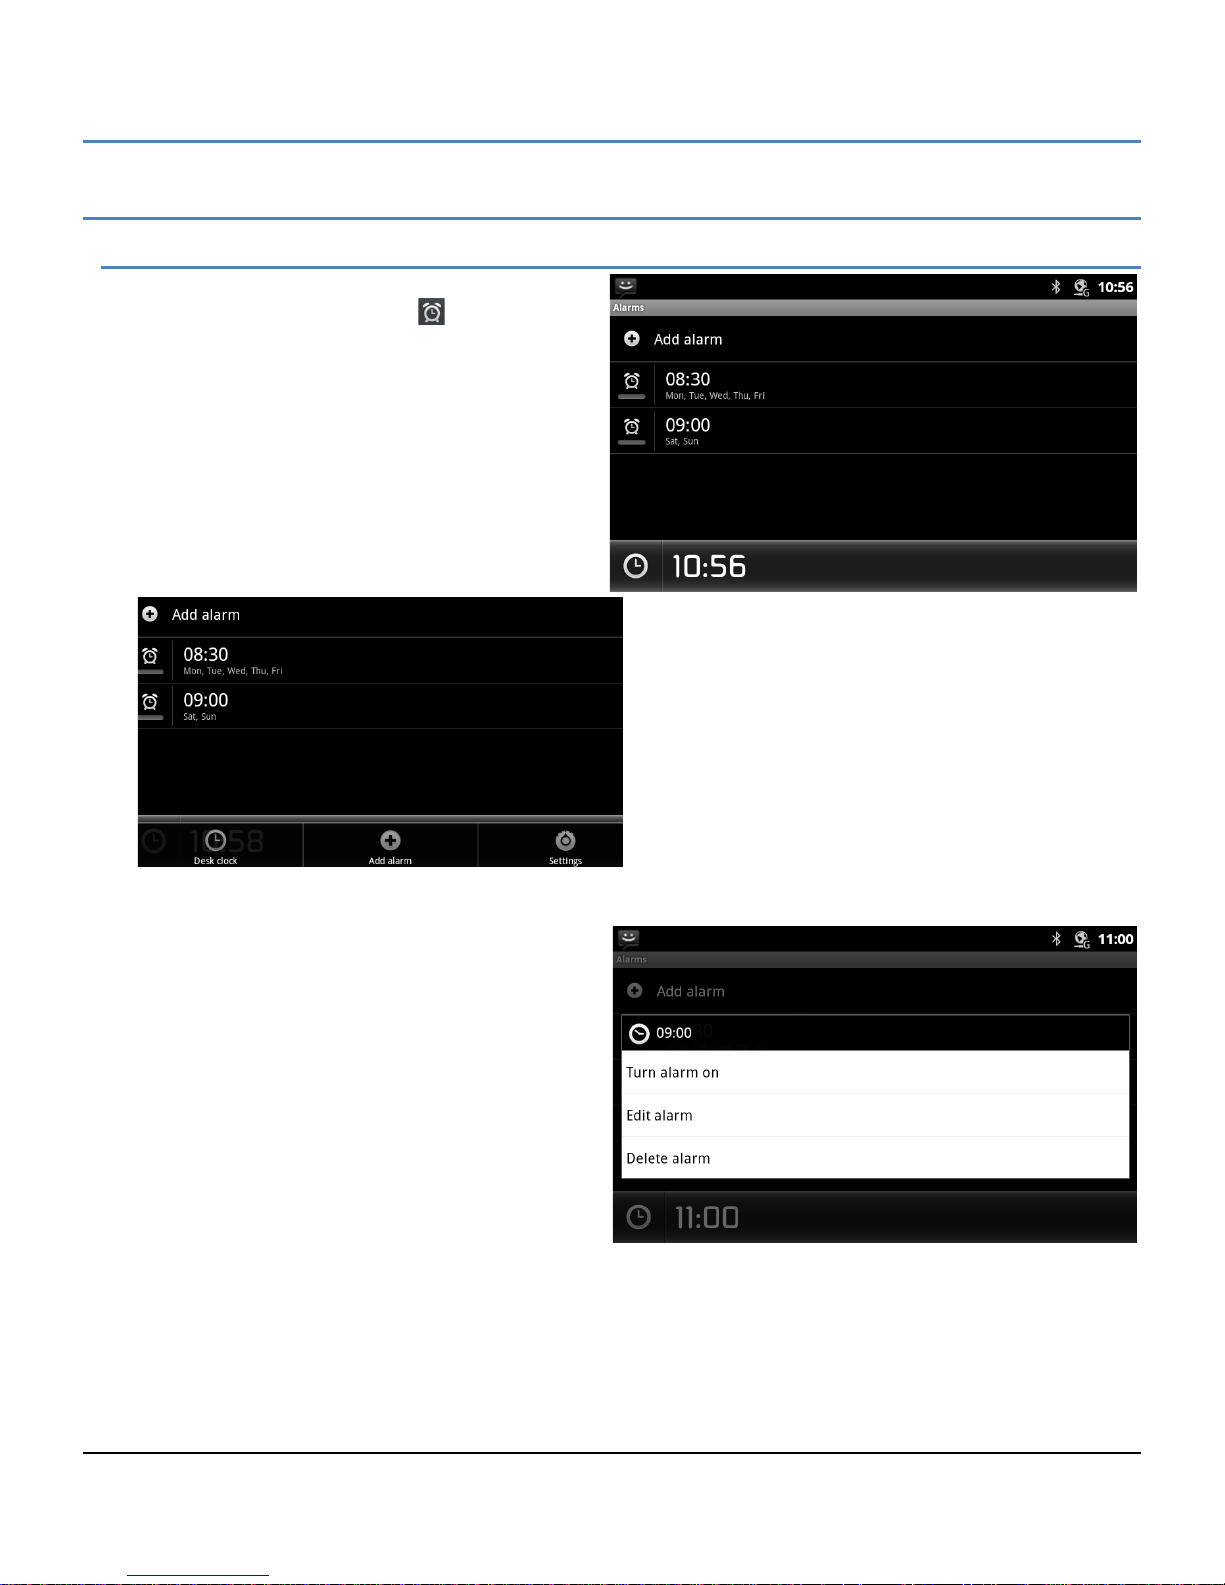
LIP-9070 iPKTS User Guide
10 General Purpose Apps
10.1 Setting the Alarm Clock
The LIP-9070 includes an Alarm Clock widget.
Selecting the Alarm Clock icon ( ) displays the list
of Alarms that ha ve be en set. Alarms c an be s et as a
single alarm or can be s et to repeat on s elected da ys
of the week. Alarm s can be added, ed ited, turned o n
or off, or deleted.
Touch ‘Add Alarm ’ to add an alarm then follow the onscreen instructions. The Alarm time, days of week
and state (on/off) for the al arm can be set. An alarm
can also be set by touch ing the Menu button t o show
the Alarm screen Option menu then touch the Add
Alarm or Settings button.
To edit, change the alarm state or delete an alarm,
touch and hold the desired Alarm and select the
desired function. Then enter the modified alarm
information and save the changes.
42
Page 54
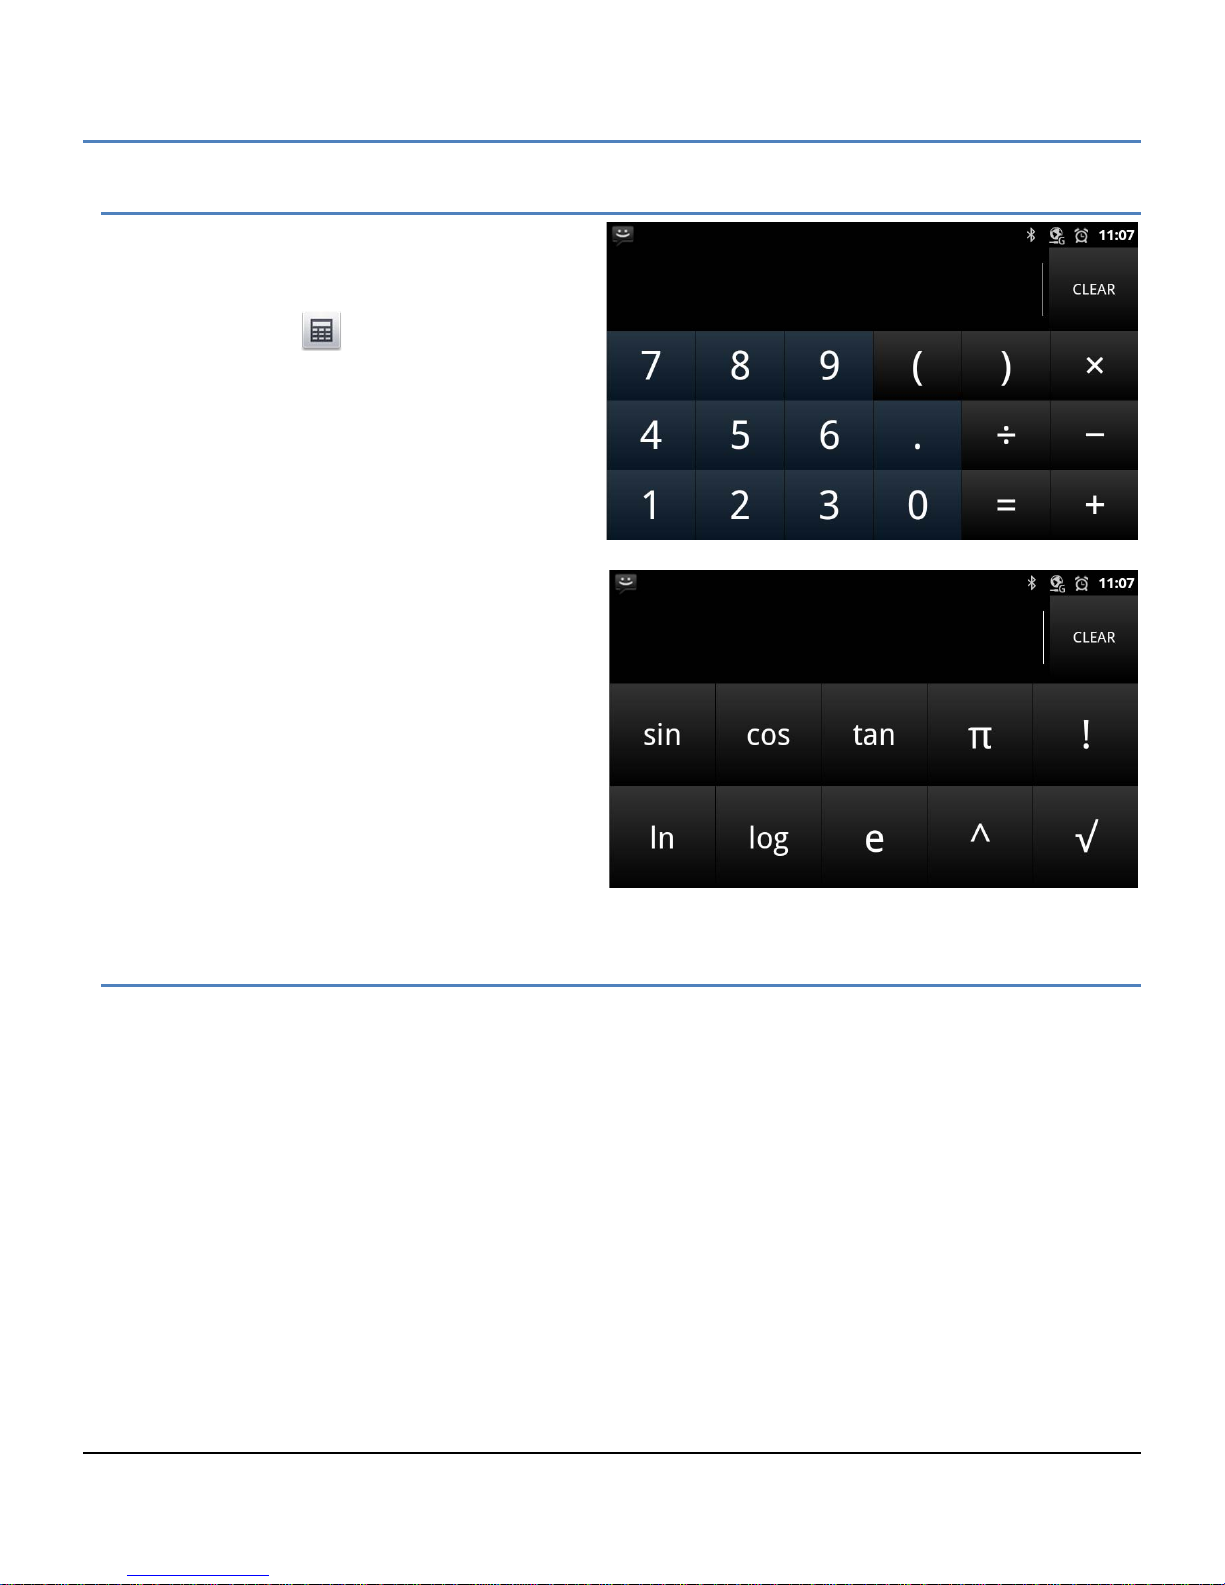
LIP-9070 iPKTS User Guide
10.2 Us ing the Calculator
The Calculator has the common arithmetic functions
and with a left flick, the advanced mathematic
function calculator is exposed.
The Calculator icon ( ) opens the basic calculator.
Use the keypad to enter digits and the functions
buttons to complete an operation. Touch and hold
the number in the calculator display to show the
Result menu where the r es ults ca n be copi ed to other
applications or other tools can be accessed.
Note
° Touch clear to erase the last entry or touch
and hold to erase the displayed value.
° Lef t flick on the basic Calc ulator to show the
advanced mathematics function calculator.
10.3 Handling Pictures and Videos
Pictures and vide os have two assoc iated applicat ions. The Camera application tak es pictures and r ecords videos
with the built-in camera. Pictures a nd videos are stored on t he SD card and c an be shared. In addition, pictures
can be used as wallpa per o r a user contact icon. The Gallery application organizes pictures and videos into albums
that can be viewed and managed.
The camera is a 1.3 Mega-pixel CMOS cam era and c an be tilted m anuall y for the best v iew. P ictures tak en by the
Camera are stored as the jpeg file type. Videos employ the 3GPP file types.
43
Page 55
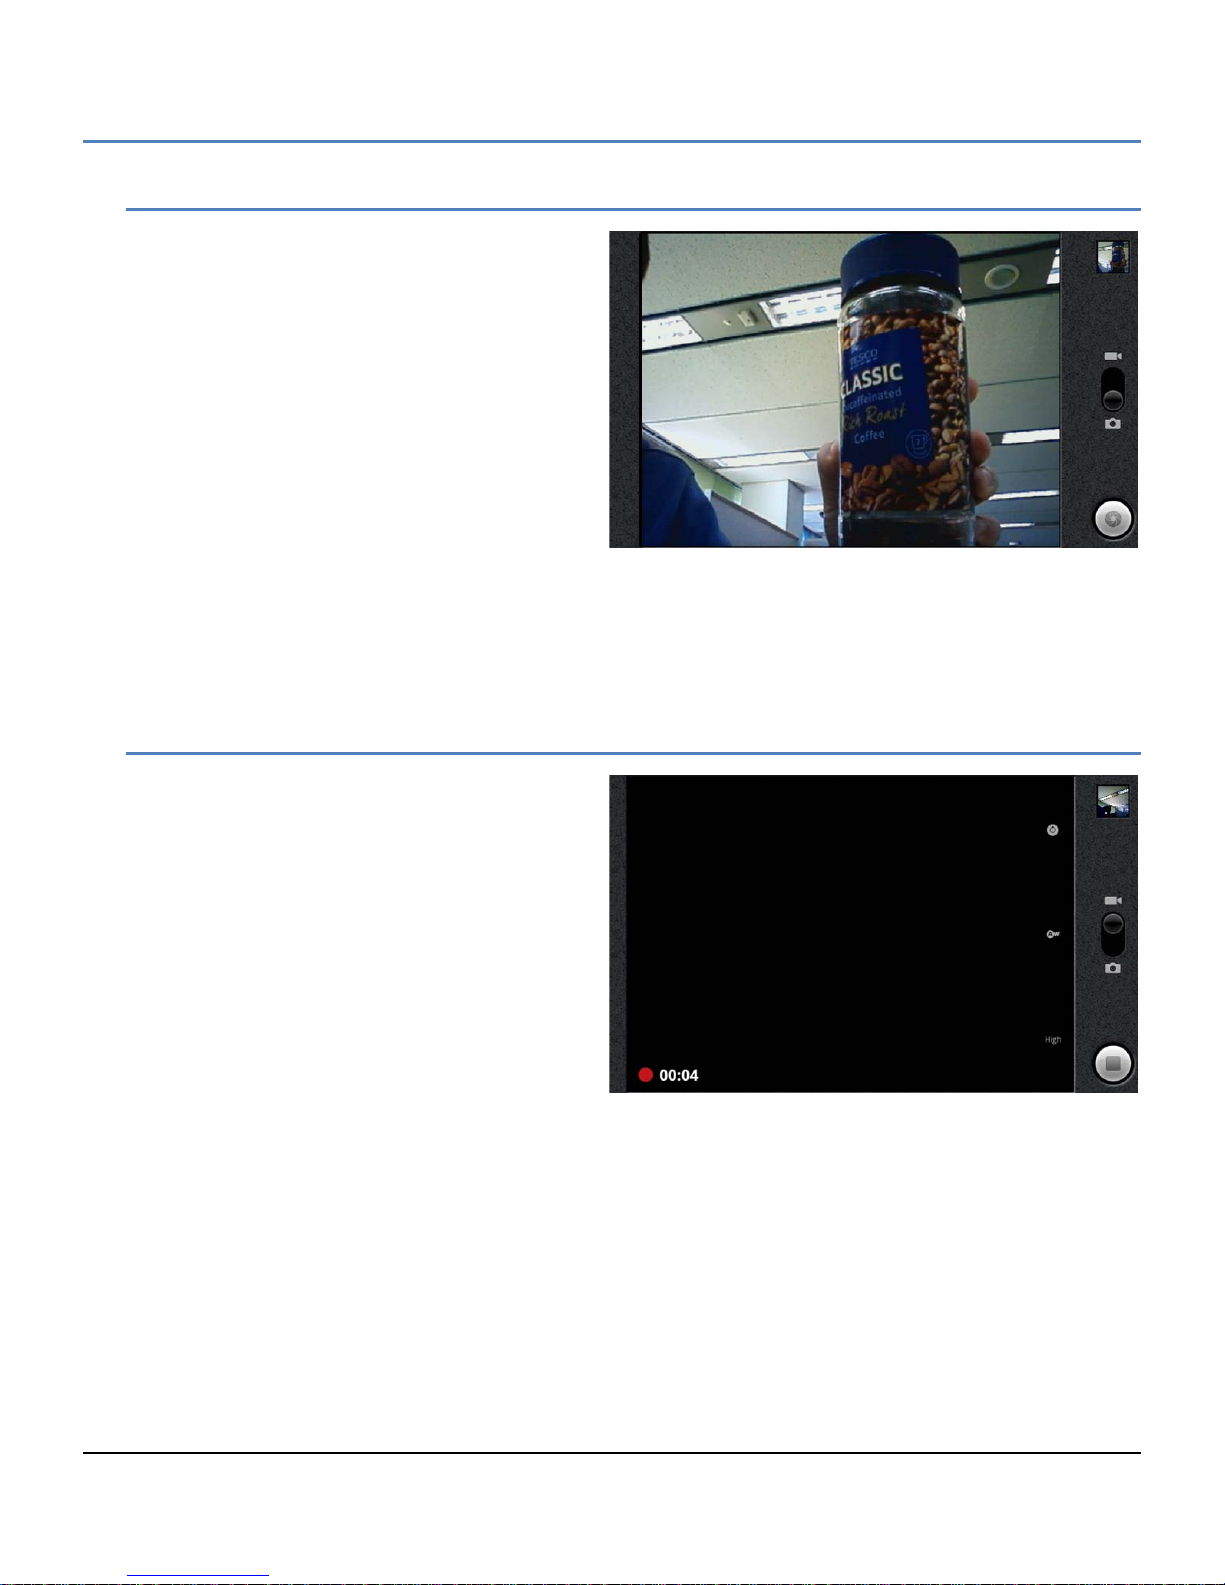
LIP-9070 iPKTS User Guide
10.3.1 Taking Pictures
Touching the Cam era icon in the App Doc k or on a
Launcher screen, opens the Camera screen in the
landscape orientation. The right side of the screen
includes several controls.
Picture Thumbnail: displays a thumbnail of the
last picture or Video in the upper right of the
screen.
Picture/Video Control: switch the Camera mode
between still shots or video.
Shutter/Record: take picture or start/stop video
recording.
To take a picture,
1. Frame the subject in the display.
2. Touch and hold the shutter icon. The camera focuses on the subject and takes the picture.
The picture is displayed for several moments then the display is cleared and a thumbnail of the last picture
displays in the upper right of the screen.
10.3.2 Recording Videos
As a default, when the Picture application opens,
the camera mode is s et for sing le shot pict ures. B y
changing the camera mode, videos up to 30
minutes in length can be recorded. To record a
video,
1. Change the Camera control to the Video
Camera.
2. Touch the Record button. The video
recording starts with the recor ding duration
displayed at the bottom left of the screen.
Once complete a thumbnail of the video
displays in the upper right corner.
To stop recording video,
1. Touch the Record button.
Note
° Videos and pictures taken with the camera are stored in the user dedicated 2G memory.
° A video can be a maximum of 30 minutes.
44
Page 56
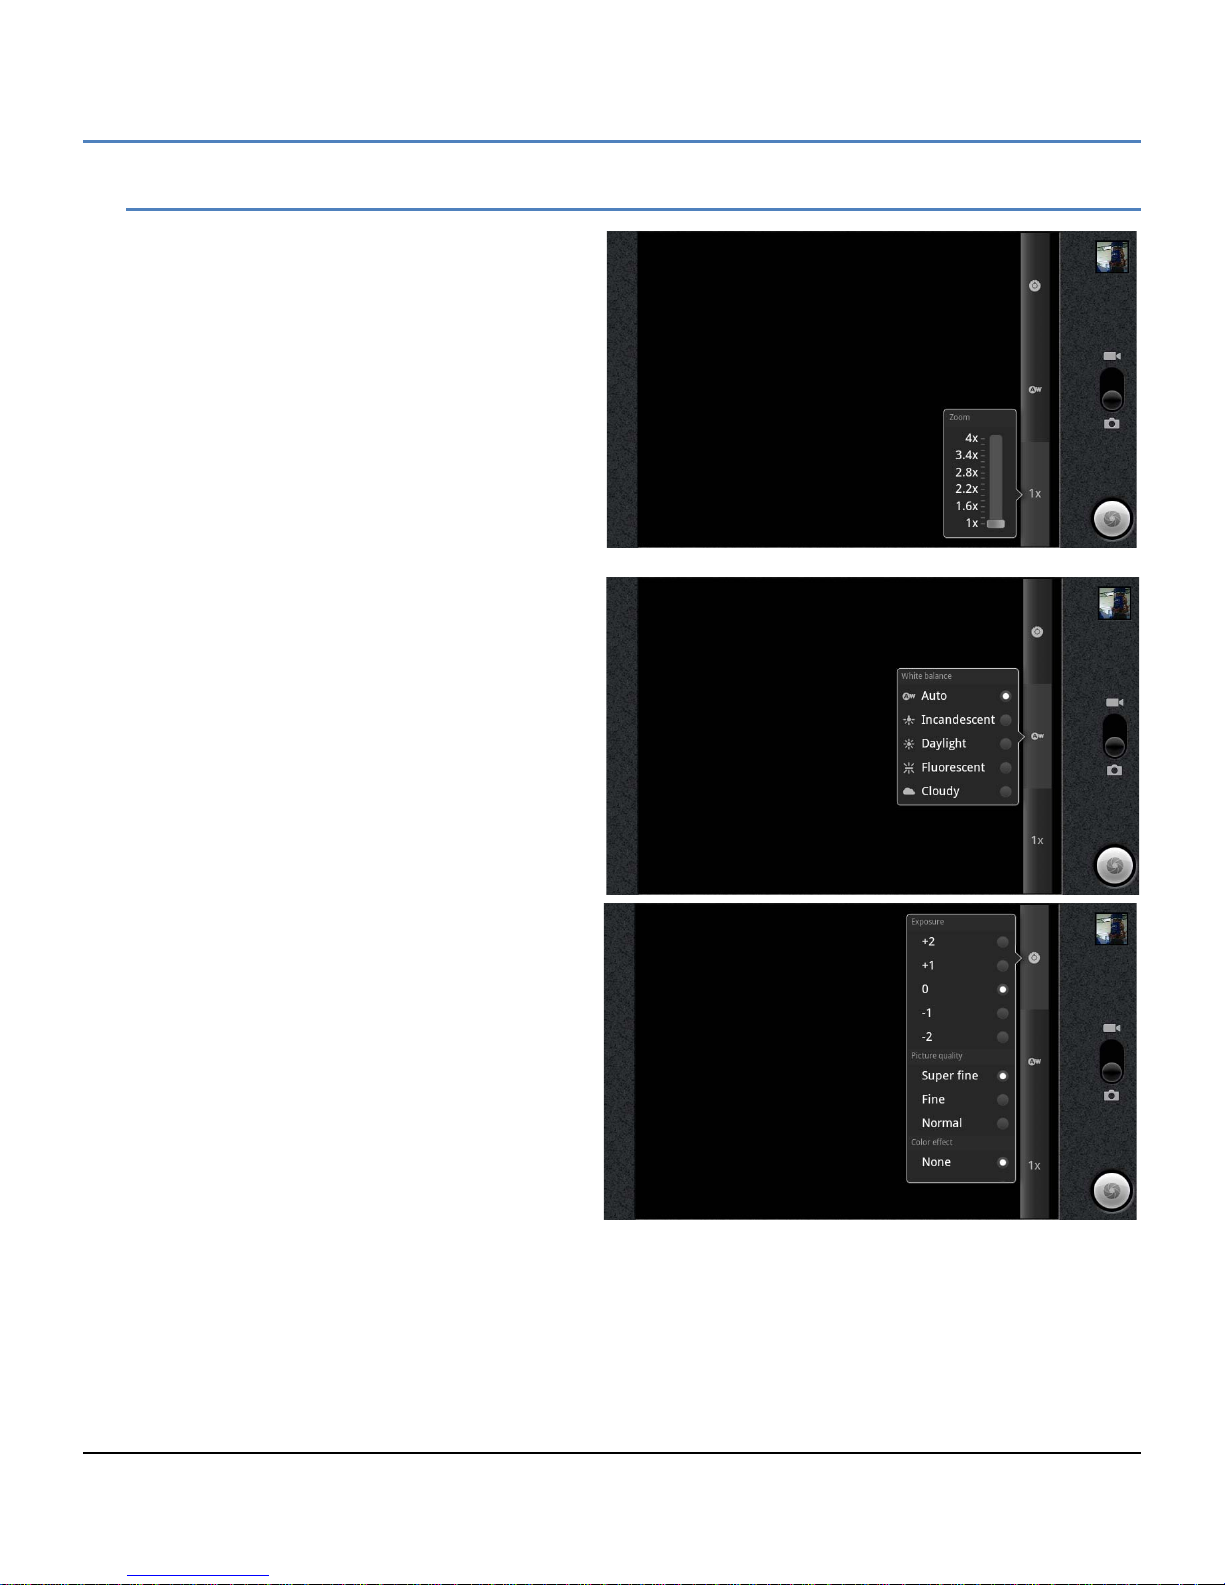
LIP-9070 iPKTS User Guide
10.3.3 Picture and Video Controls
Various controls are available for pictures and
videos. Touching the picture displays the controls
including,
Zoom: expand the picture with the adjusted zoom,
1 to 4x.
White balance: adjust the white balance for the
ambient lighting
Exposure, Quality & Color: set exposure duration,
quality of picture and color effects
45
Page 57
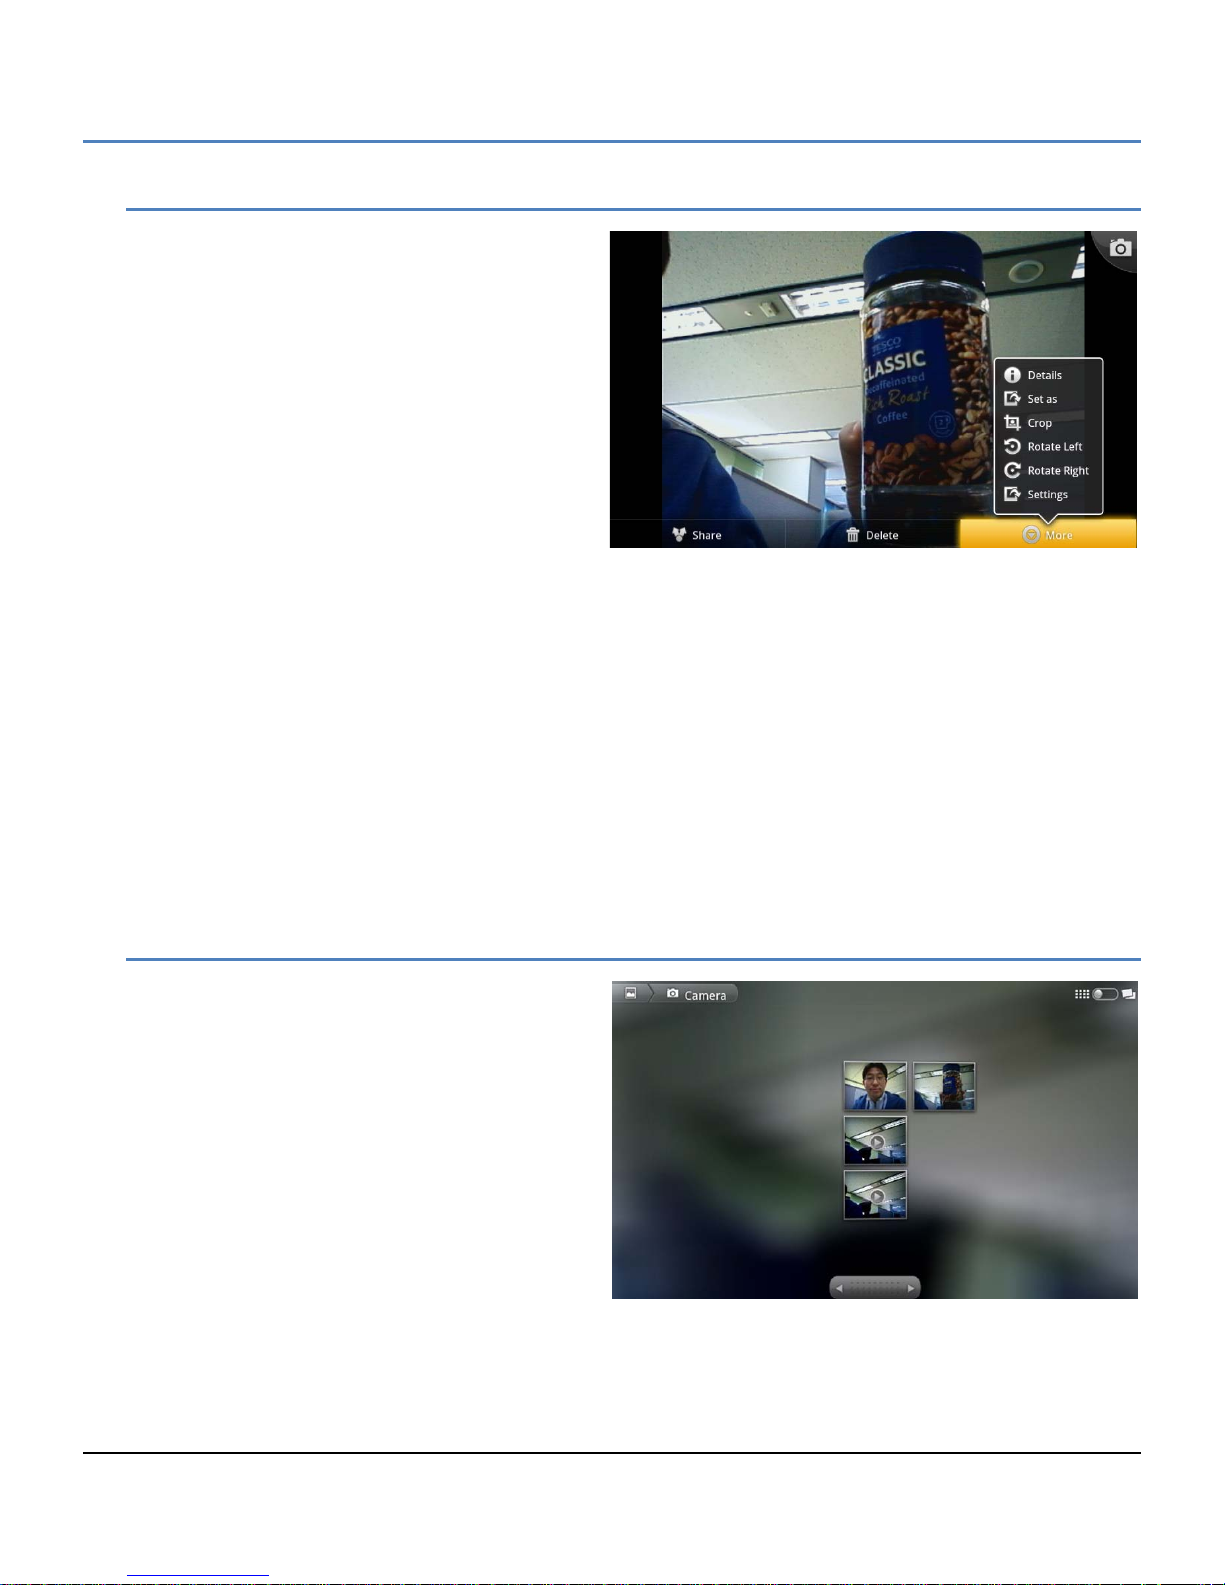
LIP-9070 iPKTS User Guide
10.3.4 Review Pictures and Videos
Pictures and videos stored in the Camera
application memor y, can be viewed, edited, delete d
or shared. The Pinch gesture can be used to
control zoom and, if the lef t/right arro w displays, the
Flick gesture will display the next/previous picture.
The Picture revie w screen opens when a thum bnail
in the upper right corner of the Camera screen is
touched. The screen inclu des the following Picture
tools.
Share: share the picture with a Bluetooth
device, the Bluetooth device selection
screen will appear.
Delete: delete the picture, a confirmation is required.
More:
Details: display details for the picture including name, type of file, date and album.
Set as: conf igure the picture as a contact icon or as the wallpaper. The picture will be sized t o fit the
Contact icon or Wallpaper scr een size.
Crop: crop the picture and save as a new picture in the Album.
Rotate Left: rotate the picture 90° counterclockwise.
Rotate Right: rotate the picture 90° clockwise.
Settings: enable subtitles and the select font for the subtitles.
To return to the Camera, touch the Camera in the upper right corner of the review screen to take a picture.
10.3.5 Using the Gallery and Albums
The Gallery application organizes and displays
picture albums on the SD card and in the Cam era.
Items in the album are shown in a grid view with
thumbnails of each picture or video. The Gallery
displays files of the JPEG, PNG, BMP and GIF
types as pictures and H.263, H.264 and MPEG4
files as videos. At the to p of Gallery screen is the
name of the Gal lery a nd, at the to p r ight, is the View
Control. At the bottom is the navigation control to
view the next or previous album. The navigation
displays thumbnails for additional pictures and
videos organized by date.
View Control:
Slideshow: show all pictures in album as a slide show.
Multiple select: select multiple items to share or delete.
46
Page 58
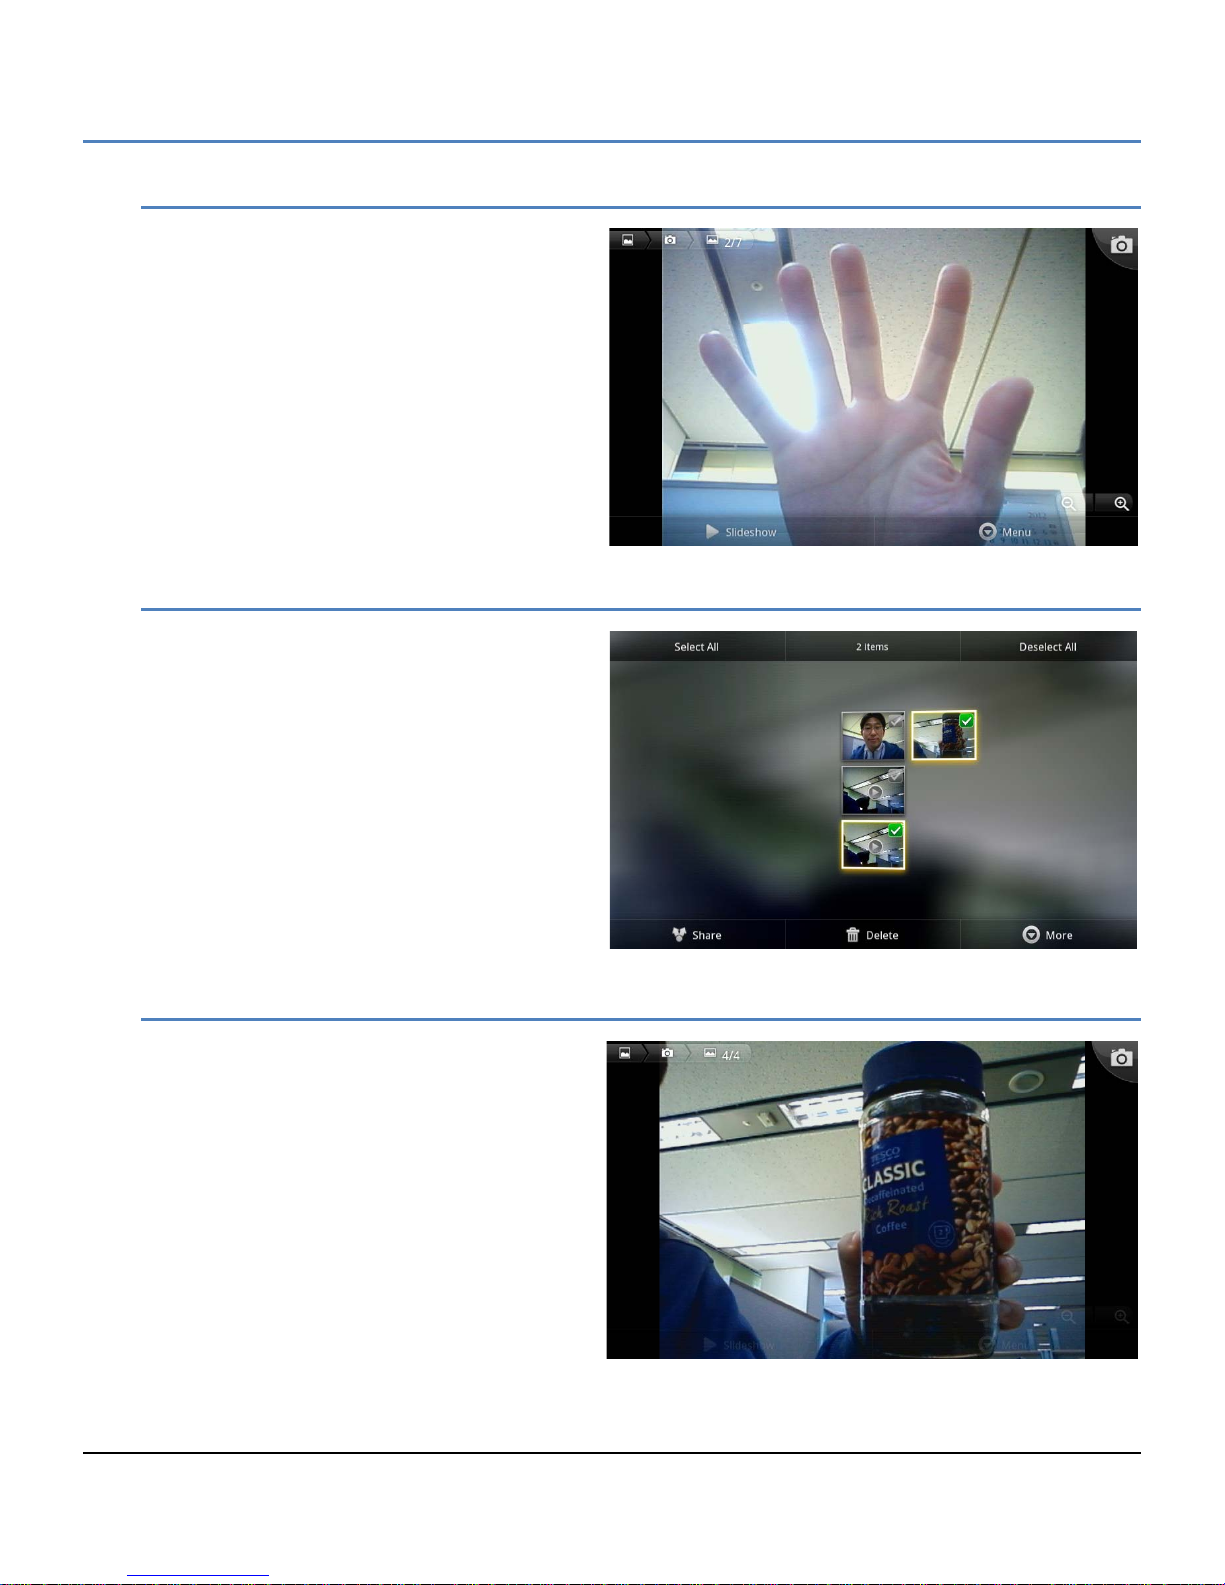
LIP-9070 iPKTS User Guide
10.3.5.1 Viewing a Slide show
When the Slide show view is selected in the
Gallery, the Slide show screen appears. Each
picture and first video frame display. Each is
displayed for about 2 seconds and the next
picture or video disp lays. Videos display with the
play arrow, when touch ed the video plays. The
navigation arrow is used to view the next or
previous picture in the album. In addition, the
Picture tools are availab le under the Menu button
to modify the picture.
10.3.5.2 Selecting Multiple Pictures
Multiple pictures can be selected with the
‘Multiple select’ view. Once selected, the
pictures can be shared with a Bluetooth device or
deleted.
10.3.5.3 Viewing Pictures
In the Gallery, pictures can be selected for
display. To display a picture,
1. Touch the picture thumbnail.
47
Page 59
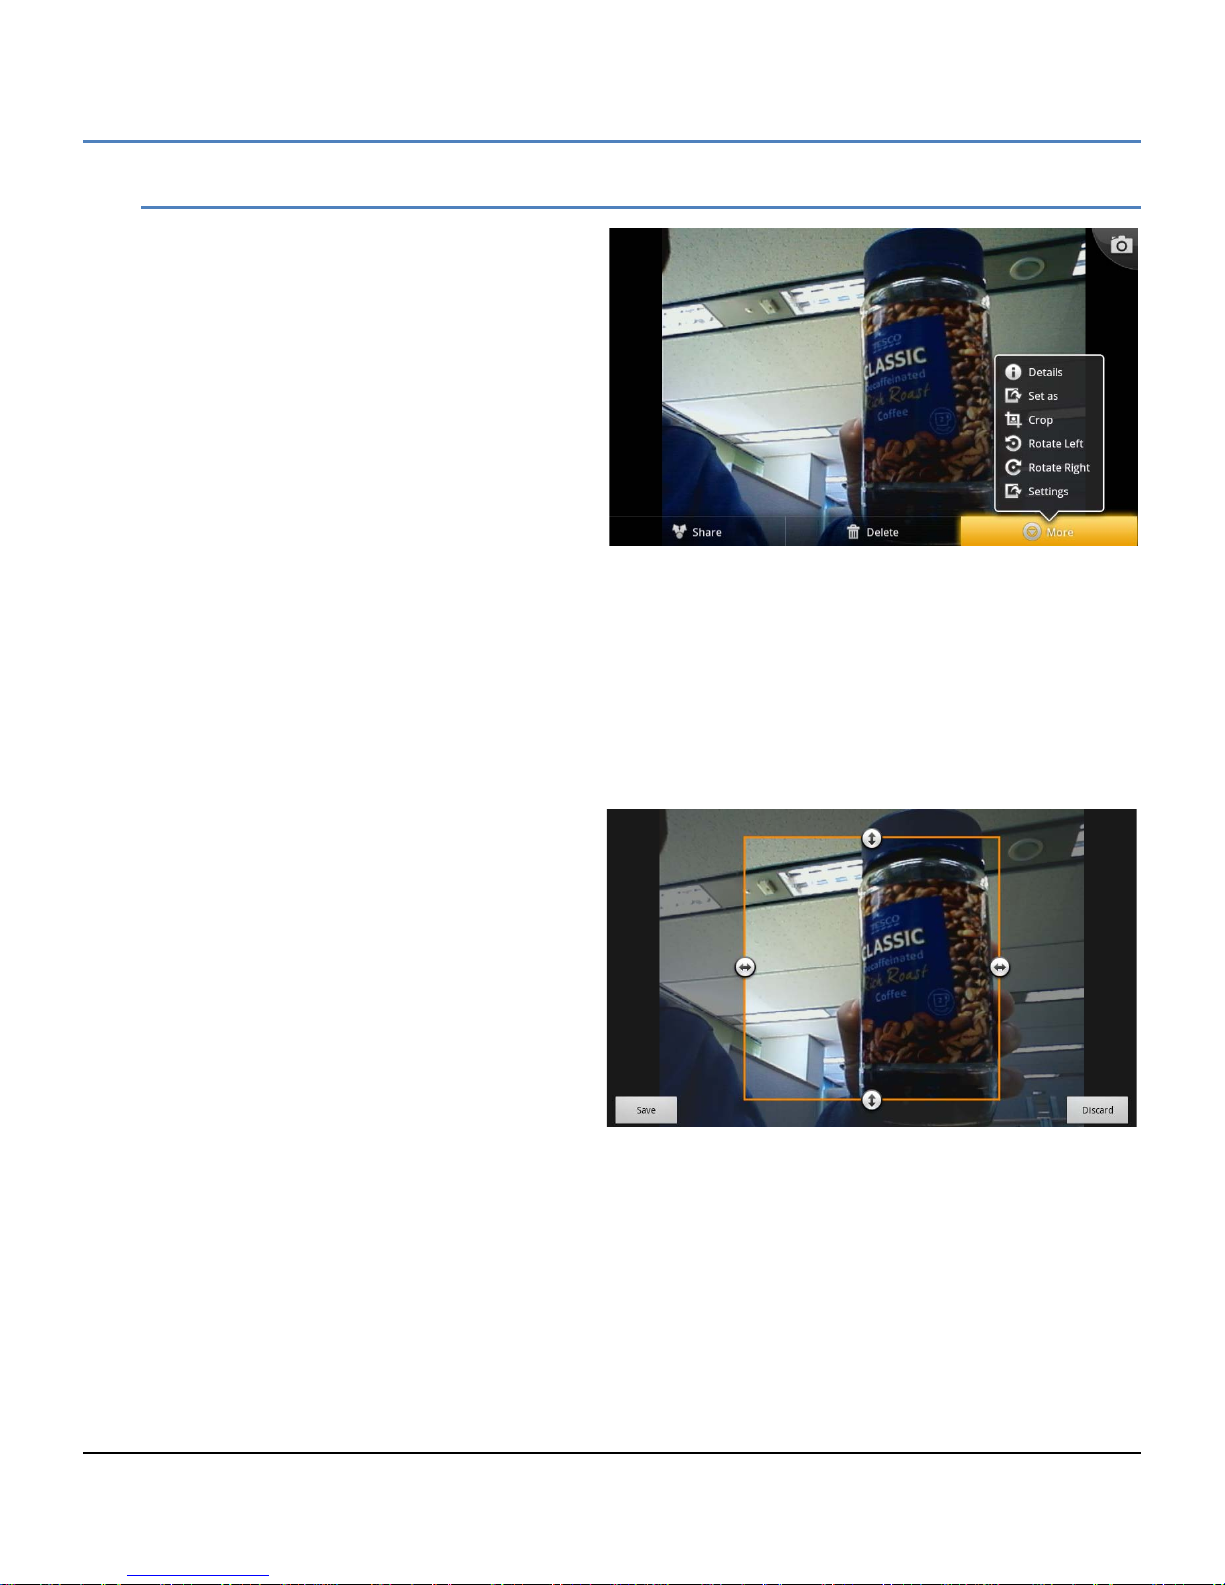
LIP-9070 iPKTS User Guide
10.3.5.4 Picture Gallery Tools
The Picture tools are available in the Gallery to
allow the picture to be modified, used as a
contact icon or wallpaper, etc.
While viewing the picture, touch the picture or
press the Menu button in the Slideshow screen
to display the Picture tools.
Share: share the pictur e wi th a Blueto oth
device, the Bluetooth device selection
screen will appear.
Delete: delete the p icture, a confirm ation
is required.
Details: display details for the picture
including name, type of file, date and
album.
Set as: configure the picture as a con tact icon or as the wallpaper . The picture will be s ized to fit the
Contact icon or Wallpaper scr een size.
Crop: crop the picture and save as a new picture in the Camera Album.
Rotate Left: rotate the picture 90° counterclockwise.
Rotate Right: rotate the picture 90° clockwise.
Settings: enable subtitles and the font for the subtitles.
If a picture is modified, it can be saved in the
Camera Album without affecting the albums on
the SD card.
48
Page 60
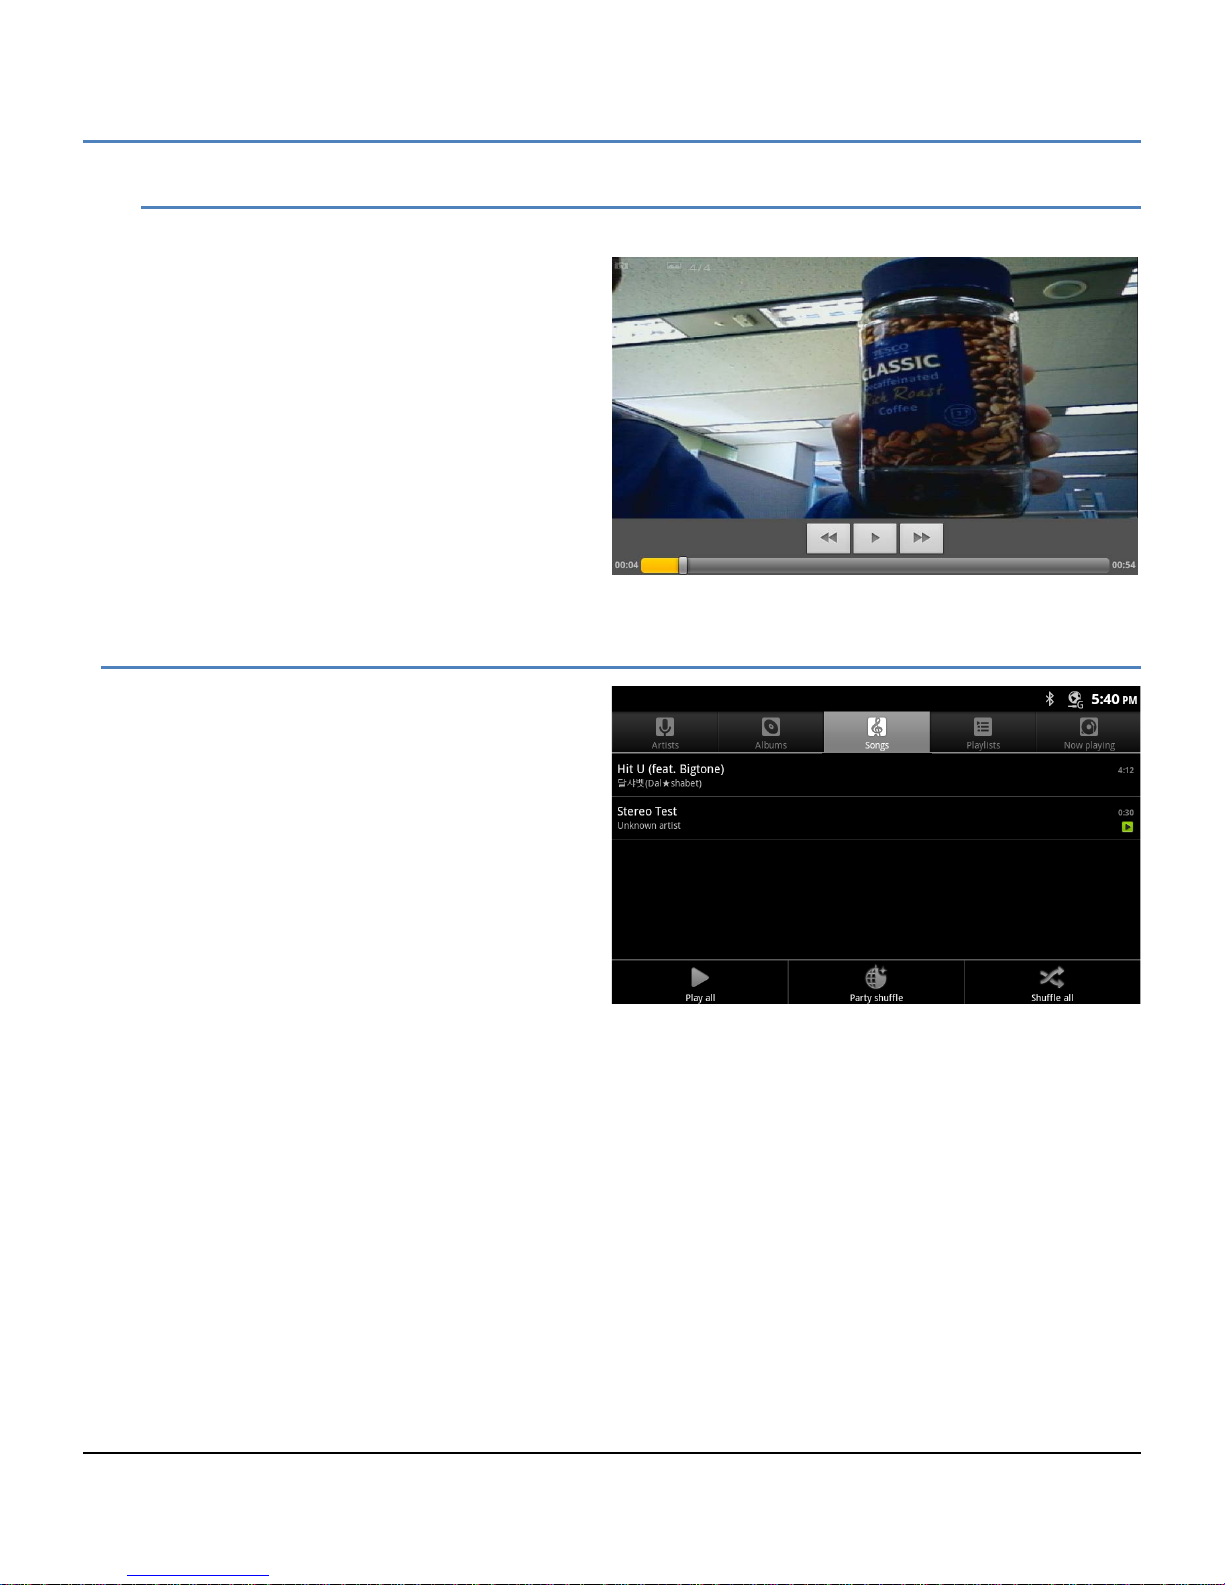
LIP-9070 iPKTS User Guide
10.3.5.5 Viewing Videos
In the Gallery, videos can be selected for display. To display a video,
1. Touch the video thumbnail. The initial
frame in the video displays.
2. Touch the video frame to display the
Video controls for fast forwar d or revers e
as well as the play-pause control.
10.4 Playing Music
The Music application or ganizes, manages and plays
music and other audio files located on the SD card.
When the Music icon in the Dock or Launcher screen
is selected, the Music app builds a Mus ic Library from
information in the audio files (MP3, MIDI and OOG
Vorbis formats) on the SD card. Constructing the
catalog takes a short period of several seconds or
longer depending on the number of files on the SD
card. When complete, the Music Library screen opens
where music is cataloged and sorted by Artists,
Albums, Songs, Playlists and ‘Now’ pla ying. To view
the contents of a list, select the tab.
Music can be selected ad hoc, from an album or
playlist, or randomly selected.
The Music Library scr een Option menu varies slight ly based on the specific library in view. T he menu has song
shuffling tools appropriate for the view.
Note
° Album s may include a tag ind icating a Gallery photo to use as the Thumbnai l. If the tag is included, the
LIP-9070 will display the thumbnail.
49
Page 61
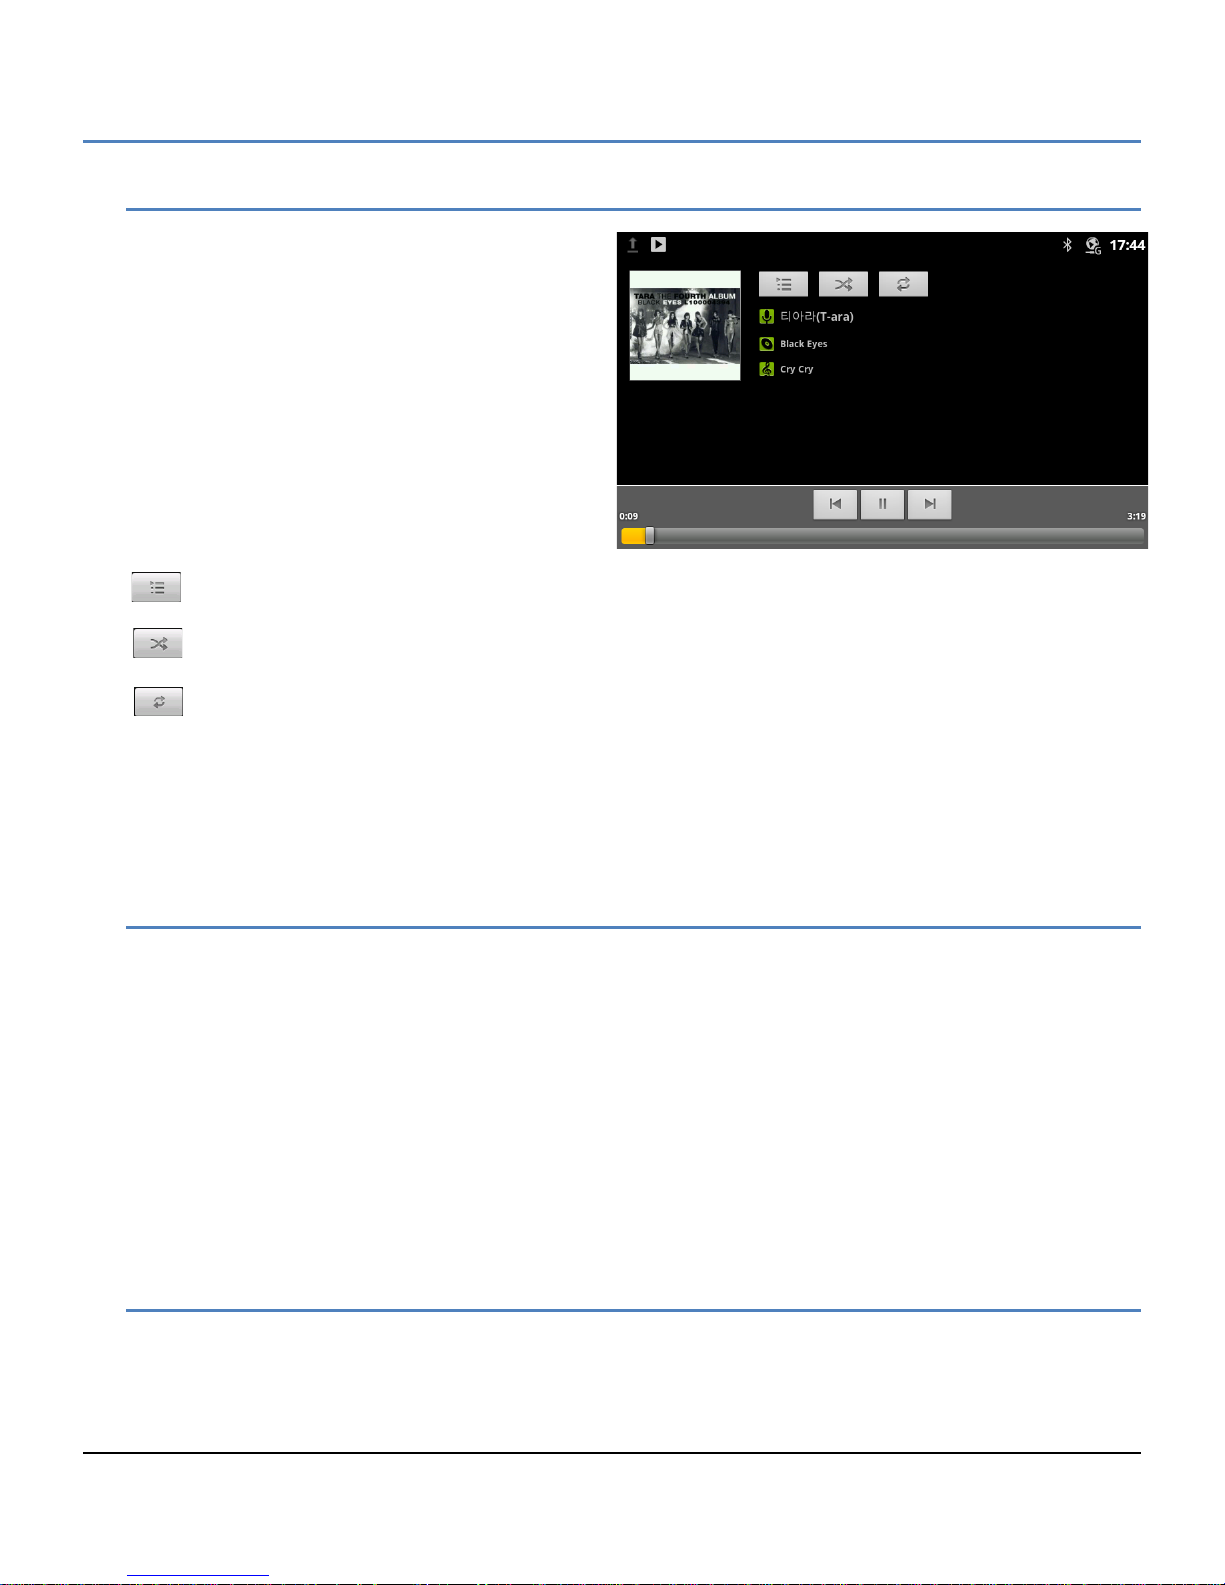
LIP-9070 iPKTS User Guide
10.4.1 Playing Songs
To play a song, select a song or playlist from the
Music Library, or in the Songs or Album list, press
Menu and Play All. The playback screen appears
and the song plays over the speaker of the phone.
At the bottom of the playback screen is the progress
bar indicating the playback time and total length of
the song. Above the progress bar are the comm on
next and previous track controls along with the
pause/resume button.
On-screen is information from the files such as
album cover, artist, song, etc. In addition, there are
three icon tools,
Playlist: open the current Playlist.
Shuffle: shuffle the current playlist for random order playback.
Repeat: repeat the current song, album or playlist.
Note
° T he music will c ontinue to play even when you switc h applicati ons. Music s tops w hen the last s ong in the
playlist is reached, unless the repeat option is active, or if playback is stopped by the user.
10.4.2 Playing a Party-Shuffle
When Party Shuff le is selected, the LIP-9070 pla ys songs from the SD c ard in a random order. To pla y a Party
Shuffle,
1. In the Music Library screen, touch the Menu button
2. Select Party Shuf fle. Twelve trac ks are selected a t random fr om the SD card and p layed as the current
Playlist. When the dozen tracks are completed, another twelve tracks are selected and played.
If desired, a song can be added to the Party Shuffle playlist. To add a song to the end of the current Party Shuffle
playlist,
1. In the Music Library, touch and hold a song from a list.
2. Touch the Menu button
3. Select ‘Add to Playlist’ and select ‘Current Playlist’.
10.4.3 Play songs from a Playlist
To play songs in a Playlist,
1. In the Music Library, select Playlist.
2. Select the desired Playlist. Songs in the Playlist are played.
50
Page 62
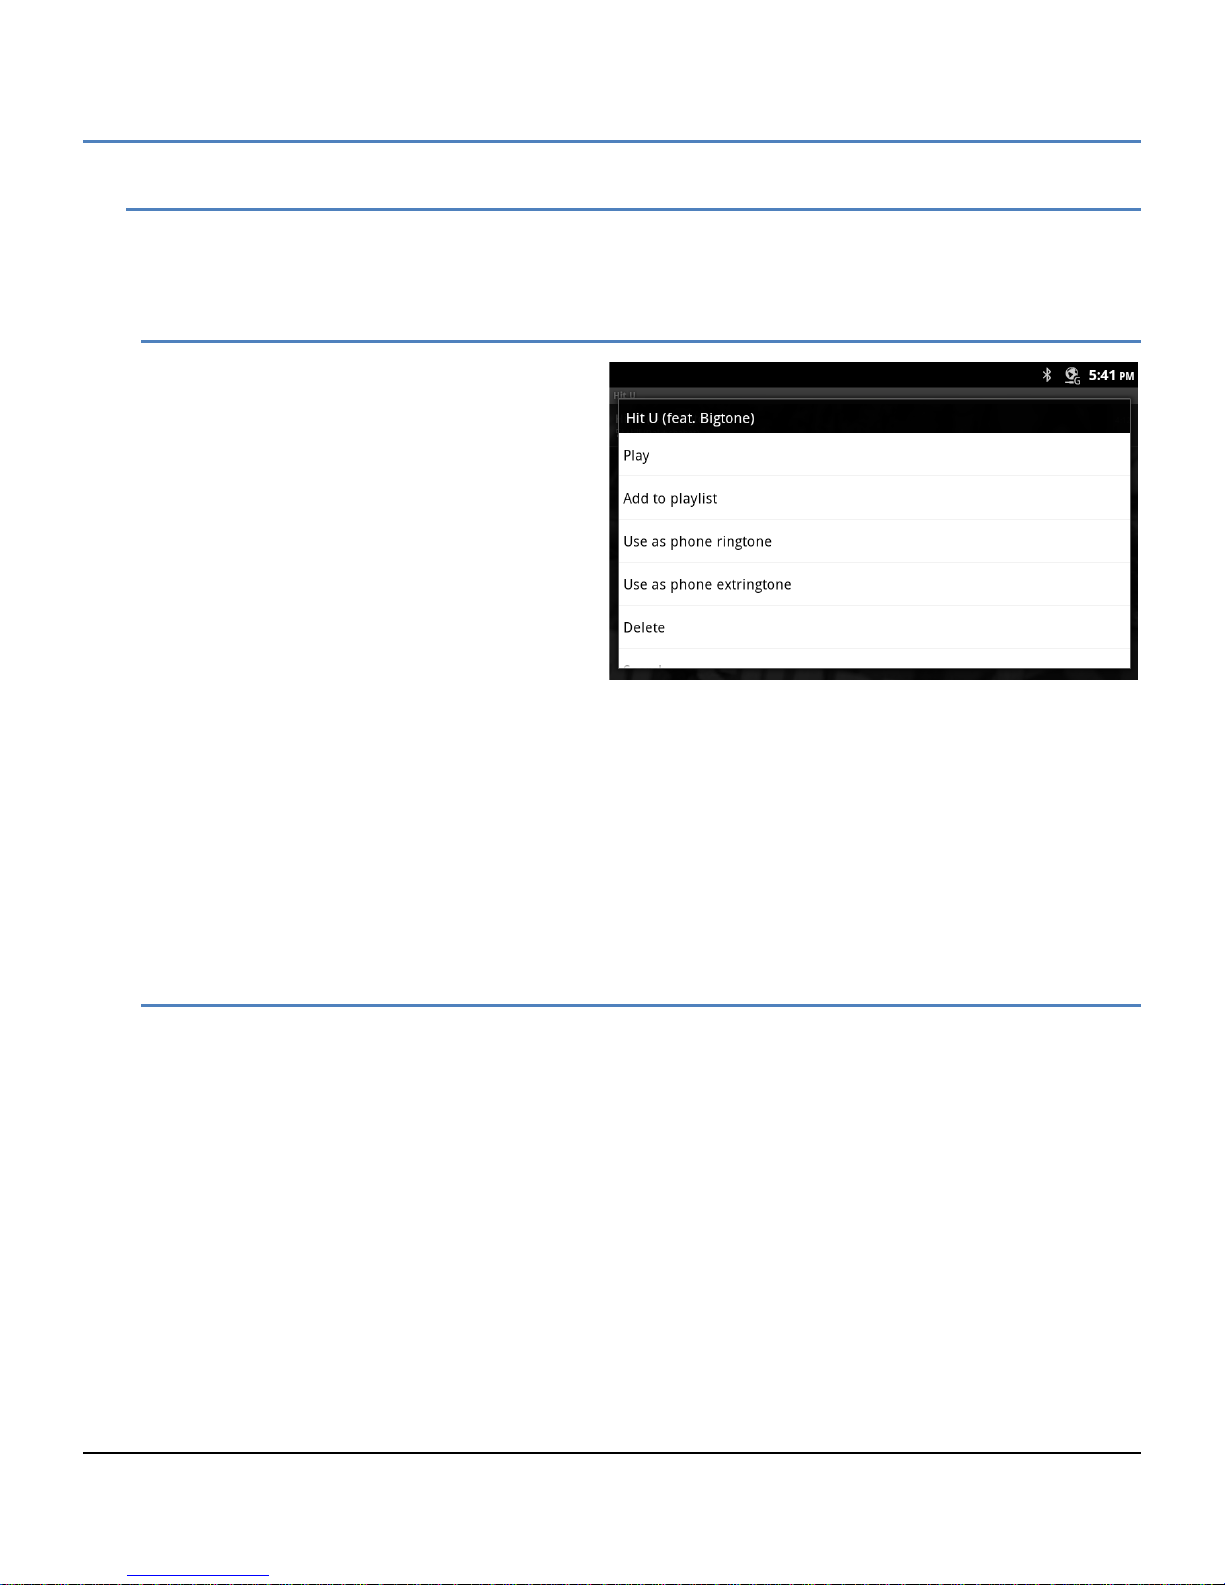
LIP-9070 iPKTS User Guide
10.4.4 Managing Playlists
A Playlist is a set of songs that have been or ganized in a group. Son gs in the Playlist are pl ayed in the order
entered in the Playlist or the list can be shuffled before playback.
10.4.4.1 Create a Playlist
To create a new Playlist,
1. From a Library, touch and hold the first
song title to add to the new Playlist.
2. In the menu touch ‘Add to Playlist’.
3. Touch ‘New’ in the popup menu and
enter a name.
4. Touch Save.
A song currently playing in the playback window
can be added as the first song in Playlist
1. In the playback screen touch the Menu
button.
2. Touch ‘Add to Playlist’
3. Touch New in the menu and enter a name.
4. Touch Save.
An entire Album can be saved as a Playlist as follows.
1. From the Music Library, select a list and touch and hold a song title from an Album.
2. From the menu touch ‘Save As Playlis t’.
3. In the popup, enter a name.
4. Press Save to store the new playlist.
10.4.4.2 Add Songs to a Playlist
To add a song to a Playlist,
1. From a Library list, touch and hold a song title.
2. Touch ‘Add to Playlist’.
3. Select the Playlist to receive the song, the song is added to the Playlist.
A song that is playing can be added to a Playlist as follows,
1. While the song is playing in the Playback screen, touch the Menu button.
2. Select Add to Playlist in the menu.
3. Select the Playlist to receive the song.
51
Page 63
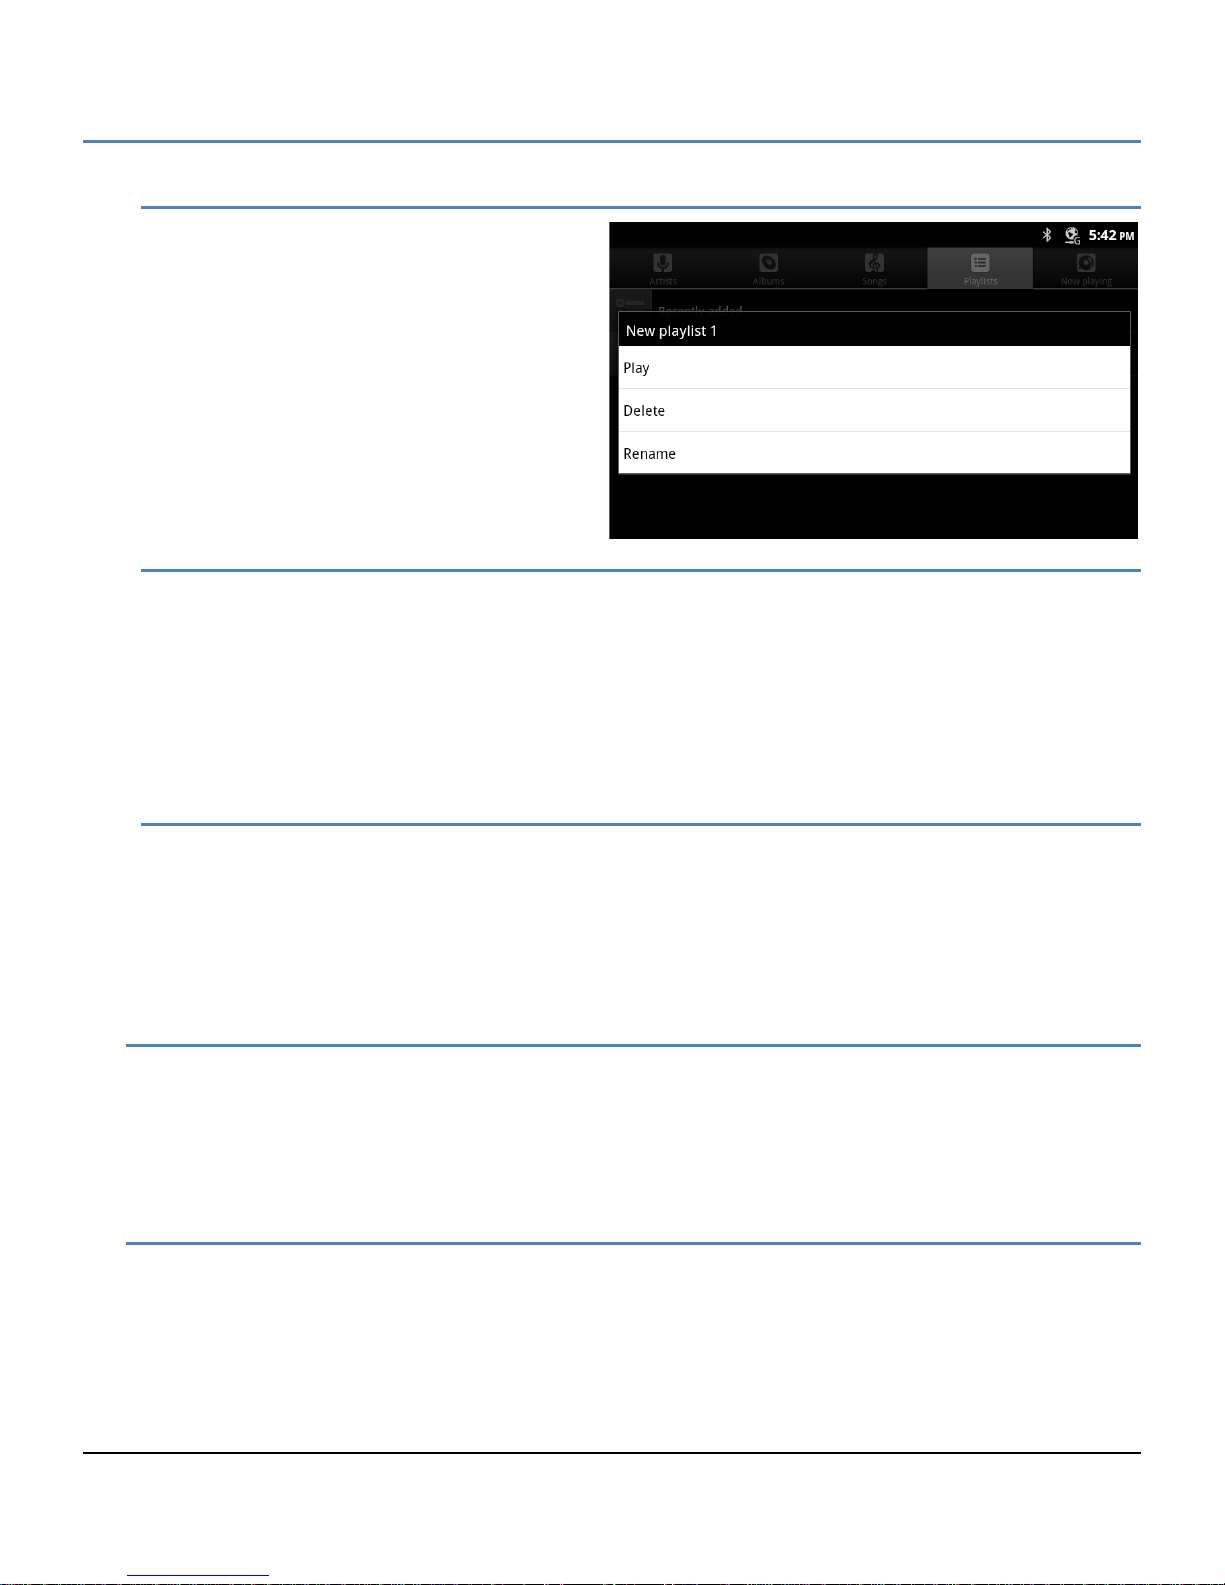
LIP-9070 iPKTS User Guide
10.4.4.3 Rename a Playlist
To rename a Playlist,
1. Touch and hold the Playlist from the
Music Library.
2. In the menu, touch Rename.
3. Enter the new name for the Playlist.
10.4.4.4 Delete a Playlist
To delete a Playlist,
1. Touch and hold the Playlist from the Music Library.
2. In the menu, touch Delete.
Note
° The ‘Recently Added’ item in the Playlist cannot be deleted.
10.4.4.5 Delete Song from Playlist
To delete a song from a Playlist,
1. Select the Playlist from the Music Library.
2. From the list, touch and hold the song to delete.
3. In the menu, select Rem ove from Playlist. The song is r emoved from the playlist but rem ains on the
SD card.
10.4.5 Delete Songs from SD Card
Individual songs can be removed from the SD Card. To remove a song from the SD card,
1. Select a Music Library.
2. From the list, touch and hold the song to be deleted.
3. In the menu, select Delete, the song is deleted from the SD card.
10.4.6 Use as Ringtone
A song in the Music library can be assigned for use as a Ringtone. To assign a song as a Ringtone,
1. Select a music library.
2. From the library list, touch and hold the song to be used as a Ringtone.
3. In the menu, select Use as Desk Phone ringtone.
Or
1. During playback of a song, press the Menu button.
2. In the menu, select ‘Use as Ringtone’.
52
Page 64
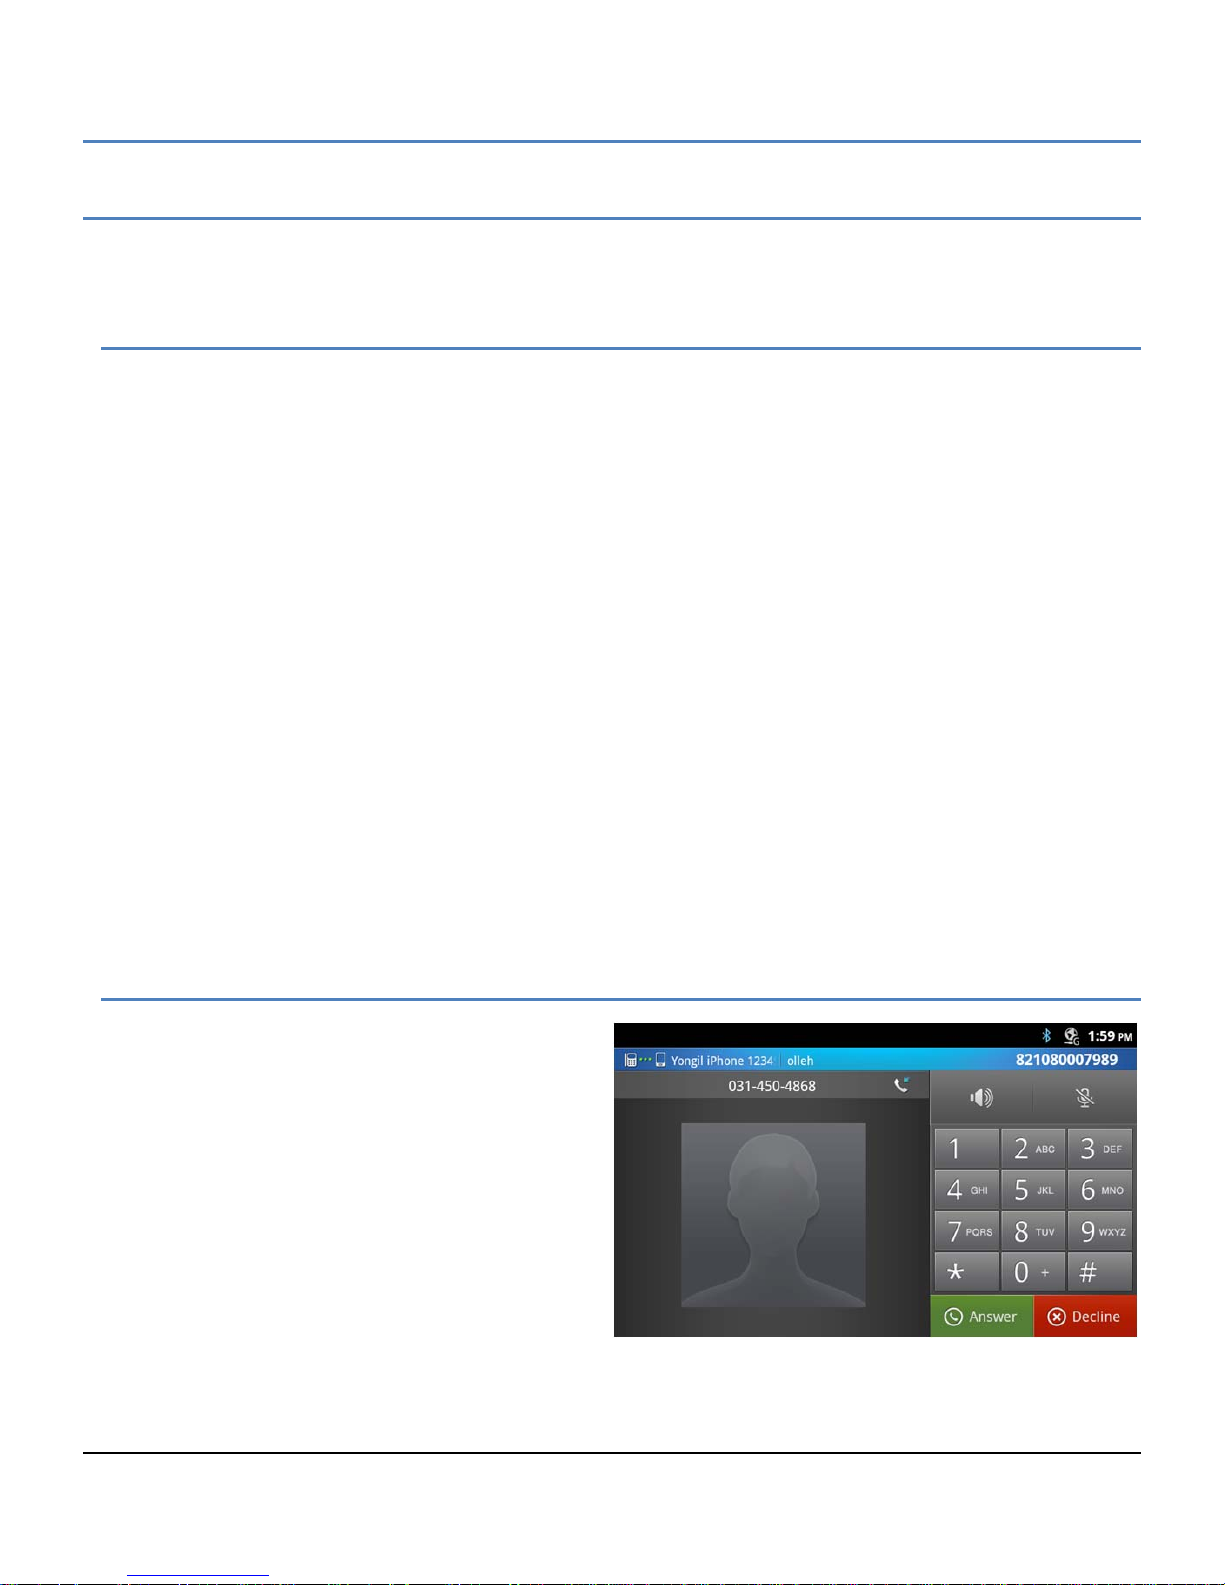
LIP-9070 iPKTS User Guide
11 Managing Bluetooth
LIP-9070 can interfac e with several types of Bluetoot h devices. For handling fil es and contacts, a Bluetooth s torage
device can be selected to share files. For voice, two profiles are available, headset and handsfree.
11.1 Bluetooth Headset
The headset connection delivers iPECS phone audio to the Bluetooth headset paired with the LIP-9070. The
headset icon appears in th e main screen and, when the headset icon is touc he d durin g a c a ll, t he a ud io is d eli ver ed
to the headset and the icon illum inates. Touc hing the active headset ic on discon nects th e call. When the handset
is lifted, the active voice device is changed to t he han d s et. Also , the iPECS can b e c onf igured to d el iv er r ingt one t o
the headset in place of the speaker. In this case, if the headset is active, ringing and audio are sent to the headset.
The following is a list of known compatible headsets
Plantronics M155
Plantronics M50
Plantronics M20
Plantronics Discovery 975
LG HBM-260
Samsung HM1700
Motorola HX550
Jabara EASYGO; user might experience a connection tone for several seconds after the call is connected
Jabara EXTREME2
Note
° Us e of a ster eo headse t is not rec omm ended as c all progr ess tones (dial to ne, rin g back tone, etc .) m a y be
distorted.
11.2 Bluetooth Handsfree
The LIP-9070 can be configured to function as a
Bluetooth headset for an external Bluetooth Audio
Gateway (AG) device that supports the Bluetooth
Handsfree Profile such as a mobile phone. In this
case, audio from the exter nal Bluetooth dev ice is sent
to the LIP-9070 over the Bluetooth connection. The
Bluetooth HF profile permits the LIP-9070 to receive
Caller Id, support Call Waiting and place outgoing
calls using the external Bluetooth AG.
53
Page 65
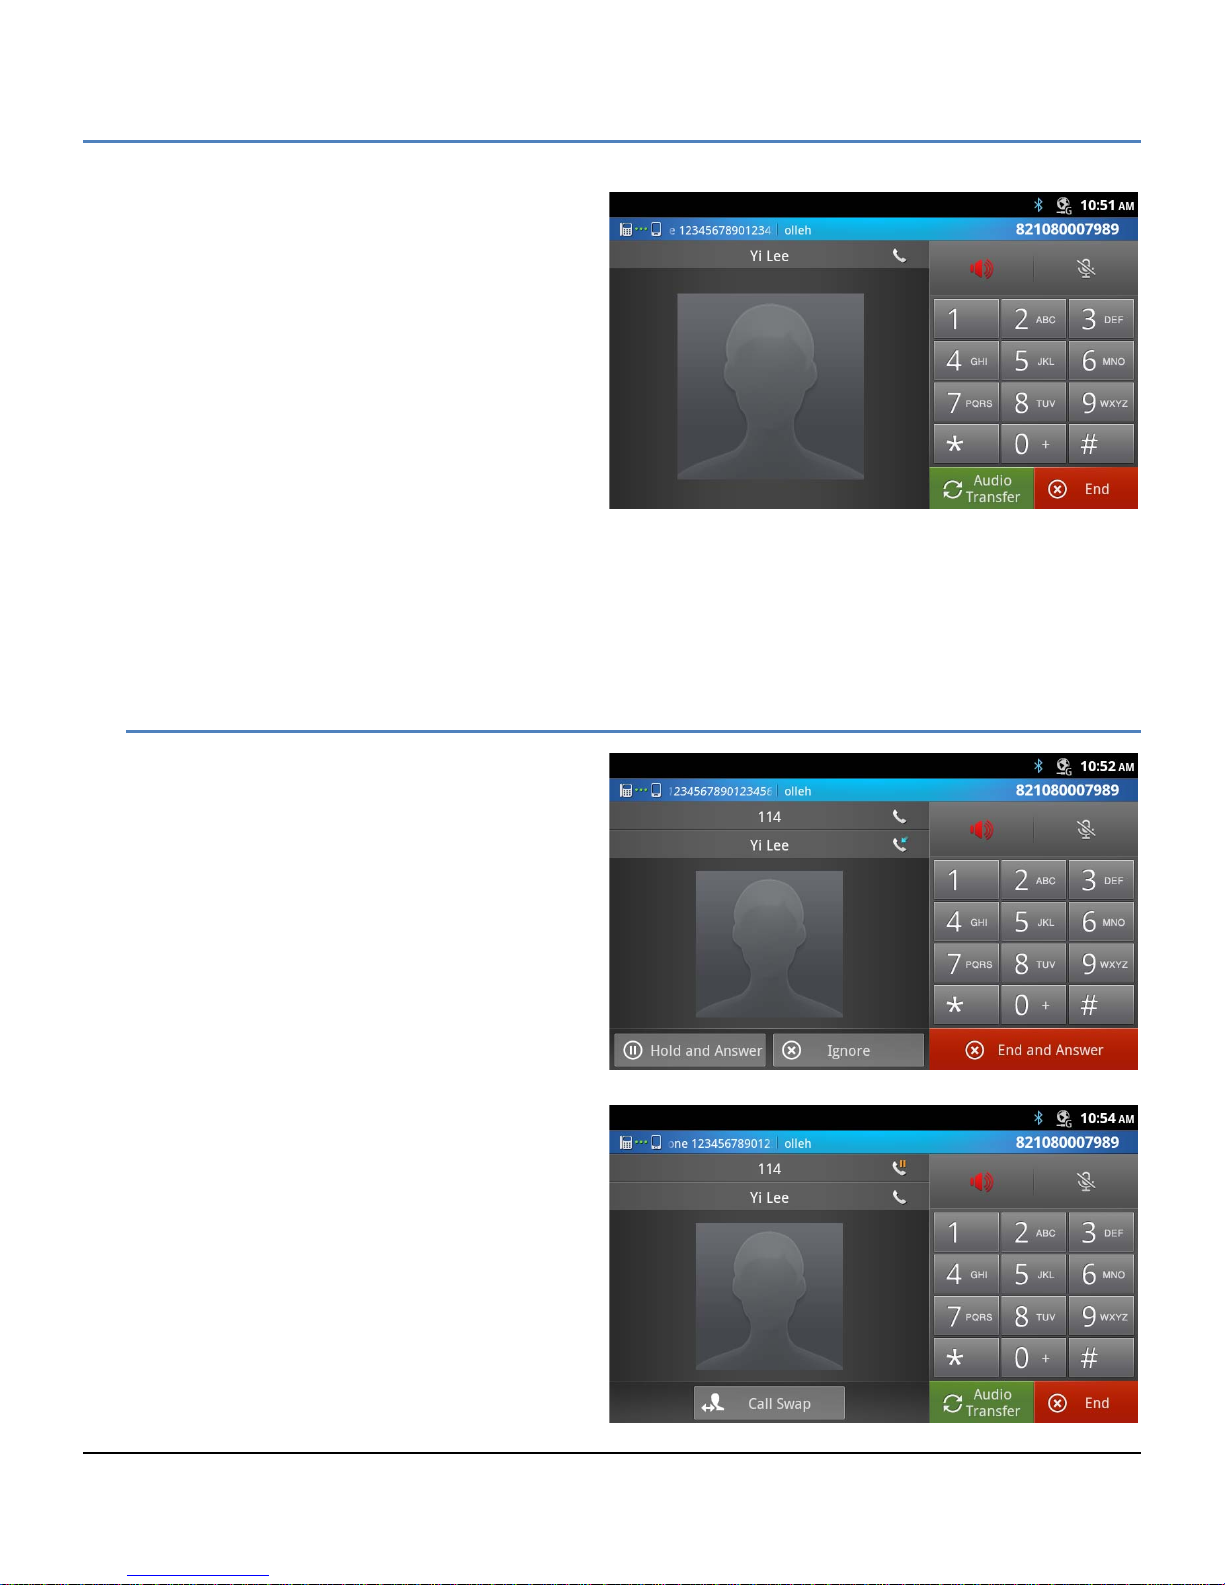
LIP-9070 iPKTS User Guide
When the Bluetooth HFP application is activated by
touching the HFP icon, the HFP call screen appears.
Below the Notification and Status bar, the screen
displays information for the connected Bluetooth AG
including the device name, service name and mobile
number. To the left is the connec t ed c al ler id a nd ico n.
To the right are the aud io c ontrols f or the speaker and
microphone of the LIP-9070, a dial pad and the call
controls.
Note
° A warning message will appear if the
Bluetooth HF device is not connected or
disconnects unexpectedly.
° As a default, the Bluetooth Handsf ree icon is not assigned to a Launc her screen or the Apps Dock . To
activate the application the icon must be added to a Launcher screen or the dock.
° The redial feature may not be available on mobile phone.
° Sm art Phones employ different noise reduction and autom atic gain control algorithms that ma y affect the
voice quality when switching to the Bluetooth HFP operation.
11.2.1 Bluetooth HF Call Waiting
The Bluetooth AG will deliver caller id to the LIP9070 over the Bluetooth co nnection. The LIP-9070
will compare the caller id with the Contacts and, if
matched, the Contact name and icon display.
Should a second call arrive, the Bluetooth device
sends information f or the waiting call. The caller id
is displayed, as sho wn here. The user may select
to ignore the cal l, plac e the exist ing c all on ho ld an d
answer the new call, or end the existing call and
answer the new call.
If the existing call is plac ed on ho ld and th e new c all
answered, the user can switch between the two
calls by touching the Swap button.
54
Page 66
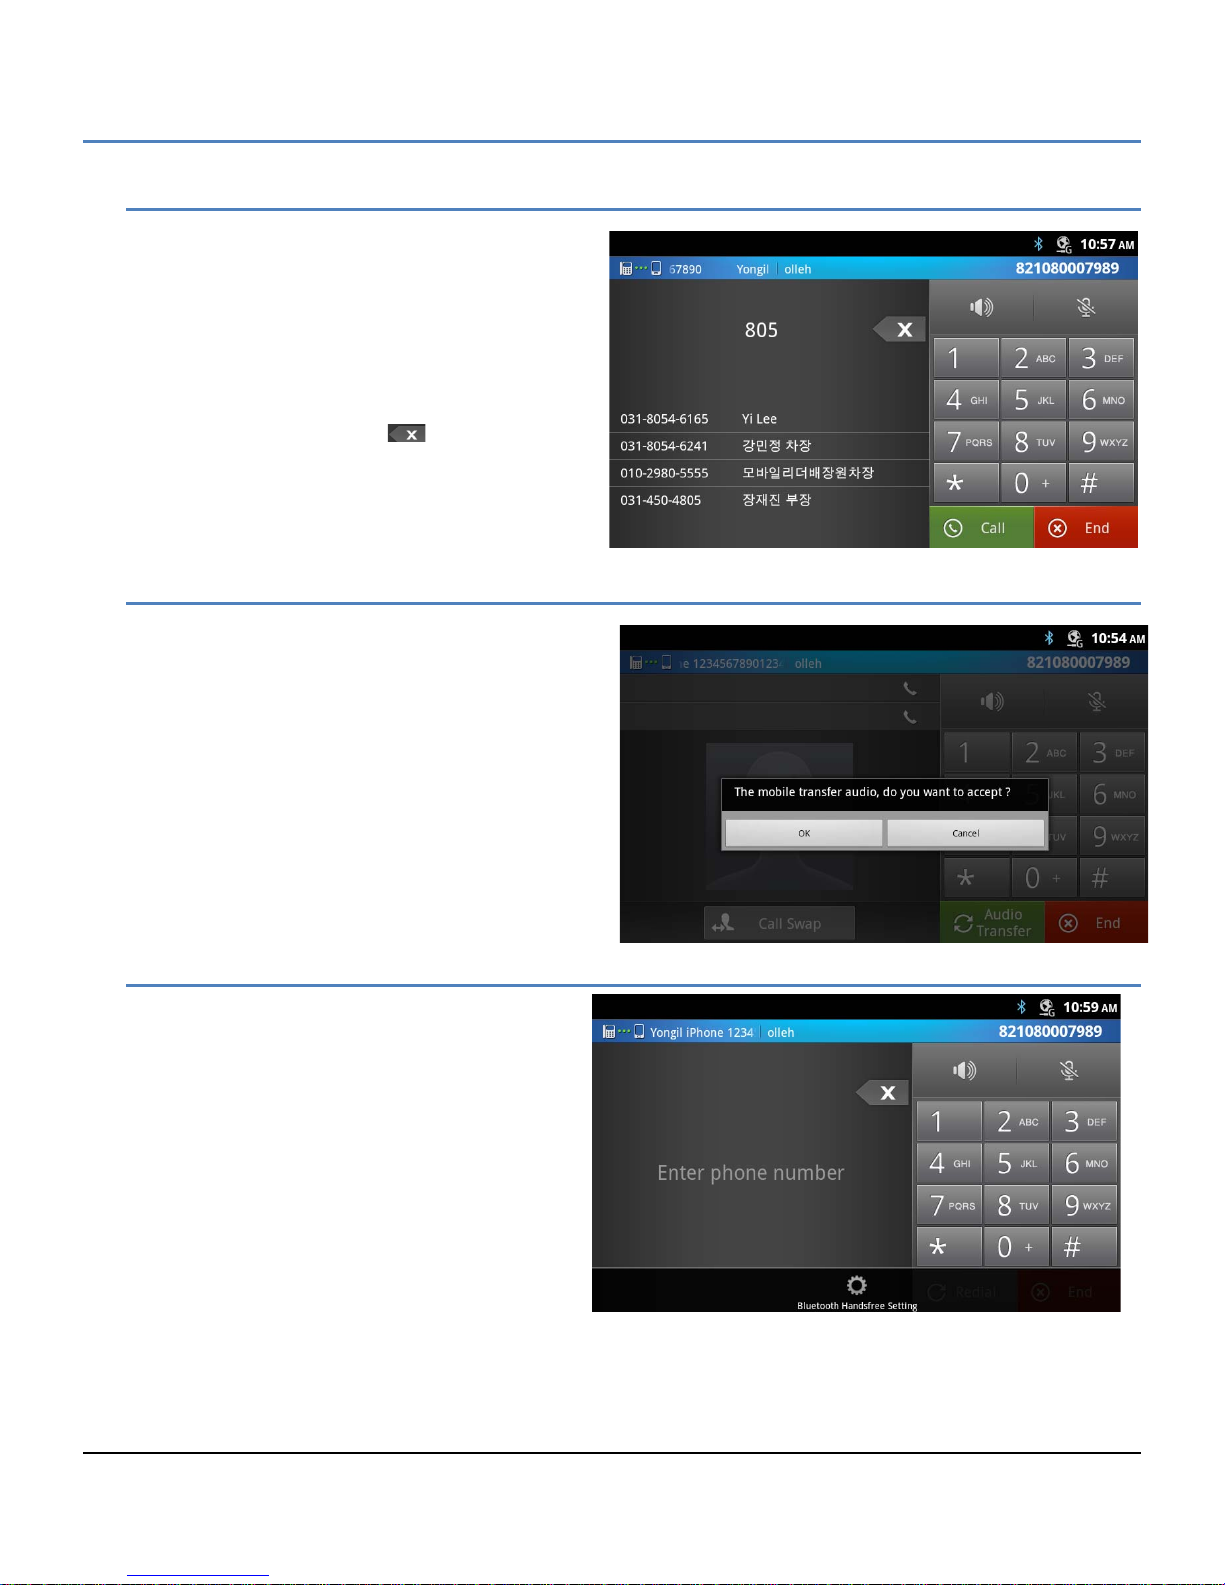
LIP-9070 iPKTS User Guide
11.2.2 Outgoing HFP call
With the Bluetooth HF profile, the LIP-9070 can
place an outgoing call using the Bluetooth AG.
Digits dialed from the dial pad display. Matching
contacts are also displa yed and can be selected f or
dialing. Touching the ‘Call’ button signals the
Bluetooth AG to place the call.
Note
° The Backspace icon, , can be used to
delete dialed digits.
11.2.3 Audio Transfer
While active on a Bluetooth HF call, the external
Bluetooth device can request to terminate the HF
connection and return audio to the device’s audio
interface. If acc epted, the audio is transferred back
to the device.
The LIP-9070 can init iate t he audi o trans fer using the
Audio Transfer button. The phone will initiate the
transfer automatically if an iPECS call is received and
audio priority is not assigned for the Bluetooth
connection.
11.2.4 Bluetooth HF Audio Priority
Normally, when an iPECS call arrives with the
HFP application active, the HFP audio is
transferred to the Bluetooth AG, the HFP
application closed and the iPECS window opens
to notify the user of the ne w iP EC S c all. If desired,
Bluetooth Handsfree Audio Priority can be set to
maintain the Bluetooth call and reject the
incoming iPECS call. T o enable Bluetooth audio
priority,
1. Activate the HF P app by touching the icon
in the Apps Dock or on a Launcher s c reen.
2. Touch the Menu button.
3. Select ‘Bluetooth Handsfree S etting’ from
the Option menu.
4. Touch ‘Bluetooth Handsfree audio priority’ to check the box and enable Bluetooth priority.
55
Page 67
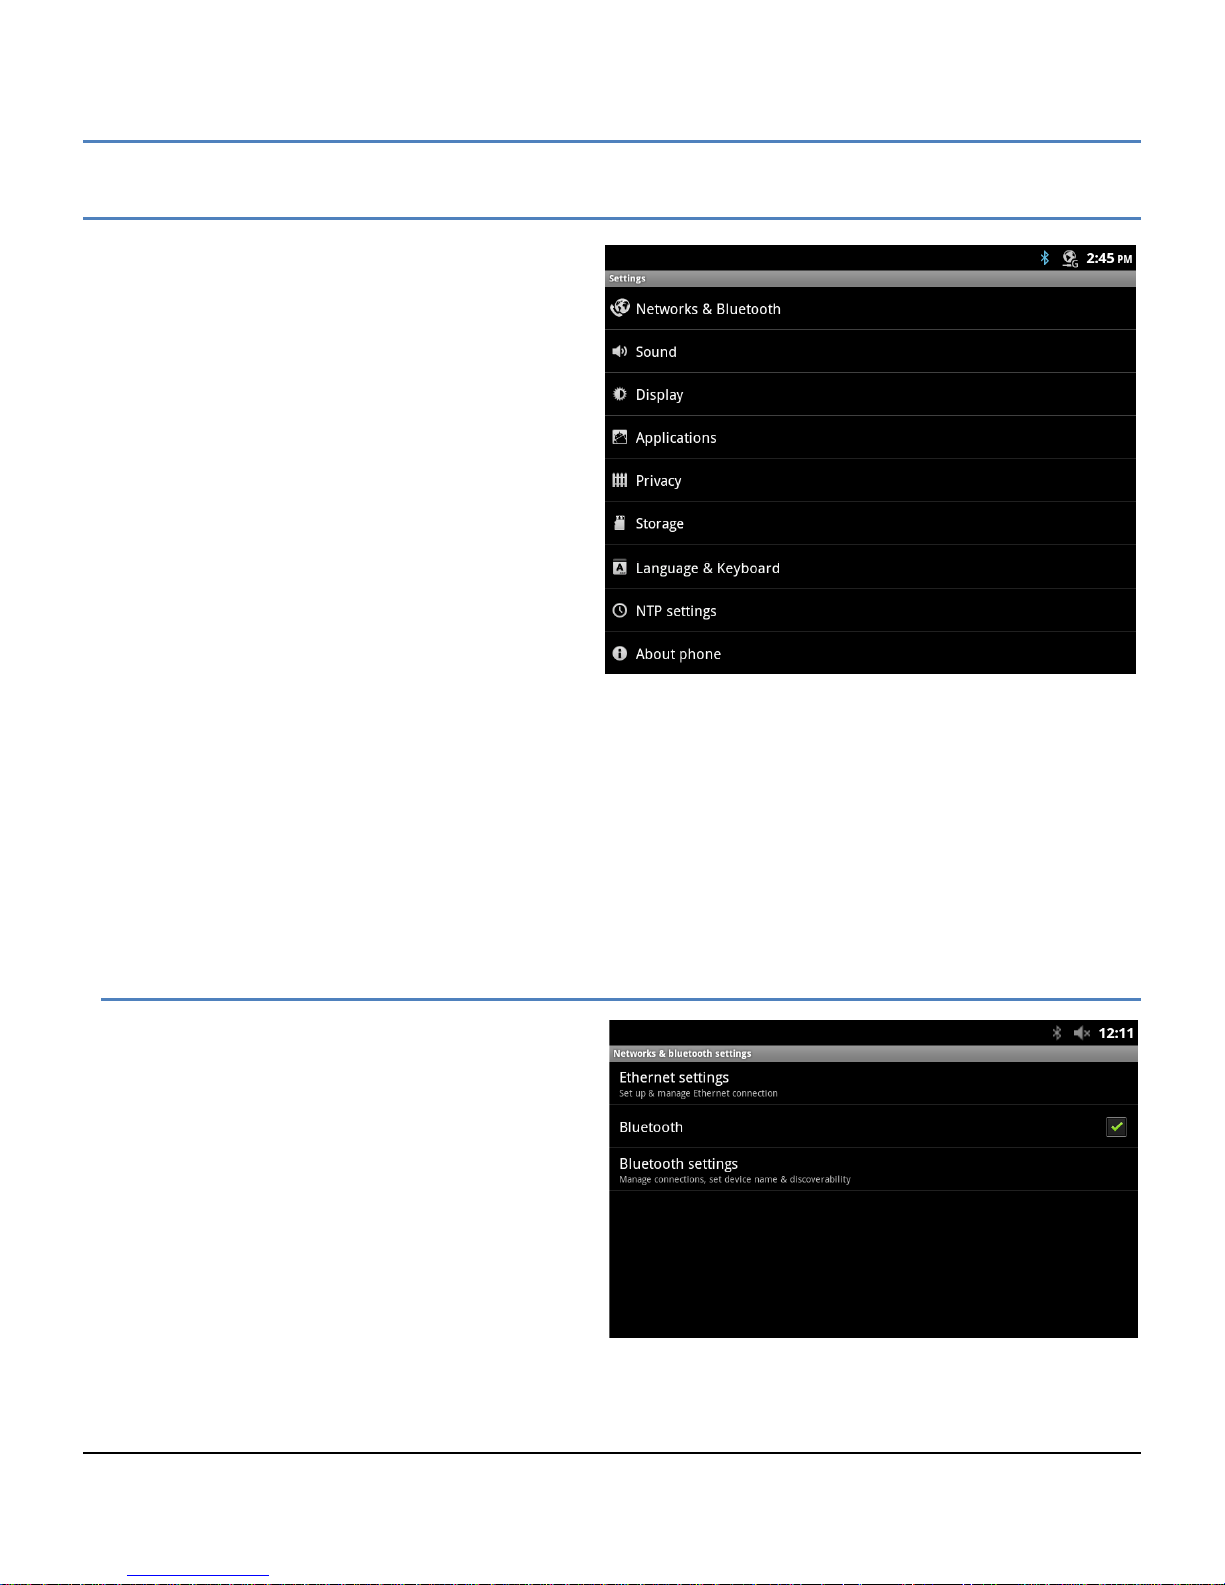
LIP-9070 iPKTS User Guide
12 Settings
The System Settings menu, which accessed with the
Setting icon in the Dock or the Home screen option
menu, contains a list of ite ms that have a global effect
on operation of the LIP-9070. In general, your
administrator should configure the Settings. The listing
includes:
Networks and Bluetooth: Section 12.1, assign
characteristics of the LAN and the Bluetooth
interface.
Sound: adjus t audio levels, Section 12.2, assign
incoming call ringtone and ringtone for
Notifications.
Display: Section 12.3, adjust disp lay brightness,
enable animations and configure the screen
time-out.
Applications: Section 12.4, manage and control
applications, and view storage use.
Privacy: Section 12.5, return the LIP-9070 to
factory default and erase contacts and all user
data from memory.
Storage: Section 12.6, vie w storage of built-in memory and external SD card, manage SD c ard and unmounts
the SD card.
Language & Keyboard: Section 12.7, select language, select keyboard type and configure Asian keyboards.
NTP Settings: Section 12.8, configure Network Time Protocol server.
About phone: Section 12.9, phone version display and update software.
Note
° You may need to scroll down the screen to see all selections.
12.1 Ne twork and Bluetooth
The Network and Bluetooth selection from the
settings menu include:
Ethernet Settings: configure the LIP-9070
Ethernet ports for the LAN and an attached PC.
Bluetooth: enable the Bluetooth interface.
Bluetooth Settings: configure the interface,
scan for devices and select devices for pairing.
56
Page 68
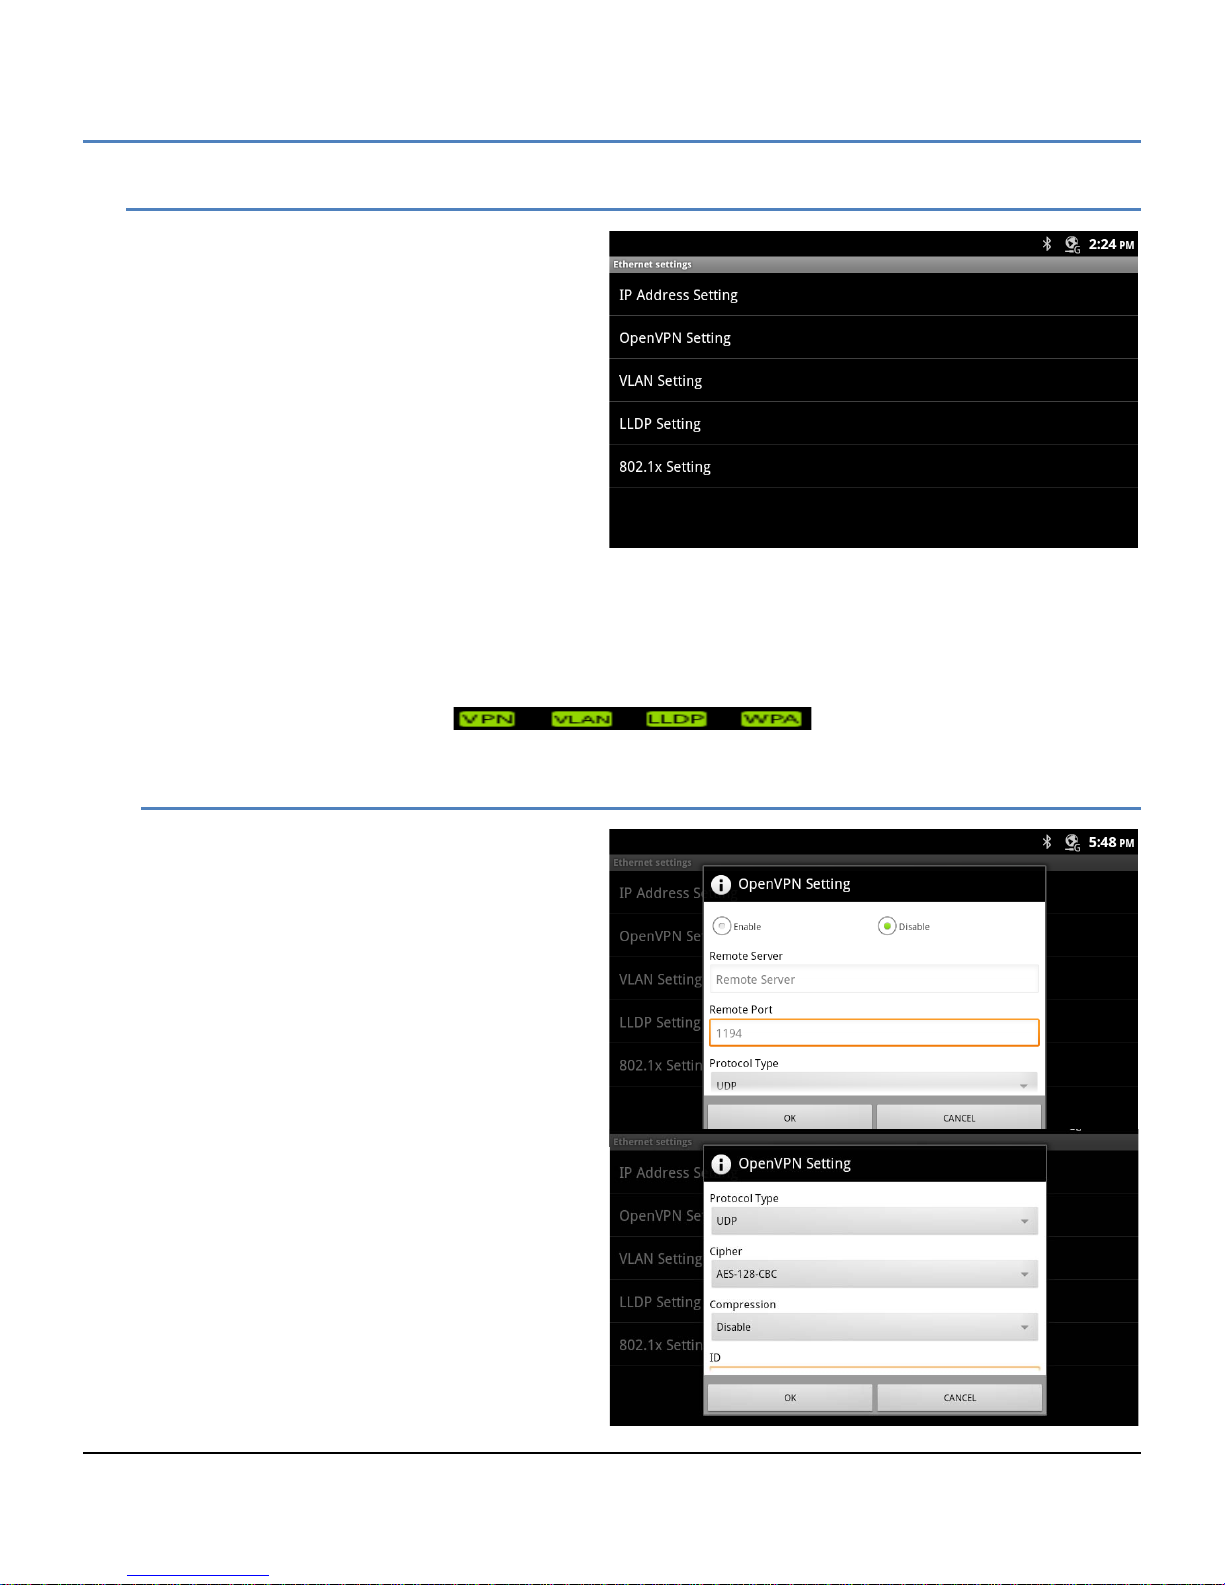
LIP-9070 iPKTS User Guide
12.1.1 Network (Ethernet) Configuration
The Ethernet settings permit configuration of the
LIP-9070 network interface and the local PC
connection. Configurable characteristics include:
IP Address Setting: select the type of
addressing (Static or Dynamic), for Static
addressing, conf igure the IP address, subnet
and default Gateway address, also assign
DNS server address.
OpenVPN Setting: c onf igur e t h e Op en s o ur ce
VPN.
VLAN Setting: configure Virtual LAN id, and
priority for LIP-9070 LAN and PC ports.
LLDP Setting: enable Link Layer Discovery
Protocol and Automatic VLAN configuration,
the later requires LLDP be enabled.
802.1x Setting: assign the Id and password for 802.1x authentications.
Note
° On the r ight side of the Notif ications bar an icon , as below, displa ys showing the s ettings that are enabled
and active. If enabled but not active, the icon is colored grey.
12.1.1.1 OpenVPN
OpenVPN implements virtual private network
technology employing an open source software
application. The LIP-9070 OpenVPN
implements User name/password or certificates
for authentication utilizing SSL/TLS (Secure
Socket Layer/Transport Layer Security). The
following Open VPN chara cteristics are availab le.
Enable/Disable: set the Open VPN
status.
Remote Server: Open VPN server IP
address or URL.
Remote port: set transport protocol port.
Protocol Type: set the tran sport protocol
UDP or TCP.
Cipher: establish any encryption.
Compression: enable or disable
compression.
ID: assign authentication User Id.
Password: assign the password for
authentication.
Install Root CA Certificate: initiate
process to install a CA certificate.
57
Page 69
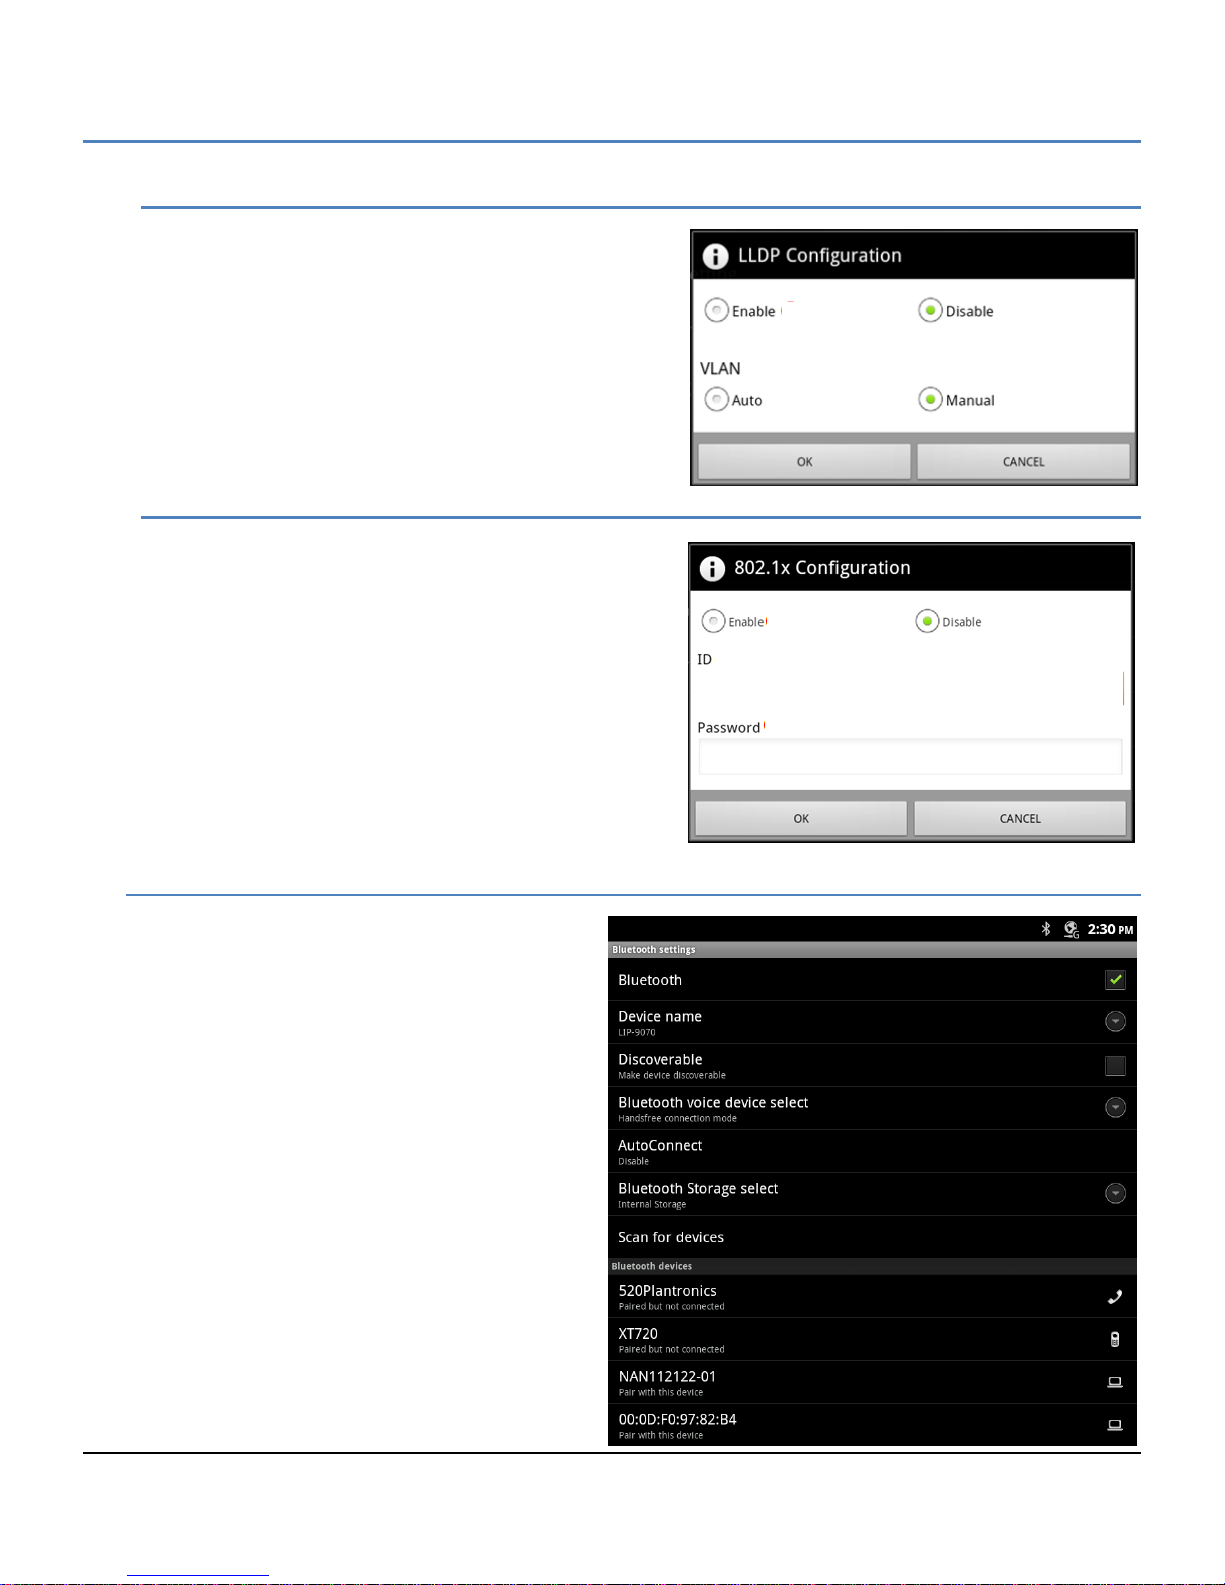
LIP-9070 iPKTS User Guide
12.1.1.2 LLDP Setting
When enabled, the LIP-9070 employs LLDP (Link Layer
Discovery Protocol) to advertise capabilities and
determine characteristics of the surrounding network
environment. The phone can determine and
automatically configure VLAN settings for both the LAN
and PC ports when LLDP is enabled.
12.1.1.3 802.1x Setting
The LIP-9070 supports Layer 2 (Ethernet) security
employing 802.1x port based Network Access Control.
EAP-MD5 method is used for ID and password
authentication for access to the network. The ID and
password can be up to 128 characters each.
12.1.2 Bluetooth settings
Settings for the Bluetooth interface are:
Bluetooth: checkbox to enabl e the Bluetooth
interface.
Device Name: enter a name that is
advertised to other devices.
Discoverable: check to allow other Bluetooth
devices to detect the LIP-9070, the interface
advertises for 600 seconds.
Bluetooth voice device select: for a Bluetooth
device such as a headset, select operating
mode as Headset or Speakerphone, the
latter receives signals normally sent to the
Speaker (audio and ring), a reboot is required.
AutoConnect: external Bluetooth devices can
automatically connect with the LIP-9070, if
enabled, or select devices from the scan list.
Bluetooth Storage select: define location of
storage for files from the Bluetooth device
either internal memory or SD card, if
available.
Scan for devices: scan and list local
Bluetooth devices , and show status and type
icon, click to connect manually.
58
Page 70
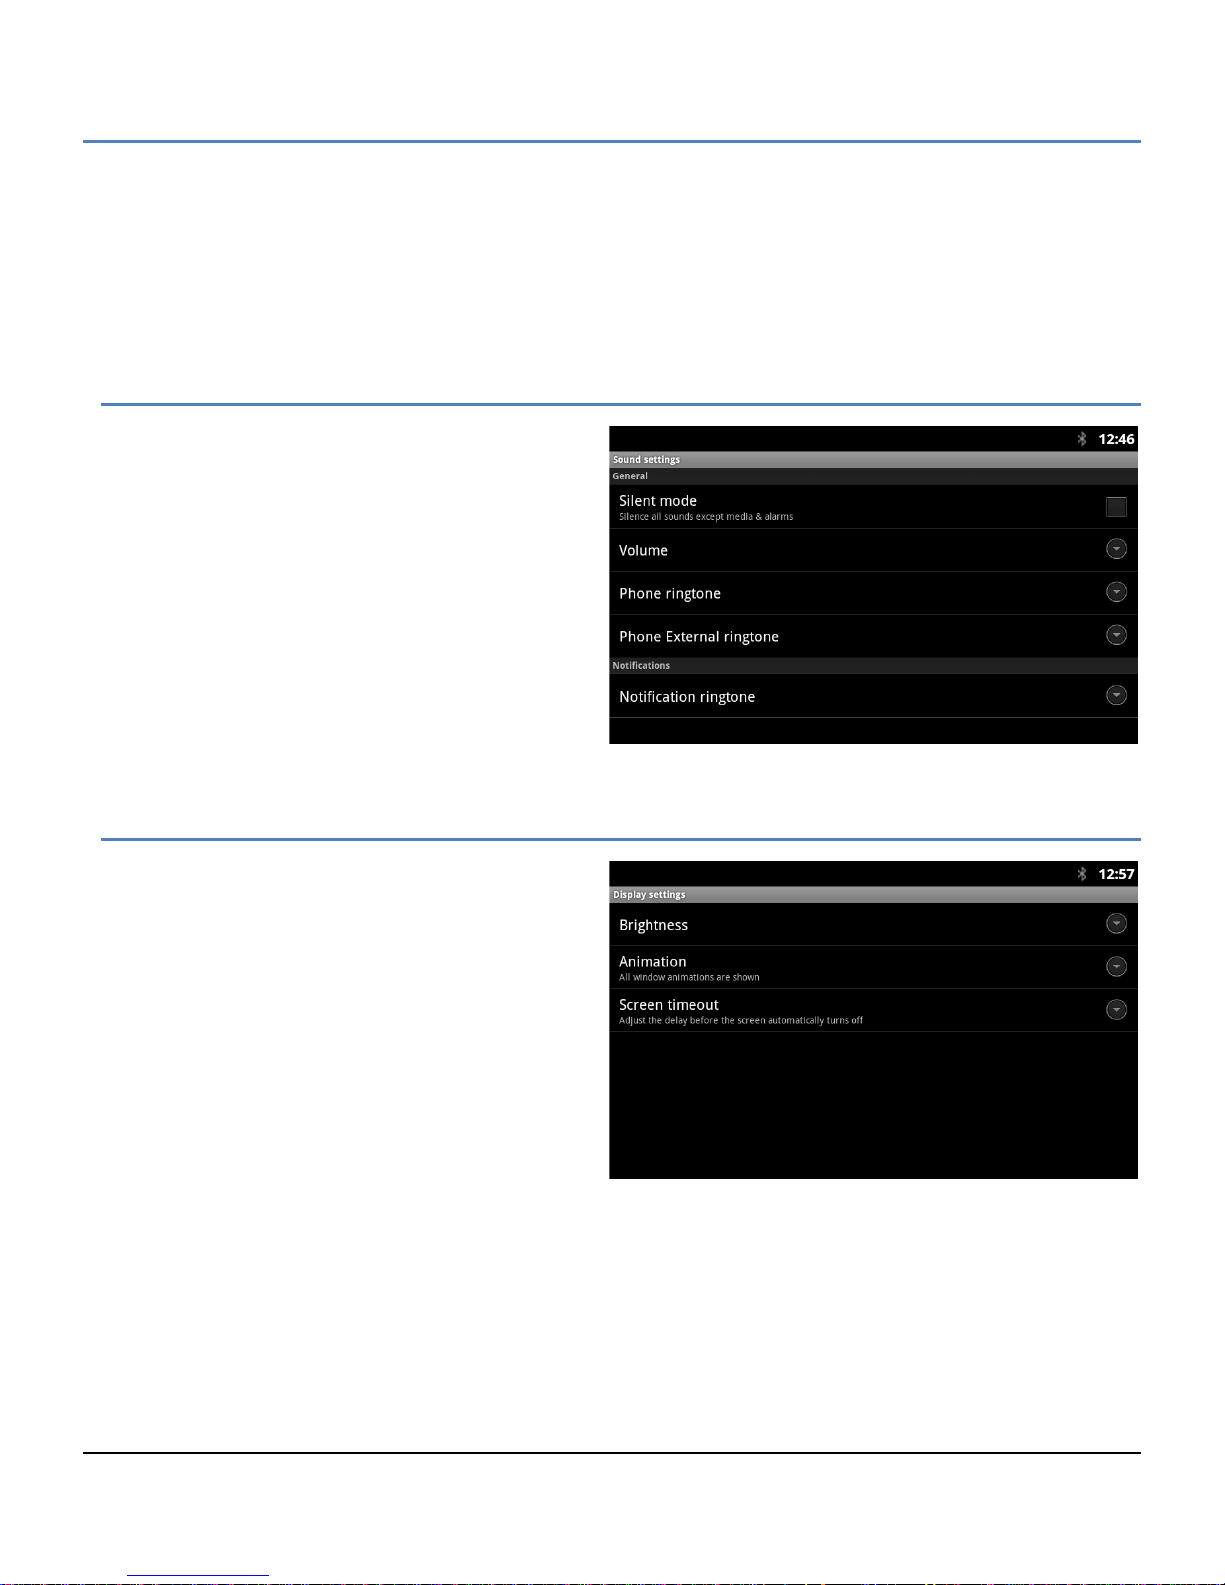
LIP-9070 iPKTS User Guide
Note
° You may need to scroll down the screen to see all selections.
° If the Bluetooth voice or storage device selection is changed, the LIP-9070 m ust be rebooted. Refer to
section 5.5.6 to r eboot us ing the Call Setti ngs, or unplug t he ph one from power o r, if PoE is used to p ower
the phone, unplug the LAN port.
12.2 Sound
Sound settings control the ringtones and volume for
incoming calls and Notifications. The Sound s ettings
include:
Silent Mode: turn-off the ring signals f or inc oming
calls and most notifications, not alarm clock
notifications.
Volume: set the volum e level for ringtones , voice
and alarm signals.
Phone ringtone: select the tone for incoming
intercom calls.
Phone External ringtone: select the tone for
incoming calls from a CO line or trunk.
Notifications: select the ringtone for new
message and missed call notifications.
12.3 Display
Display settings include:
Brightness: set the screen brightness.
Animation: set screen transition left to right
and smooth popup appearance.
Screen timeout: set the duration the screen
will stay on when the user takes no action
with the LIP-9070.
59
Page 71
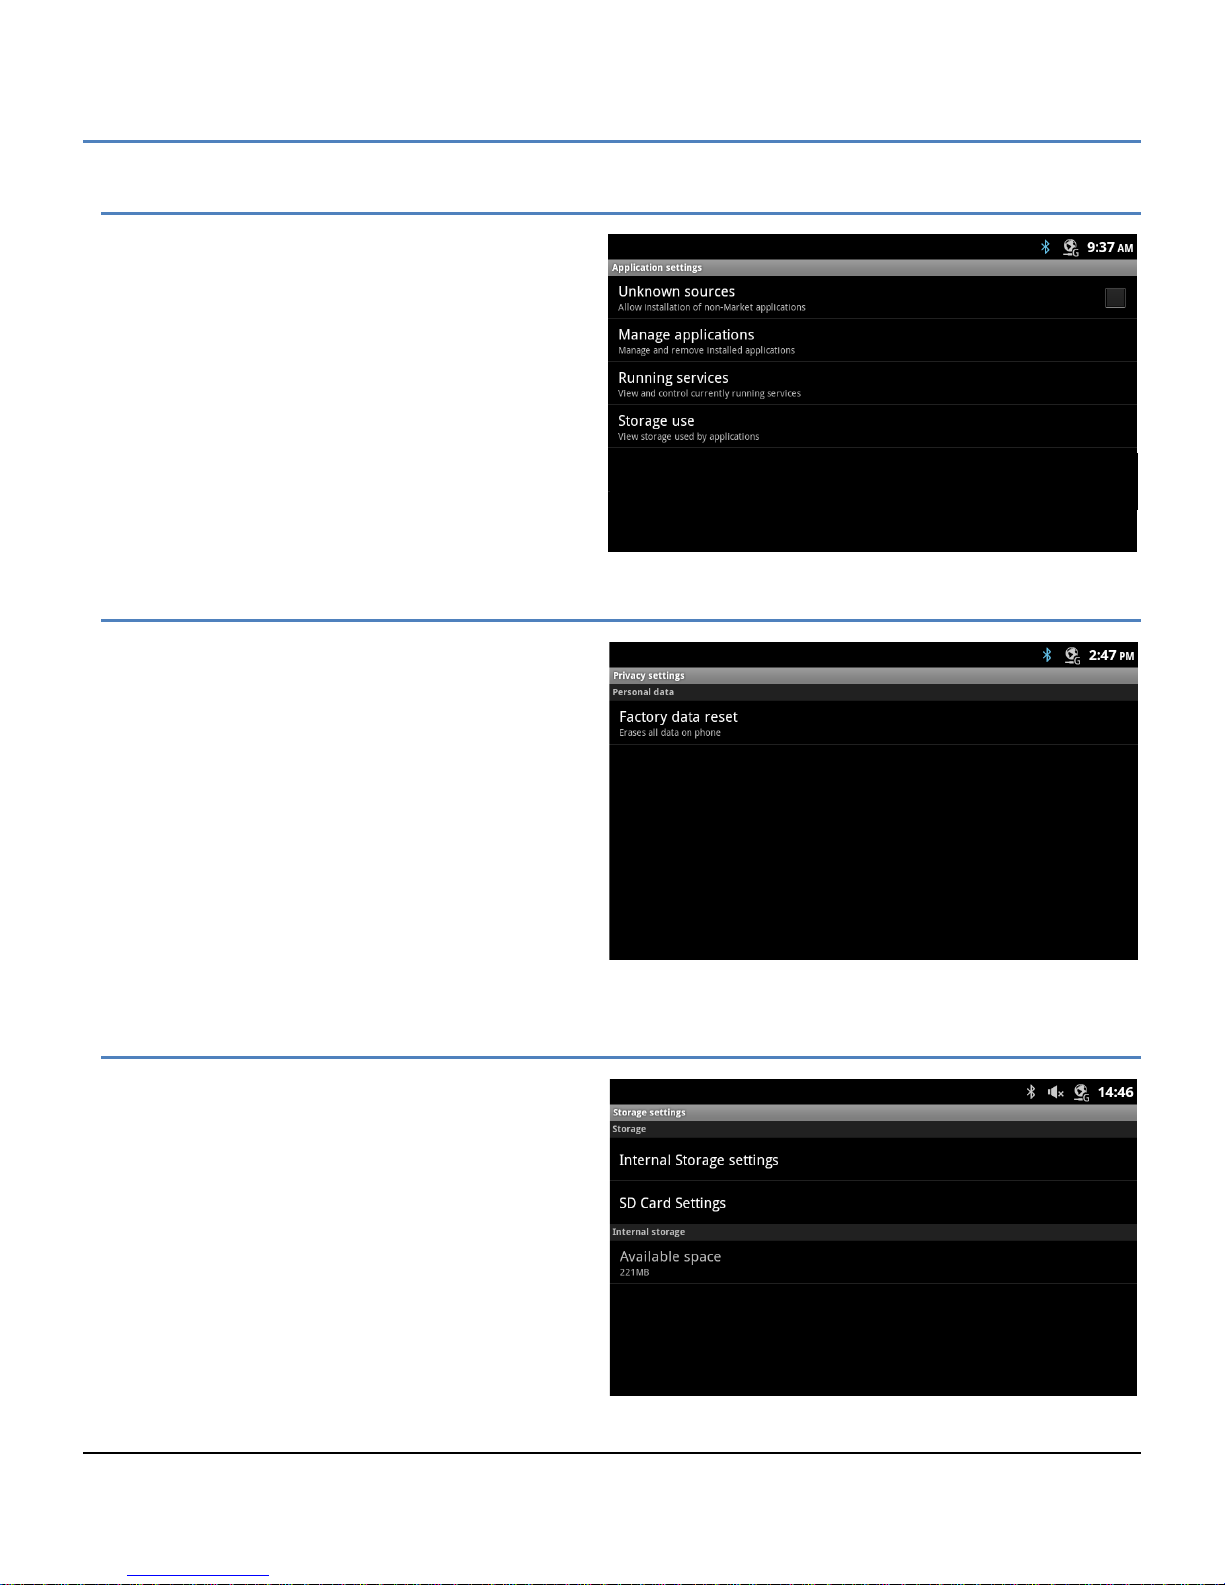
LIP-9070 iPKTS User Guide
12.4 Applications
The Applications settings menu is used to manage
and view the status of Android applications in the LIP-
9070. Selections include:
Unknown sources: permit installation of
applications from sources other than the
Android apps store.
Manage applications: manage installed
applications.
Running services: manage active process
and services.
Storage use: view the storage in use by
active applications.
12.5 Privacy
Privacy is used t o return the LIP-9070 to the default
configuration. The reset removes all entries in the
Contacts and Calendar databases, and all other
personal data stored in the internal Flash memory.
Note the reset to defaul t d oes not impact inform ation
stored on the SD card.
12.6 Storage
The Storage settings are provided to view and
manage the internal memory and the SD card.
Settings include:
Internal Storage settings: view the status of
the system memory.
SD Card Settings: Section 12.6.1, view and
manage SD card.
Available space: memory space available for
user data.
60
Page 72
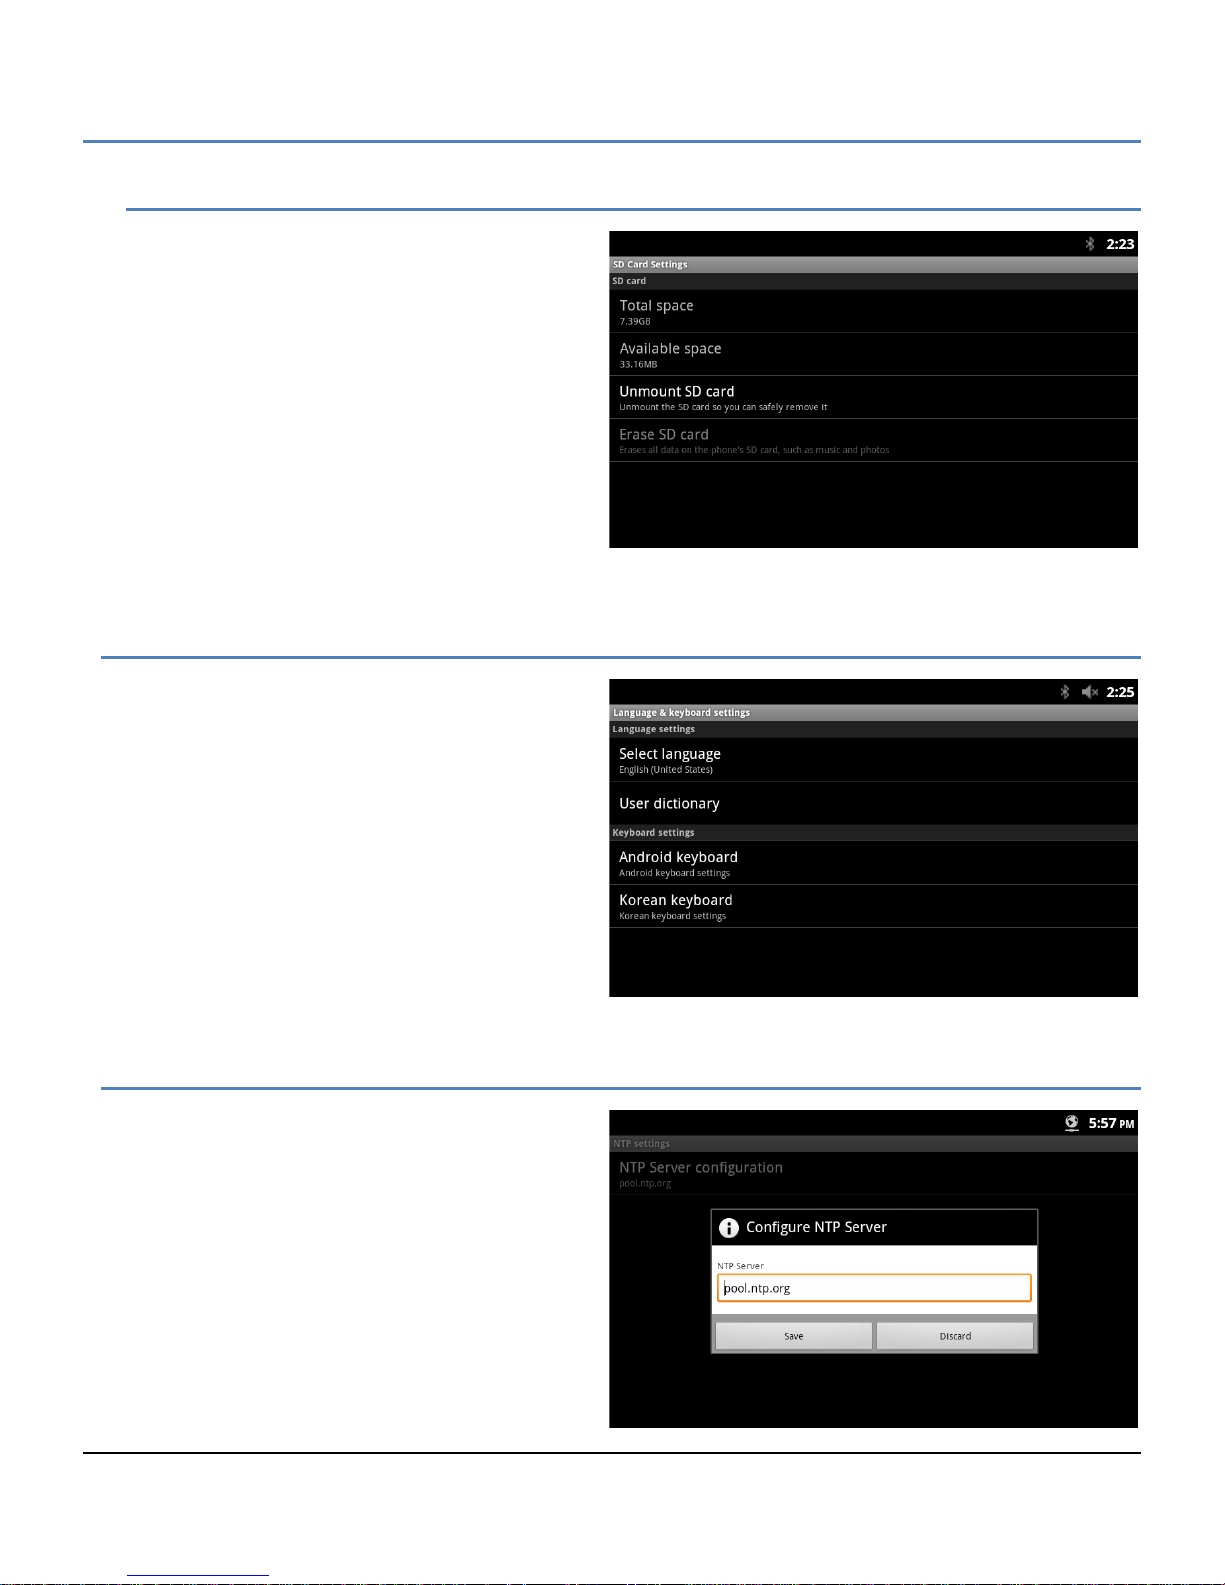
LIP-9070 iPKTS User Guide
12.6.1 SD Card
An SD Card can be insert ed in the card slot on the
right side of the LIP-9070. With the SD Card
Settings, the total a nd avai l abl e memory on the card
displays, a card can be safely removed with the
Unmount command and the data on the card may
be erased.
12.7 La ngua ge & Keyboard
The Language and Keyboard menu includes:
Select language: select from the available
display languages.
User dictionary: selects the dictionary.
Android keyboard: select and configure the
standard Android qwerty keyboard.
Korean keyboard: select and configure the
Korean keyboard.
12.8 NTP s e t t ings
NTP (Network Time Protocol) Server Configuration
defines the URL of an NTP sever the LIP-9070 will
employ to determine the time when verifying VPN
certificates.
61
Page 73
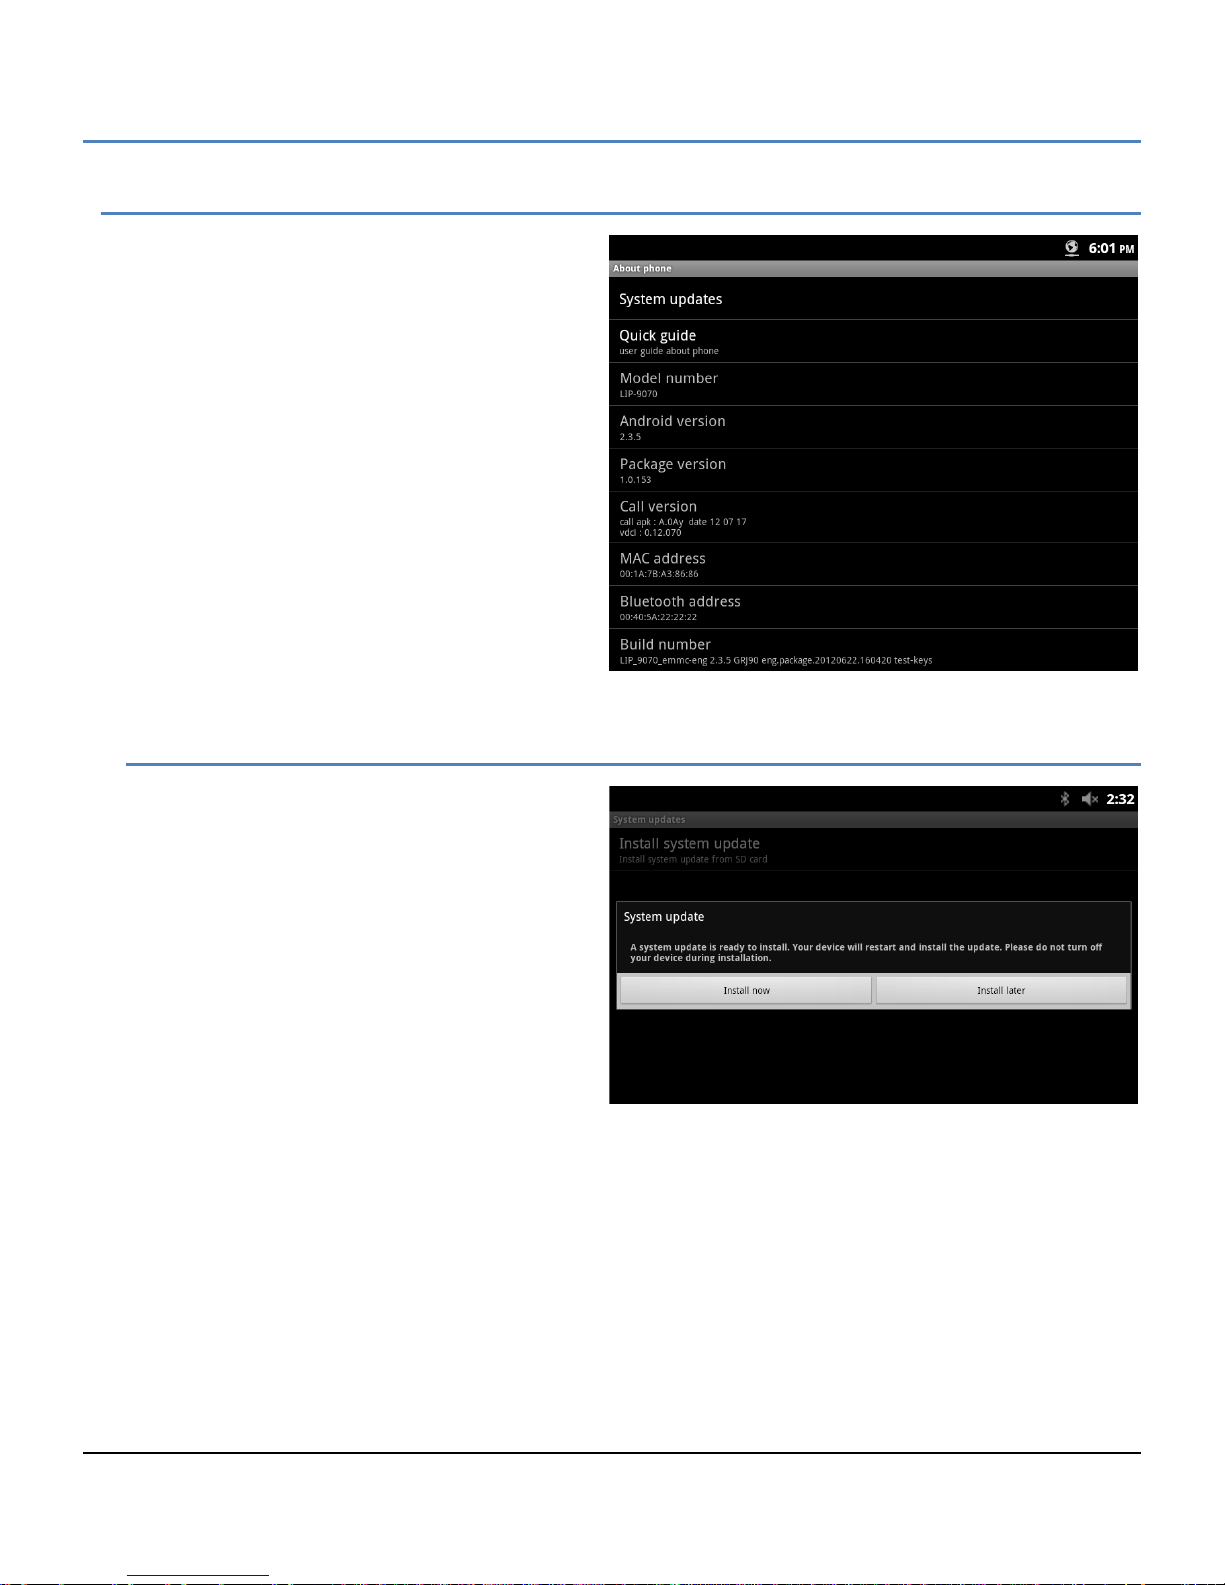
LIP-9070 iPKTS User Guide
12.9 About phone
About displays information about the LIP-9070
including the OS ver sion, build and MA C address. In
addition, System Updates can be selected to update
the LIP-9070 software from the SD card.
Note
° You may need to scroll down the screen to
see all selections.
12.9.1 System Updates
The LIP-9070 soft ware c an be updated from the S D
card in the slot located on the right side of the
phone. When 'System updates' is selected, the
LIP-9070 checks for updated software in a valid
update.zip file. T he f ile m ay c ont ai n either newer or
older version software and, if available on the SD
card, a confirmation dialog appears.
Selecting ‘Install now’ initiates the update process
with a phone reboot.
Note
° Durin g the upd ate proc edure, do NOT unplug
or remove the phone from the power source.
° An update will return the Call Preferences, Flex button labels and Call Sound settings to the default values.
62
Page 74
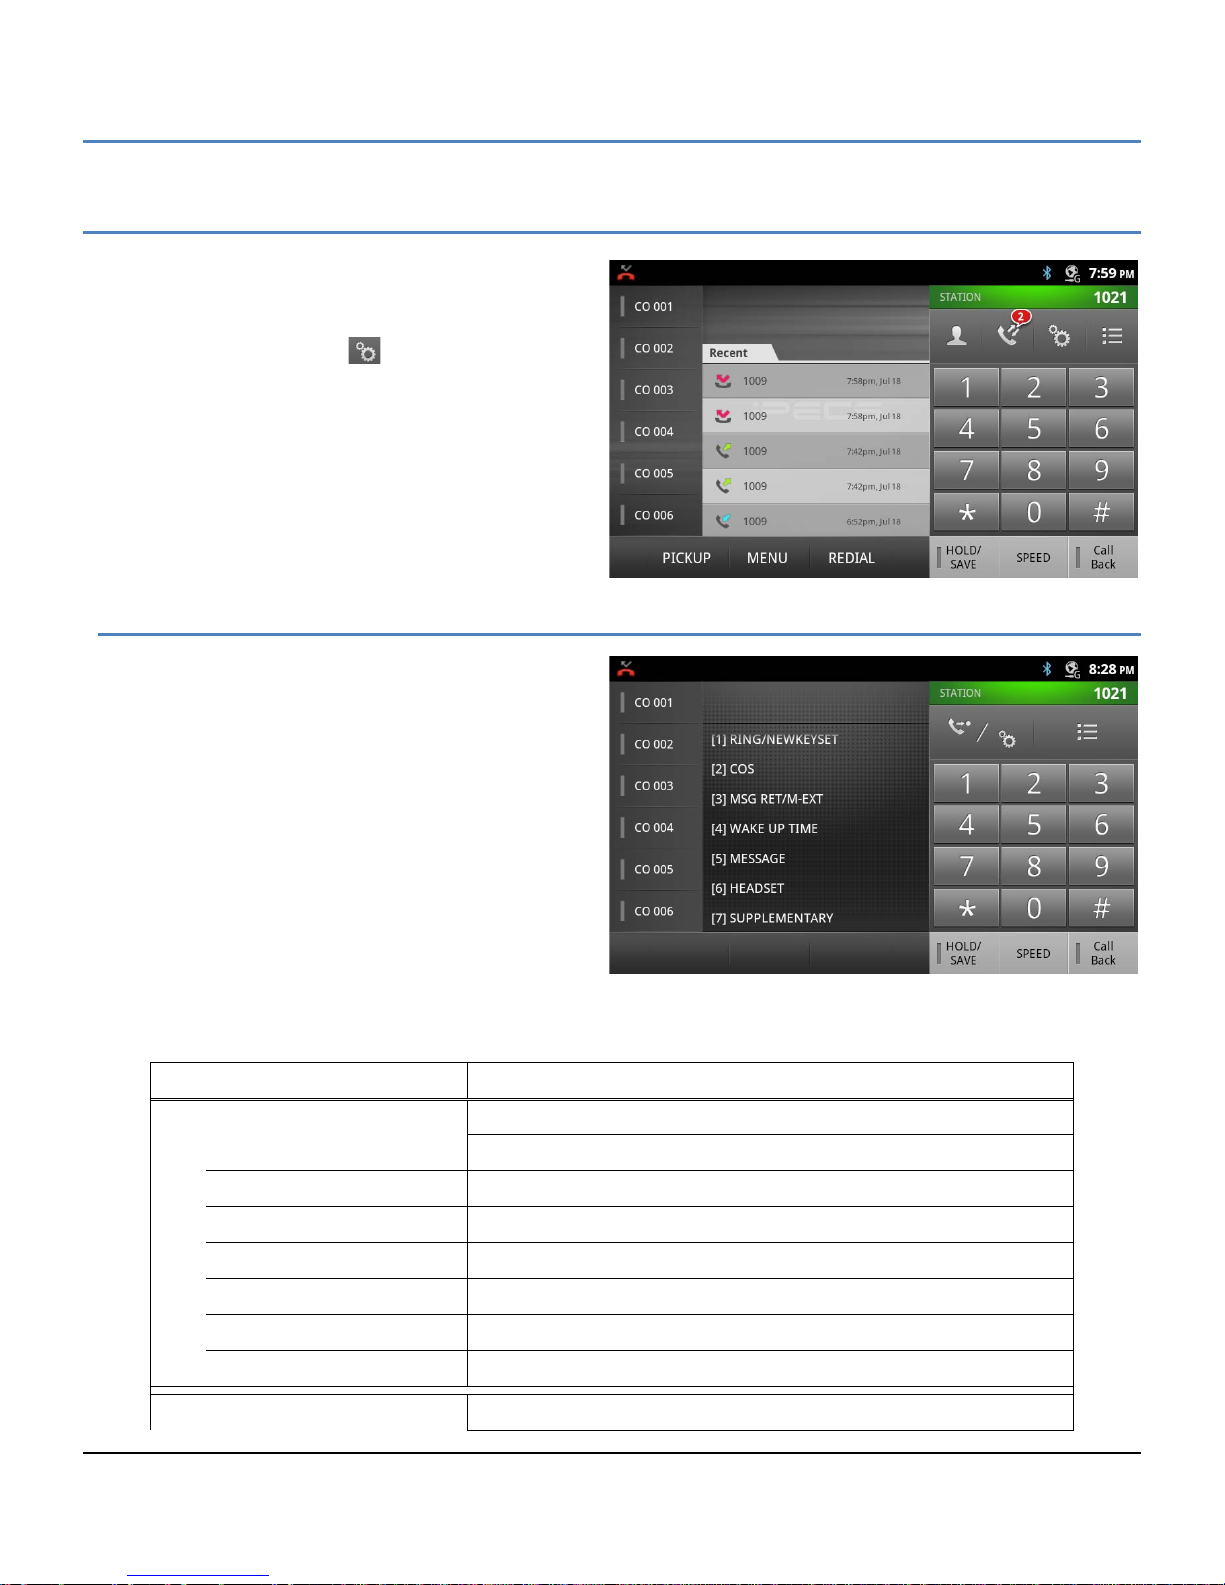
LIP-9070 iPKTS User Guide
Appendix A Station User Programming
Like all iPECS Phones, the LIP-9070 incorporates the
Station User Program ming. This programming includes
menus and tools that im pact the User’s statio n and Flex
buttons. Station User Programming is accessed by
touching the PGM button ( ) in the iPECS Phone
application. An item can be selected fr om the displayed
Station User Menu or a Fle x button can be selected and
assigned a feature.
Note
° Station User Programm ing can be accessed
with the Menu button in the iPECS Phone
screen and then selecting Trans/PGM.
Station User Menu
The Station User Menu is a layered m enu, selecting a
menu item exposes the n ex t m enu la yer until a sim ple
selection for the feature is entere d. T he main layer of
the Station User Menu is shown in the chart below
with a brief description of the purpose of each item in
the menu. Touching a menu item or dialing the digit in
front of the item opens the nex t layer. Select th e next
item or enter a value for the item and then press the
HOLD/SAVE button.
Station User Menu(iPECS LIK)
Menu Selections Input and function
[1] RING/NEWKEYSET
1 Intercom Ring Select Internal call ringtone, 1 - 8
2 CO Line/Trunk Ring Select outside call ringtone, 1 - 8
3 Intercom Answer Mode Select internal call answer mode – 1: HF, 2: Private, 3 : Ring
4 Call Coverage Attribute Allow Coverage (1: On/Off) and select ring delay 2: 0-9
5 Station Ring download
9 Ear & Mic Headset Activate Ear/Mic Headset, 1: On, 2: Off
0 Enblock dialing Set Enblock dialing, all di gits are sent to the network at one time
[2] COS
63
Download ringtones 5 – 8 from iPECS
Page 75

LIP-9070 iPKTS User Guide
Menu Selections Input and function
1 Knock down COS Set COS to 7, ICM calls only
2 Restore COS Restore COS, requires pass word
3 Walking COS Employ user COS, requires password
[3] MSG RET/M-EXT
1 View station Callback msgs Display Station Callback Messages waiting
2 View Missed calls View missed calls
3 Authorization code Enter up to 12 digits, Station number + Auth code = password
4 DID Call Wait Button Assign a button to receive 2nd external DID or DISA call
5 Exec/Sec Pair Msg option Set Exec or Sec to receive Exec Msg waiting signal
6 Send SMS Send an SMS, enter receiver and message
7 Register a Mobile extens ion Assigns the Mobile phone number to support the Mobile Ext feature
8 Activate Mobile Ext feature Activate the Mobile Ext feature, calls ring the Mobile and desk phone
9 Set Mobile CLI Assign the Mobile CLI to support the Mobile Calling feature
0 Notify Mobile for new VM When a new Voice mail is received, notify the registered Mobile phone
[4] WAKE UP TIME
1 Set Wake up time Select Alarm 1-5, enter time and repeat
2 Erase Wake up time Select Alarm 1-5 and erase
[5] MESSAGE
1 Activate Display Message Display a Custom or Pre-defined Msg, select Msg 00 - 20
2 Input a Custom Message Msg 00, enter up to 24 characters, two digits/character
3 Create a Conf room Activate a Conference Room (1-9) and assign password
4 Delete a Conf room Delete a Conference Room
5 Monitor a Conf Group Monitor a personal Conference group status
[6] HEADSET
1 Headset or Spkrphone Audio through headset or Spkrphone, 1: HS, 2: Spkrphone
2 Headset ring mode 1: ring Spkrphone, 2: ring Headset, 3: Both
[7] SUPPLEMENTARY
1 LCD Change Language
2 Version Display
3 Background Music
4 Enter Station Name Reg.
5 Display IP Address
6 Change IP Address
Toggles through the available display languages
Display the phone software version
Select and play BGM from the IPECS
Station Display number sent to other users, 7-characters
Displays the phone’s IP address
Change the IP address, onl y if Static mode
64
Page 76

LIP-9070 iPKTS User Guide
Menu Selections Input and function
7 Display MAC Address
8 Change Connect Mode
9 Display Phone Version
* SYSTEM
6 Set Forced Fwd Dest
7 Forced Fwd to Dest
8 Register Bluetooth
9 Bluetooth Usage
0 Hot desk Login
* Hot desk Logout
# Enter Admin Access the Keyset Admin, a password may be required
Displays the Phone’s MAC address
Set the iPECS connection mode, 1: Local, 2: Remote, 3: Local/Remote
View the software version of the phone
Assign a destination for Forced Forward
Activate Forced Forward
Enter a Bluetooth device for use
Pair and Connect a Bluetooth device
Log in to a Hot desk station
Log out of a Hot desk station
** Button assignment menus 8 and 9 do not display in the Station User Menu and are used only to assign a
function to a Flex button.
Configuring Flex Buttons
Access to the Station User Menu a lso permits the user to reconfigure the Flex bu ttons on the phone. Buttons can
be configured to call and monitor th e status of another statio n, select an item fr om the Station User Menu or dia l a
number from the iPECS N umbering Plan . In addition to the Station User Menu codes, certain additional button
Function codes ma y be av ailable f or Flex b utto n assig nm ent as show n in th e Stat ion User Codes c hart in A ppend ix
section A.1. Not all Station User Menu codes can be assigned to a Flex button of all phones.
To configure a Flex button,
1. Touch the PGM button ( ).
2. Press the desired Flex button, the present function of the button displays.
3. Dial a Station Number,
Dial a number from the iPECS Numbering plan or
Press the PGM button and dial a Station User Menu code.
4. Press the Hold/Save button to store the new configuration.
5. Repeat steps 2 to 4 for additional button programming.
Note
° To use a button may require configuration of the iPECS to enable use of the feature by the station.
° T he user may not be allowed to ass ign or modify butt ons for outside access such as a CO Line button, a
Loop button, etc.
65
Page 77
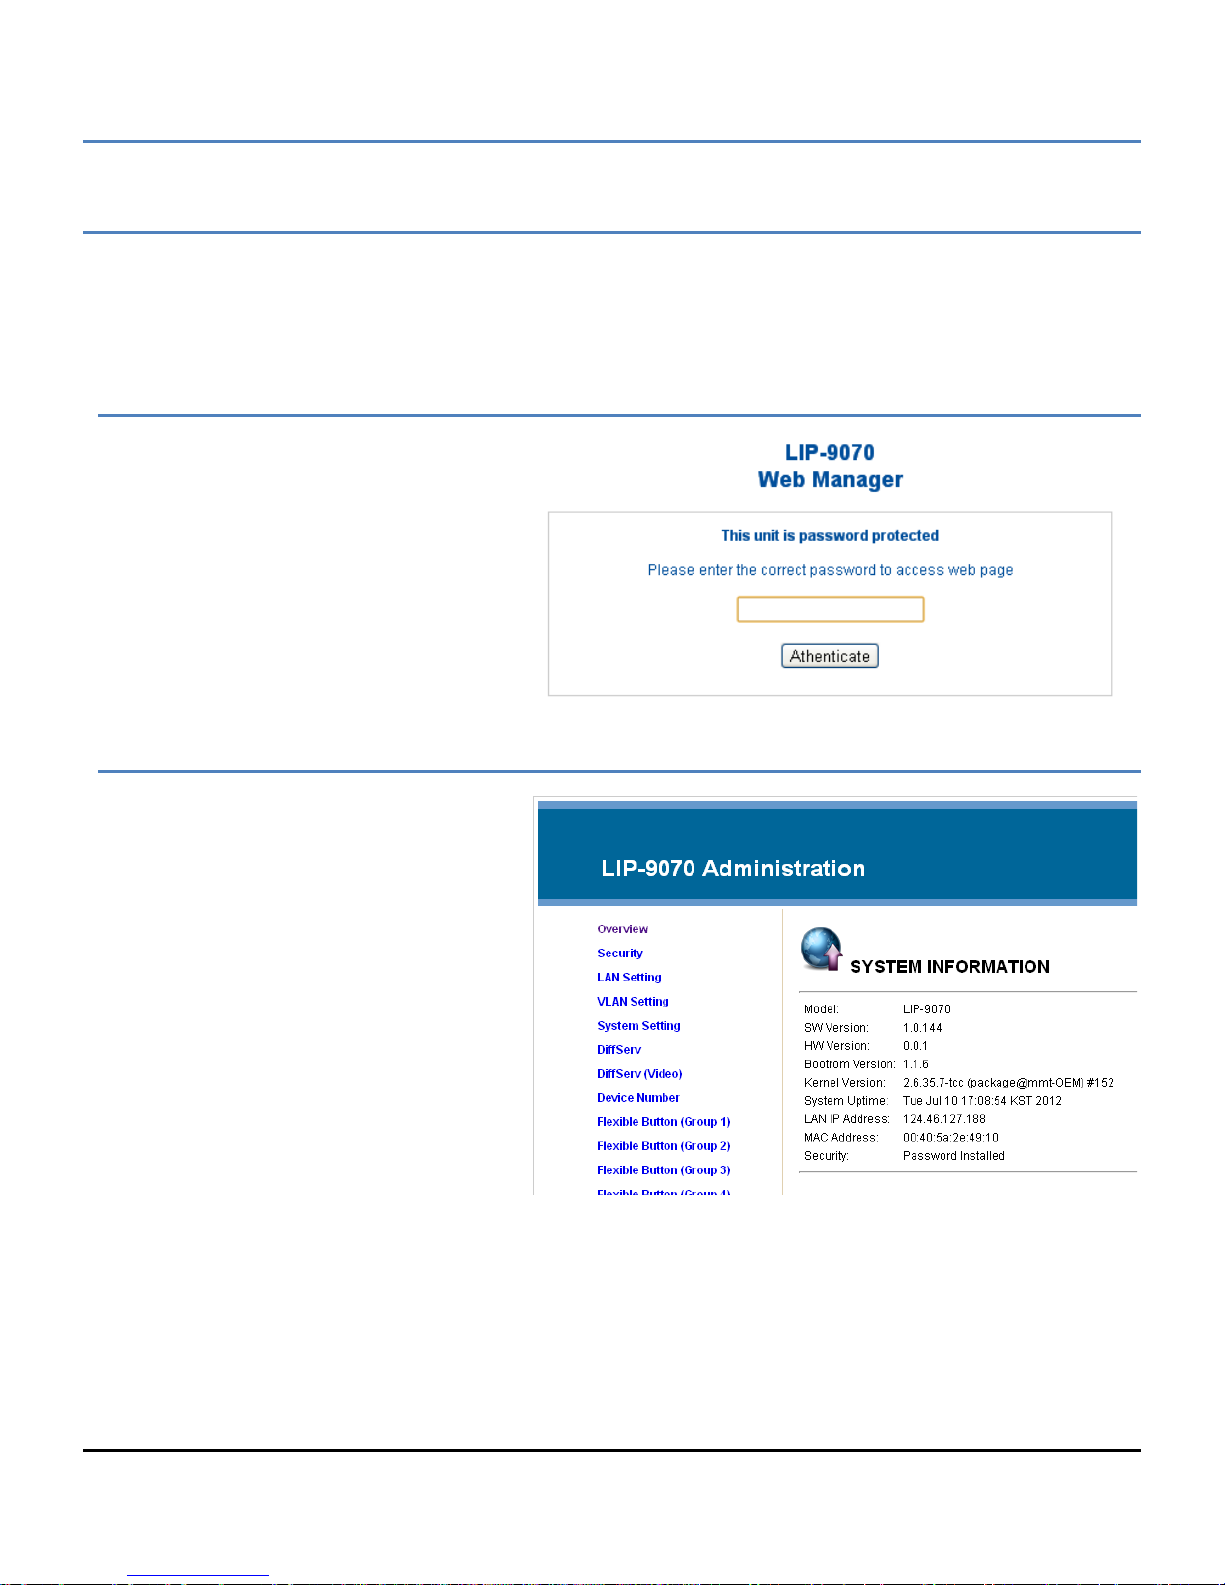
LIP-9070 iPKTS User Guide
Appendix B Web Admin
The LIP-9070 software incorporates a Web server used to configure the LIP-9070 IP addressing, iPECS host
parameters, Network setting characteristics , flexible buttons, etc. The Web Manager allows f or remote access to the
LIP-9070 through the LAN port and is intended for use by the iPECS administrator.
Web Manager Login
To access the Web Manager, point the
browser to the IP addres s of the LIP-9070 a t
TCP port 8000 as <ip address:8000>. The
Web Manager may be password protected.
At the Login screen enter the password and
touch the Authenticate button. There is no
default password.
Overview Screen
At login, the Overview screen displa ys a list
of menus on the left and gener al inform ation
for the LIP-9070. Touching the m enu it em in
the left navigation exposes the menu where
data can be entered and saved.
66
Page 78
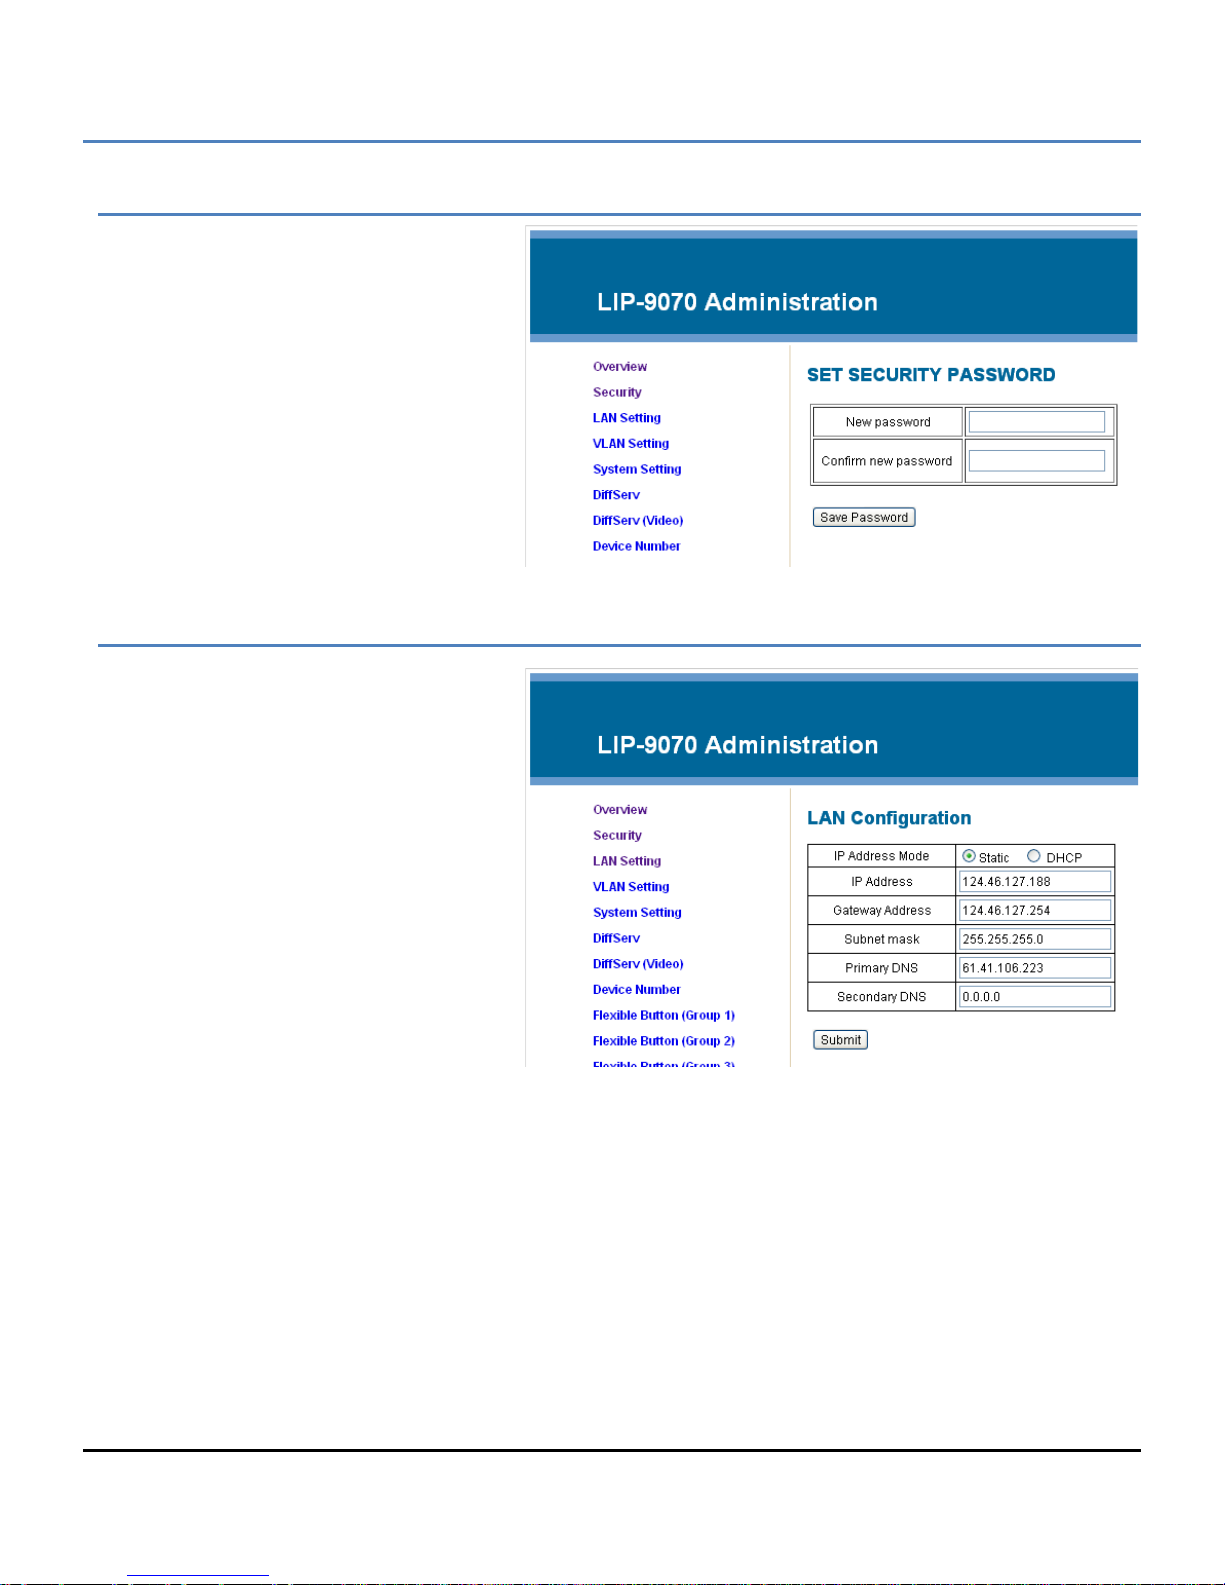
LIP-9070 iPKTS User Guide
Security Menu
The Security menu perm its the definition of a
password of up to 20 characters. When
entered, the pass word wil l be requ ired in th e
LIP-9070 Web Manager login screen.
LAN Settings
The LAN Setting menu configures the
address Mode, Static or Dynamic. If static
addressing is employed, the IP and Gatewa y
address as well as the sub net m as k must be
defined. In addition a Primary and
secondary DNS (Directory Name Server)
can be configured to support VPN
installations.
67
Page 79
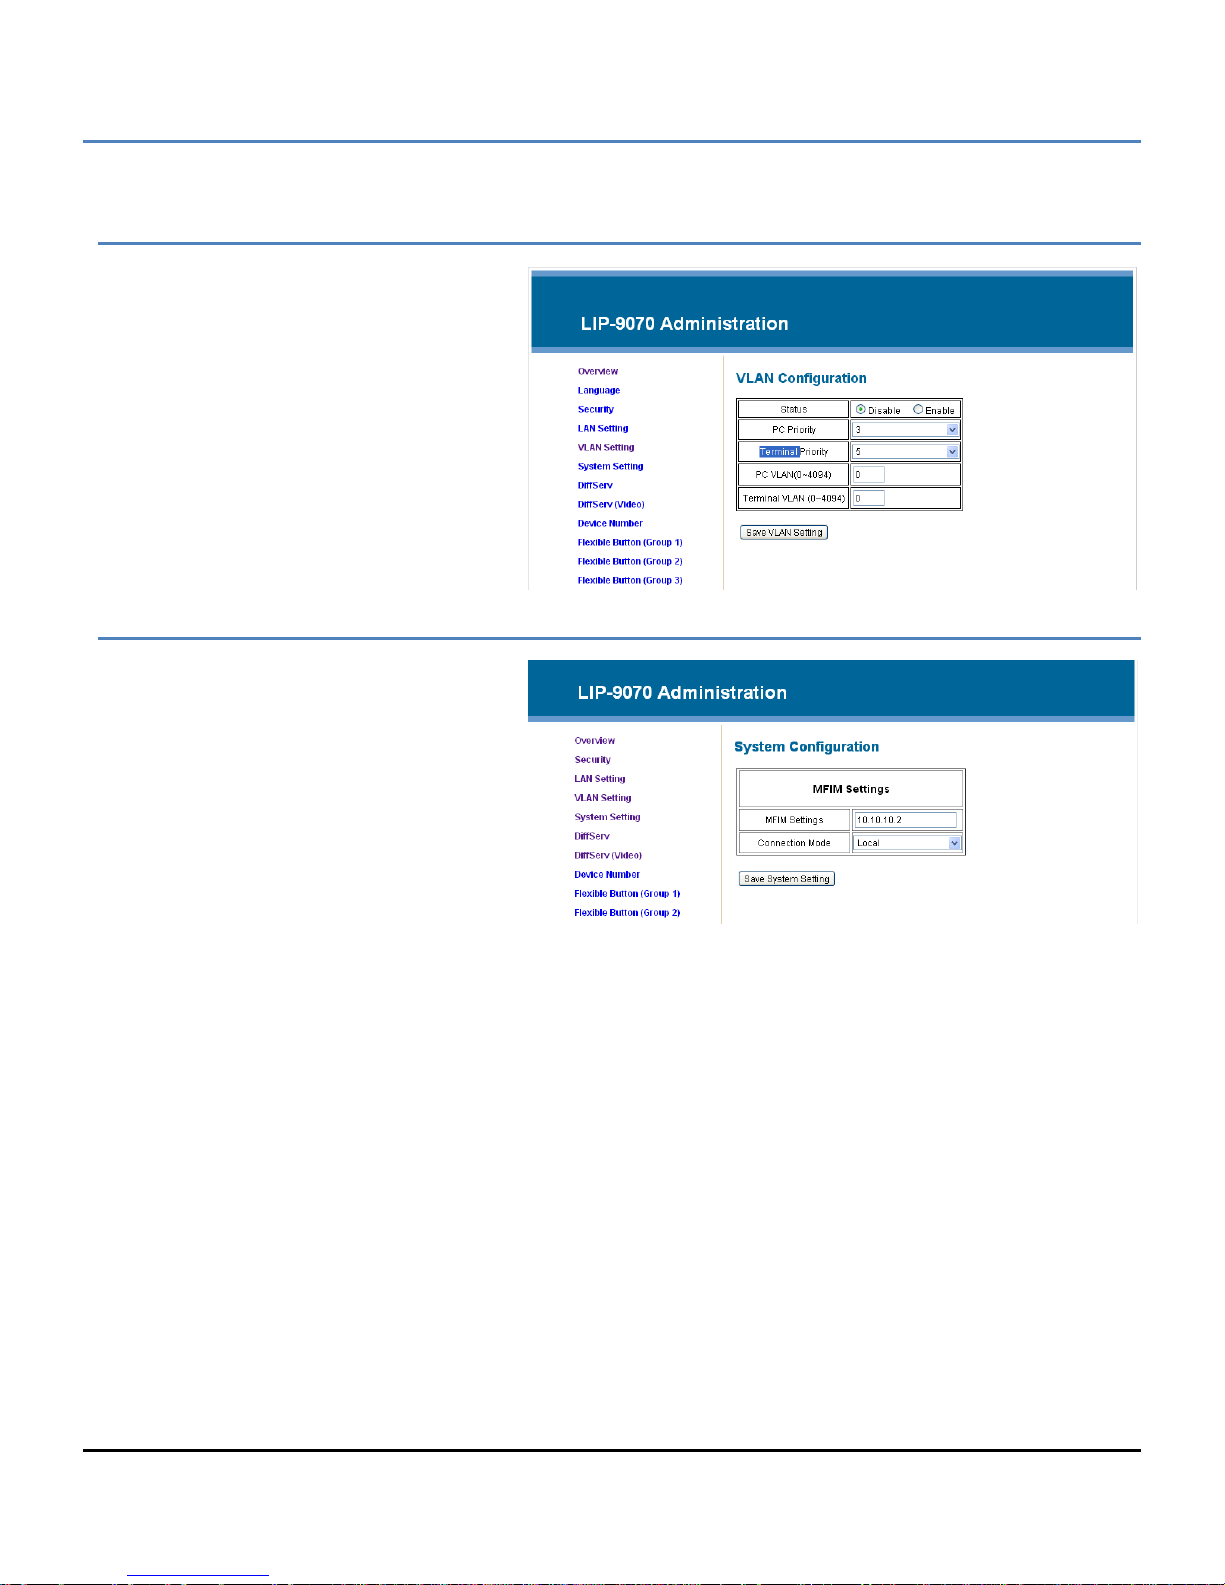
LIP-9070 iPKTS User Guide
VLAN Settings
The VLAN Setting menu configures the Id
and password of Virtual LANs for both the
LAN and PC port. Enable the VLAN Status,
enter a priority and id for both the LAN and
PC port and save the changes.
The PC port should have a lower priority
than the terminal; typically a PC priorit y of 3
and Terminal prior it y of 5 provi de ac ceptabl e
performance. Also, in g ene r al, th e PC VL AN
id will be 0, while the T erminal VLAN id will
be a number between 1 and 4094.
System Setting
The System Setting as signs the IP address
of the iPECS system and the type of
connection that can be local, remote or
Local/remote. If these va lues are changed,
the phone must restart to properly register
with the iPECS system.
68
Page 80
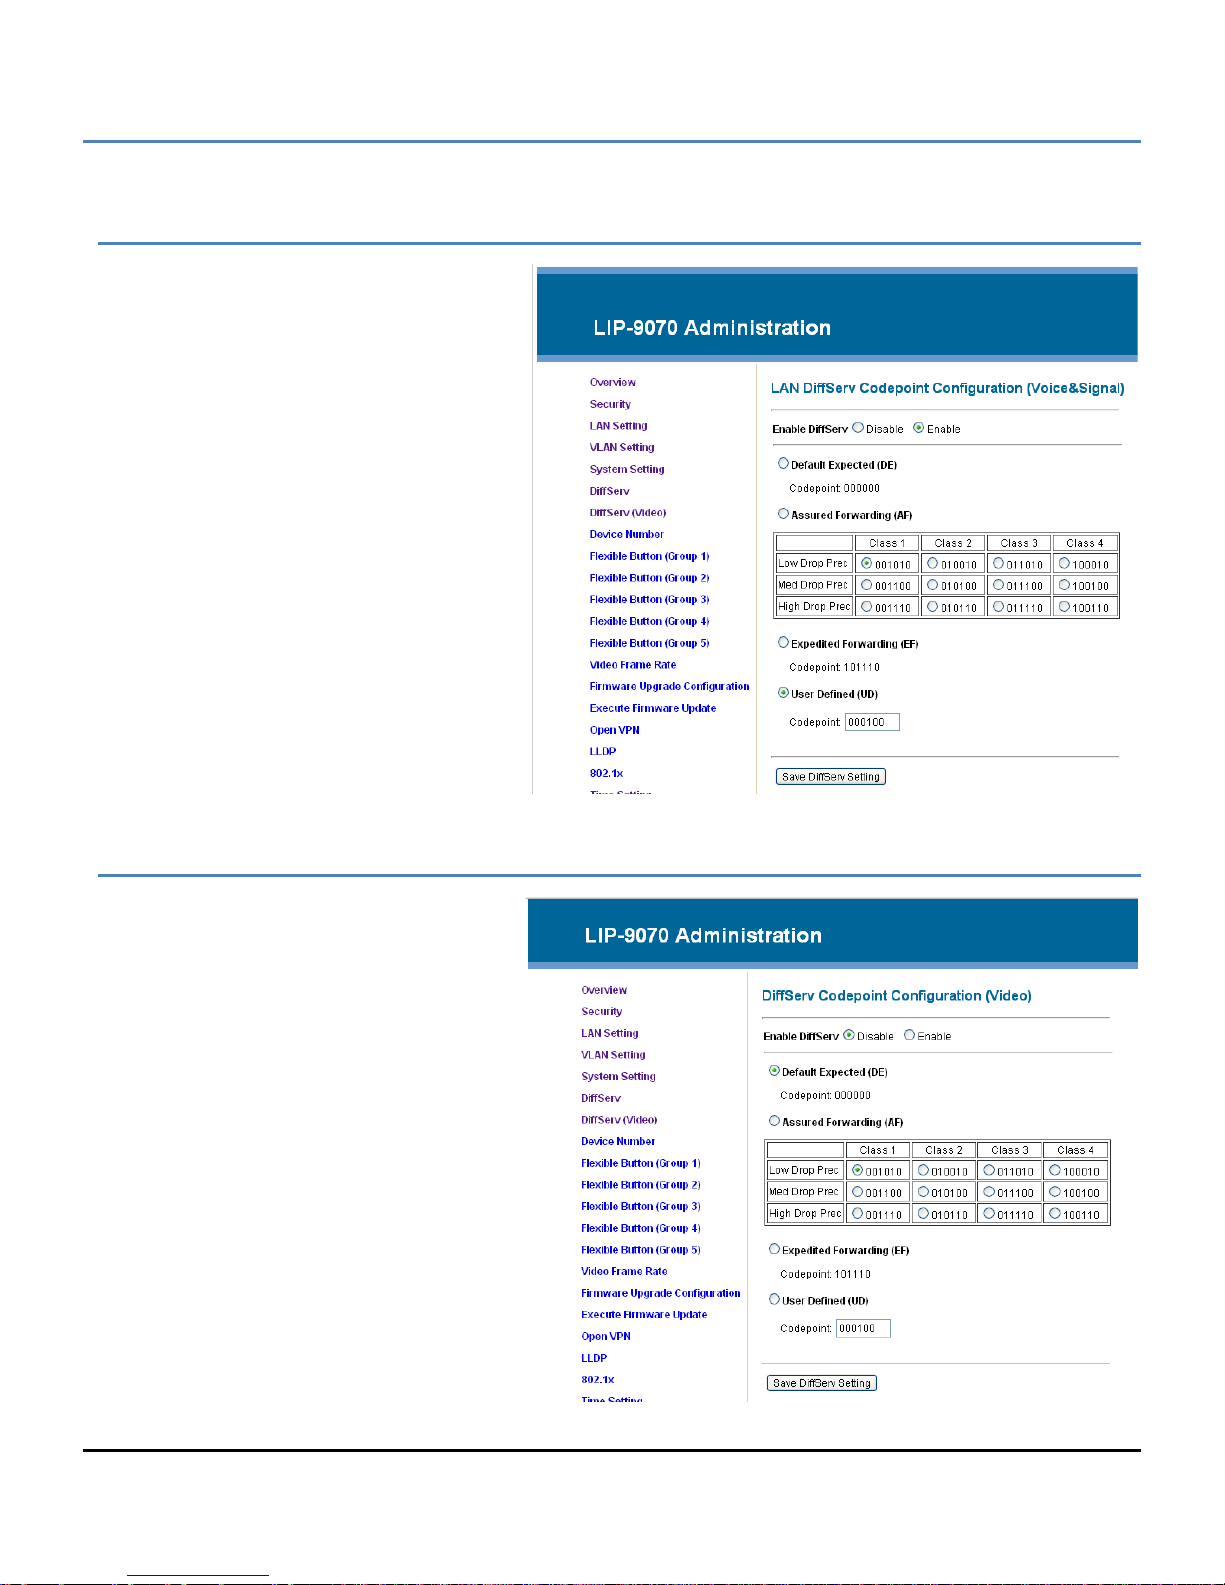
LIP-9070 iPKTS User Guide
DiffServ Menu
DiffServ als o c all ed Different ial Ser vices is a
protocol allowing r outers to provide differing
levels of service based on t he Dif f Ser v Code
Point (DSCP). Diffserv is a commonly
supported layer-3 protocol that, to be
effective, must be support by all routers in
the chain. The higher the DSC P the sooner
the router will sen d the p ack et. However , in
a congested environment, packets with the
highest DSCP are discarded first.
This menu establishes the DSCP the LIP9070 will employ with voice and signaling
packets.
In the menu, enable or disable Diffserv,
select an appropriate Code Point and save
the changes.
Video DiffServ Menu
The Diffserv (Video) menu establishes the
DSCP applied to video pa ckets only. Refer
to section A.6 for a brief discussion of
Diffserv.
69
Page 81
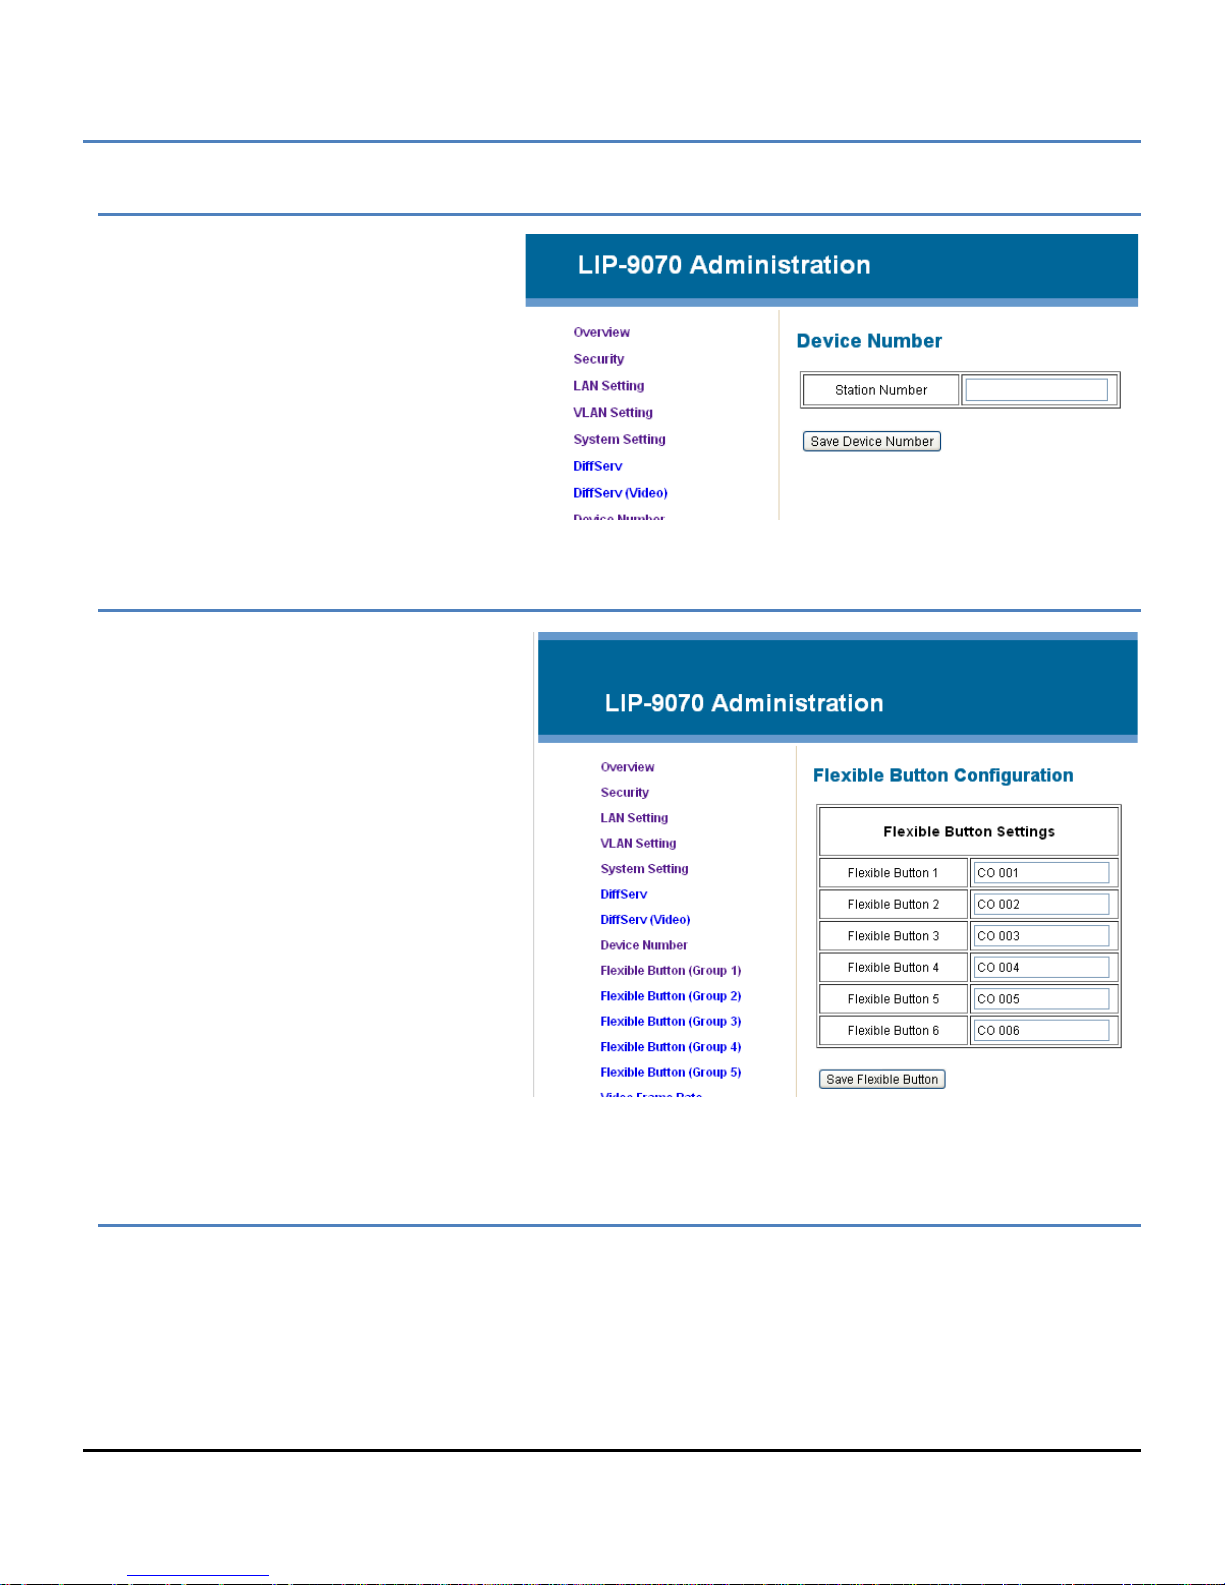
LIP-9070 iPKTS User Guide
Desired Station Number
A desired station num ber can be configured
in the Device Num ber menu. At registrati on
the phone will request the station number
desired. If available, the iPECS allo ws use
of the desired number.
Flexible Buttons
The LIP-9070 has a group of thirty (30)
Flexible or Flex buttons. The function for
each button is configured in the iPECS or
through the Station Us er Programm ing. For
more on Flex button assignments see the
host iPECS manuals.
The Flex button menu defines a label for the
button of up to 16 characters. The Flex
buttons are assigned in 5 different menus
with 6 buttons per menu Here, the Flex
button Group 1 menu is shown covering
buttons 1 ~ 6. The remainin g four (4) Flex
button menus are identical except for the
Flex button numbers match the Flex button
group selected.
Enter a custom label for each of the
displayed Flex buttons and save the
changes. If no custom label is assigned, a
default label based on the button function or blank for unassigned buttons is used.
Firmware Upgrade
From time to time the LIP-9070 phone software may be modified or upgraded to improve performance or add
features. The LIP-9 070 sof tware can be upgr aded to t he modified s oftware. T he upgrade m ay include upda tes to
the Android operating system as well as the iPECS Phone application. The upgrade software file named update.zip,
is placed on an http/ https server. The software is then downloaded by the p hone. The phone reboots an d loads
the new software. Note that the upgrade software on the server may be a previous or newer version than is running
on the LIP-9070.
70
Page 82
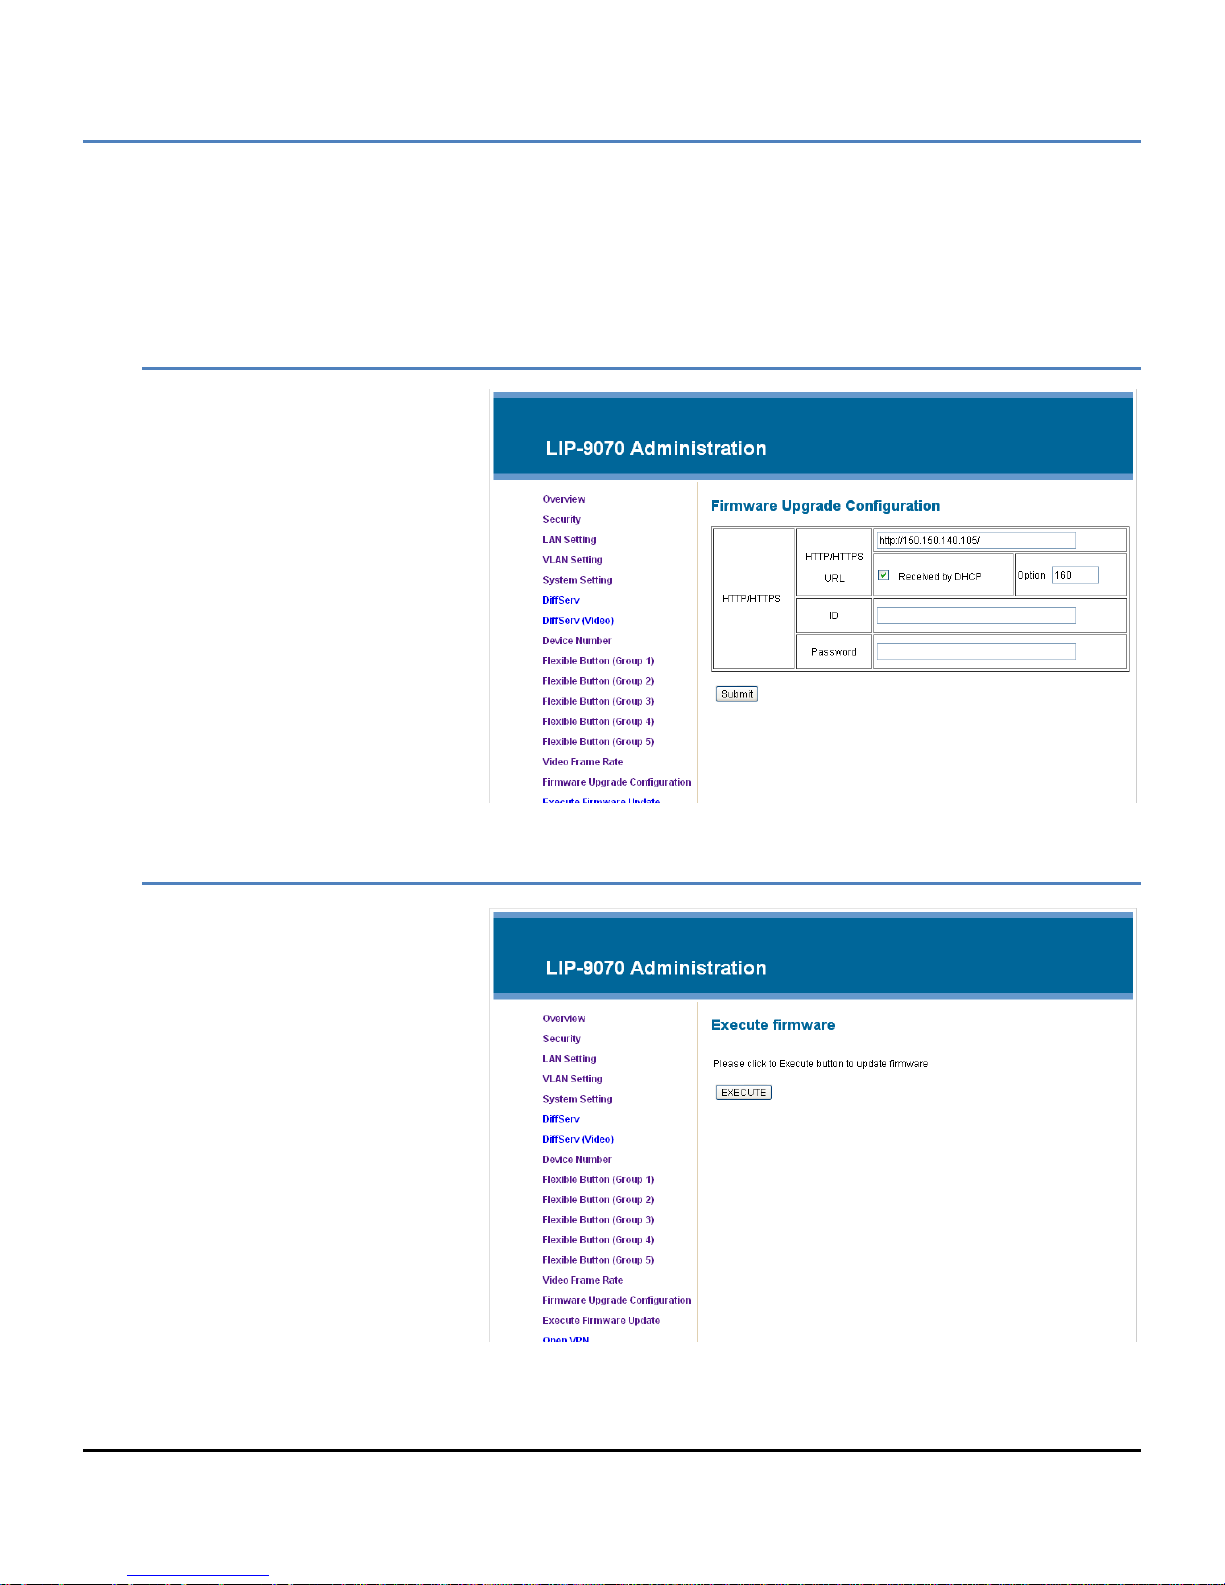
LIP-9070 iPKTS User Guide
Note
° The upgrade software file, upgrade.zip, can be obtained from the local Ericsson-LG representative.
° During the upgrade procedure, do NOT unplug or remove the phone from the power source or LAN.
° An upgrade will return the Cal l Pref er enc es, F lex button labels and Call Sound s etti ngs to t he d ef ault val ues.
Firmware Upgrade Configuration
Prior to upgrading the software, the
phone must be configured with the
upgrade server information. The
information required includes the
server IP address or UR L a nd f or https ,
the Authentication ID and password.
The phone may request th e server IP
address or URL f rom the local D HCP
server using Option 160 as the server
address or URL.
Note
° iPECS-CM may use FTP to
upgrade the phone software.
Execute Firmware Upgrade
Once the software is loaded on the
upgrade server and the phone
configured with the server inform ation,
the software can be upgraded. To
upgrade the software,
1. Select ‘Execute Firmware
Upgrade’.
2. The LIP-9070 contacts the
upgrade server and
downloads the firmware.
71
Page 83
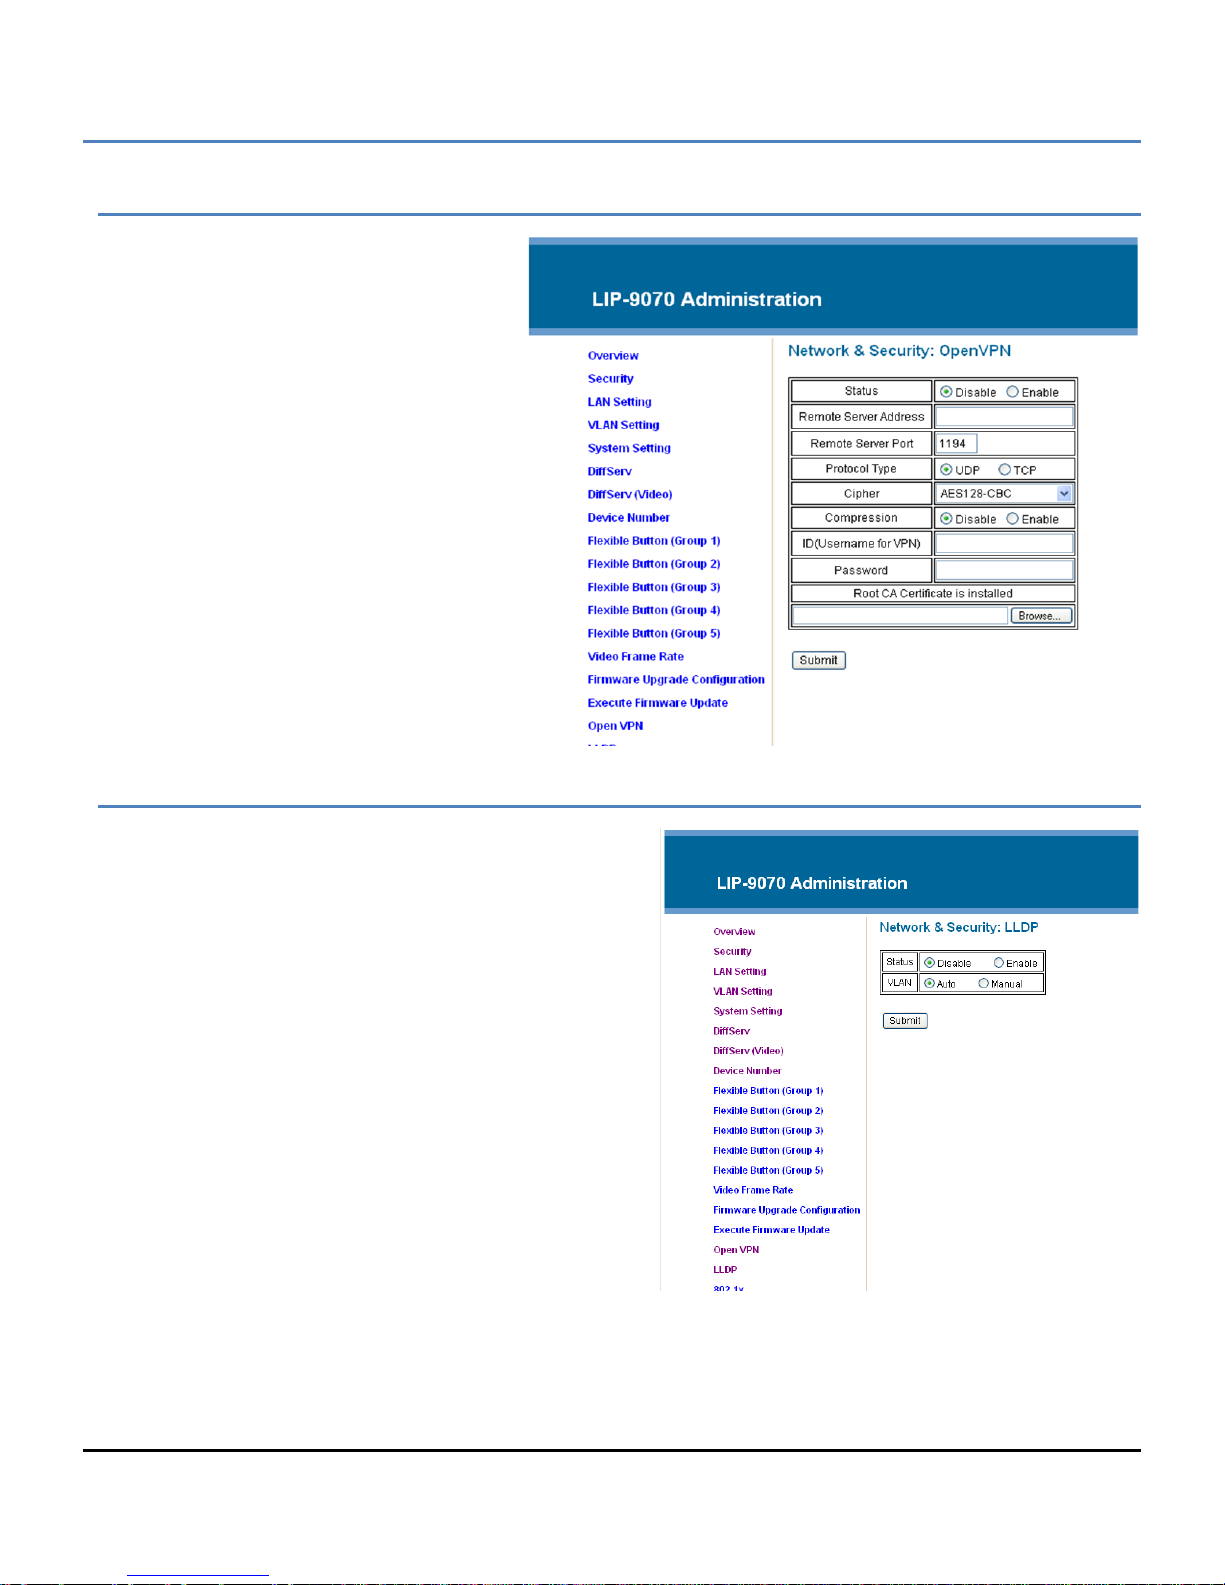
LIP-9070 iPKTS User Guide
Open VPN
OpenVPN implements virtual private network
technology employing an open source
software application. The LIP-9070
OpenVPN im plements User name/password
or certificates for authentication utilizing
SSL/TLS (Secure Socket Layer/Transport
Layer Security).
Among the needed parameters, once the
Status is enabled, the remote server must be
identified and the authentic ation param eters,
ID, and Password or certificate must be
defined.
LLDP
When enabled, the LIP-9070 employs LLDP (Link Layer
Discovery Protocol) to a dvertise capabilities and determine
characteristics of the surrounding network environment.
The phone can determine and automatically configure
VLAN settings for both the LAN and PC ports when LLDP is
enabled.
72
Page 84
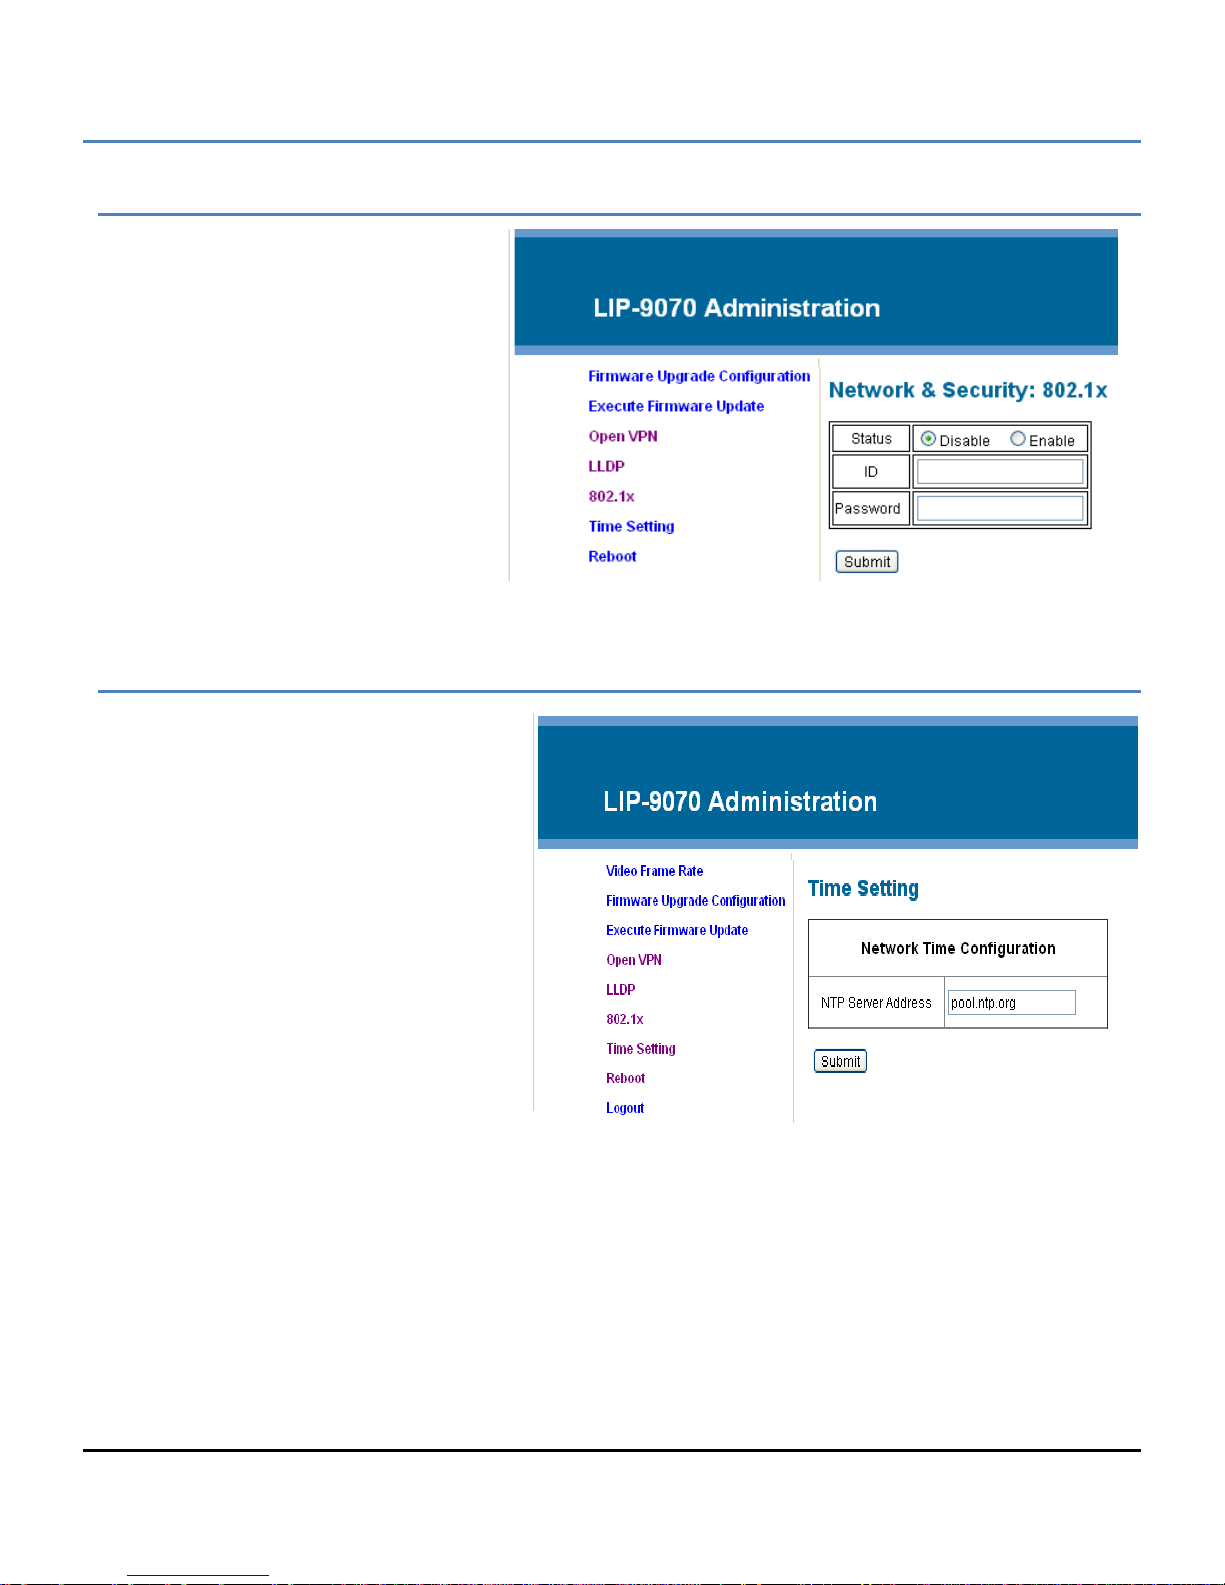
LIP-9070 iPKTS User Guide
802.1x
The LIP-9070 suppor ts Layer 2 (Ethernet)
security employing 802.1x port based
Network Access Control. EAP-MD5
method is used for ID and password
authentication for access to the network.
The Id and password can be a maximum
of 128 characters.
Time Server
NTP (Network Time Protocol) Server
Configuration defines the URL of an NTP
sever the LIP-9070 wil l employ to determine
the time when verifying VPN certificates.
73
Page 85
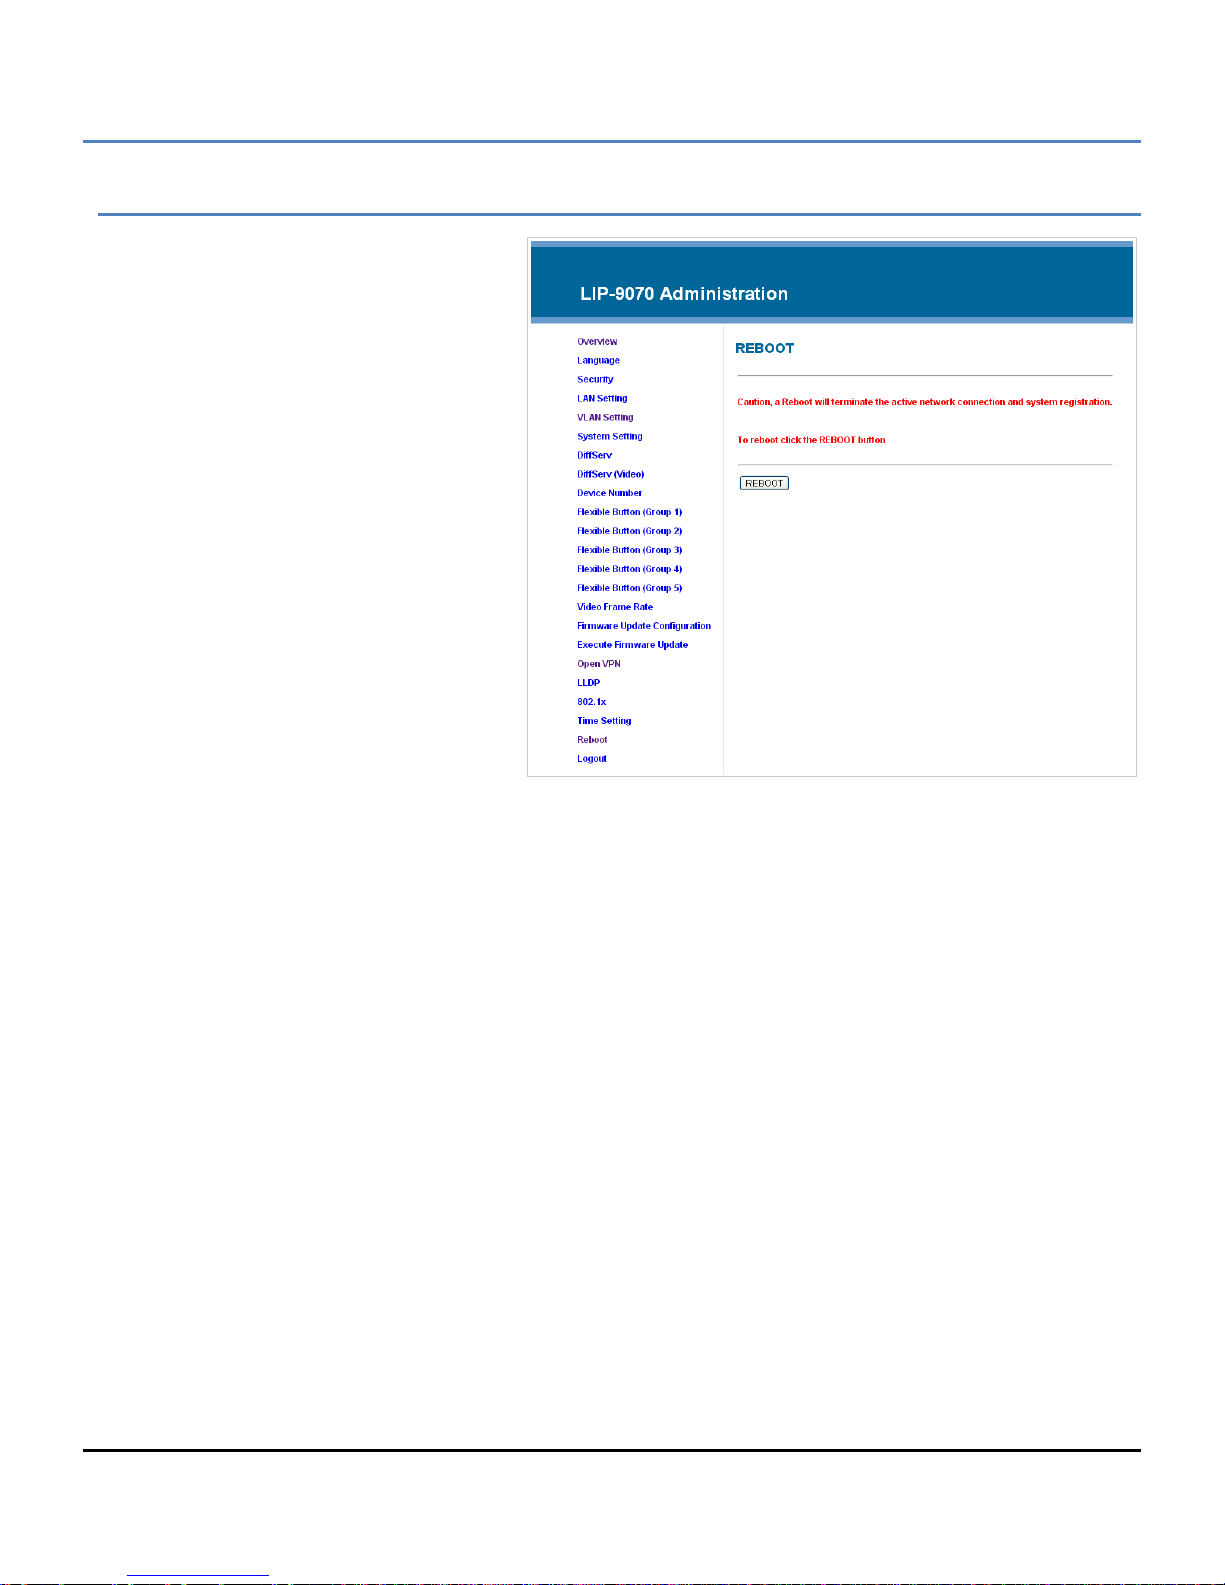
LIP-9070 iPKTS User Guide
Reboot
When certain parameter s, see lis t belo w, are
modified, the phone will require a reboot to
modify the active configuration.
A reboot will terminate all network
connections and regis trations with an iPECS
host. After the reboot the phone will
establish the network connection and
register with the iPECS.
74
Page 86
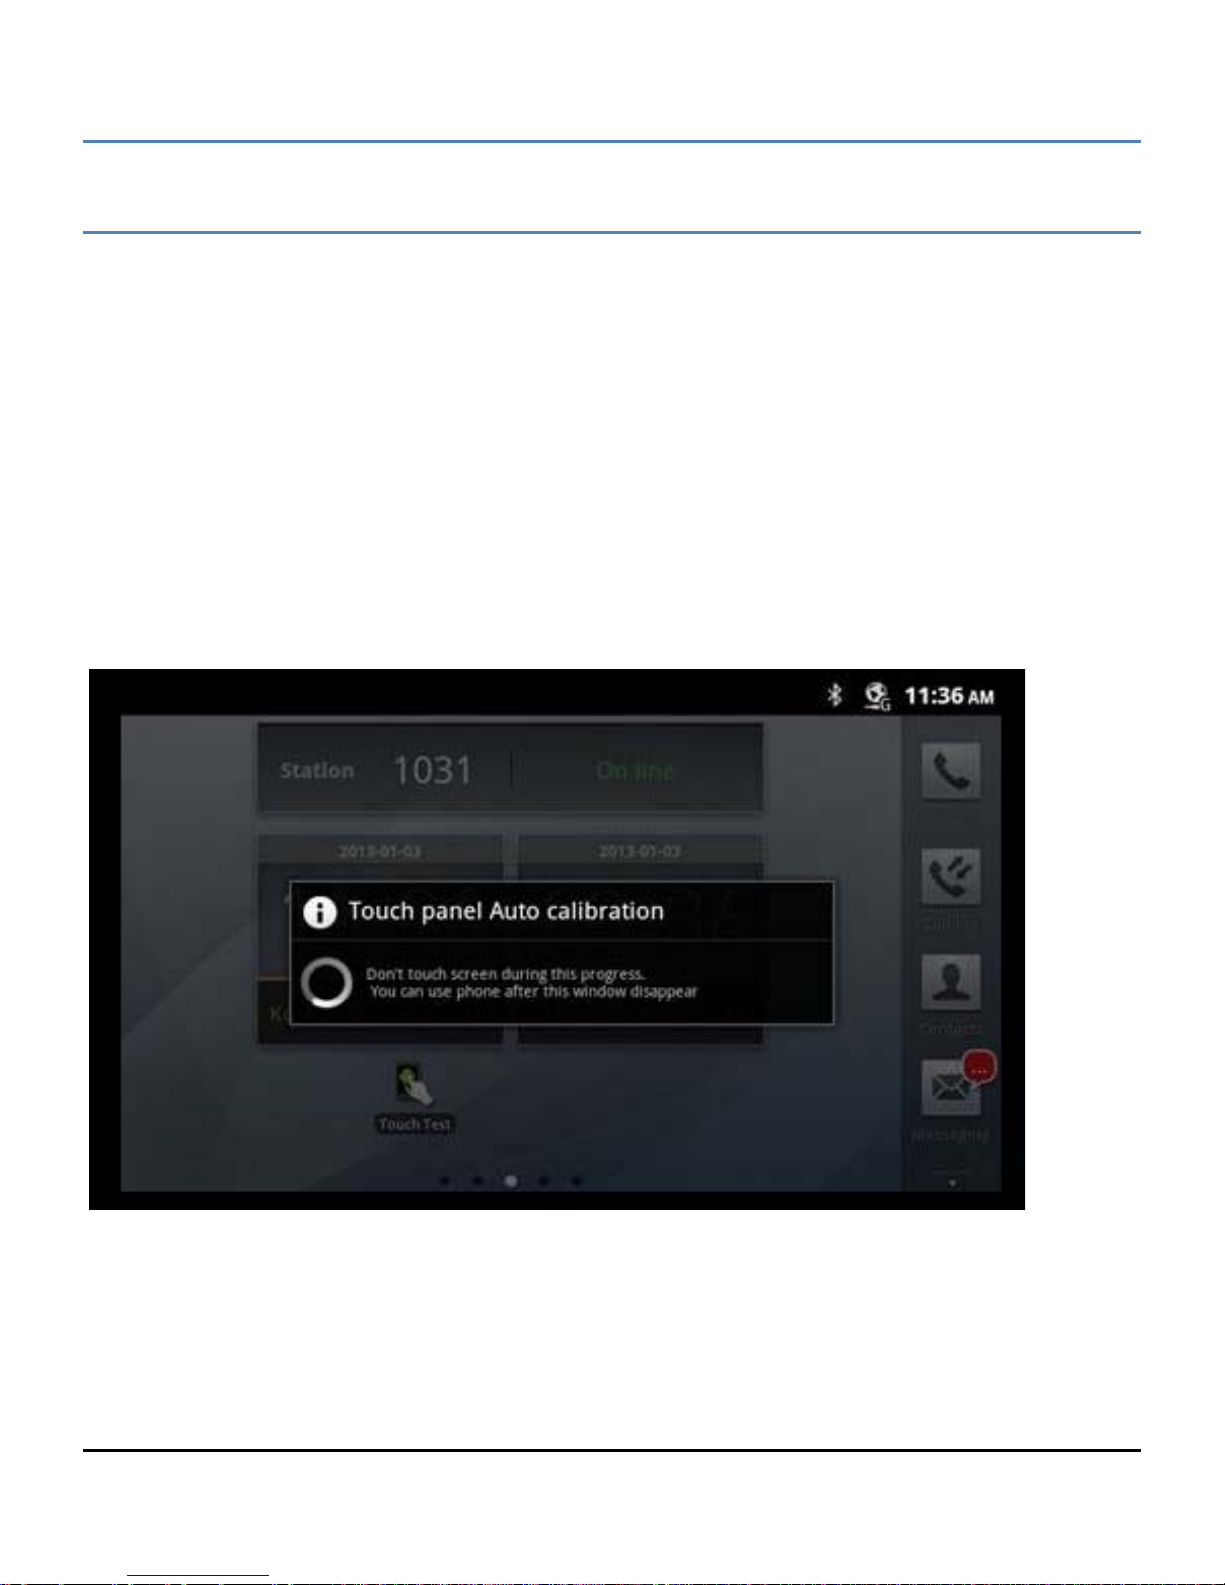
LIP-9070 iPKTS User Guide
Appendix C Touch screen calibration
The LIP-9070 uses to uc h screen as user inter f ac e. If user have some prob lem to the touch scr een op erat ion t he below
sequence could provide to do touch screen calibration manuall y.
1) Move to ‘Home’ screen.
2) Press ‘Menu’ key twice.
3) Press ‘Back’ key once.
4) Press ‘Volume down’ key seven times.
5) Press ‘Volume up’ key three times.
6) Press ‘Back’ key five times. -* have to do 3~6
7) Then, start the calibration of touch panel and you can find below display.
th
within 10 second. *-
75
Page 87

Thanks
 Loading...