

Page 1

LIP-8012E/8024E
User Guide
Please read this manual carefully before
operating Phone. Retain it for future reference
Page 2
LIP-8012E & LIP-8024E Gigabit Phone User Guide
Issue
Date
Remark
1.0
Mar. 2012
Initial Release
1.1
Oct. 2012
Changed CI to Ericsson-LG
Disposal of your old appliance
product.
Revision History
1. When the crossed-out wheeled bin symbol is attached
to a product, it means the product is covered by the
European Directive 2002/96/EC .
2. All electrical and electronic products should be
disposed of separately from the municipal waste stream
via designated collection facilit ies appo inted by
government or the local authorities.
The correct disposal of your old appliance will help
prevent potential negative consequences for the
environment and human health.
4. For more detailed information about disposal of your
old appliance, please contact your city office, waste
disposal service or the shop where you purchased the
Copyright© 2012 Ericsson-LG Co., Ltd. All Rights Reserved.
This material is copyrighted by Ericsson-LG Co., Ltd. Any unauthorized reproductions,
use or disclosure of this material, or any part thereof, is stri ctl y prohibi ted and is a
violation of Copyright Laws. Ericsson-LG reserves the right to make changes in
specifications at any time without notice. The information furnished by Ericsson-LG in
this material is believed to be accurate and reliable, but is not warranted to be true in
all cases. iPECS is trademarks of Ericsson-LG Co., Ltd. All other brand and product
names are trademarks or registered trademarks of their respective companies.
Page 3
LIP-8012E & 8024E Gigabit Phone User Guide
Important Safety Information
To prevent unexpected danger or damage please read this information before
installing or attempting to repair you phone. Warning and Caution information is
provided to alert the consumer of known dangers:
Warning: To reduce the possibility of electric shock , do not expose your
phone to high humidity areas, such as a bathroom, swimming area, etc.
Caution: Use only Ericsson-LG approved batteries and desktop chargers
to avoid the damage to the phone. Using other batteries or chargers voids
your warranty and may cause an explosion.
1. Only trained and qualified service personnel shall install, replace or service
the phone.
2. Do not spill liquid life water on the phone. If so, call the service center as
this may result in fire or electric shock.
3. If you see smoke or smell something during use, unplug the power cord and
the phone line. Call the service center immediately.
4. If the power adapter is used, do not touch the plug with wet hands. This
may result in a fire or an electric shock or equipment damage.
5. Do not use the phone during a thunderstorm. Lightning strike may result in
fire, severe electrical or acoustic shock.
6. Do not use the power adapter if the power cord or wall outlet is damaged.
This may result in fire or an electric shock.
1. Ensure that children do not pull on phone cords. This may injure children or
result in equipment damage.
2. The ear-piece houses a magnetic device which may attr act p ins or smal l
metal objects. Keep headset clear of such objects and check before use.
3. Avoid placing the phone in an area that is excessively dusty, damp or
subject to vibration.
4. Choose a site for the phone that is well-ventil ated and dry.
5. Do not plug multiple plug-packs into one power outlet. This may result in the
plug overheating and may result in a fire or plug pack failure.
6. Do not put heavy things on the phone.
7. Do not drop or throw the phone.
8. Static electricity discharge will damage electronic components.
9. Keep out of direct sunlight and away from heat.
10. No user-serviceable parts inside. Do not insert a screwdriver or any metal
objects into the phone. This may cause electric shock or damage the
equipment and will render the warranty void.
11. Clean the phone with a soft, dry cloth only. Do not use volatile liquids such
as petrol, alcohol, or acetone as this may cause a fire or result in
discoloration or damage to plastics. Do not clean with wax or silicon
products as these may enter the equipment and cause operation to become
unstable.
Page 4

LIP-8012E & 8024E Gigabit Phone User Guide
[EU]
European Union Declarations of Conformity
Ericsson-LG Co., Ltd. declare that the equipment specified in this document
bearing the “ CE” mark conforms to the European Union Radio and
Telecommunications Terminal Equipment Directive(R&TTE 1999/5/EC),
including the Electromagnetic Compatibility Directive(2004/108/EC) and Low
Voltage Directive(2006/95/EC).
Copies of these Declarations of Conformity (DoCs) can be obtained by
contacting your local sales representativ e.
[USA/CSA]
FCC/IC Interference Statement
This equipment has been tested and found to comply with the limits for a Class
B digital device, pursuant to part 15 of the FCC Rules.
These limits are designed to provide reasonable protection against harmful
interference in a residential installation.
This equipment generates, uses and can radiate radio frequency energy and, if
not installed and used in accordance with the instructions, may cause harmful
interference to radio communicati ons . How ev er , there is no guarant ee that
interference will not occur in a particular installation. If this equipment does
cause harmful interference to radio or television reception, which can be
determined by turning the equipment off and on, the user is encouraged to try to
correct the interference by one or more of the following measures:
Reorient or relocate the receiving antenna.
Increase the separation between the equipment and receiver.
Connect the equipment into an outlet on a circuit different from that to
which the receiver is connected.
Consult the dealer or an experienced radio/TV technician for help.
This device complies with part 15 /RSS-GEN of the FCC/IC rules. Operation is
subject to the following two conditions:
(1)This device may not cause harmful interference; and (2) This device must
accept any interference received, including interference that may cause
undesired operation.
This Class B digital apparatus complies with Canadian ICES-003.
Cet appareil numérique de la classe B est conforme à la norme NMB-003 du
Canada.
The use of this device in a system operating either partially or completely
outdoors may require the user to obtain a license for the system according to the
Canadian regulations.
CAUTION :
are not expressly approved by the party responsible for compliance could void
the user's authority to operate the equipmen t.
Any changes or modifications in construction of this device which
Page 5

LIP-8012E & LIP-8024E Gigabit Phone User Guide
TABLE OF CONTENTS
1. INTRODUCTION ............................................................................................ 1
1.1 General ......................................................................................................... 1
1.2 Feature Information ...................................................................................... 1
1.3 Feature Groupings ........................................................................................ 1
1.4 iPECS LIP-8012E & 8024E Gigabit Phone Description ................................ 2
1.5 LIP-8012E & 8024E Phone Installation ........................................................ 3
1.5.1 Phone Connections ........................................................................... 3
1.5.2 Wiring Connectors ............................................................................. 4
1.5.3 Power ................................................................................................ 4
1.5.4 Wall Mount ........................................................................................ 5
1.6 DSS(Direct Station Select) Console Installation ........................................... 5
2. LCD,
3. R
4. P
SPEAKERPHONE & RELATED FEATURES ............................................. 8
2.1 Using the Display Menu ................................................................................ 8
2.1.1 Phone Setting .................................................................................... 9
2.1.2 Conference Room (iPECS-LIK) ....................................................... 10
2.1.3 ICM SMS (iPECS-LIK) .................................................................... 11
2.1.4 Network Config. ............................................................................... 12
2.1.5 Attenda nt menu (iPEC S-LIK & iPECS SBG-1000) .......................... 14
2.2 Using the Speakerphone ............................................................................ 15
2.3 Using a Serial DSS ..................................................................................... 16
ECEIVING CALLS ..................................................................................... 18
3.1 Answering a Call While Idle ........................................................................ 18
3.2 Responding to a Call While Busy ............................................................... 19
3.3 Using Answering Machine Emulation (AME) .............................................. 19
3.4 Differential Ring Signals ............................................................................. 21
3.5 Answering Calls at Night ............................................................................ 22
3.6 Answering Calls to Other Stations .............................................................. 22
3.7 Using Do-Not-Disturb (DND) to Block Incoming Calls ................................ 22
3.8 Forwarding Calls ......................................................................................... 23
3.8.1 Forwarding calls to another Station or Voice Mail ........................... 23
3.8.2 Forwarding calls to an external number .......................................... 24
3.8.3 Forwarding callers to a Text Message............................................. 26
LACING A CALL ....................................................................................... 30
4.1 Internal Calls............................................................................................... 30
4.1.1 Using Camp-On when calling a busy station ................................... 30
4.1.2 Leaving a Message Wait ................................................................. 31
4.2 External Calls ............................................................................................. 31
4.2.1 Placing external CO/VoIP calls ....................................................... 31
i
Page 6

LIP-8012E & LIP-8024E Gigabit Phone User Guide
4.2.2 Waiting for the next available CO/IP line ......................................... 33
4.2.3 Account Codes: Tracking External calls for billing ........................... 33
4.2.4 Disable dialing from your phone ...................................................... 34
4.2.5 T emporari ly over ride dia lin g restr i ctio ns at a phone ........................ 34
4.3 Using Directory ........................................................................................... 35
4.3.1 Using Last Number Redial (LNR) .................................................... 35
4.3.2 Using and Entering Saved Number Dial .......................................... 35
4.3.3 Using System Speed Dial Numbers ................................................ 36
4.3.4 Using and Entering Station Speed Dial Numbers ............................ 37
4.3.5 Using Dial by Name and Entering Your Name ................................ 38
4.3.6 Using Automatic Called Number Redial (ACNR) ............................. 40
RANSFER, CONFERENCE & OTHER CALL HANDLING ................................. 41
5. T
5.1 Call Transfer: Sending a call to a different destination ............................... 41
5.2 Call Hold: Placing a call in a waiting state .................................................. 41
5.3 Broker Call: Switching between two calls ................................................... 42
5.4 Joining Multiple People in a Conference .................................................... 42
5.4.1 Setting up a Conference Room ....................................................... 43
5.5 Call Park: Placing a call on Hold to Page ................................................... 45
5.6 Two-Way Record: Recording a call ............................................................ 45
END & RETRIEVE MESSAGES ................................................................... 46
6. S
6.1 Responding to a Station Message Waiting Indication ................................. 46
6.2 Getting Voice Mail Messages ..................................................................... 47
6.3 Sending and Receiving Short Text Messages ............................................ 48
EMOTE SYSTEM ACCESS ......................................................................... 51
7. R
7.1 Direct Inward System Access (DISA) ......................................................... 51
7.2 Mobile Phone Extension ............................................................................. 51
ISC. FEATURES....................................................................................... 54
8. M
8.1 Call Log ...................................................................................................... 54
8.2 Contrast (iPECS-LIK) ................................................................................. 56
8.3 Background Music and Music on Hold (iPECS-LIK) ................................... 56
8.4 Using Internal, External and Meet-Me Paging ............................................ 57
8.5 Push-To-Talk (PTT) Page .......................................................................... 58
8.6 Wake-Up Alarm .......................................................................................... 58
8.7 Alarm/Door Bell .......................................................................................... 59
8.8 Power Fail Transfer (PFT) .......................................................................... 59
8.9 System Voice Memo ................................................................................... 59
8.10 Hot Desk ..................................................................................................... 60
9. PBX,
CENTREX & ISDN FEATURES ........................................................... 62
9.1 Access PBX or Centrex features ................................................................ 62
9.2 Access the ISDN Network .......................................................................... 62
9.2.1 Using the Keypad facility to access ISDN features ......................... 62
ii
Page 7

LIP-8012E & LIP-8024E Gigabit Phone User Guide
9.2.2 Using ISDN Supplementary Services .............................................. 63
9.2.3 Activating ISDN Caller ID Restriction .............................................. 63
EATURES & FLEX BUTTONS ..................................................................... 64
10. F
10.1 Entering Station Program Data ................................................................... 64
10.2 Assigning Features to Flex Buttons ............................................................ 64
PPENDIX A FLEXIBLE NUMBERING PLAN ....................................................... 65
A
PPENDIX B USER PROGRAM CODES .............................................................. 71
A
PPENDIX C USEFUL INFORMATION : OPEN SOURCE SOFTWARE NOTICE ......... 75
A
iii
Page 8

LIP-8012E & LIP-8024E Gigabit Phone User Guide
1. Introduction
1. INTRODUCTION
1.1 General
Your telephone is connected to an advancedtechnology, highly-versatile, fully-featured telecom
system designed to make office communications easy
and productive. Employing state-of-the-art Voice over
Internet Protocol (VoIP) technology, voice and data
converge on a single IP packet network. Because each
iPECS Phone is an IP appliance, it can be moved easily
throughout the office LAN and maintain normal
operation.
1.2 Feature Information
We have taken every effort to make this user guide
simple and straightforward. The guide starts with the
simpler operations of the iPECS Phone Speakerphone,
moves on to receiving and placing calls, and then to
more advanced features. Each section includes a brief
and basic description of each feature and step-by-step
operation instructions.
The operations shown in this guide use the System’s
base default Numbering Plan. Your specific Numbering
Plan may be different. Some features may not be
available for you to access or may be subject to certain
limitations based on the set-up of the System.
Under certain operating conditions, this equipment may
not be able to make emergency calls. Alternative
arrangements should be made for access to emergency
services.
1.3 Feature Groupings
Every effort has been taken to divide the features into a
logical and consistent sequence so that features can be
quickly located.
Features have been divided into groups, Receiving
Calls, Placing Calls etc. Within each group, features
are arranged according to the difficulty of operation and
frequency of use.
1
Page 9
LIP-8012E & LIP-8024E Gigabit Phone User Guide
1.4 iPECS LIP-8012E & 8024E Gigabit Phone Description
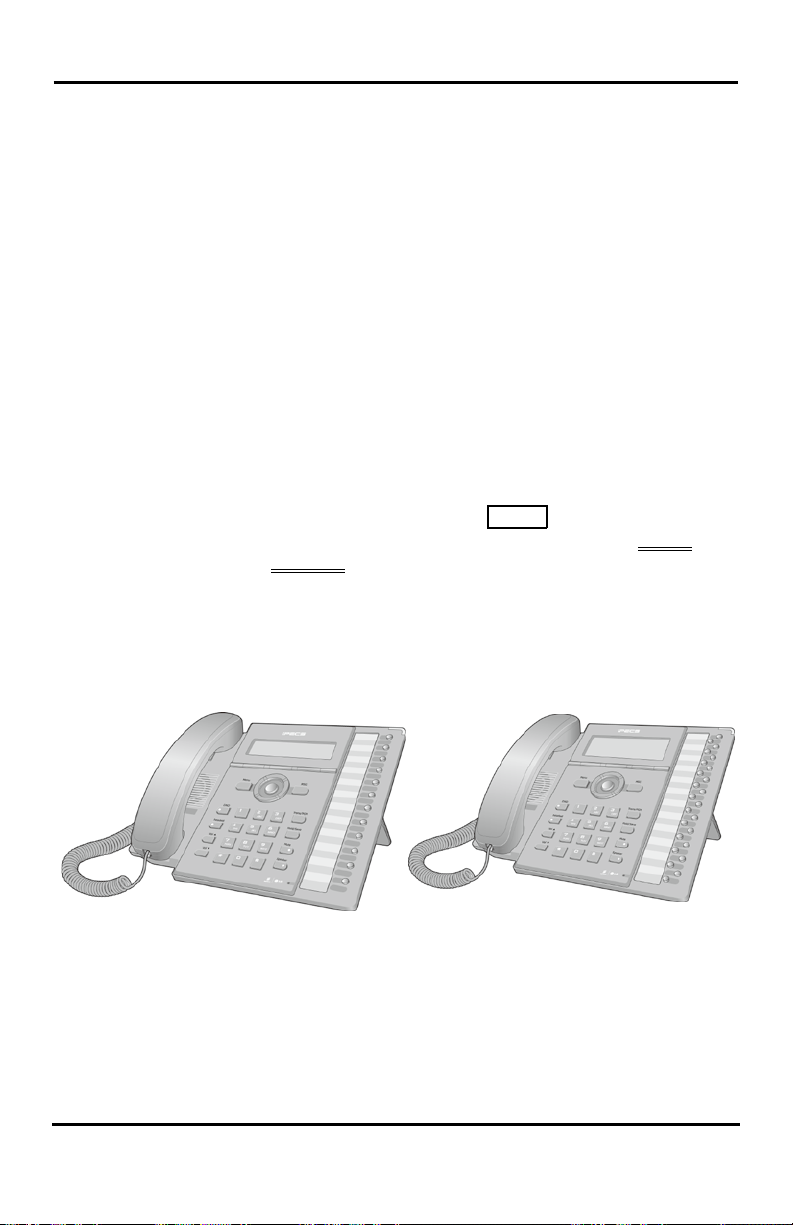
The iPECS LIP-8012E and LIP-8024E Gigabit Phones
(shown) incorporate the latest in VoIP technology and
user interface to provide you with a cost effective,
simple to use, productive communications tool. It
includes a large 3-line (LIP-8012E) or 4-line (LIP-8024E)
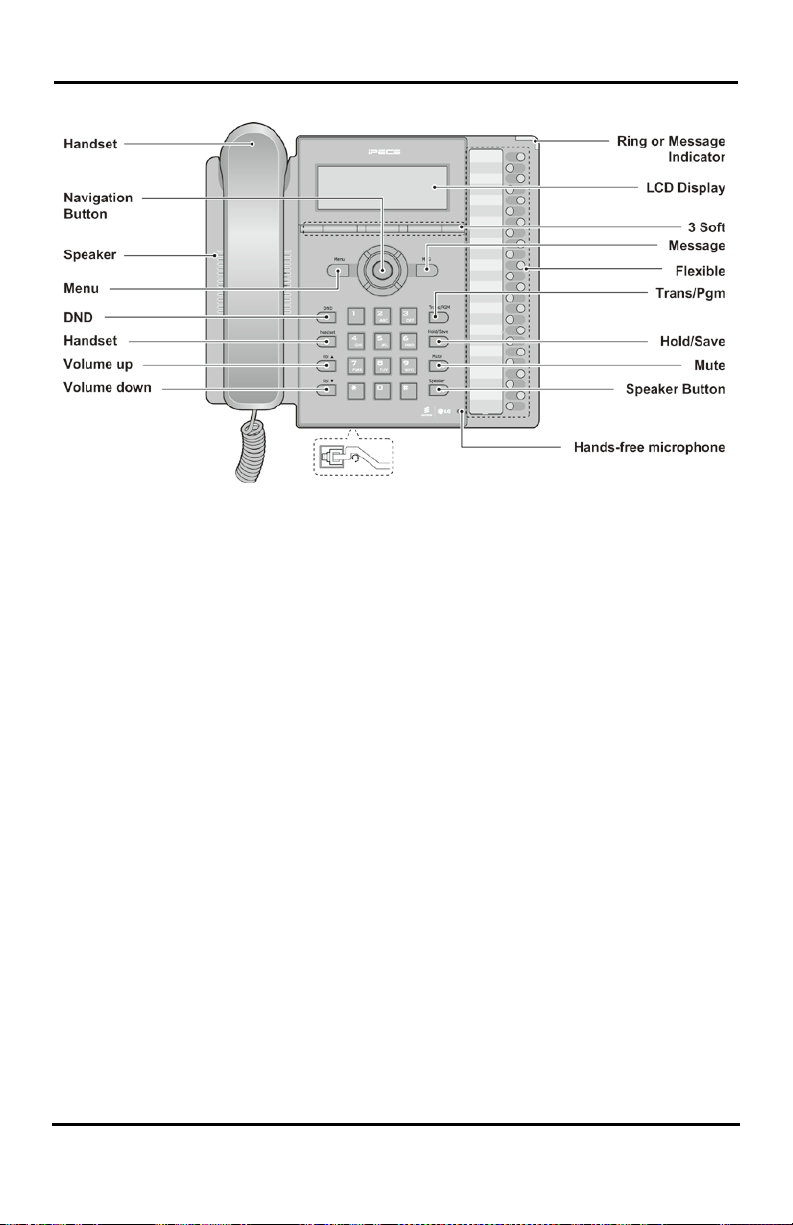
24-character per line LCD (refer to Phone Diagrams,
next page). The bottom line of the display is an
interactive menu accessed with the 3 Soft buttons just
below the display. The Navigation button in the lower
center of the Phone allows you to move through the
menu choices when more than three selections are
available.
Features and functions of your iPECS are accessed
either using the Fixed or Flexible buttons or by selecting
a menu item using the Soft buttons. In the remainder of
this User Guide, the Fixed or Flexible buttons are shown
with a box surrounding the
Soft button menu selections are shown with a double
underline.
The LCD display screens shown in this User Guide are
captured from the LIP-8024E. The screen may differ
slightly in the LIP-8012E.
LIP-8012E Gigabit Phone LIP-8024E Gigabit Phone
BUTTON designation while
2
Page 10
LIP-8012E & LIP-8024E Gigabit Phone User Guide
LIP-8024E Gigabit Phone Diagram
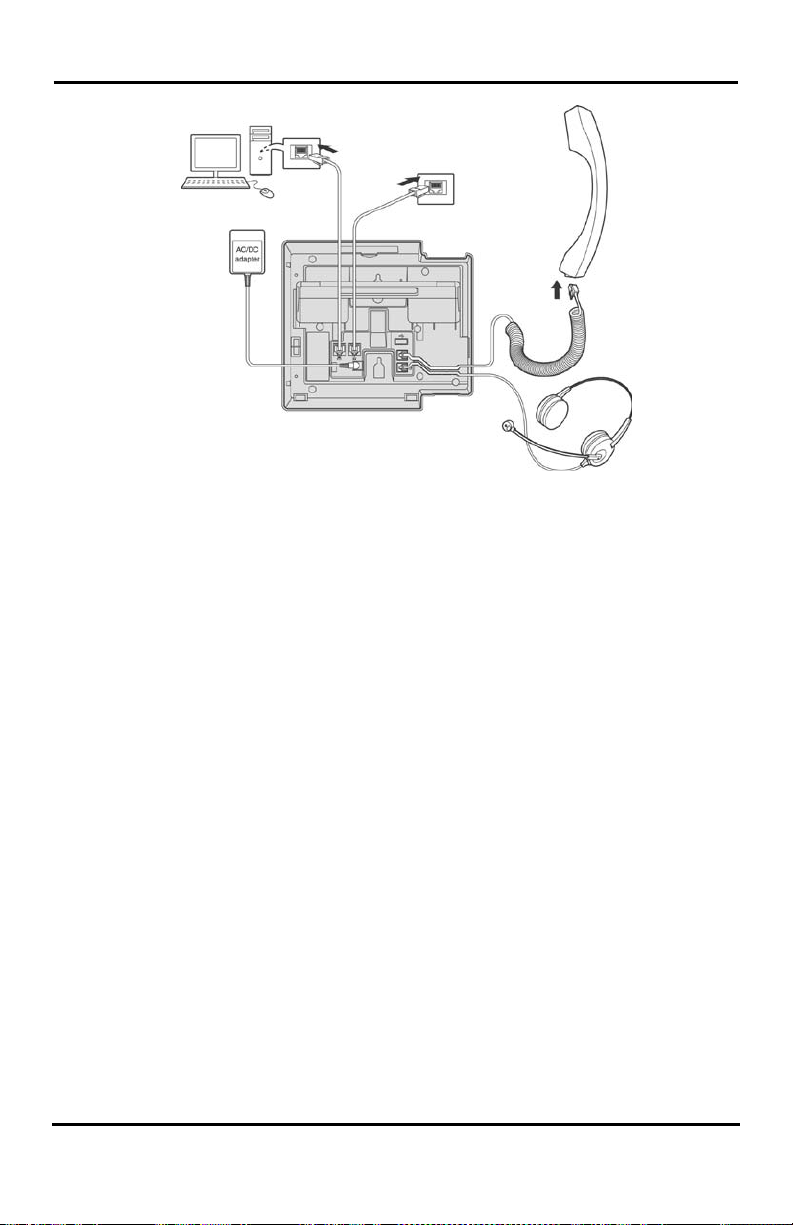
1.5 LIP-8012E & 8024E Phone Installation
LIP Gigabit Phones and Consoles can be connected to
any standard 10/100 Base-T Ethernet switch port
(shown in graphic). When connected to an 802.3af
compliant switch port (ex., POE8), LIP Gigabit Phones
and series consoles can derive power from the Ethernet
port. When LAN power is not available, the optional
AC/DC adaptor must be used. The following image
shows how to connect the handset, power cord, and
LAN cable to the phone.
1.5.1 Phone Connections
The LIP-8012E and LIP-8024E each have 2 RJ-45 and
10/100 Base-T LAN connection ports (refer to following
graphic). One port is for connecting to the LAN (‘D’ in
graphic), and the other can be connected to a desktop
data device such as a PC (‘B’ in graphic), or another
LAN interface terminal (refer to iPECS Hardware and
Installation Manual).
3
Page 11
LIP-8012E & LIP-8024E Gigabit Phone User Guide
(A)
(B)
(C)
(D)
iPECS LIP-8012E & 8024E Connections
1.5.2 Wiring Connectors
The LIP-8012E & LIP-8024E each have two (2) 10/100
Base-T Ethernet ports, a “LAN” port and a “PC” port.
An intelligent switch, which implements voice packet
priority, connects the two (2) ports. This permits the
LAN to be shared between the LIP Gigabit Phone and
the desktop PC or other Ethernet terminal without
significant affect on the voice or data traffic. The “LAN”
port is connected to the LAN as described above for the
single port Phones. The “PC” port is connected to a
desktop device using any standard straight through
category 5 cable.
1.5.3 Power
All LIP-8000 series phones can be powered by the
AC/DC Adapter-K- (48 VDC @0.3A) or over the LAN
cable using the POE8 or other 802.3af compliant switch.
If using the AC/DC Adapter, after connecting the Phone
to the LAN, the Adapter’s DC voltage plug is inserted
into the power-input jack in the underside of the Phone.
One end of the AC power cord is inserted into the
mating receptacle of the AC Adapter, and the other end
is inserted into the AC power outlet.
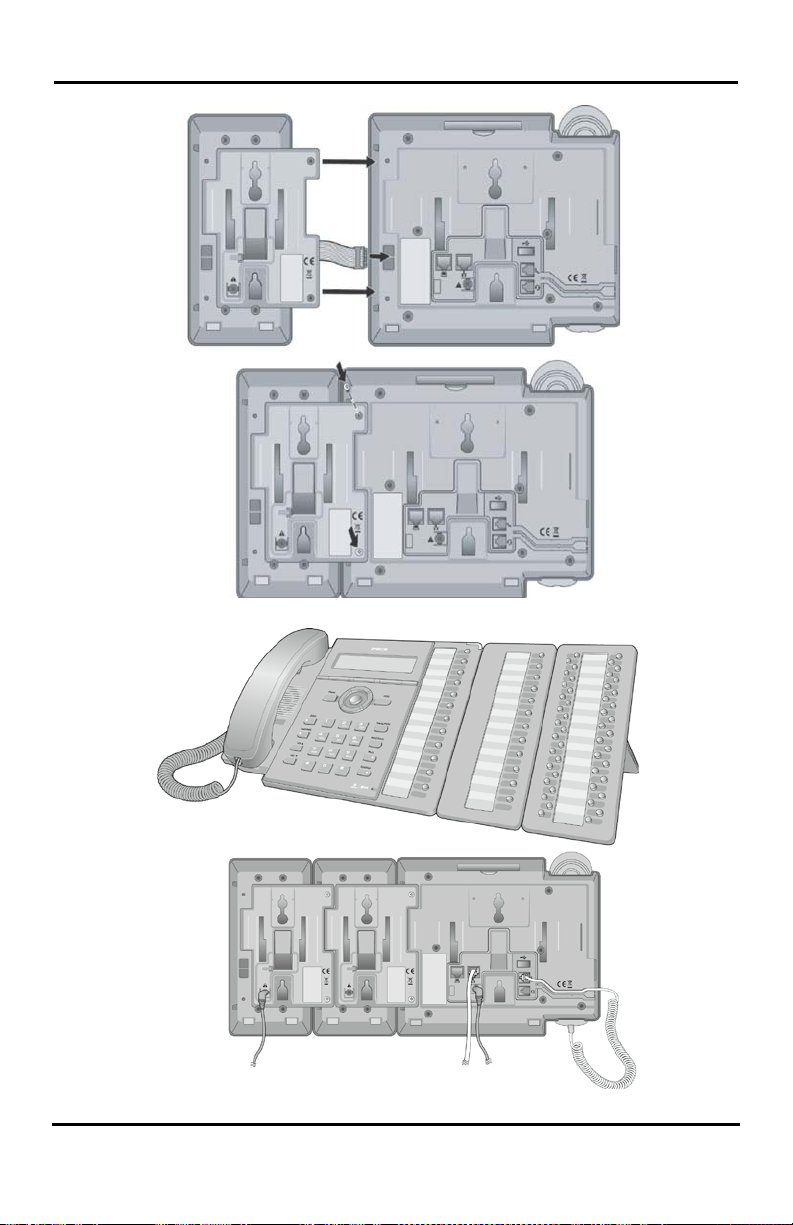
NOTE—LIP-8000 series consoles are powered through
the flat cable used to connect the console to the IP
4
Page 12

LIP-8012E & LIP-8024E Gigabit Phone User Guide
Gigabit phone (shown). Up to 2(without LIP-8048DSS)
or 4(with LIP-8048DSS) con soles can be chain-link
connected to the phone.
1.5.4 Wall Mount
The LIP-8000 series phones can be wall mounted as
needed. The following instructions describe how to
perform a wall mount installation. For more information
on installing your LIP-8000 series phone, refer to the
iPECS Hardware Description and Installation
Manual.
• Mark and drill two (2) 7mm holes for plastic wall anchors.
• Insert the two (2) anchors into the holes and insert and tighten
the each screw leaving about 2.5 mm (1/8-inch) of the screw
exposed.
• Slide the LIP-8000 phone over the screws and assure the
phone is secure.
• NOTE—It may be necessary to remove the phone and tighten
or loosen the screws for a secure mounting.
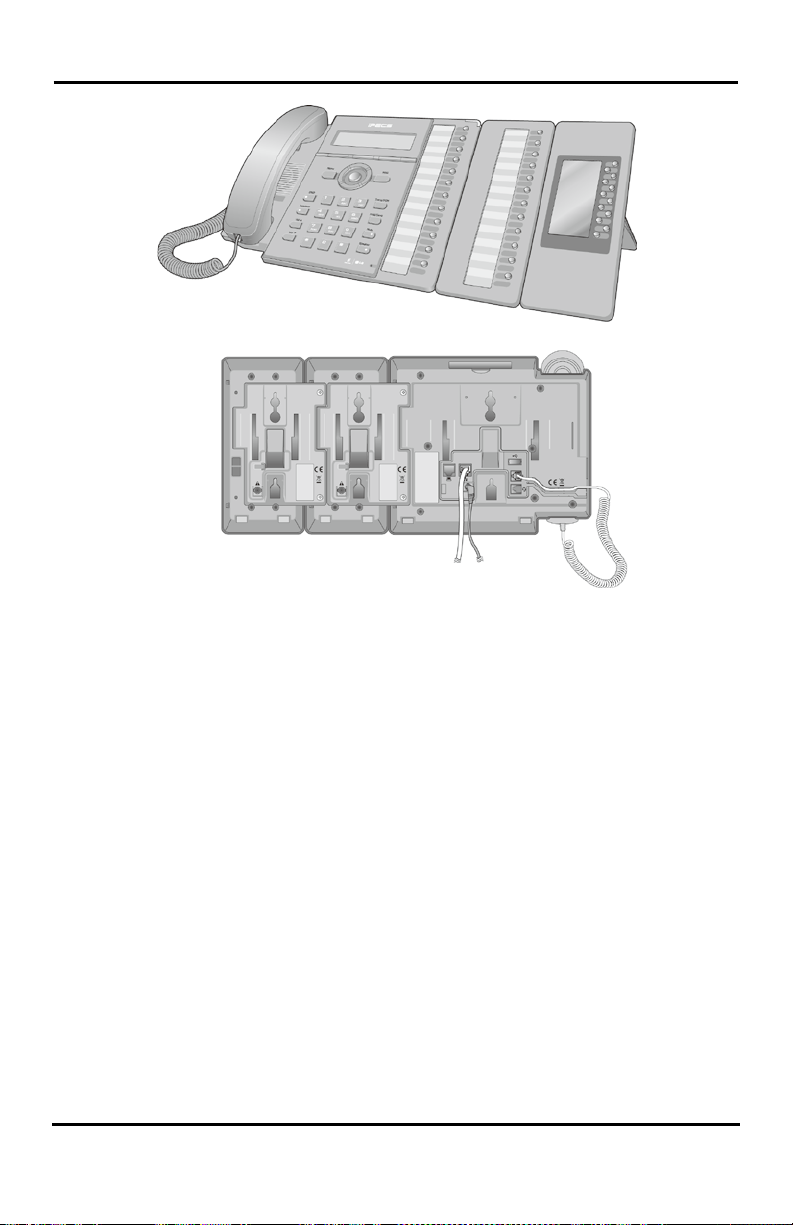
1.6 DSS(Direct Station Select) Console Installation
A DSS console can be installed with the LIP-8000E series
phone as shown in Figure. Up to 3 consoles may be daisy
chained as shown using the flat cable provided. Keep in
mind the following conditions when installing LIP-8000
DSS consoles.
1. The AC/DC adapter must be used for LIP-8048DSS.
2. Up to two (2) LIP-8012LSS and/or LI P-8012DSS can be
installed with LIP-8000E Phone.
3. The LIP-8048DSS must be separately pow er ed.
The available DSS is as follo ws:
1) LIP-8012DSS
2) LIP-8012LSS
3) LIP-8048DSS
5
Page 13
LIP-8012E & LIP-8024E Gigabit Phone User Guide
LIP-8000 DSS Installation
LIP-8000 DSS Installation (12DSS + 48DSS)
6
Page 14
LIP-8012E & LIP-8024E Gigabit Phone User Guide
LIP-8000 DSS Installation (12DSS + 12LSS)
7
Page 15
LIP-8012E & LIP-8024E Gigabit Phone User Guide
4. NETWORK CONFIG
BACK OK
1. PHONE SETTING
BACK OK
2. LCD,
Speakerphone
& Related
Featrues
In iPECS-LIK
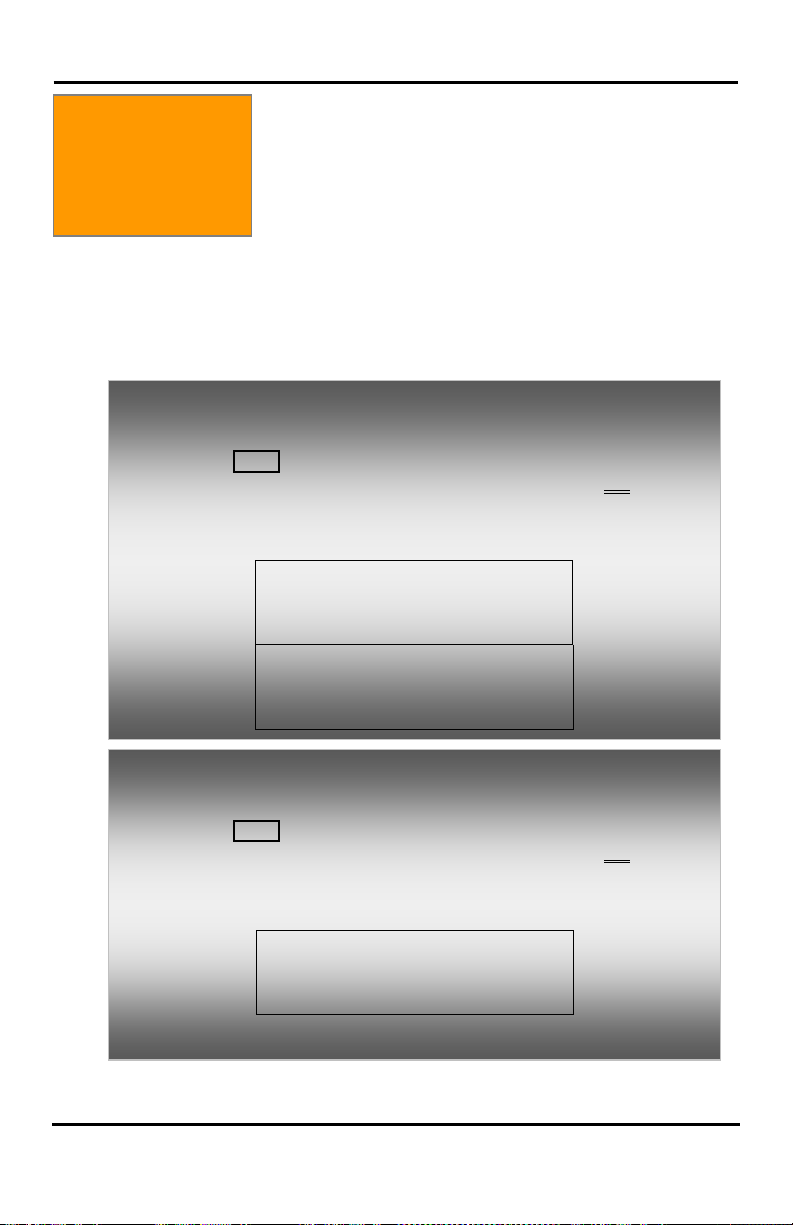
To activate the Display Menu:
• Press MENU button,
• Press the Navigation up/down buttons and press the OK Soft
button to select,
OR
• Dial the associated digit (Menu selections shown):
2. LCD, SPEAKERPHONE & RELATED FEATURES
2.1 Using the Display Menu
The Liquid Crystal Display (LCD) of the iPECS LIP8012E has three lines, and the LIP-8024E has four lines
of 24 characters each. The LCD is used to convey
information to you. It provides the date, time and station
number on the display while idle. It will also provide
called/calling name/number display, feature status and
an interactive menu to guide you through feature access
and User Program selections:
1. PHONE SETTING
2. CONFERENCE ROOM PGM
3. ICM SMS
BACK OK
0. ATTENDANT
•
In iPECS SBG-1000
To activate the Display Menu:
• Press MENU button,
• Press the Navigation up/down buttons and press the OK Soft
button to select,
OR
• Dial the associated digit (Menu selections shown):
2. NETWORK CONFIG
8
Page 16
LIP-8012E & LIP-8024E Gigabit Phone User Guide
BACK OK EXIT
BACK OK
BACK OK
7. BACKLIGHT
BACK OK
In iPECS-MG
To activate the Display Menu:
• Press MENU button,
• Press the Navigation up/down buttons and press the OK Soft
button to select,
OR
• Dial the associated digit (Menu selections shown):
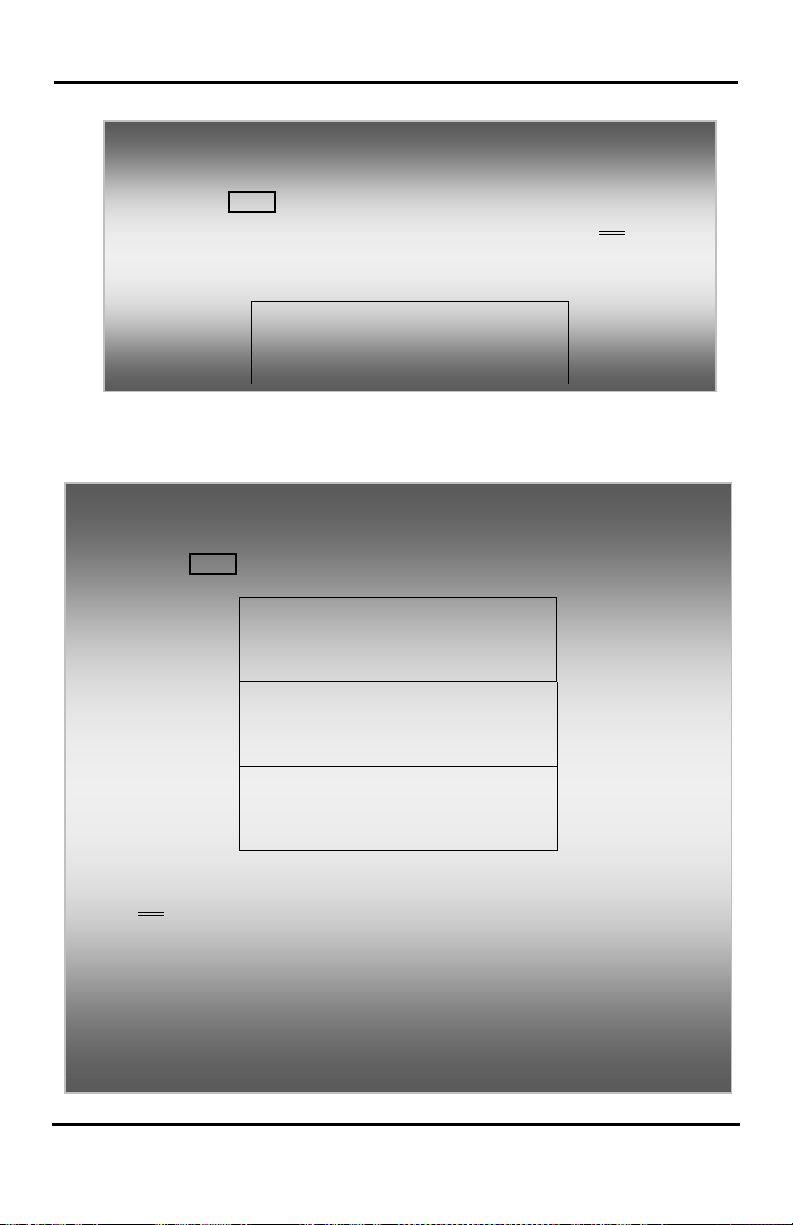
1. PHONE SETTING
2. NETWORK CONFIG
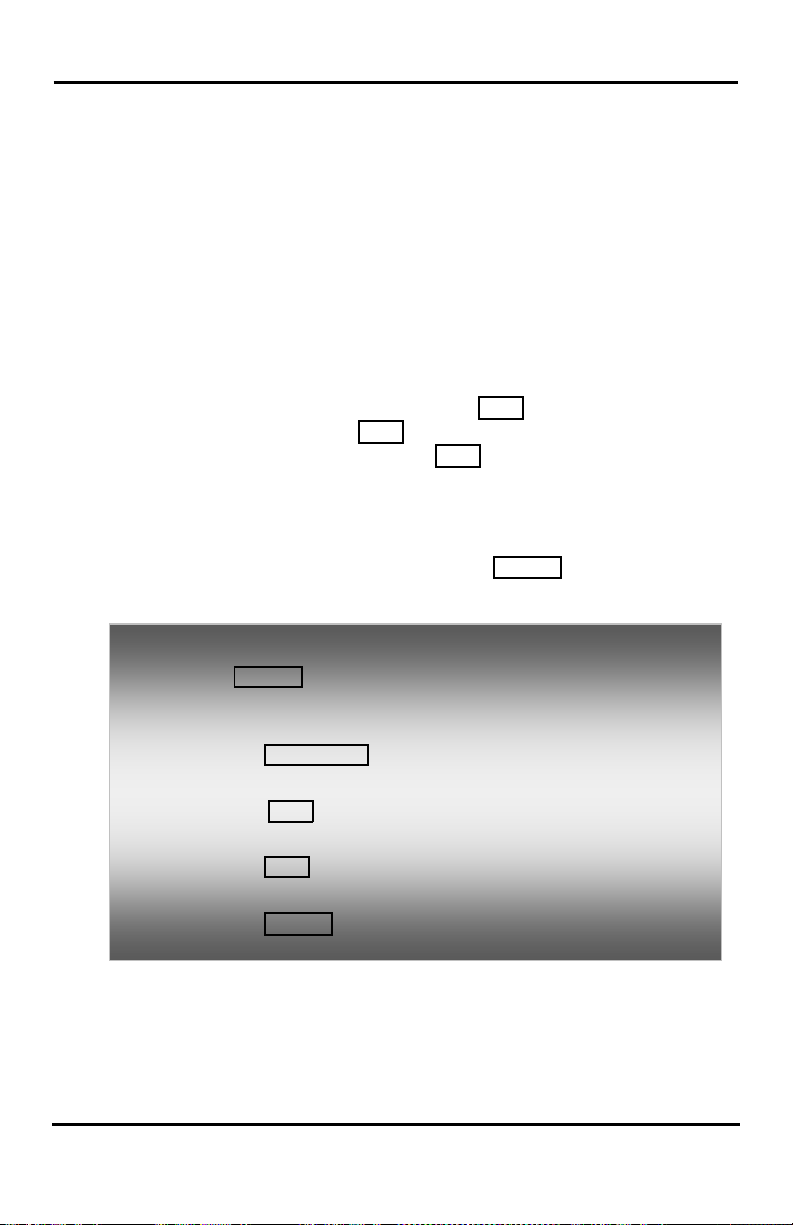
2.1.1 Phone Setting
In iPECS-LIK & iPECS SBG-1000
To configure the Phone:
• Press MENU button and 1 (Phone Setting),
• The following menu displays:
1. STATION NAME PROGRAM
2. ICM RING
3. CO RING
4. PASSWORD PROGRAM
5. LANGUAGE PROGRAM
6. STA RING DOWNLOAD
8. FONT PROGRAM
• Station Name Program—Input up to 12 digits using the keypad
(press DND button to backspace/delete a character), then press the
OK Soft button. To input characters:
• Press the second Soft button to select ABC> or abc> mode,
• To input the first character of a button, press the button 1 time (ex., for
‘a’, press 2 button once),
• To input the second character of a button, press the button 2 times
(ex., for ‘b’, press the 2 button tw ice.
• To input the third character of a button, press the button 3 times (ex.,
for ‘f’, press the 3 button three times.
•
9
Page 17
LIP-8012E & LIP-8024E Gigabit Phone User Guide
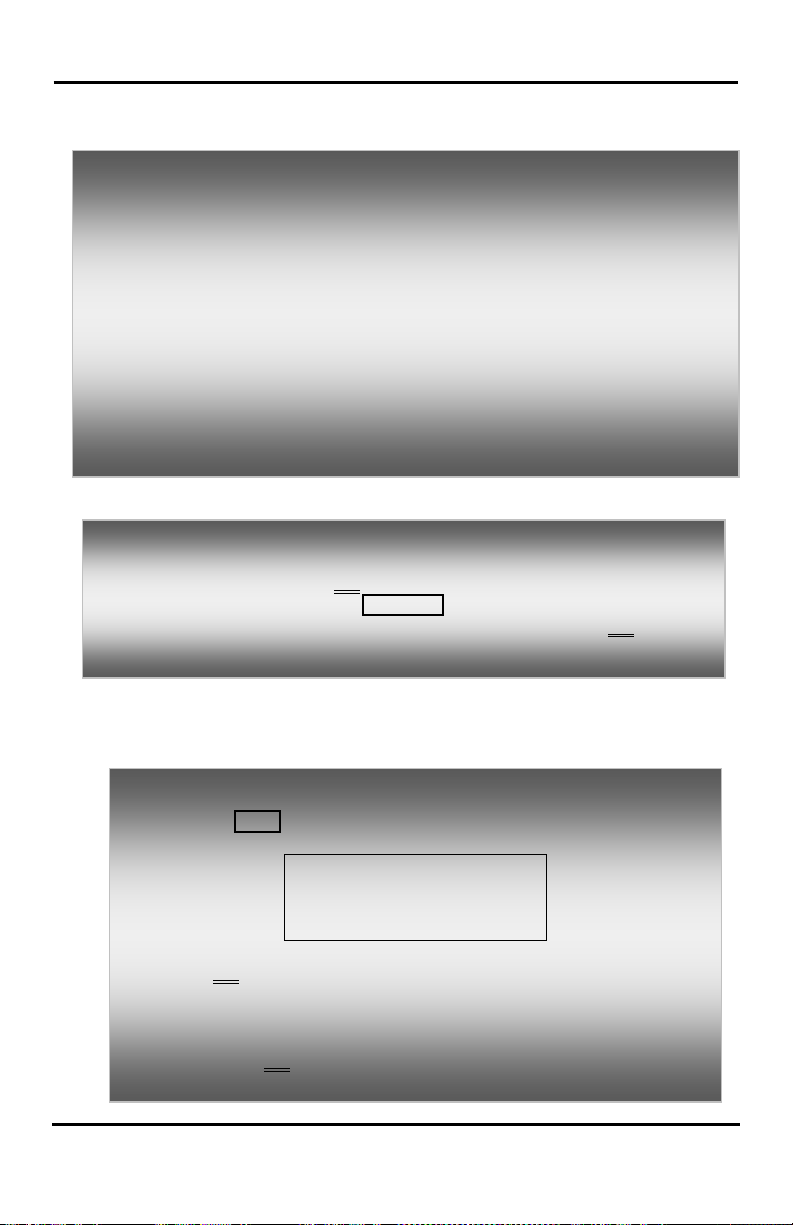
ICM Ring/CO Ring—
BACK OK
•
types, and press OK Soft button to select.
• Password Program—Enter the current password and press the OK
Soft button, then enter the new password and press the OK Soft
button.
• Language Program—Use Navigation up/down buttons to highlight
available languages supported, and press OK Soft button to select.
• Station Ring Download—Select the ring position (5-8) and select the
ring file; press the SAVE So ft button to select.
• Backlight—Use Navigation up/down buttons to select the operation of
the backlight, and press the OK Soft button to sel ect.
• Font Program— Use Navigation up/down buttons to select the LCD
Font, and press the OK Soft button to select.
In iPECS-MG
• Set Font Type—Select the font type(0 for new roman, 1 for
gothic), and press the OK
• Set Contrast—Press the VOL buttons or Use Navigation
up/down buttons to adjust the brightness, then press the OK Soft
button to select.
2.1.2 Conference Room (iPECS-LIK)
Use Next Soft button to move through list of ring
Soft button to select.
The User can create and delete Conference rooms.
To configure a Conference R oom:
• Press MENU button and 2 (Conference Room),
• The following menu displays:
• Press the Navigation up/down keys to highlight and then press
the OK
OR
• Dial the number associated to the selection,
• Enter the room number and dial the password,
• Press the OK Soft button.
1. CREATE CONF ROOM
2. DELETE CONF ROOM
•
Soft button to select,
10
Page 18

LIP-8012E & LIP-8024E Gigabit Phone User Guide
1. SEND MESSAGE
BACK OK
2.1.3 ICM SMS (iPECS-LIK)
The user can send SMS messages to other stations and
retrieve received SMS messages.
To retrieve a SMS message:
• Press MENU button and 3 (ICM SMS),
• The following menu displays:
2. IN BOX(03)
• Press the Navigation up/down keys to highlight and then press
the OK
Soft button to select,
OR
• Dial the number associated to the selection (2); the messages
will display.
To send a SMS message:
• Select Mode - select 1 if resending a previous message, or
select 2 if sending a new message,
• Enter the Station range (ex., 100-105=100105),
• Enter message (if in mode 2),
• Press the OK Soft button.
11
Page 19
LIP-8012E & LIP-8024E Gigabit Phone User Guide
MFIM #[1/2] ?
802.1x ?
[ENABLED] – CHANGE[#]
• LLDP?
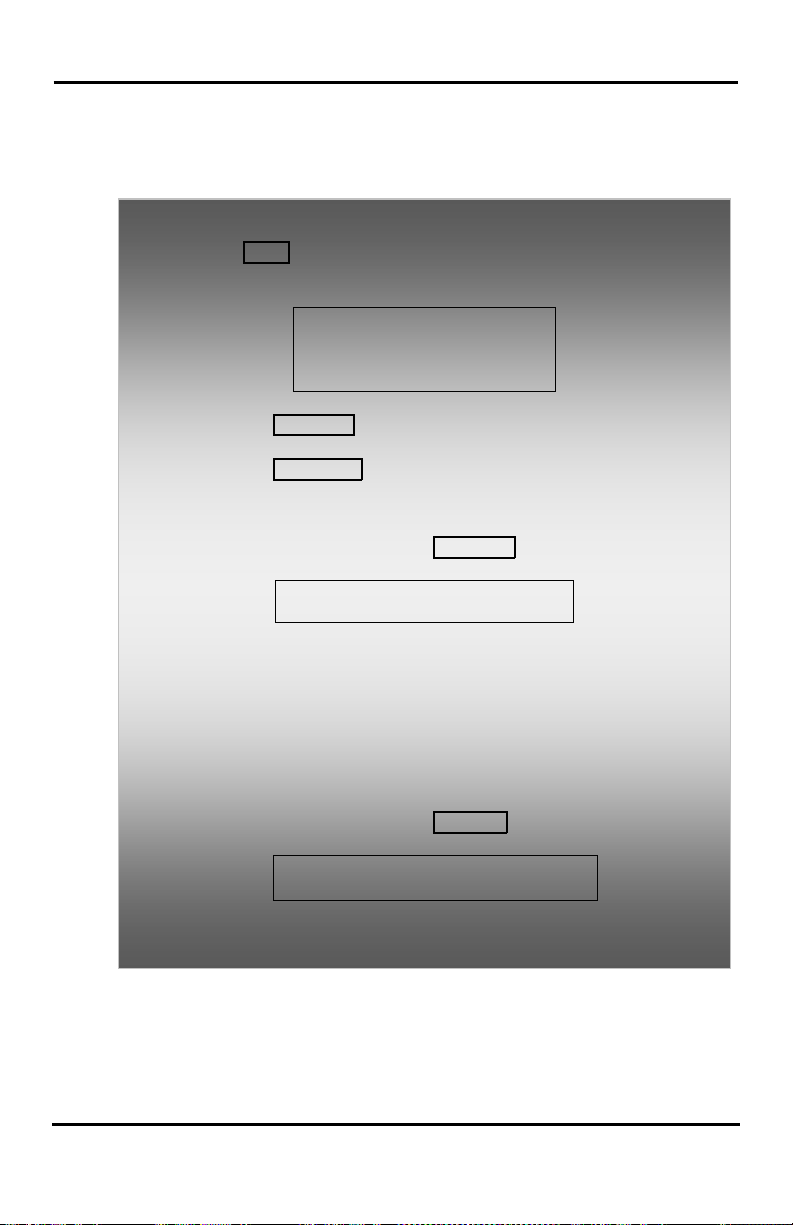
2.1.4 Network Config.
The User can review the current netw ork conf iguration
or modify a new phone network configuration.
To access Network Config. settings:
• Press MENU button and 4(iPECS-LIK)/2(iPECS SBG-1000,
iPECS-MG),
• Enter the password (default=147*); the following will display:
MFIM #1 - CHANGE[#]
• Press the # key to toggle between multiple profiles (MFIM),
• Press the VOL buttons to advance to the next network
configuration item,
• Press the HOLD/SAVE button to save each setting.
To configure 802.1x:
• In Network Config. Menu, use VOL buttons to locate the
802.1x configuration screen (shown),
• Enable in 802.1x menu and press the Hold button.
• Enter ID in 802.1x USER ID menu (It appears when 802.1x is
enabled.) and press the Hold button.
• Enter Password in 802.1x PASSWORD menu (It appears when
802.1x is enabled.) and press the Hold button.
To set LLDP:
• In Network Config. Menu, use VOL buttons to locate the
LLDP configuration screen (shown),
• Enable in LLDP? menu and press the Hold/Save button.
• [ENABLED] – CHANGE [#]
12
Page 20
LIP-8012E & LIP-8024E Gigabit Phone User Guide
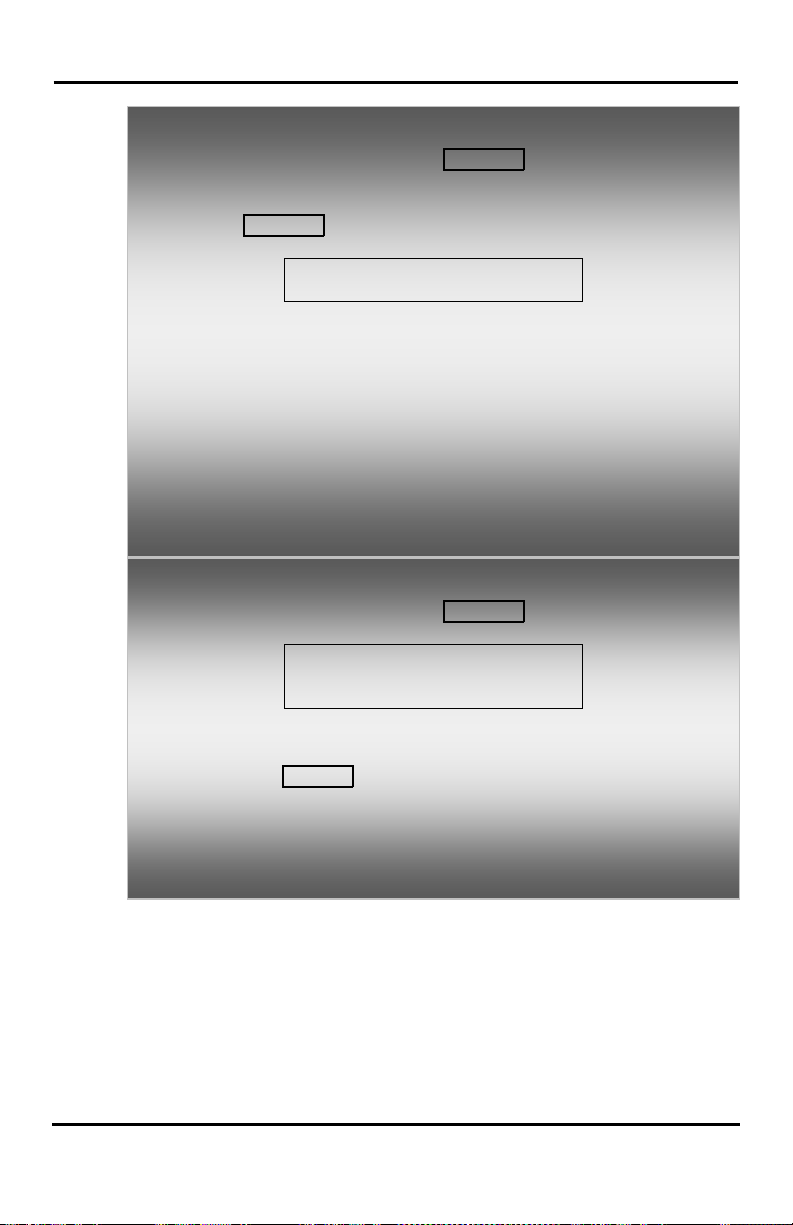
SET DEFAULT CONFIG(DOT:*)
[ENABLED] – CHANGE[#]
To configure VPN:
• In Network Config. Menu, use VOL buttons to locate the
DNS Address menu.
• Enter DNS address in DNS ADDRESS menu
• Use VOL buttons to locate the VPN configuration screen
(shown),
VPN ?
• Enable in VPN Menu and press the Hold button.
• Following steps are available when VPN is enabled.
• Enter VPN Server address in VPN SERVER IP menu and
press the Hold button.
• Enter TCP/UDP port number for both local and remote in VPN
PORT and press the Hold button. The default value is 1194.
• In VPN USER ID, enter ID and press the Hold button.
• In VPN USER PASSWORD, enter Password and press the
Hold button.
To set default Config. settin gs:
• In Network Config. Menu, use VOL buttons to locate the
Default Config. Screen (shown),
• Press the * key.
To exit Config. settings:
• Press the SPEAKER button,
• Press the * key to exit,
OR
• Press the # key to Reset/Reboot the phone with new setting.
•
13
Page 21
LIP-8012E & LIP-8024E Gigabit Phone User Guide
1. DATE/TIME SET
BACK OK
4. MONITOR CONF ROOM
BACK OK
1. SET ICM ONLY MODE
BACK OK
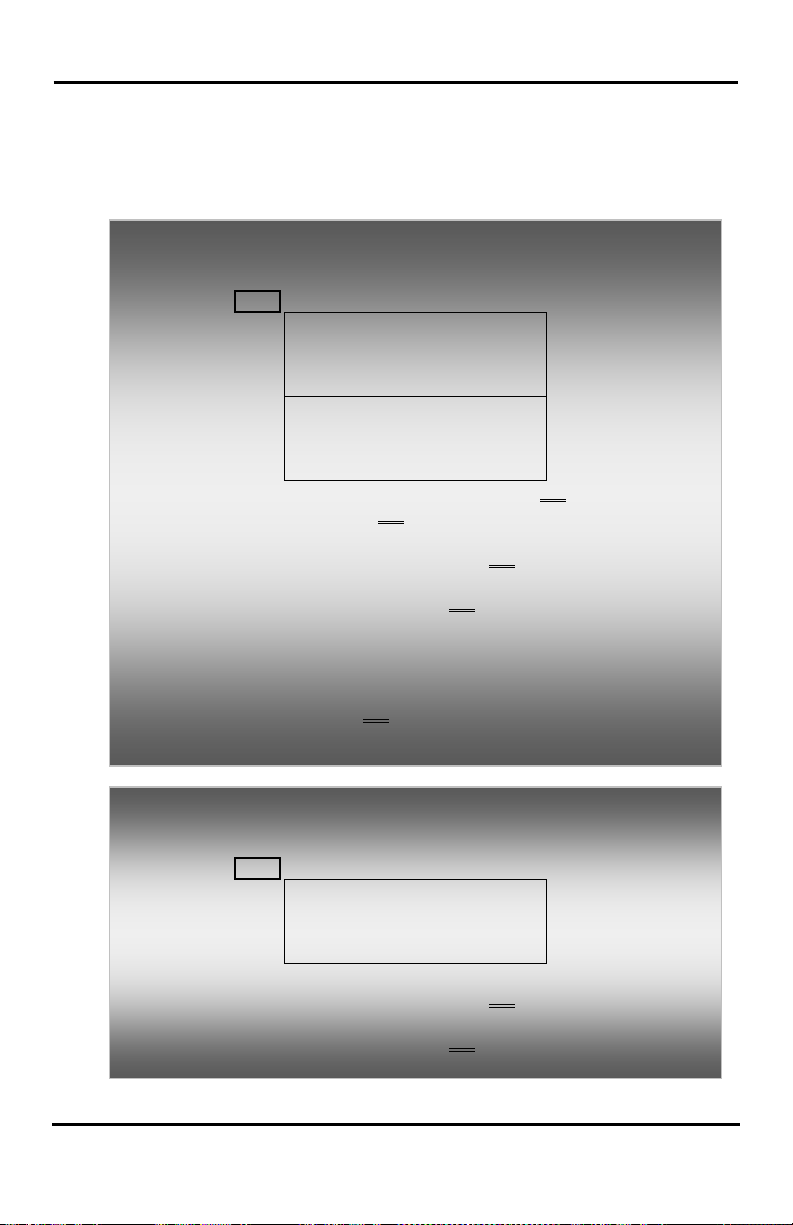
2.1.5 Attendant menu (iPECS-LIK & iPECS SBG-1000)
The Attendant menu is only available on the System
Attendant phone.
In iPECS-LIK
To access the Attendant menu:
• Press MENU button and 0 (Attendant); the following will display:
2. SET ICM ONLY MODE
3. RESTORE COS
5. DELETE CONF ROOM
• Date/Time Set—Enter mm/dd/yy, and press OK Soft button;
enter hh/mm, and press OK
• Set ICM Only Mode—Dial the Station Range for ICM only calls
(ex., 103-108=103108), and pr ess the OK
• Restore COS—Dial the Station Range for COS restoring (ex.,
103-108=103108), and press the OK
• Monitor Conference Room—Enter the Conference Room
number to view the number of attendees in the Conference
Room.
• Delete Conference Room—Enter the Conference Room
number and press the OK Soft button to delete.
Soft button.
Soft button.
Soft button.
In iPECS SBG-1000
To access the Attendant menu:
• Press MENU button and 0 (Attendant); the following will display:
• Set ICM Only Mode—Dial the Station Range for ICM only calls
(ex., 103-108=103108), and pr ess the OK
• Restore COS—Dial the Station Range for COS restoring (ex.,
103-108=103108), and press the OK
2. RESTORE COS
Soft button.
Soft button.
14
Page 22
LIP-8012E & LIP-8024E Gigabit Phone User Guide
2.2 Using the Speakerphone
Activate the iPECS Speakerphone at any time (except
forPaging) in place of lifting the handset to receive or
place calls.
Additionally, you may switch between the handset and
Speakerphone during a call. By keeping the handset
Off-hook, the Group Listen feature is activated, which
provides incoming audio over the speaker with outgoing
audio from the handset. This permits a local ‘group’ to
listen to both sides of the conversation without
interfering with the conversation.
While in a conversation using the Speakerphone, Mute
the microphone using the M
active, the MUTE button LED will be illuminated. To turn
off Mute, press the MUTE button again..
With Auto Speaker Select, activating or accessing a
feature by pressing its button will activate the
Speakerphone automatically.
When using a Headset, the SPEAKER button controls the
ON/OFF-hook state for the phone.
To use the Speakerphone to answer or place a call:
• Press SPEAKER, the phone goes off-hook and sends audio to
the speaker and the microphone.
To control the volume of the Speakerphone or handset:
• Press the ▼ VOLUME ▲ button.
To Mute the microphone:
• Select the MUTE button.
To turn off Mute (turn the microphone ON):
• Press the MUTE button.
To activate Group Listen while on an active handset call:
• Press the SPEAKER button.
UTE button. When Mute is
15
Page 23
LIP-8012E & LIP-8024E Gigabit Phone User Guide
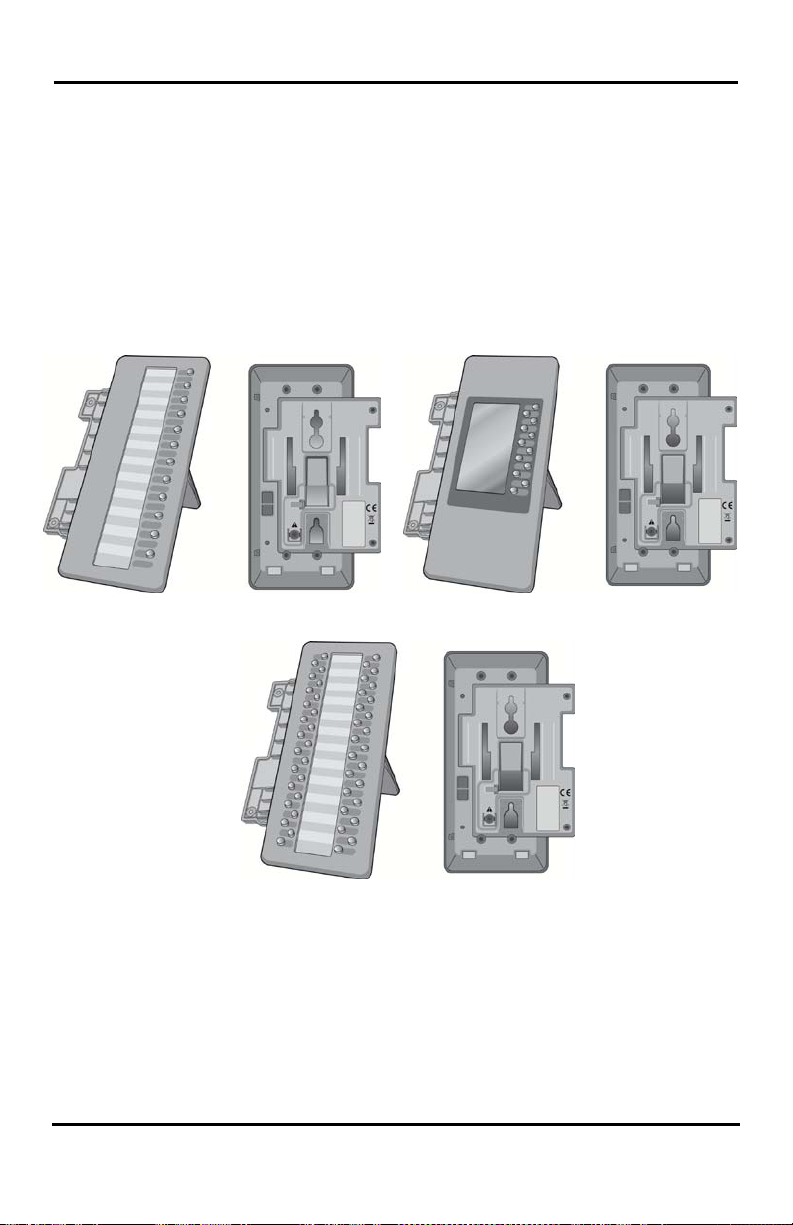
LIP-8012ESS
LIP-8012LDSS
LIP-8048DSS
2.3 Using a Serial DSS
The LIP-8012ESS, LIP-8012LS S, and LIP-8048DSS
can be connected with the LIP-8012E or LIP-8024E
using the RS-232 cable. Be sure to verify the serial
DSS and LSS capacities with the iPECS System to
ensure usability (refer to iPECS Manual). The following
graphics show the front and rear view of each.
NOTE—A Linked Pair slave station cannot use a serial
DSS. iPECS SBG-1000 does not support serial DSS.
16
Page 24

LIP-8012E & LIP-8024E Gigabit Phone User Guide
In iPECS-LIK
To use a Serial DSS:
• Verify the Station has Serial DSS Usage authority (Admin
PGM111-Flex21),
• Verify the DSS power is OFF (LIP-8048DSS only),
• Power-OFF the phone,
• Connect the serial DSS to the phone,
• Power-ON the phone and the DSS (LIP-8048DSS only),
• Program the DSS button using Web Admin Programming or
PGM115,
• Edit LSS label from Admin PGM129 (default label is provided
from MFIM).
To initialize Serial DSS Database:
• Enter Admin PGM111-Flex21,
• Select Station range to clear Serial DSS Database,
• Dial 0,
• Press the HOLD/SAVE button.
In iPECS-MG
To use a Serial DSS:
• Set the Station’s Serial DSS Usage Map (Admin PGM120Flex2),
• Verify the DSS power is OFF (LIP-8048DSS only),
• Power-OFF the phone,
• Connect the serial DSS to the phone,
• Power-ON the phone and the DSS (LIP-8048DSS only),
• Program the DSS button using Web Admin Programming or
PGM126,
• Edit LSS label from Admin PGM126.
To initialize Serial DSS Database:
• Clear the Station’s Serial DSS Usage Map (Admin PGM120Flex2),
• Admin PGM120-Felx3 to reset the phone.
17
Page 25

LIP-8012E & LIP-8024E Gigabit Phone User Guide
3. Receiving
Calls
3. RECEIVING CALLS
3.1 Answering a Call While Idle
There are 3 basic types of incoming calls;
internal/external ringing calls , Intercom Voice
Announce calls, and Hold recalls.
Your phone may be assigned Ringing Line Preference;
in this case, calls that ring are answered by lifting the
handset. Otherwise, you must press the flashing Flex
button.
External calls to an iPECS Phone will appear under the
CO/IP line or a LOOP button.
External calls are from CO lines or VoIP channels that
are programmed to ring at your phone. For external
calls, Delay Ring may be assigned allowing others to
answer the call before the call rings at your phone.
Calls can be forwarded in some manner from another
user; if providing call coverage for other users, you may
also receive Station Call Coverage calls.
Calls placed on Hold, including Transfers, parked calls,
etc. will recall if left on hold for too long.
ICM Voice Announce calls are answered based on the
ICM Signaling mode at the receiving phone; in Hands-
free (HF) mode, after the splash tone and
announcement, speak normally into the microphone. In
the Privacy (PV) mode, lift the handset to respond. The
ICM Signaling mode can be assigned in Station
Programming.
The LCD will display the calling number or, if available,
the name of the station or CO/VoIP line, CO Line Name
Display.
To answer a call ringing at your phone:
• Lift the handset or press the flashing Flex button (as needed),
To respond to an Intercom Voice Announce call:
• In HF mode, simply speak as normal into the microph one,
• OR
• In PV mode, lift the handset to respond.
the call will be connected.
18
Page 26
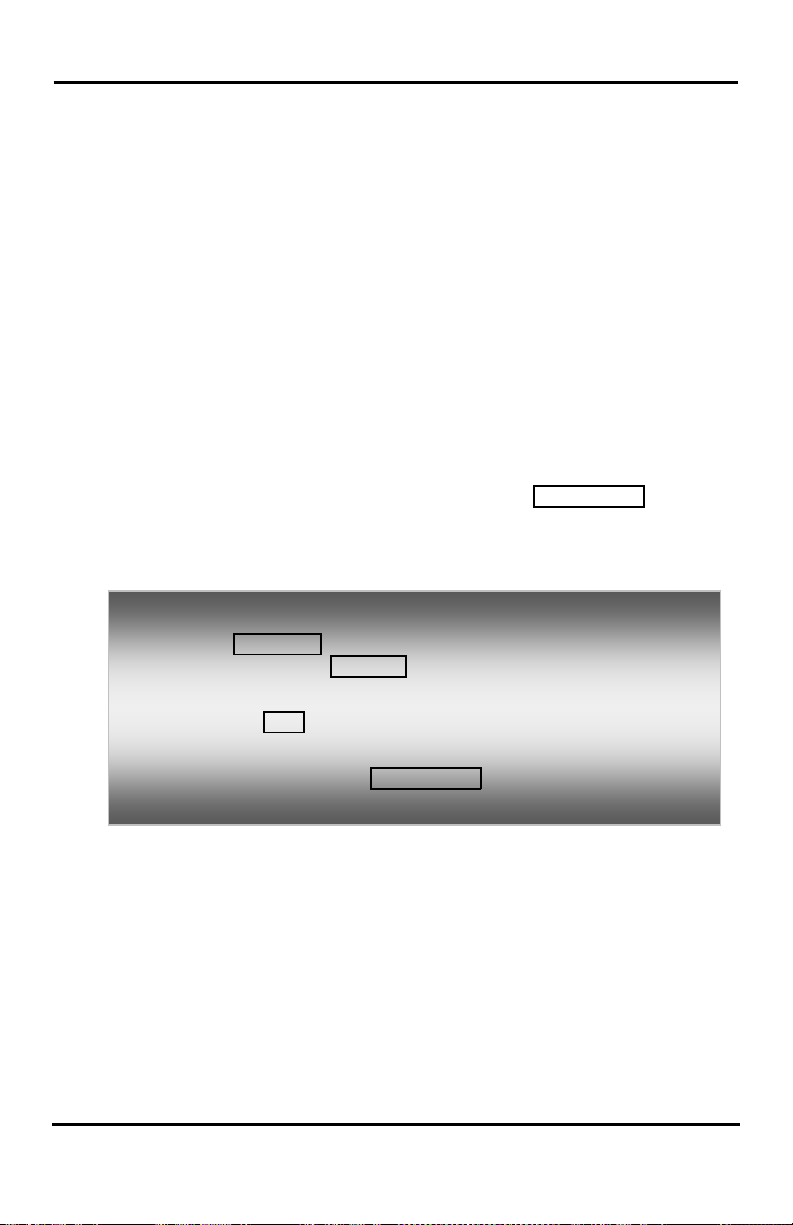
LIP-8012E & LIP-8024E Gigabit Phone User Guide
3.2 Responding to a Call While Busy
While you are busy on another call, you may receive a
Muted Ring, Camp-On tones, or Voice-Over
announcements. Muted Ring is provided over the
speaker of your Phone indicating a Call Waiting. You
also may receive Camp On tones, a burst of tones on
top of the existing call, as an indication of another call
waiting.
While busy, certain stations can activate Voice-Over to
your phone. In this case, audio is received from both
the active call and the Voice Over announcement at the
same time.
Respond to any of these Off-hook Signals in one of
several ways; place the existing call on Hold and
respond to the new incoming call, activate One-time
DND, send a Silent Text Message, or ignore the new
call.
Silent Text Message requires a TEXT MESSAGE button
(not available on a SLT or other non-display terminal).
The Attendant or Secretary may use Intrusion to
announce a call while you are busy.
To answer a Call Waiting:
• Press HOLD/SAVE, and/or
• Press the flashing CO/IP LINE button.
To activate One-time DND:
• Press the DND button.
To send a Silent Text Message:
• Press the programmed TEXT MESSAGE button,
• Select the desired message to send.
3.3 Using Answering Machine Emulation (AME)
When a call is connected to your voice mail, you can
screen the call as with a normal Answering Machine.
The caller’s voice is played over your speaker while the
message is being recorded. There are two methods of
notification and call screening provided, LED blink mode
or Speaker hearing mode.
Ring Mode (iPECS-LIK & SBG)/LED Blink Mode
(iPECS-MG)—the Answering Machine Emulation (AME)
Flex button will flash to notify you of a call. You may
press the Flex button to hear the caller as the voice
message is stored.
19
Page 27
LIP-8012E & LIP-8024E Gigabit Phone User Guide
Speaker Mode (iPECS-LIK & SBG)/Speaker Hearing
Mode (iPECS-MG)—when the call is sent to the voice
mailbox, the caller’s voice is automatically broadcast
over the speaker of your iPECS Phone.
You may terminate screening, leaving the caller in voice
mail to record a message, talk with the caller and record
the conversation in the mailbox, or answer the call and
disconnect the Voicemail. The AME feature is only
available when using the iPECS VMIB Voice Mail; a
MUTE and AME button should be programmed (refer to
Appendix A User Program Codes).
To screen a call in Ring mod e (iPECS-LIK & SBG)/LED blink
mode (iPECS-MG):
• Press the flashing AME button, the caller’s voice is broadcast over
the station speaker and stored in the voice mailbox (in the Speaker
hearing mode, broadcast is automat ic).
To stop the voice broadcast and leave the caller in Voice Mail:
• Press the illuminated SPEAKER button.
To talk with the caller and record the conversation in Voice
Mail:
• Press the MUTE button.
To answer the call and cancel the voice message recording:
• Press the illuminated AME button, the caller is connected and the
Voice Mail disconnected.
20
Page 28
LIP-8012E & LIP-8024E Gigabit Phone User Guide
3.4 Differential Ring Signals
When multiple phones in a small area ring, it can be
difficult to tell which are ringing. The iPECS Phone has
14 Ring Tones available for differentiating one phone’s
ringing from another. Four of the tones are stored in the
phone permanent memory; the remaining ten tones are
in the system memory. Four of these ten can be
downloaded into the phone memory for use as the 5
8th Ring Tone.
In iPECS-LIK
To download a Ring Tone from System memory:
• Press TRANS/PGM,
• Dial 1 for Ring Tones,
• Dial 5 for Ring Tone download,
• Dial the phone’s memory location to receive the tone (5-8),
• Dial 0-9 for the desired tone number; a confirmation tone is heard,
• Press HOLD/SAVE to download.
To select a Ring Tone from phone memory:
• Press the TRANS/PGM button,
• Dial 1 for Ring Tones,
• Dial 1 or 2 for Internal or External ring,
• Dial 1-8 for the desired tone number; a confirmation tone is heard,
• Press HOLD/SAVE to make the selection.
th
to
In iPECS-MG
To download a Ring Tone from System memory:
• Press TRANS/PGM,
• Dial 2 for Ring Tones,
• Dial 3 for Ring Tone download,
• Dial the phone’s memory location to receive the tone (5-8),
• Dial 0-9 for the desired tone number; a confirmation tone is heard,
• Press HOLD/SAVE to download.
To select a Ring Tone from phone memory:
• Press the TRANS/PGM button,
• Dial 2 for Ring Tones,
• Dial 1 or 2 for Internal or External ring,
• Dial 1 for Keyset Ring Source,
• Dial 1-8 for the desired tone number; a confirmation tone is heard,
• Press HOLD/SAVE to make the selection.
21
Page 29

LIP-8012E & LIP-8024E Gigabit Phone User Guide
3.5 Answering Calls at Night
In the Night mode, Loud Bell C ontr ol may be used to
send ring signals to external bells. You may answer
these calls with Universal Night Answer (UNA).
To answer a call ringing during night mode:
• Lift the handset,
• Dial 567(iPECS-Lik)/587(iPECS-MG) (UNA code).
3.6 Answering Calls to Other Stations
When nearby stations are ringing, you may pick-up
(answer) the call. Select to answer a call ringing at a
specific station (Directed Call Pick-Up) or you may
choose to answer the oldest call ringing to your station
group (Group Call Pick-Up). Assign a Flex button with
the Group Call Pick-Up code (566) for one-touch access.
NOTE—Pick-Up will not answer calls on the ringing
station Private Line unless the line appears on your
phone.
To answer a call ringing at another station:
• Lift the handset,
• Dial 7 (Directed Call Pick-Up code),
• Dial the Intercom Number of the ringing station; the call will be
connected.
To answer a call ringing at a station in your group:
• Lift the handset,
• Dial 566 (Group Call Pick-Up code), the call is connected.
3.7 Using Do-Not-Disturb (DND) to Block Incoming Calls
Activate Do-Not-Disturb when you wish to not be
interrupted; the phone will block incoming calls. Internal
callers will receive a fast busy tone and the display will
show the DND status. Activate Do-Not-Disturb while
ringing(One-Time DND); Ringing terminates and the
caller will get a fast busy tone and it requires a DND
button.
When an Executive activates DND, calls are forwarded
to the paired Secretary automatically.
22
Page 30

LIP-8012E & LIP-8024E Gigabit Phone User Guide
Press the DND button.
The Attendants and Secretary may be able to activate
DND Override and Intrude on an active call. The
Attendants may also cancel DND at other stations.
To toggle DND ON and OFF:
•
3.8 Forwarding Calls
3.8.1 Forwarding calls to another Station or Voice Mail
Incoming calls may be diverted to other resources of the
system. Resources include other stations, VMIM/VSF
Voice Mail and External Voice Mail. Your LCD and
the LCD of the forward receiver will both indicate the
forward status.
Call Forward can be activated from your phone or from
a different station (Call Forward, Remote). You may
define the conditions or ‘type of forward’ as below:
1: Unconditional—all calls to the station, except
recalls, are forwarded.
2: Busy—Immediately forwards all calls, except
recalls, when the station is busy.
3: No Answer—forwards all calls to the station,
except recalls, when the station does not answer
within the No Answer timer.
4: Busy/No Answer—forwards calls if the station is
busy or does not answer within the No Answer
timer.
When you forward calls from a different station, you
may need to enter your Authorization Code.
Calls on a Private Line will not forward except to a
station with an appearance of the Private Line or to
Voice Mail.
23
Page 31

LIP-8012E & LIP-8024E Gigabit Phone User Guide
To activate Call Forward from your phone to another
phone or internal system resource:
• Lift the handset,
• Press the Fwd Soft button,
• Dial the type of forward code 1-4,
• Dial the destination number.
To deactivate Call Forward from your phone:
• Lift the handset,
• Press the Fwd Soft button,
• Dial #.
To activate Call Forward for your phone from a different
phone within the System (Call Forward, Remote):
• Lift the handset,
• Press the Fwd Soft button,
• Dial 0 (Remote Call Forward code),
• Dial your Authorization code (Station number & Password),
• Dial the ‘type of forward’ code 1-4,
• Dial the destination number.
To deactivate Call Forward, Remote:
• Lift the handset,
• Press the Fwd Soft button,
• Dial 0 (Remote Call Forward code),
• Dial your Authorization code (Station number & Password),
• Press the # key.
3.8.2 Forwarding calls to an external number
Forward calls to an external destination; calls can be
forwarded from an internal station or a remot e locat ion.
You may define the conditions or ‘type of forward’ as
listed below:
1: Unconditional—all calls to the station, except
recalls, are forwarded.
2: Busy—Immediately forwards all calls to the station,
except recalls, when station is busy.
3: No Answer—forwards all calls to the station,
except recalls, when the station does not answer
within the No Answer timer.
4: Busy/No Answer—forwards calls if the station is
busy or does not answer within the No Answer
timer.
24
Page 32

LIP-8012E & LIP-8024E Gigabit Phone User Guide
When you forward calls from a different station or a
remote location, you may need to enter your
Authorization Code. In addition, from a remote location,
you must access the system through a DISA enabled
CO line.
In iPECS-LIK & iPECS SBG-1000
To activate Call Forward, Off Premise (forward to an
external number) from your phone:
• Lift the handset,
• Press the Fwd Soft button,
• Dial the type of Forward code (1-4),
• Press Speed Soft button,
• Dial Speed Dial bin number,
• Replace the handset, return to idle.
To activate Call Forward, Off Premise (forward to an
external number) from a different phone within the
System:
• Lift the handset,
• Press the Fwd Soft button,
• Dial 0 (Remote Call Forward code),
• Dial your Authorization code (your Station number +
Password),
• Dial the type of Forward code (1-4),
• Press Speed Soft button,
• Dial Speed Dial bin number,
• Replace the handset, return to idle.
To activate Call Forward, Off Premise (forward to an
external number) from a remote location:
• Lift the handset,
• Dial the telephone number of a DISA assigned CO line,
• While receiving dial-tone, dial 554 (Call Forward feature code),
• Dial your Authorization Code (your Station number +
Password),
• Dial the type of Forward code (6-9),
• Dial Speed Dial bin number,
• Replace the handset, return to idle.
25
Page 33

LIP-8012E & LIP-8024E Gigabit Phone User Guide
In iPECS-MG
To activate Call Forward, Off Premise (forward to an
external number) from your phone:
• Lift the handset,
• Press the Fwd Soft button or dial 554
• Dial the type of Forward code (1-4),
• Dial Telephone number,
• Replace the handset, return to idle.
To activate Call Forward, Off Premise (forward to an
external number) from a different phone:
• Lift the handset,
• Press the Fwd Soft button or dial 554,
• Dial 0 (Remote Call Forward code),
• Dial your Authorization code (your Station number +
Password),
• Dial the type of Forward code (1-4),
• Dial Telephone number,
• Replace the handset, return to idle.
3.8.3 Forwarding callers to a Text Message
Using an iPECS Phone, the system can be setup to
return a ‘Text Message’ to internal callers. When calling
your Station, internal callers will automatically receive
the selected message or you can send a text message
you select in response to an internal call, Silent Text
Message.
There are 11 Custom Display Messages each up to
24 characters. Ten can be assigned by the Attendant
and one assigned by you.
In addition, there are ten fix Pre-Defined Text Messages;
some allow auxiliary input for time, date, etc. (as shown
in message list).
In iPECS-LIK
Message 01: LUNCH RETURN AT hh:mm
Message 02: ON VACATION
RETURN AT DATE mm:dd
Message 03: OUT OF OFFICE
RETURN AT TIME hh:mm
Message 04: OUT OF OFFICE
RETURN AT DATE mm:dd
Message 05: OUT OF OFFICE
RETURN UNKNOW N
26
Page 34

LIP-8012E & LIP-8024E Gigabit Phone User Guide
Message 06: CALL (enter up to 17 digits)
Message 07: IN OFFICE STA xxxx
Message 08: IN MEETING
RETURN AT TIME hh:mm
Message 09: AT HOME
Message 10: AT BRANCH OFFICE
In iPECS-MG
Message 1: LUNCH RETURN AT hh:mm
Message 2: ON VACATION
RETURN AT DATE mm:dd
Message 3: OUT OF OFFICE
RETURN AT TIME hh:mm
Message 4: OUT OF OFFICE
RETURN AT DATE mm:dd
Message 5: OUT OF OFFICE
RETURN UNKNOW N
Message 6: CALL (enter up to 17 digits)
Message 7: IN OFFICE STA xxxx
Message 8: IN MEETING
RETURN AT TIME hh:mm
Message 9: AT HOME
Message 0: AT BRANCH OFFICE
* User Custom Message
# Deactive
27
Page 35
LIP-8012E & LIP-8024E Gigabit Phone User Guide
Q – 11
1 – 10
A - 21
2 - 20
D - 31
3 - 30
G – 41
4 - 40
J - 51
5 - 50
M - 61
6 - 60
P - 71
7 - 70
W - 91
9 - 90
*3 - ,
In iPECS-LIK
To activate Custom or Pre-Defined Message Forward:
• Press TRANS/PGM,
• Dial User Program feature code 51,
• Dial the two-digit text Message code (00-20),
• Dial any auxiliary input for messages 01-04 and 06-08,
• Press HOLD/SAVE, forward confirmed.
To cancel activated Message:
• Press the Fwd Soft button,
• Dial #.
To program the Station Custom Message (00) at your
station:
• Press TRANS/PGM,
• Dial User Program feature code 52,
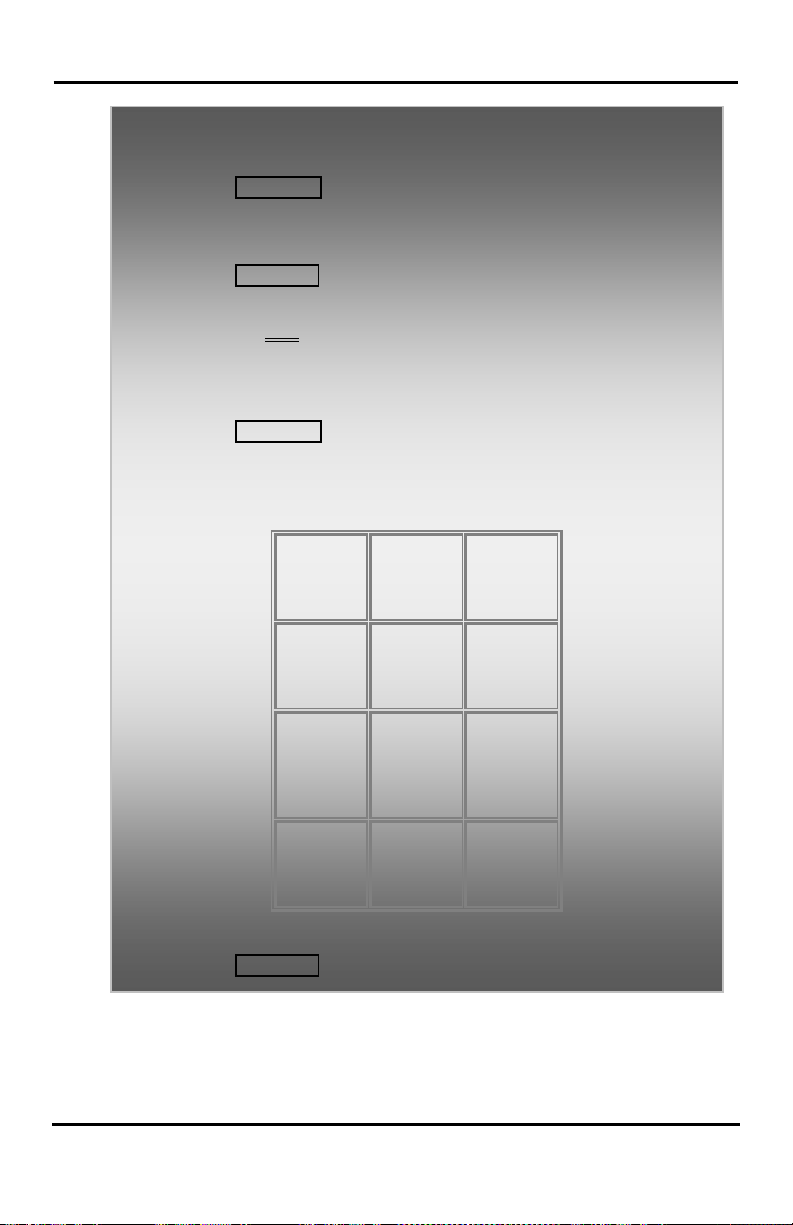
• Enter Message contents, up to 24 characters, using the
following Character Entry Chart:
•
Z – 12
. – 13
H - 42
I - 43
R - 72
S - 73
Q - 7*
*1 Blank
*2 - :
• Press HOLD/SAVE, to save the message.
B - 22
C - 23
K - 52
L - 53
T - 81
U - 82
V - 83
8 - 80
0-00 #
Character Entry Chart
28
E - 32
F - 33
N - 62
O - 63
X - 92
Y - 93
Z - 9#
Page 36
LIP-8012E & LIP-8024E Gigabit Phone User Guide
Letter Type
Uppercase
(ABC)
Lowercase
(ABC)
Button depressions
1 2 3 4 1 2 3 4 1
1 @ : / < @ : / < 1 2 A B C a b c 2 3 D E F d e f
3
5 J K L j k l 5 6 M N O m n o 6 7 P Q R S p q r s 7 8 T U V t u v 8 9 W X Y Z w x y z 9 0 . , ? ! . , ? ! 0 * * * * # # #
#
In iPECS-MG
To activate Custom or Pre-Defined Message Forward:
• Press TRANS/PGM,
• Dial User Program feature code 41,
• Dial the one-digit text Message code (0-9),
• Dial any auxiliary input for messages 1-4 and 6-8,
• Press HOLD/SAVE, forward confirmed.
To cancel activated Message:
• Press the Fwd Soft button,
• Press FWD button or dial 554,
• Dial #.
To program the Station Custom Message (00) at your
station:
• Press TRANS/PGM,
• Dial User Program feature code 42,
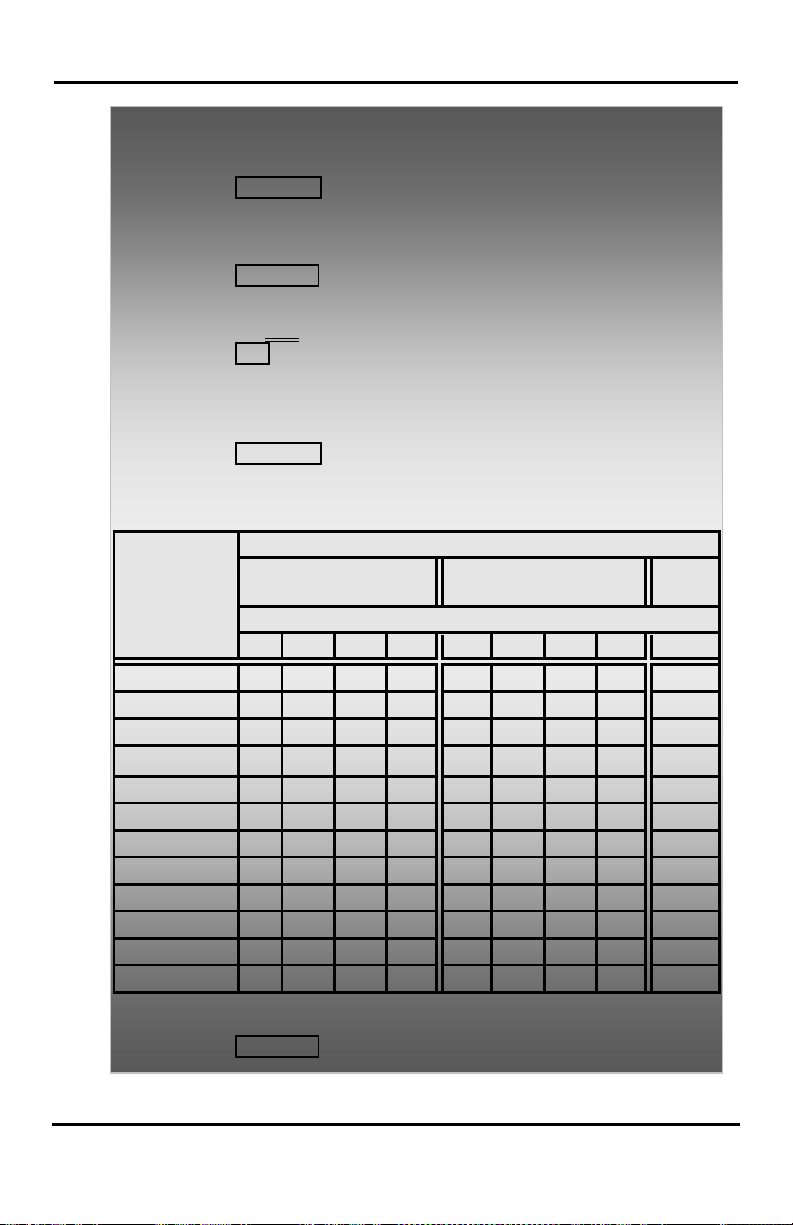
• Enter Message contents, up to 24 characters, using the
following Character Entry Chart:
Dial Pad
Num
button
4 G H I g h i 4
Character Entry Chart
• Press HOLD/SAVE, to save the message.
29
Page 37

LIP-8012E & LIP-8024E Gigabit Phone User Guide
4. Placing
4. PLACING A CALL
Calls
4.1 Internal Calls
You can place calls to other stations in the system over
the Intercom. The call will ring, or for an ICM Voice
Announce call, a splash tone will be heard. Ring or
Voice Announce is normally determined by settings at
the called station but you may change this by dialing ‘#’
after placing the call. By changing the mode, a Voice
Announce call will ring or a ringing ICM call will allow
Voice Announce (toggle).
You can assign a Flex button for Direct Station
Selection/Busy Lamp Field (DSS/BLF). The
button allows you to call another station with the single
of a button. The button LED will display the other
station’s status (ON=busy, OFF=idle).
When you go off-hook, you may connect to another
station or system resource automatically. This Prime
Line Preference may be immediate or delayed allowing
you to take other actions during the delay. Otherwise,
you may press another Flex button before going offhook to override Prime Line Preference.
If you go off-hook and take no action, Intercom dial-tone
will time-out, and after the Howler tone is received,
your phone will be placed out-of-service in Intercom
Lock-Out; you then must hang-up to return the phone
to an idle state.
DSS/BLF
To place an Intercom call:
• Lift the handset,
• Dial the Intercom number of the desired station,
• When the call is answered or the Splash tone is heard, begin
speaking with the called party.
4.1.1 Using Camp-On when calling a busy station
If the called party is busy, you may activate Camp-On,
Callback or Voice Over at th e station. Camp-On
allows you to wait off-hook for the call ed stat ion to
answer. Callback allows you to hang-up, and when the
busy station returns to an idle state, the system will call
your Station; after you answer the callback, the system
will call the previously busy station.
30
Page 38

LIP-8012E & LIP-8024E Gigabit Phone User Guide
If you are the Attendant or Secretary, you may activate
Intrusion. You may also use Step Call; dial the next
station by dialing the last digit of the Intercom number.
To Camp-On (wait off-hook) for a busy station:
• Press * and await an answer.
To request a Callback (wait on-hook) for a busy station:
• Press the MSG button and hang-up.
To make a Voice Over announcement to a busy station:
• Dial #,
• After the Splash tone is heard, begin speaking.
4.1.2 Leaving a Message Wait
If the called user does not answer or is in DND mode,
you may leave a Message Wait. The called user will
receive a Message Wait indication; the messa ge ico n
will be displayed in the LIP-8024E. If the ring/message
LED is set to Message Wait Indication, the
ring/message LED will flash.
To activate Message Waiting:
• Press the MSG button and hang-up.
4.2 External Calls
4.2.1 Placing external CO/VoIP calls
External calls are placed on CO/IP lines. These ‘lines’
are accessed either using a button on the iPECS Phone
assigned as a CO/IP line or using dial codes. The
CO/IP lines are grouped for different types of calls, local,
long distance, etc. Using the CO/IP line group code,
you will be able to access any line from the group. A
Flex button on the iPECS Phone assigned as a
button lets you access a line from a group. Dial codes
for access to CO/IP lines are:
Individual CO/IP line access—
88 + Line number (01-10 for iPECS SBG-1000, 01-42
for iPECS-50 & 100, 001-200 for iPECS-300, 001400 for iPECS-600, or 001-600 for iPECS-1200).
31
LOOP
Page 39

LIP-8012E & LIP-8024E Gigabit Phone User Guide
or
88 + Line number (01-80 for iPECS-MG100, or 001-240
for iPECS-MG300).
CO/IP Group access—
801-805 for iPECS SBG-1000, 801-820 for iPECS- 50 &
100, 801-872 for iPECS-300 & 600, or 8900`-89100
for iPECS-1200
or
801-824 for iPECS-MG100, or 801-872 for iPECS-
MG300
Any CO/IP Line access—
9
When dialing on a CO line which uses pulse style
signals, you may activate Dial Pulse to Tone
Switchover changing to DTMF style dialing (for banking
services, etc.) .
When placing an IP call, you must dial an IP address
using the ‘*’ key in place of the dot.
If Least Cost Routing is set-up, the number you dial
will be analyzed and the system will place the call on
the least expensive route.
You may be assigned Dialing and/or CO/IP Line
Access Restrictions, in which case you will receive
error tone if you attempt to dial or access a restricted
number/CO/IP line. CO/IP line and Station Class Of
Service (COS), which establish dialing restrictions, may
vary during Day and Night operation (Day/Night COS).
You may need to enter an Authorization code before
placing calls, in which case you will receive a second
dial tone.
Your external calls may be subject to Call Time
Restrictions, you will receive a Call Warning Tone
prior to disconnect.
NOTE—In the event of an emergency, assigned
Emergency numbers (ex., a 911 call) may be dialed
from any station in the System, regardless of a
Station’s dialing restrictions (COS).
32
Page 40
LIP-8012E & LIP-8024E Gigabit Phone User Guide
To place an external call:
• Lift the handset,
• Dial the CO/IP line/group,
• Dial the desired number.
4.2.2 Waiting for the next available CO/IP line
If all the lines connected to your system are busy, you
will receive an All Trunks Busy signal. You may request
to be notified when a line becomes free.
To activate a queue if the selected/dialed line is busy:
• Select the desired CO/IP line button; when the busy notification
is returned, press the MSG button,
• Return to an idle state by going on-hook; when the line is
available, the Station will be notified (ringing).
4.2.3 Account Codes: Tracking External calls for billing
In some cases, you or your company may desire to
track calls for billing or other purposes. You may enter
an Account Code, which is output from the system to a
printer in the SMDR report. You may have an
Code
Flex button (refer to Assigning features to Flex
buttons).
Account
In iPECS-LIK
To enter an Account Code before the call:
• Lift the handset,
• Press the assigned ACCOUNT CODE button,
• Dial the Account Code (1-12 digits),
• Press *, Intercom dial tone is heard,
• Place the CO/IP call as normal.
To enter an Account Code during a call:
• Press the assigned ACCOUNT CODE button,
• Dial the Account Code (1-12 digits),
• Press *.
33
Page 41
LIP-8012E & LIP-8024E Gigabit Phone User Guide
In iPECS-MG
To enter an Account Code before the call:
• Lift the handset,
• Dial 550,
• Dial the Account Code (1-12 digits),
• Press *, Interncom dial tone is heard,
• Place the CO/IP call as normal.
4.2.4 Disable dialing from your phone
You can temporarily ‘Lock’ your phone by activating
Temporary COS, which will disable all dialing from the
phone. To deactivate Temporary COS you must enter
the station’s Authorization code.
To activate Temporary COS:
• Press TRANS/PGM,
• Dial 21(iPECS-LIK)/31(iPECS-MG) (User Program code),
• Dial your Authorization code(iPECS-MG),
• Press HOLD/SAVE.
To deactivate Temporary COS:
• Press TRANS/PGM,
• Dial 22(iPECS-LIK)/32(iPECS-MG) (User Program code),
• Dial your Authorization code,
• Press HOLD/SAVE.
4.2.5 Temporarily overr ide dia lin g restri ctio ns at a phone
Override the dialing restrictions at any phone by
activating Walking COS. The Walking COS dialing
restriction levels are applied for a single call only. For
multiple calls, you will need to reactivate Walking COS
or use the F
To activate Walking COS:
• Press TRANS/PGM,
• Dial 23(iPECS-LIK)/33(iPECS-MG) (User Program code),
• Dial your Authorization Code (station number and password),
• Dial ‘*’ (iPECS-MG),
• Place call as normal.
LASH button to regain CO/IP dial-tone.
34
Page 42
LIP-8012E & LIP-8024E Gigabit Phone User Guide
4.3 Using Directory
4.3.1 Using Last Number Redial (LNR)
The last number dialed on an external call is
automatically saved in the Last Number Redial (LNR)
buffer. The iPECS Display Phone, the system will store
the numbers dialed on the last 15(iPECSLIK)/100(iPECS-MG) calls.
In iPECS-LIK & iPECS SBG-1000
To dial the Last Number for an external call:
• Lift the handset, and/or press the DIR Soft butt on,
• Press Speed Soft button,
• Dial *,
• Press the Navigation up and down buttons to select from the
last 15 numbers dialed,
• Press the Send Soft butt on or HOLD/SAVE.
In iPECS-MG
To dial the Last Number for an external call:
• Lift the handset,
• Press Speed Soft button,
• Dial *,
• or
• press the LOG Soft button,
• Press the Navigation up and down buttons to select from the
last 100 numbers dialed or received,
• Press the Send Soft butt on or HOLD/SAVE.
4.3.2 Using and Entering Saved Number Dial
You may store the last number dialed on an external
call to the Saved Number Dial buffer for convenient
dialing at a later time. The Saved number is stored until
a new number is saved.
35
Page 43

LIP-8012E & LIP-8024E Gigabit Phone User Guide
To place a call using Save Number Dial:
• Lift the handset, and/or press the DIR Soft button,
• Press Speed Soft button(iPECS-LIK & SBG)/Dial 1 for Station
Speed(iPECS-MG),
• Dial #.
To store a number in the Save Number Dial:
• While on an outgoing external call, press the Save Soft button.
4.3.3 Using System Speed Dial Numbers
The iPECS SBG-1000 & Micro & 50 & 100 systems
each have memory allocated for 800 System Speed
Dial numbers (bins 200-999). T he iPECS -300 system
has memory allocated for 3000 System Speed Dial
numbers (bins 2000-4999). The iPECS-600 system has
memory allocated for 6000 System Speed Dial
numbers (bins 2000-7999). The iPECS-1200 system
has memory allocated for 12000 System Speed Dial
numbers (bins 20000-31999). The iPECS-MG100
system has memory allocated for 1000 System Speed
Dial numbers (bins 2000-2999). The iPECS-MG300
system has memory allocated for 2000 System Speed
Dial numbers (bins 2000-3999).
You may, if allowed, use System Speed Dial to call
frequently dialed numbers.
In some cases, these numbers are divided into groups
called System Speed Zone Groups. In this case, you
may access some numbers and not others and your
dialing restrictions may be invoked.
Only an Attendant can assign System Speed Dial
numbers.
To place a call using System Speed Dial:
• Lift the handset,
• Press the DIR Soft button,
• Press the speed button(iPECS-LIK & SBG)/Dial 2 for System
Speed(iPECS-MG),
• Dial the desired System Speed Dial bin number (200-999 for
iPECS SBG-1000 & Micro & 50 & 100, 2000-4999 for iPECS300, 2000-7999 for iPECS-600, 20000-31999 for iPECS12000, 2000-2999 for iPECs-MG100 , or 2000-3999 for iPEC SMG300).
36
Page 44
LIP-8012E & LIP-8024E Gigabit Phone User Guide
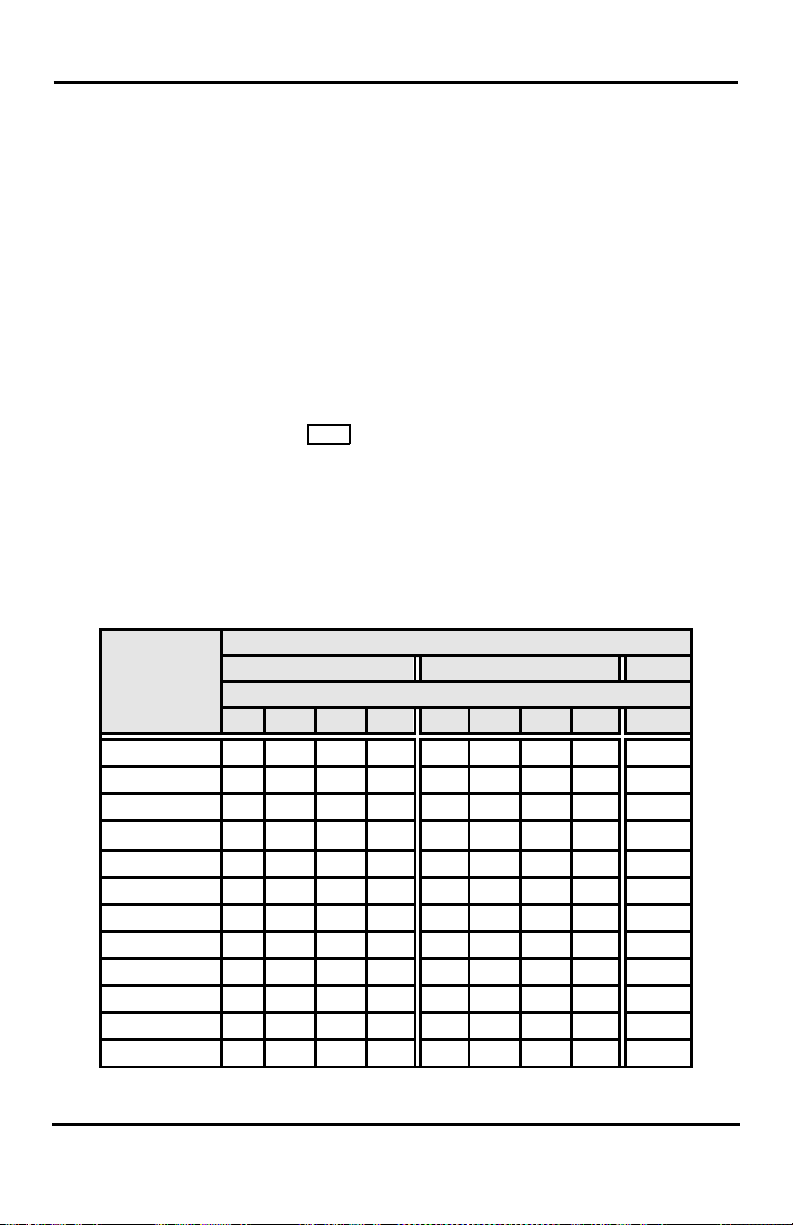
Letter Type
Uppercase(ABC)
Lowercase(ABC)
Button depressions
1 2 3 4 1 2 3 4 1
1 @ : / < @ : / < 1 2 A B C a b c 2 3 D E F d e f
3
5 J K L j k l 5 6 M N O m n o 6 7 P Q R S p q r s 7 8 T U V t u v 8 9 W X Y Z w x y z 9 0 . , ? ! . , ? ! 0 * * *
*
# # #
#
4.3.4 Using and Entering Station Speed Dial Numbers
Each station in the iPECS SBG-1000 & 50 & 100
System is allocated memory for 20
numbers (bins 00-19) each up to 23 digits. The iPECS300 & 600 & 1200 support 100 Station Speed Dial
numbers (bins 000-099). The iPECS-MG 100 & 300
each support 50 Station Speed Dial numbers (bins
000-049). These numbers are entered at the user’s
station and may include several ‘special’ instructions.
Special instructions and the corresponding button are:
PAUSE will momentarily stop dialing.
FLASH as 1
st
digit—Activate dial tone detect.
FLASH not as 1st digit—The system will generate a
flash on the CO line.
MSG as 1st digit—Send digits as ISDN Keypad
Facility message.
‘*’ as 1
st
digit—Display Security, the stored
number will not be displayed when used.
st
‘*’ not as 1
digit—Dial Pulse to Tone Switchover,
the system will switch from pulse to tone dialing.
When entering a Speed Dial, a 16 character name may
be associated with the number for Dial by Name.
Station Speed Dial
Dial Pad
button
4 G H I g h i 4
Character Entry Chart
37
Page 45
LIP-8012E & LIP-8024E Gigabit Phone User Guide
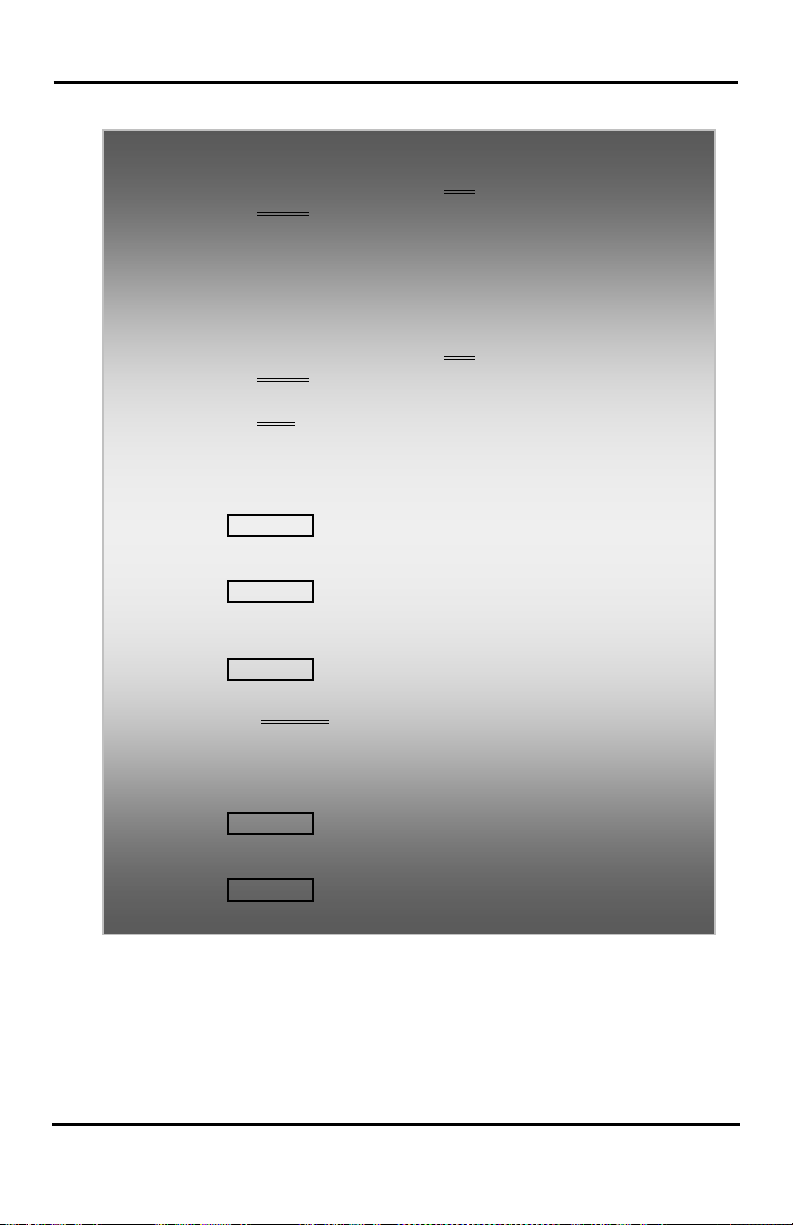
To place a call using Station Speed Dial:
• Lift the handset, and/or press the DIR Soft butt on,
• Press the Speed Soft button(iPECS-LIK, & SBG)/Dial ‘1’ for
station speed(iPECS-MG),
• Dial the desired Station Speed Dial bin number (00-19 , 000099 or 000-049).
To enter a Station Speed Dial number with CO Line and
Name:
• Lift the handset, and/or press the DIR Soft butt on,
• Press the Speed Soft button(iPECS-LIK & SBG)/Dial ‘1’ for
station speed(iPECS-MG),
• Press the ADD Soft button,
• Dial the desired Station Speed Dial bin number,
• Select/dial the CO/IP line/group, (Skip this step in iPECS SBG-
1000)
• Dial the desired number to be stored,
• Press HOLD/SAVE,
• Enter the associated name if desired, using the Character Entry
Chart,
• Press HOLD/SAVE.
To assign a Station Speed Dial number directly to a Flex
button:
• Press TRANS/PGM,
• Press the desired Flex button,
• Select the Tel Num Soft button(iPECS-LIK)/Dial ‘1’ for
Number(iPECS-MG),
• Select/dial the CO/IP line/group, (Skip this step in iPECS SBG-
1000)
• Dial the desired number,
• Press HOLD/SAVE,
• Enter the associated name if desired, using the Character Entry
chart(iPECS-LIK),
• Press HOLD/SAVE.
4.3.5 Using Dial by Name and Entering Your Name
Dial by Name employs three different Directories:
Private directory (Station Speed dial), Public Directory
(System Speed dial), or Intercom directory.
NOTE—To allow others to contact you via the Intercom
directory, you must enter a name for your station (up to
12 characters).
38
Page 46
LIP-8012E & LIP-8024E Gigabit Phone User Guide
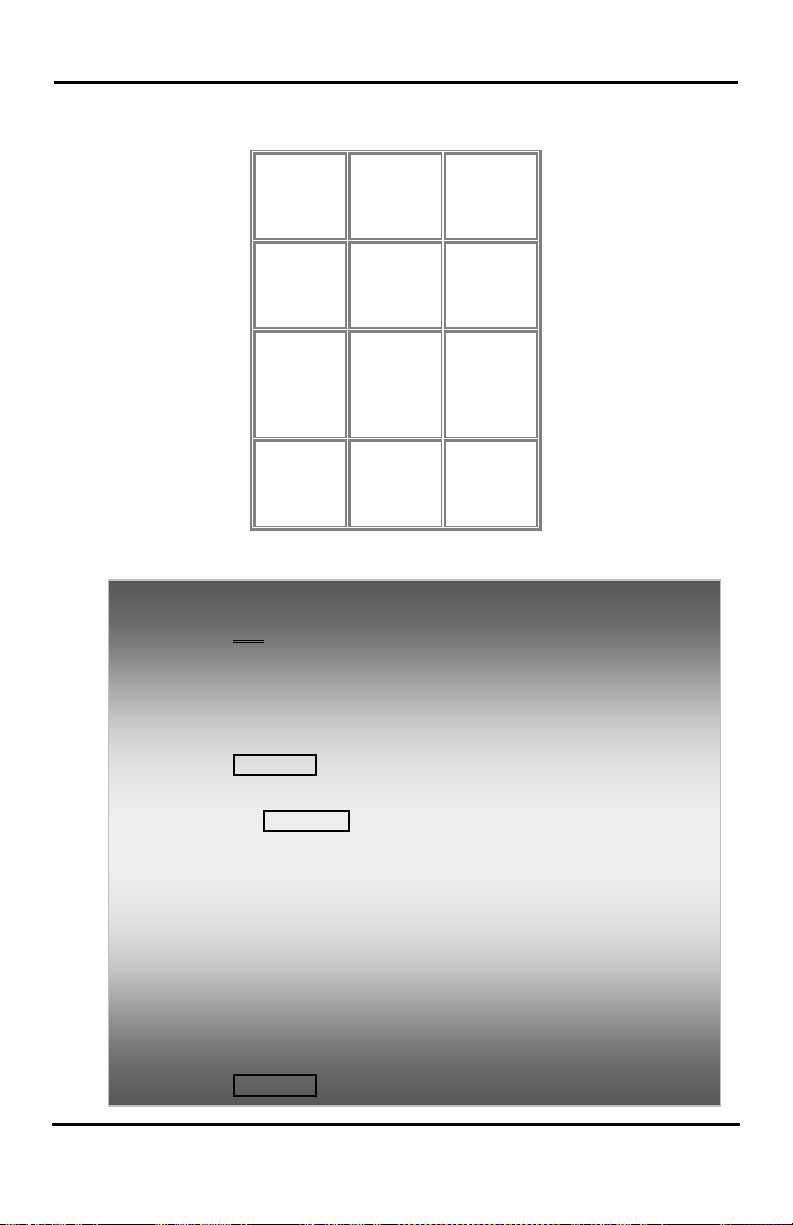
1 – 10
2 - 20
3 - 30
G – 41
4 - 40
J - 51
5 - 50
M - 61
6 - 60
P - 71
7 - 70
W - 91
9 - 90
*1 -
*3 - ,
Characters are entered with two keystrokes as in the
chart below.
Q – 11
Z – 12
. – 13
A - 21
B - 22
C - 23
D - 31
E - 32
F - 33
H - 42
I - 43
R - 72
S - 73
Q - 7*
Blank
*2 - :
To place a call using Dial by Name:
• Press DIR Soft button,
• Dial the desired directory, 1: Private directory, 2: Public
directory, 3: Intercom directory, the LCD will display the names
in alphabetical order,
• Scroll using the Navigation up/down keys, or enter search
characters (refer to the above Character Entry Chart).
• Press HOLD/SAVE to place the call.
To enter your station user name:
• Press the TRANS/PGM button,
• Dial 74(iPECS-LIK)/34(iPECS SBG-1000)/12(iPECS-MG)
(Station User Name code),
• Enter the Name, up to 12 characters (press DND button to
backspace/delete a character). To input characters:
• Press the second Soft button to select ABC> or abc> mode,
• To input the first character of a button, press the button 1 time
(ex., for ‘a’, press 2 button once),
• To input the second character of a button, press the button 2
times (ex., for ‘b’, press the 2 button twice.
• To input the third character of a button, press the button 3
times (ex., for ‘f’, press the 3 button three times.
• Press HOLD/SAVE.
K - 52
L - 53
T - 81
U - 82
V - 83
8 - 80
0-00 #
Character Entry Chart
N - 62
O - 63
X - 92
Y - 93
Z - 9#
39
Page 47

LIP-8012E & LIP-8024E Gigabit Phone User Guide
4.3.6 Using Automatic Called Number Redial (ACNR)
When making an external call and a busy signal is
received, the system can be set to retry the number until
the call is connected, the feature is cancelled, or the
maximum number of retries is attempted—this is
Automatic Called Number Redial (ACNR).
For each retry, the system will activate your speaker
then place the call with the microphone muted. When
the remote end answers, you must select the M
button, or lift the handset. Either of these actions will
cancel the ACNR request as well as connect you to the
remote party.
To set up ACNR, while on an outgoing call:
• Use the Navigation button to display the next menu and select
the ACNR
• Hang-up handset.
To cancel the ACNR request:
• Press the Stop Soft button.
Soft button,
UTE
40
Page 48
LIP-8012E & LIP-8024E Gigabit Phone User Guide
5. Call
5. TRANSFER, CONFERENCE & OTHER CALL HANDLING
Handling
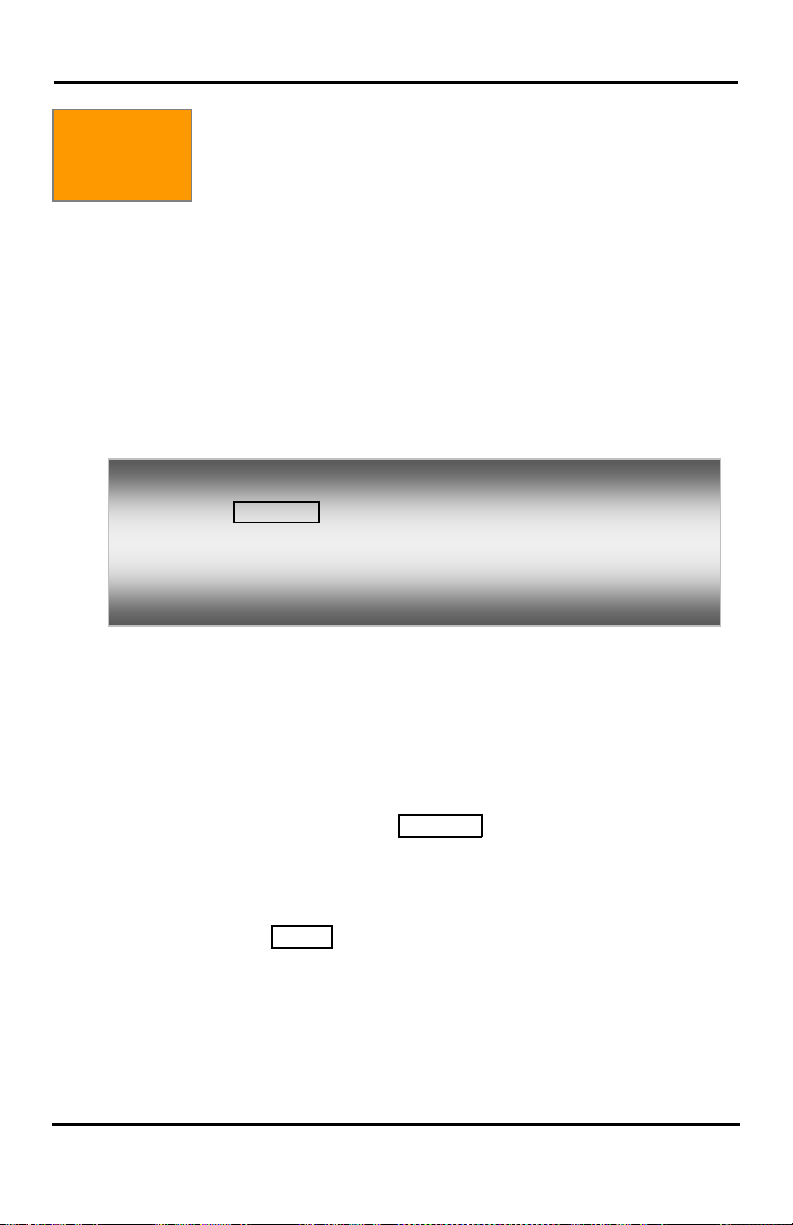
To Transfer an active call:
• Press TRANS/PGM,
• Call the transfer party,
• Unscreened Call Transfer- Hang-up,
• Screened Call Transfer– When call is answered or Splash tone
is heard, announce the call and hang-up.
5.2 Call Hold: Placing a call in a waiting state
5.1 Call Transfer: Sending a call to a different
destination
You can send an active call to another station or other
resource of the system, Call Transfer. You can screen
the transfer with the receiving party (Screened Call
Transfer) or complete the transfer without screening
(Unscreened Call Transfer).
Transferred calls, internal or external, are place in
Transfer Hold. These calls will receive Music on Hold
(MOH) and will recall if not answered in a timely manner.
If an Unscreened Transfer call encounters an error or
DND, it may immediately recall at your Station.
DSS/BLF buttons may be employed to transfer calls.
You may place an active Internal or External call in one
of several holding states. In System Hold, other nonrestricted stations may pick-up the call. In Exclusive
Hold, only the holding station may pick-up the call.
The system is assigned a preferred hold type (System
or Exclusive). You may override this Hold Preference
by pressing the
The LEDs for CO/IP line buttons flash at distinctive
rates for the holding station and other iPECS Phone
users.
There are also user operations such as pressing a
DSS/BLF button that will place a call in Automatic Hold.
Calls will remain in the held state for a period and then
recall the user. This Hold Recall is provided with a
different ring signal. If not answered in a timely manner,
the Attendant will receive Attendant Hold Recall.
HOLD/SAVE button twice.
41
Page 49

LIP-8012E & LIP-8024E Gigabit Phone User Guide
To place a call on Hold:
• Press HOLD/SAVE.
5.3 Broker Call: Switching between two calls
You may switch between the active call and a call on
Hold, placing the active call on Hold acting as a broker
between two or more parties, Broker Call. iPECS
Phone users may ‘broker’ for multiple calls up to the
number of CO/IP line buttons.
To switch between two calls (Broker Call):
• Press the desired CO/IP line button.
5.4 Joining Multiple People in a Conference
You can establish a Conference with up to 3
parties(iPECS-LIK)/13 parties(iPE CS -MG), or 32 parties
when using a Multi-Party Conference Interface Module
(MCIM)(iPECS-LIK). The other parties in the
Conference may be internal or external.
A Conference can be placed on Hold and is subject to
Hold Recall.
You may also use the Conference operation to join 2
external parties in a private conversation. This is an
Unsupervised Conference, w hich is not subject to the
normal Hold Recall operation.
42
Page 50

LIP-8012E & LIP-8024E Gigabit Phone User Guide
To establish a Conference:
• Establish call with one of the desired conference parties,
• Select the Conf Soft button,
• Establish call with the other conference party,
• Select the Conf Soft button,
• Select the Conf Soft button again to es tablish the
conference.
To place a Conference on Hold:
• Press the HOLD/SAVE button.
To retrieve the Conference from Hold:
• Select the Conf Soft button.
To establish an Unsupervised Conference:
• Establish conference with two external parties,
• Select the Conf Soft button,
• Hand-up handset.
To retrieve an Unsupervised Conference:
• Lift the handset,
• Select the Conf Soft button.
5.4.1 Setting up a Conference Room
In addition to establishing a Conference, up to 9
Conference Rooms can be set up, letting up to 32
parties converse when using a MCIM. When setting up
a Conference Room, a password can be designated for
invited parties (internal and external parties) to use for
accessing the established Conference Room.
43
Page 51
LIP-8012E & LIP-8024E Gigabit Phone User Guide
In iPECS-LIK
To set-up a Conference Room:
• Press the TRANS/PGM button,
• Dial 53 to create a Conference Room,
• Dial the desired Conference Room number (1-9),
• If desired enter a password for the Conference Room (up to 12
digits),
• Press HOLD/SAVE to establish the Room.
To join a Conference Room:
• Lift the handset,
• Dial 59 (Conference Room entry code),
• Dial the Conference Room Number,
• Dial the Conference Room password.
To delete a Conference Room:
• Press the TRANS/PGM button,
• Dial 54 (Conference Room delete code),
• Dial the Conference Room number (1-9),
• Dial the Conference Room password,
• Press HOLD/SAVE to delete the Conference Room.
In iPECS-MG
To set-up a Conference Room:
• Press the TRANS/PGM button,
• Dial 54 to create a Conference Room,
• Dial the desired Conference Room number (571-579),
• If desired enter a password for the Conference Room (up to 12
digits),
• Press HOLD/SAVE to establish the Room.
To join a Conference Room:
• Lift the handset,
• Dial 571-579 (Conference Room entry code),
• Dial the Conferen ce Room pa ssw ord.
To delete a Conference Room:
• Press the TRANS/PGM button,
• Dial 55 (Conference Room delete code),
• Dial the Conference Room number (571-579),
• Dial the Conference Room password,
• Press HOLD/SAVE to delete the Conference Room.
44
Page 52
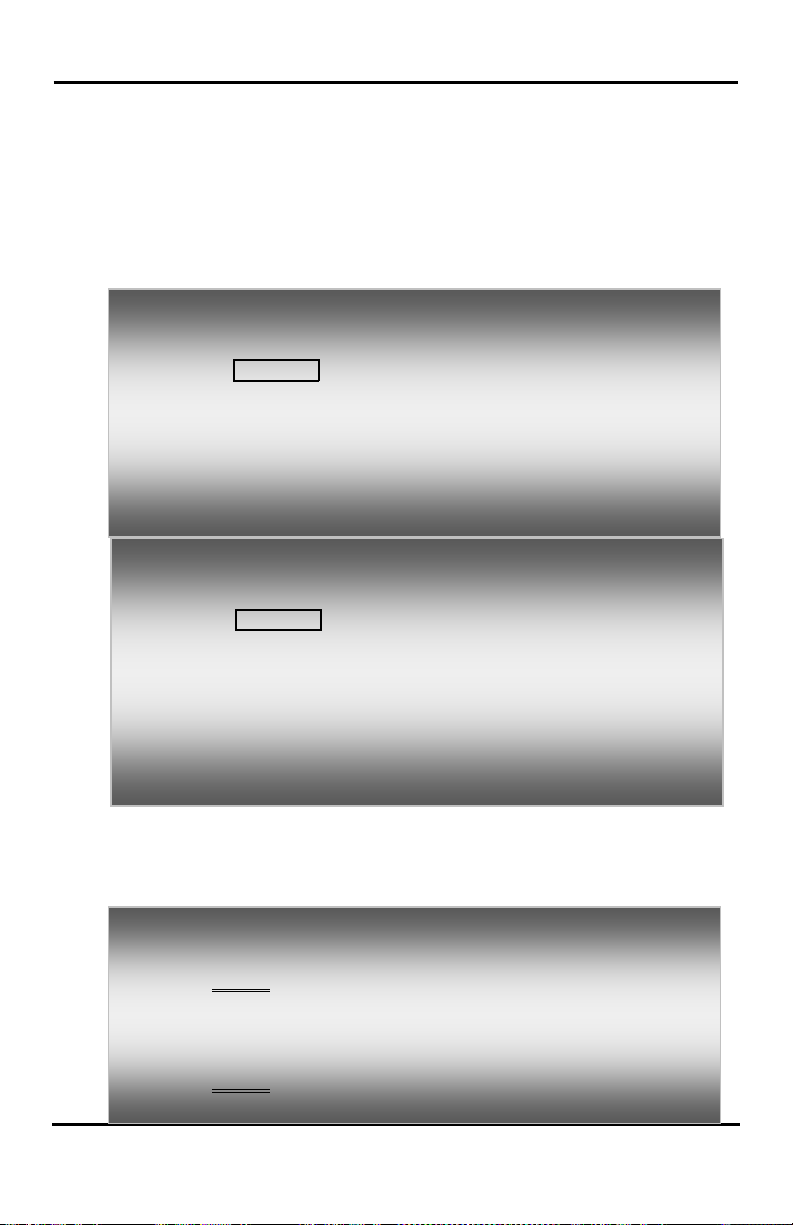
LIP-8012E & LIP-8024E Gigabit Phone User Guide
Hang-up, return to idle.
Dial the Park number (00-49)
5.5 Call Park: Placing a call on Hold to Page
A user may transfer an active CO/IP call to a special
holding location (Park Orbit), which can be accessed
easily from any station in the system. Typically, this
feature is used with Paging to notify the desired user of
a parked call.
Parked calls are subject to Hold Recall after the Call
Park timer.
In iPECS-LIK & iPECS SBG-1000
To park an active external call:
• Press TRANS/PGM,
• Dial the Park Orbit (601-610 for iPECS SBG-1000 & 50 & 100,
601-619 for iPECS-300 & 600 or 601-800 f or iPECS-1200),
• Return to idle.
To retrieve a parked call:
• Lift the handset,
• Dial the Park Orbit.
In iPECS-MG
To park an active external call:
• Press TRANS/PGM,
• Dial the Park Orbit (541),
• Dial the Park number (00-49)
• Return to idle.
To retrieve a parked call:
• Lift the handset,
• Dial the Park Orbit (541),
•
5.6 Two-Way Record: Recording a call
You may record an active external conversation in your
Voice Mail Box.
To activate Two-Way Record while on a CO/IP call:
• Use the Navigation button to display the next Menu and select
the Record
recording starts.
To stop Two-Way Record while on a CO/IP call:
• Use the Navigation button to display the next menu, and select
the Record
•
Soft button, record warning tone is heard and
Soft button or,
45
Page 53
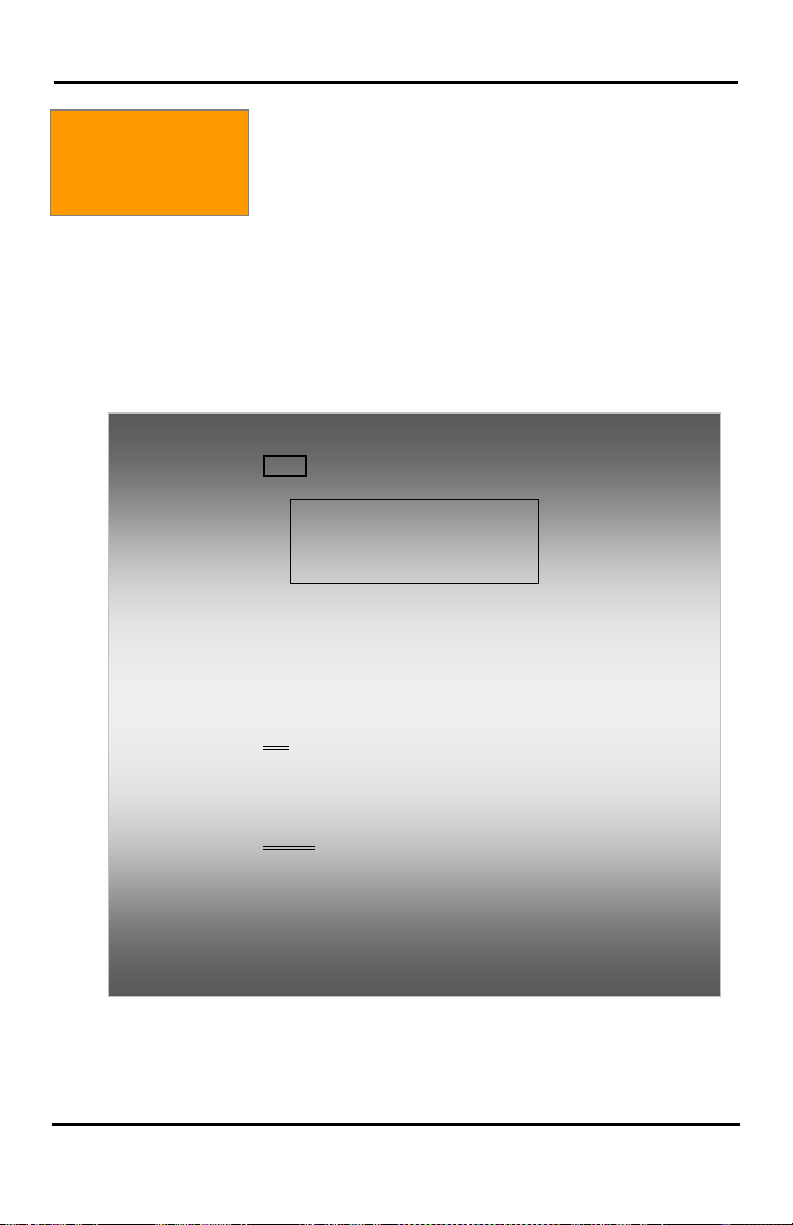
LIP-8012E & LIP-8024E Gigabit Phone User Guide
BACK OK
6. Send &
6. SEND & RETRIEVE MESSAGES
Retrieve
Messages
To review your Station messages:
• Press the MSG button, the LCD shows the Message Summary
display:
• Dial 1 to view Station messages,
• Press the navigation up/dow n button to scroll through the
messages.
To return a call from the list of Intercom (MWI):
• Press the navigation up/down buttons to scroll through the
Intercom messag e s,
• Press the OK Soft button to select and place the return call.
To delete a Station MWI:
• Press the navigation up/down buttons to scroll through the
Station messages,
• Press the Delete Soft button to select,
• Dial 1 (Delete MWI).
To delete all Station MWIs:
• Press the Delete Soft button,
• Press 3 (Delete All MWIs).
6.1 Responding to a Station Message Waiting
Indication
Another station can leave a Station Message Waiting
indication (MWI) when you do not answer or your phone
is in DND mode. The message icon will be displayed
on the LCD screen in LIP-8024E. If programmed, a
flashing MSG LED on the iPECS Phone also will
indicate when there is a Message Waiting. As a further
notification, a Message Wait Remin der To ne can be
provided. You may review and delete messages as well
as respond with a call back.
1. ICM MWI(002)
2. VSF MSG(002)
3. VMS MSG(001)
46
Page 54
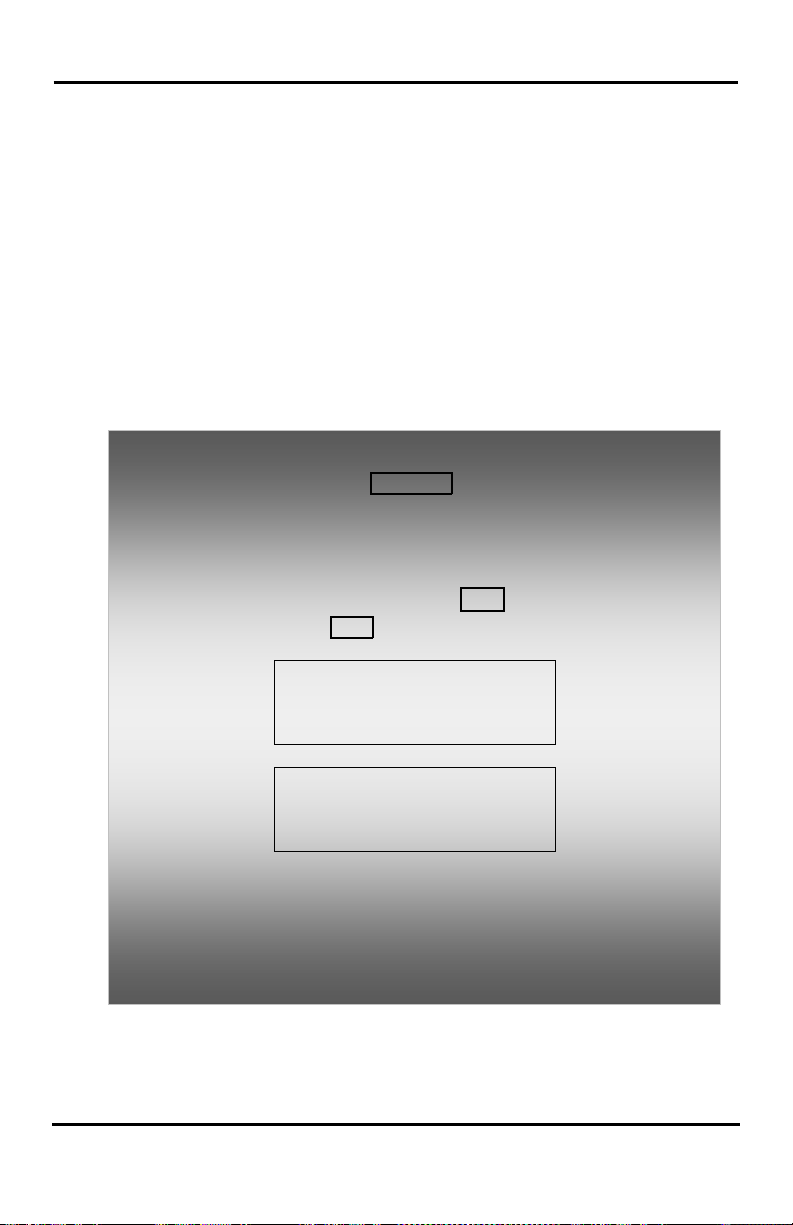
LIP-8012E & LIP-8024E Gigabit Phone User Guide
1. ICM MWI(002)
BACK OK
4. UMS MSG(003)
BACK OK
6.2 Getting Voice Mail Messages
When callers are forwarded or recall to your Voice Mail
Box, they can leave a voice message. Your Voice Mail
Box is part of the integrated VMIM/VSF/VMIB module,
the iPECS Feature Server or an external Voice Mail
system.
The Voice Mail system allows access to and
management of received voice messages. While in
your Mail Box, you have control of your password and
Mail Box greeting. In addition, you can remotely control
Call Forward for your station from the VMIM/VSF/VMIB.
You will need to register an Authorization Code for your
station to access the VMIM/VSF/VMIB Voice messages.
To retrieve Voice Mail locally using a Flex button:
• Press the programmed VOICE MAIL Flex button,
• Dial your Mail Box number and correspond ing pas sw or d to
receive the ‘Number of Messages’ prompt,
• Dial desired option codes,
• At completion of session, hang-up to return to idle.
To retrieve Voice Mail locally using the MSG button:
• Press the flashing MSG button, the LCD shows the Message
Summary display:
• Press the Navigation down key, to display additional items:
• Dial 2 for VMIM/VSF, 3 for external VM or 4 for Feature Server
• After the prompt enter your station number and password,
• Dial desired option codes,
• At completion of session, hang-up to return to idle.
2. VSF MSG(002)
3. VMS MSG(001)
5. ICM SMS(003)
Voice Mail,
47
Page 55

LIP-8012E & LIP-8024E Gigabit Phone User Guide
To access your Voice Mail Box from a Remote Location:
• Lift the handset,
• Dial the telephone number of a DISA CO line answered by the
VMIM/VSF/VMIB Auto Attendant,
• At answer,
• dial # to receive the ‘Mail Box & Password’ prompt(iPECS-LIK &
SBG),
• Or
• dial 523 (VMIB Access Code)(iPECS-MG),
• Dial the Mail Box and password to receive the ‘Number of
Messages’ prompt,
• Dial ‘*’ (iPECS-MG),
• Dial desired option codes,
• At completion of session, hang-up.
6.3 Sending and Receiving Short Text Messages
You can exchange short text messages (up to 100
alphanumeric characters) with other iPECS display
phone users. These messages will activate the
message icon on the LCD (LIP-8024E). If the
ring/message LED is set to Message Wait indication,
the ring/message LED will flash.
48
Page 56
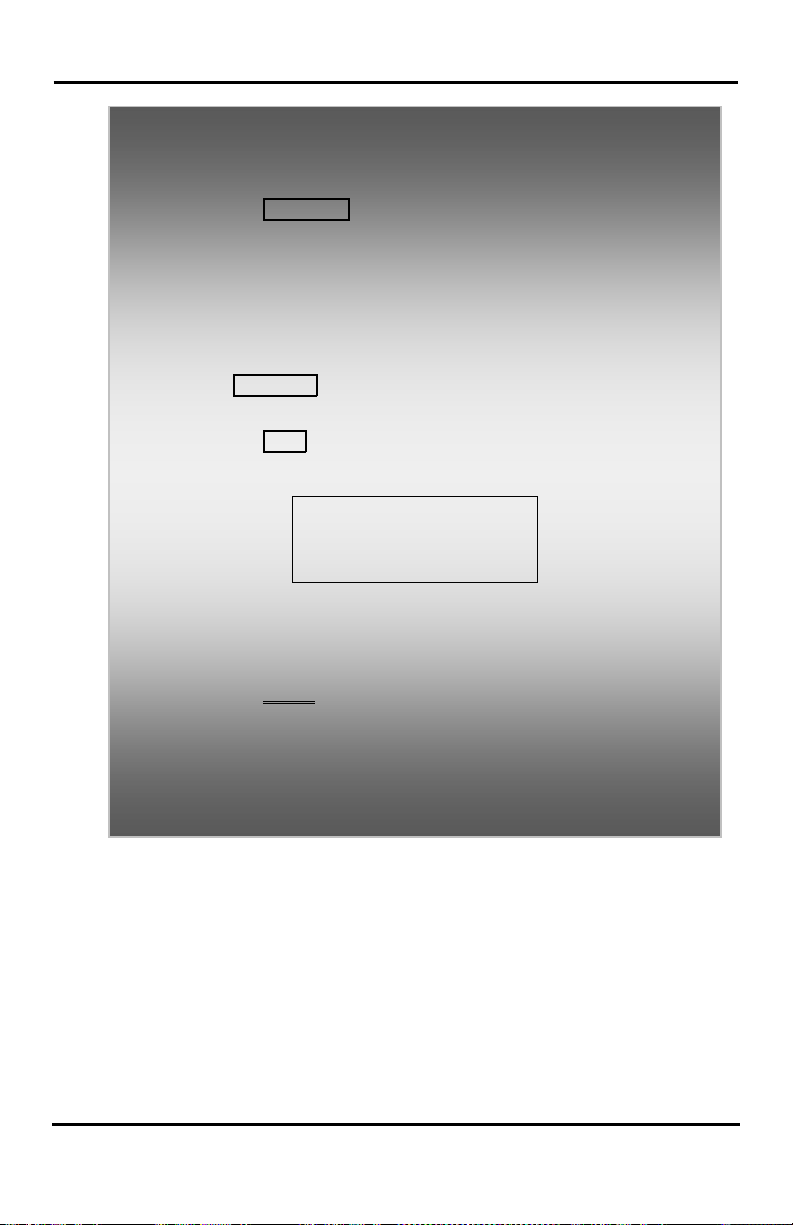
LIP-8012E & LIP-8024E Gigabit Phone User Guide
4. UMS MSG(003)
BACK OK
In iPECS-LIK
To send an SMS message to another iPECS display
Phone:
• Press the TRANS/PGM button,
• Dial 36 (SMS send code),
• Dial 1 to resend an existing message, or 2 to send a new or
edit an existing message,
• Enter the station range to receive the message, to send to a
single station enter the station numb er tw ice,
• Dial your message using 2 key strokes for each character (refer
to Character Entry Chart(iPECS-LIK) in Section 4.3.4).
• Press HOLD/SAVE to send your message.
To view your received Short text messages:
• Press the MSG button, and press the Navigation down key four
times (LIP-8012E) or three times (LIP-8024E), the LCD will
display the Message Summary display,
5. ICM SMS(003)
•
• Dial 5; the first two (LIP-8012E) or three (LIP-8024E) SMS
messages are shown in brief,
• Dial the Message number to view the entire SMS message.
To delete received Short text messages:
• Press the Delete Soft button,
• Dial 1 to Delete the message, 2 to Cancel, or 3 to Delete all
received Short text messages.
49
Page 57
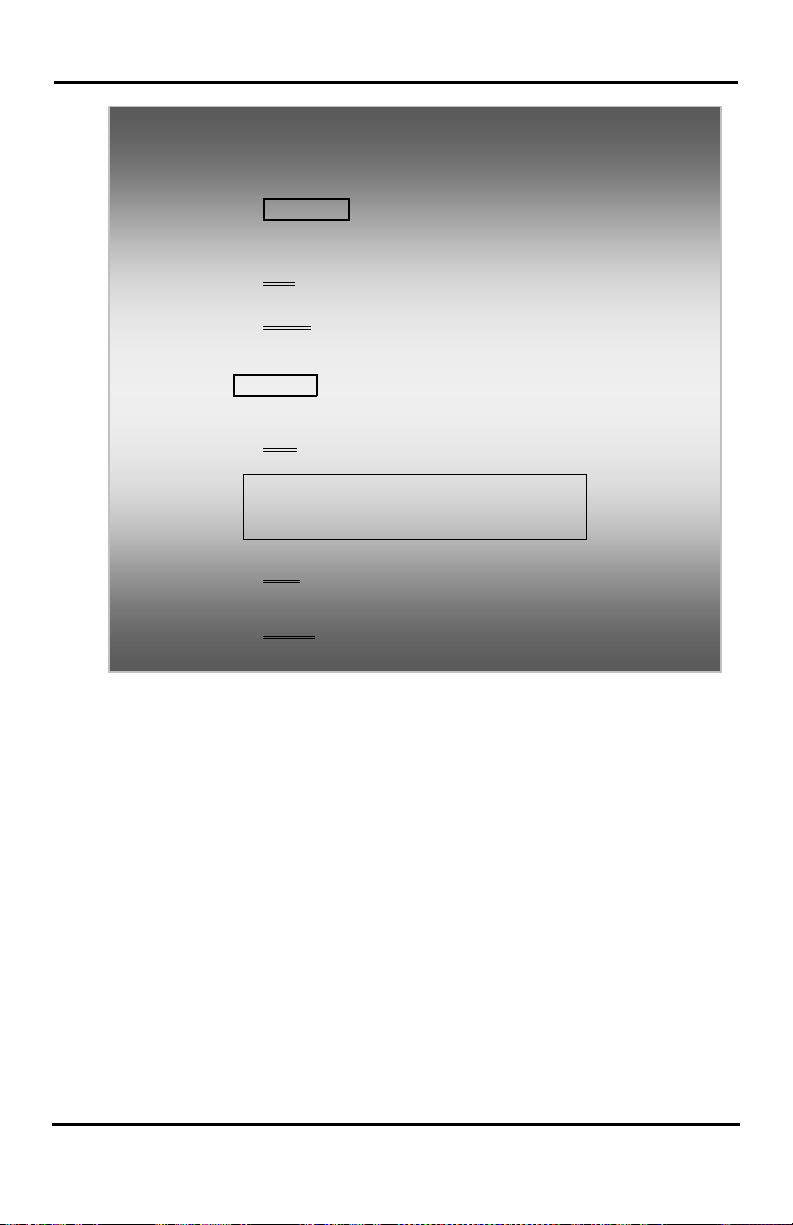
LIP-8012E & LIP-8024E Gigabit Phone User Guide
In iPECS-MG
To send an SMS message to another iPECS display
Phone:
• Press the TRANS/PGM button,
• Dial 43 (SMS send code),
• Dial the station number to receive the message,
• Press the Add Soft button to append the next station number
and Dial the station number,
• Press the Finish Soft button,
• Enter your mssage (refer to Character Entry Chart(iPECS-MG)
in Section 4.3.4),
• Press HOLD/SAVE to send your message.
To view your received Short text messages:
• Press the Msg Soft button, the LCD will display the Message
Summary display,
MWI(00) VMS(00) SMS(01)
ENTER (MWI:1, VMS:2, SMS:3)
•
• Dial 3 to view the SMS message.
• Press the Next Soft button to view the next SMS message.
To delete received Short text messages:
• Press the Delete Soft button.
50
Page 58

LIP-8012E & LIP-8024E Gigabit Phone User Guide
7. Remote
System
Access
In iPECS SBG-1000
To call to the station remotely:
• Call the telephone number of a CO line assigned for answer by
a VSF auto attendant,
• Upon answer, dial station number.
In iPECS-LIK, iPECS-MG
To access system resources remotely:
• Call the system’s DISA facility,
• Await answer and dial your authorization code (station number
and password),
• Dial “*” for end mark (iPECS-MG),
• Dial as needed for the desired system resource.
7.2 Mobile Phone Extension
7.1 Direct Inward System Access (DISA)
DISA (Direct Inward System Access) allows remote
users to gain access to the system’s resources (remote
users may be required to enter an Authorization Code).
The system will recognize remote user dialed inputs
(call other stations, place calls over CO/IP lines, review
voice mails, etc). The iPECS SBG-1000 system does
not support normal DISA service, but supports call to
the station and remote voice mail access when
answering by a VSF auto attendant.
When away from your desk or office you can place and
receive iPECS calls on a registered mobile phone. You
may need to activate the Mobile Phone Extension
feature and assign the Mobile Phone number.
This feature is only effective with an ISDN/VOIP CO line.
7. REMOTE SYSTEM ACCESS
51
Page 59

LIP-8012E & LIP-8024E Gigabit Phone User Guide
In iPECS-LIK & iPECS SBG-1000
To register a mobile phone number: (iPECS-LIK)
• Press the TRANS/PGM button,
• Dial 37,
• Dial the mobile phone number,
• Press the HOLD/SAVE button.
To activate a registered mob ile phon e: (iPECS-LIK)
• Press the TRANS/PGM button,
• Dial 38,
• 1 to activate, 0 to deactivate,
• Press the HOLD/SAVE button.
To place a call from the mobile extension using the
iPECS System:
• Dial the ISDN DID number of the station; the system will check
the Caller ID and answer the call. The user then will receive
intercom dial tone,
• Place internal or external iPECS call as normal.
To Transfer a call from the mobile extension using the
iPECS:
• Dial “*” while on an iPECS call,
• Dial the desired extension, the call is transferred and the
mobile phone returns to idle.
NOTE—The mobile may reconnect to the transfer
call by pressing the # key.
52
Page 60
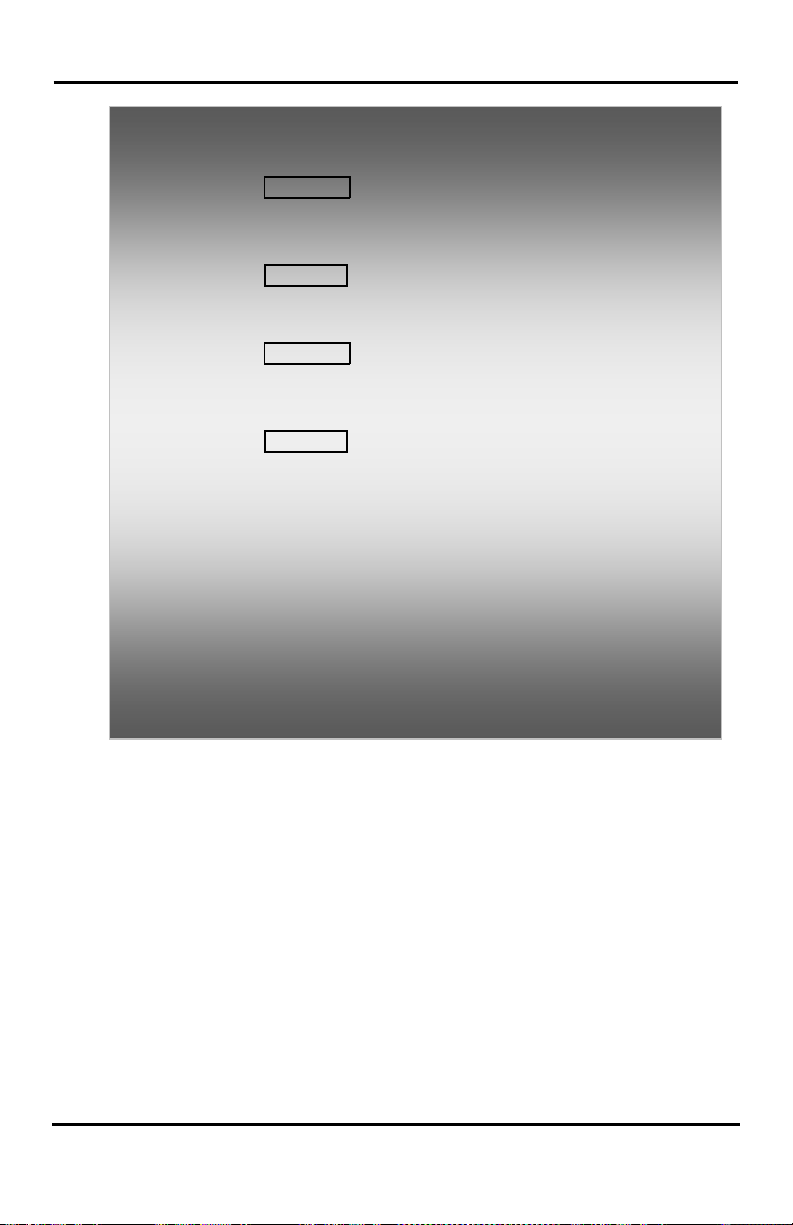
LIP-8012E & LIP-8024E Gigabit Phone User Guide
In iPECS-MG
To register a mobile phone number:
• Press the TRANS/PGM button,
• Dial 51,
• Select Mobile Index 1 or 2,
• 1 to activate, 0 to deactivate,
• Press the HOLD/SAVE button.
To activate a registered mobile phone from the user’s
station:
• Press the TRANS/PGM button,
• Dial 52,
• Select Mobile Index 1 or 2,
• Dial the mobile phone number with CO Access code,
• Press the HOLD/SAVE button.
To place a call from the mobile extension using the
iPECS System:
• Dial the ISDN DID number of the station; the system will check
the Caller ID and answer the call. The user then will receive
intercom dial tone,
• Place internal or external iPECS call as normal.
To Transfer a call from the mobile extension using the
iPECS:
• Dial the mobile flash digit “*” while on an iPECS call,
• Dial the desired extension, the call is transferred and the
mobile phone returns to idle.
NOTE—The mobile extension may reconnect to the
transfer call by pressing the mobile flash digit(*).
53
Page 61
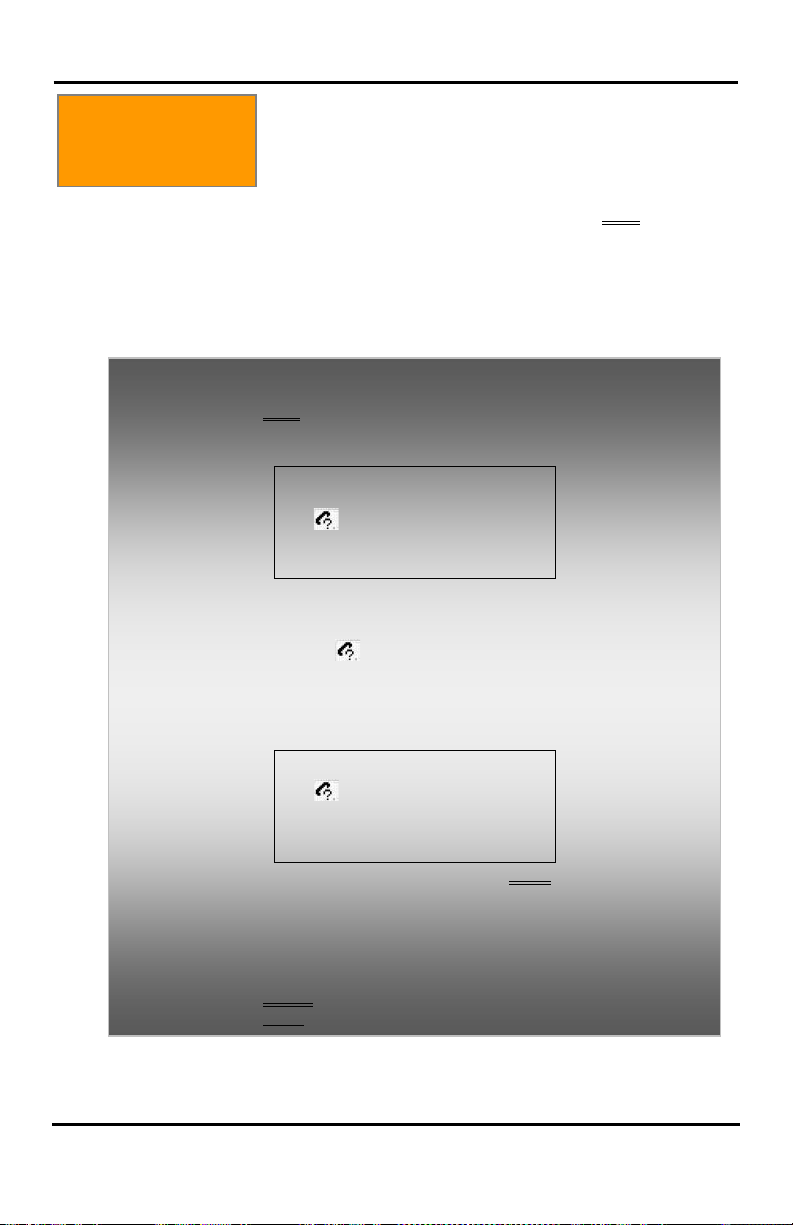
LIP-8012E & LIP-8024E Gigabit Phone User Guide
• Press the Save Soft button.
8. Misc.
Features
8.1 Call Log
Users can view a log of incoming, outgoing and missed
calls on the display (up to 99 records). A LOG
button provides simple access to incoming (called),
outgoing (dialed) and missed (lost) calls .
NOTE—if a call is missed, the LOG Soft button will be
displayed as LOG(M); the missed call icon also will
appear on the LCD (LIP-8024E).
To access the Call Log menu:
• Press the LOG Soft button,
• Using the Navigation up/down keys, to view items (Called,
Dialed, or Lost),
01. ▶ CO1 01 112345678
02. ◀ 101
03. CO2 LEE K D
• BACK SELECT
SEND ▶
• Log codes include:
◀- Incoming call
▶- Outgoing call
- Missed call
To place a call using numbers stored in the Call Log:
• From the Call Log, use the Navigation up/down keys, to view
items (Called, Dialed, or Lost),
01. ▶ CO1 01 112345678
02. ◀ 101
03. CO2 LEE K D
• BACK SELECT
SEND ▶
• Highlight the desired item, and press the Send Soft button to
place the call.
To save an external call to the Station Speed Dial:
• Use the Navigation up/down buttons to highlight the desired
external call item,
• Press the Select Soft button,
8. MISC. FEATURES
Soft
The CO code in a log item is used to seize the co line
when placing an external cal l using the call log. Up to 5
CO codes can be saved.
54
Page 62
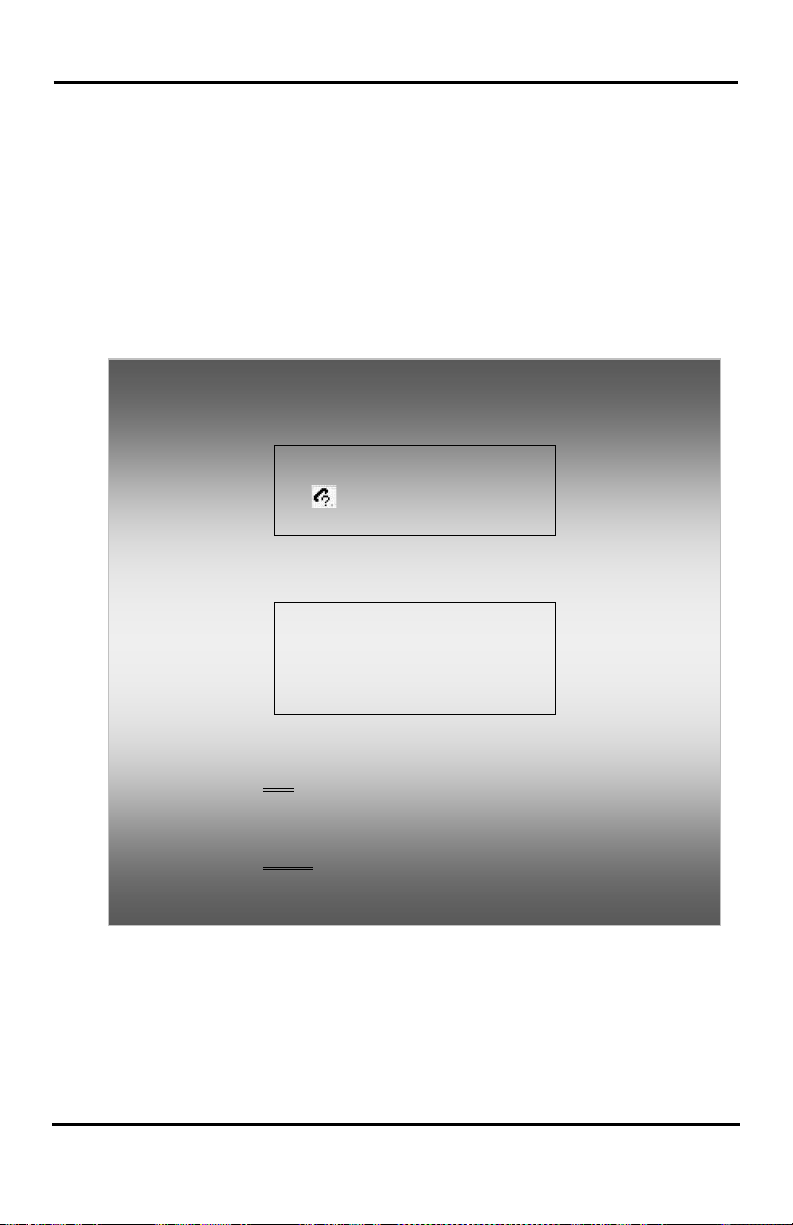
LIP-8012E & LIP-8024E Gigabit Phone User Guide
DEL CO CODE
SELECT
The first CO code is sent from the system in the saved
call log. Normally the first CO code is ‘9’, but if the
telephone number is equal to a number in the Speed
Dial list, the first CO code will be the access code of the
saved CO line of the speed dial. Therefore the first CO
code of each call log can be different and is not be
editable.
CO Codes 2 - 5 are the user-defined codes. If a code 2
- is selected, the selected code will be used in placing
all of the external calls in the call log.
To select a CO Code:
• From the Call Log, use the right Navigation key, to advance to
the next 3 Soft button items,
01. ▶ CO1 01 112345678
02. ◀ 101
03. CO2 LEE K D
•
• Press the CO CODE Soft button (code displaying the + symbol
is the currently selected item),
•
1. +88001
2.
• 3.
• BACK EDIT
To edit the CO code (positions 2-5 only):
• Use Navigation up/down buttons to highlight the desired item,
• Press the Edit Soft button to modify selection.
To select the CO code:
• Use Navigation up/down buttons to highlight the desired item,
• Press the Select Soft button.
55
Page 63

LIP-8012E & LIP-8024E Gigabit Phone User Guide
8.2 Contrast (iPECS-LIK)
LCD contrast can be adjusted to enhance viewing ability.
To change the LCD Contrast:
• While in an idle state, press the VOL buttons to adjust the
brightness.
- increase (darker)
- decrease (brighter)
8.3 Background Music and Music on Hold (iPECS-LIK)
Two audio sources can be connected to the system.
These sources or an internal source provide input for
Background Music (BGM) and Music On Hold (MOH).
In addition, a recorded message from the VMIM can be
used. BGM is played over the speakers of the iPECS
Phone when the station is idle. MOH is played to
callers placed on Hold.
There are eleven possible selections for BGM and MOH:
00: Off
01: Source BGM1
02: Source BGM2
03: VSF MOH 1
04: SLT MOH 1
05: SLT MOH 2
06: SLT MOH 3
07: SLT MOH 4
08: SLT MOH 5
09: VSF MOH 2
10: VSF MOH 3
To turn on Background Music:
• Press HOLD/SAVE to cycle through the BGM selections.
56
Page 64

LIP-8012E & LIP-8024E Gigabit Phone User Guide
8.4 Using Internal, External and Meet-Me Paging
The User can broadcast announcements to other
stations and/or external speakers. Stations are
assigned to one or more of the Internal Page Zones.
The system has two Exter nal Pag e Zones t hat can be
connected to external speakers.
In iPECS-LIK, Page Zone codes are:
Internal Page Zones 501-510 (iPECS SBG-1000
& 50 & 100), 501-535 (iPECS-300 & 600), 301-400
(iPECS-1200)
Internal All Call Page 543
External Page Zones 545-546
External All Call Page 548
All Call Page 549
In iPECS-MG, Page Zone codes are:
Internal Page Zones :
543 + Zone No(01~15) (iPECS-MG100)
543 + Zone No(01~30) (iPECS-MG300)
Internal All Call Page 543 + 00
External Page Zones 548
All Call Page 549
If the desired Page Zone is busy, the User can elect to
be recalled when their turn comes in the queue. Users
can also request a paged party answer the Page using
Meet-Me Paging. In this case, the paged party may
answer the page from any phone in the system by
dialing the Meet-Me code.
To make a page:
• Lift the handset,
• Dial the desired Page zone,
• If assigned, after page warning tone, make announcement.
To queue for a page when busy is received(iPECS-LIK &
SBG):
• Press the MSG button,
• Replace the handset returning to idle.
To answer a Meet-me-Page:
• Lift the handset.
• Dial 544(iPECS-LIK)/511(iPECS SBG-1000)/546(iPECS-MG)
(Meet-Me-Page code).
57
Page 65
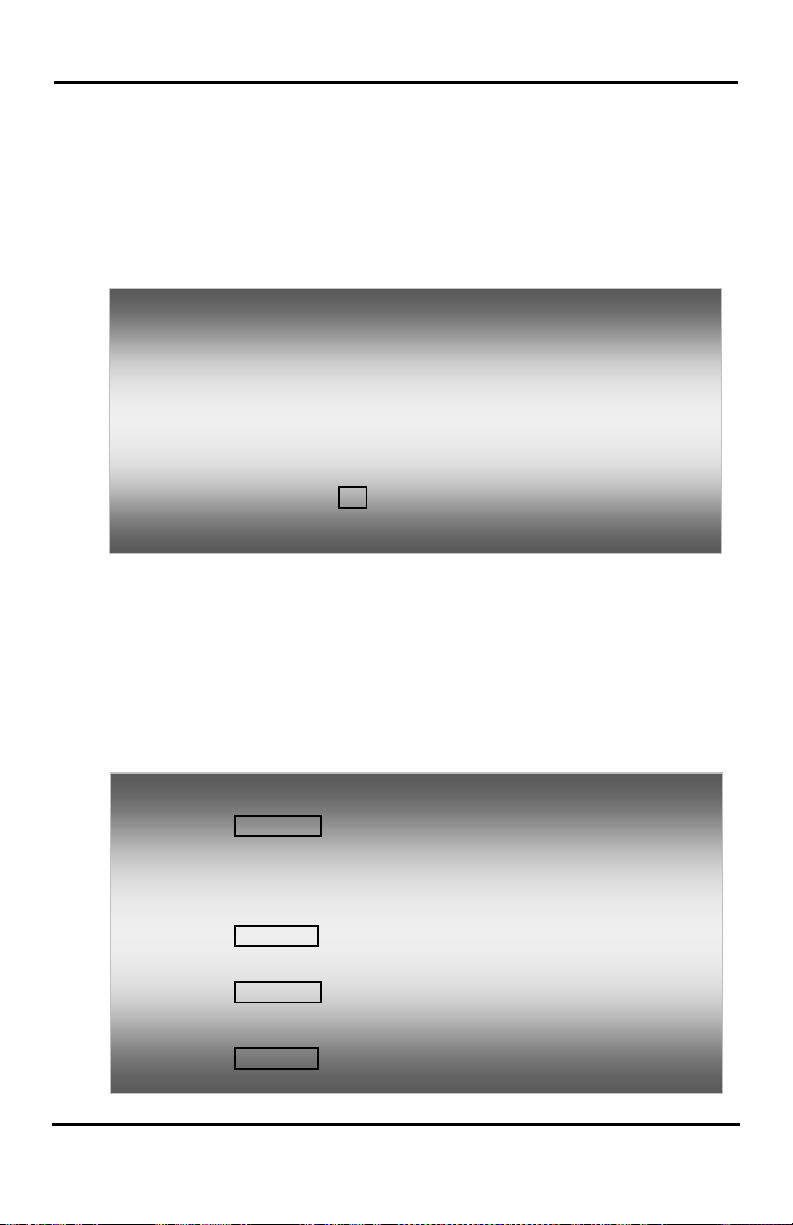
LIP-8012E & LIP-8024E Gigabit Phone User Guide
8.5 Push-To-Talk (PTT) Page
iPECS Phones can be assigned as a member of one or
more of the system’s nine Push-To-Talk (PTT) page
groups. Users separately log-in or log-out of any one or
all PTT groups to which the phone is assigned. Once
logged in, place or receive one-way page
announcements to/from other users who are logged in
to the same PTT group.
To log-in to a PTT group:
• Dial #0(iPECS-LIK)/538(iPECS-MG),
• Dial the desired PTT group number (1-9 or 0 for all groups),
To log-out of the PTT group(s):
• Dial #0(iPECS-LIK)/538(iPECS-MG), the PTT Log-in/out co de,
• Press the * key.
To place a page announcement to the active PTT group:
• Press and hold the PTT Flex button,
• After confirmation tone, make page announcement.
8.6 Wake-Up Alarm
iPECS supports an Alarm clock for each station in the
system. The alarm clock can be set to repeat daily or
as a one-time alarm.
When responding to the alarm by lifting the handset,
BGM or Wake-Up Alarm announcement (iPECS-LIK &
iPECS SBG-1000) will be provided.
To set the Wake Up Alarm clock:
• Press TRANS/PGM,
• Dial 41(iPECS-LIK)/21(iPECS SBG-1000)/13(iPECS-MG)
(Alarm Clock code),
• Dial 2-digit hour and minute for alerting,
• For a daily (repeating alarm), press #,
• Press HOLD/SAVE.
To erase Wake-Up:
• Press TRANS/PGM,
• Dial 42(iPECS-LIK)/22(iPECS SBG-1000)/14(iPECS-MG)
(Alarm Clock delete code),
• Press HOLD/SAVE.
58
Page 66

LIP-8012E & LIP-8024E Gigabit Phone User Guide
8.7 Alarm/Door Bell
The system can monitor external Alarm or Door Bell
contacts:
Alarm Monitor—should the external contact activate, a
unique Alarm Ring signal and LCD display may be
received. To restart the monitor circuit, the external
contacts must be deactivated and the Alarm Ring signal
terminated.
Door Bell—a unique Door Bell Ring (single tone burst)
may be received each time the external contact is
activated. A system contact also can be assigned to act
as a Door Open contact.
To terminate the Alarm signal:
• Dial 565(iPECS-LIK & MG)/65(iPECS SBG-1000) (Alarm Stop
code).
To activate the Door Open contacts:
• Lift the handset,
• Dial Door Open code, #* and contact number 1-4.
NOTE—Contacts 3 & 4 are only available in the
iPECS-300 & 600. Contacts 1 is available in the
iPECS -MG.
8.8 Power Fail Transfer (PFT)
When AC power to the system fai ls, back-up operation
may be provided with back-up batteries or Power Fail
Transfer (PFT). When battery back-up is provided the
station will operate normally. When PFT is
implemented, an SLT is connected to a CO line by the
system. This SLT can be used as any normal SLT,
providing service while power is out.
8.9 System Voice Memo
The integrated Voice Mail modules incorporate several
Voice Memos to provide Station Users with general
information such as station number, date, time, and
feature status. Voice Memos are heard over the iPECS
Phone speaker and over the handset for SLTs.
For the Station Status Memo, the following items are
reported:
59
Page 67

LIP-8012E & LIP-8024E Gigabit Phone User Guide
ICM Signaling Mode (Handsfree/Tone/Privacy)
Station IP Address
Station Mac Address
Number of messages x (x: number of all message
waiting)
Wake-Up Time (hh:mm )
Do Not Disturb
Forwarded to station xxx
Forwarded to speed bin xxx
Queued CO/IP line xxx
Locked (Temporary COS)
COS x
To hear Date & Time memo:
• Dial the Voice Memo code (661 for iPECS-50 & 100, *661 for
iPECS-300 & 600 & 1200, or 675+1 for iPECS-MG),
• Date and Time memo is heard, “Date is May 2nd.Time is xx:xx
pm”.
To hear Station Number Prompt:
• Dial Voice Memo code (662 for iPECS-50 & 100, *662 for
iPECS-300 & 600 & 1200, or 675+2 for iPECS-MG),
• The Station Number memo is heard, “This is station 150”.
To hear Station Settings:
• Dial Voice Memo code (663 for iPECS-50 & 100, *663 for
iPECS-300 & 600 & 1200, or 675+3 for iPECS-MG),
• Station Status Memo is heard.
8.10 Hot Desk
NOTE—only activated features are announced.
iPECS phones in the system may be assigned for Hot
Desk operation. These Hot Desk phones let you log-on
and use the Hot Desk phone as if it were your station.
Once logged-on, the Hot Desk station will take on the
attributes assigned to your station number and you can
make calls as normal. When logged-out, calls to your
station number are forwarded to the chosen destination.
60
Page 68
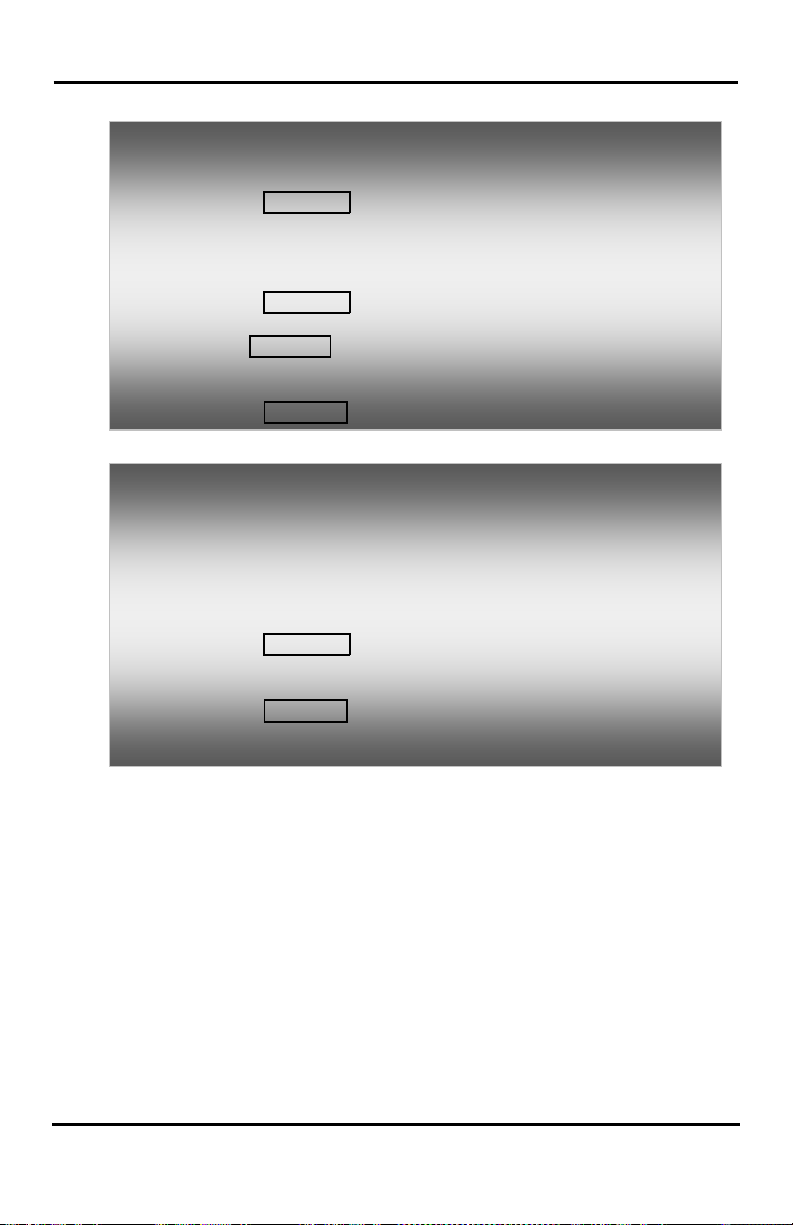
LIP-8012E & LIP-8024E Gigabit Phone User Guide
Press the
In iPECS-LIK
To Log on to a Hot Desk station:
• Press the TRANS/PGM button,
• Dial *0,
• Dial your Authorization Code (Station Number and Password).
To Log out of the Hot Desk station:
• Press the TRANS/PGM button,
• Dial * twice,
• Use the VOL buttons to select a call forward destination
for your calls, speed dial, joined mobile phone, VMIM/VSF, or
VM group,
•
In iPECS-MG
To Log on to a Hot Desk station:
• Lift the handset,
• Dial 525
• Dial your Authorization Code (Station Number and Password).
To Log out of the Hot Desk station:
• Press the TRANS/PGM button,
• Dial 525,
• Input Call forward destination number optionally
• Press the HOLD/SAVE button.
HOLD/SAVE button.
61
Page 69

LIP-8012E & LIP-8024E Gigabit Phone User Guide
9. PBX,
ISDN
Centrex &
The iPECS has been designed to operate with a host
PBX system or Centrex services from your service
provider. The iPECS connects to a host with analog CO
lines.
When accessing a CO line, the phone will act as an
extension of the host, allowing access to the host
system features using the host dial codes. While on a
call, use the iPECS Flash feature to transfer calls to
other host extensions or access features of the host.
The Flash feature may be used on other CO lines to
regain dial tone from the CO line without relinquishing
control of the CO line to place another call.
To access PBX or Centrex features while idle:
• Lift the handset,
• Select/dial access a PBX/Centrex CO line,
• Dial PBX/Centrex feature code.
To access PBX/Centrex features while on a PBX/Centrex
CO line:
• Use the Navigation button to display the next menu, and select
the Flash
• After receiving new dial tone, dial the PBX/Centrex feature
code.
9.2 Access the ISDN Network
soft button,
9.2.1 Using the Keypad facility to access ISDN features
Access to certain features of your ISDN services
requires that dialed digits be sent to the ISDN as data
and not tones. In this case, dialed digits are sent as
‘Keypad messages’.
A Keypad Facility button must be assigned using the
Flex Button program procedures. Once active, dial into
the ISDN for services; however, actions other than
dialing will deactivate the Keypad Facility operation.
9. PBX, CENTREX & ISDN FEATURES
9.1 Access PBX or Centrex features
62
Page 70
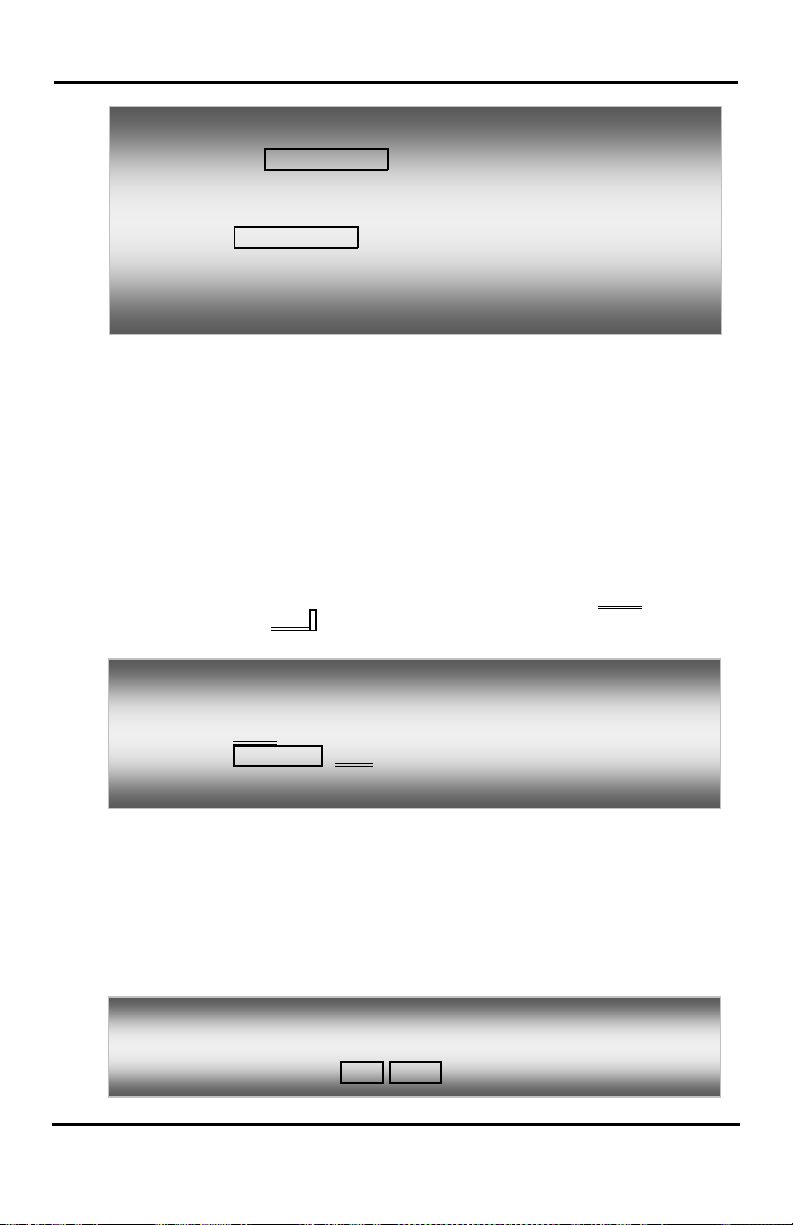
LIP-8012E & LIP-8024E Gigabit Phone User Guide
To activate Keypad Facility operation:
• Press the KEYPAD FACILITY button to switch to keypad mode,
• Dial as desired.
To deactivate Keypad Facility operation:
• Press KEYPAD FACILITY,
OR
• Press a Feature or Flex button.
9.2.2 Using ISDN Supplementary Services
ISDN service providers may incorporate features similar
to those of Centrex. These ISDN Supplementary
services are provided on a subscription basis, and as
with Centrex, are accessed using the Flash button on
an iPECS phone.
Using supplementary s ervices an ISDN line can be
placed on Hold and a second call placed on the line.
You may then alternate between the two held calls
(Broker Call) using the hold button. An ISDN line
conference can be established using the Flash
Conf Soft buttons. A conference can also be placed on
hold.
and
While on an ISDN CO line, to access ISDN Supplementary
services:
• Press Flash,
• Press HOLD/SAVE, Conf, or CO line button to activate the
desired feature.
9.2.3 Activating ISDN Caller ID Restriction
iPECS Phone users can restrict the transmission of
Caller ID to the far-end. This may be a subscription
service of your carrier. Separate Flex buttons are
required to activate outgoing, Connec ted Lin e (CO L),
and incoming, Calling Line ID (CLID) restriction.
To restrict Caller ID:
• Lift the handset,
• Press programmed CLIR/COLR button to place call.
63
Page 71
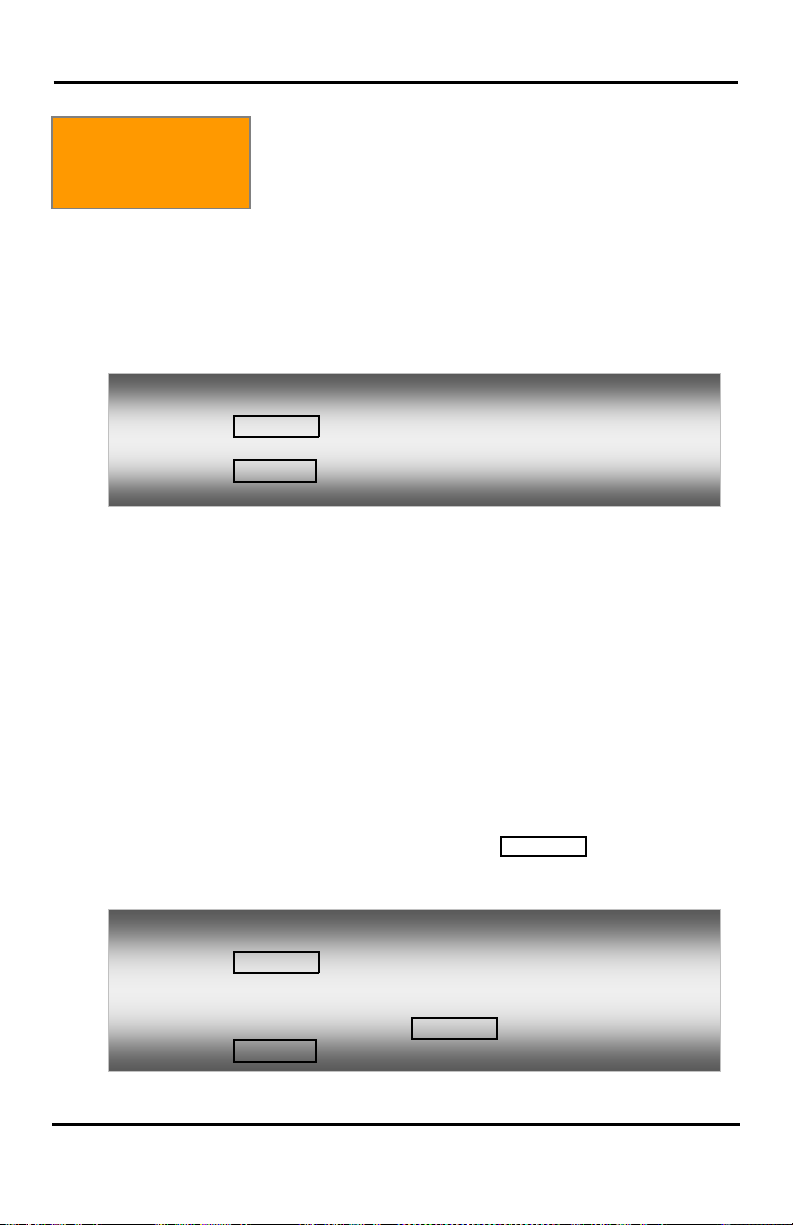
LIP-8012E & LIP-8024E Gigabit Phone User Guide
10. Features &
10. FEATURES & FLEX BUTTONS
Flex Buttons
To assign user programmable attributes to your station:
• Press TRANS/PGM,
• Dial desired User Program codes shown in Appendix B,
• Press HOLD/SAVE.
10.2 Assigning Features to Flex B utt ons
10.1 Entering Station Program Data
A special code set is available for iPECS Phone users
to assign certain attributes such as Authorization Codes
(Passwords). After entering the User Program mode,
dial the codes to select the attribute and setting. Once
selected, the setting is saved. A list of the User
Program codes, the feature/function and any input
required are given in Appendix B. In some cases, you
enter these codes as part of Flex button assignments.
You may assign features and functions to the Flex
buttons on your iPECS Phone (possibly CO/IP lines).
Flex buttons may be assigned for most features
providing One-Touch feature activat ion ( ex., a Flex
button may be assigned to access the Account Code
feature and may include the Account code digits).
Features that may be assigned to a Flex button include:
DSS/BLF—Enter station number.
Speed Dial—Enter Station/System Speed dial bin.
Flex Numbering Plan—Enter Flex Numbering Plan code
(refer to Appendix A).
User Program Code—Press TRANS/PGM and enter a
User Program code (refer to Appendix B).
CO/IP Line—Enter the CO/IP line or group number.
To assign a feature to a Flex button:
• Press TRANS/PGM,
• Press the desired Flex button,
• Dial desired code and required inputs; for User Program codes
Appendix B
• Press HOLD/SAVE.
), first press the TRANS/PGM,
64
Page 72
LIP-8012E & LIP-8024E Gigabit Phone User Guide
Feature
iPECS
iPECS
iPECS
iPECS
iPECS
iPECS
1000
149
169
399
1599
2199
CO/IP Group Access
801 –
801 -
801 -
801 -
89001
89200
801 -
Individual CO/IP Line
8801 –
8801 –
88001
88200
88001
88400
88001
88600
8801 –
659
659
667
667
500
631
Internal Page Zone
501 510
501 510
501 535
501 535
301 400
501510
610
610
619
619
800
610
Station User
VMIM/VSF Features
66 66
*66
*66
*66
#*2
#*4
#*4
#*4
Feature
iPECS-LIK
iPECS SBG1000
Remark
Internal All Call Page
543
Meet Me Page
544
511 External Page Zone 1-2
545 - 546
External All Call Page
548
(Internal/External)
SMDR Account Code Enter
550 SLT use only
Flash Command to CO Line
551 SLT use only
Last Number Redial
552
52
SLT use only
Toggle ON/OFF
Call Forward
554
54 Speed Dial Programming
555
55
SLT use only
Message Wait/Callback
Enable
556
56
SLT use only
Return
Speed Dial Access
558
58
SLT use only
Cancel DND/FWD
559
59
SLT use only
APPENDIX A FLEXIBLE NUMBERING PLAN
In iPECS-LIK & iPECS SBG-1000
-50
Intercom Call 100 -
820
Access
Group Pilot Number 620 –
Call Parking Locations 601 –
Door Open #*1 #*1 -
8842
-100
100 -
820
8842
620 -
601-
-300
100 -
872
–
620 -
601 -
#*1 -
-600
1000 -
872
–
620 -
601 -
#*1 -
-1200
1000 -
-
–
401 -
601 -
#*1 -
SBG-
10-33
805
8810
620 –
601 –
#*
All Call Page
DND 553 53 SLT use only;
Message Wait/Callback
549 500
557 57 SLT use only
65
Page 73
LIP-8012E & LIP-8024E Gigabit Phone User Guide
Feature
iPECS-LIK
iPECS SBG1000
Remark
CO System Hold
560
67
SLT use only
Program Mode Access
561 SLT use only
Attendant Unavailable
562
Alarm Reset
565
65
Group Call Pickup
566
**
Universal Answer
567
Account Code with bin
568
Walking COS Code
569
ACD Supervisor On/Off
Duty
571
ACD Supervisor Login
572
ACD Supervisor Logout
573
ACD Help Code
574
ACD Calls In Queue
Display
575
ACD Supervisor Status
Display
576
ACD Supervisor Monitor
577
ACD Reroute Queued Call
w/answer
578
ACD Reroute Queued Call
w/o answer
579
Enter Conference Room
59
Camp-On Answer
600
66
SLT use only
Call Coverage button
67
*# Direct Call Pickup
7 7
Retrieve Last Held CO/IP
8*
8*
Retrieve Individual Held
CO/IP
8# 8#
Available CO Group
Attendant Call
0 0
VM Message Wait Enabled
*8
VM Message Wait Disable
*9
MCID Request
*0
extend code
PTT Group Login/Logout
#0
Access CO Line in the 1st
Unsupervised Conference
9 9
##
66
Page 74
LIP-8012E & LIP-8024E Gigabit Phone User Guide
Name
Code
Remark
Station Number
801 ~ 824(MG-100)
620 ~ 639(MG-100)
No
Feature Name
Code
Remark
#
12
Personal VM Page
544
Attendant
(Meet-Me Page)
17
Internal-External Page All
549
Destination
Register
Destination
In iPECS-MG
1) Basic Number
1
2
CO Group Access Code
3
Station Group Number
2) Feature Code
1 Attendant Call 0
2 C onfer en ce Room 1 571
3 C onfer en ce Room 2 572
4 C onfer en ce Room 3 573
5 C onfer en ce Room 4 574
6 C onfer en ce Room 5 575
7 C onfer en ce Room 6 576
8 C onfer en ce Room 7 577
9 C onfer en ce Room 8 578
10 Conference Room 9 579
11 Internal Page
100 ~ 4xx
9,
801 ~ 872(MG-300)
620 ~ 669(MG-300)
543 543 + 00, xx
00: All Call Page
Xx: Page Group
13 Announcement Page For
14 Page Auto Answer 546
15 Internal Page Answer
16 External Page 548
18 Call Forward Register 554 554 + Type +
19 Pilot Hunt Call Forward
545
547
514 514 + Type +
67
Page 75
LIP-8012E & LIP-8024E Gigabit Phone User Guide
No
Feature Name
Code
Remark
Cancel
22
DND Delete
517 23
Account Code
550 24
CO Flash
551 25
Last Number Redial
552
27
Speed Dial
555 28
MWI Register
557 29
MW I Answer
558 30
MWI Canc el
559 31
Call Back Register
518 32
Call Back Cancel
519 33
Group Call Pickup
564 34
Direct Call Pickup
7 35
Walking COS
520
(00 ~ 49)
37
PGM Mode Access
521
39
VMIB Access
523 40
AME Access
524
100)
Group #
20 Pilot Hunt Call Forward
21 DND Status Change 516
26 Station Speed PGM 553
36 Call Parking Location 541 541 + xx
38 Two-Way Record 522
515
Xx: Parking
Location
41 CO Line Access 88 88 + xxx
42 VM MWI Enable *8
43 VM MWI Cancel *9
44 MCID Request *0
45 Unsupervised Conf Extend 5##
46 PTT Group Access 524 524 + (0~9,*)
Xxx: CO Line #
(001 ~ 200 :
MG-300
01 ~ 80 : MG-
0 ~ 9: PTT
68
Page 76

LIP-8012E & LIP-8024E Gigabit Phone User Guide
No
Feature Name
Code
Remark
47
Hot Desk Log In/Log out
525 48
Name Register
526
Room #
Room #
51
Wake Up Register
529
529 + HH:MM
52
Wake Up Cancel
530 53
Temporarily COS Down
531 54
Cancel Temp COS Down
532 55
Password Change
533 56
Inter-Phone Group Access
534 57
Call Wait Request
535 58
Preselected MSG PGM
536 59
Forced Handsfree Call
537 60
Call Based CLIR
582
*: Log out
49 Create Conf Room 527 527 + Conf.
50 Delete Conf Room 528 528 + Conf.
61 CLIR Access 583
62 COLR Access 584
63 Pilot Hunt Call 585
64 Command Call Oneway 581
65 Command Call Conf 580
66 Intrude Register 589
67 Camp On Register 590
68 OHVO Register 591
69 Mobile Num Register 592
70 Mobile CLI Register 593
71 Mobile Access 594
72 CCR Access 670
73 CCR Access And Drop 671
74 System Hold 560
75 Return Held CO 8**
76 Sys Memo 675
77 DISA Tone Service 678
78 All Feature Cancel 679
79 Add Conf Member 680
69
Page 77
LIP-8012E & LIP-8024E Gigabit Phone User Guide
No
Feature Name
Code
Remark
80 System Alarm Reset 565
81 Fault Alarm Reset 566
82 Door Open #*1
83 Keypad Facility ##*
84 T-Net Log-In/Out 586
85 Universal Answer 587
86 USB Call Record 588
87 Delete All VM Message 681
88 VM Page Message Record 682
89 Direct VM Transfer 683
90 Loop Key 684
91 Call Log 685
70
Page 78
LIP-8012E & LIP-8024E Gigabit Phone User Guide
CODE
FUNCTION
REMARK
10
Enblock Mode Dialing
iPECS LIP-7000 only
11 x
Differential Ring, Intercom
Select Ring Tone 1-8
12 x
Differential Ring, CO/IP line
Select Ring Tone 1-8
Select ICM Signal mode,
1: HF, 2: TONE, 3: Privacy
(0-9)
Select download Ring Tone
0-9
19
Ear&Mic Headset Usage
iPECS LIP-7000 only
21
Knock Down Station COS
May require Authorization
code
May require Authorization
code
30
VM Mobile Notify
31
Station Message Wait Retrieve
32
CLI/IP Message Wait Retrieve
Authorization Code (Password)
Entry
Station number +up to 12
digits, no Flex button
Message Wait in
Executive/Secretary pair
36
Send SMS Message
37
38
Activate Mobile Extension
39
Register Mobile Ext. CLI
41 xx
Set Wake-Up Time
Input time, 24 hour clock
42
Erase Wake-Up Time
Custom/Pre-defined Message
Display
52 xx
Input up to 24 characters
password
Input Conf Room (1-9) &
optional password
55
Monitor Conf. Room
61 x
Headset/Speakerphone Mode
Headset, 3: both
71
LCD Display Mode
72
Version Display
APPENDIX B USER PROGRAM CODES
In iPECS-LIK
13 x
14 x
15 x
22
23
33 x
34
35
51 xx
53 x
Intercom Answer Mode
Call Coverage Attribute Setting
Station Ring Download
Restore Station COS
Walking COS
Assign DID CALL WAIT Button
Register Mobile Extension
Register Custom Message
Create Conference Room
1+: ON/OFF, 2+: ring delay
Select Message 00-20
Input Conf Room (1-9) &
54 x
62 x Headset Ring Mode
Delete Conference Room
1: Speakerphone, 2:
71
Page 79
LIP-8012E & LIP-8024E Gigabit Phone User Guide
CODE
FUNCTION
REMARK
73
Background Music
74 x
Station User Name Registration
Input up to 7 characters
75
Display Phone IP Address
76
Change Phone IP Address
77
Display Phone MAC IP Address
78
Network Configuration
79
Display Phone Version
VM
82
85
Assign LOOP Button
87
ICM Button
89
Assign K
Button
93
DND Button Assignment
iPECS LIP-7000 only
98
FWD Button Assignment
iPECS LIP-7000 only
*0
Hot Desk Login Code
**
Hot Desk Log out Code
*7
Force Fwd to Dest.
*8
Register Bluetooth
*9
Bluetooth Usage
Code
Function
Remarks
Select ICM Signal mode,
1: HF, 2: TONE, 3: Privacy
12
Headset/Speakerphone Mode
0:Headset, 1:Speaker
both
80 Assign RECORD Button
81
84
86
88 Assign CAMP-ON Button
8# Assign OHVO Button
90 SPEED Button Assignment iPECS LIP-7000 only
91 CONF Button Assignment iPECS LIP-7000 only
92 CALL BACK Button Assignment iPECS LIP-7000 only
94 FLASH Button Assignment iPECS LIP-7000 only
95 MUTE Button Assignment iPECS LIP-7000 only
96 MONITOR Button Assignment iPECS LIP-7000 only
97 REDIAL Button Assignment iPECS LIP-7000 only
99
Assign ISDN CLIR Button
ISDN COLR Button
Assign ACCOUNT CODE Button
Assign ATD INTRUSION Button
EYPAD FACILITY
Assign PTT Button
Requires VSF/External SMDI
In iPECS SBG-1000
11 Intercom Answer Mode
13 Select Headset Ring Type
1: Speakerphone, 2: Headset, 3:
72
Page 80
LIP-8012E & LIP-8024E Gigabit Phone User Guide
Code
Function
Remarks
21
Set Wake-Up Time
Input time, 24 hour clock
22
Erase Wake-Up Time
31
LCD Display Language
32
SBG Version Display
33
Background Music
34
Station User Name Registration
Input up to 12 characters
35
Display Phone IP Address
May require Authorization code
36
Display Phone MAC IP Address
37
Display Phone Version
38
Network Configuration
41
Forced FWD to Destination
42
Call Log Display
43
CLIR Service
44
COLR Service
50
Assign
Button
Code
Function
Remarks
Name
Time
24-hour clock
4*
51
52
53
53
In iPECS-MG
Assign LOOP Button
CALL BACK
Assign CONF Button
Assign MUTE Button
Assign ICM Button
Assign REDIAL Button
11 Intercom Answer Mode 1:H, 2:T, 3:P
12 +
13 +
14 Cancel Wake-up Alarm
15 Set language for the display 00-14
16 LCD Date Mode Change DD/MM/YY or MMDDYY
17 LCD Time Mode Change 12 Hour/24 Hour
18 Set Backlight 0-2
21 ICM Ring Type
22 TRK Ring Type
23 Ring Download LIP-Series Only
24 Back Ground Music
31 Temporary COS Auth. Code required
32 Retrieve COS Auth. Code required
User name creation 2 digit for each character
Set wake-up alarm time
HH/mm,
73
Page 81
LIP-8012E & LIP-8024E Gigabit Phone User Guide
Code
Function
Remarks
(Walking COS)
[xx]
Code
Code
DTIM/SLTM
DTIM/SLTM
33
34 Register Password
35 Call Log Protect
36 SMS Message Protect LIP-Series/LDP6000-Series
41 +
MSG
number
42 Create a Station User Message
43 Send SMS Message LIP Series/LDP6000 Series
44 Receive SMS Message LIP Series/LDP6000 Series
51 + x Activate a mobile phone X=1-2
52 + x Register the mobile number X=1-2
53 + x Register the mobile CLI number X=1-2
54 + Rm
& Auth
55 + Rm
& Auth
61 Speaker/Headset Mode Speak/Headset/E-MIC
62 Headset Ring Mode Speaker/Headset/Both
71 Register Station ICLID
72 View Station ICLID
81 View IP Address
COS Override
Set Pre-defined Message.
Start a Conf Room
Close a Conf Room
Auth. Code required
0-9, MSG
*: User Custom #
Deactivation
IP Gigabit Phone/
82 View Mac Address
83 View IP Phone version
80 Network Setting LIP Series
91 System Version
92 System IP Address
IP Gigabit Phone/
74
Page 82

LIP-8012E & LIP-8024E Gigabit Phone User Guide
Appendix C Useful Information : Open Source Software
Notice
Open Source Software Notice
This following GPL (General Public License) software used in this product
are subject to the GPL License Agreements.
You can obtain a copy of the GPL licenses from Ericsson-LG Web Site
(http://www.ericssonlg.com).
GPL License:
4. u-boot
5. bash
6. linux
7. busybox
8. Alsa Libraries
9. udhcpc
10. ortp
11. Curl / LibCurl
12. libsrtp
13. Expat xml parser
Ericsson-LG offers to provide source code to you on CD-ROM for a charge
covering the cost of performing such distribution, such as the cost of media,
shipping and handling upon e-mail request to Ericsson-LG at. :
[email protected].
This offer is valid for a period of three (3) years from the date of the
distribution of this product by Ericsson-LG.
75
 Loading...