

Page 1
Page 2

Page 3
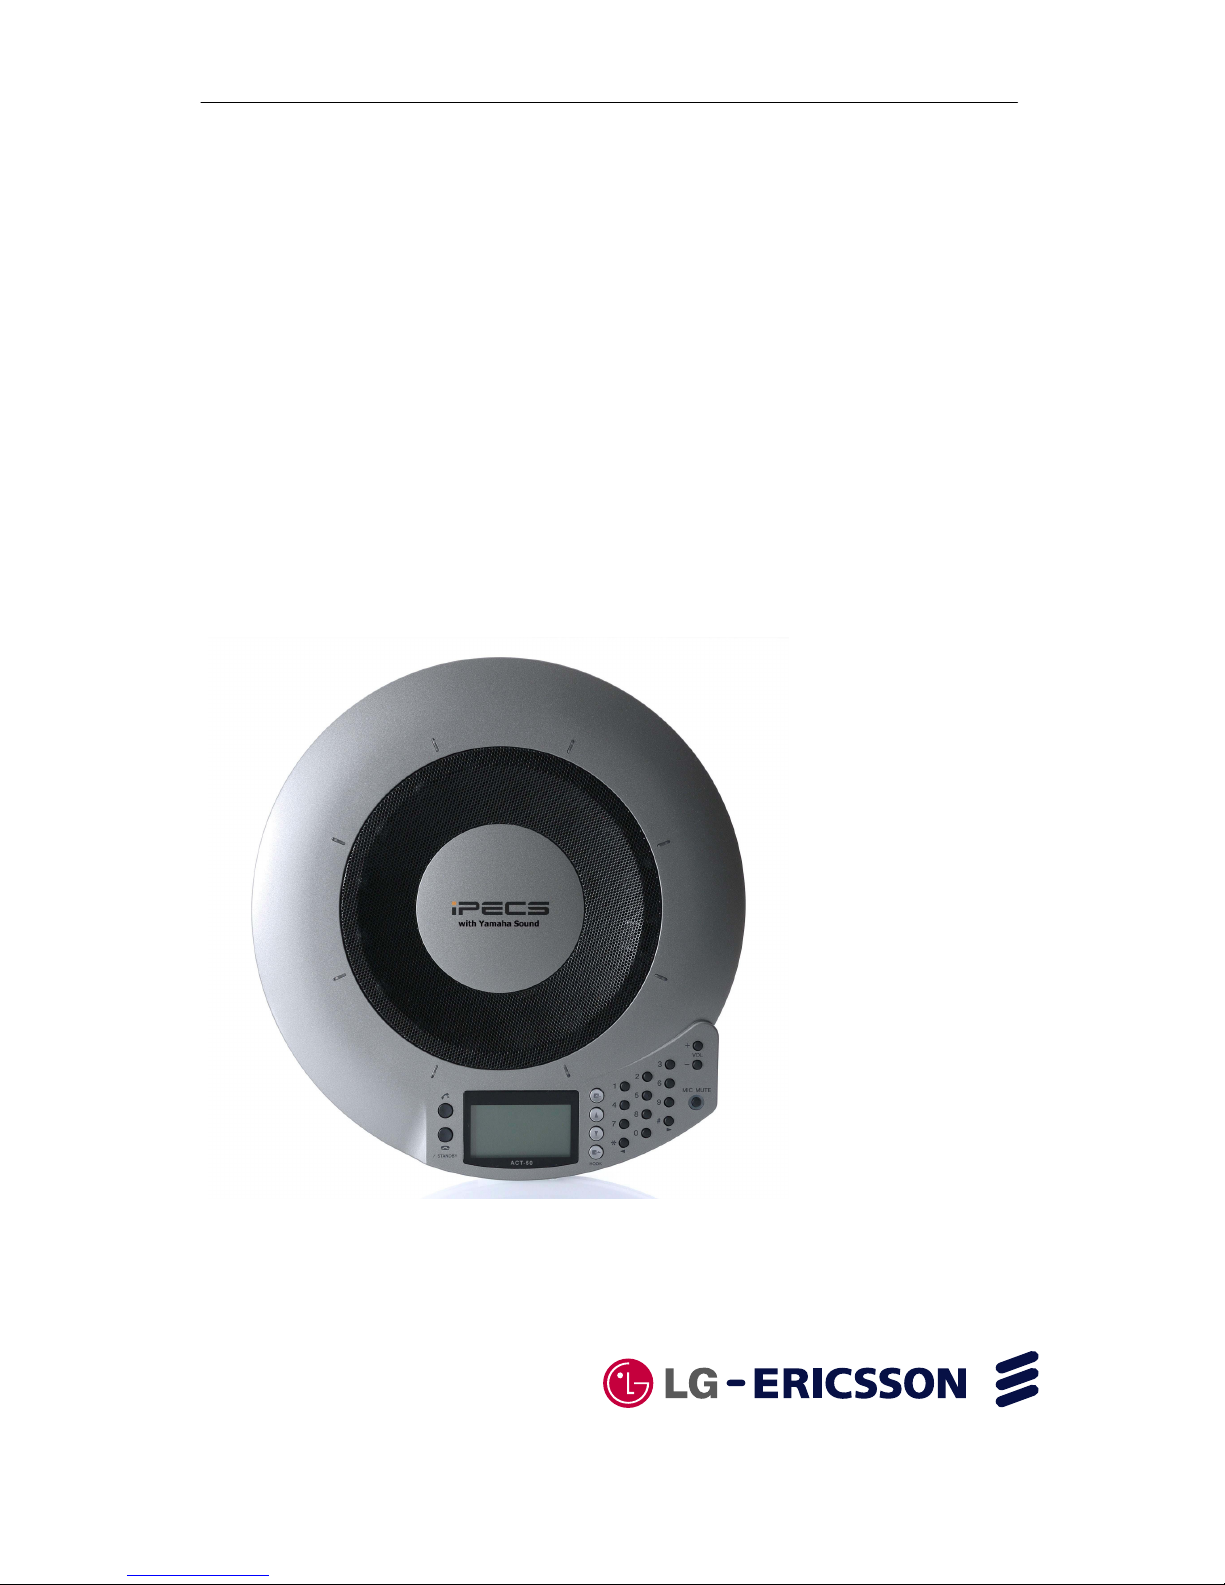
ACT-50 User Guide
ACT-50
IP Audio Conference System
User Guide
This document provides information about ACT-50 IP audio conference system.
* ACT-50 needs SIP server for proper operation.
Page 4

ACT-50 User Guide
Regulatory
RegulatoryRegulatory
Regulatory and
andand
and Compliance
Compliance Compliance
Compliance statements
statementsstatements
statements
This section provides required regulator, safety and disclaimer statements.
1. Radio Frequency Emissions:
FCC Compliance statement:
This device complies with Part 15 rules. Operation is subject to the following two conditions;
1. This device may not cause harmful interference, and
2. This device must accept any interference received, including interference that may
cause undesired operation.
This Equipment has been tested and found to comply with the limits for a Class A digital
device, pursuant to Part 15 of the FCC rules. These limits are designed to provide reasonable
protection against harmful interference in a residential installation. This equipment
generates, uses and can radiate radio frequency energy and, if not installed and used in
accordance with the instructions, may cause harmful interference to radio communications.
However, there is no guarantee that interference will not occur in a particular installation. If
this equipment does cause harmful interference to radio or television reception, which can
be determined by turning the equipment off and on, the user is encouraged to try to correct
the interference by one of the following measures:
• Reorient or relocate the receiving antenna.
• Increase the separation between the equipment and the receiver.
• Connect the equipment into an outlet on a different circuit from that to which the
receiver is connected
If problems persist, consult the dealer or an experienced radio/TV technician for help.
European Union Declarations of Conformity:
LG-Ericsson Co., Ltd. declares that the equipment specified in this document, which bears
the “CE” mark, conforms to the European Union Radio and Telecommunications Terminal
Equipment Directive (R&TTE 1999/5/EC) including,
Electromagnetic Compatibility Directive (2004/108/EC) and
Low Voltage Directive (2006/95/EC)
Copies of these Declarations of Conformity (DoCs) can be obtained by contacting your local
sales representative.
The product fulfills the essential requirements of the harmonized standards shown above.
This product also complies with the following standards:
• EN 55022 Class A
• AS/NZ CISPR 22 Class A
• EN 55024
• EN 61000-3-2
• EN 61000-3-3
2. Product Safety Instructions
This product complies with and conforms to the following international Product Safety
standards as applicable:
Page 5

ACT-50 User Guide
Safety of Information Technology Equipment, IEC 60950-1, including
Relevant national deviations as listed in Compliance with IEC for Electrical Equipment
(IECEE)
3. E-911 and use of the ACT-50 with Multi-Line Telephone Systems: Please note the use
and operation of this device as part of a multi-line telephone system (MLTS) may be subject
to state and/or federal E-911 MLTS laws that require the MLTS to provide a caller’s
telephone number, extension, and physical location to applicable state and/or local
emergency services when a caller initiates a 911 call. This device does not provide a caller’s
telephone number, extension, or physical location information to emergency services when a
caller dials 911, and compliance with state and/or federal E-911 MLTS laws is the sole
responsibility of the purchaser of this device.
4. Privacy: ACT-50 implements several security and encryption technologies however,
privacy of communications may not be ensured when using this device.
5. IMPORTANT: When connecting this product to accessories and/or another product use
only high quality shielded cables. Cable/s supplied with this product MUST be used. Follow
all installation instructions. Failure to follow instructions could void your FCC authorization
to use this product in the USA.
FCC INFORMATION (for US customers)
This equipment complies with Part 68 of the FCC rules and the requirement adopted by the
ACTA. On the back of the main body of this equipment is a label that contains, among other
information, a product identifier in the format US:AAAEQ##TXXXX. If requested, this number
must be provided to the telephone company.
A plug and jack used to connect this equipment to the premises wiring and telephone
network must comply with the applicable FCC Part 68 rules and requirements adopted by the
ACTA. A compliant telephone cord and modular plug is provided with this product. It is
designed to be connected to a compatible modular jack that is also compliant. See
installation instructions for details.
Use the RJ-11C modular cable to connect this unit and telephone network.
Connect to party line service is subject to state tariffs. Contact the state public utility
commission, public service commission or corporation commission for information.
If your home has specially wired alarm equipment connected to the telephone line, ensure
the installation of this product does not disable your alarm equipment. If you have questions
about what will disable alarm equipment, consult your telephone company or a qualified
installer.
Page 6

ACT-50 User Guide
The telephone company may make changes in its facilities, equipment, operations or
procedures that could affect the operation of the equipment. If this happens, the telephone
company will provide advance notice in order for you to make necessary modifications to
maintain uninterrupted service.
If the ACT-50 causes harm to the telephone network, the telephone company will notify you in
advance that temporary discontinuance of service may be required. But if advance notice isn’t
practical, the telephone company will notify the customer as soon as possible. Also, you will
be advised of your right to file a complaint with the FCC if you believe it is necessary.
If trouble is experienced with the ACT-50, for repair or warranty information, please contact
LG-Ericsson USA, Inc.
Responsible Party: LG-Ericsson USA, Inc.
Address: 20 Mason, Irvine, CA92618, USA
Telephone: 877-828-2673
If the equipment is causing harm to the telephone network, the telephone company may
request that you disconnect the equipment until the problem is resolved.
Ringer Equivalence Number (REN)
The Ringer Equivalence Number (REN) is used to determine the number of devices that may
be connected to a telephone line. Excessive RENs on a telephone line may result in the
devices not ringing in response to an incoming call. In most but not all areas, the sum of
RENs should not exceed five (5.0). To be certain of the number of devices that may be
connected to a line, as determined by the total RENs, contact the local telephone company.
For products approved after July 23, 2001, the REN for this product is part of the product
identifier that has the format US:AAAEQ##TXXXX. The digits represented by ## are the REN
without a decimal point (e.g., 03 is a REN of 0.3). For earlier products, the REN is separately
shown on the label.
The specifications and information regarding the products in this manual
are subject to change without notice. All statements, information, and
recommendations in this manual are believed to be accurate but are
presented without warranty of any kind, expressed or implied. Users must
take full responsibility for their application of any products.
The software license and limited warranty for the accompanying product are
set forth in the information packet that shipped with the product and are
incorporated herein by this reference. If you are unable to locate the
software license or limited warranty, contact your LG-Ericsson
representative for a copy.
Page 7

ACT-50 User Guide
Notwithstanding any other warranty herein, all document files and software
of these suppliers are provided "as is" with all faults. LG-Ericsson and the
related suppliers disclaim all warranties, expressed or implied, including,
without limitation, those of merchantability, fitness for a particular purpose
and non-infringement or arising from a course of dealing, usage, or trade
practice.
In no event shall LG-Ericsson or its suppliers be liable for any indirect,
special, consequential, or incidental damages, including, without limitation,
lost profits or loss or damage to data arising out of the use or inability to use
this manual, even if LG-Ericsson or its suppliers have been advised of the
possibility of such damages.
Copyright © 20
Copyright © 20Copyright © 20
Copyright © 2010
1010
10 LG
LGLG
LG----Ericsson
EricssonEricsson
Ericsson Co., Ltd.
Co., Ltd.Co., Ltd.
Co., Ltd.
All Rights Reserved
All Rights ReservedAll Rights Reserved
All Rights Reserved
This material is copyrighted by LG-Ericsson Co., Ltd.
Any unauthorized reproductions, use or disclosure of this material, or any
part thereof, is strictly prohibited and is a violation of Copyright Laws.
LG-Ericsson is a trademark of LG-Ericsson Co., Ltd.
All other brand and product names are trademarks or registered
trademarks of their respective companies.
Page 8

ACT-50 User Guide
Revision History
Revision
RevisionRevision
Revision DATE OF ISSUE
DATE OF ISSUEDATE OF ISSUE
DATE OF ISSUE REMARKS
REMARKSREMARKS
REMARKS
1.00 2010-02-22
Initial
Release
2.00 2010-07-01
Company logo update
2.01 2010-07-23
Image update
2.02 2010-07-26
Added static IP address restriction
2.03 2010-07-29
Updated
“Regulatory and Compliance
statements”
2.04 2010-08-12
F
ont and layout changed
2.05 2010-08-20
S
everal usage examples added
2.06 2010-08-27
S
ize changed (A4
B5)
2.07 2010-10-18
FCC notice information added
2.08 2010-10-29
Analog connection
notes
added
2.09 2010-11-08
DTMF notes added
Page 9

ACT-50 User Guide
Important Safety Instructions
When using this product, basic safety precautions should always be followed to
reduce the risk of fire, electric shock and injury to persons, including the following;
1. Read and understand all instructions.
2. Follow all warnings and instructions marked on the product.
3. Unplug this product from the wall outlet before cleaning. Do not use liquid
cleaners or aerosol cleaners. Use a damp cloth for cleaning.
4. Do not use this product near water, for example, near a bathtub, wash bowl,
kitchen sink, or laundry tub, in a wet basement, or near a swimming pool.
5. Do not place this product on an unstable stand, or table. The product may
fall, causing serious damage to the product.
6. This product should be operated only from the type of power source
indicated on the product label. If you are not sure of the type of power
supply to your home, consult your dealer or local power company.
7. Do not allow anything to rest on the power cord. Do not locate this product
where the cord might be damaged by people walking on it.
8. Do not overload wall outlets and extension cords as this can result in the
risk of fire or electric shock.
9. Never spill liquid of any kind on the product.
10. To reduce the risk of electric shock, do not disassemble this product, but
take it to a qualified person when some service or repair work is required.
Opening or removing covers may expose you to dangerous voltages or
other risk. Incorrect reassemble can cause electric shock when the
appliance is subsequently used.
11. Unplug this product from the wall outlet and refer servicing to qualified
service personnel under the following conditions:
a. When the power supply cord or plug is damaged.
b. If liquid has been spilled into the product.
c. If the product has been exposed to rain or water.
d. If the product does not operate normally by following the operating
instructions. Adjust only those controls that are covered by the
operating instructions because improper adjustment of other
controls may result in damage and will often require extensive
work by a qualified technician to restore the product to normal
operation.
e. If the product has been dropped or damaged.
f. If the product exhibits a distinct change in performance.
12. Avoid using your device during an electrical storm. There may be a remote
risk of electric shock from lightning.
Page 10

ACT-50 User Guide
13. Do not use your device to report a gas leak in vicinity of the leak.
14. Severe damage to your device will occur if this set is plugged into an ISDN
connection.
15. Consult your system administrator to ensure that you are plugging your set
into a 10/100 BaseT Ethernet jack.
Precaution
• Keep this product away from heating appliances and electrical noise generating
device such as fluorescent lamps, motors and television. These noise sources
can interfere with the performance.
• This product should be kept free of dust, moisture, high temperature (more
than 40°C) and vibration, and should not be exposed to direct sunlight.
• Never attempt to insert wires, pins, etc. into the product. If the product does not
operate properly, it should be repaired by an authorized service center.
• Do not use benzene, thinner, or the like, or any abrasive powder to clean the
product. Wipe it with a soft cloth.
Disposal of your old appliance
1. When the crossed-out wheeled bin symbol is attached to a product it means the
product is covered by the European Directive 2002/96/EC.
2. All electrical and electronic products should be disposed of separately from the
municipal waste stream via designated collection facilities appointed by the
government or the local authorities.
3. The correct disposal of your old appliance will help prevent potential negative
consequences for the environment and human health.
4. For more detailed information about disposal of your old appliance, please
contact your city office, waste disposal service or the shop where you purchased the
product.
Page 11

ACT-50 User Guide
i
Table of contents
1. Introducing LG-Ericsson ACT-50 ..................................................... 1
1.1 Overview 1
1.2 Device layout 2
2. Getting your ACT-50 up and running ............................................. 3
2.1 What’s in the box 3
2.2 AC/DC power adaptor 4
2.3 Set-up 4
2.4 Connections to ACT-50 5
2.5 Initial power up and settings 6
2.5.1 Set up IP address 6
2.5.2 Setup SIP server 12
2.5.3 Setup voice codec 14
2.5.4 Setting your room parameter 15
2.5.5 Set MIC parameter 16
2.5.6 Set speaker parameter 17
3. Using your ACT-50 ......................................................................... 19
3.1 Understanding the LCD screen 19
3.2 Calling through SIP server 21
3.3 Answering a call 23
3.4 Address book 23
3.5 Call history 24
3.6 Settings 25
3.6.1 Microphone mode 25
3.6.2 Ring volume 27
3.6.3 Date and time 28
3.6.4 Set location/time zone & SNTP time server 29
3.6.5 Changing Web GUI password 29
3.6.6 Set Syslog server 29
3.6.7 Set QoS parameters 30
3.7 Connecting multiple units for wide area coverage 31
3.8 Set up “Telephone Settings” 32
3.8.1 Set Area Code (Country Code) 32
3.8.2 Set Dial Type 32
3.8.3 Set Hooking Time 32
3.8.4 Set Line Mode (Used for Japan/China region only) 32
Page 12

ACT-50 User Guide
ii
3.8.5 Save analog phone mode configuration 33
3.8.6 Load analog phone configuration 33
4. Factory reset .................................................................................. 34
5. F/W upgrade .................................................................................. 34
6. Troubleshooting problems ........................................................... 36
7. ACT-50 product specification ...................................................... 40
8. Time zone table ............................................................................. 41
9. LCD menu tree ............................................................................... 42
Page 13

ACT-50 User Guide
1
1. Introducing LG-Ericsson ACT-50
1.1 Overview
ACT-50 is a powerful communications tool for enterprises with LG-Ericsson iPECS
series (IP enabled communication systems). ACT-50 employs arrayed microphones
with high voice capturing capability and speakers with high voice reproduction
capability. In addition, it also incorporates a high-performance adaptive echo
canceller to eliminate interruptions of sound or drop in the voice level when multiple
talkers speak simultaneously. These features make your voice conference “easy to
talk” and “easy to hear”.
• Wideband voice codec technology delivers high fidelity audio from full
duplex speakerphone.
• Spot audio pickup function for better clarity.
• Microphone auto tracking function for noisy environment.
• Audio ports for use with softphone on PC.
Page 14
ACT-50 User Guide
2
1.2 Device layout
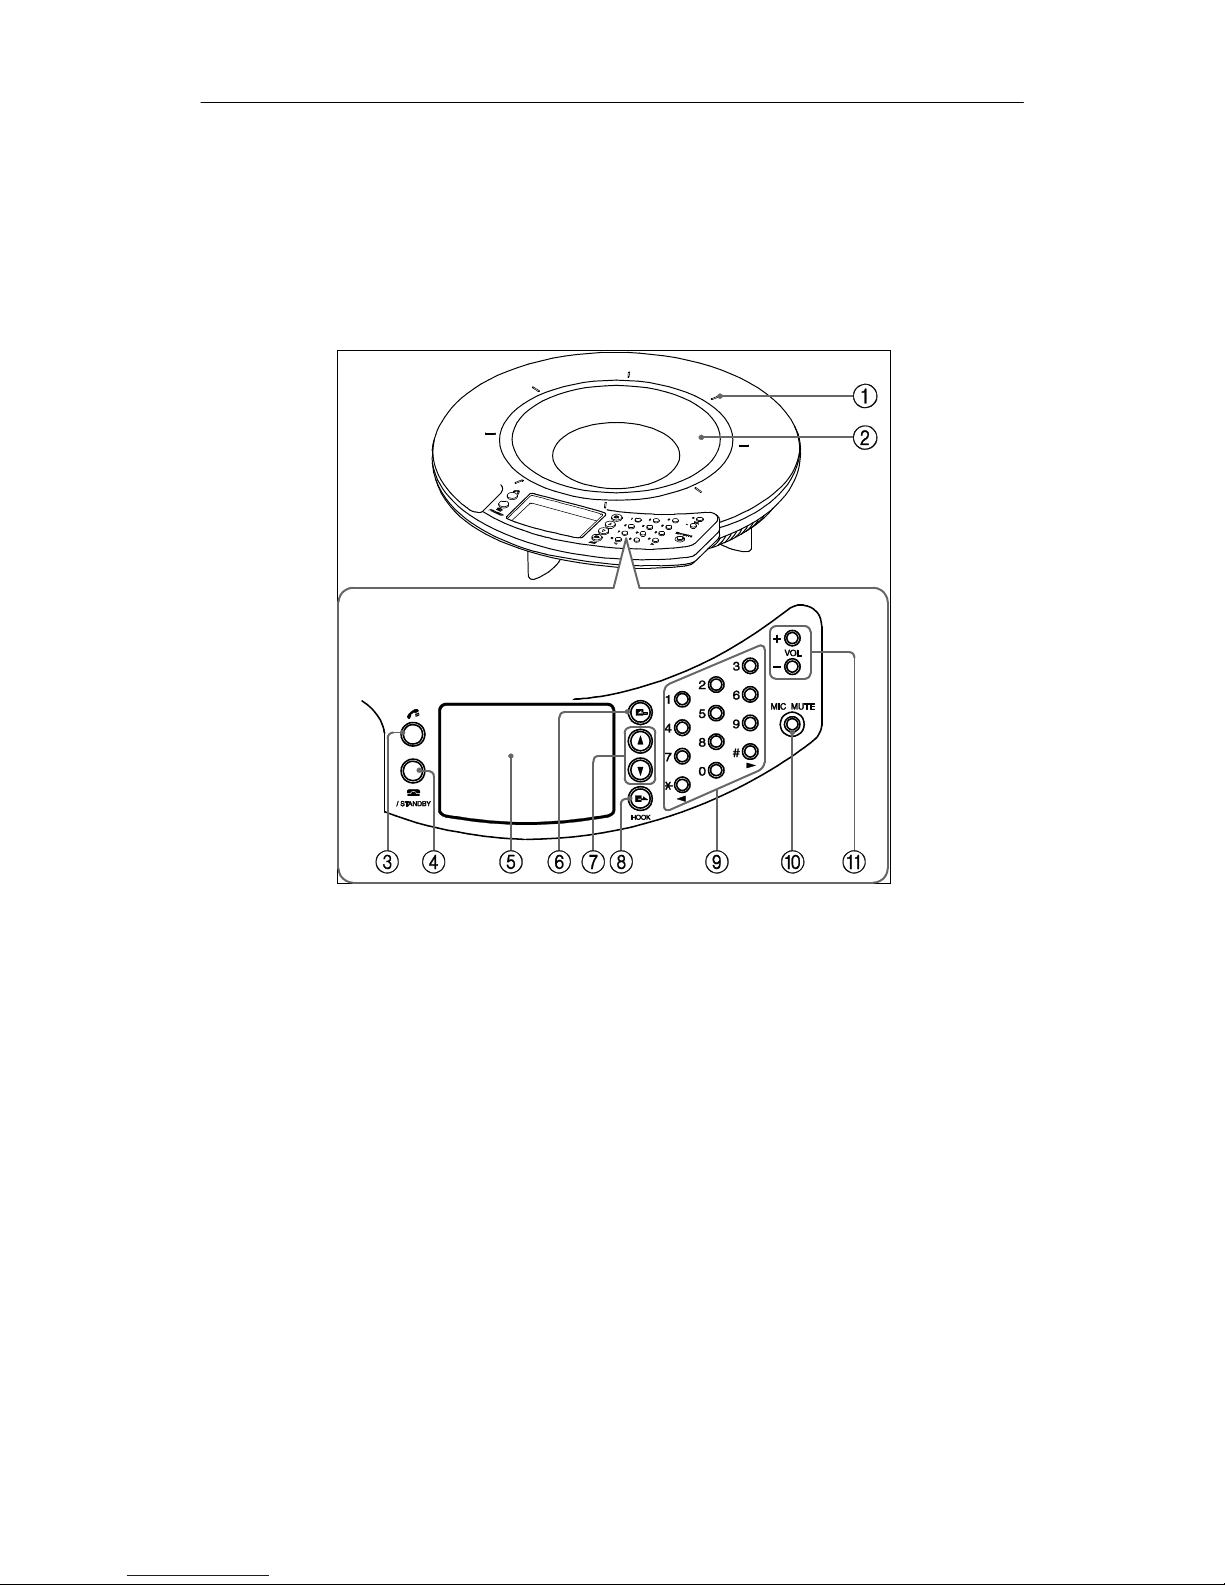
ACT-50 uses LCD screen and navigation keypad to select contacts and configure
settings, and a standard keypad for entering device numbers. Figure 1 below
describes the key elements of ACT-50.
Figure 1: Key elements of ACT-50
(1) Microphone indicators: Blue LED lights to indicate the audio pick up directions.
(2) Arrayed microphones: 16 microphones on the top panel capture the voices of
users.
(3) Connect key: Press the key when placing a call to the designated destination or
receiving an incoming call.
(4) Disconnect key/STANDBY key:
• Press the key to end a call. Pressing the key when there is an incoming call
rejects the call.
• Press for more than 5 seconds to set the system to the standby mode. Out-
going/in-coming call is disabled. (Press any key of the system to exit the standby
mode. System will reboot to normal mode.)
(5) Display: The LCD shows current status.
Page 15

ACT-50 User Guide
3
(6) Cancel key: Press the key to cancel a setting without saving it or to return to the
previous page.
(7) Up/Down keys: Press either key to select a setting item or move the cursor up
or down.
(8) Enter key/HOOK key: Press the key to enter a setting.
(9) Numeric keys: Press the keys to enter the numbers of the call destination or IP
address.
(10) MIC MUTE key: Press the key to temporarily disable (mute) the microphones
of this unit. The key lights in orange color when muted. Pressing the key when the
microphones are muted releases the mute and turns the LED off.
(11) VOL +/– key: Press either key to adjust the speaker volume. Holding either key
increases or decreases the volume continuously. (Due to echo cancelling operation,
effective loudness may increase only marginally above volume level 10 for certain
ambient conditions.)
2. Getting your ACT-50 up and running
2.1 What’s in the box
The ACT-50 product package contains the following items:
• ACT-50
• RJ-45 Ethernet cable
• User Guide
• AC/DC power adaptor
* WARNING: Use only with LG-Ericsson-approved limited power source 12 VDC, 3
A (PJP-PS02).
Page 16
ACT-50 User Guide
4
2.2 AC/DC power adaptor
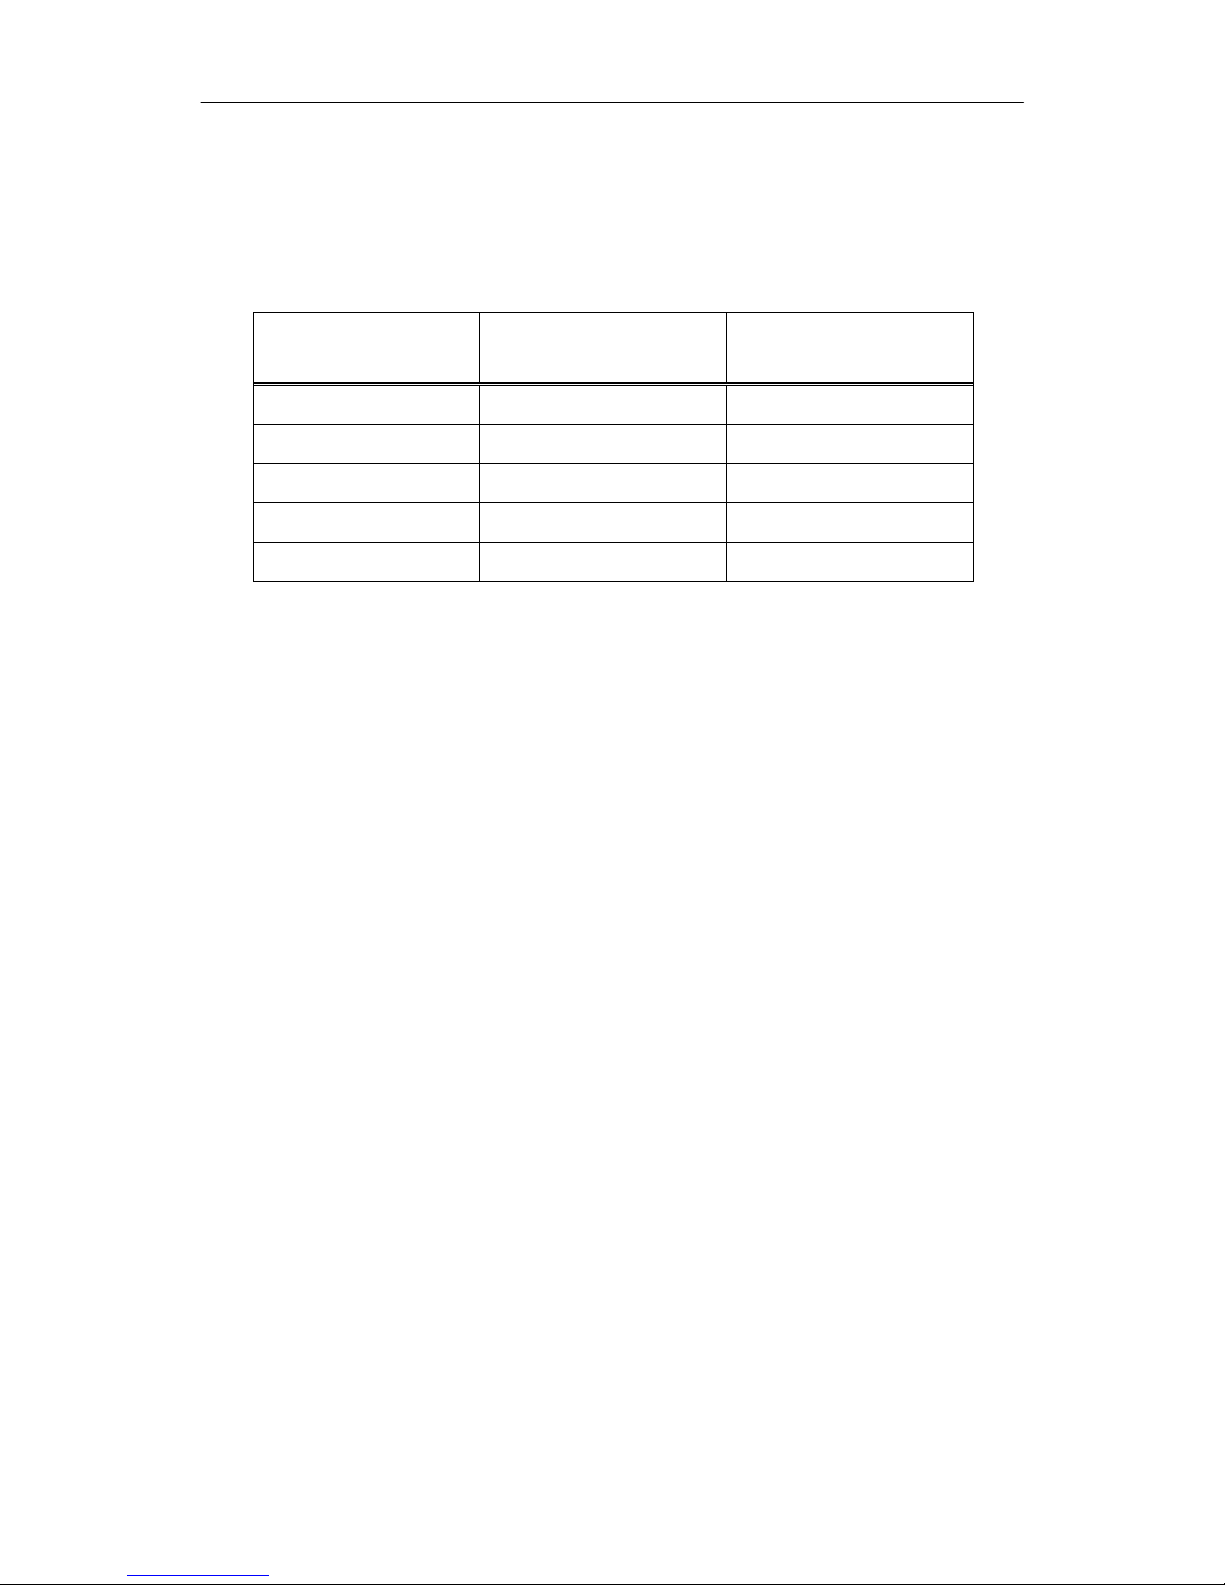
ACT-50 ships with an AC/DC power adaptor. Please check if the plug shape of AC
power cord is correct for your region.
Power Cord
Order Part Number
Model Number Applicable Region
TKTN9015503
ACT-50-PWC STG
Europe
TKTN9015602
ACT-50-PWC USA
USA
TKTN9015702
ACT-50-PWC CHN
China
TKTN9015802
ACT-50-PWC GBR
United Kingdom
TKTN9015902
ACT-50-PWC AUS
Australia
2.3 Set-up
Before connecting your new device, take a moment to consider safety and reliability.
Use common sense when locating, connecting and using your ACT-50.
• Locate the device on a dry level surface. Keep the device away from the
edges of the surface to avoid the device falling off the edge.
• Locate cables to avoid damage. For example, do not locate under rugs or
carpet. Also, do not locate cables between the desktop and walls where they
may be crushed, damaging the insulation.
• Check the cables regularly and, if damage is discovered, disconnect the
device. Contact your local representative for a replacement.
• Should liquid spill on the device, disconnect the unit from power and the
network.
• Do not use during lightning storms. Lightning presents a rare but potential
lethal shock hazard.
• Clean ACT-50 with a soft dry cloth; do not use liquid cleaners or sprays.
• Only attach peripherals specified by LG-Ericsson.
• Always use caution when connecting to AC power. Use only with approved
AC/DC adaptor for the unit.
Page 17
ACT-50 User Guide
5
2.4 Connections to ACT-50
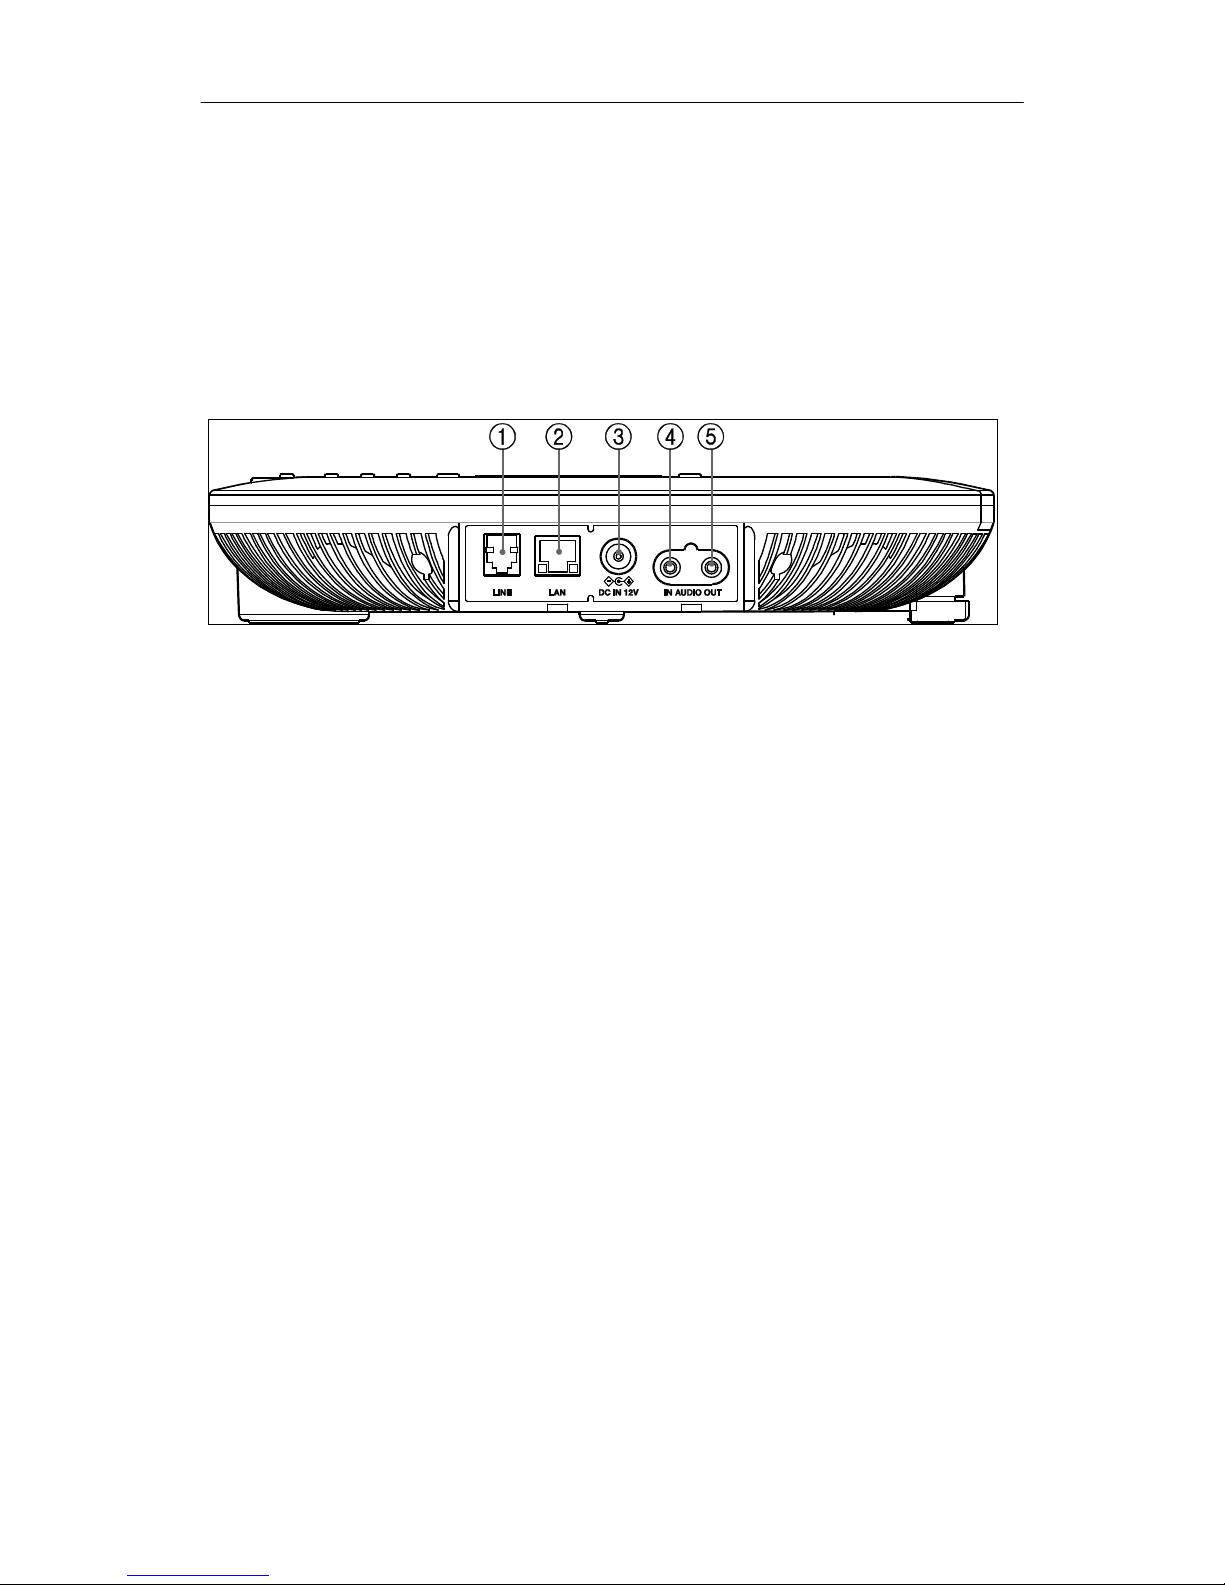
ACT-50 incorporates several standard connectors to interface to your LAN, power,
and peripherals.
To install ACT-50:
Figure 2: ACT-50 rear view
• Connect the Ethernet cable to RJ-45 connector and your Ethernet switch.
• Connect the AC/DC power adaptor to DC input connector and a standard
AC power outlet.
Optional connections and their intended uses are:
• RJ-11 connector (Connection to a KTS/PBX analog phone line for analog
phone call when IP network is down)
• TRS 3.5 mm stereo connector
(Connection to audio port on a PC; This
allows ACT-50 to work as speaker phone for softphone.)
*** Connect 3.5 mm stereo audio cable to AUDIO IN and PC headset port.
*** Connect 3.5 mm stereo audio cable to AUDIO OUT and PC MIC port.
Page 18
ACT-50 User Guide
6
2.5 Initial power up and settings
The first time you power up ACT-50, you will need to do the following:
• Setup IP address
• Setup SIP server
• Setup voice codec
• Set room parameter
• Set MIC parameter
• Set speaker parameter
2.5.1 Set up IP address
You must set up IP address after the initial power up.
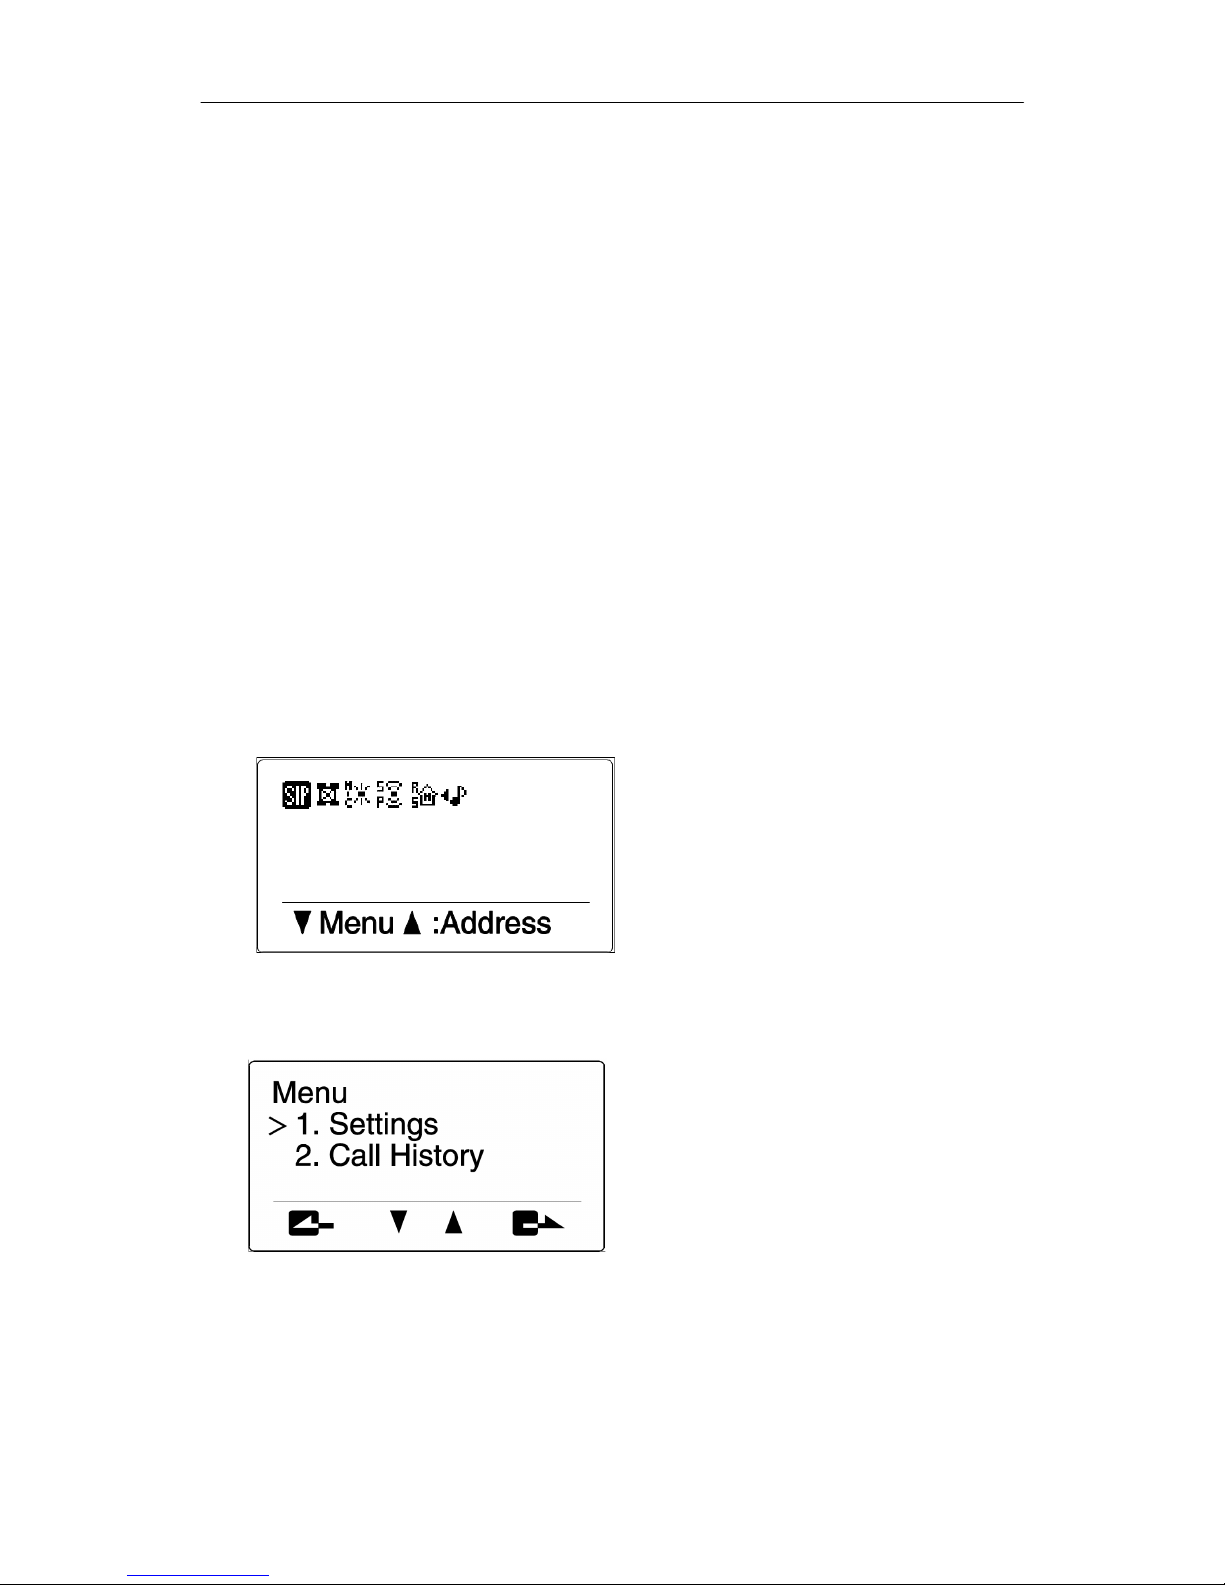
- Press “Cancel” key until following screen appears:
- Press “Down” key following menu appears:
Page 19
ACT-50 User Guide
7
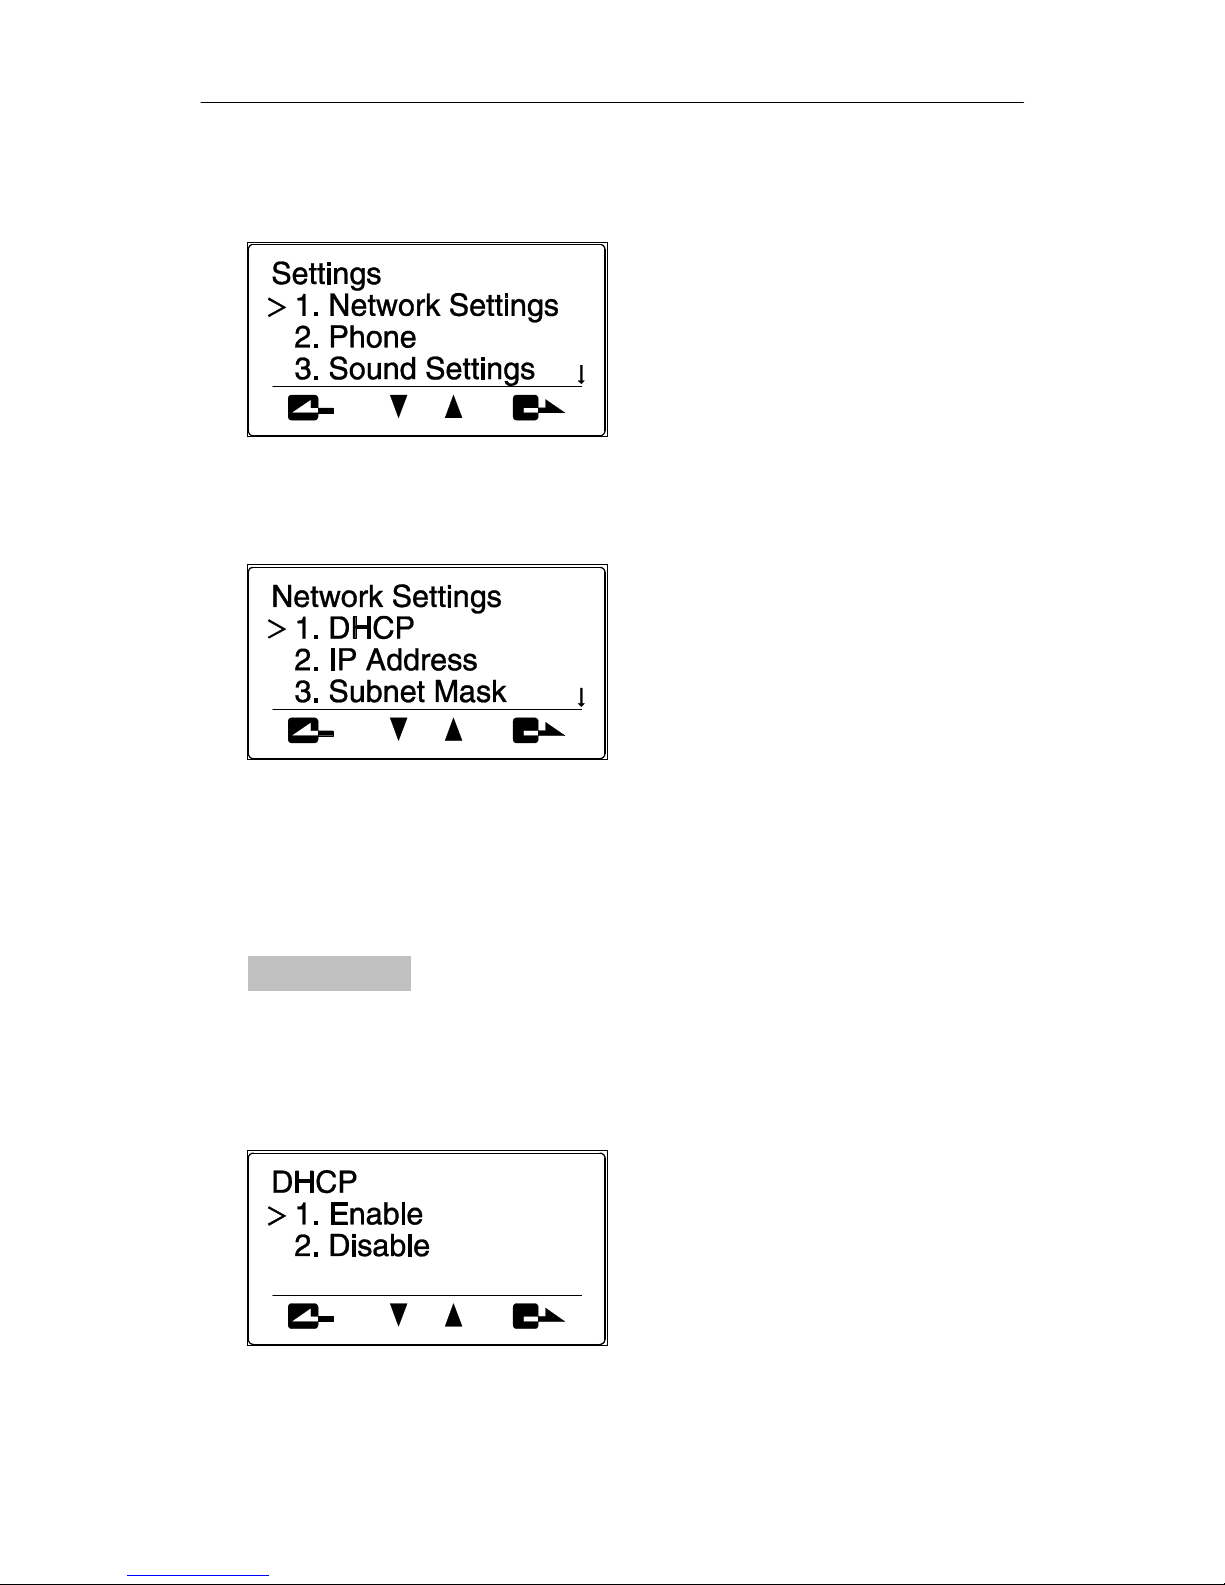
- Press “Down” / “Up” key to select “1. Settings” menu and press “Enter” key
following menu appears:
- Press “Down” / “Up” key to select “1. Network Settings” menu and press
“Enter” key following menu appears:
DHCP case
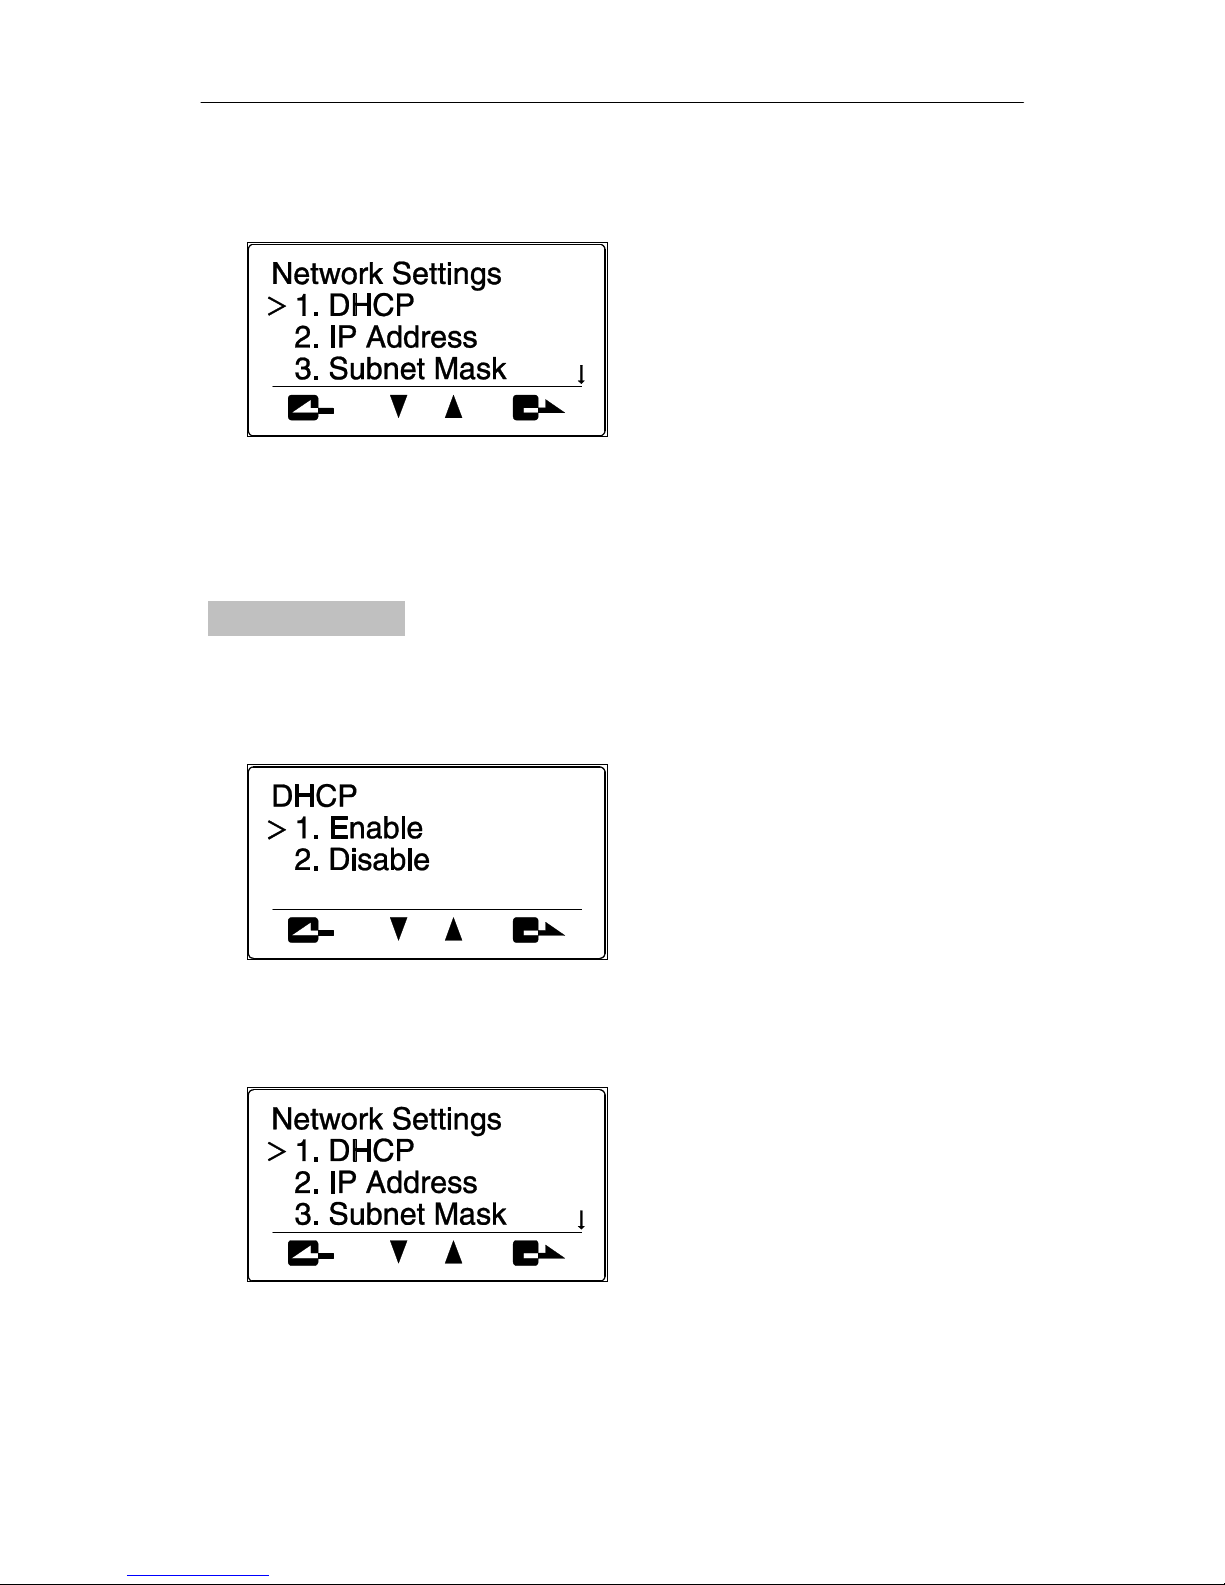
- Press “Down” / “Up” key to select “1. DHCP” menu and press “Enter” key
following menu appears:
Page 20
ACT-50 User Guide
8
- Press “Down” / “Up” key to select “1. Enable” menu and press “Enter” key
following menu appears:
Static IP case
- Press “Down” / “Up” key to select “1. DHCP” menu and press “Enter” key
following menu appears:
- Press “Down” / “Up” key to select “2. Disable” menu and press “Enter” key
following menu appears:
Page 21
ACT-50 User Guide
9
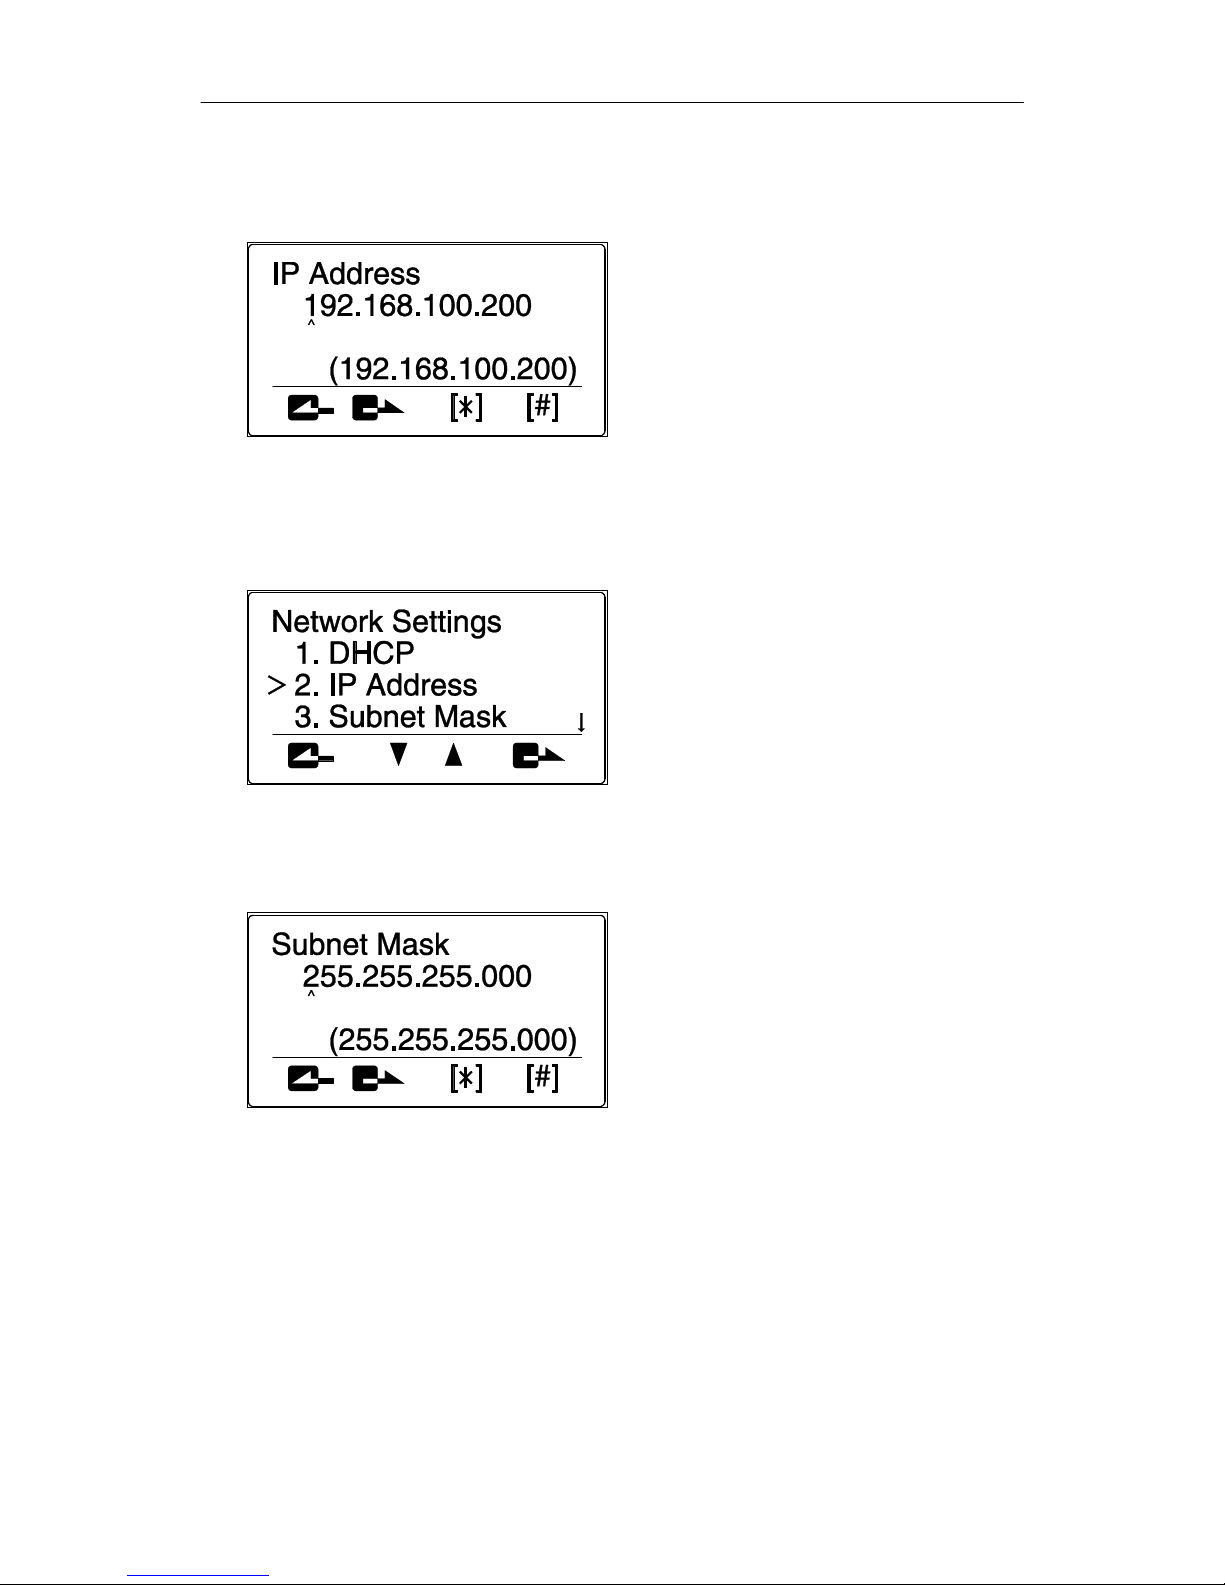
- Press “Down” / “Up” key to select “2. IP Address” menu and press “Enter”
key following menu appears:
- Press numeric keys to enter IP address and press “Enter” key (Numbers
1~99 needs to be entered as 001~099 and period ‘.’ is auto-inserted.)
following menu appears:
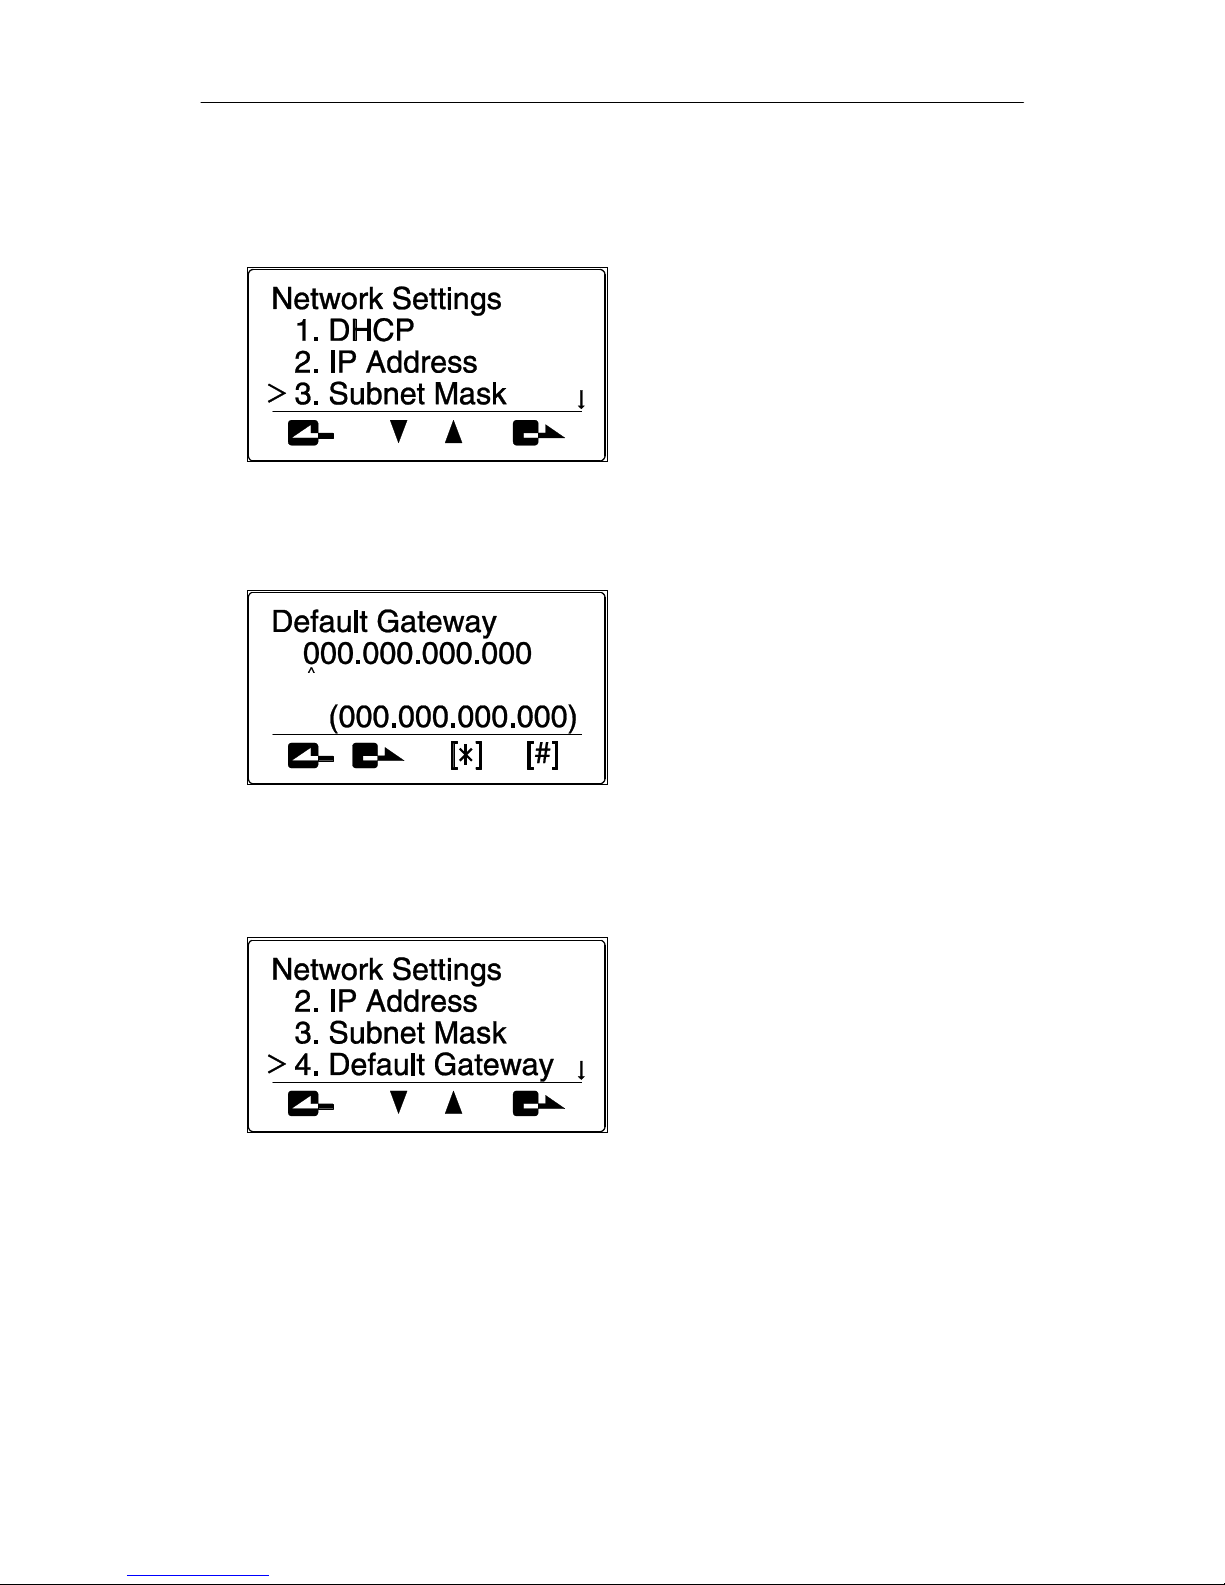
- Press “Down” / “Up” key to select “3. Subnet Mask” menu and press “Enter”
key following menu appears:
Page 22
ACT-50 User Guide
10
- Press numeric keys to enter subnet mask and press “Enter” key (Numbers
1~99 needs to be entered as 001~099 and period ‘.’ is auto-inserted.)
following menu appears:
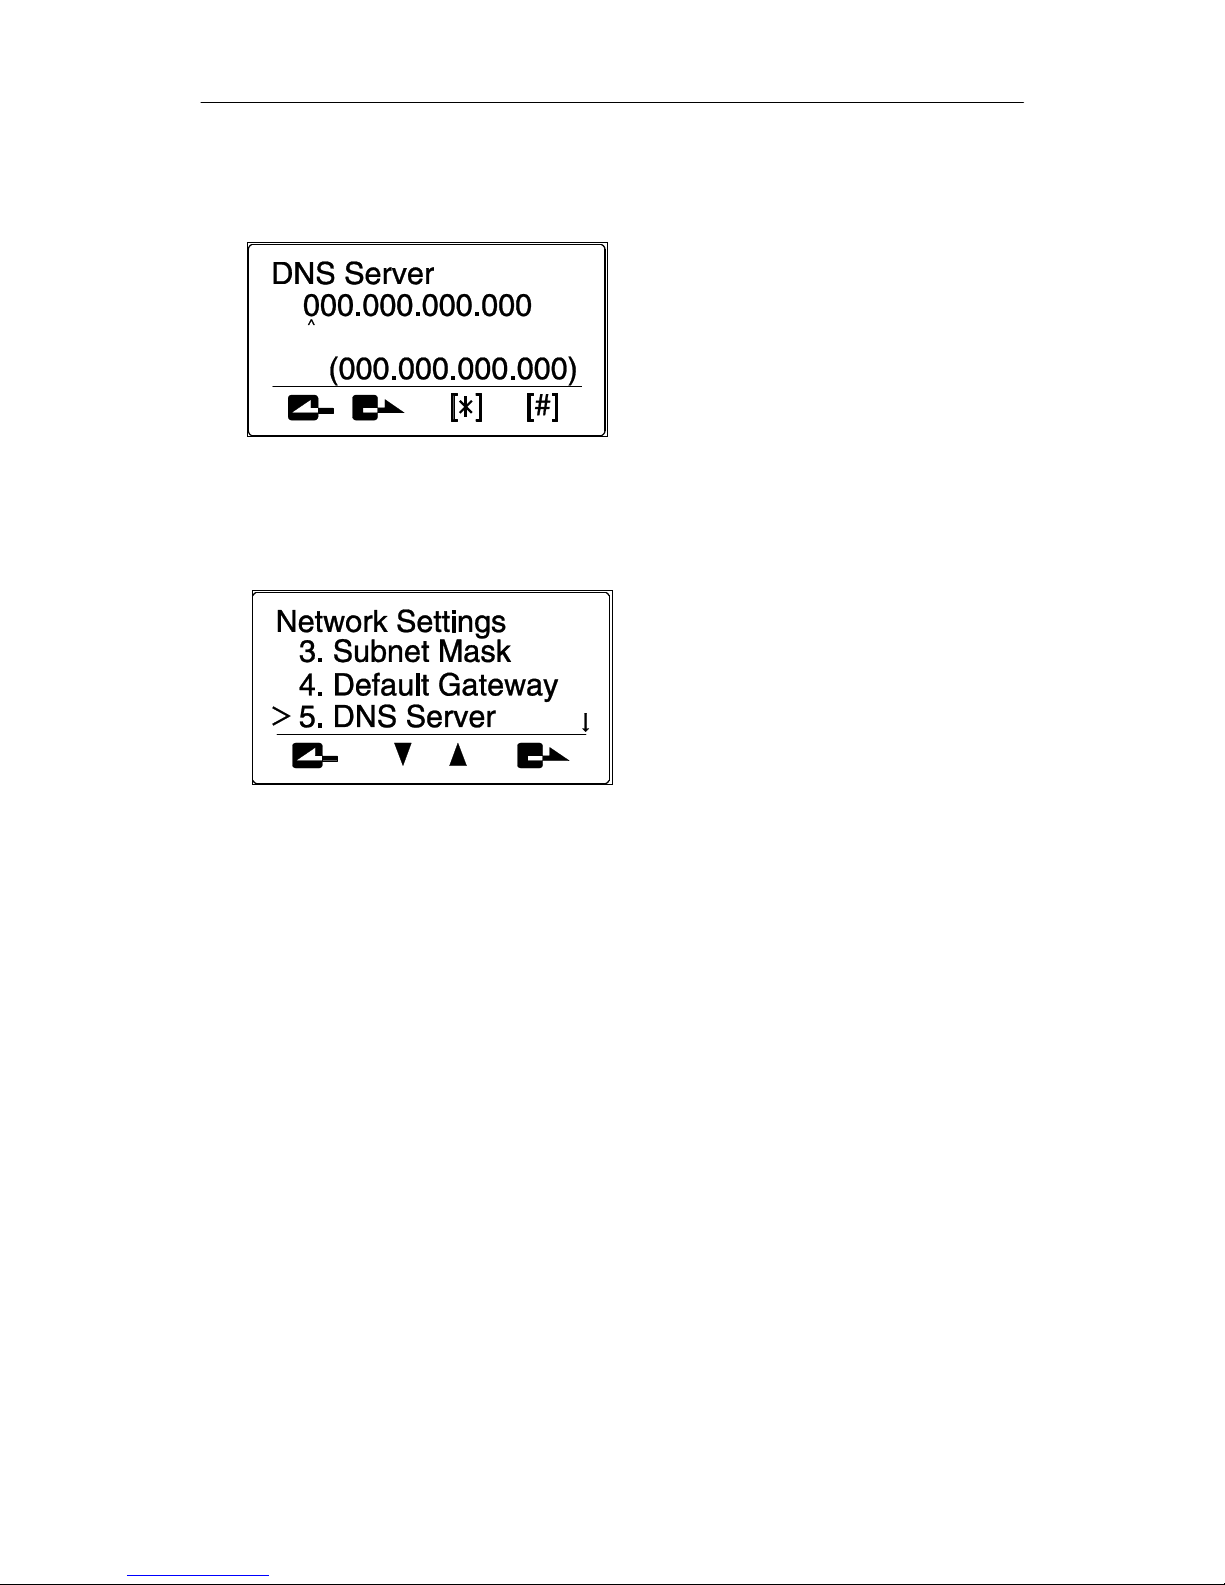
- Press “Down” / “Up” key to select “4. Default Gateway” menu and press
“Enter” key following menu appears:
- Press numeric keys to enter default gateway and press “Enter” key
(Numbers 1~99 needs to be entered as 001~099 and period ‘.’ is autoinserted.) following menu appears:
Page 23
ACT-50 User Guide
11
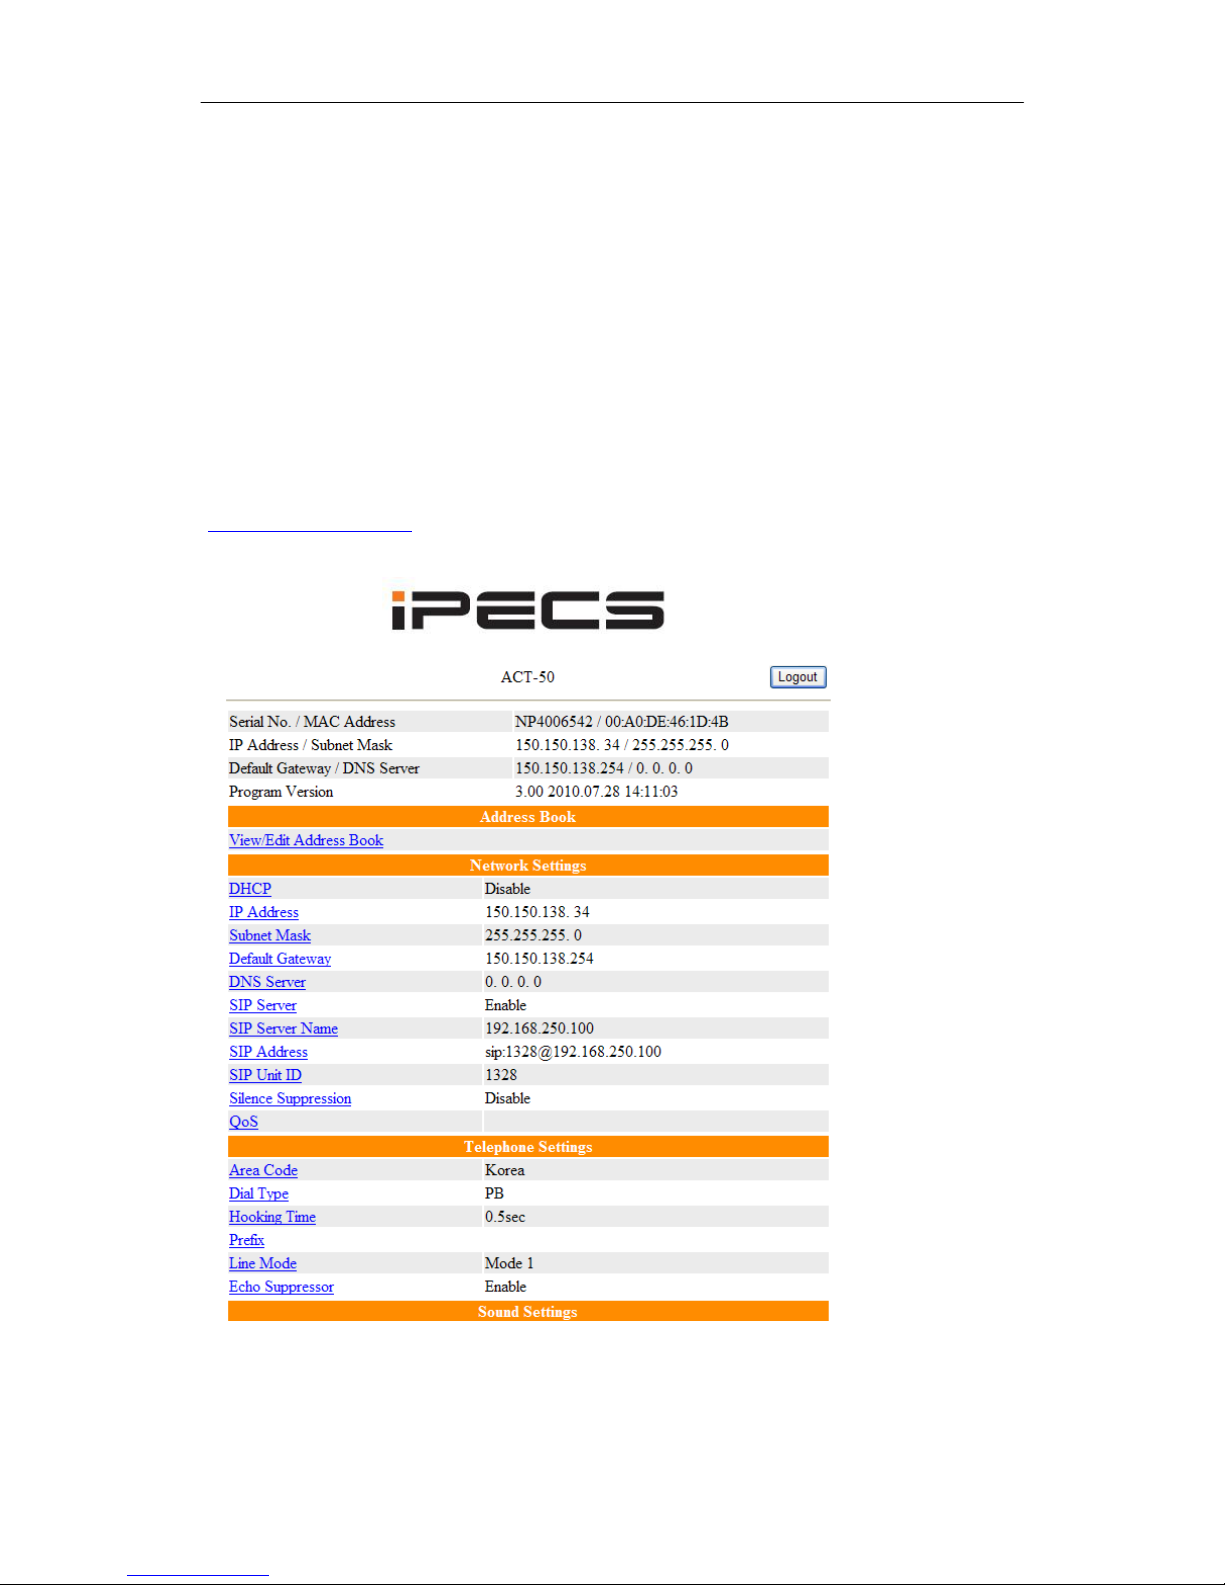
- Press “Down” / “Up” key to select “5. DNS Server” menu and press “Enter”
key following menu appears:
- Press numeric keys to enter DNS server and press “Enter” key (Numbers
1~99 needs to be entered as 001~099 and period ‘.’ is auto-inserted.)
following menu appears:
[Note] The IP address of ACT-50 must avoid the “system IP address range” of
iPECS LIK system. Please ask network administrator for proper IP address.
Page 24
ACT-50 User Guide
12
2.5.2 Setup SIP server
After setting up IP address, use Web GUI to enter SIP parameters. To use SIP
server you must enter the following:
• Username
• Password
• SIP server address
This information is available from your SIP server administrator.
Use any Web browser and enter ACT-50’s IP address in following format:
http://xxx.xxx.xxx.xxx Click “Login” button and following screen appears:
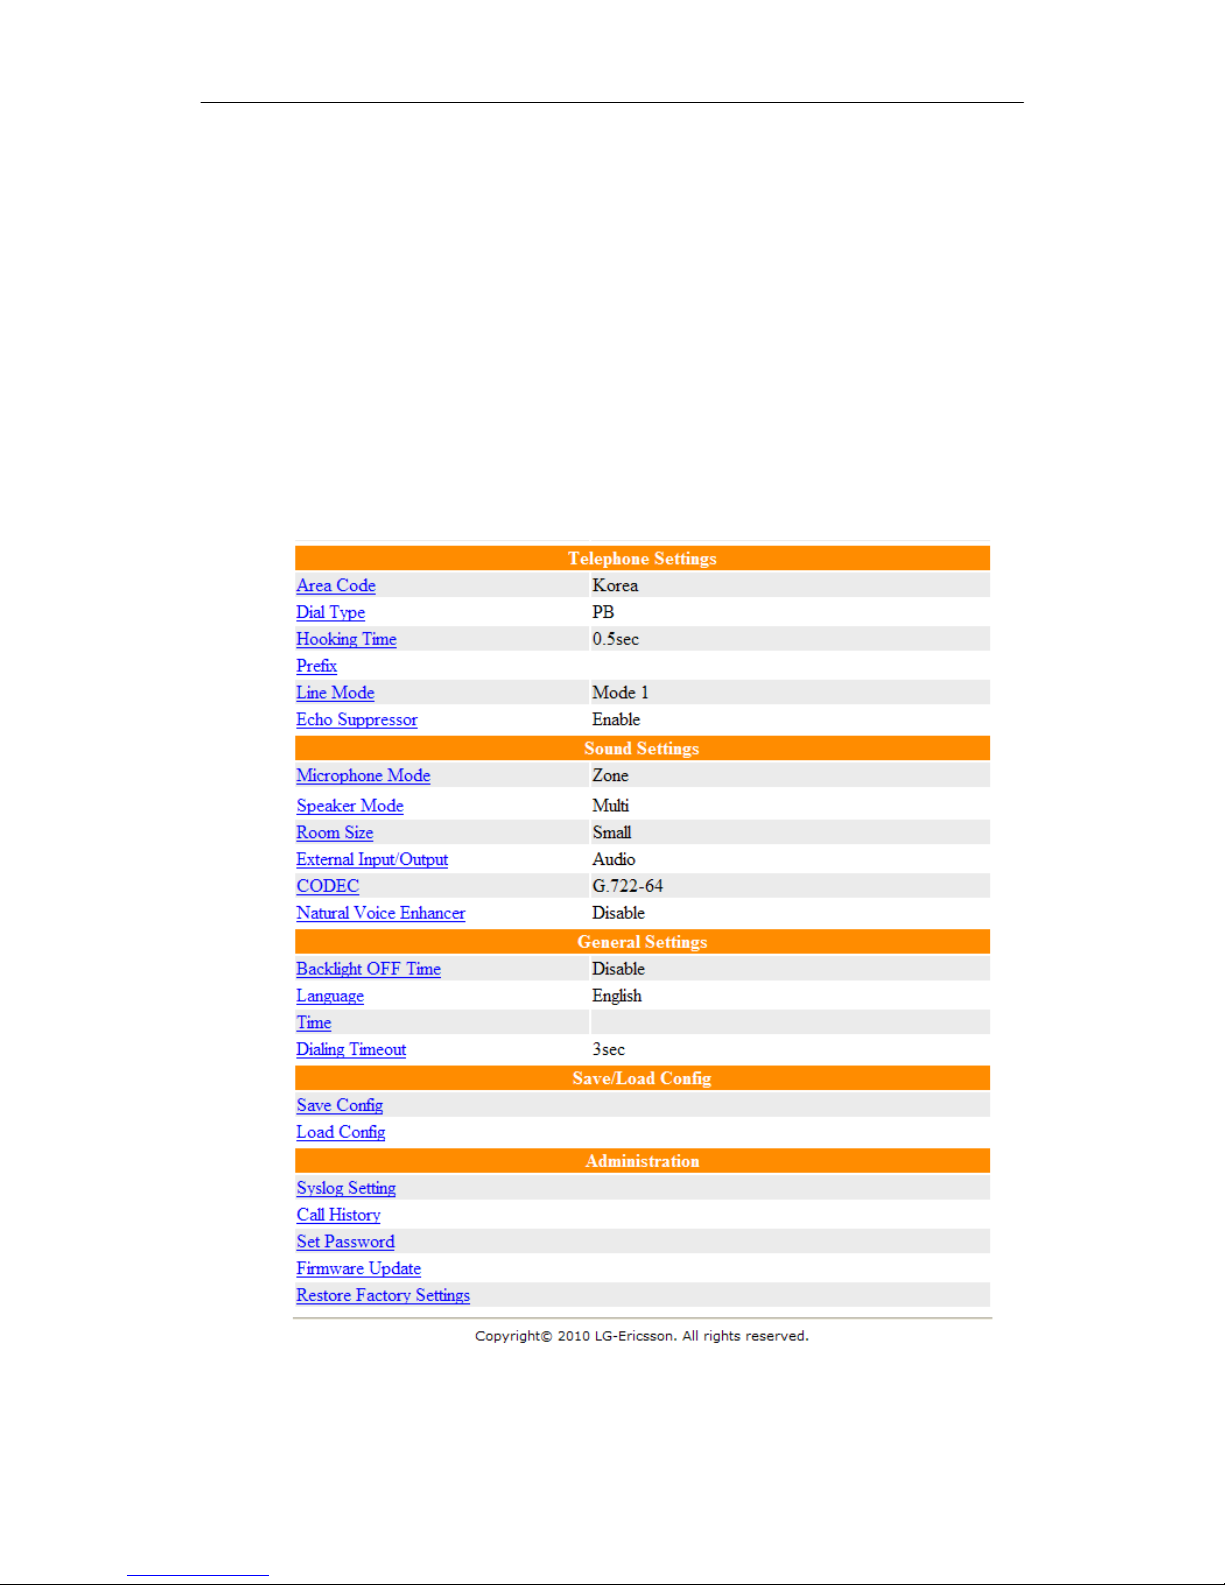
Click the “SIP server” link following screen appears:
Page 25
ACT-50 User Guide
13
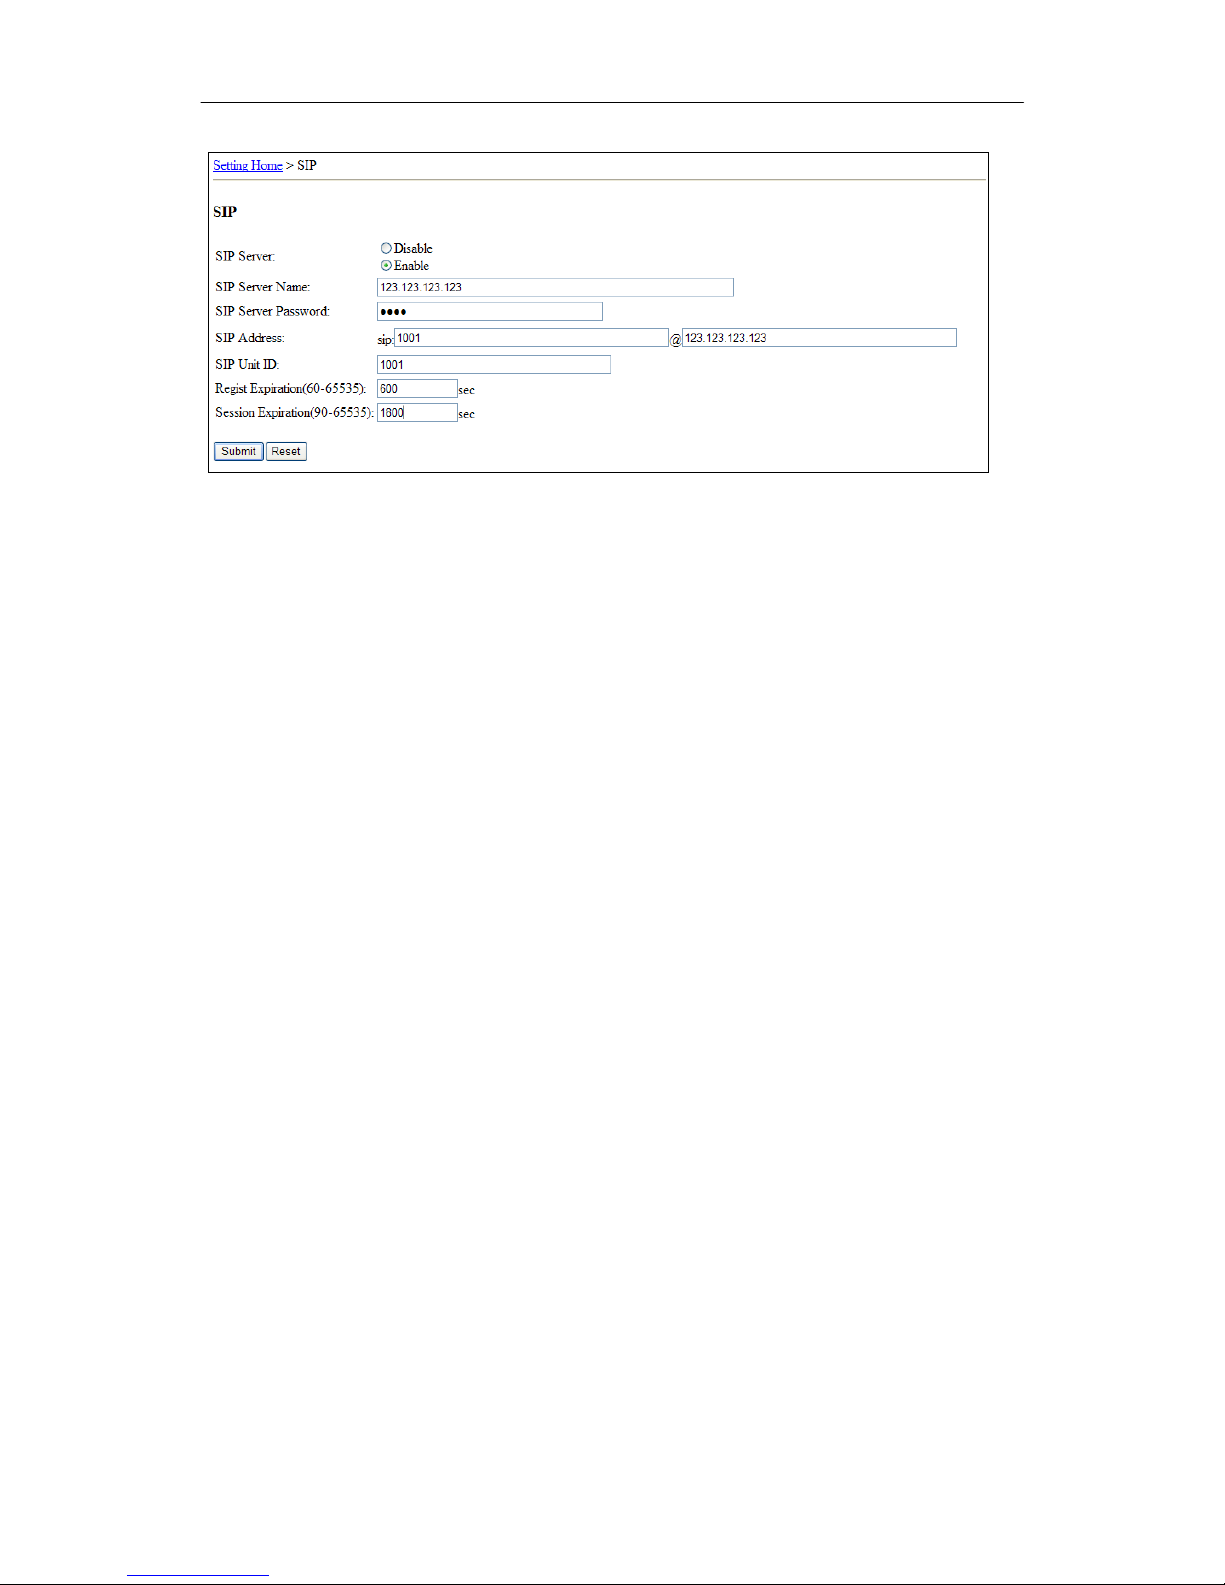
Example )
*** SIP server IP address = 123.123.123.123
*** Username = SIP account name = SIP account password = 1001
*** Register timer = 600 sec
*** Session timer = 1800 sec
• Click SIP Server “Enable” radio button to activate SIP mode.
• Type SIP server IP address or SIP server name in “SIP Server Name”
line.
• Type SIP server IP address or SIP server name in 2nd field of “SIP
Address” line.
• Type username or SIP account name in “SIP Unit ID” line and 1st field of
“SIP Address” line.
• Type SIP account password in “SIP Server Password” line.
• Set register timer in “Regist Expiration” line. (Use “600” if private IP
address is used.)
• Set session timer in “Session Expiration” line. (Use default “1800” value.)
• Finally, click “Submit” button.
[Note] Only “in-band” is supported for DTMF. Please check the destination device
supports “in-band DTMF” (iPECS voice mailbox is not accessible with ACT-50.)
Page 26
ACT-50 User Guide
14
2.5.3 Setup voice codec
After completing SIP server setup, voice codec should be selected.
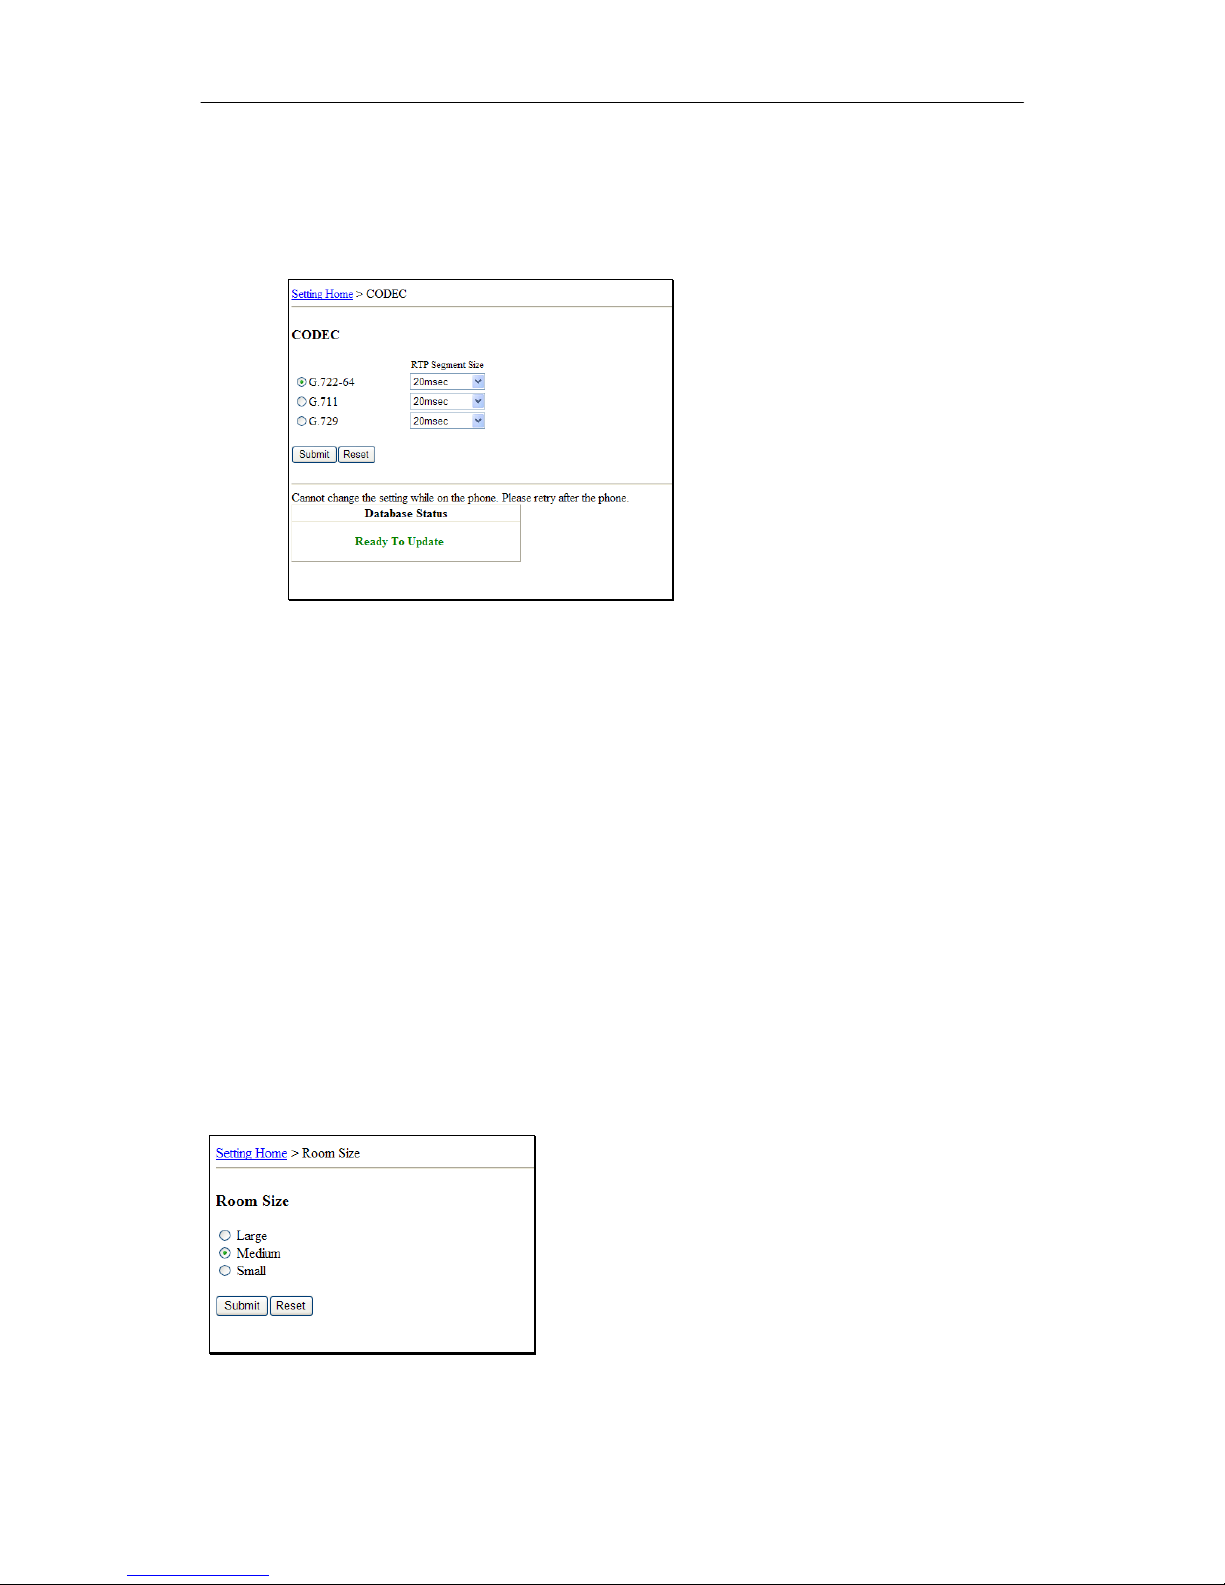
You can connect ACT-50 to other IP telephony terminals that use
G.711/G.729/G.722 voice codec.
To choose voice codec in your ACT-50, do the following:
• Click the “CODEC” link in the home page.
Page 27
ACT-50 User Guide
15
• Click the appropriate radio button for given voice codec list. Choose the
smallest “RTP Segment Size” if network bandwidth is big enough.
• Click “Submit” button.
2.5.4 Setting your room parameter
If “echo” occurs with ACT-50, then one must change the “Room size” parameter.
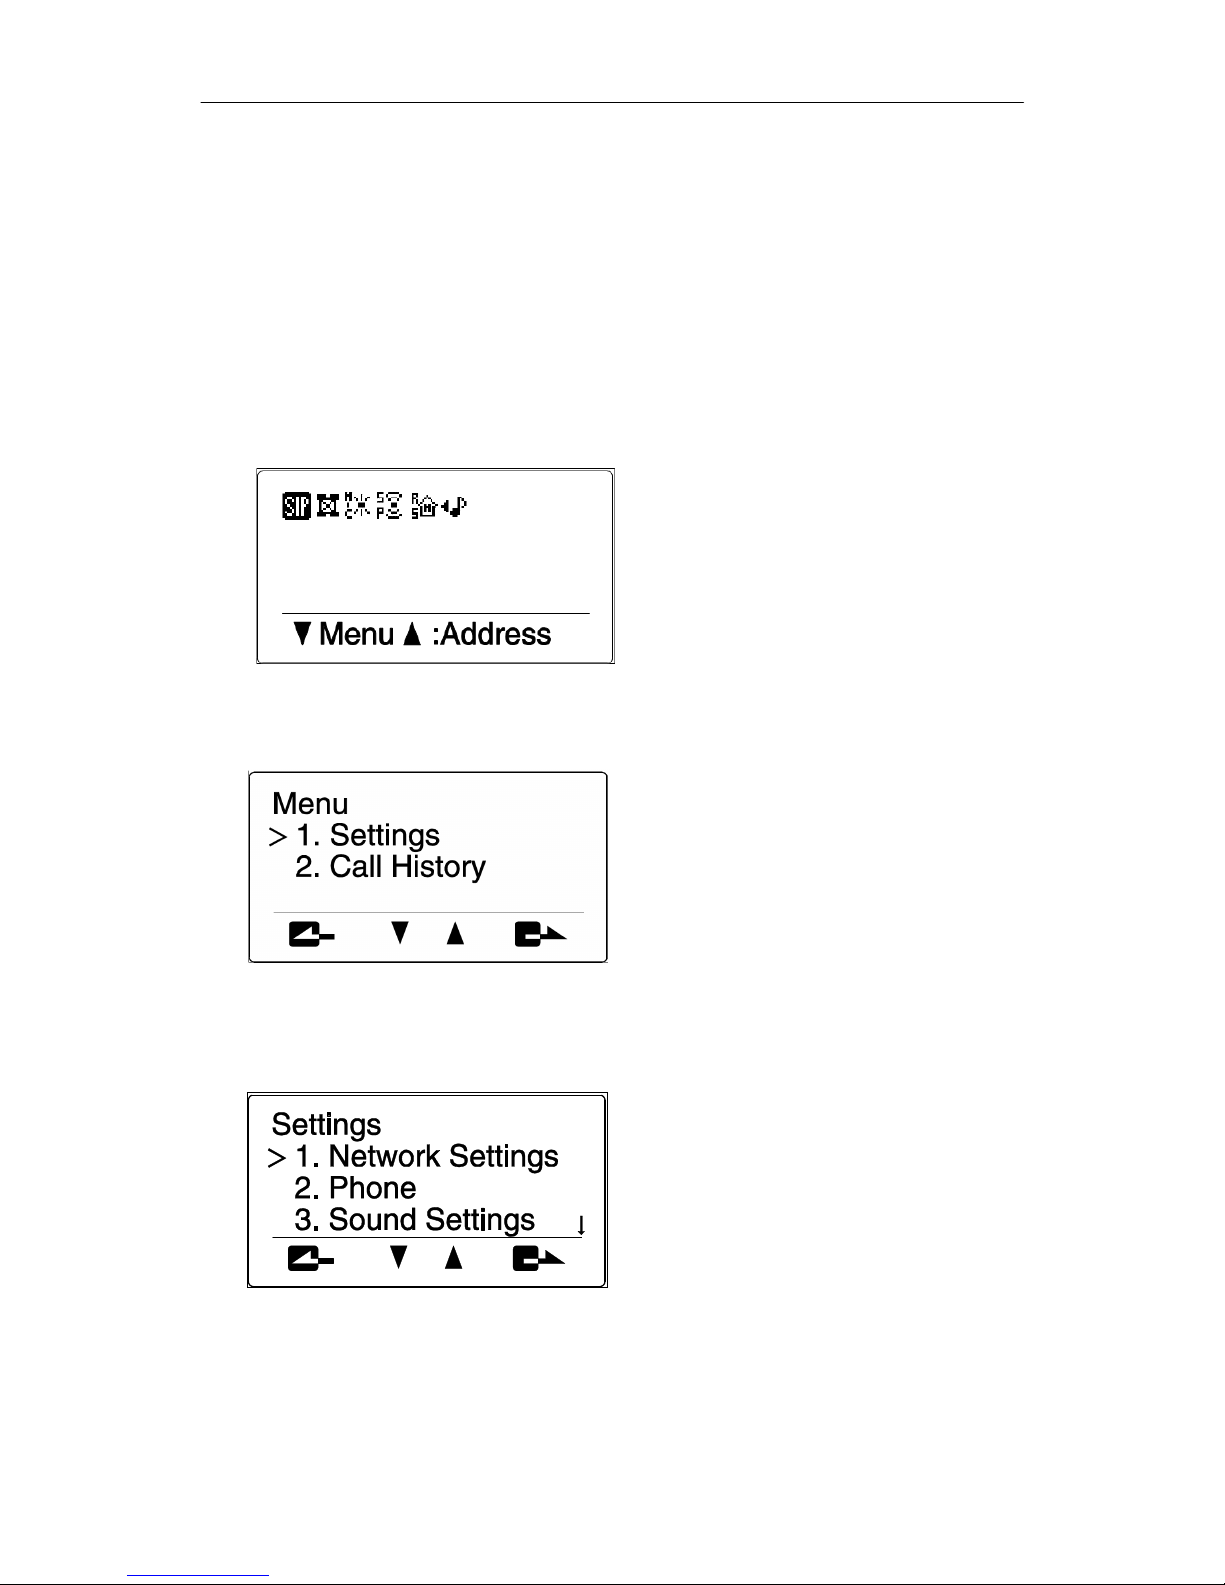
To select the right “Room size”, do the following:
• Click the “Room size” link in the home page.
• Select “Medium” and click submit.
• If the “echo” continues then select “Small” and click submit.
*** The “echo” is caused by audio reflection near to the device. Please remove
any obstacles around ACT-50.
Page 28
ACT-50 User Guide
16
2.5.5 Set MIC parameter
If “voice clipping” occurs with ACT-50, then one must change the “MIC gain”
parameter.
To select the right “MIC gain”, do the following:
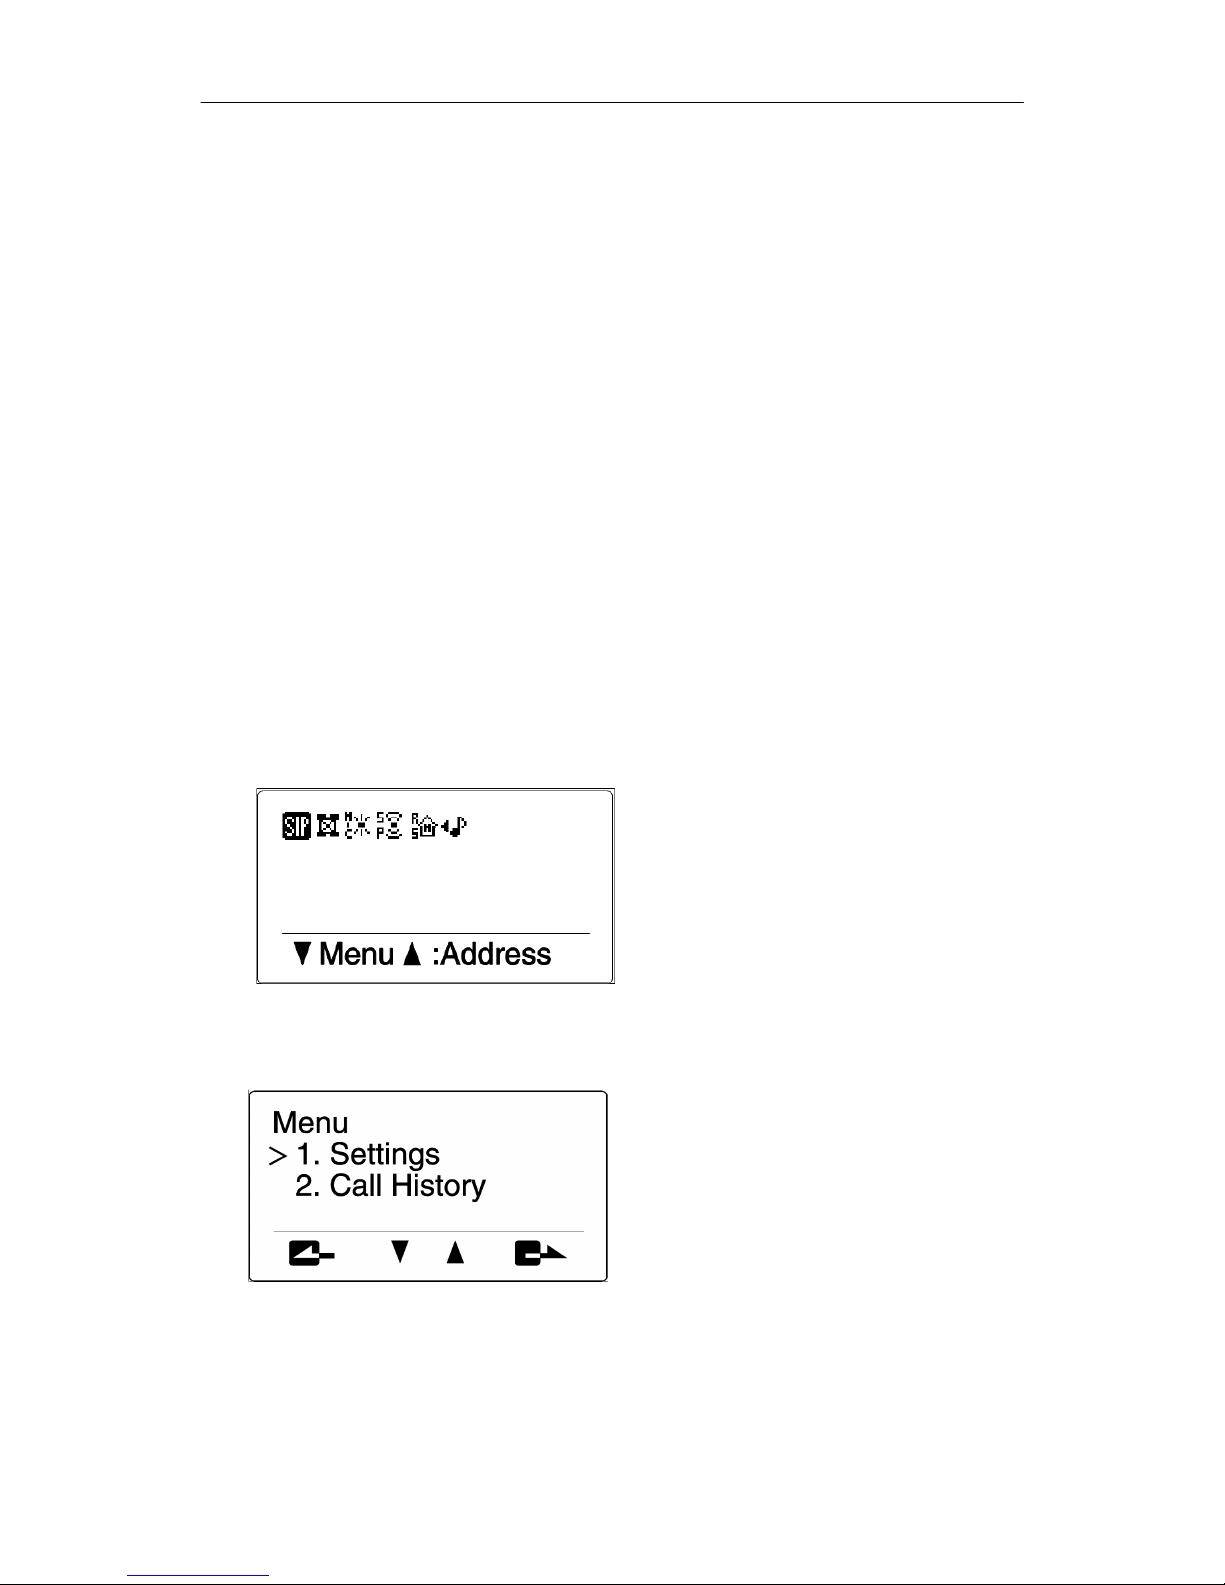
- Press “Cancel” key until following screen appears:
- Press “Down” key following menu appears:
- Press “Down” / “Up” key to select “1. Settings” menu and press “Enter” key
following menu appears:
- Press “Down” / “Up” key to select “3. Sound Settings” menu and press
“Enter” key.
Page 29
ACT-50 User Guide
17
- Press “Down” / “Up” key to select “6. Volume Fine Adj” menu and press
“Enter” key.
- Press “Down” / “Up” key to select “1. Microphone” menu and press “Enter”
key.
- Press “Up” key to increase MIC gain and press “Enter” key. (Try 3 dB
increments for each adjustment. Excessive increments result in voice echo
on the other side.)
2.5.6 Set speaker parameter
The default speaker mode is “Multi”, where four speakers with different outputs
create a virtual sound source at opposite side of LCD screen to provide impression
of virtual presence. To disable this feature, set the speaker mode to “Mono”.
To select “Mono” mode, do the following:
- Press “Cancel” key until following screen appears:
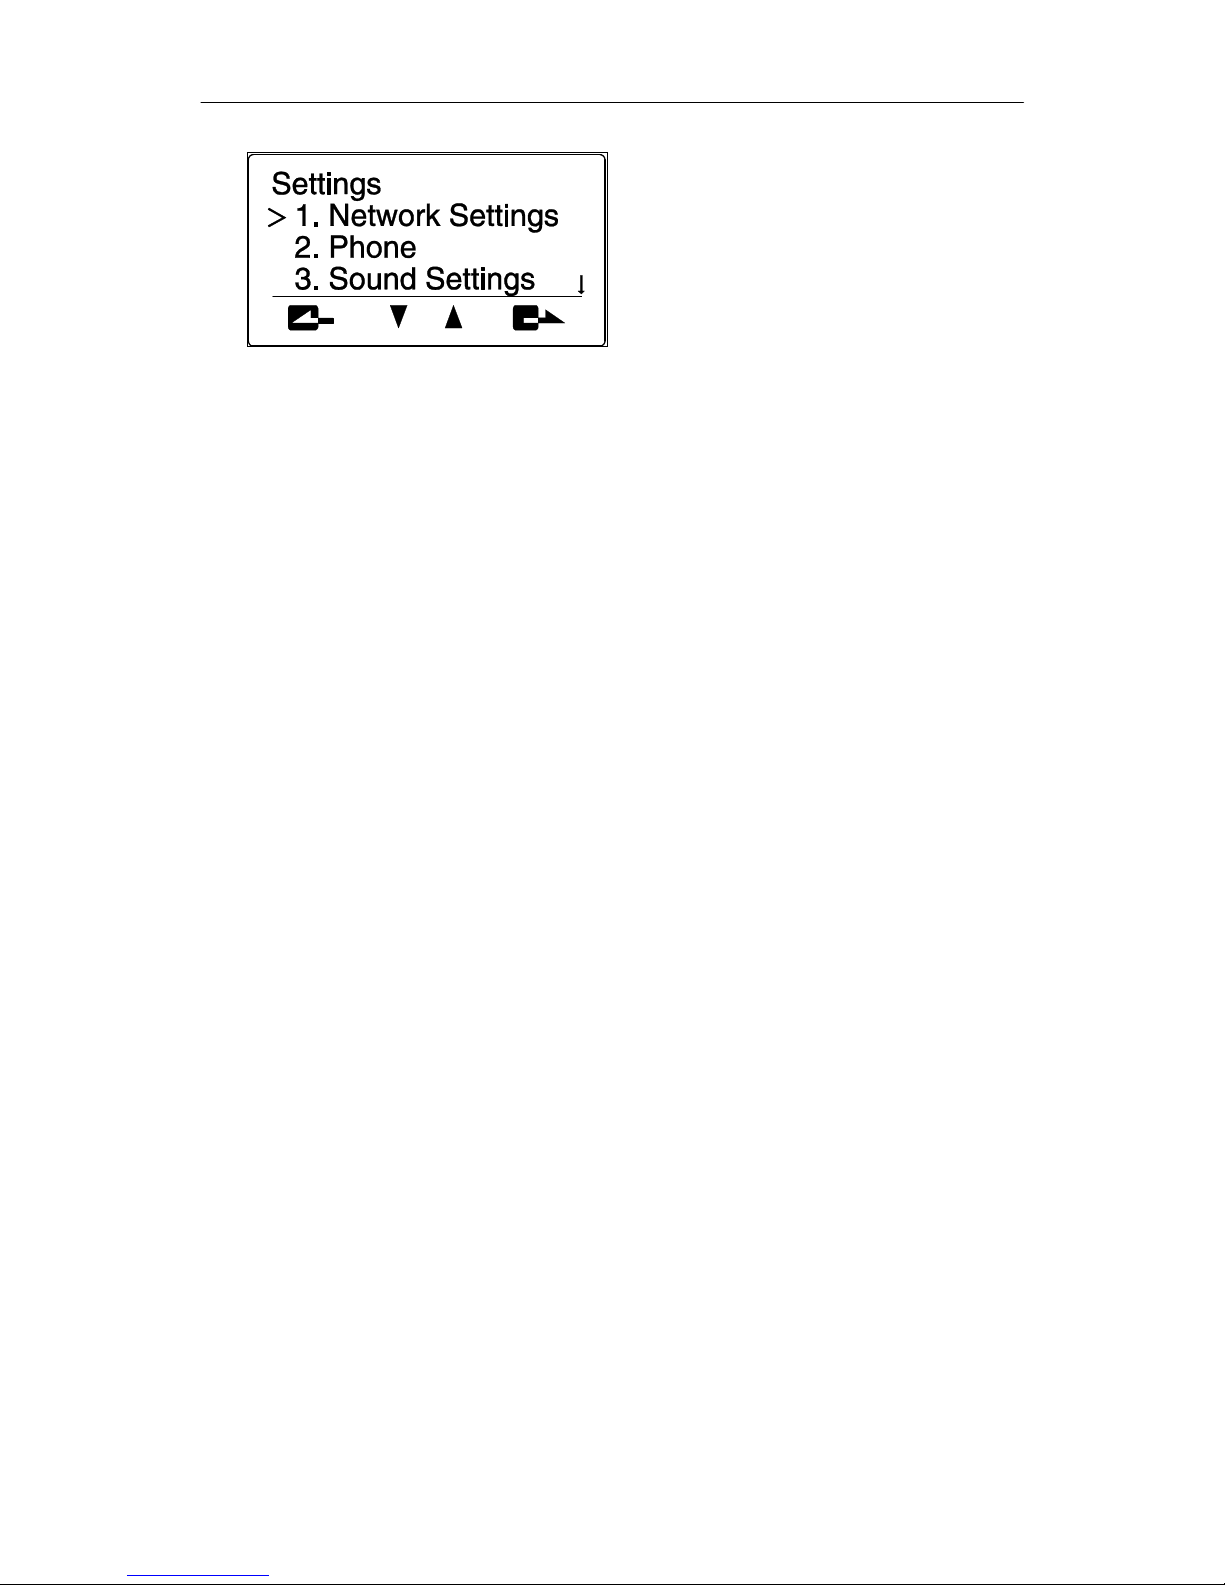
- Press “Down” key following menu appears:
- Press “Down” / “Up” key to select “1. Settings” menu and press “Enter” key
following menu appears:
Page 30
ACT-50 User Guide
18
- Press “Down” / “Up” key to select “3. Sound Settings” menu and press
“Enter” key.
- Press “Down” / “Up” key to select “2. Speaker Mode” menu and press
“Enter” key.
- Press “Down” / “Up” key to select “1. Mono” menu and press “Enter” key.
Page 31
ACT-50 User Guide
19
3. Using your ACT-50
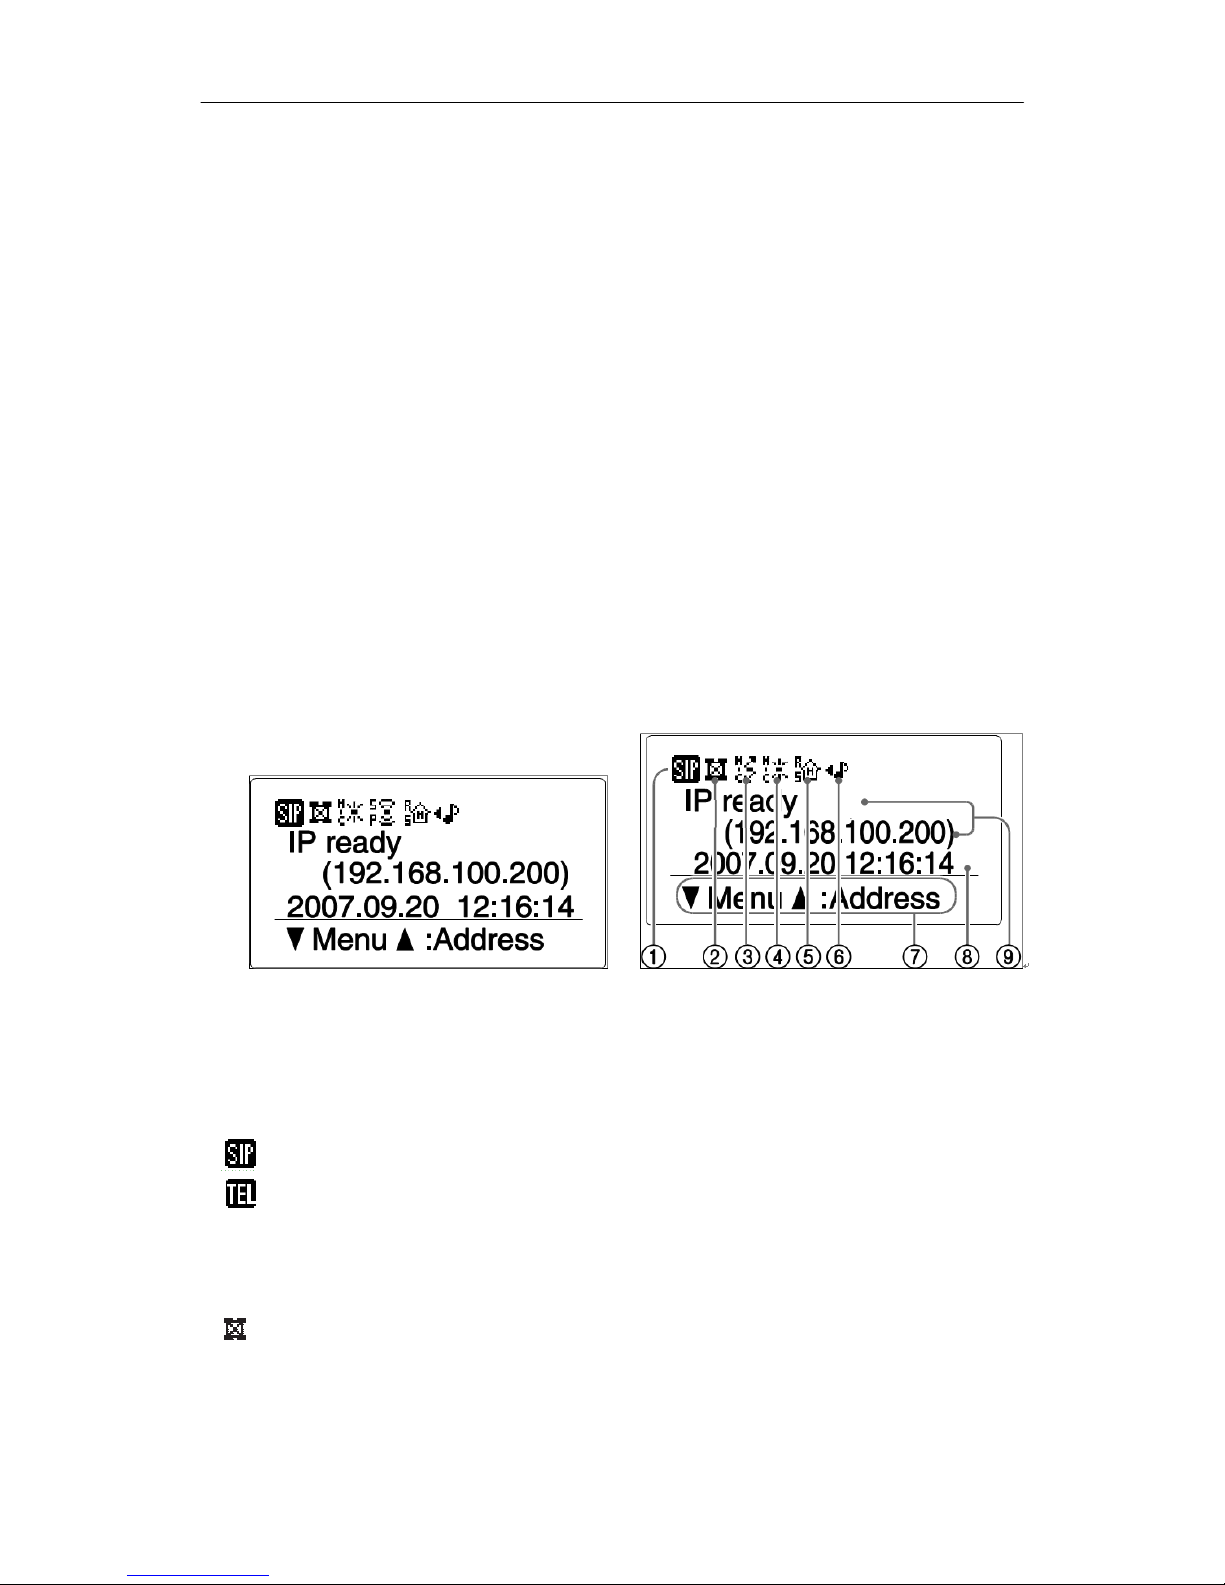
3.1 Understanding the LCD screen
Before you begin use of your ACT-50, take a moment to familiarize yourself with the
overall screen layout. As shown in the Figure 3, the screen is divided into three (3)
major sections:
• Info bar – The Info bar at the top of the screen displays major configuration
parameter settings.
• Main Window – The Main Window displays the menus or status.
• Control bar – The Control bar at the bottom of the screen displays context
sensitive controls for the ACT-50.
Figure 3: ACT-50 screen layout
(1) Communication mode indicator: Indicates the communication mode used in
the communication through the IP network.
• : Call using a SIP server {Basic mode}
• : Call using analog telephone port (LINE port) when IP network is down
{Emergency mode}
(2) Connection mode indicator: Indicates the connection mode used in
connecting other systems for communication through the IP network.
• : Mesh mode {Basic mode}
(3) Microphone mode indicator: Indicates the voice output mode used in
communication.
Page 32

ACT-50 User Guide
20
• : Zone mode {Basic mode}
• : Spot mode {Recommended for 1~2 users}
• : Tracking mode {Recommended for noisy environment}
(4) Speaker mode indicator: Indicates the speaker output mode used in
communication.
• : Voice output in monaural mode. {Optional mode}
• : Voice output in multi mode. {Basic mode}
(5) Room size indicator: Indicates the room size setting.
• : Large setting
• : Medium setting
• : Small setting
(6) External input/output indicator: Indicates the external input/output setup.
• (No indication): External input/output is not set.
• : External audio equipment can be connected to this unit.
• : Interlocked connection of multiple devices with this device as a master unit.
• : Interlocked connection of multiple devices with this device as a slave unit.
(7) Operation guide: Displays the names of the currently available operations and
their keys.
(8) Present time display: Displays the present date and time.
(9) IP address: Displays the IP address of this unit.
Page 33
ACT-50 User Guide
21
3.2 Calling through SIP server
To make voice calls through IP network (LAN port), dial destination phone number
and press “Connect” key. Press “Disconnect” key to hang-up the call.
*** To make voice calls through analog telephone port (LINE port) when IP network
is down, disable the SIP server first. Then dial destination phone number and press
“Connect” key. Press “Disconnect” key to hang-up the call.
[Note] When accessing iPECS LIK conference room number with password, please
dial conference room number and password together, i.e. “*591+11111” where
“*591” is conference room number and “11111” is password.
When entered phone number is incorrect, then press “Cancel” key to re-enter the
phone number.
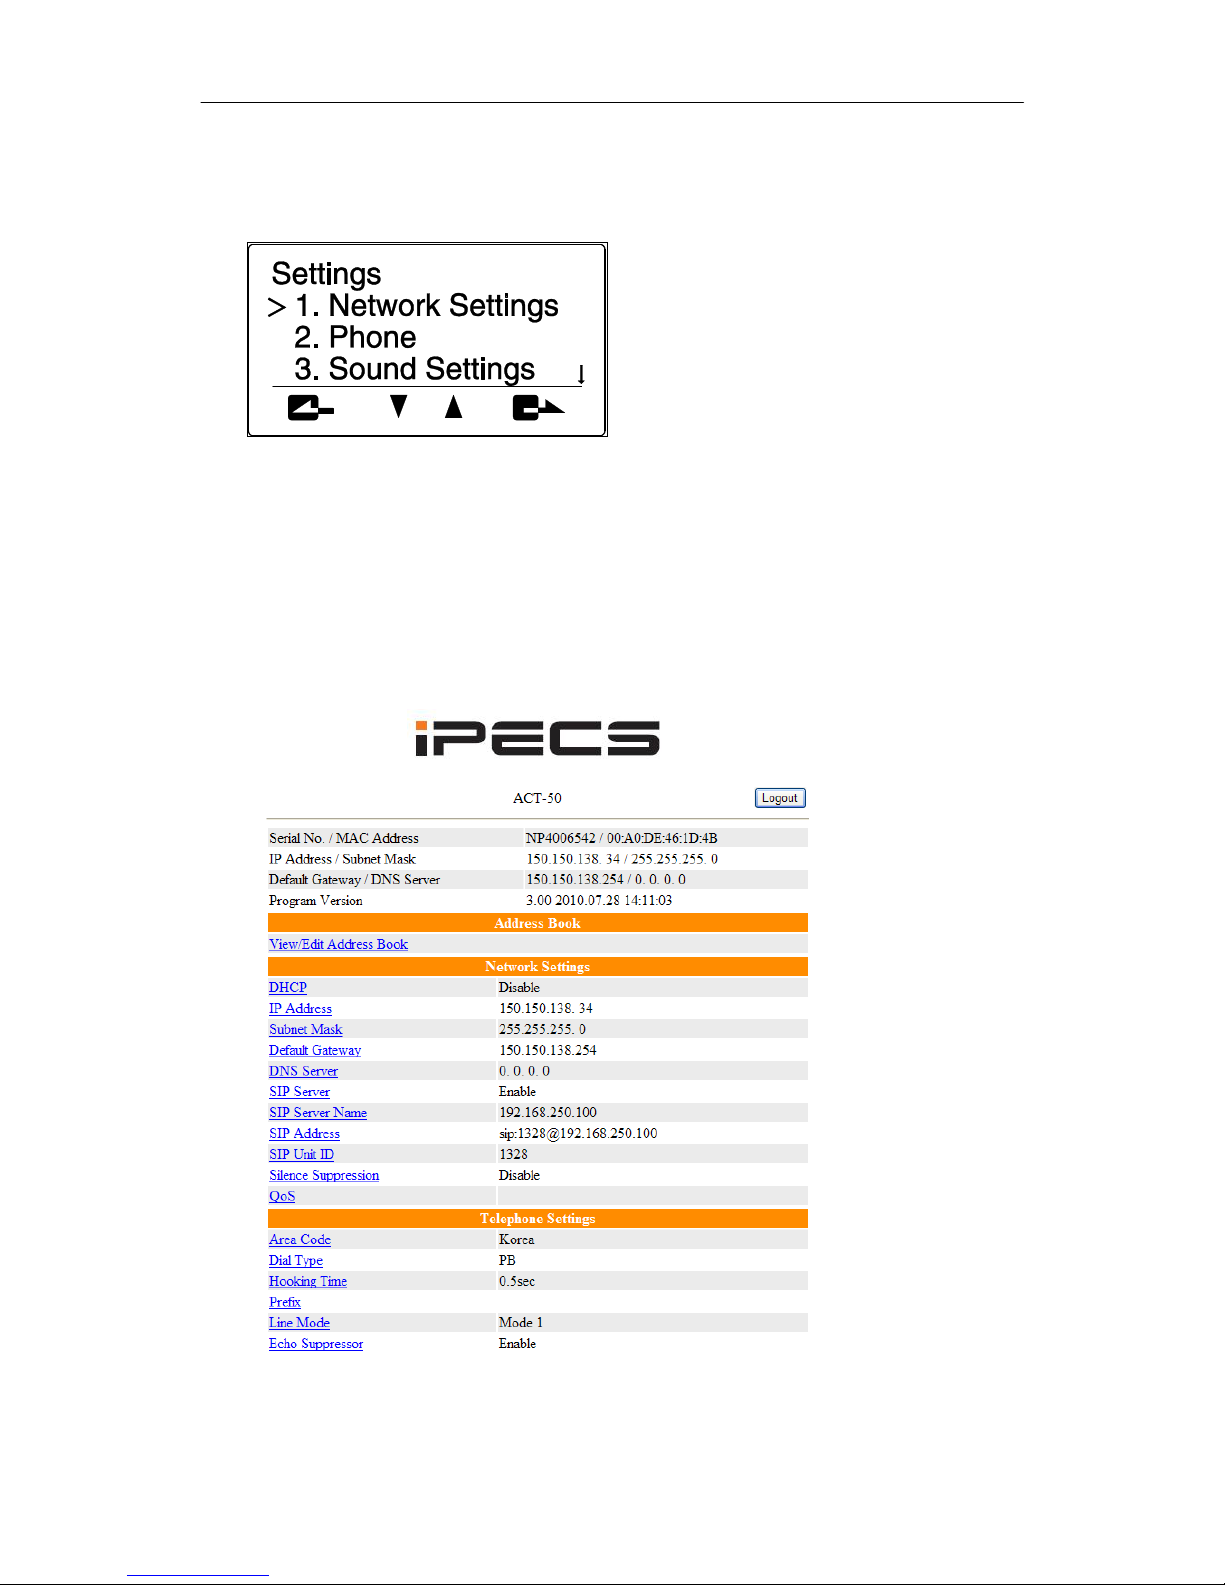
Default prefix “9#” can be used for accessing address book phone numbers.
Current prefix for address book call can be checked by following steps:
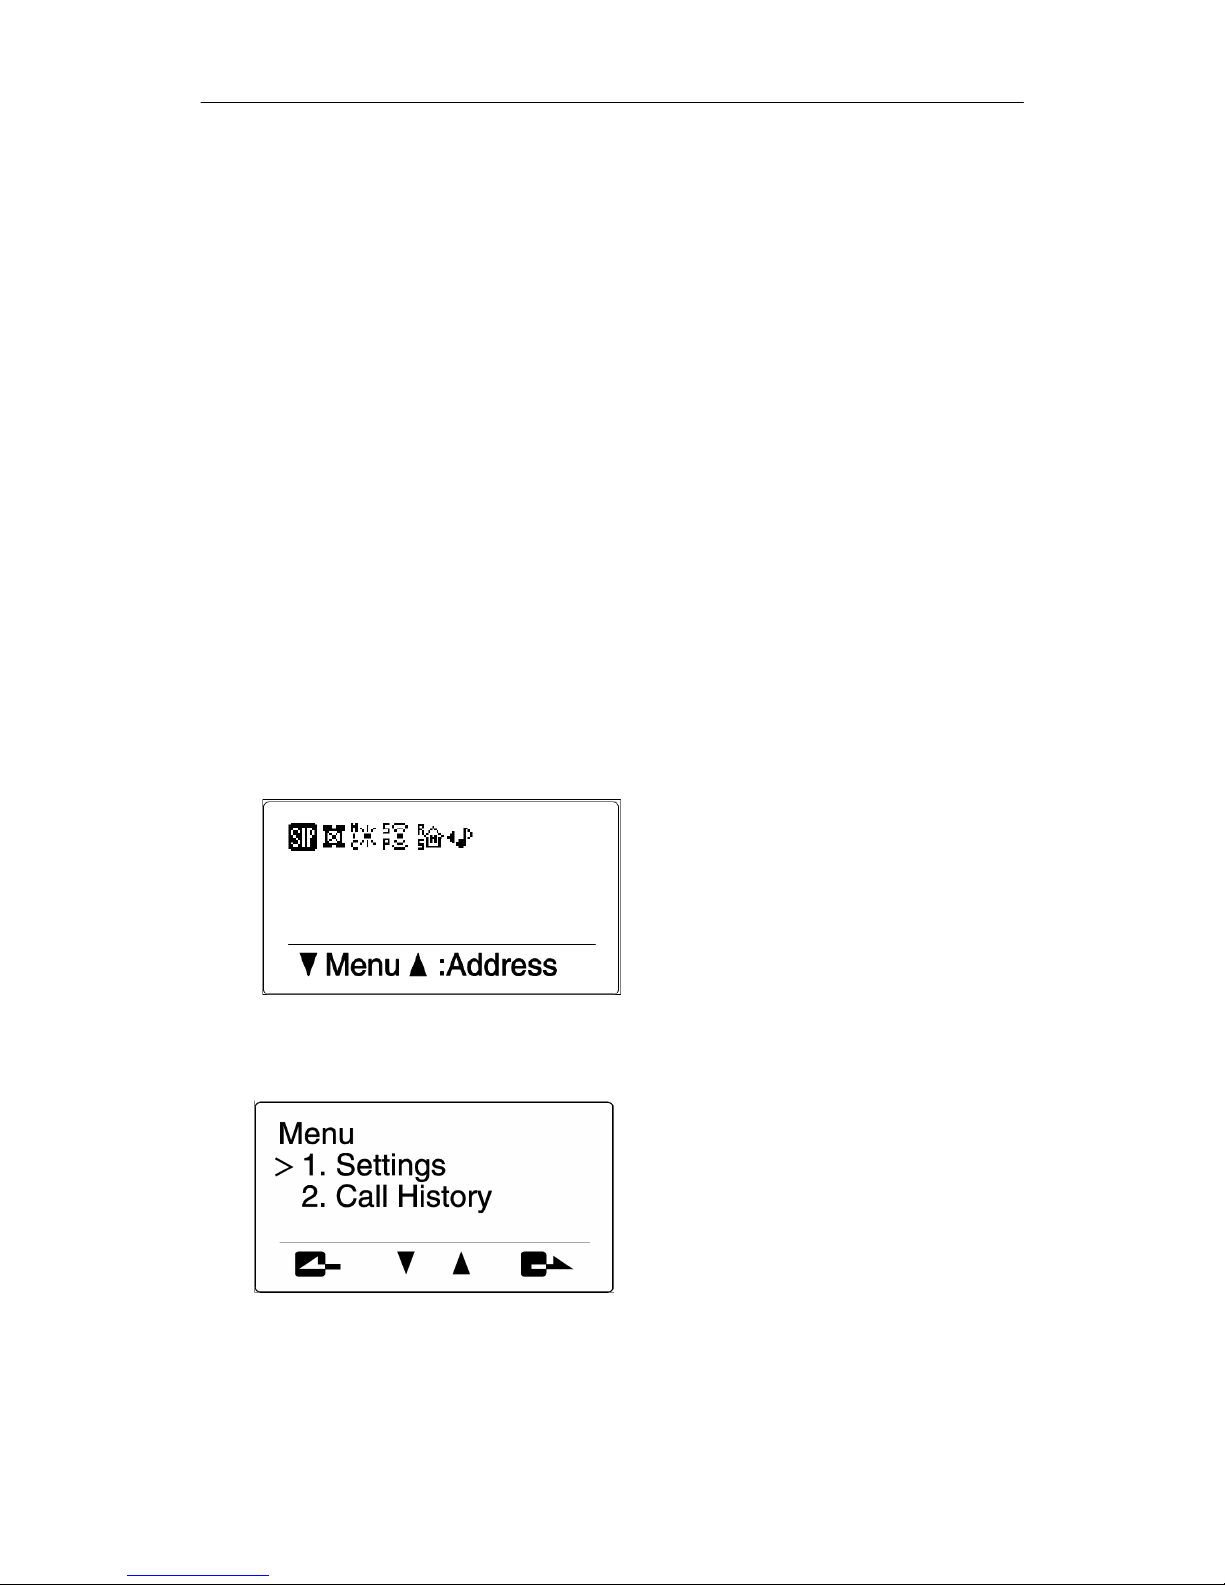
- Press “Cancel” key until following screen appears:
- Press “Down” key following menu appears:
Page 34
ACT-50 User Guide
22
- Press “Down” / “Up” key to select “1. Settings” menu and press “Enter” key
following menu appears:
- Press “Down” / “Up” key to select “2. Phone” menu and press “Enter” key.
- Press “Down” / “Up” key to select “4. Prefix” menu and press “Enter” key.
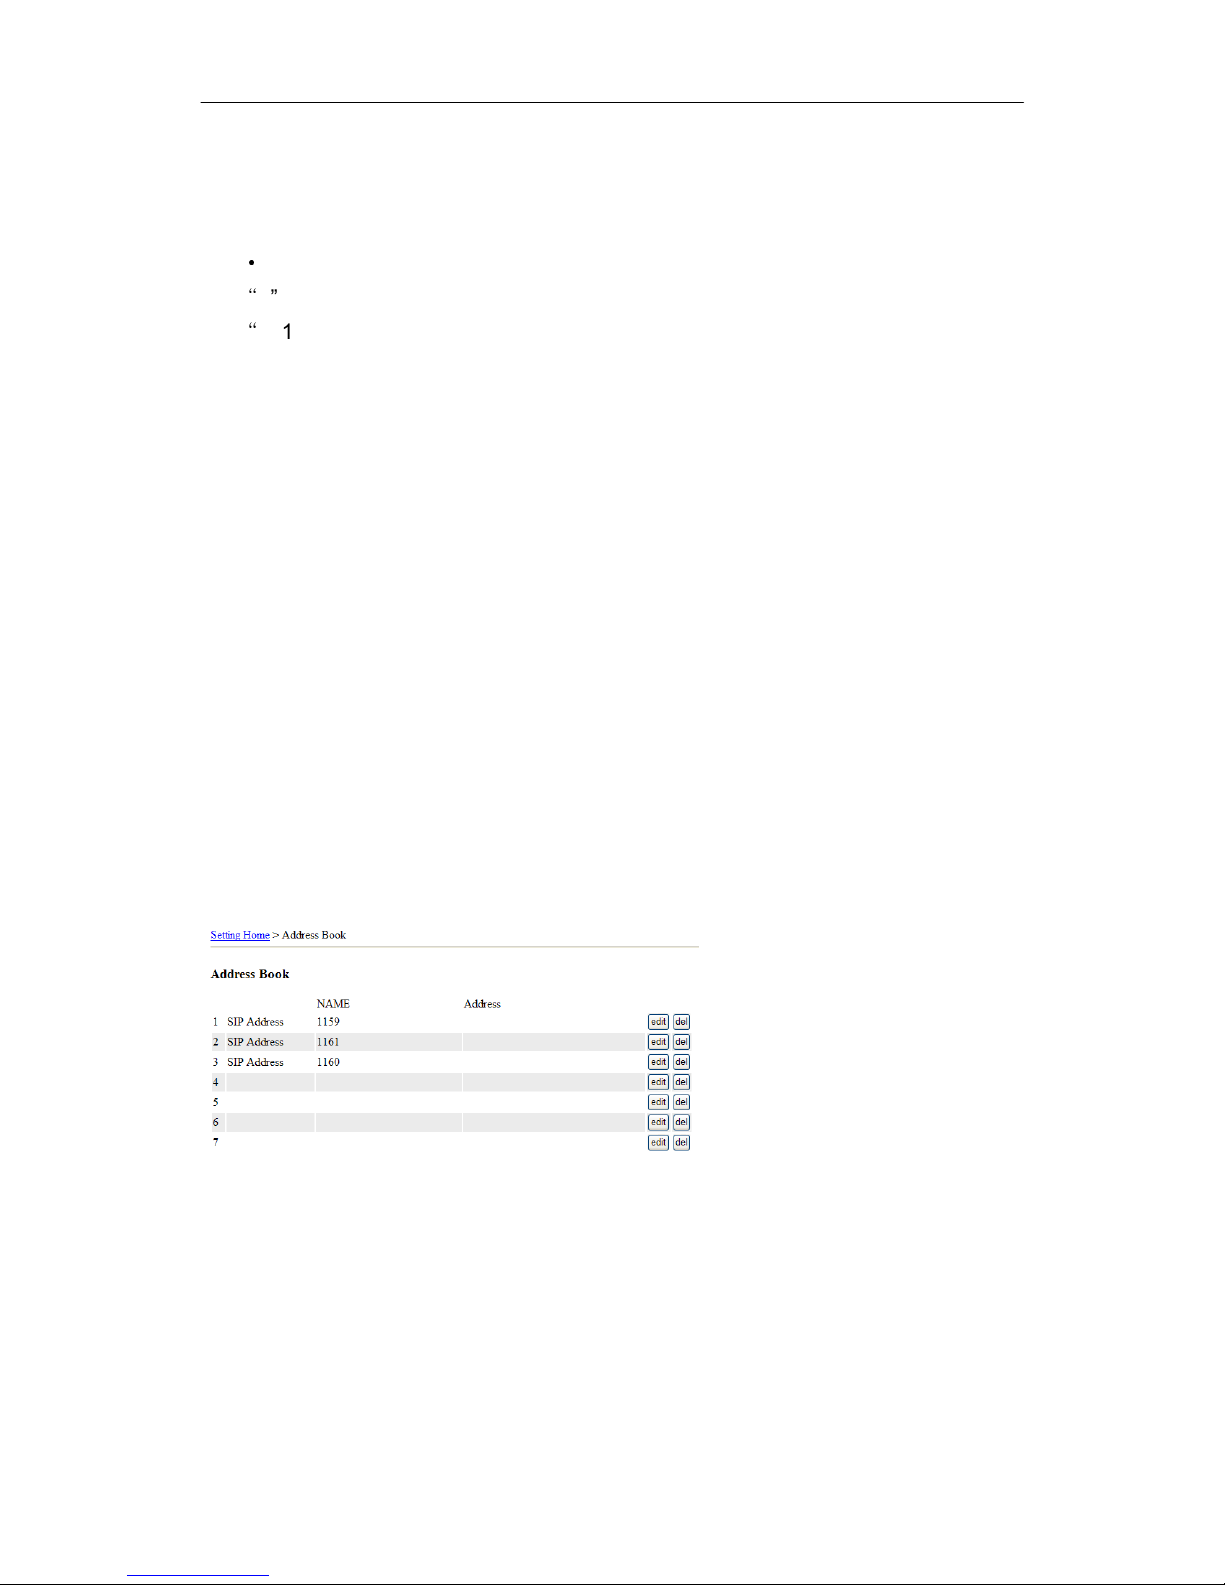
*** Prefix for address book call can be changed by following steps:
- Use a Web browser to open the Web GUI home page.
- Click “Prefix” link under “Telephone Settings” section.
Page 35
ACT-50 User Guide
23
- Modify the prefix number in “Address Book” field.
Note:
•
The following strings cannot be set as a prefix:
“
1”, “11”, “110”, “118”, “119”, “110x”, “118x”, “119x”,
“
x#1”, “x#11”. (x is any number from 0 to 9.)
3.3 Answering a call
Press “Connect” key to answer the call and press “Disconnect” key to hang-up the
call.
3.4 Address book
You can save up to 16 names/SIP-phone numbers and 34 names/analog-phone
numbers in internal address book for quick dial.
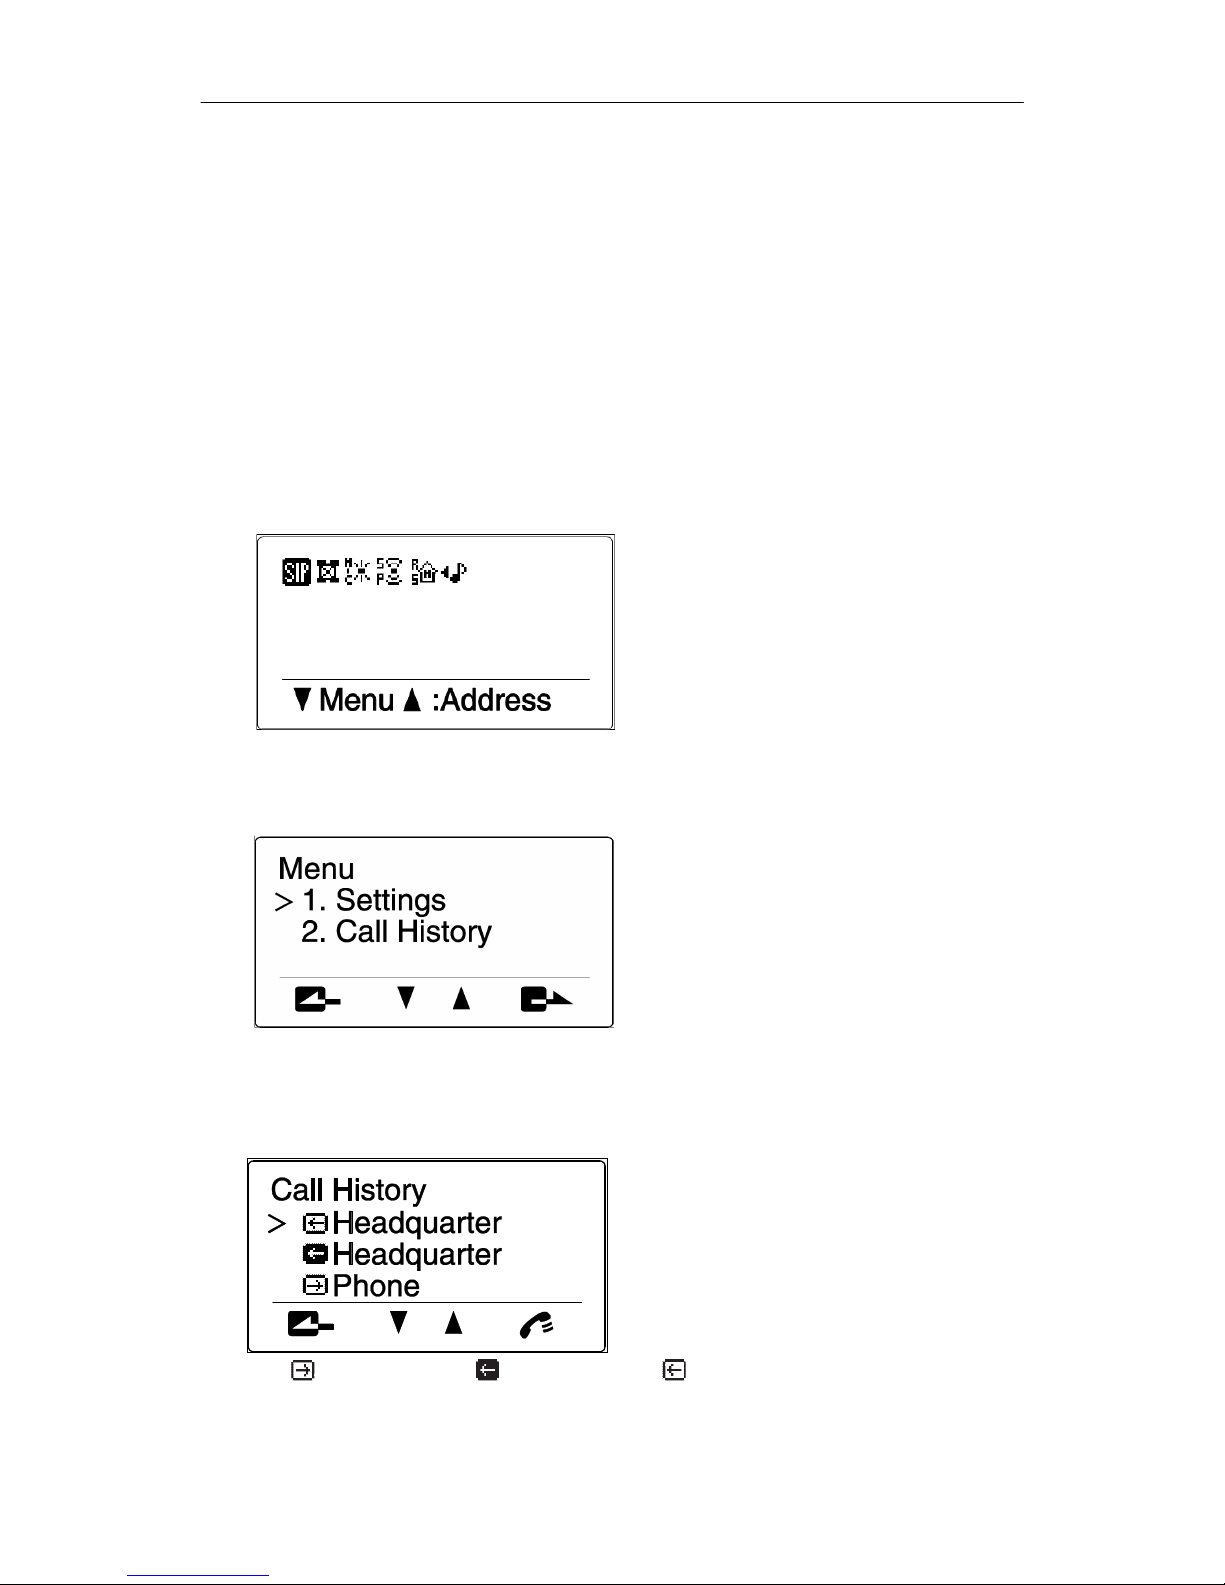
To edit the address book, do the following steps:
- Use a Web browser to open the Web GUI home page.
- Click “View/Edit Address Book” link under “Address Book” section.
- Click “Edit” button to type in new addresses.
- Select address type and type in name and appropriate phone numbers.
- Click “Del” button to remove existing addresses.
[Note] Phone numbers with external line access prefix are not supported.
Page 36
ACT-50 User Guide
24
3.5 Call history
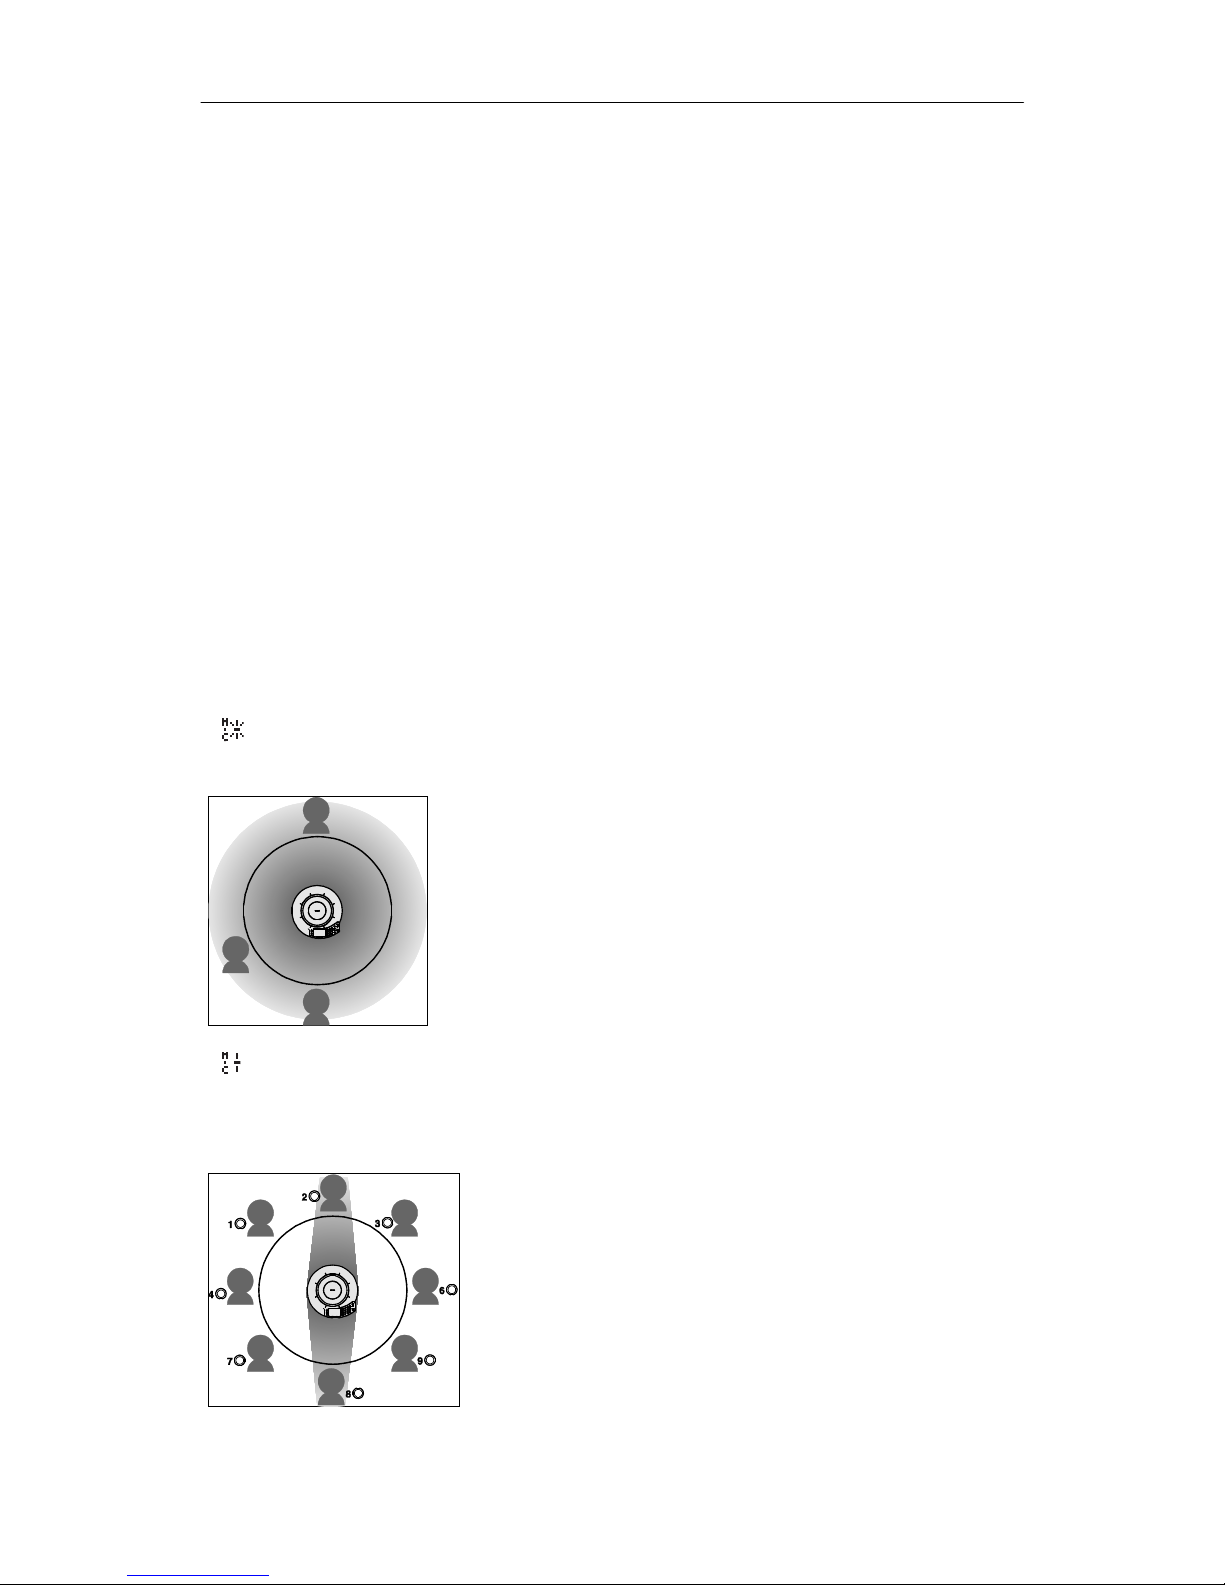
A log of your calls (missed, received, and placed) is available in the ACT-50. Using
ACT-50, you may view and return calls from the call history menu. ACT-50 stores a
maximum of 50 records in the log. You can also view the call logs from your
desktop PC using Web browser.
*** Call history can be accessed by following steps:
- Press “Cancel” key until following screen appears:
- Press “Down” key following menu appears:
- Press “Down” / “Up” key to select “2. Call History” menu and press “Enter”
key following menu appears:
***
: Placed call / : Missed call / : Received call
Page 37
ACT-50 User Guide
25
3.6 Settings
ACT-50 allows you to configure settings for various parameters. User can change
the following selections:
• Microphone mode
• Ring volume
• Date and Time, Location/Time Zone, SNTP time server
• Web GUI Password
• Syslog server
• QoS setup
3.6.1 Microphone mode
ACT-50 provides 3 microphone modes for various environments.
• : Zone mode is used for quiet environments and picks up audio from all
directions. {Basic mode}
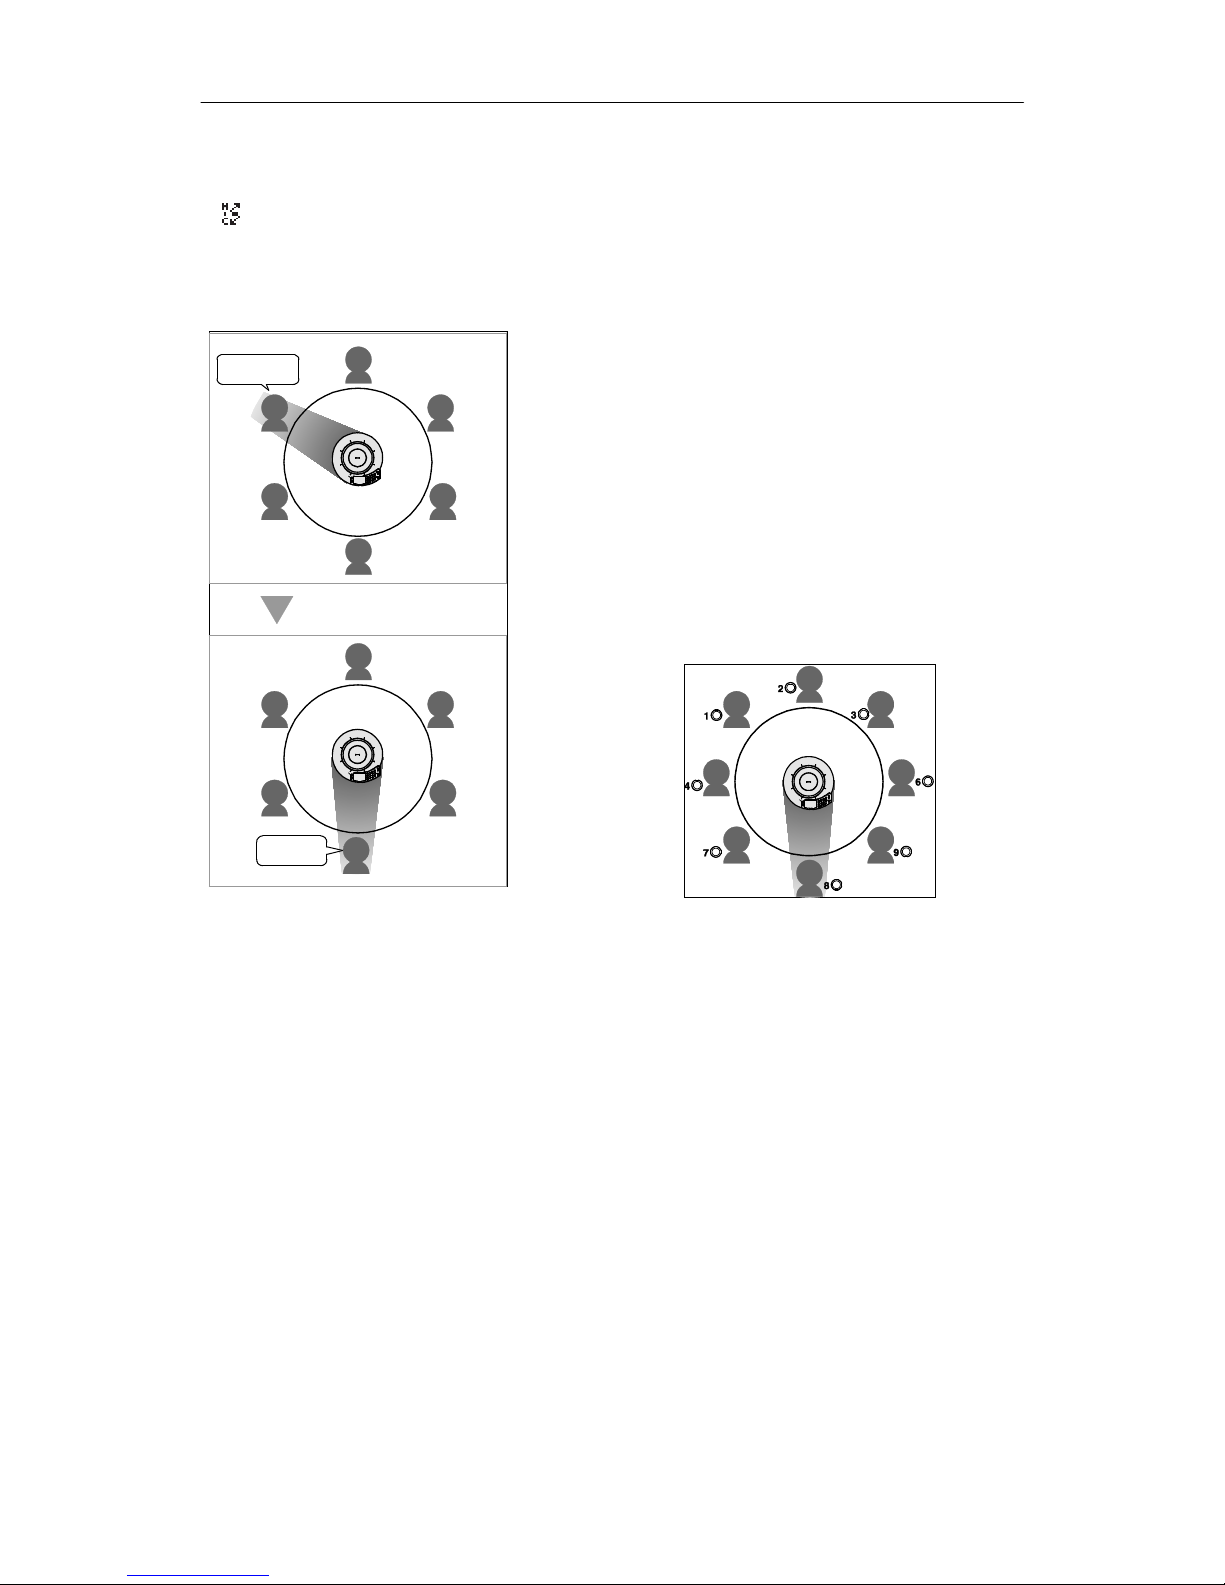
• : Spot mode is used when the number of talkers is limited to one or two, or
when there is equipment that produces noise such as a projector nearby. ACT-50
fixes the audio pick up area to the front of the microphone by narrowing the
directivity. {Recommended for 1~2 users}
To specify the audio pick up area, use the numeric keys
in the “Microphone Mode” menu. When a key is
pressed, the areas in the direction of the pressed key
and the opposite direction is enabled or disabled. The
left illustration shows the areas enabled by pressing “2”
button.
Microphone indicators (blue LEDs) turn on to show the
direction where audio can be picked up.
Page 38
ACT-50 User Guide
26
• : Tracking mode automatically tracks and focuses on the audio of the talker. The
audio can be picked up with narrow directivity so that other noises can be reduced.
This mode is suitable to pick up the audio clearly in a noisy environment. The voice
of only one talker can be captured at a time.
In the “Microphone Mode” menu, press a numeric
key to specify the area in which tracking is
disabled.
Every numeric key enables or disables the
tracking in the direction corresponding to the key
as shown in the following illustration. You can
select multiple areas at the same time. Pressing
“5” button enables microphone tracking in all
directions.
All microphone indicators (blue LEDs) turn on for the direction which audio can be
picked up.
Page 39
ACT-50 User Guide
27
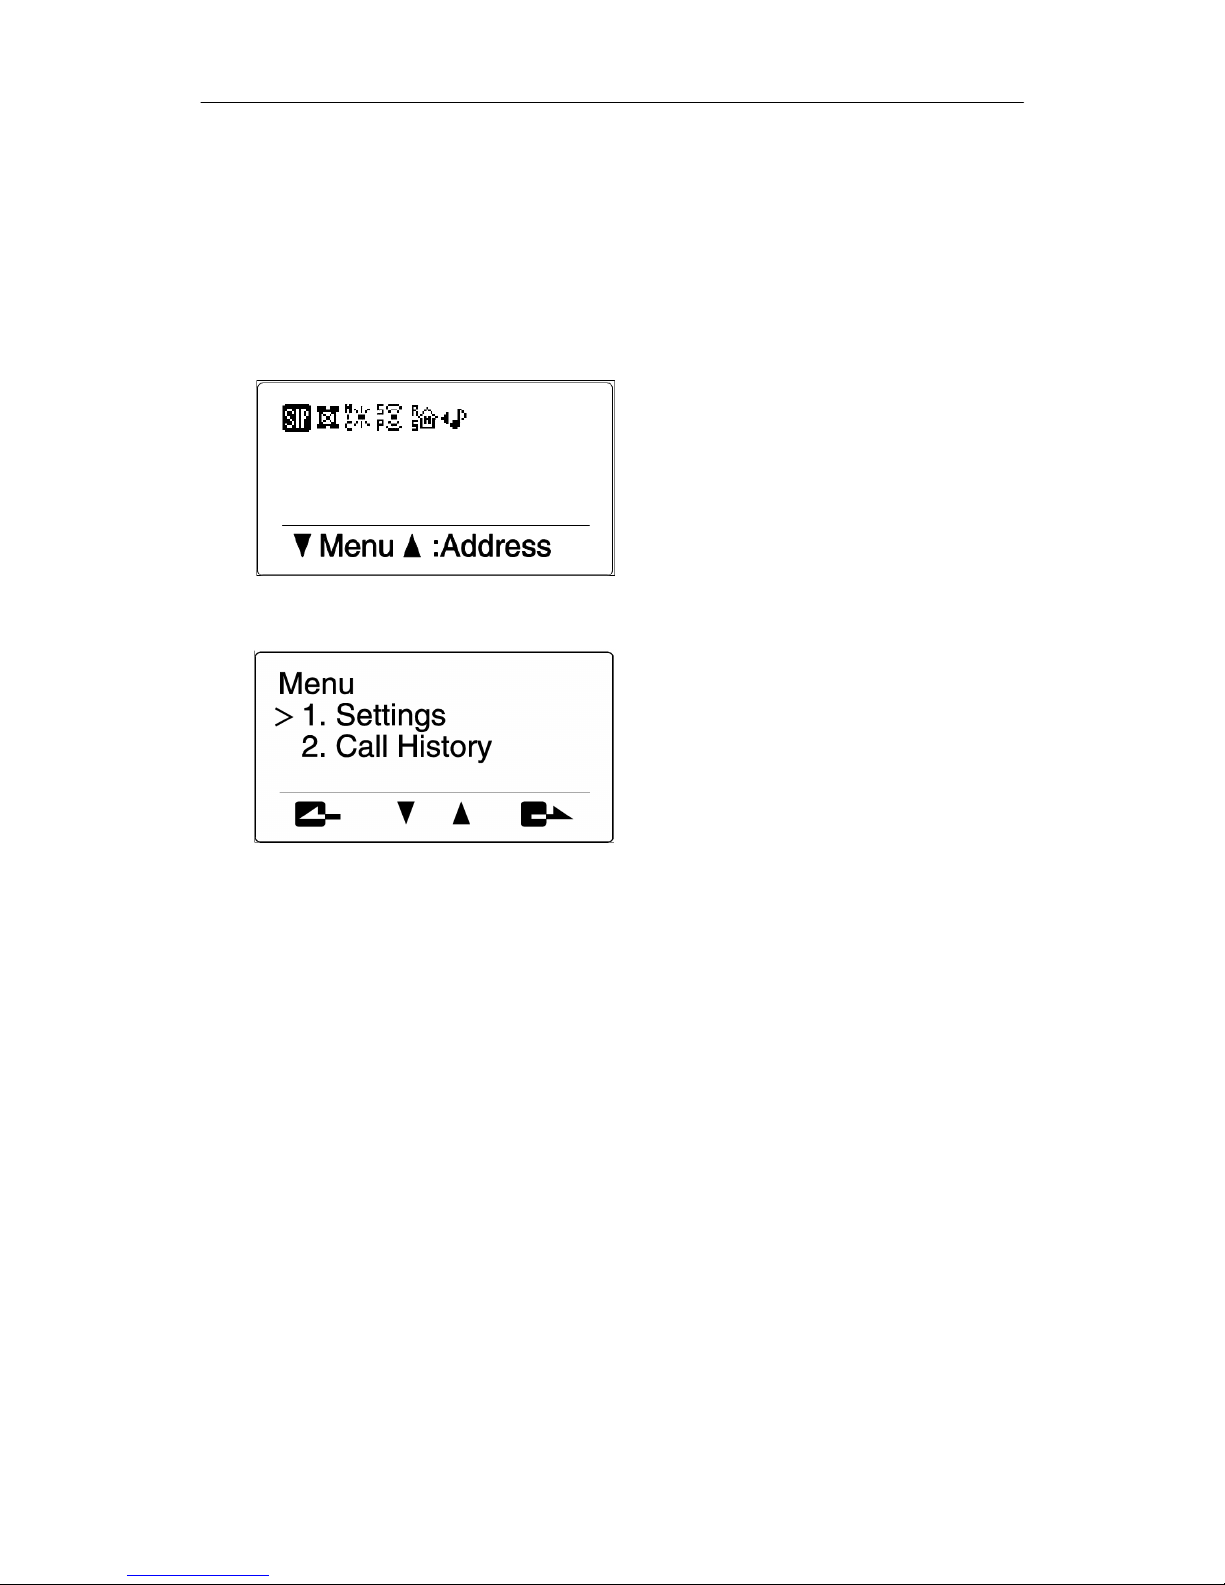
3.6.2 Ring volume
To set ring volume levels:
- Press “Cancel” key until following screen appears:
- Press “Down” key following menu appears:
- Press “Down” / “Up” key to select “1. Settings” menu and press “Enter” key.
- Press “Down” / “Up” key to select “4. General Settings” menu and press
“Enter” key.
- Press “Down” / “Up” key to select “1. Ring Volume” menu and press “Enter”
key.
- Press “Vol+” / “Vol-” key to adjust ring volume and press “Enter” key.
Page 40
ACT-50 User Guide
28
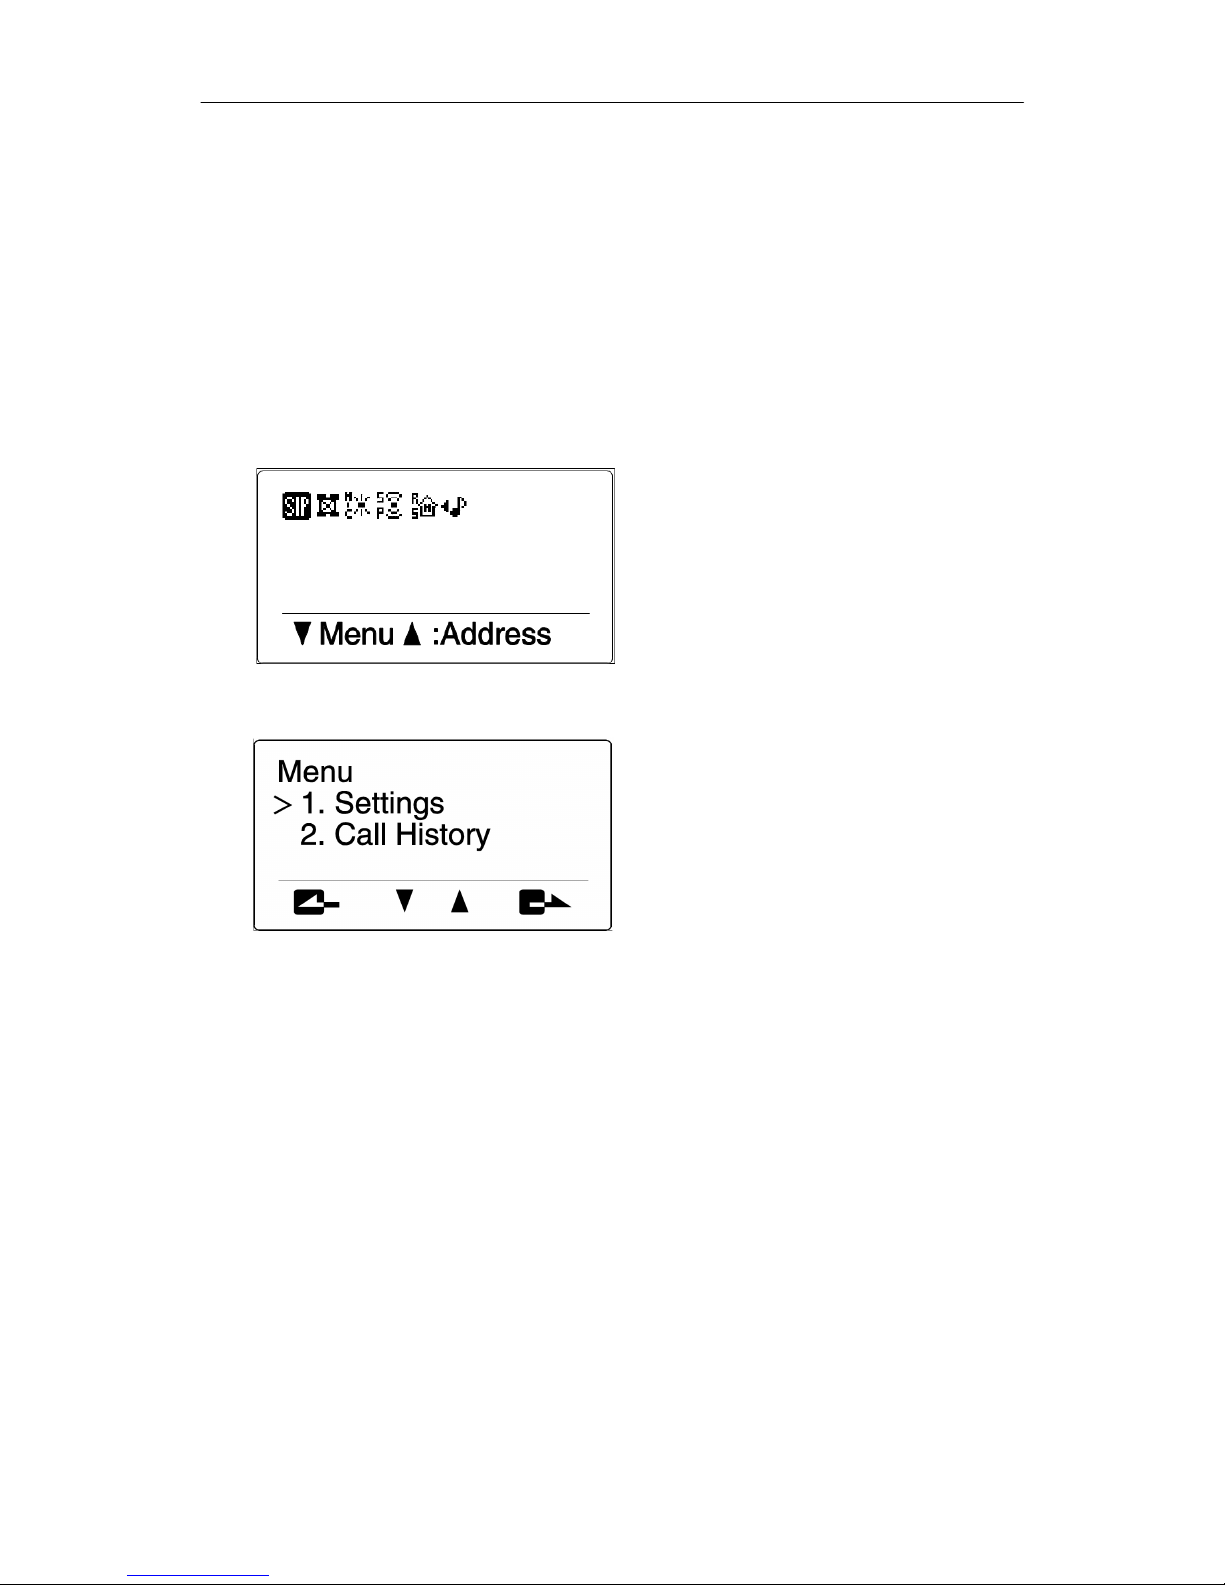
3.6.3 Date and time
You can set date and time manually or use Internet time server for automatic
configuration.
To configure time manually, do the following:
- Press “Cancel” key until following screen appears:
- Press “Down” key following menu appears:
- Press “Down” / “Up” key to select “1. Settings” menu and press “Enter” key.
- Press “Down” / “Up” key to select “4. General Settings” menu and press
“Enter” key.
- Press “Down” / “Up” key to select “6. Time” menu and press “Enter” key.
- Press numeric keys to enter date/time and press “Enter” key. (Numbers 1~9
needs to be entered as 01~09 and period ‘.’ is auto-inserted.)
Page 41

ACT-50 User Guide
29
3.6.4 Set location/time zone & SNTP time server
To use Internet time server for automatic configuration, do the following:
- Use a Web browser to open the Web GUI home page.
- Click “Time” link under “General Settings” section.
- Type in available SNTP server address. Ex) 0.asia.pool.ntp.org
- Select “Synchronization Interval”.
- Select “Time Zone”. {Please refer to section 8 for time zone table}
- Click “Daylight Saving Time” button if needed.
- Click “Submit”.
3.6.5 Changing Web GUI password
To change the Web GUI password, do the following:
- Use a Web browser to open the Web GUI home page.
- Click “Set Password” link under “Administration” section.
- Type in “Current Password”.
- Type in “New Password” twice.
- Click “Submit”.
*** The master password for emergency is the serial number with the second
letter omitted.
Example ) serial number = “NP4012345” master password = “N4012345”
3.6.6 Set Syslog server
To set up the Syslog server for device monitoring, do the following:
- Use a Web browser to open the Web GUI home page.
- Click “Syslog Config” link under “Administration” section.
- Select required modes.
- Enable/disable network output.
- Type in Syslog Host Address.
- Click “Submit”.
Page 42

ACT-50 User Guide
30
3.6.7 Set QoS parameters
To set up the QoS parameters, do the following:
- Use a Web browser to open the Web GUI home page.
- Click “QoS” link under “Network settings” section.
- Enable/disable ToS/CoS.
- Select required ToS/CoS value.
- Type in required VLAN-ID.
- Click “Submit”.
[Note] Before setting VLAN-ID, current configuration must be saved to ACT-50 for
the case when configuration restore is needed.
To save the current configuration, do the following:
- Use a Web browser to open the Web GUI home page.
- Click “Save Config” link under “Save/Load Config” section.
- Select “Config2” or second “No Data”.
- Click “Save”.
*** “Config1” or first “No Data” is reserved for analog phone mode configuration.
To load the saved configuration, do the following:
In the LCD menu, select “Menu” → “1. Settings” → “5. Save/Load Config” → “2.
Load Config” → “1. Config2” → “1. Yes” → Device reboots automatically.
[Note] Increased network delay and voice volume can degrade echo cancelling and
voice quality. It is recommended that proper QoS value be used.
Page 43
ACT-50 User Guide
31
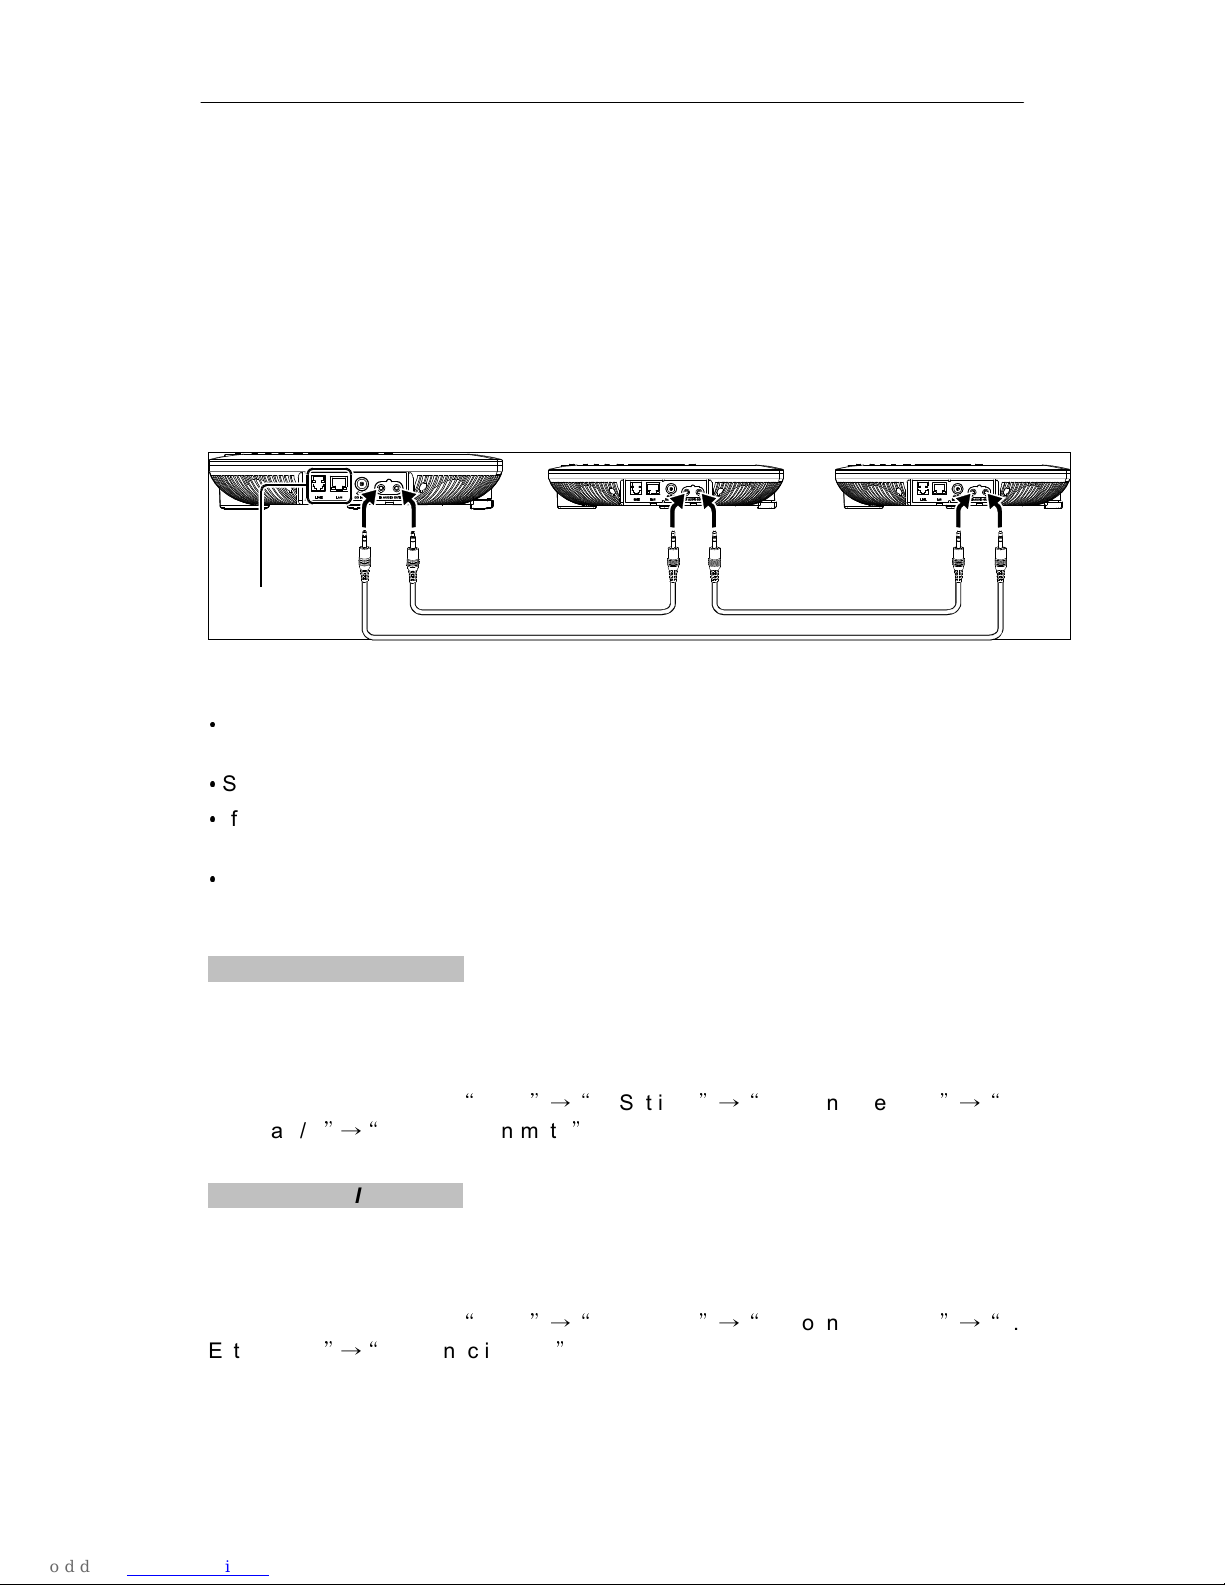
3.7 Connecting multiple units for wide area coverage
You can connect multiple ACT-50 units in daisy chain configuration to provide wider area
coverage.
Using 3.5 mm stereo mini-plug cables, connect the AUDIO OUT terminal of each ACT-50
system to the AUDIO IN terminal of another ACT-50 system
Master unit Slave unit #1 Slave unit #2
Figure 4: ACT-50 daisy chaining
•
In an interlocked connection of the ACT-50 systems, allow a distance of at least 2
meters between them.
•
Set the “Room Size” to “Small” for an interlocked connection.
•
If echo is produced, install the ACT-50 systems at larger distances or decrease
their volumes.
•
Do not set the volume of the ACT-50 systems connected as the master or slave
units to 0. Otherwise, echo may be produced.
Setup of the Master unit:
In the Web menu, click “External Input/Output” link under “Sound Settings” section
and select “Connection (Master)”.
In the LCD menu, select “Menu” → “1. Settings” → “3. Sound Settings” → “4.
External I/O” → “3. Connection(mstr)”.
Setup of the Slave units:
In the Web menu, click “External Input/Output” link under “Sound Settings” section
and select “Connection (Slave)”.
In the LCD menu, select “Menu” → “1. Settings” → “3. Sound Settings” → “4.
External I/O” → “4. Connection(slv)”.
Page 44

ACT-50 User Guide
32
3.8 Set up “Telephone Settings”
If the analog telephone port is used for making voice calls when IP network is down,
then several analog settings must be configured.
3.8.1 Set Area Code (Country Code)
To set up the area code (country code), do the following:
- Use a Web browser to open the Web GUI home page.
- Click “Area Code” link under “Telephone Settings” section.
- Select appropriate region.
- Click “Submit”.
* When area code is changed, all telephone settings will be initialized.
3.8.2 Set Dial Type
To set up the dial type, do the following:
- Use a Web browser to open the Web GUI home page.
- Click “Dial Type” link under “Telephone Settings” section.
- Select appropriate signaling mode. (BP = DTMF: this is default mode)
- Click “Submit”.
3.8.3 Set Hooking Time
To set up the hooking time, do the following:
- Use a Web browser to open the Web GUI home page.
- Click “Hooking Time” link under “Telephone Settings” section.
- Select appropriate hooking time.
- Click “Submit”.
3.8.4 Set Line Mode (Used for Japan/China region only)
To set up the line mode, do the following:
- Use a Web browser to open the Web GUI home page.
- Click “Line Mode” link under “Telephone Settings” section.
- Select appropriate line mode.
- Click “Submit”.
Page 45

ACT-50 User Guide
33
*** If one mode does not work, please try the other modes.
3.8.5 Save analog phone mode configuration
To use analog phone mode without Web GUI, analog phone mode configuration
must be saved to ACT-50.
To save the analog phone mode, do the following:
- Use a Web browser to open the Web GUI home page.
- Click “SIP Server” link under “Network Settings” section.
- Select “Disable” for SIP Server menu.
- Click “Submit”.
- Click “Save Config” link under “Save/Load Config” section.
- Select “Config1” or first “No Data”.
- Click “Save”.
*** Using “Config1” or first “No Data” is more convenient when loading analog
phone mode configuration.
3.8.6 Load analog phone configuration
To use analog phone mode without Web GUI, analog phone mode configuration
must be load from ACT-50.
To load the analog phone mode, do the following:
In the LCD menu, select “Menu” → “1. Settings” → “5. Save/Load Config” → “2.
Load Config” → “1. Config1” → “1. Yes” → Device reboots automatically.
*** It is assumed that “Config1” was used for saving analog phone mode
configuration.
[Notes for using analog phone mode]
- The volume at the other party decreases compared to SIP mode, so the
other party may increase speaker volume.
- Please use analog phone mode only when IP network is down.
- Please use volume level 1~10 in analog phone mode.
- Since the echo cancelling performance of analog phone mode is lower than
the echo cancelling performance of SIP mode, voice quality may degrade in
analog phone mode.
- Dial tone in analog phone mode is generated by four speakers in roundrobin style for distinguishing analog phone mode. To disable this feature,
set speaker mode to “Mono”.
Page 46

ACT-50 User Guide
34
4. Factory reset
To reset F/W of ACT-50, do the following:
- Use a Web browser to open the Web GUI home page.
- Click “Restore Factory Setting” link under “Administration” section.
- Click “Restore Factory Setting” or “Restore Factory Settings without
deleting an address book”. The setups of the system are reset, and this unit
restarts automatically.
*** In the LCD menu, select “Menu” → “1. Settings” → “5. Restore Settings” → “1.
Yes” or “2. Not Del AddrBook”.
5. F/W upgrade
To upgrade F/W of ACT-50, you need to download the latest firmware to your PC,
and then install it using TFTP.
Step1: Confirm the current version number
Check the “Program Version” on the top of the Web menu.
Step2: Get the latest firmware
Contact local LG-Ericsson dealer for the latest firmware.
Step 3: Install the firmware to the unit
Follow the procedure below to install the firmware to the unit.
(1) Press “Cancel” repeatedly until the initial display appears.
(2) Start “Command Prompt” in the Windows PC that can access the Web
menu of this unit.
When using Windows XP, select the “Start” menu → “All Program” →
“
Accessories” → “Command Prompt”.
(3) Enter and run the following command.
Page 47

ACT-50 User Guide
35
> tftp -i [IP address of this unit] put [file name of the firmware]
Example:
> tftp -i 192.168.100.200 act_50_300.bin
*** Set the directory containing the firmware as the current directory before
executing the above command.
(4) When the system shows the revision upgrading confirmation message,
press “Connect” key. The revision upgrading operation will start.
*** To cancel the firmware update, press “Disconnect” key.
*** MIC MUTE (orange LED) on the top panel of this unit flashes during the
firmware update process. Do not turn this unit off while MIC MUTE (orange
LED) is flashing.
(5) When the firmware update is complete this unit restarts automatically.
Check the version number in the “Program Version” on the top of the Web
menu to confirm that the new firmware has been installed properly.
Notes:
Once the firmware update is started, do not perform any other operation until the update
operation is completed and this unit is restarted. If the update operation is
interrupted, this unit may become unusable, in which case you need to return this
unit to the factory for repairs.
When the firmware update is completed, this unit is restarted automatically. All of the
ongoing calls are disconnected at this time.
Do not unplug the LAN cable during the firmware update. Otherwise, this unit could
become unusable, in which case you need to return this unit to the factory for repairs.
*** Firmware update through LCD menu (“Menu” → “1. Settings” → “7. Firmware
Update” ) will be supported in future release.
Page 48

ACT-50 User Guide
36
6. Troubleshooting problems
Please follow the suggested procedures for troubleshooting stated problems in
boldface.
The microphone indicators do not light up.
• This unit is not turned on. Check that the AC adapter and power cable are
connected properly.
• The power cable is not connected to the AC outlet. Check that the power
cable is connected to the AC outlet properly.
• The main or branch circuit breaker is shut off. If the circuit breaker is tripped
to “OFF”, set it to “ON”. If the circuit breaker is “ON”, set it to “OFF” then
“ON” again.
• There is a power failure. Wait until the power supply is restored.
• Power is not supplied to the AC outlet. If another electrical appliance also
cannot be turned on, have the power outlet or power wiring serviced. If
another electrical appliance can be turned on, have this unit serviced.
• The microphones are muted (the MIC MUTE LED lights up). Press MIC
MUTE so that the MIC MUTE LED is turned off.
The Web menu cannot be opened.
• The network setting of the PC is inappropriate (when other PCs and
network printers in the LAN are also unusable). Set the LAN board and LAN
card again and reboot the PC. Or reset the IP address of the PC.
• An inappropriate LAN cable is used for the connection between this unit
and the network. Use an optimum LAN cable (straight or cross cable). Use
a LAN cable of Category 5 or higher.
• This unit is malfunctioning. Reset this unit to restore the factory settings,
and then perform desired settings.
• An inappropriate URL is specified. When using this unit for the first time or
after restoring the factory settings, access “http://(IP address shown in the
initial display of this unit)”.
• The Web browser of the PC is set to use a proxy server. The Web menu
cannot be opened when the proxy setting is inappropriate. When using
Internet Explorer for Windows, open the “Tool” menu, select “Internet
Options” → “Connection” tab → “Set LAN”, and clear the “Use proxy user”
check box.
• A network fault occurred, or the communication is blocked by a firewall.
Consult your network administrator to have the network status checked.
The password for the Web menu is entered but it cannot be opened.
Page 49

ACT-50 User Guide
37
• The password is incorrect (when a password error is displayed). The
password is case-sensitive. Be sure to enter alphanumeric characters
correctly by distinguishing the uppercase and lowercase letters.
The settings are returned to the previous settings.
• You did not click “Submit” or “Register” to confirm the settings. After
configuring the Web menu settings, be sure to click “Submit” or “Register”
to confirm the changed settings. If the window is closed without
confirmation, the settings you made are not saved.
A call cannot be originated.
• An inappropriate IP address is entered. Check the IP address of the other
unit and enter the correct IP address.
• The IP address of the other unit has been changed. Check the IP address
of the other unit and enter the correct IP address.
• The communication is blocked by a firewall. Call by designating the IP
address cannot cross a firewall. If you want to change the calling method to
SIP, consult your system administrator.
• A network fault occurred. Wait until the fault is released. Consult your
system administrator.
• The connection mode settings of this unit and the other unit are different. A
unit in the mesh connection mode cannot communicate with a unit in a
cascade connection mode. Set the two units to the same connection mode.
• The IP/SIP settings of this unit and the other unit are different. A unit using
the SIP address cannot communicate with a unit using the IP address.
Enable the SIP server operation as required so that both units use the
same type of address.
• The SIP address in the address book is incorrect. Register the correct SIP
address.
• The SIP server is not running. Consult your system administrator.
• The SIP address of the other unit is not registered in the SIP server.
Consult your system administrator.
• The Dial Type setup of this system differs from the actual type of the
telephone line. Check the telephone line type and set the Dial Type setup of
this system accordingly.
• This unit is connected to an incompatible telephone circuit (digital circuit,
etc.). Consult the manager of your telephone circuit
A call cannot be received.
• An incorrect IP address is entered on the other unit. Enter the correct IP
address on the other unit.
• The communication is blocked by a firewall. Call by designating the IP
address cannot cross a firewall. If you want to change the calling method to
SIP, consult your system administrator.
Page 50

ACT-50 User Guide
38
• A network fault occurred. Wait until the fault is released. Consult your
system administrator.
• The connection mode settings of this unit and the other unit are different. A
unit in the mesh connection mode cannot communicate with a unit in a
cascade connection mode. Set the two units to the same connection mode.
• The IP/SIP settings of this unit and the other unit are different. A unit using
the SIP address cannot communicate with a unit using the IP address.
Enable the SIP server operation as required so that both units use the
same type of address.
• The SIP server is not running. Consult your system administrator.
• This unit is connected to an incompatible telephone circuit (digital circuit,
etc.). Consult the manager of your telephone circuit.
The audio from the other unit cannot be heard.
• The microphones are muted on the other unit. Cancel mute on the other
unit.
The audio is interrupted.
• The required bandwidth is not reserved. Check that the bandwidth required
for communication is reserved.
• A network fault occurred. Wait until the fault is released. Consult your
system administrator.
• The LAN cable is not connected properly. Check that the LAN cable is
connected firmly.
• The modular cable is unplugged or connected unstably. Connect the
modular cable firmly.
The audio output is delayed.
• The required bandwidth is not reserved. Check that the bandwidth required
for communication is reserved.
This unit generates feedback noises.
• This unit is located against a wall. Locate this unit at a certain distance from
a wall.
• An object is placed near this unit. Avoid placing an object in front of the
microphones.
• This unit is used in a room with high reverberation. Place objects with high
sound absorbance in the room by avoiding the positions in front of the
microphones. Avoid talking with a loud voice to reduce reverberations.
Change the Room Size setup.
I forgot the password.
Page 51

ACT-50 User Guide
39
• Reset this unit to restore the factory settings.
*** The master password for emergency is the serial number with the second
letter being omitted.
Example ) serial number = “NP4012345” master password = “N4012345”
The clock setting has been cleared.
• The built-in battery for clock information is dead. Consult nearest authorized
LG-Ericsson dealer or service center.
Page 52

ACT-50 User Guide
40
7. ACT-50 product specification
Item Specification
IP network interface IEEE 802.1 10/100 Base-T Fast Ethernet, RJ-45
Phone line Interface RJ-11
PC audio interface Stereo analog input/output, 3.5 mm mini jacks
Indicators
Mute LED
Speakerphone LED
Headset LED
Presence LED
VoIP protocol Session Initiation Protocol (SIP)
Audio processing
Codec: G.722, G.729, G.711
Voice Activity Detection (VAD)
Comfort Noise Generation (CNG)
User Interface elements
monochrome LCD
Navigation keys
Functional buttons
• Mute
• Connect/Disconnect
• Volume Control
Numeric 12-button dial pad
Microphone
Speaker
Physical Size (W x H x D) 283 mm x 53.6 mm x 297.5 mm
Weight 1.4 kg approx.
Power
External AC/DC adaptor:
Input 100~240VAC, 1.2 A (Max.), 50/60 Hz
Output 12VDC, 3.0 A (Max.)
8W Avg.
Operation Temperature 0~40 (ºC) , 32~104 (ºF)
Storage Temperature -20 ~ 60 (ºC) , -68~140 (ºF)
Operation Humidity 20-85% RH (non-condensing)
Page 53

ACT-50 User Guide
41
8. Time zone table
Country
CountryCountry
Country
Country
CountryCountry
Country
UCT-12:00 I
nt.Date L
ine
, W
est UCT
+01:00 O
slo, Norway
UCT-11:00 M
idway
/S
amoa
UCT
+01:00 P
aris, France
UCT-10:00 H
awaii
UCT
+01:00 R
ome, Italy
UCT-09:00 A
laska
UCT
+01:00 S
tocholm, Sweden
UCT-08:00 L
os Angeles, Califonnia
UCT
+01:00 V
ienna, Austria
UCT-08:00 P
acific
Standard
UCT
+02:00 A
thens, Greece
UCT-07:00 M
ountain
Standard
UCT
+02:00 H
arare, Zimbabwe
UCT-06:00 C
entral Standard
UCT
+02:00 H
elsinki, Finland
UCT-06:00
Mexico City
,
Mexico
UCT
+02:00 I
stanbul, Turkey
UCT-06:00 S
askatc.,
C
anada
UCT
+02:00 J
erusalem, Israel
UCT-05:00 B
ogota
, C
olombia
UCT
+03:00 K
uwait
UCT-05:00 E
astern
Standard
UCT
+03:00 M
oscow, Russia
UCT-05:00 L
ima
, P
eru UCT
+03:00 N
airobi, Kenya
UCT-05:00 N
ew York, NY
UCT
+03:00 R
iyadh, Saudi Arabia
UCT-04:00 A
tlantic
S
tandard
UCT
+03:30 T
ehran, Iran
UCT-04:00 C
aracas, Venezuela
UCT
+04:00 A
bu Dhabi,
UAE
UCT-04:00 L
a Paz, Bolivia
UCT
+04:00 T
blisi, Georgia
UCT-03:30 N
ew Foundland
UCT
+04:30 K
abul
,
Afghanistan
UCT-03:00 B
rasilia, Brazil
UCT
+05:00 I
slamaba
d, Pakistan
UCT-03:00 B
uenos Aires, Argentina
UCT
+05:30 N
ew Delhi, India
UCT-03:00 G
eorgetown, Guyana
UCT
+06:00 D
haka, Bangladesh
UCT-02:00 N
uuk, Greenland
UCT
+06:30 Y
angon, Myanmar
UCT-01:00 A
zores, Portugal
UCT
+07:00 B
angkok, Thailand
UCT-01:00 C
ape Verde
UCT
+07:00 J
akarta, Indonesia
UCT 00:00 C
asablanca, Morocco
UCT
+08:00 B
eijing, China
UCT 00:00 L
isbon, Portugal
UCT
+09:00 S
eoul, Korea
UCT 00:00 L
ondon, England
UCT
+09:00 T
okyo, Japan
UCT
+01:00 A
msterdam, Nertherlands
UCT
+09:30 D
arwin, Australia
UCT
+01:00 B
erlin, Germany
UCT
+10:00 G
uam Standard
UCT
+01:00 B
ern, Switzerland
UCT
+11:00 S
olomon Islands
UCT
+01:00 B
russels, Belgium
UCT
+12:00 M
arshall Islands
UCT
+01:00 C
entral Europeon
UCT
+12:00 A
uckland, Wellington
UCT
+01:00 C
openhagen, Denmark
UCT
+13:00 N
uku’Alofa
UCT
+01:00 M
adrid, Spain
Page 54
ACT-50 User Guide
42
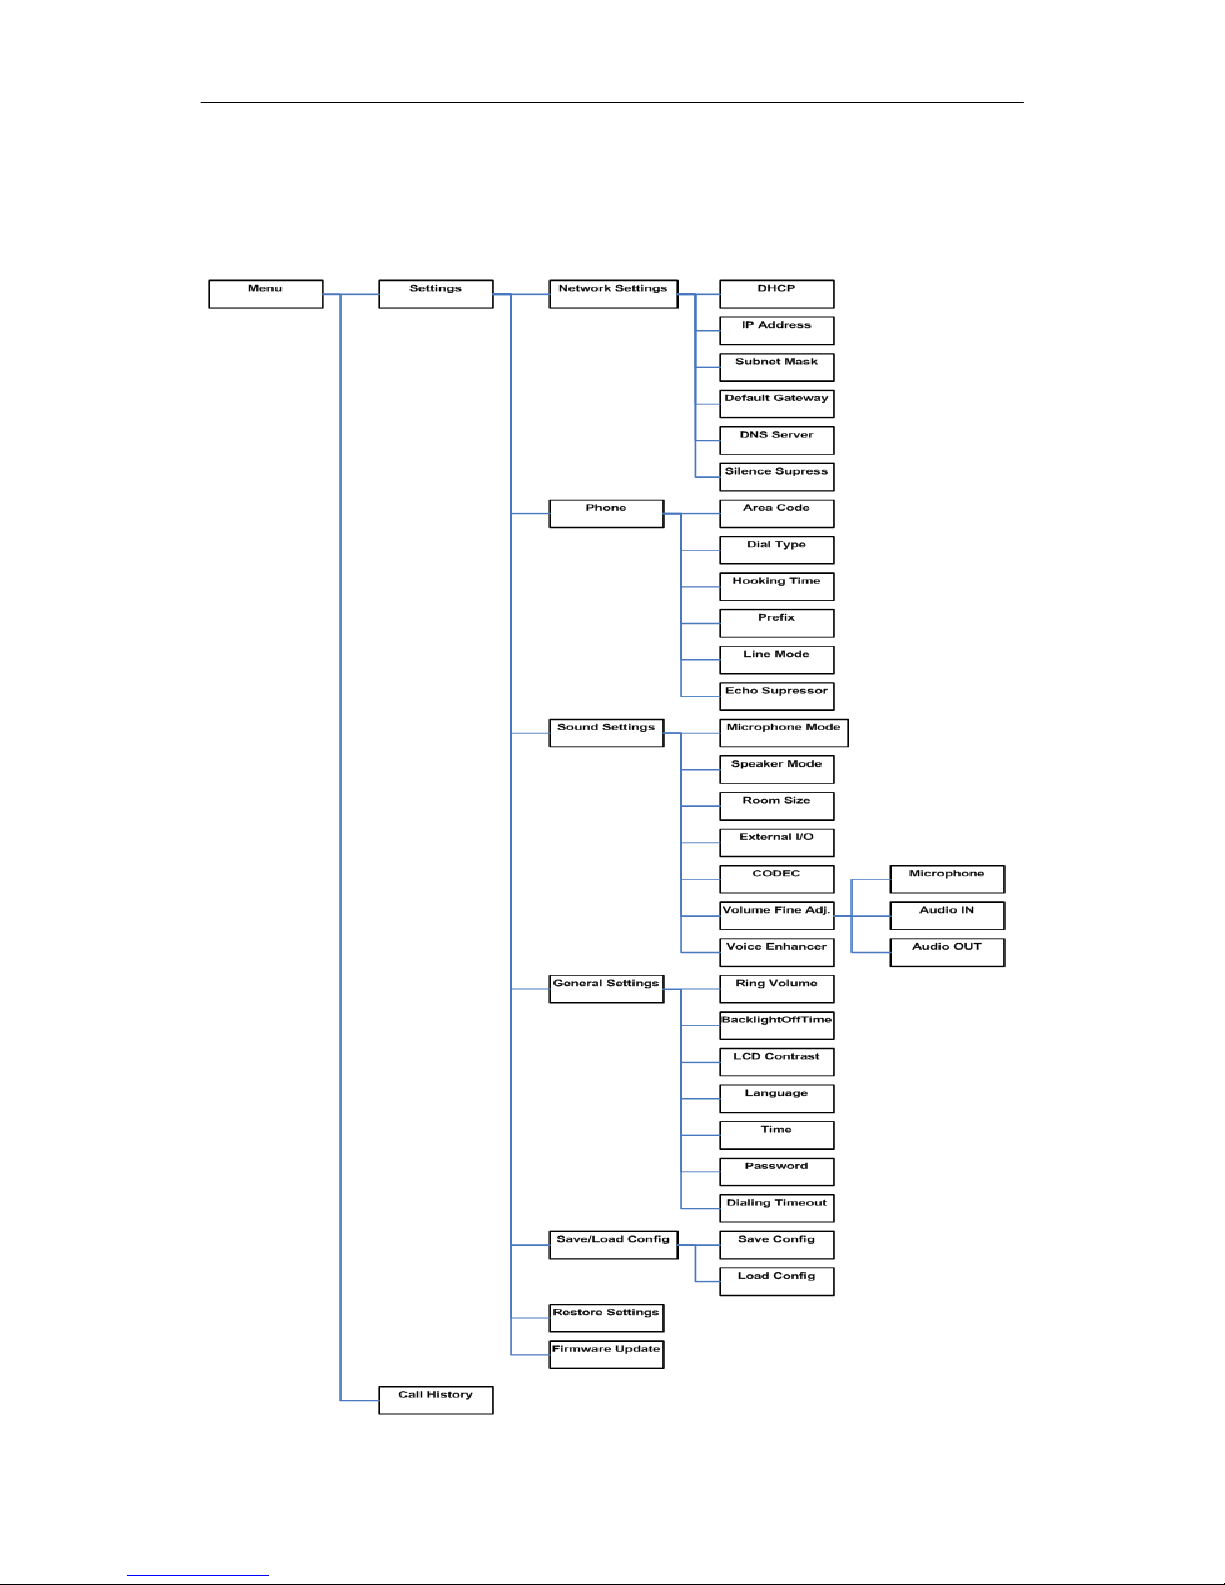
9. LCD menu tree
Page 55

Page 56

LG-Ericsson Co., Ltd.
GS Gangnam Tower, 679-1, Yeoksam-1-dong, Gangnam-Gu
Seoul, 135-985
Korea
www.LG-Ericsson.com
WY03390-209
 Loading...