

Page 1
MOTOSPAZZATRICE/FLOORSWEEPER/BA R RE D OR A /
MOTORKEHRMASCHINE
ECOL
MANUALED'USO/OPERATOR'SMANUAL/
MANUAL DE INSTRUCCIONES/BEDIENUNGSANLEITUNG
Page 2
I N D I C E
Pag.
I N D E X
Page
Introduzione
3
Foreword
3
Convenzioni e legenda
4
General information and key
4
Matricola e marchio CE
4
Serial number and CE marking
4
Scheda di identificazione
5
Machine registration sheet
5
Dati tecnici
6
Technical specifications
6
Uso del prodotto
7
Using the Machine
7
Disimballo
8
Unpacking the Machine
8
Montaggio spazzola laterale
8
Mounting the side brush
8
Montaggio ed Uso scuotifiltro
9
Mounting and using the filter shaker
9
Preparazione macchina
10
Preparing the Machine for operation
10
Prima carica alla batteria
10
First charge
10
Ricarica batteria
10
Recharging
10
Gruppo comandi
11
Controls
11
Avviamento
12
Starting
12
Manutenzione ordinaria
13
Routine maintenance
13
Manutenzione batteria
13
Battery maintenance
13
Sostituzione e regolazione spazzola laterale
14
Replacing and adjusting the side brush
14
Sostituzione e regolazione spazzola centrale
15
Replacing and adjusting the centre brush
15
Sostituzione motore ventola
16
Replacing the suction fan
16
Sostituzione motore trazione
17
Replacing the gear motor
17
Pulizia cassetti raccoglipolvere
18
Cleaning the waste bins
18
Sostituzione e regolazione cinghie
19
Replacing and adjusting the belts
19
Sostituzione e manut. del filtro a cartuccia
21
Replacing and servicing the cartridge filter
21
Sostituzione flap
22
Replacing the flaps
22
Rottamazione della macchina
22
Scrapping
22
Materiale di consumo
22
Consumables
22
Schema elettrico
23
Wiring diagram
23
Tabella difetti / cause / rimedi
24
Trouble shooting
24
I N H A L T S V E R Z E I C H N I S
Seite
Í N D I C E
Einführung
3
Introducción
3
Allgemeine Hinweise und Zeichenerklärung
4
Información general
4
Matrikelnummer und CE-Zeichen
4
N° de série y marqueting CE
4
Maschinenkennblatt
5
5
Technische Daten
6
Datos técnicos
6
Verwendung
7
Uso de la máquina
7
Auspacken
8
Desembalaje
8
Montage der Seitenbürste
8
Montaje de cepillos laterales
8
Montage und Betrieb des Filterrüttlers
9
Montaje y uso del filtro
9
Zurichtung der Maschine
10
Preparación de la máquina
10
Erste Aufladung
10
Primera carga de batería
10
Aufladen der Batterie
10
Recarga de batería
10
Steuergruppe
11
Controles
11
Anlassen
12
12
Wartung
13
13
Wartung der Batterie
13
13
Wechsel und Einstellung der Seitenbürste
14
Cambio y ajuste del cepillo lateral
14
Wechsel und Einstellung der Mittelbürste
15
Cambio y ajuste del cepillo central
15
Austausch des Flügelradmotors
16
Cambio del ventilador de succión
16
Austausch des Getriebemotors
17
Cambio de los engranajes del motor
17
Reinigung der Staubauffangbehälter
18
Limpieza del cajón de desperdicios
18
Wechsel und Einstellung der Riemen
20
Cambio y ajuste de los cinturones
20
Wechsel und Wartung des Filters
21
Sustitución y mantenimiento del cartucho de filtro
21
Auswechseln der Grobschmutzklappen
22
Cambio de los flaps
22
Maschinenverschrottung
22
Desguace
22
Verbrauchsstoffe
22
Consumibles
22
Schaltplan
23
Esquema eléctrico
23
Störungen / Ursachen / Beseitigung
24
Resolución de problemas
24
ITALIANO (Istruzioni originali) ENGLISH (Translation of original instructions)
DEUTSCH(Übersetzung der Original-Bedienungsanleitung)
ESPAÑOL(Traducción de las instrucciones originales)
Página
Ficha de la máquina
Puesta en marcha
Rutina de mantenimiento
Mantenimiento de la batería
P a g . 1
Page 3

INTRODUZIONE
FOREWORD
Il presente libretto di istruzioni,ha lo scopo di servire da guida e
contiene le informazioni pratiche per la sicurezza,il
funzionamento,la registrazione e la manutenzione della macchina.
La macchina è stata progettata e costruita per assicurare il
massimo delle prestazioni del comfort e della facilità di lavoro in
una grande varietà di condizioni.
Prima della consegna la Vostra macchina è stata controllata in
fabbrica e dal nostro concessionario per garantire che Vi venga
consegnata in perfette condizioni.
Per mantenere la macchina in tali condizioni o assicurare un lavoro
senza problemi,è indispensabile che le operazioni di manuten-
zione periodica indicate in questo manuale siano eseguite.
NOTA IMPORTANTE
PRECAUZIONI DA PRENDERE PRIMA DI METTERE IN
FUNZIONE LA MACCHINA
Per facilitarne il trasporto, la spazzola laterale,lo scuotifiltro,il
manico,il coperchio filtro non sono nelle rispettive posizioni per il
funzionamento della macchina,procedere al montaggio come descritto dal presente libretto.I particolari da montare si trovano nel
cassetto raccoglirifiuti anteriore della macchina.
The purpose of this manual is to inform the operator of the basic rules,
safety rules and criteria which must be observed when using, adjusting
and maintaining the machine.
The machine has been developed and manufactured to ensure an
excellent performance and the utmost comfort and and ease of
operation in a variety of working conditions.
Before delivery,the machine has been checked at our factory and by
our dealer to make sure it is handed over to you in perfect working
order.
To mantain the machine in this conditions and ensure problem-free
operation,it is essential to follow the routine maintenance instructions
given in this handbook.
IMPORTANT NOTE
PRECAUTIONS TO TAKE BEFORE ATTEMPTING TO
START THE MACHINE
To facilitate transport,the side brush,the filter shaker,the handlebar
and the filter cover have not been assembled in their actual work
position.Therefore before using the machine,assemble them as shown
in this handbook.The components to assemble are in the front waste
bin of the machine
EINFÜHRUNG
Das vorliegende Handbuch soll einen praktischen Leitfaden für
den Gebrauch darstellen. Es enthält Hinweise für Sicherheit,
Betrieb, Einstellung und Wartung der Maschine.
Die Maschine wurde entwickelt und hergestellt, um eine hohe
Betriebsleistung, Komfort und Einfachheit in der Bedienung unter
den verschiedensten Arbeitsbedingungen bieten zu können.
Vor der Auslieferung ist die Maschine in der Fabrik und von
unserem Konzessionär einer gründlichen Kontrolle unterzogen
worden, um sicherzustellen, daß Sie sie in einwandfreiem
Zustand erhalten. Damit dieser Zustand erhalten bleibt und die
Arbeiten ohne Probleme durchgeführt werden können, ist es
notwendig, daß die in diesem Handbuch aufgeführten
Wartungsarbeiten gewissenhaft durchgeführt werden.
WICHTIGER HINWEIS
VORSICHTSMAßNAHMEN VOR INBETRIEBNAHME
DER MASCHINE.
Um den Tra nsport zu erleichtern , wurden Seite nbürste, Filt errüttler,
Griff und Filterdeckel nicht an ihrer regulären Arbeitsposition
m on ti er t; fü r d ie Mont ag e bef ol ge n S ie die en ts pre ch en de n A ng ab en
in diesem Handbuch.Die zu montierenden Einzelteile befinden
sich im vorderen Abfallsammelbehälter der Maschine.
INSTRUCCIONES
El propósito de este manual es informar al operador de las reglas básicas,
normas y criterios de seguridad que deben ser observadas al usar, ajuste y
mantenimiento de la máquina.
La máquina ha sido desarrollado y fabricado para asegurar un excelente
rendimiento y el máximo confort y la comodidad de uso, en una variedad de
condiciones de trabajo.
Antes de la entrega, la máquina ha sido comprobado en fábrica y por
nuestro distribuidor para asegurarse de que sea entregado a usted en
perfecto estado de funcionamiento.
Para MANTENER la máquina en estas condiciones y garantizar un
funcionamiento sin problemas, es esencial seguir las instrucciones de
mantenimiento de rutina que figuran en este manual.
NOTA IMPORTANTE
PRECAUCIONES A TOMAR ANTES DE INICIAR LA MÁQUINA
P a r a f a c i l i t a r e l t r a n s p o r t e , el cepillo lateral, el sacudidor del filtro, el manillar y
la tapa del filtro no se han reunido en su trabajo actual position.Therefore
antes de usar la máquina, montar como se muestra en estos componentes
handbook.The de montar se encuentran en la parte delantera cubo de la
basura de la máquina
Pag. 2
Page 4
CONVENZIONI e LEGENDA
GENERAL INFORMATION - KEY
Eventuali indicazioni DESTRA e SINISTRA o ORARIO e d
ANTIORARIO presenti in questo libretto si intendono sempre
r i f e r i t e a l s e n s o d i a v a n z a m e n t o d e l l a m a c c h i n a .
I p a r a g r a f i p r e c e d u t i d a q u e s t o s i m b o l o t r a t t a n o d i
a r g o m e n t i c h e , s e n o n r i s p e t t a t i , p o s s o n o a r r e c a r e
d a n n i a l l a m a c c h i n a .
I p a r a g r a f i p r e c e d u t i d a q u e s t o s i m b o l o t r a t t a n o d i
a r g o m e n t i c h e , s e n o n r i s p e t t a t i p o s s o n o p r o v o c a
r e l e s i o n i .
I paragrafi preceduti da questo simbolo trattano di
argomenti che devono essere letti molto attenta-
mente
U s a t e q u e s t o m a n u a l e p e r i m p a r a r e l e c a r a t t e r i s t i c h e d e l l a V o s t r a
m a c c h i n a e p e r c o m p r e n d e r e c o m e m e g l i o s f r u t t a r l e .
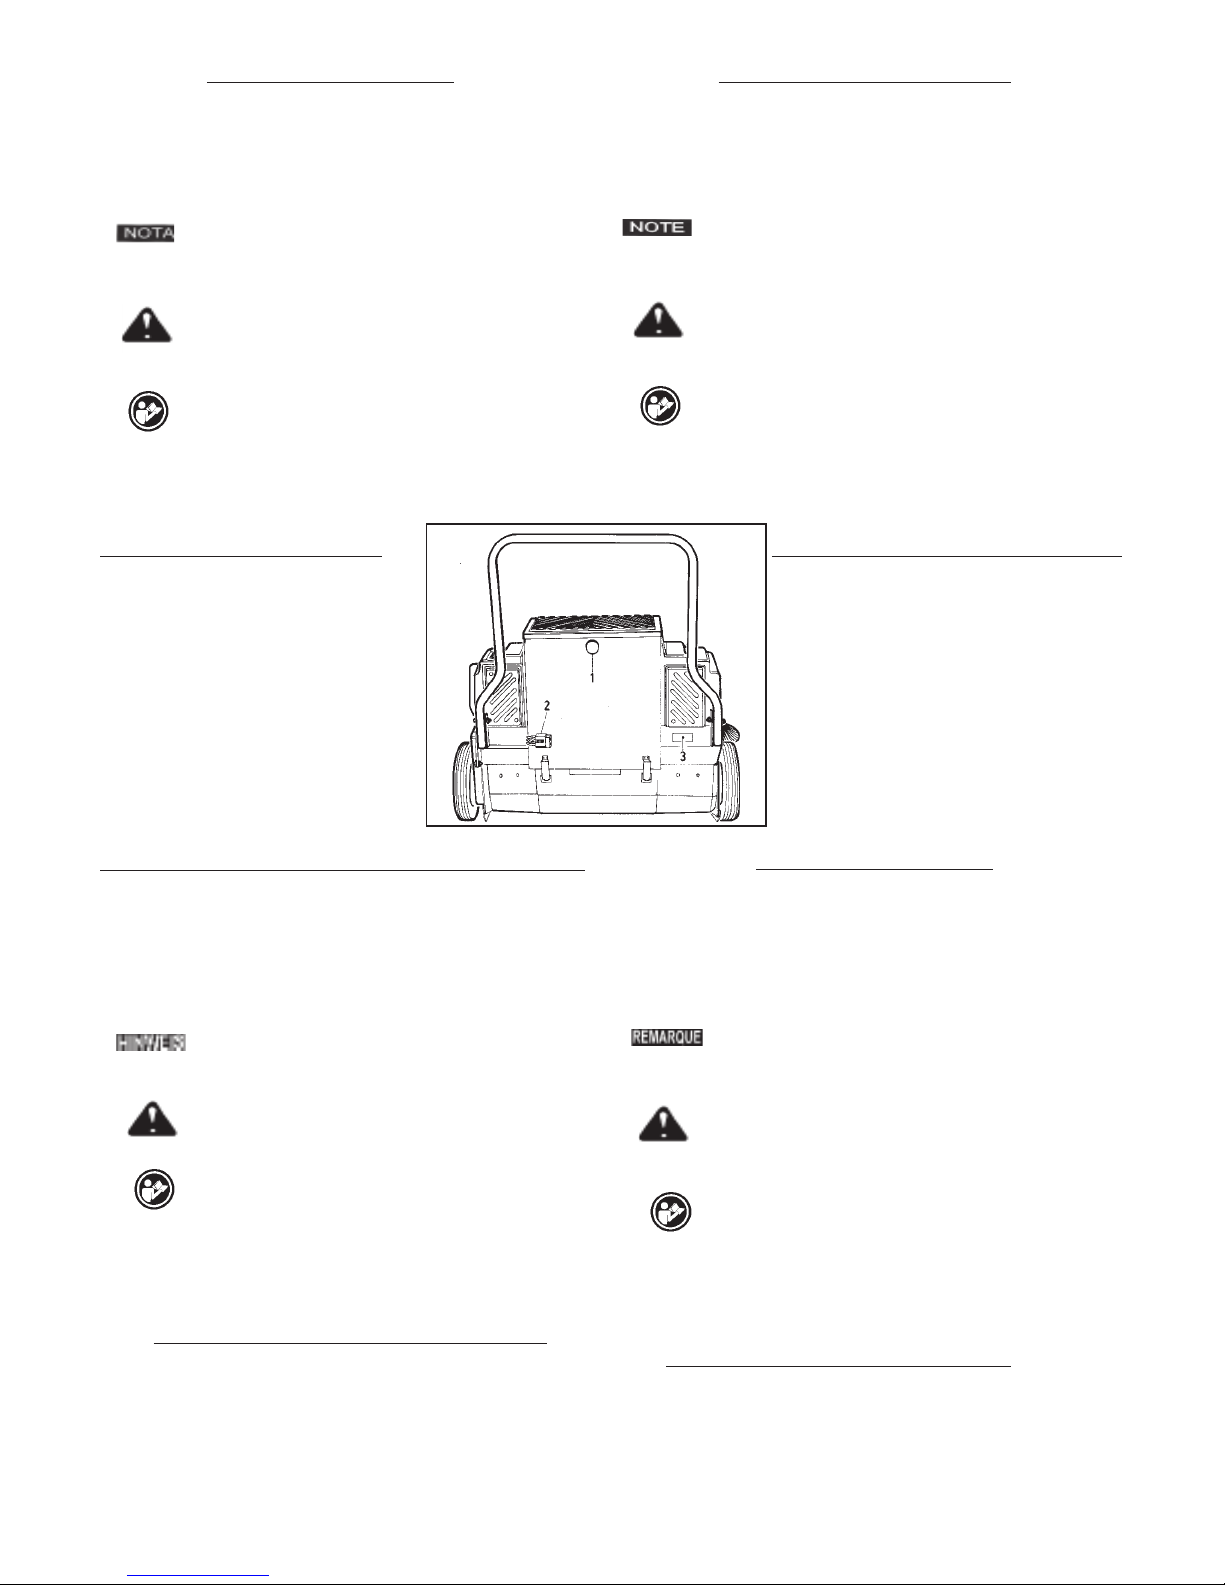
1.1 MATRICOLA MARCHIO CE
A c c e r t a r s i c h e l a m a c c h i n a s i a p r o v v i s t a
d i t a rg h et t a r ip o r t a nt e i l n u me r o d i
m a t r i c o l a , e d i l m a r ch i o C E p o s i z i o n a t a
c o m e d a f i g u r a . I n c a s o c o n t r a r i o a v v i s a r e
sub ito il rivenditor e.
P o s i z . 1 : P o m o l o s c u o t i f i l t r o
P o s i z . 2 : P r e s a c a r i c a b a t t e r i a
P o s i z . 3 : T a r g a m a t r i c o l a e m a r c h i o C E
Any RIGHT or LEFT CLOCKWISE or COUNTER CLOCKWISE
i n d i c a t i o n s i n c l u d e d i n t h i s h a n d b o o k a r e a l w a y s t o b e i n t e n d e d w i t h
r e s p e c t t o t h e m a c h i n e ’ s d i r e c t i o n o f m o v e m e n t .
T h i s s y m b o l d r a w s y o u r a t t e n t i o n t o o p e r a t i o n s t h a t
c o u l d c a u s e d a m a g e t o t h e m a c h i n e i m p r o p e r l y
e x e c u t e d .
T h i s s y m b o l d r a w s y o u r a t t e n t i o n t o o p e r a t i o n s t h a t
c o u l d c a u s e i n j u r i e s t o t h e o p e r a t o r i f i m p r o p e r l y
e x e c u t e d .
This symbol draws your attention to operations
that must be read abaut very carefully.
C o n s u l t t h i s m a n u a l c a r e f u l l y t o g a i n c o n f i d e n c e w i t h y o u r m a c h i n e
and le arn ho w to u se i t more effic ently.
1.1 SERIAL NUMBER and CE MARKING
A l w a y s e n s u r e t h a t t h e m a c h i n e i s p r o v i d e d
w i t h a n a m e p l a t e g i v i n g t h e s e r i a l n u m b e r a n d
CE marking i n t h e p o s i t i o n s h o w n i n f i g u r e .
O n t h e c o n t r a r y , a d v i s e y o u r d e a l e r i m m e d i a t e l y .
P o s . 1 :Filter shaker knob
P o s . 2 : S o c k e t f o r t h e b a t t e r y c h a r g e r
P o s . 3 :Serial number and CE marking plate
ALLGEMEINE HINWEISE UND ZEICHENERKLÄRUNG
Angaben, wie RECHTS, LINKS, IM UHRZEIGERSINN,
GEGEN DEN UHRZEIGERSINN, die in diesem Handbuch
ver we ndet wu rd en, bezi eh en sich stet s au f di e Vo rwär ts laufr ic htun g
der Maschine.
Dieses Symbol weist auf Anweisungen hin, deren
Nichtbefolgung zu Maschinenschäden führen
könnte.
Dieses Symbol weist auf Anweisungen hin, deren
Nichtbefolgung zu Verletzungen führen könnte.
Dieses Symbol weist auf Anweisungen hin, deren
daß aufmerksam durchgelesen sein mußen.
Nehmen Sie dieses Handbuch zu Hilfe, um sich mit den
Eigenschaften der Maschine vertraut zu machen und diese dann
optimal einsetzen zu können.
1.2 MATRIKELNUMMER UND CE-ZEICHEN
Achten Sie darauf, daß die Maschine mit einem Schild versehen
ist, auf dem die Matrikelnummer und das CE-Zeichen v e r m e r k t
sind, wie in der Abbildung gezeigt. Sollte dies nicht der Fall sein,
informieren Sie bitte umgehend Ihren HäPos.
Pos.1 : Filterrüttlerknopf
Pos. 2 : Batterielade - Steckdose
Pos. 3 :Schild mit Matrikelnummer CE-Zeichen
INFORMACIÓN GENERAL - KEY
Todas las indicaciones de las manecillas del reloj DERECHA o IZQUIERDA
incluidos en esta guía son siempre para ser destinado con respecto a la
dirección de la máquina de movimiento.
Este símbolo llama la atención sobre las operaciones que
pueden causar daños a la máquina ejecutada
incorrectamente.
E st e sí m bo lo ll am a l a at e nc ió n s ob re la s o pe ra c io ne s q ue
p ue de n c au sa r l es io n es a l o pe ra d or s i s e ej e cu ta
c or re ct a me nt e .
Este símbolo llama la atención sobre las operaciones que
deben ser leídos abaut con mucho cuidado.
Consulte este manual para ganar confianza con el equipo y aprender a
usarlo más eficientemente.
1.1 NÚMERO DE MATRÍCULA Y MARCADO CE
Asegúrese siempre de que la máquina está provista de una placa de
identificación que indica el número de serie y la marca CE en la posición
m o s t r a da e n l a fi g u r a . Por el contrario, av i s e a s u d i s t r i b u id o r i n m e d i a t a m en t e .
PPPooosss...... 111: Perilla agitador de filtro
PPPooosss...... 222: Toma para el cargador de batería
PPPooosss...... 333: Número de serie y la placa de marcado CE
Pag. 3
Page 5
* SCHEDA DI IDENTIFICAZIONE MACCHINA
* MACHINE REGISTRATION SHEET
* M A S C H I N E N K E N N B L A T T
* FICHA DE IDENTIFICACIÓN DE LA MÁQUINA
* Modello:
* Model:
ECOL 65 ECOL 65T ECOL 85T
* Modell:
* Modelo
* Matricola: D a t a d i c o s t r u z i o n e :
* Se ria l Nu mber: D a t e o f m a n u f a c t u r e
* Matrikelnummer: P r o d u k t i o n d a t u n
* N ú m e r o d e s é r i e: F e c h a d e c o n s t r u c c i ó n
* Batteria:
* Battery:
* Batterie:
* Ba ter ía
O 1 2 V 6 0 A O 1 2 V 8 0 A O ____________
F e c h a : _ _ _ _ _ _ _ _ _ _ _ _ _ _ _ F i r m a : _ _ _ _ _ _ _ _ _ _ _ _ _ _ _ _ _ _
Pag. 4
Page 6
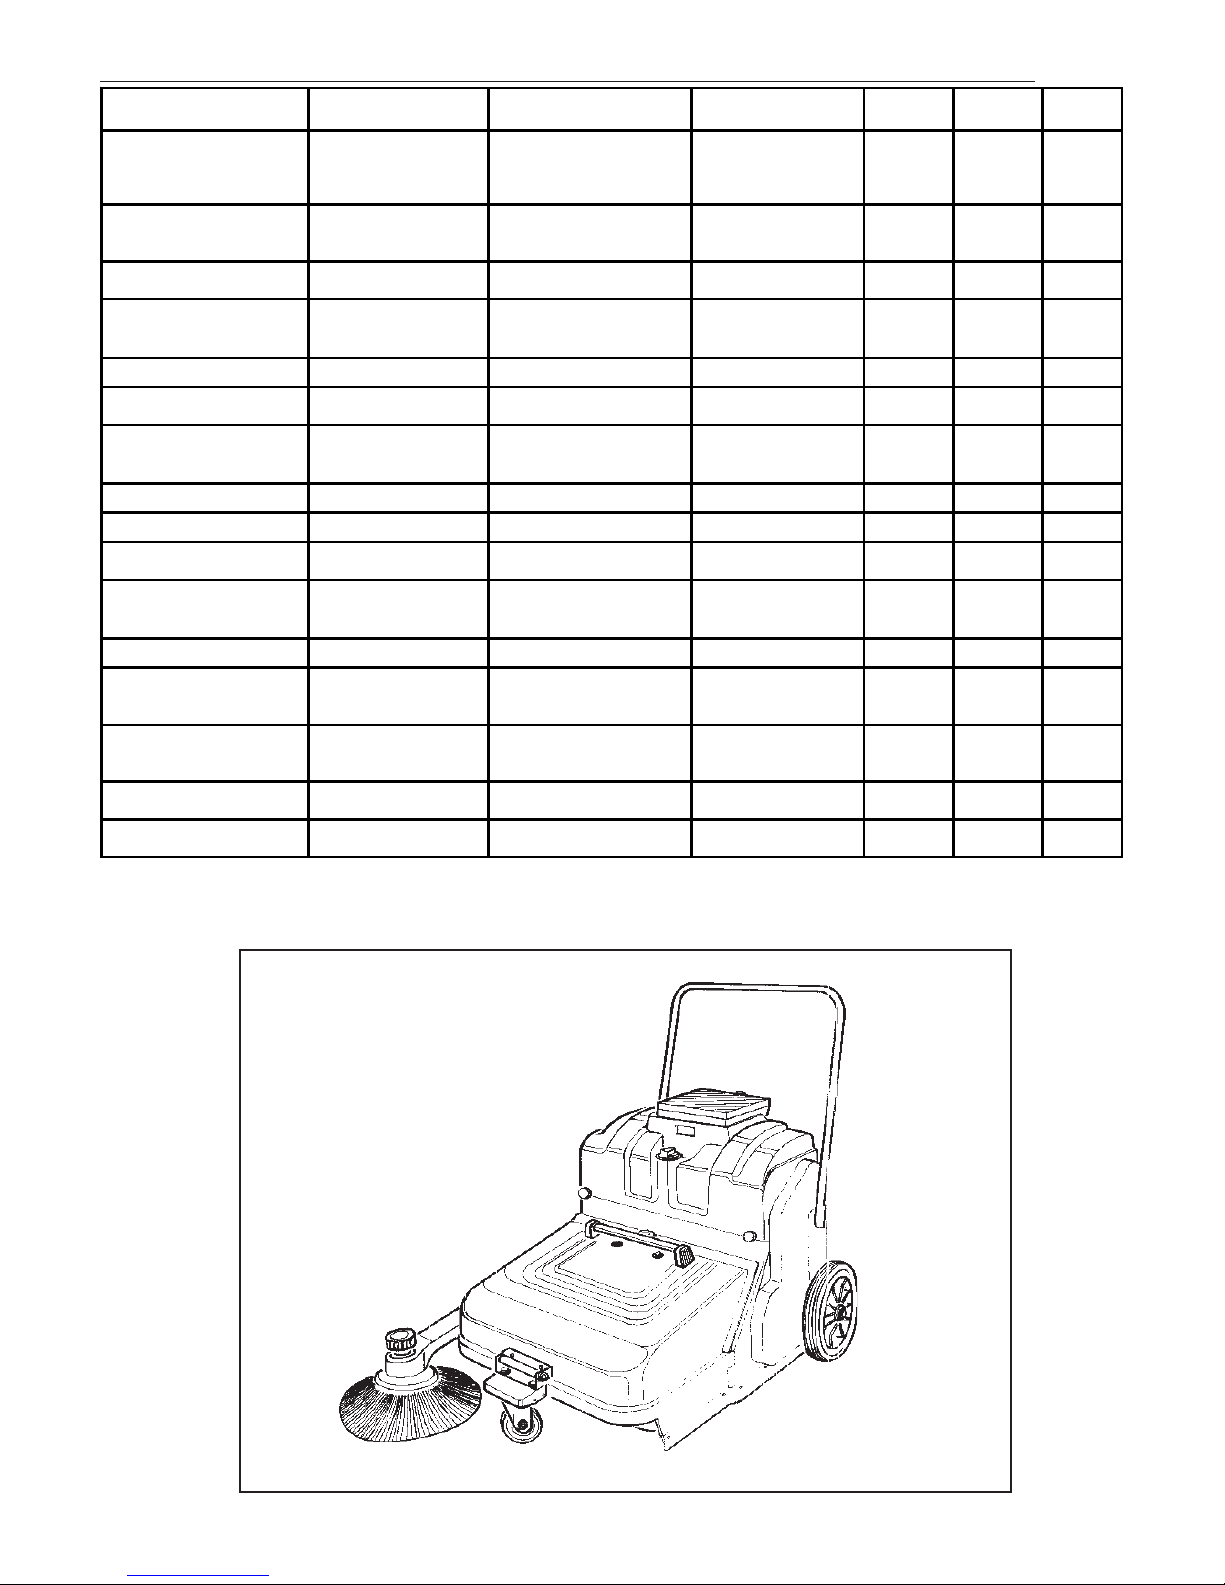
1.3 DATI TECNICI - TECHNICAL SPECIFICATIONS - TECHNISCHE DATEN - DATOS TÉCNICOS
DESCRIZIONE D E S C R I P T I O N D E S C R I P C I Ó N B E S C H R E I B U N G ECOL 65 ECOL 65T ECOL 85
L un gh ez z a ma ss i ma d ’ in go mb r o
c o n s p a z . l a t e r a l e
M a x i m u m l e n g h t w i t h t h e
s i d e b r u s h
Lo n gi tu d m áx i ma d e c ep il l o la t er al M a x i m a l e L ä n g e m i t
S e i t e n b ü r s t e
1 20 0m m 1200mm 1 20 0 mm
M a x i m a l e H ö h e m i t G r i f f
9 30 mm 930mm 9 3 0mm
P e s o Weight Pe so G e w i c h t
6 3K g 6 3K g 8 2K g
P e s o b a t t e r i a v u o t a Weight of the empty battery Pes o ba te rí a va cí a Le er b at t er i eg ew i ch t
1 0K g 1 0K g 1 3K g
A u t o n o m i a d i l a v o r o Working life Au ton omí a d e t rab aj o L ei st u ng sb e re i ch
3 h 3 h 3 h
S u p e r f i c i e f i l t r a n t e Fi ltering surface Superfí cie fi ltrante Filtrieroberfläche
1 mq 1 mq 2 m q
P r o d u t t i v i t à P r o d u c t i v i t y Pro du ctiv idad P r o d u k t i v i t ä t
2 50 0m q/ h 2 5 00 mq /h 3 20 0 mq /h
P r e s s i o n e s o n o r a L p A S o u n d P r e s s u r e L p A P re s ió n ac ú st ic a L pA S c h a l l d r u c k L p A
7 0 dB 7 0 dB 7 0 dB
P O T E N Z A S O N O R A
M I S U R A T A L W A
M E A S U R E D S O U N D
P O W E R L W A
P o t é nc ia a cú s t i c a L W A G E M E S S E N E
S C H A L L L E I S T U N G L W A
7 8 dB 7 8 dB 7 8 dB
P O T E N Z A S O N O R A
G A R A N T I T A L W A , g
G U A R A N T E E D S O U N D
P O W E R L W A , g
Po t én c ia s o no r a ga r an ti z ad a
L WA , g
G A R A N T I E R T E
S C H A L L L E I S T U N G
L WA , g
7 9 dB 7 9 dB 7 9 dB
V i b r a z i o n i m a n o H A V Ha nd v ib rat io n H AV Vi b ra c i ón m an u al H A V H and vi br ati on en HAV
0 ,9 [ m/ s ec 2] 0,9 [m/sec2] 0 , 9 [m /s e c2 ]
( i n c e r t e z z e d e l l a m i s u r a ) k (me di d a d e in c er ti d um b re ) k
(Unsicherheiten der
M e s s u n g ) k
0 ,5 [ m/ s ec 2] 0,5 [m/sec2] 0 , 5 [m /s e c2 ]
L ar gh e zz a di pu l i zi a c on
s p a z z o l a l a t e r a l e
E i n g e s t e l l t e
L ei st u ng / Au fn ah me
L ar gh e zz a ma s si ma d ’ in g omb r o
c o n s p a z . l a t e r a l e
M a x i m u m w i d h t w i t h t h e
s i d e b r u s h
Anchura máxima de cepillo lateral.
M a x i m a l e B r e i t e m i t
S e i t e n b ü r s t e
C a p a c i t à c o n t e n i t o r e r i f i u t i Ca pa ci ty of t he wa st e bi n Capa cidad del depós ito d e
des perdi cios
K a p a z i t ä t A b f a l l b e h ä l t e r
7 10 mm 710mm 9 1 0mm
A c t u a l c l e a n i n g w i d t h t h e
m a i n b r u s h
An cho de li mpi ez a del c epi ll o
ce ntr al
Re in ig un gsb re it e mit
Zentralbürste
6 70 mm 670mm 6 7 0mm
260W/22A
3 5L t 3 5L t 5 5 Lt
2 40 W /2 0A
P o t e n z a i n s t a l l a t a /
A s s o r b i m e n t o
Ins tall ed power Po te ncia in stal ada
2 40 W /2 0 A
A l t e z z a m a s s i m a d ’ i n g o m b r o c o n
m a n i c o
s i d e b r u s h
(measurement uncertainty)
k
Alt u r a m á x i m a d e c e p i l l o l a t er a lM a x i m u m h e i g h t w i t h t h e
Pag. 5
Page 7

1.4 USO DEL PRODOTTO
1.4 USING THE MACHINE
La macchina è destinata ESCLUSIVAMENTE alla pulizia di
pavimenti tramite spazzolatura ed aspirazione di superfici
asciutte. Ogni suo altro utilizzo può arrecare danni a cose o a
persone e quindi è da ritenersi ASSOLUTAMENTE
VIETATO. IMPORTANTE: Il costruttore non può essere
considerato re-sponsabile di danni provocati dalla macchina
qualora questa venga usata in maniera non conforme alla
Destinazione d’uso.La macchina NON deve subire nessun tipo
di manomissione, in caso contrario il costruttore declina ogni
responsabilità sul funzionamento corretto o su eventuali danni
provocati a cose o a persone dalla macchina stessa.
SI RACCOMANDA DI TENERE LA MACCHINA
FUORI DALLA PORTATA DEI BAMBINI
La macchina deve essere utilizzata solamente da personale autorizzato
ed addestrato all’uso.A tale proposito si ricorda che è fatto assoluto divieto di:
- Trasportare persone.
- Entrare in contatto con parti in movimento della macchina.
- Togliere i carter di protezione a macchina avviata.
- Abbandonare la macchina accesa.
E’ indispensabile portare un abigliamento adeguato al tipo
di lavoro che si sta svolgendo.Se si opera in zone molto polverose
(es. cementificio,segheria,cantieri,lavorazioni marmo) è consigliabile usare:
- mascherina.
- occhiali di protezione.
- guanti.
E’ VIETATO L’UTILIZZO E LO STOCCAGGIO IN AMBIENTI
CON ATMOSFERA POTENZIALMENTE ESPLOSIVA
1.4 VERWENDUNG
The machine, composed of a brush and a suction system,is to be used
EXCLUSIVELY forcleaning dry surfaces.Any other use could
be cause of damage to people and is therefore PROHIBITED.
IMPORTANT: The manufacturer cannot be held responsible for
damage in the event that machine is used for purposes other than
those it was designed for.The machine must never be tampered with
for any reason whatsoever; in this event, the manufacturer will
accept no responsibility for improper use or damage the machine
may cause to people or things.
ALWAYS KEEP THE MACHINE OUT OF
CHILDREN’S REACH
The machine must be used only by qualified and authorised personnel.
For this purpose,never:
- Use the machine to transport people.
- Touch the moving parts of the machine.
- Remove the machine’s guards when it is running.
- Leave the machine unattended when it is running
Always wear clothing suiting the kind of work you are carrying
out. If you are working ia a particularly dusty environment ( for
instance: cement factories,sawmills, marble processing factories), it is raccomanded to wear:
- a mask.
- protective goggles.
- gloves.
USE AND STORAGE IN ENVIRONMENTS WHERE THERE IS A
RISK OF EXPLOSION IS PROHIBITED.
1.4 USO DE LA MÁQUINA
Die Maschine ist AUSSCHLIESSLICH zur Reinigung von
trockenen Flächen durch Kehren und Absaugen bestimmt. Jeder
ander Verwendungszweck kann Personen-oder Sachschäden
verursachen und ist deshalb UNTERSAGT.
WICHTIG Für Schäden,die auf unsachgemäße Behandlung
zurückzuführen sind, übernimmt der Hersteller keine Haftung. Die
Maschine darf keine Art der Verfälschüng erleiden, andernfalls
weist der Hersteller jede Veranwortlichkeit für einen
Ordnungsgemäßen Betrieb oder für eventuelle Schäden,die von
der Maschine selbst verursacht wurden,von sich.
DIE MASCHINE SOLLTE AUSSERHALB DER REICHWEITE VON KINDERN AUFBEWAHRT WERDEN.
WICHTIG: Die Maschine darf ausschließlich von autorisiertem
Fachpersonal bedient werden.In diesem Zusammenhang möchten
wir darauf hinweisen, daß es untersagt ist:In diesem Zusammenhang
möchten wir darauf hinweisen,daß es UNTERSAGT IST:
- Personen zu transportieren;
- in Kontakt mit sich bewegenden Maschinenteil zu treten.
- das Schutzgehäuse bei laufender Maschine zu entfernen.
Es ist wichtig, bei der Arbeit angemessene Kleidung zu tragen.
Wird in besonders staubiger Umgebung gearbeitet
(z.B.Zementwerk,Sägewerk, Baustellen Marmorverarbeitung usw)
sollten besondere Schutzvorrichtungen angalegt werden, wie:
- maske
- schutzbrille
- handschuhe
DIE VERWENDUNG UND LAGERUNG IN POTENTIELL
EXPLOSIVEN UMGEBUNGEN IST UNTERSAGT
El equipo, compuesto por un cepillo y un sistema de aspiración, es para
uso eeexxxcccllluuusssiii vvvooo para limpiar superfícies secas.Cualquier otro uso podría ser
causa de daños a las personas y por lo tanto está ppprrrooohhhiii bbbiii ddd ooo .
IIIMMMPPPOOORRRTTTAAANNNTTTEEE : El fabricante no se hace responsable de los daños en el caso
de que la máquina se utiliza para fines distintos a los que se diseñó la
máquina Nunca debe ser usada para cualquier motivo, en este caso, el
fabricante no aceptará ninguna responsabilidad por uso indebido o daños
de la máquina pueden causar a las personas o cosas.
SIEMPRE MANTENGA LA MÁQUINA FUERA DEL
ALCANCE DE LOS NIÑOS
La máquina debe ser utilizada sólo por personal cualificado y autorizado. Para este
propósito, nunca:
- Use la máquina para el transporte de personas.
- Toque las partes móviles de la máquina.
- Retire las guardas de la máquina cuando está en funcionamiento.
- No deje la máquina desatendida cuando está funcionando
Siempre use ropa acorde con el tipo de trabajo que están llevando a cabo. Si está
trabajando en un entorno especialmente polvoriento (por ejemplo: fábricas de
cemento, aserraderos, fábricas de procesamiento de mármol), se recomienda
llevar:
--- UUUnnnaaa mmmááássscccaaarrraaa...
--- GGGaaafffaaasss dddeee ppprrrooottteeecccccciiióóónnn.. .
--- GGGuuuaaannnttteeesss...
UUUSSSOOO YYY AAALLLMMMAAACCCEEENNNAAAMMMIIIEEENNNTTTOOO EEENNN EEENNNTTTOOORRRNNNOOOSSS DDDOOONNNDDDEEE HHHAAAYYY UUUNNN RRR II I EEE SSSGGGOOO
DDDEEE EEEXXXPPPLLLOOOSSSIII ÓÓÓNNN eee ss s t t t ááá ppprrrooohhhiii bbbiii dd d ooo ...
P a g . 6
Page 8
2 .1 DISIMBALLO
2.1 UNPACKING THE MACHINE
1- Sballare la macchina con molta cura evitando manovre
che potrebbero danneggiarla,una volta sballata controllare
l’integrità di tutte le sue parti.
2- Per motivi di imballo e trasporto, alcuni particolari e
optionals,sono forniti sciolti,per il corretto montaggio seguire le
istruzioni riportate nei rispettivi paragrafi.
3- Contenuto dell’imballo
N° 1 Macchina
N° 1 Manico
N° 1 Spazzola laterale
N° 1 Scuotifiltro
N° 1 Coperchio filtro
N° 1 Libretto istruzoni / parti di ricambio
Assicurarsi che il materiale d'imballo ( sacchetti, cartoni, pallet,
ganci,ecc..) sia riposto in una zona adeguata e AL DI FUORI
DALLA PORTATA DEI BAMBINI
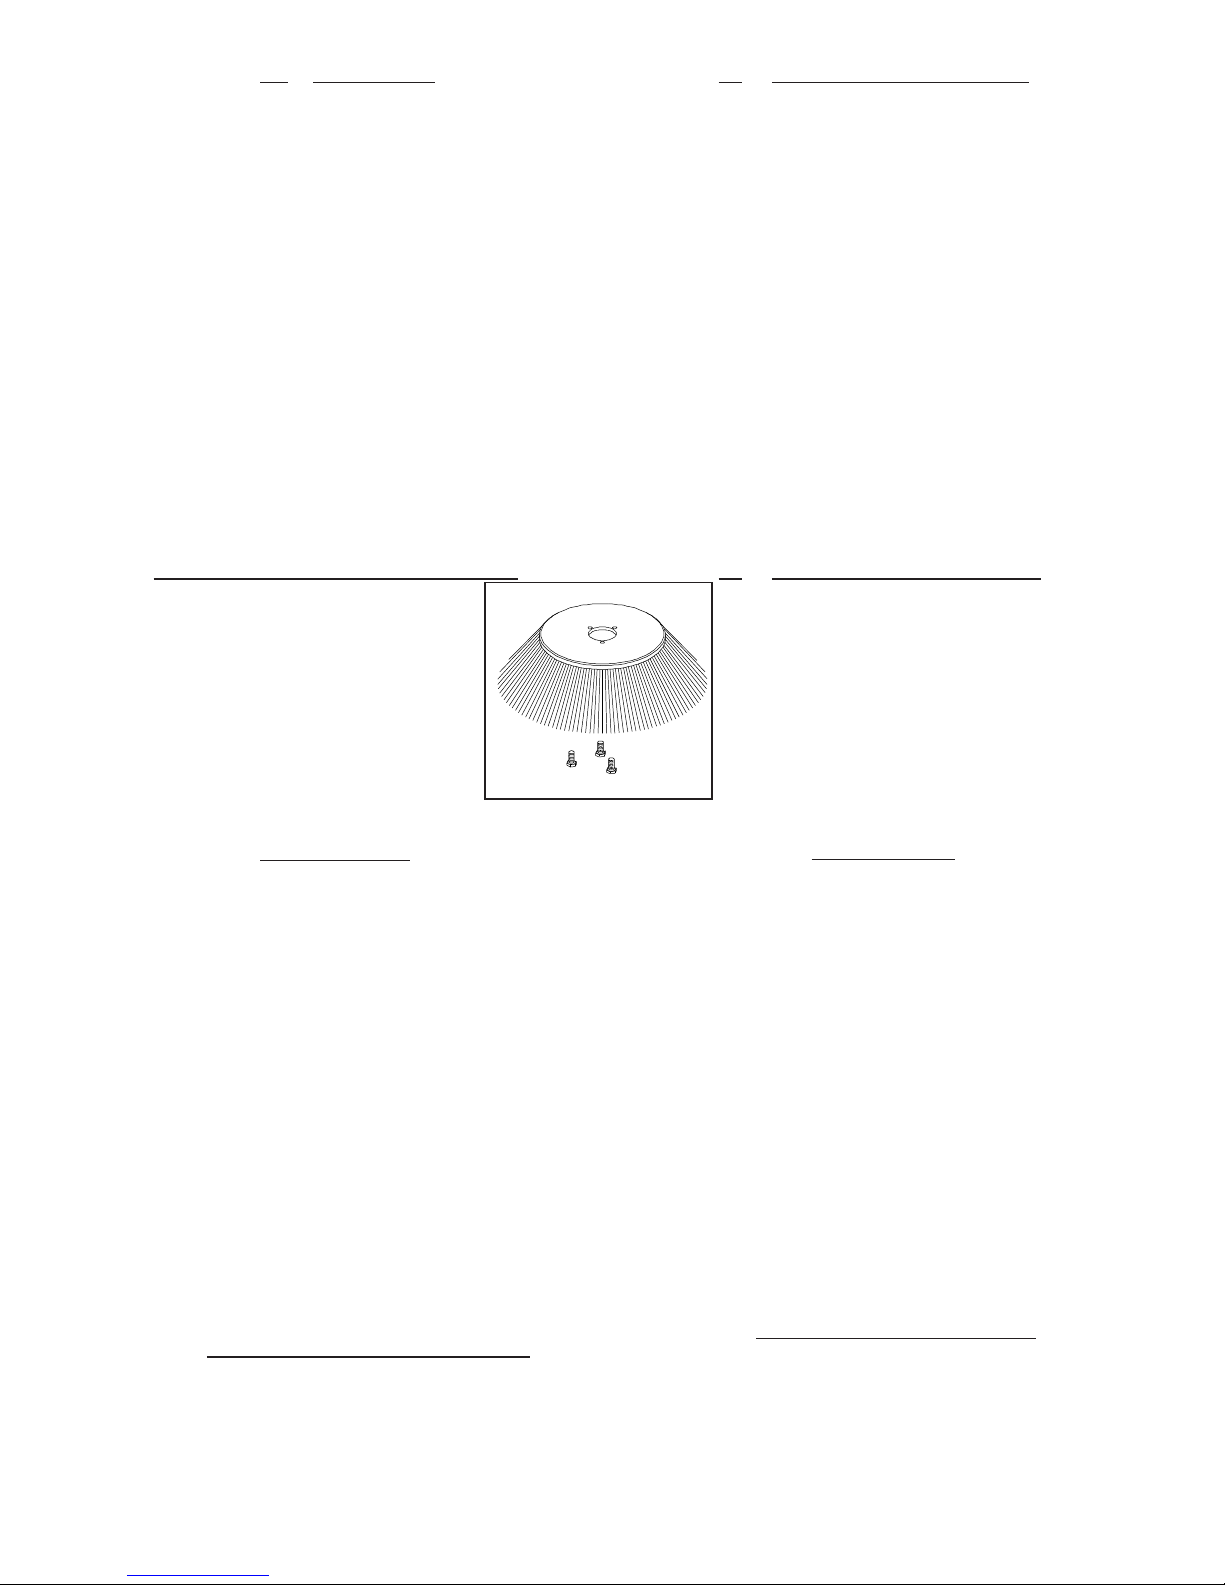
2.2 MONTAGGIO SPAZZOLA LATERALE
Per montare la spazzola laterale nella sua corretta
posizione operare come segue:
1- Alzare il braccio laterale in posizione verticale.
2- Svitare le viti dalla flangia portaspazzola.
3- Posizionare la spazzola sulla flangia.
4- Riavvitare le viti di bloccaggio
.
1- Unpack the machine with the utmost care,avoid carrying out any
operation that could damage it. Once it has been unpacked,check
whether it is damaged.
2- For packaging and transport purposes,some parts and accessories
are supplied disconnected from the machine.To assemble
them,carefully follow the instructions given in the relevant sections
3- Contents of the package:
N° 1 Machine
N° 1 Handlebar
N° 1 Side brush
N° 1 Filter shaker
N° 1 Filter cover
N° 1 Instuction and spare parts manual
Take care to keep the packaging materials (bags,cartons,pallets.hoohs
ect) OUT OF THE REACH OF CHILDREN
2.2 MOUNTING THE SIDE BRUSH
To mount the side brush in the right position:
1- Raise the side arm until it is vertical.
2- Remove the screws from the brush fixing flange.
3- Fit the brush to the flange.
4- Screw the fixing screws back on again.
2.1 AUSPACKEN
1- Packen Sie die Maschine vorsichtig aus, und vermeiden
Sie Bewegungen, die sie beschädigen könnten; kontrollieren
Sie, ob alle Einzelteile vollständig vorhanden sind.
2 - Aus verpackungs- und transporttechnischen Gründen werden
einige Einzel- und Zusatzteile lose mitgeliefert; für die korrekte
Montage beachten Sie bitte die in den entsprechenden Abschnitten
angeführten Anweisungen.
3 - Verpackungsinhalt:
N°1 Maschine
N°1 Griff
N°1 Seitenbürste
N°1 Filterrüttler
N°1 Filerdeckel
N°1 Handbuch / Ersatzteile
Achten Sie darauf, daß das Verpackungsmaterial (Tüten, Kartons,
Paletten, Haken, usw—) an einem geeigneten Ort aufbewahrt ist,
der sich AUSSERHALB DER REICHWEITE
ON KINDERN BEFINDET.
2.2 MONTAGE DER SEITENBÜRSTE
Für eine korrekte Montage der Seitenbürste folgendermaßen
vorgehen:
1 - Den Seitenarm nach oben schieben, bis er senkrecht steht.
2 - Die Schrauben vom Bürstenhalterflansch abschrauben.
3 - Die Bürste auf den Flansch setzen.
4 - Die Befestigungsschrauben festziehen.
2.1 DESEMBALAJE
1 - Desembale el equipo con el mayor cuidado, evitar la realización de
cualquier operación que pueda dañarlo. Una vez desembalado, compruebe
si está dañado.
2 - A los efectos de embalaje y transporte, algunas partes y accesorios se
suministran desconectadas de la máquina.Para ensamblarlos, siga
cuidadosamente las instrucciones dadas en las secciones correspondientes
3 - Contenido del paquete
N ° 1 máquina
N ° 1 manillar
N ° 1 cepillo lateral
N ° 1 del sacudidor del filtro
N ° 1 cubierta del filtro
N ° 1 instrucciones y manual de piezas de repuesto`
Tenga cuidado de mantener el material de embalaje (bolsas, cajas,
pallets.hoohs ect), FFFUUUEEERRRAAA DDDEEELLL AAALLLCCCAAANNNCCCEEE DDDEEE LLLOOOSSS NNNIIIÑÑÑOOOSSS
2.2 MONTAJE DEL CEPILLO LATERAL
Para montar el cepillo lateral en la posición correcta:
1 - Levante el brazo de lado hasta que esté en posición vertical.
2 - Quitar la brida de los tornillos de fijación del cepillo.
3 - Coloque el cepillo de la pestaña.
4 - Atornillar los tornillos de fijación de nuevo.
P a g . 7
Page 9
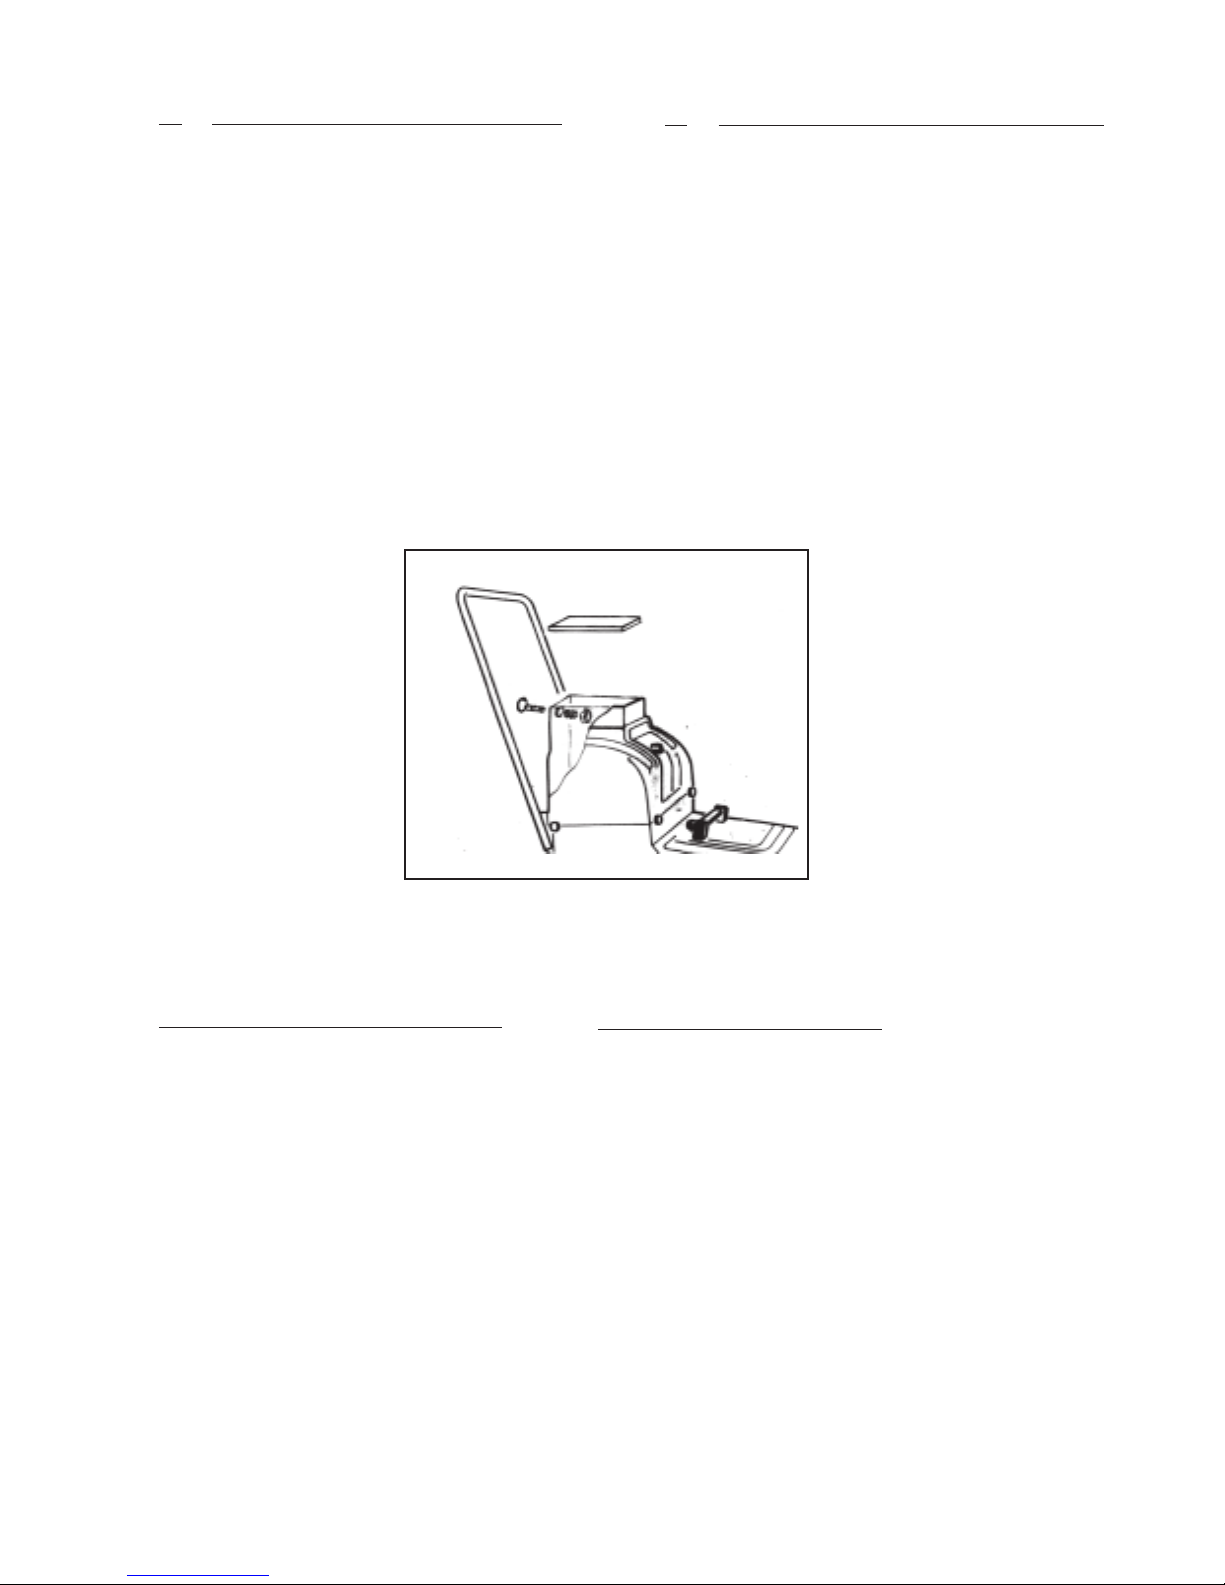
2.3 MONTAGGIO ED USO SCUOTIFILTRO
2.3 MOUNTING AND USE OF THE FILTER SHAKER
Per montare lo scuotifiltro procedere come segue:
1- Infilare l’asta scuotifiltro completa di pomello nella guida
scuotifitro situata sulla parte posteriore dalla scatola filtro.
2- Infilare la molla sull’asta scuotifiltro.
3- Avvitare e stringere la mazza dello scuotifiltro sull’asta.
Per pulire il filtro procedere come segue:
Tirare e lasciare andare la leva in modo che la mazza dello
scuotifiltro batta contro il filtro staccando la polvere. Ripetere
l’operazione 5 o 6 volte.
To mount the filter shaker
1- Fit the filter shaker rod complete with knob in the filter shaker
guide located behindthe filter box.
2- Fit the spring onto the filter shaker rod.
3- Screw the maul to the filter shaker rod.
The filter is cleaned as follows:
Pull and release the lever of the appropriate filter shaker The lever
operates a rod that will unclog the filter. Repeat this operation 5 or 6
times.
2.3 MONTAGE DES FILTERRÜTTLERS
Für die Montage des Filterrüttlers folgendermaßen vorgehen:
1 - Den Stab des Filterrüttlers komplett mit Knauf in die
Rüttlerführung einsetzen, die sich auf dem hinteren Teil der
Filterkastens befindet.
2 - Die Feder auf die Stab des Filterrüttlers setzen.
3 - Den Schlegel des Filterrüttlers auf dem Stab anschrauben
und festziehen.
Gehen sie wie folgt vor um den filter zu reiningen
Den hebel ziehen und laßen so daß den hammer kan gegen
den filter schlagen de aktion 5 o d e r 6 malen wiederholen
2.3 MONTAJE Y USO DEL FILTRO SHAKER
Para montar el filtro Shaker:
1 - Colocar la varilla del agitador de filtro completa con la perilla en el
sacudidor del filtro y guiar a la caja del filtro situada en la parte trasera.
2 - Coloque el resorte en la barra de agitador de filtro.
3 - Atornillar con el mazo, el filtro Shaker.
EEElll fffiiillltttrrrooo ssseee llliiimmmpppiiiaaa dddeee lllaaa sssiiiggguuuiiieeennnttteee mmmaaannneeerrraaa:::
Tire y suelte de la palanca del agitador de filtro apropiado. La palanca
opera una varilla que destapa el filtro. Repita esta operación 5 ó 6 veces.
Pag. 8
Page 10
2.4 PREPARAZIONE DELLA MACCHINA
2.4 PREPARING THE MACHINE FOR OPERATION
SI RICORDA CHE LA MACCHINA DEVE ESSERE TENUTA AL DI FUORI DALLA PORTATA DEI BAMBINI.
Per la carica della batteria procedere come segue:
2.4.1 Prima carica
- Togliere i tappi dei vari elementi della batteria
- Riempire la batteria con liquido elettrolitico.
Si consiglia di eseguire tale operazione prima di
posizionare la batteria sulla macchina per evitare
di danneggiarla con il liquido stesso.Effettuare questa operazione
in un ambiente sufficientemente areato,non fumare.- Posizionare
ora la batteria nell’apposito alloggiamento ed effettuare i collegamenti
facendo molta attenzione di rispettare la polarità.
- Collegare il caricabatteria all’apposita presa posta sul retro della
macchina e mantenere lo stato di carica per almeno 2 ore.
- A fine carica richiudere i tappi degli elementi della batteria.
2.4.2 Ricarica batteria
A macchina spenta operare come segue:
- Togliere i tappi dei vari elementi della batteria
- Ripristinare,se necessario,il livello del liquido della batteria con
acqua distillata
- Collegare il caricabatteria.
ATTENZIONE: Eseguire queste operazioni seguendo le NOTE
del punto 2.4.1
KEEP THE MACHINE OUT OF THE REACH OF CHILDREN
To charge the battery,proceed as described below.
2.4.1 First charge
- Remove the caps of the battery cells.
-Fill the battery with electrolytic liquid.
-It is advisable to carry out this operation before the
battery is mounted on themachine from being damaged
by the electrolytic liquid of the battery.
This operation should be done in a sufficiently ventilated environment.
Do not smoke. Now put the battery in its housing and connect it
appropriately,making sure torespect the polarity.
Connect the battery charger to the socked located on the rear part of
the machine and charge for at least 2 hours.After charging, put the caps
back on the battery cells.
2.4.2 Recharging
With the machine turned off:
- Remove the caps of the battery cells.
- Top up the battery with distilled water.
-Connect the battery charger
ATTENTION: Carry this operation out following the NOTE
instructions of paragraph 2.4.1
2.4 ZURICHTUNG DER MASCHINE
DIE MASCHINE AUSSERHALB DER REICHWEITE VON
KINDERN AUFBEWAHREN.
Für die Aufladung der Batterie folgendermaßen vorgehen:
2.4.1 Erste Aufladung
- Die Stopfen der einzelnen Batteriezellen abnehmen.
- Die Batterie mit elektrolytischer Flüssigkeit
auffüllen.
Es ist ratsam, die Batterie vor dem Einsetzen in
die
Maschine aufzuladen, damit diese nicht durch die Flüssigkeit
beschädigt werden kann. Führen Sie diesen Vorgang in einer
ausreichend belüfteten Umgebung durch und rauchen Sie nicht.
- Jetzt kann die Batterie positioniert und die Anschlüsse
vorgenommen werden, wobei sorgsam auf die Einhaltung der
Polung geachtet werden muß.
- Das Ladegerät an die dafür vorgesehene Steckdose anschließen,
die sich auf der Maschinenrückseite befindet und für mindestens 2
Stunden den Ladestatus aufrechterhalten.
- Nach beendeter Ladung die Stopfen der Batteriezellen
wieder schließen.
2.4.2 Aufladen der Batterie
Bei abgeschalteter Maschine wie folgt vorgehen:
- Die Stopfen der einzelnen Batteriezellen abnehmen.
- Wenn nötig den Flüssigkeitsstand der Batterie mit destilliertem
Wasser auffüllen.- Das Ladegerät anschließen.
2.4 PREPARACIÓN DE LA MÁQUINA PARA EL USO
MANTENGA LA MÁQUINA FUERA DEL ALCANCE DE LOS NIÑOS
Para cargar la batería, proceda como se describe a continuación:
2.4.1 Primera carga
- Sacar los tapones de las celdas de la batería.
-Llene la batería con líquido electrolítico.
-Es aconsejable llevar a cabo esta operación antes de que
la batería está montada en la máquina para evitar dañarla por el líquido
electrolítico de la batería.
Esta operación debe realizarse en un entorno suficientemente ventilado.
No fume. Ahora ponga la batería en su alojamiento y conéctela
adecuadamente, teniendo en cuenta la polaridad.
Conecte el cargador en la entrada situada en la parte trasera de la
máquina y cárguela durante al menos 2 horas. Después, ponga las tapas
de nuevo en las celdas de la batería.
2.4.2 Recarga de batería
Con la máquina apagada:
- Sacar los tapones de las celdas de la batería.
- Recarga la batería con agua destilada.
- Conecte el cargador de la batería
AAATTTEEENNNCCCIIIÓÓÓNNN::: LLLlll eee vv v aaa rrr aaa cc c aaa bbbooo eeessstttaaa ooopppeeerrraaaccciiióóónnn dddeeessspppuuuééésss dddeee lllaaa NNNOOOTTTAAA
iii nnn sss ttt rrr uuu cc c ccc iii ooo nnn eee ss s ddd eee lll aaa pppaaarrrtttaaadddooo 222... 444... 111
ACHTUNG: Für die Ausführung dieser Arbeiten befolgen Sie die
unter Punkt 2.4.1
P a g . 9
Page 11
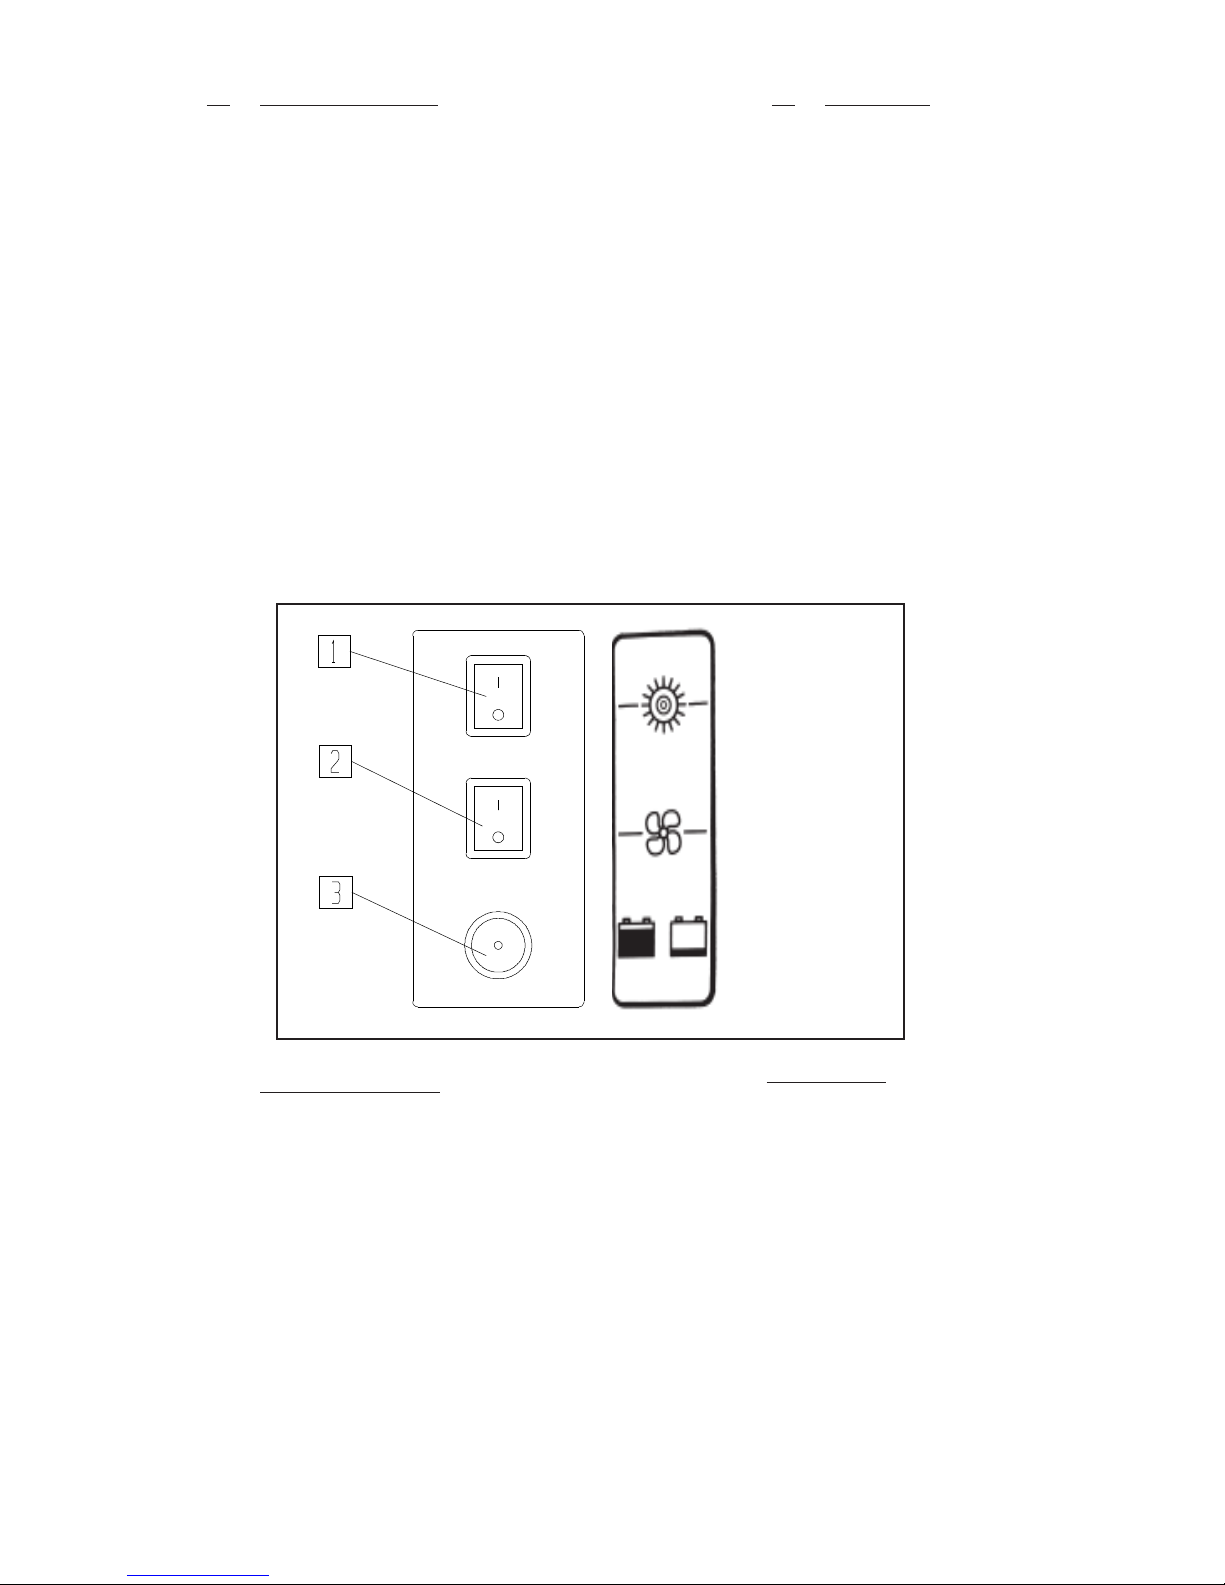
3 . 1 GRUPPO COMANDI
3 . 1 CONTROLS
1 : I n t e r u t t o r e s p a z z o l a c e n t r a l e
C o n q u e s t o i n t e r r u t t o r e s i c o m a n d a l ’ a c c e n s i o n e e l o s p e g n i m e n t o
d e l l a s p a z z o l a c e n t r a l e .
2 : I n t e r r u t t o r e v e n t o l a d ’ a s p i r az i o n e
C o n q u e s t o i n t e r r u t t o r e s i c o m a n d a l ’ a c c e n s i o n e e l o s p e g n i m e n t o
d e l l a v e n t o l a p e r a s p i r a z i o n e .
3 : S p i a s e g n a l a t o r e s t a t o d i c a r i c a b a t t e r i a .
S p i a V E R D E b a t t e r i a c a r i c a
S p i a R O S S O L A M P E G G I A N T E b a t t e r i a q u a s i e s a u r i t a p r o c e d er e al la ri c ar i ca il pr im a po ss i bi le .
S p i a R O S S O b a t t e r i a e s a u r i t a , N O N l a v o r a r e a q u e s t o l i v e l l o p e r
n o n d a n n e g g i a r e l a b a t t e r i a .
1 : M a i n b r us h s w i t c h
T hi s sw i tc h t u rn s th e c en t re b ru s h O N a n d O F F
2 : S u c t i o n f a n s w i t c h
Thi s switch tu rns the suct ion fan O N and OFF
3: Charge indicator light
G R E E N i n d i c a t o r l i g h t : b a t t e r y c h a r g e d
R E D F L A S H I N G i n d i c a t o r l i g h t : t h e b a t t e r y i s r u n n i n g o u t , r e c h a r g e
a s s o o n a s p o s s i b l e .
RED indicator light: the battery has run out. Do not use the
m a c h i n e , y o u c o u l d r i s k d a m a g i n g t h e b a t t e r y .
3.1 STEUERGRUPPE
1: Schalter Mittelbürste
Mit diesem Schalterder wird die Mittelbürsteein oder ausgeschaltet.
2: Schalter Absaugflügelrad
Mit diesem Schalter wird das Flügelrad zur Absaugungein oder
ausgeschaltet.
3: Kontrolleuchte Batterieladezustand
GRÜNE Kontrolleuchte: Batterie aufgeladen.
ROT BLINKENDE Kontrolleuchte: Batterie beinahe leer, sobald
wie möglich aufladen.
ROT EKontrolleuchte: Batterie erschöpft; um die Batterie nicht zu
beschädigen, darf bei diesem Stand NICHT gearbeitet werden.
3.1 CONTROLES
111::: EEElll iiinnnttteeerrrrrruuuppptttooorrr dddeeelll ccceeepppiiillllllooo ppprrriiinnnccciiipppaaalll
Este interruptor enciende el cepillo central de encendido y apagado
222::: iiinnnttteeerrrrrruuuppptttooorrr dddeeelll vvveeennntttiiilllaaadddooorrr dddeee aaassspppiiirrraaaccciiióóónnn
Este interruptor enciende el ventilador de aspiración ON y OFF
333::: LLLaaa llluuuzzz dddeee iiinnndddiiicccaaadddooorrr dddeee cccaaarrrgggaaa
IIInnndddiiicccaaadddooorrr VVVEEERRRDDDEEE: la batería esta cargada
IIInnndddiiicccaaadddooorrr RRROOOJJJOOO IIINNNTTTEEERRRMMMIIITTTEEENNNTTTEEE: la batería se está agotando, recárguela
tan pronto como sea posible.
IIInnndddiiicccaaadddooorrr RRROOOJJJOOO: la batería se ha agotado. No utilice la máquina, se
puede correr el riesgo de dañar la batería.
Pag. 10
Page 12

3.2 AVVIAMENTO
3.2 STARTING
Dopo aver controllato la corretta carica della batteria procedere come segue:
1- Azionare l’interruttore 1 per accendere la spazzola centrale.
2- Azionare ,se necessario,l’interruttore 2 per l’accensione della
ventola di aspirazione.
3- Abbassando il braccio laterale,la spazzola laterale inizia a
girare portando lo sporco verso la spazzola centrale.
4- Spingendo il manico in avanti (*) la macchina inizia a lavorare.
(*) - Le versioni ECOL 65T ed ECOL 85T sono provviste di
trazione a cinghia che viene comandata direttamente dallo spostamento in avanti del manico durante la fase di lavoro.
La versione ECOL65 non è trazionata l’avanzamento è dato
manualmente dall’operatore.
ATTENZIONE: Non utilizzare la macchina per raccogliere
cavi e reggette, fili di ferro ed altro materiale simile.
E’ vietato usare la macchina in prossimità di cavi elettrici o cavi
di altro genere.
Terminata l’operazione di spazzatura è consigliabile,a macchina
spenta,scuotere i filtri tirando e lasciando il pomello posto sul retro
della macchina. Ripetere questa operazione per 4 o 5 volte.
After checking if the battery is charged,carry out the following
operations
1- Turn on switch 1 to start the main brush.
2- If necessary,turn on switch 2 to start the suction fan.
3- By lowering the side arm,the side brush will start spinning
to direct the dirt towardsthe main brush.
4- By pushing the handle forwards (*) the machine will start moving.
(*) - The ECOL 65T and ECOL 85T version are provided with a belt
drive system which is activated when the handlebar is pushed forwards
during operation.
The ECOL65 version is not power driven. The machine is moved
forward manually by the operator.
ATTENTION: Do not use the machine to sweep up cables, straps,wire
or similar material.
Do not use the machine near cables,wire or similar material
After you have finished your work, it is advisable to operate the filter
shaker by pulling and releasing the knob at the back of the
machine.Repete this operation 4 or 5 times.
NON ABBANDONARE MAI LA MACCHINA ACCESA
3.2 ANLASSEN
Nachdem die korrekte Batterieladung überprüft wurde,
wie folgt vorgehen:
1 - Den Schalter 1 betätigen, um die Mittelbürste einzuschalten.
2 - Wenn nötig den Schalter 2 zum Einschalten des Absaugflügelrads
betätigen.
3 - Durch Absenken des Seitenarms beginnt die Seitenbürste sich
zu drehen, wobei sie den Schmutz zur Mittelbürste trägt.
4 - Den Griff nach vorne drücken (*), und die Maschine beginnt zu
laufen.
(*) Die Versionen ECOL 65T und ECOL 85T sind mit
Riemenantrieb ausgestattet, der während der Arbeitsphase direkt
durch Vorschieben des Griffs gesteuert wird. Die Version ECOL65
ist nicht angetrieben; der Vorwärtsschub erfolgt manuell durch
den Bediener.
ACHTUNG: Benutzen sie die maschine nicht, um kabel, bandeisen
eisendrähte oder ähnliches material aufzukehren.
es ist untersagt, die maschine in der nähe von kabeln, drähten oder
ähnlichemzu verwenden.
Nach Beendigung der Kehrarbeiten sollten die Filter - bei
abgeschalteter Maschine - gerüttelt werden, indem der Knauf auf
der Rückseite der Maschine angezogen und wieder losgelassen
wird. 4 - 5 mal wiederholen
DO NOT LEAVE THE MACHINE UNATTENDED WHEN IT IS
RUNNING.
3.2 PUESTA EN MARCHA
DDDeeessspppuuuééésss dddeee cccooommmppprrrooobbbaaarrr sssiii lllaaa bbbaaattteeerrríííaaa eeessstttááá cccaaarrrgggaaadddaaa,,, lllllleeevvvaaarrr aaa cccaaabbbooo lllaaasss
sssiiiggguuuiiieeennnttteeesss ooopppeeerrraaaccciiiooonnneeesss
111 - Encienda el interruptor 1 para iniciar el cepillo principal.
222 - Si es necesario, encienda el interruptor 2 para iniciar el ventilador de
succión.
333 - Al bajar el brazo lateral, el cepillo lateral comenzará a girar para dirigir
el polvo a través del cepillo principal.
444 - Al empujar la palanca hacia delante (*), la máquina comenzará a
moverse.
(*) - Las versiones EEECCCOOOLLL 666555TTT y EEECCCOOOLLL 888555TTT se proveen con un sistema de
transmisión por correa que se activa cuando la palanca se empuja hacia
delante durante la operación.
La versión EEECCCOOOLLL666555 no motorizada. La máquina se mueve hacia delante
manualmente por el operador.
AAATTTEEENNNCCCIII ÓÓÓNNN: No utilice la máquina para barrer correas, cables o material
similar.
No utilice la máquina cerca de cables, alambre o material similar
Después de que haya terminado su trabajo, es recomendable hacer
funcionar el filtro shaker tirando y soltando la perilla en la parte posterior
de la máquina.Repita esta operación 4 o 5 veces.
NO DEJE LA MÁQUINA DESANTENDIDA SI LA ESTA UTILIZANDO...
ENTFERNEN SIE SICH NIE VON DER LAUFENDEN
MASCHINE
P a g . 1 1
Page 13
4.1 MANUTENZIONE ORDINARIA
4.1 ROUTINE MAINTENANCE
A T T E N Z I O N E: TUTTE LE OPERAZIONI
DI MANUTENZIONE ORDINARIA O DI MA
NUTENZIONE STRAORDINARIA,DEVONO
ESSERE EFFETTUATE DA PERSONALE COMPETENTE
OPPURE DAL CENTRO DI ASSISTENZA TECNICO
AUTORIZZATO.TUTTE LE OPERAZIONI DI MANUTEN-
SONNEL OR BY AUTHORISED SERVICE
CENTRE.ALL MAINTENANCE OPERATIONS MAST BE
CARRIED OUT WITH THE MACHINE OFF
ZIONE DEVONO ESSERE ESEGUITE A MACCHINA
SPENTA.
4 . 2 M A N U T E N Z I O N E B A T T E R I A
La batteria deve sempre essere tenuta pulita
asciutta,controllare che i morsetti ed i poli siano
tenuti costantemente puliti. Ogni 10 ore togliere i
tappi e controllare il livello dell’elettrolito rabboccando con acqua
distillata se necessario.Si ricorda che dove viene effettuata tale
operazione deve essere ben ereato.Non avvicinarsi con fiamme
libere,non fumare durante questa operazione.La batteria ha
un’autonomia di circa 3 ore.Nel caso l’autonomia risultasse
sensibilmente inferiore controllare che:
* le spazzole siano libere.
* prima di iniziare a lavorare la batteria sia completamente
carica.La durata della batteria,dipenderà dalla manutenzione
periodica,dal controllo del livello e della densità dell’elettrolito e
dal valore di scarica raggiunto. Non scaricare la batteria oltre il
limite segnalato dalle spie presenti sul cruscotto.
Tenere pieno di grasso il contenitore posto sul riduttore Par 5.2.
Ogni 20 ore di lavoro bisogna ingrassare l'ingranaggio del
riduttore di trazione ruotando in senso orario di 2 o 3 g i r i l ' i n g r a s -
up withdistilled water. The battery should be serviced in a prop-
erly ventilated area.During this operation,do not expose the
battery to naked flames and do not smoke.The battery has a 3
hour working life,if you notice that it is much shorter,check
that:
* The brushes are not obstructed
* the battery is completely charged.
The life of the battery depends on its rountine maintenance,the
checks carried out on the level and density of the electrolyte and
on its discharge level. Do not allow the battery charge to drop be-
low the limit signalled by the indicator lights on the dashboard.
To keep the container set on the reductor gear full with grease
Par.5.2. Every 20 hours you must be grease the traction's re-
ductor gear by turning clockwise 2 o 3 times the hangle placed on
the side of the reductor.
satore posto sul lato del riduttore
ATTENZIONE: NON LAVARE LA MACCHINA UTILIZZANDO UN GETTO D’ACQUA
WARNING: DO NOT USE A JET OF WATER IN ORDER
TO WASH THE MACHINE.
IM PO R TA NT : AL L RO UT I NE MA I NT EN A NC E
AND SPECIAL MAINTENANCE MAST BE
CARRIED OUT BY COMPETENT PER-
4.2 BATTERY MAINTENANCE
The battery must be kept clean and dry.Keep the
terminals and poles clean.Every 10 hours,remove the
caps and check the electrolyte level.If necessary top
4. 1 WARTUNG
WARTUNGSARBEITEN JEGLICHER ART
MÜSSEN VON KOMPETENTEM FACH-
PERSONAL ODEREINER GENEHMIGTENK
UND END IENSTWERKSTAT DERCHGEFÜHRT WERDEN. DIE WARTUNGSARBEITEN DÜRFEN NUR BEI
ABGESCHALTETER MASCHINE DURCHGEFÜHRT
WERDEN.
4.2. WARTUNG DER BATTERIE
Die Batterie muß stets sauber und trocken sein;
überprüfen Sie, daß die Klemmen und Pole immer
sauber sind. Alle 10 Stunden die Stopfen abnehmen,
den Elektrolytstand kontrollieren und wenn nötig mit destilliertem
Wasser auffüllen.Führen Sie diese Wartungsarbeiten in einem
ausreichend durchlüfteten Raum durch, halten Sie offenen
Flammen fern und rauchen Sie nicht.Die Batterie hat eine
Autonomie von ca. 3 Stunden, sollte sie weniger betragen,
überprüfen Sie, ob
* die Bürsten frei laufen.
* die Batterie vor Arbeitsaufnahme voll aufgeladen ist.
Die Lebensdauer der Batterie hängt von den regelmäßig
durchgeführten Wartungsarbeiten, der Kontrolle von Stand und
Dichte des Elektrolyts, sowie vom erreichten Entladewert ab.
Die Batterie darf nicht soweit entladen werden, daß der von den
Kontrolleuchten auf dem Armaturenbrett angezeigte Stand
unterschritten wird. Der Behalter auf dem Untersetzungsgetriebe
muß stets mit Fett gefüllt sein Par. 5.2. Alle 20 B e t r i e b s s t u n d e n
ist das Raderwerk des Antriebsgetriebes zu schmieren, wobei der
Schmiernippel an der Getriebeseite um 2 - 3 U h r z e i g e r s i n n g e d r e h t
wird.
ACHTUNG: WASCHEN SIE DIE MASCHINE MIT EINEM
WASSERSTAHL NICHT.
4.1. RUTINA DE MANTENIMIENTO
IMPORTANTE: MANTENIMIENTO Y ALLROUTINE
MAST MANTENIMIENTO ESPECIAL SER
REALIZADA POR PERSONAL COMPETENTE O POR
S E RV I C I O A UT O R I ZA DO c e n t re . A ll M A N T EN I M I EN T O O P ER A C I O NE S
MAST llevarse a cabo con la máquina
4.2 MANTENIMIENTO DE LA BATERÍA
La batería se debe mantener limpia y seca. Mantenga
terminales y postes limpios. Cada 10 horas, retire
los tapones y compruebe el nivel de electrolito. Si es
necesário añada agua destilada. LLLaaa bbbaaattteeerrríííaaa dddeeebbbeee ssseeerrr
rrreee ppp aaa rrr aaa ddd aaa eee nnn uuu nnn aaa ááá rrr eee aaa vvv eee nnn ttt iii lllaaa ddd aaa aaa ddd eee ccc uuu aaa ddd aaa mmm eee nnn ttt eee . .. MMM iii eee nnn ttt rrr aaa sss ddd uuu rrr eee eeessstttaaa oooppp eee rrr aaa ccc iii óóó nnn ,,,
nnnooo eeexxxpppooonnngggaaa lllaaa bbbaaattteeerrríííaaa aaa lllaaasss llllllaaammmaaasss yyy nnnooo aaalll hhhuuummmooo... LLLaaa bbbaaattteeerrríííaaa tttiiieeennneee uuunnnaaa vvviiidddaaa
dddeee tttrrraaabbbaaajjjooo 333 hhhooorrraaasss,,, sssiii uuusssttteeeddd nnnoootttaaa qqquuueee eeesss mmmuuuccchhhooo mmmááásss cccooorrrtttaaa,,, cccooommmppprrruuueeebbbeee:::
*** LLLooosss ccceeepppiiillllllooosss nnnooo eeessstttééénnn ooobbbssstttrrruuuiiidddooosss
*** LLLaaa bbbaaattteeerrríííaaa eeessstttááá cccooommmpppllleeetttaaammmeeennnttteee cccaaarrrgggaaadddaaa...
La vida de la batería depende de su mantenimiento, los controles efectuados
en el nivel y la densidad del electrolito y de su nivel de descarga. No
permita que la carga de la batería caiga por debajo del límite señalado por
el indicador que se ilumina en el tablero de instrumentos.
Mantener el contenedor situado en el engranaje reductor completo con
grasa Par.5.2. Cada 20 horas que debe ser grasa para engranajes reductor
de la tracción girando hacia la derecha 2 o 3 veces el mango colocado en el
lado del reductor.
ADVERTENCIA: NO UTILICE UN CHORRO DE AGUA PARA LAVAR LA
MÁQUINA.
Pag. 12
Page 14
4.3 SOSTITUZIONE e REGOLAZIONE
SPAZZOLA LATERALE
4.3 REPLACING AND ADJUSTING THE SIDE
BRUSH
Prima di effettuare qualsiasi intervento sulla
macchina,assicurarsi che la stessa sia spenta.
4.3.1 Per sostituire la spazzola laterale operare come segue:
1-Alzare il braccio laterale in posizione di non lavoro.
2-Svitare le 3 viti di fissaggio spazzola laterale al braccio.
3-Sfilare la spazzola.
4-Sostituire la spazzola con una nuova.
5-Riavvitare le viti di fissaggio spazzola laterale.
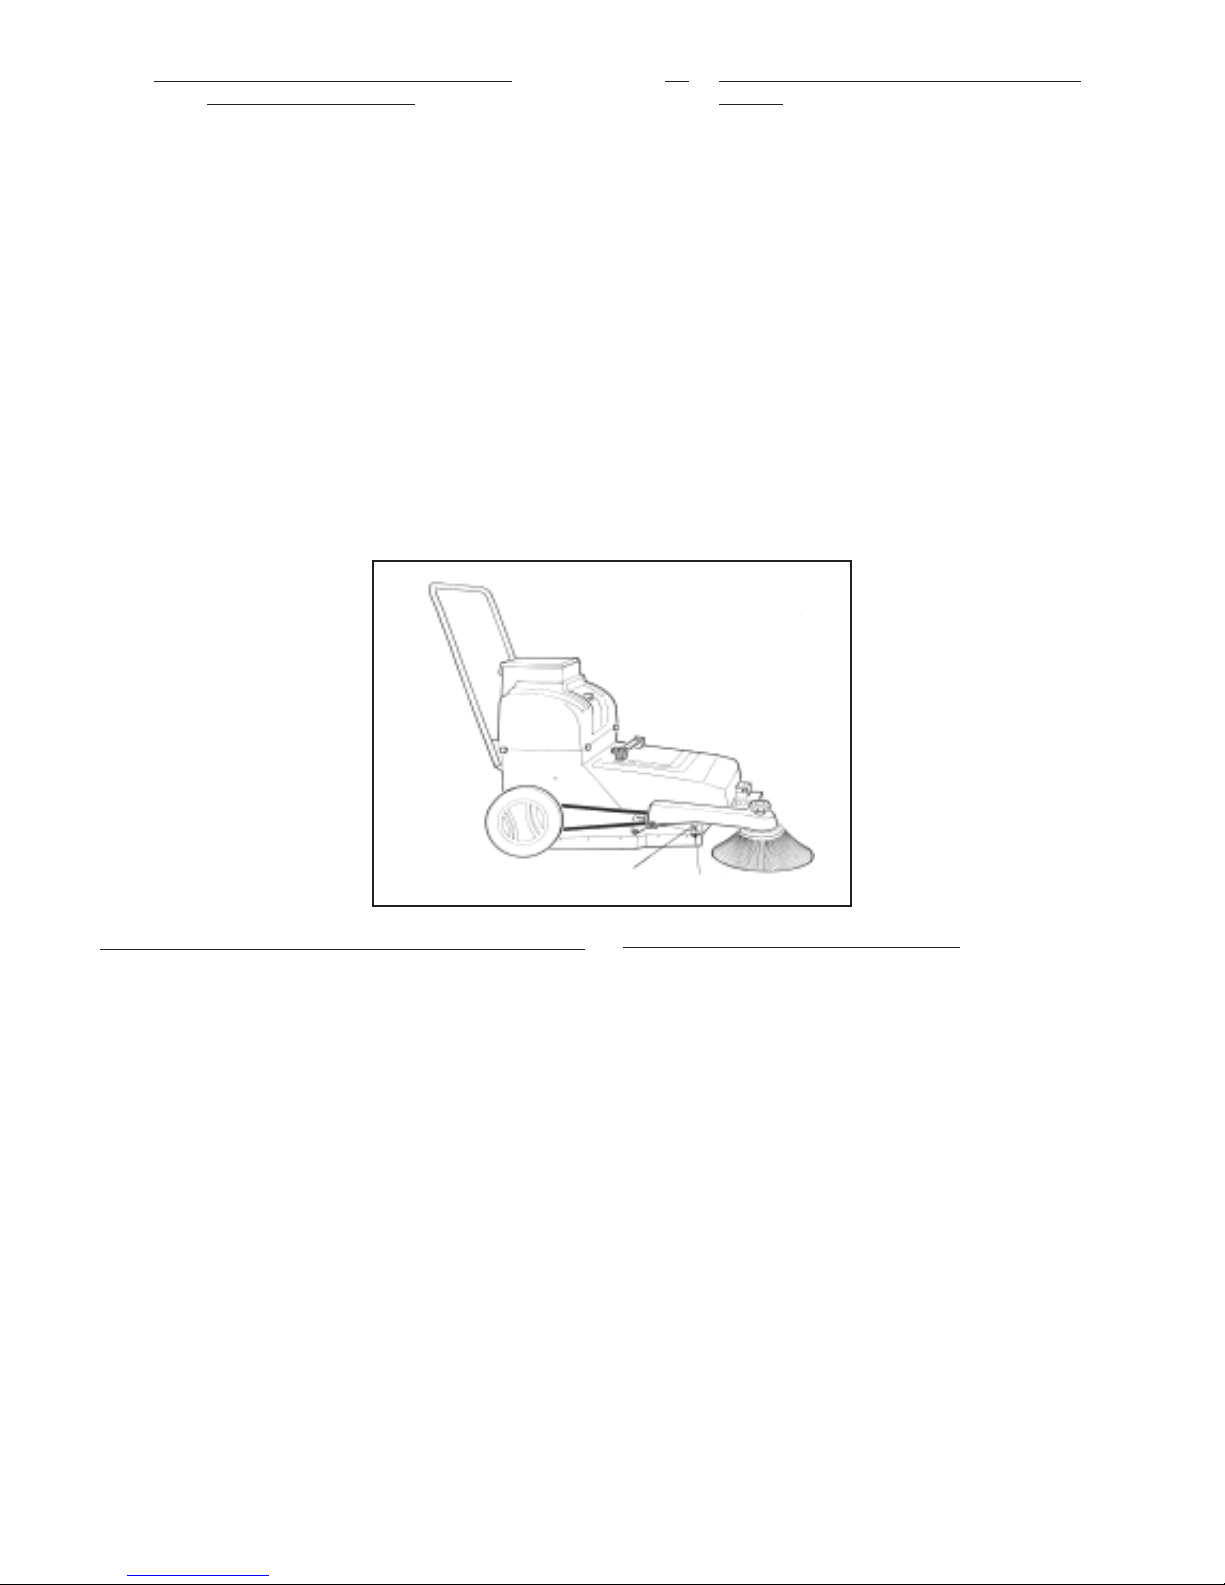
4.3.2 Per regolare la spazzola laterale agire sul tampone di
regolazione 1 svitando prima la ghiera zigrinata di fermo 2 e
regolando il tampone all’altezza desiderata.
Ribloccare il tampone tramite la ghiera di fermo.
NOTA ECOL 65 e 65T: la spazzola laterale gira solamente
quando la macchina è in movimento ed il braccio laterale è in
posizione di lavoro.
NOTA ECOL 85T: la spazzola è provvista di motore che entra
in funzione quando il braccio laterale viene portato in posizione
di lavoro.
Before carrying out an maintenance work on the machine,make
sure it is off.
4.3.1 To replace the side brush
1- Raise the side arm to rest position.
2- Loosen the 3 screws wich fix the side brush to the arm.
3- Remove the brush.
4- Replace the brush with a new one.
5- Screw the side brush fixing screws back on
4.3.2 To adjust the side brush,act on the adjustment pad 1 by
unscrewing the knurled locking nut 2 and adjusting the height of the
pad as required.
NOTE ECOL 65 and 65T the side brush will only spin when the
machine is in moving and the side arm is in work position.
NOTE ECOL 85T the side brush is fitted with a motor that start
when the side arm is moved in work position
4.3 WECHSEL UND EINSTELLUNG DER SEITENBÜRSTE
Achten Sie darauf, daß die Maschine ausgeschaltet ist, bevor
Arbeiten an ihr vorgenommen werden.
4.3.1 Für den Wechsel der Seitenbürste wie folgt vorgehen:
1- Den Seitenarm anheben, so daß er sich nicht in Arbeitspos-
tion befindet.
2 - Lösen Sie die 3 Schrauben, mit denen die Seitenbürste
am Arm befestigt ist.
3 - Die Bürste abnehmen.
4 - Eine neue Bürste einsetzen.
5 - Die Befestigungsschrauben der Seitenbürste wieder
festziehen.
4.3.2 Für die Einstellung der Seitenbürste auf den Einstellpuffer
einwirken, wobei erst die gerändelte Sperrnutmutter losgeschraubt
und dann der Puffer auf die gewünschte Höhe gesetzt
wird.Die Sperrnutmutter wieder festziehen, wodurch der Puffer blockiert wird.
HINWEIS ECOL 65 UND 65T: Die Seitenbürste dreht sich nur
dann, wenn die Maschine in Bewegung ist und der Seitenarm auf
Arbeitsposition steht.
HINWEIS ECOL 85T : Die Bürste ist mit einem Motor versehen,
der beginnt zu laufen, sobald der Seitenarm in Arbeitsposition
gebracht wird.
1
4.3 SUSTITUCIÓN Y AJUSTE DEL CEPILLO LATERAL
AAAnnnttteeesss dddeee lllllleeevvvaaarrr aaa cccaaabbbooo uuunnn tttrrraaabbbaaajjj ooo dddeee mmmaaannnttteeennniiimmmiiieeennntttooo eeennn lllaaa
mmmáááqqquuuiiinnnaaa,,, aaa ssseeegggúúúrrreeessseee dddeee qqquuueee eeessstttááá aaapppaaagggaaadddaoo ...
444... 333... 111 PPPaaarrraaa rrreeeeeemmmppplllaaazzzaaarrr eeelll ccceeepppiiillllllooo lllaaattteeerrraaalll
111 --- Levante el brazo de un lado a posición de reposo.
222 --- Aflojar los 3 tornillos que fijan el cepillo lateral con el brazo.
333 --- Retire el cepillo.
444 --- Reemplace el cepillo por uno nuevo.
555 --- Atornille el cepillo lateral tornillos de fijación de nuevo
444... 333... 222 PPPaaarrraaa aaajjj uuussstttaaarrr eeelll ccceeepppiiillllllooo lllaaattteeerrraaalll, actuar sobre la almohadilla de
2
ajuste 1, desenroscando la tuerca de bloqueo moleteado 2 y el ajuste
de la altura de la almohadilla según sea necesario.
NNNOOOTTTAAA EEECCCOOOLLL 666555 yyy 666555TTT el cepillo lateral sólo gira cuando la máquina está
en el movimiento y el brazo lateral está en posición de trabajo.
NNNOOOTTTAAA 888555TTT EEECCCOOOLLL el cepillo lateral está equipado con un motor que se
inicia cuando el brazo lateral se mueve en la posición de trabajo.
P a g . 1 3
Page 15

4.4 SOSTITUZIONE E REGOLAZIONE
SPAZZOLA CENTRALE
4.4 REPLACING AND ADJUSTING THE CENTRE BRUSH
4.4.1 Per sostituire la spazzola centrale operare come segue:
1-Togliere il cassetto raccogli-polvere anteriore.
2-Svitare 2 viti,una a destra ed una a sinistra ,poste sui lati della
spazzola.
3-Afferrare la spazzola e tirarla verso l’esterno della macchina.
Durante la fase di rimontaggio della spazzola,avere cura di
posizionare i due perni di trascinamento nello stesso senso e di
infilare la spazzola partendo prima da un lato e poi
dall’altro.Riavvitare le 2 viti di fissaggio spazzola ai relativi
perni di trascinamento.
4.4.2 Per regolare la spazzola centrale operare come segue:
ECOL 65 - ECOL 65T
Ruotare il volantino posto sul cofano superiore della macchina.
Ruotando in senso orario la pressione della spazzola
aumenta,ruotando in senso antiorario la pressione della spazzola
diminuisce.
ECOL 85
- Svitare i 4 pomelli di fissaggio cofano superiore.
- Allentare la ghiera di fermo posta sull’albero alzaspazzola.
- Ruotare il pomolo di regolazione spazzola centrale ( senso orario
maggior pressione) .
- Una volta trovata la pressione desiderata ribloccare il pomolo
di regolazione stringendola ghiera di fermo.
4.4.1 To replace the centre brush
1- Remove the front waste bin.
2- Loosen the brush’s left and right screws.
3- Grasp the brush and pull it outwards.
When remounting the brush,make sure the two pins are positioned in
the same direction.
First insert one side of the brush and then the other.Screw the
two fixing screws on the rele
vant pins.
4.4.2 To adjust the main brush
ECOL 65 - 65T
Turn the handwheel located on the top bonnet of the machine.
By turning it clockwise,brush pressure increases,by turning in counterclockwise,the pressure decreases.
ECOL 85
- Loosen the 4 top bonnet fixing knobs.
- Loosen the locking nut located on brush bearing shaft.
- Turn the main brush knob to adjust it (clockwise to
increase pressure).
- Once you have adjusted it,lock the adjustment knob by tightening
the locking nut.
4.4 WECHSEL UND EINSTELLUNG DER MITTELBÜRSTE
4.4.1 Für den Wechsel der Mittelbürste wie folgt vorgehen:
1 - Den vorderen Staubauffangbehälter abnehmen.
2 - Die 2 Schrauben, eine rechts und eine links, auf den Bürstenseiten
lösen.
3 - Die Bürste greifen und nach außen ziehen.Beim Montieren der
neuen Bürste achtgeben, daß die beiden Mitnahmebolzen in dieselbe
Richtung positioniert werden. Die Bürste muß erst auf der einen
und dann auf der anderen Seite eingesetzt werden. Die beiden
Befestigungsschrauben der Bürste wieder festziehen.
4.4.2 Für die Einstellung der Mittelbürste wie folgt vorgehen:
ECOL 65 / ECOL 65T
Das Handrad auf der oberen Maschinenhaube drehen.
Durch eine Drehung im Uhrzeigersinn wird der Bürstendruck
erhöht und durch eine Drehung gegen den Uhrzeigersinn
verringert.
ECOL 85
- Die 4 Befestigungsknäufe auf der oberen Haube losschrauben.
- Die Sperrnutmutter auf der Bürstenhubwelle lösen.
- Den Einstellknauf der Mittelbürste drehen (im Uhrzeigersinn
wird der Druck erhöht).
- Ist der gewünschte Druck erreicht, den Einstellknauf durch
Festziehen der Sperrnutmutter wieder blockieren.
4.4 SUSTITUCIÓN Y AJUSTE DEL CEPILLO DE CENTRAL
444... 444.. . 111 PP P aaa r r r aaa r r r eee eee mmm ppp l l l aa a zzzaaarrr eeelll ccceeepppiiillllllooo ccceeennntttrrraaalll
1 - Retire el cubo de desperdicios delantero.
2 - Aflojar los tornillos izquierdo y derecho del cepillo.
3 - Sujete el cepillo y tire de él hacia fuera.
Al volver a montar el cepillo, asegúrese de que los dos pasadores se
colocan en la misma dirección.
Primero inserte un lado de la brocha y luego el otro. Atornille los dos
tornillos de fijación de las clavijas pertinentes.
444... 444.. . 222 PPPaaarrraaa aaajjjuuussstttaaarrr eeelll ccceeepppiiillllllooo ppprrriiinnnccciiipppaaalll
EEECCCOOOLLL 666555 --- 666555TTT
Gire el volante situado en la parte superior del capó de la máquina.
Girando en sentido horario, aumenta la presión del cepillo, girando en
sentido antihorario, la presión disminuye.
EEECCCOOOLLL 888555
- Aflojar los 4 botones de fijación del capó.
- Aflojar la tuerca de bloqueo situado en el eje del cojinete del cepillo.
- Gire el botón cepillo principal para ajustarlo (en sentido horario para
aumentar la presión).
- Una vez que haya ajustado que, bloquee el botón de ajuste al apretar la
tuerca de bloqueo.
P a g . 1 4
Page 16
4.5 SOSTITUZIONE MOTORE VENTOLA
ASPIRAZIONE
4.5 REPLACING THE SUCTION FAN
Si ricorda che sia il montaggio che lo smontaggio
del motore deve essere eseguito da personale
addestrato,che devono sempre essere usati ri
cambi originali e che qualsiasi manomissione o
modifica alla struttura originale è ASSOLUTA
MENTE VIETATA.Staccare sempre i poli della
batteria prima di intervenire sulla macchina.
Per sostituire il motore ventola aspirazione procedere come segue.
1- Svitare i 4 pomelli di fissaggio cofano superiore ( nei modelli
ECOL 65 e ECOL 65T togliere anche la manopola di regolazione
spazzola centrale).
2- Togliere il cofano superiore
3- Staccare i poli di alimentazione dalla batteria.
4- Scollegare il motore dal rispettivo interruttore sfilando i faston
di collegamento.
5- Svitare le 2 viti di fissaggio supporto interruttori dal supporto
motore ventola.
6- Svitare le viti di fissaggio motore al supporto.
7- Svitare il grano di fissaggio ventola.
8- Sfilare la ventola dall’albero motore.Prima di togliere il
motore ricordarsi ti tagliare le fasciette che raggruppano i cavi
di collegamento e di sostituirle dopo aver montato il nuovo
motore.Per il rimontaggio del motore eseguire le operazioni
descritte in senso contrario.
NOTA: RISPETTARE LA POLARITA' NEL COLLEGARE IL MOTORE
4.5 AUSTAUSCH DES FLÜGELRADMOTORS
Der Einund Ausbau des Motors darf
ausschließlich von Fachpersonal durchgeführt
werden; verwenden Sie nur Original-Ersatzteile;
es ist STRENGSTENS HINWEIS VERBOTEN, die Originalgestalt der Maschine zu
verfälschen oder auf irgendeine Art zu
verändern.Die Batteriepole müssen
stets
abgetrennt werden, bevor Arbeiten an der Maschine
durchgeführt werden.
Für den Wechsel des Flügelradmotors wie folgt vorgehen:
1 - Die 4 Befestigungsknäufe der oberen Haube lösen (bei
den Modellen ECOL 65 und 65T auch den Einstellgriff
der Mittelbürste abnehmen).
2 - Die obere Haube abnehmen.
3 - Die Speisungskabel von der Batterie lösen.
4 - Den Motor von dem entsprechenden Schalter trennen,
indem die Verbindungs-Fastons herausgenommen werden.
5 -Die 2 Befestigungsschrauben der Schalterhalterung vom
Träger des Flügelradmotors losschrauben.
6 - Die Schrauben lösen, mit denen der Motor am Träger befestigt ist.
7 - Den Befestigungszapfen des Flügelrads lösen.
8 - Das Flügelrad von der Antriebswelle abnehmen.
Bevor der Motor herausgenommen wird, müssen die Bänder, die
die Verbindungskabel zusammenhalten, durchgeschnitten und
nach Einbau des neuen Motors durch neue ersetzt werden.
Für die Montage des neuen Getriebemotors in umgekehrter
Reihenfolge vorgehen.
The motor must be mounted and removed by
qualified personnel only.Always use original
spare parts. Tampering with the machine or
altering its structure is ABSOLUTELY
FORBIDDEN.Detach the battery poles every
time you work on the machine.
To replace the suction fan
1- Loosen the 4 top bonnet fixing knobs ( on versions ECOL
65 and ECOL 65T also remove the main brush adjustment
knob).
2- Remove the top bonnet.
3- Disconnect the battery poles.
4- Disconnect the motor from the relevant switch by removing the
connection.
5- Remove the 2 switch support screws from the fan motor stand.
6- Loosen the screws that secure the motor to the support.
7- Loosen the fan security dowels.
8- Remove the fan from the drive shaft.Before removing the
motor,remember to cut the straps fastening the bundles of cables
and replace them after mounting the new motor.
To mount the motor follow the instructions in reverse order
NOTE: WHEN CONNECTING THE MOTOR,RESPECT
THE POLARITY
4.5 REEMPLAZANDO EL MOTOR DE ASPIRACIÓN
El motor debe ser montado y reemplazado por solo por
personal cualificado. Siempre utilizando repuestos
originales. La manipulación de la máquina o la
alteración de su estructura está ABSOLUTAMENTE
PROHIBIDA. Desconectar los polos de la batería cada
vez que se trabaja en la máquina.
Para reemplazar el ventilador de succión
111 --- Aflojar las 4 perillas de fijación del bonete (en las versiones de ECOL65
y ECOL 65T también quitar la perilla de ajuste del cepillo principal).
222 --- Retire la parte superior del capó.
333 --- Desconecte los polos de la batería.
444 --- Desconecte el motor con interruptor correspondiente mediante la
eliminación de la conexión.
555 --- Quitar los 2 tornillos del soporte del interruptor de la parada del motor
del ventilador.
666 --- Aflojar los tornillos que sujetan el motor al soporte.
777 --- Afloje los pasadores de seguridad del ventilador.
888 --- Retire el ventilador del árbol de transmisión. Tras retirar el motor,
recuerde cortar las correas de sujeción de los haces de cables y
reemplazarlos después de montar el nuevo motor.
PPPaaarrraaa mmmooonnntttaaarrr eeelll mmm o o o t t t o o o r r r s s s i i i gggaaa lll aaasss iiinnnssstttrrruuucccccciiiooonnneeesss eeennn ooorrrdddeeennn iii nnn vvveeerrrsssooo
NOTA: AL MONTAR EL MOTOR, RESPETE LA POLARIDAD.
HINWEIS: BEIM ANSCHLUSS DES MOTORS DIE
POLUNG BEACHTEN.
P a g . 1 5
Page 17
4.6 SOSTI TUZIONE MOTORIDUT TORE TRAZIONE
4.6 REPLACING THE DRIVE GEAR MOTOR
Si ricorda che sia il montaggio che lo smontaggio
del motoridittore deve essere eseguito da perso
nale addestrato,che devono sempre essere usati
particolari originali e che qualsiasi manomissio-
ne o modifica alla struttura originale è
ASSOLUTA MENTE VIETATA. Staccare sempre i poli della batteria prima di intervenire sulla macchina.
- Per sostituire il motoriduttore procedere come segue:
1- Svitare i 4 pomelli di fissaggio cofano superiore.
2- Scollegare i cavi di alimentazione del motoriduttore.
3- Togliere il pomello di regolazione spazzola centrale (solo per il
modello 65).
4- Staccare il copriruota sinistro e togliere la ruota.
5- Svitare le viti di fissaggio del carter laterale e togliere il
carter. 6- Svitare la vite di fissaggio della puleggia
dall’albero del motoriduttore e sfilare la puleggia facendo
attenzione a non perdere la chiavetta.
7- Svitare le viti di fissaggio motore al supporto motore.
Per il rimontaggio del motoriduttore eseguire le operazioni
descritte in senso contrario
NOTA: RISPETTARE LA POLARITA’
NEL COLLEGARE I MOTORI
The gear motor must be mounted and removed by
qualified personnel only.Always use original spare
parts. Tampering with the machine or altering its
structure is ABSOLUTELY FORBIDDEN.Detach
the battery poles every time you work on the machine.
To replace the gear motor:
1- Loosen the 4 top bonnet fixing knobs.
2- Disconnect the gear motor’s power supply cords.
3- Remove the main brush adjustment knob (for the 65 version
only).
4- Remove the left wheel cover and remove the wheel.
5- Loosen the side casing fixing screws and remove the casing.
6- Remove the pulley fixing screw from the gear motor shaft
and remove the pulley paying attention not to lose the key.
7- Loosen the screws that secure the motor to the motor support.
To mount the gear motor follow the instructions in reverse order.
NOTE: WHEN CONNECTING THE MOTOR, RESPECT
THE POLARITY.
4.6 AUSTAUSCH DES ANTRIEBSGETRIEBEMOTORS
Der Ein- und Ausbau des Motors darf
ausschließlich von Fachpersonal durchgeführt
werden; verwenden Sie nur Original-Ersatzteile;
es ist STRENGSTENS HINWEIS VERBOTEN,
die Originalgestalt der Maschine zu verfälschen
oder auf irgendeine Art zu verändern.
Die Batteriepole müssen stets abgetrennt werden, bevor
Arbeiten an der Maschine durchgeführt werden.
Für den Wechsel des Getriebemotors wie folgt vorgehen:
1 - Die 4 Befestigungsknäufe auf der oberen Haube lösen.
2 - Die Speisungskabel vom Motor lösen.
3 - Den Einstellknauf der Mittelbürste abnehmen (nur bei Modell
65).
4 - Den linken Raddeckel lösen und das Rad herausnehmen.
5 -Die Befestigungsschrauben des Seitengehäuses lösen und das
Gehäuse abnehmen.
6 - Die Befestigungsschraube der Riemenscheibe von der
Getriebemotorwelle lösen und die Riemenscheibe herausnehmen;
verlieren Sie dabei den Keil nicht.
7 - Die Schrauben lösen, mit denen der Motor am Träger befestigt
ist.
Für die Montage des neuen Getriebemotors in umgekehrter
Reihenfolge vorgehen.
4.6 REPLACING EL EQUIPO MOTOR
EEElll mmmoootttooorrr rrreeeddduuuccctttooorrr dddeeebbbeee mmmooonnntttaaarrrssseee yyy qqquuuiiitttaaarrrssseee
pppooorrr sssooolllooo pppooorrr ppp eeerrrsssooonnnaaalll cc c uuu aaa l l l i i i fffii i ccc aaa ddd ooo ... SSSiii eee mmm ppp r rr eee
uuu t t t i i i l l l i i i zzzaaannndddooo rrreeepppuuueeessstttooosss ooorrriiigggiii nnn aaa lll eee sss... LLLaaa
mmmaaannniiipppuuulllaaaccciiióóónnn dddeee lllaaa mmmáááqqquuuiiinnnaaa ooo lllaaa aaalllttteeerrraaaccciiióóónnn
ddd eee sssuuu eeessstttrrruuuccctttuuurrraaa eeessstttááá AAABBBSSSOOOLLLUUUTTTAAAMMMEEENNNTTTEEE PPPRRROOOHHHIIIBBBIIIDDDAAA... DDDeeessscccooonnneeecccttteee
lll ooo sss pppooolllooosss dddeee lllaaa bbbaaattteeerrrííí aaa cccaaadddaaa vvveeezzz qqquuueee ssseee tttrrraaabbbaaajjj aaa eeennn lll aaa mmmáááqqquuuiiinnnaaa...
Para reemplazar los engranajes del motor:
1 - Aflojar las 4 perillas de fijación del capó.
2 - Desconecte los cables de alimentación del motor de engranajes.
3 - Retire la perilla de ajuste del cepillo principal (sólo para la versión
65).
4 - Retire la cubierta de la rueda izquierda y quitar la rueda.
5 - Aflojar el lado de la carcasa tornillos de fijación y quitar la
carcasa. 6 - Retire el tornillo de fijación de la polea del eje del motor
de engranajes y retire la polea teniendo cuidado de no perder la llave.
7 - Afloje los tornillos que sujetan el motor al soporte del motor.
Para montar el motor del engranaje siga las instrucciones en orden
inverso.
NOTA: Al conectar el MOTOR, RESPETAR LA POLARIDAD.
HINWEIS: BEIM ANSCHLUSS DES MOTORS DIE
POLUNG BEACHTEN.
P a g . 1 6
Page 18

4.7 PULIZIA DEI CASSETTI PORTARIFIUTI
P e r s v u o t a r e i c a s s e t t i p o r t a r i f i u t i , o p e r a r e c o m e s e g u e :
4 . 7 . 1 C A S S E T T O A N T E R I O R E
1 - A l z a r e e r u o t a r e d i 9 0 ° i l p o m o l o d i c h i u s u r a c a s s e t t o .
2 - A f f e r r a r e l a m a n i g l i a d e l c a s s e t t o , s o l l e v a r e i l c a s s e t t o f a c e n d o
u s c i r e i l s u p p o r t o c a s s e t t o d a l l a b a s e s u p p o r t o .
3 - S v u o t a r e i l c a s s e t t o . ( * )
P er i l r im on t ag gi o d e l c as se t to :
1 - I n s e r i r e i l s u p p o r t o c a s s e t t o n e l l a b a s e s u p p o r t o c a s s e t t o .
2- Spingere il cassetto verso il basso fino a riportarlo nella sua
p o s i z i o n e d i l a v o r o .
3 - R u o t a r e i l p o m o l o d i c h i u s u r a c a s s e t t o e c o n t r o l l a r e c h e s i a b e n
c h i u s o .
4 . 7 . 2 CASSETTO POSTERIORE
1 - S g a n c i a r e l a c h i u s u r a d e l c a s s e t t o p o s t e r i o r e s o l l e v a n d o l a l e v a
d i b l oc c o .
2 - A f f e r r a r e i l c a s s e t t o p o s t e r i o r e e d e s t r a r l o d a l c o r p o d e l l a m a c c h i n a .
3 - S v u o t a r e i l c a s s e t t o . ( * )
P er i l r im on t ag gi o d e l c as se t to :
1- I n s e r i r e i l c a s s e t t o i n m o d o c h e l a b a t t u t a p o s t a s u l f o n d o d e l
c a s s e t t o a p p o g g i a l t u b o p o r t a f l a p p o s t e r i o r e d e l l a m a c c h i n a , p o r t a r e
i l c a s s e t t o i n p o s i z i o n e d i c h i u s u r a e d a g g a n c i a r e l a s e r r a t u r a .
2 - L a f o rz a d i te n ut a d e ll a ch i us u ra pu ò e ss e re re g ol a ta ru ot a nd o
l ’ a g g a n c i o d e l l a s e r r a t u r a . S i c o n s i g l i a , a l l a c h i u s u r a d e i c a s s e t t i , d i
c o n t r o l l a r e l a t e n u t a de l l a g u a r n i z i o n i n q u e s t o m o d o s i ev i t e r à , i n
c a s o d i u s u r a d e l l a s t e s s a , d i l a v o r a r e i n m a n i e r a n o n c o n f o r m e .
S e s i n o t a c h e l a g u a r n i z i o n e è u s u r a t a p r o v v e d e r e a l l a s o s t i t u z i o n e .
(*) PER LO SMALTIMENTO DEI RIFIUTI SI RICORDA DI
ATTENERSI SCRUPOLOSAMENTE ALLE NORME VIGENTI.
4. 7 REINIGUN DER ABFALLBEHÄLTER
4 . 7 CLEANING THE WASTE BINS
T o e m p t y t h e w a s t e b i n s , p r o c e e d a s f o l l o w s :
4 . 7 . 1 F R O N T B I N
1- Lift and turn 90° the bin locking knob
2- G r a s p t h e h a n d l e a n d p u l l o u t t h e b i n . W h e n d o i n g s o , t h e
d r a w e r s up p o r t s h o u l d c o me o u t o f i t s s i d e.
3- Empty the bin (*).
o put the bin back in place
1- I n s er t t he b i n s u p po r t in i ts ba s e .
2- Push th e bin down to work po sit ion.
3- T ur n t he l oc k in g k no b a nd ma k e s u re th e bi n is c lo s ed .
4 . 7 . 2 REAR BIN
1- Relea se the re ar bi n lo ck by flick ing up the le ver.
2- G r as p t h e h an d l e a n d p u ll t h e b i n o u t o f th e ma c h in e .
3- Empty the bin (*).
To put the bin back in place
1- In se rt th e bi n so t ha t th e st riker at t he b ottom is r es ting on t he
re ar fla p pipe .Clo se the b in and lock it.
2- You c an adj us t the ti gh tn es s of th e lo ck in g by ro ta ting t he
l o c k i n g ' s h i n g e s . I t i s a d v i s e d , t o c h e c k t h e t i g h t n e s s o f t h e
g a s k e t s w h e n e v e r y o u c l o s e t h e m u p . D o i n g s o y o u ' l l a v o i d , i n
t he ca se th at th ey ar e w or n, to wo rk in a n in ap pr op ri at e wa y . I f
y o u s e e t h a t a g a s k e t i s w o r n , r e p l a c e i t s t r a i g h t a w a y .
(*) A T T E N T I O N: WASTES MUST BE DISPOSED OF
STICTLY IN ACCORDANCE TO THE LAW.
444...777 LLLIIIMMMPPPIIIEEEZZZAAA DDDEEE LLLOOOSSS CCCOOONNNTTTEEENNNEEEDDDOOORRREEESSS DDDEEE RRREEESSSIIIDDDUUUOOOSSS
Für die Leerung der Abfallbehälter folgendermaßen vorgehen:
4.7.1 VORDERER BEHÄLTER
1 - Den Verschlußknopf des Behälters heben und 90° drehen.
2 - Den Griff festhalten, den Behälter anheben und aus seinem Sitz
herausziehen.
3 - Den Behälter ausleeren (*).
Wiedereinsetzen des Behälters:
1 - Den Behälter in seinen Sitz einführen.
2- Den Behälter nach unten drücken, bis er sich in Arbeitsposition
befindet.
3 - D e n V e r s c h l u ß k n o p f d e s B e h ä l t e r s d r e h e n u n d k o n t r o l l i e r e n , d a ß
dieser richtig geschlossen ist.
4.7.2 HINTERER BEHÄLTER
1 - Den Verschluß des hinteren Behälters lösen, indem der Sperrhebel
angehoben wird.
2 - Den hinteren Behälter greifen und aus der Maschine nehmen.
3 - Den Behälter ausleeren (*).
Wiedereinsetzen des Behälters:
1 - Den Behälter so einsetzen, daß der auf dem Behälterboden
befindliche Anschlag auf dem hinteren Schmutzklappenträgerrohr
aufliegt; den Behälter in Schließposition bringen und den Verschluß
einhaken.
2 - Die Verschlußkraft kann eingestellt werden, indem der Haken
des Verschlusses gedreht wird.Beim Schließen der Behälter sollten
die Dichtungen überprüft werden. Auf diese Weise wird
verhindert, daß - im Verschleißfall - unter unzulässigen Bedingungen
gearbeitet wird.Falls notwendig müssen die Dichtungen
ausgewechselt werden.
(*)ACHTUNG: DIE ABFALLSAMMLUNG MUSS UNTER
GENAUESTER EINHALTUNG DER DIESBEZÜGLICH
GELTENDEN GESETZE DURCHGEFÜHRT WERDEN.
Para vaciar las depósitos de desperdicios, haga lo siguiente:
444...777...111 CCCAAAJJJÓÓÓNNN DDDEEELLLAAANNNTTTEEERRROOO
1 - Levantar y girar 90 ° el botón de bloqueo bin
2 - Sujete la palanca y tire del bin.Cuando lo haga, el cajón de apoyo debe
salir del lateral.
3 - Vaciar la el cajón (*).
OOO pppooonnneeerrr lllaaa bbbaaannndddeeejjjaaa eeennn sssuuu llluuugggaaarrr
1 - Inserte el soporte de la bandeja en su base.
2 - Introducir la bandeja hasta la posición de trabajo.
3 - Gire el botón de bloqueo y asegúrese de que la bandeja está cerrada.
444...777...222 CCCAAAJJJÓÓÓNNN TTTRRRAAASSSEEERRROOO
1 - Suelte el bloqueo bin trasera accionando la palanca.
2 - Sujete el asa y tire de la bandeja de salida de la máquina.
3 - Vaciar el cajón(*).
PPPooonnneeerrr eeelll rrreeeccciiipppiiieeennnttteee eeennn sssuuu llluuugggaaarrr
1 - Introduzca la bandeja por la parte delantera, apoyándola en la parte
inferior sobre el tubo de la tapa trasera. Coloque la bandeja y ciérrela.
Se aconseja ajustar la tensión de la cerradura girando bisagras. Bloquéela,
para comprobar la estanqueidad de las juntas siempre que se cierre.
2 - Si lo hace, podrá evitar, que se use para trabajar de una manera
inadecuada. Si usted ve que una junta está desgastada, cámbiela de
inmediato.
(((***))) AAATTTEEENNNCCCIIIÓÓÓNNN::: LLLOOOSSS RRREEESSSIIIDDDUUUOOOSSS DDDEEEBBBEEENNN SSSEEERRR EEELLLIIIMMMIIINNNAAADDDOOOSSS DDDEEE AAACCCUUUEEERRRDDDOOO AAA
LLLAAA NNNOOORRRMMMAAATTTIIIVVVAAA...
Pag. 17
Page 19
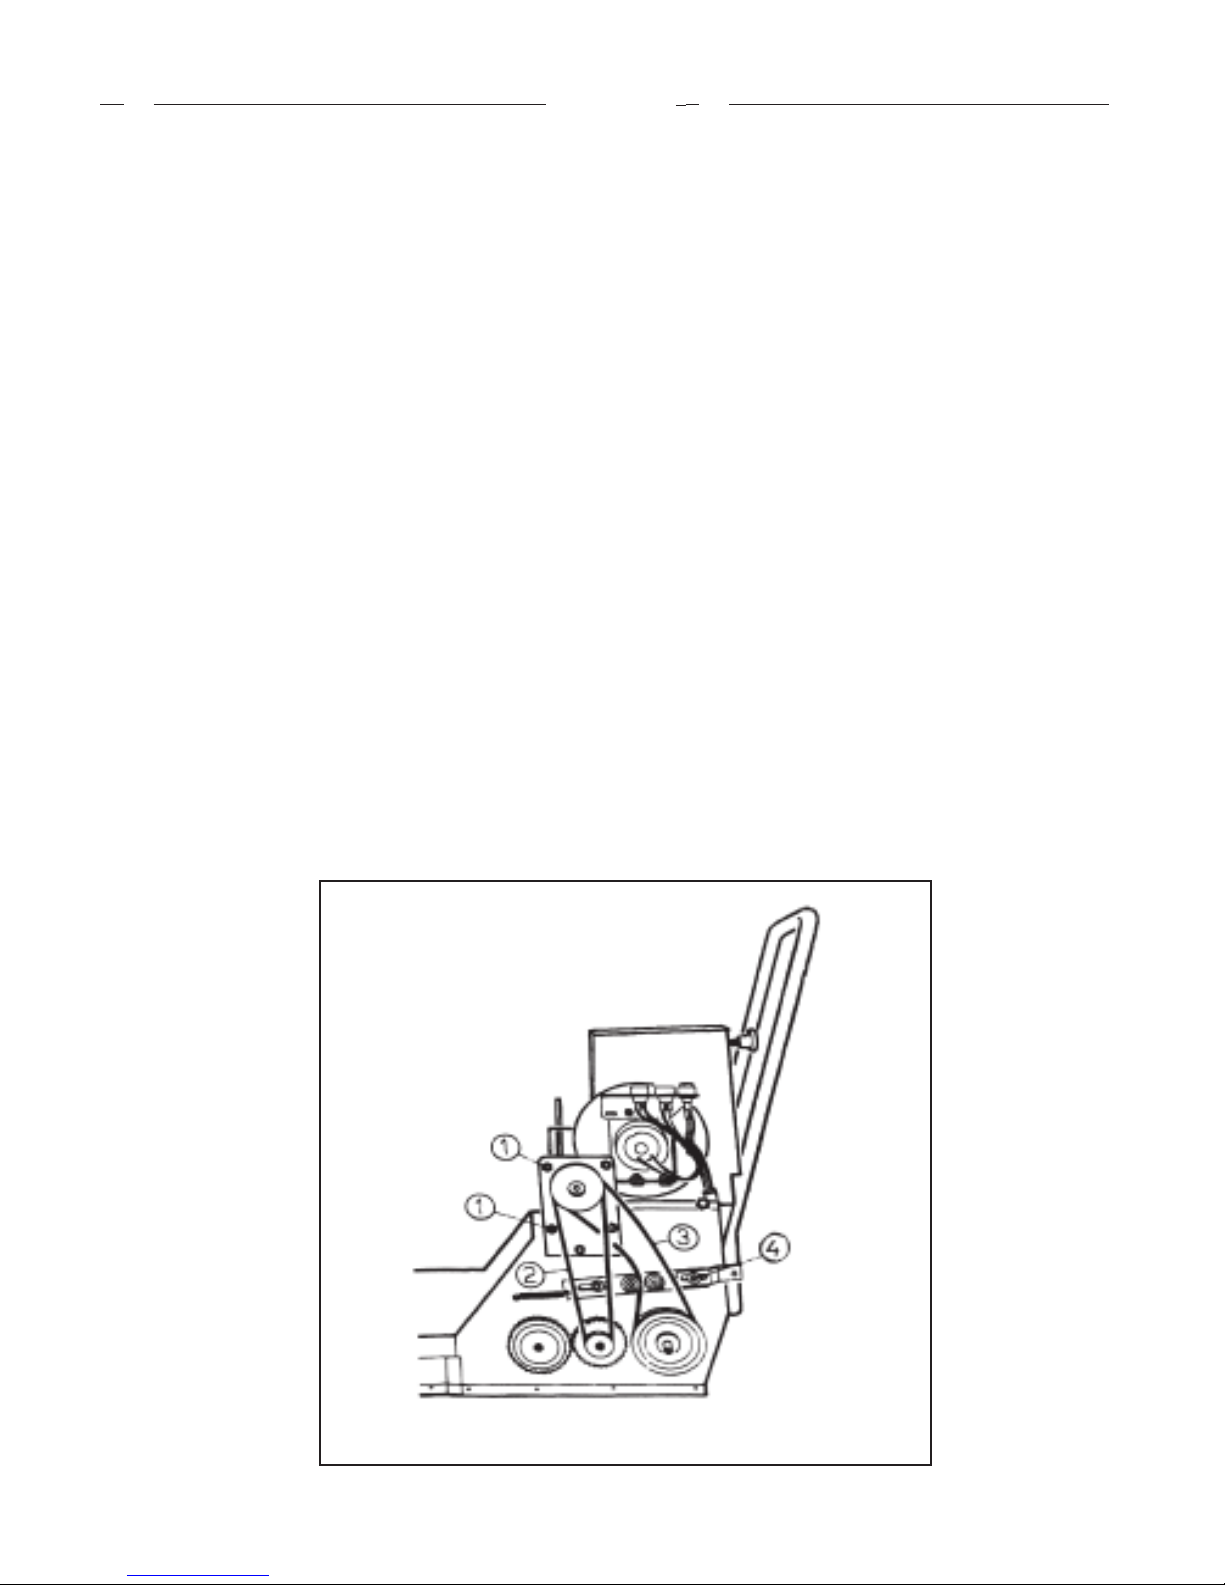
4.8 SOSTITUZIONE E REGOLAZIONE CINGHIE
Per la sostituzione delle cinghie procedere come descritto.
1- Togliere il copriruota alla ruota sinistra.
2- Togliere la ruota sinistra.
3- Togliere il carter laterale alla macchina.
4- Svitare i pomelli di bloccaggio cofano superiore
5- T o g l i e r e l a m a n o p o l a d i r e g o l a z i o n e s p a z z o l a c e n t r a l e ( solo per
i modelli ECOL 65 e 65T).
6- Sfilare il cofano superiore.
4 . 8 REPLACING AND ADJUSTING THE BELTS
To replace the belts, proceed as follows.
1- Remove the wheel cover from the left wheel.
2- Remove the left wheel.
3- Remove the machine’s side casing.
4- Loosen the top bonnet locking knobs.
5- Remove the main brush adjustment knob (for ECOL 65 and 65T
models only).
6- Remove the top bonnet.
4.8.1 Cinghia movimento spazzola centrale:
A- A l l e n t a r e l e 4 v i t i d i f i s s a g g i o (1) del motoriduttore al supporto.
B- Fare scorrere il motoriduttore sulle asole.
C- Togliere la cinghia (2).
D- Sostituire la cinghia con una nuova,riposizionare il
motoriduttore portando così la cinghia in tensione,stringere le 4
viti (1) di blocco motoriduttore. Rimontare la macchina seguendo
le fasi dal 1 al 6 in senso contrario.
4.8.2 Cinghia di trazione macchina:
Per poter togliere la cinghia di trazione macchina,è necessario
togliere prima la cinghia di movimento spazzola (vedi sopra
4.8.1) e questo punto è possibile sfilare la cinghia di trazione
macchina (3) dalle sedi delle pulegge.Dopo aver sostituito
la cinghia,rimontare la macchina seguendo le indicazioni relative
al punto 4.8.1Se durante la trazione si nota che la cinghia slitta
sulla puleggia,regolare la stessa allentando la vite (4) e portando
più in tensione la cinghia.
4.8.1 Centre brush drive belt
A- Loosen the 4 screws (1) that secure the gear motor to the support.
B- Let the gear motor run along the slot.
C- Remove the belt (2).
D- Replace the belt with a new one. Position the gear motor in order
to tension the belt.Tighten the 4 gear motor fixing screws.Mount the
machine by performing steps 1 to 6 in reverse order.
4.8.2 Machine drive belt
To remove the machine drive belt,first remove the brush drive belt
(see 4.8.1).This makes it possible to remove the machine drive belt
(3) from the pulleys. After replacing the belt,remount the machine
following the instructions given in par.4.8.1.
If you notice that the belt on the pulley slips out of place,adjust it
by loosening the screw (4) and tensioning it.
Pag. 18
Page 20
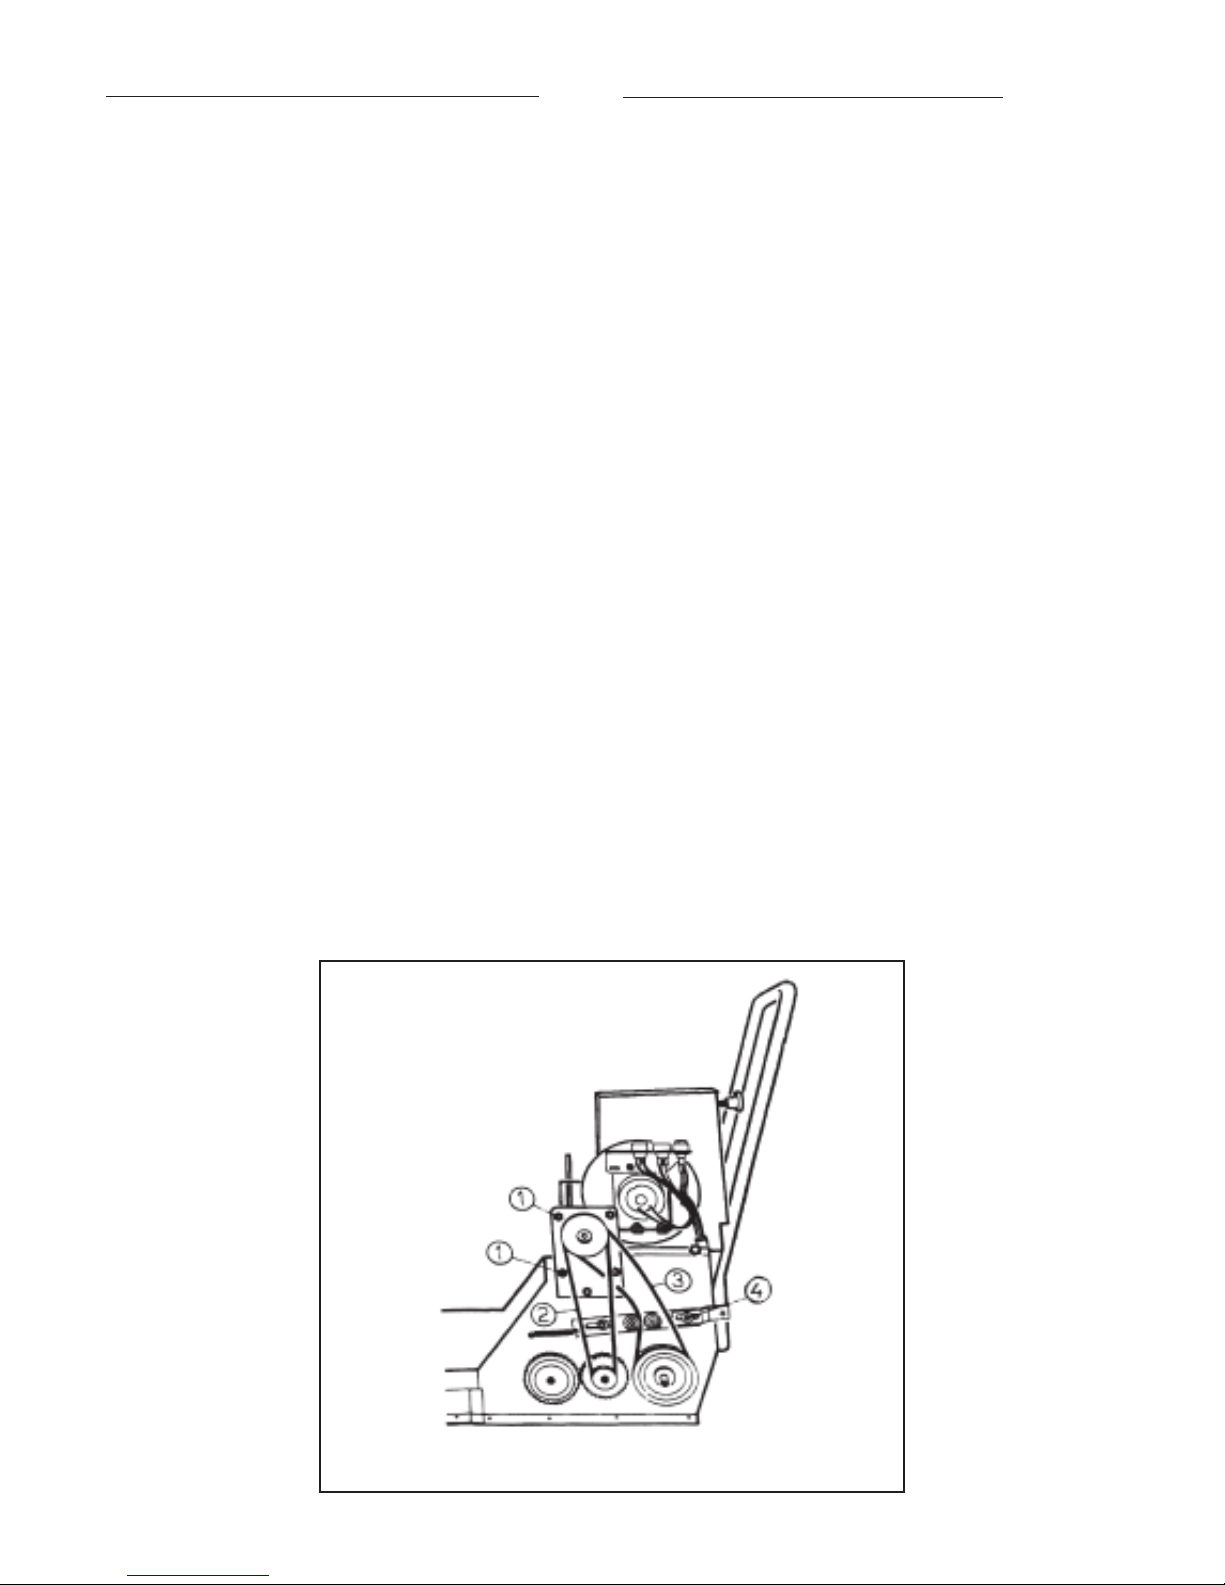
4.8 WECHSEL UND EINSTELLUNG DER RIEMEN
4.8 SUSTITUCIÓN Y AJUSTE DE LOS CINTURONES
Für das Wecheln einer oder mehrerer Riemen
wie folgt vorgehen:
1 - Den Raddeckel des linken Rades abnehmen.
2 - Das linke Rad abnehmen.
3 - Das seitliche Gehäuse abnehmen.
4 - Die Befestigungsknäufe der oberen Haube aufschrauben.
5 - Die Einstellgriffe der Mittelbürste abnehmen (nur bei den
Modellen ECOL 65 und 65T).
6 - Die obere Haube herausnehmen.
4.8.1 Riemen Mittelbürstenlauf:
A - Die 4 Schrauben lösen, mit denen der Getriebemotor auf dem
Träger befestigt ist.
B - Den Getriebemotor auf den Ösen verschieben.
C - Den Riemen (2) abnehmen.
D - Den neuen Riemen einsetzen und den Getriebemotor wieder
positionieren, wodurch der Riemen gespannt wird; die 4
Befestigungsschrauben (1) des Getriebemotors festziehen.
Die Maschine wieder zusammenbauen, indem die Schritte 1 bis 6
in umgekehrter Reihenfolge durchgeführt werden.
4.8.2 Maschinenantriebsriemen
Um den Maschinenantriebsriemen abehmen zu können, muß
zunächst der Riemen für den Bürstenlauf entfernt werden (siehe
oben 4.8.1); dann kann der Antriebsriemen (3) aus den
Riemenscheiben genommen werden.Nachdem der Riemen
ausgetauscht wurde, kann die Maschine nach den Anweisungen
unter Punkt 4.8.1 wieder zusammengebaut werden.Sollte während
des Antriebs der Riemen auf der Riemenscheibe schlingern, sollte
dieser durch Lockern der Schraube (4) eingestellt und seine
Spannung erhöht werden.
Para reemplazar las correas, haga lo siguiente.
1 - Retire la cubierta de la rueda de la rueda izquierda.
2 - Retirar la rueda izquierda.
3 - Retire la carcasa lateral de la máquina.
4 - Aflojar los botones de bloqueo del capó.
5 - Retire la perilla de ajuste del cepillo principal (por ECOL 65 y sólo 65T
modelos).
6 - Retire la parte superior del capó.
444... 888... 111 CCCeeennntttrrrooo dddeee lll aaa cccooorrrrrreeeaaa dddeee tttrrraaannnsssmmmiiisssiiióóónnn dddeeelll ccceeepppiiilll ll l ooo
A-Afloje los 4 tornillos (1) que sujetan el motor del engranaje.
B-Deje que el motor sea dirigido a lo largo de la ranura.
C-Retire la correa (2).
D-Cambiar la correa por una nueva. Coloque el motor del engranaje con el
fin de tensar el cinturón. Aprete los 4 tornillos del motorreductor. Monte
la fijación de la máquina realizando los pasos 1 a 6 en el orden inverso.
444... 888... 222 cccooorrrrrreeeaaa dddeee tttrrraaannnsssmmmiiisssiiióóónnn dddeee lll aaa mmmáááqqquuuiiinnnaaa
Para quitar la correa de transmisión de la máquina, retire primero la correa
de transmisión del cepillo (ver 4.8.1). Esto hace que sea posible retirar la
correa de transmisión de la máquina (3) de las poleas. Después de cambiar
la correa, volver a montar el equipo siguiendo las instrucciones dadas en
par.4.8.1.
Si usted nota que la correa en la polea se desliza fuera de lugar, ajustar
aflojando el tornillo (4) y tánsela.
P a g . 1 9
Page 21

4.9 SOSTITUZIONE E MANUTENZIONE DEL FILTRO
4 . REPLACING AND SERVICING THE CARTRIDGE
FILTER
Il filtro è un componente di primaria importanza per il corretto
funzionamento della macchina,una sua correttta manutenzione
farà si che il rendimento della macchina sia sempre ai massimi
livelli.Per sostituire il filtro operare come segue:
1-Togliere il coperchio filtro.
2-Svitare la mazza dello scuotifiltro e sfilare lo scuotifiltro facen-
do attenzione a non perdere la molla.
3-Svitare il dado di fissaggio filtro e togliere la rondella.
4 - Sf il ar e il fi lt ro da ll ’a st a portafi lt ro . Re cu perare,se a nc ora in ta tt i, la
staffa montata sul filtro svitando le due viti, e la guar-nizione OR
montata sulla base del filtro e rimontatela sul nuovo
filtro.Rimontare il filtro seguendo le fasi descritte in senso contrario facendo attenzione che durante questa fase il filtro sia
posizionato correttamente nella sua sede posta sul fondo della
scatola filtro.
Nota: Il modello ECOL 85 è d o t a t o d i 2 filtri uguali montati
affiancati.Eseguire le medesime operazioni per la sostituzione dei
filtri.
PER LO SMALTIMENTO DEL FILTRO ATTENERSI
SCRUPOLOSAMENTE ALLE LEGGI VIGENTI IN PROPOSITO.
The filter is one of the machine main component.It is essential for the
machine’s operation.Correct maintenance of the filter will allow you
to obtain the best results form your machine.To replace a filter:
1- Remove the filter cover.
2- Loosen the filter shake maul and remove the filter shaker.paying
attention not to lose the spring.
3- Loosen the filter fixing nut and remove the washer.
4- Remove the filter from the filter holder.If it is still in good repair,you
may reuse the bracket fastened to the old filter by removing
the 2 screws, and the O-ring mounted at the bottom of the filter for the
new filter.Remount the filter following the instructions in reverse
order.Make sure the filter is resting properly in its seat in the filter box.
Note: The ECOL 85 version is fitted with 2 identical filters mounted
side by side.Carry out the same operations to replace each filter.
WASTES MUST BE DISPOSED OF IN ACCORDANCE TO
THE LAW.
4.9 WECHSEL UND WARTUNG DES FILTERS
Der Filter ist eines der wichtigsten Bestandteile für einen
reibungslosenMaschinenbetrieb. Seine ordnungsgemäße Wartung
trägt dazu bei, daß die Maschine stets eine maximale Leistung
erbringen kann.Für den Filterwechsel wie folgt vorgehen:
1 - Den Filterdeckel abnehmen.
2 - D e n S c h l e g e l d e s F i l t e r r ü t t l e r s l o s s c h r a u b e n u n d d e n F i l t e r r ü t t l e r
herausnehmen; verlieren Sie dabei die Feder nicht.
3 - Die Filterbefestigungsmutter losschrauben und die Scheibe
abnehmen.
4 - Den Filter von der Filterhalterstange nehmen.Falls er noch
benutzbar ist, kann der Bügel auf dem Filter weiterverwendet
werden; dazu die beiden Schrauben und die OR Dichtung an der
Unterseite des Filters lösen und den Bügel auf dem neuen Filter
befestigen. Den neuen Filter einbauen, indem die Arbeitsschritte
in umgekehrter Reihenfolge durchgeführt werden; achten Sie
darauf, daß der Filter korrekt in seinem Sitz auf dem Boden des
Filterkastens positioniert wird.
Hinweis:Das Model ECOL 85 ist mit 2 Filtern ausgestattet, die
auf die gleiche Weise nebeneinander montiert sind. Für den
Filterwechsel dieselben Arbeitsschritte durchführen.
DIE FILTERENTSORGUNG MUSS GEMÄSS DER
GELTENDEN BESTIMMUNGEN ERFOLGEN.
4.9 SUSTITUCIÓN Y MANTENIMIENTO DEL FILTRO CARTUCHO
El filtro es un componente de las máquinas. Principalmente es esencial para
el mantenimiento. Un correcto mantenimiento delfiltro le permitirá obtener
los mejores resultados en su máquina. Para reemplazar un filtro:
1 - Retire la tapa del filtro.
2 - Aflojar el filtro y retirelo teniendo en cuenta de no perder el resorte.
3 - Aflojar la tuerca de fijación del filtro y retire la arandela.
4 - Retire el filtro del soporte. Si el filtro todavía está en buenas
condiciones, es posible reutilizar el soporte fijado al filtro viejo quitando
los tornillos 2, y la junta tórica montada en la parte inferior del filtro para
el nuevo filtro. Monte el filtro siguiendo las instrucciones en orden inverso.
Asegúrese de que el filtro está apoyado adecuadamente en su lugar en la
caja del filtro.
NNNoootttaaa::: LLL aaa vvv eee rrr sss iiióóó nnn EEE CCC OOO L L L 88 8 555 eeessstttááá eeeqqquuuiiipppaaadddooo cccooonnn 22 2 fff iii lll ttt rrrooo sss iii ddd ééé nnn tttiii ccc ooo sss lll aaa ttteee rrraaa lll mmmooonnntttaaadddaaasss
pppooorrr sssiiidddeee...CCCaaarrrrrryyy lllaaasss mmmiiisssmmmaaasss ooopppeeerrraaaccciiiooonnneeesss pppaaarrraaa rrreeeeeemmmppplllaaazzzaaarrr cccaaadddaaa fffiiillltttrrrooo...
LLLOOOSSS RRREEESSSIIIDDDUUUOOOSSS DDDEEEBBBEEENNN SSSEEERRR EEELLLIIIMMMIIINNNAAADDDOOOSSS SSSIIIGGGUUUIIIEEENNNDDDOOO LLLAAA NNNOOORRRMMMAAATTTIIIVVVAAA
VVVIIIGGGEEENNNTTTEEE...
Pag. 20
Page 22
4 . 1 0 SOSTITUZIONE FLAP
4.10 REPLACING THE FLAP
4.10.1 Flap laterali
1- Togliere i due copiruota e le ruote.
2- Sv ita re le viti di fis saggio f lap al telai o e so stit uirlo co n uno nuov o.
3- Rimontare la macchina eseguendo le fasi in senso contrario
4.10.2 Flap posteriore
1- Togliere il copriruota alla ruota destra e la ruota
2- Togliere il flap laterale destro
3- Sfilare il flap posteriore e sostituirlo con uno nuovo.
Rimontare la macchina eseguendo le fasi in senso contrario.
5 . 1 ROTTAMAZIONE DELLA MACCHINA
Questo prodotto è un rifiuto speciale di tipo RAEE, e risponde ai
requisiti richiesti dalle nuove direttive a tutela dell’ ambiente
(2002/96/CE RAEE). Deve essere smaltito separatamente ai rifiuti comuni in ottemperanza alle leggi e norme vigenti.
Rifiuto Speciale. Non smaltire
nei rifiuti comuni.
5.2 MATERIALE DI CONSUMO
M o t o r i d u t t o r e : G ra s so al Li t io MO V IB LA K 3 00
o di uguali caratteristiche
B a t t e r i a : Acqua distillata.
4.10.1 Side flap
1- Remove the 2 wheel cover and the wheel.
2- Loosen the screws fixing the flap to the frame and replace the flap
with a new one.
3- Reasse mbl e the m ach ine f oll owi ng th e inst ruc tio ns in r eve rse or der .
4.10.2 Rear flap
1- Remove the right wheel cover and the right wheel.
2- Remove the right side flap.
3- Remove the rear flap and replace it with a new one.
4- Reasse mbl e the m ach ine f oll owi ng th e inst ruc tio ns in r eve rse or der .
5.1 S C R A P P I N G T H E M A C H I N E
This product is classified as RAEE type special waste and is
covered by the requisites of the new environmental protection
regulations (2002/96/CE RAEE). It must be disposed of separately
from ordinary waste in compliance with current legislation and
standards.
Special waste. Do not dispose of
with ordinary waste.
5.2 C O N S U M A B L E S
G e a r m o t o r : Moviblak 300 lithium grease or a similar product
B a t t e r y : D isti lled water.
4.10 AUSWECHSELN DER GROBSCHMUTZKLAPPEN
4.10.1 Seitliche Schmutzklappen
1 - Die beiden Raddeckel und die Räder abnehmen.
2 - D i e S c h r a u b e n l ö s e n , m i t d e n e n d i e S c h m u t z k l a p p e a m R a h m e n
befestigt ist und diese austauschen.
3 - Für die Montage die Schritte in umgekehrter Reihenfolge
durchführen.
4.10.2 Hintere Schmutzklappe
1 - D e n R a d d e c k e l d e s r e c h t e n R a d e s u n d d a s R a d s e l b s t a b n e h m e n .
2 - Die seitliche, rechte Schmutzklappe abnehmen.
3 - Die hintere Schmutzklappe herausnehmen und durch eine neue
ersetzen. Für die Montage die Schritte in umgekehrter Reihenfolge
durchführen.
5 . 1 M A S C H I N E N V E R S C H R O T T U N G
Dieses Produkt gilt nach der Richtlinie über Elektro- und
Elektronik-Altgeräte (RAEE) als Sondermüll und erfüllt die
Anforderungen der neuen Umweltschutzrichtlinien (2002/96/EG
R A E E ) .
Es muss nach den geltenden Gesetzen und Bestimmungen
getrennt vom Hausmüll entsorgt werden.
Sondermüll. Nicht über den
Hausmüll entsorgen.
4.10 CAMBIO DE LA TAPA
444...111000...111 aaallleeetttaaa lllaaattteeerrraaalll
1 - Retirar la tapa 2 de la cubierta y la rueda.
2 - Aflojar los tornillos de fijación de la aleta para el marco y reemplazar
la tapa con una nueva.
3 - Volver a montar la máquina siguiendo las instrucciones en orden
inverso.
444...111000...222 aaallleeetttaaa tttrrraaassseeerrraaa
1 - Retire la cubierta de la rueda derecha y la rueda derecha.
2 - Retirar la tapa del lado derecho.
3 - Retirar la tapa trasera y sustituirlo por uno nuevo.
4 - Volver a montar la máquina siguiendo las instrucciones en
orden inverso.
5 .1 D E SG U AC E D E L A MÁ Q UI N A
E st e p ro d uc to es t á cl a si f ic a do c o mo re si d uo es pe c ia l t ip o R AE E y s e
v e af e ct a do po r l os r e qu i si t os d e l a n ue v a no r ma t iv a d e p ro t ec ci ó n
a mb ie n ta l ( 2002/9 6/ C E R AE E ). D e be se r t ra t ad o s ep a ra d am en t e d e
l os r e si d uo s o rd i na ri o s d e co n fo r mi d ad c o n l a le g is l ac ió n y la s
n or ma s v i ge nt e s.
Los residuos especiales. No deseche junto con la basura ordinaria.
5.2 VERBRAUCHSSTOFFE
Getriebemotor: Lithiumfett MOVIBLAK 300 oder mit denselben
E ig en s ch af t en .
Batterie: Distillieren wasser.
5.2 CONSUMIBLES
Engrana je motor: Gra sa de liti o Moviblak 30 0 o un pro ducto
similar .
Batería : Agua destilada .
Pag. 21
Page 23
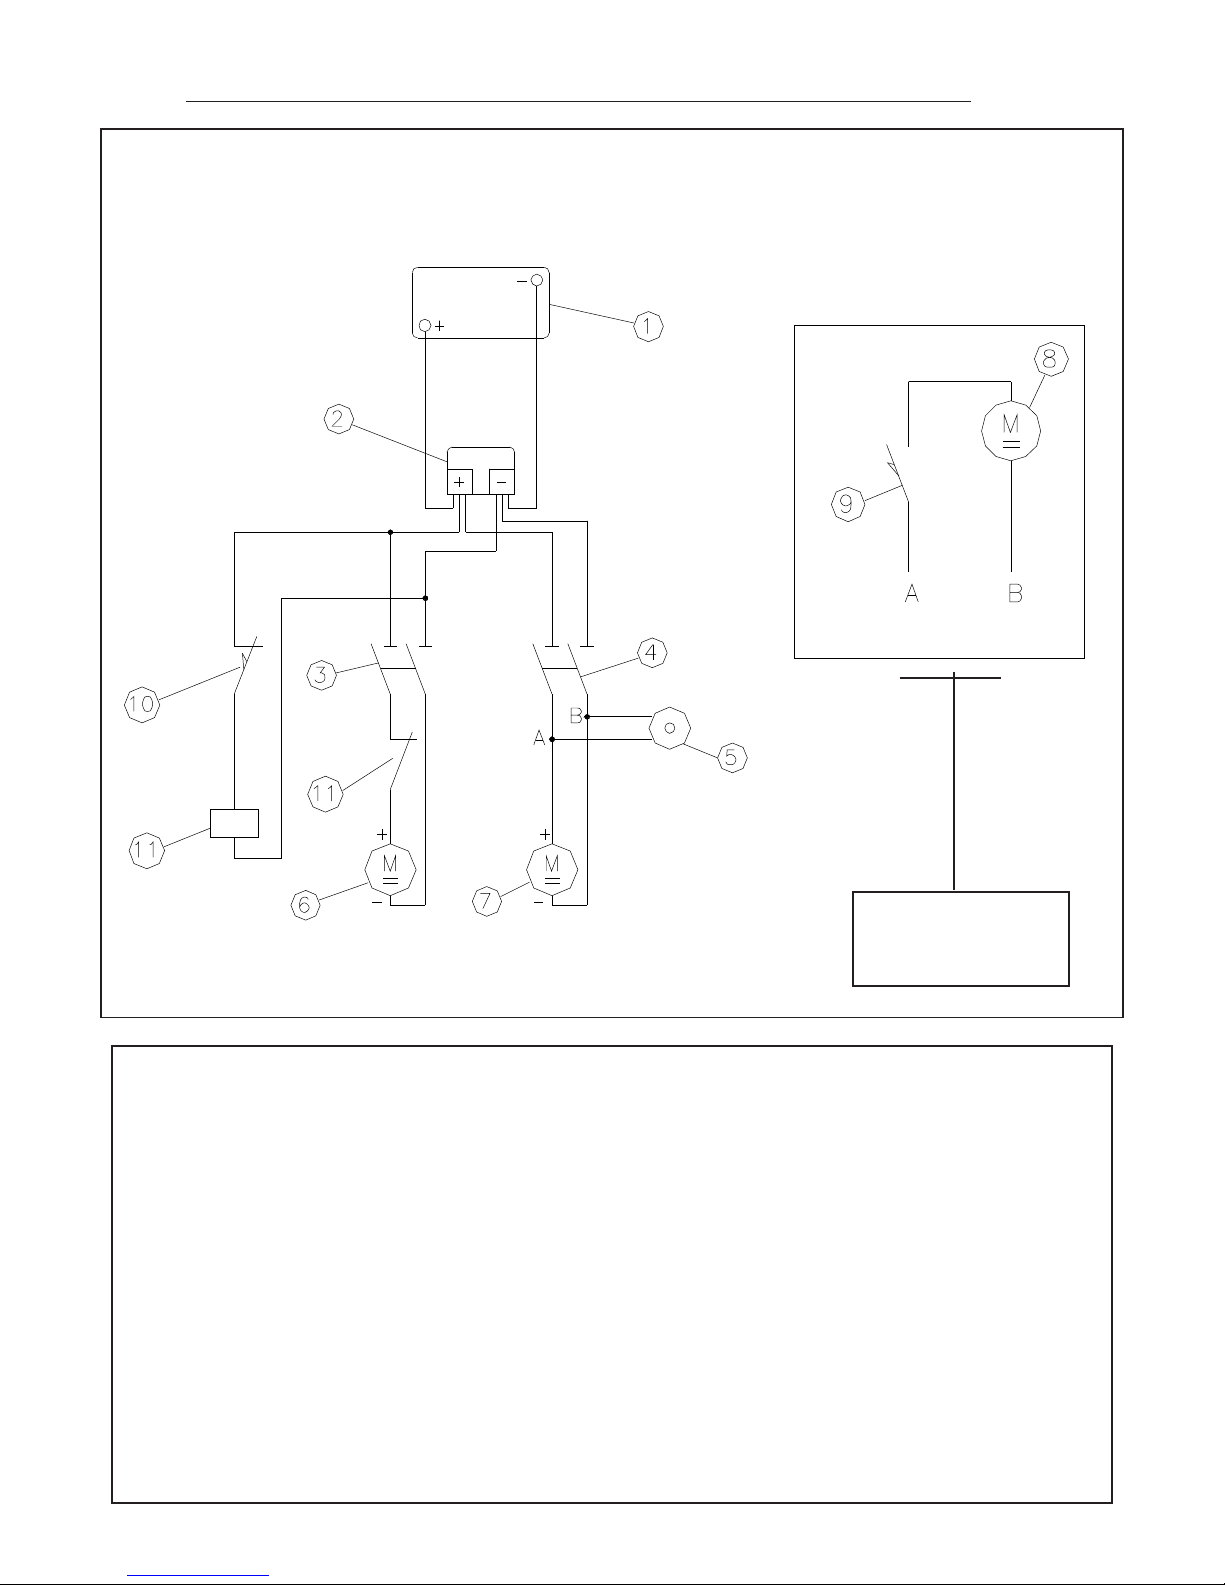
SCHEMA ELETTRICO - WIRING DIAGRAM - SCHALTPLAN - ESQUEMA ELÉCTRICO
Versión ECOL 85T
ECOL 85 T version
Collegare ai punti A - B
Connect to point A - B
Ad de Punkten A - B
Conectar al punto A - B
1- Batteria 1- Battery 1- Batterie 1 - Batería
2- Presa carica batteria 2- Battery charge socket 2- Steckdose Batterieladung 2 - Entrada carga batería
3- Interruttore per ventola. 3- Fan switch 3- Schalter für Flügelrad 3 - Interruptor ventilador
4- Interruttore per spazzola. 4- Brush switch 4 - Schalter für Bürste 4 - Interruptor cepillo
5- Spia carica batteria. 5- Battery charge indicator light 5 - Kontrolleuchte Batterieladung 5 - Luz indicadora carga de batería
6- Motore ventola.
7- Motore spazzola centrale. 7- Main brush motor 7- Mittelbürstenmotor 7 - Motor cepillo central
*8- M o t o r e s p a z z o l a l a t e r a l e . *8- S i d e b r u s h m o t o r *8 - Seitenbürstenmotor *8- Motor cepillo lateral
*9- Micro comando spaz. laterale.*9- Side brush micro control *9- Mikroschalter Seitenbürstensteuerung*9 - Micro control cepillo lateral
10- Micro . 10- Micro 10- Mikroschalter 1 0 - Micro
11- Rele . 10- Relay 10- Relais 1 0 - Relé
(*)-Versione ECOL 85T (*)- ECOL 85T version (*)- ECOL 85T version (*) - Versión ECOL 85T
6- Fan motor 6 - Flügelradmotor 6 - Motor ventilador
Pag. 22
Page 24
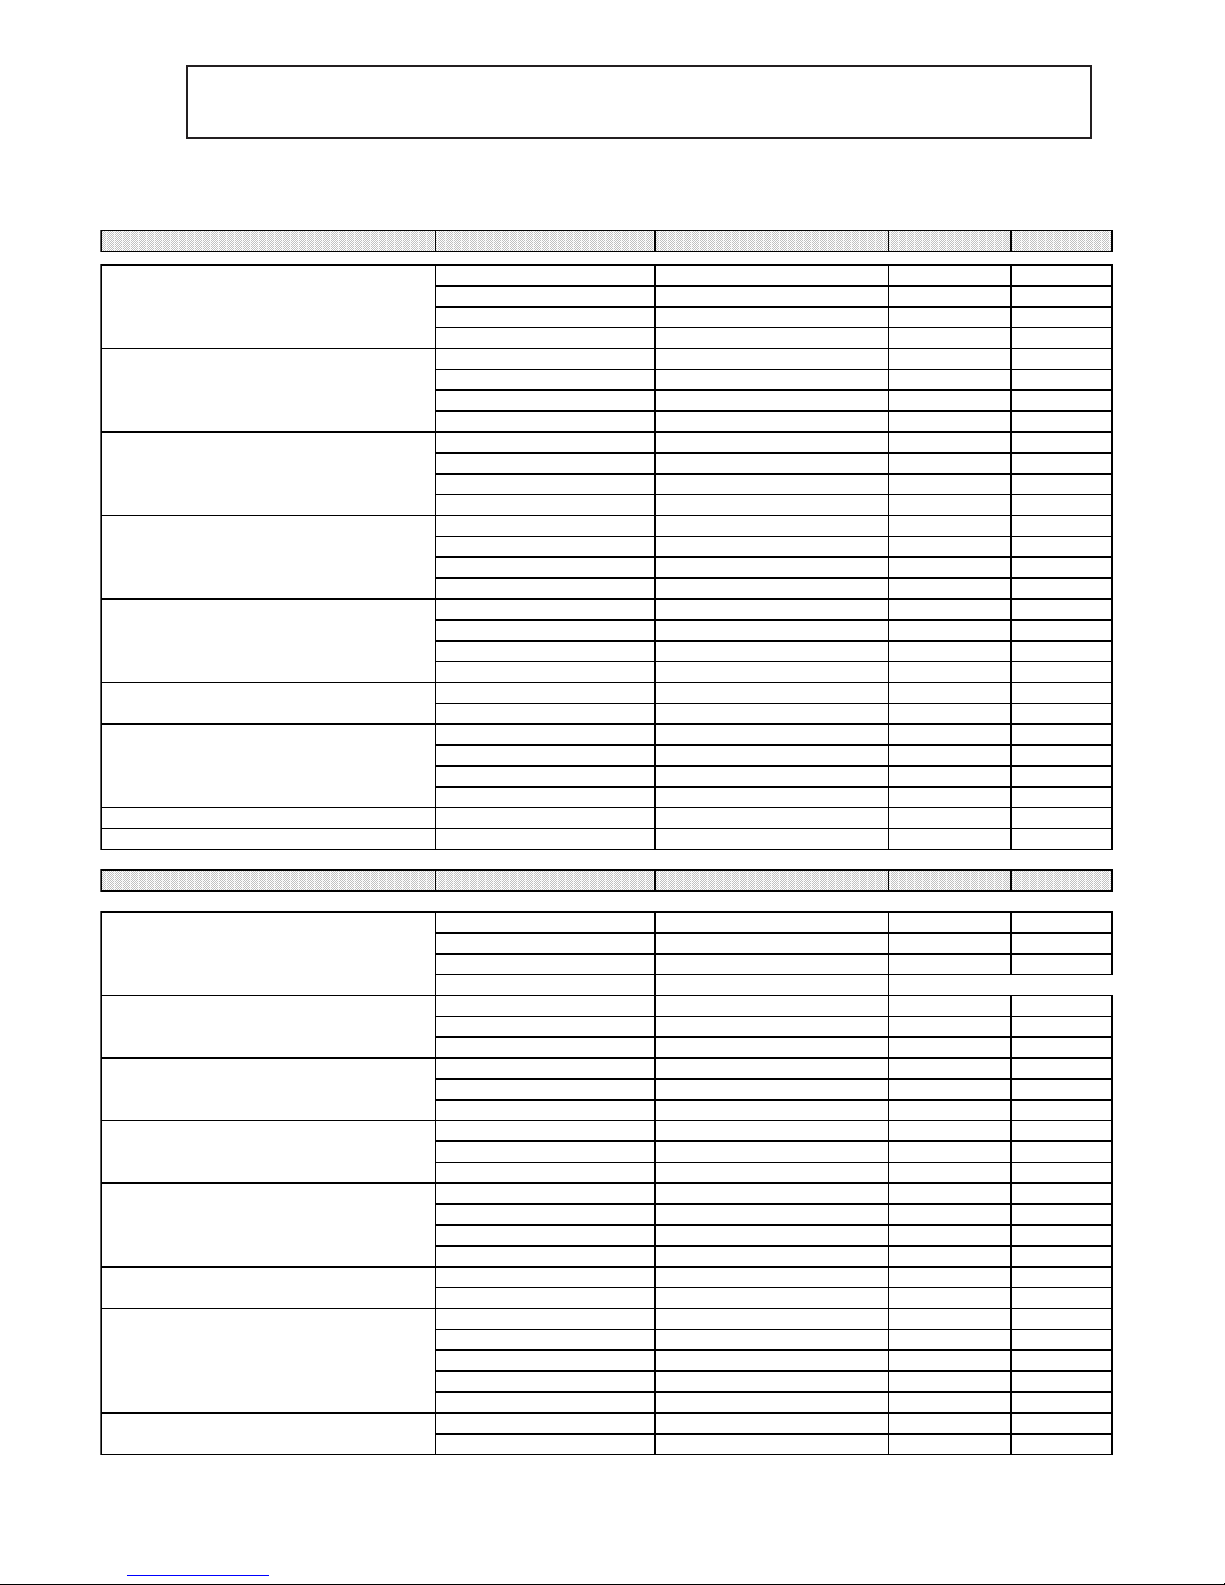
Tabella difetti / cause / rimedi Trouble shooting
DIFETTO CAUSA CAUSE RIMEDIO REMEDY
Cinghia rotta The belt is broken Sostituire Replace
La spazzola centrale non gira Motore bruciato The motor has burnt out Sostituire Replace
The main brush is not spinning Filo staccato A wire is d isconn ected Controllare Check
Inranaggio rotto The gear is broken Sostituire Replace
Cinghia rotta The belt is broken Sostituire Replace
Spazzola laterale non gira Filo staccato The motor has burnt out Controllare Check
The side brush is not spinning Motore bruciato A wire is disconnected Sostituire Replace
Liquido mancante The liquid is insufficient Rabboccare Top up
La batteria non mantiene la carica Morsetto allentato The terminal is loose Stringere Tighten
The battery does not stay charged
Filtro rotto The filter is broken Sostituire Replace
Uscita di polvere dalla ventola Filtro posizionato male The filter is in the wrong position Sistemare Pos. correctly
Dust comes out of the fan Guarnizioni usurate The gaskets are worn Sostituire Replace
Spazzola troppo premuta The brushes are too low Regolare Ad just
Le spazzole si consumano troppo velocemente
The brushes wear out too quickly
Uscita di polvere durante il lavoro Flap laterali consumati The side flaps are worn Sostituire Replace
Dust forms during operation Filtro intasato Clogged filter
Pulire Clean
Motore bruciato The motor has burnt out Sostituire Replace
Motore aspirazione non funziona Interrutt ore rotto The switch is broken Sostituire Replace
The suction motor does not work Filo staccato The wire is disconnected Controllare Check
La macchina non si accende Morsetti batteria staccati The battery terminals are discon. Controllare Check
The machine does not come on Batterie scariche The battery is discharged Ricaricare Recharge
STÖRUNG URSACHE
CAUSA
BESEITIGUNG REMEDIO
Riemen beschädigt
El cinturón esta roto
Auswechseln
Reemplazar
Die Mittelbürste dreht sich nicht Motor durchgebrannt
El motor se ha quemado
Auswechseln
Reemplazar
El cepillo central no gira
Draht lose
El cable esta desconectado
Kontrollieren
Comprobar
Zahnrad beschädigt
El engranaje esta roto Auswechsel n Reemplazar
Riemen beschädigt
El cinturón está roto
Auswechseln
Reemplazar
Die Seitenbürste dreht sich nicht Draht lose
El motor se ha quemado
Kontrollieren
Comprobar
El cepillo lateral no gira
Motor durchgebrannt
El cable esta desconectado
Auswechseln
Reemplazar
Die Batterie bleibt nicht aufgeladen Flüssigkeit fehlt
No hay líquido suficiente
Auffü llen
Rellenar
La batería no se mantiene cargada
Klemme gelockert
El terminal esta suelto
Anzi ehen
Apretar
Filter beschädigt
El filtro esta roto
Auswechseln
Reemplazar
Das Flügelrad gibt Staub ab Filter falsch positioniert
El filtro esta mal colocado
Kontrollieren
Recolocar
Sale polvo del ventilador
Dichtungen verschlissen
Las juntas estan deterioradas
Auswechseln
Reemplazar
Die Bürsten nutzen sich zu schnell ab Bürsten üben zuviel Druck aus
Los cepillos estan demasiado bajos
Regulieren
Ajustar
Los cepillos se deterioran rápidamente
Staubaustritt während der Arbeit Grobschmutzklappen abgenutzt
Las solapas laterales estan desastadas
Auswechseln
Reemplazar
Se forma polvo durante las operaciones
Filter verstopft
El filtro esta obstruido
Reinigen
Limpiar
Saugmotor funktioniert nicht Motor durchgebrannt
El motor se ha quemado
Auswechseln
Reemplazar
El motor de aspiración no funciona
Schalter defekt
El interruptor esta roto
Auswechseln
Reemplazar
Draht lose
El cable esta desconectado
Kontrollieren
Comprobar
Die Maschine springt nicht an Batterieklemmen lose
Terminales de la batería desconectados
Kontrollieren
Comprobar
La máquina no se enciende
Batterien leer
La batería esta descargada
Wiederaufladen
Recargar
Störungen / Ursachen / Beseitigung Tableau des pannes /causes /remèdes
P a g . 2 3
Page 25
 Loading...