

Page 1

USB Floppy
USB Floppy Disk Emulator
Manual
ipcas GmbH Phone: +49 (0)9131/ 7677-0
Gundstraße 15 Fax: +49 (0)9131/ 7677-78
D-91056 Erlangen Internet: http://www.ipcas.de
Germany Email: info@ipcas.de
Page 2

Subject to change without prior notice Date: 09-03-10
ipcas GmbH USB Floppy Disk Emulator – USB Floppy v0.2 Page 2 of 17
Contents
1. Scope of Supply.................................................................3
2. Important Notes ................................................................3
3. Introducing the device........................................................4
4. Front panel – description, connections ..................................5
5. Back – description, connections ...........................................6
6. Installation .......................................................................7
7. One USB Stick replaces one floppy .......................................7
8. Data import and use on the machine/system.........................8
9. One USB Stick replaces 100 floppies.....................................9
10. Rading and writing...........................................................12
11. Safely remove USB Stick – USB Floppy Disk Emulator...........12
12. Safely remove USB Stick – Computer/PC ............................12
13. Internal jumpers.............................................................. 13
13.1 Jumper 1 and 2 – Select disk drive............................................ 13
13.2 Jumper 5 Ready signal.............................................................. 13
14. FAQ's – Often Asked Questions.......................................... 14
Page 3

Subject to change without prior notice Date: 09-03-10
ipcas GmbH USB Floppy Disk Emulator – USB Floppy v0.2 Page 3 of 17
This manual explains how the USB Floppy Disk Emulator is installed and
used to replace the legacy disk drive.
You will always find an up-to-date pdf document of the manual on our
Website www.ipcas.de.
1. Scope of Supply
• USB Floppy Disk Emulator
2. Important Notes
COPYRIGHT © 2009 ipcas GmbH
All rights reserved. No part of this document is allowed to be copied, reproduced,
transcribed or transferred in any other form without the explicit writ ten permission of
ipcas GmbH. Subject to printing mistakes, errors, or changes without prior notice.
All brand names or trademarks mentioned in this document serve to identify and may
belong to respective owners and must, therefore, be treated as such.
The warranty claim expires immediately if the product is changed, incorrectly used,
purposely or negligently damaged or impaired by force majeure or operation beyond
the allowed working conditions.
CAUTION:
The warranty claim expires upon removing the serial number. Shipping or insurance
companies cannot be made liable for damage caused by inadequate packing.
Note:
Please read this manual carefully before you deploy the device.
Page 4

3. Introducing the device
The USB Floppy Disk Emulator of ipcas GmbH replaces legacy disk drives.
The floppy is replaced by a USB Stick. Up to 100 virtual floppy disks can
be stored on one USB Stick.
Retrofitting of your machines/systems is no longer required. Just replace
the disk drive 1:1.
Î
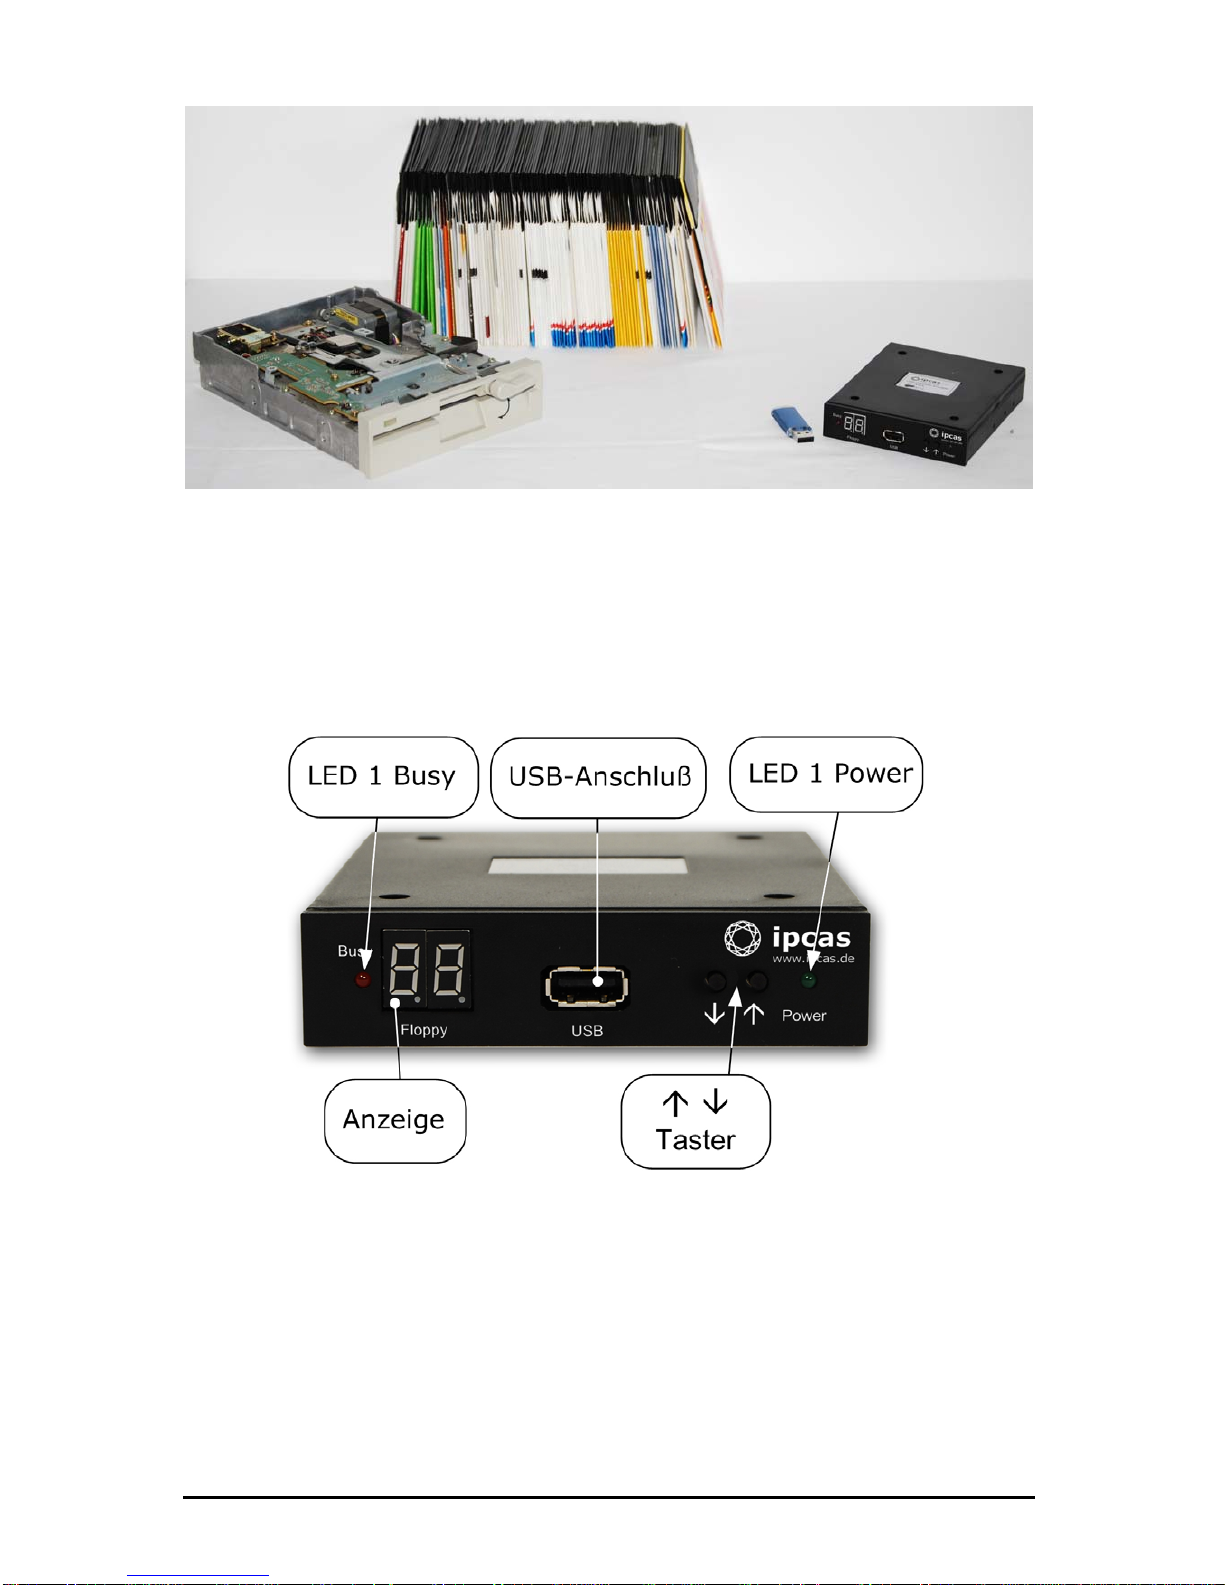
Comparison: Left: 3.5 inch disk drive with 100 x 1.44 MB floppies
Right: ipcas USB Floppy Disk Emulator with USB Stick
In the industrial sector many machines are still equipped with flopy disk
drives. The floppy disk is often the only means of importing updates or
reading out data. This could become a source of future problems.
Floppies are sensitive and short-lived. The maintenance of disk drives is
expensive, and quite often they can be no longer replaced.
The ipcas Floppy Disk Emulator depends on USB Sticks as data carriers,
which are far more compact, practical and long-lived than the oldfashioned floppy disk. So the ipcas "Floppy" makes your machine/system
fit for the future.
The ipcas Floppy Disk Emulator can also replace other forms of disk drives
and disk storage systems. Refer to the comparison with a 5¼ inch floppy
disk drive with 1.2 MB floppies.
Subject to change without prior notice Date: 09-03-10
ipcas GmbH USB Floppy Disk Emulator – USB Floppy v0.2 Page 4 of 17
Page 5
Ô
A 5¼ inch installation frame for 3.5 inch disk drives and a 34-pin adapter are optionally
available.
4. Front panel – description, connections
LED 1 – Busy (red): lights up when system is reading or writing.
LED 2 - Power (green): lights up when the voltage supply is connected.
Display (2 digits): displays the status of the disk drive or the currently
selected floppy (00 to 99).
USB: USB socket (USB type A) to connect a USB Stick (the data carrier
replacing the floppy disk).
Subject to change without prior notice Date: 09-03-10
ipcas GmbH USB Floppy Disk Emulator – USB Floppy v0.2 Page 5 of 17
Page 6
¶µ : Selection button to select the desired virtual floppy disk (00-
99 if previously preset)
When the virtual floppy changes from one to another, dots light up
next to the digits. Please wait before you use the disk drive until the
dots disappear.
• Caution: When LED 1 – Busy – lights up, do not under any
circumstances remove the USB Stick or deploy the selection
button, or else you might incur data losses.
• The virtual floppy images must be in correct sequence in order
to be selected with the selection button.
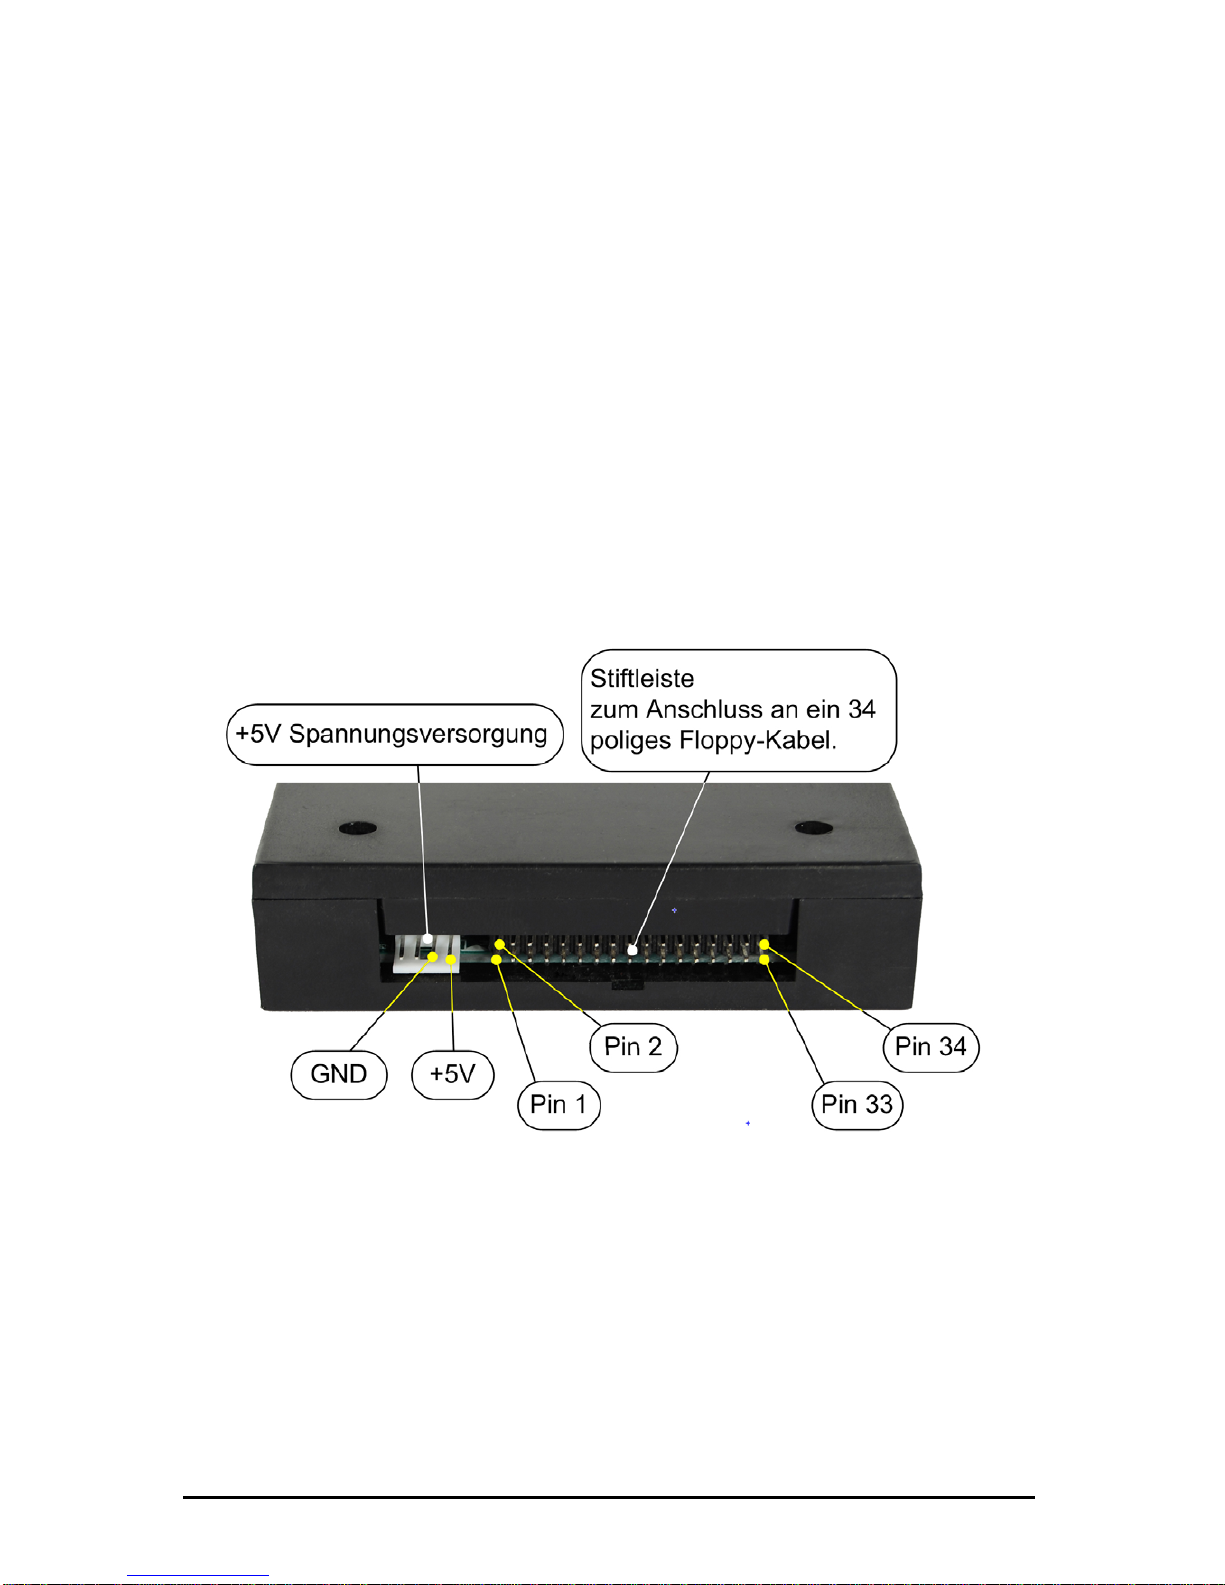
5. Back – description, connections
At the back of the disk drive you will find the connection for the
voltage supply (+5V DC) and the 34-pin interface to connect the
floppy disk drive controller.
Please check for correct polarity of voltage supply when connecting
the floppy disk drive. GND (ground) is usually indicated by a black
wire, and +5V by red wire.
Please also correctly attach the 34-pin connection cable.
Subject to change without prior notice Date: 09-03-10
ipcas GmbH USB Floppy Disk Emulator – USB Floppy v0.2 Page 6 of 17
Page 7

On modern flatcables the 34-pin plugs have a gib at the bottom.
When connecting, the gib has to settle into the corresponding
sliding notch at the drive housing below the header.
Also make sure the correct pin sequence is observed (Wire 1 on Pin
1, etc.). Wire 1 is usually indicated by color at the floppy cable
(often red or blue).
Illustration of a connected disk drive
Caution: If the connection cable is attached incorrectly the drive
disk will not function properly and may also be damaged thereby.
6. Installation
Connect the disk drive as described under Back – description,
connections.
7. One USB Stick replaces one floppy
You have just installed the disk drive and switched on your
machine/system.
The display of the USB Floppy Disk Emulator shows
(c4), the
power LED lights up
(green).
Subject to change without prior notice Date: 09-03-10
ipcas GmbH USB Floppy Disk Emulator – USB Floppy v0.2 Page 7 of 17
Page 8

The display of (c4) indicates that the disk drive is ready and
is waiting for the USB Stick to be connected.
The power LED is always on when the disk drive is supplied with
sufficient voltage.
Insert a customary USB Stick into the USB socket of the disk drive.
Í
After connecting it the disk drive searches for the already available
virtual floppies. This is indicated by the fast succession of the
numbers 00 to 99 in the display. If no virtual floppies are found on
the USB Stick, the display stops at
(00). 00 is the first floppy
and has already been created automatically.
The disk drive can be used immediately. You may use the USB Stick
in the same way as you used your floppy.
A directory with the name UFDDD00 has been created on the USB
Stick. Do not delete this directory, since it displays you virtual
floppy 00.
8. Data import and use on the machine/system
Connect a USB Stick into a USB connection of your computer or PC.
Should the USB Stick already have been used once in the USB
Floppy Disk Emulator, you will find a directory UFDDD00 on the
USB
Stick.
Copy the desired data into the directory.
Subject to change without prior notice Date: 09-03-10
ipcas GmbH USB Floppy Disk Emulator – USB Floppy v0.2 Page 8 of 17
Page 9

Safely remove the USB Stick from your PC and connect it to the
USB Floppy Disk Emulator.
Í
The display of the USB Floppy Disk Emulators now shows
(00).
Use the USB Stick in the USB Floppy Disk Emulator in the same way
as you used your floppy in the disk drive.
9. One USB Stick replaces 100 floppies
The USB Floppy Disk Emulator in multi-disk mode behaves as if only one
floppy were to be emulated. Please first read Chapter 1.
USB Stick replaces 1
floppy.
When more than one floppy are managed by just one USB Stick, the desired
floppy can be selected with the selection button
(¶µ). The display
always shows you the currently set floppy
to (from 0 to
99).
Preliminary steps:
To manage up to 100 virtual floppies on one USB Stick, you must first create
virtual floppies on the USB Stick.
Connect the USB Stick into the USB port on your PC.
If the USB Stick should already have been used on your USB Floppy Disk
Emulator, then the directory UFDDD00 should be located on the USB
Stick.
The contents of this directory include your first floppy. The ending "00" at the
end of the directory name refers to the floppy number
(00) on your
Floppy Disk Emulator.
Create additional directories on the USB Stick. For the directories, enter the
names UFDDD01, UFDDD02, UFDDD03 etc. to the maximum
UFDDD99.
You do not have to create 100 directories. If you only want to manage three
floppies with the USB Stick, then just create the directories UFDDD00,
UFDDD01 and UFDDD02.
Subject to change without prior notice Date: 09-03-10
ipcas GmbH USB Floppy Disk Emulator – USB Floppy v0.2 Page 9 of 17
Page 10

Always make sure that you start at 00 and do not omit any
directory within a sequence.
Negative example:
Let us assume you have one directory for Floppy 00, one for 01 and
one for 15. When you insert your USB Stick into the USB Floppy
Disk Emulator, then you can change back and forth from Floppy 00
to 01. Switching to Floppy 15 is also possible, but not back again
to Floppies 00 or 01, since there is a sequence gap.
Switching from one virtual floppy to another
Example:
Let us assume you want to use the 4th floppy (i.e. Floppy 03) and the
USB Stick is not yet connected to the USB Disk Emulator.
Insert the USB Stick into the USB Floppy Disk Emulator.
Í
The display of the USB Disk Emulator now shows
(00), i.e.
the first floppy.
Use the selection button
(µ) to change over to Floppy (just
tap lightly until "03" appears on the display).
When you have selected Floppy 03, the display shows
(03
with dots) for some time. The dots indicate that the selected Floppy
is just being initialized.
Please wait until the dots disappear from the display before you
continue to use the USB Stick (reading, writing or removing).
Note: You can only select virtual floppies for which
directories have been previously created.
Please make sure the Busy LED (red) is not on. Should the
Busy LED be on, this indicates an ongoing reading or writing
process. In that case, please wait until the read/write process has
been completed.
You can now use the selected (virtual) floppy just as you used to do
with your customary floppies.
If you want to now change from Floppy 03 to 01, proceed in the
same way. Here are the individual steps to take:
Subject to change without prior notice Date: 09-03-10
ipcas GmbH USB Floppy Disk Emulator – USB Floppy v0.2 Page 10 of 17
Page 11

Starting point: The display shows , and you want to select
.
1. Make sure the Busy LED (red)
is not on
2. Press selection button (¶)
3.
The display shows (02) (After a while the dots
disappear:
. You do not have to wait, and can continue
to switch.)
4.
Press the selection button (¶) again
5.
In the display you now see (0.1.)
6.
Wait until the dots after the 0 and after the 1 disappear. As
soon as you see
(01 without dots) in the display, you
may use Virtual Floppy01.
Note: Once you have selected the desired floppy, you should
always wait until the dots next to the digits in the display
disappear. These indicate that the selected floppy is still being
initialized. If you start writing on the floppy during the
initialization phase, you may incur faults or data loss.
Subject to change without prior notice Date: 09-03-10
ipcas GmbH USB Floppy Disk Emulator – USB Floppy v0.2 Page 11 of 17
Page 12

10. Reading and writing
During the reading or writing process (data are being saved on or
read from the virtual floppy) the red Busy LED
lights up. During
this process, do not under any circumstances remove the USB Stick
or deploy the selection buttons
(¶µ).
Please always wait until a read or write process has been
completed, before you continue, or else you may thereby cause
data loss.
11. Safely remove USB Stick from USB Floppy Disk Emulator
Only remove the USB Stick when the Busy LED (red) is not on.
When a read/write process has just been completed, but the LED is
still on for a moment, please wait for a couple of seconds before you
remove the USB Stick.
Also do not remove the USB Stick as long as the two dots are still
visible in the display as here, for example, 03 with dots:
12. Safely remove USB Stick from Computer/PC
Please always remove the USB Stick safely from your computer or
PC. Proceed safely as usual with your operating system (Windows:
safely remove or log out; Linux/Unix: unmount; Mac OS: eject).
Subject to change without prior notice Date: 09-03-10
ipcas GmbH USB Floppy Disk Emulator – USB Floppy v0.2 Page 12 of 17
Page 13

13. Internal jumpers
13.1 Jumper 1 and 2 – Select disk drive
Jumper J1 and J2 (In default J2, 2-3 is connected)
The following options are available:
J1: 1-2 connected: Disk drive mode 1
J1: 2-3 connected: Disk drive mode 2
J2: 1-2 connected: Disk drive mode 3
J2: 2-3 connected: Disk drive mode 4
The default mode is J2 connecting 2-3.
13.2 Jumper 5 Ready signal
Jumper J5
J5 open: active due to low level
J5 connected: active due to high level
Jumper J5 is open by default (Ready signal due to low level).
Please observe: when the jumper is connected, the data throughput
may possibly exceed the maximum throughput of your floppy
controller (especially with older systems). The deviation of the USB
Floppy Disk Emulator can amount up to 10%.
Subject to change without prior notice Date: 09-03-10
ipcas GmbH USB Floppy Disk Emulator – USB Floppy v0.2 Page 13 of 17
Page 14

Note:
Jumpers 1 and 2 help you set disk drive modes or,
repsectively, the disk drive compatibility mode. Before you
change the desk drive mode with Jumpers 1 and 2, please
maintain the default setting (J2 2-3) and additionally
connect Jumper 5.
The combination of Jumpers 1, 2 and 5 thus yields five possible
compatibility modes.
Caution:
Please do not ever use J1 and J2 or J3 and J5
simultaneously. Or else your device might be damaged.
Please consult one of our qualified technicians before you make your
own jumper settings. If you open up the device without explicit
instructions, your guarantee and warranty will no longer be valid.
14. FAQ's – Often Asked Questions
1. The USB Floppy Disk Emulator is connected at the voltage supply.
The LED 2 (green) lights up, LED 1 (red) is off. The display shows
C4. What does that mean?
When the display shows C4 (
), the disk drive is
waiting for a USB Stick to be connected.
2. No USB Stick is connected, the display does not show anything,
and the LED 2 (green) is not on, although the device is connected to
the voltage supply.
What caused this?
Normally, LED 2 (green) is on in the idle state when the
voltage supply is connected. Please check whether the
voltage supply is connected properly. You will find a
detailed description on how to connect the voltage
supply under
Back: Description, connections
in this
manual.
3. The voltage supply is connected, and no USB Stick has been
inserted into the device, but both LED's (LED 1 and LED 2) have lit
up and the display shows C4. Why?
Subject to change without prior notice Date: 09-03-10
ipcas GmbH USB Floppy Disk Emulator – USB Floppy v0.2 Page 14 of 17
Page 15

Subject to change without prior notice Date: 09-03-10
ipcas GmbH USB Floppy Disk Emulator – USB Floppy v0.2 Page 15 of 17
Back - description, connections
Possibly, the 34-pin data cable has not been connected
at all or done so incorrectly (the wrong way around).
Please shut down your system (PC, computer, machine)
and check your cable connection. You will find a detailed
description on how to connect the 34-pin data cable in
the manual under
. When
the disk drive has been correctly connected and LED 1
(red) is still on, then please change the jumper setting
of J1 and J2. The default setting is J2: 2-3. For a
complete list of possible jumper settings please refer to
Internal jumpers
in this manual.
4. The display shows E0, E1, E2, E3, E6, E7, E8 or E9, no USB Stick
has been connected, LED 2 (green) is on and LED 1 (red) is off.
What does this error code mean?
E0-E3: The voltage supply is not normal. Please check
the contacts and make sure that a constant
voltage of +5V DC is available. Due to voltage
fluctuations, the self test of the device may
also have failed. Please shut down your
PC/machine/ computer system and reboot.
E6-E8: Please re-format your USB Stick, or insert a
USB Stick that is formatted correctly and
suitably to the disk drive. (Note: Prior to
formatting please always make sure that all
data has been properly saved.)
E9: The data in one sector are too extensive. Or
the data volume exceeds the capacity of the
virtual floppy.
If the error display continues to be shown, then please
consult our technical support. (for contact, refer to last
page of this manual)
5. The display shows
(00). A USB Stick has been attached,
LED 2 (green) is on and LED 1 (red) is off. Is that normal?
Yes, that is the normal state after connecting a USB
Stick or after switching on your machine or system.
The display
(00) indicates that your USB Stick has
been successfully recognized, and the USB Floppy Disk
Emulator is ready to deploy the USB Stick.
Page 16

6. The USB Floppy Disk Emulator has been connected correctly and
LED 2 (green) is on, while LED 1 (red) is off. A USB Stick has been
inserted into the USB port. And yet the display shows
(C4),
why?
This behavior may indicate contact failure.
Plug the USB Stick in and out a couple of times or use a
different USB Stick.
7. The USB Stick has been correctly attached and the voltage supply
is appropriate, but both LED's (red and green) are on and the
display shows the current virtual floppy number. Why are both
LED's on?
That is quite normal. When the device is reading or
writing, LED 1 lights up (red). Please do not under any
circumstances select a different virtual floppy or remove
the USB Stick when the red LED is on! Or else the
read/write process is interrupted and could lead to data
loss. In the worst case the USB Stick or the disk drive
could become damaged.
8. The current read/write operation has been completed. You would
like to now select the next higher number virtual floppy with the
right button
(µ). You select the next higher number virtual floppy
disk, however, the digital display does not switch to the next higher
number and shows
(F5). Why?
Most probably you have pressed the button for longer
than 5 seconds.
Please just shortly tap both buttons
(¶µ) and,
subsequently, select your virtual floppy image as usual.
9. After a read/write process has been completed, you have
removed the USB Stick from the disk drive and now want to further
process the saved data on a PC. There you find out that the data
are faulty or useless, or the USB Stick itself cannot be opened.
What happened and how can you avoid this in the future?
Probably, the USB Stick has been removed prematurely.
LED 1 (red)
lights up and indicates that no
read/write process is being performed. Do not under
any circumstances remove the USB Stick while the red
LED is still on.
Subject to change without prior notice Date: 09-03-10
ipcas GmbH USB Floppy Disk Emulator – USB Floppy v0.2 Page 16 of 17
Page 17

To be on the safe side, wait for a short time (2-3
seconds) after LED 1 (red)
turns off before you
remove the USB Stick.
10. The end of a document has been damaged, how can something
like that happen?
That happens when there is not sufficient space on the
virtual floppy to save the document.
Suppose there is some data on your virtual floppy image
and you still have 1MB memory space left. But the
document to be saved has a total size of 1.28MB. The
transfer of the document to the virtual floppy would be
interrupted after saving 1MB.
To avoid this make sure that your data to be written will
actually fit on the virtual image. When in doubt, please
safely select the next free virtual floppy.
Contact
ipcas GmbH Phone: +49 (0)9131/ 7677-0
Gundstraße 15 Fax: +49 (0)9131/ 7677-78
D-91056 Erlangen Internet: http://www.ipcas.de
Germany Email: info@ipcas.de
Subject to change without prior notice Date: 09-03-10
ipcas GmbH USB Floppy Disk Emulator – USB Floppy v0.2 Page 17 of 17
 Loading...