

Page 1
User Manual
IPCC-9605E
Page 2

2
Notice
FCC Warning
The Megapixel Network Bullet camera has been tested and found to
comply with the limits for a Class A digital device pursuant to the FCC rules.
This equipment can radiate radio frequency energy and if not installed and
used in accordance with the instructions, may cause harmful interference to
radio communications. There is no guarantee that interference will not occur
in particular installation。
Read this manual carefully before installation. This manual should be
saved for future use。
Important Safety Instructions and Warnings:
Electronic devices must be kept away from water, fire or high magnetic
radiation.
Provide adequate ventilation,
Clean with a dry cloth
Unplug the power supply when the device is not to be used for an
extended period of time;
Only use components and parts recommended by manufacturer;
Position power source and related wires to assure to be kept away from
ground and entrance;
Refer to qualified personnel for all service matters.
Save product packaging to ensure availability of proper shipping
containers for future transportation
Indicates that the un-insulated components within the product may
carry a voltage harmful to humans
Indicates operations that should be conducted in strict compliance
Page 3

3
with instructions and guidelines contained in this manual
Table of Contents
Contents .................................................................... 2
Chapter Ⅰ System Introduction ....................................
1.1 Product Discription ...........................................
1.2 Product Features ......................................... 5
1.3 System Requirement ................................... 7
1.4 Technical Specification ................................. 7
1.5 Warning .......................................................... 9
ChapterⅡ Camera Install Mount ...................................
2.1 Install Tips ................................................. 10
2.2 Cable Introduction ..................................... 10
ChapterⅢ IE Browser Setting .......................................
3.1 Equipment Connection ................................... 11
3.2 Set IE Browser .......................................... 11
3.3 Install Video viewing software ................... 13
ChapterⅣ System Operation ........................................
4.1 Login ......................................................... 15
4.2 View .......................................................... 16
Page 4

4
4.2.1 Video view .................................... 17
4.2.2 PTZ Control .................................. 18
4.2.3 PTZ Function ................................ 18
4.2.4 Intelligent Control ............................ 19
4.2.5 Common used short-cut button .... 20
4.3 Camera Setting ......................................... 21
4.3.1 System ......................................... 21
4.3.2 Network ................................ ........ 24
4.3.3 Camera ........................................ 29
4.3.4 Audio/Video .................................. 34
4.3.5 PTZ Function ................................... 39
4.3.6 RTC Function ............................... 42
4.3.7 Alarm ............................................ 43
4.3.8 Record.......................................... 44
4.3.9 User ............................................. 45
4.3.10 Log ................................................... 47
AppendixⅠ Frequent Break down ............................ 48
Page 5

5
Chapter Ⅰ System Introduction
1.1 Product Description
This manual mainly introduces the settings and operation of this HD IP IR
Bullet camera.
This camera has adapt CMOS image sensor, combine with newest
Network coding technology, and is able to provide user high-definition, high
frame rate and high SNR real-time image.
This camera adapts newest image processing technology, support Dual
coding and has functions like Alarm and Motion Detect. User can control
through web interface or through Manage platform to execute intelligent
surveil plan and record. Auto recoding when Alarm activated. Qos Service to
ensure user better video transfer and quality service.
1.2 Product Features
Main features are as below:
1.3Mega Pixel 1/3” Progressive Scanning CMOS
2.0Mega Pixel 1/2.8” Progressive Scanning CMOS
Auto zoom lens, 4X optical zooming.
Auto IR-CUT, Color/Black mode auto-switch
H.264 / MJPEG Dual coding method,three stream
Low bandwidth, high definition image, High frame rate output
Page 6

6
PTZ Remote control
Unique Intelligent control like Web frame selection to zoom+ &zoom-,
Vector control, 3D location.
Quick focus
Headline setting and display, no more than 24 Character.
Preset points, Patrol Scan, Pattern Scan, Auto Scan, Regular Scan,
Motion Detect
Private zone masking, Motion detect
Multiple Alarm manage method, like email, FTP upload, Relay out
Support Protocol like TCP/IP,HTTP,ICMP,PPPoE,DHCP,UDP,
SMTP,RTP,RTSP,SNMP,ARP
Qos Service to ensure user better video transfer and quality service.
Lively view and parameter setting available to multi-users through
Web interface.
Remote update
12VDC
Beside above features, there are more:
High definition image compress technology
Available resolution is 1280*960P, 1280* 720P, D1, 2CIF, CIF, QCIF
1920*1080 1280*960P,1280* 720P,D1,2CIF,CIF,QCIF
Complete video transfer and quality service
This dome connect to Internet through RJ45 self-adaptive 10M/100M port,
support complete TCP/IP Protocol stack (TCP/IP、HTTP、ICMP、UDP、SMTP、
Page 7

7
RTP、RTSP、SNMP), and can adjust the bit flow rate and frame transmission
rate. Date, Time and OSD info can be set on the web interface.
Saturation, Brightness, Contrast, Sharpness can be flexible
adjusted.
1.3 System Requirement
The requirement to computer to control this camera:
Processor:Intel Pentium 4 2.4 GHz or above
RAM:512 MB or above
Internet access:100M Ethernet port
Operation system:Windows 7 ,Windows 2000/2003, Windows XP
Internet web browser:Microsoft Internet explorer 6.0 or above
1.4 Technical Specification
Lens: 4X Optical zoom,F1.6~F2.7,f=3-12mm
Zoom: Auto/Manual
Sensor: CMOS,1/3"
CMOS,1/2.8"
Min illumination: Color:0.2 Lux @F1.6 (50IRE,AGC ON)
Black/ white:0.02 Lux @F1.6 (50IRE,AGC ON)
S/N Ratio: ≥50dB
E-shutter: NTSC: 1/30~1/8,000 s; PAL: 1/25~1/8,000 s
AGC: On/Off
Page 8

8
BLC: On/Off
White Balance: Auto/Manual/Day/Cloudy/Filament lamp/fluorescent
Mirror Function: Off/Horizontal/Vertical
3D Location: Yes
Intelligent Vector control: Yes
Web frame selection to zoom+ &zoom-:Yes
Motion detect: 4 zones
Alarm: 1way in, 1 way out (optional)
OSD Language: Chinese/English
Video standard: NTSC/PAL optional
Video compress standard:H.264 Dual stream/ MJPEG
Max frame rate: NTSC: 30fps; PAL: 25fps
Output code rate: 128Kbps~6Mbps
Max resolution: 1280X960 @25fps (IPCC-9610)
1920X1080 @25fps (IPCC-10801)
Sub-stream: D1(720×480)/ CIF(352×288)/QCIF(176×144)
Password: Yes
Network: 1RJ45 10/100M self-adaptive port
Internet protocol: TCP/IP,HTTP,ICMP,PPPoE,DHCP,UDP,
SMTP,RTP,RTSP,SNMP,ARP
Alarm input: 1way
Alarm output: 1way
Internet remote update:Yes
Page 9

9
Power: 12VDC
Max power consumption:12VDC@12W
Working temperature: -20℃ ~ 50℃
Working humidity: 0~90% RH(no condensation)
1.5 Warning
When login, user should do internet setting first. Please make sure
the Gateway setting should be the same with this dome.
IP address can’t be same as other device, otherwise no video is
available.
If the ordered dome use PoE power supply, please connect it strictly
to the parameter of PoE switch, and do testing of max distance of
available PoE supply, in case of poor performance of this dome or the
damage of switch.
Page 10
10
Chapter Ⅱ Camera Install Mount
2.1 Install tips
1. Please note no falling down and roughly bit to this dome
2. Please do not line this dome directly to Sunlight or Hard light
3. Please avoid circumstance like -10℃ to 50℃ temperature, or high
humidity, frequent shocking.
4. Assistant lighting equipment can be added when it is to dark and
camera is of bad image.
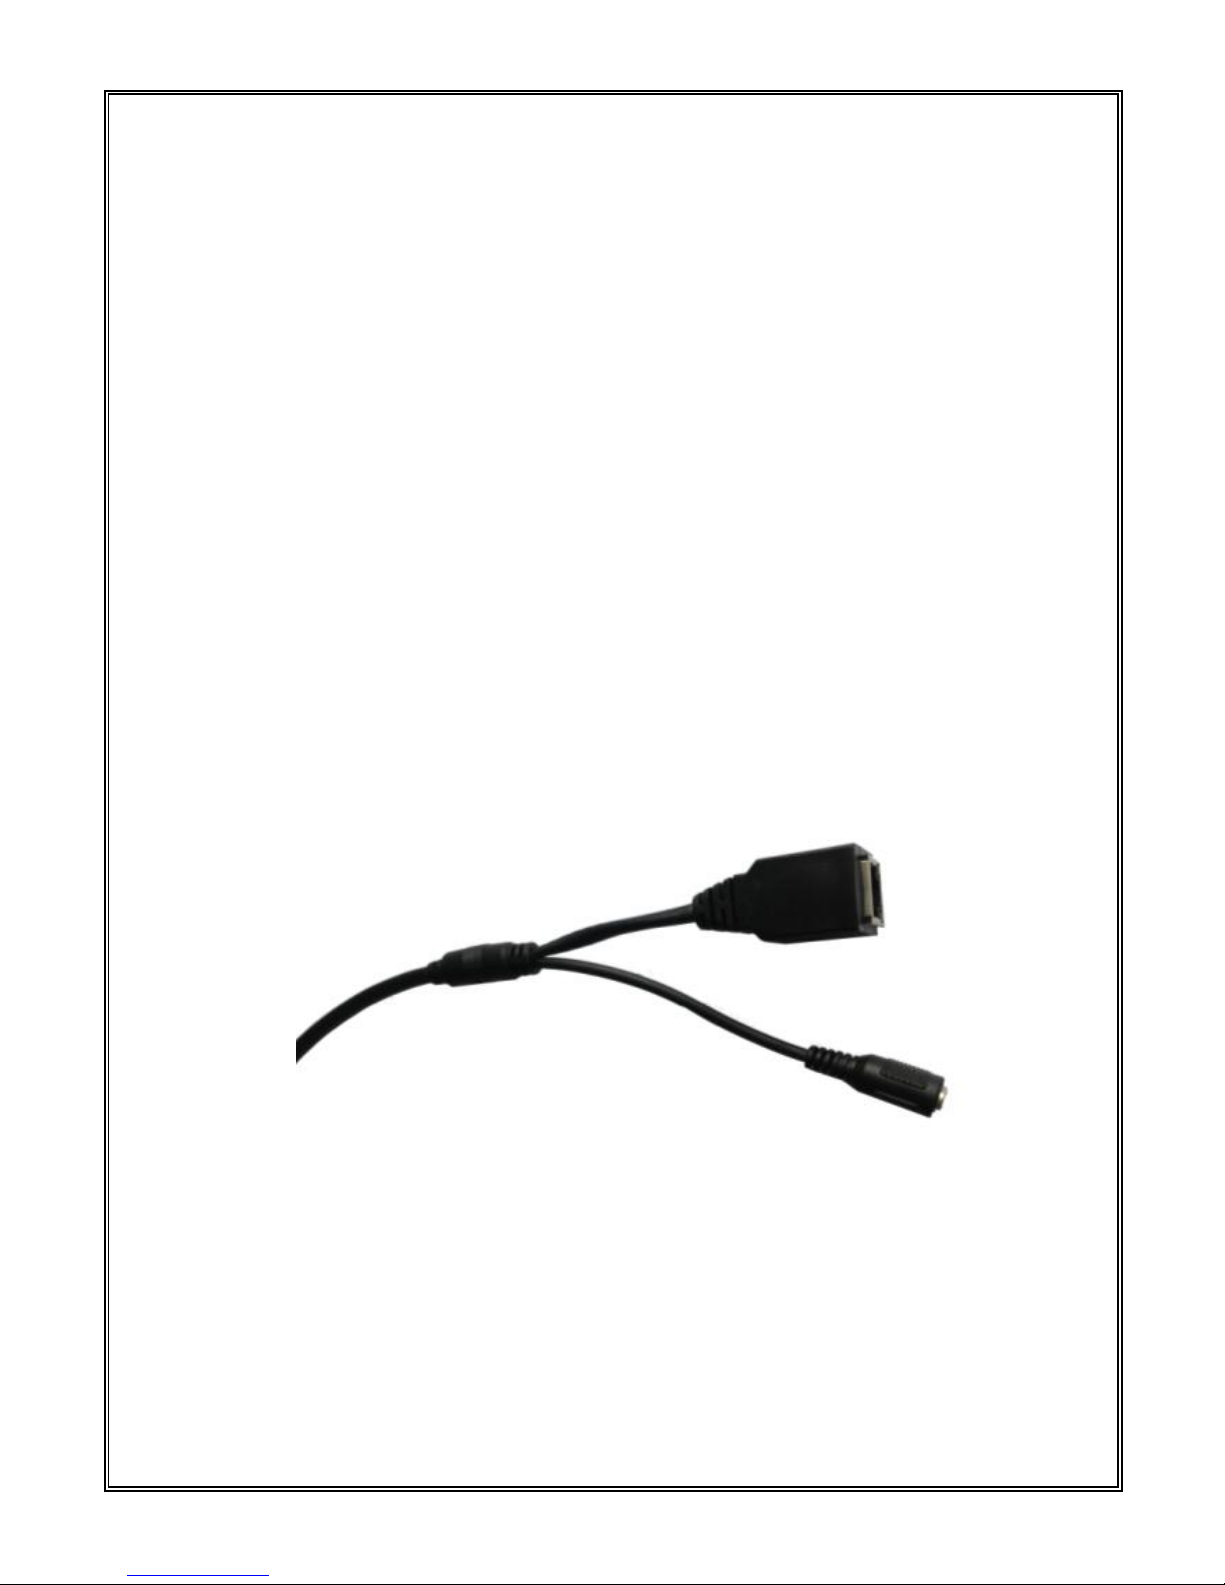
2.2 Cable introduction
Figure2-1
Shown as above, one port for RJ45 Network port and another for DC12V
power supply.
Page 11

11
Chapter Ⅲ IE Brower Setting
For video viewing, user should do settings to the IE Browser on monitor or
other video device, and please do according to the pop-up tips.
Tips when set the IE Browser:
IE version supported:Internet Explorer 6.0 or above;
ActiveX controls installed and video viewing software that support
Directx 9.0c
3.1 Equipment connection
This dome can connect to computer and internet the same.
Note:Please check the connectivity of Power cable before connect the
camera
3.2 Set IE browser
User can view video through IE or TNMS. Video image only be available
after ActiveX controls is installed and user has to set the security property of
Internet browser.
1. Click “Tool” in the menu, and then click “Internet”
2. Select “Security” in the pop up options, as shown in Figure 3-1
Page 12

12
Figure 3-1
3. Select the “Internet” icon, and then click “Custom Level”, the
following interface will pop up:
Figure 3-2
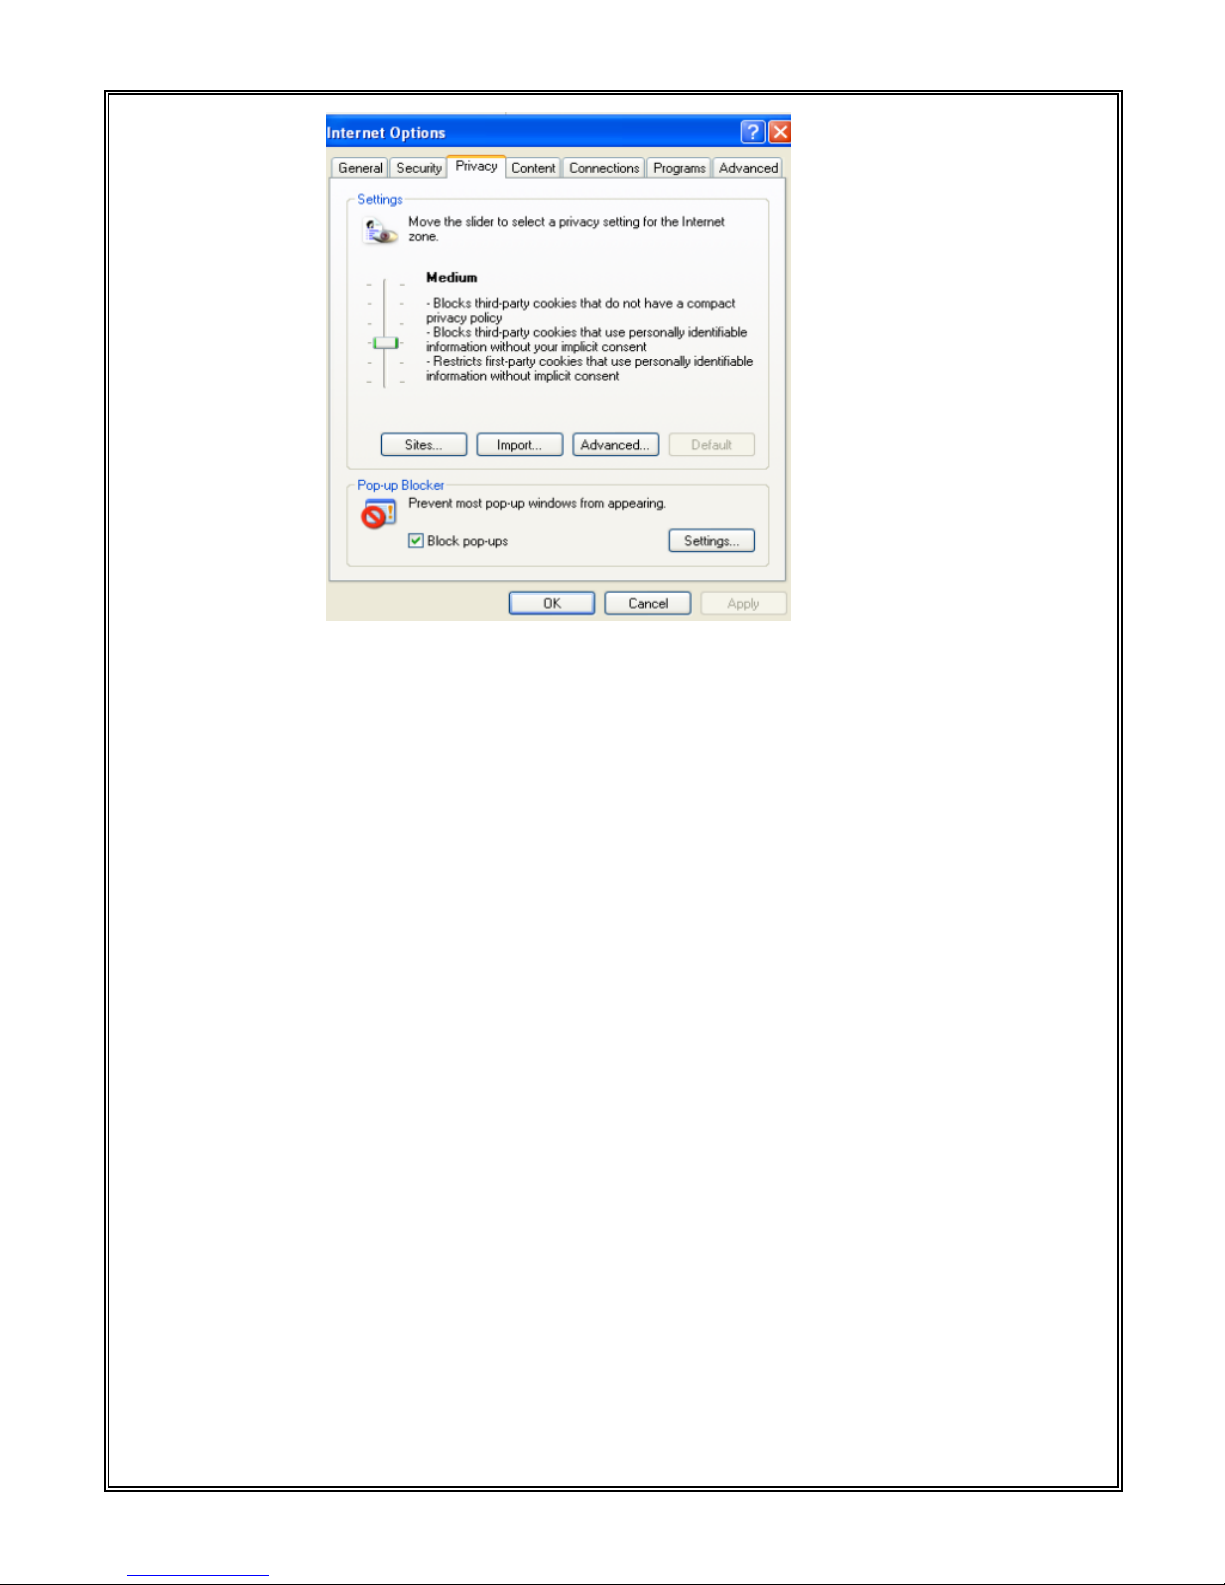
4. Set all “Disable” to “Enable”; Switch to “Privacy” option, and disable the
checkbox of “Block pop-ups”
Page 13
13
Figure 3-3
3.3 Install Video viewing software
Steps to install are as below:
(1) Login
After the dome is powered for about 60 seconds, please open the IE browser
and then enter IP address, such as http://192.168.1.18 ( Default setting),The
user login dialog box will be displayed, as shown below. User should use
default super user name and password (more details please go to 4.1 Login)
Page 14

14
Figure3-4
(2) A pop-up window says “whether download ActiveX control”, please
accept , download and run it.
(3) Refresh browser and video will come out.
Figure3-5
Page 15
15
Chapter Ⅳ System Operation
In this chapter, basic function and operation are introduced.
4.1 Login
After the dome is powered for about 60 seconds, please open the IE
browser and then enter IP address, Default setting is http://192.168.1.18
(Sub-net mask is 255.255.255.0, Gateway is 192.168.1.1).
Note: Local IP address should be setted before login.
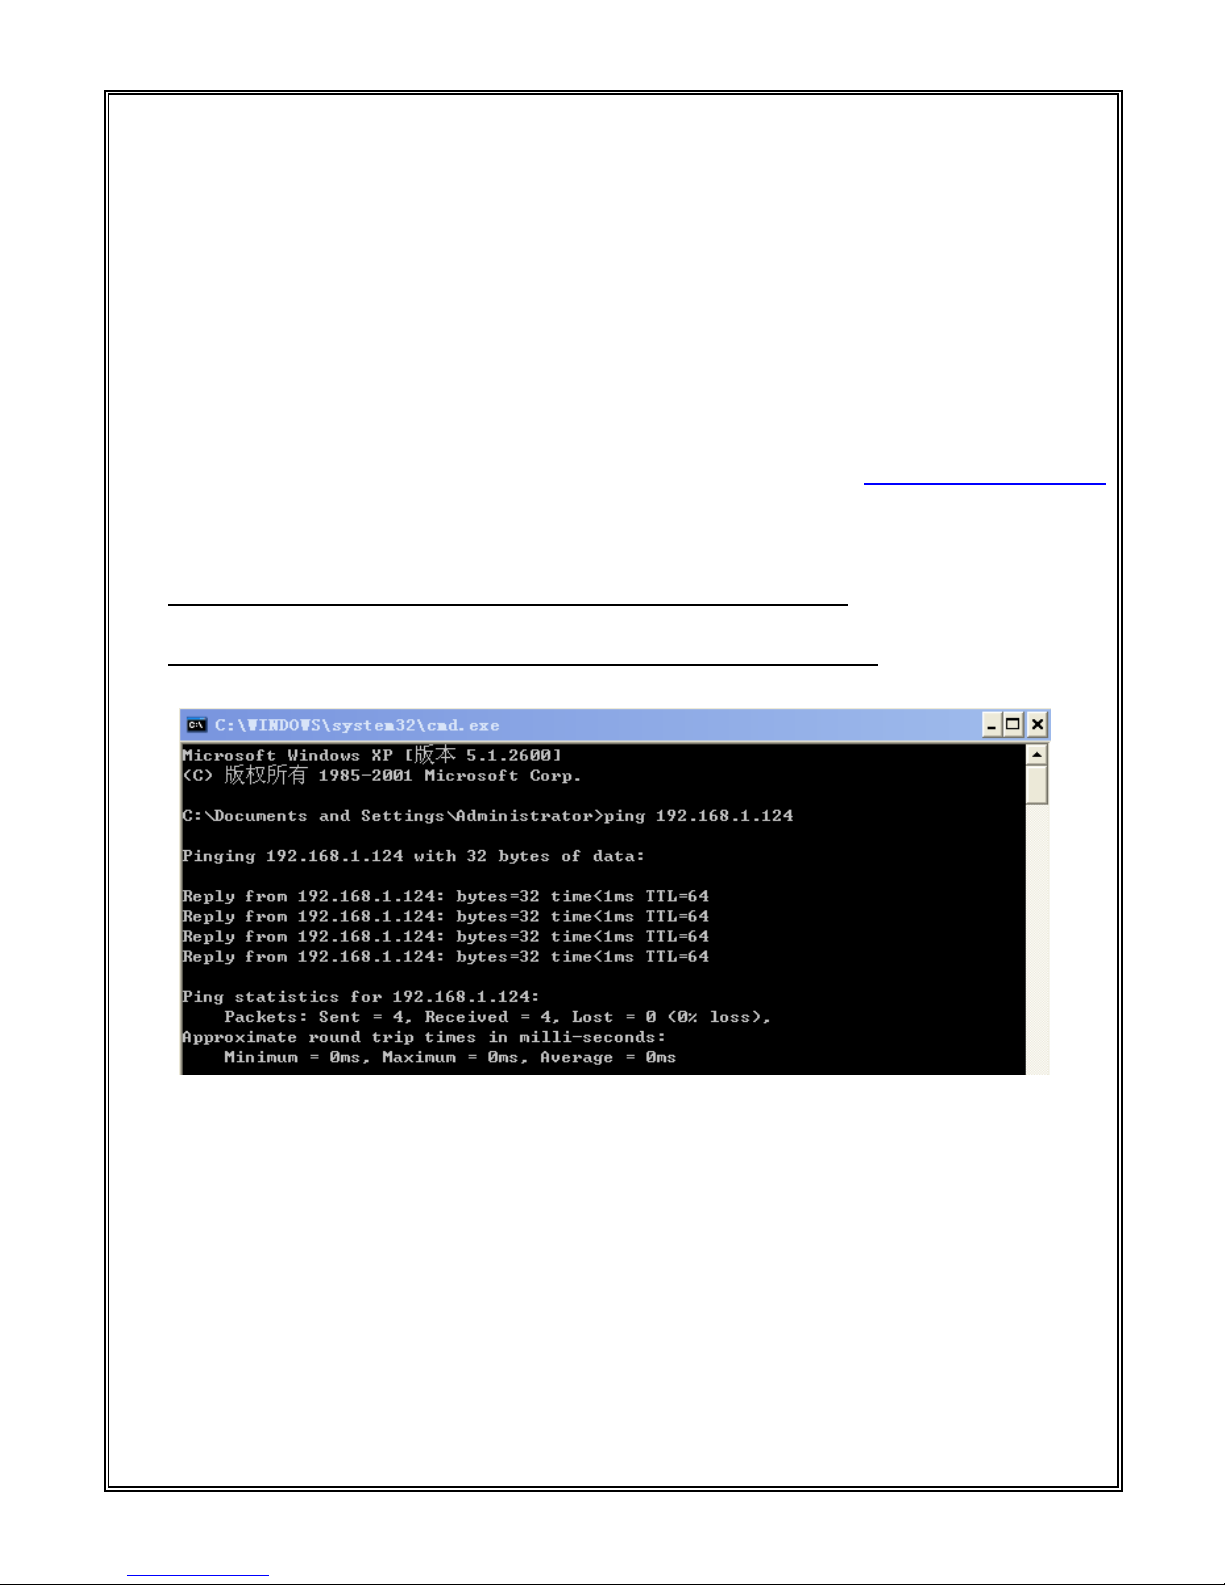
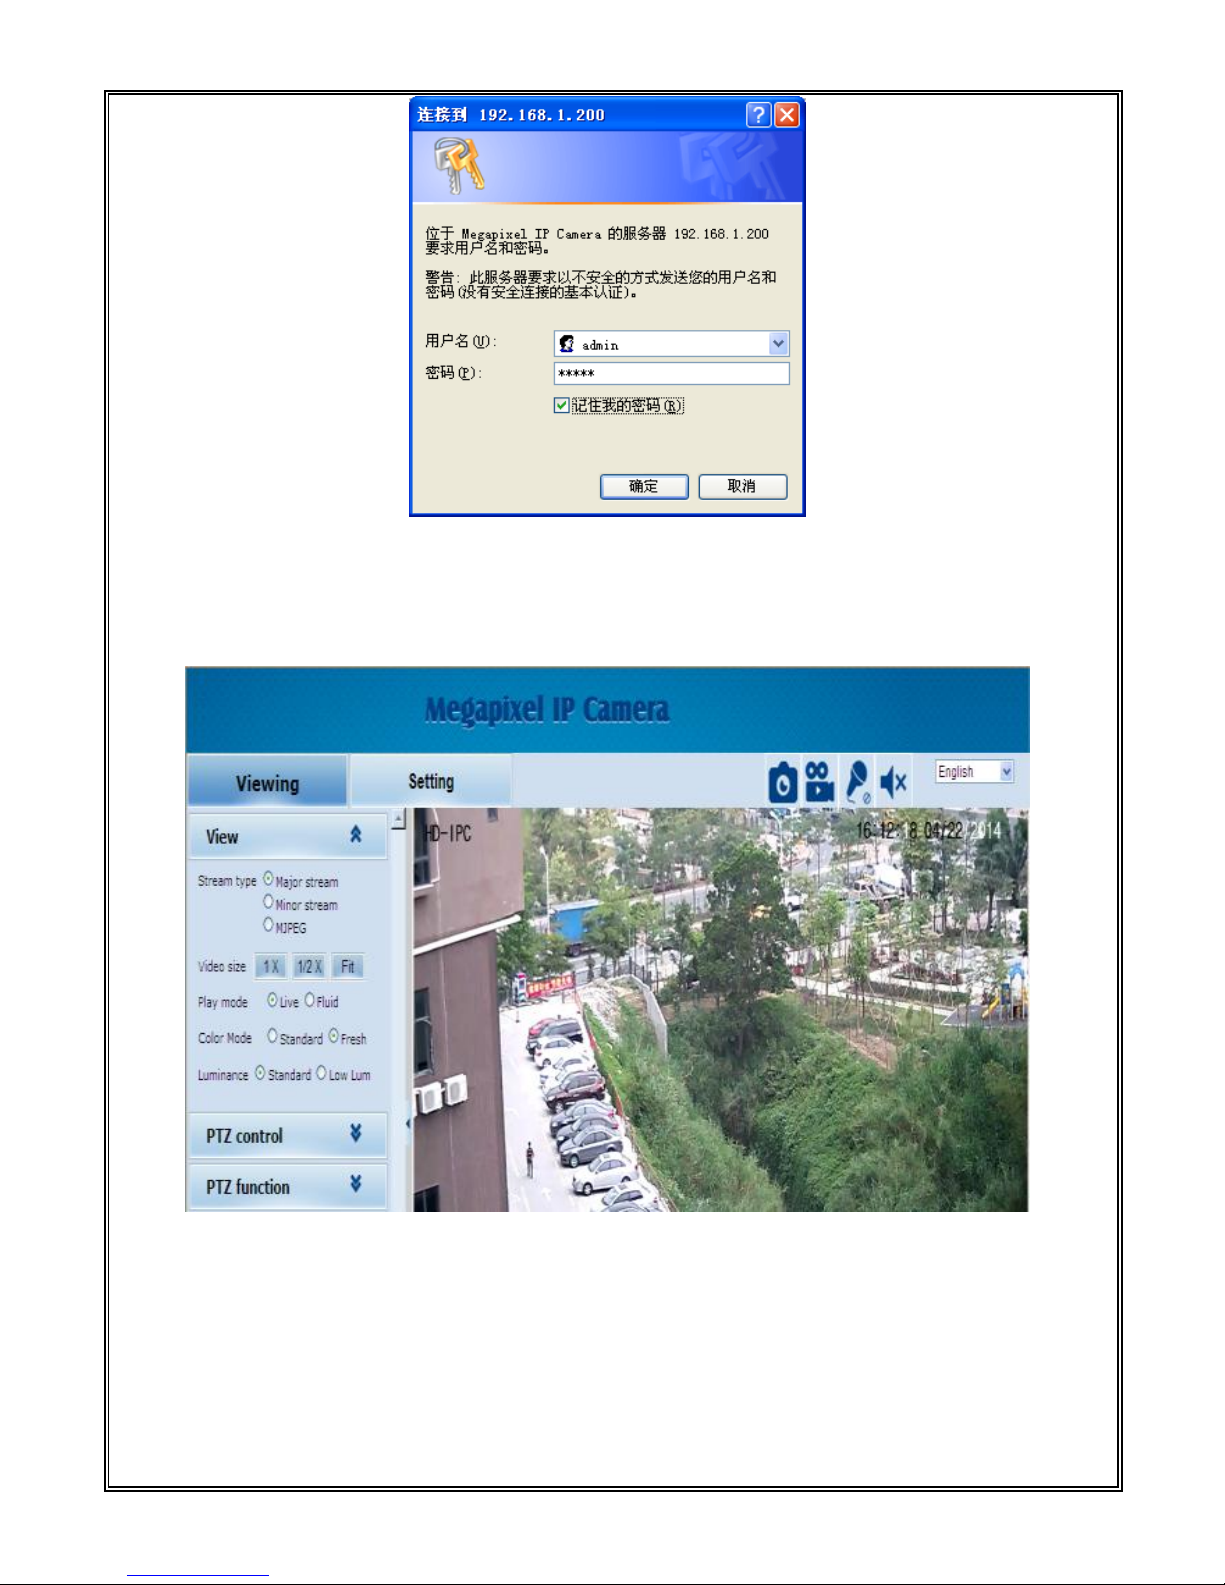
Now the IP address of camera should be “ping”through.
Figure4-1-1
The language of webpage will be different based on operating system. In
Chinese operation it is as below:
Page 16
16
Figure4-1-2
Below interface is shown if login succeed.
Figure4-1-3
Since H.264/MJPEG dual coding format supported, user may choose
“MJPEG” button to check live video under “MJPEG” Coding Method.
4.2 View
Page 17
17
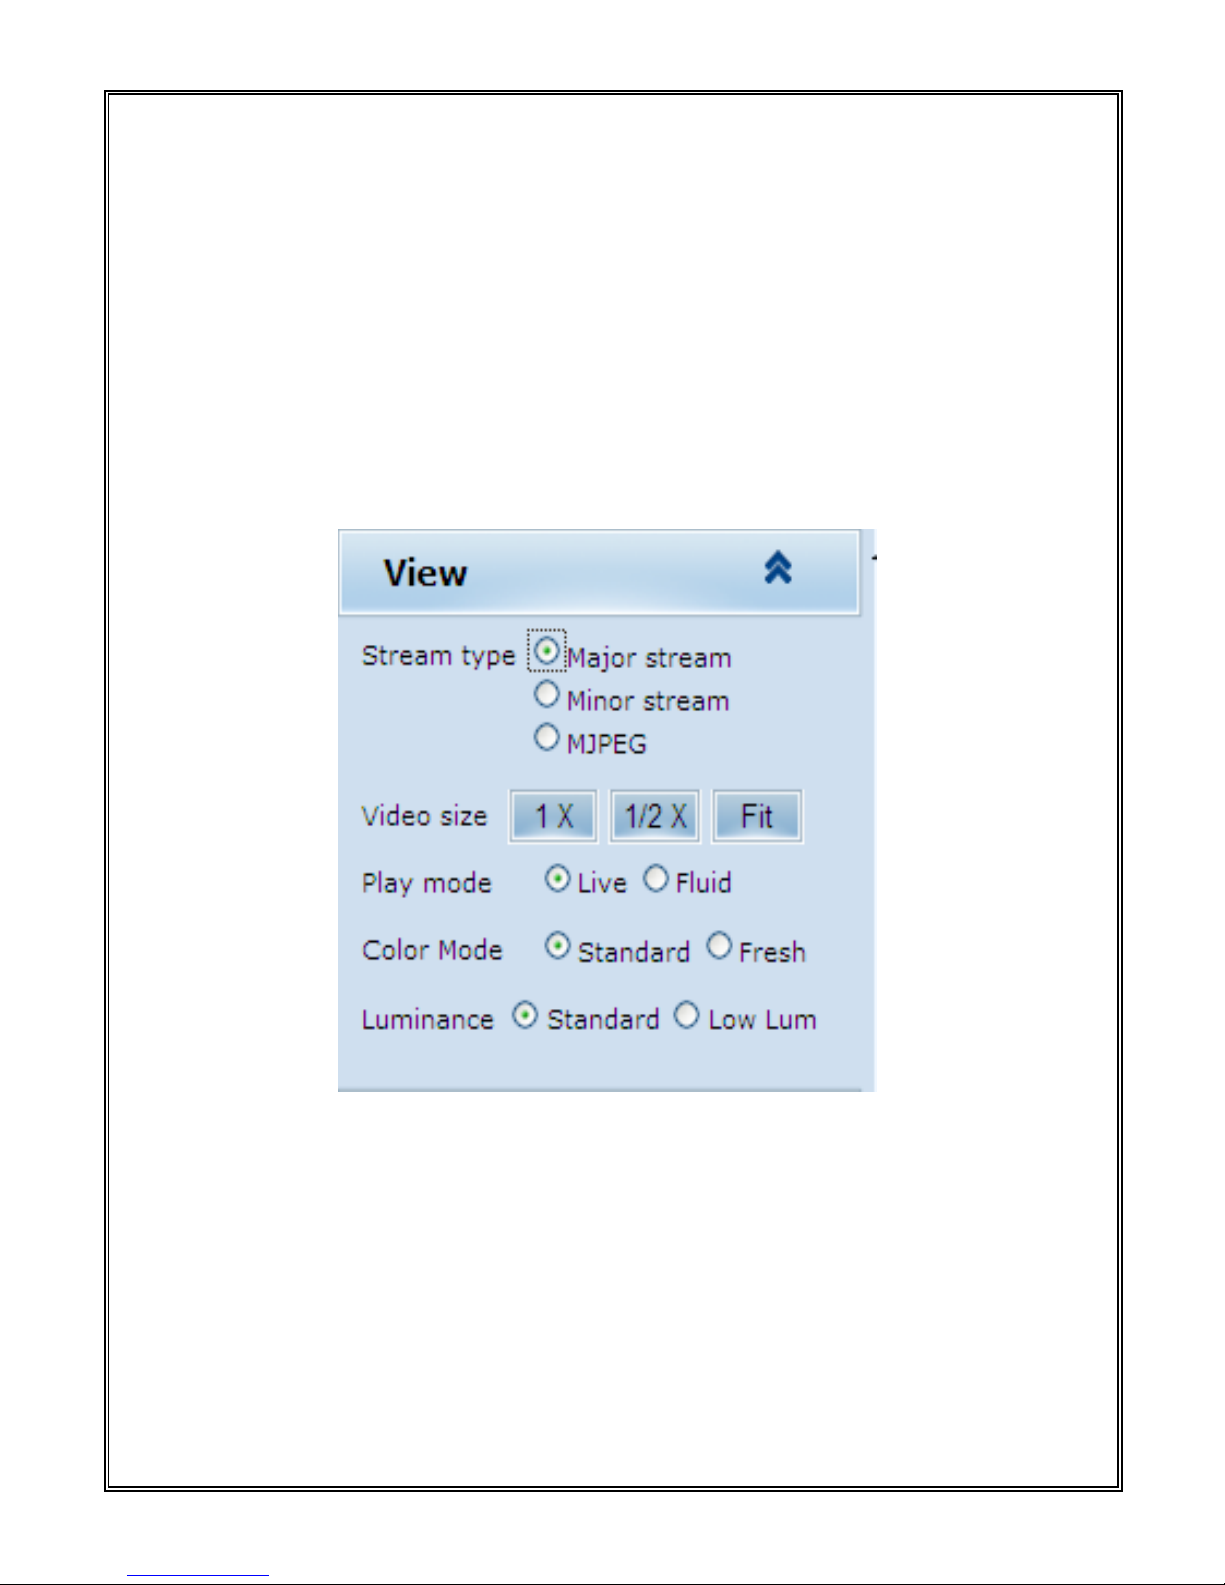
In view interface, user can set Video viewing, PTZ control, PTZ function,
frequently used short-cut button.
4.2.1 Video view
Video view: setting of Stream type, Video size, Play mode, Color mode,
Luminance.
Click “view” button to enter setting interface as below:
Figure 4-2-1
Stream type: H.264 Major stream, Minor stream, MJPEG
Video size: Picture can be 1X, 1/2X, Fit
Playmode: Live, Fluid
Color Mode: Standard, Fresh
Luminance: Standard, Low Lum
Page 18
18
4.2.2 PTZ Control
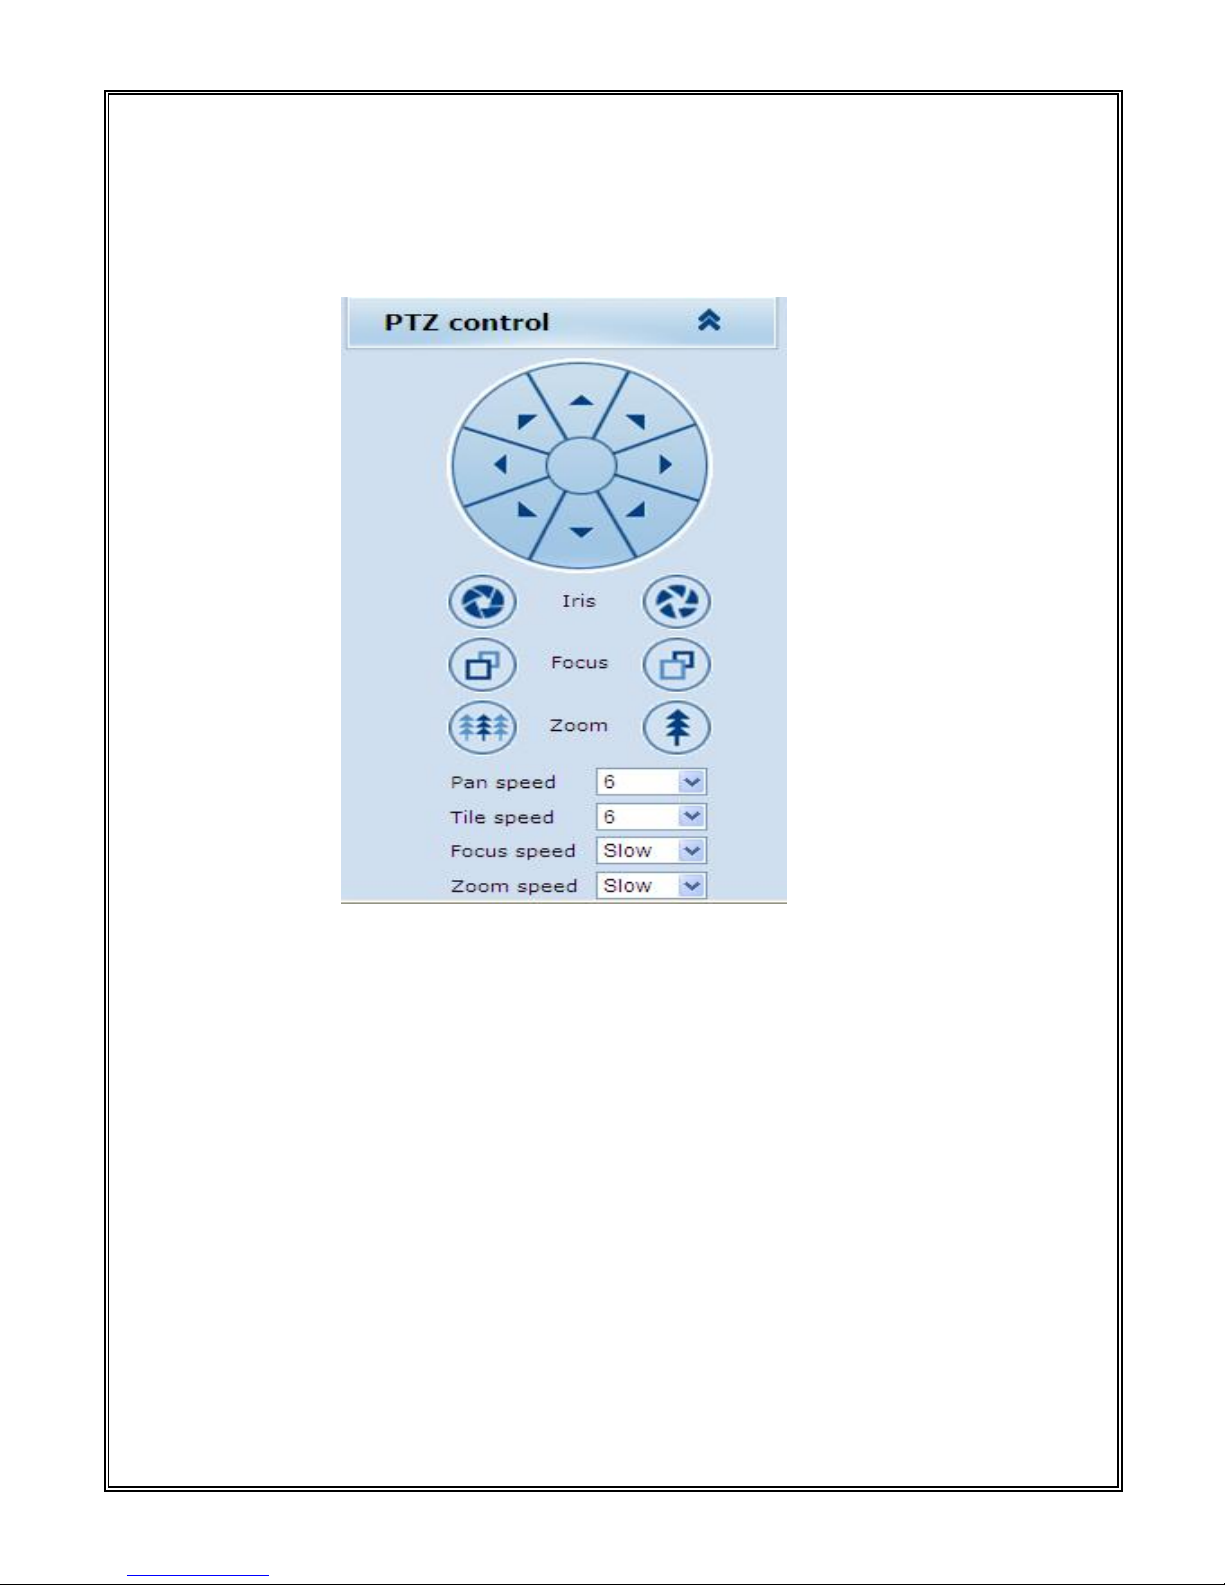
PTZ Control:To control the direction, horizontal speed, vertical speed:
Figure 4-2-2 PTZ Control
PTZ Direction:8 directions
Horizontal speed:1 — 8 optional
Vertical speed:1 — 8 optional
4.2.3 PTZ Function (not support)
PTZ Function:
Page 19
19
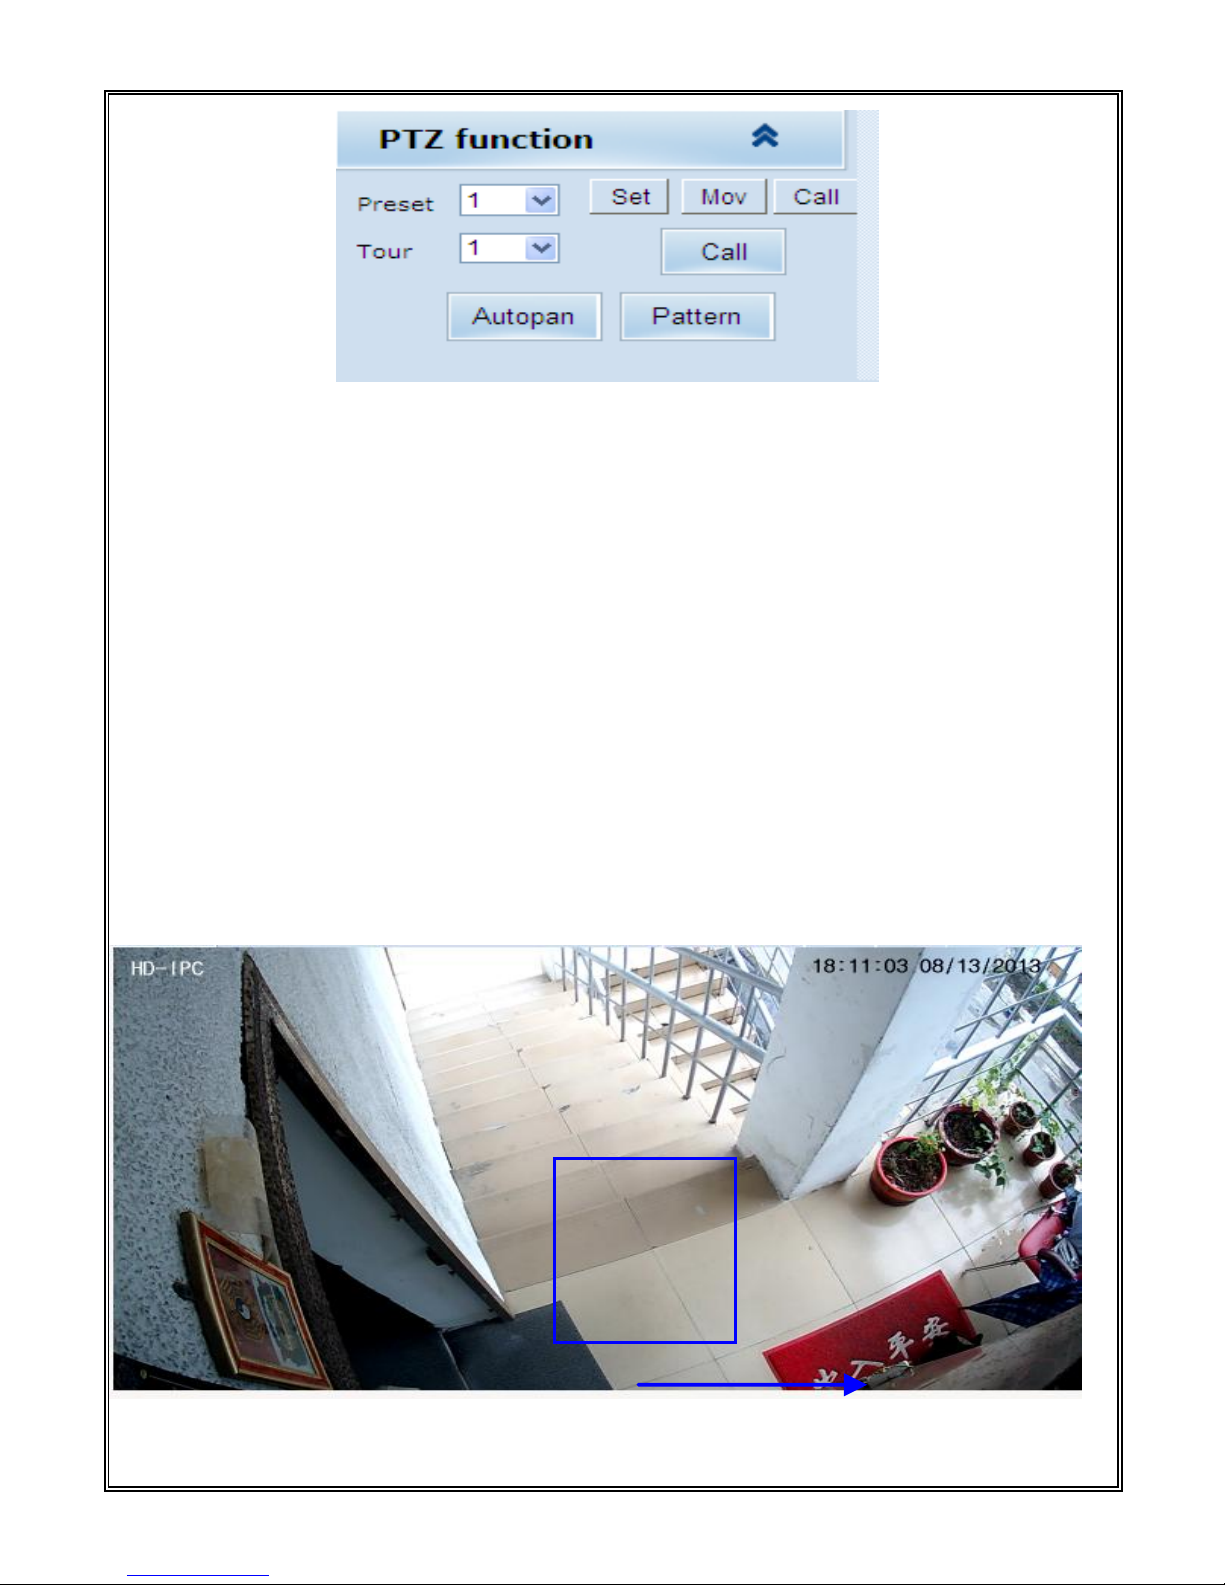
Figure 4-2-3
Preset:1--220 call
Tour:1--4 call
Autopan:1--4 call
Pattern:1 call
4.2.4 Intelligent control
Intelligent control like Web frame selection to zoom+ &zoom-,Vector
control, 3D location.
Figure 4-2-4
Page 20
20
1. Left click, the click point will be center of the pic, namely 3D location;
2. Left double click, the click point will be the center and zoom+;
3. Left-bottom or Left-up to frame, camera will zoom+ with framed as center;
Right-bottom or Right-up to frame, camera will zoom- with framed as center;
4. Right-button clicking, draw arrow to make camera turn according to the
arrow direction, Longer the arrow, the turning speed faster. And this is Vector
control;
5. Mouse scroller rolling can do zoom+ and zoom-
4.2.5 Common used short-cut button
Common used short-cut button:Snapshot, Video, Audio in, Audio out,
Language.
Figure 4-2-5
User can set the common used function here, the storage section of snapshot
and video is according to the setting principle which introduced in 4.3.5.
The file name of snapshot is based on the IP address and time info, for
example, the file name 20121006_221325_125_01_192.168.1.18.jpg
means device’s IP address is 192.168.1.18, and is taped in 125ms,25s,13rd
Minutes,10PM of 6th,October,2012.
Page 21
21
4.3 Setting
Setting:setting of detailed parameter of camera, including System, Network,
Camera, Audio& Video, PTZ function, Alarm, User, Log.
Figure 4-3-1 Camera setting
4.3.1 System
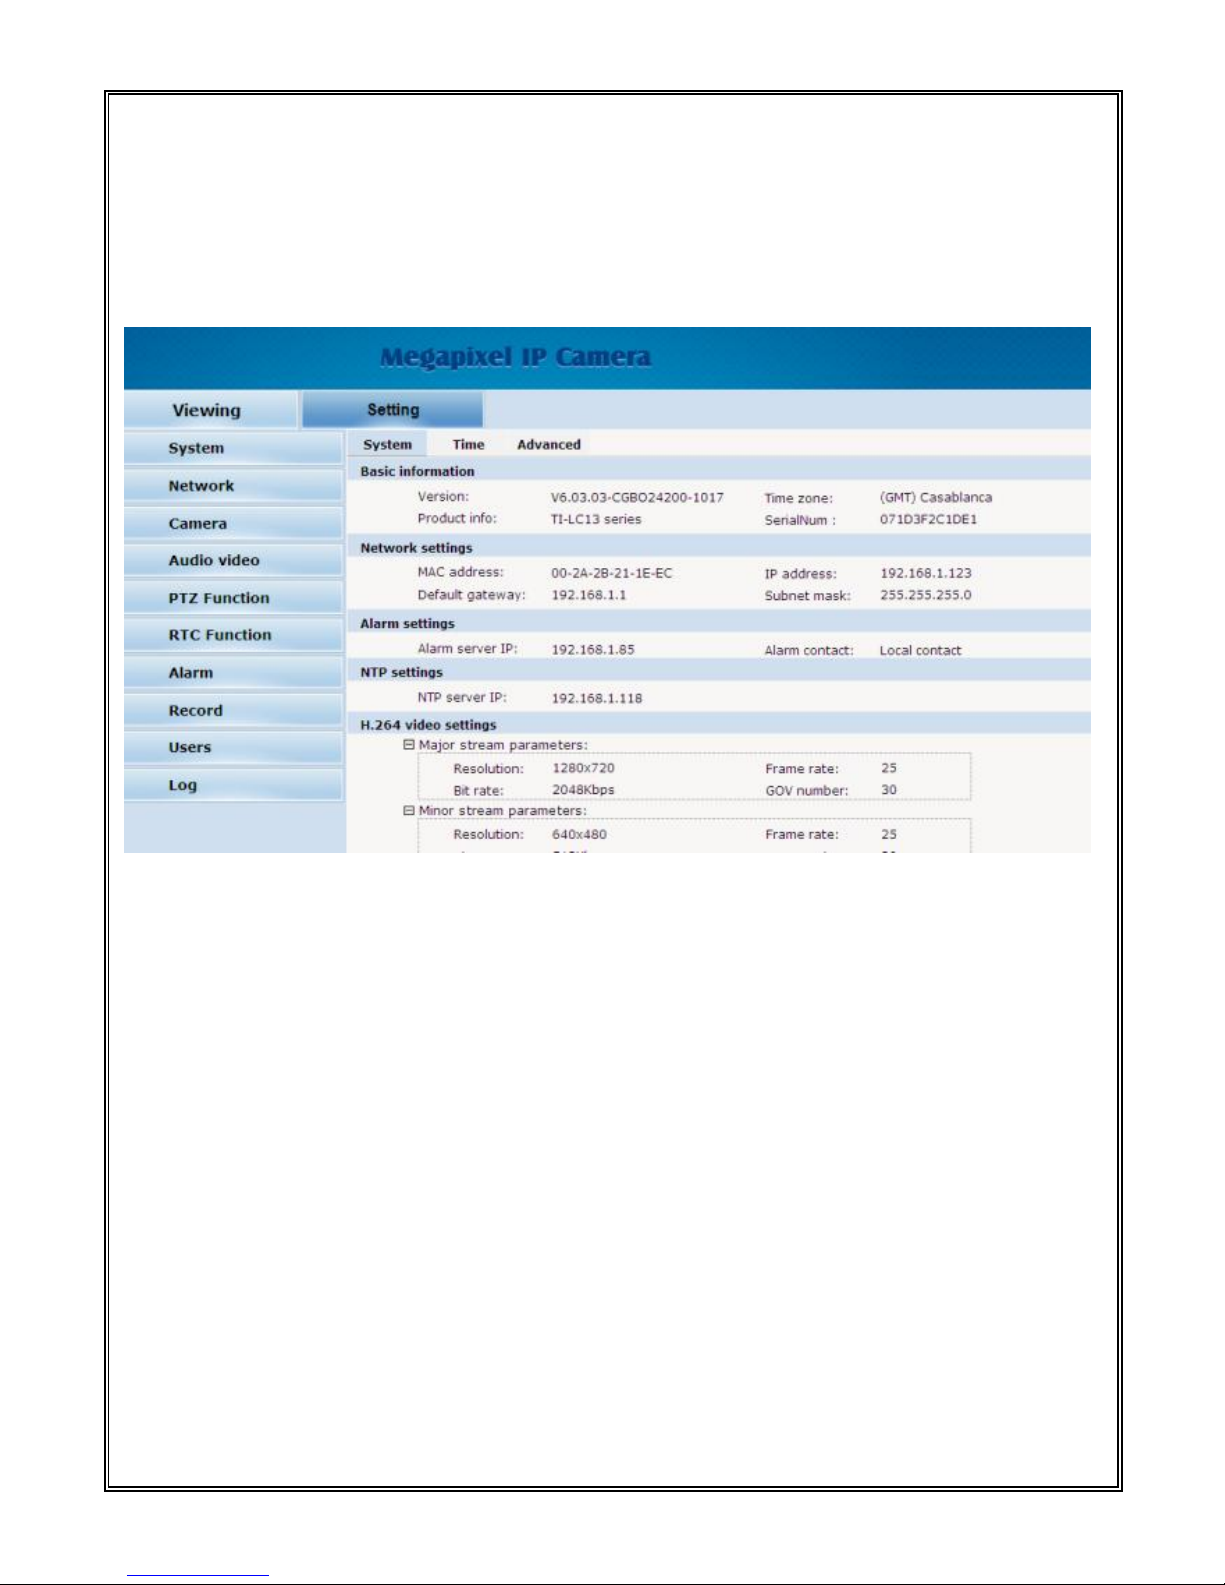
System: it is about the system info of camera, time and advanced setting.
System info: The initial system setting is basic system info, like Basic info,
Network settings, Alarm settings, NTP settings, H.264 video setting, MJPEG
video setting.
Page 22
22
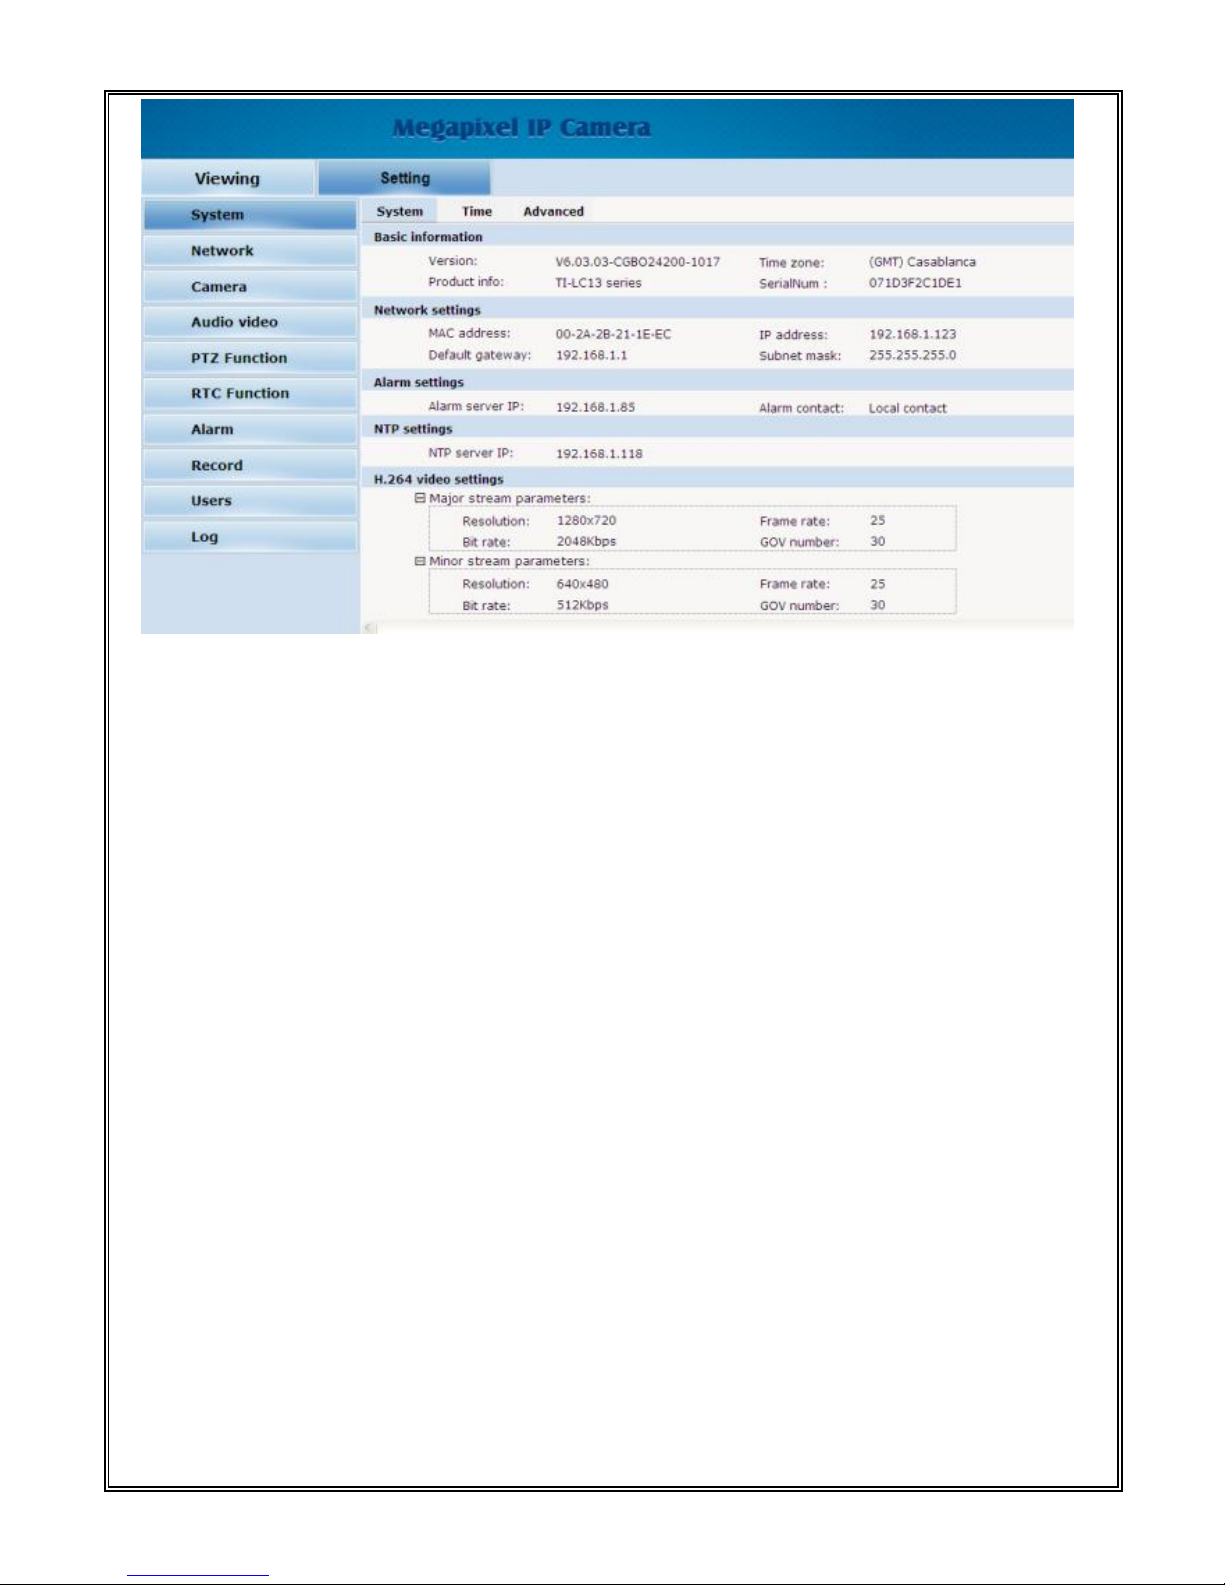
Figure 4-3-2 Camera system info
Basic info: Version, Timezone, Product info, Serial No.
Network setting: MAC address, IP Address, Default Gateway, Subnet Mask.
Alarm setting: Alarm Server IP, Alarm Contract
NTP Setting:NTP Server IP。
H.264 Video Setting: Major stream parameter, Minor stream parameter
(Frame rate/ Bite rate/ GOV No.)
MJPEG Video setting:Resolution, Frame rate
Time: Timezone setting, NTP setting, Sync now.
Page 23
23
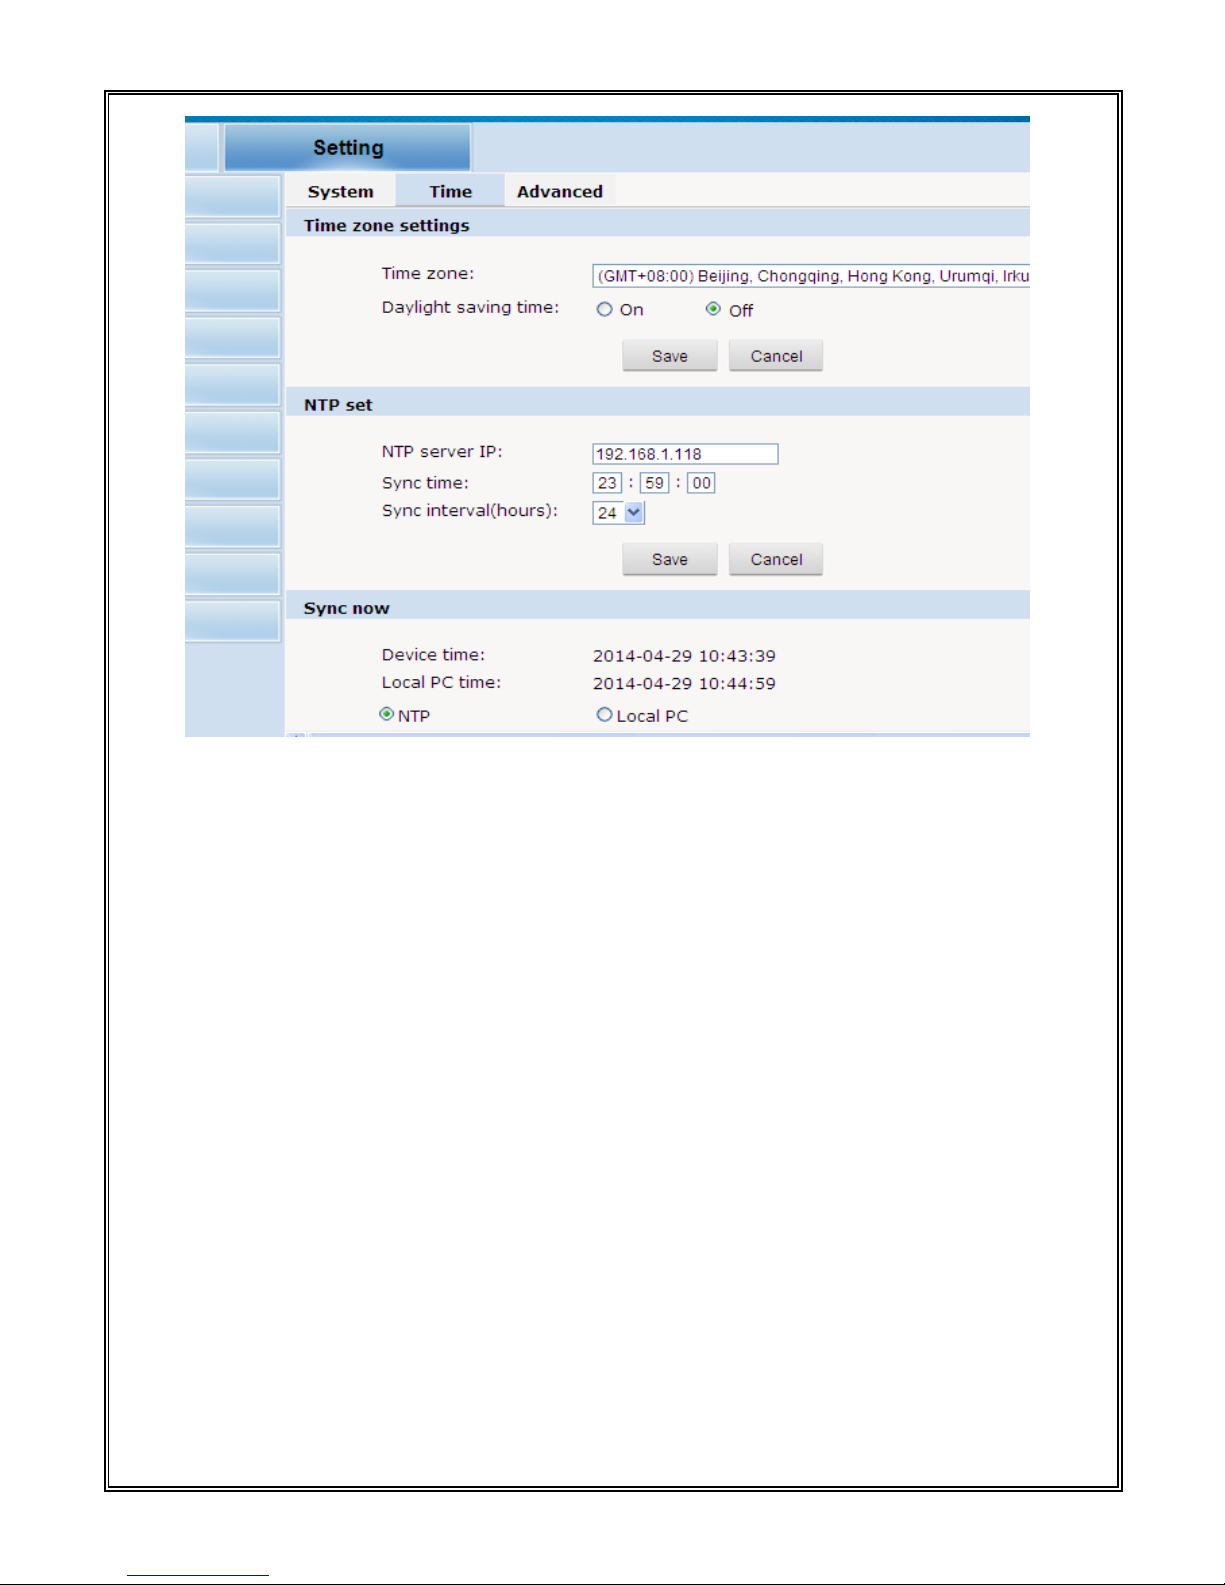
Figure 4-3-3 Time setting
Timezone: Select timezone from list and click “save”. The optional timezone
is about 26pcs, vary from “GMT-12:00~GMT~GMT+13:00”. Factory default
setting is GMT(Greenwich Mean Time), so Beijing time is GMT+08:00. If
“Daylight saving time” is used in your area, please turn it on also.
NTP Set: NTP Server IP is normally the IP address of camera
Sync time: Sync time at set time
Sync interval: Set a interval to sync time
Sync now: Adapt time of camera synchronously with NTP Server or local PC
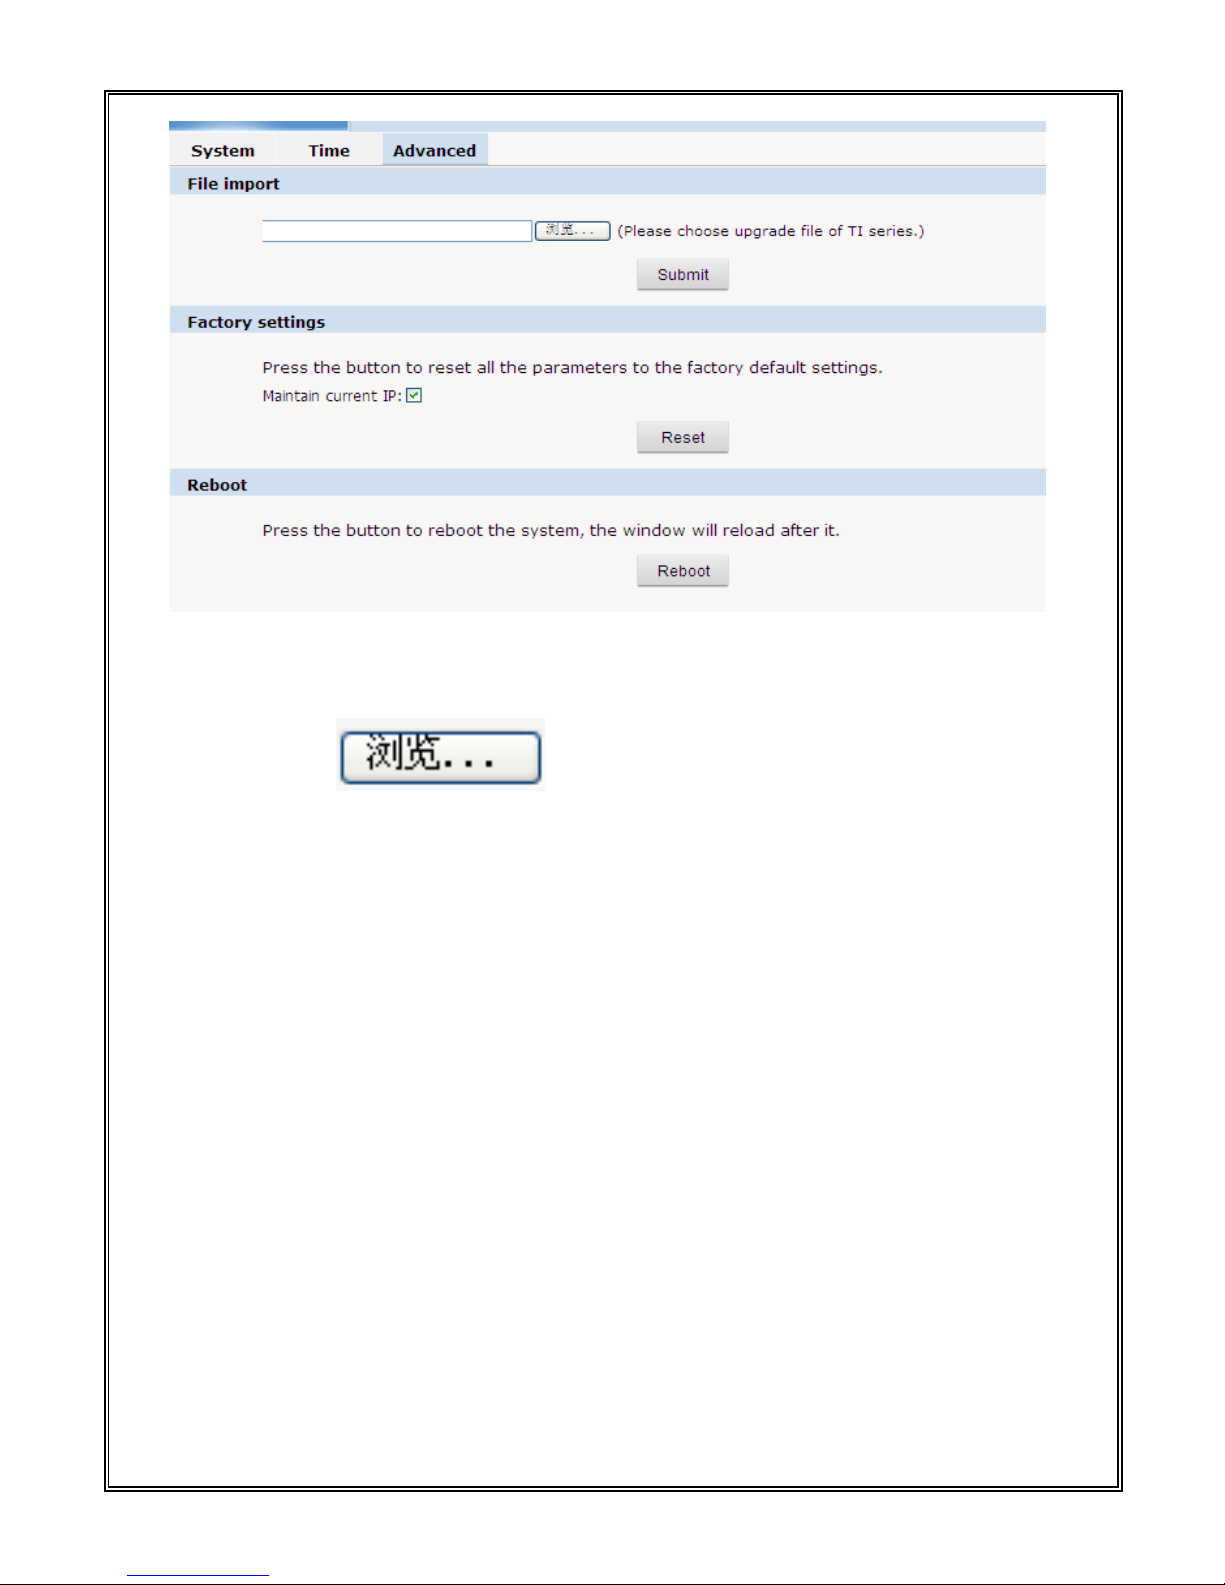
Advanced: Including file update, factory settings, reboot.
Page 24
24
Figure 4-3-4 Advance setting
File Import: Click , and choose .ifc file to upload and update.
Reboot after update. Please contact your supplier for the updating file.
Factory settings: Click “Reset” to set all parameter to factory default setting,
and you may choose “Maintain current IP” to keep the IP address, otherwise,
the IP address will be 192.168.1.18.
Reboot: Click “Reboot” and in 110s the system will finish rebooting.
4.3.2 Network
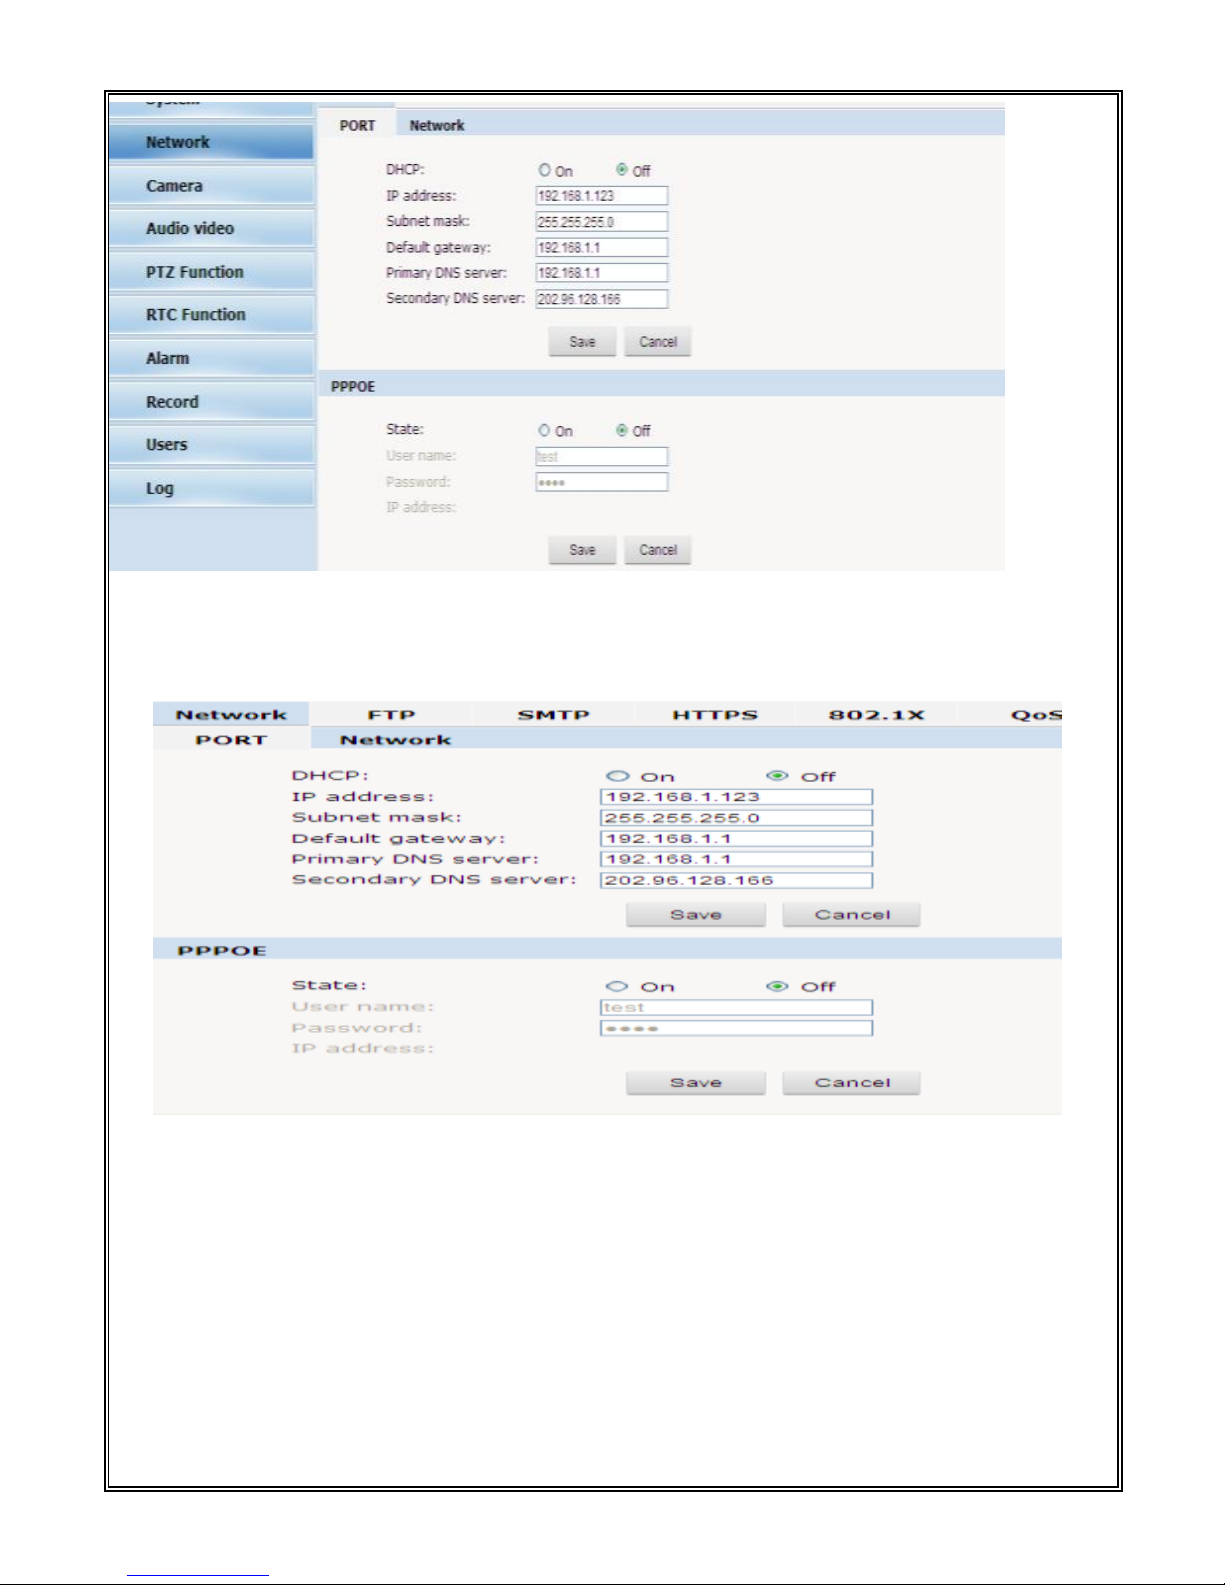
Network:Setting of Network parameter of Network、FTP、SMTP/HTTPS、
802.1X、QoS、IGMP、SIP、DDNS PORT.
Page 25
25
Figure 4-3-5 Network
Network:Setting of Network parameter
Figure 4-3-6 Network setting
DHCP:Dynamic Host Configuration Protocol, is part of the TCP/IPC Protocol,
is used to distribute dynamic IP address to IP Camera. If On, then the IP
address and Subnet mask .etc can’t be changed, only be allotted by Server. If
Off, then do the setting of by user himself, but please make sure the IP
address and Gateway address in a same network segment.
Page 26
26
PPPOE: Connect main server of Ethernet to a remote access concentrator
through a simple bridge device. “User name” and “Password” is needed for
activating it.
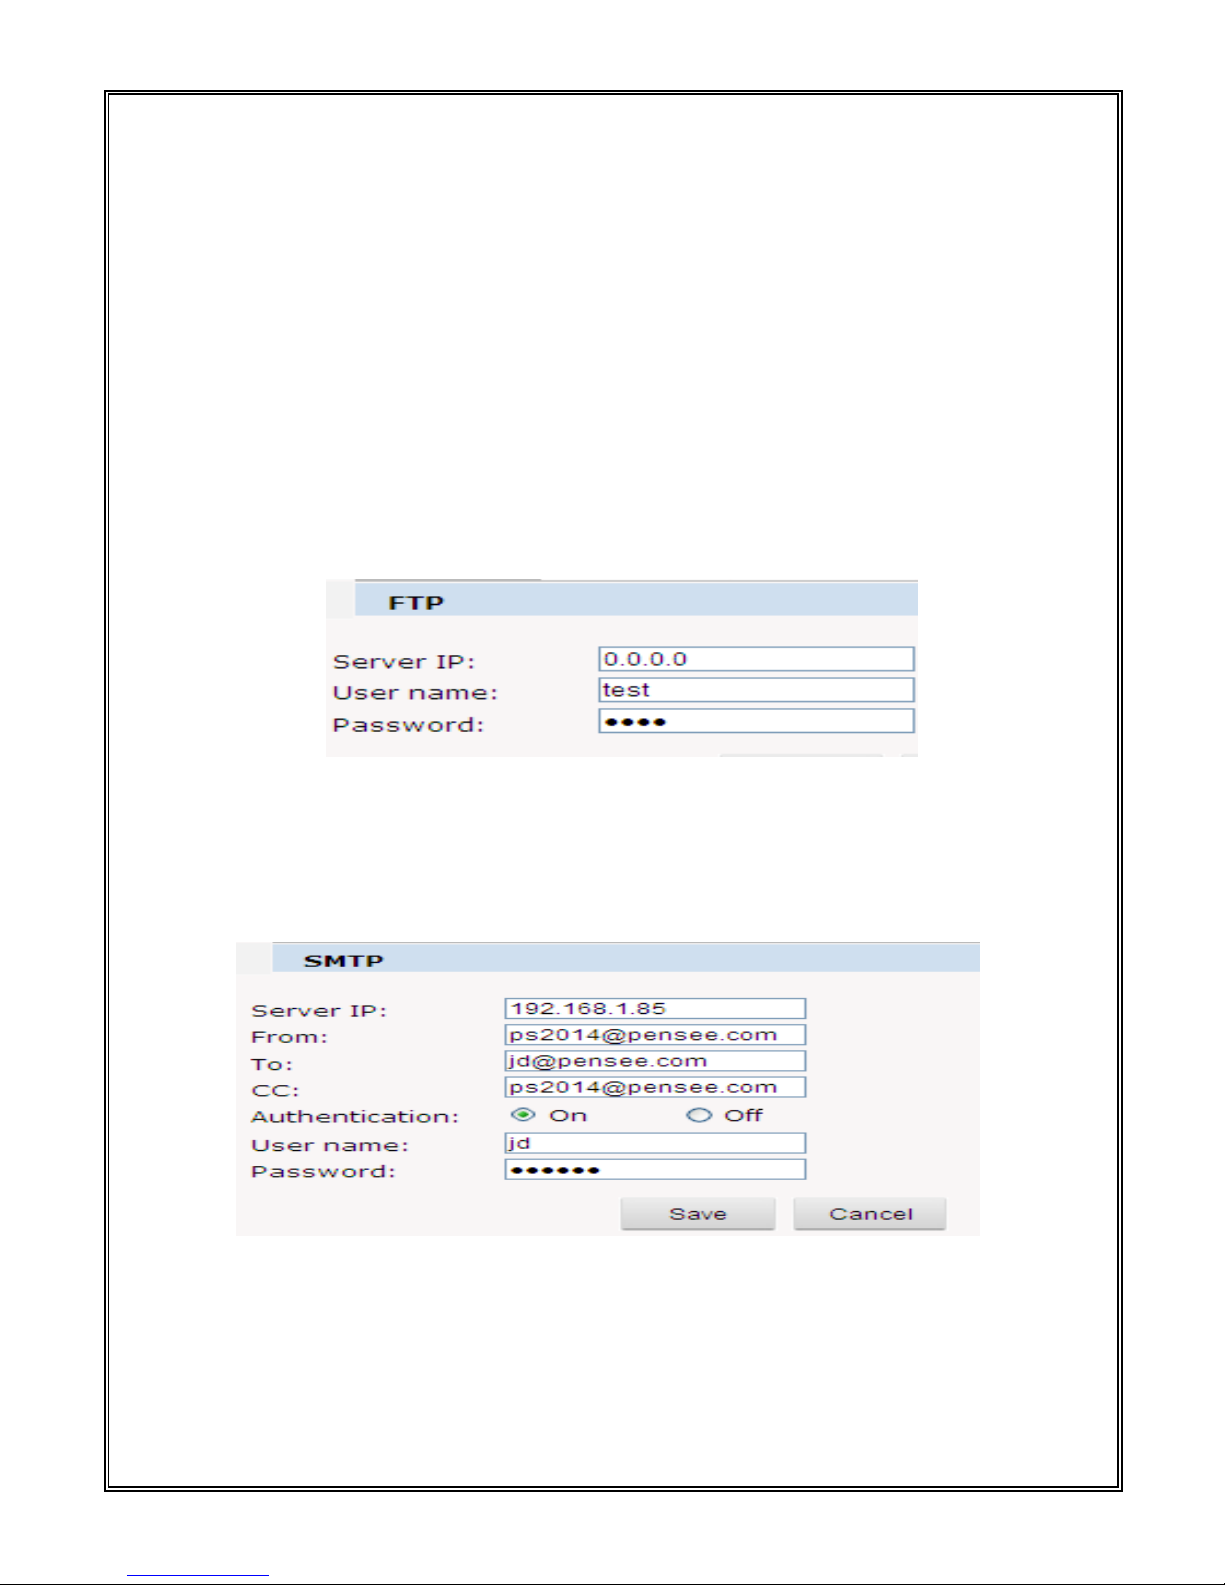
FTP: FTP is protocol of application layer, which is based on transport layer,
and provide service like file transportation to user. Also this IP camera
supports FTP upload image function. To fulfill this function, user may set
server’s IP address, user name, password, and then activate relating FTP
Alarm setting.
Figure 4-3-7 FTP setting
SMTP:SMTP Protocol is one of TCP/IP Protocol, it helps PC to find the
destination when sending or transfering mail.
Figure4-3-8 SMTP setting
Sever IP: Set the Email sever address
From: Set the sender’s Email address
Authentication: On or Off, is according to the verify of Email server.
Page 27
27
User name: Sender’s name:
Password: Sender’s password
To: Set the name of receiver’s email address.
CC: set the email address of carbon copy.
Note: No limit for user name and password in this version.
Click “save” to activate settings
When “email” selected in Alarm, system will send email according the settings
in SMTP.
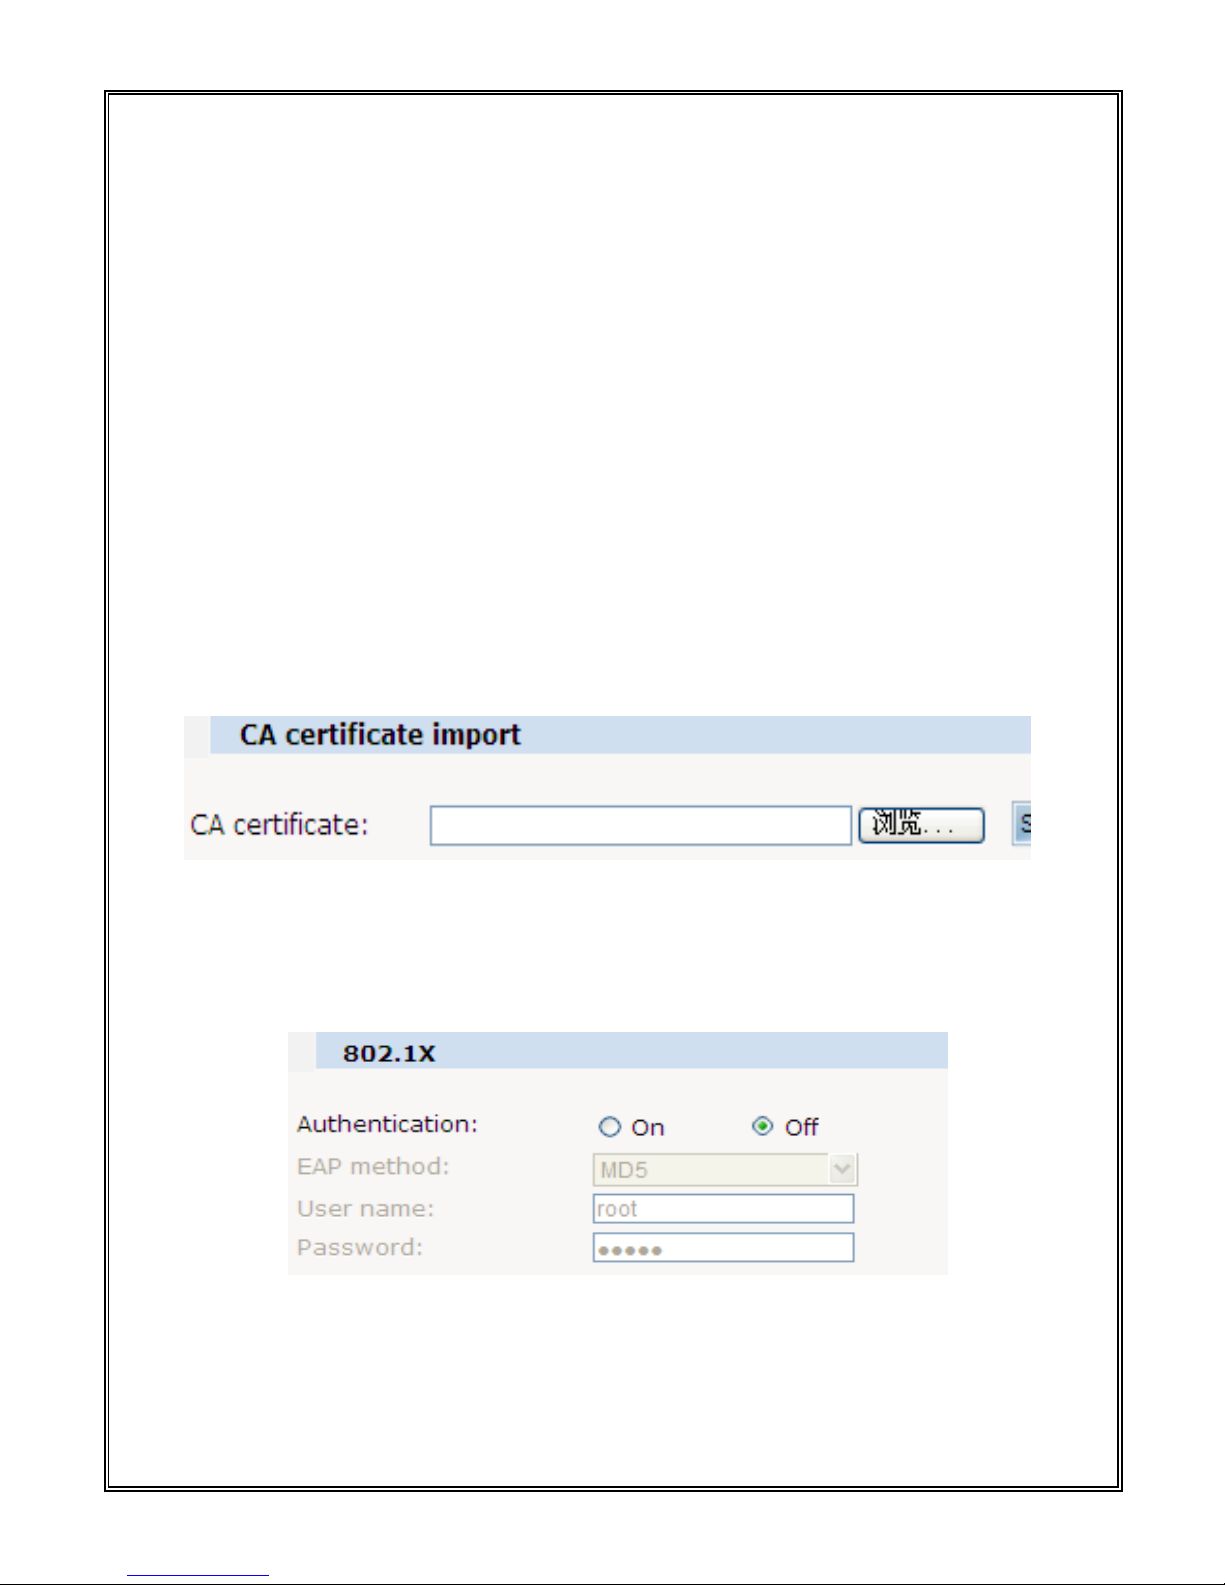
HTTPS: It is a HTTP Channel which is aimed at security, in simple. It is a
much more secured version of HTTP.
Figure4-3-9 CA certificate import
802.1X:
Figure 4-3-10 802.1X set
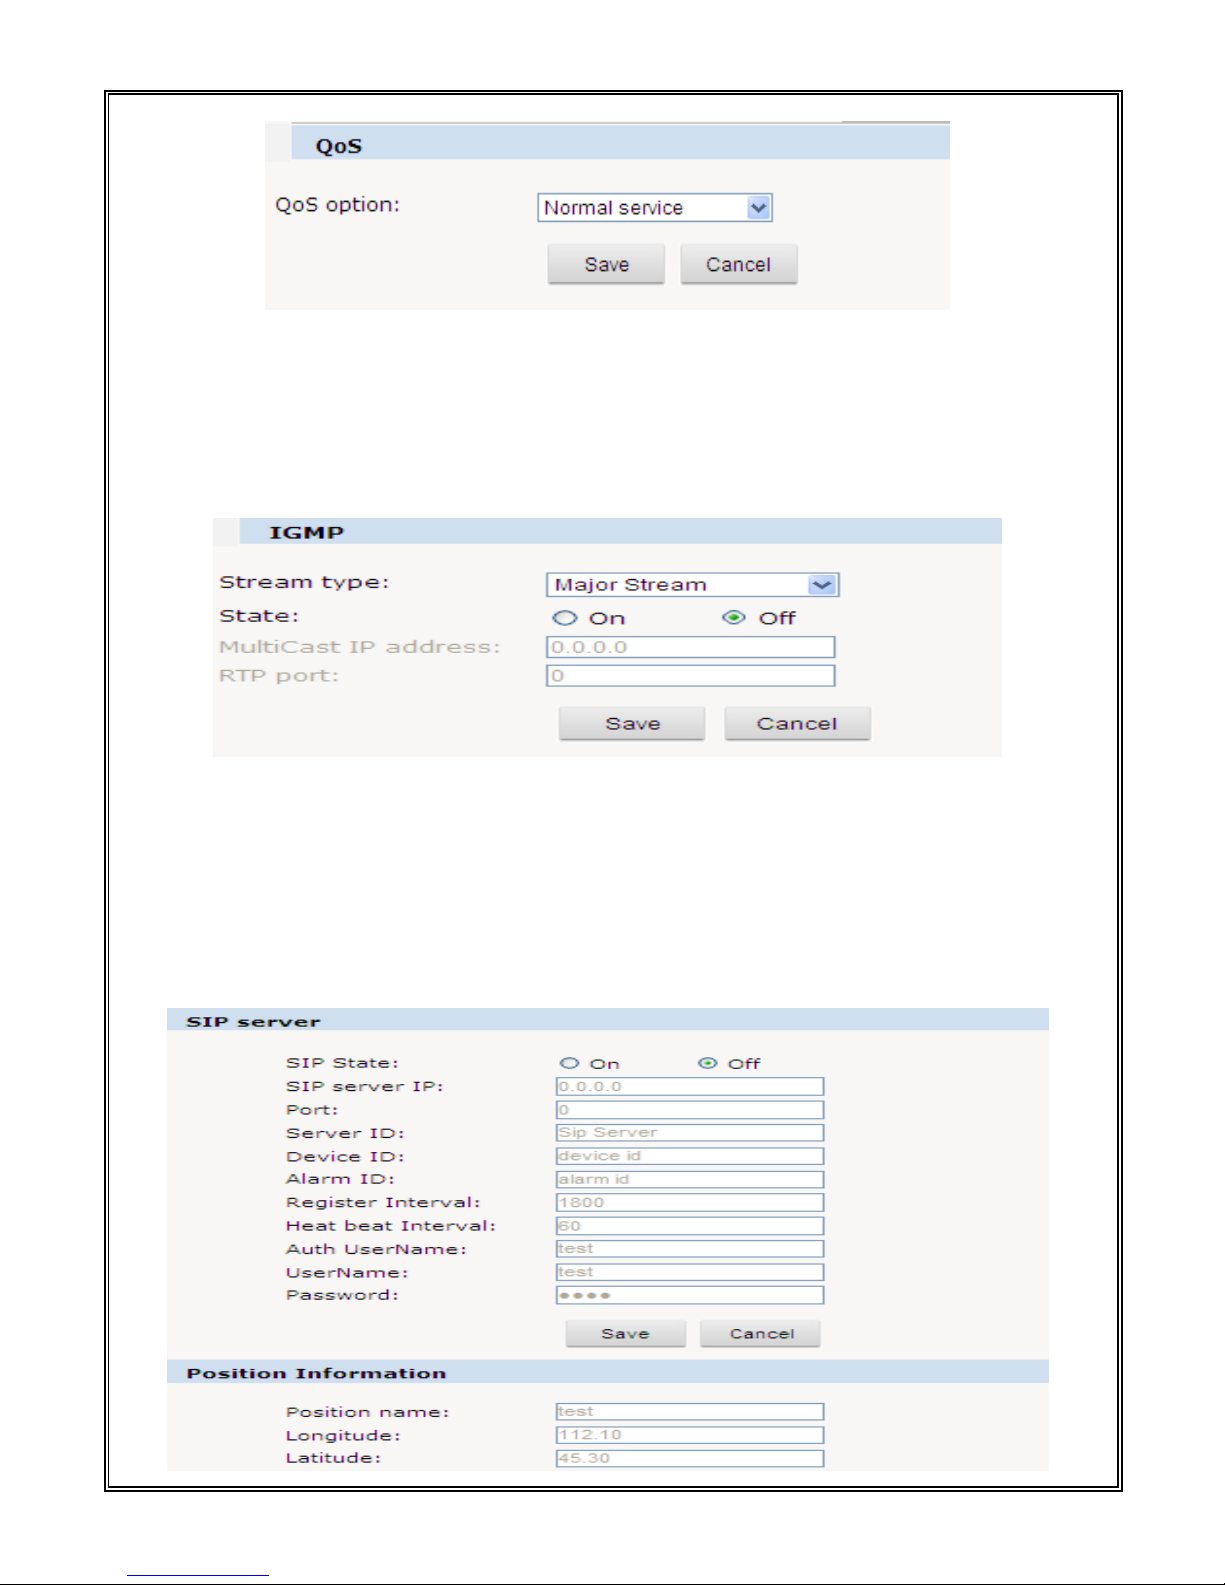
QoS: Service quality, is kind of security mechanism of Network, is a kind of
technology, which is used to solve problem like Network delay and block.
Page 28
28
Figure 4-3-11 QoS setting
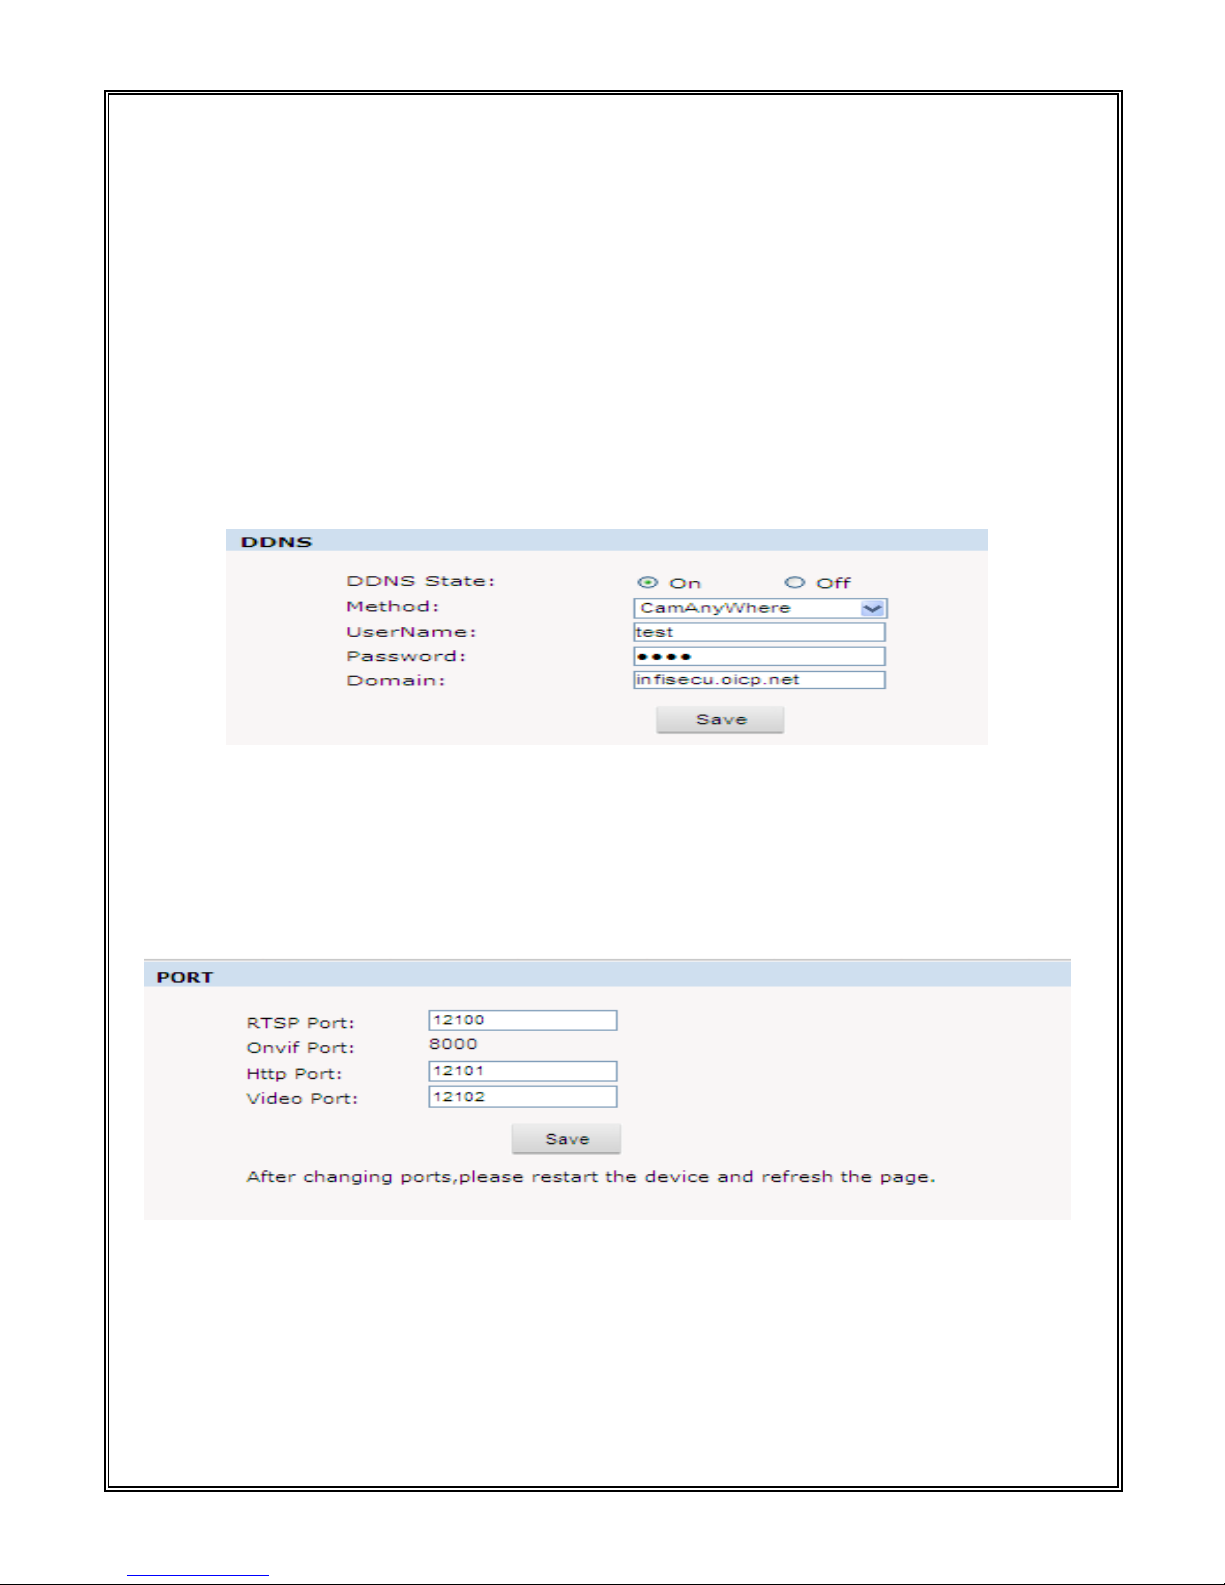
IGMP: It is a multicast protocol of Internet protocol, used by IP Host to report
the group member situation to the direct connected Router.
Figure 4-3-12 IGMP setting
SIP: It is a signal control protocol, based on application layer, and it can be
used to create, change, or release the conversation of one participant or
multi-participant.
Page 29
29
Figure4-3-13 STP server
DDNS: Mapping user’s dynamic IP address to a fixed DNS. Every time user
connect device to Network, the client program will send the dynamic IP
address through signal to server program of Server host. Then the server
program will provide DNS service and realize DDNS. In another words, DDNS
capture the changing IP address and make it correspond to domain name, in
this way, other users can communicate through domain name.
Figure4-3-14 DDNS setting
PORT: A kind of port, data transfer through PC and other device(Printer,
Mouse, Monitor. etc), network or other directly connected PC.
Figure 4-3-15 PORT setting
4.3.3 Camera
Camera: Settings like basic setting, Expose setting, Effect setting, White
Page 30
30
balance setting and reset.
Figure 4-3-16 Camera setting
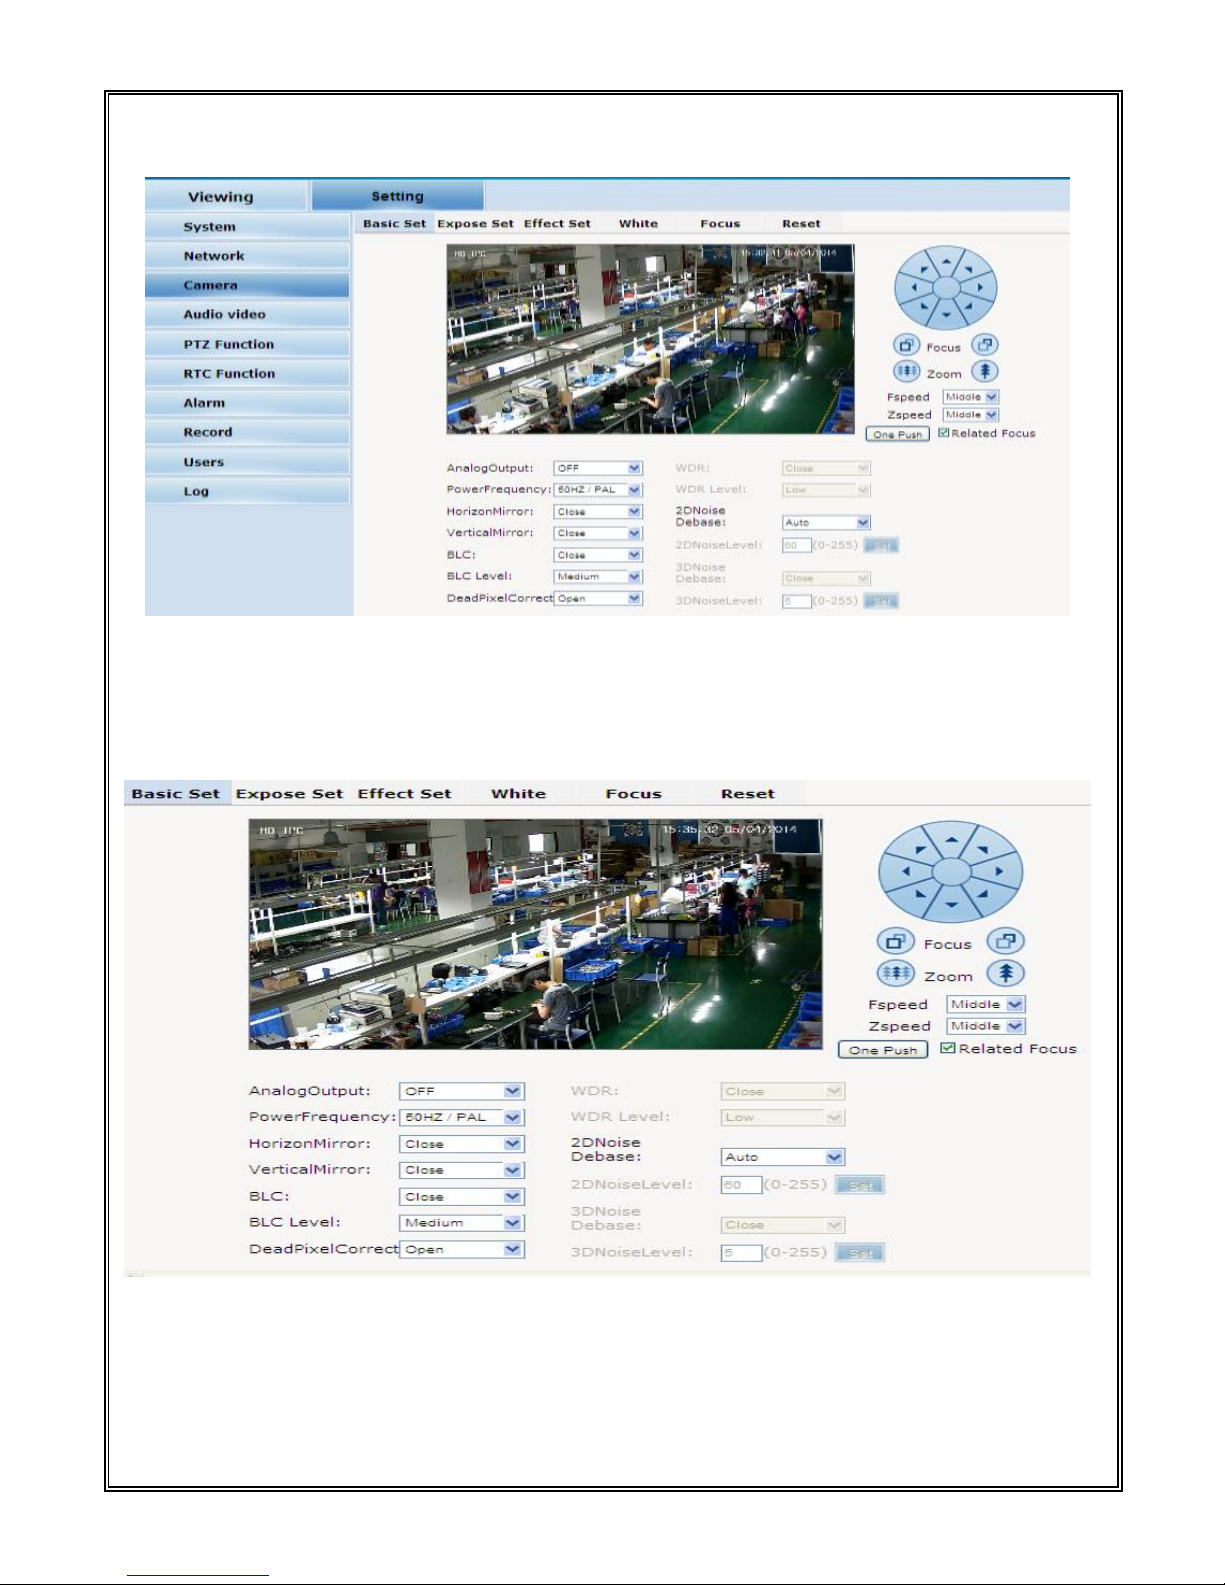
Basic setting: Settings of Camera system, Mirror function, BLC, DNR.etc
Figure4-3-17 Basic Set
Power frequency: 50HZ/60HZ
Horizontal Mirror: Image horizontal mirror display
Page 31
31
Vertical Mirror: Image vertical mirror display
BLC: It is divide image into different section, every section be exposed
separately. In this way, objective can be ideally exposed even in a strong
backlight circumstance. Optional levels are Low, Medium, High.
DeadPixel correct: Correct the deal pixel of CCD/CMOS.
WDR: This technology enables camera to see the characteristic of image in
strong contrast. Optional level is Low Medium, High.
Note: This version does not support this function.
3D NR: Camera compares the nearby two frame of Images to find out the
noise position, and then deal with gain control. In this way, the Noise
interference will be lowered.
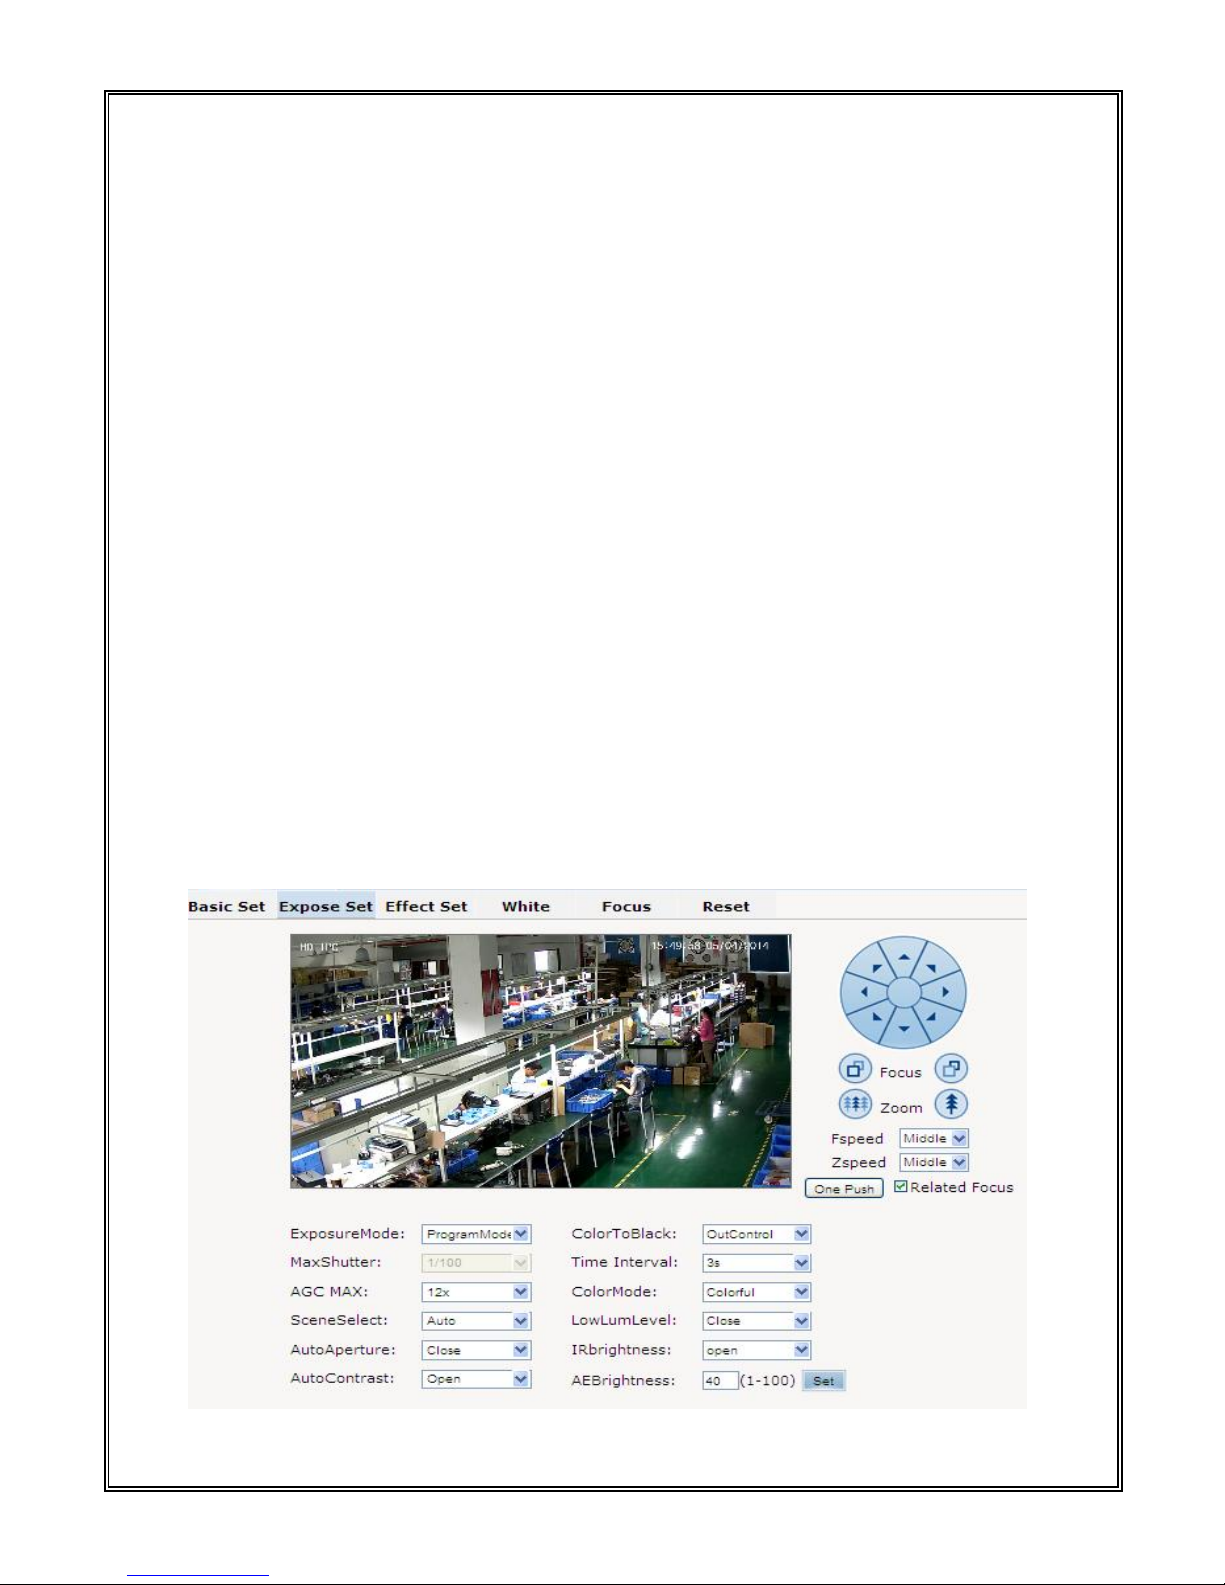
Exposure setting: Setting of exposure mode, IR LEDS control, scene select,
AGC.etc
Figure4-3-18 Expose set
Page 32
32
Exposure mode: Program mode, Shutter mode, Manual mode.
Scene select: “Indoor”- to eliminate the light flashing effect. Others like
“Outdoor” “Auto”.
AGC MAX: Make the gain of amplifying circuit adjust automatically with the
signal. Higher the AGC, lighter in night. User can control it according to real
effect.
Auto aperture: Use the electric signal to control the motor to enlarge or
diminish the aperture. No need of manual adjustment. Big aperture when it is
dark while small aperture if bright.
Color to black: “auto” “night” “day” “outcontrol”
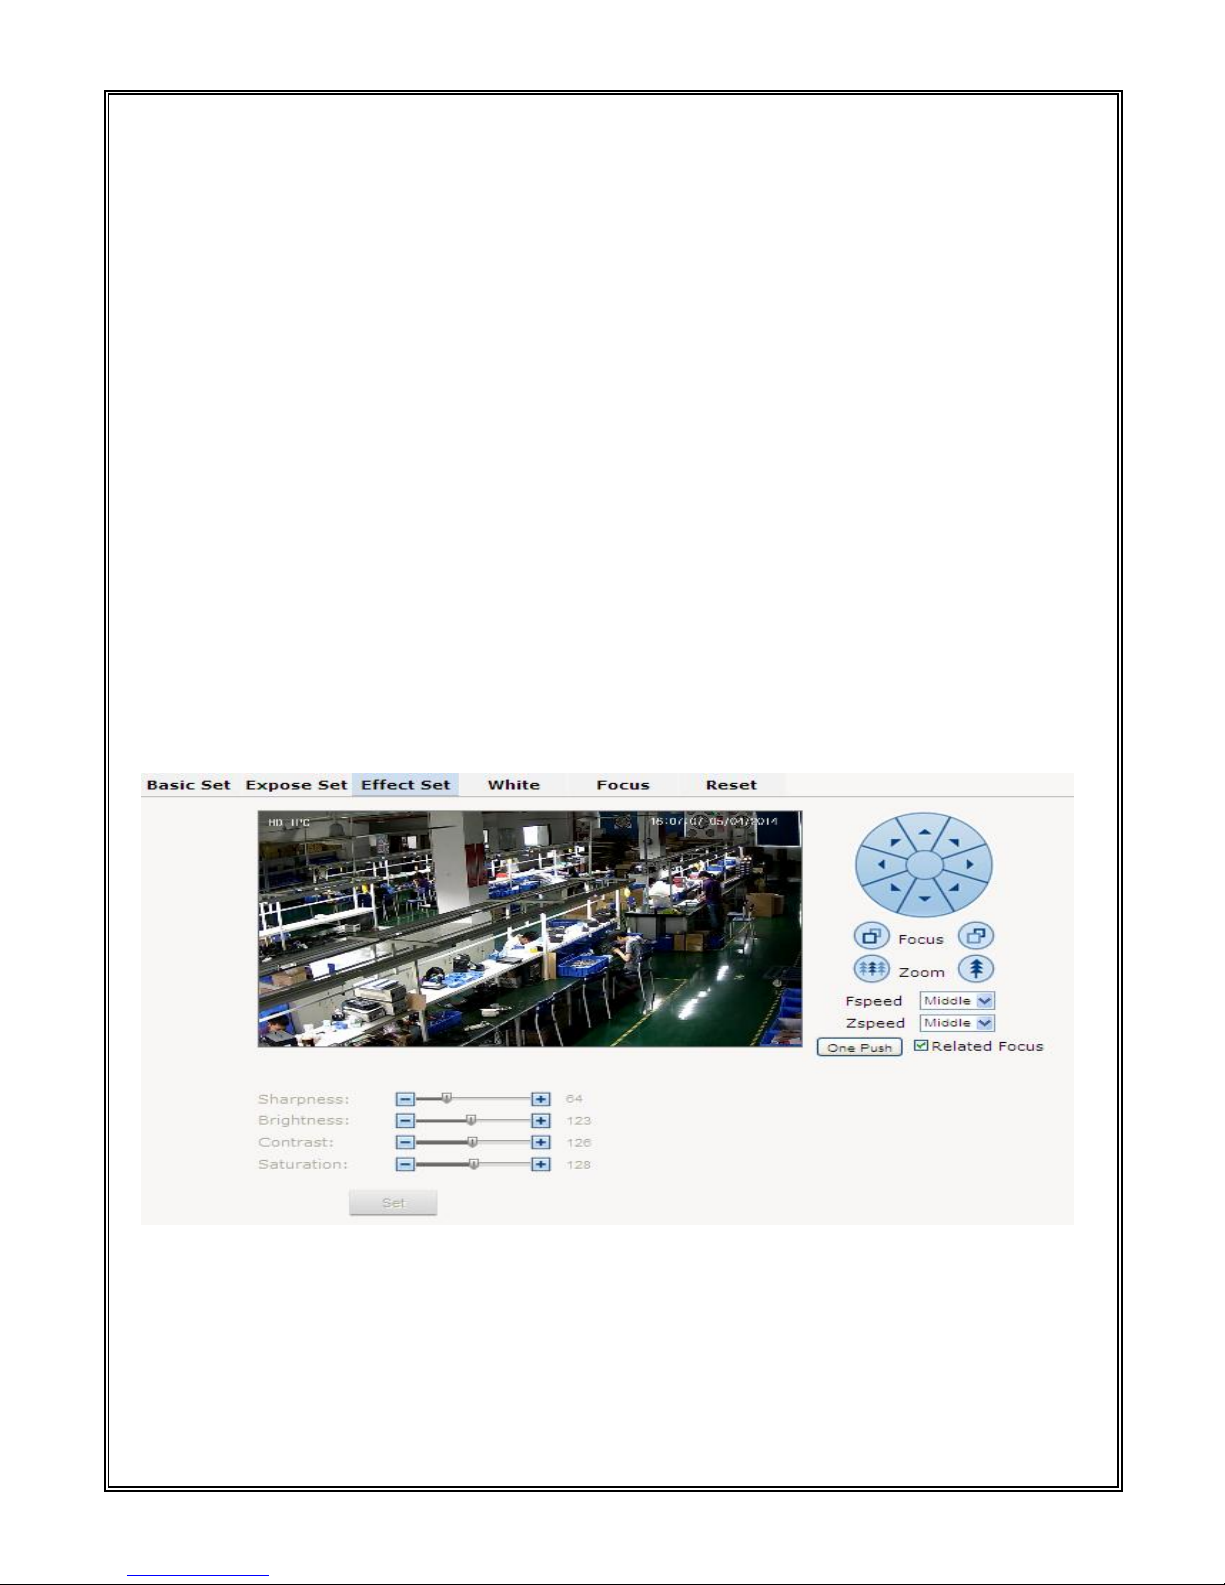
Effect set: Setting of the Sharpness, Brightness, Contrast, Saturation.
Figure4-3-19 Effect set
Sharpness: Sharpness is sometimes called “Definition”. It is a index of
Horizonal definition and edge sharpness. If raise the sharpness, then image
will looks like much clearer since the image’s detail contrast is higher. But with
Page 33
33
over high sharpness, image will be of distortion and dazzling.
Brightness: Raising the light intensity of Unit projection area can get brighter
effect of total image while over top brightness will cause lack of transparency.
Contrast: Contrast is the key to image visual effect. Normally, higher contrast
leads to clearly marked image and bright color. Conversely, low contrast will
make all images seem gray.
Saturation: Saturation means the bright degree, or the purity of color. The
bigger the color composition, the greater the degree of saturation; The smaller
the decolorization composition, the greater the degree of saturation
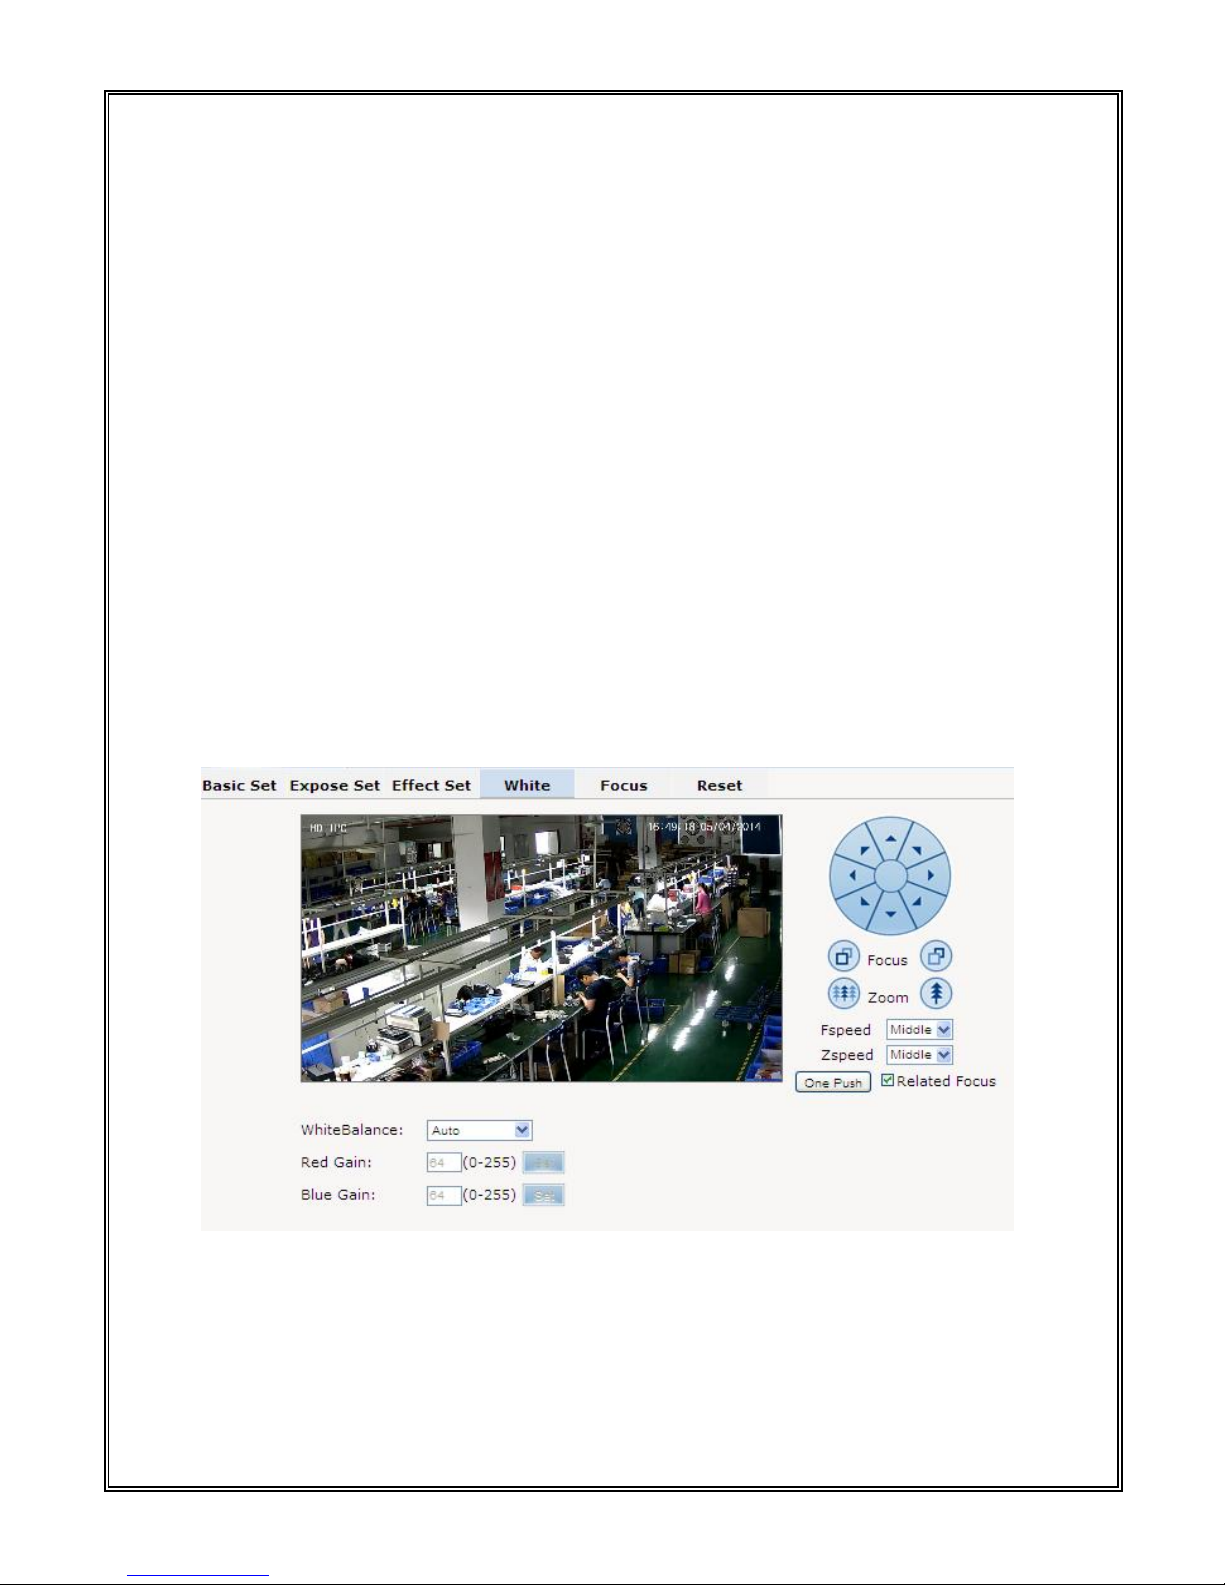
White Balance: Balance of White color, means in any circumstance, the white
object will be white.
Figure4-3-20 White Balance
White balance: Options are Auto, Manual, Cloudy, Day, Filament lamp,
Fluorescent
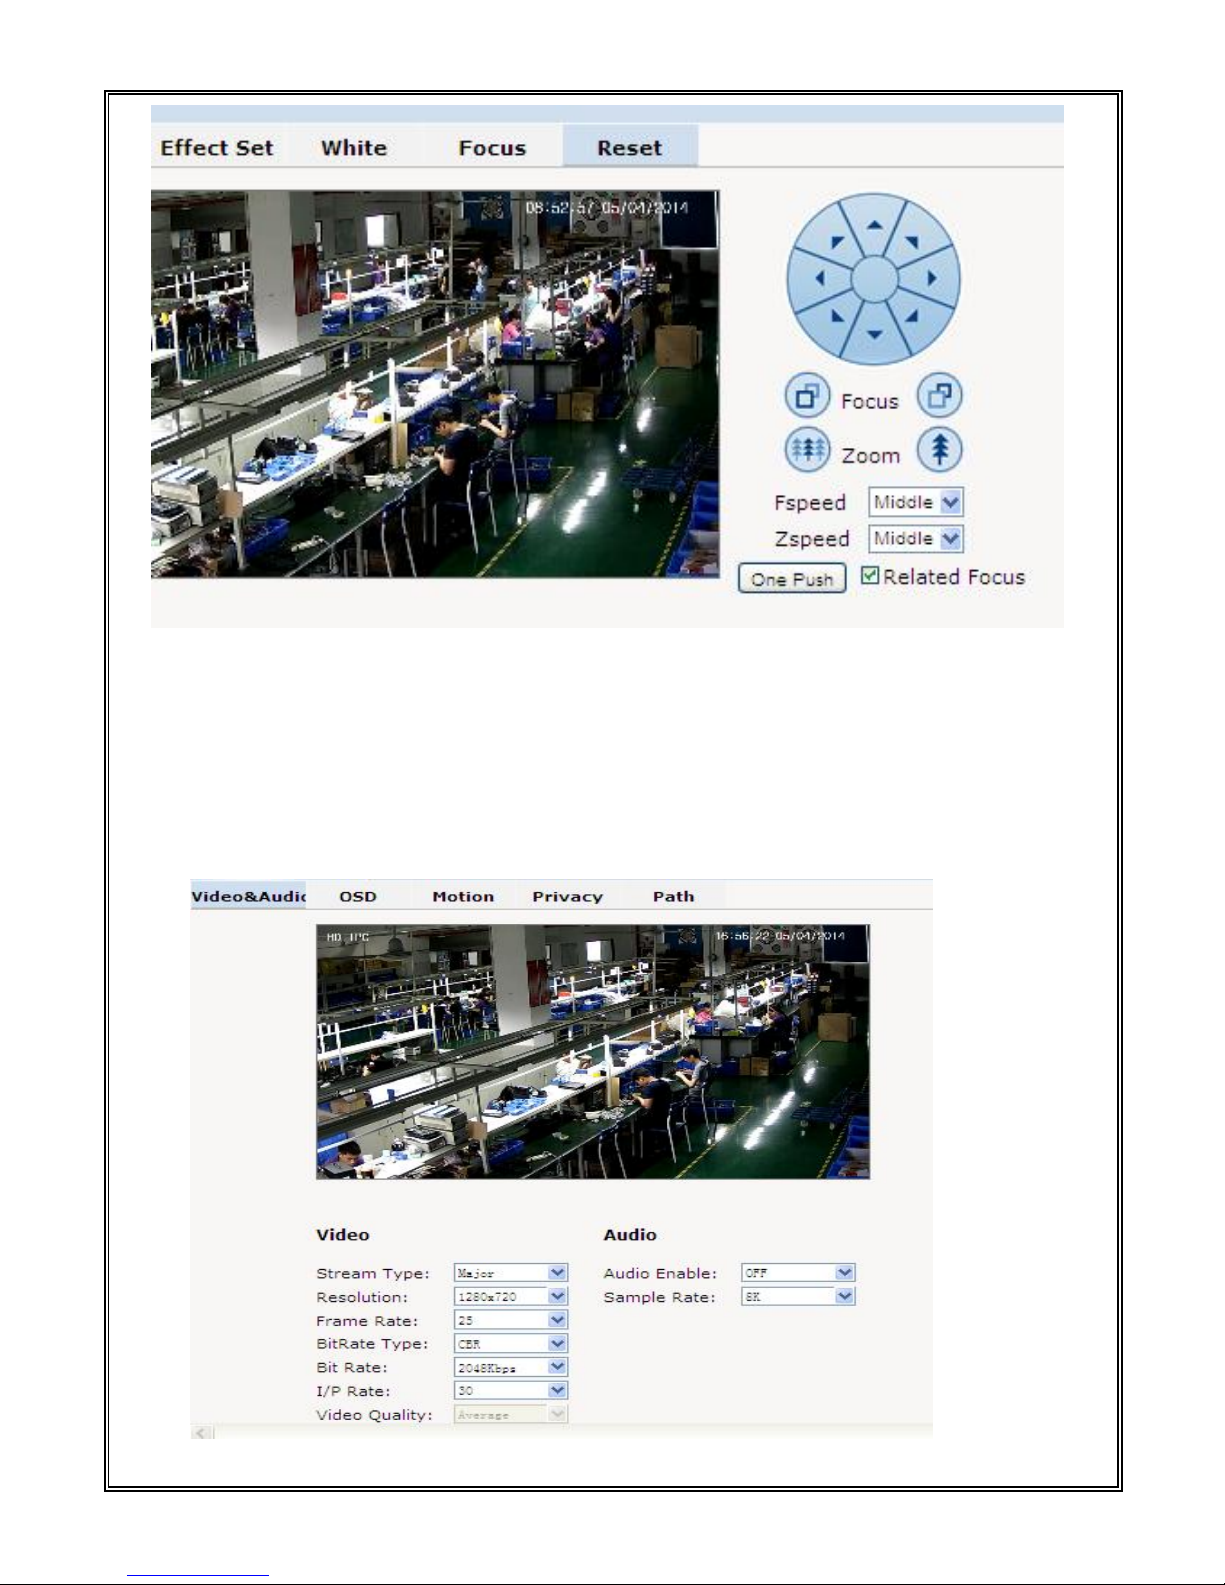
Reset: Back to factory default setting
Page 34
34
Figure4-3-21Reset
4.3.4 Audio& Video
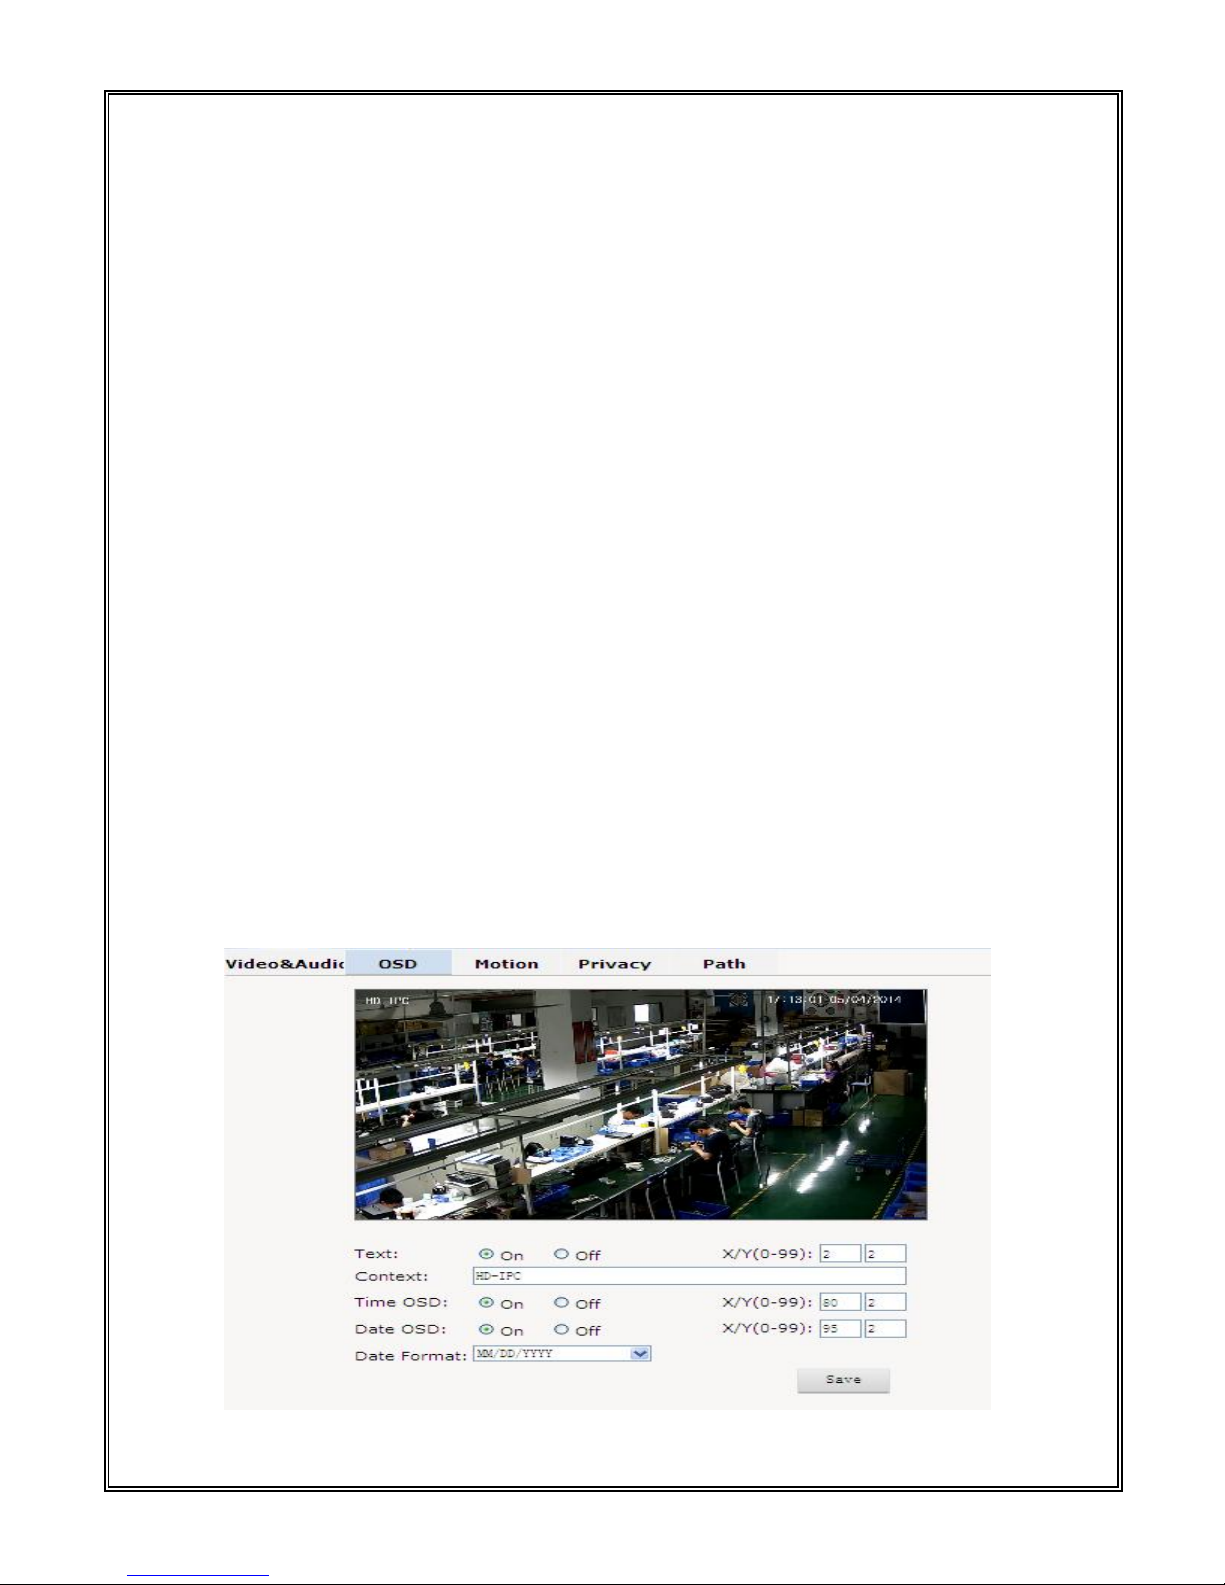
Audio & Video: Setting of audio, video, OSD text, privacy zone, store path
.
Page 35
35
Figure4-3-22 Audio & Video
Stream type: Major, Minor, MJPEG
Resolution:1280*960、1280*720、640*480.
Frame rate: It is handled and transferred frame number in a second. More
coherent image with bigger frame rate, but the performance of dealing with
other incident of CPU. With smaller frame rate, image will be of more
interruption, but CPU can deal with more incidents. Recommended setting:
NTSC:30;PAL:25.
BitRate type: VBR--used when bandwidth is big enough.
CBR--Image will transfer in a constant bandwidth.
Bit Rate: Options as 512K、1024K、2048K、3072K、4096K、5120K、6144K,
Bigger bit rate, higher CPU occupation, better image effect.
I/P Rate:I frame/P frame,Bigger I/P rate, smaller data. Recommend: 15
TXT: Camera can display text, time, with XY 2D coordinate table.
Figure4-3-23 OSD
Page 36
36
OSD Setting includes TXT OSD, Time OSD, Date OSD.
TXT OSD:Set the context and display place.
Enter content in “Context”,, it can be about 24 characters or 24pcs
Chinese characters.
X coord and Y coord can set to integer between “0-99”. And it shows the
context location relative to the “0”of top-left of image. After set the context and
coordination, choose “On”, the text will be display on real time video.
Otherwise “Off”
Time OSD: Set the display direction of time, On or Off.
Date OSD:Set the date format, display position, on or off. Date display on or
off.
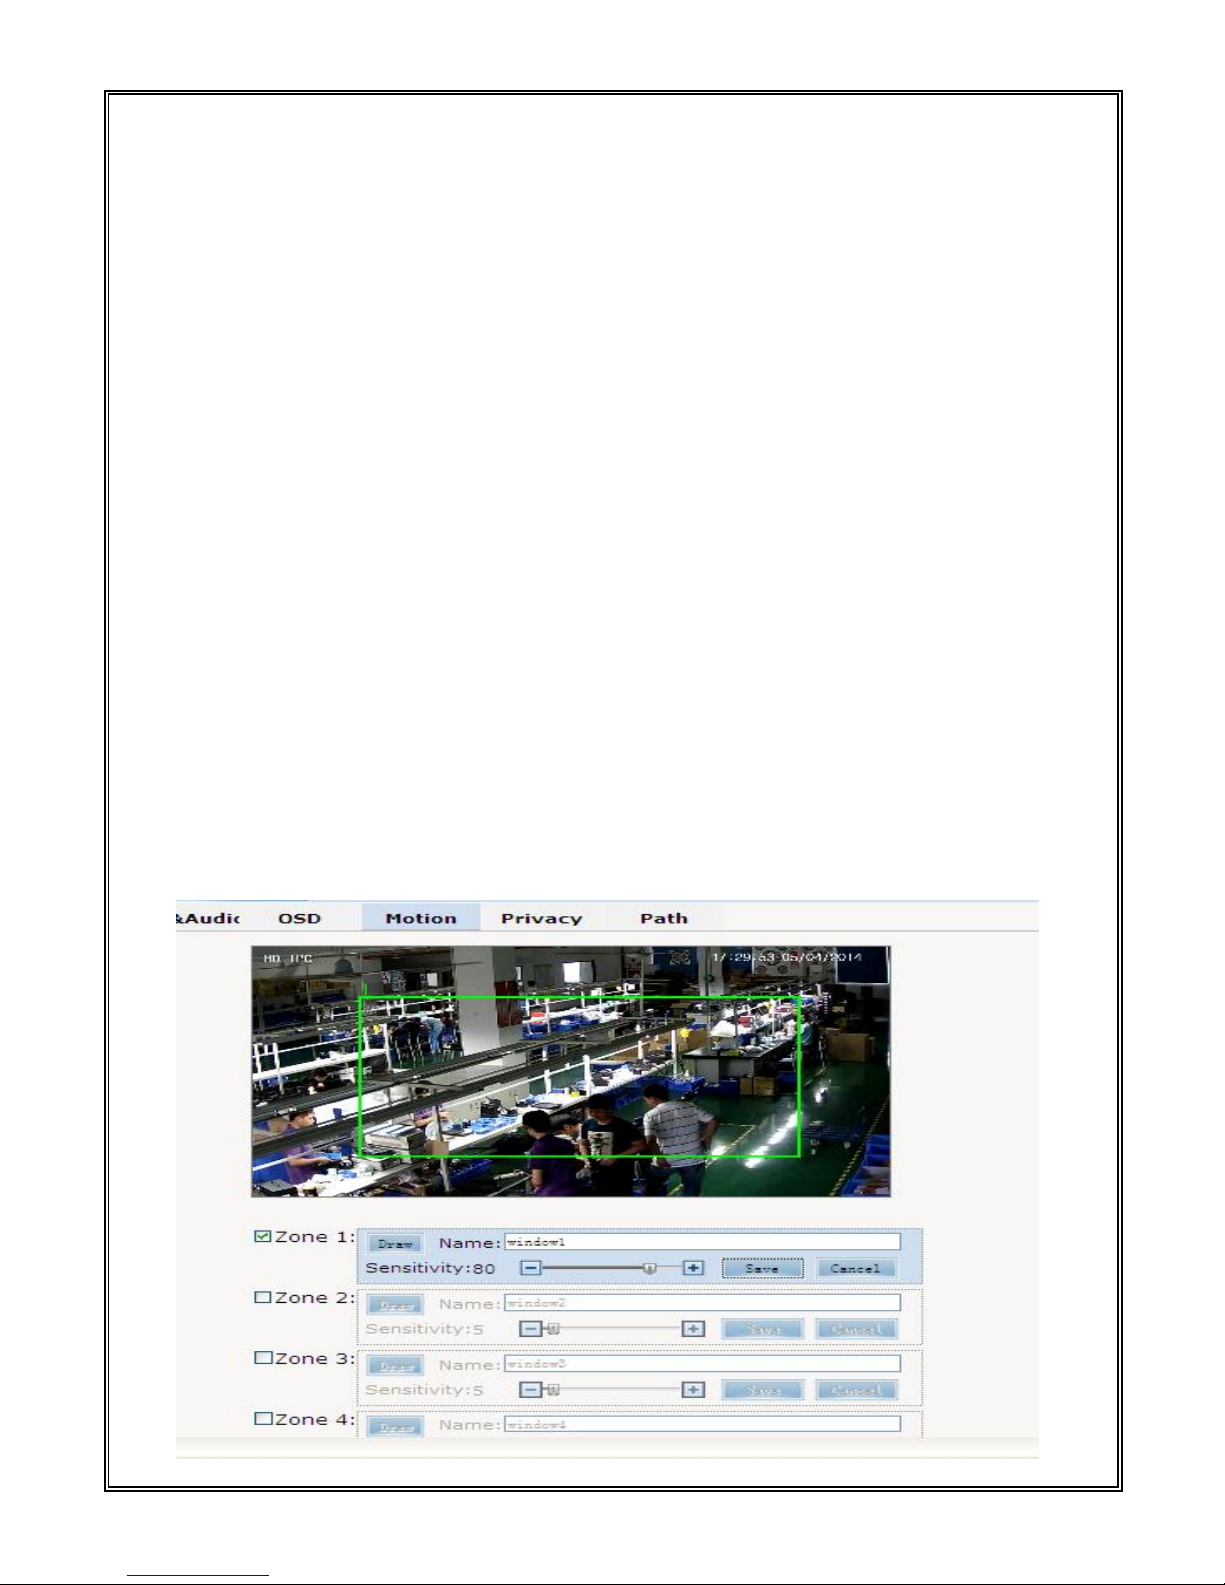
Motion: Normally called motion detection and is applied in Unmanned
surveillance video and auto alarm.
Page 37
37
Figure4-3-24 Motion
【Sensitivity】: set the motion detect sensitivity, which range from 1-100.
Recommend: 15。
【Zone】:You can set four motion detect zone, just draw a frame with
mouse .
When alarm alert in setted zone, the alarm will be activated and also
there is record in log.
Note: 5seconds later, the setting of motion detect will be in effect.
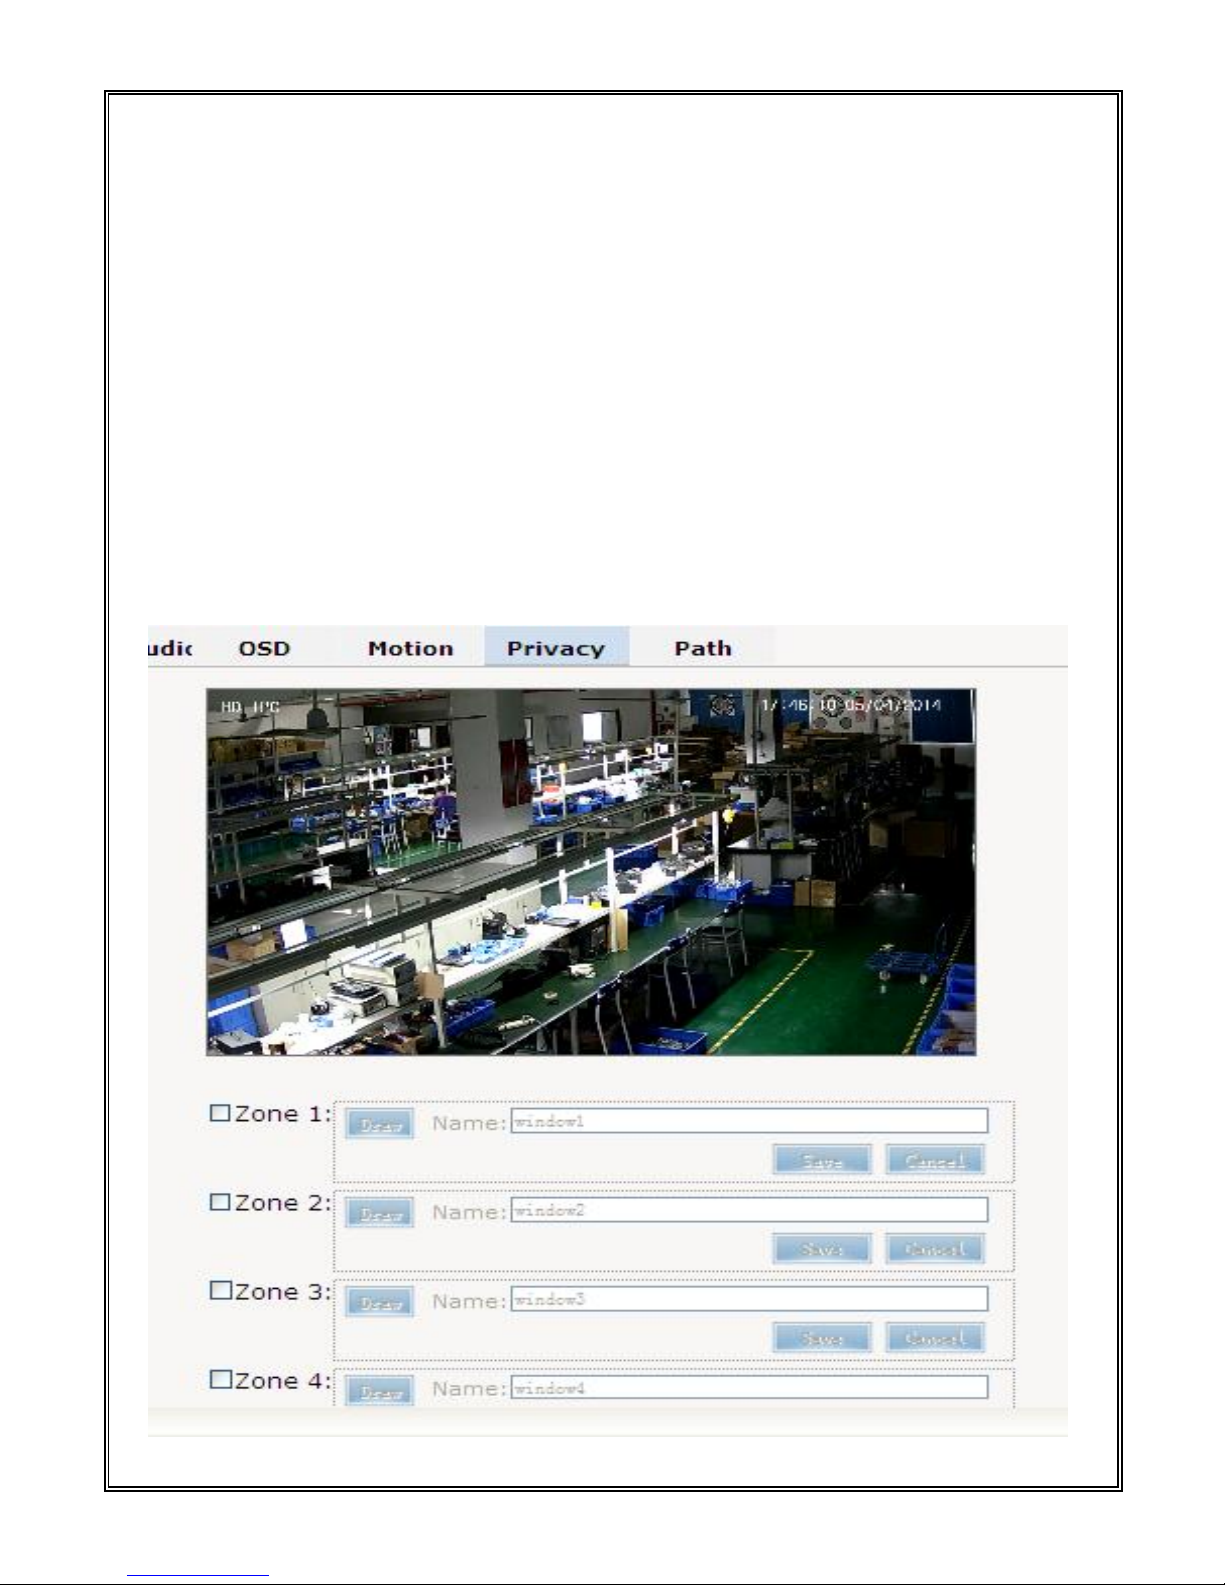
Privacy zone: hidden setting of some zone.
Page 38
38
Figure4-3-25 Private zone
This IP PTZ Dome support privacy zone function. When there are some
particular zone which should not be seen in survey zone, user may set this
zone into privacy zone. Mask will be added so the operation staff can’t see
unauthorized zone from the monitor.
【Zone】: You can set 4 masked zone, just draw frame with mouse.
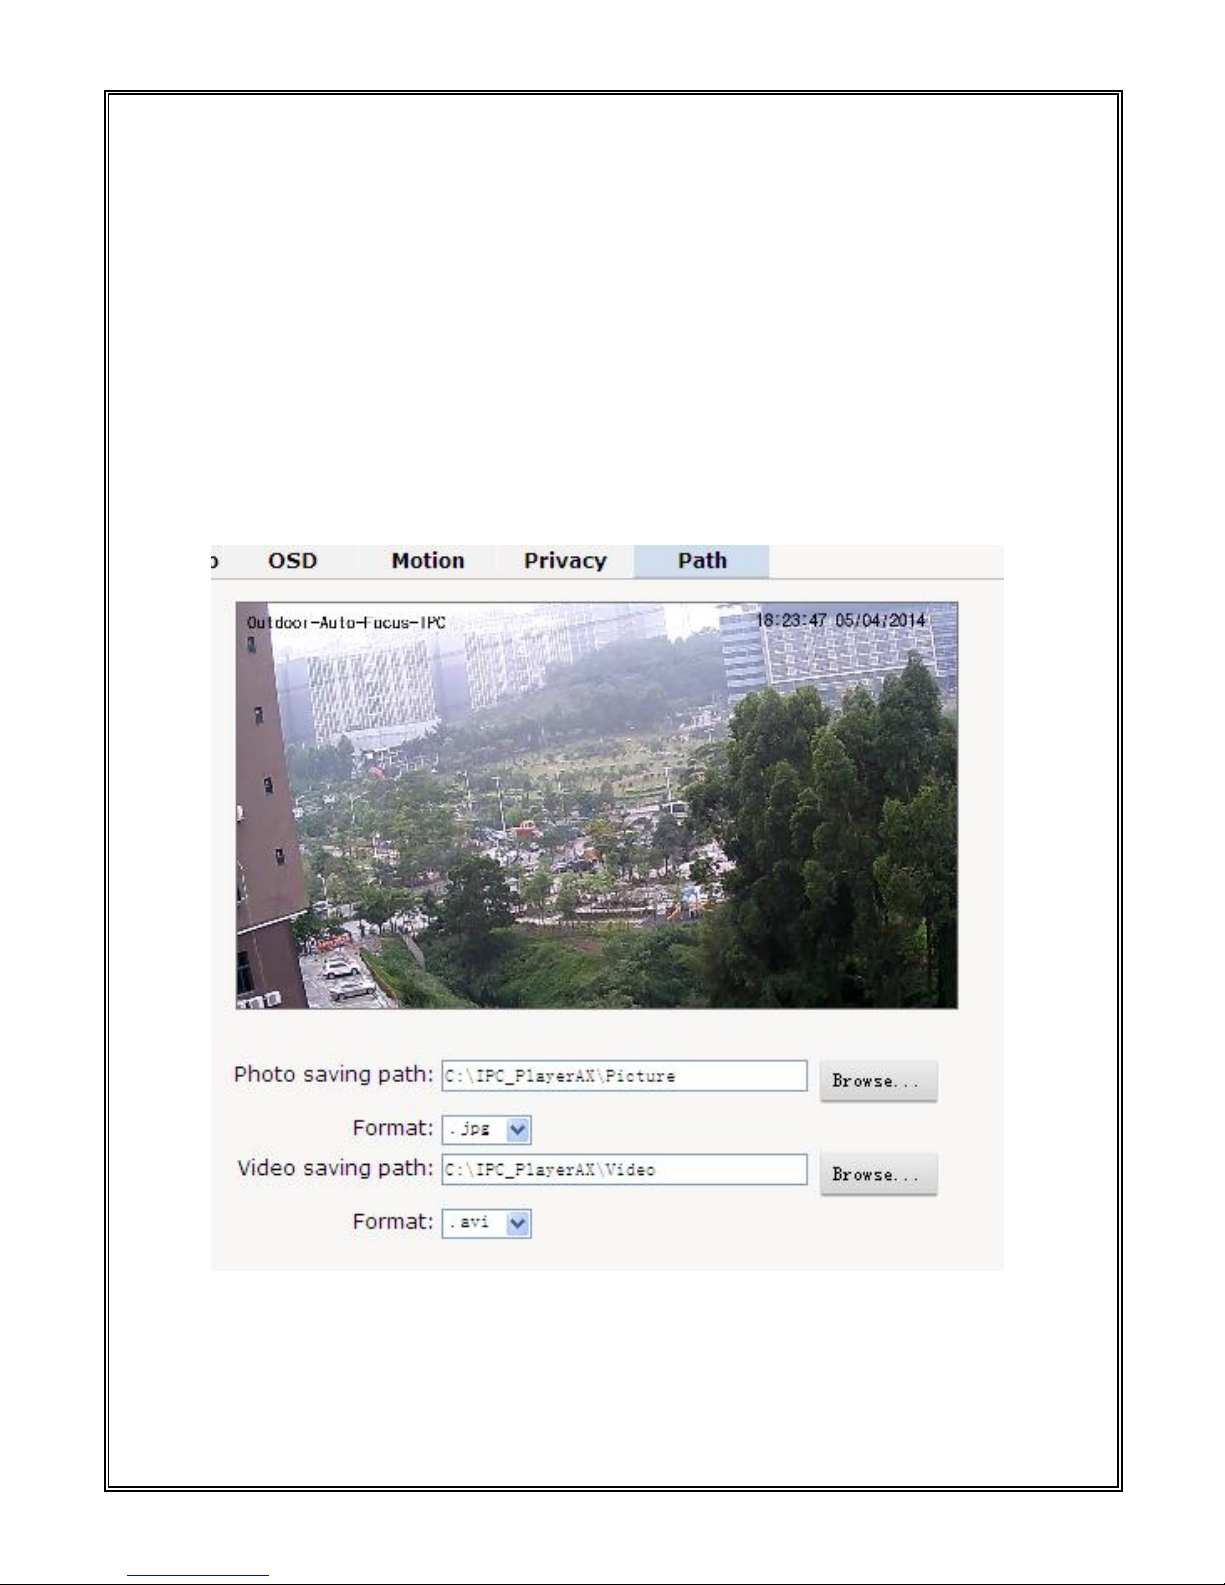
Store path: The store path of IE Video and IE snapshot.
Figure 4-3-26 store path
Default set is in C:/ IPC_PlayerAX, choose browse you may reselect the store
path.
Page 39
39
The file type of Image is jpg/bmp, video is avi/ifv。
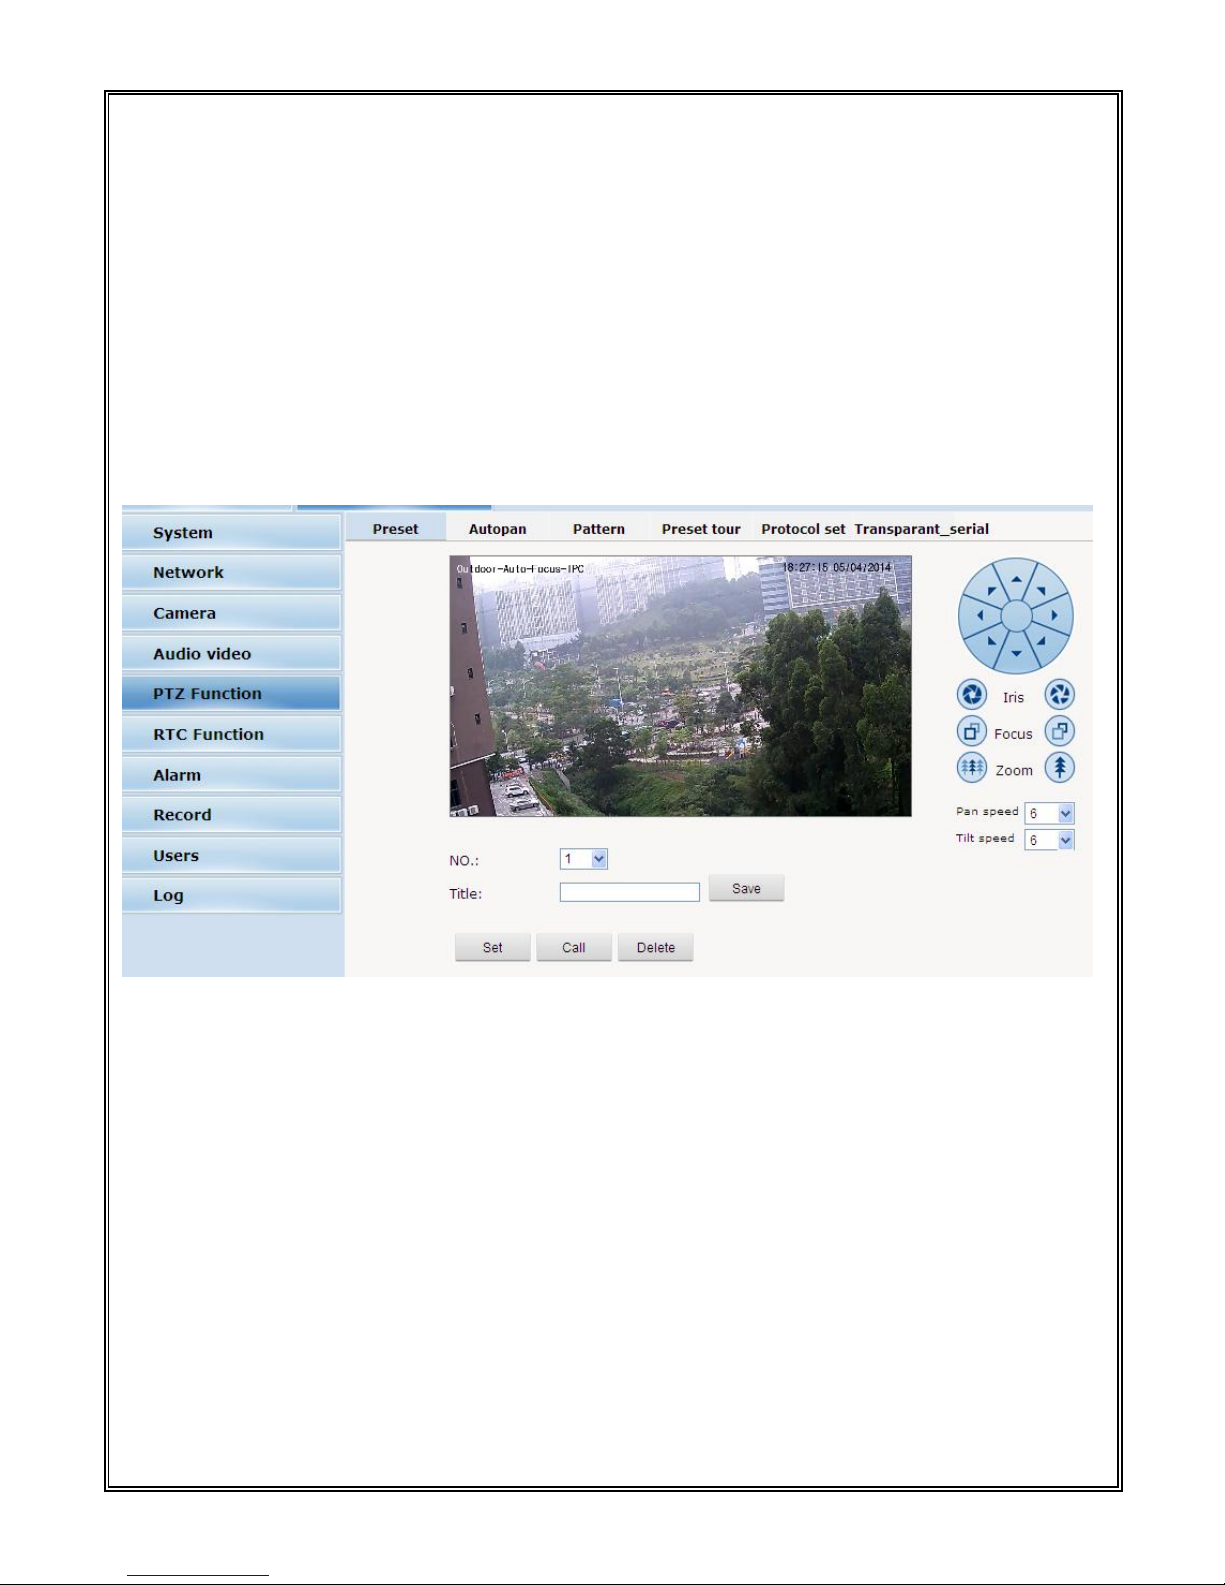
4.3.5 PTZ Function
For this camera, only “Iris” “Focus” “Zoom” can work. Others are
design for HD IP IR PTZ Dome Series.
PTZ Function: Preset, Autopan, Pattern, Preset tour, Protocol set,
Transparant serial
Figure4-3-27 PTZ Function
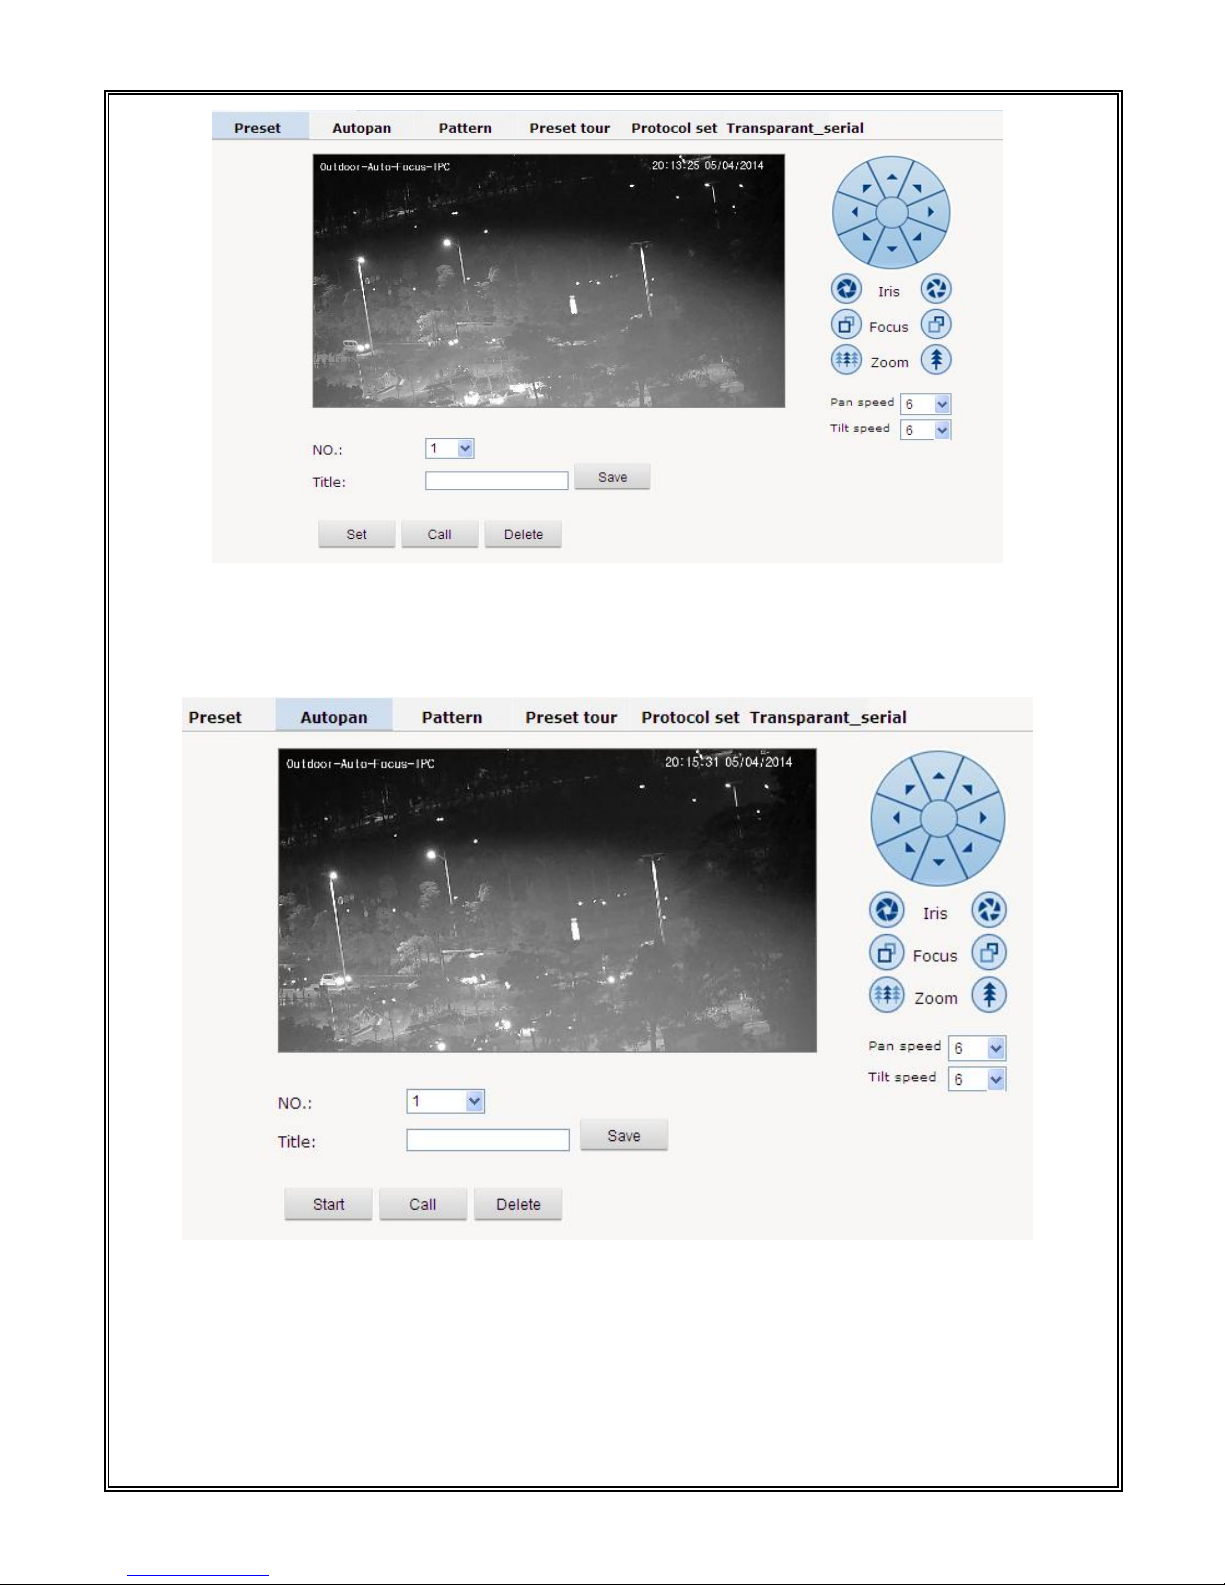
Preset: When camera pan to important point, which needs higher security,
send order of preset point to camera, then camera will memorize the current
position and condition and relate it to the preset number. When send order
again, camera will go back to this point fastly and back to the condition. In this
way, operator can check surveil area quickly and conveniently. Total there are
220pcs preset points.
Page 40
40
Figure4-3-28 Preset point
Autopan:
Figure4-3-29 Autopan
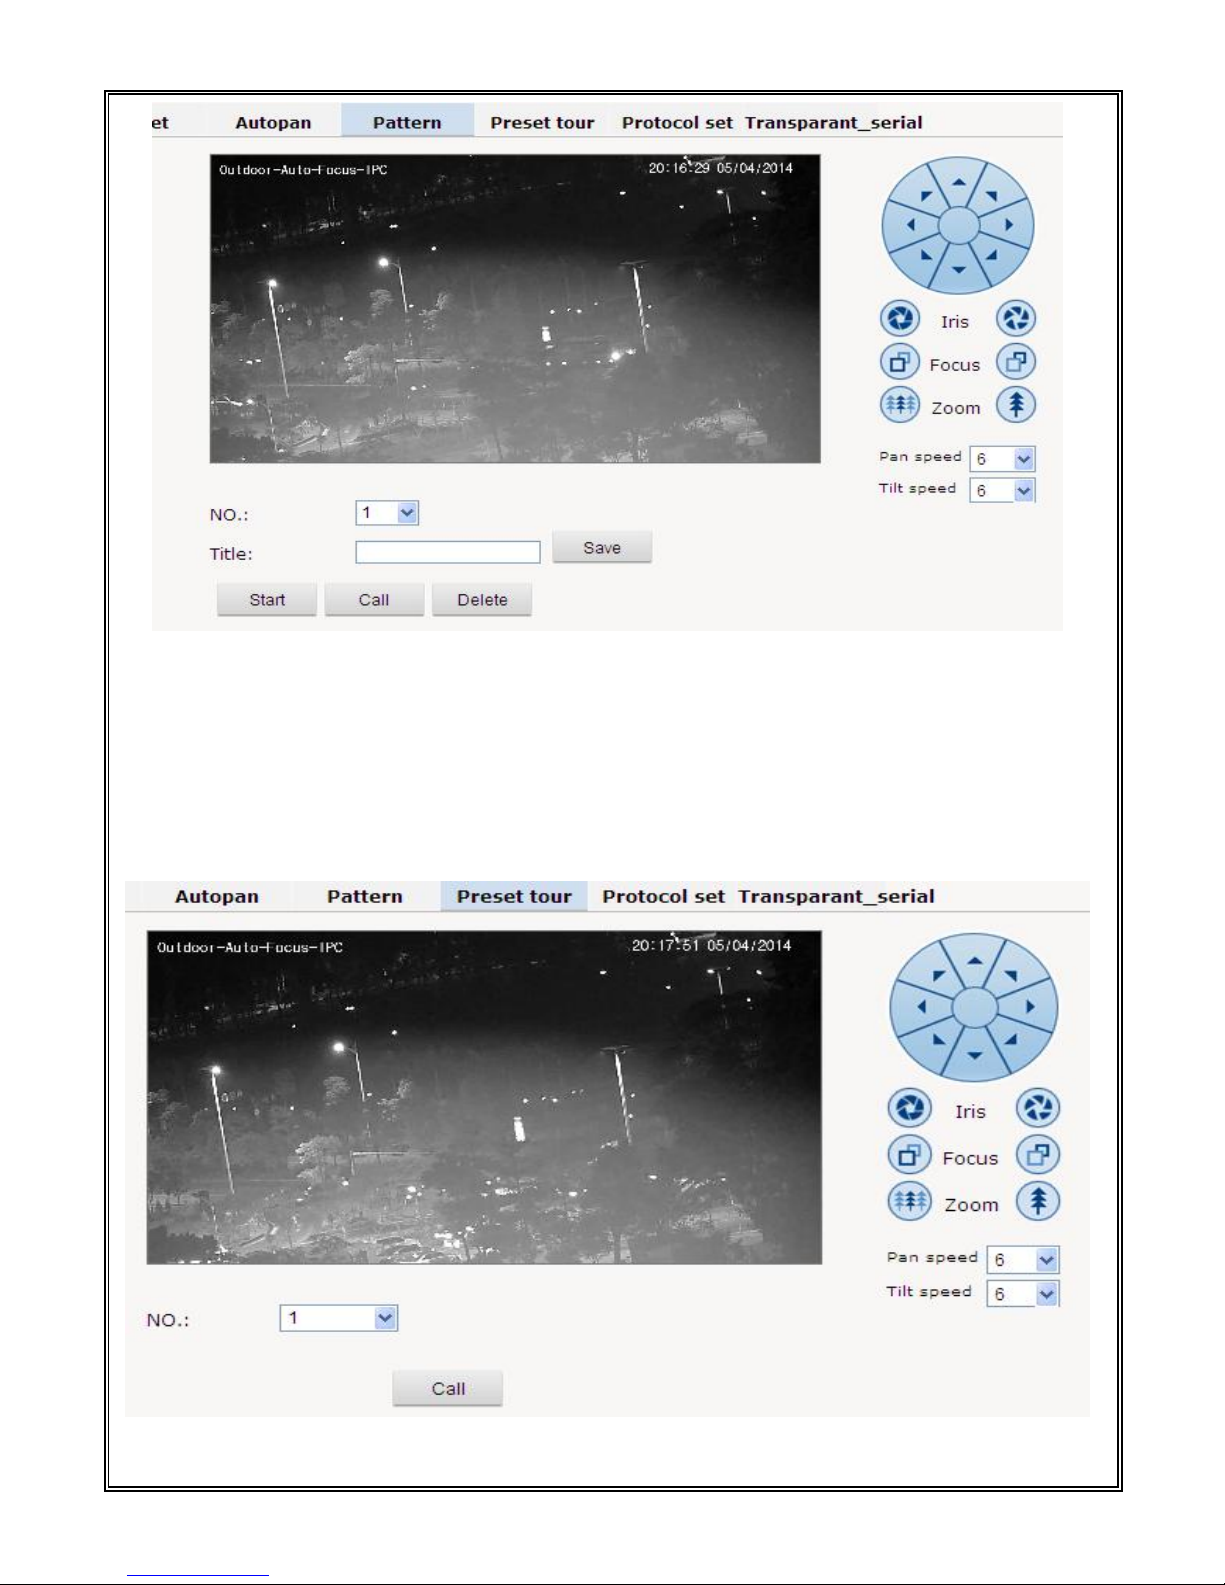
Pattern:
Page 41
41
Figure4-3-30 Pattern
Preset tour:(under updating)
There are 3 preset tours in system, No.1 will activate preset points 1-10, No.2
will activate preset points11-20 while No.3 will activate preset points 21-30.
Figure4-3-31 Preset
Page 42
42
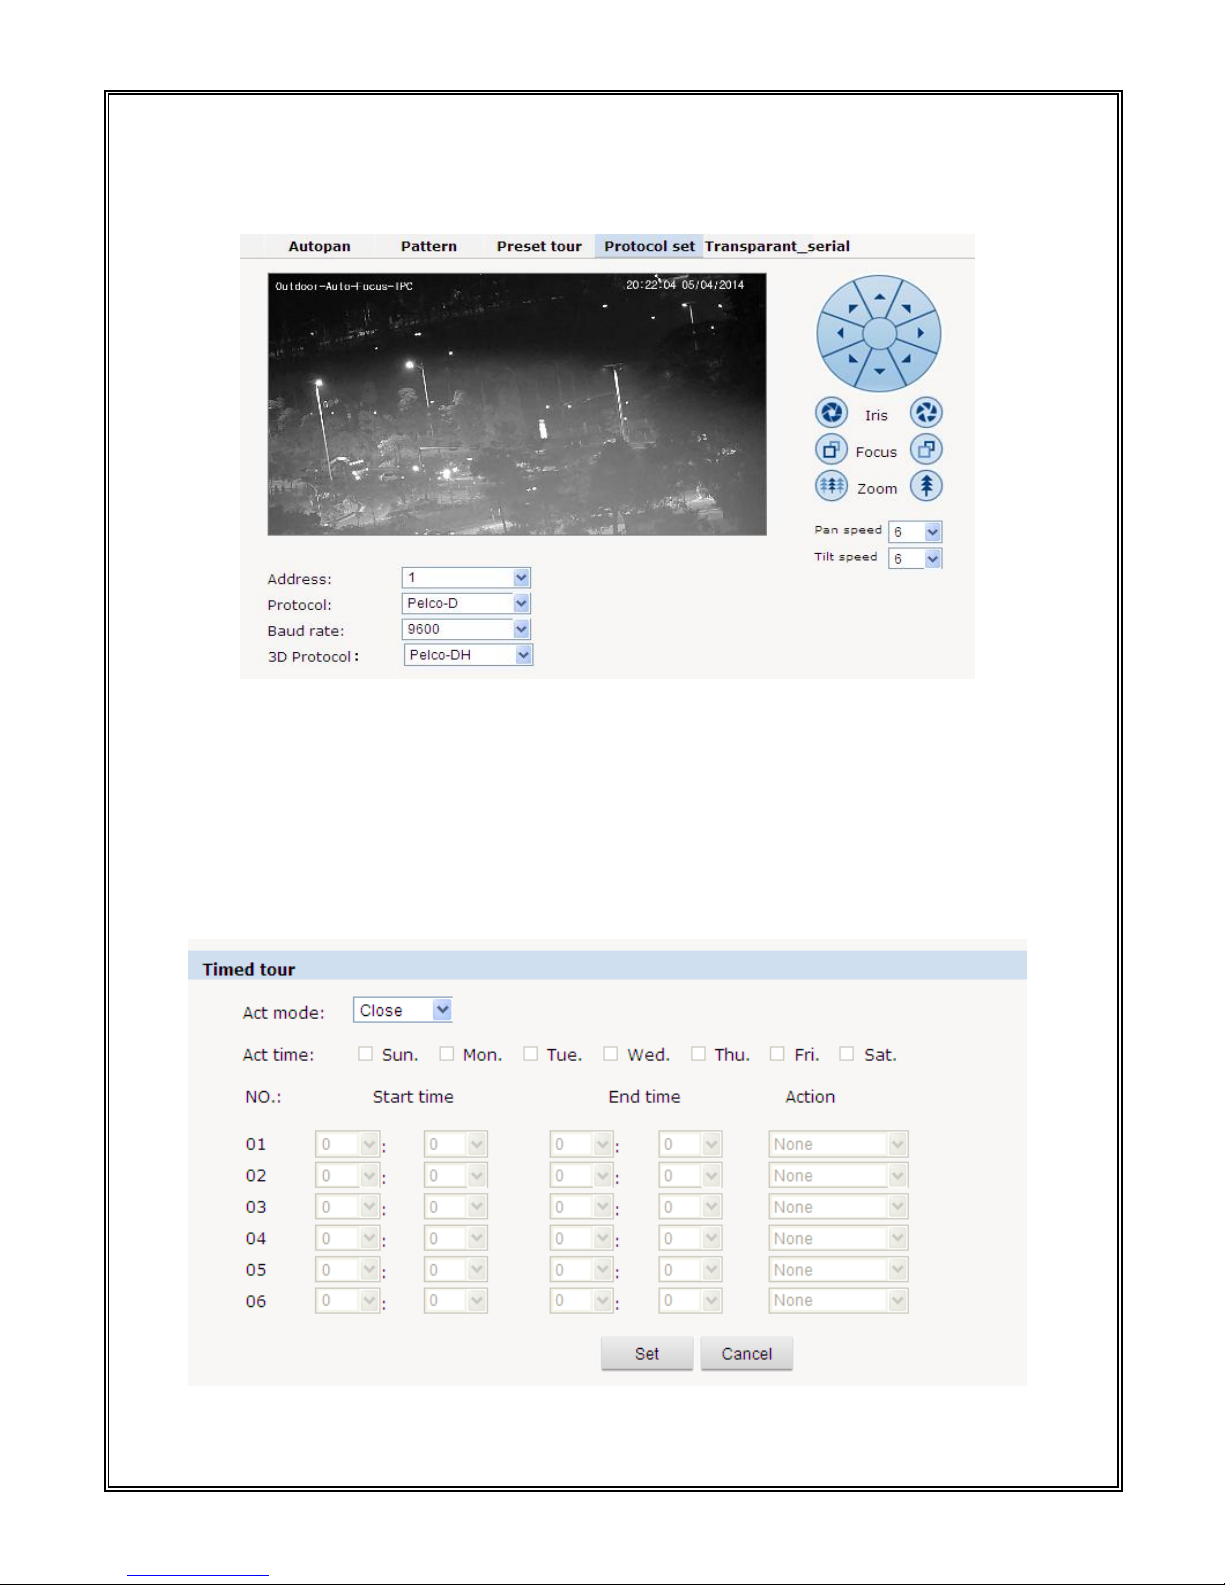
Protocol set:
Set the address, protocol and baud rate
Figure4-3-32 Protocol set
4.3.6 RTC Function
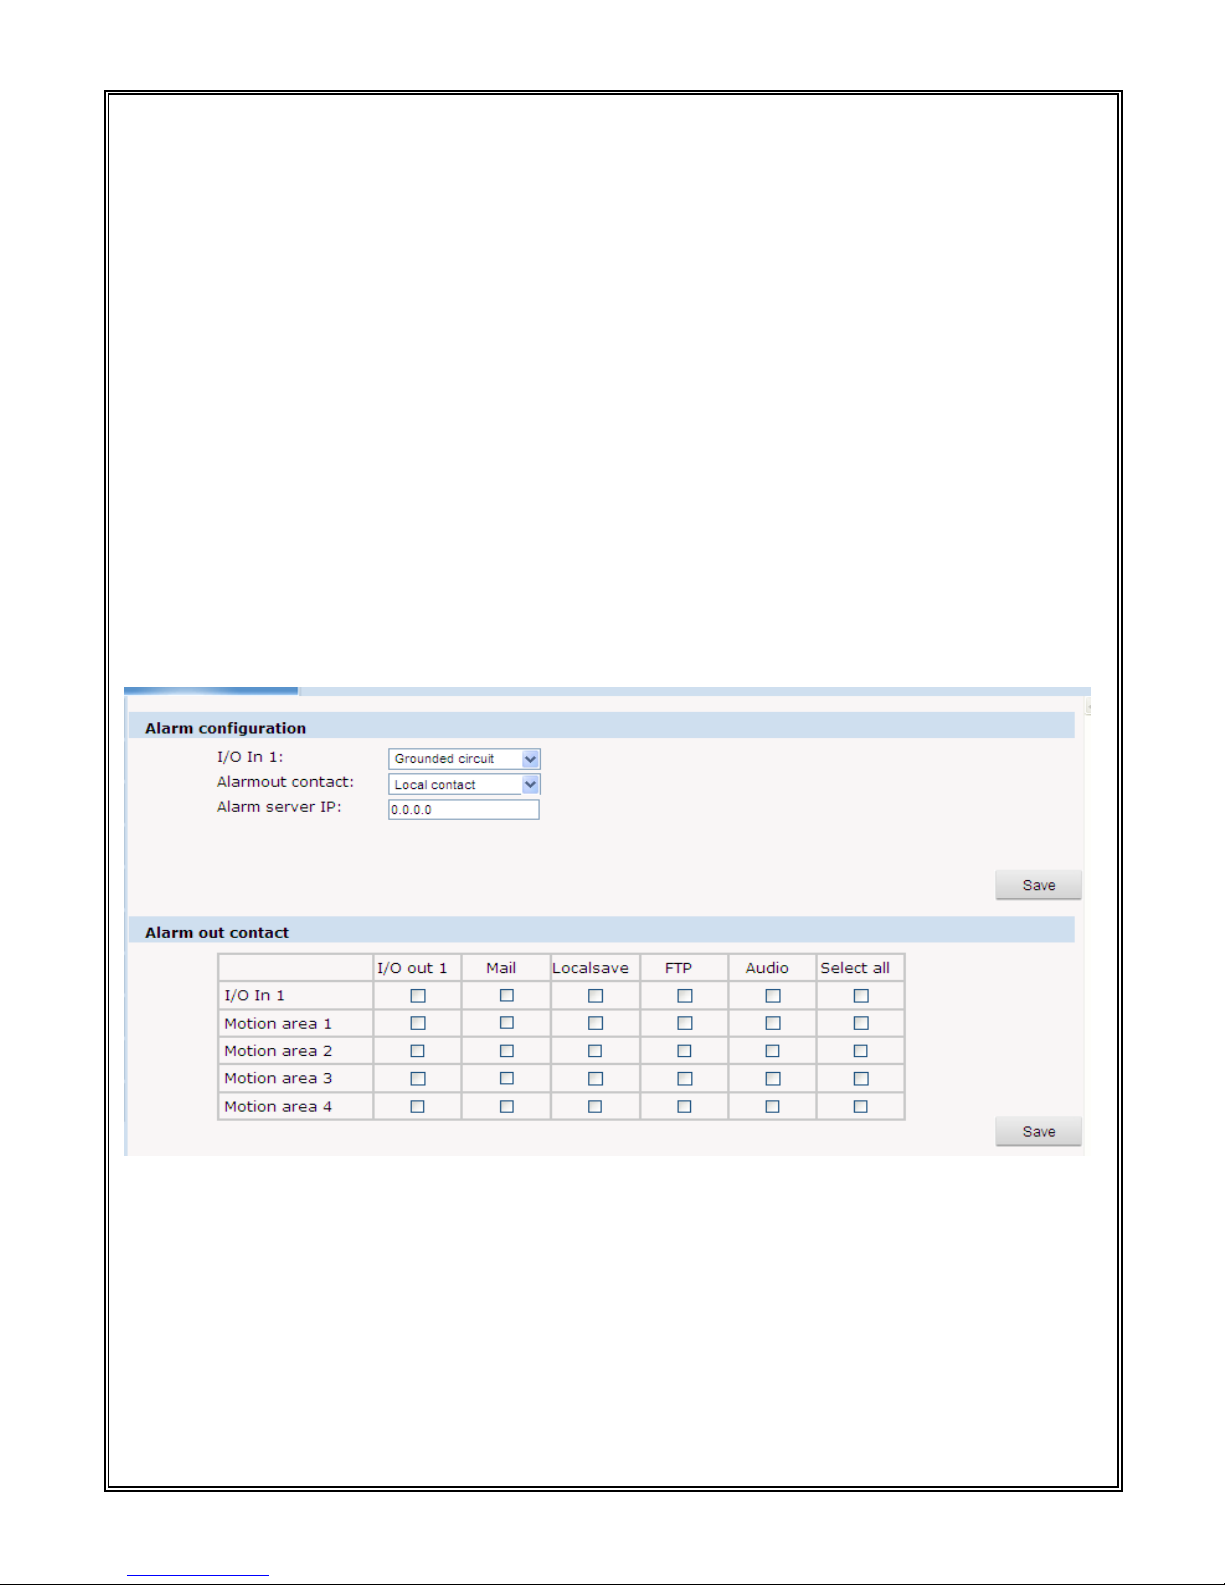
Timed tour: Set the camera to tour timely.
Figure4-3-33 Timed tour
Page 43
43
The PTZ Dome support timed tour. User may set tour with his own
situation. Tour consists of 6 pcs time quantum and preset points, autopan,
pattern.etc.
Act mode: User can choose to be “close” “once” “everyday” “user-self”
Act time: Only available under Act mode-“user-self”.
User can set the start time, end time and action of this time quantum. Like
preset points, autopan, pattern .etc. Click “set” to activate the settings.
4.3.7 Alarm
Alarm: User can set network relevancy or local relevancy.
Figure4-3-34 Alarm
This PTZ Dome support one way semaphore input, user can set the
alarm input condition of “Grounded circuit” or “Open circuit”.
Alarm output contact: Choose the transfer method of alarm.
Local contact: Only local alarm Output, and this is factory default setting.
Page 44
44
Net contact: the network transfer method of alarm signal.
Alarm server IP: The IP address of Alarm server
User can set alarm respond method of each channel: I/O output, Mail,
Local save, FTP, Audio. Please click “save” to save the settings.
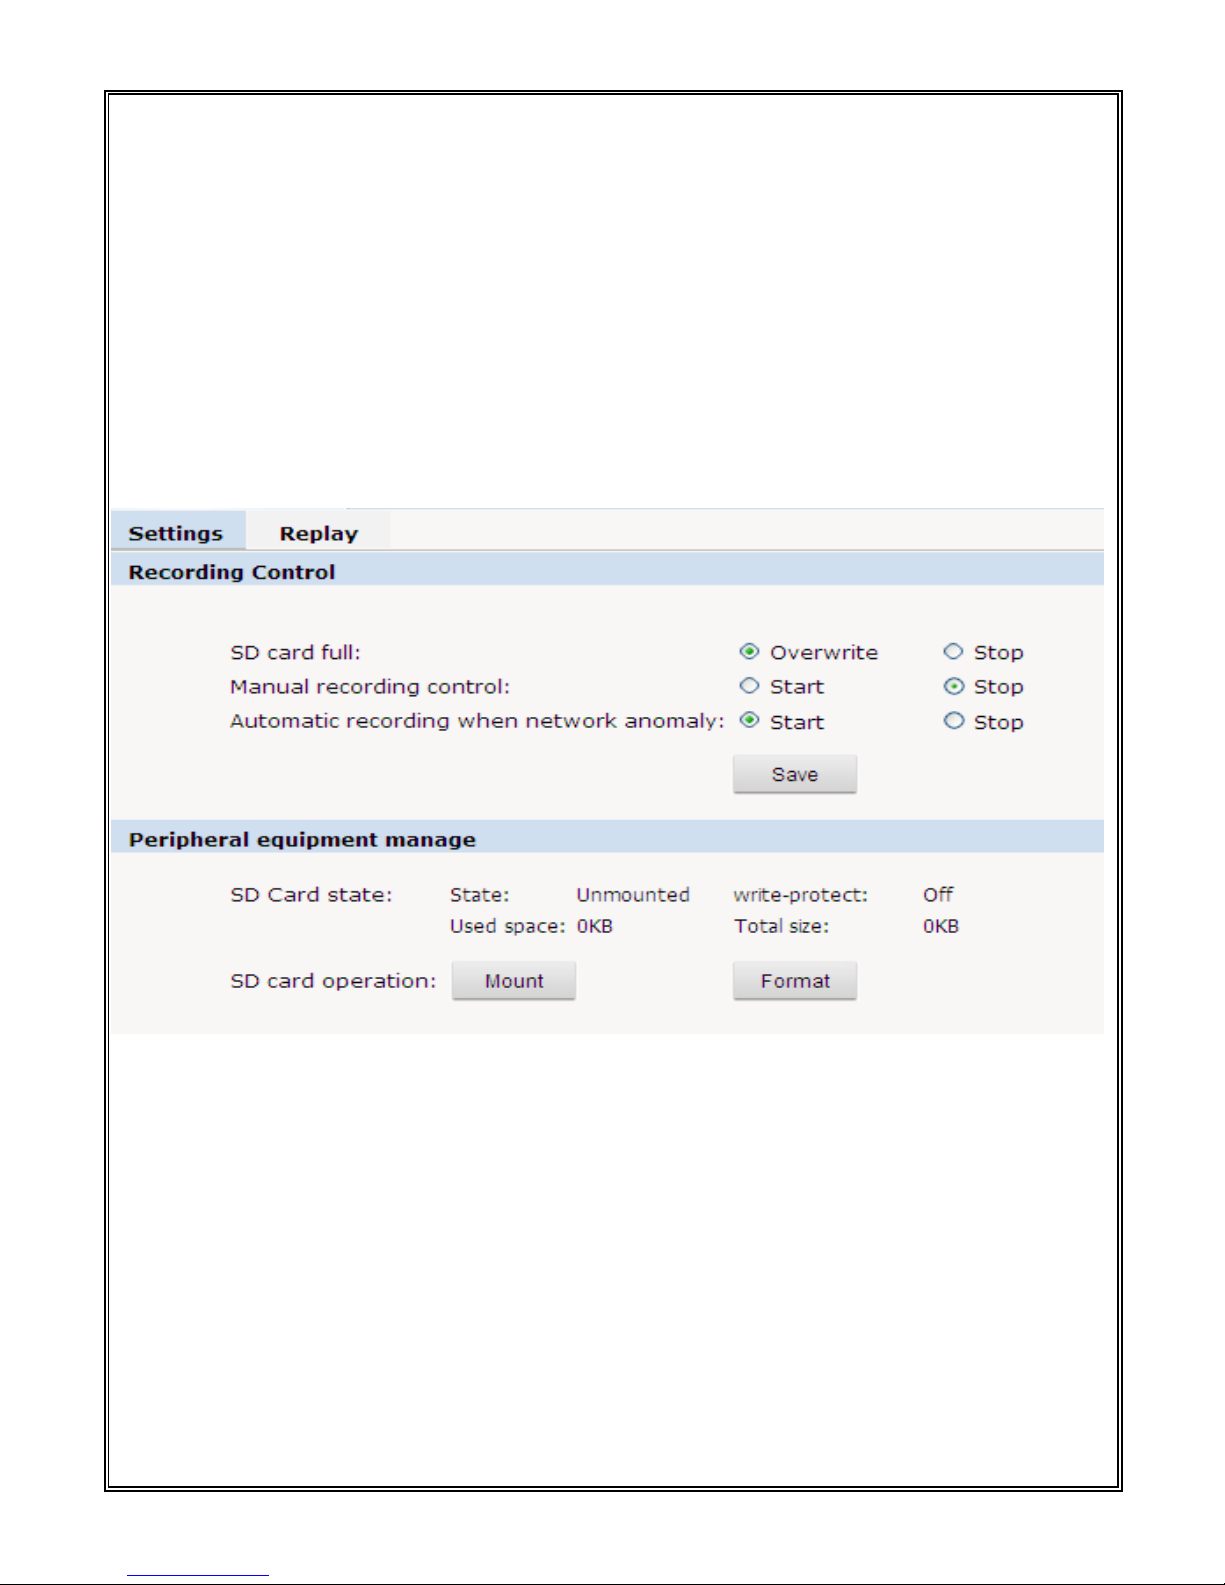
4.3.8 Record (This Camera does not support)
Record: The settings and replay of local SD card.
Figure4-3-35 Record
Settings:
SD card full: User can choose overwrite on the former video or stop when
sd card full.
Manual recording control: Manually choose “start” or “stop”
Automatic recording when network anomaly: choose “start” or “stop” to
record when network anomaly or not.
Page 45
45
Peripheral equipment manage: User can read the SD card state of total
size and used space and operate the SD card. When pull out SD card, please
choose “format” first, otherwise data may be damaged.
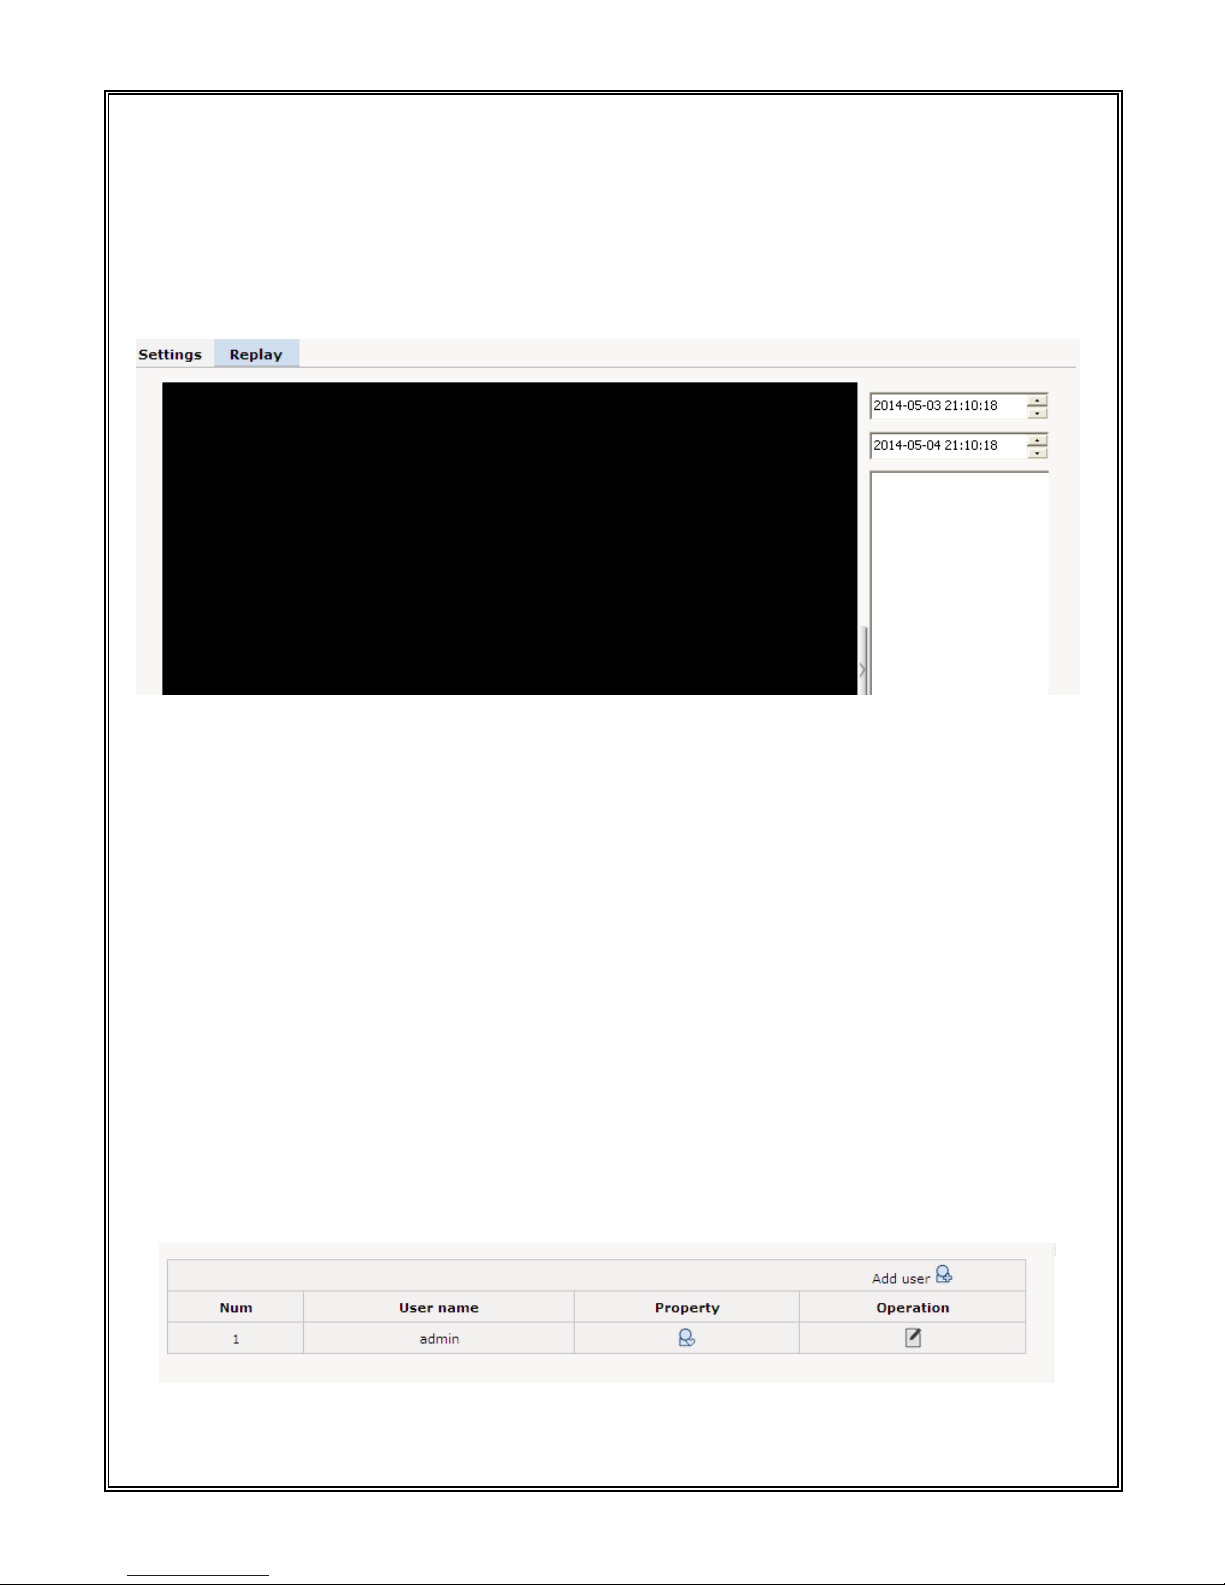
Replay:
Figure4-3-36 Replay
Search: Set the start time and end time of video, then click “search”, file
of video in this time period will be listed.
Download: User can download the video file in SD card to local PC. “Ctrl”
or “Shrift” button on keyboard is used for multi-selection of video. Then go to
download interface after click “Download”.
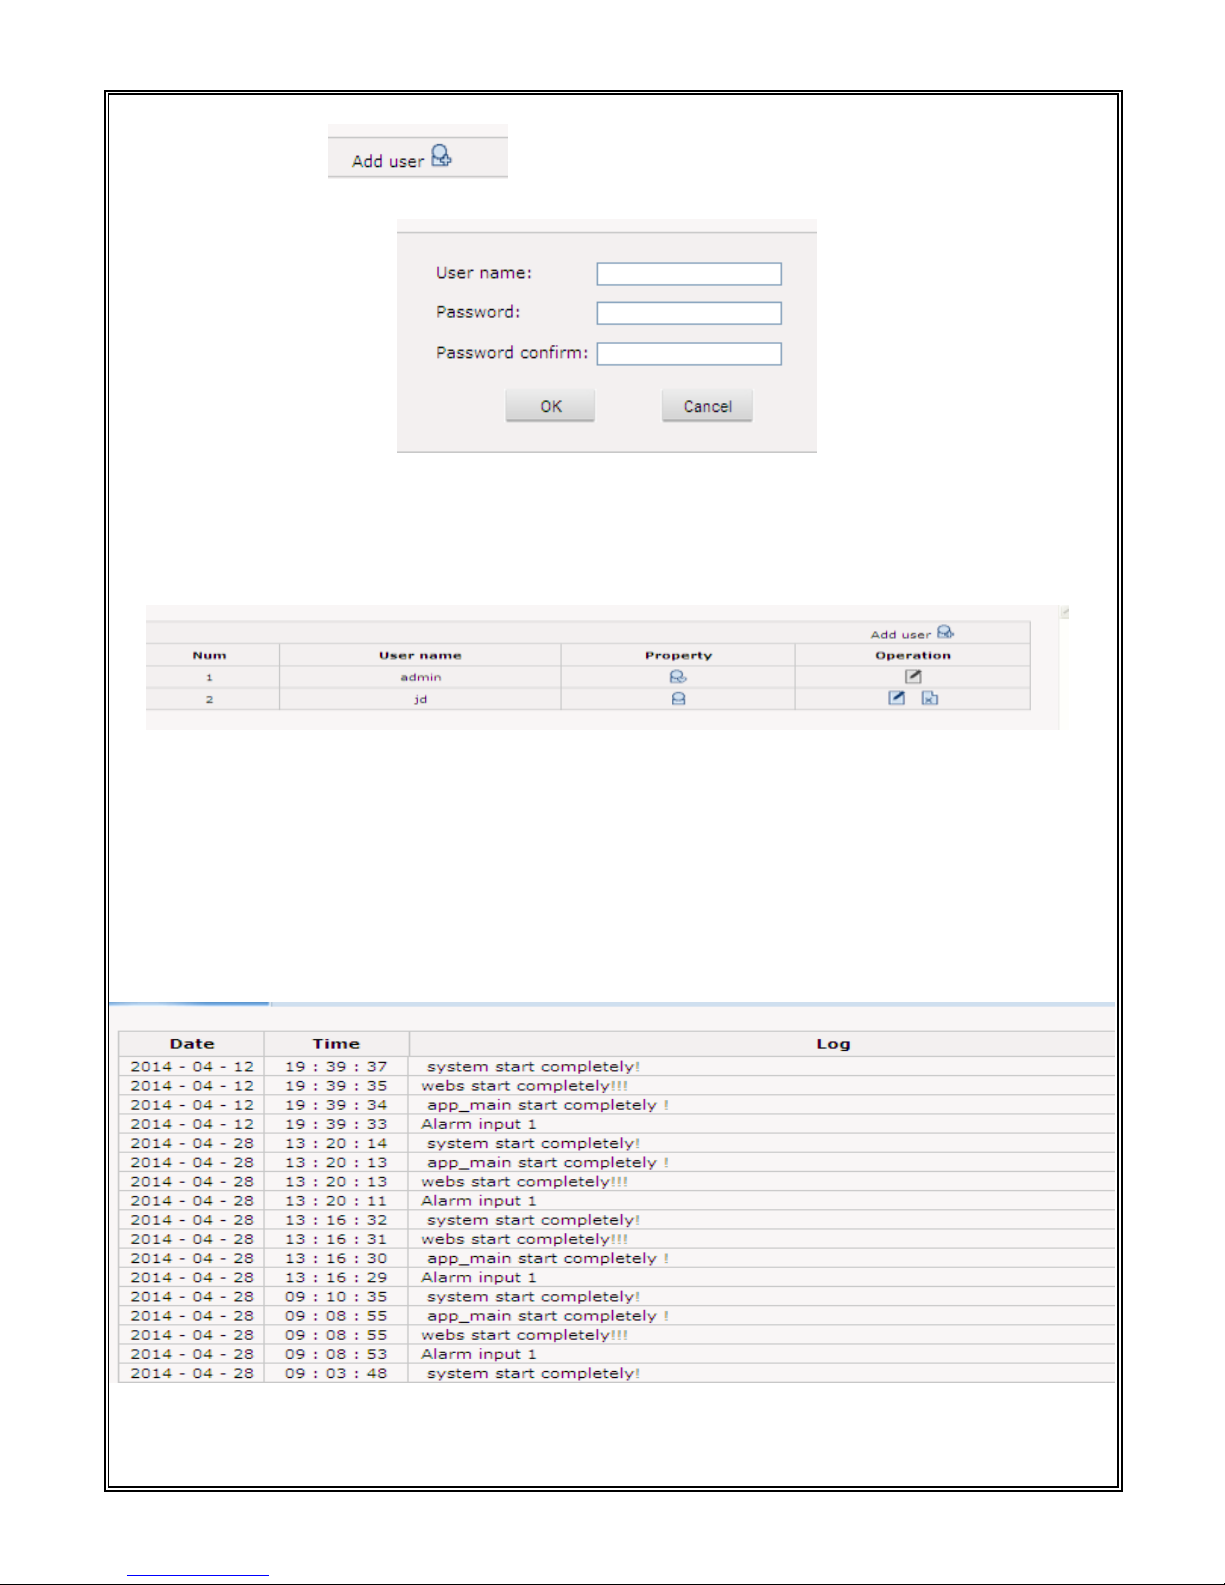
4.3.9 User
User: Setting of Admin
Figure 4-3-37 Add user
Page 46
46
Add user: Click , below window will pop up.
Figure4-3-38 Add user
Enter user name and password.
Figure4-3-39 Check new user
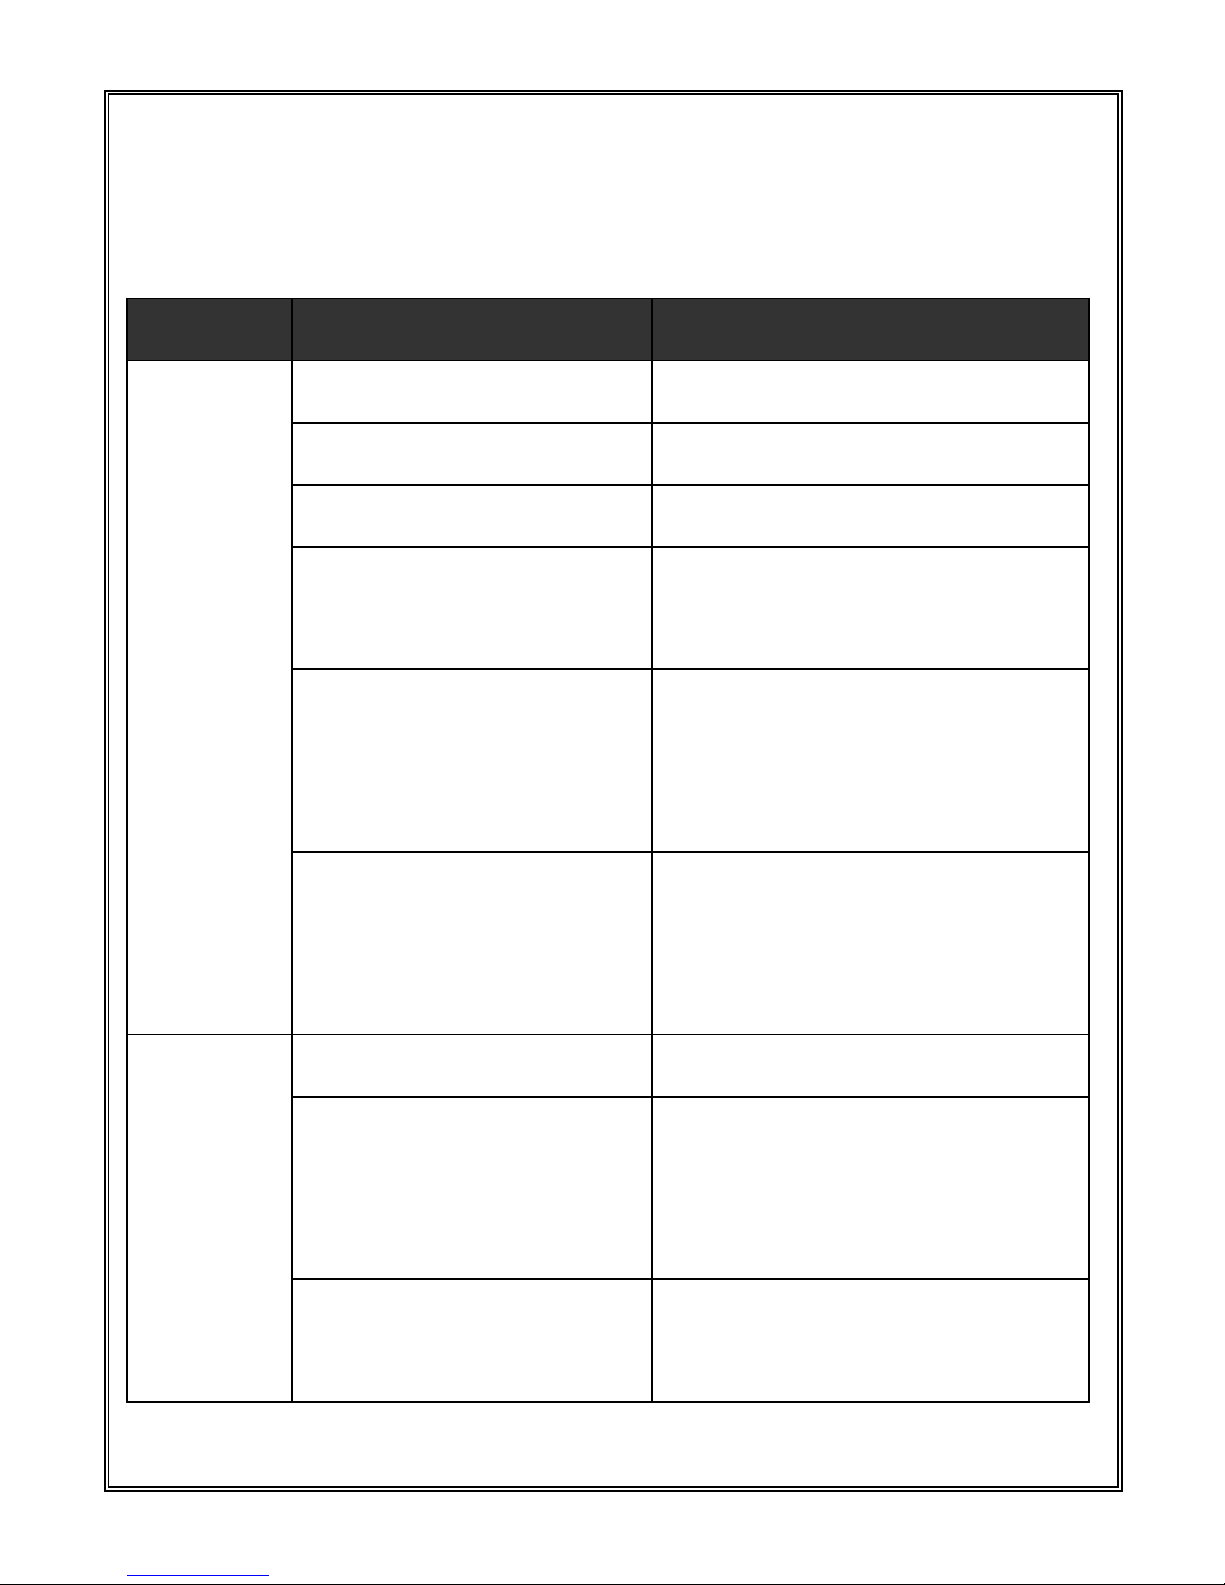
4.3.10 Log
Log: Record of the operation of Camera.
Figure4-3-40 System Log
Page 47
47
Appendix Ⅰ Frequent breakdown
Below table contains detailed analyzation of breakdowns and solutions.
Problem
Possible reason
Solution
No
initialization
operation
after power
on of IP
camera
Power line connected wrongly
Re-connect power line
Power failure
Repair or change Power supply
Damage of Fuse of PCB Board
Change fuse
Launch immediately after power
off
Launch in 10s after power off
If PoE adapted, maybe Power of
PoE switch is not big enough or
power line is too long
Shorten the power line or change big
power supply PoE switch
If PoE adapted, and other device
connected, the electric level is not
in a same level
Cut off other device
Can not see
video signal
ActiveX plugin install wrongly
Activate activeX plugin, and install again.
IP address can not be pinged
Set the segment of server to default
192.168.1, or change the address of
camera
IP address can be pinged, but no
video
Check client is recording online or not, and
stop client
Page 48

48
IP address is same with other
device
Set unique IP address
Image blur
Not Focus
Manually adjust
 Loading...