

Page 1
IPCAM User Manual
1 / 67
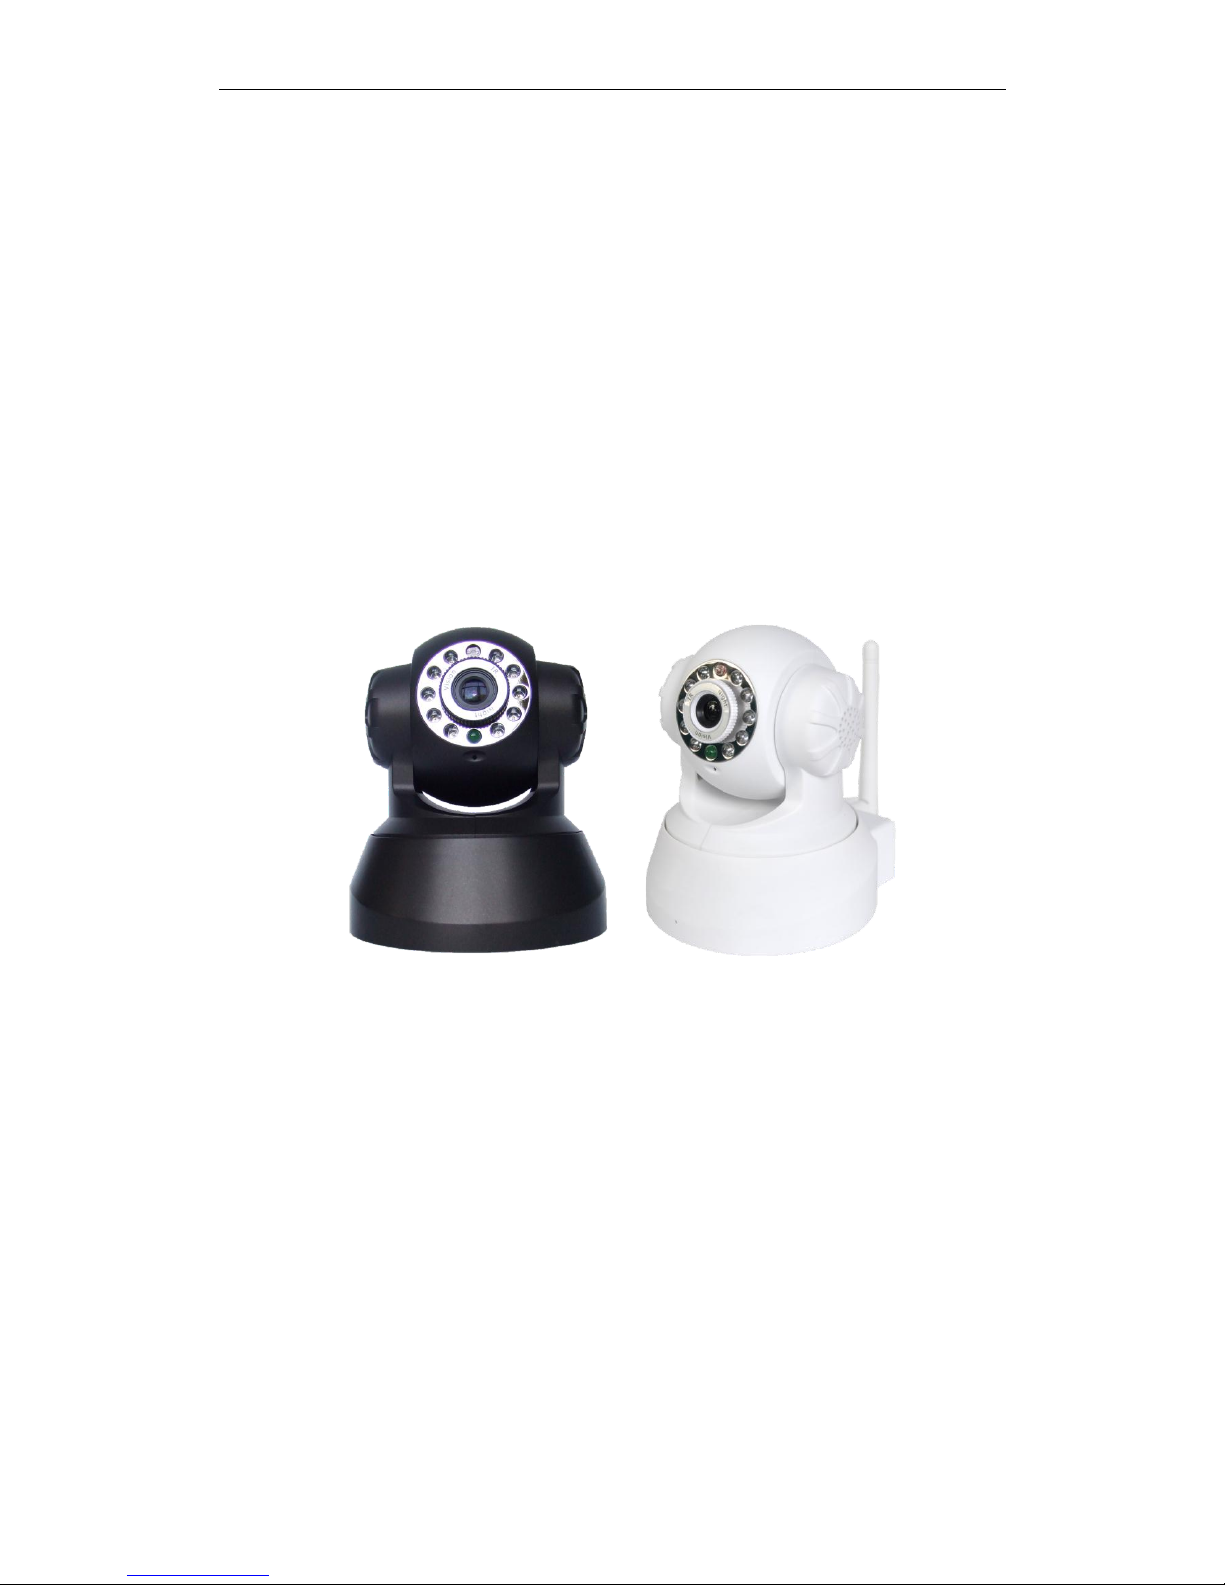
IP Camera User Manual
Page 2

IPCAM User Manual
2 / 67
Content
1. User Manual brief introduction…………………………………………………………..4
1.1 Appointment…………………………………………………………………………..4
1.2 Cautions………………………………………………………………………………..4
1.2.1 Installation environment………………………………………………………4
1.2.2 Transporting and carrying…………………………………………………….4
1.2.3 Maintenance and protection…………………………………………………..5
1.2.4 Packing list.……………………………………………………………………..5
2. Products overview…………………………………………………………………………..6
2.1.1 Features………………………………………………………………………………6
2.1.2 Advanced Features…………………………………………………………………..7
2.2 Product views…………………………………………………………………………..8
2.2.1 Front views………………………………………………………………………8
2.2.2 Interface…………………………………………………………………………9
2.3 PC System Requirements.……………………………………………………………..9
2.4 Hardware Instruction…………………………………………………………………10
2.5 Software installation………………………………………………………………….11
3. SOFTWARE OPERATION……………………………………………………………….13
3.1 IP Camera Tool……………………………………………………………………….13
3.2 Camera Login………………………………………………………………………...16
3.3 For Visitor.…………………………………………………………………………….22
3.4 For operator…..……………………………………………………………………….23
3.5 For Administrator.……………………………………………………………………24
3.5.1 Multi-Device Settings.…………………………………………………………24
3.5.2 Network Settings………………………………………………………………26
3.5.3 UPnP and MSN settings………………………………………………………32
3.5.4 DDNS Service Settings………………………………………………………..35
3.5.5 Mail and FTP Service…………………………………………………………36
3.5.6 Motion Detection………………………………………………………………41
4. HOW TO USE……………………………………….. ……………………………………44
4.1 Step by step to use……………………………………………………………………44
4.2 Setting Wi-Fi of IP Camera…………………………………………………………44
4.3 Using a router to access the Internet……………………………………………….45
4.4 Static IP user…………………………………………………………………………46
4.5 How to use DDNS……………………………………………………………………48
5. APPENDIX…………………………………………………………………………………51
5.1 Frequently Asked Questions……………………………………………………….. 51
Page 3

IPCAM User Manual
3 / 67
5.1.1 I have forgotten the administrator username and/or password. ………………51
5.1.2 IP Address configuration…………………………………………………………51
5.1.3 Network Configuration……………………………………………………………51
5.1.4 No pictures Problems with ActiveX Controller………………………………….51
5.1.5 Problems with network bandwidth………………………………………………53
5.1.6 For example: Register procedure from a DDNS web…………………………. .53
5.1.7 Why pop-up the prompt ”Fail to connect to the device…”? …………………..58
5.1.8 Can’t access the IPCAM in the internet? ……………………………………….59
5.2 Operate common problem solving……………………………………………………. 59
5.3 IPCAM special use………………………………………………………………………..61
5.31 Use vlc player and mplayer to play ip camera audio data prompt. …………....61
5.32 Set the camera miscellaneous parameters………………… ………………….. ..64
5.4 Default Parameters……………………………………………………………………….64
5.5 Specification………………………………………………………………………………65
Page 4

IPCAM User Manual
4 / 67
1.User Manual brief introduction
Thank you for choosing our network ip camera. The manual can help you to
use the camera correctly. Some descriptions maybe aren’t perfect. If you meet
unsolvable problems according to this manual,please contact the product supplier.The
camera’s software,hardware and shell will update ,we will be subject to change
without notice.But we will released updated notice on our website,please pay
attention to it.
1.1 Appointment
Please obey this manual strictly to use the camera.
1.2 Cautions
Before using the camera, please read all the safety instructions as below carefully
then install .
1.2.1 Installation environment
The camera can be installed indoor ,if outdoor, please add waterproof
components and lightning protection equipment;
Working temperature limited to 0 ℃ ~ 50 ℃ between, humidity limited to 5%
~ 90% (non-condensable)
Banned in inflammable, explosive environment install and use;
Avoid installing in strenuous vibration place, do not put other equipment on
the camera;
Avoid installing near a strong field of electronic equipment that could cause
the unit cannot be normal use and even damage;
To ensure the normal radiating of camera, should avoid the poor ventilation
places or high temperature environment;
Use wireless ip cameras, should try to avoid or reduce transmission range of
obstacles
1.22 Transporting and carrying
The camera package has aseismatic design and testing, ensure ip cameras will
not be accidental breaking during transport, in handling this unit, it is best to
use original package. Avoid moving the camera between extreme cold and hot
place, Avoid machine internal dewing, affect the service life of equipment.
Page 5
IPCAM User Manual
5 / 67
1.23 Maintenance and protection
Non-professional maintenance personnel, do not tear open the camera, avoid
damage and shock
Please use the original configuration of the power adapter, use unauthorized
power adapter can damage of the camera.
Please do not touch canera’s lens, it will leave fingerprint on it that cause image
blurring;
Do not put liquid in the unit, lest cause machines internal short circuit or fire.
The camera software upgrade process cannot without electricity, otherwise it will
damage it, the software prior to upgrade, It is best to restart camera, and ensure
the external no other users are visiting.
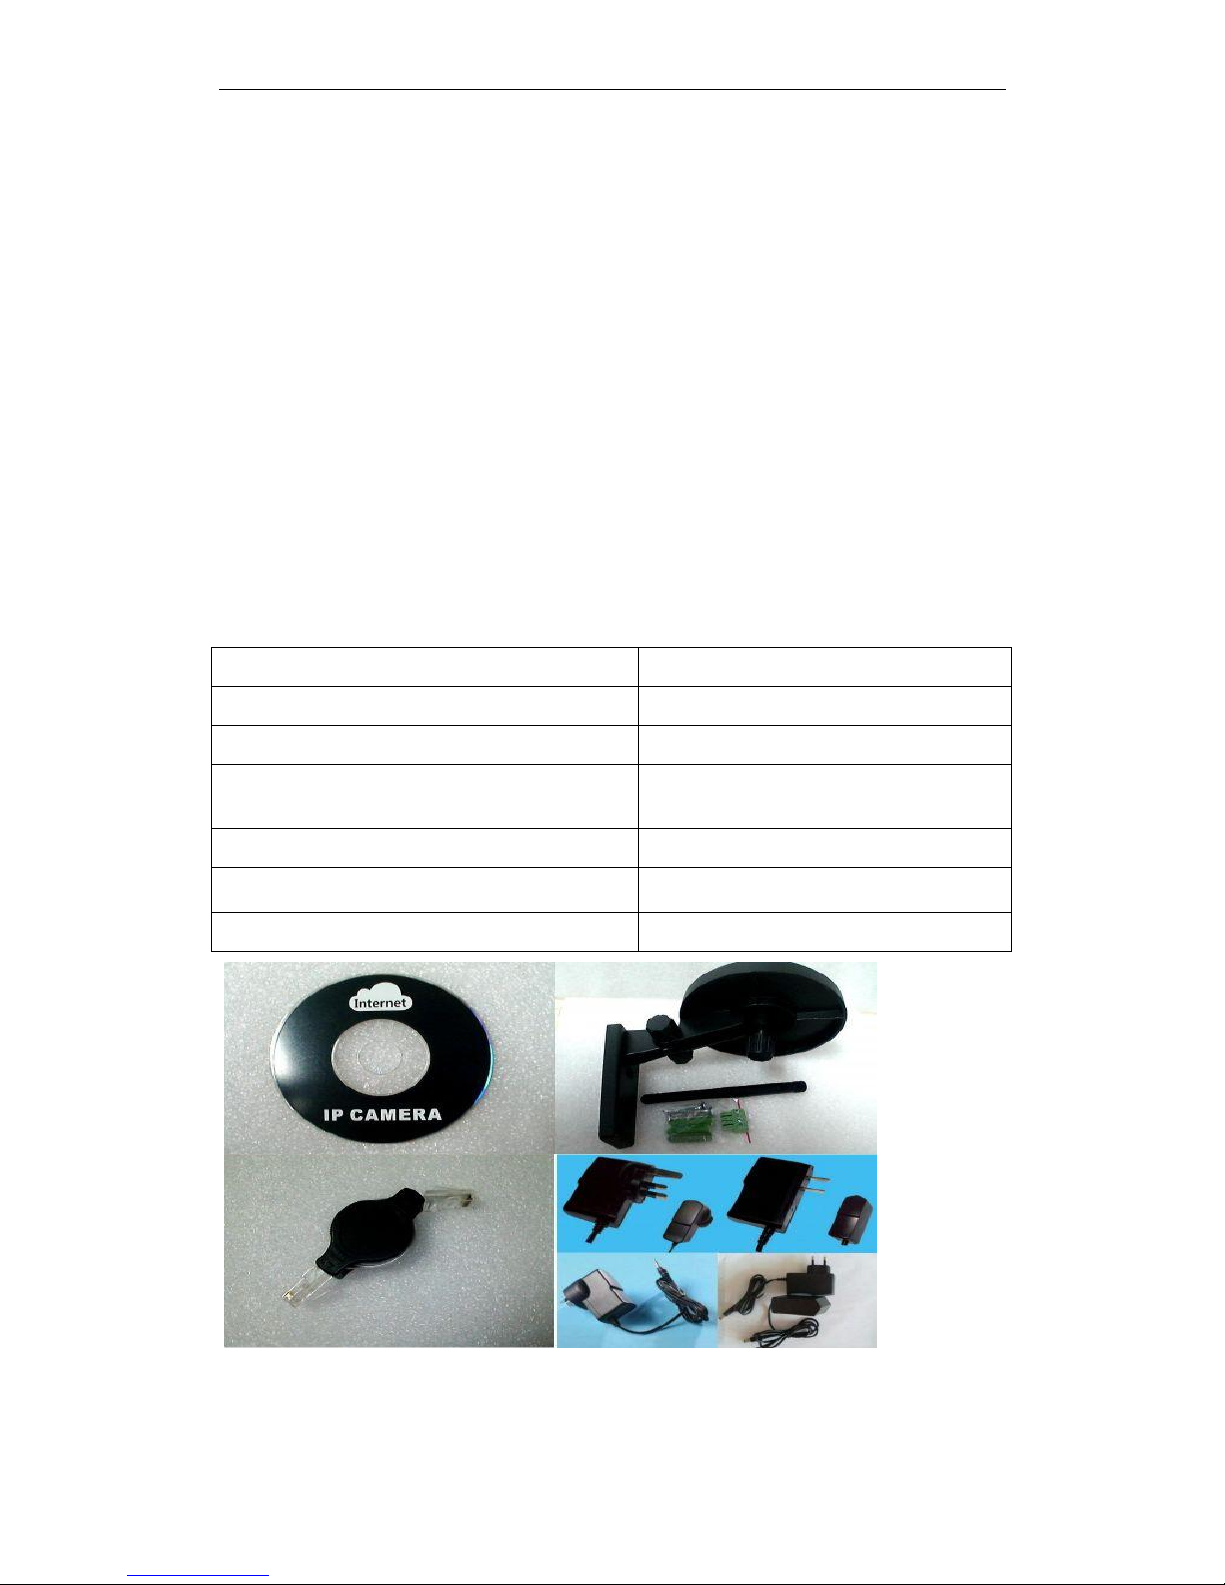
1.24 Packing list
Optional : One Wire for alarm input/output
NOTE: Contact us immediately in the case of any damaged or short of contents.
Item Quantity
IP Camera 1 piece
Wi-Fi Antenna 1 piece (only wireless IPCAM user)
CD 1 piece(Include User Manual、IP camera
tool)
DC Power Supply(5V 2A) 1 piece
Network Cable
1 piece
Mounting bracket 1 piece (option)
Page 6

IPCAM User Manual
6 / 67
2 Products overview
IPCAM is an integrated wireless IP Camera solution. It combines a high quality digital
video Camera with network connectivity and a powerful web server to bring clear to
your desktop from anywhere on your local network or over the Internet.
The basic function of IPCAM is transmitting remote video on the IP network. The high
quality video image can be transmitted with 30fps speed on the LAN/WAN by using
MJPEG hardware compression technology.
The IPCAM is based on the TCP/IP standard. There is a WEB server inside which
could support Internet Explore. Therefore the management and maintenance of your
device become more simply by using network to achieve the remote configuration,
start-up and upgrade firmware.
You can use this IPCAM to monitor some special places such as your home and your
office. Also controlling the IPCAM and managing image are simple by clicking the
website through the network.
NOTE: You can use the IP Camera Step by Step(details: 3).
2.1.1 Features
● Powerful high-speed video protocol processor
● High-sensitivity 1/4" CMOS sensor
● 300K Pixels
● IR night vision(Range:3~5m)
● Optimized MJPEG video compression for transmission
● Multi-level users management and passwords definition
● Embeded Web Server for users to visit by IE
● Support wireless network (Wi-Fi/802.11/b/g)mobile
● Supporting Dynamic IP (DDNS)and UPnP LAN
● Giving alarm in cause of motion detection
● Support one-way (I/O) alarm connection
● Supporting image snapshot
● Support multiple network protocols:
HTTP/TCP/IP/UDP/STMP/DDNS/SNTP/DHCP/FTP
● Support remote system update
Page 7

IPCAM User Manual
7 / 67
2.1.2 Advanced Features
Multi-Protocol support and Transportation
IPCAM supports Multi-Protocol such as TCP/IP, SMTP and HTTP. Sending the image
to your mailbox automatically when the IPCAM is triggered.
Motion Detection
Your may use the internal Motion Detection function or external sensor to trigger images
recording and transportation.
Alarm sensor input/output
The detection sensor sends an alarm and records it by itself when there is a fire or
accident. A message as an email is send to you by this sensor. (The input/output
discreteness can be chosen)
DDNS support
Using the IPCAM in the condition which including ADSL and IP change often is more
convenient,
because IPCAM provides dynamic DNS function.
Advanced User Management
Only allowing authorized users access to real-time images of the IP Camera.
Page 8
IPCAM User Manual
8 / 67
2.2 Product views
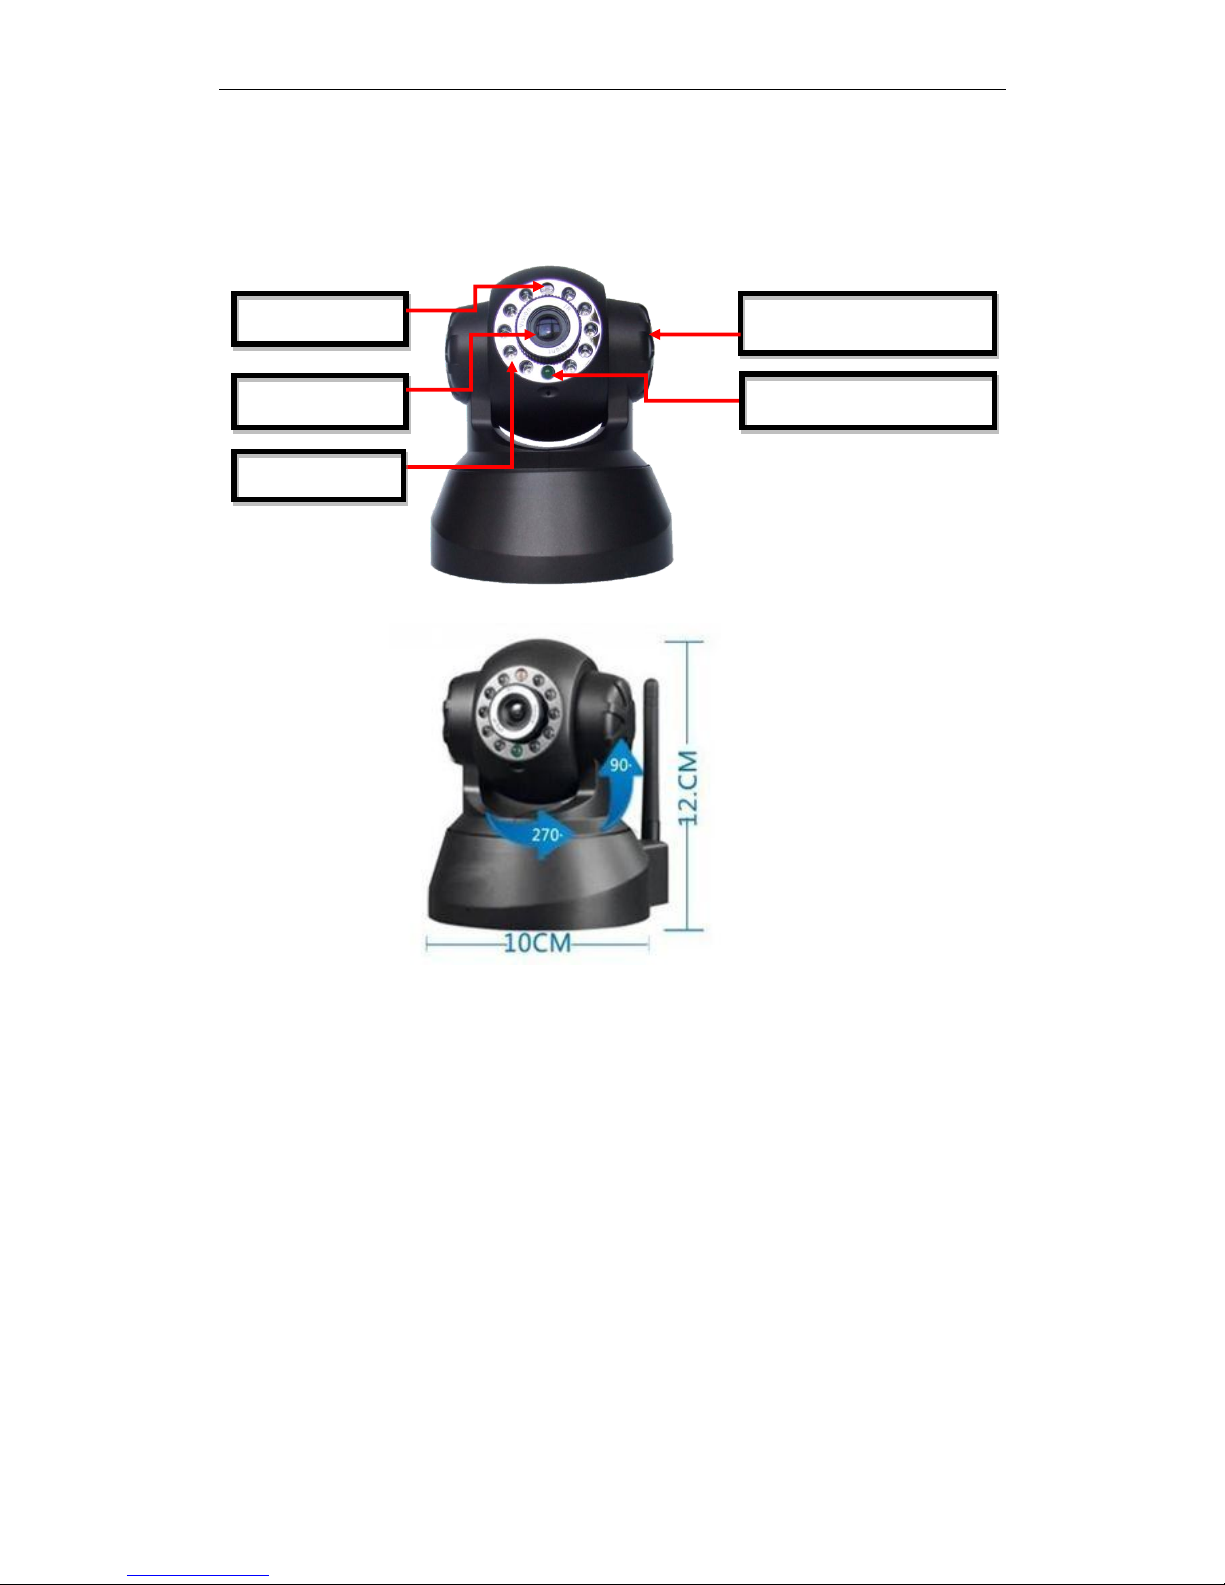
2.2.1 Front views
Figure 1.1
1. Sensitive Hole: According to outside of light decide whether open infrared LED
2. Infrared LED
3. Network Indicator LED
Network Indicator LED’s three conditions:
1) Slow blink(about every two seconds once),IPCAM is searching network
2) Blink (about once or twice per second),IPCAM is using wired network
3) Fast blink(about three or four times per second),IPCAM is using wireless
network
4. Lens :CMOS Sensor .You can turn around the lens manually to adjust the focus
range
5. Build-in Microphone
Warning: please don't forcibly manual translation/lifting cameras, because it is
likely that damaged internal component!:
Build-in Microphone
Sensitive Hole
5P Lens
Infrared LED
Network Indicator LED
Page 9
IPCAM User Manual
9 / 67
2.2.2 Interface
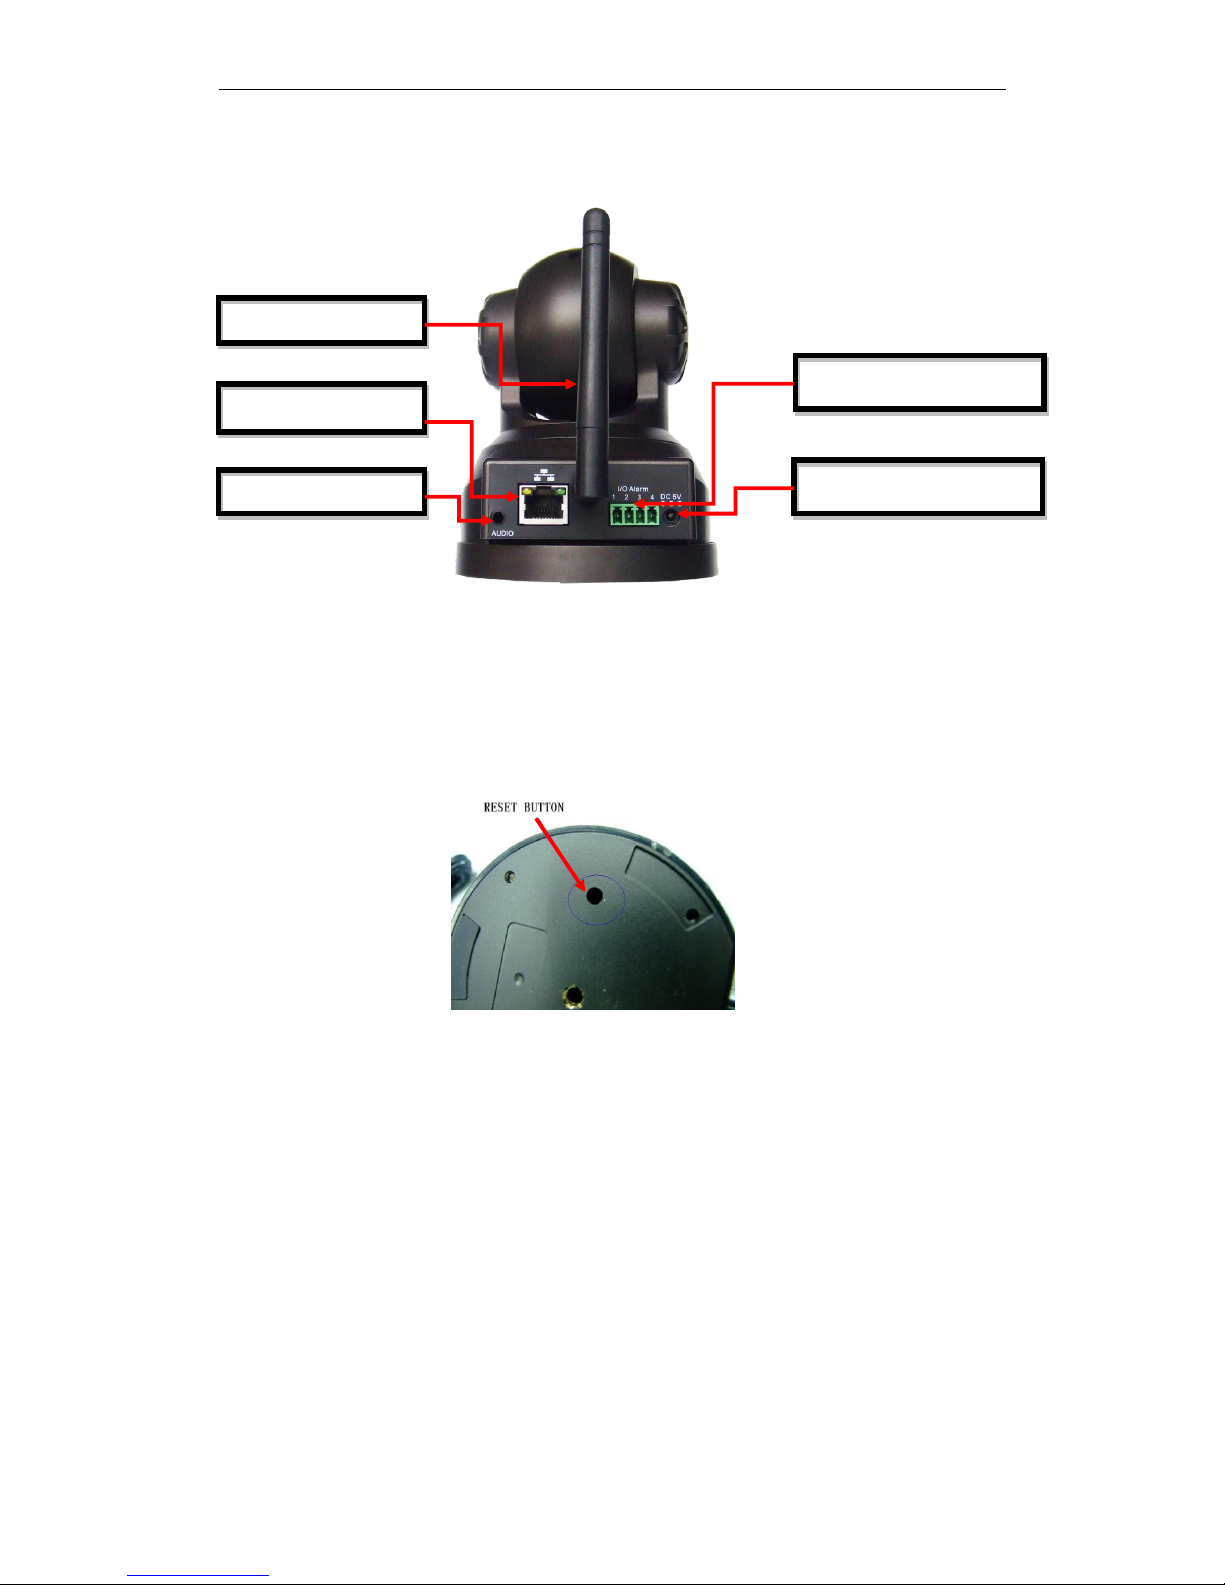
Figure 1.2
LAN : RJ-45/10-100 Base T
DC5V : 5V/2A Power supply
I/O PINS: 1)Output(GND) 2)Output (+5V) 3)Alarm input 4)Input (GND) (you can see 3.5.6
For more information)
Figure 1.3
RESET BUTTON: Press and hold down the RESET BUTTON for 5 seconds.Release the
power button
and IP camera will be reset back to the factory default parameter
2.3 PC System Requirements
System configuration requirements: ( Example for view four IP Camera )
CPU: 2.06GHZ or above Memory: 256M or above
Network Card: 10M or above Display Card: 64M or above memory
Recommendable Operating System: Windows2000 ,Windows XP,VISTA,WIN7
Support web browser: IE. FireFox. Google etc .
WIFI antenna
RJ-45 Ethernet
Audio output
I/O Alarm input/output
DC5V Power adapter
Page 10
IPCAM User Manual
10 / 67
2.4 Hardware Instruction
Follow the steps below to set up your camera hardware. Make sure to follow each step
carefully to ensure
that the camera operates properly.
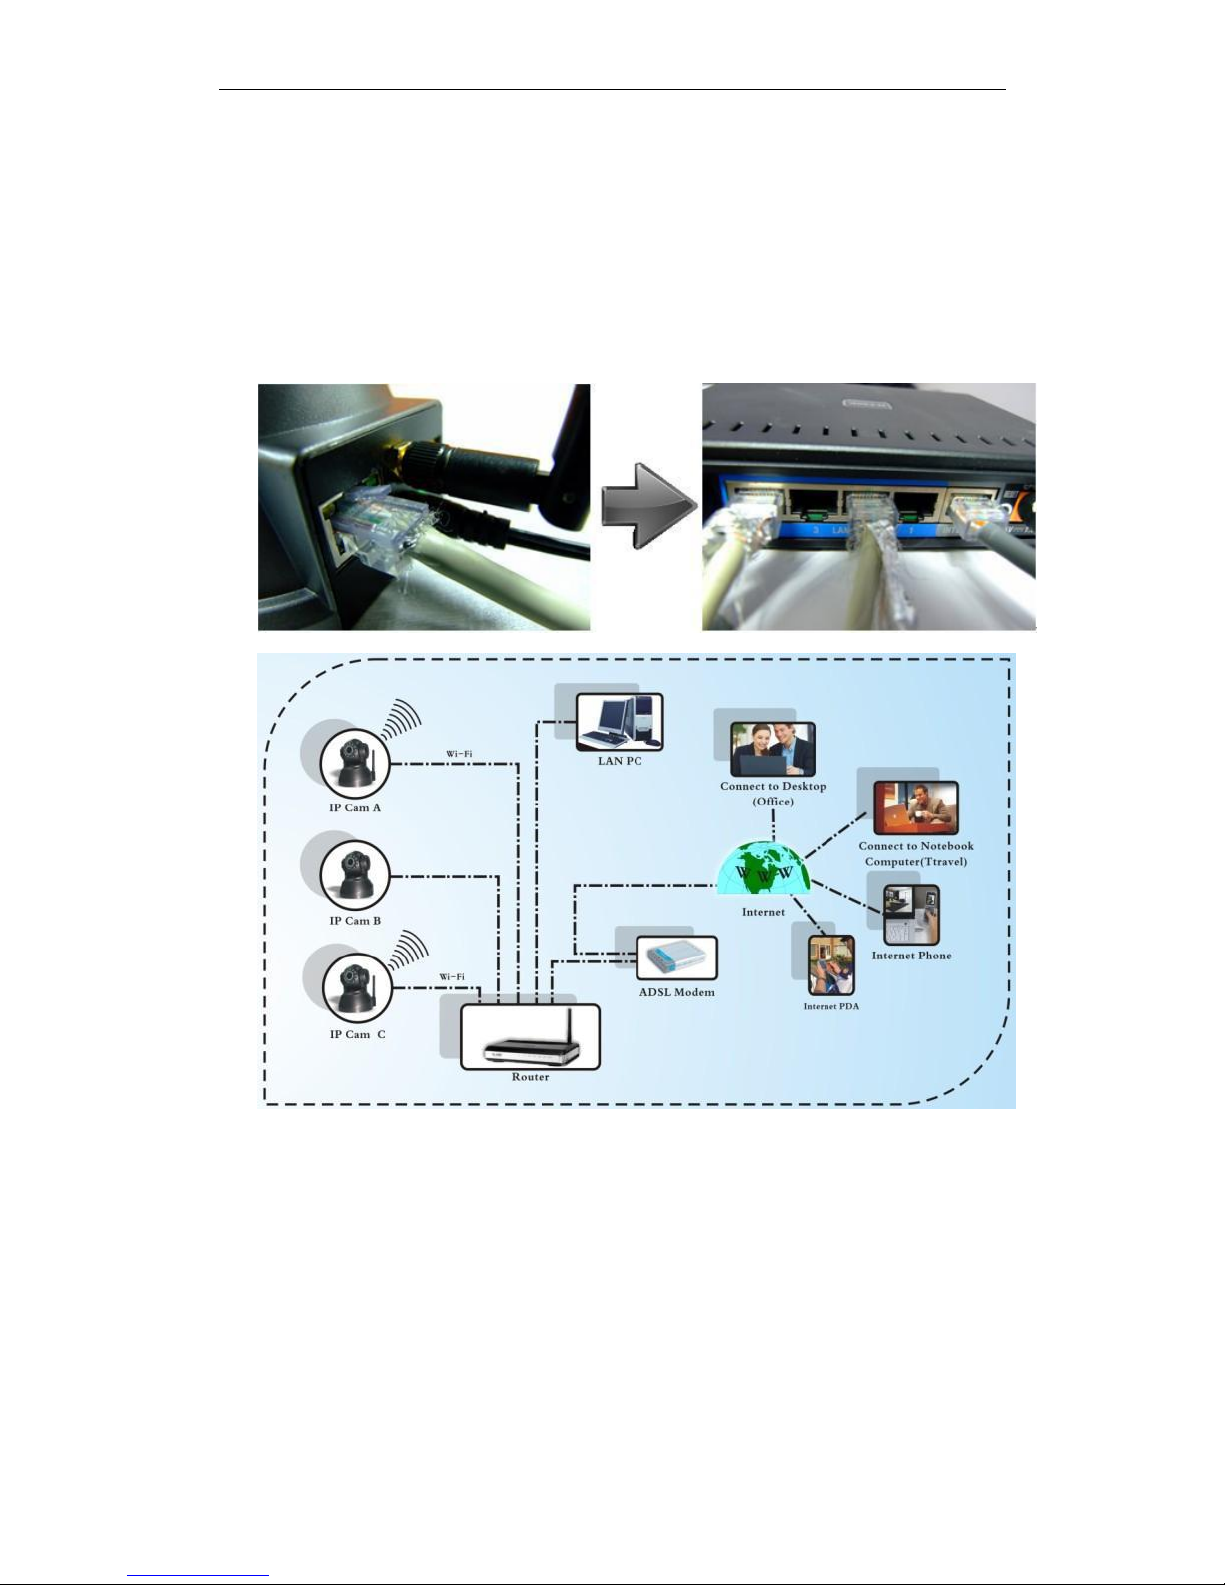
1) Plug the network cable into the camera and then into your Cable/DSL router.
2) Plug the power adapter into the camera and then into the power outlet.
Figure 1.4
CAUTION: Make sure to only use the power adapter supplied with IPCAM. Using a
non-approved power adapter may damage the camera.
3) The camera takes approximately 30 seconds to start up before it displays an IP
address on the IP Camera Tool(details: 3.1).
4) When the camera is powered and network cable plug correctly.It‟s head will turn
around and the Network Indicator LED is blank.
Page 11
IPCAM User Manual
11 / 67
2.5 Software installation
Software installation is the key to the successful use of this product.
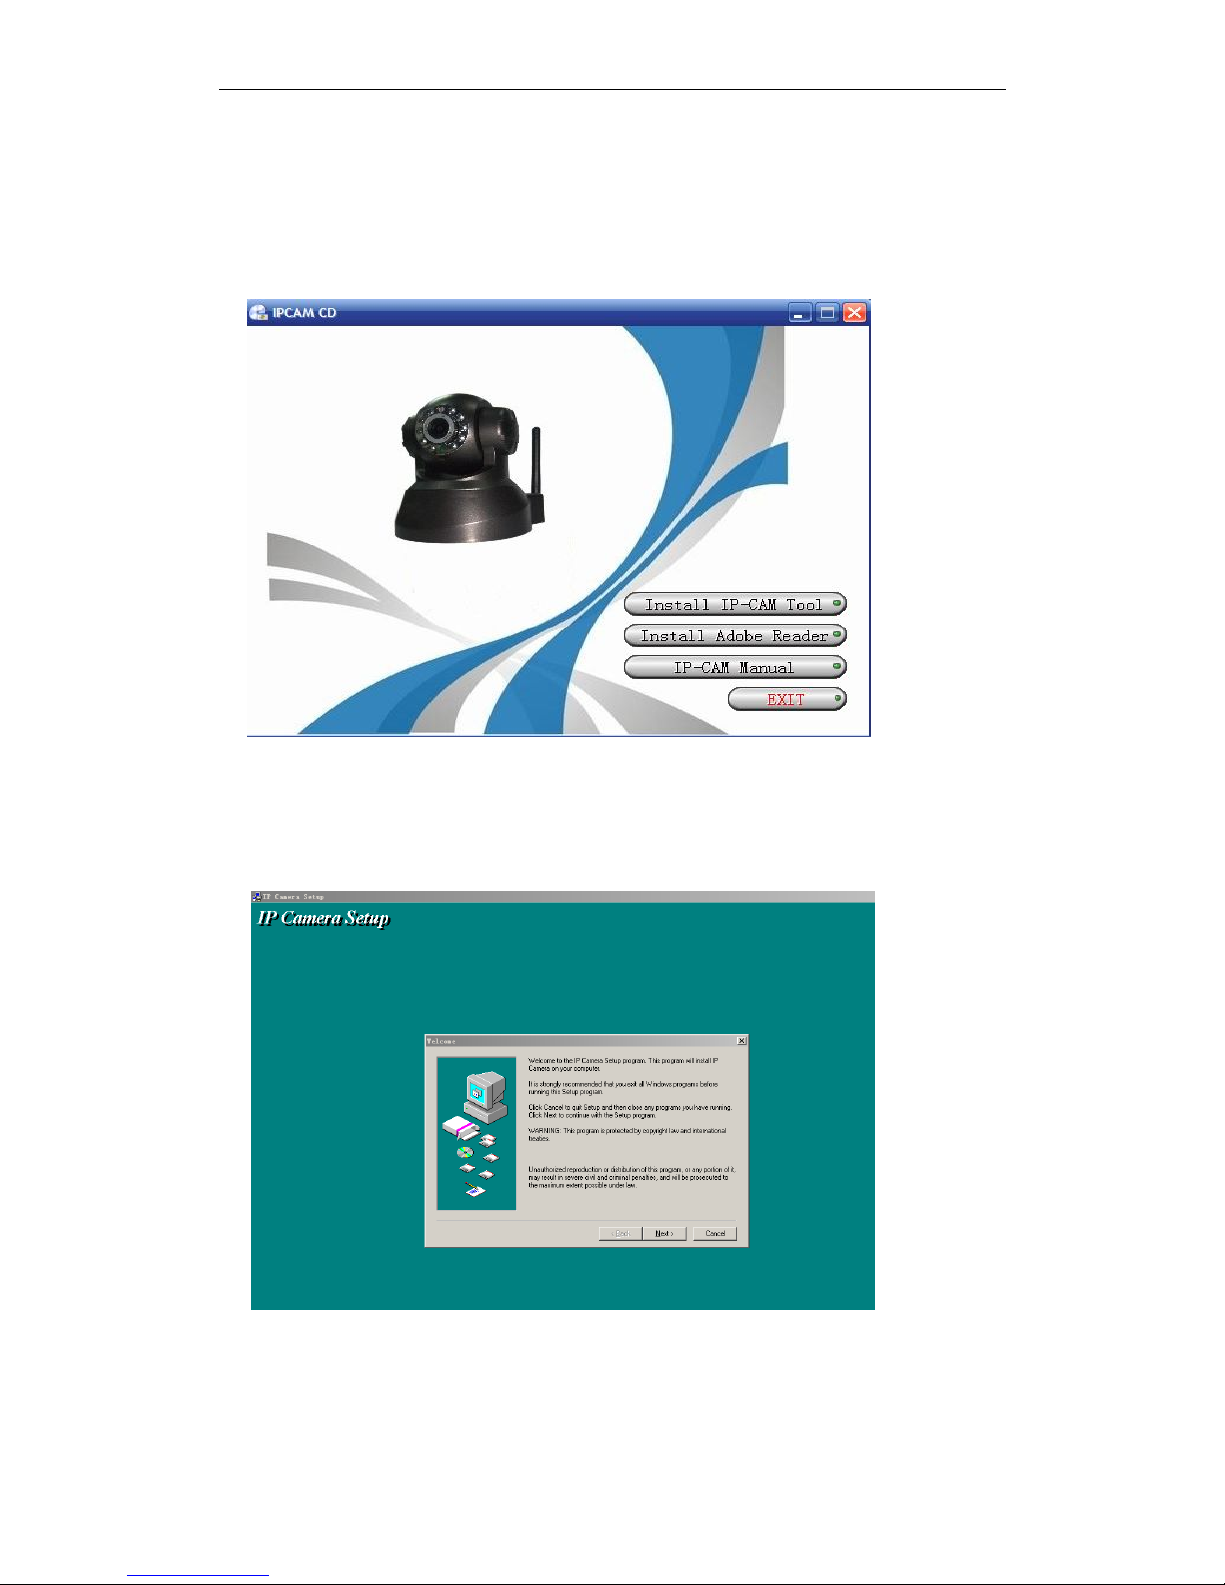
1 Open the CD,find the software as instruction;
Figure 1.5
3 Click IPCamSetup.exe and install the software as instruction
Figure 1.6
Page 12
IPCAM User Manual
12 / 67
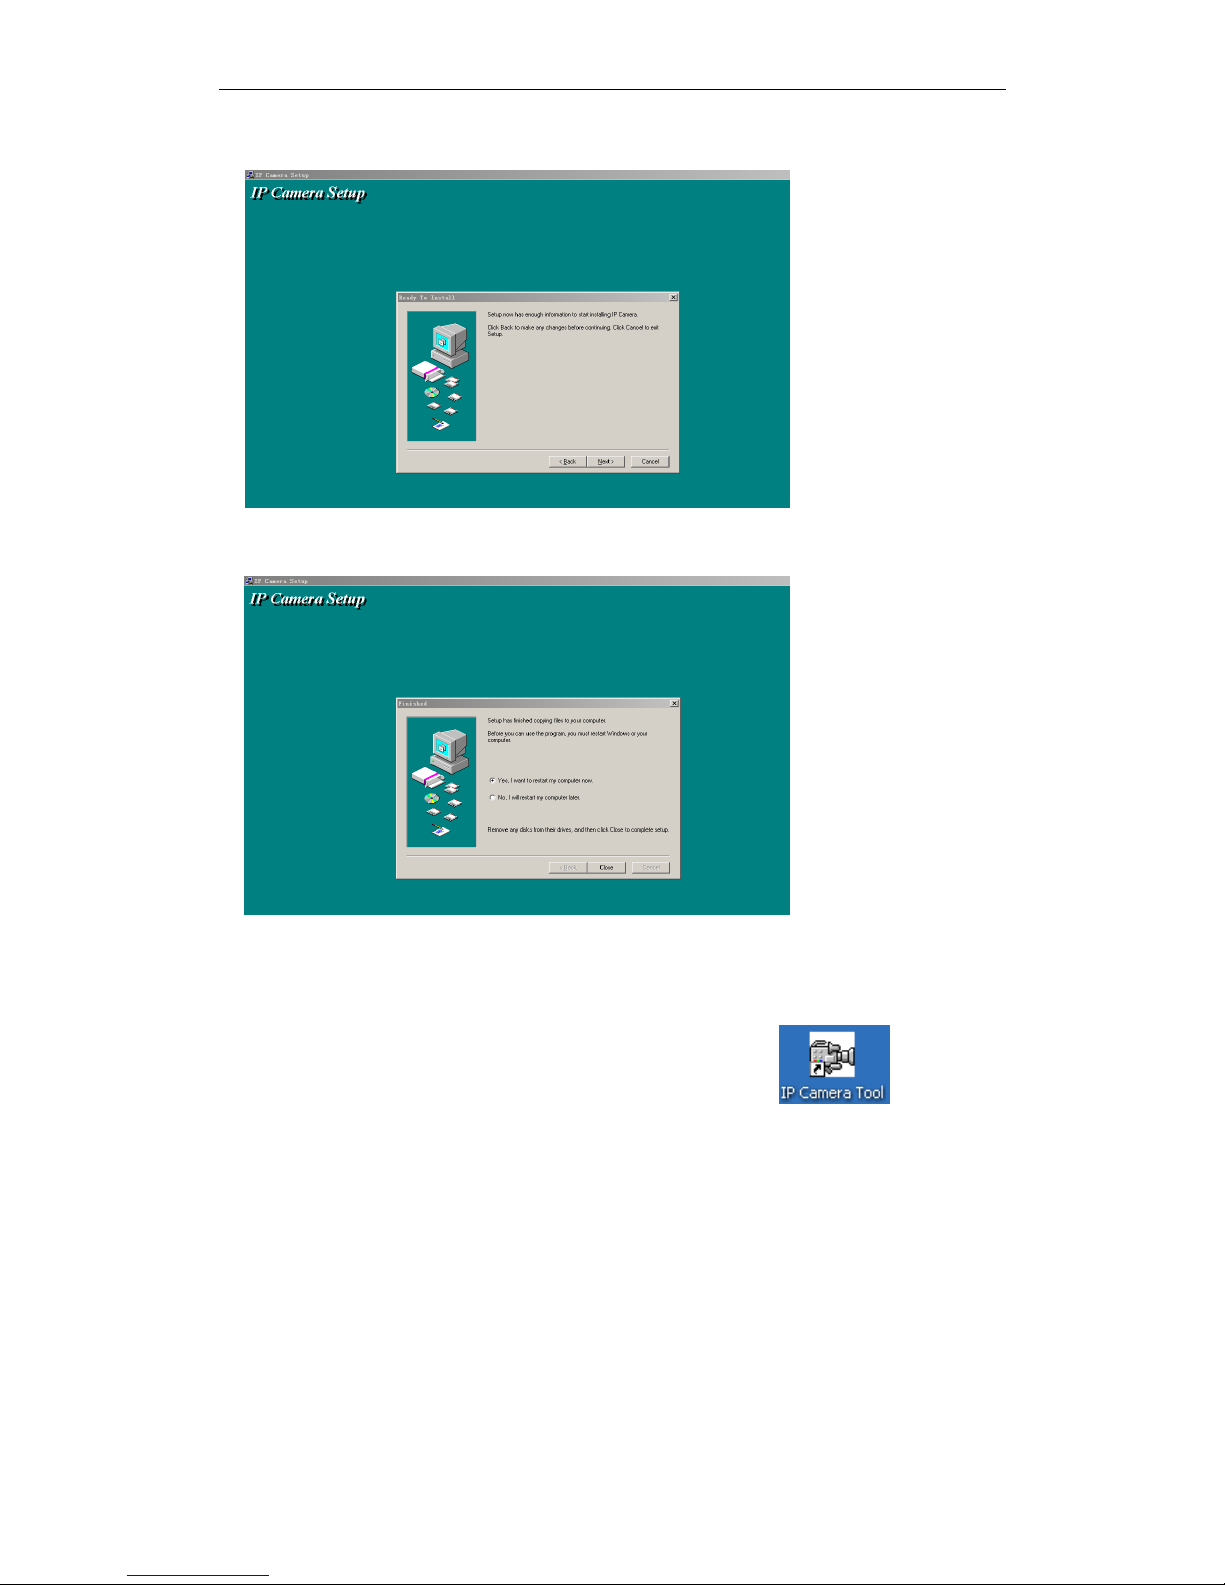
3 .Click Next
Figure 1.7
4.Click Next
Figure 1.8
5.Choose restart then click Close
The computer restarts upon installation completion and an icon appears on
the desktop automatically.
NOTE: Before installing and using the product, please read the following precautions
carefully and make sure they are fully understood.
Use only the power adapter attached with the product. Use of unauthorized power
adapter may cause damage to your IP Camera. IP Camera terminal shall be installed in
an indoor environment.
Page 13
IPCAM User Manual
13 / 67
3 SOFTWARE OPERATION
3.1IP Camera Tool
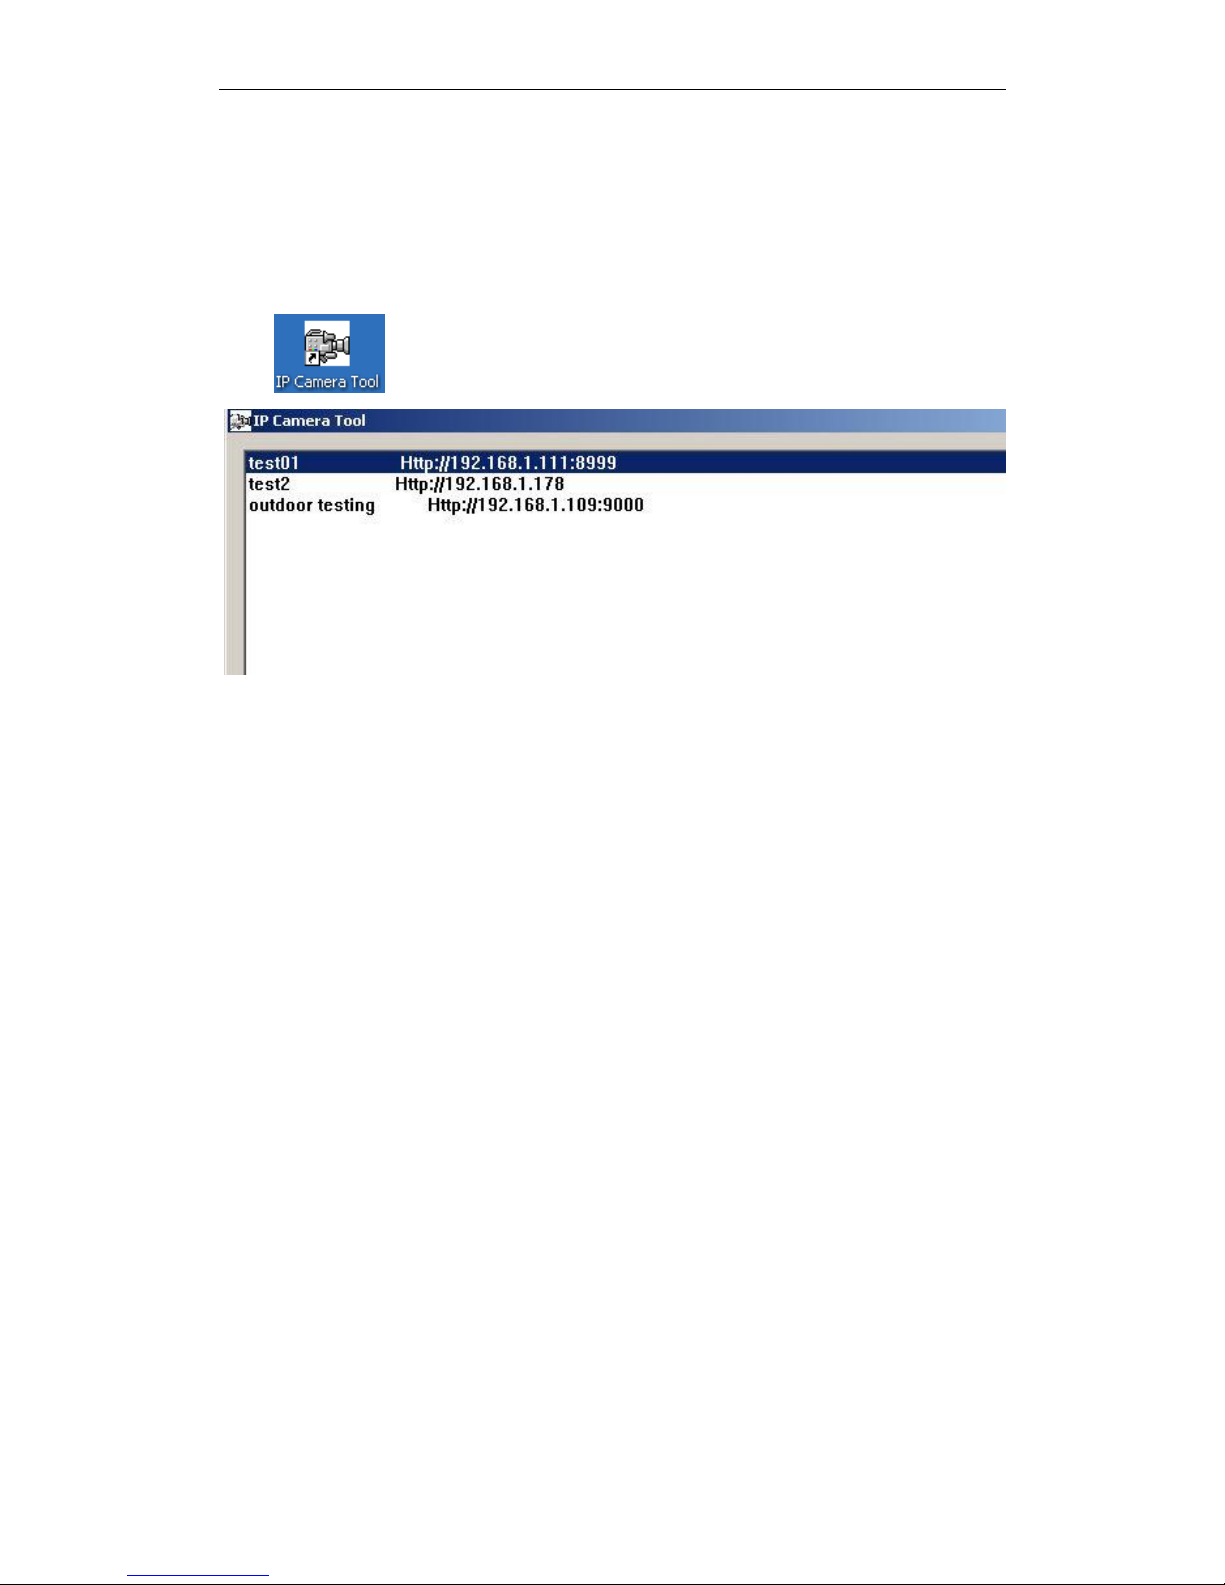
When the Device has been mounted properly, you can double click the icon “IP Camera
Tool” and a dialog box as Figure 1.9 will pop up.
Figure 1.9
Note: The software searches IP Servers automatically over LAN.
There are 3 cases:
1 No IP Camera found within LAN. After about 1 minute search, the Result Field will
show “not found IP Server” and the program shut automatically;
2 IP Cameras having been installed within LAN. All the IP Cameras will be listed and the
total number is displayed in the result field as shown in Figure 2.0.
3 The IP Cameras installed within LAN do not share the same subnet with the monitoring
PC. A prompt as shown in result field (prompt: Subnet doesn‟t match,dbclick to change!).
Click the left mouse button to choose the prompt and click the right mouse, choose
Network Configuration to set the IP address of the Camera to the same subnet as LAN.
Five Options
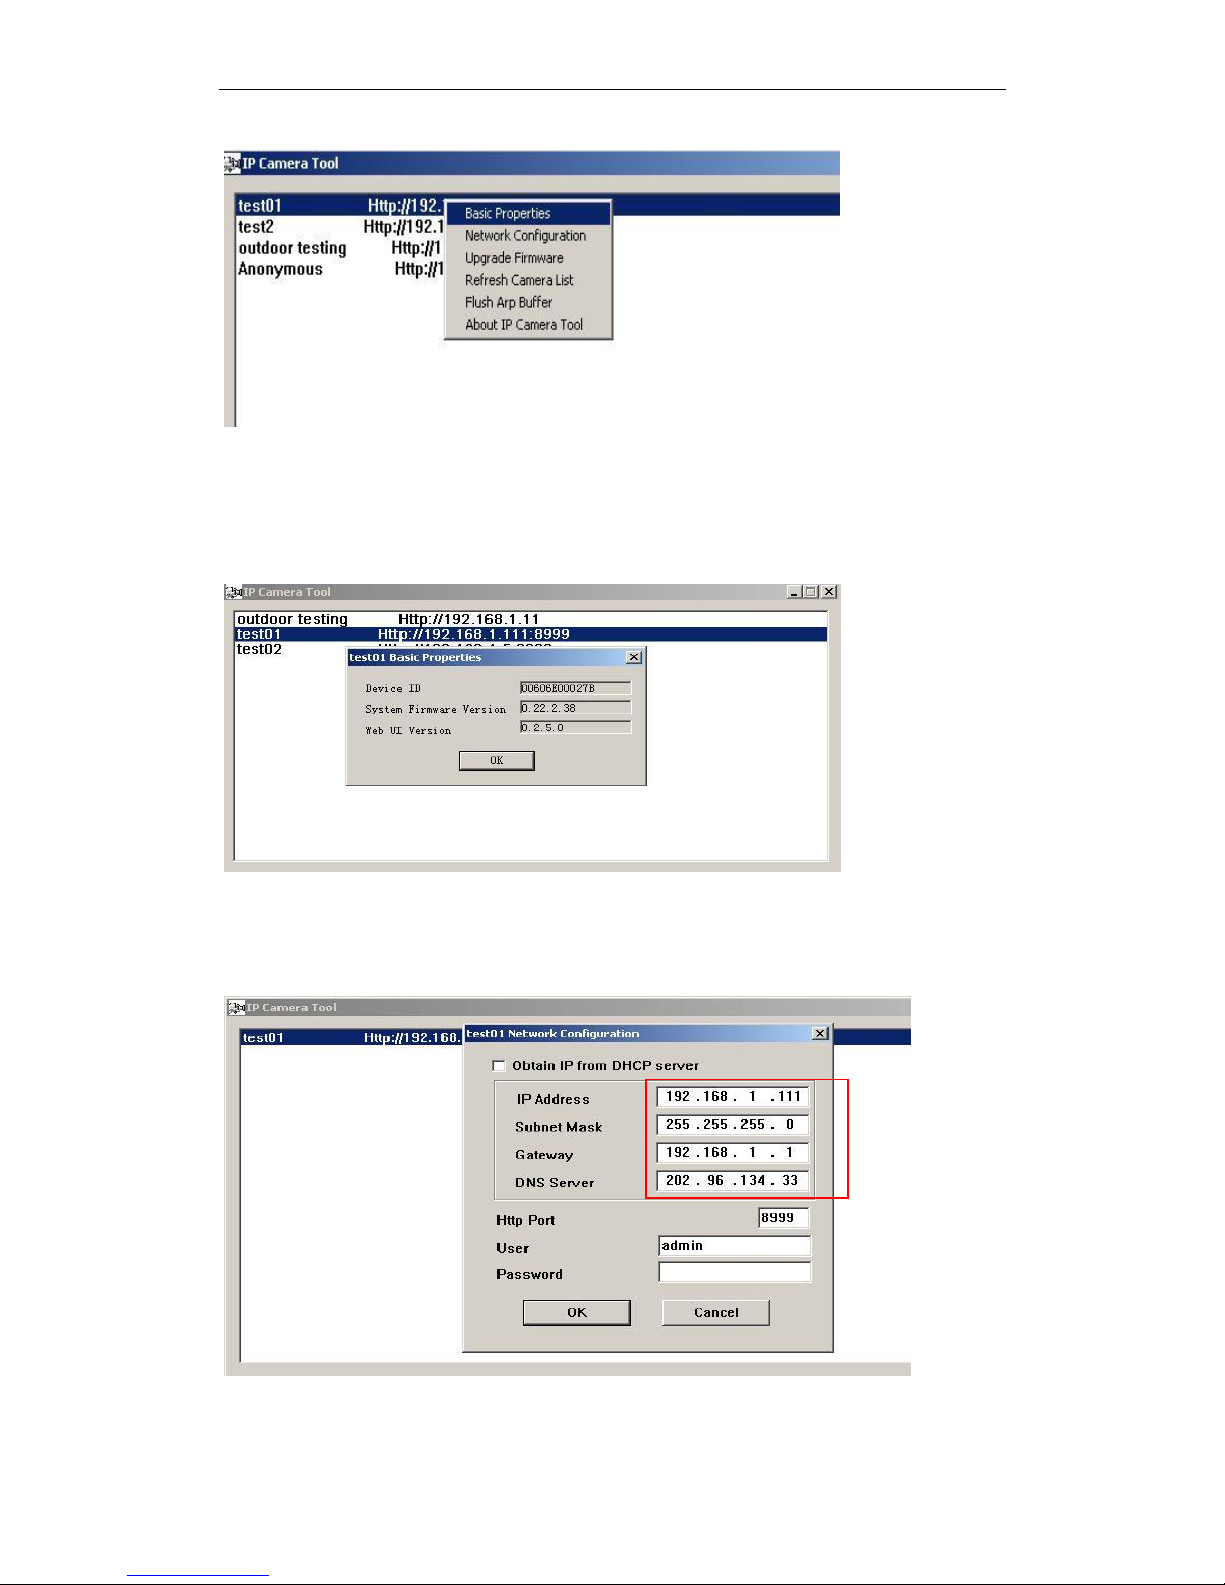
Choose the IP Camera list and Click right mouse button,there are five options,Basic
Properties, Network Configuration, Upgrade Firmware, Refresh Camera List, Flush Arp
Buffer as shown Figure 2.0.
Page 14
IPCAM User Manual
14 / 67
Figure 2.0
Basic Properties
There are some device information in the Basic Properties, such as Device ID, System
Firmware Version, Web UI Version
Figure 2.1
Network Configuration
In this page, you can configure the Network parameter.
Figure 2.2
Page 15
IPCAM User Manual
15 / 67
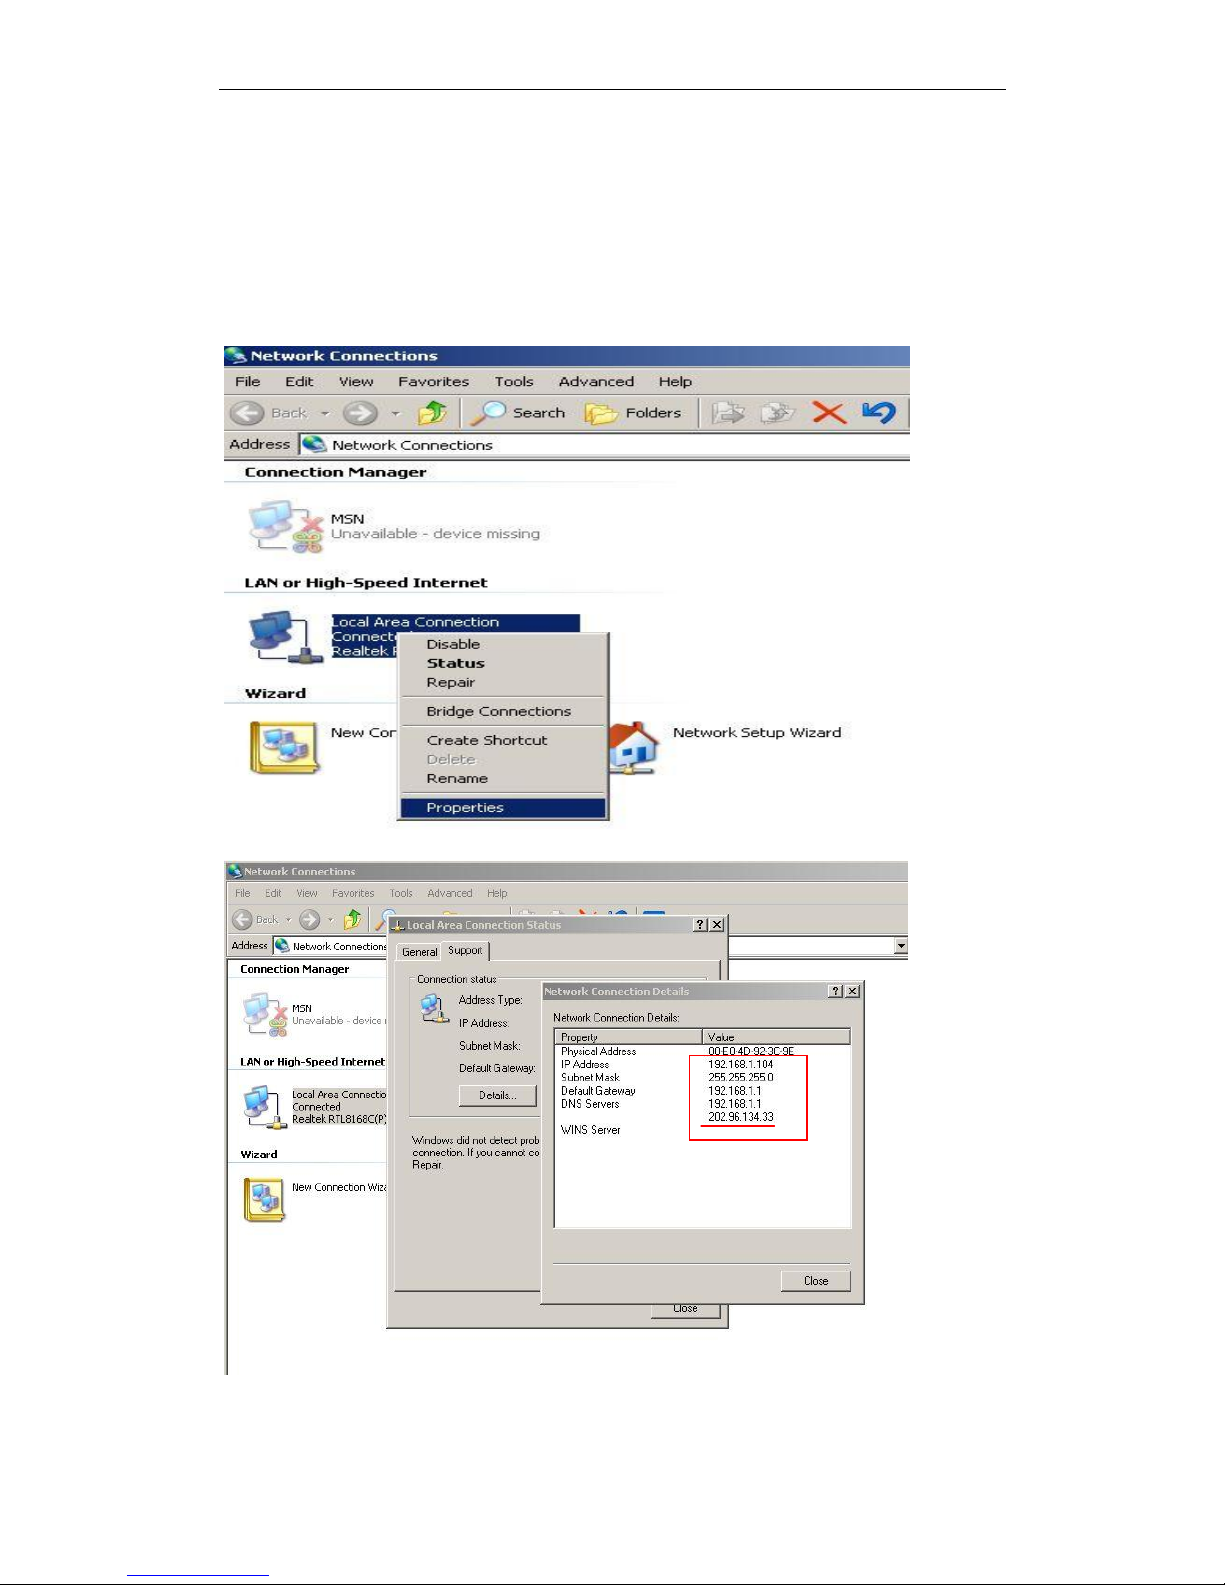
IP address: Fill in the IP address assigned and make sure it is in the same subnet as the
gateway.(i.e.the first three sections are the same)
Mask: The default subnet mask of the equipment is: 255.255.255.0
Gateway: Make sure it is in the same subnet with PC IP address. Default Gateway
address is 192.168.1.1
DNS: IP address of IPS network provider.
Figure 2.3
Page 16
IPCAM User Manual
16 / 67
Port: LAN port assigned for the equipment, usually 80
User & Password : Default administrator username/password: admin/No password
Enable Using DHCP the system will assign a reasonable IP address for your equipment
only if your gateway supports DHCP (It is the case with most gateways).
DHCP checkbox: if checked, the device will obtain IP from DHCP server (To be make
sure the Router which the device connect with has DHCP function).
NOTE: when the prompt ”subnet doesn‟t match, double click to change!”, please set the
IP Camera IP address once again.
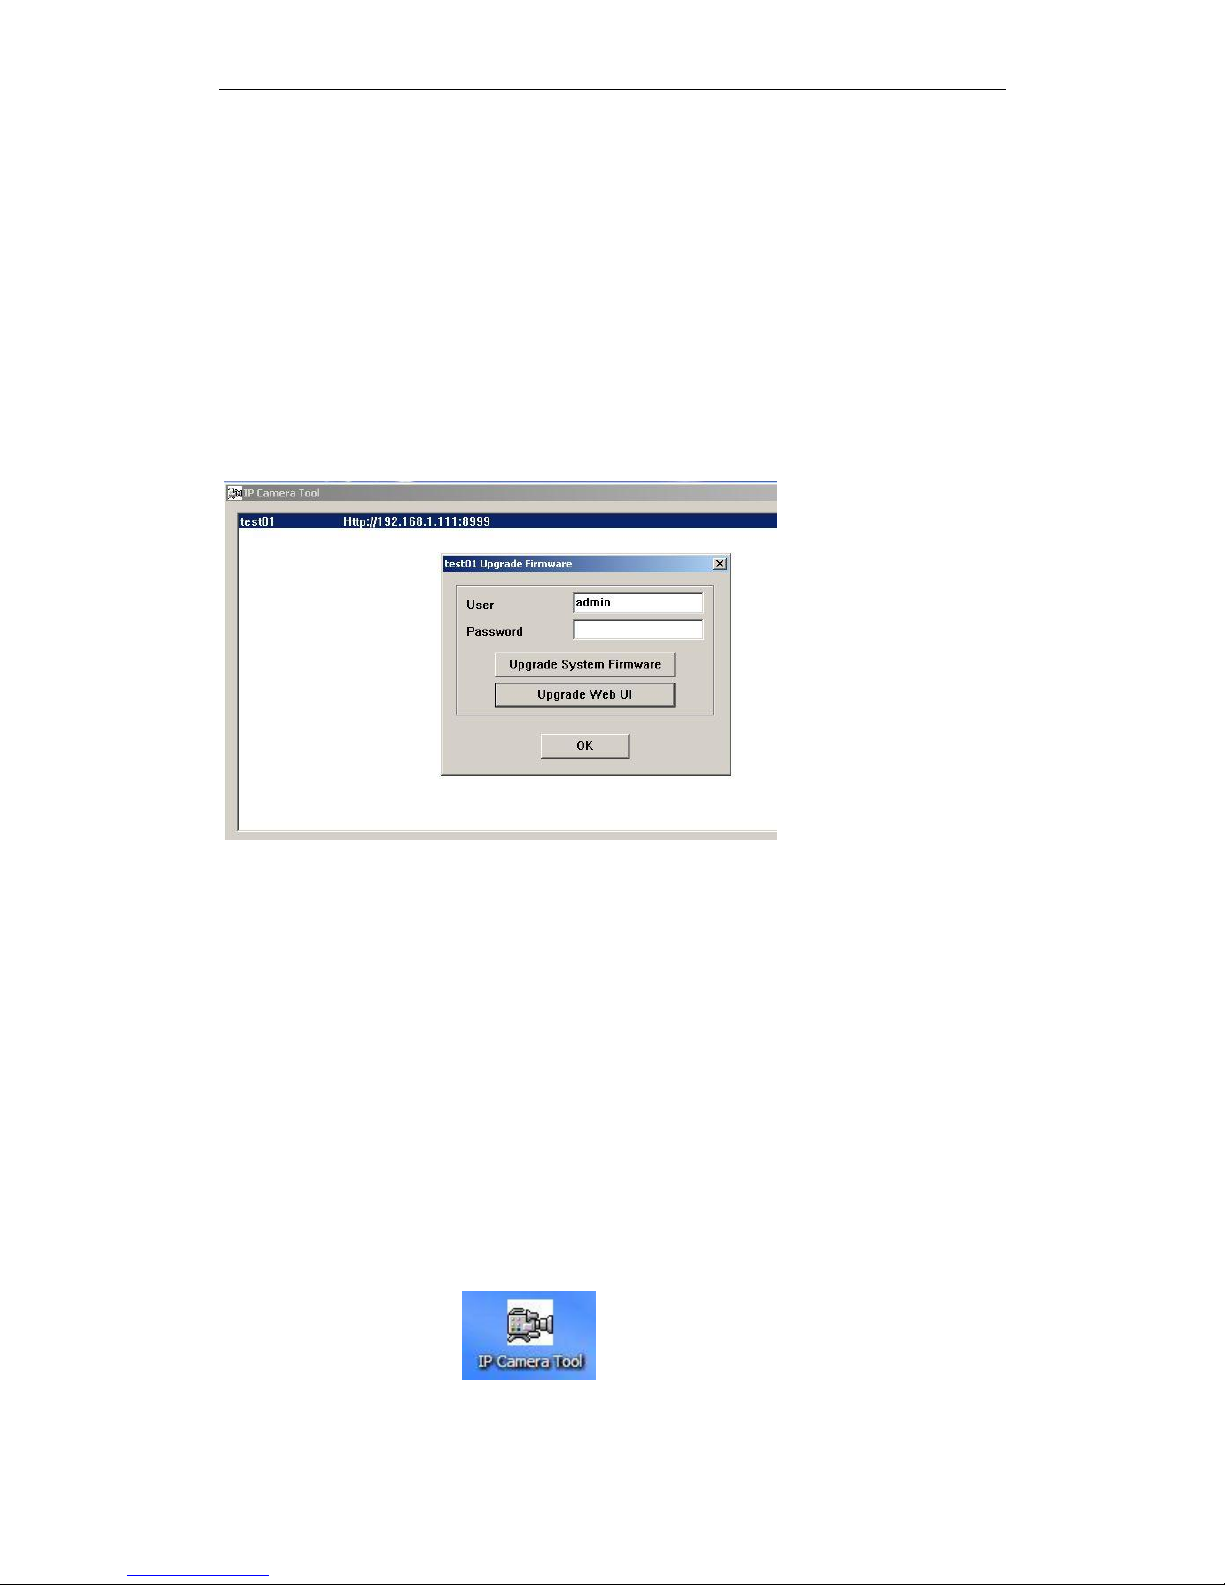
Upgrade Firmware
Enter the correct User and Password to upgrade system Firmware and Web UI.
Figure 2.4
Refresh Camera List
Refresh camera list manually.
Flush Arp Buffer
When cable network and wireless network of the device both are fixed IP address. There
is a problem you may encounter is can search the camera IP but can‟t open the camera
web page.you may try to use flush arp buffer.
3.2 Camera Login
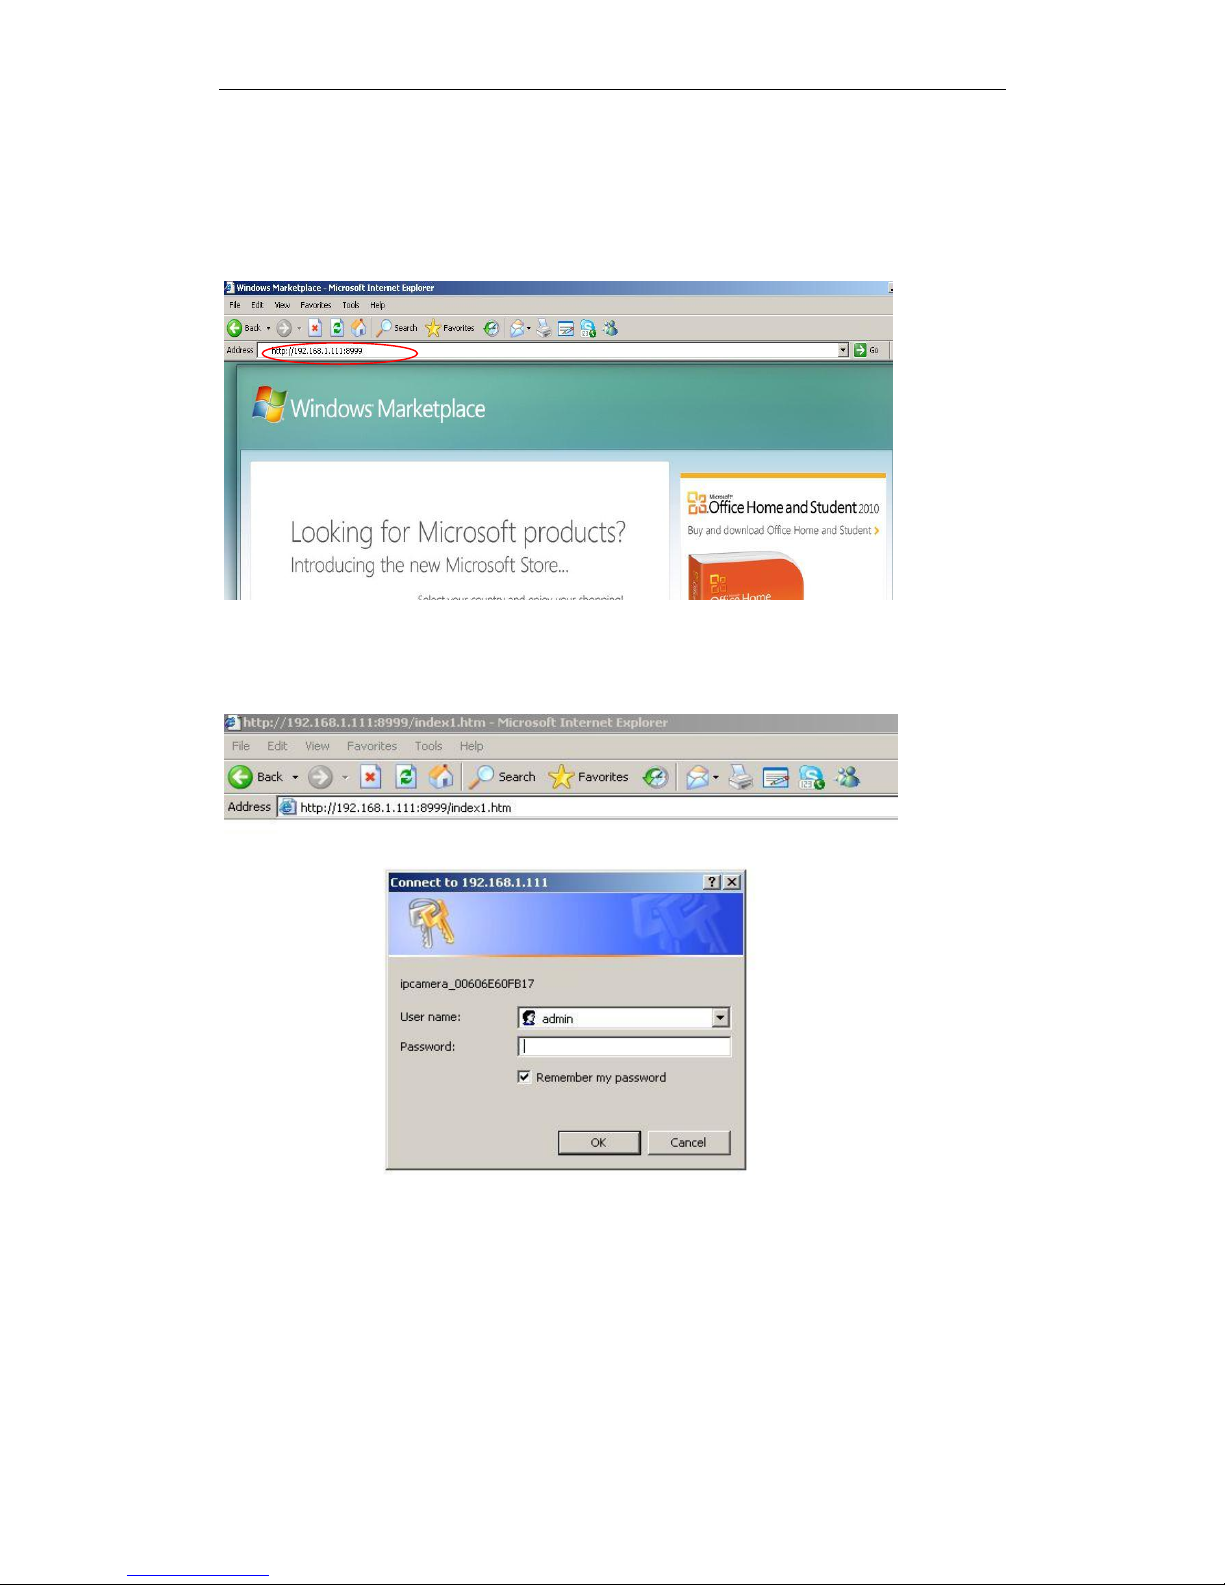
You can access the camera :
1.through IP Camera Tool or IE directly.
Double click the IP address of the IP Camera listed(Figure 2.0).IE will be opened
Page 17
IPCAM User Manual
17 / 67
automatically and display the camera login page.
2. Access the camera by IE browser directly, type in the camera‟s IP address. for
example.
1)By IE browser as below:
Figure 2.5
·The Camera Login page pop-up.
Figure 2.6
enter your account and password on the login page as shown in Figure 2.6. By default,
administrator‟s username is: admin and no password.
Page 18
IPCAM User Manual
18 / 67
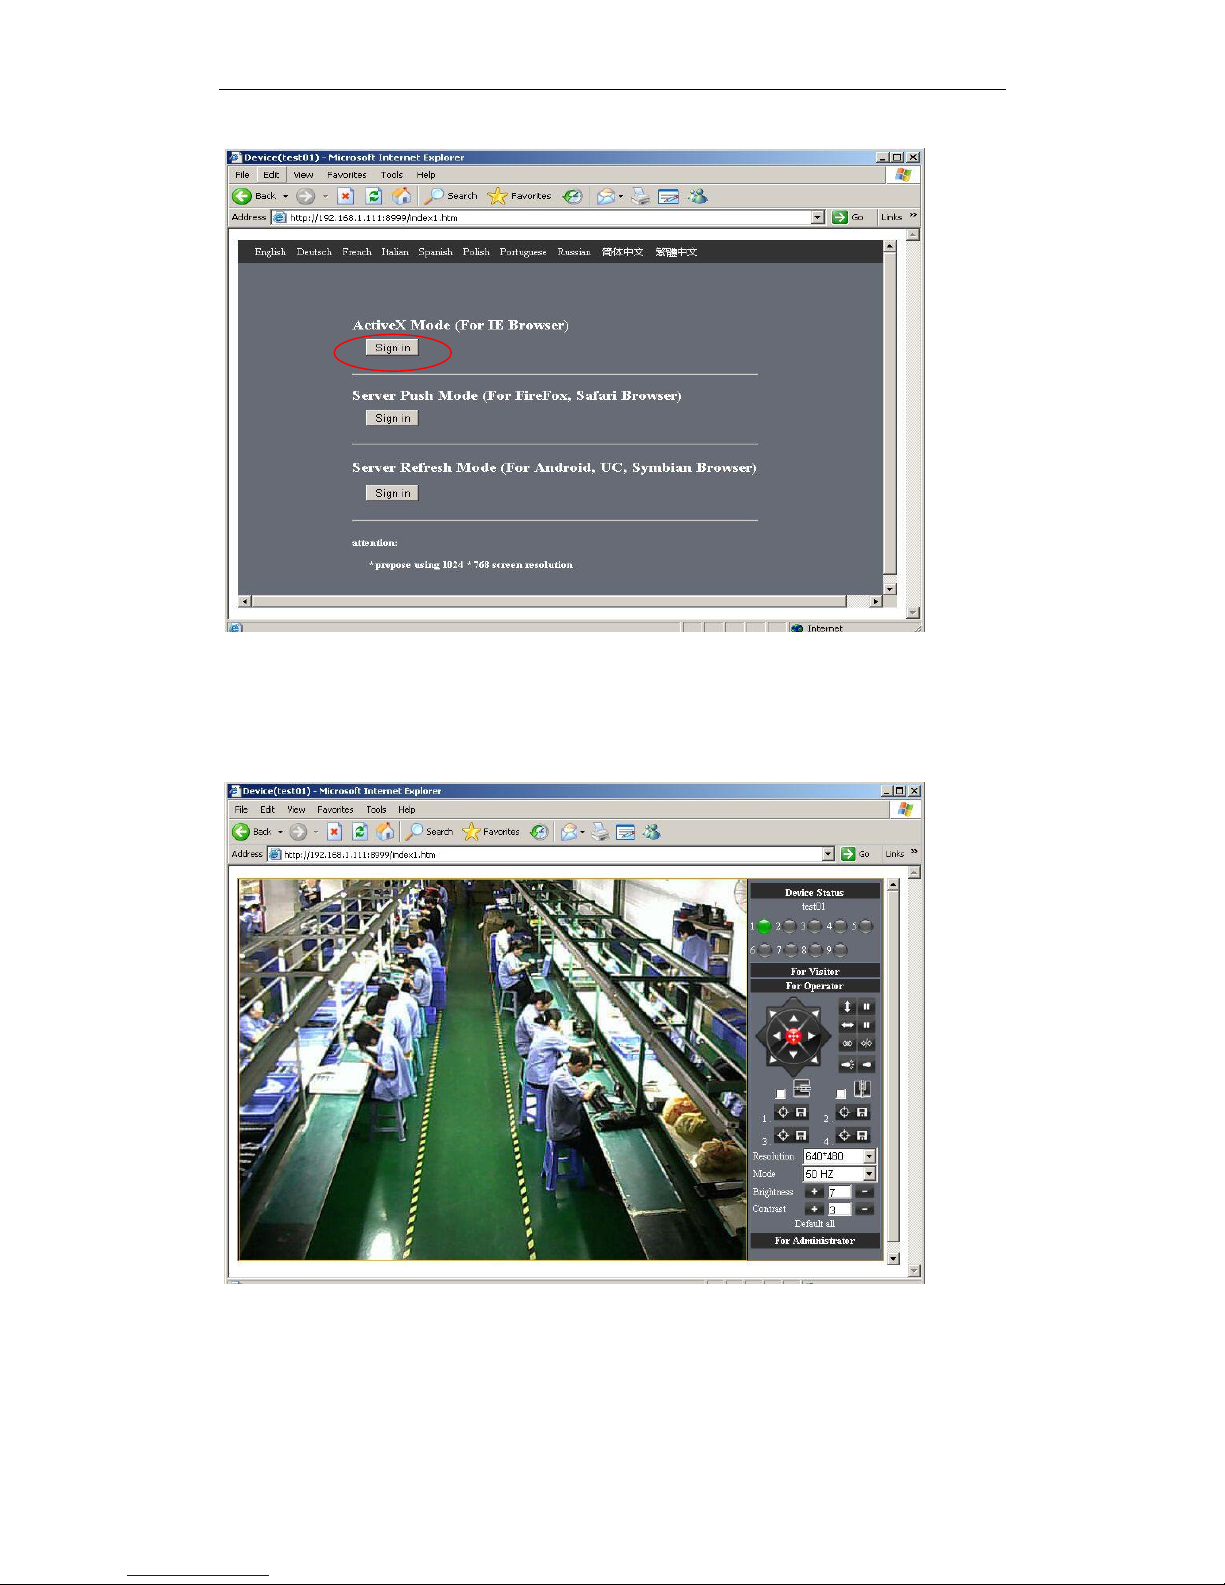
Figure 2.7
Click “Sign in” to enter the monitoring page(Figure 2.8).You can set the username and
password as Administrator, Operator or Visitor.
Figure 2.8
Page 19
IPCAM User Manual
19 / 67
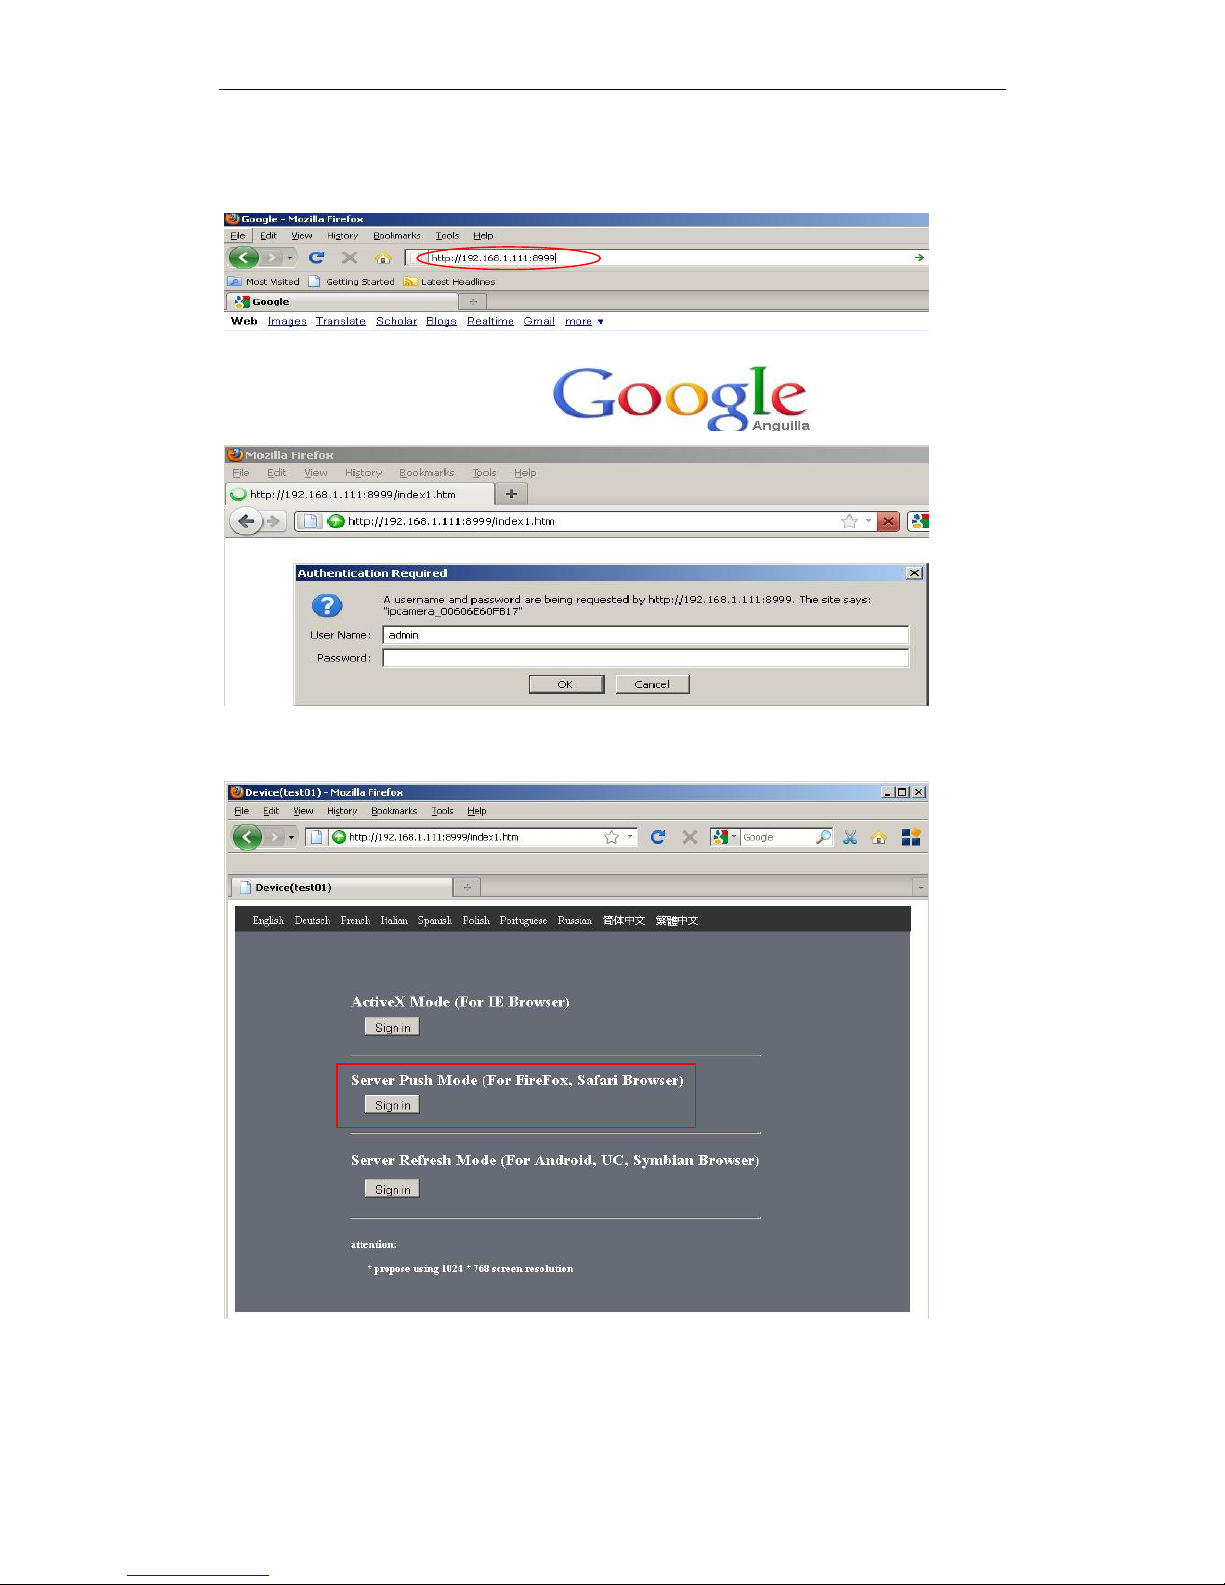
2) By Mozilla Firefox browser as below:
Figure 2.9
The Camera Login page pop-up.
Figure 3.0
Click sign in,Server Push Mode’s functions are less than ActiveX
Page 20
IPCAM User Manual
20 / 67
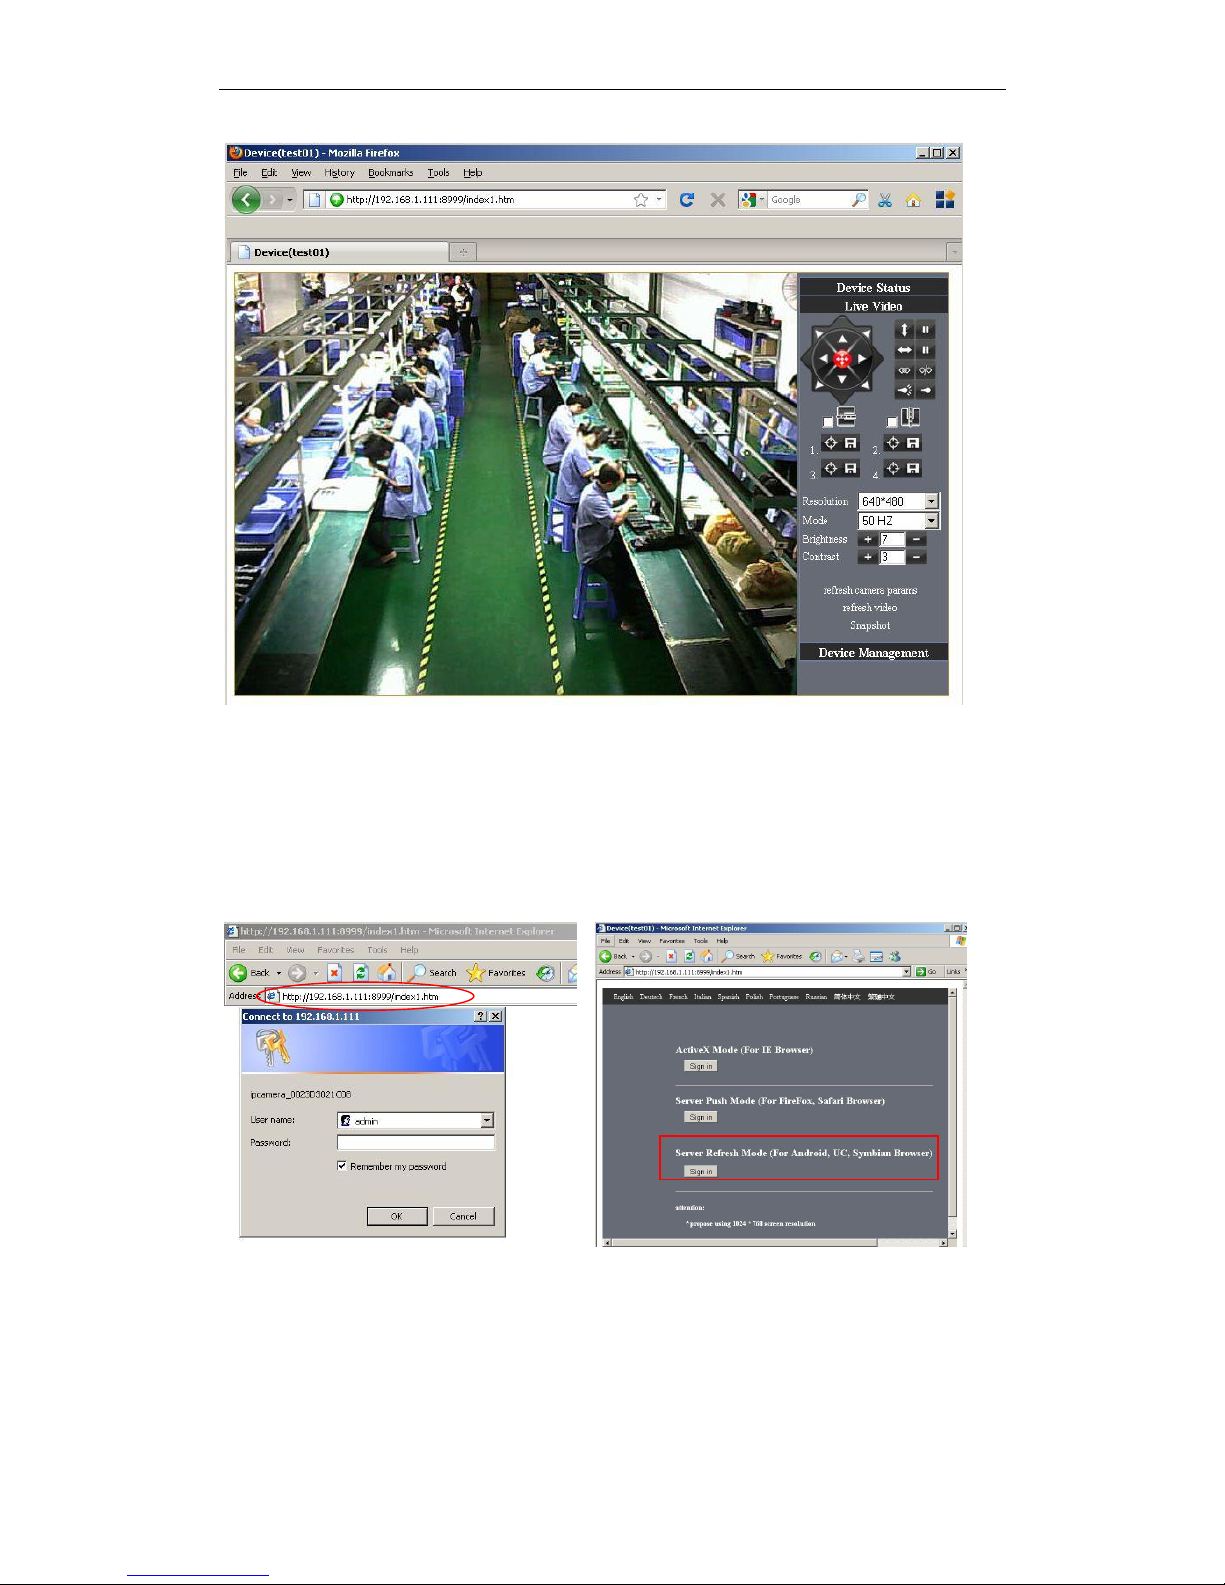
Figure 3.1
3). with mobile phones equipped with special tools wap browser visit IPCAM with
computer access similar as follows:
Popup equipment connect interface:
Figure3.2
Click Sign in
Page 21
IPCAM User Manual
21 / 67
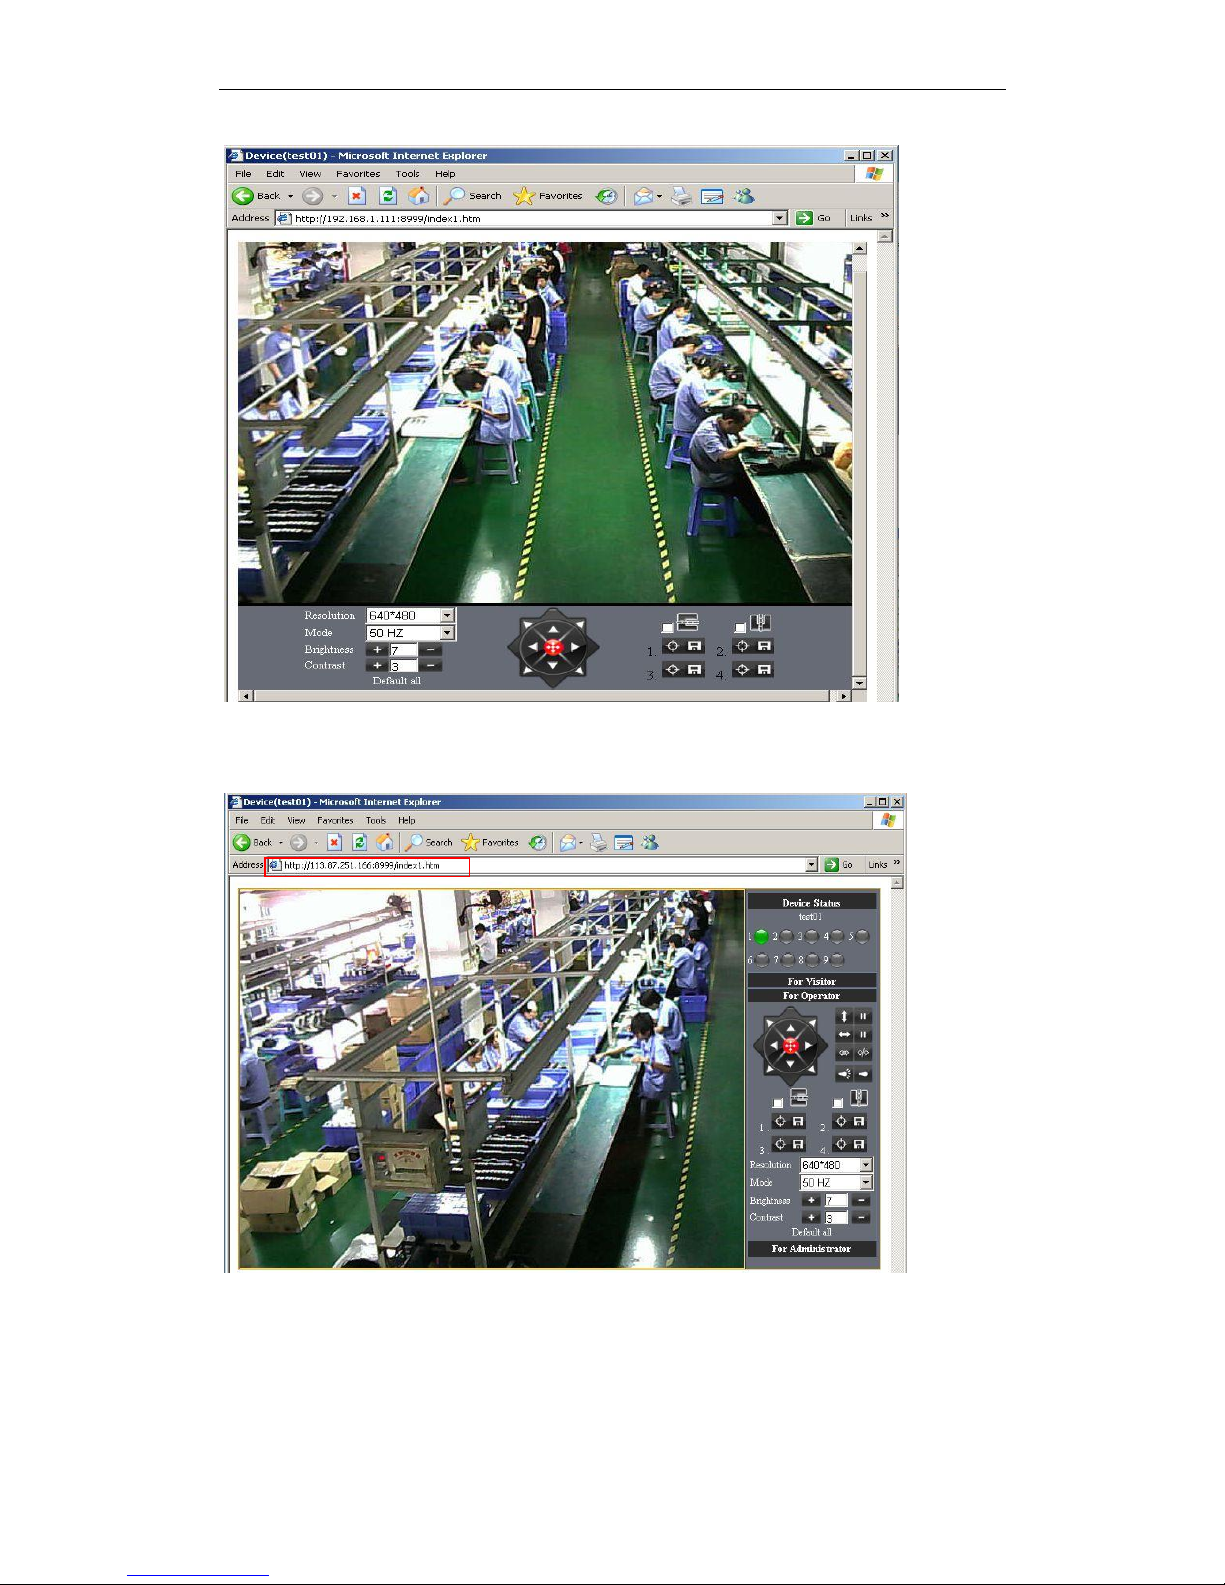
Figure 3.3
Also can browse ip camera by inputting ip address to browser:
Figure 3.4
Page 22
IPCAM User Manual
22 / 67
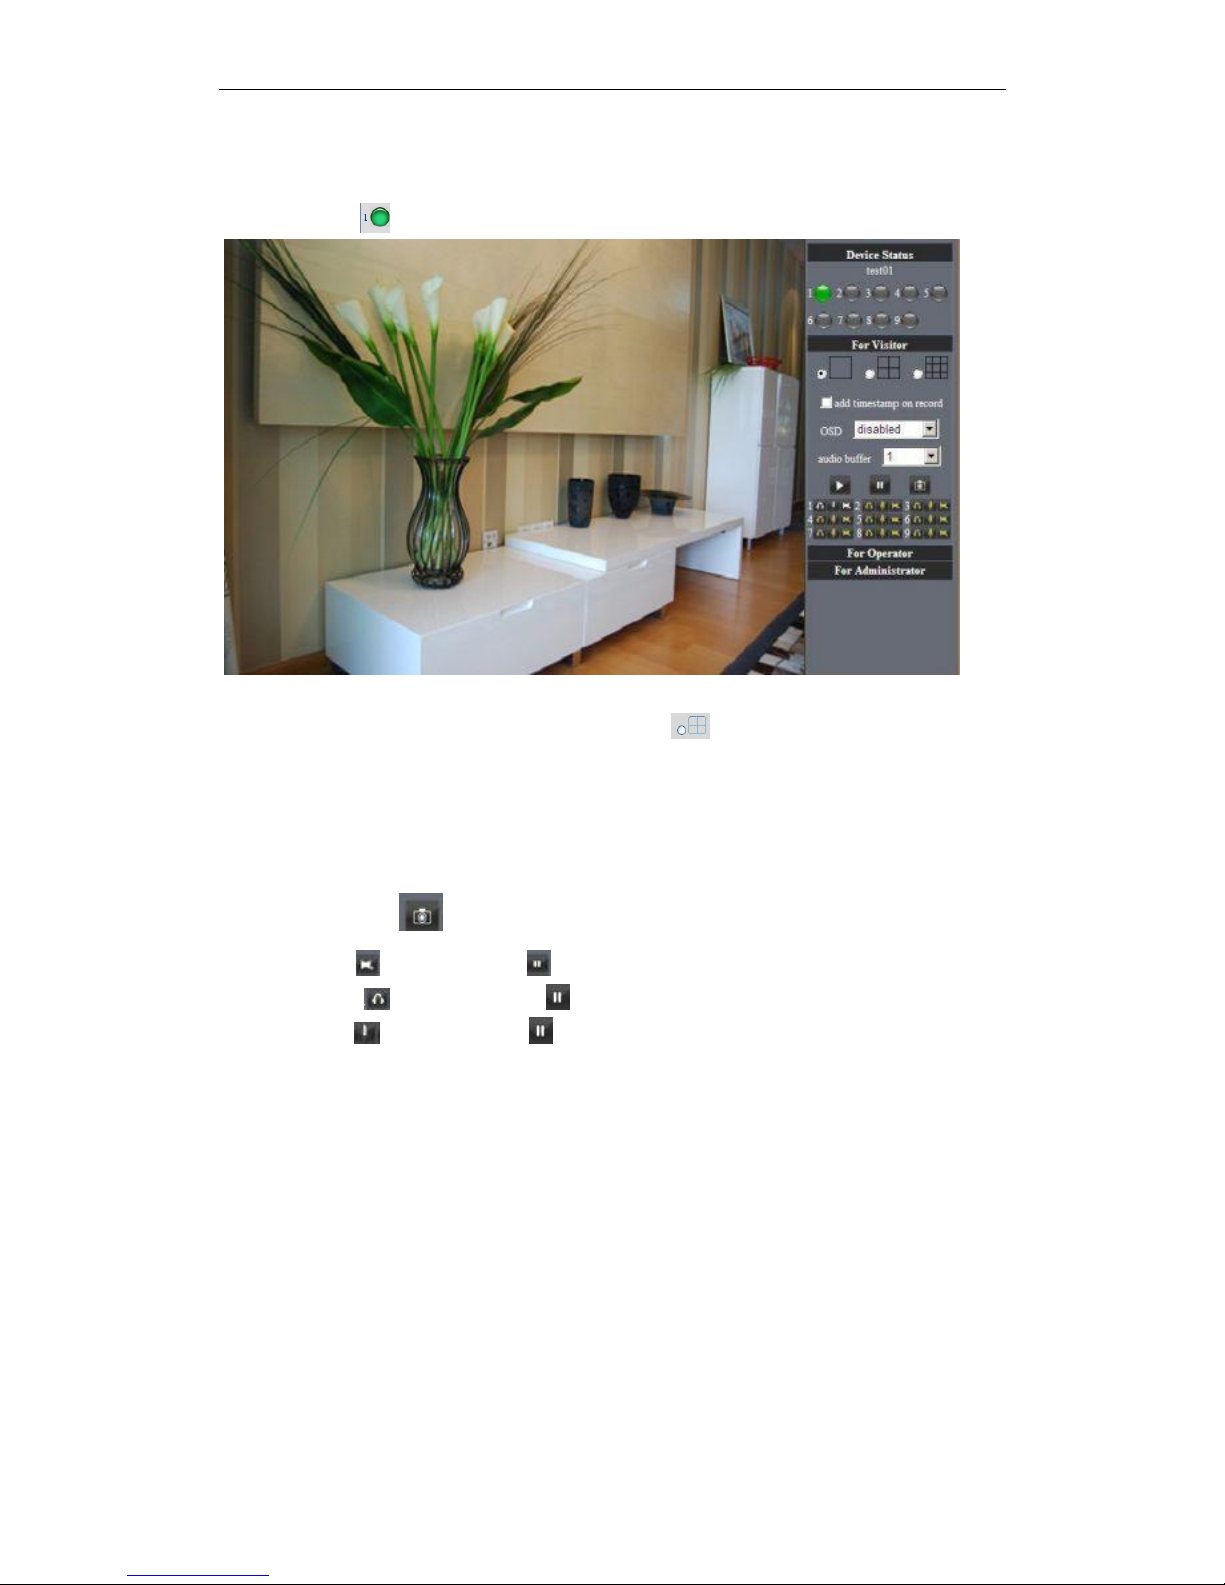
3.3 For Visitor
For example: if is bright ,the first route is on Detection(Motion Detection).
Figure 3.5
If you want to detect 4 views , need to click this ico .The first you should add more
deivce.see details in 3.5.1 Multi-Device Settings.
OSD: Display date and time on the video. You can disable the OSD function or choice
other color.
(OSD:on-screen display)
Snapshot: Click ico to snap the picture.
REC: Click ico into REC mode, is stop.
Audio:Click ico into Audio mode, can listen the voice in monitoring range..
Talk:Click ico into Talk mode, Visitor can talk with whom is in the monitoring
range.
Note:
the record file name is: device Alias_ Current time.Avi
For example: IPCAM_20081211134442.Avi
It means the device alias is IPCAM and its record‟s end time is : At 13:44:42 on
December 11, 2008.When use motion detection and checked Send Mail on Alarm.
The name of the picture received in mailbox is like this: device id(Alias)_ Current
time.jpg
For example: 00606E576A02(IPCAM)_m20081216212745.jpg
It means the device ID is 00606E576A02, the device alias is IPCAM and its picture‟s time
is : At 21:27:45 on December 16, 2008
Page 23
IPCAM User Manual
23 / 67
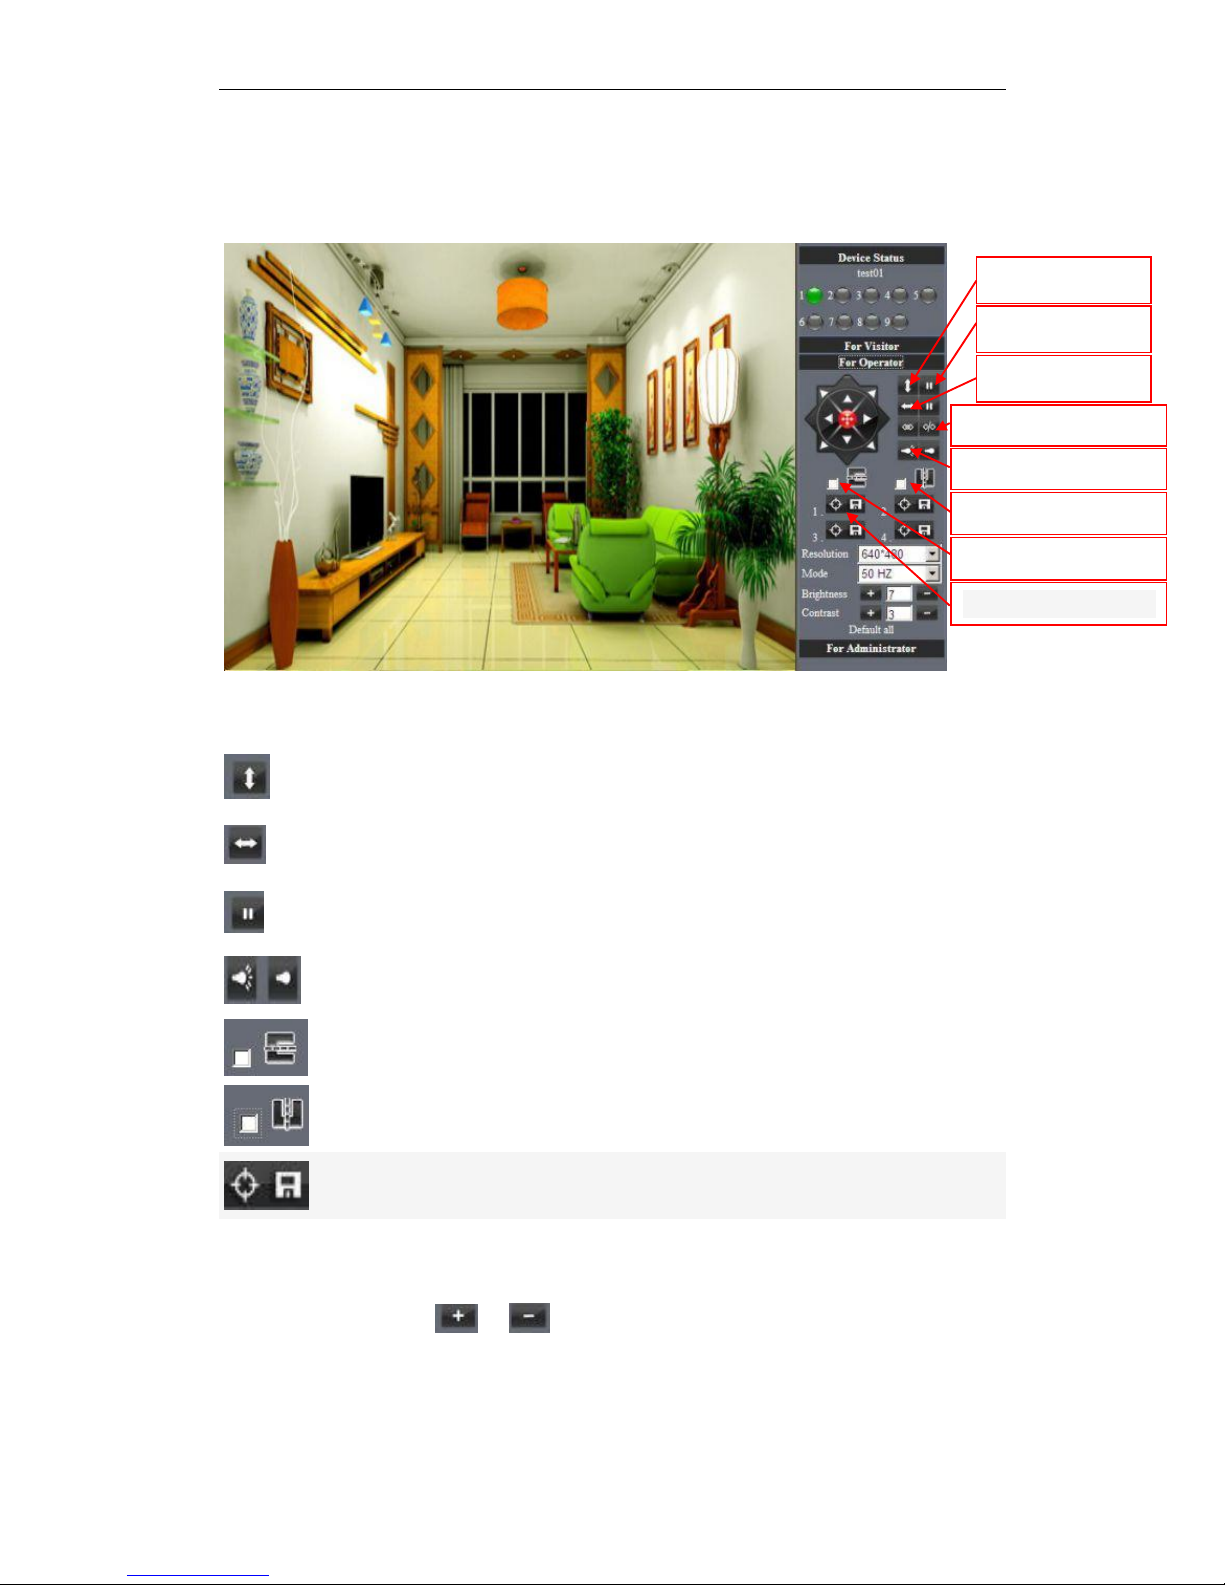
3.4 For operator
When login as operator or administrator,you can enter the For Operator.
Figure 3.6
Direction control: click the different arrow will get different direction view.
Vertical patrol
Horizontal patrol
Stop patrol
I/O output Switch on /off.(see 3..5.6 for more information)
Image around flip
Image fluctuation flip
Set Preset
Resolution: VGA(640 X 480)/ QVGA(320 X 240)
Mode: 50Hz/60Hz/Outdoor
color parameter:Click or can adjust brightness and contrast .
Vertical patrol
Stop patrol
I/O output Switch on /off
Lens adjusting
Image around flip
Image fluctuation flip
Horizontal patrol
Set Preset
Page 24
IPCAM User Manual
24 / 67
3.5 For Administrator
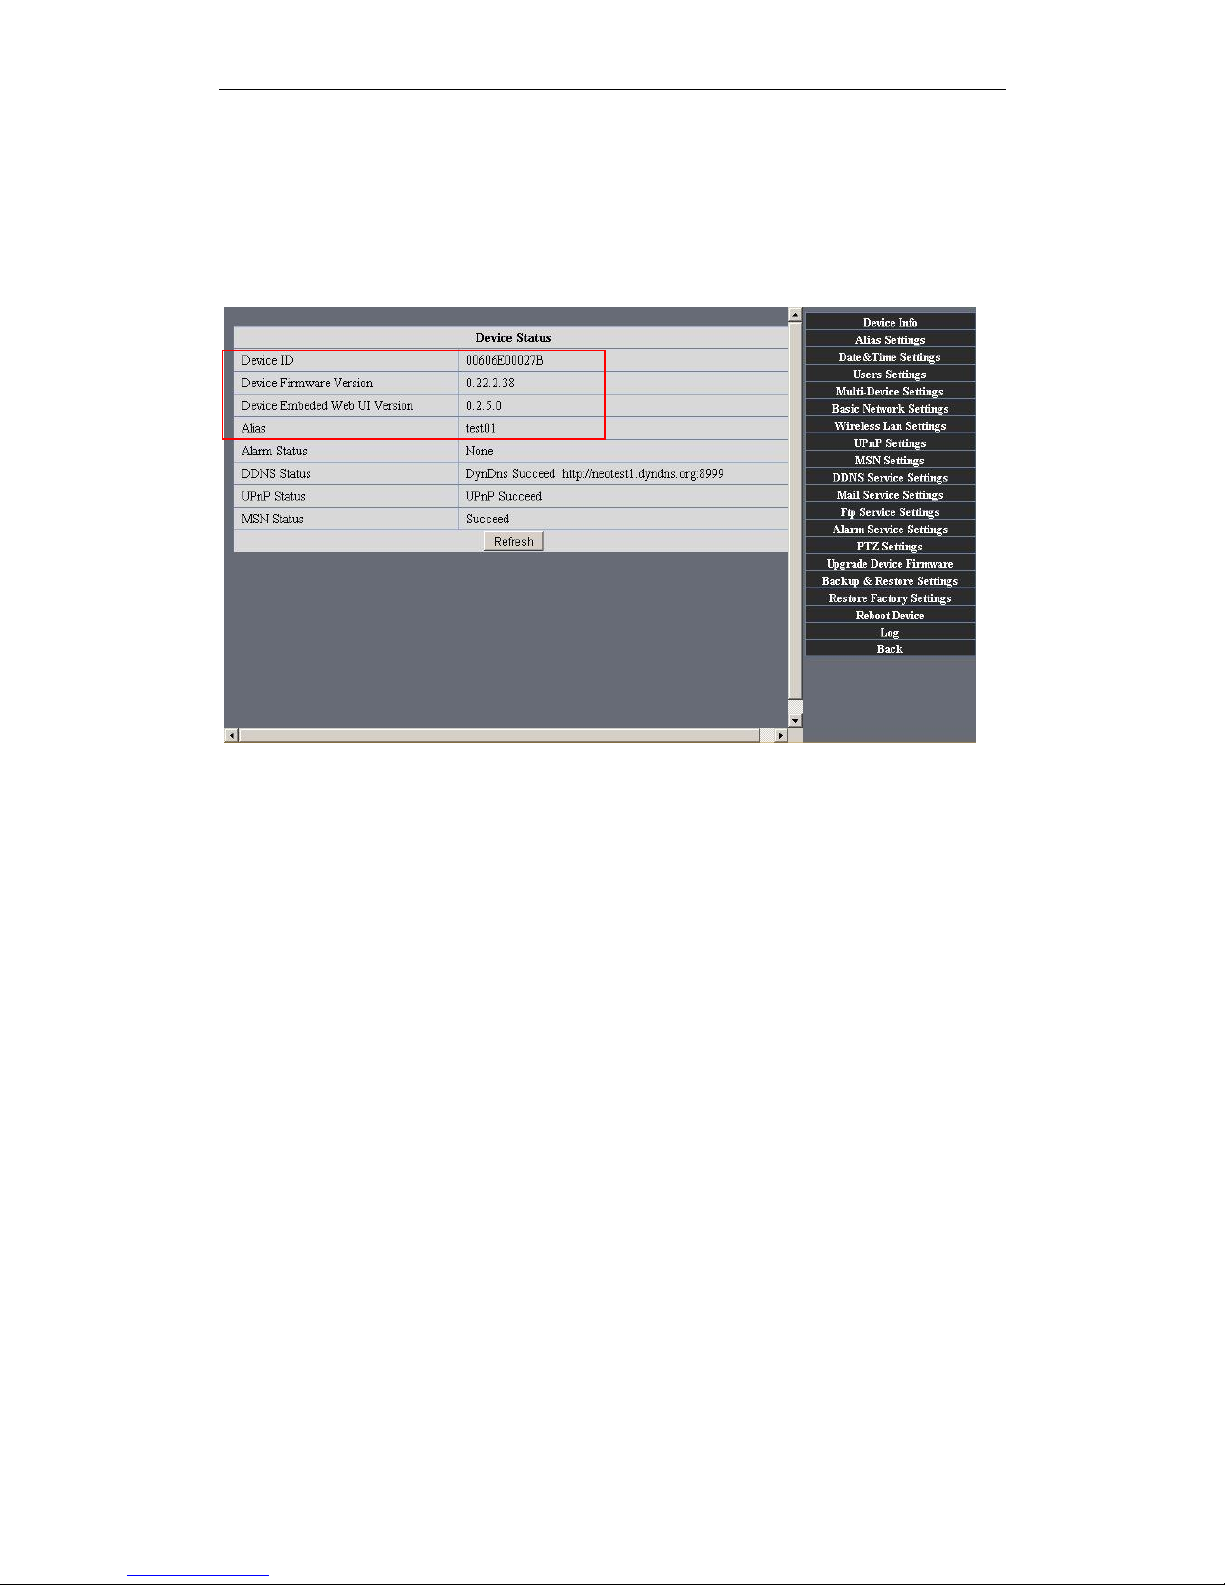
When you login as administrator, “For Administrator” is enabled.
Device Info:You can find the information about Device ID,Firmware Version and
Embeded Web UI Version.
Figure3.7
Alias Settings: You can Input the new name as you like.
Data &Time Settings: Data &Time Settings page.
Users Settings: Eight accounts are acceptable for this system. Here the eight users can
configure their user names and password as Administrator, Operator or Visitor.
Visitor: In this mode, you can only view.
Operator: You can control the direction of IP Camera and set some parameter.
Administrator: You can setup the advanced configurations of the IP Camera.
UpnP Settings: If you access IP Camera, to be make sure UpnP Status is Succeed.
Upgrade Device Firmware: Upgrade Device Firmware and device embeded web UI
software in this page.
Restore Factory Settings: Restore factory settings of the device.
Reboot Device: Reboot the device.
Back: Back to Monitoring Mode.
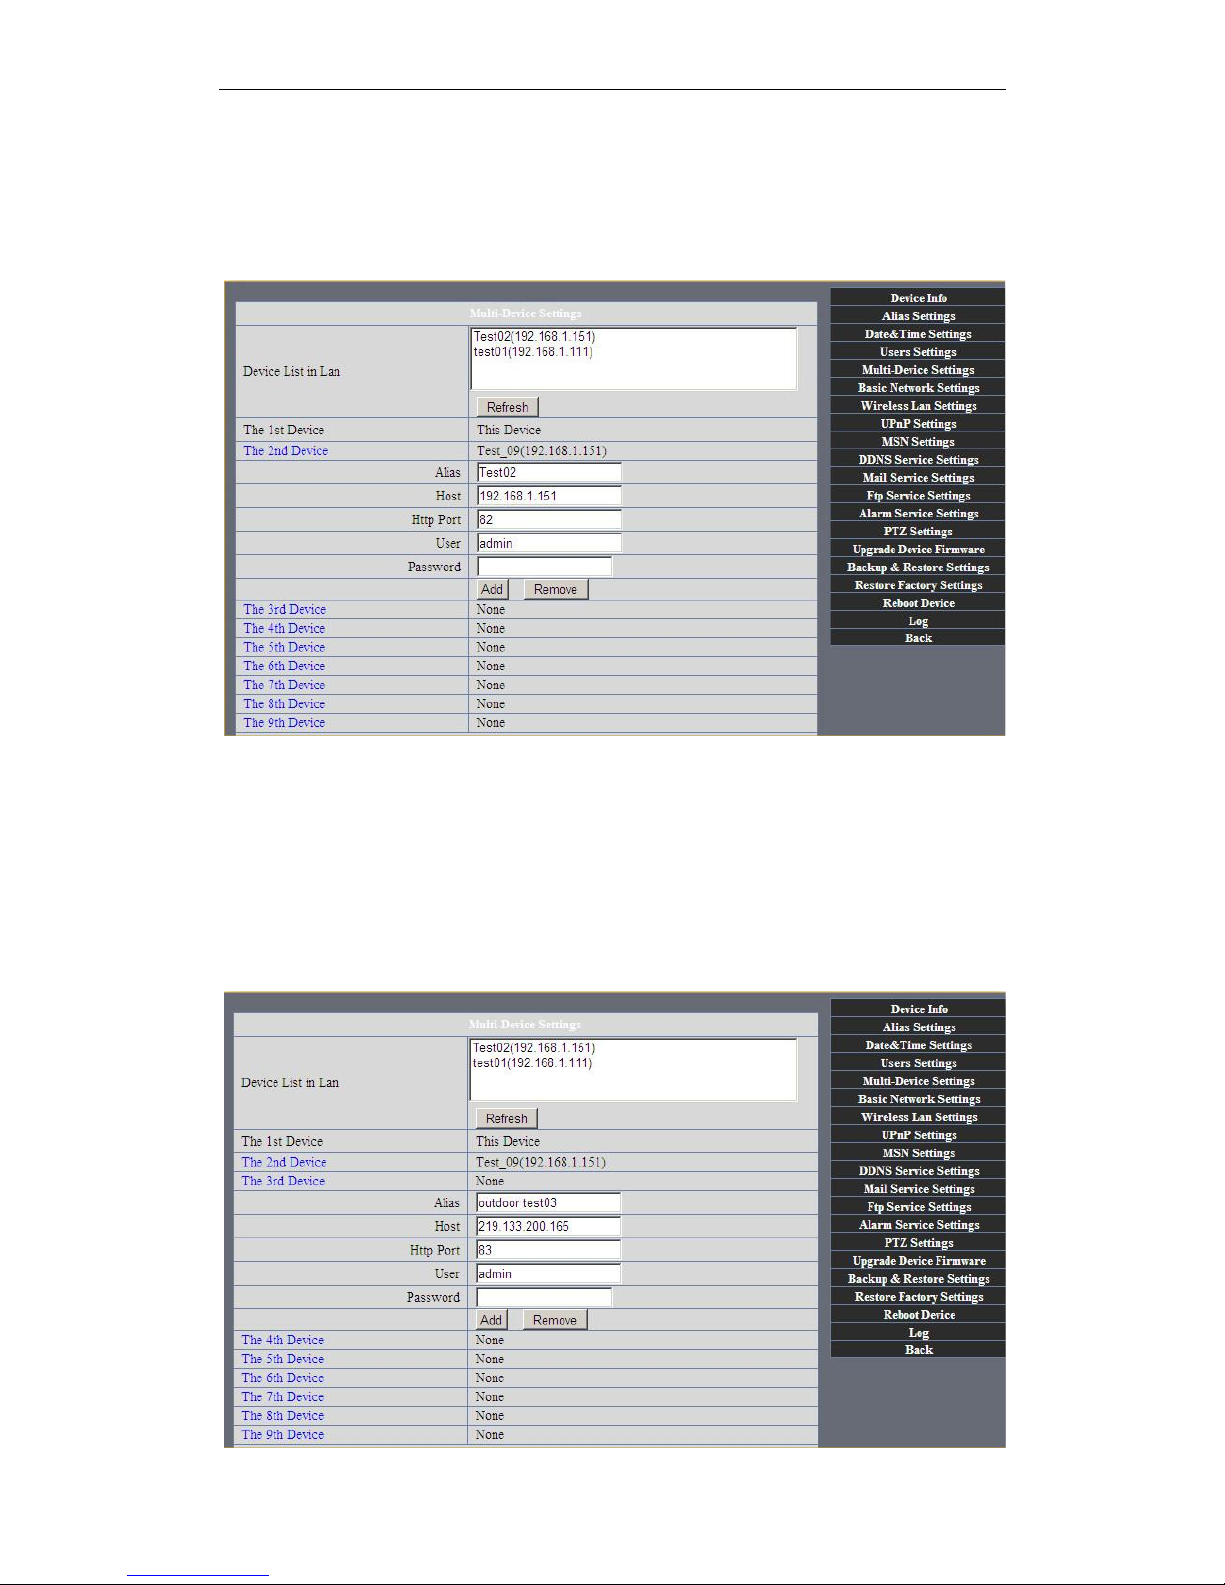
3.5.1 Multi-Device Settings
Add cameras in LAN
In the Multi-Device Settings page, you can see all devices searched in LAN. The 1st
Device is this device in default. You can add more cameras list in LAN for monitoring.
Page 25
IPCAM User Manual
25 / 67
This Web software supports up to 4 IP Cameras online simultaneously. Click “The 2ND
Device” and Double click the item in the “Device List in LAN”, Alias、Host and Http Port
will fill in automatically. Enter the correct username and password then click “add”.Add
more cameras in the same way.
Figure3.8
Add cameras in the Internet
Firstly, make sure the camera added can access in the Internet with the IP address or
DDNS domain. Like this:http:/219.133.200.165: 83 or http://IPCAM.dyndns.org:9008
You can enter the Host: 219.133.200.165 port: 83 or Host: IPCAM.dyndns.org port:
81.Enter the correct username and password then click “add”. Add more cameras in the
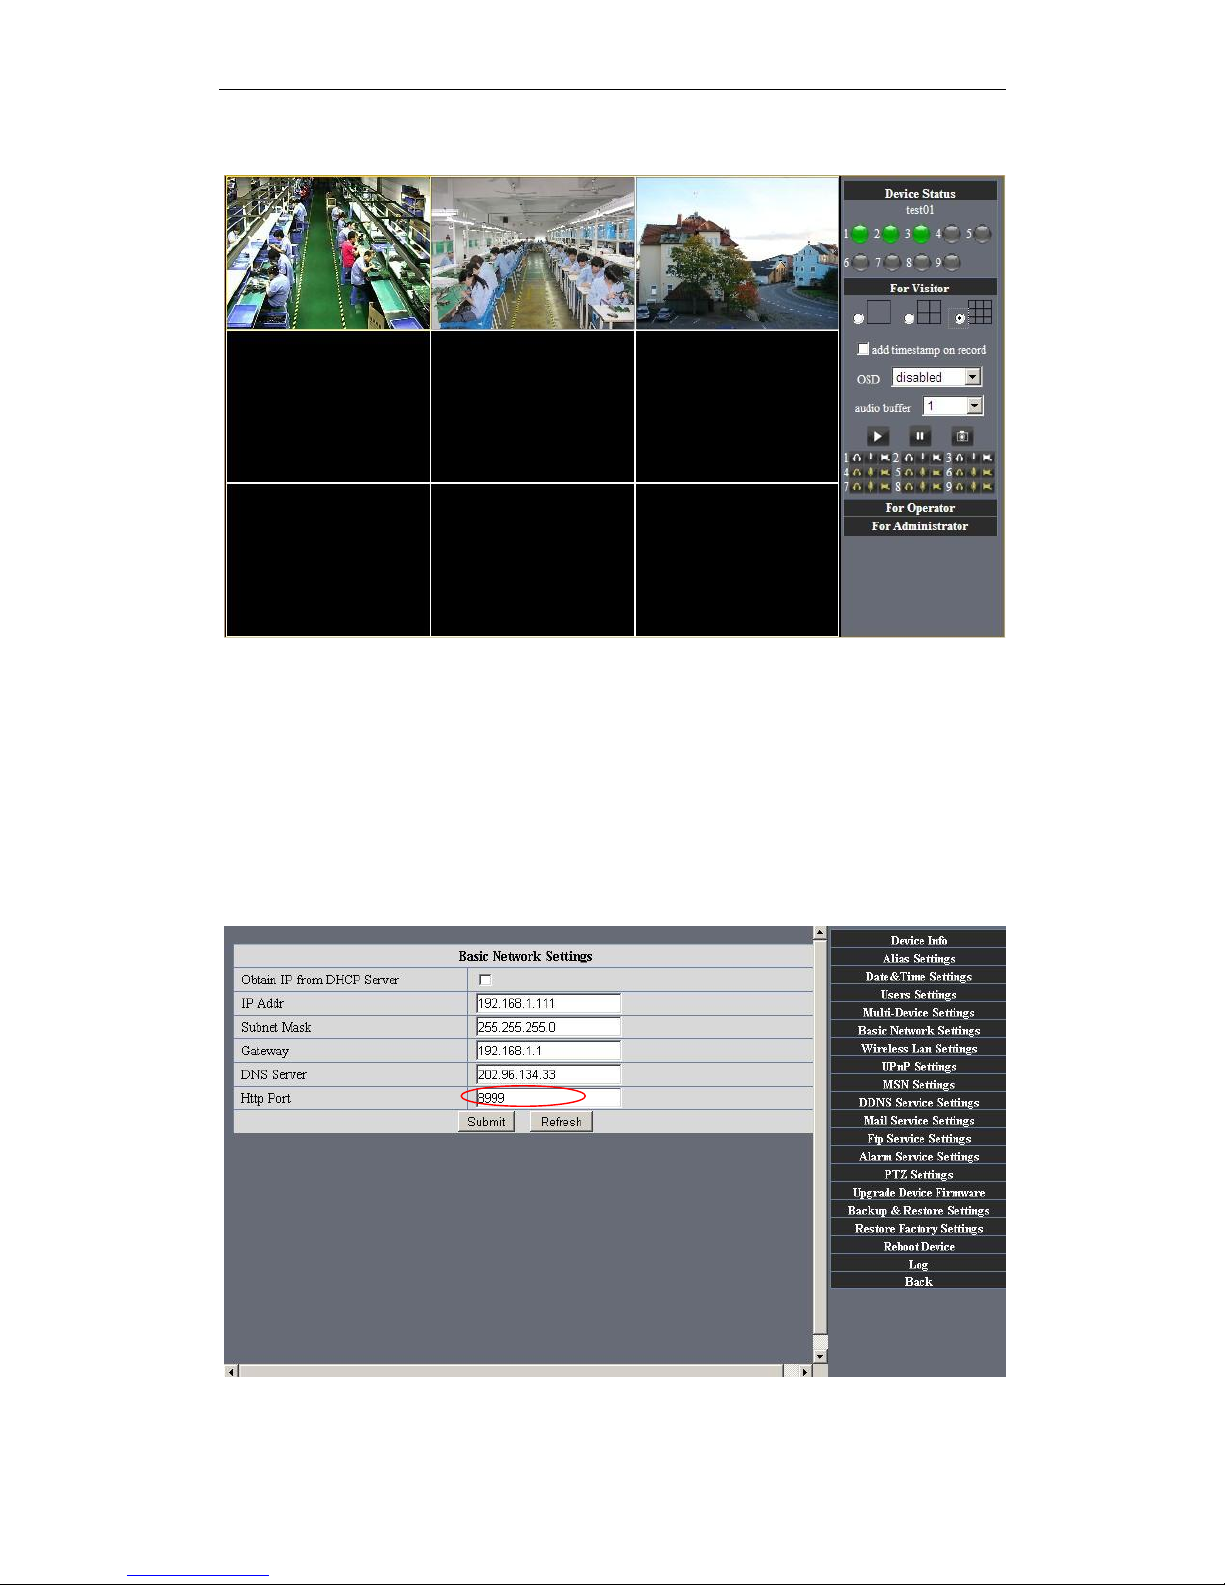
same way as shown in Figure3.9
Page 26
IPCAM User Manual
26 / 67
Figure3.9
Figure4.0
3.5.2 Network Settings
Basic Network Settings
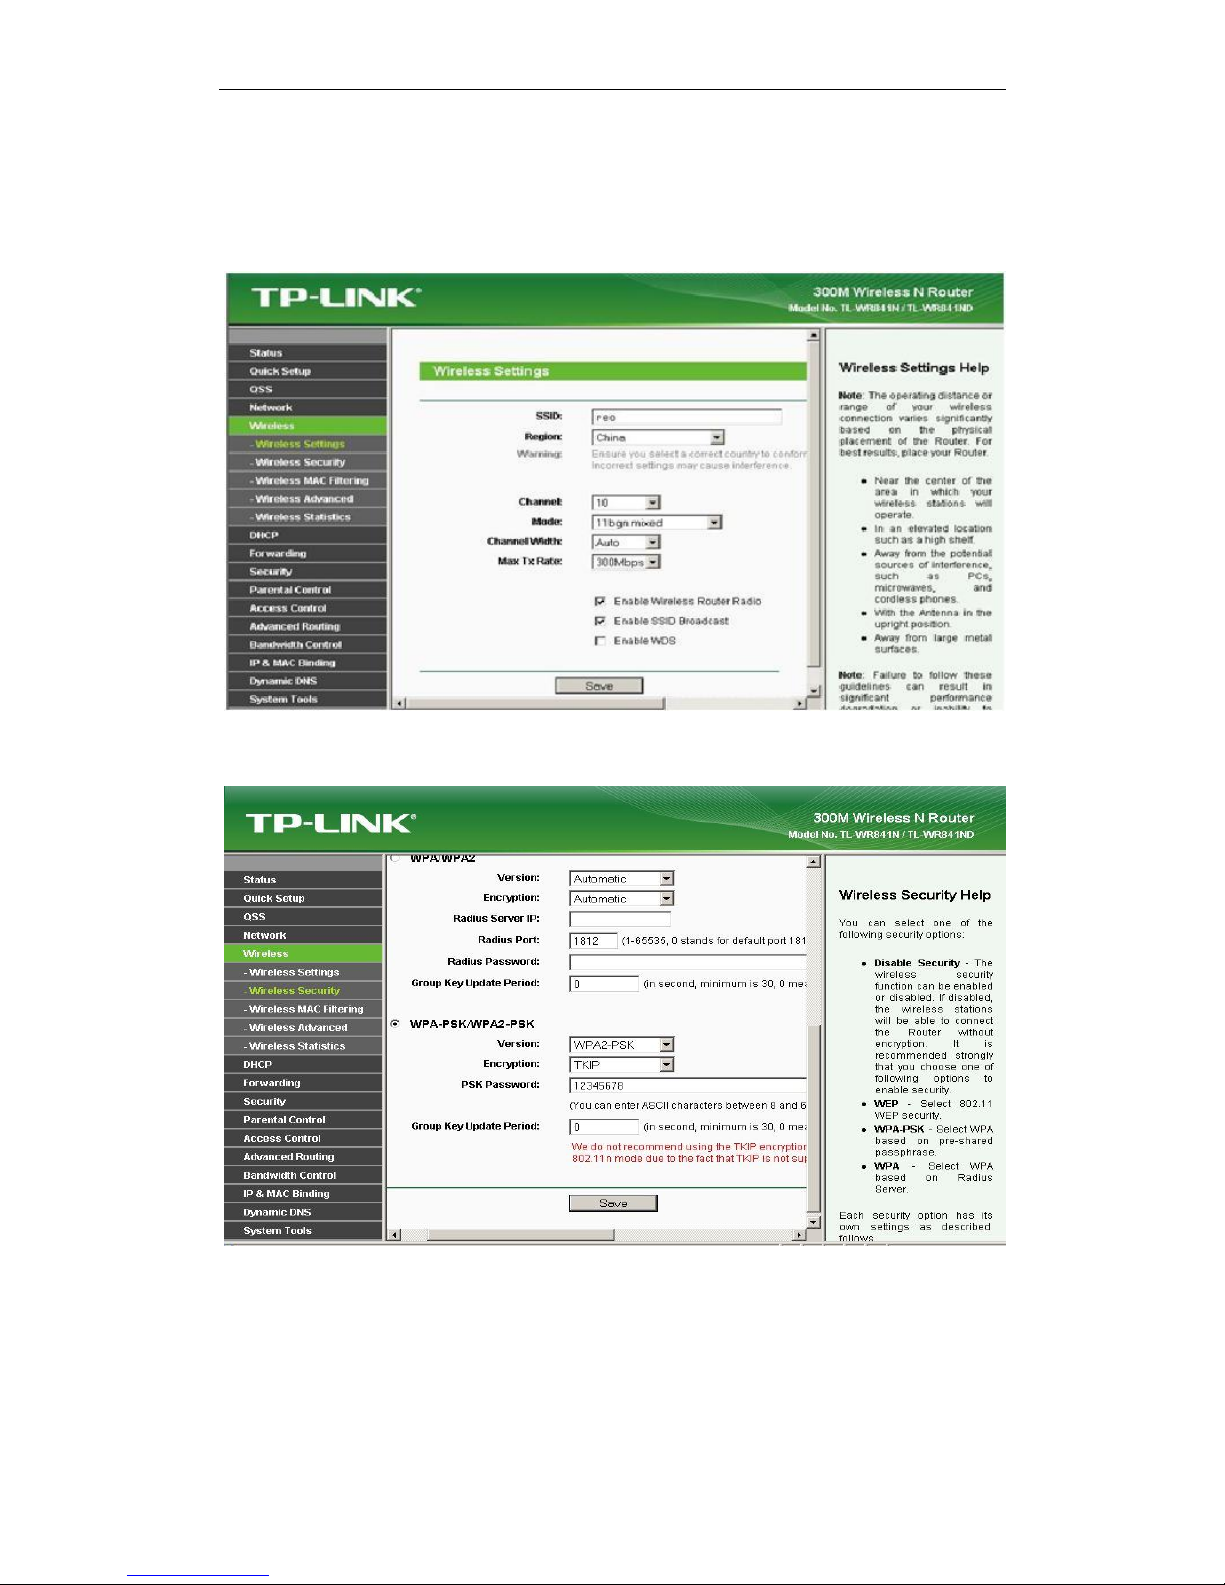
If the router that the IP camera connect has DHCP function, you can choice “Obain IP
from DHCP Server”else fill in the network parameters manually.
Http Port: In most cases, you can leave this value as 80, however, if your Internet
Service Provider blocks this port, you may switch to another port number such as 8999.
Page 27
IPCAM User Manual
27 / 67
Figure4.1
Wireless LAN Settings
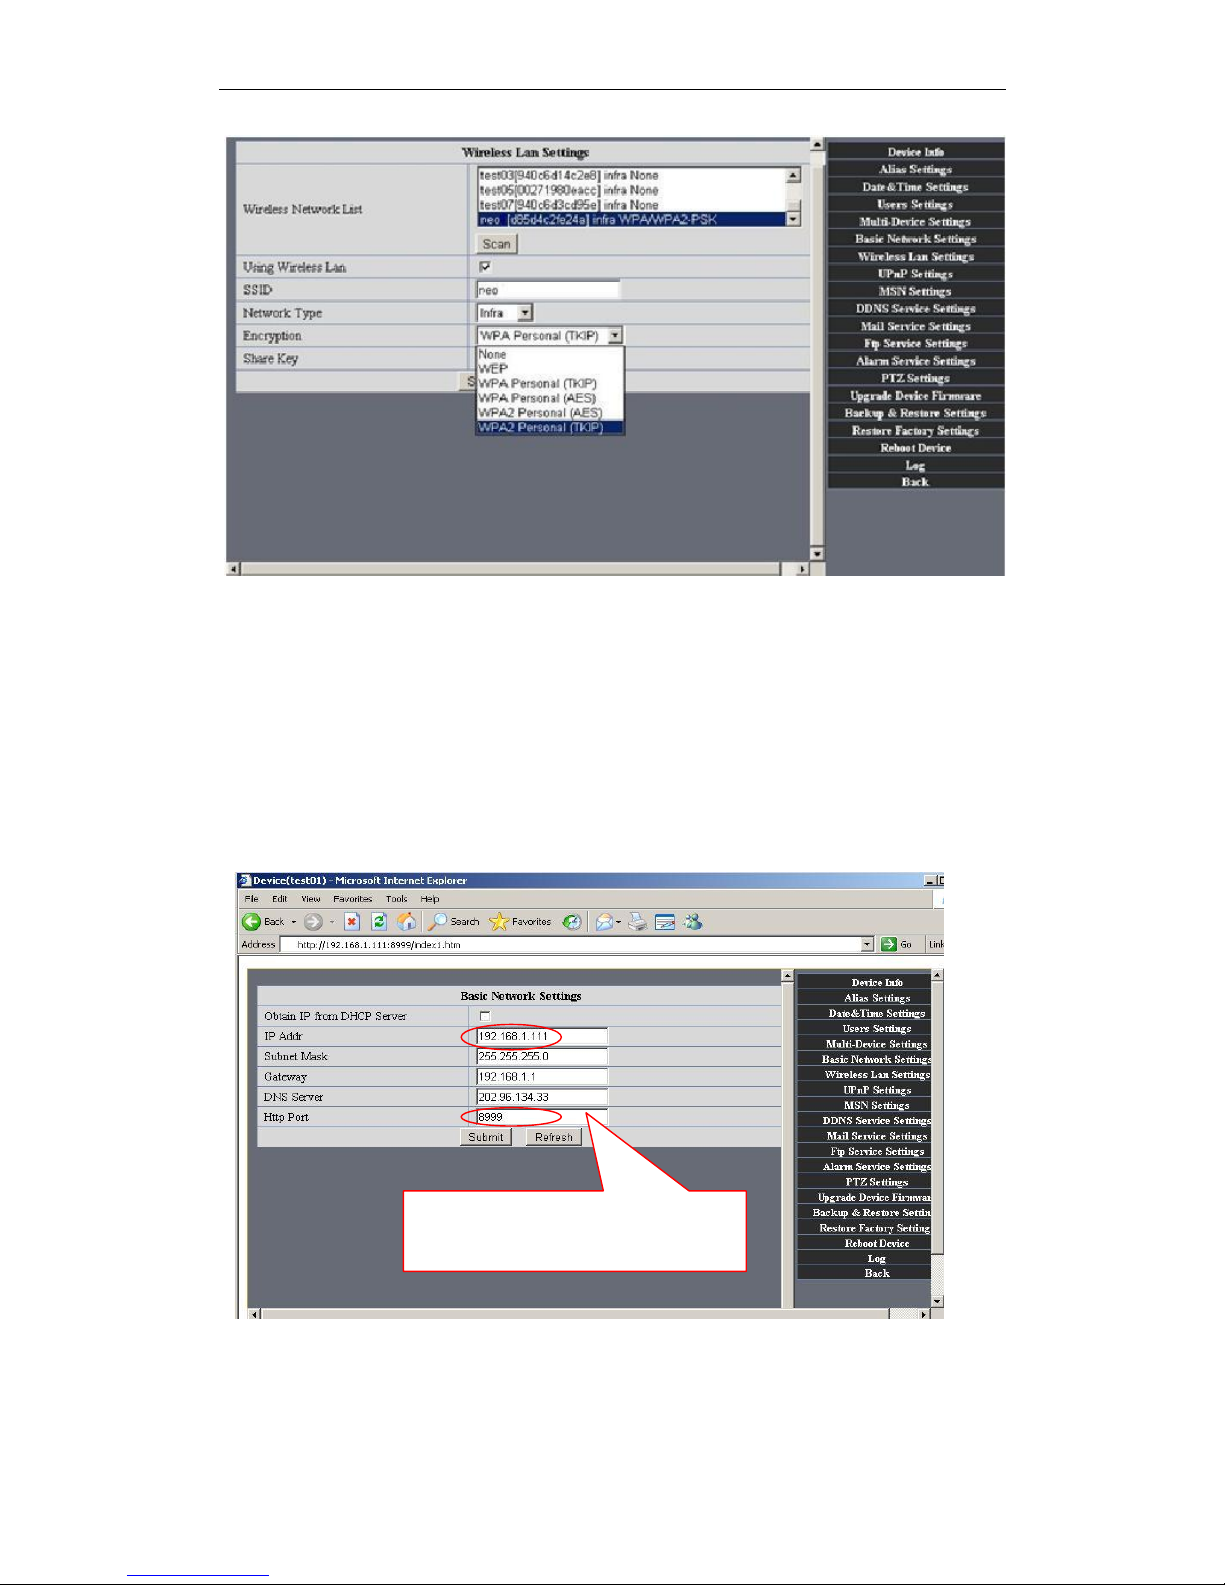
1) Please enter the wireless net setting page of the wireless Router to find out SSID,
Channel(less than 10), Encryption Authentication as below:
Figure 4.2
figure4.3
2) As Administrator to Login camera, open wireless LAN Settings page, fill in every
setting(ensure keep the same as router‟s ), and then pulled out of the cable, wireless
network function can be used. For example: as shown in figure4.4
Page 28
IPCAM User Manual
28 / 67
Figure4.4
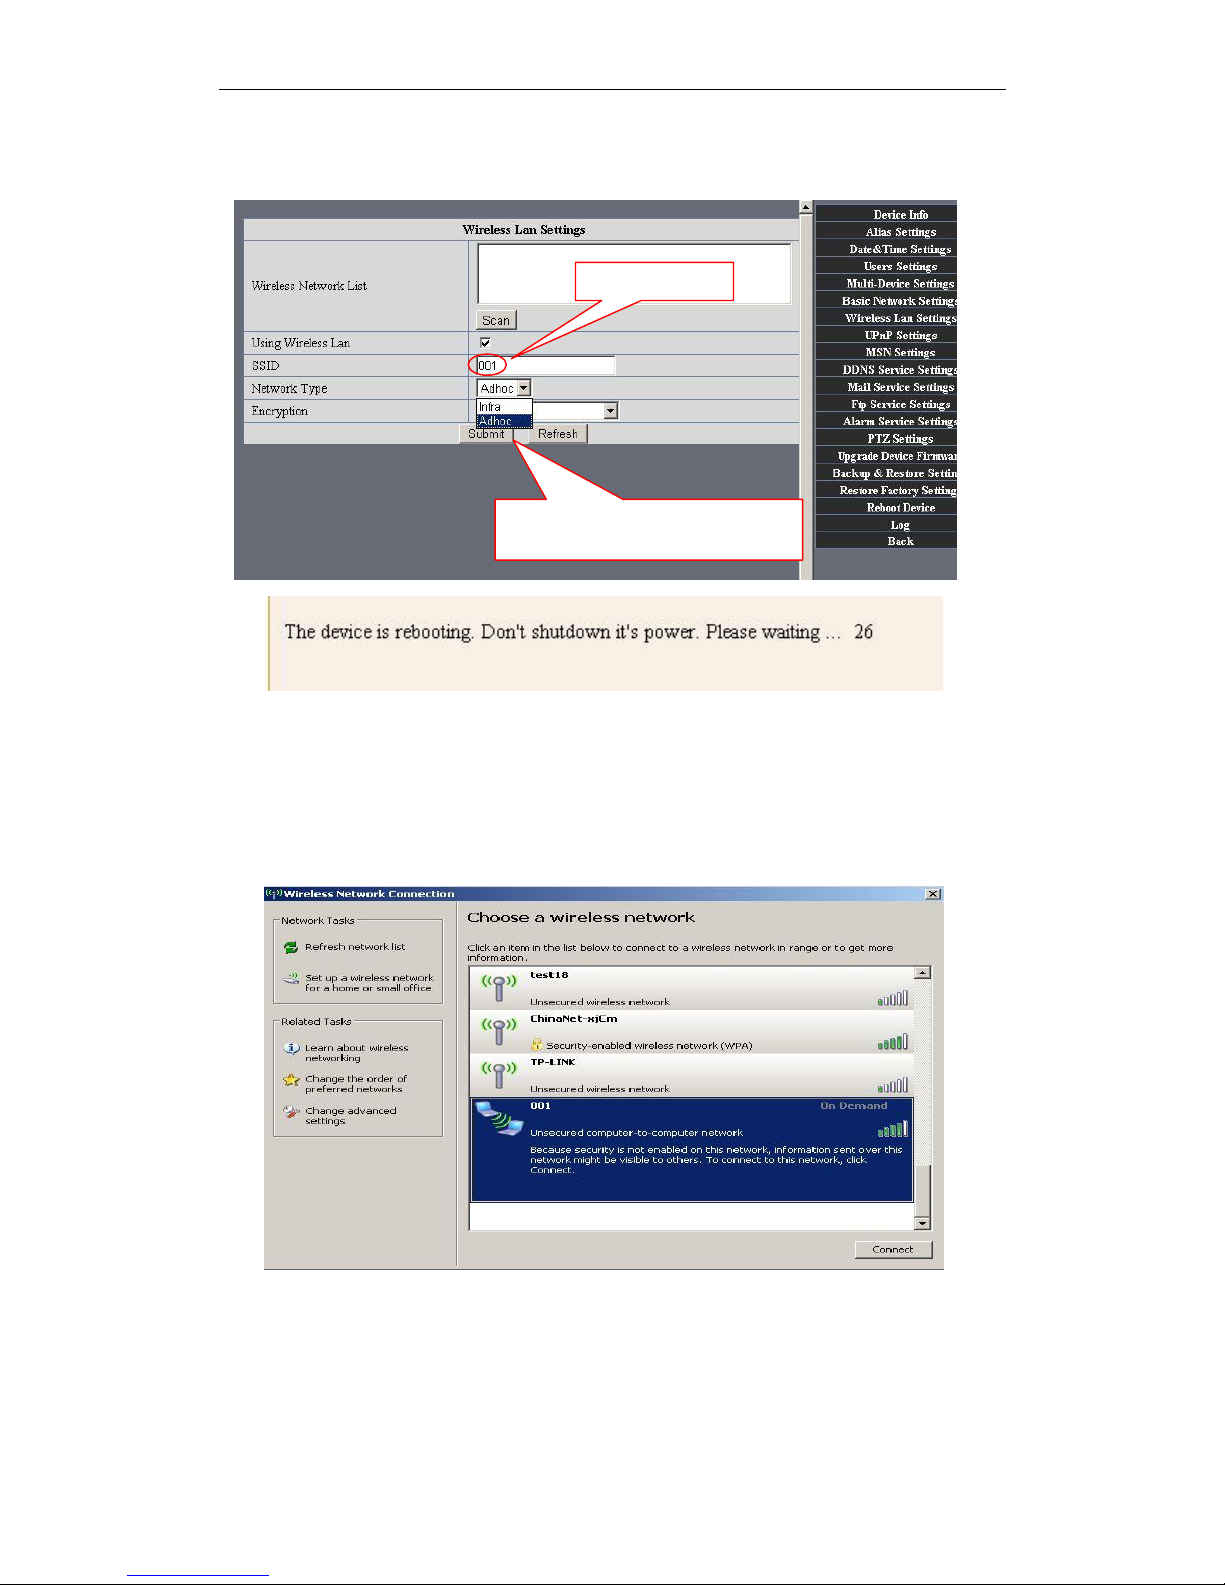
. Adhoc point to point Wireless connection Setting
1)Open the basic network setting interface,check the device status
Figure4.5
2)Open the wireless lan setting interface, choose Adhoc for network type, you
can define SSID such as 001
Please remember the Ip address
and Http Port of device.
Page 29
IPCAM User Manual
29 / 67
Figure4.6
3)Unplug the RJ45 from IP camera .Use laptop or other devices which are with
wifi function( include smart phone,ipad and so on) searching the SSID you defined
on proccess 2,then make a connection.
Figure4.7
Click wireless network and check the link status of ip camera.Please note IP
address of your connected laptop must be the subset of your ip camera .if not,
please reset the ip address of your laptop manually.
click submit,device will reboot
and save
alias setting
Page 30
IPCAM User Manual
30 / 67
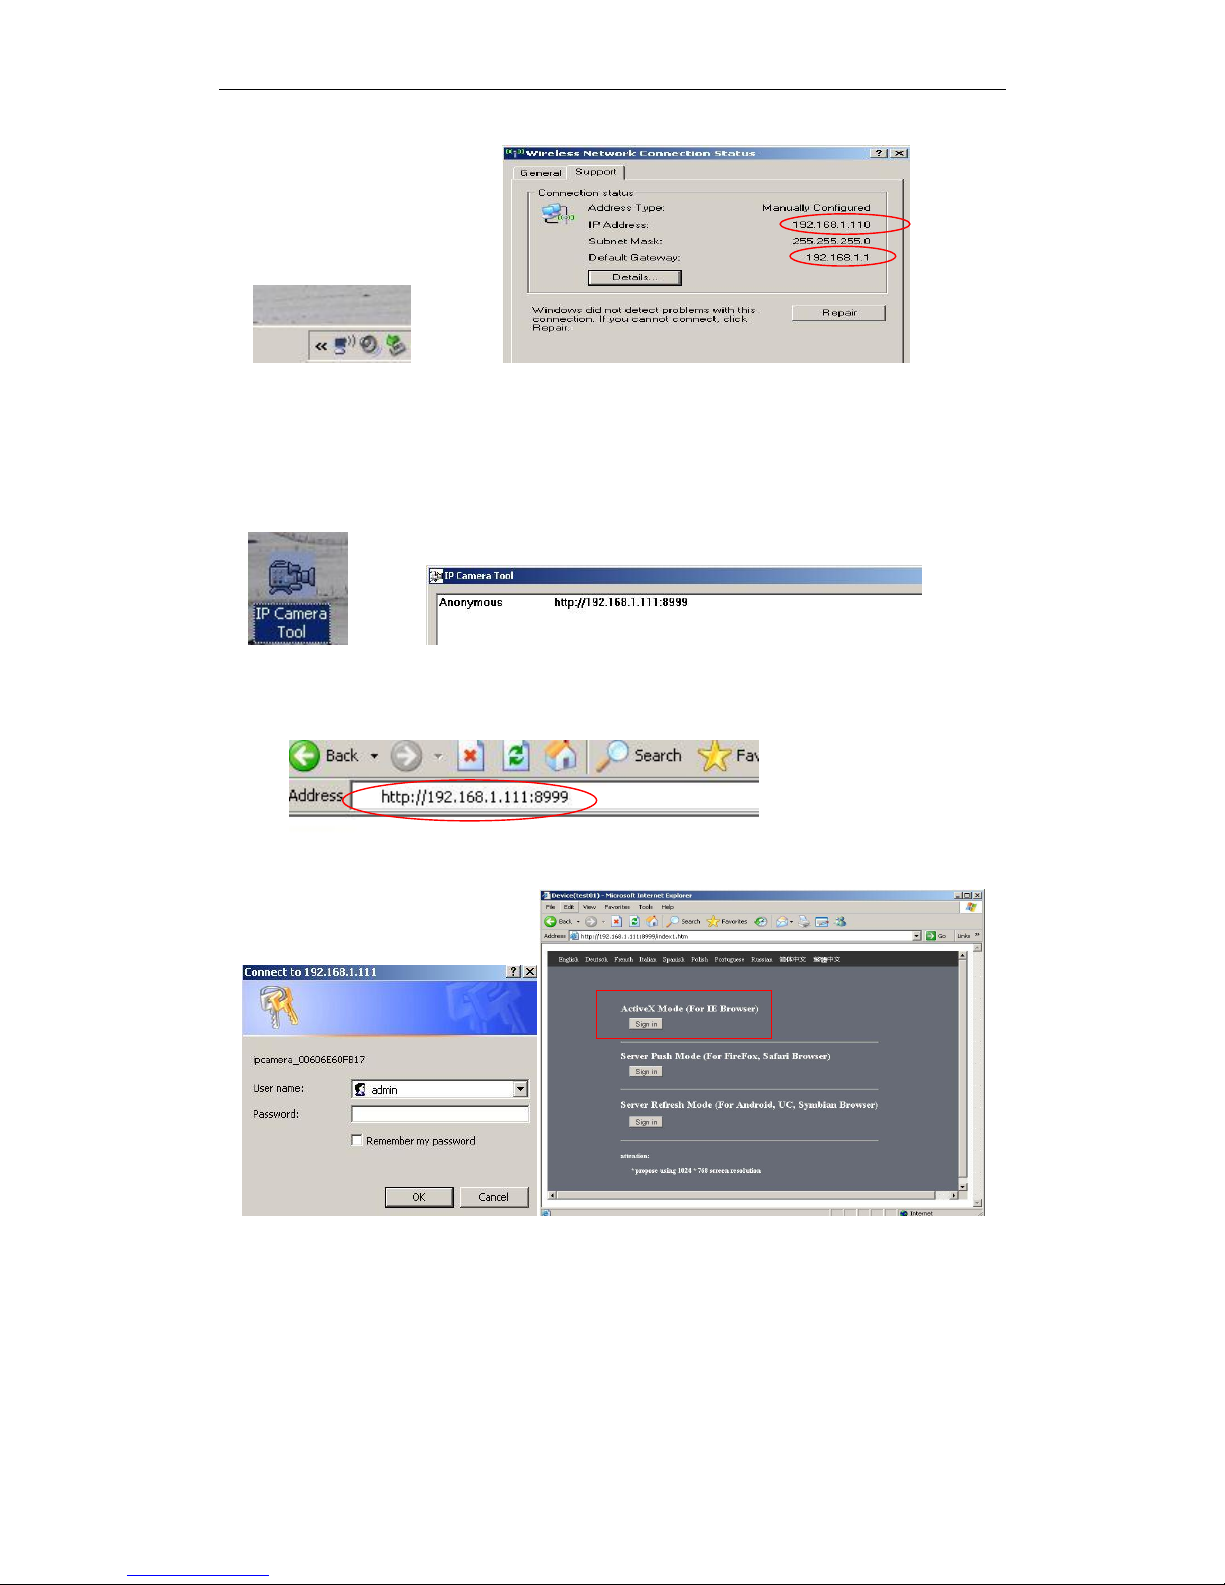
Figure4.8
4)Now we can use the ip camera tool or enter ip address of camera derectly in
browser blank to visit
1. visit by ip camera tool :
.
Figure4.9
2. Visit by ip address:
Enter user name and password in the login interface
Figure5.0
Click login to visit device .Scheme as bellow
Page 31
IPCAM User Manual
31 / 67
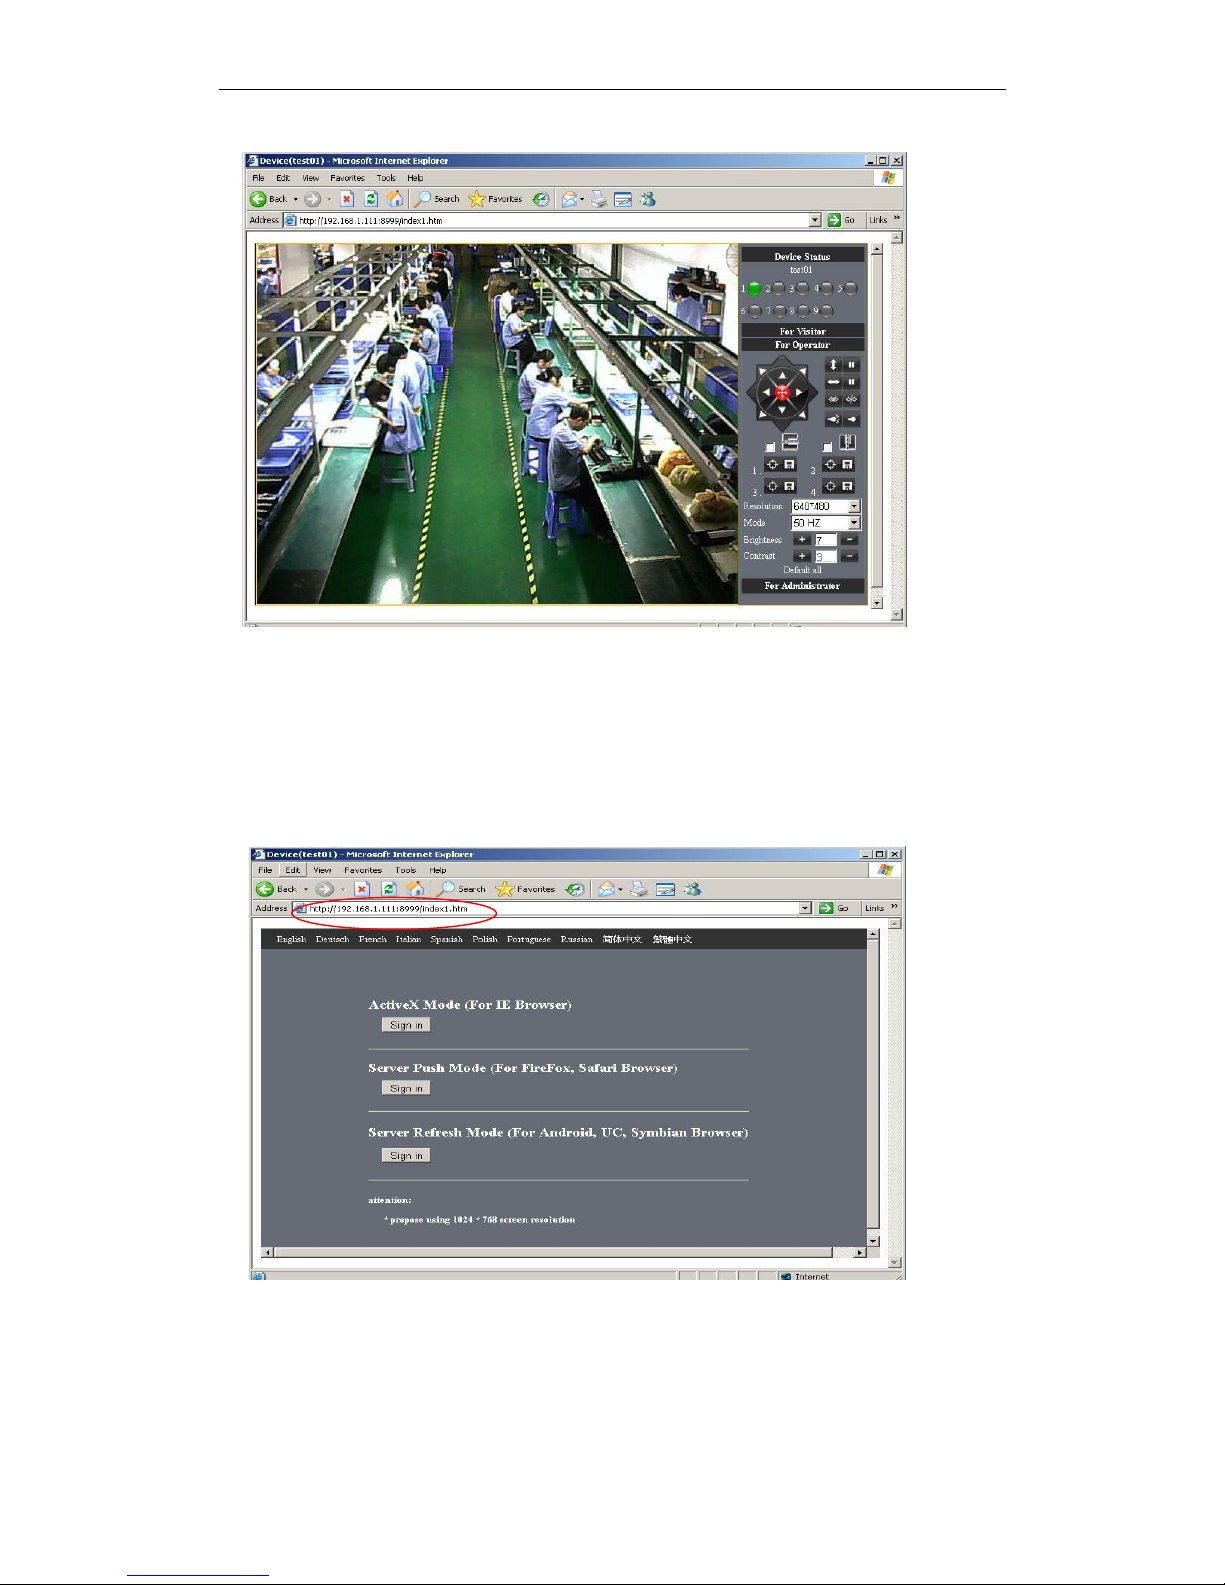
Figure5.1
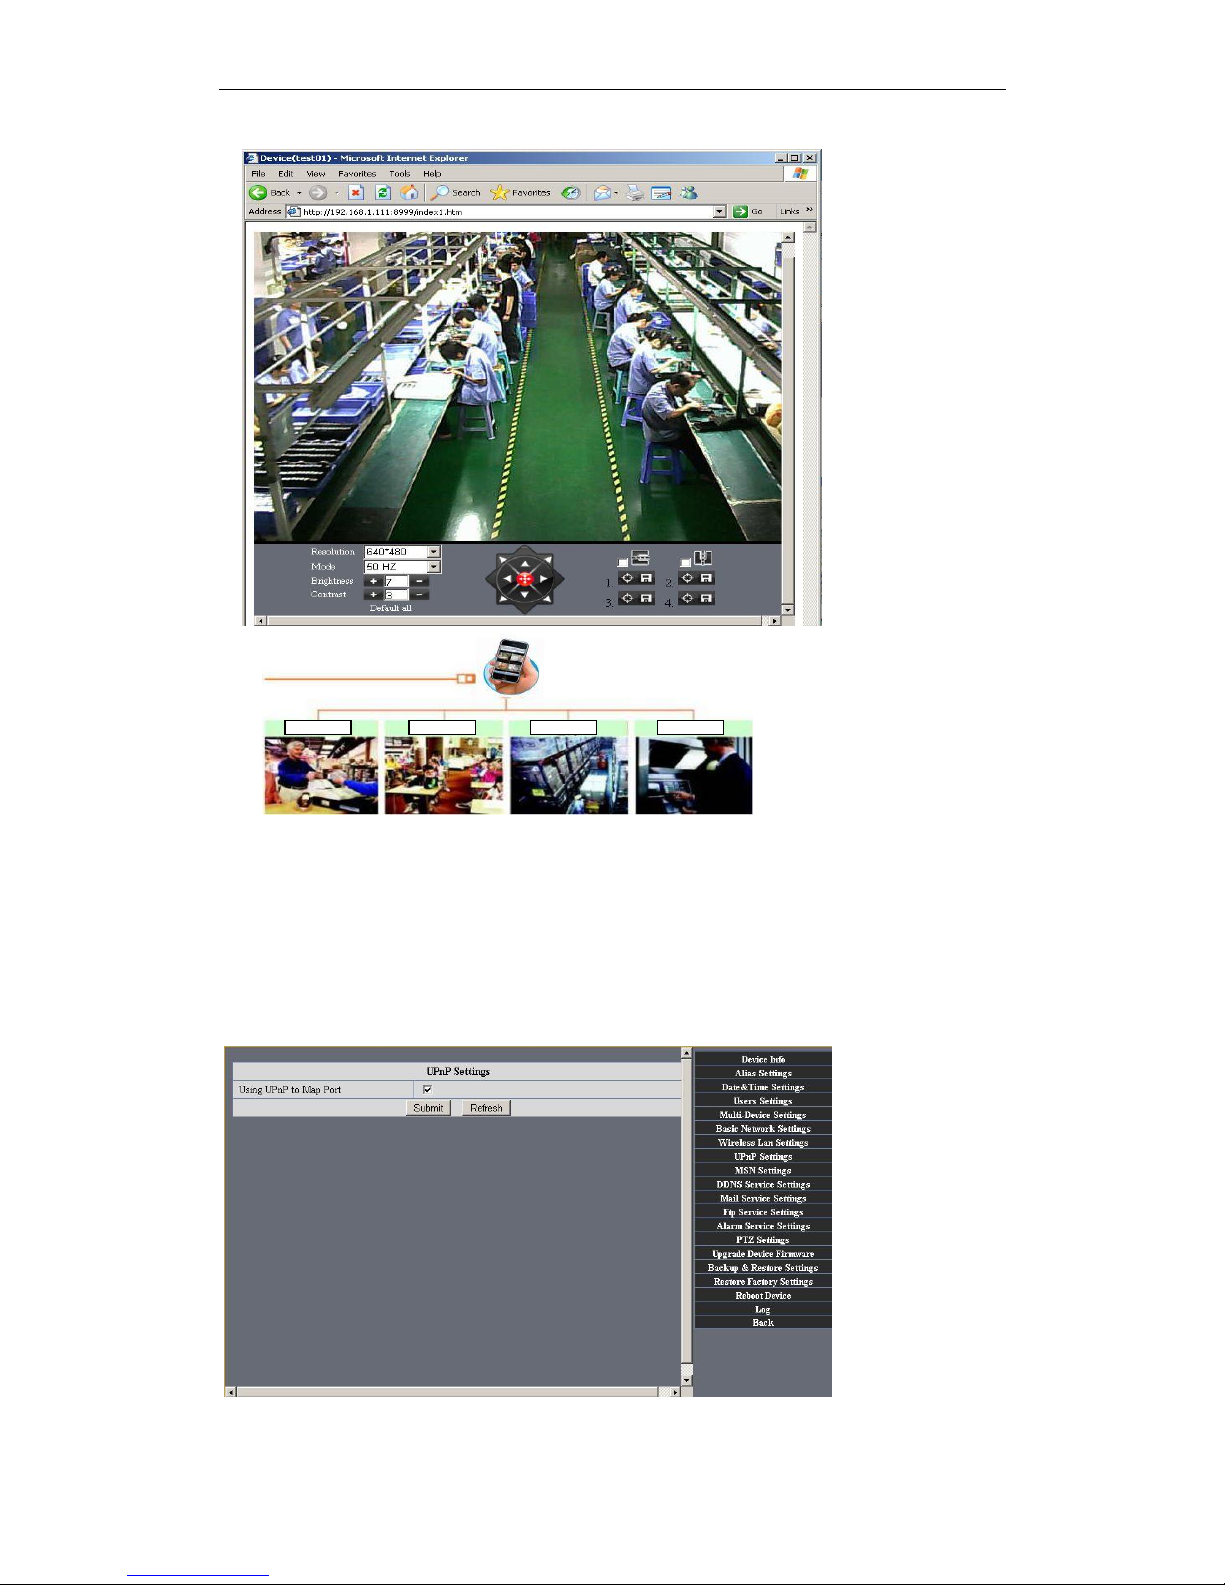
mobile phone ,ipad or other wireless device can also visit by entering the ip
address of camera in browser blank
·Enter ip address in the browser
Figure5.2
·Enter user name and password in the login interface
·Click “Sign in”and visit
Page 32
IPCAM User Manual
32 / 67
Figure 5.3
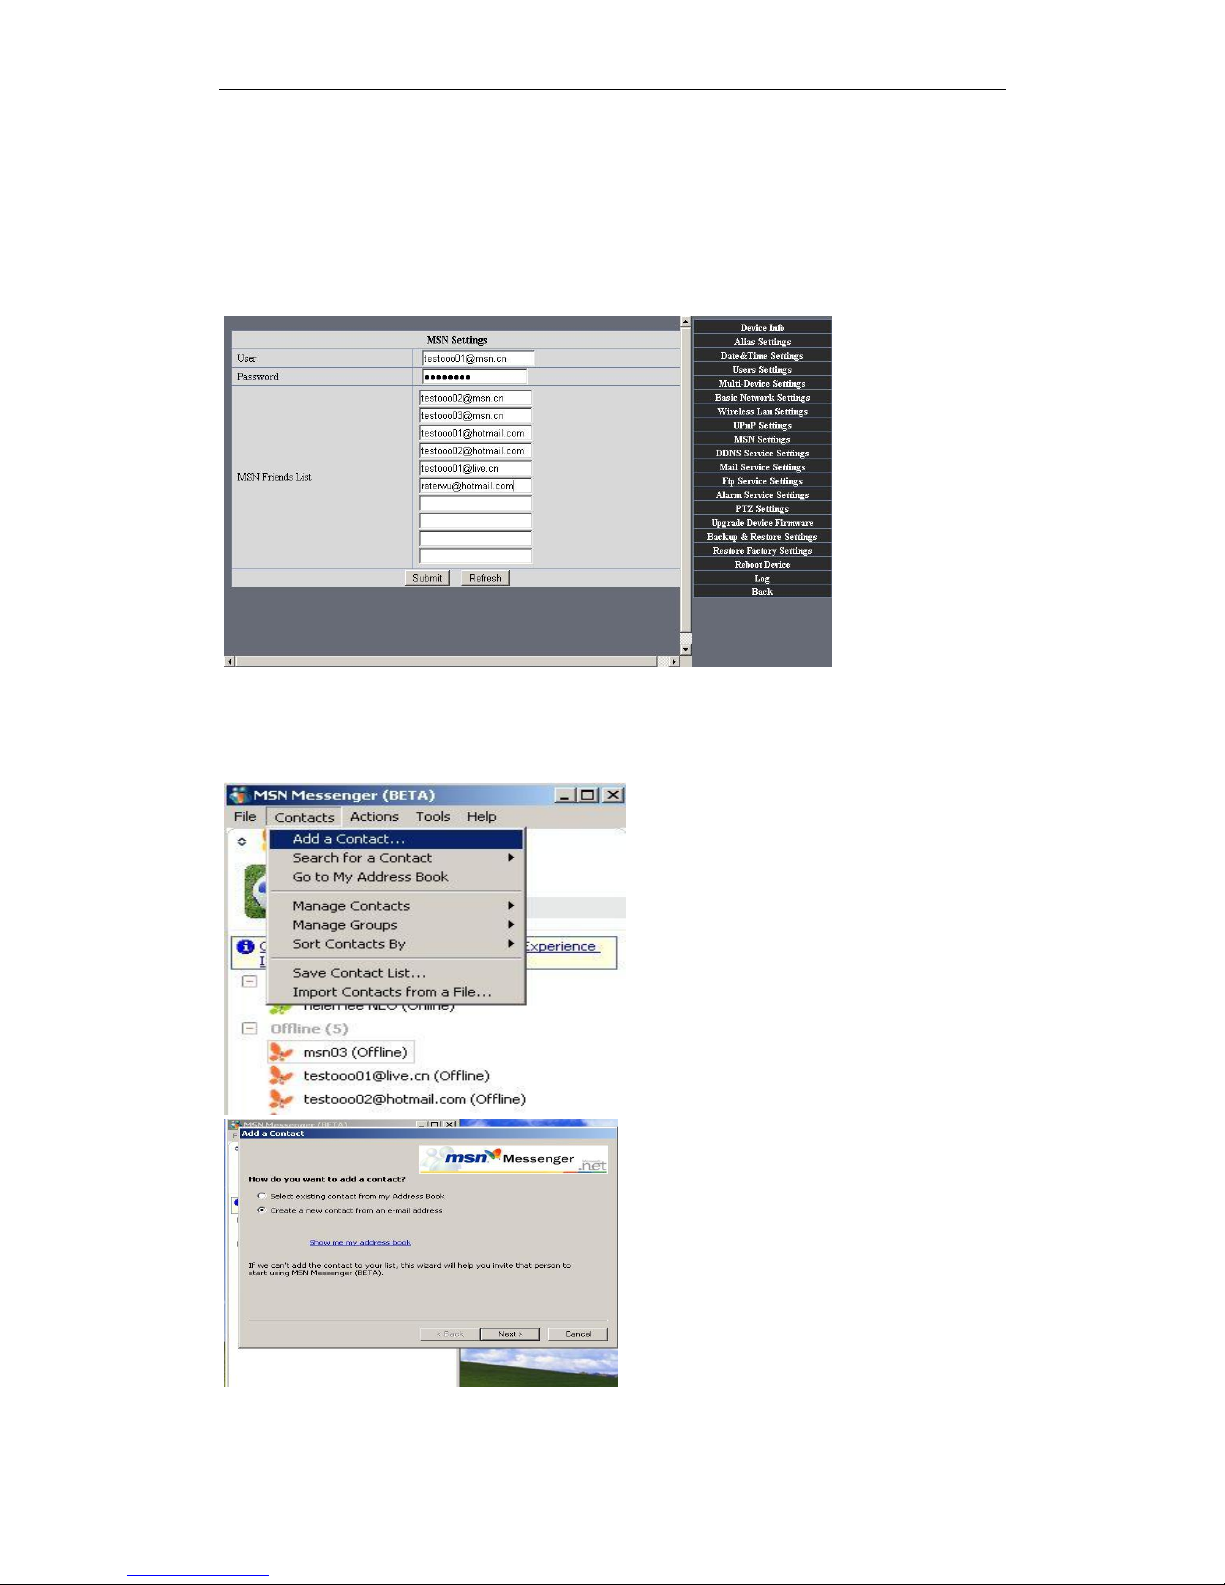
3.5.3 UpnP and MSN settings
1) UpnP setting:
If you wanna browse by Internet,you have to use UpnP to Map Port,check this function
then click Submit button.
Figure 5.4
Page 33
IPCAM User Manual
33 / 67
2) MSN Settings
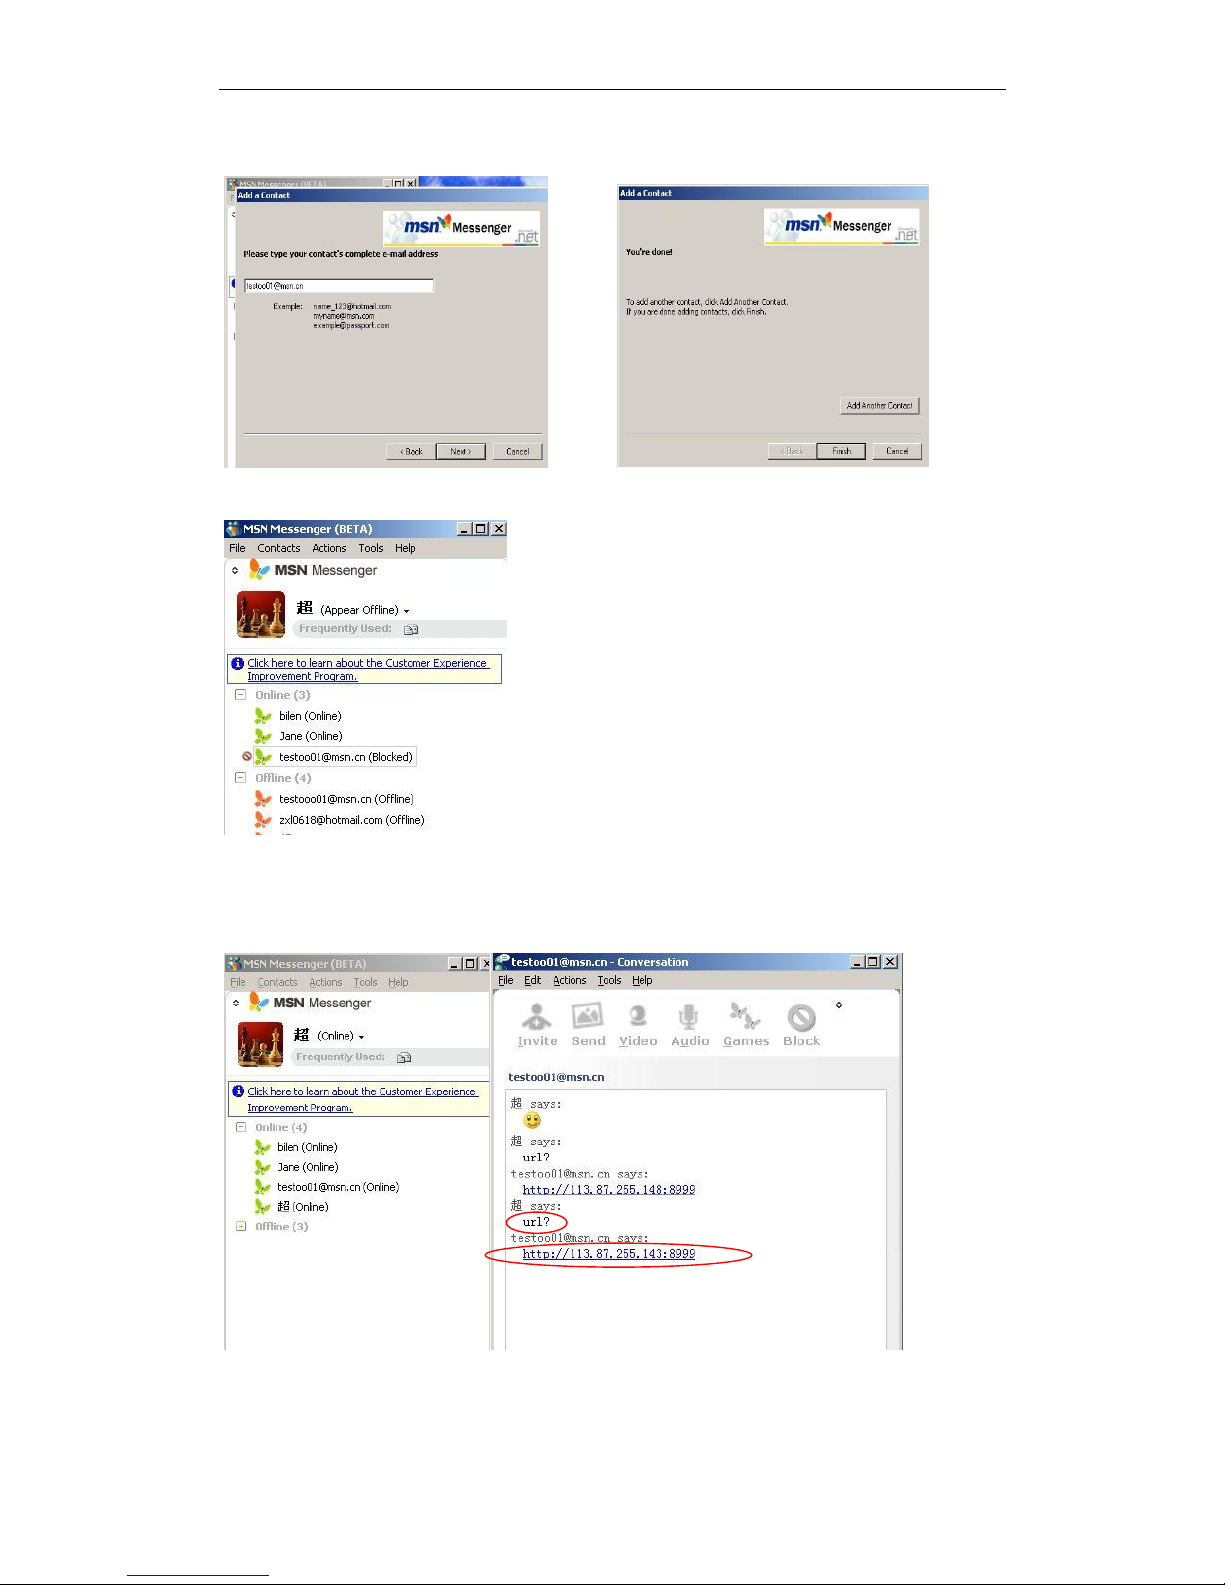
Fill in your MSN account and password, then add account which need to receive
IPCAM‟S ip address to IPCAM‟S MSN list (Figure 4.6),click submit then you‟d better
restart IP camera. After it ,login your MSN to add IPCAM‟s MSN account to MSN List that
you can receive IPCAM‟s ip address.
Figure5.5
First login and click "add contacts " choose Add Contact ,then fill IPCAM‟s MSN account
in "instant messaging address" ,click next then send offers.
Figure5.6
Page 34
IPCAM User Manual
34 / 67
Next:
Figure5.7
. Figure5.8
When IPCAM‟s MSN account shows online you can chat with it, input path command
"url?" camera account will show its IP address in chatting box promptly as below :
Figure5.9
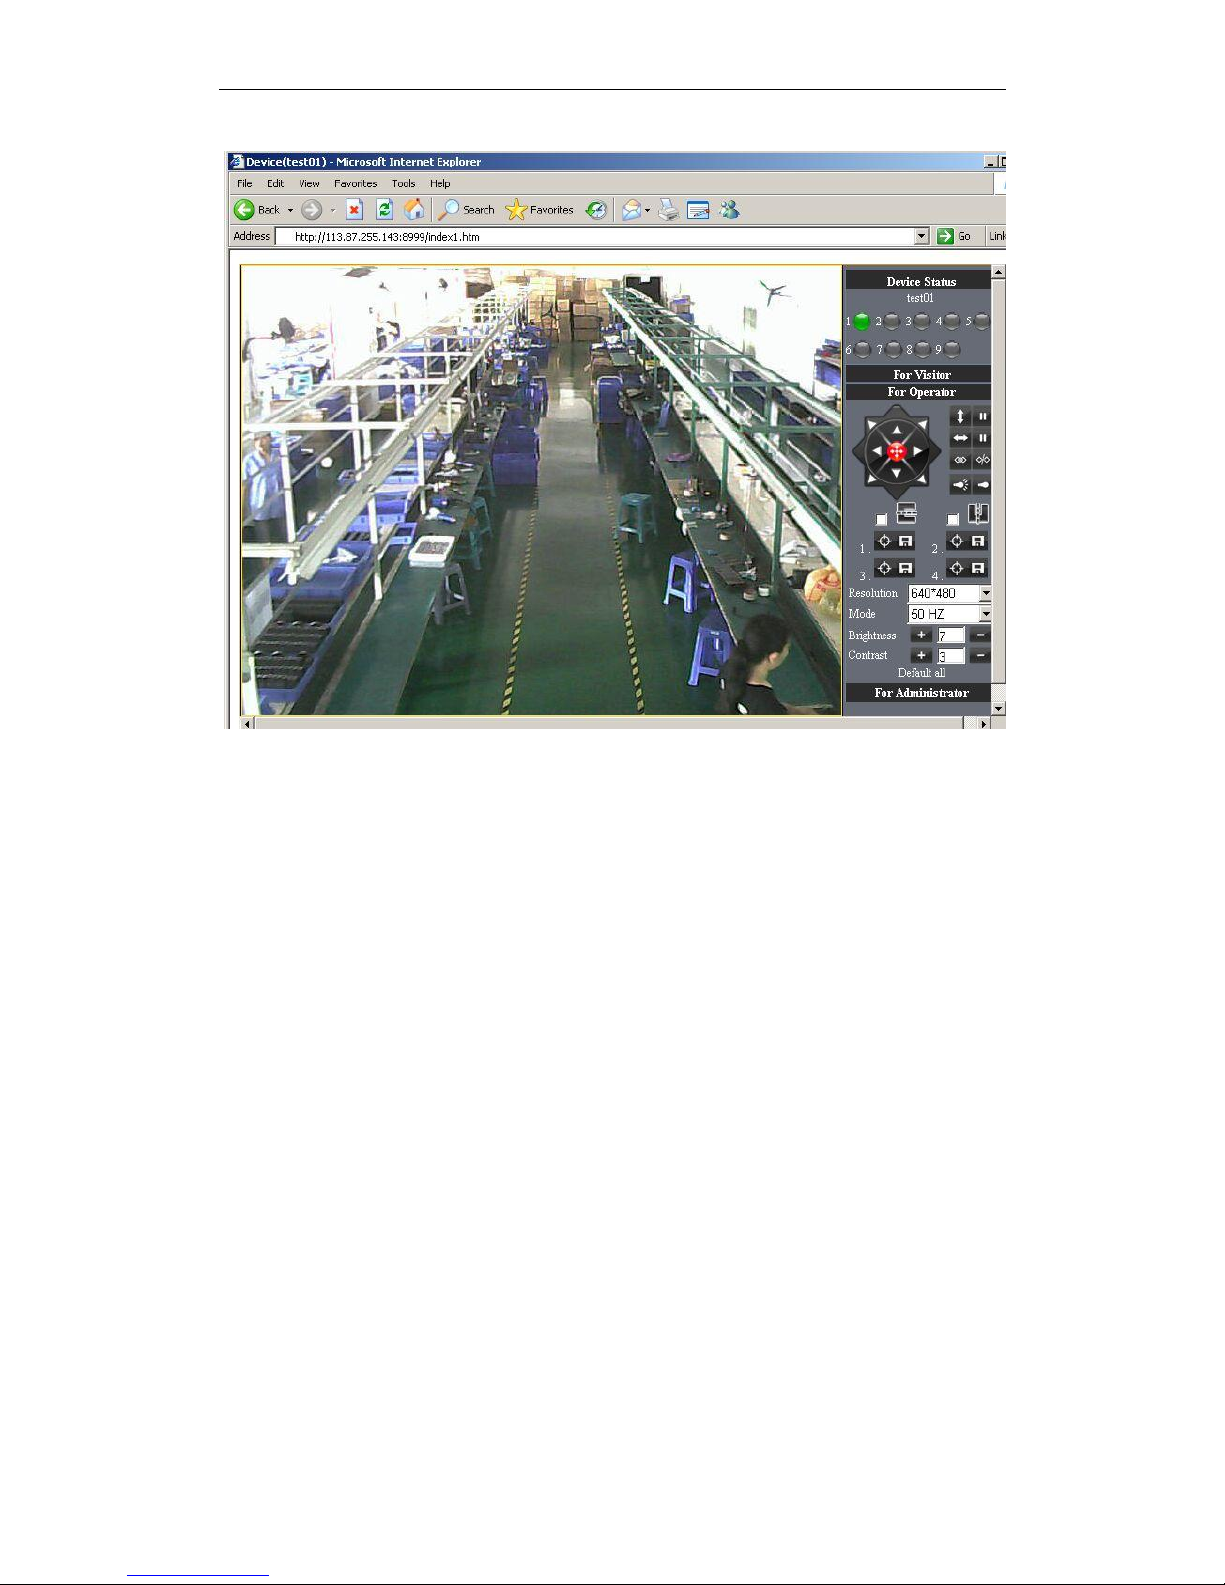
You can input the IP address to browser then can browse ip camera as below:
Page 35
IPCAM User Manual
35 / 67
Figure 6.0
Attention:You should fill MSN account in IPCAM first.
3.5.4 DDNS Service Settings
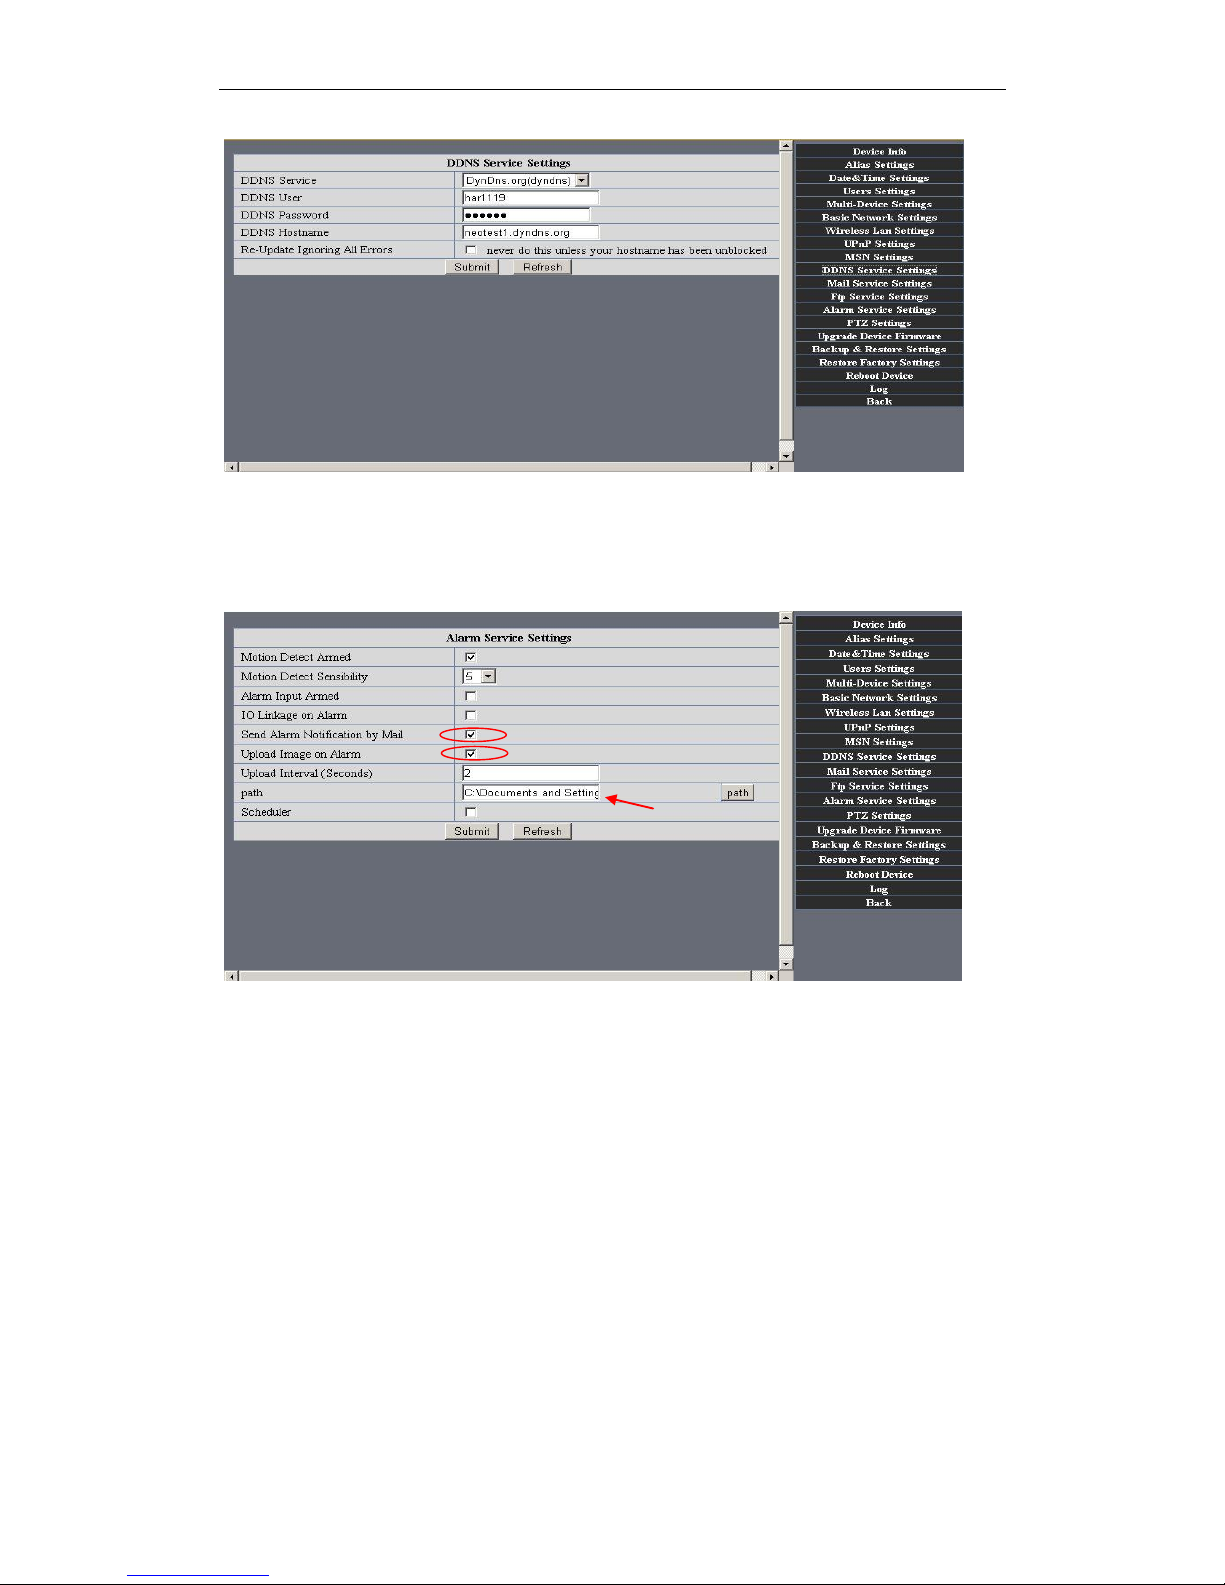
DDNS Service: The system supports protocols from some DDNS providers: Dyndns.org.
User and Password: the user name and password used when applying for the domain
name. (details:4.5)
DDNS Host: the Domain Name
DDNS or Proxy Server: If you access the DDNS host through a proxy, you should input
the Proxy IP.
DDNS or Proxy Port: Proxy Port
Page 36
IPCAM User Manual
36 / 67
Figure 6.1
3.5.5 Mail and FTP Service
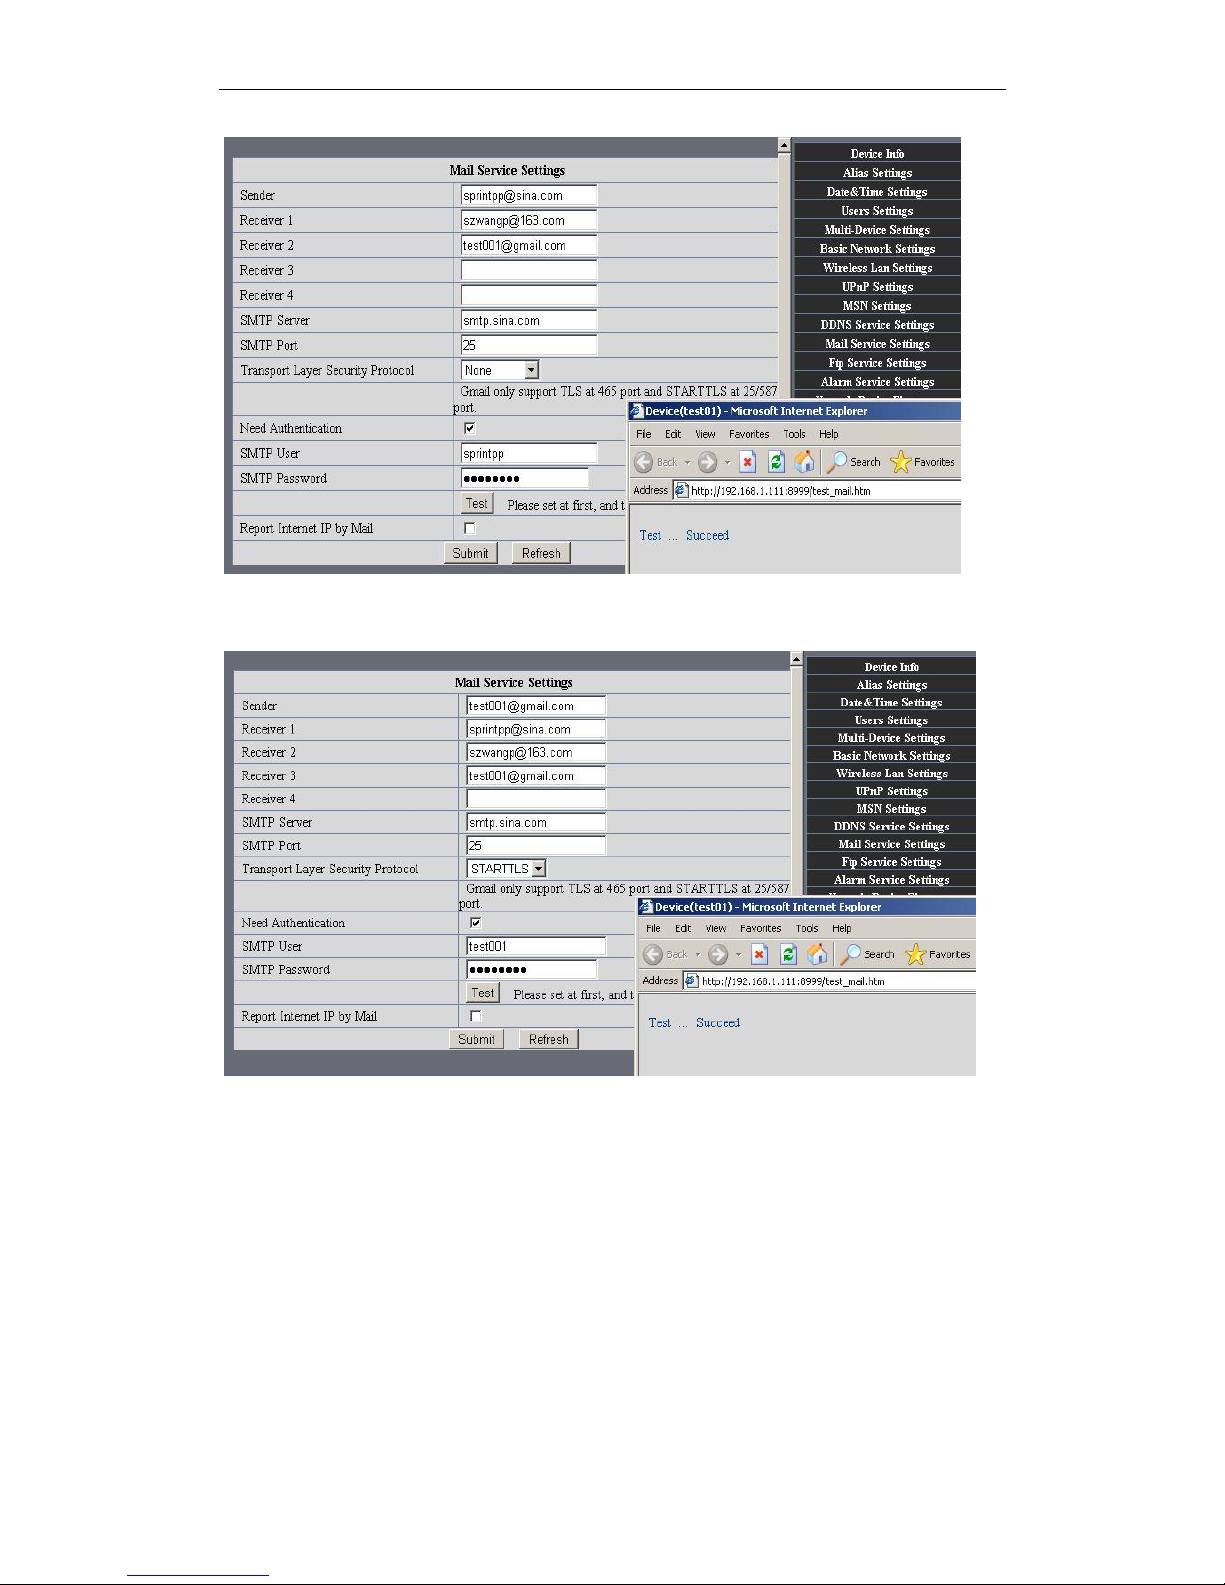
Note: When Alarm Service Settings-> Send Mail on Alarm is check, the Mail
Service takes effect.
Figure 6.2
Configure the E-mail box to receive and send mails. The E-mail box is used for receiving
the images sent after alarm and the system IP address after successful dial-up.
Sender: This device use the sender mailbox to send mails.
Receiver: To receive the mail from the Sender. You can set up to 4 receiver mailbox.
SMTP Server: the SMTP server for the sender mailbox
Need Authentication: if the sender mailbox need authentication, you should
check it then input the SMTP username & Password.
Mail test: Please set the Mail parameter and click "Submit" first. There are Mail test
result.
Page 37
IPCAM User Manual
37 / 67
Figure 6.3
Gmail also set as the same:
Figure6.4
1 Can not connect to the server
2 Network Error. Please try later
3 Server Error
4 Incorrect user or password
5 The sender is denied by the server. Maybe the server need to authenticate the user,
please check it and try again。
6 The receiver is denied by the server. Maybe because of the anti-spam privacy of the
server
Page 38
IPCAM User Manual
38 / 67
7 The message is denied by the server. Maybe because of the anti-spam privacy of the
server
8 The server does not support the authentication mode used by the device
Report Internet IP by Mail: When ipcam port or Internet IP changed, it will send the
internet IP by mail.(for example: IPCAM 's url is http://119.123.207.96:9002). Make sure
the port is map to the router correctly by UPNP or Virtual Map function.
2)FTP Server use and settings
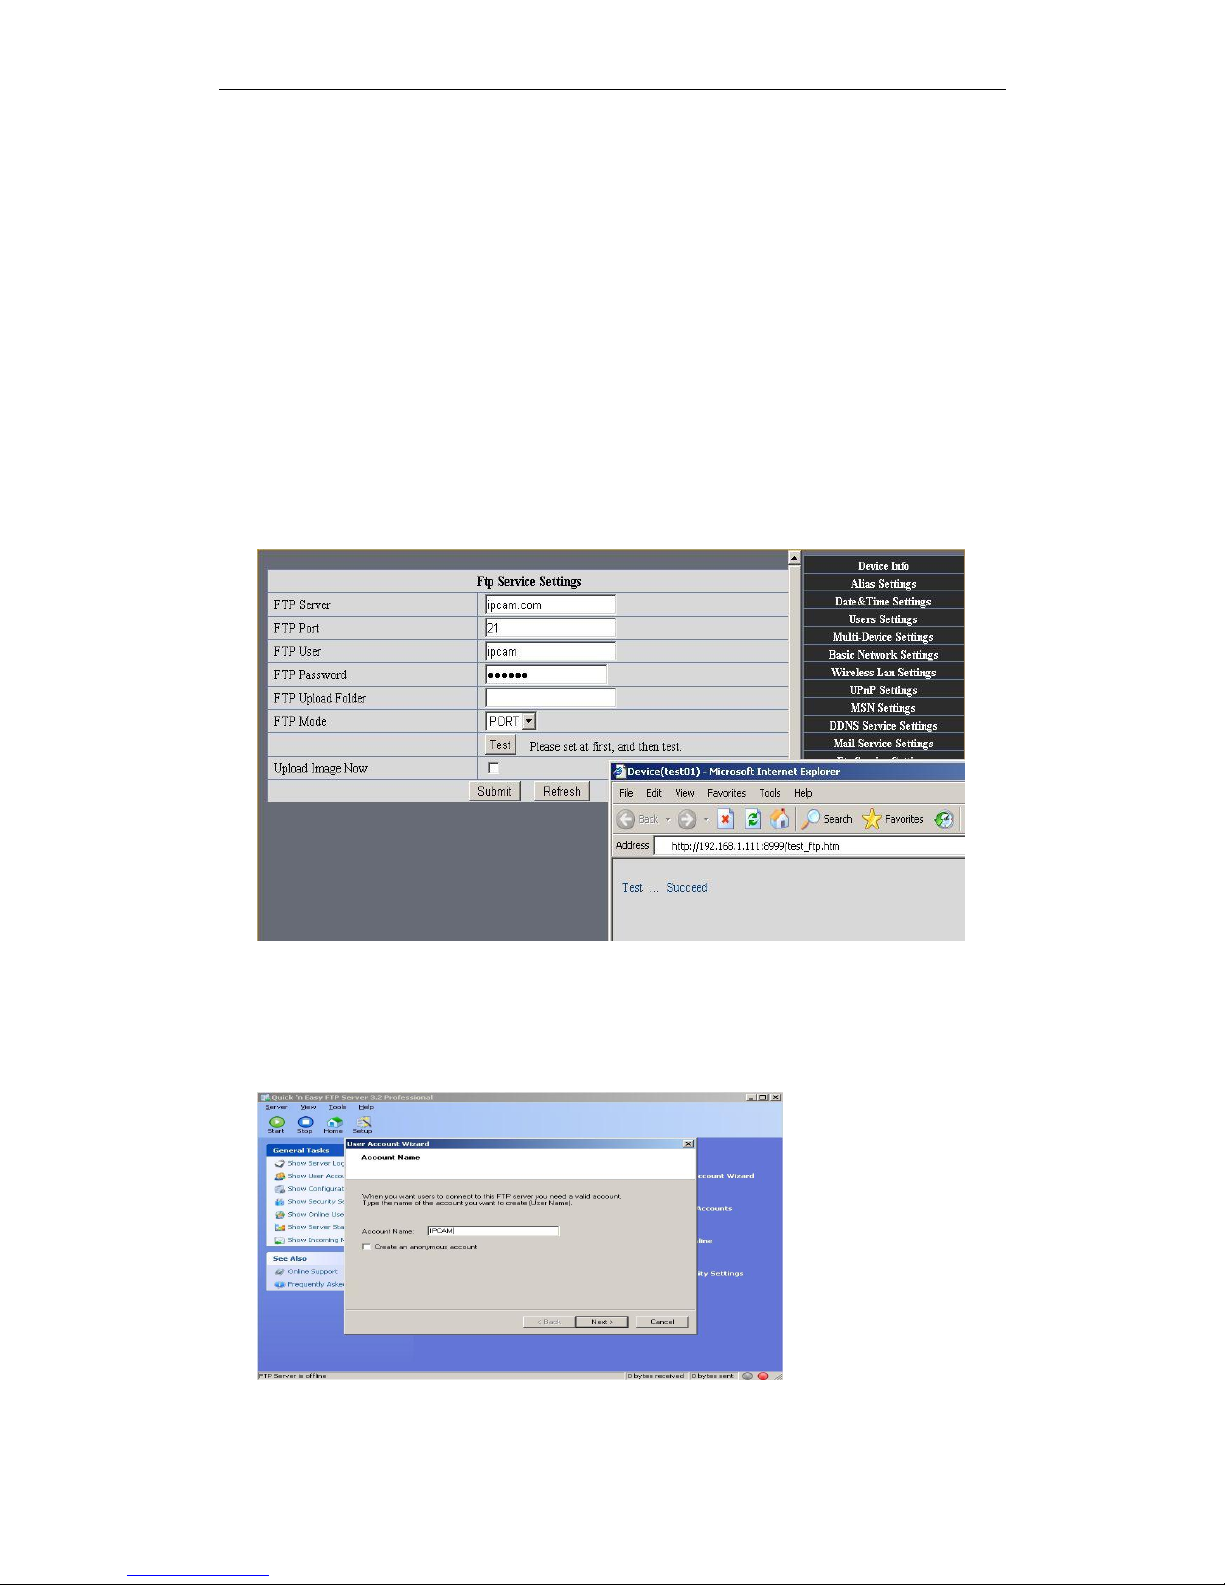
If you already have an FTP Server (ipcam. com)and email ipcam ,you can fill the
parameters as below:
Figure 6.5
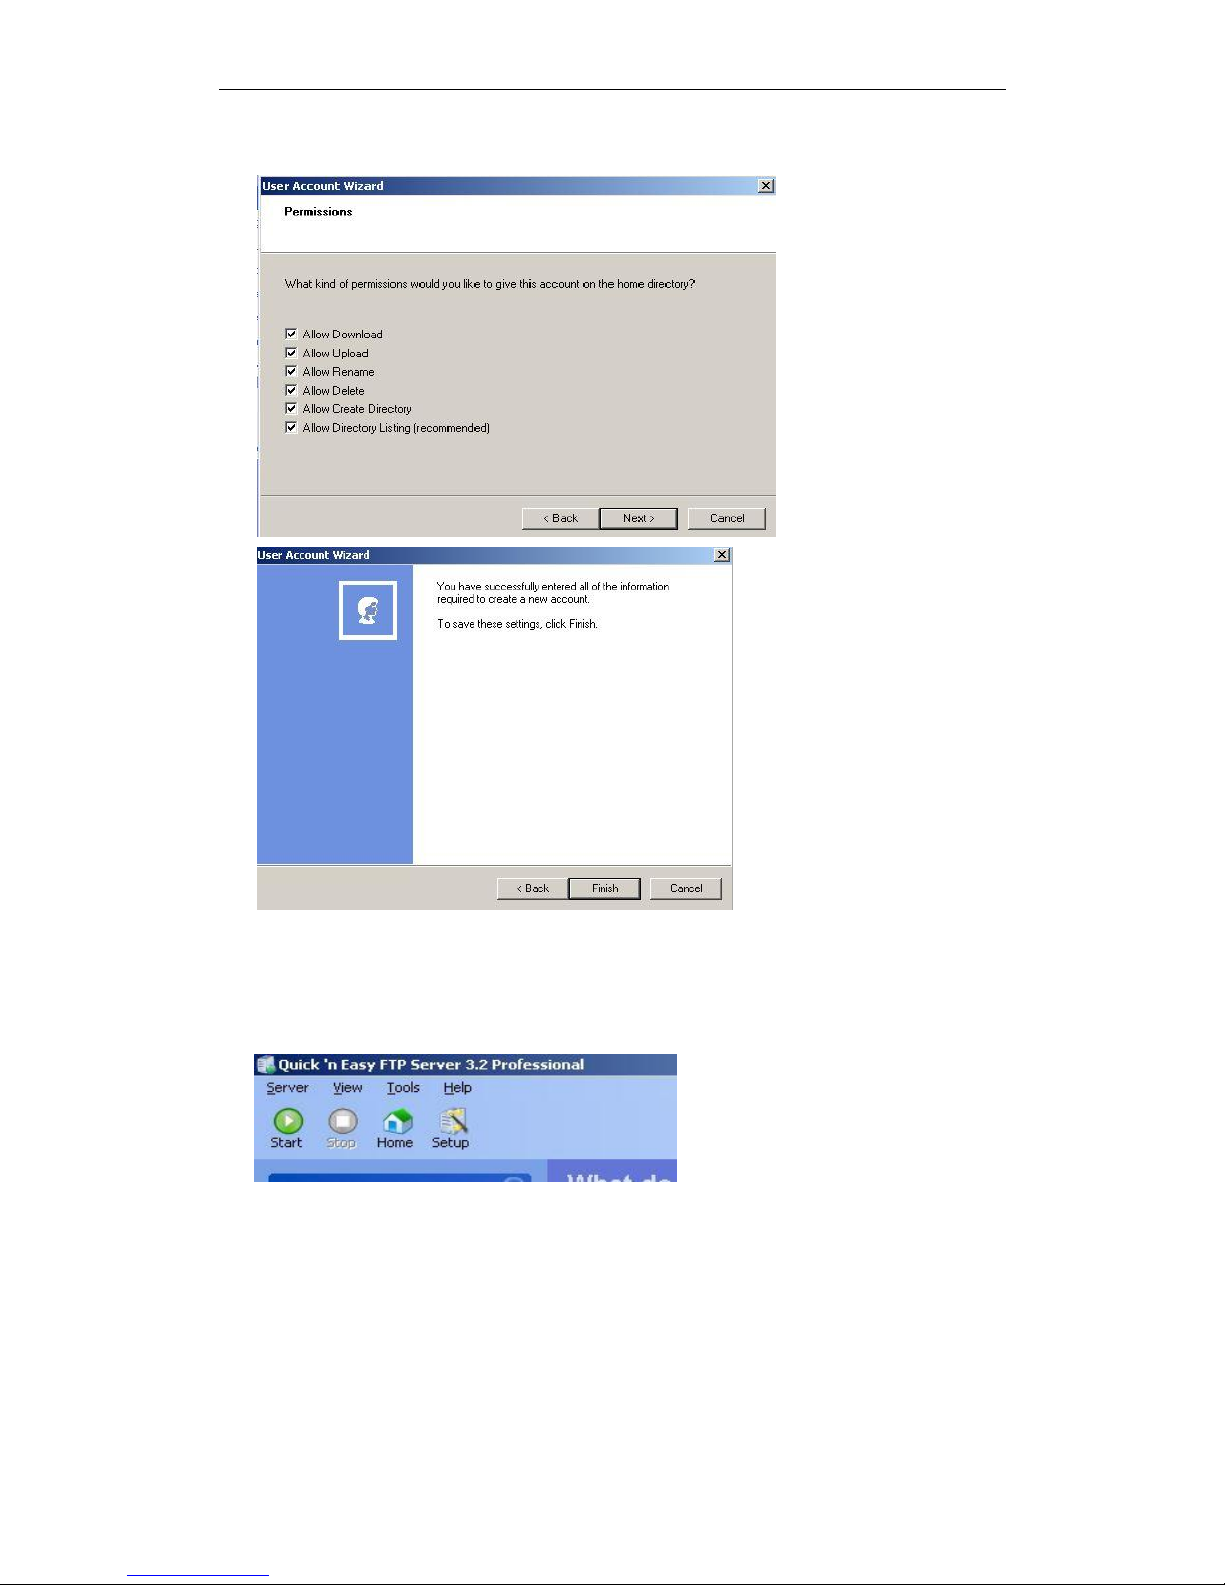
FTP Server of LAN as below:
1. Creat an account
Figure 6.6
ftp.htm
Page 39
IPCAM User Manual
39 / 67
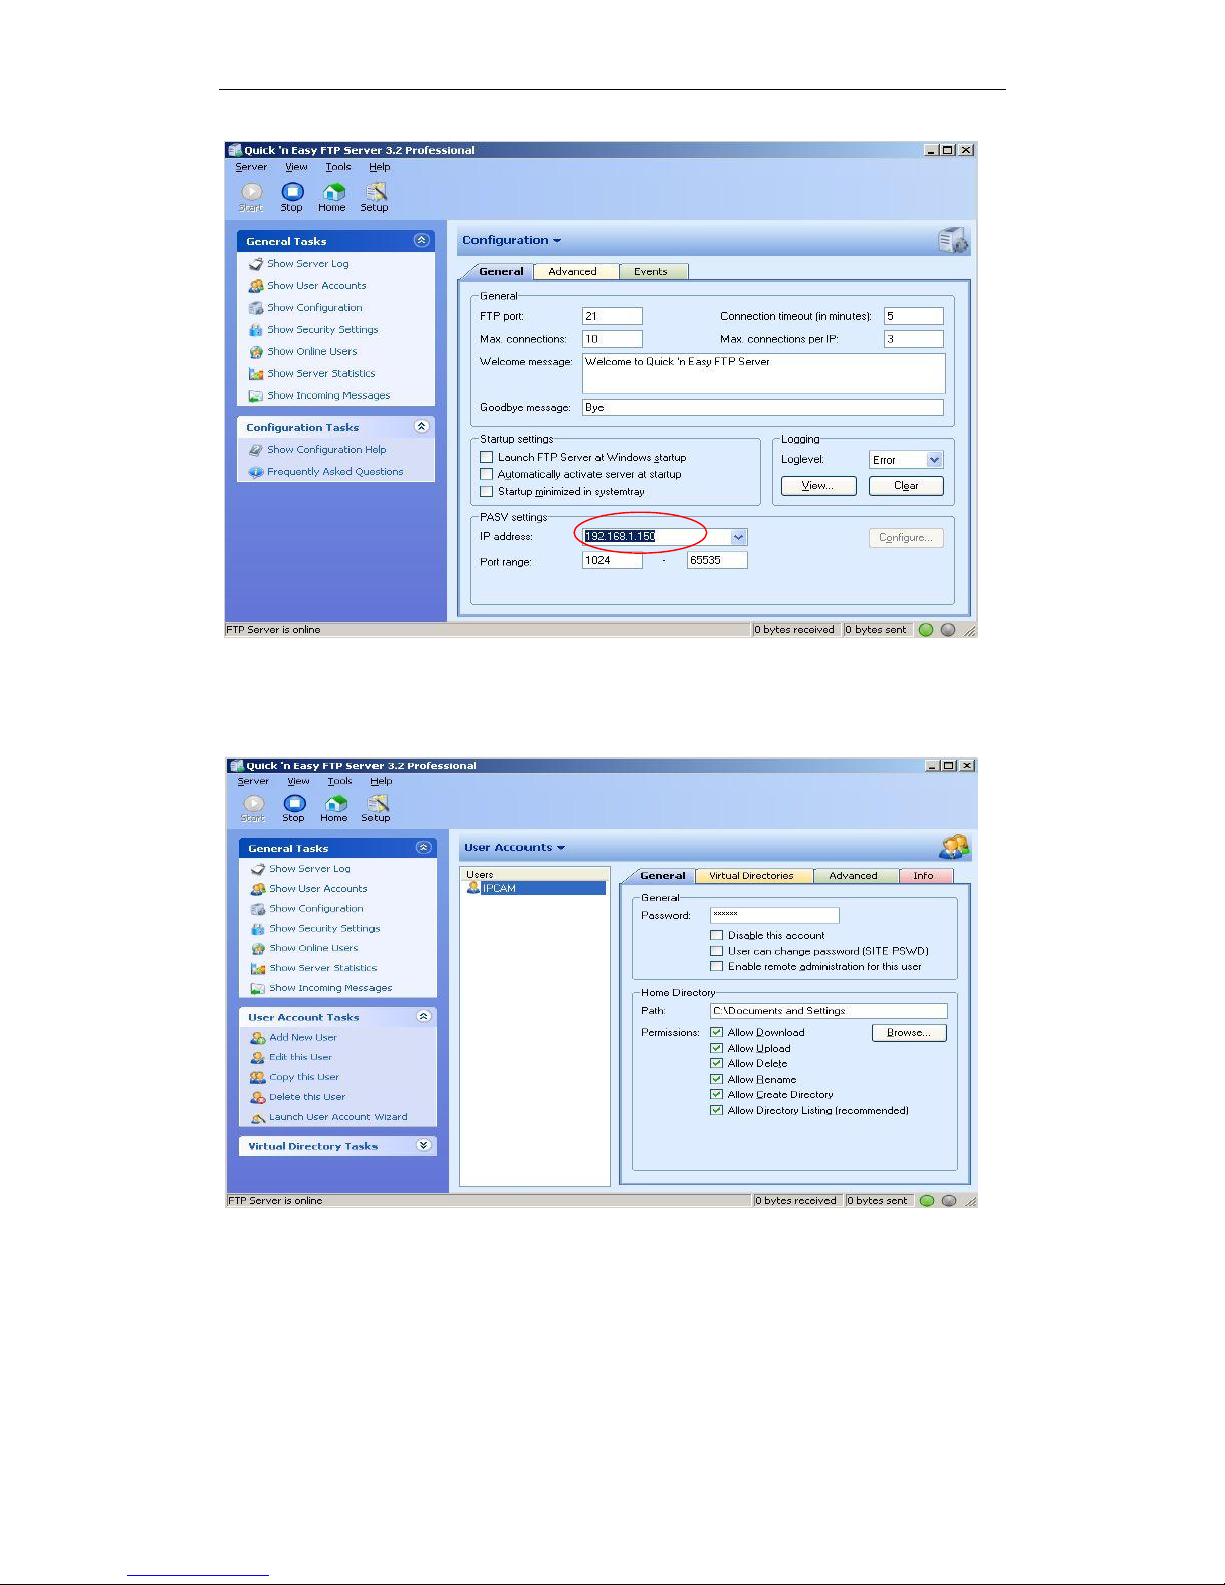
2. Step by step setting until finish it.
Figure6.7
3. Start Server
Continue to finish it
Page 40
IPCAM User Manual
40 / 67
Figure6.8
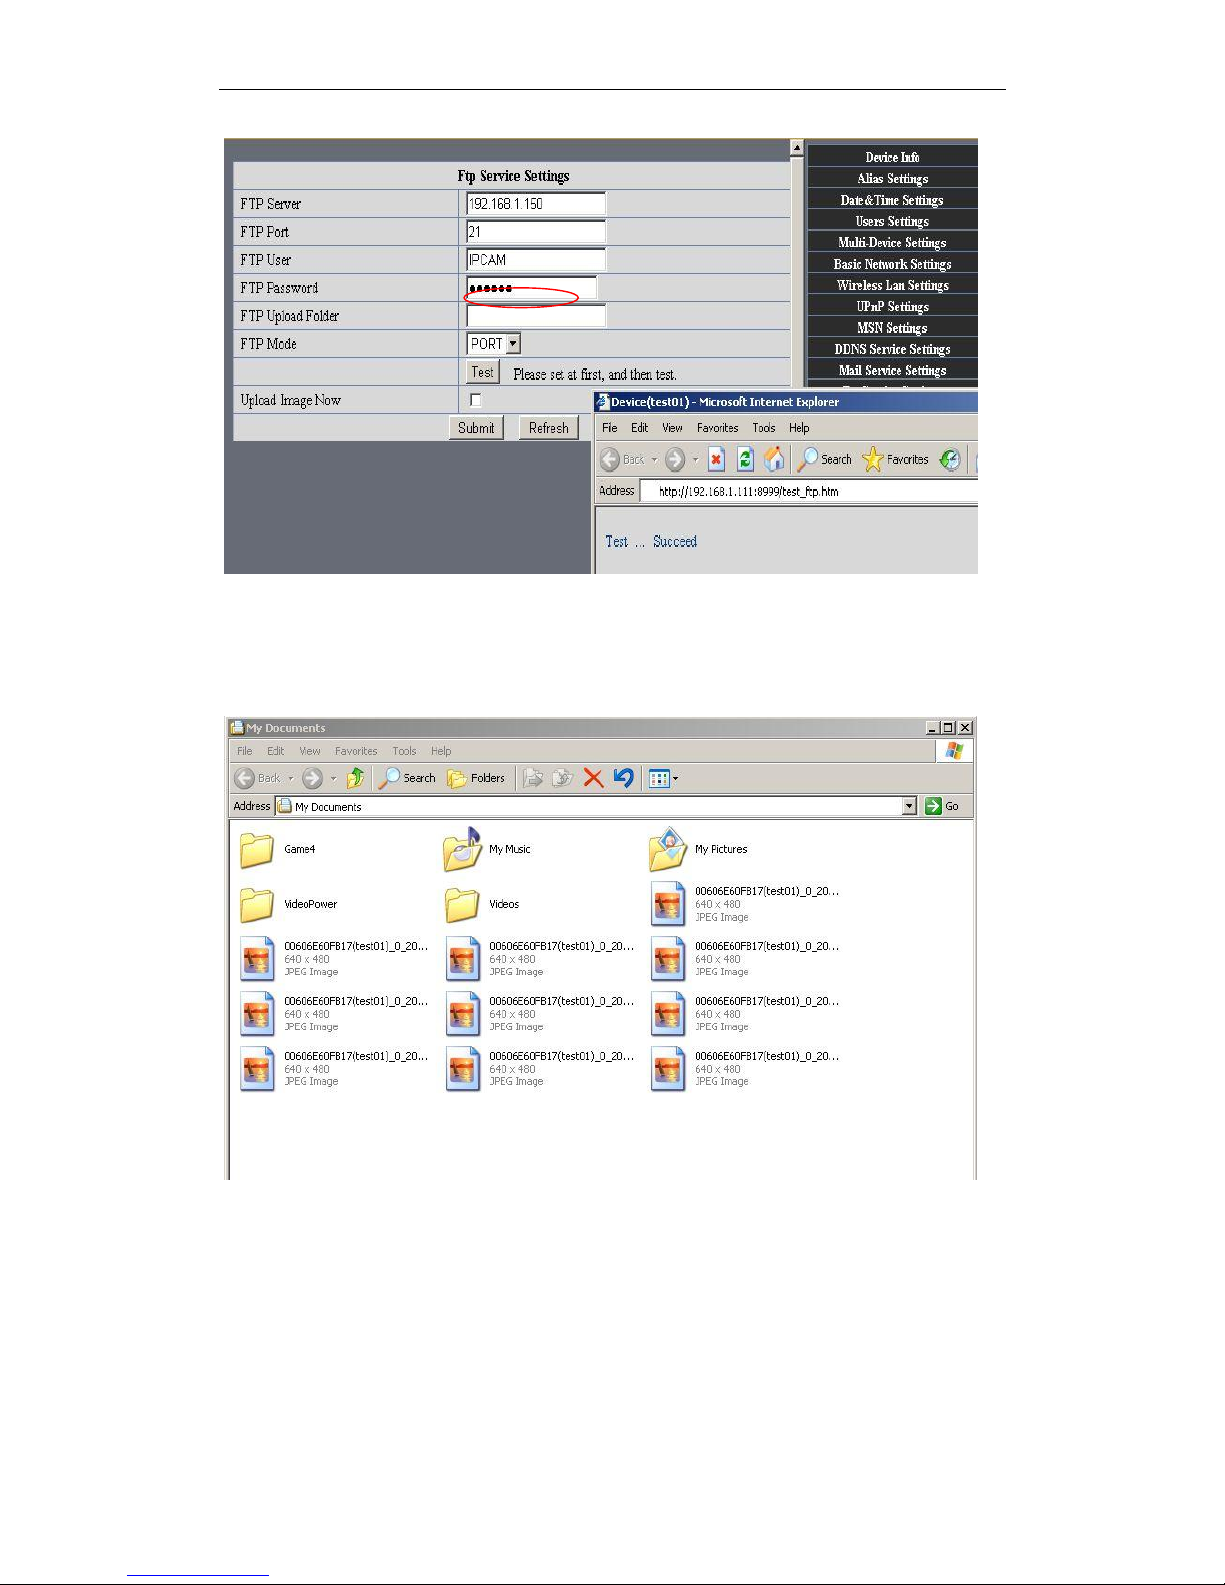
4. IPCAM‟S account can be used.
Figure 6.9
5. IP camera‟s FTP Server set
Page 41
IPCAM User Manual
41 / 67
Figure7.0
6. Set up and complete testing is successful,when it alarms, IP camera will upload
pictures to the FTP server Settings of main directory path (as shown )
Figure7.1
FTP Server: the FTP server address.
FTP port: the port usually is 21
FTP Mode: support standard(POST) mode and passive(PASV) mode.
Upload Image Now: it will upload image now when checkbox is not checked. When
checked, you can input upload interval(Seconds)
Page 42
IPCAM User Manual
42 / 67
3.5.6 Motion Detection
Enter Alarm Service Settings page to configure Motion Detection function.
Motion Detect Armed
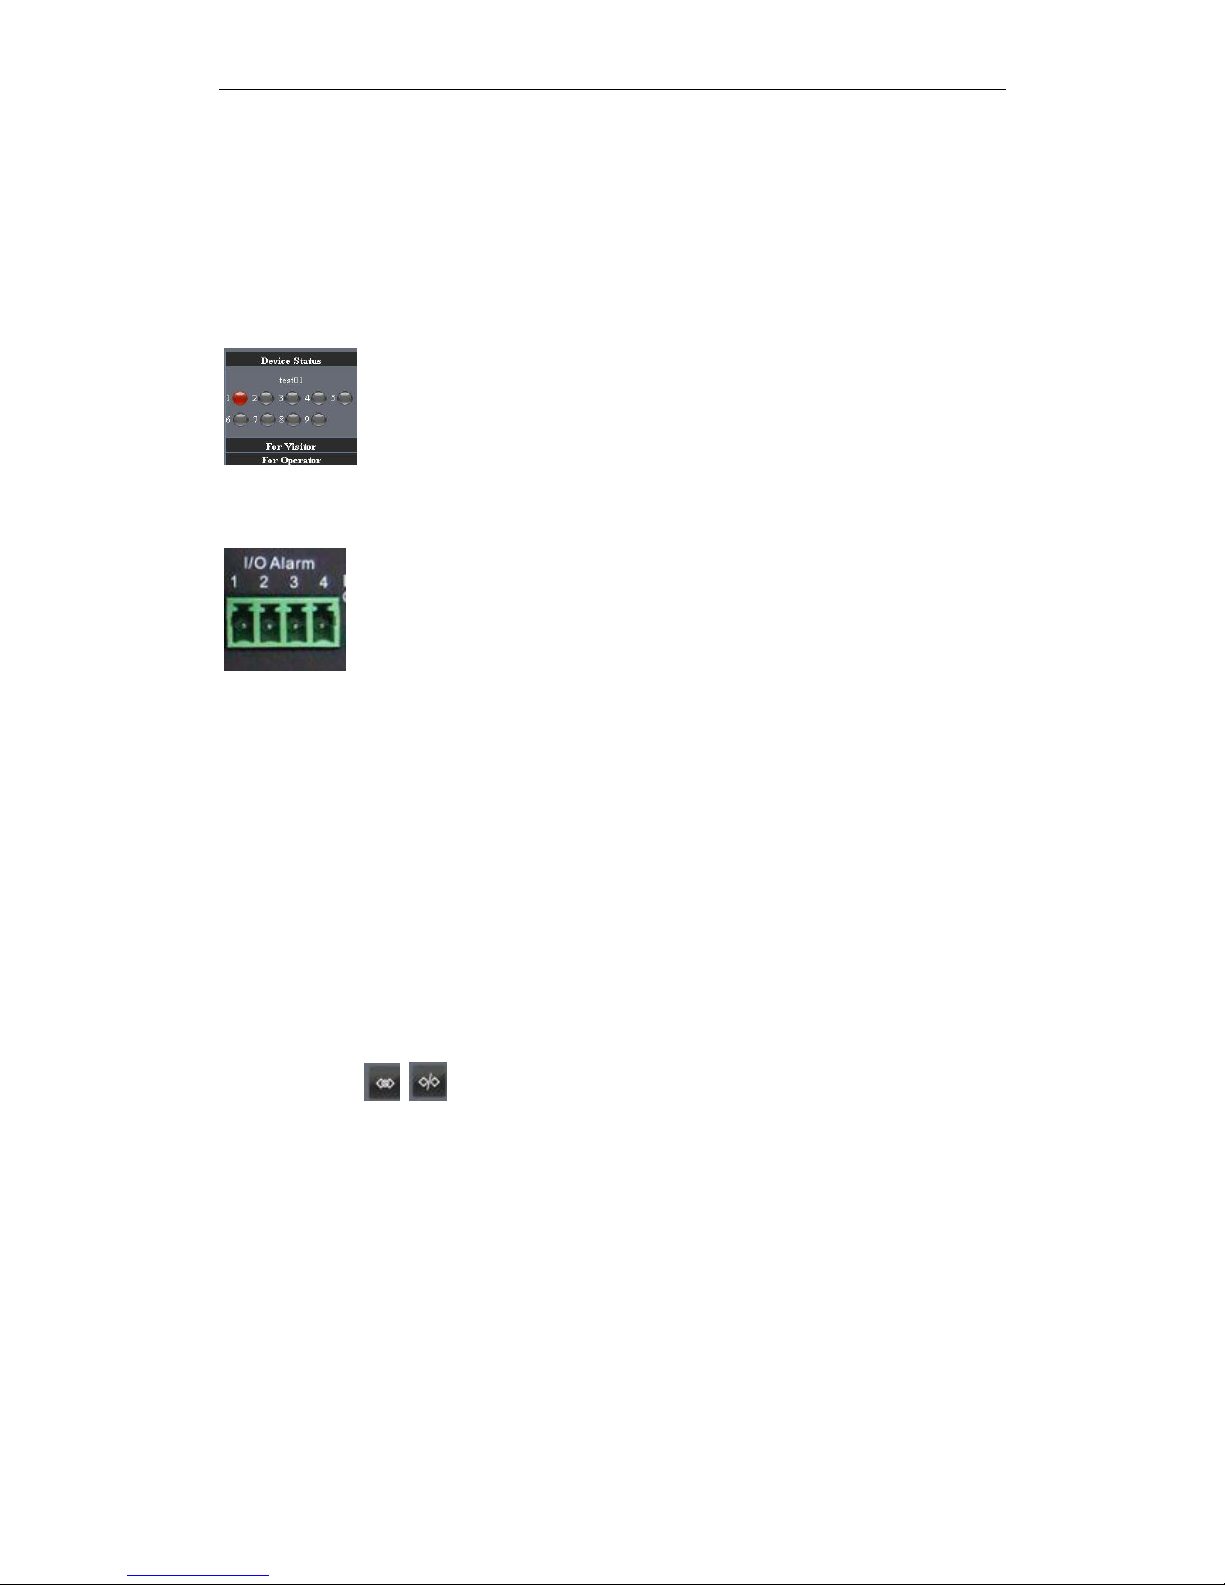
When you enable motion detect armed, the camera can be triggered to send email alerts
and record images. In the camera monitoring page, the green icon turn to red and an
alert sound you will hear,
Motion Detect Sensibility
you can choose High, Medium, Low
I/O PINS:1) Output(+5V) 2) Output 3) Alarm input 4) Input (GND)
Alarm Input Armed
Input Pins: The input pins can be used for 1-way external sensor input. For example,
you may connect a Person Infrared Sensor (PIR) to it for motion detection. When
external sensor triggered, IPCAM can be programmed to send an email with picture or
control the internal relay output.
If you link a external alarm with Pin3 and Pin4,when enable alarm input armed, external
alarm is enabled.
IO Linkage on Alarm
Enable IO linkage on alarm,Pin1 will output +5V when alarm triggered, and output LOW
when alarm release automatically.
Switch on/off buttons control Pin1 output manually.
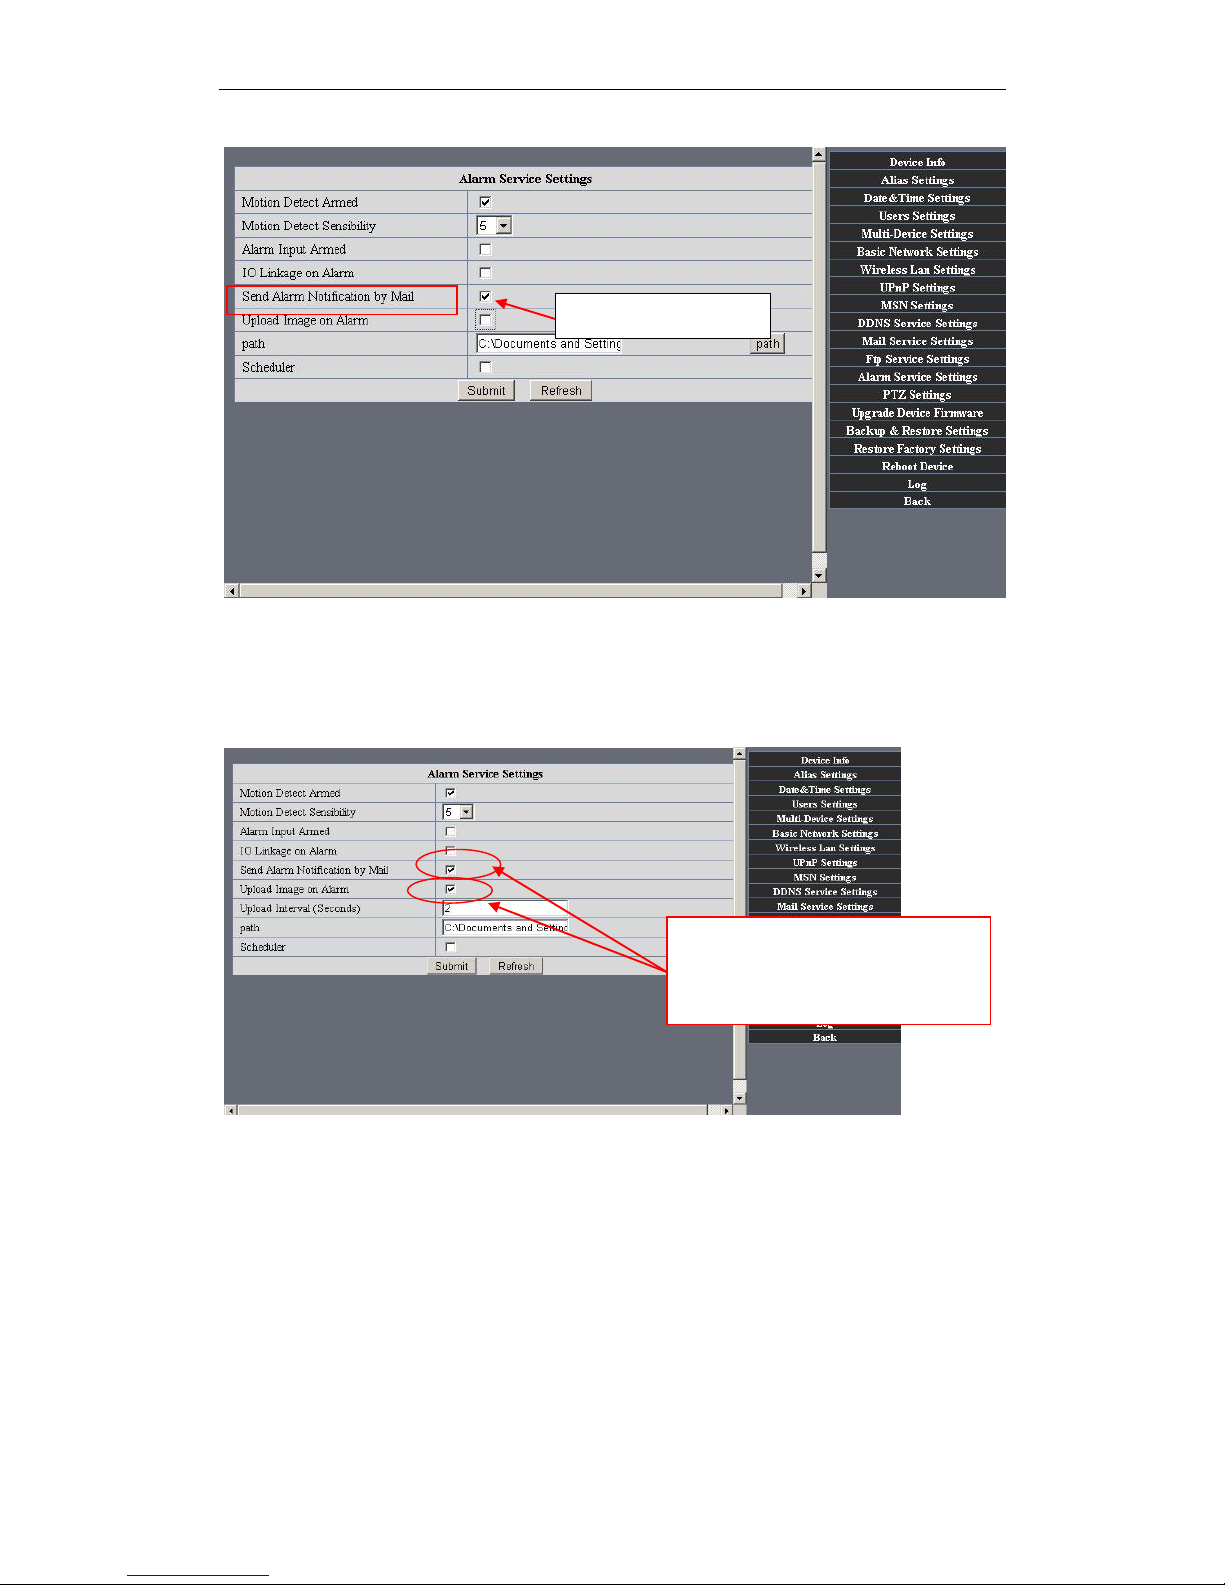
Send Mail on Alarm
Sent picture and mail inform to customer‟s e-mail after alarmed.(firstly you should finish
the Mail Service Settings.)
Page 43
IPCAM User Manual
43 / 67
Figure7.2
Upload Image on Alarm
Enable upload image on alarm and set upload interval(Seconds).
Figure7.2
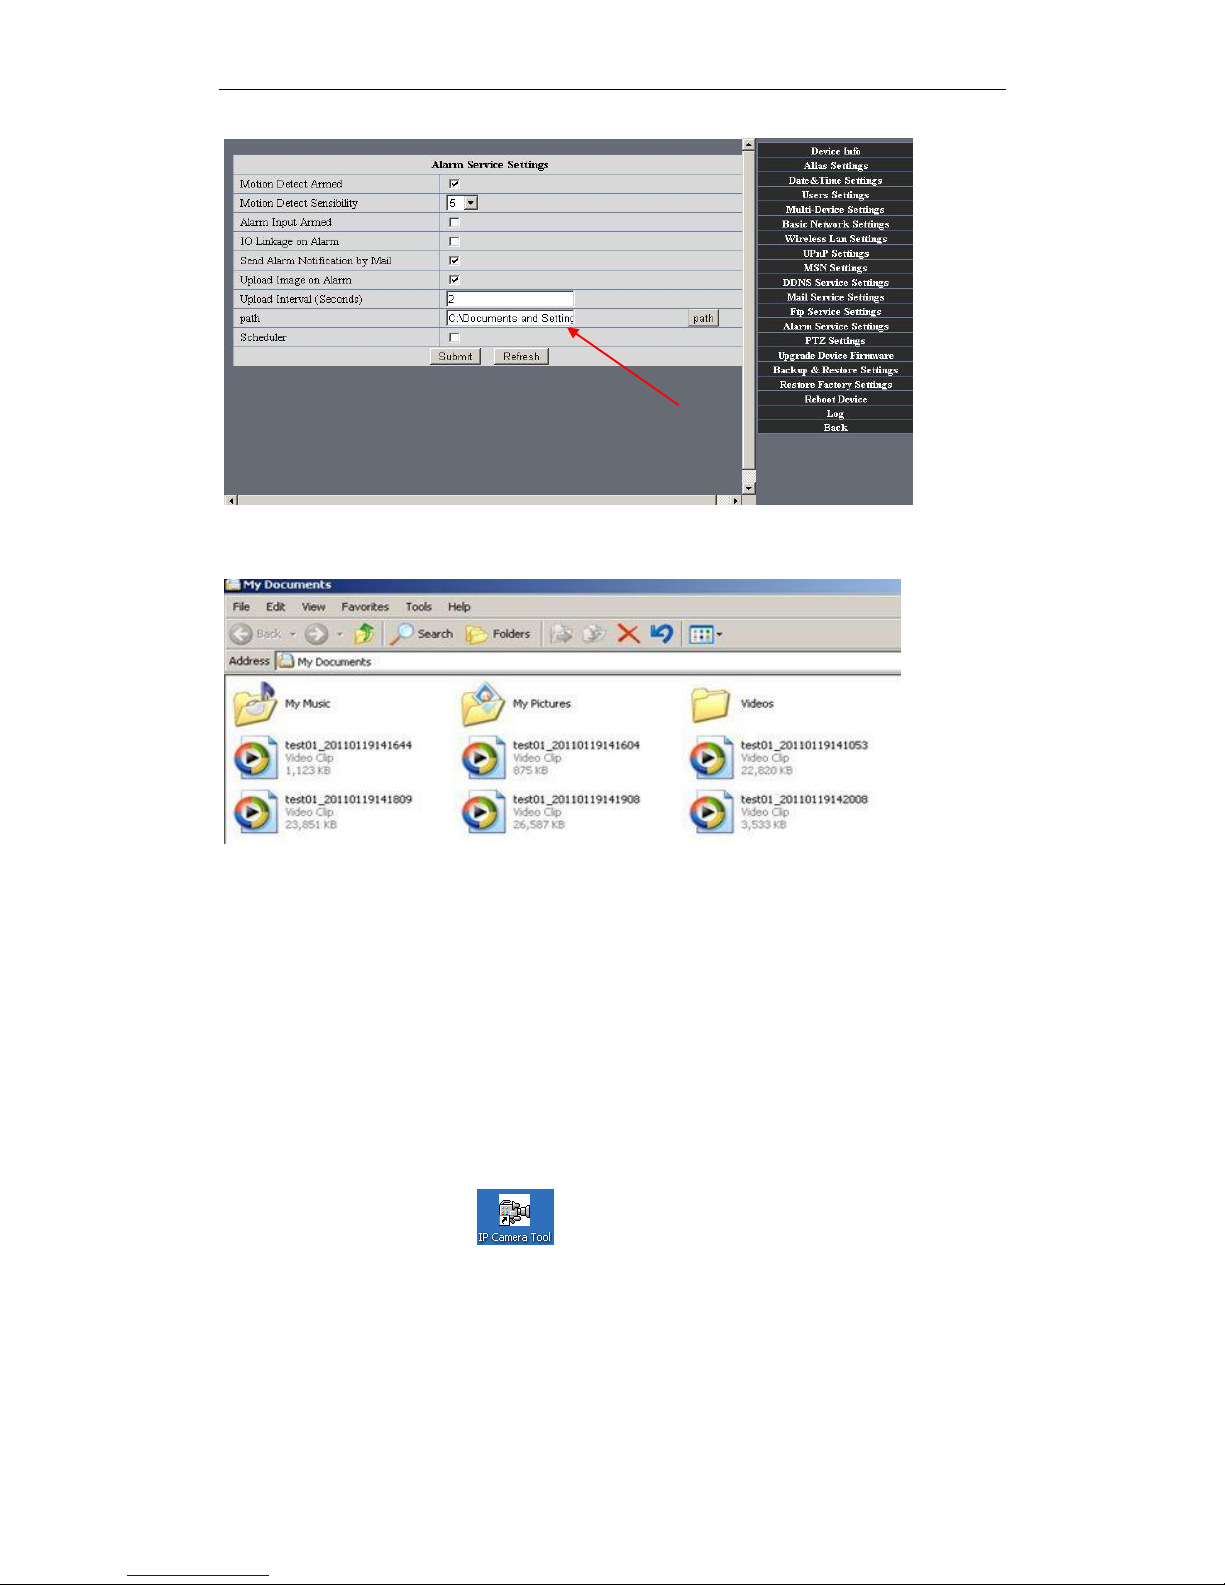
REC automatically and save to PC
When you enable motion detect and open the camera monitoring page on the PC. If
there is an alarm triggered, REC will start automatically for several seconds and save to
the PC.
Choose it.
When alarming it will upload
pictures to choosing email and
FTP server after setting
Page 44
IPCAM User Manual
44 / 67
Figure7.3
REC save to pc‟s position
Figure7.4
4 HOW TO USE
4.1 Step by step to use
Follow the instructions below to get started after the Camera has been mounted
properly.When the IP camera powered on, it will rotate itself and stop to the center.
1) Use Network cable connect IP Camera to LAN.
2) Enter IP Camera Tool to set the basic configuration.(details: 3.1)
3) When IP address of the Camera listed in the Result Field of the IP Camera Tool, it
means the basic configuration is completed.
4) set the safety property of IE in the PC when you view it first time.(details: 5.1.3 )
5) Camera login(details:3.2)
6) Now you can use the IP Camera as Visitor, Operator or Administration in the LAN.
Page 45
IPCAM User Manual
45 / 67
4.2 Setting Wi-Fi of IP Camera
1) To use the wireless functions of the IP Camera,a wireless router like linksys is
required.
2) Enter the wireless router setup page(you may see the wireless router user
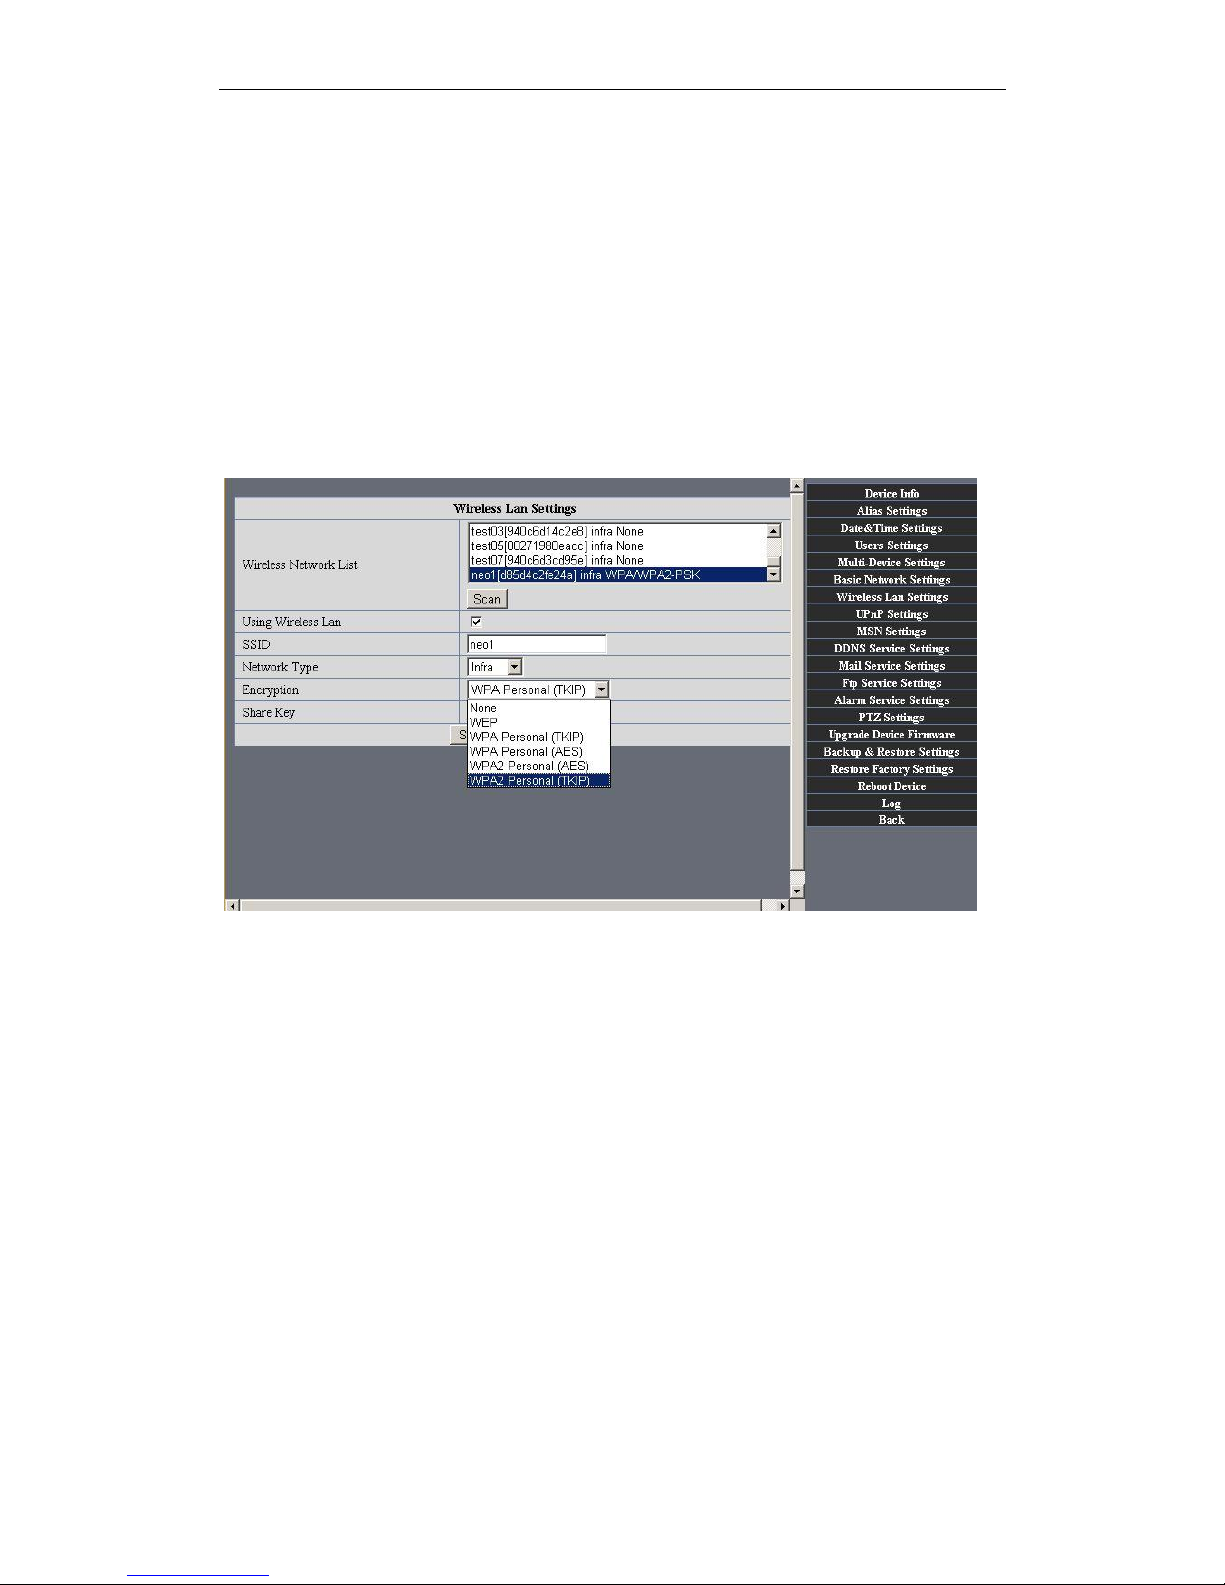
manual).To Find out the SSID, Channel(less than 10), Security
Way(NONE,WEP),Authentication Type,encryption.
3) Enter Wireless LAN Settings to input contents gotten from the wireless router then
click Submit to reboot the device.
NOTE: This product only supports WEP encryption.
Figure7.5
4) Wait at least 30 seconds to unplug the ethernet cable, then unplug the power supply.
5) Plug the power supply making sure that the ethernet is not connected
6) After around 30 seconds, if the LED blinks ,it indicates it is working in wifi mode
7) Camera login.(details:3.2)
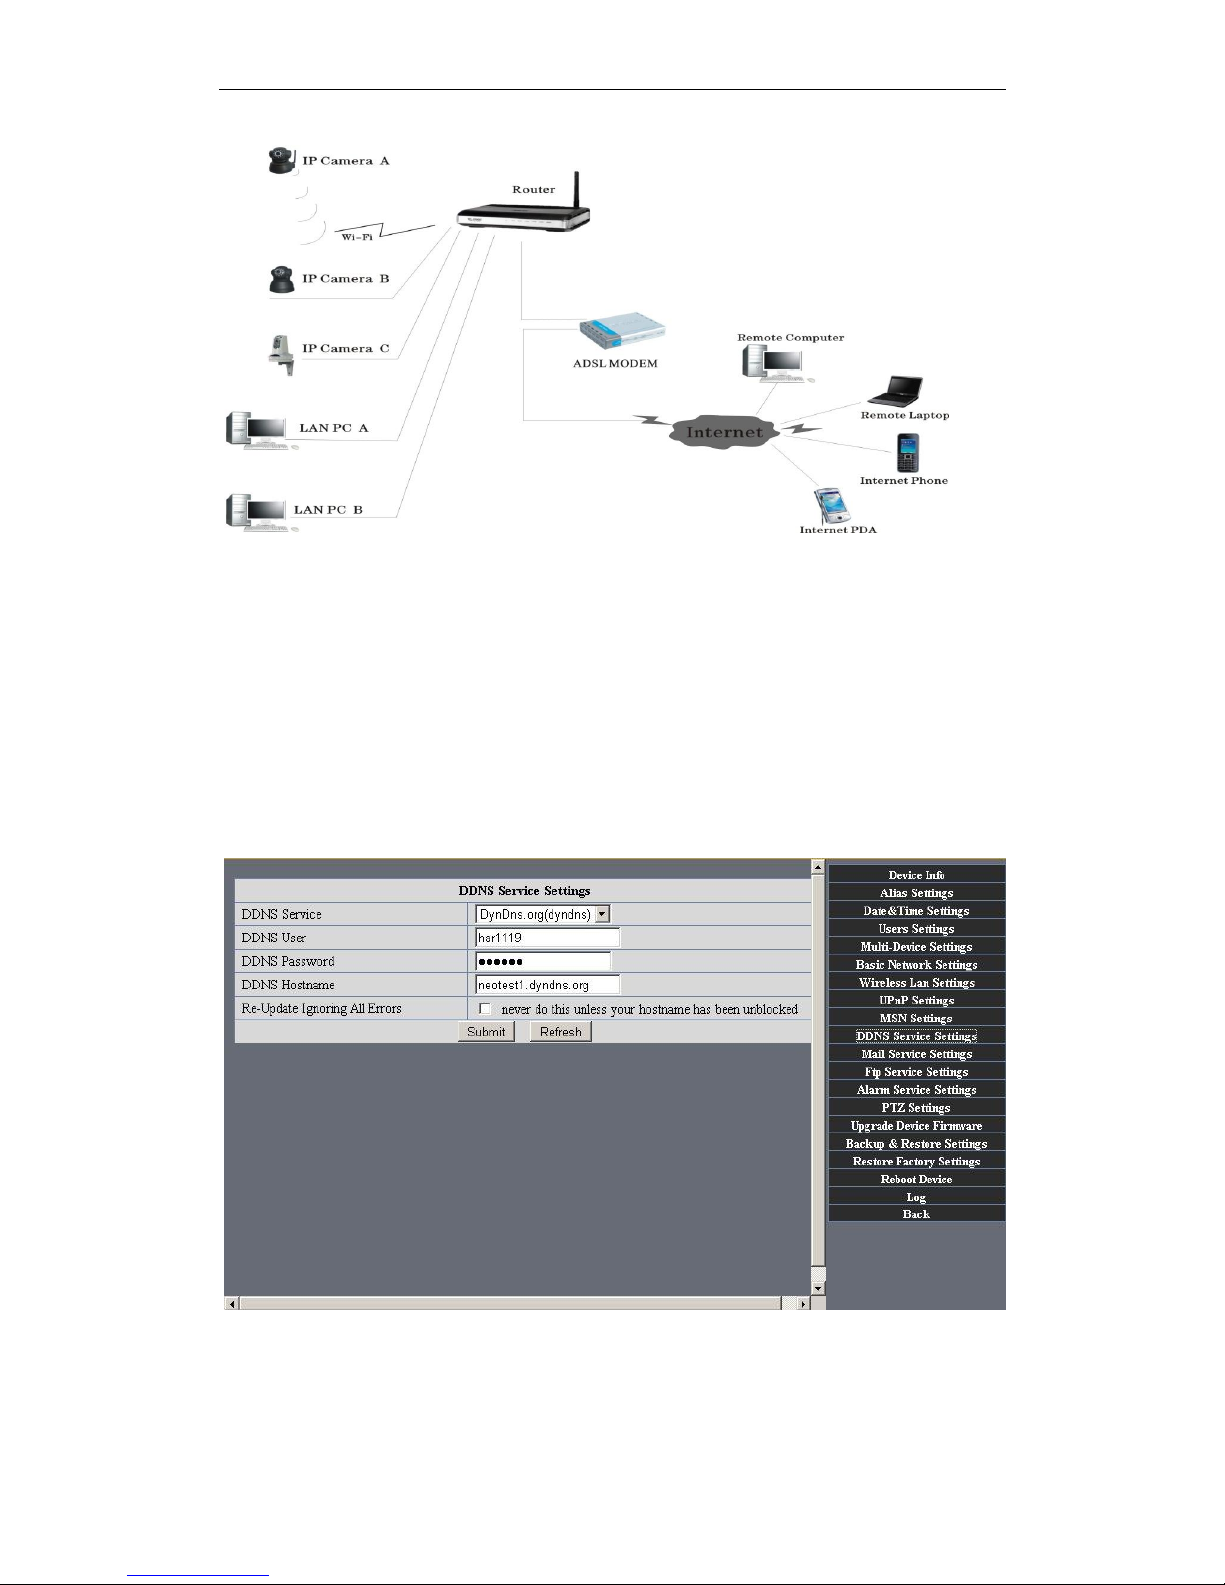
4.3 Using a router to access the Internet
Using a router to access the Internet by shared ADSL If a router is set for dial-up Internet
access,it is not required to set ADSL dial-up account and password on the IP Camera.
Page 46
IPCAM User Manual
46 / 67
Figure7.6
1) Use Network cable connect IP Camera to the LAN.
2) Enter IP Camera Tool to set the basic configuration.(details:3.1)
3) login the Camera homepage as Administration
4) Enter DDNS Settings Page and ennable DDNS service.Click <submit> and the
device will reboot.(detail:3.5.4)
Figure7.7
5)How to use DDNS service (detail:4.5)
6) You can access the Camera from Internet by domain name.
Page 47
IPCAM User Manual
47 / 67
4.4 Static IP user
Static IP user is not need to use DDNS for remote access. When finished the setting of
the IP Camera in LAN, you can access the Camera directly from Internet by the WAN IP.
You can obtain the WAN IP by two ways.
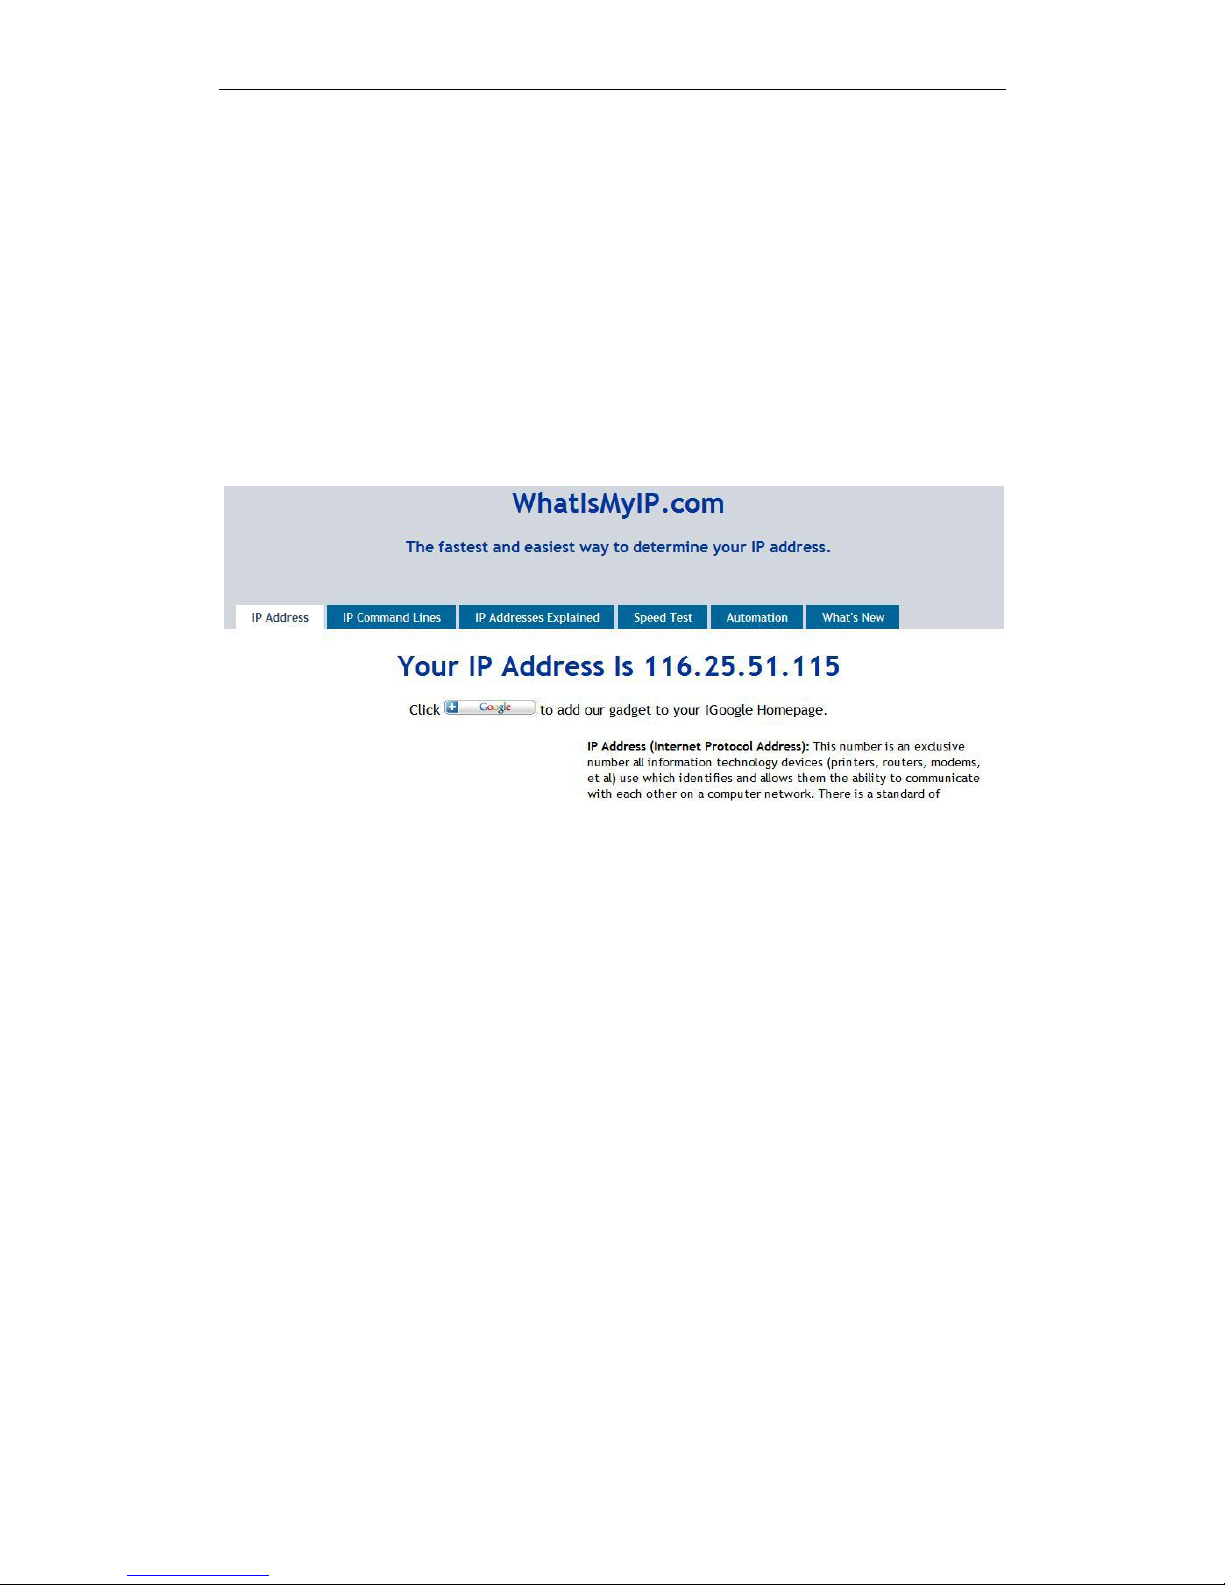
Obtain the WAN IP from some Website
You can discover this easily by opening on a computer using the same connection as the
IP camera and entering this address: http://www.whatismyip.com.The page at this
address will show you the current WAN IP.
Figure7.8
According to MSN and IP camera built-in account access (details:3.53)
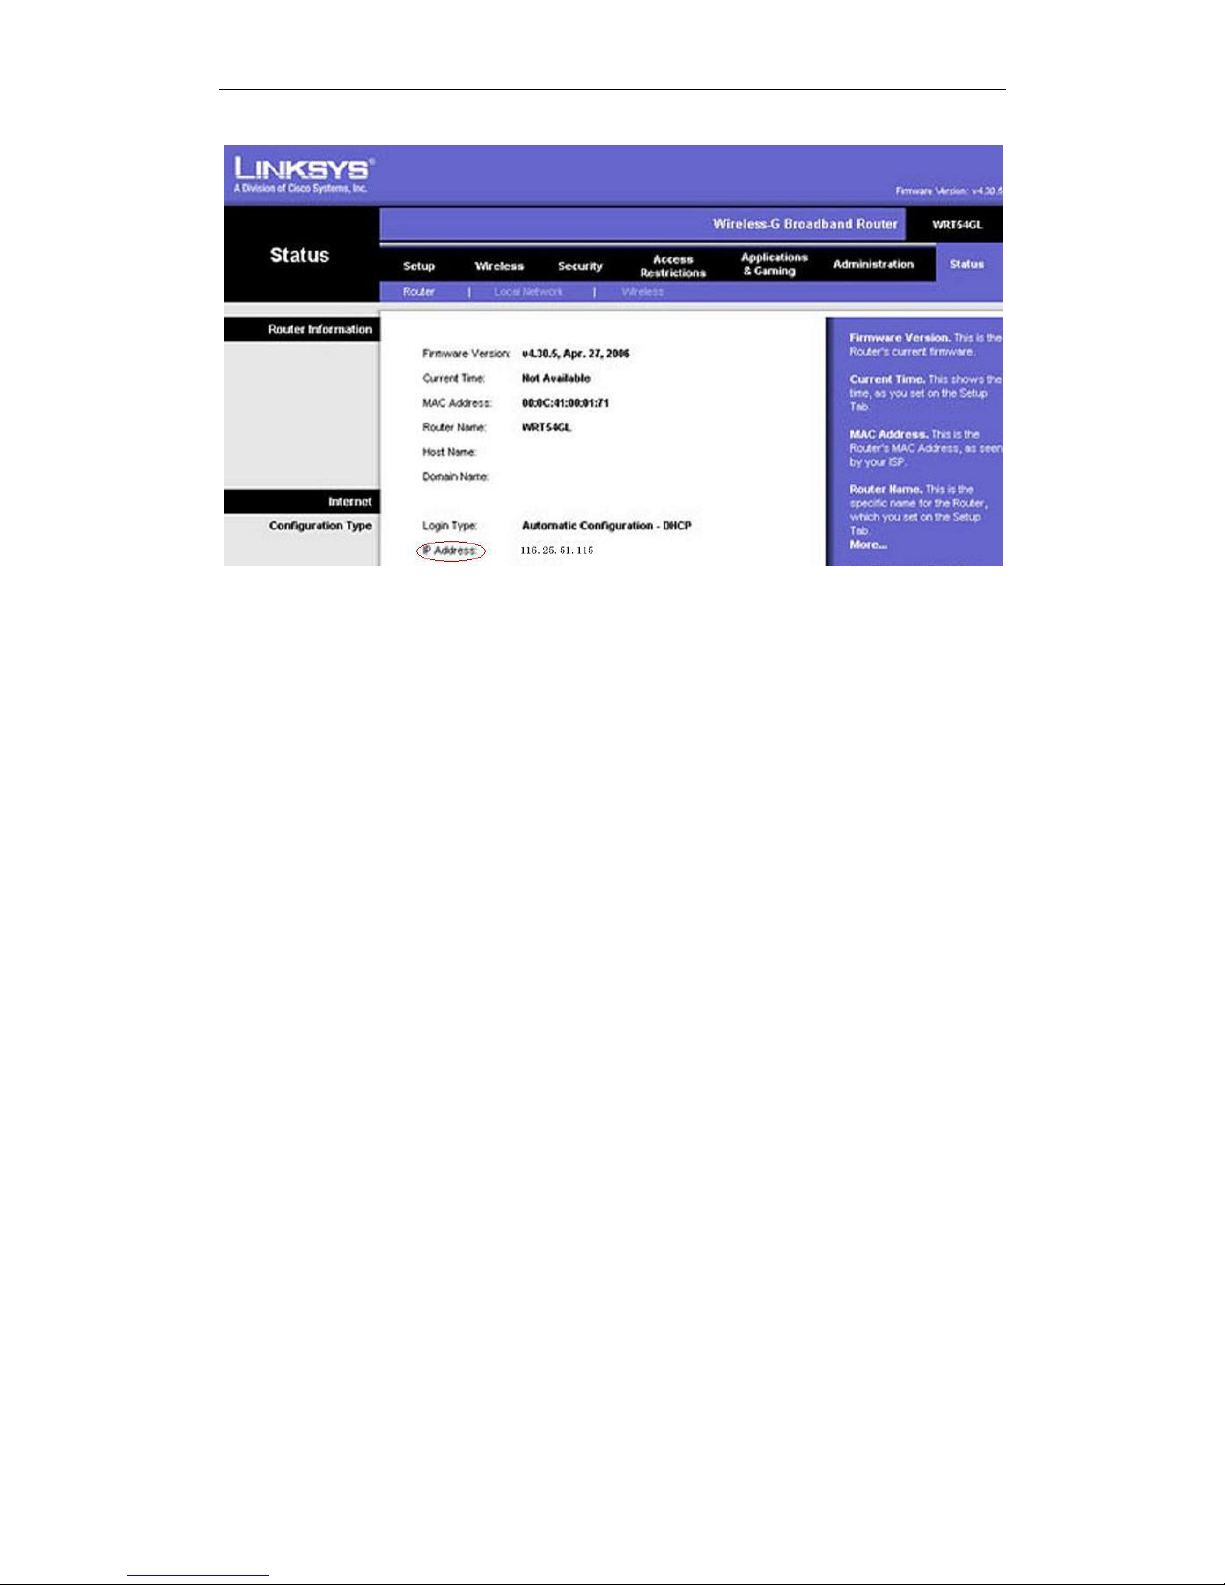
Obtain the WAN IP address from the router
Take the WRT54G router of LINKSYS for example,
1) Obtain the IP address of the router(LAN gateway address),user name and password
for logon to the router from the network administrator,
2) Enter the LAN IP address of the router(LINKSYS WRT54G default:192.168.1.1) in the
address bar of the IE to log on to the router; Open the Status page to find out the WAN
address of the router. In this example, the address is 116.25.51.115.(Figure7.1)
Page 48
IPCAM User Manual
48 / 67
Figure7.9
Access the IP Camera from the Internet
User can access the IP Camera from the Internet, Enter WAN IP address + port number
in the IE to access IP Camera. For example, Http:// 116.25.51.115:8999
Note: Make sure the Port mapping is success. You can do port mapping by two ways:
Enter setting page of the router which IPCAM connect with to enable UPNP function.
Enter IPCAM “UPnP Settings” to enable UPNP and make sure the state is “UPnP
success”.
If your router has the Virtual Map function. Enter router setting page, add IP CAM‟s IP
and port to the Virtual map list.
4.5 How to use DDNS
When use ADSL, the IP Camera will connect to the Internet through ADSL automatically.
For each ADSL reconnection, ISP will re-assign a new IP address for the IP Camera to
facilitate the access. DDNS(Dynamic Domain Name Server) can map the dynamic IP
address of an IP Camera to a fixed domain name. Therefore, we can access the IP
Camera by the fixed domain name whether the IP address changes or not. The IP
address is not necessary when you using the DDNS via the domain name to find your
network.
1) Go to the website which Provides free domain name, register and apply a free domain
name. such as http://www.dyndns.com(details:5.1.6 ).
Page 49
IPCAM User Manual
49 / 67
2) login the Camera homepage as Administration and enter ”DDNS Service Settings”
page input the name, password and Host(details: 3.5.4) .Then click <SUBMIT> and
reboot Device.
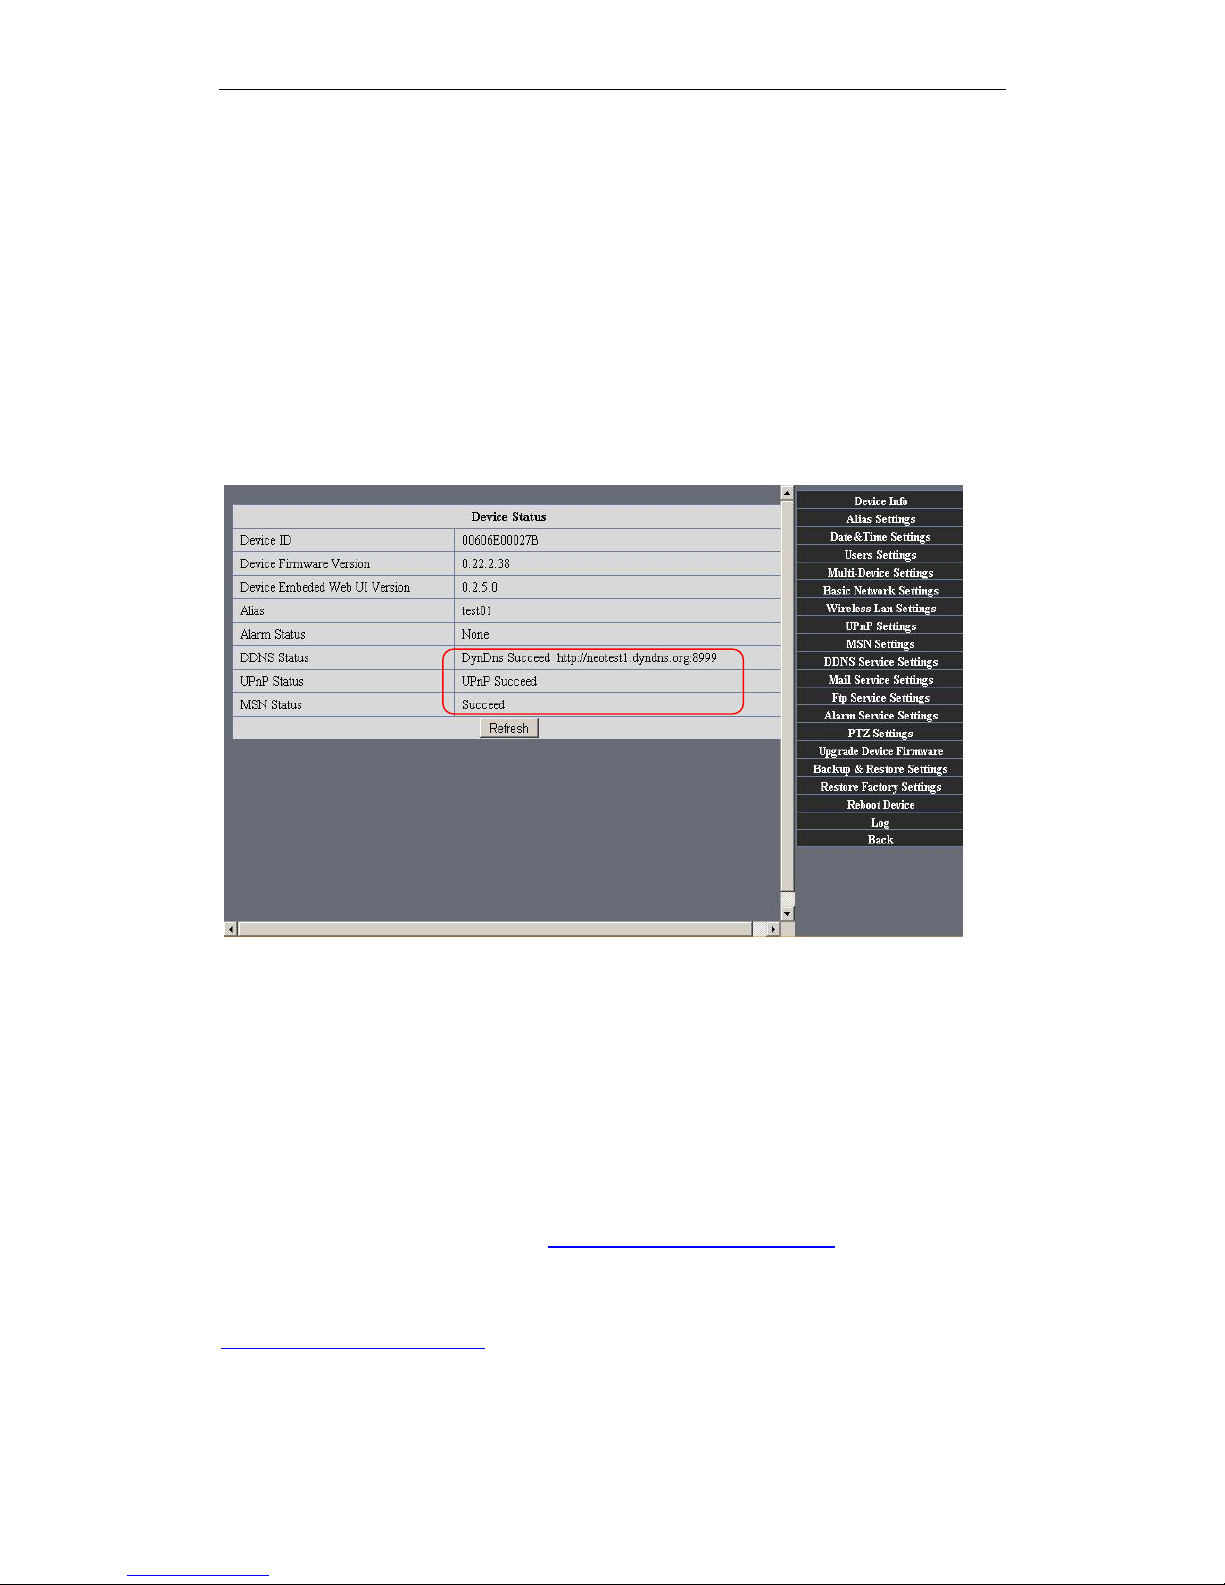
3) Re-login the Camera homepage and enter”DDNS Service Settings”page to check the
DDNS Status is DynDns Succeed or not.
4) Enter”UPnP Settings”page,the UPnP Status should be UPnP Succeed.If the status
is not Succeed, you may enter “Basic Network Settings” page to change Http Port
(details: 3.5.2). Then click <SUBMIT> and reboot Device.
5) Re-login the Camera homepage to check and make sure the DDNS Status and UPnP
Status is Succeed.
Figure8.0
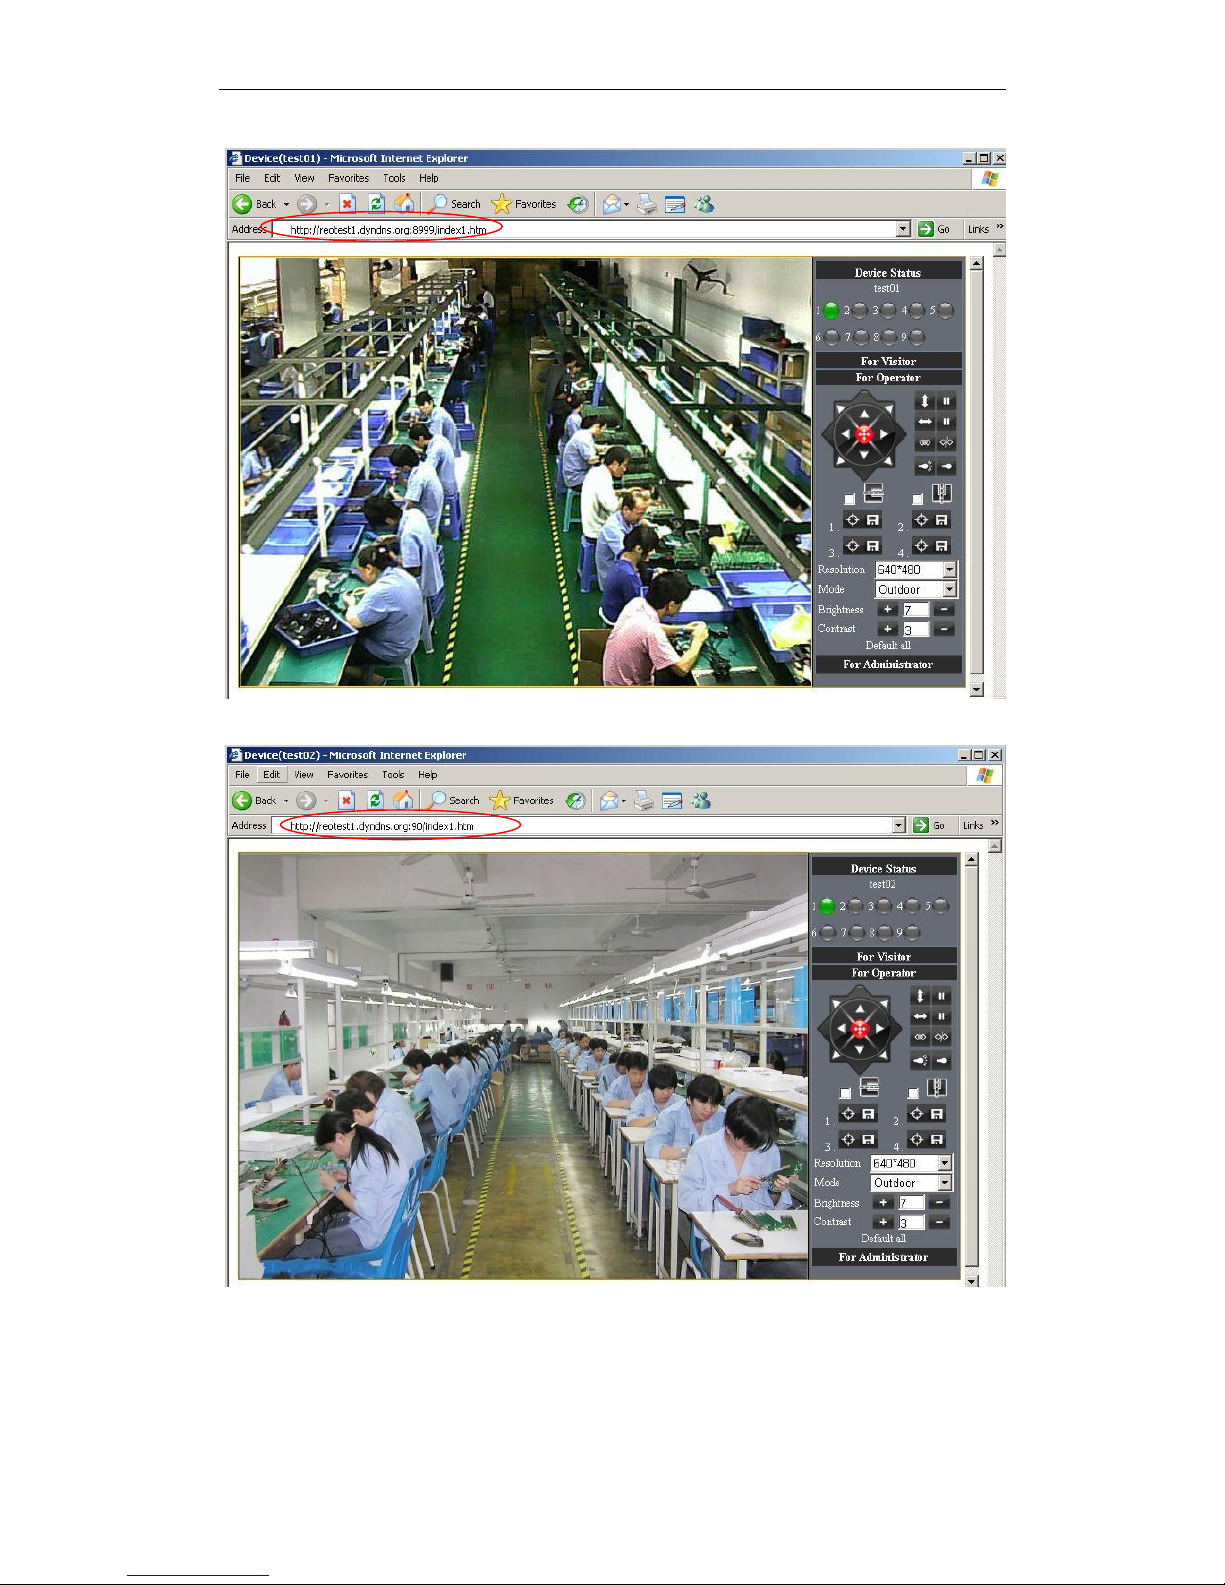
6) You only need to enter the domain name(domain name+Port number
http://reotest1.dyndns.org:8999) in the IE address bar ,the browser will visit the IP
Camera.Wait for several minutes and the IP Camera will dial up to access the Internet
automatically, and the communication with the DDNS server is established successfully.
In the way, the user can access the IP Camera from a WAN by using the DDNS domain
name.
If the gateway settings and DDNS settings have been completed,ener the DDNS
dynamic domain name(for example, (http://reotest1.dyndns.org:8999),do not add www.)
in the address bar of the IE to access the IP Camera.If multiple IP Cameras are
connected to the same router,enter DDNS dynamic domain + port number(for example,
http://reotest1.dyndns.org:90)) in the address bar of the IE to access different IP
Cameras.
You will view the pictures as below:
Page 50
IPCAM User Manual
50 / 67
Figure 8.1
Figure 8.2
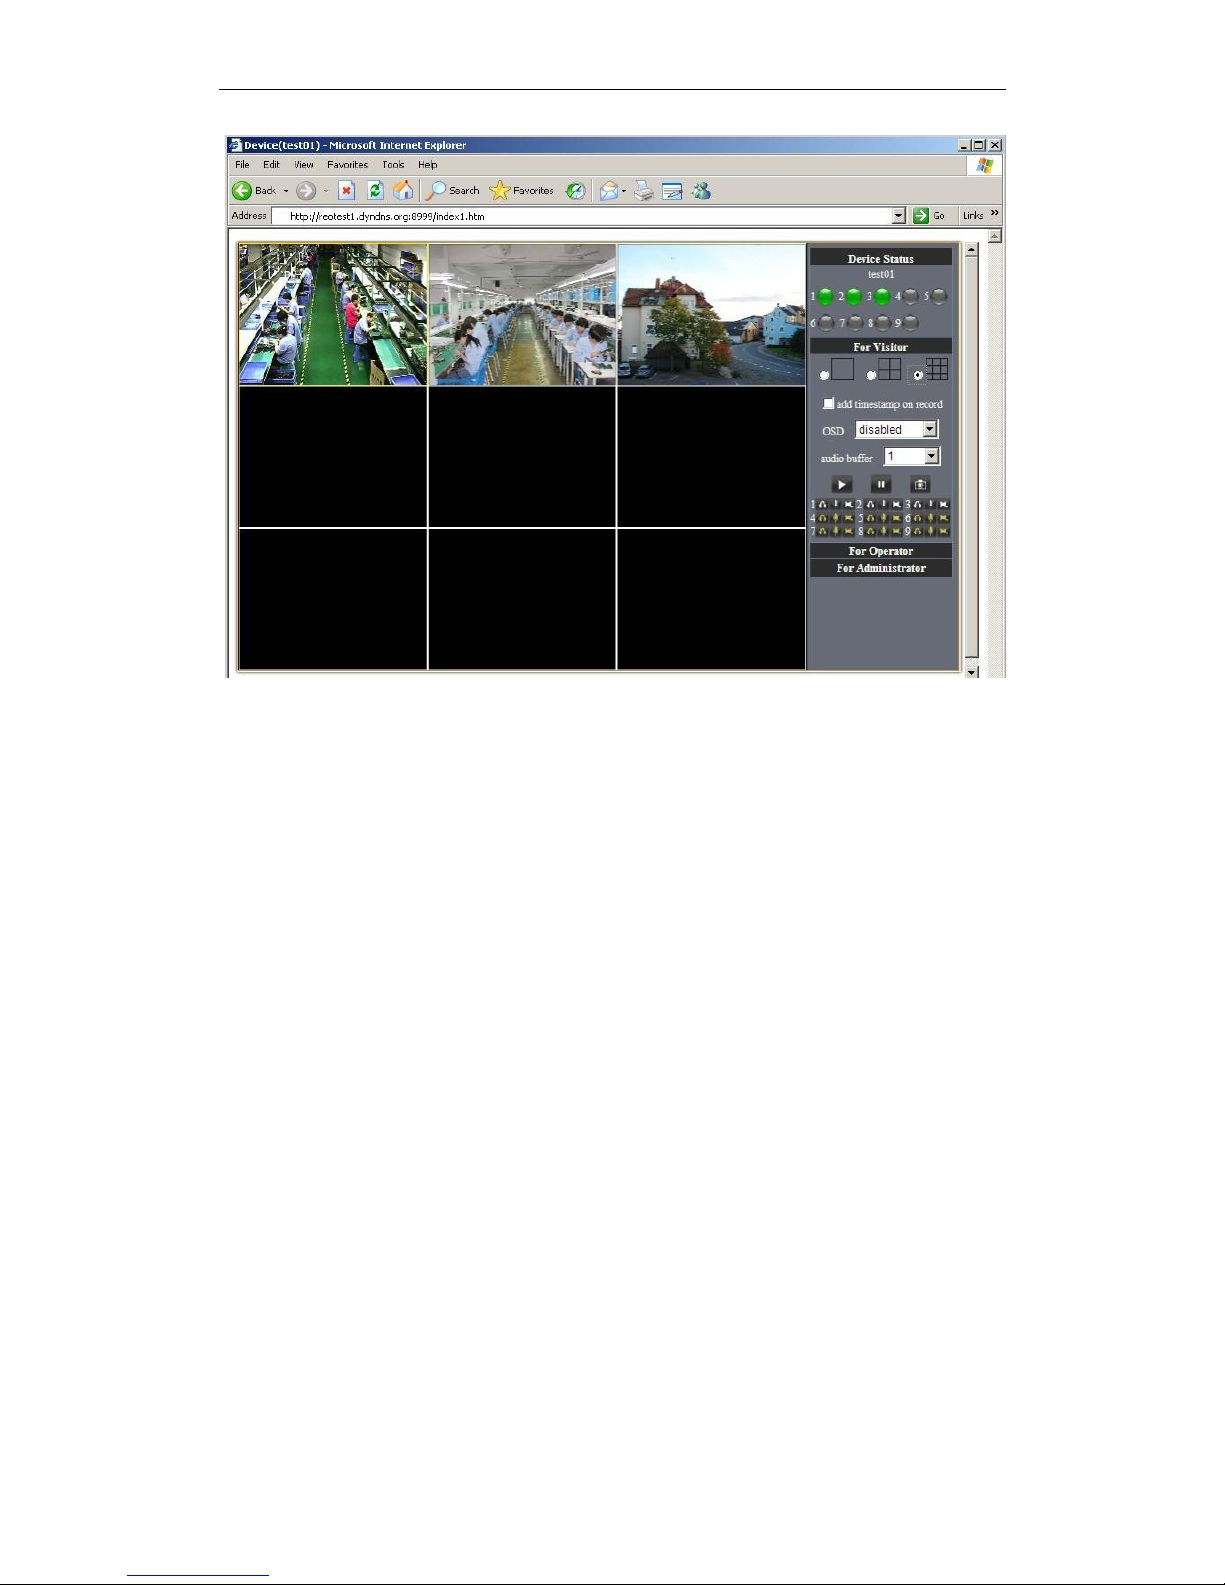
Add more devices:
Page 51
IPCAM User Manual
51 / 67
Figure8.3
5 APPENDIX
5.1 Frequently Asked Questions
Note:
1) Any question you would meet, please check Network connections firstly.
2) Check the working status revealed by the indicators on the network server, hub,
exchange and network card. If abnormal, check the network connections.
5.1.1 I have forgotten the administrator username and/or password.
To reset the administrator username and password, Press and hold down the RESET
BUTTON for 5 seconds. Release the power button and the username and password
will be reset back to the factory default administrator username and password.
Default administrator username: admin
Default administrator password: No password
5.1.2 IP Address configuration
Check whether IP address of the IP Camera server shares the same subnet as your
work station: Click My Computer > Control Panel>Network & Dial-up Connections >
LAN > Attributes >Internet Protocols (TCP/IP), and check IP Address and Subnet
Mask. Make sure they are in the same subnet when configuring IP Camera IP
address manually.Unable to access IP Camera via web browser
5.1.3 Network Configuration
Page 52
IPCAM User Manual
52 / 67
Double Check to ensure that your HTTP server software is configured and running
properly. If you‟re running any firewall software, make sure it‟s allowing inbound
connections to port 80,Also, if you happen to be using a cable/DSL router, make sure
you‟ve set up port forwarding properly. ( consult your router‟s documentation for more
information ) .If none of these seem to be the problem, it‟s also possible that your
ISP is blocking inbound connections to port 80 –many IPSs have done this because
of internet worms such as Code Red, If this is the case, you „ll have to setup your
HTTP server on an alternate port (such as 8080).
5.1.4 No pictures Problems with ActiveX Controller
The video streaming is transmitted by the ActiveX controller. If ActiveX controller isn‟t
installed correctly ,you will see no video image. There are two way to solve this problem:
1) Install “IP Camera Tool”, ActiveX controller is installed simultaneity
(recommendable).
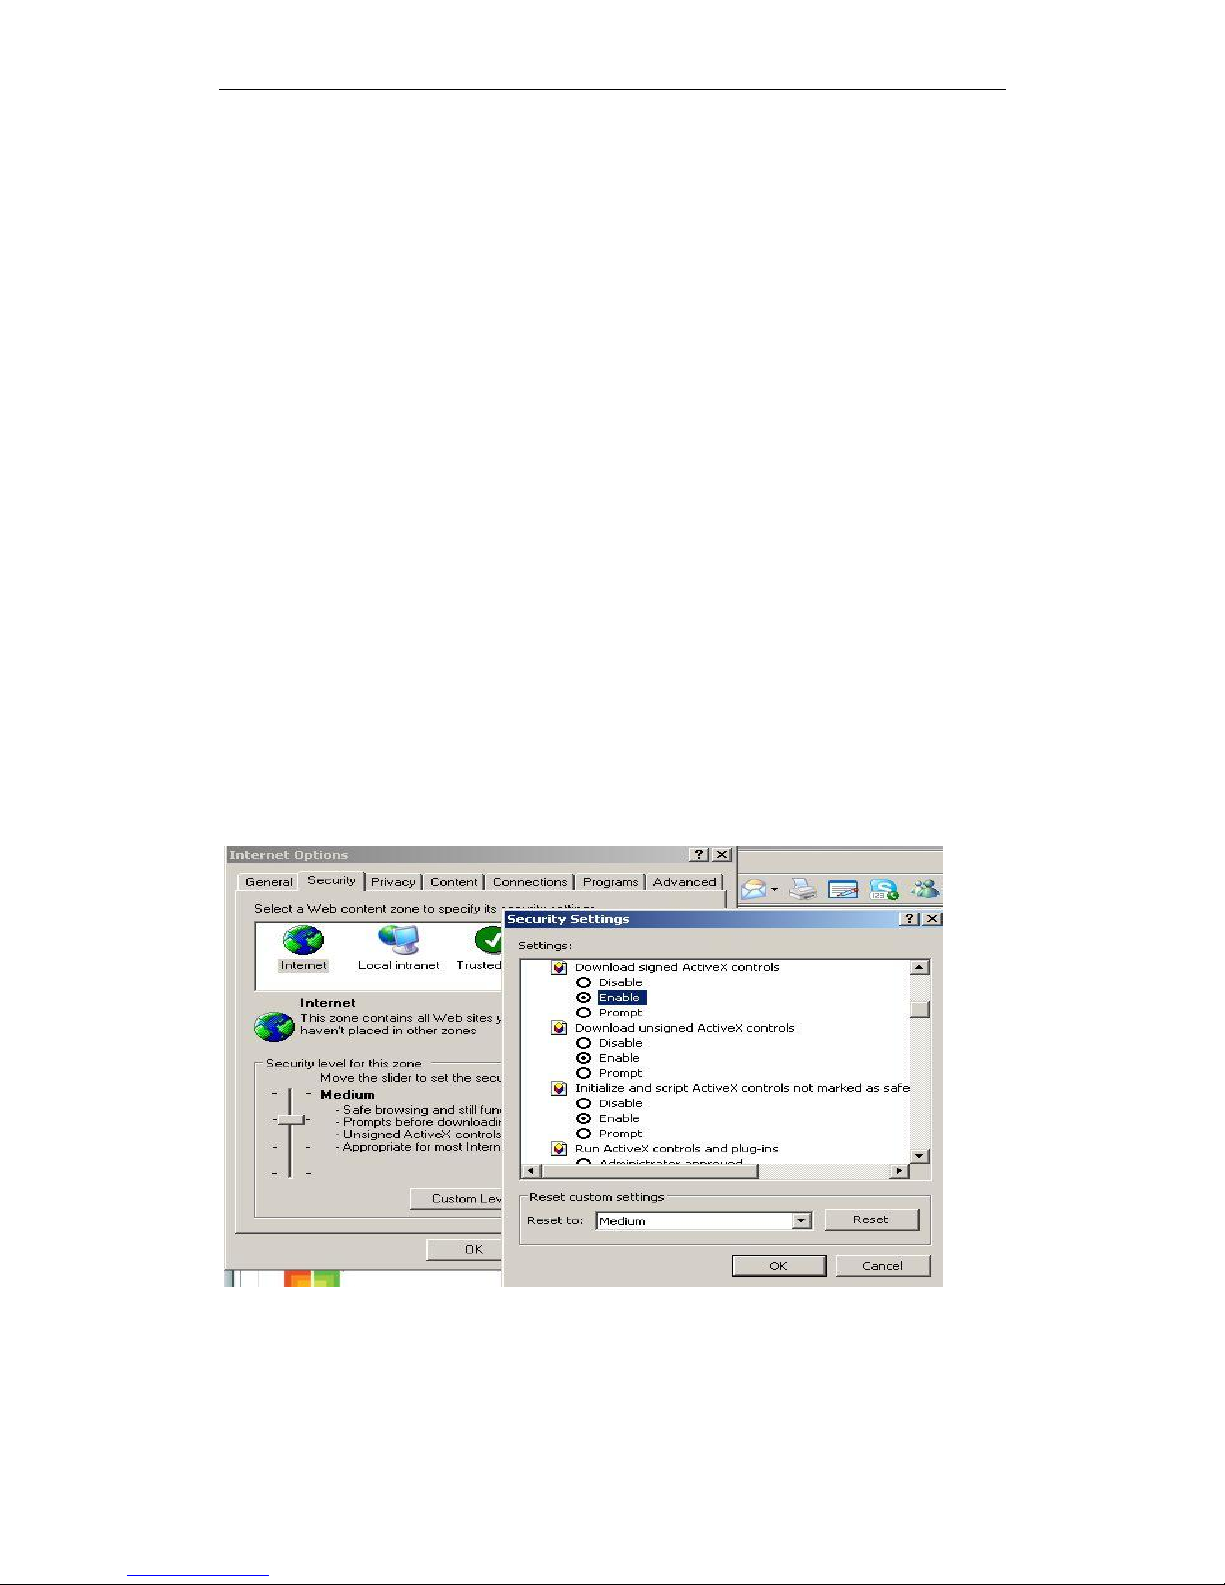
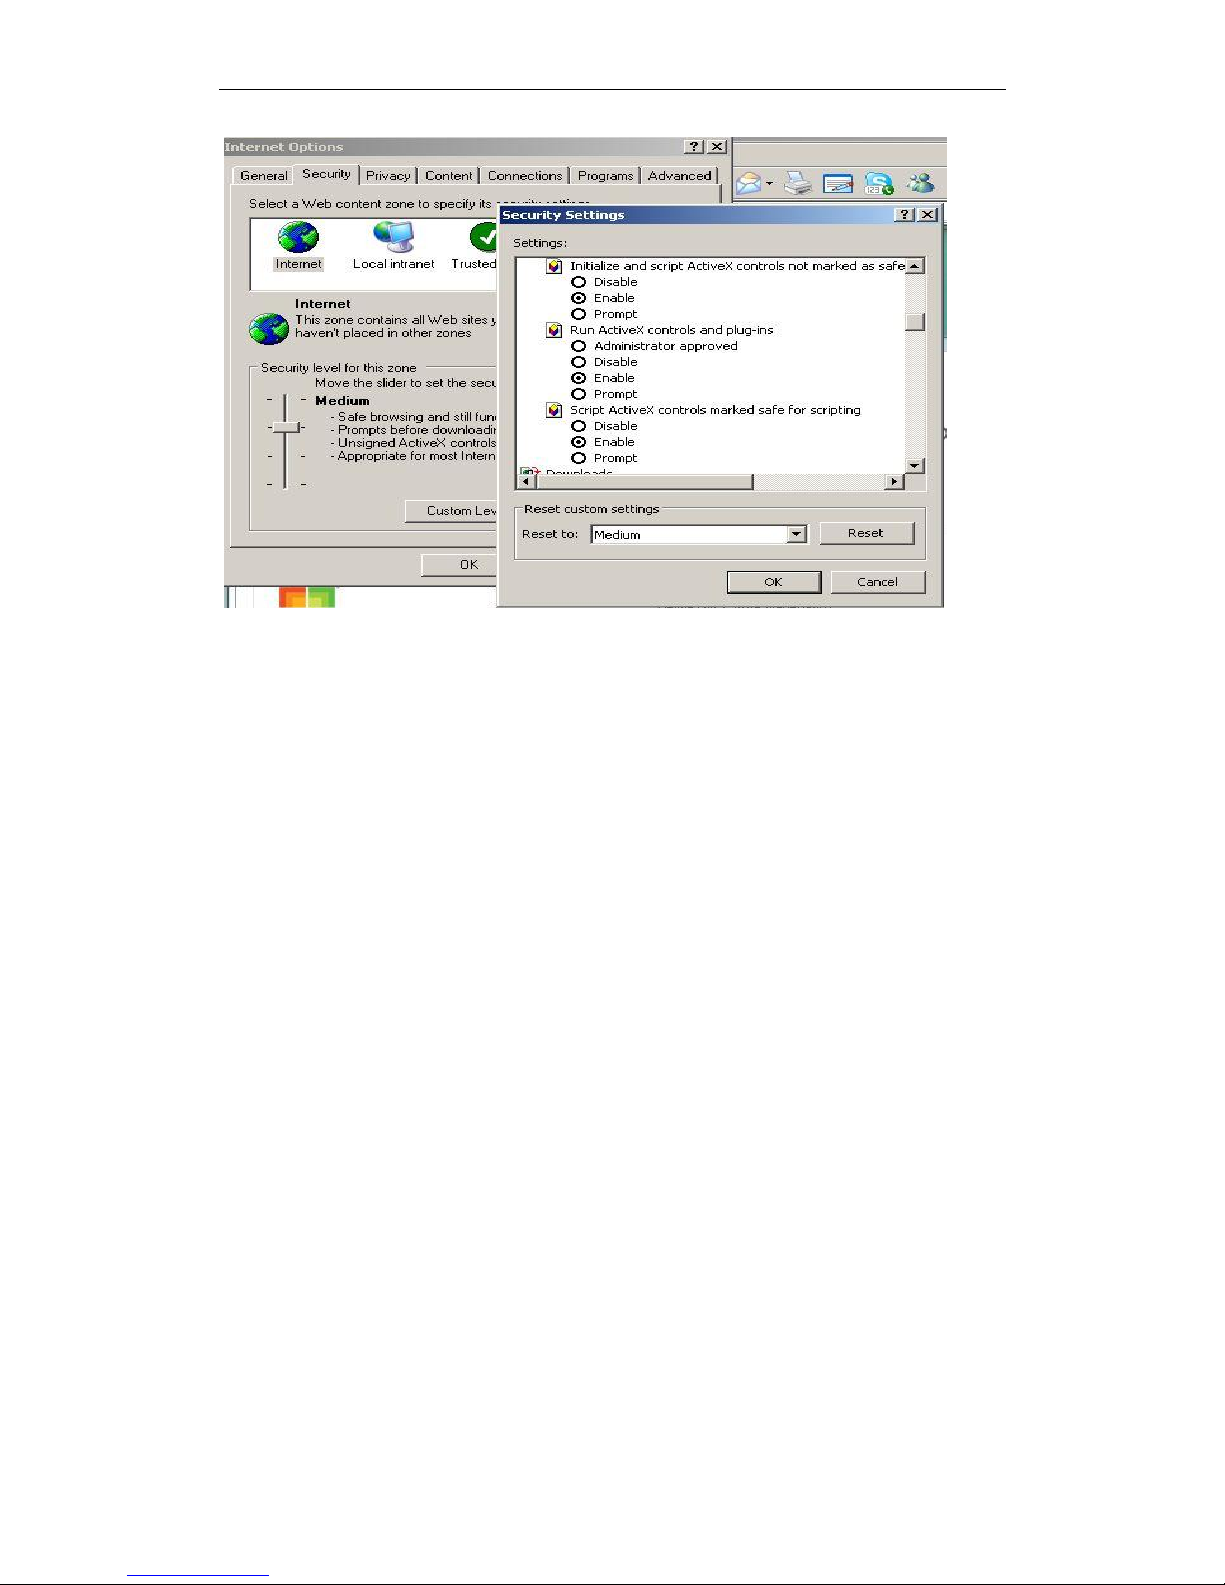
2)download ActiveX controller and set the safety property of IE in the PC when you
view it first time:“IE” browser“Tool”“Internet Proper”“Security”“Custom
Level””ActiveX control and Plug-ins” three options of front should be set to be “Enable”,
The ActiveX programs read by the computer will be stored. as follows:
Enable: Download unsigned ActiveX controls
Enable: Initialize and script ActiveX controls not marked as safe
Enable: Run ActiveX controls and plu-ins
Figure 8.4
Page 53
IPCAM User Manual
53 / 67
Figure8.5
5.1.5 Problems with network bandwidth
The image frame rate is subjected to the following factors: 1.network bandwidth; 2. PC
performance,network environment and display preference setting (brightness, theme,
etc.); 3. the number of visitors (Too many visitors will slow down the image frame rate.); 4.
choice of switch or hub (Use a switch for multiple IP Camera Servers rather than a HUB.).
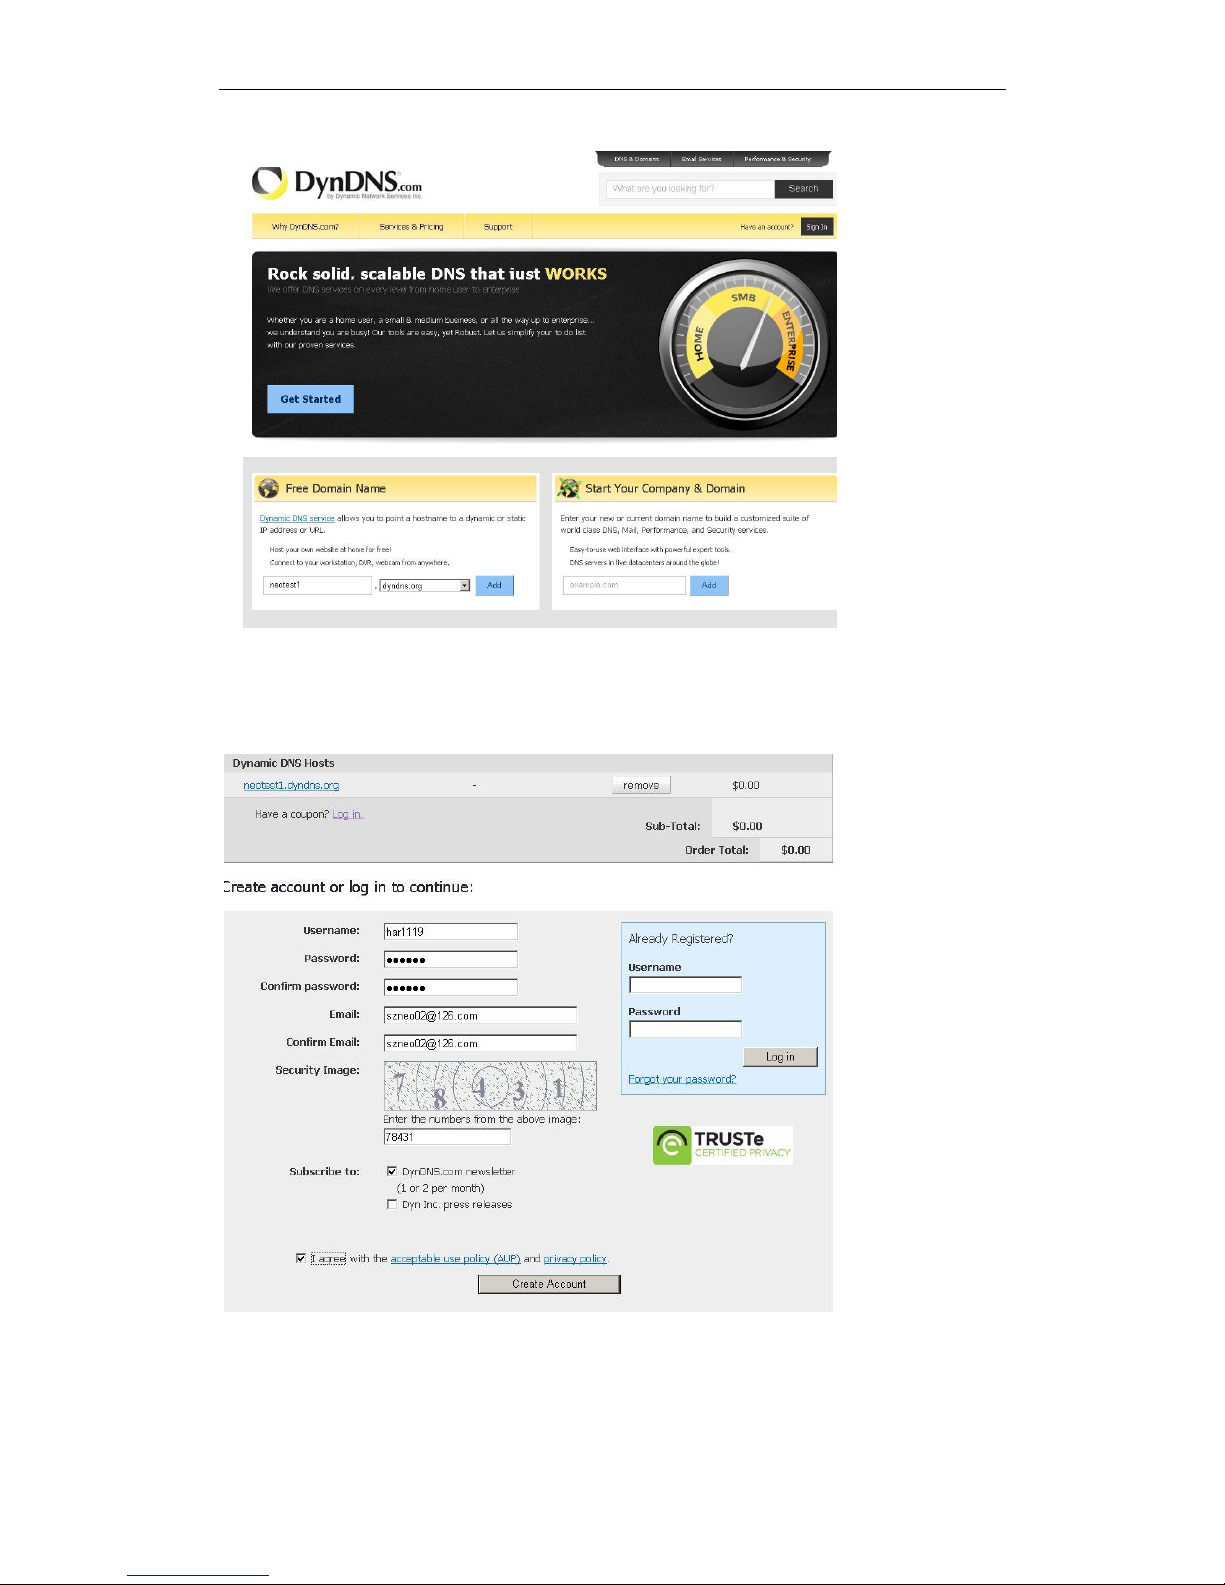
5.1.6 For example: Register procedure from a DDNS web
1.Users use DDNS management system first time.Users need to apply account
to manage and inquire the domain state.
Step1: enter http://www.dyndns.com/ and Create Account.( Fill in Domain
Name .dyndns.org then Click Add)
Page 54
IPCAM User Manual
54 / 67
Figure8.6
Step2: enter your information
Figure8.7
Page 55
IPCAM User Manual
55 / 67
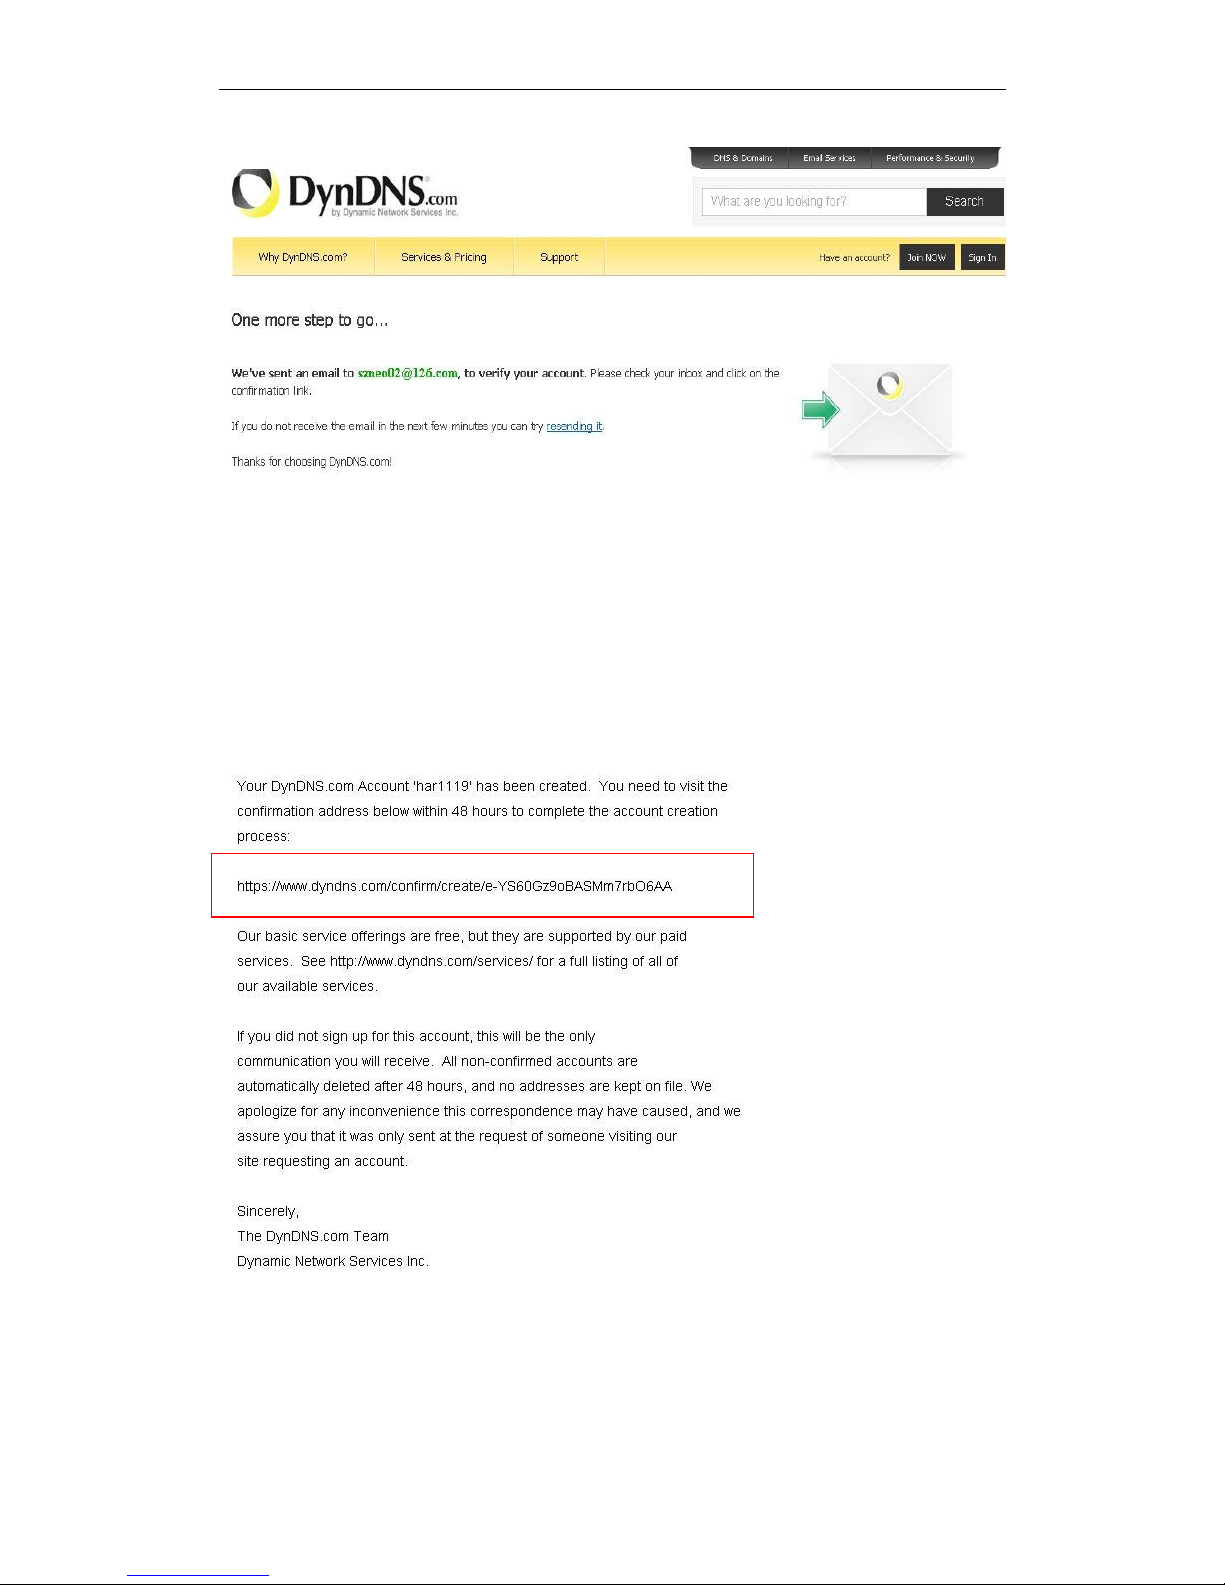
Figure8.8
Step3: After a minute, you will receive an E-mail from DynDNS Support and it will give
you a confirmation address
(e.g. https://www.dyndns.com/confirm/create/e-YS60Gz9oBASMm7rbO6AA
)
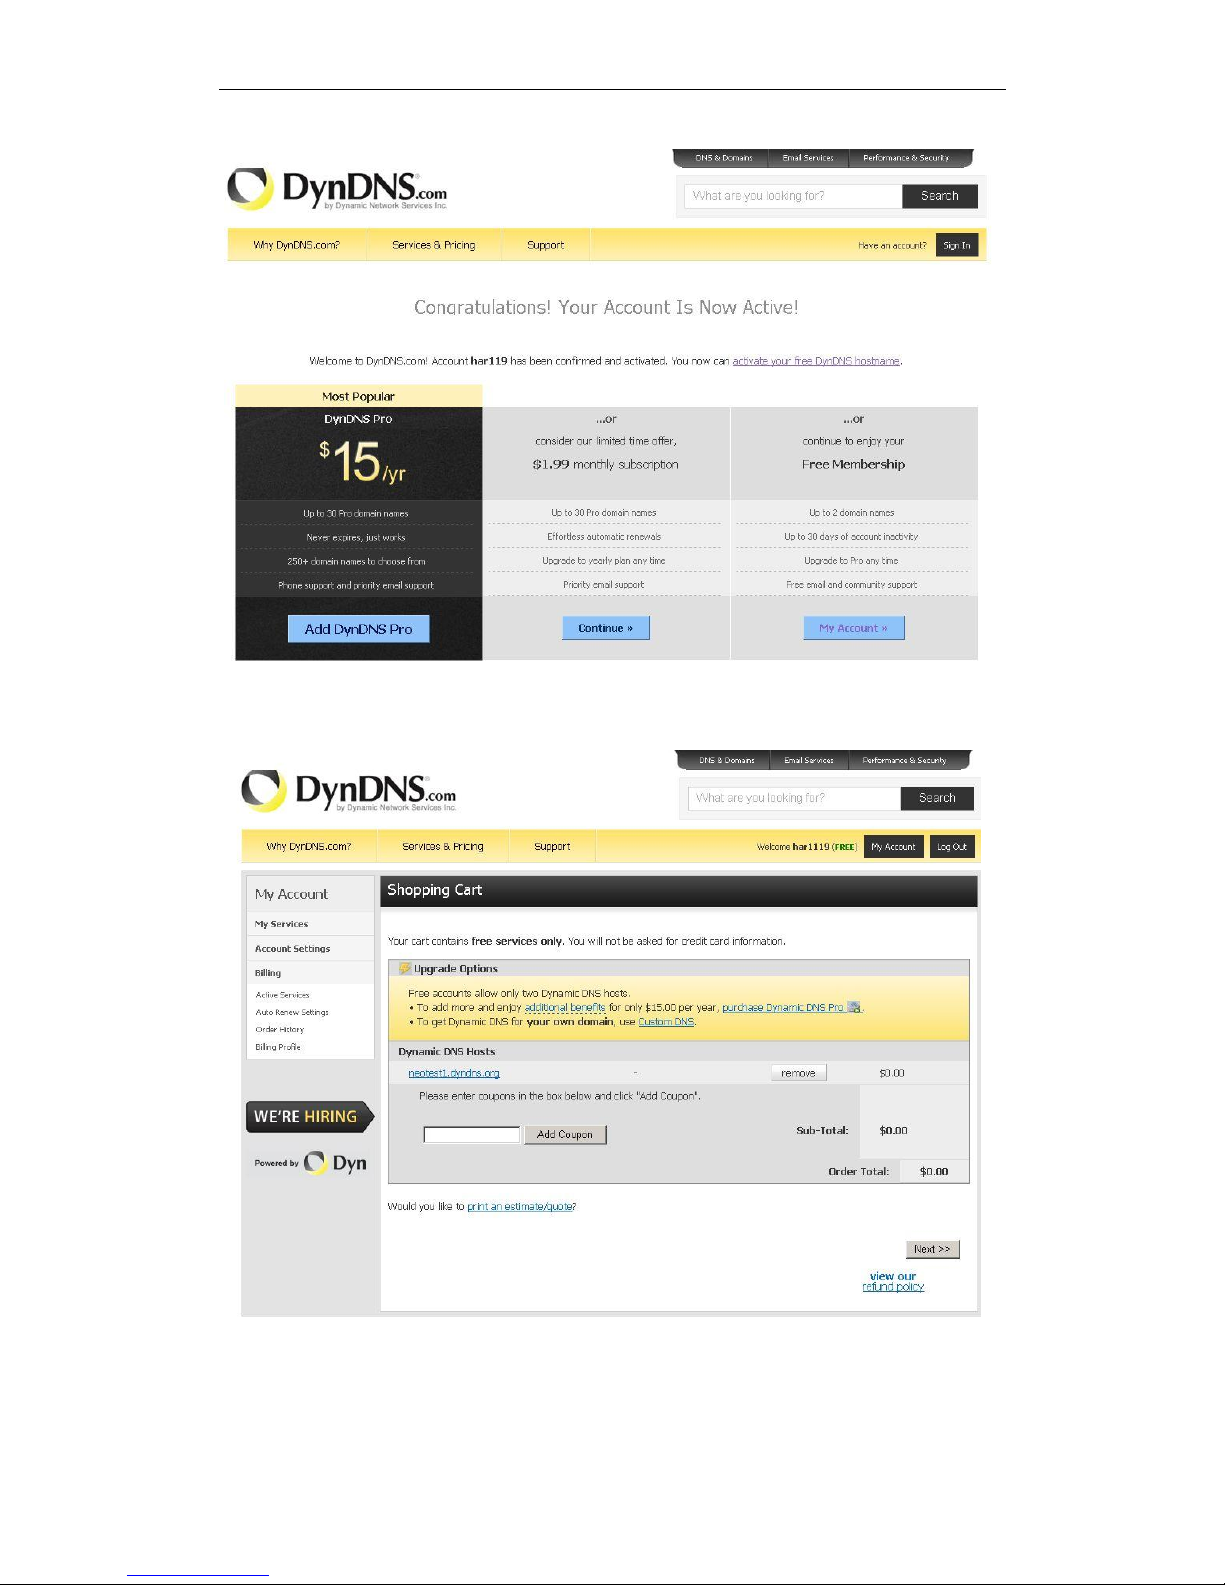
Step4: Open the link to active your Domain Name as below.
Page 56
IPCAM User Manual
56 / 67
Figure8.9
Figure9.0
Page 57
IPCAM User Manual
57 / 67
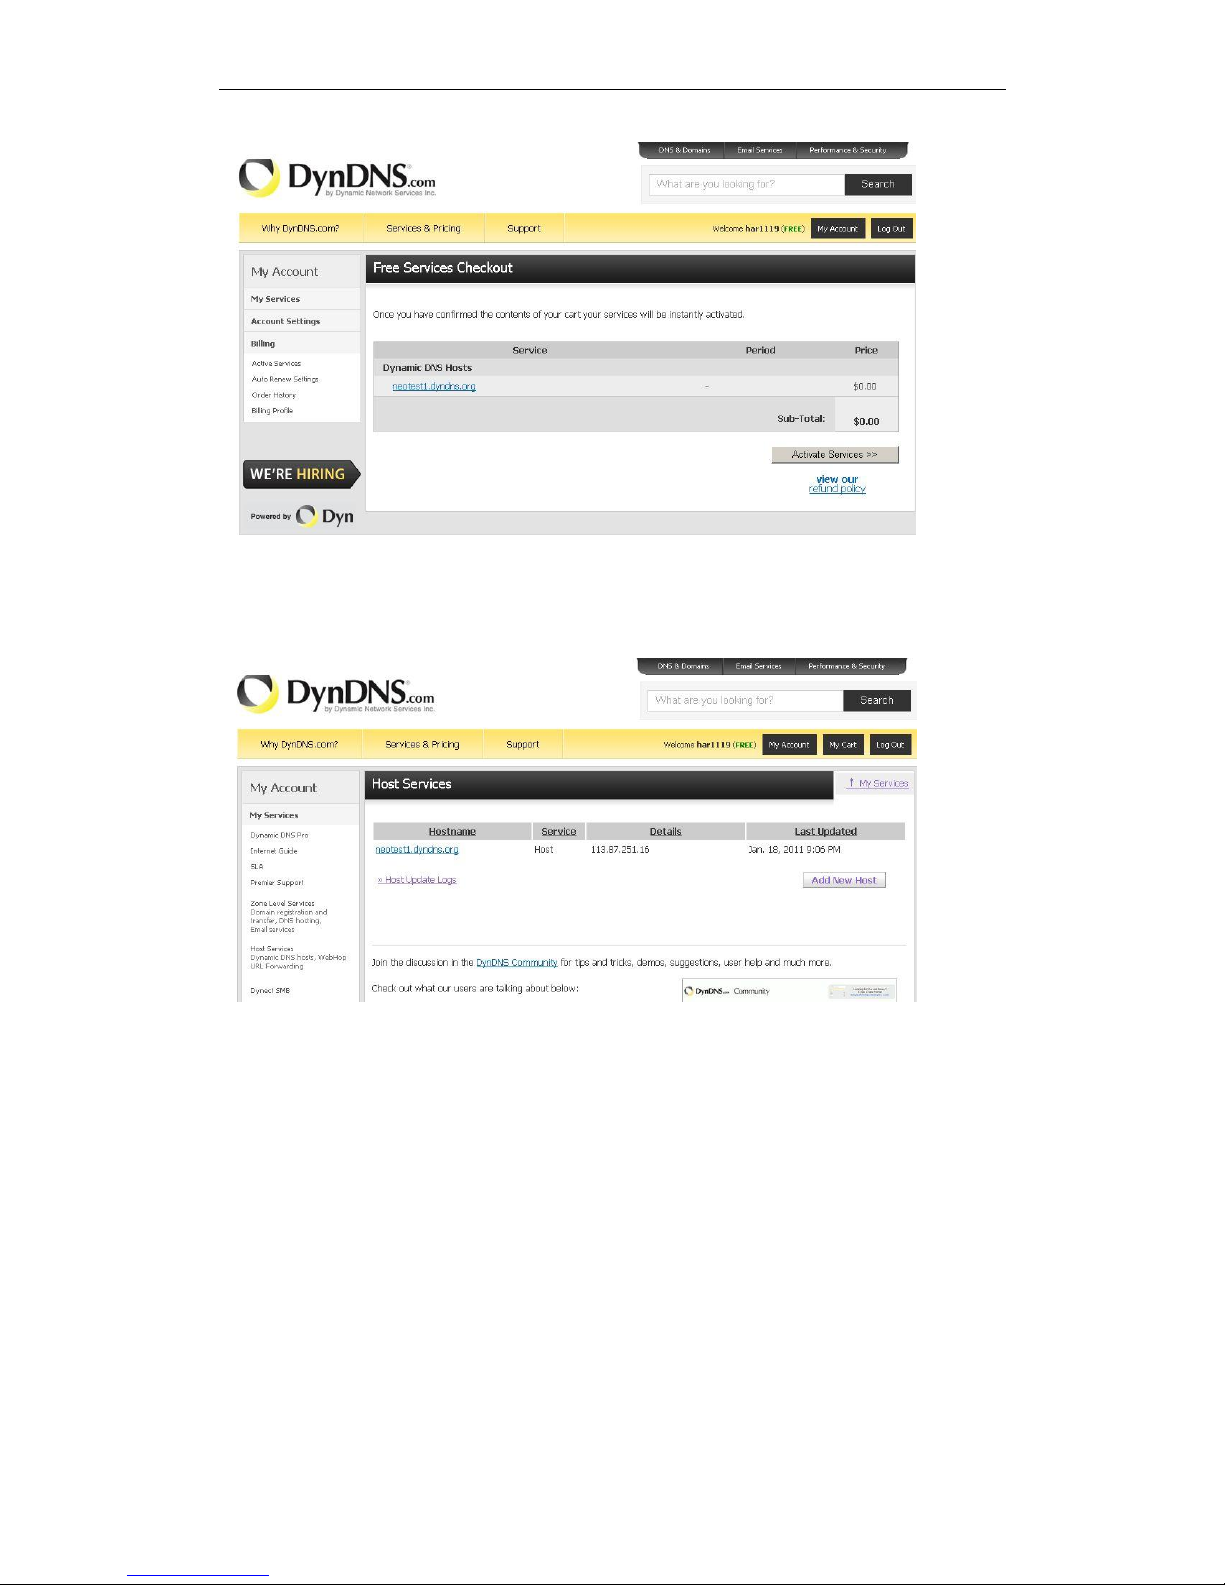
Figure9.1
Step6: Now you obtained a Dynamic Domain Name(Figure 8.4),and can use it in the
DDNS Service Settings(details: 3.5.4)
Figure 9.2
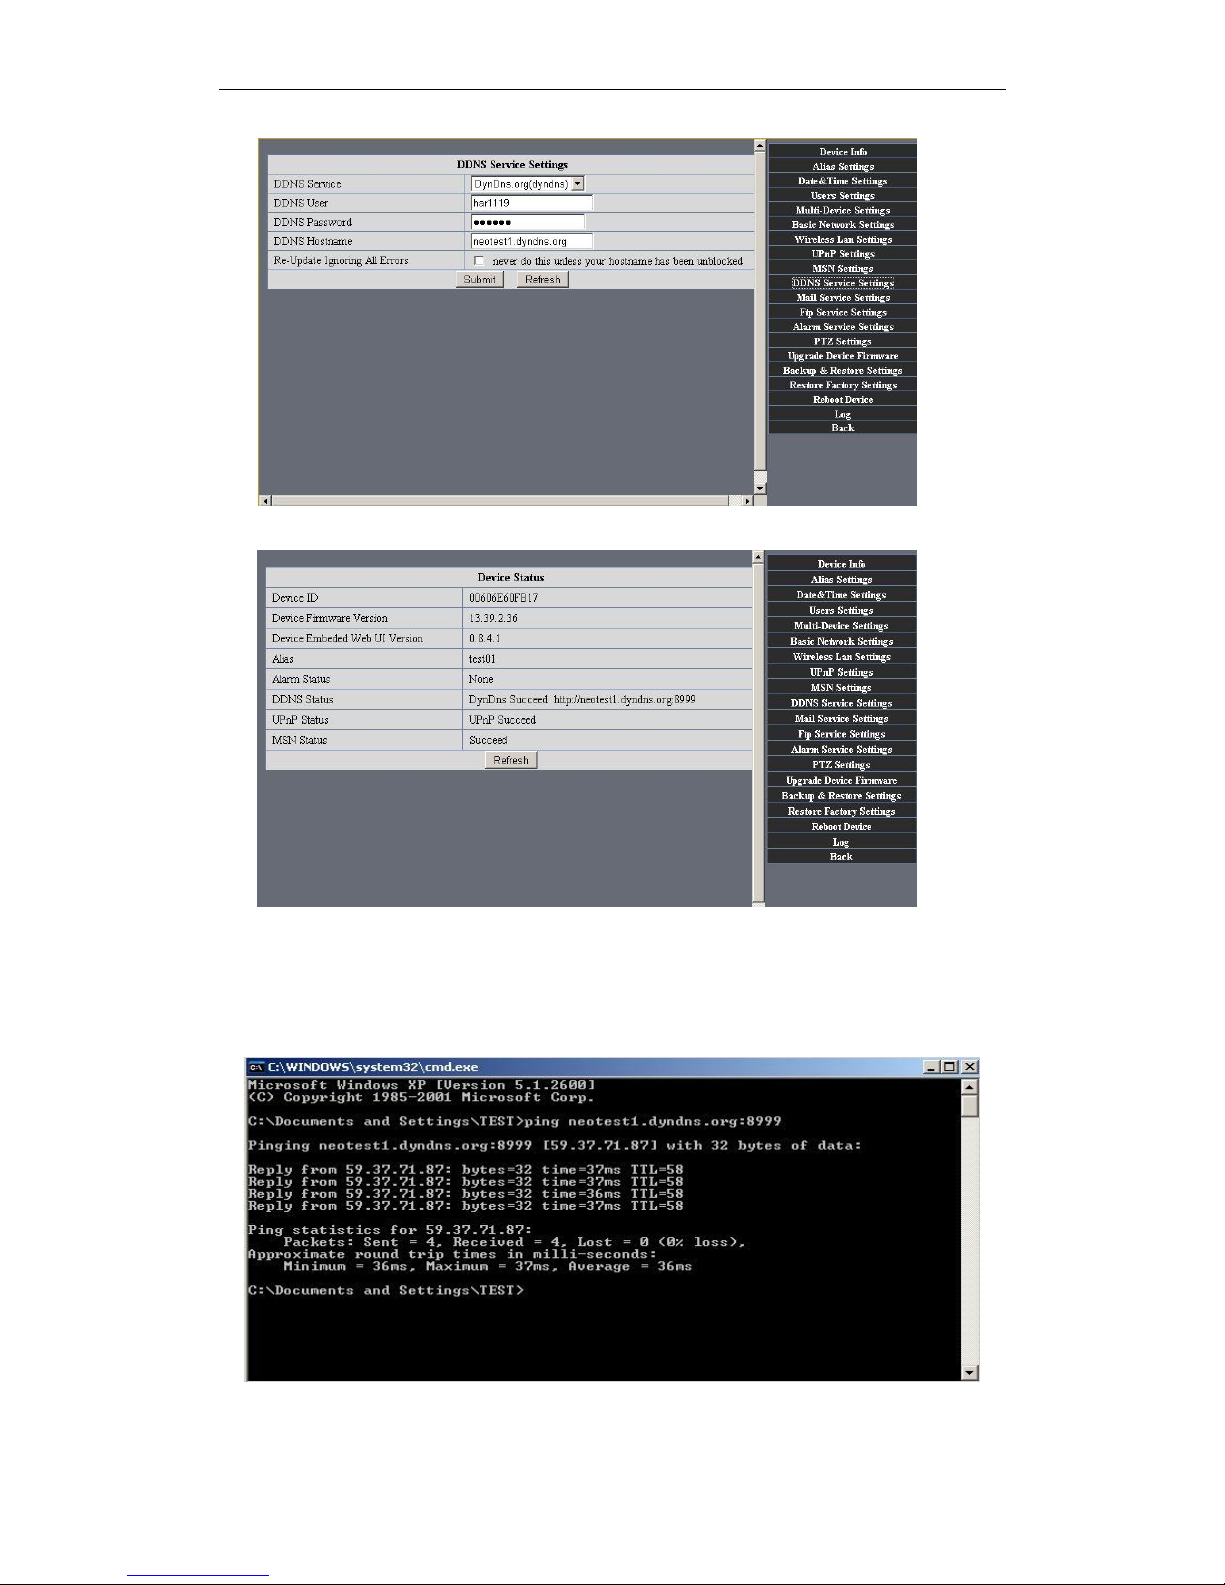
2. Fill the DDNS account you applied in DDNS Settings,If it success,it will
show as below
Page 58
IPCAM User Manual
58 / 67
Figure 9.3
Figure9.4
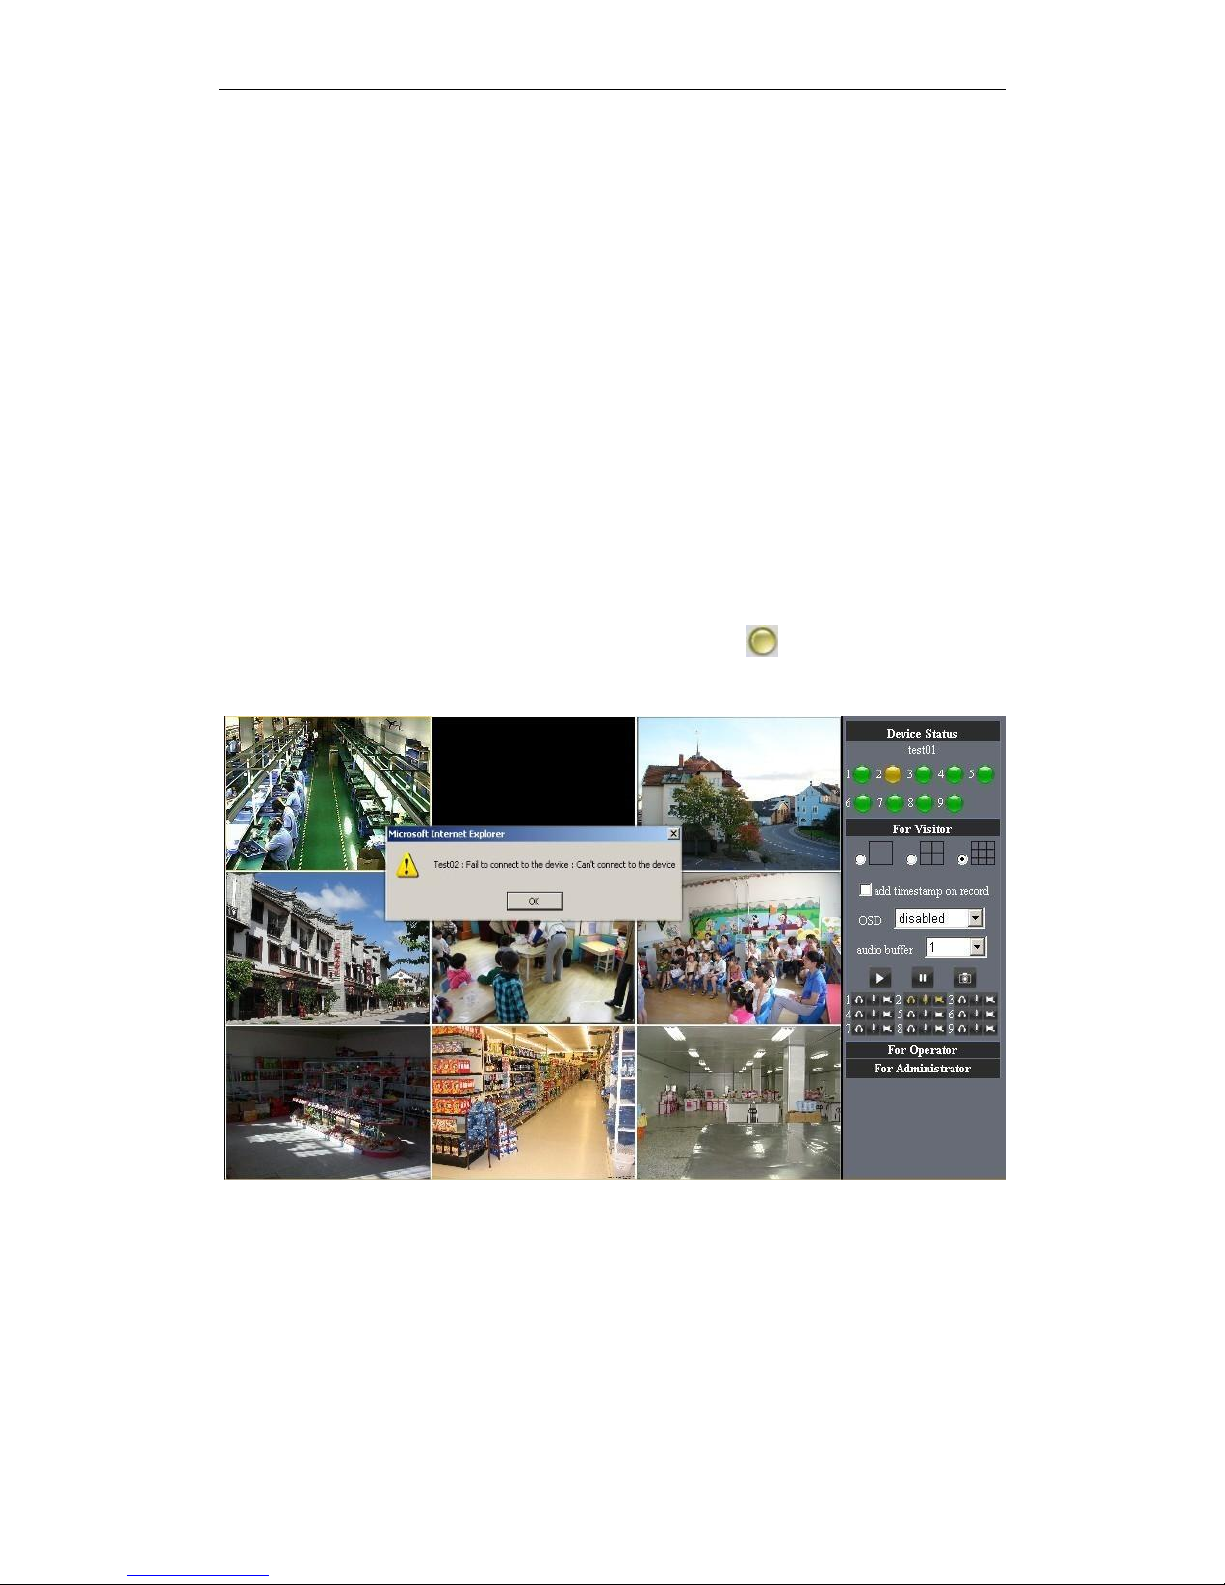
3. How to test whether DDNS is on-line?
Click Start > Running >input CMD then click Enter,test DDNS by PING as
below:
Figure 9.5
Page 59
IPCAM User Manual
59 / 67
The DDNS can return the web response information by PING.It tells you that
DDNS is on-line.If DDNS failed to update!There should be two
reasons:1)DDNS parameter Settings incorrectly.2) DNS address
configuration is wrong.
DDNS Service Operation:Creat Account > Login/Management > Setting up
DDNS > Configurate IPCAM parameter
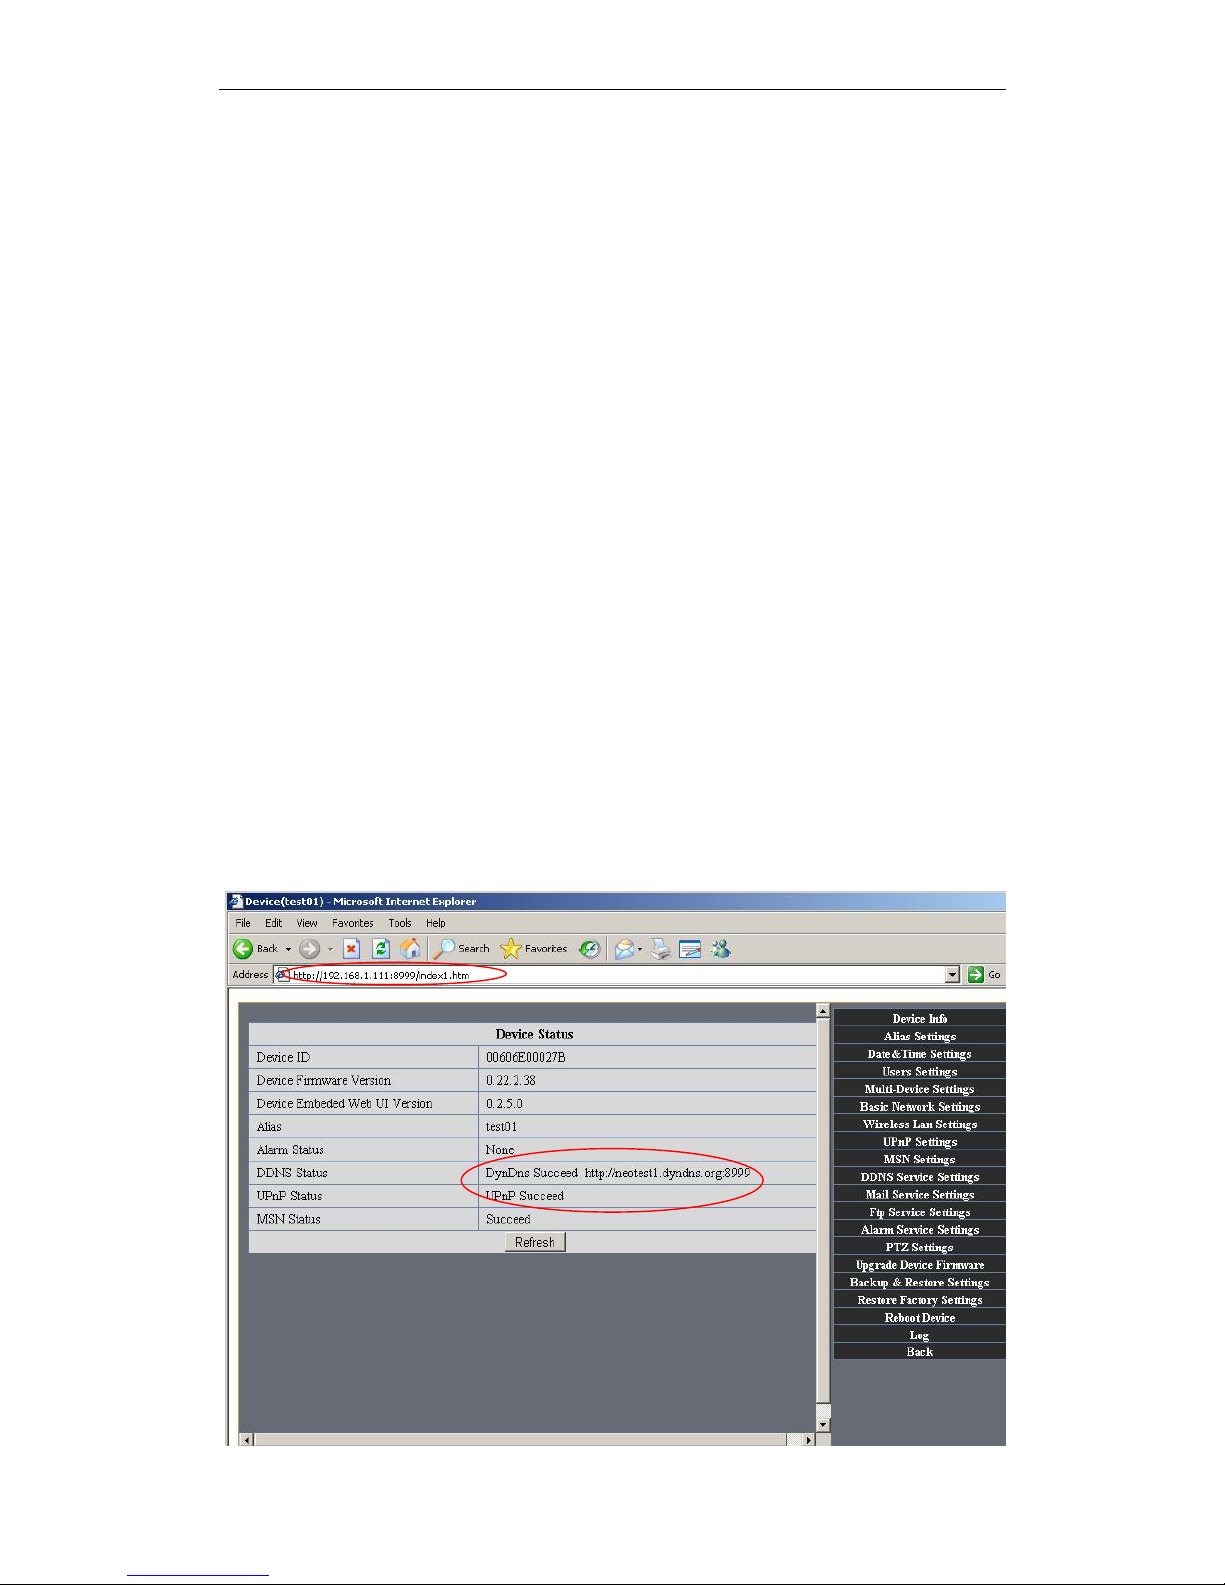
5.1.7 Why pop-up the prompt ”Fail to connect to the
device…”?
This prompt only appeared in the case of using multiple cameras.
Enter the Multi-Device Settings page(login as administrator) to check the
Device setting is correct or not.
When one of the multiple cameras disconnected, the color changed to
yellow and pop-up the prompt“Fail to connect to the device…”.
Figure 9.6
5.1.8 Can’t access the IPCAM in the internet?
There are some reasons:
1 ActiveX controller is not installed correctly(see more details:5.1.4).
2 The port IPCAM used is blocked by Firewall or Anti-virus software. Please change a
Page 60

IPCAM User Manual
60 / 67
port number and try again.
3 Port mapping is not success. You can do port mapping by two ways:
Enter setting page of the router which IPCAM connect with to enable UPnP function.
Enter IPCAM “UPnP Settings” to enable UPnP and make sure the state is “UPnP
success”.
If your router has the Virtual Map function. Enter router setting page, add IPCAM‟s IP
and port to the Virtual map list.
When use ADSL, the IP is dynamic. You should set DDNS(see more details 3.5.4 & 5.1.6)
and also make sure port mapping success.
5.2 Operate common problem solving
IP camera tool can’t find the camera?
Except of the camera broken
1. Make sure the cable connector no problem, recommend connector
(AMP),it is with international standard. Another note, IPCAM’s data
transmission channel require higher than computer’s, so maybe the
computer can run normally but IPCAM can’t, Please press heavily when
making the cable connector.
2. Confirm the power supply normally. First, check whether power indication
light turn on or not, If it is on,then check the yellow light on RJ45 Port
(power indication light) and green light (network indication light) are on or
not.If they are on,so power supply and cable runs normally.
3. Confirm all the firwall and antivirus software are close.The firewall often
block unrecognized data so if the firewall is running ,so maybe the IPCAM
TOOL can’t find the device.Suggest to close firewall and antivirus
software temporarily before searching.
How to solve the camera blank screen?
1. Check if you are using the wrong power adaptor.please use original
one.
2. Close antivirus software.
How to solve the camera can’t login by Internet?
1. Check if you set DDNS success or not?
2. Check the current IPCAM’s port number is the same as router’s?They
need to keep same.
Can’t view the monitoring picture
1. Reason: can’t connect with network
Solution:Check if the network connect well, exclude cable fault and PC virus
cause network fault until can be used between PC and PING.
Page 61
IPCAM User Manual
61 / 67
2. Reason:IP address occupy by other device
Solution: Choose automatic gain
3. Reason: IP address located within different subnet
Solution: Check IPCAM’S ip address and subnet mask address and gateway
settings.
Reason:Web port has been modified
Solution:contact network administrator to obtain port information.
4. Reason:unknown
Solution:Press reset button to factory default state,then reconnecting.systen
default to gain ip address automatic,subnet mask is 255.255.255.0
5.3 IPCAM special use
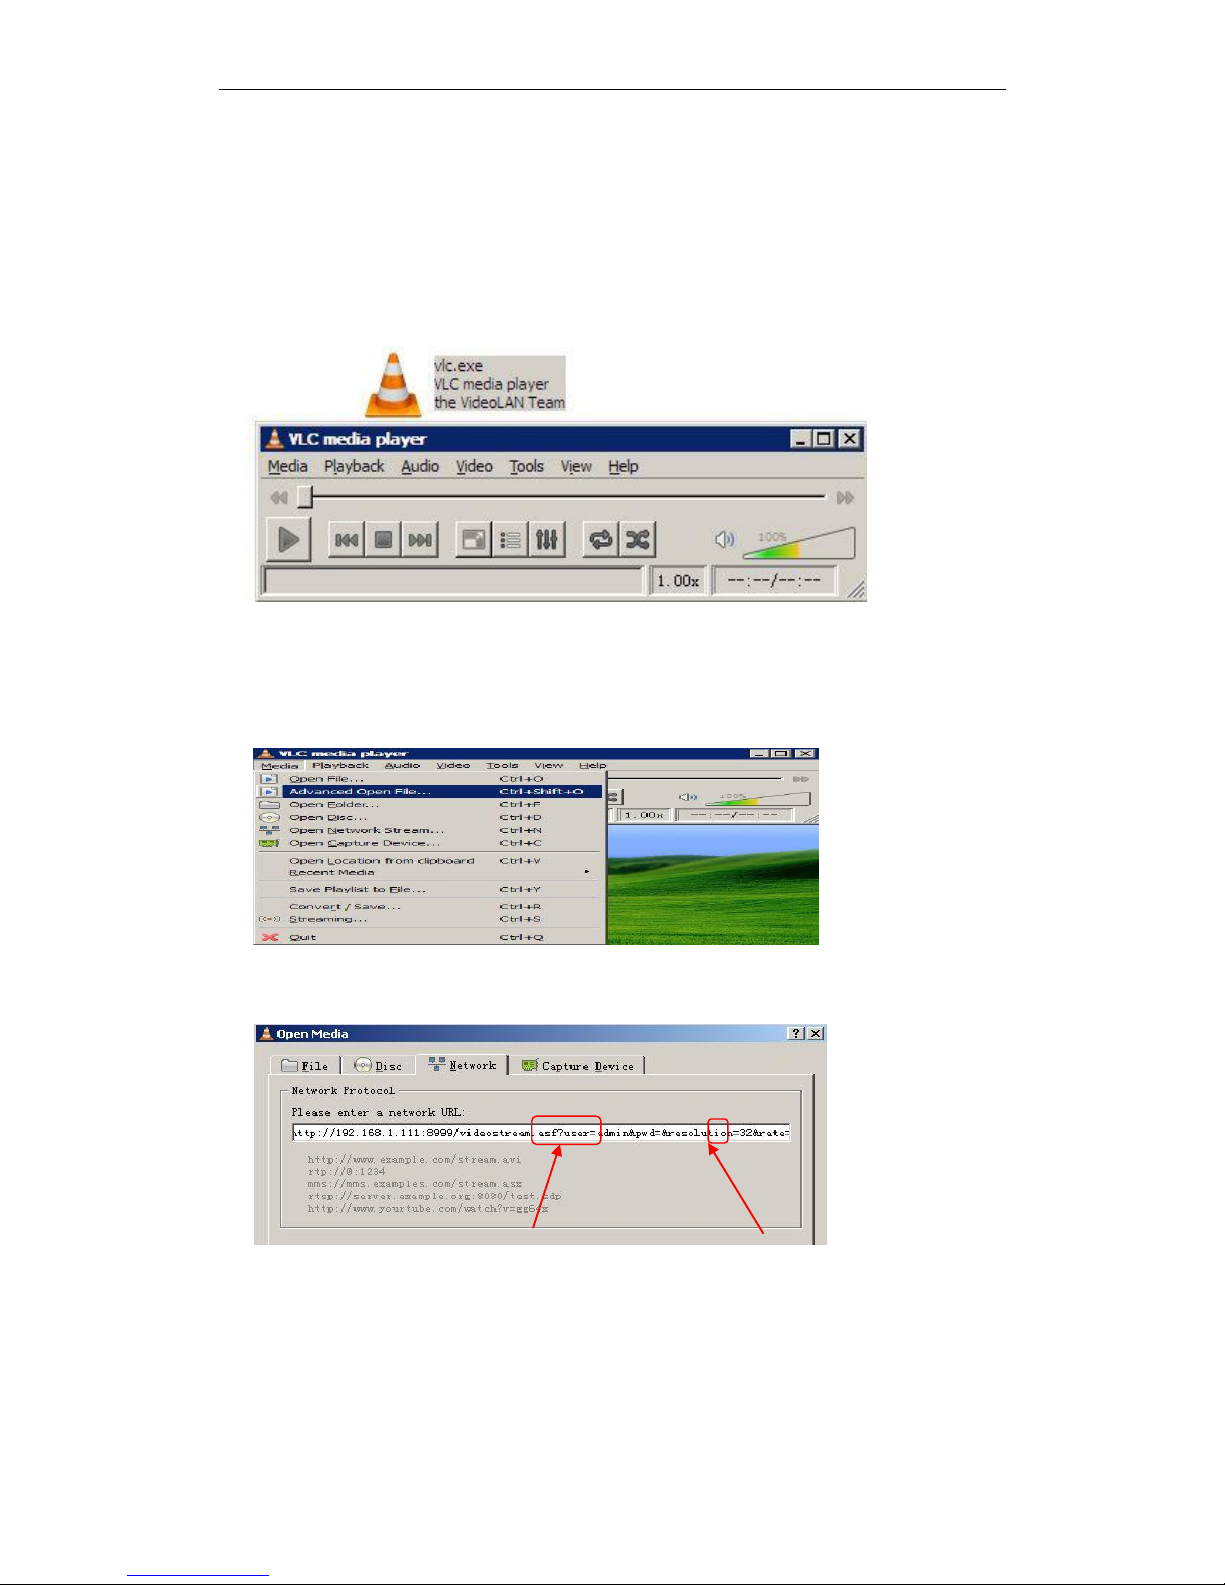
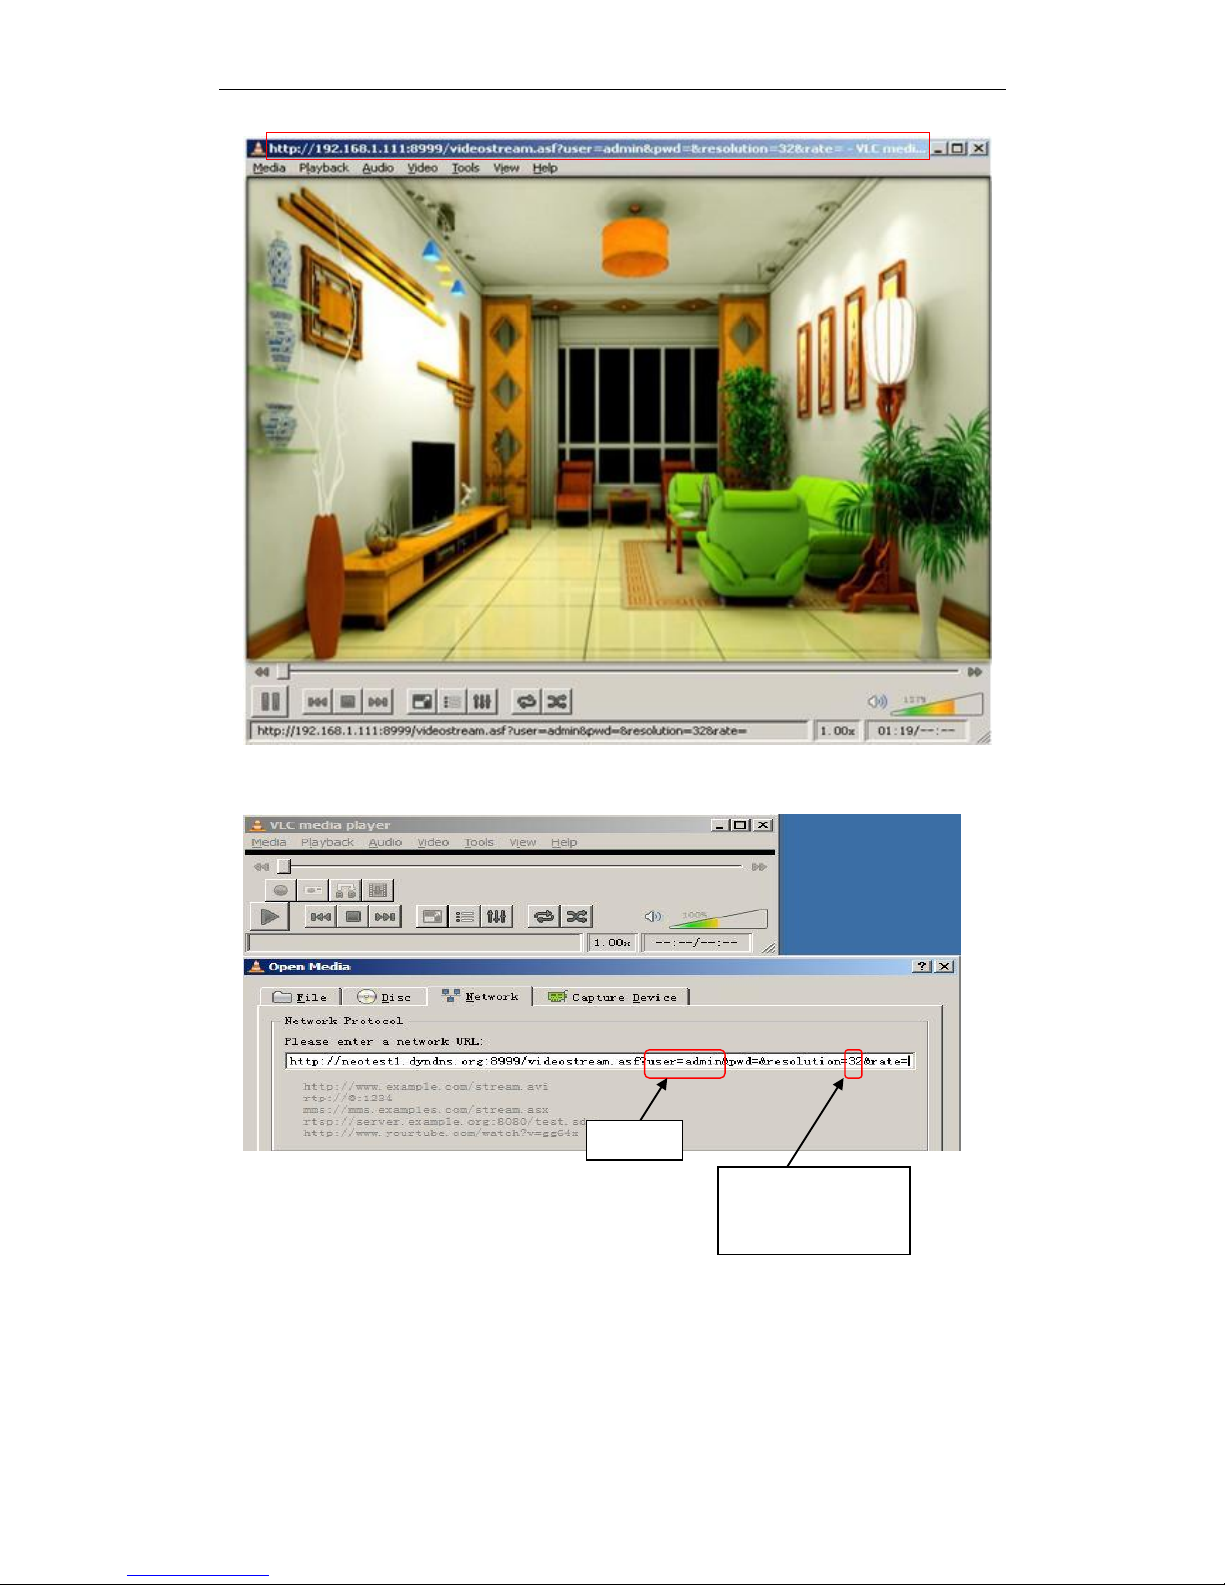
5.31 Use vlc player and mplayer to play ip camera audio data prompt.
(parameter:
/videostream.asf?user=&pwd=&resolution=&rate=)
Show as below:
Page 62
IPCAM User Manual
62 / 67
Figure 9.7
As figure 8.8 shows IPCAM current ip address is http://192.168.1.111:8999
Internet ip address is http://szneo1.dyndns.org:8999,you can view video of
IPCAM by inputting ip address.
Figure 9.8
Open broadcast position by “VLC media player”:
Figure9.9
LAN broadcast address:
Figure10.1
Page 63
IPCAM User Manual
63 / 67
Figure 10.2
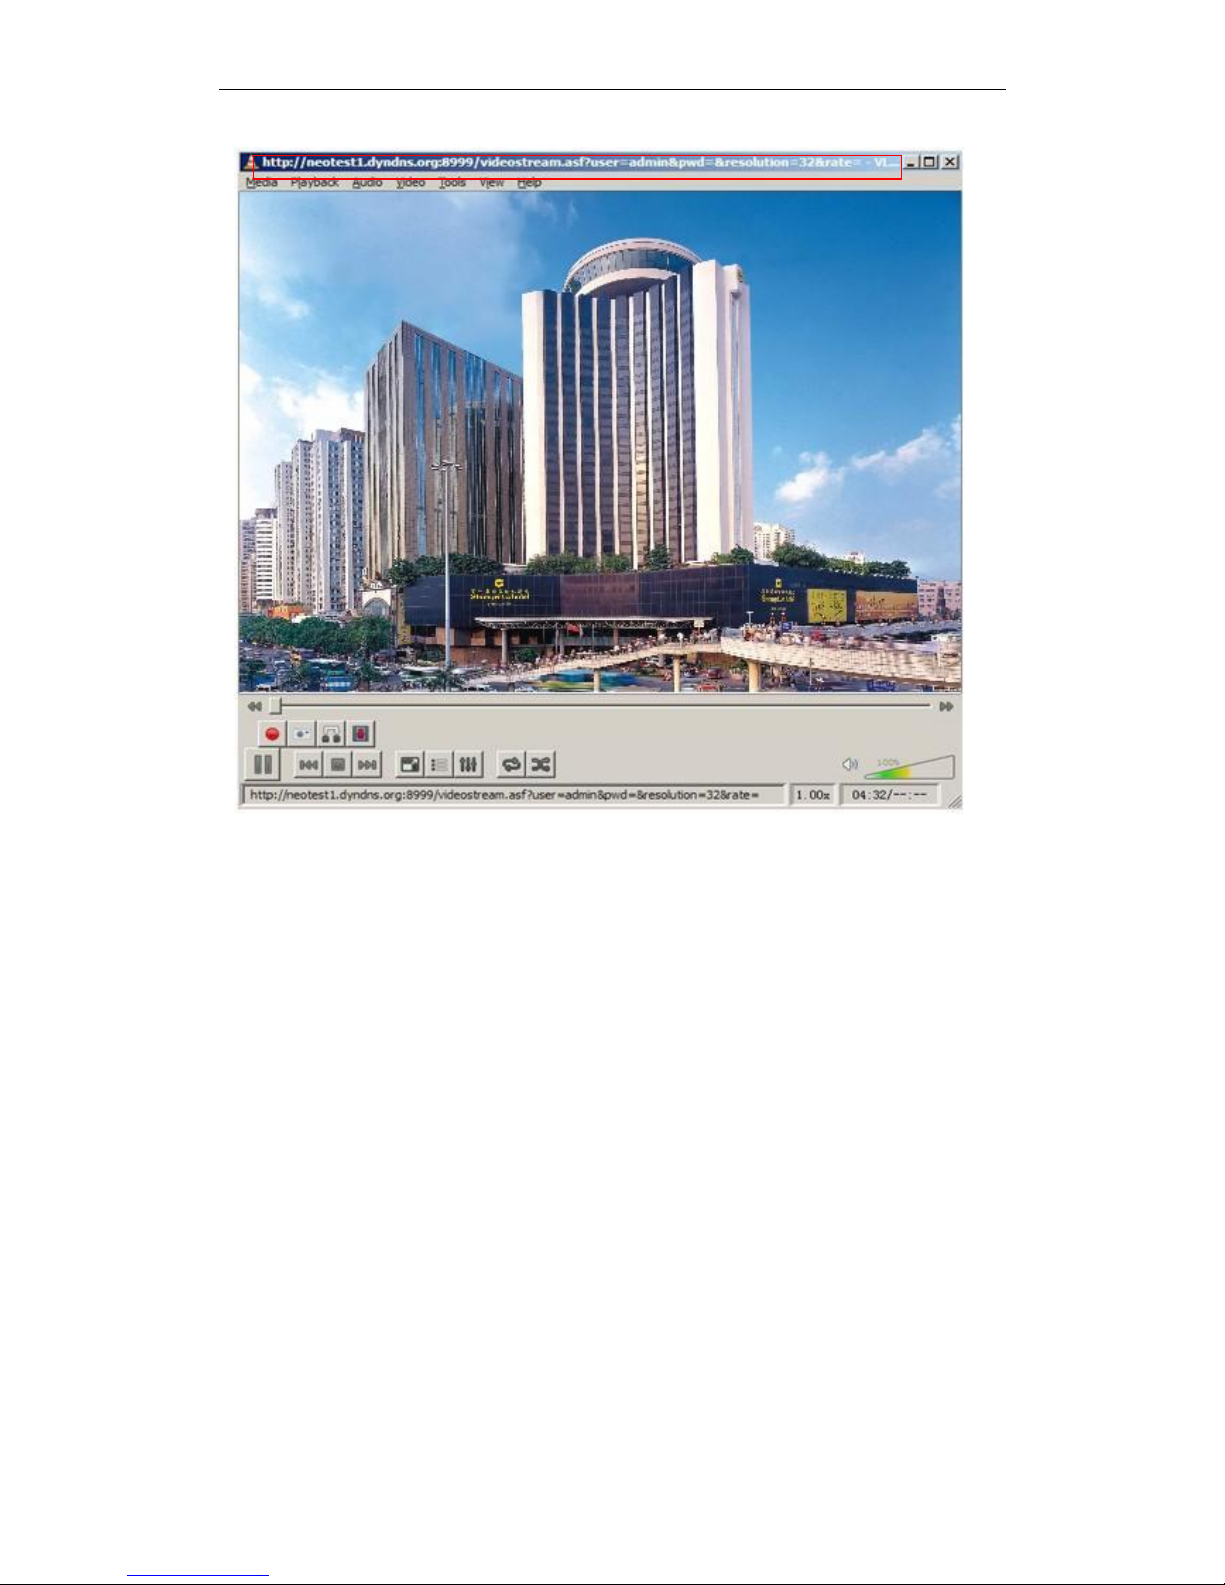
Open the Internet play position:
Figure10.3
Watch ip camera send streaming format video as show below:
User
Resolution:640x4
80
Page 64
IPCAM User Manual
64 / 67
Figure 10.4
5.32 Set the camera miscellaneous parameters
Grammar:
/set_misc.cgi?led_mode=&ptz_center_onstart=&ptz_auto_patrol_interval
=&ptz_auto_patrol _type=& ptz_patrol_h_rounds=&
ptz_patrol_v_rounds=& ptz_disable_preset=&user=&pwd=&next
Parameter:
led_mode:0:mode;1:mode;2: turn off indicator light
ptz_center_onstart:
ptz_auto_patrol_interval: =0:doesn’t auto patrol interval
ptz_auto_patrol_type:0:None;1:horizontal; 2:vertical;3:horizontal &vertical
ptz_patrol_h_rounds:
ptz_patrol_v_rounds:
ptz_patrol_rate:
ptz_patrol_up_rate:
Page 65

IPCAM User Manual
65 / 67
ptz_patrol_down_rate:
ptz_patrol_left_rate:
ptz_patrol_right_rate:
ptz_disable_preset:
5.4 Default Parameters
Default network Parameters
IP address: dynamic obtain
Subnet mask:255.255.255.0
Gateway: dynamic obtain
DHCP: Disabled
DDNS: Disabled
Username and password
Default administrator username: admin
Default administrator password : No password
5.5 Specification
ITEMS
IP CAM
Image Sensor
Image Sensor
1/5" Color CMOS Sensor
Display
Resolution
640 x 480 Pixels(300k Pixels)
Lens
f: 3.6mm, F:2.4 (IR Lens)
Mini.
Illumination
0.5Lux
Lens
Lens Type
Glass Lens
Viewing Angle
67Degree
Video
Image
Compression
MJPEG
Page 66

IPCAM User Manual
66 / 67
Image Frame
Rate
15fps(VGA),30fps(QVGA)
Resolution
640 x 480(VGA), 320 x 240(QVGA)
Flip Mirror
Images
Vertical / Horizontal
Light Frequency
50Hz, 60Hz or Outdoor
Audio Function
Two-way Talk
Video
Parameters
Brightness, Contrast
Communication
Ethernet
One 10/100Mbps RJ-45
Supported
Protocol
Supported
Protocol
HTTP,FTP,TCP/IP,UDP, SMTP, DHCP, PPPoE,
DDNS,UPnP, GPRS
Wireless
Standard
IEEE 802.11b/g
Data Rate
802.11b: 11Mbps(Max.) 802.11g: 54Mbps(Max.)
Wireless
Security
64/128-bitWEP Encryption
Physical
Pan/Tilt Angle
Horizontal:270° & Vertical: 90°
Infrared Light
10 IR LEDs, Night visibility up to 10 meters
rm Input
1 Channel on/off input
Alarm Output
1 Channel relay output
Product size
110(L) x100(W) x130mm(H)
packing size
215x165x123mm
Carton size
62.5X23X18.5 cm
Q'ty
10pcs/CTN
Weight
N.W:6.7kgs;G.W:7.8kgs
CBM
0.068CBM/CTN
Power
Power Supply
DC 5V/2.0A
Power
Consumption
5 Watts (Max.)
Environment
Operate Temper
0° ~ 55°C (14°F ~ 122°F)
Operating
Humidity
20% ~ 85% non-condensing
Page 67

IPCAM User Manual
67 / 67
Storage Temper
-10°C ~ 60° (14°F ~ 140°F)
Storage
Humidity
0% ~ 90% non-condensing
PC Requirements
CPU
2.0GHZ or above (suggested 3.0GHz)
Memory Size
256MB or above (suggested 1.0GHz)
Display Card
64M or above
Supported OS
Microsoft Windows 2000/XP/Vista/window7
Browser
IE 5.0,IE 6.0, IE7.0, IE8.0, firefox2.0, firefox3.0 or
other standard browsers
Certification
CE,FCC,ROHS
Warranty
Limited 1-year warranty
 Loading...