

Page 1
Mini Wireless Keyboard
with IR Remote
Model: KP-810-18R
Page 2

1.Intr oduction:
Mini wireless keyboard with IR remote, named as iPazzPort, combo
of wireless keyboard, mouse touchpad, and remote for other home electric
appliance, is designed small and portable, it is widely used for:
■ people who need to be apart from their personal computer and yet
control it for their training, teaching, presentation, lecturing.
■ Multi media home theater, people can sit in their easy chair or sofa even
in bed to enjoy the film, music, surf the internet instead of change its
channel physically.
■ Remote of other home electric appliance, such as DVD PLAYER, CD
PLAYER, TV, Air Conditioner, with the feature of IR learning, Mini Air
Mouse and Keyboard can quickly learn original code from other home
electric appliance remote
English
2.Package:
Mini Wireless Keyboard with IR Remote
USB Receiver
USB cable for recharge the unit
User manual
3.Feature and spec ification s:
■R.F 2.4G connection
■ rechargeable lithium-ion battery
■backlit for operation in darken room
■Plug and play
■Ultra sensitive mouse touchpad
■Battery capacity: 400mA
■charge voltage: DC 5V/300mA
■standby time: 800 hours
■QWERTY keyboard
■Built-in Laser pointer
■ quick learning original code from other remote
■ Size: 163mm*60mm*12mm
4.System requirement:
- Windows 2000/XP/ vista/ 7/win CE
- lINUX
-Android
- Mac
Page 3
English
How to use
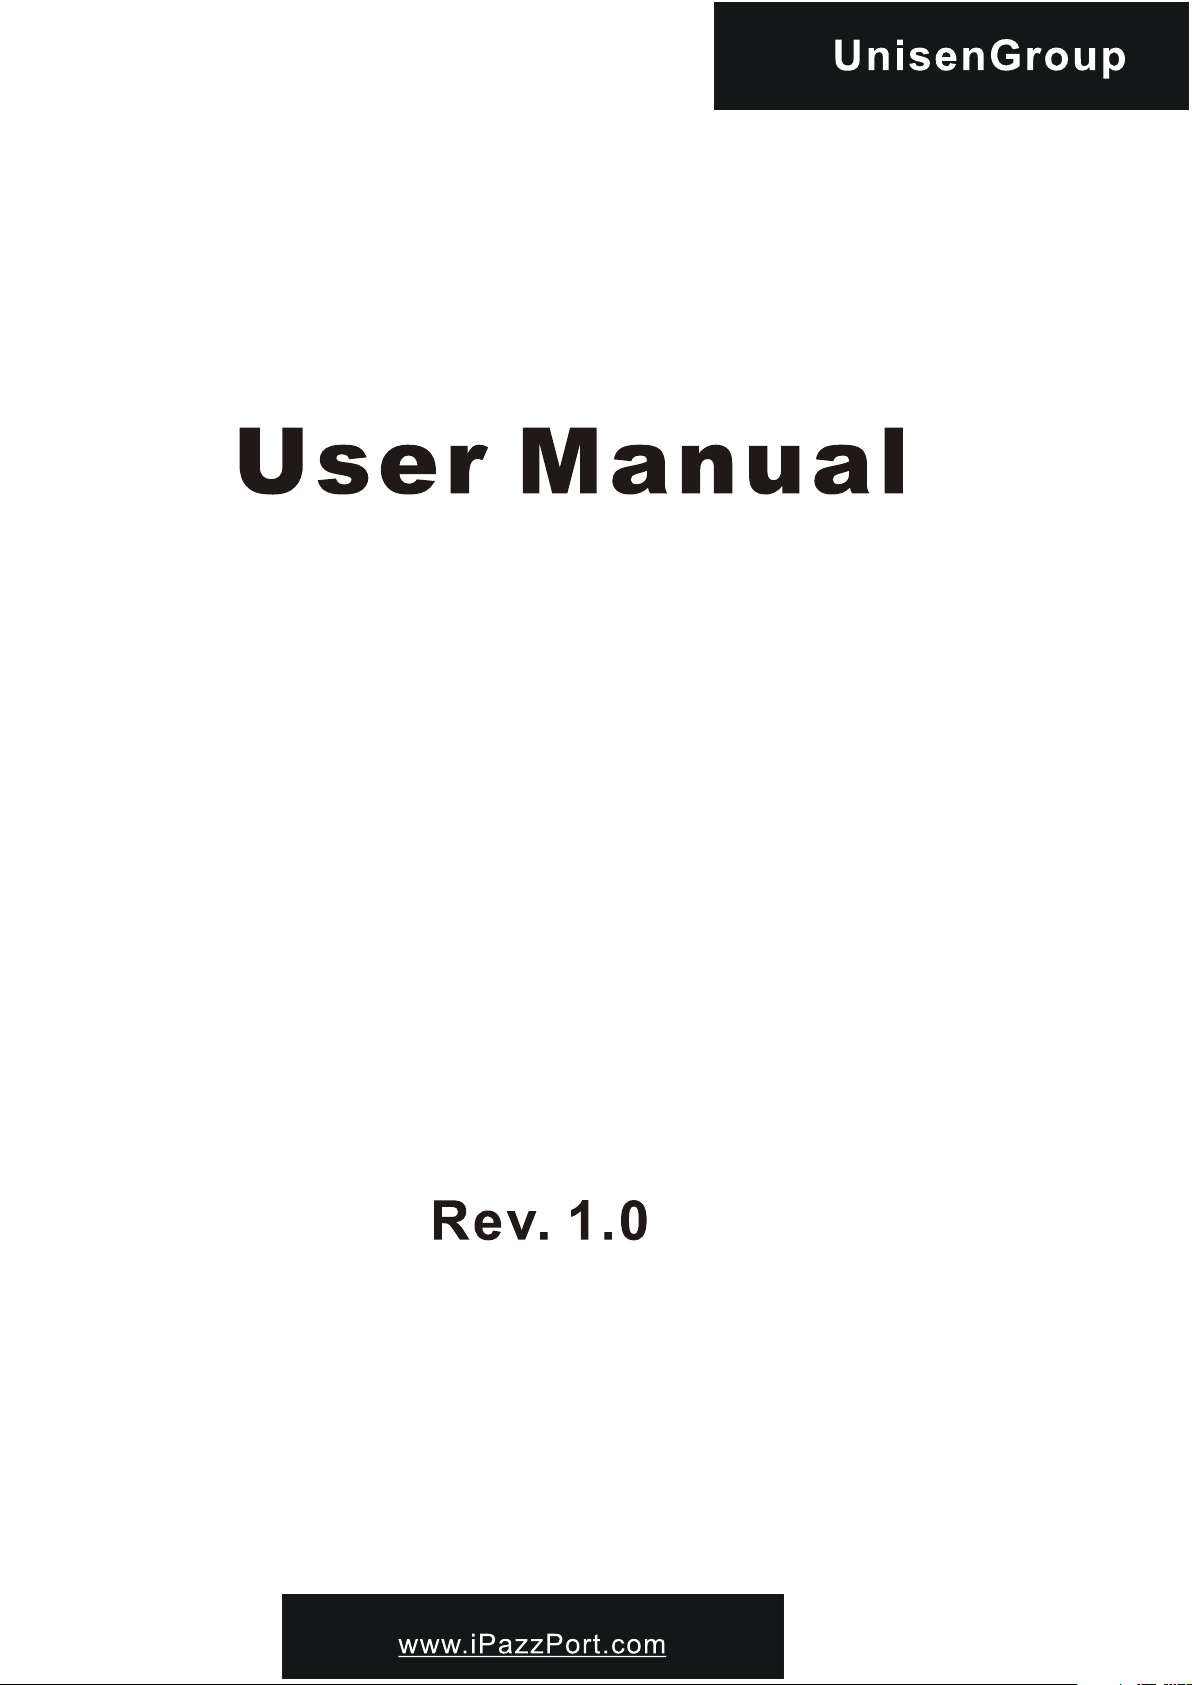
1. Lift up back case from the bottom, and take USB Receiver out, Insert
USB rceiver into USB port on the computer
USB RECEIVER
Battery cover
1.press and push battery
2. Take USB Receiver out
cover downward
2. Turn unit on by switching power button to on, LED will flash one time
then go out.
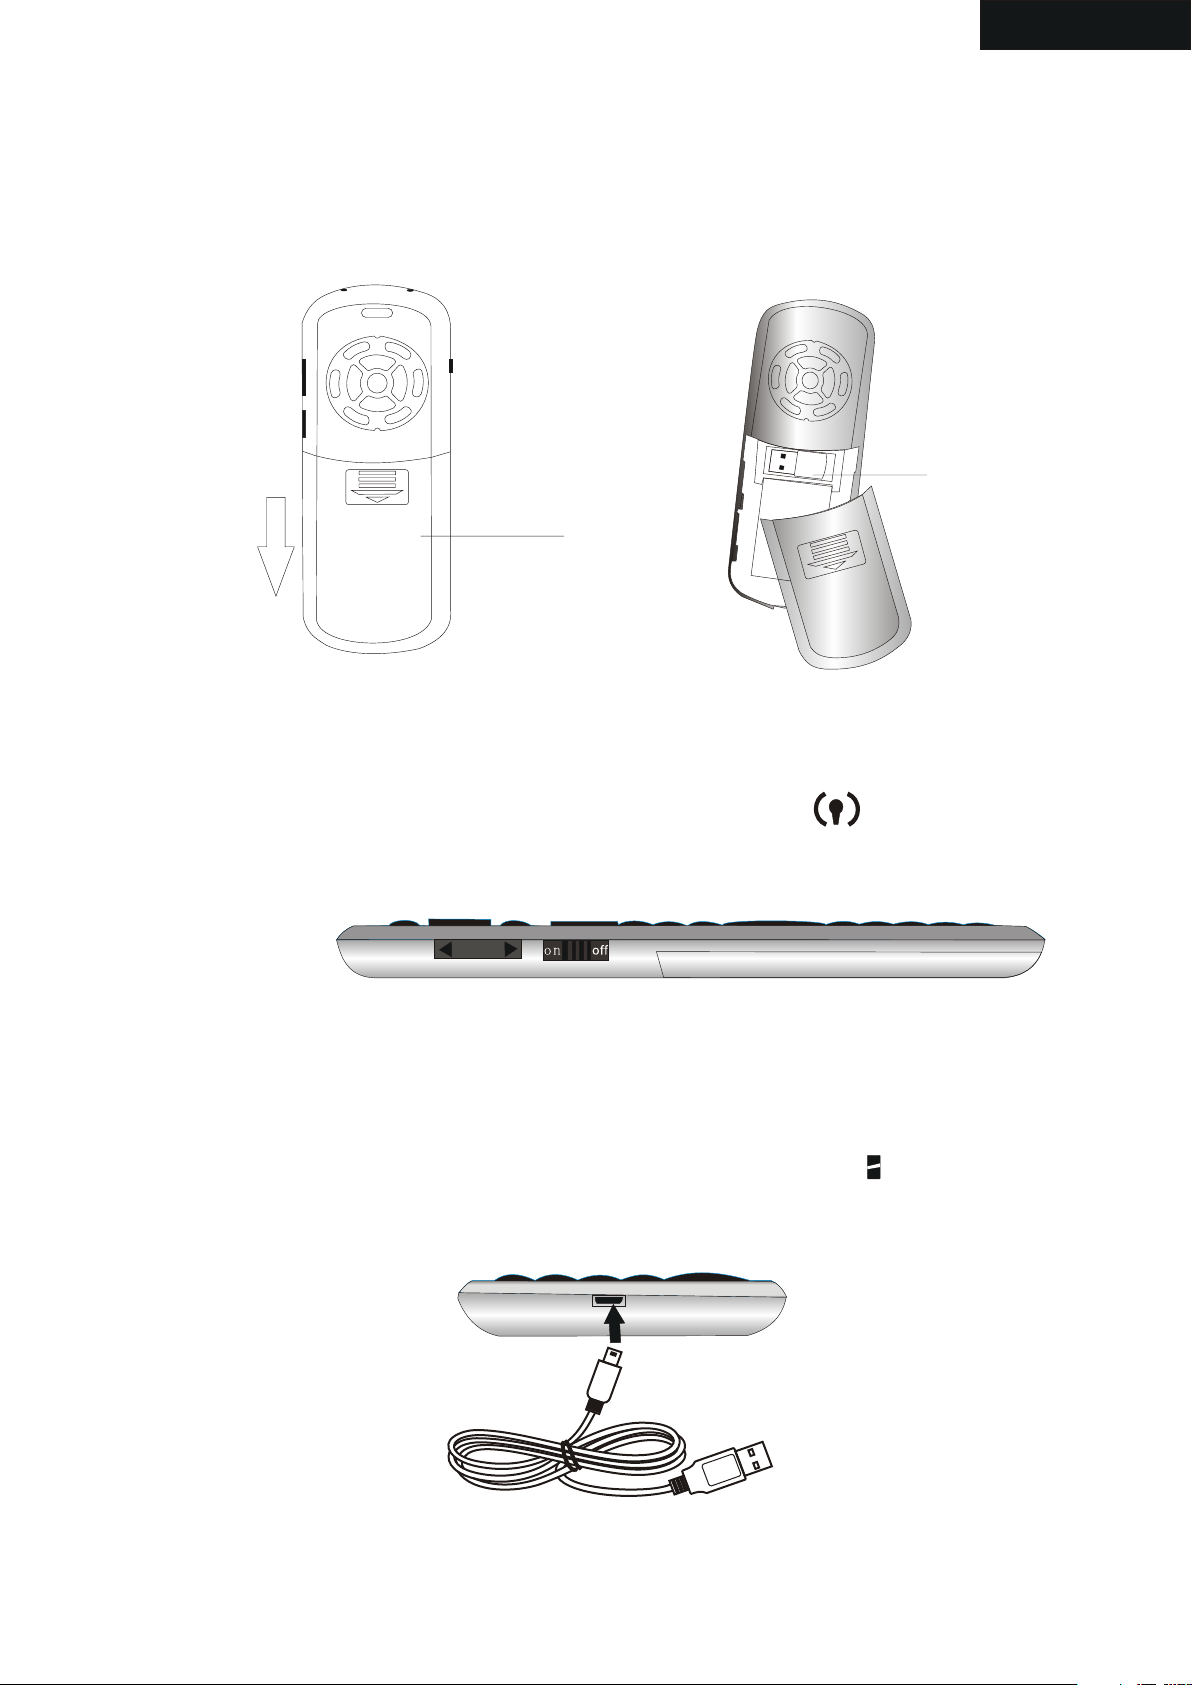
2.right view
3. Recharge your keyboard: when your keyboard backlit flash without any
operation that means your keyboard is in low charge, and need to recharge
connect your keyboard to your computer with mini end of USB cable to
your keyboard and another end to computer, then led will light up with
steady on, and go out when it is fully recharged.
3. Bottom view
Page 4
English
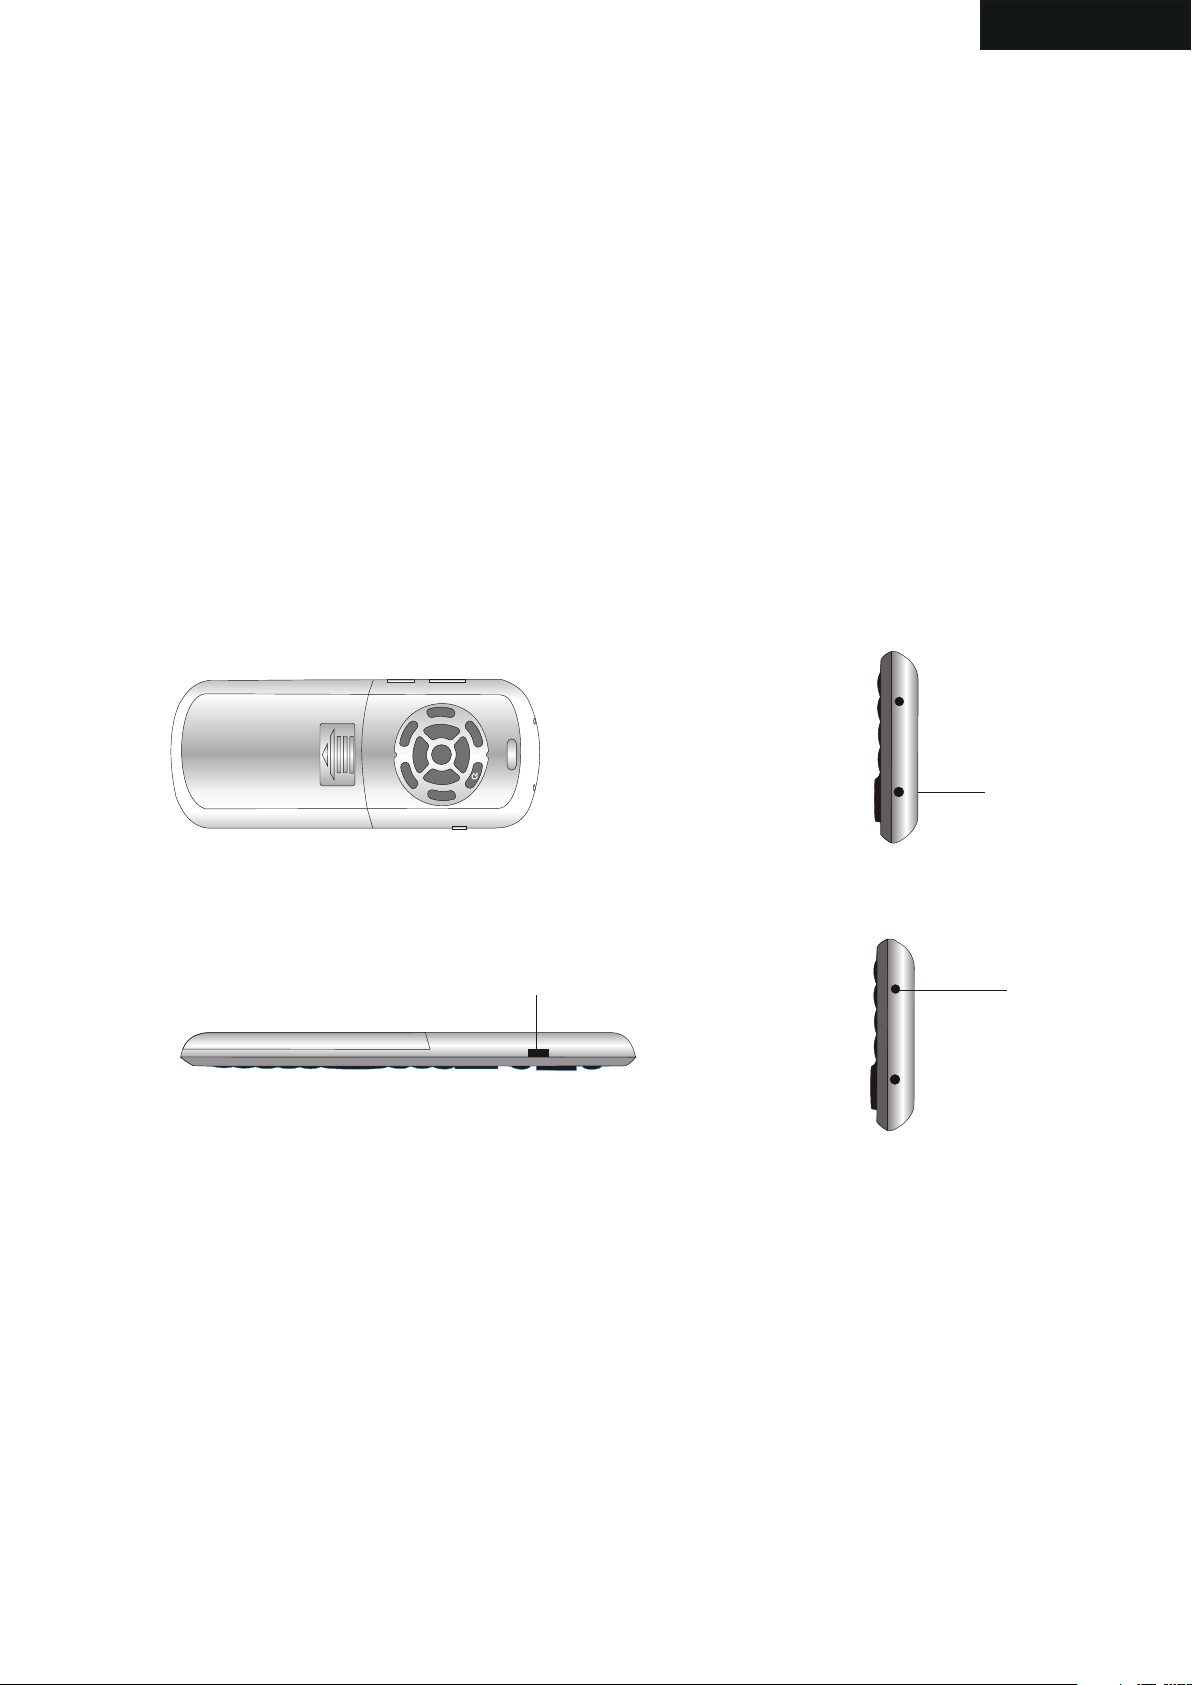
4. Feature of IR lear ning:
with feature of IR learning, this Air Mouse and Keyboard can be used as remote for other
home electric appliance, such as DVD/CD player, TV, air conditioner, refrigerator. In order
to be a remote for other electric appliance, Air Mouse and Keyboard must learn the original
code from other electric appliance, take TV remote as an example:
4.1 set the device to be learned by pressing key “AV” or “TV”, if you want to learn TV Remote
please press key TV, LED blue will flash, if AV, LED orange will flash
4.2. Press key “set” for about 2 seconds till LED on to enter learning mode, then tap the key
you want and LED will flash one time then light on that means keyboard is waiting signal
to learning.(LED will go out and quit learning mode if no operation within 10seconds)
4.3. Approach TV remote to keyboard within 10mm by aiming them at IR Emitter, press KEY
on the TV remote for about 1 seconds, then release this key and you will see LED on the
keyboard flash 3 time quickly then light up with a steady on, that means your keyboard
has learned the original code of the TV Remote successfully.
4.4. Repeat step 4.2 and 4.3 to complete other key original code learning.
4.5. Press key “set” to save and quit learning mode when all key finish original code learning
MENU
V L
A
O +
V
TV
5. Back view
SET
C
CH
H
OK
+
-
VOL
Inpu t
-
IR sensor
6. Top view
5. Laser pointer : press laser button to activate laser and release it to shut off.
7. Left view
Laser button
8. Top view
Laser head
6. Change operation directions:
As we know, some times, we want to operate the wirelss keyboard vertically, and some
times horizontally, when operation direction is changed from vertical to horizontal, but
touchpad will not, for example, supposed you operate unit vertically, and you slide your
finger on the touchpad vertically, the mouse cursor on the screen of computor will move
vertically but when operation direction is changed from vertical to horizontal, when you slide
your finger vertically and mouse cursor will move horizontally, now please press key Fn
together with key Esc to change its operation direction, and mouse cursor will move with
your finger direction.
Page 5

7. Function desc ription of keyboar d
English
KEY R.F
F1
F2
F3
F4
F5
F6
F7
Page up/down
9. Front view
F8
Back Space
F9
F1 0
F1 1
Mouse left
F1 2
Touch PAD
8. Front view
Navigator
Indicator
Mouse right
Item
Mouse left
Mouse right
Key R.F
Navigate key
Page up
Page down
Touch PAD
Indicator
Function
Mouse left
Mouse right
Key R.F
Cursor up,down
left, right
Page up
Page down
Mouse touch pad
Operation
Press to operate like left mouse key
Press to operate like right mouse key
Press to pair keyboard and USB receiver
Press the four keys to move cursor up,
down, left,and right
Press to scroll page up
Press to scroll page down
Slide your finger on touch pad to move
mouse cursor
recharge indicator and go out when fully
recharged
Light up when fully recharged
Flash when signal transited
Light up when switch to Caps lock input
Page 6

English
8. Binds keys descri ption
all binds key must work with Fn, for example: if you want to operate key “Home”, you
have to press key “Fn” and key “9” together,
F1
F2
F3
F4
F5
F6
F7
F8
F9
F1 0
F1 1
F12
8. Front view
10. Front view
Fn
PrtScPrtSc
Work with other binds keys
Change operation directions
Press to turn backlit on/off
Volume down
Volume up
Mute
Previous
End
Next
Return to main page
Back to previous page
Print screen
Press this key and other
binds key together
Press “Esc” and “Fn” together
Press “F1” and “Fn” together
Press “F2” and “Fn” together
Press “F3” and “Fn” together
Press “F4” and “Fn” together
Press “F5” and “Fn” together
Press “F6” and “Fn” together
Press “F7” and “Fn” together
Press “F8” and “Fn” together
Press “F9” and “Fn” together
Press “F10” and “Fn” together
Del
Home
F12
F11
End
Ins
Ctrl+Alt+Del
Delete
Home
F12
F11
End
Insert
Ctrl+Alt+Del
Press “ ” and “Fn” together
Press “9” and “Fn” together
Press “=” and “Fn” together
Press “-” and “Fn” together
Press “0” and “Fn” together
Press “8” and “Fn” together
Press Fn+Enter together
Page 7

English
WEEE Directive & Product Disposal
At the end of its serviceable life, this product
should not be treated as household or general
waste. It should be handed over to the applicable
collection point for the recycling of electrical and
electronic equipment, or returned to the supplier
for disposal
No tic e to c ust ome rs :
This symbol on the battery indicates that the battery
is to be collected separately.
The following apply only to users in European countries.
This battery is designed for separate collection at
an appropriate collection point.
Do not dispose of as household waste
For more information, contact the retailer or local
authorities in charge of waste management.
Caution :
Changes or modifications not expressly approved by the party
responsible for compliance could void the user's authority to operate
the equipment.
Compliance statement:
1: This device is verified to comply with Part 15 of the FCC Rules.
Operation subject to the following two conditions:
(1) this device may not cause harmful interference, and
Page 8

English
(2) this device must accept any interference received, including interference
that may cause undesired operation.
2: This equipment has been tested and found to comply with the limits for a
Class B digital device, pursuant to Part 15 of the FCC Rules. These limits
are designed to provide reasonable protection against harmful interferenc
in a residential installation. This equipment generates, uses and can radiate
radio frequency energy and, if not installed
And used in accordance with the instructions, may cause harmful interference
to radio communications. However,there is no guarantee that interference
will not occur in a particular installation.If this equipment does cause harmful
interference to radio or television reception, which can be determined by
turning the equipment off and on, the user is encouraged to try to correct
the interference by one or more of the following measures:
-- Reorient or relocate the receiving antenna.
-- Increase the separation between the equipment and receiver.
-- Connect the equipment into an outlet on a circuit different from that to
which the receiver is connected.
-- Consult the dealer or an experienced radio/TV technician for help
Page 9

1.特点与规格:
a. R.F 2.4 G无线 连 接 , 最 远 距 离 达1 0米 半 径 。
b.三轴螺陀仪设计 , 精 确 操 作 鼠 标
c. QWERT Y键盘 布 局
d.USB收发,即 插 即 用
e.带背光灯,方便 在 黑 暗 环 境 操 作
f.造型小巧, 85 * 1 3 5 * 1 0 毫 米/重 量: 6 0克
g.带可充电锂电池 :8 0 0毫 安,待 机 时 间 :4 0 0小 时
h.工作电压:3 . 7 V
j.充电:DC 5V / 3 0 0 m A
2.包装:
a.无线语音键盘 B . U S B接 收 器 c . U S B充 电 线 d .说 明书
3.系统支持
- Windows 2000/XP/ vista/ 7/win CE
- lINUX/-Android/- Mac
中文
4.使用说明
4.1掀开后 盖 , 从 里 面 取 出USB接 收器,将USB 接收插到 电 脑 的USB接 口 上 ,
T
ES
+
H
C
VOL-
L+
VO
MENU
OK
Input
H-C
AV
TV
USB接收器
电池盖
图1.按住向下推
图2.取出USB接收器
4.2这时打 开 键 盘 的 电 源 开 关 。 蓝 色 指 示 灯会闪烁一下然后熄灭,这 里 移 动 键 盘 , 蓝 色 指 示
灯会闪,如图:
电源开关
图3
4.3, 充电:当未进行任何操作量,背光灯突 然 闪 烁 , 这 说 明 电 池 要 进 行 充电,用USB线将
键盘与电脑连接起 来 , 指 示 灯 会 亮 起 来 , 充 电 过 程中,指示灯长亮。充满电 指 示 灯
熄灭。这时将USB线 从 电 脑 脑 上 拔 下 来 。
图4
Page 10

中文
5.红外 学习功 能
该键盘具有红外学 习 功 能 , 可 以 通 学 习 其 它 遥 控器的源代码,当作其它的 家 用 电 器 的
遥控器使用,如电 视 ,DVD/CD空调等 , 下 面 以 电 视 的 遥 控 器 为 例 说 明如何使用该键
盘的红外学习特征 :
5.1 指定设 备 : 如 果 你 想 学 习 电 视 遥 控 的话就按一下AV键,那么蓝色的指示灯会闪一下 ,
如果是AV的话就按一下AV键,那么橙色的指示灯会闪一 下 。
5.2 按住“SET” 键 约2秒 直 到LED指示灯亮,说明键盘进入到学习模式,按住键盘 上
的其它键,如MENU,约一秒钟的时间,LED指示灯会 闪 一 次 然 后 长 亮 , 这 说 明 键 盘进
入到等待信号的模 式 。( 1 0秒 钟 内 未 进 行 任 何 操 作,指示灯熄灭并退出学习 模 式 )
5.3将电视遥控器 红 外 感 应 器 与 键 盘 的 红 外 感 应器对准,然后按住电视遥 控 器 上 的
MENU键约1秒,你会 看 到L E D指 示 灯 闪 三 次 , 说 明 键盘成功学习电视遥控器的 源 代 码
5.4 重复步骤5 . 1和5 . 2, 完 成 其 它 键 的 学 习 。
5.5 最后按“S E T” 键 保 存 并 退 出
MENU
V
A
OL
OK
Inpu t
S
ET
+
CH
+
VO
L-
V
H
-C
TV
图5
6. 激光笔使用:
按住激光发射按钮 发 射 激 光 , 释 放 该 键 关 闭 激 光
激光按钮
图7
红外感应器
图6
激光头
图8
7. 鼠标操作方向转换:
不同人有不同的习 惯 , 有 人 喜 欢 竖 着 使 用 键 盘 ,有人喜欢橫向使用键盘, 比 方 说 , 你 当 前
如果是橫向使用键 盘 , 你 手 指 在 触 摸 板 上 作 橫 向移动时,那么鼠标光标也 会 跟 着 橫 向 移 动 ,
这时,你如果转换 使 用 方 向 纵 向 使 用 时 , 这 时 你手指在触摸板上作橫向移 动 时 , 那 么 你 会 感
觉到鼠标光标移动 方 向 与 你 手 指 移 动 方 向 不 一 致,这时你只需按住Fn+Esc一次进行转换就
可以了。然后光标 的 移 动 方 向 就 会 与 你 的 手 指 的移动方向一致了。
Page 11

8.键盘功能描述
中文
R.F
F1
F2
F3
F4
F5
F6
F8
F7
上/下翻页
图9
F9
F1 0
F1 1
鼠标左键
删除
F1 2
触摸板
8. Front view
导航键
指示灯
鼠标右键
鼠标左键
鼠标右键
R.F
导航键
向上翻页
向下翻页
触摸板
指示灯
功能描述 操作
鼠标左键
鼠标右键
R.F
上下左右移动光标
向上翻页
向下翻页
移动鼠标
鼠标左键
鼠标右键
同时按住Fn+R.F与接收器配对
上,下,左,右移 动 光 标
向上翻页
向下翻页
触摸板上移动手指 以 移 动 鼠 标
充电指示,充电时 灯 亮 , 充 满 电 时 灯 灭
充电指示,充满电 时 灯 亮
发生信号交换时灯 闪
切换到大写输入时 灯 亮
Page 12

中文
9.组合键Fn:
所有的组合键都必 须 与Fn配合使用,例如你想操作Home键,你就要按住Fn+数字
键9
F1
F2
F3
F4
F5
F6
F7
F8
F9
F1 0
F1 1
F12
8. Front view
Fn
图10
功能说明
配合其它的键使用
鼠标操作方向转换 键
背光灯开关
音量减小
音量增大
静音
前一曲
最后一曲
下一曲
返回到主页
操作
按住该键以及其它 的 键
按住Fn+Esc
按住Fn+F1
按住Fn+F2
按住Fn+F3
按住Fn+F4
按住Fn+F5
按住Fn+F6
按住Fn+F7
按住Fn+F8
PrtScPrtSc
Del
Home
F12F12
F11
End
Ins
Ctrl+Alt+Del
返回到上一页
抓屏
删除
Home
F12F12
F11
End
Insert
Ctrl+Alt+Del
按住Fn+F9
按住Fn+F10
按住Fn+
按住Fn+9
按住Fn+=
按住Fn+-
按住Fn+0
按住Fn+8
按住Fn+Enter
 Loading...