

Page 1
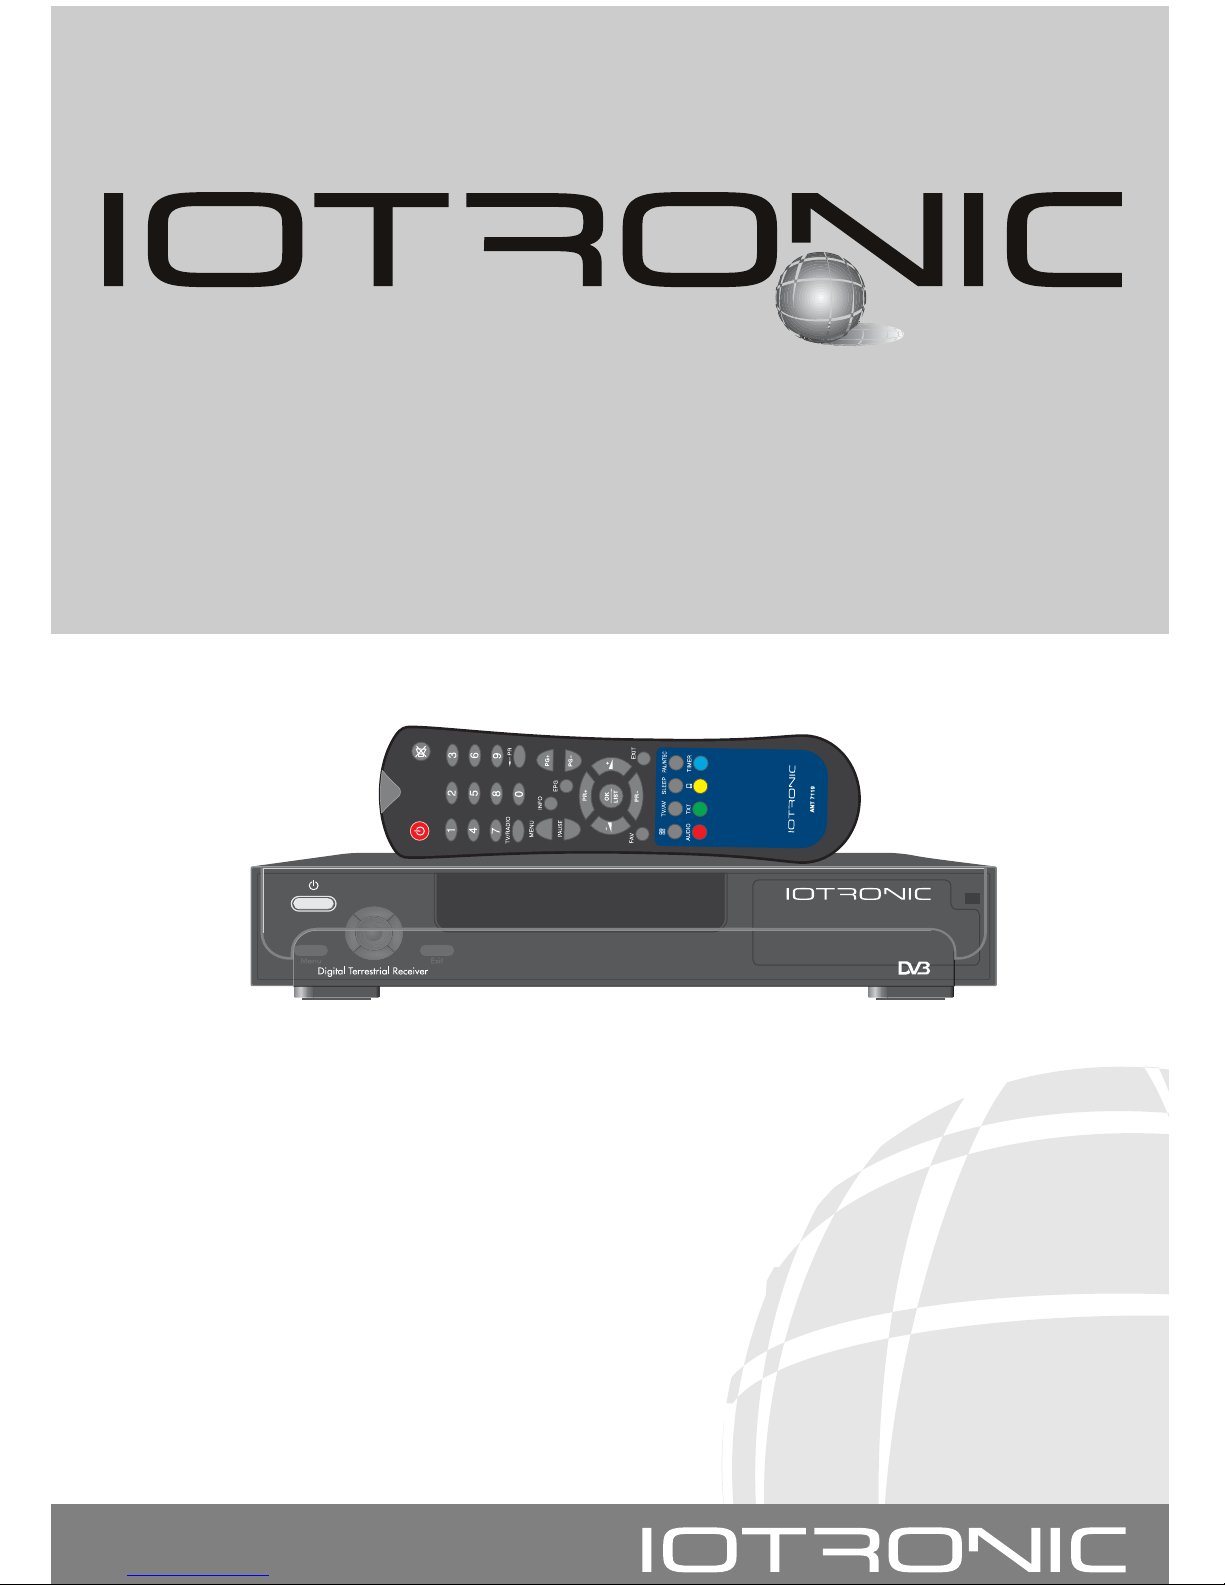
Receptor TV Digital Terrestre
Digital Terrestrial TV Receiver
Manual de instrucciones
User manual
Ref. 7119
1100110011000110011000111111000111
Page 2

Page 3

Manual de instrucciones
Receptor TV Digital Terrestre
3
1.- Precauciones . . . . . . . . . . . . . . . . . . . . . . . . . . . . . . . . . . . . . . . . . . . . . . . . . . . . . . . . . . . . . . . . . . 4
2.- Antes de empezar.... . . . . . . . . . . . . . . . . . . . . . . . . . . . . . . . . . . . . . . . . . . . . . . . . . . . . . . . . . . . . 5
2.1.- Prefacio . . . . . . . . . . . . . . . . . . . . . . . . . . . . . . . . . . . . . . . . . . . . . . . . . . . . . . . . . . . . . . . 5
2.2.- Características generales . . . . . . . . . . . . . . . . . . . . . . . . . . . . . . . . . . . . . . . . . . . . . . . . . . . 5
2.3.- Composición . . . . . . . . . . . . . . . . . . . . . . . . . . . . . . . . . . . . . . . . . . . . . . . . . . . . . . . . . . . 5
2.4.- Funcionamiento General . . . . . . . . . . . . . . . . . . . . . . . . . . . . . . . . . . . . . . . . . . . . . . . . . . . 5
3.- Descripción de paneles y conexiones . . . . . . . . . . . . . . . . . . . . . . . . . . . . . . . . . . . . . . . . . . . . . . . . 6
4.- Instalación del Equipo . . . . . . . . . . . . . . . . . . . . . . . . . . . . . . . . . . . . . . . . . . . . . . . . . . . . . . . . . . . . 8
4.1.- Conexiones a realizar . . . . . . . . . . . . . . . . . . . . . . . . . . . . . . . . . . . . . . . . . . . . . . . . . . . . . . 8
5.- Primera instalación . . . . . . . . . . . . . . . . . . . . . . . . . . . . . . . . . . . . . . . . . . . . . . . . . . . . . . . . . . . . . . 9
6.- Funciones Básicas. . . . . . . . . . . . . . . . . . . . . . . . . . . . . . . . . . . . . . . . . . . . . . . . . . . . . . . . . . . . . . . . 10
6.1.- Como seleccionar programas . . . . . . . . . . . . . . . . . . . . . . . . . . . . . . . . . . . . . . . . . . . . . . . . 10
6.2.- Como ajustar el volumen . . . . . . . . . . . . . . . . . . . . . . . . . . . . . . . . . . . . . . . . . . . . . . . . . . 11
6.3.- Suprimir el sonido (Mute) . . . . . . . . . . . . . . . . . . . . . . . . . . . . . . . . . . . . . . . . . . . . . . . . . . . 11
6.4.- Idioma del audio . . . . . . . . . . . . . . . . . . . . . . . . . . . . . . . . . . . . . . . . . . . . . . . . . . . . . . . . 11
6.5.- Modos de audio . . . . . . . . . . . . . . . . . . . . . . . . . . . . . . . . . . . . . . . . . . . . . . . . . . . . . . . . . 12
6.6.- Como usar la Lista de Favoritos . . . . . . . . . . . . . . . . . . . . . . . . . . . . . . . . . . . . . . . . . . . . . 12
6.7.- Guía Electrónica de Programación (EPG) . . . . . . . . . . . . . . . . . . . . . . . . . . . . . . . . . . . . . . . 13
6.8.- Función Teletexto . . . . . . . . . . . . . . . . . . . . . . . . . . . . . . . . . . . . . . . . . . . . . . . . . . . . . . . . 14
6.9.- Función Subtítulos . . . . . . . . . . . . . . . . . . . . . . . . . . . . . . . . . . . . . . . . . . . . . . . . . . . . . . . 14
6.10.- Función Mosaico . . . . . . . . . . . . . . . . . . . . . . . . . . . . . . . . . . . . . . . . . . . . . . . . . . . . . . . 15
6.11.- Llamada al canal anterior . . . . . . . . . . . . . . . . . . . . . . . . . . . . . . . . . . . . . . . . . . . . . . . . 15
6.12.- Regreso al último canal . . . . . . . . . . . . . . . . . . . . . . . . . . . . . . . . . . . . . . . . . . . . . . . . . . 15
6.13.- Pausa . . . . . . . . . . . . . . . . . . . . . . . . . . . . . . . . . . . . . . . . . . . . . . . . . . . . . . . . . . . . . . . 15
7.- Menú Principal . . . . . . . . . . . . . . . . . . . . . . . . . . . . . . . . . . . . . . . . . . . . . . . . . . . . . . . . . . . . . . . . . 16
8.- Menú Canal . . . . . . . . . . . . . . . . . . . . . . . . . . . . . . . . . . . . . . . . . . . . . . . . . . . . . . . . . . . . . . . . . . . 16
8.1.- Organizar canales TV o Radio . . . . . . . . . . . . . . . . . . . . . . . . . . . . . . . . . . . . . . . . . . . . . . . . 17
8.2.- Borrar todos los favoritos. . . . . . . . . . . . . . . . . . . . . . . . . . . . . . . . . . . . . . . . . . . . . . . . . . . . 19
8.3.- Borrar todos los canales . . . . . . . . . . . . . . . . . . . . . . . . . . . . . . . . . . . . . . . . . . . . . . . . . . . . 19
8.4.- Renombrar grupo . . . . . . . . . . . . . . . . . . . . . . . . . . . . . . . . . . . . . . . . . . . . . . . . . . . . . . . . . 19
9.- Menú Instalación . . . . . . . . . . . . . . . . . . . . . . . . . . . . . . . . . . . . . . . . . . . . . . . . . . . . . . . . . . . . . . . 20
9.1.- Búsqueda automática . . . . . . . . . . . . . . . . . . . . . . . . . . . . . . . . . . . . . . . . . . . . . . . . . . . . . 20
9.2.- Búsqueda manual . . . . . . . . . . . . . . . . . . . . . . . . . . . . . . . . . . . . . . . . . . . . . . . . . . . . . . . . 20
9.3.- Alimentación antena . . . . . . . . . . . . . . . . . . . . . . . . . . . . . . . . . . . . . . . . . . . . . . . . . . . . . . 21
9.4.- Función LCN . . . . . . . . . . . . . . . . . . . . . . . . . . . . . . . . . . . . . . . . . . . . . . . . . . . . . . . . . . . . 21
10.- Menú Configuración . . . . . . . . . . . . . . . . . . . . . . . . . . . . . . . . . . . . . . . . . . . . . . . . . . . . . . . . . . . . 22
10.1.- Idioma del menú . . . . . . . . . . . . . . . . . . . . . . . . . . . . . . . . . . . . . . . . . . . . . . . . . . . . . . . . 22
10.2.- Sistema TV . . . . . . . . . . . . . . . . . . . . . . . . . . . . . . . . . . . . . . . . . . . . . . . . . . . . . . . . . . . . 22
10.3.- Región y Hora . . . . . . . . . . . . . . . . . . . . . . . . . . . . . . . . . . . . . . . . . . . . . . . . . . . . . . . . . . 23
10.4.- Ajustes del temporizador . . . . . . . . . . . . . . . . . . . . . . . . . . . . . . . . . . . . . . . . . . . . . . . . . . 24
10.5.- Configuración de OSD . . . . . . . . . . . . . . . . . . . . . . . . . . . . . . . . . . . . . . . . . . . . . . . . . . . 25
10.6.- Bloqueo con contraseña . . . . . . . . . . . . . . . . . . . . . . . . . . . . . . . . . . . . . . . . . . . . . . . . . . 26
11.- Menú Herramientas . . . . . . . . . . . . . . . . . . . . . . . . . . . . . . . . . . . . . . . . . . . . . . . . . . . . . . . . . . . . 27
11.1.- Información del receptor . . . . . . . . . . . . . . . . . . . . . . . . . . . . . . . . . . . . . . . . . . . . . . . . . 27
11.2.- Juegos . . . . . . . . . . . . . . . . . . . . . . . . . . . . . . . . . . . . . . . . . . . . . . . . . . . . . . . . . . . . . . . 27
11.3.- Valores de fábrica . . . . . . . . . . . . . . . . . . . . . . . . . . . . . . . . . . . . . . . . . . . . . . . . . . . . . . 27
11.4.- Actualización software . . . . . . . . . . . . . . . . . . . . . . . . . . . . . . . . . . . . . . . . . . . . . . . . . . . 28
Descripción de conectores . . . . . . . . . . . . . . . . . . . . . . . . . . . . . . . . . . . . . . . . . . . . . . . . . . . . . . . . . . . 29
Estructura del Menú . . . . . . . . . . . . . . . . . . . . . . . . . . . . . . . . . . . . . . . . . . . . . . . . . . . . . . . . . . . . . . . 30
Características técnicas . . . . . . . . . . . . . . . . . . . . . . . . . . . . . . . . . . . . . . . . . . . . . . . . . . . . . . . . . . . . . 31
Garantía . . . . . . . . . . . . . . . . . . . . . . . . . . . . . . . . . . . . . . . . . . . . . . . . . . . . . . . . . . . . . . . . . . . . . . . 63
Indice
Page 4
Manual de instrucciones
Receptor TV Digital Terrestre
4
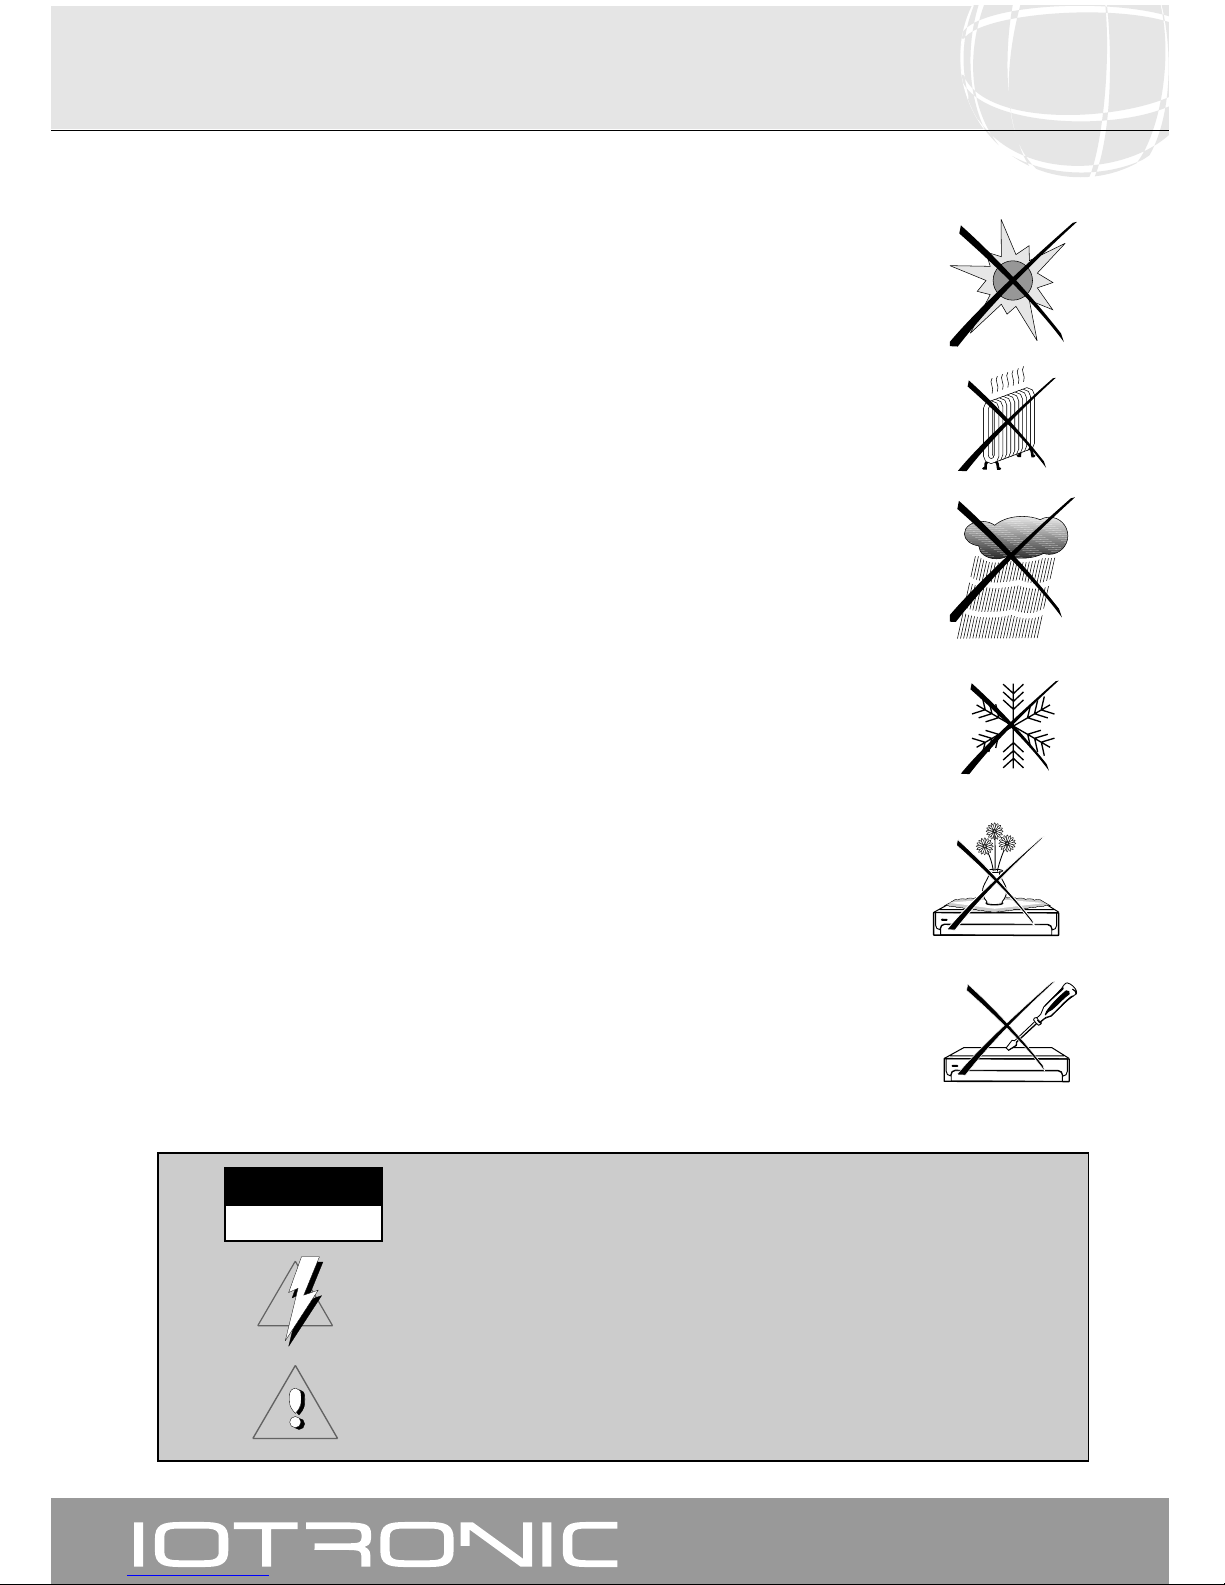
< 5°C
> 80 %
> 50°C
El Receptor que acaba de adquirir ha sido construido conforme las normas
internacionales de seguridad.
Le aconsejamos que lea atentamente los siguientes consejos de seguridad.
ALIMENTACIÓN:
175 - 250 V~ 50/60 Hz.
SOBRECARGA:
No sobrecargar las tomas, prolongaciones o adaptadores para evitar el riesgo de
incendio o descarga eléctrica.
LÍQUIDOS:
No exponer el Receptor a la caída o salpicaduras de agua.
No situar objetos o recipientes que contengan líquido sobre o en las
proximidades del aparato.
PEQUEÑOS OBJETOS:
Evitar la proximidad de pequeños objetos metálicos. Estos podrían entrar por las
ranuras de ventilación del Receptor y causar graves daños.
LIMPIEZA:
Desenchufar el Receptor de la red antes de efectuar la limpieza.
Utilizar un paño suave, ligeramente humedecido en agua (sin detergentes) para
limpiar el exterior del Receptor.
VENTILACIÓN:
Colocar el Receptor en un lugar bien ventilado con las ranuras al descubierto.
Evitar la exposición al sol, a fuentes de calor o a llamas.
No colocar encima otros equipos.
CONEXIONES:
Efectúe solamente las conexiones recomendadas para evitar posibles daños.
CONEXIÓN AL TV o VCR:
Apague el Receptor antes de conectar o desconectar a un TV o VCR.
NO ACTUANDO ASI, PODRÍA DAÑAR EL TV o VCR.
UBICACIÓN:
Colocar el Receptor en un local interior protegido de descargas, lluvia o sol directo.
Instale el Receptor en posición horizontal.
WARNING
RISK ELECTRICAL SHOCK
DO NOT OPEN
PARA REDUCIR EL RIESGO DE DESCARGA ELÉCTRICA, NO RETIRAR LA TAPA.
NO HAY PARTES REPARABLES POR EL USUARIO EN EL INTERIOR.
PARA UNA REPARACIÓN, CONSULTE CON UN TÉCNICO CUALIFICADO
Este símbolo indica "voltaje peligroso" dentro del producto que puede presentar un
riesgo de descarga eléctrica o daños personales.
Este símbolo indica que existen instrucciones importantes para este producto.
1.- Precauciones
Page 5
Manual de instrucciones
Receptor TV Digital Terrestre
5
Compatible MPEG2, DVB
Salida de audio digital (SPDIF)
Menú fácil de usar
Primera instalación guiada
Varias funciones de edición de programas (favoritos,
mover, bloquear, borrar...)
Posee 8 listas de canales favoritos
Almacena hasta 1000 programas
Actualización de software rápida y fácil a través del puerto
RS-232
Actualización de receptor a receptor a través de un cable
RS-232
Permite alimentar una antena activa con 5 V (100 mA)
Función temporizador, enciende y apaga el receptor
automáticamente.
Soporta la función LCN (Localización Automática de
Canales)
Guía Electrónica de Programación (EPG)
Soporta la función OSD Teletexto y Subtítulos (estándar y
teletexto)
Soporta Teletexto VBI
Salida multi-video - CVBS, RGB
Display en pantalla de 256 colores
Conversión automática PAL/NTSC
Guarda el último programa automáticamente
Posee mosaico constituido por nueve programas
Dispone de 3 juegos (Tetris, Serpiente y Othello)
El receptor ANT 7119 le permite ver una amplia gama de canales terrestres.
Este manual le explica cómo realizar la instalación del receptor y los pasos necesarios al usar sus diferentes funciones.
También explica en detalle las funciones especiales disponibles únicamente en este receptor, y facilita el uso de estas funciones.
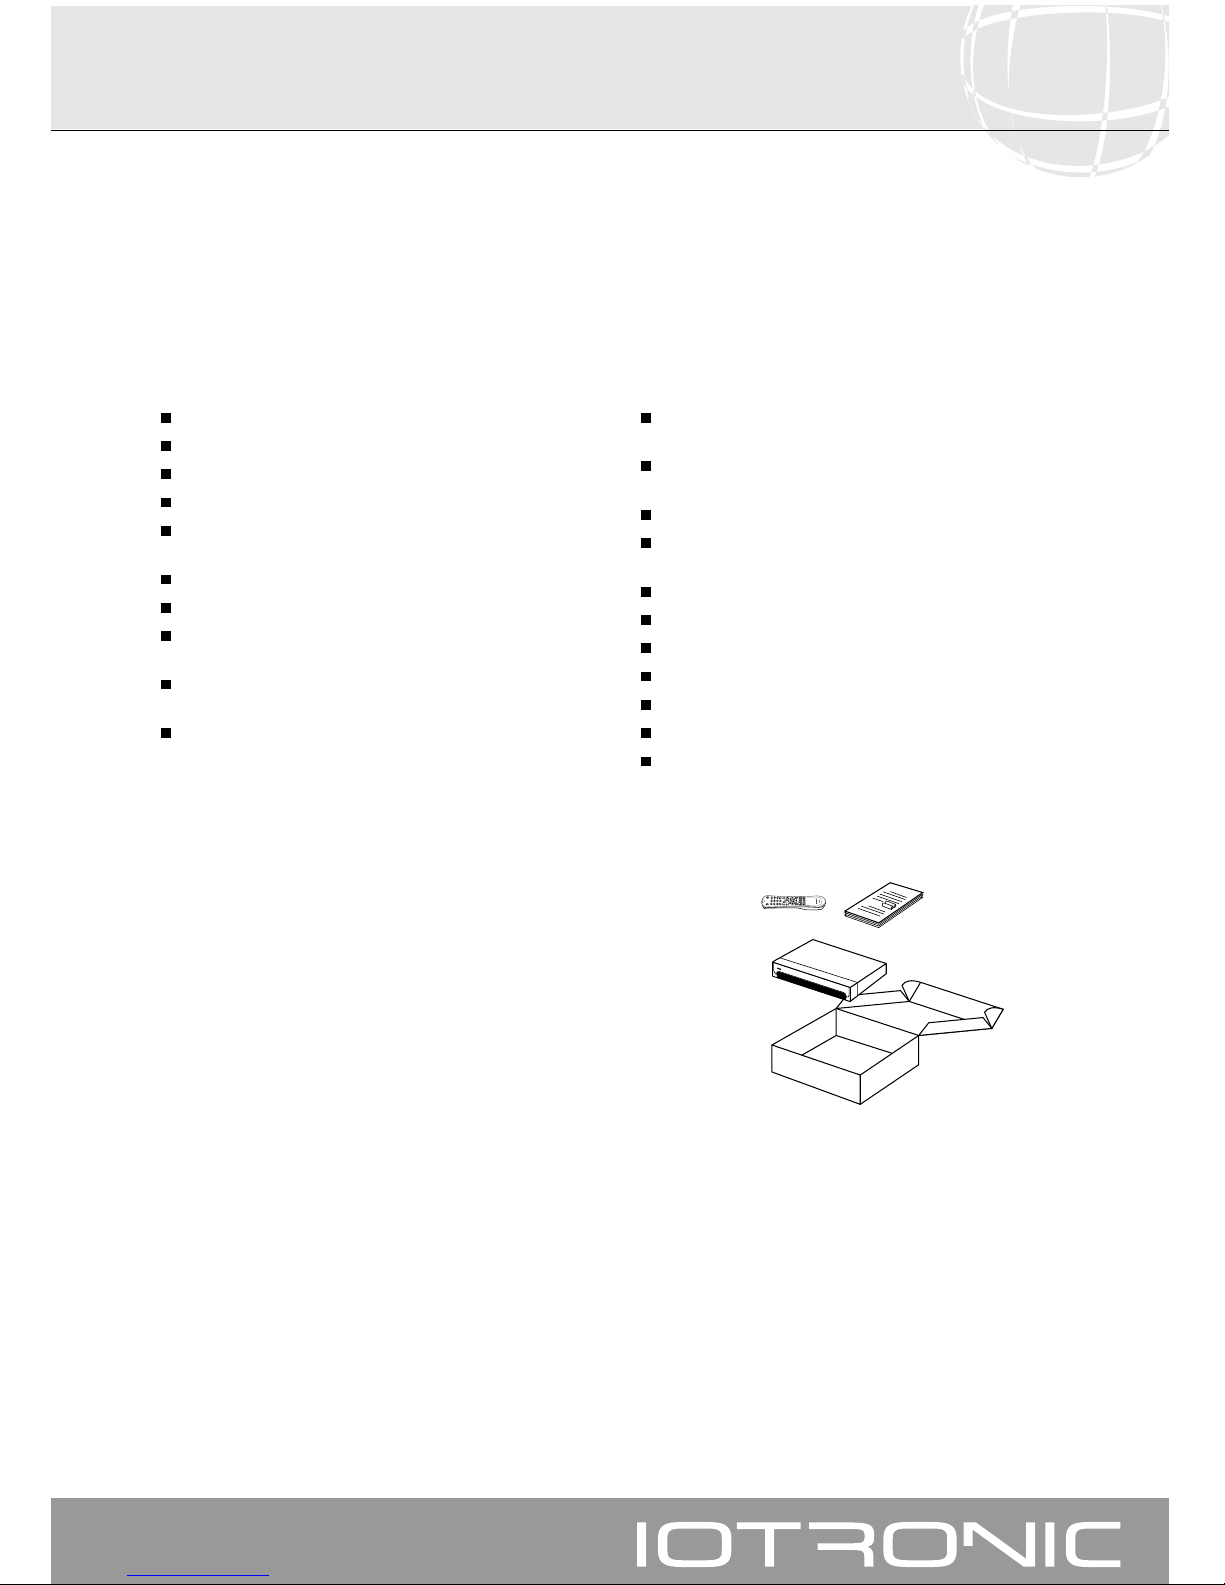
Verifique que los siguientes componentes están incluidos en el embalaje:
- 1 x Receptor digital terrestre ref. 7119
- Manuales de Instrucciones
- 1 x Mando a distancia
- 2 x Pilas tipo ”AAA"
A lo largo de este manual se dará cuenta que el uso diario del receptor está basado en una serie de menús y displays en
pantalla muy fáciles de usar. Estos menús le ayudarán a disfrutar de su receptor, al guiarle por la instalación, la ordenación de
programas, la visualización y muchas otras funciones.
Todas las funciones pueden realizarse utilizando las teclas del mando a distancia, y algunas de las funciones también pueden
realizarse con los botones en el panel frontal.
Es necesario tener en cuenta que un nuevo software puede cambiar la funcionalidad del receptor.
Si tiene algún problema con el funcionamiento de su receptor, lea el apartado correspondiente de este manual, o
alternativamente llame a su instalador o al servicio de asistencia técnica.
2.- Antes de empezar ...
2.1.- Prefacio
2.2.- Características generales
2.3.- Composición
2.4.- Funcionamiento general del receptor ANT 7119
Page 6
Manual de instrucciones
Receptor TV Digital Terrestre
6
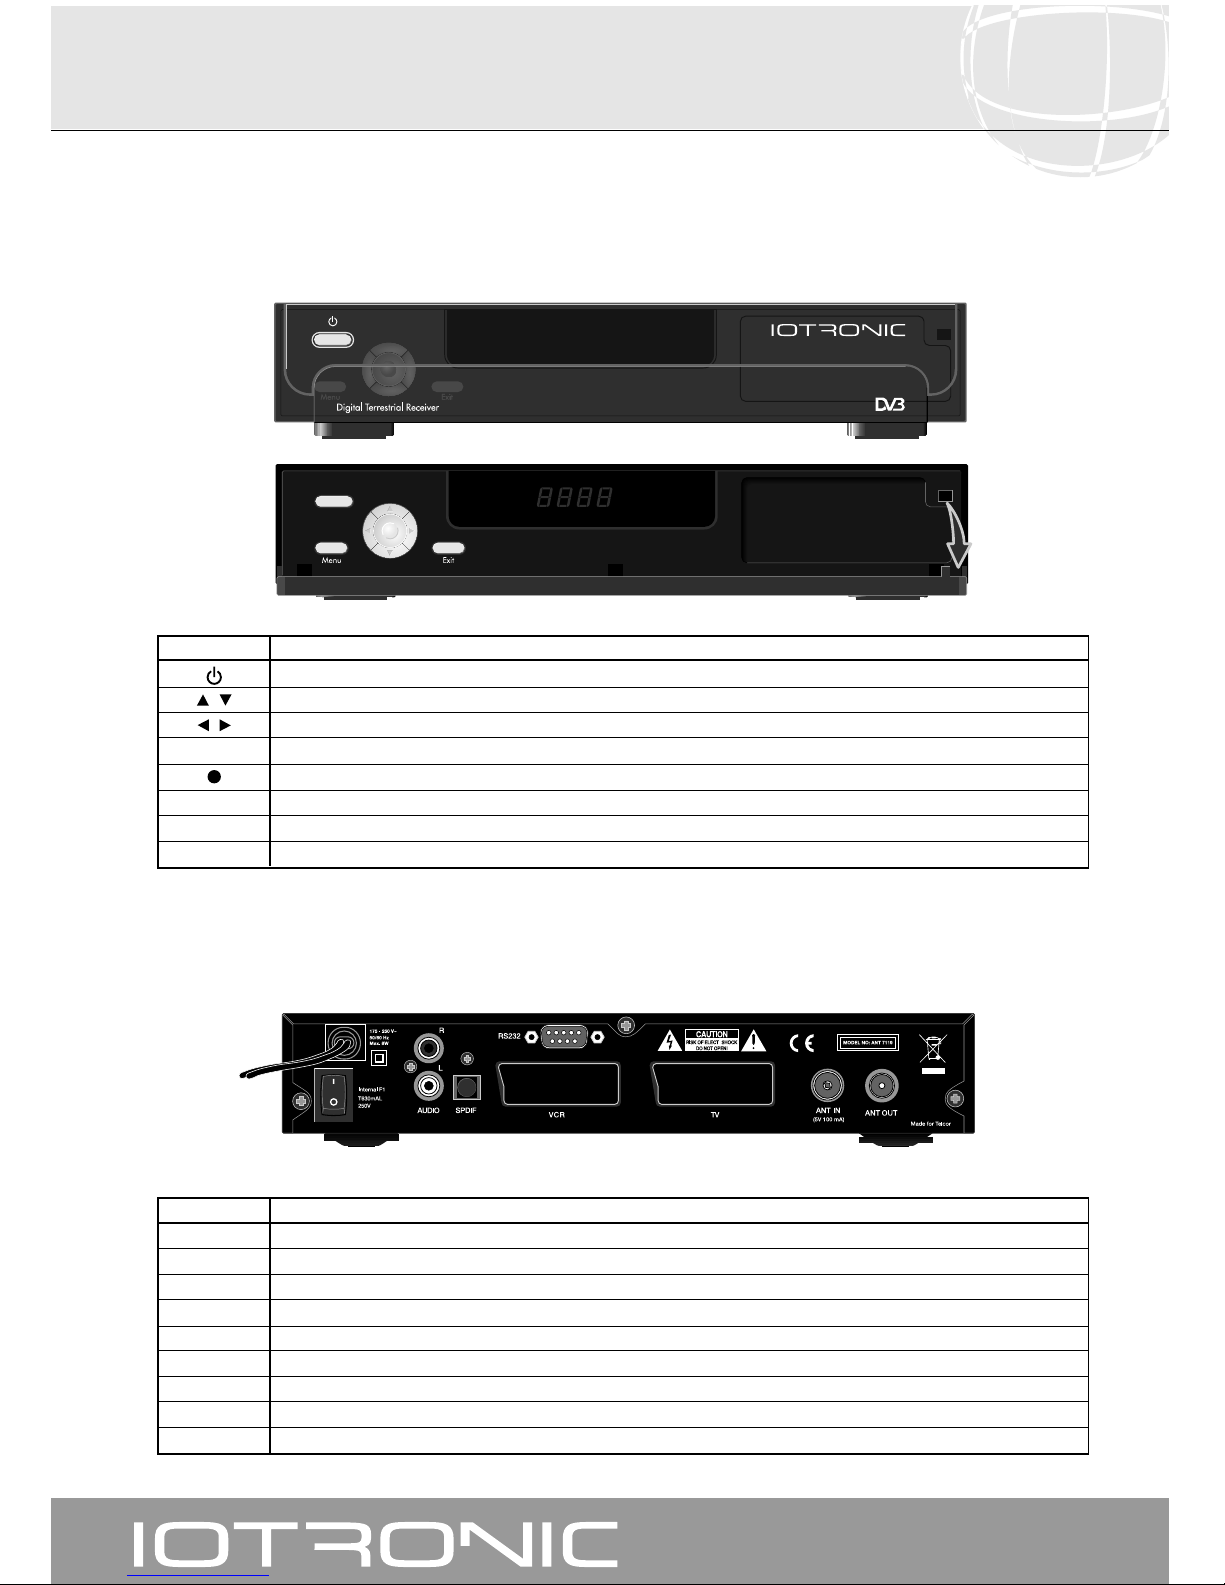
Tecla Función
Conmuta entre el modo de funcionamiento normal y standby.
/
Incrementa y Disminuye un nº de programa. Selecciona una opción en el menú.
/
Aumenta o Disminuye el volumen. Selecciona una opción en el menú.
Menu Permite acceder al Menú Principal.
Ejecuta la opción seleccionada.
Exit Para salir del menú
Display En modo normal muestra el nº de canal, en modo STANDBY muestra la hora actual
LEDs Rojo: En espera (Standby) - Verde: Nivel de señal de entrada correcto
Nombre Función
ANT IN
Entrada de señal de la antena terrestre (alimentación +5V/100mA seleccionable por menú)
ANT OUT Salida de señal RF para conectar a un TV o VCR.
TV Para conectar a un TV mediante euroconector.
VCR Para conectar a un VCR mediante euroconector.
AUDIO R Salida de audio (canal derecho).
AUDIO L Salida de audio (canal izquierdo).
S/PDIF Salida de audio digital.
RS232 Conexión a un puerto serie (RS232) para transmisión de datos.
I/O Interruptor encendido/apagado
3.- Descripción de
paneles y conexiones
Fig. 1 Panel Frontal
Fig. 2 Panel Posterior
Page 7
Manual de instrucciones
Receptor TV Digital Terrestre
7
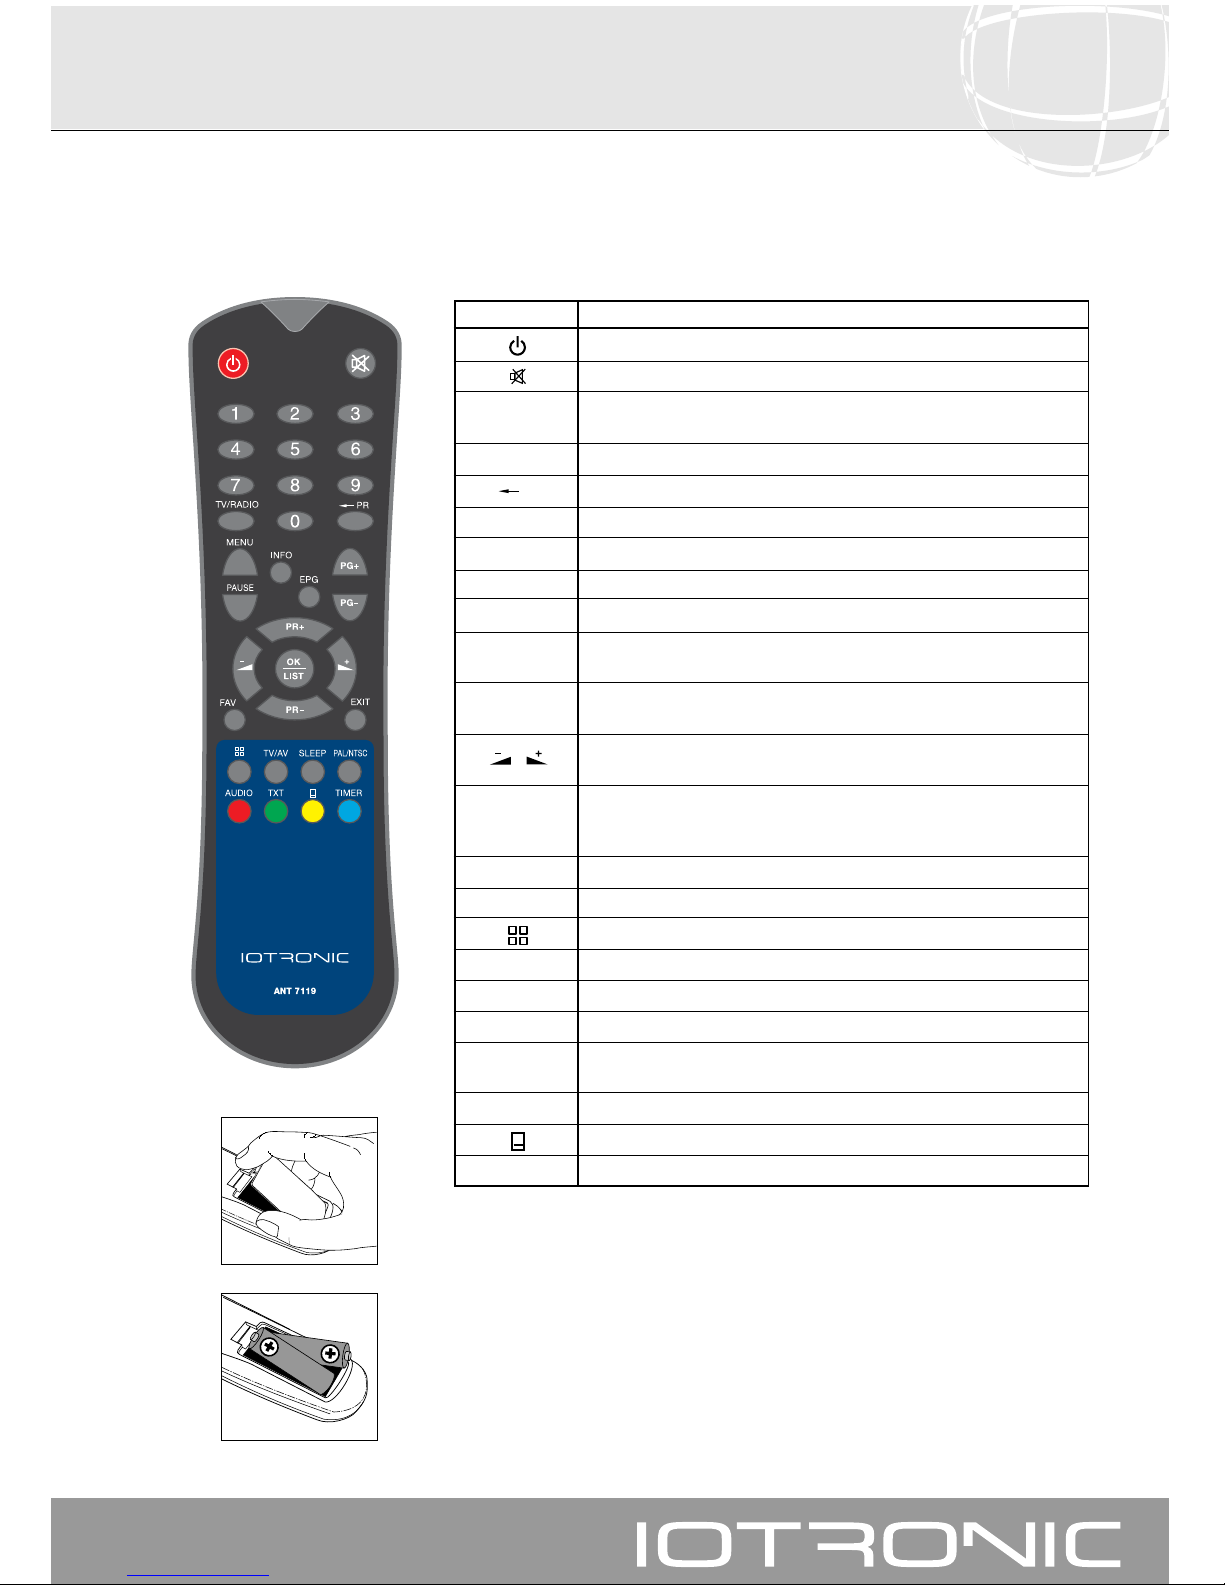
Tecla Función
Enciende y apaga el receptor.
Suprime el sonido
0 ... 9
Selecciona un número de programa para ver.
Entrada directa de datos en el menú.
TV/RADIO Cambia entre los modos TV y Radio.
PR Retorna al programa anterior
MENU Para activar el menú Principal o para salir de los menús.
PAUSE Permite congelar la imagen que se está visualizando.
INFO Muestra información del programa actual.
EPG Activa la EPG (Guia Electrónica de Programas).
PG+/PG-
Avanza o retrocede página a página en la lista de canales.
Conmuta entre los distintos grupos de favoritos.
PR+/PR-
Incrementa o decrementa un nº de programa.
Selecciona una opción en el menú.
/
Aumenta o disminuye el volumen.
Selecciona una opción en el menú.
OK/LIST
Ejecuta la opción seleccionada en el menú, o introduce el valor
deseado en cualquier modo de entrada.
Activa lista de programas
FAV Activa la lista de canales favoritos.
EXIT Vuelve al menú anterior en la pantalla del menú
Presenta un mosaico de imágenes en pantalla.
TV/AV Conmuta entre el modo TV y el modo AV.
SLEEP Activa el menú de autoapagado.
PAL/NTSC Selecciona el estándar de TV (AUTO, PAL o NTSC).
AUDIO
Selecciona los diferentes idiomas de audio disponibles.
Selecciona los diferentes modos de audio.
TEXT Activa el menú Teletexto, si éste es emitido.
Activa la función subtítulos, si estos están disponibles.
TIMER Activa el menú del Temporizador.
Fig. 3 Mando a distancia
Nota: Las teclas de color rojo, verde, amarilla y azul tienen funciones secundarias
que no aparecen descritas aqui y que pueden aparecer en los diversos
menús.
Page 8
Manual de instrucciones
Receptor TV Digital Terrestre
8
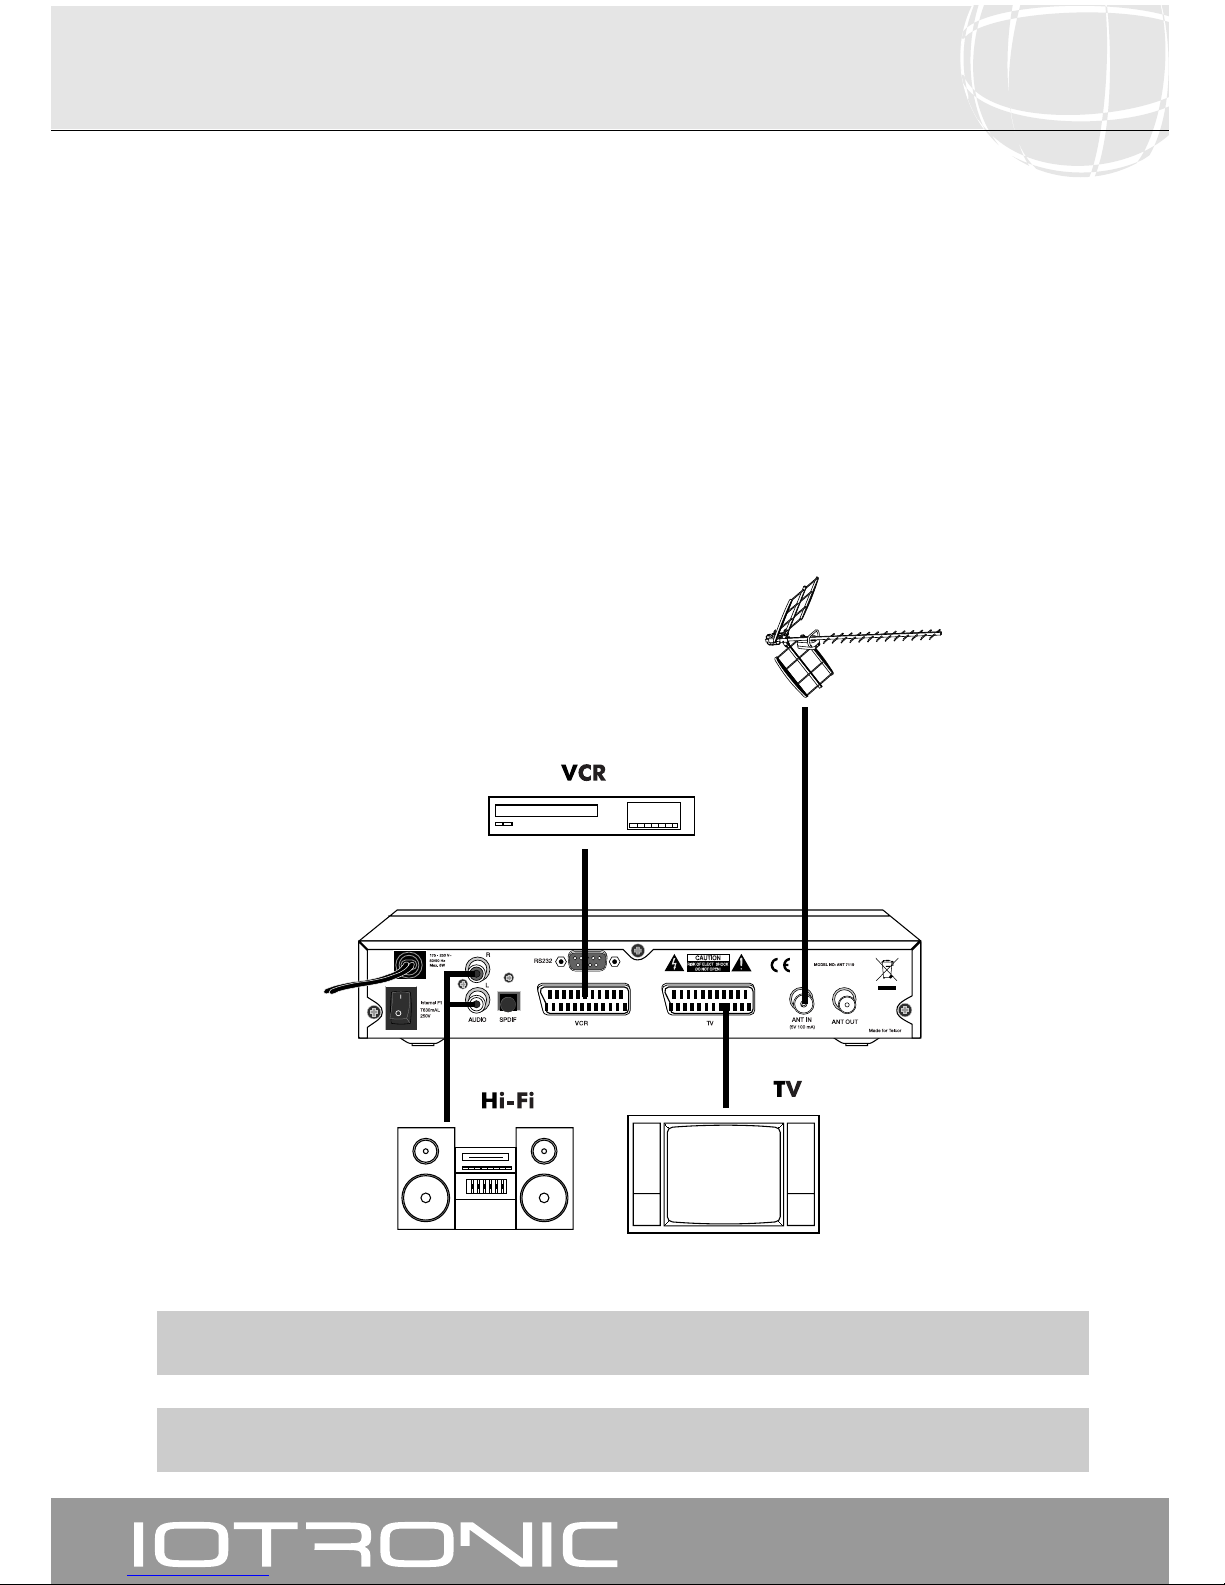
Esta sección explica la instalación del receptor ANT 7119.
Lea los manuales que vienen con el equipo para la instalación del equipo exterior como, por ejemplo, la antena.
Al añadir algún equipo nuevo, lea la parte correspondiente del manual para su instalación.
- Conecte la antena a la entrada ANT IN del receptor.
- Conecte el receptor al Televisor mediante un euroconector.
- Conecte el receptor a la toma de corriente.
NO ENCHUFE el receptor a la red antes de finalizar todas las conexiones de la unidad.
Todos los cables utilizados para las conexiones de los Receptores serán de tipo apantallado.
4.- Instalación del equipo
4.1.- Conexiones a realizar
Page 9
Manual de instrucciones
Receptor TV Digital Terrestre
9
Una vez que haya instalado el receptor ANT 7119, proceda a encenderlo en
el interruptor que aparece en el panel trasero.
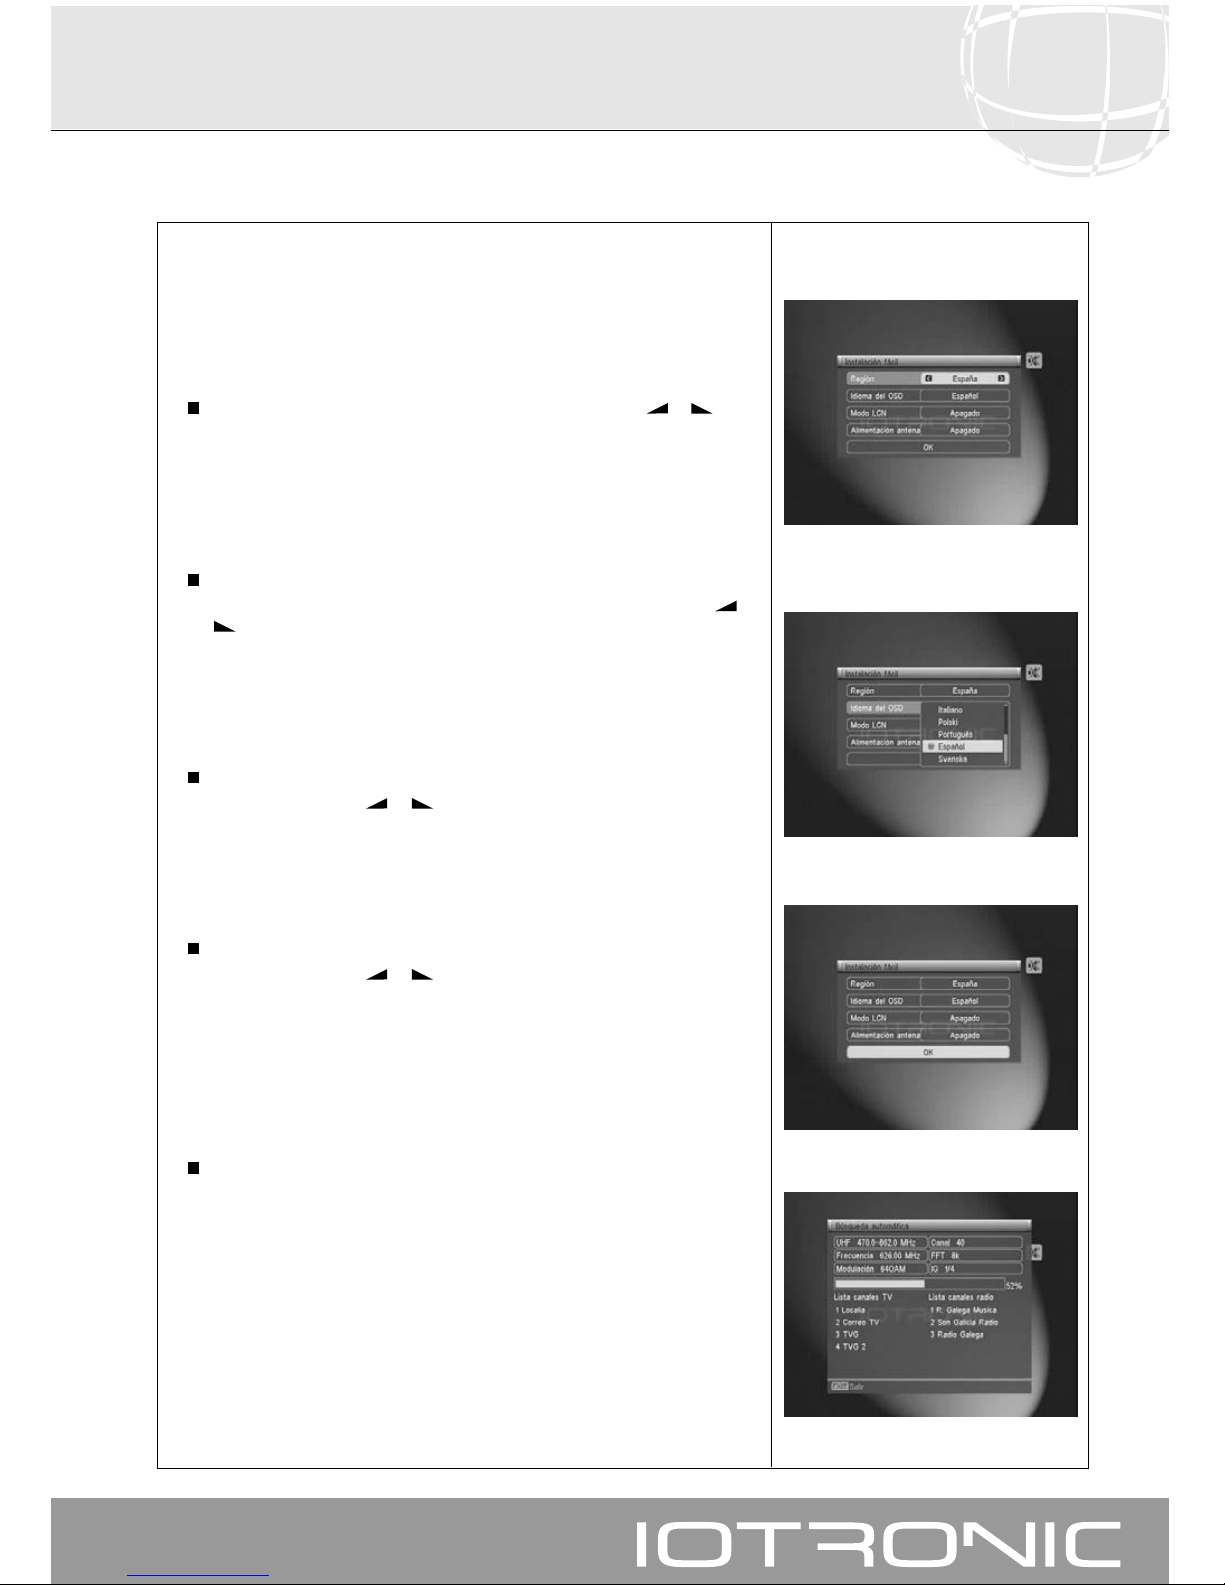
La primera vez que se encienda el receptor, mostrará una ventana de
instalación guiada. A fin de configurar los parámetros del mismo, siga las
instrucciones siguientes:
Seleccione el país en que se encuentra mediante las teclas -ó
+
.
Los paises disponibles son: Australia, Austria, Rep. Checa, Dinamarca,
Dubai, Finlandia, Francia, Alemania, Grecia, Holanda, Italia, Portugal,
Rusia, España, Suecia, Suiza, Reino Unido y Vietnam.
También puede pulsar la tecla OK y seleccionar el país con las teclas PRo PR+ en el menú emergente. Pulse la tecla OK para confirmar.
Pulse la tecla PR-.
Seleccione el idioma deseado para los menús mediante las teclas -ó
+
.
Los idiomas disponibles son: Inglés, Danés, Francés, Alemán, Griego,
Italiano, Polaco, Portugués, Español y Sueco.
También puede pulsar la tecla OK y seleccionar el idioma con las teclas
PR+ o PR- en el menú emergente. Pulse la tecla OK para confirmar.
Pulse la tecla PR-.
Mediante las teclas -ó
+
active (Encendido) o desactive (Apagado)
la ordenación automática de canales (LCN).
También puede pulsar la tecla OK y seleccionar una de las opciones con
las teclas PR+ o PR- en el menú emergente. Pulse la tecla OK para
confirmar.
Pulse la tecla PR-.
Mediante las teclas -ó
+
active (Encendido) o desactive (Apagado)
la alimentación a posibles previos colocados en la antena.
También puede pulsar la tecla OK y seleccionar una de las opciones con
las teclas PR+ o PR- en el menú emergente. Pulse la tecla OK para
confirmar.
Si no dispone de antena activa deberá seleccionar la opción “Apagar”,
de lo contrario podría dañar el receptor.
Finalmente sitúe el cursor en la opción “OK” y pulse la tecla OK para
iniciar la búsqueda.
El receptor realizará una búsqueda por toda la banda de frecuencia de
entrada del mismo.
Una vez finalizada la búsqueda el receptor mostrará el primero de los
canales de la lista.
Puede detener el proceso en cualquier momento pulsando la tecla MENU.
5.- Primera instalación
Page 10
Manual de instrucciones
Receptor TV Digital Terrestre
10
6.- Funciones básicas
6.1.- Como seleccionar programas
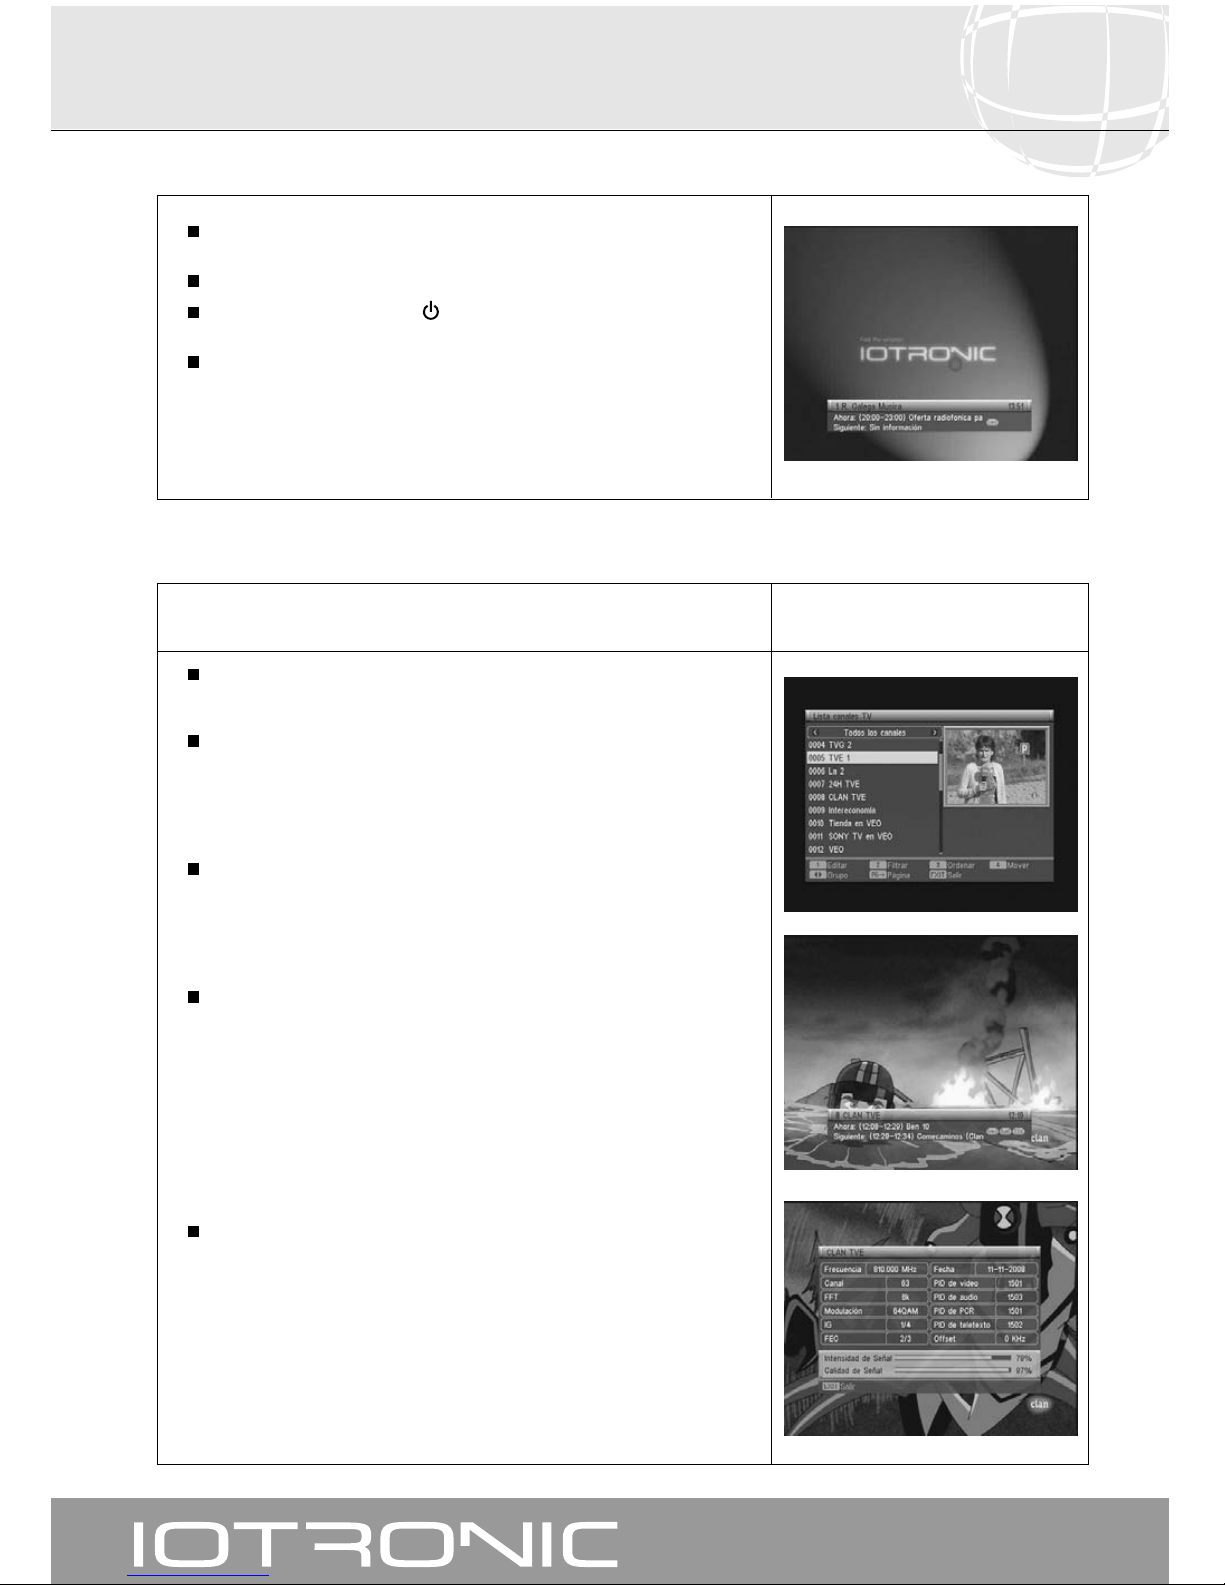
Encienda el TV y todos los equipos periféricos conectados al sistema.
Encienda el receptor mediante el interruptor trasero I/O.
Pulse la tecla de encendido ( )
del receptor o del mando a distancia.
Seleccione uno de los modos TV o Radio mediante la tecla TV/RADIO.
(El modo TV viene establecido de fábrica por defecto).
Los canales de TV/Radio se pueden seleccionar usando tanto el mando a
distancia como las teclas del receptor.
Presione la tecla TV/RADIO para seleccionar el modo de servicio deseado
(canales de TV o canales de radio).
Pulse la tecla OK cuando esté visualizando un programa. Se muestra
entonces en pantalla la Lista de Canales de TV. A continuación seleccione
un programa en la lista con las teclas PR+/PR- y pulse OK para pasar a
visualizarlo. También podrá moverse en la lista de canales página a
página mediante las teclas PG+/PG-.
Otra manera de seleccionar un programa es cuando ya esté visualizando
uno, pulse la tecla PR+ para seleccionar el siguiente programa, o la tecla
PR- para seleccionar el programa anterior, tanto en el mando como en el
teclado frontal del receptor. Si lo que desea es ir a un programa concreto,
teclee el número del mismo mediante el teclado numérico del mando.
El programa seleccionado aparecerá al momento en la pantalla con una
pequeña ventana de información.
Esta ventana de información nos muestra el nombre y la posición que
ocupa el programa en la lista, así como la lista que está seleccionada en
este momento (Todos los canales, Grupo 1, Grupo 2, ....). También indica
el número de audios disponibles en el programa y el modo de audio
seleccionado.
Si el programa dispone de Teletexto o Subtítulos, muestra las indicaciones
“TTX” y “SubT”, así como la hora y el título del evento actual y del próximo
en emisión.
Pulsando la tecla INFO, se muestra en pantalla la misma ventana
explicada en el punto anterior.
Volviendo a pulsar la tecla INFO mientras está visible esta ventana, se
muestra otra pantalla con la información completa disponible
correspondiente al programa seleccionado.
También muestra el Nivel y la Calidad de la señal recibida mediante unas
barras indicadoras.
Para salir pulse la tecla EXIT.
Page 11
Manual de instrucciones
Receptor TV Digital Terrestre
11
6.2.- Como ajustar el volumen
6.3.- Suprimir el sonido (Mute)
6.4.- Idioma del audio
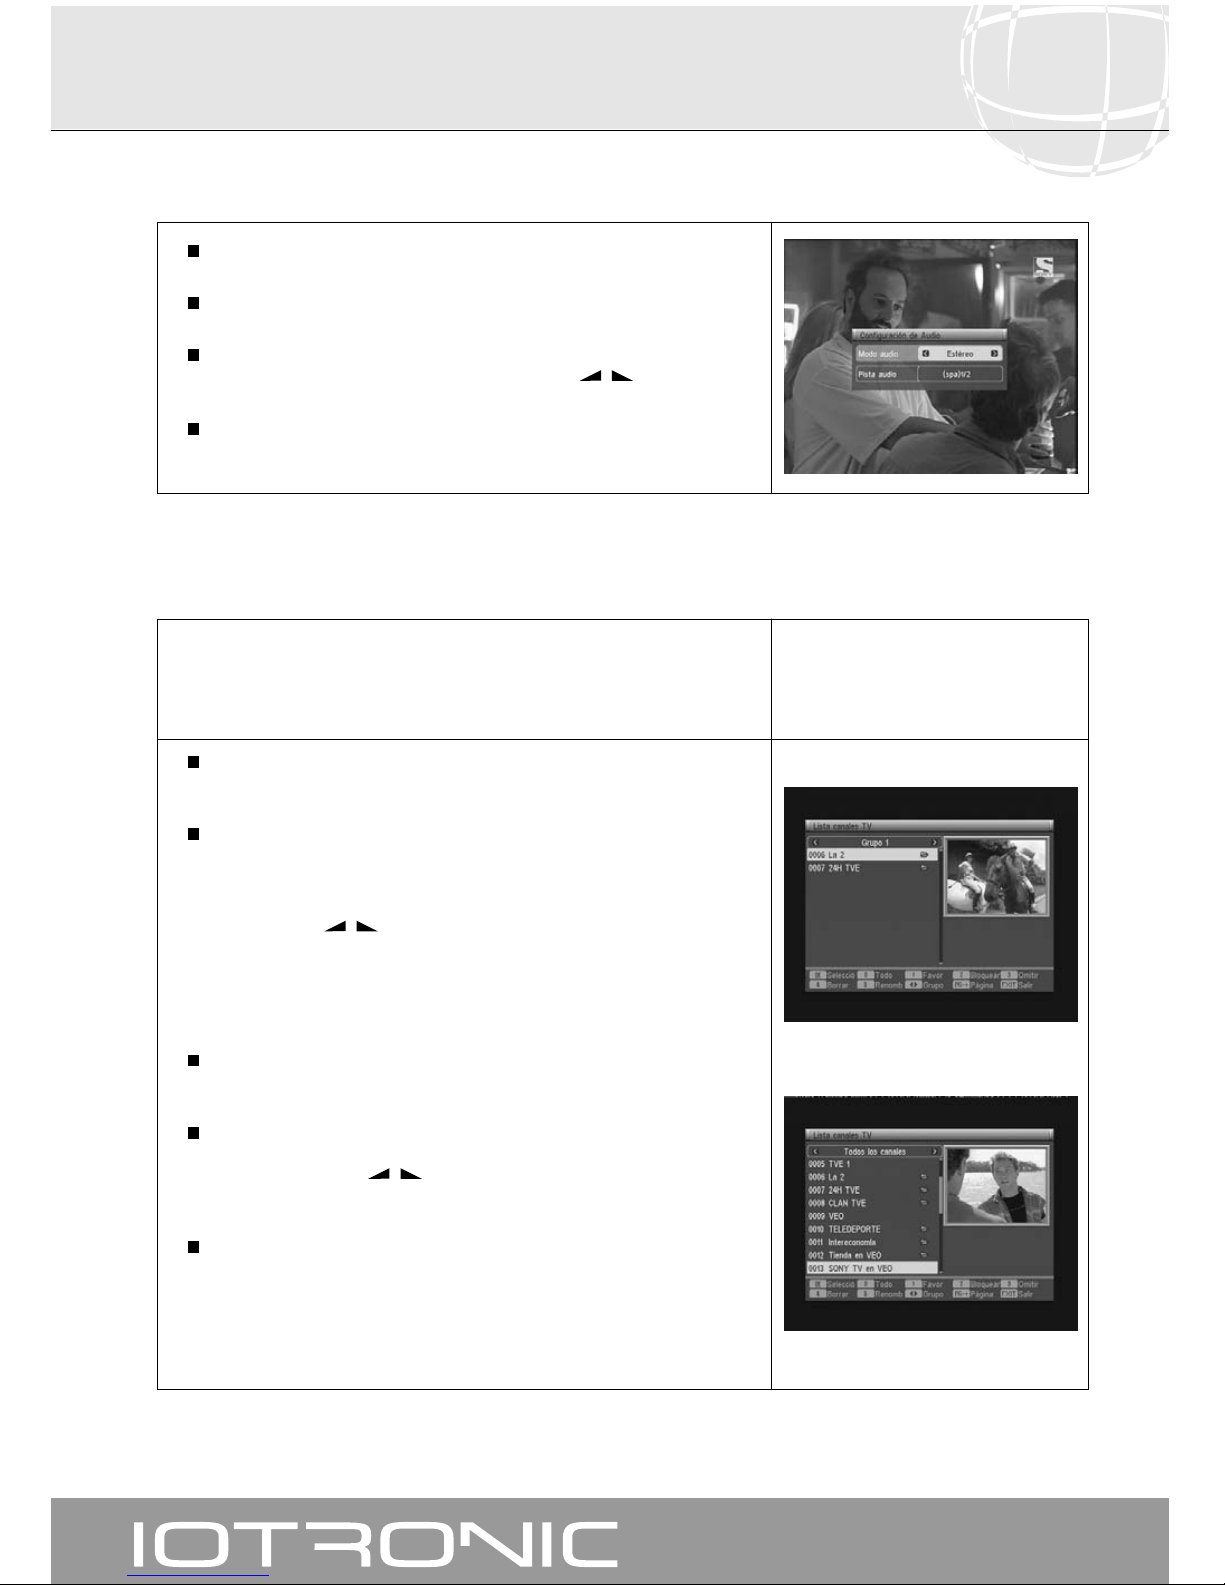
Pulse la tecla para suprimir el sonido de la emisión.
Para devolver el sonido a la misma, pulse la misma tecla una vez más.
Se recuperará el sonido con el mismo volumen que antes.
Para ajustar el volumen pulse las teclas -ó
+
.
Algunos canales son transmitidos con varios audios. Esta función depende de
si la transmisión incluye esta información en la señal enviada al Receptor.
Pulse la tecla AUDIO para activar el menú que contiene los distintos
idiomas de la transmisión.
Pulse la tecla PR- para situar el cursor en la opción “Pista Audio” y con las
teclas -/
+
seleccione el audio deseado de entre los existentes. Pulse
OK para confirmar.
Para salir del menú de audio pulse la tecla EXIT o AUDIO.
El volumen puede ser ajustado usando el mando a distancia.
Para aumentar el volumen pulse la tecla
+
, y para disminuirlo pulse la
tecla -del mando a distancia o del receptor.
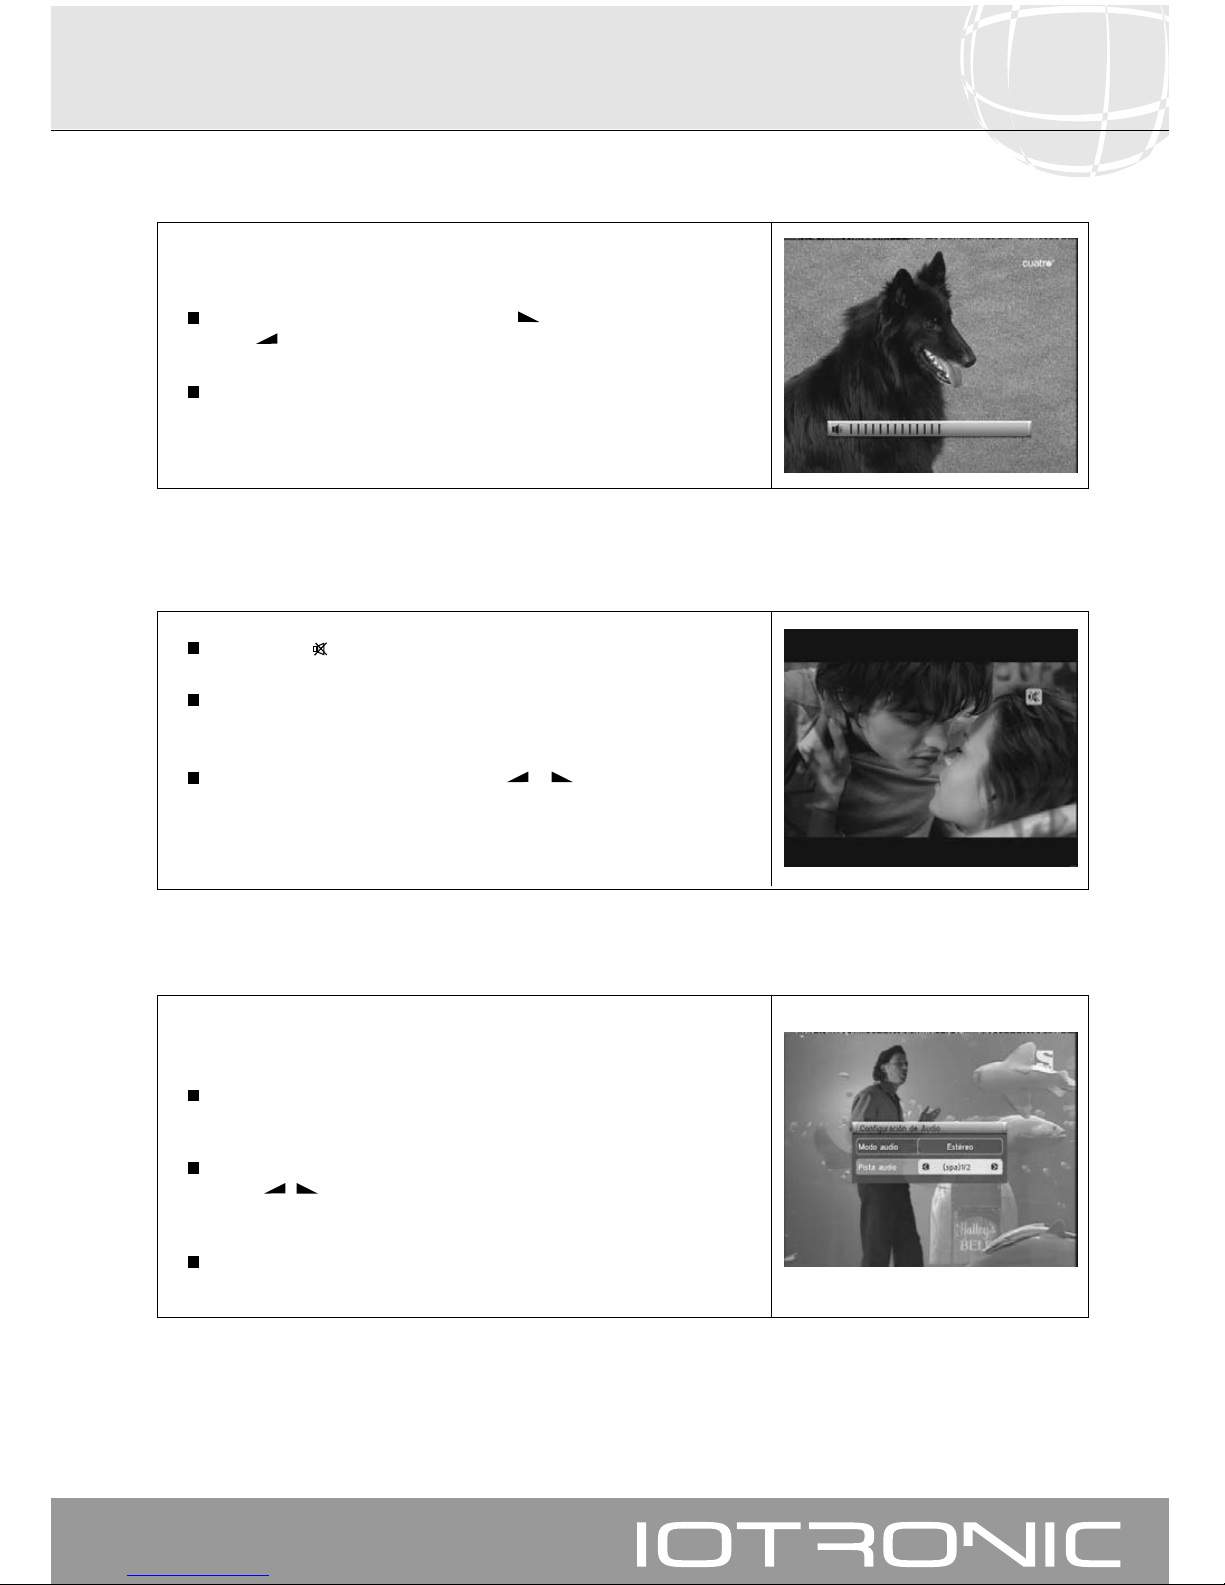
Los niveles de volumen existentes pueden ser identificados mediante el
indicador de nivel de volumen que aparece en pantalla.
Page 12
Manual de instrucciones
Receptor TV Digital Terrestre
12
Usted puede seleccionar fácilmente sus canales favoritos de TV o Radio
mediante las Listas de Canales Favoritos. Tiene la posibilidad de guardar
hasta 8 listas diferentes. En estas listas sólo aparecen los canales de TV o
Radio seleccionados de la lista de canales principal.
Pulse la tecla TV/RADIO para seleccionar la lista de canales de TV o
Radio.
Visionando un canal de TV o escuchando un canal de Radio, pulse la
tecla FAV para acceder a las listas de Canales Favoritos.
Si no hay canales asignados a cualquier grupo, el menú de favoritos no
se muestra en pantalla, mostrando el mensaje “No hay canal FAV”.
Con las teclas -/
+
seleccione una lista o grupo de canales en la cual
se encuentre su programa favorito. Los programas pueden estar
agrupados por: Grupo 1, Grupo 2, Grupo 3, Grupo 4, Grupo 5, Grupo
6, Grupo 7 y Grupo 8. Si alguno de estos grupos no tiene asignado un
programa, no se muestra el grupo.
Seleccione cualquier programa de la lista mediante las teclas PR+/PR- y
pulse la tecla OK para visualizarlo.
Para volver a la lista general de programas, pulse la tecla OK en modo
normal (viendo un programa). Se muestra en pantalla el grupo actual.
Mediante las teclas -/
+
seleccione el grupo “Todas las cadenas” y
seleccione otro programa pulsando OK.
Para salir de la lista de canales favoritos pulse la tecla EXIT.
Vea el apartado 8.1.- “Organizar canales TV o Radio” de la sección 8.“Menú Gestión de Canales” para saber como elaborar las Listas de
canales Favoritos.
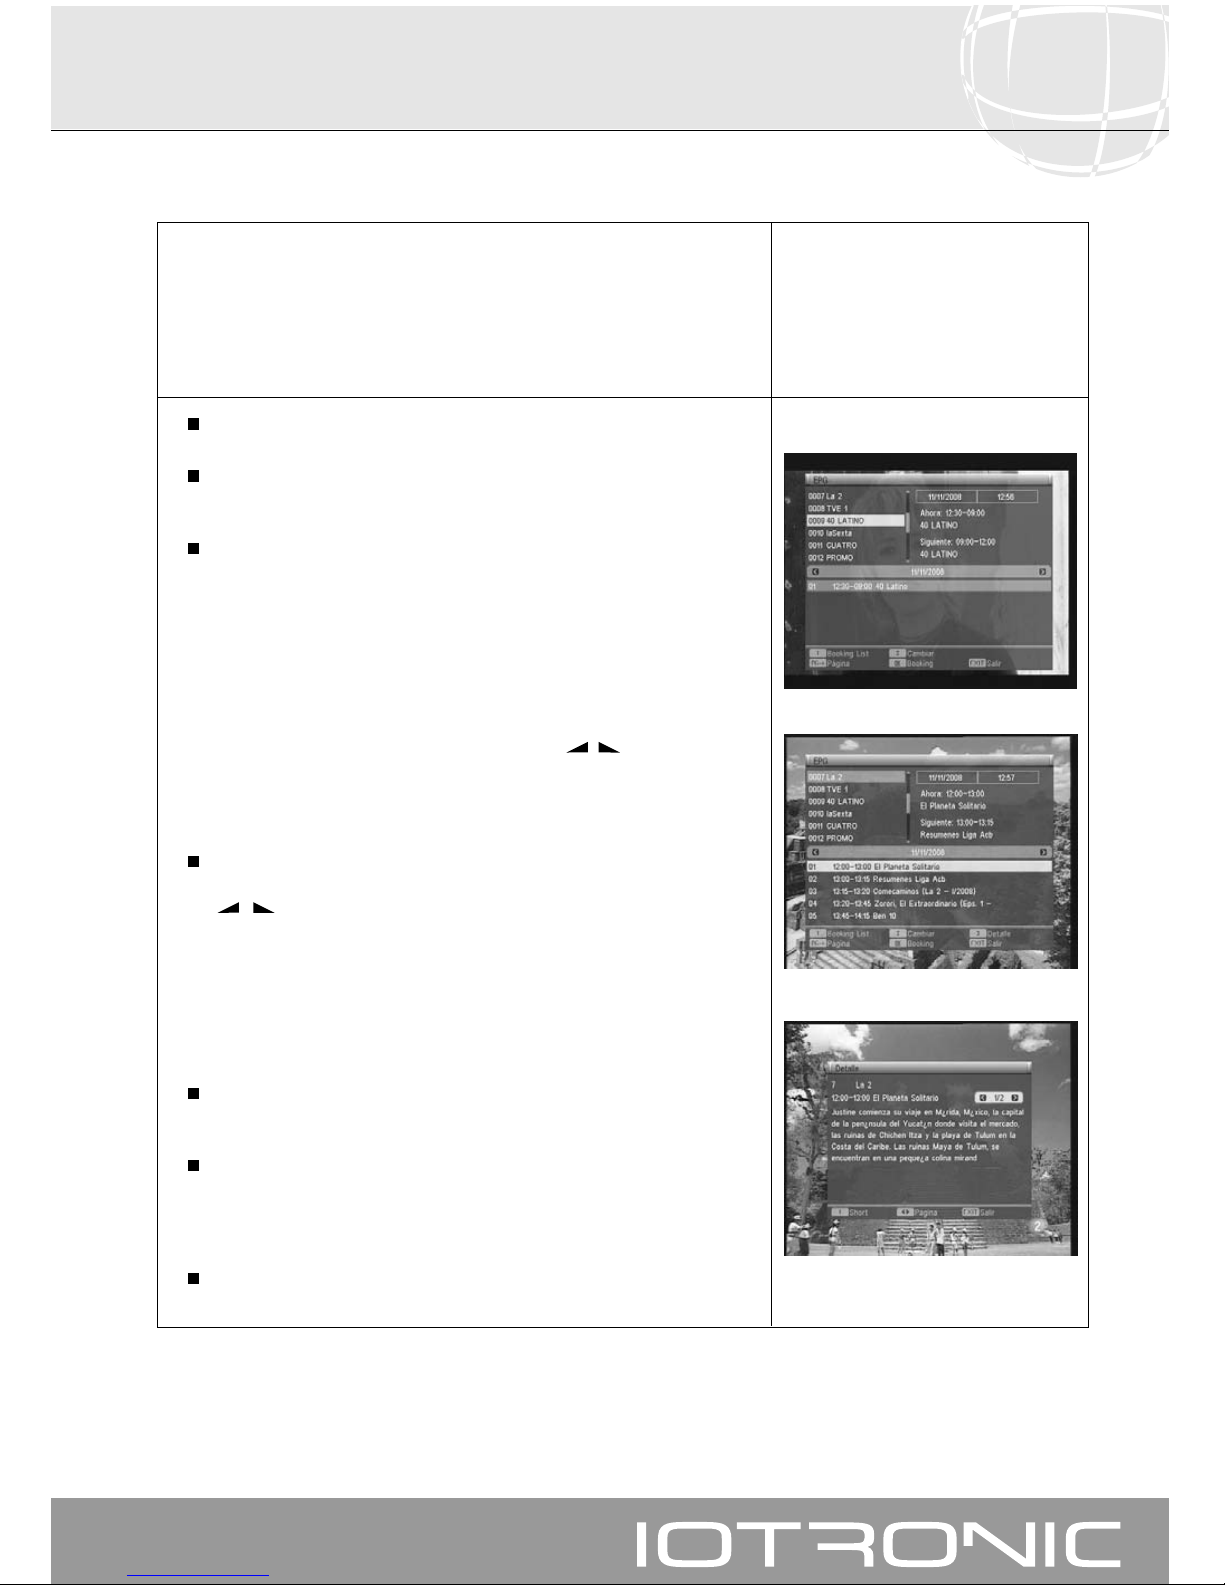
Pulse la tecla AUDIO para activar el menú de audio.
Active la opción “Modo Audio” con las teclas PR+/PR-.
Seleccione el modo de salida del audio deseado de entre los existentes
“Izquierda”, “Derecha” y “Estéreo”, con las teclas -/
+
Para salir del menú de audio pulse la tecla EXIT o AUDIO.
6.5.- Modos de Audio
6.6.- Como usar la Lista de Canales Favoritos
Page 13
Manual de instrucciones
Receptor TV Digital Terrestre
13
El ANT 7119 recibe y almacena la información sobre los canales de TV y
Radio en curso. Esta información incluye el horario de la próxima
programación en detalle. Esta guía es muy fácil de usar, ya que muestra toda
la información en pantalla.
La información que proporciona dicha guía está formada por: nº de
programa, nombre del programa, fecha y hora de emisión (hora de inicio y
de finalización).
Con la tecla TV/RADIO puede cambiar de la lista de TV a la de Radio.
Presione la tecla EPG mientras esta sintonizando canales de TV o Radio,
y accederá a la guía electrónica de programación (EPG).
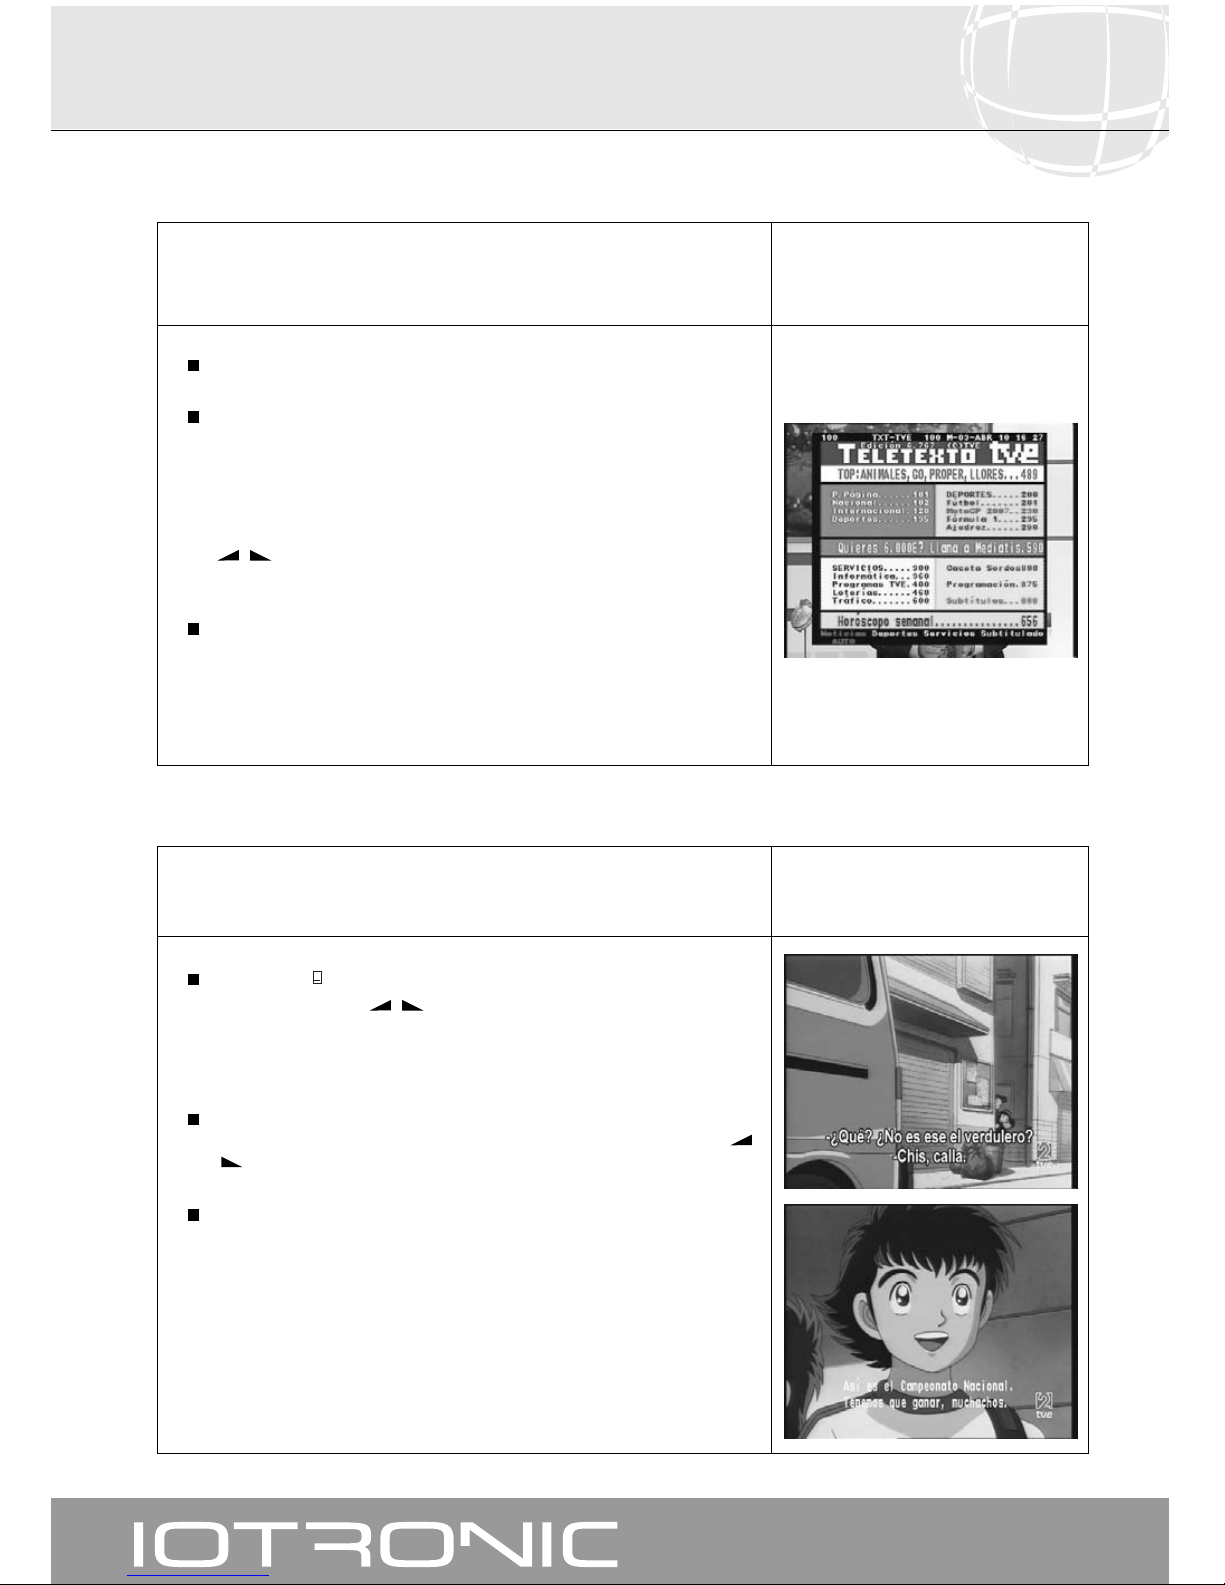
La EPG aparece configurada básicamente en tres apartados.
A la izquierda se muestra una lista donde aparecen el nº y el nombre de
los programas. Con las teclas PR+/PR- puede moverse de un programa a
otro. Al cambiar de programa la información mostrada se actualiza.
Inmediatamente a su derecha muestra la fecha y hora actual, así como el
nombre del evento actual y del próximo con sus respectivas horas de
emisión. Mediante las teclas PR+/PR- puede moverse entre uno y otro
evento.
En la parte de abajo se muestra una lista con todos los eventos y sus
horários en formato diário. Mediante las teclas -/
+
puede avanzar o
retroceder en la linea de tiempo. Pulsando OK sobre un evento, éste pasa
a formar parte de la “Booked List”. El receptor irá mostrando
automáticamente los eventos de la lista en orden horário.
Pulse la tecla 1 en la ventana EPG para acceder a la “Booked List”.
Para moverse por los distintos días y horarios de emisión use las teclas
-
,
+
, PR+ o PR-. Si desea información más detallada de un evento
en concreto, deberá acceder al submenú “Detalle” pulsando la tecla OK.
Pulse la tecla 2 consecutivamente para moverse de una a otra ventana de
forma cíclica.
Pulsando la tecla 3 sobre uno de los eventos, se accede al submenú
“Detalle” donde se muestra un resumen del mismo. Pulsando la tecla 1
podrá ver esta descripción en forma extendida o resumida.
Finalmente aparecen en la parte inferior de la ventana las opciones que
podemos llevar a cabo en este menú.
La información contenida en la EPG viene con las señales suministradas
por el proveedor. En el caso de que un programa no contenga datos para
la información de la guía, en pantalla aparecerá el mensaje "Sin
información".
Pulse la tecla EXIT o MENU para salir de la EPG y acceder directamente al
canal seleccionado.
Notas:
- Para recibir los horarios de emisión en la guía de una forma correcta, deberá ajustar primero como referencia su HORA
LOCAL con referencia al GMT (horario del meridiano de Greenwich) o directamente insertando su hora actual en la opción
“país y Hora”.
- Cuando definimos la hora a través de la opción GMT, el horario que aparece en la pantalla es suministrado por el proveedor,
por lo que a veces estos datos pueden aparecer incorrectos en determinados programas.
6.7.- Guia Electrónica de Programación (EPG)
Page 14
Manual de instrucciones
Receptor TV Digital Terrestre
14
En este menú podrá seleccionar todos los servicios de teletexto
proporcionados por el proveedor de servicios. Entre ellos también se
encuentran los subtítulos (ver como acceder a ellos en cada canal).
Pulse la tecla TEXT del mando para activar el menú Teletexto.
Los servicios de teletexto se visualizarán de la manera habitual.
Incluso si su TV no dispone de descodificador de Teletexto, Ud. podrá
visualizarlo en pantalla, ya que el Receptor lo genera automáticamente.
Pulsando la tecla OK del mando, puede hacer que el color de fondo de la
página del teletexto sea mas o menos transparente.
Para avanzar o retroceder las páginas de 100 en 100, pulse las teclas
-
/
+
y para avanzar o retroceder página a página pulse las teclas
PR+/PR-.
Para salir del menú “Teletexto” pulse la tecla EXIT o TEXT.
NOTA: No todos los proveedores proporcionan este tipo de información.
Los canales que disponen de esta función muestran la indicación
“TTX” en la ventana de información.
El receptor le permite visualizar los subtítulos de un determinado programa,
siempre que sean proporcionados por el operador.
Pulse la tecla del mando para acceder a la función subtítulos.
Mediante las teclas -/
+
seleccione el tipo de subtítulos que desea
ver. Las opciones son: “Apagado”, “Estándar” (muestra los subtítulos
siempre que estos sean emitidos) y “Teletexto” (se ven los subtítulos a
través de la página subtítulos del teletexto).
Dentro de esta opción también es necesario seleccionar el idioma con
que serán mostrados los subtítulos (si hay mas de uno) con las teclas
-
/
+
.
Para salir de los “Subtítulos” pulse la tecla EXIT o SubT.
NOTA: Los canales que disponen de esta función muestran la indicación
“SubT” en la ventana de información.
6.8.- Función Teletexto
6.9.- Función Subtítulos
Page 15
Manual de instrucciones
Receptor TV Digital Terrestre
15
En caso de un fallo en el suministro de la energía eléctrica, ya sea por desenchufar el receptor o por la falta de
corriente eléctrica, al enchufar de nuevo el receptor o al volver la corriente eléctrica, el canal de TV/RADIO que
estaba sintonizado, aparece en la pantalla con el último Audio seleccionado sin tener que pulsar tecla alguna.
Si desea ver el último canal que ha estado visionando y no recuerda que nº de canal era, pulse la tecla PR.
Si desea congelar una imagen en pantalla mientras esté visionando un programa, pulse la tecla PAUSE. Para
continuar viendo el programa, vuelva a pulsar la tecla PAUSE.
Tenga en cuenta que al congelar una imagen en pantalla, el canal que estaba visionando continúa con su emisión
normalmente, por lo que se perdería lo sucedido durante el tiempo que permanezca la imagen congelada en pantalla.
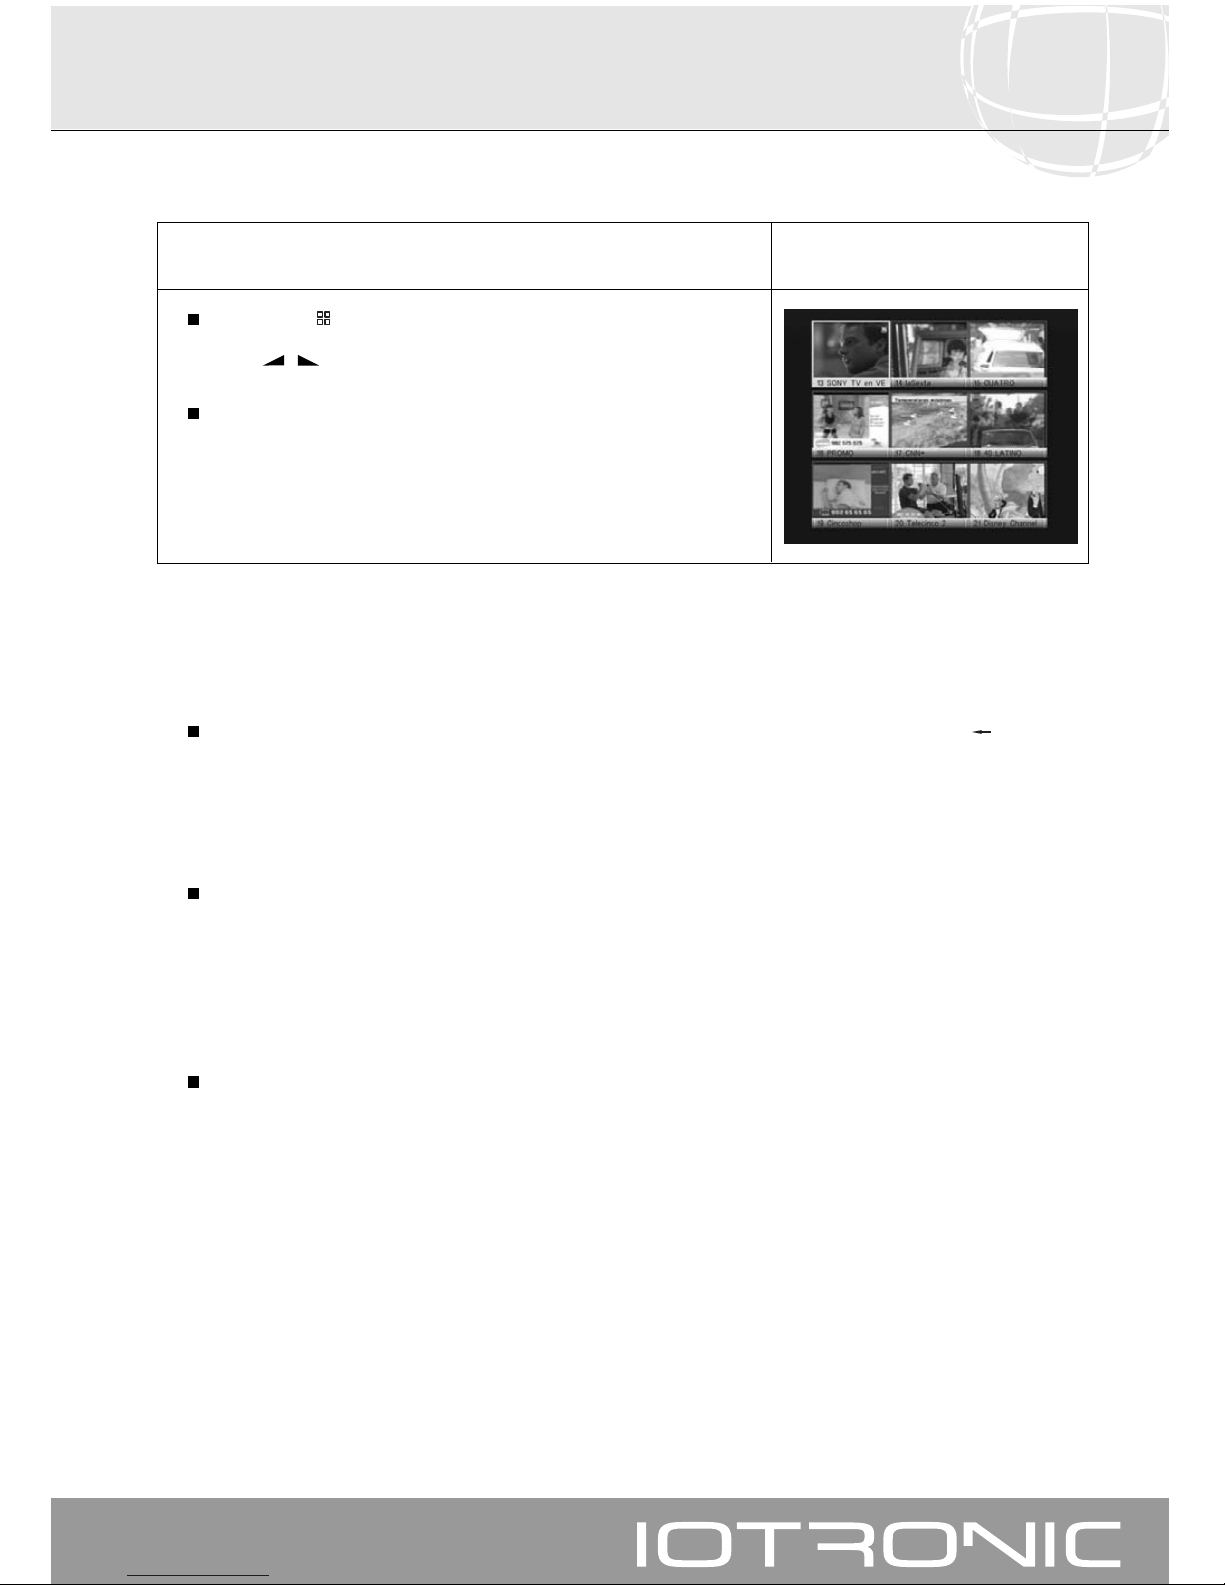
Esta función le permite visualizar un mosaico de imágenes (conjunto de
programas) constituido por 9 pequeñas pantallas.
Pulse la tecla para activar esta opción. Una vez mostrado el mosaico
en pantalla, es posible escoger un canal para visualizar mediante las
teclas -,
+
, PR+ o PR-.
Pulsando la tecla OK sobre la imagen seleccionada, ésta pasa a
mostrarse a pantalla completa.
NOTA: Esta función no permite la visualización de dos programas
simultáneamente.
6.10.- Función Mosaico
6.11.- Llamada al canal anterior
6.12.- Regreso al último canal
6.13.- Pausa
Page 16
Manual de instrucciones
Receptor TV Digital Terrestre
16
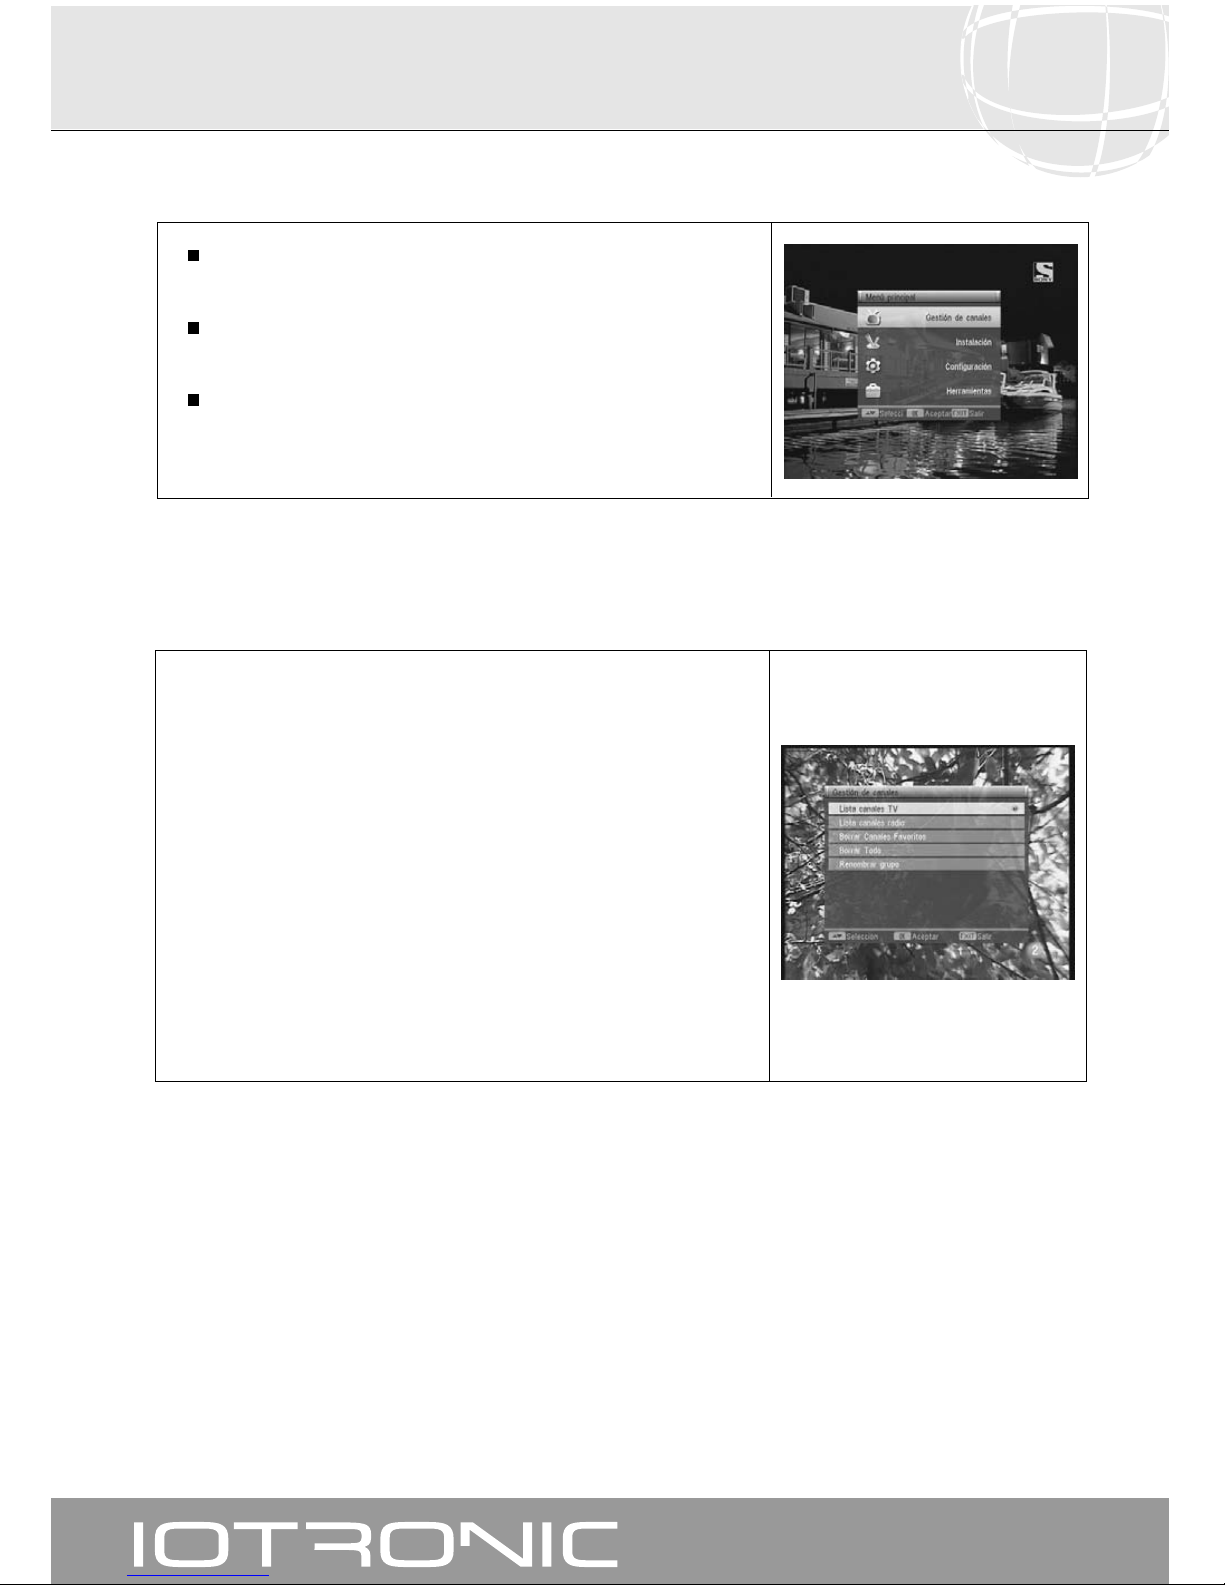
7.- Menú Principal
8.- Menú Gestión de Canales
Pulse la tecla MENU cuando esté visionando un canal y el menú principal
aparecerá en la pantalla.
Seleccione una de las opciones del menú con las teclas PR+/PR- y
presione la tecla OK para ejecutarlo.
Pulse la tecla EXIT o MENU para salir del menú principal y regresar al
canal de TV o Radio que estaba visionando.
En este menú puede gestionar las listas de canales de TV o Radio, así como
las listas de favoritos, pudiendo editar (seleccionar como favoritos, bloquear,
saltar, borrar, renombrar), buscar, ordenar y mover canales de la lista de
canales.
También puede borrar todos los canales de la lista o bien borrar todos los
favoritos.
Seleccione una de las opciones con las teclas PR+/PR- y pulse OK.
Después de la edición, los restantes canales se fijan automáticamente.
Como el funcionamiento relativo a la edición de canales de Radio es el
mismo que el de canales de TV, en este manual solo mostraremos la edición
de canales de TV.
Para cambiar de la lista de canales de TV a la de Radio, pulse la tecla
TV/RADIO, o acceda a la opción “Lista Canales de Radio” en el menú.
Page 17
Manual de instrucciones
Receptor TV Digital Terrestre
17
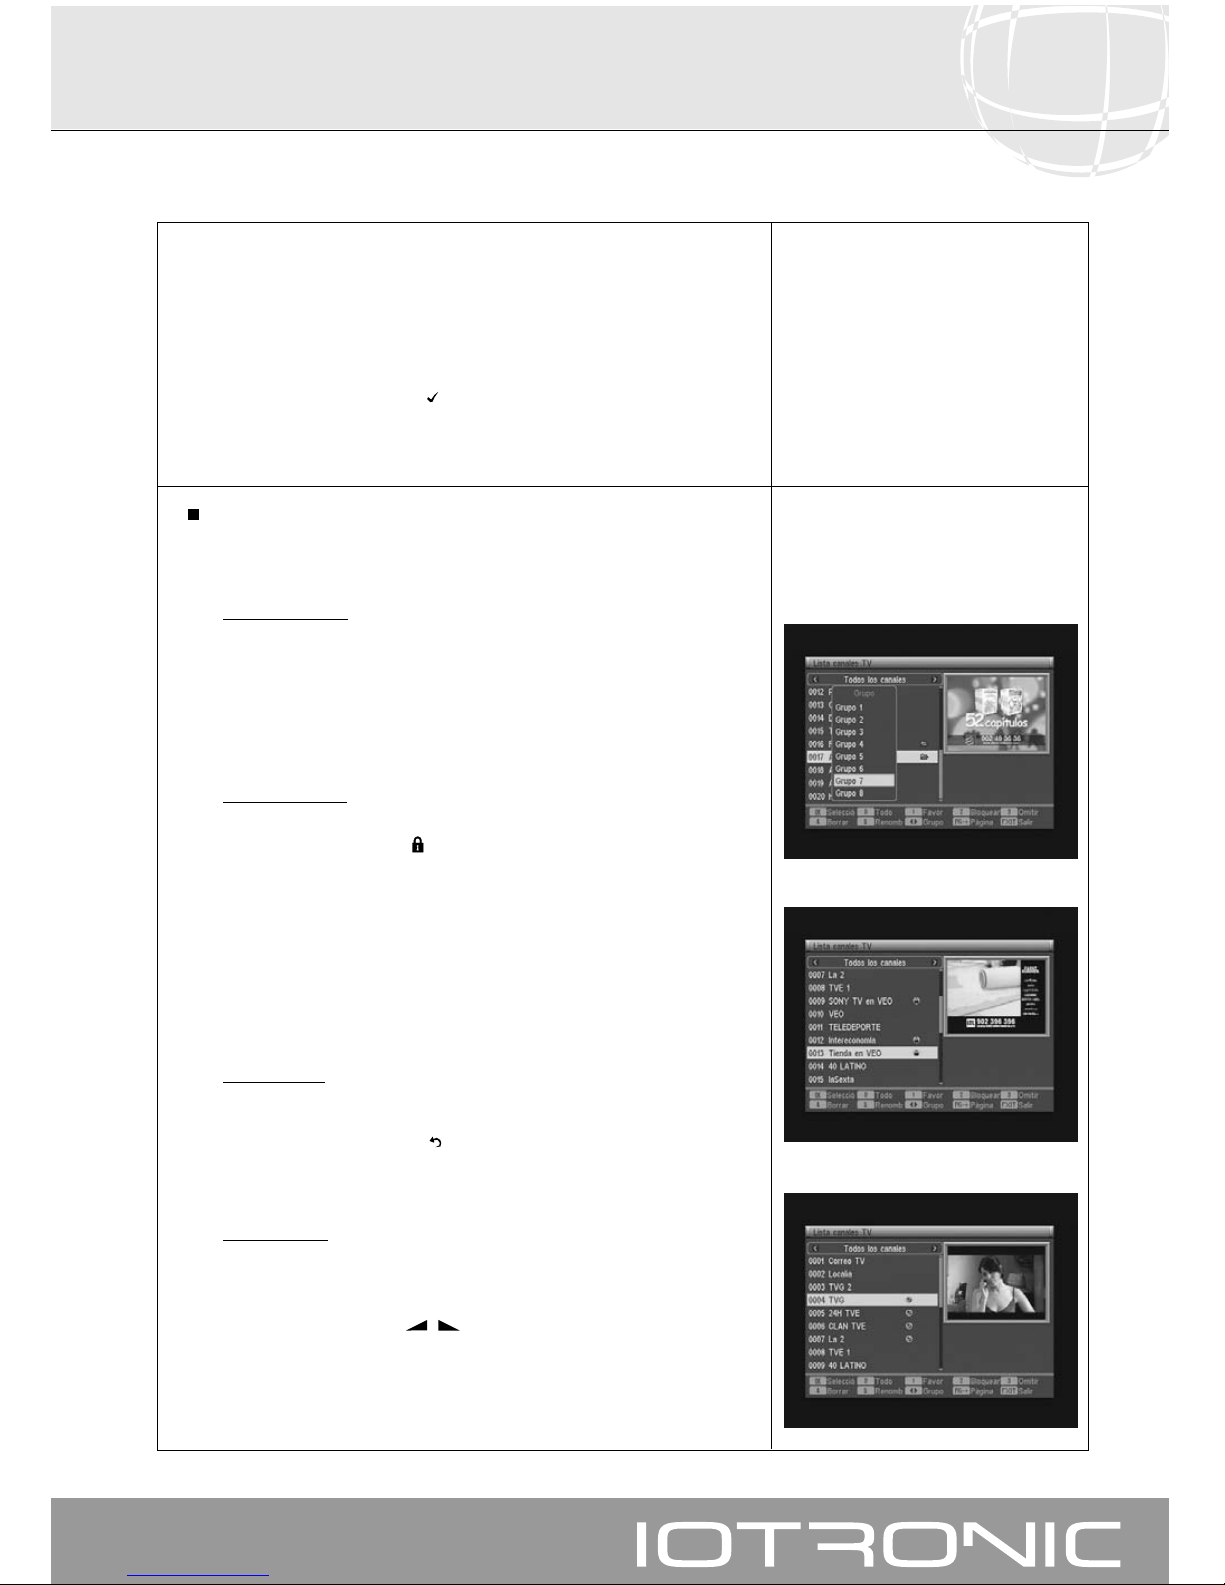
Acceda a este menú seleccionando la opción “Lista de canales de TV” o
Radio en el menú “Canal”. También puede acceder a este menú
directamente pulsando la tecla OK en modo de visualización normal (viendo
un programa).
Puede seleccionar varios canales al mismo tiempo para realizar alguna de
las funciones que se indican a continuación, pulsando la tecla OK sobre cada
uno de ellos o bien pulsando la tecla 0 para seleccionar todos los canales de
la lista (aparece el símbolo “ ” indicando la nueva condición de los
mismos).
Al volver a pulsar las teclas OK ó 0 sobre un canal que ya estaba marcado,
se elimina la marca y éste no será modificado.
Editar canales: Esta opción le permite hacer una edición más
pormenorizada de la lista de canales.
Para ello pulse la tecla 1 y entrará en un submenú.
- Canales favoritos
:
Seleccione el canal que desea marcar como favorito en la lista general
mediante las teclas PR+/PR- y a continuación pulse la tecla 1. En una
ventana emergente deberá seleccionar uno de los ocho grupos
disponibles en el cual se va incluir ese programa y pulsar OK.
Al incluir un canal en un grupo o tipo, damos de alta este grupo y se
mostrará como una lista más cuando se pulse la tecla FAV u OK.
- Bloquear canales
:
Para bloquear un canal, pulse la tecla 2 sobre el canal elegido, con lo
que aparece un símbolo ( )indicando la nueva condición del mismo. Si
desea desbloquearlo vuelva a pulsar la tecla 2 sobre el canal, con lo
que el símbolo desaparece.
El nuevo estado de los canales estará disponible cuando salga de este
menú.
Para salir del menú pulse la tecla EXIT.
Para acceder a cualquier canal que esté bloqueado deberá introducir la
contraseña, siempre que la opción “Bloqueo de Canales” en el menú
“Control Paterno” esté activada.
- Saltar canales
:
Para saltar un canal o que éste no se visualice cuando nos desplazamos
mediante las teclas PR+/PR-, pulse la tecla 3 sobre el canal elegido, con
lo que aparece un símbolo ( ) indicando la nueva condición del mismo.
Al volver a pulsar la tecla 3 sobre un canal que ya estaba marcado, se
elimina la selección y éste no será omitido.
- Borrar canales
:
Para borrar un canal de la lista general, pulse la tecla 4 sobre el canal
elegido.
Para borrar un canal favorito de uno de los grupos, deberá seleccionar
el grupo con las teclas -/
+
, a continuación el canal o canales a
borrar con la tecla OK y finalmente pulsar la tecla 4.
Si borra todos los canales de un grupo, éste desaparece.
Si hay mas de un canal marcado para borrar, éstos serán borrados al
mismo tiempo.
8.1.- Organizar canales TV o Radio
Page 18
Manual de instrucciones
Receptor TV Digital Terrestre
18
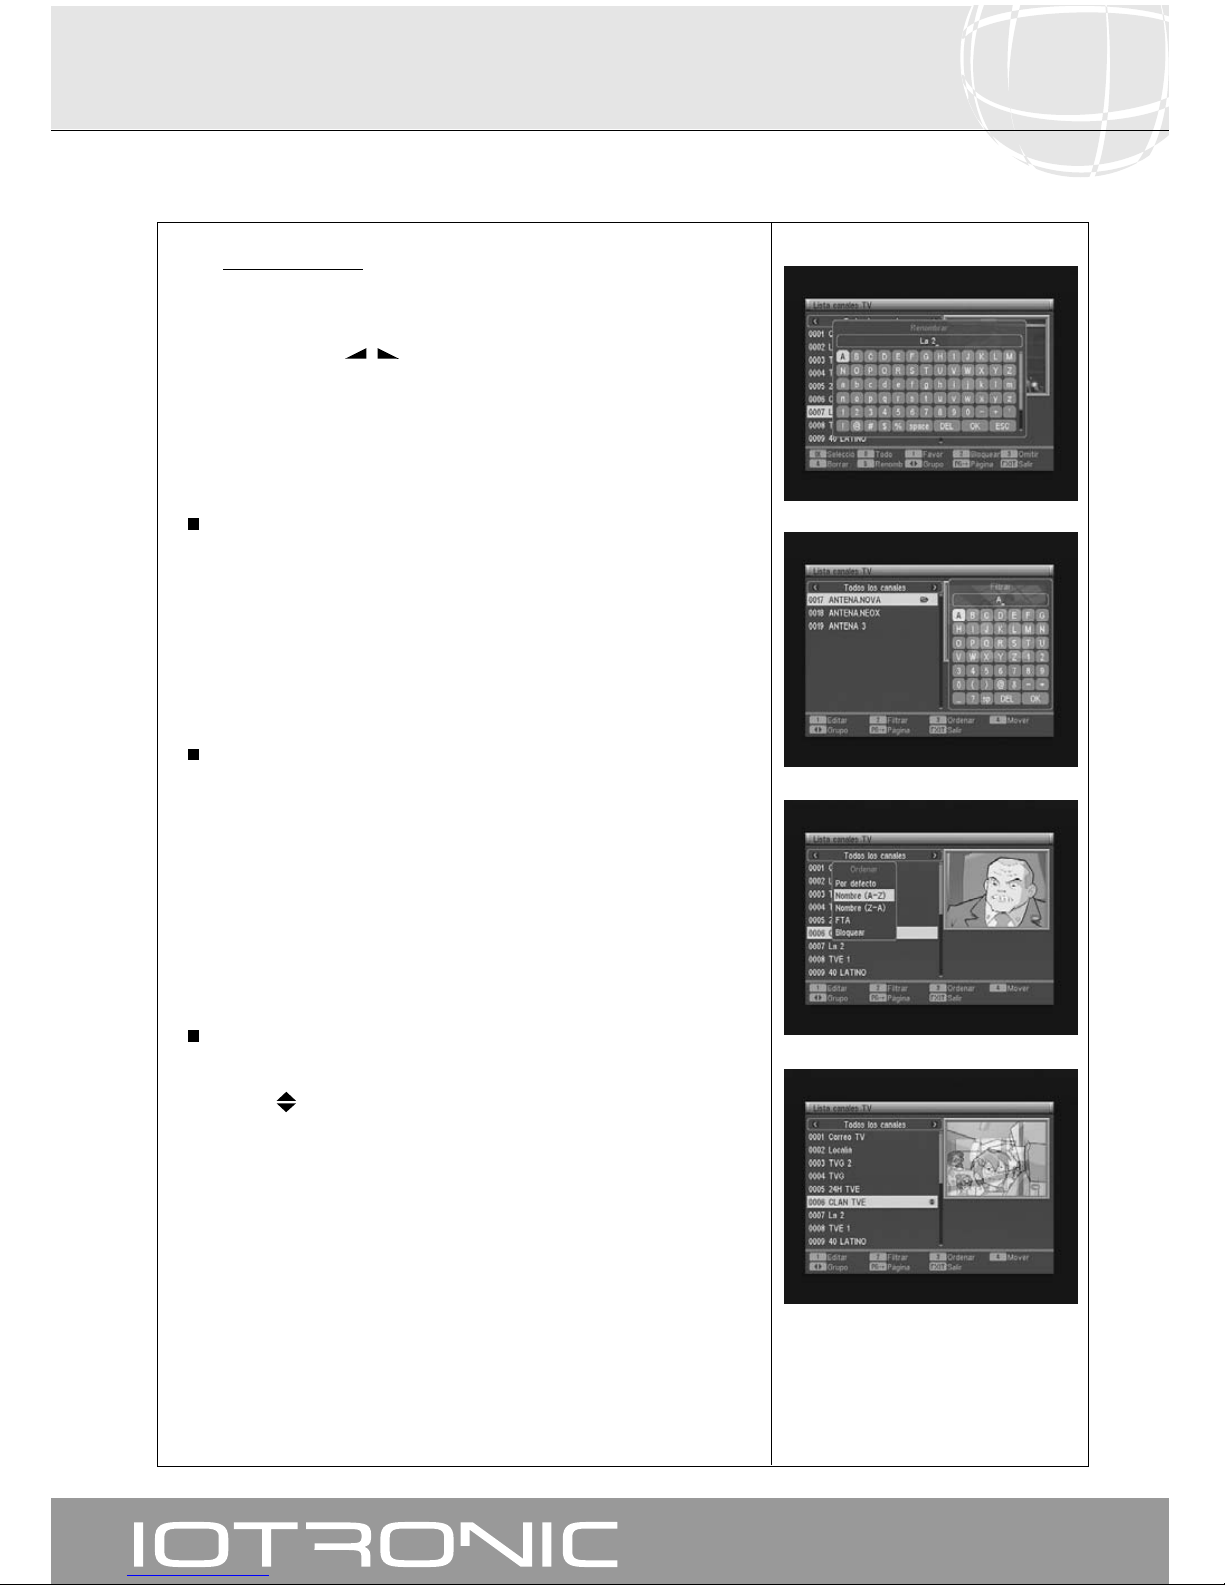
- Renombrar canales:
Esta opción le permite cambiar el nombre de un canal.
Seleccione el canal a renombrar mediante las teclas PR+/PR- y a
continuación pulse la tecla 5. En el teclado emergente y mediante las
teclas PR+/PR-/-/
+
podrá confeccionar un nuevo nombre para el
canal. Finalmente sitúe el cursor en la opción “OK” y pulse la tecla OK
del mando para confirmar.
Pulse la tecla EXIT para regresar al menú anterior.
Encontrar canales: Si desea ver un canal y no recuerda su posición,
puede realizar una búsqueda por nombre. Para ello pulse la tecla 2.
En el teclado que aparece a continuación, comience a escribir el nombre
del canal. Al ir completando el nombre, irá limitando el número de
canales en la lista. Cuando aparezca en la lista el deseado, sitúe el cursor
en la opción “OK” del teclado y pulse la tecla OK.
En la lista de canales resultante, seleccione el canal y finalmente pulse la
tecla OK para visualizarlo.
Ordenar canales: Puede hacer que la lista de canales aparezca ordenada
por varios criterios. Estos son: “Defecto” (configuración original),
“Nombre (A-Z)”, “Nombre (Z-A)”, “FTA” y “Bloquear”.
Para ello pulse la tecla 3 y en el menú emergente seleccione uno de los
criterios de ordenación mediante las teclas PR+/PR- y pulse OK.
La lista se mostrará en función del criterio seleccionado.
Para salir del menú pulse la tecla EXIT y surgirá un mensaje de
confirmación, donde si desea guardar las modificaciones seleccione “SI”,
o en caso contrario seleccione “NO”.
Esta opción solo está disponible en el grupo “Todos los canales”.
Mover canales: Si lo que desea es mover un canal de su actual posición
en la lista general, seleccione en primer lugar dicho canal en la lista y
luego pulse la tecla 4. El canal marcado para mover será marcado con el
símbolo .
Mediante las teclas PR+/PR- desplace el canal a la nueva posición en la
lista y pulse la tecla OK. Surgirá un mensaje de confirmación, donde si
desea guardar las modificaciones seleccione “SI”, o en caso contrario
seleccione “NO”.
Esta opción solo está disponible en el grupo “Todos los canales”.
Nota: Si la opción LCN se encuentra activa, cuando mueva un canal de
posición éste mantendrá su numeración.
Para salir del menú pulse la tecla EXIT.
Page 19
Manual de instrucciones
Receptor TV Digital Terrestre
19
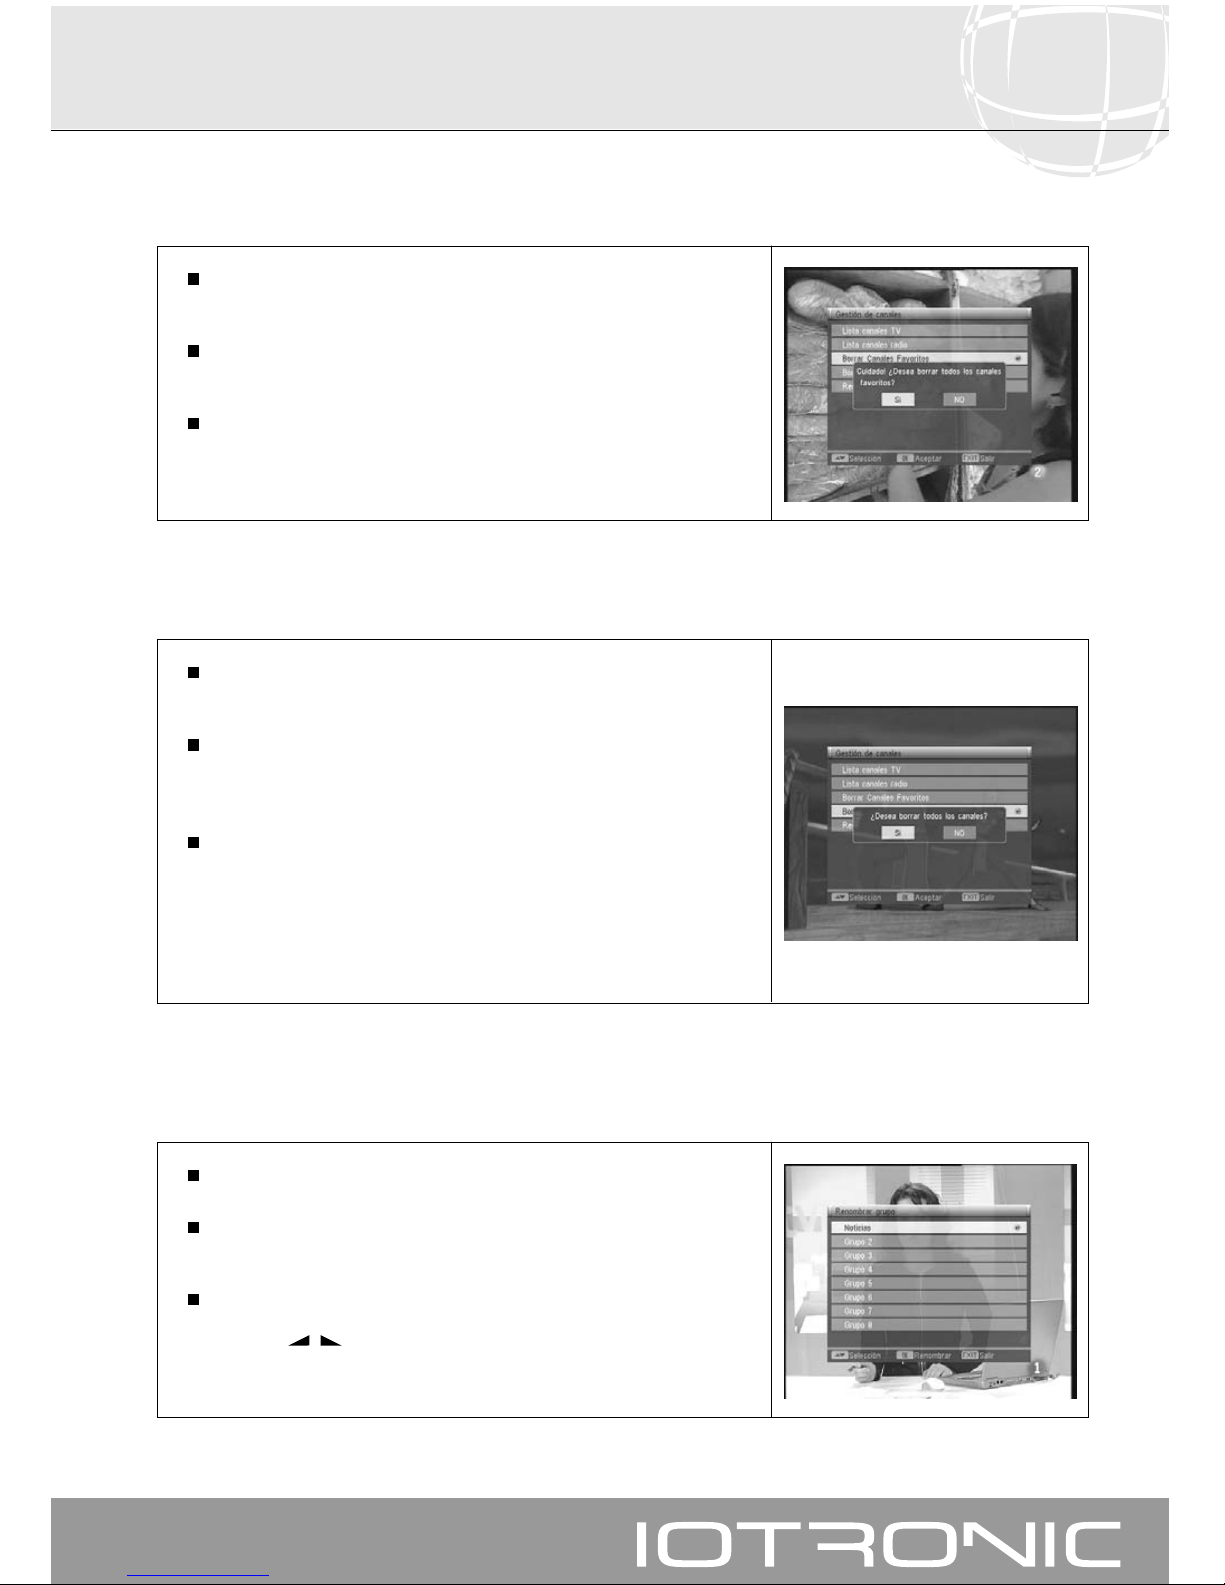
Esta opción le permite borrar de una sola vez todos los grupos de canales
favoritos.
Para ello seleccione la opción “Borrar Canales Favoritos” en el menú
“Gestión de Canales” con las teclas PR+/PR- y pulse OK.
Aparece una nueva ventana pidiendo confirmación para eliminar todos
los Grupos de Canales Favoritos (SI) o para salir del menú sin realizar
modificaciones (NO).
8.2.- Borrar Canales Favoritos
Esta opción le permite cambiar el nombre a los grupos de canales.
Seleccione esta opción en el menú “Gestión de Canales” con las teclas
PR+/PR- y pulse OK.
Seleccione el grupo a renombrar mediante las teclas PR+/PR- y a
continuación pulse OK. En el teclado emergente y mediante las teclas
PR+/PR-/-/
+
podrá confeccionar un nuevo nombre para el grupo.
Finalmente sitúe el cursor en la opción “OK” y pulse la tecla OK del
mando para confirmar.
8.4.- Renombrar grupo
Si lo que desea es borrar todos los canales de la lista de canales,
seleccione esta opción.
Para ello seleccione la opción “Borrar Todo” en el menú ”Gestión de
Canales” con las teclas PR+/PR- y pulse OK.
Se le pedirá que introduzca su contraseña.
Aparece una nueva ventana pidiendo confirmación para Eliminar Todos
los Canales (SI) o para salir del menú sin realizar modificaciones (NO).
Nota: Para poder ver nuevamente programas de TV o Radio, deberá realizar
una nueva búsqueda, bien de forma automática o manual. Vea apdo.
9.- Menú Instalación => Búsqueda de canales.
8.3.- Borrar todos los canales
Page 20
Manual de instrucciones
Receptor TV Digital Terrestre
20
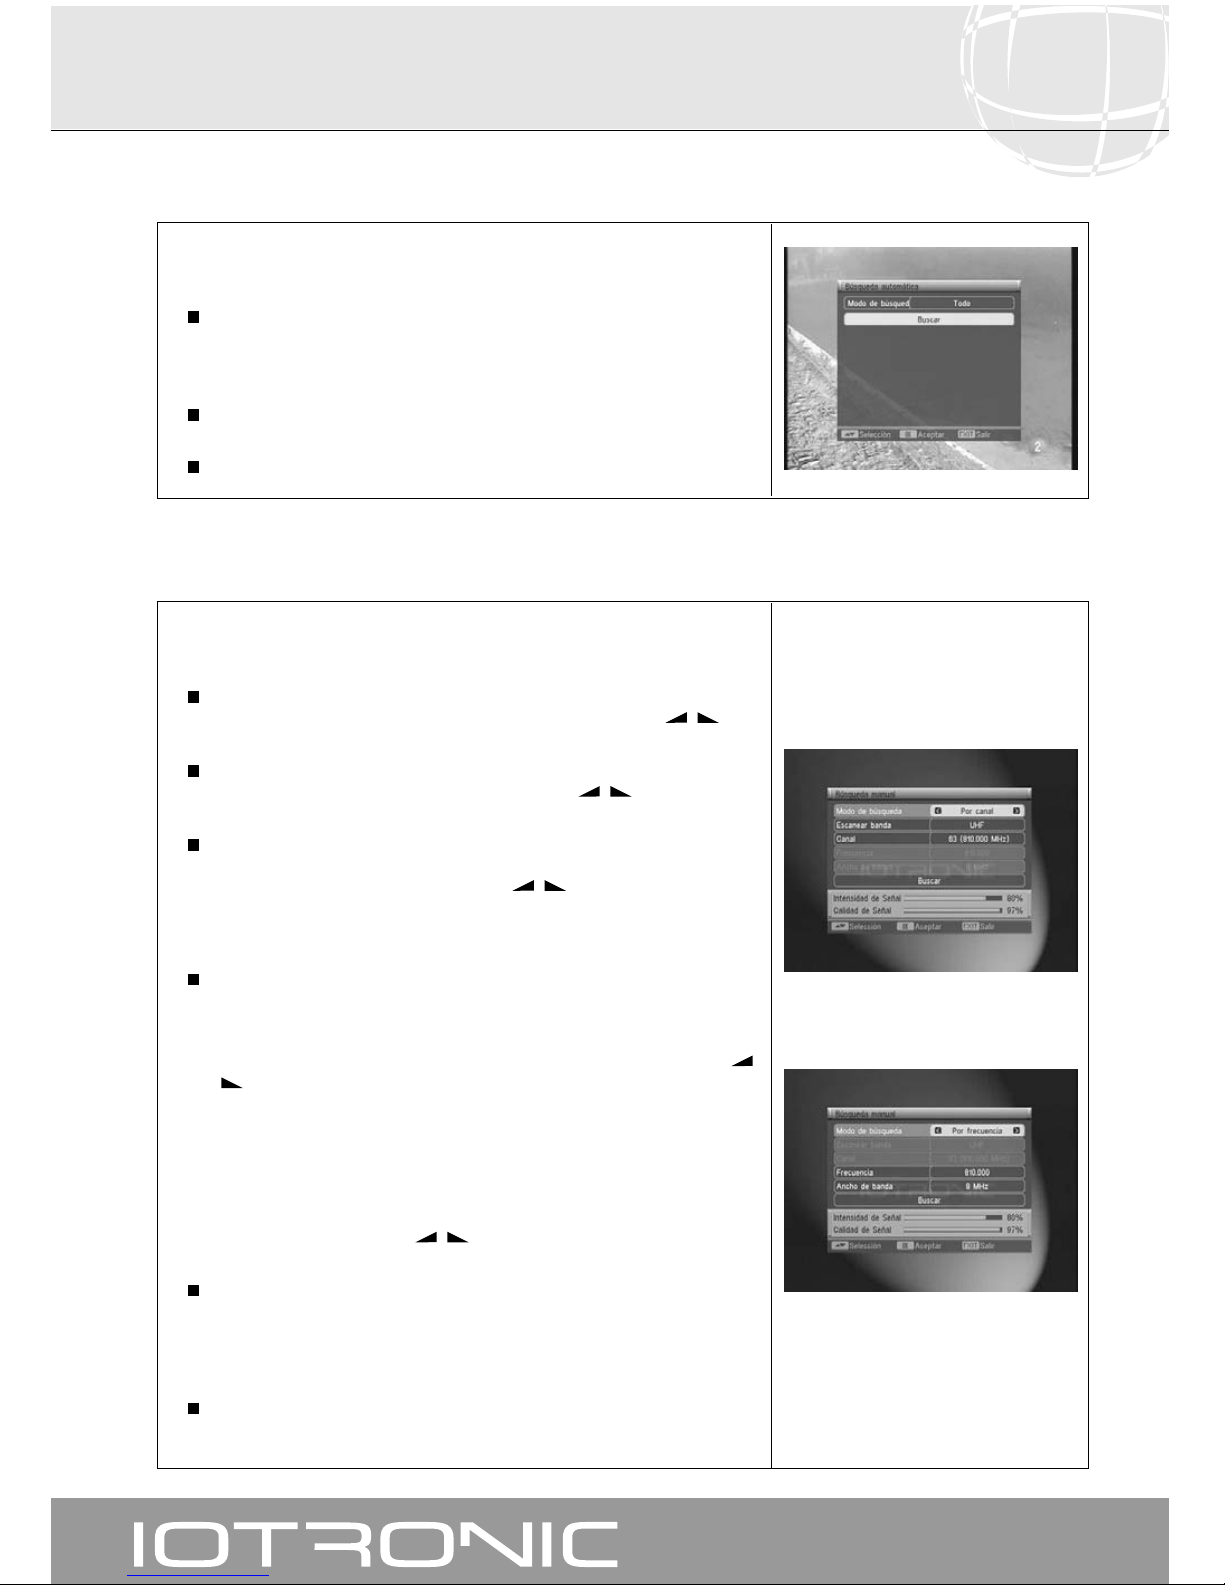
Seleccione este modo para realizar una búsqueda en toda la banda de
entrada del receptor de forma automática.
En la opción “Modo de Búsqueda”, seleccione una de las opciones de
búsqueda, “Libres” (solo canales en abierto) o “Todos” (todos los canales).
Sitúe en cursor en la opción “Buscar” y pulse la tecla OK del mando.
La búsqueda completa puede tardar varios minutos.
Si desea interrumpir la búsqueda pulse la tecla MENU o EXIT.
9.1.- Búsqueda automática
Seleccione este modo para realizar una búsqueda sobre un canal o una
frecuencia concreta.
En la opción “Modo de Búsqueda”, seleccione una de las opciones de
búsqueda, “Por canal” o “Por frecuencia” mediante las teclas -/
+
.
En la opción “Escaner Banda” seleccione la banda donde se va a realizar
la búsqueda, “UHF” o “VHF” mediante las teclas -/
+
.
En la opción “Canal” seleccione el canal donde se va a realizar la
búsqueda. Los canales varían en función de la banda seleccionada.
Seleccione un canal mediante las teclas -/
+
o bien pulse la tecla OK
para activar un menú emergente, seleccione el canal con las teclas
PR+/PR- y pulse OK para confirmar.
Si va a realizar una búsqueda por frecuencia, en la opción “Frecuencia”
deberá introducir la frecuencia del canal y en la opción “Ancho de Banda”
el valor adecuado a esa frecuencia. Para introducir la frecuencia, pulse
OK sobre esta opción. Se mostrará un cursor sobre el primer dígito
indicando que puede modificarlo con las teclas PR+/PR-. Las teclas
-
/
+
le permitirán seleccionar otro dígito. También se puede introducir la
frecuencia mediante el teclado numérico (0..9). Vuelva a pulsar la tecla
OK para fijar el dato.
Observe si el canal o la frecuencia seleccionada corresponden a un canal
digital. Lo sabrá fácilmente si la barra inferior “Calidad de Señal” indica
un porcentaje de calidad aceptable.
En la opción “Ancho de banda” podrá seleccionar entre las opciones 6, 7
u 8 MHz, usando las teclas -/
+
.
Finalmente sitúe en cursor en la opción “Buscar” y pulse la tecla OK del
mando.
Puede seguir el proceso de búsqueda mediante las indicaciones que se
muestran en la pantalla del TV.
Si desea interrumpir la búsqueda pulse la tecla MENU o EXIT.
9.2.- Búsqueda manual
9.- Menú Instalación
Page 21
Manual de instrucciones
Receptor TV Digital Terrestre
21
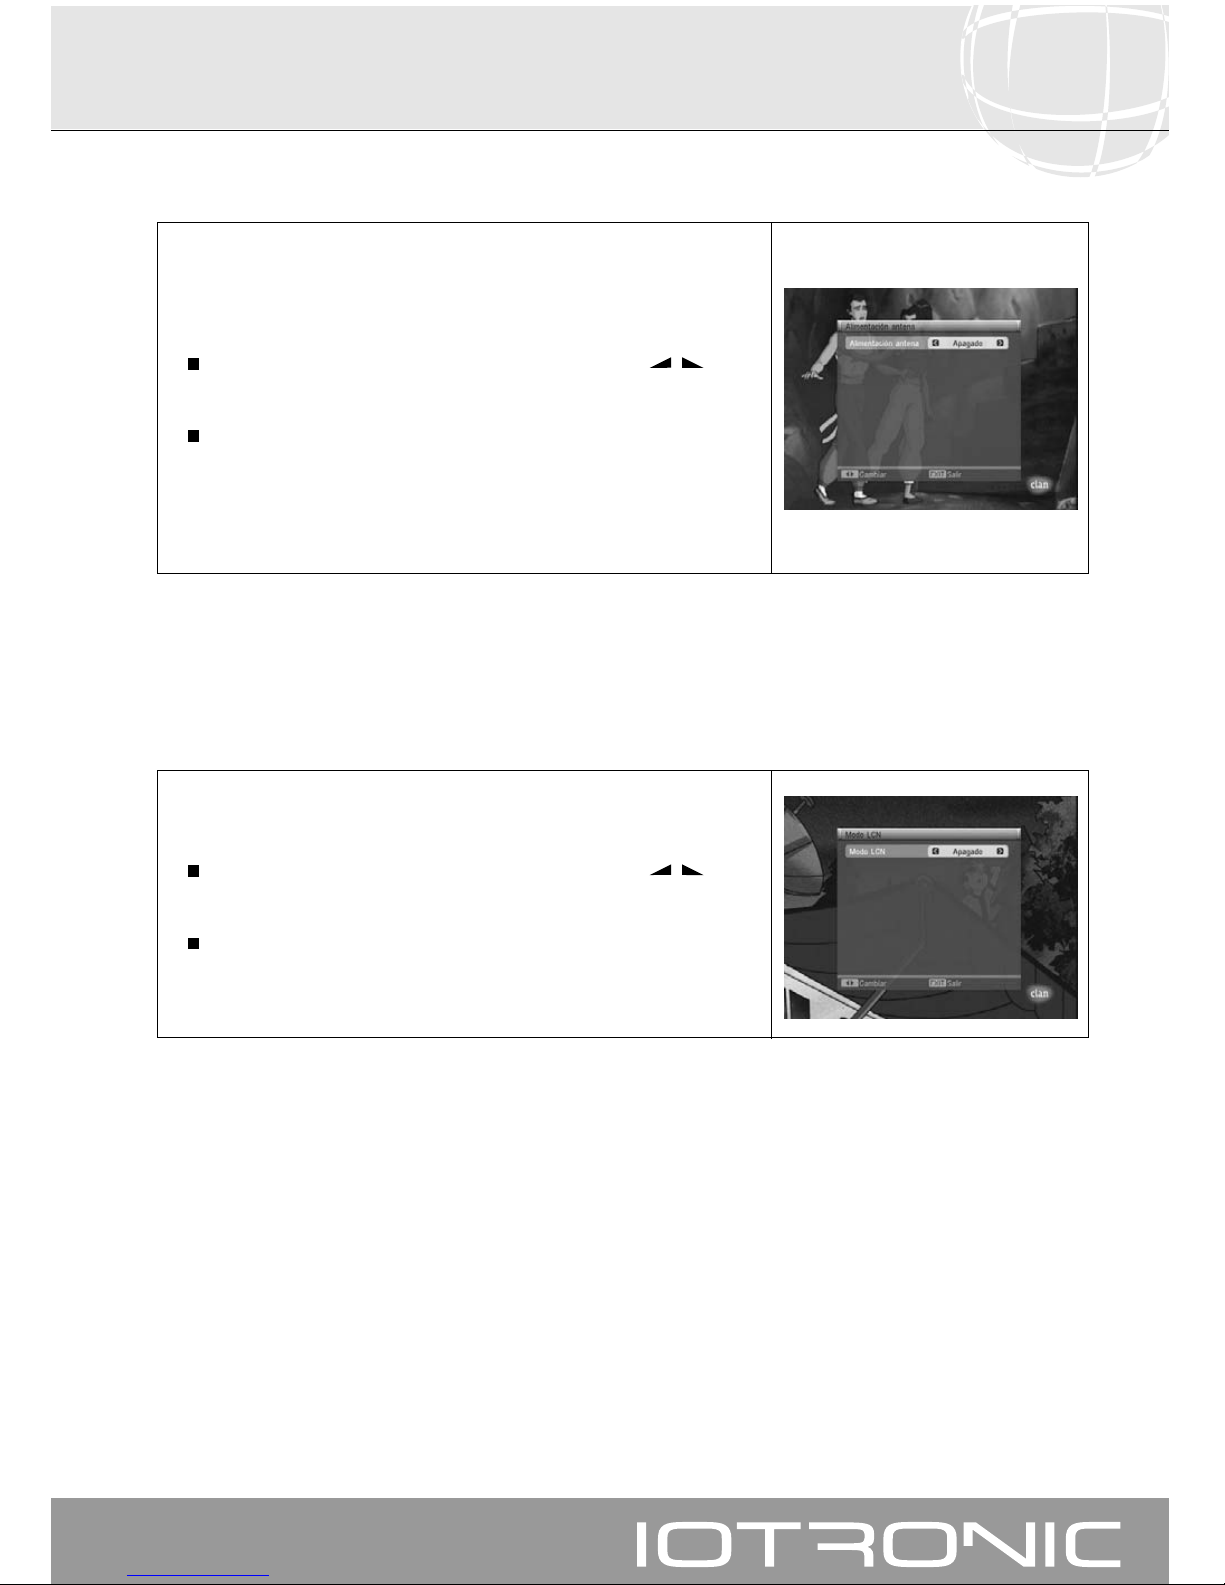
Si está utilizando una antena activa (con amplificador) deberá activar esta
opción para alimentar el amplificador de la misma con 5V / 100mA. La
alimentación se realiza a través del propio cable coaxial conectado a la
entrada ANT IN del receptor.
Para activar o desactivar esta opción utilice las teclas -/
+
para
seleccionar “Apagado” o “Encendido”.
Para salir del menú pulse la tecla EXIT.
Nota: Si no dispone de amplificador deberá seleccionar la opción NO, de lo
contrario podría dañar el receptor.
9.3.- Alimentación de Antena
Esta opción permite al usuario activar o desactivar el modo de organización
de los canales definido por el operador.
Para activar o desactivar esta opción utilice las teclas -/
+
para
seleccionar “Apagado” o “Encendido”.
Para salir del menú pulse la tecla EXIT.
9.4.- Función LCN
Page 22
Manual de instrucciones
Receptor TV Digital Terrestre
22
10.- Configuración
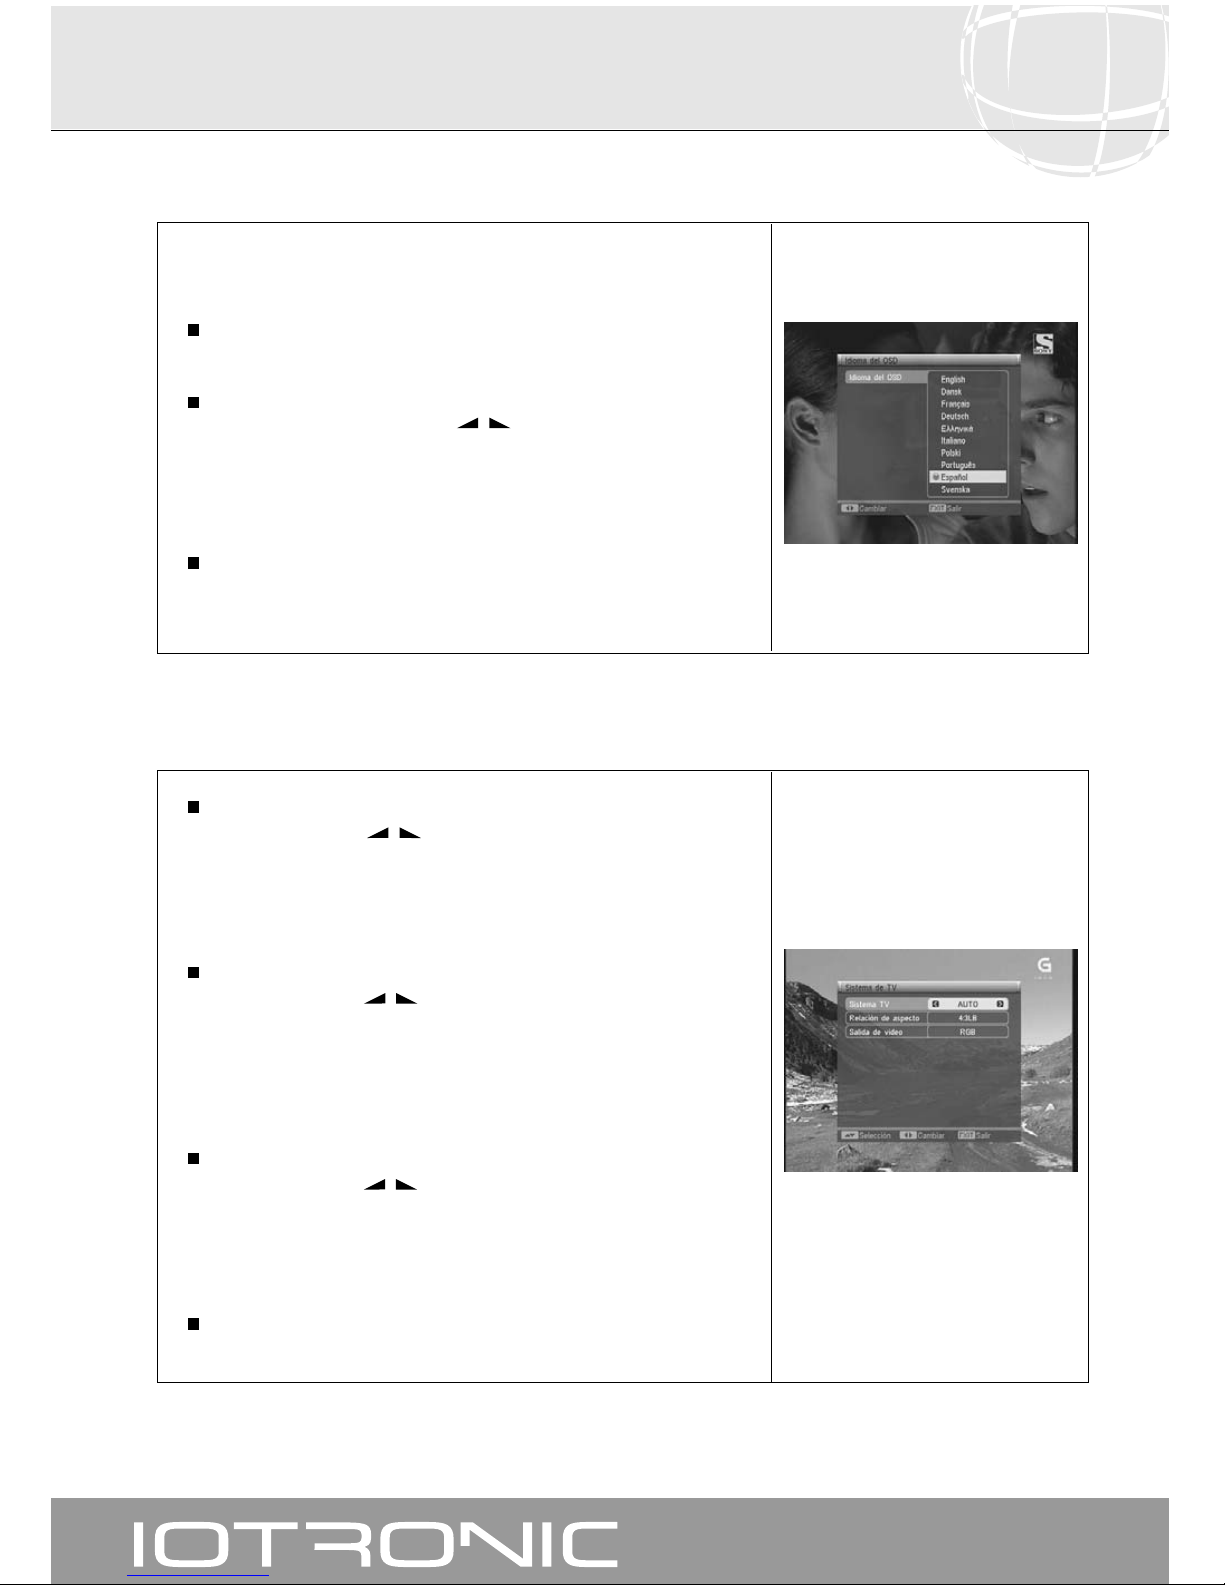
Esta opción le permite seleccionar el idioma con que se muestran los menús
en pantalla.
Para ello pulse la tecla OK sobre la opción “Idioma del OSD” en el menú
“Configuración”.
En la opción “Idioma del OSD” seleccione uno de los idiomas
disponibles mediante las teclas -/
+
. También puede pulsar la tecla
OK para activar un menú emergente, seleccionar uno de los idiomas
mediante las teclas PR+/PR- y volver a pulsar OK para fijar el dato.
Los idiomas disponibles son: Inglés, Danés, Francés, Alemán, Griego,
Italiano, Polaco, Portugués, Español y Sueco.
Pulse la tecla EXIT para volver al menú anterior.
10.1.- Idioma del Menú
Sistema TV
Mediante las teclas -/
+
seleccione el estándar de video adecuado.
También puede pulsar la tecla OK para activar un menú emergente,
seleccionar uno de los estándares mediante las teclas PR+/PR- y volver a
pulsar OK para fijar el dato.
Las opciones son AUTO, PAL o NTSC.
Relación de aspecto
Mediante las teclas -/
+
seleccione entre las opciones 4:3 LB, 4:3 PS
o 16:9. También puede pulsar la tecla OK para activar un menú
emergente, seleccionar una de las opciones mediante las teclas PR+/PRy volver a pulsar OK para fijar el dato.
Esta opción permite la configuración automática de su pantalla
dependiendo del modelo de su TV.
Salida de Video
Mediante las teclas -/
+
seleccione una de las opciones de salida de
video. También puede pulsar la tecla OK para activar un menú
emergente, seleccionar una de las opciones mediante las teclas PR+/PRy volver a pulsar OK para fijar el dato.
Las opciones son CVBS o RGB.
Pulse la tecla EXIT para volver al menú anterior.
10.2.- Sistema de TV
Page 23
Manual de instrucciones
Receptor TV Digital Terrestre
23
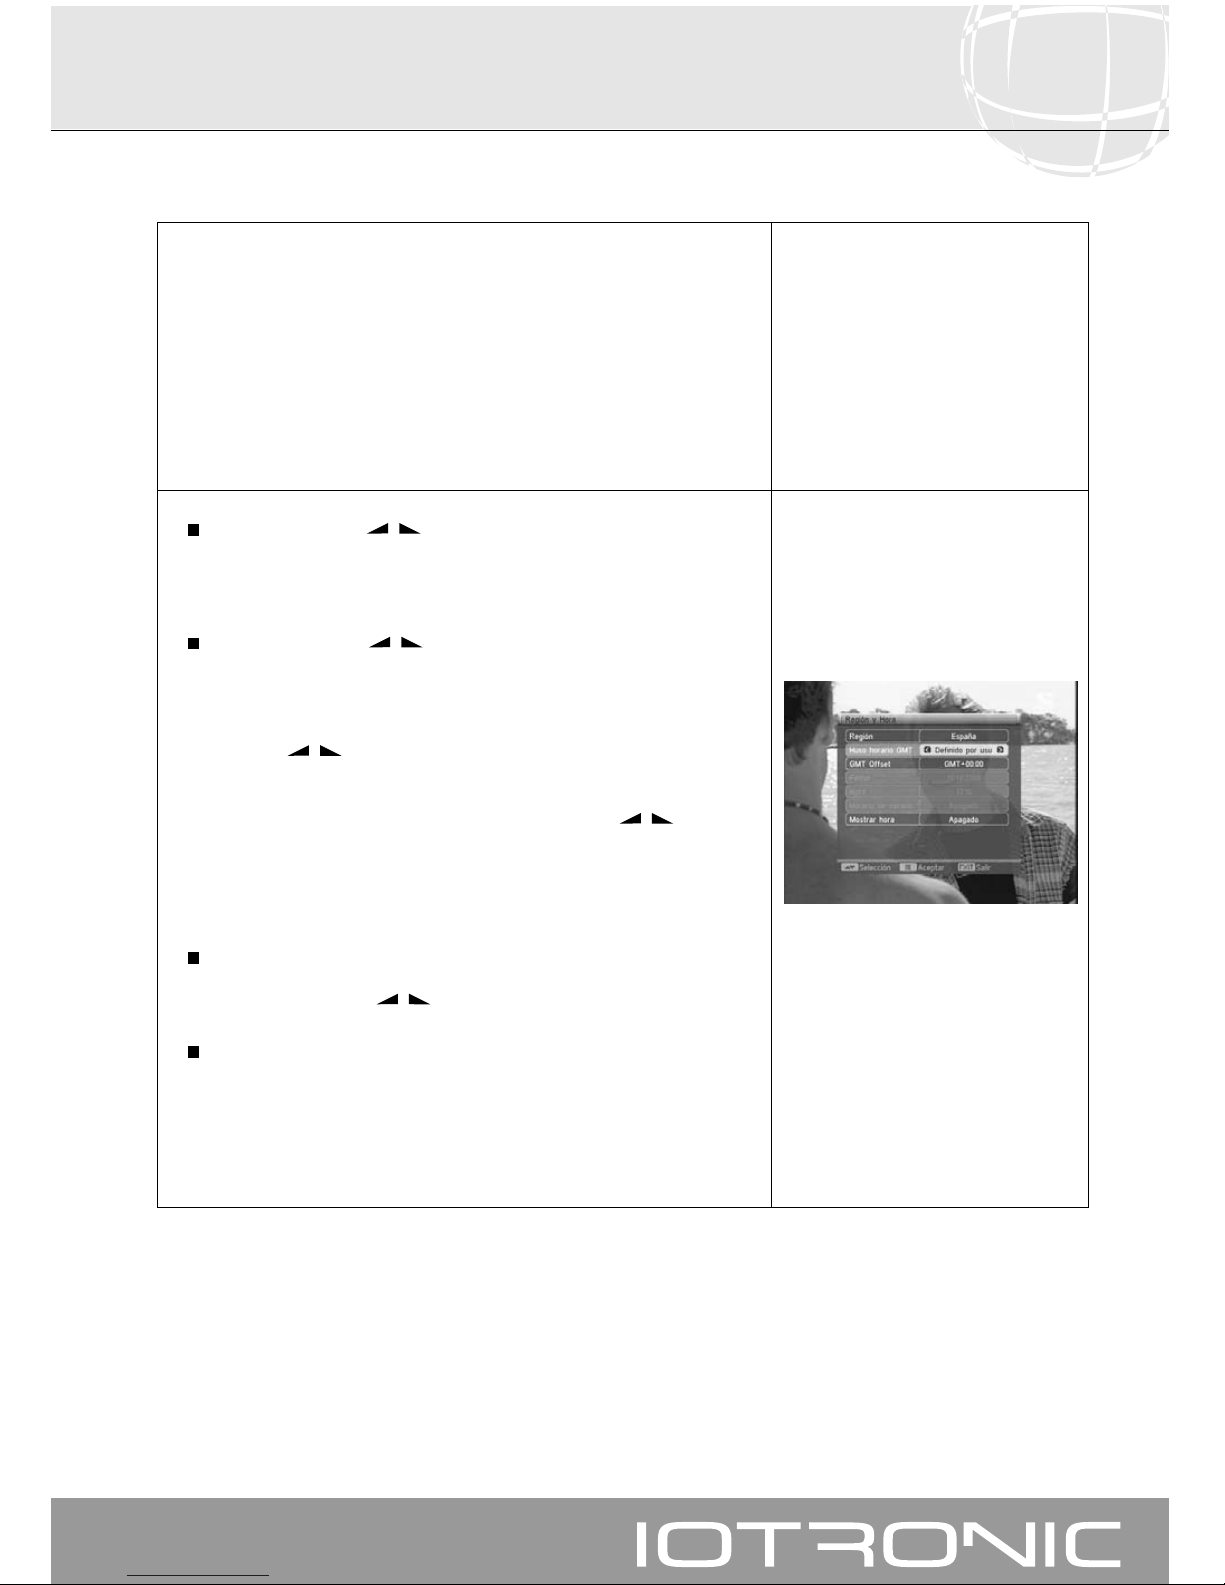
El receptor dispone de un Reloj para indicar la hora. Este Reloj se ajusta
automáticamente con la información suministrada por el proveedor de
servicios en la propia señal de TV, no obstante también podrá definir la fecha
y la hora sin recurrir a la opción GMT.
El proveedor de servicios envía dos tipos de información horaria, una relativa
a la hora actual (para ser visualizada en el Reloj) y otra informando de los
horarios de emisión de los distintos eventos (que es la utilizada en la EPG).
Ambos tipos de información horaria son enviados en formato GMT, por lo
que Ud. deberá ajustar el Receptor introduciendo el offset de la zona horaria
de su país en esta opción.
Mediante las teclas -/
+
seleccione el país en el que se va a usar el
receptor. También puede pulsar la tecla OK para activar un menú
emergente, seleccionar uno de los paises mediante las teclas PR+/PR- y
volver a pulsar OK para fijar el dato.
Mediante las teclas -/
+
seleccione el tipo de uso horario entre las
opciones “Apagado”, “Definido por usuario” y “Por región”.
Seleccionando la opción “Apagado” es el propio usuario el que tiene que
introducir la fecha y la hora manualmente. Para ello pulse OK sobre una
de las dos opciones (Fecha/Hora), introduzca los datos con las teclas
PR+/PR-/-/
+
o el teclado numérico y vuelva a pulsar OK para fijar
el dato.
Seleccionando la opción “Definido por usuario” deberá ajustar el Offset
GMT a su zona horaria. Para ello, mediante las teclas -/
+
indique si
lo que desea es aumentar (+) o disminuir (-) a la hora GMT el tiempo de
complementación en fracciones de 30 minutos.
Finalmente, si selecciona la opción “Por región” simplemente deberá
indicar si activa o desactiva el Horario de verano.
Con la opción “Muestra de Hora” activada, se muestra de forma
permanente la hora actual en pantalla. Para activar o desactivar esta
opción, use las teclas -/
+
.
Pulse la tecla EXIT para volver al menú anterior.
NOTA: No todos los proveedores proporcionan este tipo de información
10.3.- Región y Hora
Page 24
Manual de instrucciones
Receptor TV Digital Terrestre
24
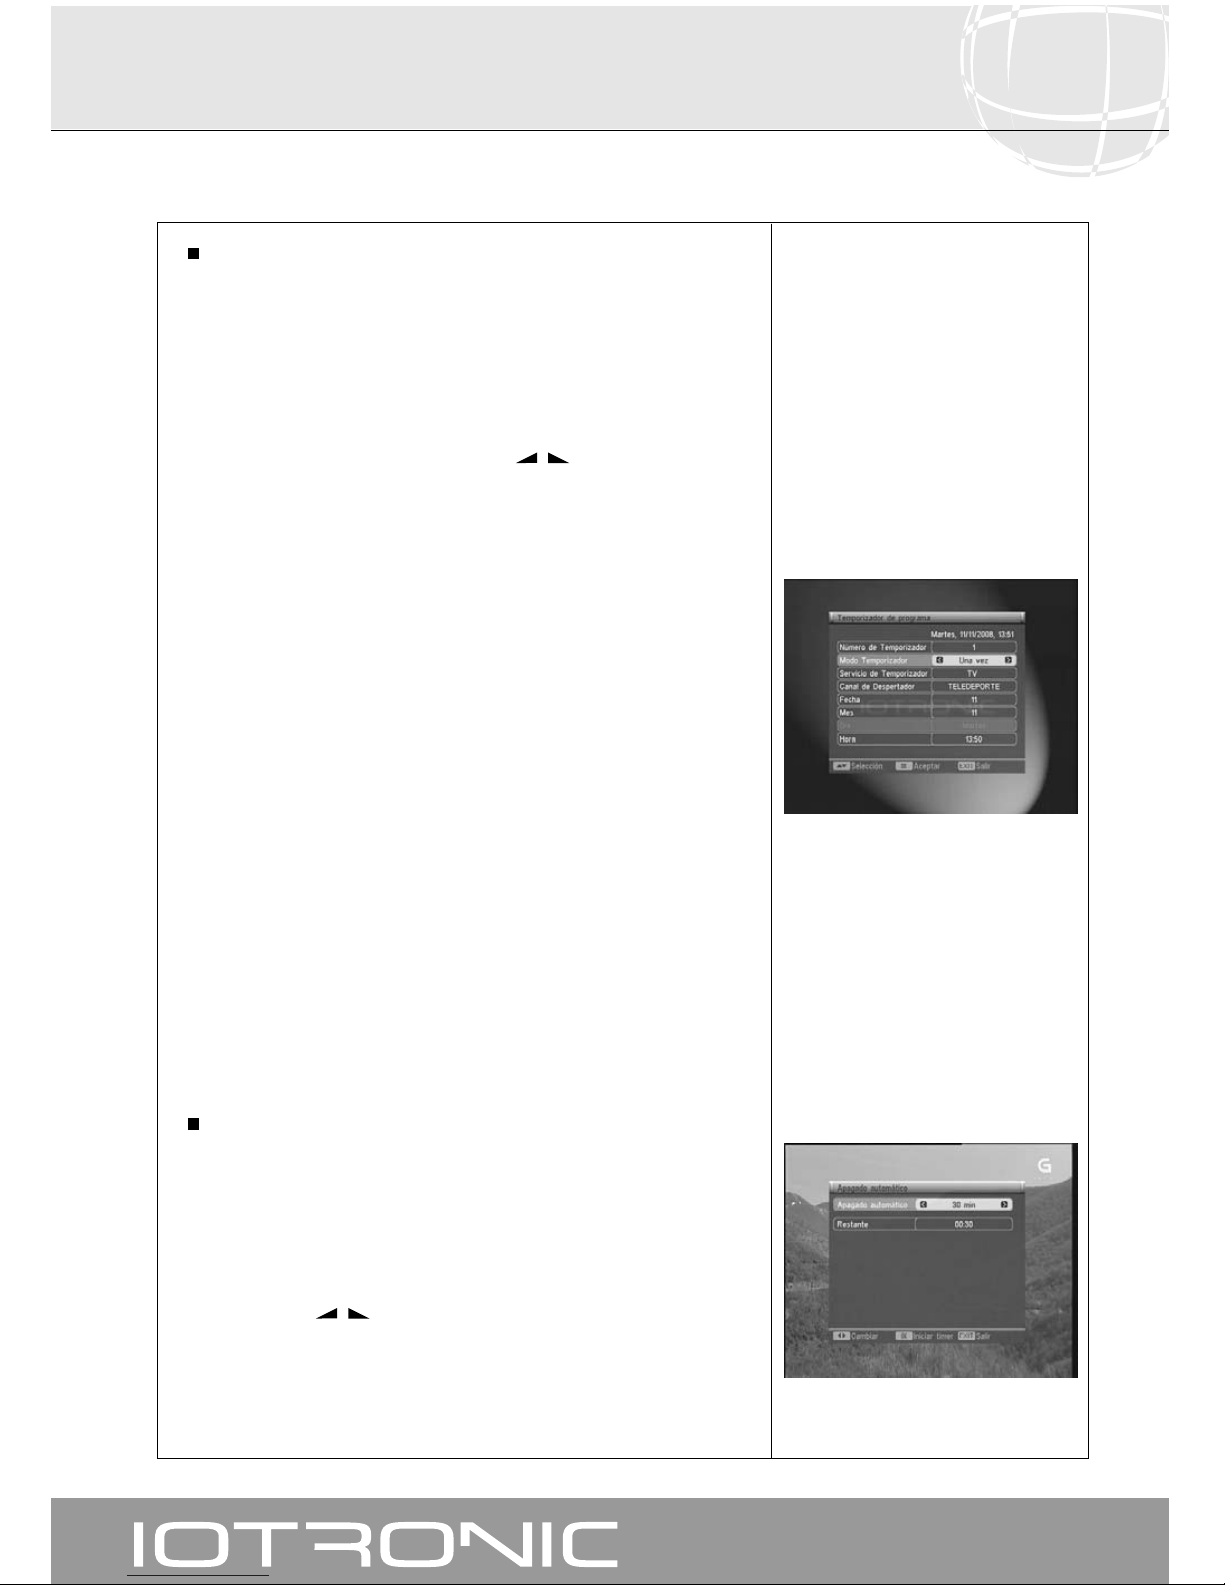
Temporizador de programa
El receptor dispone de un temporizador para el encendido y apagado
automático del mismo a una hora predeterminada. Consta de 8
posiciones, en las cuáles puede programar otros tantos eventos. Solo
tiene que introducir los siguientes datos.
Por defecto, el cursor aparecerá siempre sobre el primer número de
temporizador libre. Si no hay ningún evento programado, se sitúa en el
número 1.
La selección se realiza mediante las teclas -/
+
o bien pulsando la tecla
OK en una opción, luego mediante las teclas PR+/PR- seleccione un valor
en el menú emergente y finalmente confirme la selección pulsando
nuevamente la tecla OK. Las opciones son:
- Número.- Seleccione uno de los 8 eventos disponibles.
- Modo.- Por defecto aparece en modo “Apagado”. Puede seleccionar otros
modos como “Una vez” (una sola vez), “Diario” (todos los días), “Semanal”
(una vez a la semana) o bien “Mensual” (una vez al mes).
- Servicio.- Seleccione el tipo de servicio que quiere realizar con el
Temporizador. Puede seleccionar un programa de TV o Radio.
- Canal.- Seleccione el canal que desea para el Temporizador.
- Fecha.- Seleccione el día en el que se activará el temporizador.
- Mes.- Seleccione el mes en el que se activará el temporizador.
- Dia.- Seleccione el dia de la semana en el que se activará el
temporizador (solo con Modo semanal).
- Hora.- Mediante el teclado (0 .. 9) numérico introduzca el tiempo
estimado de duración del evento.
Repita los mismos pasos si desea programar otros eventos.
Si lo que desea es eliminar alguno de estos eventos, puede hacerlo
situándose en el número de éste y luego en la opción “Modo” seleccione
la opción “Apagar”.
Para memorizar los datos y salir del menú pulse la tecla EXIT.
Apagado automático
Esta función le permite dejar el receptor encendido durante un período de
tiempo definido por Ud. y que luego se apague automáticamente.
Para ello pulse la tecla OK sobre la opción “Apagado automático” en el
menú “Ajustes del temporizador”.
Podrá seleccionar el tiempo que pasará hasta que se apague el receptor
con la teclas -/
+
. Los valores permitidos son: Off, 10, 30, 60, 90 y
120 minutos.
En la opción “Restante” podrá visualizar el tiempo recorrido después de
haber activado la opción “Apagado automático”.
Pulse la tecla EXIT para volver al menú anterior.
10.4.- Ajustes del Temporizador
Page 25
Manual de instrucciones
Receptor TV Digital Terrestre
25
10.5.- Configuración de OSD
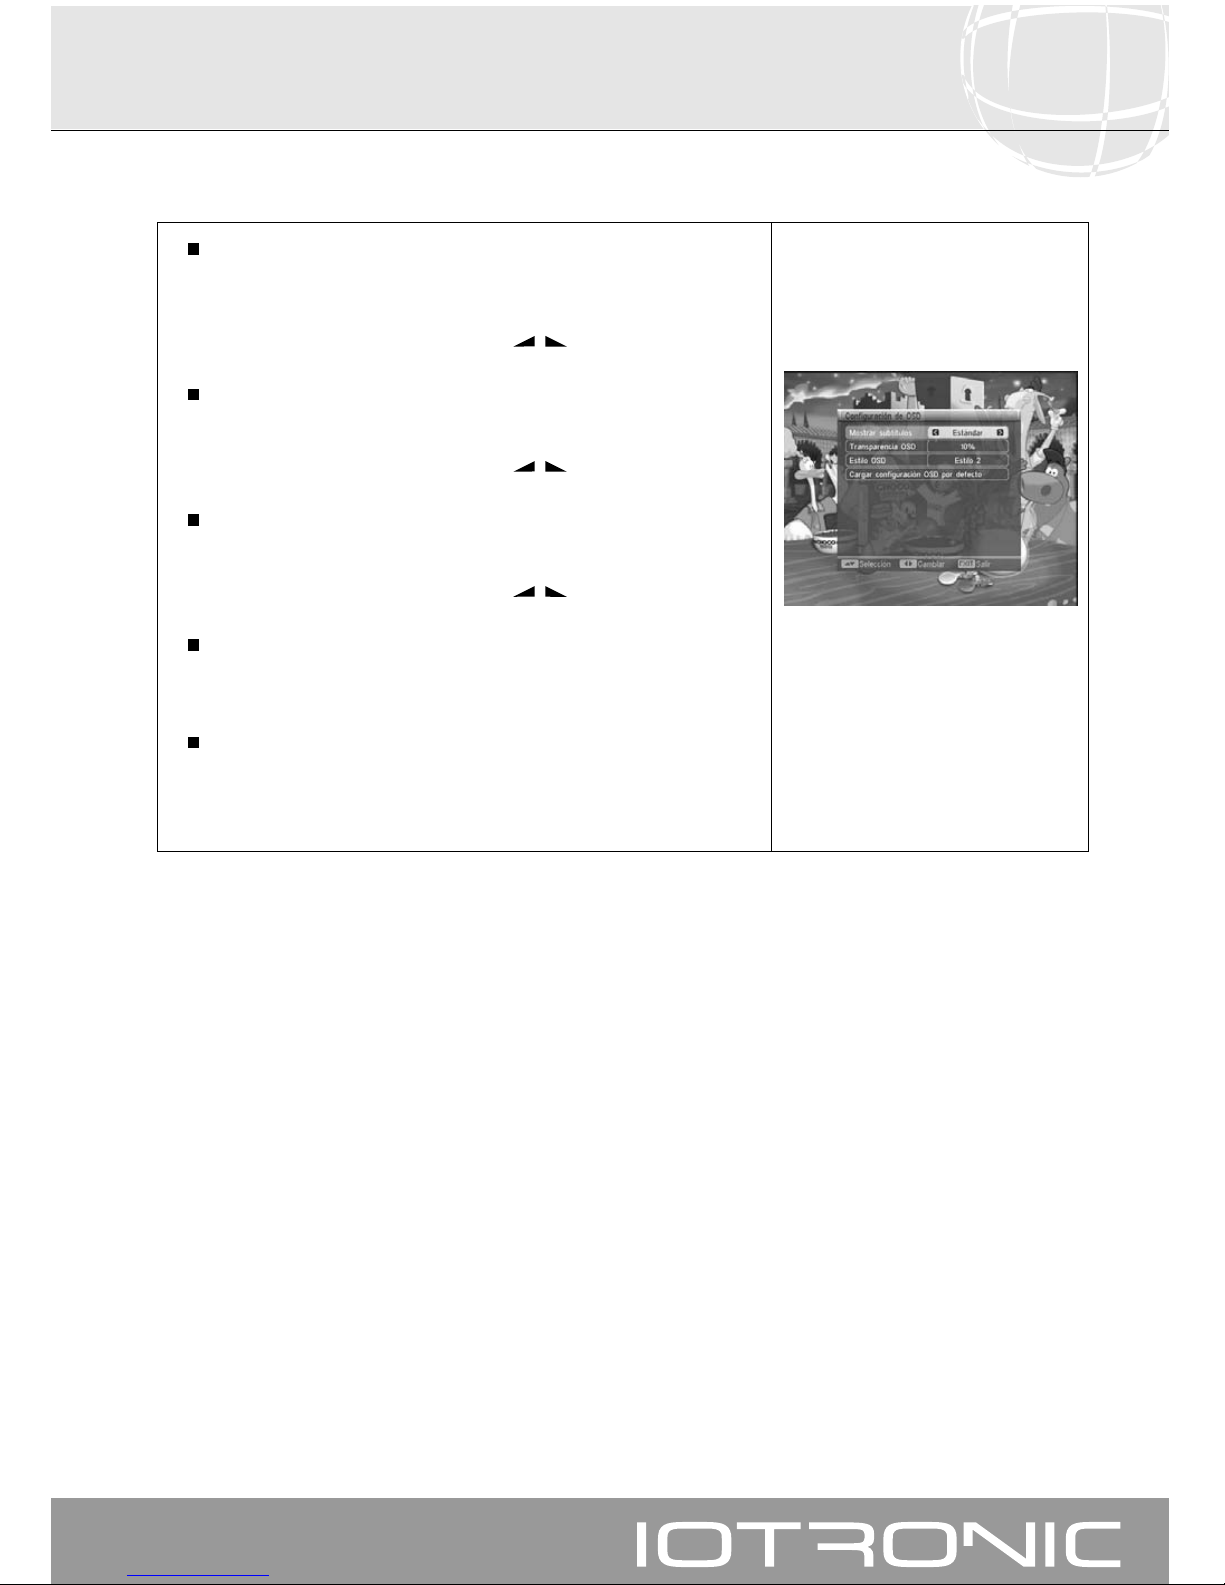
Mostrar subtítulos
Esta opción le permite seleccionar el modo en que se muestran los
subtítulos en pantalla. Las opciones son “Apagado”, “Teletexto” o
“Estándar”.
La selección se realiza pulsando las teclas -/
+
.
Transparencia del menú
Le permite definir el grado de transparencia del menú en una escala
entre 10%, 20%, 30%, 40%, 50% y Apagado.
La selección se realiza pulsando las teclas -/
+
.
Estilo OSD
Le permite definir el color en que se muestra el menú en pantalla.
Dispone de dos estilos, uno violeta y otro azul.
La selección se realiza pulsando las teclas -/
+
.
Cargar configuración OSD por defecto
Esta opción le permite recuperar la configuración original del OSD. Para
ello pulse la tecla OK sobre esta opción.
Para salir del menú pulse la tecla EXIT.
Page 26
Manual de instrucciones
Receptor TV Digital Terrestre
26
La contraseña está formada por 4 números, los cuáles nunca aparecerán
visibles en la pantalla.
Cuando seleccione en el menú alguna de las opciones que implique el uso
del código secreto (acceso a canales bloqueados, modificar lista de canales,
etc.) en la pantalla aparecerá el mensaje "Introducir contraseña", indicándole
que teclee su contraseña.
En el caso de que la contraseña introducida sea incorrecta, no se le permitirá
el acceso.
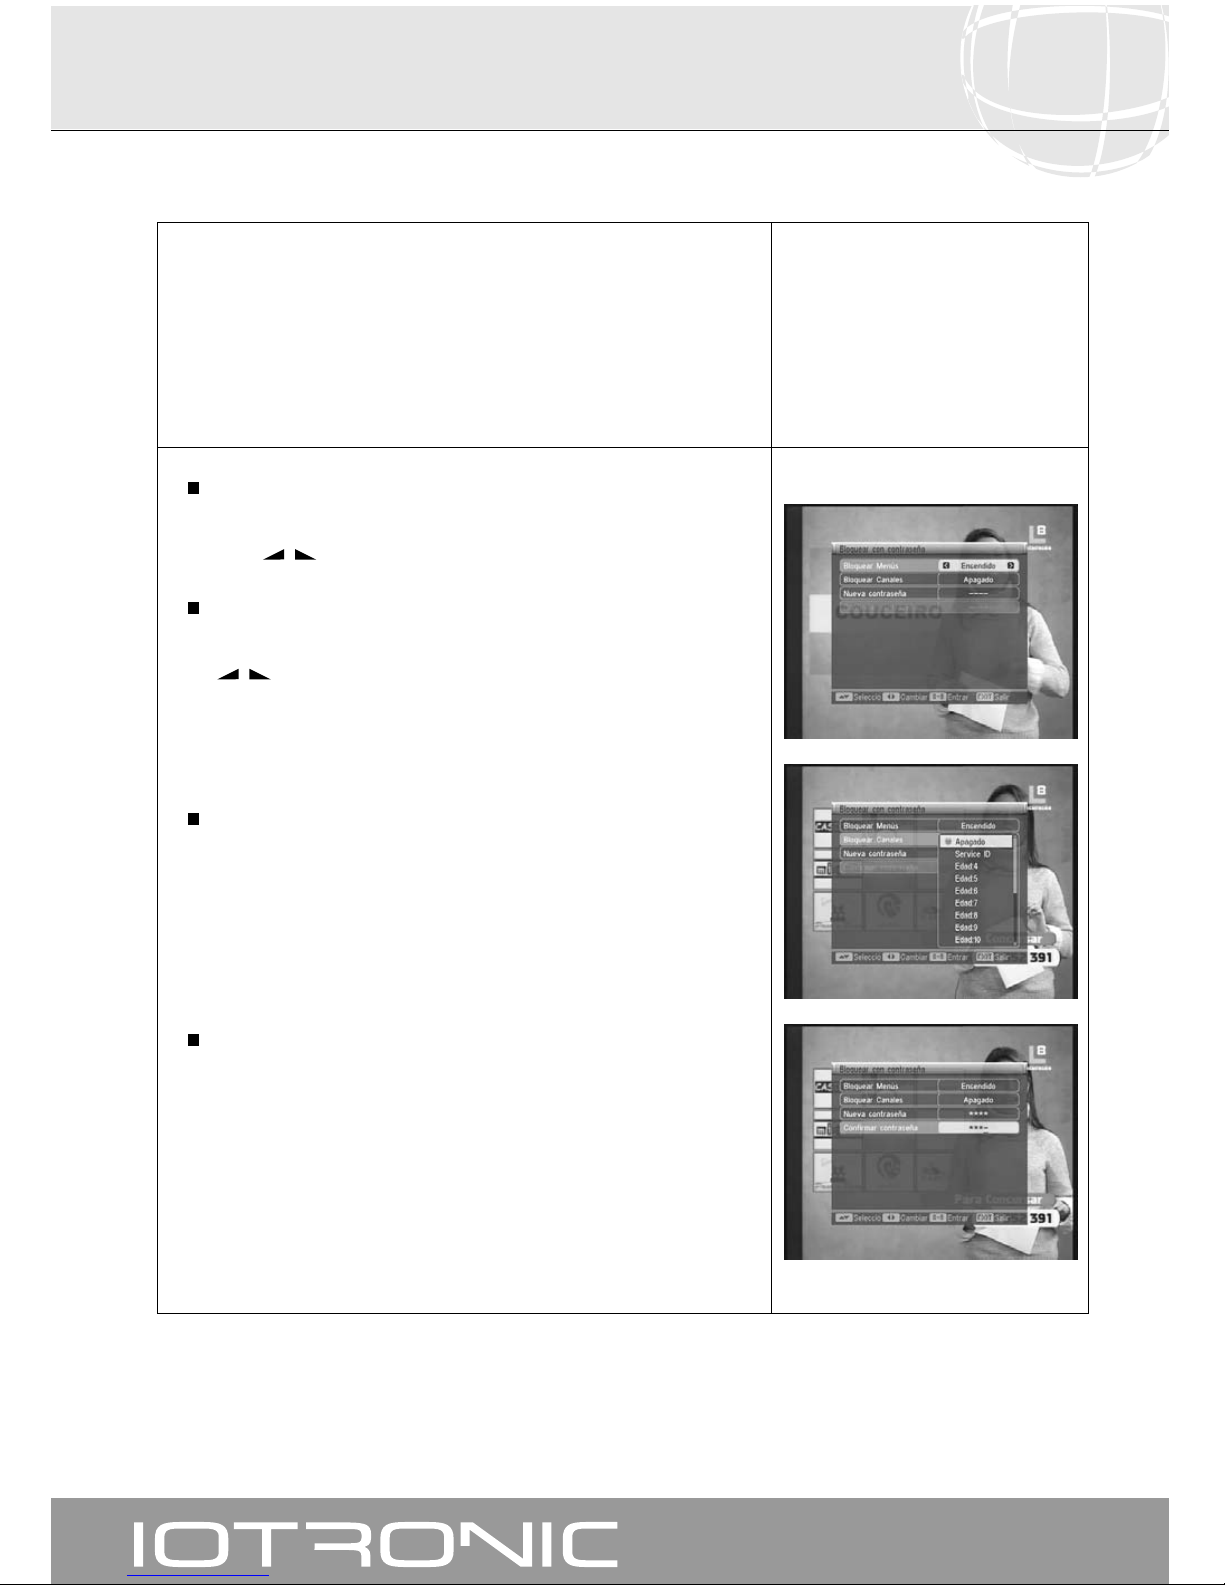
Bloquear Menús
Si desea proteger los datos e informaciones relativas a su instalación
deberá activar esta función seleccionando la opción “Encendido” con las
teclas -/
+
.
Bloquear Canales
Si desea bloquear el acceso de niños a algunos canales deberá activar
esta función seleccionando una de las opciones disponibles con las teclas
-
/
+
.
Las opciones disponibles son: Apagado, Service ID, Edad:4, .... ,
Edad:18.
Si esta opción está desactivada, los canales que marque como bloqueados
en la “lista de canales” del menú “Canal” permanecerán en abierto.
Cambiar contraseña
Esta opción le permite cambiar la contraseña predefinida.
Introduzca una nueva contraseña mediante el teclado numérico (0 ... 9)
del mando.
A continuación confirme la nueva contraseña volviendo a introducirla.
A partir de este momento, deberá utilizar siempre el nuevo código cuando
ésta le sea requerido.
Pulse la tecla EXIT para volver al menú anterior.
Nota: La contraseña por defecto predefinida en fábrica es: 0 0 0 0
Una vez modificada la contraseña, guárdela en lugar seguro.
10.6.- Bloquear con contraseña
Page 27
Manual de instrucciones
Receptor TV Digital Terrestre
27
11.- Menú Herramientas
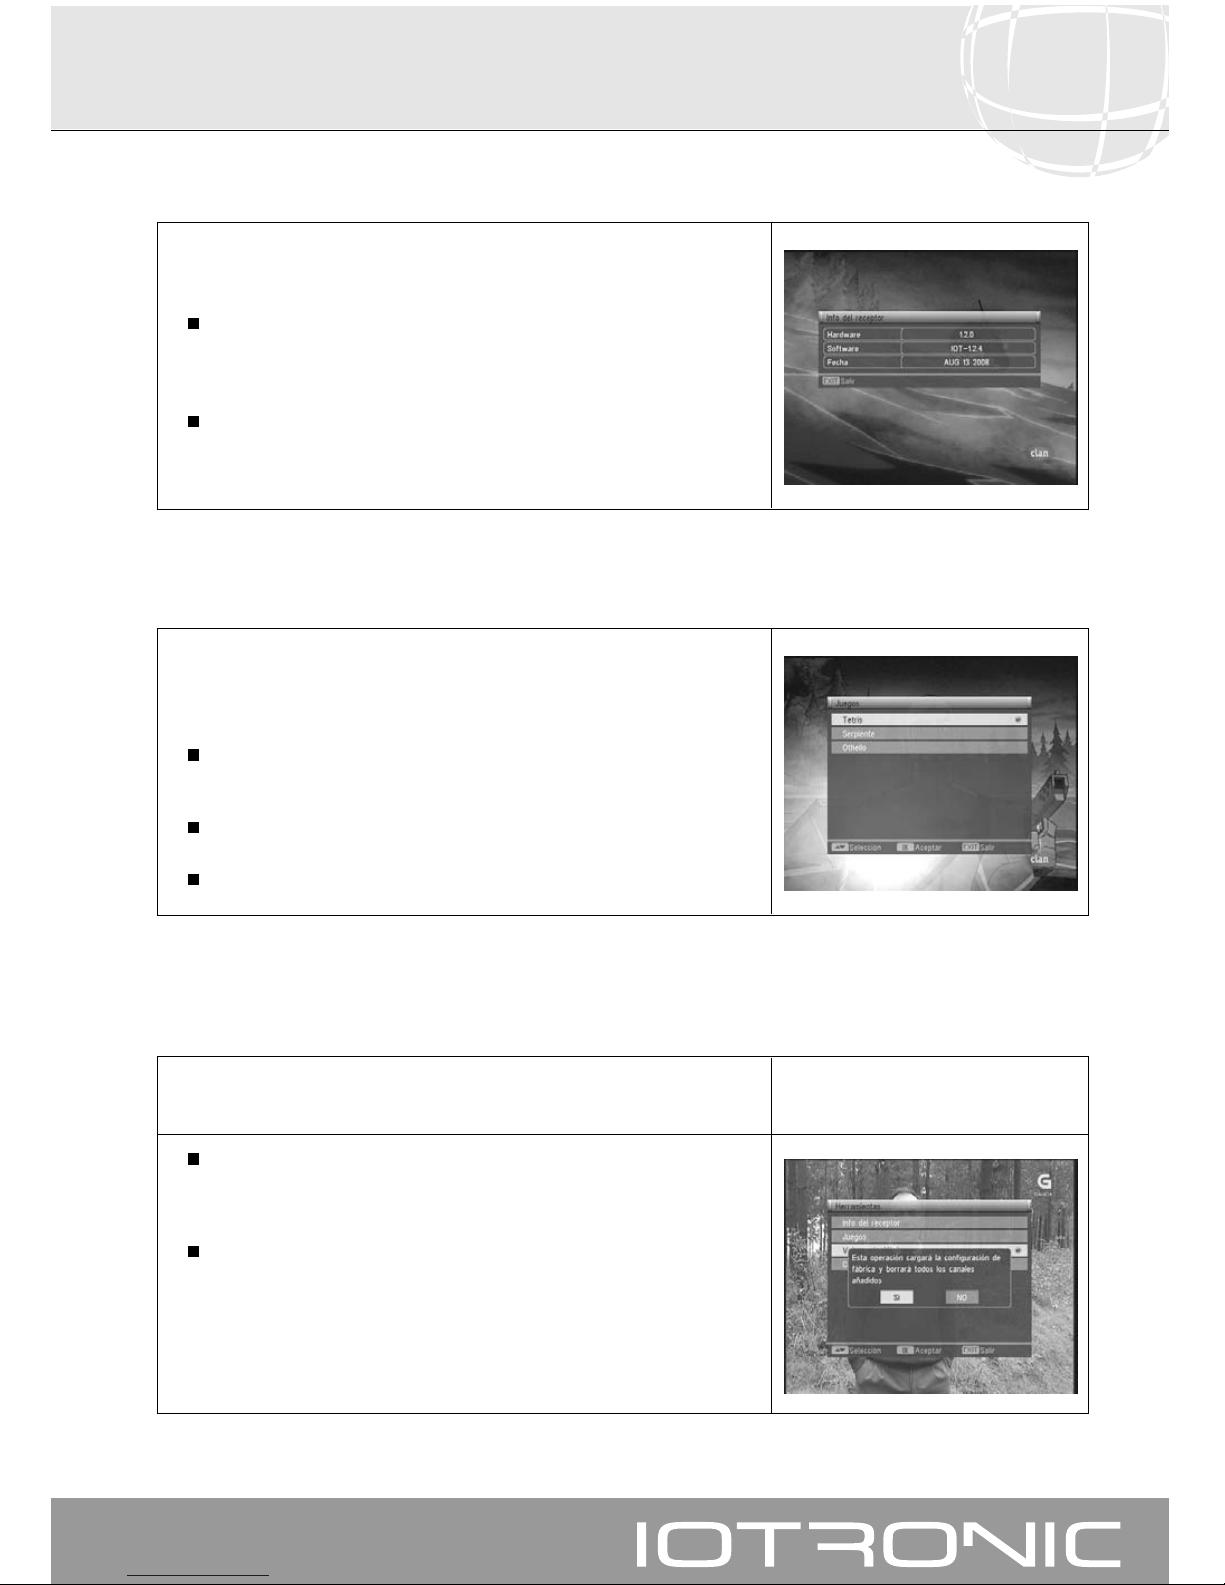
Esta opción le permite visualizar la versión de software y hardware de su
receptor.
Seleccione la opción “Info del receptor” en el menú “Herramientas” y
pulse al tecla OK.
Pulse la tecla EXIT para volver al menú anterior.
11.1.- Información del Receptor
En este menú puede seleccionar uno de los tres juegos disponibles en el
receptor:
- Tetris, Serpiente y Othello
Seleccione uno de los juegos disponibles mediante las teclas PR+/PR- y
pulse OK.
Para jugar siga las indicaciones que aparecen en pantalla.
Para salir del juego en cualquier momento pulse la tecla EXIT.
11.2.- Juegos
11.3.- Valores de fábrica
Esta función cambiará todos los parámetros introducidos por aquellos
preestablecidos en fábrica por defecto.
Si desea devolver su receptor al estado original de fábrica, seleccione la
opción “Valores de fábrica” y pulse la tecla OK. Se le pedirá que teclee su
contraseña para efectuar la operación.
En la pantalla aparecerá un mensaje de aviso. Para aceptar pulse OK
sobre la opción “SI”.
Aviso: Siempre que ejecute la función “Valores de fábrica”, todos los datos e
informaciones introducidas por el usuario serán automáticamente
borradas y sustituidas por las configuraciones predefinidas en Fábrica.
Page 28
Manual de instrucciones
Receptor TV Digital Terrestre
28
Si desea tener el mismo software en varios receptores, puede hacer un
duplicado del mismo (volcado entre receptores) simplemente disponiendo de
un cable RS-232 “Null Modem” (hembra-hembra).
Después de conectar ambos receptores a través del cable RS 232, deberá
seguir las siguientes instrucciones.
Encienda mediante el interruptor trasero el receptor definido como
“Master” (receptor que posee el software a transferir).
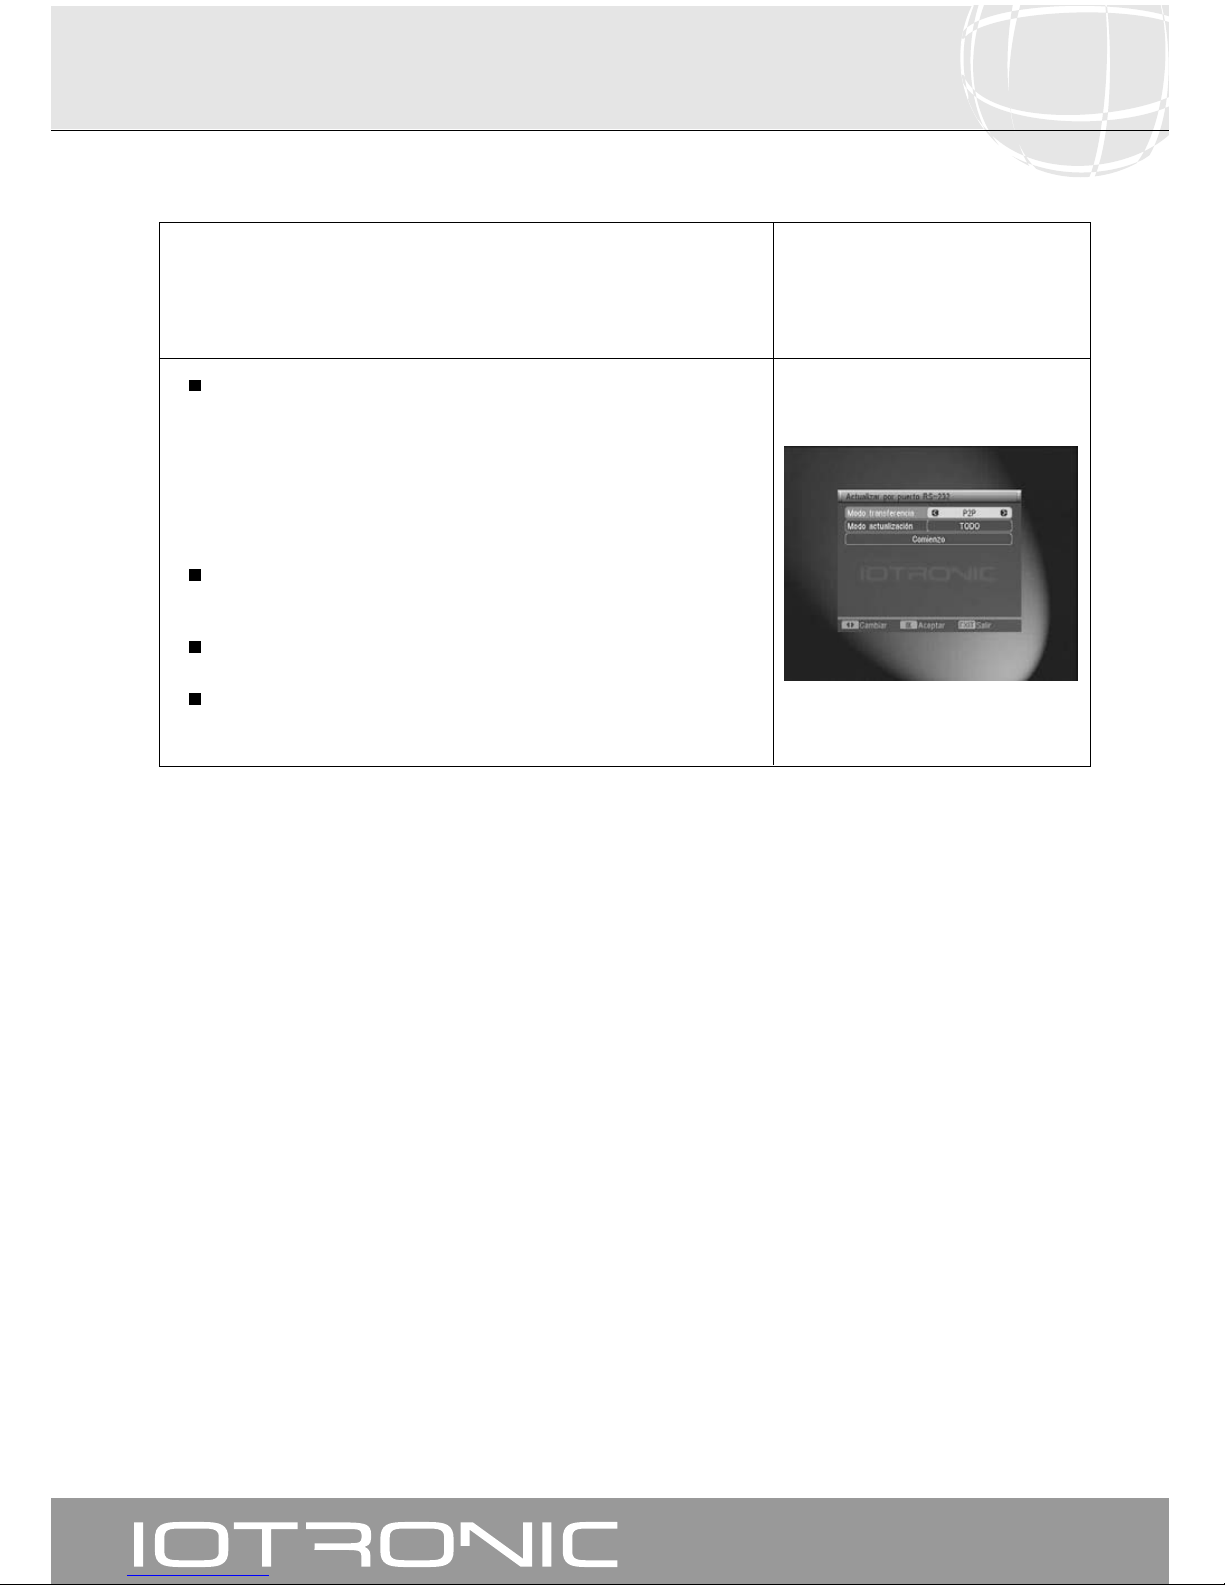
Acceda a la opción “Actualización por RS 232” del menú “Actualización
software” en el menú “Herramientas” y pulse la tecla OK.
Se le pedirá que teclee su contraseña.
En la opción “Modo de transferencia” seleccione la opción “P2P”, sitúe el
cursor en la opción “Empezar” y pulse la tecla OK.
Encienda ahora mediante el interruptor trasero el receptor definido como
“Slave” (receptor que desea actualizar).
La actualización llevará unos minutos. Por favor, espere.
Una vez finalizado el proceso de transferencia, surgirá un mensaje de
confirmación en el receptor (Master).
11.4.- Actualización por RS 232
Page 29
Manual de instrucciones
Receptor TV Digital Terrestre
29
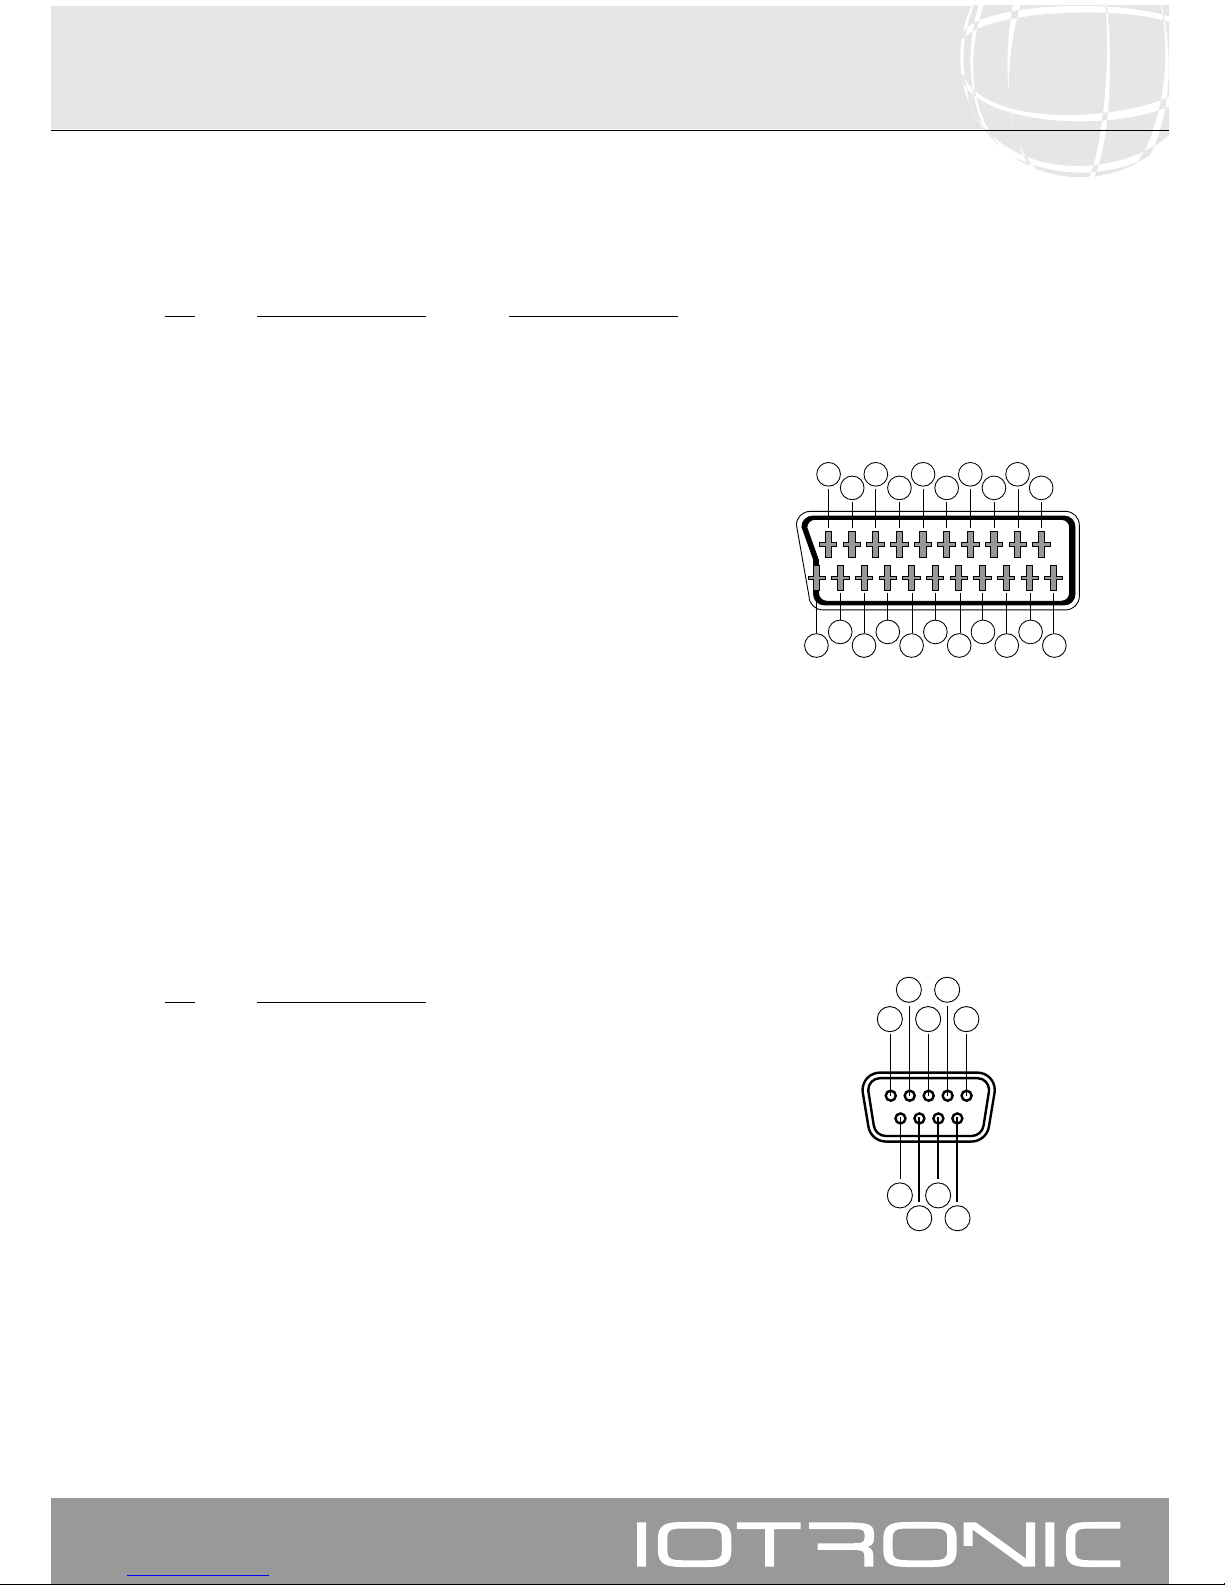
PIN TV VCR
1 Salida audio (D) Salida audio (D)
2 N/C Entrada audio (D)
3 Salida audio (I) Salida audio (I)
4 Masa audio Masa audio
5 Masa azul Masa azul
6 N/C Entrada audio (I)
7 Salida azul Entrada azul
8 Tens. conmutac. Tens. conmutac.
9 Masa verde Masa verde
10 N/C N/C
11 Salida verde Entrada verde
12 N/C N/C
13 Masa rojo Masa rojo
14 Masa “Fast Blanking” Masa “Fast Blanking”
15 Salida rojo Entrada rojo
16 Salida “Fast Blanking” Entrada “Fast Blanking”
17 Masa video Masa video
18 Masa video Masa video
19 Salida video Salida video
20 N/C Entrada video
21 Masa Masa
PIN Descripción
1N/C
2 RXD (Entrada de datos)
3 TXD (Salida de datos)
4N/C
5 Masa
6N/C
7N/C
8N/C
9N/C
201816
14
12
1086
4
2
1
3
5
7
9
11
13
15
17
19
21
1 3 5
2 4
6 8
7 9
Descripción de conectores
Euroconector (SCART)
RS 232
Page 30
Manual de instrucciones
Receptor TV Digital Terrestre
30
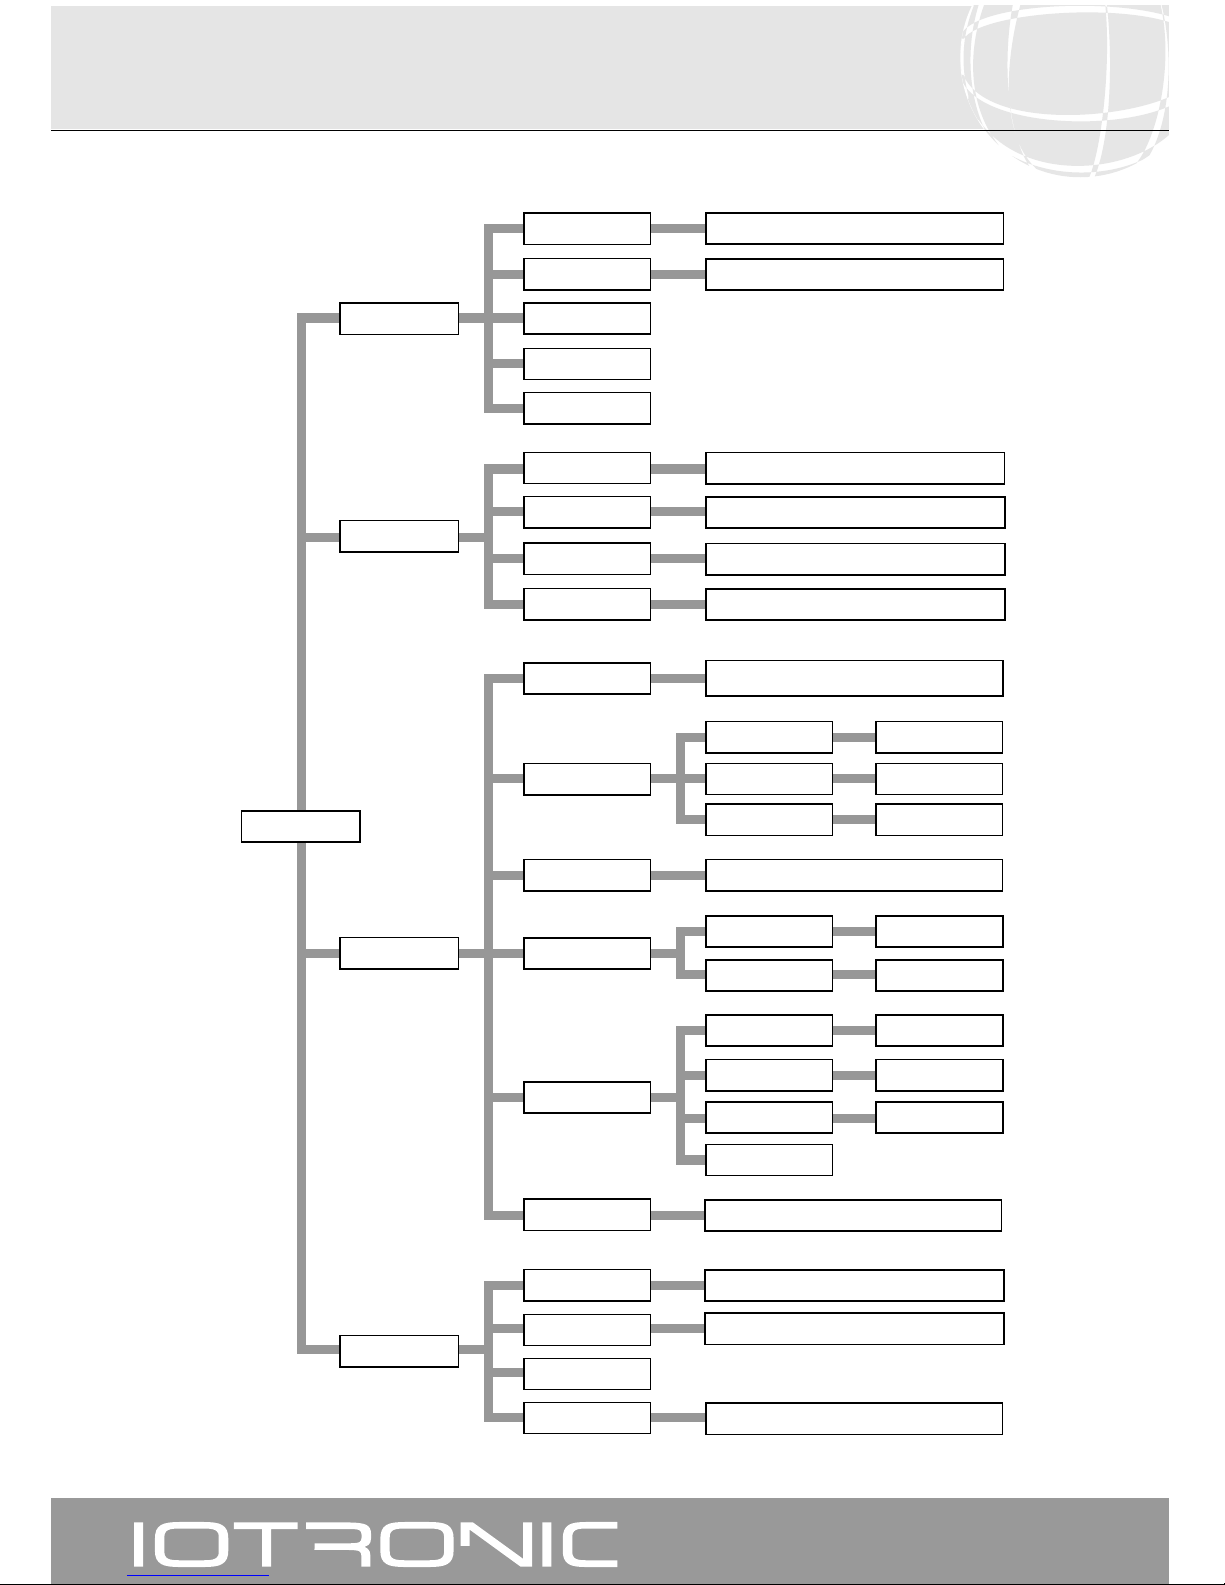
Estructura del menú
Encendido, Apagado
Alimentación de
antena
Configuración
Modo, Banda, Canal/Frecuencia, Buscar
Búsqueda manual
Modo, Buscar
Búsqueda automática
Idioma del OSD
Ajuste temporizador
Configuración OSD
Relación aspecto
Herramientas
Instalación
Sistema TV
Región y Hora
Encendido, Apagado
Pais, Tipo GMT, Fecha, Hora, Horario verano,
Mostrar hora
Apagado
automático
Mostrar subtítulos
MENU
PRINCIPAL
Modo LCN
Info del receptor
Borrar canales
favoritos
Editar (Favorito, Bloquear, Omitir, Borrar, Renombrar)
Filtrar, Ordenar, Mover
Gestión de canales
Salida de Video
4:3LB, 4:3PS, 16:9
CVBS, RGB
Inglés, Danés, Francés, Alemán, Griego, Italiano,
Polaco, Portugués, Español y Sueco
Temporizador de
programa
Off, 10, ... 120 min
Temporizador, Modo
Transparencia OSD
Estilo OSD
Apagado, Estándar,
Teletexto.
Apagado, 10, .. 50%
Estilo1, Estilo 2
Valores de fábrica
Juegos
Actualización
por RS 232
Modo de transferencia
Tetris, Serpiente, Othello
Lista Canales TV
Lista Canales Radio
Borrar todo
Editar (Favorito, Bloquear, Omitir, Borrar, Renombrar)
Filtrar, Ordenar, Mover
Bloquear con
contraseña
Bloqueo menú, Bloqueo canales,
Nueva contraseña, Confirmar contraseña
Sistema TV Auto, PAL, NTSC
Versión SW, Versión HW, Fecha
Renombrar grupo
Cargar configuración
OSD por defecto
Page 31

Manual de instrucciones
Receptor TV Digital Terrestre
31
Receptor DVB-T:
Frecuencias de entrada 50...862MHz
Banda pasante tuner 50...862MHz
Conector de entrada CEI hembra
Impedancia 75 Ohms
Conector de salida CEI macho
Sistema Video AUTO, PAL y NTSC
Filtro 6,7 y 8 MHz
Desmodulación CODFM 2k/8k
Alimentación antena 5V/100mA
De-multiplexado: MPEG II, ISO/IEC 13818-1
Descodificación Video:
Compresión Video MPEG-1 / MPEG-2 Compatible MP@ML (Main profile @ main level)
Estándar Video PAL / NTSC
Imagen 720 pixels x 576 lineas / 724 pixels x 480 lineas
Formato 4:3LB / 4:3PS / 16:9
Descodificación Audio:
Compresión MPEG-1 & MPEG-2
Modo Audio Dual (main/sub), Estéreo
Frecuencia muestreo 32KHz, 44.1KHz, 48KHz
Parámetros Audio:
Salida analógica:
Nivel de salida 0.5 rms (nominal)
Impedancia de salida 600 Ohms
THD >60dB (1KHz)
Salida audio HiFi 2 Conectores RCA (L+R)
1 Conector RCA (SPDIF)
Parámetros Video:
Salida:
Nivel de salida CVBS 1 Vpp sobre 75 Ohms
Nivel de salida ROJO 0.7 Vpp sobre 75 Ohms
Nivel de salida VERDE 0.7 Vpp sobre 75 Ohms
Nivel de salida AZUL 0.7 Vpp sobre 75 Ohms
Teletexto:
Teletexto Estándar ETS 300 472
Conector SCART:
Salida: CVBS y RGB
Interface RS 232:
Tipo RS 232, bidireccional
Bit rate 115 k Bit/s
Conector SUB D 9 pin
Función Actualización
Alimentación:
Alimentación principal: 175 - 250 V~ 50/60 HZ
Potencia consumida: 8 W
General:
EPG Eventos actuales, futuros y anteriores del programa seleccionado
Temporizador 8 eventos
Idioma OSD Multilenguaje
Temperatura +15'C....+35'C
Humedad <80%
Dimensiones (L x A x H): 260mm x 160mm x 50mm
Peso: 0.5 kg
10.- Características
técnicas
Page 32

Page 33

User manual
Digital Terrestrial TV Receiver
33
1.- Safety measures . . . . . . . . . . . . . . . . . . . . . . . . . . . . . . . . . . . . . . . . . . . . . . . . . . . . . . . . . . . . . . . . 34
2.- Before starting.... . . . . . . . . . . . . . . . . . . . . . . . . . . . . . . . . . . . . . . . . . . . . . . . . . . . . . . . . . . . . . . . 35
2.1.- Introduction . . . . . . . . . . . . . . . . . . . . . . . . . . . . . . . . . . . . . . . . . . . . . . . . . . . . . . . . . . . . 35
2.2.- General features . . . . . . . . . . . . . . . . . . . . . . . . . . . . . . . . . . . . . . . . . . . . . . . . . . . . . . . . . 35
2.3.- Composition . . . . . . . . . . . . . . . . . . . . . . . . . . . . . . . . . . . . . . . . . . . . . . . . . . . . . . . . . . . . 35
2.4.- General Operation . . . . . . . . . . . . . . . . . . . . . . . . . . . . . . . . . . . . . . . . . . . . . . . . . . . . . . . 35
3.- Description of panels and connections . . . . . . . . . . . . . . . . . . . . . . . . . . . . . . . . . . . . . . . . . . . . . . . 36
4.- Equipment installation . . . . . . . . . . . . . . . . . . . . . . . . . . . . . . . . . . . . . . . . . . . . . . . . . . . . . . . . . . . . 38
4.1.- Connections to be made . . . . . . . . . . . . . . . . . . . . . . . . . . . . . . . . . . . . . . . . . . . . . . . . . . . 38
5.- First Installation . . . . . . . . . . . . . . . . . . . . . . . . . . . . . . . . . . . . . . . . . . . . . . . . . . . . . . . . . . . . . . . . . 39
6.- Basic Functions . . . . . . . . . . . . . . . . . . . . . . . . . . . . . . . . . . . . . . . . . . . . . . . . . . . . . . . . . . . . . . . . . 40
6.1.- How to select programs. . . . . . . . . . . . . . . . . . . . . . . . . . . . . . . . . . . . . . . . . . . . . . . . . . . . . 40
6.2.- How to adjust the volume . . . . . . . . . . . . . . . . . . . . . . . . . . . . . . . . . . . . . . . . . . . . . . . . . . 41
6.3.- Sound suppression (mute) . . . . . . . . . . . . . . . . . . . . . . . . . . . . . . . . . . . . . . . . . . . . . . . . . . . 41
6.4.- Audio language . . . . . . . . . . . . . . . . . . . . . . . . . . . . . . . . . . . . . . . . . . . . . . . . . . . . . . . . . 41
6.5.- Audio modes . . . . . . . . . . . . . . . . . . . . . . . . . . . . . . . . . . . . . . . . . . . . . . . . . . . . . . . . . . . 42
6.6.- How to use the favorites list . . . . . . . . . . . . . . . . . . . . . . . . . . . . . . . . . . . . . . . . . . . . . . . . 42
6.7.- Electronic Programming Guide (EPG) . . . . . . . . . . . . . . . . . . . . . . . . . . . . . . . . . . . . . . . . . 43
6.8.- Tele-text function . . . . . . . . . . . . . . . . . . . . . . . . . . . . . . . . . . . . . . . . . . . . . . . . . . . . . . . . 44
6.9.- Subtitle function . . . . . . . . . . . . . . . . . . . . . . . . . . . . . . . . . . . . . . . . . . . . . . . . . . . . . . . . . 44
6.10.- Mosaic function . . . . . . . . . . . . . . . . . . . . . . . . . . . . . . . . . . . . . . . . . . . . . . . . . . . . . . . . 45
6.11.- Recall to previous channel . . . . . . . . . . . . . . . . . . . . . . . . . . . . . . . . . . . . . . . . . . . . . . . . 45
6.12.- Return to previous channel . . . . . . . . . . . . . . . . . . . . . . . . . . . . . . . . . . . . . . . . . . . . . . . . 45
6.13.- Pause . . . . . . . . . . . . . . . . . . . . . . . . . . . . . . . . . . . . . . . . . . . . . . . . . . . . . . . . . . . . . . . 45
7.- Main Menu . . . . . . . . . . . . . . . . . . . . . . . . . . . . . . . . . . . . . . . . . . . . . . . . . . . . . . . . . . . . . . . . . . . . 46
8.- Channel Menu . . . . . . . . . . . . . . . . . . . . . . . . . . . . . . . . . . . . . . . . . . . . . . . . . . . . . . . . . . . . . . . . . 46
8.1.- TV or radio Channel organizer . . . . . . . . . . . . . . . . . . . . . . . . . . . . . . . . . . . . . . . . . . . . . . . 47
8.2.- Erase all favorites . . . . . . . . . . . . . . . . . . . . . . . . . . . . . . . . . . . . . . . . . . . . . . . . . . . . . . . . . 49
8.3.- Erase all channels . . . . . . . . . . . . . . . . . . . . . . . . . . . . . . . . . . . . . . . . . . . . . . . . . . . . . . . . . 49
8.4.- Group Rename . . . . . . . . . . . . . . . . . . . . . . . . . . . . . . . . . . . . . . . . . . . . . . . . . . . . . . . . . . . 49
9.- Menu installation . . . . . . . . . . . . . . . . . . . . . . . . . . . . . . . . . . . . . . . . . . . . . . . . . . . . . . . . . . . . . . . 50
9.1.- Auto Scan . . . . . . . . . . . . . . . . . . . . . . . . . . . . . . . . . . . . . . . . . . . . . . . . . . . . . . . . . . . . . . 50
9.2.- Manual Search . . . . . . . . . . . . . . . . . . . . . . . . . . . . . . . . . . . . . . . . . . . . . . . . . . . . . . . . . . 50
9.3.- Aerial Feed . . . . . . . . . . . . . . . . . . . . . . . . . . . . . . . . . . . . . . . . . . . . . . . . . . . . . . . . . . . . . 51
9.4.- LCN Function . . . . . . . . . . . . . . . . . . . . . . . . . . . . . . . . . . . . . . . . . . . . . . . . . . . . . . . . . . . . 51
10.- System Setup Menu . . . . . . . . . . . . . . . . . . . . . . . . . . . . . . . . . . . . . . . . . . . . . . . . . . . . . . . . . . . . . 52
10.1.- OSD Language . . . . . . . . . . . . . . . . . . . . . . . . . . . . . . . . . . . . . . . . . . . . . . . . . . . . . . . . . 52
10.2.- TV System . . . . . . . . . . . . . . . . . . . . . . . . . . . . . . . . . . . . . . . . . . . . . . . . . . . . . . . . . . . . . 52
10.3.- Region and Time . . . . . . . . . . . . . . . . . . . . . . . . . . . . . . . . . . . . . . . . . . . . . . . . . . . . . . . . 53
10.4.- Timer Setting . . . . . . . . . . . . . . . . . . . . . . . . . . . . . . . . . . . . . . . . . . . . . . . . . . . . . . . . . . . 54
10.5.- OSD Setting . . . . . . . . . . . . . . . . . . . . . . . . . . . . . . . . . . . . . . . . . . . . . . . . . . . . . . . . . . . 55
10.6.- Parental Lock . . . . . . . . . . . . . . . . . . . . . . . . . . . . . . . . . . . . . . . . . . . . . . . . . . . . . . . . . . 56
11.- Tools Menu . . . . . . . . . . . . . . . . . . . . . . . . . . . . . . . . . . . . . . . . . . . . . . . . . . . . . . . . . . . . . . . . . . 57
11.1.- Receiver Information . . . . . . . . . . . . . . . . . . . . . . . . . . . . . . . . . . . . . . . . . . . . . . . . . . . . 57
11.2.- Games . . . . . . . . . . . . . . . . . . . . . . . . . . . . . . . . . . . . . . . . . . . . . . . . . . . . . . . . . . . . . . 57
11.3.- Load Factory Default . . . . . . . . . . . . . . . . . . . . . . . . . . . . . . . . . . . . . . . . . . . . . . . . . . . . 57
11.4.- Software Upgrade . . . . . . . . . . . . . . . . . . . . . . . . . . . . . . . . . . . . . . . . . . . . . . . . . . . . . . 58
Connectors description . . . . . . . . . . . . . . . . . . . . . . . . . . . . . . . . . . . . . . . . . . . . . . . . . . . . . . . . . . . . . 59
Menu Structure . . . . . . . . . . . . . . . . . . . . . . . . . . . . . . . . . . . . . . . . . . . . . . . . . . . . . . . . . . . . . . . . . . . 60
Technical Features . . . . . . . . . . . . . . . . . . . . . . . . . . . . . . . . . . . . . . . . . . . . . . . . . . . . . . . . . . . . . . . . . 61
Guarantee . . . . . . . . . . . . . . . . . . . . . . . . . . . . . . . . . . . . . . . . . . . . . . . . . . . . . . . . . . . . . . . . . . . . . . 63
Index
Page 34
User manual
Digital Terrestrial TV Receiver
34
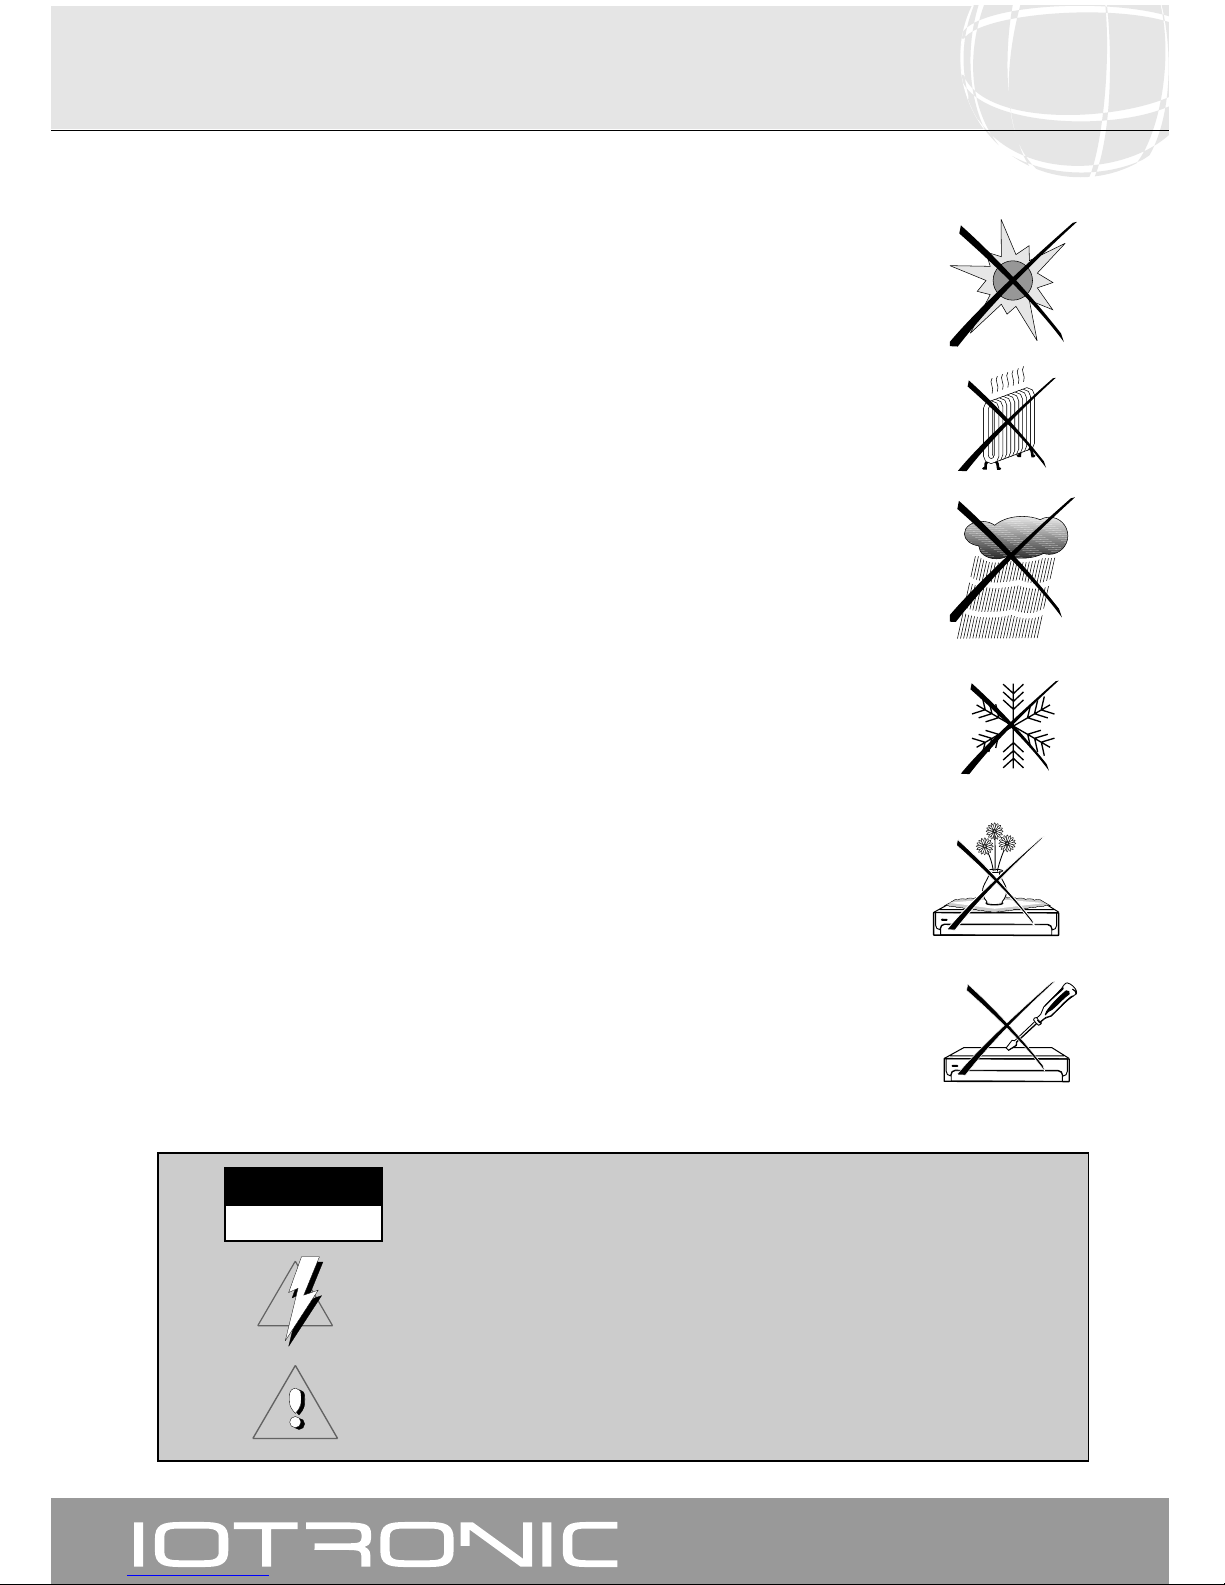
< 5°C
> 80 %
> 50°C
The receiver you have just bought has been built in accordance with international safety
standards.
We recommend you to read the following safety advice carefully.
POWER:
175 - 250 V~ 50/60 Hz.
OVERLOAD:
Do not overload the points, extensions or adaptors to avoid fire and electric shock
hazard.
LIQUIDS:
Do not expose the Receiver to splashing or dripping water.
Do not place objects or vessels containing liquids on or near the equipment.
SMALL OBJECTS:
Keep small metal objects away from the equipment. They might slip through the
Receiver ventilation grille causing serious damage.
CLEANING:
Unplug the Receiver from the power grid before cleaning.
Use a soft rag, slightly moistened in water (without detergent) to clean the outside
of the Receiver.
VENTILATION:
Place the Receiver in a well ventilated spot, leaving the grilles unobstructed.
Avoid heat source, sunlight or flame exposure.
Do not place other pieces of equipment on top of it.
CONNECTIONS:
Carry out only the recommended connections in order to avoid possible damage.
TV or VCR CONNECTION:
Turn the Receiver off before connecting it to a TV set or a VCR.
IF THIS IS NOT DONE, THE TV SET OR VCR EQUIPMENT MAY SUFFER DAMAGE.
LOCATION:
Place the Receiver in an inner room, safe from electric discharges, rainfall or direct
sunlight.
Install the Receiver in a horizontal position.
WARNING
RISK ELECTRICAL SHOCK
DO NOT OPEN
TO REDUCE THE RISK OF ELECTRIC SHOCKS, DO NOT REMOVE THE COVER.
NONE OF THE INSIDE PARTS ARE REPAIRABLE BY THE USER.
FOR REPAIRS, CONSULT A QUALIFIED TECHNICIAN.
This symbol indicates “dangerous voltage” within the product that can present electric
shock or personal injury hazard.
This symbol indicates that this product has important instructions for use.
1.- Safety Measures
Page 35
User manual
Digital Terrestrial TV Receiver
35
MPEG2, DVB Compatible
Digital Audio Output (SPDIF)
Easy use menu
Guided initial installation
Several program editing functions:
(favorites, move, block, erase..)
Possesses 8 lists of favorite channels
Stores up to 1,000 programs
Quick and easy software updating through port RS-232
Receiver-to-receiver updating through an RS-232 cable
Enables active aerial feed with 5 V (100mA)
Timer function, turning receiver on and off automatically
Supports LCN (Automatic Channel Location) function
Electronic Programming Guide (EPG)
Supports OSD Tele-text and Subtitle (standard and
Tele-text) functions
Supports VBI Tele-text
Multi-video CVBS, RGB output
256 color screen display
Automatic PAL/NTSC conversion
Stores last program automatically
Has a nine-program mosaic
Has 3 games (Tetris, Snake & Othello)
The ANT 7119 receiver enables you to view a wide range of land-based channels.
This manual explains how to carry out receiver installation and the steps necessary to use its different functions.
It also explains in detail the special functions that are only available in this receiver, and eases the use of these functions.
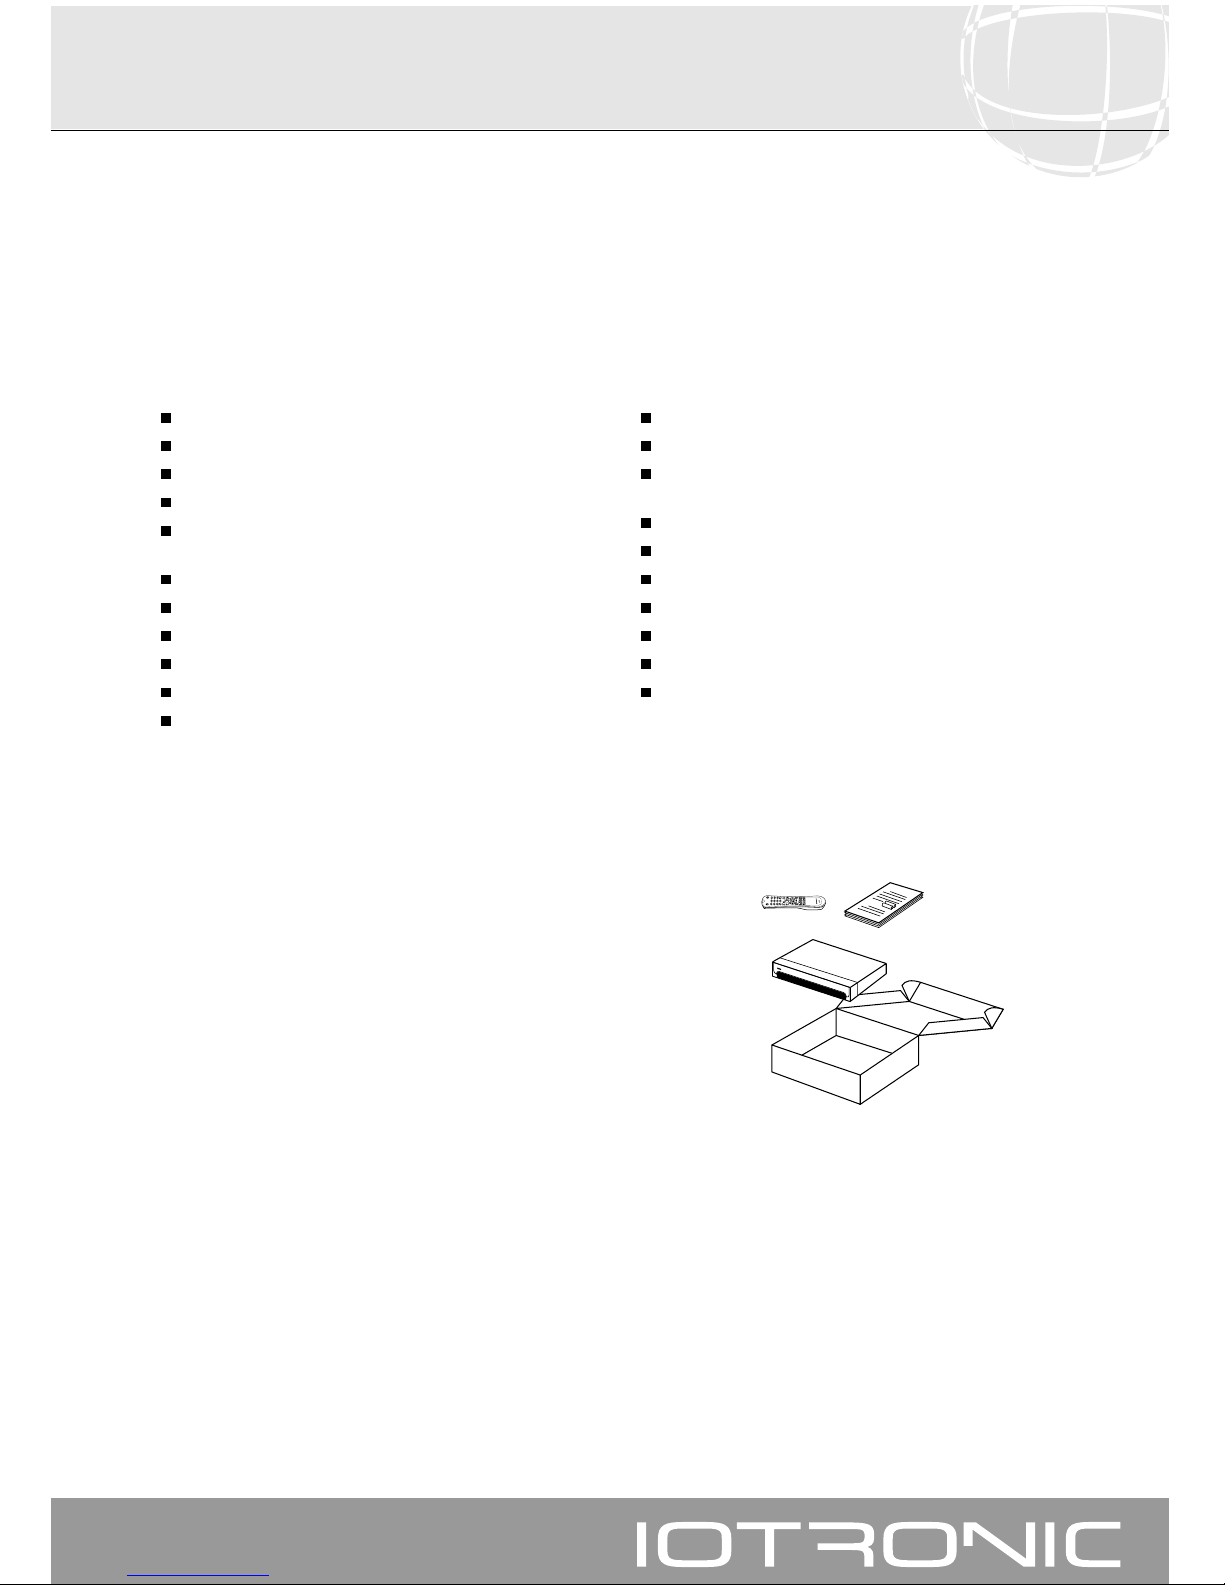
Check that the following components are packed in the shipment:
- 1 x Digital terrestrial receiver ref.7119
- User manuals
- 1 x Remote Control
- 2 x Type “AAA” Batteries
On reading this Manual you will find that daily use of the receiver is based on a series of very easy to use onscreen menus and
displays. These menus will help you to enjoy your receiver by guiding you through installation procedure, program ordering,
viewing and many other functions.
All the functions may be operated by using the buttons on the remote control, and some of the functions can also be operated
by using the front panel buttons.
It should be borne in mind that the addition of new software may change the receiver’s functionality.
If you find any problems in operating your receiver, read the corresponding paragraph of this Manual, or alternatively, call your
installer or technical support service.
2.- Before Starting ...
2.1.- Introduction
2.2.- General Features
2.3.- Composition
2.4.- General Operation of the ANT 7119 receiver
Page 36
User manual
Digital Terrestrial TV Receiver
36
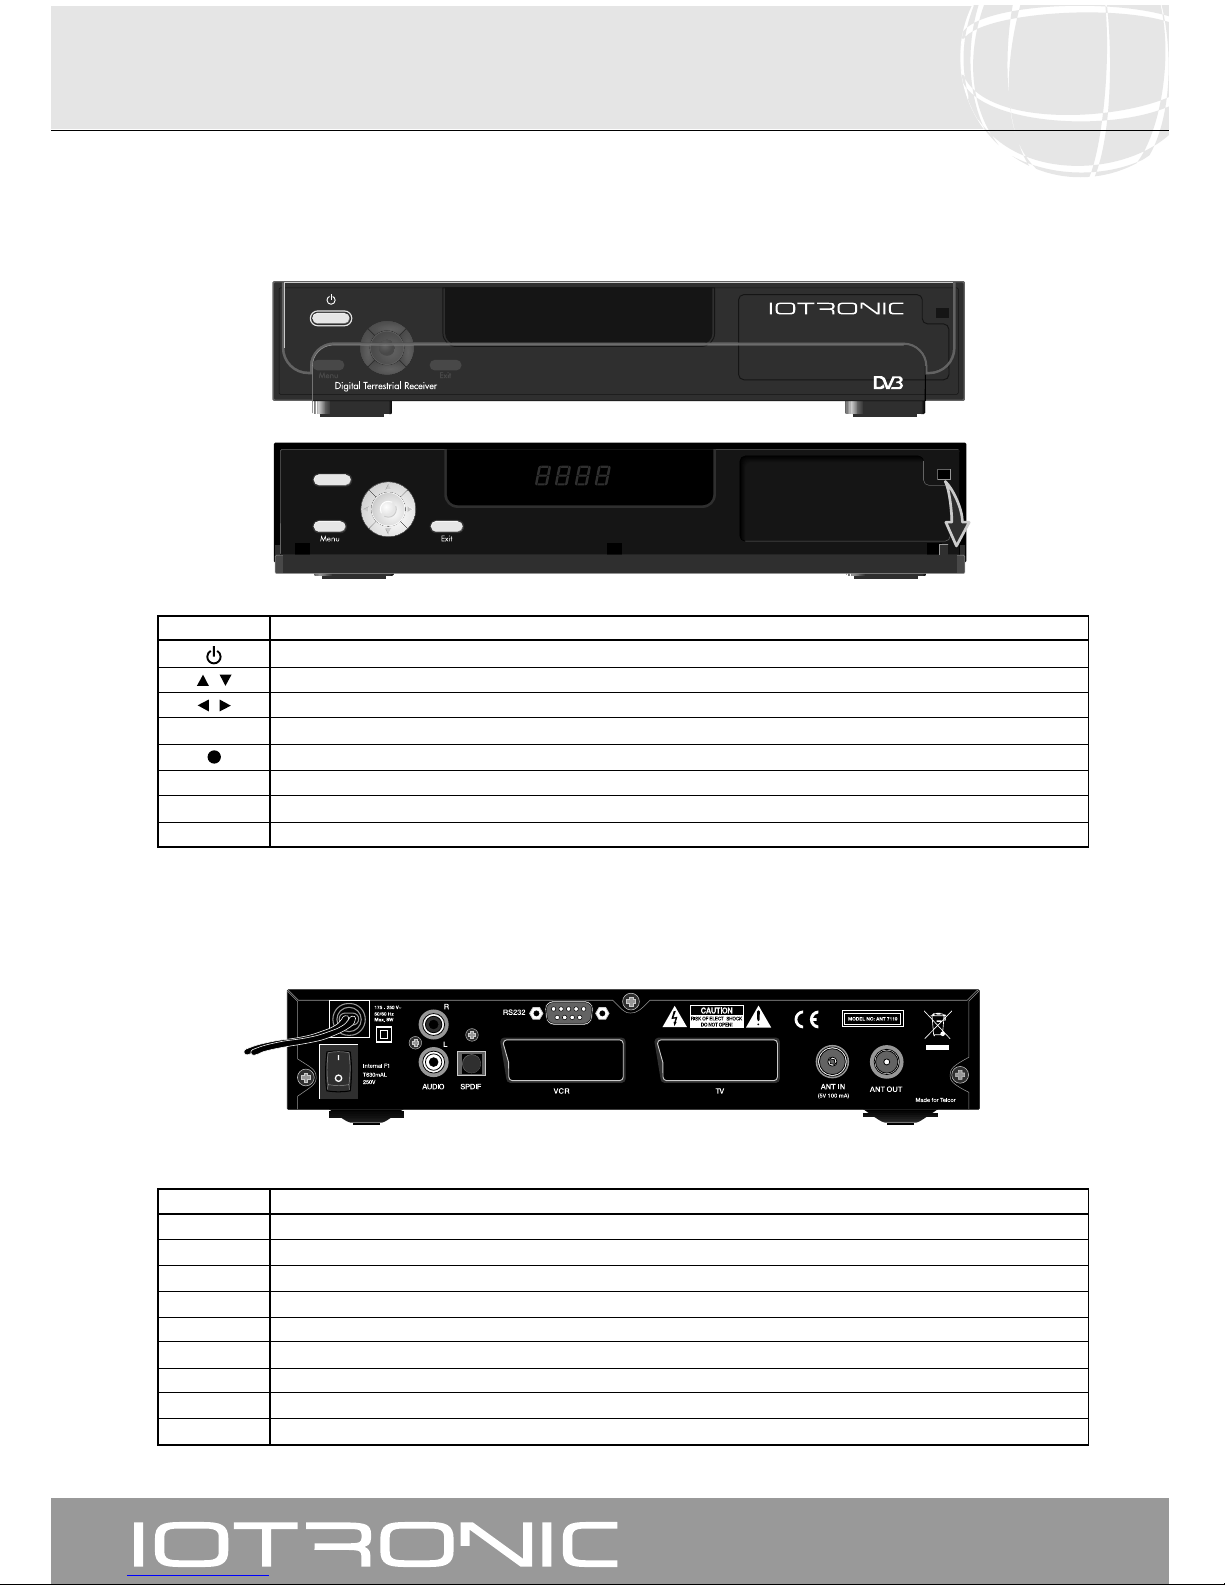
Button Function
Commutes between normal and standby operating modes.
/
Switches Upward or Downward by one program number. Selects a menu option.
/
Turns volume Up or Down. Selects a menu option.
Menu Enables main menu access.
Executes option selected.
Exit Returns to previous menu on the menu screen.
Display In normal mode, shows channel number. In standby mode, shows current time.
LEDs Red: in waiting (Standby) mode - Green: Input signal level correct
Name Function
ANT IN
Input signal of the terrestrial antenna (feed: +5V/100mA selectable by menu)
ANT OUT RF output signal to connect to a TV set or a VCR.
TV To connect to a TV set using a Euroconnector (scart).
VCR To connect to a VCR using a Euroconnector (scart).
AUDIO R Audio output (right channel).
AUDIO L Audio output (left channel).
S/PDIF Digital audio output.
RS232 Connection to a serial port (RS232) for data transmission.
I/O Switch On/Off
3.- Panel and
Connection Description
Fig. 1 Front Panel
Fig. 2 Back Panel
Page 37
User manual
Digital Terrestrial TV Receiver
37
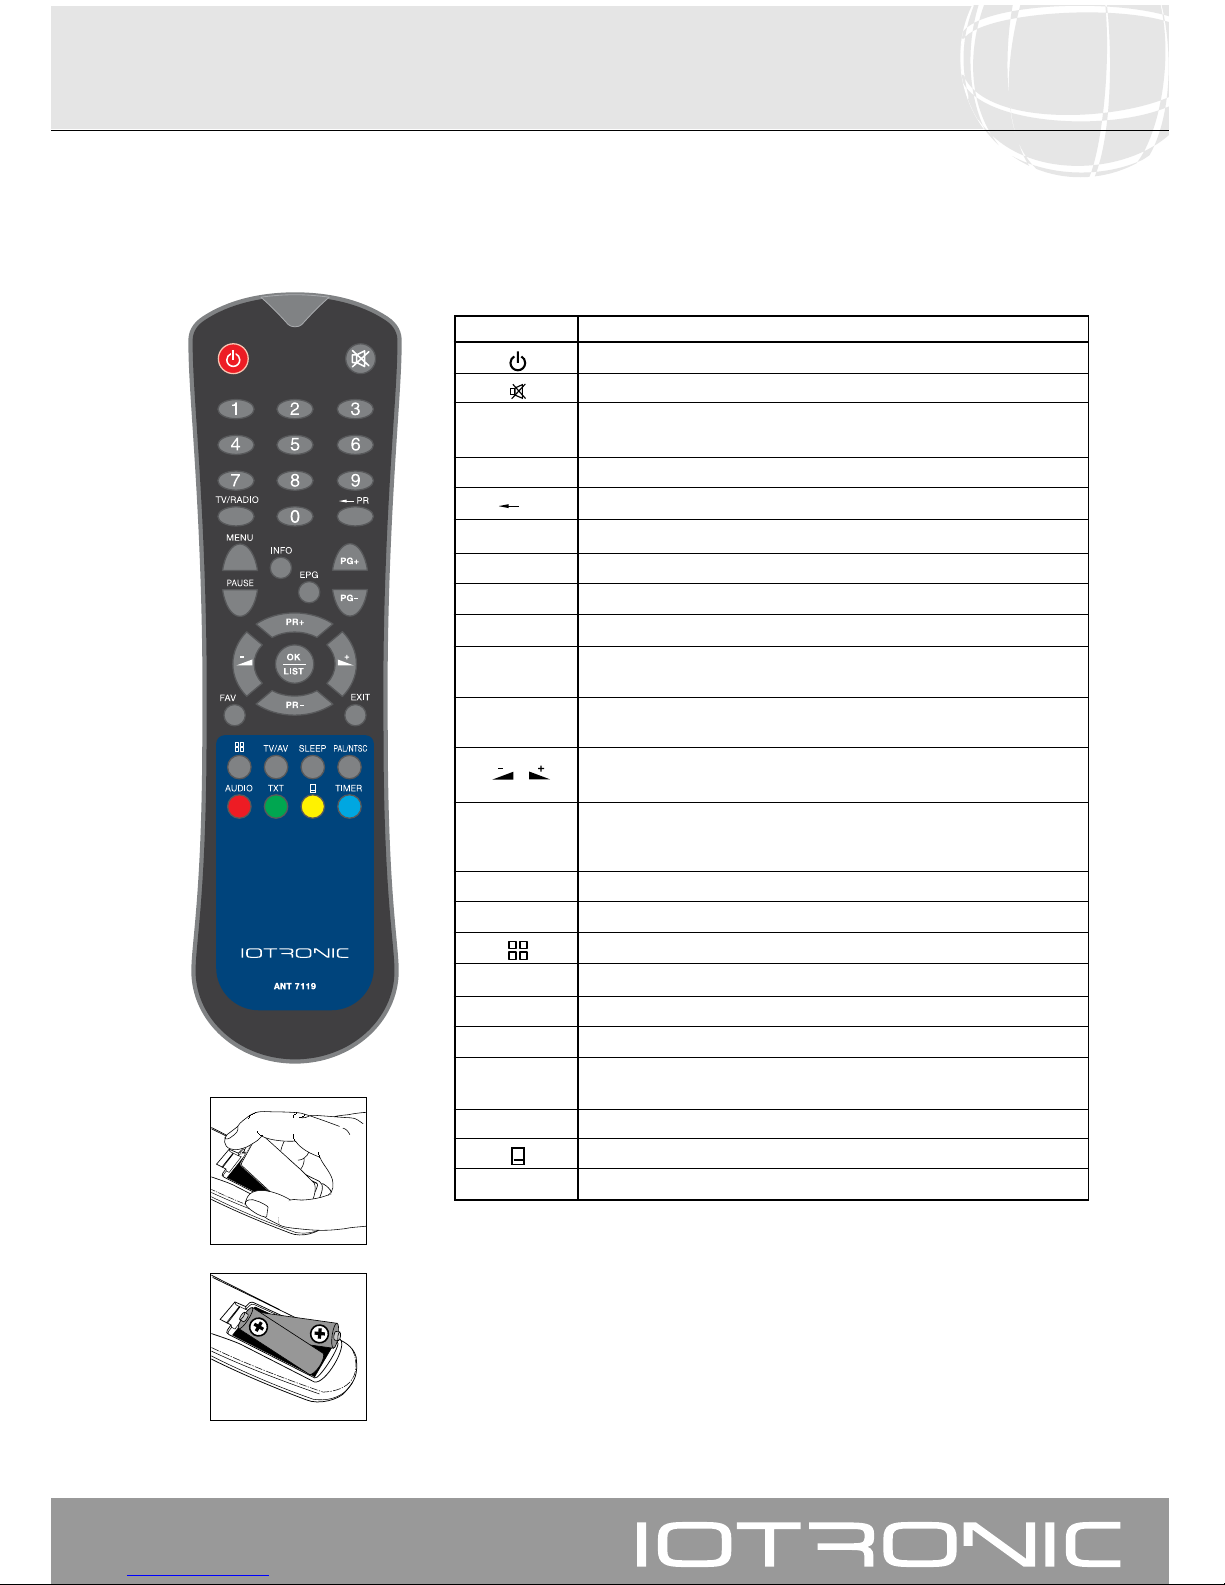
Button Function
Turns receiver on and off.
Suppresses sound.
0 ... 9
Selects a program number for viewing.
Enters data directly in menu.
TV/RADIO Changes between TV and Radio modes.
PR Returns to previous program.
MENU Used to enable main menu access or leave menus.
PAUSE Freezes the picture being viewed.
INFO Shows information on the current program.
EPG Enables the EPG (Electronic Program Guide).
PG+/PG-
Pages up or down on the channel list.
Commutes among the different groups of favorites.
PR+/PR-
Switches Upward or Downward by one program number.
Selects a menu option.
/
Turns volume Up or Down.
Selects a menu option.
OK/LIST
Executes option selected in the menu or enters a desired value in
any entry mode.
Enables a program list.
FAV Enables the favorite channel list.
EXIT Returns to previous menu on the menu screen.
Presents an image mosaic on screen.
TV/AV Commutes between TV and VCR modes.
SLEEP Activates Auto off menu.
PAL/NTSC Selects TV standard (AUTO, PAL or NTSC).
AUDIO
Selects the different audio languages available.
Selects the different audio modes.
TEXT Enables the Tele-text menu, if it is being broadcasted.
Enables the subtitle function, if available.
TIMER Shows the Timer function.
Fig. 3 Remote Control
Note: The buttons in red, green, yellow and blue color have secondary functions
that are not described here and that can appear in various menus.
Page 38
User manual
Digital Terrestrial TV Receiver
38
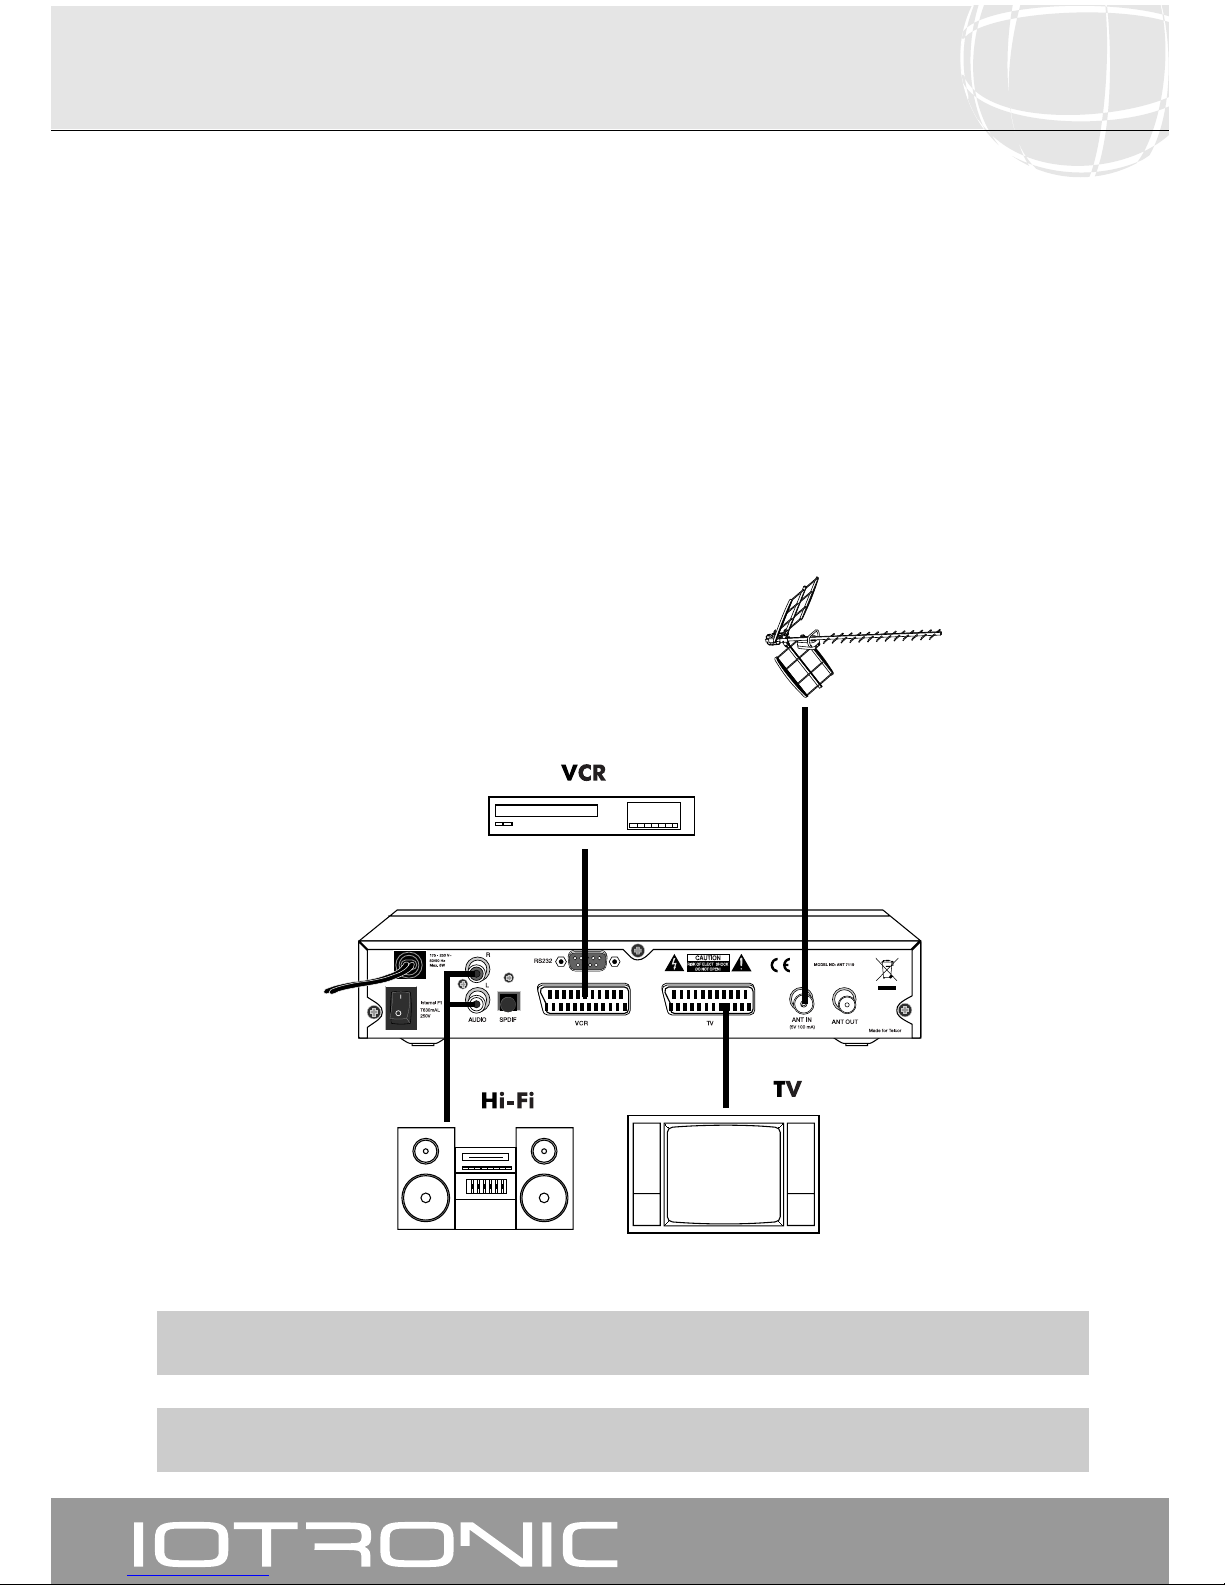
This section explains how to install the ANT 7119 receiver.
Read the manuals supplied with the equipment for the installation of external equipment such as the aerial.
On adding some new piece of equipment, read the corresponding part of the Manual for its installation.
- Connect the aerial to the ANT IN entry port of the receiver.
- Connect the receiver to the TV set using a Euroconnector (scart).
- Connect the receiver to the power point.
DO NOT PLUG IN the Receiver to the power grid before finishing all connecting work.
All cables used for Receiver connections must be of the shielded type
4.- Equipment Installation
4.1.- Connections to be Made
Page 39
User manual
Digital Terrestrial TV Receiver
39
Once you have installed the ANT 7119 receiver, switch it on using the switch
on the back panel.
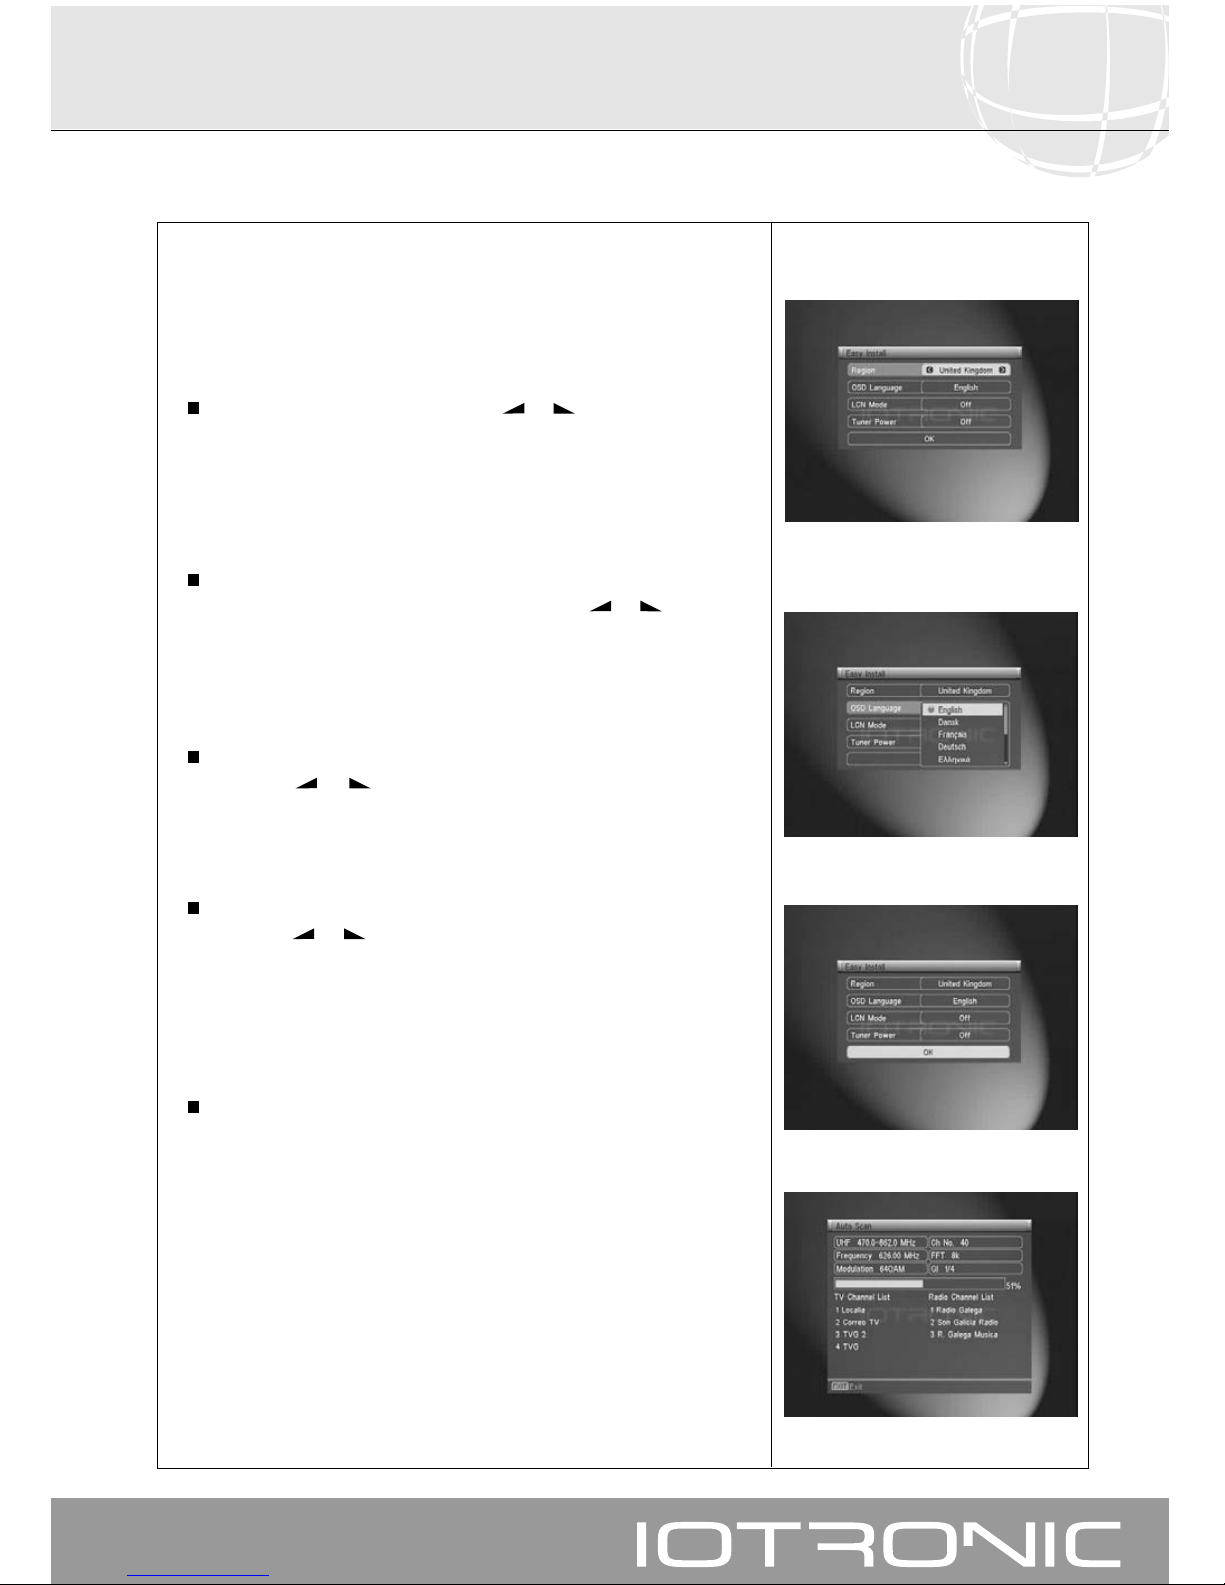
The first time the receiver is switched on, it will show a guided installation
window. In order to configure the parameters for this window, follow the
instructions below:
Select the Region of location, using the -or
+
buttons.
The available countries are: Australia, Austria, Czech, Denmark, Dubai,
Finland, France, Germany, Greece, The Netherlands, Italy, Portugal,
Russia, Spain, Sweden, Switzerland, United Kingdom and Vietnam.
You can also press the OK button and select the countries using buttons
PR+ or PR- on the pop-up menu. Press the OK button to confirm.
Press the PR- button.
Select the desired language for the OSD, using the -or
+
buttons.
The available languages are: English, Danks, Français, Deutsch, Greek,
Italian, Polski, Português, Español and Svenska.
You can also press the OK button and select a language, using the PR+ or
PR- buttons on the pop-up menu. Press the OK button to confirm.
Press the PR- button.
Using the -or
+
buttons, enable (ON) or disable (OFF) automatic
channel ordering (LCN).
You can also press the OK button and select one of the options using the
PR+ or PR- buttons on the pop-up menu. Press the OK button to confirm.
Press the PR- button.
Using the -or
+
buttons, enable (ON) or disable (OFF) the antenna
power to any possible previously installed aerial amplifiers.
You can also press the OK button and select one of the options using the
PR+ or PR- buttons on the pop-up menu. Press the OK button to confirm.
If there is no active aerial, you must select the option “Off”, otherwise
the receiver may be damaged.
Finally, place the cursor on the “OK” option and press the OK button to
start the search.
The receiver will carry out a search over its whole input frequency band.
Once the search has ended, the receiver will show the first of the channels on
the list.
The process may be halted at any moment by pressing the MENU button.
5.- First Installation
Page 40
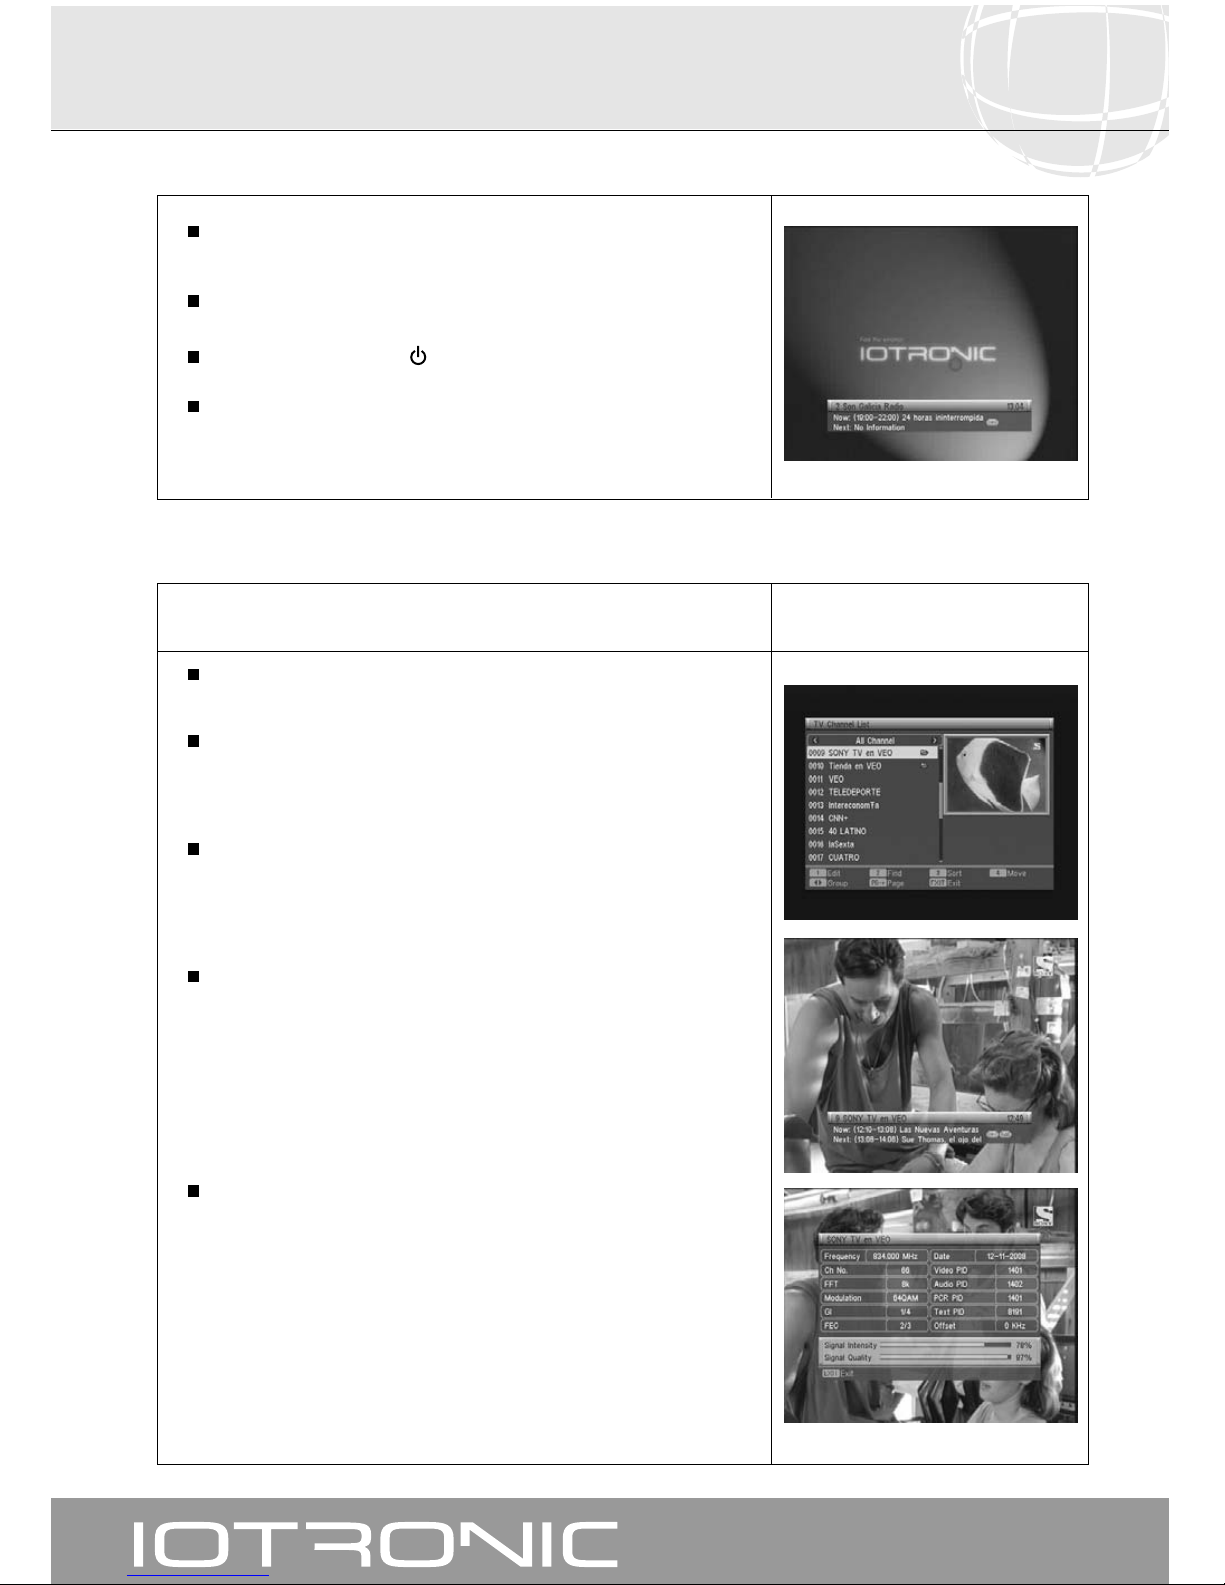
User manual
Digital Terrestrial TV Receiver
40
6.- Basic Functions
6.1.- How to Select Programs
Turn on the TV set and all the peripheral equipment connected to the
system.
Turn on the receiver by means the I/O back panel switch.
Press the ON/OFF button ( )
of the receiver or the remote control.
Select one of the TV or Radio modes, using the TV/RADIO button.
(the TV mode is the factory-set default mode).
The TV/Radio channels can be selected by using both the remote control and
the receiver buttons.
Press the TV/RADIO button to select the desired service mode (TV channels
or radio channels).
Press the OK button when you are viewing a program. The TV channel list
will then be shown on screen. Then select a program from the list using
the PR+/PR- buttons, and press OK to view. You can also page along the
channel list using the PG+/PG-.
Another way of selecting a program is, when you are already viewing one,
press the PR+ button to select the following one or the PR- button to select
the previous one either on the remote control or on the front keyboard of
the receiver. If you wish to go straight to a given program, type its number
on the numerical keyboard of the remote control.
The program you selected will appear immediately onscreen, together
with a small information window.
This information window shows us the program name and its position on
the list, as well as the list that has been selected at that moment (All
Channel, Group 1, Group 2, etc....). It also indicates the number of
audios available in the program and the selected audio mode.
If the program offers Tele-text or Subtitles, it shows the indications “TTX” or
“SubT”, as well as the time and the names of the current event and the
next to be broadcasted.
When you press the INFO button, the same window described in the
previous paragraph appears.
If you press the INFO button again while you are viewing this window,
another screen will appear, showing the complete information available
corresponding to the program that has been selected.
It will also show the level and quality of the signal received with a bar-type
indicator.
To exit, press the EXIT button.
Page 41
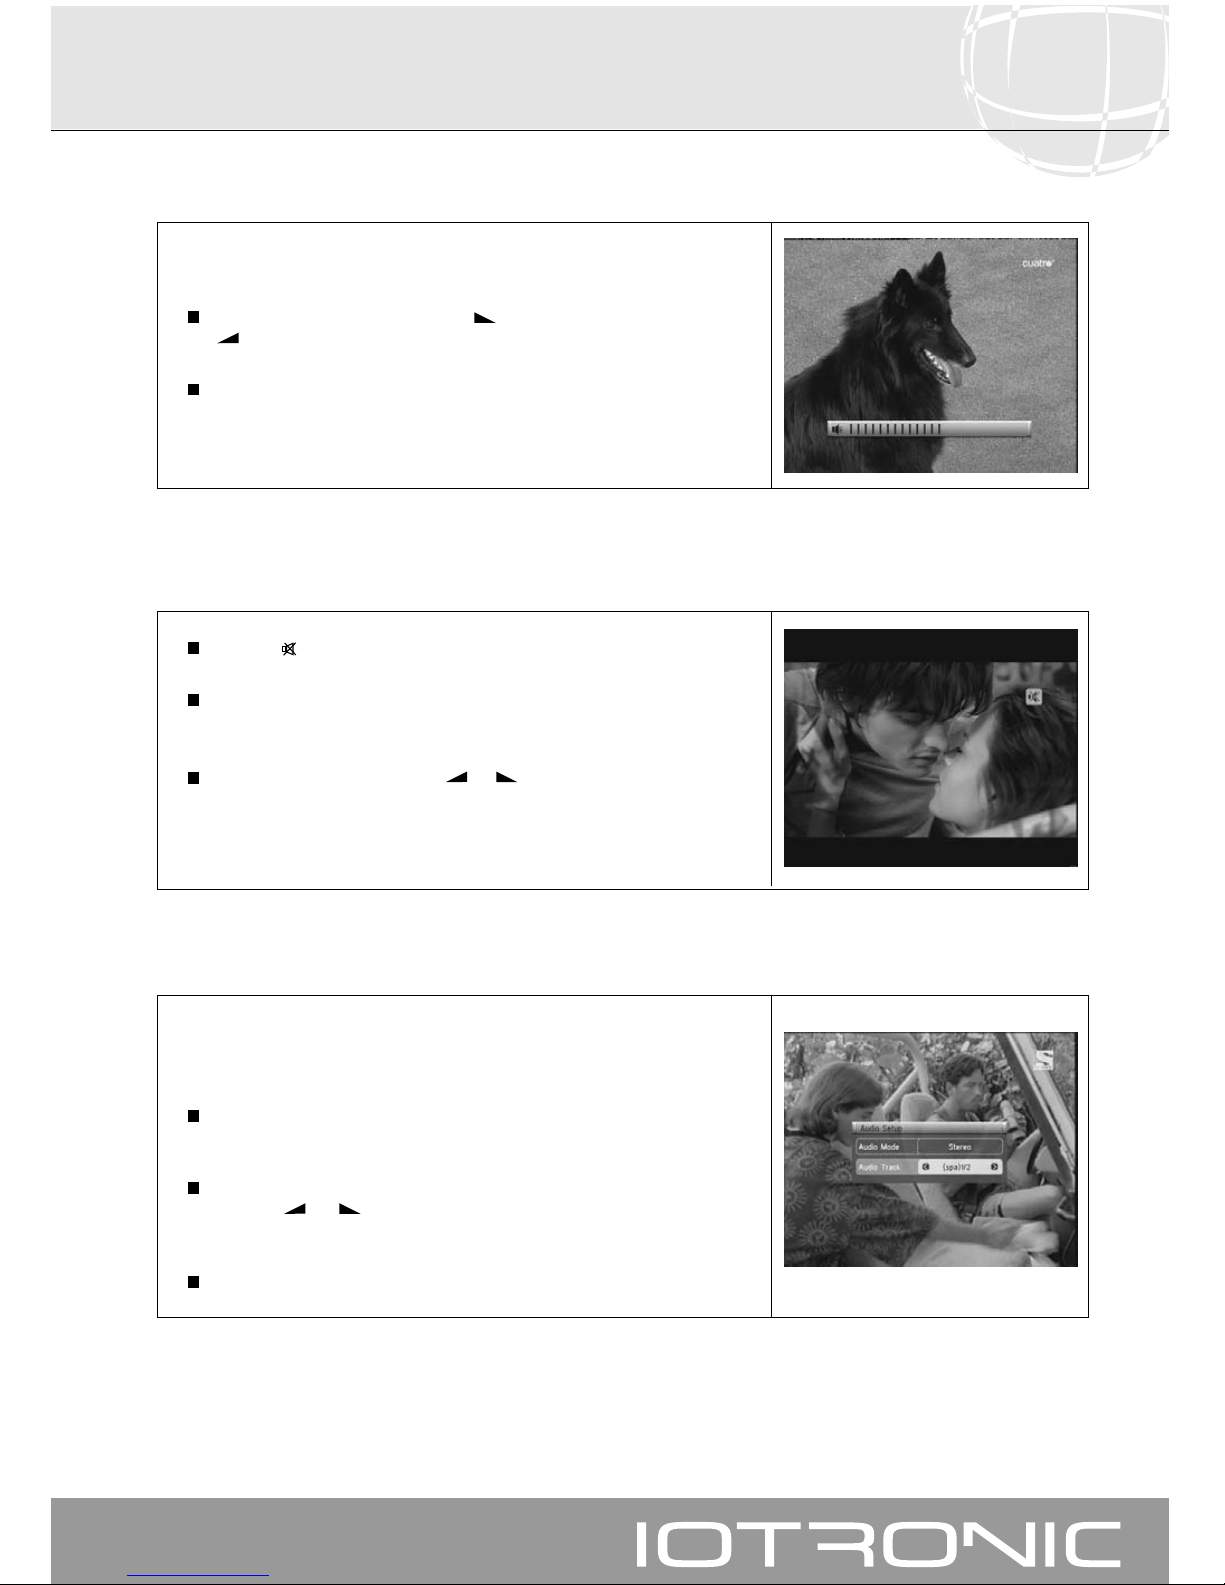
User manual
Digital Terrestrial TV Receiver
41
6.2.- Volume Adjustment
6.3.- Sound Suppression (Mute)
6.4.- Audio Language
Press the button to suppress the soundtrack of the broadcast.
To return sound level, press the same button again.
Sound will return at the same level as previously.
To adjust the volume, press the -or
+
buttons.
Some channels are transmitted in different audio languages. This function
depends on whether the transmission includes this information in the signal
sent to the receiver.
Press the AUDIO button to enable the menu containing the different
broadcast languages.
Press the PR- button to locate the cursor on the “Audio Track” option, and
with the -or
+
buttons, select the desired audio from among the
existing ones. Press OK to confirm.
To leave the audio menu, press the EXIT or AUDIO button.
The volume may be adjusted using the remote control.
To increase the volume, press the
+
button, and to lower it press the
-
button on the remote control or the receiver.
Existing volume levels may be modified by using an indicator appearing
on the screen.
Page 42
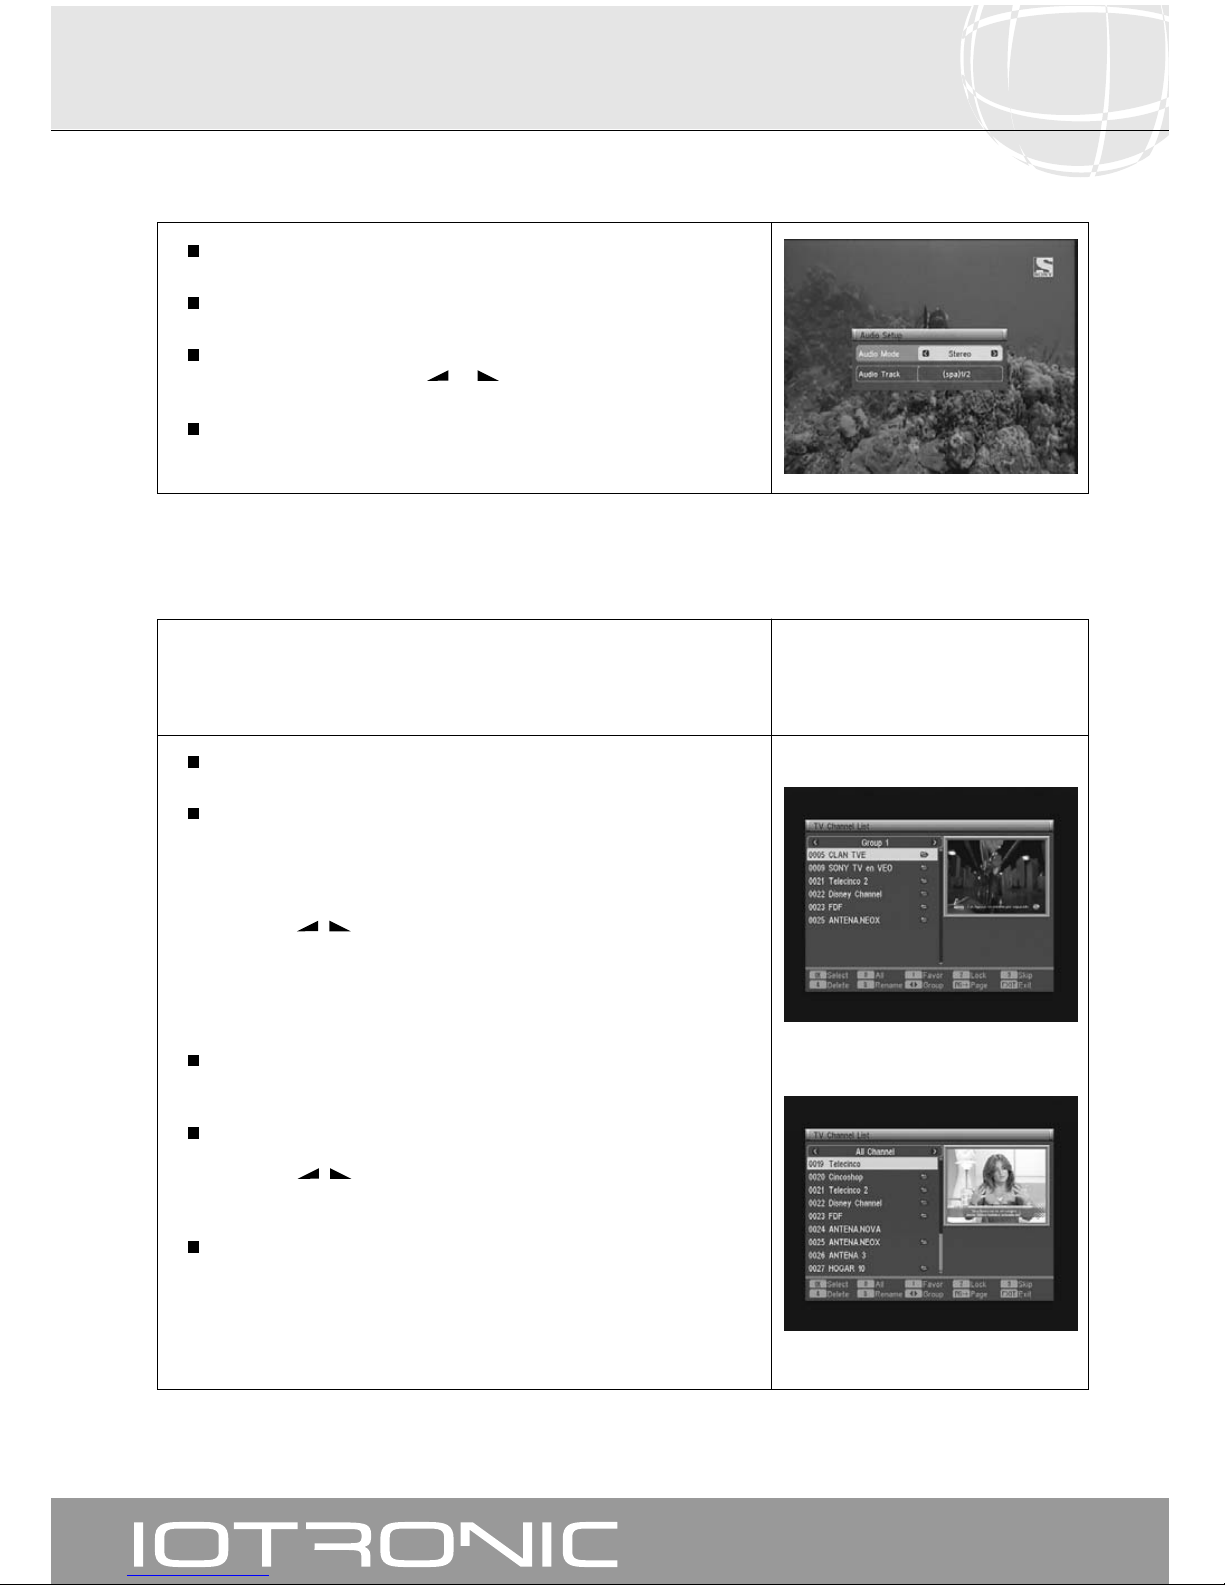
User manual
Digital Terrestrial TV Receiver
42
You can easily select your favorite Radio or TV channels using the Favorite
Channels List. You will be able to store up to 8 different lists. Only the Radio
and TV channels selected from the Main Channels List will appear on these
lists.
Press the TV/RADIO button to select the TV or Radio channel list.
While viewing a TV channel or listening to a radio channel, press the FAV
button to access the Favorite Channels List.
If there are no channels allocated to a given group, the Favorites menu
will not be shown on screen, the message “No FAV channel” appearing
instead.
Using the -/
+
buttons, select a list or group of channels in which
your favorite program is located. The programs may be grouped as:
Group 1, Group 2, Group 3, Group 4, Group 5, Group 6, Group 7 or
Group 8. If any one of these groups does not have a program allocated
to it, that group will not appear.
Select any program from the list, using the PR+/PR- buttons, and press
OK to view it.
To return to the general program list, press the OK button in the normal
mode (viewing a program). The current group will be shown on screen.
Using the -/
+
buttons, select the group “All Channel”, and select
another program by pressing OK.
To leave the favorite channels list, press the EXIT button.
See paragraph 8.1 “Organizing TV and Radio Channels” in Section 8
“Installation Menu” for instructions on how to make Favorite Channels
Lists.
Press the AUDIO button to enable the audio menu.
Enable the “Audio Mode” option using the PR+/PR- buttons.
Select the desired audio output mode from the existing ones “Stereo”,
“Left” and “Right”, using the -or
+
buttons.
To leave the audio menu, press the EXIT or AUDIO button.
6.5.- Audio Modes
6.6.- How to Use the Favorite Channels List
Page 43
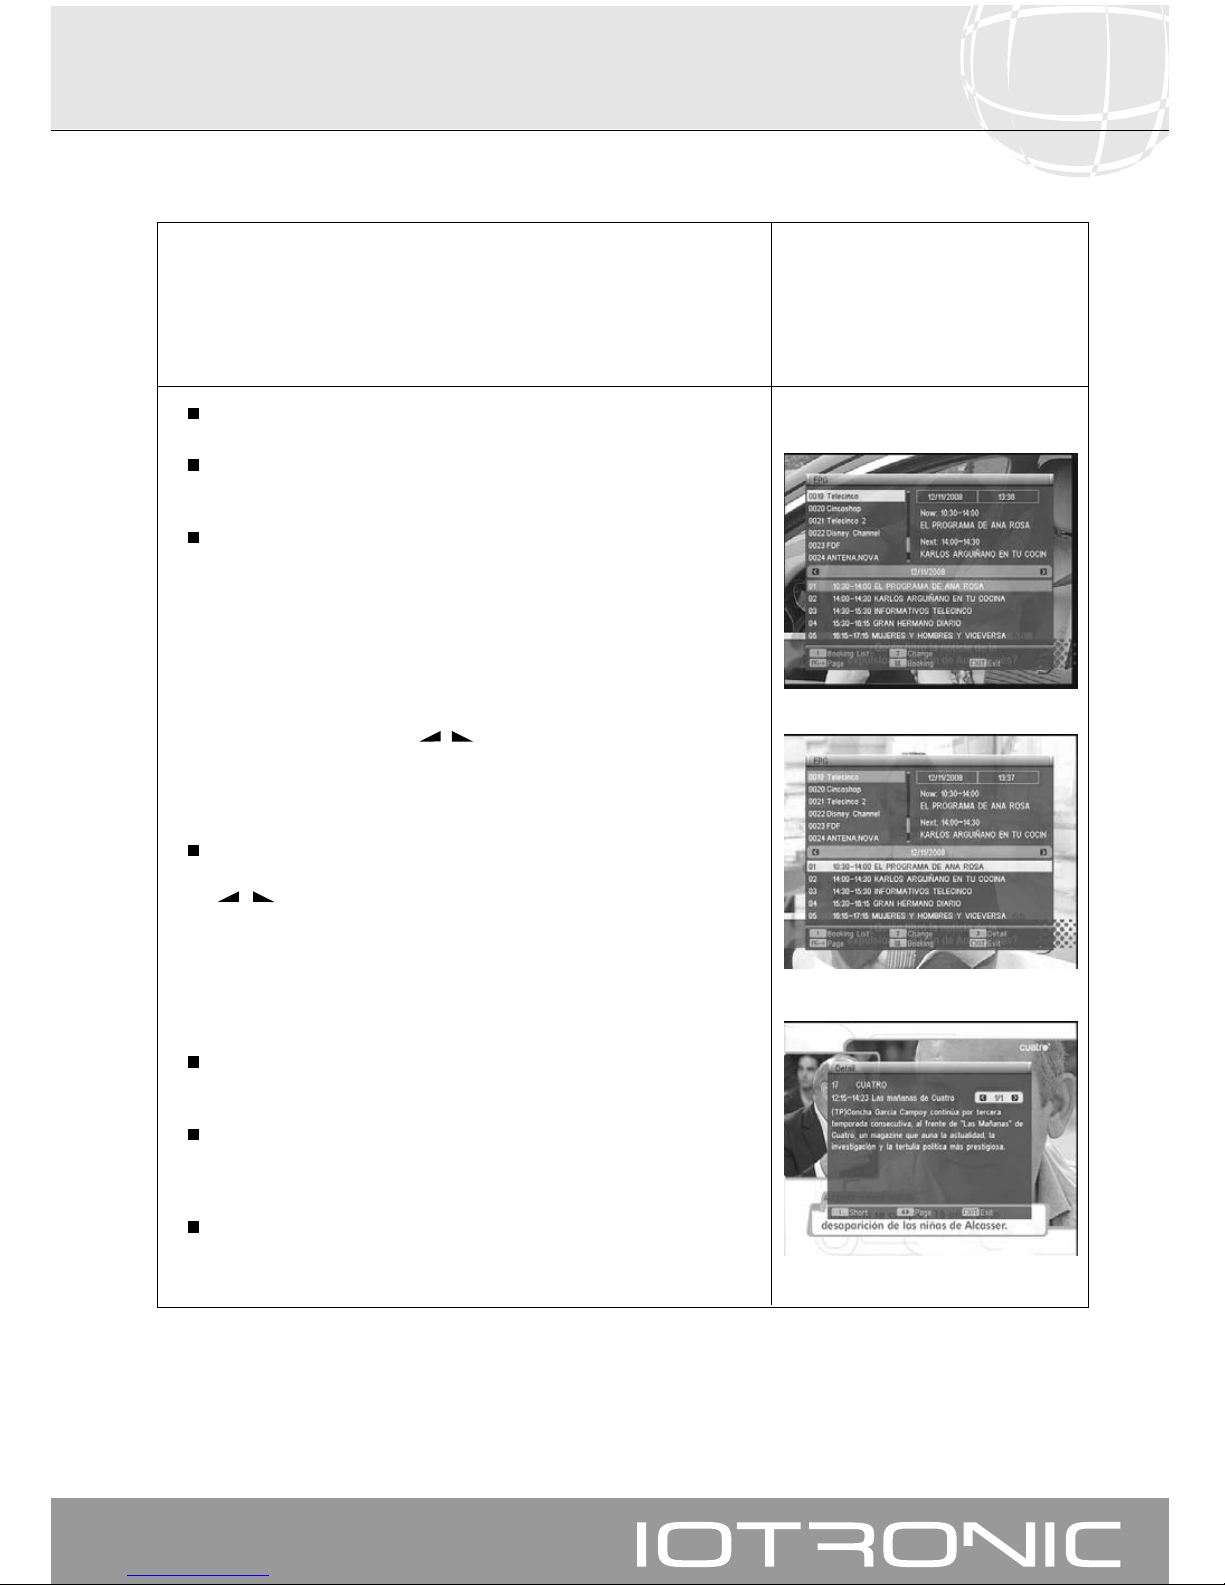
User manual
Digital Terrestrial TV Receiver
43
The ANT 7119 receives and stores information on the current TV and Radio
channels. This information includes a detailed timetable for the next
programming. This guide is very easy to use, as it shows all the information
on screen.
This guide supplies information on: program number, program name, date
and time (beginning and end) of broadcast.
Using the TV/RADIO button, you can change from TV to Radio lists.
Press the EPG button while you are tuned in to TV or Radio channels, and
you will access the Electronic Programming Guide (EPG).
The EPG will appear basically configured in three parts.
A list is shown on the left with the name and number of the programmes.
Using the PR+/PR- keys, it is possible to change from one programme to
another. On changing the programme, the information shown is updated.
Immediately to the right, the current date and time are shown, as well as
the name of the current event and the next, with their respective broadcast
times. By using the PR+/PR- keys, it is possible to move between one event
and another.
A list is shown in the bottom part with all of the events and their times in a
daily format. By using the -/
+
keys, it is possible to go forward or
backwards on the time line. By clicking OK on an event, this will form part
of the “Booked List”. The receiver will automatically show the events from
the list in hourly order.
Press key 1 on the EPG window to access the “Booked List”.
To navigate through the different broadcast days and times, use the
-
,
+
, PR+ or PR-. keys. If you require more detailed information on
a specific event, access the “Details” sub-menu by pressing the OK key.
Press key 2 consecutively to cycle between one window and another.
By pressing key 3 on one of the events, you will enter the “Details” sub-
menu, which shows a summary of the event. By pressing key 1 you will
see this description in an extended or concise format.
Finally, at the bottom of this screen will appear the options allowed by this
menu.
The information contained in the guide comes with the signals provided by
the supplier. In the event that a program does not contain data for guide
information, the legend “No Information” will appear on screen.
Press the EXIT or MENU buttons to leave EPG and directly access the
selected channel.
Notes:
- To receive the broadcast timetables correctly on the guide, you must first make the reference adjustment of YOUR LOCAL TIME
with reference to GMT (Greenwich Mean Time) or adjust directly by entering your current time in the “Region and Time”
option.
- When we define the time by using the GMT option, the time which will appear on screen is that provided by the supplier, so
these data may sometimes appear as incorrect for certain programs.
6.7.- Electronic Programming Guide (EPG)
Page 44
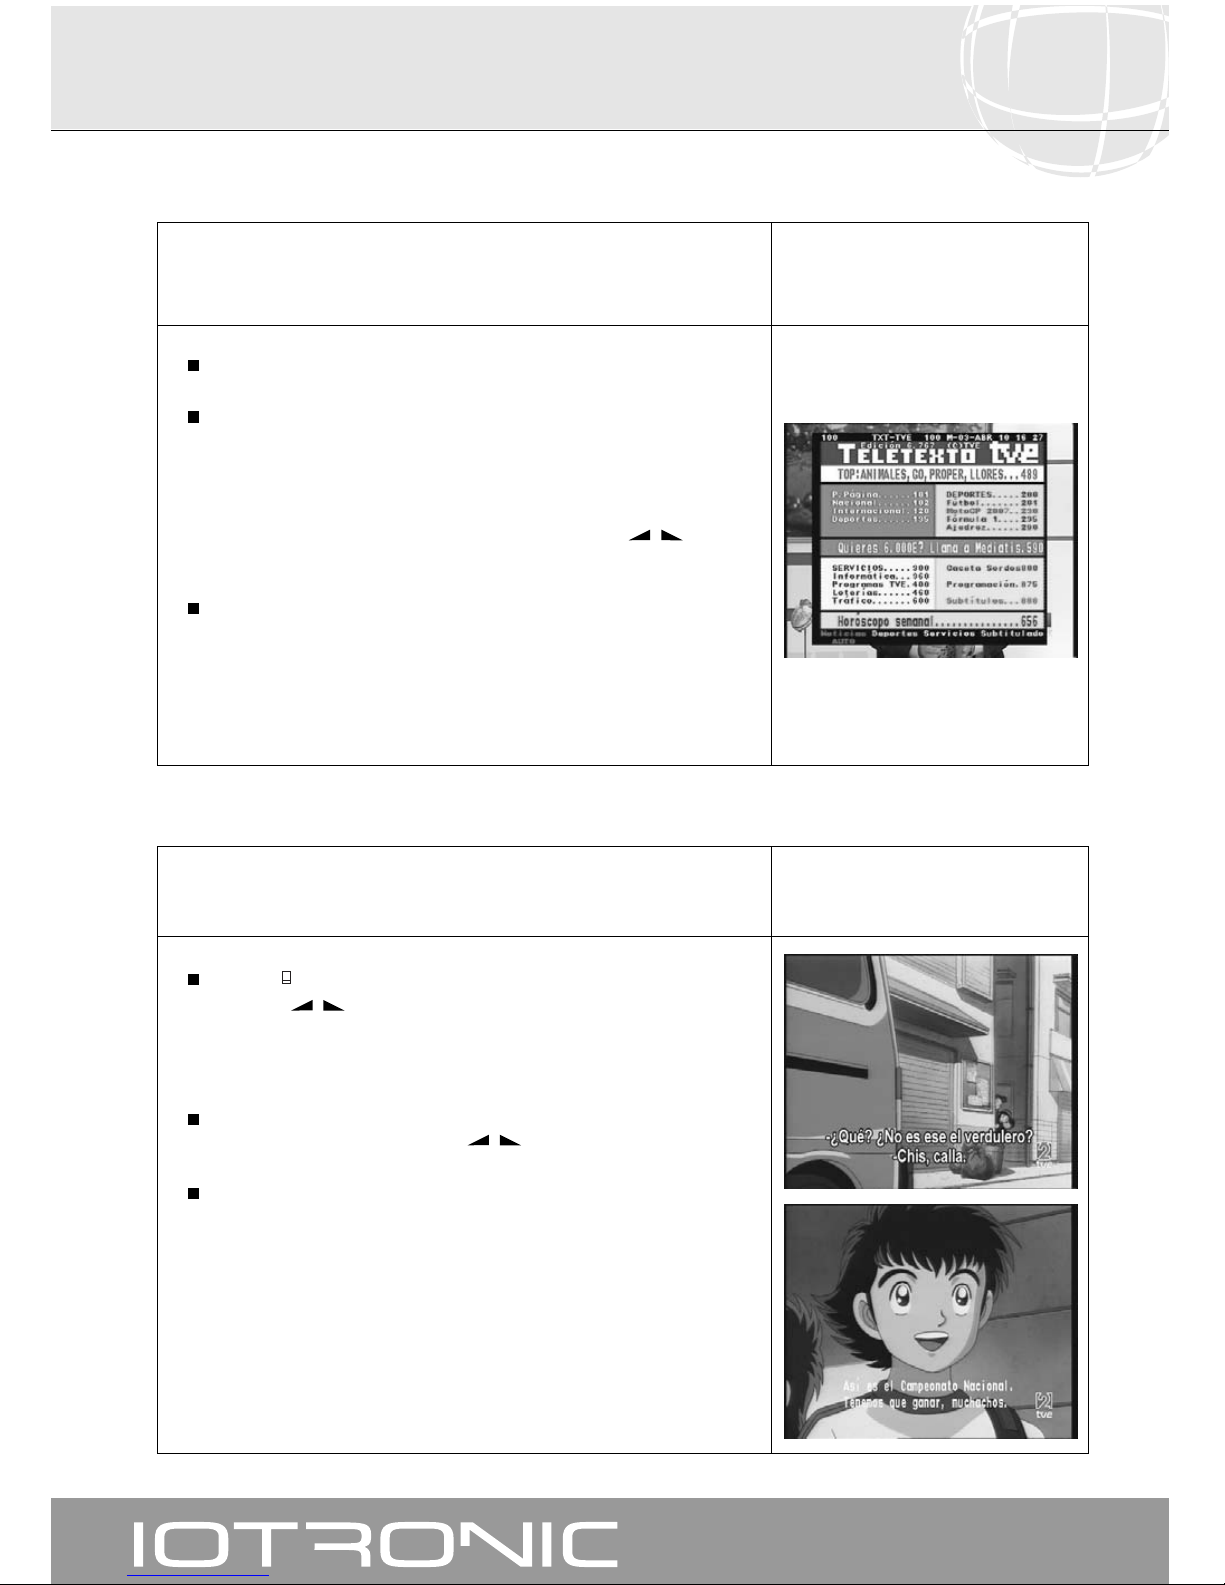
User manual
Digital Terrestrial TV Receiver
44
On this menu you may select all the Tele-text services provided by the service
supplier. Among them are also included the subtitles (see how to access them
on each channel).
Press the TEXT button on the remote control to enable the Tele-text menu.
The Tele-text services will be viewed in the usual way.
Even if your TV set is not provided with a Tele-text decoder, you can view it
on screen, since the receiver generates it automatically.
By pressing the OK button on the remote control, you can make the
background color of the Tele-text page more or less transparent.
To page up or page down by groups of 100, press the -/
+
buttons,
and to page up or down one page at a time, press the PR+/PR- buttons.
To leave the “Tele-text” menu, press the EXIT or TEXT buttons.
NOTE: Not all of the service suppliers will provide this type of information.
The channels that have this information available show the message
“TTX” in the information window.
The receiver will enable you to view the subtitles of a given program, if they
are provided by the operator.
Press the button on the remote control to access the subtitle function.
Using the -/
+
buttons, select the type of subtitles you wish to see. The
options are “Off”, “Standard” (shows the subtitles if they are being
broadcasted), and “Tele-text” (subtitles are seen on the Tele-text subtitle
page).
Within this option, it is also necessary to select the subtitle language (if
there is more than one), using the -/
+
buttons.
To leave “Subtitles”, press the EXIT or SubT buttons
NOTE: The channels with this function available show the option “SubT” on
the information window.
6.8.- Tele-text Function
6.9.- Subtitle Function
Page 45
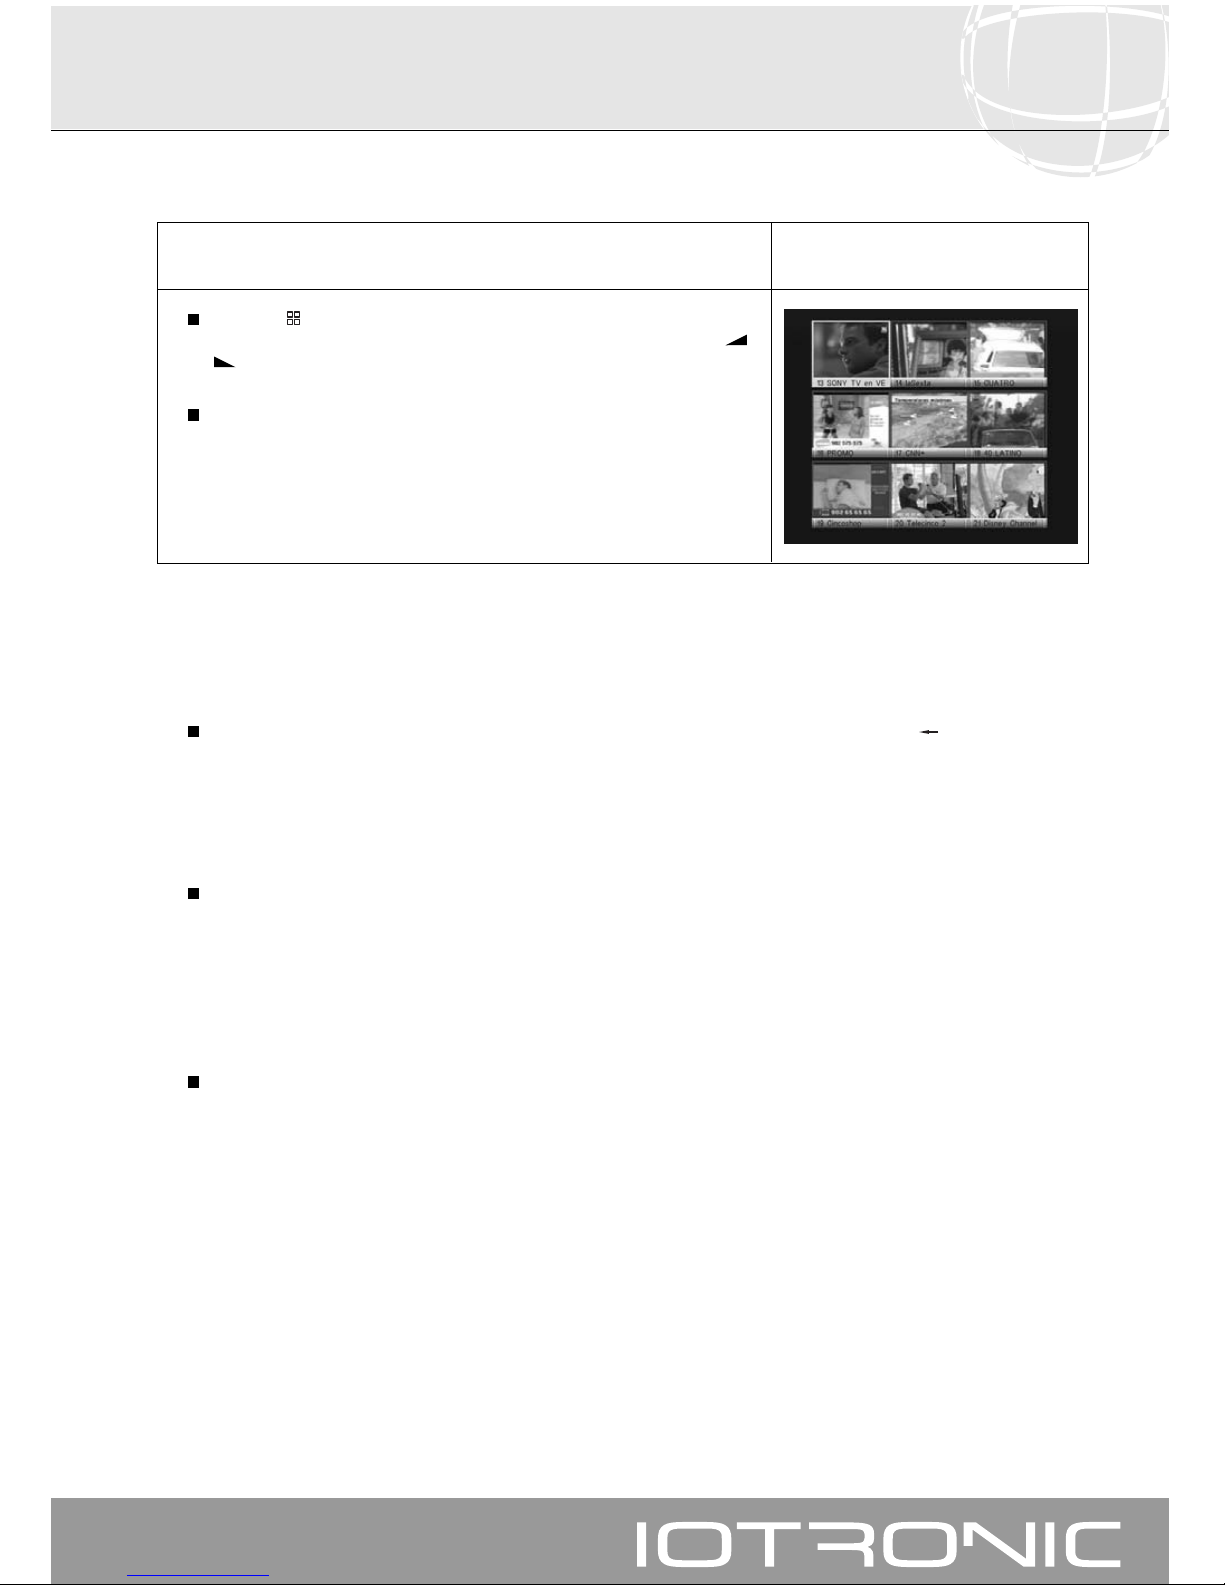
User manual
Digital Terrestrial TV Receiver
45
In the event of a power outage, whether due to unplugging the receiver or a grid power failure, when you plug the
receiver in again or when the power returns the TV/Radio channel you were tuned in to will appear on screen together
with the last Audio option you selected, without any need for you to press any buttons.
If you wish to view the last channel you were viewing and do not remember its number, press the PR button.
If you wish to freeze an image on screen while you are viewing a program, press the PAUSE button. To go on viewing
the program, press the PAUSE button again.
Bear in mind that while you are freezing an image on screen the channel you were viewing continues to broadcast, due
to which you will lose the transmission that took place while the image you froze was on screen.
This function enables the viewing of an image mosaic (group of programs),
consisting of 9 small screens.
Press the button to enable this option. Once the mosaic appears on
screen, you will be able to choose a channel for viewing by using the -,
+
, PR+ or PR- buttons.
If you click the OK button on the selected image, this will appear in full
screen format.
NOTE: This function does not enable the viewing of two programs at the
same time.
6.10.- Mosaic Function
6.11.- Recall to a Previous Channel
6.12.- Return to Last Channel
6.13.- Pause
Page 46
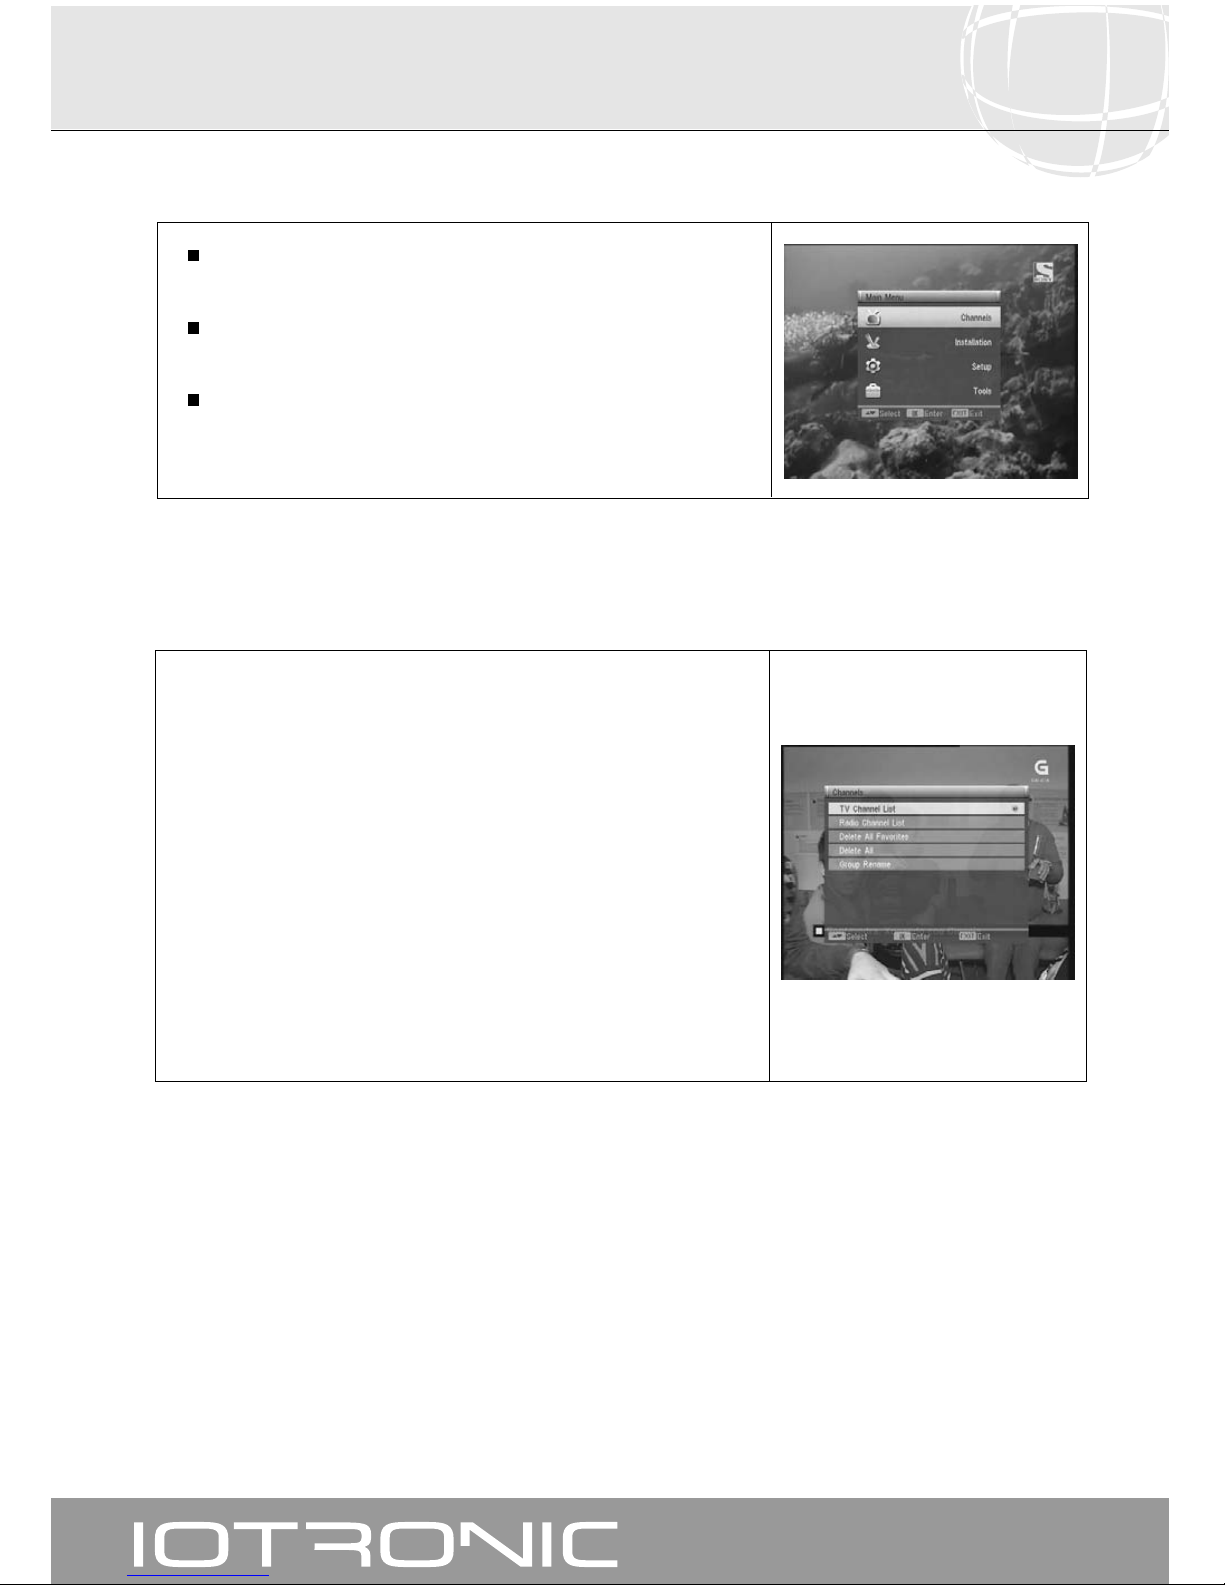
User manual
Digital Terrestrial TV Receiver
46
7.- Main Menu
8.- Channels Menu
Press the MENU button while you are viewing a channel and the Main
Menu will appear on screen.
Select one of the menu options by pressing the PR+/PR- buttons, and
press the OK button to execute it.
Press the EXIT or MENU buttons to leave the Main Menu and return to the
TV or Radio channel you were viewing.
Using this menu, you can edit the TV or Radio channel lists, and also the
favorites list (selecting favorites, blocking, skipping, erasing or renaming),
search, organize and move channels on the channel list.
You can also erase all channels from the list, or simply erase the favorites.
Select one of the options, using the PR+/PR- buttons, and press the OK
button.
After editing, the rest of the channels are automatically set in place.
As the Radio Channel editing function is the same as that for the TV
Channels, this Manual only refers to TV channel editing.
To change the channels list from TV to Radio, press the TV/RADIO button, or
access the “List of Radio Channels” menu option.
Page 47
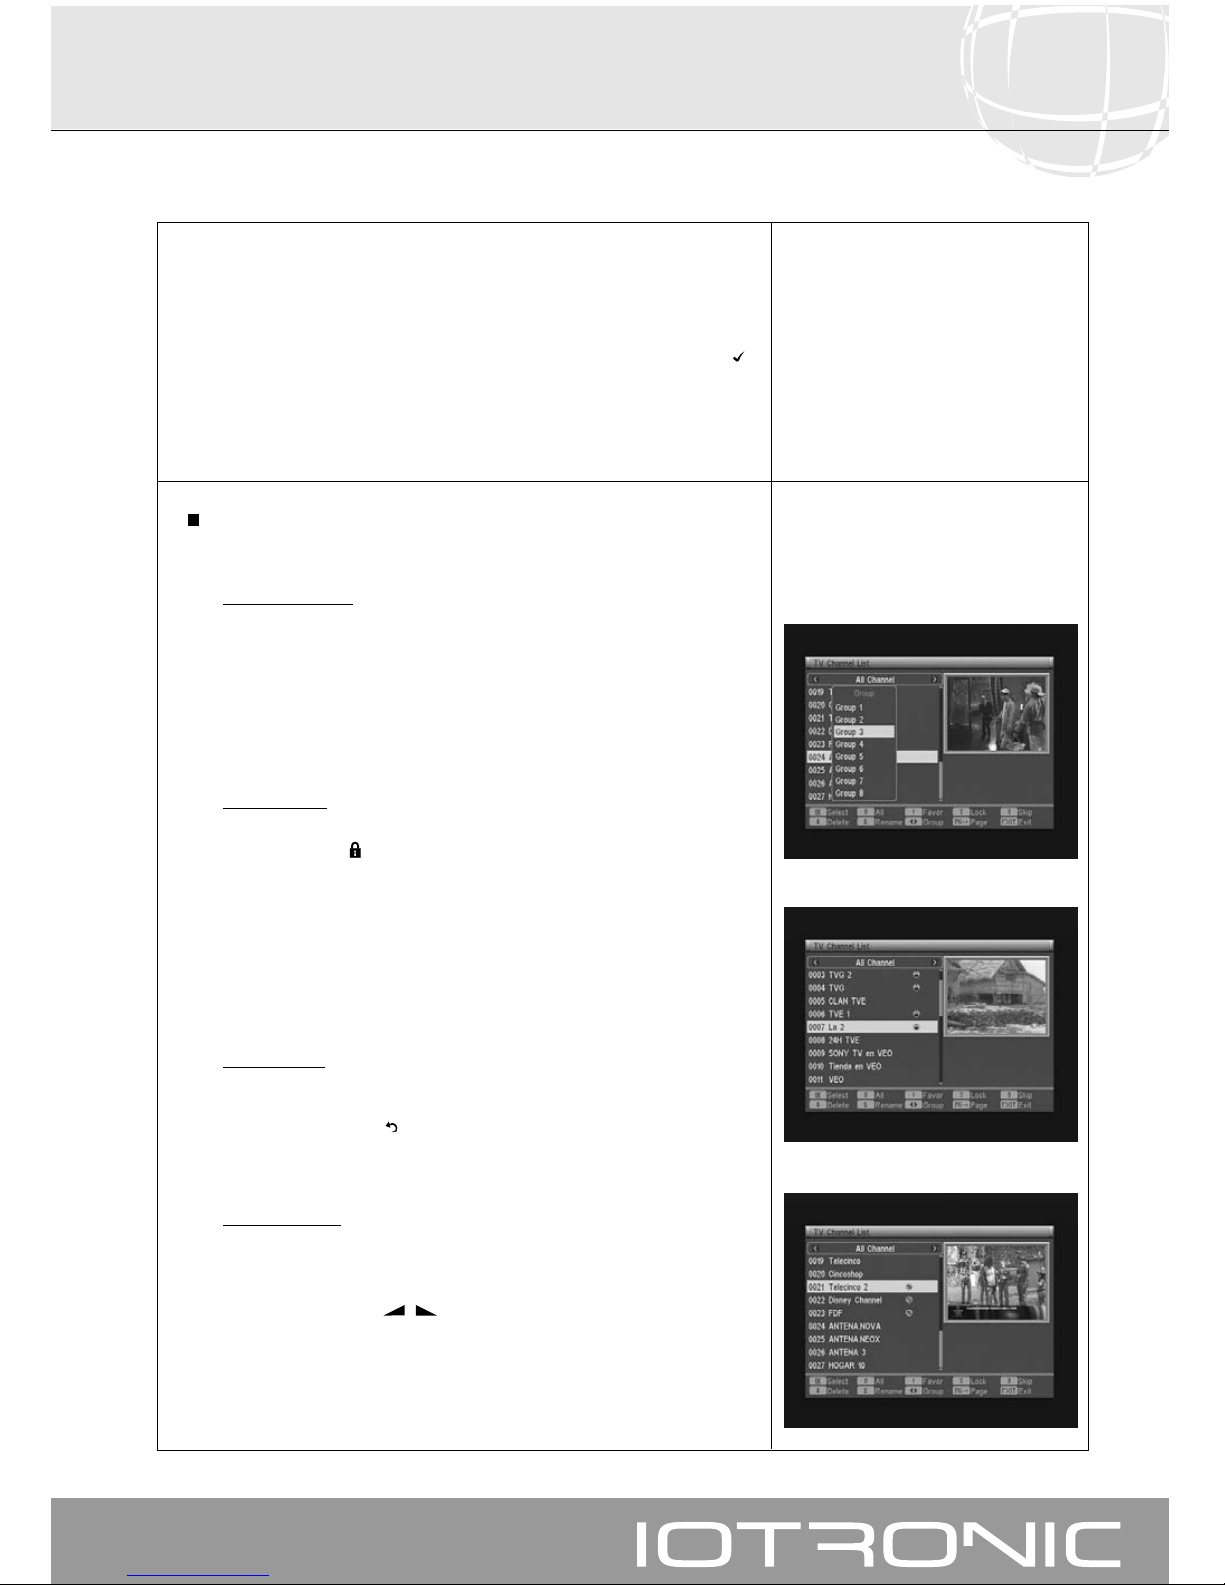
User manual
Digital Terrestrial TV Receiver
47
Access this menu by selecting the “TV Channel List” option or Radio on the
“Channel” menu. You can also access this menu directly by pressing the OK
button in the normal viewing mode (while viewing a program).
You can select several channels at the same time to carry out one of the
functions described below by pressing the OK button on each one of them, or
else by pressing the 0 button to select all the channels on the list. The “ ”
symbol will appear, indicating their new status.
When you press the OK or 0 buttons again on a channel which was already
marked, the checkmark is eliminated and the status of the channel will not be
changed.
Edit Channel : This option enables you to edit the channels list in detail.
For the purpose, press button 1 to enter a sub-menu.
- Favorite Channels
:
Select the channel you wish to mark as a favorite on the general list,
using the PR+/PR- buttons, and then press button 1. On an emerging
window you must select one of the 8 available groups in which this
program is to be included, and then press OK.
On including a channel within this group or type, we enable this group,
and it will be shown as another list when you press the FAV or OK
buttons.
- Lock Channels
:
To block a channel, click with button 2 on the channel concerned, upon
which a symbol ( ) will appear, indicating its new status. If you wish to
unblock the channel, click on it again with button 2, and the symbol will
disappear.
The new channel status will be available when you leave this menu.
To leave the menu, press the EXIT button.
To access any blocked channel you should enter your password,
provided the “Channel Lock” option in the “Parental Lock” menu is
enabled.
- Skip Channels
:
To skip a channel or for it not to be shown when we use the PR+/PRbuttons to zap through the channels, click button 3 on the chosen
channel, causing the ( ) symbol to appear, indicating its new status. On
clicking button 3 on an already marked channel a second time, the
selection is eliminated, and the channel will not be omitted.
- Delete Channels
:
To delete a channel from the general list, click button 4 on the channel
concerned.
To erase a favorite channel from one of the groups, you must first select
the group, using the -/
+
buttons, then the channel or channels to
be erased, using the OK button, and finally press button 4.
If you delete all of the channels from a group, it will disappear.
If more than one channel is marked for erasure, all channels will be
erased at the same time.
8.1.- Organizing TV or Radio Channels
Page 48
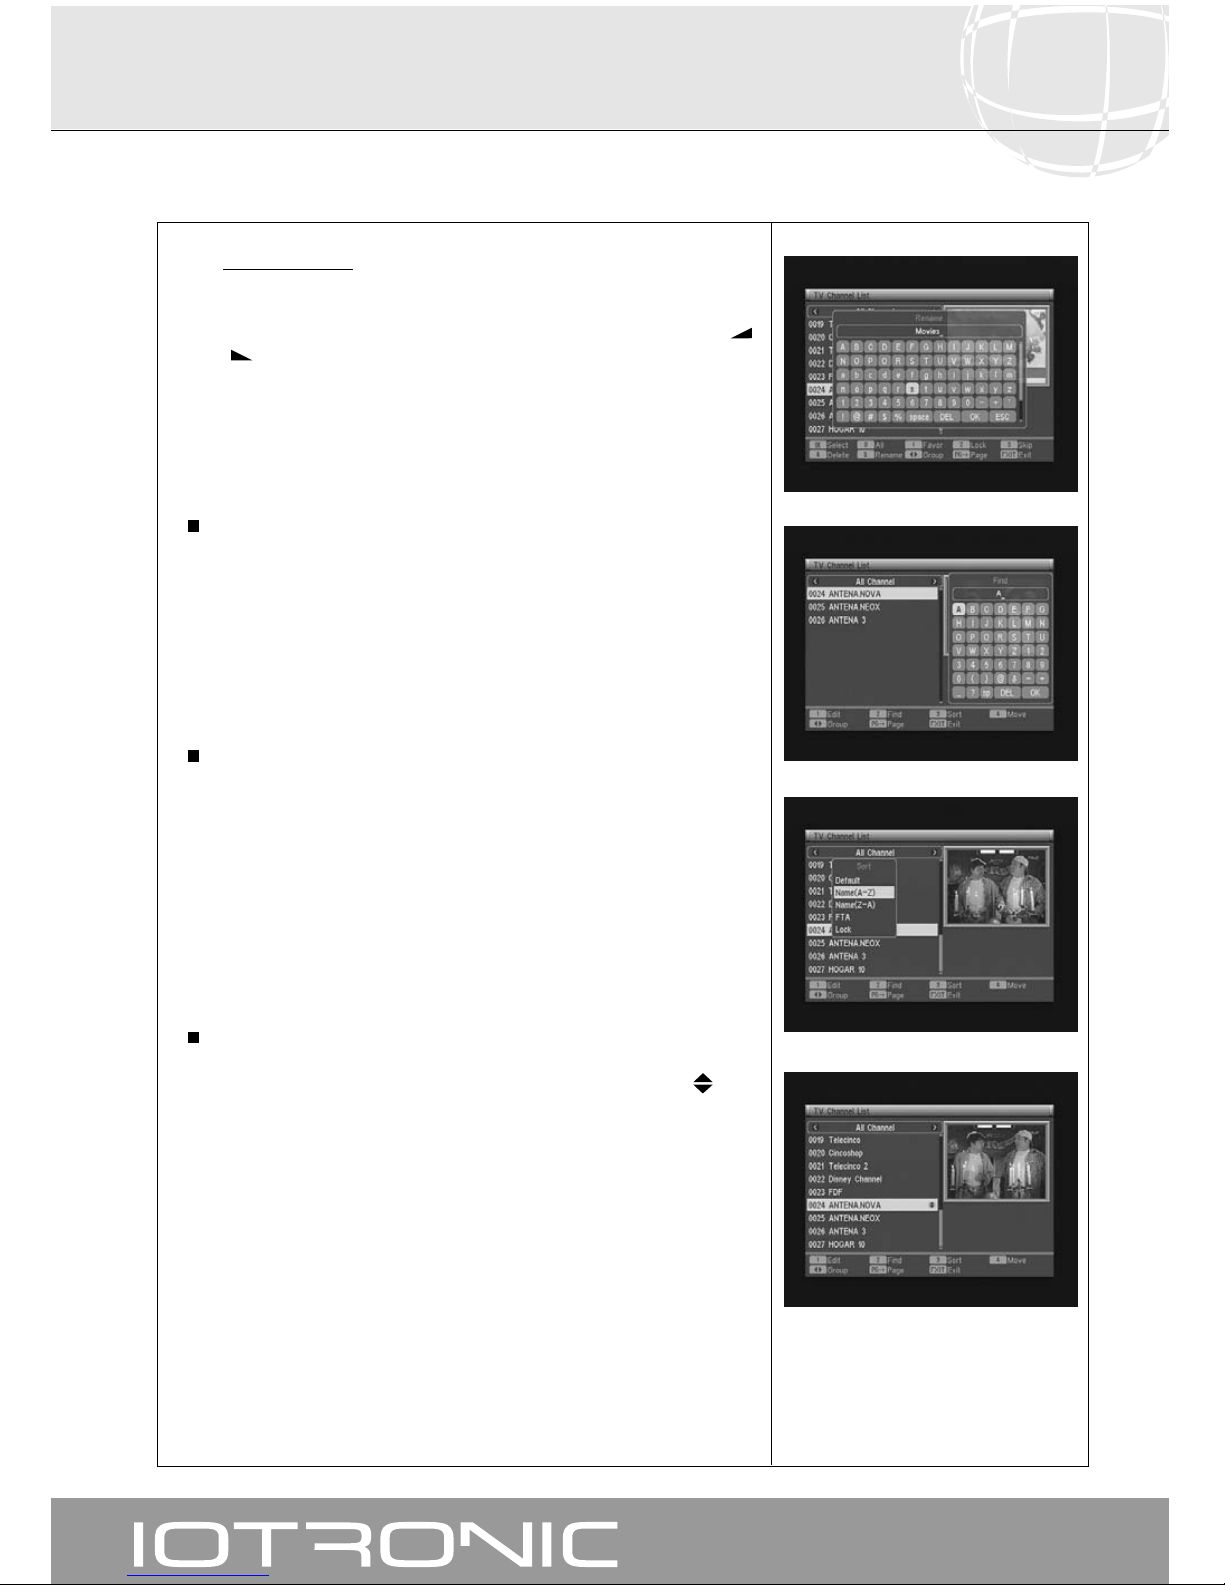
User manual
Digital Terrestrial TV Receiver
48
- Rename Channels:
This option enables you to change the name of a channel.
Select the channel to be renamed, using the PR+/PR- buttons, and then
press button 5. On the emerging keyboard, and using the PR+/PR-/
-
/
+
buttons, you will be able to choose a new name for the channel.
Finally, locate the cursor on the “OK” option and press the OK button on
the remote control to confirm.
Press the EXIT button to return to the previous menu.
Find channels: If you want to view a channel and cannot remember its
position, you can carry out a search by name. To do this, press button 2.
On the emerging keyboard, begin to write the name of the channel. As
you write, you will start limiting the channel name options. When the
desired channel’s name appears on the list, place the cursor on the “OK”
option of the keyboard and press the OK button.
On the resulting channel list select the channel you want, and finally press
OK to view it.
Sort channels: The channel list can be shown organized by different
criteria. These are: “by Default” (original configuration), “by Name (A-Z)”,
“by Name (Z-A)”, “FTA” and “Lock”.
To do this, press button 3, and on the pop-up menu select one of the
organizing criteria using the PR+/PR- buttons, and press OK.
The list will be shown organized according to the selected criterion.
To leave the menu, press the EXIT button, and a confirmation message will
appear, where you should choose “YES” if you wish to keep the changes
or “NO” if you do not.
This option is only available in the “All Channel” group.
Move channels: If you wish to move a channel from its current position on
the general list, first select the channel on the list, and then press button 4.
The channel marked for moving will be identified with the symbol .
Using the PR+/PR- buttons, move the channel to its new position on the
list, and press the OK button. A confirmation message will appear where
you should choose “YES” if you wish to keep the changes or “NO” if you
do not.
This option is only available in the “All Channel” group.
Note: If the LCN option is enabled, when you move a channel’s position, it
will keep its number.
To leave the menu, press the EXIT button.
Page 49
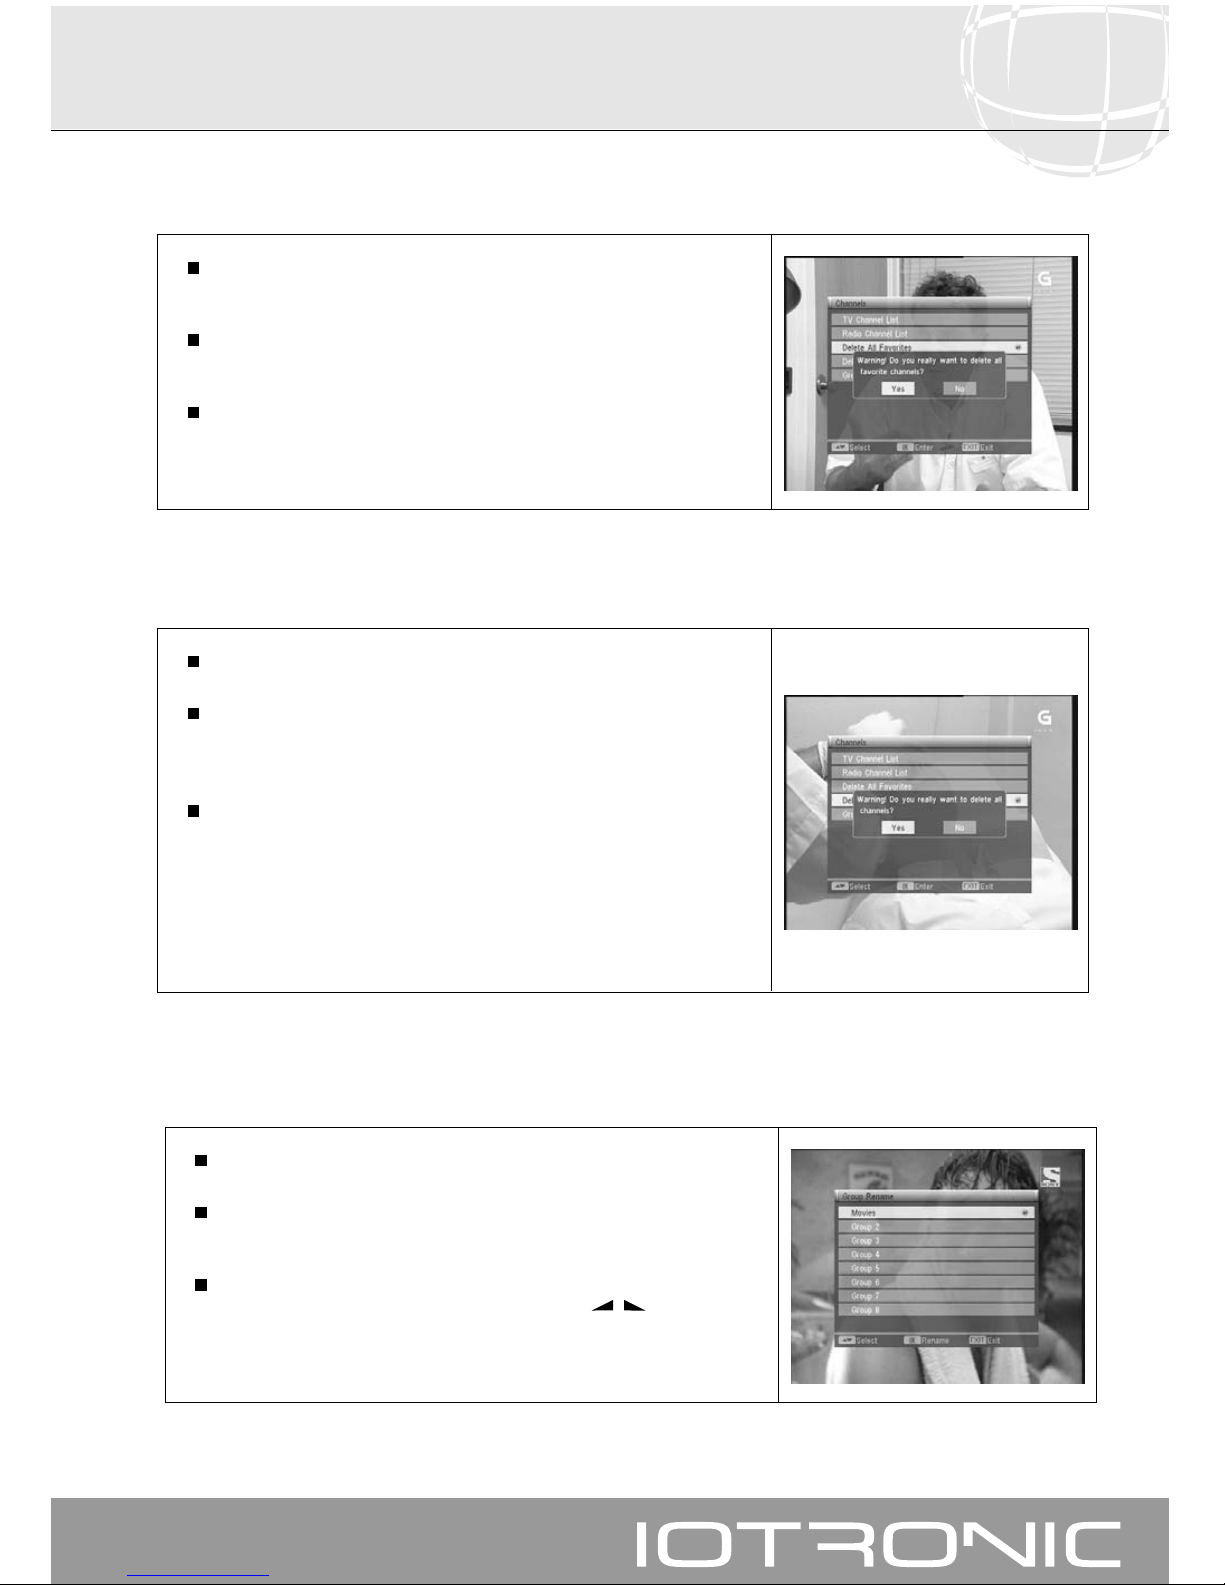
User manual
Digital Terrestrial TV Receiver
49
This option enables you to erase all the favorite channel groups at one
stroke.
To do this, select the option “Delete All favorites” on the “Channels” menu
using the PR+/PR- buttons, and press the OK button.
A new window will appear, asking for confirmation (YES) to eliminate all
Favorite Channel Groups, or to leave the menu (NO) without carrying out
any changes.
8.2.- Delete All Favorites
Select this option if you wish to erase all the channels on the channel list.
To do this, select the option “Delete All” on the “Channels” menu using the
PR+/PR- buttons, and press the OK button.
You will be asked to enter your password.
A new window will appear, asking for confirmation (YES) to erase all
channels, or to leave the menu (NO) without carrying out any changes.
Note: In order to be able to view TV channels or tune in to radio channels once
again, you will have to carry out a new search, either automatically or
manually. See paragraph 9.- Menu Installation => Channel search.
8.3.- Delete All the Channels
8.4.- Group Rename
This option allows you to change the name for groups of channels.
Select this option in the “Channels” menu using the PR+/PR- keys, and
then press OK.
Select the group to be renamed using the PR+/PR- keys and then press
OK. Using the keyboard shown and the PR+/PR-/-/
+
keys, you may
enter a new name for the group. Once you have finished, place the cursor
on the “OK” option and press the OK key on the remote to confirm the
action.
Page 50
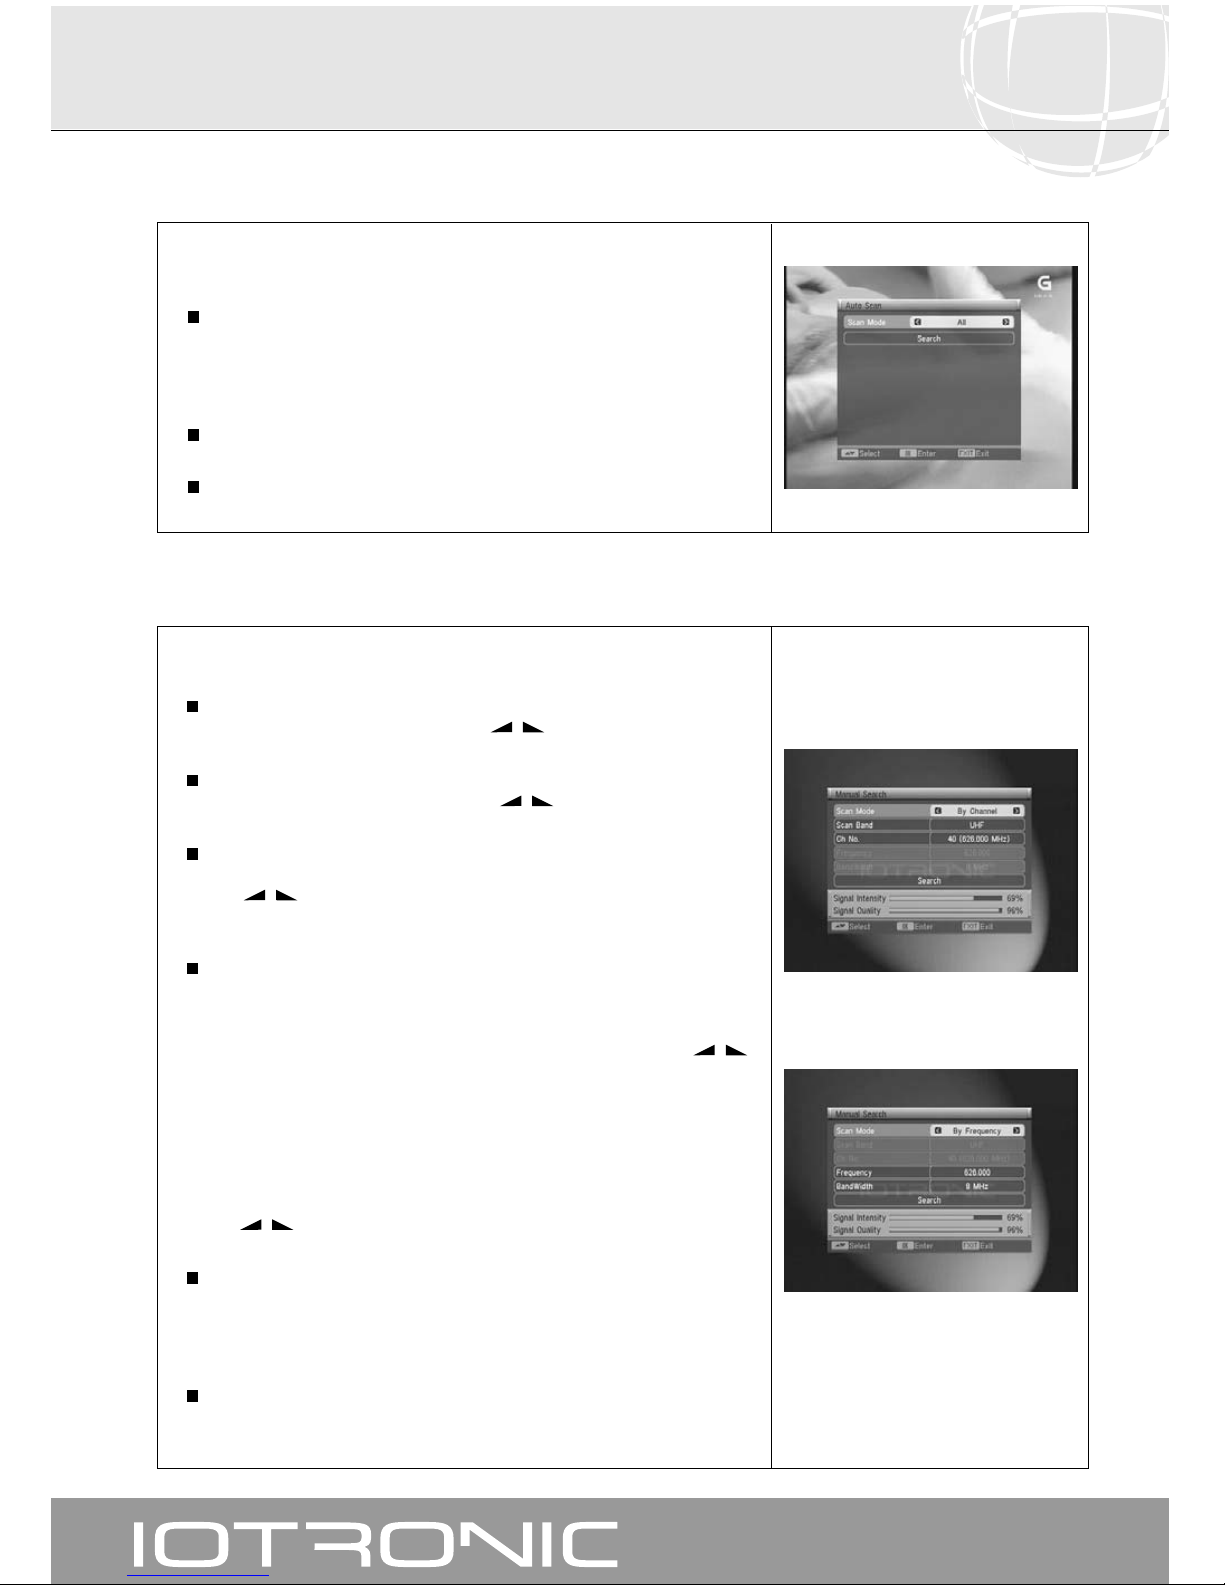
User manual
Digital Terrestrial TV Receiver
50
Select this mode to carry out an automatic search over the whole receiver
input band.
In the option “Scan Mode”, select one of the two options, “Free” (Only the
open channels) or “All” (All channels).
Locate the cursor on the “Search” option and press the OK button on the
remote control.
The complete search can take a few minutes.
If you wish to interrupt the search, press the MENU or EXIT buttons.
9.1.- Auto Scan
Select this mode to carry out a search for a given channel or frequency.
In the option “Scan Mode”, select one of the two search options, “by
channel” or “by frequency” using the -/
+
buttons.
In the option “Scan Band”, select one of the two options for carrying out
the search: “UHF” or “VHF”, using the -/
+
buttons.
In the option “Ch No”, select the channel where the search will be made.
The channels vary according to the band selected. Select a channel using
the -/
+
buttons, or else press OK to enable an merging menu, select
the channel with the PR+/PR- buttons, and select OK to confirm.
If you are carrying out a search by frequency, enter the channel frequency
in the “Frequency” option, and the value corresponding to that frequency
in the “BandWidth” option. To enter the frequency, click the OK button on
this option. A cursor will be shown positioned over the first digit to show
that it may be modified by using the PR+/PR- buttons. The -/
+
buttons will allow you to select another digit. You can also enter the
frequency by using the numerical (0 ... 9) keyboard. Press the OK button
again to make the setting.
Check whether the channel or frequency you selected corresponds to a
digital channel. This will be easily seen if the quality bar at the bottom of
the screen shows an acceptable quality percentage.
In the “BandWidth” option, you can choose among 6, 7 or 8 MHz, using
the -/
+
buttons.
Finally, place the cursor on the “Search” option and press the OK button
on the remote control.
You can continue the search process by using the indicators shown on the
TV screen.
If you wish to interrupt the search, press the MENU or EXIT buttons.
9.2.- Manual Search
9.- Menu Installation
Page 51
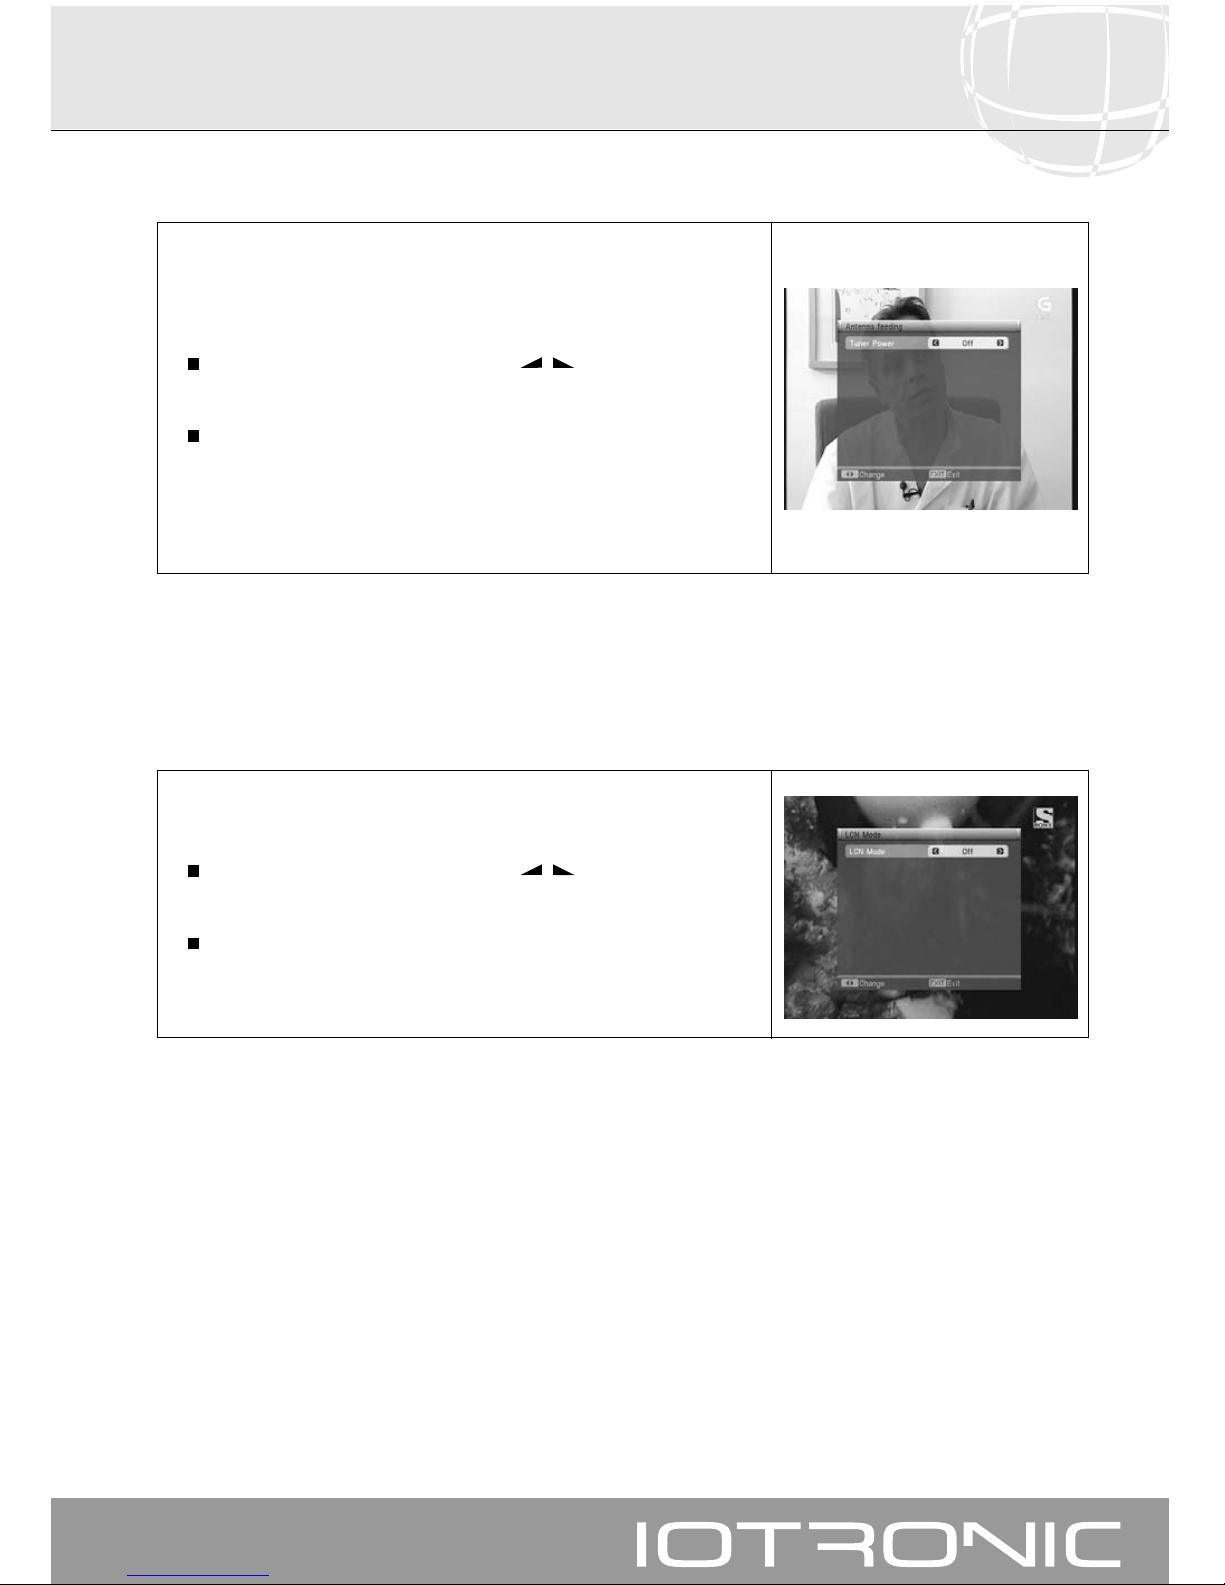
User manual
Digital Terrestrial TV Receiver
51
If you are using an “active” aerial (with an amplifier included), you should
enable this option in order to feed the amplifier with 5 V / 100 mA. The feed
is done through the same coaxial cable connected to the ANT IN entry port
of the receiver.
To enable or disable this option use the -/
+
buttons to select “Off”
or “On”.
To leave the menu, press the EXIT button.
Note: If there is no amplifier you must select the NO option, otherwise you
may damage the receiver.
9.3.- Antenna Feed
This option allows the user to enable or disable the channel organization
mode defined by the operator.
To enable or disable this option use the -/
+
buttons to select “Off”
or “On”.
To leave the menu, press the EXIT button.
9.4.- LCN Function
Page 52
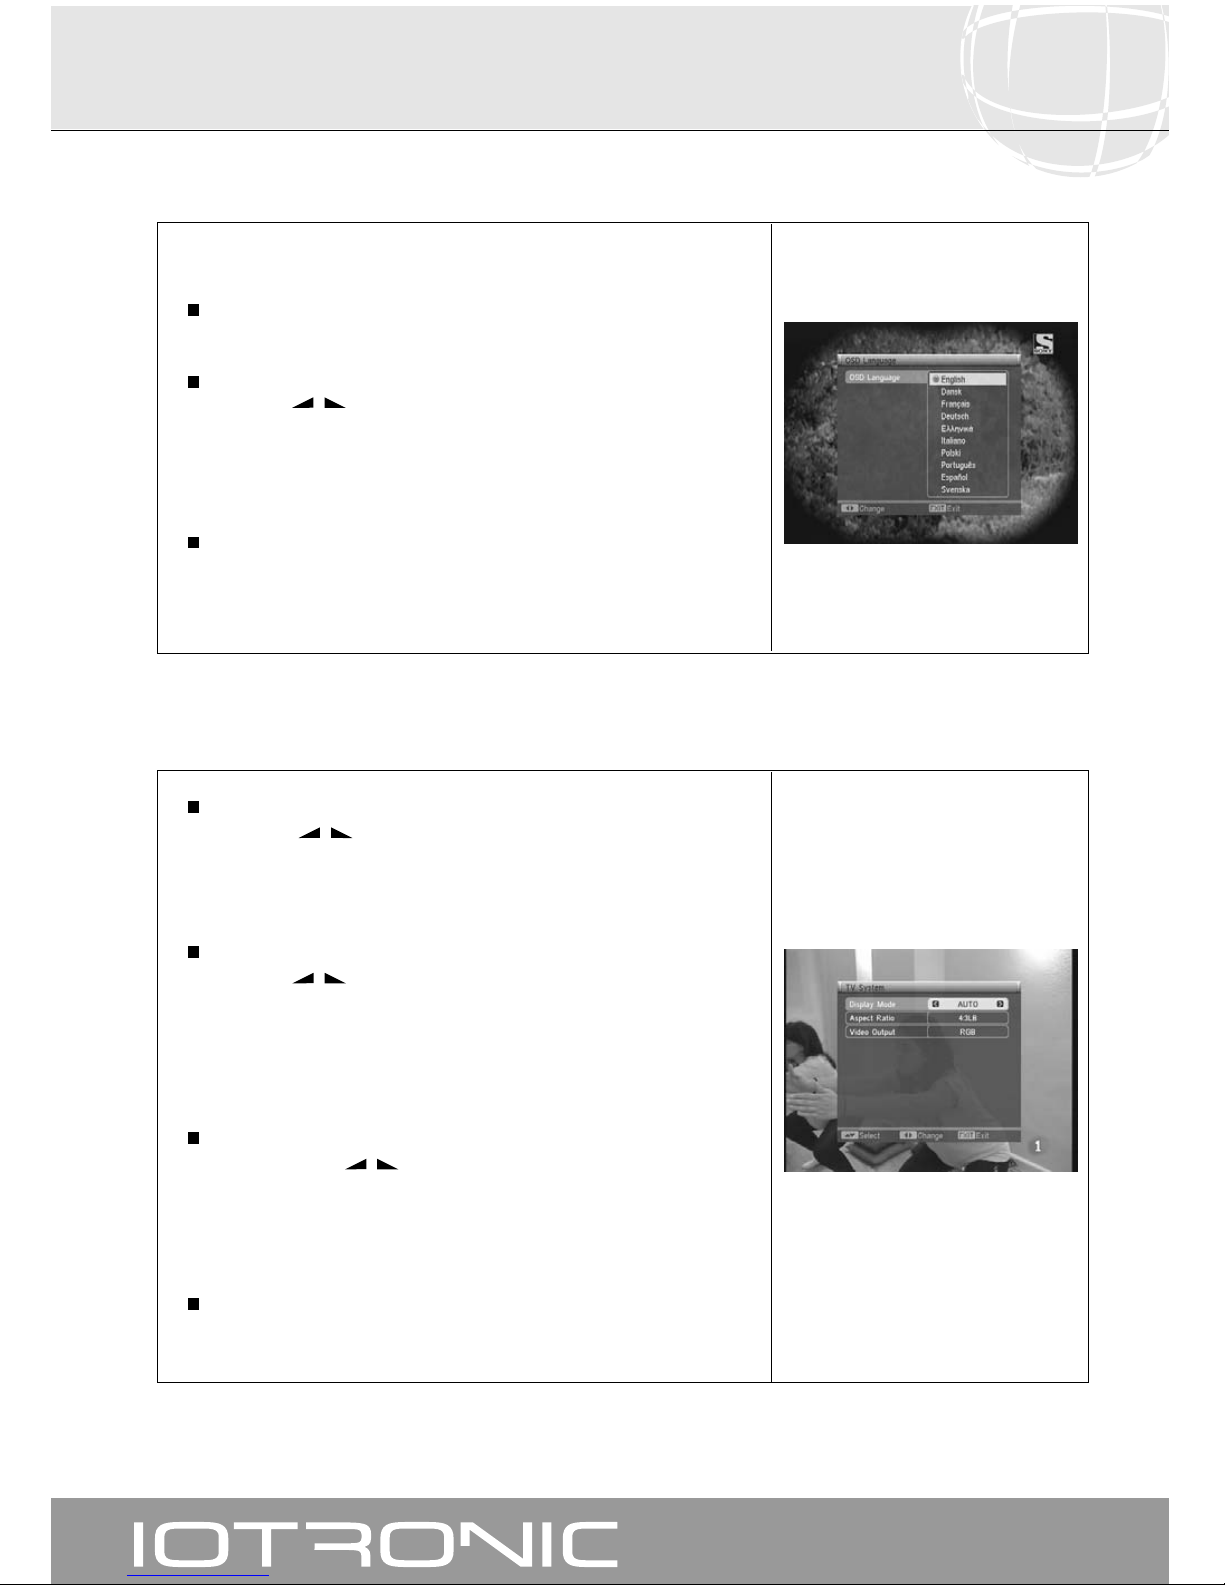
User manual
Digital Terrestrial TV Receiver
52
10.- System Setup
This option enables you to select the languages for menu display on screen.
To do this, click the OK button on the “OSD Language” option in the
“System Setup” menu.
In the “OSD Language” option, select one of the available languages,
using the -/
+
buttons. You can also press the OK button to enable
an pop-up menu and select one of the languages, using the PR+/PRbuttons, pressing OK again to make the setting.
The languages available are: English, Dansk, Français, Deutsch, Greek,
Italiano, Polski, Português, Español and Svenska.
Press the EXIT button to return to the previous menu.
10.1.- OSD Language
Display Mode
Using the -/
+
buttons, select a suitable video standard. You can
also press the OK button to enable an pop-up menu, select a standard
using the PR+/PR- buttons, and press OK again to make the setting.
The options are AUTO, PAL or NTSC.
Aspect Ratio
Using the -/
+
buttons, select among options 4:3 LB, 4:3 PS or 16:9.
You can also press the OK button to enable an pop-up menu, select one
of the options using the PR+/PR- buttons, and press OK again to make
the setting.
This option enables automatic configuration of your screen depending on
your TV set model.
Video Output
Using one of the -/
+
buttons, select one of the video output options.
You can also press the OK button to enable an pop-up menu, select one
of the options using the PR+/PR- buttons, and press OK again to make
the setting.
The options are CVBS and RGB.
Press the EXIT button to return to the previous menu.
10.2.- TV System
Page 53
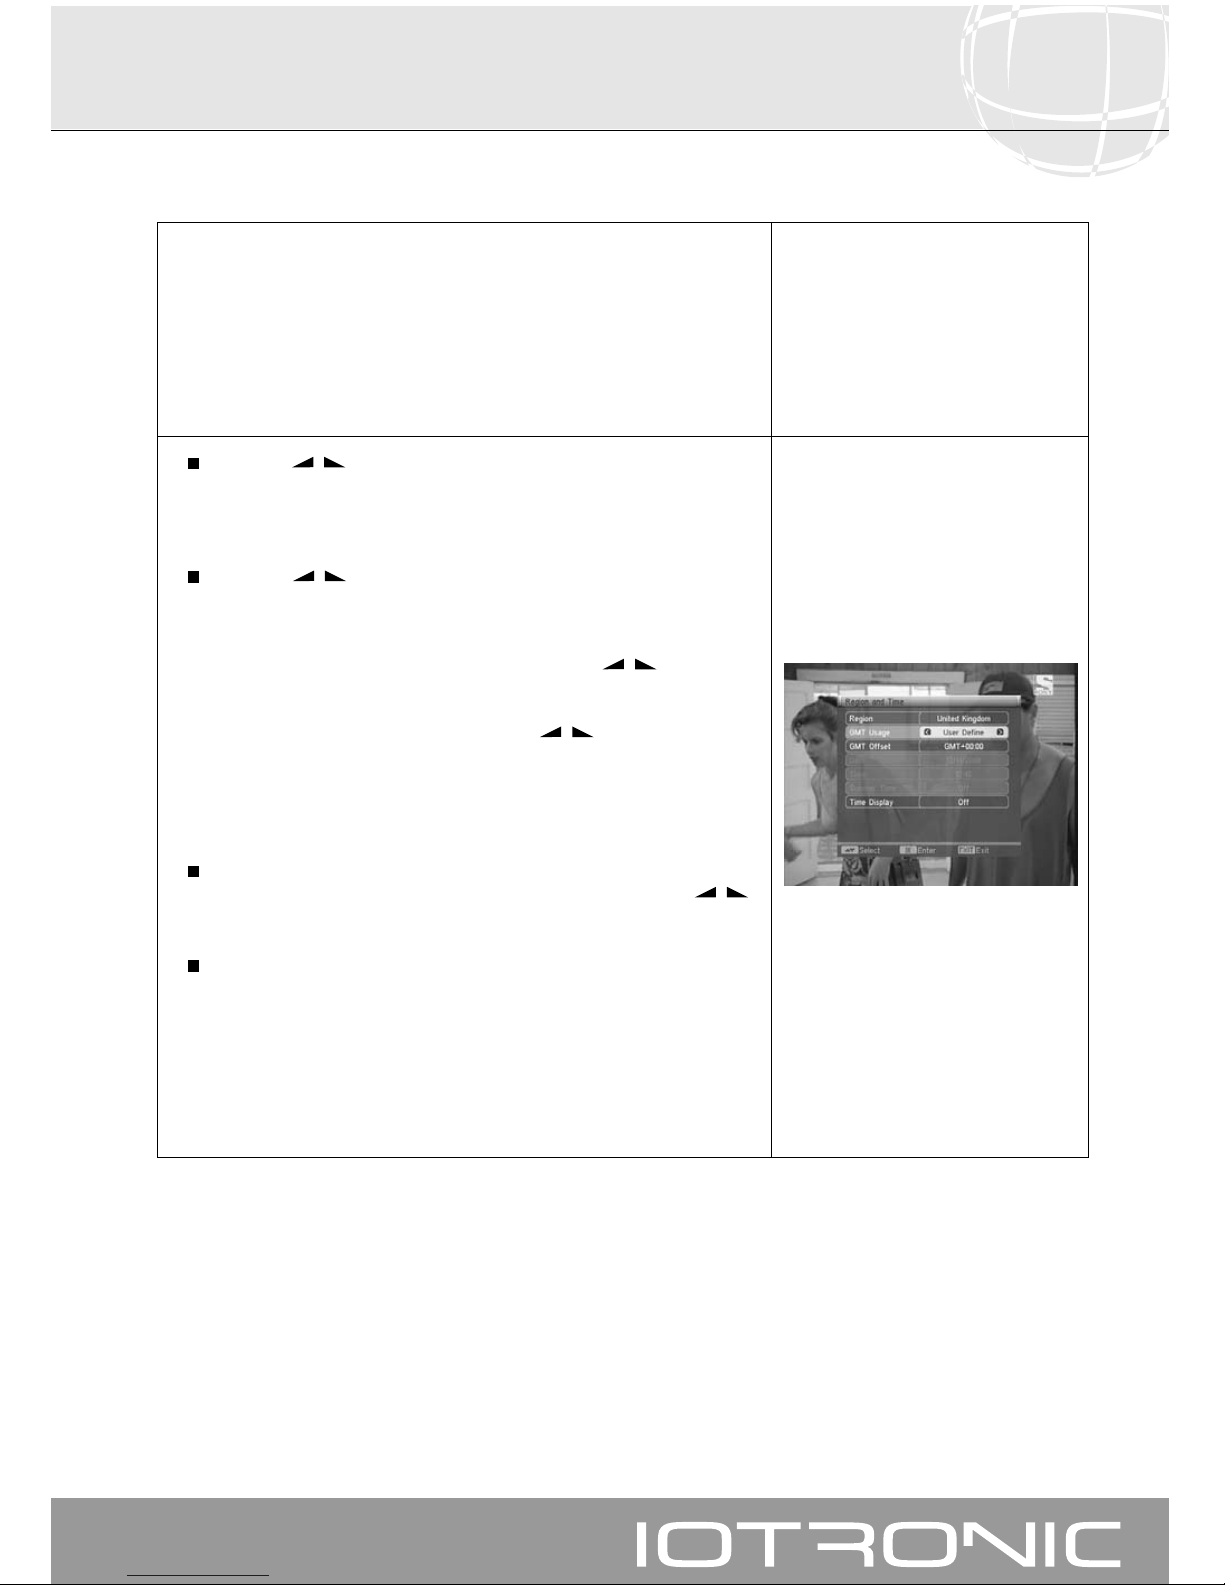
User manual
Digital Terrestrial TV Receiver
53
The receiver includes a clock to show the time. This clock self-adjusts using the
information provided by the service supplier in the TV signal itself.
Nevertheless, you can set the date and time without using the GMT option.
The service supplier sends two kinds of time information, one with the time of
day (for viewing on the clock), and the other informing the broadcasting times
of different events (for use on the EPG).
Both kinds of time information are sent in GMT format, so you must adjust the
receiver by entering the offset of your country time zone in this option.
Using the -/
+
buttons, select the country in which the receiver will be
used. You can also press the OK button to enable an pop-up menu,
select one of the countries using the PR+/PR- buttons, and press OK
again to make the setting.
Using the -/
+
buttons, select the type of time zone, from the options
“Off”, “User Define” and “by Region”.
When the “Off” option is selected, it is up to the user to enter the date
and the time manually. To do this, click OK on one of the options
(Date/Time), entering the data with the PR+/PR-/-/
+
buttons, or
with the numerical keyboard, and press OK again to make the setting.
When selecting the option “User Define”, you must adjust the GMT Offset
to your time zone. To do that, use the-/
+
buttons to indicate
whether you wish to set GMT time forward (+) or backward (-) by
complementary periods of 30 minutes.
Finally, if you select the “by Region” option, simply indicate whether to
enable or disable summer daylight saving time.
With the “Time Display” option enabled, current time is shown
permanently on screen. To enable or disable this option, use the -/
+
buttons.
Press the EXIT button to return to the previous menu.
NOTE: Not all the service suppliers provide this type of information
10.3.- Region and Time
Page 54
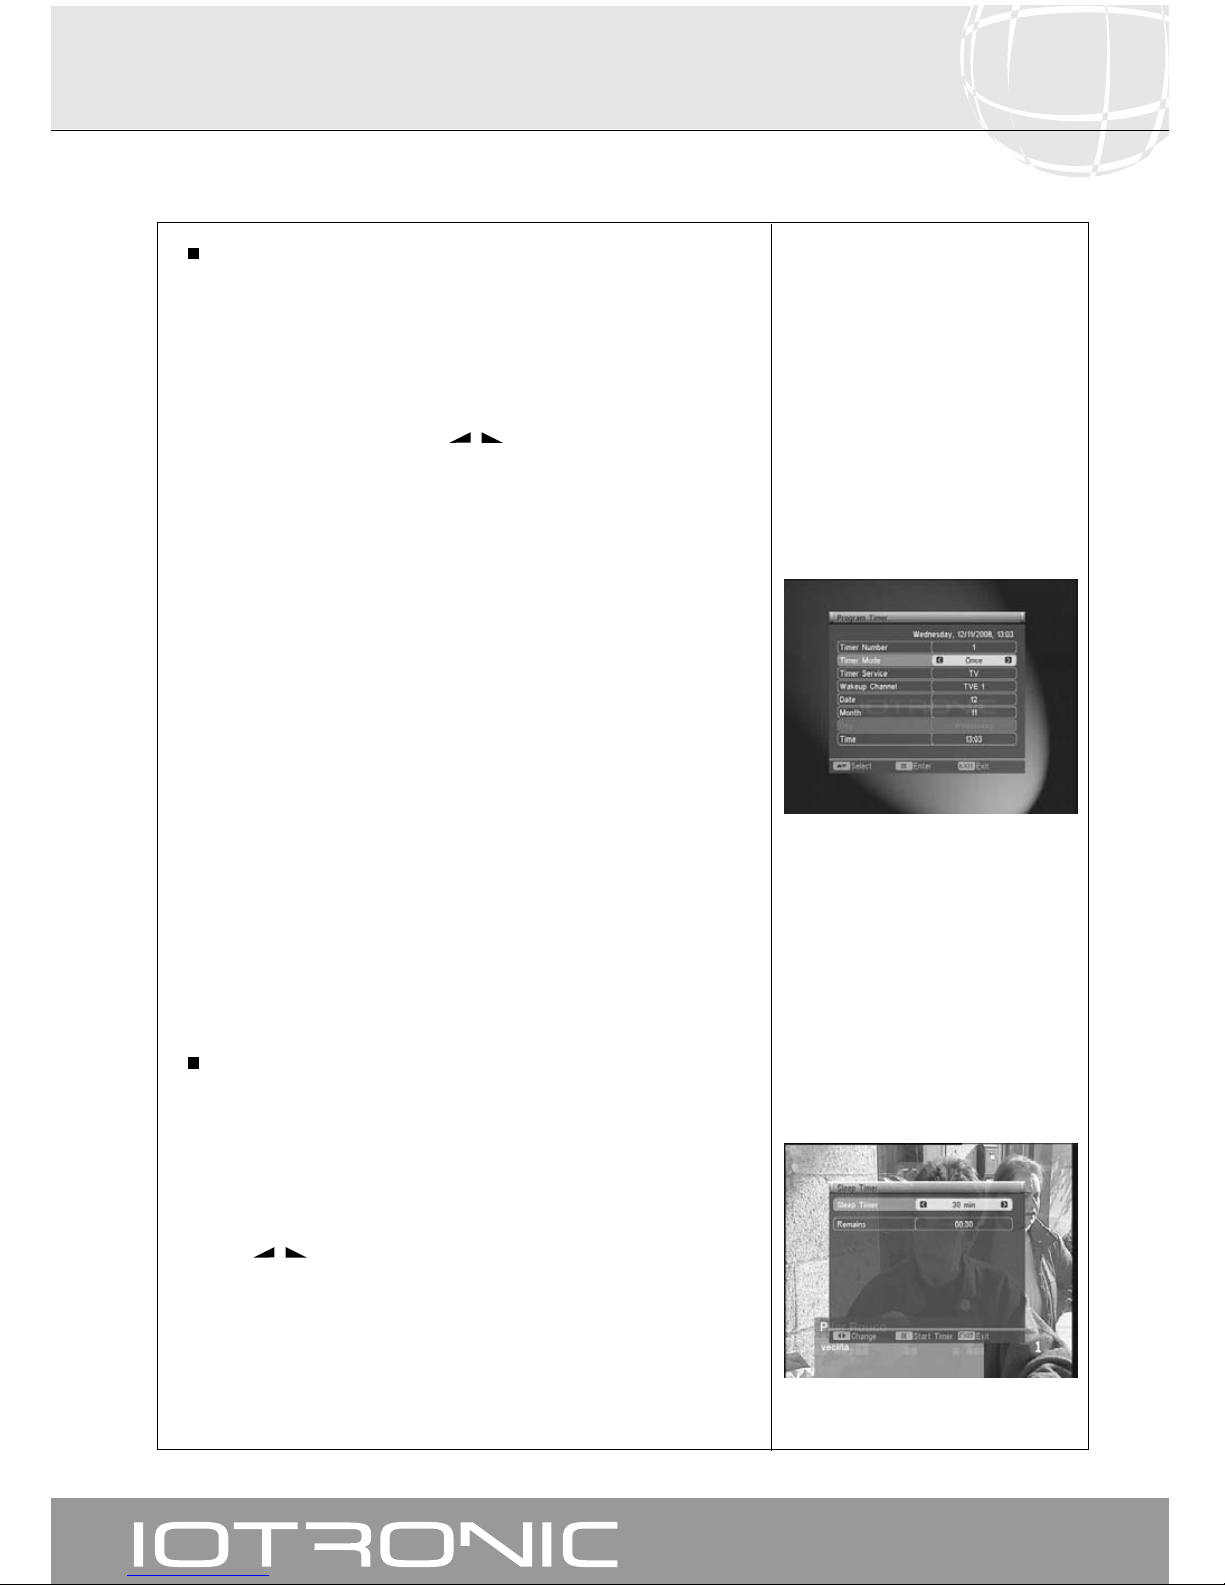
User manual
Digital Terrestrial TV Receiver
54
Program Timer
The receiver includes a timer for automatic turning on and off at preset
times. It has 8 positions enabling the programming of a similar number of
events. You need only enter the following data.
The cursor will always appear positioned on the first free timer number by
default setting. If no event has been programmed, it will be positioned on
number 1.
Selection is carried out using the -/
+
buttons, or else by clicking the OK
button on an option, and then using the PR+/PR- buttons to select an
option on the pop-up menu, and finally, confirming the selection by
pressing OK again. The options are:
- Number.- Select one of the 8 available events.
- Mode.- The “Off” mode will appear by default. You can select other modes,
such as “Once” (one time only), “Daily” (every day), “Weekly” (once a week)
or “Monthly” (once a month).
- Service.- Select the kind of service you wish to carry out with the timer. You
can select a TV or Radio program.
- Channel.- Select the desired channel for the timer.
- Date.- Select the day of the month for timer enabling.
- Month.- Select the month for timer enabling.
- Day.- Select the day of the week for timer enabling (Weekly mode only).
- Time.- Using the numerical (0 ... 9) keyboard, enter the estimated
duration time of the event.
Repeat the same steps if you wish to program other events.
If you wish to eliminate one of these events, you can do this by placing
yourself on its number, and then in option “Mode” select the “Off” option.
To memorize data and leave the menu, press the EXIT button.
Sleep Timer
This function enables you to leave the receiver on for a given period off
time, after which it will turn itself off automatically.
To do this, press the OK button on the option “Sleep Timer” on the “Timer
Setting” menu.
You can set the time to elapse before the receiver turns itself off, using
thes -/
+
buttons. The allowed values are: Off, 10, 30, 60, 90 and
120 minutes.
In the “Remains” option, you can view the time that has gone by since
enabling the “Timer On” option.
Press the EXIT button to return to the previous menu.
10.4.- Timer Setting (Timer)
Page 55
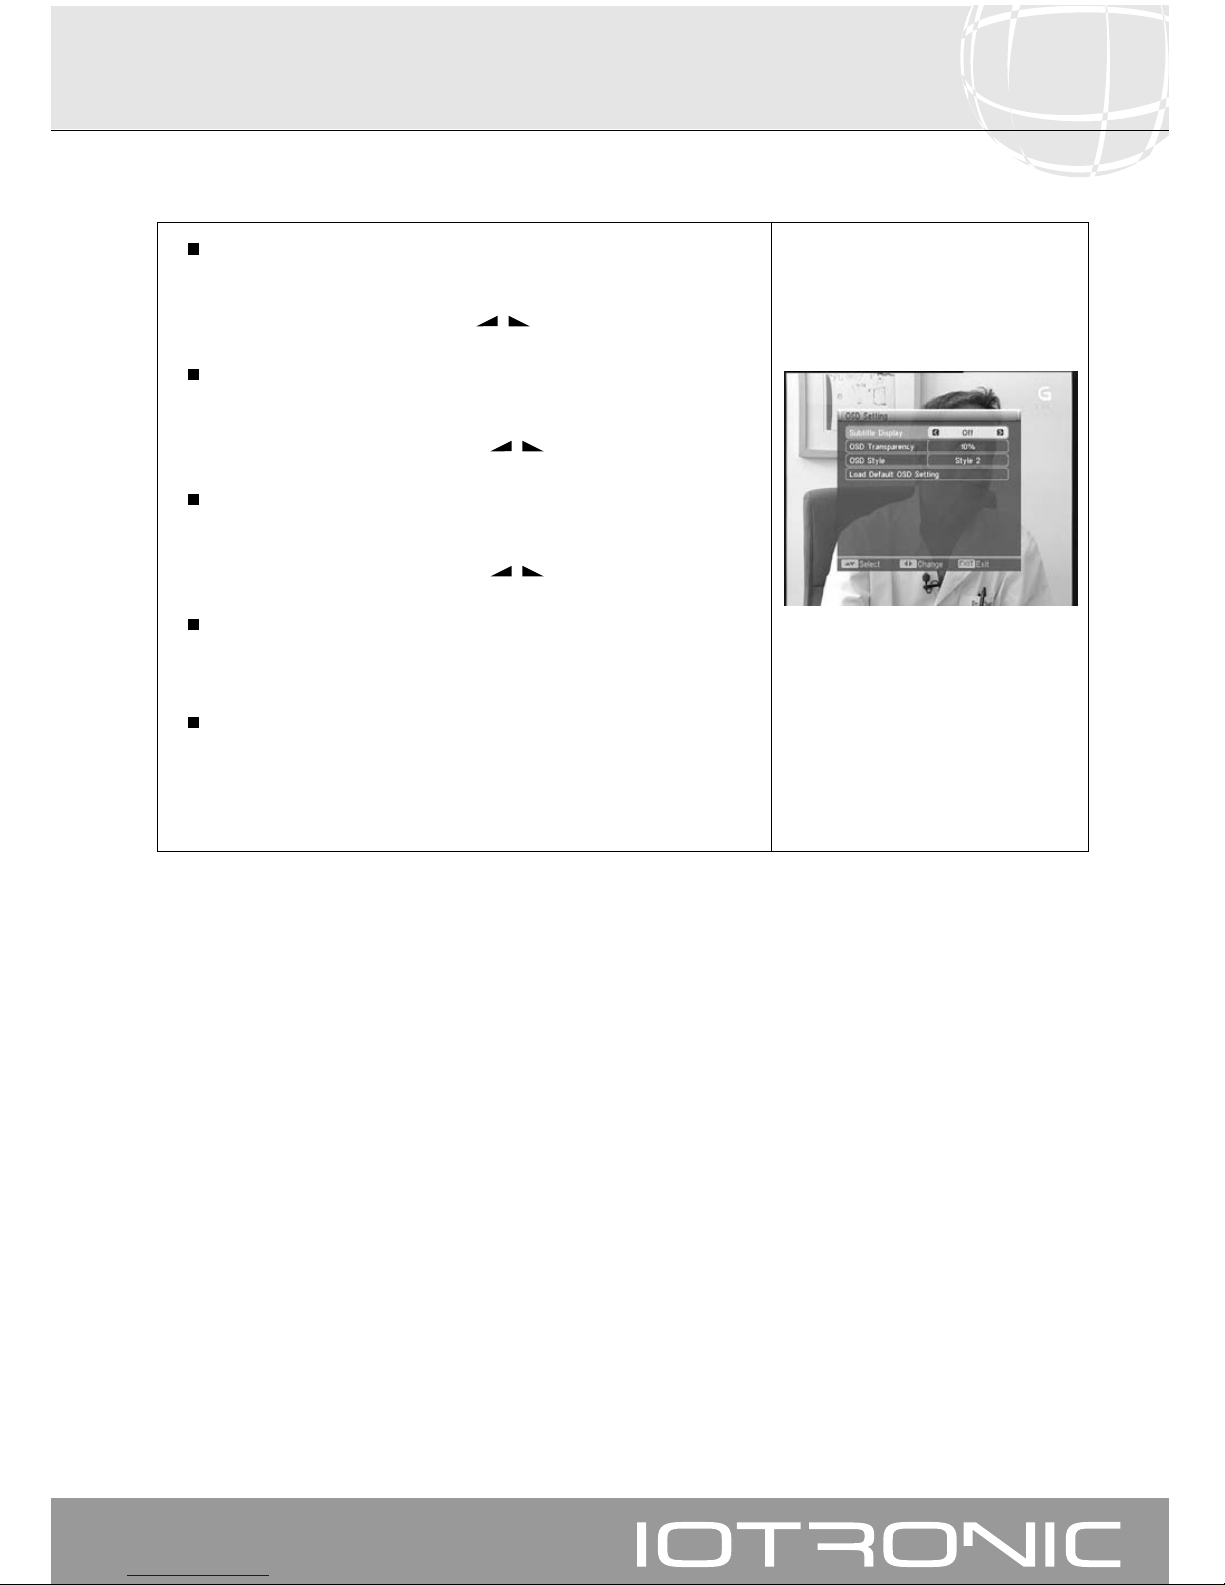
User manual
Digital Terrestrial TV Receiver
55
10.5.- OSD Setting
Subtitle Display
This option enables you to select the mode in which subtitles will be shown
on screen. The options are: “Off”, “Tele-text” or “Standard”.
The selection is done by pressing the -/
+
buttons.
OSD Transparency
This enables you to define the degree of menu transparence on a range
of 10%, 20%, 30%, 40%, 50% and Off.
Selection may be done by pressing the -/
+
buttons.
OSD Style
This enables you to define the color in which the menu will be shown on
screen. There are two styles, violet and blue.
Selection may be done by pressing the -/
+
buttons.
Load Default OSD setting
This option enables you to recover the original configuration of the OSD.
To do this, press the OK button on this option.
To leave the menu, press the EXIT button.
Page 56
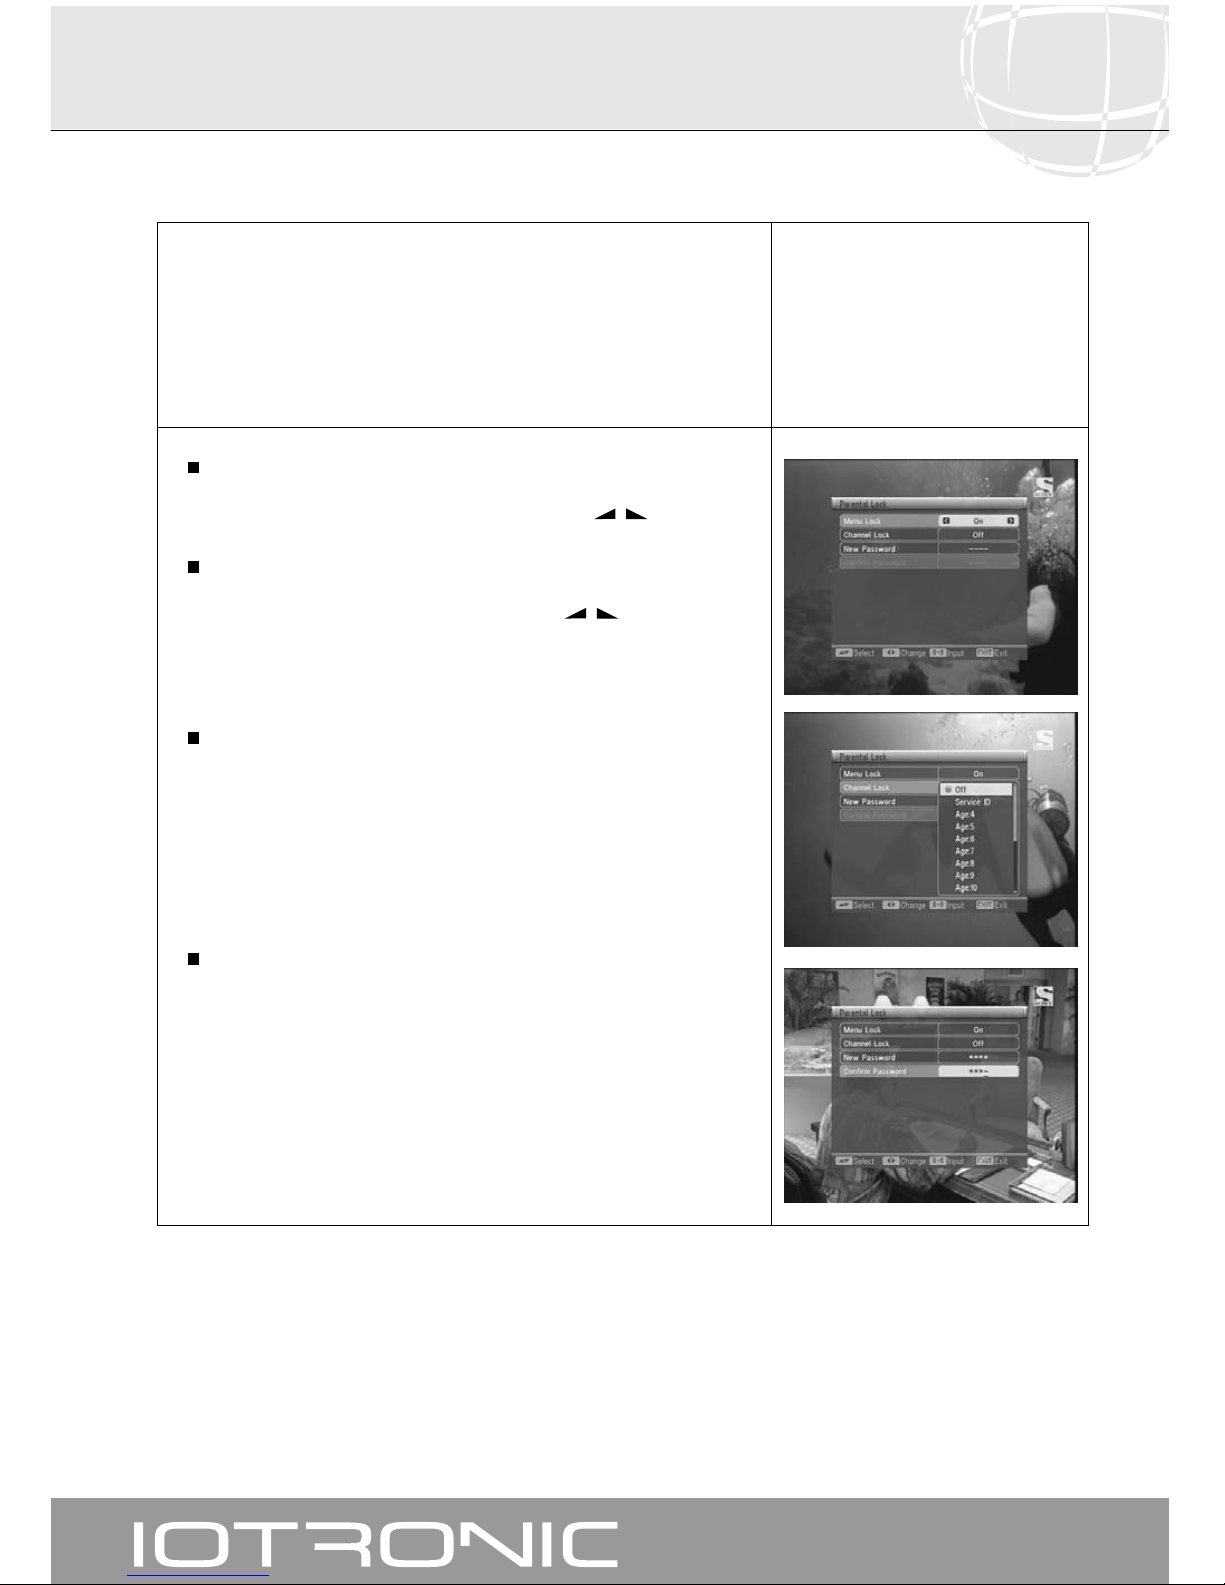
User manual
Digital Terrestrial TV Receiver
56
The 4-number password will never appear on the screen.
When selecting a menu option involving the use of a password (access to
blocked channels, channel list changes, etc.), the message “Input Password”
will appear on the screen letting you know that you should type in your
password.
In the event that the password entered is an incorrect one, you will not be
allowed access.
Menu Lock
If you wish to protect installation data and information, you should enable
this function by selecting the “On” option, using the -/
+
buttons.
Channel Lock
If you wish to block child access to any channel, you should enable this
function by selecting the “On” option, using the -/
+
buttons.
The disponible options are: Off, Service ID, Age:4, ... , Age:18.
If this option is disabled, the channels that are marked as blocked on the
“channel list” of the “Channels” menu will remain open.
Changing your password
This option enables you to change the preset password.
Enter a new password, using the numerical (0 ... 9) keyboard on the
remote control.
Then confirm the new password by re-entering it.
As from this moment, you should always use the new password when
requested to do so.
Press the EXIT button to return to the previous menu.
Note: The factory-set default password is: 0 0 0 0
Once the password has been changed, keep it safe.
10.6.- Parental Lock
Page 57
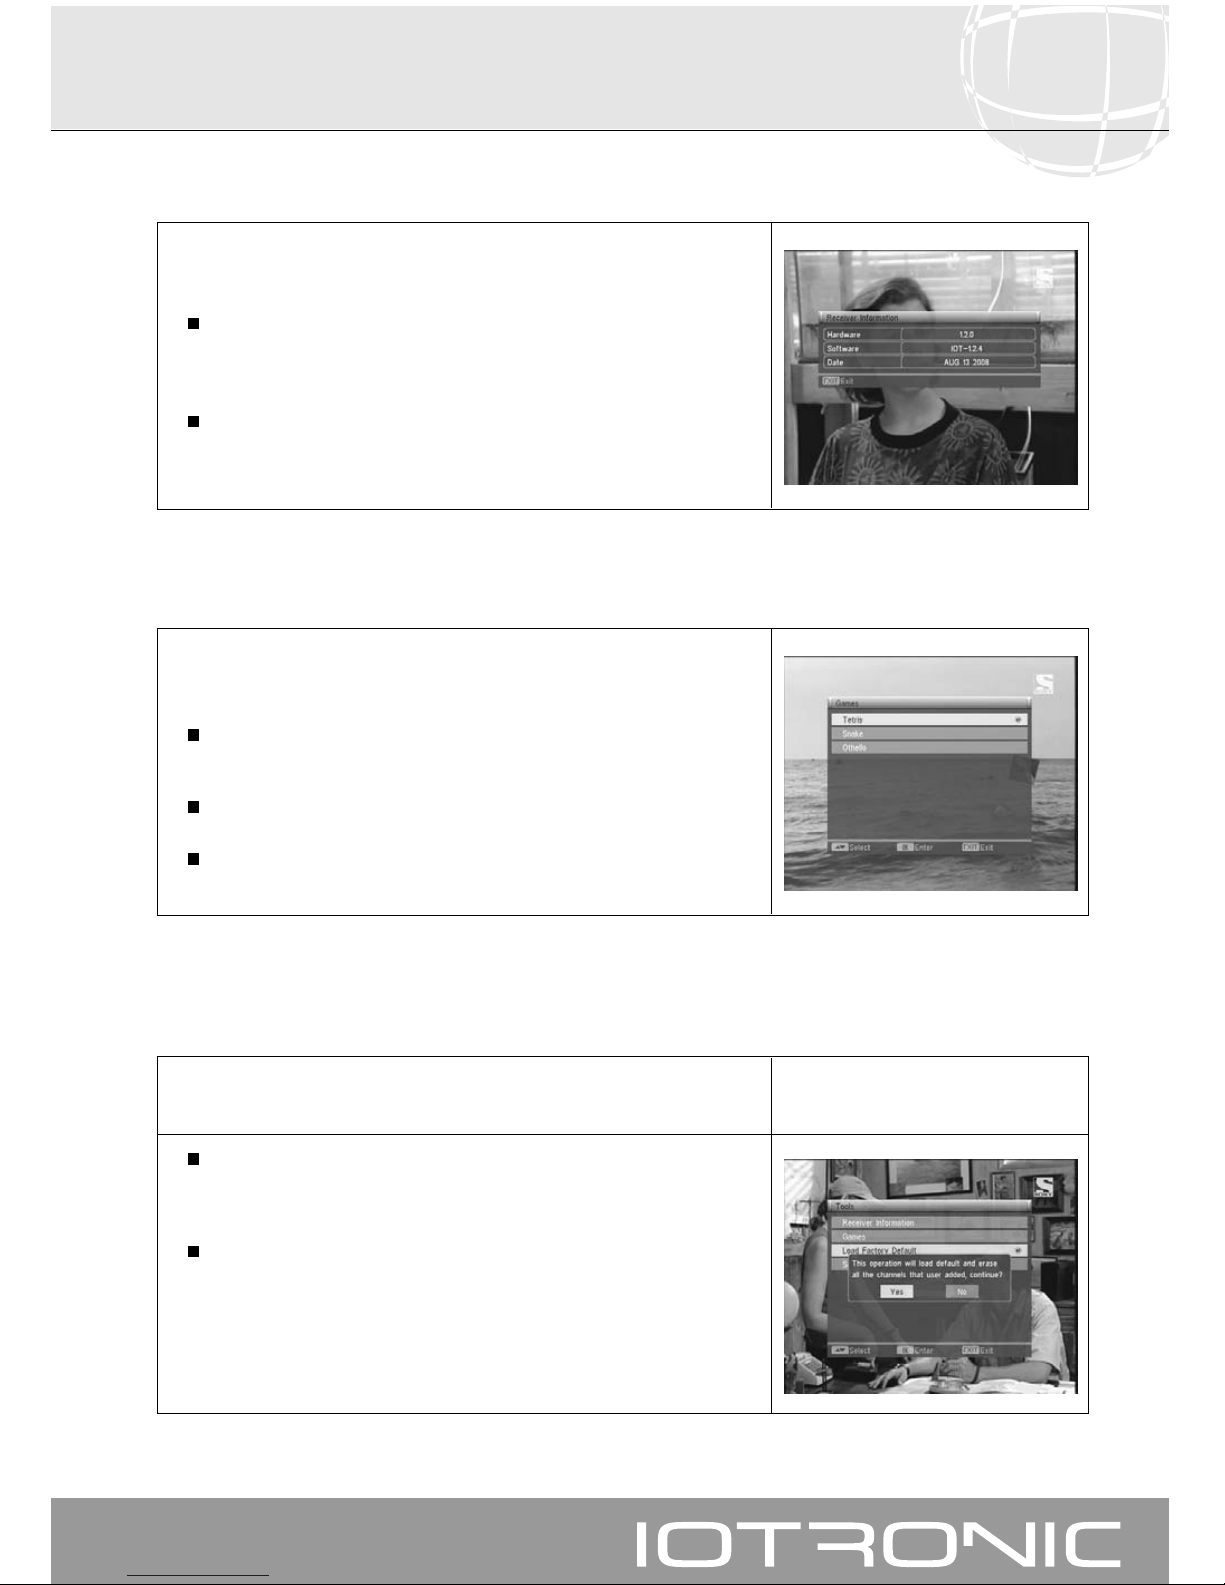
User manual
Digital Terrestrial TV Receiver
57
11.- Tools Menu
This option enables you to view the software and hardware versions of your
receiver.
Select the option “Receiver Information” on the “Tools” menu, and press
the OK button.
Press the EXIT button to return to the previous menu.
11.1.- Receiver Information
With this menu, you can select one of the receiver’s three available games:
- Tetris, Snake and Othello
Select one of the available games using the PR+ or PR- buttons, and press
OK.
To play, follow the instructions appearing on the screen.
To leave the game at any time, press the EXIT button.
11.2.- Games
11.3.- Load Factory Default
This function will change all the subsequently entered parameters back to the
default parameters preset in the plant.
If you wish to return your receiver to its original factory settings, select the
option “Load Factory Default”, and press the OK button. You will be asked
to type in your password to carry out this operation.
A confirmation message will appear on screen. To accept, click OK on the
“Yes” option.
Warning: whenever you execute the “Load Factory Default” function, all the
data and information entered by the user will be automatically
erased and replaced by the factory set configurations.
Page 58
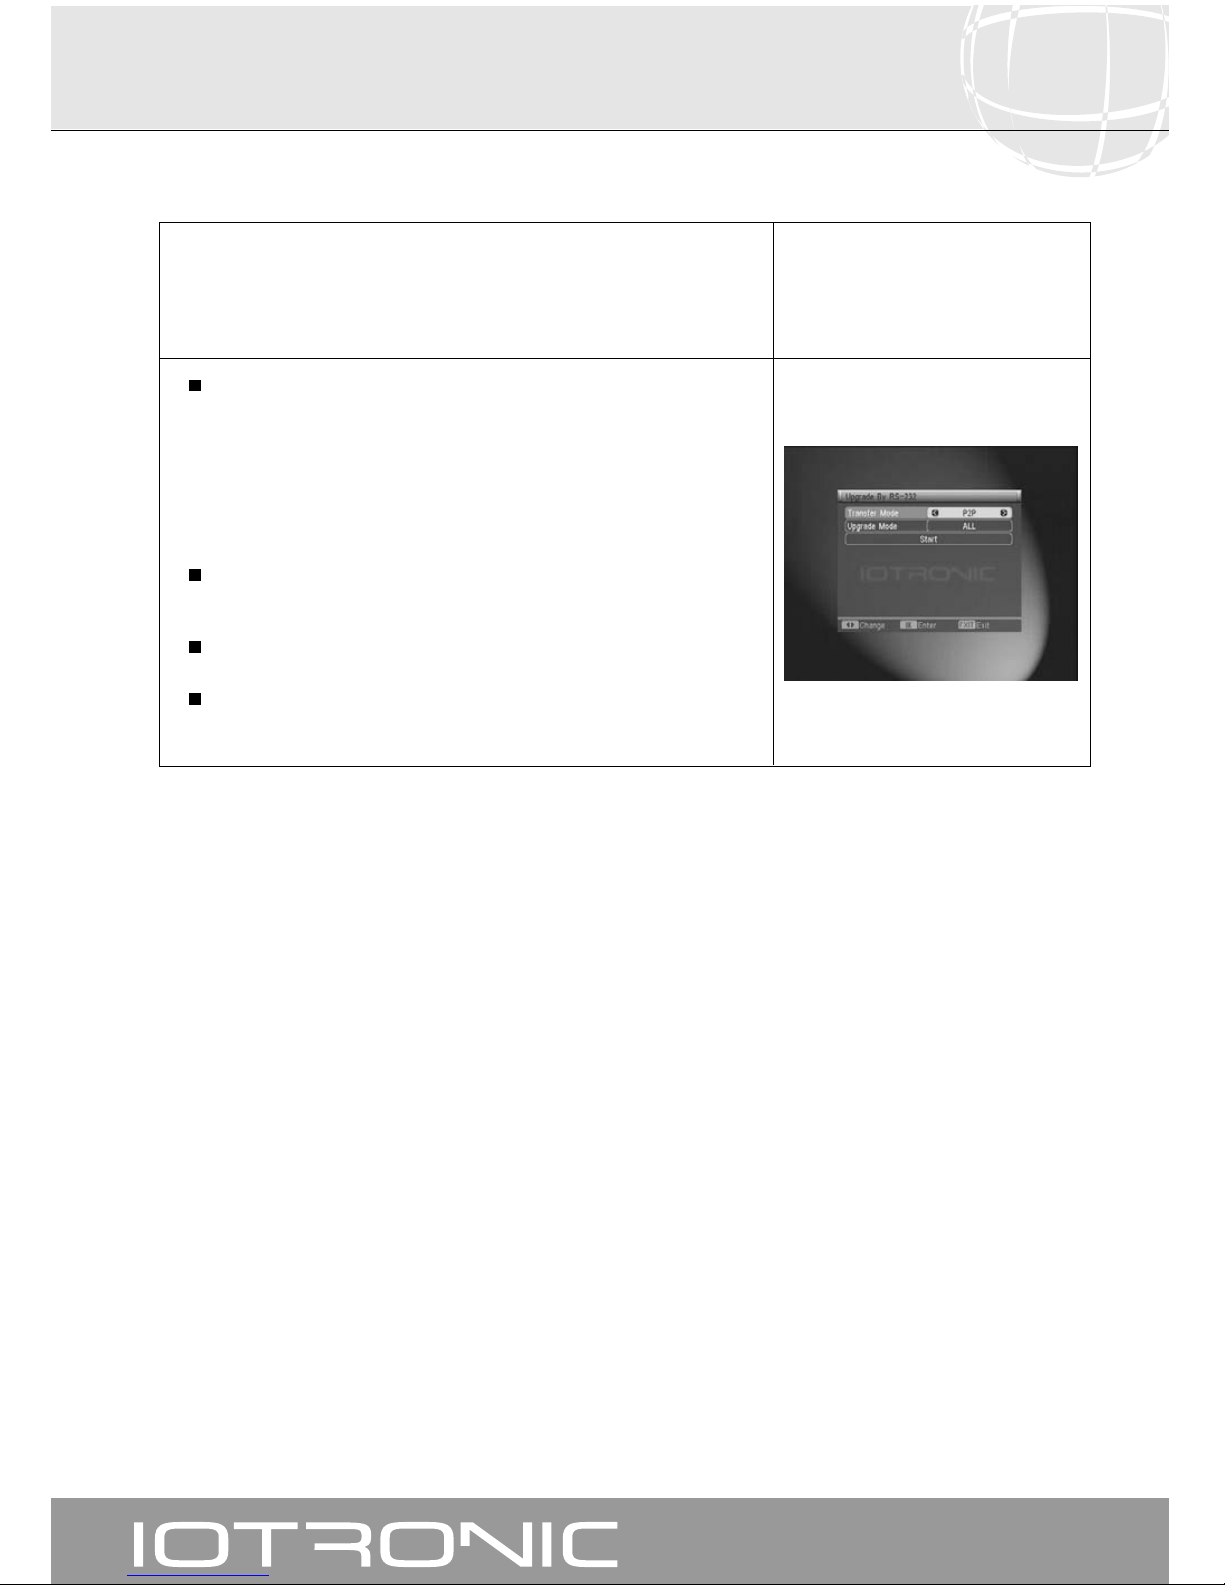
User manual
Digital Terrestrial TV Receiver
58
If you wish to possess the same software on several receivers, you can
duplicate it (inter-receiver copying) with the assistance of an RS-232 “Null
Modem” (female-female) cable.
After connecting both receivers with the RS-232 cable, you should follow the
instructions below.
Using the back “Master” switch of the receiver (the one with the software
to be transferred), turn it on.
Access the option “RS-232 Update” of the “Software Updating” menu on
the “Tools” menu, and press the OK button.
You will be asked to type in your password.
In the “Transfer Mode” option, select the option “P2P”, place the cursor on
the option “Start” and press the OK button.
Now turn on the “Slave” receiver (the one to be updated), using the back
switch.
Updating will take a few minutes, so please wait until it is finished.
Once the transfer process is finished, a confirmation message will appear
on the (Master) receiver.
11.4.- Update by RS 232
Page 59
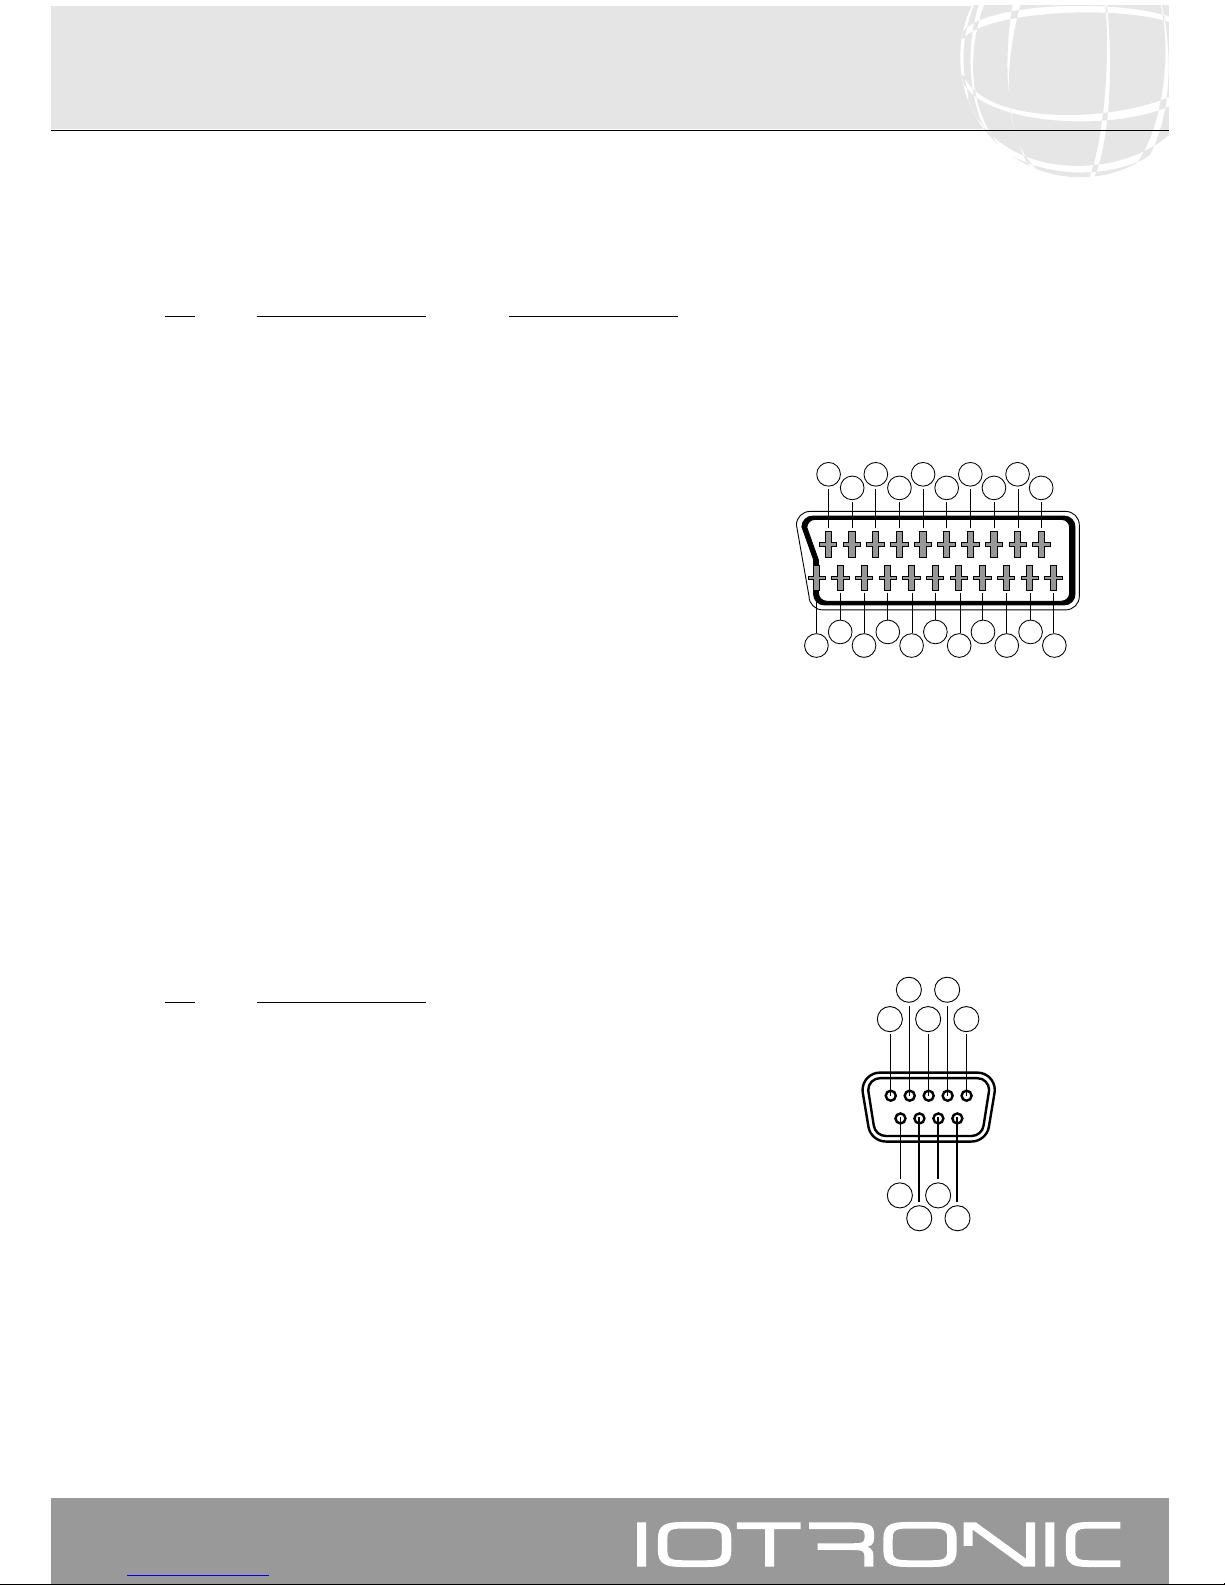
User manual
Digital Terrestrial TV Receiver
59
PIN TV VCR
1 Audio output (D) Audio output (D)
2 N/A Audio input (D)
3 Audio output (I) Audio output (I)
4 Ground audio Ground audio
5 Ground (blue) Ground (blue)
6 N/A Audio input (I)
7 Output (blue) Input (blue)
8 Voltage switching Voltage switching
9 Ground (green) Ground (green)
10 N/A N/A
11 Output (green) Input (green)
12 N/A N/A
13 Ground(red) Ground (red)
14 “Fast Blanking” Ground “Fast Blanking” Ground
15 Output (red) Input (red)
16 “Fast Blanking” Output “Fast Blanking” Input
17 Video Ground Video Ground
18 Video Ground Video Ground
19 Video Output Video Output
20 N/A Video Input
21 Ground Ground
PIN Description
1N/A
2 RXD (Data Input)
3 TXD (Data Output)
4N/A
5 Ground
6N/A
7N/A
8N/A
9N/A
201816
14
12
1086
4
2
1
3
5
7
9
11
13
15
17
19
21
1 3 5
2 4
6 8
7 9
Connectors Description
SCART
RS 232
Page 60
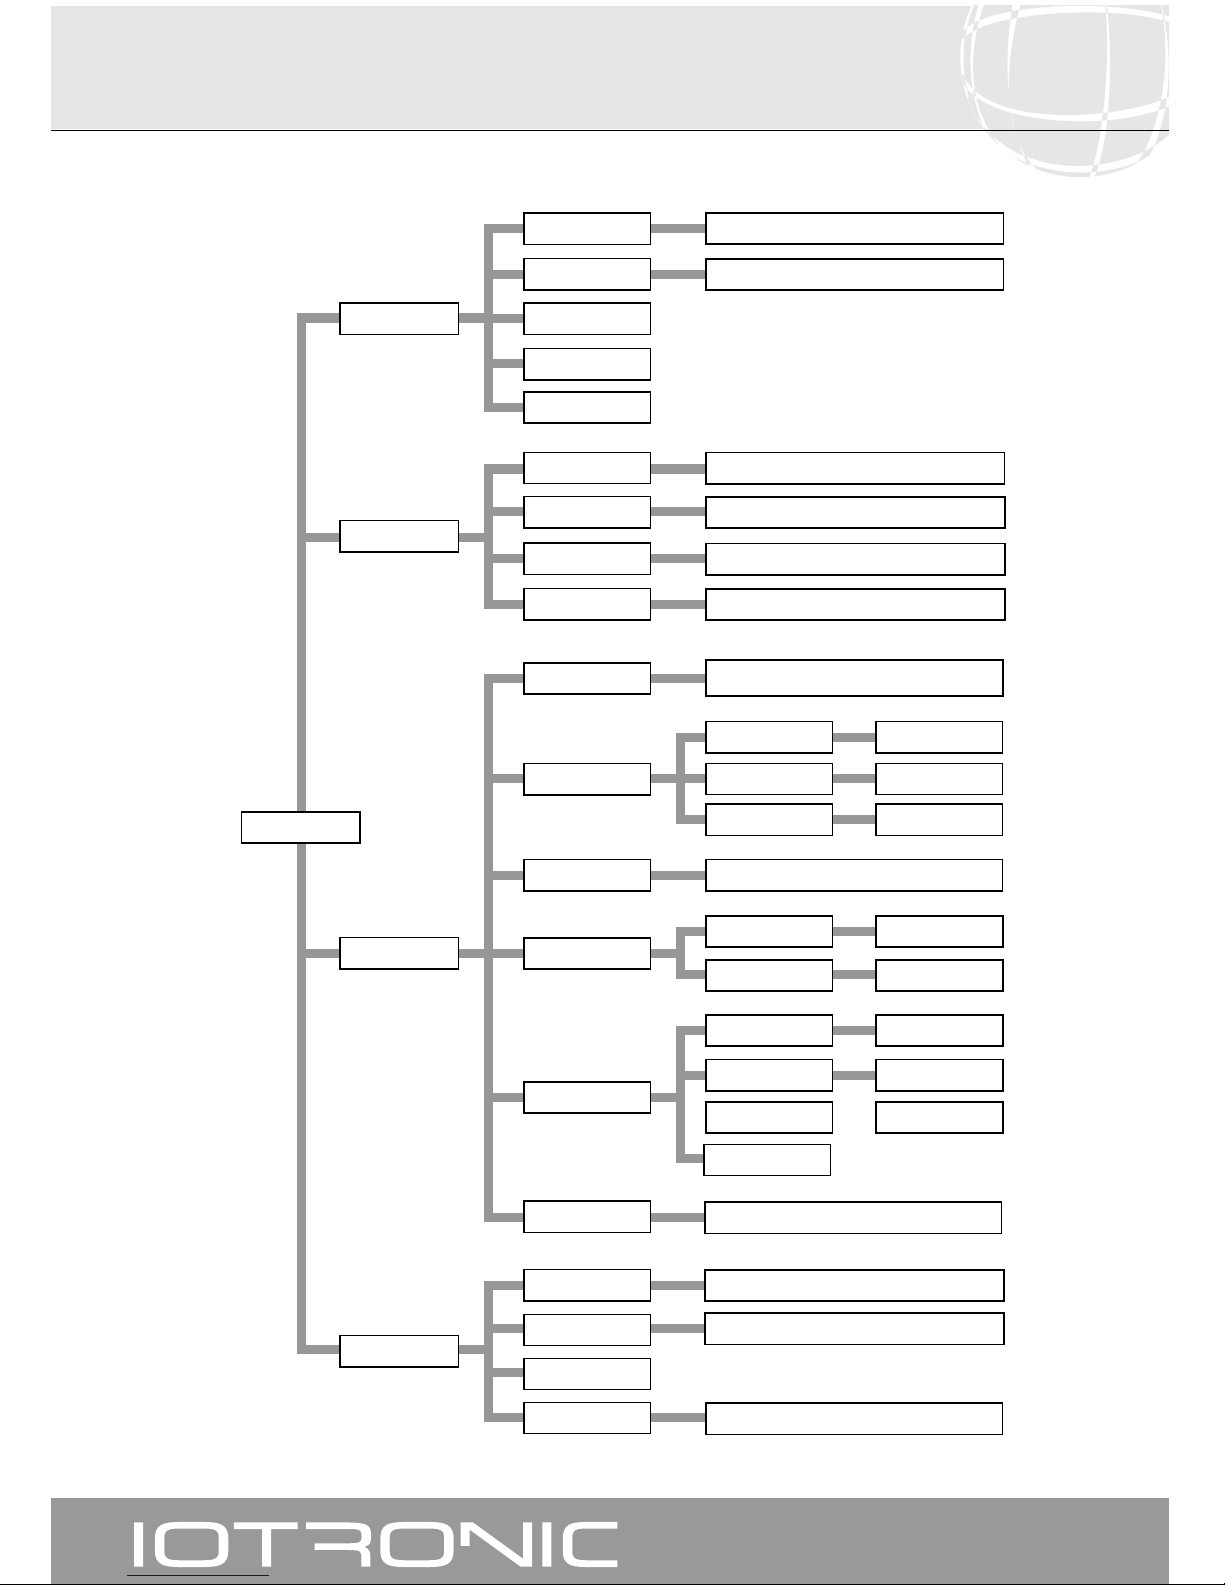
User manual
Digital Terrestrial TV Receiver
60
Menu Structure
On, Off
Antenna feeding
Setup
Mode, Band, Channel/Frequency, Search
Manual Search
Mode, Search
Auto Scan
OSD Language
Timer Setting
OSD Setting
Aspect Ratio
Tools
Installation
TV System
Region and Time
On, Off
Region, GMT Usage, Date, Time, Summer Time,
Time Display
Sleep Timer
Subtittle Display
MAIN MENU
LCN Mode
Receiver Information
Delete All Favorites
Edit (Favorite, Lock, Skip, Delete, Rename)
Find, Sort, Move
Channels
Video Output
4:3LB, 4:3PS, 16:9
CVBS, RGB
English, Dansk, Français, Deutsch, Greek, Italiano,
Polski, Português, Español and Svenska
Program Timer
Off, 10, ... 120 min
Timer, Mode
OSD Transparency
OSD Style
Off, Standard,
Teletext.
Off, 10, ... 50%
Style1, Style 2
Load Factory Default
Games
Software Upgrade
Transfer mode
Tetris, Snake, Othello
TV Channel List
Radio Channel List
Group Rename
Edit (Favorite, Lock, Skip, Delete, Rename)
Find, Sort, Move
Parental Lock
Menu Lock, Channel Lock,
New Password, Confirm Password
Display Mode Auto, PAL, NTSC
Software, Hardware, Signature
Delete All
Load Default OSD
Setting
Page 61

User manual
Digital Terrestrial TV Receiver
61
DVB-T Receiver:
Input Frequencies: 50....862MHz
Tuner band: 50....862MHz
Input Connector CEI female
Impedance 75 Ohms
Output connector CEI male
Video System AUTO, PAL and NTSC
Filter 6, 7 and 8 MHz
Demodulation CODFM 2k/8k
Aerial Feed 5V/100mA
De-multiplexing MPEG II, ISO/IEC 13818-1
Video decoding:
Video Compression: MPEG1 / MPEG-2 MP@ML Compatible (Main Profile @ Main Level)
Standard Video: PAL, NTSC
Image: 720 pixels x 576 lines / 724 pixels x 480 lines
Format: 4:3LB, 4:3PS, 16:9
Audio decoding:
Compression MPEG-1 & MPEG-2
Audio Mode Dual (main/sub), Stereo
Frequency sampling 32KHz, 44.1KHz, 48KHz
Audio parameters:
Analog Output:
Output level: 0.5 rms (nominal)
Output Impedance: 600 Ohms
THD >60 dB (1 KHz)
Hi-Fi Audio Output: 2 RCA Connectors (L&R)
1 RCA Connector (SPDIF)
Video parameters:
Output:
CVBS Output level: 1 Vpp on 75 Ohms
RED Output level: 0.7 Vpp on 75 Ohms
GREEN Output level: 0.7 Vpp on 75 Ohms
BLUE Output level: 0.7 Vpp on 75 Ohms
Tele-text:
Tele-text Standard ETS 300 472
SCART Connector:
Output: CVBS and RGB
RS 232 Interface:
Type: RS 232, bidirectional
Bit rate: 115 kBit/s
Connector: SUB D 9 pin
Function: Updating
Alimentación:
Main power: 175 – 250 V ~ 50/60 Hz
Power consumed: 8 W
General:
EPG: Current and future events, and those before the selected program
Timer: 8 events
OSD Language: Multi-language
Temperature: +15º Celsius to +35º Celsius
Humidity: <80%
Dimensions (LxWxH): 260mm x 160mm x 50mm
Weight: 0.5 kgs
10.- Technical
Specifications
Page 62

Page 63
63
Telcor S.A. ofrece una garantía de dos años calculados a partir de la fecha de compra para los países de la UE. En los
países no miembros de la UE se aplica la garantía legal que está en vigor en el momento de la venta. Conserve la factura de
compra para determinar esta fecha.
Durante el período de garantía, Telcor S.A. se hace cargo de los fallos producidos por defecto del material o de
fabricación. Telcor S.A. cumple la garantía reparando o sustituyendo el equipo defectuoso.
No están incluidos en la garantía los daños provocados por uso indebido, desgaste, manipulación por terceros,
catástrofes o cualquier causa ajena al control de Telcor S.A.
Garantía
Telcor S.A. offers a two year guarantee, beginning from the date of purchase for countries in the EU. For countries that
are not part of the EU, the legal guarantee that is in force at the time of purchase is applied. Keep the purchase invoice to
determine this date.
During the guarantee period, Telcor S.A. complies with the guarantee by repairing or substituting the faulty equipment.
The harm produced by improper usage, wear and tear, manipulation by a third party, catastrophes or any other cause
beyond the control of Telcor S.A. is not included in the guarantee.
Guarantee
Page 64

1100110011000110011000111111000111
Distribué par: Telcor S.A. Rúa B. de Conxo, 17 - 15706 Santiago de Compostela. Spain
7119_001_ES-UK
 Loading...