

Page 1
• Fanless Airflow Design
• Data Recovery Service (DRS)
• No-HassleTM Warranty
Built to protect and backup data:
• Backup for Primary Hard Drive
Protect against primary drive failure or corruption
• Fire Damage
Up to 1550°F per ASTM E-119, 30 minutes
• Floods & Water Damage
10 foot depth, 72 ho urs, salt or fresh water
• Theft
Padlock Capable Design
ioSafe P/N: 910-11131-00 Rev 7
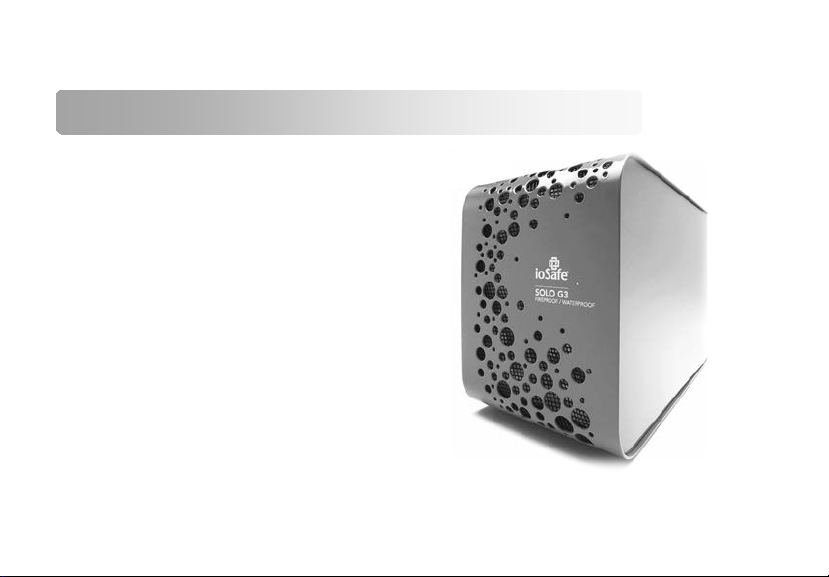
ioSafe Solo G3
User Manual
Kensington® Lock Slot and Floor Bolt Down and
Page 2

2
Contents
Welcome ................................................................................................... 3
Package Contents ..................................................................................... 7
Specifications ........................................................................................... 8
System Requirements .............................................................................. 9
About USB ............................................................................................. 11
Securing the ioSafe Solo G3 .................................................................. 12
Kensington® Security Slot ...................................................................... 12
Backup and Encryption Software .......................................................... 13
Connecting the ioSafe Solo G3 ............................................................. 14
Formatting for Mac OSX (High Sierra) ................................................... 16
Formatting for older Mac OSX (El Capitan OS) ...................................... 17
Formatting for older Mac OSX (Yosemite and older) ............................ 18
Data Recovery Service (DRS) ................................................................. 19
Data Recovery Procedure ...................................................................... 21
ioSafe No-Hassle Warranty .............................................................. 23
Page 3

3
Welcome
Thank you for purchasing the ioSafe® Solo G3 – our third generation of Solo series desktop drive.
Fire Protection:
Water Immersion:
Theft:
NOTE:
Designed to backup your primary ha rd drive from failure and accidental deletion a s well as protect
against data loss due to natural disasters such as fires and floods. For years, ioSafe ha s set the standard
for disaster proof hardware. The ioSafe Solo G3 delivers an unprecedented combination of security and
natural disaster protection a t the price and near silent noise levels for our home and home office
customers.
Your ioSafe Solo G3 is covered for one (1) year sta ndard under ioSa fe’s No-HassleTM Warranty and Data
Recovery Service (DRS). Standard warranty term is one (1) yea r and covers the repair or replacem ent of
the Solo G3 if the unit breaks for any reason. The Data Recovery Service (DRS) must be activated on our
website by the original owner. Vis it www.iosafe.com for more details on the wa rranty and DRS.
The ioSafe Solo G3 has been rigorously tested to protect the data contained in the device to meet the
following specific ations:
depth up to 3 days in salt or fresh wa ter.
padlock capable design.
Protects data against loss from fire u p to 1550°F per ASTM E-119, 30 minutes.
Protects data against loss from full immersion in fresh or salt water fo r up to a 10’
Kensington Lock Slot compatible – metal lock slot construction. Floor mount bolt down and
Please read this User Manual and retain it for future reference.
Page 4

4
Copyrights
Copyright ioSafe, Inc. 2012. All rights reserved. No part of this publication may be reproduced or
Trademarks
Federal Communication Commission (FCC)
WARNING:
transmitted in any form by any means, electronic, mechanica l photocopying, recording or otherwise,
without prior written consent.
All Trademarks mentioned or appearing in this document are the property of their respective owners.
Radio Frequency Interference Statement
This product complies with Part 15 of the FCC Rules. Operation is subject to the fo llowing two
conditions: (1) this device may not cause harmful interference, and (2) this device must accept any
interference rec eived, including interference that may cause undesired operat ion.
Changes or modifications to this unit not expressly approved by the pa rty responsib le for
compliance may void the user’s authority to operate the equipment.
This equipment has been tested a nd found to comply with the limits for a Class B digita l device,
pursuant to Part 15 of the FCC rules. These limits are designed to provide reasonable protectio n
Page 5

5
against harmful interference in a residential installation. This equipment generates, uses, a nd can
radiate radio fre quency energy, and if not installed and used in accordance with the instruction
manual, may cause harmful interference to radio c ommunications. However, there is no guarantee
that interference will not occur in a particular installation. If this equipment does cause
interference to radio or televisio n equipment reception, which can be determined by turning the
equipment off and on, the user is encouraged to try to correct the interference by one or more of
the following measures:
• Reorient or relocate the receiving antenna
• Increase the separation between equipment and receiver
• Connect the equipment to an outlet on a circuit different from that to which the receiver is
connected
• Consult the dea ler or an experienced radio/television technician for help
• Use a shielded and properly grounded I/O cable and power cable to ensure compliance of this
unit to the spec ified limits of the rules
Page 6

6
CE Compliance For Europe
Marking by the CE symbol indicates compliance of this system to the applicable
Changes
Council Directives of the European Union, including the EMC Directive (2004/108/EC)
and the Low Voltage Directive (2006/95/EC). A “Declaration of Conformity” in
accordance with the applicable directives has been made and is on file at ioSafe, Inc.
The material in this document is for information only and subject to change without
notice. While reasonable efforts have been made in the preparation of this document
to assure its accuracy, no liability resulting from errors or omissions in the document,
or form the use of the information contained herein is assumed. The publisher
reserves the right to make changes or revisions without reservation and without
obligation to notify any person of such revisions and changes.
Page 7
7
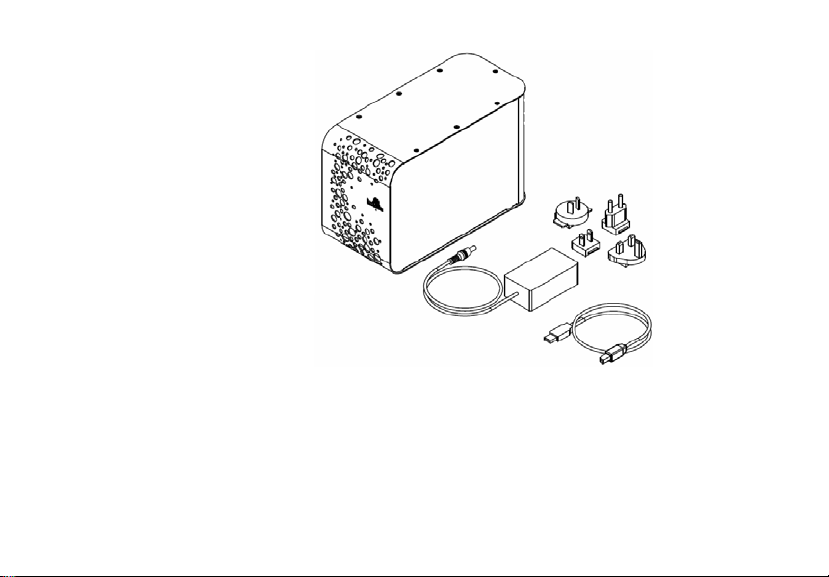
Included in the package:
Package Contents
A.
D.
C.
A. ioSafe Solo G3
B. USB 3.0 cable (compatible with USB 2.0)
C. AC Power Brick
D. AC Power Adapters (US, UK, EU, AU)
E. Quick Start Guide (not shown)
F. DRS Activation Card (not shown)
B.
Page 8

8
Specifications
Dimensions
Weight
Interface Transfer Rate
Ambient Temp erature
Humidity
Theft:
USB 3.0 ........................................................................... up to 5 Gbps
Operating........................................................................... 32°F - 95°F
Shipping .......................................................................... 32°F - 135°F
Operating (non-condensing) ................................................ 5% - 80%
Shipping (non-condensing) .......................................................... 90%
Non-operating Water Submersion .......... Up to 72 hours @ 10’ depth
Complete submersion, fresh or salt water with no data loss
Kensington Lock Slot compatible – metal lock slot construction.
Floor mount bolt down and padlock capable.
(Inches) ........................................................ 5.0"W x 7.1"H x 11.0"L
(Lb.) ............................................................................................... 15 lbs
Non-operating ..................................32°F to 1550°F with no data loss
Page 9

9
System Requirements
Supported OS/interface connection:
Precautions
Mac OS 10.3 or later ................................................................ USB 3.0, USB 2.0
Windows 10/ 8.1 /8 / 7 ............................................................ USB 3.0, USB 2.0
Note: For MS Windows Server and Linux OS we suggest using the SoloPro which has
firmware more conducive with those operating systems.
The ioSafe Solo G3 can be purchased formatted either for Windows or MAC OS. A majority of
the Solo G3’s sold are natively formatted for Windows with the “NTFS” drive format. Since
Windows and Mac file systems do not function between each other if you are trying to use a
drive formatted for Windows on a MAC it will need to be reformatted to work properly. See
page 16 - Formatting the USB 3.0 ioSafe Solo G3 for Mac OS.
Please read the precautions listed below. Failure to do so may result in damage to the device
and loss of data. All drives covered under ioSafe’s Data Recovery Service (DRS) would qualify for
data recovery for any reason under our general terms and conditions for the service. See our
website for more details.
Page 10

10
•
THE TERM “BACKUP” MEANS TO MAKE A REDUNDANT “COPY” OF YOUR DATA – NOT TO
SIMPLY “MOVE” YOUR DATA FROM ONE DEVICE TO ANOTHER.
3-2-1 Backup!
3 copies
•
on multiple devices. In addition to a primary copy of your data (your working directory), at
least one copy of your data should sit on a fireproof waterproof hard drive, like the ioSafe
Solo series, or be offsite at a second location. The ioSafe Solo G3 is a great backup device
that can help protect data onsite. No matter what the data storage device, keeping
redundant copies of your irreplaceable data will improve your chances for data recovery.
• Avoid bumping, jarring or dropping the ioSafe Solo G3 while connected to a computer and
in use. Mechanical hard disk drives (HDD) are more susceptible to damage while they’re
operating. Inside a mechanical hard disk drive is a spinning disk and small read/write drive
head that “flies” on a cushion of air above the disk. If the drive head hits the spinning disk,
data loss can occur. Solid State Drives (SSD) have no moving parts so are less susceptible to
shock. If you require that the drive continue to operate while being dropped or during
vibration (as present while in an operating vehicle), we highly recommend the ioSafe
products that incorporate an SSD for the ultimate in drop and shock protection.
• Do not disconnect any cables while the ioSafe Solo G3 is powered on without first stopping
or ejecting the device through the operating system software interface. Disconnecting any
drive during a read/write event can cause logical corruption on the drive, both SSD and
HDD drives, which can sometimes result in data loss.
We strongly recommend that you keep at least
of all your data
• Use proper surge and uninterruptible power supplies (UPS) to guard your computer system
against abrupt outage and voltage spikes during brownouts and lightning storms.
Page 11

11
About USB
Actual connection performance depends on many factors including: CPU, file system
NOTE
overhead, number of attached devices and more. Given these and other factors, in day-today use you can expect maximum, sustained transfer rates to be less than the theoretical
rates maximum rates possible with the connection.
USB 3.0 is backwards compatible with USB 2.0 and 1.1. This means you can generally
connect newer devices to older devices. However, interface transfer rates are limited by
the interface with the lower speed.
: The cable supplied with your system has been optimized for performance. Longer
cables may not work or only work intermittently.
Page 12

12
Securing the ioSafe Solo G3
Kensington
®
Security Slot
Kensington® Security Slot
Floor Mount Suggestion
Cable Lock Suggestion
For drive security, the ioSafe Solo G3 is equipped with a Kensington security slot, which
supports a standard Kensington security cable (sold separately). For more information on the
Kensington security slot and available products, visit www.kensington.com
ioSafe Solo G3 is designed to be floor mounted or padlock compatible as well.
. Alternatively, the
Page 13

13
Backup and Encryption Software
Backup Software
•
Upon proper activation of your Data Recovery Service, qualified users can download:
Genie Timeline Professional ($50 Value) Award winning backup software for Windows OS.
Simple, block level, open file and OS Continuous Data Protection (CDP) software for
Windows users. DRS Activation required at https://iosafe.com/activate
prior to downloading software and install code.
Apple® Mac® TimeMachine®— Mac specific drives are already formatted with Mac
compatible GUID Partition Table (GPT) formatting. If not, reformatting may be required.
Simple instructions are online in the support and FAQ sections at iosafe.com or on page 14
for Mac users who have purchased a NTFS formatted drive and wish to format the drive for
a Mac.
to validate purchase
Page 14

14
Connecting the ioSafe Solo G3
Connect USB Cable.
Connect Power Supply.
Power On.
Verify that the Drive Mounts.
For Windows PC
For Mac
The ioSafe Solo G3 not specifically “for Mac” should be reformatted for the Mac
OS (See page 16 - Formatting the ioSafe Solo G3 for Mac OS).
1.
computer port.
2.
the power brick. Plug the cord into the back of the ioSafe and the other end to a power
source (surge protector recommended)
3.
4.
be “mounted” (physically connected and recognized by the OS) to the computers
operating system.
and the drive should mount in a few moments. A new drive icon/letter will appear on
the desktop or in My Computer/Windows Explorer.
the drive in a few moments. A new drive icon will appear on the Desktop and in the
Finder.
Turn on the power switch on the back of the unit.
, once the ioSafe Solo G3 is connected, you will see a blue light on the drive
, once the ioSafe Solo G3 for Mac is powered on the operating system should mount
Use the supplied USB 3.0/2.0 cable to connect the Solo G3 to a
Select the correct country specific adapter plug and attach to
Before storing data on the ioSafe Solo G3, the drive must
Page 15

15
5.
The ioSafe Solo G3 is ready to use.
Or select the ioSafe Solo G3 as the backup target for any automated backup target
program (like Genie Timeline for PC or Time Machine for Mac)
Genie Timeline Professional
to any other drive attached to your computer.
6.
Save or drag and drop files to the drive as you would
7. Although
ioSafe Solo G3 upon proper DRS Activation, you are free to use whatever backup software
you choose and any commercially available application should work. Genie Timeline
Professional is only compatible with Windows OS. We recommend Mac users utilize Time
or an equivalent software may be bundled with the
Page 16

16
Formatting for Mac OSX (High Sierra)
The ioSafe Solo G3 not specifically labeled as “for Mac” is likely fo rmatted NTFS (for Windows) and may not be
immediately recognized by Mac. You may get an alert message whic h reads: “You have inserted a disk
containing no volumes ...” or “The disk you inserted w as not readable by this computer” Click the ignore button
and follow the steps below.
(**NOTE: Any information currently on the disk w ill be deleted.)
1. Power up your ioSafe, plug it into your Mac, and wait for it to show up on the desktop.
2. Click Go on a Finder window, and select Utilities.
3. Open up the Disk Util ity applicat ion located within the "Utilities" folder.
4. Click the View drop-down arrow in the top left of the Disk Utility window and select “Show All Devices”.
5. You will see all drives listed in the left pane. T he ioSafe should be listed under “Ex ternal Devices”.
6. Click to highlight the main partit ion of the ioSa fe media.
7. You should see the button tools across the top of Disk Utility, select the “Erase” option to open the Erase
Wizard.
8. Give the Name of the drive you would like.
9. Under the “Format” select OS X Ex tended (Journa led)
10. Under “Scheme” Select GUID Partition map.
11. Then click the “Erase” button and it will then got through the formatting process of your ioSafe.
The partitioning process should take less than 30 seconds. Once complete, the device will
mount on your desktop with the name you provided.
Page 17

17
Formatting for older Mac OSX (El Capitan OS)
The ioSafe Solo G3 not specifically labeled as “for Mac” is likely fo rmatted NTFS (for Windows) and may not be
immediately recognized by Mac. You may get an alert message whic h reads: “You have inserted a disk
containing no volumes ...” or “The disk you inserted w as not readable by this computer” Click the ignore button
and follow the steps below.
(**NOTE: Any information currently on the disk will be deleted.)
1. Remove all external Hard Drives inc luding Flash Drives.
2. Power up your ioSafe, plug it into your Mac, and wait for it to show up on the desktop.
3. Click Go on a Finder window, and select Utilities.
4. Open up the Disk Util ity applicat ion located within the "Utilities" folder.
5. You will see all drives listed in the left pane. T he ioSafe should be listed under “External Devices”.
6. Click to highlight the main partit ion of the ioSa fe media.
7. You should see the button tools across the top of Disk Utility, select the “Erase” option to open the Erase
Wizard.
8. Give the Name of the drive you wo uld like.
9. Under the “Format” select OS X Ex tended (Journa led)
10. Under “Scheme” Select GUID Partition map.
11. Then click the “Erase” button and it will then got through the formatting process of your ioSafe.
The partitioning process should take less than 30 seconds. Once complete, the device will
mount on your desktop with the name you provided.
Page 18

18
Formatting for older Mac OSX (Yosemite and older)
The ioSafe Solo G3 not specifically labeled as “for Mac” is likely fo rmatted NTFS (for Windows) and may not be
immediately recognized by Mac. You may get an alert message whic h reads: “You have inserted a disk
containing no volumes ...” or “The disk you inserted w as not readable by this computer” Click the ignore button
and follow the st eps below.
(**NOTE: Any information currently on the disk will be deleted.)
1. Remove all external Hard Drives including Flash Drives.
2. Power up your ioSafe G3, plug it into your Mac, and wait for it to show up on the desktop.
3. Click Go on a Finder window, and select Utilities.
4. Open up the Disk Util ity applicat ion located within the "Utilities" folder.
5. You will see all drives listed in the left pane. T he ioSafe should be listed under “Ex ternal Devices”.
6. Click to highlight the main partit ion of the ioSa fe media.
7. You should see the button tools across the top of Disk Utility, select the “Partition” option.
8. Click on the drop down menu where it says “Volume Scheme” and select “1 Partition”.
9. Click on the “Options” button, select the “GUID Partition Table” option and click “OK”.
10. Click in the field that allows you to name the volum e and type in the value you prefer.
11. Verify the volume format is set to “Mac OS Extended (journaled).
12. Click “Apply” and then click “Partition” to start the formatting process
The partitioning process should take around a minute. Once complete, the device will mount on your desktop
with the name you provided.
Page 19

19
Data Recovery Service (DRS)
Data Recovery Service
“No Hassle Warranty”
Backup installation and support
Cancel at any time
The ioSafe Solo G3 comes with one (1) year of Data Recovery Service standard upon proper
activation by the original end user. Various options to extend DRS coverage and manufactures
warranty up to 5 years are available at www.iosafe.com
Registration”
Benefits of the Data Recovery Service:
support if requested. Limitations Apply. See DRS terms and conditions for more details.
or replace the ioSafe product free of charge. All domestic shipping paid for by ioSafe.
– Both ioSafe + 3rd Party Forensic Recovery Services, onsite technical
– if it breaks for any reason while covered under any DRS, ioSafe will repair
- phone and remote access support
– no obligation, no commitment
Click on “Support” and then “DRS Product
Page 20

20
ioSafe Data Recovery Service Terms and Conditions
As applicable during the DRS period, the Company or its contracted partner will assist the original purchaser for one "data recovery event"
without the requirement
to pay a deductible. Additional attempts beyond the first “data recovery event” will require a deductible of $500 for the
second “data recovery event”, $1000 for the third “data recovery event” and $2000 for the any additional “data recovery event
Basic or original ioSafe DRS plan (products sol d prior to 2012), the DRS plan applies to the original owner for the ioSafe product. For the DRS
Pro plan, data recovery services will be performed on the registered ioSafe product for the original owner and to one register e d c om p uter o f th e
original ioSafe owner attached to the ioSafe product
following ways in ioSafe’s sole discretion:
The Company or its contracted partner will provide phone or email based support to assist in recovering the data, or
1. The Company will pay for the disaster exposed product to be shipped back to the Company's headquarters for data recovery. If data
recovery is successful, a replacement product will be loaded with the original data and shipped back to the original user, or
2. At the discretion of the Company, if the data recovery by the Company is not successful, the Company will pay up to the total amount
shown in the table below for the specific product to a third
choice to extract the data. Any data extracted will be loaded on a replacement product and shipped back to the original user. The Company has
the right to use a factory refurbished product as the replacement ioSafe branded product. Data recove
computer will cover the costs of data recovery only up to the total limits below if applicable and will not cover replacement
ioSafe branded ser ver or computer.
Limits of Coverage in US Dollars per terabyte of data capacity of ioSafe product
The Company's good faith attempts to restore and recover the data in accordance with these terms and conditions shall be the purchaser's sole
and exclusive remedy and the sole and exclusive obligation o
damages whatsoever due to loss of data or otherwise. The Company cannot and does not guarantee that any data will be recover
cannot and does not guarantee which data files are on the product or the attached computer if applicable. Data restoration or recovery shall be
strictly limited to whatever files are restorable or recoverable and not what the purchaser believes to exist on the product
if appli
products with proper serial numbers and activation codes for products owned by the original purchaser only. The DRS is not
third party without prior written signed consent of an ioSafe, Inc. executive based in the United States of America.
. The Company will attempt to restore the lost data by employing one or more of the
-party disk recovery service and/or an onsite technical support of the Company's
ry services for any at t ac h ed s er ver or
s.” For the DRS
costs for the non-
Product Line DRS Basic DRS Pro
Any Solo or SoloPRO HDD $2,500 / TB $5,000 / TB
SoloPRO SSD or Rugged Portable SSD $5,000 / TB $5,000 / TB
ioSafe Rugged Portable HDD $2,500 / TB $5,000 / TB
f ioSafe with respect to the DRS and the Company shall not be liable for any
cable. The DRS is valid only upon verified, activation on the ioSafe.com website in addition to valid registration for ioSafe branded
able and it
or attached computer
transferable to a
Page 21

21
Data Recovery Procedure
If the ioSafe Solo G3 faces possible data loss for any reason, you should immediately call the
ioSafe Disaster Response Team at 1-888-984-6723 (US & Canada) or 1-530-820-3090
(International) extension 430. You can also send an email to disastersupport@iosafe.com
professionals at ioSafe can determine the best actions to take to protect your valuable
information. In some cases a self recovery can be performed and provide you with immediate
access to your information. In other cases, ioSafe may request that the ioSafe Solo G3 be
returned to the ioSafe factory for data recovery. In any case, contacting ioSafe is the first step.
The general steps for disaster recovery are:
1. Email disastersupport@iosafe.com with your serial number, product type and date of
purchase.
2. If you can not email, call ioSafe Disaster Support Team at 1-888-984-6723 (US & Canada)
or 1-530-820-3090 (International) extension 430
3. Report disaster event, and obtain return shipping address/instructions
4. Follow ioSafe team instructions on proper packaging.
5. ioSafe will recover all data which is recoverable according to the terms of the Data
Recovery Service Terms and Conditions.
6. ioSafe will then place any recovered data on a replacement ioSafe device
7. ioSafe will ship the replacement ioSafe device back to the original user
. The
Page 22

22
8. Once the primary server / computer is repaired or replaced, the original user should
restore the primary drive data with the ioSafe backup data
Page 23

23
ioSafe No-Hassle Warranty
If the ioSafe Solo G3 breaks during the warranty period, for any reason, we will repair or
replace it. Yes, even if you break it on purpose.
The standard term for the warranty is one (1) year from the date of purchase. Monthly or
yearly extended terms for No-Hassle Warranty services may be available upon activation. See
the website or contact customerservice@iosafe.com for help. ioSafe reserves the right to have
its representative inspect any product or part to honor any claim, and to receive a purchase
receipt or other proof of original purchase before warranty service is performed.
This warranty is limited to the terms stated herein. All expressed and implied warranties
including the warranties of merchantability and fitness for a particular purpose are excluded,
except as stated above. ioSafe disclaims all liabilities for incidental or consequential damages
resulting from the use of this product, or arising out of any breach of this warranty. Some
states do not allow the exclusion or limitation of incidental or consequential damages, so the
above limitation may not apply to you. This warranty gives you specific legal rights, and you
may have other rights as well, which will vary from state to state.
Page 24

24
ioSafe Contact Information
Corporate Headquarters
ioSafe, Inc.
Technical Support
Disaster Support
Email: disastersupport@iosafe.com
10600 Industrial Ave, Suite 120
Roseville CA 95678
USA Toll Free Phone: 888.98.IOSAFE (984.6723)
International Phone: 530.820.3090
Email: customerservice@iosafe.com
US Toll Free Phone: 888.98.IOSAFE (984.6723) x450
International Phone: 530. 820.3090 x450
Email: techsupport@iosafe.com
US Toll Free Phone: 888.98.IOSAFE (984.6723) x430
International Phone: 530. 820.3090 x430
 Loading...