

Page 1

ioSafe® Duo
Fireproof and Waterproof RAID Storage Device
User Manual
Page 2

ioSafe Duo User Manual2
Table of Contents
1 General Information 3
1.1 Introduction . . . . . . . . . . . . . . . . . . . . . . . . . . . . . . . . . 3
1.2 Activate Warranty and Data Recovery Service Protection . . . . . . . . 3
1.3 Package Contents . . . . . . . . . . . . . . . . . . . . . . . . . . . . . . 4
1.4 ioSafe Duo at a Glance . . . . . . . . . . . . . . . . . . . . . . . . . . . 5
1.5 LED Behavior . . . . . . . . . . . . . . . . . . . . . . . . . . . . . . . . . 6
1.6 Warnings and Notices . . . . . . . . . . . . . . . . . . . . . . . . . . . . 6
2 Hardware Setup 8
2.1 Drive Installation . . . . . . . . . . . . . . . . . . . . . . . . . . . . . . .8
2.1.1 Tools and Parts for Drive Installation . . . . . . . . . . . . . . . . . 8
2.1.2 SATA Drive Installation or Removal . . . . . . . . . . . . . . . . . . 8
2.2 Connecting the ioSafe Duo . . . . . . . . . . . . . . . . . . . . . . . . 14
USB Type-C Cable . . . . . . . . . . . . . . . . . . . . . . . . . . . . . 14
USB Type-C to A Cable . . . . . . . . . . . . . . . . . . . . . . . . . . 14
2.3 RAID Configuration . . . . . . . . . . . . . . . . . . . . . . . . . . . . 16
2.3.1 Introduction to RAID . . . . . . . . . . . . . . . . . . . . . . . . . 16
2.3.2 Selecting the RAID Mode . . . . . . . . . . . . . . . . . . . . . . 17
2.4 Connect Additional USB Peripherals . . . . . . . . . . . . . . . . . . . 18
3 Usage with Windows and Mac Operating Systems 19
3.1 Usage with Windows Operating Systems. . . . . . . . . . . . . . . . . 19
3.1.1 Accessing or Disconnecting the ioSafe Duo in Windows . . . . . 19
3.1.2 Formatting the ioSafe Duo . . . . . . . . . . . . . . . . . . . . . 20
3.2 Usage with macOS . . . . . . . . . . . . . . . . . . . . . . . . . . . . . 22
3.2.1 Accessing or Disconnecting the ioSafe Duo in macOS . . . . . . 22
3.2.1 Formatting the ioSafe Duo . . . . . . . . . . . . . . . . . . . . . 23
3.2.3 Create a Boot Drive . . . . . . . . . . . . . . . . . . . . . . . . . 24
4 Securing the ioSafe Duo 25
5 Hardware Maintenance 26
5.1 Verify RAID Creation in Windows . . . . . . . . . . . . . . . . . . . . . 26
5.2 Replace a Failed Drive in a RAID 1 Array . . . . . . . . . . . . . . . . . 30
5.3 Drive Rotation as Part of a Backup Schedule . . . . . . . . . . . . . . 31
5.4 Replace System Fan . . . . . . . . . . . . . . . . . . . . . . . . . . . . 32
6 Troubleshooting 33
My ioSafe Duo will not show up on my Windows computer and causes it
to make repeating disconnection sounds. . . . . . . . . . . . . . . . . . 33
7 Product Support 37
7.1 Activate Data Recovery Service Protection . . . . . . . . . . . . . . . . 37
7.2 ioSafe No-Hassle Warranty . . . . . . . . . . . . . . . . . . . . . . . . 37
7.3 Data Recovery Procedure . . . . . . . . . . . . . . . . . . . . . . . . . 37
7.4 Contact Us . . . . . . . . . . . . . . . . . . . . . . . . . . . . . . . . . 38
Appendix: Technical Specifications 39
Page 3

ioSafe Duo User Manual 3
1 General Information
1.1 Introduction
Congratulations on the purchase of your fireproof and waterproof ioSafe Duo! The Duo is
ideal for making sure your data is fully protected—from fire, water (floods and plumbing
breaks, for example), and even hard drive failure. The ioSafe Duo contains two hard drives
that are configured so that two copies of your work are automatically created.
This User Manual will show you how to properly set up an ioSafe Duo, from installing your
own drives, to customizing your RAID configuration, to using it with Windows and macOS operating systems. You will also learn how replace a failed drive, the unit’s system fan, and verify
a RAID array using Windows.
1.2 Activate Warranty and Data Recovery Service Protection
Please make sure you register your product to ensure you receive notices of product updates
and are fully protected by our hardware warranty and Data Recovery Service (if applicable).
Register your product to activate your Data Recovery Service protection plan and warranty by
visiting iosafe.com/activate.
Page 4
ioSafe Duo User Manual4
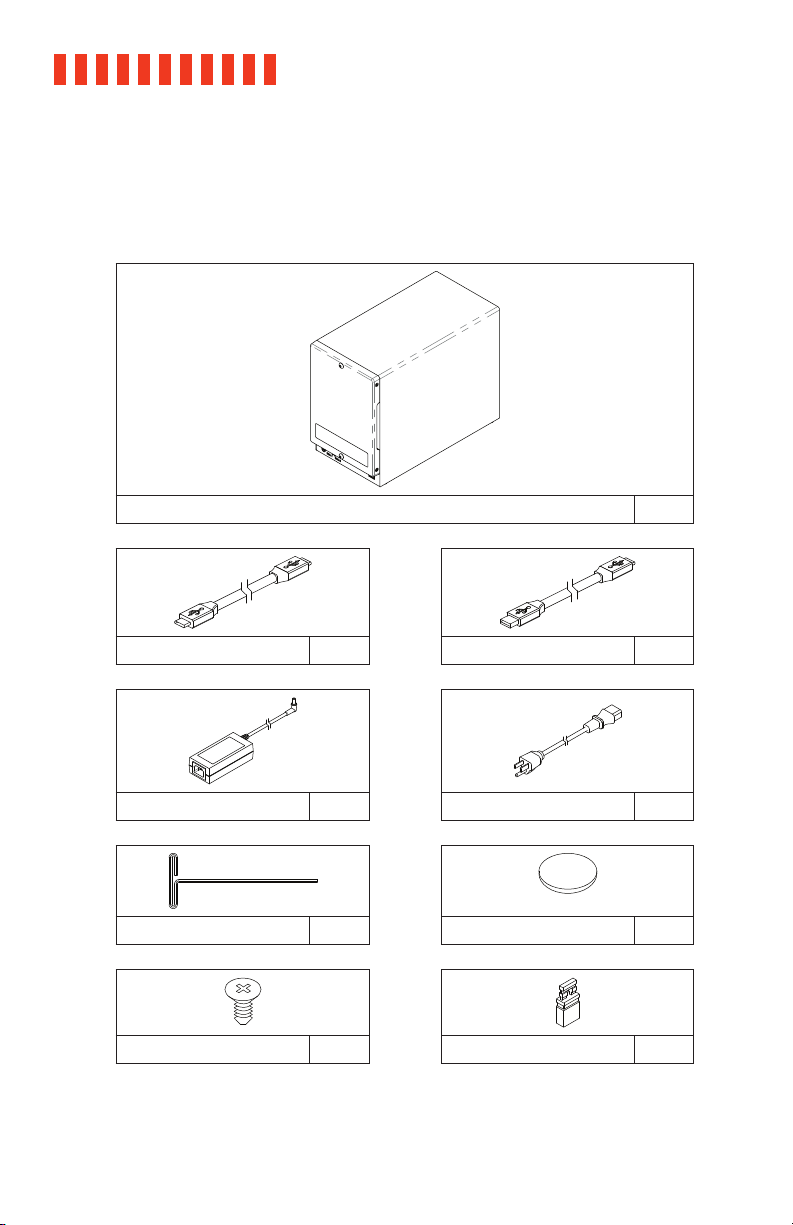
1.3 Package Contents
Check the package contents to verify that you have received the items below. Please contact
ioSafe if any items are missing or damaged.
ioSafe Duo Qty. 1
USB Type C Cable Qty. 1 USB Type A to C Cable Qty. 1
Power Brick Qty. 1 Power Cable** Qty. 1
Hex Tool Qty. 1 Magnet Qty. 1
Drive Screws* Qty. 9 RAID Jumper Qty. 1
*Only included with unpopulated units
**Power cable is localized to the region you purchased your product for, whether North America, European Union/United Kingdom, or
Australia. European Union and United Kingdom units are packaged with two power cables, one for each region.
Page 5
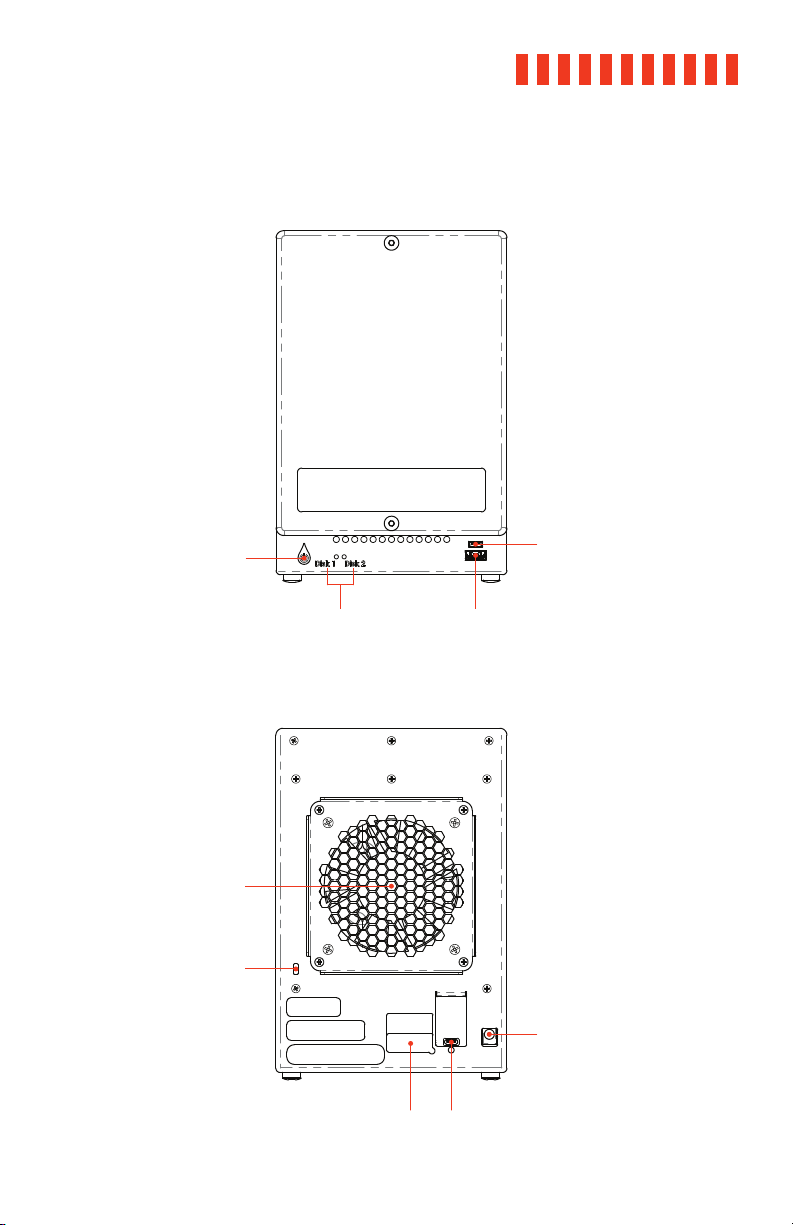
1.4 ioSafe Duo at a Glance
Power
Button
Front
ioSafe Duo User Manual
USB Type-C
Peripheral Port
5
System Fan
Kensington®
Lock Slot
Drive
Status
Indictators
RAID Jumper
Rear
Pin Cover
USB Type-A
Peripheral Port
USB
Type-C Port
Power Connector
Page 6
ioSafe Duo User Manual6
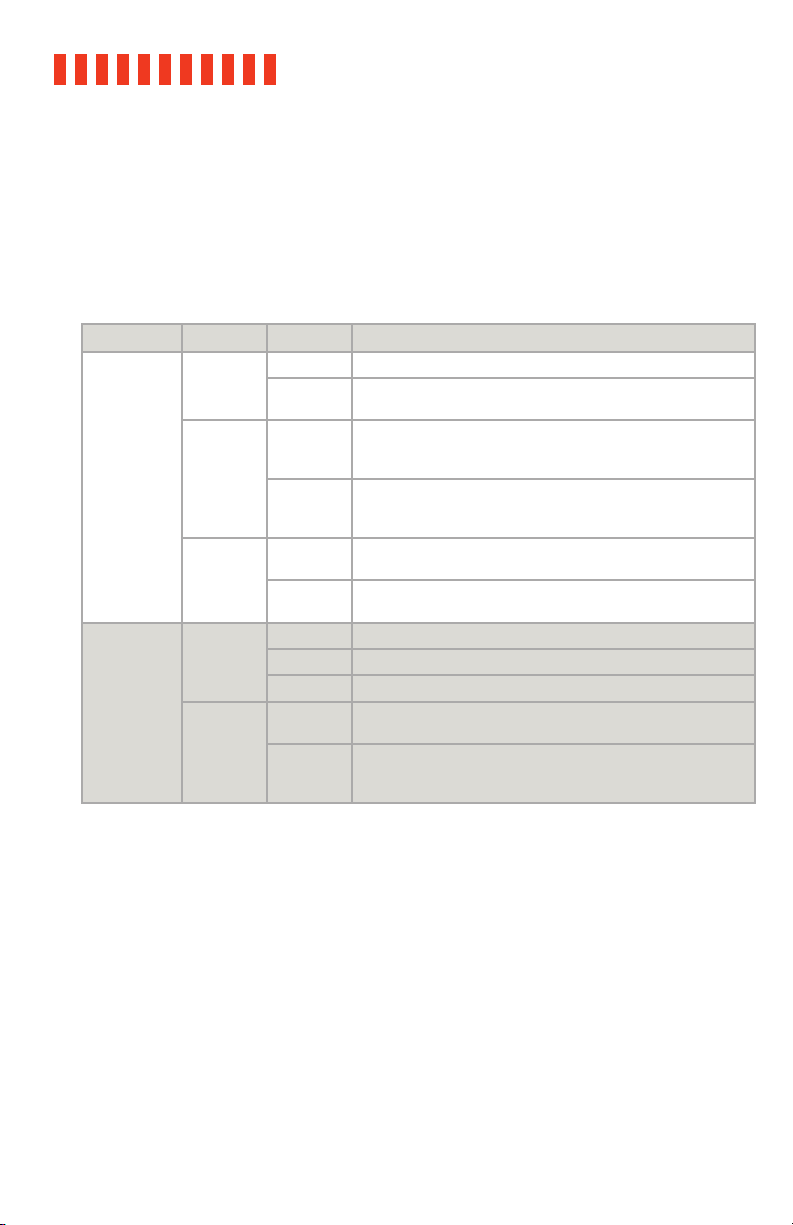
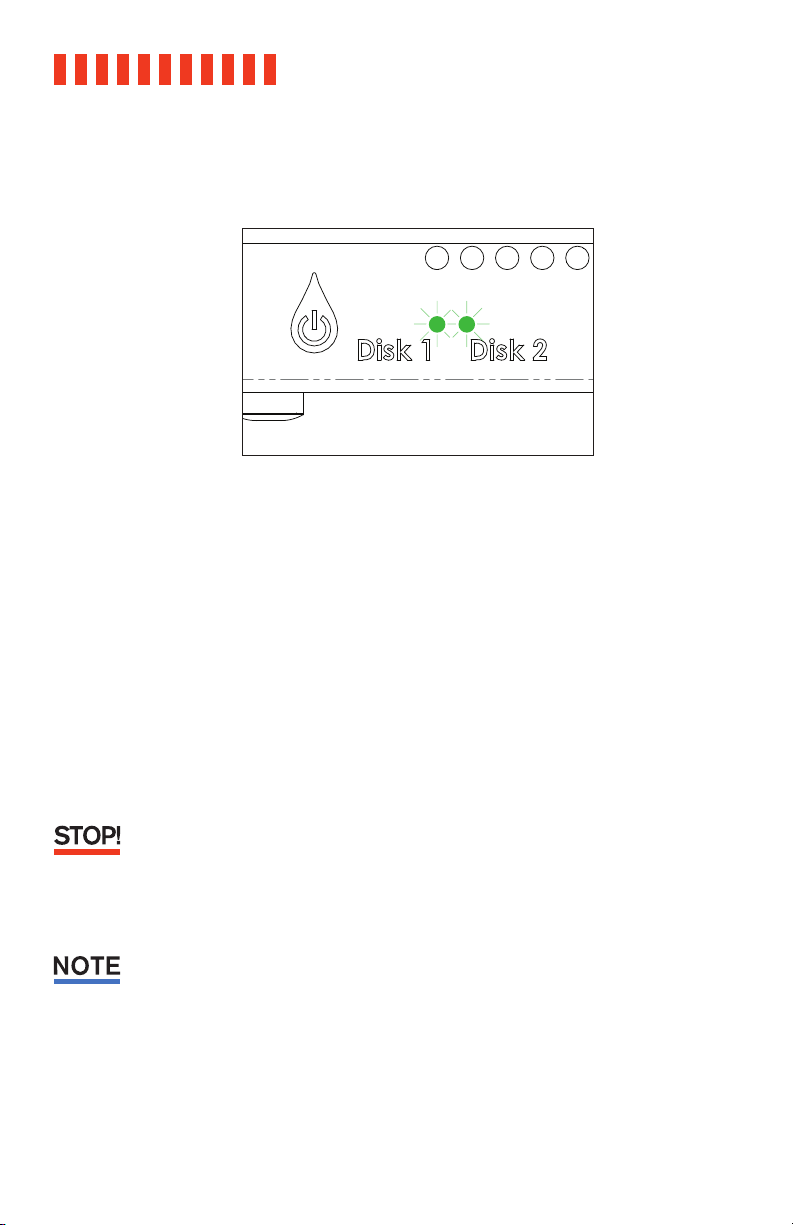
1.5 LED Behavior
This table describes the behavior of the LEDs on the front of the ioSafe Duo. Note that a “RAID
array” is how the two hard drives inside the ioSafe Duo are linked together. One of the ways
they can be linked together is as a RAID 1, which automatically ensures that an exact copy of
your data is always available in case one of the hard drives in the ioSafe Duo dies. Other RAID
modes are available. To use them, see Section 2.3.
LED Name Color State Description
Solid The corresponding drive bay is powered on.
Disk Activity
LEDs #1-2
Power LED
Green
Amber
Red
Blue
Red
Slow
Blinking
Solid
Slow
Blinking
Slow
Blinking
Fast
Flickering
Solid The unit is powered on.
Blinking A RAID array is being created.
Solid
Blinking
The corresponding drive is being accessed.
Both LEDs are solid amber when the internal temperature of
the ioSafe Duo is over 131° F/55° C. Ensure the unit is being
stored in a properly ventilated area.
Indicates that the correspending drive is being accessed while
the internal temperature of the ioSafe Duo is over 131° F/55° C.
Ensure the unit is being stored in a properly ventilated area.
Indicates a drive failure or disconnection of the corresponding
drive.
The RAID 1 array is being rebuilt. The disk with the red LED is
the disk that is being overwritten.
Off The unit is powered off.
Indicates a fan failure. Please contact Technical Support to
obtain a replacement fan (see Section 7).
A RAID array is being created at the same time a fan has failed.
Please contact Technical Support to obtain a replacement fan
(see Section 7).
1.6 Warnings and Notices
Please read the following before using the product.
General
• If a hard drive inside the ioSafe Duo ever fails, do not replace it without consulting
Section 5.2 in this manual first. We’ve made the drive replacement procedure very
easy to follow, but if you don’t follow it you might accidentally erase your data!
• The circuit boards within the product are susceptible to static electricity. Proper
grounding is strongly recommended to prevent electrical damage to the product or
other connected devices, including the computer host. Avoid all dramatic movement,
tapping on the unit, and vibration.
Page 7

ioSafe Duo User Manual
• Avoid placing the drive carrier close to magnetic devices or high voltage devices.
• Before starting any type of hardware installation, please ensure that all power
switches have been turned off and all power cords have been disconnected to prevent personal injury and damage to the hardware.
• To avoid overheating, the ioSafe Duo should be operated in a well-ventilated area.
RAID
• Use only drives that are in perfect condition. Avoid using drives that have ever developed bad sectors during previous use. This could lead to possible device failure or
loss of data.
• The ioSafe Duo supports SATA drives of various specifications and different capacities. However, we recommend using drives of the same brand and type for optimal
performance that have been qualified by ioSafe. To view a list of qualified drives,
please visit iosafe.com.
• If drives of different capacities are used in a RAID 1, the capacity of the smallest drive
will determine how much of each drive is used. The additional capacity on the larger
drive will not be used by the RAID.
7
• Always back up data before switching RAID types. Switching RAID types will destroy
current data. You must reformat your drives afterwards.
About USB
• Actual connection performance depends on many factors including: CPU, file system
overhead, number of attached devices and more. Given these and other factors, in
day-to-day use you can expect maximum, sustained transfer rates to be less than
the theoretical rates maximum rates possible with the connection.
• USB 3.2 is backwards compatible with USB 2.0, USB 3.0, and USB 3.1 host computers.
• The cables supplied with your system have been optimized for performance. Longer
cables or third-party cables may not work or only work intermittently.
Page 8

ioSafe Duo User Manual
8
2 Hardware Setup
2.1 Drive Installation
If you purchased an ioSafe Duo with pre-installed drives, skip this section and continue on to
Section 2.2.
2.1.1 Tools and Parts for Drive Installation
• Phillips screwdriver
• Hex tool (included)
• At least one 3.5-inch or 2.5-inch SATA hard drive or solid state drive (SSD). Please visit
iosafe.com for a list of qualified drive models.
Using drives with previously existing data on them in a new RAID or SPAN array will cause the
previously existing data to be erased. Please back up your data before beginning this operation.
However, if you are using the ioSafe Duo in JBOD mode, the previously existing data will not be
erased. See Section 2.3 for an introduction to the RAID and non-RAID modes that the ioSafe Duo
supports.
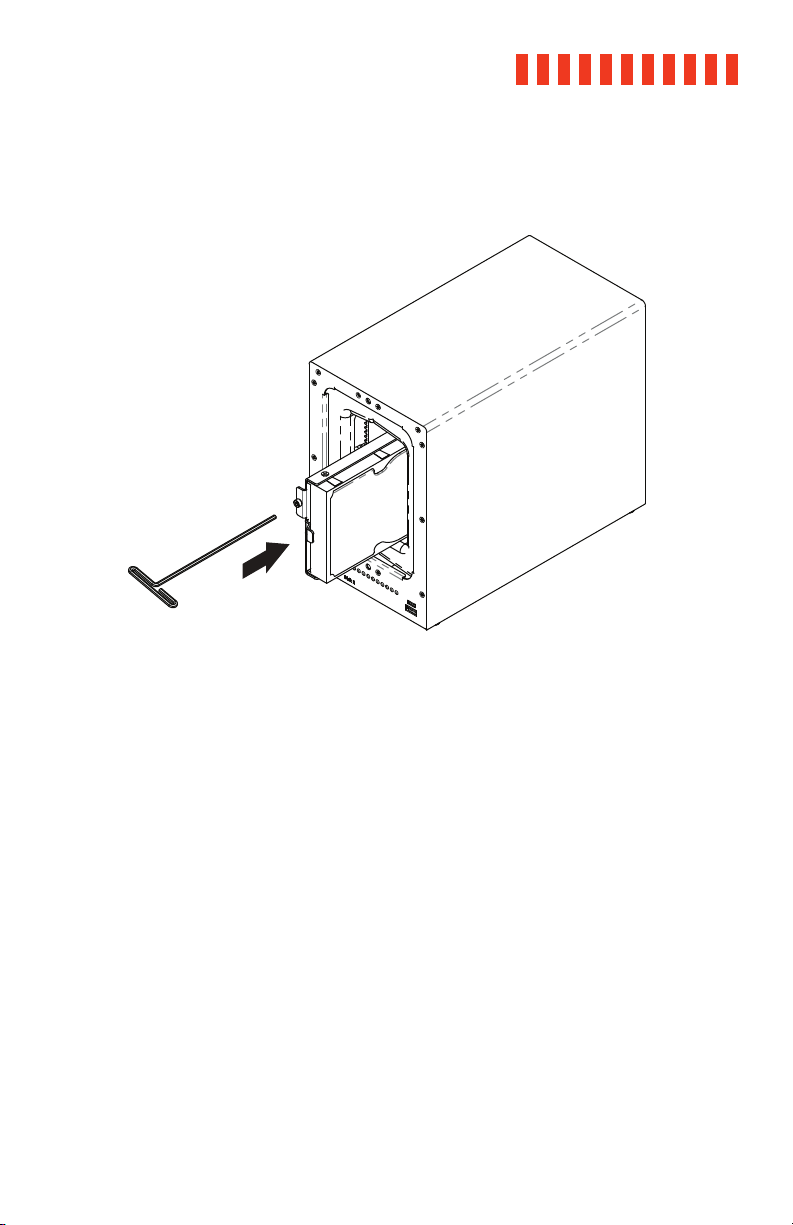
2.1.2 SATA Drive Installation or Removal
a. Use the included hex tool to remove the screws on the top and bottom of the front
cover. Then remove the front cover.
Page 9
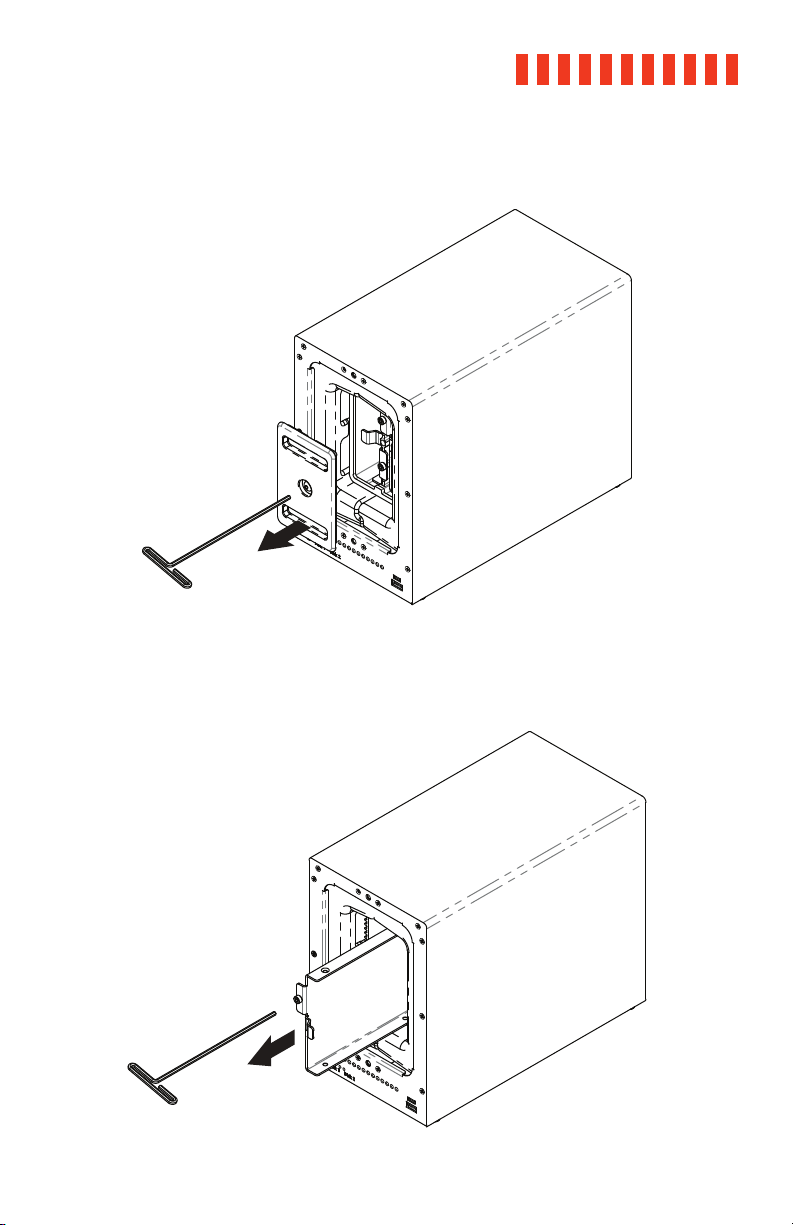
b. Remove the waterproof drive cover with the 3mm hex tool.
ioSafe Duo User Manual
9
c. Remove the drive trays with the hex tool.
Page 10

ioSafe Duo User Manual
10
d. If you are removing a previously installed hard drive(s), remove the drive(s) from the
drive tray by removing the four (4) drive screws holding it into the tray with a Phillips
screwdriver.
Otherwise, skip this step.
e. Install a compatible drive into each drive tray using the supplied four (4) drive screws
and a Phillips screwdriver. Please visit iosafe.com for a list of qualified drive models.
Since you’ll likely be using this as part of a RAID array, ioSafe recommends that both installed
drives should have the same capacity.
Page 11
ioSafe Duo User Manual
f. Insert each loaded drive tray into an empty drive bay, ensuring that each one is
pushed in all the way. Then tighten the screws using the hex tool.
11
Page 12

ioSafe Duo User Manual12
g. Replace the waterproof drive cover and securely tighten it using the hex tool.
Avoid using tools other than the supplied hex tool to secure the waterproof drive cover as you
could under-tighten or break the screw. The hex tool has been designed to flex slightly when
the screw is sufficiently tight and the waterproof gasket is properly compressed.
Page 13

ioSafe Duo User Manual 13
h. Install the front cover to finish installation and protect the drives from fire.
i. You may optionally use the round magnet provided to attach and store the hex tool
on the back of the unit.
Page 14

ioSafe Duo User Manual
14
2.2 Connecting the ioSafe Duo
a. Connect the ioSafe Duo to your computer using one of the provided USB cables.
USB Type-C Cable
For the fastest performance, connect
the Duo to a USB 3.2 Gen 2 Type-C
port on your computer.
USB Type-C
Connector
USB Type-C to A Cable
The Duo also runs on USB 3.x and
2.0 Type-A ports.
USB Type-A
Connector
The cables that come in the box have been optimized for performance. Longer cables or thirdparty cables may not work or only work intermittently.
Page 15

b. Connect the Duo to power using the provided power cord.
If you purchased the ioSafe Duo without pre-installed drives, or if you plan to use a different
RAID mode other than RAID 1, do not turn on the power yet. Continue to Section 2.3 instead.
ioSafe Duo User Manual
15
c. Press the power button on the front to turn on the unit.
Page 16

ioSafe Duo User Manual
16
2.3 RAID Configuration
If you purchased the ioSafe Duo with pre-installed drives and you intend to use the default
RAID 1 mode, skip this section.
2.3.1 Introduction to RAID
A RAID (Redundant Array of Independent Disks) is an array of multiple data drives that
are combined in a way that provides faster performance or data safety. The ioSafe Duo is
capable of several RAID and RAID-like modes. Choose your preferred mode based on factors such as disk capacity, desired data safety, and desired performance.
ioSafe recommends that you use this product as a RAID 1 device. RAID 1 automatically maintains
an exact copy of all data stored on the Duo and protects you against the loss of a single drive. If
you purchased an ioSafe Duo with pre-installed drives, no additional steps are necessary to do
use it in this mode. The Duo works as a RAID 1 device right out of the box.
Supported RAID Modes
Mode Description
All drives are combined into one single volume and benefit from
RAID 0
increased read and write speeds at the cost of a higher risk of failure.
If one drive fails, the data on all drives is destroyed.
Known as mirroring. All data is replicated on two separate disks, so
RAID 1
only half of the combined disk capacity is available for data storage.
Required No.
of Drives
2
2
Supported RAID-Like Modes
Mode Description
All drives are treated as individual volumes and will appear as sepa-
JBOD
All drives are combined into one single volume at the cost of a higher
SPAN
risk of failure. It does not benefit from the same speed advantages
that RAID 0 does. If one drive fails, the data on all drives is destroyed.
rate volumes in your operating system.
Required No.
of Drives
1
2
Page 17

ioSafe Duo User Manual
2.3.2 Selecting the RAID Mode
a. Power off the ioSafe Duo.
b. Peel away the RAID Jumper Pin Cover sticker located on the rear of the ioSafe
Duo.
c. Insert the included jumper onto the appropriate jumper pins according to your
desired RAID mode, which is indicated on the legend above the jumper pins.
17
Page 18

ioSafe Duo User Manual
18
d. Press and hold down on the Power button until the Power button begins blinking
blue. The Drive Activity LEDs for both disks will also briefly blink red. The blinking
indicates that the array is being created.
Failure to hold the power button down will cause the ioSafe Duo to appear on your computer as
two separate drives (JBOD Mode) instead of one unified drive, regardless of what RAID jumper
setting you use.
e. The Power button will stop blinking and the Disk Activity LEDs will glow a solid
green once the array has been created. Verify that the RAID mode is correct (see
Section 5.1).
2.4 Connect Additional USB Peripherals
The USB ports on the front of the ioSafe Duo allow you to connect additional USB peripherals,
including thumb drives and phones. One (1) USB Type-A port and one (1) USB Type-C port
have been provided. Any connected devices will connect to your computer like normal.
Page 19

ioSafe Duo User Manual
3 Usage with Windows and Mac Operating Systems
3.1 Usage with Windows Operating Systems
3.1.1 Accessing or Disconnecting the ioSafe Duo in Windows
Accessing the ioSafe Duo
When the ioSafe Duo is properly connected and turned on (see Section 2), a window
may open on your computer to allow you access it.
If you need to use the ioSafe Duo with both macOS and Windows computers, you will need to
reformat it. See Section 3.2.1 for directions.
If you are using Windows 10 and no window appears, press Windows Key + E on your
keyboard to open a File Explorer window. Then click on This PC in the File Explorer
window’s navigation pane. Double-click on the icon representing the ioSafe Duo.
If you are using Windows 8.1, press Windows Key + E on your keyboard to open a File
Explorer window. Then click on Computer in the File Explorer window’s navigation
pane. Double-click on the icon representing the ioSafe Duo.
If you have installed your own hard drives in the ioSafe Duo and did not order a Duo with
pre-installed drives, then you will need to reformat your Duo before you can see it on your
computer. Please consult the User Manual located at iosafe.com for instructions.
19
If your computer begins making repeating device disconnection sound effects when you turn on
the ioSafe Duo, and the Duo will not appear on your computer, then please see Section 6.
Disconnecting the ioSafe Duo
a. Left click the USB plug icon with the checkmark on the Desktop task bar (see the
image below) and select the ioSafe Duo from the menu that pops up. You may
have to click on the Show Hidden Icons arrow on the task bar to find the correct
icon. Windows will indicate when it is safe to disconnect the USB cable from the
ioSafe Duo.
The USB Plug icon in the Windows 10 Desktop task bar.
Page 20

ioSafe Duo User Manual
20
b. Power off the ioSafe Duo.
Turning off the ioSafe Duo or disconnecting it from your computer without following the
procedure above can result in data loss.
3.1.2 Formatting the ioSafe Duo
Follow the steps below for Windows 10 and Windows 8.1 to reformat your ioSafe Duo.
If you purchased an ioSafe Duo with pre-installed drives, it will work with Windows right out of
the box without needing to format it. You may skip this section.
a. Press WINKEY + X and then select Disk Management.
b. The drive should appear in the list of Disks in the lower pane. You may need to scroll
down to see it. If the drive is already formatted, you can identify it easily by its volume
name. If the drive is not initialized or is brand new, a window will pop up asking you to
select a partition type. Select GPT and press OK.
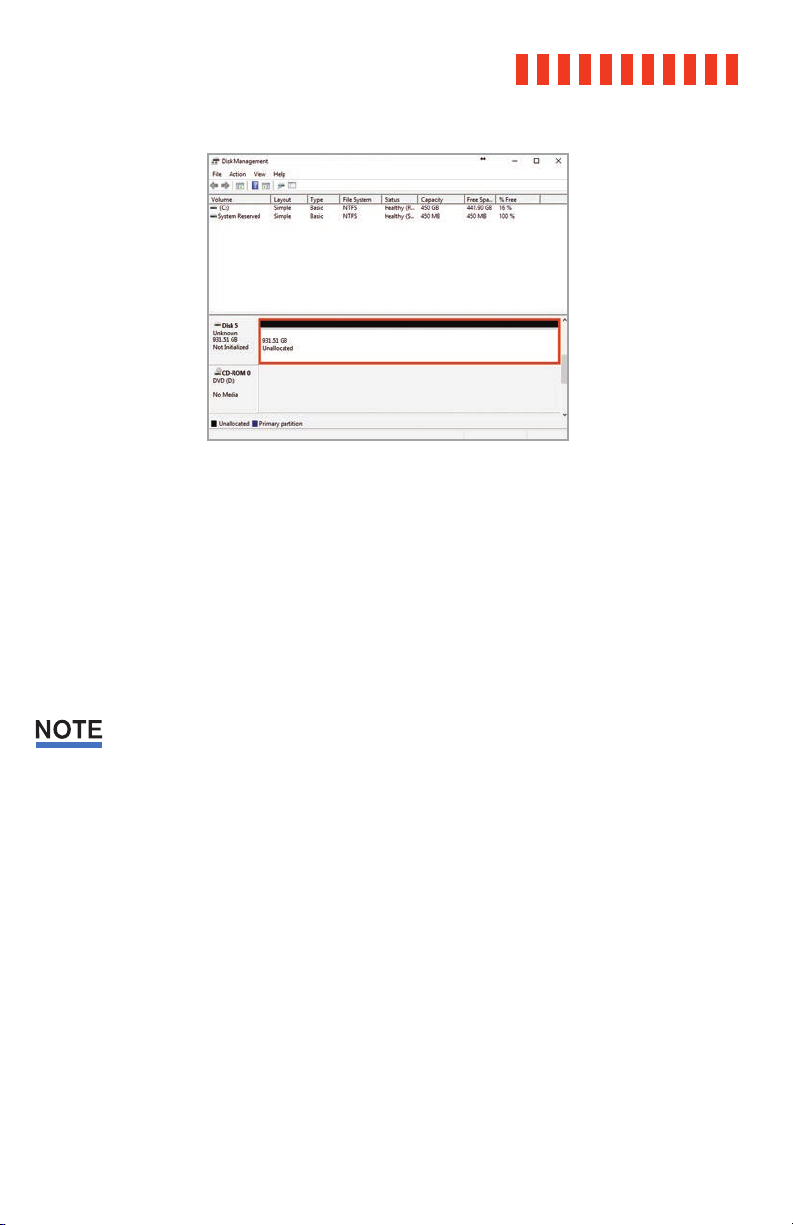
c. To format the volume, right-click the Drive Properties Box of the drive (highlighted
red in the figure below) and select New Simple Volume...
Page 21
ioSafe Duo User Manual
The Disk Management pane with the Drive Properties Box
highlighted in red.
d. Unless you wish to customize the settings in these dialog prompts, click Next on the
Select Partition, Specify Volume/Partition Size, and Assign Drive Letter or Path dialog
prompts, leaving the default settings.
e. Choose your preferred file system from the file system selection window that appears
and enter a name for the new volume. Then check the box labeled Quick Format,
which ensures that the formatting process will take less than a minute.
21
If you want to use your ioSafe Duo with both macOS and Windows, choose the ExFAT file
system.
f. Click Next and then Finish to start the format process. When the format is complete,
the Drive Properties Box will update to show the new volume name.
Once the ioSafe Duo is reformatted, a window may open on your computer to allow you
access it.
If you are using Windows 10 and no window appears, press Windows Key + E on your keyboard to open a File Explorer window. Then click on This PC in the File Explorer window’s
navigation pane.
If you are using Windows 8.1, press Windows Key + E on your keyboard to open a File
Explorer window. Then click on Computer in the File Explorer window’s navigation pane.
Page 22

ioSafe Duo User Manual
22
3.2 Usage with macOS
3.2.1 Accessing or Disconnecting the ioSafe Duo in macOS
Accessing the ioSafe Duo
If the ioSafe Duo is already formatted, an icon representing it will appear on the
desktop. Double-click on the icon to access it.
If you purchased an ioSafe Duo with pre-installed hard drives and this is your first time using it,
then you will need to reformat it before you can write files to it.
If it’s unformatted, a message will appear on the desktop saying that the disk is
unreadable. Use Disk Utility to easily format the drive (see Section 3.2.2).
Disconnecting the ioSafe Duo
a. Eject the ioSafe Duo before powering down the unit by dragging the ioSafe Duo’s
icon to the Trash, or by selecting the ioSafe Duo’s icon and then pressing Com-
mand + E on your keyboard.
b. Power off the ioSafe Duo.
Turning off the ioSafe Duo or disconnecting it from your computer without following the
procedure above can result in data loss.
Page 23

ioSafe Duo User Manual
3.2.1 Formatting the ioSafe Duo Use Disk Utility to format the drives in the Duo, which can be found in Applications → Utilities, or by selecting Spotlight Search (Command + Space) and typing in “Disk Utility”
and then hitting Return on your keyboard.
a. Click on the drive in the window to the left.
b. Click on the Erase button at the top.
c. Enter a name for the new volume.
d. Select the format type. Select APFS if you are using SSDs. If you purchased the
ioSafe Duo with pre-installed drives or are using your own hard drives, choose OS X
Extended (Journaled). If you need to use your ioSafe Duo with both macOS and Windows computers, select ExFAT instead.
e. For the scheme, select GUID Partition Map.
f. Click Erase to start the process.
g. Once the format is complete, click Done.
h. Once the ioSafe Duo is formatted, double-click on the icon representing the Duo on
the desktop to access it.
23
macOS Disk Utility, showing the “Erase” submenu.
Page 24

ioSafe Duo User Manual
24
3.2.3 Create a Boot Drive
To create a boot drive, you must first install macOS on the ioSafe Duo by using a thirdparty app like MacDaddy Install Disk Creator. Next, go to System Preferences → Startup
Disk. A window will list the available bootable volumes. Select the volume from which you
wish to boot. Another method is to hold down the Option key during boot up. A screen
should appear that allows you to select the volume you wish to use. This is useful if you
are sporadically booting from the ioSafe Duo.
Page 25

ioSafe Duo User Manual
4 Securing the ioSafe Duo
For drive security, the ioSafe Duo is equipped with a Kensington security slot, which supports a
standard Kensington security cable (sold separately). For more information on the Kensington
security slot and available products, visit kensington.com.
25
Kensington
Security Slot
Page 26
ioSafe Duo User Manual26
5 Hardware Maintenance
5.1 Verify RAID Creation in Windows
You can verify that the RAID was created correctly by following these steps:
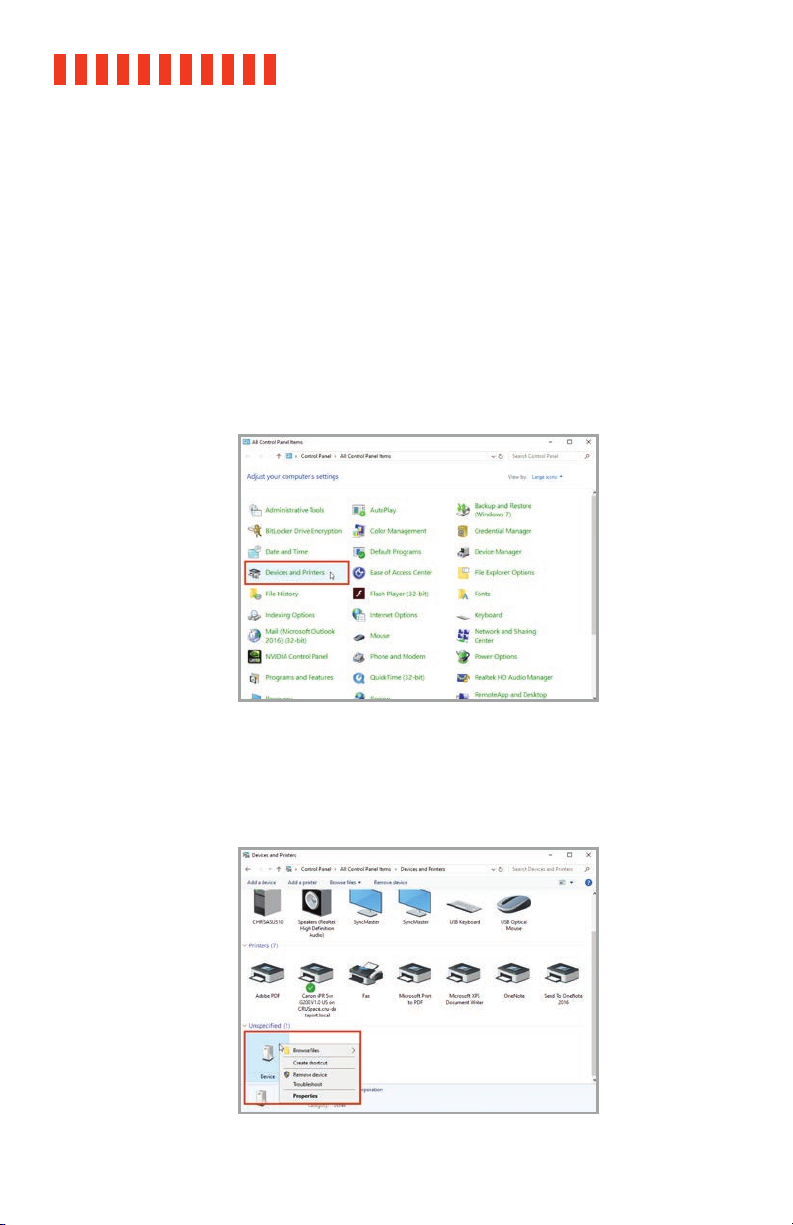
a. In Windows, go to Control Panel → Devices and Printers. In Windows 10, you can find the
Control Panel by typing “Control Panel” into the taskbar search field and selecting the
Control Panel app in the results listing.
If your Control Panel is sorted by category, then “Devices and Printers” can be found in the
“Hardware and Sound” category.
The Control Panel, sorted by Large Icon view.
b. Right click on the ioSafe Duo device and select Properties. It may be categorized under
the “Unspecified” category and named “Device”.
Right-clicking on the ioSafe Duo device in “Devices and
Printers”.
Page 27

ioSafe Duo User Manual 27
c. In the Device Properties window that opens, select the Hardware tab.
d. Select USB Mass Storage Device from the list on the Hardware tab. Then click the Proper-
ties button.
Page 28

ioSafe Duo User Manual
28
e. In the properties window that opens, select the Details tab.
f. Click on the Property drop-down box and select Bus reported device description from
the list that appears.
Page 29
ioSafe Duo User Manual 29
g. In the Value box, you should see text similar to “ASM1352R-XXXXXX,” where the X’s are
placeholder names. The X’s correspond to the RAID mode that the device is currently in.
Mode Corresponding Device Name
RAID 0 ASM1352R-FAST
RAID 1 ASM1352R-SAFE
JBOD ASM1352R-PM
SPAN ASM1352R-VOLUME
If the text corresponds to the RAID mode you expected, then you have successfully verified that the RAID array was created successfully. You may skip the remaining steps.
If the text does not correspond to the RAID mode you expected, continue to the next
steps to recreate the RAID.
Recreating the RAID will result in the loss of data on your drives. Do not proceed to the next
step unless you are sure your data is backed up!
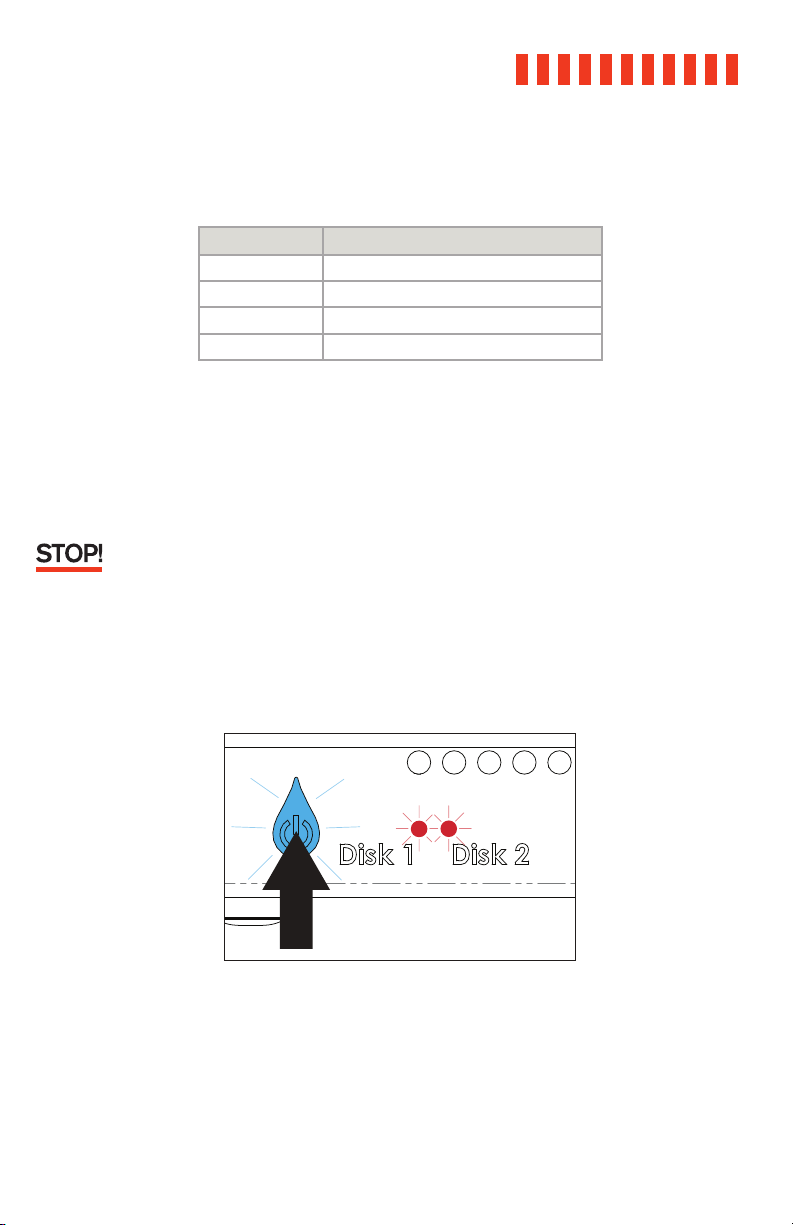
h. If the RAID mode is incorrect or the ioSafe Duo does not appear on your computer, restart
the array creation process by powering off the ioSafe Duo. Then, press and hold down on
the Power button until the Power button begins blinking blue. The Drive Activity LEDs for
both disks will also briefly blink red. The blinking indicates that the array is being created.
Page 30
ioSafe Duo User Manual30
i. The Disk Activity LEDs will glow a solid green once the array has been created. Repeat the
steps above to verify the RAID.
5.2 Replace a Failed Drive in a RAID 1 Array
a. Note which drive has failed, indicated by the Disk Activity LEDs on the front of the ioSafe
Duo. The LED corresponding to the failed drive will be red.
b. Shut down the ioSafe Duo.
c. Disconnect the USB cable connecting the ioSafe Duo to your computer.
d. Remove the failed drive. Refer to Section 2.1.2 for detailed instructions.
e. If the good drive is located in the bay labelled “Disk 2”, then move it to the side labelled
“Disk 1”.
It is very important to move the remaining good drive to Bay 1. After being powered off, the
ioSafe Duo will always rebuild a RAID 1 mirror from the drive located in Bay 1. Failure to place
the good drive in Bay 1 will cause your data to be overwritten.
f. Insert the replacement drive into the bay labelled “Disk 2”.
ioSafe recommends that you use a replacement drive with the same capacity as the remaining
drive.
g. Reattach the waterproof drive cover and the front cover. Refer to Section 2.1.2 for detailed
instructions.
h. Turn on the ioSafe Duo. The Disk Activity LED corresponding to the drive being overwritten
will begin flickering red very quickly, indicating that the RAID is rebuilding. This process
may take several hours.
Page 31

ioSafe Duo User Manual 31
Do not attempt to use the ioSafe Duo while the RAID is rebuilding. While the ioSafe Duo can
handle data transfers during a rebuild, if something else happens like a loss of power while
data is transferring during a RAID rebuild, there is a chance that data loss may occur.
i. Reconnect the USB cable only after the Disk Activity LEDs glow a solid green, indicating
that the RAID rebuilding process is complete.
5.3 Drive Rotation as Part of a Backup Schedule
The following directions demonstrate how to rotate drives for backup purposes.
ioSafe does not recommend using a backup rotation schedule for the ioSafe Duo, since regular
rotation of drives can wear down the waterproof seal and the drives are protected well enough
to survive the vast majority of disaster scenarios. Drive rotation should only be carried out
between lengthy intervals, if at all.
a. Shut down the ioSafe Duo.
b. Disconnect the USB cable connecting the ioSafe Duo to your computer.
c. Remove the drive from Bay 2. Refer to Section 2.1.2 for detailed instructions.
It is very important to only replace the drive located in Bay 2. After being powered off, the
ioSafe Duo will always rebuild a RAID 1 mirror from the drive located in Bay 1. Inserting a
replacement drive into Bay 1 will cause your data to be overwritten.
d. Insert the replacement drive into Bay 2.
e. Reattach the waterproof drive cover and the front cover. Refer to Section 2.1.2 for detailed
instructions.
f. Turn on the ioSafe Duo. The Disk Activity LED for Bay 2 will begin flickering red very
quickly, indicating that the RAID is rebuilding. This process may take several hours.
g. Reconnect the USB cable only after the Disk Activity LEDs glow a solid green, indicating
that the RAID rebuilding process is complete.
Page 32

ioSafe Duo User Manual32
5.4 Replace System Fan
The power LED will turn a solid red if the system fan is not working. Follow the steps below to
replace the malfunctioning fan.
a. Shut down your ioSafe Duo. Disconnect all cables connected to your ioSafe Duo to pre-
vent possible damage.
b. Remove the four (4) perimeter screws around the rear fan assembly plate.
c. Pull the assembly from the back panel of your ioSafe to expose the fan connections.
d. Disconnect the fan cables from the connector wires attached to the rest of the ioSafe and
then remove the assembly.
e. Install the new fan assembly or replace the existing fans. Connect the fan cables of the
new fans to the fan connector wires attached to the main ioSafe unit.
f. Replace and tighten the four (4) screws you removed in Step B.
Page 33

ioSafe Duo User Manual 33
6 Troubleshooting
My ioSafe Duo will not show up on my Windows computer and causes it to make repeating disconnection sounds.
If you have properly connected your ioSafe Duo to your Windows computer and turned it on,
try turning off the ioSafe Duo and connecting it to a different USB port.
If that is unsuccessful, then you have likedly connected the ioSafe Duo to a USB port on your
computer that uses what’s known as an ASMedia™ USB host controller, which will need different driver software to work correctly with the ioSafe Duo.
Follow these simple steps to change the driver.
a. Power off the ioSafe Duo.
b. Press Windows Key + X on your keyboard and click on Device Manager from the menu
that pops up from the bottom-left corner of the screen.
The Quick Access Menu, pictured, allows you to access
the Device Manager.
Page 34

ioSafe Duo User Manual34
c. Click on the arrow next to “Universal Serial Bus controllers” from the Device Manager
window that pops up to expand the list of USB controllers.
The “Universal Serial Bus controllers” list is located at
the bottom of the Device Manager.
d. Right-click on an item in the list that contains both “ASMedia” and “Host Controller” in
the label. There may be more than one item in the list. In the submenu that appears, click
Update driver.
These items will need their driver updated to work
properly with the ioSafe Duo. Choose one and follow the
remaining steps.
Page 35

ioSafe Duo User Manual 35
e. Select Browse my computer for driver software on the new window that appears.
Choose “Browse my computer for driver software”.
f. Choose Let me pick from a list of available drivers on my computer.
Click “Let me pick from a list of available drivers on my
computer”.
Page 36

ioSafe Duo User Manual
36
g. Make sure Show compatible hardware is checked. Then click on USB xHCI Compliant
Host Controller. Finally, click the Next button.
This is the USB driver that comes standard in Windows
and works with ASMedia USB add-on cards.
h. Repeat Steps C through F for all items in the Device Manager list that say both “ASMedia”
and “Host Controller”.
The ioSafe Duo should now appear on your computer. If you experience any issues with this
procedure, please contact ioSafe Technical Support (see Section 6.3).
Page 37

ioSafe Duo User Manual
7 Product Support
Congratulations! You are now ready to enjoy all the features of your ioSafe Duo. For more information regarding specific features, please refer to our online resources available at iosafe.com.
7.1 Activate Data Recovery Service Protection
Register your product to activate your Data Recovery Service protection plan and warranty by
visiting iosafe.com/activate.
7.2 ioSafe No-Hassle Warranty
If the ioSafe Duo breaks during the warranty period, we will repair or replace it.
The standard term for the warranty is two (2) years from the date of purchase. A five (5) year
extended term warranty service is available for purchase upon activation of the Data Recovery
Service. See the website or contact customerservice@iosafe.com for help. ioSafe reserves the
right to have its representative inspect any product or part to honor any claim, and to receive
a purchase receipt or other proof of original purchase before warranty service is performed.
This warranty is limited to the terms stated herein. All expressed and implied warranties
including the warranties of merchantability and fitness for a particular purpose are excluded,
except as stated above. ioSafe disclaims all liabilities for incidental or consequential damages
resulting from the use of this product, or arising out of any breach of this warranty. Some
states do not allow the exclusion or limitation of incidental or consequential damages, so the
above limitation may not apply to you. This warranty gives you specific legal rights, and you
may have other rights as well, which will vary from state to state.
37
7.3 Data Recovery Procedure
If the ioSafe faces possible data loss for any reason, you should immediately call the ioSafe
Disaster Response Team at 1-888-984-6723 extension 430 (US & Canada) or 1-530-820-3090
extension. 430 (International). You can also send an email to disastersupport@iosafe.com.
ioSafe can determine the best actions to take to protect your valuable information. In some
cases a self-recovery can be performed and provide you with immediate access to your
information. In other cases, ioSafe may request that the product be returned to the factory for
data recovery. In any case, contacting us is the first step.
The general steps for disaster recovery are:
a. Email disastersupport@iosafe.com with your serial number, product type and date of
purchase. If you cannot email, call the ioSafe Disaster Support Team at 1-888-984-6723
(US & Canada) or 1-530-820-3090 (International) extension 430.
Page 38

ioSafe Duo User Manual
38
b. Report the disaster event and obtain return shipping address/instructions.
c. Follow ioSafe team instructions on proper packaging.
d. ioSafe will recover all data which is recoverable according to the terms of the Data
Recovery Service Terms and Conditions.
e. ioSafe will then place any recovered data on a replacement ioSafe device.
f. ioSafe will ship the replacement ioSafe device back to the original user.
g. Once the primary server/computer is repaired or replaced, the original user should
restore the primary drive data with the ioSafe backup data.
7.4 Contact Us
Customer Support
USA Toll Free Phone: 888.98.IOSAFE (984.6723) x400
International Phone: 530.820.3090 x400
Email: customersupport@iosafe.com
Technical Support
USA Toll Free Phone: 888.98.IOSAFE (984.6723) x450
International Phone: 530.820.3090 x450
Email: techsupport@iosafe.com
Disaster Support
US Toll Free Phone: 888.98.IOSAFE (984.6723) x430
International Phone: 530. 820.3090 x430
Email: disastersupport@iosafe.com
Page 39

Appendix: Technical Specifications
Product Model ioSafe Duo
Fire Protection Up to 1550° F, 30 minutes per ASTM E-119
Water Protection Fully submersed, fresh or salt water, 10 foot depth, 72 hours
Theft Protection Metal Kensington Lock Slot
Interface Types &
Speeds
Front USB Peripheral
Connectors
Rear Data Connector One (1) USB Type-C connector
Host Compatibility USB 2.0, 3.0, 3.1, and 3.2 ports
Supported Drive Types 3.5-inch SATA hard drives
Drive Bays 2
Max Internal Capacity 28 TB (14 TB x 2)* (Capacity may vary by RAID mode)
Torque
Supported RAID Types JBOD, SPAN, RAID 0, RAID 1
RAID Configuration Jumper pin
Number of LEDs 3
Description of LEDs HDD1 status/activity, HDD2 status/activity, power on/fan failure
Temperature LED Alert Yes
Supported Operating
Systems
Cooling Fan One (1) 92mm cooling fan
Variable Fan Speed Yes
Power Switch Illuminated push-button switch
Power Supply Unit 60W 12V 5A Adapter
Environmental
Requirements
USB 3.2 Gen 2: up to 10 Gbps
One (1) USB Type-A connector
One (1) USB Type-C connector
2.5-inch SATA hard drives
2.5-inch SATA SSDs
Complete list of qualified drive models available on iosafe.com
2.5-inch drives, M3 screws: 4 inch-pounds max.
3.5-inch drives, #6-32 screws: 6 inch-pounds max.
Windows 10 and 8.1
macOS 10.13 “High Sierra” or newer
Linux distributions that support the connection type used
Line voltage: 100V to 240V AC
Frequency: 50/60Hz, Single Phase
ioSafe Duo User Manual 39
*Product has been tested with up to 14TB drives, but may support larger drives.
Page 40

ioSafe Duo User Manual
40
Product Weight Unpopulated: 23.8 pounds (10.80 kg)
Populated: 25.8-26.8 pounds (11.70-12.16 kg) (depending on drive
model)
Product Dimensions 5.9in W x 11.5in L x 9.06in H (150mm W x 292mm L x 230mm H)
Compliance EMI Standard: FCC Part 15 Class A
EMC Standard: EN55024, EN55032
CE, RoHS, RCM
Warranty 2 or 5 years, depending on purchased configuration. A 5 year war
ranty service is also available upon activation of Data Recovery
Service.
US Patents 7291784, 7843689, 7855880, 7880097, 9854700
International Patents AU2005309679B2, CA2587890C, EP1815727B1, JP2011509485A,
WO2006058044A2, WO2012036731A1, WO2016195755A1
-
Page 41

ioSafe Duo User Manual 41
THIS PAGE INTENTIONALLY LEFT BLANK
Page 42

ioSafe Duo User Manual42
THIS PAGE INTENTIONALLY LEFT BLANK
Page 43

ioSafe Duo User Manual 43
THIS PAGE INTENTIONALLY LEFT BLANK
Page 44

©2020 CRU Data Security Group, LLC. ALL RIGHTS RESERVED.
This User Manual contains proprietary content of CRU Data Security Group, LLC (“CDSG”) which is protected by copyright, trademark, and
other intellectual property rights.
Use of this User Manual is governed by a license granted exclusively by CDSG (the “License”). Thus, except as otherwise expressly
permitted by that License, no part of this User Manual may be reproduced (by photocopying or otherwise), transmitted, stored (in a
database, retrieval system, or otherwise), or otherwise used through any means without the prior express written permission of CDSG.
Use of the full ioSafe Duo product is subject to all of the terms and conditions of this User Manual and the above referenced License.
®
, ioSafe®, and No-Hassle™ (collectively, the “Trademarks”) are trademarks owned by CDSG and are protected under trademark law.
CRU
Kensington® is a registered trademark of Kensington Computer Products Group. ASMedia™ is a trademark of ASMedia Technology, Inc.
This User Manual does not grant any user of this document any right to use any of the Trademarks.
Product Warranty
CDSG warrants this product to be free of significant defects in material and workmanship for a period of two (2) years from the original
date of purchase. A five (5) year extended warranty service is available for purchase upon activation of the Data Recovery Service. CDSG’s
warranty is nontransferable and is limited to the original purchaser.
Limitation of Liability
The warranties set forth in this agreement replace all other warranties. CDSG expressly disclaims all other warranties, including but not
limited to, the implied warranties of merchantability and fitness for a particular purpose and non-infringement of third-party rights with
respect to the documentation and hardware. No CDSG dealer, agent, or employee is authorized to make any modification, extension, or
addition to this warranty. In no event will CDSG or its suppliers be liable for any costs of procurement of substitute products or services,
lost profits, loss of information or data, computer malfunction, or any other special, indirect, consequential, or incidental damages
arising in any way out of the sale of, use of, or inability to use any CDSG product or service, even if CDSG has been advised of the pos
sibility of such damages. In no case shall CDSG’s liability exceed the actual money paid for the products at issue. CDSG reserves the right
to make modifications and additions to this product without notice or taking on additional liability.
FCC Compliance Statement: “This device complies with Part 15 of the FCC rules. Operation is subject to the following two conditions:
(1) This device may not cause harmful interference, and (2) this device must accept any interference received, including interference that
may cause undesired operation.”
This equipment has been tested and found to comply with the limits for a Class A digital device, pursuant to Part 15 of the FCC Rules.
These limits are designed to provide reasonable protection against harmful interference when the equipment is operated in a commer
cial environment. This equipment generates, uses, and can radiate radio frequency energy and, if not installed and used in accordance
with the instruction manual, may cause harmful interference to radio communications. Operation of this equipment in a residential area
is likely to cause harmful interference in which case the user will be required to correct the interference at this own expense.
In the event that you experience Radio Frequency Interference, you should take the following steps to resolve the problem:
1) Ensure that the case of your attached drive is grounded.
2) Use a data cable with RFI reducing ferrites on each end.
3) Use a power supply with an RFI reducing ferrite approximately 5 inches from the DC plug.
4) Reorient or relocate the receiving antenna.
-
-
Part Number: A8-7240-0000 Rev. 1.4
 Loading...