

Page 1
Document ID
910-11569-00 REV01 USER GUIDE, NAS, ENG , DSM5_0
ioSafe NAS User's Guide
Based on Synology DSM 5.0
Page 2

Table of Contents
Chapter 1: Introduction
Chapter 2: Get Started with Synology DiskStation Manager (DSM)
Install ioSafe NAS and DSM .................................................................................................................................................. 6
Sign into DSM .......................................................................................................................................................................... 6
DiskStation Manager Desktop ............................................................................................................................................... 7
Open Applications and Packages with Main Menu ............................................................................................................ 9
Shutdown, Restart, Logout, or Manage Personal Options .............................................................................................. 10
Chapter 3: Modify Sys tem Settings
Use Control Panel ................................................................................................................................................................. 12
Change Network Settings .................................................................................................................................................... 13
Modify Regional Options ...................................................................................................................................................... 14
Use Energy Saving Features .............................................................................................................................................. 15
Chapter 4: Perform Advanced Management Tasks
Check System Information ................................................................................................................................................... 16
View System Logs ................................................................................................................................................................ 17
Monitor System Resources .................................................................................................................................................. 18
Automate Tasks .................................................................................................................................................................... 18
Update DSM or Restore Defaults ....................................................................................................................................... 18
Receive Event Notifications ................................................................................................................................................. 19
Access Applications with Independent Login .................................................................................................................... 19
Index Multimedia Files for Applications .............................................................................................................................. 19
Reset Admin Password ........................................................................................................................................................ 19
Reinstall IoSafe NAS ............................................................................................................................................................ 20
Enable SNMP Service .......................................................................................................................................................... 20
Enable Terminal Services .................................................................................................................................................... 20
Chapter 5: Manage Storage Space
Volumes and Disk Groups ................................................................................................................................................... 21
Repair Volumes or Disk Groups ......................................................................................................................................... 23
Change RAID Type ............................................................................................................................................................... 23
Expand Volumes or Disk Groups ........................................................................................................................................ 24
Data Scrubbing ...................................................................................................................................................................... 25
SSD TRIM .............................................................................................................................................................................. 25
iSCSI Targets and LUNs ...................................................................................................................................................... 25
Manage Hard Disks .............................................................................................................................................................. 26
SSD Cache ............................................................................................................................................................................ 26
Hot Spare ............................................................................................................................................................................... 27
Manage External Disks ........................................................................................................................................................ 27
2
Page 3

Chapter 6: Access your IoSafe NAS from the Internet
Use the EZ-Internet Wizard ................................................................................................................................................. 28
Set Up Port Forwarding Rules for Router .......................................................................................................................... 29
Register DDNS for the IoSafe NAS .................................................................................................................................... 29
Access DSM Services via QuickConnect .......................................................................................................................... 30
Set up VPN Connection ....................................................................................................................................................... 31
Chapter 7: Enhance Internet Security
Prevent Unauthorized Connection with Firewall ............................................................................................................... 32
Prevent Attacks over the Internet ....................................................................................................................................... 32
Automatically Block Suspicious Login Attempts ............................................................................................................... 33
Chapter 8: Set Up File Sharing
Enable File Sharing Protocols for All Platforms ................................................................................................................ 34
Join IoSafe NAS to Directory Service ................................................................................................................................ 35
Host LDAP Service with Directory Server ......................................................................................................................... 36
Manage Users and Groups.................................................................................................................................................. 37
Set Up Shared Folders ......................................................................................................................................................... 39
Define Windows ACL Privileges for Shared Folder .......................................................................................................... 41
Index Shared Folder Contents ............................................................................................................................................ 41
Chapter 9: Access Files from Anywhere
Access Files within the Local Network ............................................................................................................................... 42
Access Files via FT P ............................................................................................................................................................ 44
Access Files via WebDAV ................................................................................................................................................... 45
Sync Files via Cloud Station ................................................................................................................................................ 45
Access Files via File Station ................................................................................................................................................ 46
Chapter 10: Back Up Data
Back Up Computer Data ...................................................................................................................................................... 49
Back up Data or iSCSI LUN on IoSafe NAS ..................................................................................................................... 51
Backup and Restore System Configurations .................................................................................................................... 51
Sync Shared Folder Contents between IoSafe NAS ....................................................................................................... 51
Back up Data on USB Device or SD Card......................................................................................................................... 51
Chapter 11: Host Websites and Print Server
Use Web Station to Host Websites .................................................................................................................................... 52
Set IoSafe NAS as Print Server .......................................................................................................................................... 53
Chapter 12: Discover Various Applications with Package Center
What Package Center Offers .............................................................................................................................................. 54
Install or Buy Packages ........................................................................................................................................................ 55
Chapter 13: Communicate with Mobile Devices
Manage DSM Settings with DSM mobile ........................................................................................................................... 56
Use iOS, Android, and Windows Apps .............................................................................................................................. 56
Use Other Mobile Devices ................................................................................................................................................... 57
3 Table of Contents
Page 4

Chapter
Chapter 1: Introduction
Congratulations on your purchase of IoSafe NAS powered by Synology. IoSafe NAS is a multi-functional
Network-Attached Storage server, serving as a file-sharing center within your Intranet. Moreover, it is specially
designed for a variety of purposes, allowing you to perform the following tasks with the web-based
Synology DiskStation Manager (DSM):
Store and Share Files over the Internet
Windows users, Mac users, and Linux users can easily share files within the Intranet or through the Internet.
Unicode language support makes sharing fil es in differ ent la nguag es fr om IoSafe NAS simple.
Manage Files with Web-Based File Station
One of Synology DiskStation Manager’s applications, File Station, can make it possible for users to manage their
files on IoSafe NAS easily through a web interface. You can also access the files stored on IoSafe NAS with a
mobile device.
Transfer Files via FTP
Synology DSM provides FTP service with bandwidth restriction and anonymous login. To transfer data safely,
FTP over SSL/TLS and uninvited IP auto-block are also available.
Sync Files with Cloud Station
Cloud Station is a file sharing service that allows you to synchronize files between a centralized IoSafe NAS and
multiple client computers, mobile and IoSafe NA S dev ic es.
Share Storage Capacity as iSCSI LUNs
You can designate portion of your IoSafe NAS volume spa ce to be an iSCSI LUN, which will allow the iSCSI
initiator to access the space like a local disk.
Back up Files on Computer and Server
Synology DSM provides various backup solutions to back up computer data to IoSafe NAS, back up IoSafe NAS
data or iSCSI LUN to an external hard drive, another IoSafe NAS, an rsync-compatible server, Amazon S3 server,
HiDrive backup server, etc.
Enjoy Entertainment Content on the Server
Download Station allows you to download files from the Internet through BT, FTP, HTTP, eMule and NZB to
IoSafe NAS. The Media Server and iTunes support allows computers or DMA devices within LAN to playback
multimedia files on IoSafe NAS
With the USBCopy or SDCopy function, you can press the Copy button on your IoSafe NAS to instantly copy files
from a camera or SD card to IoSafe NAS.2
1
.
4
Organize Videos with Video Station
Video Station allows you to organize your collection of movies, TV shows, and home videos into a media platform
on which you can watch and play video clips, live stream and record digital TV programs with a USB DTV dongle
plugged into your IoSafe NAS, view and edit video metadata whose information is retrieved automatically from
the Internet. You can also stream videos to your iPhone or iPad for playback.
---------
1
For recommended peripheral models, including hard drive, USB printer, DMA, and UPS, please visit www.synology.com.
2
USBCopy or SDCopy is supported on specific models only. Visit www.synology.com for more information.
Page 5

ioSafe NAS User's Guide
Online Resources
If you cannot find what you need here, please see DSM Help or take a look at Synology's online resources
Based on Synology DSM 5.0
Share Photos, Videos, and Blogs with Photo Station
Photo Station gives you the freedom to share photos and videos over the Internet without complicated upload
steps. Furthermore, a blogging system is integrated for you to easily share your life and thoughts over the
Internet.
Enjoy Music Anytime and Anywhere
Audio Station allows you to listen to music stored on the IoSafe NAS, from a connected iPod, or even stream
Internet Radio stations. In addition, you can stream music from the IoSafe NAS with a web browser over the
Internet.
Host Websites
The Virtual Host feature allows you to host up to 30 websites using Web Station, with PHP and MySQL
supported.
Record Videos with IP Cameras
Surveillance Station allows you to manage, view, and record videos from multiple IP cameras over the network.
By accessing the web-ba sed managem ent interface of Surveillance Station, you can watch the real-time image
the camera is monitoring, and record videos continuously in motion-detection mode or in alarm-re cord ing mod e.
Manage Multiple IoSafe NAS Devices
Synology CMS (Central Management System) allows you to quickly and conveniently manage multiple Synology
DSM based NAS servers made by both Synology and ioSafe. Once CMS is installed, you can designate your
IoSafe NAS server as the CMS Host and designate other servers as managed servers. The CMS Host provides a
single interface to monitor and maintain the manag ed serv ers.
Discover More Apps with Package Center
Package Center brings intuitiveness and convenience for users to easily install and update a variety of
applications (which are packed into packages). Just browse all available applications and select the ones that
best suit your needs. All can be done with just a few clicks.
Set up Print Server
USB or network printers connected to your IoSafe NAS can be shared by client computers over the local area
network. AirPrint support allows you to print to the printer from an iOS device, while Google Cloud Print support
allows you to print to the printer when you are using Google products and services.
below.
Knowledge Base: www.synology.com/support
Forum: forum.synology.com
Download Center: www.synology.com/support/download.php
Technical Support: myds.synology.com/support/support_form.php
1
---------
1
For recommended peripheral models, including hard drive, USB printer, DMA, and UPS, please visit www.synology.com.
5
Page 6
Chapter
Chapter 2: Get Started with Synology’s DiskStation
Manager (DSM)
This chapter explains how to sign into Synology’s DiskStation Manager (DSM), customize your desktop, use
the taskbar and widgets, and open applications and packages with the Main Menu.
Install your ioSafe NAS and DSM
For more information about setting up your ioSafe NAS and installing DSM, see the Quick Installation Guide for
your ioSafe NAS model available at www.iosafe.com .
Sign into DSM
After setting up and installing DSM on your ioSafe NAS, you can sign into DSM using a web browser on your
computer.
To log in with Web Assistant:
1 Make sure your computer is connected to the same network as the ioSafe NAS and can access the Internet.
2 Open a web browser on your computer and go to find.synology.com.
3 Web Assistant will find your ioSafe NAS within the local network. Click Connect to go to the login screen.
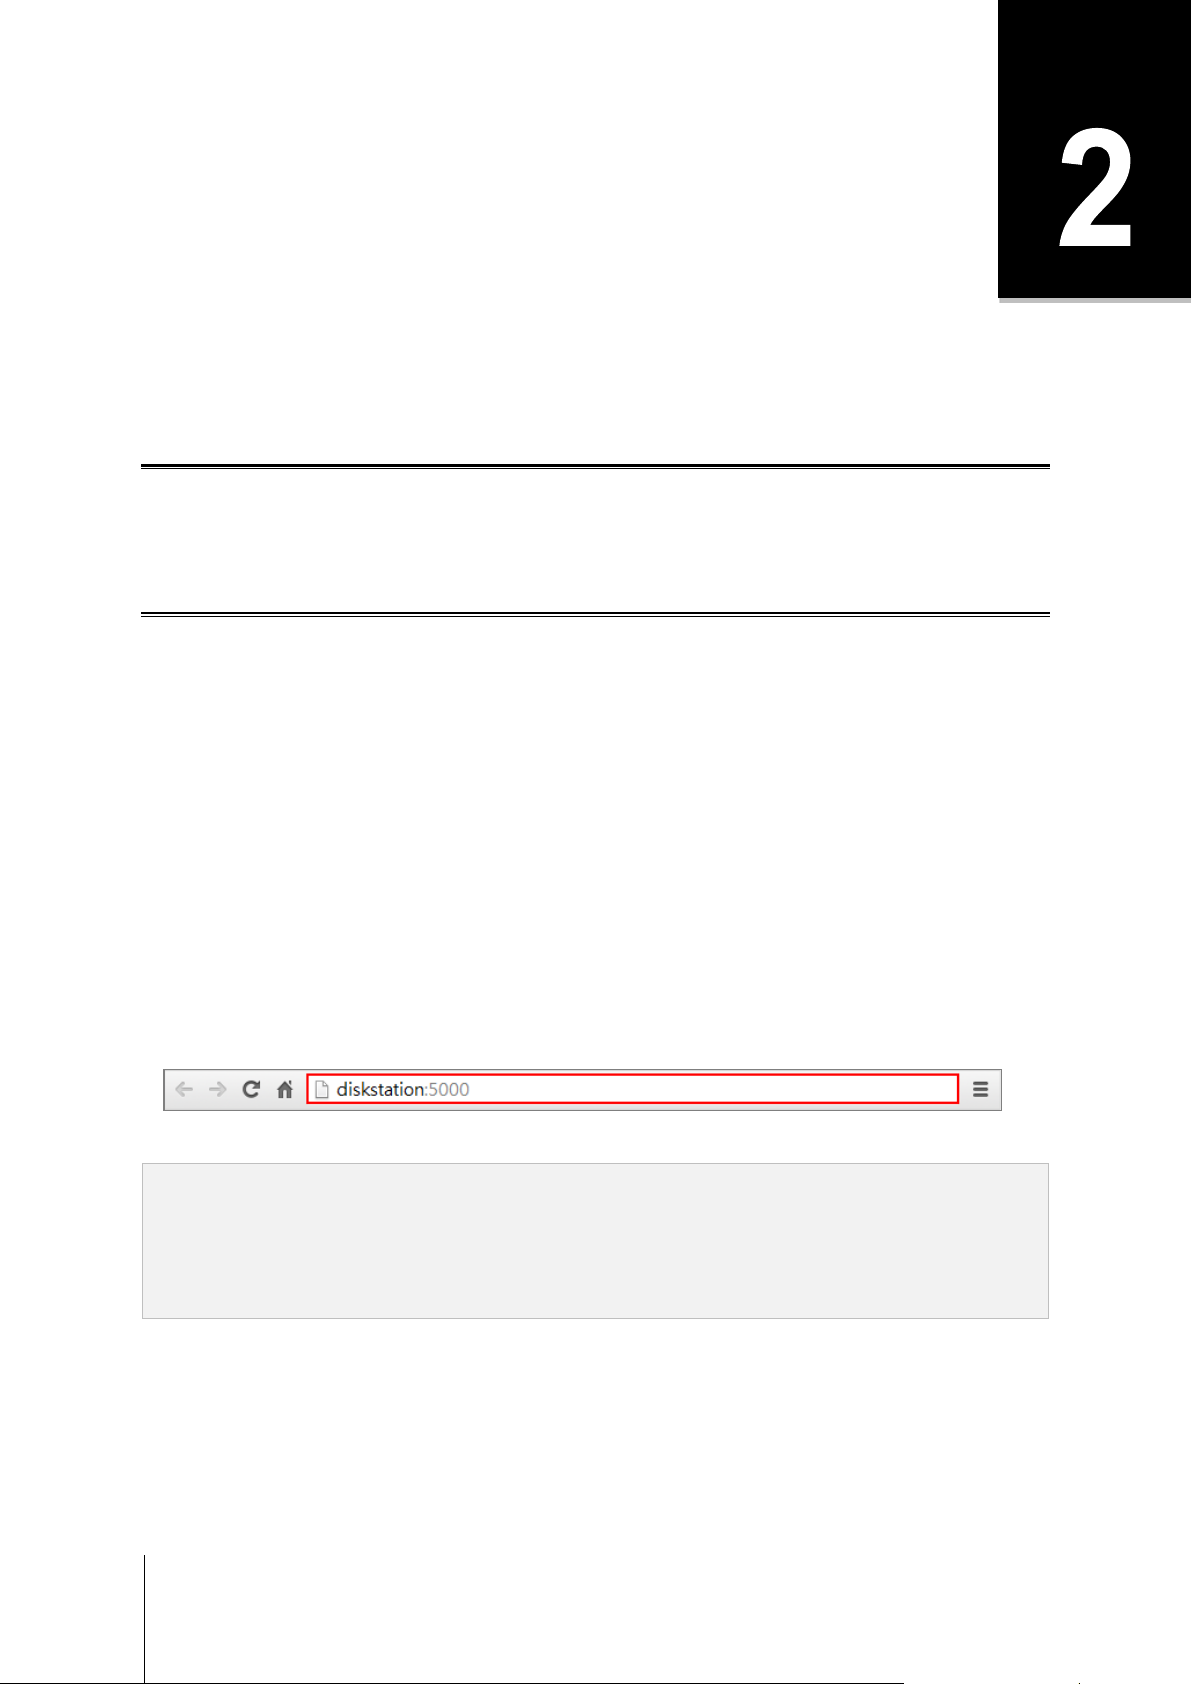
To log in with the server name or IP address:
1 Make sure your computer is connected to the same network as your IoSafe NAS.
2 Open a web browser on your c ompu ter, enter any of the following in the address field, and then press Enter on
your keyboard:
http://IoSafe_Server_IP:5000
http://IoSafe_Server_Name:5000/ (or http://IoSafe_Server_Name.local:5000/ on a M ac)
IoSafe_Server_Name should be replaced with the name you set up for IoSafe NAS during the initial
installation process. If you choose One-step Setup during the installation process, the IoSafe_Server_Name
will be DiskStation, CubeStation, USBStation, or RackStation.
3 Enter your user name and password, and click Sign in. The default password for admin is empty .
Note: To ensure your connection to DSM runs smoothly, please use the following browsers.
Chrome
Firefox
Safari: 5.0 or later
Internet Explorer: 8.0 or later
6
Page 7
ioSafe NAS User's Guide
Based on Synology DSM 5.0
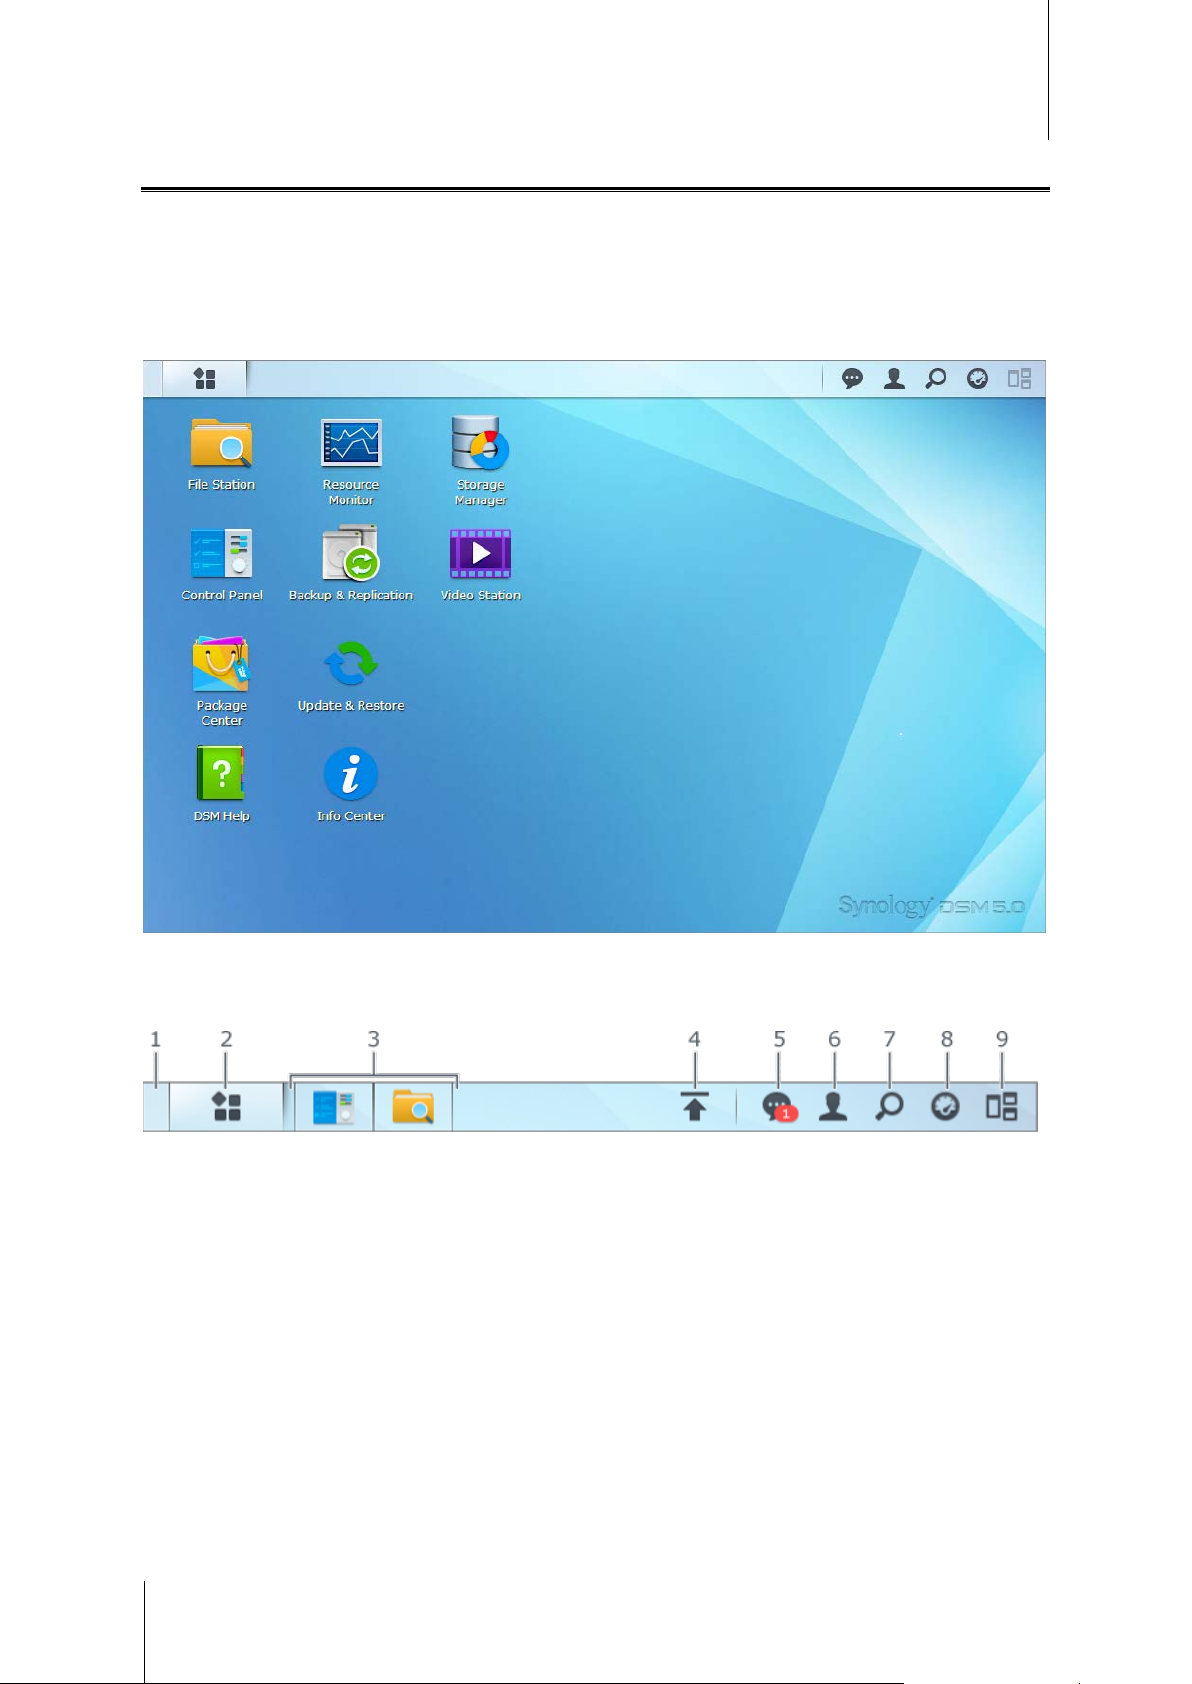
DiskStation Manager Desktop
When you sign into DSM, you will see the desktop. From here, you can start getting things done, like mana ge
settings, use packages, or view notifications.
Desktop
The desktop is where your application and package windows are displayed. You can also create desktop
shortcuts to frequently used applications.
Taskbar
The taskbar at the top of the desktop includes the following items:
1 Show Desktop: Minimize all open application and package windows.
2 Main Menu: View and open applications and packages installed on your IoSafe NAS. You can also click and
drag to create desktop shortcuts.
3 Open applications:
Click the icon of an application to show or hide its window on the desktop.
Right-click the icon and choose from the shortcut menu to manage the application window (Maximize,
Minimize, Restore, Close) or its taskbar icon (Pin to Taskbar, Unpin from Taskbar).
7
Page 8
ioSafe NAS User's Guide
Based on Synology DSM 5.0
4 Upload Queue: Appears when you start uploading files to the IoSafe NAS. Click to see more details, like
progress and upload speed.
5 Notifications: Displays notifications, like errors, status updates, and package installation notifications.
6 Options: Shutdown, restart, logout, or modify personal account options.
7 Search: Quickly find specific applications, packages, or DSM Help articles here.
8 Widgets: Show or hide widgets.
9 Pilot View: See a preview of all open application and package windows.
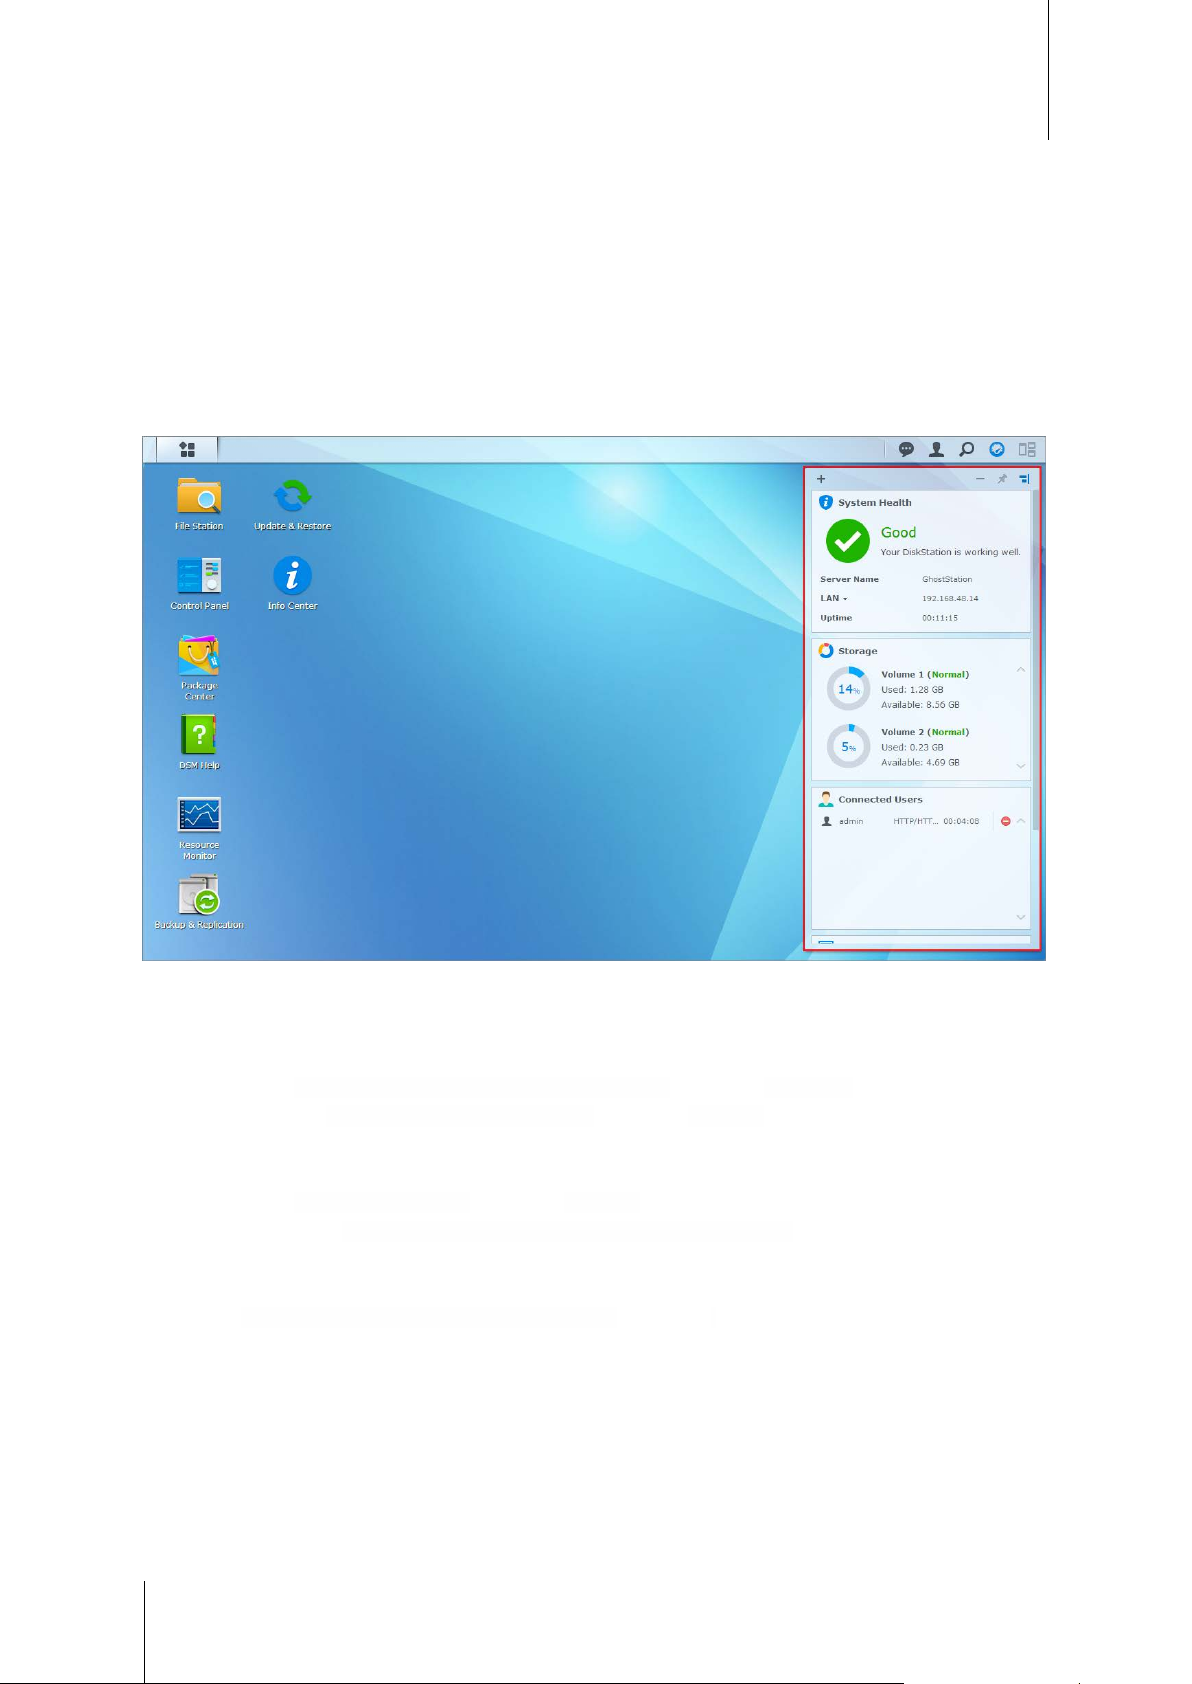
Widgets
Widgets display various types of system information related to your IoSafe NAS.
To open/close the widget panel:
Click Widgets to show or hide the widgets panel.
Click the + to select which widgets to display. You can choose from the following:
Current Users: See a list of users who are currently accessing IoSafe NAS resources.
File Change Log: View the file change log records of IoSafe NAS services.
No active logs: Appears when none of the logs (Samba, WebDAV, FTP, File Station) is enabled.
No logs available: Appears when any one of the logs (Samba, WebDAV, FTP, File Station) is enabled.
Recent Logs: View the log records of IoSafe NAS services.
Resource Monitor: Monitor the CPU usage, memory usage, and network flow.
Scheduled Backup: View the status of your backup tasks.
Scheduled Tasks: View a list of upcoming tasks.
Storage: View the volume usage and disk status of your IoSafe NAS.
System Health: Obtain an overall status of your IoSafe NAS and all connected devices (if any). You will be
advised to take corrective action when system error occurs.
8
Page 9
ioSafe NAS User's Guide
Based on Synology DSM 5.0
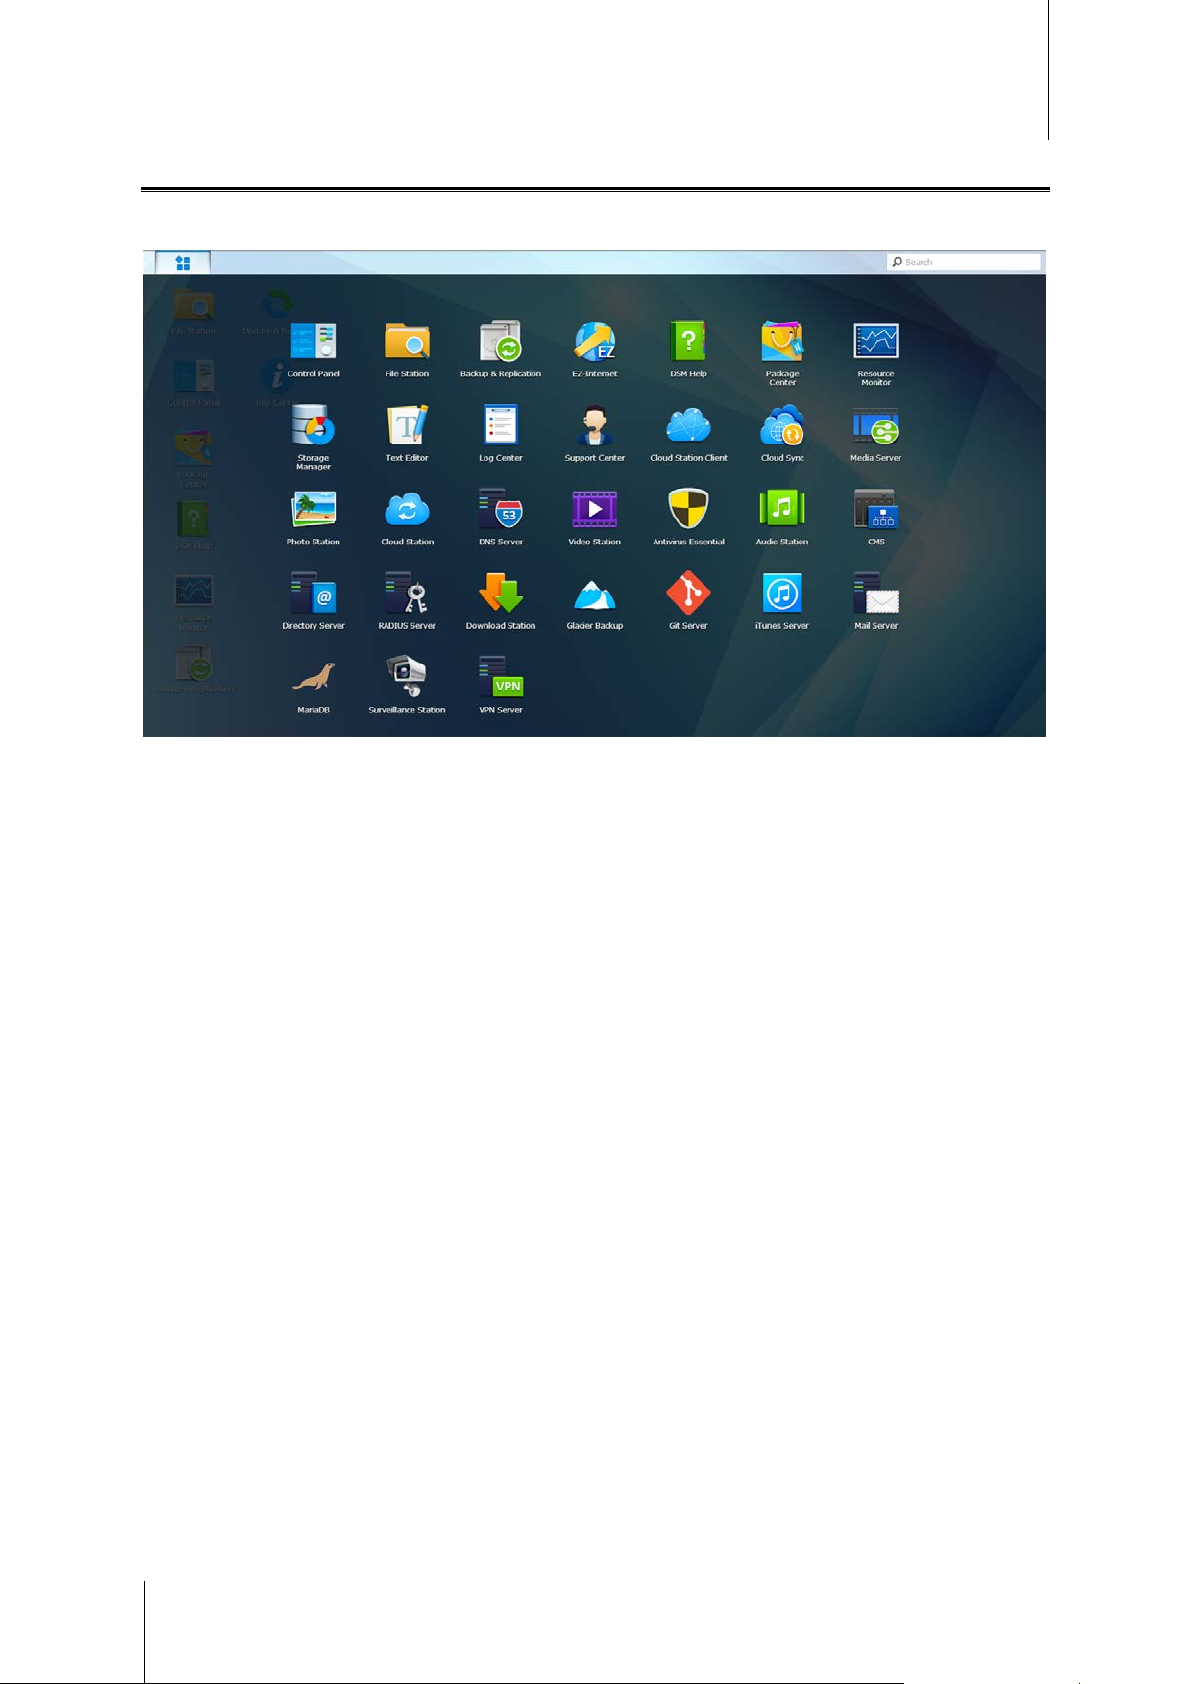
Open Applications and Packages with Main Menu
The Main Menu (the button at the top-left of the deskto p) is where you can find all the applications and packages
installed on your IoSafe NAS.
To open applications or packages:
Open Main Menu and click the icon of the application or package that you want to open.
To reorder icons:
Open Main Menu and drag an icon to any position you want.
To create a desktop shortcut:
Open Main Menu and drag an icon to the side.
9
Page 10

ioSafe NAS User's Guide
Based on Synology DSM 5.0
Shutdown, Restart, Logout, or Manage Personal Options
Click the Options menu (the person-shaped icon at the top right) to shutdown, restart, logout, or manage your
user account settings
To manage personal options:
Select Options from the drop-down menu to manage personal account options, like password, 2-step verification,
desktop, etc.
.
10
Page 11
ioSafe NAS User's Guide
Based on Synology DSM 5.0
Account
Under Account, you can edit your account settings, enable 2-step verification, and view recent login activity of
your DSM account.
Limitations:
The user description is case sensitive and can be 0 to 64 displayable Unicod e characters.
The passw ord is case sensitive and should be 0 to 127 displ ayable character s, including letters, numbers, signs ,
and space.
2-Step Verification
2-step verification provides improved security for your DSM account. If 2-step verification is enabled, you will
need to enter your password in addition to a one-time verification code when logging into DSM. Verification codes
are obtained from authenticator apps installed on your mobile device. Therefore, if someone wants to access
your account, he will not only need your username and password, but also your mobile device.
Requirements:
2-step verific ation requires a mobile devi ce and an authenticator app which supports the Time-bas ed O ne-Time
Password (TOTP) protocol. Authentic ator apps include Goo gle Authenticat or (Android/iPhone/BlackBerry) or
Authenticator (Windows Phone).
Account Activity
Account activity displays recent login activity of your DSM account, such as the time your account was accessed
or from what IP address.
Volume Usage
Under Volume Usage, you can view your quota on all IoSafe NAS volumes set by DSM administrators, as well
as the amount of capacity you have used on each volume.
Desktop
Under Desktop, you can customize the appearance of your desktop by changing the background and text color
of the desktop, or uploading images to be used as the desktop wallpaper.
Photo Station
This tab is viewable only when users belongin g to the administrators group enable Personal Photo Station
service in Photo Station. IoSafe NAS provides the home/photo folder for you to store photos and videos that you
want to share. The system will create index thumbnails of the photos and videos automatically, and then people
can view photo albums via a web browser.
Social Network
You can sign into a social network account (e.g. Facebook, Google+) and take advantage of more features, such
as creating file sharing links in File Station that will be accessible to select social network friends only.
Others
Under Others, you can customize other personal options. For more information about personal options, plea se
see DSM Help.
11
Page 12
Chapter
Chapter 3: Modify System Settings
After you have connected to Synology DiskStation Manager (DSM) and learned how to access its functions and
customize its appearance, users belonging to the administrators group can begin to modify basic settings.
This chapter explains the basics of modifying network settings, display languages, time, and energy saving
features. For more detailed instructions, please see DSM Help.
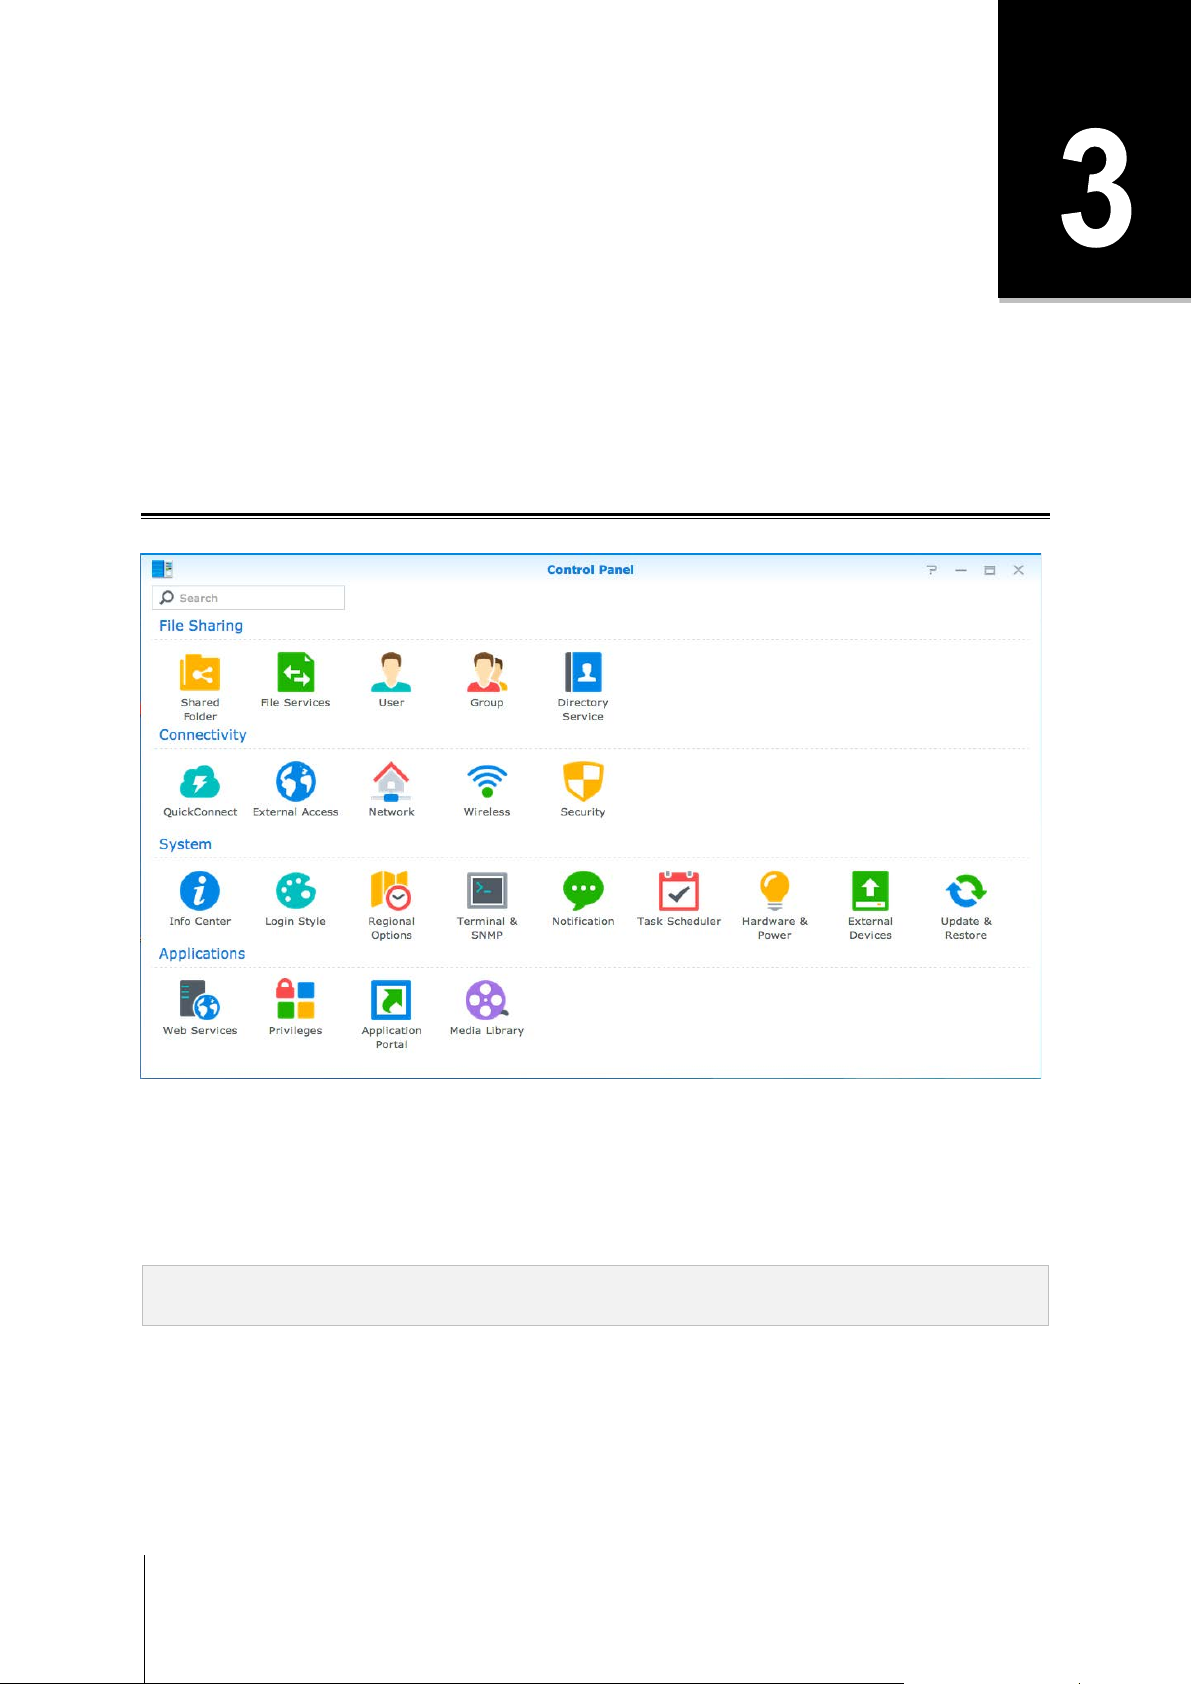
Use Control Panel
Choose Control Panel from the Main Menu to configure DSM settings.
12
The DSM settings on the Control Panel are grouped into the following categories:
File Sharing: Manage file sharing options to host your files and share with other people easily.
Connectivity: Make your IoSafe NAS accessible over the Internet, and protect it with security mechanisms
such as firewall and auto block.
System: Manage system settings for your IoSafe N AS dev ice.
Applications: Manage general settings related to Synology-designed applications.
Note: Control Panel is accessible only to users belonging to the administrators group. See "Create Groups" for
more information.
Page 13
ioSafe NAS User's Guide
Based on Synology DSM 5.0
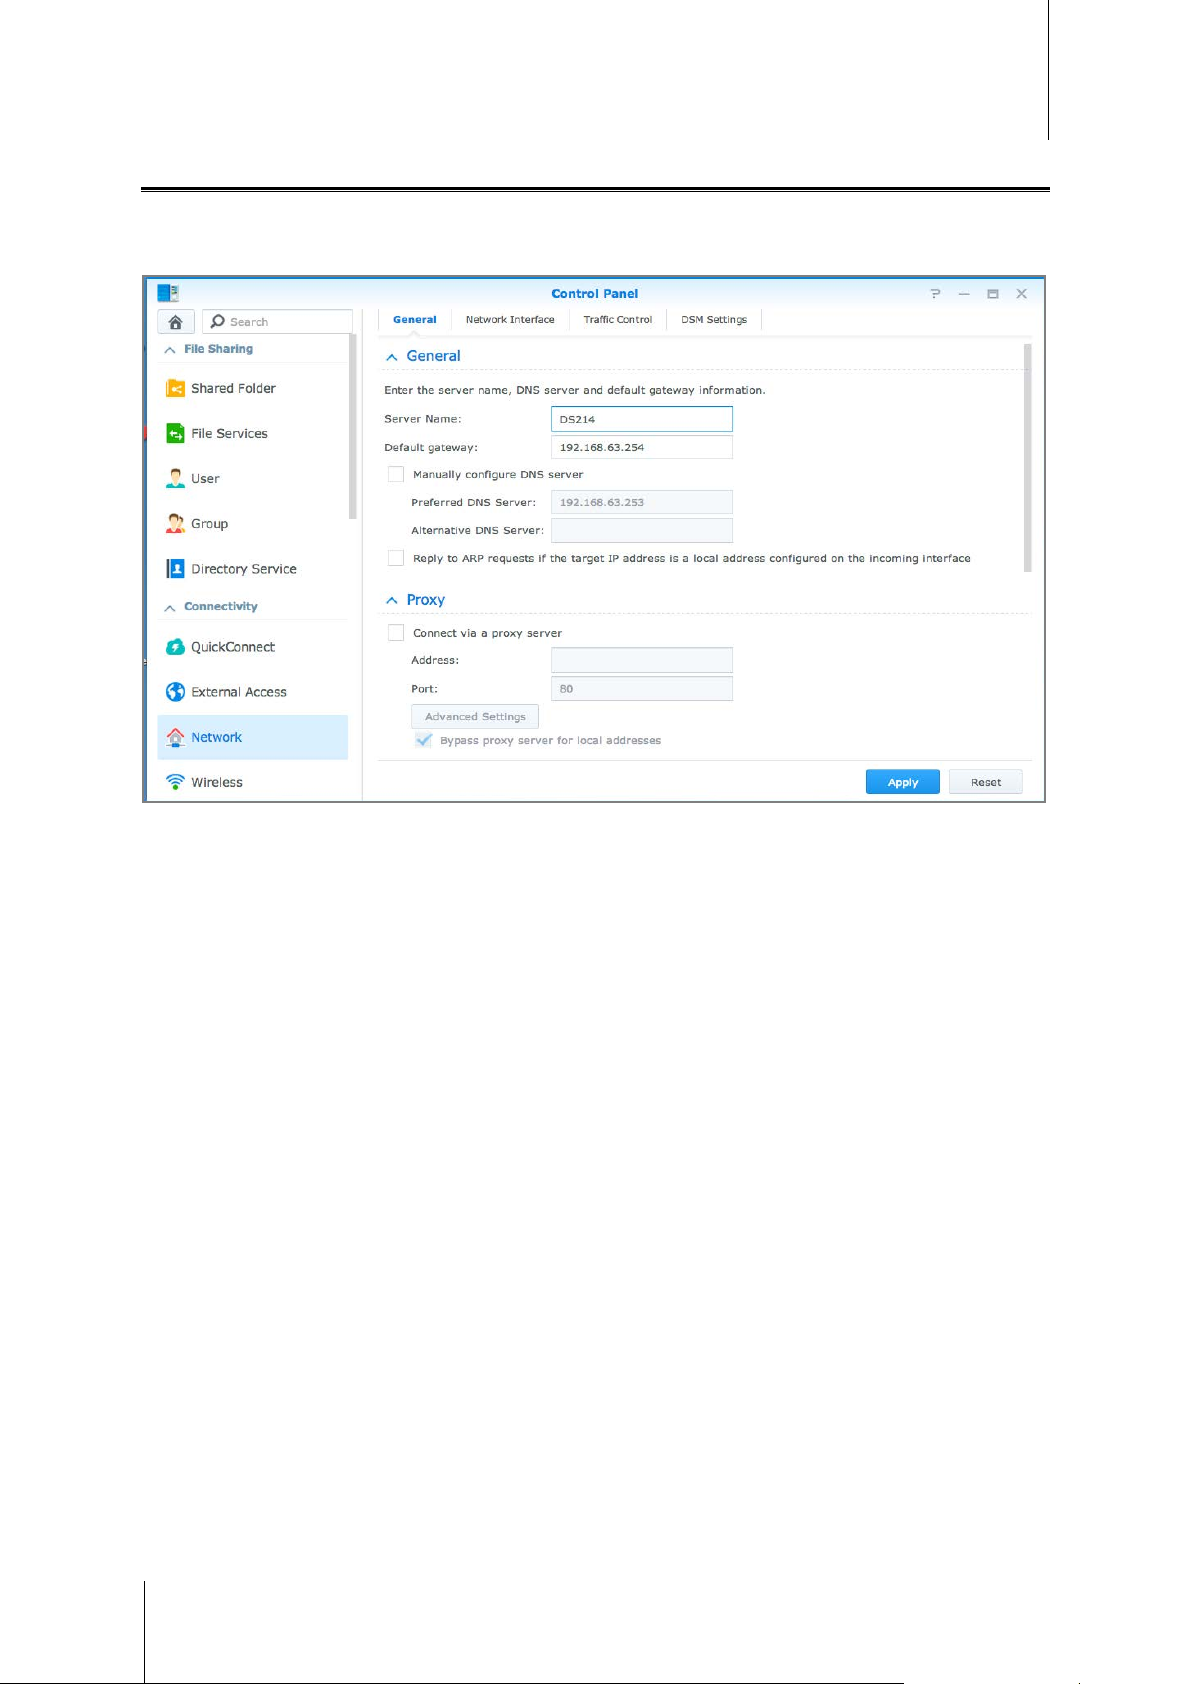
Change Network Settings
Go to Control Panel > Network to configure network settings and connect your IoSafe NAS device to the
Internet. You can also manage traffic control rules to adjust the outgoing traffic allowed when clients access
services on your IoSafe NAS. For more detailed instructions, please see DSM Help.
General
The General tab provides options to edit the name and default gateway of the IoSafe NAS, as well as configure
domain name server, proxy server settings and IPv6 tunneling.
Network Interface
The Network Interface tab provides options to manage the network interfaces with which your IoSafe NAS
connects to the network.
Traffic Control
Traffic control aims to control the outgoing traffic of services running on IoSafe NAS. Click Create to create traffic
control rules.
DSM Settings
Change the port number for accessing DSM or configure HTTPS settings. When the HTTPS connection function
is enabled, any connection to IoSafe NAS via the HTTPS protocol will be encrypted with the SSL/TLS encrypting
mechanism.
13
Page 14
ioSafe NAS User's Guide
Based on Synology DSM 5.0
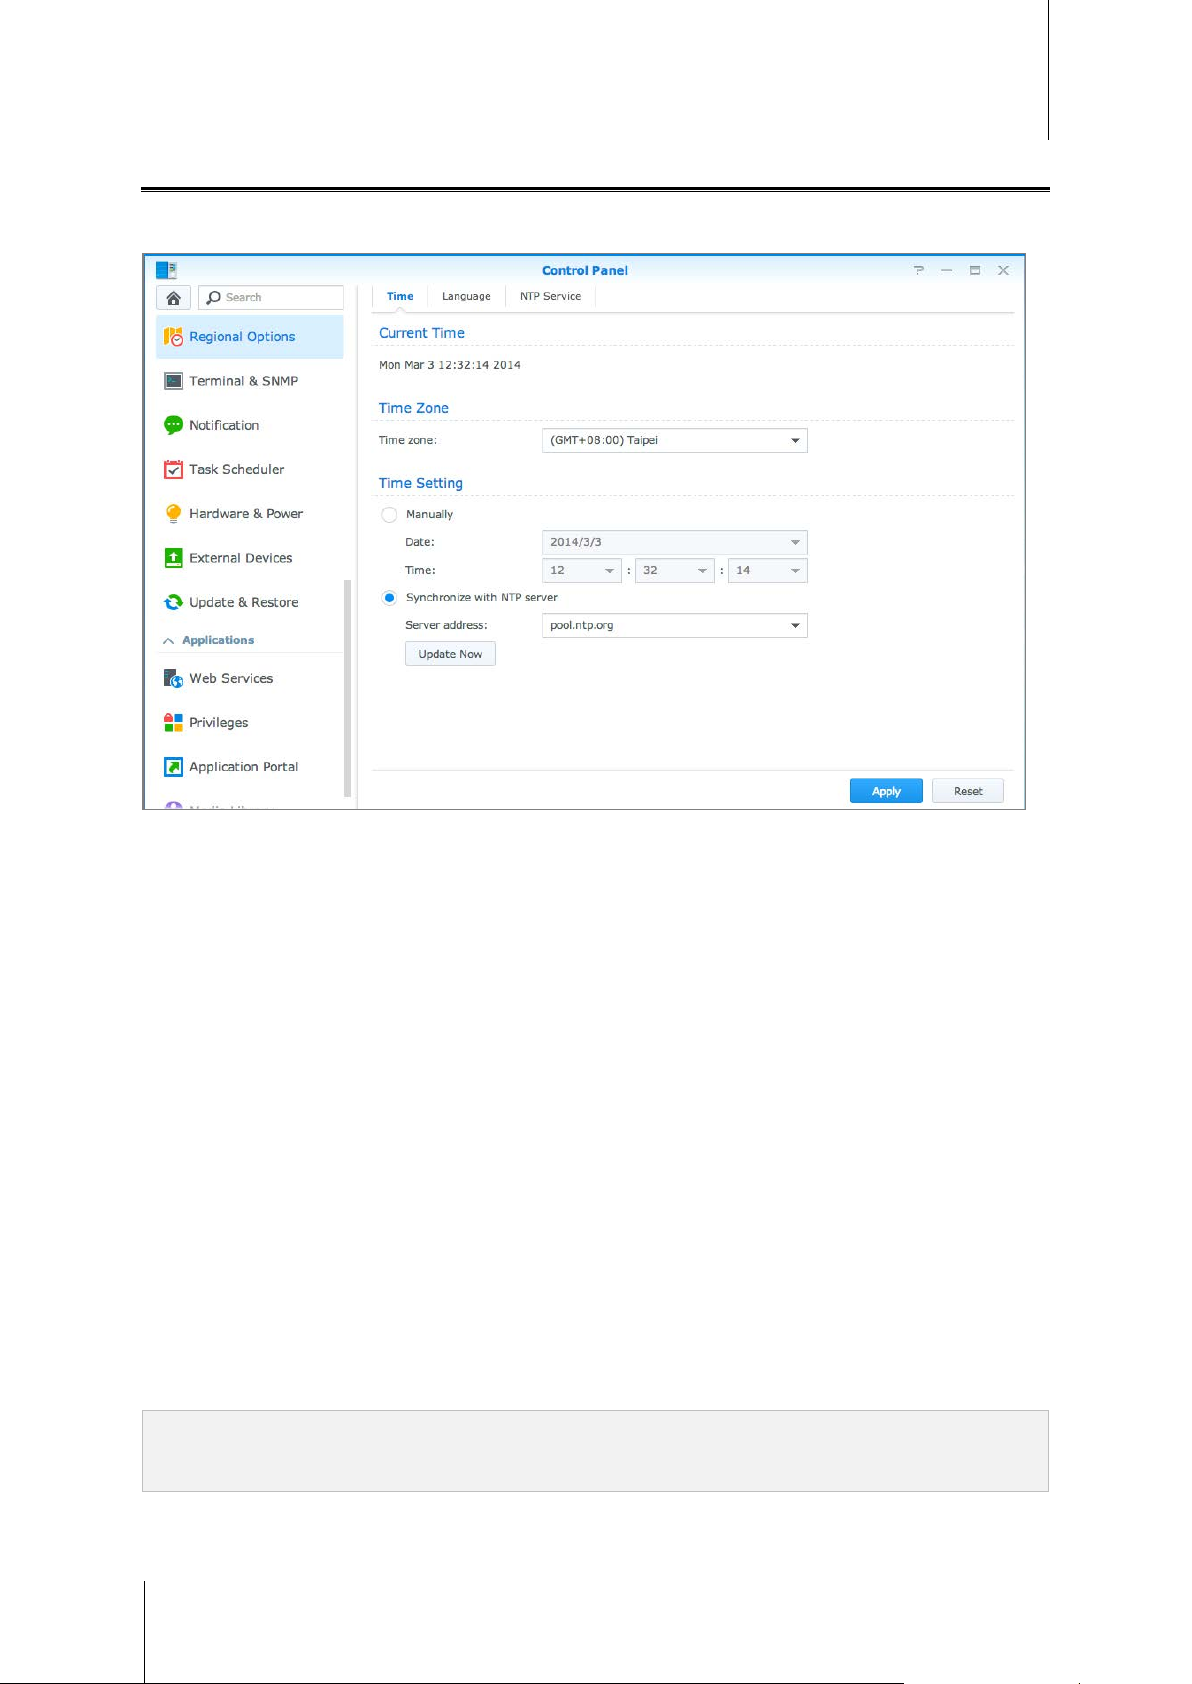
Modify Regional Options
Go to Control Panel > Regional Options to configure the following regional options. For more detailed
instructions, please see DSM Help.
Time
Click the Time tab to set up the system time settings of the IoSafe NAS. You can check the current time,
manually set the server's date and time, or automatically set the time using a network time server.
Language
Click the Language tab to set the language for Synology DiskStation M anager, notifications, and specify the
codepage for Unicode filename conversion.
Display Language: Choose your preferred display language, or have it the same as your default browser
setting.
Notification Language: Set your preferred language for email a nd inst ant messa gin g notifications from IoSafe
NAS.
Codepage: IoSafe NAS uses Unicode to avoid file inaccessibility from computers using different languages.
But for the following devices or applications to use IoSafe NAS services without problem, you need to choose
the appropriate codepage for them:
Computers without Unicode support
Applications that convert non-Unicode strings to Unicode, such as FTP service, UPnP support, music
metadata indexing
NTP Service
Click the NTP Service tab to have your IoSafe NAS serve as a network time server to synchronize time between
different network devices and the IoSafe NAS over netw or k.
14
Note: The NTP service is required for Surveillance Stati on and Synology High Av ailability. Therefore, if you have
Surveillance Stat ion installed and run on your IoSafe NAS, t he service cannot be disabled while the package is
running.
Page 15
ioSafe NAS User's Guide
Based on Synology DSM 5.0
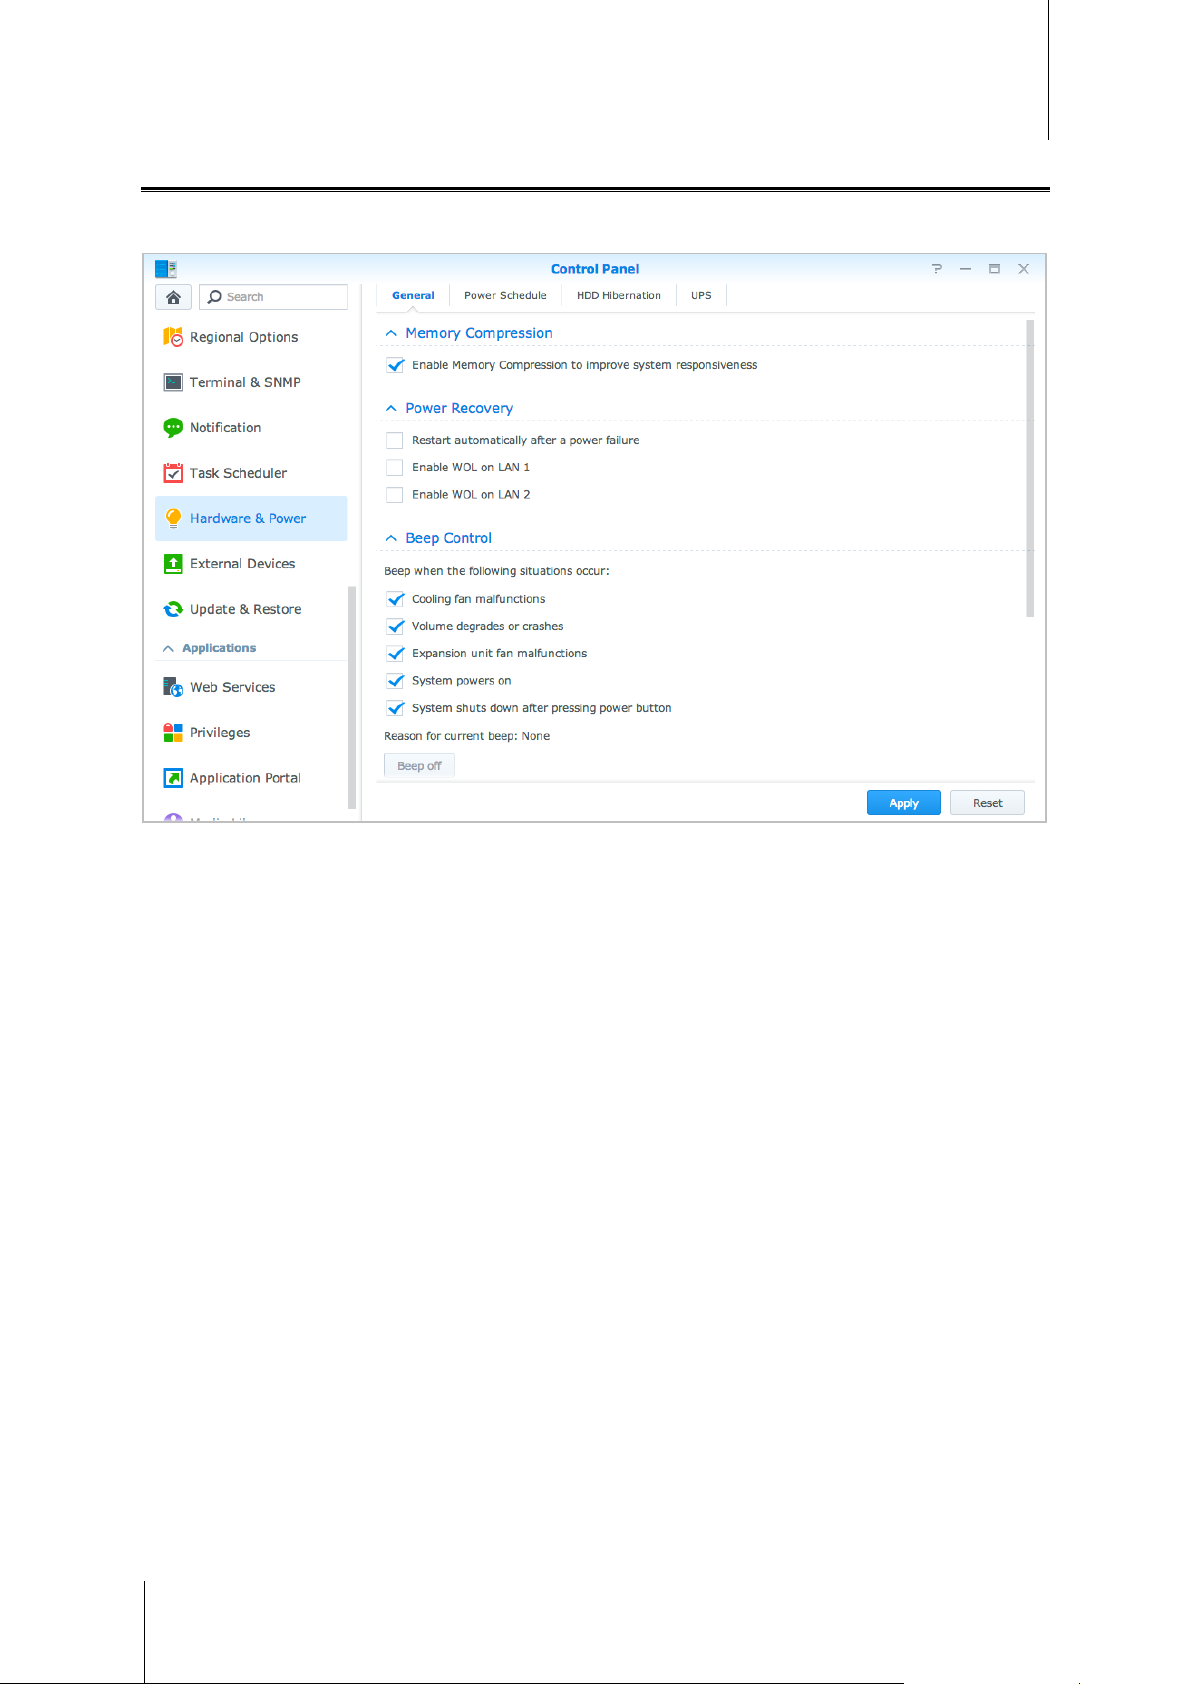
Use Energy Saving Features
Go to Control Panel > Hardware & Power to manage the following energy saving features provided by DSM.
For more detailed instructions, please see DSM Help.
General
Click the General tab to enable power recovery, Wake on LAN (WOL) and Memory Compression. You can also
modify beep control and fan speed mode here.
Power Schedule
Click the Power Schedule tab to start up or shut down automatically at a specified time.
HDD Hibernation
Click the HDD Hibernation tab to manage disk hibernation for all internal or external disks on your IoSafe NAS.
When a disk enters HDD hibernation mode, it will stop spinning and become inactive, which not only saves
energy but also extends the disk's lifespan.
UPS
Under the UPS tab, you can modify UPS-related settings. UPS (Uninterruptible Power Supply) is a backup power
device that allows the IoSafe NAS to continue operating for a short time if power failure occurs. This function
helps prevent data loss by giving the IoSafe NAS enough time to save data and unmount volumes before losing
power and shutting off. IoSafe NAS supports connecting to local or SNMP UPS devices.
15
Page 16
Chapter
Chapter 4: Perform Advanced Management Tasks
Synology DiskStation Manager comes with a variety of management functions, allowing you to check system
information, monitor system resour ces , manage notification services, restore or upgrade DSM, access
applications with independent login, index multimedia files for applications and more.
This chapter explains how to comprehend advanced management functions to make sure your IoSafe NAS is
providing the best performance. For detailed instru cti ons, please see DSM Help.
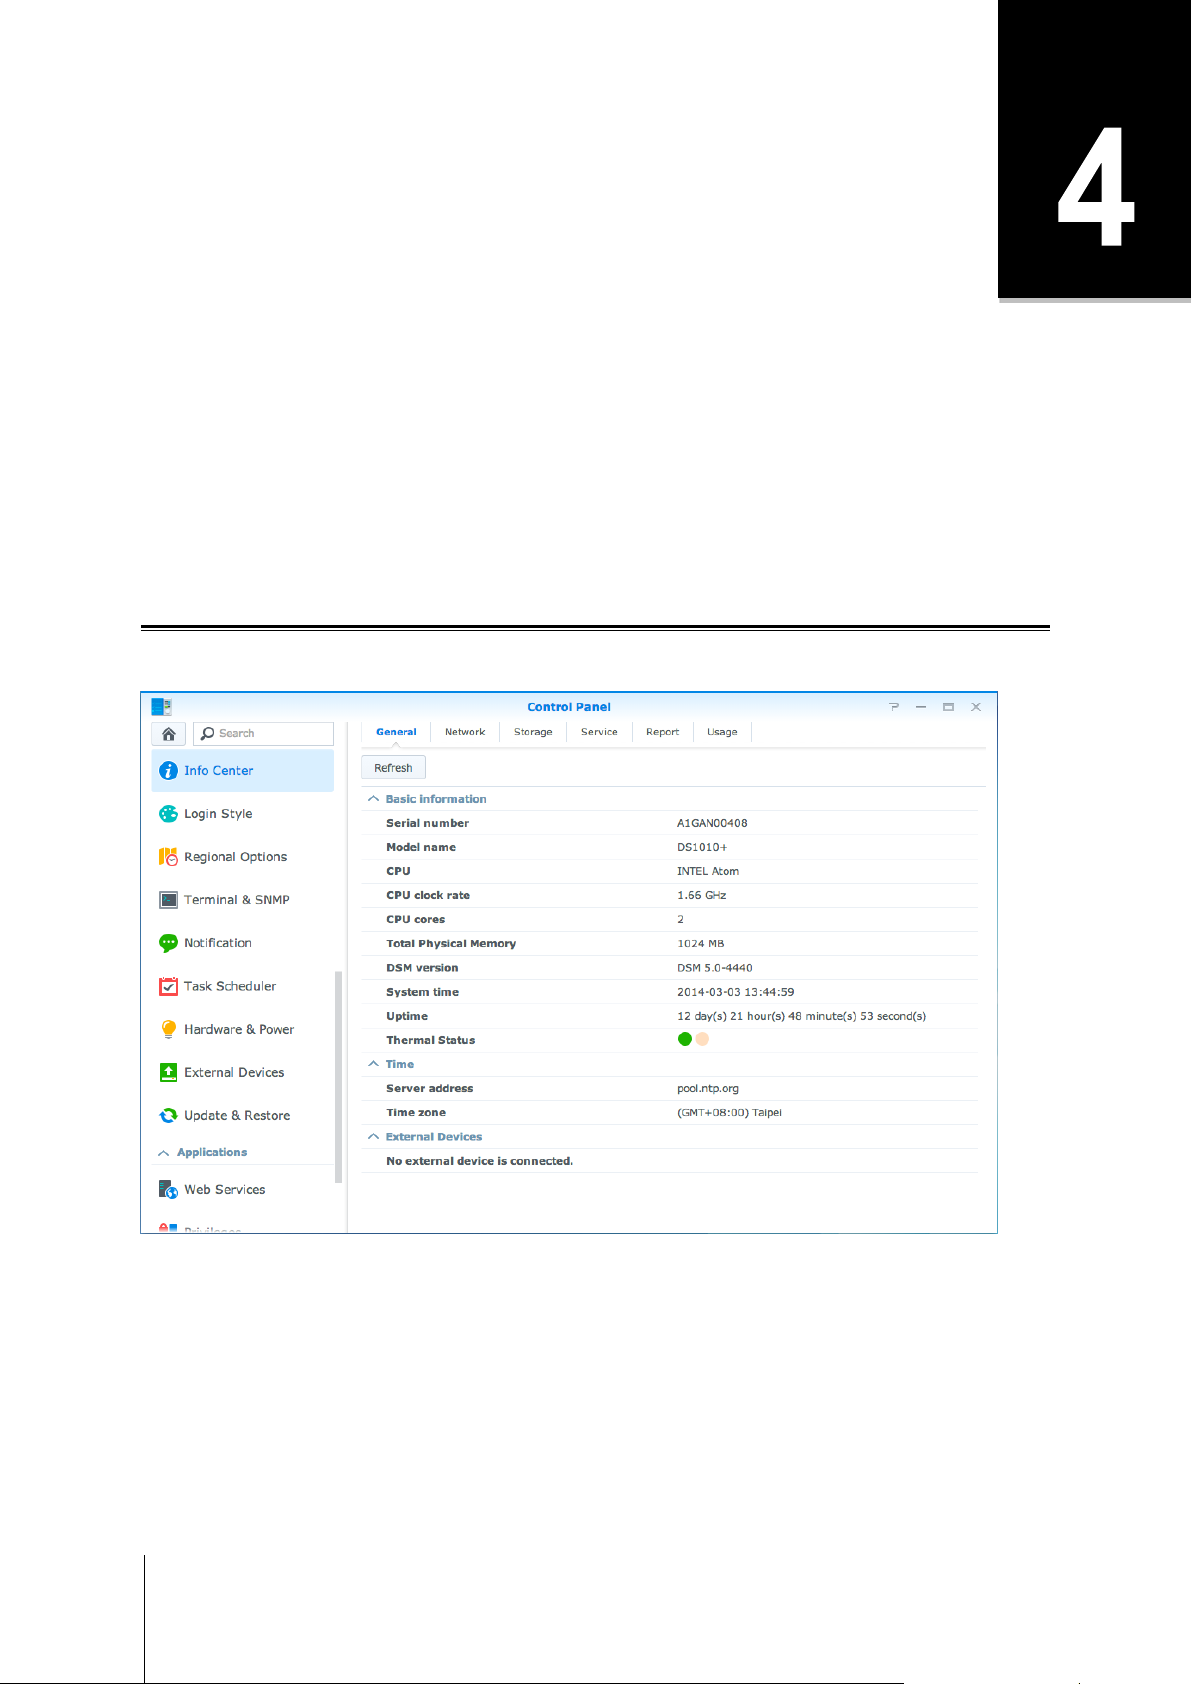
Check System Information
Info Center provides an overview of the status of the IoSafe NAS and other connected devices. Go to Control
Panel > Info Center to check the below information. For more detailed instructions, please see DSM Help.
16
Page 17
ioSafe NAS User's Guide
Based Synology o n DS M 5.0
General
Under the General tab, you can see the basic information about your IoSafe NAS, including serial number, model
name, amount of physical memory, DSM version, time information, thermal status, and external devices.
Network
Under the Network tab, you can view the status of network configuration and network interfaces.
Storage
Under the Storage tab, you can check the free or used space of your IoSafe NAS volum es and check the stat us
of the hard disks.
Service
Under the Service tab, you can see the list of DSM services, which can be enabled or disabled by clicking
Enable or Disable under the Action column. The checkmarks under the Status column indicate whether the
services are enabled.
Report1
Under the Report tab, you can collect data and generate reports that provide information about disk usage trends. You can select report types, set a schedule to receive periodic storage reports or generate reports on demand. For more detailed instructions, please see DSM Help.
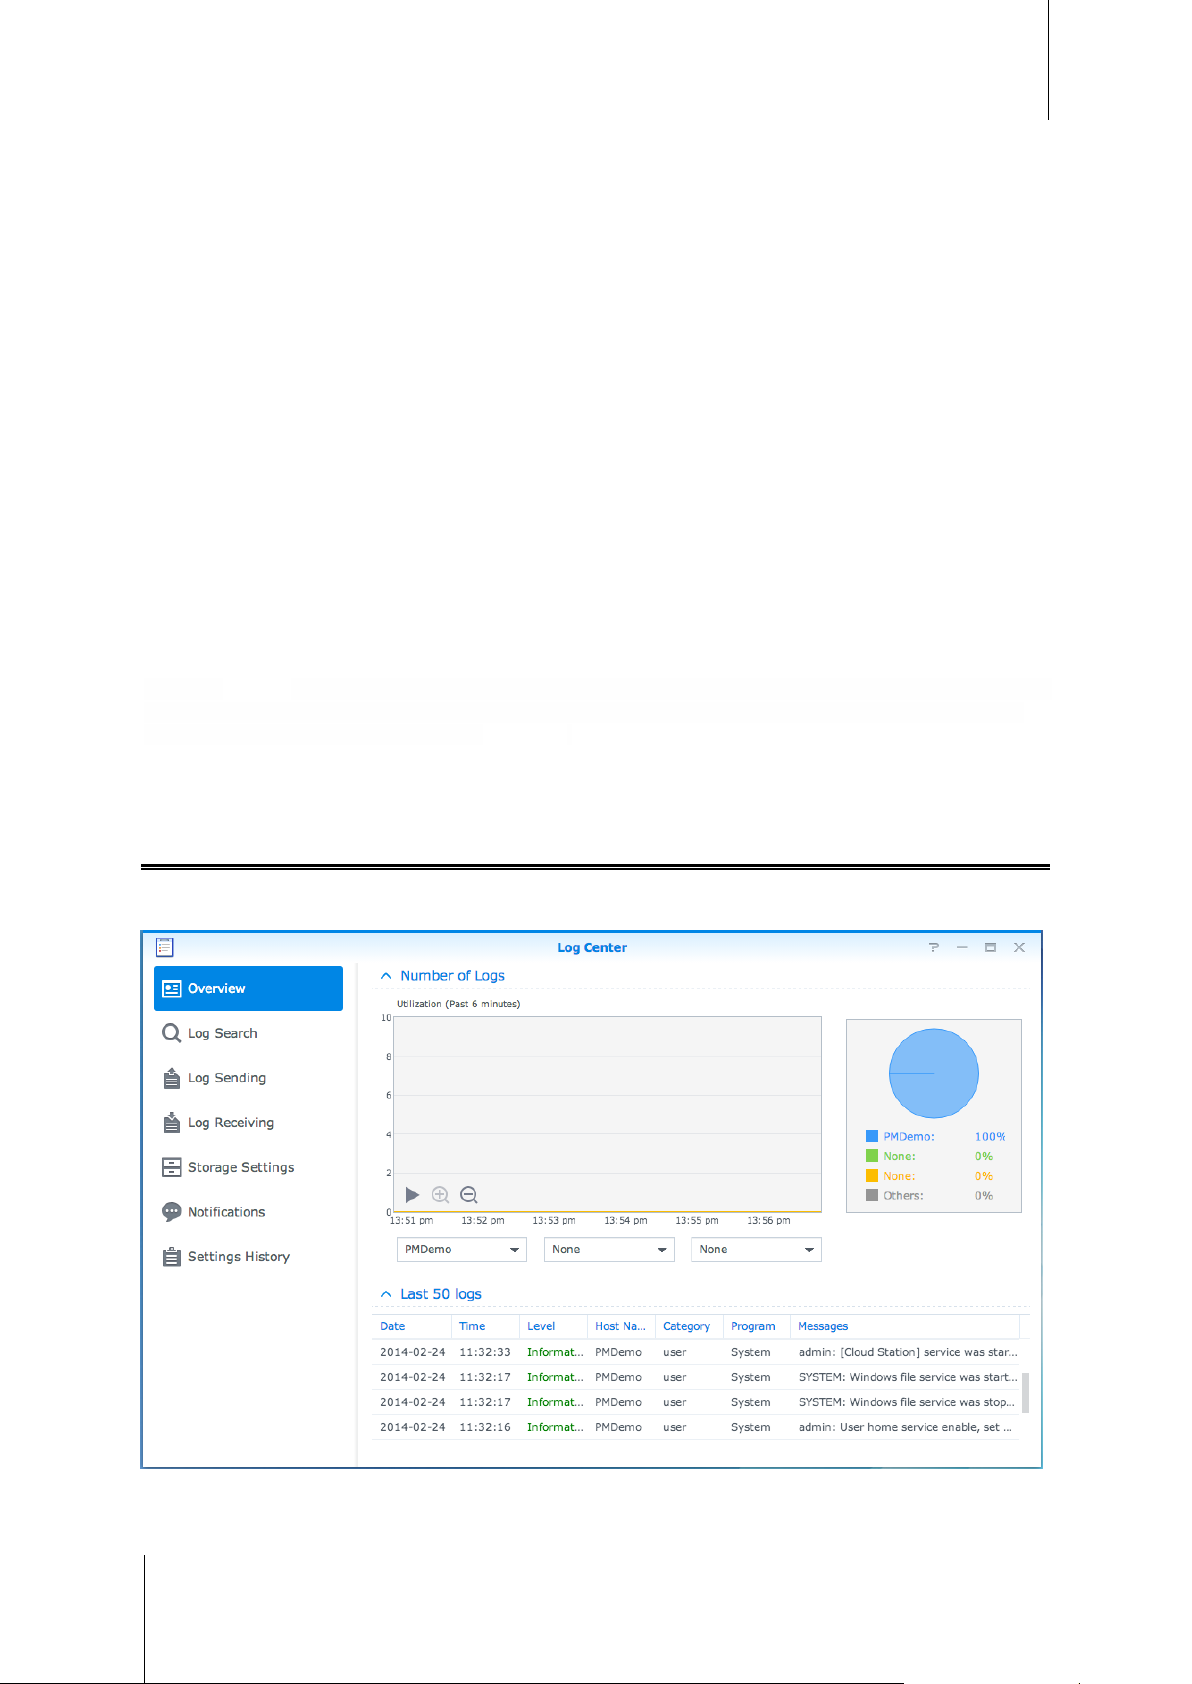
View System Logs
Log Center is a centralized log management application that allows you to view and manage log records of
IoSafe NAS services easily and efficiently. For detailed instructions, please see DSM Help.
---------
1
Only available on specific models.
17
Page 18
ioSafe NAS User's Guide
Based Synology o n DS M 5.0
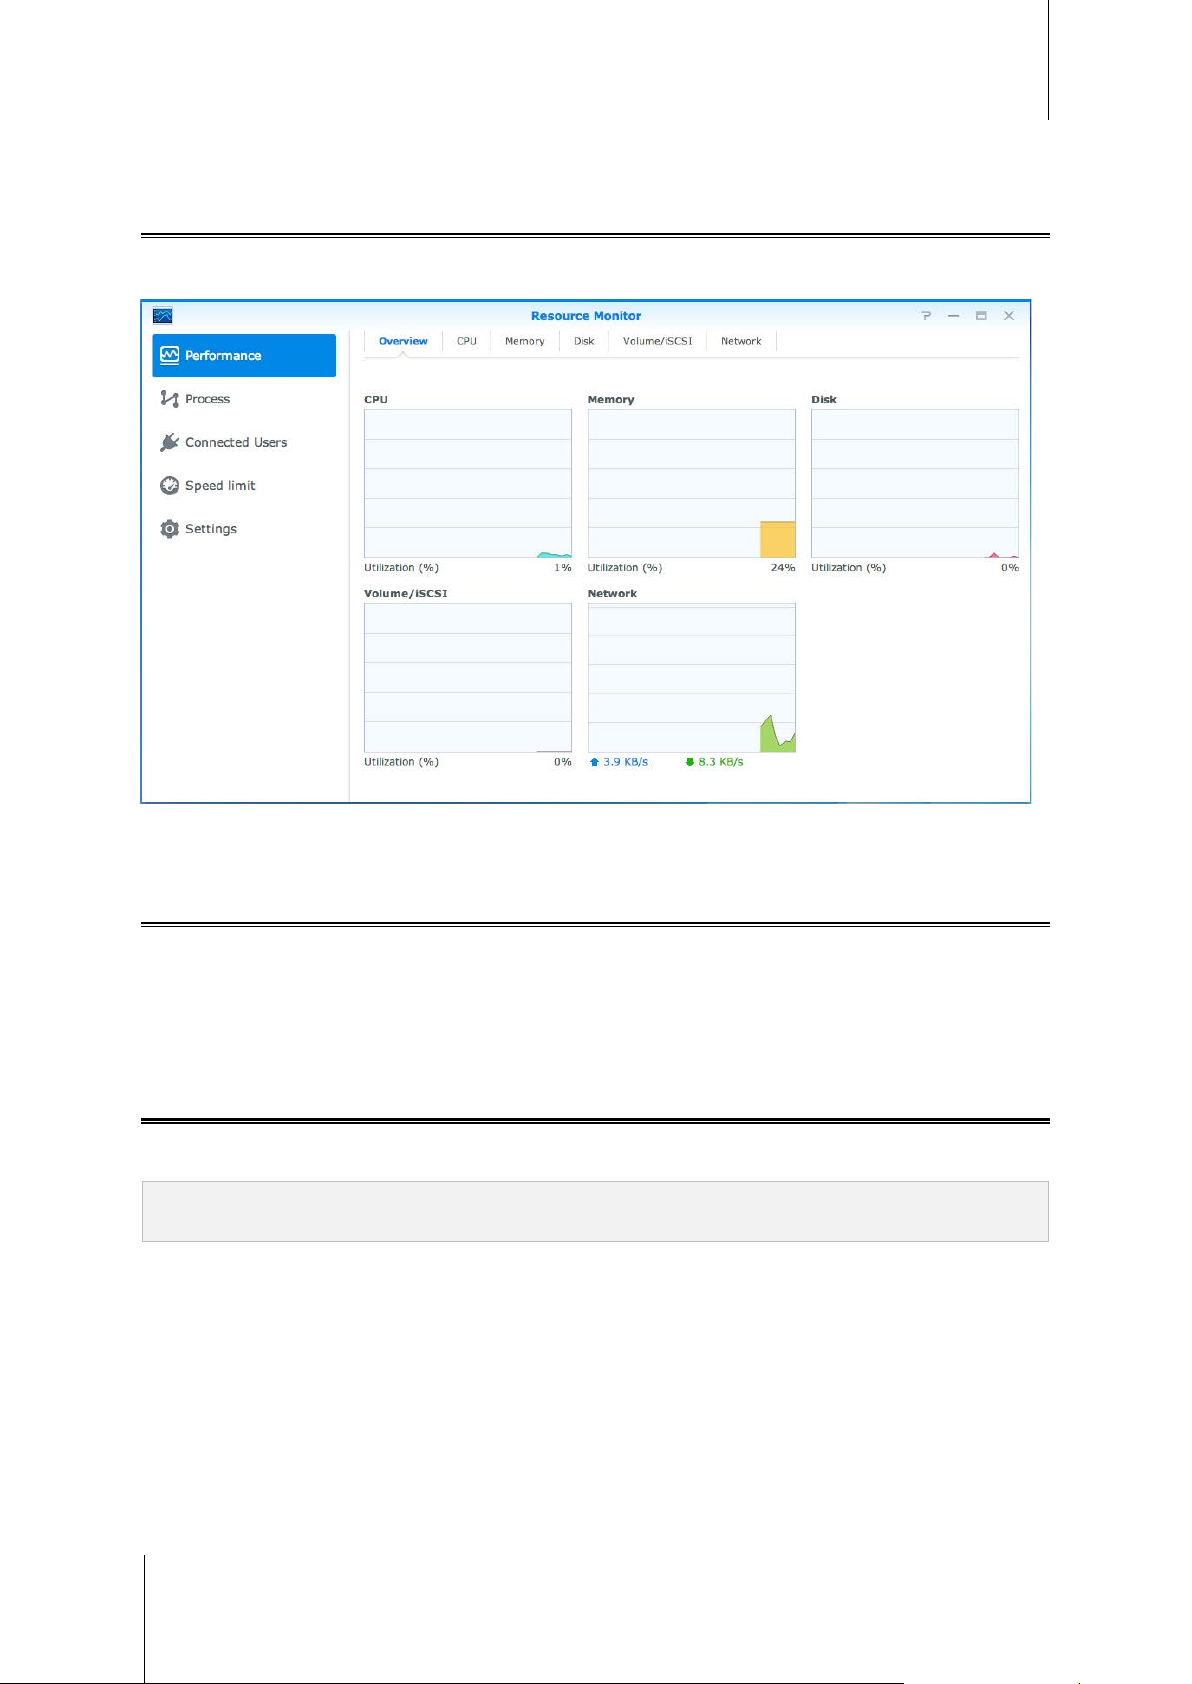
Monitor System Resources
Resource Monitor allows you to monitor the CPU usage, memory usage, disk utilization and network flow. You
can choose to monitor in real time or view previous data. For more detailed instructions, please see DSM Help.
Automate Tasks
Go to Control Panel > Task Scheduler to schedule and run services or scripts at pre-defined times. You can
create and manage tasks to automatically run user-defined scripts, empty shared folder recycle bins, or start and
stop certain services. For more detailed instru cti ons, please see DSM Help.
Update DSM or Restore Defaults
At Control Panel > Update & Restore, you can update DSM to a newer version, back up and restore system
configurations or restore IoSafe NAS device to its original ma nufa ctur er set ting s.
Important: The data s aved on the IoSafe NAS wi ll not be erased during t he updating proces s. However, for s ecurity
reason, we recommend that you back up t he data first.
18
Page 19

ioSafe NAS User's Guide
Based Synology o n DS M 5.0
Receive Event Notificati ons
At Control Panel > Notification, you can set your IoSafe NAS to send notifications when specific events or
errors occur, notifying you via email, SMS, mobile devices, Skype, or Windows Live Messenger. For more
detailed instructions, please see DSM Help.
Access Applications with Independent Login
With Application Portal, you can configure the connection settings of various applications, allowing you to access
and run these applications in independent browser tabs or windows. To enable Application Portal, go to Control
Panel > Application Portal.
Customized Alias
Applications can be opened in an independent browser window at [http(s)://DSM server address:DSM server
port number [HTTP(S)]/alias name/] once the portal alias is set up.
Customized HTTP(S) Ports
Applications can be opened in an independent browser window at [http(s)://DSM server address:customized
port number] once the HTTP(S) port is set up.
Index Multimedia Files for Applications
Go to Control Panel > Media Library to automatically scan multimedia files, such as photos, music, and videos
stored on your IoSafe NAS, and compile them into a multimedia library to be used by multimedia applications.
For more detailed instructions, please see DSM Help.
Reset Admin Password
If you forgot the password for admin and are therefore unable to log in to DSM, you can reset the password to
blank and set a new password.
To reset admin's password:
Press and hold the RESET button on the back panel of your IoSafe NAS for 4 seconds until you heard a beep
sound.
Note: Other than resetting adminis trator's passwor d, using the RESET button wi ll also restore the IP and D NS of
IoSafe NAS to the def ault value.
19
Page 20

ioSafe NAS User's Guide
Based Synology o n DS M 5.0
Reinstall IoSafe NAS
If you want to reinstall your IoSafe NAS without losing its data, you can use the RESET button on the back panel.
To reinstall IoSafe NAS:
1 Press and hold the RESET button for about 4 seconds until the IoSafe NAS emits a beep sound.
2 Within the next 10 seconds, press and hold RESET button for about 4 seconds until the IoSafe NAS emits a
beep sound.
3 Follow the installation instructions in the Quick Installation Guide for your model available at IoSafe’s Support
Section to set up the ioSafe NAS.
Important: The data s aved on the IoSafe NAS will not be erased during the reinstallati on. However, for s ecurity
reason, we strongly recommend that you back up the data first.
Enable SNMP Service
Go to Control Panel > Terminal & SNMP to enable SNMP service, which allows users to monitor IoSafe NAS
network flow with the network management software.
Enable Terminal Services
Go to Control Panel > Terminal & SNMP to enable Terminal service, which allows you to use Telnet or SSH to
log in to IoSafe NAS and modify its settings.
Important: Use the Ter minal service wi th caution. Improper manipulation or modifi cation to IoSafe NAS may result in
system malfunction or data loss.
20
Page 21

Chapter
Chapter 5: Manage Storage Space
Before taking advantage of the various features of your IoSafe NAS, you need to set up at least one storage
space. This chapter explains how Storage Manager can help you manage storage spaces, such as volumes,
Disk Groups, iSCSI Targets, or iSCSI LUNs, as well as view the status of hard drives. For more detailed
instructions, please see DSM Help.
Volumes and Disk Groups
Volumes are the basic storage spaces on your IoSafe NAS. Before you star t stor in g or serv ing any data, you will
need to create at least one volume. With DSM’s Storage Manager, volumes can be created with various options,
such as different RAID types or customized capacity allocation. For detailed instructions, ple ase see DSM Help.
21
Create Volumes
To create a volume, go to Storage Manager > Volume and click Create. This action launches a setup wizard
which helps create a volume based on your individual needs.
Page 22

Quick or Custom Volumes
Method
Features
Option
Feature
Allowed
≧
≧
When creating a new volume, the following options are available:
Creates an SHR (Synology Hybrid RAID) volume.
Quick
Custom
Automatically optimizes volume capacity and performance based on member hard disks.
Recommended for saving time and simplifying storage management.
Supports different RAID types.
Supports creating single or multiple volumes on Disk Groups.
Provides options to allocate specific amounts of capacity for each volume (only when creating
multiple volumes on RAID)
Recommended for users who want to precisely control storage management on your IoSafe
NAS.
Single or Multiple Volumes on RAID
When creating a custom volume, the following options are available:
ioSafe NAS User's Guide
Based Synology o n DS M 5.0
Uses all of the available capacity of the selected disks to create a single volume.
Single Volume on RAID
Multiple Volumes on
RAID
Provides better speed and performance.
Supports different RAID types.
Allows you to create multiple volumes on a Disk Group.
Supports allocating specific amounts of capacity to each volume.
Provides greater storage management flexibility.
Supports different RAID types.
RAID Types
Depending on your model and number of installed hard disks, the below RAID types can be implemented when
creating custom volumes or Disk Groups.
RAID Type HDD #
1 0
2-3 1
SHR1
4 1-2
Basic 1 0
Failed HDD #
A Synology Hybrid RAID volume optimizes
storage capacity and performance when
combining hard drives of different sizes. SHR
volumes consisting of two or three hard disks
provide 1-disk fault tolerance, while SHR volumes
consisting of four or more hard disks can provide
1- or 2-disk fault tolerance.
A Basic volume is created with one hard drive as
an independent unit. When creating a Basic
volume, you can select only one hard drive at a
time.
Description Capacity
1 x (HDD size)
Optimized by the
system
1 x (HDD size)
JBOD
RAID 0 ≧ 2 0
2 0
JBOD is a collection of hard drives.
Combining multiple disks to build a storage space,
RAI D 0 offers Striping, a process of dividing data
into blocks and spreading the data blocks across
several hard drives, but without safety measures.
---------
1
RAID types except for Basic are supported on specific models only. Visit www.synology.com for more information.
22
Sum of all HDD
sizes
(HDD #) x
(Smallest HDD
size)
Page 23

ioSafe NAS User's Guide
Allowed
Failed HDD #
≧
≧
RAI D Type
Can be changed to...
Based Synology o n DS M 5.0
RAID Type HDD #
RAID 1 2-4 (HDD #) - 1
RAID 5 ≧ 3 1
RAID 5+Spare ≧ 4 2
RAID 6
RAID 10
4 2
4
(even
number)
1 HDD within
each RAID 1
group
The system will write identical data to each hard
drive at the same time, so data integrity is
protected when at least one disk is normal.
This configuration includes a backup option. It
uses parity mode to store redundant data on
space equal to the size of one disk for later data
recovery.
A RAID 5+Spare storage space requires at least
four drives, one of which will act as a hot spare
drive to rebuild the failed drive of the volume
automatically.
RAI D 6 provides extra data protect i on. It uses
parity mode to store redundant data on space
equal to the size of two disks for later data
recovery.
RAI D 10 has the performance of RAID 0 and data
protection level of R AID 1. R AID 10 combines two
hard drives into a RAID 1 group, and combines all
the groups with RAID 0.
Description Capacity
Smallest HDD
size
(HDD # – 1) x
(Smallest HDD
size)
(HDD # – 2) x
(Smallest HDD
size)
(HDD # – 2) x
(Smallest HDD
size)
(HDD # / 2) x
(Smallest HDD
size)
Create Disk Groups
As stated above, creating Disk Groups provides more flexibility when managing storage spaces. Disk Groups can
be created within the volume creation setup wizard, or you can go to Storage Manager > Disk Group and click
Create.
Repair Volumes or Disk Groups
The repair function is available for RAID 1, RAID 10, RAID 5, RAID 5+Spare, RAID 6, and SHR volumes or Disk
Groups. Depending on your RAID types, when one of the hard drives in the volume or Disk Group fails, it will be
in the degraded mode. You can repair the volume or Disk Group by replacing the crashed disk(s) to keep the
data on the volume or Disk Group protected. For more detailed instructions, please see DSM Help.
Change RAID Type
The RAID types of existing volumes and Disk Groups can be changed without losing existing data, allowing you
to easily and economically manage storage capacity. For example, you can create a RAID 1 volume on your
IoSafe NAS, and later change to RAID 5 if you install more hard disks.
The sections below provide basic information regarding changing RAID types. For more detailed instructions,
please see DSM Help.
Supported RAID Types
RAID types can be changed as follows.
Basic RAID 1, RAID 5, RAID 5+Spare
RAID 1 RAID 5, RAID 5+Spare
RAID 5 RAID 5+Spare, RAID 6
23
Add mirror disk to RAID 1 RAID 1
Page 24

ioSafe NAS User's Guide
RAI D Type
Minimum Hard Disks
RAI D Type
Minimum Hard Disk Size
Based Synology o n DS M 5.0
Hard Disk Requirements
In order to change the RAID type of a volume or Disk Group, there must be a sufficient number of available hard
disks installed in your IoSafe NAS. Please see below for the minimum number of hard disks required for each
RAID type.
RAID 1 2 or 4
RAID 5 3
RAID 5+Spare 4
RAID 6 4
Expand Volumes or Disk Groups
The storage capacity of volumes or Disk Groups can be gradually expanded by installing more or larger hard
disks. This feature allows you to expand the capacity of your volume or Disk Group according to your budget and
with no need to worry about losing any existing data.
The sections below provide basic information regarding expanding volumes and Disk Groups. For more detailed
instructions, please see DSM Help.
Expand a Volume by Changing Volume Size
When creating multiple volumes on RAID, specified amounts of Disk Group storage capacity can be allocated to
each volume. If you want to change the amount of allocated storage capacity for a volume, plea se select the
volume and click Edit.
Expand a Volume or Disk Group b y Replacing Hard Disks
For SHR, RAID 1, RAID 5, RAID 5+Spare, or RAID 6, the storage capacity of volumes and Disk Groups can be
expanded by replacing smaller hard disks with larger ones. When expanding storage capacity with this method,
please be careful to replace each hard disk one-by-one. After replacing one hard disk, the volume or Disk Group
must be repaired before the next hard disk is replaced. For more detailed instructions, please see DSM Help.
Please see the following table to see which hard disk should be replaced first.
When replacing hard disks of RAID 5 or RAID 6 volumes or
Disk Groups, the smallest hard disk should always be
replaced first. The storage capacity of RAID 5 volumes is
RAID 5 and RAID 6
(number of hard disks – 1) x (smallest hard disk size), and
RAID 6 is (number of hard disks – 2) x (smallest hard disk
size). Therefore, the smallest hard disk should always be
replaced first in order to maximize hard disk usage.
If the capacity of all member hard disks is equal, then you
should replace at least two hard disks. Otherwise, the
capacity of your volume will not expand.
24
SHR (Synology Hybrid RAID)
If the capacity of member hard disks is different, then the
new, replacement hard disks should be equal to or larger
than the largest existing hard disk. In addition, you should
replace smaller member hard disks first in order to optimize
capacity usage.
Page 25

ioSafe NAS User's Guide
RAI D Type
Minimum Hard Disk Size
Based Synology o n DS M 5.0
Expand a Volume or Disk Group by Adding Disks
For SHR, JBOD, RAID 5, RAID 5+Spare, and RAID 6, the storage capacity of volumes and Disk Groups can be
expanded by adding more hard disks if there are empty hard drive bays in your IoSafe NAS. For more deta ile d
instructions, please see DSM Help.
Please see the following table regarding the minimum size of new hard disks.
The capacity of the hard disk you wish to add must be equal
to or larger than the largest hard disk in the volume or Disk
SHR
RAID 5, RAID 5+Spare, or RAID 6
Group. For example, if your volume is composed of three
hard disks – 2 TB, 1.5 TB, and 1 TB respectively – then the
capacity of the new hard disk must be at least 2 TB.
The capacity of the hard disk you wish to add must be equal
to or larger than the smallest hard disk in the volume or Disk
Group. For example, if your volume is composed of three
hard disks – 2 TB, 1.5 TB, and 1 TB respectively – then the
capacity of the new hard disk must be at least 1 TB.
Data Scrubbing
Data scrubbing is a data maintenance function that inspects volumes or Disk Groups and repairs any detected
data inconsistencies. This function can be used with volumes or Disk Groups that implement SHR (comprised of
three or more disks), RAID 5, or RAID 6.
We recommend regularly performing data scrubbing in order to maintain data consistency and avoid losing any
critical data in the event of disk failure. For detailed instructions, please see DSM Help.
SSD TRIM
If a volume consists entirely of SSDs (Solid State Drives), we recommend enabling SSD TRIM. This feature
optimizes the read and write performance of volumes created on SSDs, increasing efficiency as well as
extending the lifetime of your SS Ds.
Before trying to set up SSD TRIM, please see DSM Help for detailed instructions and more limitations.
Note:
SSD TRIM is only available on cer tain IoSafe NAS models and RAID types.
Some SSD models are not able to perform SSD TRIM on RAID 5 and RAI D 6 volumes. Please r efer to the
compatibilit y list at www.ioSafe.com.
iSCSI Targets and LUNs
iSCSI (Internet Small Computer System Interface) is a type of storage area networking (SAN) service that
provides access to consolidated, block level data storage. The main use of iSCSI is to facilitate data transfers
over intranets, allowing users to manage storage over long distances.
The sections below provide basic information regarding iSCSI Targets and LUNs. For more detailed in structions,
please see DSM Help.
Manage iSCSI Targets
Go to Storage Manager and clic k the iSCSI Target tab to manage iSCSI Targets on your IoSafe NAS. The
maximum number of iSCSI Targets varies depending on the model. For more information, please refer to
“Manage iSCSI LUNs”.
25
Page 26

ioSafe NAS User's Guide
Based Synology o n DS M 5.0
Manage iSCSI LUNs
An iSCSI LUN (logical unit number) represents an individually addressable portion of an iSCSI Target. An iSCSI
LUN can be mapped to multiple iSCSI Targets to perform storage operations such as read or write.
Go to Storage Manager and clic k the iSCSI LUN tab to manage iSCSI LUNs on your IoSafe NAS. The
maximum number of iSCSI LUNS varies depending on the model. For detailed product specifications, please
refer to www.ioSafe.com.
Clone iSCSI LUNs
LUN Clone1 allows you to create near-instantaneous virtual copies of a LUN. It means much higher productivity
and less complex deployment during system-wide operations. LUN Clone also consumes only a fraction of
storage at the time of creation.
Go to Storage Manager and clic k the Clone button to make a writable copy of an iSCSI LUN or an iSCSI LUN
snapshot
Take iSCSI LUN Snapshots
LUN Snapshot1 allows you to create up to 256 snapshots per LUN using point-in-time technology without having
any impact to system performance. It is efficient for your valuable storage space and also increases the level of
protection, letting you easily recover valuable data.
Go to Storage Manager and click the Snapshot button to take iSCSI LUN snapshots.
Manage Hard Disks
The HDD/SSD tab allows you to monitor the status of the hard disks installed in your IoSafe NAS, providing
options to manage and analyze hard disk performance and health. To see this tab, go to Storage Manager and
click HDD/SSD. For more detailed instructions, please see DSM Hel p.
Enabling Write Cache Support
Enabling write cache support enhances the per form anc e of your IoSafe NAS. Only certain hard disk models
support this feature. To ensure data protection while using write cache support, usage of a UPS device is
strongly recommended. We also suggest the system be shut down properly every time after use. Disabling write
cache will reduce the chances of data loss caused by abnormal power outages, but system performance will
decline.
Running S.M.A.R.T. Tests
Disk S.M.A.R.T. tests examine and report the status of your hard disk, alerting you to possible disk failures. We
recommended promptly changing your disk if any errors are detected. S.M.A.R.T. tests can also be scheduled to
run automatically by creating tasks.
Checking Disk Info
The Disk Info section displays a hard disk's model name, serial number, firmware version, and total size.
SSD Cache
SSD cache2 drives can be installed and mounted in a RAID 0 configuration to boost the read speed of a volume,
including iSCSI LUN (Regular Files) on a volume, or iSCSI LUN (Block-Level) on your IoSafe server. You can
mount, check SSD compatibility, and view related information by going to Storage Manager > SSD Cache.
Please refer to your IoSafe server Quick Installation Guide for information regarding SSD installation. For more
detailed information regarding SSD management, please see DSM Help or Synology SSD Cache White Paper.
---------
1
LUN Clone and Snapshot are only available on specific models.
2
SSD cache is supported on specific models only. Visit www.synology.com for more information
26
Page 27

ioSafe NAS User's Guide
Based Synology o n DS M 5.0
Hot Spare
Hot spare1 disks are standby hard disks that can repair a degraded volume/Disk Group/iSCSI LUN by
automatically replacing a failed disk. Hot spare disks can be globally assigned to protect any volume/Disk
Group/iSCSI LUN within your IoSafe NAS, as long as the volume/Disk Group/iSCSI LUN matches the following
criteria:
The RAID type of the volume/Disk Group/iSCSI LUN must be one with data protection (i.e. RAID 1, RAID 5,
RAID 6, RAID 10).
The hot spare disk size must be equal to or larger than the size of the smallest disk in the volume/Disk
Group/iSCSI LUN.
Managing Hot Spares
Go to Storage Manager > Hot Spare > Manage to assign and manage hot spare disks. For more detailed
information, please see DSM Help.
Manage External Disks
External USB or eSATA disks can be attached to the USB or eSATA port of your IoSafe NAS for backup or file
sharing purposes.
2
Go to Control Panel > External Devices to manage attached external disks or setup printers. The External
Devices tab provides options to view device information, change formats, or eject the device. The Printer tab
provides options to setup USB or network printers. For more detailed instructions, please see DSM Help.
---------
1
The hot spare feature is available on specific models only.
2
eSATA is supported on specific models only. Visit www.synology.com for more information.
27
Page 28

Chapter
Chapter 6: Access your IoSafe NAS from the
Internet
You can connect to your IoSafe NAS over the Internet, allowing its services to be accessible from anywhere and
anytime.
This chapter explains the basics regarding us ing the Synology EZ-Internet wizard, advanced port forwarding
functions, and DDNS hostname registration to connect your IoSafe NAS to the Internet. For more detailed
instructions, please see DSM Help.
Use the EZ-Internet Wizard
The EZ-Internet Wizard can set up access via the Internet with an easy-to-use wizard, without going through the
complicated firewall settings, PPPoE setup, DDNS registration, and router port forwarding configuration.
28
Page 29

ioSafe NAS User's Guide
The servers of the DDNS service provider are working normally.
Based Synology o n DS M 5.0
Set Up Port Forwarding Rules for Router
If your IoSafe NAS is within the local network, you can set up port forwarding rules for the router to allow your
IoSafe NAS to be accessible over the Internet.
Note: Before you start, make sure you have m anually assigned a static IP address for your IoSafe NAS. See
"Network Interface" for more inform ation.
Go to Control Panel > External Access > Router Configuration to set up your router and port forwarding rules.
For more detailed instructions, please see DSM Help.
Note: To configur e port forwarding rules and assign static IP address, you mus t have the administrative permission
to the router.
Set up Router
Before adding port forwarding rules with DSM, you need to set up IoSafe NAS device’s connection to the router.
To begin, please click the Set up router button.
Add Port Forwarding Rules
Add port forwarding rules to specify the destination ports of your IoSafe NAS that will receive packages from
specific router ports. Click Create to start creating port forwarding rules.
Register DDNS for the IoSafe NAS
DDNS (Dynamic Domain Name Service) simplifies connecting to your IoSafe NAS over the Internet by mapping a
hostname to its IP address. For example, DDNS allows you to access your IoSafe NAS using a domain name
(e.g. www.john.synology.me), with no need to remember an IP address (e.g. 172.16.254.1).
Service Requirement
The IoSafe NAS is able to connect to the Internet.
DDNS will only run in a network environment where there is no proxy server required.
You can only enter one hostname for each DDNS provider.
Register a DDNS hostname for IoSafe NAS
Go to Control Panel > External Access > DDNS. You can point an existing hostname at the IP address of your
IoSafe NAS, or register for a new one provided by Synology or several other DDNS providers. Please consult
each provider for more details regarding hostname registration.
29
Page 30

ioSafe NAS User's Guide
Based Synology o n DS M 5.0
Access DSM Services via QuickConnect
QuickConnect is a solution that helps client appl ic atio ns (such as DS file, Cloud Station, DS audio, etc.) connect
to your IoSafe NAS via the Internet without setting up port forwarding rules. Go to Control Panel >
QuickConnect to manage the QuickConnect serv ic e. For more details regarding QuickConnect, please see
DSM Help.
30
Page 31

ioSafe NAS User's Guide
Based Synology o n DS M 5.0
Set up VPN Connection
VPN Server is an add-on package that enables your IoSafe NAS to become a PPTP, OpenVPN, or L2TP/IPSec
VPN (virtual private network) server, allowing DSM local users over the Internet to access resources shared
within local area network of the IoSafe NAS.
Set up your IoSafe NAS as a VPN Server
To install VPN Server on your IoSafe NAS, go to Package Center. For more information about VPN Server, run
and launch the package, and then click on the DSM Help button (with a question mark) at the top-right corner.
Connect your IoSafe NAS to a VPN Server
Go to Control Panel > Network > Network Interface to set your IoSafe NAS as a VPN client to connect to a
VPN server, and then gain access to the virtual private network. For each VPN server, you can create or modify
its connection profile, and then use the profile to connect to the server with a simple click.
Note: Your IoSafe NAS cannot be set as a VPN server and client at the same time.
31
Page 32

Chapter
Chapter 7: Enhance Internet Security
After your IoSafe NAS is available on the Internet, you will need to safeguard it against any attacks from Internet
hackers.
This chapter explains how to set up firewall, enable DoS protection and enable auto block. For more detailed
instructions, please see DSM Help.
Prevent Unauthorized Connection with Firewall
The built-in firewall can prevent unauthorized logins, and control which services can be accessed. In addition,
you can choose to allow or deny access to certain network ports from specific IP addresses.
Go to Control Panel > Security > Firewall, and click Create to create firewall rules.
Apply Firewall Rules to Ports
In the Ports section, apply firewall rules to all ports or selected ports using one of the following options:
All: Choose this option to apply the rule to all ports on IoSafe NAS.
Select from a list of built-in applications: Tick the system services that will be included in the rule.
Custom: Specify the type and protocol of the port, and enter the custom port number.
You can enter up to 15 ports separated with comma, or by specifying a port range.
Apply Firewall Rules to Source IP Addresses
In the Source IP section, choose to allow or deny access from a source IP addresses using one of the following
options:
All: Choose this option to apply the rule to all source IP address es.
Single host: Choose this option to apply the rule to an IP address.
Subnet: Choose this option to apply the rule to a subnet.
Prevent Attacks over the Internet
Denial-of-service (DoS) protection helps to prevent malicious attacks over the Internet. Go to Control Panel >
Security > Protection to enable DoS protection and improve network security.
32
Page 33

ioSafe NAS User's Guide
Based Synology o n DS M 5.0
Automatically Block Suspicious Login Attempts
Auto block allows you to prevent unauthorized login. After enabling the service, an IP address will be blocked if it
has too many failed login attempts. Go to Control Panel > Security > Auto Block to create and manage your
block list and allow list.
33
Page 34

Chapter
Chapter 8: Set Up File Sharing
ioSafe NAS can become the file sharing cen ter within the local network or over the Internet, allowing users to
access its files anytime and anywhere. For more detailed instructions, please see DSM Help.
This chapter explains how to enable the support for file sharing protocols for all platforms, create and manage
users and groups, set up shared folders, and allow or deny access to the shared folders, applications or
subfolders from specific users or groups.
Enable File Sharing Protocols for All Platforms
This section tells you how to allow the IoSafe NAS to support file sharing protocols for all platforms.
IoSafe NAS supports the following file sharing protocols:
For Windows: SMB/CIFS (My Network Places), FTP, WebDAV
For Mac: SMB, FTP, AFP, WebDAV
For Linux: SMB, FTP, NFS, WebDAV
34
Page 35

ioSafe NAS User's Guide
Based Synology o n DS M 5.0
Join IoSafe NAS to Directory Service
Go to Control Panel > Directory Service to join your IoSafe NAS to a directory service as a Windows domain or
LDAP client. When the IoSafe NAS is joined to a directory service, you can manage domain/LDAP users' access
privileges to shared folders and DSM applications and enable their home service.
Joining a Windows Domain
Click the Domain tab, and enter domain name and DNS server (optional) to join the IoSafe NAS to a Windows
ADS domain. In the window that appears, enter the user name and password for the administrator of the domain
server.
After IoSafe NAS joins the domain, domain users can log in to IoSafe NAS with their domain account and
password.
Note:
If your domai n user name includes “%” and “$”, you might not be able to access your home folder. Please ask your
domain administ rator to give you a new user nam e.
Domain groups Domain Admins and Enterprise Admin s wi ll be added to the local group administrators
automatically. In other words, domai n users in these groups have administrat ive right on the IoSafe NAS, including
performing DSM/CIFS/FTP/AFP/WebDAV applications.
You can also configure domain users’ access privileges to the shared folders on IoSafe NAS. See "Allow Domain
Users or Groups t o A ccess Shared Folders" for more information.
Binding to an LDAP Server
LDAP allows your IoSafe NAS to join an existing directory service as an LDAP client, and then retrieve user or
group information from an LDAP server (or "direct ory server ") . The profiles option allows you to smoothly connect
to different types of LDAP servers, such as standard (Synology Directory Servers or Mac Open Directory), IBM
Lotus Domino servers, or customize your own profile settings. You can manage LDAP users' or groups' access
privileges to DSM applications and shared folders, just as you would with DSM local users or groups.
35
Page 36

ioSafe NAS User's Guide
Based Synology o n DS M 5.0
Host LDAP Service with Directory Server
Directory Server is an add-on package based on LDAP version 3 (RFC2251) that allows your IoSafe NAS to
become an account administration center to centralize the account management of all connecting clients, and
provides authentication service for them.
In addition, with Google Apps Single Sign-On support, Directory Server can become an identity provider for
your Google Apps domain. This allows users to log into Google Apps services (such as Gmail or Google
Calendar) using their accounts and passwords stored on Directory Server, eliminating the need for users to
remember another set of accounts and passwords.
To install Directory Server on your IoSafe NAS, go to Package Center. For more information about Dir ect ory
Server, please refer to DSM Help. To learn more about how to access Directory Server with a LDAP client, refer
to the Directory Server User's Guide available at Synology's Download Center.
36
Page 37

ioSafe NAS User's Guide
Based Synology o n DS M 5.0
Manage Users and Groups
Go to Control Panel > User or Group to create users or groups, and allow or deny their access to different
shared folders.
Create Users
Click Create to create a user account. The user can log in to edit his/her account info after the user account has
been established. You can also choose to set an account expiration date or disallow the user to change account
password.
Allow Self-service Password Reset
If you would like to allow users to reset forgotten passwords via email, you can click Password Settings and tick
the box marked Allow non-admin users to reset forgotten passwords via email. When this option is enabled,
a link marked Forgot your password? will appear on the DSM login page. If a user forgets his password, he can
click this link and enter his username. In this case, the system will send a message to the user containing a link
to reset his forgotten password.
For detailed instructions and notes, please see DSM Help.
Apply Password Strength Rules
You can enable password strength service to make sure DSM users’ passwords are secure enough to withstand
malicious login attempts. Click Password Settings to configure this measure of the effectiveness of a password.
Note:
Password Strength rules only work for passwords created or modified after the Passw ord Strength service is
enabled. Existi ng passwords won’t be af fected by the rules.
The rules won’t apply to the passwords of users creat ed by importing user list.
37
Page 38

ioSafe NAS User's Guide
Based Synology o n DS M 5.0
Create User's Home Folder
Each DSM user (except for guest) can have his/her own folder called the home folder, which is accessible only
by the user and the system administrator. Click User Home to enable user home service.
For users belonging to the administrators group, DSM users’ home folders are here: homes/[Username]
Note:
When the us er home service is disabled, the homes folder w ill be kept but accessible by users belonging to the
administrators group only. User s can access their home f olders again if the user home service is enabled again.
To delete th e homes folder, the user home service must be disabled first.
Create Domain/LDAP User’s Home Folder
If you have joined your IoSafe NAS to a directory service as a Windows domain or LDAP client, you can go to
Control Panel > Directory Service > Domain users or LDAP user to cre ate dom ain/LDAP users' home folder.
Click User Home and tick Enable home service for domain users or Enable home service for LDAP users.
Like local users, all domain/LDAP users can access their own home folder via CIFS, AFP, FTP, WebDAV, or File
Station. Users belonging to the administrators group can access all personal folders located in the homes
default shared folder. For users belonging to the administrators group, domain/LDAP users’ home folders are in
the folder named @DH-domain name (for domain users) or @LH-FQDN name (for LDAP users). The name of
the user's home folder is the user account plus a unique number.
Note:
To delete th e homes shared folder, user home service must be disabled firs t.
Enabling domain/LDAP user home service will also enable the local user home service if it' s not enabled yet.
The domain user home service would be disabled if the local user home servic e is disabled.
Create Groups
Go to Control Panel > Group to create and edit a group, add users to the group, and then edit the group's
properties, saving you the trouble of editing users one by one.
Groups created by default include the following:
administrators: Users belonging to the administrators group have the same administrative privilege as
admin.
users: All users belong to the users group.
Note: For more information about editing a group's access privileges to shar ed folders or applications, see "Allow
Users or Groups t o A ccess Shared Folders" and "Allow Users to Access Applications" for more information.
Allow Users to Access Applications
Go to Control Panel > Privileges to decide which applications could be accessed by a user.
38
Page 39

ioSafe NAS User's Guide
Based Synology o n DS M 5.0
Set Up Shared Folders
Go to Control Panel > Shared Folder to manage the shared folders, which are the root folders of IoSafe NAS.
You can store data in the shared folders and share them with users or groups with access privileges.
39
Page 40

ioSafe NAS User's Guide
Name
Description
Based Synology o n DS M 5.0
Built-in Shared Folders Created by the System
System built-in shared folders are created when the services or applications requiring the folders are enabled.
public
web
photo
music
video
surveillance
home
homes
NetBackup
usbshare
esatashare
The public folder will be created automatically after the first time you set up IoSafe NAS.1
The web folder contains contents of your website. It will be created automatically when Web Station is
enabled.
The photo folder contains photos and videos you want to share on Photo Station. It will be created
automatically when Photo Station or DLNA/UPnP Media Server is enabled.
The music folder contains music you want to share on Audio Station. It will be created automatical l y when
Audio Station is enabled.
The video folder contains videos you want to browse through DLNA/UPnP DMA. It will be created
automatically when Media Server is enabled.
The surveillance folder contains Surveillance Station recordings. It will be created automatically when
Surveillance Station is enabled. It is read-only and can only be accessed by the system administrator.
The home folder provides a private space for each user to store data where only the user can access. It will
be created automatically when User Home is enabled.
The homes folder contai ns t he home folders of all users. It will be created automatically when User Home is
enabled. Only system administrator can access and manage all users' home folders.
The NetBackup folder is created automatically when Network Backup Service is enabled.
The usbshare[number] folder is created automatically when you connect an USB disk to IoSafe NAS
device’s USB port.
The esatashare folder is created automatically when you connect an eSATA disk to IoSafe NAS device’s
eSATA port.
Create a Shared Folder
If you are a user belonging to the administrators group, you can click Create to create shared folders and
assign access privileges to the folders.
Remove a Shared Folder
If you are a user belonging to the administrators group, you can click Delete to remove an y shared fol der
created by yourself.
Important: Removing any shared folder als o removes all data within it. If you still need the data, back them up first.
Encrypt a Shared Folder
When creating a shared folder, you can choose to encrypt it.2 After a folder is encrypted, you can use the
Encryption drop-down menu to edit the folder.
The AES 256-bit encryption can block off all unauthorized access attempts. Without the encryption key, other
people will not be able to use the encrypted data even if they remove the hard drives from your IoSafe NAS and
mount it on their device.
Note: Tick Mount automatically on startup to mount the encrypted folder automatically after IoSafe NAS starts up
next time. By default , encrypted shar ed folder will be unmounted automatically on startup for security reasons. If you
reset default passwords with the reset button located on t he IoSafe NAS, encr ypted shares will be unm ounted, and
the option to automatically mount will be disabled.
---------
1
This is applied to 1-bay models only.
2
Shared folder encryption is supported on specific models only.
40
Page 41

ioSafe NAS User's Guide
Based Synology o n DS M 5.0
Allow Users or Groups to Access Shared Folders
Go to Control Panel > Shared Folder, click Edit and go to Permissions to allow or deny users' or groups'
access to a shared folder.
Allow Linux Clients to Access Shared Folders
Go to Control Panel > Shared Folder, click Edit and go to NFS Permissions to assign NFS permissions to any
shared folder, allowing Linux clients to access it.
Allow Domain Users or Groups to Access Shared Folders
If you have joined your IoSafe NAS to a directory service as a Windows domain or LDAP client, you can go to
Control Panel > Directory Service > LDAP User, LDAP Group, Domain users, or Domain Group to set up
and modify the shared folder privileges of a domain/LDAP user or group.
Note: In the event of privilege conflicts, the privilege priority will be: No access (NA) > Read/Write (RW) > Read only
(RO).
Define Windows ACL Privileges for Shared Folder
Windows Access Control List (ACL) is a list of privileges or permissions that determine specif ic access rights under the Windows environment. This can help administrator define access control rules for an individual file or a directory, and give different access rights for individual user or group. Go to Control Panel > Shared Folder and click Edit. On the Permissions tab, click Customize.
Through Windows ACL, you can assign different privileges to local and domain users in the system. The
privileges apply to all file-related applications, such as FTP, File Station, NFS, AFP, WebDAV, etc.
Index Shared Folder Contents
Go to Control Panel > Shared Folder, click Edit and go to the File Indexing tab to enable file in dexing. This
option indexes the contents of a shared folder so you can find files or folders more quickly during file search.
Note: See "Search for Files or Folders" for more information about searching files with File Station.
41
Page 42

Chapter
Chapter 9: Access Files from Anywhere
When you have set up users or groups with proper access privileges to the shared folders, they can share their
files with your IoSafe NAS from anywhere.
This chapter explains the ways to access the IoSafe NAS shared folders within the local ne twork or over the
Internet. For more detailed instructions, please see DSM Help.
Access Files within the Local Network
This section explains how to allow users to use Windows, Mac, or Linux computer to access shared folders on
IoSafe NAS within the local network.
Note: Before accessing, make sure the relative file s haring protocols have been enabled for your IoSafe NAS. See
"Enable File Sharing Protocols for Al l Platforms" for more information.
Access Shared Folders from Windows
To access shared folders from Windows, you can use any of the following methods.
Method 1: Use Synology Assistant to map the shared folders as network drives.
Run Synology Assistant (av ailable at www.ioSafe.com/support) and select the server from the server list. Click
Map Drive and follow the onscreen steps to finish the setup.
Upon completion, you can access the mapped shared folder directly in Windows Explorer.
Method 2: Use Windows Explorer.
Open a Windows Explorer window and choose Tools > Map network drive to show the Map Network Drive
window. Choose a drive number from the Drive drop-down menu.
Locate the shared folder by doing one of the following:
Enter \\IoSafe_Server_Name\Shared_Folder_Name in the Folder field.
Click Browse to locate the shared folder, and then click OK.
Enter your user name and password for Synology DiskStation Manager and click OK. Upon completion, you can
access the mapped shared folder directly in Windows Explorer.
42
Page 43

ioSafe NAS User's Guide
Based Synology o n DS M 5.0
Access Shared Folders from Mac
Choose Go > Connect to Server from the menu bar. Type the IP address or name (appended with .local) of the
IoSafe NAS preceded by smb:// or afp:// in the Server Address field and click Connect. (e.g.
smb://EricaWang.local or afp://192.168.0.2)
Note: For better performance, it is recommended that you connect to the shared folders via SMB.
Select the shared folder you want to access. Upon completion, you can access the shared folder in the Finder
window.
Access Shared Folders from Linux
In Synology DiskStation Manager, Go to Main Menu > Control Panel > Shared Folder. Select the shared folder
you want to access, click NFS Privileges, and find the mount path at the bottom of the window that appears.
On a Linux computer, enter the mount path to mount the shared folders.
Note: For more information about NFS Privileges, see "Al low Users or Groups to Access Shared Folders".
43
Page 44

ioSafe NAS User's Guide
Based Synology o n DS M 5.0
Access Files via FTP
If your IoSafe NAS is accessible over the Internet, you can use a FTP application to access the shared folders.
Note: For more information about mak ing IoSafe NAS accessible over the Internet, see "Chapter 7: Access your
IoSafe NAS from the Internet".
Go to Control Panel > File Services > FTP to enable FTP service, allowing users to upload or download IoSafe
NAS data via FTP.
Connect to IoSafe NAS Using a FTP Application
Open any FTP application on your computer and enter the following information to connect to IoSafe NAS:
IP address or domain name of the IoSafe NAS
Your user account and password
The port number (The default number is 21)
44
Page 45

ioSafe NAS User's Guide
Based Synology o n DS M 5.0
Access Files via WebDAV
By enabling WebDAV or CalDAV (at Control Panel > File Services > WebDAV), you can remotely manage and
edit files or calendars stored on the IoSafe NAS.
Sync Files via Cloud Station
Cloud Station is a file sharing service that allows you to synchronize files between a centralized IoSafe NAS and
multiple client computers, mobile and IoSafe NA S dev ic es. Go to Package Center to install and run the Cloud
Station package.
45
Page 46

ioSafe NAS User's Guide
Based Synology o n DS M 5.0
Access Files via File Station
File Station is DSM's file management tool, allowing DSM users over the Internet to access the IoSafe NAS
folders with their web browsers. By launching two or more File Stations, you can manage all your IoSafe NAS
data by dragging and dropping them between different File Stations.
File Station Appearance
Left panel: Displays shared folders and their subfolders in the upper part, and the folders on your local
computer in the lower part.
Main section: Displays contents of the currently selected folder.
Help button (top-right corner): Click the Help button (with a question mark) to reveal the DSM Help, where
you can get useful help about how to use File Station.
Search field: Enter a keyword to filter through files or folders in the current folder.
Advanced Search (magnifying glass button): Search for refined search results.
Manage File Station Options
Click Settings to configure general settings, enable File Station log, mount remote folders or virtual drives,
determine who can share file links, and set speed limit to control the bandwidth usage for DSM file transfer
services.
Note:
For more information about rem ote folders or vir tual drives, see "Mount Remote Folders or Virtual Drives".
For more information about shared links, see "Shar e F ile Links".
46
Page 47

ioSafe NAS User's Guide
Based Synology o n DS M 5.0
Search for Files or Folders
You can type keywords in the Filter field at the top-right corner of File Station to filter through files or folders in
the current folder. Additionally, you can also perform advanced search in the Advanced Search panel for more
refined search results.
Note: For quicker search result, it is recommended that you index shared folder contents. See "Index Shared Folder
Contents" for more information.
Set File Station in Action
With the Action menu, right-clicking, and dragging-and-dropping, you can easily download, upload, copy, mov e,
rename, delete, extract, and compress files or folders, and more.
Edit the Properties of Files and Subfolders
You can edit the access privileges to files and subfolders (meaning folders and their subfolders in a shared
folder), copy download links and open file in a new browser window in the Properties window. Select the files
and folders for which you want to set access privileges. Right-click one of the files or folders, or choose the
Action menu, and then choose Properties.
Note:
To set access privileges to shared folders, please see "Allow Users or Groups to Access Shared Folders" for mor e
information.
You are not al lowed to edit the access privileges to f iles and subfolders in the photo shared folder here. To set
access privileges to photo albums for Photo Station user s, open Photo Station, go to the Settings page, and click
the Help tab for more information.
With File Station, you can only p erform the upload action for files and folders on your computer. All the other File
Station actions and properties setting are available for files and folders on IoSafe NAS only.
Share File Links
Files or folders stored on your IoSafe NAS can be shared quickly and easily. Simply right-click a file or folder and
select Share file links. This generates a link and QR code, which can be sent to friends or other users. They can
follow the link to download the selected file or folder, whether or not they possess a DSM account.
47
Page 48

ioSafe NAS User's Guide
Based Synology o n DS M 5.0
Mount Remote Folders or Virtual Drives
File Station allows you to mount remote folders to access contents shared by network computers or other IoSafe
NAS, or virtual drives to access contents within disc images. That way, you can easily navigate all available
network resources or disc images with File Station. For more information about remote folders or virtual drives,
click the Help button (with a question mark) at the top-right corner.
Edit Music Information
With File Station’s Music Information Editor, you can view or edit the information of music files. Simply right-click
the music files and choose Edit music information.
View Documents, Photos, or Videos
With File Station, you can view documents, videos or photos easily. For more information, click the Help button
(with a question mark) at the top-right corner.
Edit Photos
With File Station, you can edit photos with web-based editors, such as Pixlr Editor or Pixlr Express. For more
information, click the Help button (with a question mark) at the top-right corner.
48
Page 49

Chapter
Chapter 10: Back Up Data
IoSafe offers comprehensive backup solutions for your computer and IoSafe NAS, allowing you to back up data
on your computer to IoSafe NAS. If you are a user belonging to the administrators group, you can also back up
the IoSafe NAS data with local or network backup, or sync shared folder contents between IoSafe NAS. The
creative Copy button simplifies external storage devices backup with One-touch design. The support for the
Amazon S3 backup service and the innovative Time Backup package give you other choices for server backup.
This chapter explains how the various backup solutions of DSM can help protect your data. For more detailed
instructions, please see DSM Help.
Back Up Computer Data
Synology-designed Data Replicator 3 allows you to back up data from a Windows computer to IoSafe NAS. If you
are using a Mac or Linux, IoSafe NAS can also serve as their backup destinatio n.
49
Page 50

ioSafe NAS User's Guide
Based Synology o n DS M 5.0
Use Data Replicator for Windows
The Synology Data Replicator installation package can be found at Synology's Download Center at:
http://www.synology.com/support/download.php
What Can Data Replicator Do?
Monitor specific folders on your Windows computer and perform real-time backup when any modification to the
contents within a monitored folder is made.
Adjust backup versions and restore points.
Restore backup data from IoSafe NAS to your Windows computer according to your preference.
Important:
Your computer and IoSafe NAS s hould use the same encoding. See "Language" for more information.
Synology D ata Replicator 3 is the next generation of Synology Data Replicator. It can only r estore the data on
IoSafe NAS that was backed up after Data R eplicator 3 was instal led. If users have backed up data on IoSafe NAS
using Synology Data R eplicator, we recommend restoring dat a on IoSafe NAS to PC first before using Synology
Data Replicator 3.
The ioSafe NAS can be used with almost any backup program that can recognize a network or iSCSI dri ve as a
target destinat ion. Use any suitable backup program you desi re with this device if you have a preference.
Data Replicator Requirement:
Free HDD Space: 5MB
Operating System: Windows 2000 or later
Best Screen Resolution: 1024 x 768 or above
Network Environment: Microsoft Networking over TCP/IP enabled and has network connection with IoSafe
NAS
To install Data Replicator:
Unzip the file downloaded from Download Center. Find and double-click the setup.exe file, then follow the
onscreen instructions.
To use Data Replicator:
For detailed instructions on how to use Data Replicator, see its Help by clicking the Help button.
Use Time Machine for Mac
IoSafe NAS provides compatibility for backup with Apple Time Machine. Mac users can back up their data to the
shared folder of the IoSafe NAS without problem. Go to Control Panel > File Services > Win/Mac/NFS, tick
Enable Mac file service, and choose a shared folder from the Time Machine drop-down menu. The chosen
shared folder will become Time Machine's backup destination
Note: For more information about using Time Machine, see the help on your Mac computer.
Use rsync for Linux
You can use rsync to back up Linux data to the IoSafe NAS.
50
Page 51

ioSafe NAS User's Guide
Based Synology o n DS M 5.0
Back up Data or iSCSI LUN on IoSafe NAS
Other than backing up computer data to IoSafe NAS, users belonging to the administrators group can perform
backup tasks, restore files, and sync shared folders from one IoSafe NAS device to another with Backup &
Replication. For more detailed instructions, please see DSM Help.
Backup and Restore System Configurations
Go to Control Panel > Update & Restore > Configuration Backup to back up and restore the system
configurations of your IoSafe NAS. You can back up system configurations to a configuration file (.dss) and then
restore the configurations at a later time.
Sync Shared Folder Contents b etween IoSafe NAS
Shared Folder Sync allows you to sync shared folder contents from a source IoSafe NAS (or "client") to a
destination IoSafe NAS (or "server") over the network. Shared Folder Sync backup tasks can be viewed and
managed by going to Backup & Replication > Shared Folder Sync. For detailed instructions regarding how to
enable Shared Folder Sync, please see DSM Help.
Back up Data on USB Device or SD Card
You can go to Control Panel > External Devices to specify a shared folder for use with USBCopy or SDCopy,
and then use the Copy button on the front panel of your IoSafe NAS to copy data from a USB device or SD card
to the shared folder.
1
---------
1
USBCopy and SDCopy are supported on specific models only. Visit www.synology.com for more information.
51
Page 52

Chapter
Chapter 11: Host Websites and Print Server
IoSafe NAS is designed for small and medium businesses (SMB), providing the ability to set up web and print
servers on a single IoSafe NAS without spending extra money. This chapter provides basic information regarding
these features. For more detailed instructions, please see DSM Help.
Use Web Station to Host Websites
Go to Control Panel > Web Services to set up your website with Web Station, which is integrated with support
for PHP and MySQL. For detailed instructions, please see DSM Help.
52
Enable Web Station
With the Web Station feature, you can create a website with web pages on the IoSafe NAS. With built-in PHP
and MySQL support, you can create dynamic, database-driven website for your business. There is also a variety
of 3rd party packages such as Content Management, Customer Relationship Management & e-Commerce
system in Package Center, so that you can install them with a few clicks. The default shared folder, "web" will
store the web page files for your website.
Enable Virtual Host to Host Websites
You can host multiple websites on a single server with virtual host feature. Each website can have different port
numbers or even different hostname s.
Enable Personal Website
The personal website function is a convenient way to allow IoSafe NAS users to host their own personal websites.
Each local user, domain user and LDAP user will have a unique website address.
Page 53

ioSafe NAS User's Guide
More Information
Based Synology o n DS M 5.0
Modify HTTP Service Options
In addition to the default port number 80, you can add another port for the use of Photo Station and Web Station.
For more detailed instructions, please see DSM Help.
Manage PHP Settings
After you have enabled Web Station, you can click the PHP Settings tab to configure PHP related settings. For
more detailed instructions, ple ase see DSM Help.
Install Featured Applications
After you have finished setting up your web environment, you can install applications to enhance the features
of your website using many of the free Open Source applications.
For a list of featured applications tested to be compatible with IoSafe NAS, visit
http://www.synology.com/support/faq_show.php?q_id=404. For the download links and installation
instructions of those applications, visit their official websites.
Set IoSafe NAS as Print Server
Go to Control Panel > External Devices > Printer to set the IoSafe NAS as a print server over your local area
network, allowing client computers or mobile devices to access printers connected to the IoSafe NAS. The IoSafe
NAS can connect to USB printers or network printers. In addition, AirPrint support allows you to print from an iOS
device, and Google Cloud Print support allows you to print using Google products and services.
detailed instructions, please see DSM Help.
Set up Computer to Access Print Server
After the print server is set up on your IoSafe NAS, Windows, Mac, and Linux clients within the local area network
can connect to the print server and access its print/fax/scan service.
Access Print Server with iOS Devices
If you have enabled DSM's AirPrint support, any iOS devices running on iOS 4.2 or later can print to the printer
connected to your IoSafe NAS.
1
1
For more
---------
1
For recommended peripheral models, including hard drive, USB printer, DMA, and UPS, please visit www.synology.com.
53
Page 54

Chapter
Chapter 12: Discover Various Applications with
Package Center
Synology has integrated third party or Synology-designed applications into packages that can be installed on
IoSafe NAS and managed with Package Center.
Coming with full-featured applications, IoSafe NAS provides you with a variety of privileges to enjoy multimedia
contents, share photos, videos, and blogs, access files anytime and anywhere, monitor live actions from cameras,
live stream and record digital TV programs, search and download files from the Internet, back up precious data,
and build your own cloud.
This chapter introduces packages availa ble at Package Center and how to install packages. F or more deta ile d
instructions, please see DSM Help.
What Package Center Offers
Go to Package Center to find out what Package Center has to offer.
54
Audio Station
Audio Station is a web-ba sed audio appli cati on, allowing you to access the music library on your IoSafe NAS,
choose available audio sources on the local area network, and add your favorite music to playlists for playback.
Central Management System
Synology CMS (Central Management System) allows you to efficiently and conveniently manage multiple IoSafe
NAS servers. It provides a single interface to monitor the status of multiple servers, create policies for batch
editing the settings of server groups, and keep each server in your fleet up-to-date and running smooth ly .
Cloud Station
Cloud Station is a file sharing service that allows you to synchronize files between a centralized IoSafe NAS and
multiple client computers, mobile and IoSafe NA S dev ic es.
Page 55

ioSafe NAS User's Guide
Based Synology o n DS M 5.0
DNS Server
DNS (Domain Name System) is a naming system that facilitates the exchange of data between computers over
the Internet and other networks. Its main function is to translate user-friendly domain names (e.g.
www.ioSafe.com) into corresponding fixed, public IP addresses (e.g. 120.89.71.100). This function allows users
to easily find web pages, computers, or other devices over the Internet or local network.
Download Station
Download Station is a web-based download application which allows you to download files from the Internet
through BT, FTP, HTTP, NZB, Thunder, FlashGet, QQDL, eMule, and Xunlei-Lixian, and subscribe to RSS feeds
to keep you updated on the hottest or latest BT.
Photo Station
Photo Station is an online photo album integrated with a blog for you to easily share photos, videos, and blog
posts over the Internet. With Photo Station, you can upload, organize, edit, and share your photos in quick, easy
steps.
Video Station
Video Station is an ideal video organizer of your collection of movies, TV shows, home videos, and TV recordings,
allowing you to watch videos on your computer, DLNA/UPnP-compliant DMAs, and mobile devices.
Surveillance Station
Surveillance Station is a professional Network Video Recording (NVR) software bundled with DiskStation
Manager (DSM), allowing you to remotely record and monitor video footages from IP cameras which are paired
with your IoSafe NAS.
Synology High Availability
High Availability refers to a server layout solution designed to reduce interruptions of services caused by server
malfunctions. With Synology High Availability, two servers form a “high-availability cluster,” in which one assumes
the role of the active server while the other acts as the stand-by server. If the server malfunctions, the stand-by
server takes over all services, thus minimizing serv er downtime.
Install or Buy Packages
Click Install, Try or Buy, and follow the onscreen instructions to install packages. You can also click Manual
Install and follow the wizard to install packages by uploading .spk files (available at Synology's Download
Center or third party websites).
55
Page 56

Chapter
Chapter 13: Communicate with Mobile Devices
As Internet access grows popular on mobile devices, Synology provides you with several creative alternatives to
communicate with your IoSafe NAS using iOS/Android, Windows Phone, or other mobile devices.
Manage DSM Settings with DSM mobile
DSM mobile allows DSM users belonging to the administrators group to manage DSM settings and check DSM
information with the web browser of an iOS (iPho ne, iPad or iPod touc h) , Android device, or Windows Phone.
To log in to DSM mobile:
1 Use the web browser of your iOS/Android device or Window s Phone to connect to
http://IoSafe_Server_IP:5000.
2 Enter your DSM user credentials and tap Login.
Note: For more information about DSM mobile, tap Help on the hom e page.
Use iOS, Android, and Windows Apps
The Synology mobile apps are now available on Apple's App Store, Android Market, and Windows Marketplace,
allowing you to communicate with IoSafe NAS wherev er Wi-Fi access is available. You can manage files, music,
photos, videos, even the surveillance videos on your NAS, sync folders between your mobile devices and NAS,
download files, and watch videos on the go.
DS audio
DS audio allows you to access Audio Station with an iOS/Android device or Windows Phone and listen to your
favorite music on the go. Besides, the remote controller feature allows you to control Audio Station's music
playback when there is an audio output device connected to the USB port of your IoSafe NAS, such as a USB
speaker, or an external speakers or home stereo equipment connected to the audio dock of Synology Remote
(sold separately).
DS cam
DS cam allows users who own an iOS/Android device to live view their IP cameras, take snapshots, and view
recorded events from your Surveillance Station whenever a network connection is available.
DS cloud
DS cloud is the mobile counterpart to Synology's Cloud Station and allows you to easily sync folders between an
iOS/Android device and IoSafe NAS.
56
DS download
DS download allows you to access Download Station and download files directly with an iOS/Android device or
Windows Phone. You can create download tasks by adding a URL, via a built-in mini browser of the application,
or the integrated Safari browser for user convenien ce. M anaging basic settings such as transfer speed limits or
activating the advanced schedule is also possible.
DS file
DS file allows you to access and manage files on your IoSafe NAS with an iOS/Android device or Windows
Phone.
Page 57

ioSafe NAS User's Guide
Based Synology o n DS M 5.0
DS finder
DS finder allows you to monitor or email the status of your IoSafe NAS, and request it to perform wake on LAN
(WOL), restart, shut down, or play beep sounds (to help you quickly find the its location) with an iOS/Android
device or Windows Phone.
DS photo+
DS photo+ allows you to access Photo Station with an iOS/Android device or Windows Phone and share your
precious moments on the go. Download and save photos from Photo Station to your mobile device so you can
enjoy the flashbacks anytime anywhere. You can also use DS photo+ to upload snapshots or videos from your
camera phone straight to Photo Station. Besides, you and your friends can interact by leaving comments on any
photos, adding more fun to your photo sharing experiences.
DS video
DS video allows you to access Video Station and watch videos both at home and on the move with an
iOS/Android device or Windows Phone. You can browse and organize your collections of videos, record digital
TV programs available at the place you are located with a USB DTV dongle (sold separately) plugged into your
IoSafe NAS, and manage your recording tasks and schedules.
Note: For more information about those mobile Apps, refer to the Help files t hat come with the Apps.
Use Other Mobile Devices
If you have a mobile device running on Windows Mobile 6.0 (with Internet Explorer Mobile or Opera 9.0 or later),
Symbian OS 9.1 (with S60 3rd Edition or later), or iPhone OS 2.3.1 or later, you can use the device to log in to
IoSafe NAS to view photos with Mobile Photo Station and read supported file formats with Mobile File Station
around the world where Internet access is available.
57
Page 58

oubleshooting
Tr
any questions about managing your DSM, go to DSM Help or click the Help button (with a question mark) at
For
the top-right corner of every window. For any questions other than that, please visit IoSafe Inc. website
www.ioSafe.com for further assistance.
Con
Cus
USA Toll Free Phone: 888.98.IOSAFE (984.6723) x400
International Phone: 530.820.3090 x400
Email: customersupport@iosafe.com
Technical Support
USA Toll Free Phone: 888.98.IOSAFE (984.6723) x450
International Phone: 530.820.3090 x450
Email: techsupport@iosafe.com
Disaster Support
US Toll Free Phone: 888.98.IOSAFE (984.6723) x430
International Phone: 530. 820.3090 x430
Email: disastersupport@iosafe.com
Cor
ioSafe, Inc.
12760 Earhart Avenue
Auburn CA 95602
This device complies with part 15 of the FCC Rules. Operation is subject to the following two conditions:
(1) This device may not cause harmful interference, and (2) this device must accept any interference
received, including interference that may cause undesired operation .
Any Changes or modifications not expressly approved by the party responsible for compliance could void the user's
authority to operate the equipment.
Note: This equipment has been tested and found to comply with the limits for a Class B
digital device, pursuant to part 15 of the FCC Rules. These limits are designed to
provide reasonable protection against harmful interference in a residential installation
This equipment generates uses and can radiate radio frequency energy and, if not
installed and used in accordance with the instructions, may cause harmful interference
to radio communications. However, there is no guarantee that interference will not
occur in a particular installation. If this equipment does cause harmful interference to
radio or television reception, which can be determined by turning the equipment off and
on, the user is encouraged to try to correct the interference by one or more of the following measures:
-Reorient or relocate the receiving antenna.
-Increase the separation between the equipment and receiver.
-Connect the equipment into an outlet on a circuit different from that to which the receiver is connected.
-Consult the dealer or an experienced radio/TV technician for help.
tact Us
tomer Support
porate Headquarters
58
 Loading...