

Page 1
ioSafe® 1019+
Network-Attached Storage Device
User Manual
Page 2
ioSafe 1019+ User Manual
2
Table of Contents
Section Page Number
1 General Information 3
1.1 Package Contents 3
1.2 Identifying Parts 4
1.3 LED Behavior 5
1.4 Warnings and Notices 5
2 Hardware Installation 6
2.1 Tools and Parts for Drive Installation 6
2.2 SATA Drive Installation 6
2.3 M.2 NVMe SSD Installation 11
2.4 Replace Memory Modules 11
2.5 Connecting the ioSafe 1019+ 13
3 Install Synology DiskStation Manager 14
4 Connect and Log in to Synology DiskStation Manager 15
5 Replace System Fan Assembly 16
6 Product Support 17
6.1 Activate Data Recovery Service Protection 17
6.2 ioSafe No-Hassle Warranty 17
6.3 Data Recovery Procedure 17
6.4 Contact Us 18
7 Technical Specifications 19
Page 3

ioSafe 1019+ User Manual
1 General Information
1.1 Package Contents
Check the package contents to verify that you have received the items below. Please contact CRU®
if any items are missing or damaged.
1x
24x*
3
1x
1x
1x
*Only included with unpopulated units
**Power cable is localized to the region you purchased your product for, whether North America, European Union/United Kingdom, or Australia.
European Union and United Kingdom units are packaged with two power cables, one for each region.
1x**
1x
Page 4
ioSafe 1019+ User Manual
4
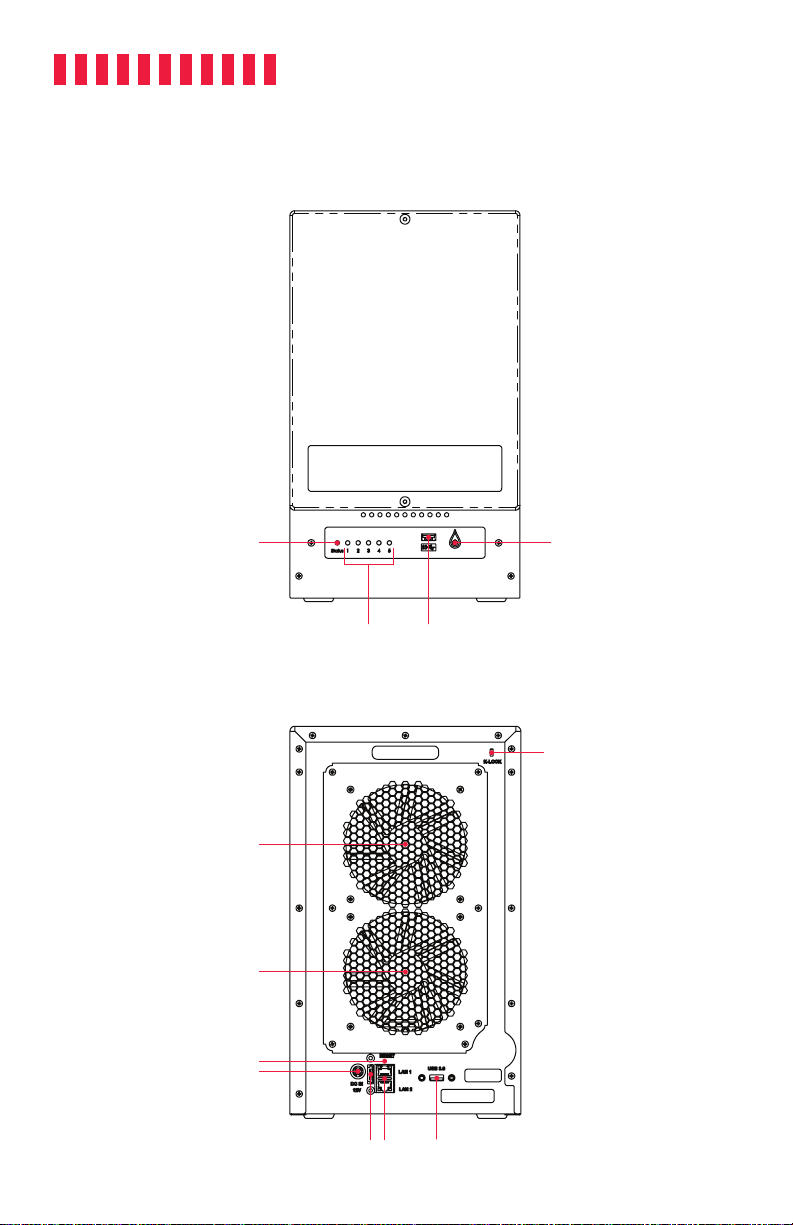
1.2 Identifying Parts
Front
System Status
Indicator
System Fan
System Fan
Reset Button
Power In
Drive
Status
Indictators
USB 3.0
Rear
Port
Power Button
Kensington
®
Security Slot
eSATA
Port
LAN
Ports
USB 3.0
Port
Page 5
ioSafe 1019+ User Manual
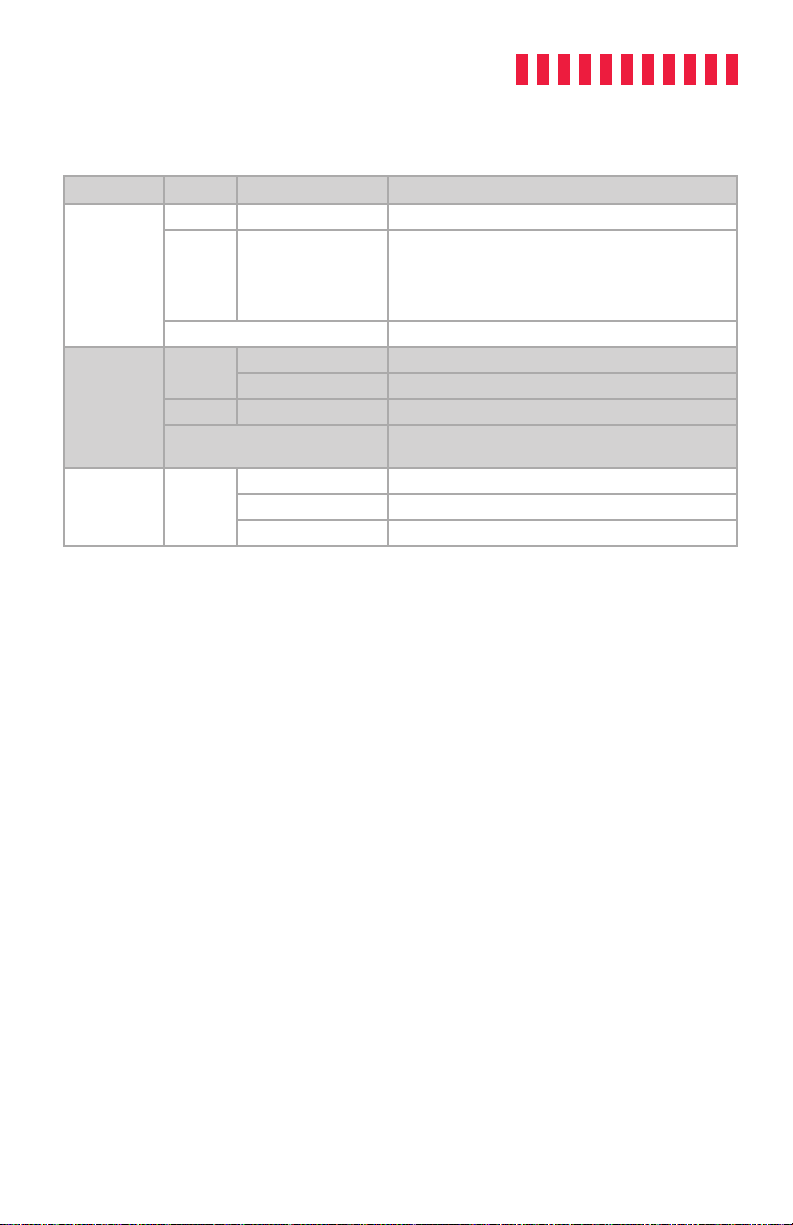
1.3 LED Behavior
LED Name Color State Description
Green Solid The unit is operating normally.
Status
Drive Activity
LEDs #1-5
Power Blue
Amber
Green
Amber Solid Indicates a drive error for the corresponding drive
Blinking Indicates one of the following states:
Off The hard drives are in hibernation.
Solid The corresponding drive is ready and idle.
Blinking The corresponding drive is being accessed
Off
Solid Indicates that the unit is powered on.
Blinking The unit is booting up or shutting down.
Off The unit is powered off.
• Volume degraded
• Volume crashed
• Volume not created
• DSM not installed
No internal drive installed in the corresponding drive bay,
or the drive is in hibernation.
1.4 Warnings and Notices
Please read the following before using the product.
General Care
• The internal components in the ioSafe 1019+ unit are susceptible to static electricity. Proper
grounding is strongly recommended to prevent electrical damage to the unit or other connected
devices. Avoid all dramatic movement, tapping on the unit, and vibration.
5
• Avoid placing the unit close to large magnetic devices, high voltage devices, or near a heat
source. This includes any place where the product will be subject to direct sunlight. Do not
allow water to make contact with the unit.
• Before starting any type of hardware installation, ensure that all power switches have been
turned off and all power cords have been disconnected to prevent personal injury and damage
to the hardware.
• To avoid overheating, the unit should be operated in a well-ventilated area. Do not place the
unit on a soft surface, such as carpet, that will obstruct air flow into the vents on the underside
of the product.
Page 6

ioSafe 1019+ User Manual
6
2 Hardware Installation
2.1 Tools and Parts for Drive Installation
• A Phillips screwdriver
• 3mm hex tool (included)
• At least one 3.5-inch or 2.5-inch SATA hard drive or SSD (please visit iosafe.com for a list of
compatible drive models)
Formatting a drive will result in data loss, so be sure to back up your data before beginning this
operation.
2.2 SATA Drive Installation
If you purchased an ioSafe 1019+ that was shipped with hard drives pre-installed, skip Section 3 and
continue on to Section 4.
a. Use the included 3mm hex tool to remove the screws on the top and bottom of the front cover.
Then remove the front cover.
Page 7

b. Remove the waterproof drive cover with the 3mm hex tool.
ioSafe 1019+ User Manual
7
c. Remove the drive trays with the 3mm hex tool.
Page 8

ioSafe 1019+ User Manual
8
d. Install a compatible drive into each drive tray using (4x) drive screws and a Phillips screwdriver.
Please visit iosafe.com for a list of compatible drive models.
When setting up a RAID set, it is recommended that all installed drives should be the same size in order
to make the best use of drive capacity.
e. Insert each loaded drive tray into an empty drive bay, ensuring that each one is pushed in all the
way. Then tighten the screws using the 3mm hex tool.
Page 9

ioSafe 1019+ User Manual
f. Replace the waterproof drive cover and securely tighten it using the 3mm hex tool.
Avoid using tools other than the supplied hex tool to secure the waterproof drive cover as you could
under-tighten or break the screw. The hex tool has been designed to flex slightly when the screw is
sufficiently tight and the wateproof gasket is properly compressed.
9
Page 10

ioSafe 1019+ User Manual
10
g. Install the front cover to finish installation and protect the drives from fire.
h. You may optionally use the round magnet provided to attach and store the hex tool on the back
of the unit.
Page 11

ioSafe 1019+ User Manual
11
2.3 M.2 NVMe SSD Installation
You may optionally install two M.2 NVMe SSDs into the ioSafe 1019+ to create an SSD cache
volume. Follow the steps below for SSD module installation.
a. Shut down your ioSafe. Disconnect all cables connected to your ioSafe to prevent possible
damage.
b. Turn the ioSafe over so that it is upside down.
c. Use a Phillips screwdriver to remove the screw securing the bottom cover and remove it. You will
see four slots, two slots populated with RAM memory and two slots for SSDs.
d. Remove the plastic retainer clip from the rear of the SSD slot(s) you intend to use.
e. Align the notch on the gold contacts of the SSD module with the notch on the empty slot and
insert the module into the slot to install it.
f. Reinsert the plastic retainer clip back into the rear of the slot to secure the SSD. Press down
firmly to secure it in place.
g. Repeat the steps above to install another SSD into the second slot if needed.
h. Replace the bottom cover and secure it in place using the screw you removed in Step C .
i. Turn the ioSafe back over and reconnect the cables you removed in Step A (see Section 2.5).
You may not turn your ioSafe back on.
2.4 Replace Memory Modules
The ioSafe 1019+ comes with two 4GB of 204-pin SO-DIMM DDR3 RAM (8GB total) memory. This
memory is not user upgradable. Follow these steps to replace the memory modules in event of a
memory failure.
a. Shut down your ioSafe. Disconnect all cables connected to your ioSafe to prevent possible
damage.
b. Turn the ioSafe over so that it is upside down.
c. Use a Phillips screwdriver to remove the screw securing the bottom cover and remove it. You will
see four slots, two slots for SSDs and two slots populated with 204-pin SO-DIMM RAM memory.
d. Push the levers on both sides of a memory module outward to release the module from the slot.
e. Remove the memory module.
f. Align the notch on the gold contacts of the memory module with the notch on the empty slot and
insert the memory module into the slot. Push firmly until you hear a click to secure the memory
module in the slot. If you encounter difficulty when pushing down, push the levers on either side
of the slot outward.
g. Repeat the steps above to install another memory module into the second slot if needed.
Page 12

ioSafe 1019+ User Manual
12
h. Replace the bottom cover and secure it in place using the screw you removed in Step C.
i. Turn the ioSafe back over and reconnect the cables you removed in Step A (see Section 2.5).
You may not turn your ioSafe back on.
j. If you haven’t already, install Synology DiskStation Manager (DSM) (see Section 3).
k. Log into DSM as an administrator (see Section 4).
l. Go to Control Panel > Info Center and check Total Physical Memory to verify that the
correct amount of RAM memory is installed.
If your ioSafe 1019+ does not recognize the memory or fails to start up, please make sure that each
memory module is correctly seated in its memory slot.
Page 13

ioSafe 1019+ User Manual
2.5 Connecting the ioSafe 1019+
Do not place the ioSafe 1019+ device on a soft surface, such as carpet, that will obstruct air flow into
the vents on the underside of the product.
a. Connect the ioSafe 1019+ to your switch/router/hub using the provided Ethernet cable.
b. Connect the unit to power using the provided power cord.
c. Press and hold the power button to turn on the unit.
13
A B C
Page 14

ioSafe 1019+ User Manual
PURCHASE D WITH HARD DRIVE S
14
3 Install Synology DiskStation Manager
Synology DiskStation Manager (DSM) is a browser-based operating system which provides tools to
access and manage your ioSafe. When installation is complete, you will be able to log into DSM and start
enjoying all the features of your ioSafe powered by Synology. Before getting started, please check the
following:
Your computer and your ioSafe must be connected to the same local network.
In order to download the latest version of DSM, Internet access must be available during installation.
Any ioSafe 1019+ that was shipped with hard drives pre-installed already has Synology DiskStation
Manager installed. If you have drives pre-installed, continue on to Section 4.
a. Turn on the ioSafe 1019+ if it is not already powered on. It will beep once when it is ready to set up.
b. Type in one of the following addresses into a web browser to load the Synology Web Assistant. The
status of your ioSafe should read Not Installed.
Synology Web Assistant is optimized for the Chrome and Firefox browsers.
http://iosafe:5000
OR
PURCHASE D WITHOUT DRIVES
http://diskstation:5000
OR
CONNECT VIA SYNOLOGY.COM
http://find.synology.com
Page 15

ioSafe 1019+ User Manual
ioSafe
PURCHASE D WITH HARD DRIVE S
c. Click the Connect button to begin the setup process.
Connect
d. Follow the on-screen instructions to install Synology DSM. Your ioSafe will automatically restart in
the middle of setup.
4 Connect and Log in to Synology DiskStation Manager
a. Turn on the ioSafe 1019+ if it is not already powered on. It will beep once when it is ready to set up.
b. Type in one of the following addresses into a web browser to load the Synology Web Assistant. The
status of your ioSafe should read Ready.
15
If you do not have an Internet connection and you purchased the ioSafe 1019+ without drives preinstalled, you will need to connect using the second method. Use the server name you gave your
ioSafe 1019+ while installing Synology DiskStation Manager (see Section 3).
http://iosafe:5000
OR
PURCHASE D WITHOUT DRIVES
http://<server_name>:5000
OR
CONNECT VIA SYNOLOGY.COM
http://find.synology.com
Page 16

ioSafe 1019+ User Manual
ioSafe
ioSafe
16
e. Click the Connect button.
Connect
f. The browser will display a login screen. If you purchased the ioSafe 1019+ with pre-installed drives,
the default username is admin and the password is left blank.
For those who purchased the ioSafe 1019+ without drives, the username and password are the ones
you created while installing Synology DSM (see Section 3).
<username>
<password>
Stay signed in
Sign In
You can change the username and password with the “User” Control Panel applet in the Synology
DiskStation Manager user interface.
5 Replace System Fan Assembly
The ioSafe 1019+ will play beep sounds if either of the system fans is not working. Follow the steps
below to replace the malfunctioning fans with a good set.
a. Shut down your ioSafe. Disconnect all cables connected to your ioSafe to prevent possible damage.
b. Remove the seven (7) perimeter screws around the rear fan assembly plate.
c. Pull the assembly from the back panel of your ioSafe to expose the fan connectiosn.
d. Disconnect the fan cables from the connector wires attached to the rest of the ioSafe and then
remove the assembly.
Page 17

ioSafe 1019+ User Manual
e. Install the new fan assembly or replace the existing fans. Connect the fan cables of the new fans to
the fan connector wires attached to the main ioSafe unit.
f. Replace and tighten the seven (7) screws you removed in Step B.
6 Product Support
Congratulations! You are now ready to manage and enjoy all the features of your ioSafe 1019+ device.
For more information regarding specific features, please check out DSM Help or refer to our online
resources available at iosafe.com or synology.com.
6.1 Activate Data Recovery Service Protection
Register your product to activate your Data Recovery Service protection plan by visiting
iosafe.com/activate.
6.2 ioSafe No-Hassle Warranty
If the ioSafe 1019+ breaks during the warranty period, we will repair or replace it.
The standard term for the warranty is two (2) years from the date of purchase. A five (5) year
extended term warranty service is available for purchase upon activation of the Data Recovery
Service. See the website or contact customerservice@iosafe.com for help. CRU reserves the right
to have its representative inspect any product or part to honor any claim, and to receive a purchase
receipt or other proof of original purchase before warranty service is performed.
17
This warranty is limited to the terms stated herein. All expressed and implied warranties including
the warranties of merchantability and fitness for a particular purpose are excluded, except as stated
above. CRU disclaims all liabilities for incidental or consequential damages resulting from the use of
this product, or arising out of any breach of this warranty. Some states do not allow the exclusion or
limitation of incidental or consequential damages, so the above limitation may not apply to you. This
warranty gives you specific legal rights, and you may have other rights as well, which will vary from
state to state.
6.3 Data Recovery Procedure
If the ioSafe faces possible data loss for any reason, you should immediately call CRU’s ioSafe
Disaster Response Team at 1-888-984-6723 extension 430 (US & Canada) or 1-530-820-3090
extension. 430 (International). You can also send an email to disastersupport@iosafe.com. CRU can
determine the best actions to take to protect your valuable information. In some cases a self-recovery
can be performed and provide you with immediate access to your information. In other cases, CRU
Page 18

ioSafe 1019+ User Manual
18
may request that the product be returned to the factory for data recovery. In any case, contacting us
is the first step.
The general steps for disaster recovery are:
i. Email disastersupport@iosafe.com with your serial number, product type and date of purchase. If
you cannot email, call the ioSafe Disaster Support Team at 1-888-984-6723 (US & Canada) or
1-530-820-3090 (International) extension 430.
j. Report the disaster event and obtain return shipping address/instructions.
k. Follow ioSafe team instructions on proper packaging.
l. CRU will recover all data which is recoverable according to the terms of the Data Recovery
Service Terms and Conditions.
m. CRU will then place any recovered data on a replacement ioSafe device.
n. CRU will ship the replacement ioSafe device back to the original user.
o. Once the primary server/computer is repaired or replaced, the original user should restore the
primary drive data with the ioSafe backup data.
6.4 Contact Us
Customer Support
USA Toll Free Phone: 888.98.IOSAFE (984.6723) x400
International Phone: 530.820.3090 x400
Email: customersupport@iosafe.com
Technical Support
USA Toll Free Phone: 888.98.IOSAFE (984.6723) x450
International Phone: 530.820.3090 x450
Email: techsupport@iosafe.com
Disaster Support
US Toll Free Phone: 888.98.IOSAFE (984.6723) x430
International Phone: 530. 820.3090 x430
Email: disastersupport@iosafe.com
Page 19

ioSafe 1019+ User Manual
7 Technical Specifications
Product Model ioSafe 1019+
Fire Protection Up to 1550° F, 30 minutes per ASTM E-119
Water Protection Fully submersed, fresh or salt water, 10 foot depth, 72 hours
Interface Types & Speeds Ethernet (RJ45): up to 10 Gbps
Supported Drive Types 2.5” SATA hard drives up to 9.5mm height / 2.5” SATA SSDs up to 9.5mm height X5
CPU 64-bit Intel Celeron J3455 2.3Ghz Quad Core Processor
Encryption AES 256-bit
Memory 8GB DDR3L
NVMe Cache Ye s
LAN Port Two (2) 1 Gbps RJ-45 ports
Front Data Connectors One (1) USB Type-A connector
Rear Data Connectors One (1) eSATA connector
Max Internal Capacity 70TB (14TB x 5) (Capacity may vary by RAID type)
Max Raw Capacity with
Expansion Units
Torque
Supported Clients Windows 10 and 7
File Systems Internal: Btrfs, ext4
Supported RAID Types JBOD, RAID 0, 1, 5, 6, 10
Compliance EMI Standard: FCC Part 15 Class A
HDD Hibernation Ye s
eSATA: up to 6 Gbps
USB 3.2 Gen 1: up to 5 Gbps
M.2 2280 NVMe SSD X2
One (1) USB Type-A connector
140TB (14TB x 10) with (Capacity may vary by RAID type)
2.5-inch drives, M3 screws: 4 inch-pounds max.
3.5-inch drives, #6-32 screws: 6 inch-pounds max.
Windows Server 2016, 2012 and 2008 product families
macOS 10.12 “Sierra” or newer
Linux distributions that support the connection type used
External: Btrfs, ext3, ext4, FAT, NTFS, HFS+, exFAT*
Synology Hybrid RAID (up to 2-disk fault tolerance)
EMC Standard: EN55024, EN55032
CE, RoHS, RCM
19
*Support for exFAT can be enabled after you have purchased and downloaded exFAT Access in the Synology DSM Package Center.
Page 20

Scheduled Power On/Off Yes
Wake on LAN Ye s
Product Weight Unpopulated: 57 pounds (25.85 kg)
Populated: 62-65 pounds (28.53-29.48 kg) (depending on drive model)
Product Dimensions 19in W x 16in L x 21in H (483mm W x 153mm L x 534mm H)
Environmental
Requirements
Line voltage: 100V to 240V AC
Frequency: 50/60Hz
Operating Temperature: 32 to 104˚F (0 to 40˚C)
Storage Temperature: -5 to 140˚F (-20 to 60˚C)
Relative Humidity: 5% to 95% RH
©2019 CRU Acquisition Group LLC, ALL RIGHTS RESERVED. CRU®, ioSafe®, and Protecting Your Data™ are trademarks of CRU Acquisition
Group, LLC and are protected by trademark law.
Synology® is a registered trademark of Synology, Inc.
Product Warranty
CRU warrants this product to be free of significant defects in material and workmanship for a period of two (2) years from the original date
of purchase. A five (5) year extended warranty is available for purchase upon activation of the Data Recovery Service. CRU’s warranty is
nontransferable and is limited to the original purchaser.
Limitation of Liability
The warranties set forth in this agreement replace all other warranties. CRU expressly disclaims all other warranties, including but not limited
to, the implied warranties of merchantability and fitness for a particular purpose and non-infringement of third-party rights with respect to the
documentation and hardware. No CRU dealer, agent, or employee is authorized to make any modification, extension, or addition to this warranty. In
no event will CRU or its suppliers be liable for any costs of procurement of substitute products or services, lost profits, loss of information or data,
computer malfunction, or any other special, indirect, consequential, or incidental damages arising in any way out of the sale of, use of, or inability
to use any CRU product or service, even if CRU has been advised of the possibility of such damages. In no case shall CRU’s liability exceed the
actual money paid for the products at issue. CRU reserves the right to make modifications and additions to this product without notice or taking
on additional liability.
FCC Compliance Statement: “This device complies with Part 15 of the FCC rules. Operation is subject to the following two conditions: (1)
This device may not cause harmful interference, and (2) this device must accept any interference received, including interference that may cause
undesired operation.”
This equipment has been tested and found to comply with the limits for a Class A digital device, pursuant to Part 15 of the FCC Rules. These limits
are designed to provide reasonable protection against harmful interference when the equipment is operated in a commercial environment. This
equipment generates, uses, and can radiate radio frequency energy and, if not installed and used in accordance with the instruction manual, may
cause harmful interference to radio communications. Operation of this equipment in a residential area is likely to cause harmful interference in
which case the user will be required to correct the interference at this own expense.
In the event that you experience Radio Frequency Interference, you should take the following steps to resolve the problem:
1) Ensure that the case of your attached drive is grounded.
2) Use a data cable with RFI reducing ferrites on each end.
3) Use a power supply with an RFI reducing ferrite approximately 5 inches from the DC plug.
4) Reorient or relocate the receiving antenna.
Kensington® is a registered trademark of Kensington Computer Products Group.
Part Number: A8-7520-0000-1 Rev. 1.0
 Loading...