

IONX CMUE5 B User Manual

IONX Support Center 1-800-621-8442, supportcenter@ionxlive.com
_____________________________________________________________________________________
303550 Installation Manual E-Series CMU Confidential
Revision Date: 17-June-19 Revision: P
Process Owner: Engineering Page 1 of 44
Installation Manual
for the
Edge E-Series
Communications Management Unit (CMU)
IONX LLC
300 Willowbrook Lane, Suite 320
West Chester, PA 19382 USA
www.ionxlive.com
+1.484.653.2600

IONX Support Center 1-800-621-8442, supportcenter@ionxlive.com
_____________________________________________________________________________________
303550 Installation Manual E-Series CMU Confidential
Revision Date: 17-June-19 Revision: P
Process Owner: Engineering Page 2 of 44
1. Contents
1. Precautions and Preparation .................................................................................................. 4
2. Unpacking the CMU ............................................................................................................ 6
3. Activating the CMU ............................................................................................................. 6
4. 4 Associating the CMU ........................................................................................................ 7
A. Before starting ................................................................................................................. 7
B. Associating the Car Number to the CMU ......................................................................... 7
1. Start a new email message .......................................................................................... 7
2. Send the message ....................................................................................................... 8
3. A response message confirming the installation will be sent from TARA (Figure 2) ..... 8
4. The CMU is associated with the car number. The installation is complete. The car
now can be released into service. ....................................................................................... 8
C. Replacing a device on a car ............................................................................................ 8
1. Start a new email message .......................................................................................... 8
2. An email response message confirming the replacement will be sent from TARA. ...... 9
D. Using the TARA web site ................................................................................................. 9
E. Other TARA Web Site Commands. ................................................................................11
1. Uninstall ......................................................................................................................12
2. Change battery. See Appendix F. ...............................................................................12
3. Replace ......................................................................................................................12
4. Wireless Sensor Monitor (WSM) – For information purposes only. .............................14
5. Miscellaneous ....................................................................................................................14
Appendix A: Mechanicals ..........................................................................................................15
A.1 E4S and E5S Dimensions ..............................................................................................15
A.2 E4S and E5S Installation with Bracket ............................................................................16
A.3 E4S and E5S Installation with Magnetic Bracket and Safety Tether ...............................17
A.4 E4S and E5S Dome Mounted .........................................................................................19
A.5 E4S and E5S J-Bolt Mounting ........................................................................................20
A.6 E4X, E5X and E6X Dimensions ......................................................................................22
A.7 E4X, E5X and E6X Installation with Bracket ...................................................................23
A.8 E4X, E5X, and E6X Dome Mounted ...............................................................................25
Appendix B: Validating the Installation ......................................................................................26
Appendix C: Replace command ................................................................................................30
Appendix D: General Information ..............................................................................................32
Appendix E: Trouble Shooting ...................................................................................................34

IONX Support Center 1-800-621-8442, supportcenter@ionxlive.com
_____________________________________________________________________________________
303550 Installation Manual E-Series CMU Confidential
Revision Date: 17-June-19 Revision: P
Process Owner: Engineering Page 3 of 44
Appendix F: Battery Replacement .............................................................................................35
Appendix G: Inspection of Equipment for Return to Service ......................................................40
Appendix H: Compliance Requirements ....................................................................................41
Appendix I: Declaration of Conformity .......................................................................................43
IONX Support Center 1-800-621-8442, supportcenter@ionxlive.com
_____________________________________________________________________________________
303550 Installation Manual E-Series CMU Confidential
Revision Date: 17-June-19 Revision: P
Process Owner: Engineering Page 4 of 44
1. Precautions and Preparation
These instructions are not designed to imply or replace any operating or safety rules.
It is the responsibility of the installer to understand and follow all company safety practices.
WARNING In order to comply with hazardous classification, only those items
specifically listed can be used and must be used only as shown. Substitution of components
may affect intrinsic safety.
WARNING Installation shall be carried out in accordance with the applicable code of
practice by suitably-trained personnel.
WARNING Repair of this equipment shall be carried out in accordance with the
applicable code of practice.
WARNING Any machining, drilling, and/or sanding related to the installation of this
system should be pre-approved by the authorized department before work is started.
WARNING If the equipment is likely to come into contact with aggressive substances,
then it is the responsibility of the user to take suitable precautions that prevent it from being
adversely affected, thus ensuring that the type of protection is not compromised.
WARNING RF Device: Unit cannot be painted or coated with any material. Coating can
adversely affect the performance of the device. Unit shall be masked appropriately if post
installation coating is required.
WARNING EXPLOSION HAZARD: The equipment temperature Class is T4 and only
certified for use in ambient temperatures. Product is rated from -40C to +55C and should not
be used outside this range in an explosive environment.
WARNING POTENTIAL ELECTROSTATIC CHARGING HAZARD: Under certain extreme
circumstances, the non-metallic parts incorporated in the enclosure of this equipment may
generate an ignition-capable level of electrostatic charge. Therefore the equipment shall not be
installed in a location where the external conditions are conducive to the build-up of electrostatic
charge on such surfaces. This is particularly important if the equipment is installed in a zone 0
location.
WARNING POTENTIAL ELECTROSTATIC CHARGING HAZARD: Suitable for hose down
cleaning only. Do not clean unit with a dry cloth. Static can be generated when two dry parts are
rubbed together.
WARNING DO NOT OPEN WHEN EXPLOSIVE ATMOSPHERE IS PRESENT. Battery
replacement shall be done in an area known to be non-hazardous. Use only replaceable battery
pack IONX model 303382 (19 mAH) or 303406 (76 mAH). See battery replacement procedure in
Appendix F.
WARNING Products contain Primary Lithium batteries. Proper disposal procedures are
required at end of life conditions. Use local regulatory disposal method for lithium Thionyl
chloride batteries. For example, disposal procedure 49 CFR 173.185 or Directive 2006/66/CE.
IONX Support Center 1-800-621-8442, supportcenter@ionxlive.com
_____________________________________________________________________________________
303550 Installation Manual E-Series CMU Confidential
Revision Date: 17-June-19 Revision: P
Process Owner: Engineering Page 5 of 44
1) Avertissements
Ces instructions ne sont pas conçues pour impliquer ou remplacer des règles d'utilisation ou de sécurité.
Il est de la responsabilité de l'installateur de comprendre et de suivre toutes les pratiques de sécurité de l'entreprise.
Instructions complètes pour utiliser CMU en français en attente.
AVERTISSEMENT Afin de se conformer à la classification des matières dangereuses,
seuls les éléments spécifiquement énumérés peuvent être utilisés et doivent être utilisés uniquement
comme indiqué. La substitution de composants peut affecter la sécurité intrinsèque.
AVERTISSEMENT L'installation doit être effectuée conformément au code de pratique
applicable par du personnel dûment formé.
AVERTISSEMENT La réparation de cet équipement doit être effectuée conformément au
code de pratique applicable.
AVERTISSEMENT Tout usinage, perçage et / ou ponçage lié à l'installation de ce système
doit être préalablement approuvé par le service autorisé avant le début des travaux.
AVERTISSEMENT Si l'équipement est susceptible d'entrer en contact avec des substances
agressives, il est de la responsabilité de l'utilisateur de prendre les précautions appropriées qui empêchent
qu'il soit affecté de manière négative, garantissant ainsi que le type de protection n'est pas compromis.
ATTENTION Dispositif RF: L'unité ne peut être peinte ou revêtue d'aucun matériau. Le
revêtement peut nuire aux performances de l'appareil. L'unité doit être masquée de manière appropriée si
un revêtement post-installation est requis.
ATTENTION DANGER D'EXPLOSION: La classe de température de l'équipement est T4 et
seulement certifiée pour une utilisation à des températures ambiantes. Le produit est évalué de -40C à +
55C et ne doit pas être utilisé en dehors de cette plage dans un environnement explosif.
ATTENTION DANGER D'EXPLOSION: L'installation doit être effectuée conformément au code
de pratique en vigueur par du personnel qualifié.
ATTENTION DANGER DE CHARGE ÉLECTROSTATIQUE POTENTIEL: Dans certaines
circonstances extrêmes, les pièces non métalliques incorporées dans l'enveloppe de cet équipement
peuvent générer un niveau de charge électrostatique capable d'amorçage. Par conséquent, l'équipement
ne doit pas être installé dans un endroit où les conditions externes favorisent l'accumulation de charges
électrostatiques sur ces surfaces. Ceci est particulièrement important si l'équipement est installé dans un
emplacement de la zone 0.
ATTENTION DANGER DE CHARGE ÉLECTROSTATIQUE POTENTIEL: Convient uniquement au
nettoyage par tuyau. Ne nettoyez pas l'appareil avec un chiffon sec. Statique peut être généré lorsque deux
parties sèches sont frottées ensemble.
ATTENTION NE PAS OUVRIR LORSQU'UNE ATMOSPHÈRE EXPLOSIVE EST PRÉSENTE. Le
remplacement de la batterie doit être effectué dans une zone connue comme non dangereuse. Utilisez
uniquement une batterie remplaçable IONX modèle 303382 (19 mAH) ou 303406 (76 mAH). Voir la procédure
de remplacement de la batterie à l'annexe F.
ATTENTION Les produits contiennent des batteries au lithium primaire. Des procédures
d'élimination appropriées sont requises en fin de vie. Utiliser une méthode d'élimination réglementaire
locale pour les piles au lithium-chlorure de thionyle. Par exemple, procédure d'élimination 49 CFR 173.185
ou Directive 2006/66/CE.
IONX Support Center 1-800-621-8442, supportcenter@ionxlive.com
_____________________________________________________________________________________
303550 Installation Manual E-Series CMU Confidential
Revision Date: 17-June-19 Revision: P
Process Owner: Engineering Page 6 of 44
2. Unpacking the CMU
Required Tools/Materials
Tool Name
(Part No)
Description
3/8” Magnetic Drive
Socket
Securing self-drilling screws
T-27 Tamper-Resistant
Torx driver
Securing CMU to bracket
If using a knife to cut the tape, do not let the blade extend more than ½ inch
inside of the cardboard box.
2.1 Inspect shipping box/s to make sure there is no damage.
2.2 Carefully unpack the shipping box making sure to open the top of the box. There will be
instruction guide/s for modules associated with the system order.
2.3 Open shipping box/s and verify that the internal contents match the shipping receipt.
Contact IONX Support Center (Appendix D) in the event of any above problems.
3. Activating the CMU
3.1 Before starting
3.1.1 Confirm your email address is set-up in the IONX TARA system by emailing
tara@ionxlive.com with “help” in the subject line.
3.1.2 If there is no reply, contact the IONX Support Center (Appendix D) to get your
email address set-up to use TARA and IONXlive.net.
3.2 If the device has a red label on the top of the case, CMU devices may be activated by
removing a magnet, under the red label on the top surface of the CMU.
3.3 Alternately, configure CMU with IONX E-series application for Near Field
Communication (NFC) reader (supplied by IONX).
WARNING: NFC tag reader is not for use in potentially explosive atmospheres.
Activate the CMU on a benchtop in a non-hazardous area.
ATTENTION: Le lecteur d'étiquette NFC ne doit pas être utilisé dans des atmosphères
potentiellement explosives. Activer la CMU sur une paillasse dans une zone non
dangereuse.
3.3.1 Start IONX application.
3.3.2 Place NFC reader device near yellow label of CMU. This wakes the CMU from
deep sleep.
3.3.3 Confirm device wake up message was received using IONX E-series application.

IONX Support Center 1-800-621-8442, supportcenter@ionxlive.com
_____________________________________________________________________________________
303550 Installation Manual E-Series CMU Confidential
Revision Date: 17-June-19 Revision: P
Process Owner: Engineering Page 7 of 44
3.4 Attach the CMU to the mounting plate or car using the supplied hardware.
3.5 See mechanical installation drawings in Appendix A for specific mounting details
3.6 If the CMU is being mounted to a hatch, be sure the hatch is closed after the CMU has
been mounted (Figure 1).
Figure 1: Final CMU connection to mounting plate
3.7 Associate the CMU with the car according to Section 4.
4. Associating the CMU
The IONX Totally Autonomous Reporting Agent (TARA) is used to associate the car number
with the CMU. This is completed by email using an email-enabled smart phone or any
computer with email access.
A. Before starting
1. Confirm your email address is set-up in the IONX TARA system by
emailing tara@ionxlive.com with “help” in the subject line.
2. If there is no reply within 60 minutes, contact the IONX Support Center
(Appendix D) to get your email address set-up to use TARA and
IONXlive.net.
B. Associating the Car Number to the CMU
1. Start a new email message
To: type TARA@IONXLive.com
Subject: type
‘I’ or ‘i’
Period ‘.’
The serial number of the CMU
Period ‘.’
The Car initials
Period ‘.’

IONX Support Center 1-800-621-8442, supportcenter@ionxlive.com
_____________________________________________________________________________________
303550 Installation Manual E-Series CMU Confidential
Revision Date: 17-June-19 Revision: P
Process Owner: Engineering Page 8 of 44
The Car number which the CMU is installed on
Period ‘.’
Company Name
Example:
I.SerialNumber.CarInitial.CarNumber.CompanyName
Example: I.E6AA015000.ABCX.1234.ABCRailroad
2. Send the message
3. A response message confirming the installation will be sent from TARA
(Figure 2)
4. The CMU is associated with the car number. The installation is
complete. The car now can be released into service.
C. Replacing a device on a car
1. Start a new email message
To: type TARA@IONXLive.net
Subject: type
‘R’ or ‘r’
Period ‘.’
The serial number of the old replaced CMU
Period ‘.’
The serial number of the new CMU being installed
Period ‘.’
The Car initials
Period ‘.’
The Car number which the CMU is installed on
Example:
R.OldSerialNumber.NewSerialNumber.CarInitial.CarNumber
Example: R.E5AC011001.E4AB011000.ABCX.1234
Success!
Unit E6AA015000 now installed on ABCX 1234
associated to ABC. If this is not correct - Contact
IONX Support at– 484-653-2600.
**This is an automated report email, please do not
reply directly to this message as it will be
discarded.
Figure 2: Sample Installation Response

IONX Support Center 1-800-621-8442, supportcenter@ionxlive.com
_____________________________________________________________________________________
303550 Installation Manual E-Series CMU Confidential
Revision Date: 17-June-19 Revision: P
Process Owner: Engineering Page 9 of 44
2. An email response message confirming the replacement will be sent from
TARA.
To see details of all TARA email service commands, go to Appendix C.
D. Using the TARA web site
Click on the link below and log in using the same credentials you use to access
the IONX web site:-
https://www.ionxlive.net/IonxLiveMassTARA/
Note: If you receive the error message ‘User is not a valid TARA user’, please
contact IONX support to be added to the list of valid TARA users.
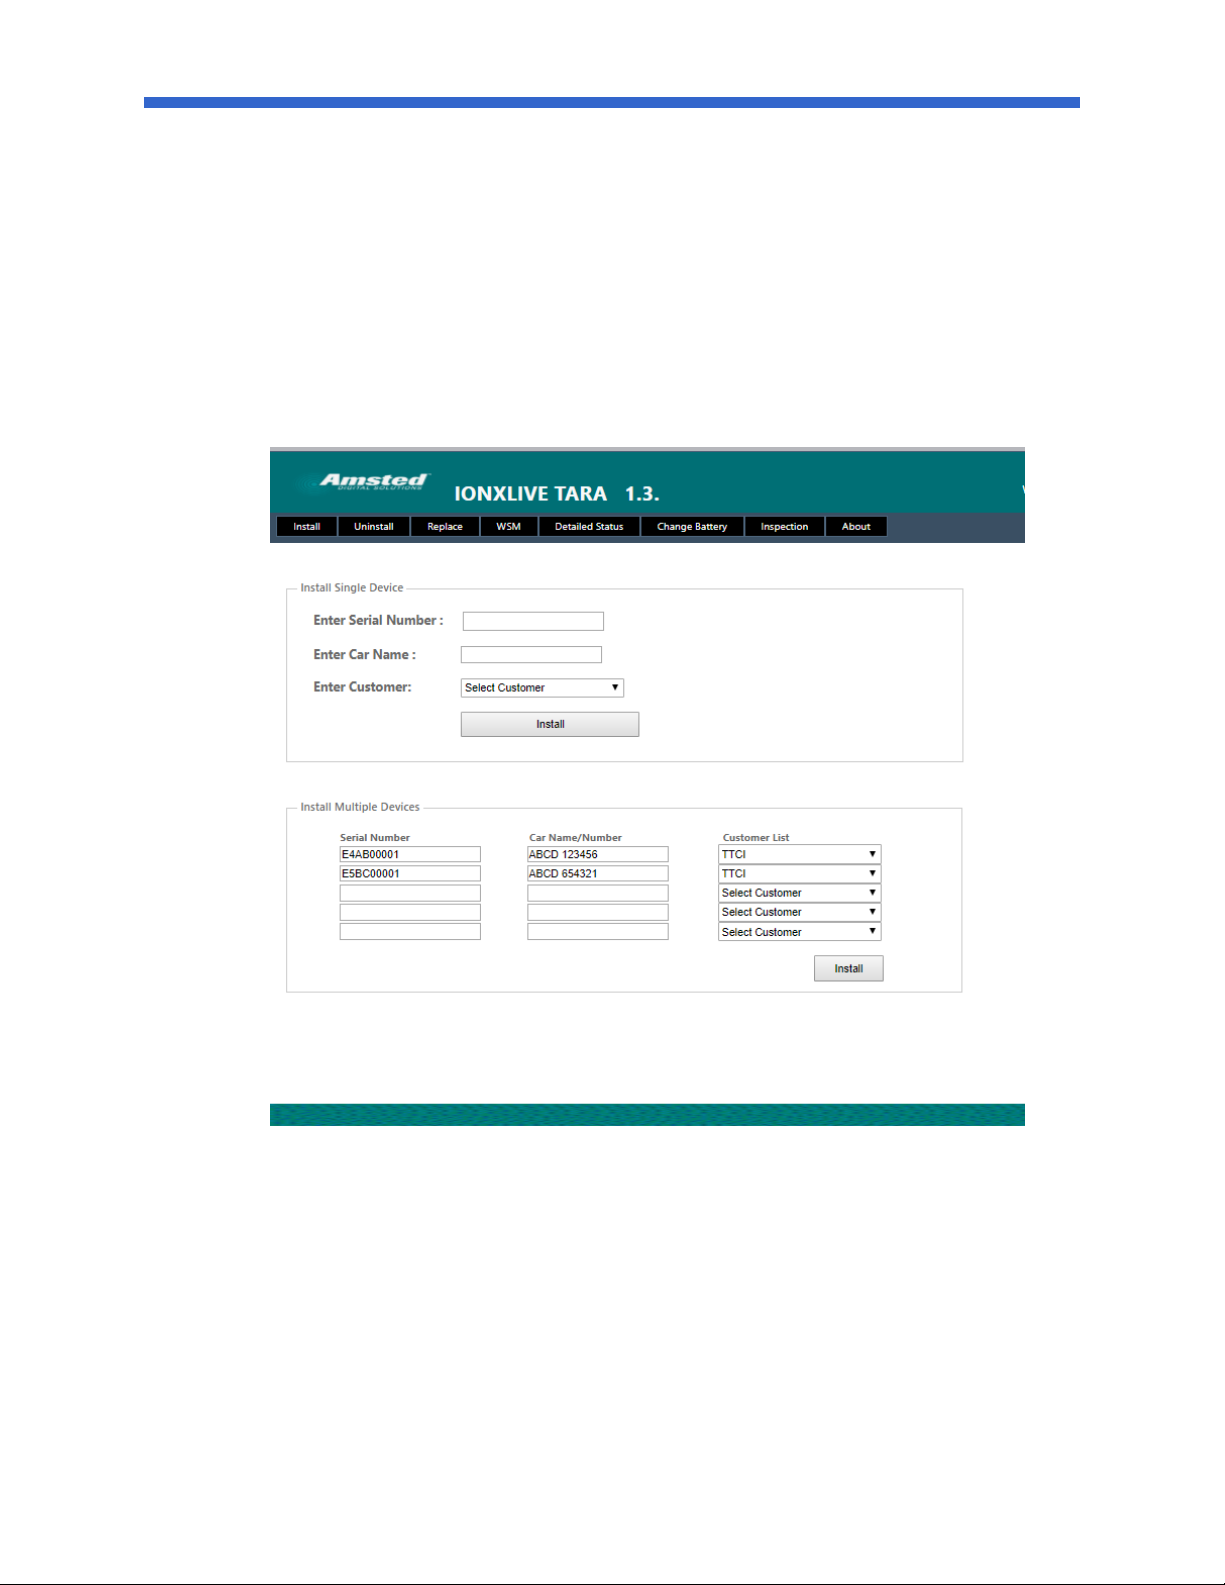
1. After logging in, you should see the following screen. This is the ‘Install’ tab
and should be used if installing a device on a new car. If replacing a device on a
car, please see the ‘Replace’ command instructions in section 4.5.3.
IONX Support Center 1-800-621-8442, supportcenter@ionxlive.com
_____________________________________________________________________________________
303550 Installation Manual E-Series CMU Confidential
Revision Date: 17-June-19 Revision: P
Process Owner: Engineering Page 10 of 44
2. If installing only one device, fill in the serial number of the CMU to be installed,
the car name and number (format ABCD 123456) and choose the customer
name from the dropdown. Then press the ‘Install’ button.
The following message should be displayed:-
'Success! Unit <Serial Number> is now installed on <Car Mark> associated to
<Customer>. If this is not correct - Contact customer support at IONX - 484-653-
2600.'
If the above message is not displayed and an error message displayed which
you do not understand, please capture the message and send to IONX Support
for further investigation.
Note that IONX installers will have access to all customers from the dropdown
list.
IONX Support Center 1-800-621-8442, supportcenter@ionxlive.com
_____________________________________________________________________________________
303550 Installation Manual E-Series CMU Confidential
Revision Date: 17-June-19 Revision: P
Process Owner: Engineering Page 11 of 44
3. If installing multiple devices, please use the section at the bottom of the page.
Up to five (5) devices can be installed at one time. Success messages will be
displayed for all installed devices and they will be removed from the table.
Unsuccessful installs will still remain in the table for correction and error
messages will be displayed for them.
E. Other TARA Web Site Commands.
The TARA web site also can be used to send other TARA commands namely uninstall, replace,
change, wireless sensor monitor (WSM), detailed status and change battery (certain
customers). Below is a short description of each function. Note that descriptions for TARA
commands not used during installation can be found in Appendix B.
IONX Support Center 1-800-621-8442, supportcenter@ionxlive.com
_____________________________________________________________________________________
303550 Installation Manual E-Series CMU Confidential
Revision Date: 17-June-19 Revision: P
Process Owner: Engineering Page 12 of 44
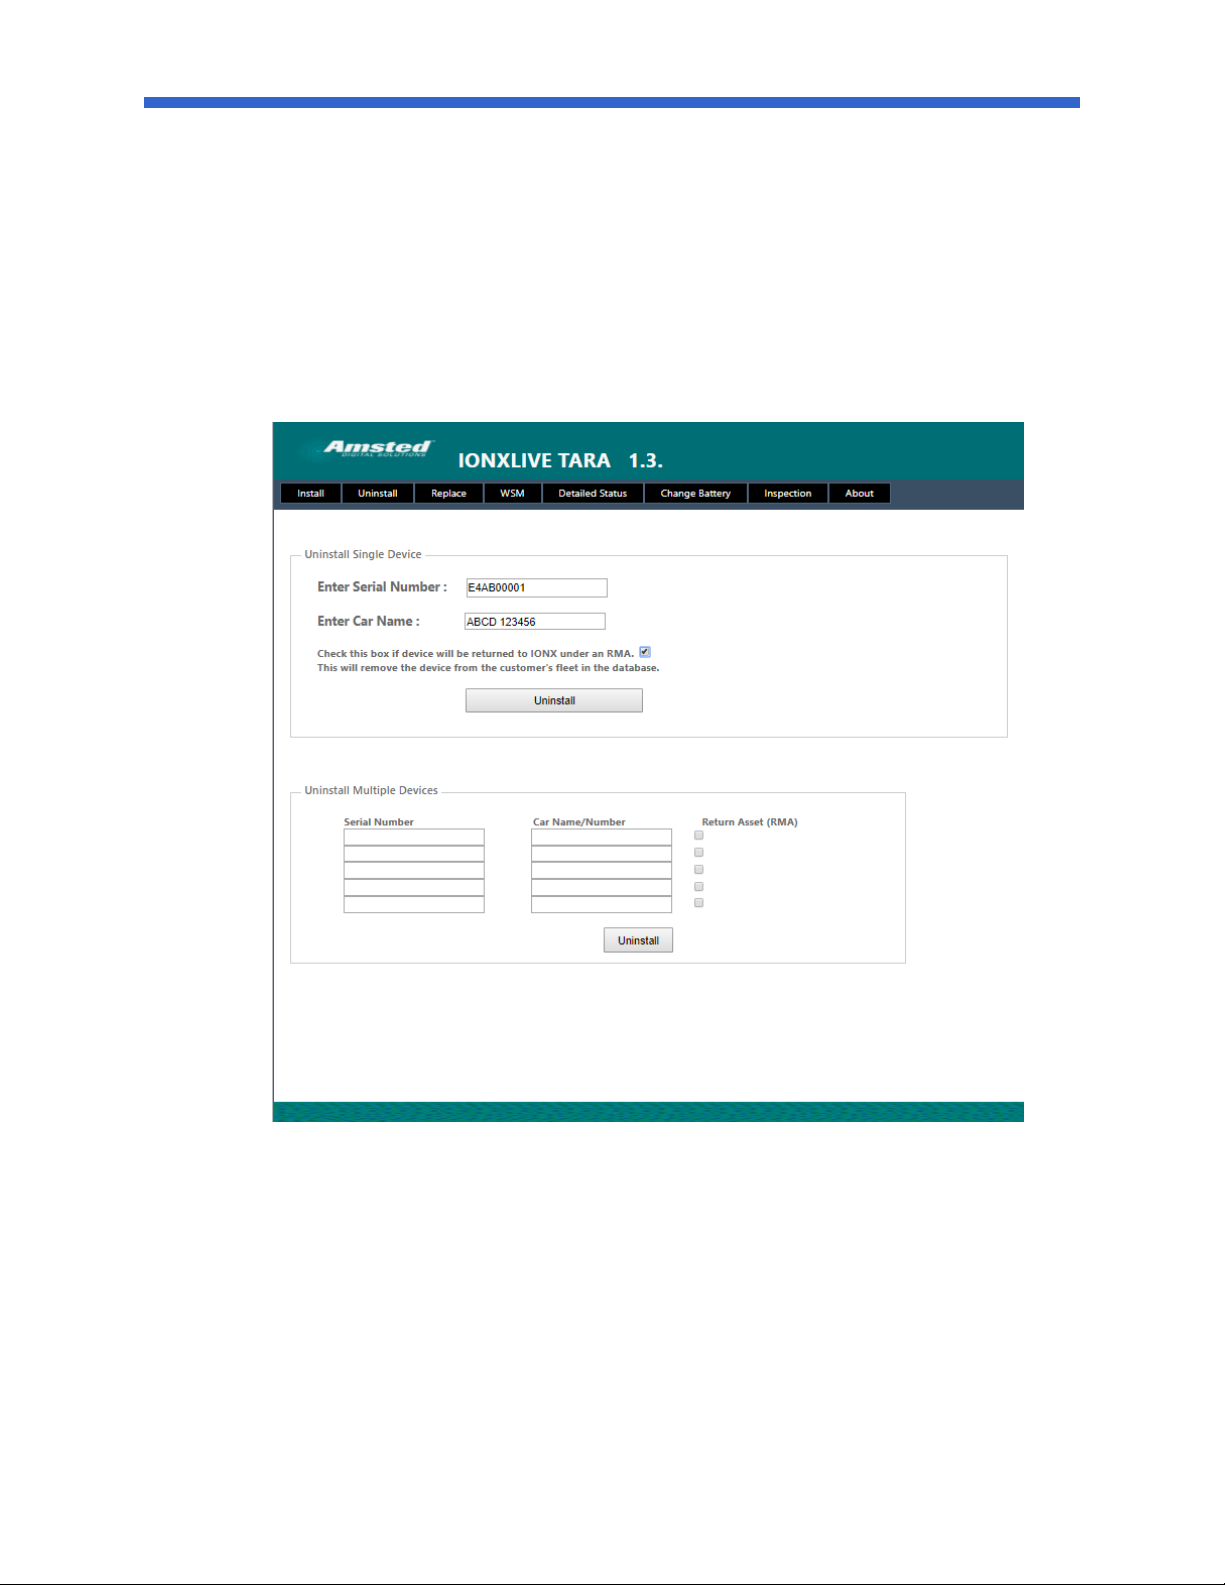
1. Uninstall
Used when uninstalling IONX CMU devices from cars.
Enter the serial number and car name for the device to be uninstalled. Check the RMA
check box if the device is to be returned to IONX and press the ‘Uninstall’ button. If the
RMA checkbox is selected, the unit will be moved to the IONX uninstalled fleet,
otherwise it will be moved to the customer uninstalled fleet. Note that the car name
entered must be in the format ‘ABCD 123456’ unless the customer is designated as a
European customer. European customers may enter the car name in any format.
For multiple uninstalls, up to 5 devices can be uninstalled using the ‘Uninstall Multiple
Devices’ table at the bottom of the web page above.
2. Change battery. See Appendix F.
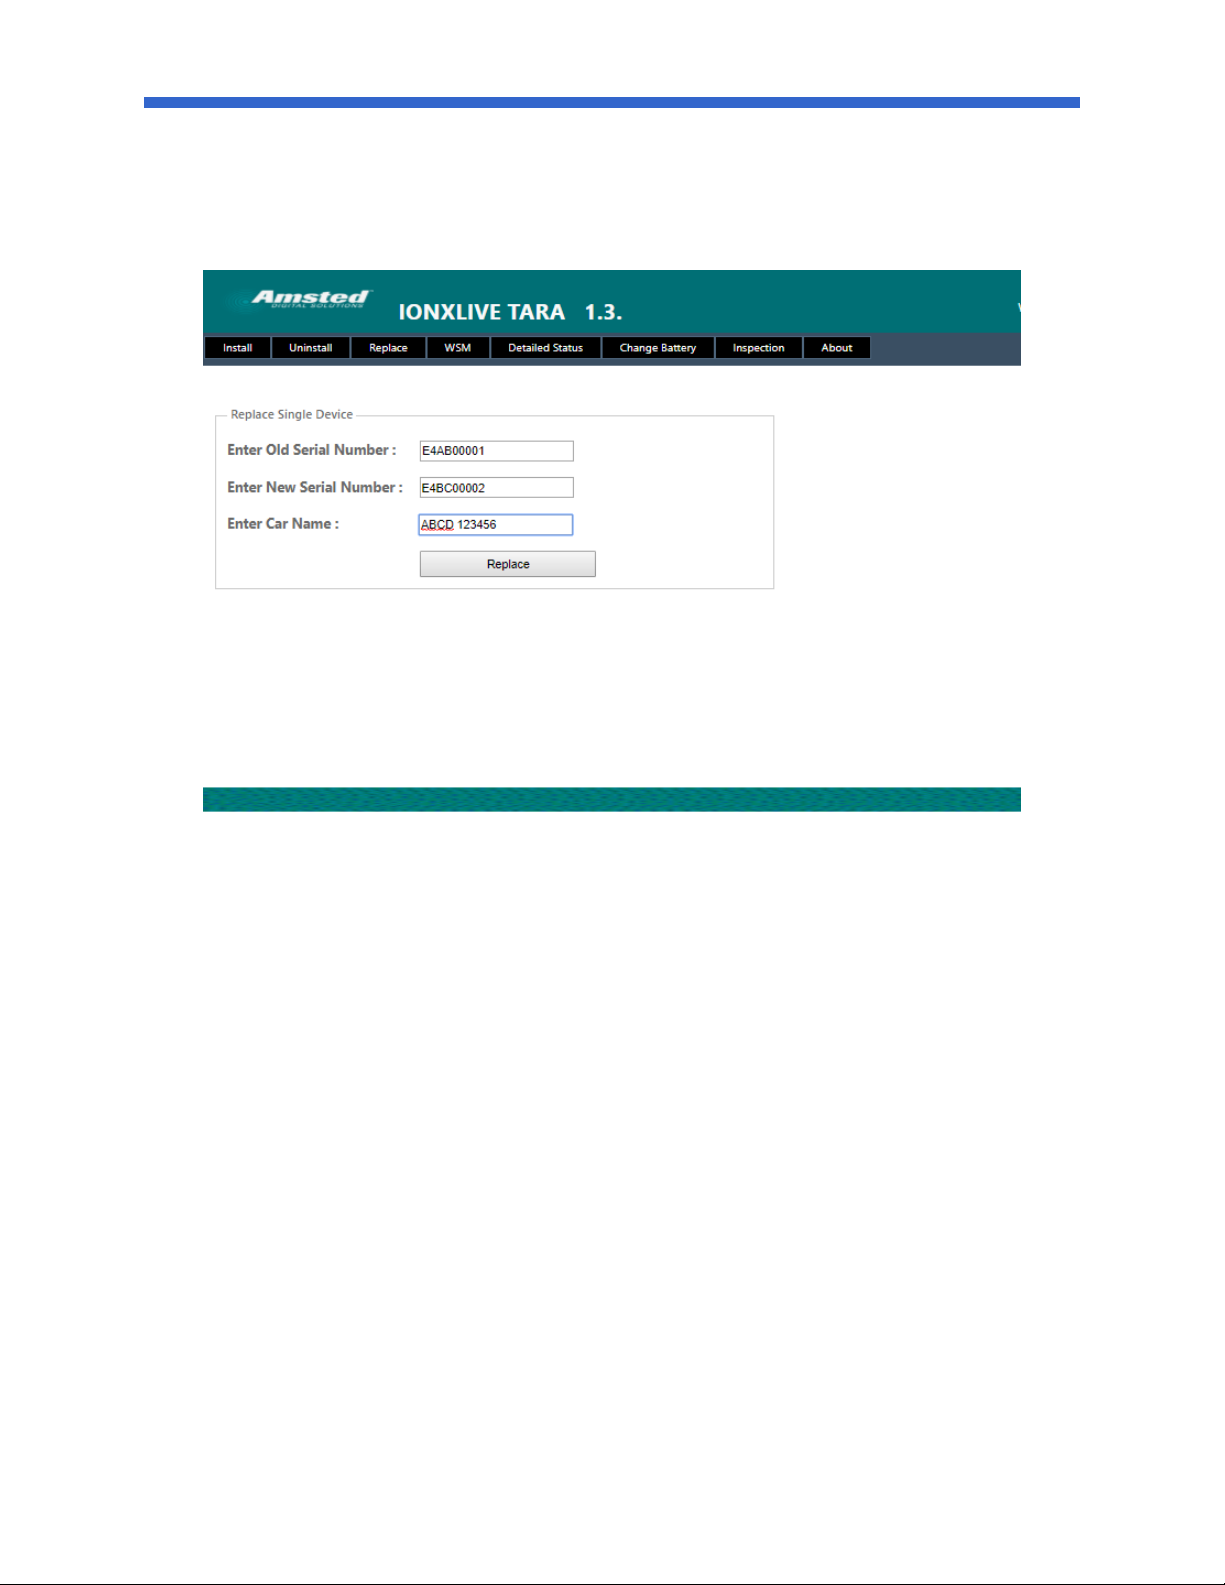
3. Replace
Used when replacing a CMU device on a car with another CMU.
IONX Support Center 1-800-621-8442, supportcenter@ionxlive.com
_____________________________________________________________________________________
303550 Installation Manual E-Series CMU Confidential
Revision Date: 17-June-19 Revision: P
Process Owner: Engineering Page 13 of 44
Enter old CMU serial number (to be replaced), new CMU serial number
(replacement) and car name. Press the ‘Replace’ button.
Note that the car name must be of the format ‘ABCD 123456’ unless the
customer is designated as a European customer.
IONX Support Center 1-800-621-8442, supportcenter@ionxlive.com
_____________________________________________________________________________________
303550 Installation Manual E-Series CMU Confidential
Revision Date: 17-June-19 Revision: P
Process Owner: Engineering Page 14 of 44
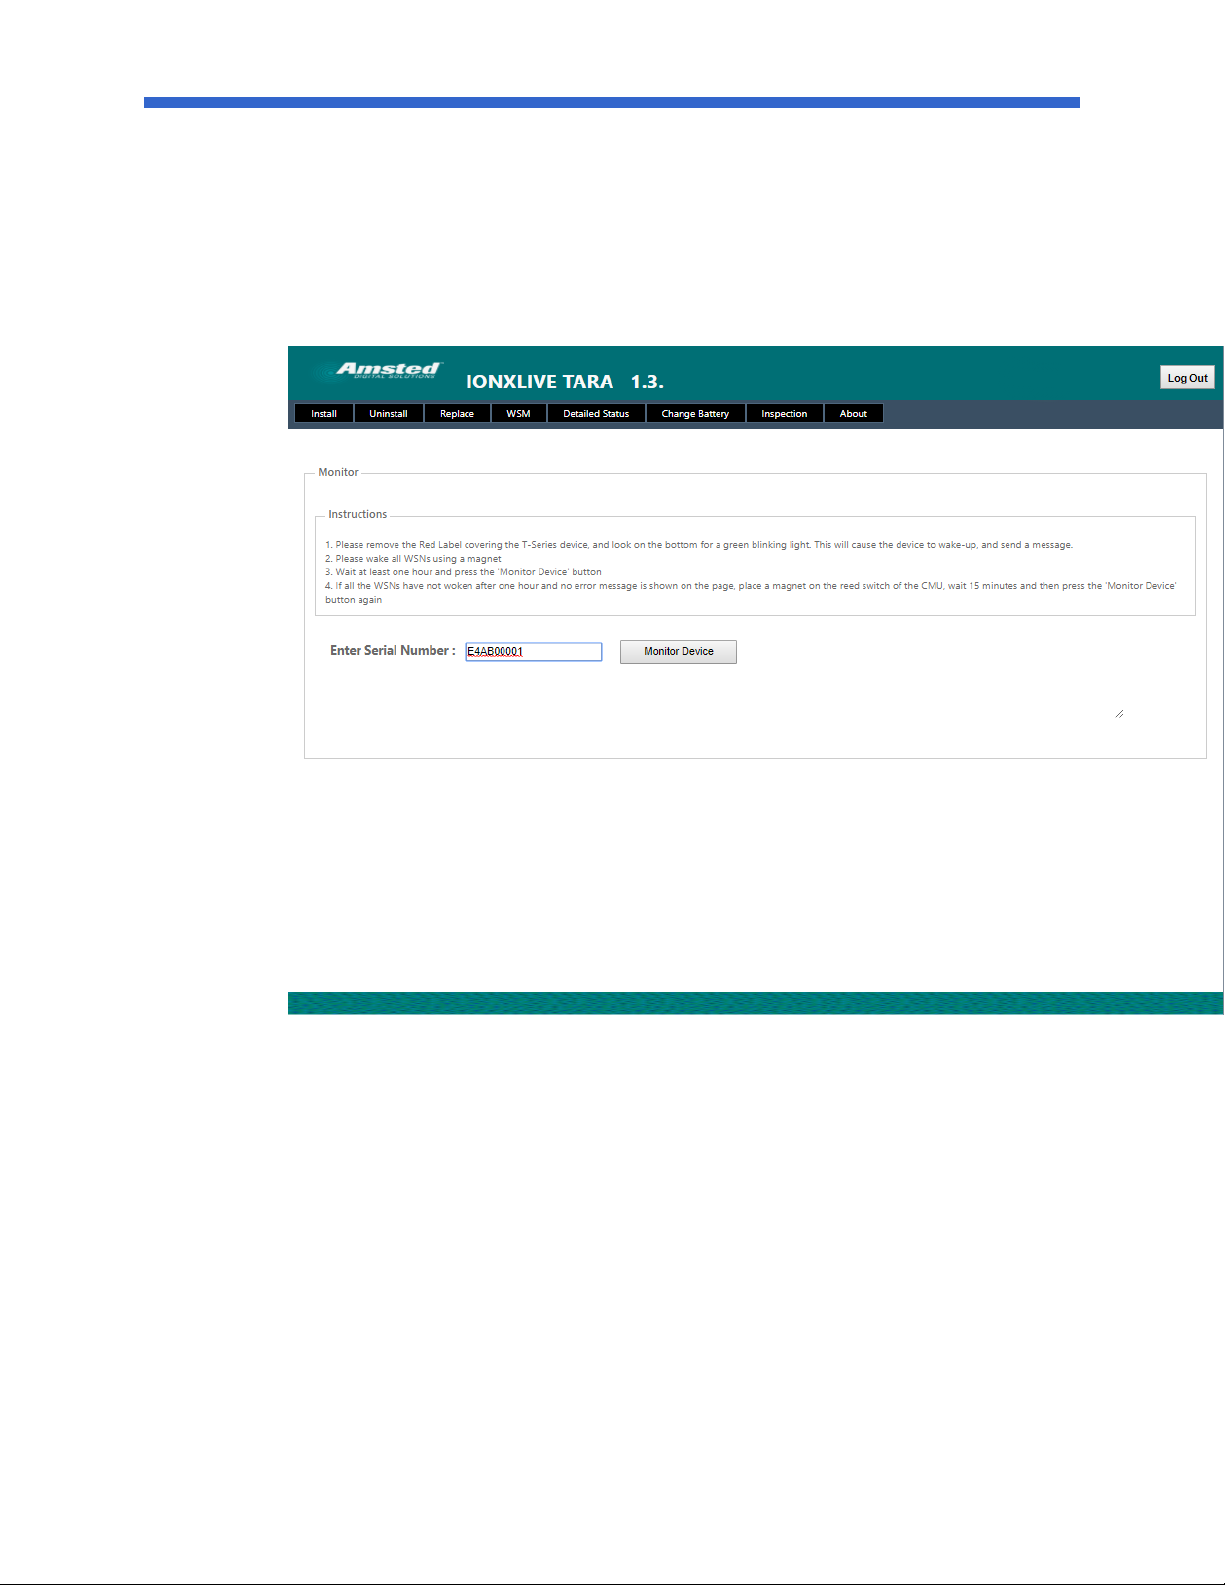
4. Wireless Sensor Monitor (WSM) – For information purposes only.
Car sets are CMU devices plus Wireless Sensor Nodes (WSNs). WSM is used to
determine if a CMU is awake and all WSNs have joined the network.
Following the instructions on the web page and then enter the CMU serial
number and press the ‘Monitor’ button.
A table of the WSNs (serial number, node number and status) for the car set
should be displayed.
5. Miscellaneous
Translations available upon request.
Traductions disponibles sur demande.
 Loading...